Off the Record: Linden Shades Walkthrough, Guide, & Tips
Off the Record: Linden Shades Walkthrough

Welcome to the Off the Record: Linden Shades Walkthrough
Something’s driven everyone away from Linden Shades. Can you break the story after all these years?
Whether you use this document as a reference when things get difficult or as a road map to get you from beginning to end, we’re pretty sure you’ll find what you’re looking for here.
This document contains a complete Off the Record: Linden Shades game walkthrough featuring annotated screenshots from actual gameplay!
We hope you find this information useful as you play your way through the game. Use the walkthrough menu below to quickly jump to whatever stage of the game you need help with.
Remember to visit the Big Fish Games Forums if you find you need more help. Have fun!
This walkthrough was created by prpldva, and is protected under US Copyright laws. Any unauthorized use, including re-publication in whole or in part, without permission, is strictly prohibited.
General Tips

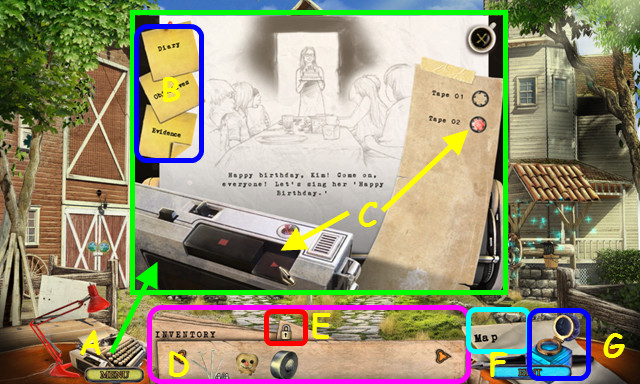
- Select the typewriter to view the diary, objective, and evidence (A).
- Select a sticky note to switch between the sections (B).
- When viewing evidence you have collected, select a tape, and then press ‘play’ (C).
- Your inventory (D) is located in the lower panel; select an item to use it.
- The panel auto-hides; move your mouse down to bring it up.
- You can lock the inventory panel in place with this lock (E).
- Select the paper to view the map (F).
- Hints are unlimited, but you must wait for the inkwell to refill (G).
- Hidden-object puzzles are referred to as HOPs in this walkthrough.
- Mini-games and HOPs are sometimes randomized; your solution may vary.
- Items listed in red are hidden, or they require additional actions to locate.

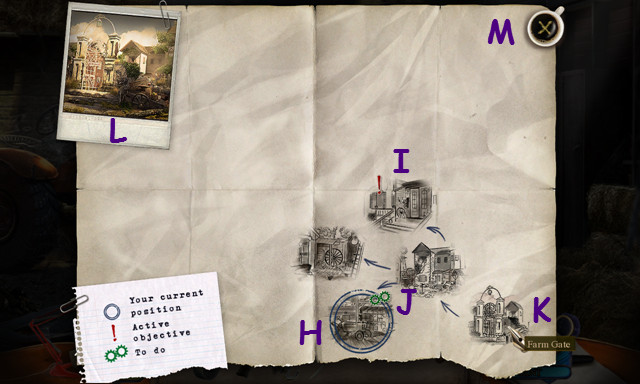
- Your current location is circled (H).
- An exclamation point indicates the location has an active objective (I).
- Gears indicate that there are still tasks to complete at that location (J).
- Hover your mouse over a location to see the name (K) and view a picture (L).
- Travel to a location by selecting it on the map.
- As you visit locations, the map will fill in.
- Select the ‘X’ to return to the game (M).
Chapter 1: Arrival at Linden Shades

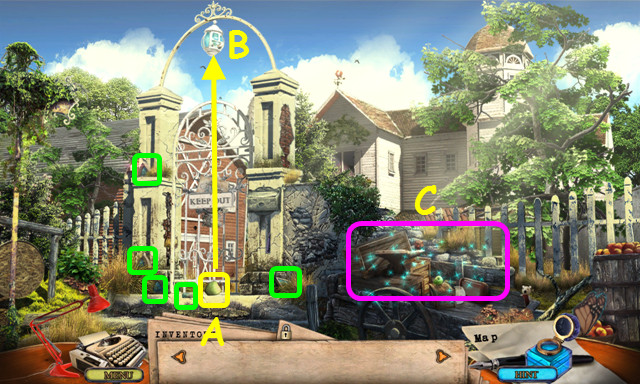
- You will have the option of an interactive tutorial.
- Take the APPLE (A).
- Throw the APPLE at the lantern (B).
- Collect the 5 LOCK PIECES (green).
- Select the wagon for a HOP (C).

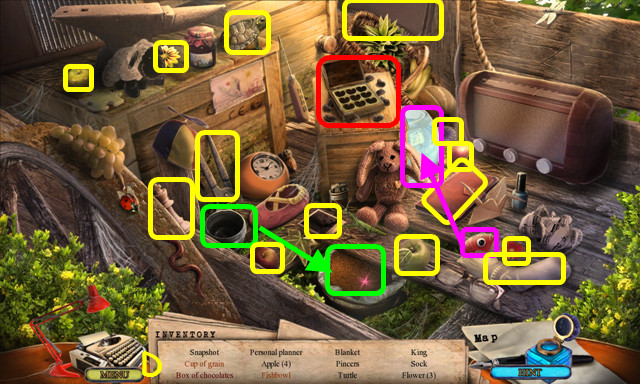
- Locate all the items on the list (D).
- You will earn the PINCERS.

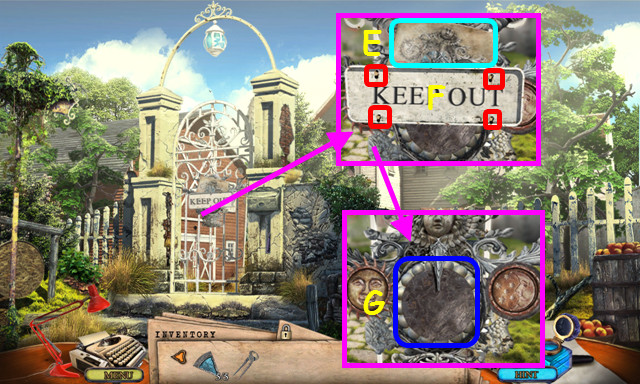
- Look at the gate and take the mini-game clue (E).
- Use the PINCERS to take the 4 NAILS and remove the sign (F).
- Place the 5 LOCK PIECES in the circle for a mini-game (G).

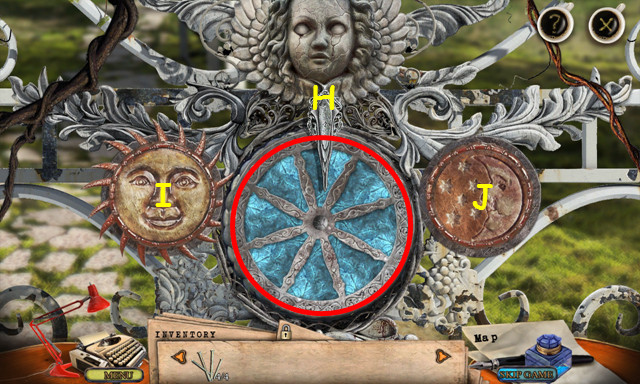
- Use the buttons to turn all the pieces blue (H).
- Press the Sun (I) to turn the wheel 1 space clockwise; press the Moon (J) to turn the wheel 2 spaces counterclockwise.
- Press: J, I, J, J, J, I, J, and I.
- Walk forward to the Farm Pathway.

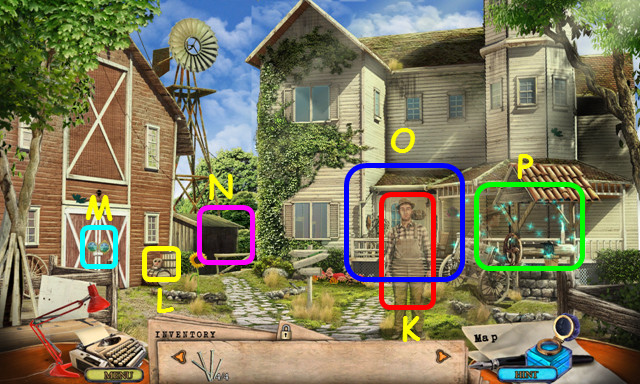
- Talk to Bob (K).
- Take the SCARECROW HEAD (L).
- Note the mini-game on the barn door (M).
- Note the path to the Farmhouse Garden (N) and the Farmhouse Entrance (O).
- Select the well for a HOP (P).

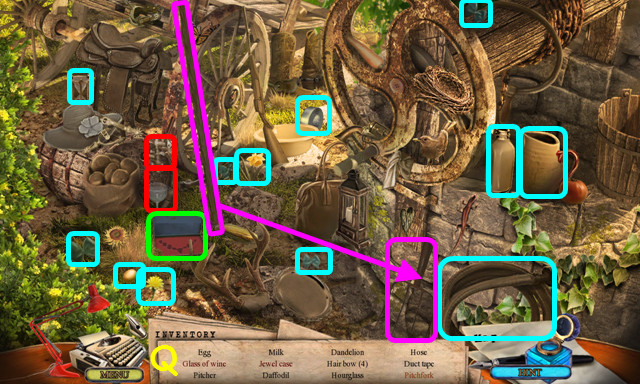
- Locate all the items on the list (Q).
- You will earn the DUCT TAPE.
- Walk to the Farmhouse Entrance.

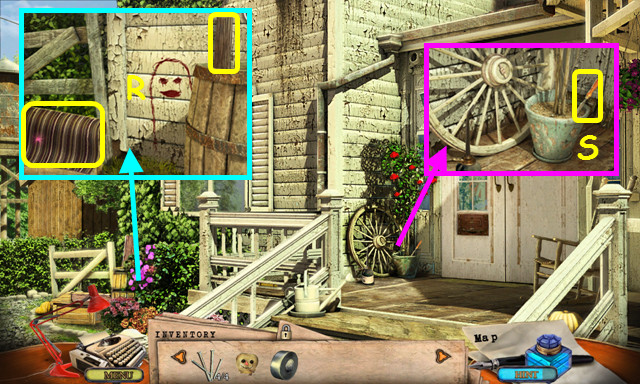
- Look at the flowers; take the RUG and the 1/2 LADDER CROSSBARS (R).
- Look at the plant and take the CHISEL (S).
- Walk down twice.

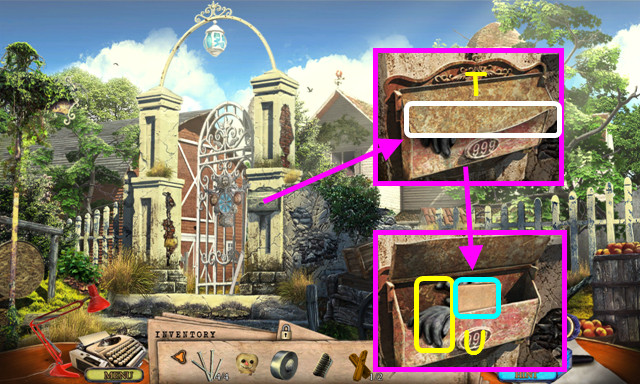
- Look at the mailbox and use the CHISEL on the lid (T).
- Take the drawing and the GLOVES (U).
- Walk forward twice to the Farmhouse Garden.

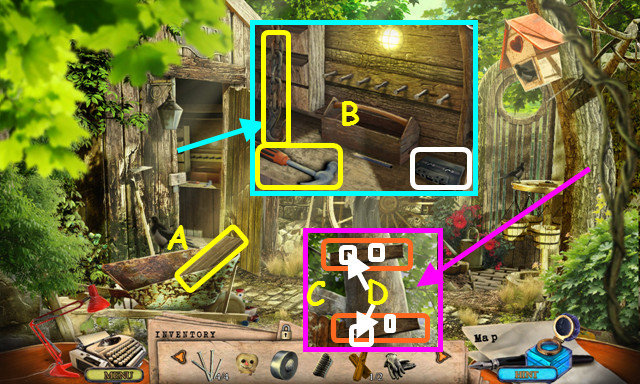
- Take the 2/2 LADDER CROSSBARS (A).
- Look in the shed; take the CHAIN, HAMMER, and Tape 01 (B).
- Look at the tree and place the 2 LADDER CROSSBARS on the trunk (C).
- Use the 4 NAILS and the hammer on the crossbars (D).

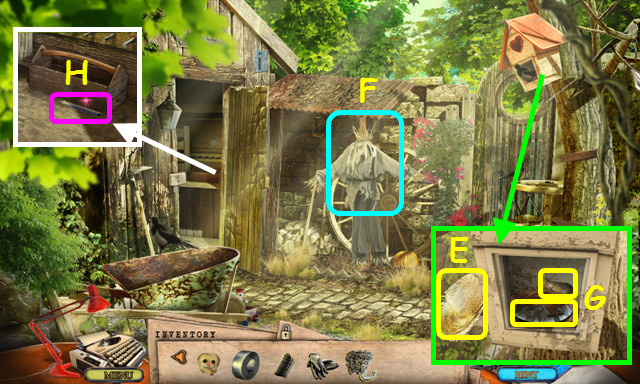
- Look at the birdhouse and take the HAT (E).
- Place the SCARECROW HEAD, GLOVES, and then the HAT on the scarecrow (F).
- Look at the birdhouse again; take the BARN LOCK PIECE and the SCREWDRIVER HEAD (G).
- Look in the shed and place the SCREWDRIVER HEAD on the shaft to make the SCREWDRIVER (H).
- Walk down and look at the barn door for a mini-game.

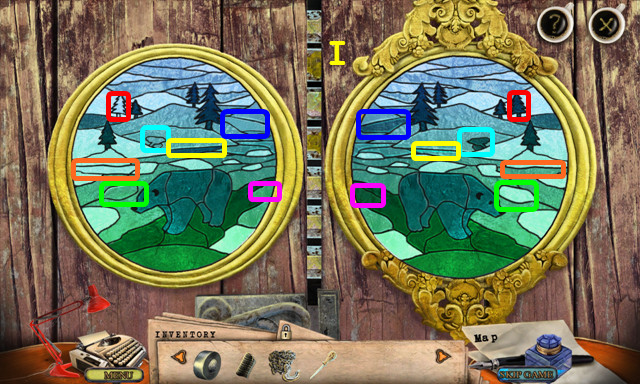
- Place the BARN LOCK PIECE in the right circle to activate the mini-game (I).
- Find the 7 differences (color-coded).
- You can select the differences on either circle.

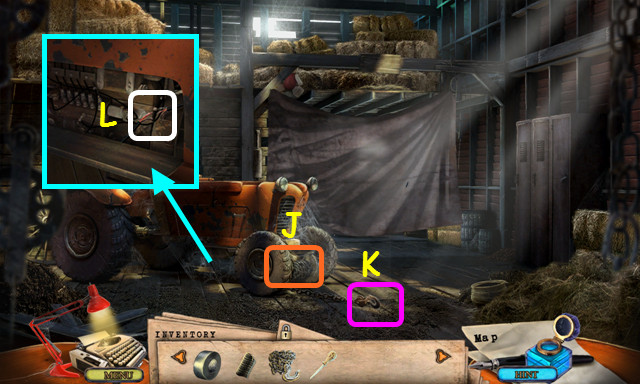
- Place the CHAIN on the front of the tractor (J).
- Take the end of the chain to attach it to the locker (K).
- Look at the side of the tractor, open the cover, and use the DUCT TAPE on the wires (L).

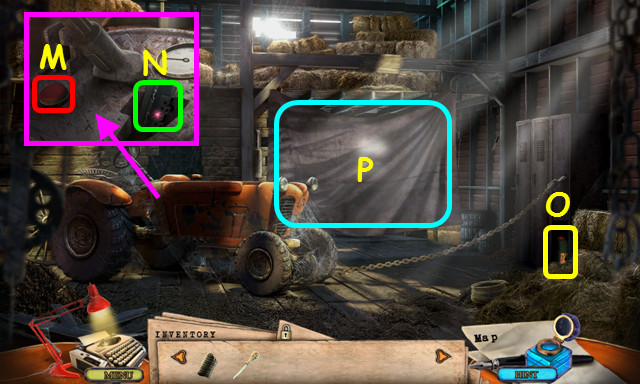
- Look at the controls and press the red button (M).
- Look at the controls again and take the Tape 02 (N).
- Take the OIL CANISTER (O).
- Pull down the tarp and select the area behind it for a HOP (P).

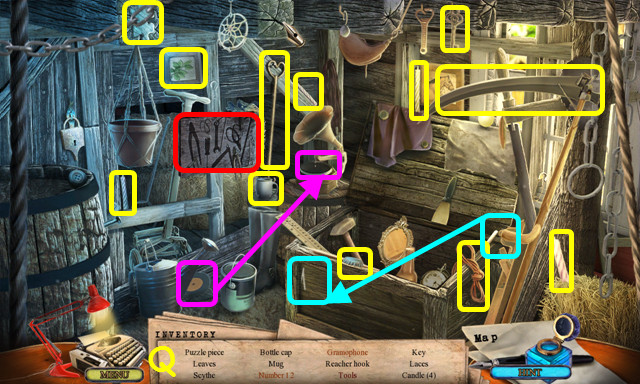
- Locate all the items on the list (Q).
- You will earn the REACHER HOOK.
- Walk down and go the Farmhouse Entrance.

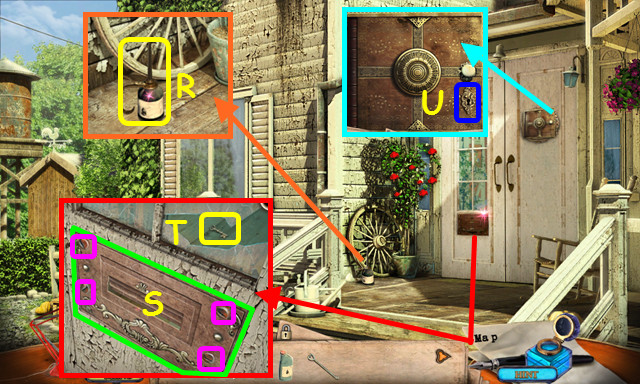
- Look near the wheel; use the OIL CANISTER to fill up, and then take the OIL CAN (R).
- Look at the mail slot; use the OIL CAN on the screws, followed by the SCREWDRIVER (S).
- Use the REACHER HOOK to pull it close, and then take the FRONT DOOR KEY (T).
- Look at the door and use the FRONT DOOR KEY in the lock; turn it and open the cover for a mini-game (U).

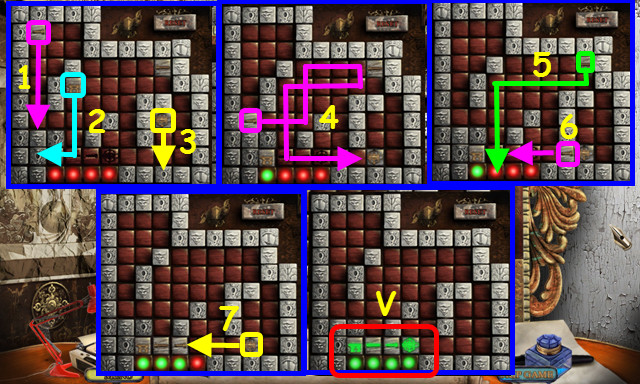
- Move the key pieces to the matching bottom area (V).
- Pieces will continue in a direction until they hit an obstacle.
- Select a piece, and then choose an arrow to move in that direction.
- Move the pieces along the indicated paths in numerical order (1-7).
- Walk forward to the Living Room.
Chapter 2: The Farmhouse

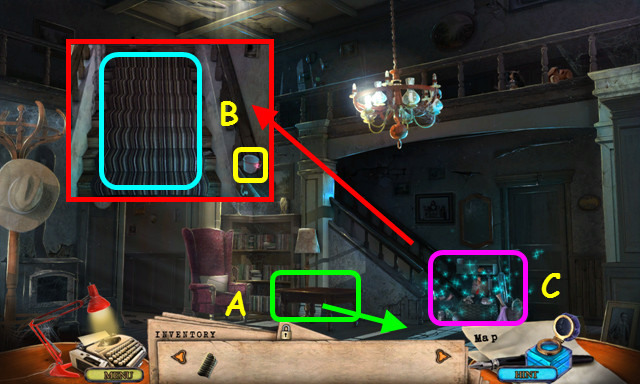
- Move the table under the chandelier (A).
- Look at the stairs; take the CUP and place the RUG on the steps (B).
- Select the basket for a HOP (C).

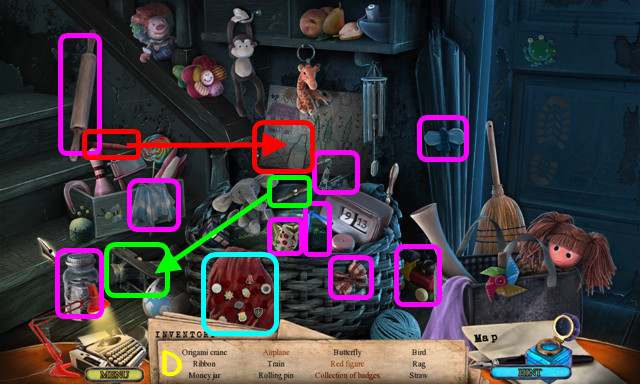
- Locate all the items on the list (D).
- You will earn the RAG.

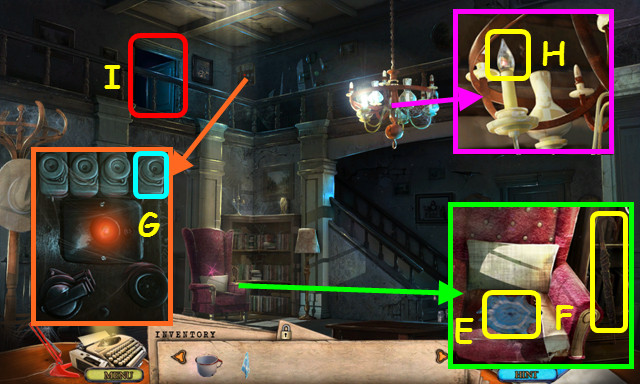
- Look the chair and place the RAG on the seat (E).
- Take the MOIST RAG and the UMBRELLA (F).
- Look at the panel and pull the right fuse (G).
- Look at the chandelier and use the MOIST RAG to take the LIGHT BULB (H).
- Enter the Bedroom (I).

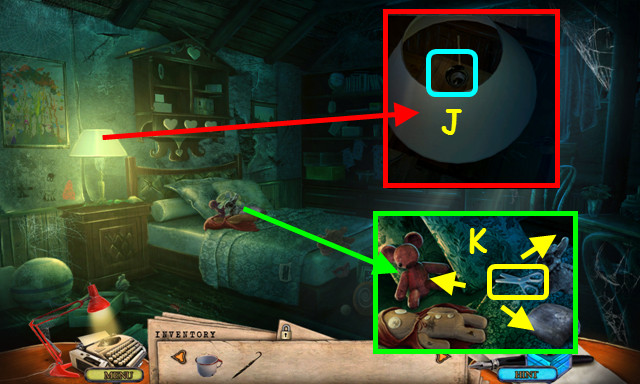
- Look at the lamp and place the LIGHT BULB inside (J).
- Look at the bed; move the animals and take the PLASTIC SCISSORS (K).

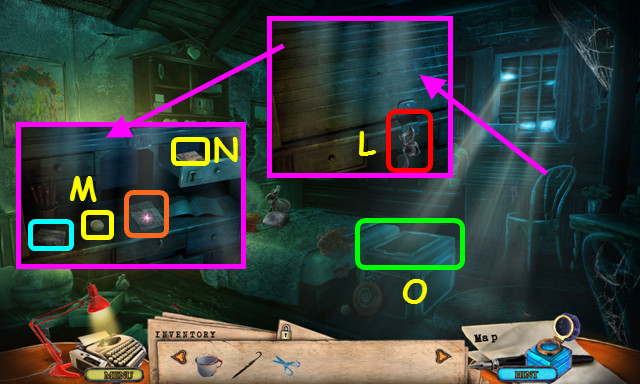
- Look at the desk and use the PLASTIC SCISSORS to cut the tie (L).
- Open the roll-top; take the Tape 03, 1/2 COINS, and the clue (M).
- Open the drawer and take the 1/2 OLD PHOTO (N).
- Open the chest for a HOP (O).

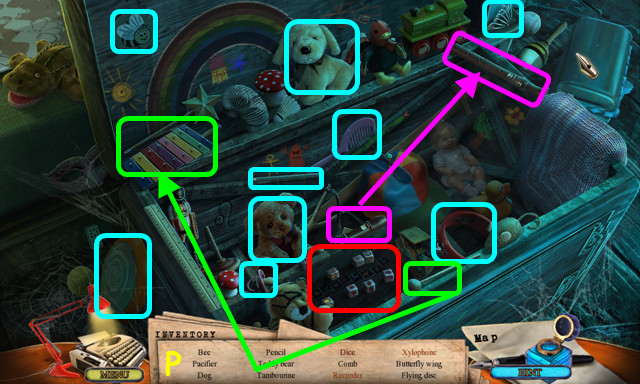
- Locate all the items on the list (P).
- You will earn the BUTTERFLY WING.
- Walk down.

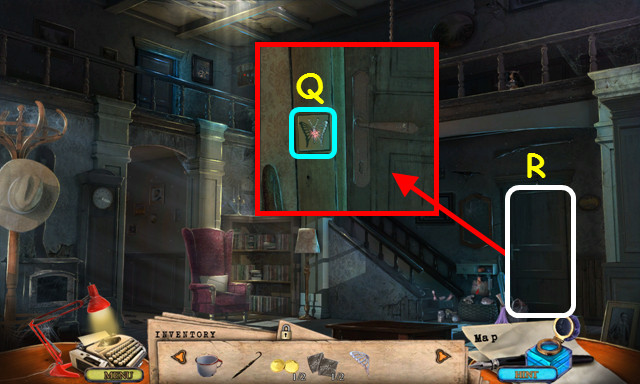
- Look at the door and place the BUTTERFLY WING on the emblem (Q).
- Enter the Principal’s Study (R).

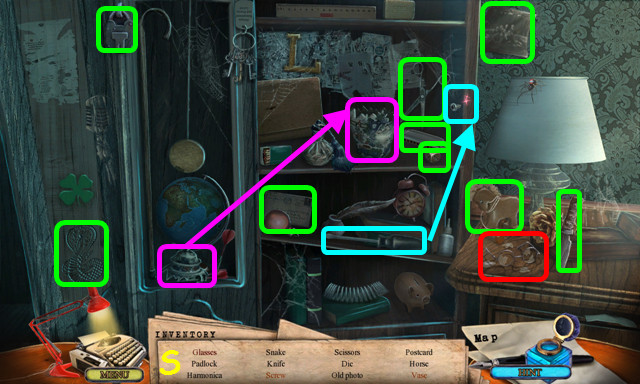
- Open the cabinet to the right of the clock for a HOP.
- Locate all the items on the list (S).
- You will earn the 2/2 OLD PHOTO.

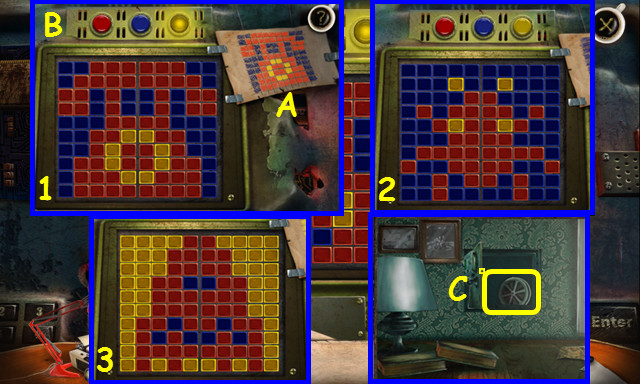
- Look at the desk and place the 2 OLD PHOTOS in the frames (T).
- Drag the 3 frames to the outlines on the wall (U).
- Look at the wall safe for a mini-game (V).


- Complete the picture shown in the sketch (A).
- Select a color button at the top (B), then select the squares you want to color.
- There are 3 pictures to complete (1-3).
- Take the FILM REEL (C).

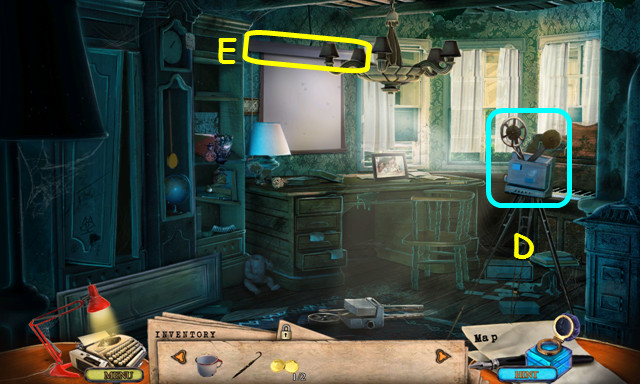
- Place the FILM REEL on the projector (D).
- Pull down the screen (E).
- Walk down and select the basket at the bottom of the stairs for a HOP.

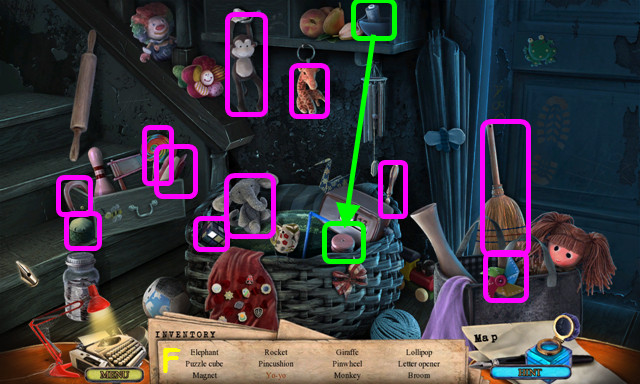
- Locate all the items on the list (F).
- You will earn the LETTER OPENER.
- Enter the bedroom on the second floor.

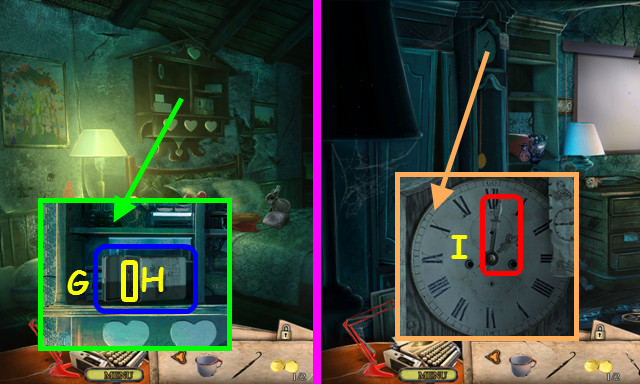
- Look at the hutch and use the LETTER OPENER on the tin (G).
- Take the CLOCK HAND (H).
- Walk down and enter the Principal’s Study.
- Look at the clock and place the CLOCK HAND on the face (I).

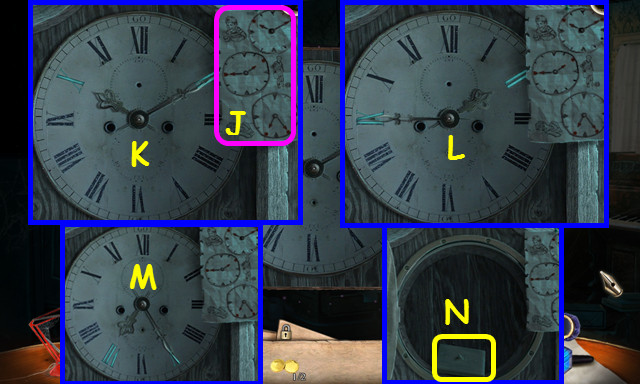
- Look at the clue for the times to set (J).
- You will see the numbers lit if correctly set.
- Set the clock to 10:10 (K).
- Set the clock to 2:45 (L).
- Set the clock to 7:25 (M).
- Take the LIGHT SWITCH (N).
- Walk down.

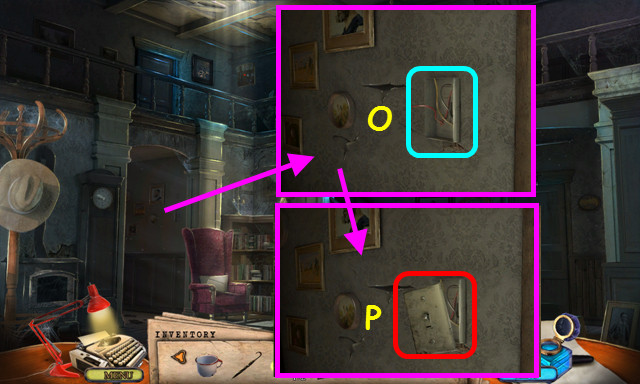
- Look at the archway and place the LIGHT SWITCH on the wires (O).
- Flip the switch (P), and enter the Hallway.

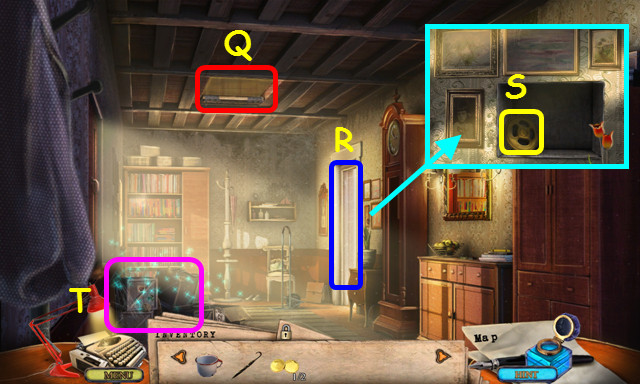
- Note the hatchway (Q).
- Note the entrance to the Library (R).
- Look at the wall, move the painting, and take the 1/4 COG (S).
- Select the crates for a HOP (T).

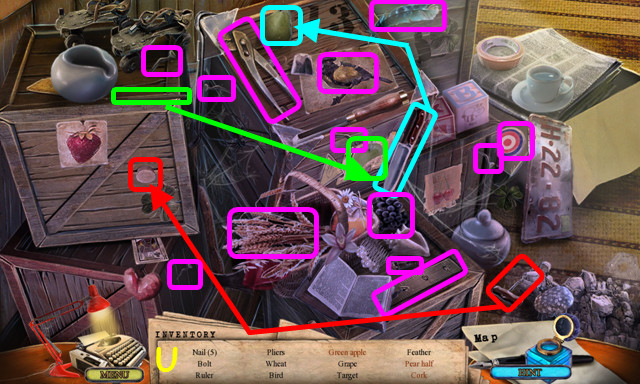
- Locate all the items on the list (U).
- You will earn the BOLT.
- Walk right to the Library.

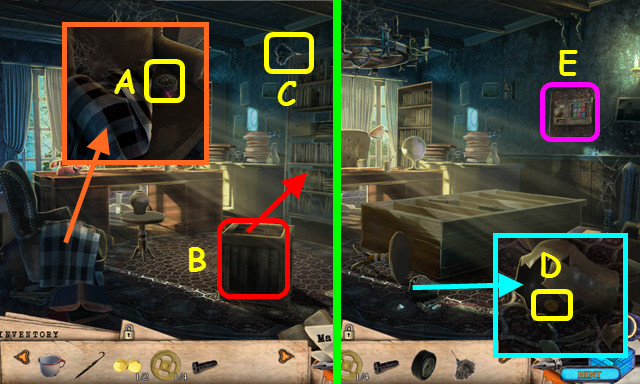
- Look at the chair, move the blanket, and take the WHEEL (A).
- Move the crate (B) and take the FEATHER DUSTER (C).
- Look at the broken vase and take the 2/2 COINS (D).
- Note the mini-game on the wall (E).
- Walk down.

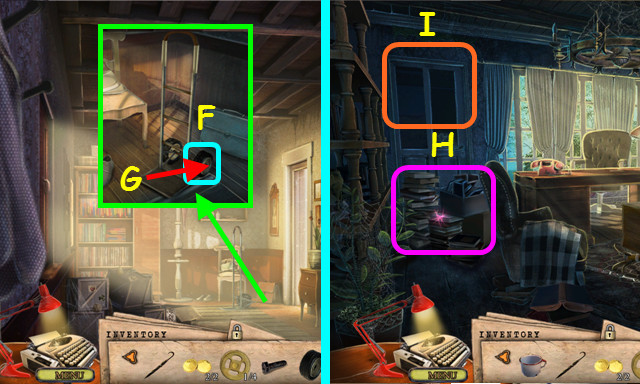
- Look in the corner and place the WHEEL on the hand truck (F).
- Place the BOLT on the wheel, and then take the HAND TRUCK (G).
- Walk to the right.
- Use the HAND TRUCK twice on the boxes (H).
- Go out the door to the Back Porch (I).

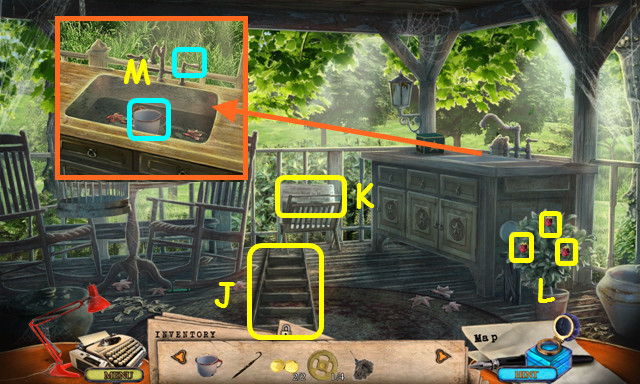
- Take the FLIMSY LADDER (J).
- Zoom into the rack and take the OLD NEWSPAPER (K).
- Zoom into the bush and take the 3 BERRIES (L).
- Look at the sink, use the CUP on the tap, and turn on the tap to get the CUP OF WATER (M).
- Walk down twice.

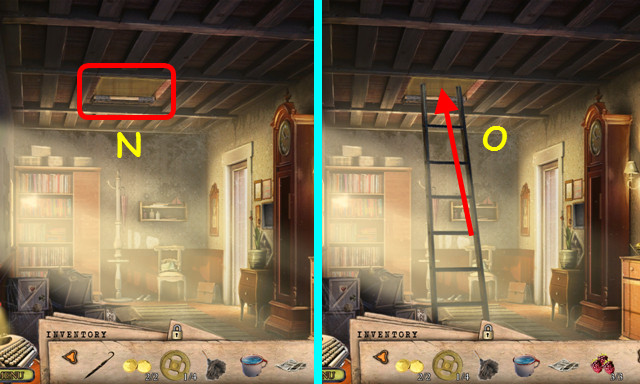
- Use the FLIMSY LADDER on the hatch (N).
- Go up to the Attic (O).

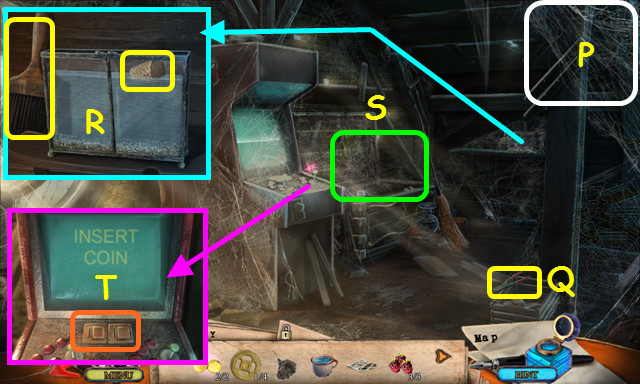
- Use the FEATHER DUSTER anywhere on the scene to clear away cobwebs (P).
- Take the METAL CUTTER (Q).
- Look at the shelves; take the PAINTBRUSH, use the CUP OF WATER on the case, and take the CORK (R).
- Note the chest (S).
- Look at the arcade game; insert the 2 COINS in the slot for a mini-game (T).

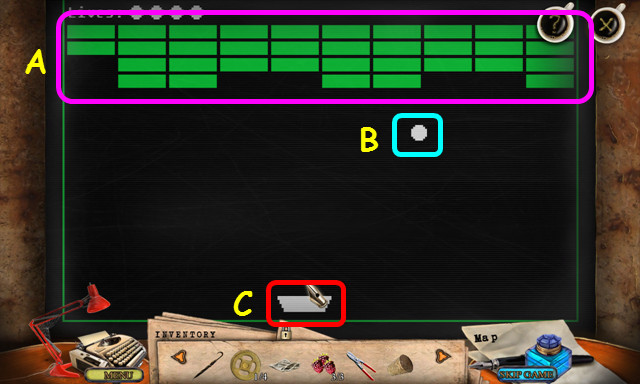
- Clear all the green bricks (A) by hitting them with the ball (B).
- Select the paddle (C) to begin, and move your mouse left and right to move the paddle to hit the ball.
- Do not let the ball go below the paddle or you will lose a life; lose too many of your lives and you will have to start again.
- Take the 2/4 COG from the front of the arcade game.
- Look at the chest for a HOP.

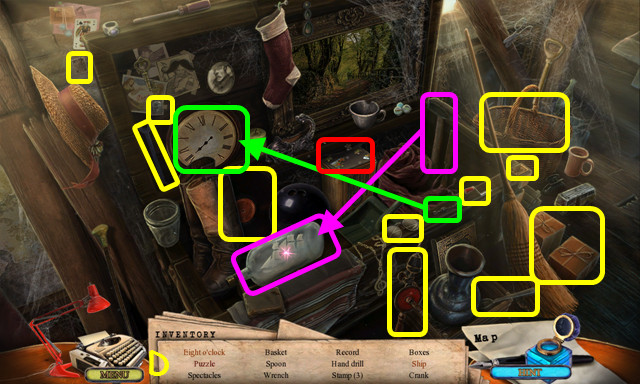
- Locate all the items on the list (D).
- You will earn the CRANK.
- Use the map to return to the Back Porch.

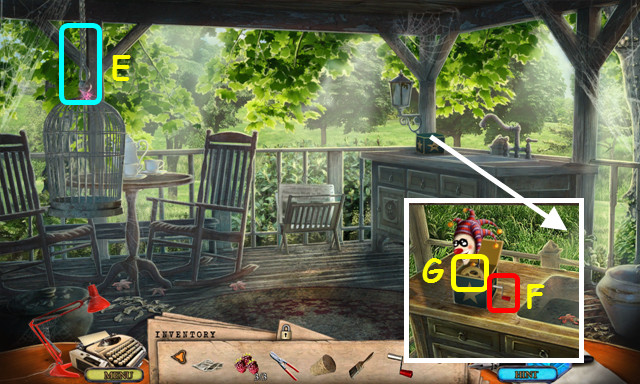
- Use the METAL CUTTERS on the chain to take the CAGE (E).
- Look at the counter and use the CRANK on the box (F).
- Take the 3/4 COG (G).
- Return to the Attic.

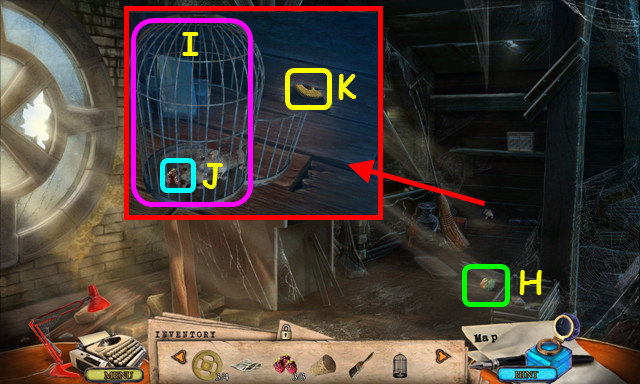
- Zoom into the floor and read the note (H).
- Look at the mouse and place the CAGE on the floor (I).
- Place the BERRIES in the cage (J) and take the 4/4 COG (K).
- Return to the Library and look at the mini-game on the wall.

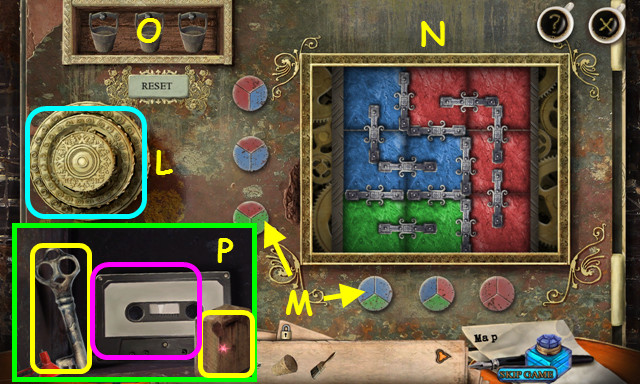
- Place the 4 COGS on the spindle (L).
- Look at the circles to determine where colors should be placed (M).
- Turn the metal bars in the grid to all the paint to flow (N).
- Drag the paints to the correct reservoir (O).
- Take the GARDEN KEY, 1/2 SMALL TILE, and the Tape 04 (P).
- Use the map to travel to the Farmhouse Garden.

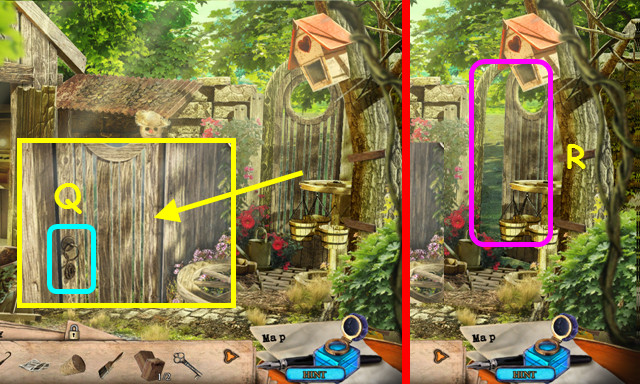
- Look at the gate and use the GARDEN KEY in the lock (Q).
- Walk forward to the Field (R).
Chapter 3: Out the Back Gate

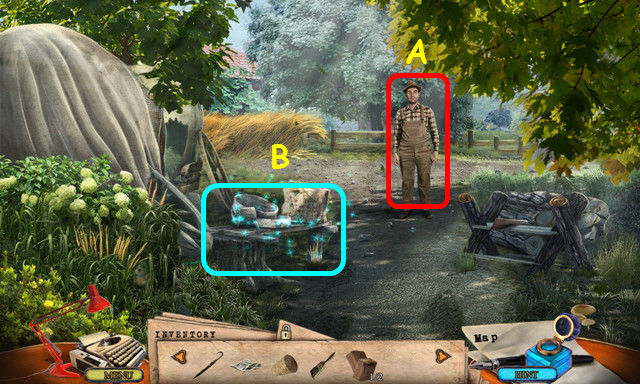
- Talk to Bob (A).
- Select the bench for a HOP (B).

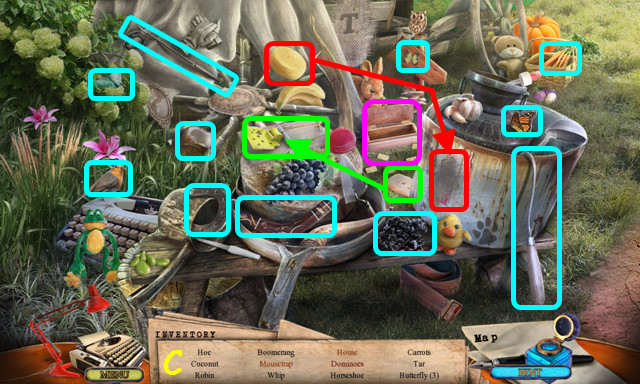
- Locate all the items on the list (C).
- You will earn the TAR.
- Walk right to the River.

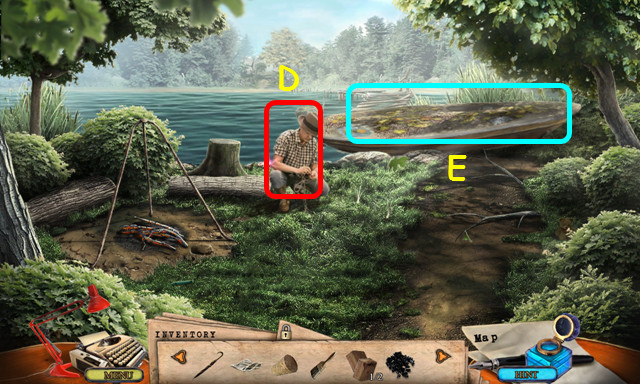
- Talk to Ricky (D).
- Look at the boat tarp for a mini-game (E).

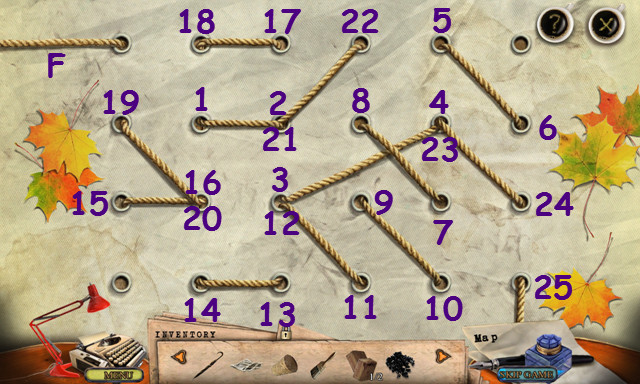
- Pull the rope (F) from the tangle of holes.
- Select the holes in numerical order (1-25).
- You will see a red flash if incorrect.

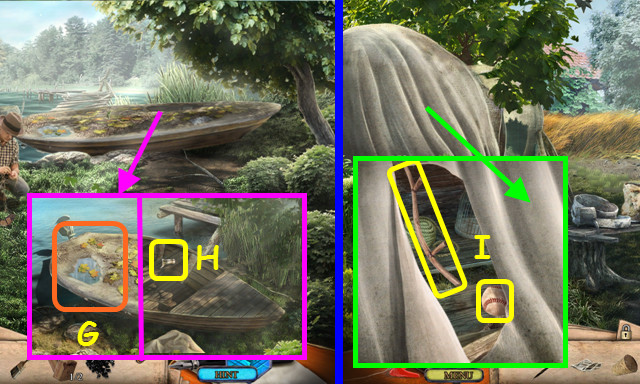
- Remove the tarp from the boat (G).
- Take the BROKEN BOTTLE NECK (H).
- Walk down.
- Look at the canvas, use the BROKEN BOTTLE NECK to cut a hole, and then take the BASEBALL and SCYTHE HANDLE (I).
- Walk to the right.

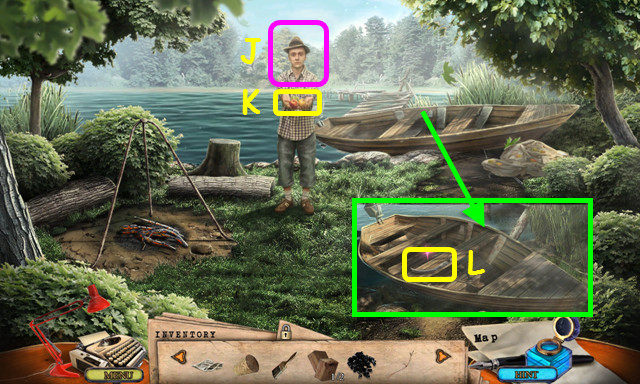
- Give the BASEBALL to Rickey (J).
- Take the APPLES (K).
- Look in the boat and use the SCYTHE HANDLE on the blade to make the SCYTHE (L).
- Walk down.

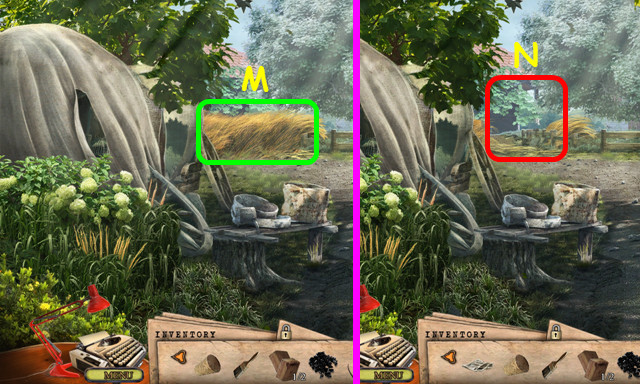
- Use the SCYTHE on the hay (M).
- Walk forward to the Groundskeeper’s Front Door (N).

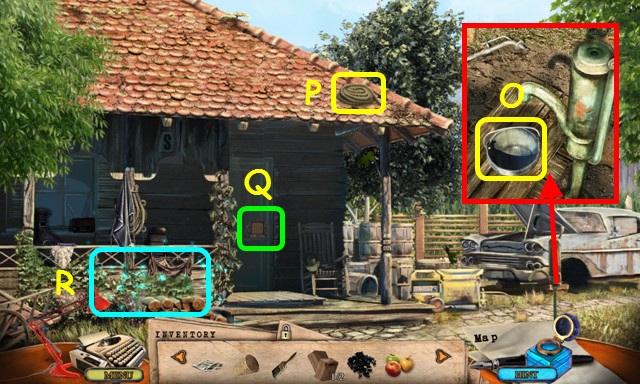
- Look at the pump and take the BUCKET (O).
- Use the UMBRELLA to take the ROPE (P).
- Note the mini-game on the door (Q).
- Select the railing for a HOP (R).

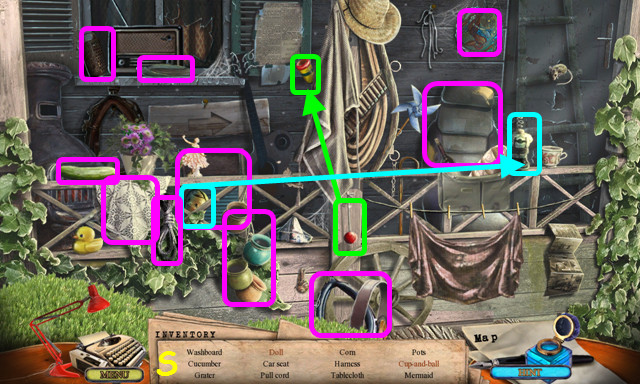
- Locate all the items on the list (S).
- You will earn the HARNESS.
- Walk to the right.

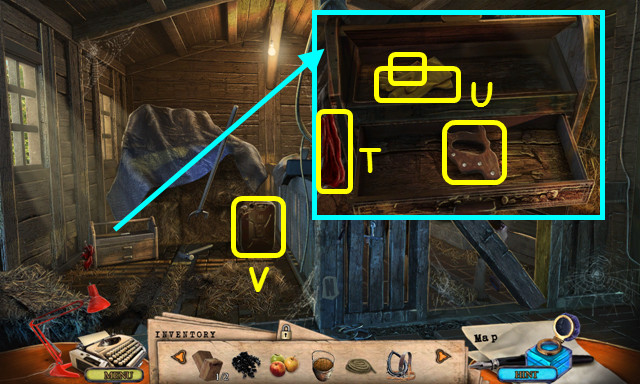
- Look at the toolbox and take the red cloth (T).
- Open the lid and drawer; take the SAW HANDLE, RUBBER GLOVES, and the 2/2 SMALL TILE (U).
- Take the FUEL CAN (V).
- Walk down and look at the mini-game on the door.

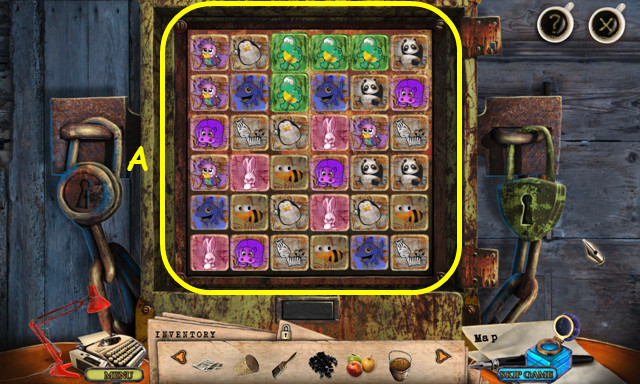
- Place the 2 SMALL TILES into the grid to trigger the mini-game.
- Find matching pairs by turning over 2 tiles as a time (A).
- This mini-game is randomly generated; your solution may vary.
- Enter the Groundskeeper’s House.

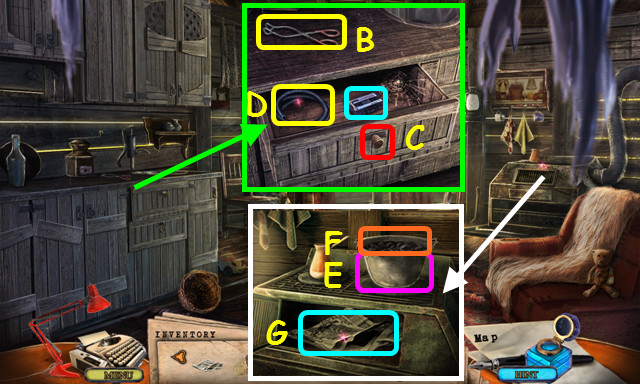
- Look at the counter and take the TONGS (B).
- Use the CORK on the drawer (C).
- Open the drawer; take the RUBBER HOSE and Tape 05 (D).
- Look at the stove and place the BUCKET on top (E).
- Place the TAR in the bucket (F).
- Open the grate and place the OLD NEWSPAPER inside (G).
- Walk down.

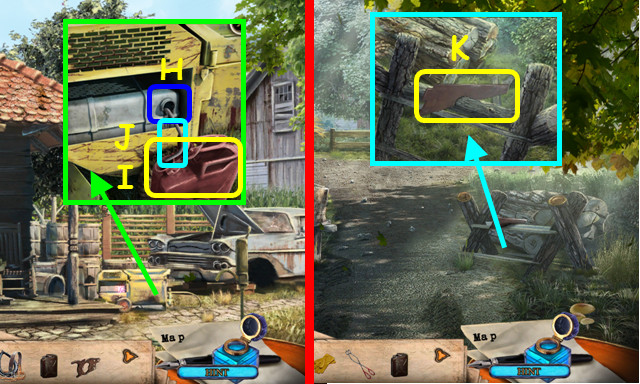
- Look at the generator and remove the cap (H).
- Set the FUEL CAN on the ground (I).
- Use the RUBBER HOSE on the tank to get the FUEL (J).
- Walk down.
- Look at the sawhorse and use the SAW HANDLE on the blade to get the SAW (K).
- Walk to the right.

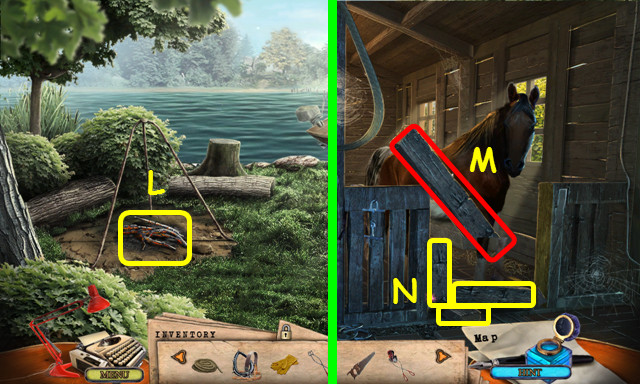
- Zoom into the campfire and use the TONGS to take the HOT EMBERS (L).
- Return to the Stables.
- Use the SAW on the beam twice (M).
- Take the 3 WOOD pieces (N).
- Pet the horse.
- Walk down and enter the Groundskeeper’s House.

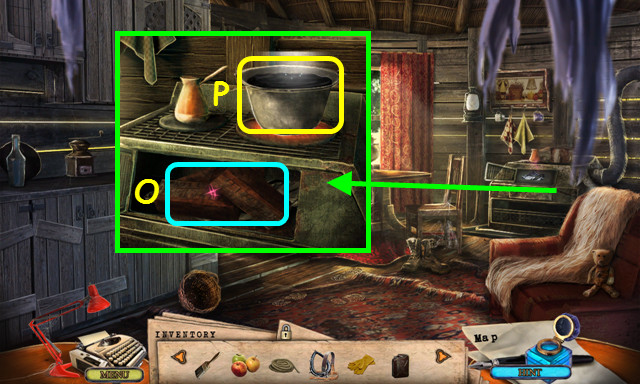
- Look at the stove; place the 3 WOOD pieces inside, followed by the HOT EMBERS (O).
- Take the BUCKET OF TAR (P).
- Return to the River.

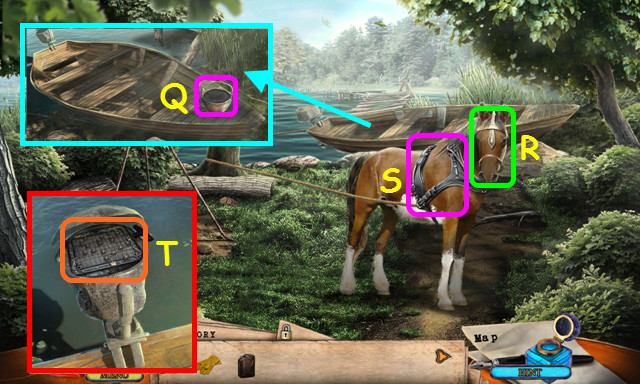
- Look at the boat, place the BUCKET OF TAR on the bow, and use the PAINTBRUSH on the bucket (Q).
- Give the APPLES to the horse (R).
- Place the HARNESS on the horse (S).
- Use the ROPE on the horse and move the horse forward.
- Once the horse leaves, look at the boat and open the engine for a mini-game (T).

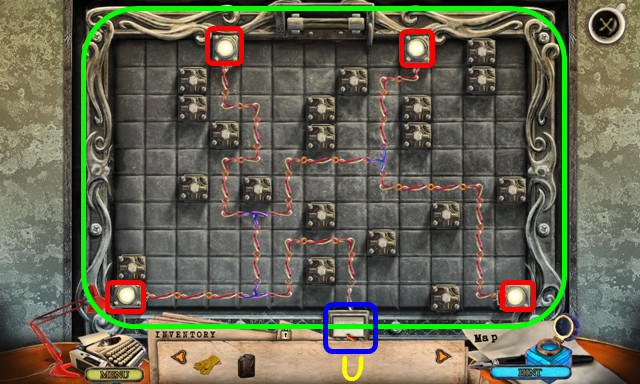
- Place the red wire pieces to connect the 4 lights (red) with the power supply (U).
- The blue wires do not move.

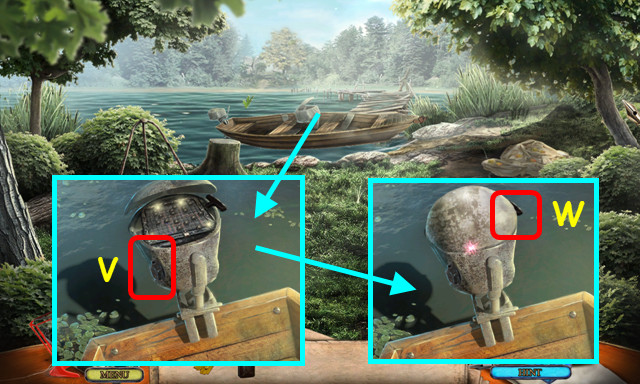
- Use the FUEL on the motor (V).
- Close the cover and pull the starter cord (W).
Chapter 4: Outside the Orphanage

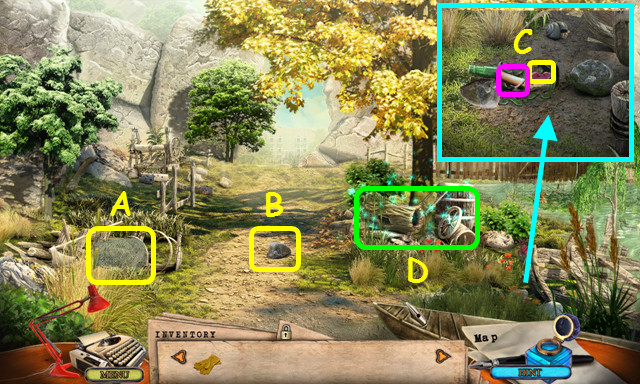
- Zoom into the woodpile and take the TORN FISHING NET (A).
- Take the ROCK (B).
- Look at the shore, use the ROCK on the bottle, take the HEART-SHAPED KEY, and read the message (C).
- Select the barrel for a HOP (D).

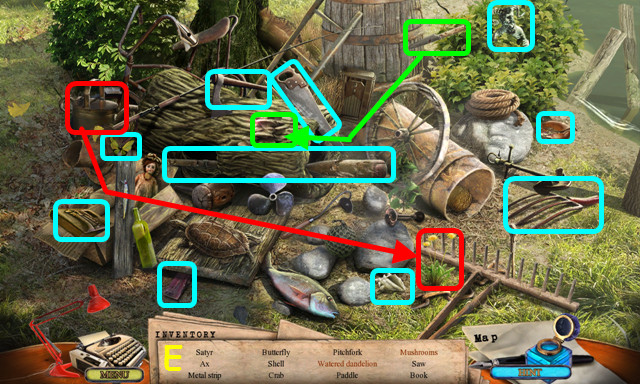
- Locate all the items on the list (E).
- You will earn the METAL STRIP.
- Walk forward.

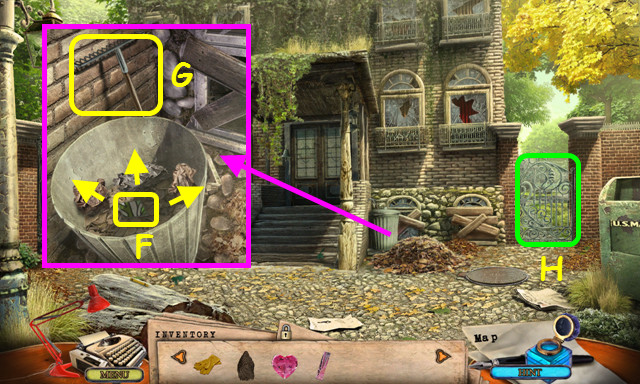
- Look at the garbage can, remove the lid, and use the RUBBER GLOVES 3 times to find the 1/2 STAINED GLASS PIECE (F).
- Take the RAKE (G).
- Walk to the Orphanage Backyard (H).

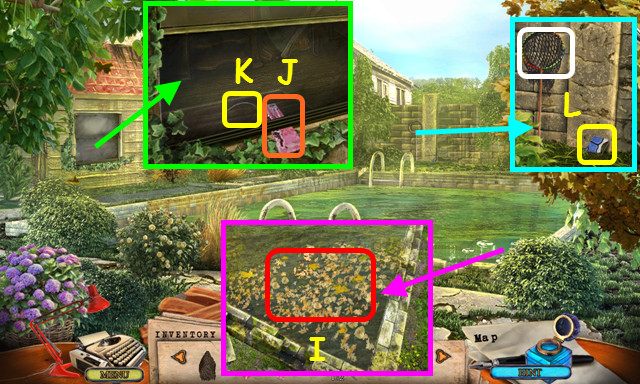
- Look at the corner of the pool and use the RAKE on the leaves (I).
- Look at the window and use the METAL STRIP at the bottom (J).
- Open the window and take the SICKLE (K).
- Look at the wall; take the 2/2 STAINED GLASS PIECE and place the TORN FISHING NET on the ring (L).
- Walk down.

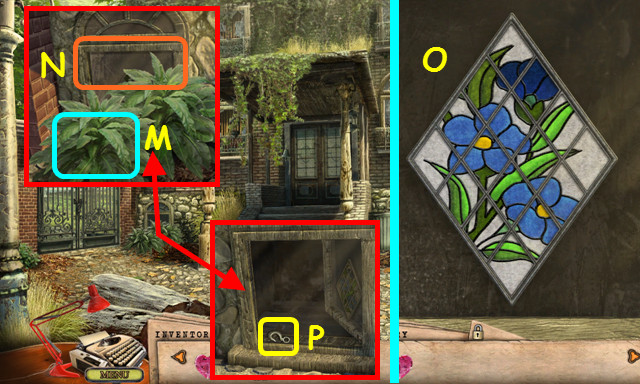
- Look at the bushes and use the SICKLE to cut them back (M).
- Look at the window for a mini-game (N).
- Place the 2 STAINED GLASS PIECES in the diamond to activate the mini-game.
- Select 2 pieces to swap positions until the picture is restored (O).
- Take the HOOK (P).
- Walk down.

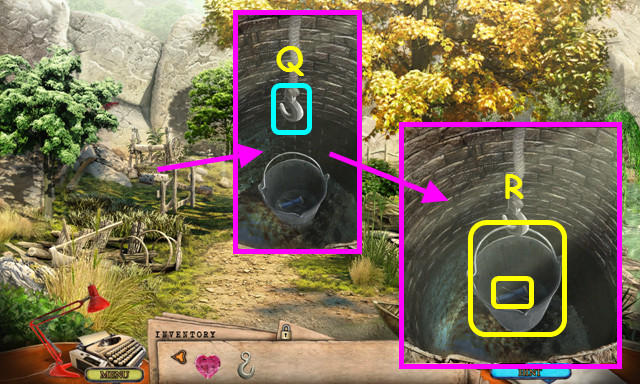
- Look at the well and place the HOOK on the rope (Q).
- Lower the rope; take the NEEDLE AND THREAD and the WATER (R).
- Return to the Orphanage Backyard.

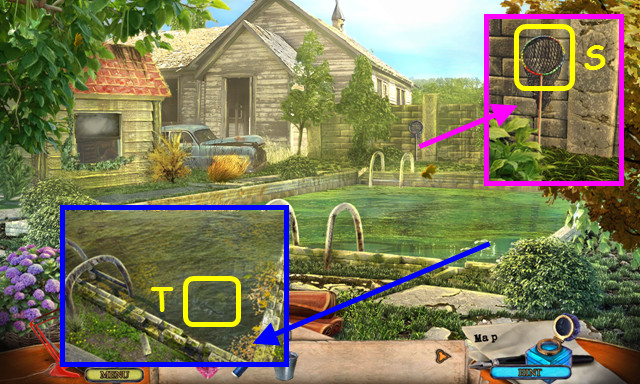
- Look at the wall; use the NEEDLE AND THREAD on the ring and net to make the NET (S).
- Look in the pool; use the NET to get the HANDLE (T).
- Walk down.

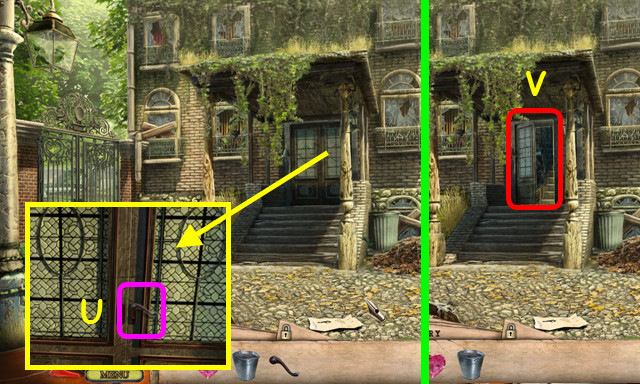
- Look at the doors and use the HANDLE to open them (U).
- Enter the Orphanage Hall (V).

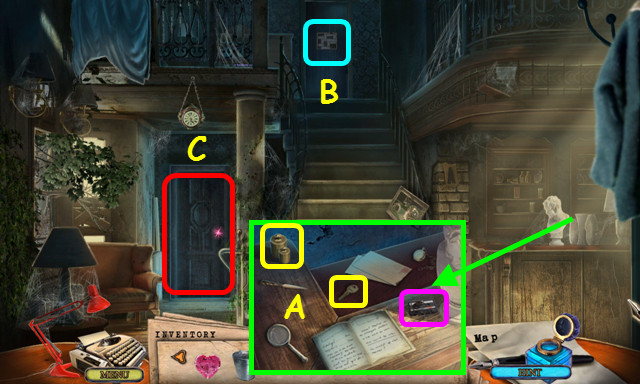
- Look at the front desk; take the WEIGHTS, PLAYGROUND KEY, and Tape 06 (A).
- Note the mini-game on the door at the top of the stairs (B).
- Note the locked door (C).
- Walk down.

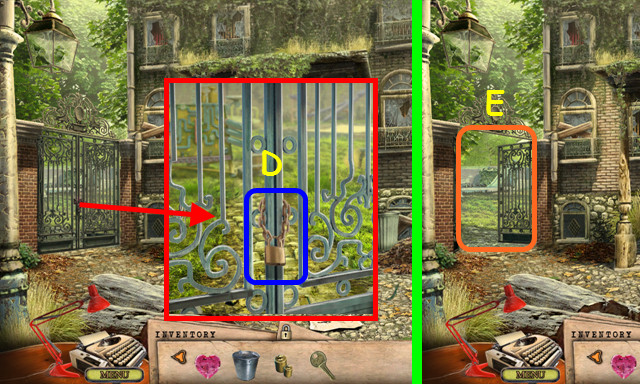
- Look at the gate and use the PLAYGROUND KEY in the lock (D).
- Walk left to the Playground (E).

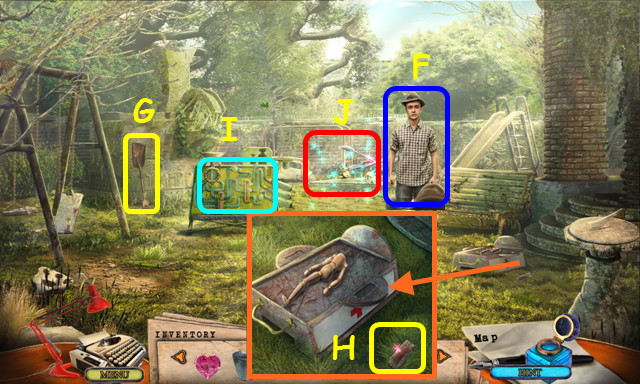
- Talk to Ricky (F).
- Take the SHOVEL (G).
- Look at the anatomy doll and take the CARETAKER’S PUZZLE TILE (H).
- Note the mini-game (I).
- Select the sandbox for a HOP (J).

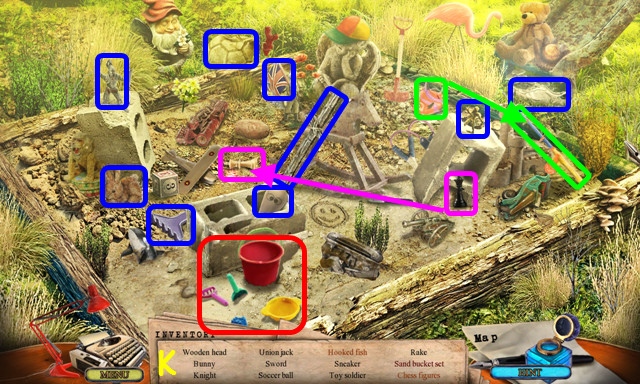
- Locate all the items on the list (K).
- You will earn the WOODEN HEAD.
- Look at the mini-game.

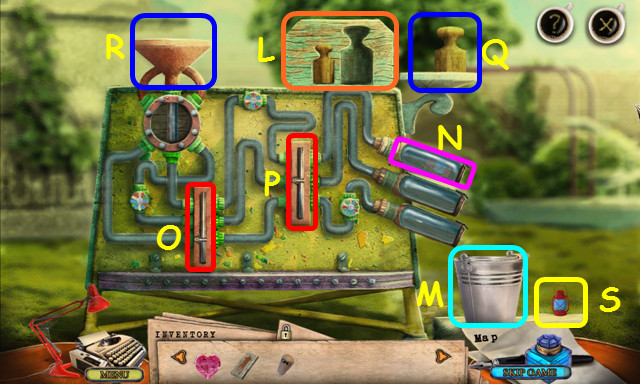
- Place the WEIGHTS in the top right (L).
- Place the WATER on the right (M).
- Move the sliders and weights to force the water out the top pipe (N).
- Move the left slider down to the 3rd pipe (O).
- Move the right slider to the middle pipe (P).
- Place the large weight on the scale (Q).
- Pour the WATER in the funnel (R).
- Take the 1/3 MINING TOOLS (S).
- Return to the Orphanage Hall and look at the mini-game at the top of the stairs.

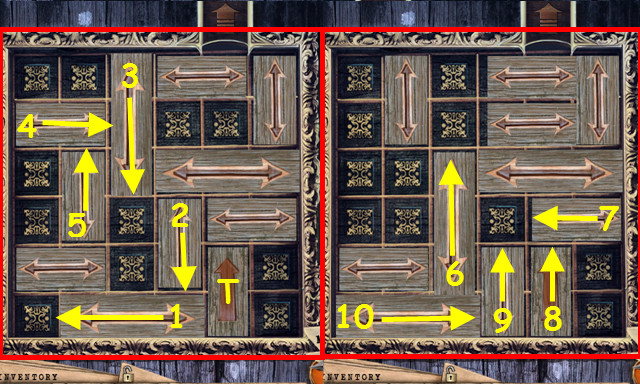

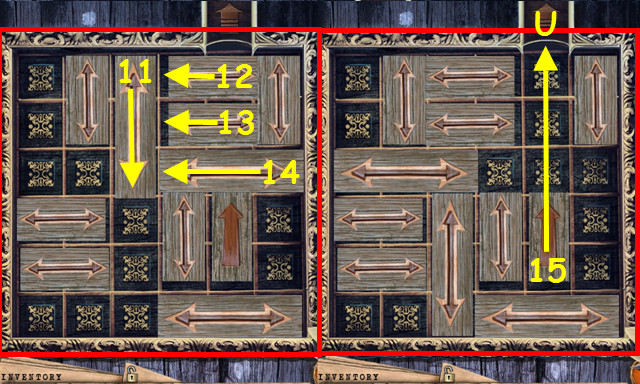
- Place the CARETAKER’S PUZZLE PIECE in the board to activate the mini-game.
- Slide the arrow tiles to allow the red arrow (T) to move to the exit (U).
- Slide the tiles in numerical order in the direction indicated (1-15).
- Enter the Caretaker’s Room.

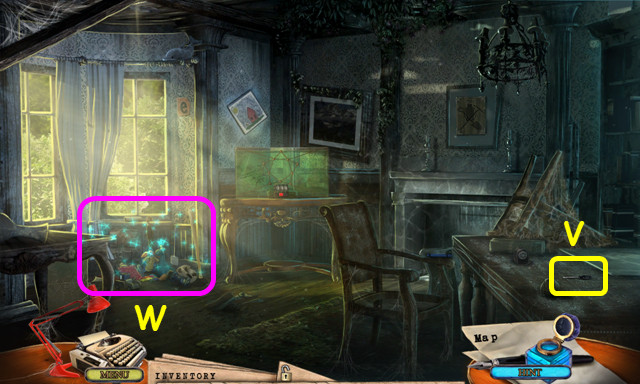
- Zoom into the table and take the SCREWDRIVER (V).
- Select the window seats for a HOP (W).

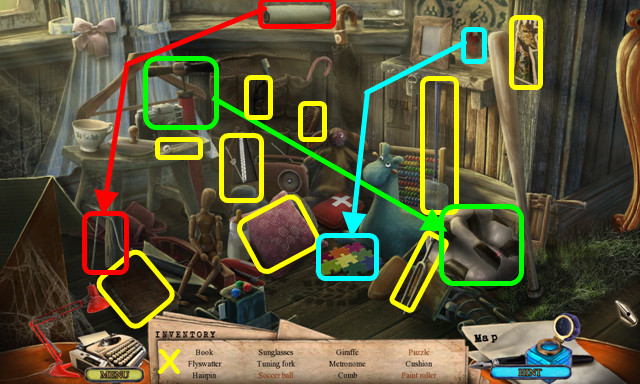
- Locate all the items on the list (X).
- You will earn the HAIRPIN.
- Walk down.

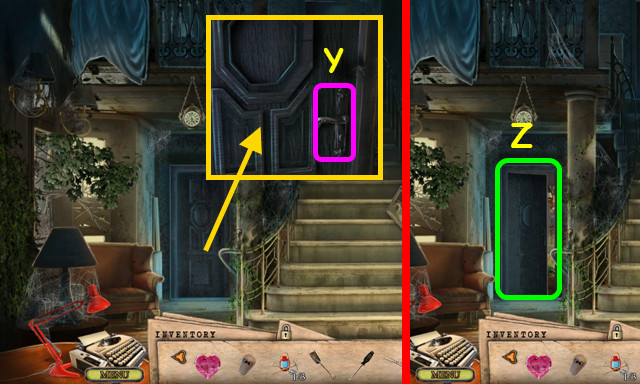
- Look at the door and use the HAIRPIN in the lock (Y).
- Enter the Children’s Room (Z).
Chapter 5: The Children’s Floor

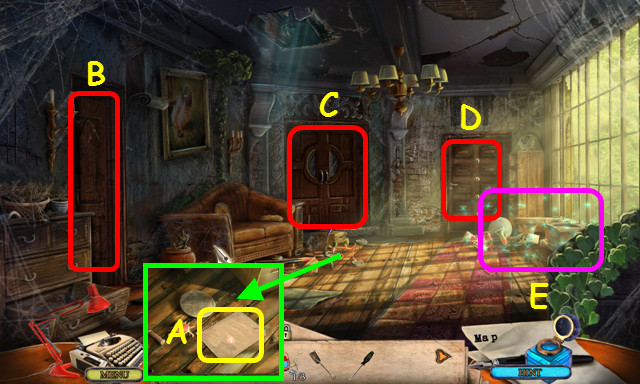
- Look at the toys and take the SKETCHBOOK PAPER (A).
- Note the door to James’ Room (B).
- Note the door to Jasmine’s Room (C).
- Note the locked door (D).
- Select the debris for a HOP (E).

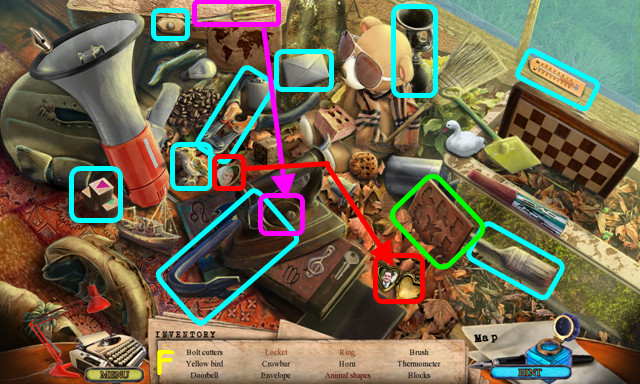
- Locate all the items on the list (F).
- You will earn the TOY BLOCKS.
- Walk left to James’ Room.

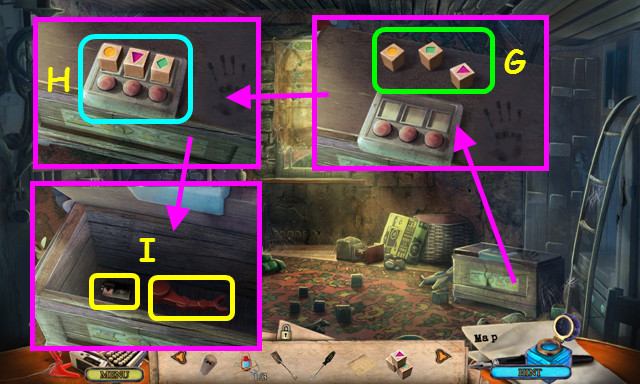
- Look at the chest and place the TOY BLOCKS on the lid (G).
- Place the cubes in the panel as shown and press the button (H).
- Take the 1/2 BATTERY and the RIGHT ROBOT ARM (I).
- Walk down, and then enter Jasmine’s Room.

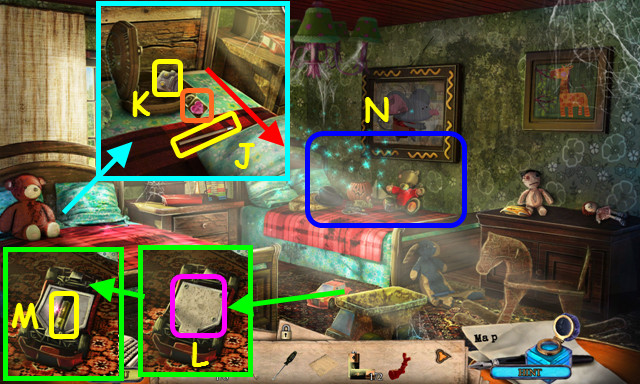
- Look at the left bed, move the pillow, and take the PENCIL (J).
- Use the HEART-SHAPED KEY in the lock and take the ROBOT HEAD (K).
- Look at the floor, turn over the car, and use the SCREWDRIVER on the panel (L).
- Take the 2/2 BATTERY (M).
- Select the right bed for a HOP (N).

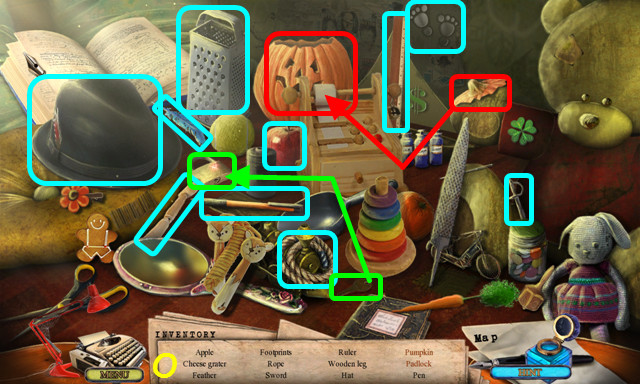
- Locate all the items on the list (O).
- You will earn the WOODEN LEG.
- Return to the Caretaker’s Room.

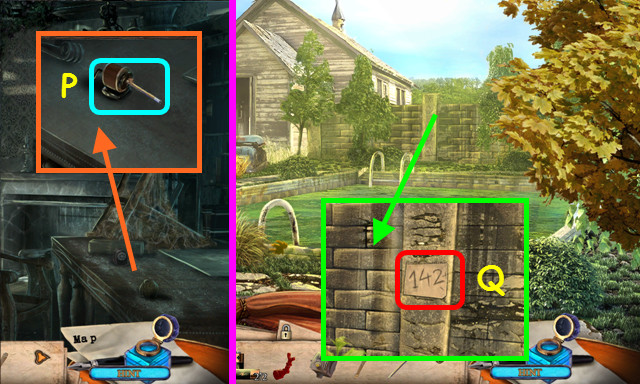
- Look at the table and use the PENCIL on the sharpener to get the SHARPENED PENCIL (P).
- Walk down twice and go to the Orphanage Backyard.
- Look at the wall; place the SKETCHBOOK PAPER on the wall, and use the SHARPENED PENCIL on the paper to reveal the code 142 (Q).
- Walk down and go to the Playground.

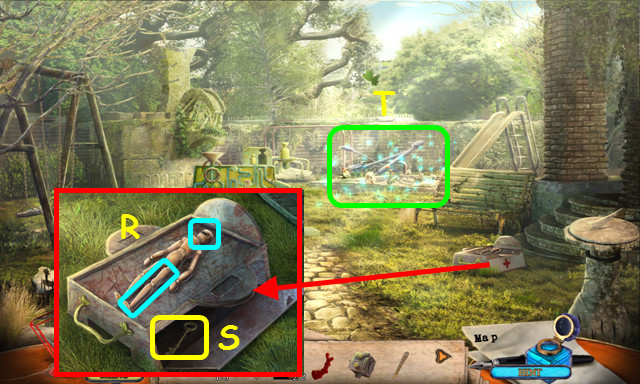
- Look at the anatomy doll; place the WOODEN HEAD and the WOODEN LEG on the body (R).
- Take KIM’S ROOM KEY (S).
- Look at the sandbox for a HOP (T).

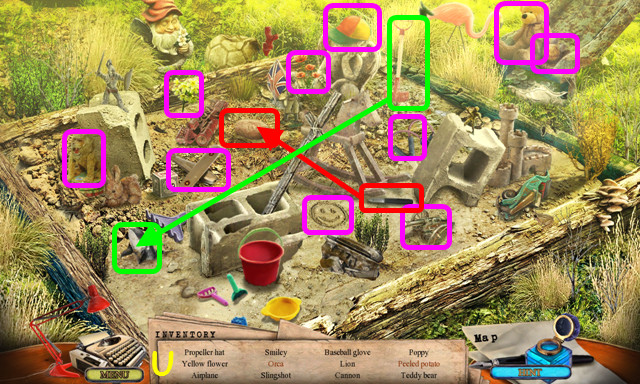
- Locate all the items on the list (U).
- You will earn the LEFT ROBOT ARM.
- Return to James’ Room.

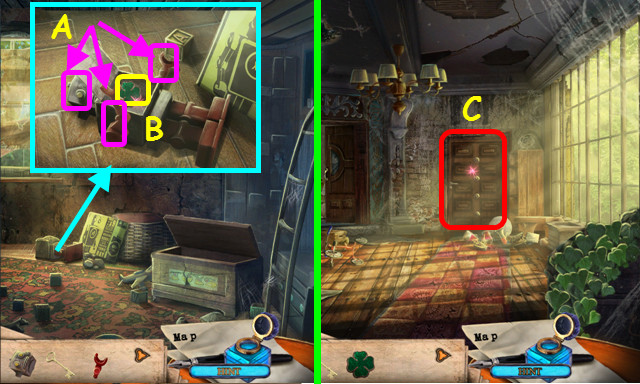
- Look at the robot and place the RIGHT ROBOT ARM, LEFT ROBOT ARM, and ROBOT HEAD on the body (A).
- Take the CLOVER (B).
- Walk down.
- Zoom into the locked door and use KIM’S ROOM KEY in the lock (C).
- Enter Kim’s Room.

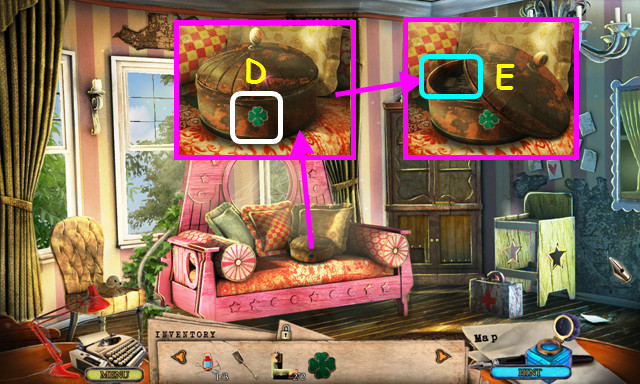
- Look at the daybed and place the CLOVER on the box (D).
- Open the box and look inside for a mini-game (E).

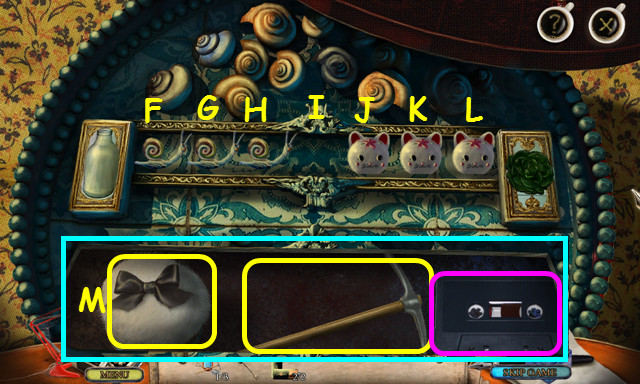
- Swap the snails and kitties locations.
- They can only move forward a space at a time or jump over another piece.
- Select the pieces in these locations: H, J, K, I, G, F, H, J, L, K, I, G, H, J, and I.
- Take the POWDER, 2/3 MINING TOOLS, and the Tape 07 (M).
- Return to Jasmine’s Room.

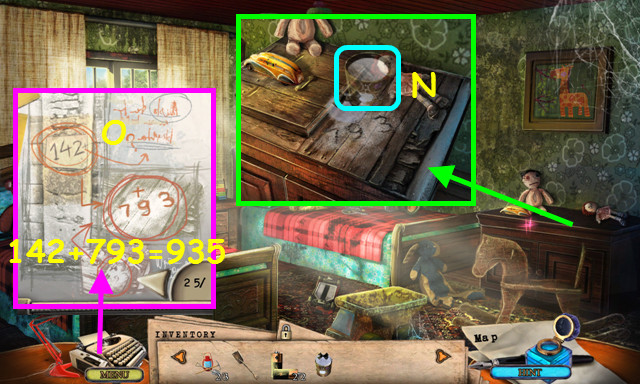
- Look at the chest and use the POWDER on the surface to find the code 793 (N).
- Look in your diary; read the 2 codes and add them together 142 + 793 = 935 (O).
- Return to the Caretaker’s Room.

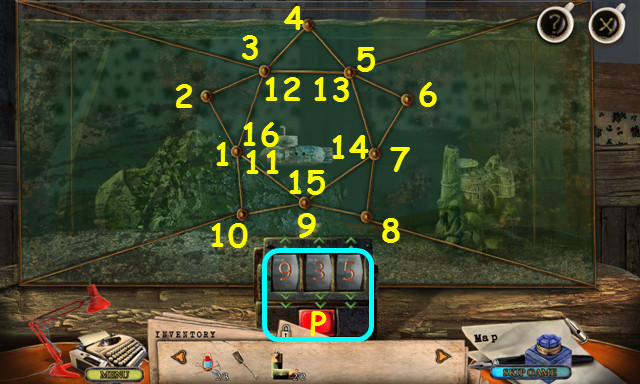
- Look at the aquarium and use the arrows to enter 935 (P).
- Select any point on the star, and then make a continuous path covering every line and intersection.
- Select the points in numerical order (1-16).
- You will earn the 3/3 MINING TOOLS.

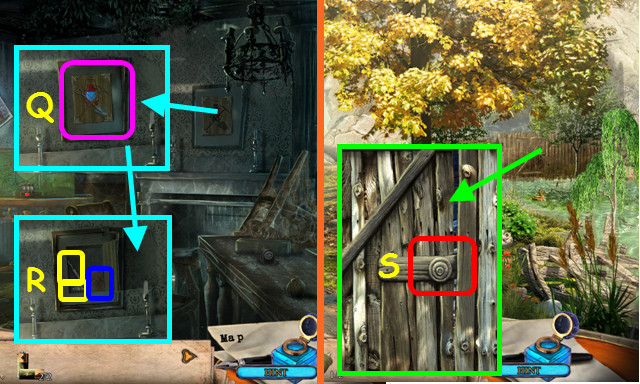
- Look at the mantle and place the 3 MINING TOOLS in the frame (Q).
- Take the LOCK PICK, 1/2 SPARKPLUG, and read the note (R).
- Return to the Shore.
- Look at the gate and use the LOCK PICK in the lock (S).
- Walk through the gate to the Mine Entrance.
Chapter 6: The Mine

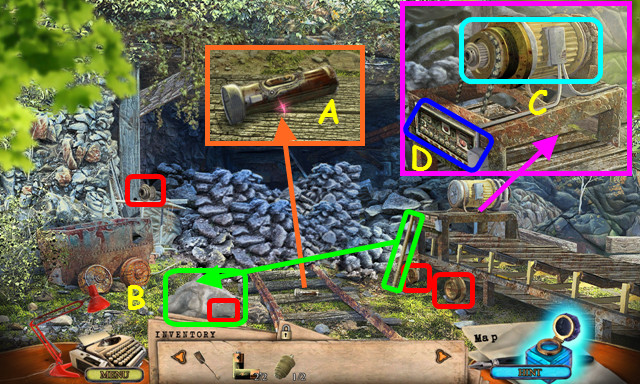
- Look at the ground; place the 2 BATTERIES in it, and then take the FLASHLIGHT (A).
- Take the WOODEN POLE and use it on the rock (B).
- Take the 4 CONVEYOR BELT PARTS (red).
- Look at the machine and attach the 4 CONVEYOR BELT PARTS (C).
- Look at the panel for a mini-game (D).

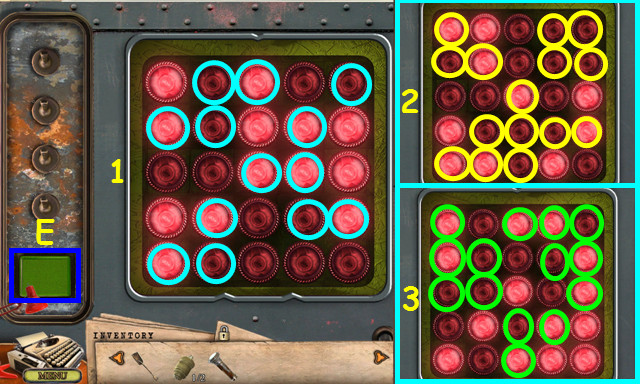
- Turn on all the lights on the panel.
- Selecting a light will change the surrounding lights as well.
- Select each of the circled lights to solve the 3 levels (1-3).
- You can press the circled lights in any order.
- Press the green button to reset a board (E).
- Once the panel opens, press the red button.

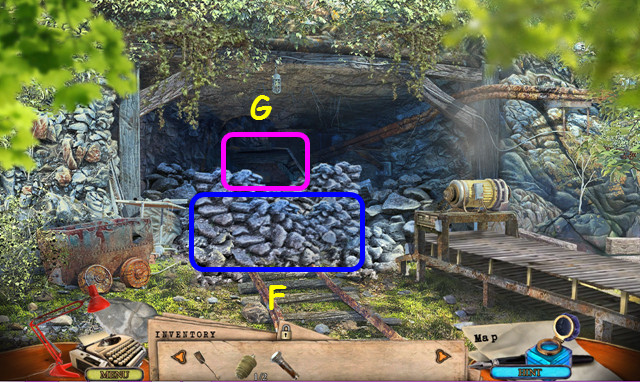
- Use the SHOVEL on the rocks (F).
- Walk forward to the Engine Room (G).

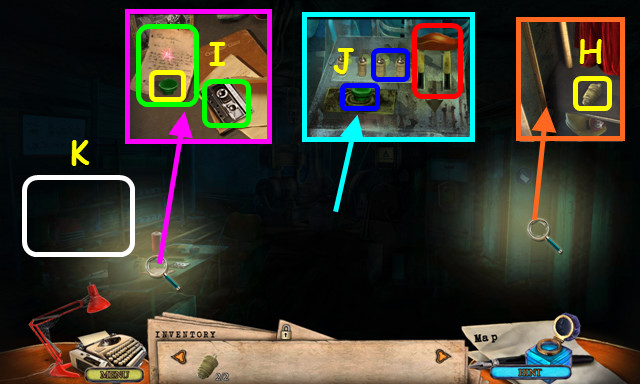
- Use the FLASHLIGHT on the scene; look at the locker, take the 2/2 SPARKPLUG (H).
- Look at the table; take the note, START BUTTON, and the Tape 08 (I).
- Look at the generator, place the 2 SPARKPLUGS and the START BUTTON on the console and pull the switch (J).
- Select the shelves on the left for a HOP (K).

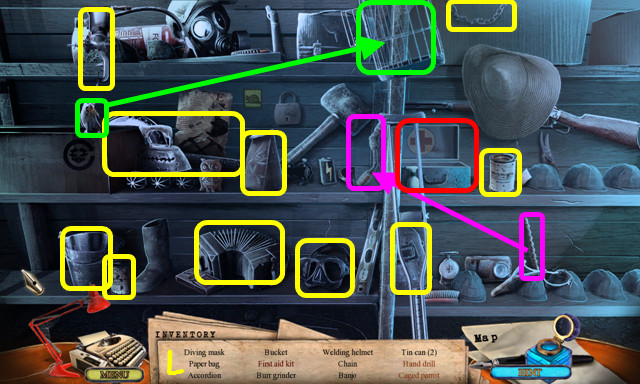
- Locate all the items on the list (L).
- You will earn the 1/3 SCUBA GEAR.
- Walk forward.

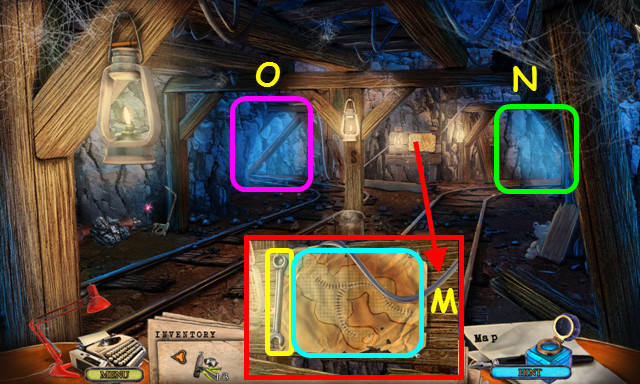
- Look at the board; take the map and the WRENCH (M).
- Note the path to Equipment Storage (N).
- Walk left to the Copper Pit (O).

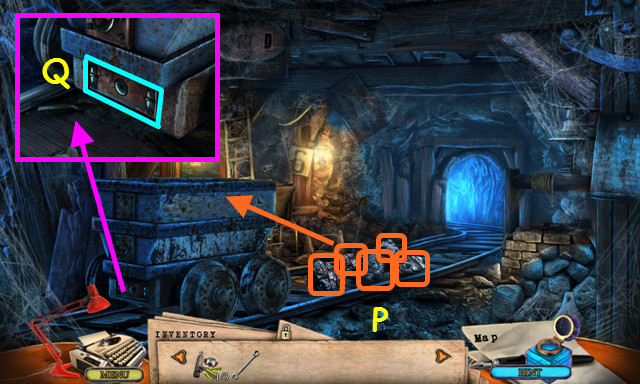
- Move the 5 rocks into the cart (P).
- Look at the back of the cart and use the WRENCH to remove the cover (Q).
- Walk down and right to Equipment Storage.

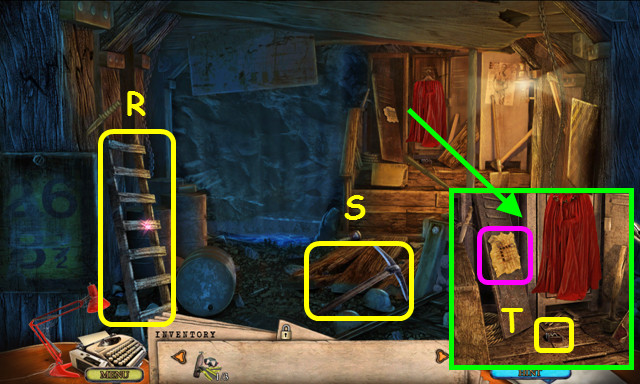
- Take the WOODEN LADDER (R).
- Take the PICKAX (S).
- Look at the lockers; take the clue and the LOCKER PART (T).
- Walk down.

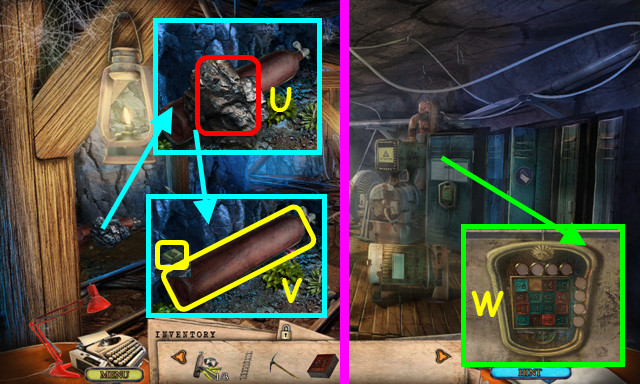
- Look on the left and use the PICKAX 3 times on the stone (U).
- Take the 2/3 SCUBA GEAR and the 1/2 SQUARE TILE (V).
- Walk down.
- Look at the locker and place the LOCKER PART on the keypad (W).
- Select the keypad for a mini-game.

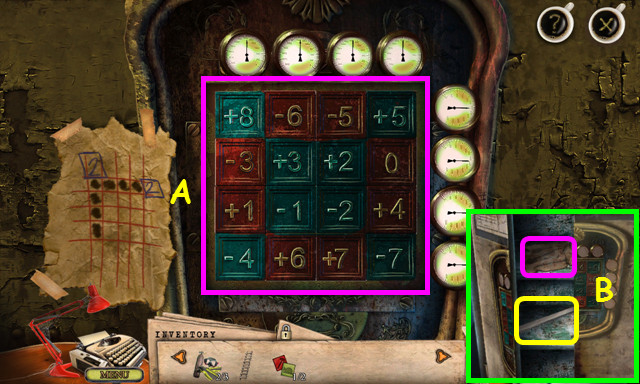
- Move the red tiles so that each column and row equals 2 (A).
- Drag a tile to the tile you want to swap.
- Take the HANDSAW BLADE and note (B).
- Walk forward.

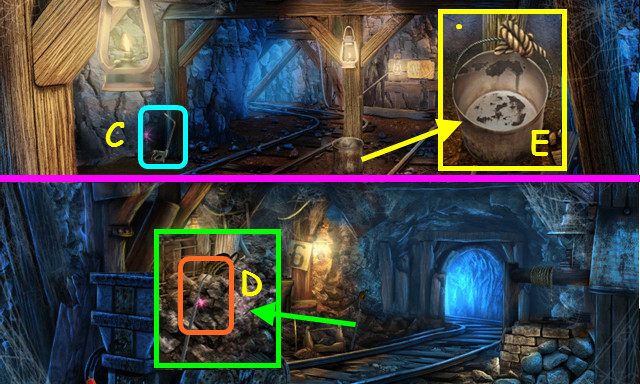
- Zoom into the wall use the HANDSAW BLADE on the handle to get the HANDSAW (C).
- Walk to the left.
- Look at the rocks and use the HANDSAW to take the COIL OF ROPE (D).
- Walk down.
- Look at the bucket and attach the COIL OF ROPE to get the RUSTY BUCKET ON ROPE (E).
- Walk to the left.

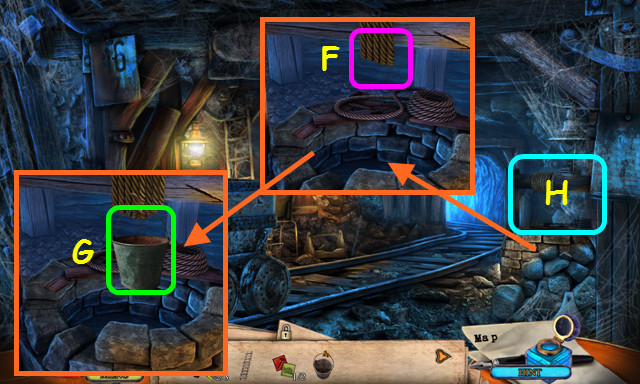
- Look at the well and place the RUSTY BUCKET ON ROPE on the beam (F).
- Select the bucket to lower it into the well (G).
- Select the well for a HOP (H).

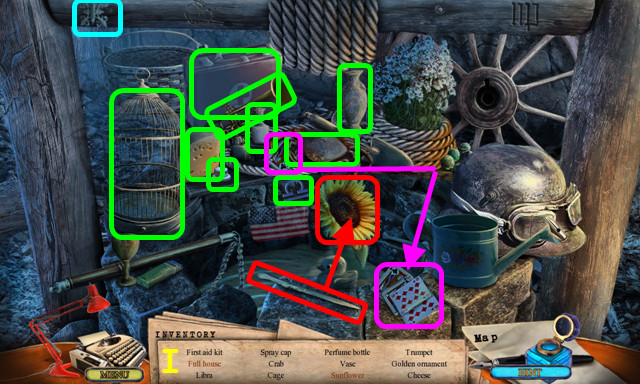
- Locate all the items on the list (I).
- You will earn the SPRAY CAP.
- Walk down twice.

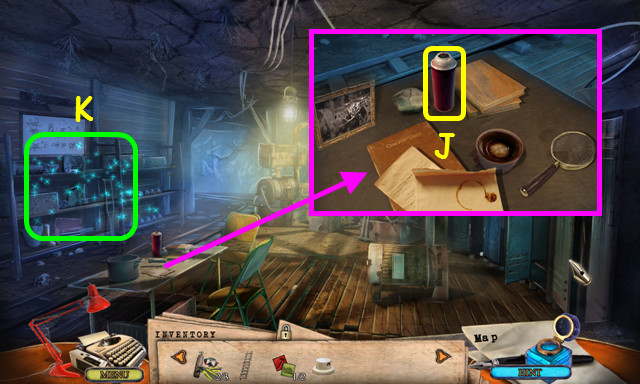
- Look at the table and place the SPRAY CAP on the can to get the ANTIRUST SPRAY (J).
- Select the left shelves for a HOP (K).

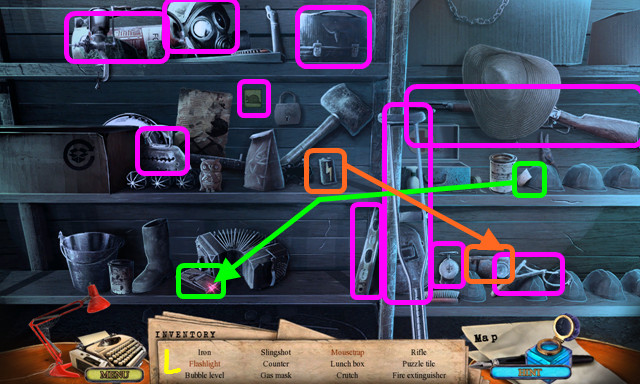
- Locate all the items on the list (L).
- You will earn the 2/2 SQUARE TILE.
- Walk forward and left.

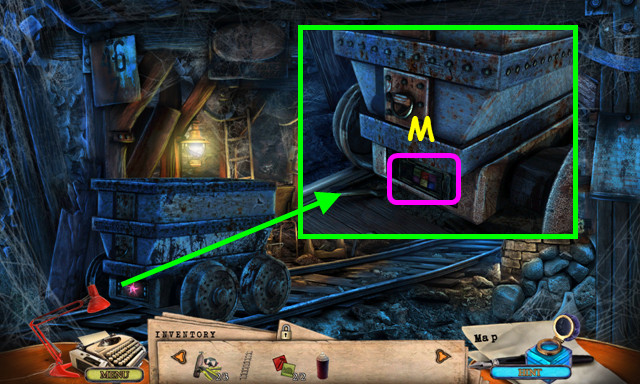
- Look at the back of the cart and use the ANTIRUST SPRAY on the panel (M).
- Look at the panel for a mini-game.

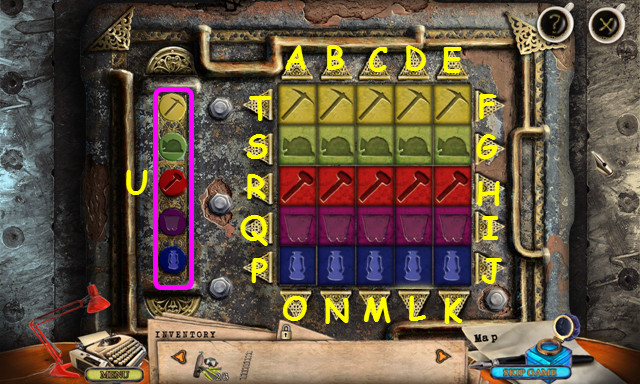
- Place the 2 SQUARE TILES in the grid to trigger the mini-game.
- Use the arrow buttons to slide the colored tiles to the correct rows as indicated by the legend (U).
- Press the arrows in this order: H, I, Bx2, E, G, C, L, Ex2, H, D, Q, Ax2, N, M, Jx2, K, B, Px2, and D.
- Once a row is complete, it will lock in place.
- Push the cart 3 times and walk forward to the Dead End.

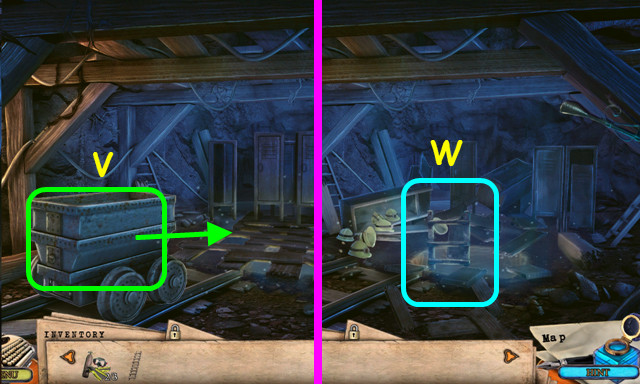
- Push the cart to fall in the hole (V).
- Place the WOODEN LADDER in the hole (W).
- Climb down into the Mine Hole.
Chapter 7: Escape

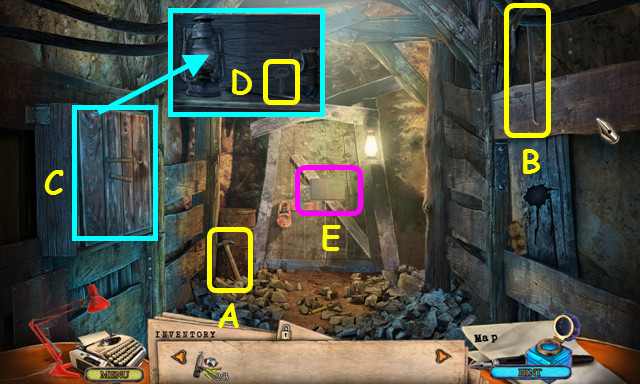
- Take the RUSTY HAMMER (A).
- Take the CROWBAR (B).
- Zoom into the cabinet and use the CROWBAR twice to remove the cover (C).
- Take the TRIANGLE KEY (D).
- Zoom into the door and use the TRIANGLE KEY to remove the cover for a mini-game (E).

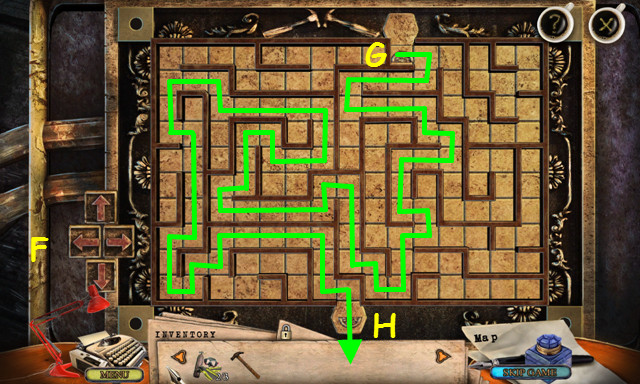
- Use the arrows (F) to move the coin half (G) through the maze to the bottom (H).
- Walk forward to the Gold Pit.

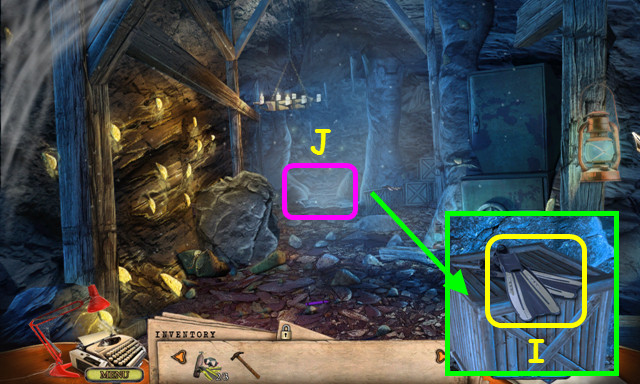
- Look at the crates and take the 3/3 SCUBA GEAR (I).
- Zoom into the water and use the 3 SCUBA GEAR to go forward (J).

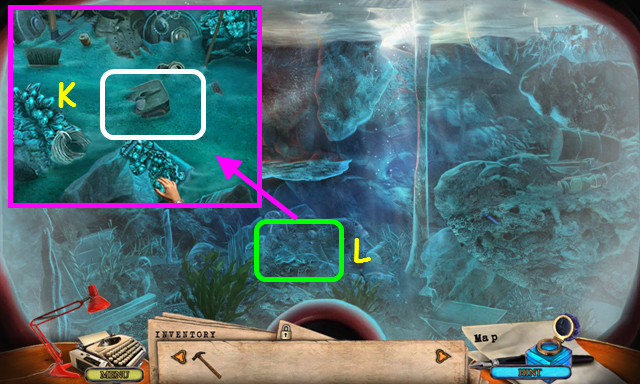
- Look at the debris and stir up the sand (K).
- Select the area for a HOP (L).

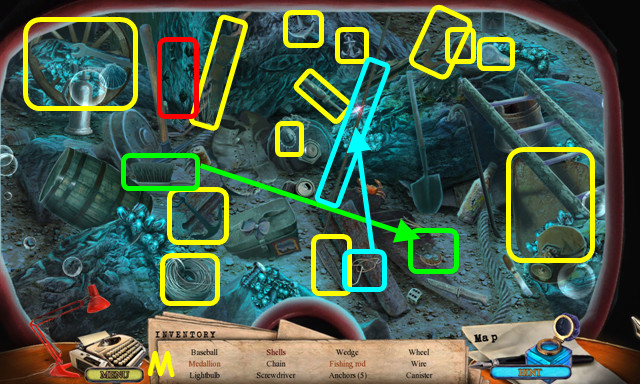
- Locate all the items on the list (M).
- You will earn the WEDGE.
- Go down to the Gold Pit.

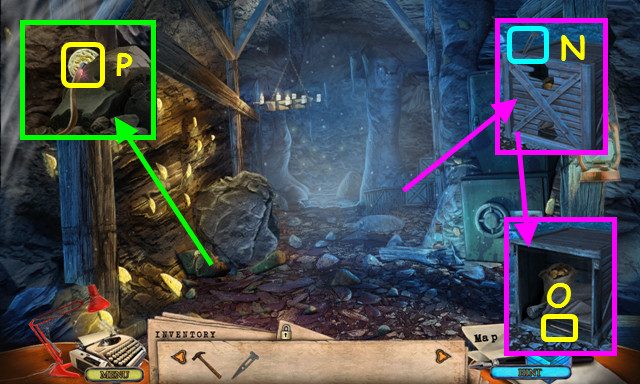
- Look at the crates and place the WEDGE on the right crate, then use the RUSTY HAMMER on the wedge (N).
- Take the MEDICAL TWEEZERS (O).
- Look at the rocks and use the MEDICAL TWEEZERS to take the PENDANT (P).

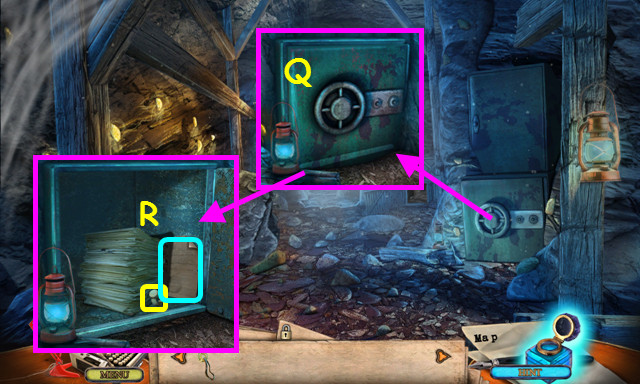
- Look at the safe and place the PENDANT in the lock (Q).
- Open the safe; take the evidence and the STRANGE RING (R).
- Walk forward into the Lake, and swim up to the Mine Cave.

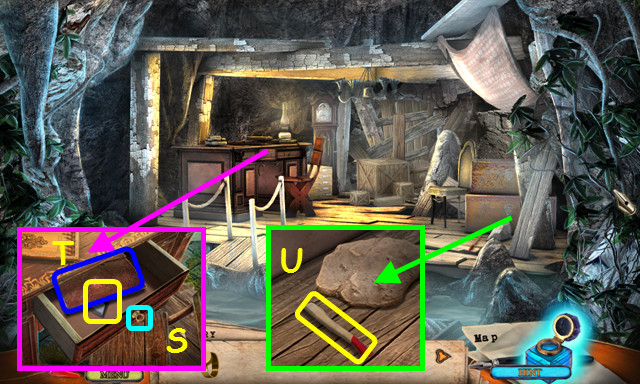
- Look at the desk and use the STRANGE RING on the drawer (S).
- Open the drawer; take the LETTER and the AX HEAD (T).
- Look at the chest; use the AX HEAD on the handle to make the AX (U).

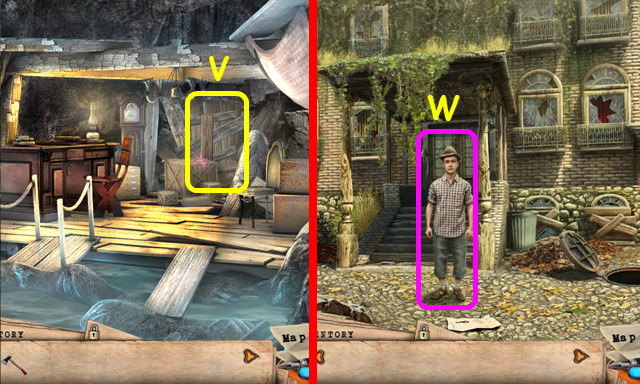
- Use the AX 3 times on the exit, then go forward (V).
- Talk to Ricky (W).
- Congratulations, you have completed Off the Record: Linden Shade.





 Delaware St. John Volume 3: The Seacliff Tragedy Walkthrough, Guide, & Tips
 Queen's Tales: The Beast and the Nightingale Walkthrough, Guide, & Tips
 Lost Chronicles: Salem Walkthrough, Guide, & Tips
 The Secrets of Da Vinci Walkthrough, Guide, & Tips
 Criminal Minds Walkthrough, Guide, & Tips