Hide and Secret: The Lost World Walkthrough, Guide, & Tips
Hide and Secret: The Lost World Walkthrough

Welcome to the Hide and Secret: The Lost World Walkthrough!
The nefarious treasure thief Jacques has kidnapped another damsel, and it’s up to you to stop his plans before she is sacrificed!
Whether you use this document as a reference when things get difficult or as a road map to get you from beginning to end, we’re pretty sure you’ll find what you’re looking for here.
This document contains a complete Hide and Secret: The Lost World game walkthrough featuring annotated screenshots from actual gameplay!
We hope you find this information useful as you play your way through the game. Use the walkthrough menu below to quickly jump to whatever stage of the game you need help with.
Remember to visit the Big Fish Games Forums if you find you need more help. Have fun!
This walkthrough was created by Robin, and is protected under US Copyright laws. Any unauthorized use, including re-publication in whole or in part, without permission, is strictly prohibited.
General Tips
- This is a Hidden Object Puzzle Adventure game.
- There is no timer.
- The game autosaves automatically.
- There are unlimited Hints, just wait for the HINT Button the recharge.
- When there is an item to find, clicking on the HINT button will show it circled in white stars.
- When there are no items to find, clicking on the HINT button will display text instructions for solving your current Objectives.
- The Journal Icon in the lower left will glitter when it has new information for you.
- Once you get the Map, it will appear as an icon in the lower right. You can use the Map to travel between any two locations that you have already visited.
- You will need to revisit each location several times during the game. When you see sparkles, a Hidden Object Scene or mini-game is available. You can also click on characters to talk to them.
- Skip a mini-game by clicking the SKIP Button once it has recharged.
- One item in each Hidden Object scenes can be used elsewhere in the game. The game refers to these as Handy Items.
- You may be awarded a Handy Item for completing a mini-game.
- Some characters will give you a Handy Item after you complete a task for them.
- All of your Handy Items are stored in your backpack in the lower right. You can scroll through these by using the arrows on the left and right of backpack.
- You may not be able to use a Handy Item until a long time after you’ve collected it.
- Move your cursor slowly around and you will find from 1 to 4 yellow arrows which are exit points to other scenes. An exit arrow can point up, down, left, or right.
- Sometimes the Up Exit is off to one side or another, usually associated with a building or path there.
- Some exits are locked until you do other things in the game. So each time you revisit a scene, scan again to see if new exit arrows have opened.
- When you get stuck and can’t think of what to do next, check your Handy Items to see if there are any you can use. If not, search each location to see if any Hidden Object scenes have become available.
- Use the Down Exit to leave a Zoom Scene or mini-game.
- When you are doing a jigsaw puzzle mini-game, a piece will lock into place once it is in the right position.
- When you are doing a rows and columns mini-game, the pieces do not lock into place when they are in correct position.
Chapter 1: Lord Rockwood

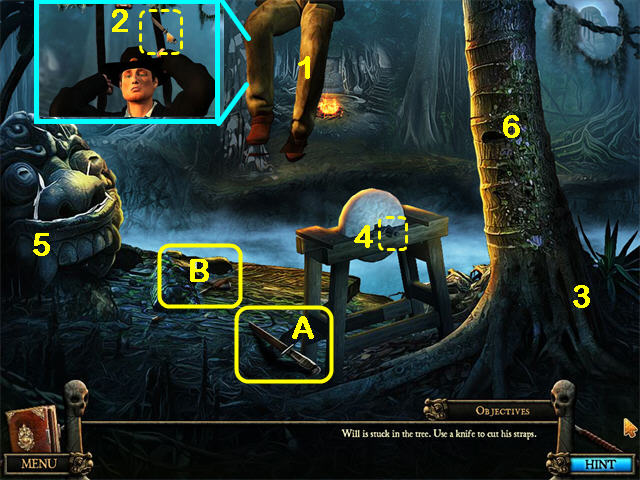
- This is the Landing Site. Use the KNIFE (A) to cut Will (1) down. After you zoom in, use the KNIFE on the straps (2) that are holding him.
- Move the Rock to reveal the DULL AXE (B).
- Zoom in on the Tree base (3) to reveal a Hidden Object Scene.

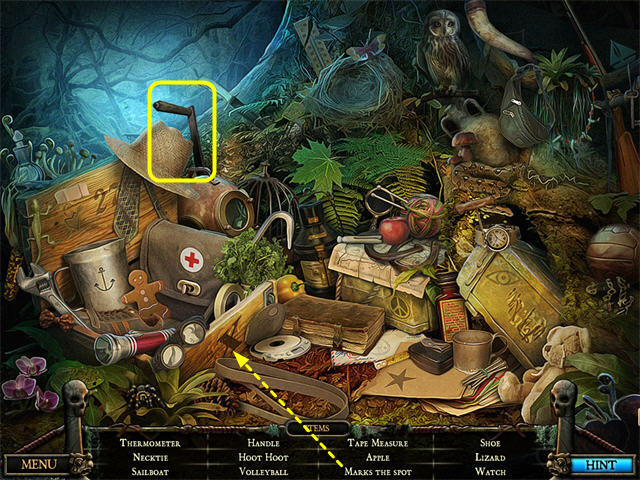
- Collect the items on the Find List including the HANDLE (C).
- “Hoot hoot” is an Owl.
- “Marks the spot” is the letter X.
- Put the HANDLE on the Sharpener (4).
- Sharpen the DULL AXE on the Sharpener to get the SHARP AXE.
- Examine the Panther Head Statue (5). You need to find two DIAMOND EYES and return later.
- Use the SHARP AXE on the Tree (6) until it falls down.
- Position the cursor on the Tree to reveal the Up Exit, then click to cross the chasm.

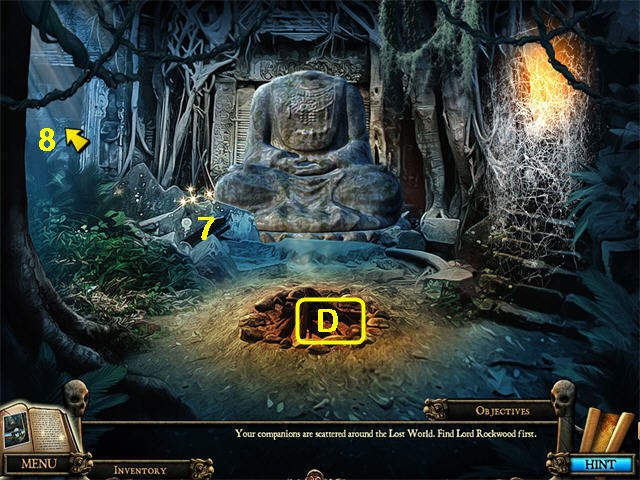
- You are now at the Base Camp.
- Collect the MAP (D) from the fire. It will go into the lower right corner. Now you can use it to quickly travel between locations.
- Zoom in on the Hidden Object Scene by the left rocks (7).

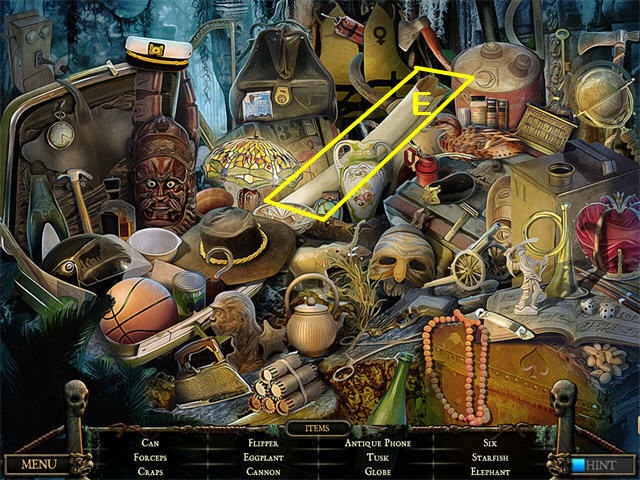
- Collect the items on the Find List including the TUSK (E).
- The Statue needs a head. The spider web is blocking the stairs on the right.
- Exit Left (8).

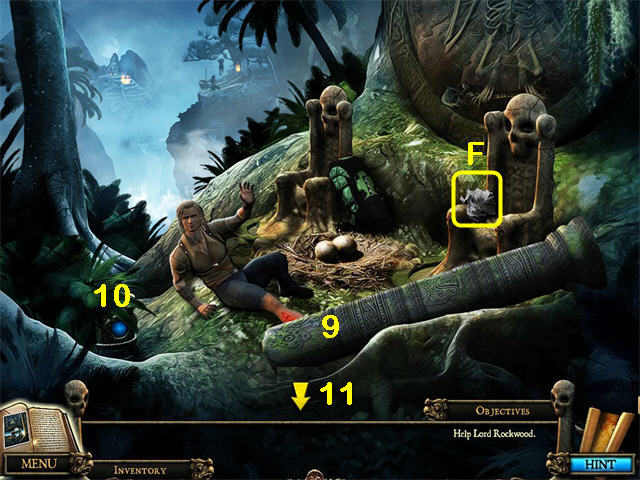
- You are by a Giant Nest. Use the TUSK from the Base Camp to lift the Column (9) off Lord Rockwood.
- Click on Lord Rockwood to add him to your party.
- Move the leaves away from the Blue Light Device (10).
- Examine the Blue Light Device. You will have to come back later when you know the code.
- Collect the JOURNAL PAGE (F) from the throne. Click on the Journal to read it.
- Exit Down (11) to return to the Base Camp.

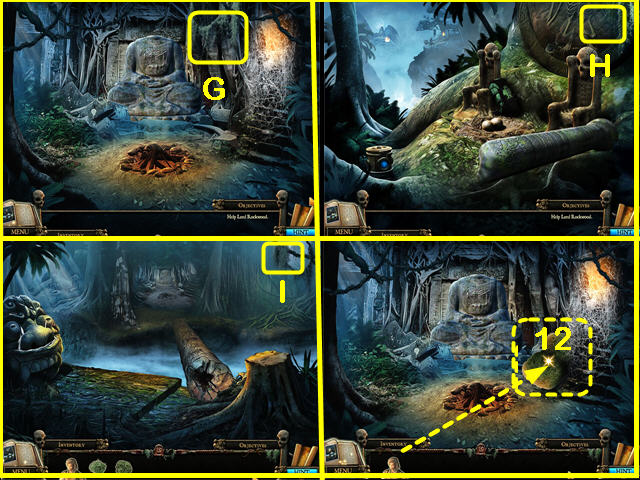
- There is one piece of SPANISH MOSS in each of the 3 locations, at Base Camp (G), by the Giant Nest (H) and at the First Landing Site (I). You need all 3 pieces.
- When you have put all 3 pieces in the Base Camp, put Lord Rockwood on the MOSS (12). He will give you his LIGHTER.
- Exit Left to the Giant Nest.
- Zoom in on the Giant Nest for the Hidden Object Scene.

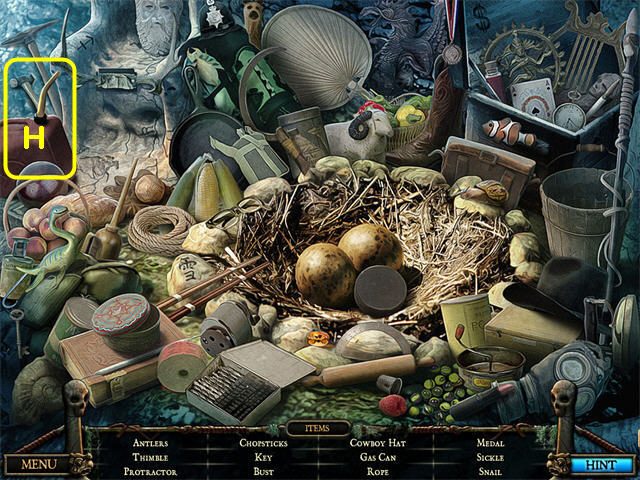
- Collect the items on the Find List including the GAS CAN (H).
- Exit Down to the Base Camp.
- Use the GAS CAN from the Giant Nest and the LIGHTER from Lord Rockwood on the Fire.
Chapter 2: Up the Hill

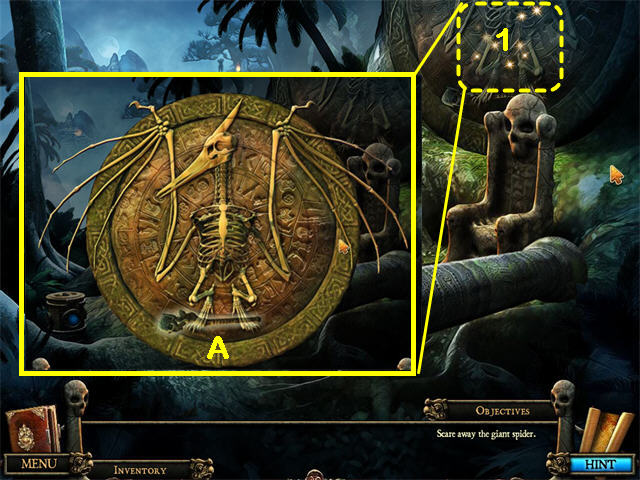
- The Giant Spider will appear. You need a Torch. Exit Left to the Giant Nest.
- Click on the Carving (1) to trigger a mini-game.
- Click on each ring multiple times to turn it to assemble the picture as shown.
- Collect the TORCH (A).
- Exit Down twice to return to the Base Camp.
- Light the TORCH from the Giant Nest mini-game in the Fire, then use it on the Giant Spider.
- Go up the stairs to the right.

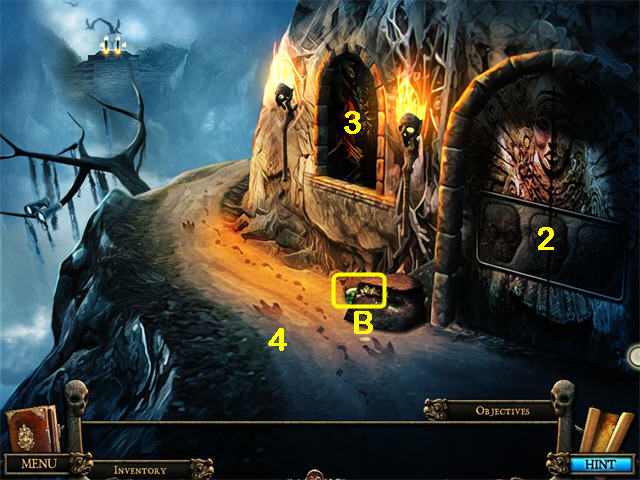
- This is the Hillside Trail. Collect the JEWEL KEY (B) from under the rock.
- Examine the Spooky Door (2). You will need more JEWEL KEYS.
- Examine the second Alcove (3) and the Footprints (4).
- There are BINOCULARS in the tree on the left but you can’t get to them yet.
- Continue up the hill to the Tipi.

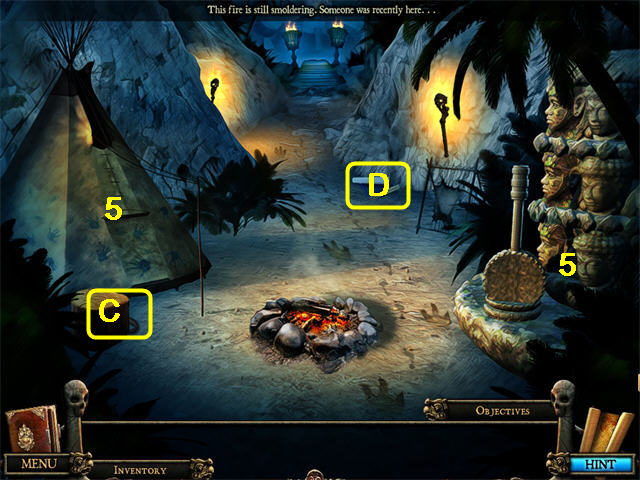
- Collect the ENGINE BELT (C).
- Examine the Tipi (5). There is a light inside, but you can’t get in yet.
- Examine the statues on the right (6). There is a puzzle to solve here, but you need to find the second LEVER.
- Collect Jacques’ BLUEPRINTS (D), then read the journal.
- Exit Up to the Broken Bridge.

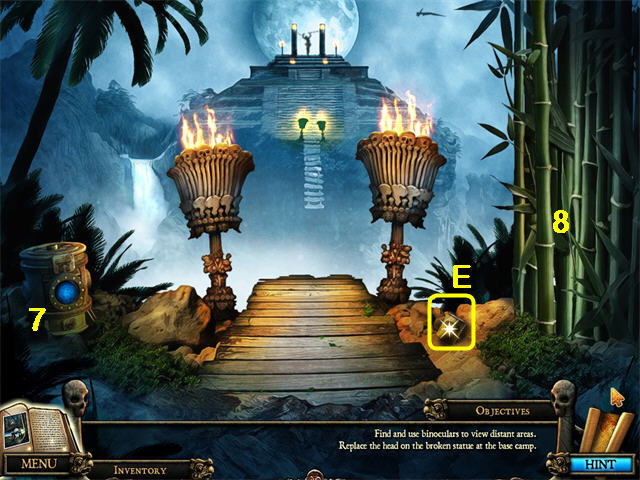
- Examine the Blue Light Device (7).
- Collect the CAN OF FOOD (E).
- Examine the BAMBOO (8). You need something to cut it.
- Exit Down 3 times and give the CAN OF FOOD to Lord Rockwood. You need something to open it.
- Exit Up twice to the Tipi.
- The Tipi will be open. Go inside and collect the DULL MACHETE.
- Exit Up to the Broken Bridge.
- Use the DULL MACHETE from the Tipi on the Bamboo on the right. You will not be able to cut the Bamboo yet.

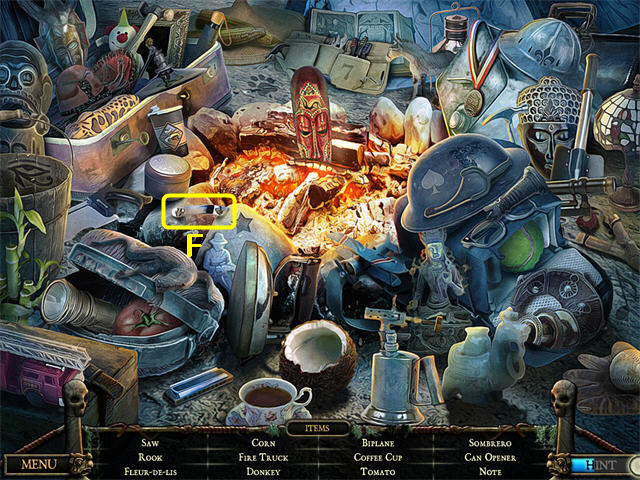
- When you return to the Tipi there will be a Hidden Object Scene in the Firepit.
- Collect the items from Find List including the CAN OPENER (F).
- The Note is a musical note.
- The Coffee Cup is a paper cup by the suitcase.
- Return to the Base Camp. Give the CAN OPENER to Lord Rockwood.
- Give the DULL MACHETE to Lord Rockwood and collect the SHARP MACHETE.
- Exit Up 3 times to the Broken Bridge.
- Use the SHARP MACHETE on the BAMBOO. A piece will fall off. Collect it.
- Return to the Hill Trail.

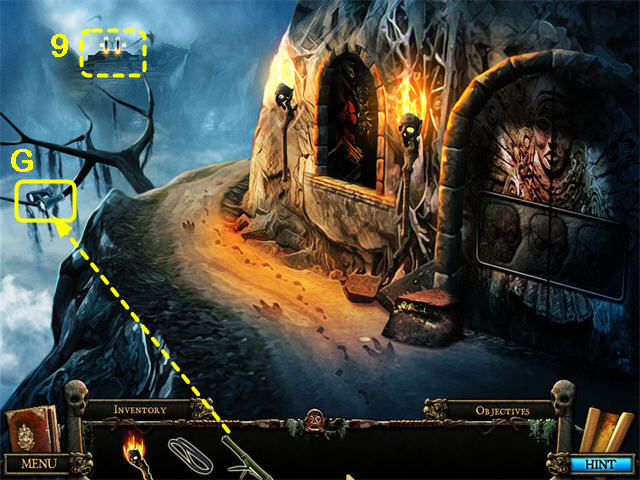
- Use the BAMBOO on the BINOCULARS (G) then click in the upper left to view the Hilltop Temple (9).
- This is a cut scene. You must watch until the Pteranadon flies off with the girl before the Down Exit arrow will appear.
Chapter 3: To the Lake
- The second Alcove is sparkling. Zoom in on a Hidden Object Scene.

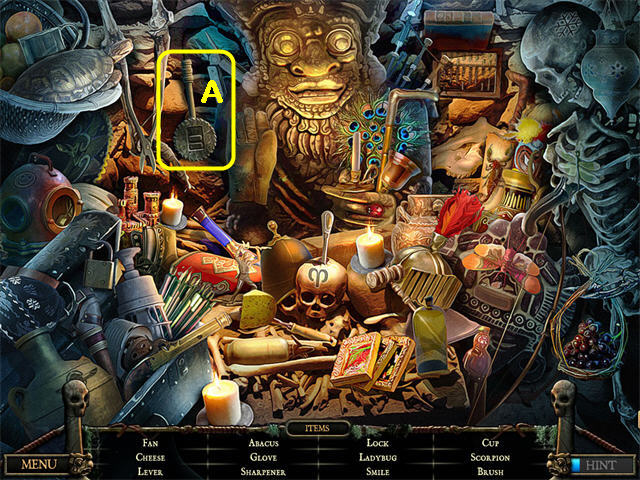
- Collect the items from the Find List including the LEVER (A).
- The only Smile that counts is the SMILEY FACE on the left.
- The Brush is a scrub brush on the right.
- Exit uphill to the Tipi.
- Zoom in on the mini-game on the right.

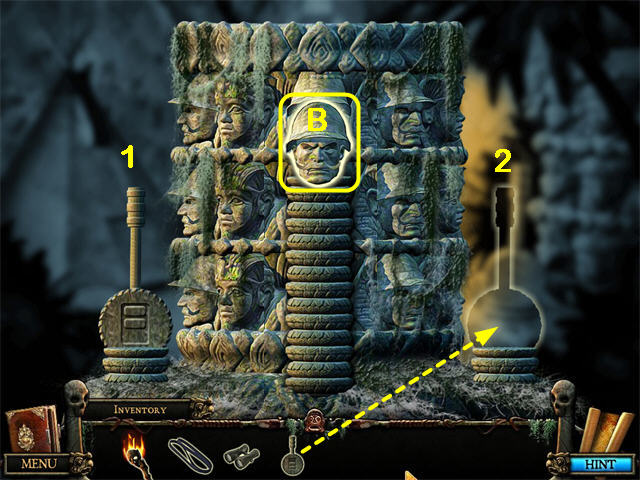
- Replace the LEVER (2).
- Try to collect the JACQUES HEAD (B) on the center post. It will go down into the ground.
- Move the LEVERS until all 3 JACQUES HEADS are lined up. There are many possible solutions. The left lever will move the top head and the center head. The right lever will move the center head and the bottom head.
- One way to solve it is to have the top head in place looking straight at you and the center and bottom heads lined up together anywhere else. At that point pull the right lever (2) until all 3 heads are lined up in looking at you.
- Our solution: 1, 2, 1, 1, 2, 1, 2, 2, 1, 1, 2, 2, 2, 1, 1, 2, 1, 1, 2, 2.
- The post will rise again.
- Collect the JACQUES HEAD off the post.
- Return to the Base Camp.
- Put the JACQUES HEAD on the statue. The statue will move, revealing a tunnel behind it.
- Enter the tunnel.

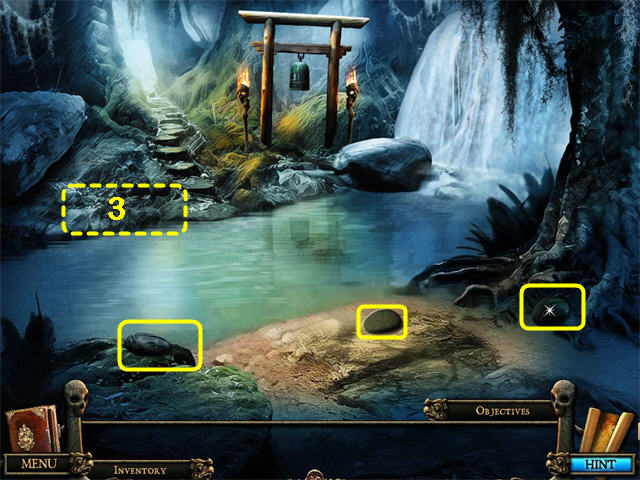
- You can see a Bell across the stream.
- Collect the 3 ROCKS and put them in the water as stepping stones.
- Zoom in on the Hidden Object Scene on the far bank (3).

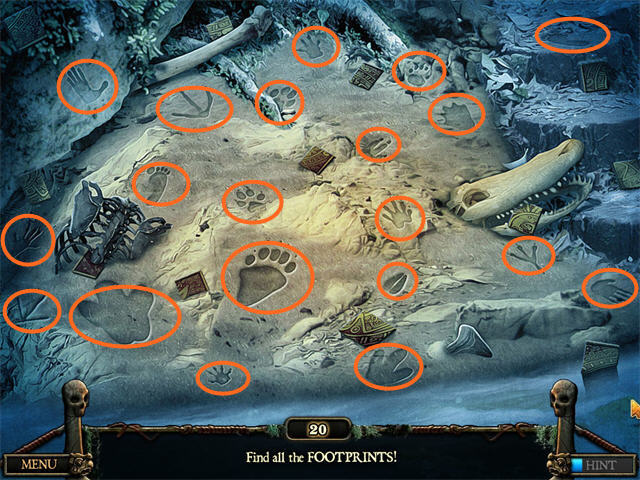
- Click on all 20 footprints. The ones that look like handprints still count, they are animal footprints.
- Read the Journal.
- Examine the Bell. It needs a CLAPPER.
- Exit Up to cross the water.

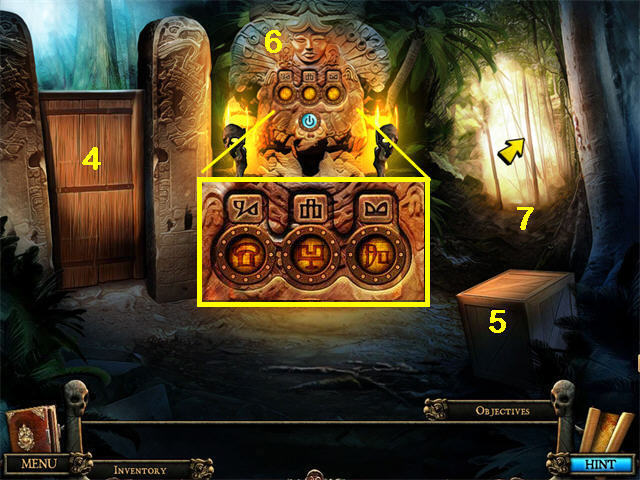
- You come to the Guardian Statue. The door on the left (4) is locked.
- Examine the Crate (5). You will need a CROWBAR to open it.
- Examine the Guardian statue (6). This shows you how the 3 Blue Light Devices in the other scenes are currently set, but it doesn’t tell you how they should be set. You will find that out later.
- Exit Right (7).

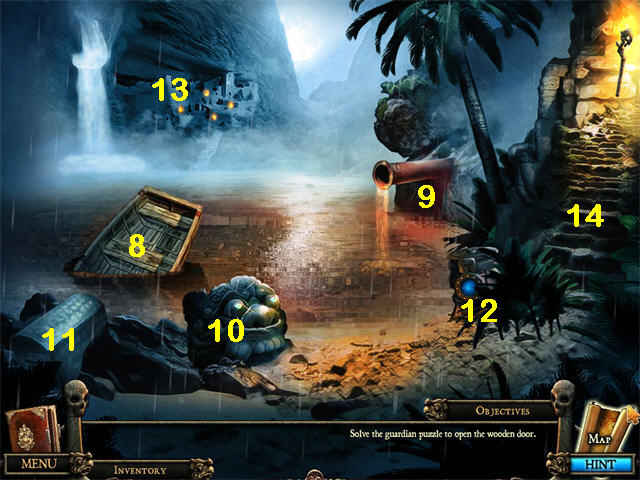
- This is the Lake.
- Examine the toxic pipe (9) and the rowboat (8).
- Zoom in on the Panther Statue (10). You will come back later when you have the solution. The Exit Arrow is at the top of this scene.
- Examine the Chest (11). It is locked.
- Examine the Blue Light Device (12). This is the center symbol on the Guardian Statue.
- Examine the village (13) across the lake. Click once or twice to get comments. Eventually you can use the down exit to close the scene.
- Exit Right to the Blue Stairs (14).

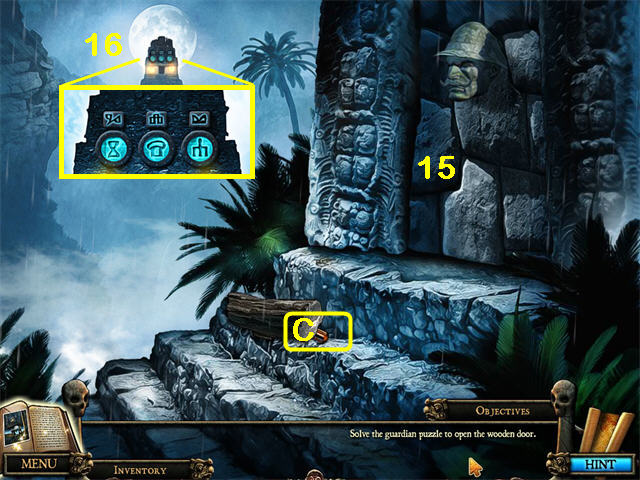
- Collect the SCREWDRIVER (C).
- Examine the Temple Doors (15). You will need dynamite.
- Look at the Temple across the way (16). You will see the solution to the Guardian puzzle.
Chapter 4: the Guardian Puzzle

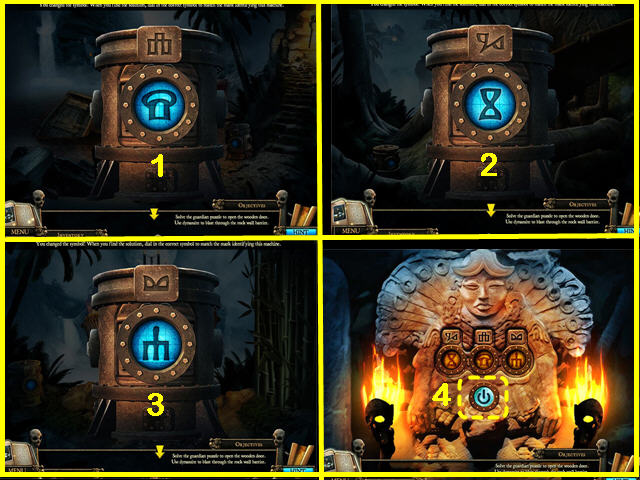
- Go down the stairs to the Lake. Set the Blue Light Device to the symbol that looks like a mushroom (1).
- Go to the Great Nest.
- Set the symbol on the Blue Light Device to the one that looks like an Hourglass.(2).
- Use the binoculars and look across the back of the scene. You will see Captain Withers hanging from a tree.
- Go to the Broken Bridge. Set the Blue Light Device to the symbol that looks like a pitchfork (3).
- Go to the Guardian Statue.
- Zoom in on the Guardian Statue and press the Blue Button (4). The left Door will open.
- Exit Left.

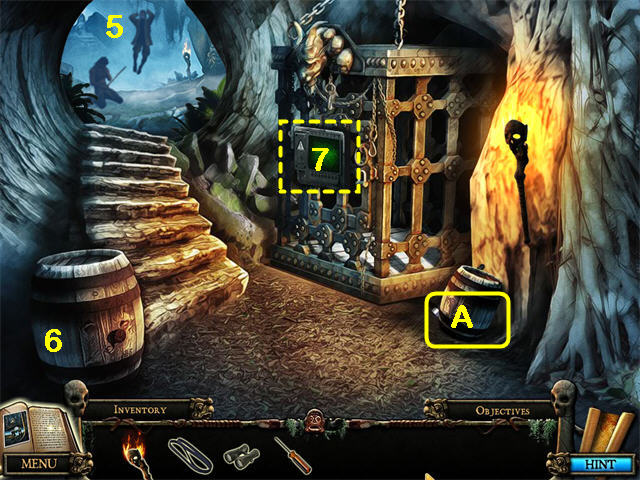
- You can see Captain Withers (5) up ahead.
- Collect the MACHINE PART (A) from behind the Barrel on the right.
- Examine the Barrel on the left (6). You need a CORKSCREW for it.
- Zoom in on the Control Panel (7) on the Temple Elevator.

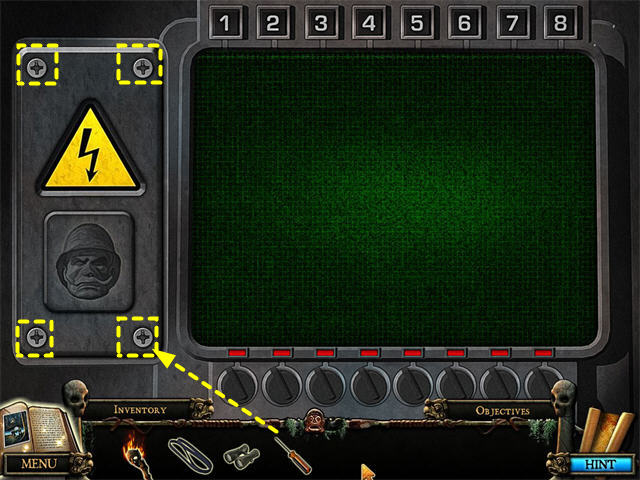
- Use the SCREWDRIVER from the top of the Blue Steps to take the 4 screws off. You need a MICROCHIP.
- Continue up the steps.
- Talk to the Warrior. He is angry because Jacques has kidnapped his two daughters.
- Return to the Lake.
Chapter 5: the Blue Steps

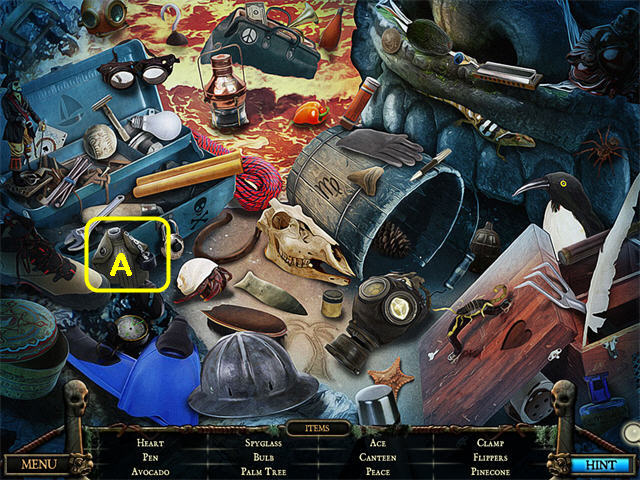
- This time the Panther Head is glittering. Click to reveal a Hidden Object Scene.
- Collect the items from the Find List including the EMPTY CANTEEN (A).
- Return to the Bell.
- Use the EMPTY CANTEEN to collect water so you have a FULL CANTEEN.
- Return to the Base Camp.
- Give the FULL CANTEEN from the Bell to Lord Rockwood. He will tell you to check the Statue for a Fuse.
- Zoom in on the Statue to reveal a Hidden Object Scene.

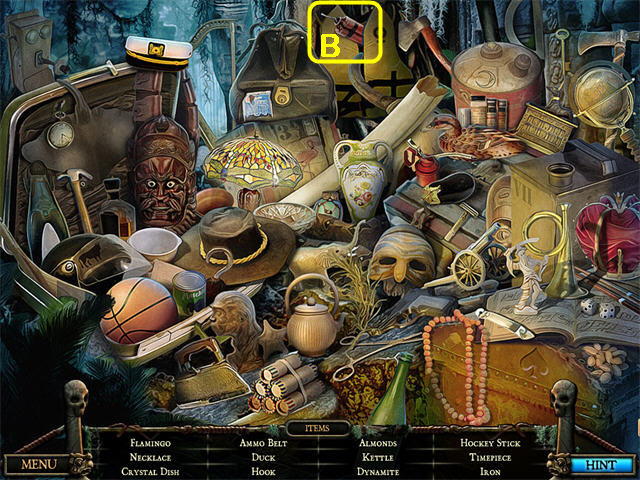
- Collect the items from the Find List including the DYNAMITE (B).
- Go to the top of the Blue Stairs.
- Put the DYNAMITE from the Base Camp by the Door.
- Try to light it with the TORCH. The rain will blow out the TORCH.
- Return to the Base Camp.
- Light the TORCH on the Fire at the Base Camp.
- Return to the top of the Blue Stairs.
- Light the DYNAMITE.
- Move the Statue Head that falls off the door to reveal the CIRCUIT BOARD.
Chapter 6: the Pit

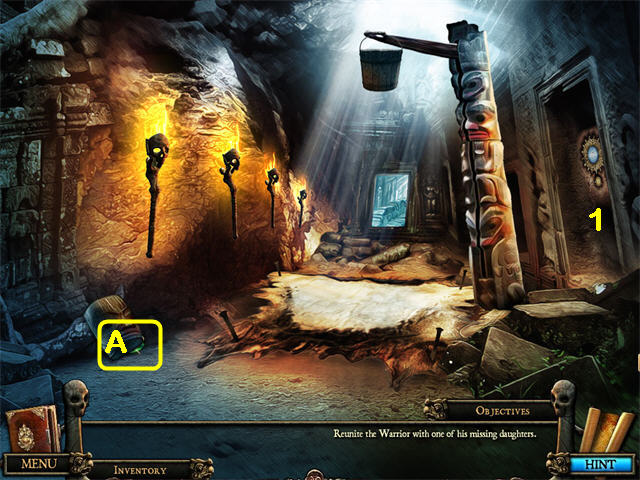
- Enter the room at the top of the Blue Stairs.
- Collect the JEWEL KEY (A) from behind the mask on the floor on the left.
- Examine the mini-game (1) on the right. You don’t have the solution yet.
- Continue forward. You will fall into the Pit.

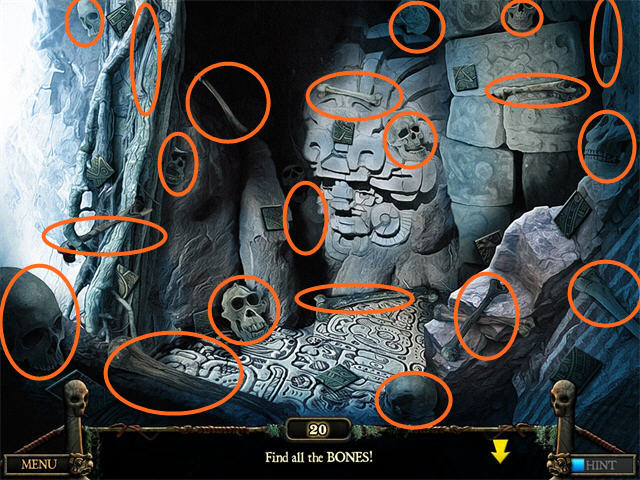
- Zoom in on the Hidden Object Scene. Find 20 Bones. You will receive a PILE OF BONES.
- Click on the Girl.
- Use the PILE OF BONES to rebuild the Ladder above her.

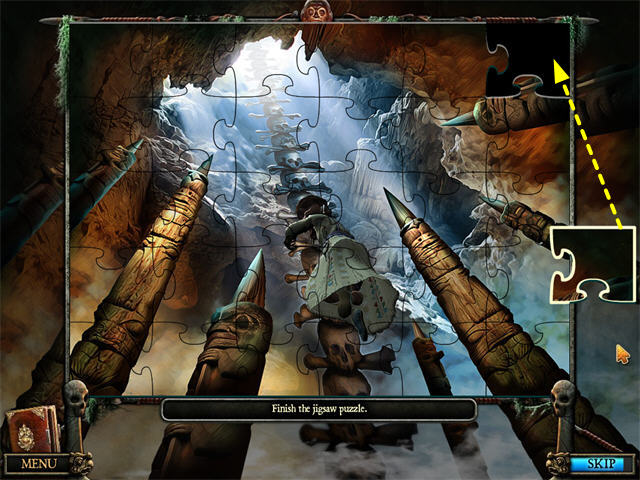
- Assemble the jigsaw puzzle.
- Click on the Girl one more time to add her to your party.
- Exit Up out of the Pit.
- Go to the Tree where the Warrior has Captain Withers.
- Give the GIRL to her father the Warrior.
Chapter 7: Free Captain Withers

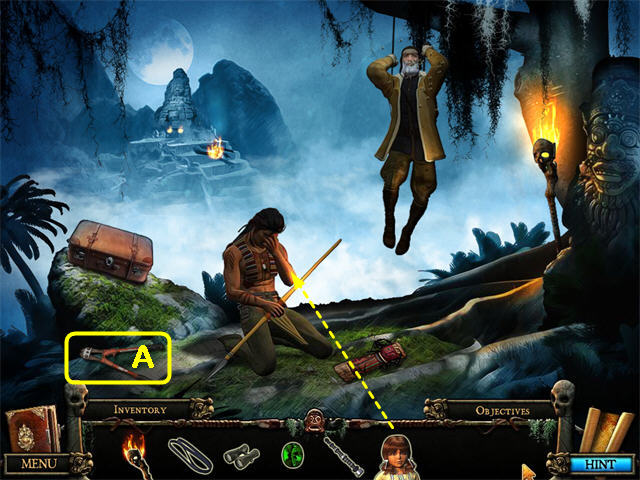
- Collect the BOLT CUTTERS (A). You still can’t reach Captain Withers.
- Exit Down.
- Zoom in on the Temple Elevator.

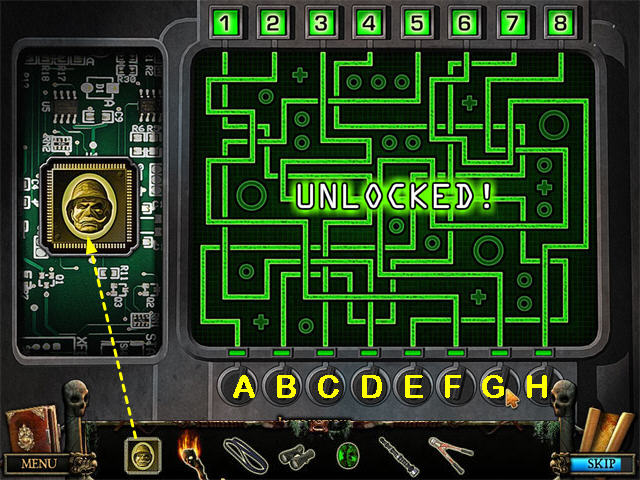
- Put the MICROCHIP from the top of the Blue Stairs in place.
- Trace Circuit 1 to the switch where it ends and click that switch.
- Trace Circuit 2 to the switch where it ends, and so on.
- Solution: C, F, E, A, D, H, B, G.

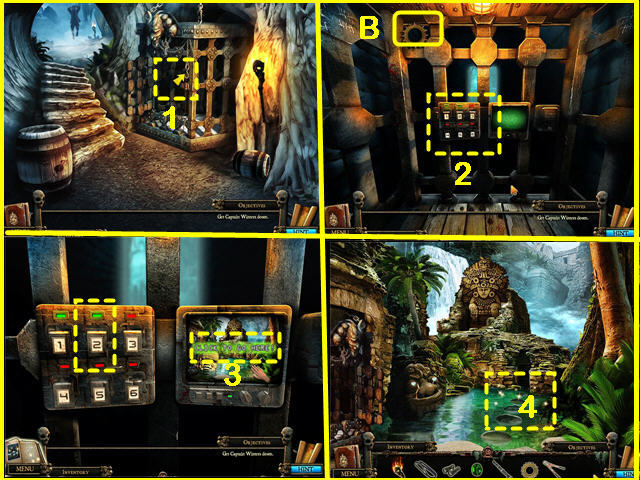
- Enter the Elevator (1).
- Collect the GEAR (B) in the upper left.
- Zoom in on the Control Panel (2).
- Click button 2, then click on the screen on the right (3) to go to the Temple Pond.
- Exit Down to leave the Temple Elevator.
- Zoom in to reveal the Hidden Object Scene (4).

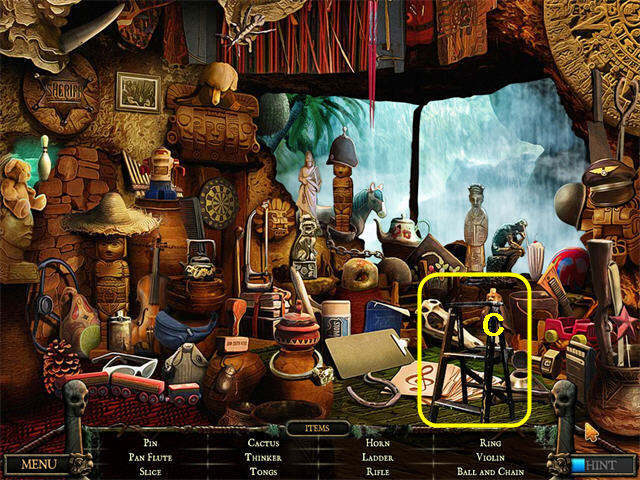
- Collect the items on the Find List, including the STEPLADDER (C).
- The Pin is a Bowling Pin.
- The Slice is a Lemon Slice.

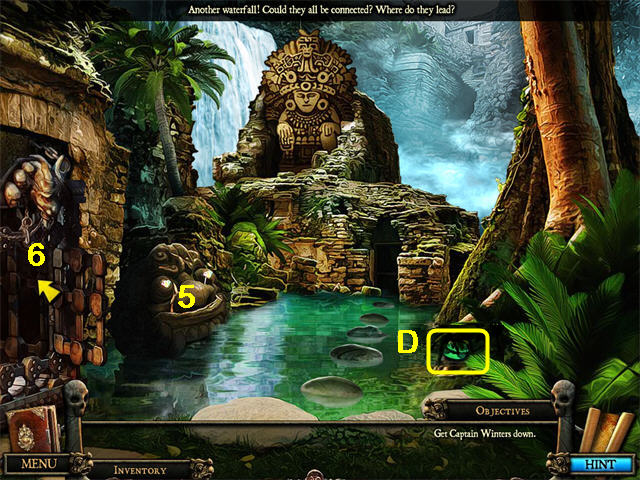
- Collect the JEWEL KEY (D).
- Examine the Panther Statue (5). It is just like the one by the lake.
- Exit Left (6) to re-enter the Elevator and return to Location 1.

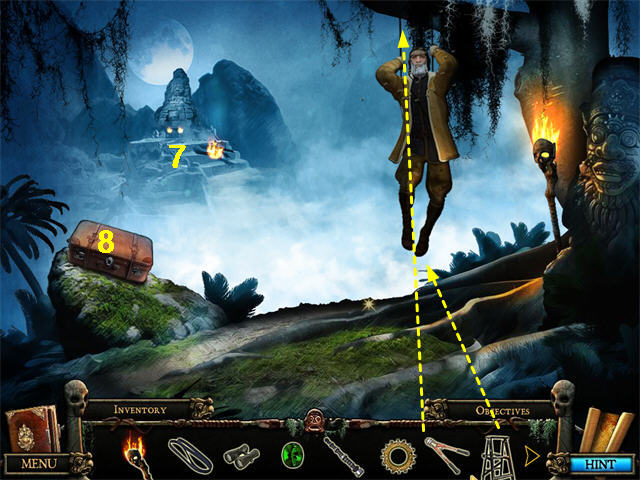
- Use the STEP LADDER and then the BOLT CUTTERS to free Captain Withers.
- Look across the Valley (7). You will see your crashed plane.
- Examine the Suitcase (8). You need a KEY.
- Go to Base Camp.
- Now you need an ANIMAL SKIN to make Captain Withers comfortable. You have passed a couple, but the one you need is in the Pit. .
- Collect the ANIMAL SKIN and return to the Base Camp.
- Put the ANIMAL SKIN from the Pit on the rock on the left side.
- Put Captain Withers on the ANIMAL SKIN.
- You will receive a KEY.
- Go to the Lake. The Warrior and his Daughter are there.
- Use the KEY on the Trunk.
- Collect the BANDAGES.
- Return to the Base Camp.
- Give the BANDAGES to Captain Withers. You will receive a HERB SKETCH. Captain Withers tells you this herb can be found across the lake.
- Go to the Lake.
Chapter 8: Cross the Lake
- The Warrior’s Daughter will give you the 2nd gear.
- Go to the Temple at the top of the Blue Stairs.
- Zoom in on the Gear Puzzle on the right.

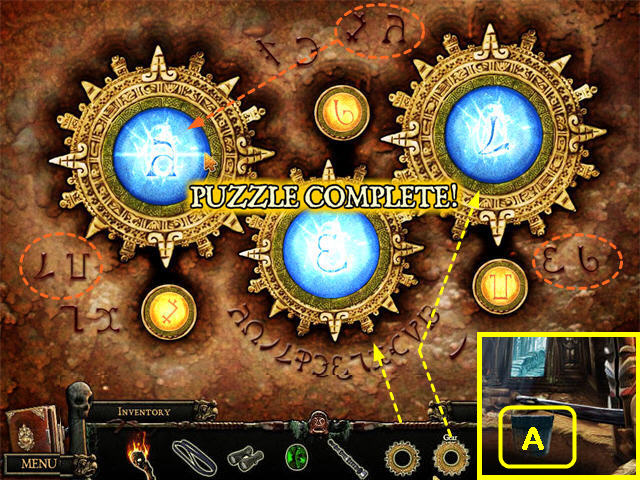
- Put the two GEARS on the puzzle. You got one in the Temple Elevator and one from the Girl by the Lake.
- Look at the symbols etched on the wall until you find one that matches one of the small yellow buttons. Then turn the blue button next to it until it matches the other symbol in that pair. (See the screenshot for the solution).
- Exit the mini-game.
- Collect the BUCKET (A).
- Go to the Lake and give the BUCKET to the Warrior.
- Now you need to find two OARS for the Boat. After a lot of exploring, you will find one near the 1st Landing Site and one in a mini-game near the Tipi.
- When you arrive at the Tipi, it is sparkling. Click to trigger a mini-game.

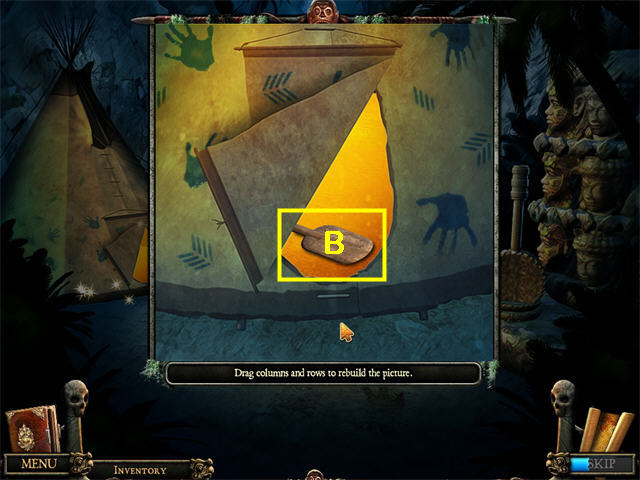
- Reassemble the picture. Drag right or left to move a whole column. Drag up or down to move a whole row. See the screenshot for the solution.
- Once the picture is assembled, collect the OAR (B).
- Return to the 1st Landing Site, where you cut down the tree to make a bridge to the Base Camp.
- The tree stump will be sparkling. Zoom in to reveal a Hidden Object Scene.

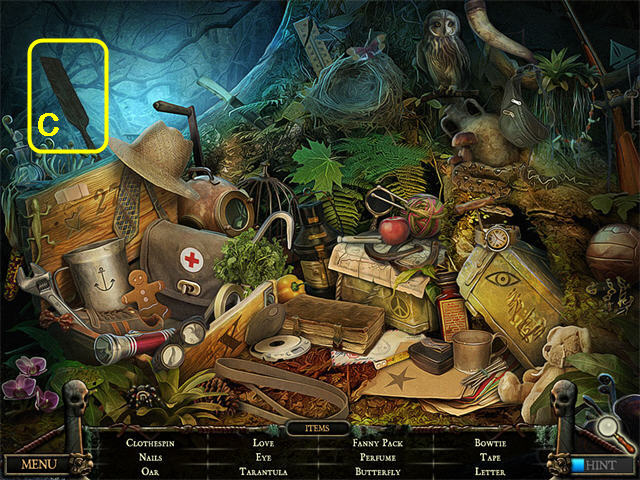
- Collect the items on the Find List including the 2nd OAR (C).
- “Love” is the Heart with an arrow through it on the left side.
- The only Eye that counts is the drawn eye on the right side.
- Return to the Lake and give the OARS to the Warrior.
- Find the Up Exit by the Warrior and use it to cross the Lake.
Chapter 9: the Village

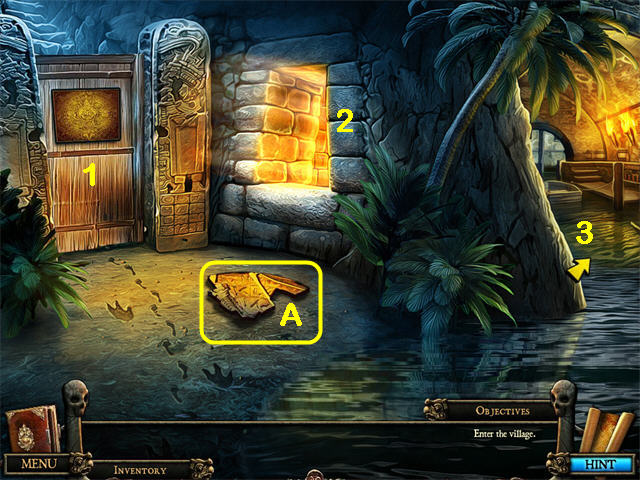
- Collect the ALTAR PIECE (A).
- There are two puzzles, one on the gate (1) and one on the Altar (2). Both are missing pieces, so you will have to collect them and come back later.
- Exit Right (3) to the Boat Dock.

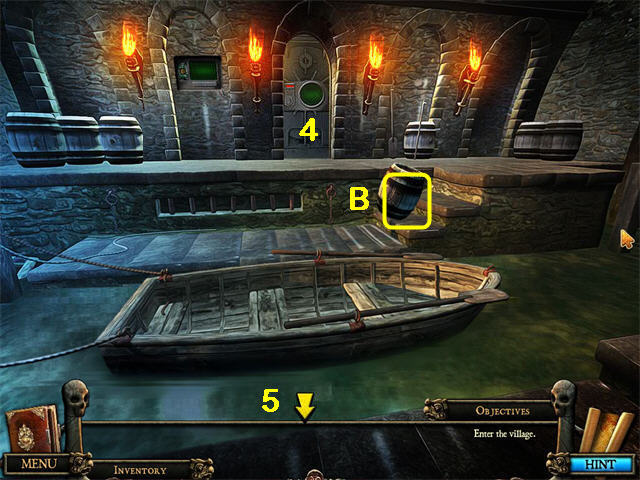
- Collect the JEWEL KEY (B).
- Examine the Control Room Door (4). You will need a SECURITY CARD to get in.
- Use the Down Exit twice to go back across the Lake.
- Once you reach this point in the game you are searching for many things: the 2 DIAMOND EYES for the Panther Statue at the 1st Landing Site, more JEWEL KEYS, the HERB to help Captain Withers, something to fish with for the Pteranadon at the Giant Nest, the missing ALTAR PIECES for the Altar across the Lake, the missing TILES for the Sun Puzzle on the Gate across the Lake, the Code for the Panther Statues, the CLAPPER for the Bell, the CROWBAR for the big Crate by the Guardian statue, the small suitcase key for the Suitcase by the Tree where you found Captain Withers, and the Corkscrew for the Barrel by the Temple Elevator.
- There are many places to search. However, if you think back, you may remember seeing the tiles when you were doing two previous Hidden Object scenes, the one where you collected the Bones and the one where you collected the Footprints.
- Go to the Pit.

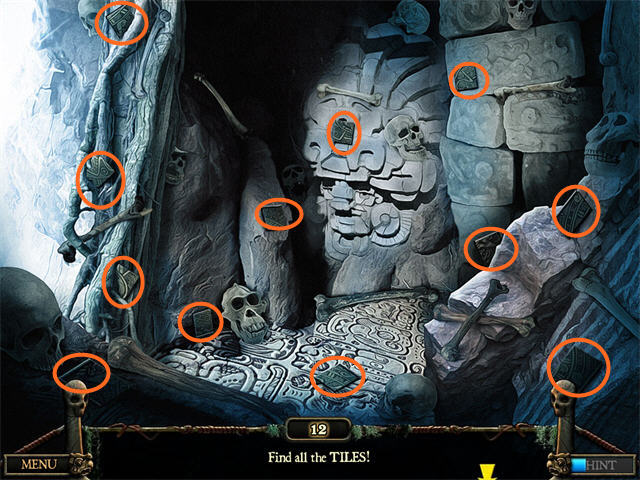
- Complete the Hidden Object Scene to collect the first group of TILES.
- Go to the Bell.

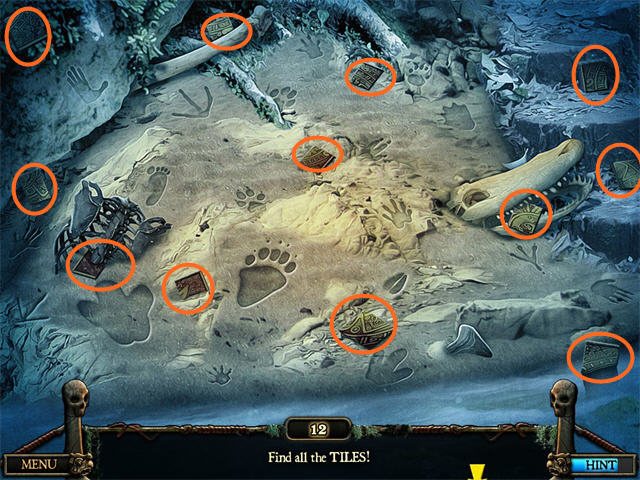
- Complete the Hidden Object Scene and collect the second set of TILES.
- Return across the Lake.

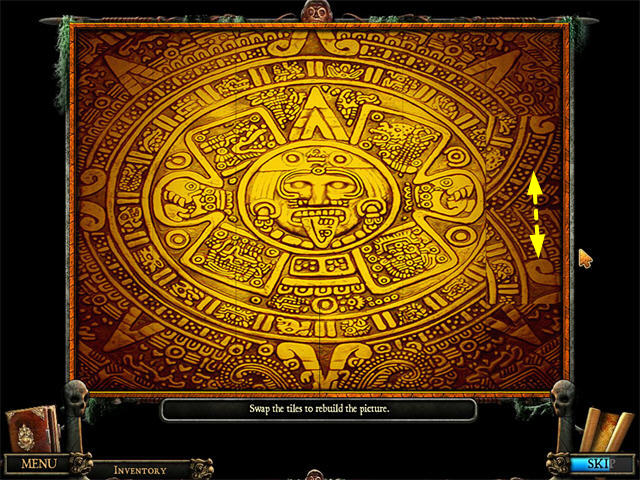
- Put the Tiles on the puzzle on the Gate and recreate the picture.
- The Gate will open. Go up the stairs.
- Talk to the man with the drum. He needs a new ANIMAL SKIN.
- Try to enter the building. The guards will stop you.

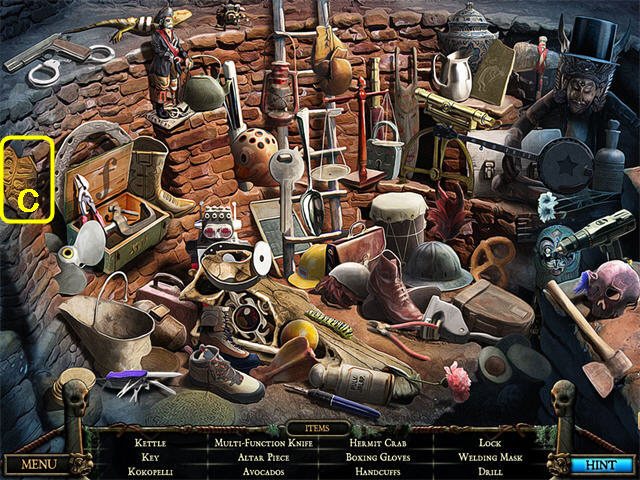
- Complete the Hidden Object Scene and collect an ALTAR PIECE (C).
- There was an ANIMAL SKIN back by the Tipi. Go there and complete the mini-game.

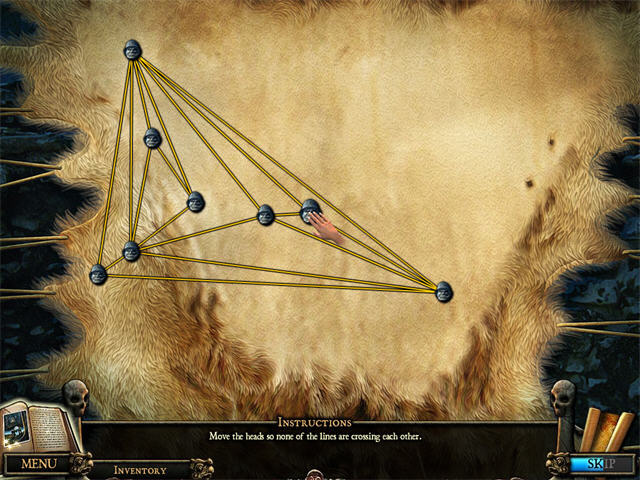
- There are several possible solutions. The screenshot shows one.
- Go to the Village across the Lake.
- Give the ANIMAL SKIN to the Shaman.
- Once he starts playing the drums, enter the Building.
- Give the HERB SKETCH to the Chief. He will give you the SECURITY CARD to Jacques’ Control Room.
- The Chief wants you to stop the toxic sludge polluting the Lake, then he will give you the right HERB.
Chapter 10: Clean the Lake

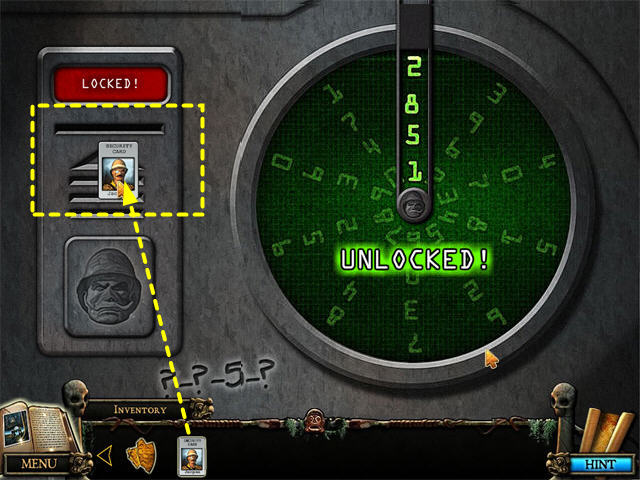
- Go to the Boat Dock.
- Use the SECURITY CARD to open the Control Room door. (If you see a message that you need a Soldering Iron, you clicked on the Control Panel on the left, not the Control Room Door on the right).
- Now you need a code. If you look in your Journal, you have a page from Jacques’ notebook that shows the first two numbers, 2 – 8. The third number, 5, is on the wall. So you just need to figure out the 4th number with trial and error. Click on each of the 4 rings to turn them to the correct numbers.
- Solution: 2 – 8 – 5 – 1.
- Down Exit to return to the main scene.
- Enter the Control Room.

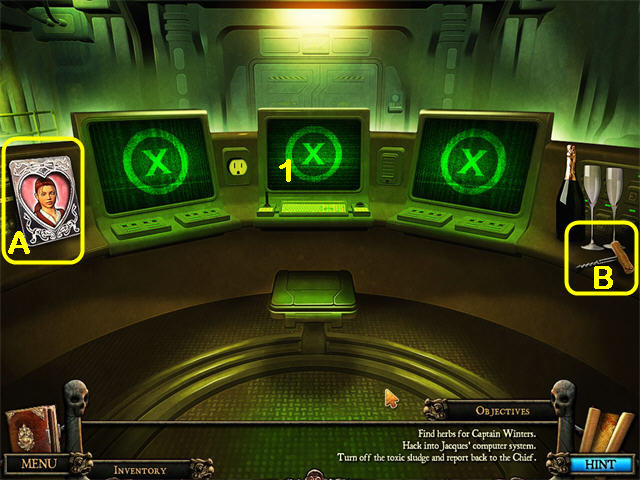
- Examine the Computer (1). You need Anna’s LAPTOP.
- Collect the CORKSCREW (B) and ANNA’S PICTURE (A).
- Go to the Temple Elevator, since that’s where the Barrel that needs the CORKSCREW is.
- Use the CORKSCREW on the Barrel.
- After the Barrel empties, exit to the main scene.
- Click on the Barrel to tip it over.

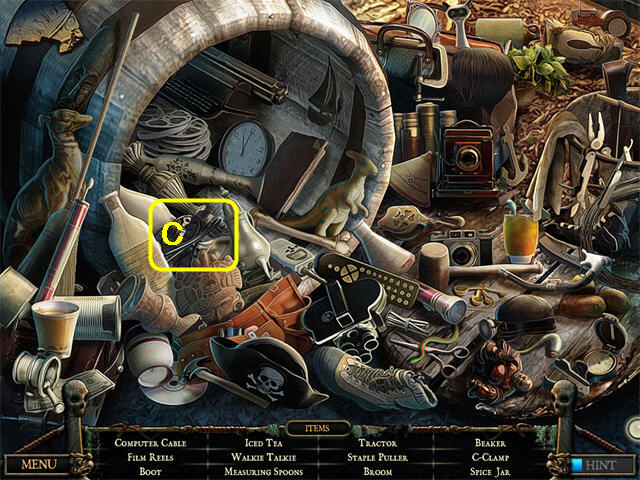
- Zoom in to complete the Hidden Object Scene. Collect the items on the Find List including the COMPUTER CABLE (C).
- The Spice Jar is a white jar with a red stripe near the CD.
- Try the Temple Elevator. Location 3, the Plane Crash, is locked.
- Now there are many places you can search, but eventually you will find that a Hidden Object Scene is available in the Village across the Lake.

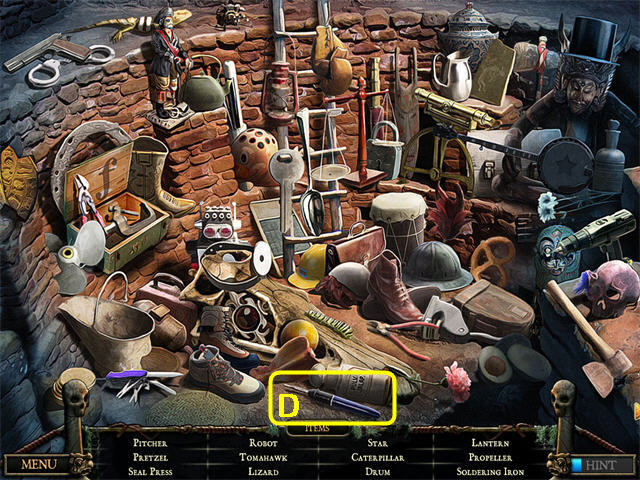
- Collect the items on the Find List, including the SOLDERING IRON (D).

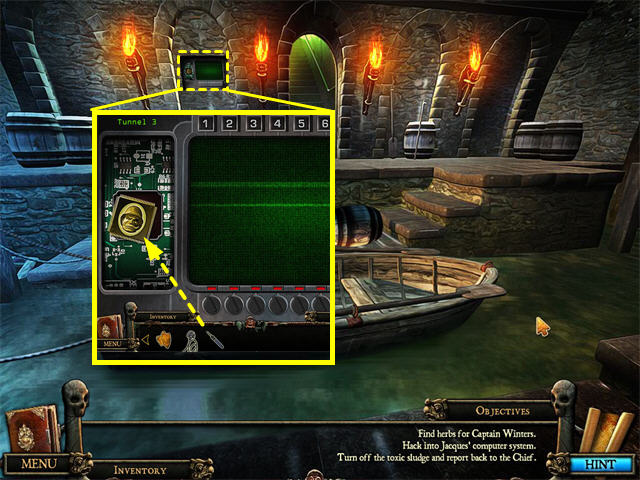
- Use the SOLDERING IRON that you got from the Village across the Lake on the Control Panel outside Jacques’ Control Room. Use it on the dangling microchip.

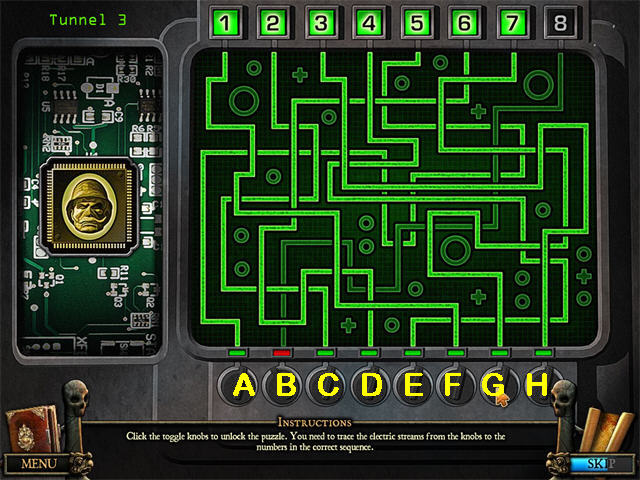
- This will trigger the circuits mini-game again, but with a different solution this time. Trace each circuit and click the switch it leads to.
- Solution: F, C, H, E, A, D, G, B
- You will get a message “Tunnel 3 Unlocked.”
- Go to the Tunnel Elevator.
- Use the Tunnel Elevator to go Location 3, the Plane Crash.

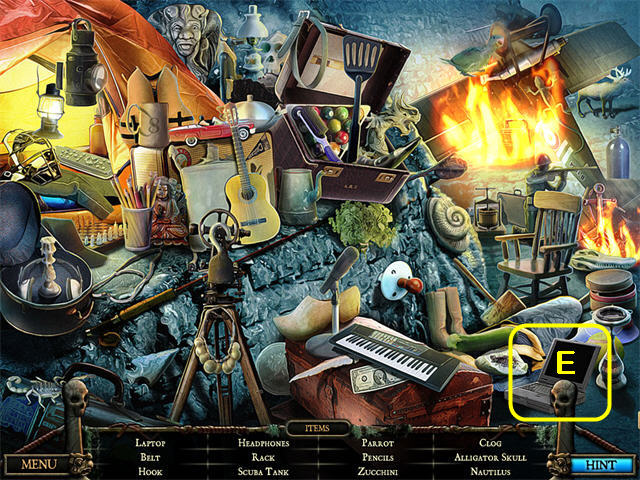
- Complete the Hidden Object Scene. Collect the items on the Find List, including Anna’s LAPTOP (E).
- The Clog is a Wooden Shoe.
- The Rack is the triangular set of billiard balls.
- The Nautilus is a shell.

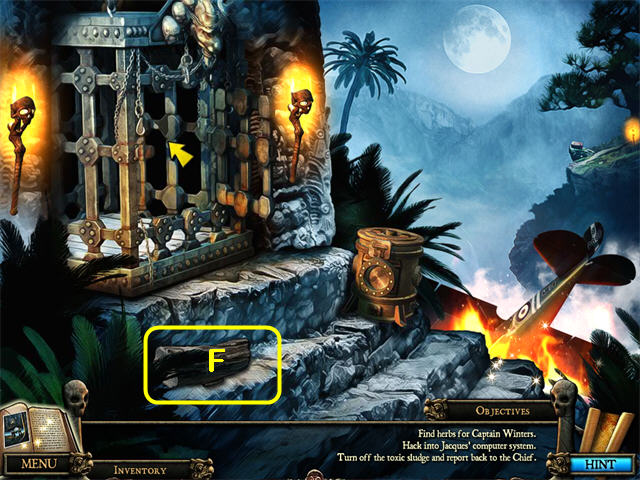
- Collect the JEWEL KEY (F) from under the Log on the steps.
- Go to Jacques’ Control Room.

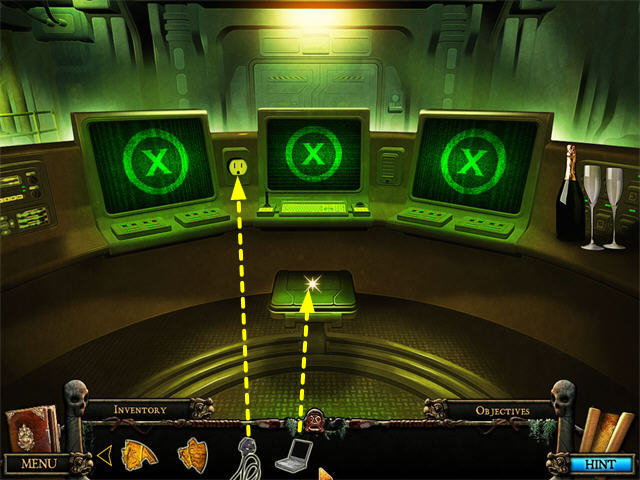
- Attach the COMPUTER CABLE from the Barrel by the Temple Elevator to the plug.
- Put the LAPTOP from the Hidden Object Scene at the Plane Crash on the stool.

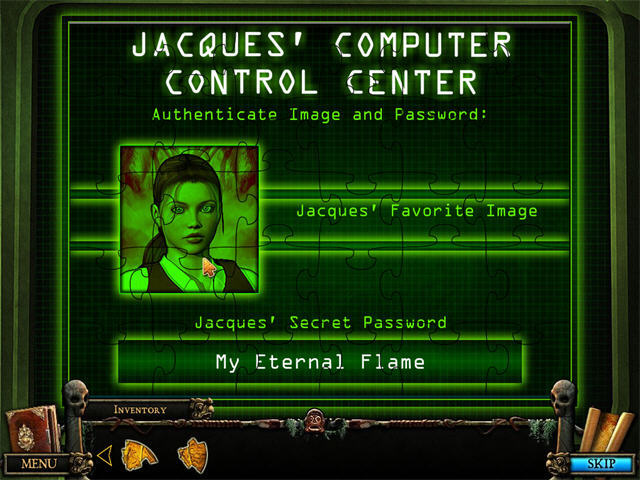
- Complete the jigsaw puzzle to hack into the system.
- Click on the left screen.

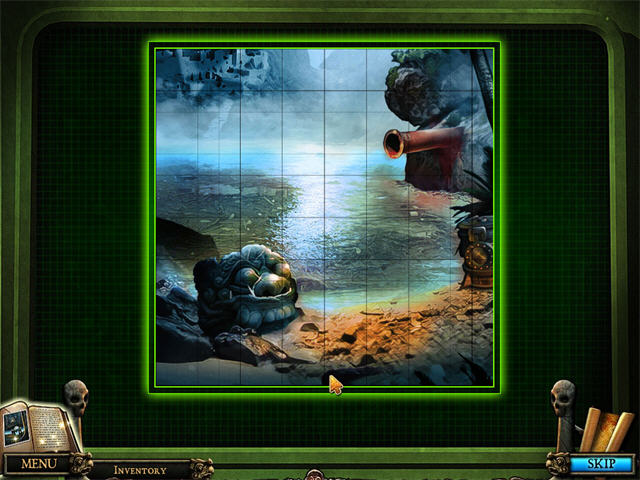
- Reassemble the picture of the Lake. Drag left or right to move a column, drag up or down to move a row.
- Return to the Village and tell the Chief the sludge is turned off.
Chapter 11: Heal Captain Withers

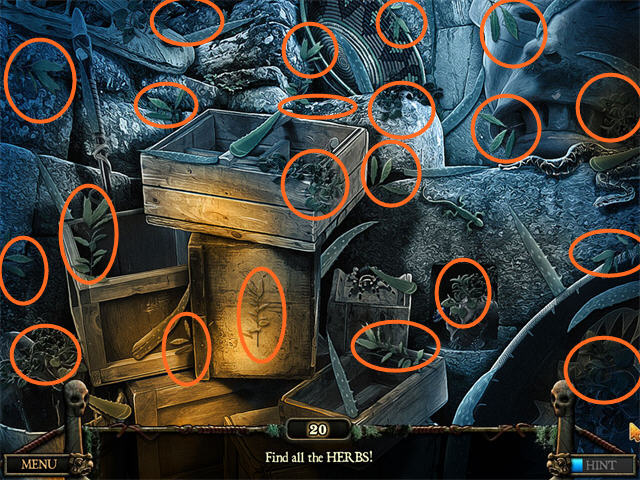
- Complete the Hidden Object Scene and collect the HERBS. Only the soft leafy plants count—aloe spikes do not.
- Return to the Base Camp.
- Give the HERBS to Captain Withers.
- Captain Withers also wants ALOE and a MORTAR AND PESTLE.
- Since you just saw ALOE at the Village across the Lake, go back and ask the Chief for some.

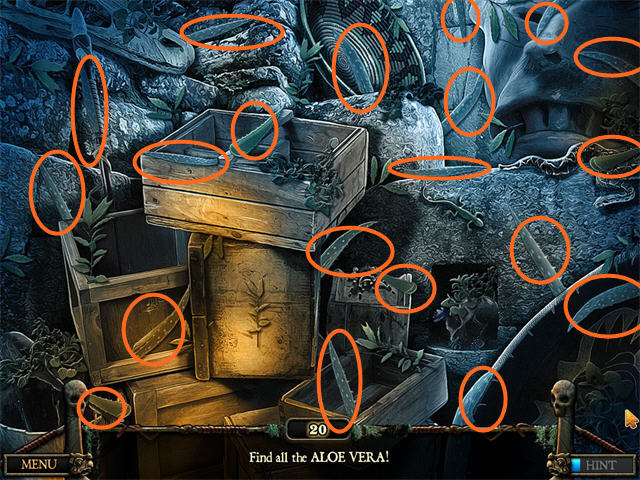
- Complete the HIDDEN OBJECT SCENE again and collect the ALOE.
- Go back to the Tipi to see if there is a MORTAR AND PESTLE there. A Hidden Object Scene is available.

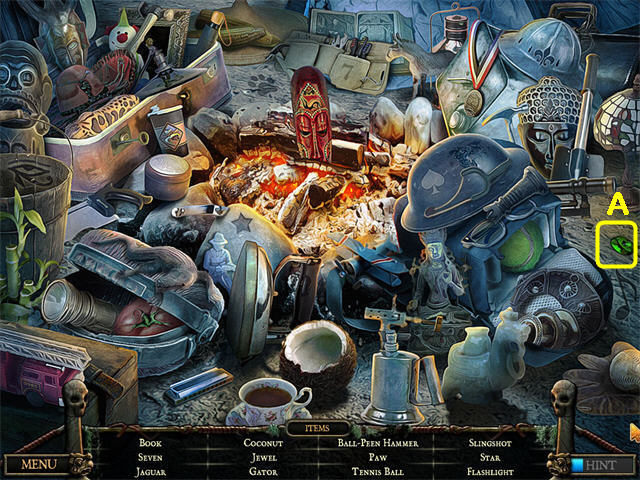
- Collect the items on the Find List, including the Last JEWEL KEY (A).
- The Paw is a pawprint in the upper left.
- Since you should now have the 5 remaining JEWEL KEYS, let’s go see what’s behind the Spooky Door. It is up the steps to the right from the Base Camp.
- The six JEWEL KEYS were: on the hill path in front of the Spooky Door, under a Mask by the Pit, under a Barrel at the Boat Dock, under a Log on the Steps by the Plane Crash, on the right side of the Temple Pond, and in a Hidden Object Scene by the Tipi.
- Put the six JEWEL KEYS in place.
- Use the Up Exit to enter the room.

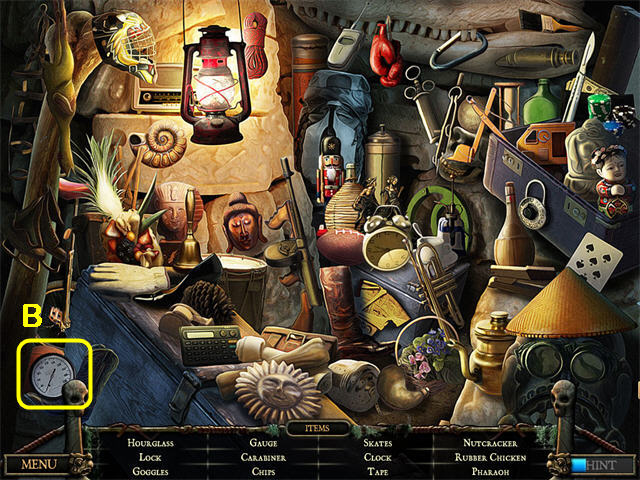
- Complete the Hidden Object Scene. Collect the items on the Find List including the GAUGE (B).
- Try the door with the Pteranadon on it. You can hear a girl crying on the other side, but you cannot open it yet.
- Exit to the Hill Path. A Hidden Object Scene is available in the Alcove.

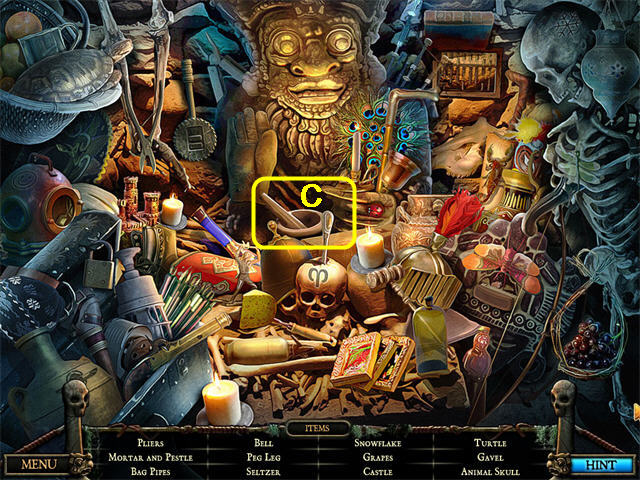
- Collect the items from the Find List including the MORTAR AND PESTLE.
- Return to the Base Camp.
- Give the ALOE from the Village across the Lake and the MORTAR AND PESTLE from the Hillside Path Alcove to Captain Withers. He will give you the SUITCASE KEY.
Chapter 12: the Pyramid

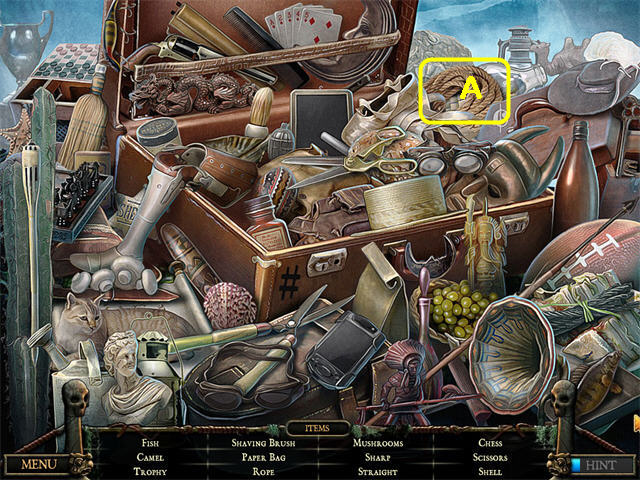
- Go to the Tree where you found Captain Withers.
- Use the Key to open the Suitcase.
- Complete the Hidden Object Scene. Collect the items from the Find List, including the Rope (A).
- The Sharp is a # sign.
- The Shell is the pink coral to the left of the suitcase.
- The Straight is the set of Cards at the top center.
- Once you reach this point you are trying to rescue the Girl behind the Spooky Door and the Professor.
- Once you reach this point in the game you are searching for: the 2 DIAMOND EYES for the Panther Statue at the 1st Landing Site, something to fish with for the Pteranadon at the Giant Nest, the missing ALTAR PIECES for the Altar across the Lake, the Code for the Panther Statues, the CLAPPER for the Bell, and the CROWBAR for the big Crate by the Guardian statue.
- You have seen some Altar Pieces in some of the Hidden Object Scenes, but the game won’t let you collect them yet.
- Go to the room at the top of the Blue Stairs.
- Attach the ROPE from the Suitcase to the Pole that used to have the BUCKET.

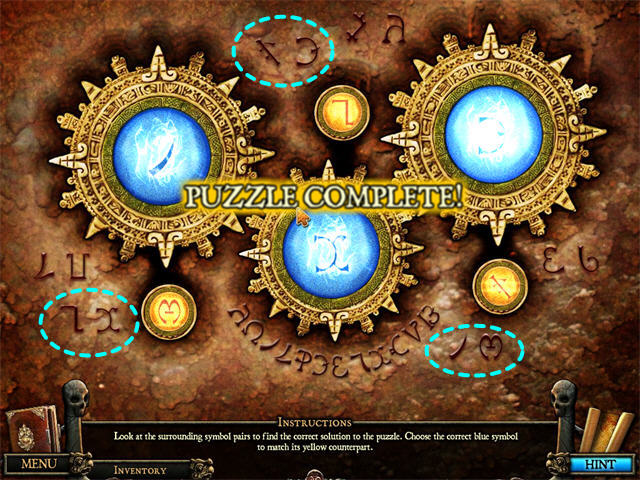
- Do the Gears Puzzle again (see Screenshot for Solution). The Pole will rise up to its original position.
- Use the ROPE to swing across the Pit.
- You are in the Panther Village at the base of the Pyramid.

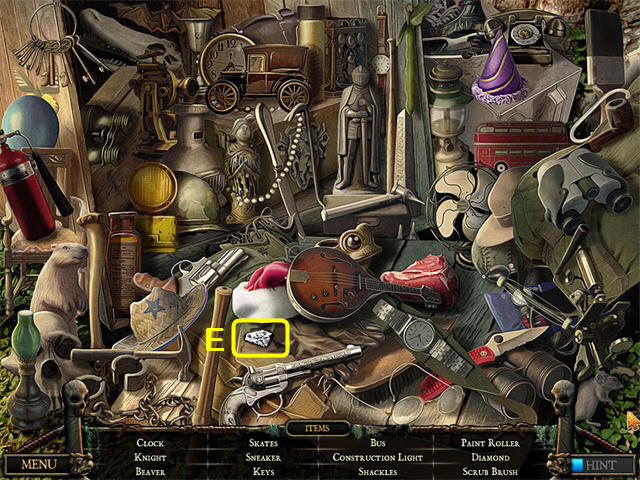
- Complete the Hidden Object Scene. Collect the items from the Find List, including the DIAMOND EYE (B).

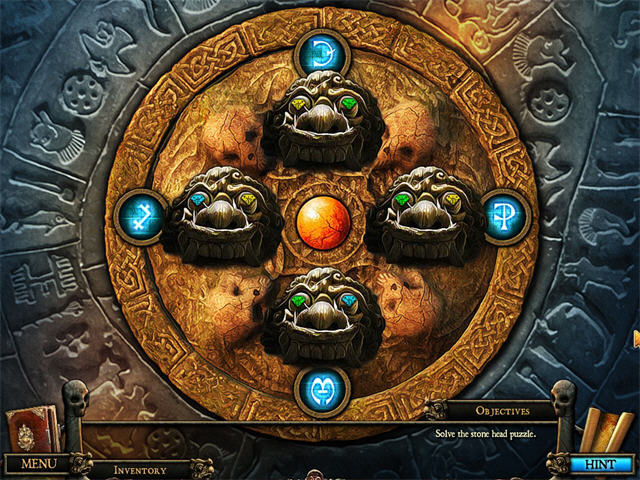
- Examine the door. This is the Code for all the Panther Head Statues. It will be copied to your journal. You still need to find one more DIAMOND EYE for the statue at the 1st Landing Site. The 4 statues are: 1st Landing Site, the Lake, the Temple Pond, and the Spooky Door, but you still don’t which code goes with each one.
- Go up the Pyramid to the right.
- Professor Columbiana is on top of the Pyramid, but Jacques will light a wall of fire between you. You need to find a FIRE EXTINGUISHER.
- Go to the Lake. The area in front of the Panther Head is sparkling.

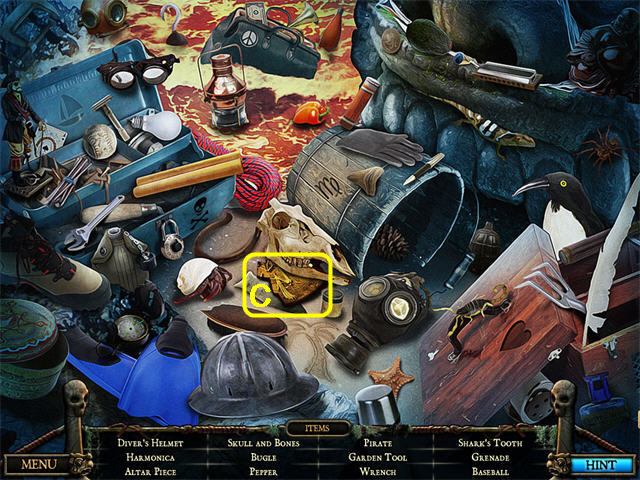
- Complete the Hidden Object Scene and collect the ALTAR PIECE (C).
- Examine the Panther Head Statue, but there’s no way to tell which one it is yet.
- Continue down to the Base Camp.
- Lord Rockwood is sinking in quicksand.
- Return to the Tree where you found Captain Withers.

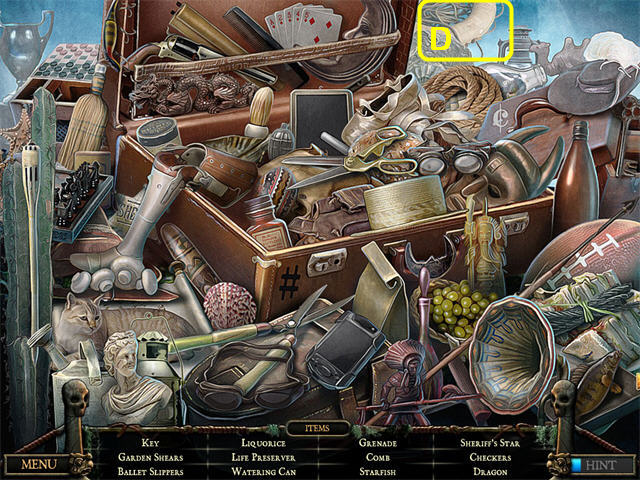
- Complete the Hidden Object Scene and collect the LIFE PRESERVER (D).
- Return to the Base Camp and give it to Lord Rockwood.
- Lord Rockwood will give you a CROWBAR he found.
- Go to the Guardian Statue.
- Use the CROWBAR on the Crate.


- Complete the Hidden Object Scene and collect the second DIAMOND EYE (E). (There is a Fire Extinguisher in the Crate, but you will not be allowed to collect it yet).
Chapter 13: the Panther Head Puzzle

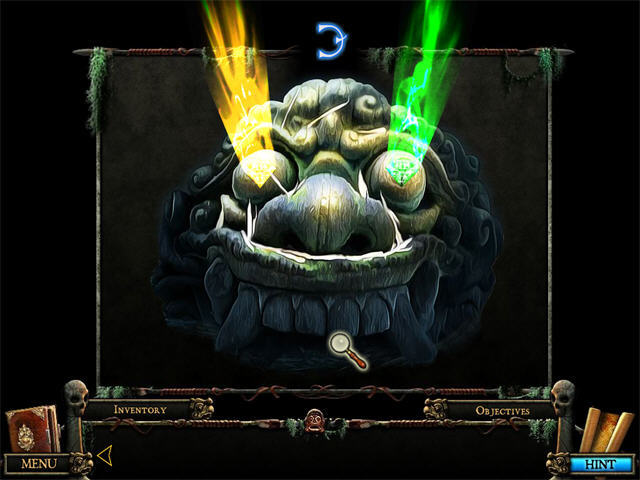
- The 4 statues are: 1st Landing Site, the Lake, the Temple Pond, and the Spooky Door.
- Go to the 1st Landing Site and put the two DIAMOND EYES in place.
- The Statue now displays a symbol. Check your journal. This one needs to be yellow on the left and green on the right.
- Go to the next Panther Head Statue at the Temple Pond.

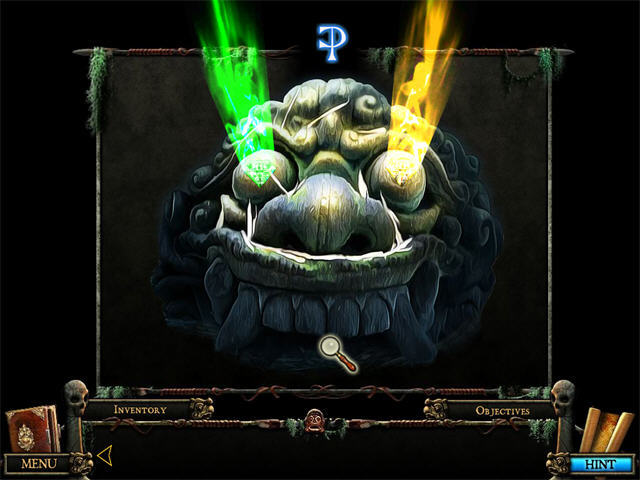
- Set the colors according to the journal, this time green on the left, yellow on the right.
- Exit to the main scene.

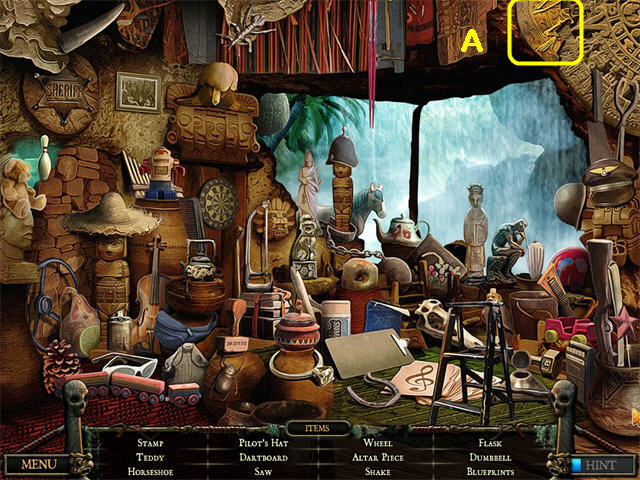
- The Hidden Object Scene is available. Complete it and collect the ALTAR PIECE. (A).

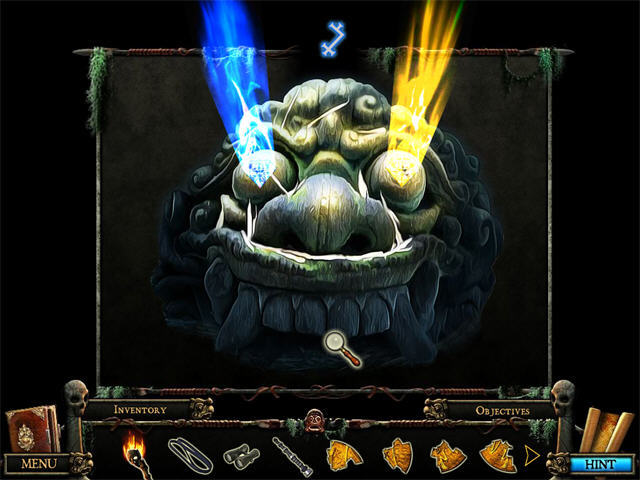
- Go to the next Panther Head Statue at the Lake. This time set the eyes to blue on the left (original setting), yellow on the right.

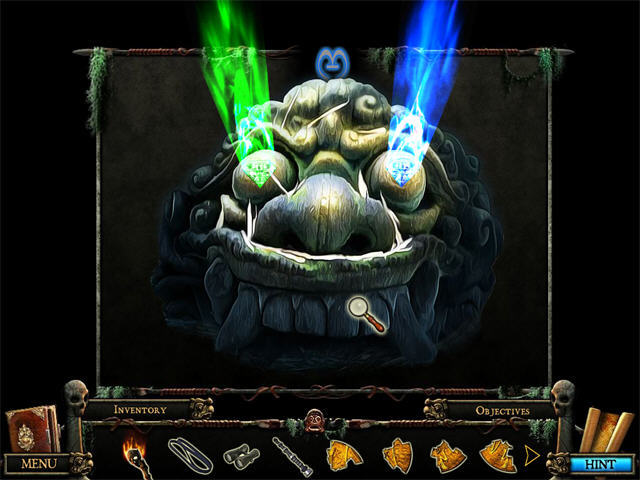
- Go to the 4th Panther Head Statue behind the Spooky Door. Set the eyes to green on the left, blue on the right.
- When all 4 panther head statues are set correctly, go to the Panther Village at the base of the Pyramid.
- Click the button on the Panther Code Door to unlock it.
- Exit to the main scene.
Chapter 14: The Telescope

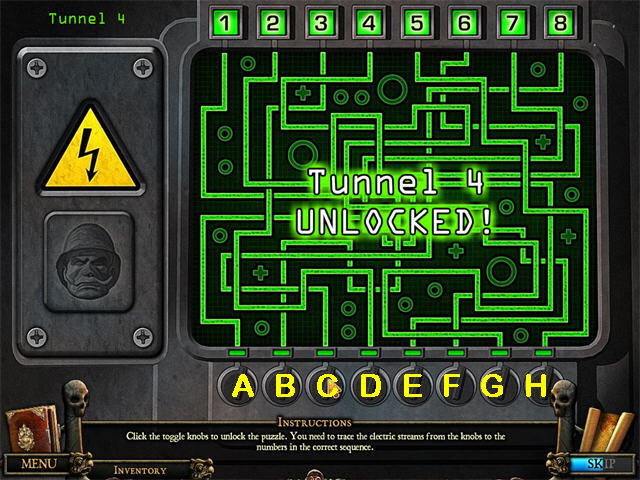
- Click on the open doorway to trigger the circuit mini-game again. This time you are going to unlock Tunnel 4.
- Solution: B, G, D, F, H, A, E, C.
- You will get the message “Tunnel 4 Unlocked”.
- Go to the Temple Elevator.
- Go to Location 4.

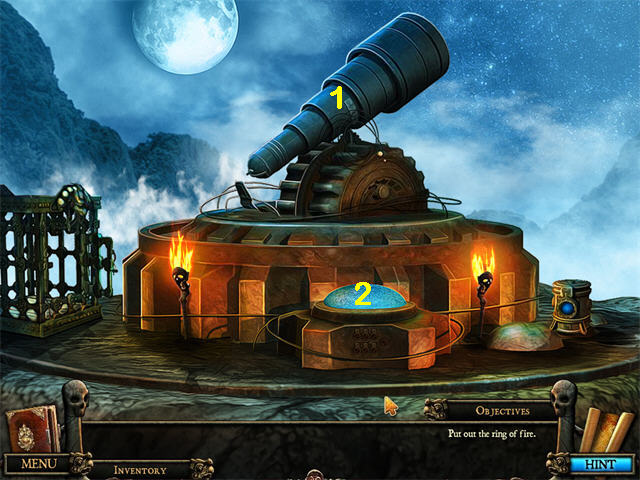
- Try to look through the Telescope (1). You will have to remove the lens cap first.
- Click on the blue Hatch Cover (2). This will bring up the hatch codes. You need to find all the machines in the Lost World and set each one correctly. You will change the settings for the original 3, plus 3 new ones. But you don’t know what codes to use yet.
- Take the elevator back to Location 1.

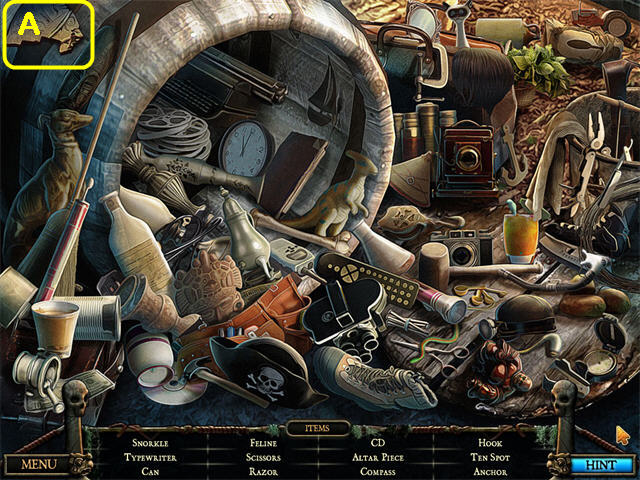
- The Hidden Object Scene is available. Complete it and collect the ALTAR PIECE. (A).

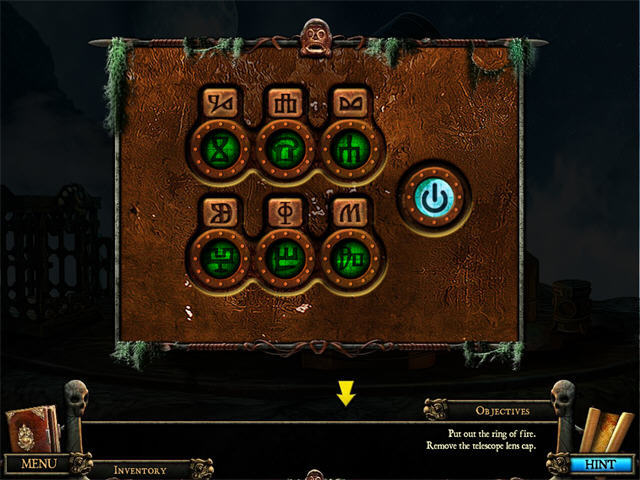
- Now you need to set each of the 6 Blue Light Devices correctly. This is just trial and error. Each time you set one, you can Go to the Telescope. Click on the blue hatch to see the lock. Click on the lock button to test your combination. Any correct setting will light up green. Incorrect settings light up red. Each Blue Light Device has its ID code just below the window where you can change the symbol so you know which one you’re changing.
- The Blue Light Devices are located by the Telescope, at the Giant Nest, at the Broken Bridge, at the Panther Village, at the Lake, and at the Plane Crash.
- See the screenshot for our solution.
- Once all 6 buttons turn green, push the blue button and the blue hatch will open. Go down inside.

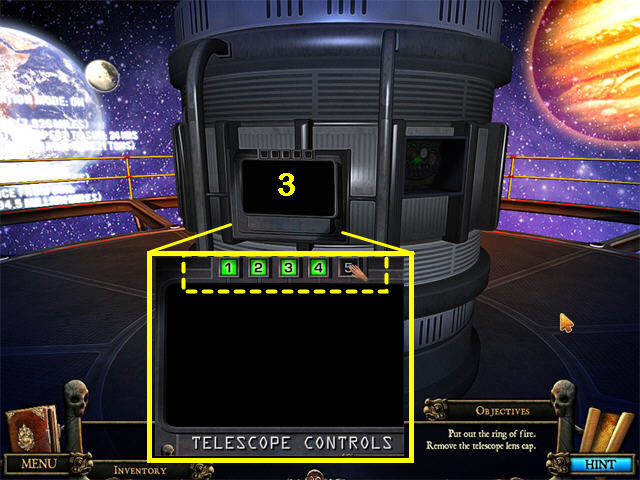
- Zoom in on the Telescope controls (3). You need to turn them on.
- Press the numbered buttons in order, 1, 2, 3, 4, 5. The telescope will turn on.
- Use the Down Exit to return to the main scene.
- Look through the Telescope again.
- Click on the UNLOCKED button to remove the Lens Cap. The Telescope is out of focus.
- Return to Jacques’ Control Room.
- Click on the right screen to trigger a mini-game.

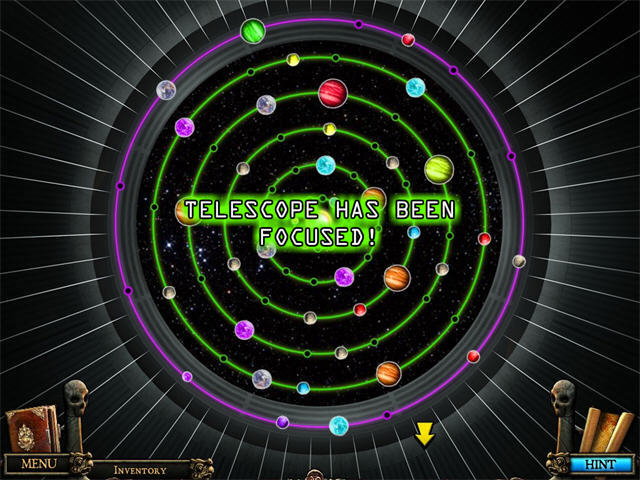
- Click on each ring until its planets are sharply in focus.
- Return to the Telescope and look through it again.
- Check your Journal. The view through the Telescope is going to be part of some kind of code.
Chapter 15: Professor Columbiana

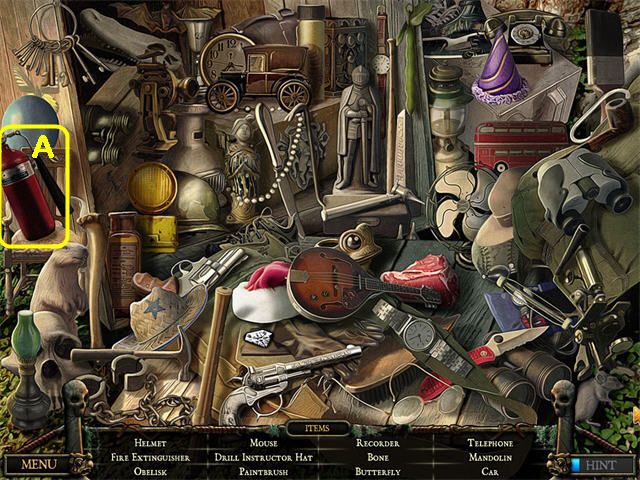
- Go to the Guardian Statue.
- Complete the Hidden Object Scene and collect the FIRE EXTINGUISHER (A).
- Go to the top of the Pyramid.
- Use the FIRE EXTINGUISHER until all of the flames are gone.
- Examine the right Column. There is a control panel here with zodiac codes. This must be related to the Telescope.
- Go to the Telescope.
- Go down the Hatch.
- Zoom in on the right panel.
- Repair the Telescope using the GAUGE, the MACHINE BELT and the MACHINE PART.
- You are still missing one part. You will have to go look for it.
- Once you reach this point you are trying to free the Girl behind the Spooky Door and repair the Telescope so you can get the constellation codes to free Professor Columbiana from the top of the Pyramid.
- You are still missing something to fish with for the Pteranadon at the Giant Nest, the CLAPPER for the Bell, one of the ALTAR PIECES, and a telescope part.
- Search everywhere. When you get back to the room behind the Spooky Door, a Hidden Object Scene will be available.

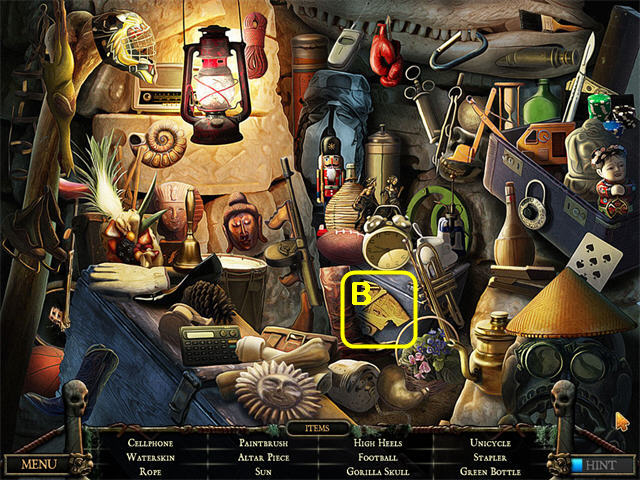
- Collect the items on the FIND LIST. This will give you the final (6th) ALTAR PIECE (B).
Chapter 16: the 2nd Girl

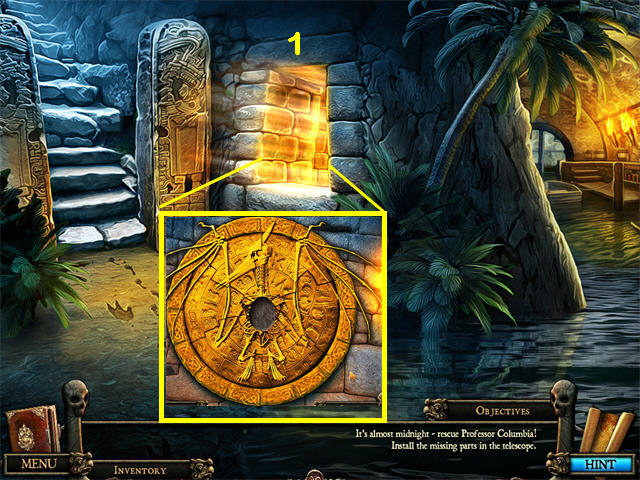
- Go across the Lake to the Altar (1).
- Put the ALTAR PIECES in place.
- Now you need an EGG. There were eggs in the giant Nest, but first you need a FISH to get the pteranadon to move.
- Search everywhere and you will find that a Hidden Object Scene is now available at the Plane Crash.

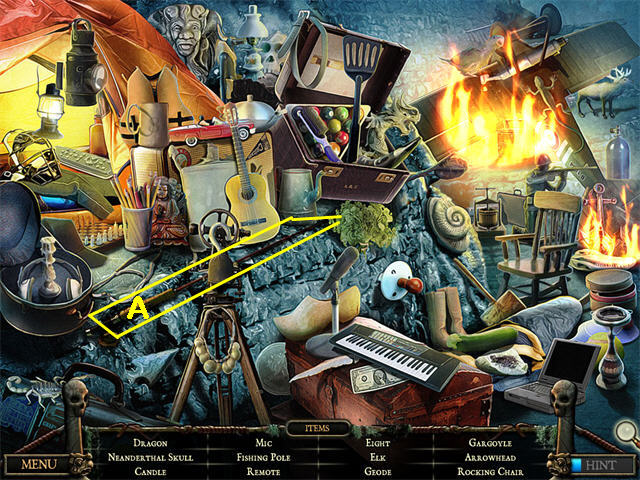
- Complete the Hidden Object Scene and collect the FISHING POLE (A).
- Take the FISHING POLE to the Bell. Use it on the Stream to trigger a mini-game.

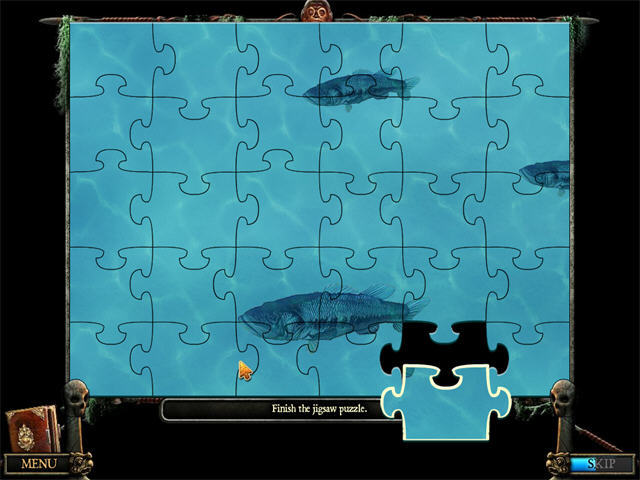
- Assemble the jigsaw puzzle. The picture will change as you are working on it because the fish are swimming through it, but the puzzle isn’t too complex.
- Take the FISH from the mini-game by the Bell to the Giant Nest and give it to the Pteranadon.

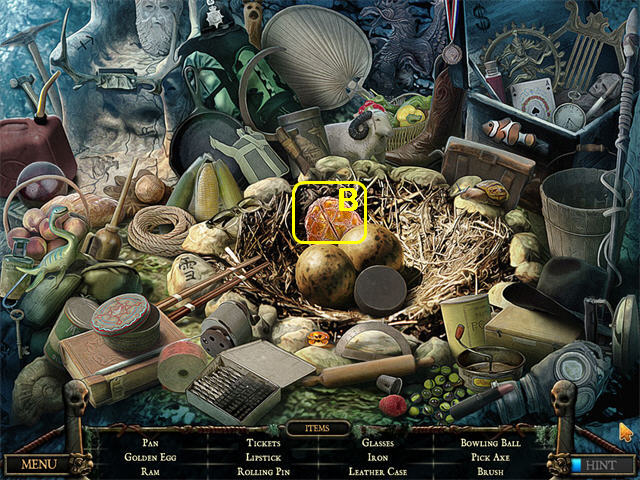
- When it moves away from the Nest, do the Hidden Object Scene there. Collect the items on the Find List, including the GOLDEN EGG (B).
- Return to the Altar.
- Put the GOLDEN EGG on the Altar.
- The message will tell you that a door has opened somewhere.
- Go to the room behind the Spooky Door. The door with the Pteranadon has opened.
- Go up the steps and collect the GIRL.
- Go see the Chief in the Village across the Lake. Give him the GIRL (his granddaughter).
- The Chief will give you the GEAR MEDALLION—the last piece you need to repair the Telescope.
Chapter 17: the Final Puzzle
- Go to the Telescope.
- Go down the Hatch.
- Zoom in on the right control panel. Replace the missing piece.
- Exit to the Main Scene.
- Zoom in on the left Control Panel.
- You need the constellations for Sagittarius, Virgo, Aries, and Pisces to solve the puzzle.

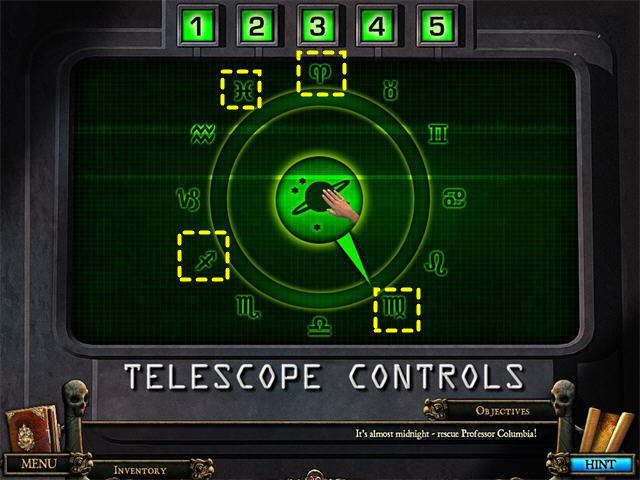
- Click the center button to rotate the pointer until it points to one of the 4 signs. Then go upstairs to the Telescope. Click on the star field.
- Return down the hatch, select the next sign you need, and repeat.

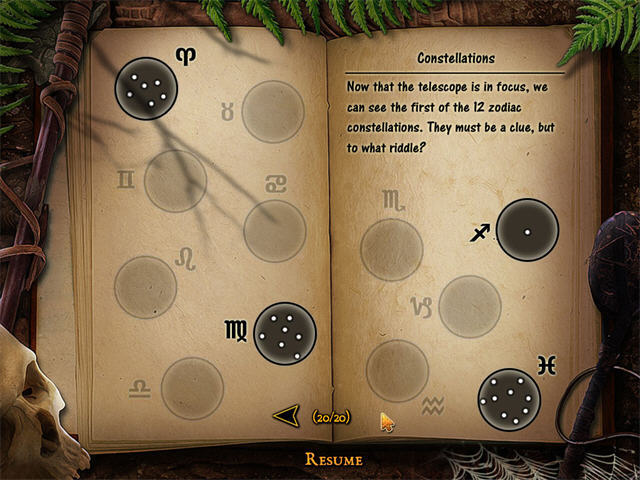
- The signs will fill in on your journal page.
- When you have all 4 constellations in your journal, you can return to the top of the Pyramid, but you will find that you are missing a LOCKET you need to complete the puzzle.
- Go to the Panther Village at the base of the pyramid. A Hidden Object Scene is available.

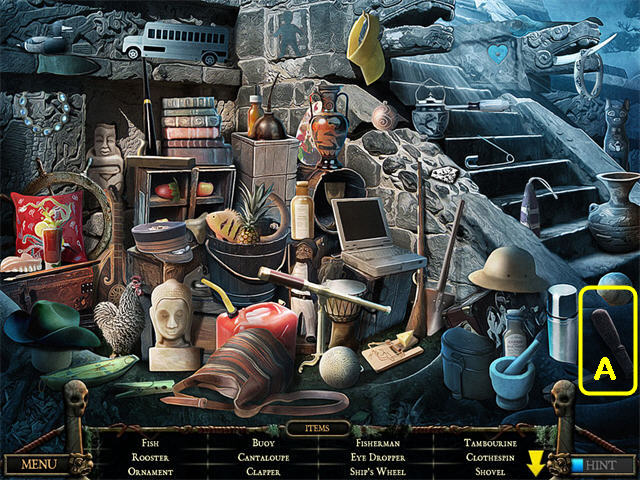
- Complete the Hidden Object Scene and you will receive a CLAPPER (A).
- Take the CLAPPER to the Bell and install it.
- When the Bell rings, the LOCKET will fly out. Collect it.
- Go to the top of the Pyramid and zoom in on the right Column.

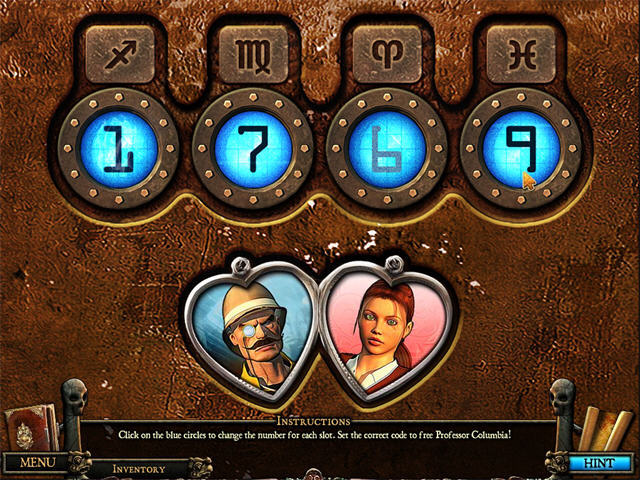
- Put the LOCKET in place.
- Check your Journal. You want to set each number to the number of dots in the constellation.
- Solution: 1, 7, 6, 9.
- Exit Down to the main scene.
- Click on the Professor to rescue her.
- Watch the end scene.
Map Key

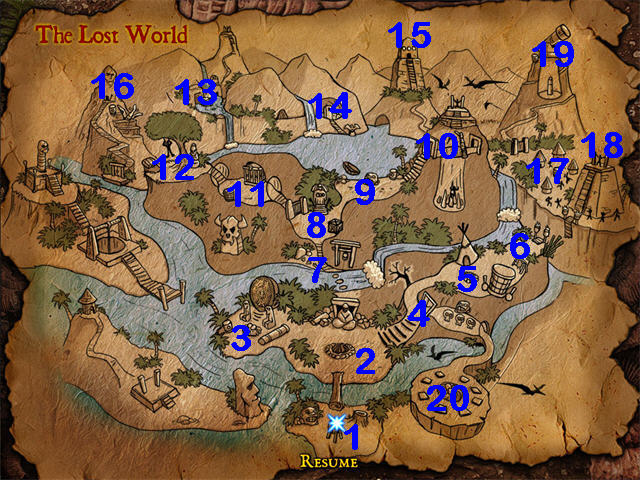
- Once you have visited a location, you can use the Map to go back there at any time. The Map also shows the location of Panther Head Statues and Blue Light Devices.
- 1 – 1st Landing Site. Panther Head Statue.
- 2 – Base Camp.
- 3 – Giant Nest. Blue Light Device.
- 4 – Hillside Path. Entrance to Spooky Door.Panther Head Statue behind Spooky Door.
- 5 – Tipi.
- 6 – Broken Bridge. Blue Light Device.
- 7 – Bell.
- 8 – Guardian Statue.
- 9 – Lake. Panther Head Statue, Blue Light Device.
- 10 – Blue Stairs. Entrance to the Pit.
- 11 – Temple Elevator.
- 12 – Tree where Captain Withers landed.
- 13 – Temple Pond. Also available as Location 2 on the Temple Elevator.Panther Head Statue.
- 14 – Village across the Lake.
- 15 – Jacques’ Control Room.
- 16 – Plane Crash. Also available as Location 3 on the Temple Elevator. Blue Light Device.
- 17 – Panther Village. Blue Light Device.
- 18 – Top of Pyramid.
- 19 – Telescope. Also available as Location 4 on the Temple Elevator. Blue Light Device.
- 20 – 2nd Nest.




 PuppetShow: Souls of the Innocent Collector's Edition Walkthrough, Guide, & Tips
 Dark Dimensions: City of Fog Walkthrough , Guide, & Tips
 Slingo Mystery 2: The Golden Escape Walkthrough, Guide, & Tips
 Myths of the World: The Whispering Marsh Walkthrough, Guide, & Tips
 Curse of the Pharaoh: Tears of Sekhmet Walkthrough, Guide, & Tips