Haunted Halls: Revenge of Dr. Blackmore Walkthrough, Guide, & Tips
Haunted Halls: Revenge of Dr. Blackmore Walkthrough

Welcome to the Haunted Halls: Revenge of Dr. Blackmore Walkthrough
Prepare for a mind-bending journey into the realm of the weird in Haunted Halls: Revenge of Dr. Blackmore! Brace yourself for the unexpected in this exciting Hidden Object adventure!
Whether you use this document as a reference when things get difficult or as a road map to get you from beginning to end, we’re pretty sure you’ll find what you’re looking for here.
This document contains a complete Haunted Halls: Revenge of Dr. Blackmore game walkthrough featuring annotated screenshots from actual gameplay!
We hope you find this information useful as you play your way through the game. Use the walkthrough menu below to quickly jump to whatever stage of the game you need help with.
Remember to visit the Big Fish Games Forums if you find you need more help. Have fun!
This walkthrough was created by Margie B, and is protected under US Copyright laws. Any unauthorized use, including re-publication in whole or in part, without permission, is strictly prohibited.
General Tips

- This is the Official Guide for Haunted Halls: Revenge of Dr. Blackmore.
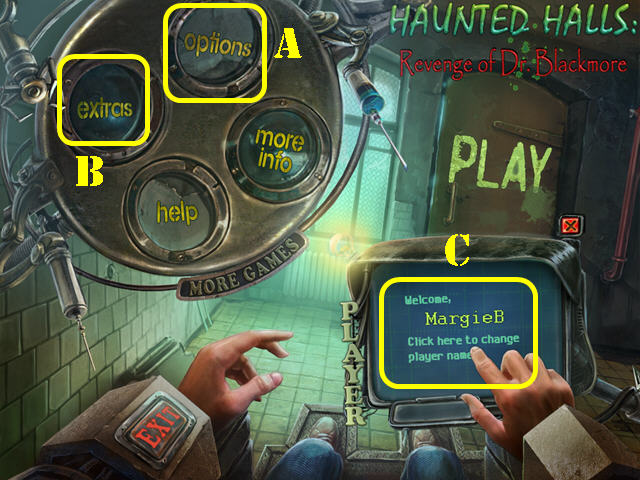
- The Options (A) Button allows you to adjust the screen size, music, cursor, and sound.
- The Extras (B) is only available in the collector’s edition.
- The ‘Click here to change player name’ button (C) can be used to manage your profiles in the game.
- This guide will refer to Hidden Object Scenes as ‘HOS’ and Hidden Object Puzzles will be referred to as ‘HOP’.
- Items will stay in inventory until they are no longer needed.
- Some HOS are random. Items written in orange in HOS require an action to be performed before the item(s) can be visible.
- The HINT button is accessible in both HOS and in quest scenes but you must wait for it to charge in between uses.
- All mini-games can be skipped once the skip button has charged. Several puzzles have a Reset button; use it if you want to follow the solutions shown in this guide.
Chapter 1: Dr. Blackmore’s Plan
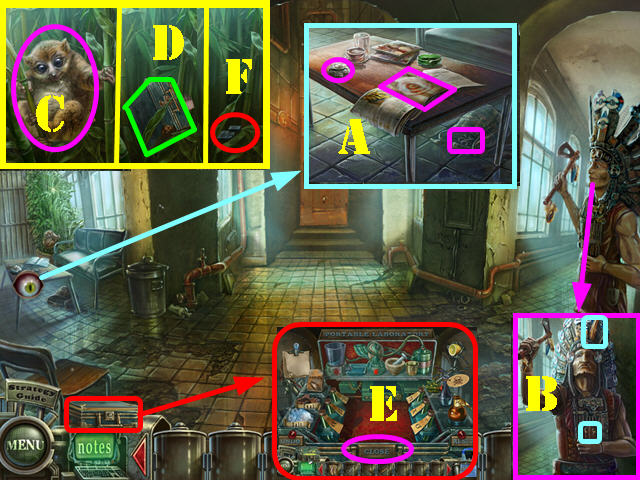
- Look on the table; take the TARGET, SCISSORS, and SUGAR CUBE (A).
- Examine the statue; take the FEATHER and the CIGAR (B).
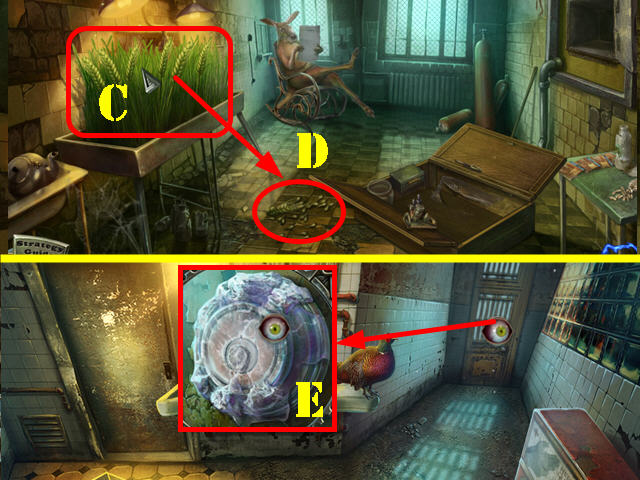
- Look at the plant; give the SUGAR CUBE to the lemur (C); take the suitcase (D).
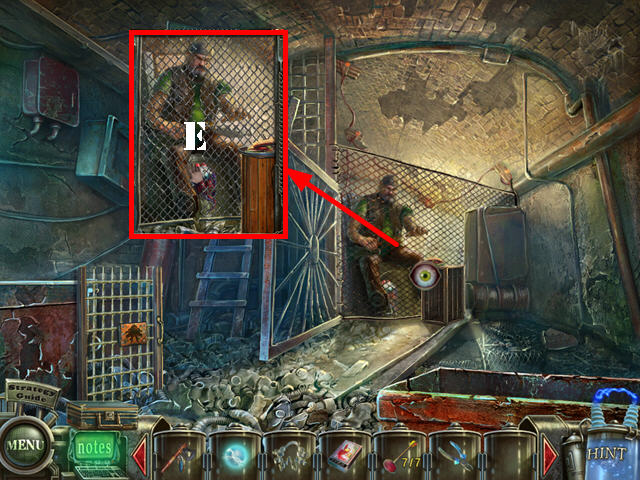
- Open the suitcase to access the Portable Laboratory. Open the suitcase to view its contents; close it (E) for now since you don’t have any items to use with it.
- Look at the plant again and take the LIGHTER (F).
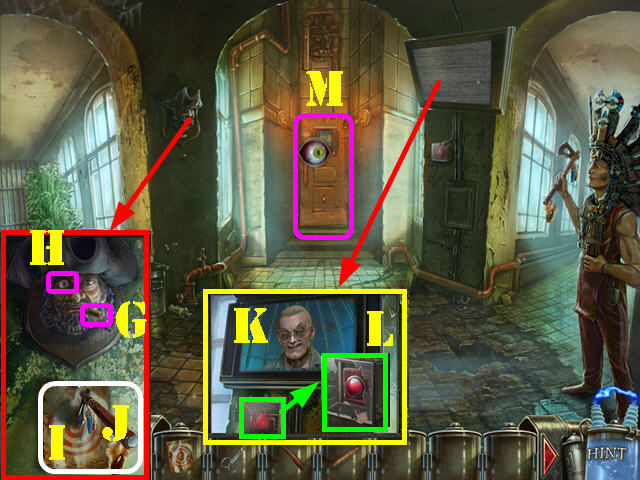
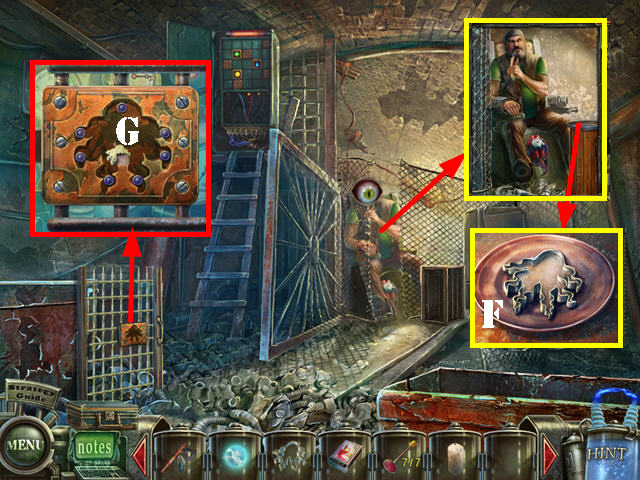
- Look at the pirate plaque; put the CIGAR (G) in its mouth. Cut the cigar with the SCISSORS and then light it with the LIGHTER.
- Take the EYE (H).
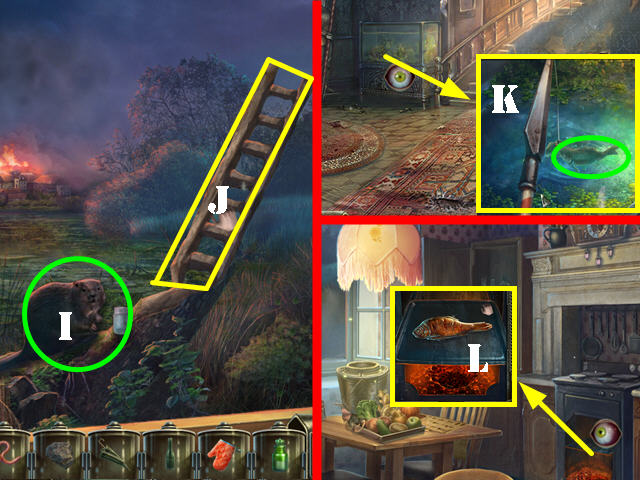
- Put the TARGET on the nail (I); the statue will throw the tomahawk.
- Look at the pirate plaque again and take the TOMAHAWK (J).
- Take a closer look at the TV to get a message from Dr. Blackmore (K).
- Look at the box; break it with the TOMAHAWK and take the BUTTON (L).
- Touch the tentacle on the ground (not pictured).
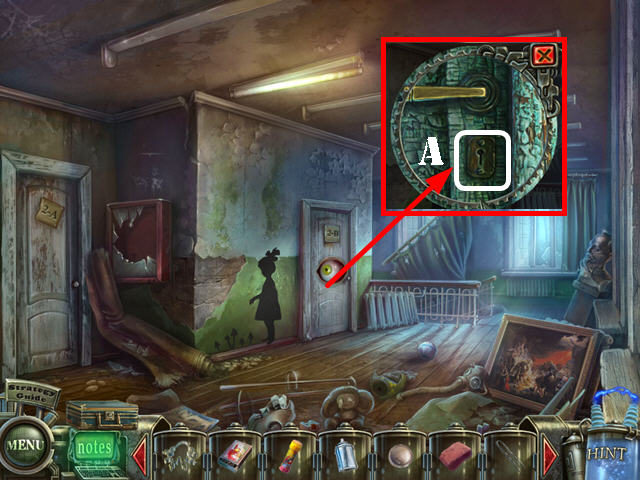
- Examine the back door (M); put the BUTTON in the slot and then put the EYE in the top slot to activate a puzzle.
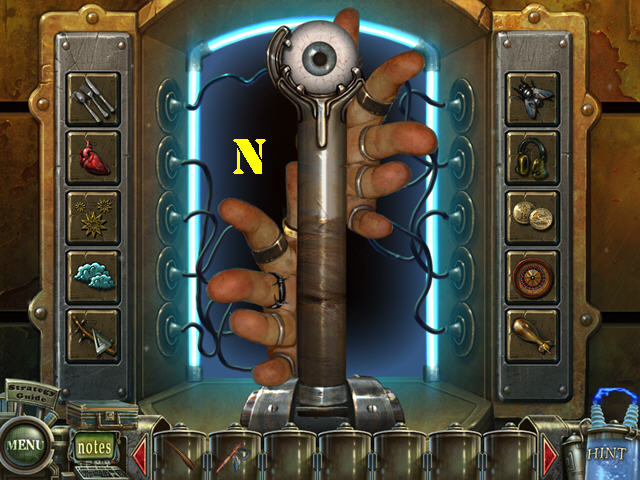
- Match each finger’s ring to a tile by following the wires attached to it. Select two tiles on the same side to swap their positions.
- A finger will pop-up when a correct selection has been made.
- Please look at the screenshot for the solution (N).
- Go through the door.
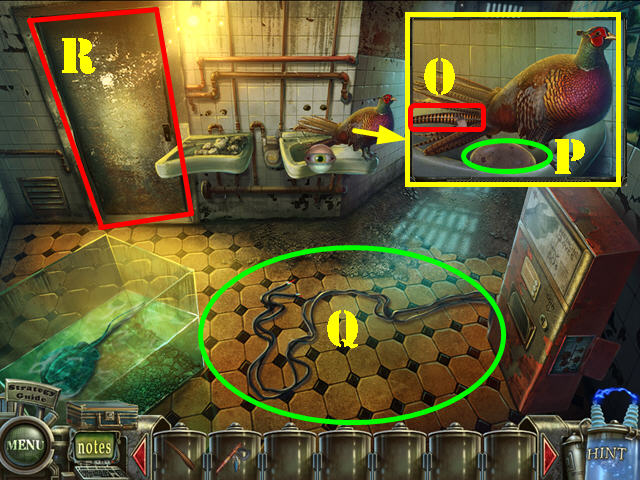
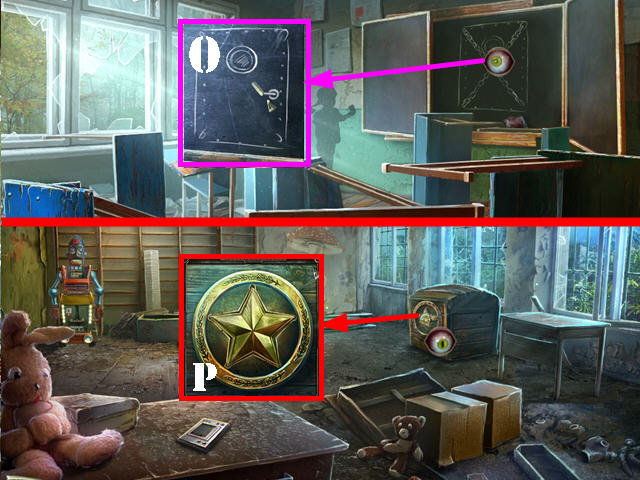
- Look at the pheasant; put the FEATHER on the tail (O) and take the EGG (P).
- Touch the cord on the ground (Q).
- Go through the left door (R).
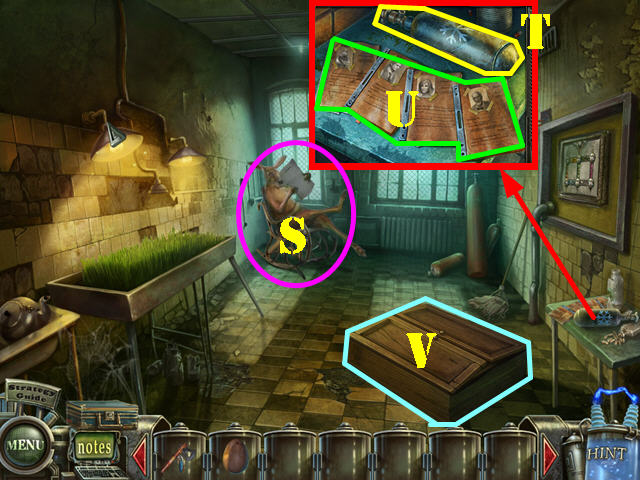
- Take a closer look at the kangaroo (S); it needs glasses.
- Look at the table; take the LIQUID NITROGEN (T).
- Take a closer look at the 4 case files (U).
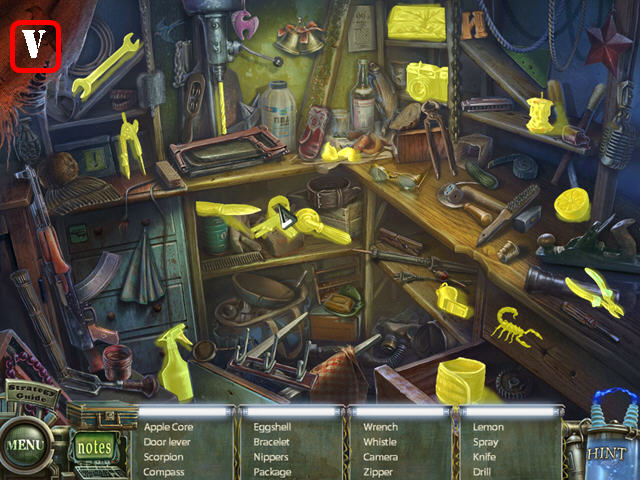
- Open the cabinet (V) to activate a HOP.
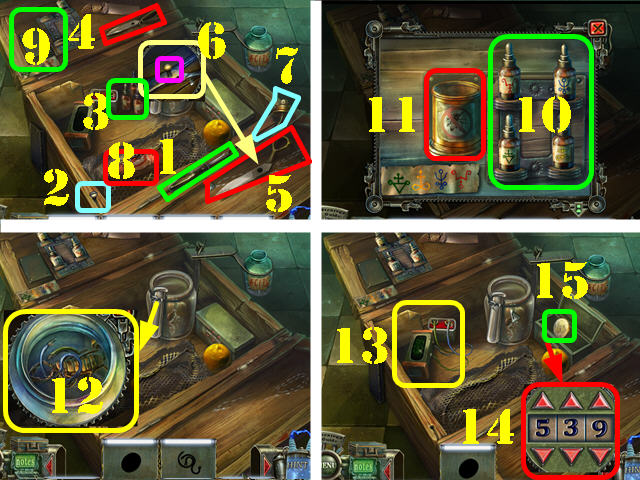
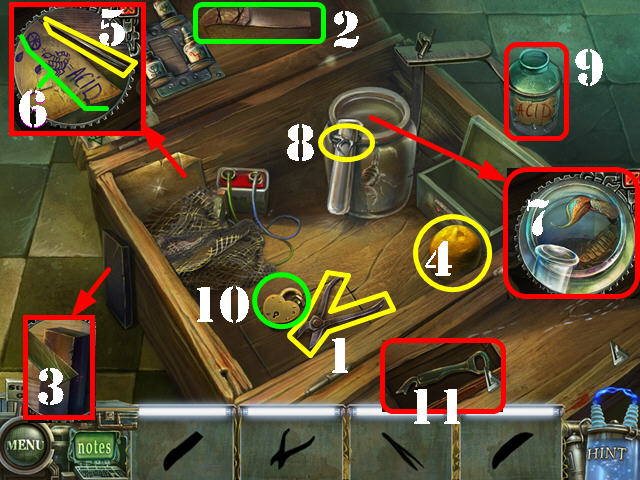
- Take the Screwdriver (1). Remove the screw (2) with the screwdriver.
- Take the chemical jars (3) and the scissor blade (4). Put the scissor blade next to the other one (5).
- Zoom into the scissors; put the screw in the center (6) and use the screwdriver on the screw.
- Take the scissors and the spray cap (7).
- Cut the net with the scissors and take the empty pesticide bottle (8).
- Look at the bracket (9); put the empty pesticide bottle and the chemical jars down. Select each of the jars (10), in any order, to add the liquid to the bottle.
- Put the spray cap on the bottle (11) to receive the pesticide.
- Look in the jar; spray the pesticide in it and take the wires (12).
- Put the wires on the battery and the number 539 will appear (13).
- Look at the box and enter the code 539 (14).
- Take the COIN (15).
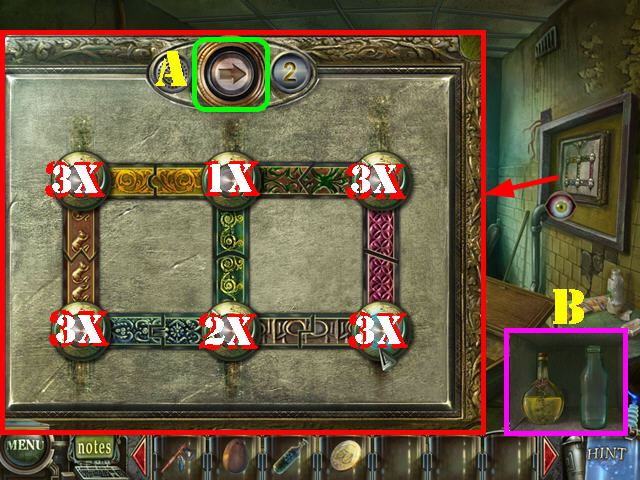
- Look at the panel on the right side of the wall to activate a puzzle.
- All the pieces on the board must be connected. Select the top button to change the arrangement of the pieces.
- To solve the puzzle, please follow these steps: press the top button once (A) and then press the rest of the buttons the amount of times shown on the screenshot.
- Take the FERTILIZER and the EMPTY BOTTLE (B).
- Put the FERTILIZER in the sink (C); touch the wheat and take the WHEAT GRAIN on the ground (D).
- Walk down.
- Zoom into the back door; use the LIQUID NITROGEN on the lock and then break the lock with the TOMAHAWK (E).
- Go through the door.
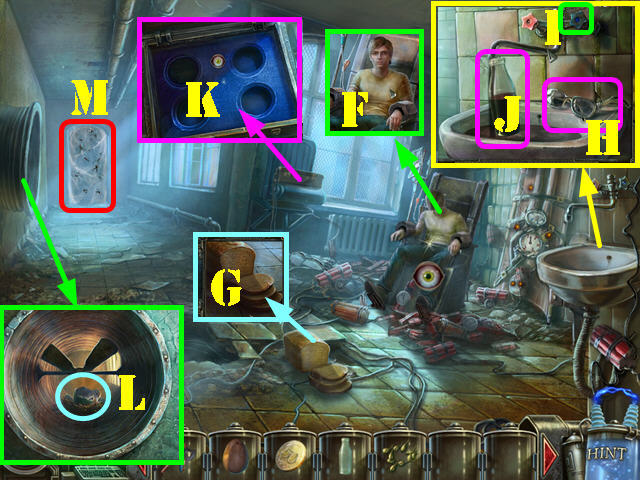
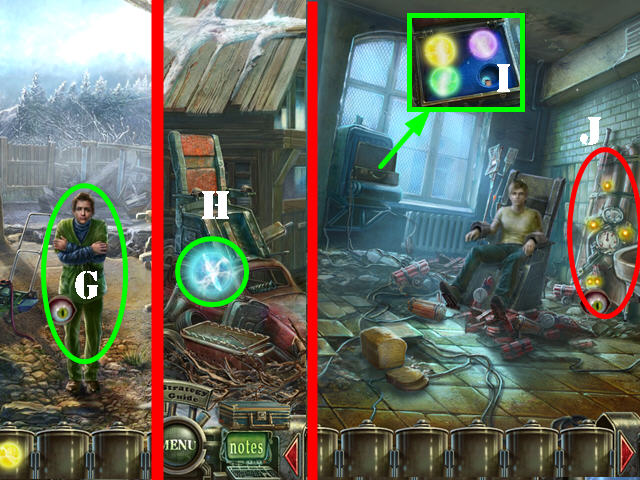
- Zoom into Tim’s chair and tap him (F).
- Examine the loaf and take the PIECE OF BREAD (G).
- Look at the sink and take the EYE GLASSES (H). Turn on the faucet (I); put the EMPTY BOTTLE in the sink to get the MACHINE OIL (J).
- Look at the case and open it (K).
- Look at the vent; put the EGG on the nest and feed the WHEAT GRAIN to the baby ostrich (L). The ostrich will eat away at the spiders on the back door.
- Go through the back door (M). You need something to defeat the hallucinations. Walk down twice.
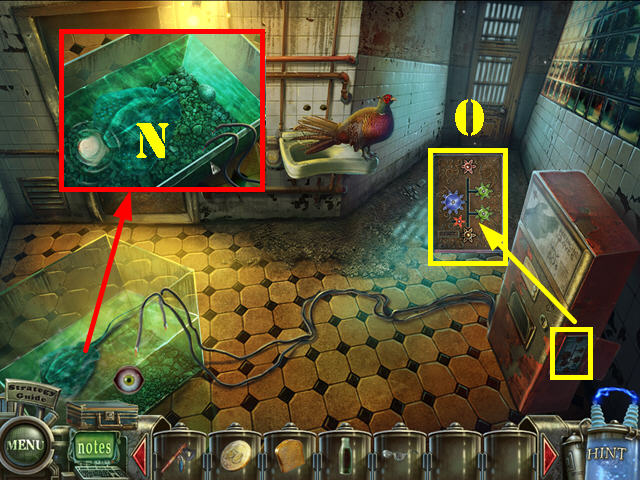
- Examine the tank; put the PIECE OF BREAD on the fish (N).
- Look at the panel on the side of the machine; put the MACHINE OIL on the gears to activate a puzzle (O).
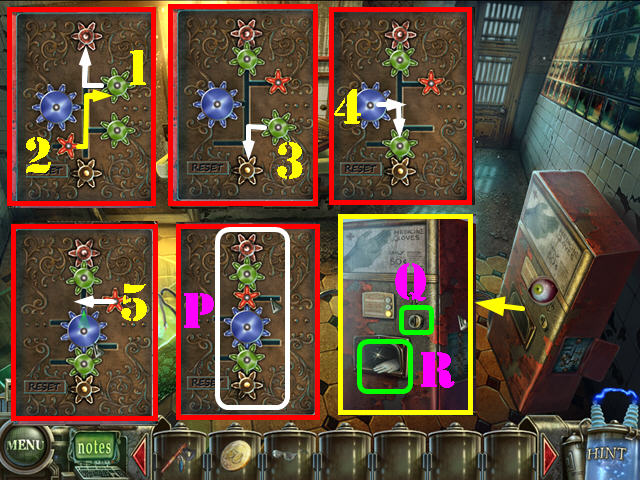
- Move the gears into the right spots until they all turn.
- Follow steps 1-5 to solve the puzzle (P).
- Look at the front of the vending machine; insert the COIN into the slot (Q).
- Take the LATEX GLOVE (R).
- Go through the left door.
- Play the HOP.
- Remove the net; take the nippers (1).
- Grab the blunt knife (2).
- Zoom into the sharpening stone; put the blunt knife on it to get the sharp knife (3).
- Cut the lemon with the sharp knife to get the lemon (4).
- Touch the paper; look at the code (6) and take the tweezers (5).
- Zoom into the jar and use the tweezers on the scorpion (7).
- Cut the wires around the vial with the nippers to get the vial of venom (8).
- Put the lemon and the vial of venom into the bottle; take the acid (9).
- Pour the acid on the lock (10); open the compartment and take the CAN OPENER (11).
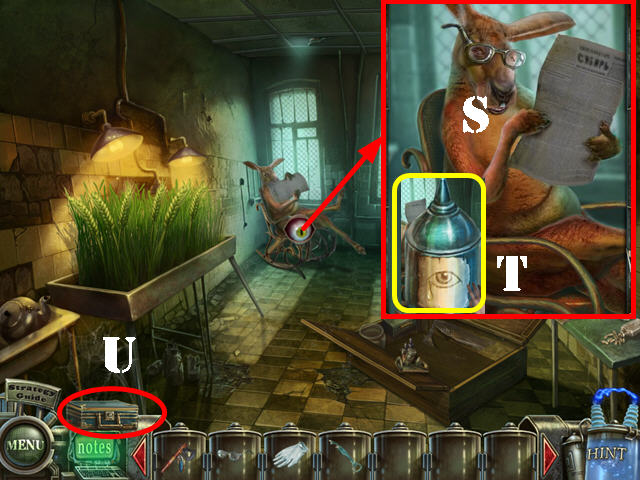
- Examine the kangaroo; give him the EYE GLASSES (S) and take the bottle (T).
- Open the suitcase to activate a puzzle (U).
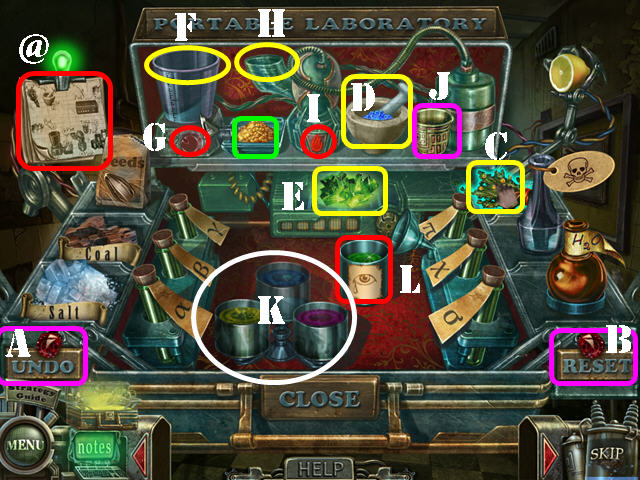
- Refer to the recipe (@) as many times as you need. A green check mark will appear next to a section that has been completed. To close the page, click on it again.
- If you make a mistake you can use the ‘undo’ button (A) to undo your last action or the ‘reset’ (B) button to start over.
- Put the flowers (C) into the mortar (D); touch the pestle to crush the flowers.
- Put the crushed flowers into the crystallizer (E).
- Take the crystals from the crystallizer and put them into the blender (F). Push the red button (G).
- Put the ingredients into the machine (H) and press the button (I).
- Drag the cup (J) into the glasses (K) and then take the EYE DROPS (L).
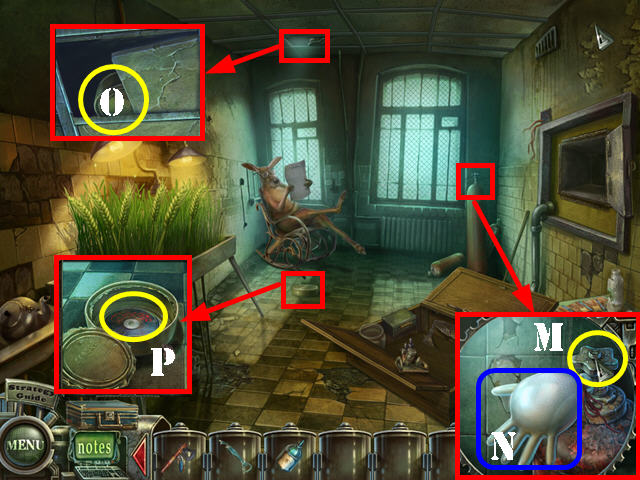
- Look at the tank; put the LATEX GLOVE on the tube and twist the valve (M).
- Take the FLOATING GLOVE (N).
- Zoom into the ceiling; use the FLOATING GLOVE on the can (O).
- Zoom into the can on the ground; use the CAN OPENER on it and take the CHICAGO DISK (P).
- Walk down, go through the right door, and then through the back door.

- Use the EYE DROPS on the hallucination (Q).
- Take a closer look at the computer; insert the CHICAGO DISK in the tray (R).
- Go through the door marked Chicago (S).
Chapter 2: Chicago
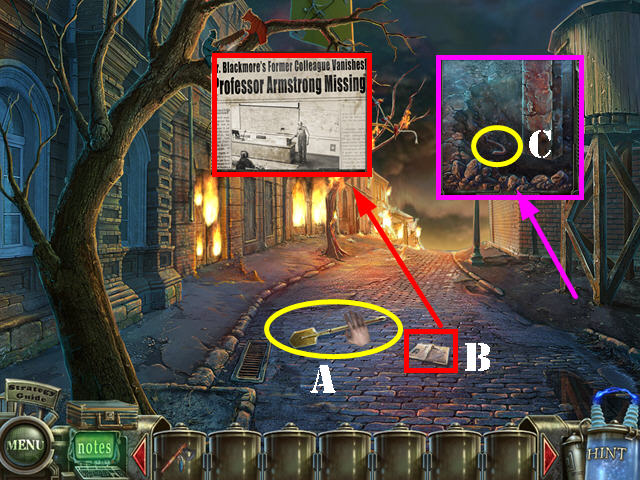
- Take the SHOVEL (A).
- Look at the newspaper (B).
- Look at the bottom of the water tower; use the SHOVEL in the dirt and take the WORM (C).
- Go forward.
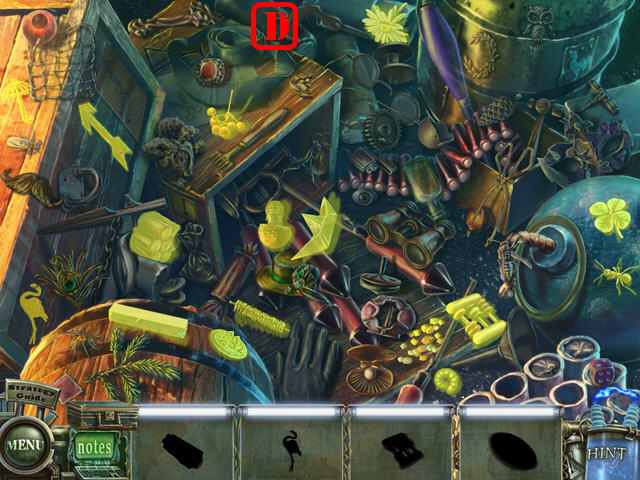
- Play the HOS.
- Take all the silhouette items marked in yellow (D).
- The DYNAMITE will be added to inventory.
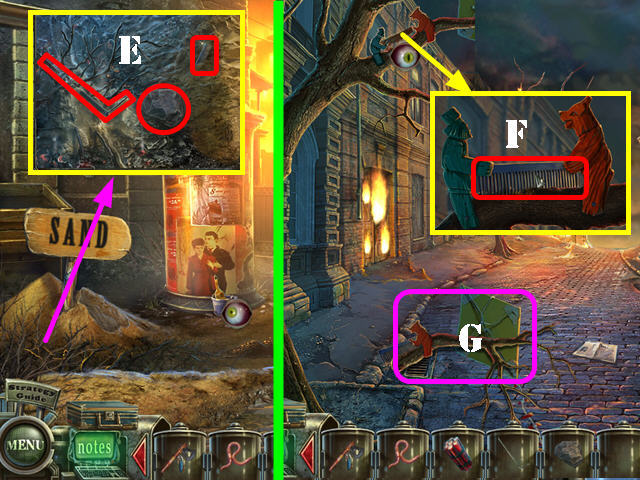
- Use the SHOVEL in the sand to put out the fire.
- Zoom into the ground; take the METAL COMB, STONE, and POKER (E).
- Walk down.
- Zoom into the wooden figures in the tree; touch their saw. Give the wooden figures the METAL COMB (F).
- Take the TWINE (G).
- Go forward.
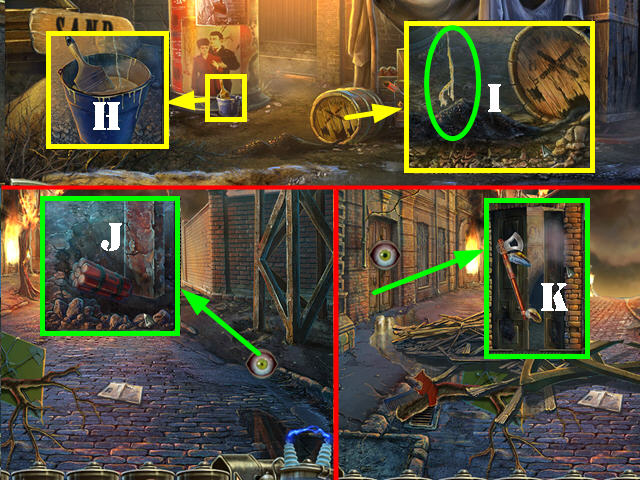
- Look at the glue bucket; dip the TWINE in it to get the STICKY ROPE (H).
- Examine the barrel; put the STICKY ROPE in it to get the FUSE (I).
- Walk down.
- Examine the base of the water tank. Put down the DYNAMITE (J) and add the FUSE to it to knock down the water tower.
- Look at the door; use the TOMAHAWK on it (K). Go through the door.
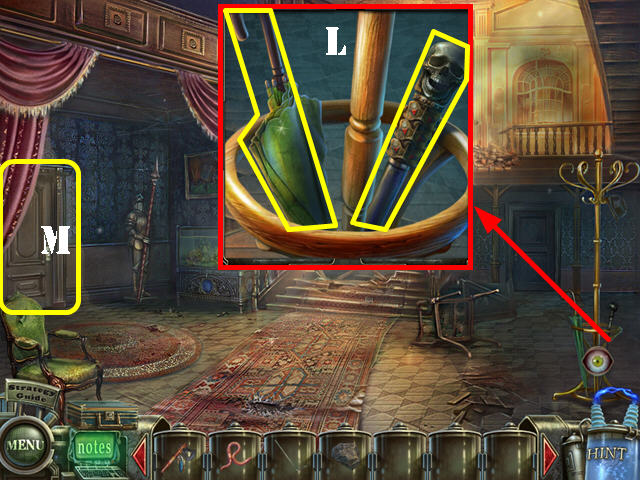
- Look at the umbrella stand; take the UMBRELLA and note the skull mechanism (L).
- Go through the left door to reach the kitchen (M).
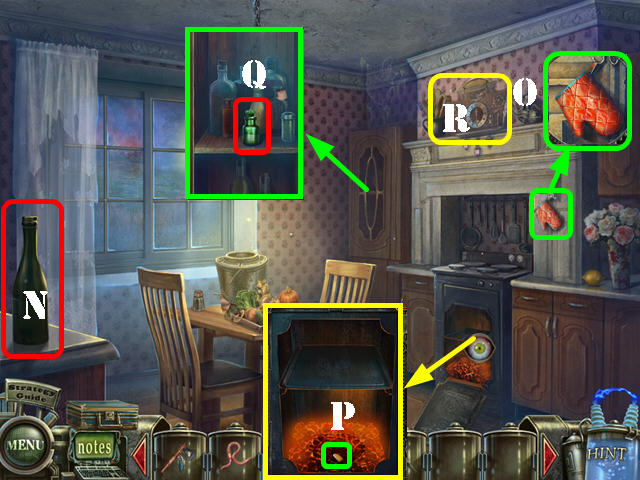
- Take the VINEGAR (N).
- Look at and take the OVEN MITT (O).
- Examine the stove and open the door. Use the POKER on the coals; take the IRON TOOTH with the OVEN MITT (P).
- Look at and then open the cabinet; take the SMELLING SALTS (Q).
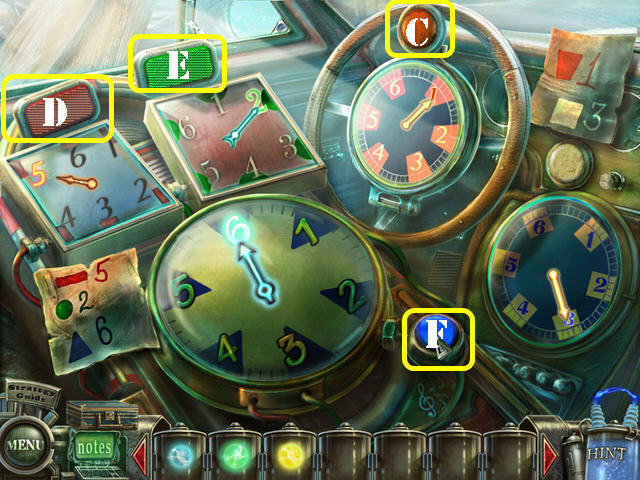
- Examine the clock to activate a puzzle (R).

- Move the pendulum and the lanterns until the two figures turn the clock hands to set the time to 12 o’clock.
- The pendulum (E) allows you to switch between the two figures. Lantern (C) moves the left figure and lantern (D) moves the right figure.
- To solve the puzzle, press on the items in this order: D x 2, E, C x 6, E, D x 6, E and C x 5.
- Take the FISHING LINE WITH HOOK (F).
- Open the window, look outside, and take the gas mask (G).
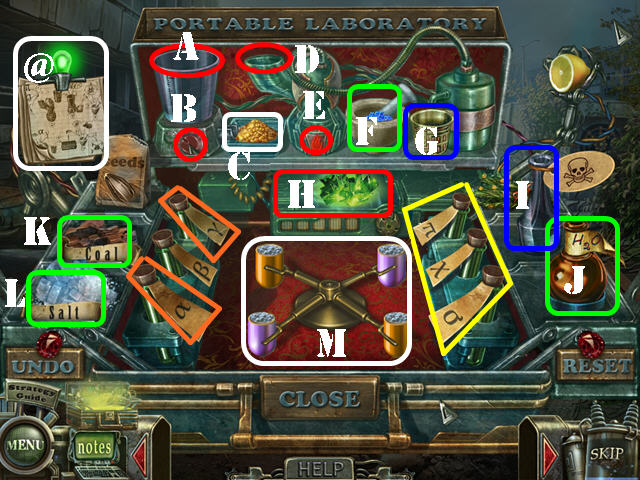
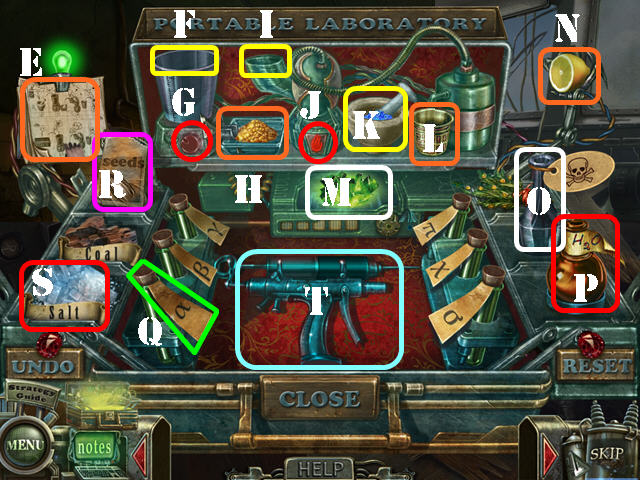
- Open the suitcase to access the portable laboratory (H).
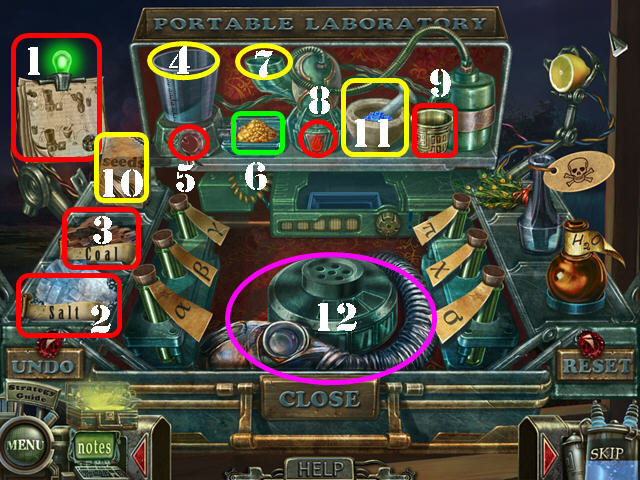
- Look at the recipe (1).
- Put the salt (2) and the coal (3) into the blender (4) and push the button (5).
- Put the blended ingredients (6) into the machine (7) and push the button (8).
- Put the cup (9) and the seeds (10) into the blender (4) and push the button (5).
- Put the blended ingredients (6) into the mortar (11); touch the pestle to mix the ingredients.
- Put the ingredients from the mortar on the mask (12). Take the GAS MASK.
- Remove the ivy on the tree with the TOMAHAWK 4 times. The beaver will start to cut the tree but his tooth breaks. Give the IRON TOOTH to the beaver (I).
- Take the LADDER (J).
- Walk down.
- Look into the tank; touch the spear. Put the FISHING LINE WITH HOOK on the spear; add the WORM to the hook. Touch the spear to get the FISH (K).
- Return to the kitchen.
- Look in the stove; use the OVEN MITT on the tray. Put the FISH on the tray. Use the oven mitt on the tray two more times and take the BAKED FISH (L).
- Walk down twice and go forward.
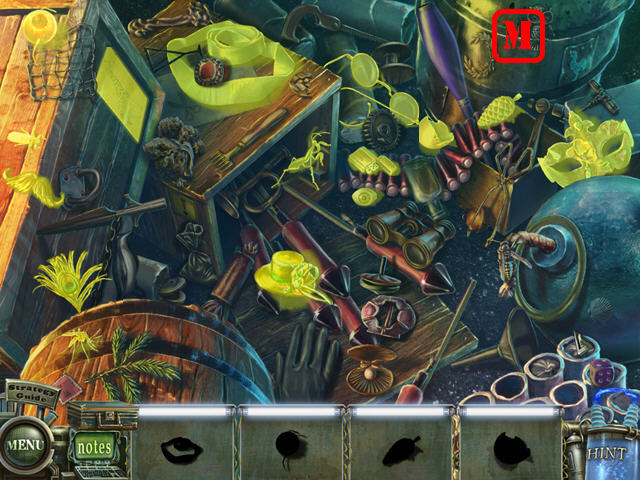
- Play the HOS.
- Find all the silhouette items (M).
- You will receive the BELT.
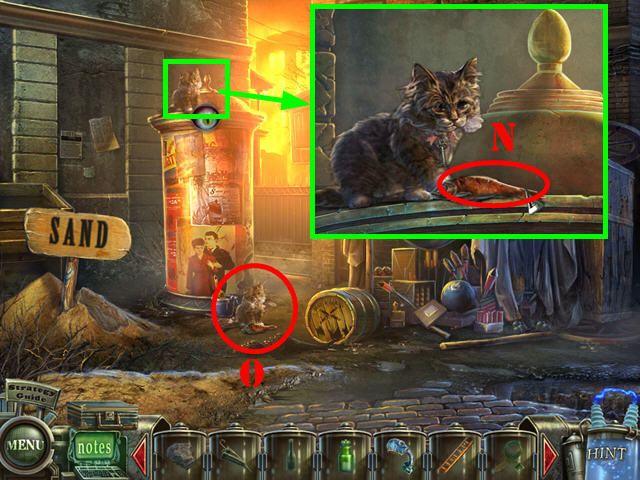
- Zoom into the cat; give it the BAKED FISH (N).
- Take the CAT (O).
- Return to the house and go through the lower right door to reach the basement.
- Break the window with the STONE (P).
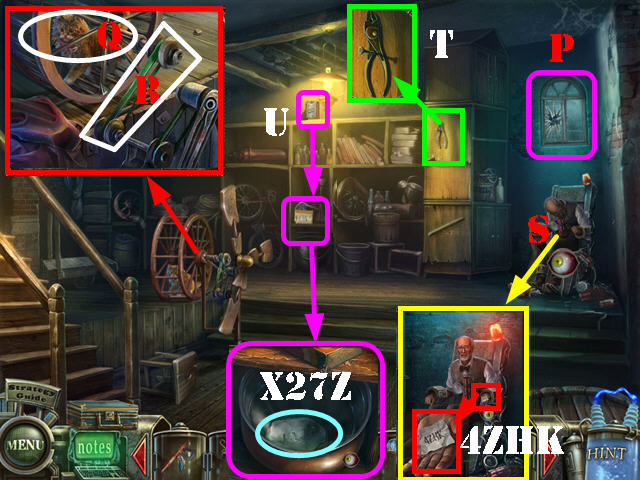
- Zoom into the wheel; put the CAT in it (Q). Add the BELT to the fan (R).
- Examine Dr. Armstrong (S); use the SMELLING SALTS on him.
- Look at his hand and look at the combination (4ZHK).
- Look at and take the PLIERS (T).
- Knock down the baking soda (U) with the UMBRELLA.
- Zoom into the bowl; put the VINEGAR in the bowl; note the code (X27Z).
- Walk down.
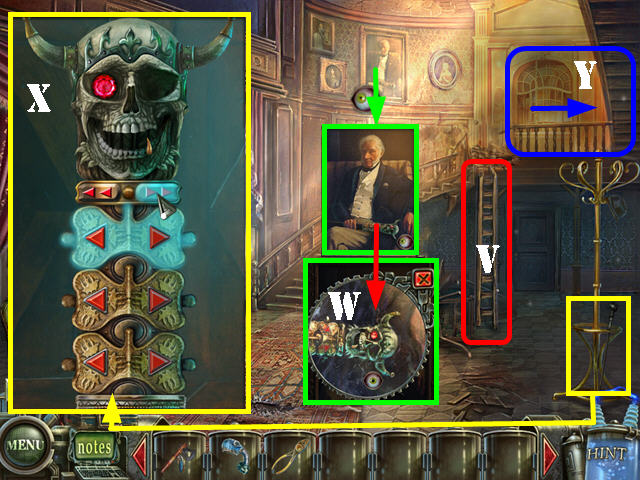
- Put the LADDER on the broken stairs (V).
- Look at the painting; note the code on the cane (W).
- Zoom into the umbrella stand and then zoom into the cane to activate a puzzle. Using the code shown on the picture, use the large arrows and the small arrows to change the skull’s features.
- Please look at the screenshot for the solution (X).
- You will receive the SWORD.
- Go to the hallway in the upper right (Y).
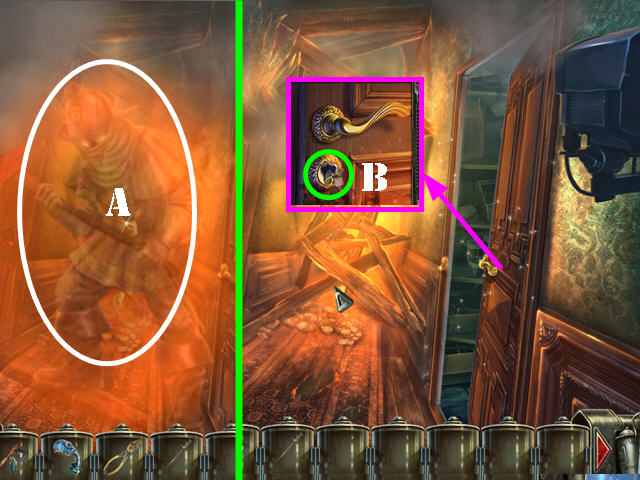
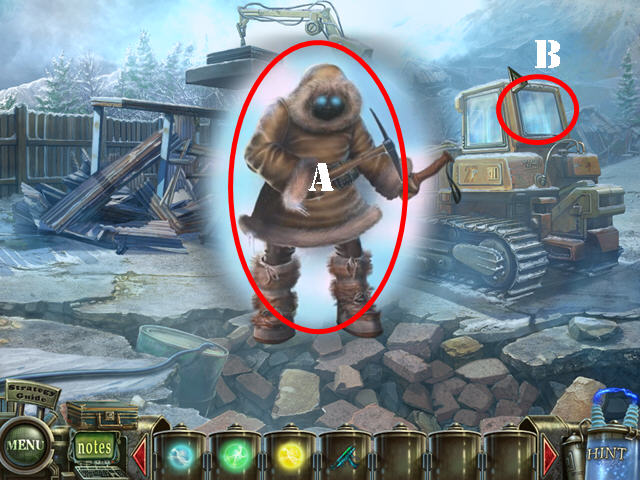
- Use the GAS MASK on the hallucination (A).
- Zoom into the right door; use the PLIERS on the lock to activate a HOS (B).
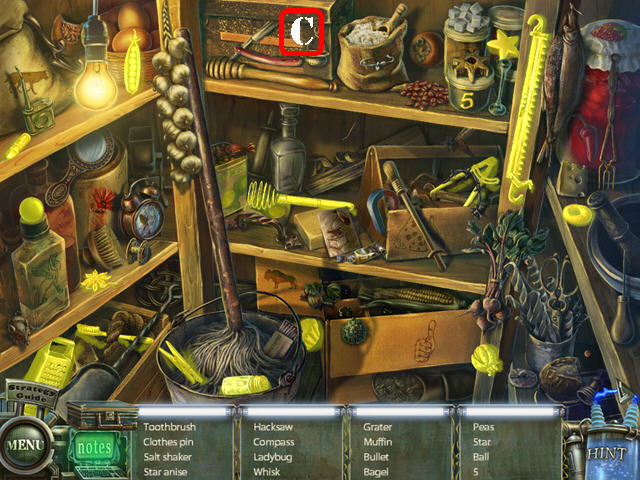
- Play the HOS.
- Find all the items listed (C).
- You will receive the SALT.
- Return to the kitchen.
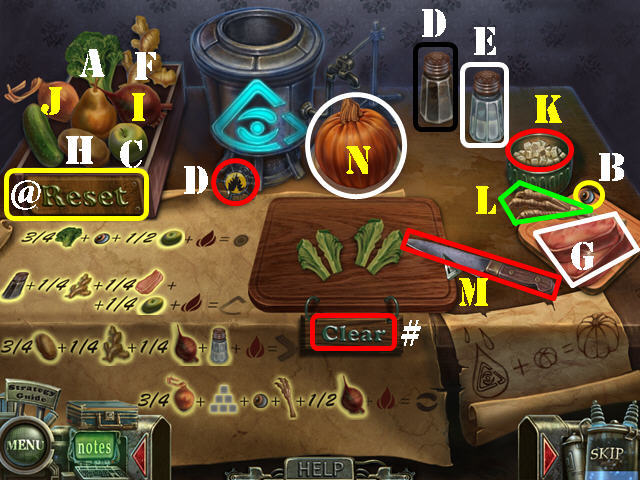
- Zoom into the table and put down the SALT to activate a puzzle.
- Look at the 4 sets of recipes on the paper. Touch an ingredient in the box or on the small cutting board to automatically add that item to the large cutting board. Use the knife (M) next to the cutting board to cut the ingredients. Select the ‘clear’ button (#) to remove items from the cutting board.
- Touch the salt, pepper, eye, chicken foot, and sugar to automatically add them to the pot. Touch the fire symbol to mix all the ingredients at the end of each recipe. Use the ‘reset’ button (@) to start a recipe over.
- Please follow the steps below to solve the puzzle.
- First Recipe: Touch the broccoli (A); cut it 3 times with the knife (M). Touch 3 of the broccoli pieces to automatically add them to the pot. Touch the eye (B). Clear the board (#). Touch the apple (C); cut it with the knife once; touch one apple piece and clear the board. Touch the fire button (D).
- Second Recipe: Touch the pepper shaker (E).Take the ginger (F); cut it with the knife 3 times; touch one piece and clear the board. Touch the meat (G); cut it with the knife 3 times; touch one piece and clear the board. Touch the apple (C); cut it with the knife 3 times; touch one piece and clear the board. Touch the fire button.
- Third Recipe: Touch the potato (H); cut it with the knife 3 times; touch three potato pieces and clear the board. Take the ginger (F); cut it with the knife 3 times; touch one piece and clear the board. Take the turnip (I); cut it with the knife 3 times; touch one piece and clear the board. Select the salt shaker (E) and touch the fire button.
- Fourth Recipe: Touch the onion (J); cut it with the knife 3 times; touch three pieces and clear the board. Touch the sugar cubes 3 times (K) and then the eye once (B). Touch the chicken foot (L). Touch the turnip (I); cut it with the knife once; touch one piece and clear the board. Touch the fire button to make the pumpkin grow.
- Take the PUMPKIN (N).
- Go to the upstairs hallway and go then through the left door.
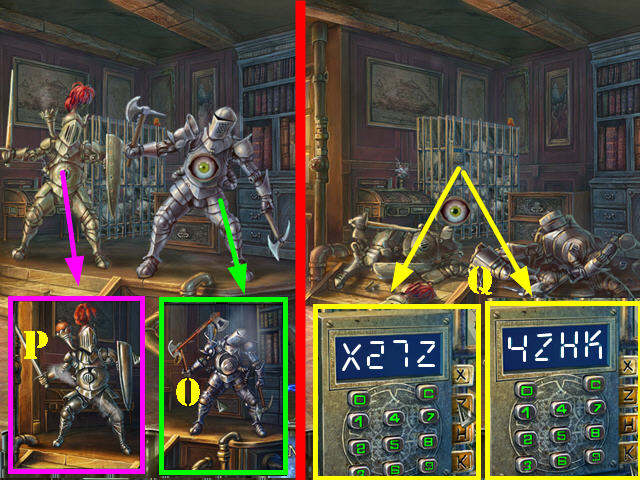
- Zoom into the right knight; use the TOMAHAWK on him (O).
- Zoom into the left knight; block the pipe with the PUMPKIN (P). Use the SWORD on the knight.
- Examine the cage; enter the code X27Z and then 4ZHK (Q).
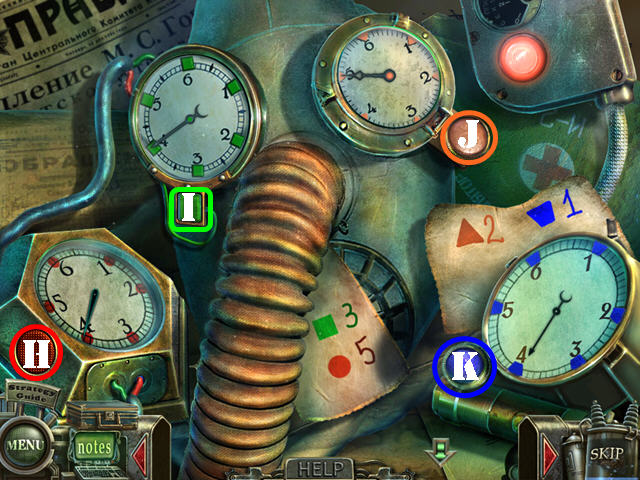
- Zoom into the bomb to activate a puzzle.
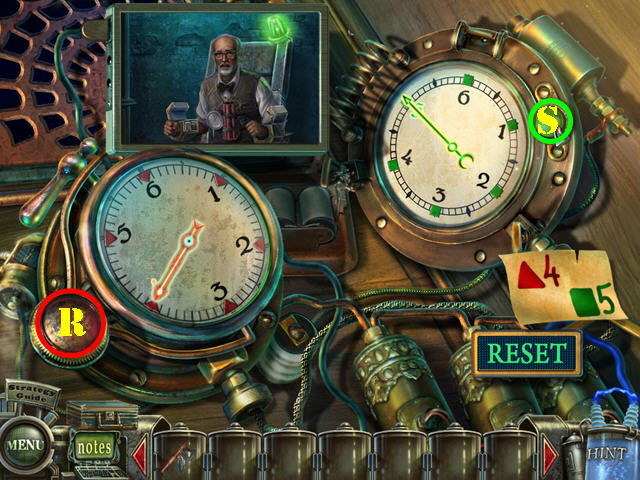
- Push the buttons on each clock so the green hand lands on 5 and the red one on 4.
- To solve the puzzle, press on the buttons in this order: Red x 2 (R) and Green x 5 (S).
- Walk down twice and go through the lower right door to reach the basement.
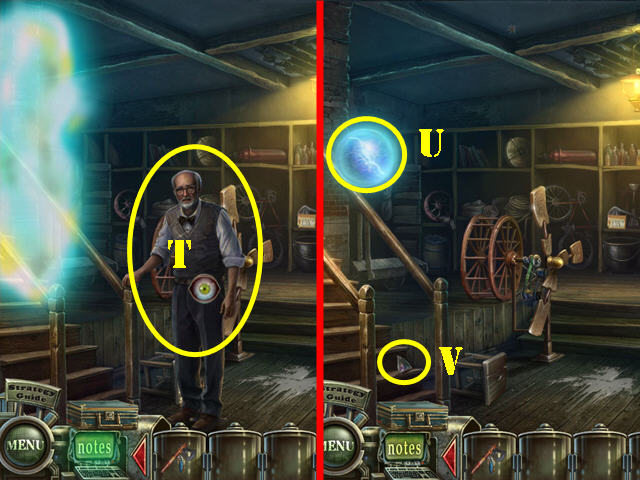
- Talk to Dr. Armstrong (T).
- Take the BLUE ENERGY ORB (U) and the DISK PIECE (V).
- Return to the upstairs hallway.
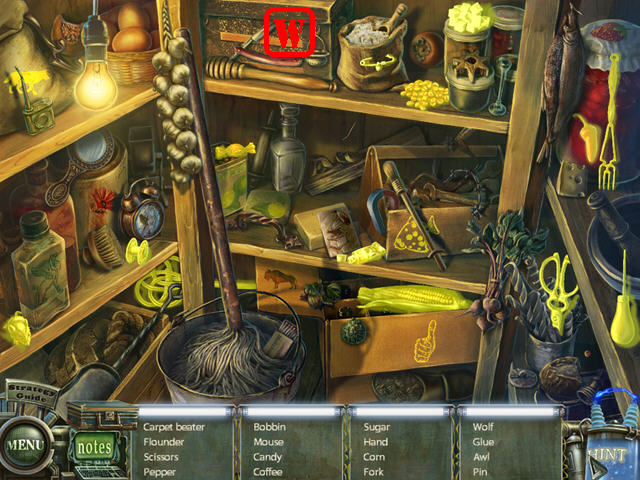
- Play the HOS.
- Find all the items listed (W).
- You will receive the GLUE.
- Go through the left door.
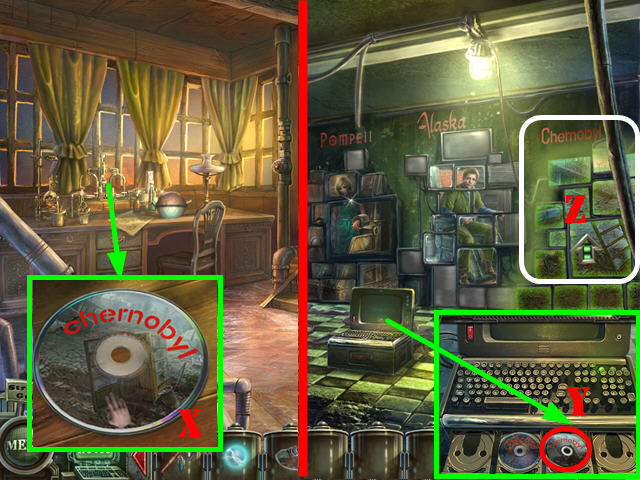
- Examine the table; put the DISK PIECE next to the others and add the GLUE to it. Take the CHERNOBYL DISK (X).
- Walk down 4 times.
- Zoom into the computer; put the CHERNOBYL DISK in the tray (Y).
- Go through the Chernobyl door (Z).
Chapter 3: Chernobyl
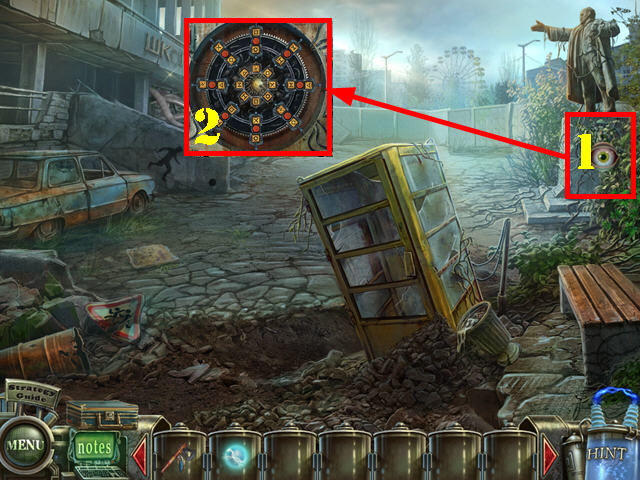
- Cut the branches with the TOMAHAWK (A).
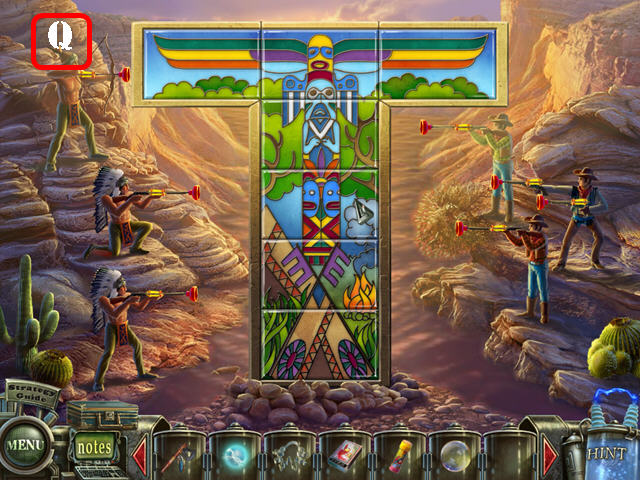
- Zoom into the target to activate a puzzle (B).
- Arrange the identical items three in a row along the entire radius of the mechanism.
- Press on the red buttons to switch the symbols attached to it. Use the arrows to turn the wheel left or right (K and L).
- To Solve the puzzle, press on the buttons in this order: L x 2, C, K, J, L x 2, D, E, K x 2, J, K x 4, F, J, I, K, G, L x 4, H, L x 2, H, L x 4, H, L x 4, I, L x 3, I, L x 5, J, L x 3, J, L x 5, I, H, L x 2, J, K, J, and K.
- Examine the jacket; touch it and take the DRUMSTICKS (1).
- Look at both statues (2); they are missing some instruments.
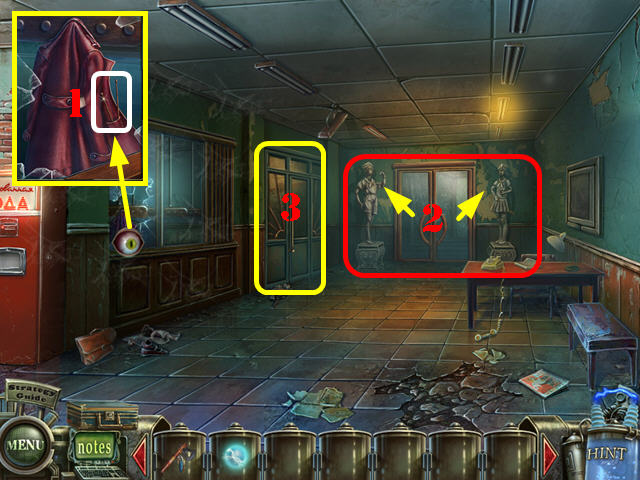
- Open the left door and go through it (3).
- Take the CROWBAR (4).
- Look at the radiator; remove the chain with the CROWBAR (5).
- Take the BALL (6).
- Examine the locker; use the CROWBAR on it and take the AMMO (7).
- Walk down twice.
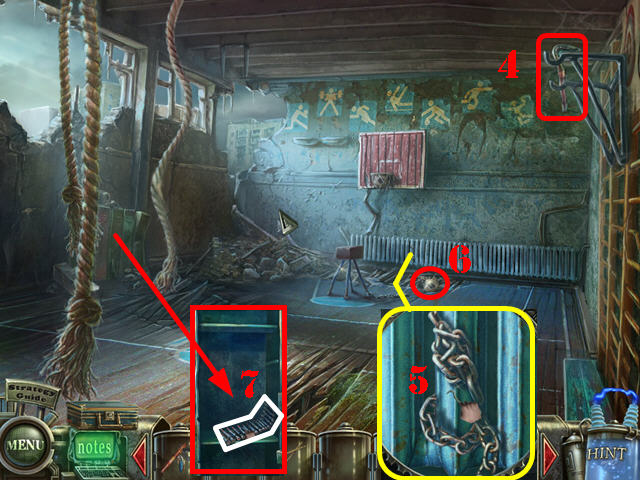
- Examine the paper; look at the phone number: 268-47 (A).
- Remove the rocks with the CROWBAR 3 times (B).
- Open the phone booth and look inside; zoom into the dials and dial 26847 (C).
- Take the COIN (D).
- Go forward.
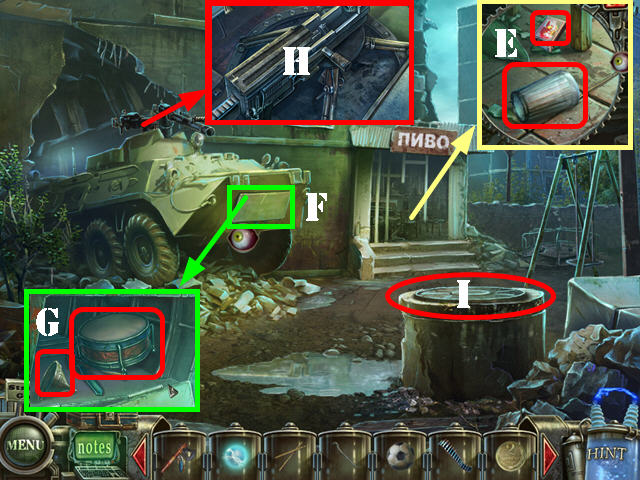
- Look at the entryway; take the MATCHES and the CLEAN GLASS (E).
- Zoom into the panel on the armored vehicle; open the panel with the CROWBAR (F).
- Take the DRUM and the FUNNEL (G).
- Zoom into the top of the tank; put the AMMO on it (H).
- Look in the sewer hole (I); put the FUNNEL on the pipes to activate a puzzle.
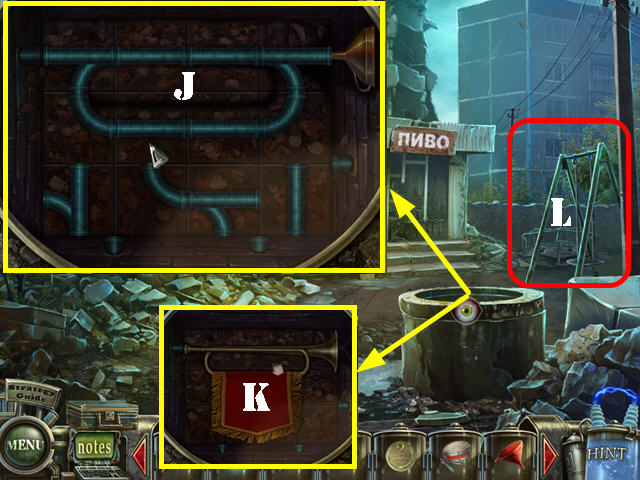
- Rotate the tiles until the pipes are connected correctly.
- Please look at the screenshot for the solution (J).
- Take the TRUMPET (K).
- Look at the swings (L).
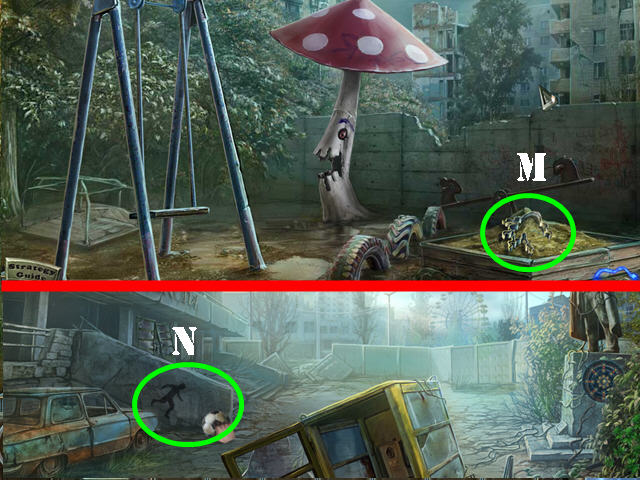
- Take the OCTOPUS CUTTER (M).
- Walk down twice.
- Give the BALL to the shadow of the boy (N) to activate a HOS; play it.
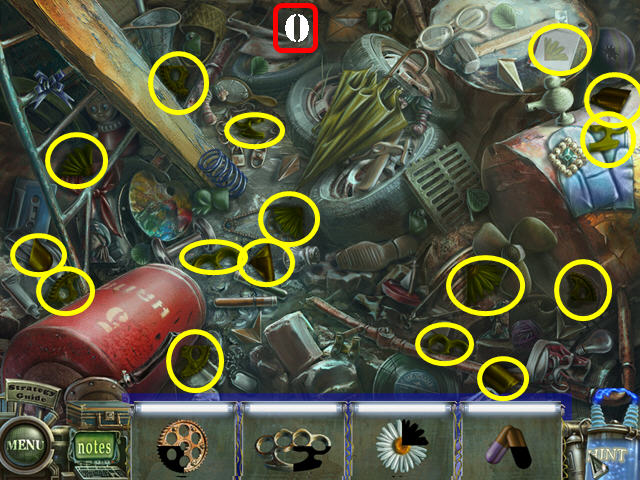
- Find all the silhouette fragments marked in yellow (O).
- Take the Pills and open your suitcase.
- Put the 3 vials marked in yellow into the machine (D) and push the red button (E).
- Add the salt (L), water (J), and the cup’s (G) content into the blender (A) and press the button (B).
- Put the ingredients (C) and the poison (I) into the mortar (F); mix it with the pestle.
- Put the ingredients from the mortar and the two vials marked in orange into the machine (D); press the button (E).
- Put the cup’s contents into the crystallizer (H); drag the ingredients from the crystallizer into the mortar along with the poison (I) and the coal (K). Use the pestle to crush the ingredients.
- Put the ingredients from the mortar into the 4 capsule pieces and take the PILLS (M).
- Go into the school.
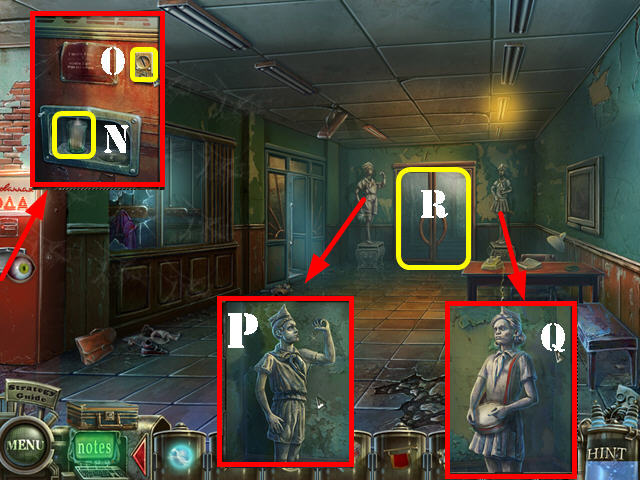
- Examine the vending machine; add the CLEAN GLASS to the cup holder (N).
- Insert the COIN into the slot (O) to receive the FIZZY WATER.
- Zoom into the boy statue; give him the TRUMPET (P).
- Zoom into the girl statue; give her the DRUM and the DRUMSTICKS (Q).
- Go through the back door (R).
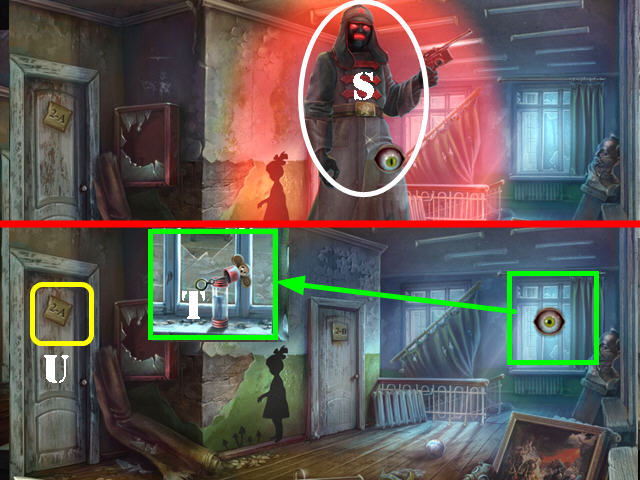
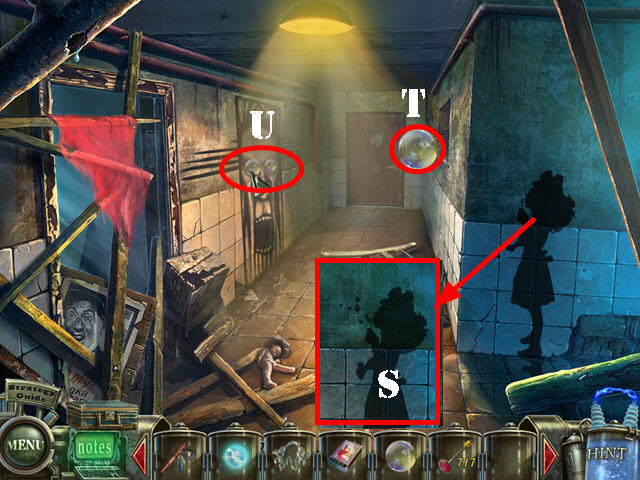
- Use the PILLS on the hallucination (S).
- Look at the window; pull the curtain and take the BUBBLES (T).
- Go through the door marked 2-A (U).
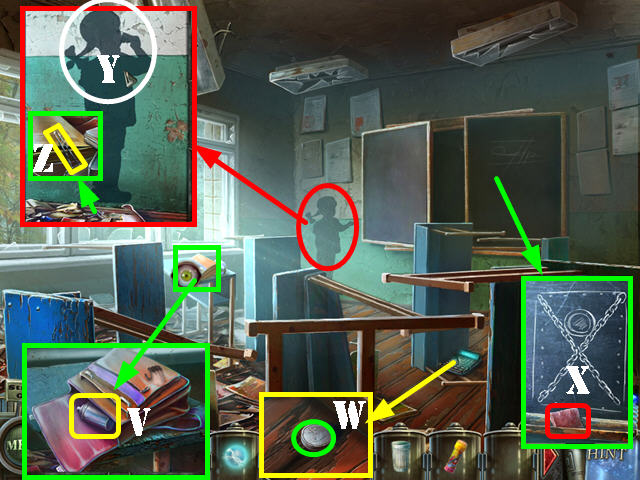
- Examine the bag; open it and take the GOLD PAINT (V).
- Look on the ground; take the BATTERY (W).
- Look at the blackboard; open it and zoom into it; take the SPONGE (X).
- Examine the girl’s shadow; give her the FIZZY WATER (Y). Look at the books and take the BOBBY PIN (Z).
- Walk down.
- Look at the door marked 2-B; use the BOBBY PIN in the lock (A).
- Go through the door.
- Look at the chalkboard and take the CHALK (B).
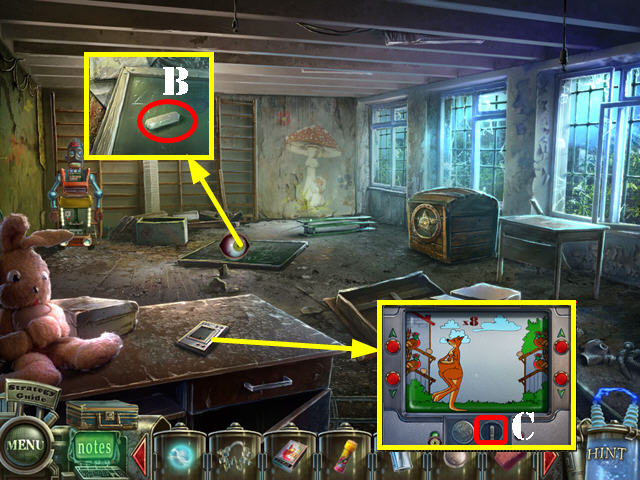
- Zoom into the desk; add the BATTERY to the device to activate a puzzle (C).
- Help the kangaroo catch the eggs as they appear.
- You must catch 8 eggs in a row without breaking one.
- To solve the puzzle, press the buttons in this order: F, D, E, G, D, F, G, and E.
- Take the BASKET (H).
- Walk down.
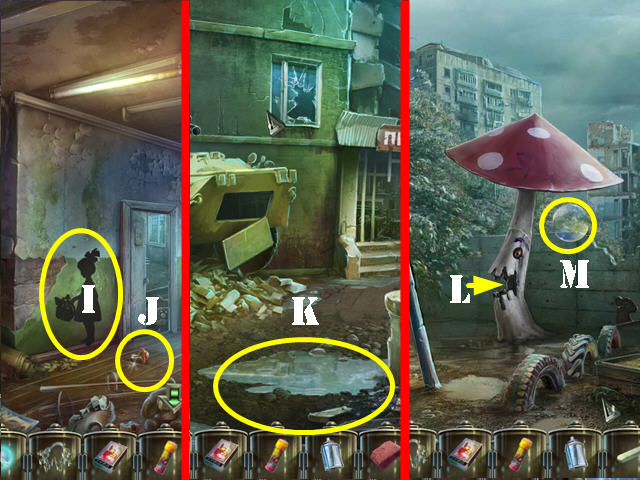
- Give the BASKET to the girl’s shadow (I).
- Take the MUSHROOM (J).
- Walk down twice and go forward.
- Dip the SPONGE in the water to get the WET SPONGE (K).
- Look at the swings. Give the MUSHROOM to the large mushroom (L).
- Take the BUBBLE (M).
- Walk down.
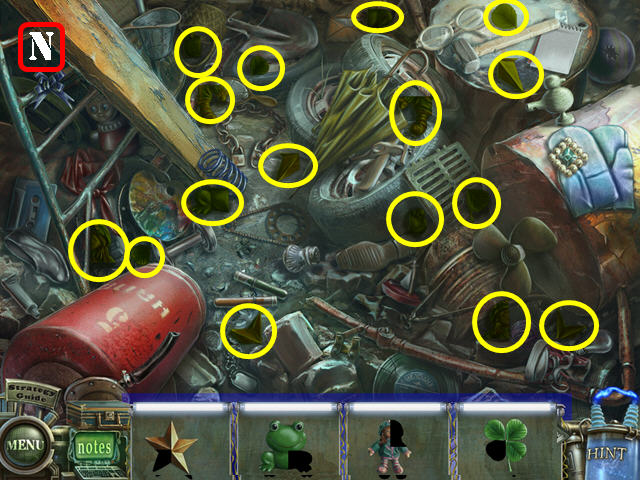
- Play the HOS.
- Find all the silhouette items (N).
- You will receive the STAR.
- Return to classroom 2-A.
- Look at the chalkboard; clean it with the WET SPONGE. Draw on the board with the CHALK (O).
- Walk down and go through the door marked 2-B.
- Zoom into the chest; touch the panel and put the STAR in the niche (P).
- Paint the star with the GOLD PAINT.
- Look in the chest to activate a puzzle.
- Select two adjacent pieces to swap their positions.
- Please look at the screenshot for the solution (Q).

- Take the 7 SUCTION CUPS marked in red (R).
- Walk down and go down the stairs.
- Zoom into the girl’s shadow on the wall; give her the BUBBLES (S).
- Take the BUBBLE (T).
- Put the 2 BUBBLES on the left door (U).
- Open the left door to activate a HOS; play it.
- Find all the items listed (V).
- You will receive the NIPPERS.

- Look at the back door; open it and go through it.
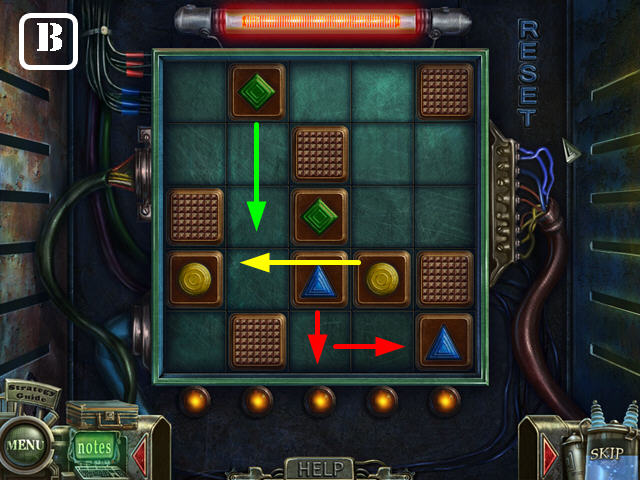
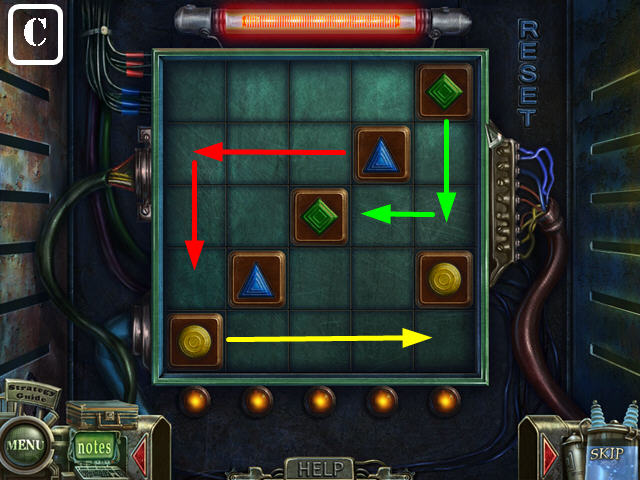
- Open the locker and zoom into it to activate a puzzle.
- In 5 moves or less, move the chips next to their matching ones.
- Hover your mouse over a chip and press the arrow of your choice to make the chip move in that direction.
- To use our solution, please follow the arrows in this order: Red, Yellow, and Green.
- Please follow the steps on screen (A) to solve the first round.
- Please follow the steps on screen (B) to solve the second round.
- Please follow the steps on screen (C) to solve the third round.
- Examine the cage; cut it with the NIPPERS (D). Open the fence.
- Walk down.
- Play the HOS.
- Find all the items listed (E).
- You will receive the CANDLE.
- Go forward.
- Zoom into the cage and then on the plate; put the OCTOPUS CUTTER on it, followed by the CANDLE. Light the candle with the MATCHES and take the OCTOPUS (F).
- Look at the left gate; put the 7 SUCTION CUPS on it and then add the OCTOPUS (G).
- Examine the gate to activate a mini-game.
- Push the buttons on each clock so the clock hands land on the numbers indicated on the papers.
- To solve the puzzle, press on the buttons in this order: J, K, I x 3, and H.
- Talk to the hostage.

- Take the GREEN ENERGY ORB (L).
- Examine the chair; take the SCREEN (M).
- Walk down twice and go through the door marked 2-B.
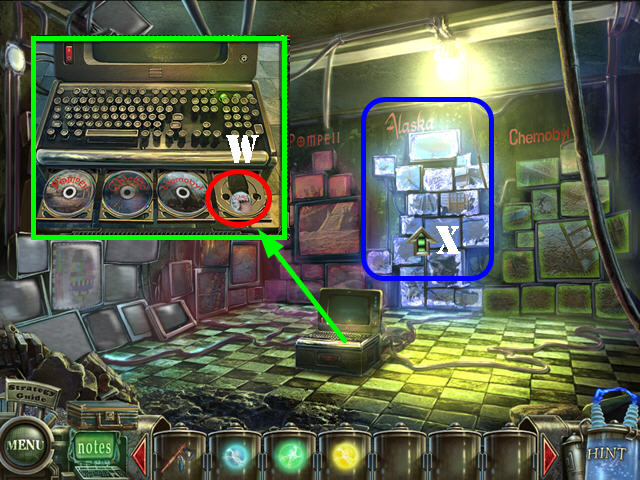
- Zoom into the robot and then into its chest; put the SCREEN on it to activate a puzzle (N).
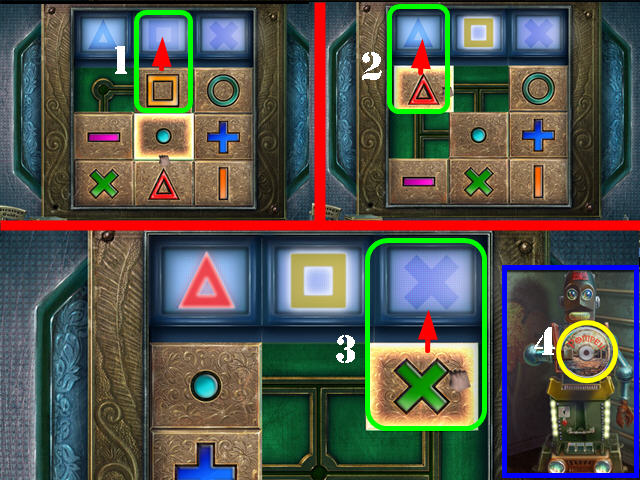
- Slide the matching chips below the matching screens to eliminate them.
- Please look at the screenshot for the solution (1, 2, and 3).
- Take the POMPEII DISK (4).
- Walk down 4 times.
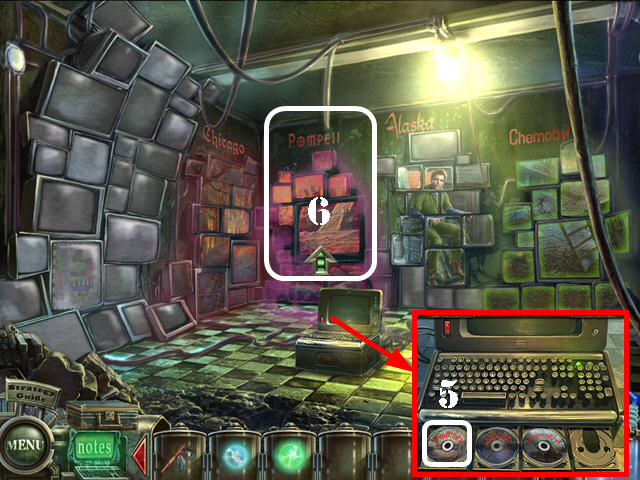
- Zoom into the computer; put the POMPEII DISK in the tray (5).
- Go through the Pompeii door (6).
Chapter 4: Pompeii
- Go through the left door.
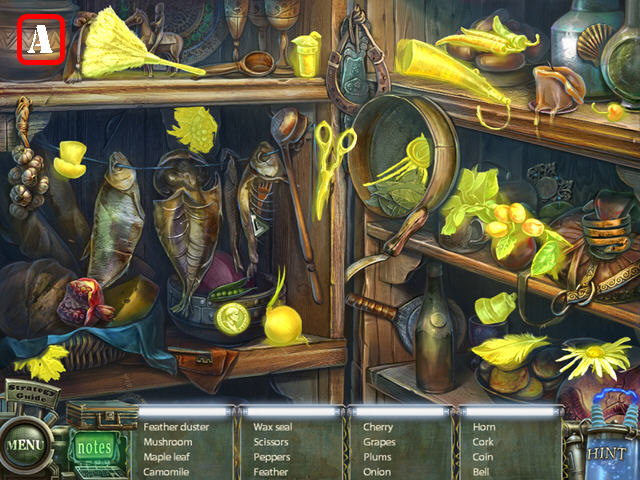
- Play the HOS.
- Find all the items listed (A).
- You will receive the DUSTER.
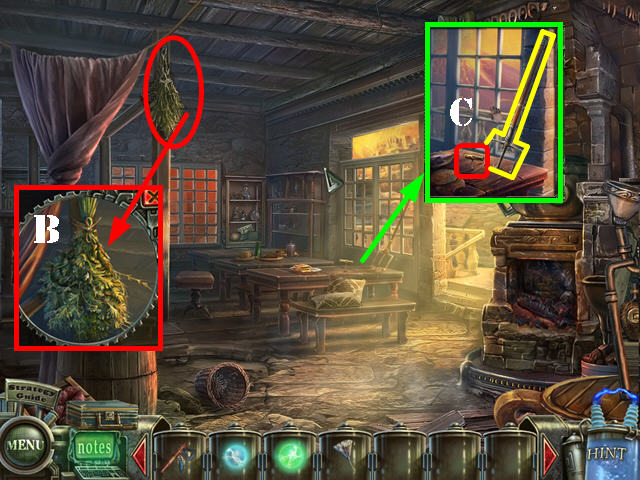
- Look at the HERBS and then take them (B).
- Examine the table; take the TRIDENT and the CORKSCREW (C).
- Exit the restaurant.
- Give the HERBS to the bull (E).
- Look at the ground; wipe off the ashes with the DUSTER and take the FEATHER (D).
- Tickle the bull’s nose with the FEATHER (E).
- Take the RING (F) and the SHIELD (G).
- Look at the slab and put the RING on it (H).
- Lift the slab; take the SWORD and the OIL (I).
- Go through the right door (J).
- Take the FLINT (K) and the HELMET (L).
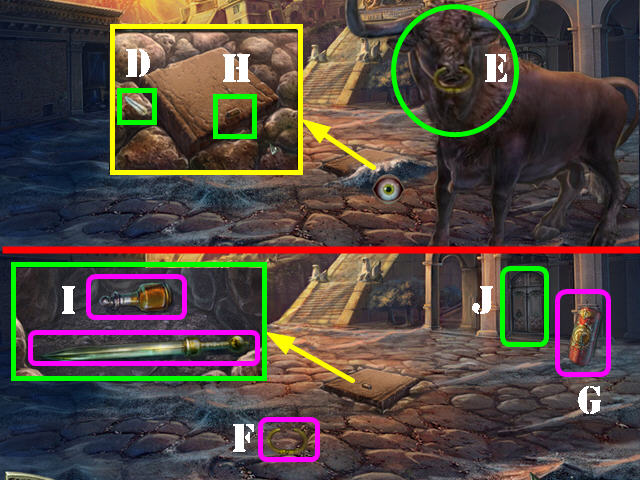
- Return to the restaurant and turn left to access the wine cellar.
- Zoom into the oil lamp; add the OIL and then the FLINT to it (M).
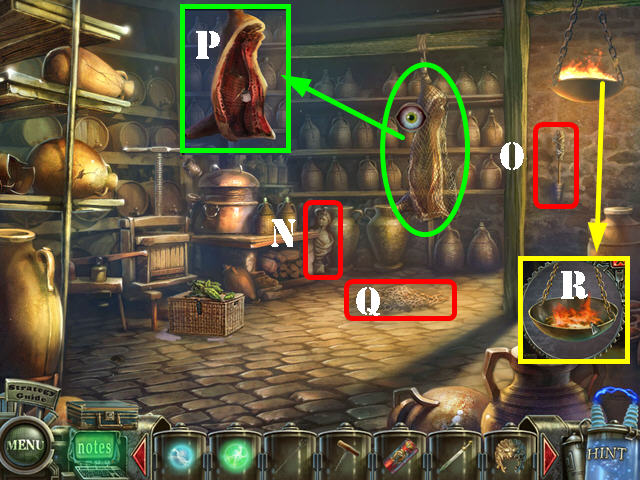
- Take the BUST OF CAESAR (N) and the TORCH (0).
- Look at the net; cut it with the TOMAHAWK and then use the TOMAHAWK on the meat to get the COOKING FAT (P).
- Take the NET on the floor (Q).
- Zoom into the oil lamp; dip the TORCH in the fire to get the BURNING TORCH (R).
- Walk down.
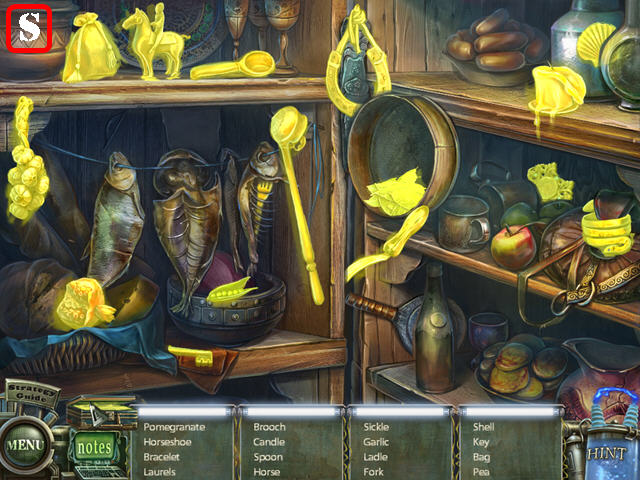
- Play the HOS.
- Find all the items listed (S).
- You will receive the LAUREL LEAVES.
- Go left.
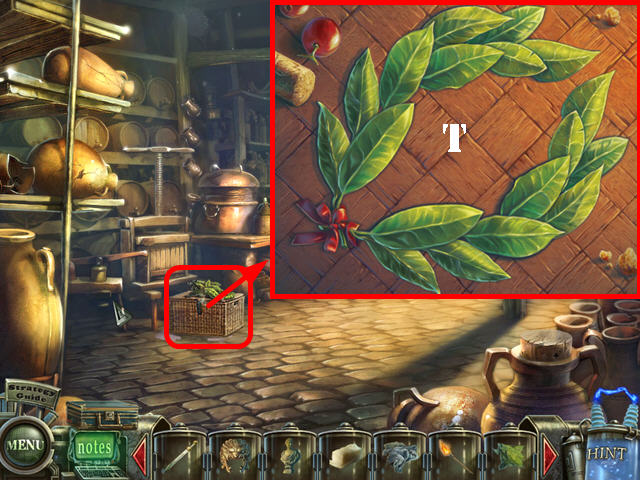
- Look at the basket; put the LAUREL LEAVES on it to activate a puzzle.
- Pick up a leaf and move it around until you see a highlighted area appear and then put down the leaf in that spot.
- Please look at the screenshot for the solution. Take the LAUREL WREATH (T).
- Return to the barracks.
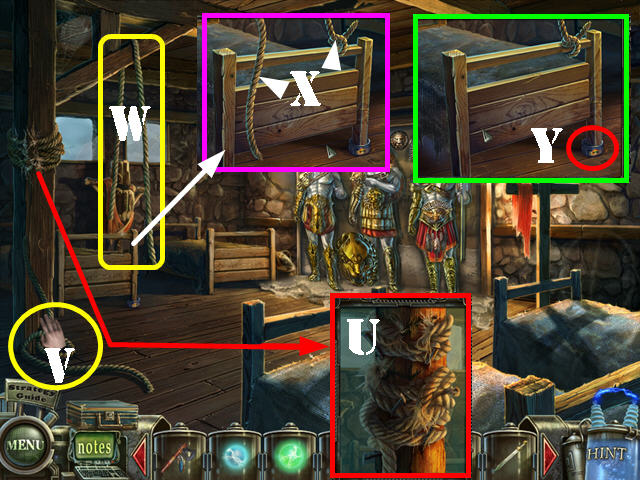
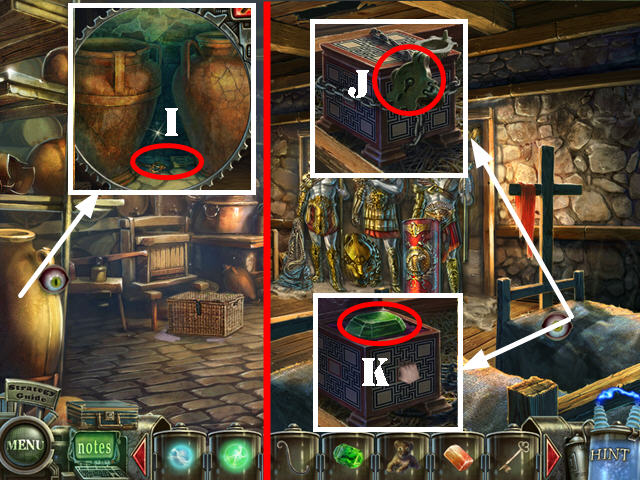
- Take a closer look at the beam; cut the rope (U) with the TOMAHAWK and take the ROPE (V).
- Throw the ROPE on the beam (W).
- Take a closer look at the left bed; touch the rope on the right and hang the BUST OF CAESAR on the left rope (X).
- Grab the Jar (Y) and open the suitcase.
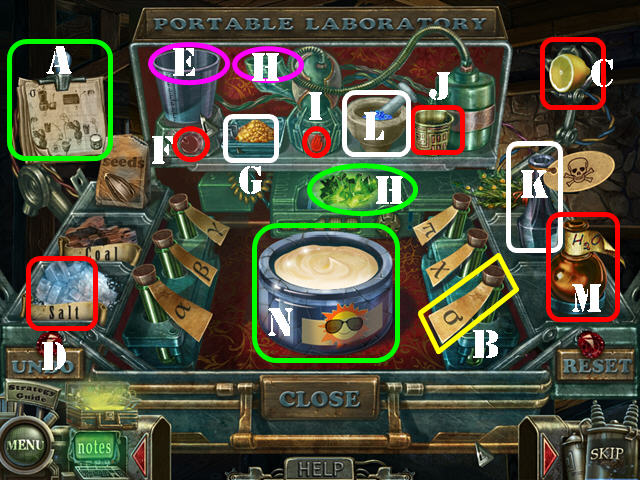
- Look at the recipe and refer to it as necessary (A).
- Drag the vial (B), the lemon (C), and the salt (D) to the blender (E) and touch the button (F).
- Drag the ingredients from the blender (G) to the crystallizer (H).
- Take the ingredients from the crystallizer and put them in the machine (H). Push the button (I).
- Put the cup (J) and the poison (K) into the mortar (L). Touch the pestle and put those ingredients into the machine (H) along with the water (M). Push the button (I).
- Drag the cup (J) to the jar and take the OINTMENT (N).
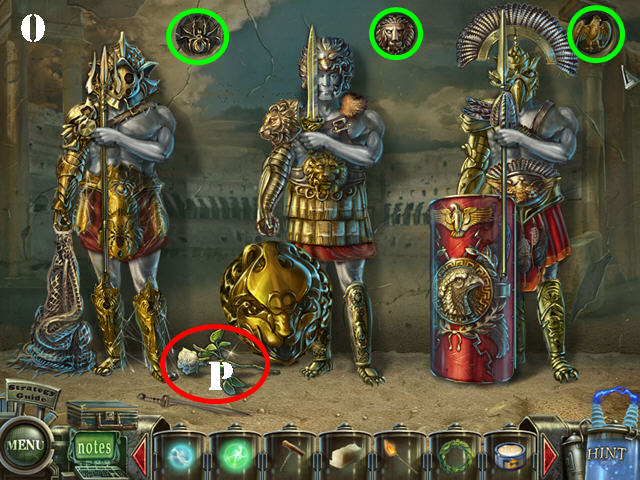
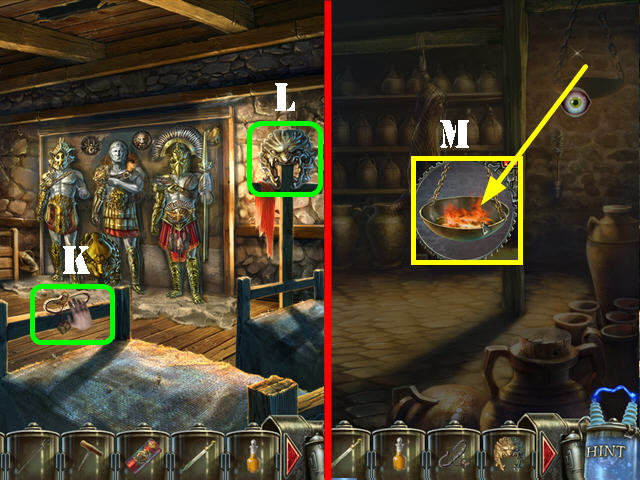
- Zoom into the warriors; give them the TRIDENT, the SWORD, the SHIELD, the HELMET, and the NET to activate a puzzle.
- Select two objects to swap their positions. Arrange the armor on the statues so the pieces match the animals above them – spider, lion, and eagle (green).
- Please look at the screenshot for the solution (O).
- Take the WHITE ROSE (P).
- Return to the wine cellar.
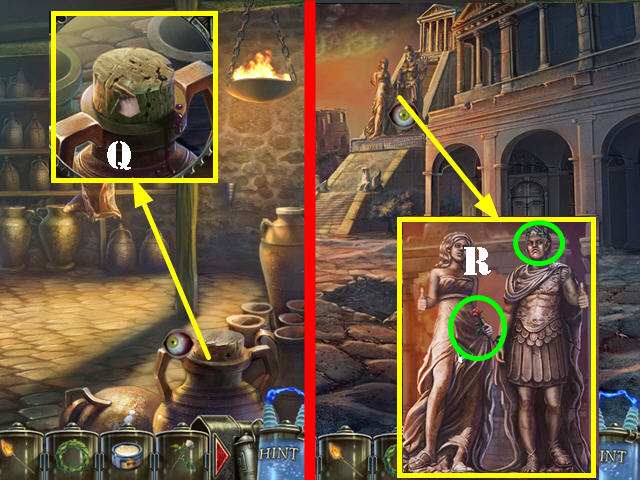
- Look at the corked amphora; remove the cork with the CORKSCREW (Q).
- Dip the WHITE ROSE into the wine to get the RED ROSE.
- Return to the courtyard.
- Zoom into the statues; put the LAUREL WREATH on Caesar’s head and give the RED ROSE to the female statue (R).
- Go up the steps.
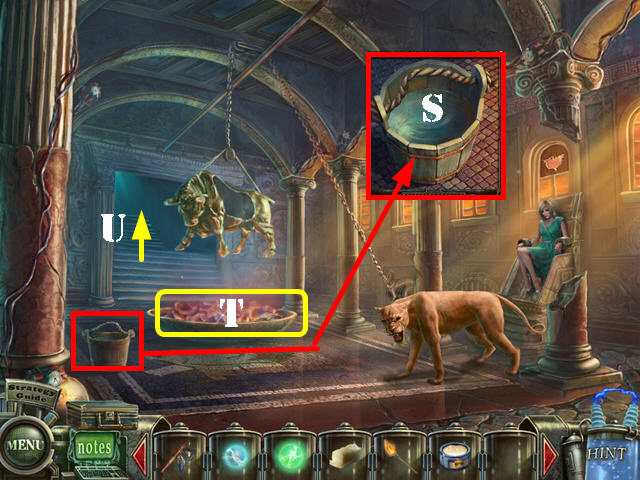
- Look at the BUCKET and then take it (S).
- Throw the BUCKET on the hot coals (T) and go up the steps (U).
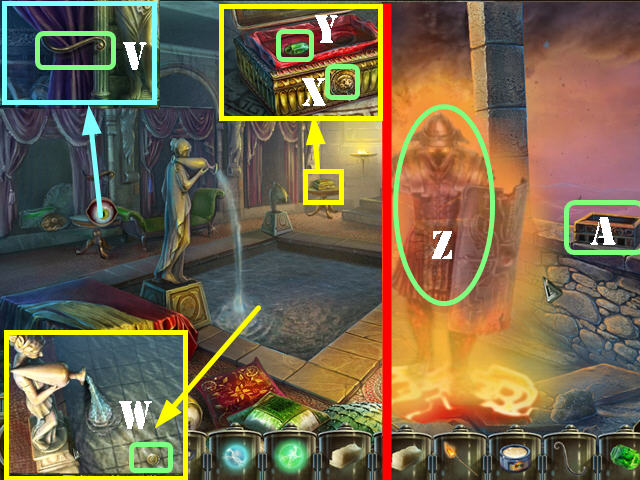
- Look at the curtain; knock the curtain holder with the TOMAHAWK and then take the CURTAIN HOLDER (V).
- Look at the pool; take the SIGNET RING (W).
- Take a closer look at the box; put the SIGNET RING on the lock (X) and take the EMERALD (Y).
- Go through the back door.
- Use the OINTMENT on the hallucination (Z).
- Take the SOAP DISH (A).
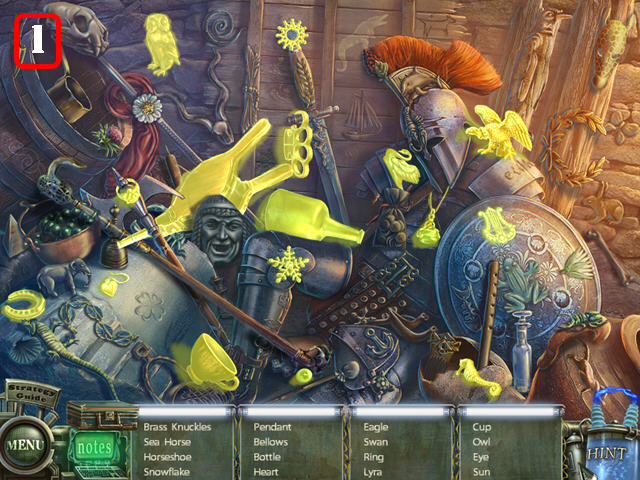
- Play the HOS.
- Find all the items on the list (1).
- You will receive the BELLOWS.
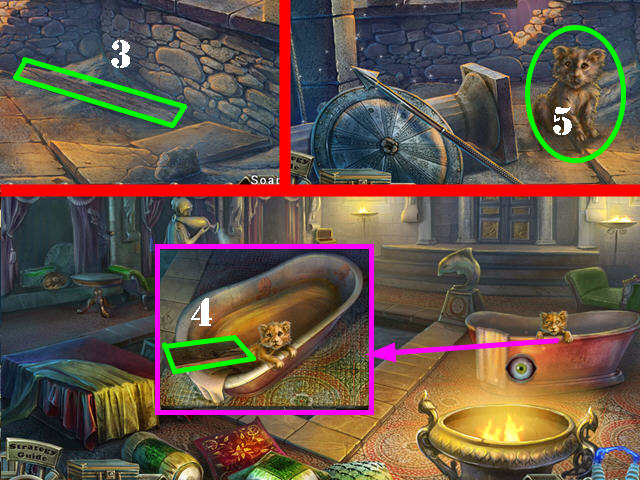
- Use the BELLOWS on the ashes and take the BOARD (3).
- Walk down.
- Zoom into the tub; put the BOARD in it (4).
- Go through the back door.
- Take the DIRTY LION CUB (5).
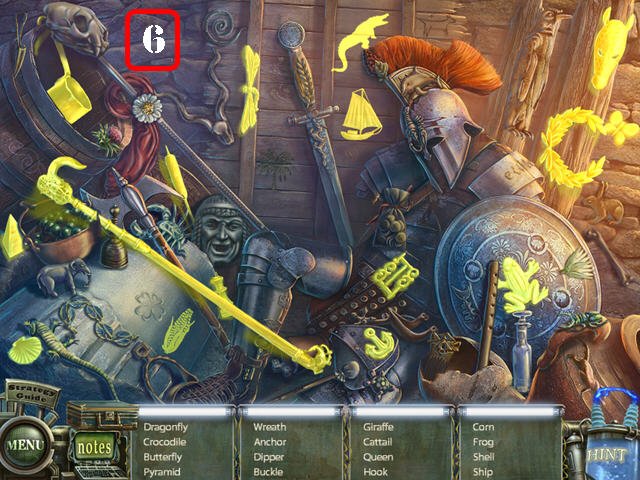
- Play the HOS.
- Find all the items on the list (6).
- You will receive the HOOK.
- Return to the restaurant.
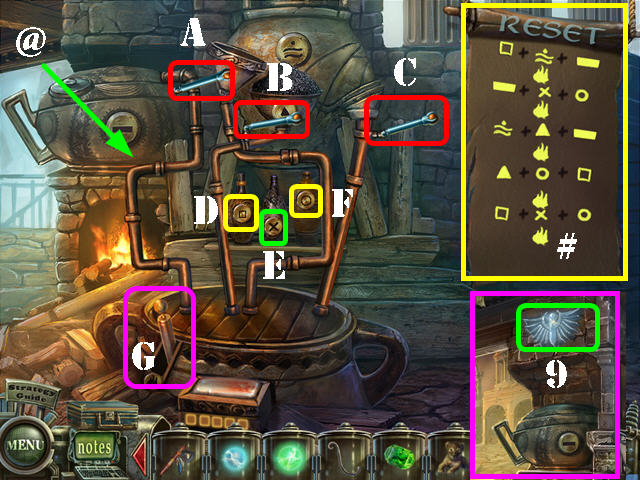
- Look at the stove; put the BURNING TORCH in it. Take the AQUILA above the stove (9).
- Look in the stove again; put the COOKING FAT and the SOAP DISH in it to activate a puzzle.
- Arrange the pipes in the correct order. A silhouette will appear in spots where a pipe can be placed. Please look at the screenshot for the solution (@).
- Once all the pipes are in place, you can begin to follow the recipe (#).
- Each lever on the device (A, B, and C) corresponds to one of the symbols in the top area. Select the bottles below (D, E, and F) to enter the symbols marked on them. Pull the lever (G) to add the fire.
- To solve the recipe follow these steps. D, C, A, G – A, E, F, G – C, B, A, G – B, F, D, G – and D, E, F, G.
- You will receive the SOAP.
- Go left.
- Zoom into the amphorae; put the HOOK in between them and then take the KEY (I).
- Return to the barracks.
- Examine the right bed; remove the sheet and press on the lock (J).
- Use the KEY in the lock; turn the key and take the EMERALD (K).
- Return to the pool area.
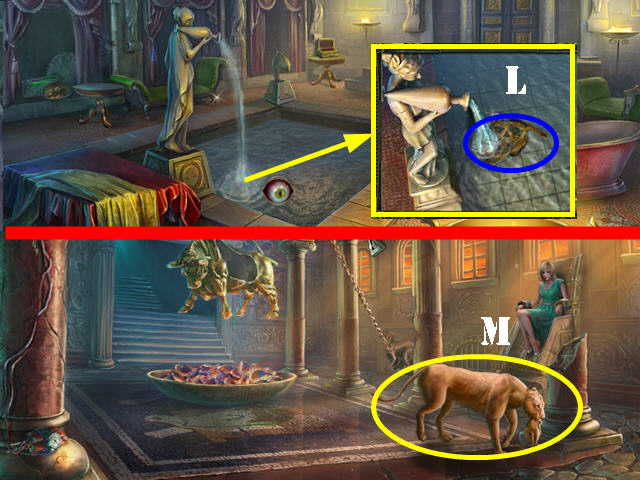
- Zoom into the pool; put the DIRTY LION CUB in it. Put the SOAP in the water to get the CLEAN LION CUB (L).
- Walk down.
- Give the CLEAN LION CUB to the lion (M).
- Talk to Caroline (N).
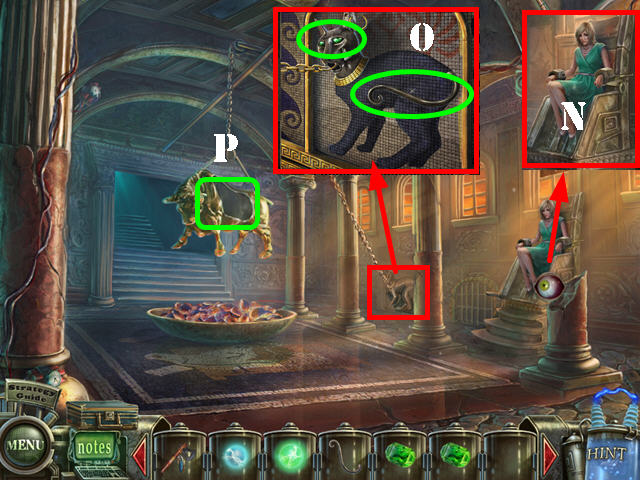
- Examine the cat on the wall; put the 2 EMERALDS in its eyes and the CURTAIN HOLDER on its tail (O).
- Touch the curtain holder to lower the bull.
- Zoom into the bull to activate a puzzle (P).
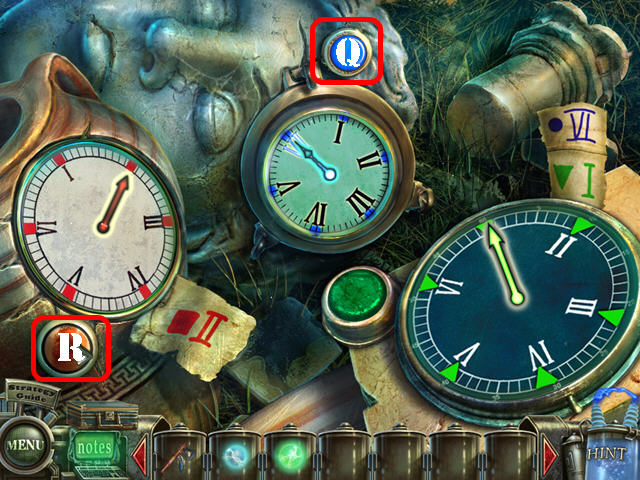
- Push the buttons on each clock so the clock hands land on the numbers indicated on the paper scraps.
- To solve the puzzle, press on the buttons in this order: Q x 1 and R x 2.
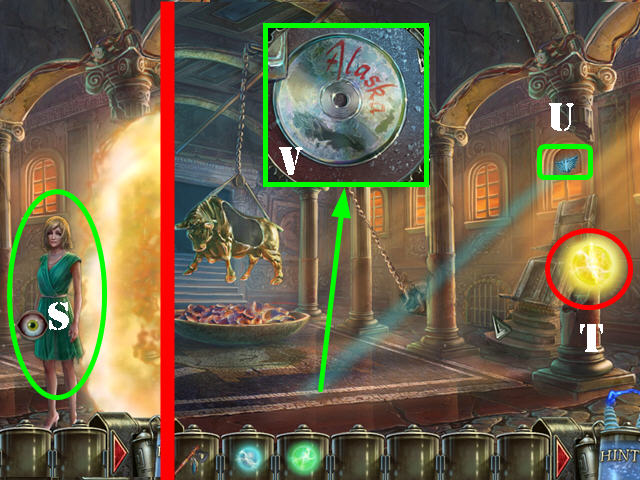
- Talk to Caroline (S).
- Take the YELLOW ENERGY ORB (T).
- Put the AQUILA in the niche above (U).
- Look on the ground; remove the stones and take the ALASKA DISK (V).
- Walk down twice.
- Zoom into the computer; put the ALASKA DISK on the tray (W).
- Go through the Alaska door (X).
Chapter 5: Alaska
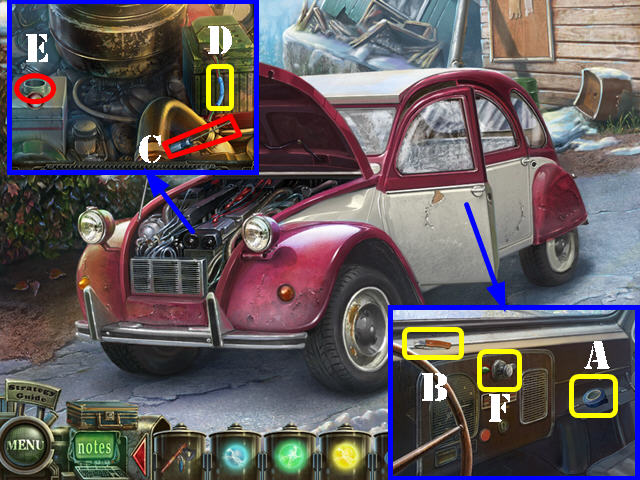
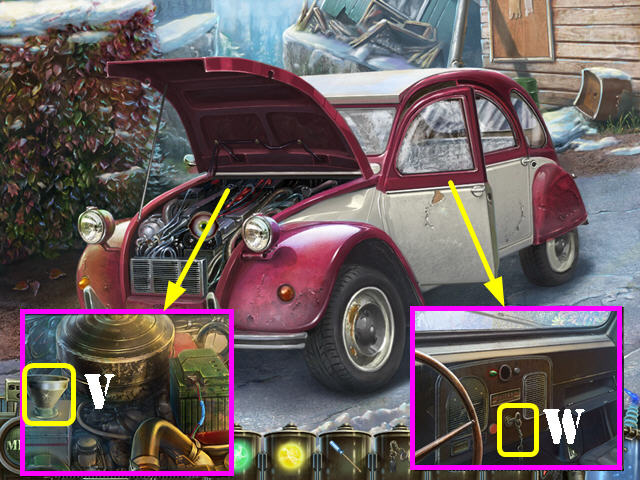
- Take a closer look at the car; open the door and look inside.
- Take the INSULATING TAPE (A) and the KNIFE (B).
- Open the hood and look inside; take the SCREWDRIVER (C).
- Put the INSULATION TAPE over the wires (D).
- Remove the cap; you will need a funnel (E).
- Go back into the car; take the LIGHTER (F).
- Walk down and go right.

- Talk to Jack (G).
- Cut the branches with the TOMAHAWK and take the CHOPPED BRANCHES (H).
- Take the FUNNEL (I).
- Look at the lawnmower and take the STRAW (J).
- Examine the fence; remove the 2 screws (K) with the SCREWDRIVER and take the LADDER (L).
- Walk down.
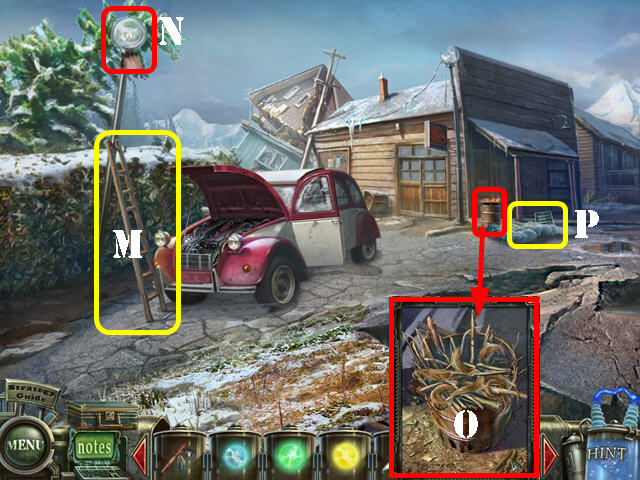
- Put the LADDER on the side of the lamppost (M); take the LIGHT COVER (N).
- Look in the barrel; put the CHOPPED BRANCHES and the STRAW in it (O). Throw the LIGHTER in the barrel.
- Take the SNOW SHOVEL (P).
- Go right.
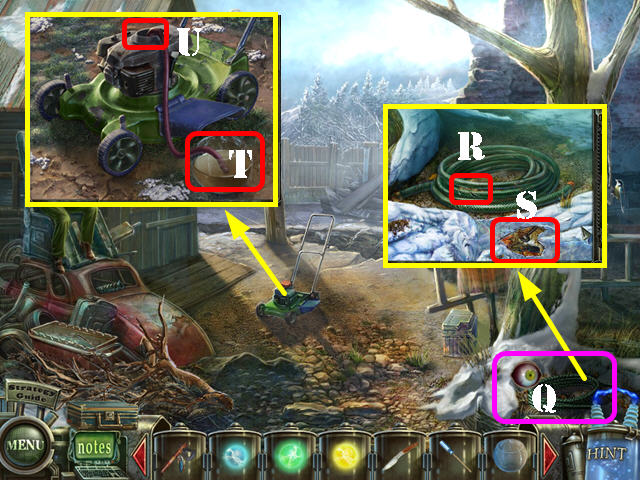
- Remove the snow with the SNOW SHOVEL (Q). Look at the hose.
- Cut the HOSE with the KNIFE (R).
- Break the ice with the TOMAHAWK 2 times and take the CAR KEY (S).
- Look at the lawnmower; put down the LIGHT COVER (T).
- Remove the gas cap and insert the HOSE into the gas tank (U).
- Take the GASOLINE.
- Return to the car.
- Zoom into the engine; put the FUNNEL and pour the GASOLINE into the funnel (V).
- Look inside the car; insert the CAR KEY into the ignition and turn the key to activate a HOS. (W).
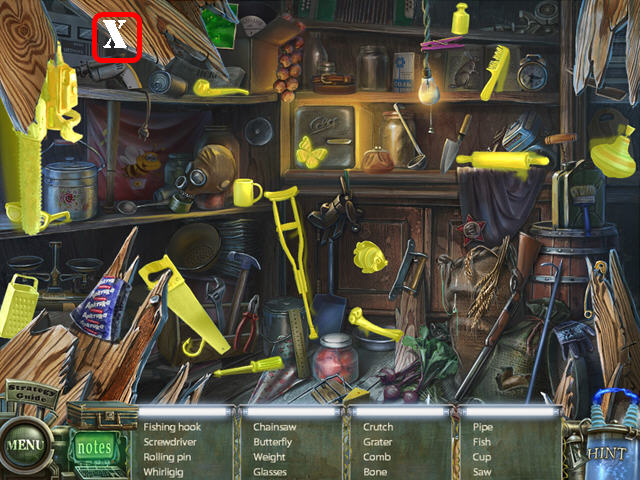
- Play the HOS.
- Find all the items listed (X).
- You will receive the CHAINSAW.
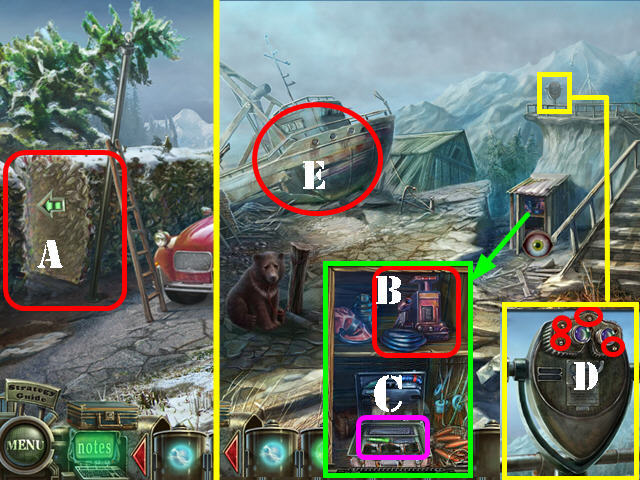
- Use the CHAINSAW on the bushes and then go left (A).
- Open the door and take a closer look at the closet. Take the JACK (B). Open the suitcase and take the REPAIR KIT (C).
- Examine the viewfinder; remove the 4 screws with the SCREWDRIVER (D). Remove the cover and take the SEGMENT.
- Go to the ship (E).
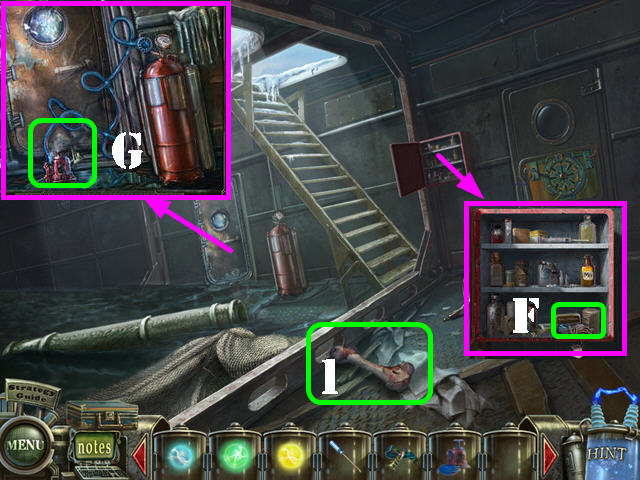
- Take the BONE (1).
- Open the first aid box and then look in it; take the TWINE (F).
- Look at the left door; use the JACK on it to activate a HOS (G).

- Play the HOS.
- Open the suitcase and take the clock (1).
- Find the rest of the listed items to receive the LENS.
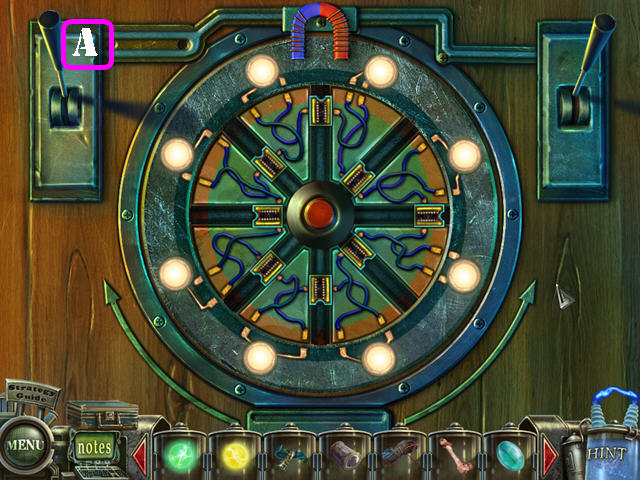
- Look at the right door to activate a puzzle.
- Click the red button to rotate the ring. Click the left lever to pick up a lead with the magnet, and click the right lever to lower a lead.
- Move the leads to the positions shown on the screenshot (A) until you light up all the perimeter lamps.
- Go through the door to reach the deckhouse.
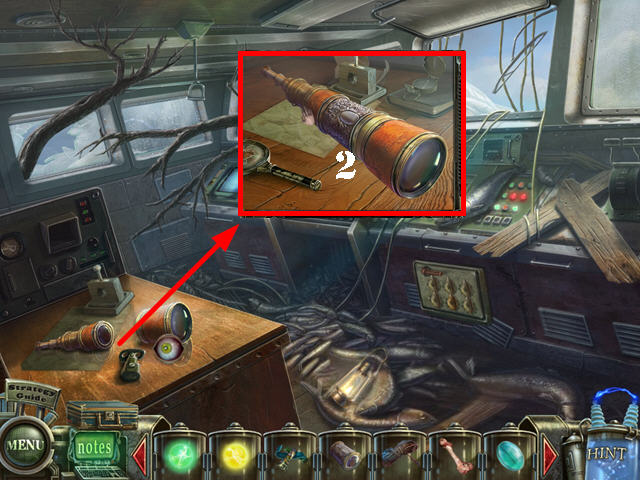
- Zoom into the table; put down the SEGMENT and LENS.
- Touch the 3 individual pieces and take the SPYGLASS (2).
- Walk down.

- Play the HOS.
- Find all the items listed (3).
- You will receive the AMMUNITION.
- Go up the steps.
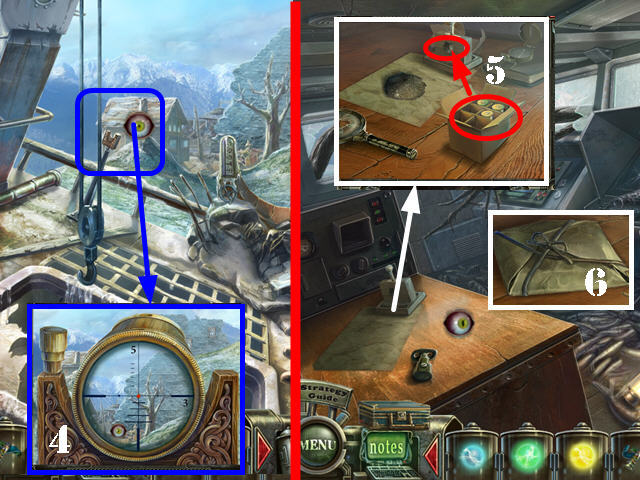
- Zoom into the stand; put the SPYGLASS on it to view the aiming parameter (4).
- Return to the deckhouse.
- Examine the table; put the AMMUNITION down. Put the 3 bullets in the contraption (5). Fold the packet twice ad tie it with the TWINE.
- Take the EXPLOSIVE PACKET (6).
- Walk down twice.
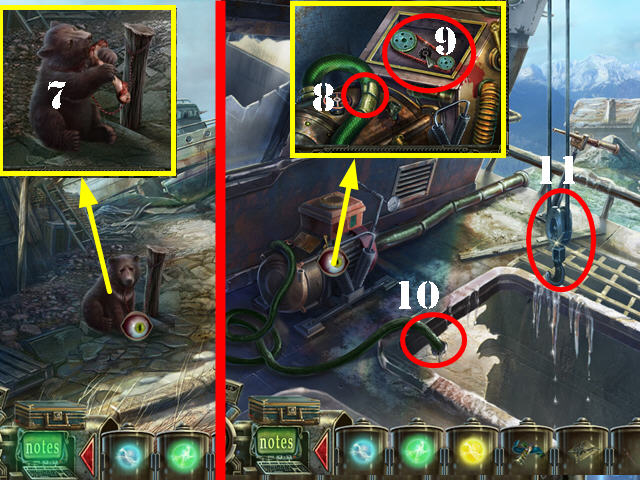
- Look at the bear; give him the BONE and take the LEASH (7).
- Go back up to the deck.
- Look at the pump; use the REPAIR KIT on the hose (8) and put the LEASH on the gears (9).
- Touch the hose (10) and lower the hook (11).
- Walk down.
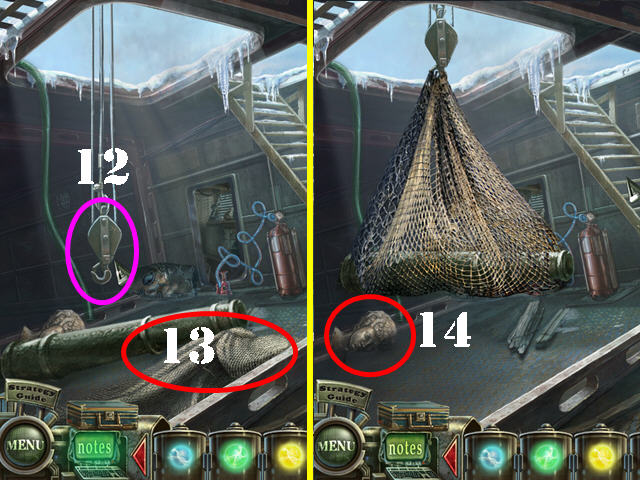
- Touch the hook (12).
- Touch the net (13) and then the hook; take the STATUE HEAD (14).
- Go back up to the deck.

- Pull on the hook and touch the net (15).
- Examine the cannon; open the lid (16) and insert the STATUE HEAD in the cannon, then insert the EXPLOSIVE PACKET.
- Close the lid.
- Move the valves so the left is on 3 and the right is on 5 (@).
- Shoot the cannon.
- Return to the car.
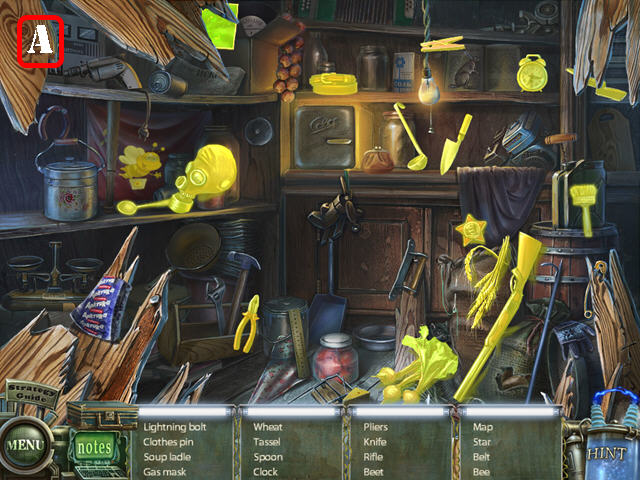
- Play the HOS.
- Find all the items listed (A).
- You will receive the MAP.
- Return to the deckhouse.
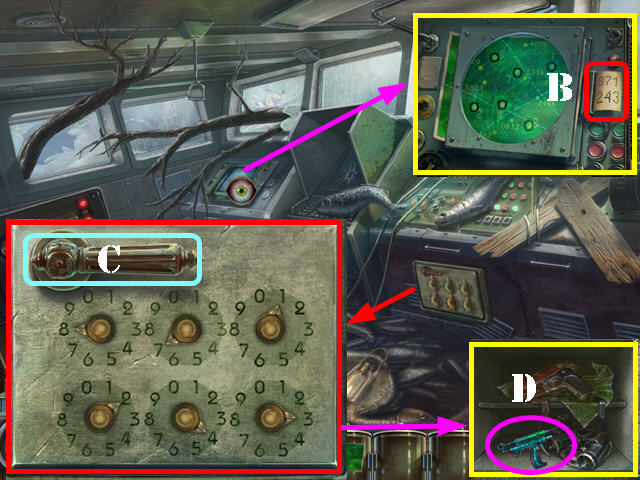
- Zoom into the device; put the MAP on it to get the code 871-243 (B).
- Examine the safe; set the top dials to 871 and the bottom dials to 243. Pull on the handle (C).
- Take the SYRINGE(D) and open the suitcase.
- Check out the recipe (E).
- Put the water (P) and the seeds (R) into the mortar (K) and touch the pestle.
- Put the ingredients from the mortar into the blender (F), along with the poison (O). Push the red button (G).
- Take the ingredients from the blender (H) and put them into the machine (I), along with the lemon (N), and the vial (Q). Push the red button (J).
- Pour the cup (L) and the salt (S) into the mortar (K). Touch the pestle and put those ingredients into the crystallizer (M).
- Put the ingredients from the crystallizer into the blender (F), along with the poison (O). Push the button (G).
- Put the ingredients from the blender (H), along with some water (P) into the machine (I). Push the button (J).
- Put the ingredients from the cup (L) into the gun. Take the ANTI-FREEZE TONIC (T).
- Return to the courtyard and go forward.
- Use the ANTI-FREEZE TONIC on the hallucination (A).
- Open the cover and zoom into it to activate a puzzle (B).
- Push the buttons on each clock so the clock hands land on the numbers indicated on the paper scraps.
To solve the puzzle, press on the buttons in this order: C x 5, D, E, and F.
- Walk down.
- Talk to Jack (G).
- Take the PINK ENERGY ORB (H).
- Walk down 3 times.
- Examine the case; put the PINK, YELLOW, GREEN, and BLUE ENERGY ORBS into the case (I).
- Look at the bomb to activate a puzzle (J).

- Push the buttons on each clock so the clock hands land on the numbers indicated on the paper scraps.
- To solve the puzzle, press on the buttons in this order: K, L x 5, M x 3, and N x 5.
- Congratulations, you have completed Haunted Halls: Revenge of Dr. Blackmore!


 Dark Sisterhood: The Initiation Walkthrough, Guide, & Tips
 Dark Cases: The Blood Ruby Walkthrough, Guide, & Tips
 Flights of Fancy: Two Doves Walkthrough, Guide, & Tips
 Aaron Crane: Paintings Come Alive Walkthrough, Guide, & Tips
 Mystic Legacy: The Great Ring Walkthrough, Guide, & Tips