Ranch Rush 2 Collector's Edition Walkthrough, Guide, & Tips
Ranch Rush 2 Collector’s Edition Walkthrough
Welcome to the Ranch Rush 2 Collector’s Edition Walkthrough!
Sara is back in a new exotic adventure! Design and decorate your ranch and corral exotic animals in this Time Management game.
Whether you use this document as a reference when things get difficult or as a road map to get you from beginning to end, we’re pretty sure you’ll find what you’re looking for here.
This document contains a complete Ranch Rush 2 Collector’s Edition game walkthrough featuring annotated screenshots from actual gameplay!
We hope you find this information useful as you play your way through the game. Use the walkthrough menu below to quickly jump to whatever stage of the game you need help with.
Remember to visit the Big Fish Games Forums if you find you need more help. Have fun!
This walkthrough was created by Robin.
General Tips: Modes and Profiles
- At the start of the game, you will choose between 3 modes: Casual, Expert, and Freeplay. Freeplay is only available in the Collector’s Edition.
- The first time you play under a new profile, you will automatically start in Casual mode. Eventually you will unlock the Expert mode. Players who own the Collector’s Edition will also unlock Freeplay mode.
- You can only have one Ranch of each mode type per profile. If you have been playing in Freeplay mode and want to go back to your Casual Ranch, go to the Main Menu, choose Continue, and then the mode you want to use. If you want to have two Ranches of the same mode type, you will have to play them under two different profile names.
- However, each new profile starts over again with Expert and Freeplay locked.
- The Trophy Room is unique to each profile. This means that if you want to win all the trophies you must eventually play all the modes under the same profile. However, trophies do stay with your profile even if you start a new Ranch, as long as you keep playing under the same name.
- The cut scenes are just for story purposes—you can skip any of them without missing anything you need for game play.
- The cut scenes are mostly the same in all modes, although there are a few “déjà vu” jokes in Expert mode to acknowledge that you’ve probably already watched the story once.
- We do not recommend going directly from the Freeplay mode to the Expert mode if you are trying to get the Trophy where you don’t fail any levels, because the Freeplay mode will tend to throw off your rhythm for the timed modes. Instead, play a couple of levels of the Casual mode first, then start a new Ranch in Expert mode.
- Use the MENU button to return to the Main Menu. This is in the lower left on some screens and in the lower right on the Ranch screen.
- The game autosaves automatically. If you leave a level before the round is finished, you’ll return to that exact same set-up when you return.

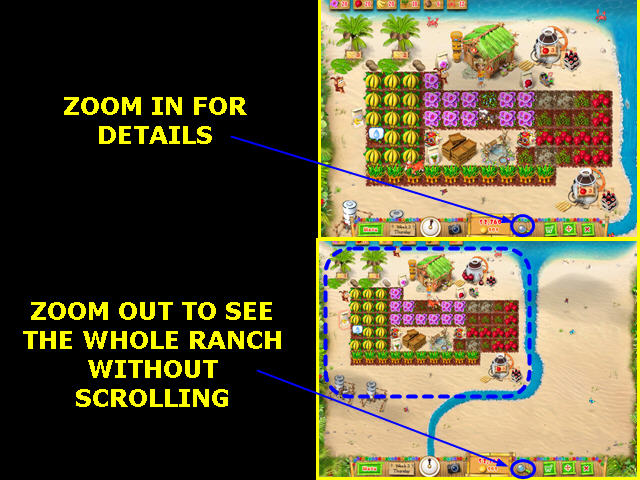
- You can play the game in zoom in view and scroll to different parts of the Ranch, or you can play in zoom out view so you can see the entire Ranch at once. To change the zoom, click on the magnifying glass or use the scroll button if your mouse has one.
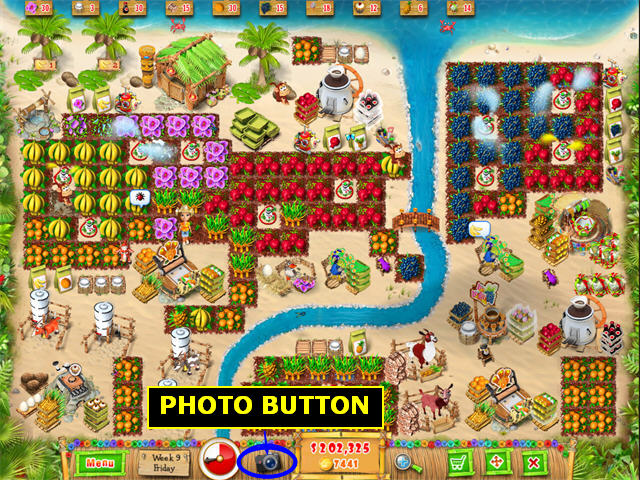
- Love your Ranch? Take a picture anytime! Clicking on the Photo Button on either the Ranch screen or in the Trophy room will save a .jpg “picture” of it for you to look at later or share with friends. The game will also automatically take a picture of your Ranch in your final set-up when you complete a mode.
- Gameplay Changes from Ranch Rush 1: in addition to new animals and products, there are several significant changes from Ranch Rush 1.
- The change most players will notice immediately is that the Ranch is not perfectly rectangular. There are curves and bumps along the edges. To place items, move your cursor until the item is outlined in green. If it’s outlined in red, there’s an obstruction there.
- Second, you now have a zoom in/zoom out feature. This lets you see the entire Ranch without scrolling.
- Third, you can purchase Décor items to decorate the Ranch. These are available in the Shop, but are purchased with Coins instead of dollars. You’ll earn Coins in the Fishing mini-game.
- Fourth, the “audible cues” from the first game are mostly gone. You will have to watch your animals for “thought bubbles” that tell you when they need something from you.
- Finally, players who bought the Collector’s Edition have 9 bonus levels in an untimed play mode in the Freeplay version. This is especially nice if you like to use the Décor items, since the untimed mode means you don’t need duplicate machines and you’ll have more space on the Ranch.
Overview of the Game in Casual and Expert Modes
- This is a Resource Management game. You will buy things for your Ranch and then use them to meet the goals of each day. You have the same Ranch throughout the game, so anything you buy will be there the next day.
- You will have many choices about what to buy and where to place things.
- There are 9 weeks in the game, and 7 days in each week. Monday through Friday you will fill orders from customers.
- Every Saturday, you will go to Market, where you will have a minute or two to sell as much as you can of any products you have available.
- Every Sunday is a mini-game where you will catch Fish and earn Coins.
- Each weekday (Monday – Friday) has a timer. You must complete all the orders for that day before the timer runs out. As the weeks go on the orders get more complex and the time allotted gets longer.
- Expert Mode has the same play as Casual mode. The difference is that the orders are larger and more complex, and the time is shorter.
- You can chain dozens of actions by simply clicking on each thing you want to do next. There will be a check mark on each thing that is already in the chain.
- If you change your mind about what you want to do next, just right-click to clear all check marks.
- You can get speed bonuses for doing the same thing several times in a row. These are easiest to get when you are harvesting large orders of plants.
- It’s up to you whether you want to do more than the required orders on a given day. Although you do get a $ bonus for finishing early, it’s often better to use the time to prep for the next day.
- Monday – Friday taking things to the Barn that are not on an order tablet will not get you any extra money, but you can get rid of things that way if you picked them up by mistake.
- What is more useful, though, is to use any extra time to build up reserve stocks of item at the machines and animal pens.
- For example it will be a lot easier to fill an order for 8 Ice Cream tomorrow if you use time today to get 3 trays of Ice Cream on the output tray and have some ingredients waiting on the input tray.
- The day will end when you fill all the required orders, so if you want to do some extra work to get ready for the next day, wait to fill the last order of the day until you’ve done everything else you want to do.
- For Expert mode in particular you will want to study both the day you are about to play and the day that’s coming up, as you are going to need to do some prep work if you want to complete all the days without the timer running out.
- When you don’t get all the orders done in the allotted time, you will have to play the day over, but you will start with the Ranch as it was at the exact moment that you ran out of time. This means you can use a round to store up items you’ll need, let the time run out, and then play again with all the stored items available. This is particularly helpful for rounds where you need a lot of Milk or Juice as these can take a long time to prepare. However, there is one trophy you can only get if you complete ALL levels without ever running out of time.
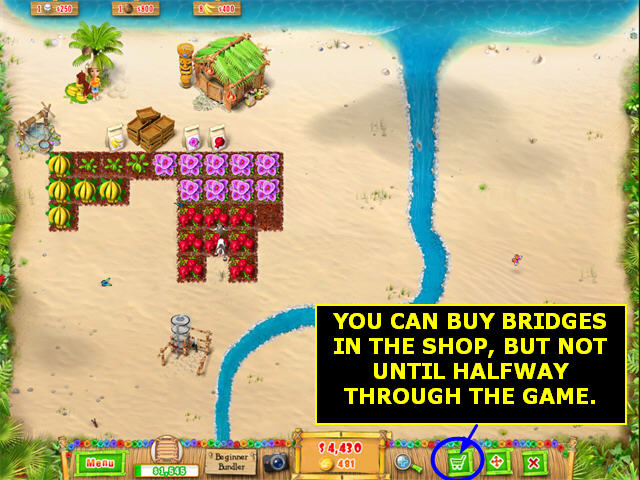
- Initially your Ranch is divided into sections, one on the west of the river and one on the right—but you can’t get over the river! Don’t worry about it. Later in the game you will be able to buy a Bridge to take you across. Until then, just work on the left side.
- Time does not pass when you are in shopping, moving, or selling mode.
Starting the Day in Casual and Expert Modes
- Different crops take different amounts of time to grow. This is critical in rounds where you will need to pick more than once from the same patch of dirt. You want to pick slow growing products first so they’ll have time to replenish before the day runs out.
- On the other hand, if you have more dirt patches with a particular plant than you need for the day’s order; you don’t have to really worry about the plant’s growth speed, since you can just pick what you need without waiting for more to grow.
- Orders that require machines like the Juice Machine or the Ice Cream Machine will always take longer than orders that just require plants, because you have to process the ingredients.
- You can greatly reduce the time it takes to fill an order by adding a 2nd or even 3rd machine of the same time. A good rule of thumb is that one machine can easily produce 6 to 9 items in a typical 3 or 4 minute round. If you have an order for 15 Juice, you’ll probably need two Juice machines. Of course if it’s a particularly long round, you can produce more from one machine.
- Similarly, one animal can easily produce 6 to 9 items in a typical 3 or 4 minute round. If you need 15 Peacock Feathers, you may want to have 2 Peacocks.
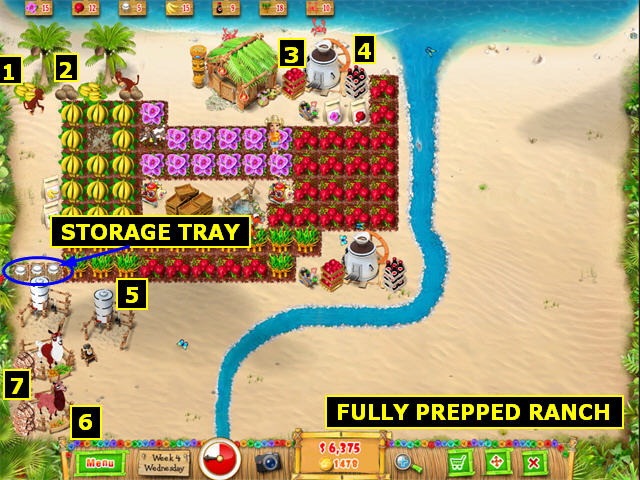
- Each producer (animal or machine) except Goats can store 3 outputs at its location, plus some additional inputs. So a Monkey/Coconut Tree can store 3 Bananas as inputs (1) plus 3 Coconuts as outputs (2). A Juice Machine can store 3 Pomegranates as inputs (3) plus 3 Juices (4). Llamas can store a full feed tray (6) plus 3 Wools (7).
- Goats are the exception. They feed themselves by walking to the Wildflowers, so they don’t store any inputs. And it takes 3 tank sections (5) before you can collect Milk, so they only store 1 output (Milk) per location. This means that Milk is often the most difficult item—it takes a long time to produce and you can’t build up stores ahead of time unless you’ve purchased the Storage Tray upgrade.
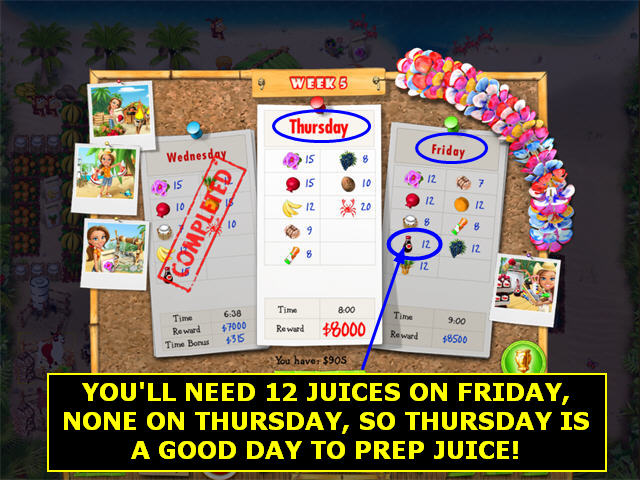
- Study the day’s orders before you start the day! If you see that you will need 15 Juice, you know you may want to buy a 2nd Juice machine if you don’t have one. If you’re going to need 20 Acai Berries and you only have 5 planted, you may want to start the day by planting additional ones rather than depending on them to regrow.
- We found that in general 12 patches of any plant were enough for the first 4 weeks in either Casual or Expert Mode. However, once we could get buy a Bridge and get across the river, we needed an additional 6 to 12 patches of Pomegranates because the Juice orders got so large.
- By week 5 we also needed a total of 15 patches of Bananas in order to keep up with the Coconut orders. (Monkeys eat Bananas and produce Coconuts.)
- At the start of each round you will want to first sell, then move things around, and then shop. This is the reverse order of the buttons on the screen, but it will make sure you can always plant new products right where you want them.
- You may also want to move or sell some items mid-round in the last few weeks when the orders get really complicated.
Placing Your Resources in Casual and Expert Modes
- The key to the game is to optimize the placement of your resources. For example, you will want to put the Pomegranate Juice machine as close as possible to the Pomegranates, so Sara can fill the machine efficiently. You’ll also want to put a Tool Kit close to the machine so it will be quick to repair.
- Similarly, you’ll want to plant some Sugar Cane close to the Llamas, so you can feed them quickly.
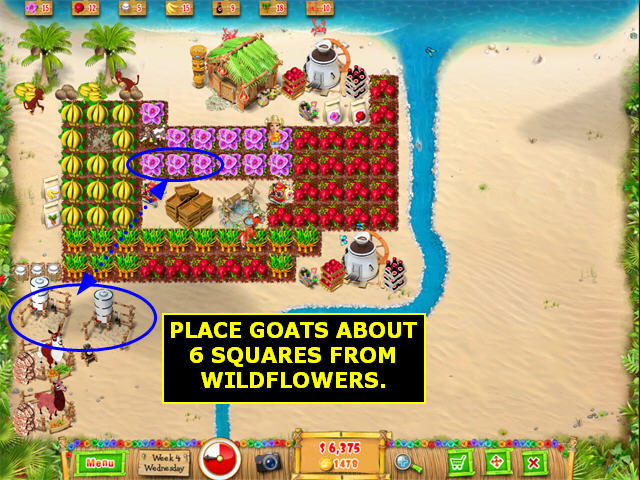
- The Goats are an exception. You’ll want to put the Goat pen 6 to 8 squares away from the Wildflowers. This is because Goats will try to keep you from taking their Milk (like the bees in the first Ranch Rush). You want the Goat to have to go at least 5 squares to get to the Wildflowers. That way you can get the Milk without the Goat interfering.
- However, if you put the Goats too far away from the Wildflowers, they won’t be able to get back quickly enough to make Milk as fast as you need it. A distance of 6 squares is optimal.
- Feel free to add more than one Well, Tool Kit, Pesticide, and even Barns and Bridges if you have enough money. Sometimes having a Well on both sides of the Ranch, or a Barn on both sides of the river, will be the difference between making the day’s goal and not.
- You will be able to buy two speed upgrades over the course of the game, the Speedy Gloves and the Speedy Shoes. Buy both as soon as they become available.
- Once you have the Speedy Shoes you will probably not need a 2nd Barn. This frees up space you will need for the machines that are required later in the game.
- Also once you have the speed upgrades you will be able to collect the Milk faster.
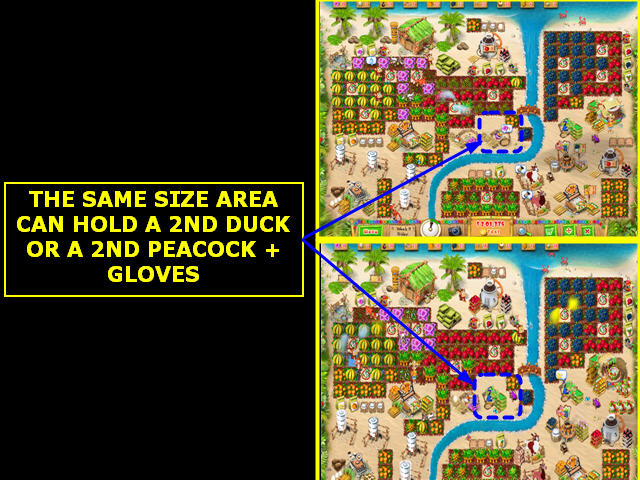
- Once you get to week 6 you should have plenty of cash on hand. Study the orders for the level carefully before starting. On some days you may want to have a 2nd Duck for Eggs while on other days you will want to have a 2nd Peacock for Feathers. 1 Duck takes up about the same amount of space as 1 Peacock + Gloves, so these are good ones to trade back and forth.
- If you have enough cash to buy machines back later, you may even want to sell something you only have one of if you won’t need it that day. For example, maybe you’d rather have an extra fruit roll-up machine on a day where you don’t need to make ice cream. It’s up to you how strategic you want to be.
- When you sell something, you get back half the price you paid for it.
- Because the time is so short in Expert mode you need to be much more careful about how you place items to minimize the distance that Sara has to walk. You will definitely want to have one Tool Kit per machine, for example.
- Because time doesn’t pass while you’re in Move or Shop mode, you will be able to change the configuration of your Ranch whenever you want to meet a particular day’s goals.
- Early in the game before Sprinklers are available, you need to use the Wells for water. In Casual Mode, you can just put one Well on each side of the river, pretty much wherever you want.
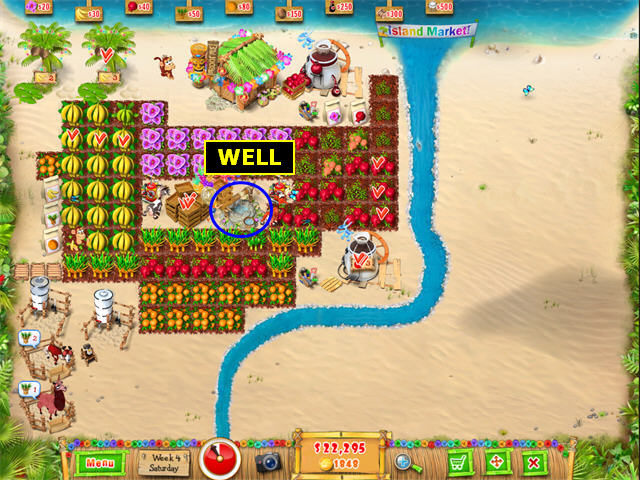
- For Expert Mode, you may want to put the Well in the center of the field, to minimize the time it takes to walk in any direction.
- Once Sprinklers are available, you can move the dirt patches to make room for them. One Sprinkler can cover an area 3 x 3 if the Sprinkler is in the center.
- Sprinklers are not that important in Casual mode until they get the AutoPest upgrade where they also kill pests. You can use some Sprinklers and continue to use the Well some all the way through the end of the game.
- Sprinklers are essential in Expert mode. You will want to use as many as you can afford as soon as they become available, especially if you are trying to get the trophy for completing the entire game without ever losing a day on time.
Décor Items
- You will buy Décor items with Coins, not dollars. You’ll earn Coins in the fishing game (and, for the Collector’s Edition, in the Freeplay mode).
- Décor items are just for fun, but they do take up space on your Ranch. It’s up to you whether you want to use them or not. They are not requires for any daily goals.
- There is one trophy that requires buying all décor items. Players who have the Collector’s Edition will find this easiest to do in Freeplay mode.
- Two of the Décor items, the Sea Turtle and the Fish, don’t take up any room on the Ranch—they just add these creatures to the ocean view.
Multistep Products: How Fast Can You Make Ice Cream?
- The key to the strategy for any day is to know how many steps each product takes.
- Anything that just grows and is picked takes just one step. That includes Wildflowers, Bananas, Pomegranates, Sugar Cane, Oranges, Acai Berries, and Pineapples. Although some of these take longer to grow than others, if you have 6 patches of Acai Berries ready to be picked, they’ll take the same amount of time to get to the warehouse as 6 patches of Wildflowers. Crabs are also a one-step product, because you just pick them up and take them to the warehouse.
- Pomegranate Juice and Fruit Roll-ups are three step products. You put the ingredients in the machine, the machine makes the product, then you pick up the product once it’s made.
- Coconuts are a four step product. You get bananas, give them to the monkey who takes time to eat it, then the monkey climbs the tree and throws down the coconut. Then you collect it.
- Llama Wool, Peacock Feathers, and Duck Eggs are five-step products. You pick the food, the animal has to eat it, the animal asks for more food and you pick that and it eats it, and then you have to collect the product. You feed the Peacock, the Peacock eats a couple of times, then you pluck the Feathers.
- Milk is a four-step product, because the Goat has to go to the Wildflower patch 3 times, and then you have to collect it. However, it can take as much time as if it was a five or even six step product because you have to time when you collect the Milk. You can’t collect the Milk until the Goat is at least 4 squares away from its pen.
- Ice Cream, Coconut Pies and Fruit Baskets are three step products once the ingredients are ready. You put the ingredients in the machine, the machine makes the product, you pick it up. However, the ingredients that go into these are multi-step products in themselves.
- Ice Cream needs Milk (4 steps) and Acai Berries (1 step), plus 3 steps to make the Ice Cream.
- Fruit Baskets need Fruit Roll-ups (3 steps), plus 3 steps to make the Fruit Basket.
- Coconut Pies need Milk (4 steps), Coconuts (4 steps) and Eggs (5 steps), plus 3 steps to make the Coconut Pie.
- If you have all the ingredients stockpiled at the start of the day, Ice Cream, Fruit Baskets, and Coconut Pies only take 3 steps. But if you have to start from scratch, these become 6 to 8 step items, which is why they can be so slow.
- Once you understand which products take the most steps to produce, you’ll know how to plan your strategy for each day. If you have to make a whole lot of a multistep item, you may want to add more resources, like a 3rd coconut tree or a 2nd Juice machine.
- You can also sell a machine you won’t need that day if you need the space for a different one.
Market Day Strategy in Casual or Expert Mode
- Every Saturday is Market Day. The strategy is simple—take anything you want to the Barn to sell it and try to earn as much money as possible.
- The exact amount of time you have varies, but is usually between one minute and two minutes.
- You will not have enough time to prepare most multistep items, so you need to have prepped as much as possible on Friday.
- Not surprisingly, the items that take the longest to make, like Fruit Baskets, bring the most money.
- Don’t waste any time with watering or Pesticide. Just pick up prepped items, sell them, then harvest whatever you can as quickly as possible.
- If Milk becomes available, collect it—it’s worth a lot.
- It’s up to you whether you want to use the Clippers on a Llama that is ready, but do so only after you’ve sold all the ready high value items.
The Fishing Game
- The Fishing Game occurs every Sunday in Casual or Expert mode, and at the end of each level in Freeplay mode.
- It is always played the same way, but the amount of time and the number of lures available changes over the course of the game.
- Your reward for this game is Coins that can be used to purchase Décor Items in the Shop. You don’t get dollars, so it doesn’t help with your Ranch goals.
- The Fishing Game also unlocks new Décor items.
- It helps to think of this like a magnetic fishing game. If you touch the fish anywhere with the lure, it will stick to it.
- You can capture more than one fish at a time simply by touching the 2nd fish after you’ve caught the first one.
- There is a trophy for catching 2 fish at one time, and another trophy for catching 4 fish at one time.
- If you are going for multiples on one line, start by catching the lowest fish first, then work your way up.
- Whenever you catch a fish, your line will automatically start to reel in. Click the mouse again if you want to move the line before bringing the fish back to the boat.
- Your lure is color-coded. Just like a magnet fishing game, some fish will be too heavy for your lure. If you try to catch one of those, the lure will come off the line.
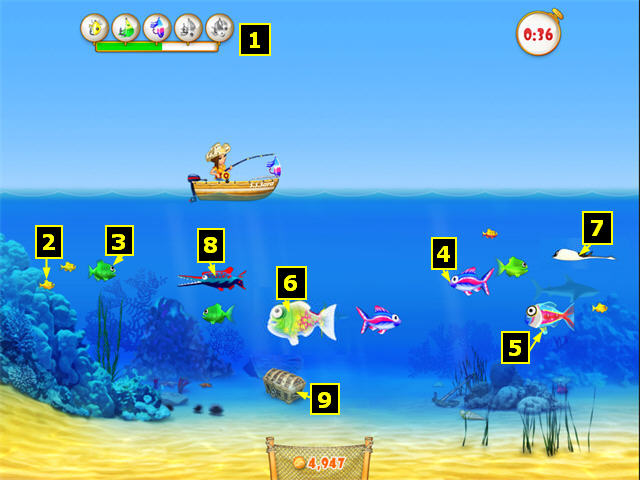
- Once you have caught 7 fish, you will get the next size lure plus a 10 second time bonus.
- The meter (1) in the upper left corner shows you how close you are to the next lure.
- You can catch fish near the surface faster than fish lower down, so if you’re close to the next lure, catch fish quickly to get there.
- The tiny yellow lure can lift only the tiny yellow fish (2). It doesn’t matter if the fish has a stripe or not.
- The second lure is green, and can catch green (3) or yellow (2) fish.
- The third lure is pink, but it’s a little confusing as it can only catch the smaller kinds of pink fish (4) (plus the green or yellow ones). You get used to this pretty quickly.
- The fourth lure can catch the larger pink fish (5), plus any smaller fish.
- The fifth lure can catch the glowing Bass (6). If you can catch 10 of these in one day of fishing you will get a trophy, but it’s not easy.
- There are two evil fish—the Sting Ray (7) and the Scissor Fish (8).
- If you hook the Sting Ray, you will get zapped with electricity and not be able to catch any fish for a few seconds.
- If the Scissor Fish touches your line anywhere it will cut through it. You will lose anything hooked to the line and have to wait a few seconds to get a new lure.
- From time to time a Treasure Chest (9) or Necklace will appear at the bottom of the sea. You can catch these just like a fish. They have bonus Coins in them.
- When you bring your catch to the surface, it will flip into the air and you have to position your boat so that it is underneath it when it falls. Usually this is easy. However, you should try to avoid fishing at the very edges of the screen, as the Fish may jump off the screen and you won’t catch it in the boat.
- Although there is a timer, you can’t “fail” fishing mode. You just get to fish until the timer runs out.
Plants (Except Coconuts)
- It is completely up to you how many of each plant you grow and where. The game will tell you if you are missing something altogether that you need for the day’s orders, like if you don’t have an Ice Cream Maker but you have an order for Ice Cream.
- A good rule of thumb is to aim for 12 patches of each plant type, with some extra Bananas and Pomegranates, but it’s up to you.
- Each seed packet holds 20 seeds. You plant 1 seed per dirt patch.
- Each plant will produce from 8 to 16 times before the ground goes bare. This is completely random. If you plant 2 Pomegranates planted side by side at the same time, one might last for 8 harvests and one last for 16.
- Once the ground goes bare, you can replant it by putting a new seed there. The seed can be the same type or different.
- When a seed packet gets down to its last 2 seeds, it will turn red. This is helpful information when you are doing very long advance chains, since the chain will be off if you are trying to plant with seeds that don’t exist.
- Plants may be moved at any time. Just use the move button.
- If you want to change the type of plant on a particular piece of dirt, use the Sell button to remove the plant. The dirt will remain and you can plant a different seed there.
- If you want to remove a piece of dirt altogether, first sell the plant (if any), then sell the dirt.
- Most players like to keep patches of one type together as it makes it a little easier to plan ahead, but it’s up to you.
- Initially Sara will have to make one trip to the seed packet each time you want a seed to plant. So if you are going to plant 12 Pomegranates, it will take 12 trips back and forth. So at the beginning you will definitely want to place each seed packet right next to where you want to plant.
- Remember you can move the seed packet later if needed.
- Once you have the 3 Seeds upgrade, you can click 3 times on a Seed Packet and get 3 seeds to carry. So now it will only take 4 trips back and forth to plant 12 Pomegranates. You will have to dig each plant individually, but you will save a lot of steps/time just picking up seeds.
- Although the Seed Upgrade shows a picture of 3 different types of Seed Bags, it only works when you are picking up 3 seeds of one type. So you can carry one, two, or three Wildflower Seeds, but you can NOT carry 1 Wildflower seed and 1 Pomegranate seed on the same trip.
- To harvest a plant, pick up a Crate, then pick up the plant.
- You will never run out of Crates in this game. The only reason to buy a 2nd stack of Crates is to place it in another location so Sara will have fewer steps to get to it.
- Wildflowers grow quickly. You need them to feed the Goats, the Ducks, and to fill some orders. They’re not much use on Saturdays. Make sure you plant them 5 to 8 squares away from the Goats.
- Bananas. You’ll need more Bananas than you think, because you have to trade them to Coco the Monkey for coconuts, but you’ll also get direct orders for them. They grow slower than Wildflowers but quicker than anything else. It’s a good idea to keep at least 12 or 15 patches of Bananas for all weeks. Try to plant them close to the Coconut Trees.
- Pomegranates. Pomegranates grow slowly, about the same rate as Sugar Cane. You will need them for both direct order and to make Pomegranate Juice. Make sure you place the Juicer closer to the Pomegranates. 9 to 12 Pomegranates should be enough in the beginning. It takes 3 Crates of Pomegranates to make one pack of Juice. Eventually you will need more Pomegranates to make more Juice.
- Sugar Cane. Sugar Cane is used to feed the Llamas and sometime the Peacocks. You will also need it for Fruit Roll-ups and Coconut Pies. To start with a patch of 3 per Llama should be enough, but eventually you will want to add another 6 to 12.
- Sugar Cane appears to die off faster than the other plants, so you will want to keep its seed packet close to where you need to plant it. Also be aware of this issue for very long action chains, particularly if you’re trying to fill a large Fruit Roll-up order.
- Oranges grow the slowest of all. However, you won’t get a lot of orders for them in the first four weeks. 5 patches should be enough.
- Once you start making Fruit Roll-ups, you will probably want 10 or more patches of Oranges.
- Acai Berries. Acai Berries grow slowly, about the same as Oranges. You will need them to make Ice Cream, and to fill some direct orders. Sometimes a Peacock wants one. You can start out with 12 but eventually you will want to have 15 or more so you can fill Ice Cream orders.
- Pineapple. Pineapple grows slowly. You will need it for direct orders and for the fruit baskets, but you’ll never need very much. 6 patches near the Fruit Basket machine and one patch near the Peacock should be enough for the whole game.
Animals and Animal Products (including Coconuts)
- It is completely up to you how many of each animal you have and where. The game will tell you if you are missing something altogether that you need for the day’s orders, like if you don’t have an Ice Cream Maker but you have an order for Ice Cream.
- Animal products are Crabs, Coconuts (from Monkeys), Goat’s Milk, Duck’s Eggs, Llama Wool, and Peacock Feathers.
- You do not need Crates to pick up animal products. If you have an empty Crate in your hand when you pick up an animal product, that’s fine—it will disappear when you deliver the product. But don’t stop to pick up Crates if all you need are animal products.
- Crabs. You will be able to catch the Crabs when they come up on the beach. Just click on them. It can be difficult to put Crabs into an action chain since they are always moving, so it’s usually best to end your chain somewhere near the beach (usually the Barn on the left side of the river), then immediately catch a few Crabs, then go back to chaining your other actions.
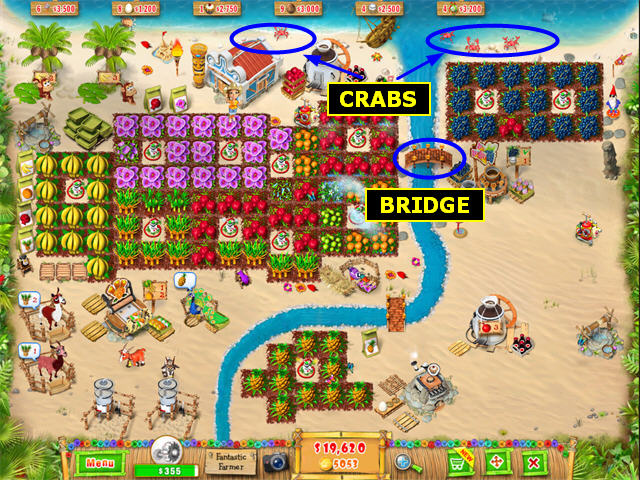
- Once you have a Bridge across the river you will find that a lot of the Crabs only appear on that side, so you’ll need to go over there to catch them.
- You don’t need Crates for the Crabs. Like everything else, you can carry up to 3 at a time until you get the upgrade that lets you carry 5 at a time.
- Try to catch half the Crabs you’ll need before the time for the day is half gone. That will help keep you from losing the level just because there weren’t enough Crabs on the beach.
- Monkeys and Coconuts. The sign on the Coconut tree will ask for 1, 2, or 3 Bananas. When you deliver them, the monkey will first eat the bananas, then climb the tree and drop a coconut on the ground that you can pick up later.
- You will start out with one Coconut tree. Eventually you will probably want 3, because you will need coconuts for direct order and for coconut pies.
- In Casual mode, you can use a strategy where you deliver only what the monkey asks for. This will allow you to get by with fewer Bananas, which is space you may need for a Well. That in turn allows you to forego getting as many Sprinklers.
- In Expert mode, we were only able to make some of the time goals if we simply gave each Monkey 3 Bananas every time. This allowed us to build long action chains without having to wonder what the Monkey would want next time.
- If a Monkey only asks for 2 Bananas and you give him 3, he will store the extra one on the ground next to the tree and use it next time.
- The Monkey can store up to 3 Bananas (inputs) and 3 Coconuts (outputs).
- Coconuts are very quick to pick up. If you’re using the strategy where you are prepping some items for the next day before completing today’s orders, the best thing to leave for last is one Coconut which is already sitting on the ground. You will be able to pick it up and get it to the Barn quicker than almost anything else.
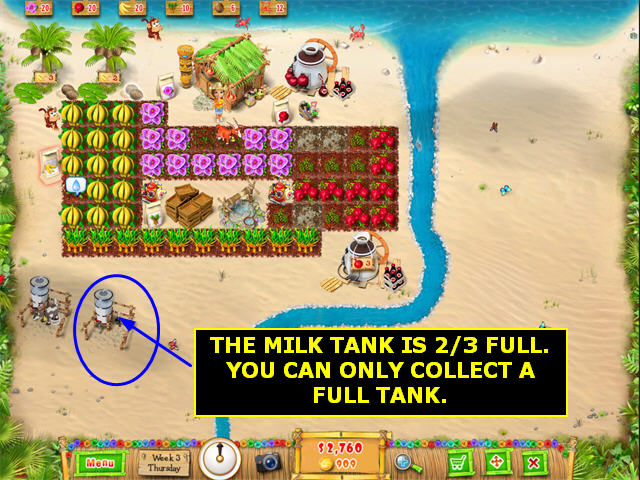
- Goat’s Milk. Each Goat Pen has a container for Milk. The container is divided into 3 sections. When the container is full, you can collect it—but only if the Goat isn’t there!
- Goats will walk by themselves to patches of Wildflowers to eat them. As long as the Goat is at least 6 patches away from the pen, you will have time to click on the Milk container, then immediately click anywhere else to get out of the pen.
- Once you have the Speedy Shoes upgrade you will only need the Goat to be 4 patches away from the pen.
- If the Goat is closer (going either direction), it will run towards the Goat pen. If it catches you, it will kick you and you will lose a few seconds.
- Goat’s Milk is worth a lot at market. It is also needed for ice cream and coconut pie.
- Because each pen only holds 1 Milk at a time, it’s a good idea to buy one or two storage trays to hold extra Milk when you have it available. This will be especially important if you are making Ice Cream the next day.
- If you see that Milk is available and the Goat is gone, it is often worth right-clicking to break your action chain and have Sara pick up the Milk immediately. Put it on the storage tray if you don’t need it right away. That way when the Goat returns it will start on the new tank.
- By week 7 we had 4 Goats in Casual mode. They do take up a lot of space on the Ranch, but having quick access to Milk makes it much easier to meet the goals in the last third of the game.
- Llama Wool. Llamas won’t give you any trouble, except that you have to feed them twice to get one Wool. Feed them 3 Crates of Sugar Cane, then use the Clippers to get one Wool. You will want to have a patch of 3 Sugar Cane planted fairly close to each Llama.
- Each Llama Pen will hold 3 Wool (outputs). Llamas seem to be willing to take an unlimited amount of Sugar Cane as inputs, so go ahead and load them up if you have extra time. This will make them produce faster later. This is the reason that you can probably play the whole game, even in Expert mode, with just 2 Llamas.
- A Llama will ask for 1, 2, or 3 Sugar Canes. Most of the time you might as Well give them 3, since they will eat it eventually. However, if you have 2 Llamas and one is asking for 1 Sugar Cane and the other is asking for 2 Sugar Canes, you’ll get two Wool more quickly by making one run to deliver 1 to the first Llama and 2 to the second.
- The Llama will usually have to eat 2 times before it produces one Wool, but if you’ve stocked the input basket with extra Sugar Cane, that will cut down the time needed.
- To collect the Wool, you must click on the Clippers, then click on the Llama. The Wool will go into the output tray. The Gloves will go back to their rack automatically.
- You can leave the Wool in the output tray or pick it up.
- You have to buy the Clippers in the shop. Place them near the Llama.
- You will only need 1 Clippers no matter how many Llamas you have as long as the Llamas are physically close together, as Sara can only use one Clippers at a time.
- Sara’s hands must be empty before she can pick up the Pesticide, Clippers, Plucking Gloves, or Tool Kit.
- You will use Llama Wools for direct orders. Once you start receiving orders for more than 6 Wool, you will probably want a 2nd Llama..
- Duck’s Eggs. Ducks eat Wildflowers and produce Eggs. Sometimes you will get direct orders, but mostly you need Eggs to make Coconut Pies.
- The Duck will only ask for 1 Wildflower at a time, but go ahead and give it 3. It will eat them eventually.
- If the Duck is sitting on the Eggs she won’t let you collect them. As long as you can see the Eggs they’re OK to pick up.
- Click once for each Egg you want to pick up.
- Peacock Feathers. Peacocks will eat any Plants, but they will ask for a specific one each time, and you never know what it will be next. They will only take one at a time.
- The Peacock will usually have to eat 3 times before it produces one Feather.
- To collect the Feather, you must click on the Plucking Gloves, then click on the Peacock. The Feather will go into the output tray. The Gloves will go back to their rack automatically.
- You can leave the Feather in the output tray or pick it up.
- You have to buy the Plucking Gloves in the shop. Place them near the Peacock.
- You will only need 1 pair of Plucking Gloves no matter how many Peacocks you have as long as the Peacocks are physically close together, as Sara can only use one at a time.
- However, if you have placed your Peacocks far apart, you will probably need a pair of Plucking Gloves near each one for Expert mode.
- Sara’s hands must be empty before she can pick up the Pesticide, Clippers, Plucking Gloves, or Tool Kit.
- You will use Peacock Feathers for direct orders and in the Fruit Basket. Once you start getting orders for 6 or more (any combination of direct orders and Fruit Baskets), you will probably want a 2nd Peacock.
- As we’ve mentioned before, quite often you will have a level where you need a lot of Duck Eggs or a level where you need a lot of Peacock Feathers, but rarely both. So it can be convenient to have one location where you swap out a 2nd Duck for a 2nd Peacock and back again as needed. You will lose some money every time you do this, but it can be a good use of space.
Machines
- Over the course of the game you will be able to buy the Juicer, Ice Cream Maker, Fruit Roll-up machine, and the Gift Basket machine.
- It is completely up to you how many of each machine you have and where. The game will tell you if you are missing something altogether that you need for the day’s orders, like if you don’t have an Ice Cream Maker but you have an order for Ice Cream.
- You do not need Crates to pick up machine products. If you have an empty Crate in your hand when you pick up a machine product, that’s fine—it will disappear when you deliver the product. But don’t stop to pick up Crates if all you need are machine products.
- Machine items require inputs of Plants, Animal Products, or other Machine products. If you have these inputs ready at the start of the day, the Machine will take 3 steps to product output (pick up the inputs, run the machine, pick up the outputs). If the inputs are not ready, then you have to add the time to get them to the time to run the machine, so it can take awhile.
- Most machines can easily produce 6 outputs in a 3 to 4 minute day.
- The Juicer may run a little faster than the other machines.
- If you have a big order of 12 or more outputs, you will probably want a 2nd machine of the same type.
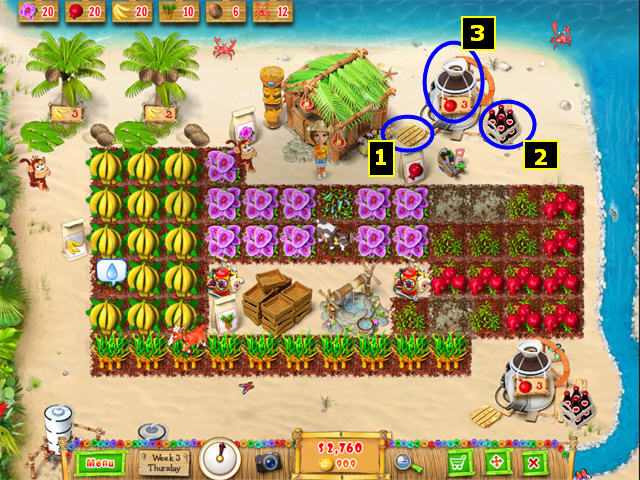
- All machines have an input tray where you put ingredients (1), an output tray (2) where you pick up products, and the machine itself (3).
- If a machine breaks down, click on the Tool Kit, then click on the Machine (3). Don’t click on the output tray (2) or you’ll pick up the output rather than fixing the machine.
- You can’t put output products back onto the machine. Once you pick them up you have to use them somewhere, put them on a Storage Tray, or deliver them to the Barn.
- In Expert Mode you will need to have a Tool Kit next to each machine to save time. You can buy as many of these as you need in the shop.
- A machine will stop producing once it has 3 outputs stacked up, but you can still put 3 inputs there.
- Machines start automatically whenever they have inputs and their output tray has room for another item.
- Keep an eye on machines for when they break down. You will probably want to right-click to break an action chain and fix the machine right away.
- Sara’s hands must be empty before she can pick up the Pesticide, Clippers, Plucking Gloves, or Tool Kit.
- Some machines use 2 or 3 ingredients. In that case they will have a separate input tray for each different kind of ingredient. There will be only 1 output tray per machine.
- All machine products sell for a lot on Market Day, so on Fridays try to make a few extra so you’ll have some to sell.
- Juice. The Juice Machine uses 3 Crates of Pomegranates to make one pack of Juice. You will not need a Crate to pick up the Juice. The machine can store 3 Pomegranates as inputs and 3 Juice Packs as outputs. There will be some days when you get orders for 20 or more Juices, so you will need to have 2 or even 3 machines.
- Once you get into week 5 you will start getting orders for massive amounts of Juice, 15 bottles or more. At that point you will want to have at least 18 Pomegranates and 2 Juice machines. You can put one machine on each side of the river with its own Pomegranate patches if you prefer.
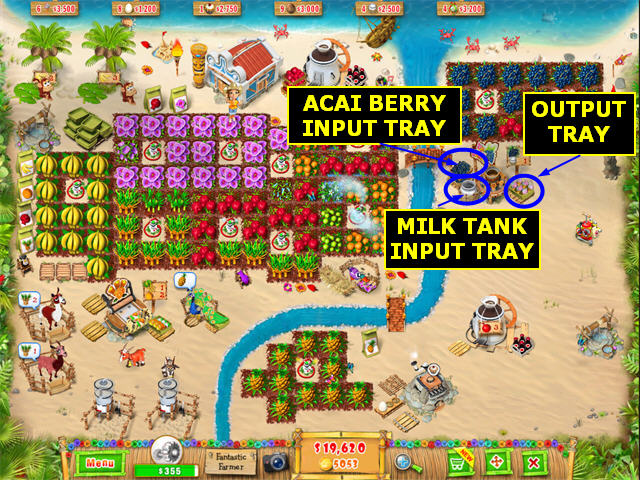
- Ice Cream. This uses 2 Acai Berries and 1 Milk to make one tray of Ice Cream. Ice Cream can take a long time because Milk is slow and hard to get.
- Any time you have Ice Cream orders to fill, keep an eye on the Goats. When Milk is available and the Goat is away you will probably want to break an action chain to pick it up. If the Ice Cream Maker input is full, put the Milk on a storage tray.
- The Milk goes into a jug on the side of the machine. If the circle in the jug looks dark, there is room for more Milk. If it looks white, the jug is full.
- If the output tray is full, you can stack up 3 Acai Berries and 3 Milks in the input tray. This means that for the next couple of deliveries the machine will need Acai Berries only.
- It’s usually best to place the Ice Cream Maker near the Acai Berries, but that’s up to you.
- Fruit Roll-ups. Very popular—you will often need 12 or 15 of these in a day. They are made with 2 oranges and 1 Sugar Cane, so put the machine near the Oranges.
- About 2/3 of the way through the game you will also need them for the Fruit Baskets. At that point you may want to add a second Fruit Roll-up machine.
- Each Fruit Roll-up requires 1 Sugar Cane and 2 Oranges.
- If the output tray is full, you can stack up 3 Oranges and 3 Sugar Canes in the input tray. This means that for the next couple of deliveries the machine will need Oranges only.
- Coconut Pies. Egg + Coconut + Sugar Cane = 1 Coconut Pie. These are the slowest product to make because 2 of their ingredients are multi-step products. The machine will hold 3 pies plus the ingredients for 3 more (3 Eggs + 3 coconuts + 3 Sugar Canes).
- Gift Baskets. Pineapple + Peacock Feather + Fruit Rollup = Gift Basket. As long as you have enough Fruit Rollups, these aren’t too hard to make.
- It’s a good idea to put a Storage Tray near the Gift Basket Machine and save extra Gift Baskets there on Fridays, as they bring a lot of money at the Market on Saturday.
Gear and Upgrades
- Check both the Gear and Upgrade tabs in the shop whenever something new is available, as the game is a bit arbitrary about the definitions for these. For example, Pesticide is under Gear, but Sprinklers are under Upgrades.
- Some items, like Storage Trays, are limited, so you can only have 3 or 4 in a game. Many items, like Tool Kits, are unlimited—you can buy as many as you like. The shop will tell you if an item is about to run out. You will usually be able to buy more in Expert mode than you could in Casual mode.
- Buy the Speedy Gloves and the Speedy Shoes upgrades as soon as they are available. You only have to buy them once per game.
- 5 Crates and 3 Seeds are upgrades that let Sara carry more things at one time. This is the equivalent of making her faster, so buy them as soon as you can afford them. You only have to buy them once and then Sara has that ability for the rest of the game.
- Sprinklers. If you don’t have time to water and you don’t have money for Sprinklers, you can let a plant die and then plant a new seed later. Sometimes this is the only strategy that works in Expert mode.
- If 3 or 4 plants in a close area all need water, you may want to put a Sprinkler there right away, rather than making 4 trips to the Well.
- Pesticide. If you see pests and you don’t have the AutoPest Sprinklers yet, use the Pesticide right away, even if you have to break an action chain to do so. Pests multiply, so if you don’t get the first one, you’ll soon find many surrounding plants infested also.
- Sprinklers aren’t that important in Casual mode, but they are essential for Expert mode as they save you a lot of time.
- AutoPest. The AutoPest Upgrade are Sprinklers that also take care of bugs. Once they are available, you will want as many as you can afford.
- Bridge. Bridges can be placed going either East-West or North-South, you just have to find a place where it turns green when you go to place it.
- You will probably want a Bridge going East-West so you can get to the Beach in the upper right to catch Crabs.
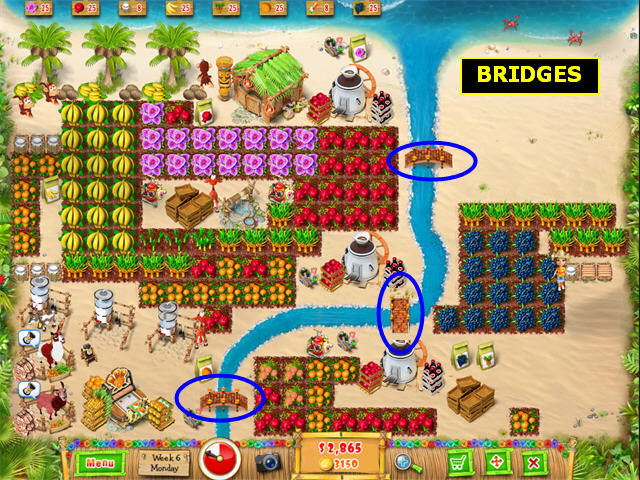
- For Expert mode you will almost certainly need two Bridges so you can also get to the area in the lower right corner quickly.
- Machines. The “Machines Upgrade” gives you Speedy Machines. It’s expensive ($75,000), but worth it, as it makes all your machines run faster. You only have to buy it once per game.
- Crates. One purchase of Crates will give you an unlimited supply for the game, but all in one location. If you want to shorten the trips that Sara takes, you may want to buy another stack of Crates. On the other hand, if you’re just worried about trips from the lower right corner, a 2nd Bridge may be more valuable than a 2nd set of Crates, as it may also shorten trips to the Barn and to get/deliver ingredients.
- Well. Sprinklers are more useful than Wells, but cost a lot more. It may be worth getting a 2nd or even 3rd Well early in the game, then selling them for space once you have Sprinklers installed.
- Barn. In the first Ranch Rush, many players used two or even 3 Barns so they didn’t have to scroll. Since you don’t have to scroll in this game, you may find 1 Barn sufficient.
- Storage Tray. You will definitely need one near the Goats to store Milk. We recommend 1 for Milk, 1 for miscellaneous items (including more Milk), and 1 for Fruit Baskets.
- In Expert mode you can buy 4 Storage Trays instead of 3. You will probably want one for Fruit Rollups.
Freeplay Mode (Collector’s Edition Bonus Levels)
- Players who purchased the Collector’s Edition will be able to unlock Freeplay Mode and play 9 additional Bonus Levels.
- The mode will unlock automatically as you play your first game in Casual Mode.
- Freeplay Mode is untimed. You still have orders, and you will earn money towards Rewards (shown in the lower left corner of the screen).
- The Rewards can be dollars to buy things on the Ranch, Coins to buy Décor items, or unlocking items in the shop.
- Once you have completed enough orders, you will get to play the same Fishing Game you played on Sundays in the other modes. This will end the level and you will get a new title.

- There are 9 titles you can earn.
- The Plants, Animals, and Machines are the same as in Casual and Expert mode. However, there is a new addition—Oysters with pearls. These will wash up on the beach from time to time like the Crabs do.
- If you click on an Oyster when it is open, you will collect the Pearl and get bonus Coins. If you click on it when it is closed, nothing will happen.
- Because play is untimed, you won’t need duplicates of the machines. This gives you lots of space to add Décor items to your Ranch. Don’t forget to take a picture!
- Freeplay mode is also good to play with friends or family members who aren’t comfortable with timed modes.
- If you want to stop playing Freeplay mode midway and play either Expert or Casual again, you’ll need to switch to a different Profile Name. The game only allows you to have one Ranch at a time, so if you change modes, you lose whatever Ranch you had been working on.
- Note that Freeplay is NOT an “endless” mode. Once you earn your 9th title, the game will be over. The game does give you notice as you reach the last 5 or 6 orders so you can stop and work on Décor items for awhile to get your Ranch ready for the last photograph.
Trophies
- Each profile name has its own Trophy Room.
- You keep your trophies no matter how many games you play as long as they’re all under the same profile name.
- Like your trophies? Take a picture! Use the camera icon in the lower left to get a .jpg picture of your trophy room.
- Ace Achiever. Collect all Achievements. Achievements happen automatically as you play through the game, like picking 500 Pomegranates. You will have to play more than one game to earn all of them.
- Some Achievements are for bad things that happen to you, like getting kicked by a Goat 5 times.
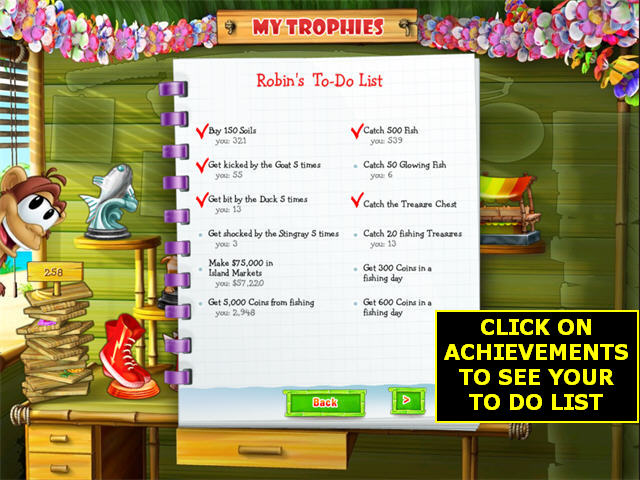
- You can check your current “To Do List” showing all Achievements by clicking on the Achievements button at the bottom of the Trophy Room screen.
- Casual Crusher. Complete an entire game (9 weeks) of Casual mode without ever running out of time.
- Coin Collector. Collect 25,000 of the Coins used to buy Décor items (not the regular money). This is easiest in Freeplay mode, but can be done using just Casual and Expert modes as Well. If you’re going for this trophy, make sure you pick up the Treasure Chests and the Necklaces on Fishing day. Freeplay players should also look for Oysters by the Crabs on the beach.
- Compulsive Cultivator. Turn in 15,000 items. This will take several games to complete.
- Dazzling Decorator. Buy every Décor item in one game.
- Duck Dodger. Collect 25 Eggs in a row without being bitten by a Duck.
- Expert Eliminator. Complete an entire game (9 weeks) of Expert mode without ever running out of time. The only way to do this is to plan ahead and prep some of the next day’s items in advance. You will also need to buy and sell extra machines for some levels.
- Fantastic Rancher. Complete both Casual and Expert modes.
- Market Maniac. Make at least $20,000 on Market Day. You will have to have prepped a lot of machine items to get this one.
- Mass Milker. Collect 25 Milks in a row without being kicked by a Goat.
- Swift Sower. Get 15 speed chains in a row. This will be easiest when you are collecting large harvest orders, like 20 Oranges + 10 Sugar Cane + 15 Bananas.
- Supersonic Sara. Get 25 speed chains in a row. Works the same way as Swift Sower.
- Time Bandit. Complete 25 levels in a row starting with level 2 or higher without failing a level. Can be earned in Casual or Expert mode.
- The following trophies are earned in the Fishing Game.
- Bass Bundler. Collect 10 Glowing Fish during one Fishing session. This is easier in later weeks when you have more time for fishing. Concentrate on getting to the top lure as quickly as possible, then work just on catching Bass. It’s faster to catch 2 Bass on one line than to catch them separately.
- Ferocious Fisher. Catch 4 Fish on one line. Watch out for Scissor Fish!
- Rapid Reeler. Catch 2 Fish on one line.
- The following trophies can only be earned in the Collector’s Edition.
- Ruler of the Ranch. Obtain all other Trophies and Achievements.
- Tablet Tallier. Complete Freeplay mode.
- Tablet Tycoon. You will get this automatically as you work through Freeplay mode. It is received for completing 200 order tablets.


 Letters from Nowhere Walkthrough, Guide, & Tips
 Life Quest 2: Metropoville Walkthrough, Guide, & Tips
 Abandoned: Chestnut Lodge Asylum Walkthrough, Guide, & Tips
 Amaranthine Voyage: The Tree of Life Walkthrough, Guide, & Tips
 Millennium Secrets: Roxanne's Necklace Walkthrough, Guide, & Tips