


Welcome to the White Haven Mysteries Walkthrough
After waking up in an abandoned building, you find that you’ve been drugged and must now find the antidote before it’s too late!
Whether you use this document as a reference when things get difficult or as a road map to get you from beginning to end, we’re pretty sure you’ll find what you’re looking for here.
This document contains a complete White Haven Mysteries game walkthrough featuring annotated screenshots from actual gameplay!
We hope you find this information useful as you play your way through the game. Use the walkthrough menu below to quickly jump to whatever stage of the game you need help with.
Remember to visit the Big Fish Games Forums if you find you need more help. Have fun!
This walkthrough was created by Prpldva, and is protected under US Copyright laws. Any unauthorized use, including re-publication in whole or in part, without permission, is strictly prohibited.

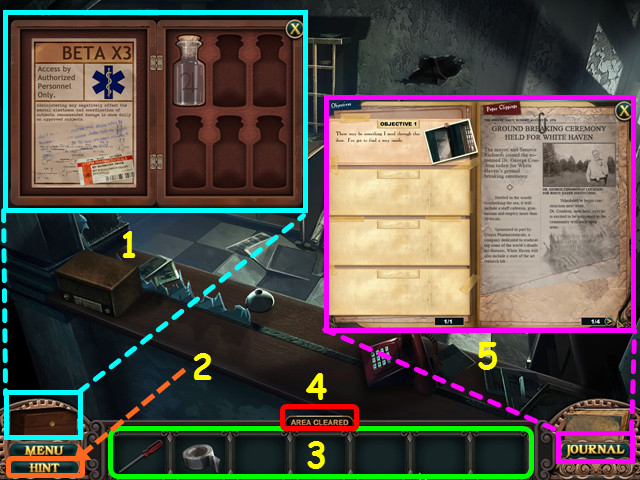
• Hidden Object Scenes and mini-games are often randomized – your solution may vary.
• Hidden Object Scenes will be referred to as HOS in this walkthrough.
• The Antidote Case will hold the vials you collect throughout the game (1).
• Hints are unlimited, but you must wait for the hint meter to refill (2).
• Your inventory is in the bottom panel – click on an item to select it for use (3).
• The inventory panel auto-hides, move your mouse down to reveal the panel.
• ‘Area Cleared’ will show at the top of the inventory panel if there is nothing more to do in a location (4).
• The journal will collect the newspaper clippings and track your objectives (5).

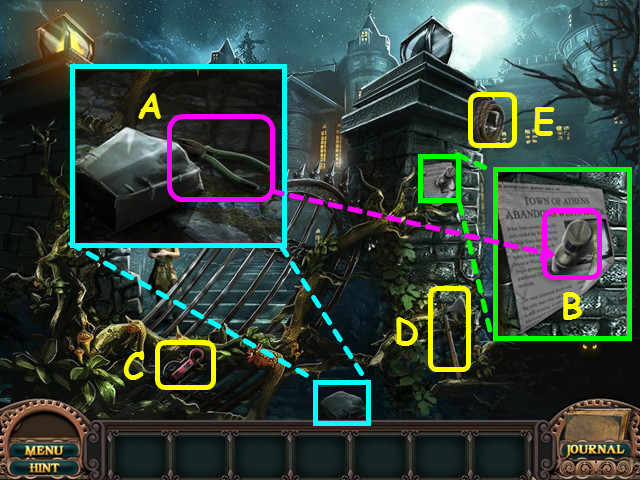
• Look at the stone; move it aside and take the PLIERS (A).
• Look at the clipping; use the PLIERS to take the SPIKE (B).
• Take the PULLEY (C), AXE (D), and ROPE (E).

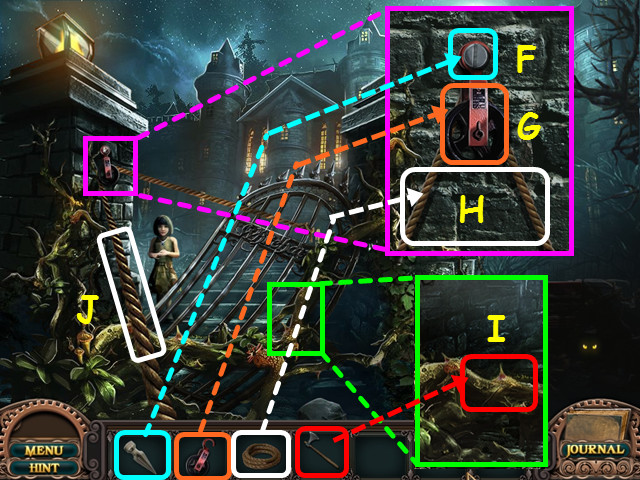
• Look at the left column and place the SPIKE into the hole (F).
• Hang the PULLEY (G) on the spike, then add the ROPE (H).
• Look at the vines on the gate and use the AXE to remove the vines (I).
• Pull on the rope (J), then walk forward.

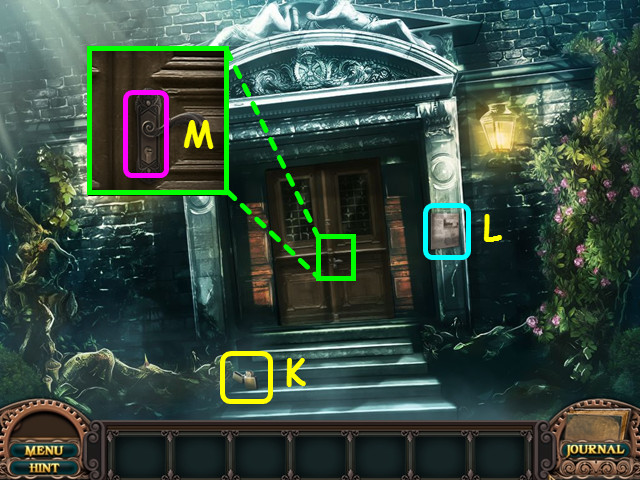
• Take the LIGHTER (K) and the news clipping (L).
• Look at the door and note the lock (M).
• Walk down to return to the gate.

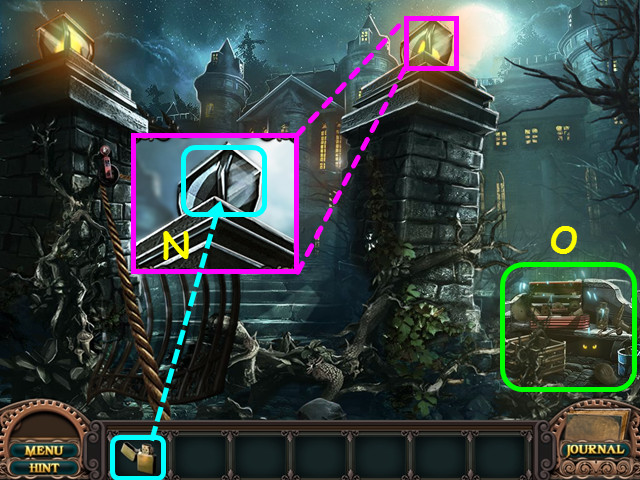
• Look at the top of the right column and use the LIGHTER on the lamp (N).
• Select the debris on the right for a HOS (O).

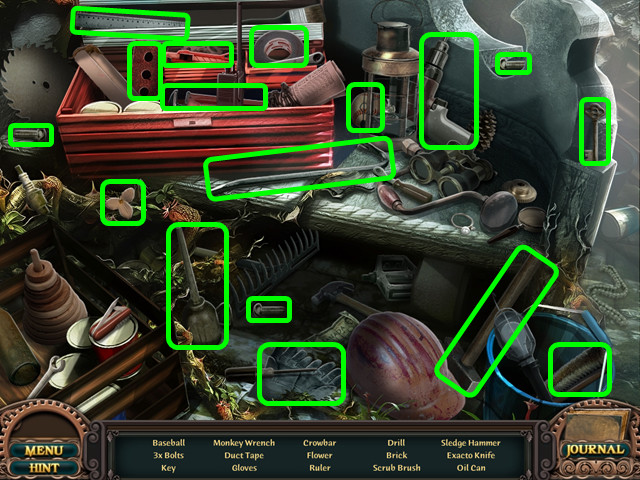
• Locate all the items on the list.
• You will earn the FRONT DOOR KEY.
• Walk forward, look at the front door and use the FRONT DOOR KEY in the lock.
• Walk forward to enter the lobby.

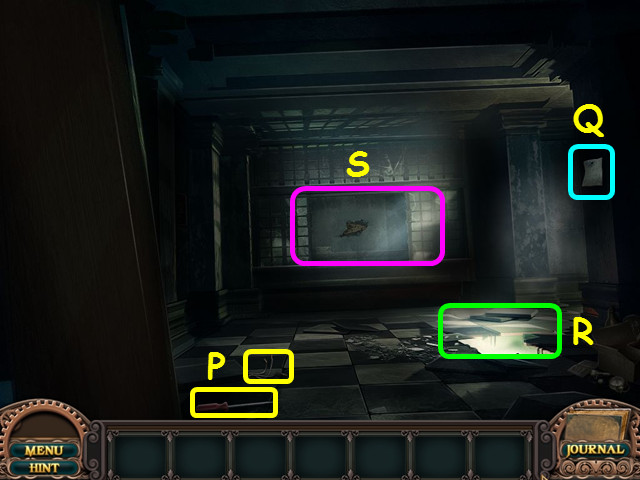
• Take the SCREWDRIVER and the WIRES (P).
• Take the clipping (Q).
• Note the hole in the floor (R).
• Walk forward to the office (S).

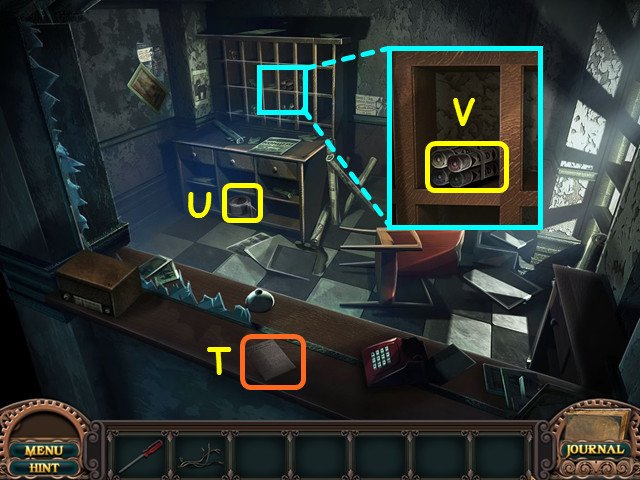
• Take the clipping (T) and the DUCT TAPE (U).
• Look in the cubbyholes and take the FUSES (V).
• Return to the lobby and look at the hole in the floor for a mini-game.

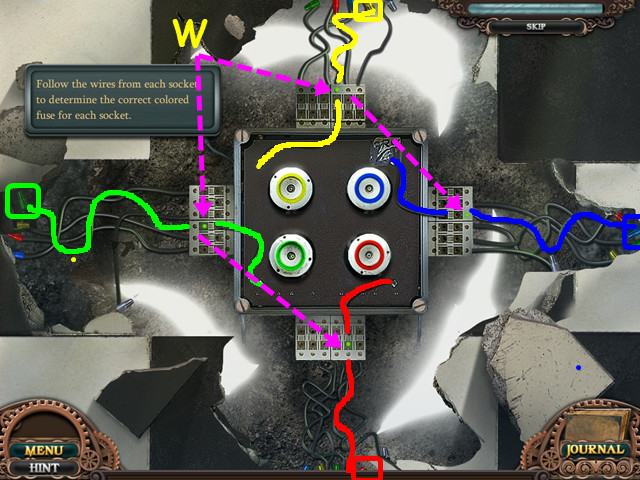
• Place the WIRES and the FUSES on the device to trigger the mini-game.
• Trace the wires with green lights (W) to determine the correct color fuse.
• Select 2 fuses to swap positions.

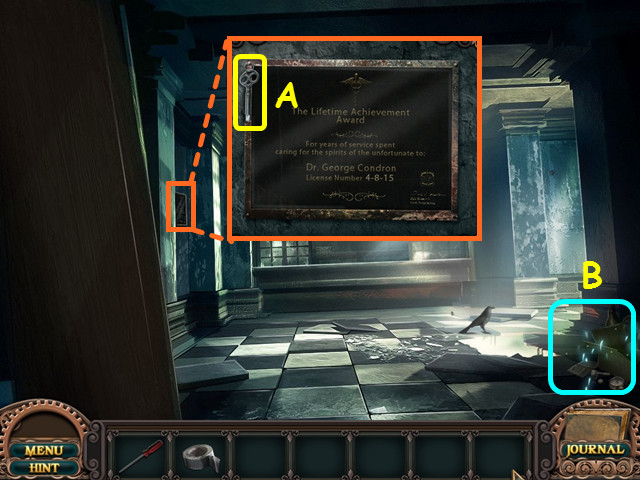
• Look at the plaque and take the DRAWER KEY (A).
• Select the debris on the right for a HOS (B).

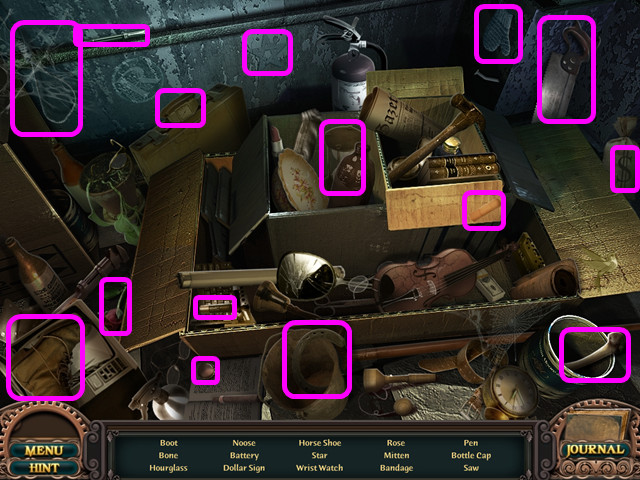
• Locate all the items on the list.
• You will earn the SAW.
• Walk forward to the office.

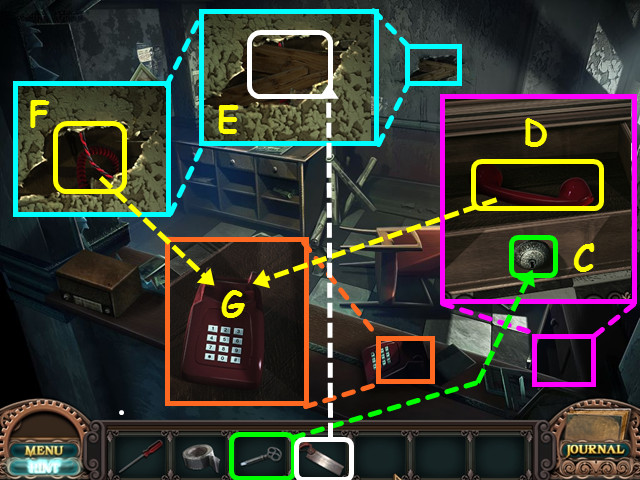
• Look at the cabinet and use the DRAWER KEY on the lock (C).
• Take the PHONE RECEIVER (D).
• Look at the hole in the wall and use the SAW to cut the boards (E).
• Take the PHONE CORD (F).
• Look at the phone. then place the PHONE CORD and PHONE RECEIVER on the phone (G).

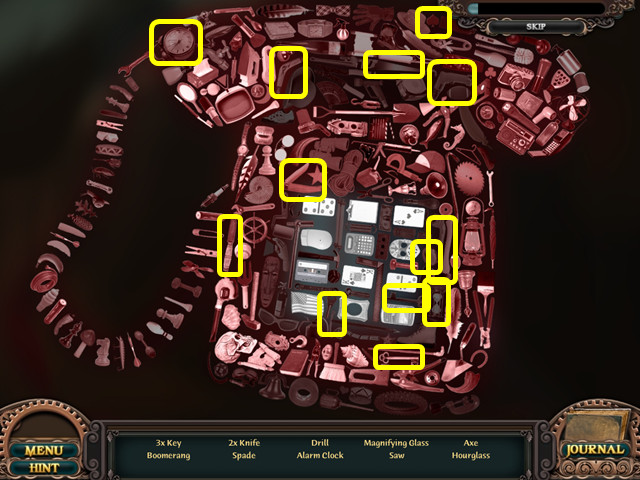
• The phone HOS will open automatically.
• Locate all the items on the list.
• You will earn the ANTIDOTE CASE.
• The antidote case will go over the menu button and will hold the medicine vials you collect.
• Note – you are able to skip this HOS.

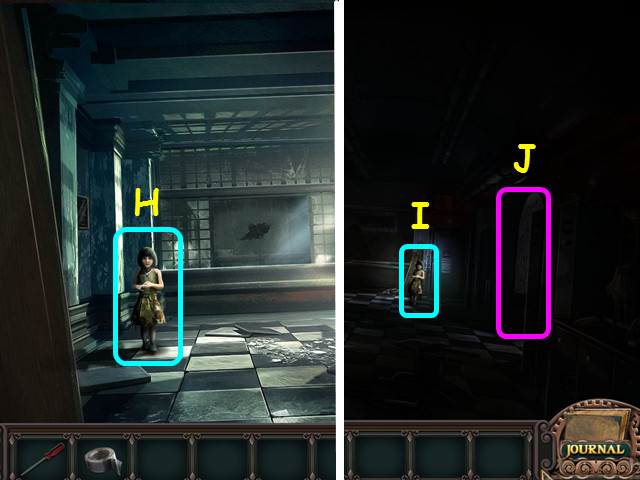
• Select the little girl, then follow her to the right (H).
• Select the girl again (I), then walk right to the stairs (J).

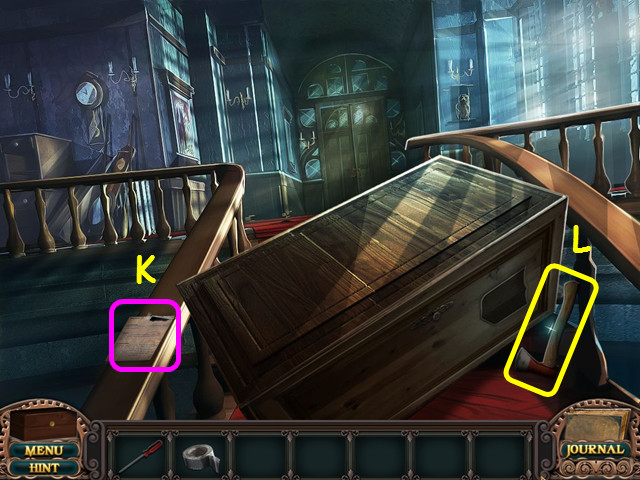
• Take the clipping (K), then take the AXE (L).
• Walk down to return to the hall, then walk forward to the hall end.

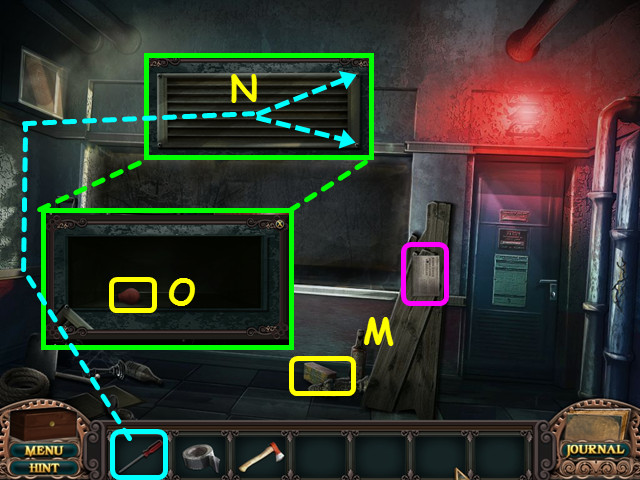
• Take the 1/8 BRICKS and the clipping (M).
• Look at the vent and use the SCREWDRIVER on the screws (N).
• Take the LIGHT BULB (O).
• Exit the close-up then walk down to the hall.

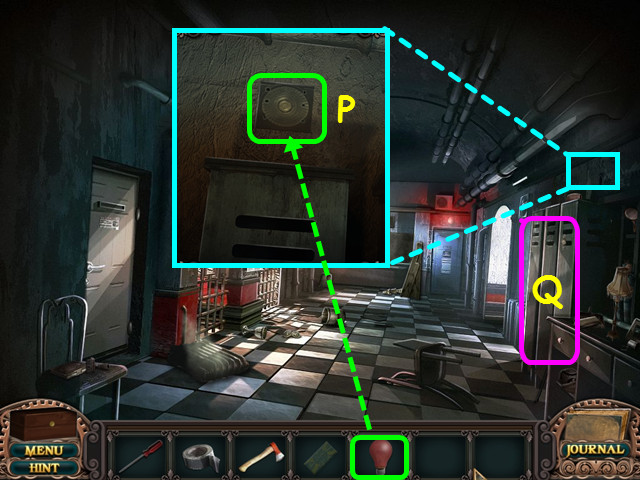
• Look over the lockers and place the LIGHT BULB into the socket (P).
• Select the lockers for a HOS (Q).

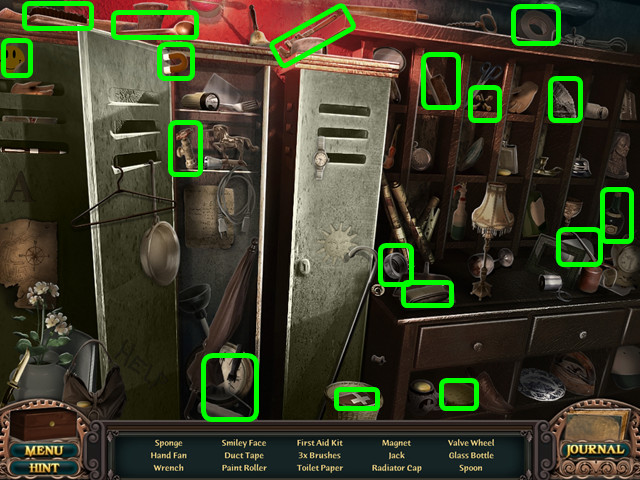
• Locate all the items on the list.
• You will earn the RADIATOR CAP.

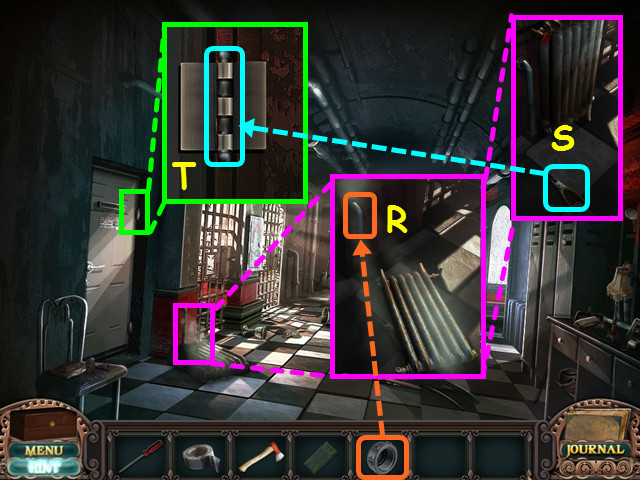
• Look at the steam and place the RADIATOR CAP on the pipe (R).
• Move the radiator and take the PLIERS (S).
• Look at the door hinge and use the PLIERS to remove the pin (T).
• Walk left to the head office.

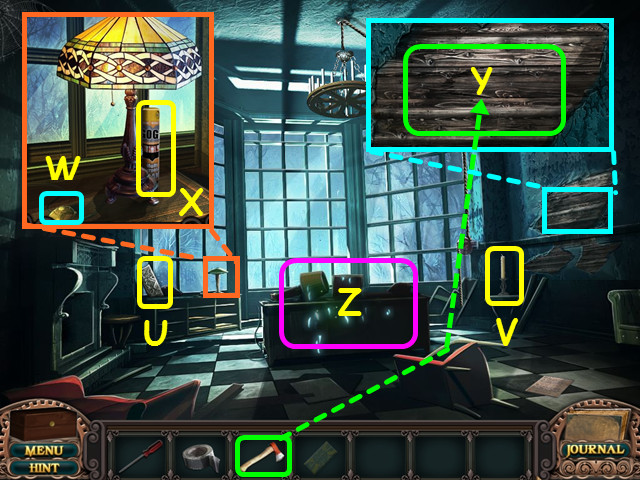
• Take the left CREST PIECE (U) and the CANDLE (V).
• Look at the lamp and press the button (W), then take the SPRAY FOAM (X).
• Look at the wall and use the AXE 3 times to get the WOOD (Y).
• Select the desk for a HOS (Z).

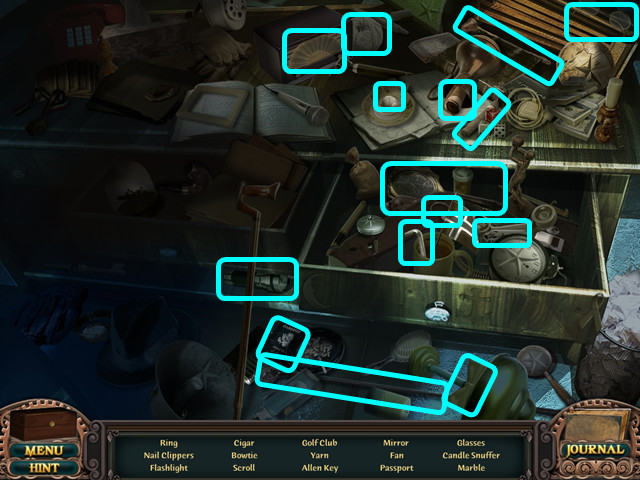
• Locate all the items on the list.
• You will earn the ALLEN KEY and the FLASHLIGHT.
• Walk right through the hole in the wall to the maintenance room.

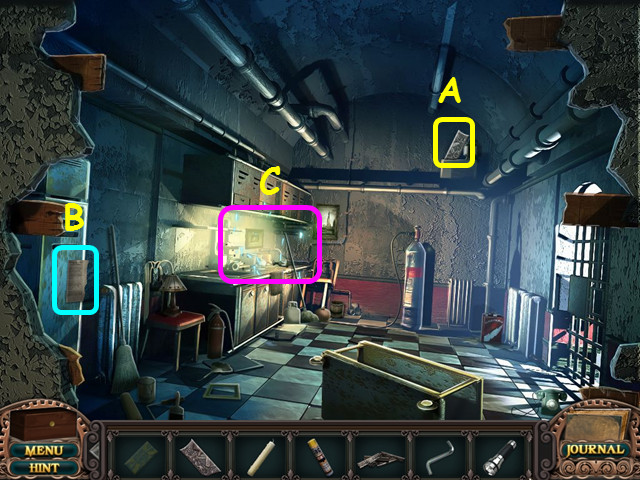
• Take the right CREST PIECE (A) and the clipping (B).
• Select the counter for a HOS (C).

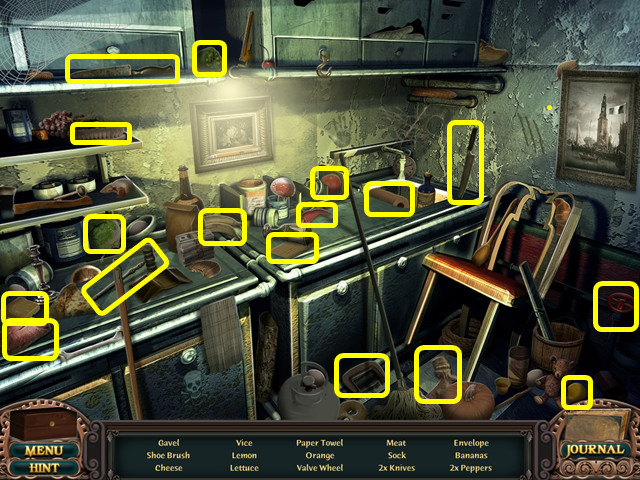
• Locate all the items on the list.
• You will earn the VALVE.
• Walk down twice, then go right to the stairs.

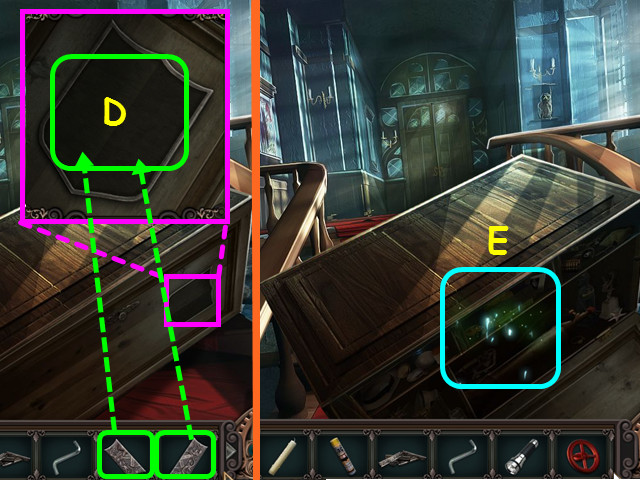
• Look at the front of the wardrobe and place the 2 CREST PIECES into the niche (D).
• Select the open wardrobe for an HOS (E).

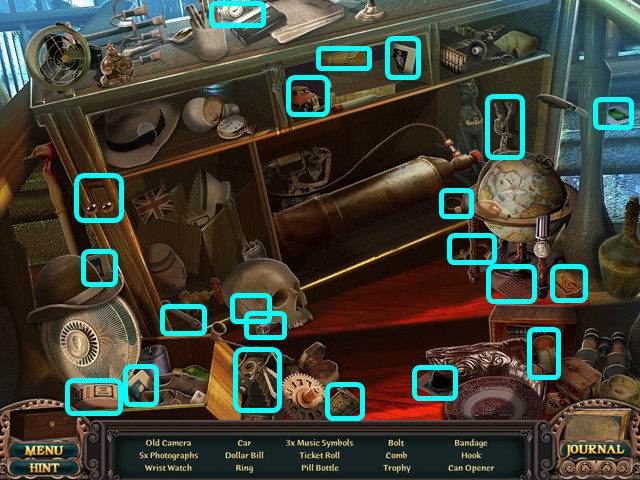
• Locate all the items on the list.
• You will earn the BOLT.
• Walk down, then go forward to the hall end.

• Look at the pipes on the right and use the SPRAY FOAM on the cracks (F).
• Exit the close-up that appears.
• Look in the vent, then use the FLASHLIGHT to light the area and take the MATCHBOOK (G).
• Walk down to the hall.

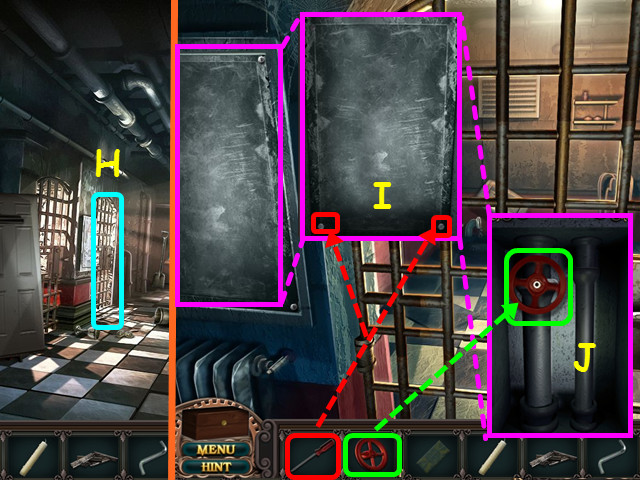
• Walk left to the holding cell (H).
• Look at the panel on the left and use the SCREWDRIVER to remove the screws (I).
• Place the VALVE on the left pipe (J).
• You will obtain the CLEANER.
• Exit the holding cell area, then walk forward to the end hall.

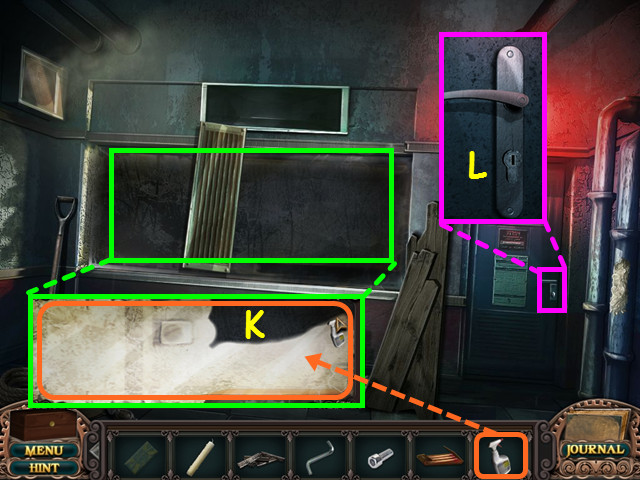
• Look at the window and use the CLEANER on the entire surface (K).
• Drag the cleaner across the entire window so it changes to white.
• Look at the door and note the lock (L).
• Walk down, then select the lockers for a HOS.

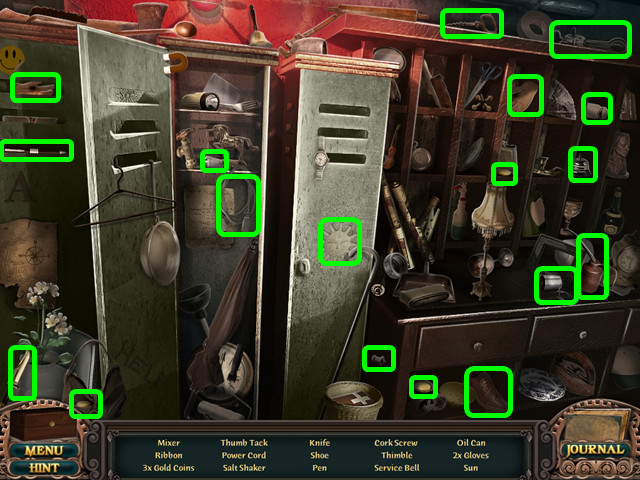
• Locate all the items on the list.
• You will earn the OIL CAN.
• Walk left to enter the head office.

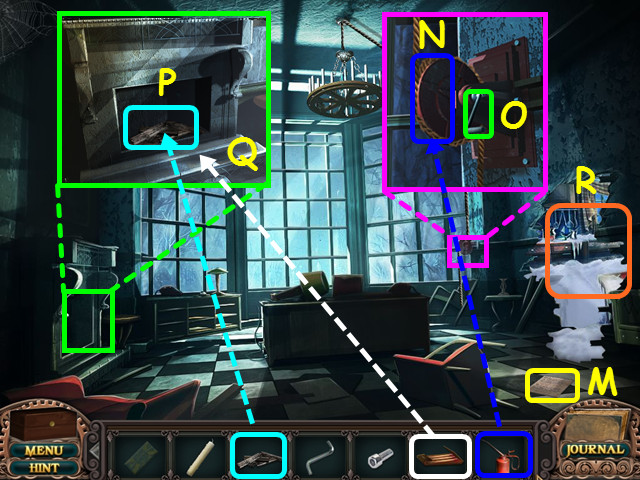
• Take the clipping (M).
• Look at the crank and use the OIL CAN on the gear (N), then turn the handle (O).
• Look in the fireplace, place the WOOD inside (P), then use the MATCHBOOK to light the wood (Q).
• Exit the fireplace, then walk right to the snow kitchen (R).

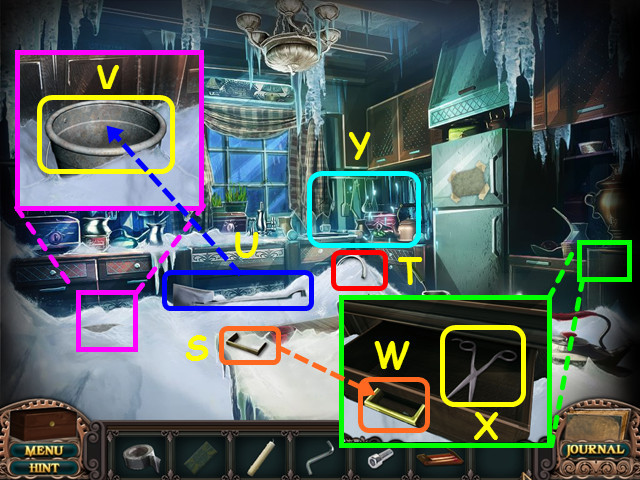
• Take the DRAWER HANDLE (S), FAUCET (T), and the SHOVEL (U).
• Look at the snow on the left and use the SHOVEL 3 times to dig out the BUCKET (V).
• Look at the drawer and place the DRAWER HANDLE on the front (W).
• Take the SCISSORS (X).
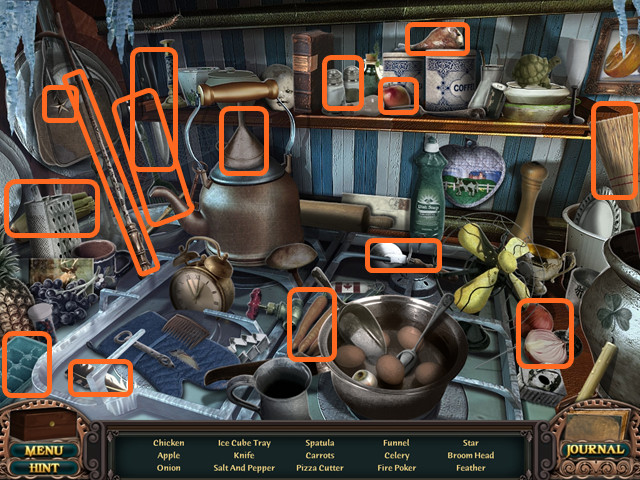
• Select the stove for a HOS (Y).


• Locate all the items on the list.
• You will earn the CHICKEN SOUP INGREDIENTS.

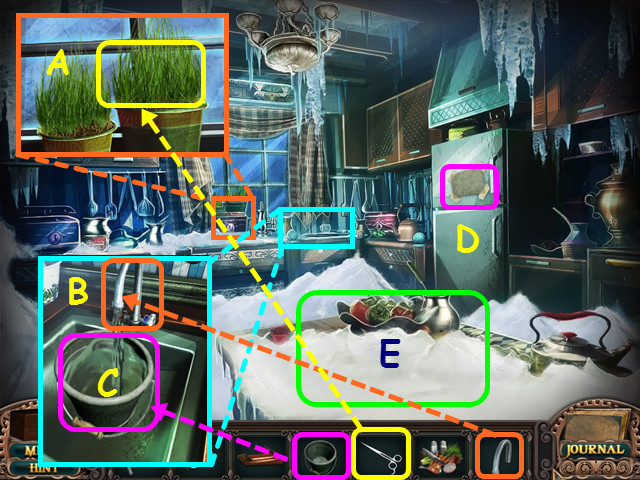
• Look at the herbs in the window and use the SCISSORS to get MOTHER’S HERBS (A).
• Look at the sink and place the FAUCET in the hole (B).
• Place the BUCKET in the sink; once it fills, take the BUCKET OF WATER (C).
• Take the clipping (D).
• Look at the island counter for a mini-game (E).

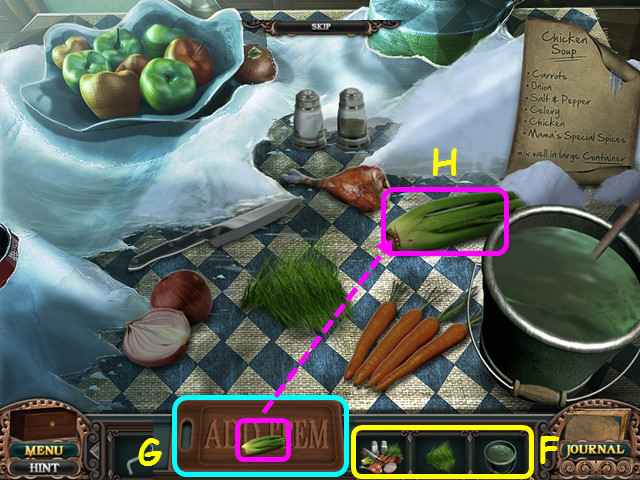
• Place the CHICKEN SOUP INGREDIENTS, MOTHER’S HERBS and the BUCKET OF WATER on the counter to trigger the mini-game (F).
• As an ingredient passes over the cutting board (G), select that ingredient on the counter (H).
• There are 4 sets of sequences to complete; if you make a mistake, that sequence will start over.
• The first set is: carrots-onion-celery-herbs-chicken.
• The second set is: salt and pepper-carrots-salt and pepper-salt and pepper-salt and pepper-carrots.
• The third set is: knife-celery-knife.
• The final set is: carrots-onions-celery-herbs-chicken-carrots-celery.
• You will find the maintenance room has returned to normal.

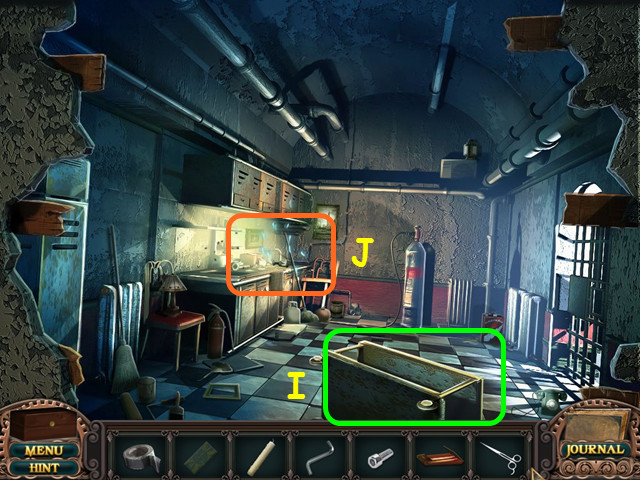
• Note the overturned cart (I).
• Select the counter for a HOS (J).

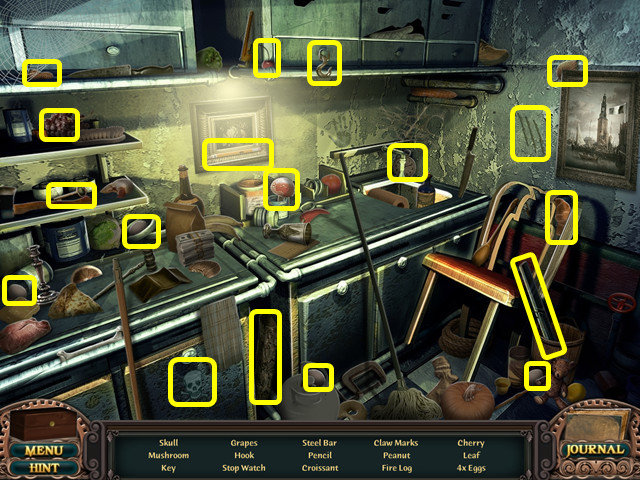
• Locate all the items on the list.
• You will earn the STEEL BAR.
• Look at the overturned cart.

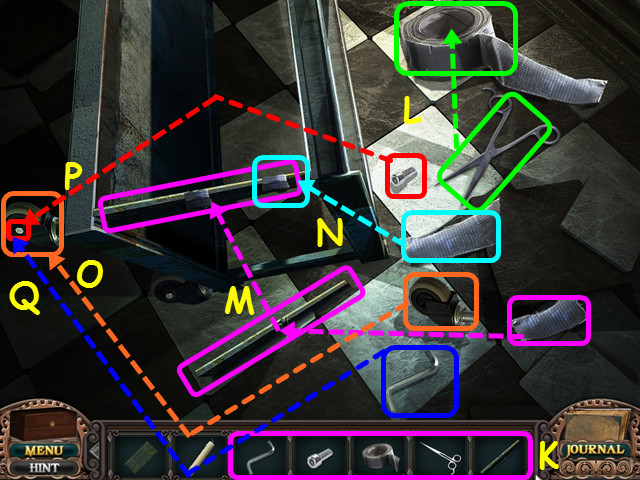
• Place the STEEL BAR, SCISSORS, DUCT TAPE, BOLT, and ALLEN KEY onto the same-shaped outlines (K).
• Use the scissors on the duct tape (L).
• Place a piece of tape on the steel bar (M), then place the bar on the cart.
• Use the other piece of tape near the top of the bar (N).
• Place the wheel at the bottom of the cart (O), then place the bolt in the wheel (P).
• Use the Allen key on the bolt (Q).
• Exit to the main office.

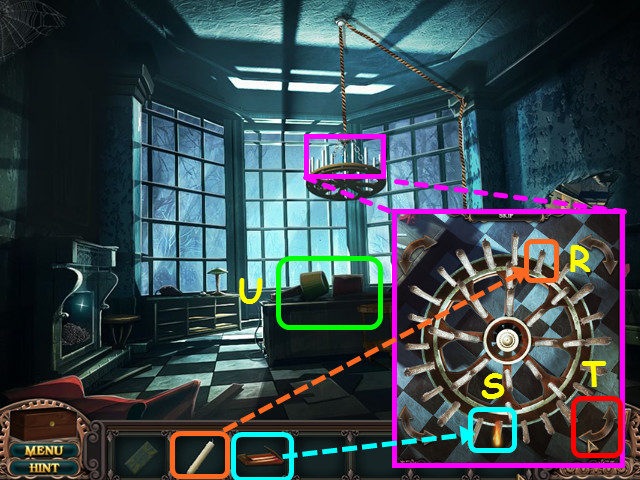
• Look at the chandelier and place the CANDLE in the empty spot (R).
• Use the MATCHBOOK to light one of the candles (S).
• Press one of the arrows to spin the candles until they are all lit (T).
• Select the desk for a HOS (U).

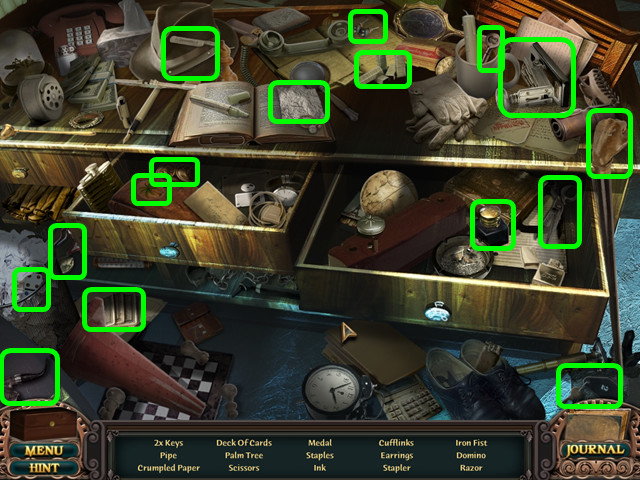
• Locate all the items on the list.
• You will earn the COMBINATION PAPER.

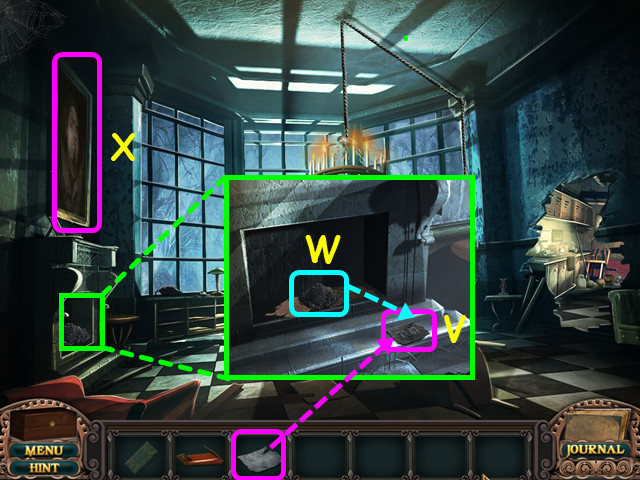
• Look at the fireplace and place the COMBINATION PAPER on the ledge (V).
• Take the ASHES from inside the fireplace and use them to make the paper legible (W).
• Take the COMBINATION PAPER.
• Look at the painting for a mini-game (X).

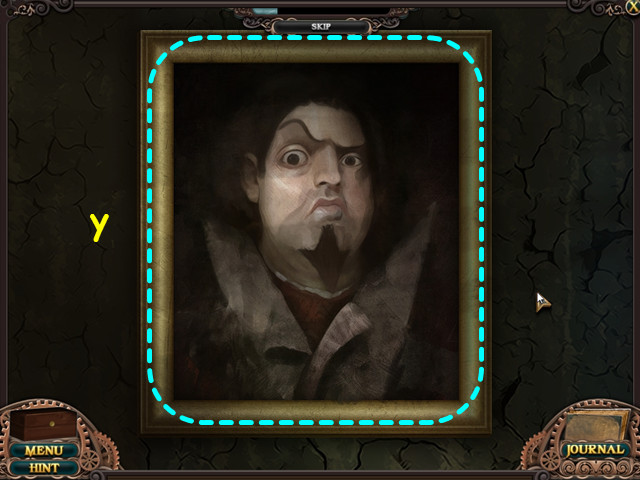
• Restore the painting by moving the strips.
• Select 2 strips to swap positions.
• The solution is pictured here (Y).

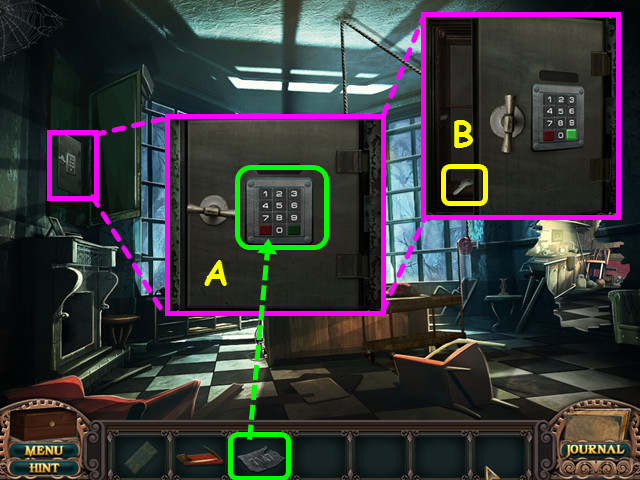
• Look at the safe behind the painting and use the COMBINATION PAPER on the keypad (A).
• Take the KEY from the open safe (B).
• Exit the office, then go the end hall.
• Look at the door, use the KEY on the lock then enter the interview room.

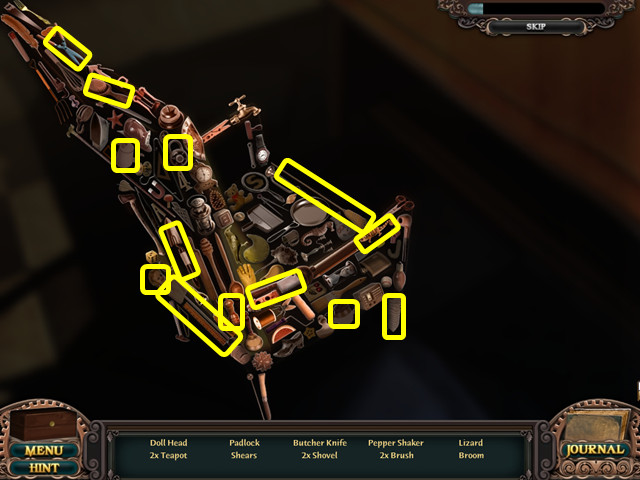
• The chair HOS will open automatically.
• Locate all the items on the list.
• You will not earn an inventory item.
• Note – you are able to skip this HOS.

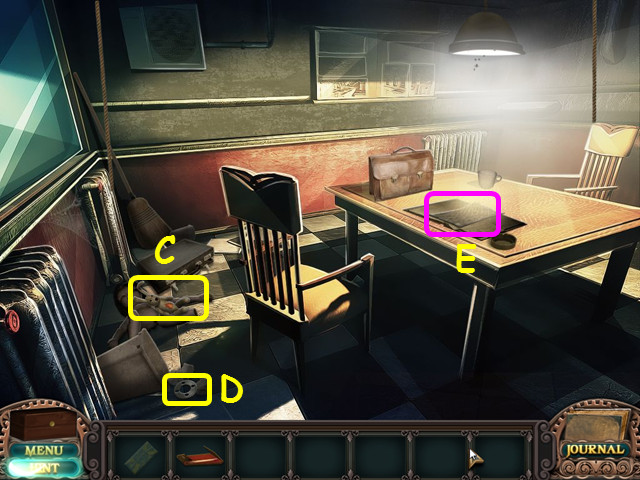
• Take the STUFFED BUNNY (C), the 1/3 GEARS (D), and the clipping (E).
• Exit and return to the maintenance room.

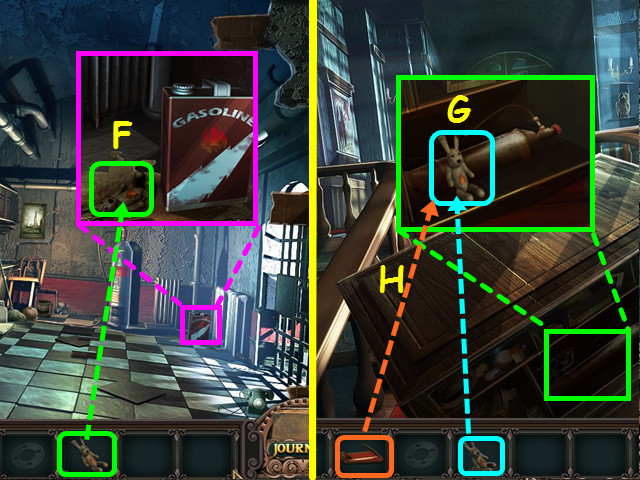
• Look at the gasoline container and place the STUFFED BUNNY in the spill (F).
• Take the GAS DRENCHED BUNNY.
• Return to the stairs.
• Look inside the cabinet and place the GAS DRENCHED BUNNY on the propane tank (G).
• Use the MATCHBOOK on the bunny (H).
• After the explosion, walk up the stairs.

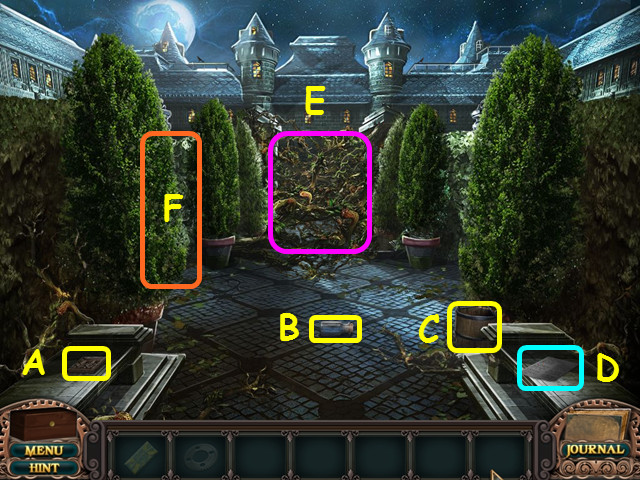
• Take the first TILE (A), ANTIDOTE VIAL (B), BUCKET (C), and clipping (D).
• The antidote vial will go into the antidote case.
• Note the vines blocking the path straight ahead (E).
• Walk left to the West Courtyard (F).

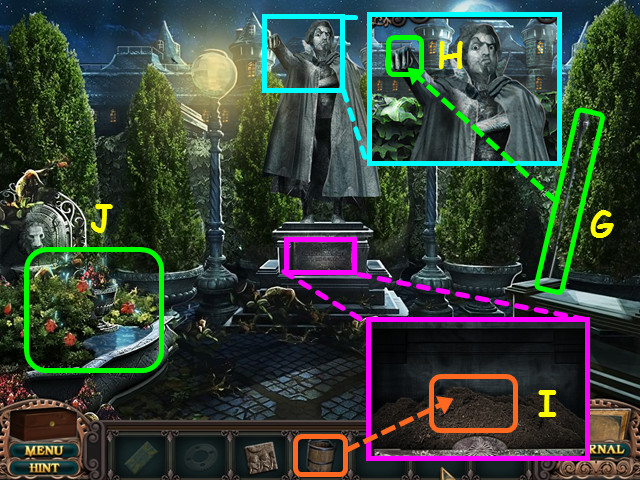
• Take the STONE CANE (G).
• Look at the statue and place the STONE CANE into the statue’s hand (H).
• Look at the base of the statue and use the BUCKET to take the BUCKET OF COMPOST (I).
• Select the fountain for a HOS (J).

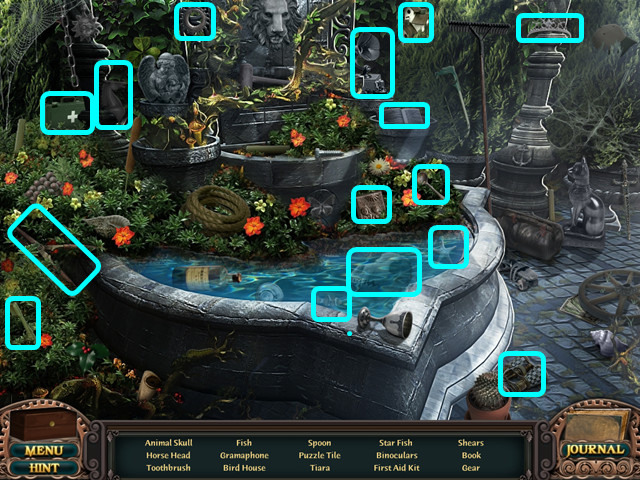
• Locate all the items on the list (blue).
• You will earn the second TILE.
• Walk down, then go right to the East Courtyard.

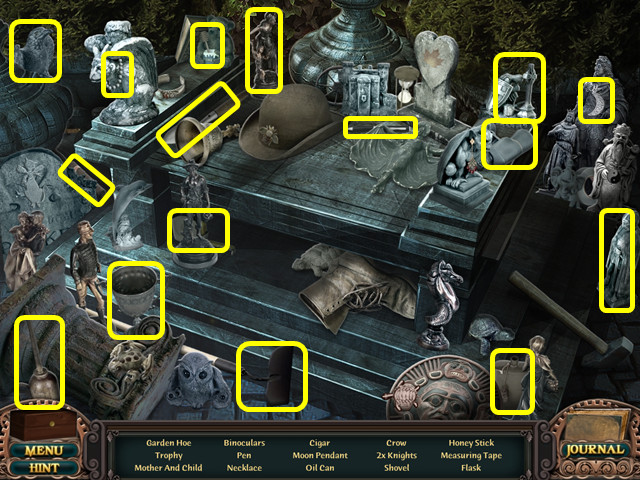
• Select the bench on the right for a HOS.
• Locate all the items on the list (yellow).
• You will earn the HOE.

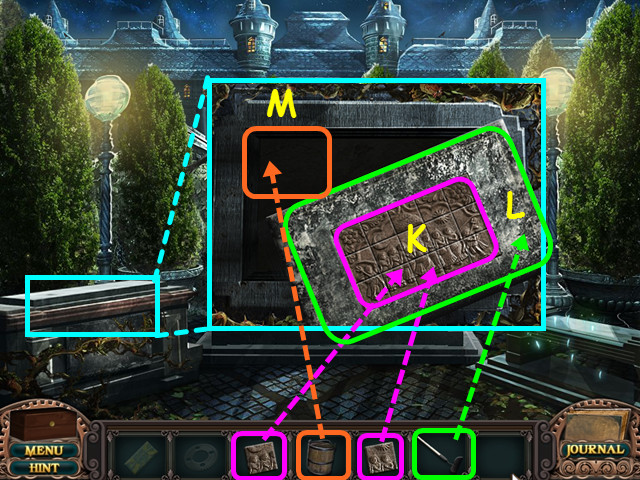
• Look at the stone box and place the 2 TILES on the lid (K).
• Use the HOE to pry open the lid (L).
• Pour the BUCKET OF COMPOST into the box (M).
• Exit the East Courtyard, then walk forward to the playground.

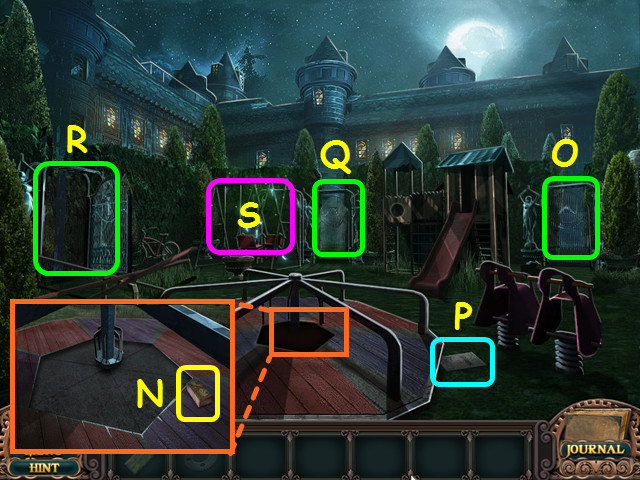
• Look at the carousel and take the 2/8 BRICKS (N).
• Note the right gate needs a key (O).
• Take the clipping (P).
• Note the center gate needs a mini-game piece (Q).
• Note the left gate to the garden entrance (R).
• Select the swings for a HOS (S).

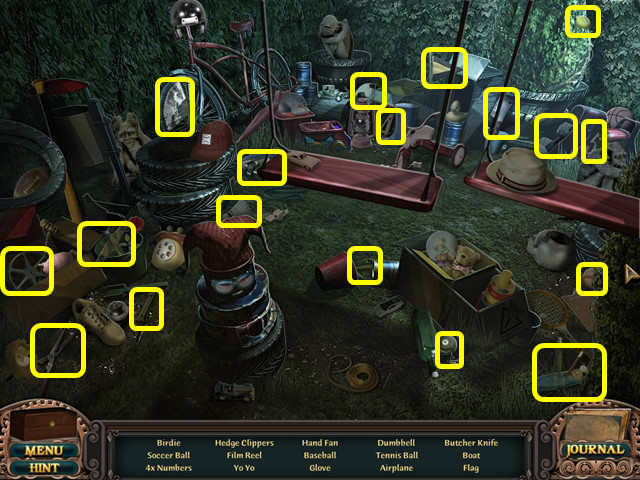
• Locate all the items on the list.
• You will earn the HEDGE CLIPPERS.
• Walk left to the garden entrance.

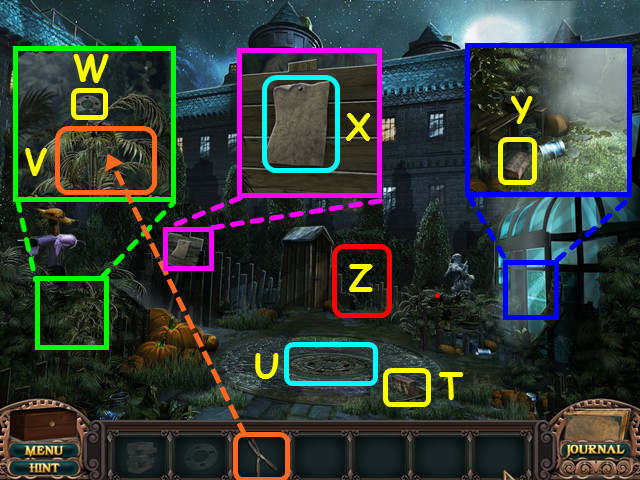
• Take the 3/8 BRICKS (T).
• Note the circle mosaic (U).
• Look at the palms, then use the HEDGE CLIPPERS (V) to find the 2/3 GEARS (W).
• Look at the sign and take the clipping (X).
• Look at the greenhouse and take the 4/8 BRICKS (Y).
• Walk forward to the terrace (Z).

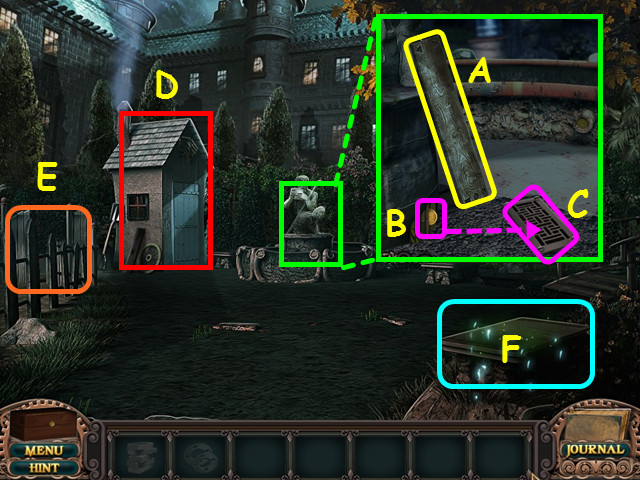
• Look in the fountain, then take the 1/5 PLANKS (A) and the COIN (B).
• Use the COIN on the GRATE (C).
• Note the shed (D).
• Note the garden gate (E).
• Select the lower right bench for a HOS (F).

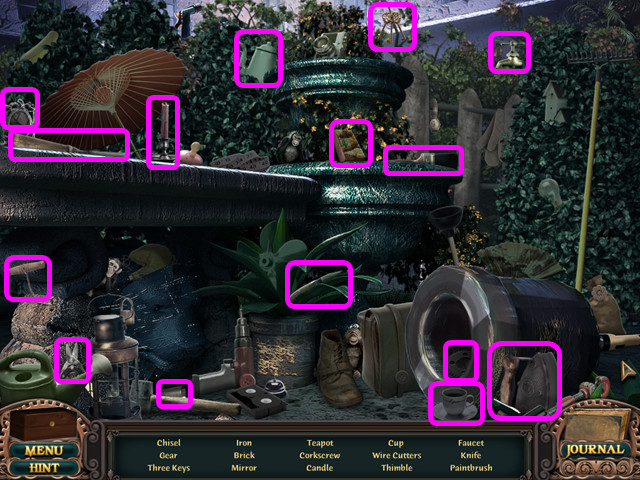
• Locate all the items on the list.
• You will earn the 5/8 BRICKS and the 3/3 GEARS.
• Walk left to the garden gate.

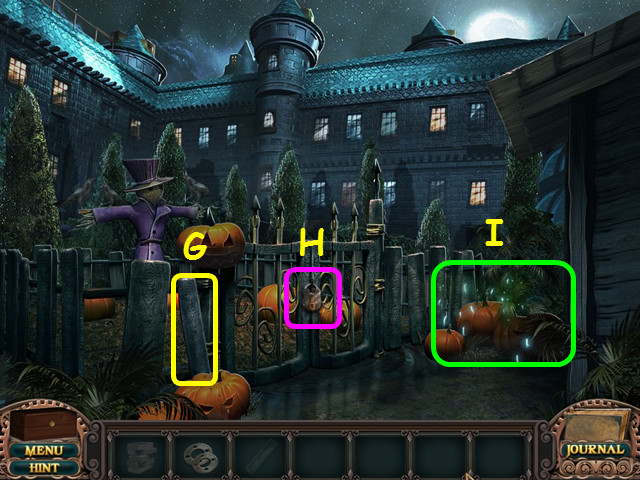
• Take the 2/5 PLANK (G).
• Note the locked gate (H).
• Select the pumpkins for a HOS (I).

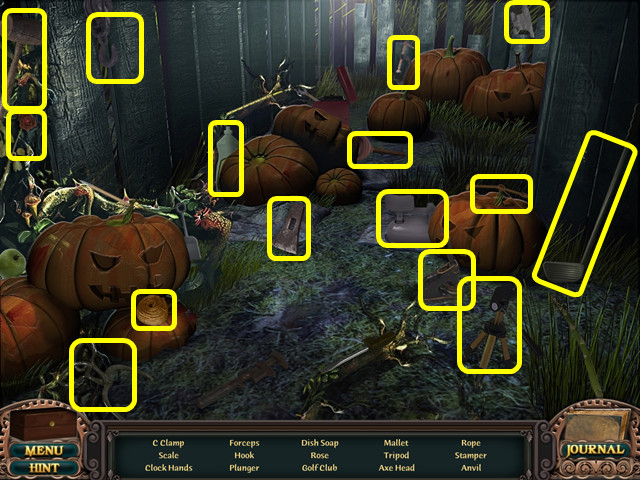
• Locate all the items on the list.
• You will earn the GOLF CLUB and the DISH SOAP.
• Walk down, then go forward to approach the shed.

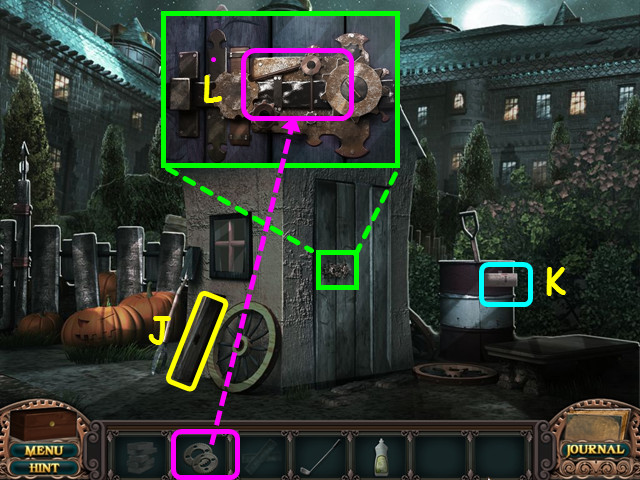
• Take the 3/5 PLANKS (J) and the clipping (K).
• Look at the shed door and place the 3 GEARS on the lock (L).
• Enter the shed.

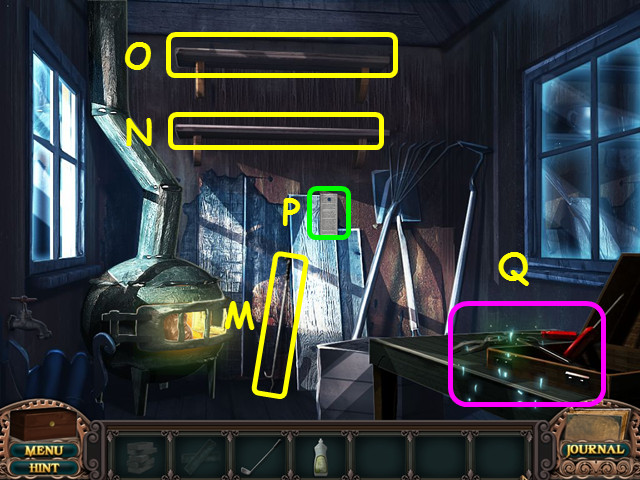
• Take the POKER (M), 4/5 PLANKS (N), 5/5 PLANKS (O), and the clipping (P).
• Select the table for a HOS (Q).

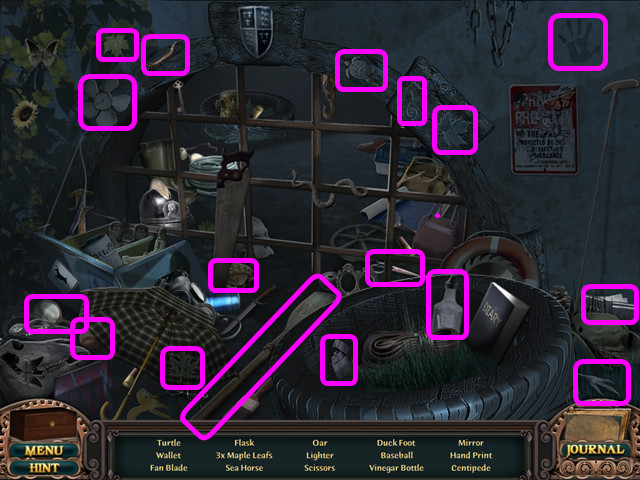
• Locate all the items on the list.
• You will earn the PIPE WRENCH and the 6/8 BRICKS.
• Walk down 3 times to the terrace, then walk right to the bridge.

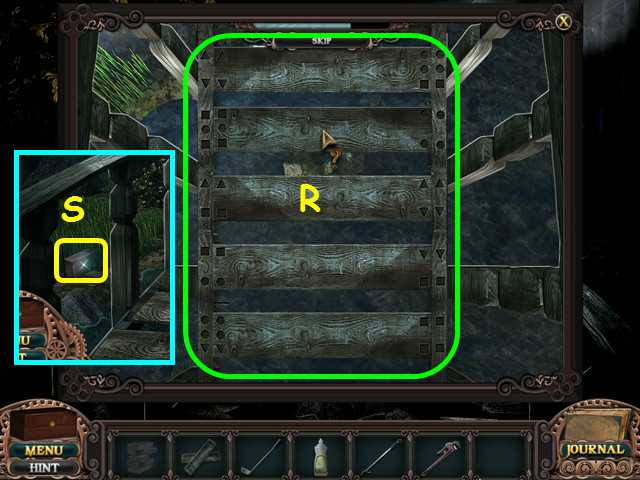
• Look down at the bridge for a mini-game.
• Place the 5 PLANKS on the bridge using the symbols on the ends as a guide (R).
• Take the 7/8 BRICKS (S).
• Walk forward across the bridge to the well.

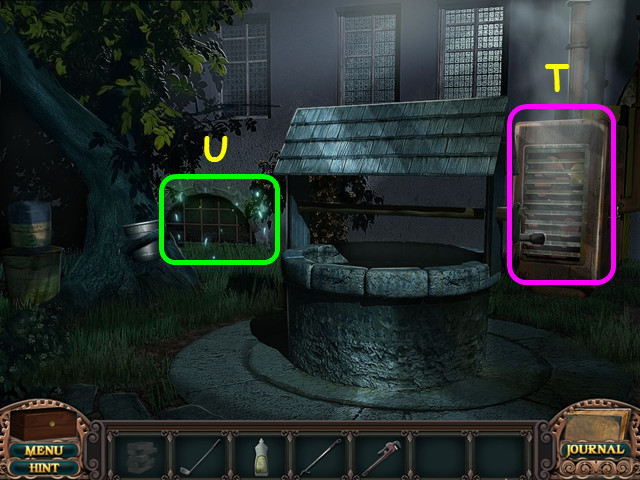
• Note the water pump (T).
• Select the grate for a HOS (U).


• Locate all the items on the list.
• You will earn the VINEGAR BOTTLE and the 1/2 FAN BLADES.
• Walk forward to the water pump.

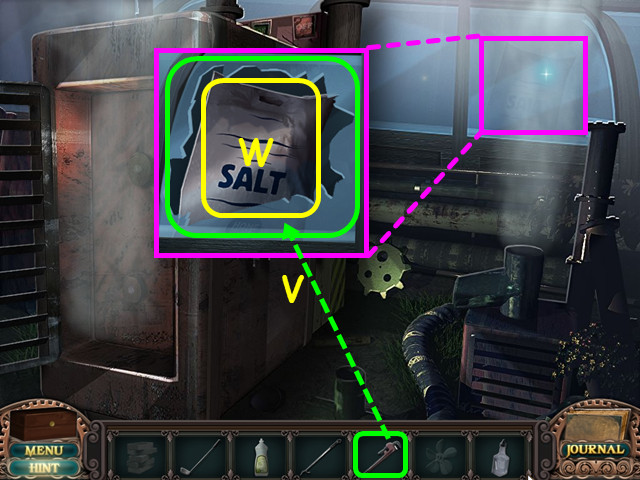
• Look at the window, use the PIPE WRENCH to break the glass (V), then take the SALT (W).
• Return to the well area.

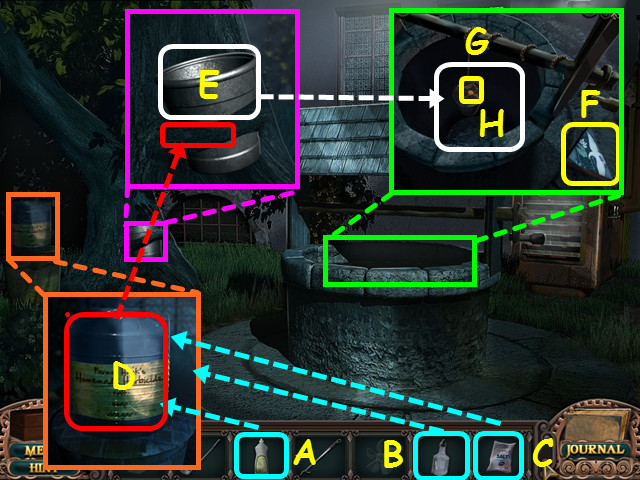
• Look at the jug, then add the DISH SOAP (A), VINEGAR BOTTLE (B), and the SALT (C).
• Take the HERBICIDE (D).
• Look at the tree and use the HERBICIDE to free the BUCKET (E).
• Look at the well and take the first CAROUSEL PIECE (F).
• Place the BUCKET on the rope (G); when it returns, take the COIN (H).
• Walk down twice to the terrace.

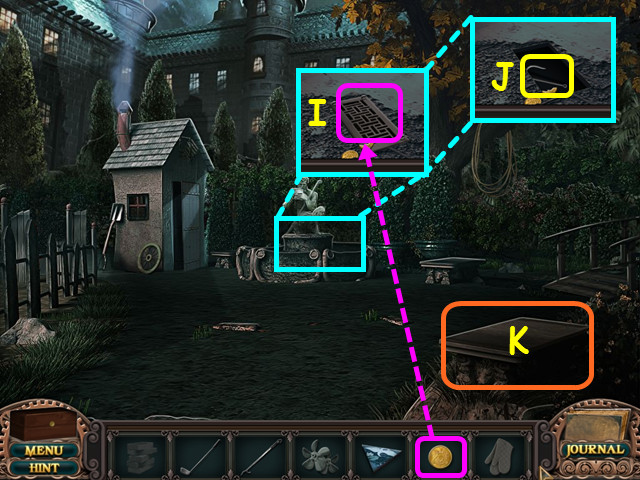
• Look at the fountain and use the COIN on the grate (I).
• Take the HOOK (J).
• Select the right bench for a HOS (K).

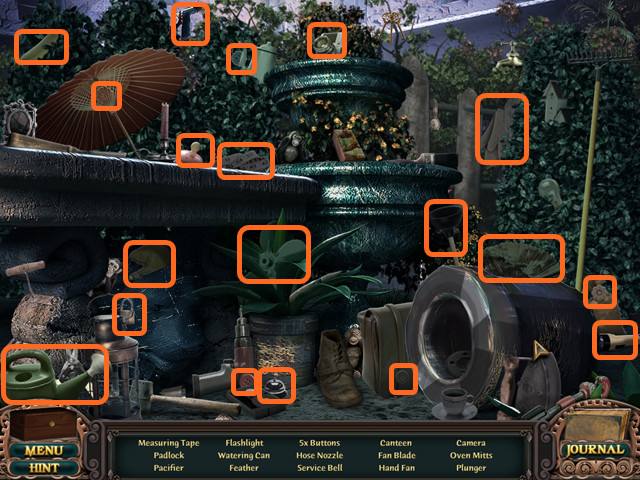
• Locate all the items on the list.
• You will earn the 2/2 FAN BLADES and the OVEN MITTS.
• Return to the shed and select the table for a HOS.

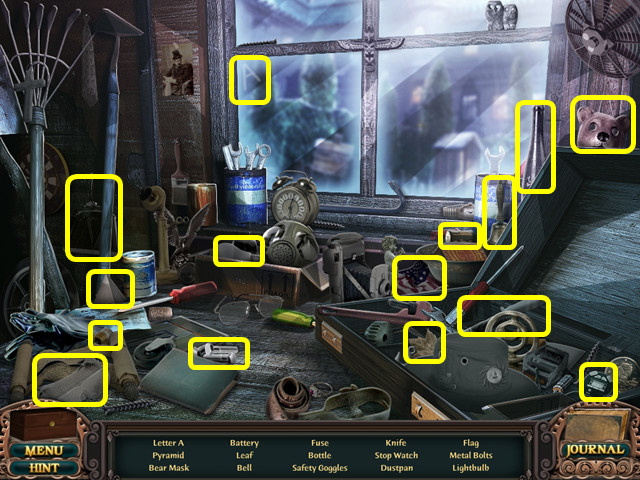
• Locate all the items on the list.
• You will earn the BOLTS.
• Return to the water pump.

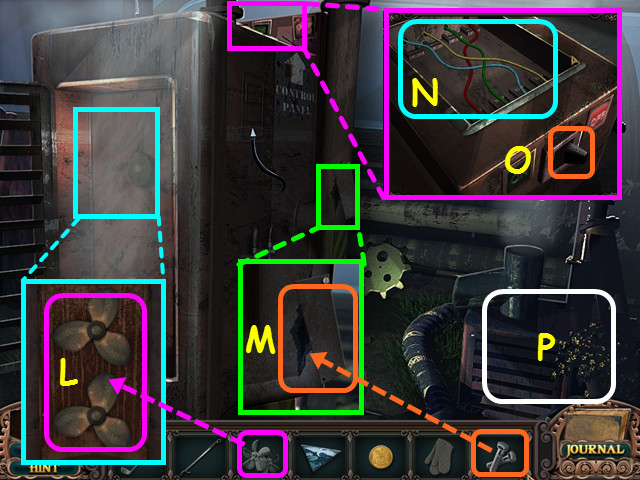
• Look at the front of the machine and place the 2 FAN BLADES on the stems (L).
• Look at the pipes and use the BOLTS to repair the patch (M).
• Look at the controls and connect the colored pairs of wires (N).
• Click on two like-colored wires to connect them.
• Press the switch (O).
• Select the debris on the right for a HOS (P).

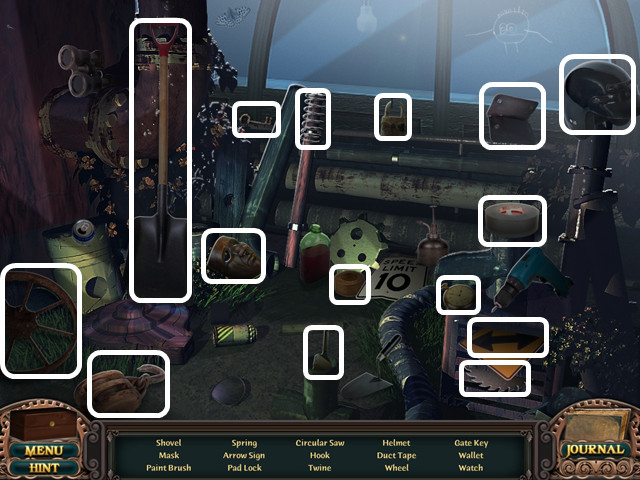
• Locate all the items on the list.
• You will earn the POOL GATE KEY and the TWINE.
• Walk down 3 times to the terrace.

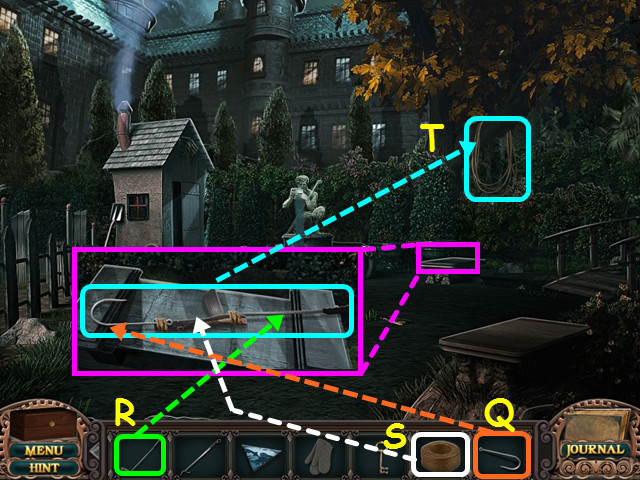
• Look at the bench under the tree; place the HOOK on the left (Q) and the GOLF CLUB on the right (R).
• Use the TWINE to tie the pieces together (S).
• Take the LONG HOOK, then use it to collect the HOSE (T).

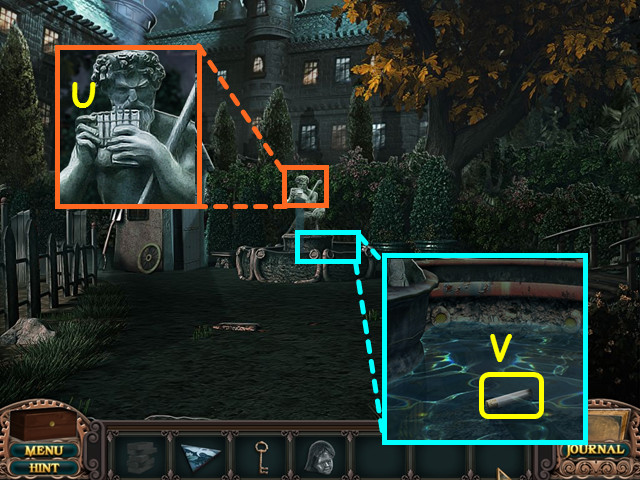
• Look at the the fountain statue (U).
• Look in the fountain and take the ANTIDOTE VIAL (V).
• Return to the shed.

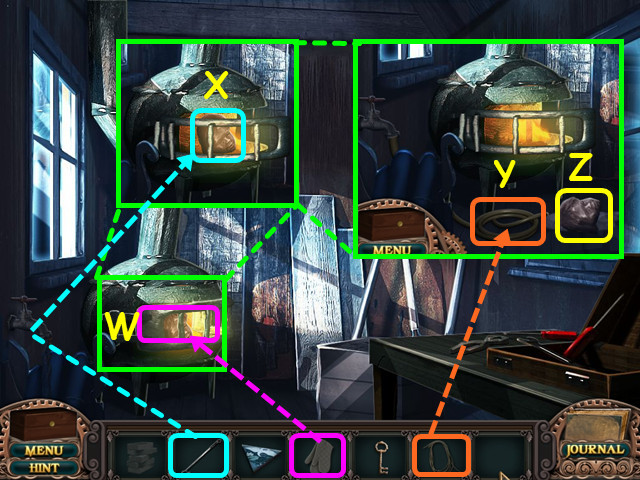
• Use the OVEN MITTS to open the stove (W).
• Use the POKER to remove the head from the stove (X).
• Use the HOSE on the head to cool it down (Y).
• Take the STATUE HEAD (Z).
• Walk down 3 times, then enter the greenhouse on the right.

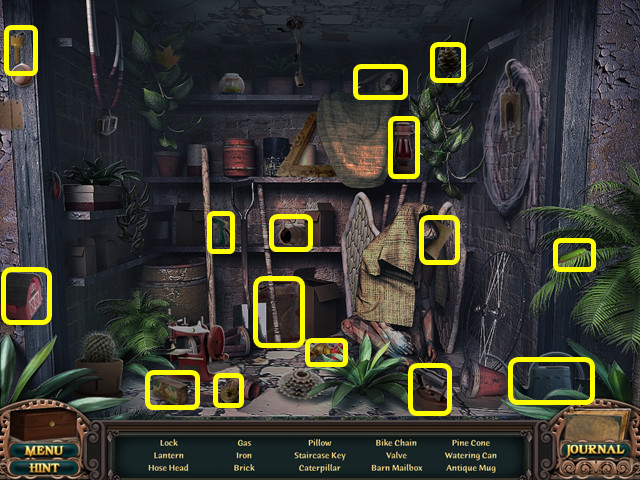
• Select the storage area on the left for a HOS.
• Locate all the items on the list.
• You will earn the LADDER KEY and the 8/8 BRICKS.

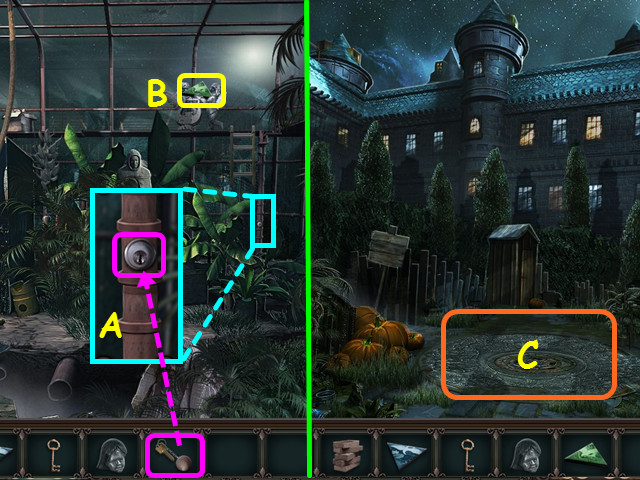
• Look at the ladder and use the LADDER KEY on the lock (A).
• Take the second CAROUSEL PIECE (B).
• Exit the green house and look at the circle mosaic on the ground for a mini-game (C).

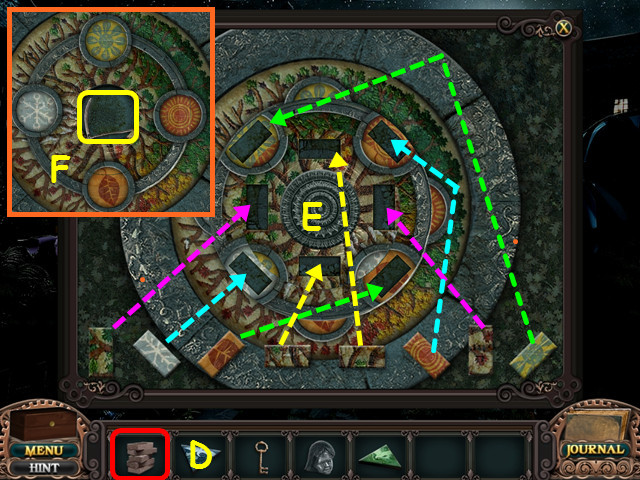
• Place the 8 BRICKS on the mosaic to trigger the mini-game (D).
• Place each brick in the coordinated hole based on the designs (E).
• Rotate the 2 inner rings to complete the circles and then take the SCYTHE from the center (F).
• Walk down twice, then go right to the East Courtyard.

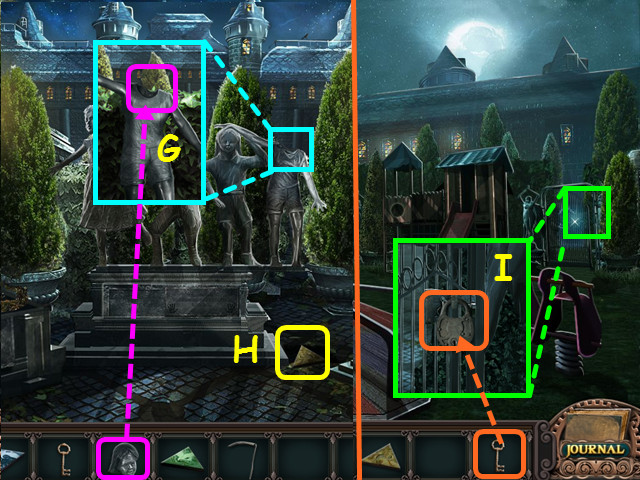
• Look at the headless statue and place the STATUE HEAD on top (G).
• Take the third CAROUSEL PIECE (H).
• Return to the playground.
• Look at the right gate and use the POOL GATE KEY on the lock (I).
• Walk forward to the pool.

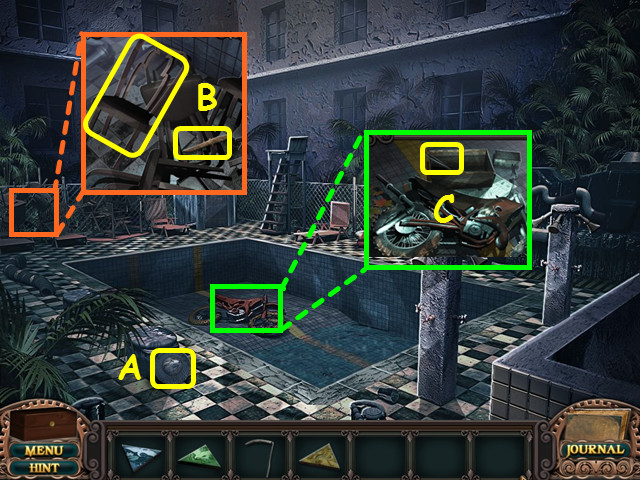
• Take the EARTH PLATE (A).
• Look at the pile of chairs; take the CHAIR and the FILTHY OBJECT (B).
• Look at the motorcycle and take the TWEEZERS (C).

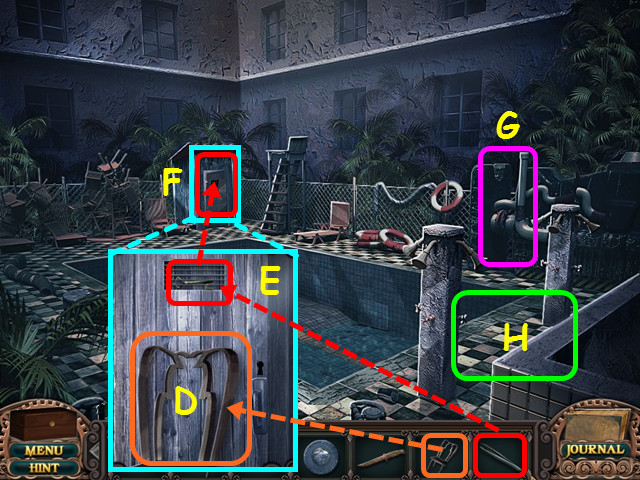
• Look at the shed and place the CHAIR in front of the door (D).
• Use the TWEEZERS on the grill to get the SHED KEY (E).
• Use the SHED KEY on the shed door (F).
• Note the path to the generator (G).
• Note the way to the changing rooms (H).
• Select the shed for a HOS.

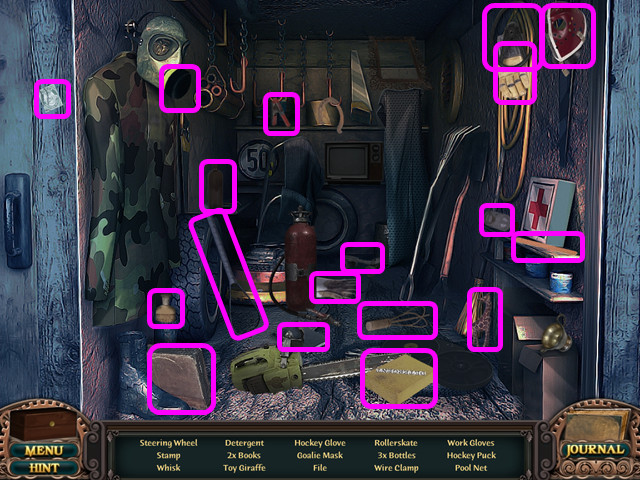
• Locate all the items on the list.
• You will earn the WORK GLOVES.
• Walk right to the changing rooms.

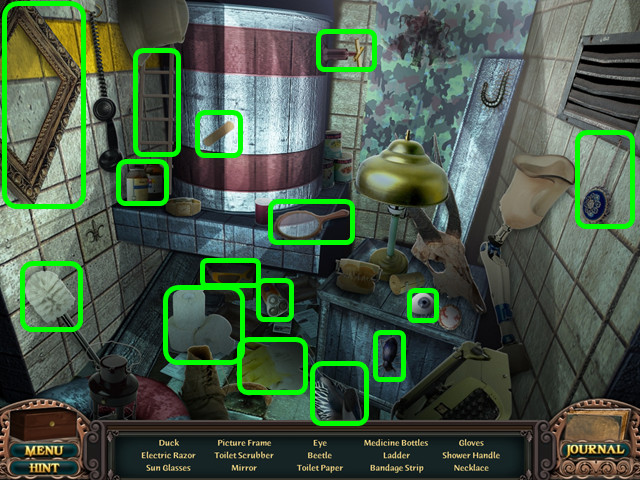
• Select the left stall for a HOS.
• Locate all the items on the list.
• You will earn the SHOWER HANDLE and the LADDER EXTENSION.

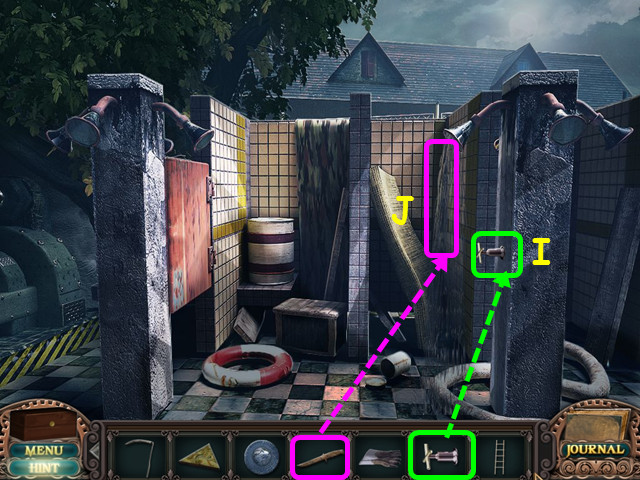
• Place the SHOWER HANDLE under the shower head (I).
• Use the FILTHY OBJECT under the water to find the BROKEN KNIFE (J).
• Exit the changing rooms and walk to the playground.

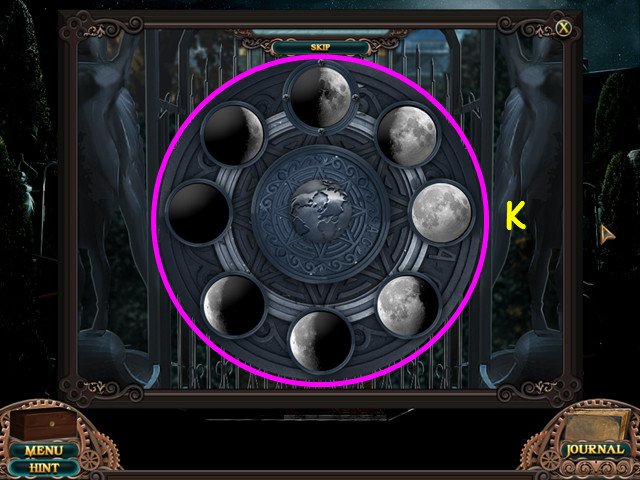
• Look at the center gate for a mini-game.
• Place the EARTH PLATE in the center of the device to trigger the mini-game.
• Set the moons to reflect a lunar cycle; select each moon to spin it to the proper position (K).
• Walk forward to the guard tower.

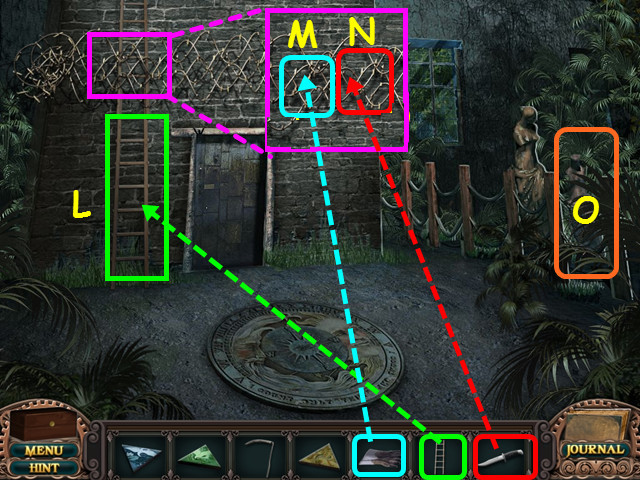
• Place the LADDER EXTENSION under the ladder (L).
• Look at the wires, then use the WORK GLOVES (M) and the BROKEN KNIFE (N) to break through.
• Note the path to the Trellis Hall (O).
• Climb the ladder to the guard tower top.

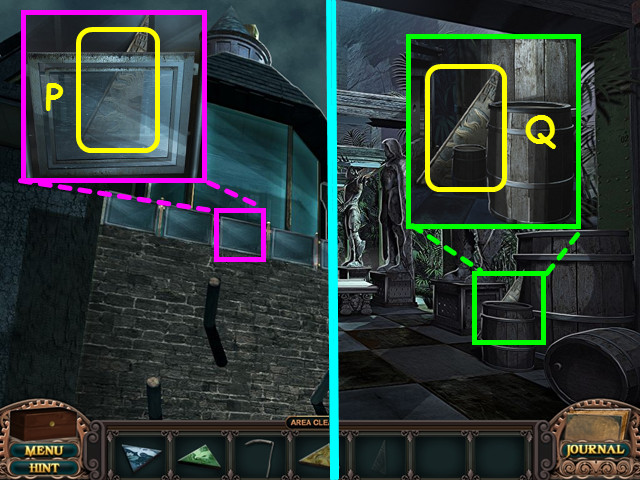
• Look at the glass partition and take the 1/2 SUNDIAL PIECE (P).
• Come down from the guard tower top, then go right to the trellis hall.
• Look behind the barrel and take the 2/2 SUNDIAL PIECE (Q).
• Exit the trellis hall.

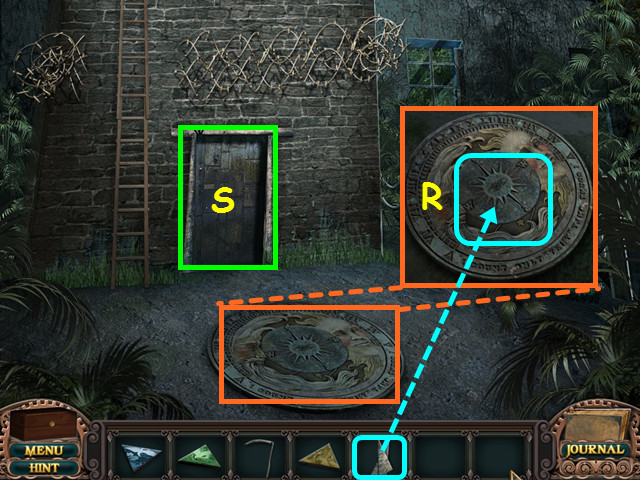
• Look at the sundial and place the 2 SUNDIAL PIECES onto the circle (R).
• Enter the guard tower first floor (S).

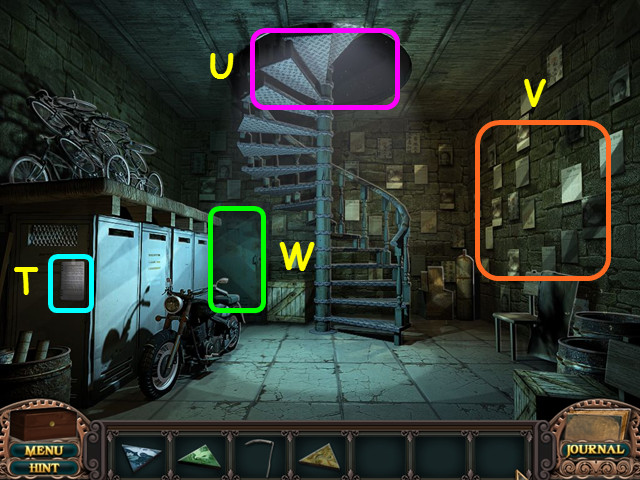
• Take the clipping (T).
• Note the stairs to the second floor (U).
• Note the wall of mug shots (V).
• Enter the locker room (W).

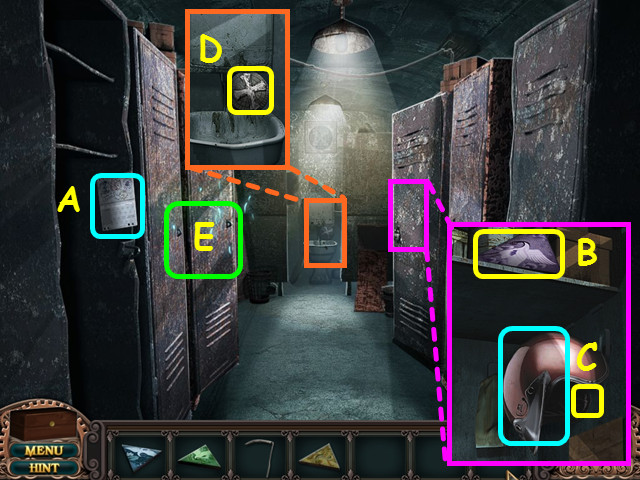
• Take the clipping (A).
• Look at the right locker, open the door and take the fourth CAROUSEL PIECE (B).
• Move the helmet and take the MOTORCYCLE KEY (C).
• Look at the toilet and take the CROSS PIECE (D).
• Select the left locker for a HOS (E).

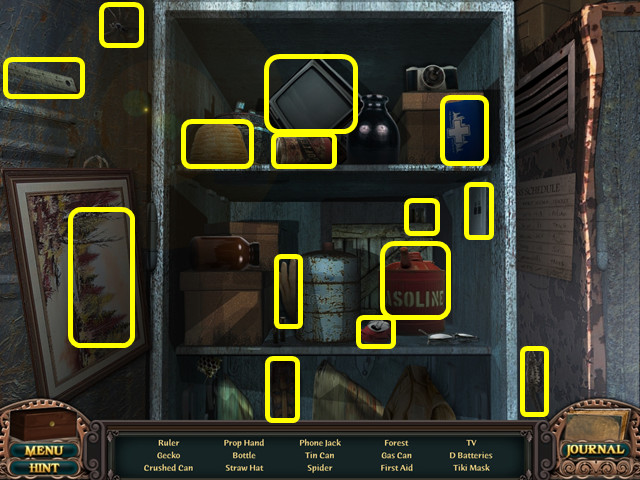
• Locate all the items on the list.
• You will earn the GAS CAN.
• Exit the locker room and go up to the second floor.

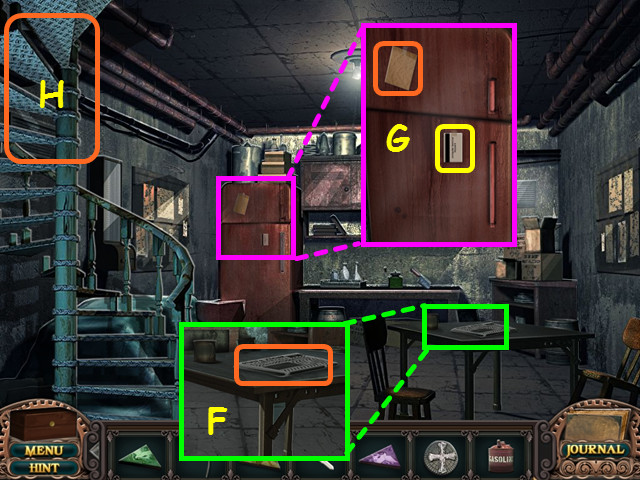
• Look at the table and take the clipping (F).
• Look at the refrigerator; take the clipping and the COMPUTER KEY CARD (G).
• Walk up the stairs to the third floor (H).

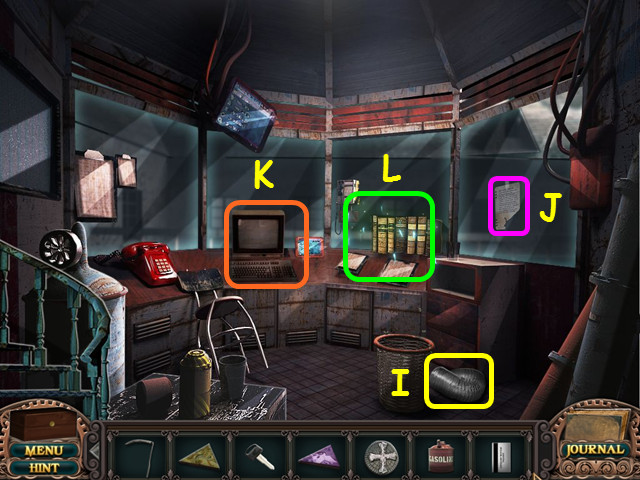
• Take the FLEX DUCT (I) and the clipping (J).
• Note the computer (K).
• Select the books for a HOS (L).

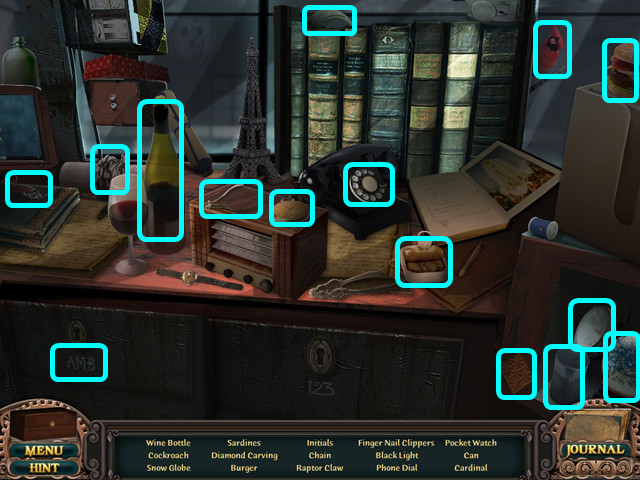
• Locate all the items on the list.
• You will earn the BLACK LIGHT.
• Walk down 4 times, the take the right gate to the pool.

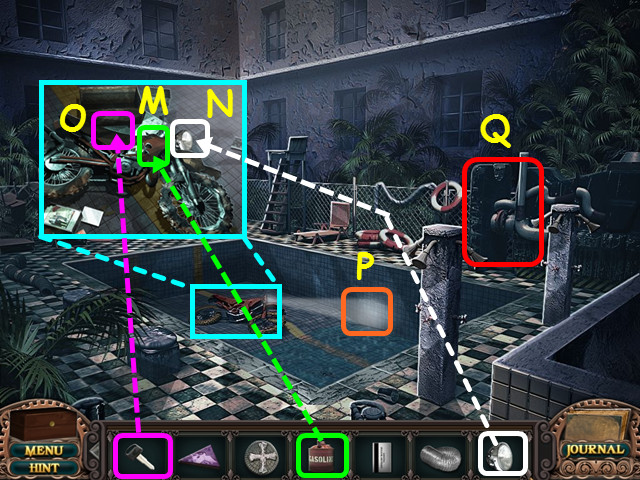
• Look at the motorcycle and use the GAS CAN on the tank (M).
• Place the BLACK LIGHT on the front (N), then use the MOTORCYCLE KEY to start the engine (O).
• Note the lighted grid area (P).
• Walk forward to the generator (Q).

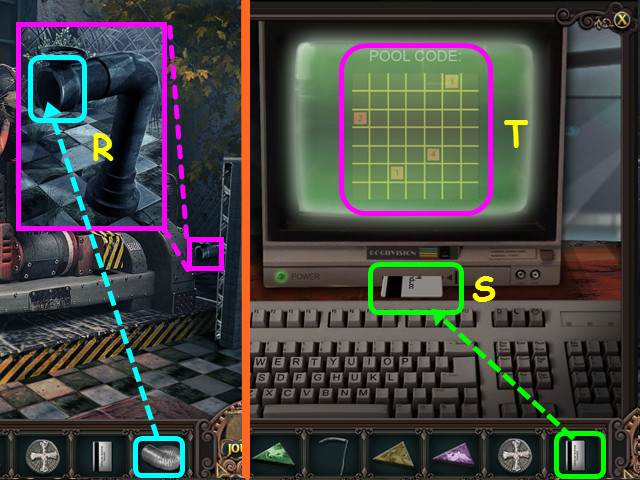
• Look at the pipe and place the FLEX DUCT on the end (R).
• Return to the guard tower third floor.
• Look at the computer and use the COMPUTER KEY CARD on the slot (S).
• You will earn the PATIENT NOTE.
• Note the screen for the pool code (T).
• Walk down to the first floor and look at the wall of mug shots.

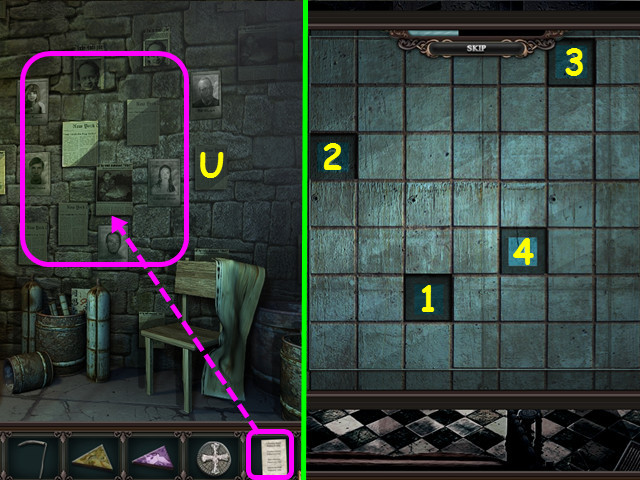
• Use the PATIENT NOTE on the wall to get the MUG SHOTS (U).
• Return to the pool and look at the lighted grid area.
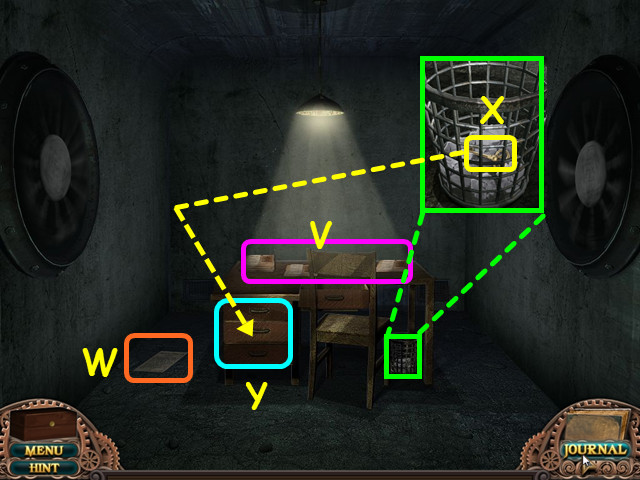
• Press the squares in numerical order (1-4).
• Enter the secret chamber behind the tiles.

• Note the top of the desk (V).
• Take the clipping (W).
• Look in the wastebasket and take the DESK KEY (X).
• Use the DESK KEY on the drawers (Y).
• Select the drawers for a HOS.

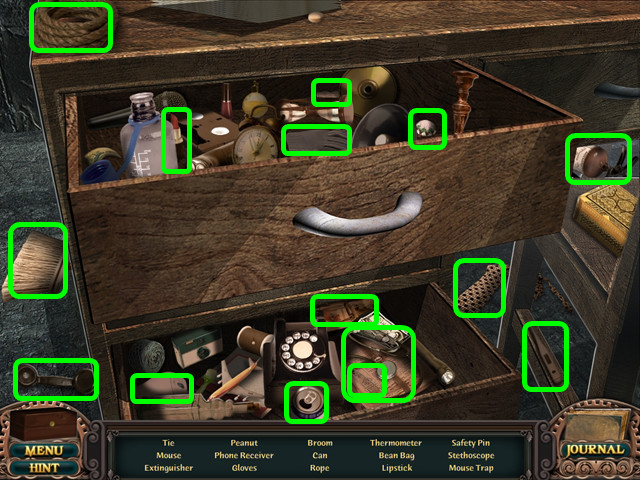
• Locate all the items on the list.
• You will earn the ROPE.
• Look at the top of the desk.

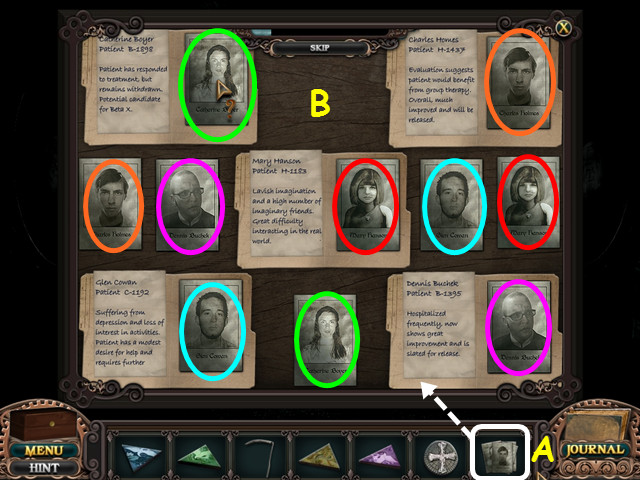
• Place the MUGSHOTS on the desk to trigger the mini-game (A).
• Drag the photos onto the files based on the silhouettes (B).
• After the cut-scene, you will earn another ANTIDOTE VIAL.
• Return to the trellis hall.

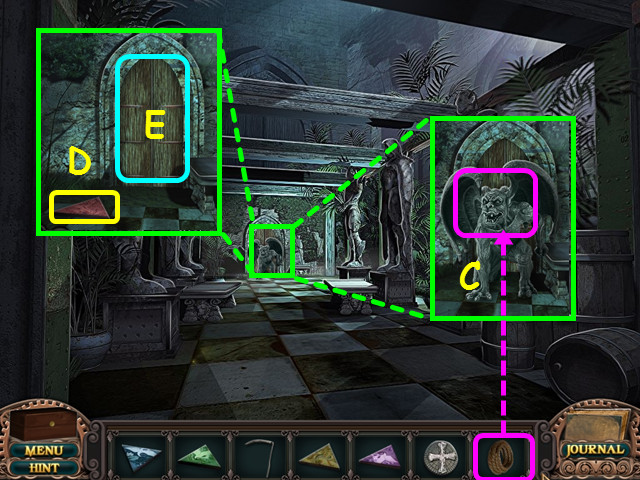
• Look at the statue and tie the ROPE to it (C).
• Take the fifth CAROUSEL PIECE (D).
• Note the door to the solitary hall (E).
• Walk to the greenhouse.

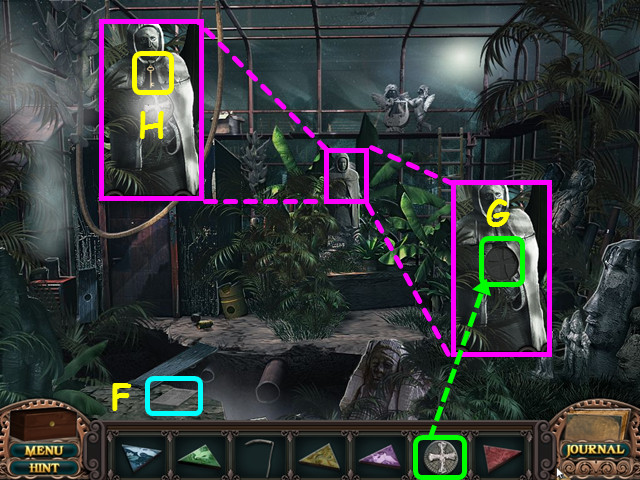
• Take the clipping (F).
• Look at the statue and place the CROSS PLATE into the circle (G).
• Take the GARDEN GATE KEY (H).
• Exit the greenhouse, go forward to the terrace, then go left to the garden gate.

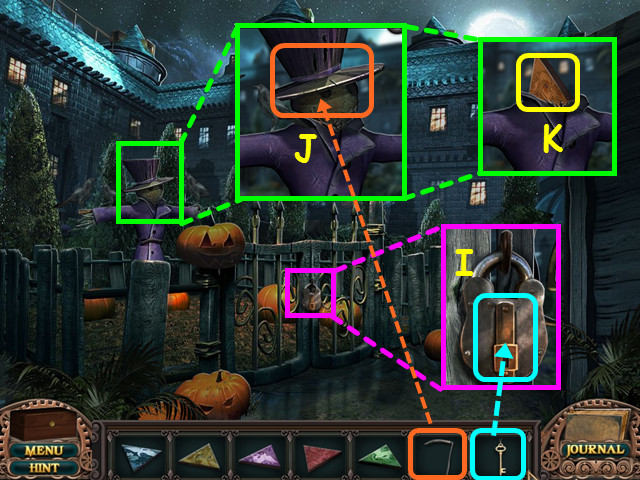
• Look at the gate and use the GARDEN GATE KEY on the lock (I).
• Look at the scarecrow and use the SCYTHE to remove his head (J).
• Take the sixth CAROUSEL PIECE (K).
• Return to the playground and look at the carousel.

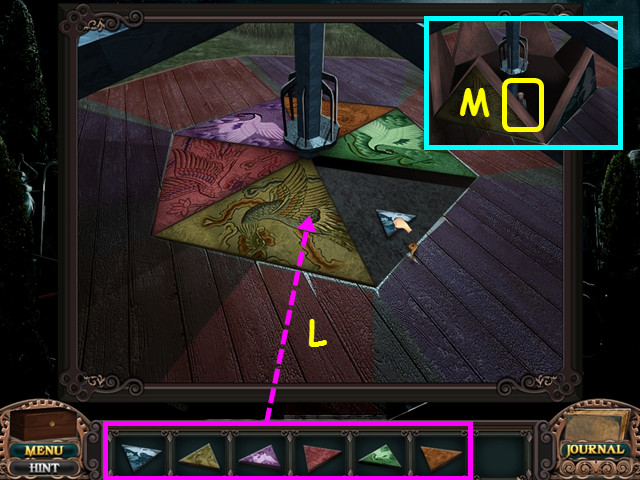
• Place the 6 CAROUSEL PIECES into the center (L).
• Take the ANTIDOTE VIAL (M).
• Return to the trellis hall.

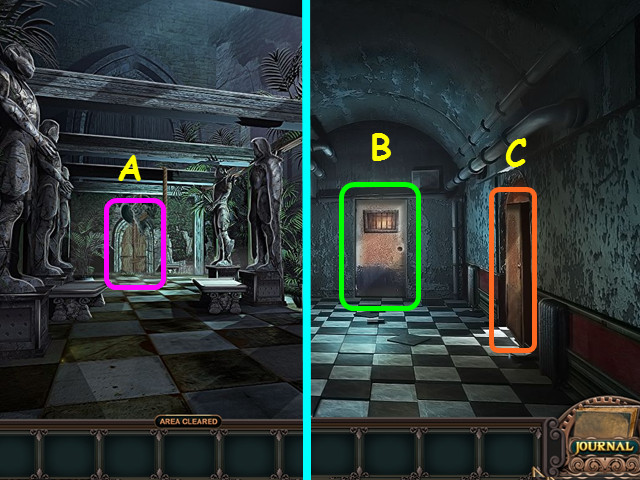
• Enter the solitary hall (A).
• Note the door at the end of the hall (B).
• Enter the door on the right to the mirror room (C).

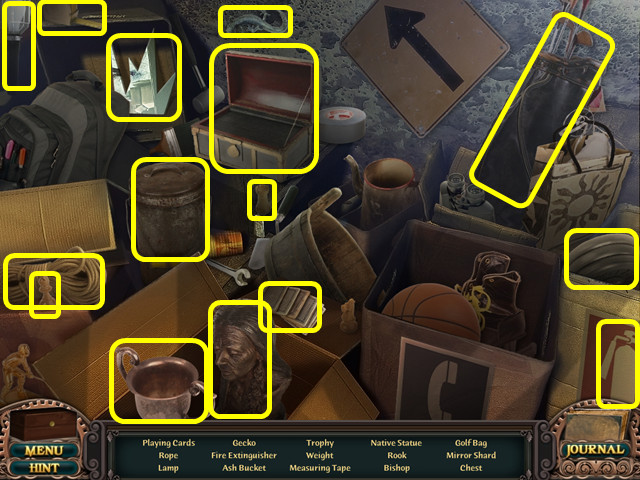
• Select the debris on the right for a HOS.
• Locate all the items on the list.
• You will earn the SMALL MIRROR SHARD.

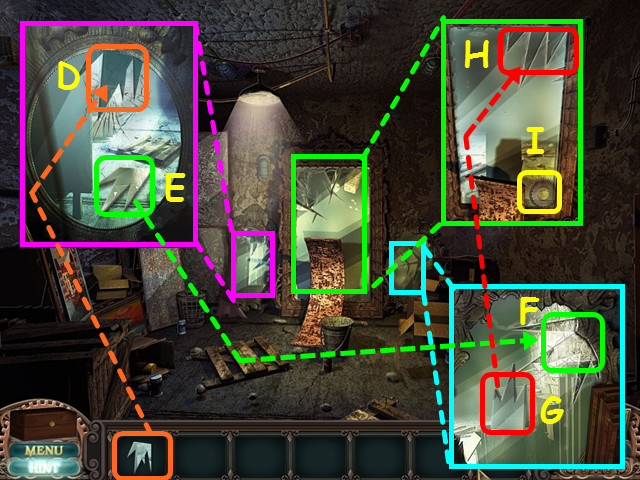
• Look at the small mirror on the left and place the SMALL MIRROR SHARD into the empty spot (D).
• Take the MEDIUM MIRROR SHARD (E).
• Look at the medium mirror on the right and place the MEDIUM MIRROR SHARD into the empty spot (F).
• Take the LARGE MIRROR SHARD (G).
• Look at the large mirror in the center and place the LARGE MIRROR SHARD into the empty spot (H).
• Take the DOOR CRANK (I).
• Exit the room.

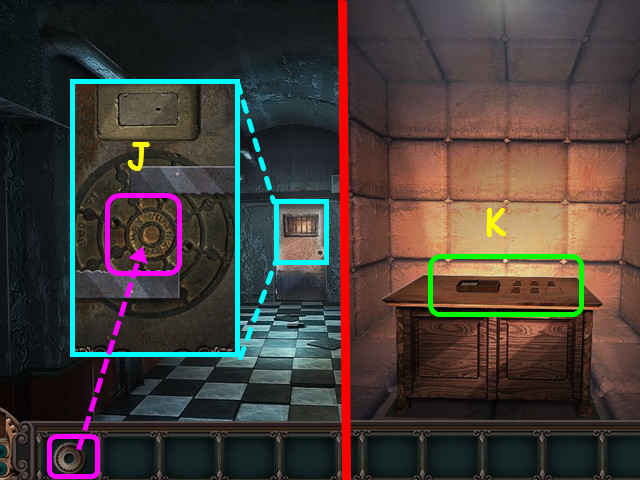
• Look at the door and place the DOOR CRANK on the device (J).
• Walk forward to enter the padded room.
• Look at the desk (K).

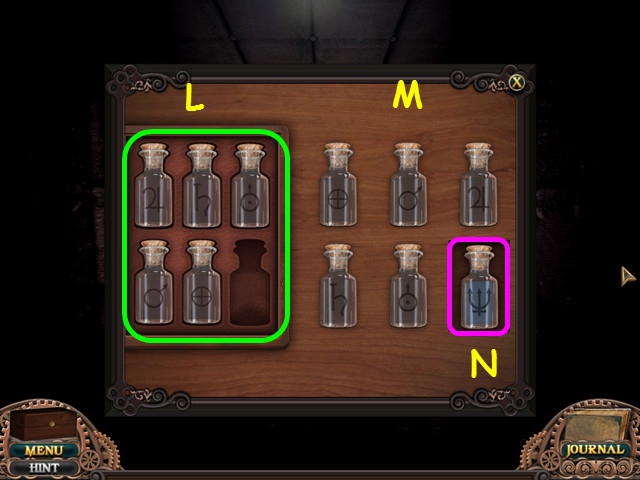
• Place the empty vials from the left (L) into the spots on the right with the matching symbols (M).
• Once the empty vials are placed, the final vial will appear.
• Take the final vial (N).
• Congratulations! You have completed White Haven Mysteries!


 Victorian Mysteries: The Yellow Room Walkthrough, Guide, & Tips
 Relics of Fate: A Penny Macey Mystery Walkthrough, Guide, & Tips
 Timeless: The Forgotten Town Walkthrough, Guide, & Tips
 Secrets of the Seas: Flying Dutchman Walkthrough, Guide, & Tips
 Mind's Eye: Secrets of the Forgotten Walkthrough, Guide, & Tips