Welcome to the Vampire Saga: Break Out Walkthrough!
Sink your teeth into the jugular of a heart-stopping journey!
Whether you use this document as a reference when things get difficult or as a road map to get you from beginning to end, we’re pretty sure you’ll find what you’re looking for here.
This document contains a complete Vampire Saga: Break Out game walkthrough featuring annotated screenshots from actual gameplay!
We hope you find this information useful as you play your way through the game. Use the walkthrough menu below to quickly jump to whatever stage of the game you need help with.
Remember to visit the Big Fish Games Forums if you find you need more help. Have fun!
This walkthrough was created by Chie, and is protected under US Copyright laws. Any unauthorized use, including re-publication in whole or in part, without permission, is strictly prohibited.

• From the main menu you can chose to play the game, change profiles, change options such as fullscreen and sound volume.
• The hidden object scenes (HOS) in this game present you with circles that have all the objects you need to find inside them. You only need to find an object and put it on any of the circles to “place” it, and it will disappear from the list.
• The HOS are not randomized.
• After finishing a HOS an object will be revealed, although sometimes you need to click the area in the middle of the circle a few times before it appears.
• There are any two types of cursors in the game: (1) when you can interact with an object and (2) when you can inspect an object closer.
• There is an inventory at the bottom of the screen (3) and a book that holds all of the notes that you find during the game (4).
• If you need a hint, press the button on the right (5), it will show you what to do next. If you are zoomed in to an area it will tell you to close the scene. You can hit the hint button again without recharge.
• Many times in the game you will not let you solve a puzzle until you find the solution first; it is important to read as many clues as possible and not skip ahead.
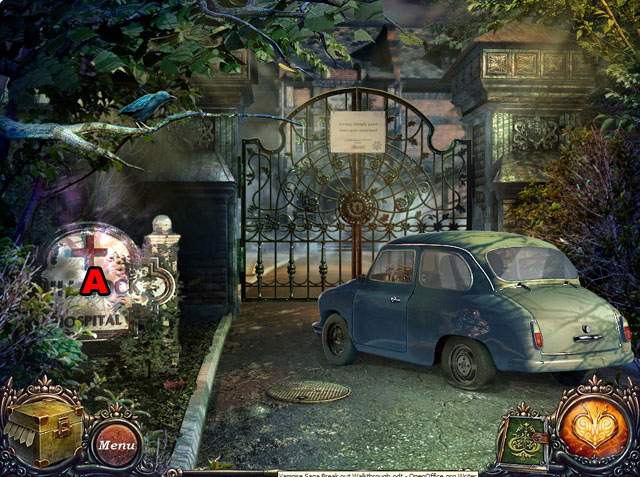
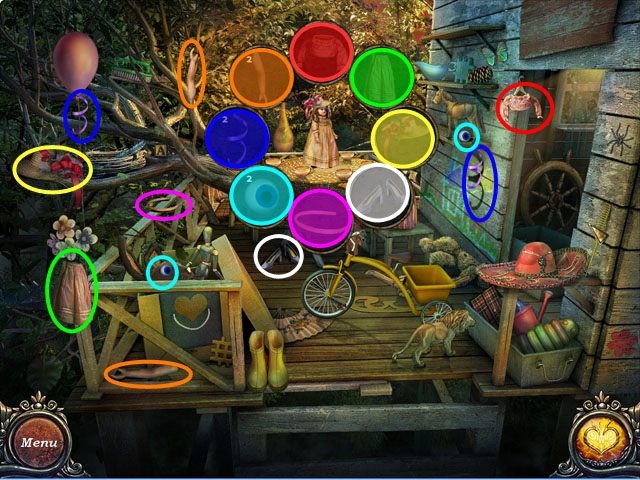
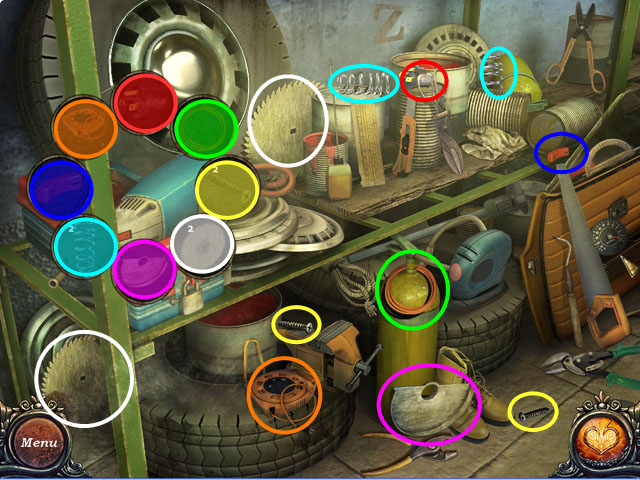
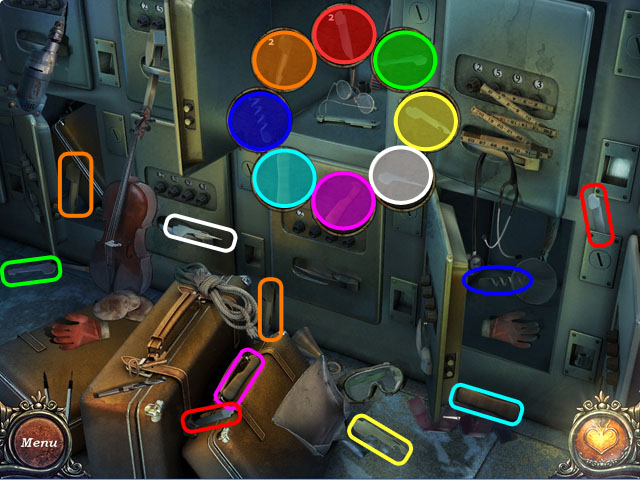
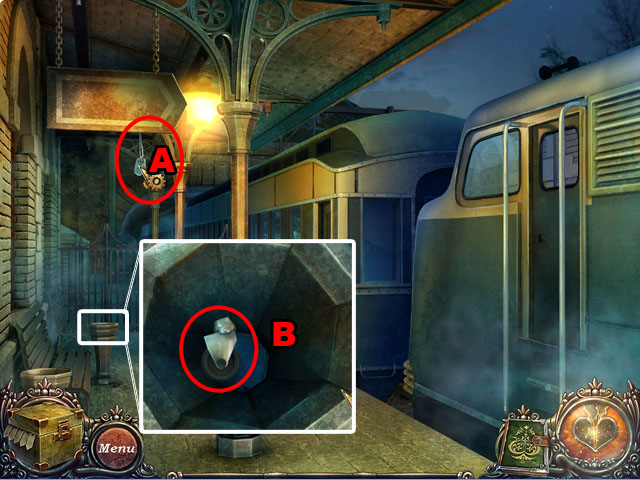
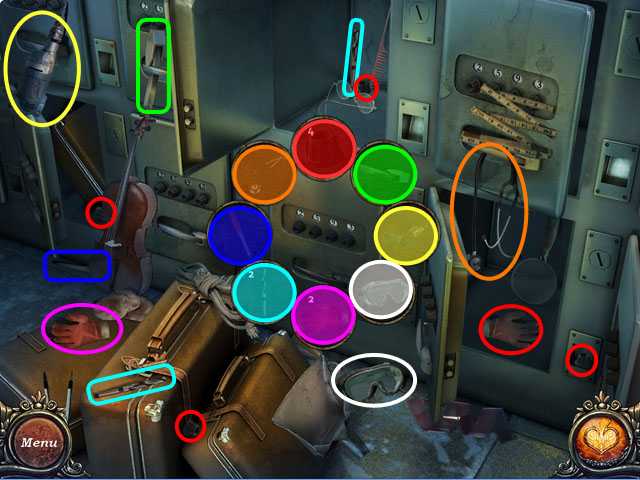
• Select the HOS (A).
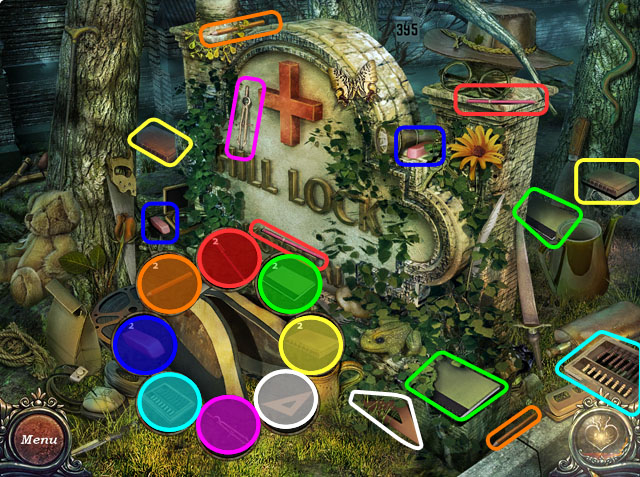
• Drag the object into the matching circles.
• Collect the RULER.
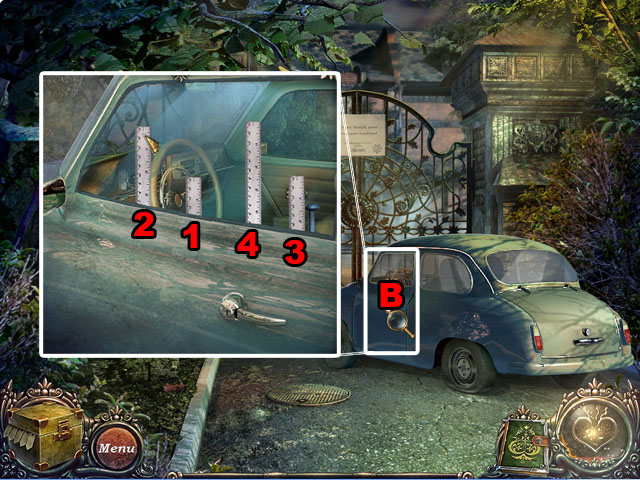
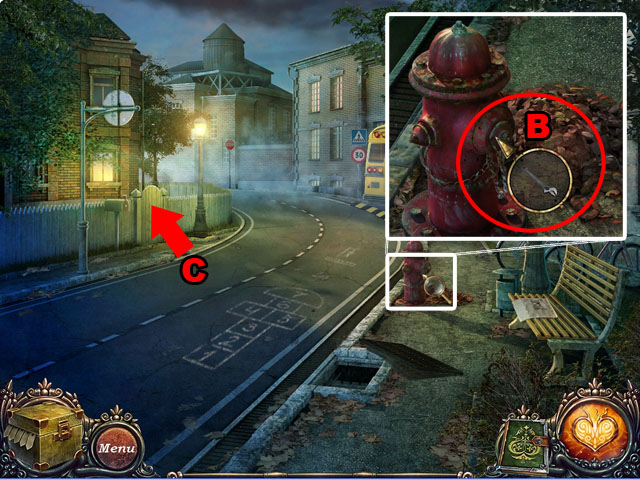
• Zoom into the door (B).
• Place the RULER on the window.
• Move the ruler from left to right while using it to unlock the door (1, 2, 3, and 4).
• The height of the ruler doesn’t matter, just the position.
• Each correct use will raise the lock by a small bit.
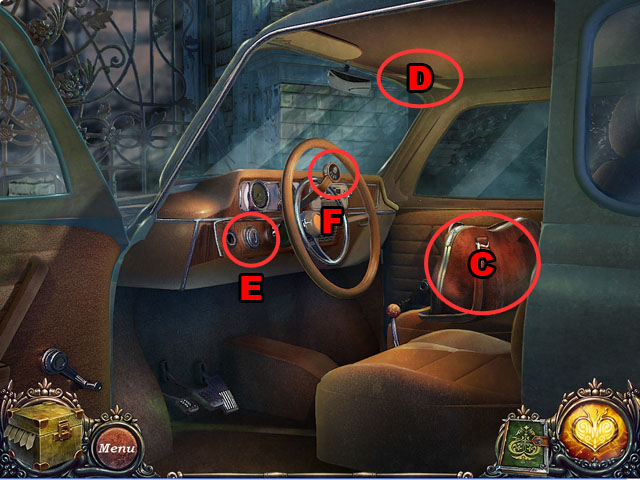
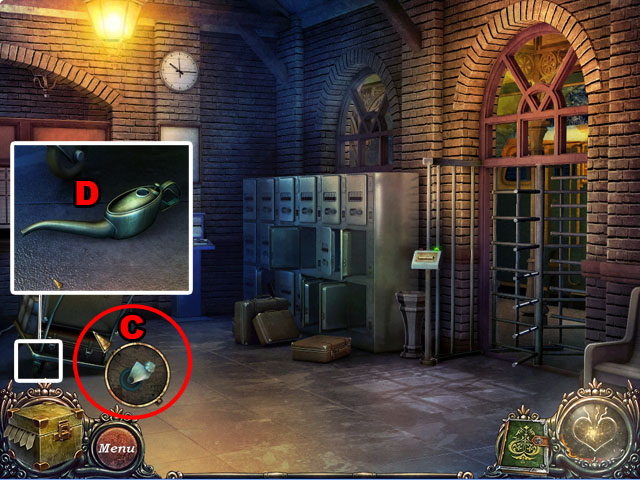
• Look inside the car.
• Zoom into the bag to find it doesn’t have a zipper (C).
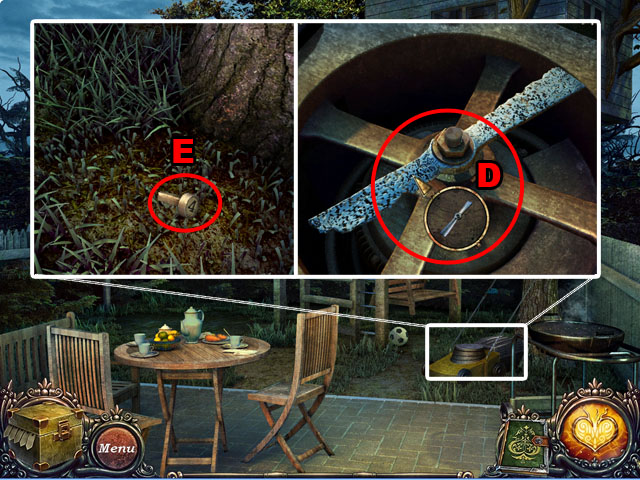
• Zoom into the visor and flip it open (D).
• Collect the KEYS.
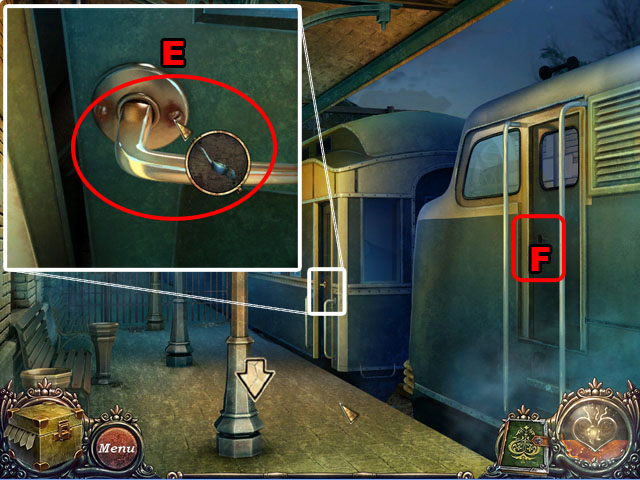
• Insert the KEYS to the ignition (E) and start the engine.
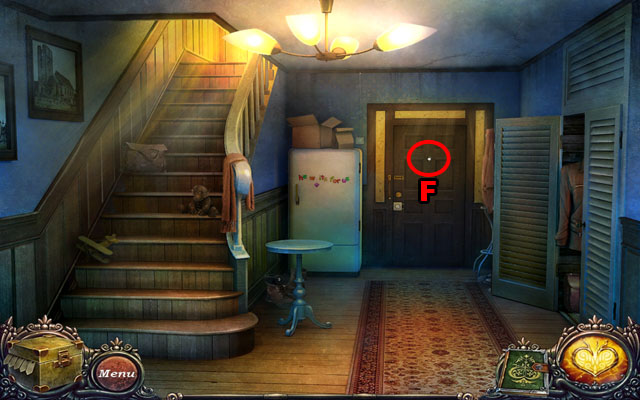
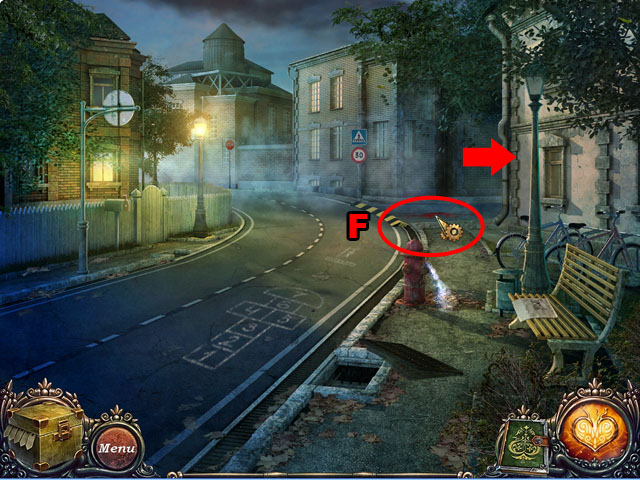
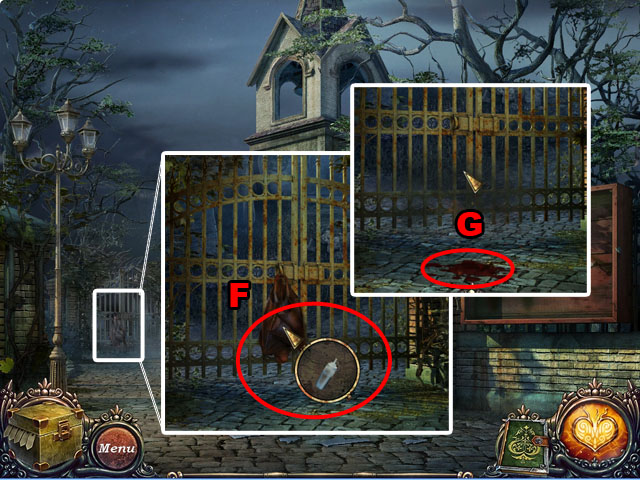
• Turn on the headlights (F) and exit the car.
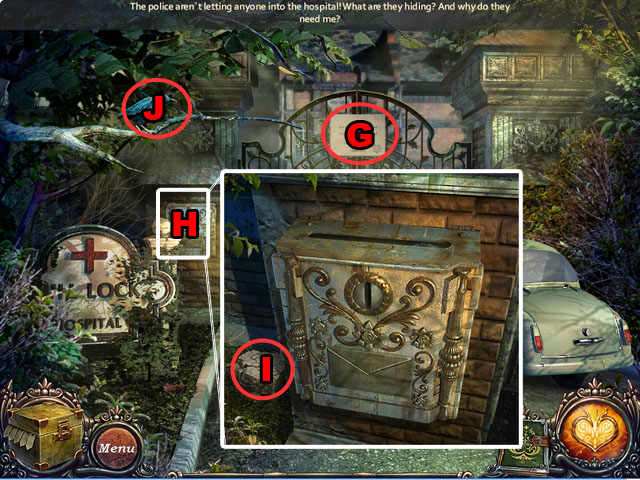
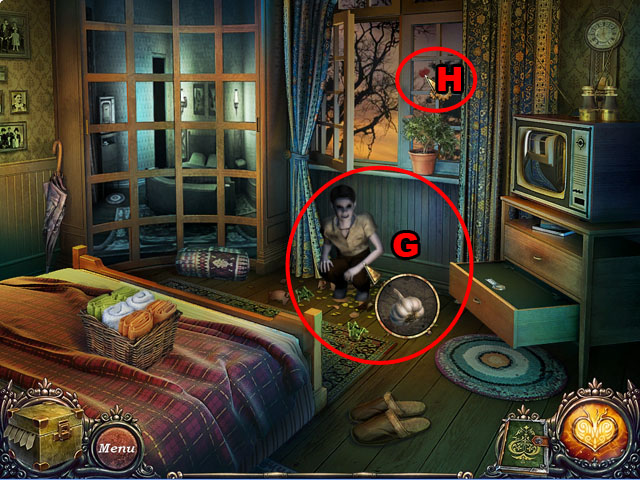
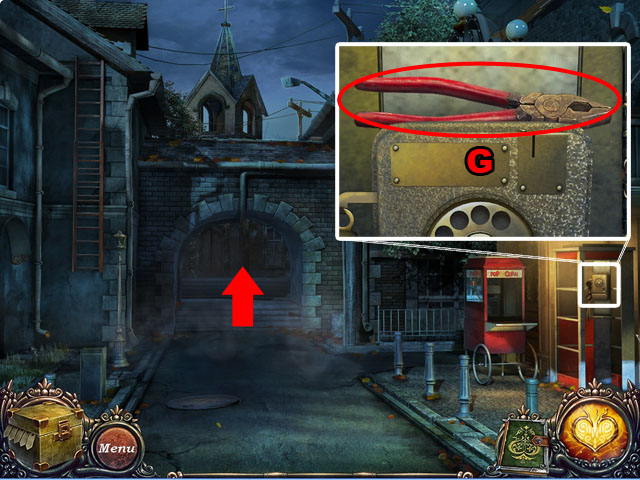
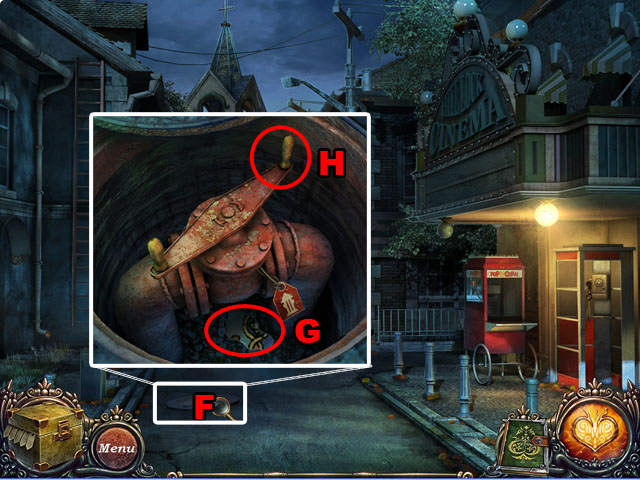
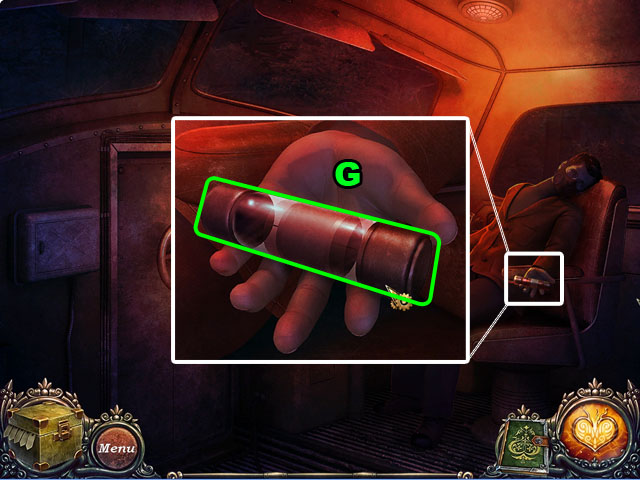
• View the posted note (G).
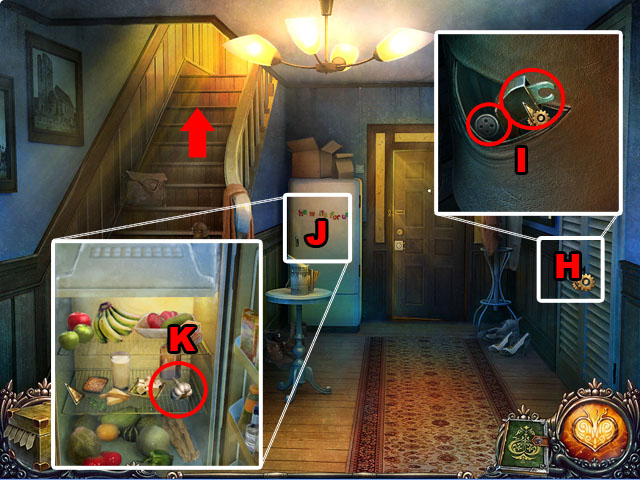
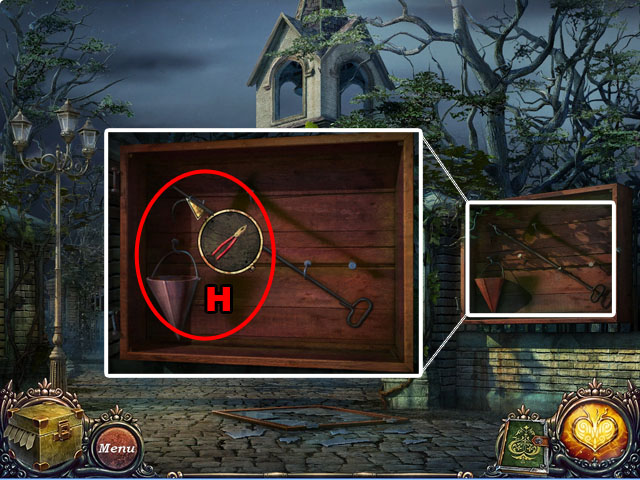
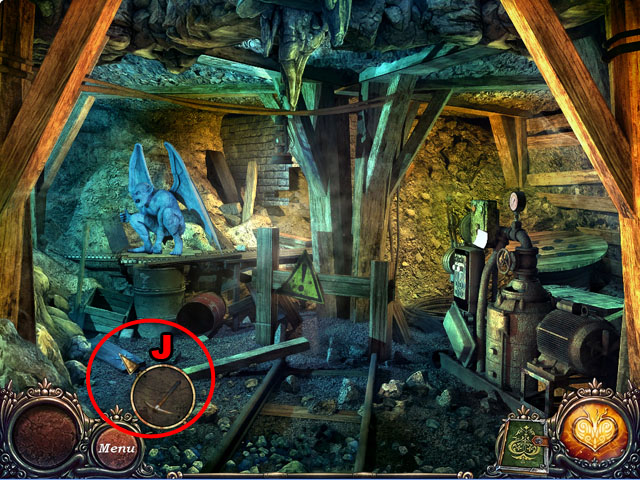
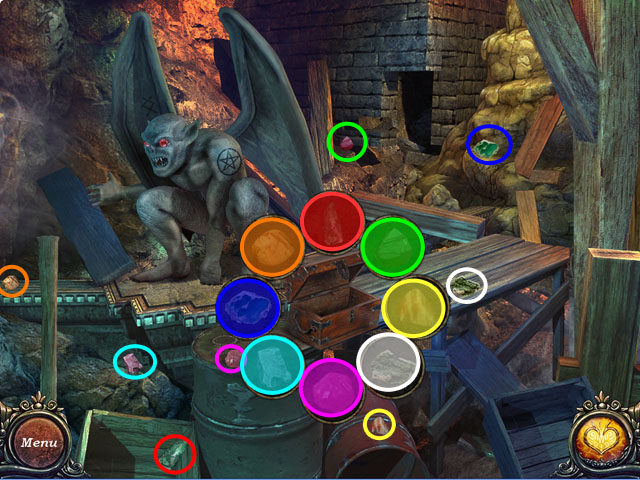
• Zoom into the mailbox (H) and collect the STONE (I).
• Zoom into the CROW (J) and throw the STONE to the crow to get the HAIRPIN.
• Collect the HAIRPIN on the ground.
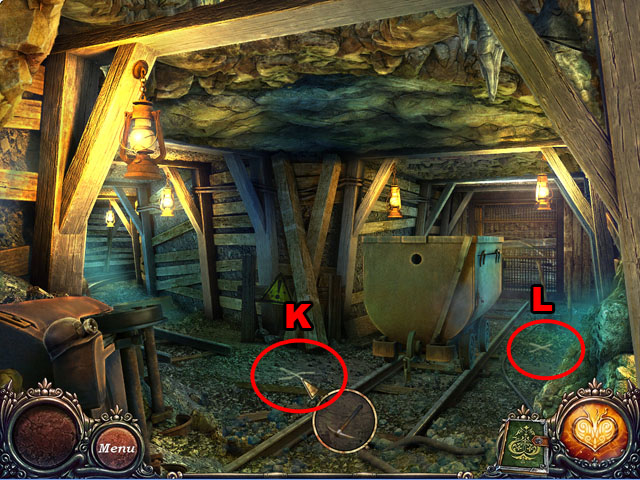
• Return to inside of the car again.
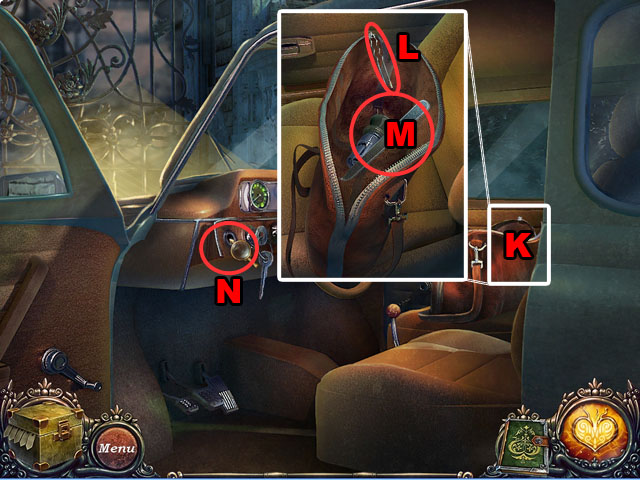
• Zoom into the bag (K).
• Use the HAIRPIN (L) to open the bag.
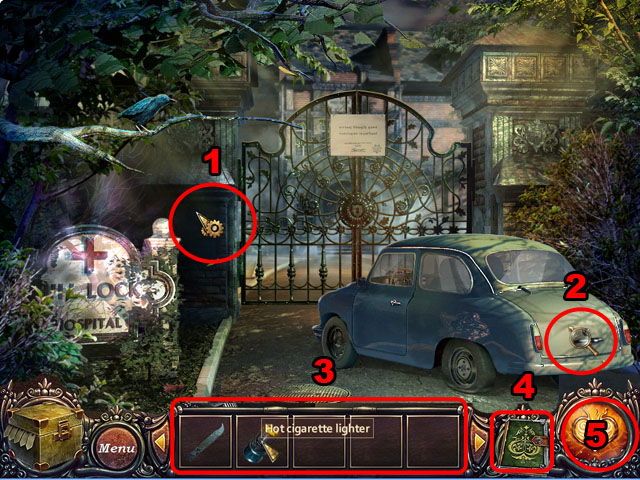
• Collect the CIGARETTE LIGHTER and NAIL FILE (M).
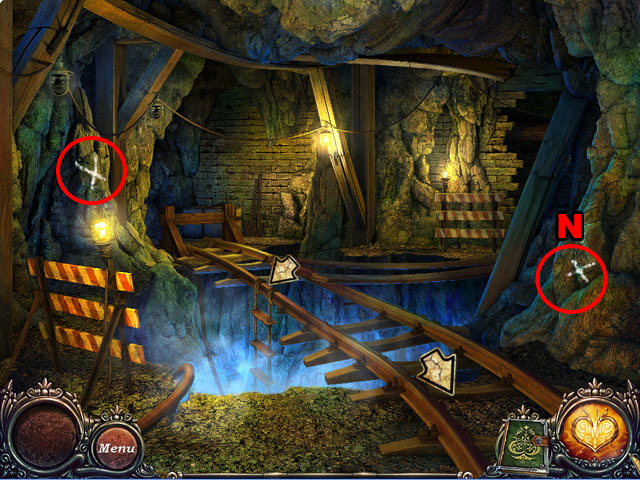
• Zoom into the driver’s wheel. Place the CIGARETTE LIGHTER (N) and collect the HOT CIGARETTE LIGHTER.
• Exit the car.
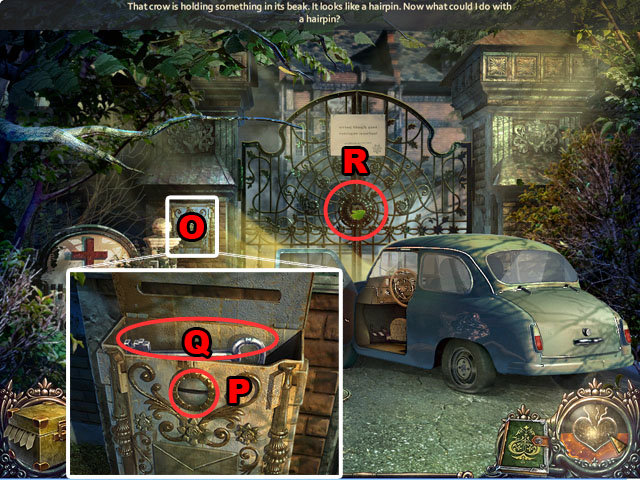
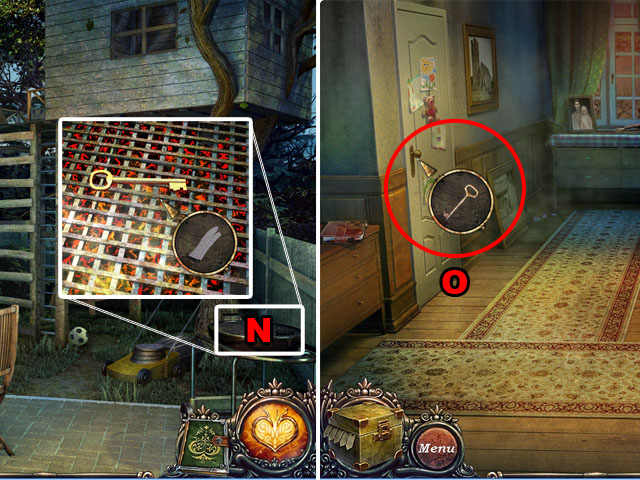
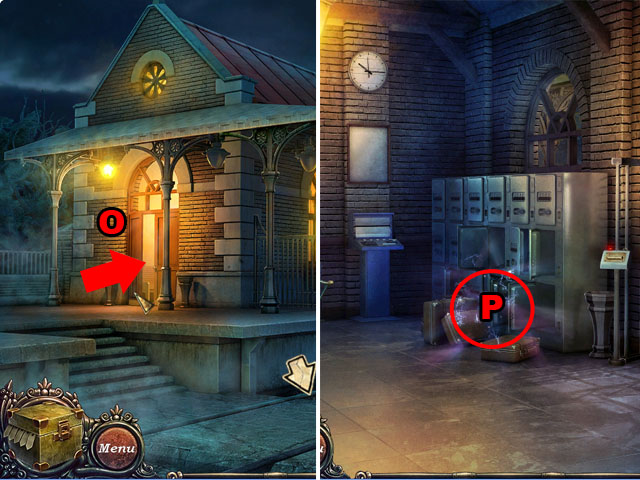
• Zoom into the mailbox (O).
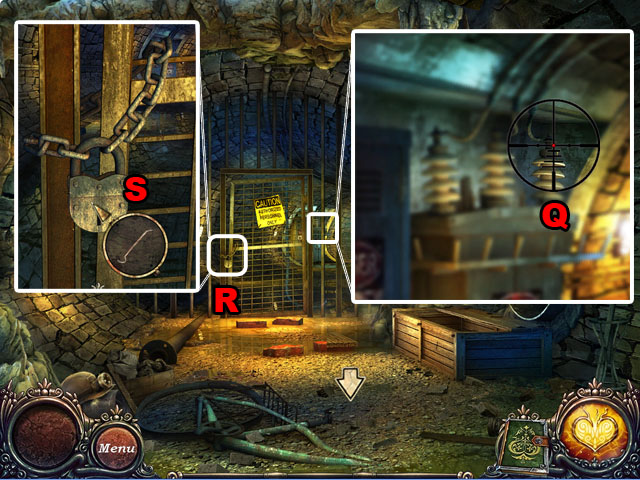
• Open the mailbox with the NAIL FILE (Q); open the lid and collect the GATE KEY (P).
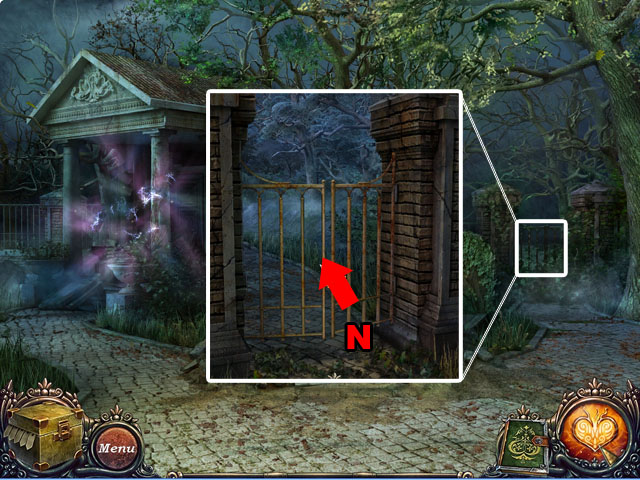
• Open the gate with the GATE KEY (R).
• Walk through the gate.
• Talk to the sheriff and go through all of the conversation topics (S).
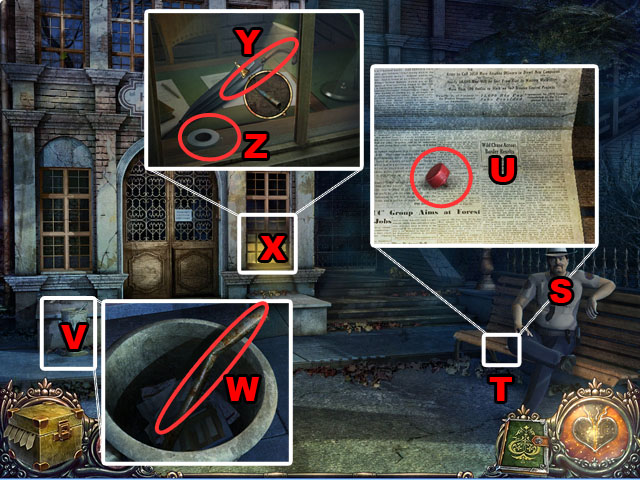
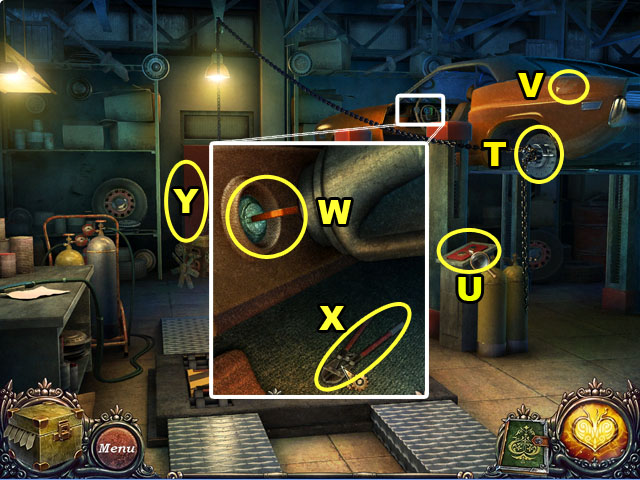
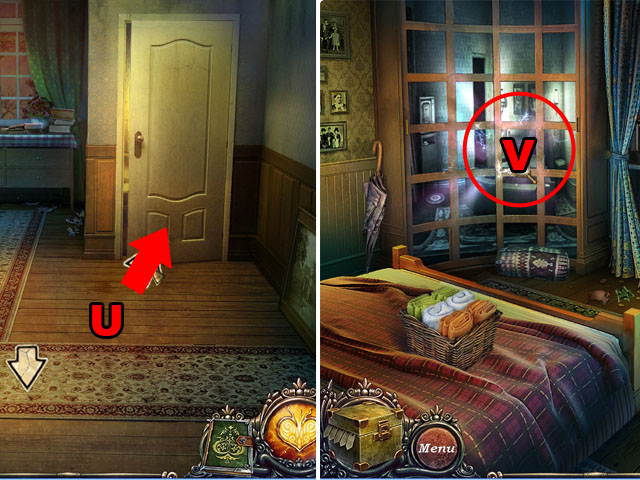
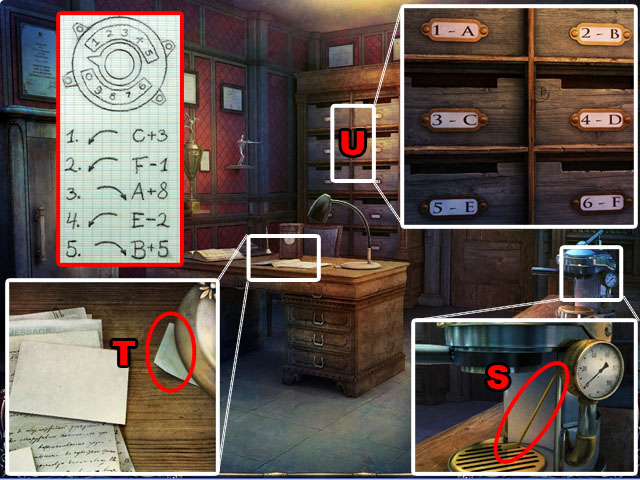
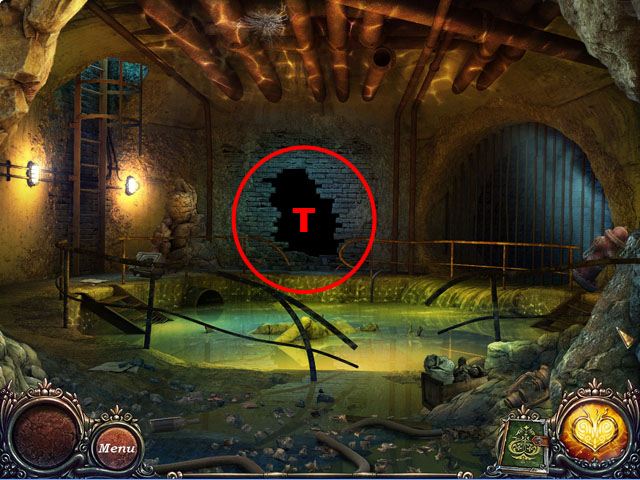
• Zoom into the newspaper (T) and open it; collect the RED BUTTON (U).
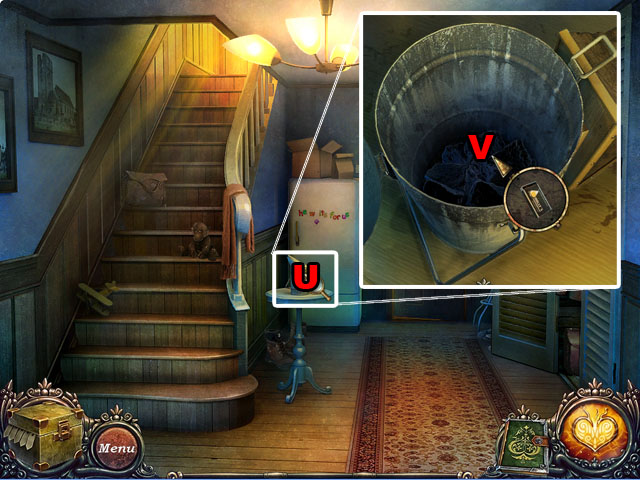
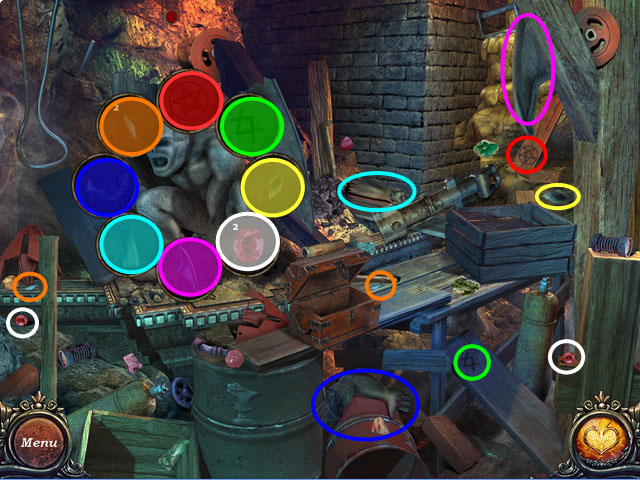
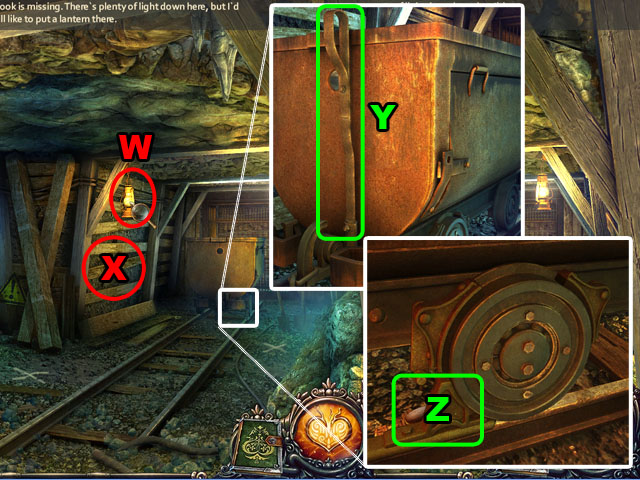
• Zoom into the trashcan (V); collect the PIPE (W).
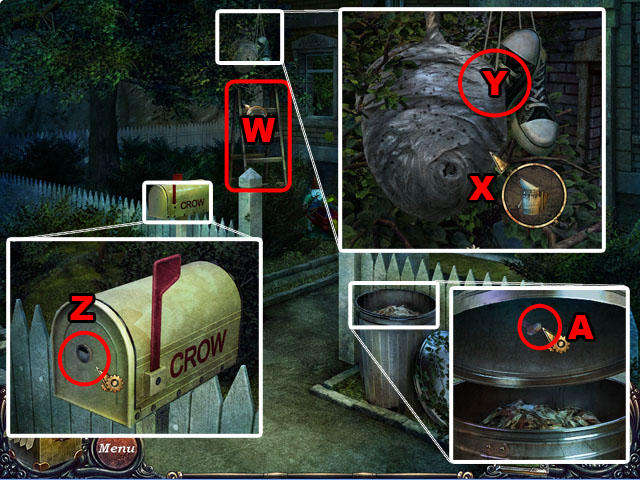
• Zoom into the window (X); break the glass with the PIPE.
• Collect the UMBRELLA (Y) and the ADHESIVE BANDAGE (Z).
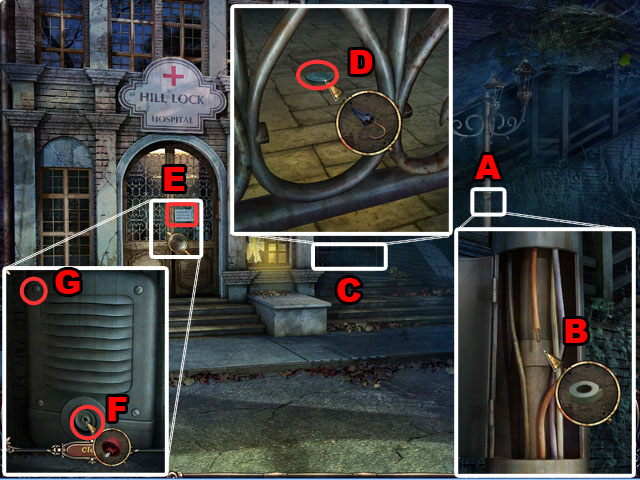
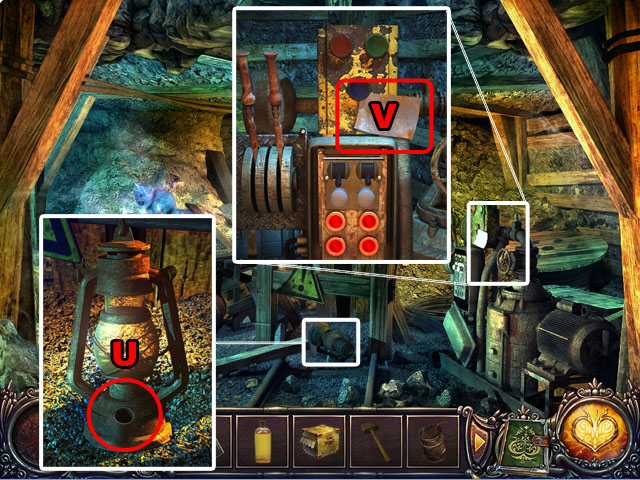
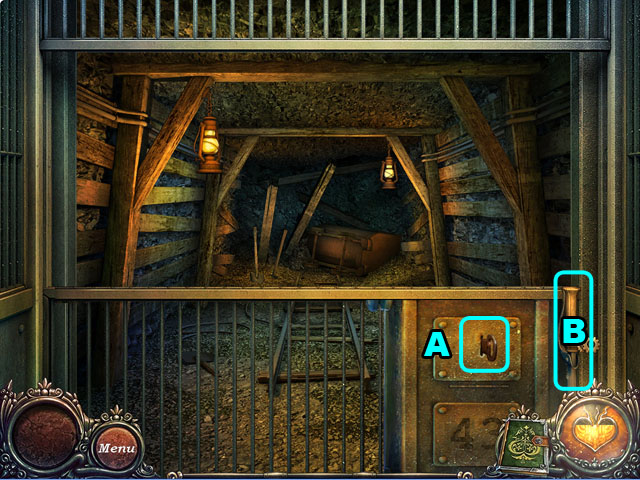
• Inspect the light pole and open it up (A).
• Use the TAPE to fix the light (B).
• Inspect the gate after Grace leaves (C) and use the UMBRELLA to get the COIN (D).
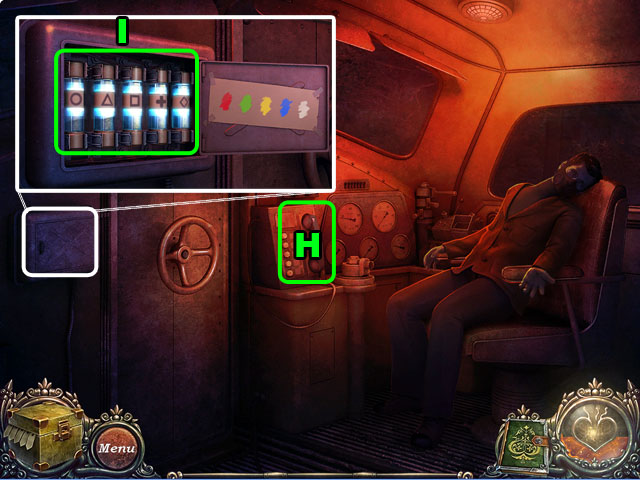
• Zoom into the entrance; read the post and then zoom into the intercom (E).
• Use the RED BUTTON on the intercom to place it (F).
• Use the QUARTER on the screws to take them off (G) and open the panel.
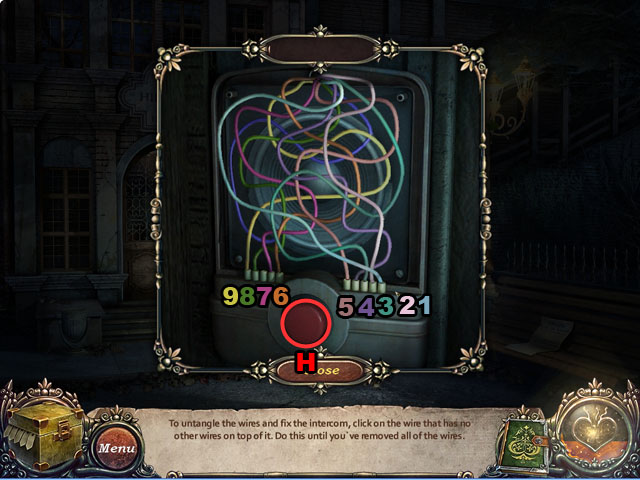
• Choose all of the wires that aren’t connected to the speaker by pressing at the bottom of the wire where it connects (1-9).
• Connect the blue wire to the missing socket and then push the button (H).
• Enter the hospital.
• Go forward to go through the green door in the center.
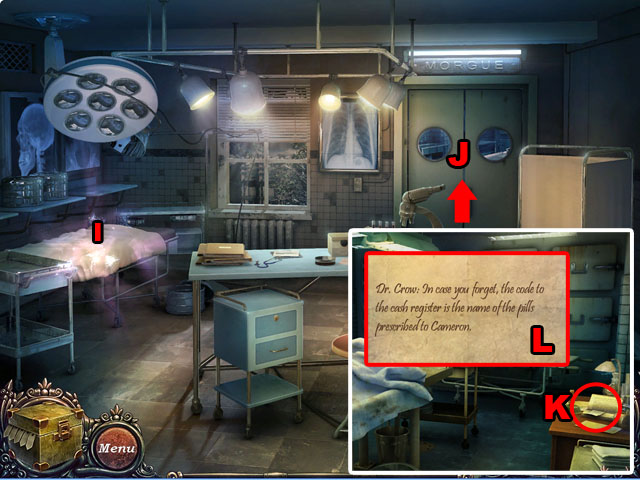
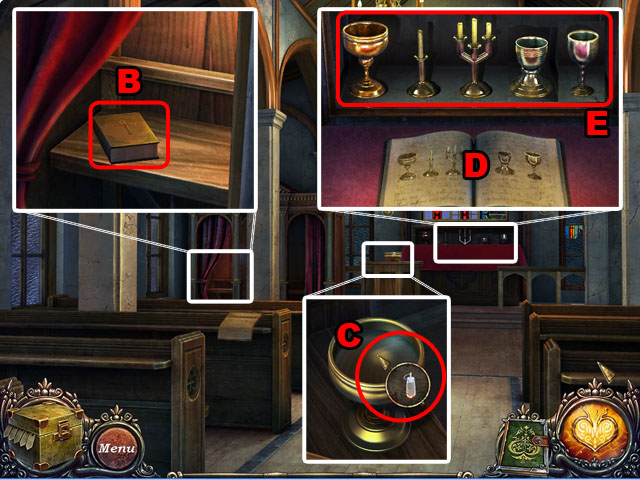
• Enter the next room (J).
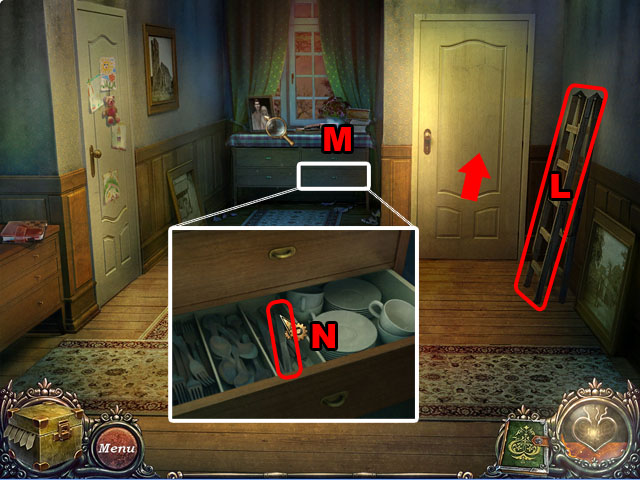
• Zoom into the desk; open the book to find the bookmark (K).
• Read the memo to get the hint to unlock the resister (L).
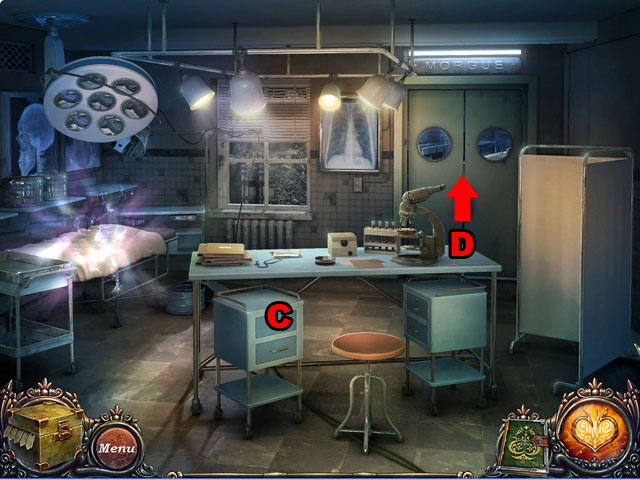
• Go back to the previous room and enter the HOS (I).
• Find all of the hidden objects and then pull the switches (M).
• Pick up the SCALPEL and exit the scene.
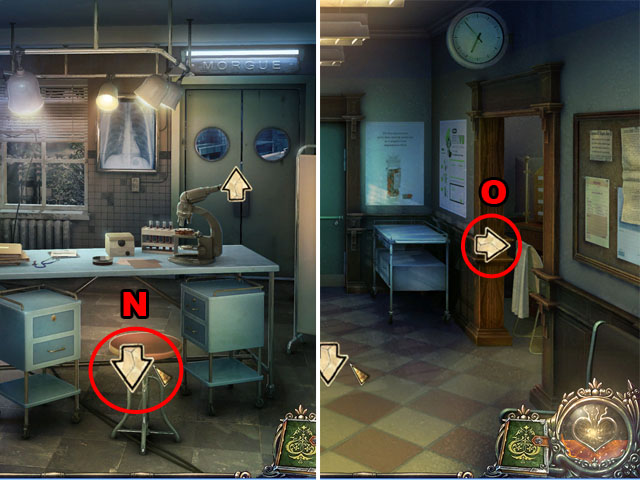
• Return to the first room (N) and go to the right (O).
• Take the PLIERS (P).
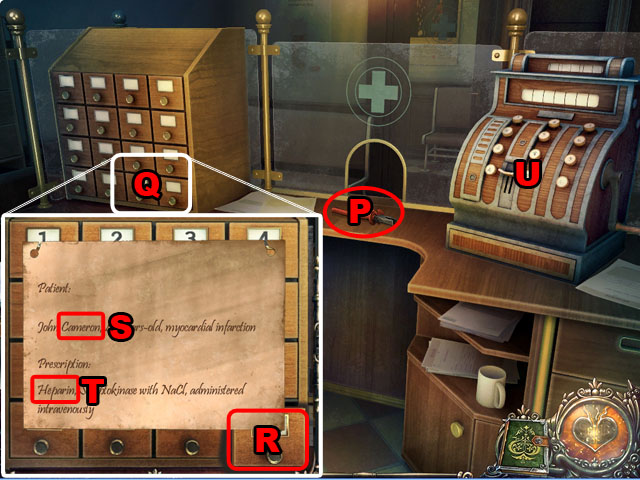
• Inspect the shelf (Q) and open up number 16 (R).
• Note the name; Cameron (S) and the name of the medicine – Heparin (T).
• Zoom into the register (U).

• Type in the name of the medicine – Heparin – using the keys on the register (V).
• Open the register and collect the DRAWER KEY (W).
• Zoom into the drawer and open it with the DRAWER KEY (C).
• Go to the next room (D).
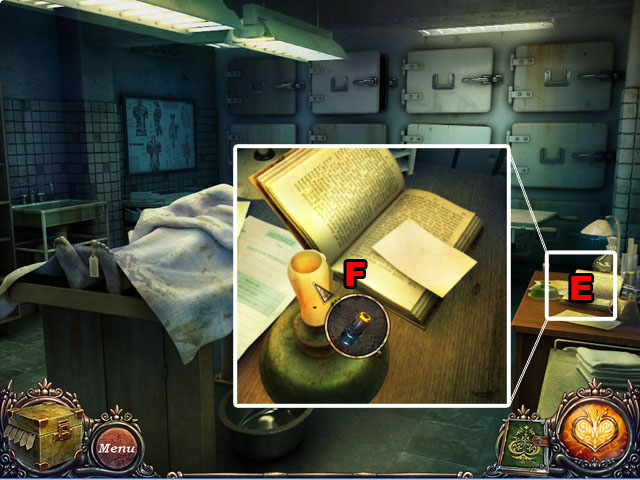
• Zoom into the desk (E) and light the candle with the HOT CIGARETTE LIGHTER (F).
• Return outside.
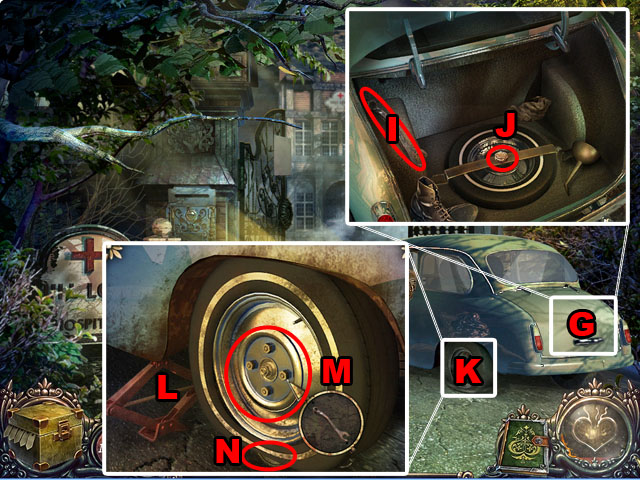
• Zoom into the trunk of the car (G).
• Open the trunk with the PLIERS and collect the WRENCH (I).
• Take off the nut with the PLIERS and collect the TIRE (J).
• Collect the JACK that was under the tire.
• Zoom into the flattened tire (K).
• Set the JACK (L) and push it once.
• Take off the tire with the WRENCH (M).
• Collect the AMULET (N) and then place the SPARE TIRE.
• Use the WRENCH on the tire to finish the job.
• Enter the hospital again.
• Move to the next operation room.
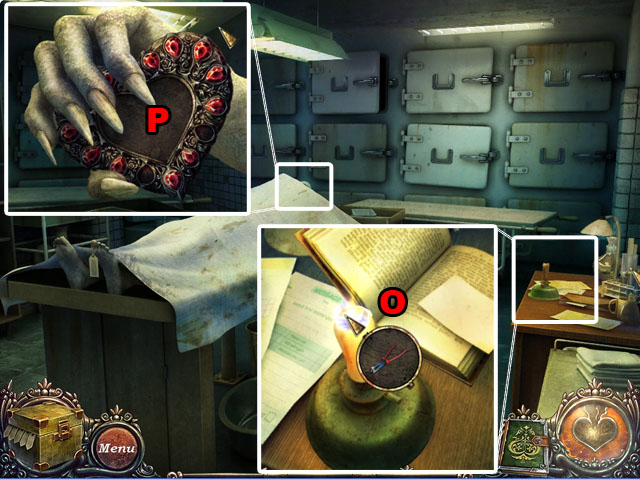
• Zoom into the desk; place the PLIERS WITH BOLT on to the candle (O).
• Uncover the body and zoom into the hand; place the AMULET into the missing spot (P).
• Return to the operation room.
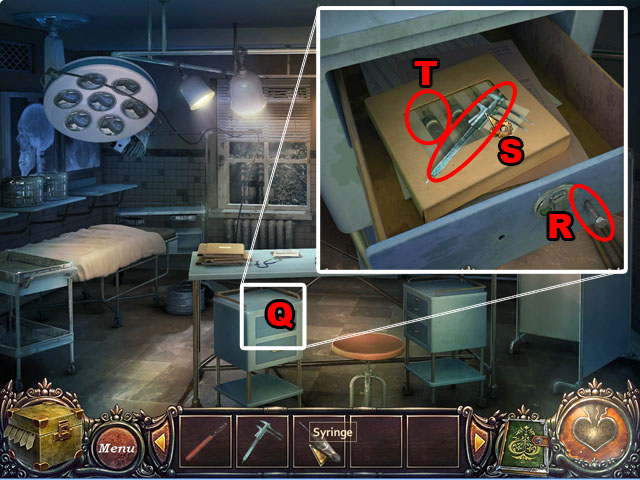
• Zoom into the drawer (Q).
• Use the HOT BOLT (R) on the drawer. Open it to collect the CALIPER (S).
• Open the syringe box with the SCALPEL; collect the SYRINGE (T).
• Return to the second room.
• Zoom into the dead body again and take some BLOOD with the SYRINGE (U).
• Zoom into the face.
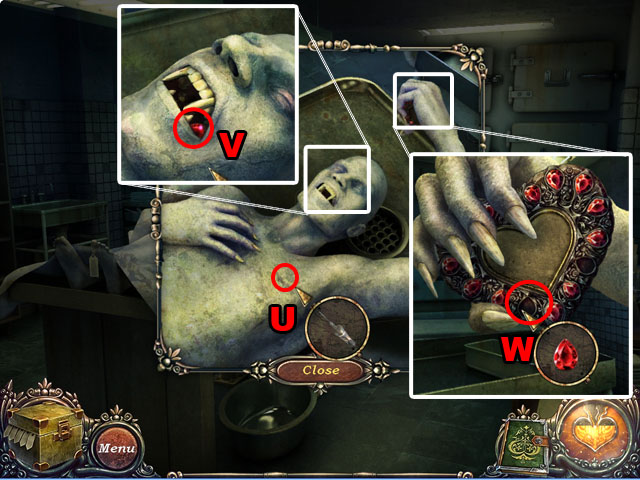
• Open the mouth with the CALIPER; collect the RUBY (V).
• Place the RUBY into the missing spot (W).
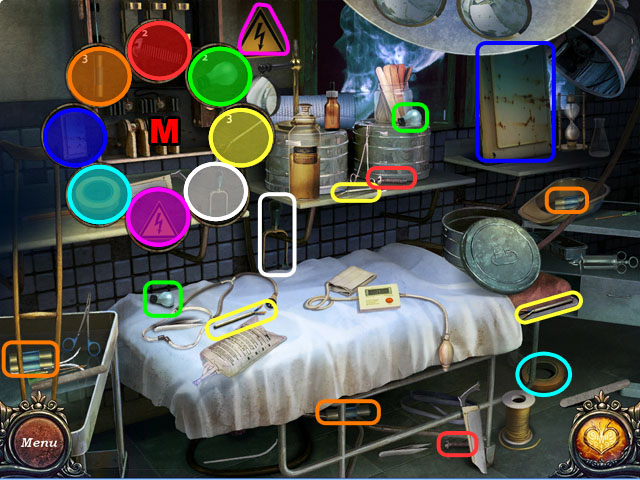
• Return to the operation room and zoom into the bed HOS a second time.

• Collect all of the objects that match the circles.
• Pick up the EYEDROPPER.

• Zoom into the desk and then again on the test tubes (A).
• Put the blood from the SYRINGE into the empty tube; take it.
• Place the test TUBE with blood in the centrifuge, and push the button to turn it on (B).
• Take the separated BLOOD with the EYEDROPPER.
• Put the blood in the petri dish (C); place it on the microscope (D).
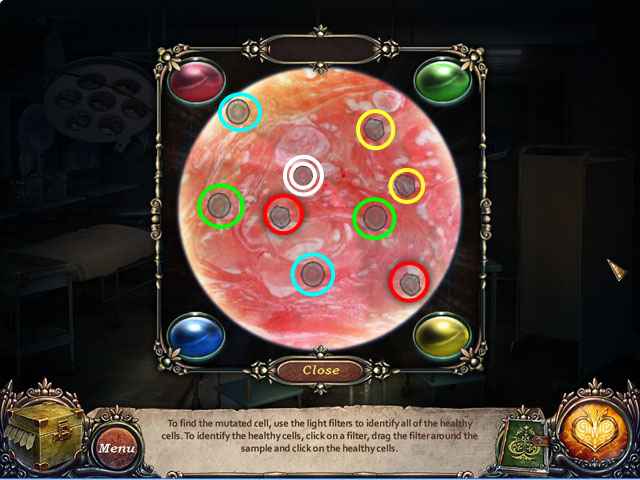
• Pick up each lens in the corner (1, 2, 3, and 4) and use it to look around the dish.
• Select the cells that are glowing until only one cell is left.
• Select that last cell to finish the mini-game.
• You will receive a PLASTIC BAGGY.
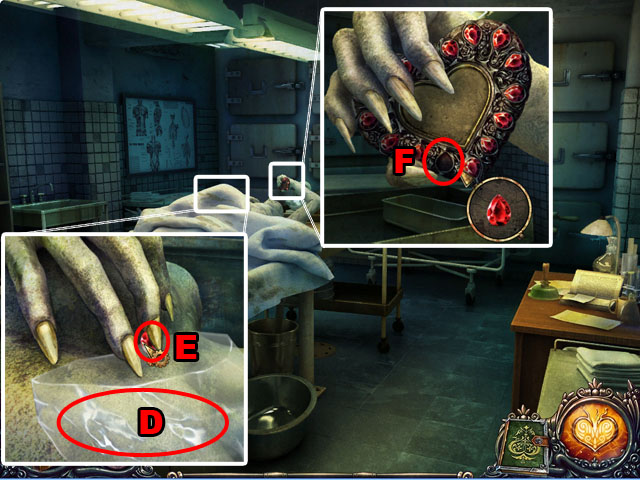
• Return to the far room and zoom into the hand.
• Place the PLASTIC BAGGY under the hand (D).
• Use the SCAPEL on the hand and collect the RUBY (E).
• Zoom into the other hand and place the RUBY (F).
• After the cut scene, zoom into the area again and collect the STETHOSCOPE.
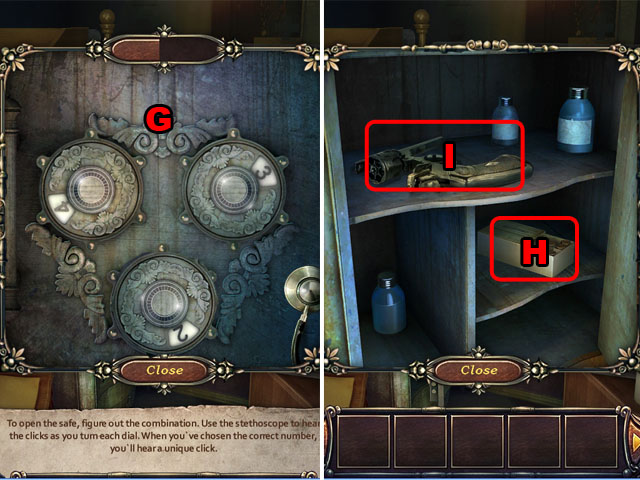
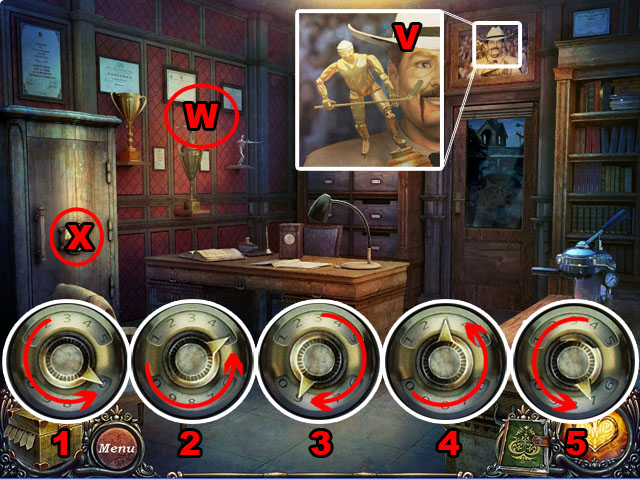
• Return to the office and zoom into the safe (G).
• Use the STETHOSCOPE on the safe and then press on the dials to find the correct combination.
• The stethoscope will shake when you move the dial to the correct number.
• The correct sequence is 4-3-2 but sometimes the numbers are in different locations.
• Take the BULLETS (H) and use them on the GUN to collect it (I).
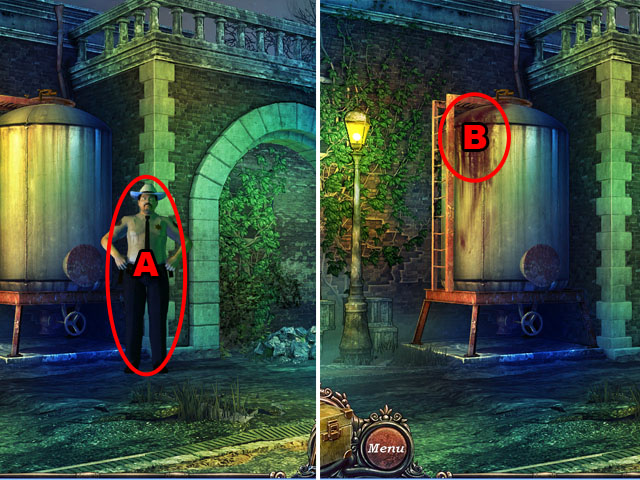
• Exit the office and the lights will turn off.
• Move forward twice and use the GUN on the corpse (J).
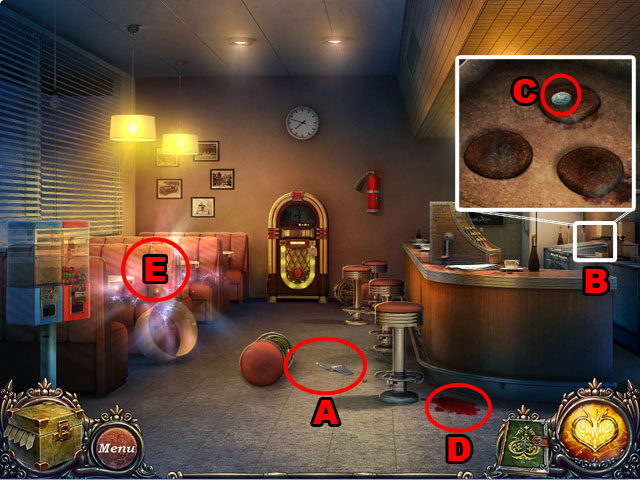
• Enter the diner from the front door.
• Move the chair and collect the SPATULA (A).
• Zoom into the kitchen (B) and flip all of the hamburgers; collect the COIN (C).
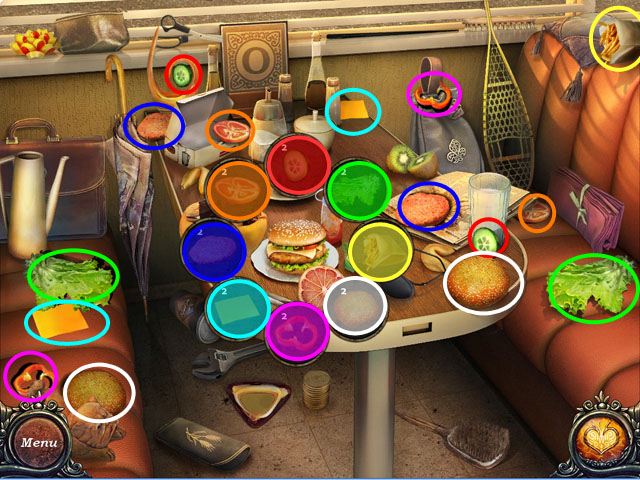
• Take the BLOOD (D) and zoom into the table HOS (E).
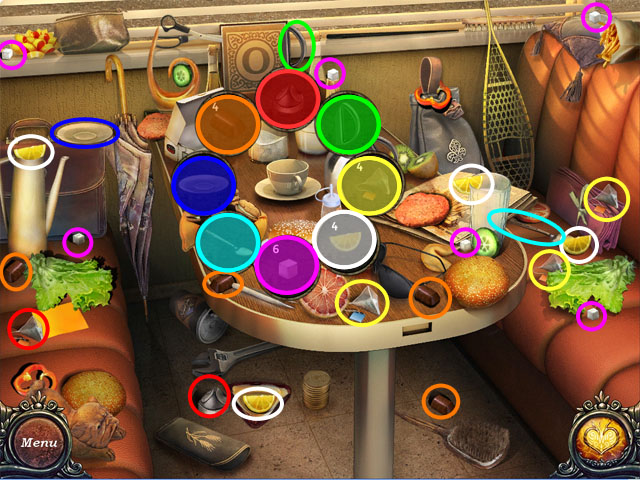
• Find the objects listed in the circles.
• Collect the FORK.
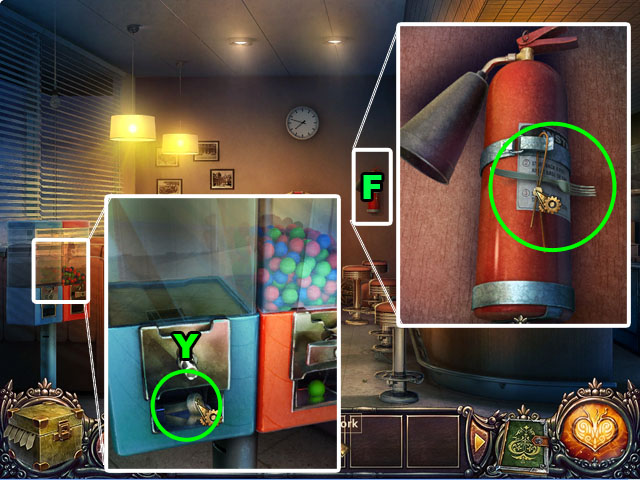
• Zoom into the fire extinguisher (F).
• Use the FORK to untie the wire; take the FIRE EXTINGUISHER.
• Inspect the gumball machine and use the FORK to get the 8 KEY (Y).
• Exit the diner.
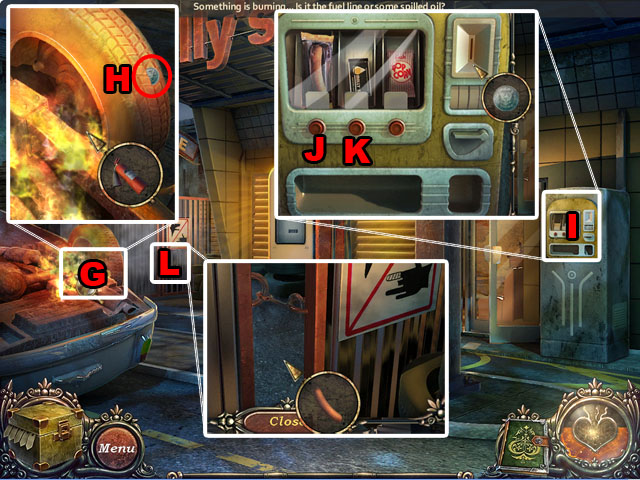
• Zoom into the car on fire (G).
• Use the FIRE EXTINGUISHER; collect the COIN (H).
• Zoom into the vending machine (I).
• Insert the COINS and buy the SAUSAGE (J). You will have change; take the change and buy the MATCH (K).
• Zoom into the gate (L) and throw the SAUSAGE.
• Open the lock with the SPATULA and go through.
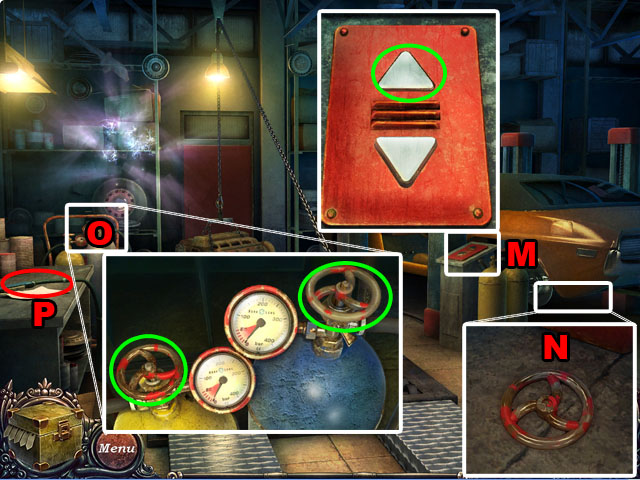
• Zoom into the controls (M) and push the upper button.
• Collect the VALVE HANDLE (N) from under the car.
• Zoom into the tanks; place the VALVE HANDLE and open both tanks (O).
• Zoom into the table; use the MATCHES and collect the ACETYLENE TORCH (P).
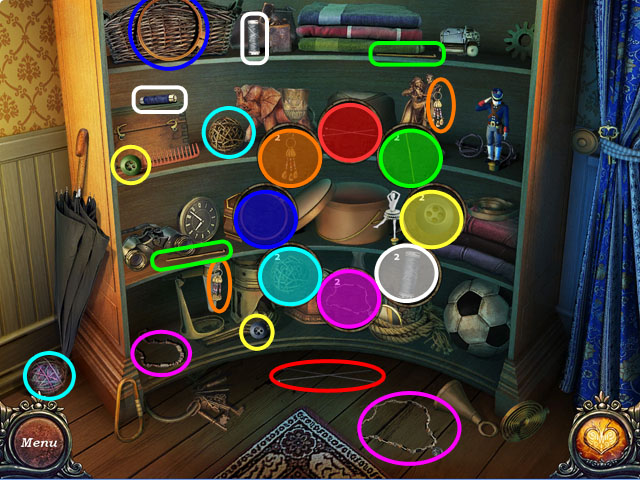
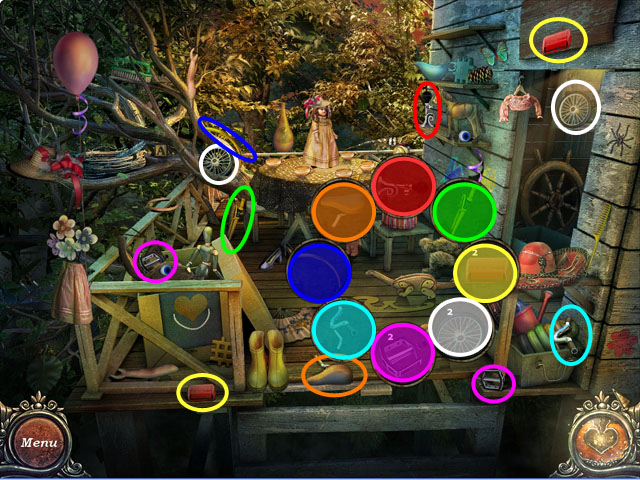
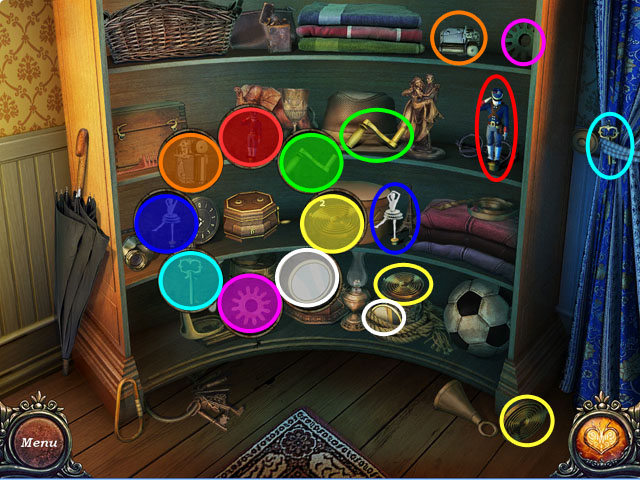
• Zoom into the shelf HOS.
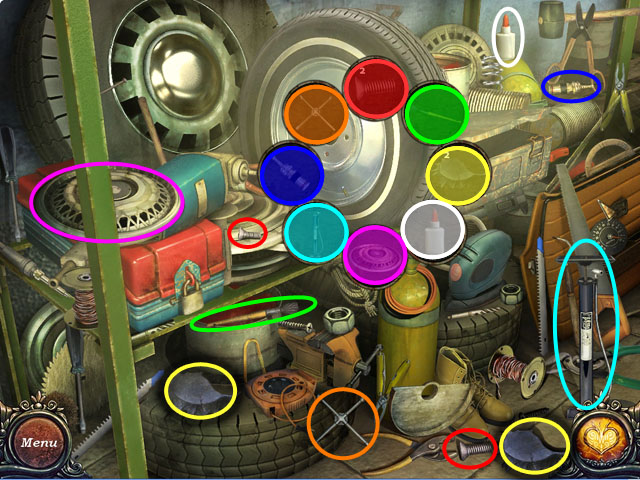
• Find all of the objects and collect the GAS CAN.
• Exit the garage.
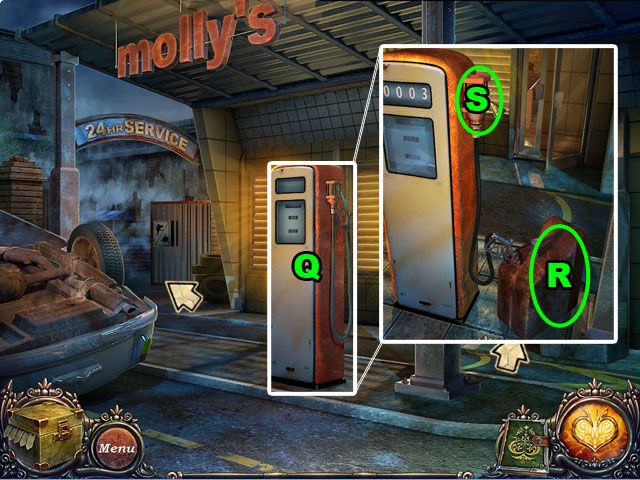
• Zoom into the gas pump (Q).
• Place the GAS CAN beside the pump (R); use the hose (S) to fill the gas can then take the FULL GAS CAN.
• Return to the garage.
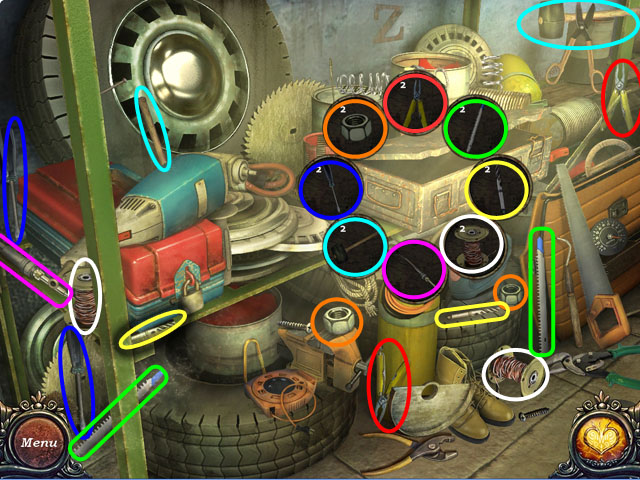
• Zoom into the shelf HOS again.
• Collect the FUNNEL.
• Use the ACETYLENE TORCH on the base of the chain and then attach the chain to the wheel (T).
• Press the down button on the control to lower the car (U).
• Zoom in on the gas tank and use the FUNNEL and then the GAS CAN on the tank to fill it up (V).
• Inspect the car interior and turn the key to wind up the chain (W).
• Lift up the floor mat and take the WIRE CUTTERS (X).
• Open the door and a demon will appear.
• Use the WIRE CUTTERS on the back wheel to drop the engine on the demon; then take the blood from the floor.
• Go through the door.
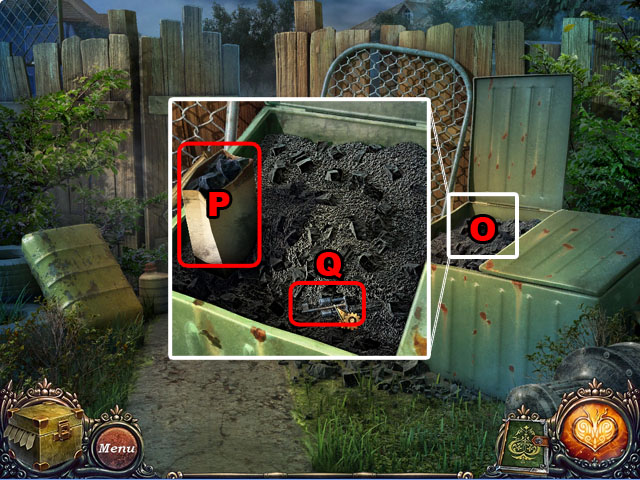
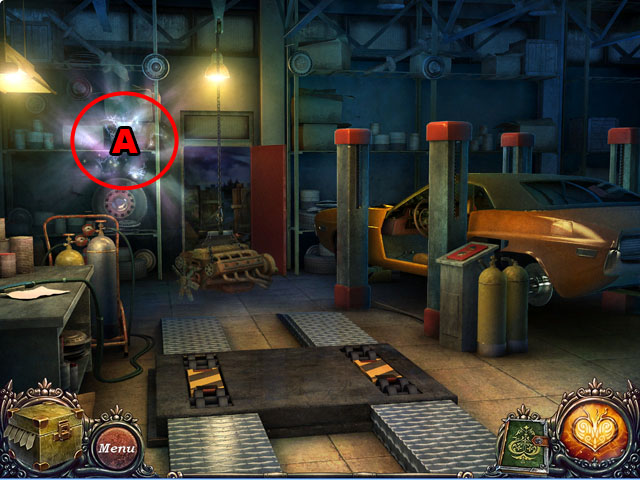
• Zoom in on the dumpster (A) and take the SCOOP (B).
• Go through the open door (C).
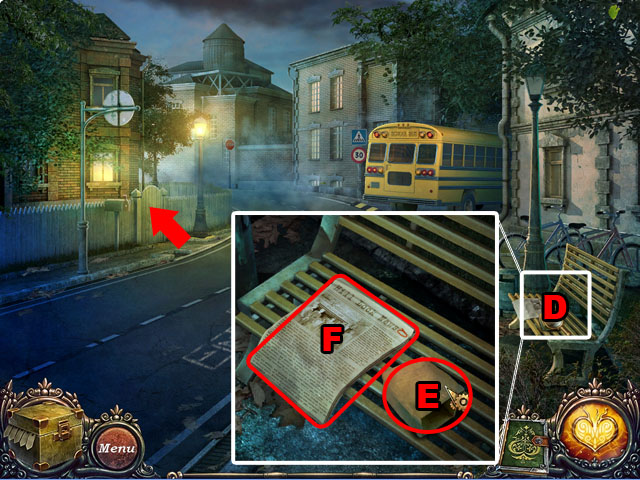
• Inspect the newspaper (F) on the bench (D) and take the PAPER BAG (E).
• Enter the house to the left.
• Open the gate (G) and then the door to the house. Go through the front door.
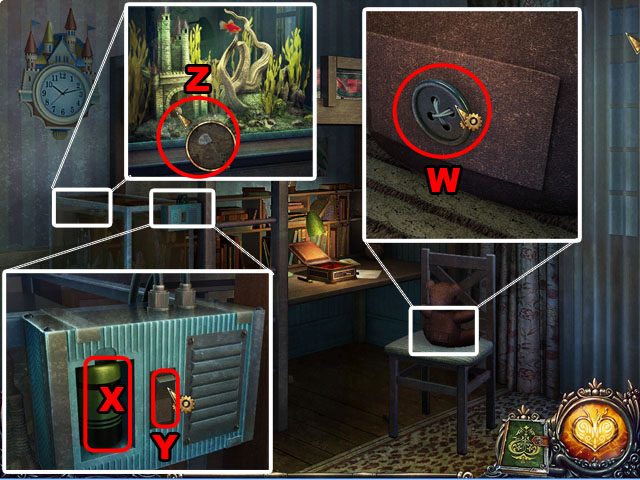
• Open the closet door (H) and zoom in.
• Take the FRIDGE HANDLE and the BUTTON (I).
• Use the FRIDGE HANDLE on the refrigerator (J) and take the GARLIC (K).
• Go upstairs.
• Take the LADDER (L).
• Zoom in on the bureau (M) and take the KNIFE (N).
• Go through the door to the right.
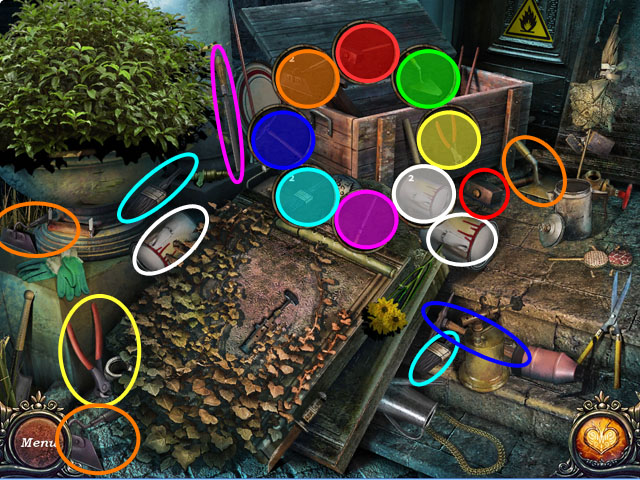
• Play the HOS.
• Take the LIGHTER FLUID that is uncovered once the hatbox has been closed.
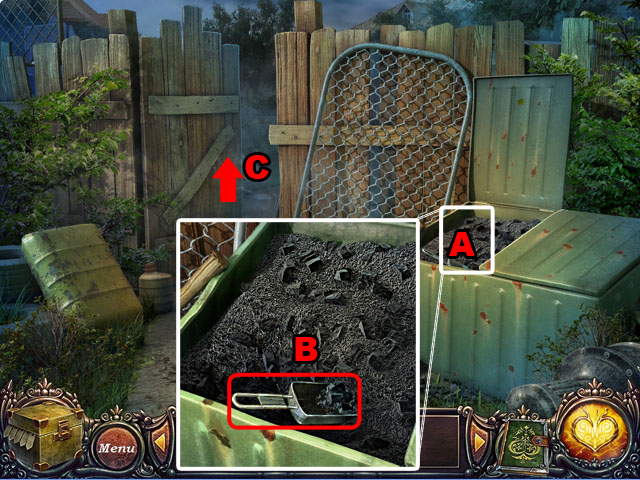
• Return to the first scene in this area with the dumpster and zoom in on it (O).
• Use the PAPER BAG on the coal pile (P) and then the SHOVEL to scoop the coal into the bag uncovering a key (Q). Take the KEY.
• Take the bag when you are finished.
• Travel forward one scene.
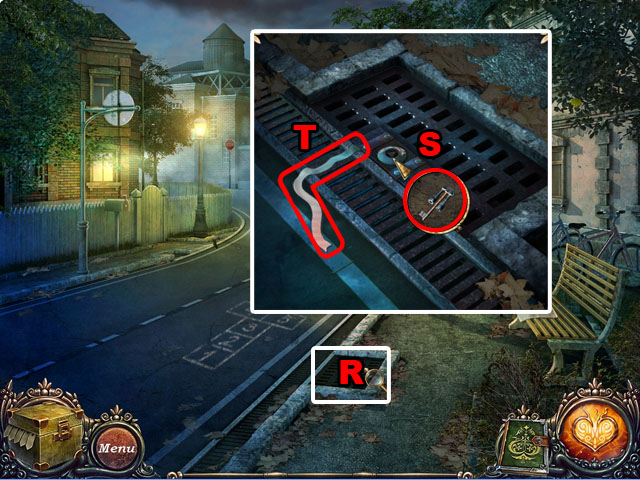
• Zoom in on the drain (R) and use the TRIANGULAR KEY in the hole (S).
• Remove the grate and take the ribbon to get the SAFE KEY (T).
• Return to the inside the house and zoom into the smoker on the table (U). Remove the cover to see inside it.
• Use the BAG OF COAL and then the MATCHES on the inside (V).
• Take the SMOKER and go outside.
• Use the STEPLADDER under the wasps’ nest (W).
• Zoom in on the top of the ladder and use the SMOKER on the nest (W).
• Put the nest in your PAPER BAG and take the HANDLE from inside the shoe (Y).
• Use the HANDLE on the mailbox (Z) and open the package inside it to get the LAWNMOWER BLADE.
• Throw the BAG with the nest away in the trash (A); take the CHALK from underneath the trash lid.
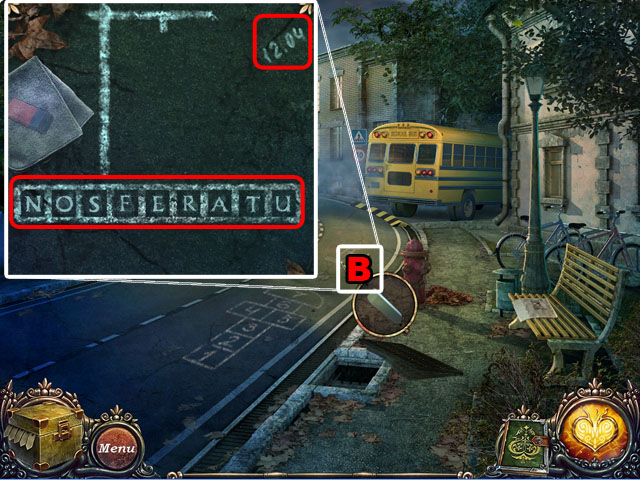
• Travel backwards to the road and investigate the drawings past the hopscotch (B).
• Use the CHALK on the puzzle to start it.
• Drag the letters to the correct positions in the word to finish the puzzle.
• The correct answer is NOSFERATU.
• Note the date that is show after you finish the puzzle: 12/04.
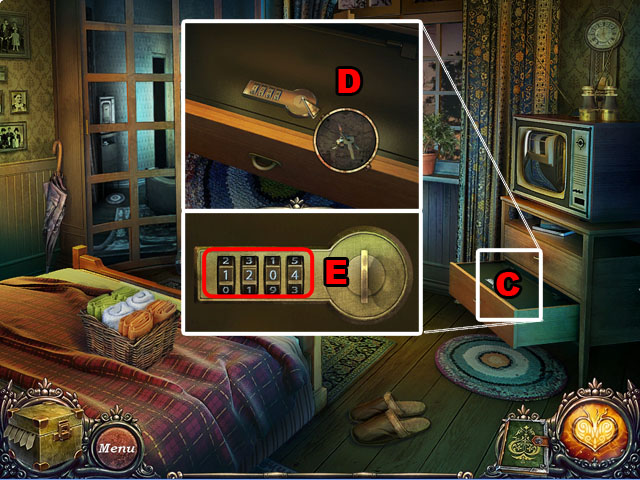
• Enter the house again and go upstairs. Go inside the room on the right again.
• Open the drawer under the TV (C) and use the SAFE KEY on the lock (D).
• Put in the date you found before 12/04 to open the lock (E).
• Take the COIN and the BLOOD sample and go downstairs.
• Zoom in on the back door and talk to Adam. Select all of the different conversation options (F).
• Travel back upstairs to the room on the right.
• Use the GARLIC on Adam after he comes through the window (G).
• Collect the BLOOD sample from the window and close the window (H).
• Go downstairs and out the back door.

• Play the HOS (I).
• Take the BASKETBALL that appears.
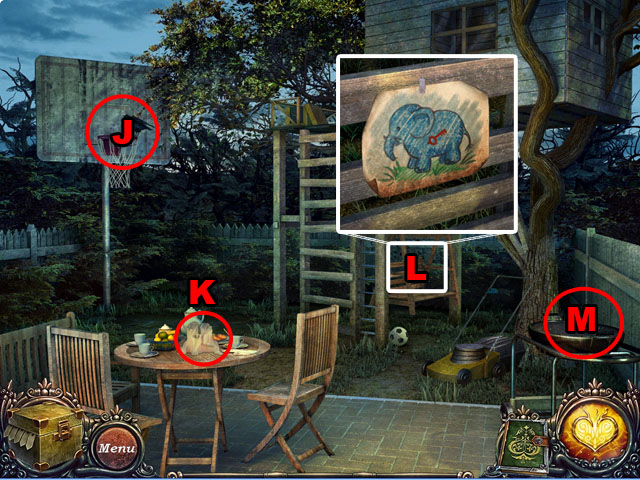
• Zoom in on the bench and inspect the elephant drawing.
• Inspect the crow near the basketball hoop and throw the BASKETBALL at it to get another COIN (J).
• Look at the table and use the KNIFE to take the CANDLES (K).
• Use the CANDLES on the grill and then use the MATCHES to melt them (M).
• Play the HOS again.
• Find all of the objects and take the ASBESTOS GLOVE.
• Use the GLOVE on the grill to take the KEY (N).
• Return inside and go upstairs. Use the KEY on the door to the left to open it (O).
• Enter the room.
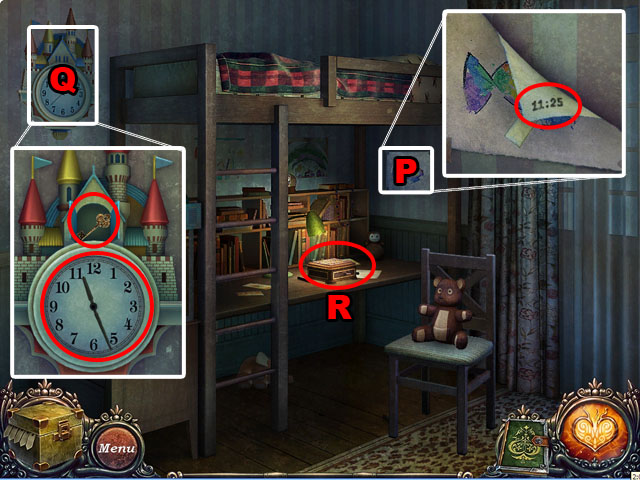
• Inspect the fish drawing and pull the corner to get another clue (P) 11:25.
• Inspect the clock and set it to 11:25 (Q) and take the small KEY.
• Use the small KEY on the puzzle box (R).
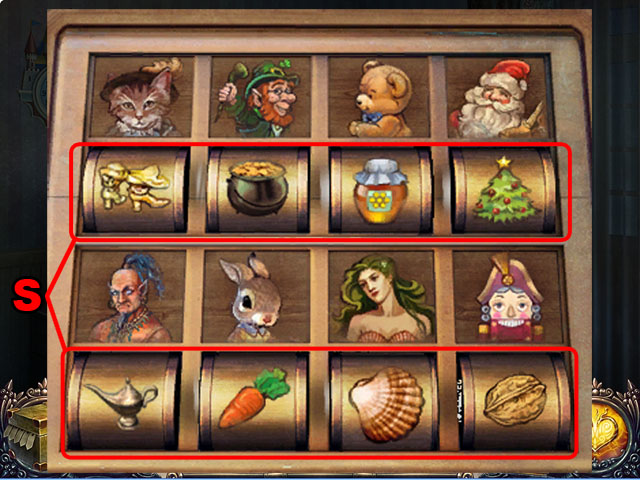
• Solve the puzzle by lining up the correct objects with the fantasy characters above them.
• The objects below each character have something to do with the classic stories that involve them.
• Press the buttons to change the images.
• See the screenshot for the final solution (S).
• Take the FISH FOOD once you are finished.
• Exit the room and go to the other bedroom upstairs (U).
• Play the HOS (V).
• After finding all of the objects take the NEEDLE AND THREAD that is revealed.
• Return to the left side room.
• Inspect the teddy bear and use the BUTTON and the NEEDLE AND THREAD on the back (W).
• Take the BATTERY.
• Inspect the aquarium electronics; open the door (X) and use the BATTERY.
• Press the switch to turn on the light (Y).
• Inspect the aquarium (Z) and take the NET. Use the FISH FOOD and then the NET to get the COIN.
• Go backward until you reach the garage again.
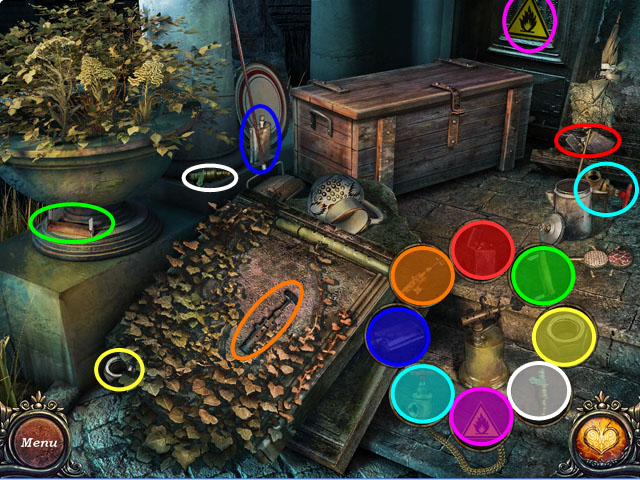
• Play the HOS (A) a second time.
• Click on the saw then open the toolbox to take the WRENCH.
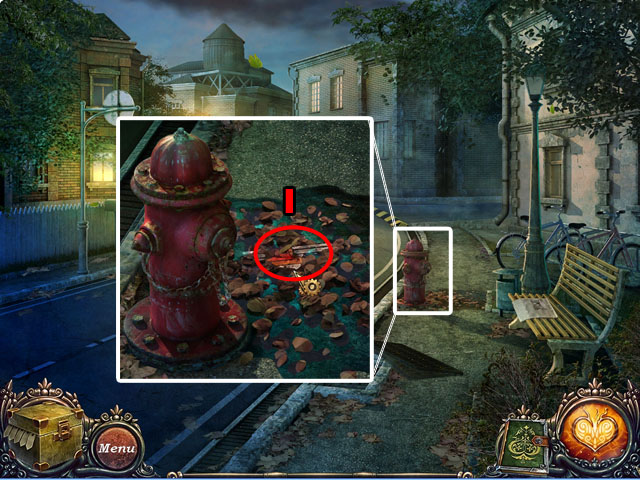
• Return to the street and use the WRENCH on the hydrant (B).
• Enter the house again (C).
• Travel through the house to the backyard.
• Inspect the lawnmower and take off the top (D); use the WRENCH and then the LAWNMOWER BLADE to replace it.
• Use the WRENCH again to put the nut back on.
• Start the lawnmower, then after it’s gone move the grass 3 times and take the SCREW from underneath it (E).
• Exit the house and watch the cut scene.
• Take the BLOOD (F) and go into the alley.
• Inspect the phone booth (G) and take the PLIERS.
• Go forward to the next scene.
• Use the PLIERS on the nail to get the BUCKET and the HOOK (H).
• Go back to the fire hydrant.
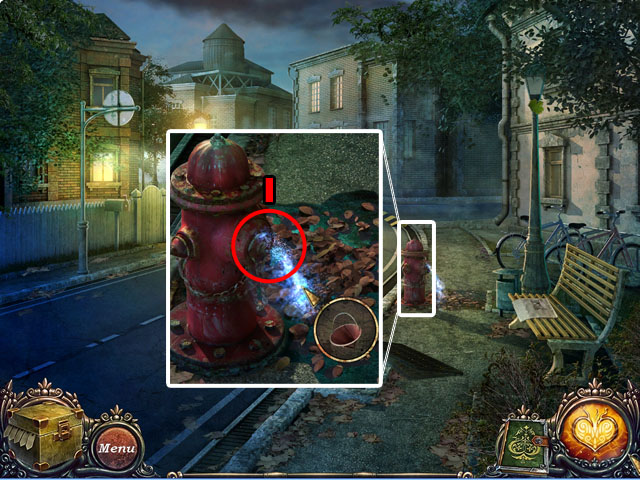
• Gather the water with the BUCKET (I).
• Return to the alleyway.
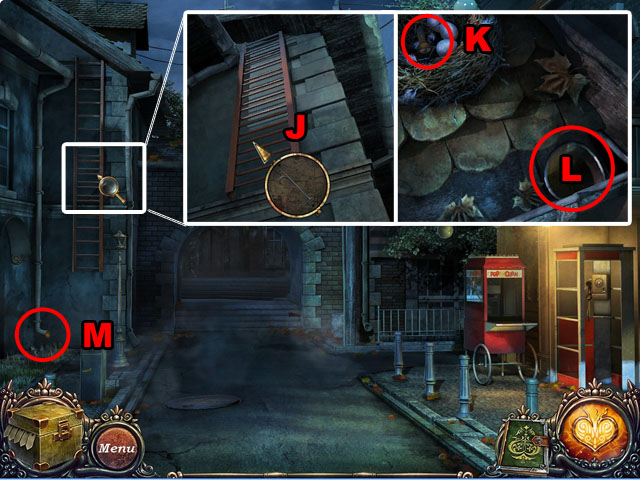
• Inspect the ladder and use the HOOK to bring it down (J).
• Take the 1 KEY (K) and use the bucket of water (L) to unclog the drain.
• Inspect the bottom of the drain pipe and pick up the COIN (M).
• Return all the way back to inside of the diner.
• Play the HOS and take the KETCHUP BOTTLE.
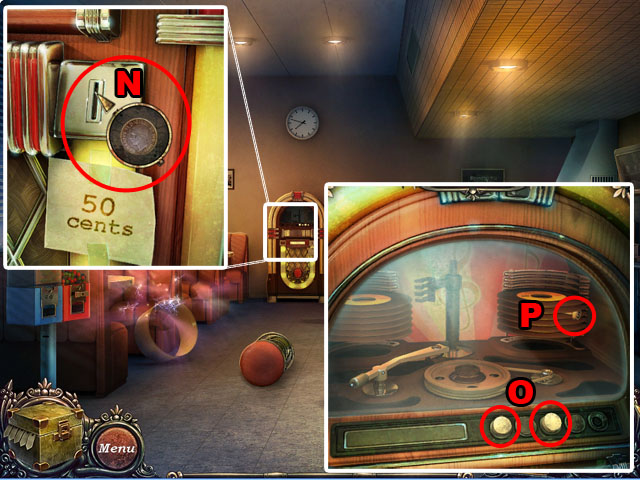
• Zoom into the jukebox and use the 50 CENT COIN on it to play the next mini-game (N).
• The records are controlled with the buttons (O) at the bottom.
• Press the left one to move 3 records to the left, and press the right one to move two records to the right.
• Press the left button twice and then the right button twice to solve the puzzle and get the 5 KEY (P).
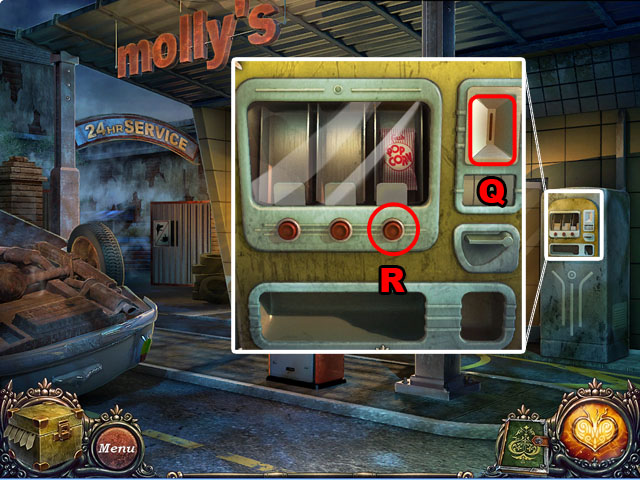
• Exit the diner and use all 3 DOLLAR COINS on the vending machine (Q).
• Press the last button to get the POPCORN (R).
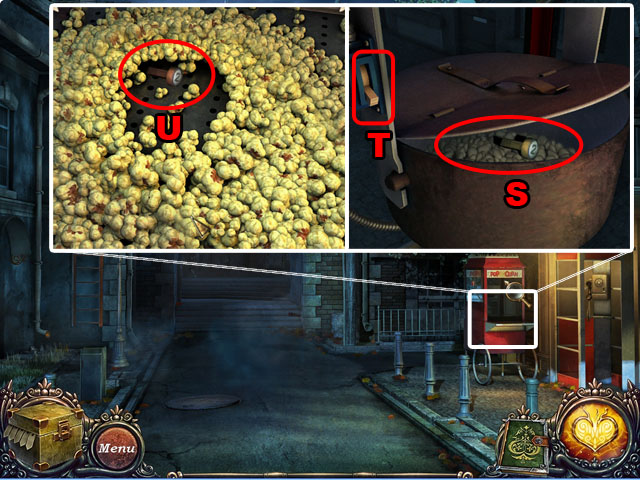
• Travel back to the alleyway and zoom in on the popcorn machine (S). Use the POPCORN inside the lid.
• Flip the switch (T) to start the machine and then zoom in on the popcorn at the bottom.
• Take the SHOVEL and use it on the pile to uncover the 2 KEY.
• Return to the diner and look at the cash register.
• Line up the keys so that the numbers in each column add up to the number at the top and the numbers in each row add up to the numbers on the right.
• Select a number and then another to switch their positions.
• You can only switch if the numbers are beside each other, not diagonally or two spaces away.
• See the screenshot for the solution (V).
• Take the CHURCH KEY.
• Return past the alley to the church and inspect the door (A).
• Use the CHURCH KEY on the padlock and enter the church.
• Inspect the confessional and take the WORSHIP MANUAL (B).
• Inspect the holy water and take some with your KETCHUP BOTTLE (C).
• Use the WORSHIP MANUAL on the altar (D) and then align the cups in the same order as in the book (E).
• Pick up one cup and then use it on another to switch their places.
• Take the BRANCH.
• Exit the church and zoom into the gate.
• Use the HOLY WATER on the bat (F) followed by the BRANCH.
• Take the BLOOD left when it is gone (G).
• Go through the gate and play the HOS.
• After finishing the scene take the SHOVEL.
• Use the SHOVEL on the grave and use the PLIERS on the nails to open it.
• Take the BLOOD on the pillow (I) and the RUNE (H).
• Talk to the sheriff and choose all of the different dialog options.

• Take the BELT (J) and click on the bedroll (K) twice to hook the bed up to the wall.
• Use the BELT to tie the bed to the wall (L) and take the SHARP TOOL underneath (J).
• Pick out the BRICK with the SHARP TOOL and use it on the light (O).
• Take the GLASS SHARD from the floor (P).
• Inspect the jacket and use the SHARD to cut away the KEY (Q).
• Use the KEY on the lock and escape to the next room (R).
• Inspect the coffee machine and take the HOCKEY STICK (S).
• Zoom into the desk and inspect the combination (T).
• Look at the drawers in the back (U).
• Inspect the hockey player trophy in the picture (V) and then inspect the trophy on the left (W).
• Use the HOCKEY STICK on the trophy and then press on the joints to arrange them into the same pose as in the picture.
• Take the SAFE DIAL and use it on the safe (X).
• Use the information from the combination note and the drawers in back to input the correct sequence.
• Press and drag the dial to move it. The rotation direction and numbers matter.
• CCW = Counterclockwise and CW = Clockwise.
• The correct combination is: 6 CCW, 5 CCW, 9 CW, 4 CCW, and 7 CCW.
• Take the RUNE from inside the safe.
• Talk to the sheriff again and go through all of the conversation options (A).
• Take the BLOOD sample from the top of the water container (B).

• Exit this area and go back to the grave site.
• Play the HOS.
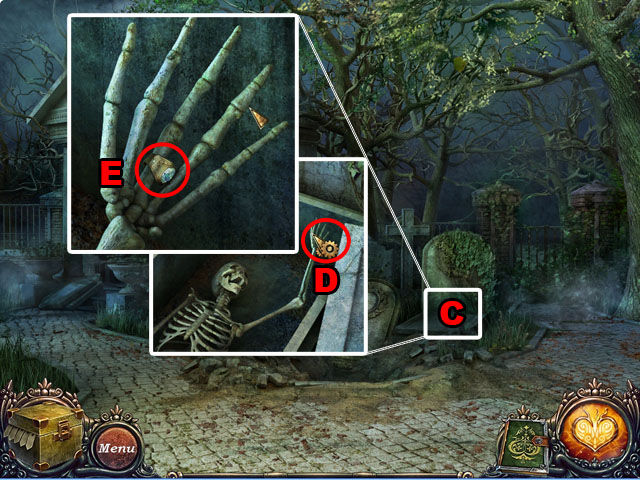
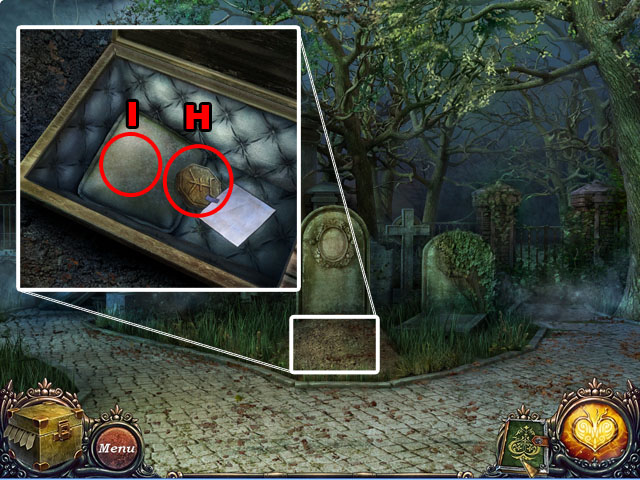
• Inspect the grave (C) and use the CROWBAR to open it.
• Zoom in on the hand (D) and take the RING (E).
• Travel down two scenes and use the CROWBAR on the manhole cover (F).
• Turn the handle (H) and take the WINDOW PIECE (G).
• Go down once more.
• Inspect the fire hydrant and take the WINDOW PIECE (I).
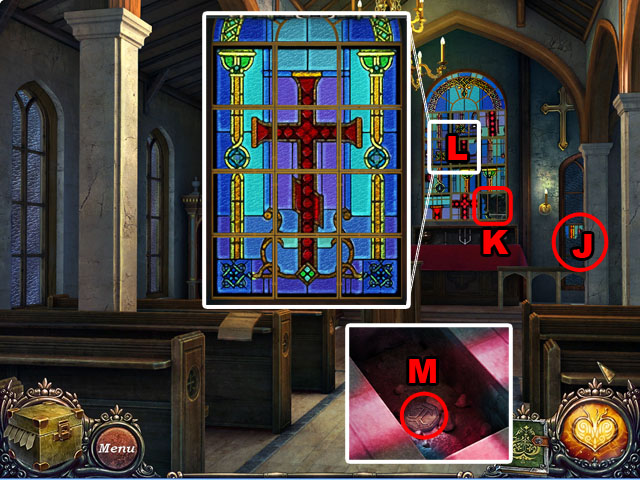
• Enter the church and use the RING to get the WINDOW PIECE from the right side window (J).
• Replace all of the WINDOW PIECES to the corner of the stained glass window (K).
• Press one piece and then another to switch their places.
• Reassemble the window into the correct pattern shown in the screenshot (L) and then inspect the hole in the floor that it lights up to find another RUNE (M).
• Return to the gravesite past the gate and play the HOS.
• Take the PRUNING SHEARS.
• Inspect the gate in the back (N) and use the PRUNING SHEARS to open it.
• Go through the gate.
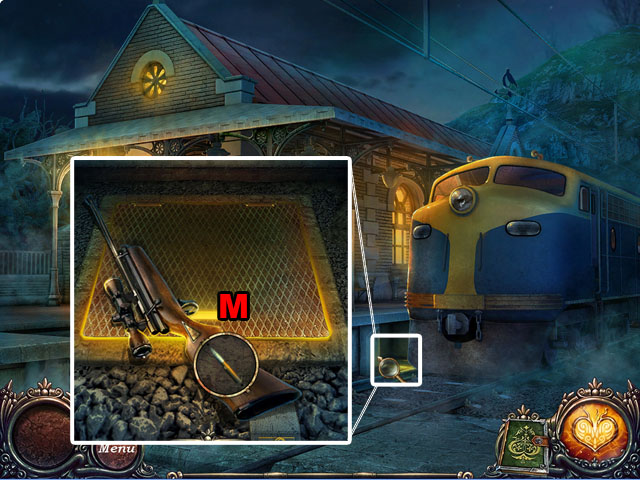
• Enter the train station (O) and play the HOS (P).
• Once finished, take the POCKET KNIFE that is revealed.
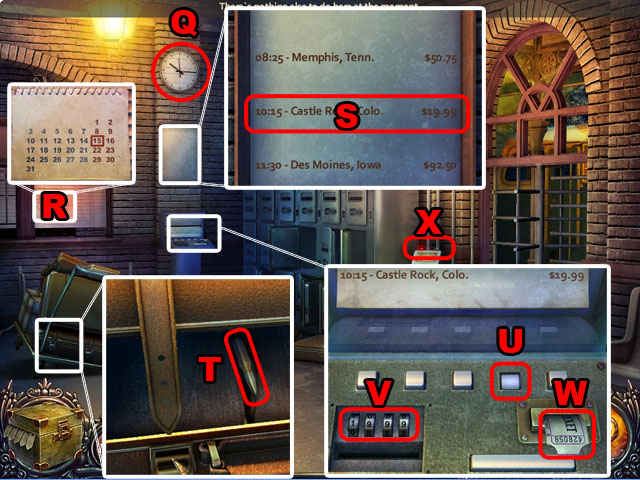
• Inspect the clock (Q) and the calendar (R).
• Look at the schedule below the clock (S) and take note of the timing of the train to Castle Rock.
• Take the PEN inside the briefcase (T).
• Inspect the ticket machine and click the 4th button to get Castle Rock (U).
• Use the POCKET KNIFE to open the panel and set the number to 1999 – the price of the ticket (V); press the long silver button.
• Take the TICKET (W) and place it in the machine to open the door (X).
• Go to the right.
• Take the ACCESS CARD (A).
• Inspect the trashcan and remove everything from it until you find a CART WHEEL (B).
• Return to the previous scene and use the CART WHEEL on the broken cart (C).
• Push the cart once and take the OILER (D).
• Go back through the turnstile.
• Zoom into the door (E) and use the OILER on the handle.
• Use the POCKET KNIFE to remove the HANDLE.
• Use the HANDLE on the door with a missing handle and then open it (F).
• Exit the zoomed in area and go to the right.
• Look at the pilot’s hand and take the FUSE (G).
• Go back twice and play the HOS.
• After finding all of the objects another FUSE will be revealed.
• Return to the train and use the two FUSES on the fuse box (I).
• You will need to know what shape is what color to find the correct order.
• Look at the phone (H) and use the ACCESS CARD to light it up. It will show you the right colors to match the shapes on the fuses.
• Now you can switch the fuses places as shown in the screenshot to light up the train,

• Use the two RUNES from your inventory on the driver’s mask (J) and take the LEVER.
• Take the BLOOD from the back of the seat.
• Use the LEVER on the control (K).
• Use the CROWBAR to open the large door and press the red button inside it (L).
• Turn the lever on the main control.
• Return to the first scene on the train station and put the BULLET in the rifle (M).
• Take the RIFLE and open the hatch.
• Go down the hatch.
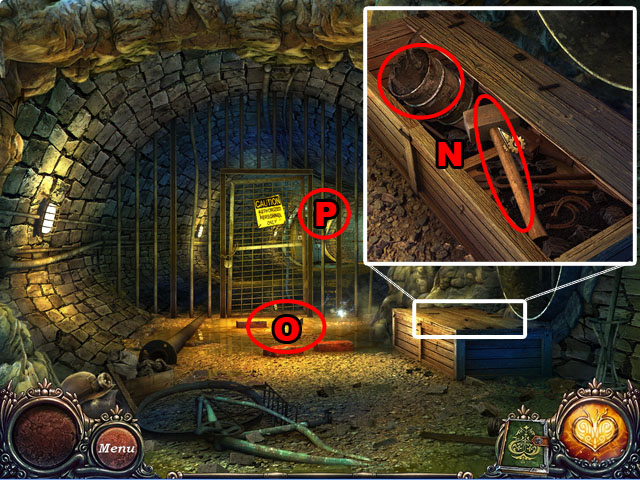
• Zoom into the crate and open it with the CROWBAR (N); you will receive PLANKS in your inventory.
• Take the SLEDGEHAMMER and CAN OF OIL from inside.
• Use the PLANKS to cross the water (O).
• Inspect through the bars (P).
• Use the RIFLE to shoot out the 3 tops of the power unit (Q).
• Then zoom in on the door (R) and use the CROWBAR to open the lock (S).
• Go through the door.
• Use the SLEDGEHAMMER on the wall and go through the hole (T).
• Go to the left and play the HOS.
• Take the ELVEVATOR KEY that is revealed after finishing.
• Zoom into the lantern and use the CAN OF OIL and then the MATCHES on it (U).
• Take the LIT LANTERN.
• Inspect the contraption and read the note (V).
• Return to the previous scene and use the LANTERN on the hook (W).
• Inspect the wall and use the SLEDGEHAMMER to break both boards (X); take the LEVER.
• Inspect the cart and use the LEVER on the cart. (Y) Pull the lever once to move the cart.
• Inspect the cart’s wheel to find an obstruction (Z). Use the SLEDGEHAMMER to remove it.
• Push the cart once to move it away and reveal a HACKSAW; take it and go forward.
• Use the ELVEVATOR KEY in the hole (A) and pull the lever (B).
• Go forward and then go down the rope ladder.
• Talk to Grace and go through all of the conversation options.
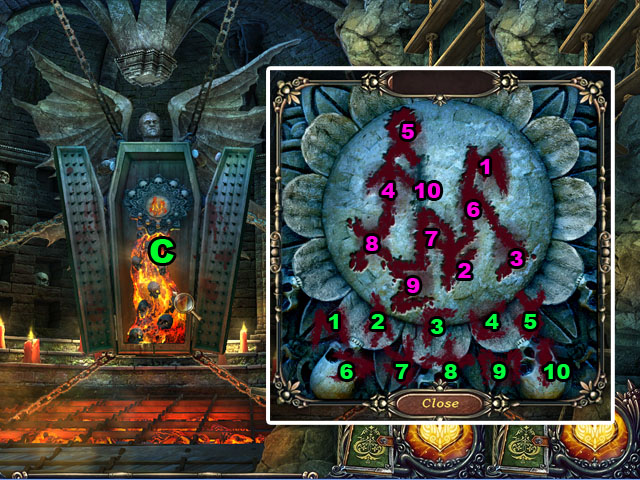
• Inspect the coffin (C) and use the BLOOD SAMPLE BOX on it.
• Drag the blood runes to the correct positions on the face of the puzzle (1-10).
• The runes are sometimes rotated from how they appear at the bottom of the screen.
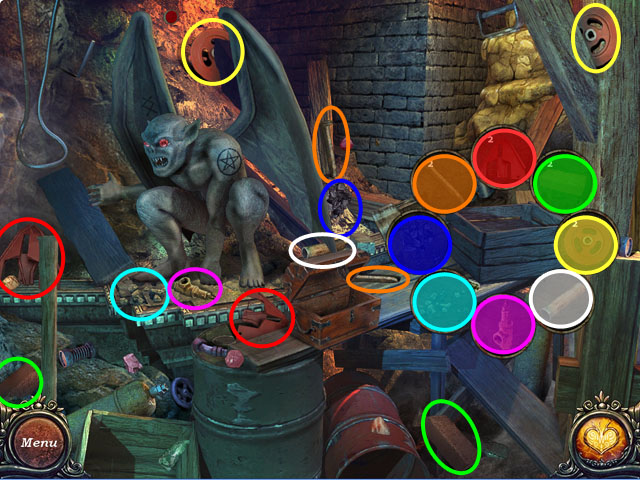
• Return to the room with the mining machinery and play the HOS.
• Take the RAG and go back two scenes.
• Inspect the top of the ladder and use the RAG to wipe off the ladder rungs (D).
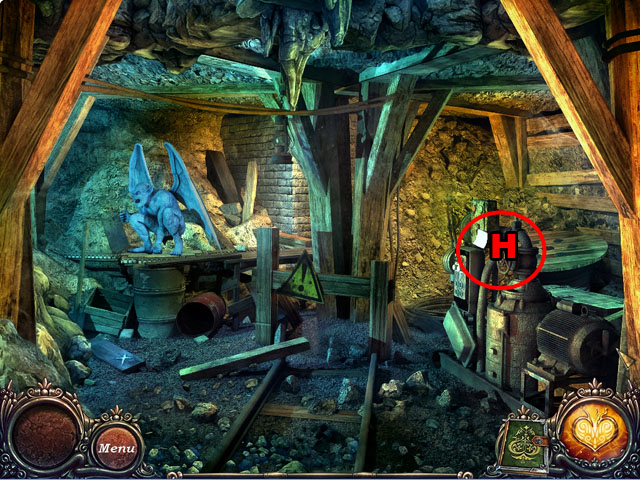
• Take the instructions at the top of the grate (E).
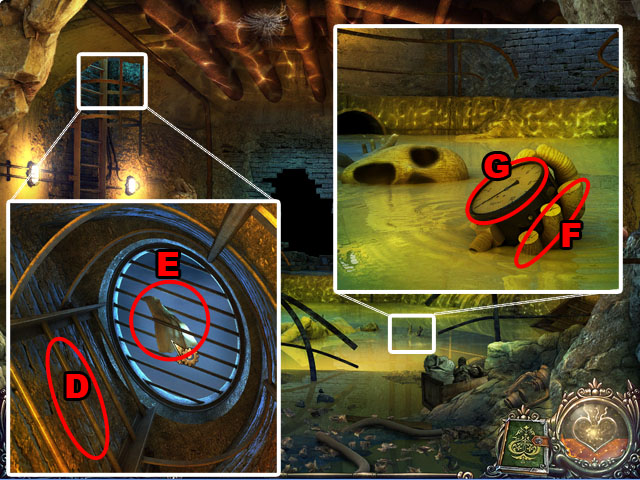
• Inspect the hand in the green water.
• Use the HACKSAW to take off the finger and take the MANOMETER.
• Return to the room with the machine and zoom into it (H).
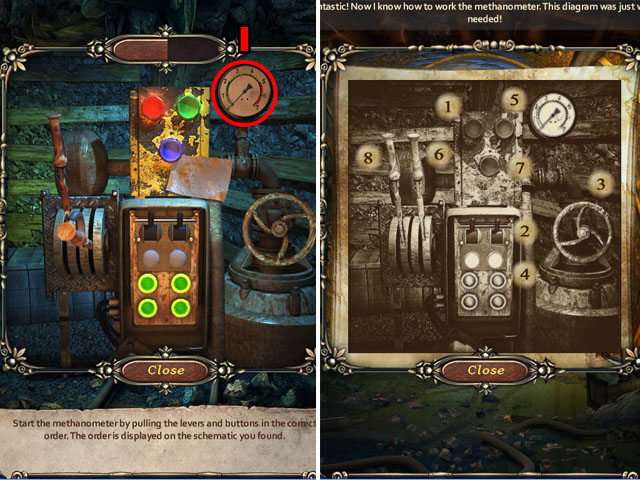
• Place the MANOMETER (I) and then follow the instructions that you found previously.
• Pull the levers and push the buttons in the order written on the screenshot (1-8).
• The game will not let you press incorrectly.
• Exit the machine and play the HOS.
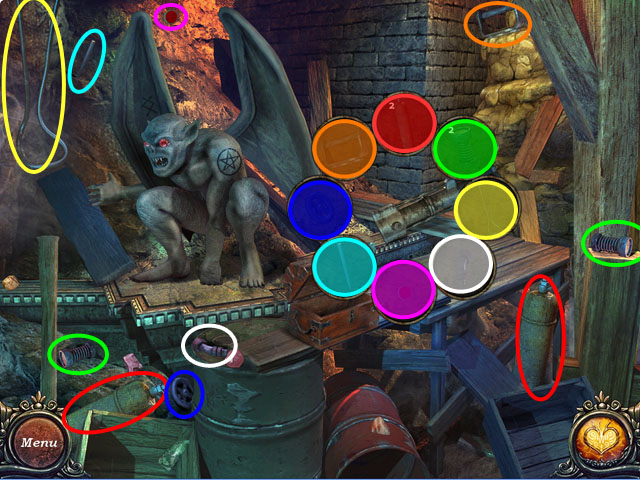
• Take the PICKAXE that is revealed after finding all of the hidden objects.
• Use the PICKAXE on the spot marked with an X (J).
• Return to the previous scene and use the PICKAXE two more times (K, L).
• Return to the bridge and use the PICKAXE two more times (N).
• Return to the machine room and play the HOS one last time.
• You will receive the DYNAMITE.
• Exit the scene to finish the game.