Fatal Passion: Art Prison Walkthrough, Guide, & Tips
Fatal Passion: Art Prison Walkthrough

Welcome to the Fatal Passion: Art Prison Walkthrough
An eccentric artist’s creations have sprung to life, and they’re terrorizing a small town.
Whether you use this document as a reference when things get difficult or as a road map to get you from beginning to end, we’re pretty sure you’ll find what you’re looking for here.
This document contains a complete Fatal Passion: Art Prison game walkthrough featuring annotated screenshots from actual gameplay!
We hope you find this information useful as you play your way through the game. Use the walkthrough menu below to quickly jump to whatever stage of the game you need help with.
Remember to visit the Big Fish Games Forums if you find you need more help. Have fun!
This walkthrough was created by David Becker, and is protected under US Copyright laws. Any unauthorized use, including re-publication in whole or in part, without permission, is strictly prohibited.
General Tips
- This is the official guide for Fatal Passion: Art Prison.
- This guide will not mention each time you have to zoom into a location; the screenshots will show each zoom scene.
- We will use the acronym HOP for Hidden-object puzzles. Interactive items will be color-coded and some will be numbered; please follow the numbers in sequence.
- Use the map to travel to a location.
Chapter 1: The Broken Bridge

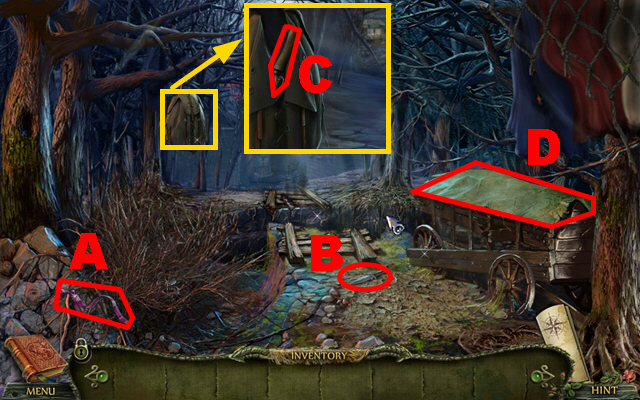
- Take the RIBBON (A) and KNIFE (B).
- Open the backpack twice; take the SPADE (C).
- Cut the tarp with the KNIFE (D).

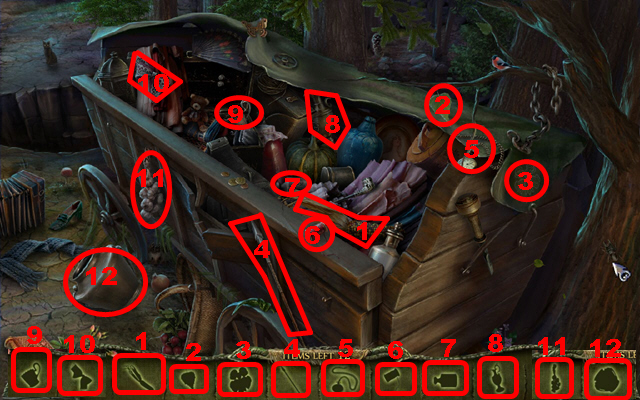
- Play the HOP.
- Solution: 1-12.
- You receive the SAW.

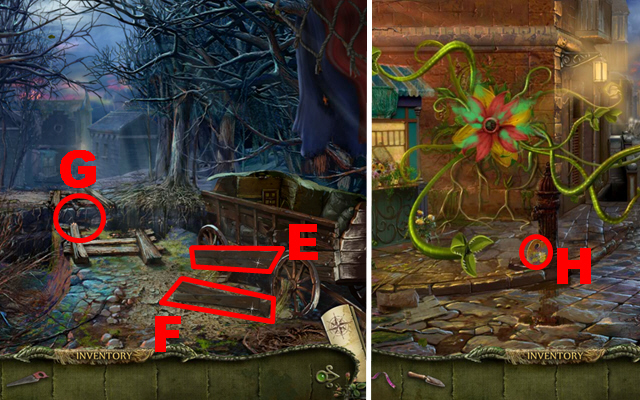
- Cut the planks with the SAW (E); take the PLANKS (F).
- Put down the PLANKS (G).
- Move forward.
- Take the palette (H).

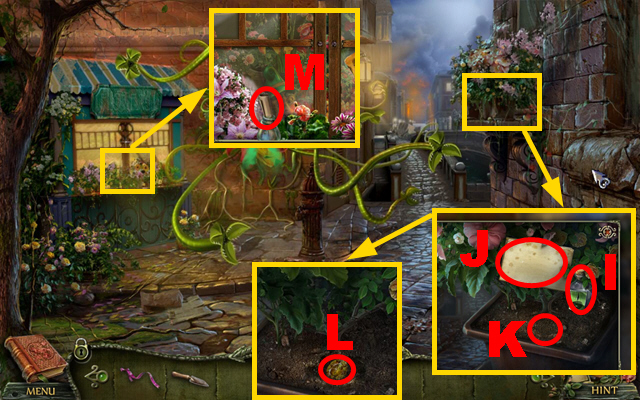
- Take the BINDER (I) and note (J); use the SPADE (K).
- Take the YELLOW JEWEL (L).
- Take the note (M); you acquire the JAR.
- Walk down.

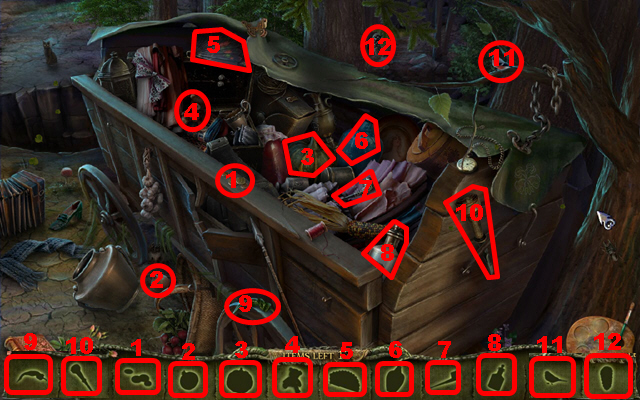
- Play the HOP.
- Solution: 1-12.
- You receive the TONGS.

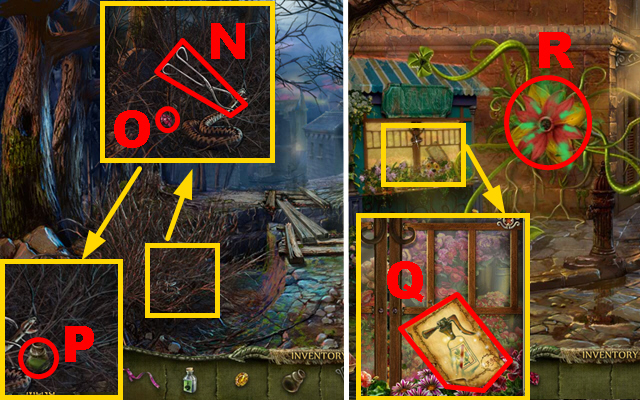
- Put down the TONGS (N); take the RED JEWEL (O).
- Put down the JAR (P); pour the BINDER into the jar to acquire the green paint.
- Move forward.
- Paint the sketch (Q) to acquire the HERBICIDE.
- Spray the HERBICIDE on the plant (R).

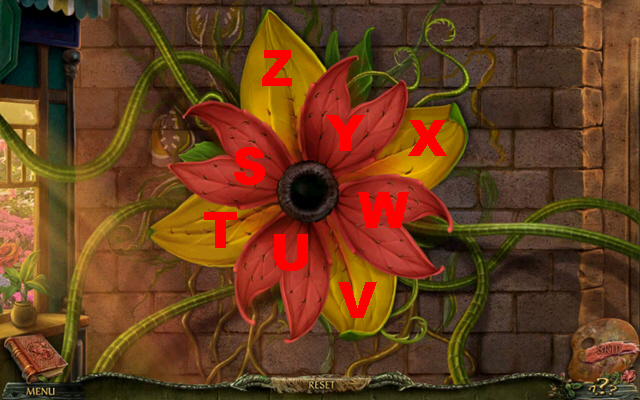
- Play the mini-game.
- Solution: Z, S, T, U, V, Y, X, W.

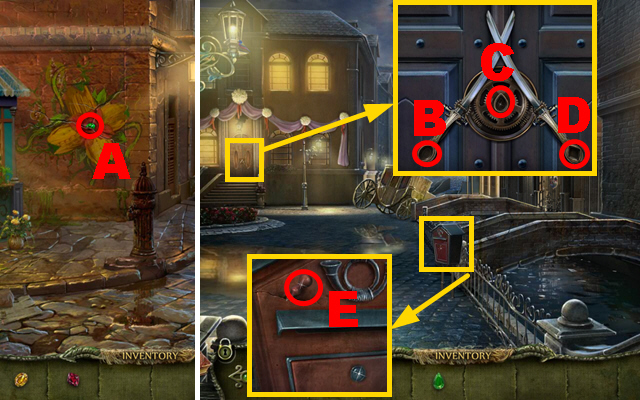
- Take the GREEN JEWEL (A).
- Move forward.
- Place the YELLOW JEWEL (B), GREEN JEWEL (C), and RED JEWEL (D) on the niches.
- Take the AWL (E).
- Turn left, move forward.

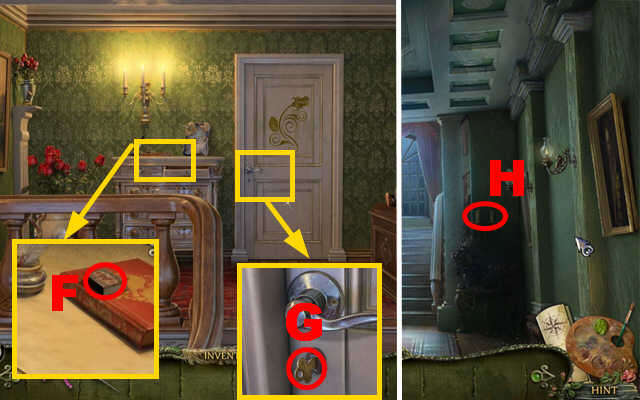
- Take the MATCHES (F).
- Take the MAILBOX KEY (G).
- Walk down.
- Light the candles with the MATCHES (H).
- Play the HOP.

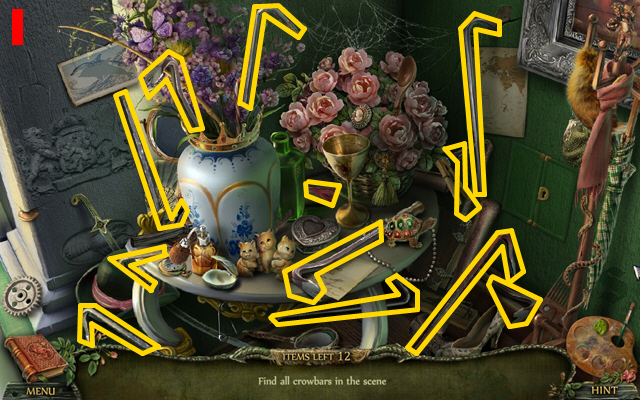
- You receive the CROWBAR (I).
- Walk down.

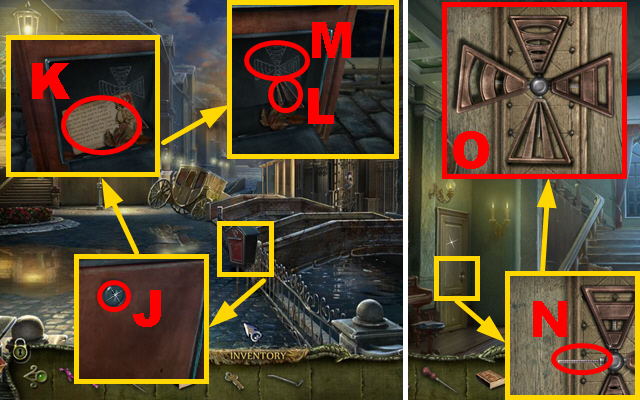
- Insert the MAILBOX KEY into the lock (J); take the postcard (K).
- Take the WINDMILL PART (L); make note of the drawing (M).
- Turn left.
- Connect the WINDMILL PART to the door (N); arrange the parts correctly (O).
- Walk down.

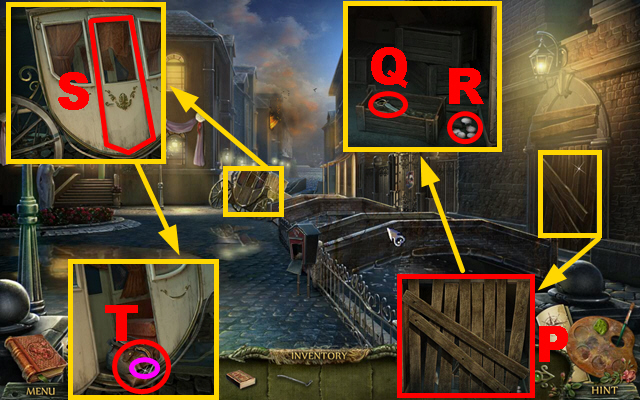
- Remove the planks with the CROWBAR (P); take the SABER (Q) and SHELLS (R).
- Open the door with the CROWBAR (S).
- Cut the bag with the SABER (T); take the PIANO KEYS (purple).
- Walk down.

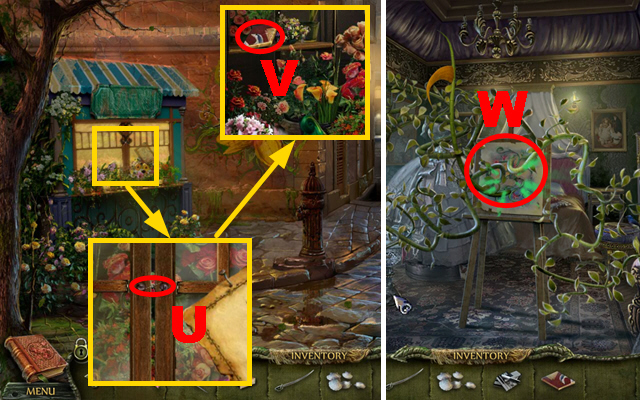
- Move the latch with the AWL (U); take the GATE TILE (V).
- Move forward, turn left twice.
- Cut the plant with the SABER (W).

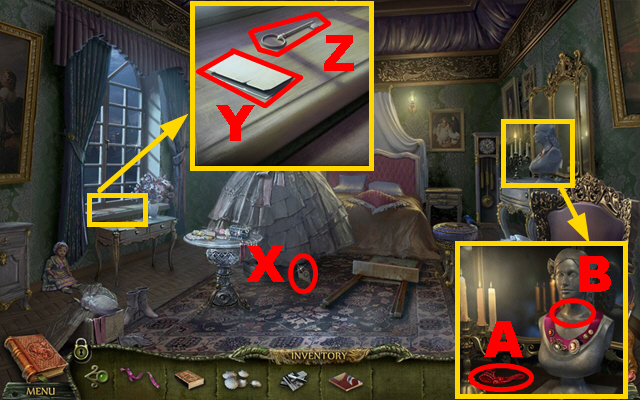
- Take the GATE TILE (X).
- Take the note (Y) and BECKY’S KEY (Z).
- Take the RED THREAD (A); put down the RIBBON (B).
- Walk down.

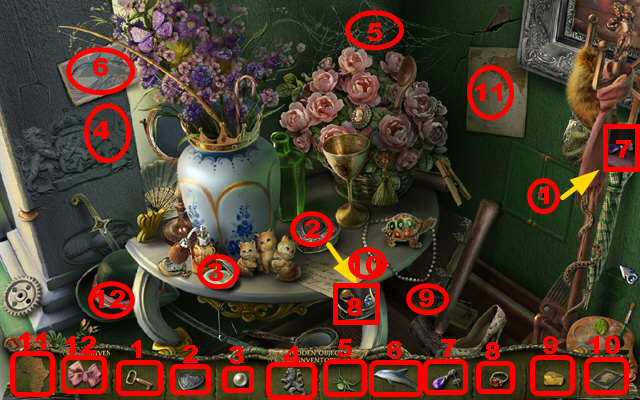

- Play the HOP.
- Solution: 1-12.
- You receive the BAIT.
- Go upstairs.
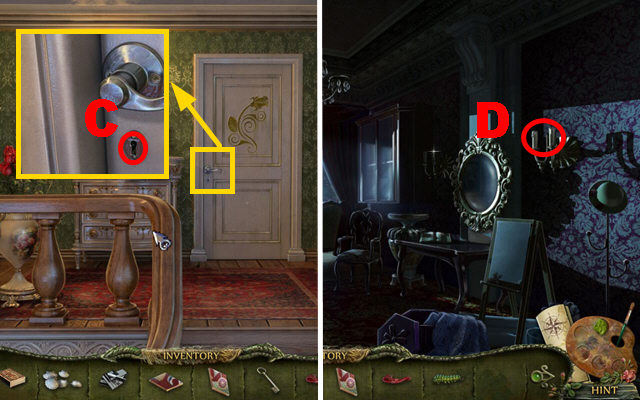
- Insert BECKY’S KEY into the lock (C); turn it.
- Move forward.
- Light the candles with the MATCHES (D).
Chapter 2: Becky’s Room

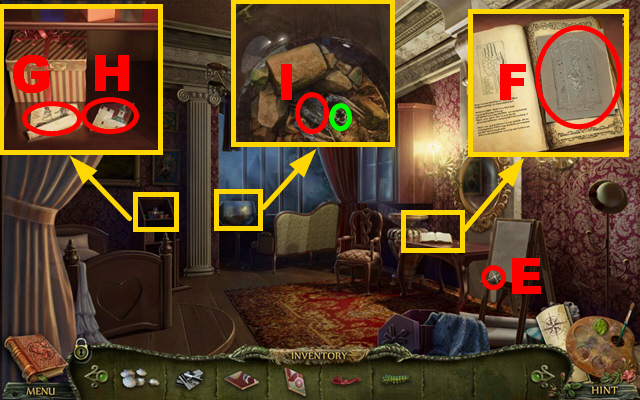
- Take the BROOCH (E).
- Take the SHEET MUSIC (F).
- Take the note (G) and GATE TILE (H).
- Put down the BAIT (I); take the DRAWER KEY (green).
- Walk down.

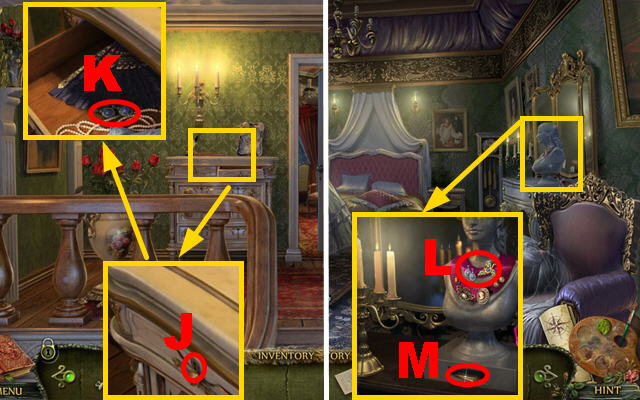
- Insert the DRAWER KEY into the lock (J); turn it.
- Take the EARRINGS (K).
- Walk down, turn left.
- Put down the EARRINGS and BROOCH (L); take the GATE TILE (M).
- Walk down twice.

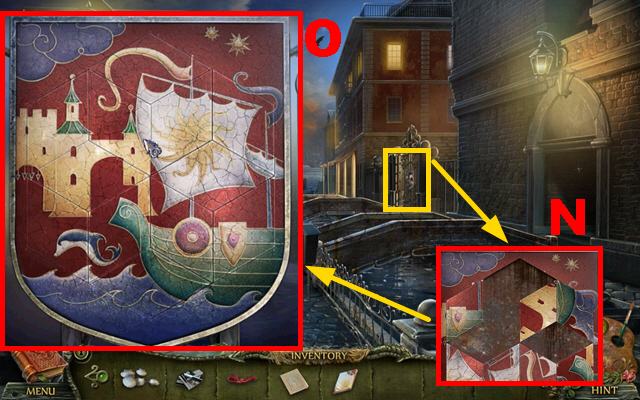
- Place 4 GATE TILES on the gate (N).
- Play the mini-game.
- Solution: (O).
- Turn right.

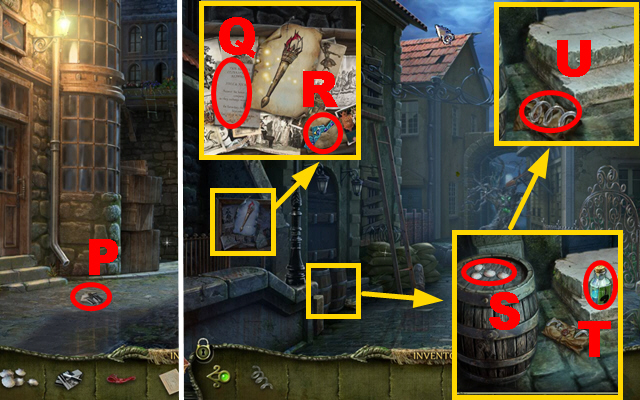
- Take the PIANO KEYS (P).
- Move forward.
- Take the note (Q) and TILES (R).
- Take the SHELLS (S) and BINDER (T).
- Open the package; take the COILED PIPE (U).

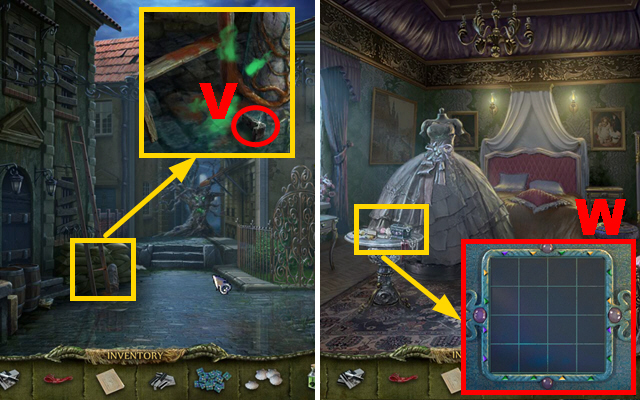
- Take the HAMMER WEDGE (V).
- Walk down twice, turn left twice.
- Put down the TILES (W).

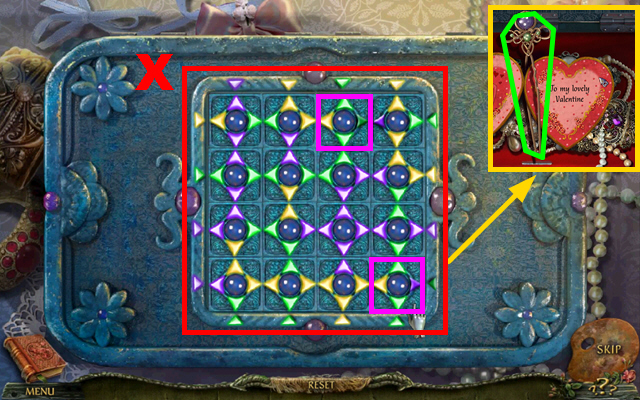
- Play the mini-game.
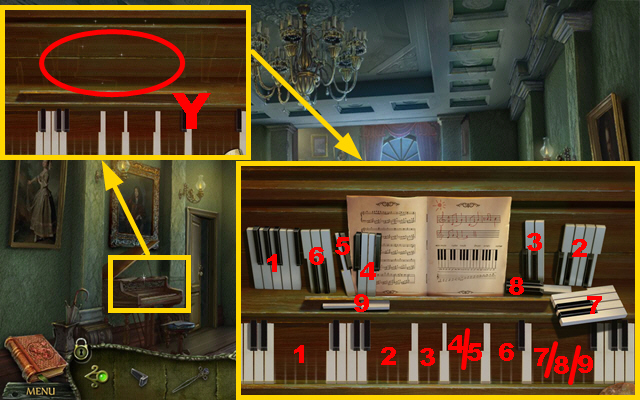
- Swap the tiles (purple) to complete the puzzle (X).
- Open the medallion; take the BOBBY PIN (green).
- Walk down.

- Put down the SHEET MUSIC and 2 PIANO KEYS (Y).
- Play the mini-game.
- Solution: 1-9.

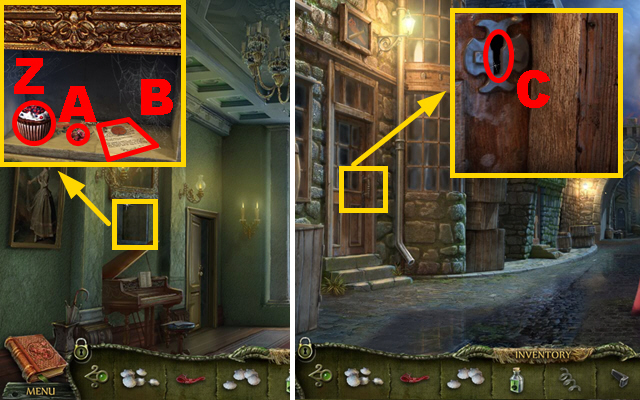
- Eat the cupcake (Z); take the DRIED BERRIES (A) and note (B).
- Walk down, turn right.
- Insert the BOBBY PIN into the lock (C).
- Turn left.

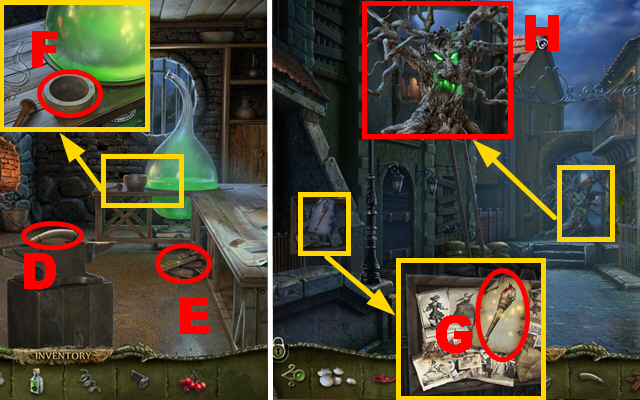
- Take the GUNPOWDER (D) and PLANKS (E).
- Pour the DRIED BERRIES and BINDER into the mortar (F) to acquire the red paint.
- Walk down, move forward.
- Paint the sketch (G) to acquire the TORCH.
- Burn the tree with the TORCH (H).
- Move forward.

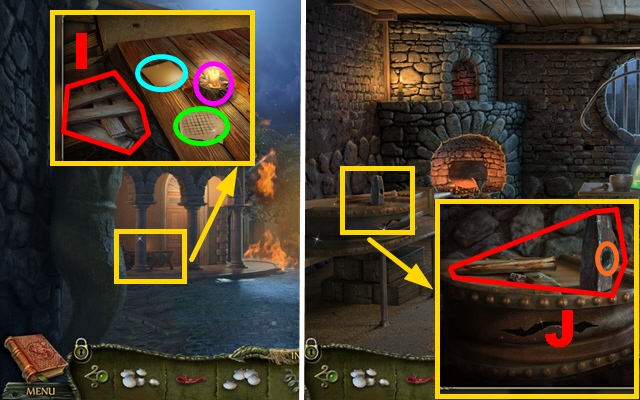
- Take the PLANKS (I), note (blue), CANDLE (purple), and GRID PATTERN (green).
- Walk down twice, turn left.
- Connect the HAMMER WEDGE to the hammer (orange); take the HAMMER (J).
- Walk down twice.

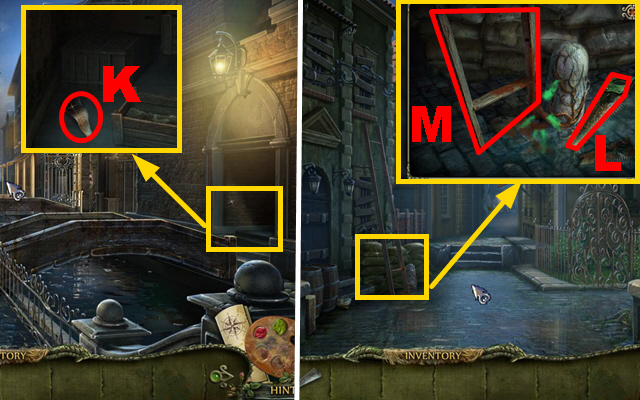
- Hit the blade with the HAMMER (K); take the SAW BLADE.
- Turn right, move forward.
- Connect the SAW BLADE to the handle; take the saw (L) and BROKEN LADDER (M).
- Walk down.

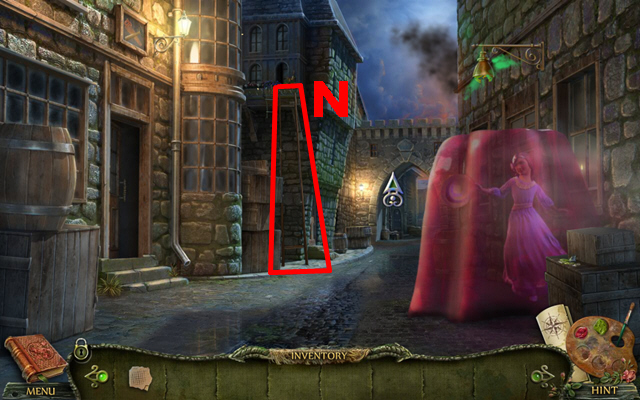

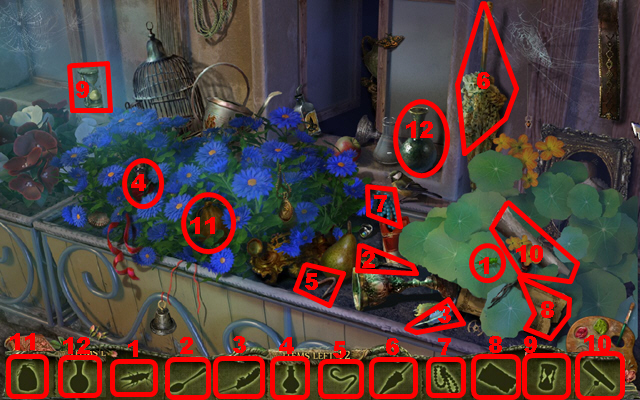

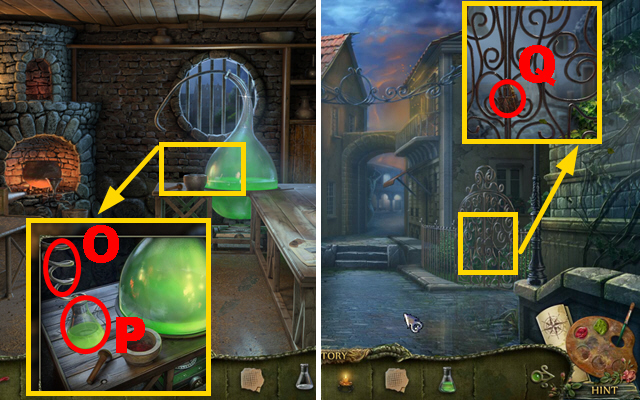
- Put down the BROKEN LADDER (N); connect 2 PLANKS to the ladder.
- Play the HOP.
- Solution: 1-12.
- You receive the RETORT.
- Turn left.
- Put down the COILED PIPE (O) and RETORT; take the ACID (P).
- Walk down, move forward.
- Pour the ACID over the padlock (Q).
- Turn right.
Chapter 3: The Gunsmith’s Shop

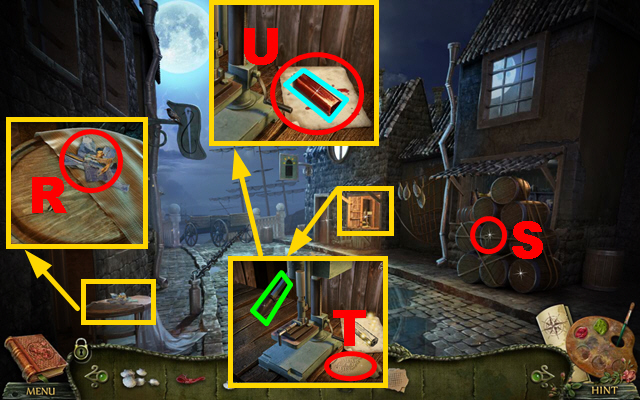
- Take the PICTURE PIECES (R).
- Burn the rope with the CANDLE (S).
- Take the WAVES PATTERN (T); pull the lever (green).
- Paint the sketch (U); take the RED PENCIL (blue).

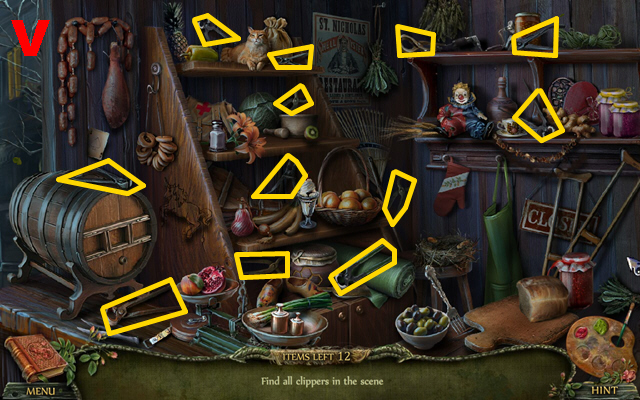
- Play the HOP.
- You receive the NIPPERS (V).

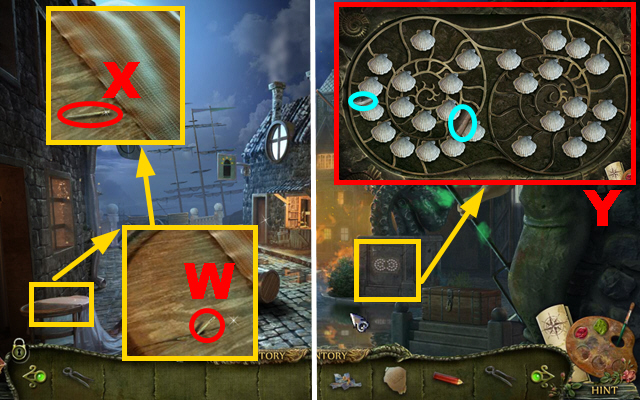
- Use the NIPPERS (W); connect the RED THREAD to the needle (X) to acquire the NEEDLE.
- Walk down, move forward.
- Put down 2 SHELLS (Y); remove 2 stones (blue) with the NIPPERS.
- Play the mini-game.

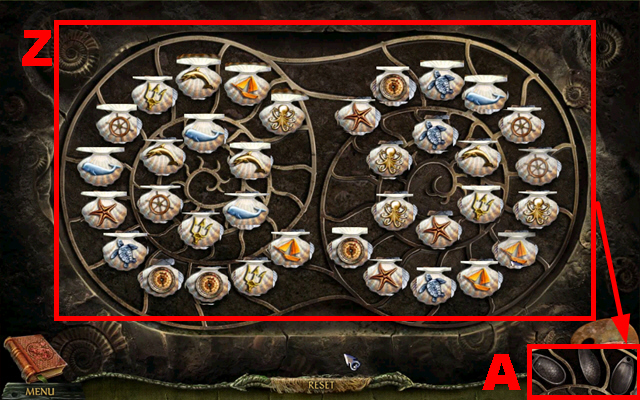
- Match all pairs of symbols (Z) to complete the puzzle.
- Take the LEAD (A).
- Walk down twice, turn left.

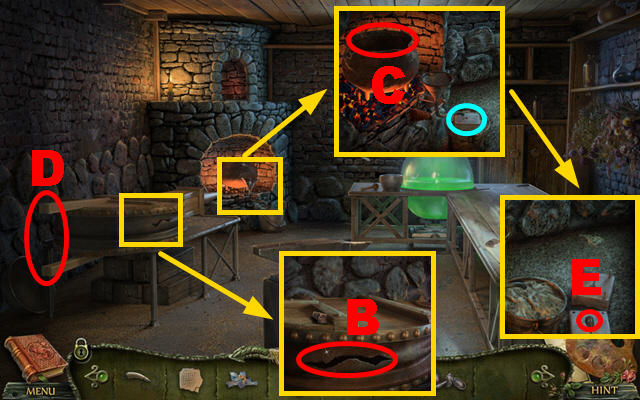
- Use the NEEDLE (B).
- Put the LEAD into the cauldron (C).
- Blow the bellows (D).
- Open the mold (blue); take the BULLET (E).
- Walk down.
- Play the HOP.

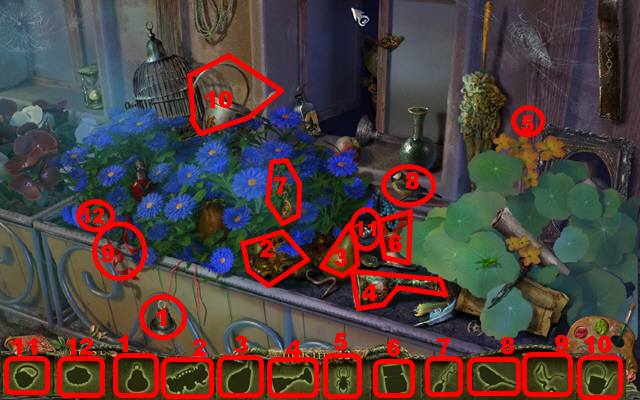
- Solution: 1-12.
- You receive the PAINT REMOVER.
- Move forward twice.

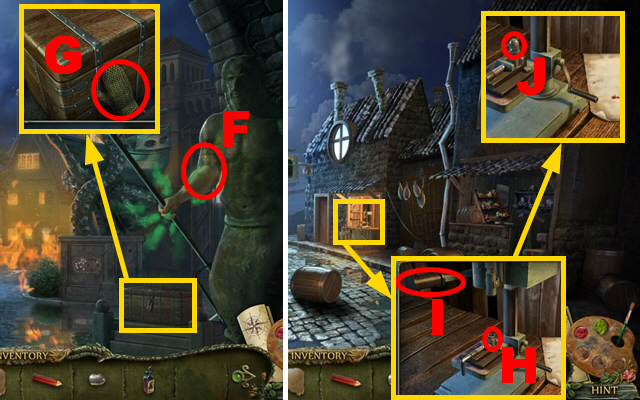
- Pour the PAINT REMOVER over the statue (F).
- Take the OVEN MITT (G).
- Walk down, turn right.
- Put the GUNPOWDER and BULLET into the press (H); pull the lever (I).
- Take the AMMUNITION (J).
- Walk down twice, turn left.

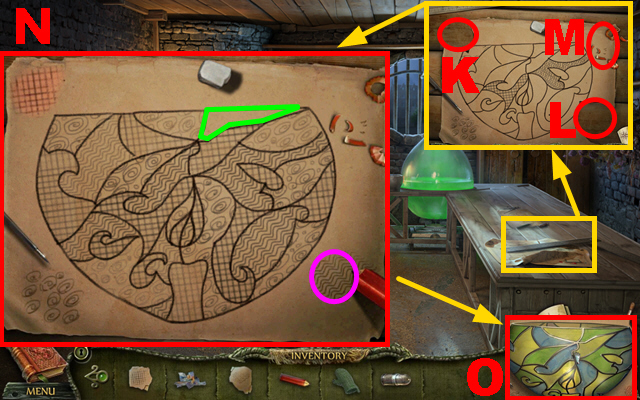
- Put down the GRID PATTERN (K), WAVES PATTERN (L), and RED PENCIL (M).
- Play the mini-game.
- Apply pattern (purple) to grid (green) to complete the puzzle (N).
- Take the LAMP (O).
- Walk down.

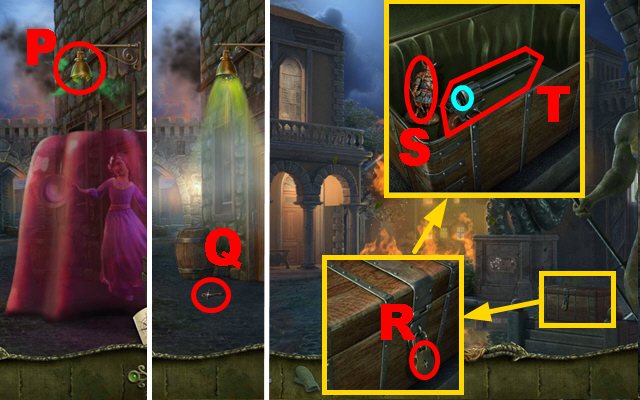
- Put down the LAMP (P).
- Take the STREET CHEST KEY (Q).
- Move forward twice.
- Insert the STREET CHEST KEY into the lock (R); take the HUNTER (S).
- Put the AMMUNITION into the pistol (blue); take the PISTOL (T).
- Walk down, turn right.

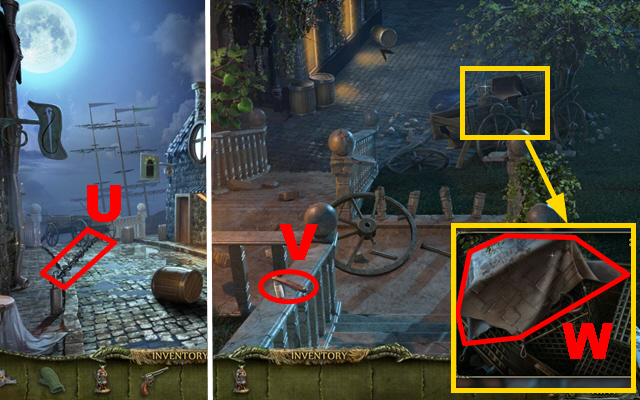
- Shoot the PISTOL (U).
- Move forward.
- Take the RAZOR (V).
- Take the CLOTH (W).
- Walk down.
- Play the HOP.

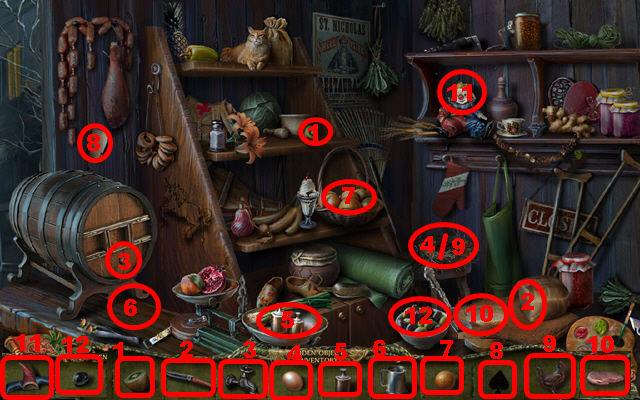
- Solution: 1-12.
- You receive the ROPE.
- Move forward twice.

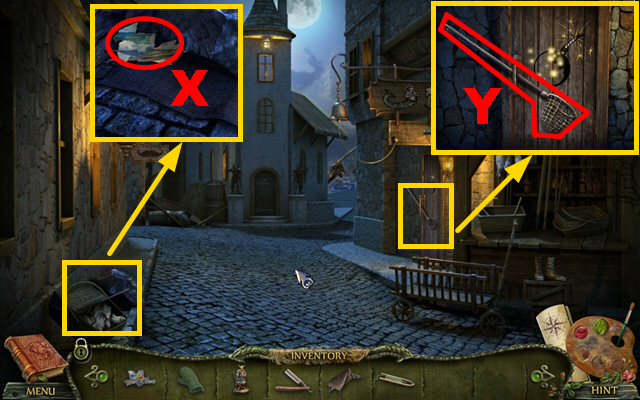
- Take the PICTURE PIECES (X).
- Take the SCOOP NET (Y).
- Move forward.

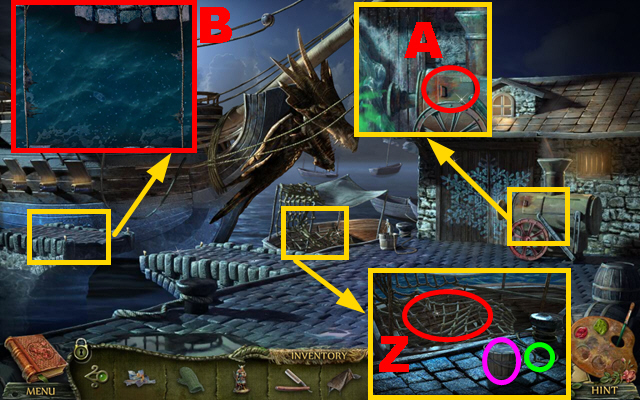
- Put down the ROPE (Z) to acquire the NET.
- Cut the rope with the RAZOR (green); take the BUCKET (purple).
- Open the lid with the OVEN MITT (A).
- Put down the CLOTH (B).

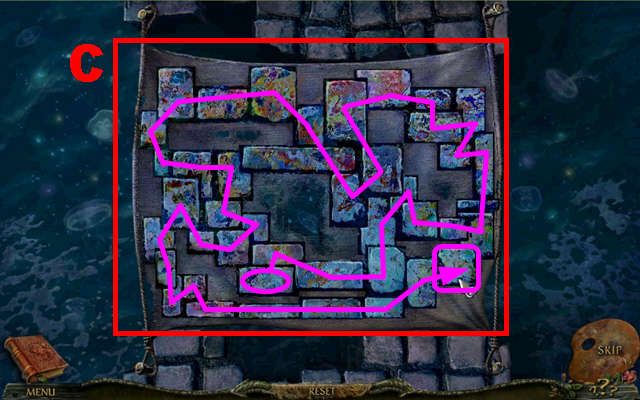
- Play the mini-game.
- Solution: (C).

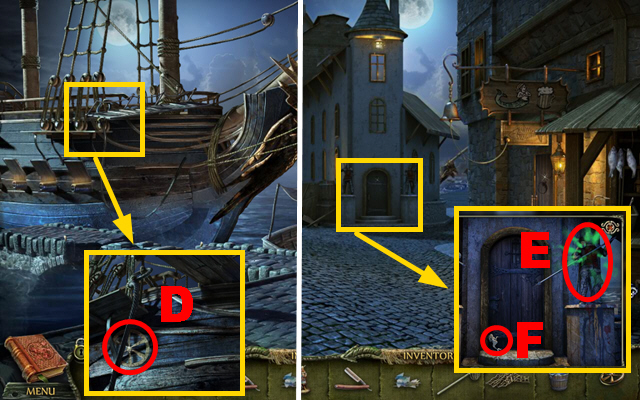
- Take the GAS VALVE (D).
- Walk down.
- Throw the NET at the statue (E); take the DESK ORNAMENT (F).
- Walk down.

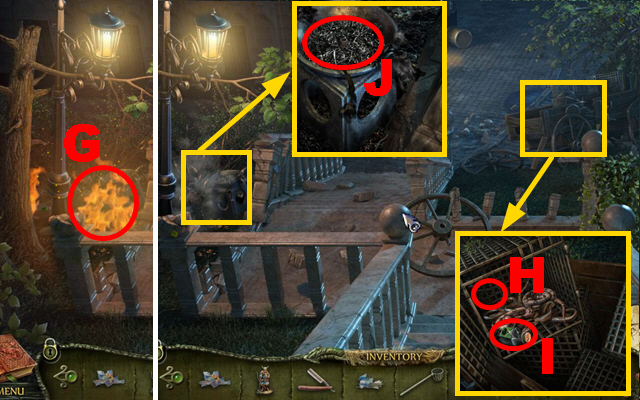
- Pour the BUCKET over the flames (G).
- Put down the SCOOP NET (H); take the BINDER (I).
- Pour the BINDER over the dirt (J) to acquire the black paint.
- Move forward.

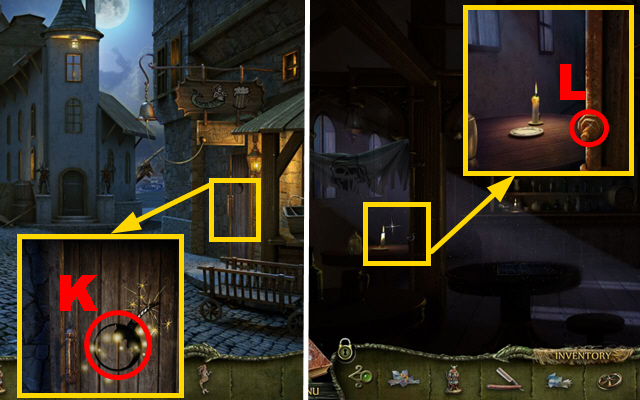
- Paint the sketch (K).
- Turn right into the bar.
- Connect the GAS VALVE to the pipe (L); rotate it.

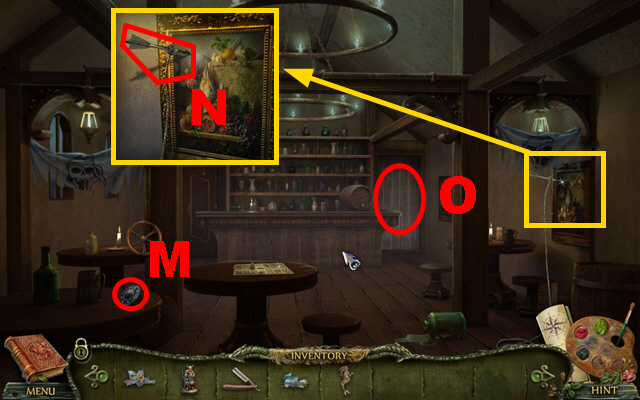
- Take the ENGINE PART (M).
- Take the BOLT (N).
- Open the door (O).
- Play the HOP.

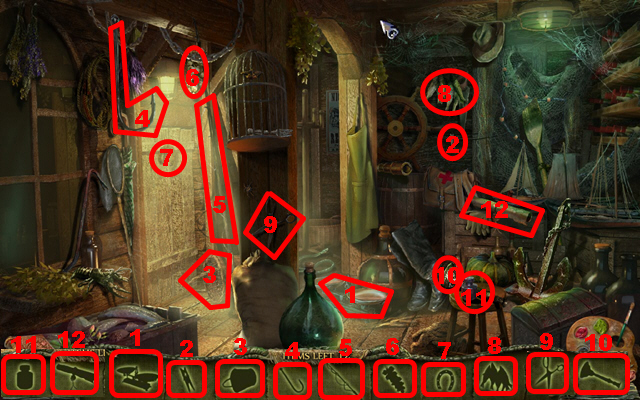

- Solution: 1-12.
- You receive the PICKAXE.
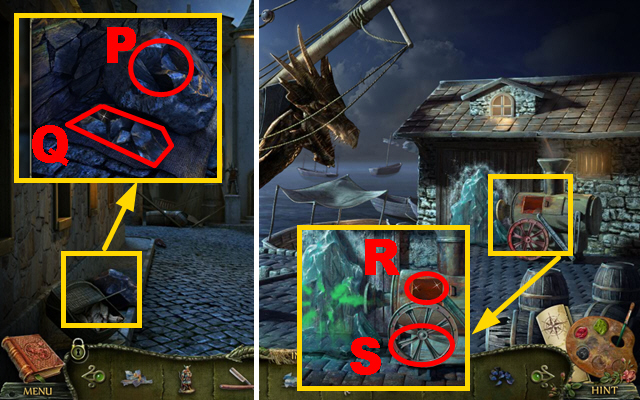
- Walk down.
- Hit the coal with the PICKAXE (P); take the COAL (Q).
- Move forward.
- Pour the COAL into the machine (R); connect the ENGINE PART to the machine (S).
- Move forward.
Chapter 4: The Armory

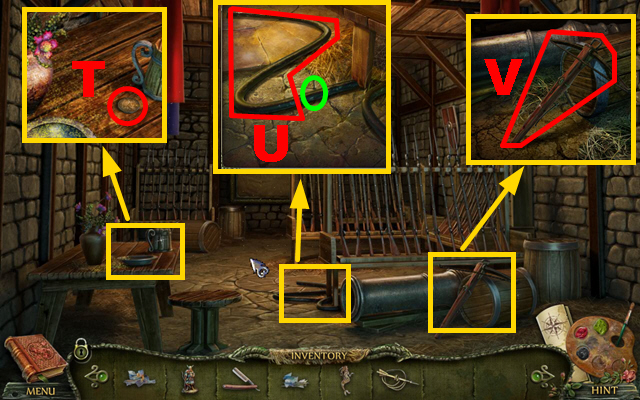
- Take the COIN (T).
- Cut the tube with the RAZOR (green); take the TUBING (U).
- Connect the BOLT to the crossbow (V); take the CROSSBOW.
- Walk down.

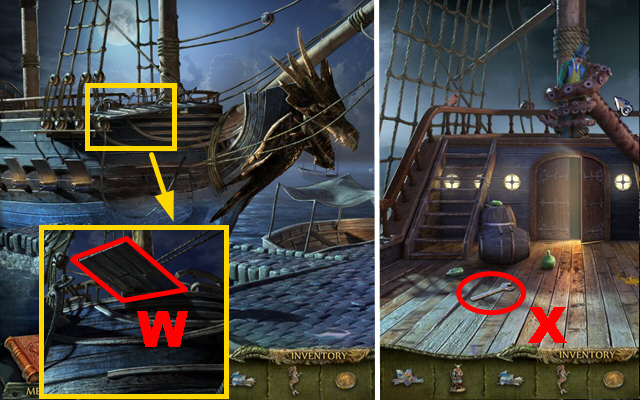
- Shoot the CROSSBOW (W).
- Turn left.
- Take the WRENCH (X).
- Turn left.

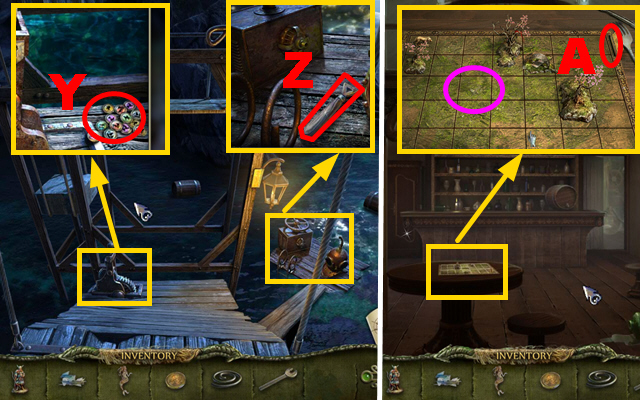
- Take the MAP TOKENS (Y).
- Take the HEX KEY (Z).
- Walk down three times, turn right into the bar.
- Insert the COIN into the slot (A); put down the HUNTER (purple).
- Play the mini-game.

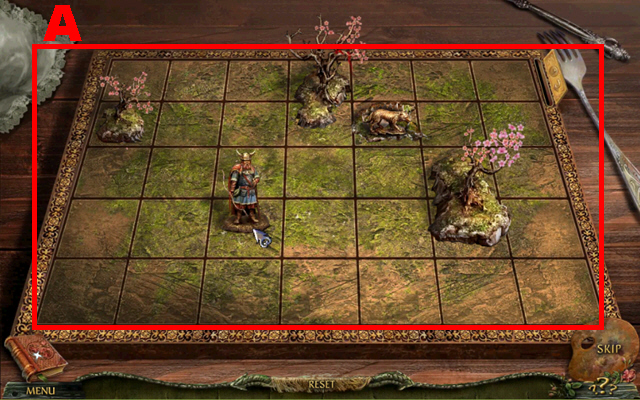
- Solution (A): Right x2, down x2, right x2, up x3, left x2, down x3, up x4, right x2, down x4, left x4, up x4, down x3.
- You receive the MAP TOKENS.
- Walk down, move forward, turn left twice.

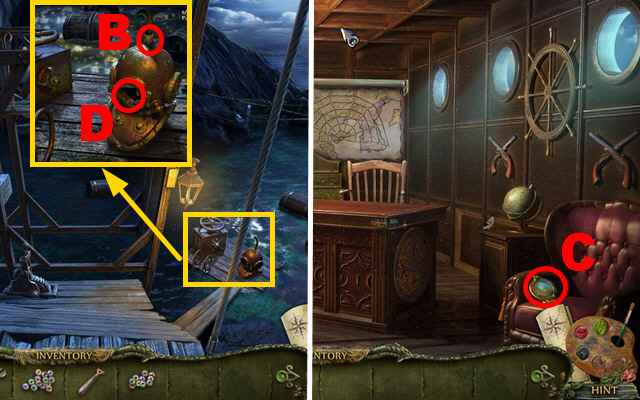
- Use the WRENCH (B); connect the TUBING to the helmet.
- Walk down, move forward.
- Take the SCUBA PORTHOLE (C).
- Walk down, turn left.
- Connect the SCUBA PORTHOLE to the helmet (D).
- Play the HOP.

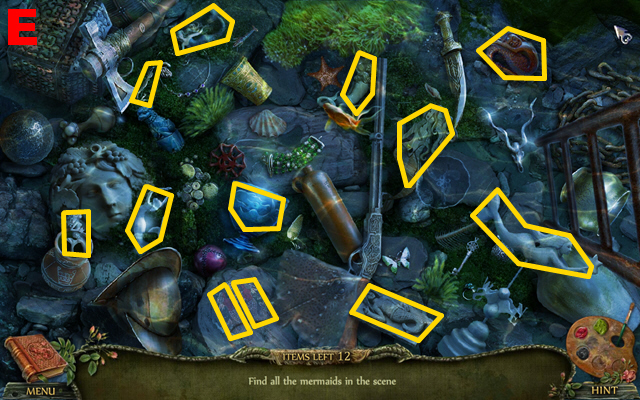
- You receive the DESK ORNAMENT (E).
- Walk down, move forward.

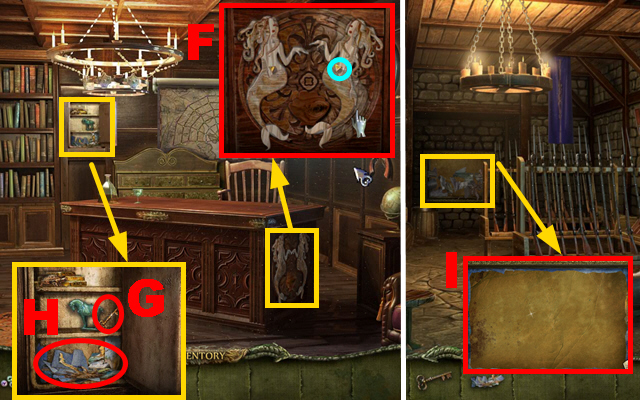
- Place 2 DESK ORNAMENTS on the niches (F); tighten the table part with the HEX KEY (blue).
- Take the BAR KEY (G) and PICTURE PIECES (H).
- Walk down twice, turn right.
- Put down 3 PICTURE PIECES (I).
- Play the mini-game.

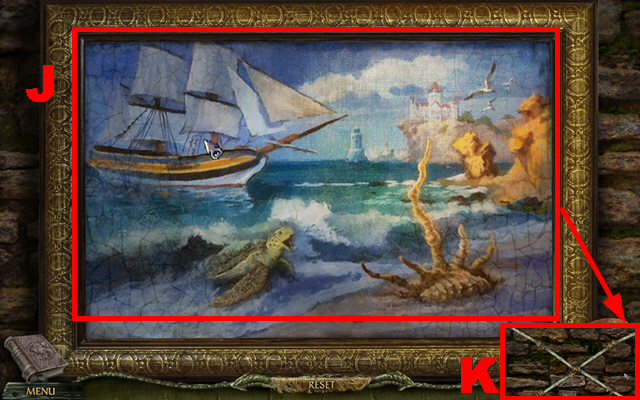
- Solution: (J).
- Take the SHAFTS (K).
- Walk down twice, turn right.
- Play the HOP.

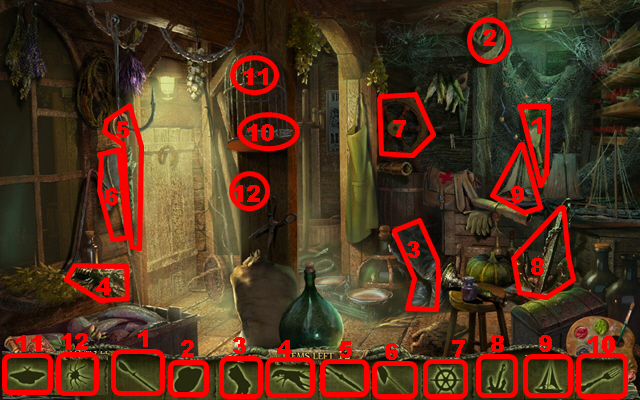
- Solution: 1-12.
- You receive the MAP TOKENS.

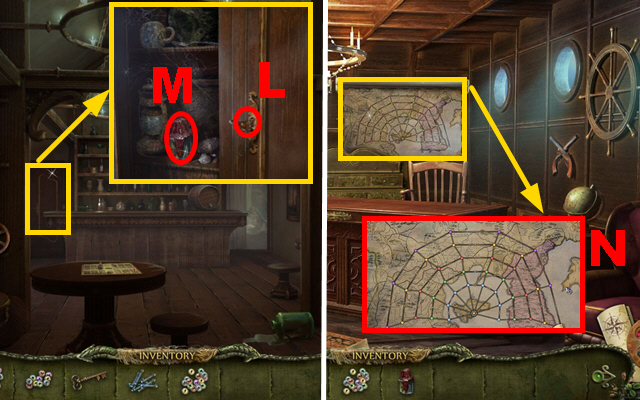
- Insert the BAR KEY into the lock (L); take the SEALED BINDER (M).
- Walk down, move forward, turn left, move forward.
- Put down 3 MAP TOKENS (N).
- Play the mini-game.

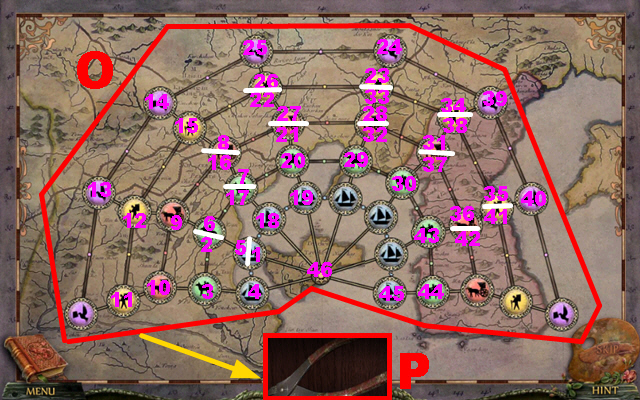
- Solution (O): 1-46.
- Take the NIPPERS (P).
- Walk down.

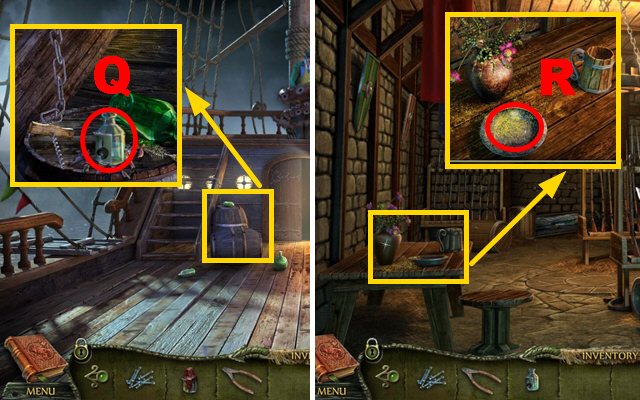
- Put down the SEALED BINDER (Q); take the BINDER.
- Walk down, turn right.
- Pour the BINDER over the pollen (R) to acquire the yellow paint.
- Walk down, turn left.

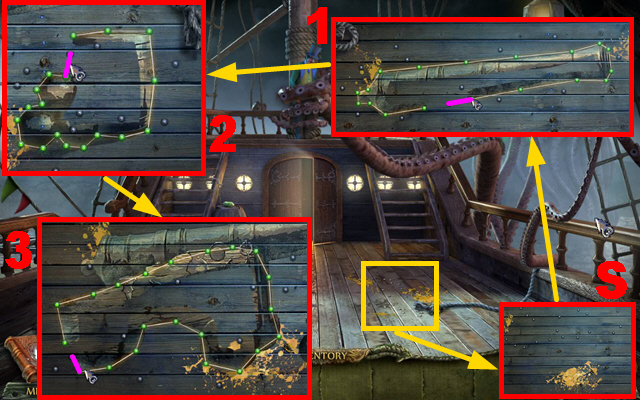
- Paint the outline (S).
- Play the mini-game.
- Solution: 1-3.

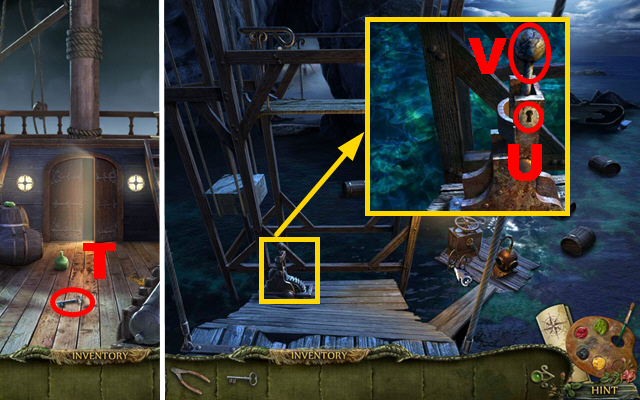

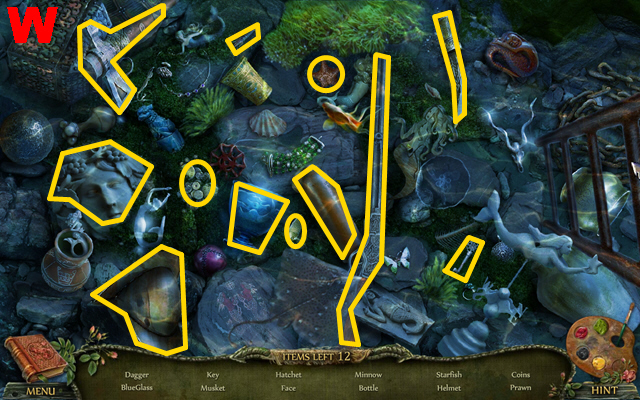
- Take the HOIST KEY (T).
- Turn left.
- Insert the HOIST KEY into the lock (U); pull the lever (V).
- Play the HOP.
- You receive the BALL (W).
- Move forward.
Chapter 5: The Fair

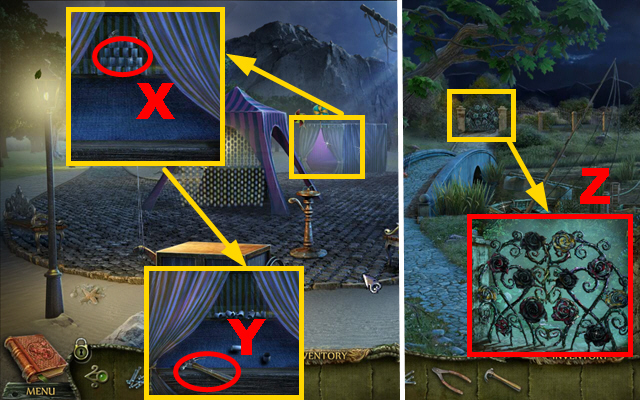
- Throw the BALL (X); take the CLAW HAMMER (Y).
- Turn left.
- Touch the roses (Z).

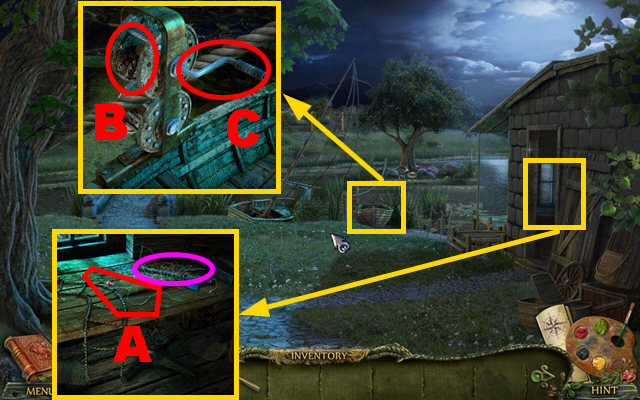
- Cut the fishing line with the NIPPERS (purple); take the FISHING LINE (A).
- Connect the SHAFTS to the wheel (B); rotate the handle (C).
- Play the HOP.

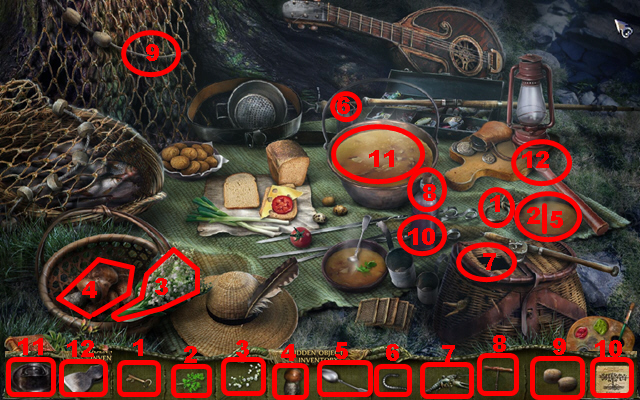
- Solution: 1-12.
- You receive the PAPER ROSES.

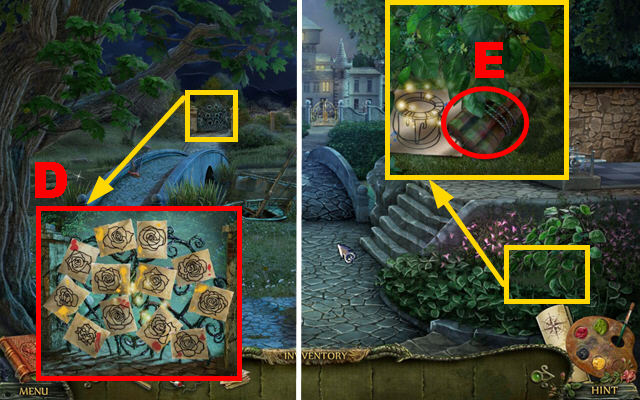
- Place the PAPER ROSES on the gate (D); paint the roses.
- Move forward.
- Take the TNT (E).
- Take the frontal left turn.

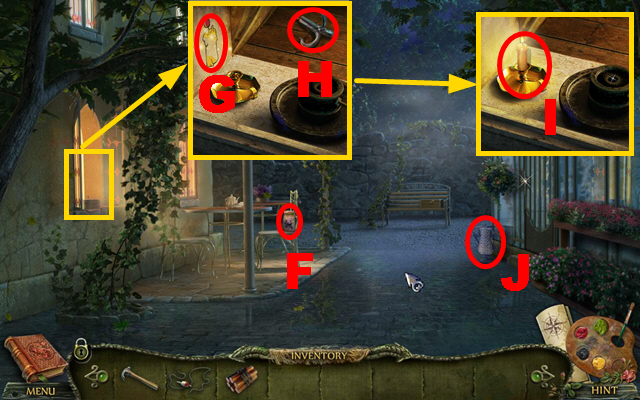
- Take the BIRD FOOD (F).
- Paint the sketch (G); take the HOOK (H).
- Take the BURNING CANDLE (I).
- Take the VASE (J).
- Walk down.

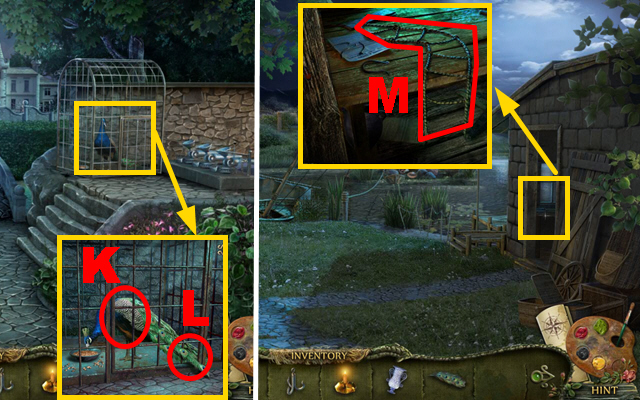
- Give the BIRD FOOD to the peacock (K); take the PEACOCK FEATHER (L).
- Walk down.
- Connect the HOOK to the rope ladder (M); take the GRAPPLING LADDER.
- Walk down.

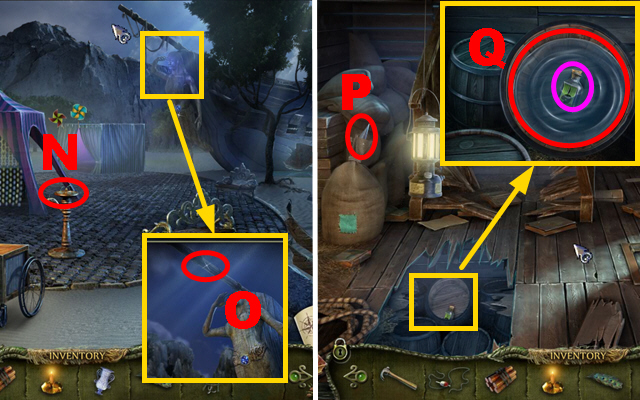
- Hold the VASE next to the fountain (N) to acquire the VASE OF WATER.
- Connect the GRAPPLING LADDER to the mast (O).
- Turn right.
- Pull out the pike (P); take the PIKE.
- Pour the VASE OF WATER into the barrel (Q); take the BINDER (purple).

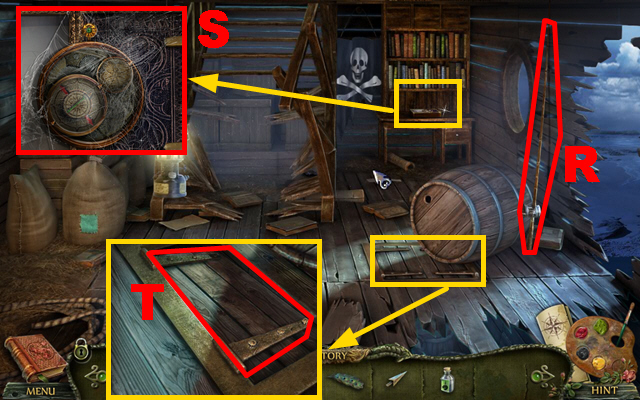
- Connect the FISHING LINE to the rod (R); take the FISHING ROD.
- Remove the cobwebs with the PEACOCK FEATHER (S).
- Use the CLAW HAMMER (T).
- Play the HOP.

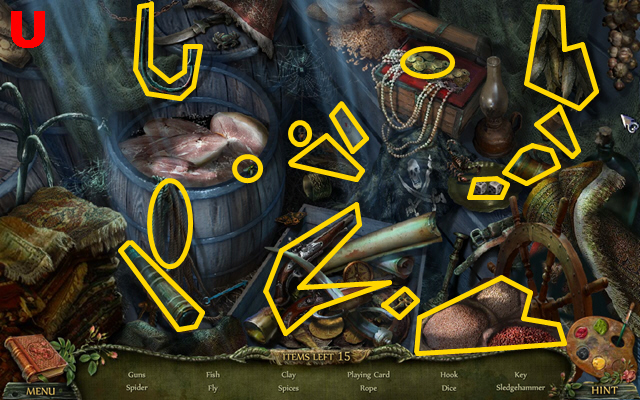
- You receive the SLEDGEHAMMER (U).
- Walk down, turn left.

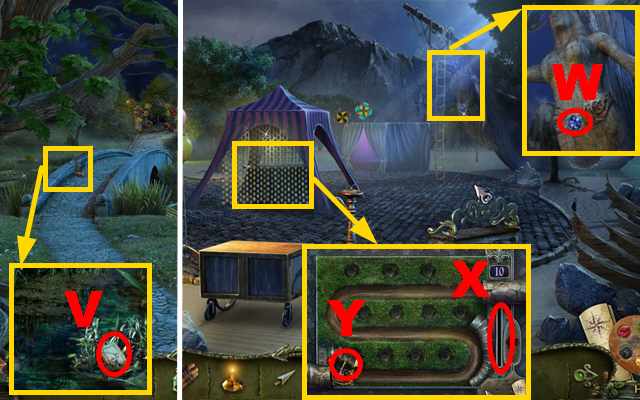
- Collect the TICKET with the FISHING ROD (V).
- Walk down.
- Loosen the gem with the PIKE (W); take the BLUE GEM.
- Insert the TICKET into the slot (X); put down the SLEDGEHAMMER (Y).
- Play the mini-game.

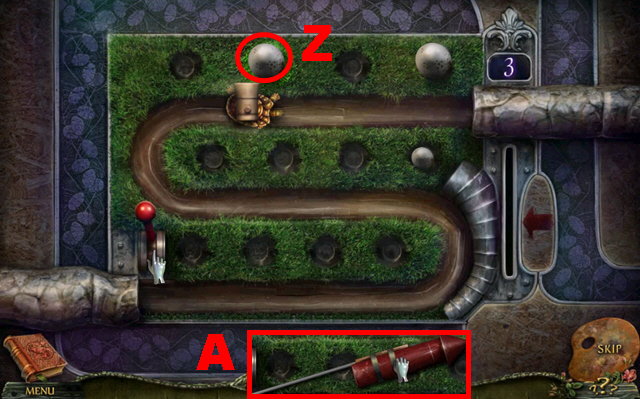

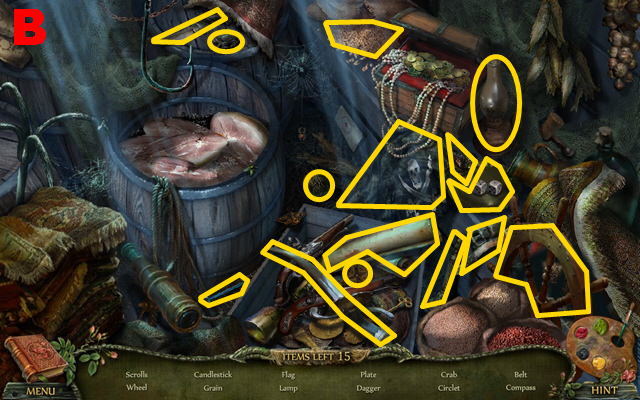
- Hit ten eggs (Z) to complete this puzzle.
- Take the ROCKET (A).
- Turn right.
- Play the HOP.
- You receive the COMPASS NEEDLE (B).

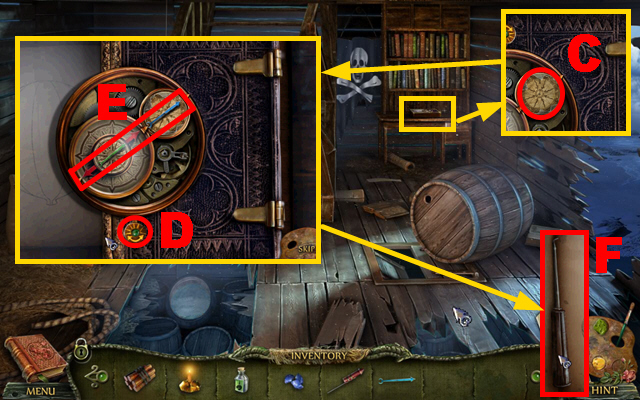
- Put down the COMPASS NEEDLE (C).
- Play the mini-game.
- Rotate the button (D) clockwise until all arrows are set in one line (E).
- Take the PICKLOCK (F).
- Walk down, turn left, move forward, take the rear left turn.

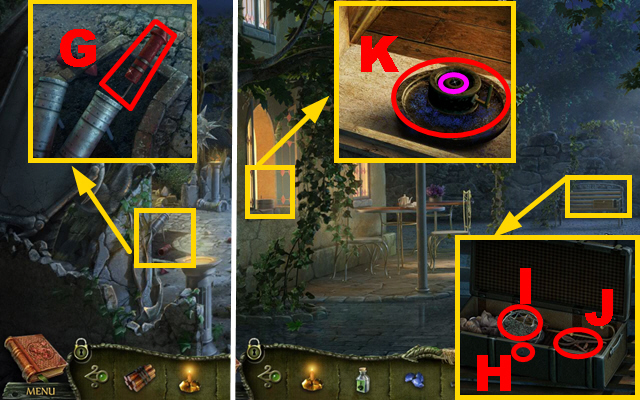
- Put down the ROCKET (G); connect the TNT to the rocket.
- Walk down, take the frontal left turn.
- Insert the PICKLOCK into the lock (H); take the HAWK EMBLEM (I) and PRUNER (J).
- Insert the BLUE GEM into the device (purple); pour the BINDER over the powder (K) to acquire the blue paint.
- Walk down.

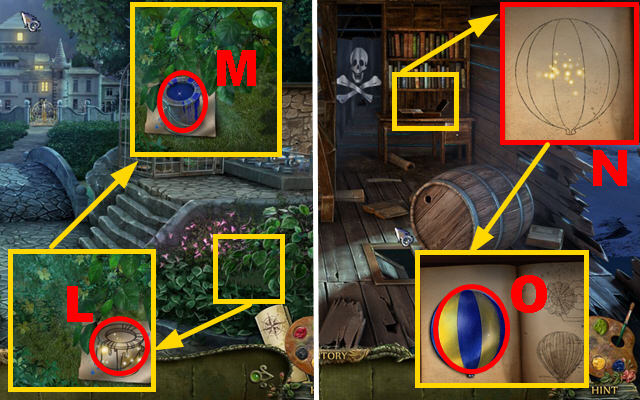
- Paint the sketch (L); take the BLUE PAINT BUCKET (M).
- Walk down twice, turn right.
- Paint the sketch (N); take the BIG BALLOON (O).
- Walk down, turn left.

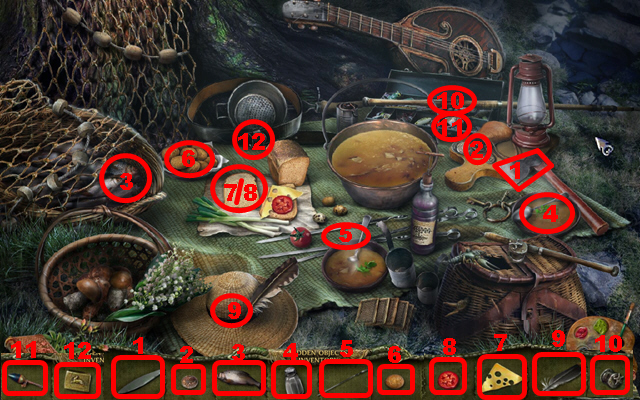
- Play the HOP.
- Solution: 1-12.
- You receive the SKETCH PIECE.

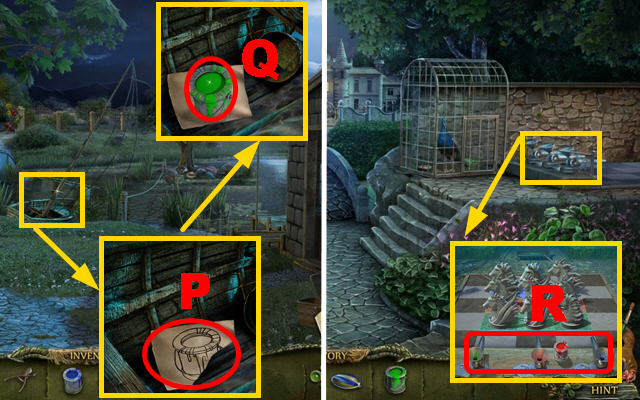
- Connect the SKETCH PIECE to the sketch (P).
- Paint the sketch; take the GREEN PAINT BUCKET (Q).
- Move forward.
- Put down the GREEN PAINT BUCKET and BLUE PAINT BUCKET (R).
- Play the mini-game.

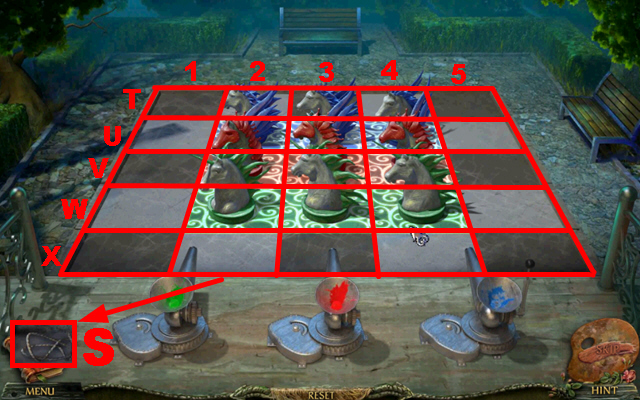
- Solution: W2-U1, V4-W2, W3-V5, U4-W3, W4-U5, V2-W4, U2-V4, V3-W1, U1-T3, W1-U2, U5-V3, U3-T1, V5-U3, T1-V2, T3-U5, W4-X2.
- U5-W4, U3-T5, W4-U3, V4-X5, T5-V4, V4-X3, U3-T1, V2-T3, T1-V2, V2-U4, T3-V2, X3-W5, U4-T2, W5-U4, T2-V1, V1-U3, X5-V4, X2-W4.
- Take the FUSE (S).
- Take the rear left turn.

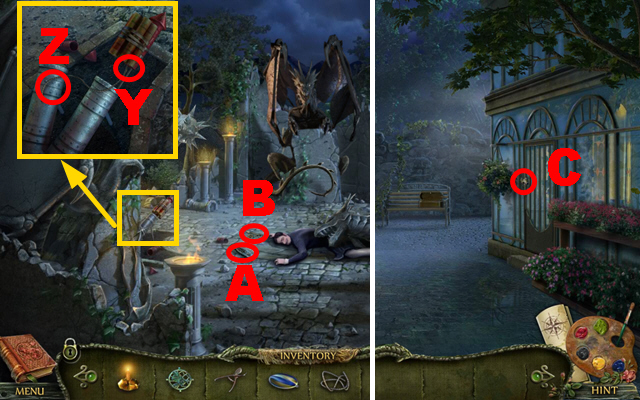
- Connect the FUSE to the rocket (Y); light it with the BURNING CANDLE (Z).
- Take the WHETSTONE (A) and CAFE KEY (B).
- Walk down, take the frontal left turn.
- Open the door with the CAFE KEY (C).
- Play the HOP.

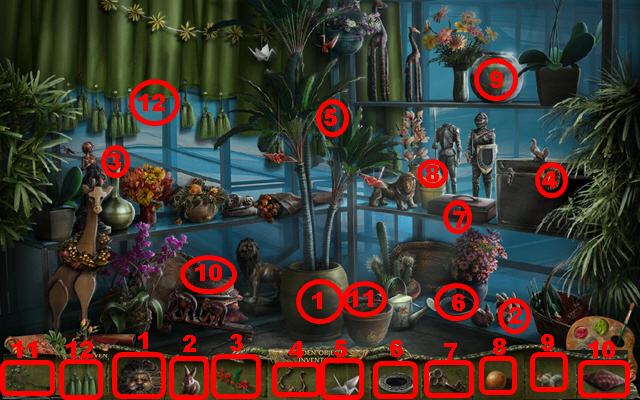
- Solution: 1-12.
- You receive the HELIUM.
- Walk down, take the rear left turn.

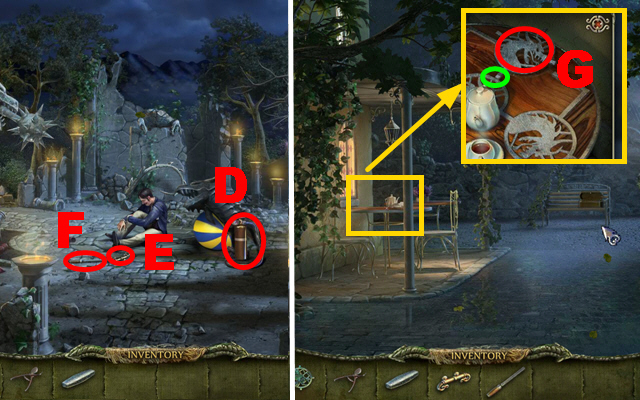
- Put down the HELIUM (D); connect the BIG BALLOON to the helium.
- Take the HANDLE (E) and RASP (F).
- Walk down, take the frontal left turn.
- Loosen the emblem with the RASP (green); take the DRAGON EMBLEM (G).
- Walk down twice.

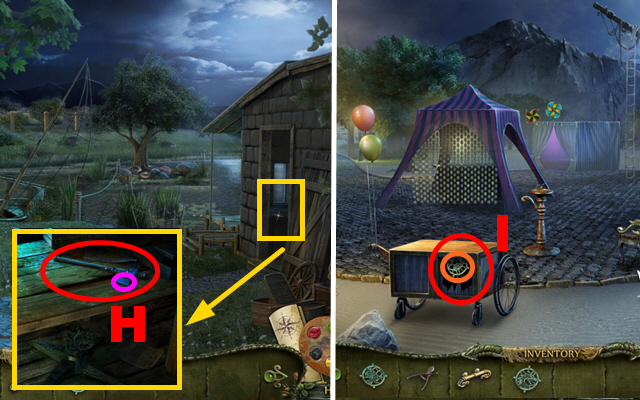

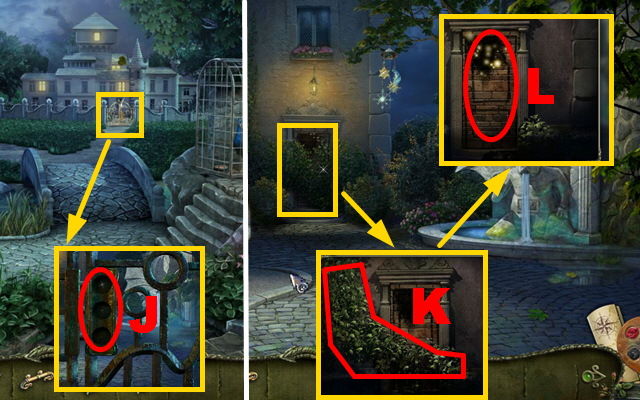
- Use the WHETSTONE (purple); take the AXE (H).
- Walk down.
- Smash the cart with the AXE (I); take the CAT EMBLEM (orange).
- Turn left, move forward.
- Connect the HAWK EMBLEM, DRAGON EMBLEM, and CAT EMBLEM to the gate (J).
- Move forward.
- Cut the ivy with the PRUNER (K); paint the door (L).
Chapter 6: The Villain’s Hideout

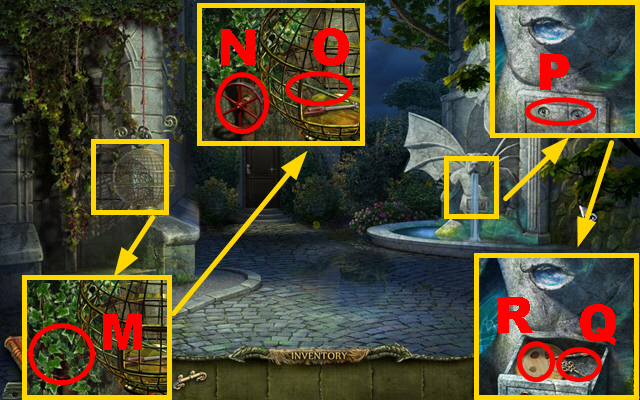
- Cut the leaves with the PRUNER (M); rotate the valve (N).
- Open the cage; take the DRY STICK (O).
- Connect the HANDLE to the fountain (P); take the BACK DOOR KEY (Q) and ARTIST TOKEN (R).

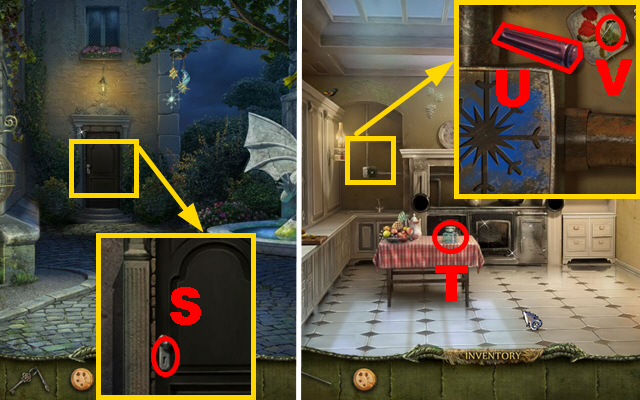
- Insert the BACK DOOR KEY into the lock (S).
- Move forward.
- Take the JAR (T).
- Take the SCREWDRIVER HANDLE (U) and NEEDLE (V).
- Walk down.

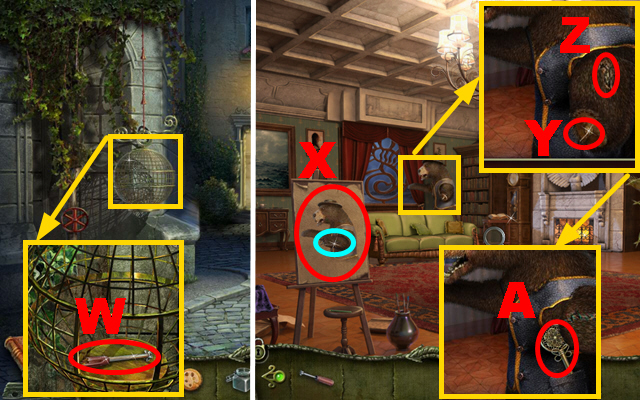
- Connect the SCREWDRIVER HANDLE to the screw (W); take the FANCY SCREWDRIVER.
- Move forward, turn right.
- Color the painting (X); take the PAW (blue).
- Place the PAW on the bear (Y); use the NEEDLE (Z).
- Take the STAINED-GLASS KEY (A).

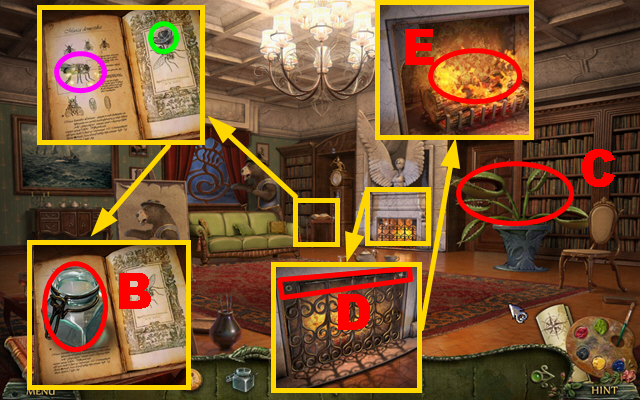
- Take the ACORN (green); paint the insects (purple).
- Put down the JAR; take the JAR WITH FLIES (B).
- Hold the JAR WITH FLIES next to the plant (C).
- Remove the cover with the FANCY SCREWDRIVER (D).
- Hold the DRY STICK into the flames (E) to acquire the FIRE.

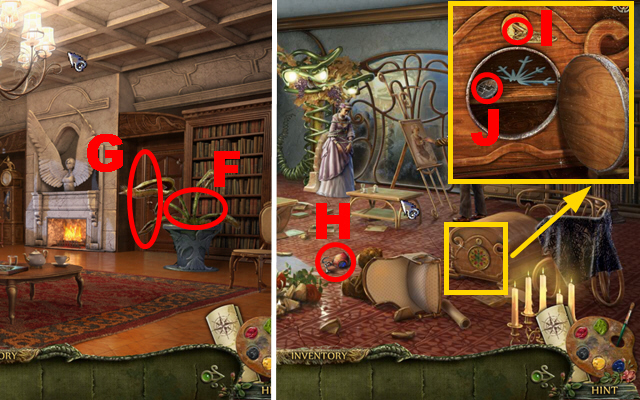
- Burn the plant with the FIRE (F).
- Open the door (G).
- Move forward.
- Take the SPRAY (H).
- Insert the STAINED-GLASS KEY into the lock (I); turn it.
- Take the LIGHTNING (J).
- Walk down.

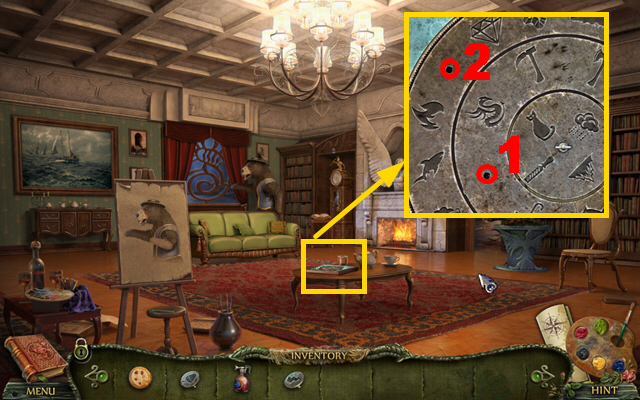
- Put down the ACORN (1) and LIGHTNING (2).
- Walk down.
- Play the HOP.

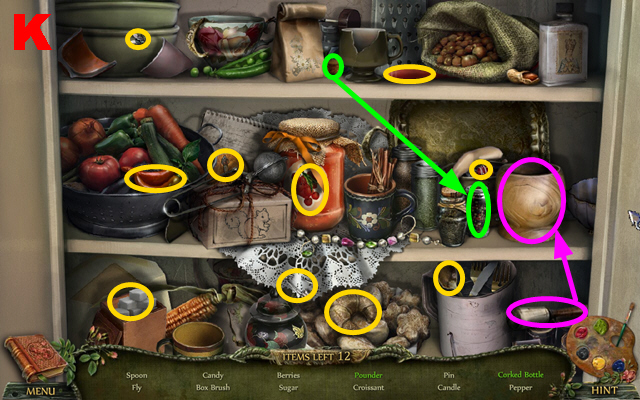
- You receive the ARTIST TOKEN (K).
- Turn right, move forward.

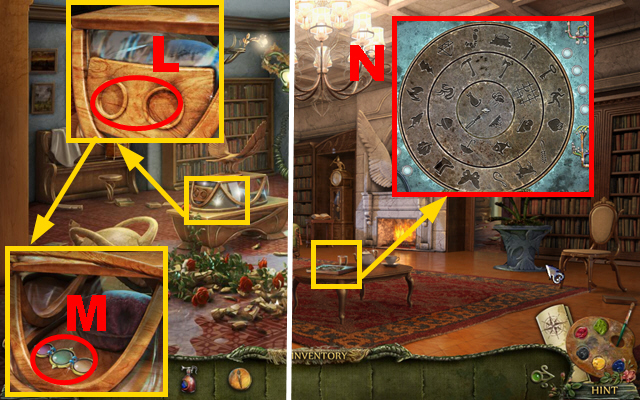
- Place 2 ARTIST TOKENS on the niches (L); take the PLANCHETTE (M).
- Walk down.
- Put down the PLANCHETTE (N).
- Play the mini-game.

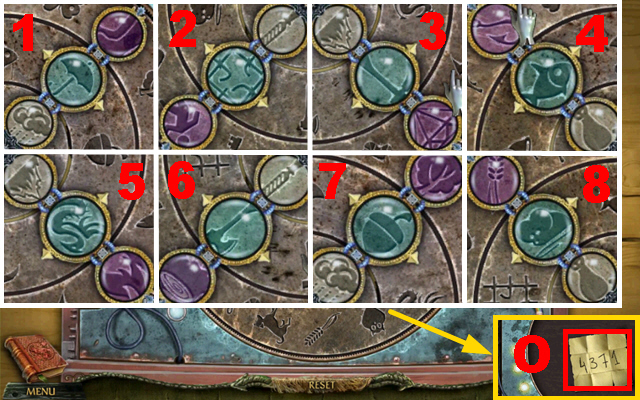
- Solution: 1-8.
- Take the CODE (O).
- Move forward.

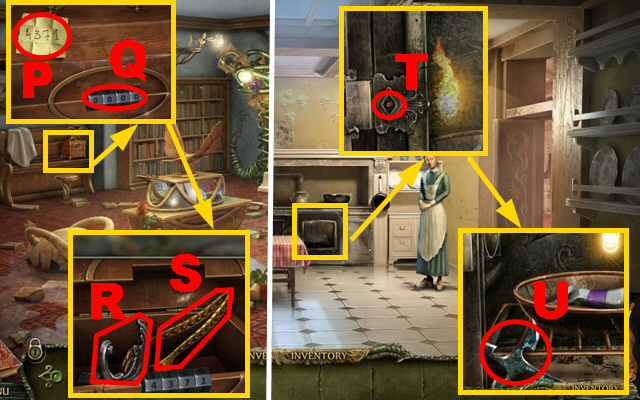
- Put down the CODE (P); enter the code ’4371′ (Q).
- Take the OVEN HANDLE (R) and TONGS (S).
- Walk down twice.
- Place the OVEN HANDLE on the oven (T); take the THROWING STAR (U).
- Play the HOP.

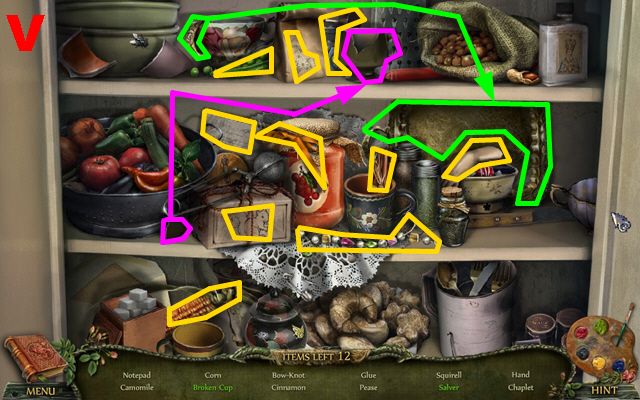
- You receive the GLUE (V).
- Walk down.

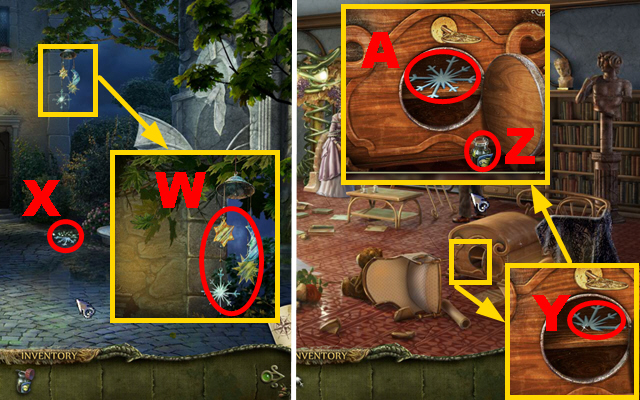
- Throw the THROWING STAR (W).
- Take the BROKEN SNOWFLAKE (X).
- Move forward, turn right, move forward.
- Connect the BROKEN SNOWFLAKE to its other half (Y); put down the GLUE (Z).
- Apply the glue to the snowflake (A); take the SNOWFLAKE.
- Walk down twice.

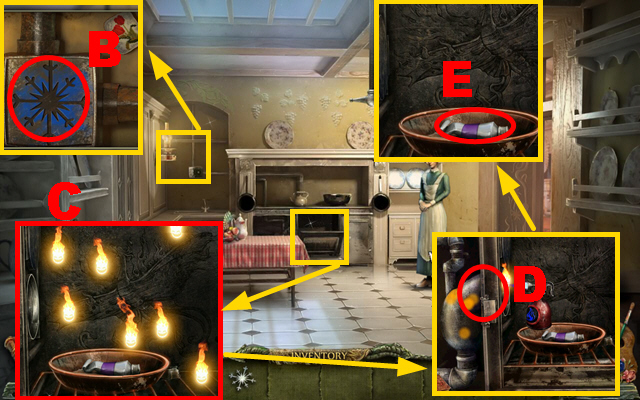

- Place the SNOWFLAKE on the niche (B); paint the snowflake.
- Use the SPRAY (C).
- Play the mini-game.
- Chase the imps into the pipe (D).
- Collect the PURPLE PAINT with the TONGS (E).
- Turn right, move forward.
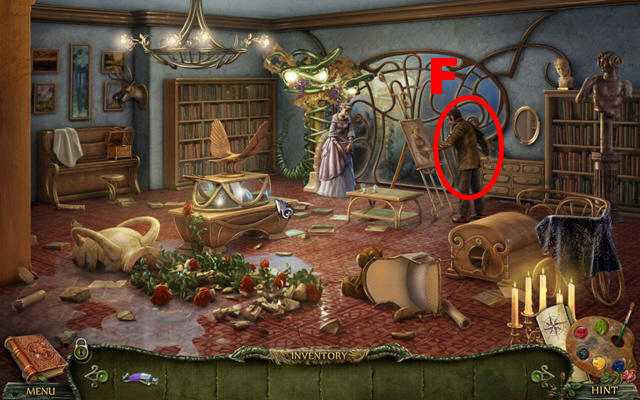
- Give the PURPLE PAINT to Edmund (F).
- Congratulations, you have completed Fatal Passion: Art Prison.


 Haunted Legends: The Stone Guest Walkthrough, Guide, & Tips
 Time Builders: Pyramid Rising 2 Walkthrough, Guide, & Tips
 Nightmares from the Deep: The Cursed Heart Walkthrough, Guide, & Tips
 Sea of Lies: Nemesis Walkthrough, Guide, & Tips
 Hidden in Time: Looking-glass Lane Walkthrough, Guide, & Tips