Mystery of the Ancients: Three Guardians Walkthrough, Guide, & Tips
Mystery of the Ancients: Three Guardians Walkthrough
Welcome to the Mystery of the Ancients: Three Guardians Walkthrough
The town of Green Hill has really gone to the birds!
Whether you use this document as a reference when things get difficult or as a road map to get you from beginning to end, we’re pretty sure you’ll find what you’re looking for here.
This document contains a complete Mystery of the Ancients: Three Guardians game walkthrough featuring annotated screenshots from actual gameplay!
We hope you find this information useful as you play your way through the game. Use the walkthrough menu below to quickly jump to whatever stage of the game you need help with.
Remember to visit the Big Fish Games Forums if you find you need more help. Have fun!
This walkthrough was created by David Becker, and is protected under US Copyright laws. Any unauthorized use, including re-publication in whole or in part, without permission, is strictly prohibited.
General Tips
- This is the official guide for Mystery of the Ancients: Three Guardians.
- This guide will not mention each time you have to zoom into a location; the screenshots will show each zoom scene.
- We will use the acronym HOP for Hidden-object puzzles. Interactive items will be color-coded and some will be numbered; please follow the numbers in sequence.
- Use the map to travel to a location.
Chapter 1: The Abandoned Town

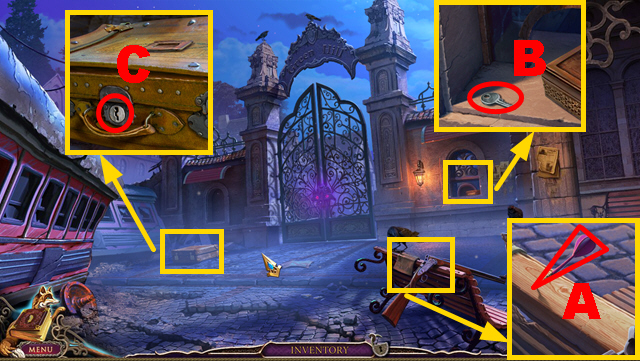
- Take the DART (A).
- Take the SUITCASE KEY (B).
- Put the SUITCASE KEY into the lock (C).
- Play the HOP.

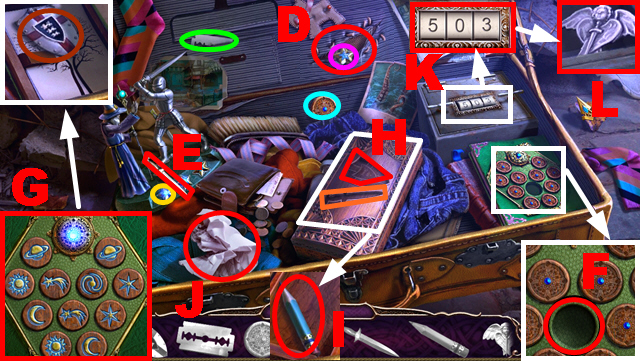
- Use the razor (green) to cut the seam (D).
- Place the star (purple) on the niche (yellow).
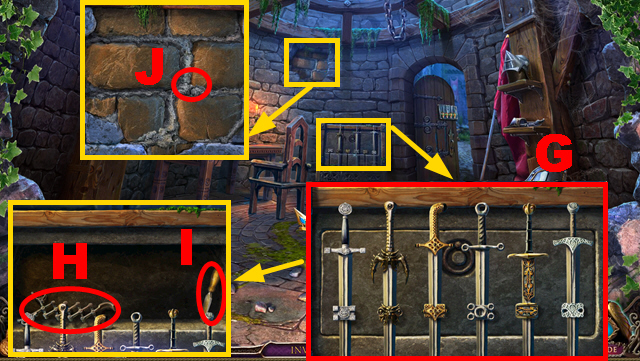
- Place the sword (E) on the slot (orange).
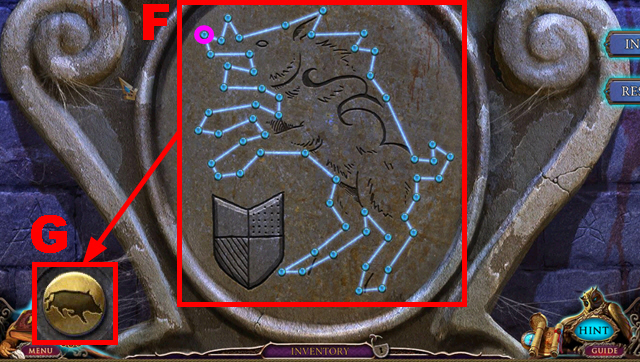
- Place the wooden token (blue) on the niche (F).
- Solution: (G).
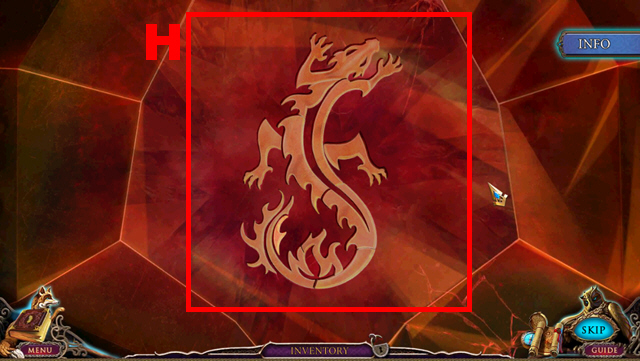
- Put the shield (brown) into the slot (H).
- Use the pencil (I) to write on the paper (J).
- Enter the code ’261′ (K).
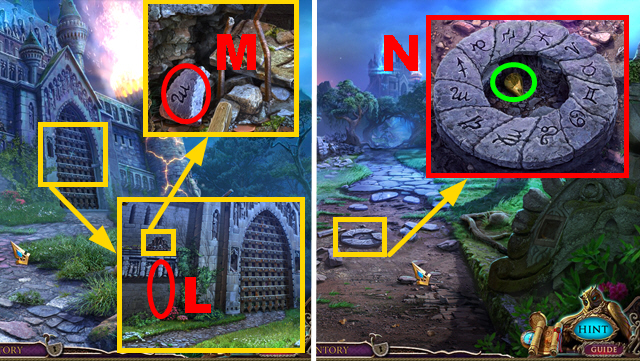
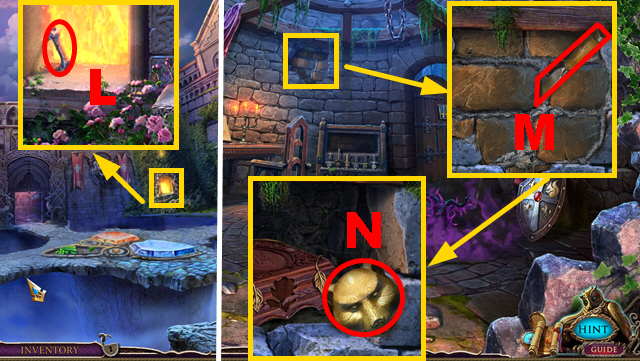
- Take the ANGEL (L).

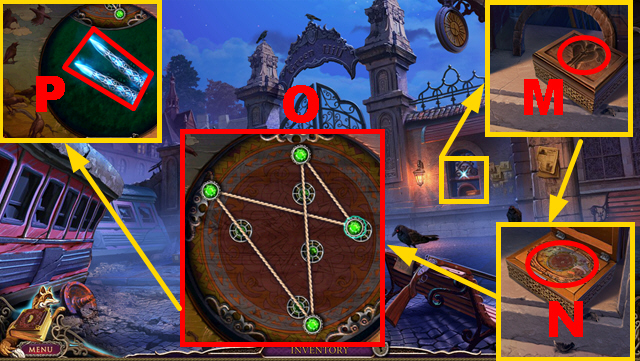
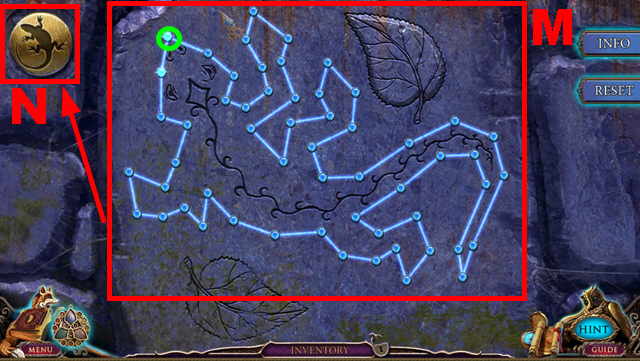
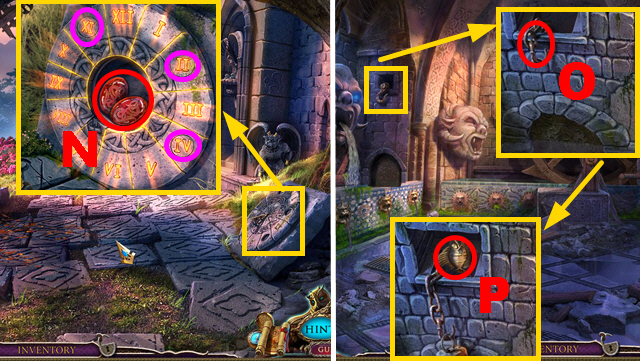
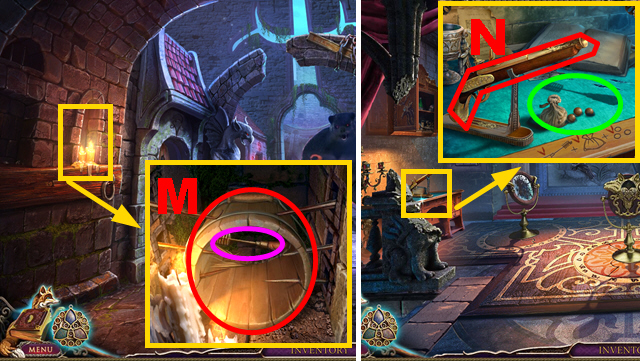
- Place the ANGEL on the box (M); play the mini-game (N).
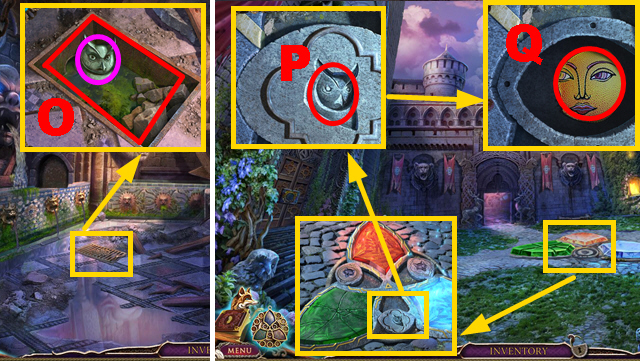
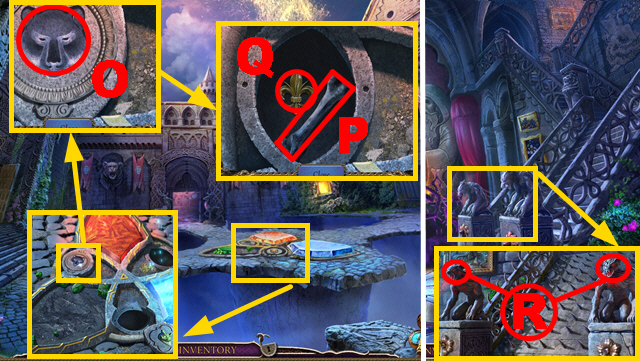
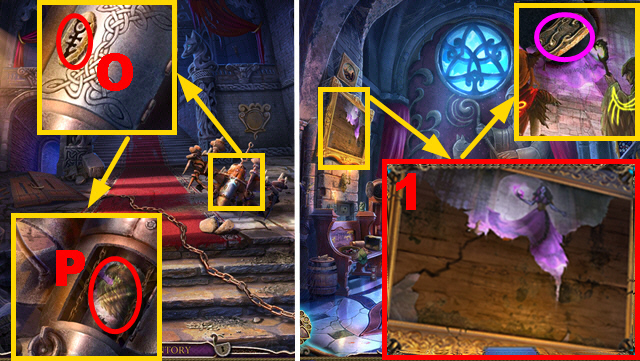
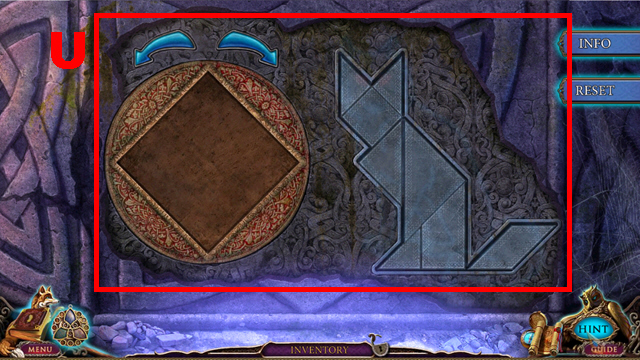
- Solution: (O).
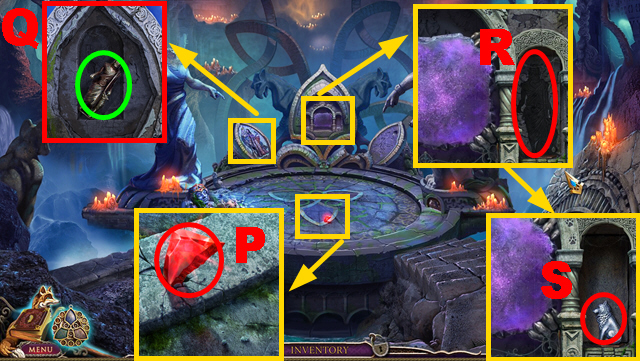
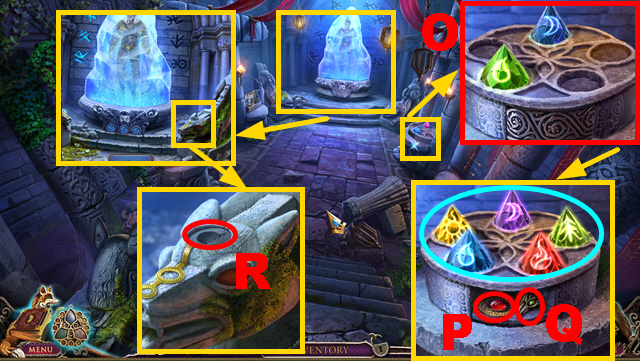
- Take the SILVER BULLETS (P).

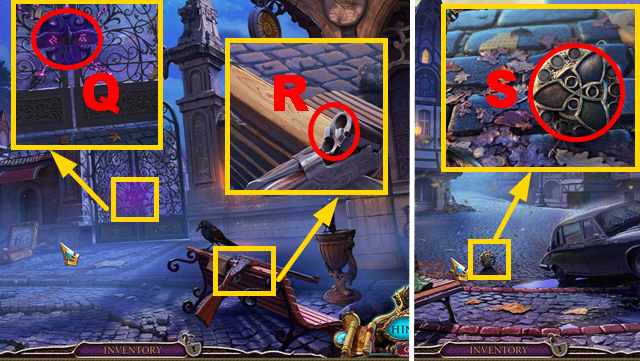
- Put the SILVER BULLETS into the rifle (R) to acquire the RIFLE.
- Shoot the RIFLE (Q).
- Move forward.
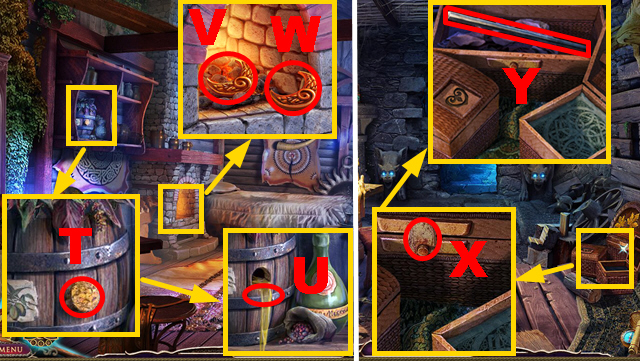
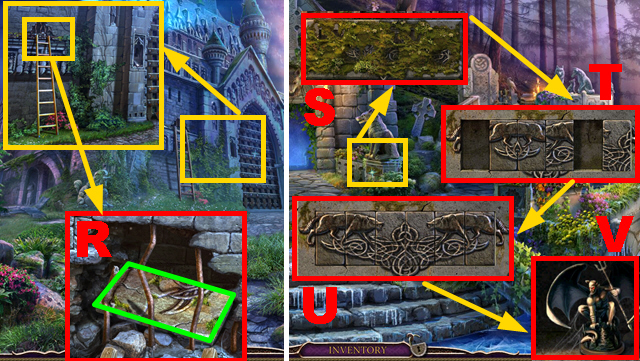
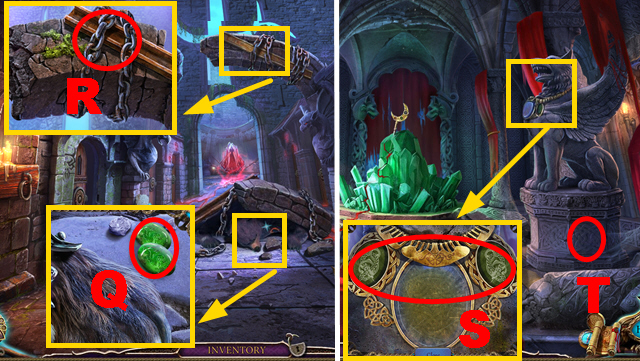
- Take the amulet (S).

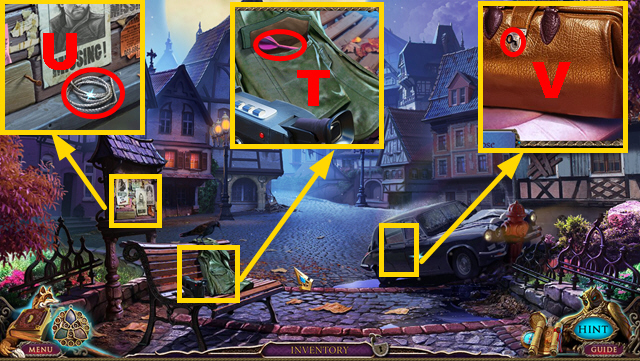
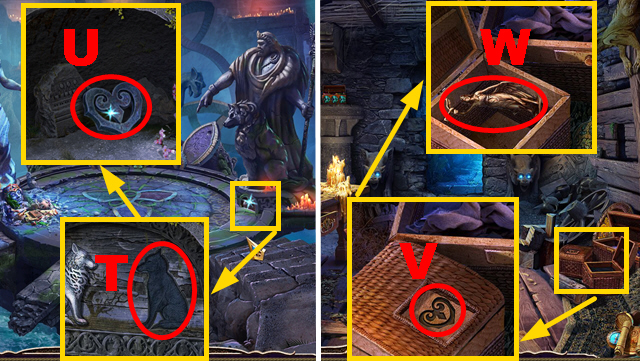
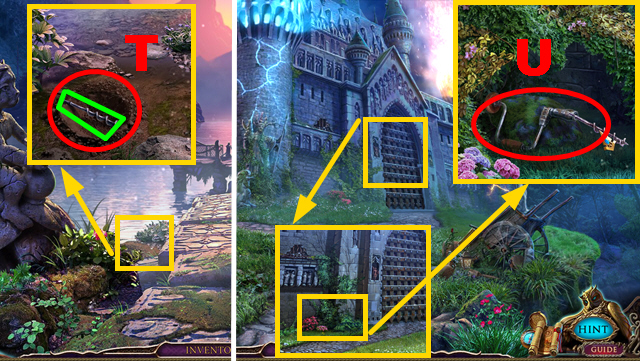
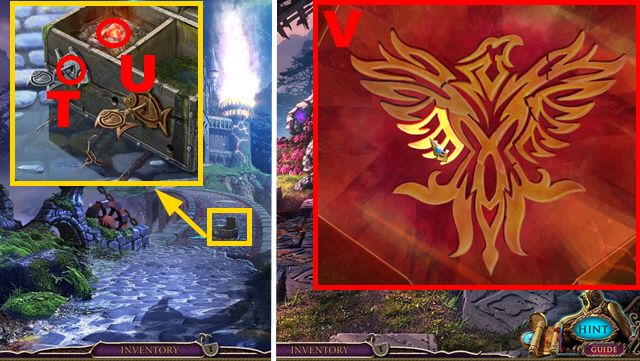
- Open the pocket; take the DART (T).
- Take the ROPE (U).
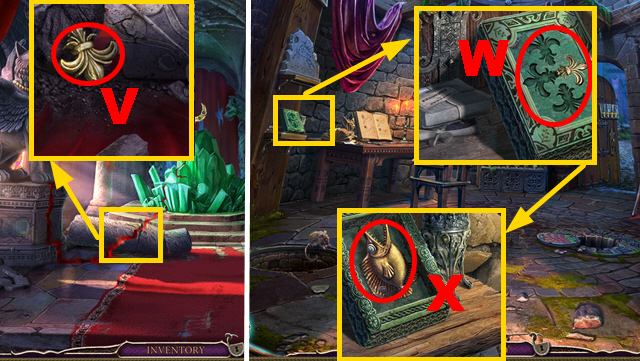
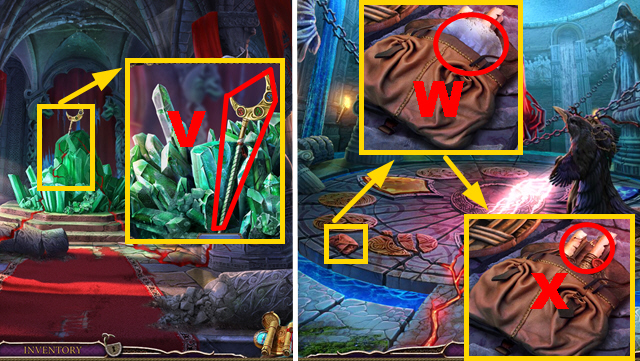
- Open the car; attempt to take the key (V).
- Move forward.

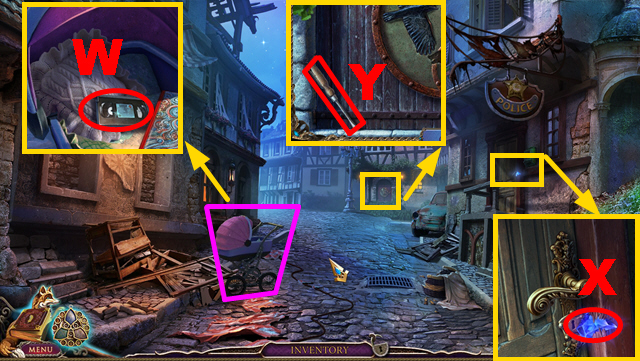
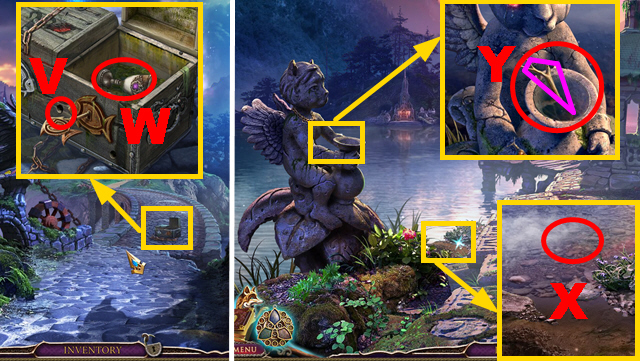
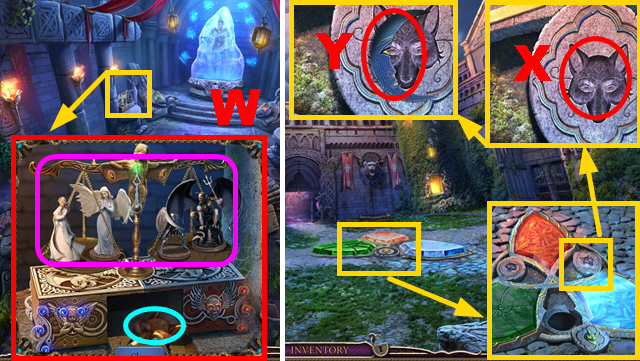
- Touch the buggy (purple); take the VIDEOTAPE (W).
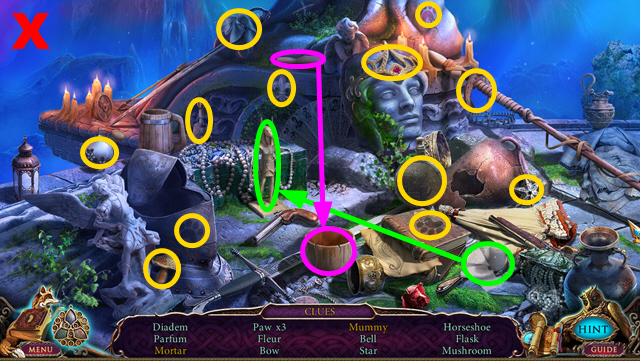
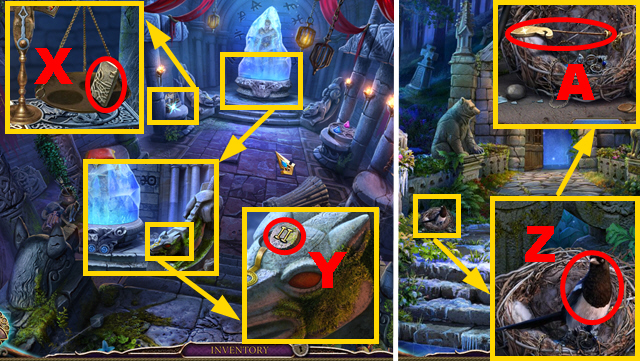
- Take the amulet piece (X).
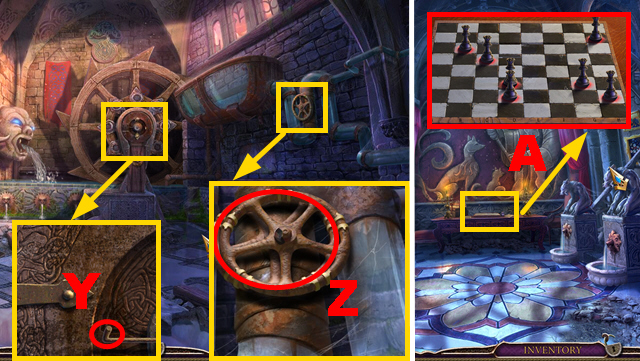
- Take the SCREWDRIVER (Y).

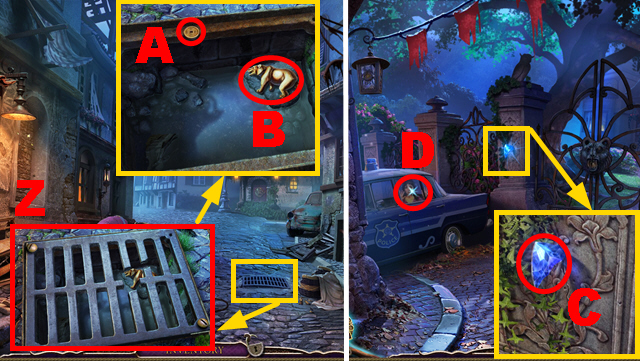
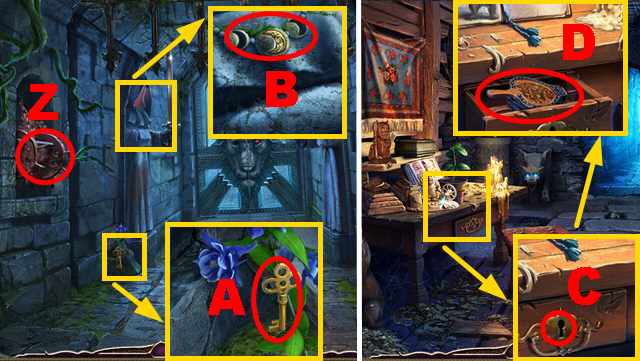
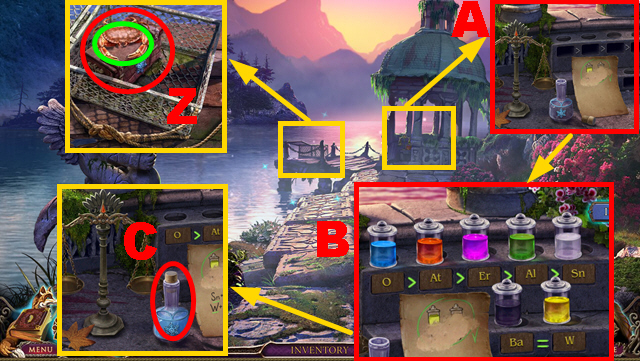
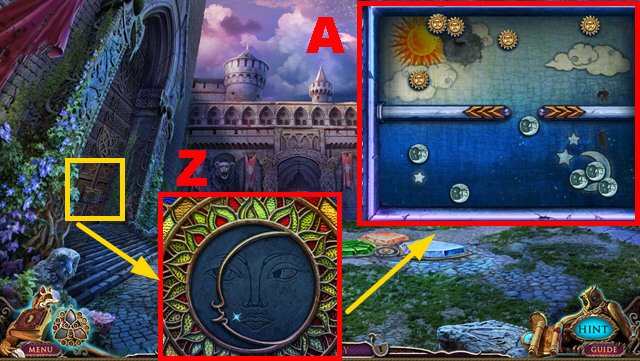
- Use the SCREWDRIVER (Z).
- Attempt to take the coin (A); take the BEAR (B).
- Move forward.
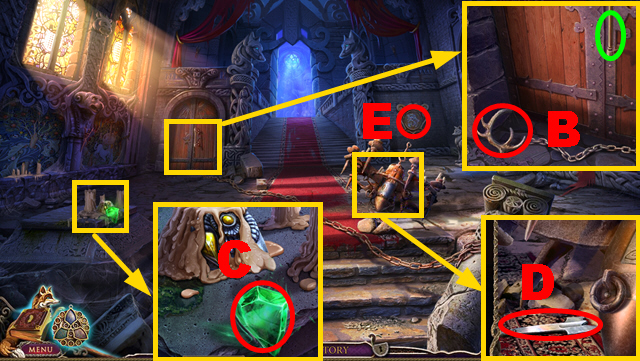
- Take the amulet piece (C).
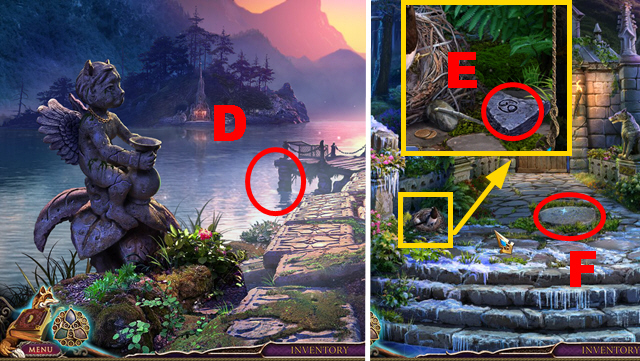
- Inspect the window (D).

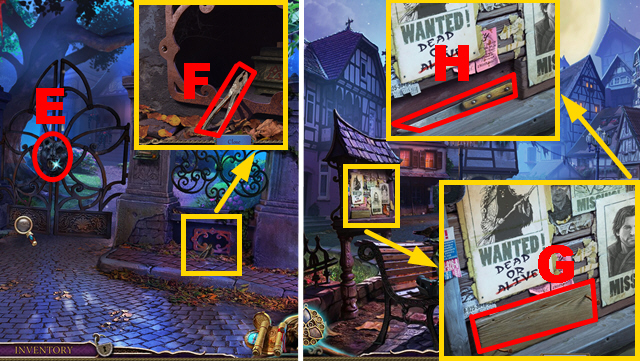
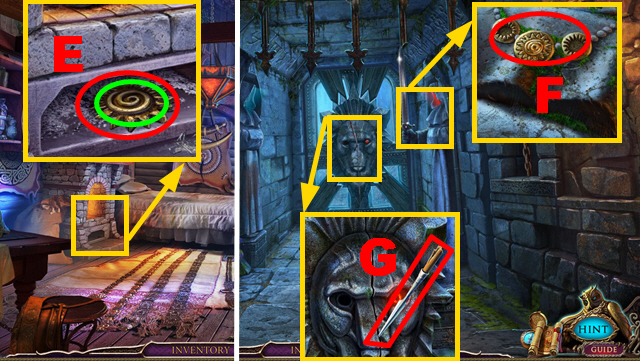
- Inspect the gate (E).
- Take the PLIERS (F).
- Walk down twice.
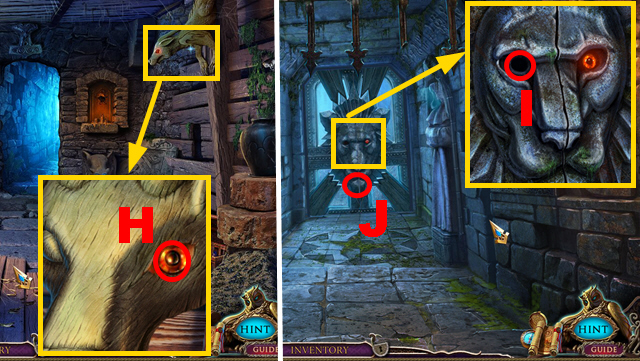
- Use the PLIERS (G); take the KNIFE (H).

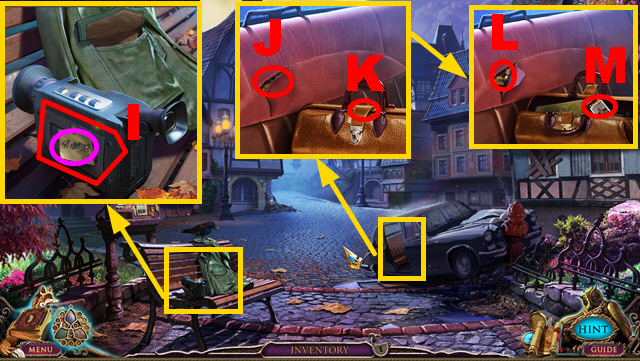
- Put the VIDEOTAPE into the camera (I); take the CODE (purple).
- Tear the cover (J); use the KNIFE (K).
- Take the OWL (L) and MATCHES (M).
- Move forward twice.

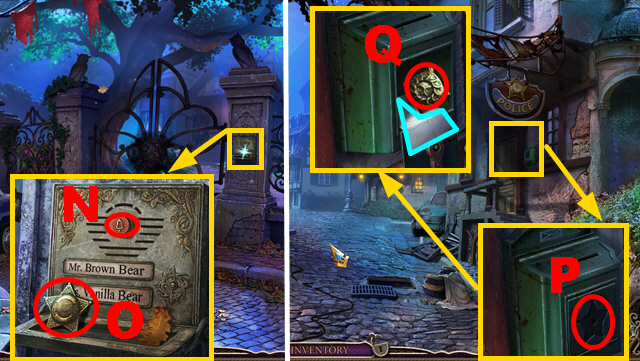
- Push the button (N); take the SHERIFF’S BADGE (O).
- Walk down.
- Place the SHERIFF’S BADGE on the mailbox (P); take the SUN KEY (Q) and note (blue).
- Move forward.

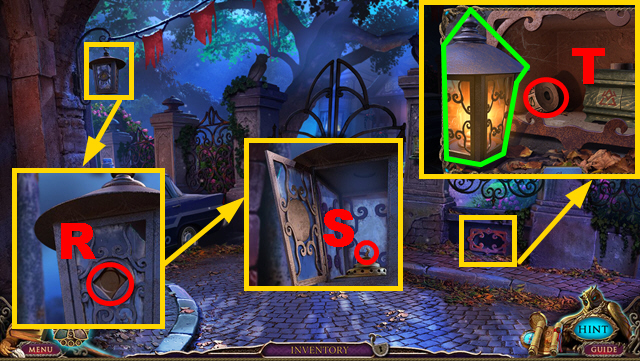
- Place the SUN KEY on the lantern (R); use the MATCHES (S) to receive the LANTERN.
- Put down the LANTERN (green); take the LOCK DISC (T).
- Walk down.

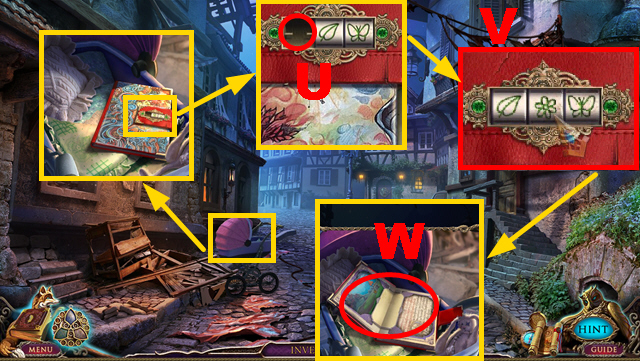
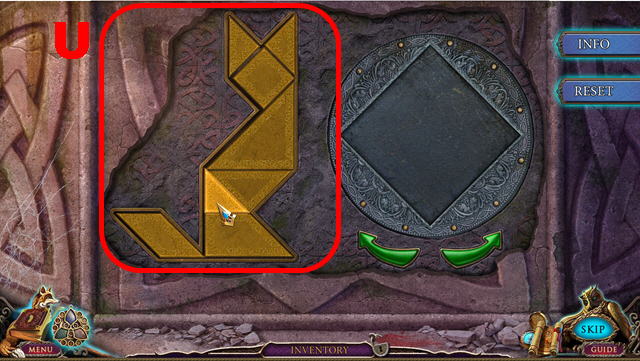
- Put the LOCK DISC into the niche (U).
- Adjust the symbols correctly (V).
- Play the mini-game (W).

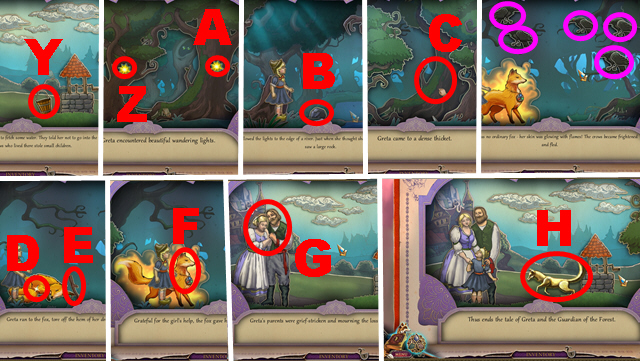
- Take the bucket (Y); catch the light (Z).
- Catch the light (A); throw the stone (B).
- Touch the tree (C); chase away 5 crows (purple).
- Patch the fox (D); take the branch (E).
- Touch the fox (F); return to the parents (G).
- Take the FOX (H).

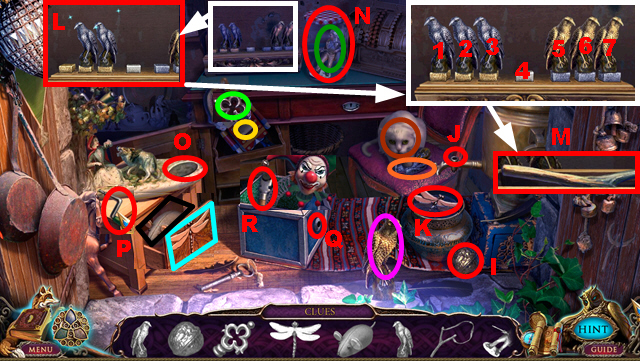
- Place the FOX (1), OWL (2), and BEAR (3) on the door.
- Play the HOP.


- Put the nut (I) into the nutcracker (yellow).
- Connect the tap handle (light green) to the faucet (J).
- Place the dragonfly (K) on the box (blue).
- Give the mouse (black) to the cat (brown).
- Place the golden bird (purple) and silver bird (orange) on the stand (L).
- Solution: 2, 3, 5, 4, 6, 5, 4, 2, 3, 5, 7, 6, 4, 3, 1, 2, 4, 5, 3, 4.
- Shoot the slingshot (M) at the jar (N).
- Place the hunter (dark green) on the niche (O).
- Connect the handle (P) to the box (Q).
- Take the GLASS CUTTER (R).
- Move forward.

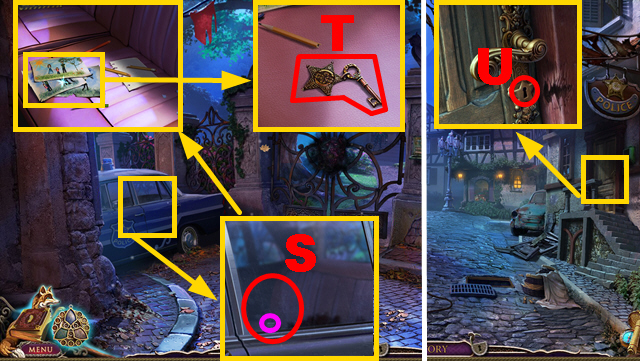
- Use the GLASS CUTTER (S); pull the lock (purple).
- Remove 3 drawings; take the SHERIFF’S KEY (T).
- Walk down.
- Insert the SHERIFF’S KEY into the lock (U).
- Turn right.
- Play the HOP.

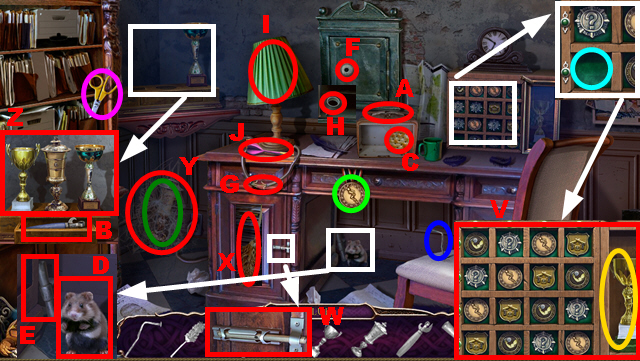
- Use the scissors (purple) to collect the medal (light green).
- Put the medal on the board (light blue).
- Solution: (V).
- Use the nail (dark blue) to move the hinge (W).
- Use the duster (X) to remove the cobwebs (Y).
- Put 2 trophies (yellow) and (dark green) on the stand (Z).
- Open the bag (A) with the opener (B).
- Give the cracker (C) to the animal (D).
- Place the handle (E) on the safe (F).
- Repair the wire (G) with the electrical tape (H).
- Touch the lamp (I).
- Take the DART (J).

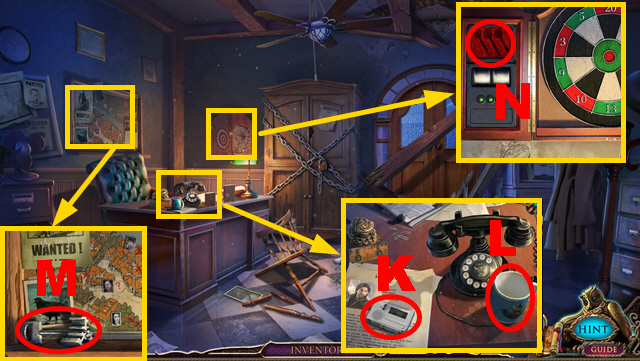
- Listen to the tape (K); take the CUP (L).
- Take the MILITARY KEY (M).
- Open the cupboard; put down 3 DARTS (N).
- Play the mini-game.

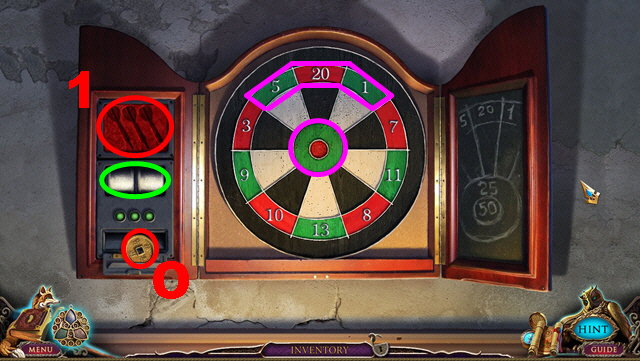
- To solve this puzzle, accumulate the points displayed on the panel (green).
- Throw the darts (1) at the purple sections.
- The required number of points is randomized.
- Take the COIN (O).
- Walk down.

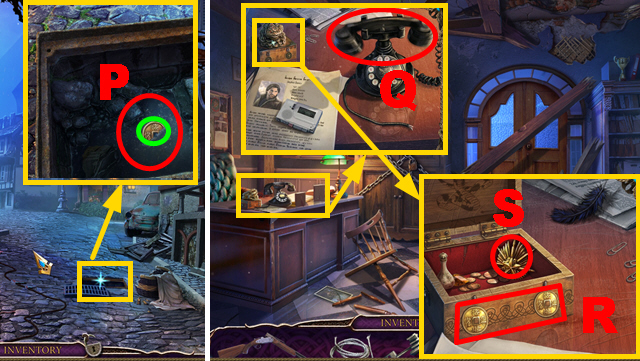
- Put the CUP into the water (P); take the COIN (green).
- Turn right.
- Pick up the phone (Q).
- Place 2 COINS on the slots (R); take the MILITARY INSIGNIA (S).
- Walk down, turn left.

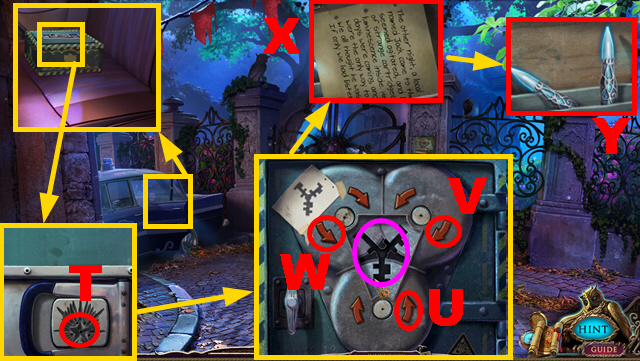
- Place the MILITARY INSIGNIA on the lock (T); press it.
- Play the mini-game.
- Solution: U x2, V x5, W x2.
- Insert the MILITARY KEY into the lock (purple).
- Grab the note (X); take the SILVER BULLETS (Y).
Chapter 2: The Mansion

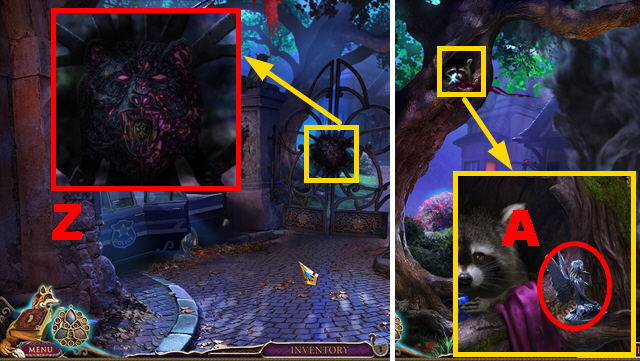
- Shoot the RIFLE (Z).
- Move forward.
- Take the FAIRY STATUETTE (A).
- Walk down.

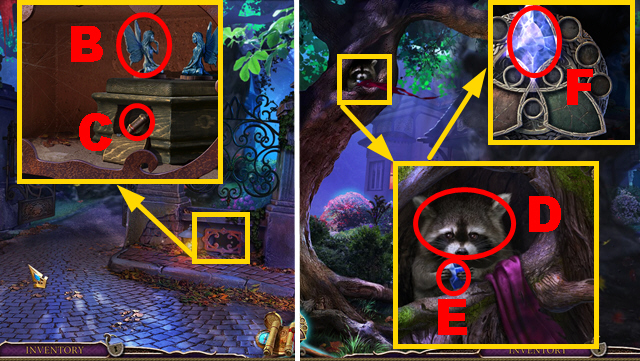
- Place the FAIRY STATUETTE on the box (B); take the WHISTLE (C).
- Move forward.
- Blow the WHISTLE (D); take the amulet piece (E).
- Press the blue gem (F).
- Play the mini-game.

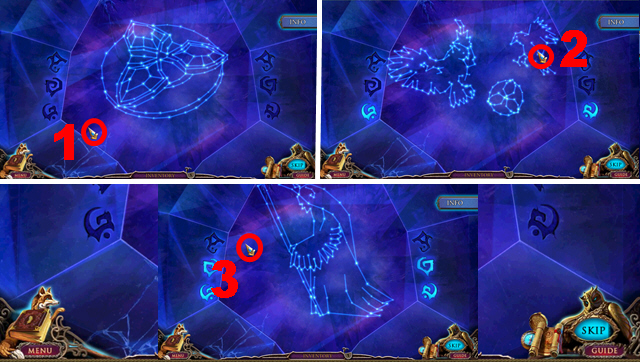
- Solution: 1-3.
- Turn right.

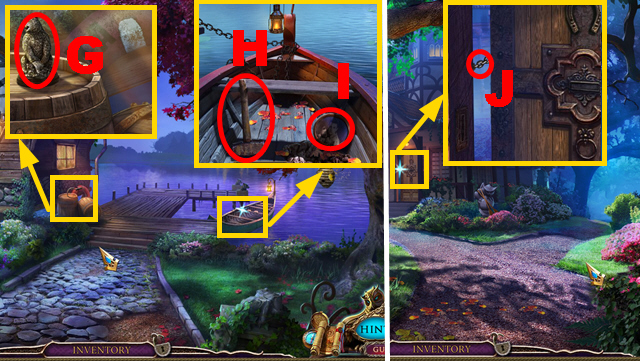
- Take the BEAR (G).
- Take the SLEDGEHAMMER (H) and PHOTO OF YOUNG STEPHEN (I).
- Walk down.
- Hit the chain with the SLEDGEHAMMER (J).
- Turn left.

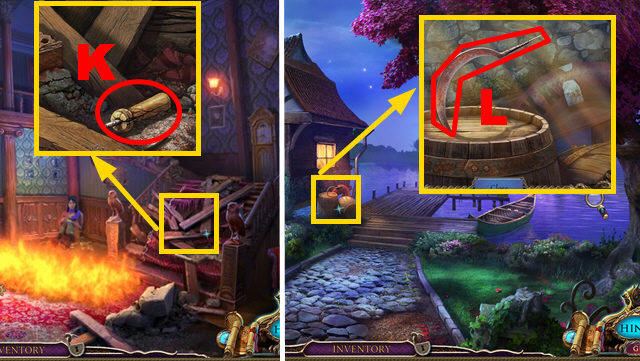
- Remove 3 planks; take the HANDLE (K).
- Walk down, turn right.
- Connect the HANDLE and ROPE to the sickle (L); take the SICKLE.
- Walk down.

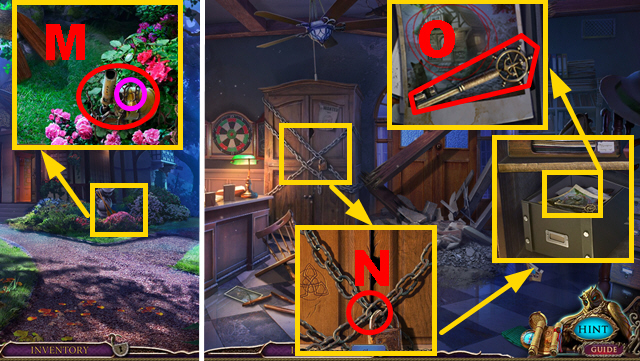
- Remove thorns with the SICKLE (M); take the BLOWTORCH (purple).
- Walk down twice, turn right.
- Remove the chain with the BLOWTORCH (N).
- Open the box; take the BOATHOUSE KEY (O).
- Go to the Boathouse.
- Activate the amulet; press the blue gem.
- Play the mini-game.

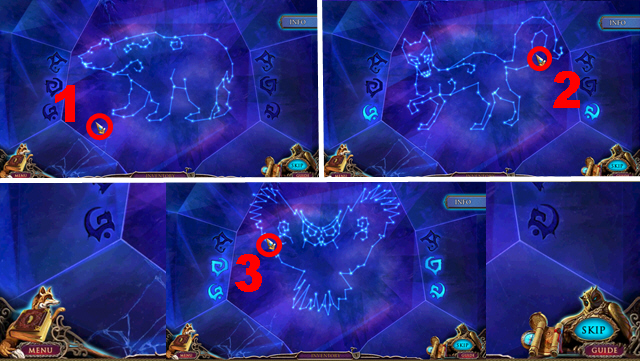

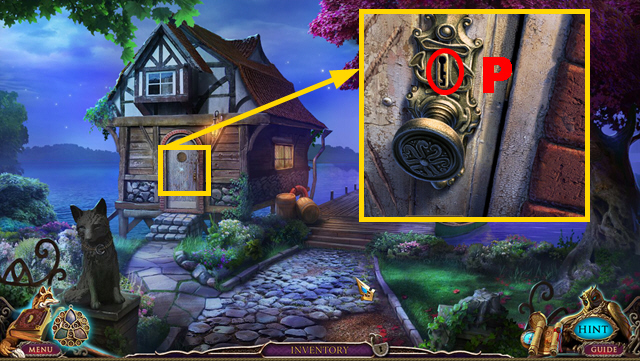
- Insert the BOATHOUSE KEY into the lock (P).
- Play the HOP.

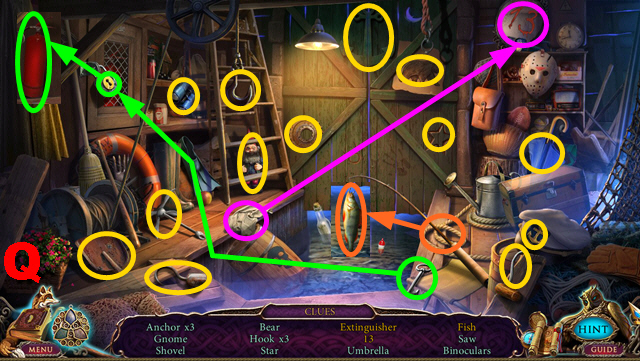
- You receive the FIRE EXTINGUISHER (Q).
- Walk down, turn left.

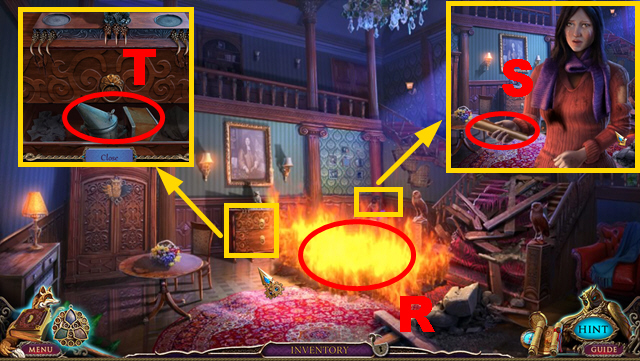
- Blow out the fire with the FIRE EXTINGUISHER (R).
- Take the note (S).
- Open the drawer; take the SMOKER (T).
- Walk down, turn right.

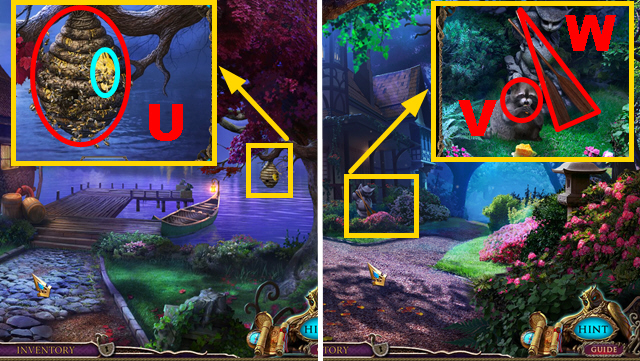
- Blow the SMOKER (U); take the HONEYCOMB (blue).
- Walk down.
- Give the HONEYCOMB to the animal (V); take the PADDLES (W).
- Turn right.

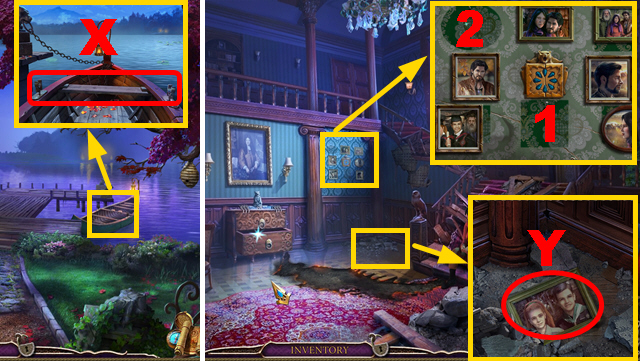
- Put down the PADDLES (X).
- Walk down, turn left.
- Remove the debris; take the PHOTO OF STEPHEN AT CAMP (Y).
- Put down the PHOTOS OF YOUNG STEPHEN (1) and STEPHEN AT CAMP (2).
- Play the mini-game.

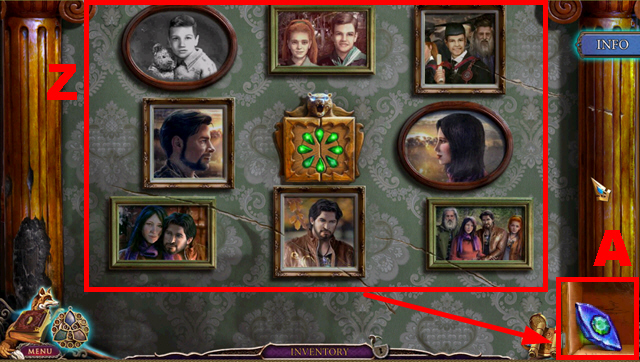
- Solution: (Z).
- Take the BEAR EYE (A).
- Walk down, turn right.
Chapter 3: The Backwoods

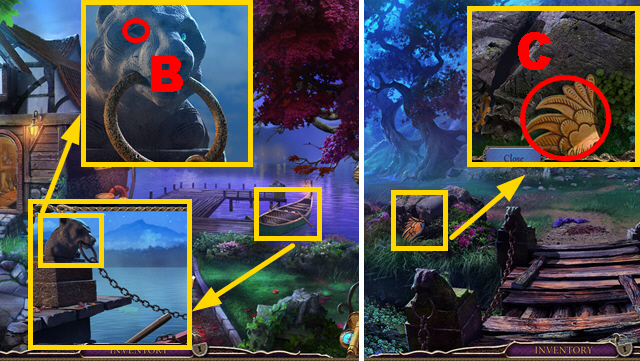
- Place the BEAR EYE on the bust (B).
- Move forward.
- Take the WING (C).

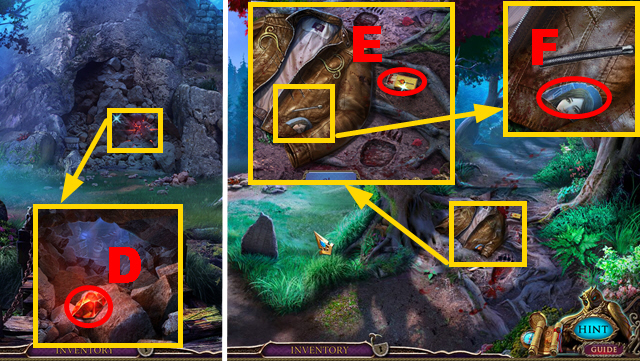
- Remove stones; take the amulet piece (D).
- Turn left.
- Take the MATCHES (E) and TORN PHOTO (F).

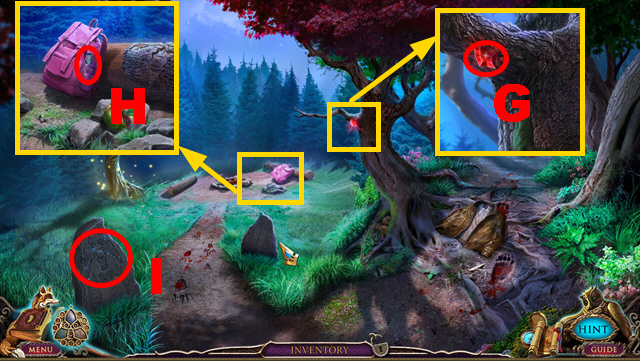
- Take the amulet piece (G).
- Open the pocket; take the BOTTLE (H).
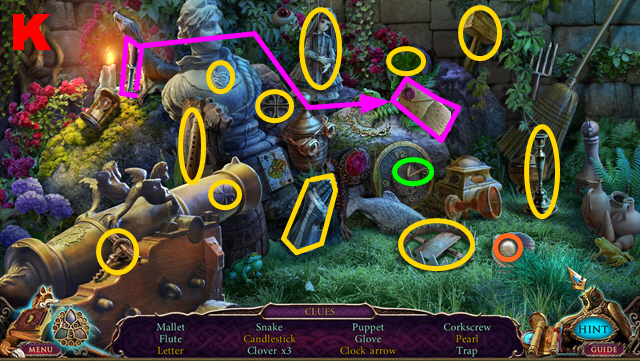
- Play the mini-game (I).

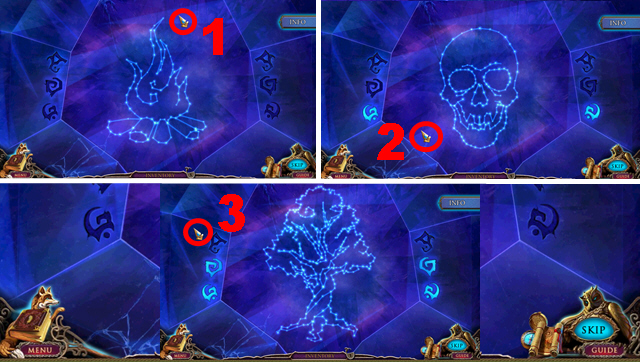
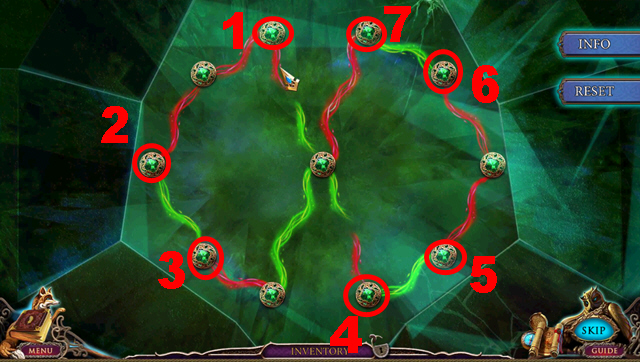
- Connect the gems according to the purple line; begin and end at gem (1).
- Take the amulet piece (J).
- Try to turn right.
- Activate the amulet; press the blue gem.
- Play the mini-game.


- Solution: 1-3.
- Turn right.

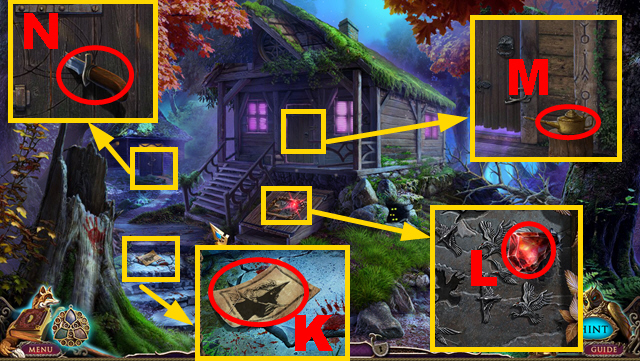
- Take the WANTED POSTER (K).
- Take the amulet piece (L).
- Take the OILCAN (M).
- Take the KNIFE (N).

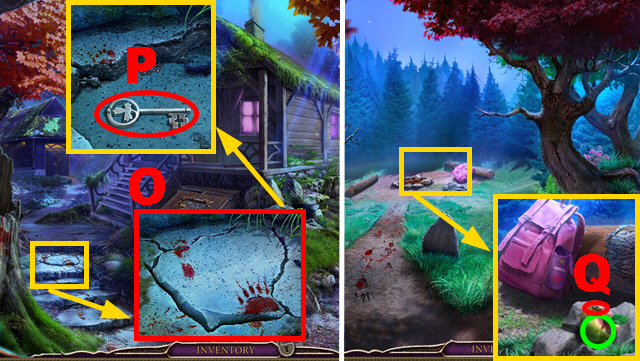
- Remove the stone with the KNIFE (O); take the KEY (P).
- Walk down.
- Chase away the bee with the WANTED POSTER (Q); take the APPLE (green).
- Turn right.

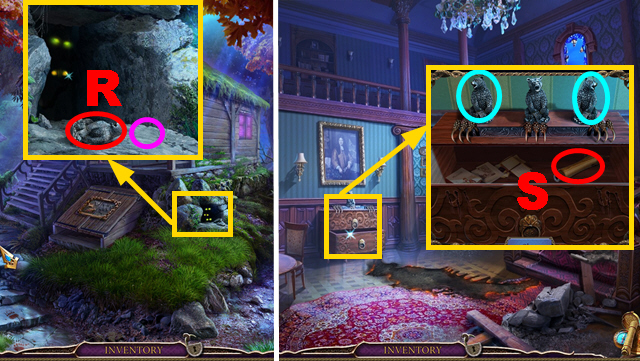
- Put down the APPLE (purple); take the BEAR (R).
- Walk down four times, turn left.
- Put 2 BEARS on the slots (blue).
- Open the drawer; take the HANDLE (S).
- Walk down, turn right, move forward three times.

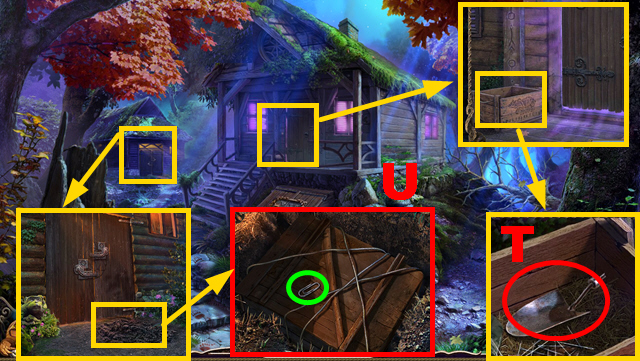
- Connect the HANDLE to the spade (T); take the SPADE.
- Dig through the soil with the SPADE (U); take the CLIP (green).
- Walk down.

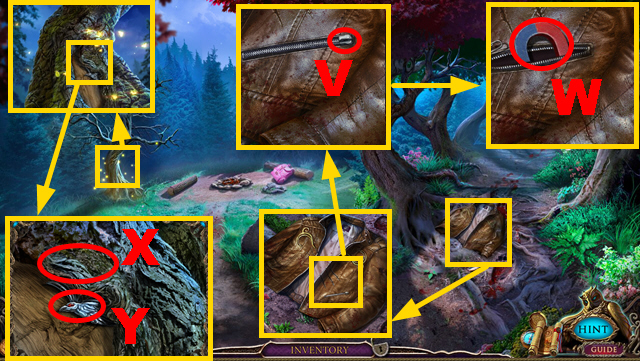
- Connect the clip to the jacket (V); pull it.
- Take the MAGNET (W).
- Remove the bark with the KNIFE (X) to acquire the CROW (Y).
- Turn right.

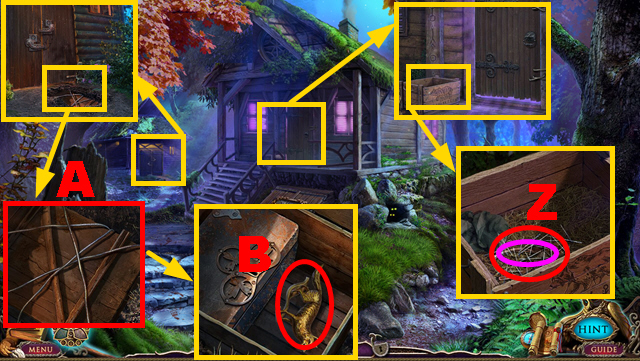
- Remove the needles with the MAGNET (Z); take the PLIERS (purple).
- Cut the wire with the PLIERS (A).
- Open the crate; take the FOX (B).

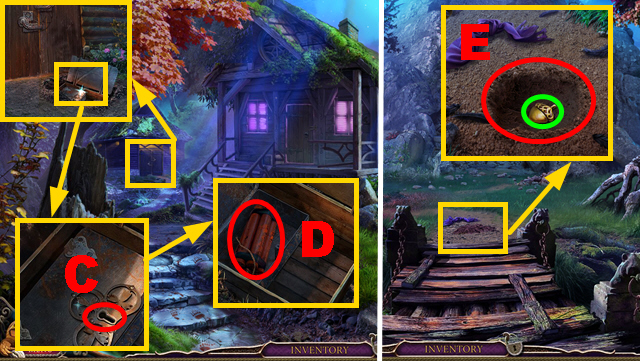
- Insert the KEY into the lock (C); take the DYNAMITE (D).
- Walk down twice.
- Dig through the soil with the SPADE (E); take the ACORN (green).

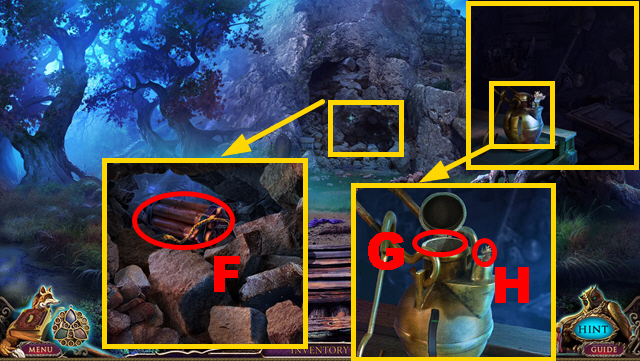
- Put down the DYNAMITE (F); light it with the MATCHES.
- Open the lantern; pour the OILCAN into it (G).
- Light it with the MATCHES (H).
- Play the HOP.

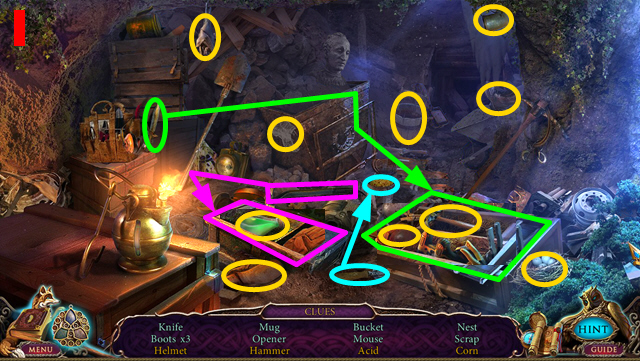
- You receive the ACID (I).
- Move forward twice.

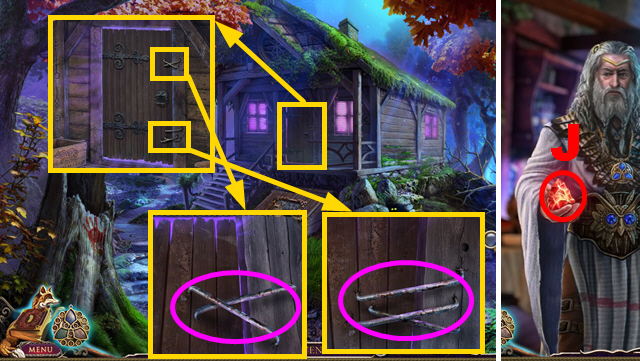
- Pour the ACID over the metal bars (purple).
- Open the door.
- Move forward.
- Take the amulet piece (J).
Chapter 4: The Cabin in the Woods

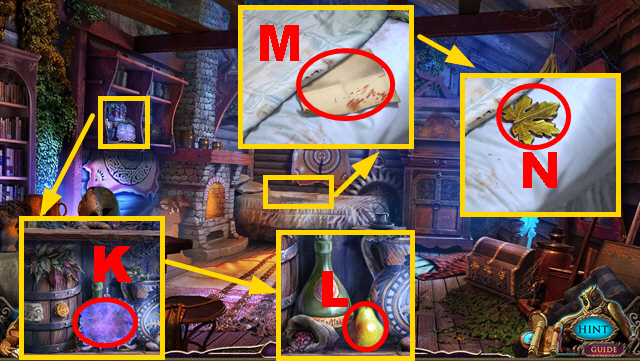
- Inspect the stone (K); take the PEAR (L).
- Remove the blanket; take the note (M) and LEAF 1/3 (N).

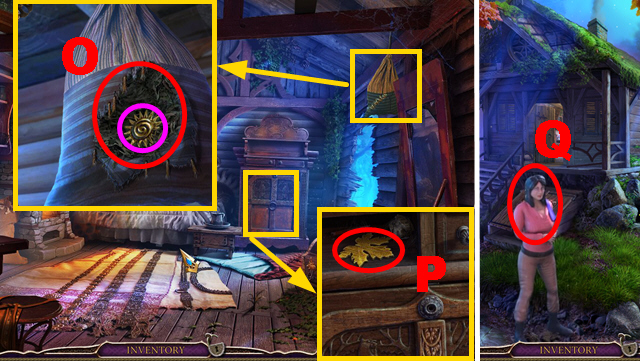
- Cut the seam with the KNIFE (O); take SUN 1/2 (purple).
- Open the drawer; take LEAF 2/3 (P).
- Walk down.
- Talk to the woman (Q).

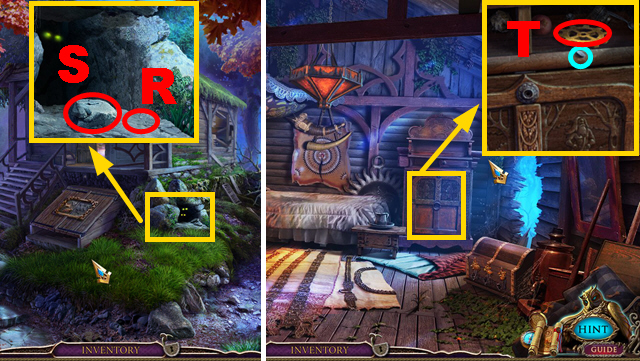
- Put down the PEAR (R); take the STONE BLOCK (S).
- Move forward.
- Hit the nail with the STONE BLOCK (blue).
- Open the drawer; take GEAR 1/2 (T).
- Walk down three times.

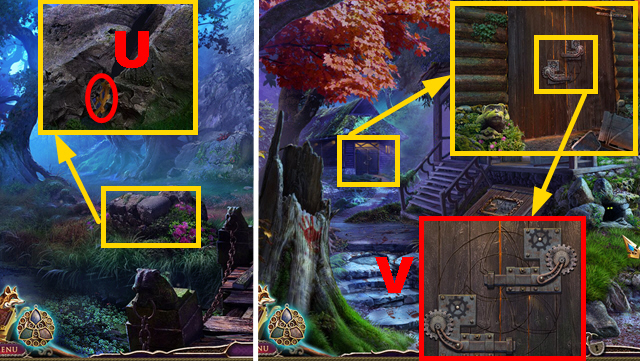
- Collect GEAR 2/2 with the MAGNET (U).
- Move forward twice.
- Place 2 GEARS on the door (V).
- Turn left.
- Play the HOP.

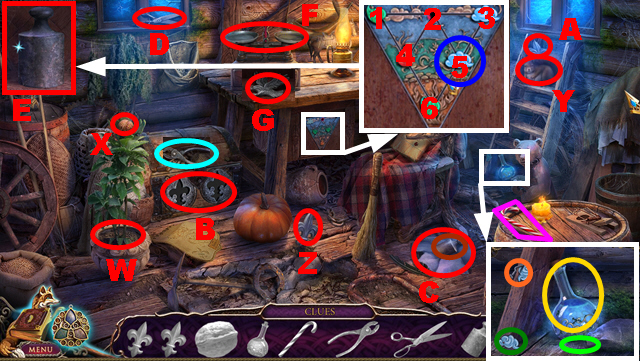
- Put the candy cane (purple) on the floor (light green).
- Pour the bottle (yellow) over the plant (W).
- Give the nut (X) to the squirrel (Y).
- Place 2 fleurs-de-lis (Z) and (A) on the chest (B).
- Remove the nail (orange) with the pliers (light blue).
- Put the puzzle part (dark green) on the board (dark blue).
- Solution: 3, 5, 2, 4, 1, 2, 5, 6, 4, 1, 2, 5, 6, 4, 2.
- Cut the package (C) with the scissors (D).
- Put 2 weights (brown) and (E) on the scale (F).
- Take the CROW (G).
- Walk down four times, turn left.

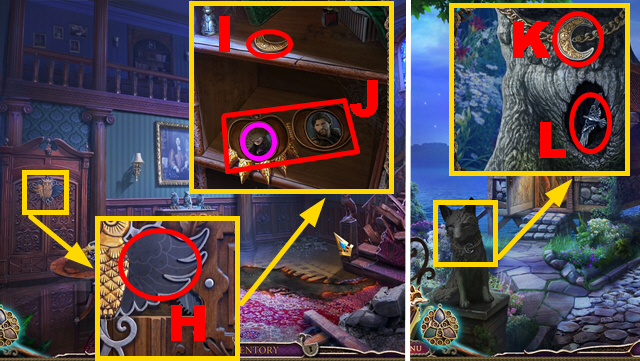
- Place the WING on the niche (H); take the MOON (I).
- Put down the TORN PHOTO (purple).
- Close the locket; take the LOCKET (J).
- Walk down, turn right.
- Place the MOON on the statue (K); take the CROW (L).
- Move forward three times.

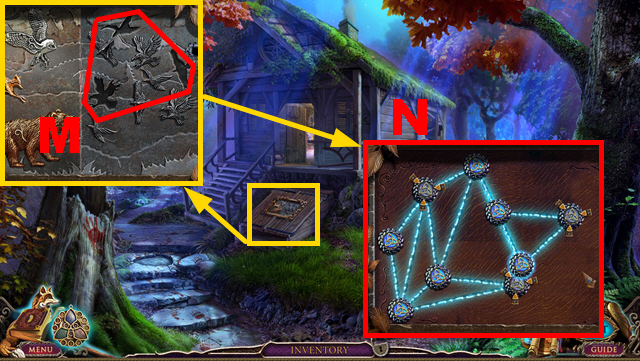
- Place 3 CROWS on the slots (M).
- Play the mini-game.
- Solution: (N).
- Enter the Cellar.

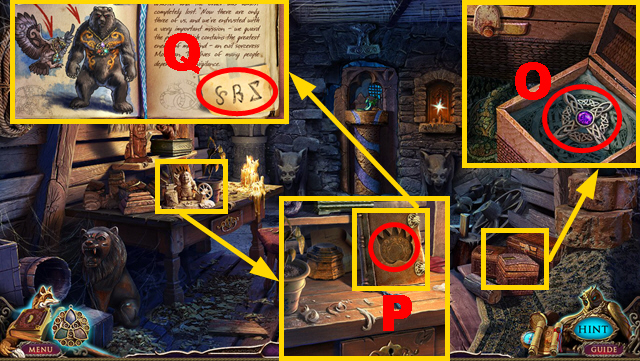
- Open the box; take the AMULET (O).
- Place the LOCKET on the book (P).
- Open the book; take the NOTE WITH CODE (Q).

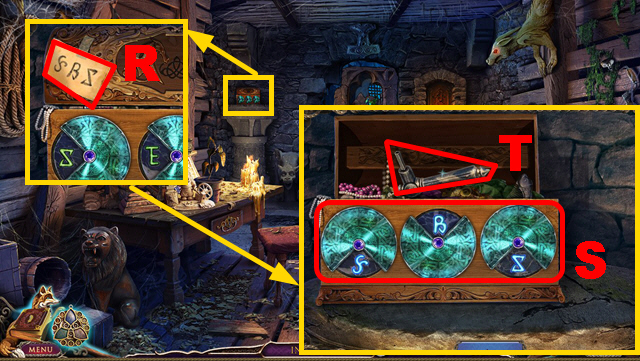
- Place the NOTE WITH CODE on the box (R).
- Enter the correct code (S); take the HANDLE (T).

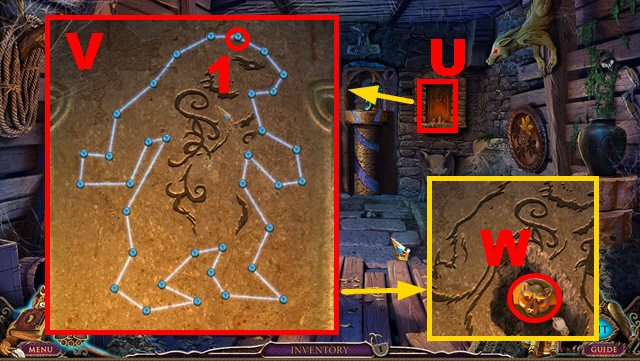
- Play the mini-game (U).
- Solution: (V).
- Begin and end at gem (1).
- Take the amulet piece (W).
- Walk down, enter the cabin.

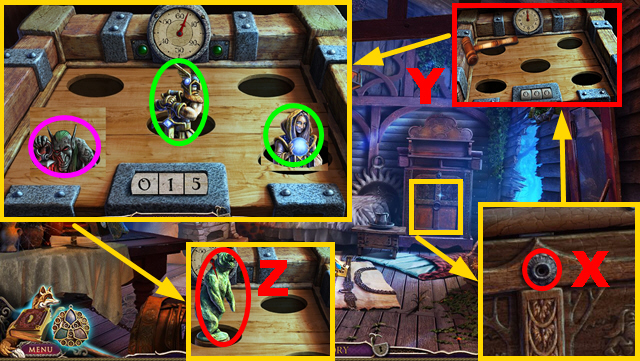
- Connect the HANDLE to the cabinet (X); open it.
- Play the mini-game (Y).
- Grab the hammer.
- Hit 15 trolls (purple); avoid other figurines (green).
- Take the BEAR (Z).
- Walk down three times.

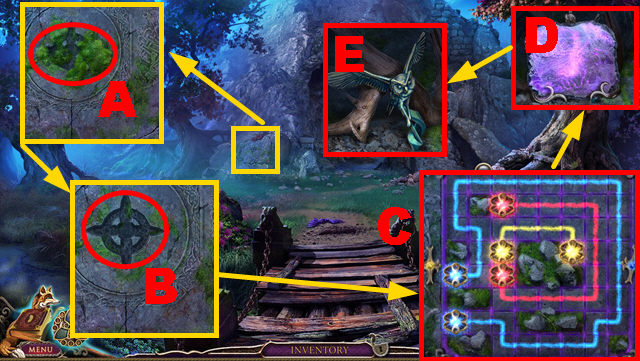
- Remove the moss with the KNIFE (A); place the AMULET on the niche (B).
- Play the mini-game.
- Solution: (C).
- Inspect the stone (D); take the OWL (E).
- Go to the Cellar.
Chapter 5: The Secret Passage

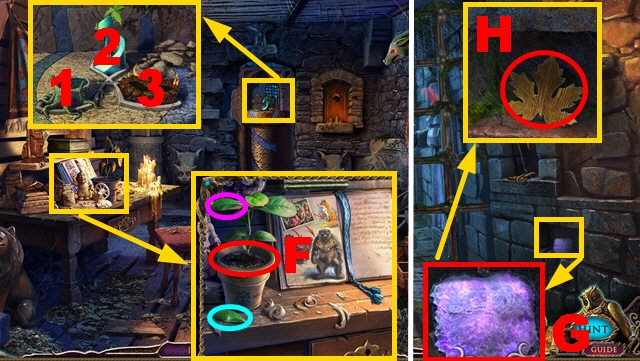
- Pour the BOTTLE over the plant (F).
- Attempt to take the leaf (purple); take the LEAF (blue).
- Put down the BEAR (1), OWL (2), and FOX (3).
- Move forward.
- Inspect the stone (G); take LEAF 3/3 (H).

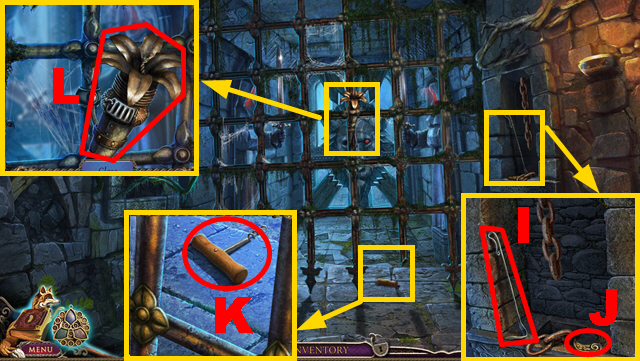
- Take the FIRE IRON (I) and MOON 1/2 (J).
- Collect the CORKSCREW with the FIRE IRON (K).
- Light the torch with the MATCHES (L); take the TORCH.

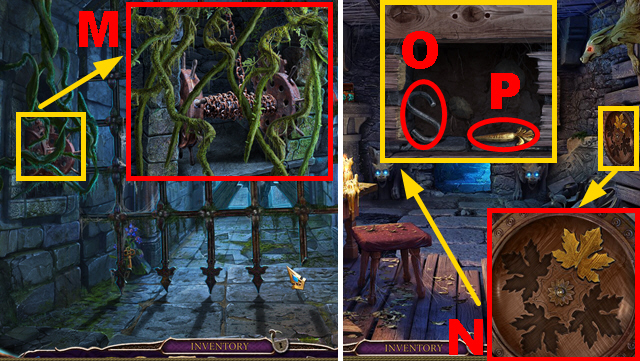
- Burn the vine with the TORCH (M).
- Walk down.
- Place 3 LEAVES on the niches (N); take the S HOOK (O) and CARROT (P).
- Move forward.

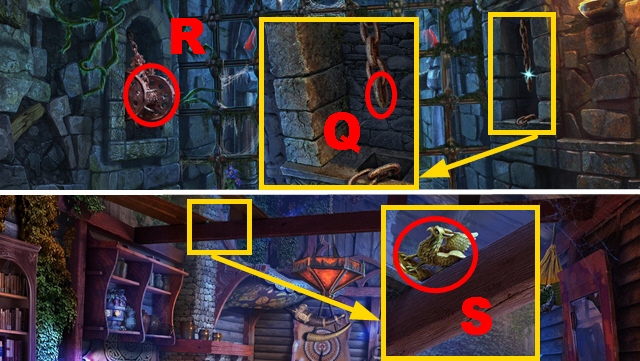
- Connect the S HOOK to the chain (Q).
- Activate the mechanism (R).
- Walk down twice, enter the cabin.
- Collect the GOLD GRIFFIN with the FIRE IRON (S).

- Remove the cork with the CORKSCREW (T).
- Put down the EMPTY OILCAN (U) to acquire the OILCAN.
- Pull the moon with the FIRE IRON (V).
- Pour the BOTTLE over the moon (W); take MOON 2/2.
- Go to the Cellar.
- Pour the OILCAN over the lock (X).
- Open the box; take the ROD (Y).
- Move forward.

- Connect the ROD to the mechanism (Z).
- Take the KEY (A).
- Place 2 MOONS on the slots (B).
- Walk down.
- Insert the KEY into the lock (C); take the BELLOWS (D).
- Walk down, enter the cabin.

- Blow the BELLOWS (E); take SUN 2/2 (green).
- Go to the Cellar, move forward.
- Place 2 SUNS on the slots (F).
- Take the LANCE (G).
- Walk down.

- Collect the LION EYE with the LANCE (H).
- Move forward.
- Put the LION EYE into the niche (I).
- Play the mini-game (J).

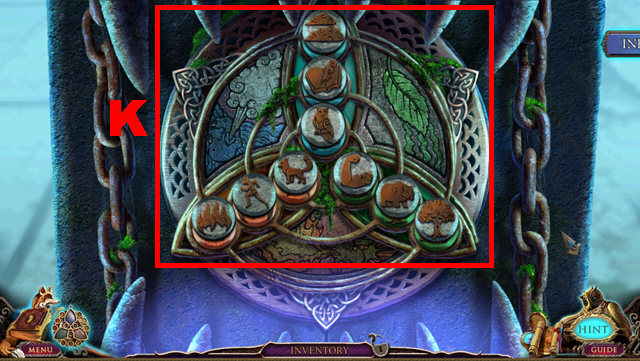

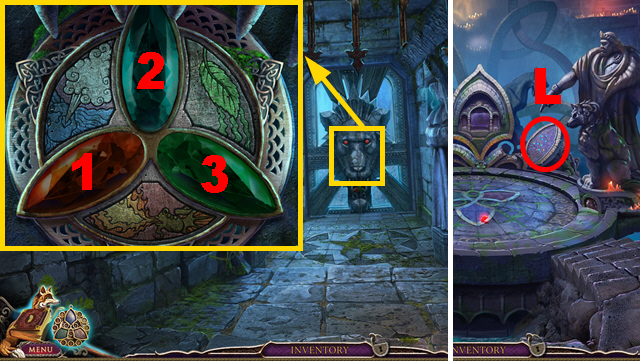
- Put the MATCHES on gem (1), BELLOWS on gem (2), and LEAF on gem (3).
- Move forward.
- Play the mini-game (L).

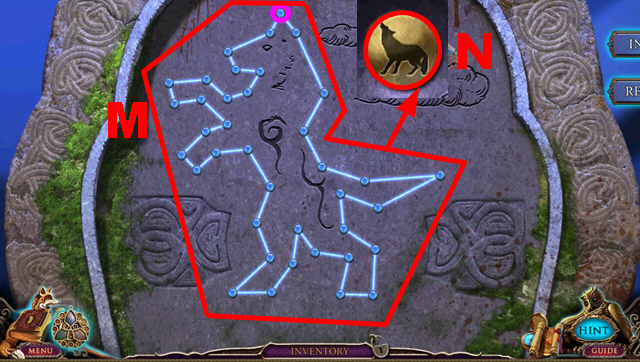
- Solution: (M).
- Begin and end at gem (purple).
- Take the amulet piece (N).
- Play the HOP.

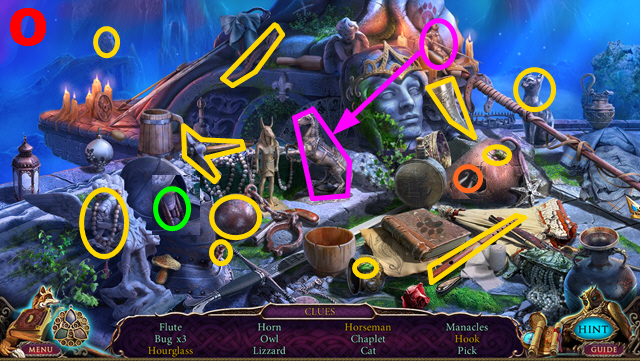
- You receive the PICK (O).

- Take the amulet piece (P).
- Break the mural with the PICK (Q); take the STATUE OF OLMO (green).
- Put down the STATUE OF OLMO (R); take the WOLF (S).

- Place the WOLF on the slot (T); take the STONE HEART (U).
- Walk down twice.
- Put the STONE HEART on the niche (V).
- Open the chest; take the STATUE OF MORRIGAN (W).
- Move forward twice.
- Play the HOP.

- You receive the MUSHROOM (X).

- Put down the STATUE OF MORRIGAN (Y); take the BRONZE FEATHER (Z).
- Walk down three times, enter the cabin.
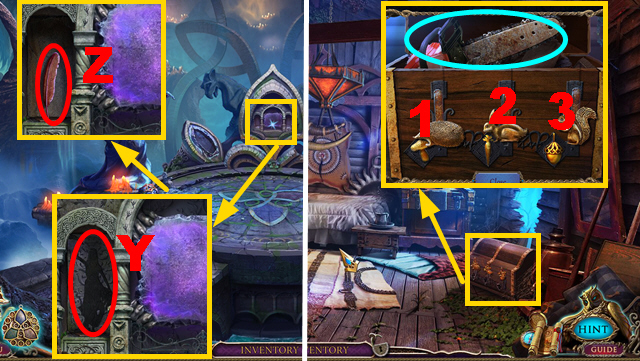
- Insert the MUSHROOM (1), CARROT (2), and ACORN (3) into the slots; take the CHAINSAW (blue).
- Walk down.
Chapter 6: The Ruins

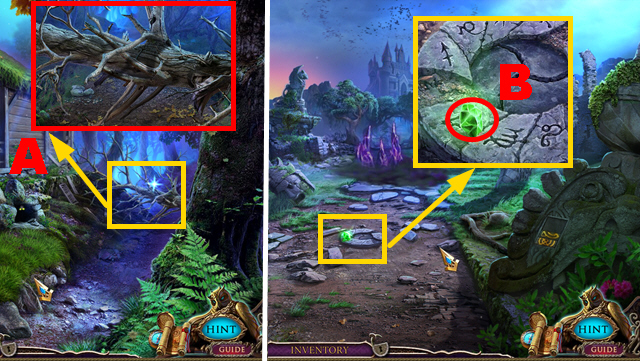
- Remove the trunk with the CHAINSAW (A).
- Turn right.
- Take the amulet piece (B).
- Activate the amulet; press the blue gem.
- Play the mini-game.

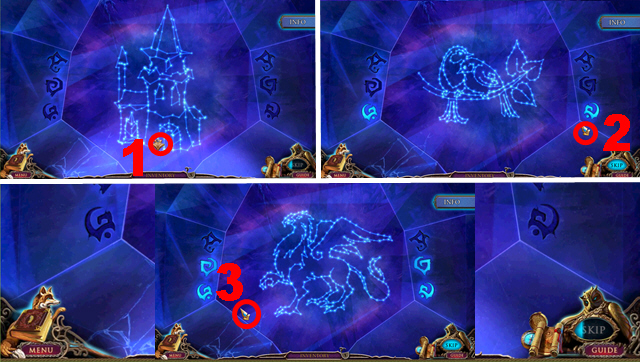
- Solution: 1-3.
- Walk down three times.

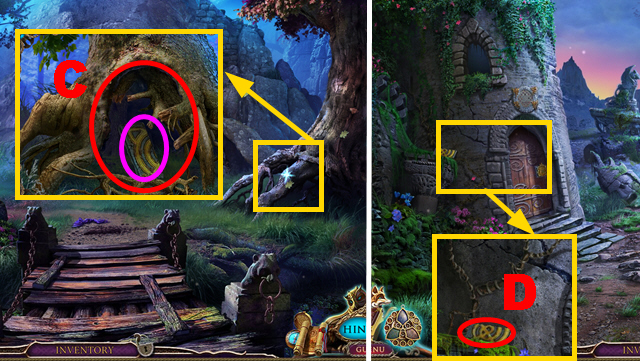
- Remove the roots with the CHAINSAW (C); take the STONE TILE (purple).
- Move forward twice, turn right.
- Take the STONE TILE (D).

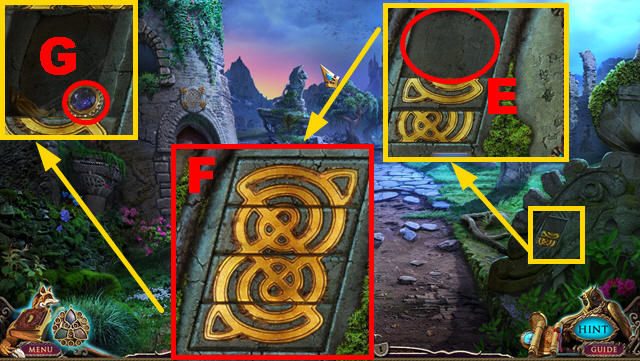
- Put 2 STONE TILES into the niche (E).
- Assemble the stone tiles correctly (F); take ROUND GEM 1/3 (G).

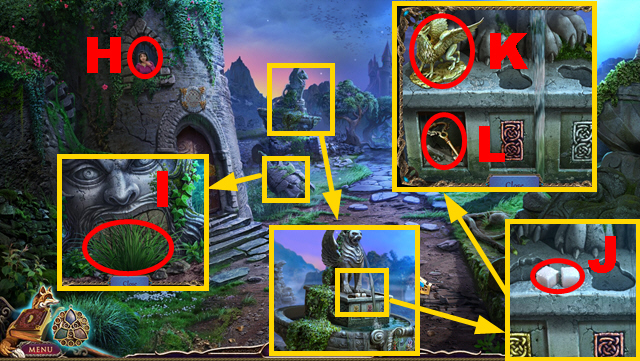
- Inspect the window (H) to acquire the RED CHALK.
- Remove the grass (I) twice.
- Take the SUGAR (J).
- Put down the GOLD GRIFFIN (K); take the TOWER KEY (L).
- Move forward.

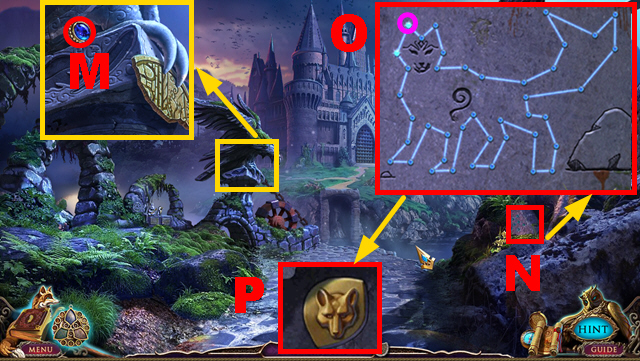
- Take ROUND GEM 2/3 (M).
- Play the mini-game (N).
- Solution: (O).
- Begin and end at gem (purple).
- Take the amulet piece (P).
- Walk down twice.

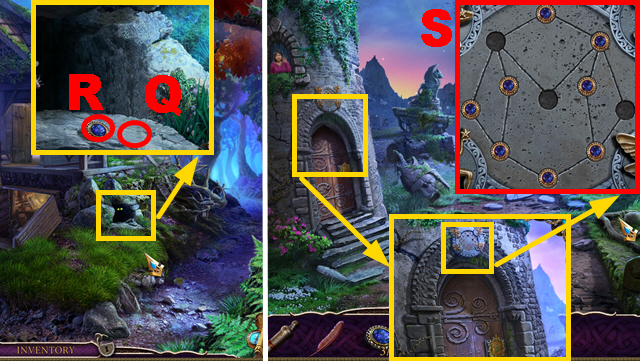
- Put down the SUGAR (Q); take ROUND GEM 3/3 (R).
- Turn right.
- Put down 3 ROUND GEMS (S).
- Play the mini-game.

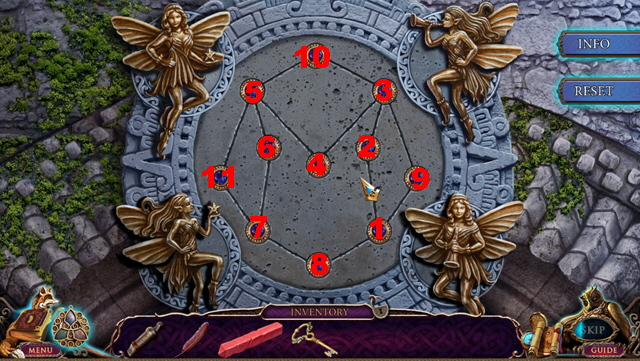
- Solution: 1-8, 1, 9, 3, 10, 5, 11, 7.

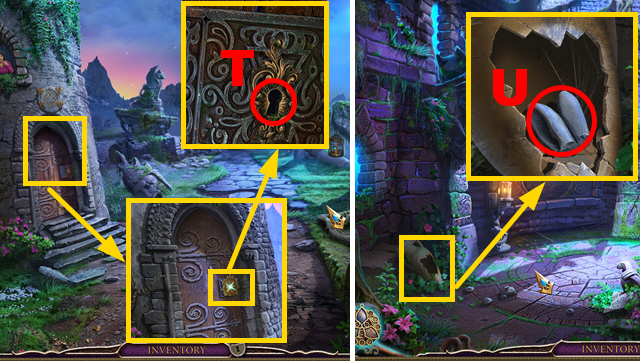
- Insert the TOWER KEY into the lock (T).
- Turn left.
- Take the RABBIT EARS (U).

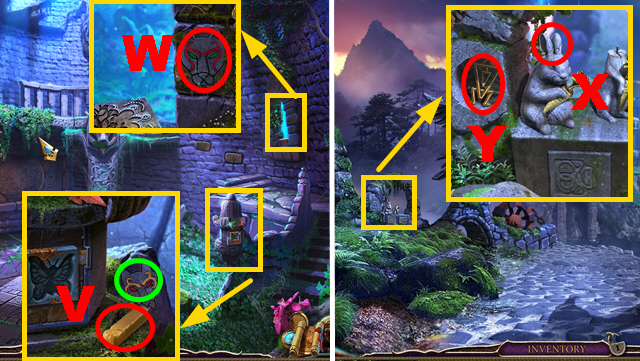
- Take the YELLOW CHALK (V); inspect the drawing (green).
- Inspect the drawing (W).
- Walk down, move forward.
- Connect the RABBIT EARS to the statue (X); take the GOLDEN RUNE (Y).
- Walk down.

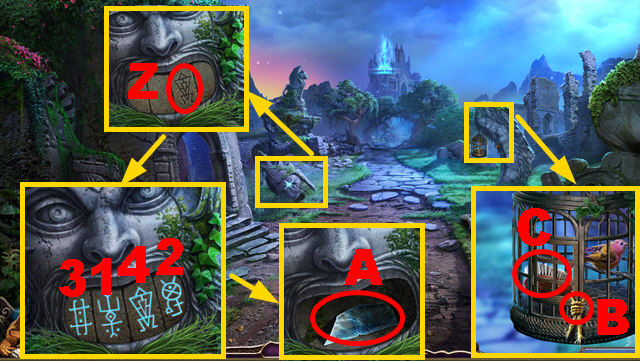
- Place the GOLDEN RUNE on the niche (Z).
- Activate the runes in numerical order 1-4; take the GLASS (A).
- Cut the rope with the GLASS (B); take the BRUSH (C).
- Turn left.

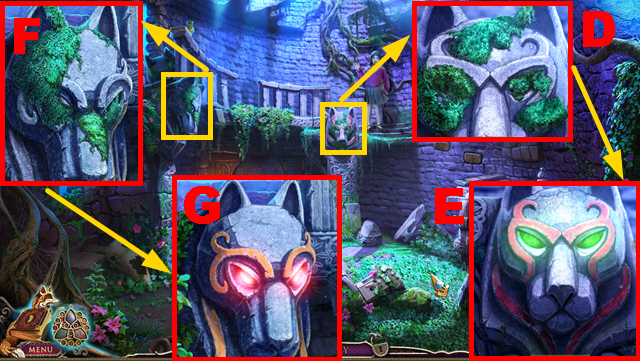
- Remove the moss with the BRUSH (D).
- Color the wolf with the RED CHALK; choose the correct eye color (E).
- Remove the moss with the BRUSH (F).
- Color the wolf with the YELLOW CHALK; choose the correct eye color (G).

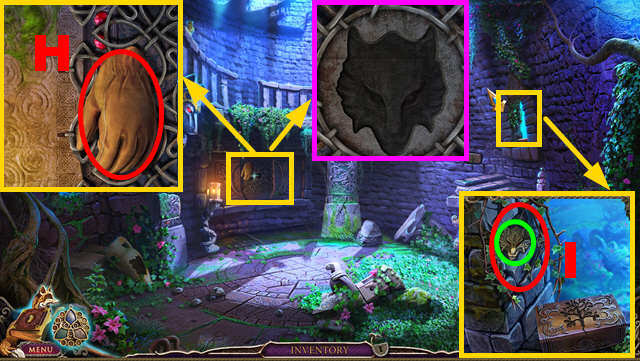
- Take the GLOVE (H).
- Remove the branches with the GLOVE (I); take the WOLF’S HEAD (green).
- Place the WOLF’S HEAD on the niche (purple).
- Play the mini-game.

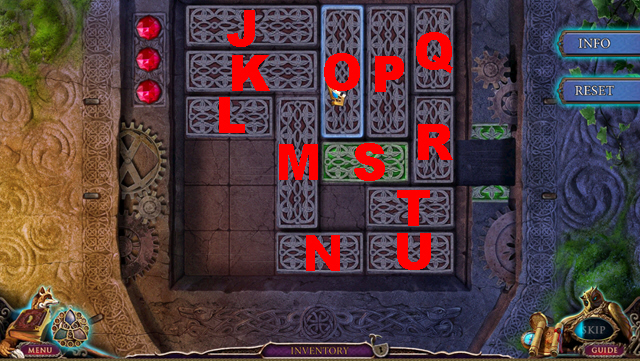
- Solution: N left x2, U left x2, T left, R down x2, S right x2.

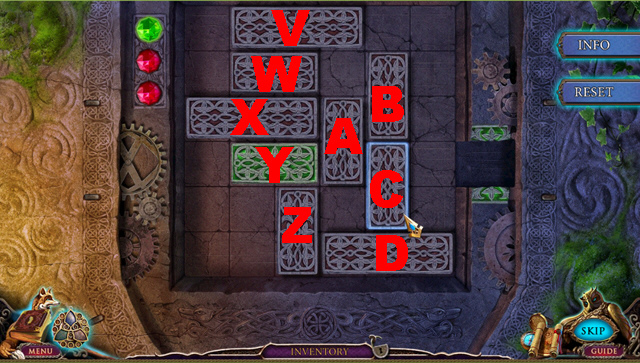
- Solution: Y left, Z up, D left x3, A down x2, C down, B down, W right, B up x2, X right x3, W left x2, Z up x2, Y right x5.

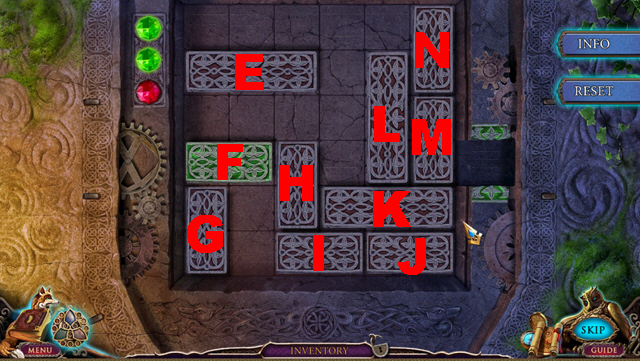
- Solution: I left, J left, H up, K left x2, M down x2, L up, K right, M up x2, J right, K left, M down, J left, M down, L down x2, E right x2, N down x2, E right, H up x2, F right x2, G up x2, I left, K left, J left, L down, G up, F left x2, H down x2, E left x2.
- N up x2, L up x3, J right, M up x2, K right x3, H down x2, F right, G down, E left, F right x2, H up x2, K left, J left, M down x2, F right x2.

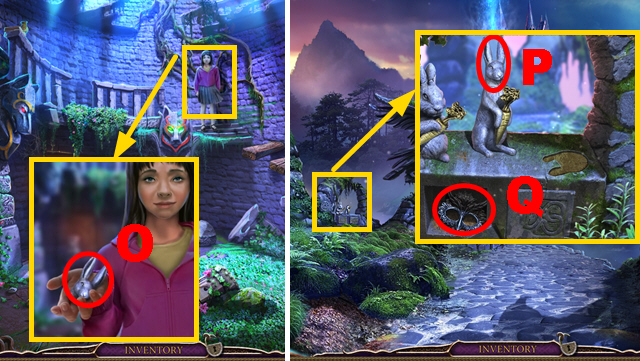
- Take the RABBIT HEAD (O).
- Walk down, move forward.
- Connect the RABBIT HEAD to the statue (P); take the OWL MASK (Q).
- Walk down, turn left.
- Play the HOP.

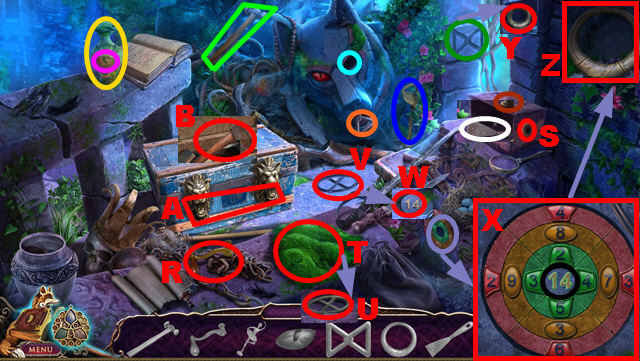
- Use the hammer (light green) to break the jug (yellow).
- Insert the red eye (purple) into the slot (light blue).
- Place the rune x (orange) on the niche (dark green).
- Connect the handle (R) to the box (S).
- Connect the ballerina (dark blue) to the box (brown).
- Use the scraper (white) to remove the moss (T).
- Insert the rune O (U) into the slot (V).
- Place the numbered token (W) on the niche (black).
- Solution: (X).
- Place 2 rings (Y) and (Z) on the chest (A).
- Take the AXE (B).

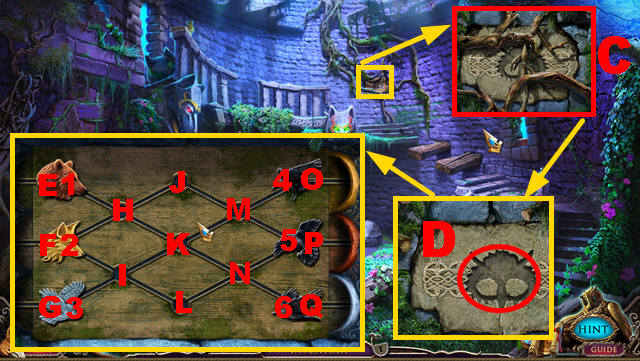
- Remove the roots with the AXE (C); place the OWL MASK on the niche (D).
- Play the mini-game.
- Solution: 1-L, 2-I, 4-E, 5-J, 2-F, 1-I, 6-M, 1-Q, 2-L, 5-H, 6-J, 2-P, 3-L, 5-F, 3-N, 6-H, 2-O, 3-L, 1-P, 3-Q, 6-G.
- Numbers refer to animal tokens, letters to fields.
- Go downstairs.

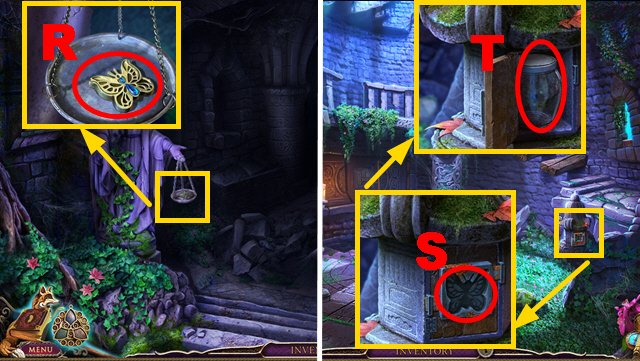
- Take the BUTTERFLY (R).
- Walk down.
- Place the BUTTERFLY on the niche (S); take the EMPTY JAR (T).
- Walk down three times.

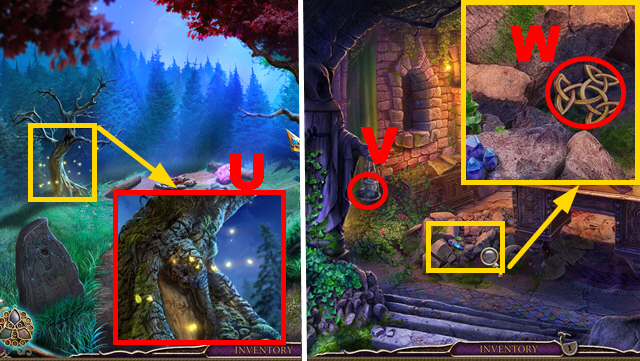
- Collect the fireflies with the EMPTY JAR (U).
- Go to the Tower, go downstairs.
- Put down the JAR OF FIREFLIES (V).
- Remove 3 stones; take the RUNIC TOKEN (W).

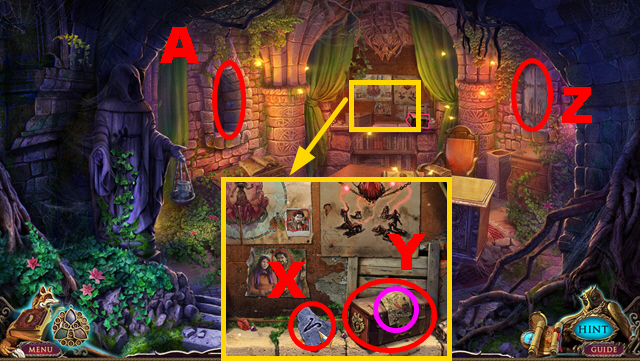
- Move aside the curtain; take ZODIAC STONE 1/3 (X).
- Take the note (purple) and POISON POTION SET (Y).
- Open the compartment (Z).
- Play the mini-game (A).

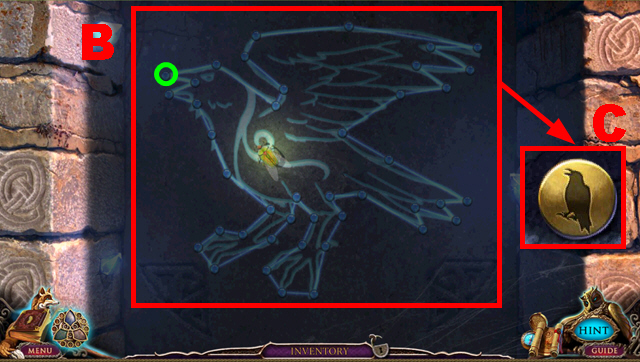
- Solution: (B).
- Start and end at gem (green).
- Take the amulet piece (C).

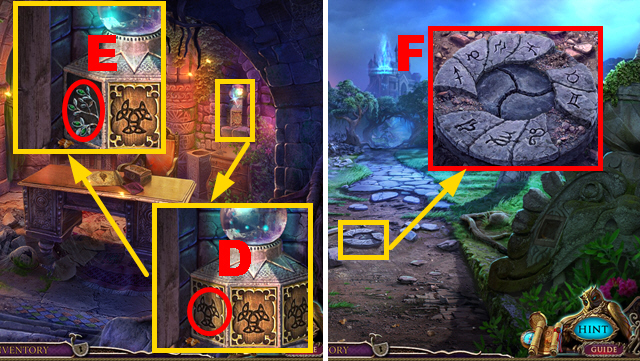
- Place the RUNIC TOKEN on the niche (D); take the LEFT TREE HALF (E).
- Walk down twice.
- Remove the dirt with the BRUSH (F).
- Turn left.

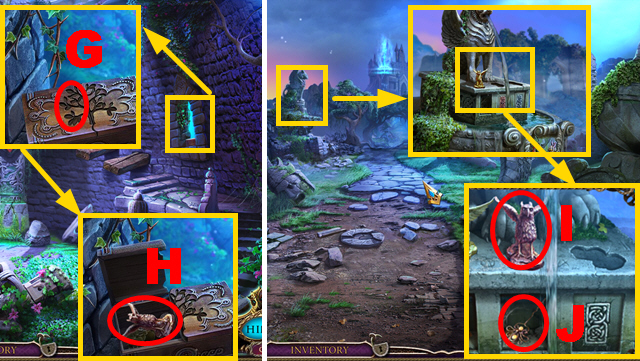
- Place the LEFT TREE HALF on the box (G); take the BRONZE GRIFFIN (H).
- Walk down.
- Place the BRONZE GRIFFIN on the slot (I); take the ORNATE PIN (J).
- Turn left, go downstairs.

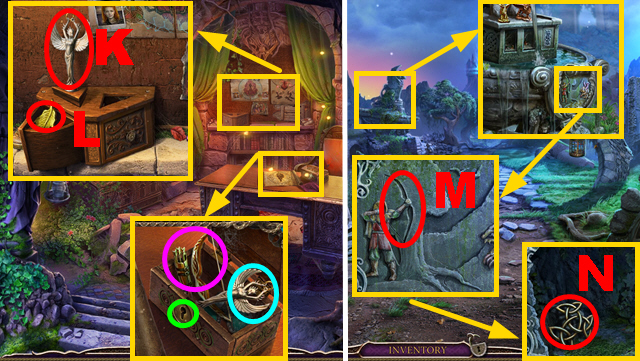
- Insert the ORNATE PIN into the lock (green); take the WINGED STATUETTE (blue) and ARCHER’S GEAR (purple).
- Put down the WINGED STATUETTE (K); take the GOLDEN FEATHER (L).
- Walk down twice.
- Place the ARCHER’S GEAR on the mural (M); take the RUNIC TOKEN (N).
- Turn left, go downstairs.

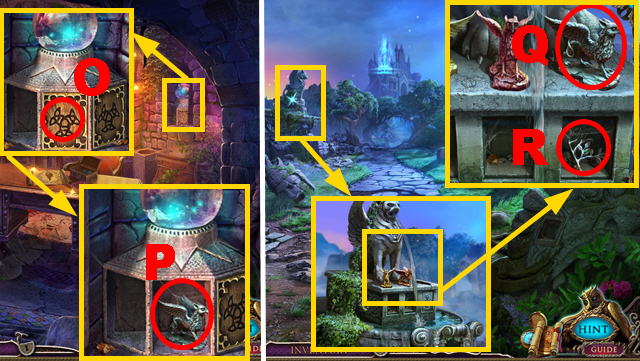
- Place the RUNIC TOKEN on the niche (O); take the SILVER GRIFFIN (P).
- Walk down twice.
- Place the SILVER GRIFFIN on the slot (Q); take the RIGHT TREE HALF (R).
- Turn left.

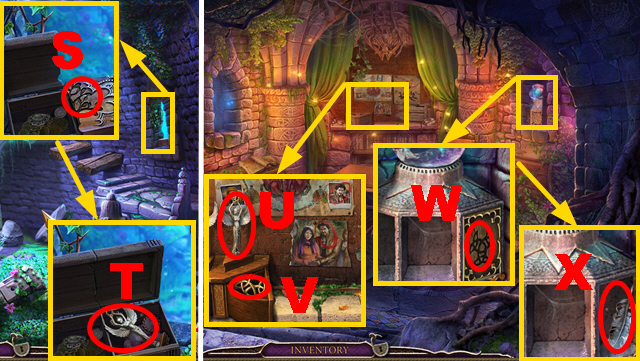
- Place the RIGHT TREE HALF on the box (S); take the WINGED STATUETTE (T).
- Go downstairs.
- Place the WINGED STATUETTE on the slot (U); take the RUNIC TOKEN (V).
- Put the RUNIC TOKEN into the niche (W); take the SILVER FEATHER (X).
- Walk down twice, move forward.

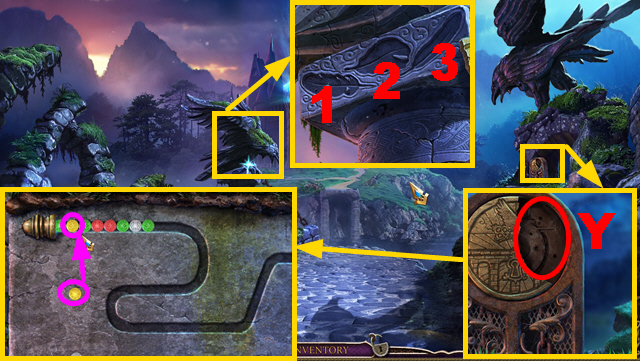
- Put down the SILVER FEATHER (1), GOLDEN FEATHER (2), and BRONZE FEATHER (3) to acquire the STONE DISK FRAGMENT.
- Place the STONE DISK FRAGMENT on the niche (Y).
- Play the mini-game.
- To solve the puzzle, shoot colored balls at balls of the same color (purple) until all of them are removed.
- Move forward.
- Play the HOP.
Chapter 7: The Guardian’s Castle

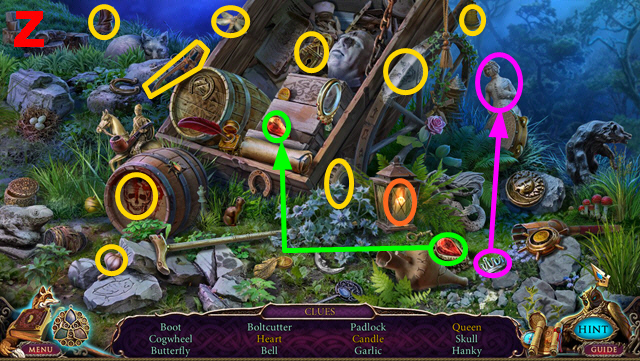
- You receive the BOLT CUTTERS (Z).

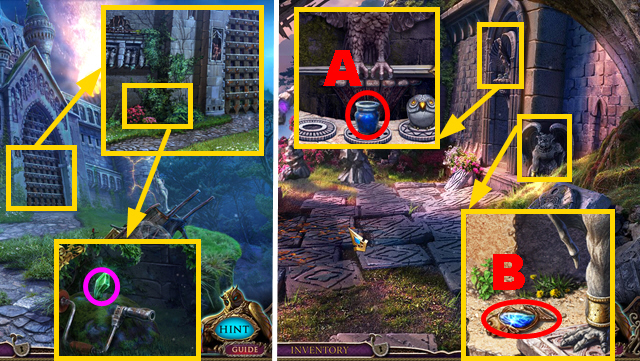
- Remove the leaves twice; take the amulet piece (purple).
- Turn left.
- Take the BLUE PAINT (A).
- Take the FISH (B).

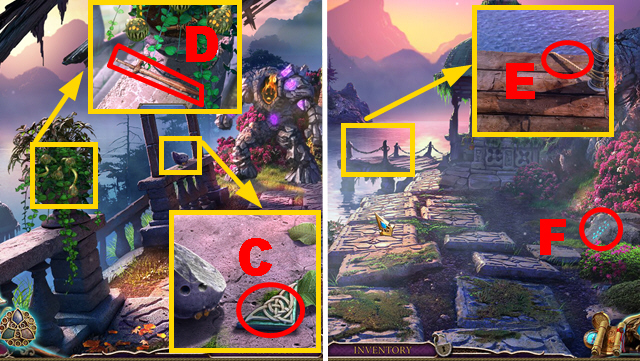
- Take the TRIANGLE KEY (C).
- Take the ANGEL SWORD (D).
- Turn left.
- Pull the rope (E).
- Play the mini-game (F).

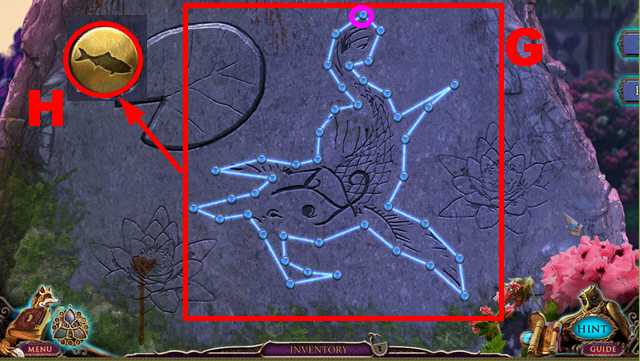
- Solution: (G).
- Start and end at gem (purple).
- Take the amulet piece (H).

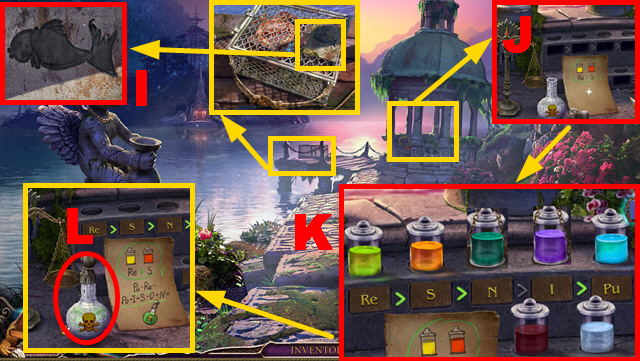
- Place the FISH on the slot (I); open the cage.
- Put down the POISON POTION SET (J).
- Play the mini-game.
- Solution: (K).
- Take the POISON POTION (L).

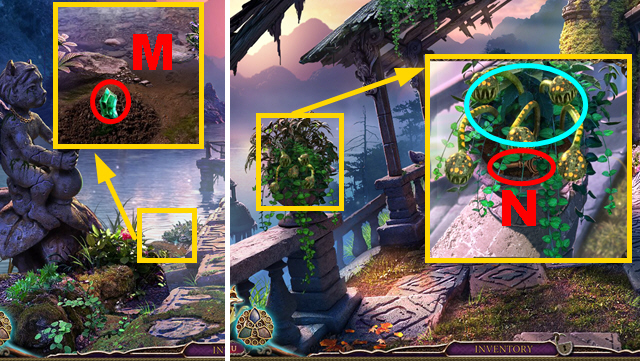
- Take the amulet piece (M).
- Walk down.
- Pour the POISON POTION over the plant (blue).
- Remove the leaves; take the BRONZE FISH KEY (N).
- Walk down twice.

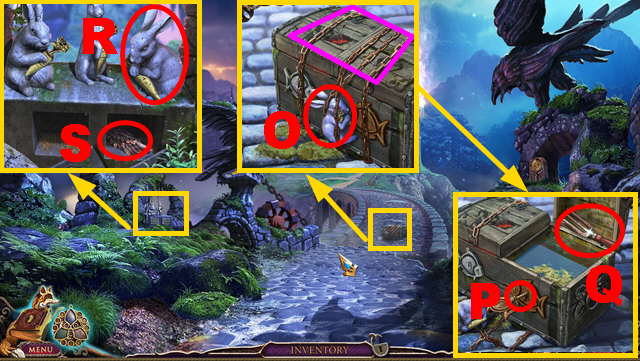
- Remove the chain with the BOLT CUTTERS (purple); take the RABBIT (O).
- Insert the BRONZE FISH KEY into the lock (P); take the HAND RAKE (Q).
- Put down the RABBIT (R); take the ANGEL WING (S).
- Move forward, turn left twice.

- Dig through the soil with the HAND RAKE (T); take the DRILL BIT (green).
- Walk down twice.
- Connect the DRILL BIT to the handle (U); take the DRILL.
- Walk down.

- Use the DRILL (V); take the GOBLET (W).
- Move forward, turn left twice.
- Put the GOBLET into the water (X) to acquire the WATER.
- Pour the WATER into the jug (Y); take the STICK (purple).

- Remove the crab with the STICK (green); take the FROST POTION SET (Z).
- Put down the FROST POTION SET (A).
- Play the mini-game.
- Solution: (B).
- Take the FROST POTION (C).
Chapter 8: The Ancient Crypt

- Throw the FROST POTION (D).
- Move forward.
- Take ZODIAC STONE 2/3 (E).
- Play the mini-game (F).

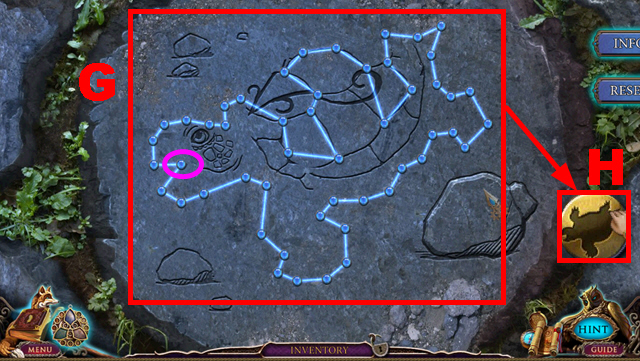
- Solution: (G).
- Start and end at gem (purple).
- Take the amulet piece (H).
- Play the HOP.

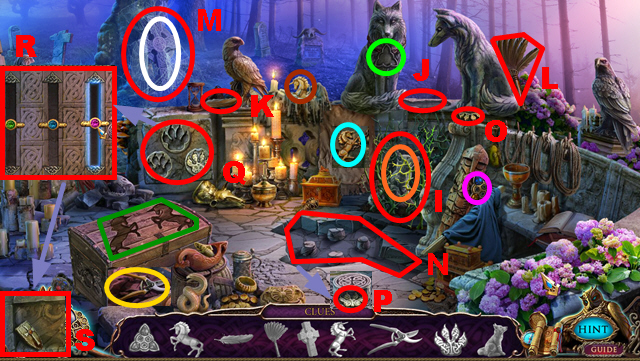
- Place the amulet (purple) on the statue (light green).
- Place 2 unicorns (brown) and (light blue) on the chest (dark green).
- Cut the plant (I) with the pruning shears (yellow).
- Place the fox pup (orange) on the niche (J).
- Put the feather (K) on the feather duster (L).
- Remove the cobwebs (M) with the feather duster.
- Place the cross (white) on the niche (N).
- Put 2 paws (O) and (P) into the slots (Q).
- Solution: (R).
- Take the KNIGHT’S SHIELD (S).

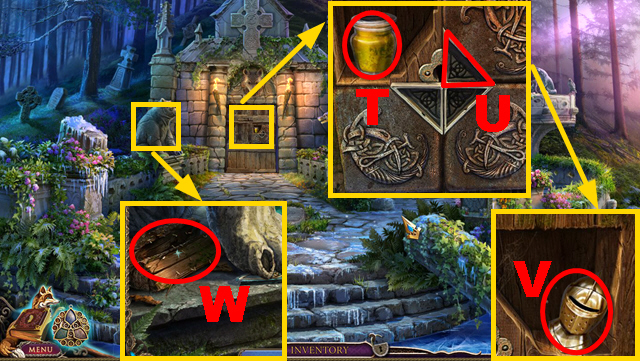
- Take the YELLOW PAINT (T).
- Put down the TRIANGLE KEY (U); take the KNIGHT’S HELMET (V).
- Hold down the STICK (W) to acquire the STICK WITH TERMITES.
- Walk down three times.

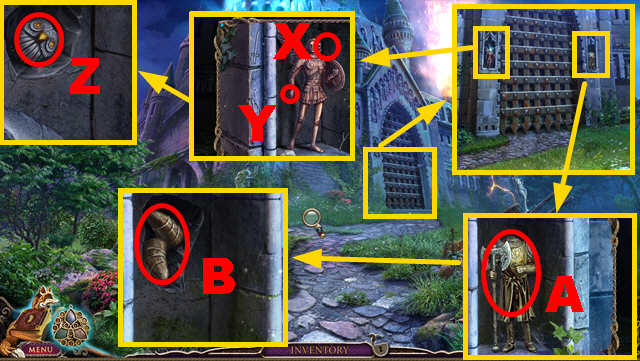
- Put down the ANGEL WING (X) and ANGEL SWORD (Y); take OWLET 1/3 (Z).
- Put down the KNIGHT’S HELMET and KNIGHT’S SHIELD (A); take the HORNS (B).
- Turn left.

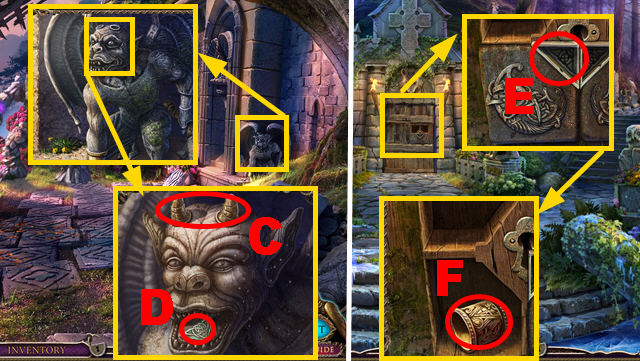
- Connect the HORNS to the statue (C); take the TRIANGLE KEY (D).
- Turn left, move forward.
- Place the TRIANGLE KEY on the niche (E); take the BRACER (F).
- Walk down twice.

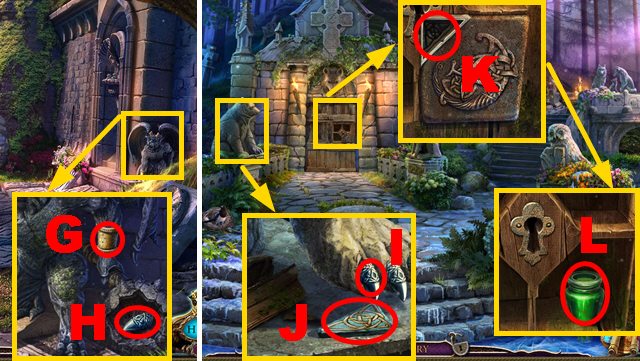
- Put down the BRACER (G); take the BEAR CLAW (H).
- Turn left, move forward.
- Place the BEAR CLAW on the statue (I); take the TRIANGLE KEY (J).
- Insert the TRIANGLE KEY into the slot (K); take the GREEN PAINT (L).

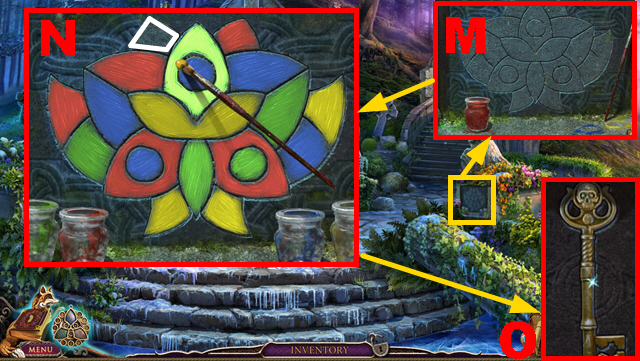
- Put down the GREEN, YELLOW, and BLUE PAINT (M).
- Play the mini-game.
- Solution: (N).
- Paint the remaining part (white) yellow.
- Take the CRYPT KEY (O).

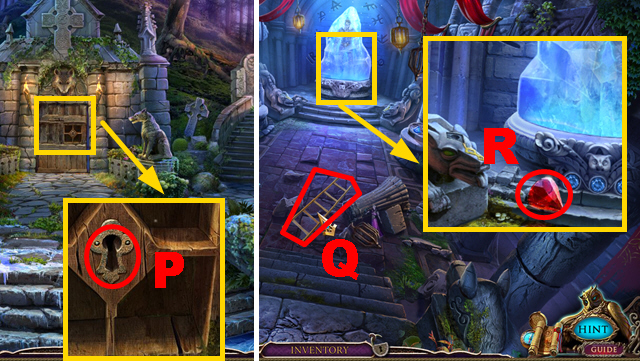
- Insert the CRYPT KEY into the lock (P).
- Move forward.
- Take the LADDER (Q).
- Take the RED CRYSTAL (R).
- Play the HOP.

- Place the wolf (orange) on the slot (S).
- Insert the key (brown) into the lock (T).
- Use the hammer (light blue) to break the statue (U).
- Use the scissors (dark blue) to cut the seam (black).
- Use the awl (purple) to remove the stone (V).
- Collect the beads (yellow); put them on the necklace (W).
- Take the NECKLACE.


- Take the WOLF PLATE 1/2 (X).
- Take ROMAN NUMERAL 1/3 (Y).
- Walk down.
- Give the NECKLACE to the bird (Z); take the SHADOW PIN (A).
- Move forward.

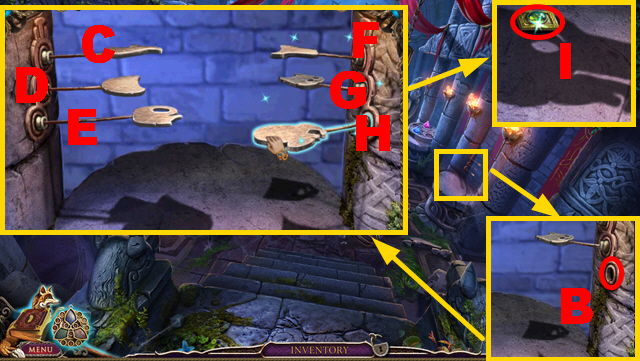
- Connect the SHADOW PIN to the column (B).
- Solution: C, E, G, F.
- Take the RHOMBOID GEM (I).

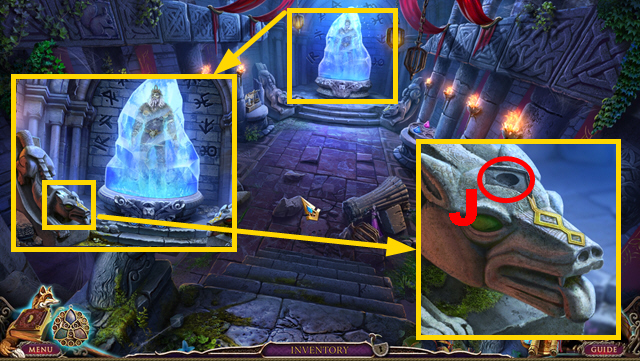
- Place the RHOMBOID GEM on the statue (J).
- Walk down four times.
- Play the HOP.

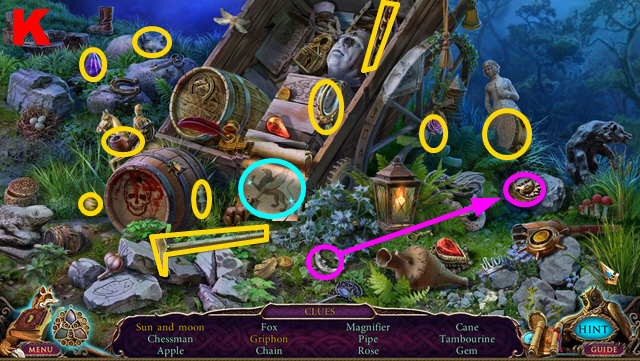
- You receive the PURPLE CRYSTAL (K).

- Put down the LADDER (L); take ZODIAC STONE 3/3 (M).
- Walk down twice.
- Put down 3 ZODIAC STONES (N); take the YELLOW CRYSTAL (green).
- Go to the Crypt.

- Put down the RED, YELLOW, and PURPLE CRYSTAL (O).
- Apply the correct color to each crystal (blue); take the OVAL GEM (P) and CROW HEAD (Q).
- Place the OVAL GEM on the statue (R).
- Play the mini-game.

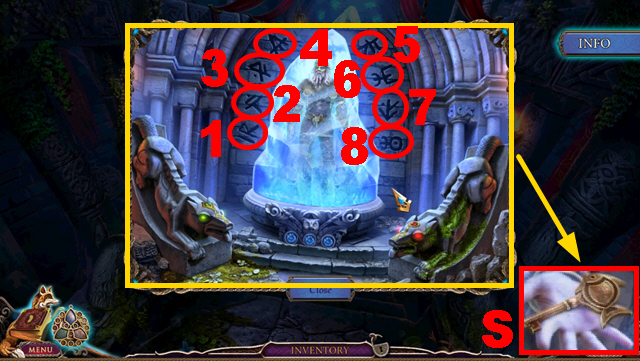
- Solution: 1, 4, 6, 8, 2, 5, 4, 6, 8, 3, 1, 7, 5, 8, 6.
- Take the SILVER FISH KEY (S).
- Walk down five times.

- Insert the SILVER FISH KEY into the lock (T); take the amulet piece (U).
- Move forward, turn left.
- Activate the amulet; press the red gem.
- Play the mini-game.
- Solution: (V).
- Move forward.

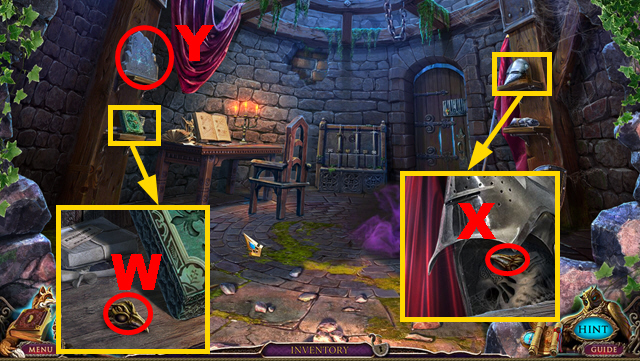
- Take CROW HEAD 2/3 (W).
- Open the helmet; take CROW HEAD 3/3 (X).
- Play the mini-game (Y).

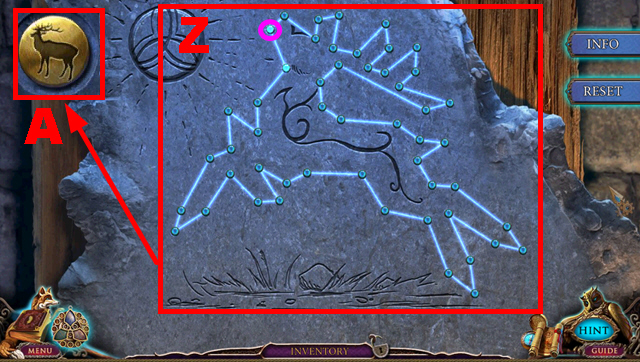
- Solution: (Z).
- Begin and end at gem (purple).
- Take the amulet piece (A).
Chapter 9: The Castle Courtyard

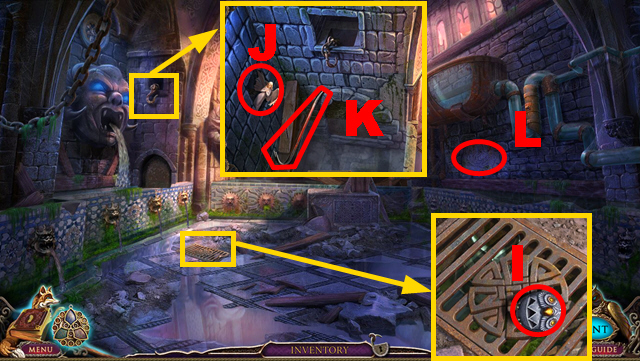
- Connect 3 CROW HEADS to the door (B); pull them.
- Move forward.
- Use the STICK WITH TERMITES (C); take the SWORD (D).
- Take the amulet piece (E) and WARRIOR (F).
- Play the HOP.

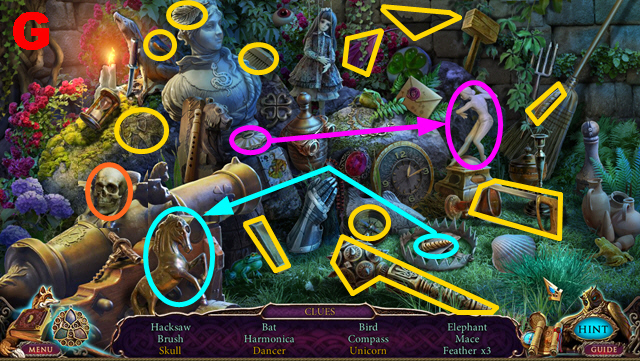
- You receive the HACKSAW (G).
- Move forward.
- Activate the amulet; press the red gem.
- Play the mini-game.



- Take OWLET 2/3 (I).
- Take the ANGEL (J) and CROWBAR (K).
- Play the mini-game (L).

- Solution: (M).
- Begin and end at gem (green).
- Take the amulet piece (N).

- Use the CROWBAR (O); take the LARGE OWL HEAD (purple).
- Walk down.
- Place the LARGE OWL HEAD on the niche (P); press it.
- Take the SUN (Q).
- Walk down three times.

- Use the HACKSAW (R); take WOLF PLATE 2/2 (green).
- Turn left twice, move forward.
- Remove the moss with the BRUSH (S); put down 2 WOLF PLATES (T).
- Create the picture (U); take the DEMON (V).
- Move forward.

- Put down the WARRIOR, DEMON, and ANGEL (W).
- Arrange the figurines correctly (purple); take the FOX (blue).
- Walk down three times, turn right twice.
- Place the FOX on the niche (X); press it.
- Take the MOON (Y).

- Place the MOON and SUN on the niche (Z).
- Play the mini-game.
- Solution: (A).
- Turn left.
Chapter 10: The Main Hall

- Take the RIGHT HORN (B); open the door (green).
- Take the amulet piece (C).
- Take the BLADE PART (D).
- Play the mini-game (E).

- Solution: (F).
- Start and end at gem (purple).
- Take the amulet piece (G).
- Move forward, walk down, turn right.
- Play the HOP.

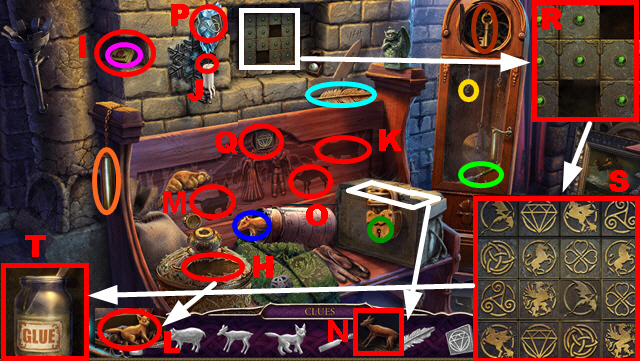
- Connect the weight (orange) to the clock (yellow).
- Insert the key (brown) into the lock (dark green).
- Use the chisel (light green) to remove the stone (I).
- Place the feather (light blue) on the slot (H).
- Use the matches (purple) to light the candle (J).
- Put the boar (dark blue) into the niche (K).
- Put the bobcat (L) into the niche (M).
- Put the deer (N) into the niche (O).
- Place 2 stone tokens (P) and (Q) on the board (R).
- Solution: (S).
- Take the GLUE (T).

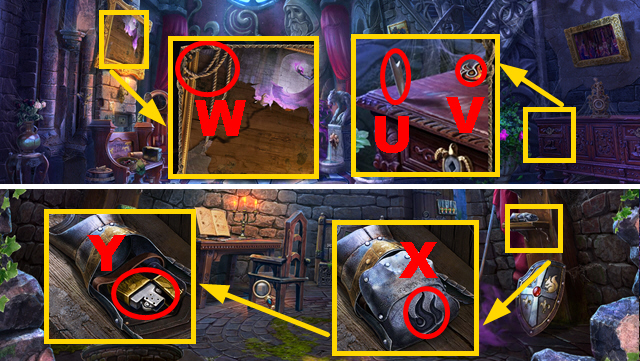
- Take the BLADE FRAGMENT (U) and FIRE SYMBOL (V).
- Take the ROPE (W).
- Walk down three times.
- Place the FIRE SYMBOL on the niche (X); open the gauntlet.
- Take the LIGHTER (Y).

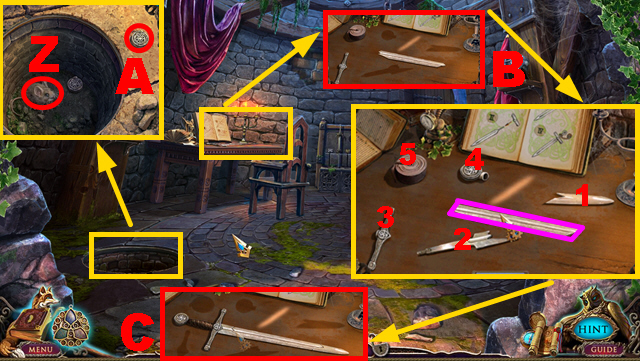
- Throw the ROPE (Z); take the POMMEL (A).
- Put down the BLADE PART, BLADE FRAGMENT, and POMMEL (B).
- Connect the sword pieces to the central part (purple) in numerical order 1-5.
- Take the SWORD (C).
- Move forward, turn left.

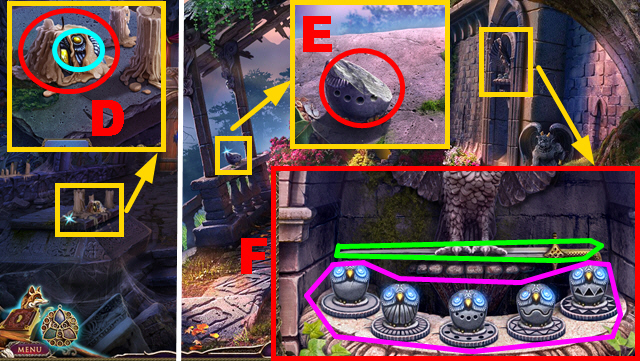
- Melt the wax with the LIGHTER (D); take the OWLET HALF (blue).
- Walk down three times.
- Apply the GLUE and OWLET HALF to the figurine (E); take OWLET 3/3.
- Put down 3 OWLETS (F).
- Arrange them correctly (purple); take the SWORD (green).
- Turn right.

- Put down 3 SWORDS; arrange them correctly (G).
- Take the BLACKSMITH TONGS (H) and CHISEL (I).
- Insert the CHISEL into the wall (J).
- Turn right.
- Play the HOP.

- You receive the MALLET (K).

- Collect BONE 1/2 (L) with the BLACKSMITH TONGS.
- Walk down.
- Hit the chisel with the MALLET (M); take the BEAR (N).
- Move forward.

- Place the BEAR on the niche (O); press it.
- Take BONE 2/2 (P) and FLEUR-DE-LIS 1/3 (Q).
- Turn left, turn right.
- Try to turn right.
- Place 2 BONES on the statues (R).
- Turn right.

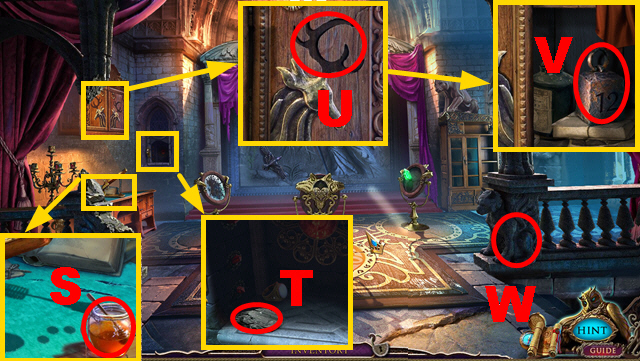
- Take the HONEY (S).
- Take the CHARCOAL (T).
- Place the RIGHT HORN on the cupboard (U); take the WEIGHT (V).
- Play the mini-game (W).

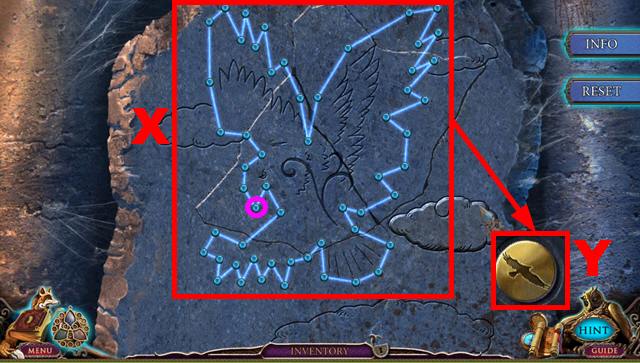
- Solution: (X).
- Start and end at gem (purple).
- Take the amulet piece (Y).

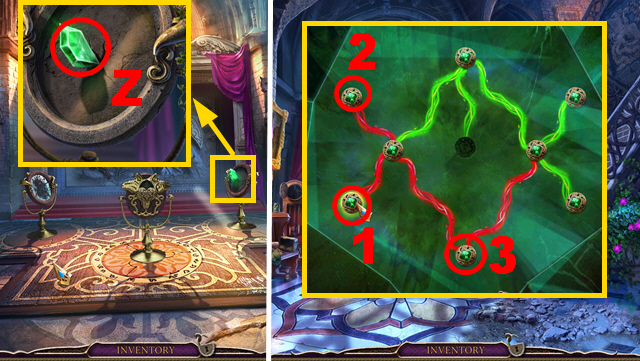
- Take the amulet piece (Z).
- Walk down.
- Activate the amulet; press the green gem.
- Solution: 1-3.

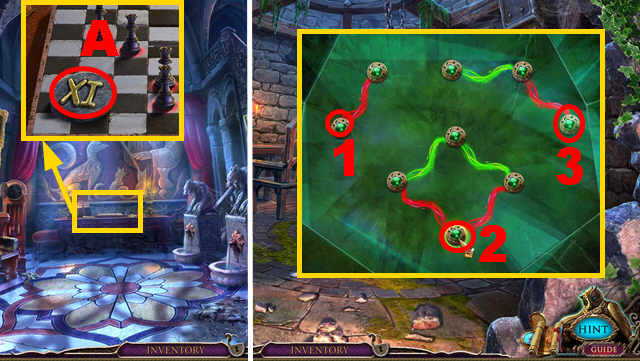
- Take ROMAN NUMERAL 2/3 (A).
- Walk down three times.
- Activate the amulet; press the green gem.
- Solution: 1-3.
- Move forward, turn left, move forward.
- Activate the amulet; press the green gem.


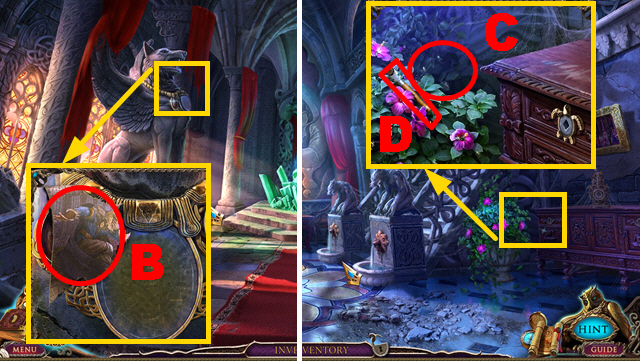
- Take the CANVAS FRAGMENT (B).
- Walk down, turn right.
- Put down the HONEY (C); take the GLASS CUTTER (D).
- Turn right.

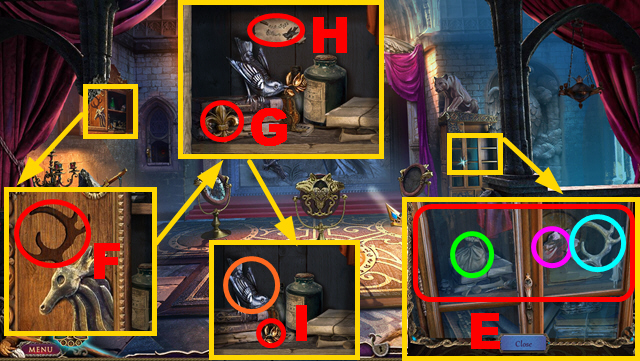
- Use the GLASS CUTTER (E); take the POUCH (green), CANVAS FRAGMENT (purple), and LEFT HORN (blue).
- Place the LEFT HORN on the cupboard (F).
- Take FLEUR-DE-LIS 2/3 (G); inspect the note (H).
- Blow the WHISTLE (orange); take the ROSE (I).
- Walk down four times.

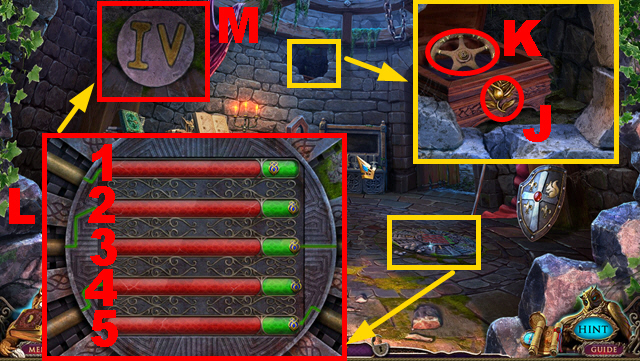
- Place the ROSE on the box (J); take the VALVE (K).
- Play the mini-game.
- Solution (L): 1, 3, 2, 4, 5.
- Take ROMAN NUMERAL 3/3 (M).
- Walk down.

- Place 3 ROMAN NUMERALS into the correct spots (purple); take the RED STONES (N).
- Turn right, move forward twice.
- Connect the WEIGHT to the hook (O); take the BIG FISH (P).

- Place the VALVE on the pipe (Q).
- Put down the BIG FISH (R).
- Walk down, turn left, move forward.
- Place the RED STONES on the niches (S).
- Play the mini-game (T).


- Take FLEUR-DE-LIS 3/3 (V).
- Walk down three times.
- Place 3 FLEURS-DE-LIS on the box (W); take the MIDDLE FISH (X).
- Move forward twice.

- Put down the MIDDLE FISH (Y).
- Rotate the VALVE (Z) to acquire the CHESS QUEEN.
- Walk down, turn left, turn right.
- Put down the CHESS QUEEN (A).
- Play the mini-game.

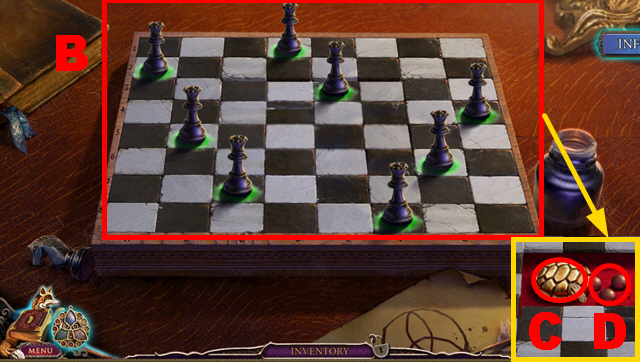
- Solution: (B).
- Take the TURTLE SHELL (C) and BULLETS (D).

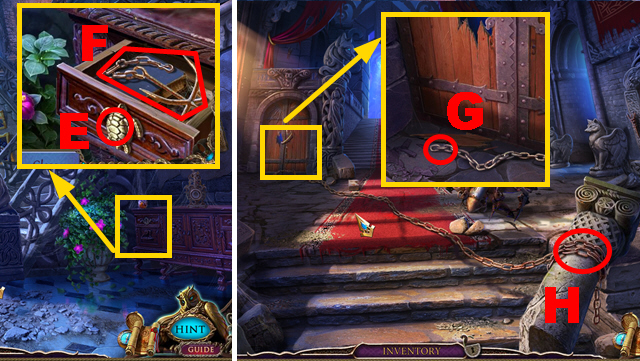
- Place the TURTLE SHELL on the drawer (E); take the HOOK (F).
- Walk down.
- Connect the HOOK to the chain (G); push the hook.
- Use the CROWBAR (H).
- Turn left.
Chapter 11: The Dungeon

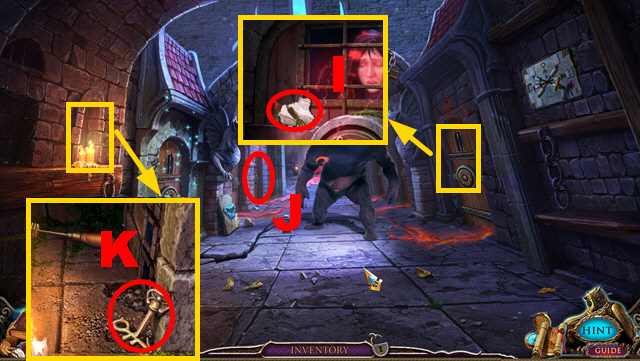
- Take the CANVAS FRAGMENT (I).
- Inspect the cells (J).
- Take the CHANDELIER KEY (K).
- Play the HOP.

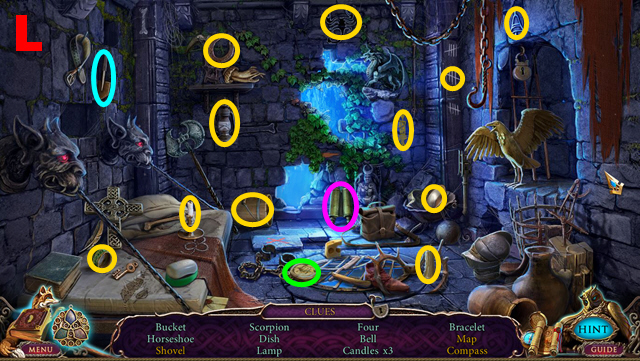
- You receive the BUCKET (L).

- Put the BUCKET into the compartment (M); take the BRUSH (purple).
- Walk down, turn right twice.
- Put down the BRUSH, POUCH, and BULLETS (green).
- Use the BRUSH, POUCH, and BULLETS on the pistol (N); take the PISTOL.
- Walk down twice.

- Insert the CHANDELIER KEY into the lock (O); take the CANVAS FRAGMENT (P).
- Turn right.
- Place 4 CANVAS FRAGMENTS on the painting (1); take the FRAGMENT (purple).
- Walk down, turn left.

- Shoot the PISTOL (R).
- Take the GREEN WOLF CRYSTAL (Q).
- Walk down, move forward.
- Put down the GREEN WOLF CRYSTAL (S).
- Play the mini-game (T).


- Take the STAFF (V).
- Walk down, turn left, move forward.
- Open the bag; take the MIRROR (W).
- Read 2 scrolls (X).
- Walk down twice, turn right twice.

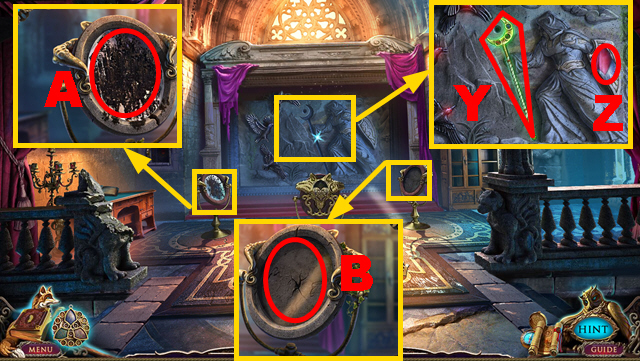
- Place the STAFF on the niche (Y); take the HANDKERCHIEF (Z).
- Use the HANDKERCHIEF (A).
- Put down the MIRROR (B).

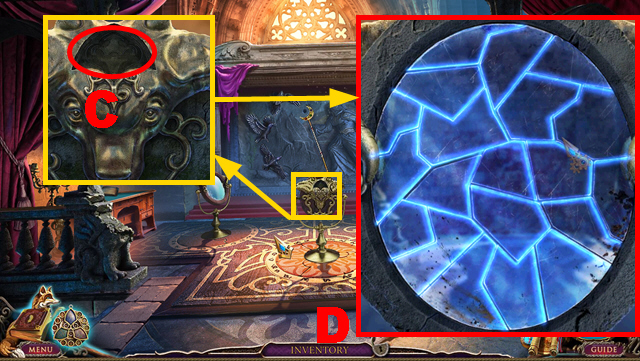
- Place the FRAGMENT on the niche (C).
- Play the mini-game.
- Solution: (D).

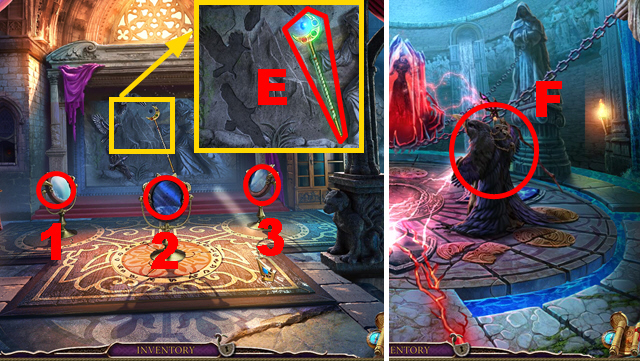
- Turn mirror (1) twice, mirror (2) twice, and mirror (3) twice.
- Take the MAGIC STAFF (E).
- Walk down twice, turn left, move forward.
- Use the MAGIC STAFF (F).

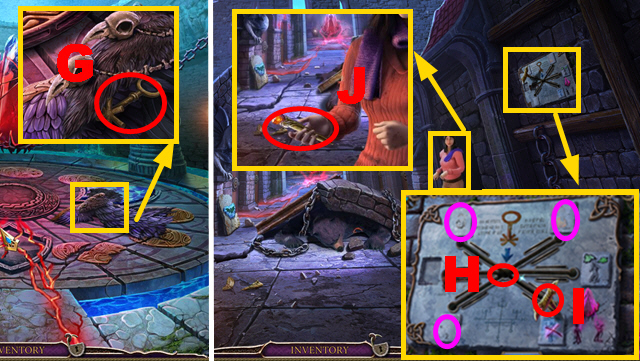
- Move the cape; take the PRISON KEY (G).
- Walk down.
- Insert the PRISON KEY into the niche (H); restore the pictures with the CHARCOAL (purple).
- Move the lever (I).
- Take the LASER LEVER (J).
- Walk down, turn right twice.

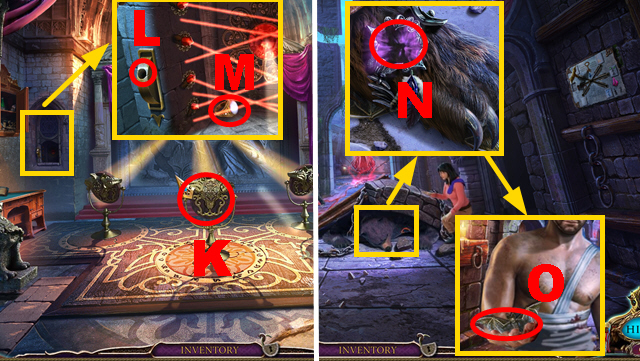
- Turn the mirror (K) three times.
- Insert the LASER LEVER into the slot (L); pull it.
- Take the RING OF LIGHT (M).
- Walk down twice, turn left.
- Use the RING OF LIGHT to remove the curse (N); take the BAT (O).

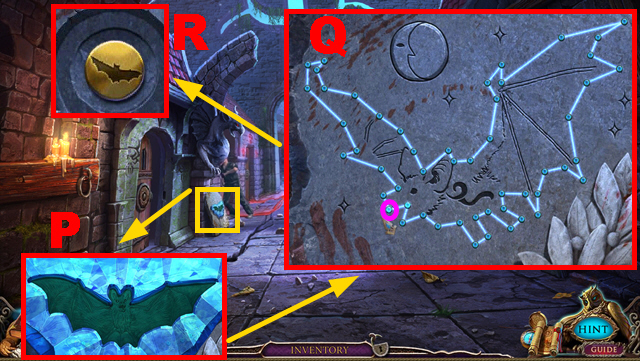
- Place the BAT on the niche (P).
- Play the mini-game.
- Solution: (Q).
- Begin and end at gem (purple).
- Take the amulet piece (R).
- Congratulations, you have completed Mystery of the Ancients: Three Guardians.





 Twisted: A Haunted Carol Walkthrough, Guide, & Tips
 Spirits of Mystery: Song of the Phoenix Walkthrough, Guide, & Tips
 Danse Macabre: Crimson Cabaret Walkthrough, Guide, & Tips
 The Missing: Island of Lost Ships Walkthrough, Guide, & Tips
 Antique Mysteries: Secrets of Howard's Mansion Walkthrough, Guide, & Tips