Haunted Hotel: Eclipse Walkthrough, Guide, & Tips
Haunted Hotel: Eclipse Walkthrough

Welcome to the Haunted Haunted: Eclipse Walkthrough
Should anyone ever check in to a place called the Final Journey Hotel?
Whether you use this document as a reference when things get difficult or as a road map to get you from beginning to end, we’re pretty sure you’ll find what you’re looking for here.
This document contains a complete Haunted Haunted: Eclipse game walkthrough featuring annotated screenshots from actual gameplay!
We hope you find this information useful as you play your way through the game. Use the walkthrough menu below to quickly jump to whatever stage of the game you need help with.
Remember to visit the Big Fish Games Forums if you find you need more help. Have fun!
This walkthrough was created by David Becker, and is protected under US Copyright laws. Any unauthorized use, including re-publication in whole or in part, without permission, is strictly prohibited.
General Tips
- This is the official guide for Haunted Hotel: Eclipse.
- This guide will not mention each time you have to zoom into a location; the screenshots will show each zoom scene.
- We will use the acronym HOP for Hidden-object puzzles. Interactive items will be color-coded and some will be numbered; please follow the numbers in sequence.
- The HOP lists may be random; our lists may vary from yours.
- Use the map to travel to a location.
Chapter 1: The Hotel Entrance

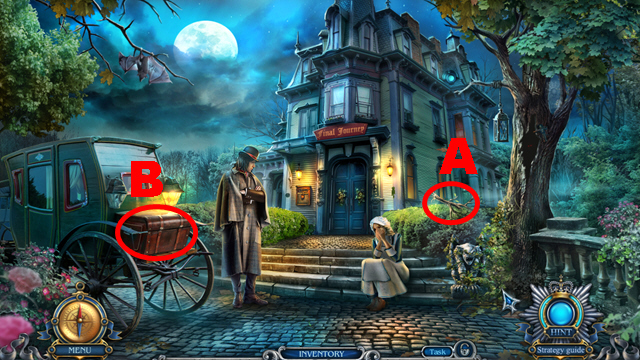
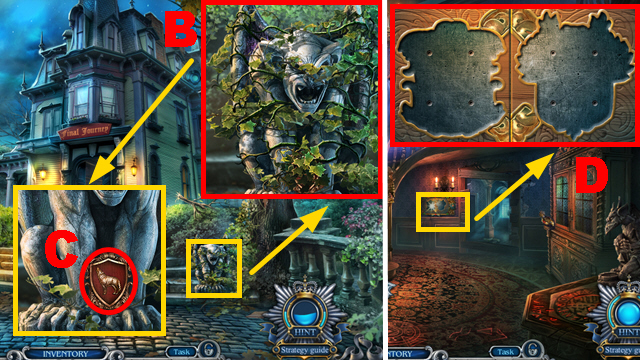
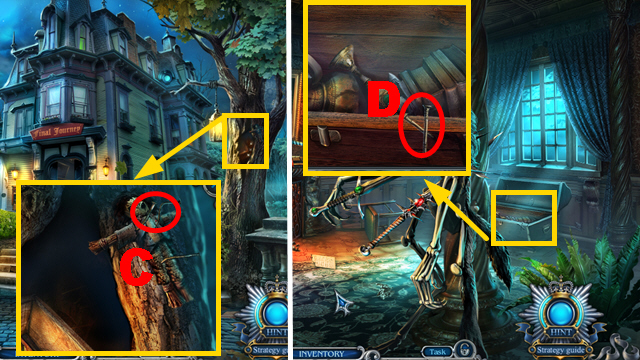
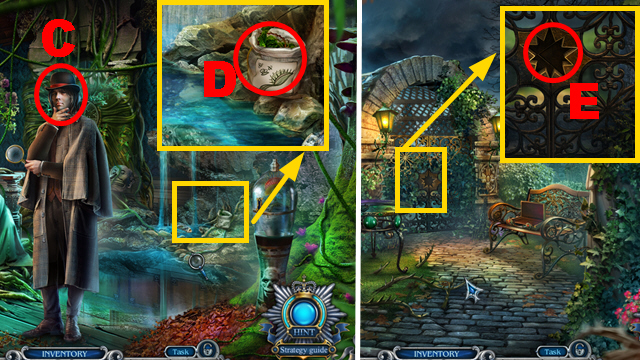
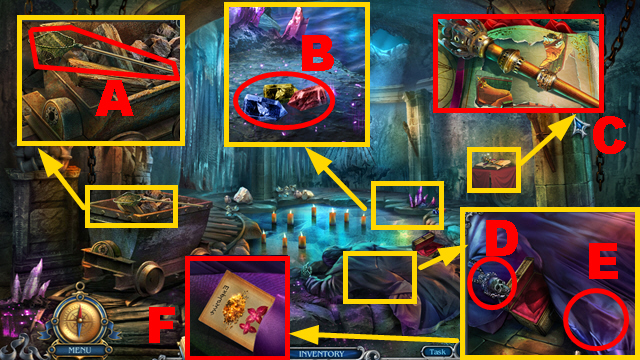
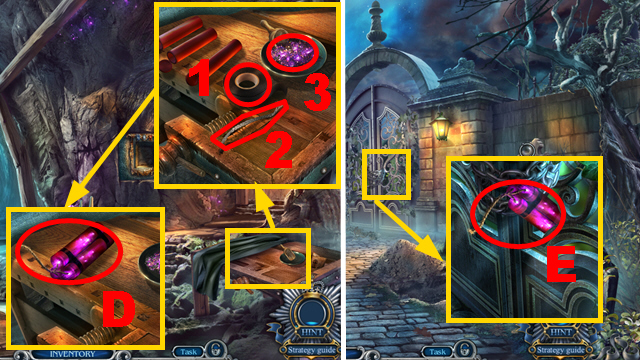
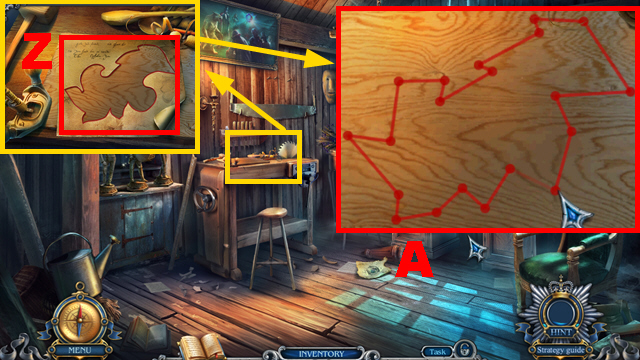
- Take a look at the branch (A).
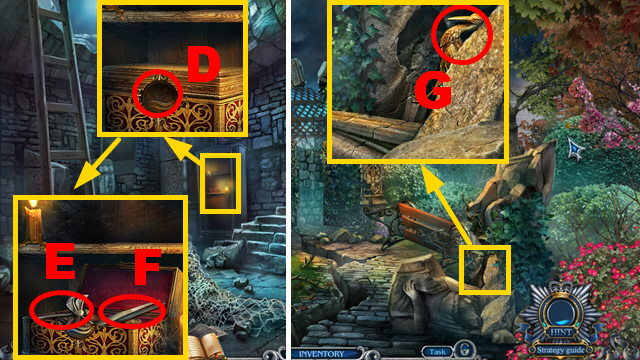
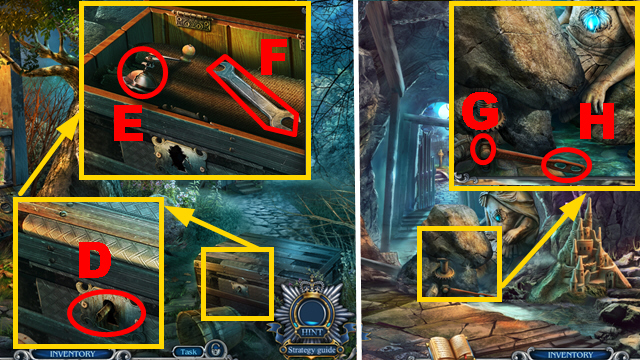
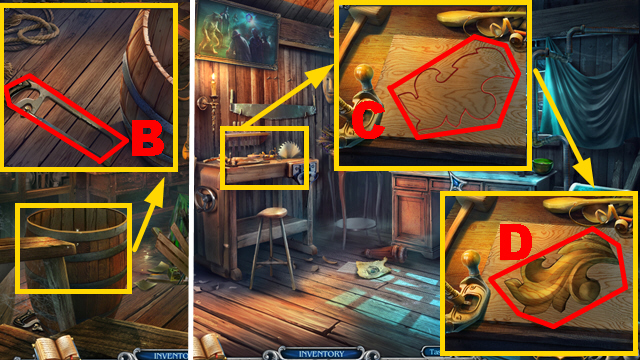
- Open the chest (B).
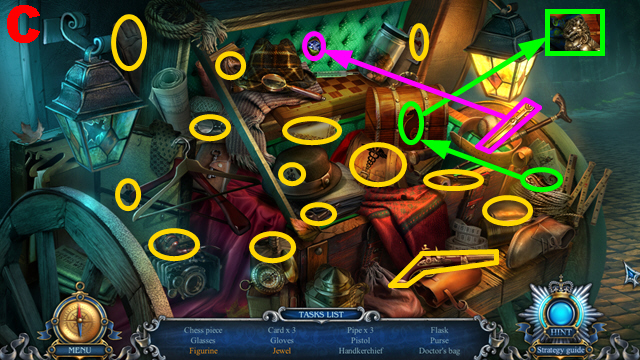
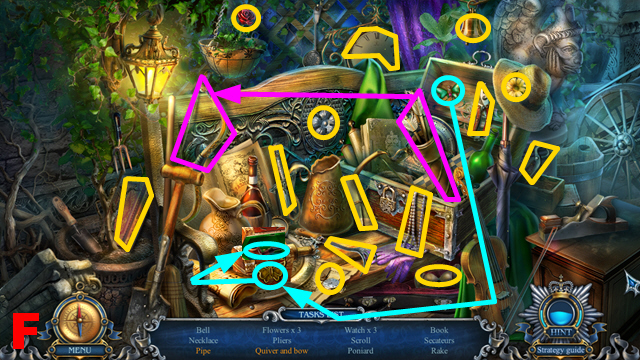
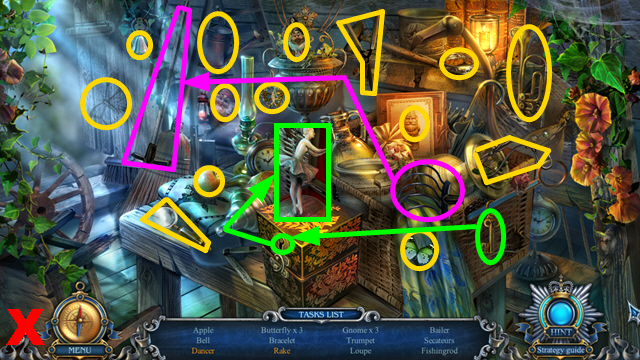
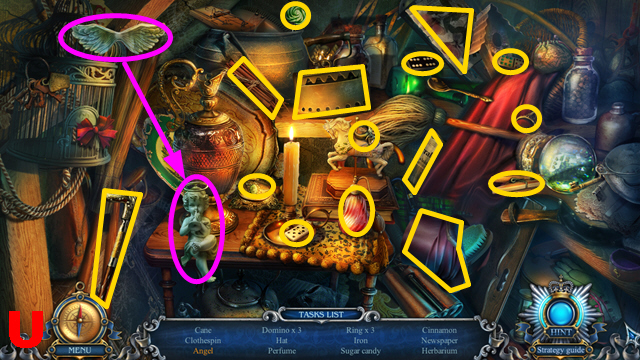
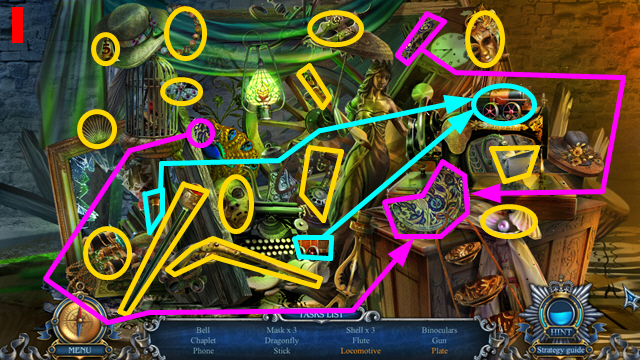
- Play the HOP.
- You receive the DOCTOR’S BAG (C).
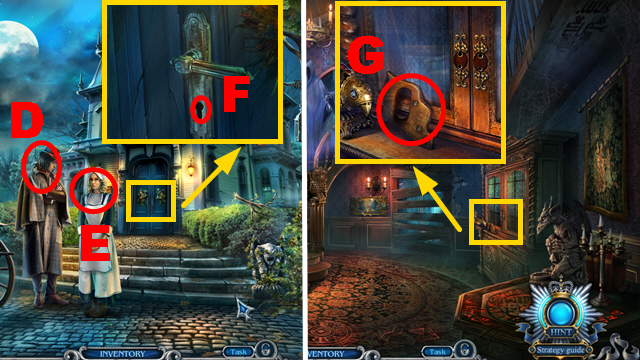
- Give the DOCTOR’S BAG to the man (D).
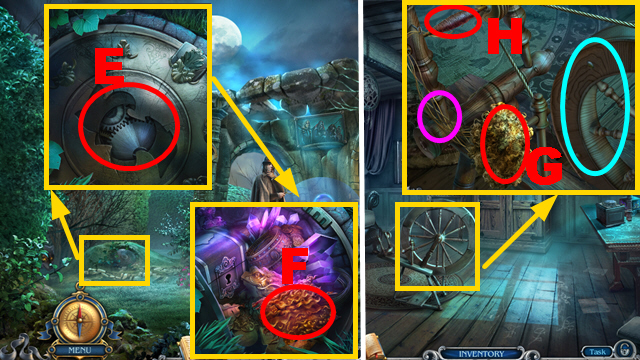
- Talk to the woman (E); you receive the HOTEL KEY.
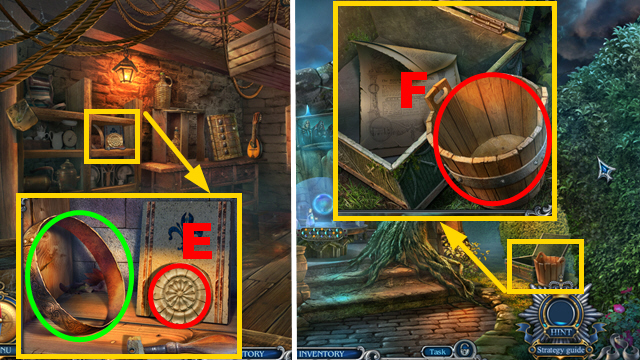
- Insert the HOTEL KEY into the lock (F); turn the key once.
- Move forward.
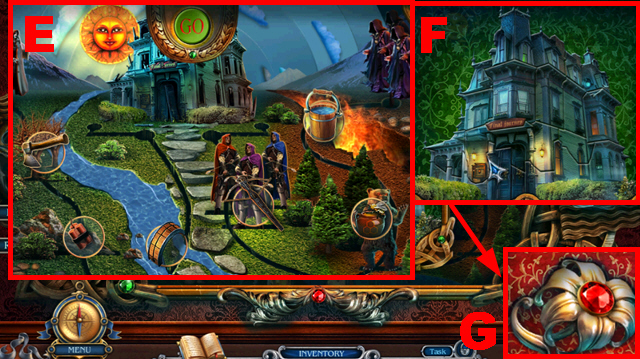
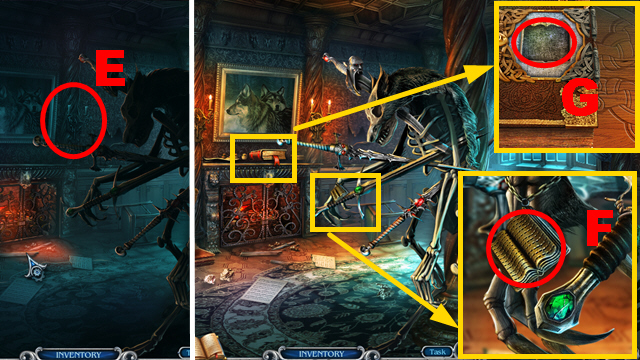
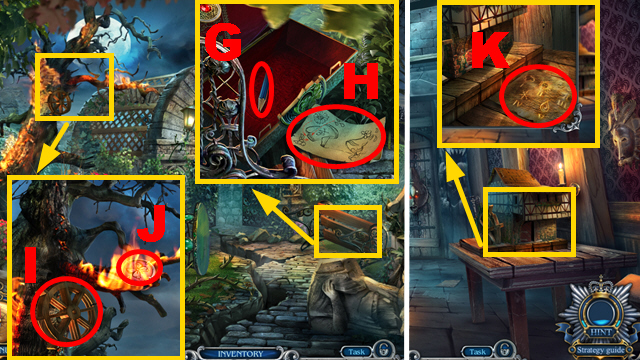
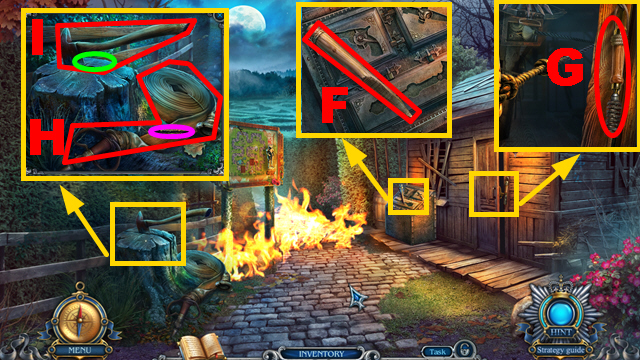
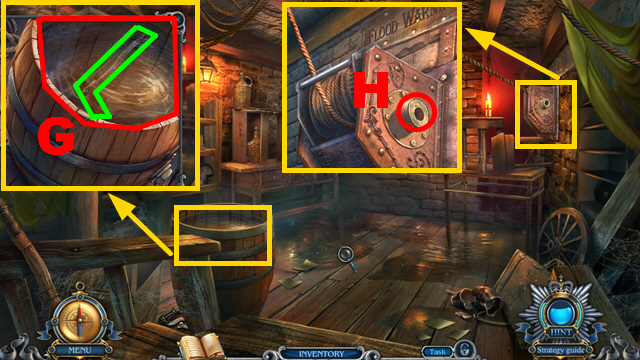
- Take the SAW HANDLE (G).
- Walk down.
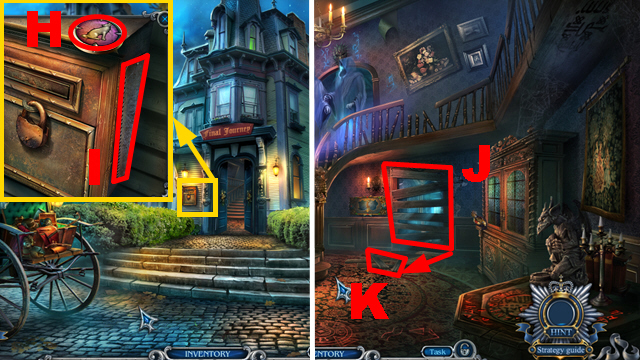
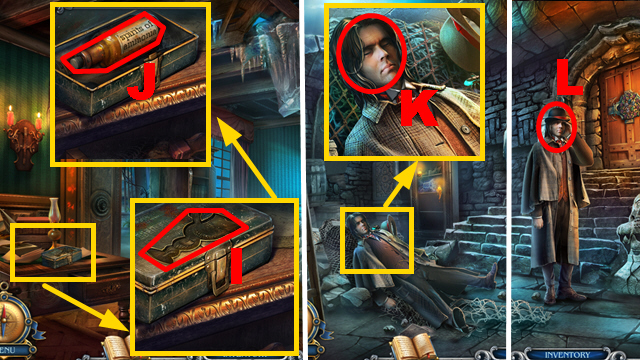
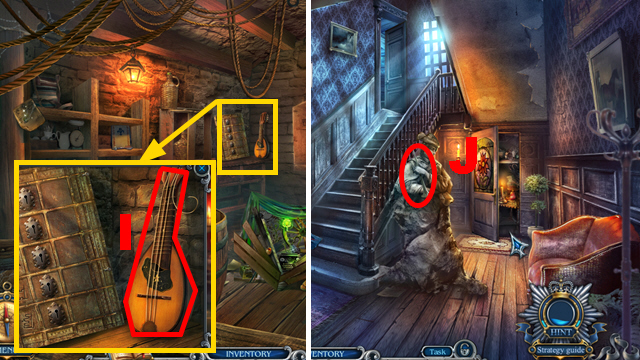
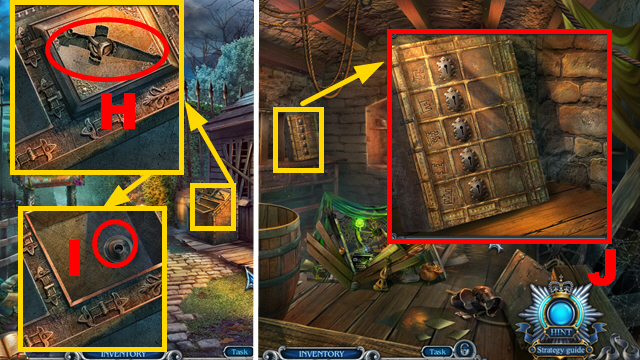
- Take the TILES (H); connect the SAW HANDLE to the blade (I) and take the SAW.
- Move forward.
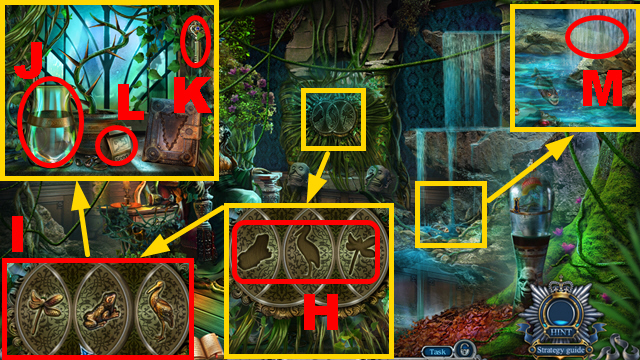
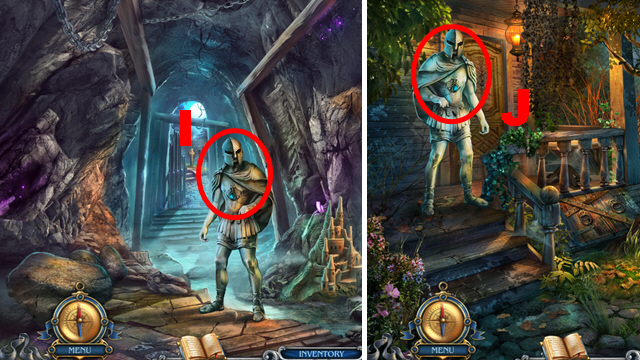
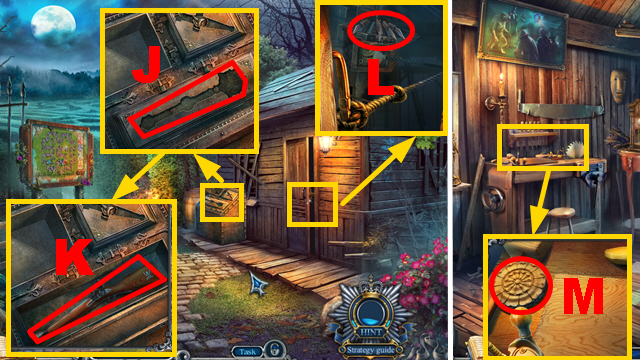
- Cut the boards with the SAW (J).
- Take the BOARDS (K).
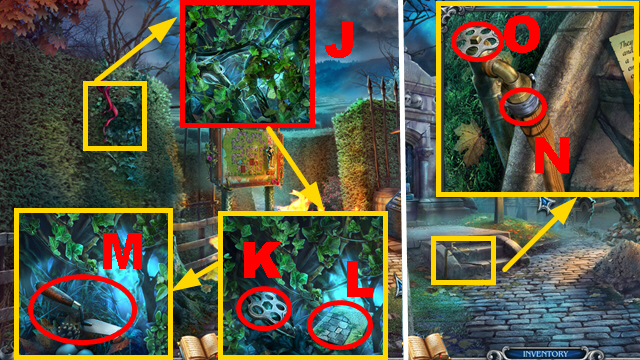
- Enter the Corridor.
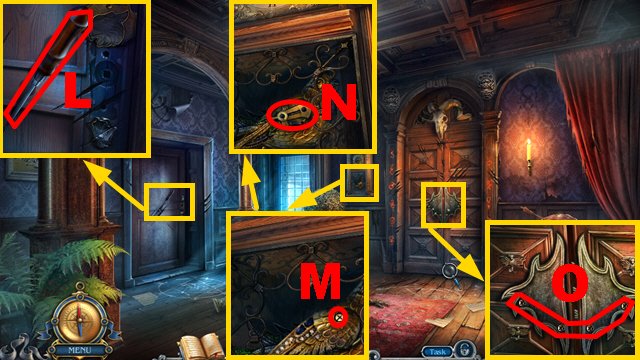
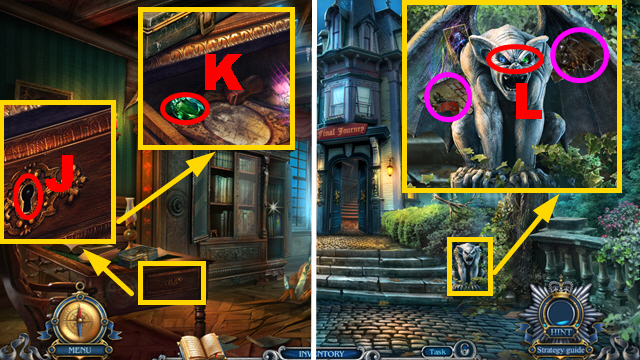
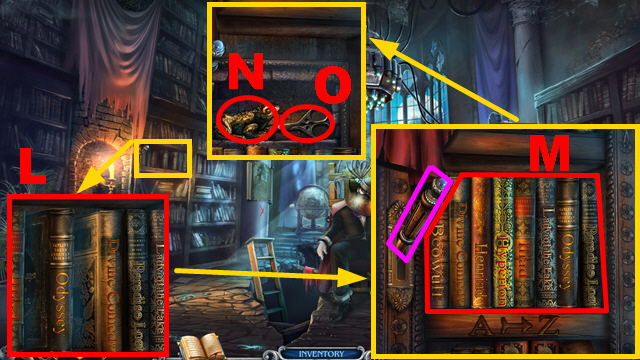
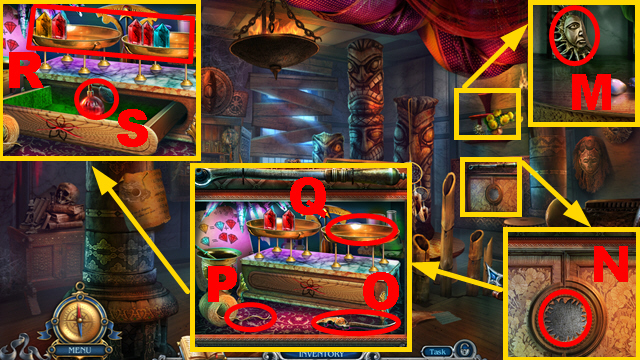
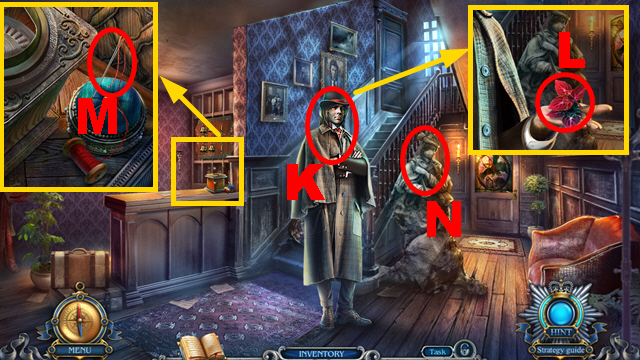
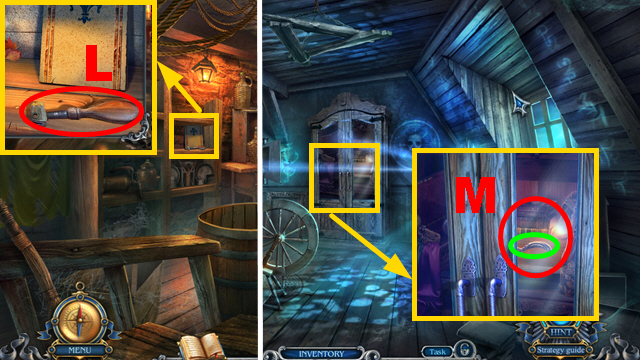
- Take the SCREWDRIVER (L).
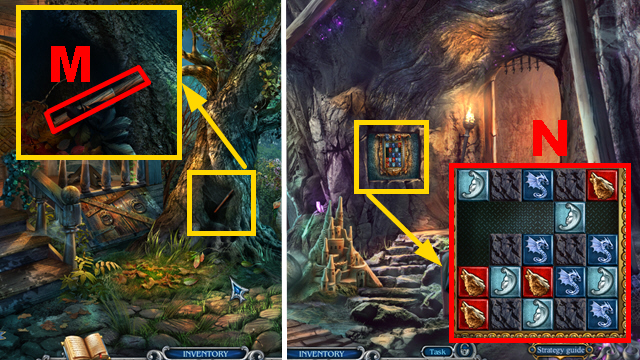
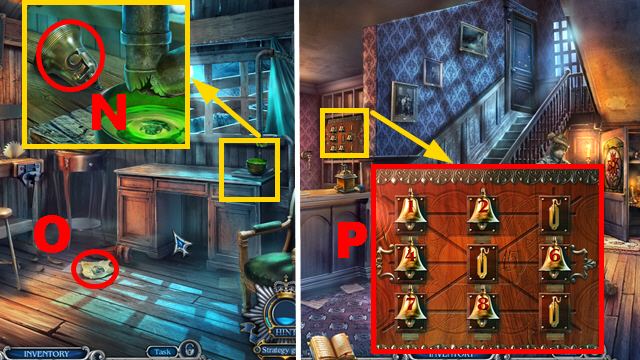
- Remove the screw with the SCREWDRIVER (M); take the DETAIL (N).
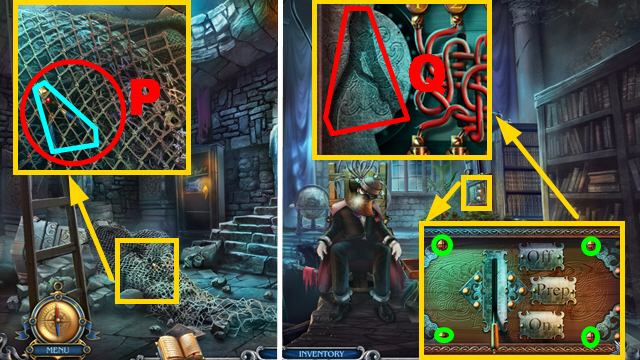
- Collect the SCREWS with the SCREWDRIVER (O).
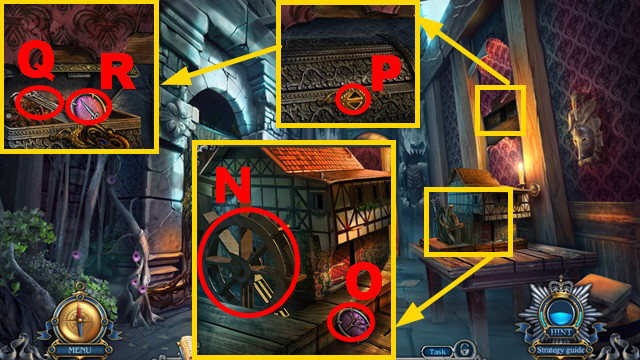
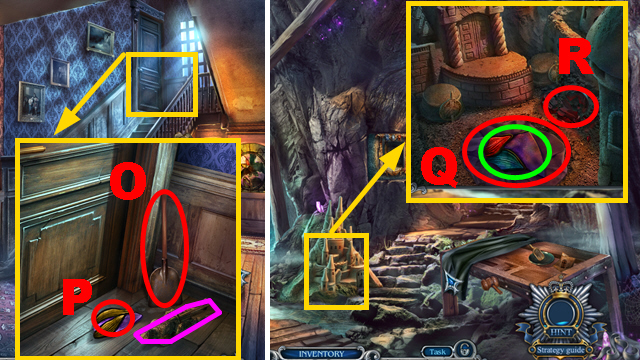
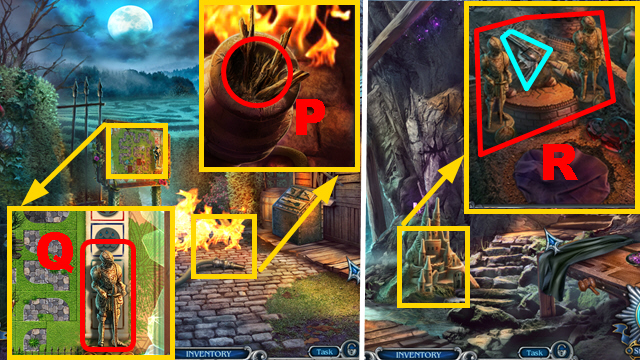
- Walk down.
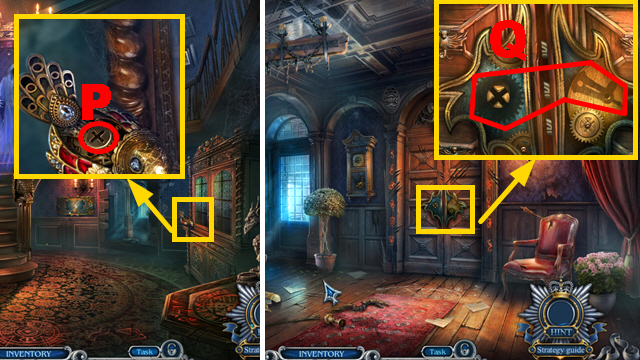
- Insert the SCREWDRIVER into the detail (P); take the DETAIL.
- Move forward.
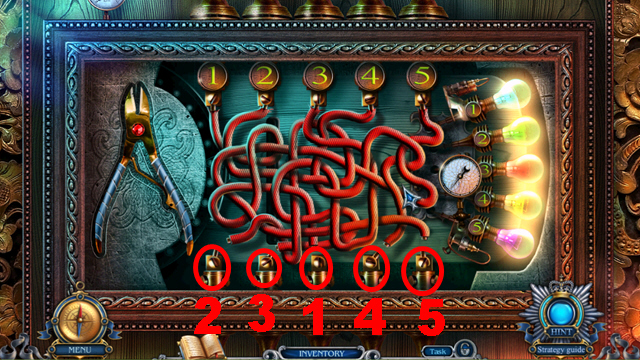
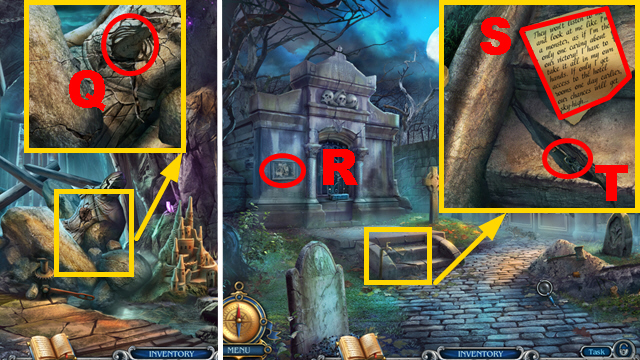
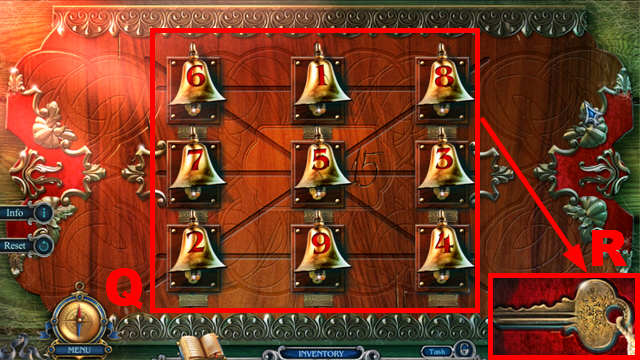
- Put the 2 DETAILS into the mechanism (Q); insert the SCREWS into the mechanism and fix them with the SCREWDRIVER.
- Enter the Vampire’s Room.
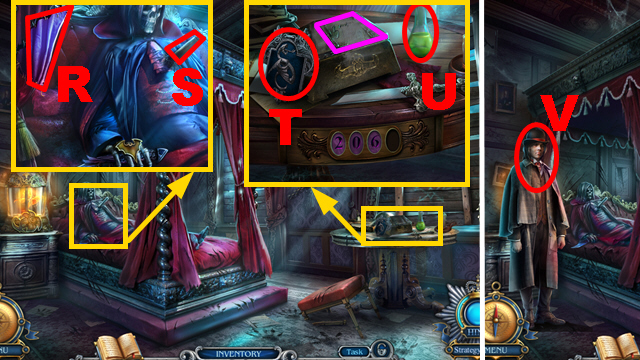
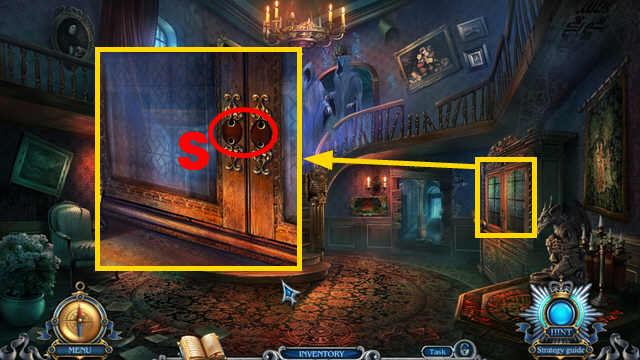
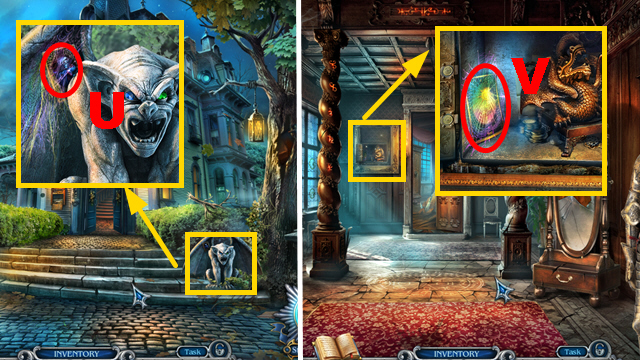
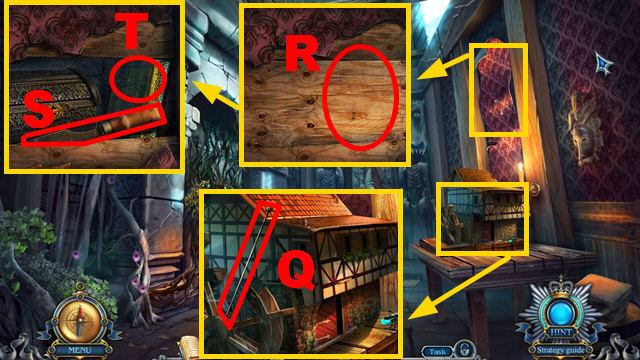
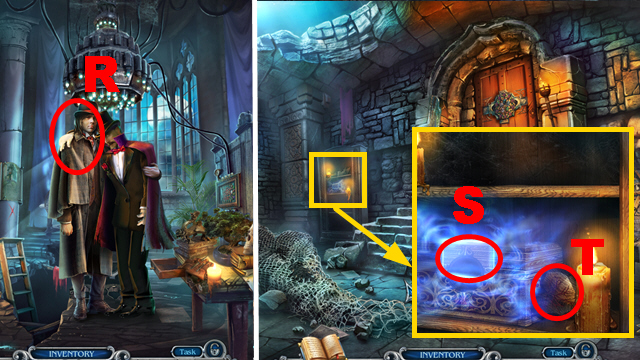
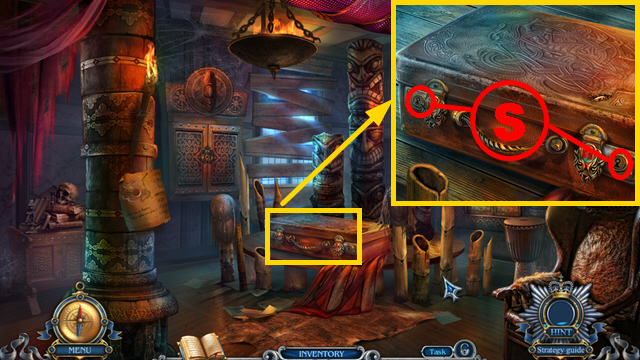
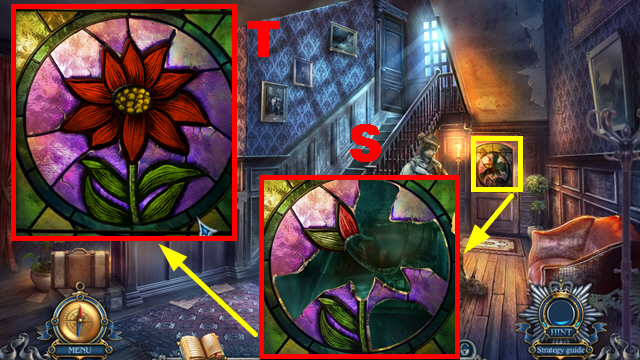
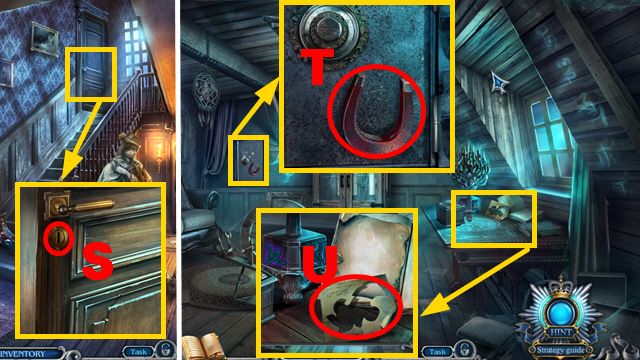
- Take the CLOTH (R); look at the vampire (S).
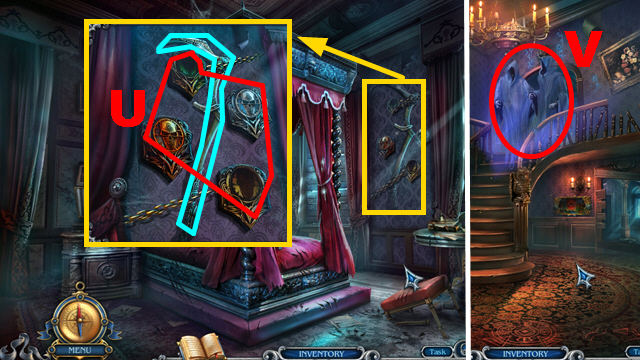
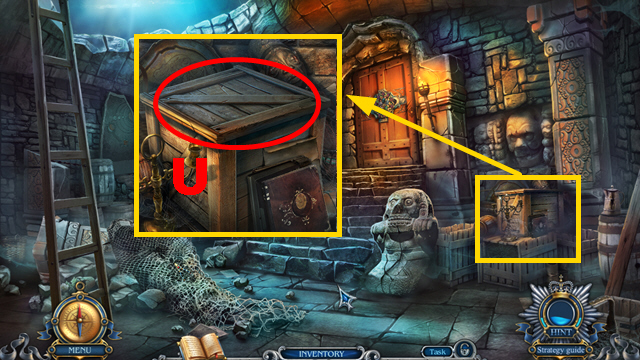
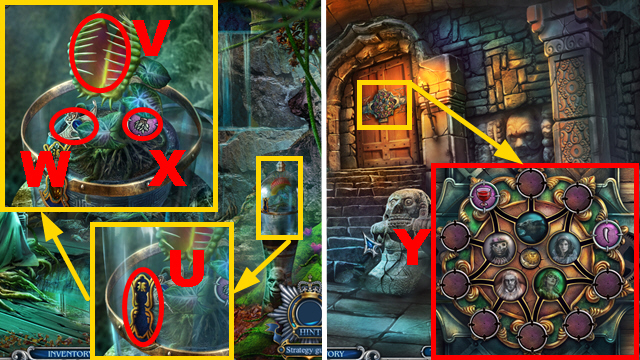
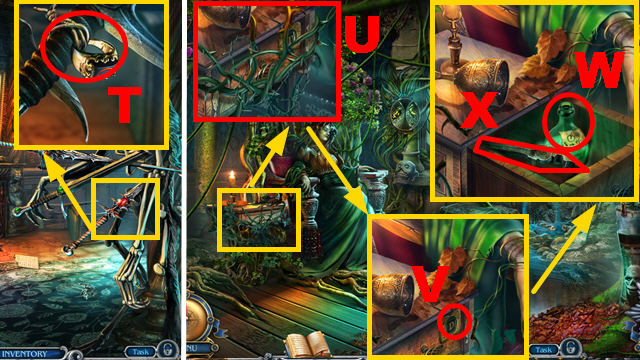
- Take the TWILIGHT BROTHERS COAT OF ARMS (T) and the ACID (U); clean the box with the CLOTH (purple) to get the code ’3179′.
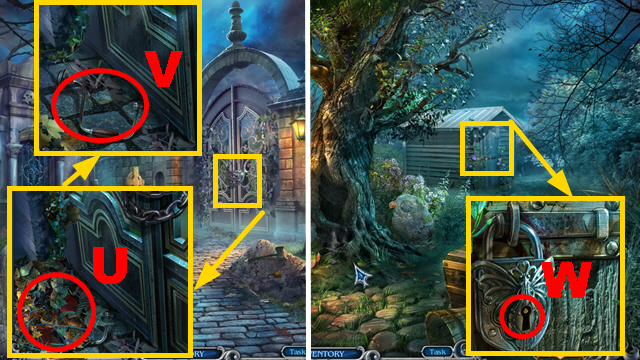
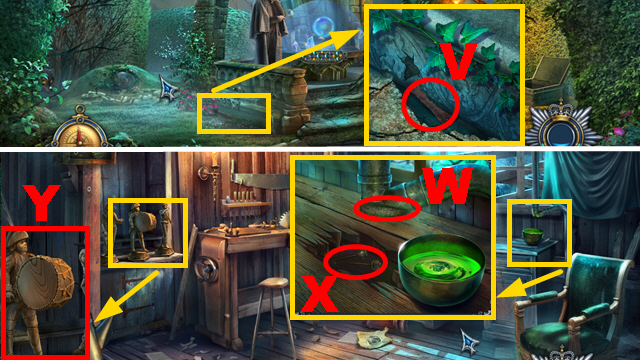
- Talk to the man (V); you receive the COPPER SKULL AMULET.
- Walk down three times.
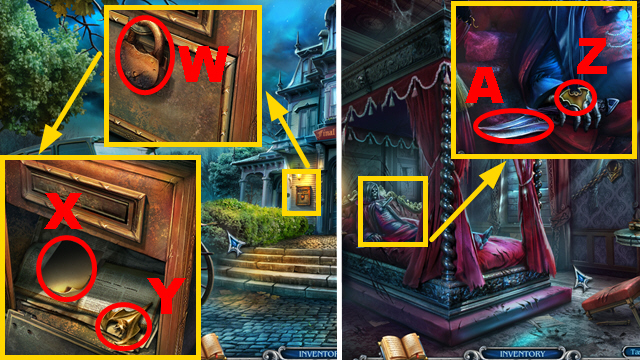
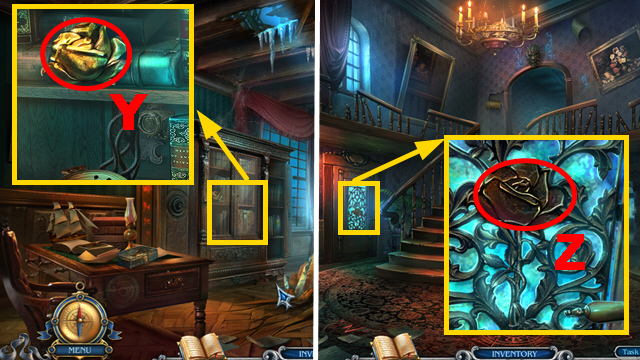
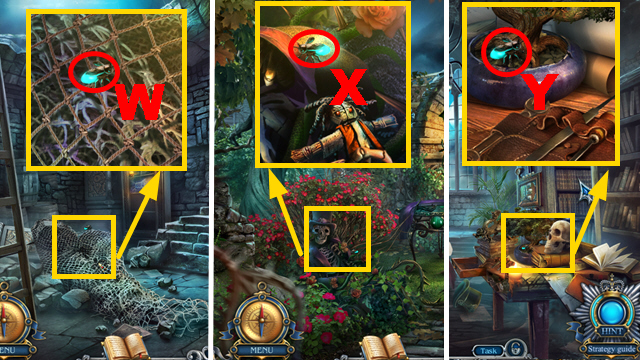
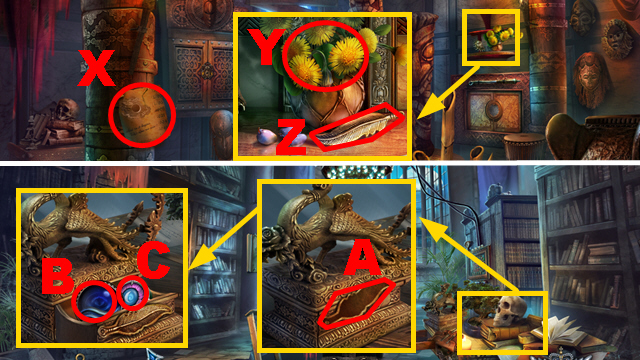
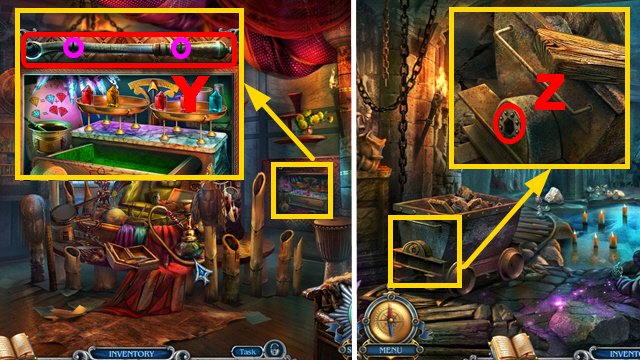
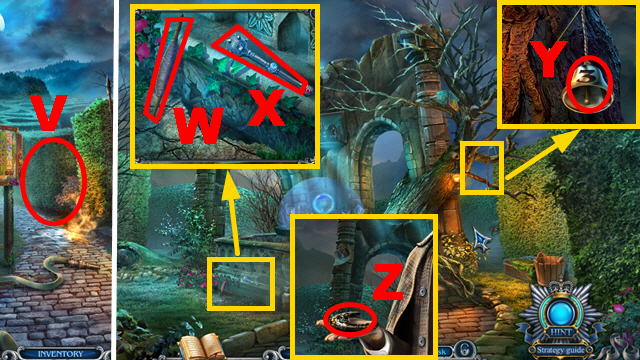
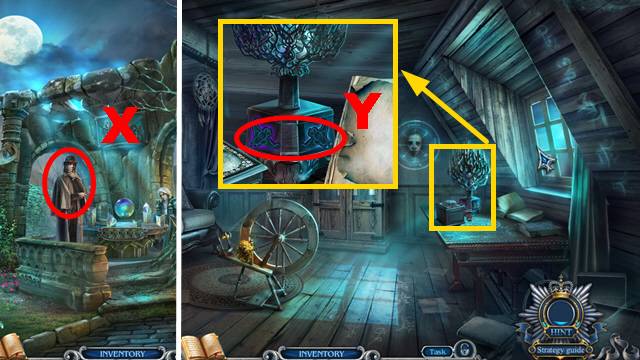
- Pour the ACID over the padlock (W) and remove the padlock; take the SHEET OF PAPER (X) and the GOLDEN BAT (Y).
- Move forward three times.
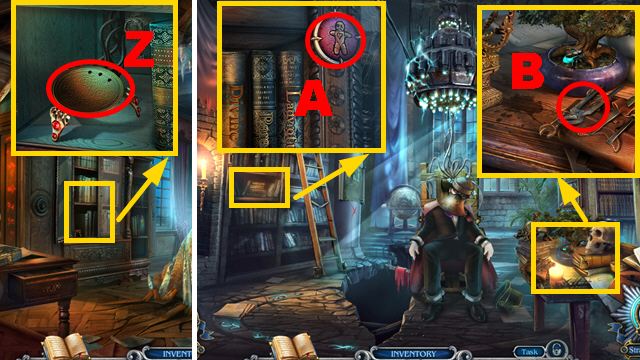
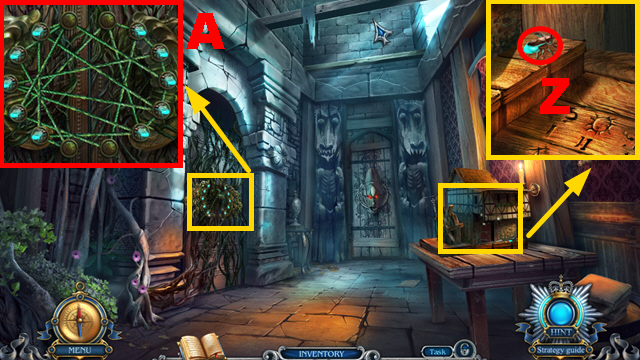
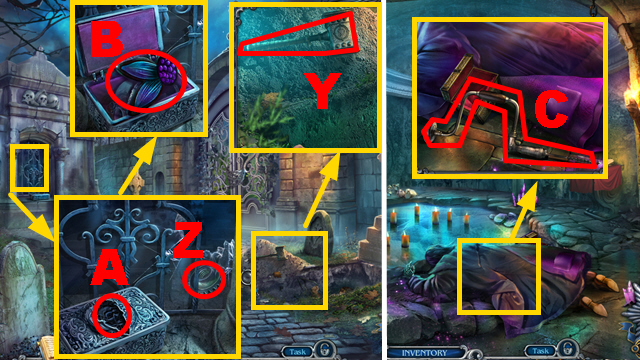
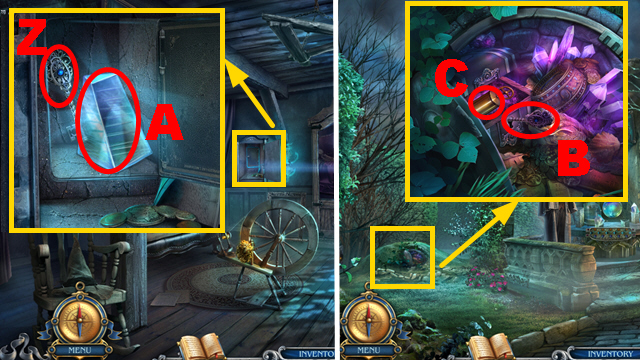
- Insert the GOLDEN BAT into the niche (Z); take the DAGGER (A).
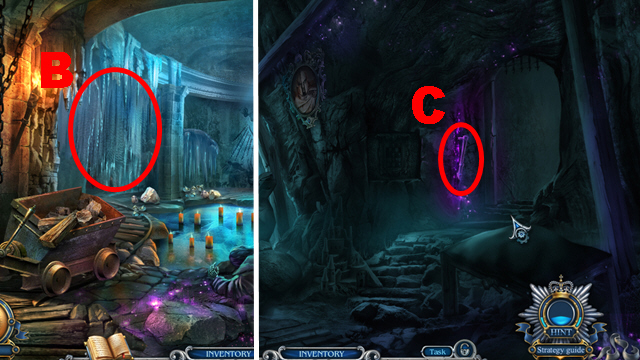
- Walk down three times.
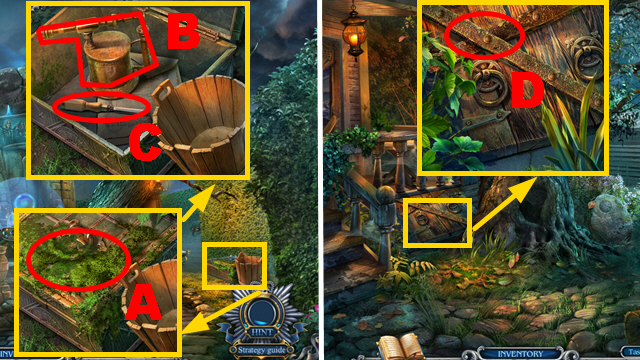
- Cut the vines with the DAGGER (B); take the GRAY ORDER COAT OF ARMS (C).
- Move forward.
- Insert the TWILIGHT BROTHERS COAT OF ARMS and the GRAY ORDER COAT OF ARMS into the slots (D).
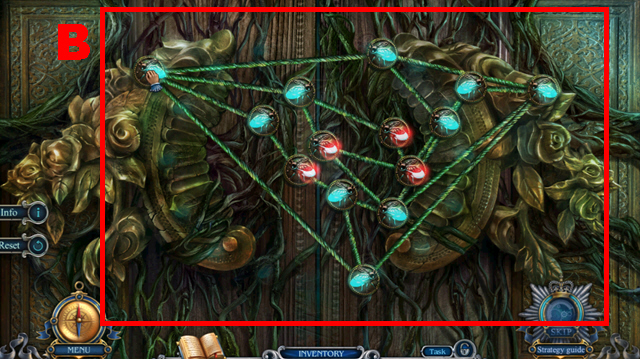
- Play the mini-game.
- Solution part 1: (E).
- Solution part 2: (F).
- Take the RUBY FLOWER (G).
- Move forward twice.
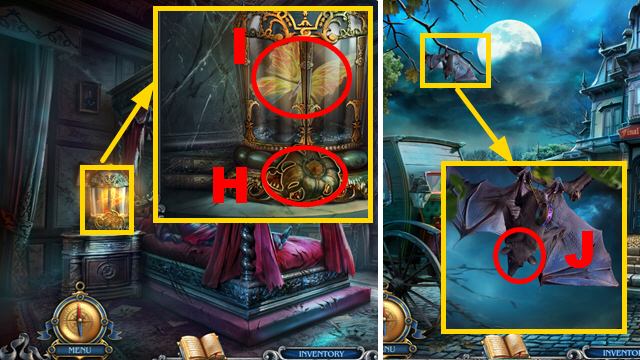
- Insert the RUBY FLOWER into the slot (H); take the FLUTTERFIRE (I).
- Walk down three times.
- Send the FLUTTERFIRE to the bat (J); you receive the TUMBLER.
- Move forward three times.
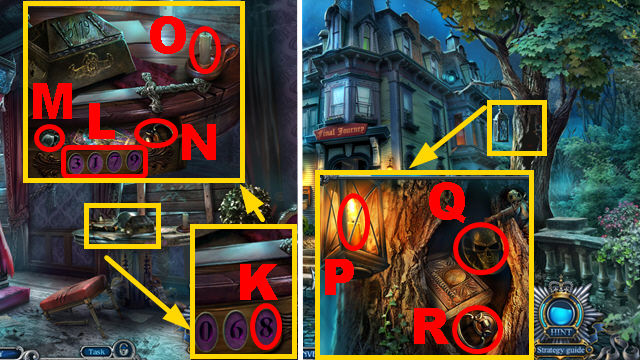
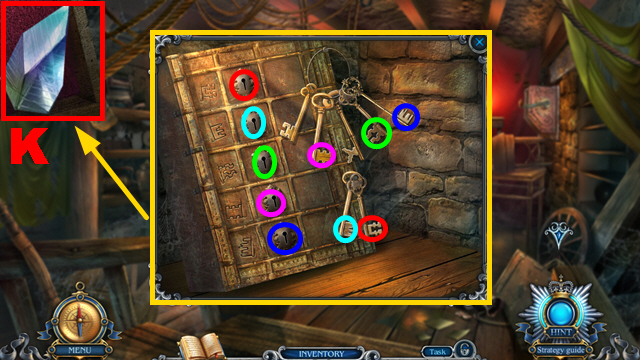
- Insert the TUMBLER into the niche (K) and enter the correct code (L); take the SILVER SKULL AMULET (M) and the RING HANDLE (N).
- Light the candle with the FLUTTERFIRE (O); take the BURNING CANDLE.
- Walk down three times.
- Remove the old candle and insert the BURNING CANDLE into the lantern (P); take the BRONZE SKULL AMULET (Q) and the RING HANDLE (R).
- Move forward.
- Insert the 2 RING HANDLES into the cabinet (S) and put the SCREWS into them; fix the screws with the SCREWDRIVER and open the cabinet.
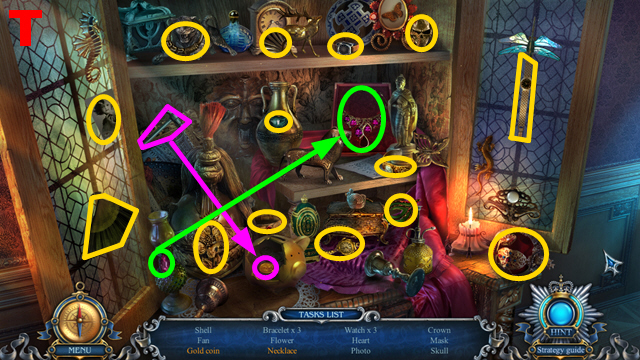
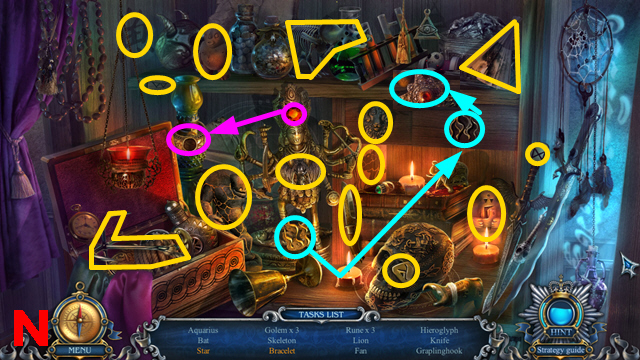
- Play the HOP.
- You receive the GOLDEN SKULL AMULET (T).
- Move forward twice.
- Insert the COPPER, BRONZE, SILVER, and GOLDEN SKULL AMULETS into the slots (U); take the SCYTHE (blue).
- Walk down twice.
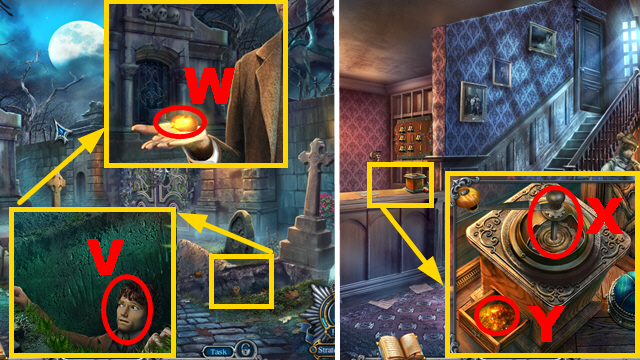
- Defeat the phantoms with the SCYTHE (V).
- Go to the Hallway.
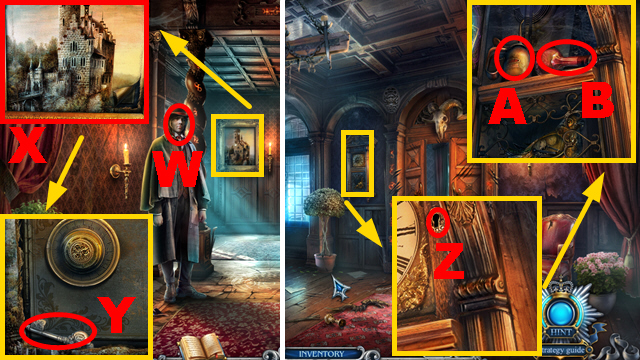
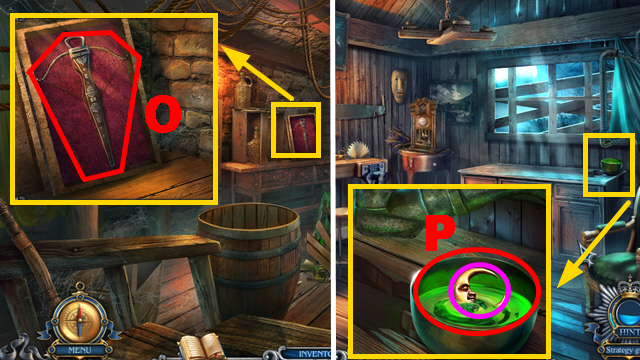
- Talk to the man (W); you receive the GREEN ELIXIR.
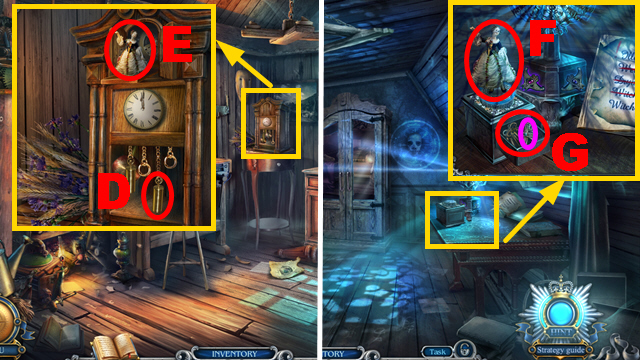
- Cut the painting with the DAGGER (X); take the CLOCK KEY (Y).
- Go to the Corridor.
- Insert the CLOCK KEY into the lock (Z); take the OIL CAN (A) and the BLOOD ELIXIR (B).
- Go to the Hallway.
- Pour the OIL CAN over the armor (C); take the DOOR HANDLE (purple).
- Go to the Corridor.
- Connect the DOOR HANDLE to the door (D) and insert the SCREWS into the door handle; fix the screws with the SCREWDRIVER and push the handle.
- Enter the Werewolf’s Room.
Chapter 2: The Werewolf’s Room
- Send the FLUTTERFIRE into the room (E).
- Take the BOOK TOKEN (F).
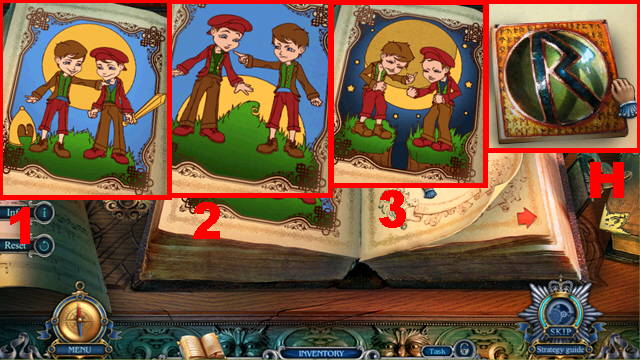
- Insert the BOOK TOKEN into the niche (G).
- Play the mini-game.
- Solution: 1-3.
- Take the RUNE (H).
- Go to the Hotel Entrance.
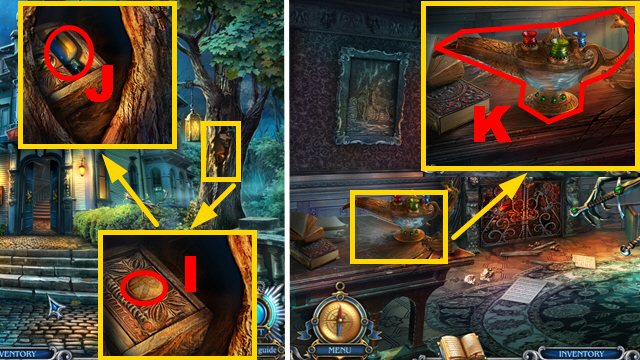
- Insert the RUNE into the niche (I); take the BLUE ELIXIR (J).
- Go to the Werewolf’s Room.
- Pour the GREEN, the BLOOD, and the BLUE ELIXIRS into the lamp (K); take the MAGIC LAMP.
- Go to the Hallway.
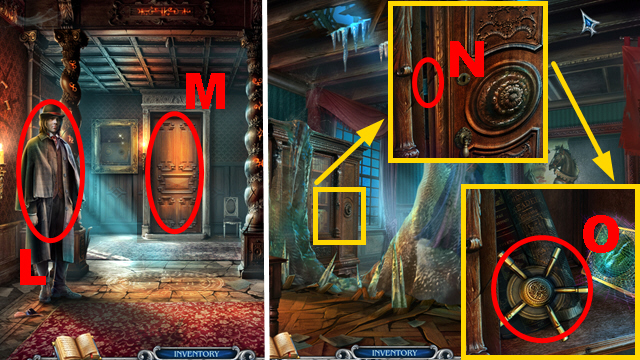
- Give the MAGIC LAMP to the man (L).
- Open the door (M).
- Enter the Office.
- Open the door with the DAGGER (N); take the SAFE KNOB (O).
- Walk down.

- Connect the SAFE KNOB to the safe (P) and turn the knob; take the BEAR’S HEAD MEDALLION (Q).
- Go to the Werewolf’s Room.
- Insert the BEAR’S HEAD MEDALLION into the slot (R); take the PICTURE PIECE (S) and the FILE (T).

- Saw the grating with the FILE (U); send the FLUTTERFIRE into the flames (V) to acquire the TUNING FORK.
- Go to the Office.
- Break the ice with the TUNING FORK (W).
- Talk to the man (X).
- Open the door; take the METAL ROSE (Y).
- Walk down twice.
- Insert the METAL ROSE into the slot (Z).
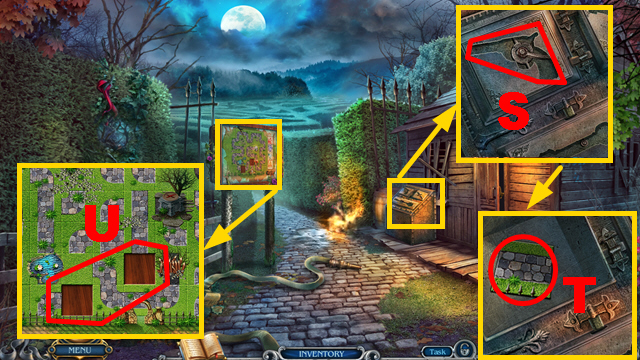
- Enter the Garden.
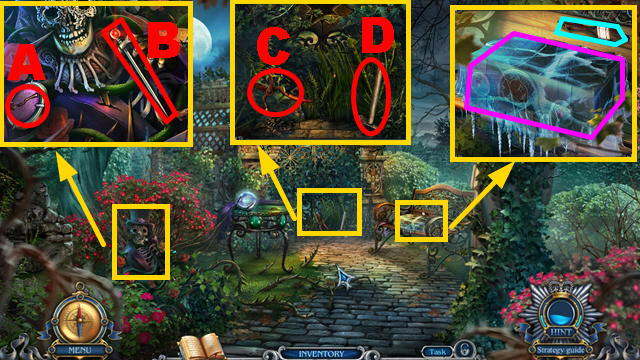
- Take the TILES (A); take the PIN (B).
- Pour the OIL CAN over the pruning shears and take the PRUNING SHEARS (C); take the HAMMER (D).
- Take the PAINTBRUSH (blue); melt the ice with the FLUTTERFIRE (purple).
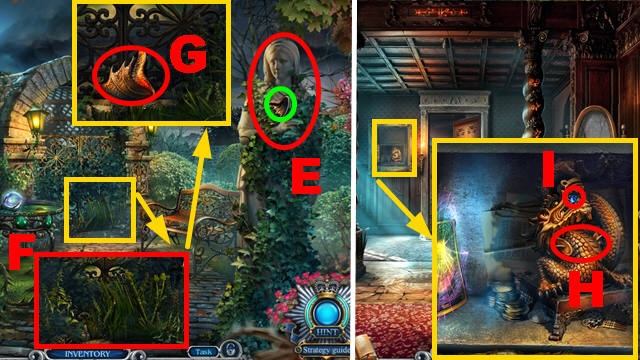
- Remove the vines with the PRUNING SHEARS (E); take the DRAGON’S WING (green).
- Cut the grass with the PRUNING SHEARS (F); take the DRAGON’S WING (G).
- Go to the Hallway.
- Connect the 2 DRAGON’S WINGS to the dragon (H); take the SAPPHIRE EYE (I).
- Move forward.
- Insert the PIN into the lock (J); take the EMERALD EYE (K).
- Walk down three times.
- Insert the SAPPHIRE and the EMERALD EYE into the slots (L); take the 2 PICTURE PIECES (purple).
- Go to the Office.
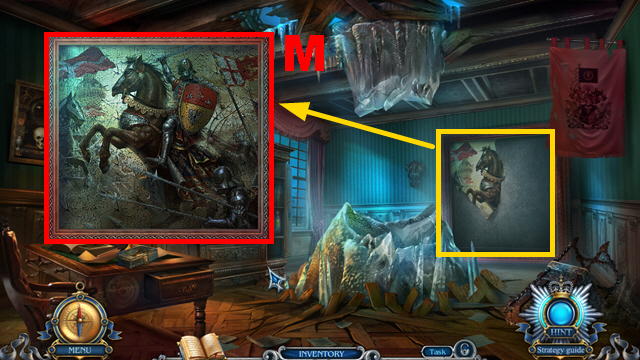
- Connect the 3 PICTURE PIECES to the torn picture (M); restore the picture with the PAINTBRUSH.
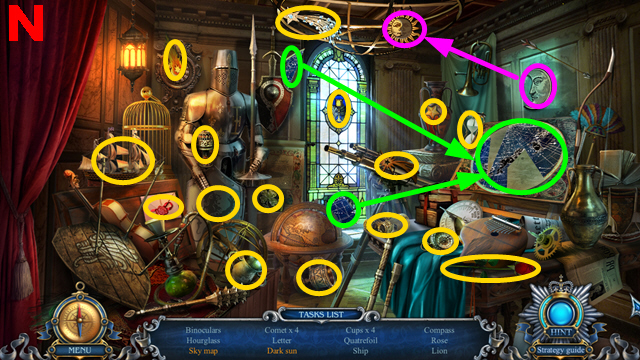
- Play the HOP.
- You receive the CLOVER CHARM (N).
- Go to the Garden.
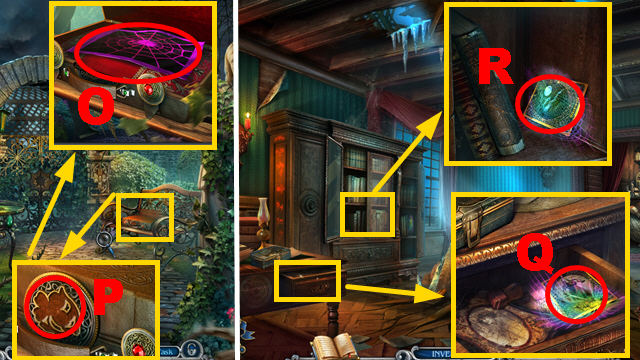
- Insert the CLOVER CHARM into the slot (O) and open the suitcase; take the MAGIC CLOTH (P).
- Go to the Office.
- Put the MAGIC CLOTH on the card (Q); take CARD 1/7.
- Put the MAGIC CLOTH on the card (R); take CARD 2/7.
- Go to the Werewolf’s Room.
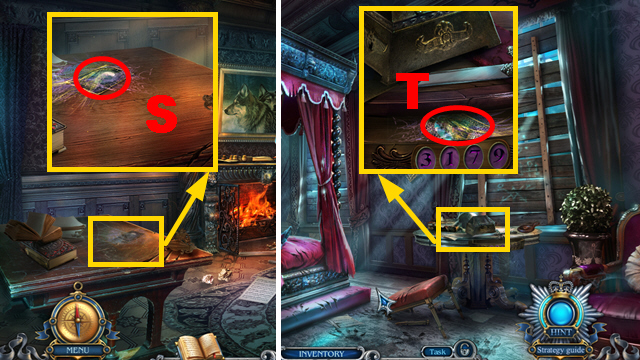
- Put the MAGIC CLOTH on the card (S); take CARD 3/7.
- Go to the Vampire’s Room.
- Put the MAGIC CLOTH on the card (T); take CARD 4/7.
- Walk down three times.
- Put the MAGIC CLOTH on the card (U); take CARD 5/7.
- Go to the Hallway.
- Put the MAGIC CLOTH on the card (V); take CARD 6/7.
- Go to the Corridor.

- Put the MAGIC CLOTH on the card (W); take CARD 7/7.
- Go to the Garden.
- Insert the 7 CARDS into the slot (X).
- Play the mini-game.
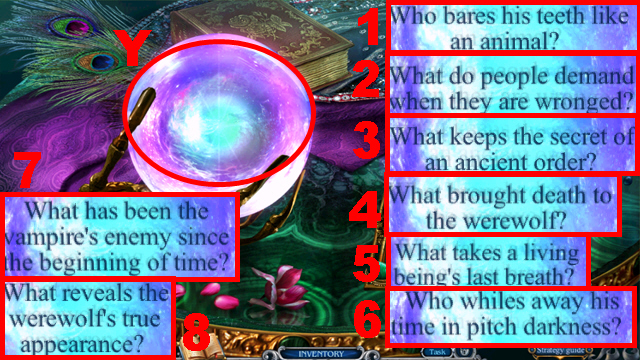
- Solution: Werewolf-1, Justice-2, Hotel-3, Sword-4, Death, 5, Vampire-6, Sun-7, Moon-8.
- Take the CRYSTAL BALL (Y).
- Go to the Office.
- Insert the CRYSTAL BALL into the bowl (Z).
- Enter the Library.
- Take the TILES (A).
- Take the PINCERS (B).
- Walk down four times.
- Collect 2 NAILS with the PINCERS (C); you receive the VOODOO DOLL.
- Go to the Werewolf’s Room.
- Collect 2 NAILS with the PINCERS (D).
- Go to the Library.

- Remove the broken rung, connect the BOARDS and the 4 NAILS to the ladder (E), and hit the nails with the HAMMER; take the LADDER.
- Put the LADDER into the crack (F).
- Go down the ladder.
- Remove the blanket (G).
- Light the candles with the FLUTTERFIRE (green); take the BOWL OF HYGEIA (H).
- Go to the Office.
- Insert the BOWL OF HYGEIA into the slot (I); take the SPIRITS OF AMMONIA (J).
- Go to the Secret Hallway.
- Hold the SPIRITS OF AMMONIA next to the man (K).
- Talk to the man (L); you receive the KEY.
- Go up.
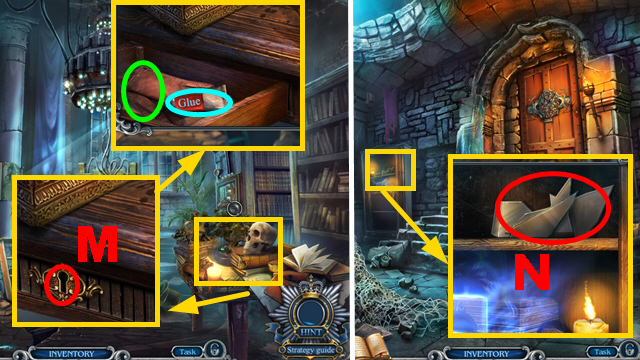
- Insert the KEY into the lock (M) and turn it; take the GLUE (blue) and the GLOVES (green).
- Go to the Secret Hallway.
- Collect the MIRROR SHARDS with the GLOVES (N).
- Go to the Hallway.
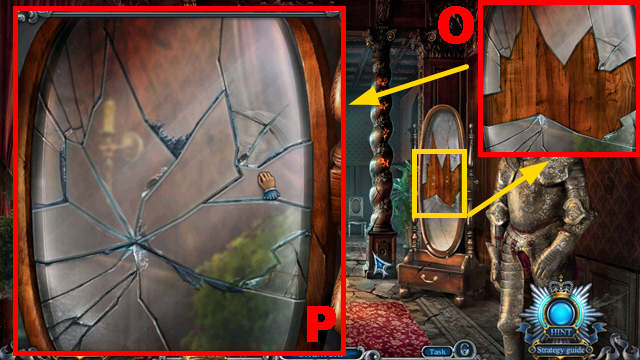
- Apply the GLUE to the mirror (O); put the MIRROR SHARDS on the mirror.
- Play the mini-game.
- Solution: (P).
- Go through the mirror.
Chapter 3: The Secret Corridor
- Take the NEEDLE (Q).
- Remove the wallpaper and insert the NEEDLE between the planks (R); take the CHISEL (S) and the BOOK (T).
- Go to the Secret Hallway.
- Open the crate with the CHISEL (U).

- Play the HOP.
- You receive the JAR (V).
- Collect fly 1/4 with the JAR (W).
- Go to the Garden.
- Collect fly 2/4 with the JAR (X).
- Go to the Library.
- Collect fly 3/4 with the JAR (Y).
- Go to the Secret Corridor.
- Collect fly 4/4 with the JAR (Z).
- Put down the JAR (A).
- Play the mini-game.
- Solution: (B).
- Enter the Dryad’s Room.
- Try to zoom anywhere; talk to the man (C) to receive the STAR.
- Take the PLANT FOOD (D).
- Go to the Garden.
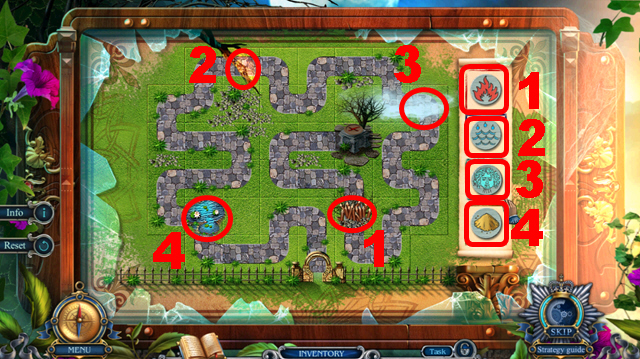
- Insert the STAR into the slot (E).
- Play the HOP.
- You receive the BOOK (F).
- Take the PENCIL (G); look at the note (H).
- Take the WATERWHEEL (I); collect the TILES (J) with the FLUTTERFIRE.
- Go to the Secret Corridor.
- Put the SHEET OF PAPER on the table (K) and use the PENCIL to draw on it; take the CLUE.
- Go to the Library.
- Put the 2 BOOKS into the shelf (L).
- Play the mini-game.
- Rearrange the books alphabetically (M); turn the lever (purple).
- Take the FROG (N) and the SCISSORS (O).
- Go to the Secret Hallway.
- Cut the net with the SCISSORS (P); take the WIRE CUTTERS (blue).
- Go to the Library.
- Remove the screws with the SCREWDRIVER (green); put down the WIRE CUTTERS (Q).
- Play the mini-game.
- Solution: 1-5.
- Talk to the man (R); you receive the ILLUSIONIST’S CARD.
- Go to the Secret Hallway.
- Insert the ILLUSIONIST’S CARD into the slot (S); take the HEART (T).
- Go to the Secret Corridor.

- Insert the HEART into the slot (U).
- Put down the CLUE (purple); enter the correct code (V).
- Enter the Voodoo Room.
- Send the FLUTTERFIRE into the room (W).
- Read the note (X).
- Look at the flowers (Y); take the QUILL (Z).
- Go to the Library.
- Insert the QUILL into the niche (A); take the WATER CHARM (B) and the TILES (C).
- Go to the Secret Hallway.
- Insert the WATER CHARM into the slot (D); take the DRAGONFLY (E) and the TWEEZERS (F).
- Go to the Garden.
- Collect the HERON with the TWEEZERS (G).
- Go to the Dryad’s Room.
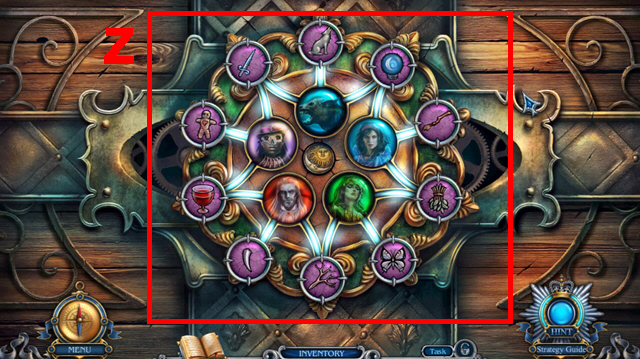
- Insert the FROG, HERON, and DRAGONFLY into the slots (H); rotate the symbols into the correct position (I).
- Take the EMPTY PITCHER (J), the CROSS KEY (K), and look at the seeds (L).
- Hold the EMPTY PITCHER next to the waterfall (M) to acquire the PITCHER OF WATER.
- Walk down.
- Remove the old waterwheel, put the WATERWHEEL in its place (N), and pour the PITCHER OF WATER over the waterwheel; take the TILES (O).
- Insert the CROSS KEY into the box (P); take the LOCKPICKS (Q) and the TILES (R).
- Enter the Voodoo Room.
- Insert the LOCKPICKS into the locks (S); open the box.

- Play the HOP.
- You receive the GLASS BEETLE (T).
- Walk down, turn left.
- Insert the GLASS BEETLE into the niche (U).
- Feed the plant with the PLANT FOOD (V); take the BROOCH (W) and the TILES (X).
- Go to the Secret Hall.
- Put down the 8 TILES (Y).
- Play the mini-game.
Chapter 4: The Grotto
- The man will talk to you.
- Take the NET (A).
- Take the GEMS (B).
- Take the TORCH (C).
- Take the SKULL AMULET (D) and remove the jacket (E); take the RECIPE (F).
- Go to the Dryad’s Room.

- Collect the FLOWER CHARM with the NET (G).
- Insert the FLOWER CHARM into the niche (H); take the BLACK KEY (I).
- Go to the Voodoo Room.
- Insert the BLACK KEY into the lock (J); put the VOODOO DOLL into the empty box (K).
- Play the mini-game.
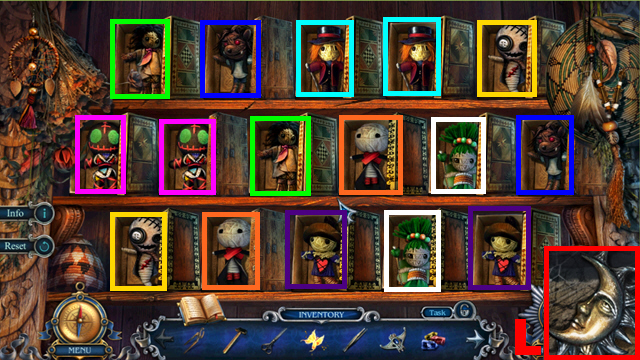
- To solve this puzzle, uncover pairs framed in the same color.
- Take the MOON AMULET (L).
- Connect the MOON AMULET to the broken amulet (M); take the ECLIPSE AMULET.
- Insert the ECLIPSE AMULET into the niche (N); take the PLIERS HALF (O).
- Cut the thread with the SCISSORS (P) to acquire the WICK.
- Put down the GEMS (Q).
- Play the mini-game.
- Rearrange the gems correctly (R); take the WEED KILLER (S).
- Go to the Werewolf’s Room.
- Collect the RING with the PINCERS (T).
- Go to the Dryad’s Room.
- Spray the WEED KILLER at the weeds (U); insert the RING into the slot (V) and turn the ring.
- Look at the potion (W); connect the PLIERS HALF to the other half (X) and take the PLIERS.
- Go to the Voodoo Room.
- Cut the wires with the PLIERS (purple); take the LEVER (Y).
- Go to the Grotto.
- Connect the LEVER to the cart (Z); turn the lever.

- Play the HOP.
- You receive the PICK AXE (A).
- Break the ice with the PICK AXE (B).
- Enter the Tunnel.
- Put down the TORCH (C).
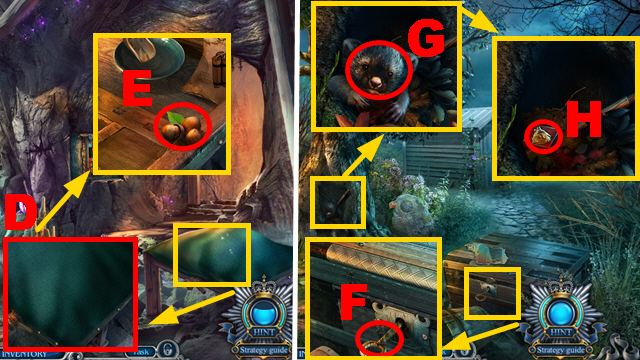
- Cut the blanket with the SCISSORS (D); take the HAZELNUTS (E).
- Turn right.
- Try to take the key (F).
- Give the HAZELNUTS to the animal (G); take the RUNE STONE (H).

- Collect PARCHMENT 1/3 with the TWEEZERS (I).
- Take the SHARDS (J).
- Walk down twice.
- Collect PARCHMENT 2/3 with the TWEEZERS (K).
- Break the ice with the PICK AXE (L); take the RAKE HEAD (green).
- Go to the Backyard.
- Connect the RAKE HEAD to the handle (M); take the RAKE.
- Walk down.
- Put down the RUNE STONE (N).
- Play the mini-game.
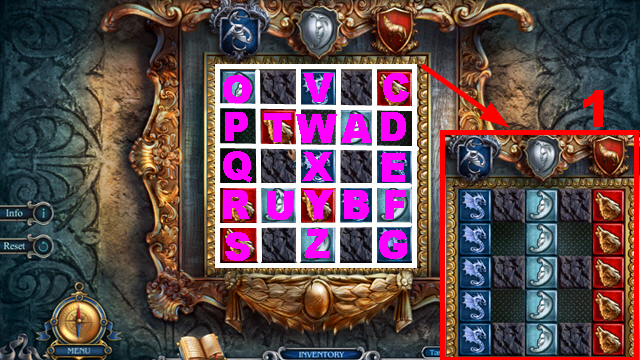
- Solution (1): R-P, S-Q, U-S, Y-R, X-Y, A-X, T-D, P-A, V-W, O-P, R-U, Q-R, P-Q, W-O.
- X-V, Y-P, B-T, F-Y, G-B, E-G, D-F, A-D, Y-W, U-X, R-Y, S-U, F-E, B-F, Y-B, U-Y, Q-U, P-S.
- T-P, W-A, X-T, Y-W, B-X, U-Q, F-R, G-U, E-G, X-E, W-Y, T-W, P-T, Q-P, R-Q, U-R, Y-U.
- W-F, U-B, R-Y, Q-U, P-R, T-P, Y-W, U-X, R-Y, P-R, T-P, X-W, P-Q, W-P, Y-W, P-T, R-Y, Q-R, Y-U, B-Y, W-X, A-W, T-P, R-Q, U-R.

- Take the SHARDS (H); collect PARCHMENT 3/3 with the TWEEZERS (I).
- Walk down.
- Put down the 3 PARCHMENTS (J).
- Play the mini-game.
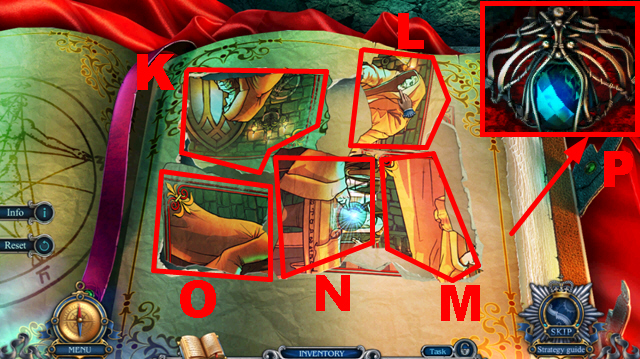
- Solution: L, K, M, O, Lx3.
- Take the SPIDER AMULET (P).
- Turn left.
- Insert the SPIDER AMULET into the niche (Q).
- Move forward.
- Look at the painting (R).
- Read the note (S); send the FLUTTERFIRE into the crack (T) to acquire the IRON KEY.
- Remove the leaves with the RAKE (U); take the DRILL HANDLE (V).
- Walk down, turn right.
- Insert the IRON KEY into the lock (W); turn the key.
- Play the HOP.
- You receive the FISHING ROD (X).
- Go to the Cemetery.
- Take the WAR HAMMER (Y).
- Collect the COGWHEEL with the FISHING ROD (Z); insert the SKULL AMULET into the slot (A), open the box, and take the SHARDS (B).
- Walk down twice.
- Attach the DRILL HANDLE to the drill; take the HAND DRILL (C).
- Move forward, turn right.
- Open the box with the HAND DRILL (D); take the COFFEE-GRINDER WHEEL (E) and the WRENCH (F).
- Walk down.
- Connect the COGWHEEL to the jack (G), tighten the cogwheel with the WRENCH, and turn the lever (H).
- Talk to the guard (I).
- Turn right.
- Give the WAR HAMMER to the guard (J).
- Turn left.
Chapter 5: The Back Hallway
- Talk to the man (K); take the BLAST HERBS (L).
- Take the NEEDLE AND THREAD (M).
- Take a look at the statue (N).
- Take the SHOVEL (O), the SHARDS (P), and the SAND SOLDIER (purple).
- Walk down twice.
- Dig through the ground with the SHOVEL (Q) three times; open the blanket, look at the gem (R), and take the SHARDS (green).
- Turn right, turn left.
- Insert the 5 SHARDS into the door (S).
- Adjust the colors correctly (T).
- Play the HOP.
- You receive the CANE (U).
- Go to the Cemetery.
- Give the CANE to the man (V); take the FLAME STONE (W).
- Go to the Back Hallway.
- Insert the COFFEE-GRINDER WHEEL into the coffee grinder (X), put the FLAME STONE into the coffee grinder and take the FLAME POWDER (Y).
- Walk down.
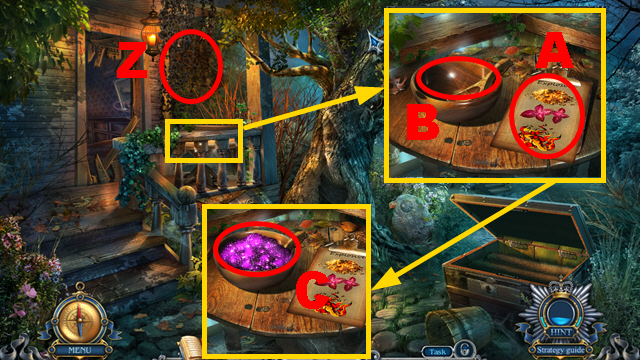
- Send the FLUTTERFIRE to the withered ivy (Z); you receive the TAPE.
- Put down the RECIPE (A); insert the BLAST HERBS and the FLAME POWDER into the bowl (B).
- Send the FLUTTERFIRE to the bowl; take the EXPLOSIVE POWDER (C).
- Walk down.
- Put down the TAPE (1), the WICK (2), and the EXPLOSIVE POWDER (3).
- Solution: 3, 1, 2; take the DYNAMITE (D).
- Go forward.
- Put down the DYNAMITE (E); light the dynamite with the FLUTTERFIRE.
- Move forward.
- Take the WEDGE (F).
- Take the CLEANING BRUSH (G).
- Sew the fire hose with the NEEDLE AND THREAD (purple); take the FIRE HOSE (H).
- Insert the WEDGE into the crack (green) and hit it with the HAMMER; take the AXE (I).
- Remove the branches with the AXE (J); take the VALVE (K) and the MAP PART (L).
- Remove leaves twice; take the PALETTE KNIFE (M).
- Walk down.
- Connect the VALVE (N) and the FIRE HOSE (O) to the faucet; turn the valve.
- Move forward.
- Clean the hose with the CLEANING BRUSH (P).
- Take the SAND SOLDIER (Q).
- Walk down twice.
- Put down the 2 SAND SOLDIERS (R); take the SILVER REVOLVER (blue).
- Go to the Labyrinth Entrance.
- Insert the SILVER REVOLVER into the slot (S); take the MAP PART (T).
- Put down the 2 MAP PARTS (U).
- Play the mini-game.
- Solution: 1-4.
- You receive the LABYRINTH MAP.
- Use the LABYRINTH MAP to navigate through the labyrinth (V).
- Take the SPINDLE (W) and the SILVER MACE (X).
- Take Bell 1/3 (Y).
- The man will talk to you; take the RUSTED AMULET (Z).
- Remove the moss with the PALETTE KNIFE (A) and open the crate; take the BURNER (B) and the CHISEL (C).
- Go to the Backyard.
- Burn the metal bars with the BURNER (D); open the trapdoor.
- Enter the Cellar.
- Take the IRON RING (green); take TOKEN 1/3 (E).
- Go to the Labyrinth Center.
- Connect the IRON RING to the bucket (F); take the BUCKET.
- Go to the Cellar.
- Put the BUCKET into the barrel (G); take the LEVER (green).
- Insert the LEVER into the slot (H); turn the lever twice.
- Play the HOP.
- You receive BELL 2/3 (I).
- Go to the Labyrinth Entrance.
Chapter 6: The Hut
- Insert the SILVER MACE into the slot (J); take the ANCIENT RIFLE (K).
- Shoot the ANCIENT RIFLE at the trap (L).
- Enter the Hut.
- Take TOKEN 2/3 (M).
- Take BELL 3/3 (N).
- Read the note (O).
- Go to the Back Hallway.
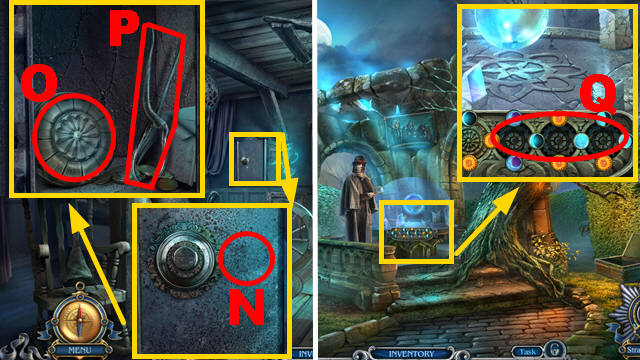
- Put down the 3 BELLS (P).
- Play the mini-game.
- Solution: (Q).
- Take the MAID’S KEY (R).
- Insert the MAID’S KEY into the lock (S); turn the key.
- Enter the Maid’s Room.
- Take the MAGNET (T).
- Take the STENCIL (U).
- Go to the Labyrinth Center.
- Collect the IRON PLATE with the MAGNET (V).
- Go to the Hut.
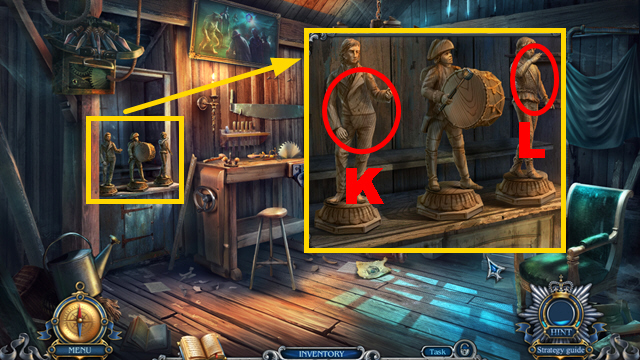
- Put the IRON PLATE on the pipe (W) and fix the iron plate with the BURNER; move aside the bowl and take the DRUMSTICKS (X).
- Give the DRUMSTICKS to the figurine (Y).
- Put the STENCIL on the table (Z).
- Play the mini-game.
- Solution: (A).
- Go to the Cellar.
- Move aside the barrel; take the HACKSAW (B).
- Go to the Hut.
- Saw the shape with the HACKSAW (C ); take the WOODEN AMULET (D).
- Go to the Labyrinth Center.
- Insert the WOODEN AMULET into the slot (E); take the GOLD WOOL (F).
- Go to the Maid’s Room.
- Connect the GOLD WOOL (G) and the SPINDLE (H) to the spinning wheel.
- Turn the wheel (blue) and cut the wool with the SCISSORS to acquire the GOLDEN STRING (purple).
- Go to the Cellar.
- Connect the GOLDEN STRING to the mandolin (I); take the MANDOLIN.
- Go to the Back Hallway.
- Collect the PIPE with the CHISEL (J).
- Go to the Hut.
- Connect the MANDOLIN (K) and the PIPE (L) to the figurines.
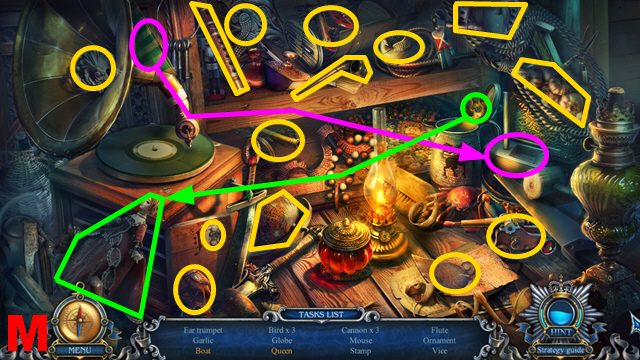
- Play the HOP.
- You receive the HEARING AID (M).
- Go to the Maid’s Room.
- Hold the HEARING AID next to the safe (N) and open the safe; take TOKEN 3/3 (O) and the TONGS (P).
- Go to the Labyrinth Center.
- Insert the 3 TOKENS into the tiles (Q).
- Play the mini-game.
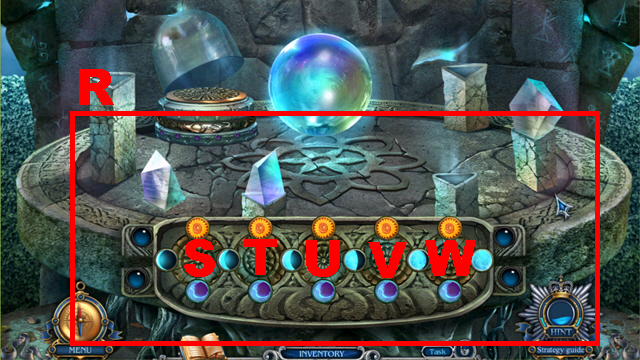
- Solution: (R): Tx3, Sx3, Tx2, Sx3, Ux2, Tx2, Vx2, U, V, Ux3, Wx2, V, Wx2.
- Vx2, Wx3, V, Wx2, V, W, V, Wx3, Vx2, Wx3, V, Wx3, V, W, Vx3, W, V, Wx2, Vx3, W.
- Talk to the man (X); you receive the BROOCH.
- Go to the Maid’s Room.
- Put the 2 BROOCHES on the lamp (Y).
- Open the compartment; take the LITTLE KEY (Z) and the SUN CRYSTAL (A).
- Go to the Labyrinth Center.
- Insert the LITTLE KEY into the lock (B); take the WEIGHT (C).
- Go to the Hut.
- Connect the WEIGHT to the clock (D); take the DANCER FIGURINE (E).
- Go to the Maid’s Room.
- Put the DANCER FIGURINE on the box (F); take the SILVER DAGGER (purple) and the BUNCH OF KEYS (G).
- Go to the Labyrinth Entrance.
- Insert the SILVER DAGGER into the slot (H); take the CUTTING WHEEL (I).
- Go to the Cellar.
- Put down the BUNCH OF KEYS (J).
- Play the mini-game.
- The solution is color-coded.
- Take the SUN CRYSTAL (K).
- Attach the CUTTING WHEEL to the handle (L); take the GLASS CUTTER.
- Go to the Maid’s Room.
- Cut the glass with the GLASS CUTTER (M); turn the handle (green).
- Play the HOP.
- You receive the GRAPPLING HOOK (N).
- Go to the Cellar.
- Connect the GRAPPLING HOOK to the crossbow (O); take the CROSSBOW.
- Go to the Hut.
- Insert the RUSTED AMULET into the bowl (P); collect the IRON AMULET with the TONGS (purple).
- Go to the Labyrinth Center.

- Shoot the CROSSBOW at the chest (Q); pull down the chest.
- Insert the IRON AMULET into the niche (R) and open the chest; take the SUN CRYSTAL (S).
- Put down the 3 SUN CRYSTALS (T) and the FLUTTERFIRE (U).
- Play the mini-game.
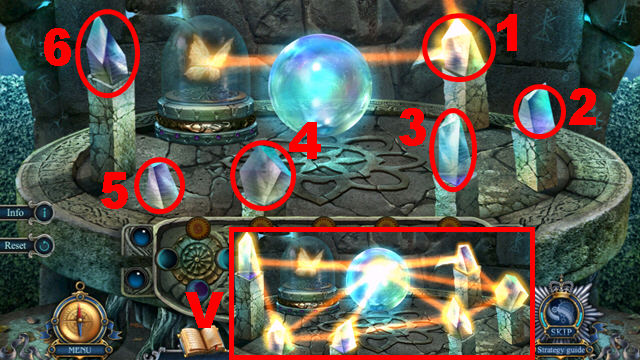
- Solution: (V): 1-5, 2-4, 3-6.
- Congratulations, you have completed Haunted Hotel: Eclipse.


 Haunted Legends: The Stone Guest Walkthrough, Guide, & Tips
 Nightmare Realm Walkthrough, Guide, & Tips
 PuppetShow: The Price of Immortality Walkthrough, Guide, & Tips
 Nightmares from the Deep: The Siren's Call Walkthrough, Guide, & Tips
 Punished Talents: Seven Muses Walkthrough, Guide, & Tips