Stranded Dreamscapes: The Prisoner Walkthrough, Guide, & Tips
Stranded Dreamscapes: The Prisoner Walkthrough

Welcome to the Stranded Dreamscapes: The Prisoner Walkthrough
Guide little Emmy through her fears and back to the real world!
Whether you use this document as a reference when things get difficult or as a road map to get you from beginning to end, we’re pretty sure you’ll find what you’re looking for here.
This document contains a complete Stranded Dreamscapes: The Prisoner game walkthrough featuring annotated screenshots from actual gameplay!
We hope you find this information useful as you play your way through the game. Use the walkthrough menu below to quickly jump to whatever stage of the game you need help with.
Remember to visit the Big Fish Games Forums if you find you need more help. Have fun!
This walkthrough was created by Friendly Cactus Limited, and is protected under US Copyright laws. Any unauthorized use, including re-publication in whole or in part, without permission, is strictly prohibited.
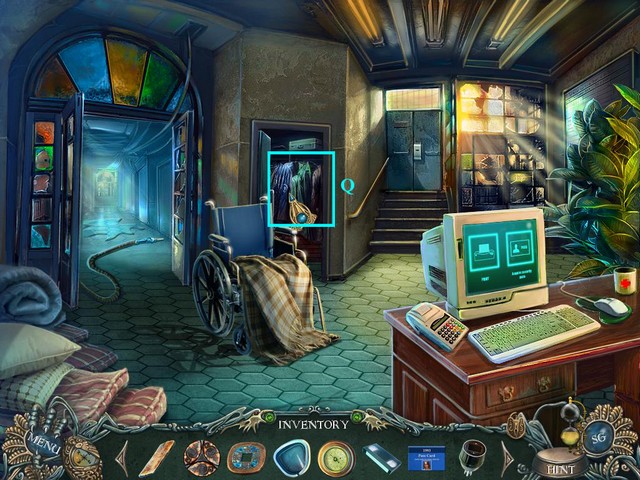
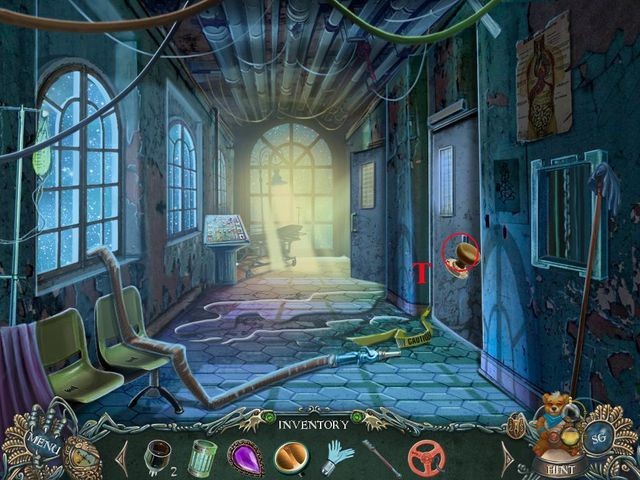
General Tips

- This is the official guide for Stranded Dreamscapes: The Prisoner.
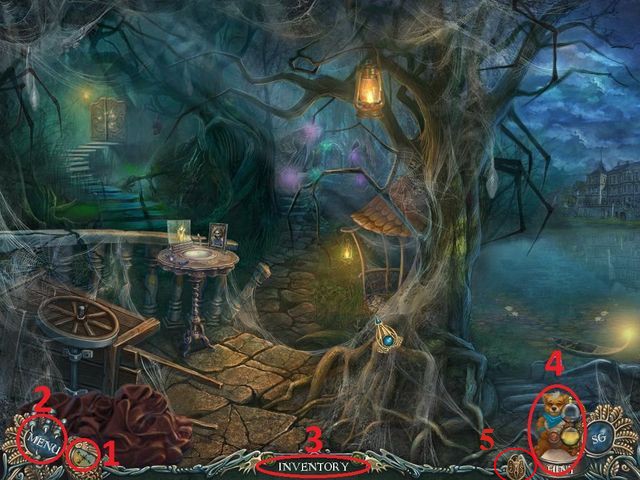
- Access the map (1) to travel to any available location.
- Select the menu (2) to leave the game, adjust the difficulty level, and to adjust the sound and display modes.
- Inventory items will be stored in the inventory (3).
- Push the hint button (4) whenever you need help.
- Push the lock icon (5) to freeze the inventory.
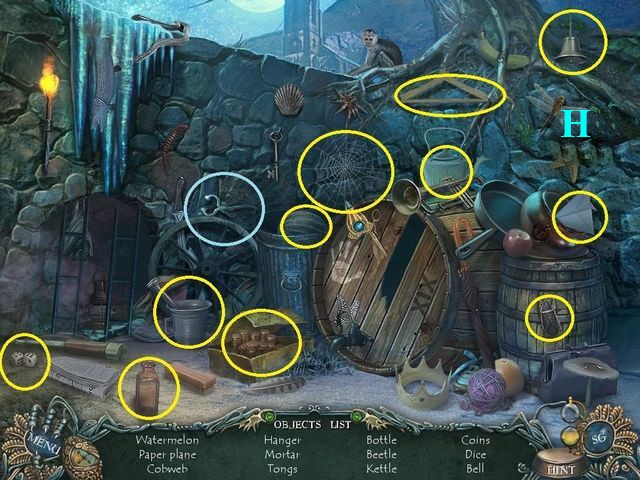
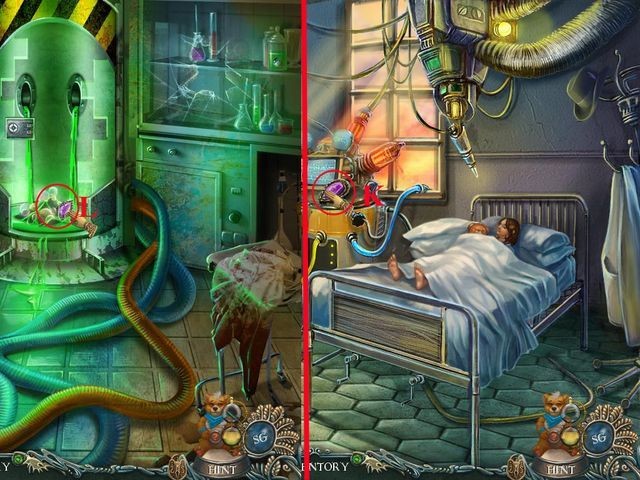
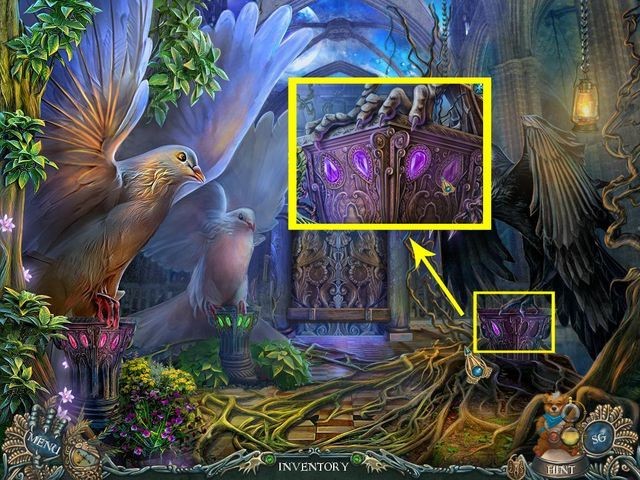
- Hidden Object Puzzles will be referred to as HOPs throughout guide. Item listed in yellow are hidden, or they require additional actions to locate. Interactive items in HOPs are color-coded.
- Choose from two modes of difficulty: Casual, or Advanced.
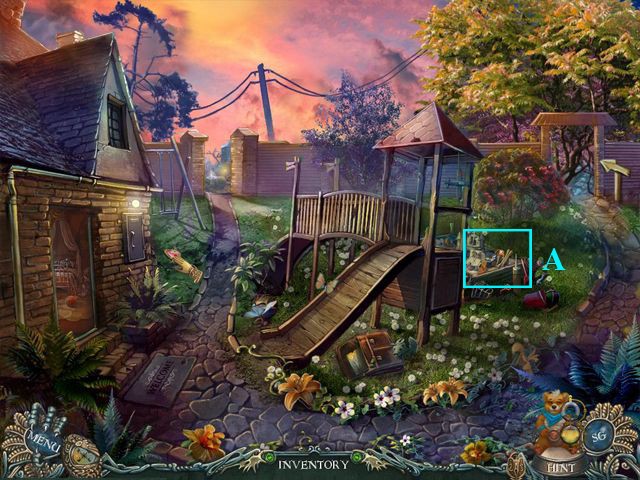
Chapter 1
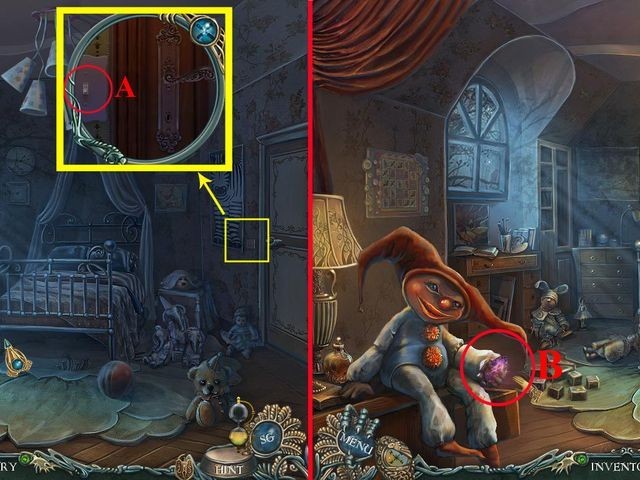
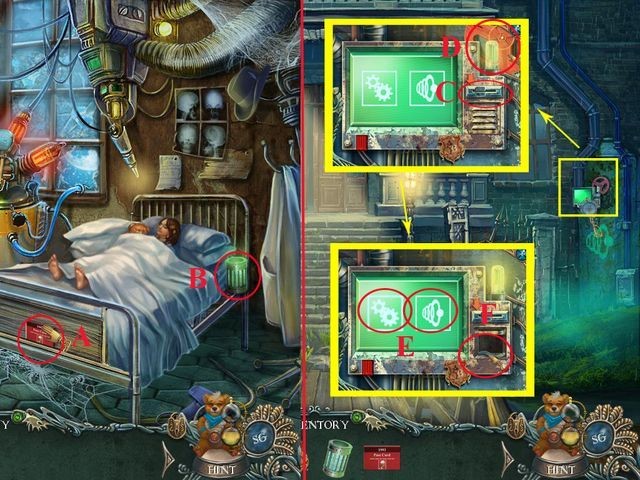
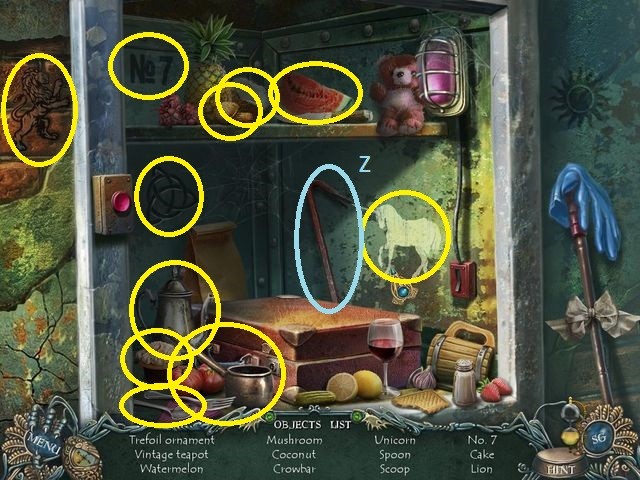
- Flip the switch (A).
- Take the CRYSTAL (B).
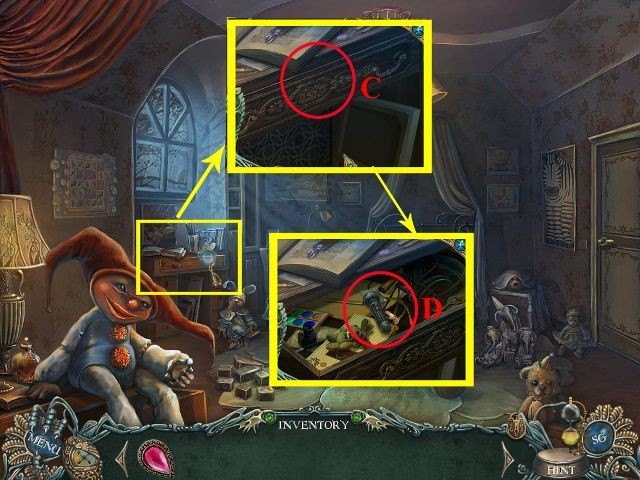
- Open the drawer (C).
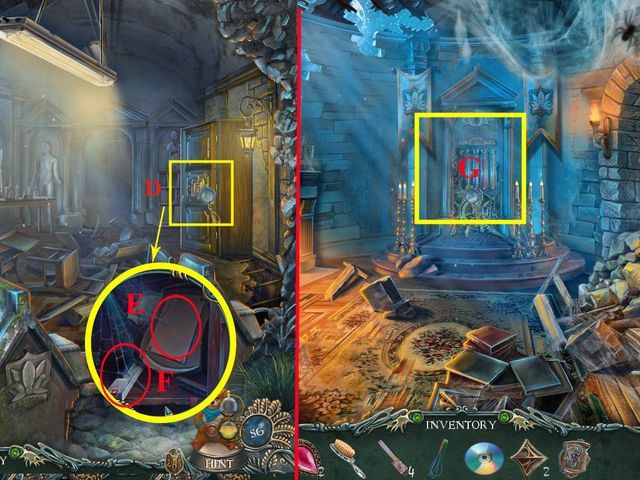
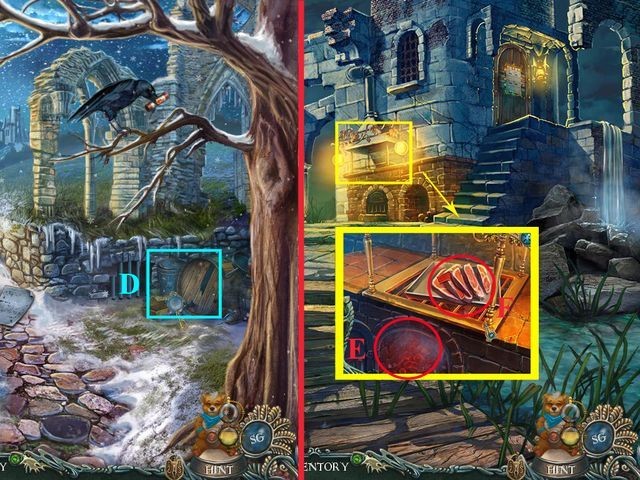
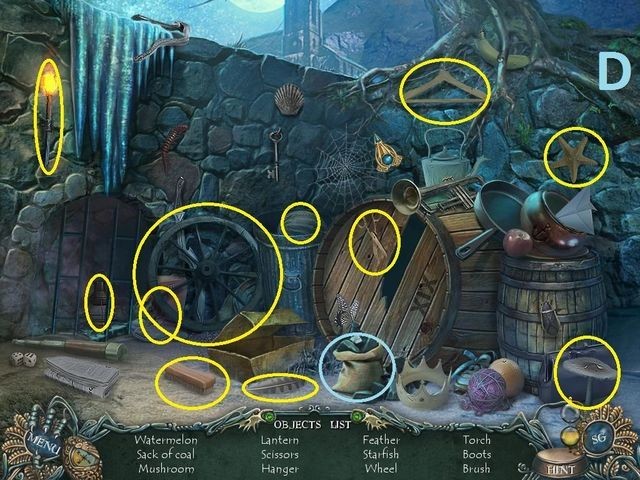
- Move the items and take the FLASHLIGHT (D).
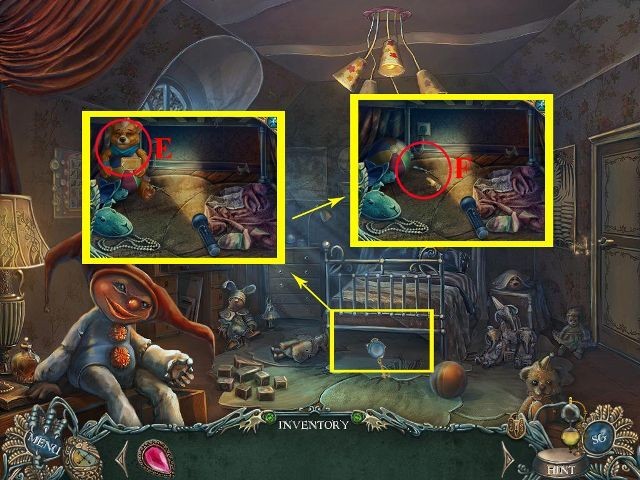
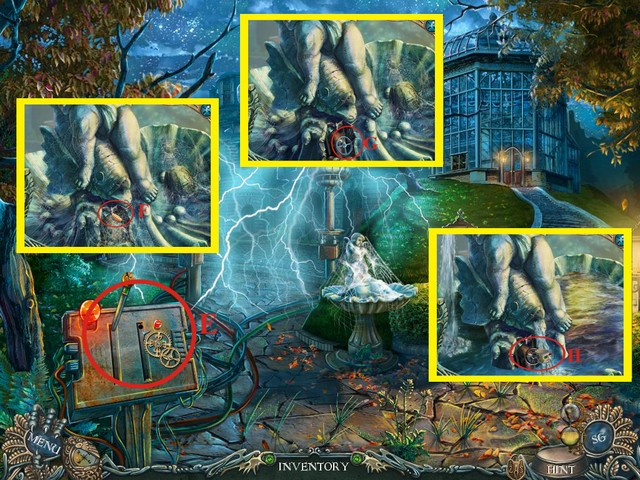
- Use the FLASHLIGHT under the bed; talk to the Bear (E).
- Take the KEY (F).
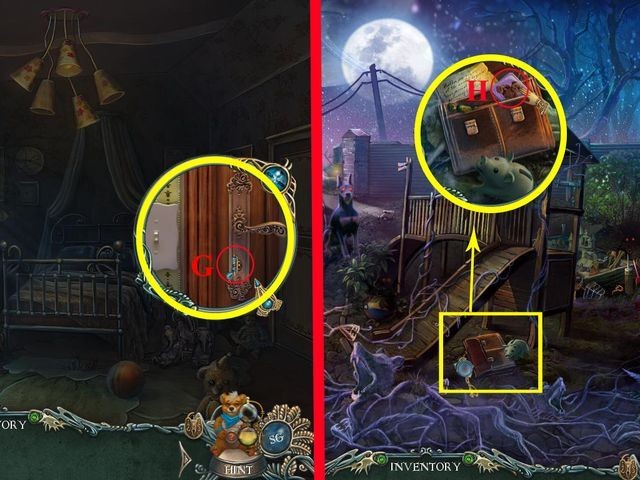
- Use the KEY on the lock (G).
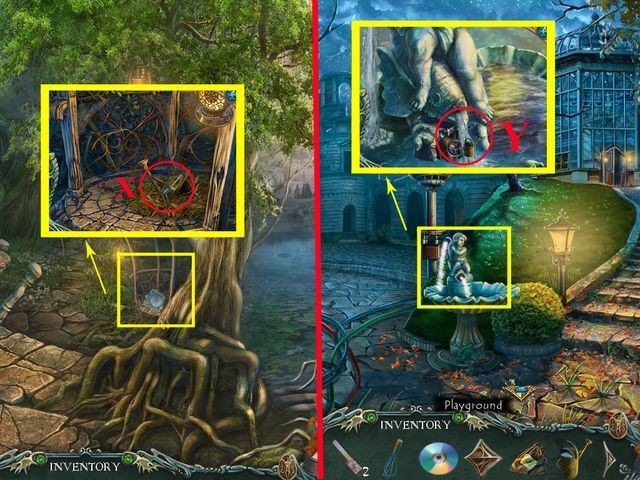
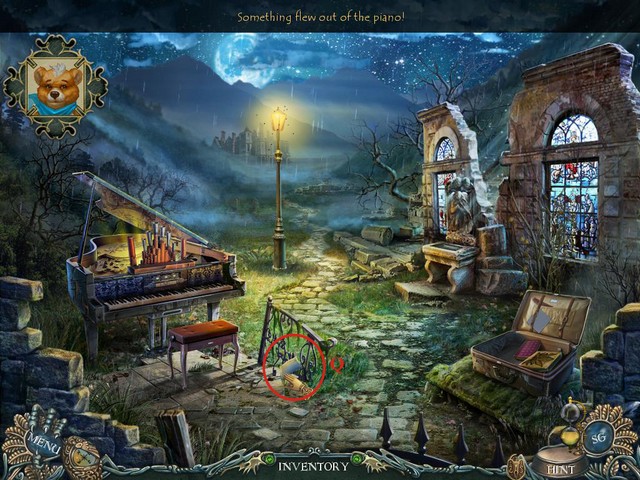
- Exit to the Playground.
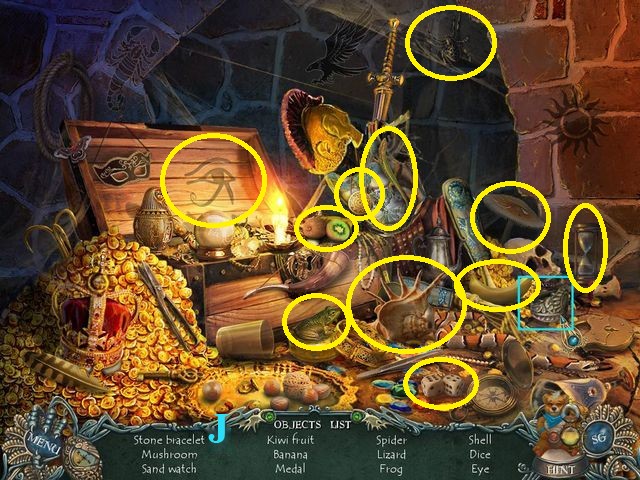
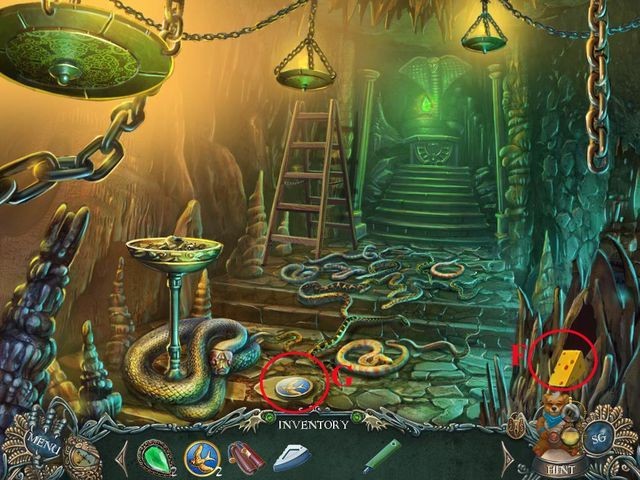
- Take the TILE (H).

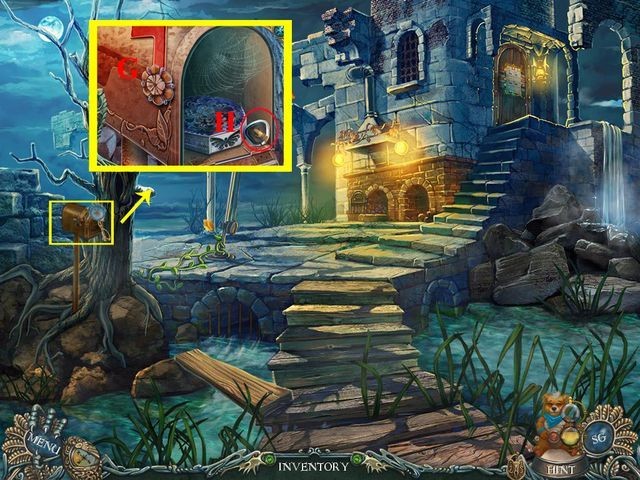
- Go to the Spider Forest.
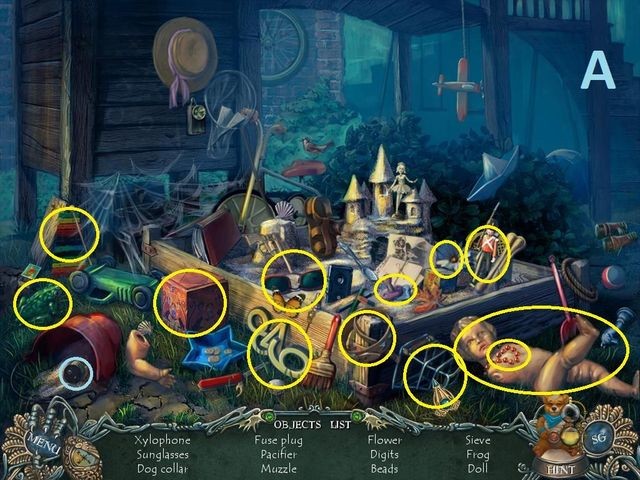
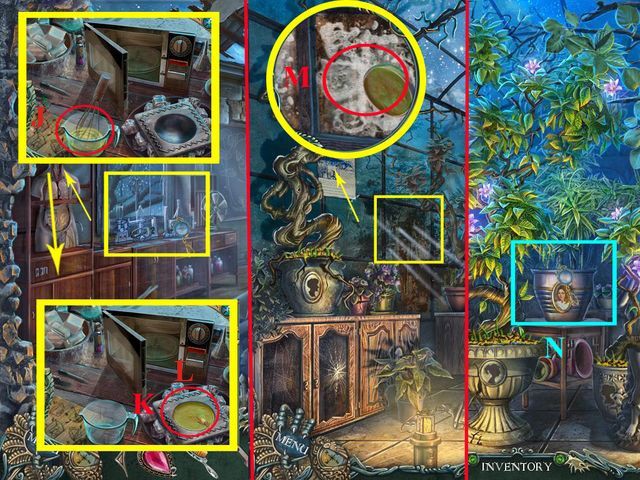
- Play the HOP (I) to earn the GLASS GLUE (I).
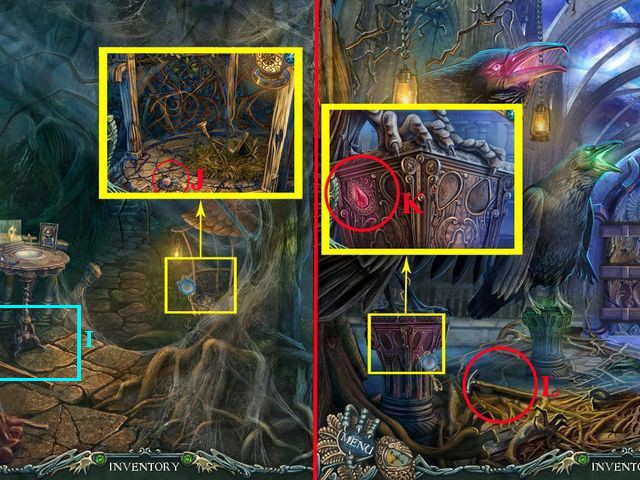
- Take the SPIDER BUTTON (J).
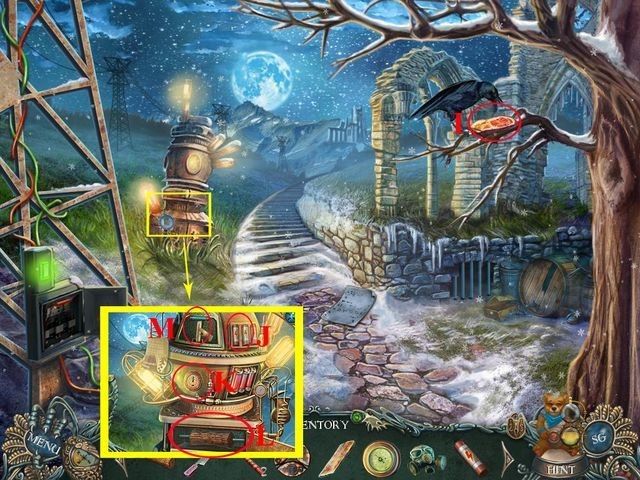
- Go to the Mind Gates.
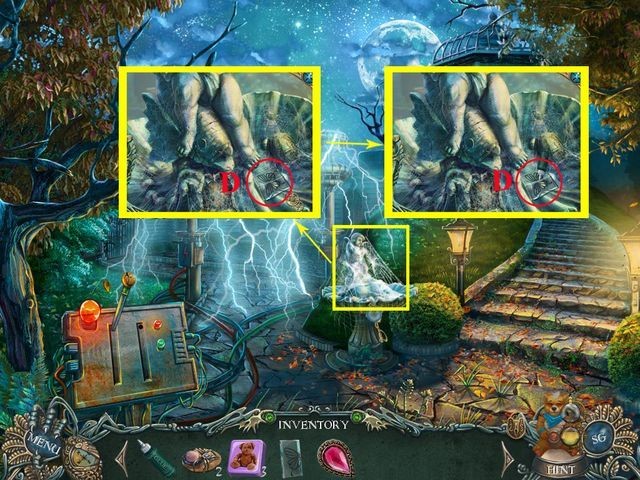
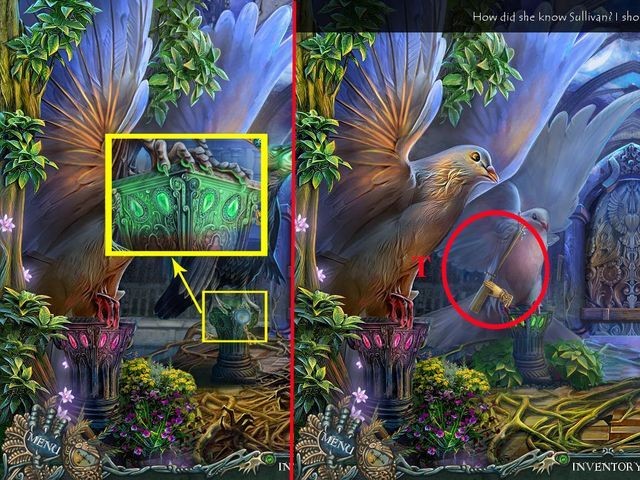
- Place the CRYSTAL on the raven’s perch (K).
- Take the HAMMER (L).
- Go to the Spider Forest.
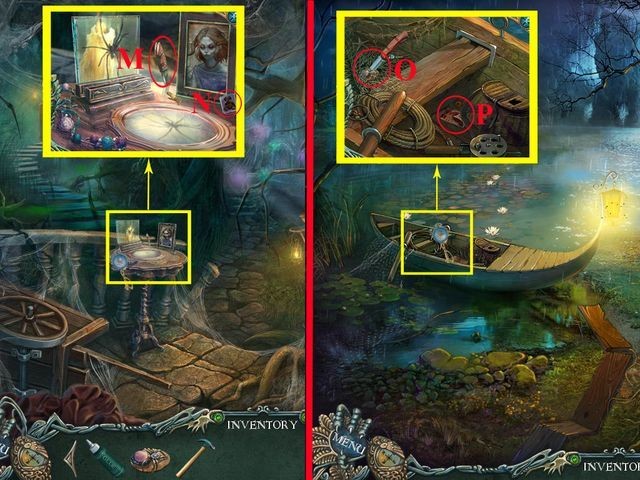
- Take the KNIFE (M) and the TILE (N).
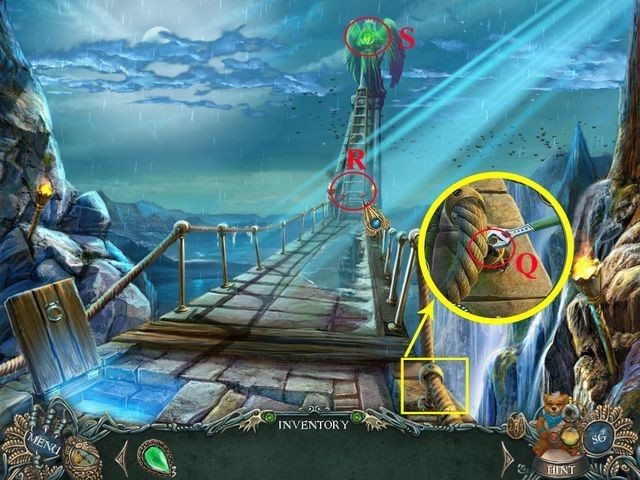
- Go to the Lake.
- Use the KNIFE on the net and take the SPIDER BUTTON (O).
- Take the BANK NOTE (P).
- Take the TILE (Q).
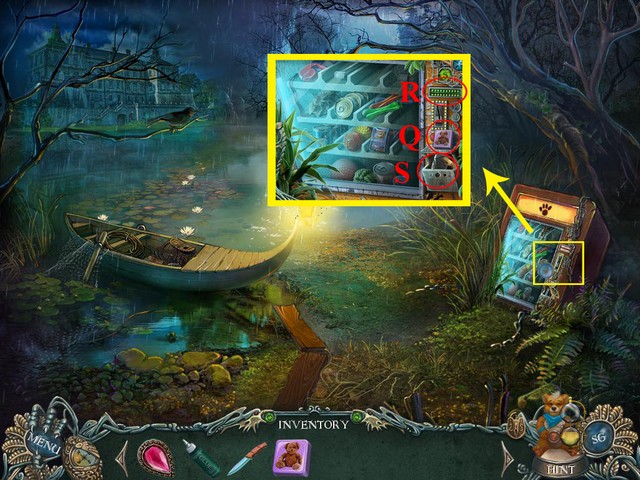
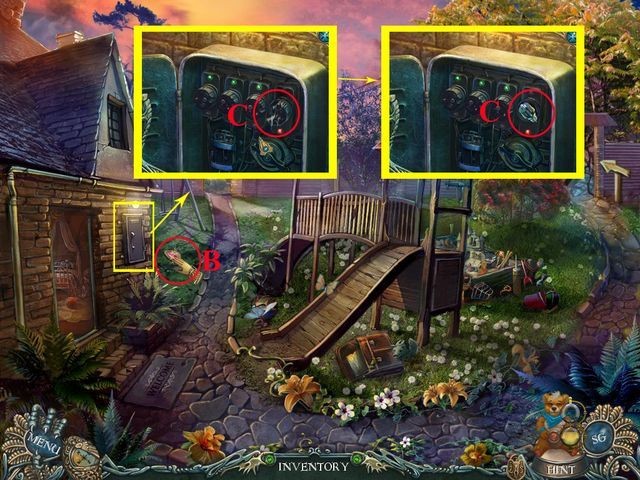
- Place the BANK NOTE in the vending machine (R).
- Take the PIECE OF GLASS (S).
- Go to the Playground.
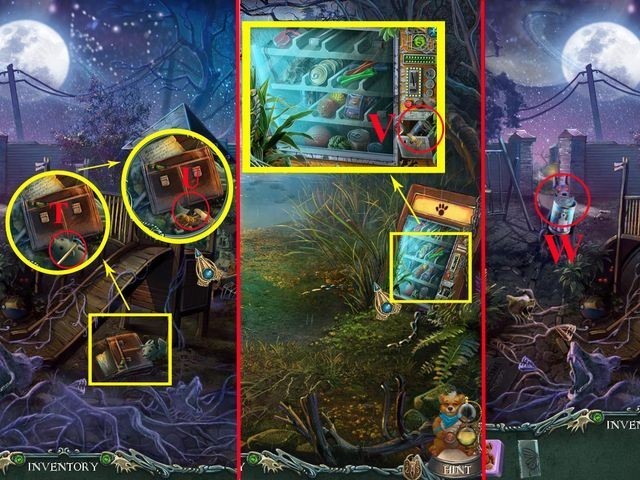
- Use the HAMMER on the piggy bank (T).
- Take the COINS (U).
- Go to the Lake.
- Place the COINS in the vending machine.
- Take the DOG FOOD (V).
- Go to the Playground.
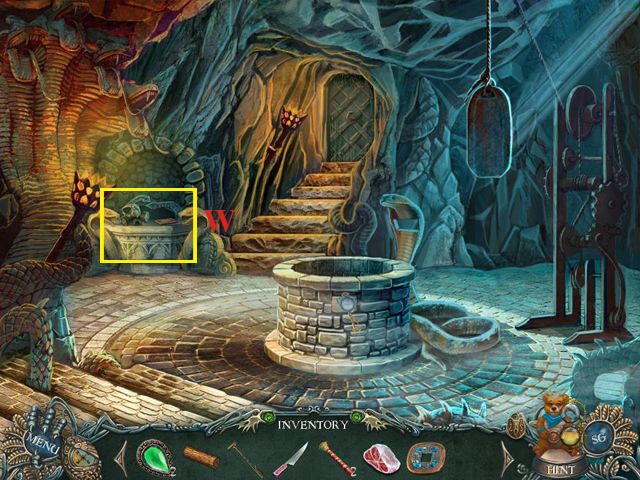
- Give the DOG FOOD to the dog (W).
Chapter 2
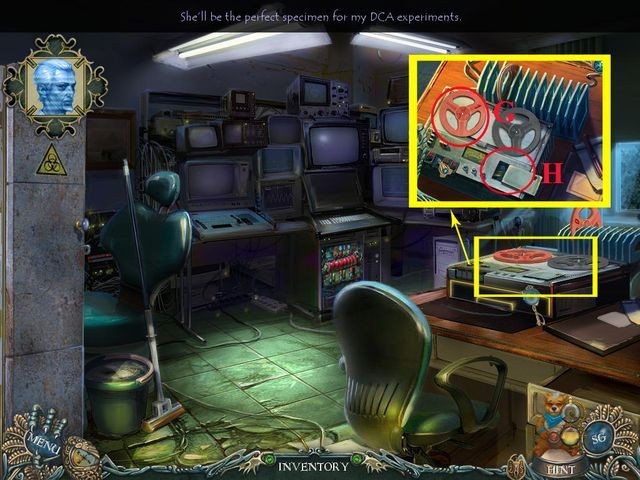
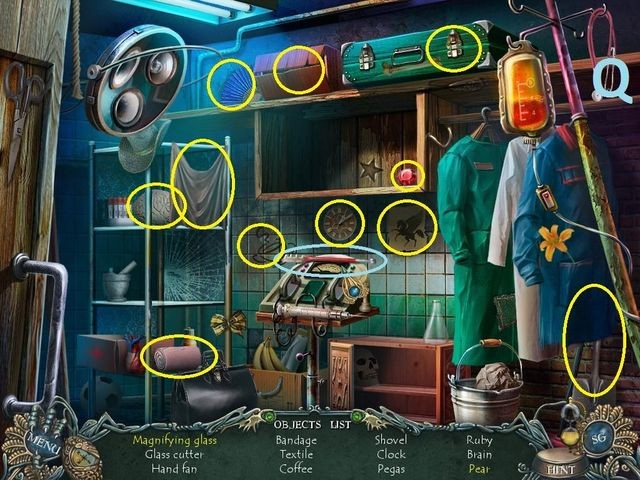
- Play the HOP (A).
- You receive the FUSE (A).
- Take the CRYSTAL (B).
- Remove the broken fuse plug, place the FUSE in the socket (C).
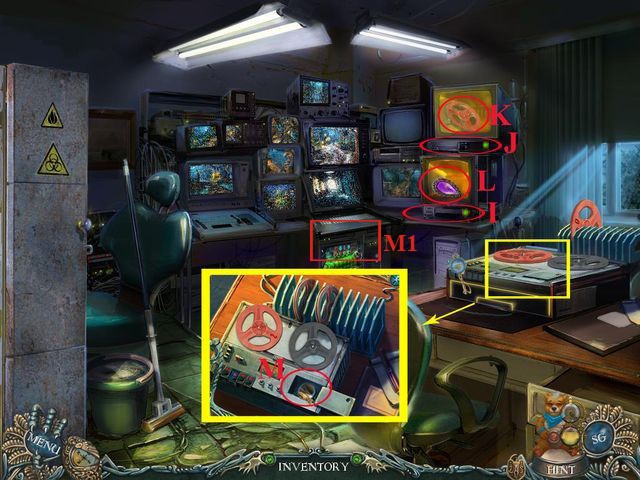
- Go to the Square.
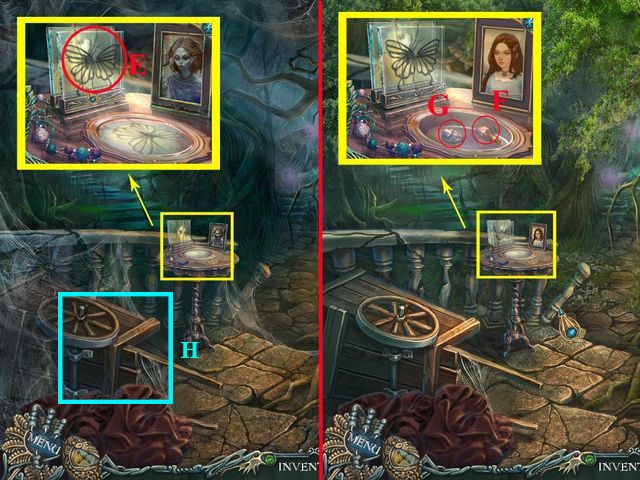
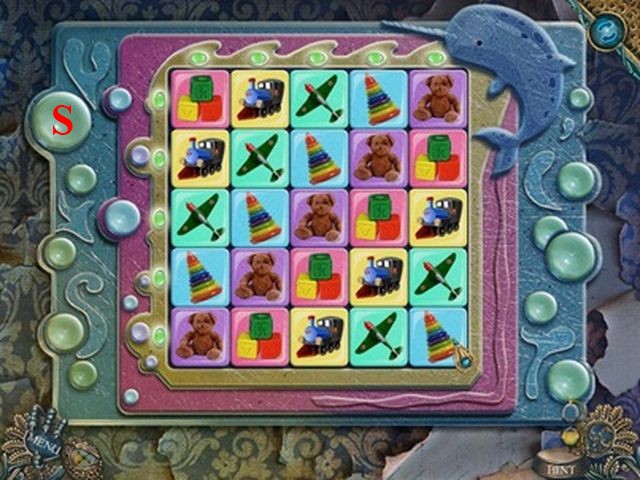
- Place the PIECE OF GLASS, use the GLASS GLUE and take the BUTTERFLY TILE (D).
- Go to the Spider Forest.
- Use the BUTTERFLY TILE on the spider (E).
- Take the CRYSTAL (F).
- Take the SPIDER BUTTON (G).
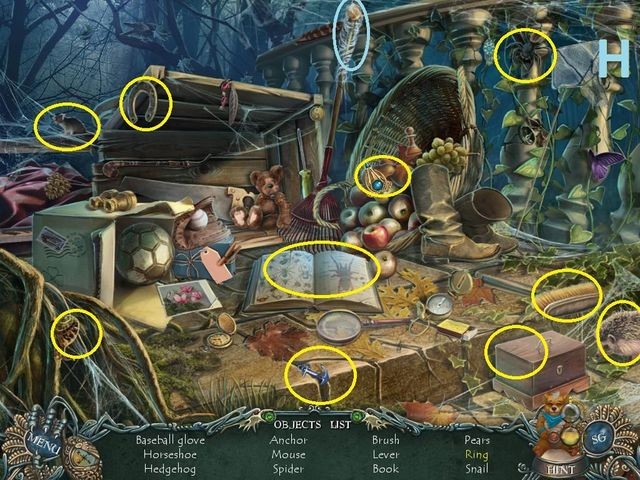
- Play the HOP (H).
- You receive the LEVER (H).
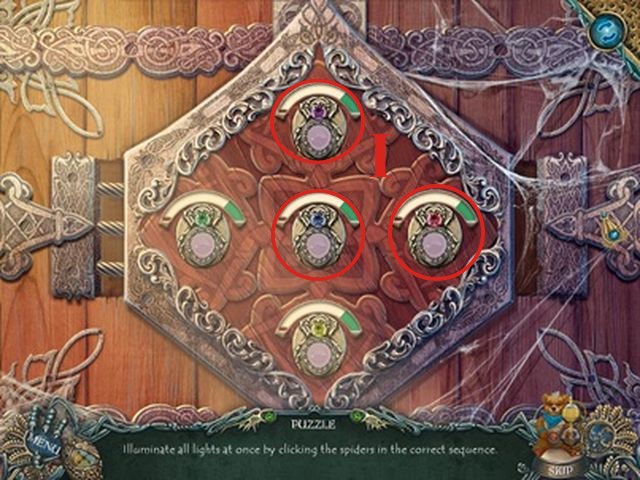
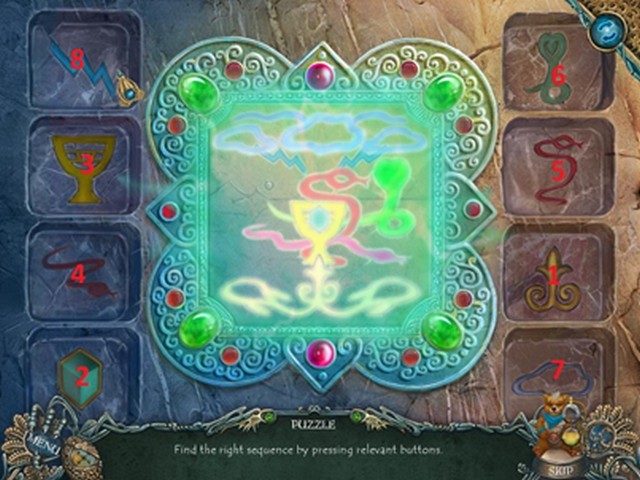
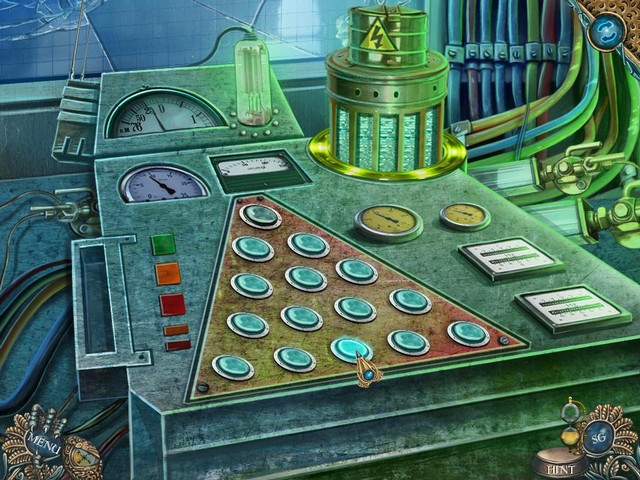
- Zoom into the gate. Place the 3 SPIDER BUTTONS (I).
- Play the mini-game.
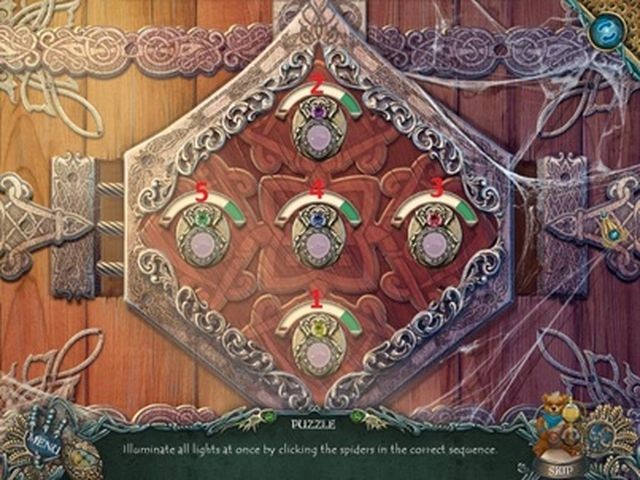
- To solve this puzzle illuminate all the lights by pressing the spiders in the correct sequence. All the indicators must be in the green at the same time. Push at intervals of 1 second: 1. 2. 3. 4. 5.
- Go to the Road.
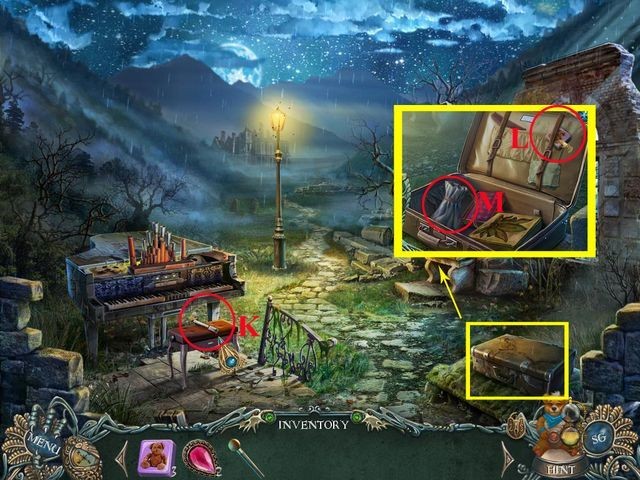
- Take the PIANO KEY (K).
- Take the TILE (L) and the GYPSUM POWDER (M).
- Take the BRUSH (N).
- Take the NECKLACE (O).
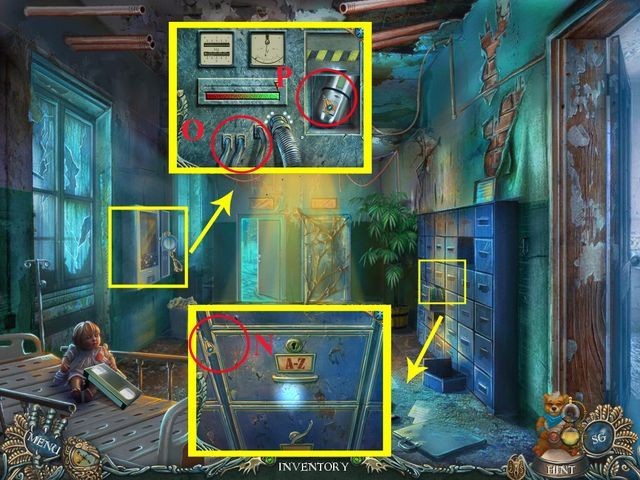
- Go to the Ruins.
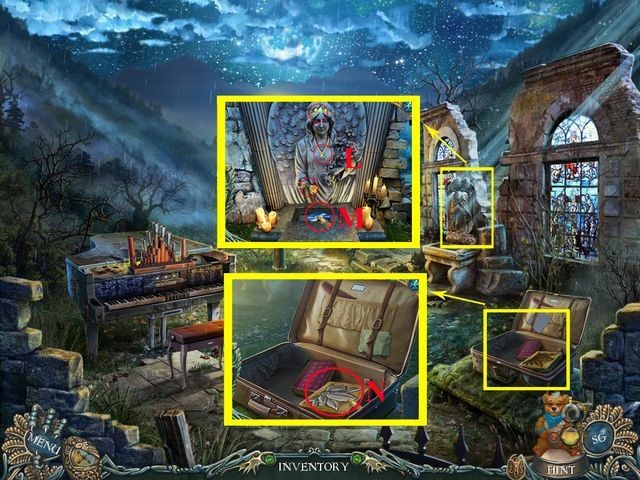
- Take the ROSE (P).
- Take the KNOB (Q).
- Go to Emmy’s Room.
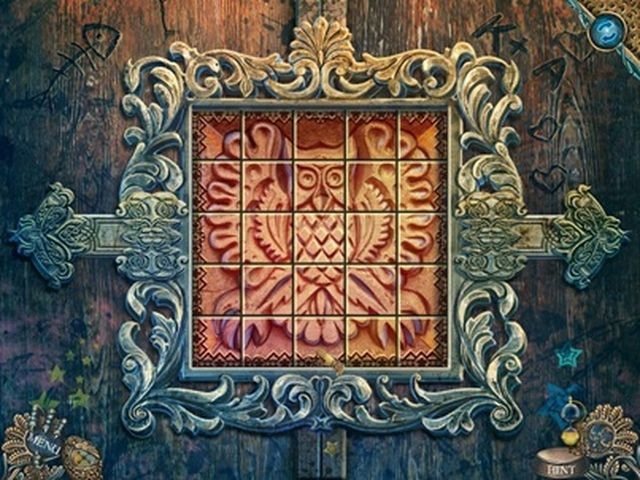
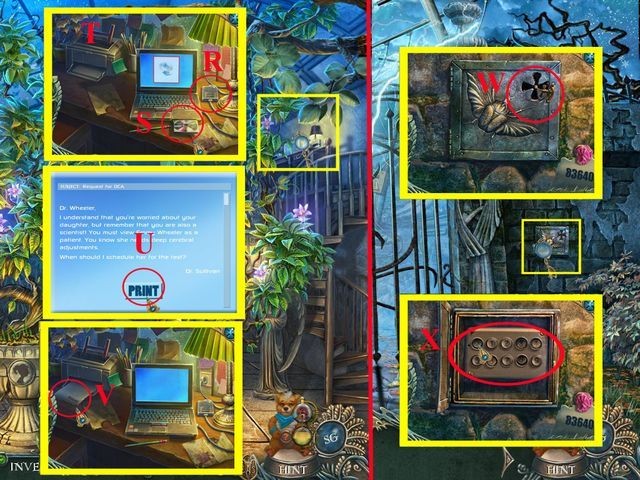
- Zoom into the safe and place the four TILES.
- To solve this mini-game, change the buttons so only one of each is in a row or column (S).
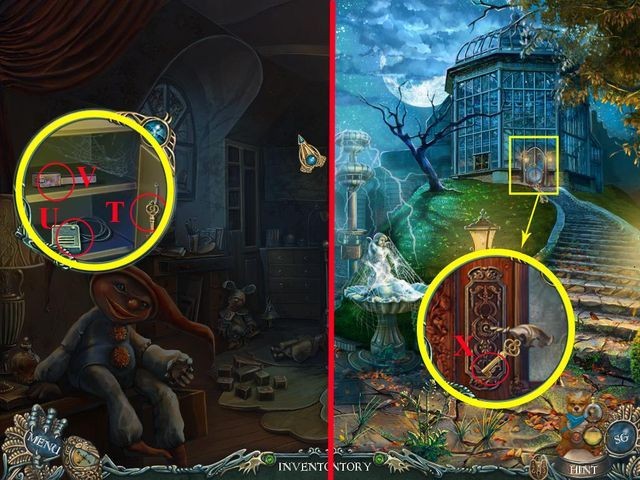
- Take the COPPER KEY (T).
- Take the CHARGER PART (U).
- Take the PIANO KEY (V).
- Go to the Square.
- Use the KEY on the lock (X).
- Go to the Greenhouse.
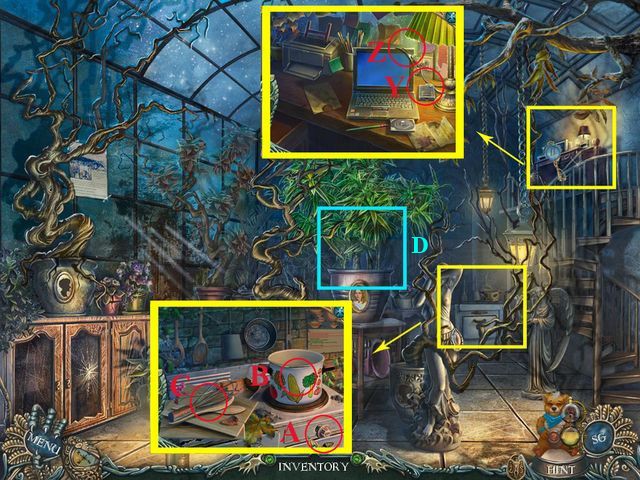
- Use the CHARGER PART on the laptop (Y).
- Take the DIADEM (Z).
- Use the KNOB on the stove (A).
- Take the PAN (B).
- Select the KNOB.
- Take the WISK (C).
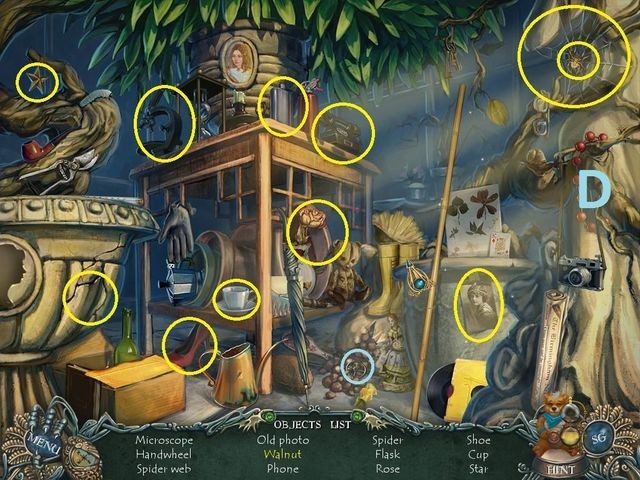
- Play the HOP (D).
- You receive the VALVE (D).

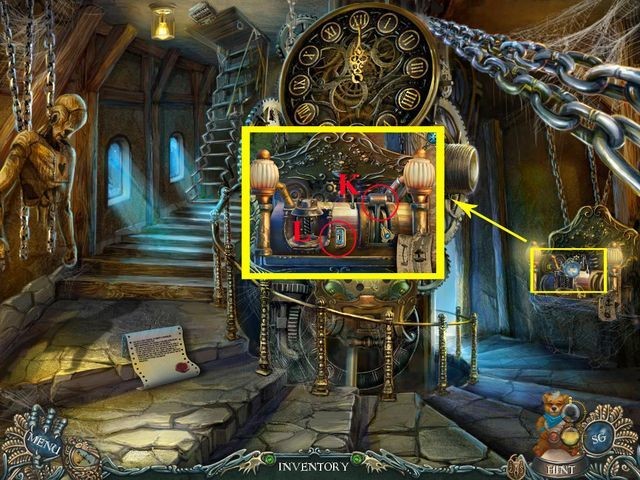
- Go to the Square. Use the BRUSH on the spider web twice (F). Use the VALVE on the pipe (G). Use the PAN in the water (H).
- Use the LEVER on the terminal (E).
- Play the mini-game.
- To solve this mini-game, select the bulbs in numerical order (1-10).

- Go to the Greenhouse.
- Place the FULL POT on the stove.
- Use the GYPSUM POWDER on the pot (I).
- Use the WISK on the pot (J).
- Take the PLASTER (K).
- Go to the Road.
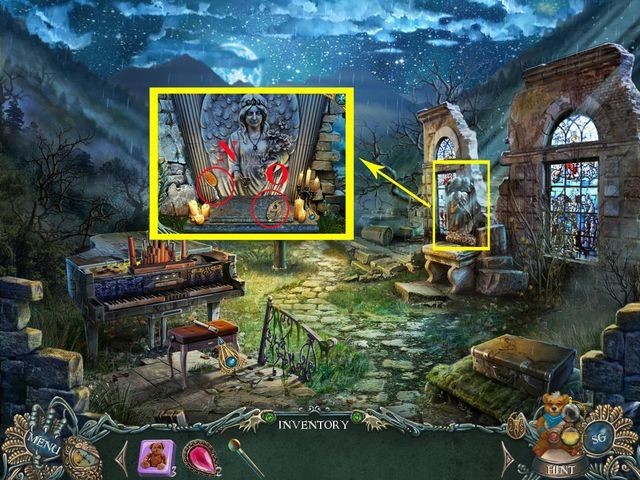
- Use the ROSE, the DIADEM, and the NECKLACE on the statue (L).
- Take the COMPACT DISK (M).
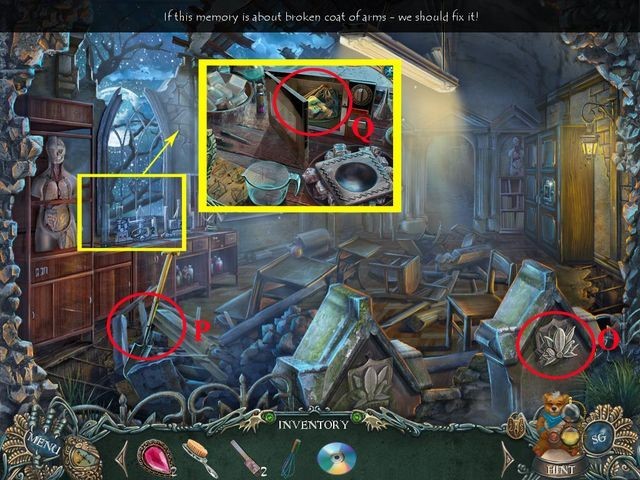
- Use the PLASTER on the form, and then take the COAT OF ARMS PIECE (N).
- Go to the Ruins.
- Place the COAT OF ARMS PIECE on the memory stone (O).
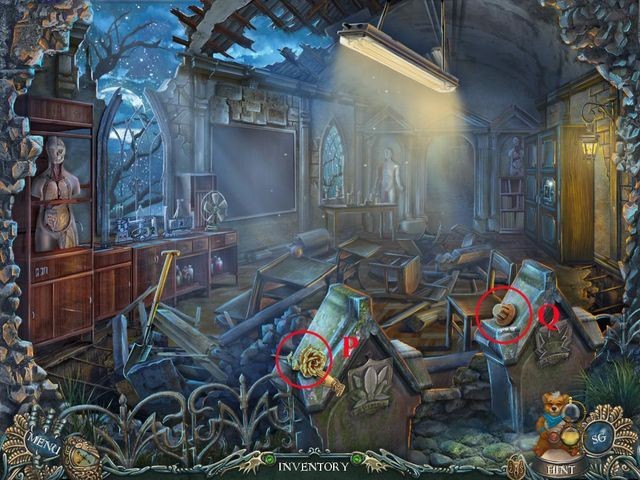
- Take the SHOVEL (P).
- Take the FERTILIZER (Q).
- Go to the Common Hall.
- Take the LEMON (R).
- Take the SLIDER (S).
- Go to the Ruins.
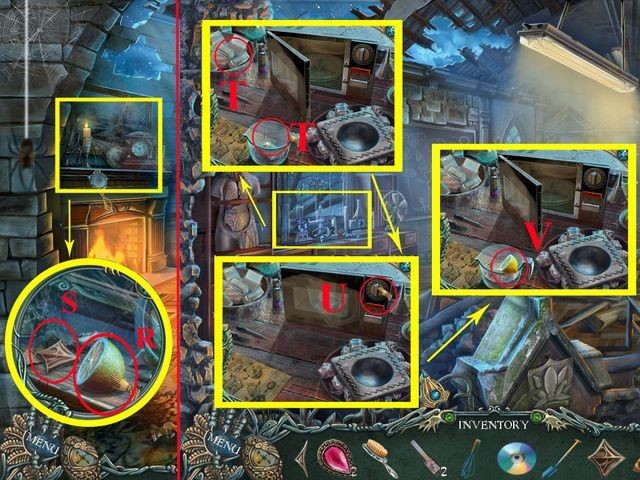
- Take the dry ice and place it into the measuring cup (T).
- Take the measuring cup and place it into the microwave (U).
- Push the button (V).
- Remove the measuring cup from microwave and use the LEMON on it (W).
- Go to the Spider Forest.
- Use the SHOVEL to remove the debris; take the WATERING CAN (X).
- Go to the Square.
- Use the WATERING CAN on the water (Y).
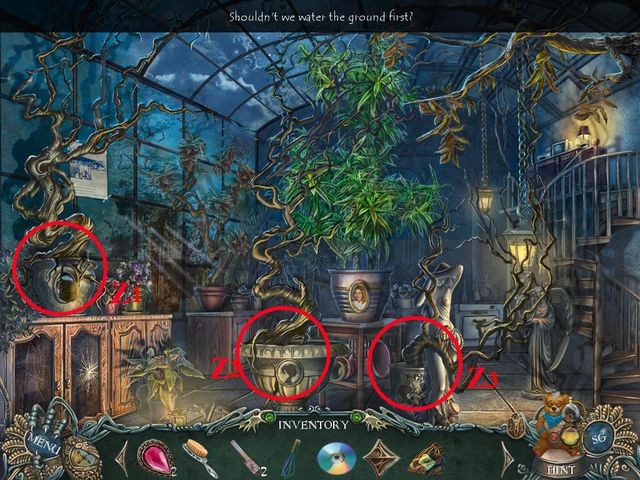
- Go to the Greenhouse.
- Use the WATERING CAN on the trees (Z1), (Z2), (Z3).
- Use the FERTILIZER on the trees (Z1), (Z2), (Z3).
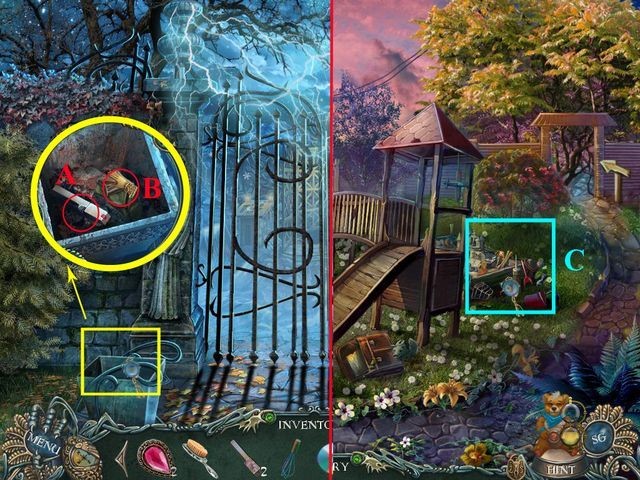
- Go to the Gates.
- Take the PIANO KEY (A).
- Take the SLIDER (B).
- Go to the Playground.
- Select the sandbox (C).
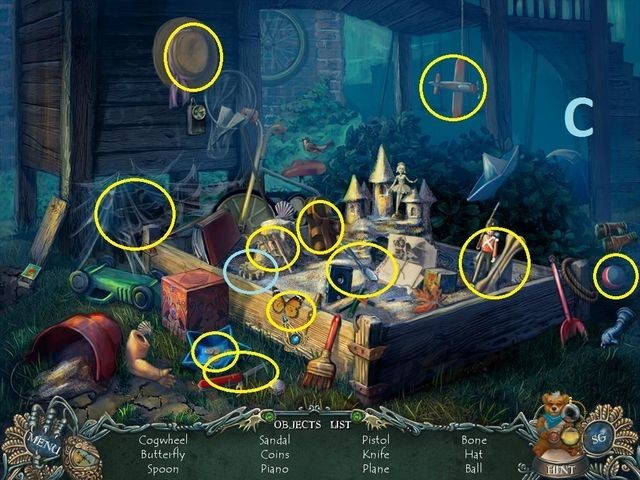
- Play the HOP.
- You receive the GOLDEN GEAR (C).
- Go to the Ruins.
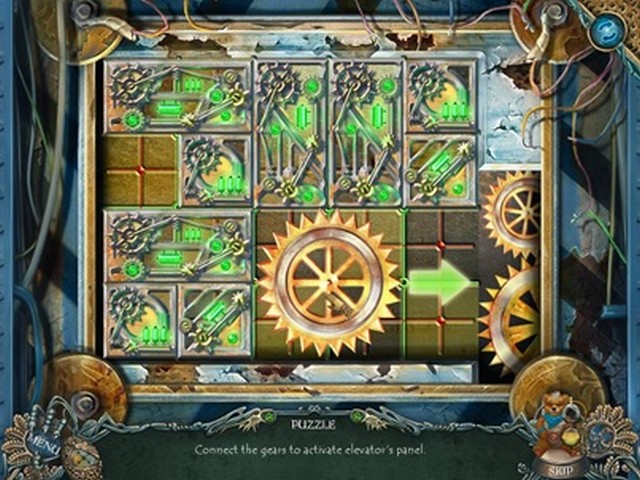
- Place the GOLDEN GEAR in mechanism (D).
- Play the mini-game.
- To solve this mini-game, move the buttons to the correct position.
- Take the AWARD PLAQUE (E).
- Take the PIANO KEY (F).
- Go to the Common Hall.
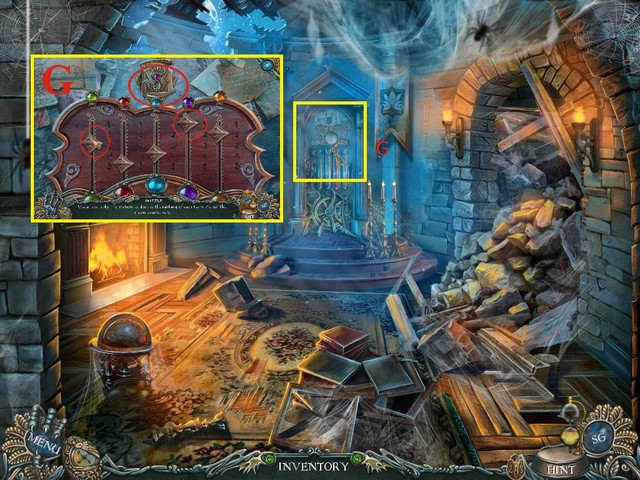
- Zoom to the scoreboard. Place the SLIDERS and the AWARD PLAQUE (G).
- To solve this puzzle, move the sliders to the correct position.
- PURPLE – 1, ORANGE – 2, GREEN – 3, BLUE – 4, RED – 5.
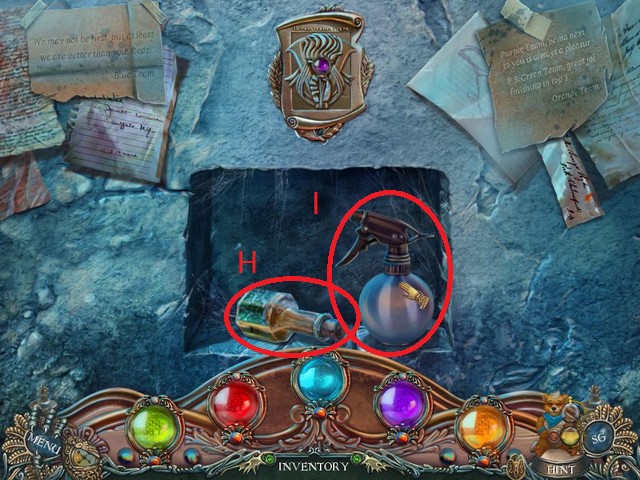
- Take the OLIVE OIL (H).
- Take the SPRAYER (I).
- Go to the Ruins.
- Use the OLIVE OIL, and then the WHISK on the measuring cup (J).
- Use the measuring cup on the ice (K).
- Take the SOAP (L).
- Go to the Greenhouse.
- Use the SPRAYER, the SOAP, and then the BRUSH in the window (M).
- Take the CRYSTAL.
- Select the pot (N).
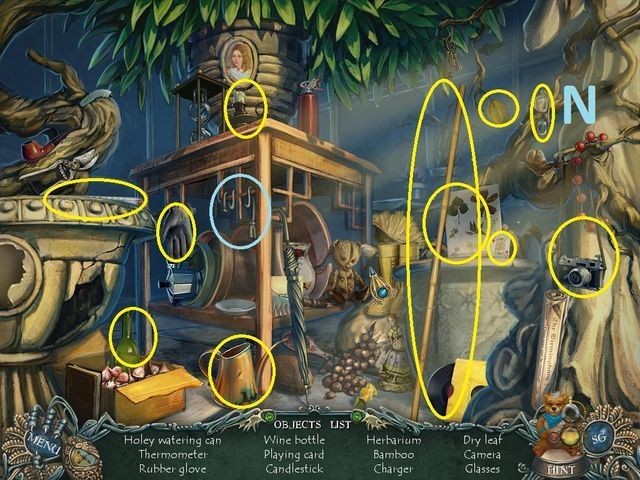
- Play the HOP.
- You receive the CHARGER PART (N).
- Go to the Mind Gates.
- Place all CRYSTALS on the raven (O).
- Take the DECORATIVE KEY (P).
- Go to the Road.
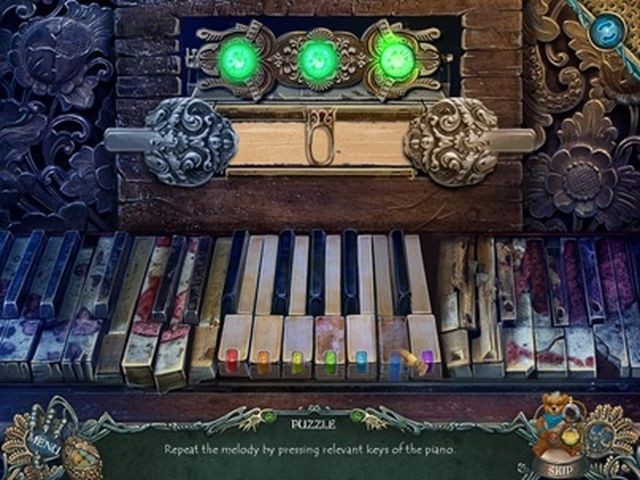
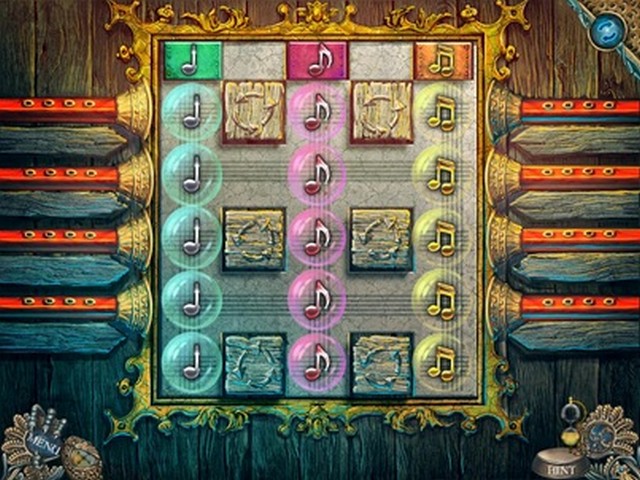
- Zoom on the piano (P1).
- Place the PIANO KEYS.
- To solve this mini-game, repeat the sequence of notes played on the piano.
- Red – R; Orange – O; Yellow – Y; Green -G; Azur – A; Blue – B; Violet – V.
- Round 1: Y-R-G-O.
- Round 2: V-O-G-B-Y.
- Round 3: G-R-Y-V-A-B.
- Take the PAPER (Q).
- Go to the Greenhouse.
- Use the CHARGER PART on the laptop (R).
- Use the COMPACT DISK on the laptop (S).
- Use the PAPER on the printer (T).
- Push ‘Print’ (U).
- Take the CODE (V).
- Go to the Gates.
- Use the KEY on the lock (W).
- Enter the CODE (X): 83640 (X).
- Go to the Pit.
Chapter 3
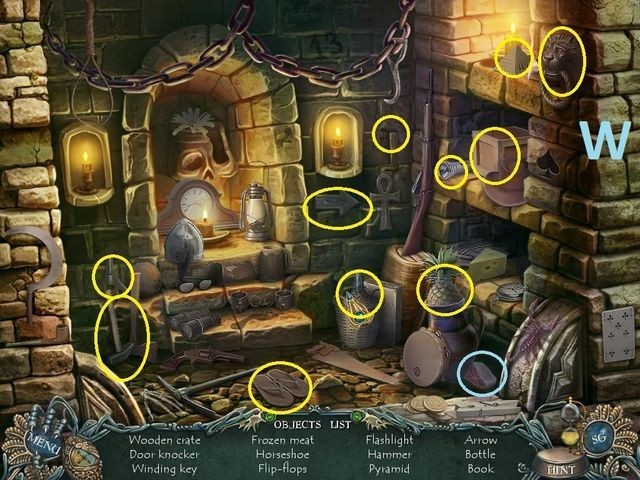
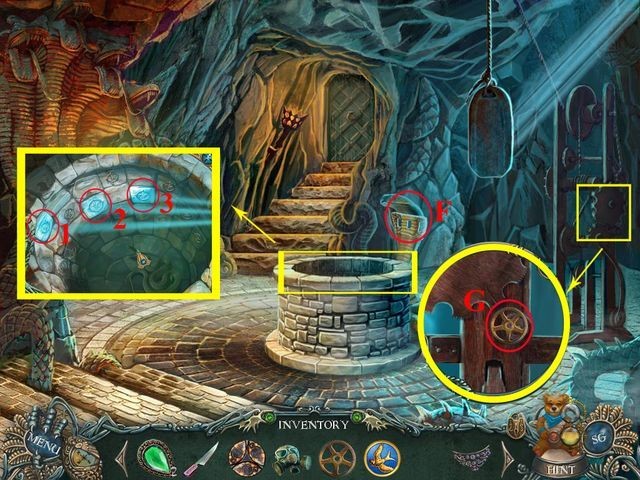
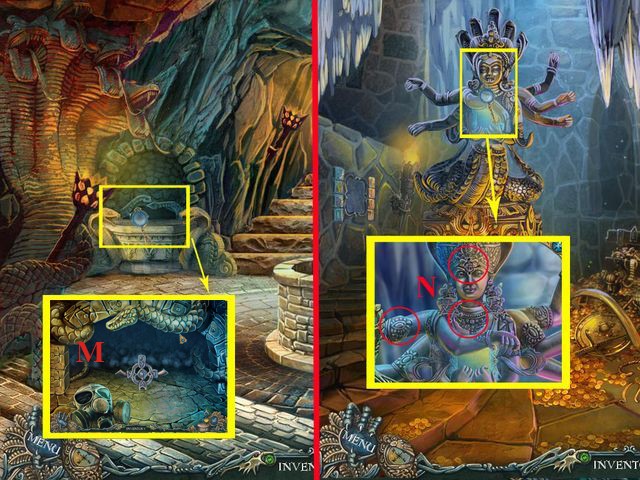
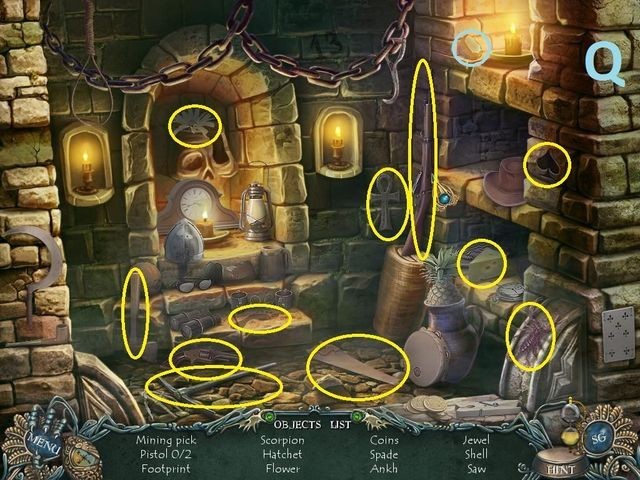
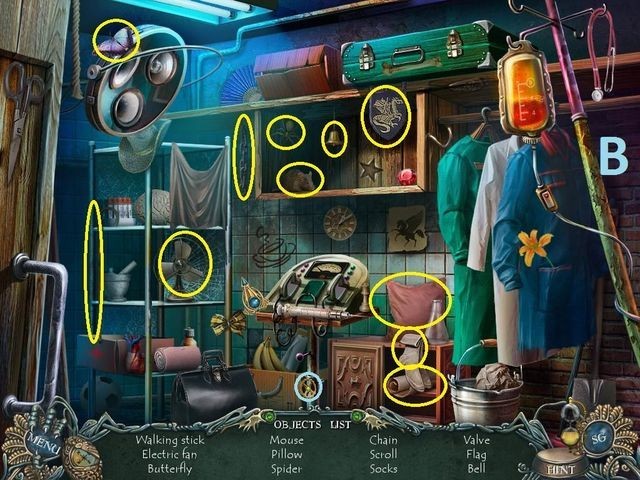
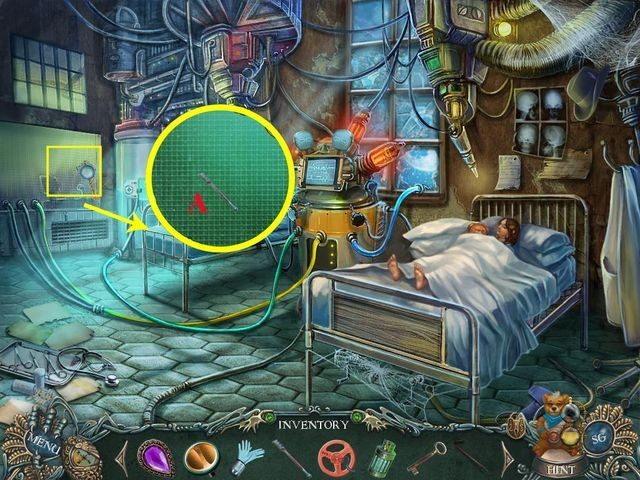
- Take the CRYSTAL (A).
- Take the RUBBER GLOVES (B).
- Take the FISHING LINE (C).
- Take the ROCK (D).
- Go to the Road.
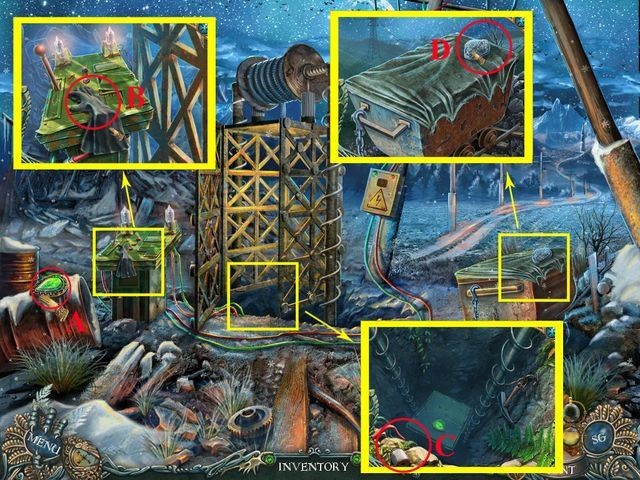
- Open the panel and pull the LEVER (E).
- Take the HOOK (F).
- Take the LOG (G).
- Select the barrel (H).
- Play the HOP.
- You receive the TONGS (H).
- Return to the pit.
- Use the HOOK AND LINE on the ice axe (H).
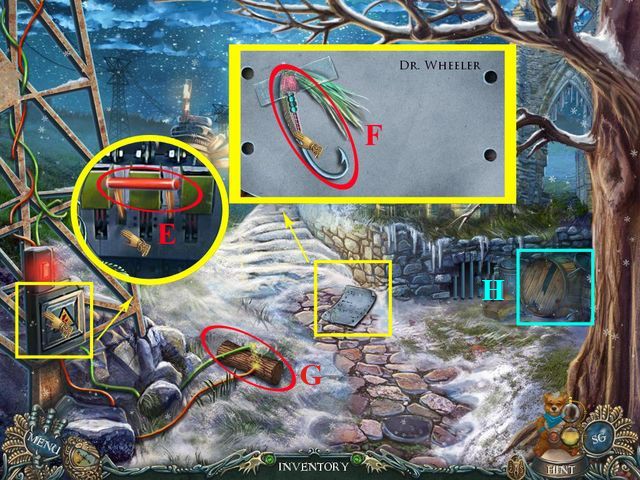
- Go to the Road.
- Use the ICE AXE on the snow (I).
- Take the INSULATING TAPE (J).
- Go to the Tower Stairs.
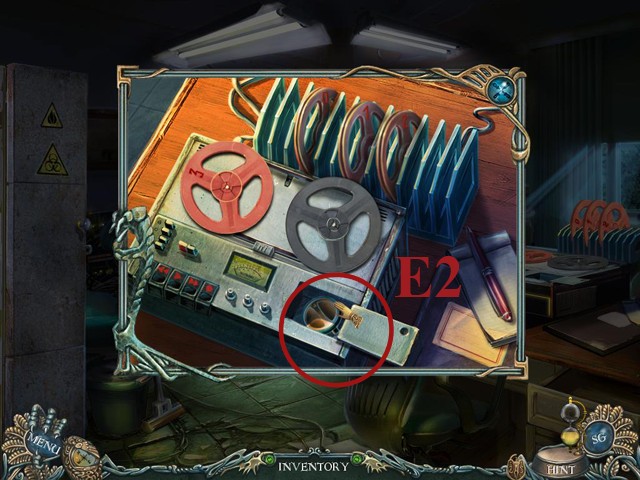
- Use the HOOK AND LINE on the TRUMPET (K).
- Take the FIRE POKER (L).
- Take the MOTOR OIL (M).
- Use the TONGS on the NAIL (N).
- Use the NAIL on the plank (O).
- Use the ROCK on the NAIL (P).
- Take the CONNECTING WIRE (Q).
- Take the KNIFE (R).
- Go to the Road.
- Use the CONNECTING WIRE, and then the REPAIR KIT on the wires (S).
- Pull the lever (T).
- Go to the pit.
- Use the FIRE POKER and then the MOTOR OIL on the panel (U).
- Play the mini-game.
- To solve this puzzle, move the blocks to free the gear.
- Take the CRYSTAL (V).
- Go to the Underground Hall.
- Take the TRUMPET (X).
- Take the TOKEN (Y).
- Select the hearth (W).
- Play the HOP.
- You receive the FROZEN MEAT (W).
- Go to the Passage.
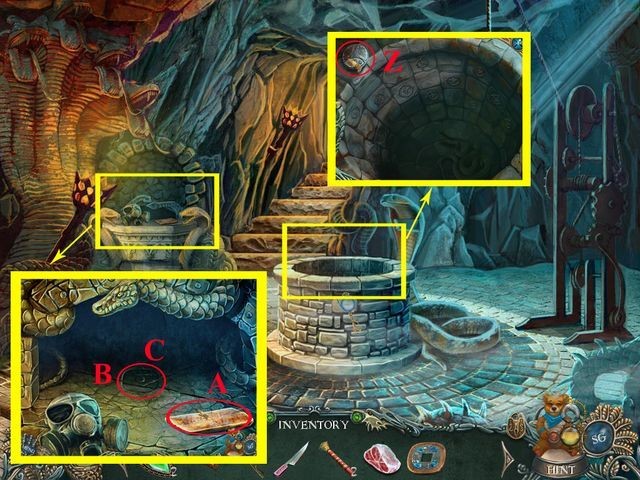
- Take the CLAY PLAQUE (Z).
- Take the STEEL PLATE (A).
- Use the TOKEN on the altar (B).
- Take the GAUGE (C).
- Go to the Road.
- Select the barrel (D). Play the HOP.
- You receive the CHARCOAL (D).
- Go to the Tower Stairs.
- Open the stove, place the CHARCOAL, use the FIRE POKER (E).
- Place the FROZEN MEAT onto the pan on top of the stove. Use the KNIFE on the MEAT (F).
- Use the KNIFE on the MEAT (F).
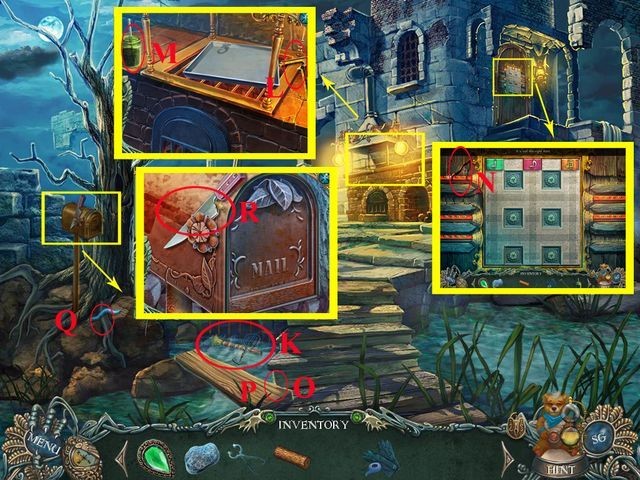
- Take the MEAT STRIP (F).
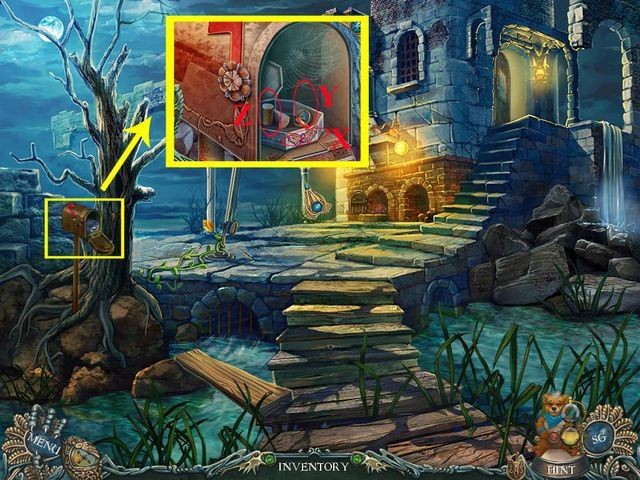
- Take the MAILBOX FLAG (F).
- Use the MAILBOX FLAG on the mailbox (G).
- Take the LENS (H).
- Go to the Road.
- Give the MEAT STRIP to the raven (I).
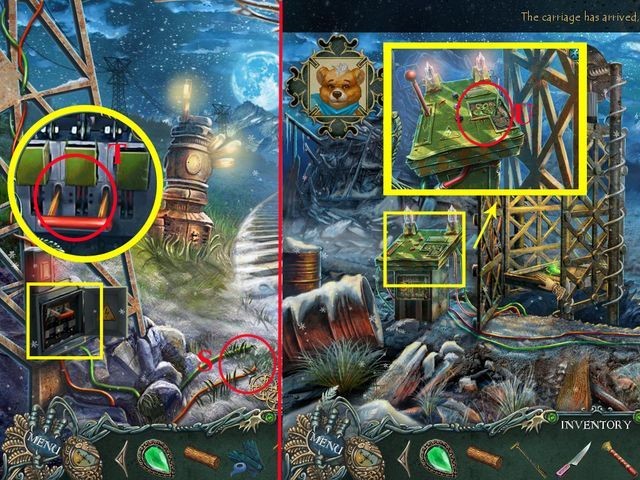
- Take the BATTERY.
- Use the BATTERY in the machine (J).
- Use the GAUGE in the machine (K).
- Use the LOG in the machine (L).
- Push the LEVER (M).
- Take the TRUMPET.
- Go to the Tower Straits.
- Use the PIPES on the door (N).
- Play the mini-game.
- To solve this puzzle, move the notes to their respective columns.
Chapter 4
- Go to the Tower.
- Take the STONE FRAGMENT (A).
- Take the METAL PIECE (B).
- Take the NECKLACE (C).
- Take the WOODEN GEAR (D).
- Put the STEEL PLATE in the machine (E).
- Go to the Passage.
- Use the STONE FRAGMENT on the snake (F).
- Place the WOODEN GEAR on the mechanism (G).
- Press the stones (1,2,3).
- Go to the Shrine.
- Take the CLAY PLAQUE (H).
- Take the LEVER (I).
- Play the HOP (J).
- You receive the BRACELET (J).
- Go to the Tower.
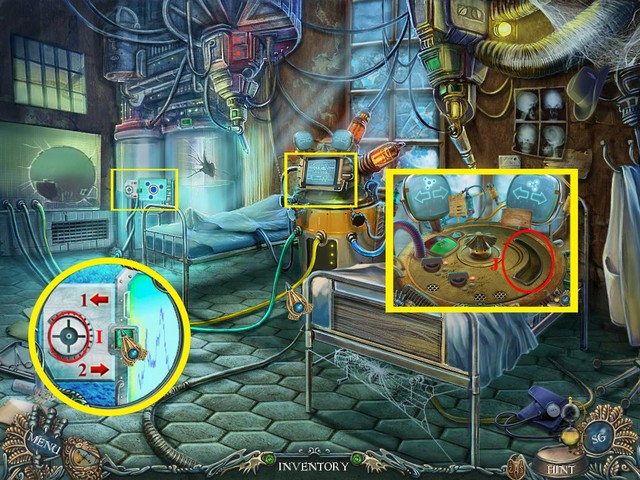
- Use the LEVER on the machine (K).
- Pull the lever.
- Take the TOKEN (L).
- Go to the Passage.
- Use the TOKEN on the altar (M).
- Take the DIADEM (M), use the LINSE on the gas mask (M).
- Go to the altar.
- Place the DIADEM, the BRACELET, and the NECKLACE on the statue (N).
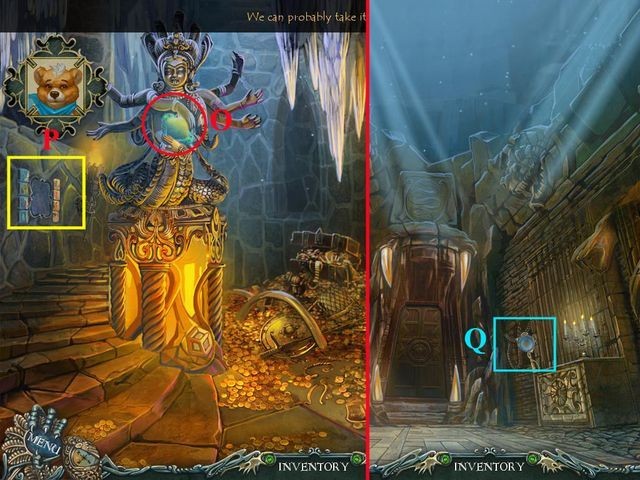
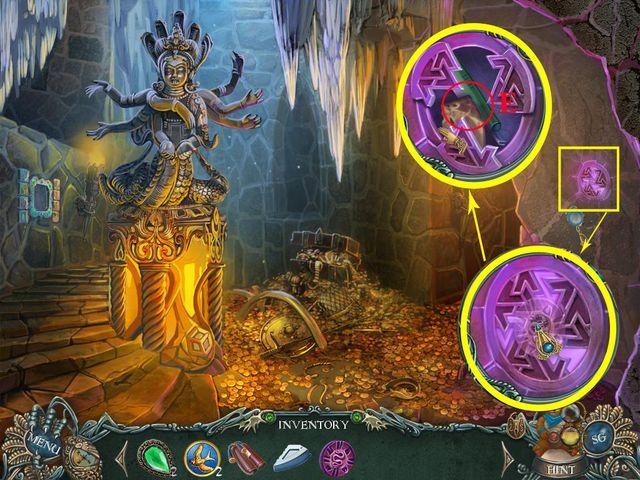
- Take the MAGIC TABLET (O).
- Place the MAGIC TABLET and play the mini-game (P).
- To solve this puzzle, push the buttons in the correct order.
- Take the MAGIC TABLET.
- Go to the Underground Hall.
- Play the HOP (Q).
- You receive the JEWEL (Q).
- Use the JEWEL (R).
- Use the MAGIC TABLET (S).
- Push the YELLOW AND BLUE JEWELS.
- Take the CLAY PLAQUE (S).
- Go to the passage.
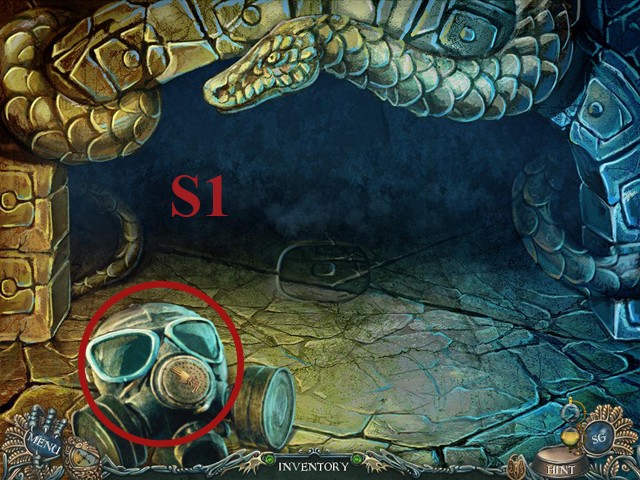
- Place the LENS on the GASMASK and collect it (S1).

- Go to the Pit.
- Use the KNIFE (T).
- Use the GAS MASK.
- Use the KNIFE.
- Take the CLAY PLAQUE (U).
- Take the TOKEN (V).
- Go to the Passage.
- Use the TOKEN (W).
- Take the BUTTERFLY (W).
- Go to the Tower Stairs.
- Use the BUTTERFLY on the box (X).
- Take the METAL PIECE (Y).
- Take the CORKS (Z).
- Go to the Underground Hall.
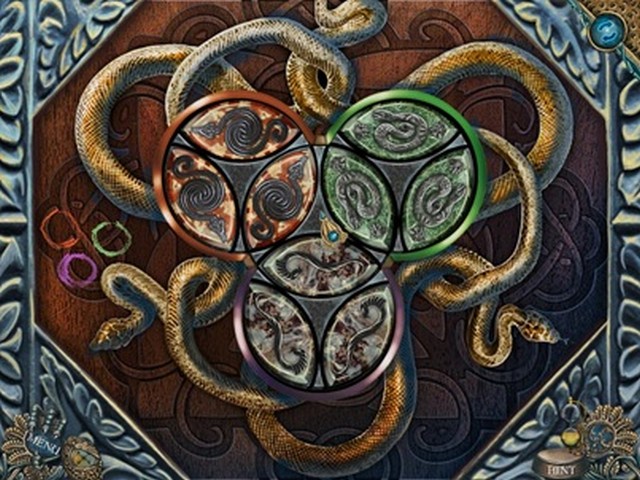
- Use the CLAY PLAQUES on the door.
- Play the mini-game.
- To solve this puzzle, spin the parts to the correct configuration.

- Go to the Sanctuary.
- Take the WOODEN HEART (A).
- Go to the Pit.
- Use the CORKS on the GAS CYLINDER (B).
- Take the GAS CYLINDER (B).
- Go to the Tower.
- Place the WOODEN HEART on the mannequin (C).
- Take the WRENCH JAW (D).
- Take the SNAKE SYMBOL (D).
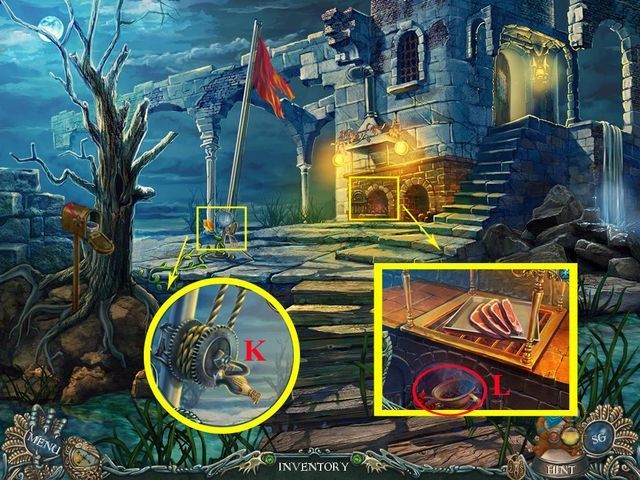
- Go to the Shrine.
- Use the SNAKE SYMBOL on the wall.
- Take the CHEESE (E).
- Take the WRENCH HANDLE (E).
- Go to the Sanctuary.
- Place the CHEESE near the glowing red eyes (F).
- Take the METAL PIECE (G).
- Go to the Tower.
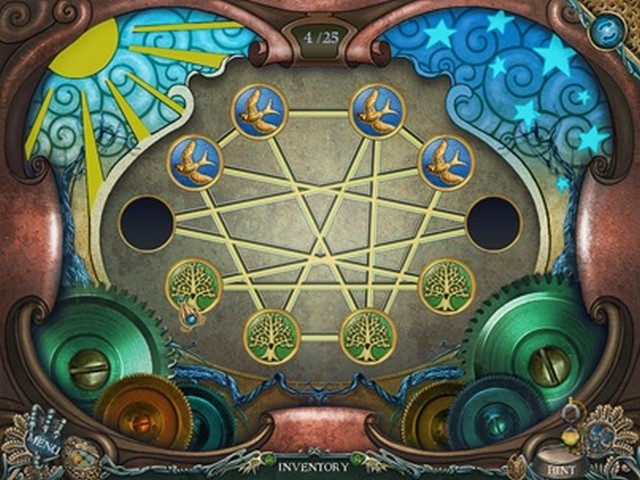
- Use the METAL PIECE on the clock in the center of the tower (H).
- Play the mini-game.
- To solve this puzzle, swap the tiles, so that the birds are in the top and the trees are in the bottom row.
- Enter the password 1825 (H).
- Go to the Spire.
- Take the HANDLE (I).
- Take the POT (J).
- Go to the Tower Stairs.
- Use the HANDLE (K).
- Take the FLAG.
- Use the POT (L).
- Use the TORN FLAG (L).
- Take the HOT COALS (L).

- Go to the Pit.
- Use the WRENCH JAW, and the WRENCH HANDLE. You will receive the WRENCH (M).
- Go to the Sanctuary.
- Use the HOT COALS on the brazier and tip it over (N).
- Use the GAS CYLINDER on the snakes (O).
- Use the WRENCH on the crystal (P).
- Take the CRYSTAL (P).
- Take the FOLDING LADDER (R).
- Go to the Spire.
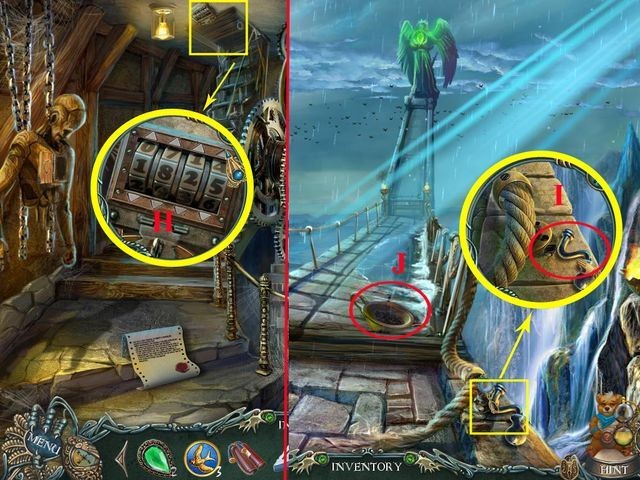
- Use the BOLT and the WRENCH (Q).
- Use the FOLDING LADDER (R).
- Use the TORN FLAG (R).
- Take the CRYSTAL (S).
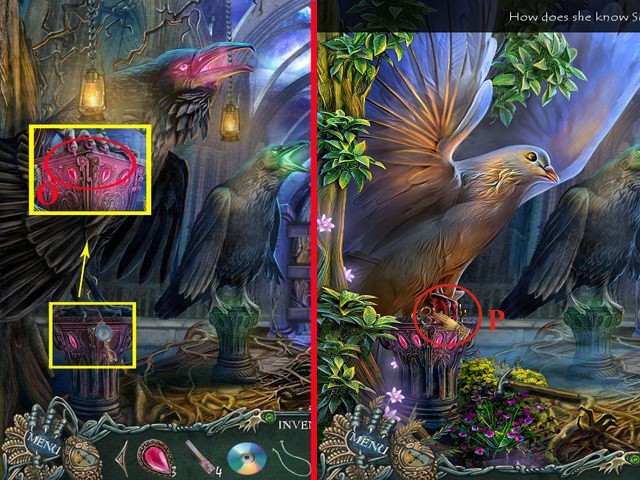
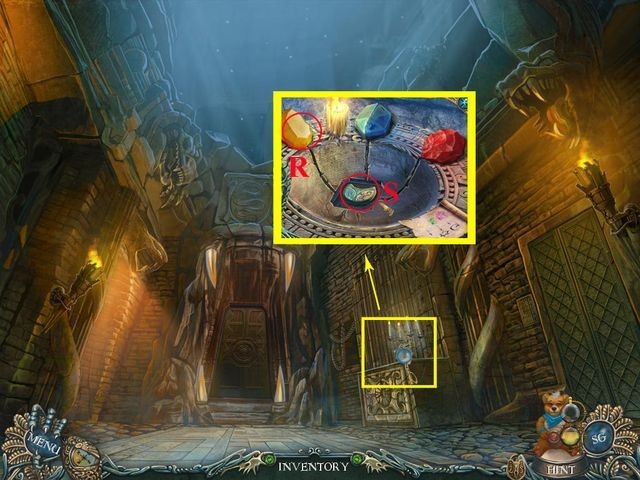
- Go to the Mind Gates.
- Use the CRYSTALS on the raven.
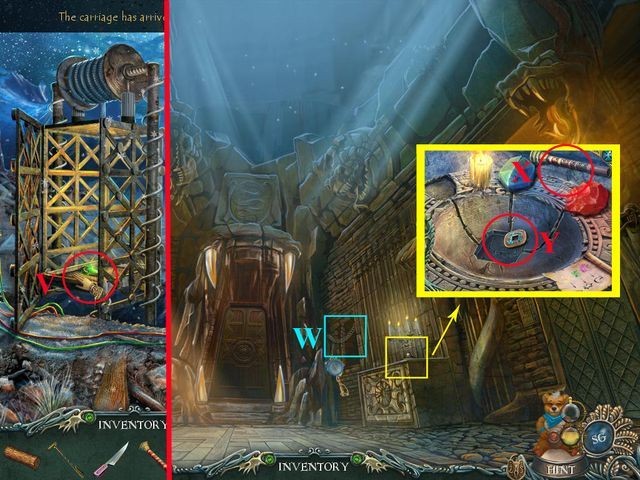
- Take the OAR (T).
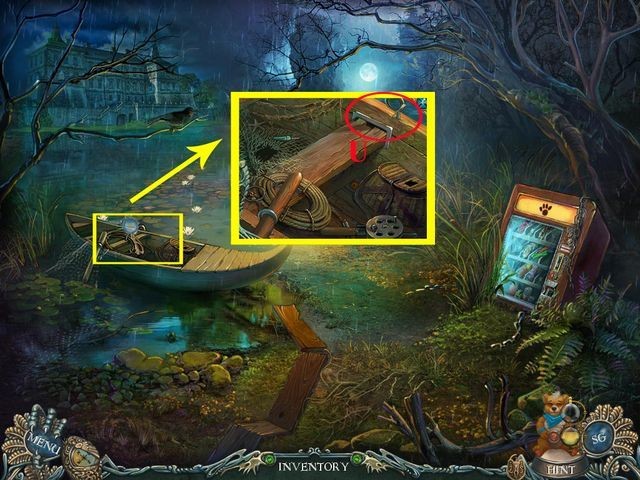
- Go to the Lake.
- Use the OAR (U).
- Go to the Entrance.
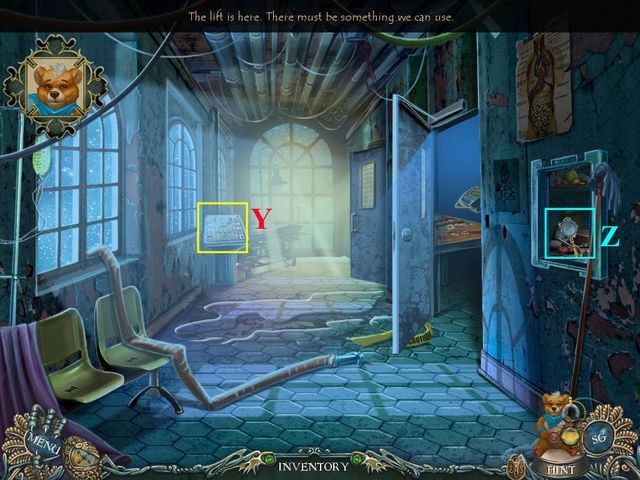
Chapter 5

- Take the SWITCH (A).
- Go to the Hallway.
- Open the door (B).
- Play the HOP (B).
- You receive the VALVE (B).
- Go to the 1st floor.
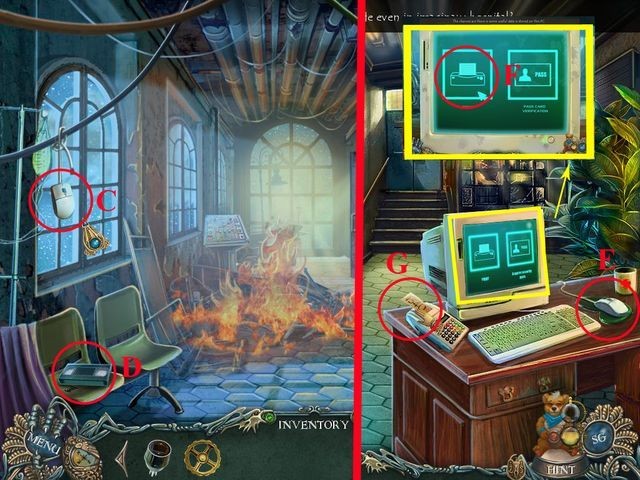
- Take the MOUSE (C).
- Take the VHS TAPE (D).
- Go to the Hallway.
- Use the COMPUTER MOUSE on the computer (E).
- Push print (F).
- Take the CODE (G).
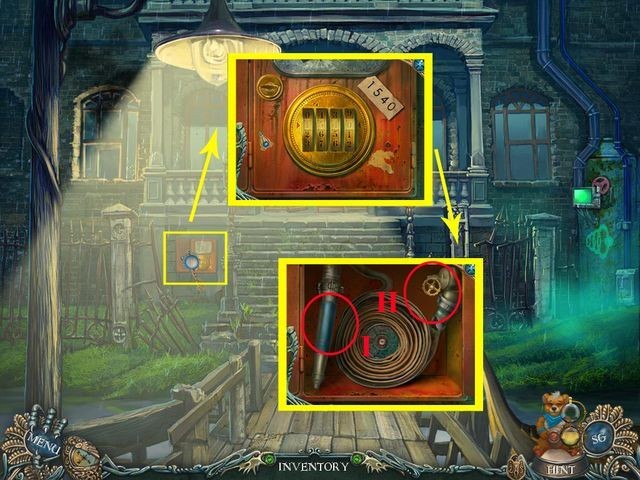
- Go to the Entrance.
- Enter the CODE: 1540 (H).
- Select the VALVE and pick up the hose (I).
- Go to the 1st Floor.
- Use the fire hose on the fire (J).
- Take the CABLE (K).
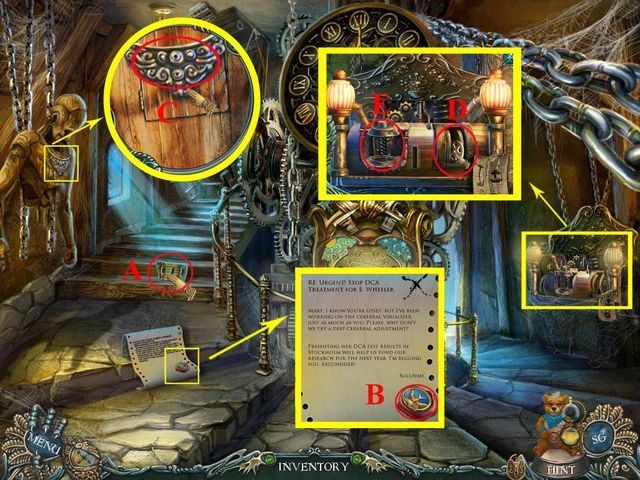
- Go to Sullivan’s Laboratory.
- Take the VHS TAPE (L).
- Take the SWITCH (M).
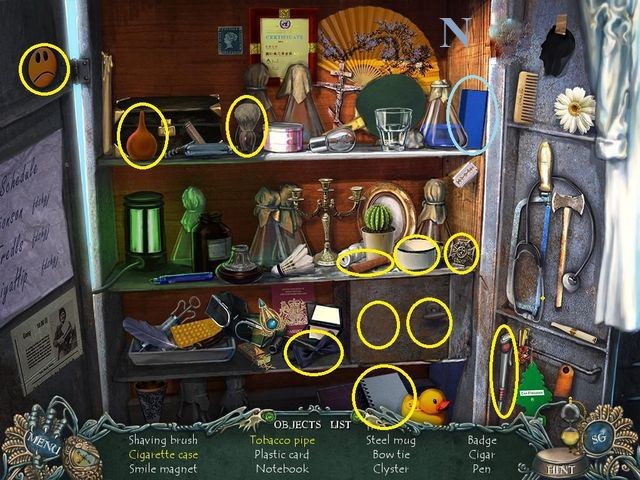
- Play the HOP (N).
- You receive the PLASTIC CARD (N).
- Push the ‘Play’ button.
- Take ABI SIGN (O).
- Go to the Hallway.
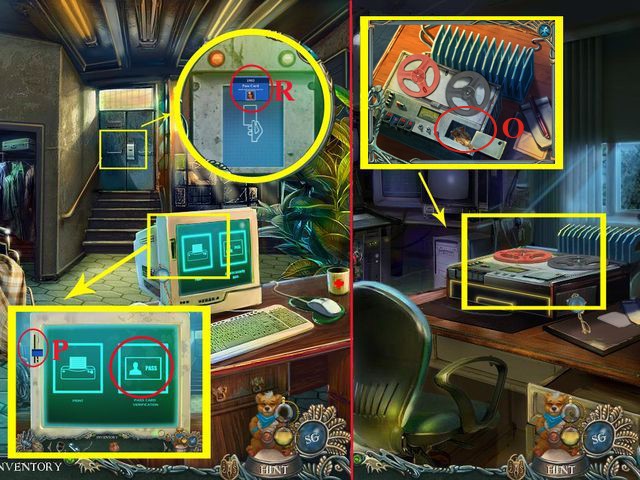
- Put the PLASTIC CARD in the computer and select the pass card verification option (P).
- Take the MARY’S PASS CARD (P).
- Use the MARY’S PASS CARD on the lock (R).
- Go to the 2nd floor.
- Take the VHS TAPE (S).
- Go to Room 205.
Chapter 6
- Take the SULLIVAN’S PASS CARD (A).
- Take the ENERGY CORE (B).
- Go to the Entrance.
- Use SULLIVAN’S PASS CARD (C).
- Enter the password: ABI.
- Take the REEL (D).
- Push the buttons (E).
- Take the CABLE (F).
- Go to Sullivan’s Laboratory.
- Use the REEL, and press play (G).
- Take the BUTTON (H).

- Place the BUTTON; play the mini-game (M1).
- To solve this puzzle, create the combinations shown at top by stopping the meters at the correct colors.
- Use the VHS TAPE on the television (I) (J).
- Take the REEL (K).
- Take the CRYSTAL (L).
- Use the REEL, and press play.
- Take the KNOB (M).
- Go to the 2nd floor.
- Take the CABLE (N).
- Use the CABLES (O).
- Take the RUBBER GLOVES (P).
- Go to the Hallway.
- Play the HOP (Q).
- You receive the CLASS CUTTER (Q).
- Go to Room 205.
- Take the REEL (R).
- Go to Sullivan’s Laboratory.
- Play the HOP (S).
- You receive the DOOR HANDLE (S).
- Go to the 1st floor.
- Use the DOOR HANDLE (T).
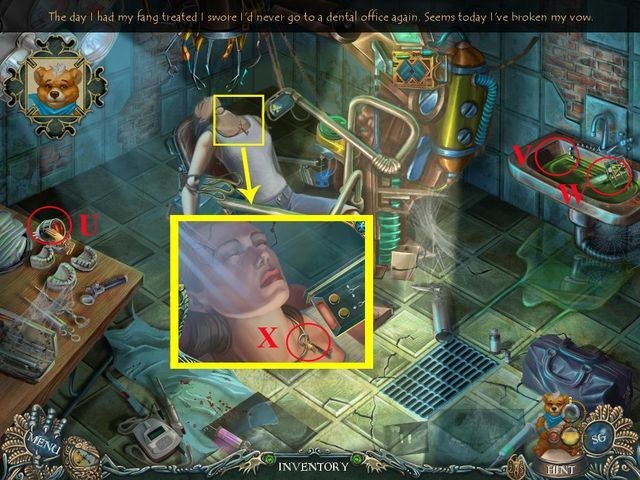
- Go to the Dental Office.
- Take the SWITCH (U).
- Use the RUBBER GLOVES (V).
- Take the ENERGY CORE (W).
- Take the KEY (X).
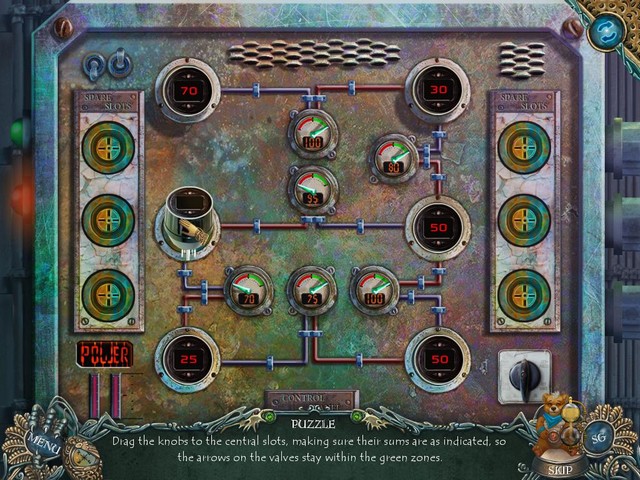
- Go to the 1st floor. Place the switches; play the mini-game (Y).
- To solve this puzzle, drag the knobs to their respective positions.
- Play the HOP (Z).
- You receive the CROWBAR (Z).
- Go to Room 205.
- Use the GLASS CUTTER on the glass (A).
- Use the CROWBAR on the glass (A).
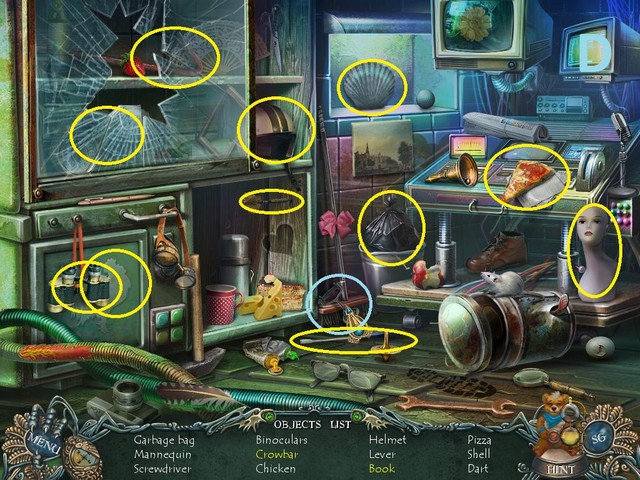
- Go to the Imaging Room.
- Use the RUBBER GLOVES to retrieve the TWEEZERS (B).
- Take the LEVER (C).
- Play the HOP (D).
- You receive the LEVER (D).
- Place the ENERGY BLOCK.
- Play the mini-game.
- To solve this puzzle, push the buttons to the right configuration.
- Use the KNOB (E).
- Select the knob.
- Go to Sullivan’s Laboratory.
- Place the REEL and push play.
- Take the KNOB (E2).
- Go to the Dental Office.
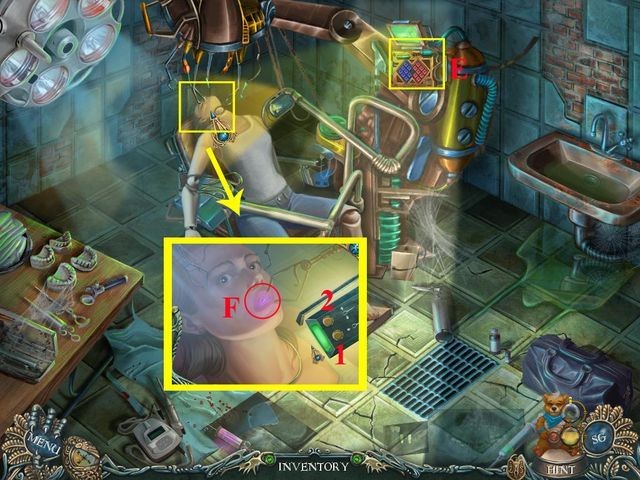
- Place the CIRCUIT PIN; play the mini-game (E3).

- To solve this puzzle, swap the positions of the red and blue buttons.
- Push button number 1.
- Push button number 2.
- Use the TWEEZERS on the mouth (F).
- Take the CRYSTAL (F).
- Go to the 2nd Floor.
- Use the KEY (G).
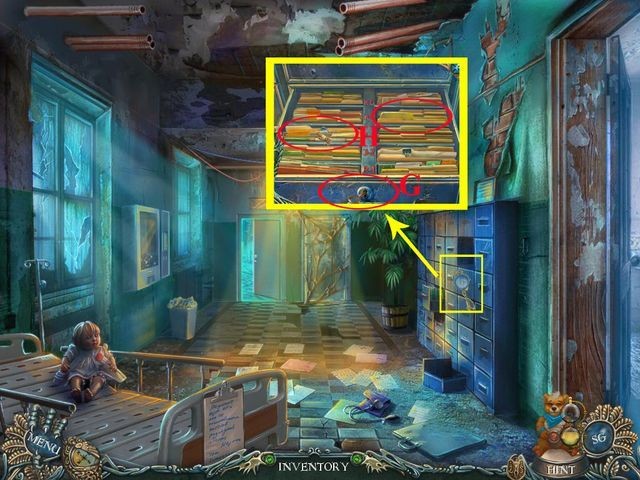
- Take the MEDICAL RECORDS (H).
- Go to Room 205.
- Place the KNOBS (I).
- Use the LEVER. Set in switches MV+1 and PX +10 (J).
- Take the CRYSTAL (K).
- Go to the Imaging Room.
- Take the CRYSTAL (L).
- Go to the Mind Gates.
- Use the CRYSTALS on the raven.
- Congratulations you have completed Stranded Dreamscapes: The Prisoner!


 Tales of Terror: House on the Hill Walkthrough, Guide, & Tips
 Jodie Drake and the World in Peril Walkthrough, Guide, & Tips
 Christmas Stories: A Christmas Carol Walkthrough, Guide, & Tips
 Danger Next Door: Miss Teri Tale's Adventure Walkthrough, Guide, & Tips
 Sea of Lies: Mutiny of the Heart Walkthrough, Guide, & Tips