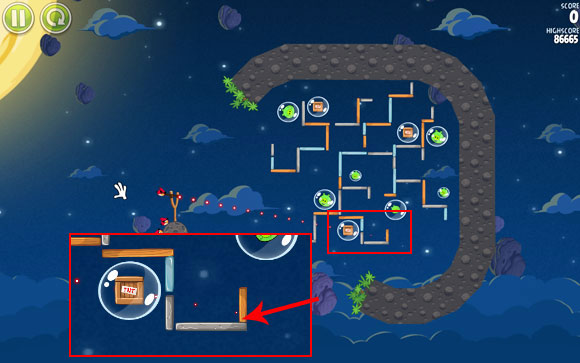
The Angry Birds Space game guide contains detailed guidelines for all levels, with descriptions on how to achieve three stars on each one of them. However, due to the fact that the game mechanics relies on the law of physics (the angle and the force of the launch, gravity, etc.), recreating an identical way of completing a level may prove difficult. Each level has been extensively tested and all solutions verified even up to several dozen times. Even so, the guide should only serve as a direction to what the player should aim at in subsequent steps.
Points:
E.g. Estimated score: 7000+ (+2x 10000) = 27000+
Meaning: 7000+ - the number of points you should receive after following instructions described in the guide. The number in brackets indicates the points you get for the birds you've saved up. The last number is the sum of the two previous ones.
Artur "Arxel" Justynski
Translated to English by Agnieszka "Aeth" Jedrzejczyk
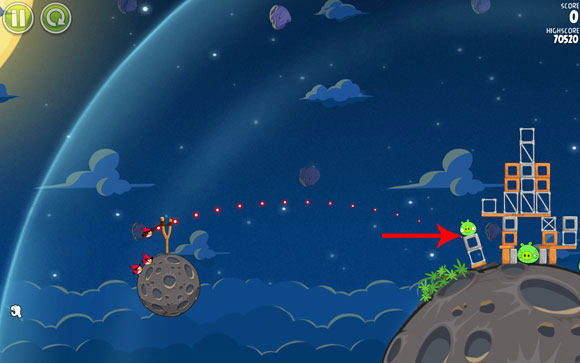
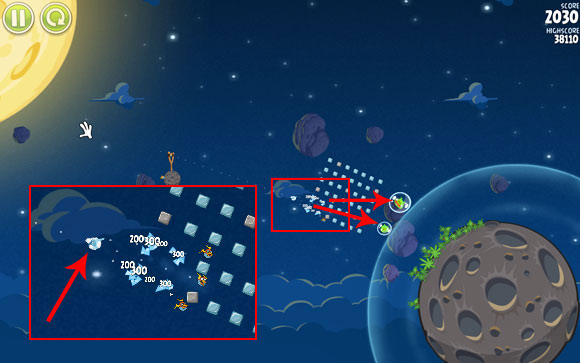
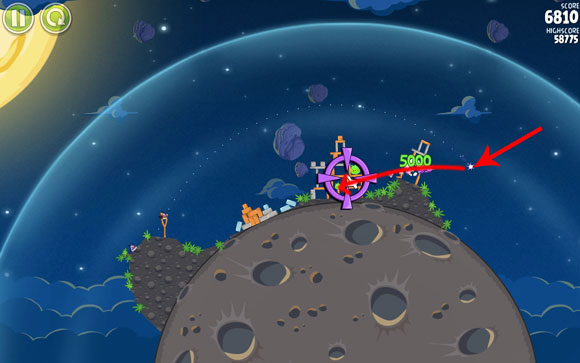
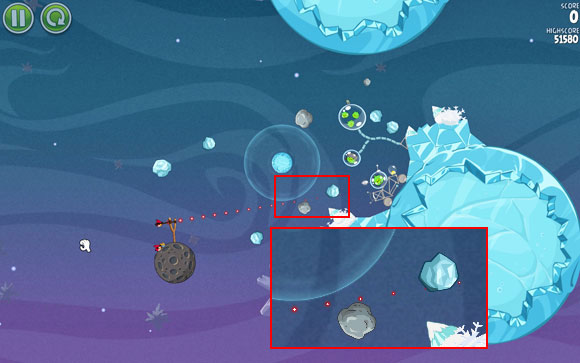
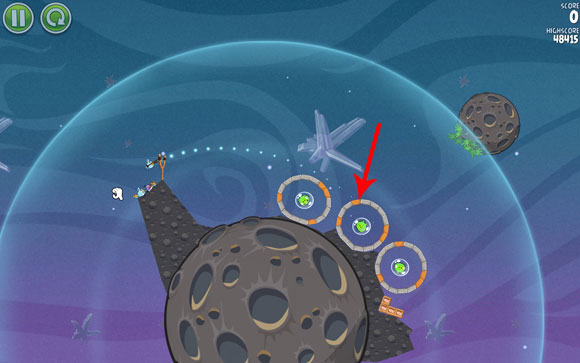
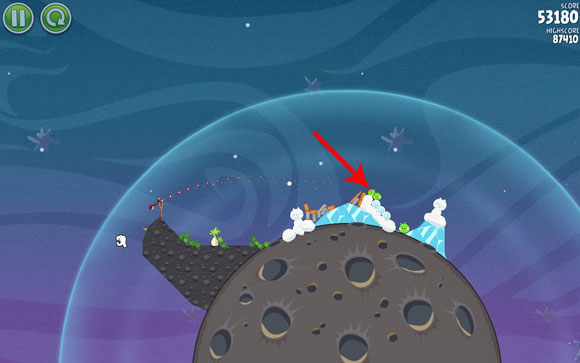
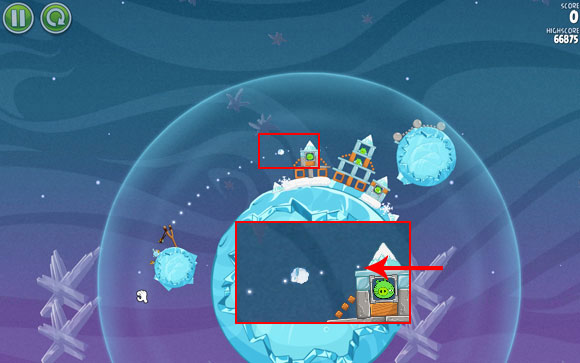
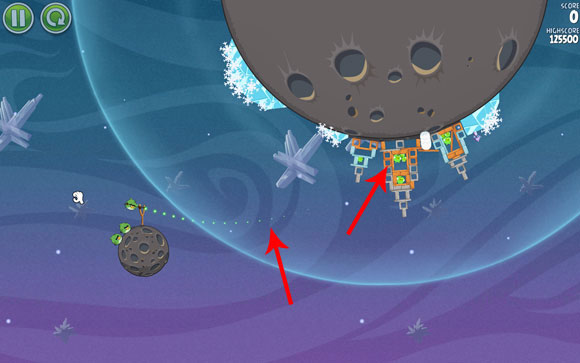
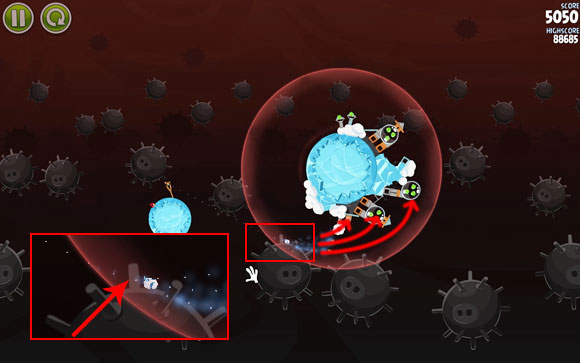
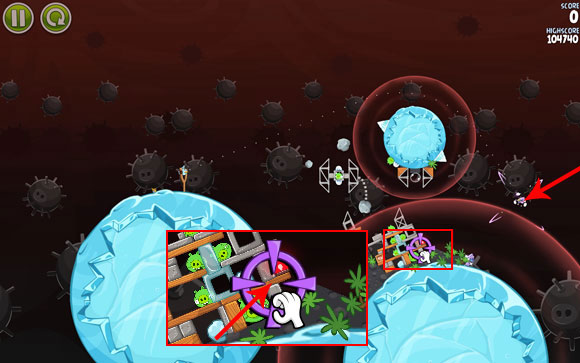
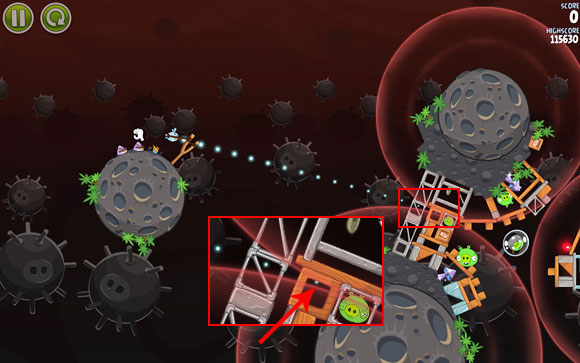
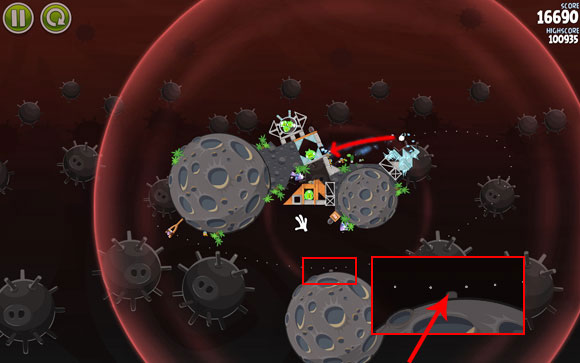
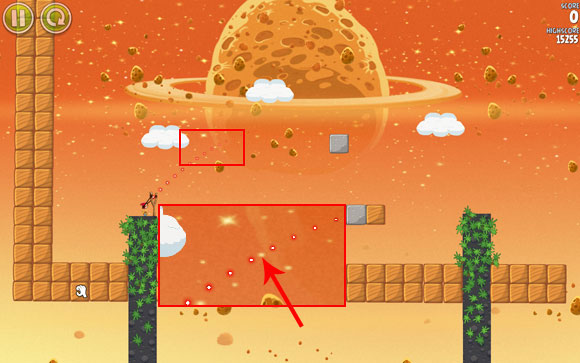
Available birds: Ca-Caw; Ca-Caw; Ca-Caw
Number of launched birds: 1/3
Estimated score: 7000+ (+2x 10000) = 27000+
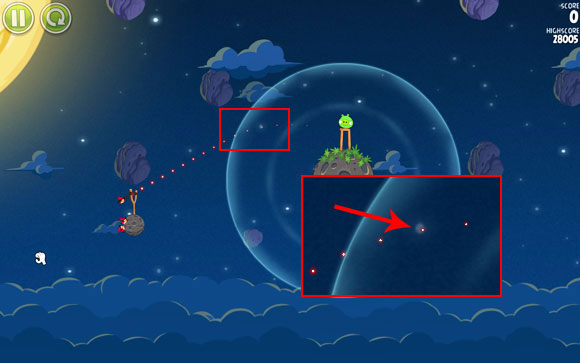
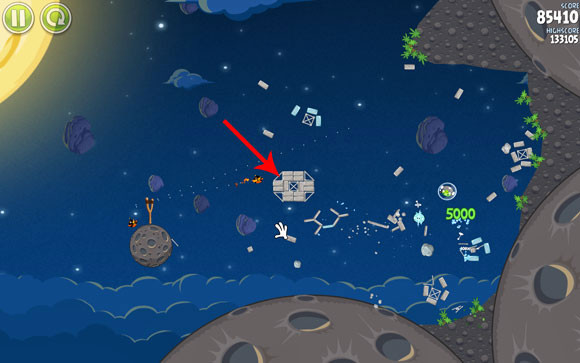
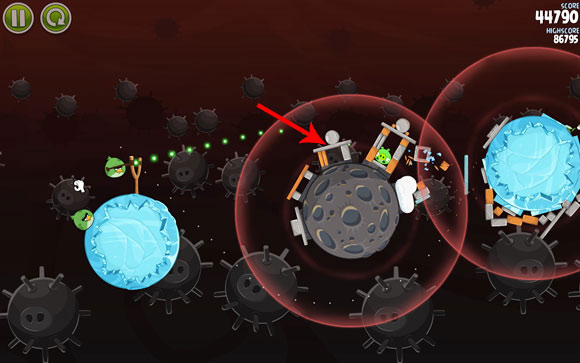
The first level is generally easy and you can complete it without any special effort or precise shooting. To receive the most points, try not only to hit the pig, but also knock it down so as to destroy the wooden barrels it's sitting on. If you zoom out to the maximum point, you can use a small star indicated on the screen to help you plan the trajectory of the shot.
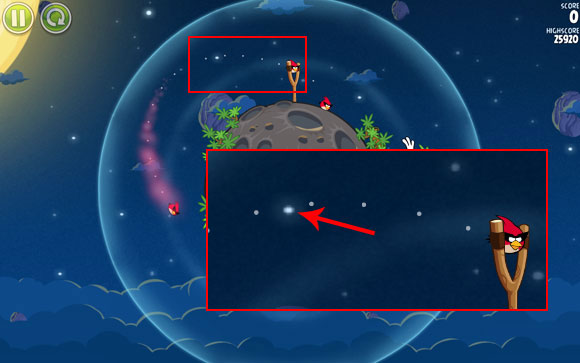
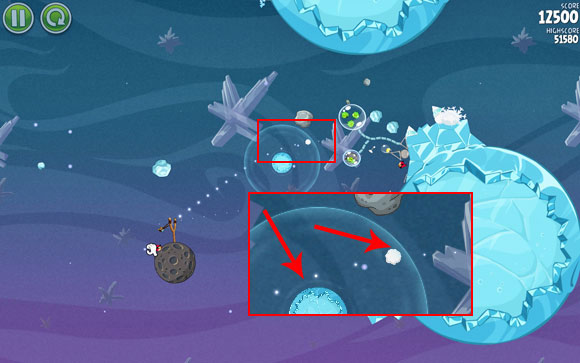
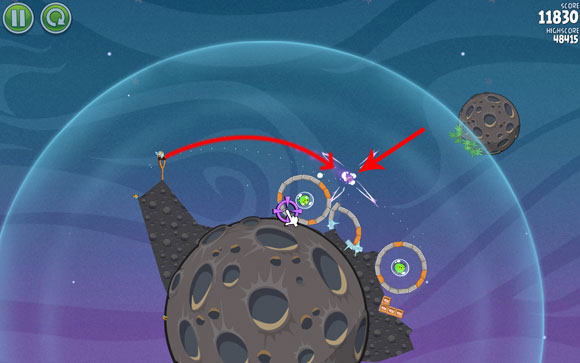
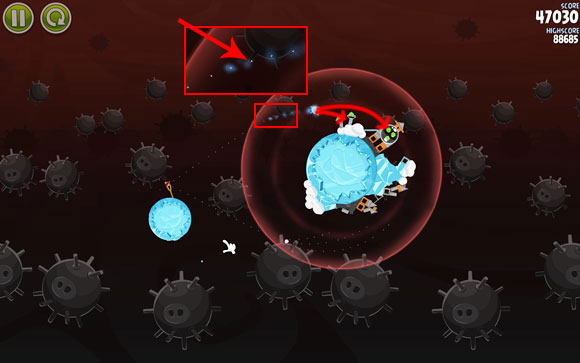
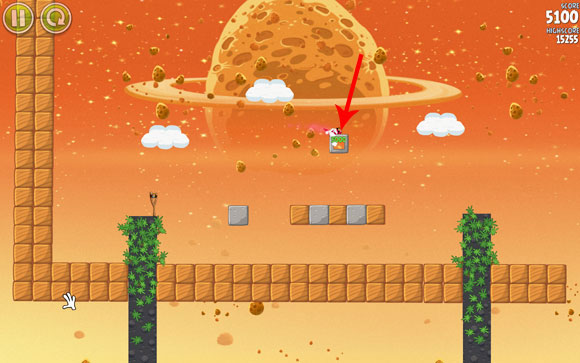
Available birds: Ca-Caw; Ca-Caw; Ca-Caw
Number of launched birds: 1/3
Estimated number of awarded points: 24000+ (+2x 10000) = 44000+

In order to get rid of all the pigs in one shot, launch the bird so that it flies from below; this way you can knock down all the balks. At maximum zoom out, you can use the star indicated on the screen and plan the path to go through it.
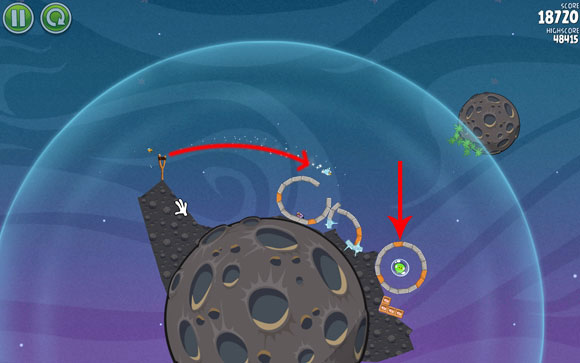
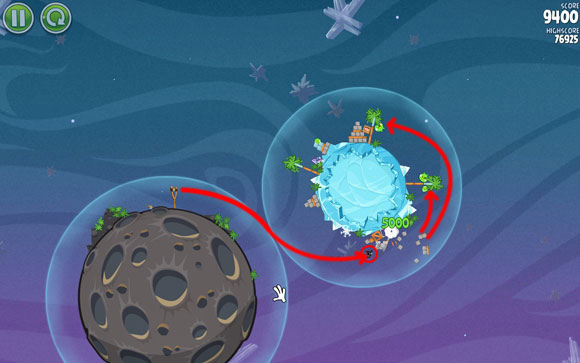
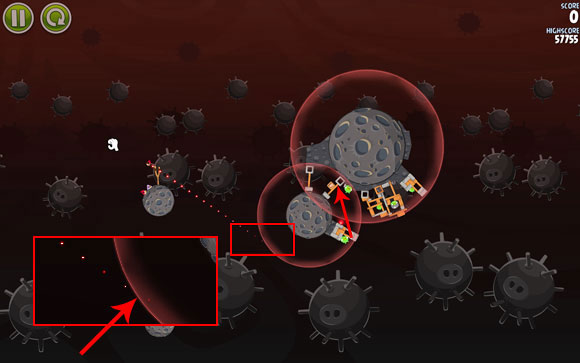
Available birds: Ca-Caw; Ca-Caw; Ca-Caw
Number of launched birds: 1/3
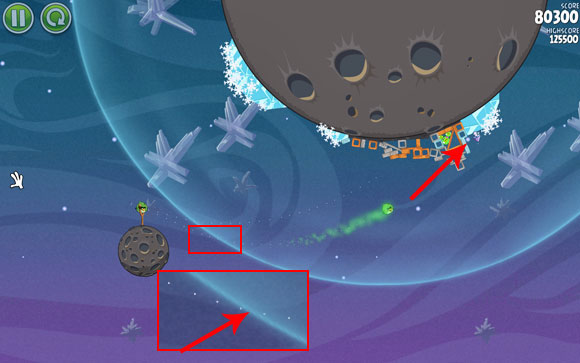
Estimated score: 5700+ (+2x 10000) = 25700+
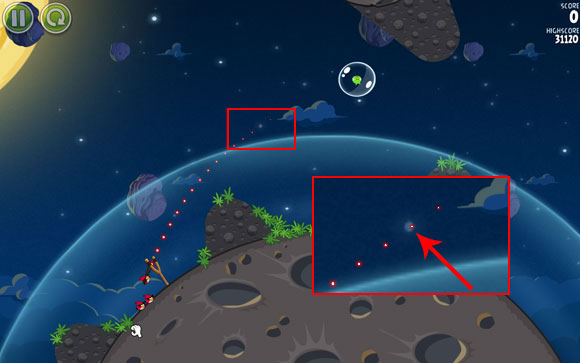
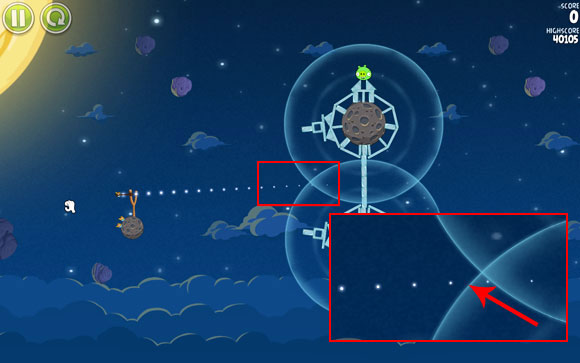
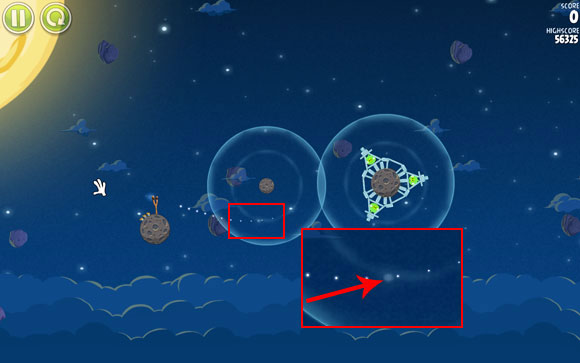
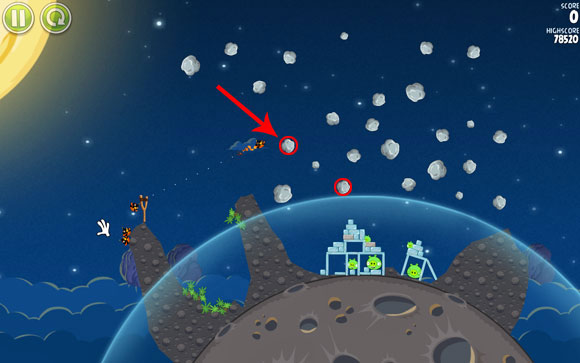
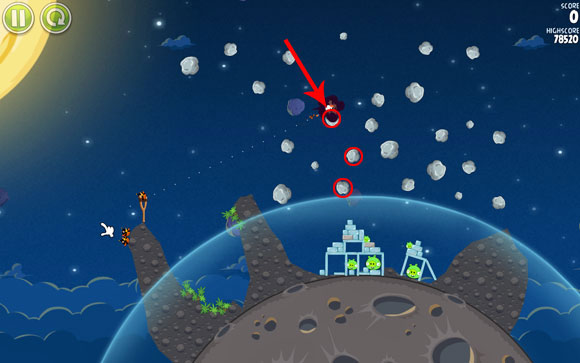
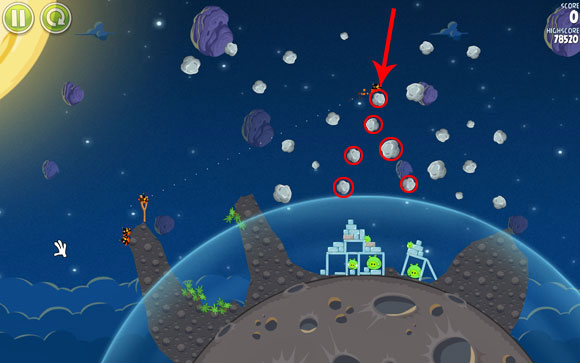
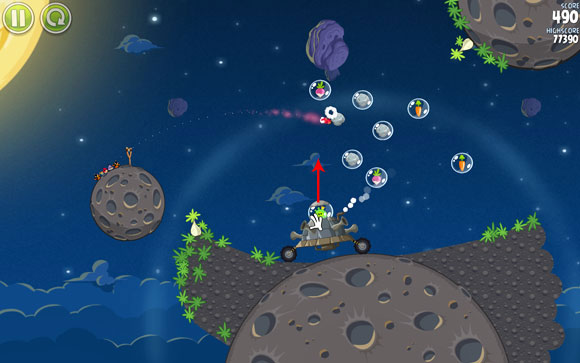
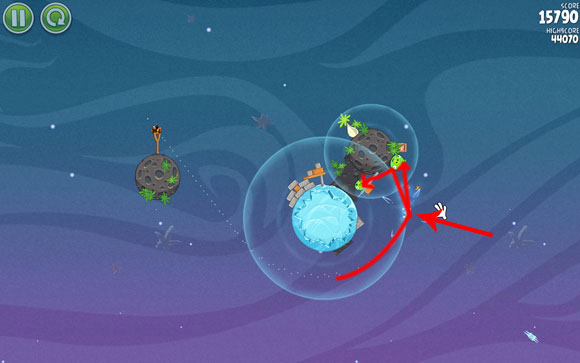
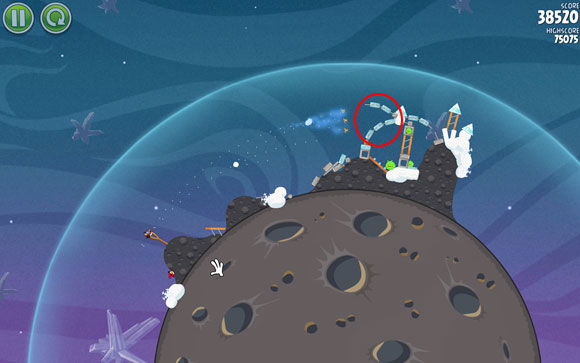
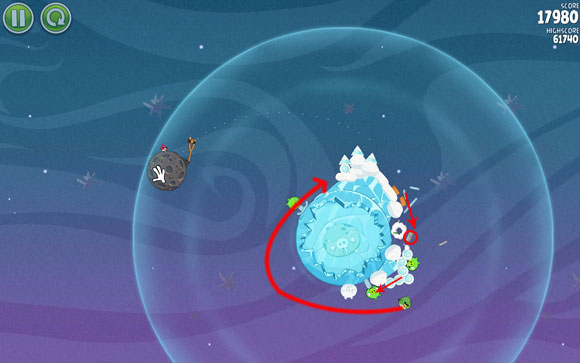
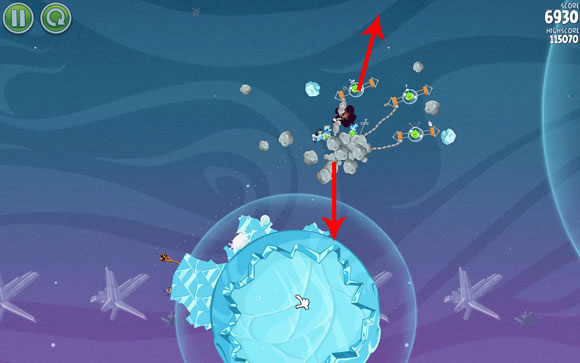
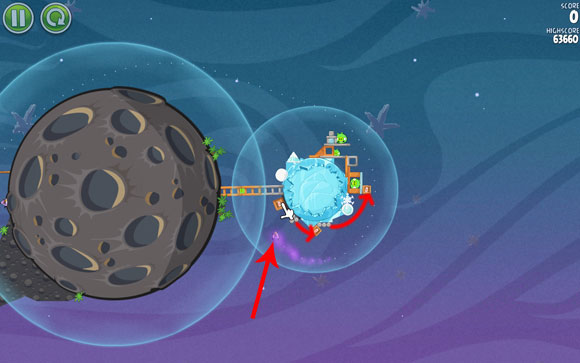
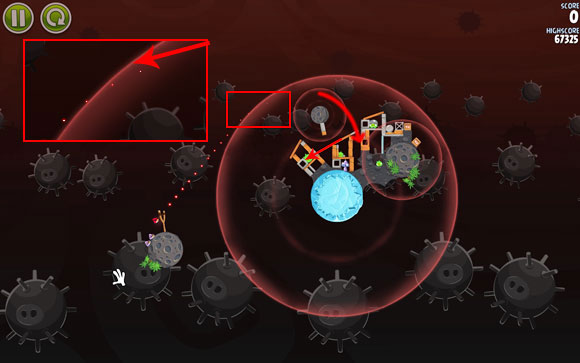
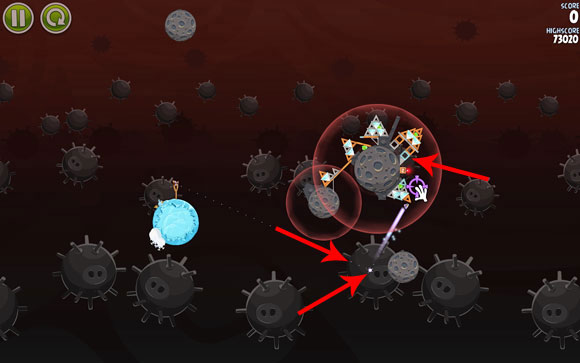
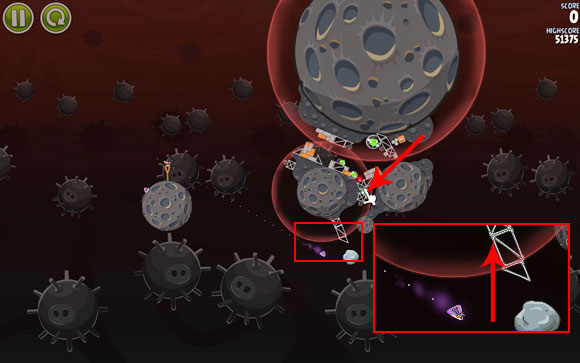
You need to launch the bird in such a way that it doesn't hit the planet but flies around it. You can use the pretty distinguishable star for help.
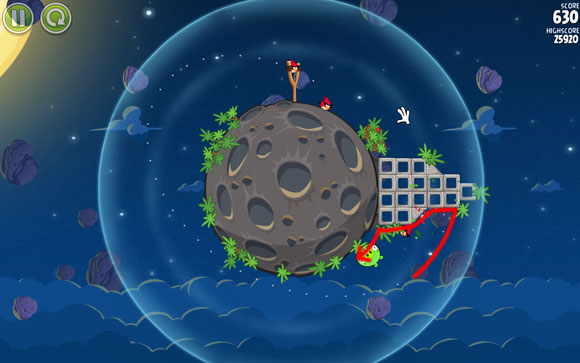
The bird will fly around the planet and hit the obstacle - wait until it rolls down and slays the pig.
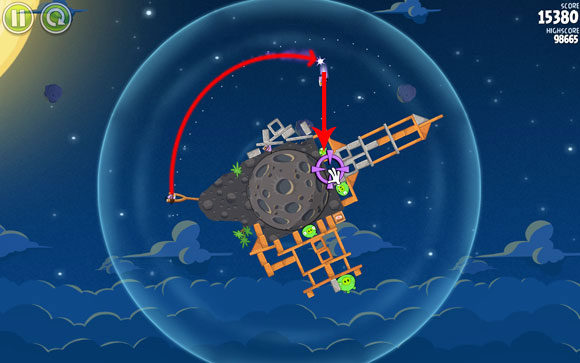
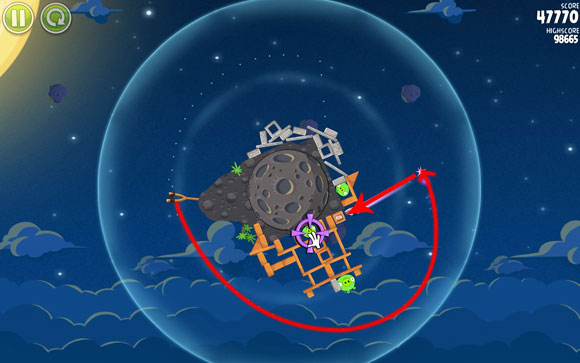
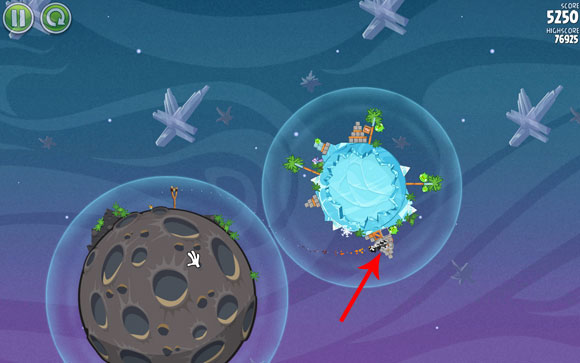
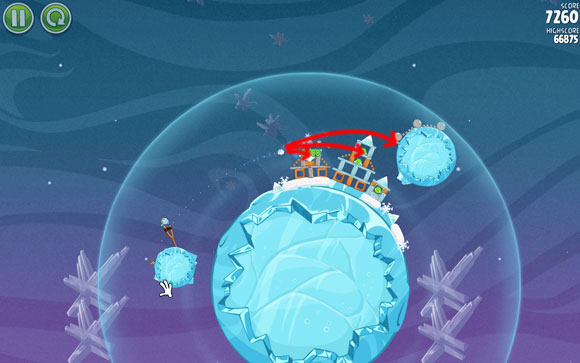
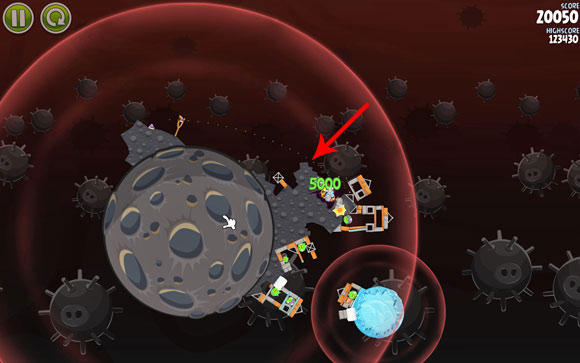
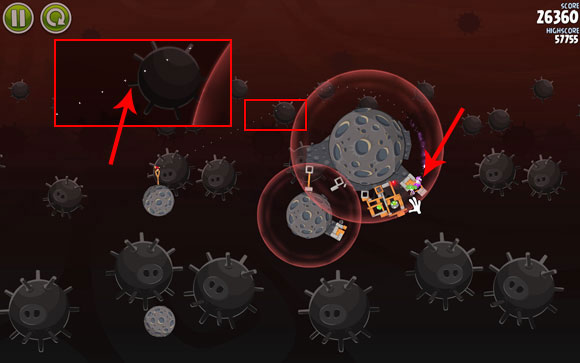
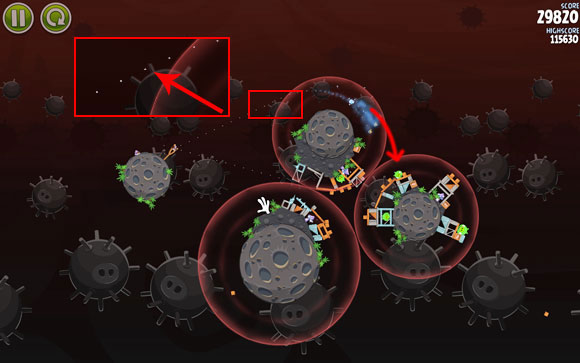
Available birds: Ca-Caw; Ca-Caw; Ca-Caw
Number of launched birds: 1/3
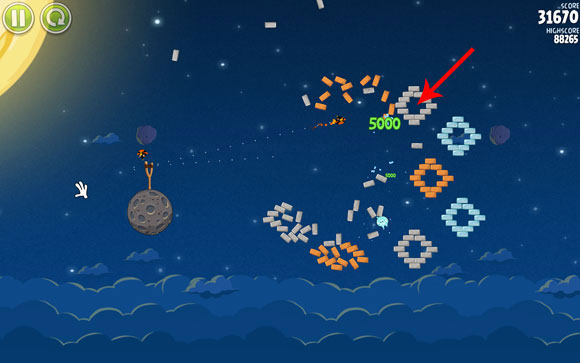
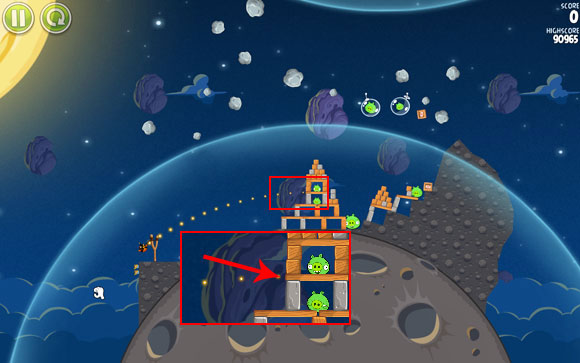
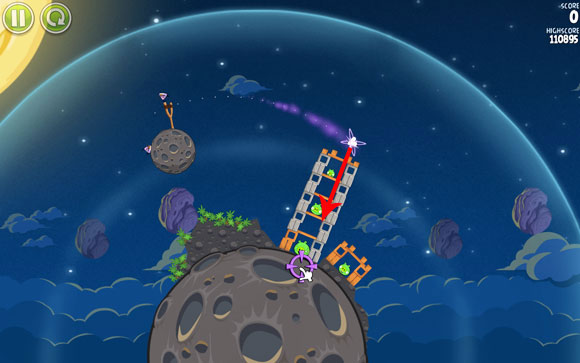
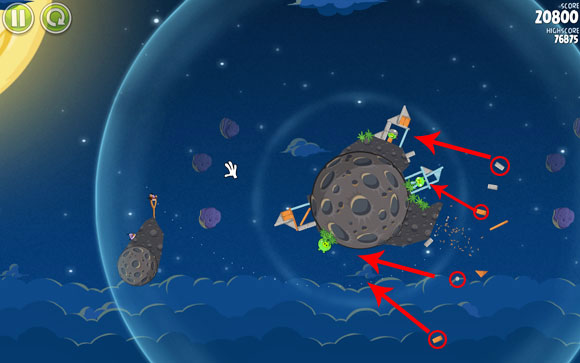
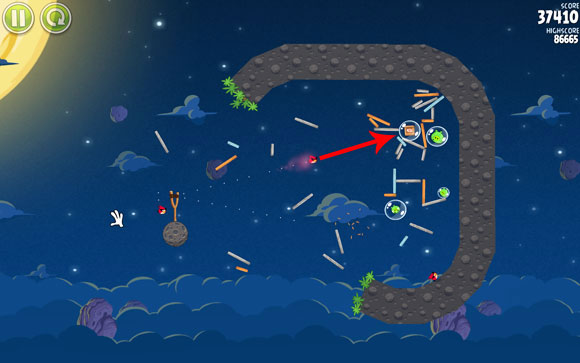
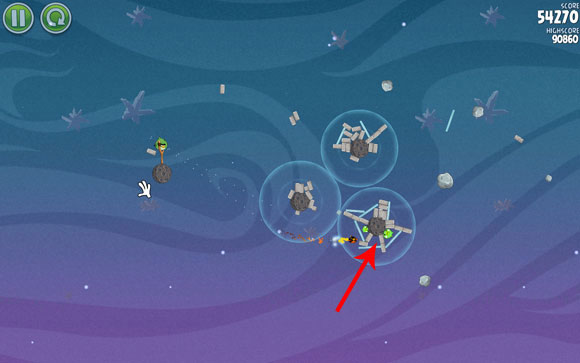
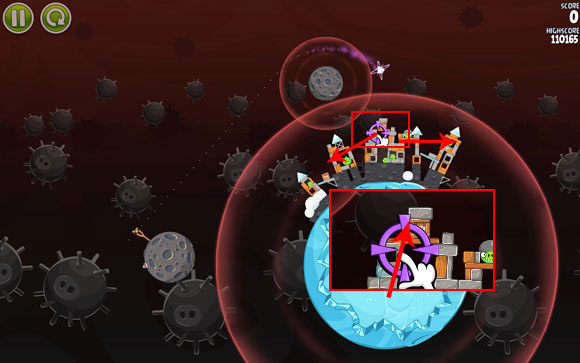
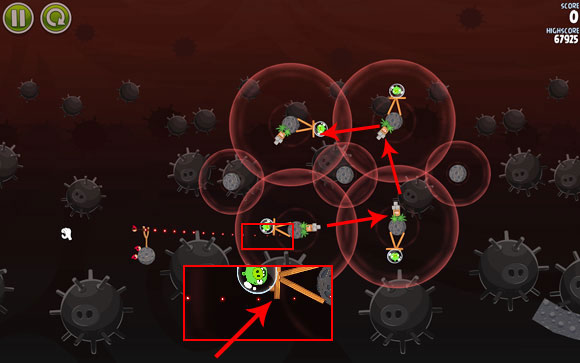
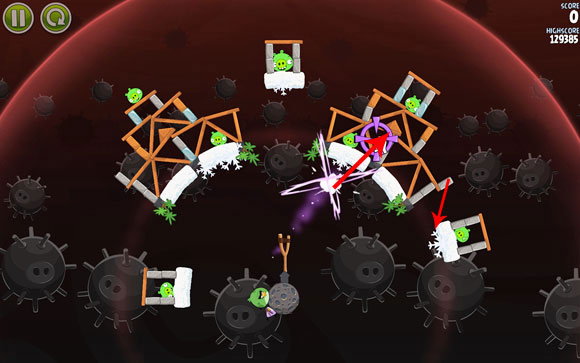
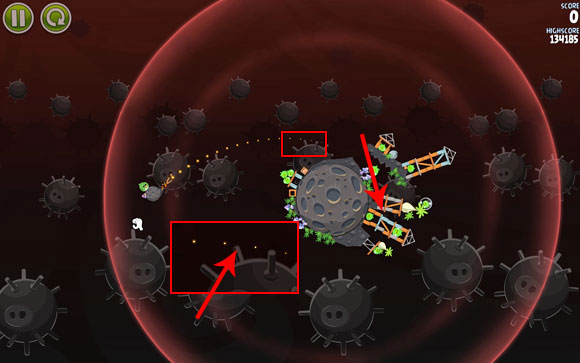
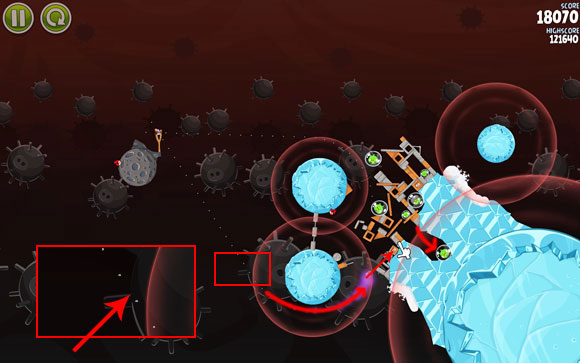
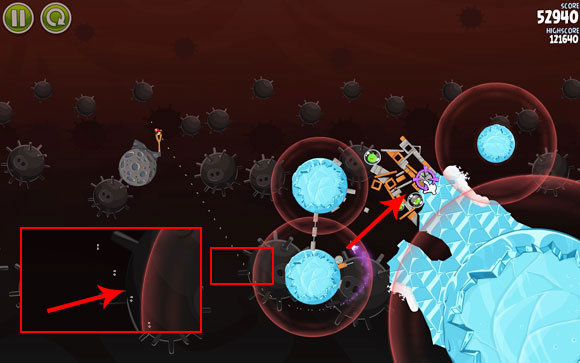
Estimated score: 48000+ (+2x 10000) = 68000+
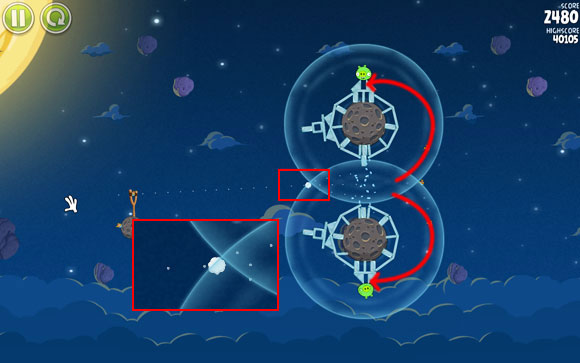
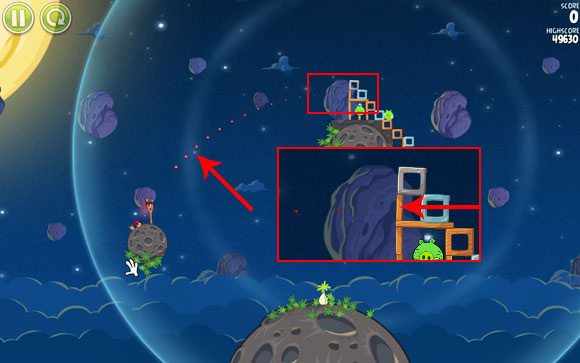
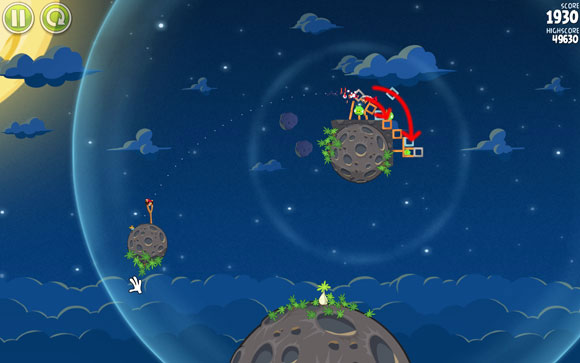
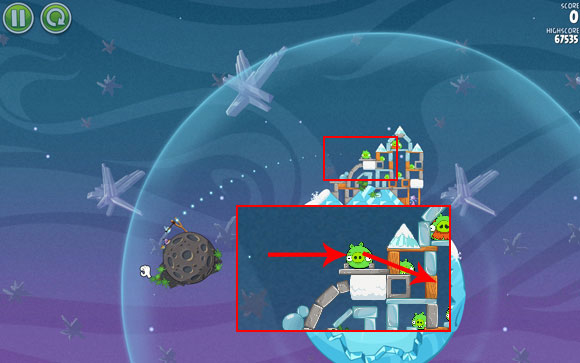
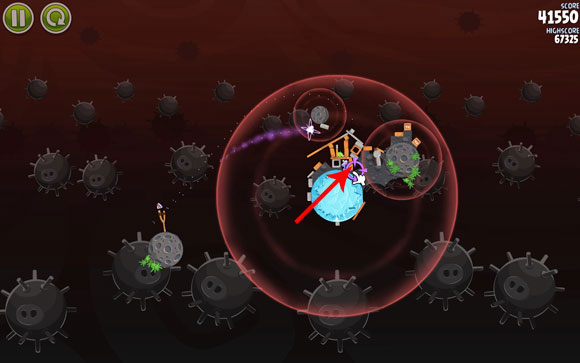
Your goal is to shake the whole structure. Aim the bird at the corner of the indicated block - it may act differently when it bounces, so you may have to adjust the height and lower the flight path, or launch the angry bird a little higher.
What you want to do is to shake the structure, which is easily achieved when the bird, after it bounces off the block, hits the indicated small plank.
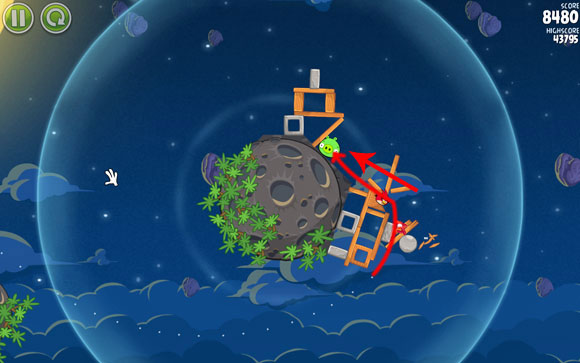
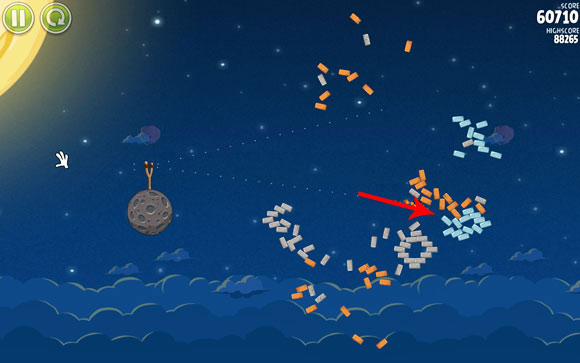
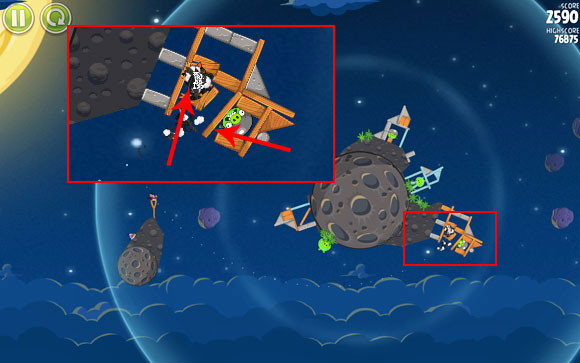
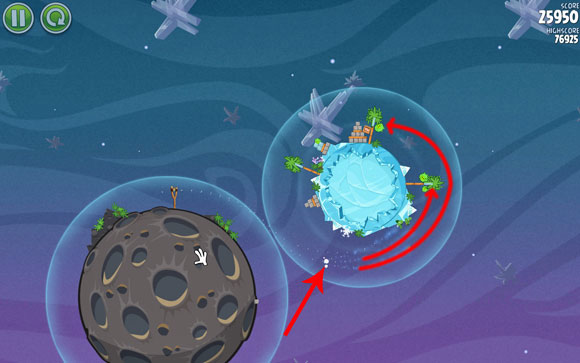
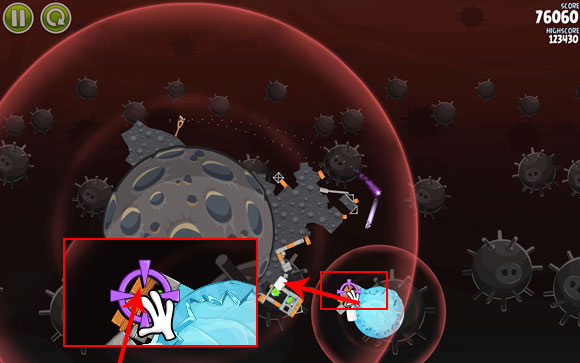
Available birds: Ca-Caw; Ca-Caw; Ca-Caw
Number of launched birds: 1/3
Estimated score: 7000+ (+2x 10000) = 27000+
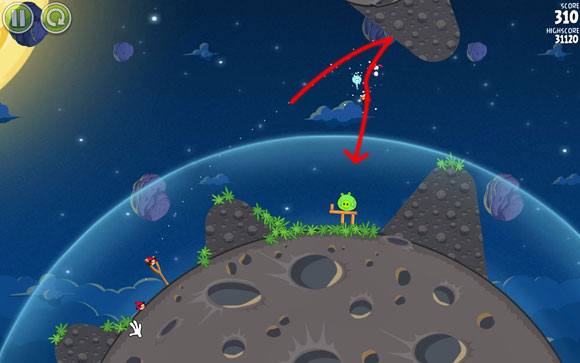
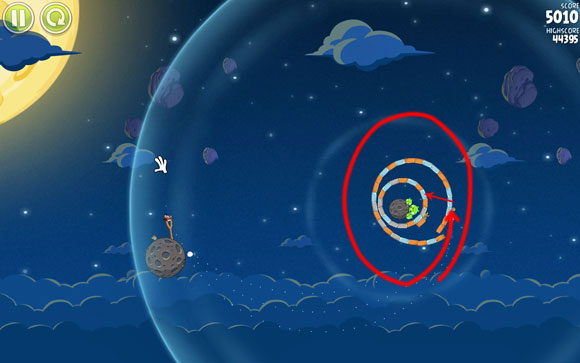
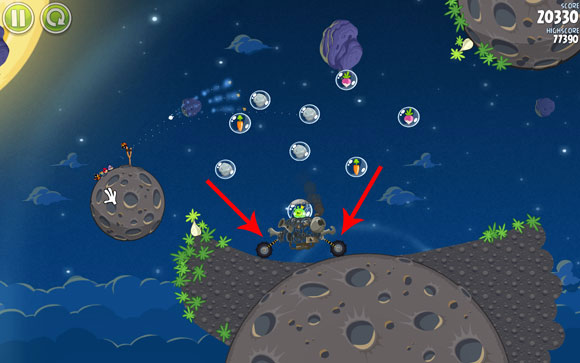
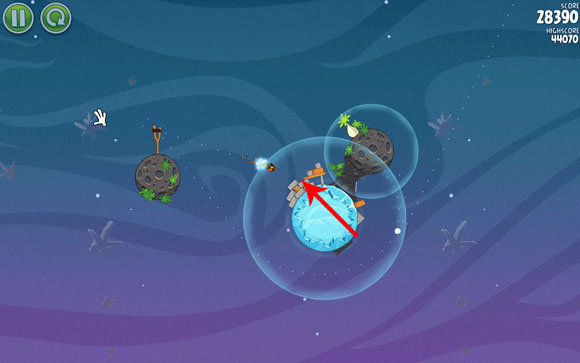
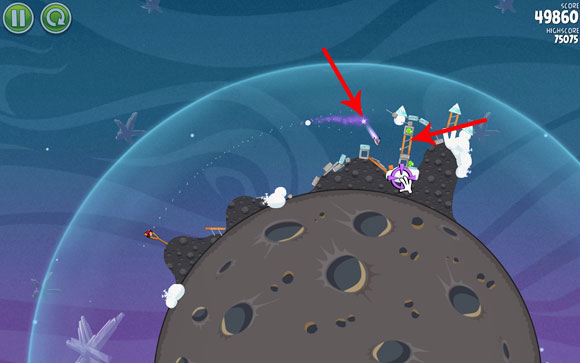
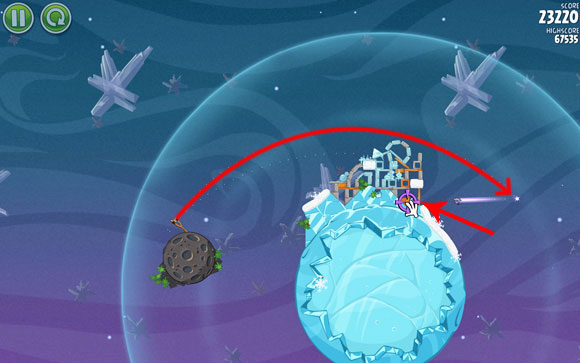
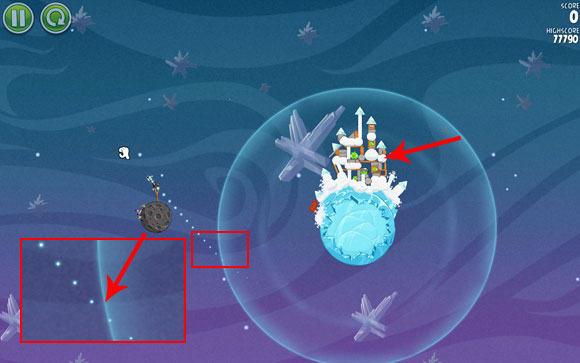
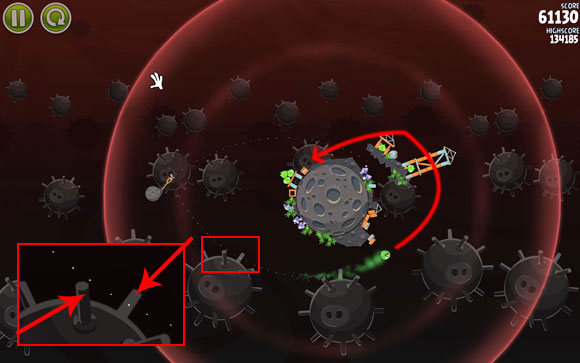
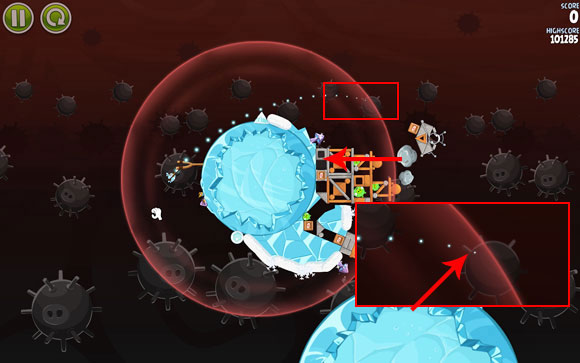
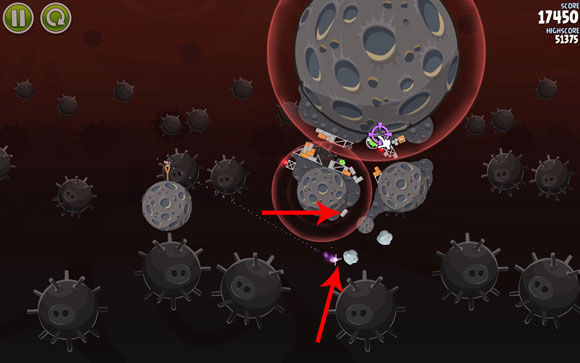
A very easy level - you need to knock down the pig to receive the most points. Zoom out to the maximum distance and use the indicated star for help.

This way, the trajectory of the flight should look more or less like the one on the above screen - the bird makes one full circle and knocks the pig down at the next approach.
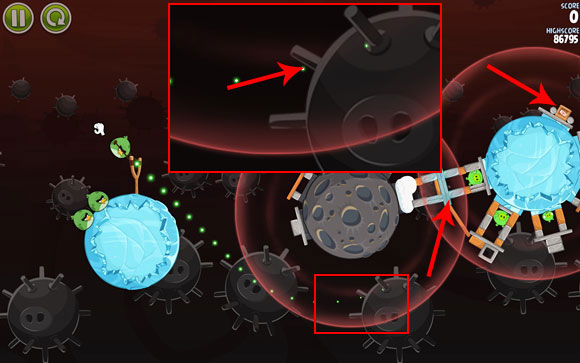
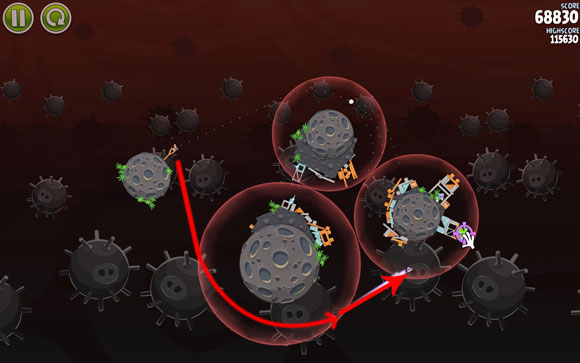
Available birds: Ca-Caw; Ca-Caw; Ca-Caw
Number of launched birds: 1/3
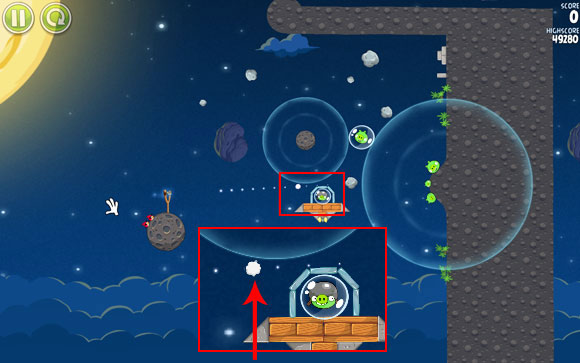
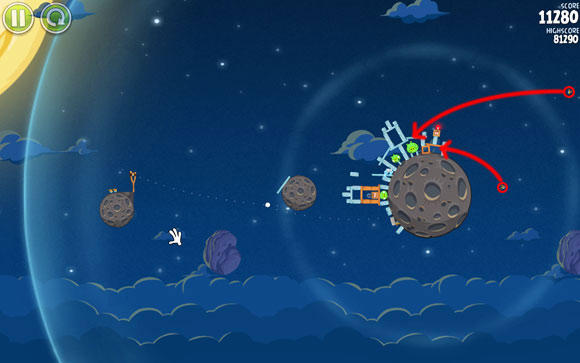
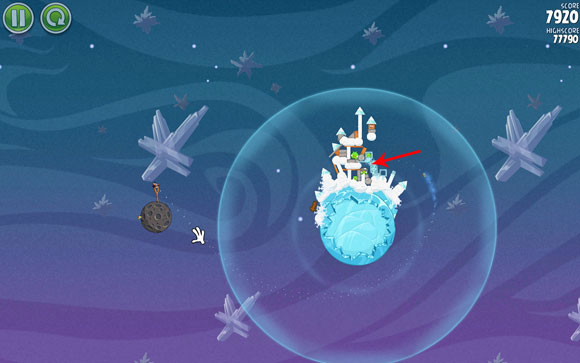
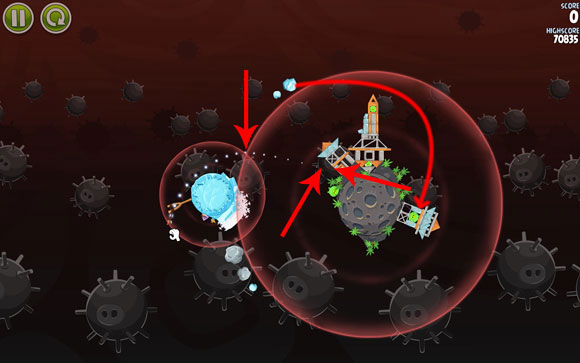
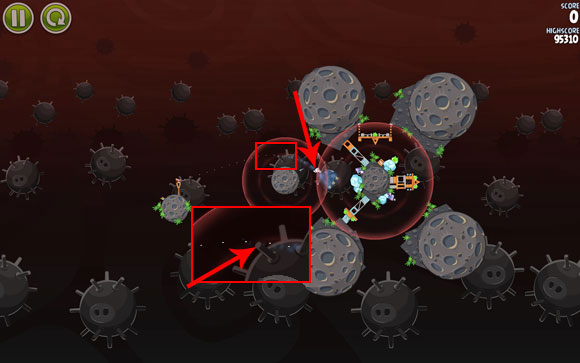
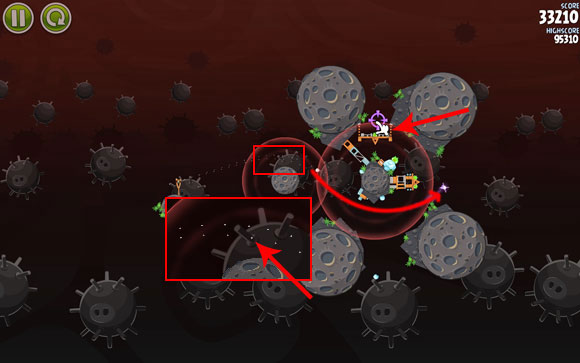
Estimated score: 10000+ (+2x 10000) = 30000+
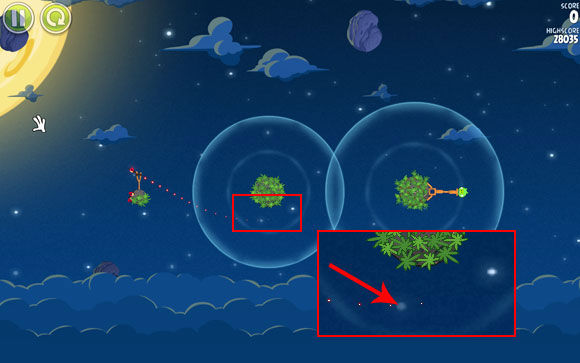
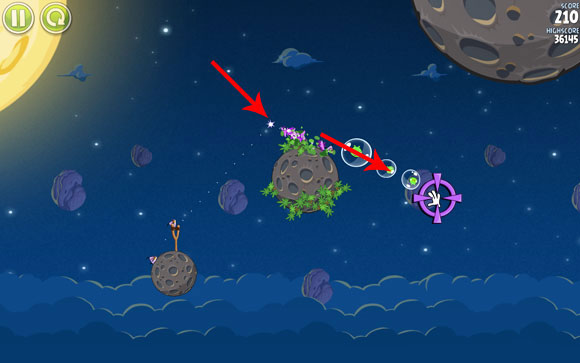
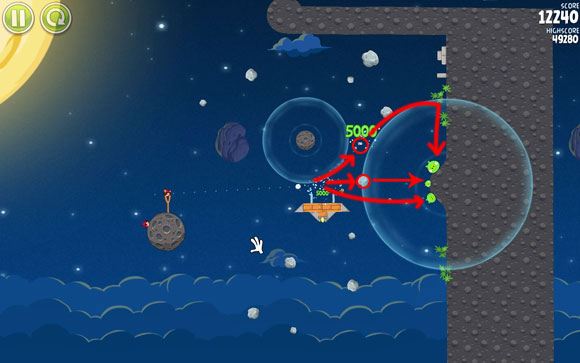
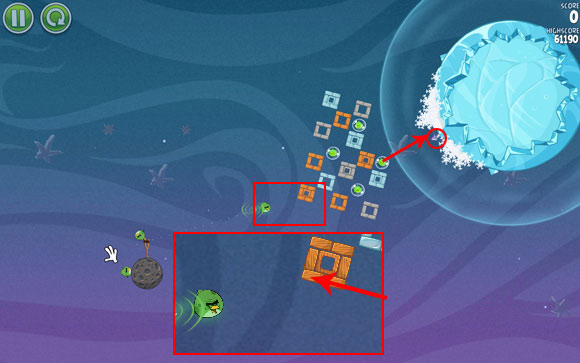
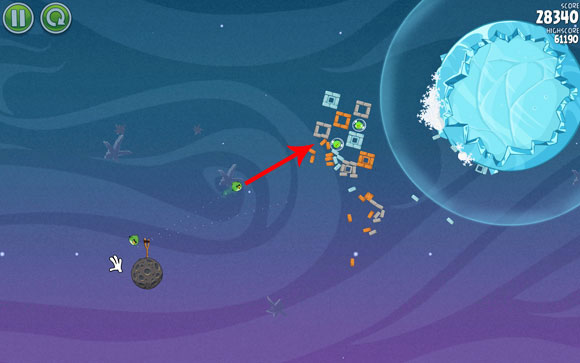
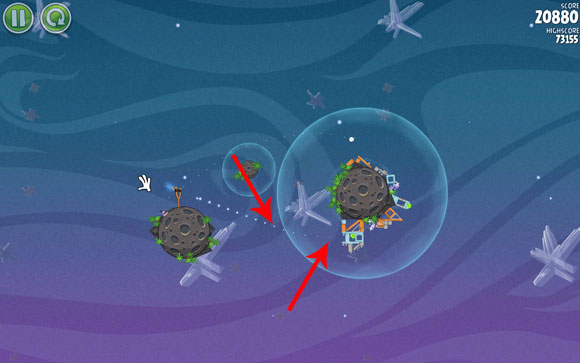
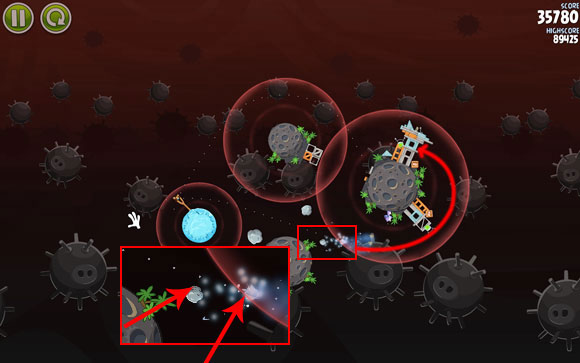
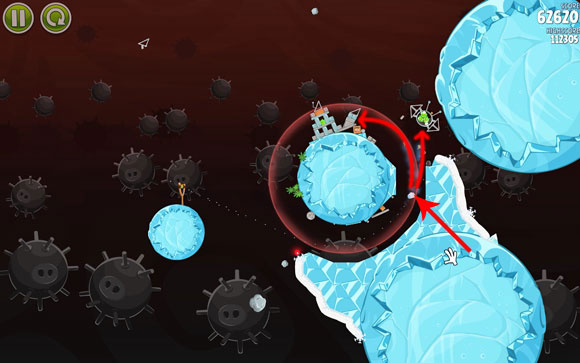
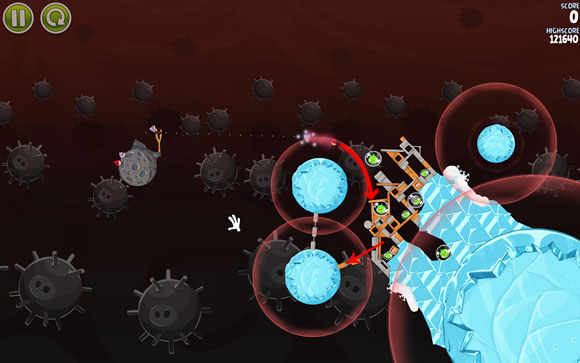
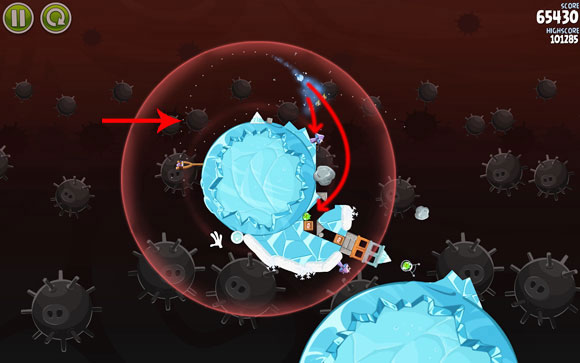
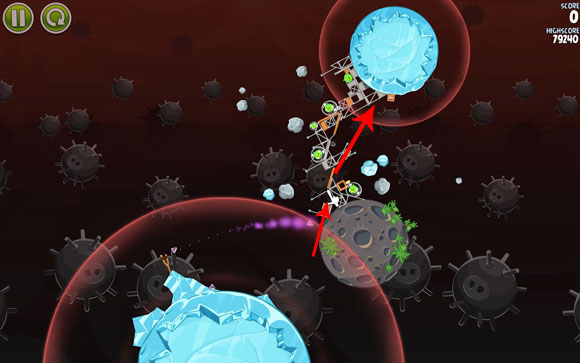
You can easily achieve three stars using only one bird. First, zoom out as much as you can, and then plan the trajectory so that that the auxiliary line passes through the star visible in the background. Naturally, pull the slingshot back as far as possible.
The bird will bounce off of the rock and hit the bubble with the pig, which will freeze and break into pieces. The bird will slowly fall down and be pulled by gravitation, pointing it in the other pig's direction. It may be possible that instead of the obstacle the bird will hit the bubble directly (millimeter differences in the primary setting of the flight trajectory), but it should fall down and hit the other pig nonetheless.
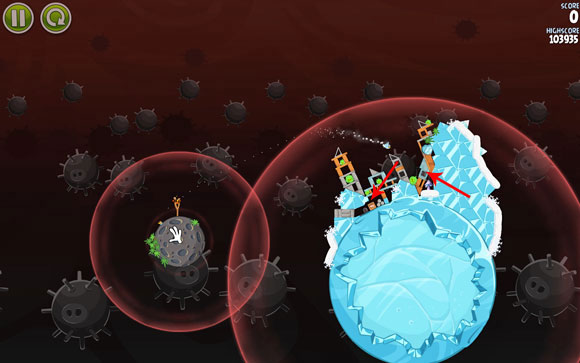
Available birds: Ca-Caw; Ca-Caw; Ca-Caw
Number of launched birds: 1/3
Estimated score:: 15000+ (+2x 10000) = 25000+
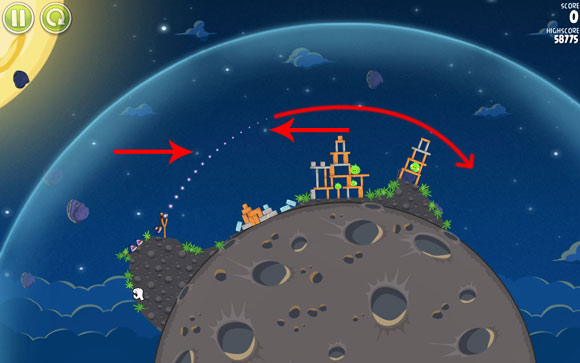
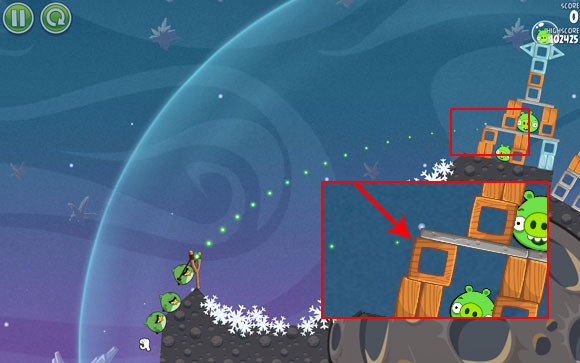
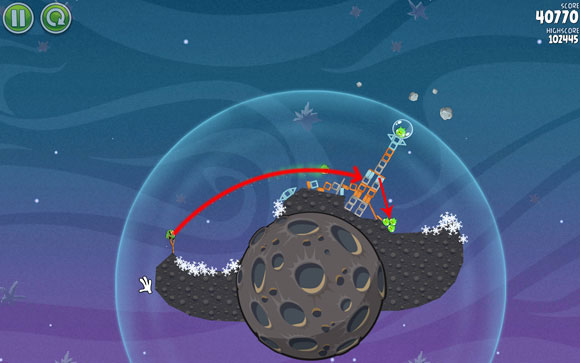
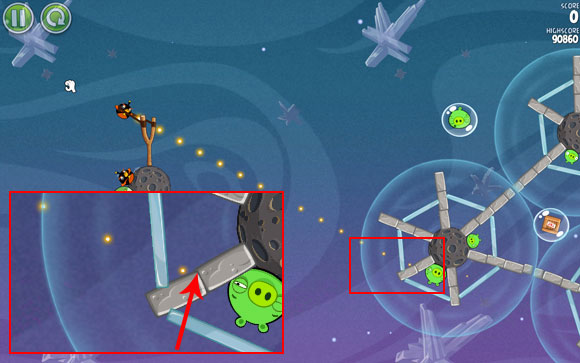
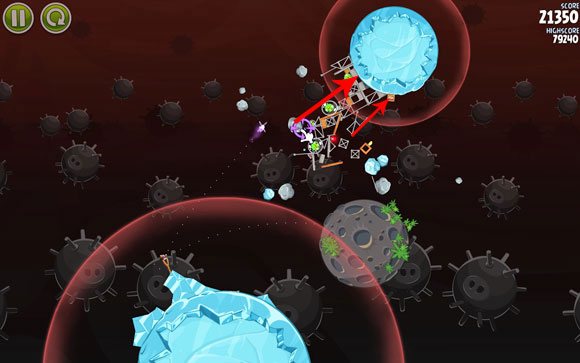
Aim the bird at the concrete plank. This time there isn't any help to refer to, so you need to plan the flight trajectory on your own - which shouldn't be any problem for you.
The bird will shake the structure and cause it to fall on the other pig. It may happen that the bird manages to roll up to it.
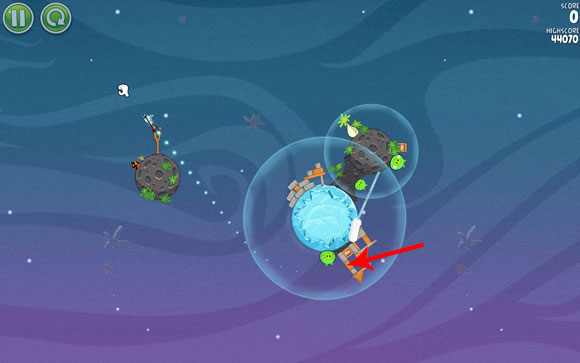
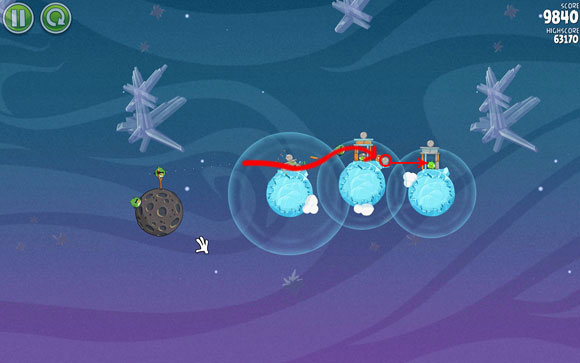
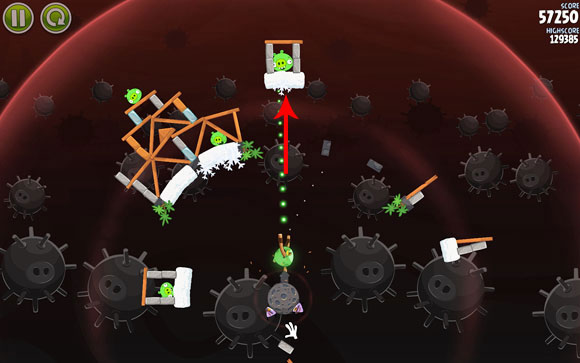
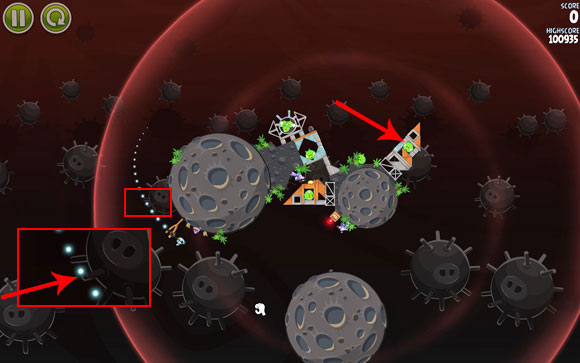
Available birds: BipBapBop; BipBapBop; BipBapBop; BipBapBop
Number of launched birds: 1/4
Estimated score: 20000+ (+3x 10000) = 50000+
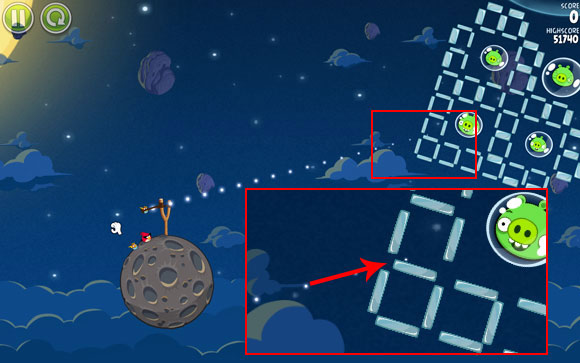
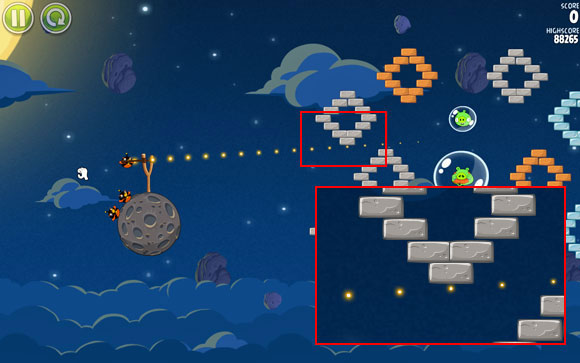
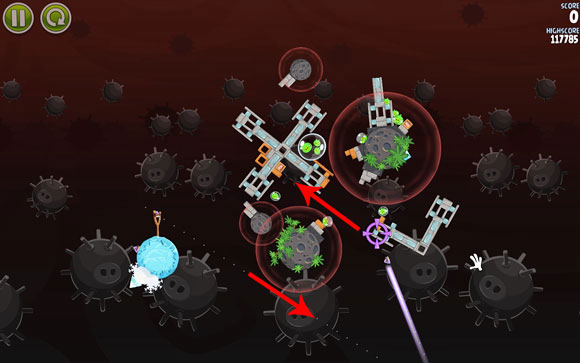
Zoom out to the maximum level and adjust the flight path through the star indicated above. Split the birds just before they hit the glass shield.
One of the birds should easily fly into the bigger pig.
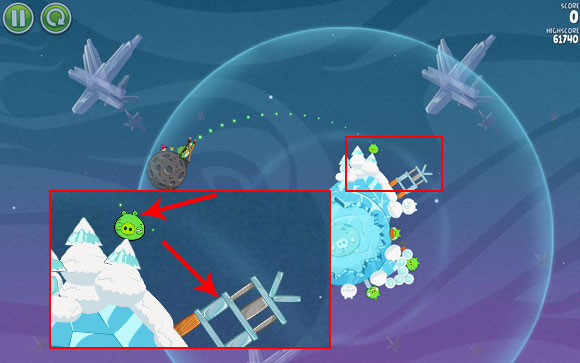
Available birds: BipBapBop; BipBapBop; BipBapBop
Number of launched birds: 1/3
Estimated score: 16000+ (+2x 10000) = 36000+

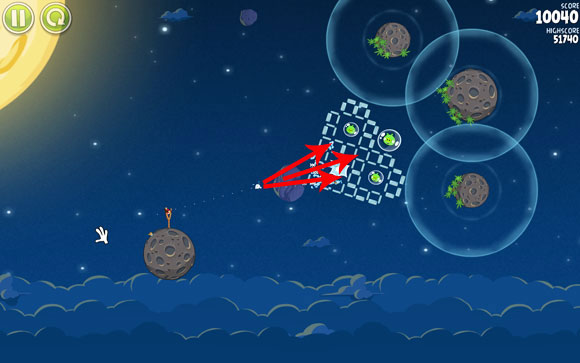
Aim the bird at the indicated rows of blocks; try to make it as close to the middle as possible.
Before the bird reaches the blocks, split it into three and they will break through further. They should either hit the pigs or at least propel some of the blocks at them. The pig don't necessarily have to die at once - it's more probable that they will be only slightly pushed, and then pulled in by the gravity of the nearby planet.
Available birds: BipBapBop; BipBapBop; BipBapBop
Number of launched birds: 1/3
Estimated score: 18000+ (+2x 10000) = 38000+
This level requires a little bit more precision - aim BipBapBop a little below the point where the gravities of the two planets meet. It's easier to do it when you zoom out as far as possible.
Split the three birds is more or less at the borderline - the task will probably require a few tries and adjusting the timing of the split. Two birds at the borders should stay in the area of the gravitational pull and make a half-circle, hitting the pigs.
Available birds: BipBapBop; Ca-Caw; BipBapBop
Number of launched birds: 1/3
Estimated score: 30000+ (+2x 10000) = 50000+
The place you should aim the bird at is more or less the indicated break between the glass planks.
Split BipBapBop at quite a distance from the glass planks. Each of the birds should break the pigs' glass spacesuit, thus freezing them.
Available birds: BipBapBop; BipBapBop; BipBapBop; BipBapBop
Number of launched birds: 1/4
Estimated score: 25000+ (+3x 10000) = 25000+
After zooming out to the maximum level, you can use the small star visible in the background to plan your bird's flight trajectory.

Split the birds right after they enter the first planet's gravity area.

The birds should eliminate, one by one, all the pigs.
Available birds: Ca-Caw; Ca-Caw; BipBapBop
Number of launched birds: 1/3
Estimated score: 27000+ (+2x 10000) = 47000+
This level is a little harder, and requires a bit more precision - luck is also a factor. You need to launch the bird at the center of the indicated wooden plank. You can use a small star indicated on the screen for help - adjust the flight path a little bit above it.
If the birds hits right, it should roll down the blocks on the second pig (the first one will be killed by a concrete block), while a glass shard should shake the structure the last of the pigs is hiding in. It may happen that you launch the bird with too much speed and it will curve around too far or don't move at all.
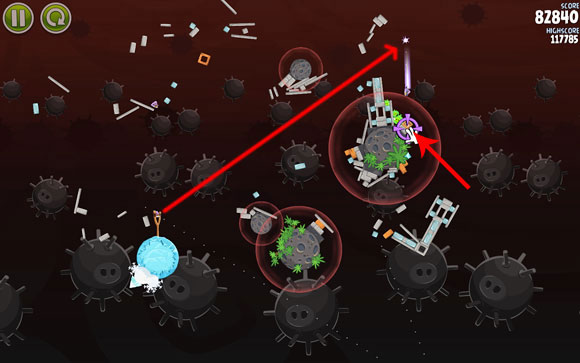
Available birds: Ka-Boom; Ka-Boom; Ka-Boom
Number of launched birds: 3/3
Estimated score: 80000+
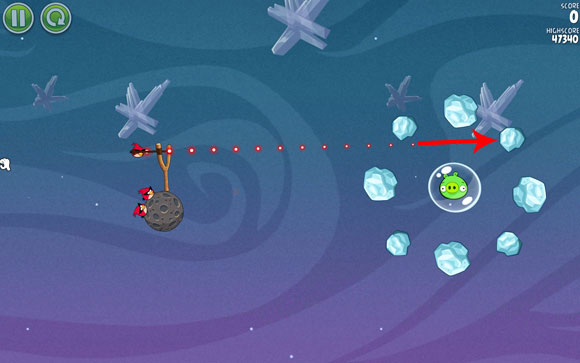
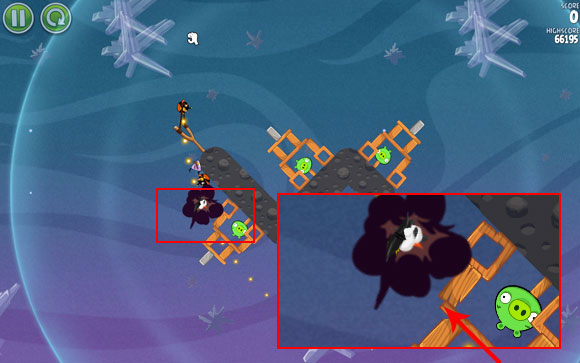
The first shot is crucial - you should know from the start that if you miss, you probably won't get the three stars. Aim the bird at the bottom brick shown on the above screen - only so as to brush against it. Once the bird hits it, detonate it at once. At this point, the second cluster of bricks should fall apart almost all around the screen, hitting all three bubbles with the pigs.
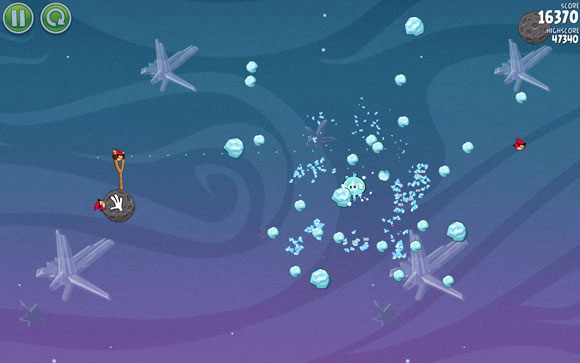
Don't wait too long before firing again, as the level will end. Aim the second bird at the indicated cluster of bricks, trying to get the bird past the bricks and into the center. Don't detonate it too quickly. The explosion has too - at least to some point - shake the structure of the wood cluster.
Aim the last shot at the cluster of bricks broken earlier. Don't detonate the bird too early - if you aimed correctly, it should destroy a few bricks first, and only then explode. It's very probable that you'll have to repeat this level many times, because how the bricks collapse can be very unpredictable and you may not have destroyed enough of them.
Available birds: Ka-Boom; Ka-Boom; Ka-Boom
Number of launched birds: 1/3
Estimated score: 18000+ (+2x 10000) = 38000+
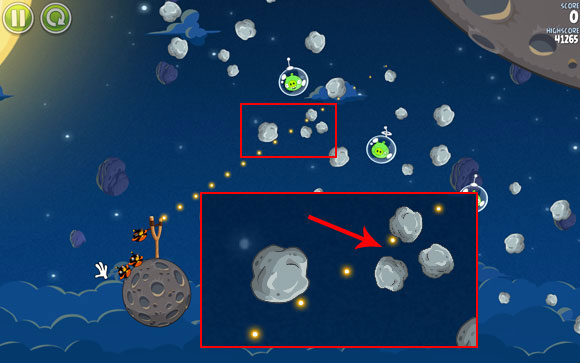
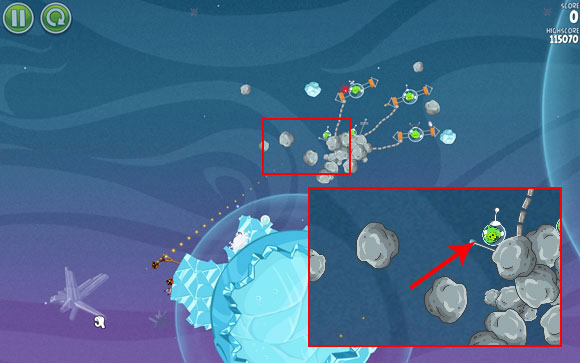
The first solution is to launch the bird between the three smaller asteroids shown on the screen. Be careful not to let the bird accidentally hit the larger one when passing by.
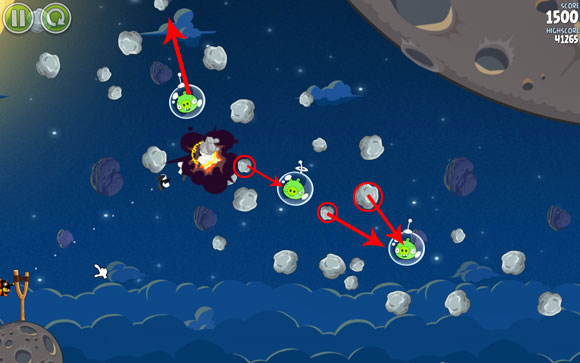
As soon as you're between the stones, detonate the bird - and while you don't need to worry about the pig on the left, the chain reaction you need to achieve on the right is another matter. One of the asteroids should hit the nearby pig, and the pig should travel further to the right and hit one of the circled asteroids, which in turn should eliminate the third pig. This solution is a little hard to achieve, because the "stones" behave in an unpredictable way.
The second solution is a little easier. Your bird needs to hit the circled asteroid - everywhere but in the middle; the bird has to bounce to the right.

It should fly just under the second pig and hit it too. When in a while the bird detonates on its own, the circled asteroid should hit the last pig. The direction it flies in relies on the spot the bird detonated at, so it may be that it misses the target completely.
Available birds: Ka-Boom; Ka-Boom; Ka-Boom
Number of launched birds: 2/3
Estimated score: 85000+ (+1x 10000) = 95000+
Launch the first bird at the indicated glass block - let it break through and get between the rest of the pieces, then detonate it.
Some of the spattered planks and blocks should eliminate some or all pigs. Nevertheless, launch the second bird at the remaining pile and detonate it there. This way you'll gain more points.
Available birds: Ka-Boom; Ka-Boom; Ka-Boom
Number of launched birds: 2/3
Estimated score: 115000+ (+1x 10000) = 125000+
Launch the first bird at the pig which is flying above the cluster of concrete planks. Detonate it only when the bird is as close as possible, but not exactly there - your aim is to use the shock wave to push the pig toward the explosives on the right.
There will the total chaos on the screen - don't mind it, but launch the second bird at the indicated spot and detonate it. All flying objects should eliminate the pigs, while you should receive a high enough score.
Available birds: Ka-Boom; Ka-Boom; Ka-Boom; Ka-Boom
Number of launched birds: 1/4
Estimated score: 45000 (+3x 10000) = 75000+
The first solution is to push the circled asteroid by detonating the bird more or less at the indicated spot, so that the "stone" hits the other asteroid on its way, thus increasing the chances of destroying everything else.
You can also try to push the other asteroid - in a straight line of the same flight path - gaining three "attacking" asteroids if you do it in the illustrated way.
The last solution greatly increases your chances to exterminate the pigs completely, as there is a chance for up to 6 asteroids to fall on the planet.
Available birds: Ka-Boom; BipBapBop; BipBapBop
Number of launched birds: 1/3
Estimated score: 65000+ (+2x 10000) = 85000+
Launch the bird at the indicated wooden plank, detonating the poor thing a moment before the hit. The blocks should fall apart in such a way that they eliminate all the pigs, as well as the box of explosives.
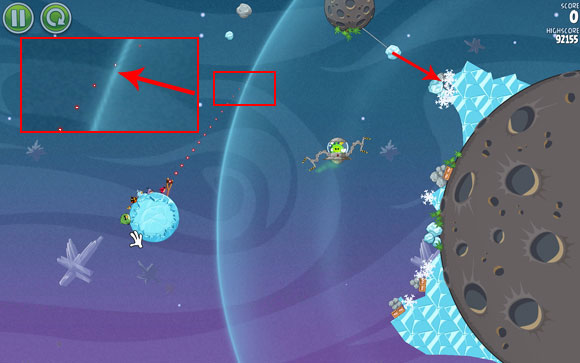
Available birds: Zzzt; Zzzt; Zzzt
Number of launched birds: 1/3
Estimated score: 16000+ (+2x 10000) = 26000+
This is the first meeting with a new type of bird. After tapping again at the indicated spot, the bird will fly there regardless of the change in the flight direction. Launch the bird at the indicated spot (somewhere up the screen), wait until it passes the planet, and then turn it right so that it cuts through all three pigs.
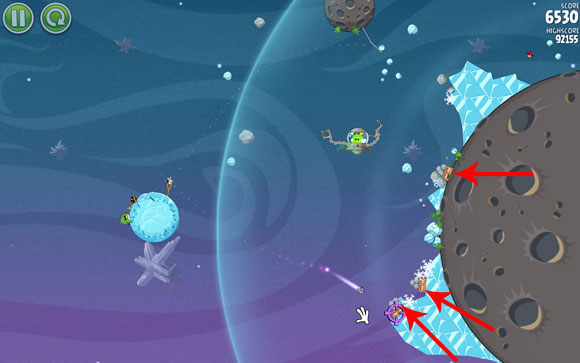
Available birds: Zzzt; Zzzt; Zzzt
Number of launched birds: 1/3
Estimated score: 80000+ (+2x 10000) = 100000+
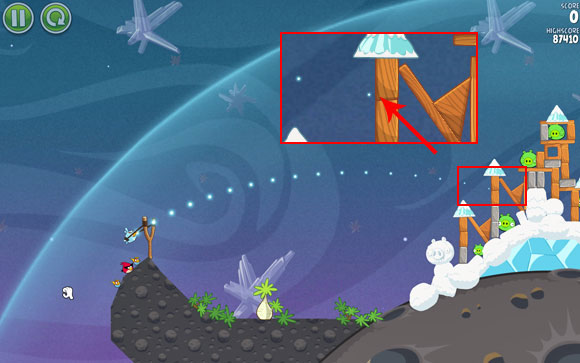
Your goal is to destroy the tower so that it collapses to the right and eliminates the pig hiding there. Launch the bird at the tower (it doesn't necessarily has to be directly above the "ceiling"), and then make it go down, but try to shoot it as close to the right as you can - you need to avoid the pigs and fly down, hitting only the wooden planks. The structure should collapse if the bird manages to break through all the way down.
Available birds: Zzzt; Zzzt; Zzzt
Number of launched birds: 1/3
Estimated score: 35000+ (+2x 10000) = 55000+
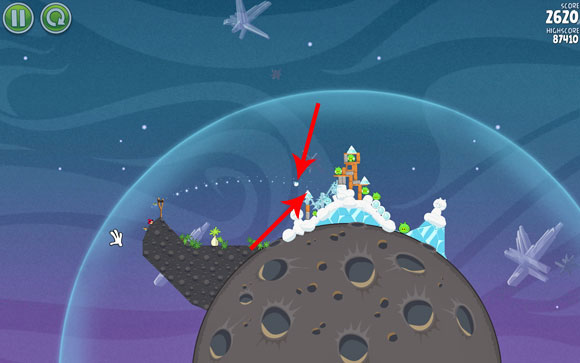
You need to launch the bird so that it crosses to the back of the enemy's line - adjust the flight path more or less between the indicated stars.
Once it's at the indicated spot, turn it in the direction of the structure with three pigs in it, so that it passes through the planks supporting the pig on the right.
Available birds: Zzzt; Zzzt; Zzzt
Number of launched birds: 3/3
Estimated score: 92000+

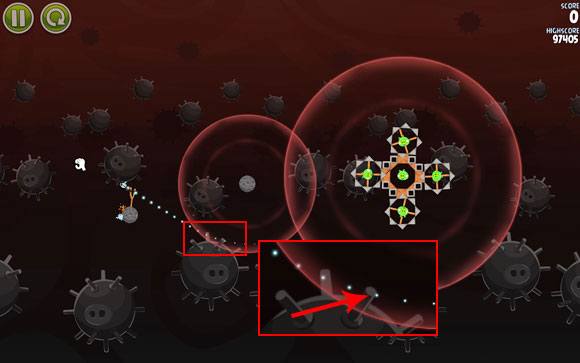
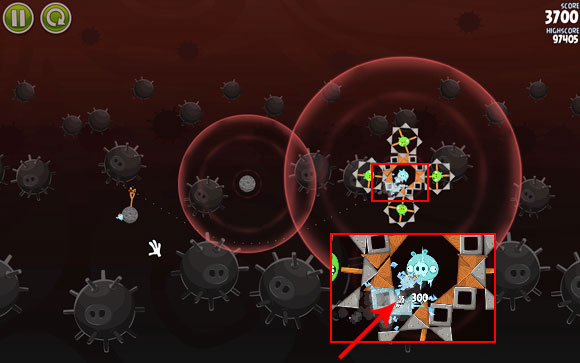
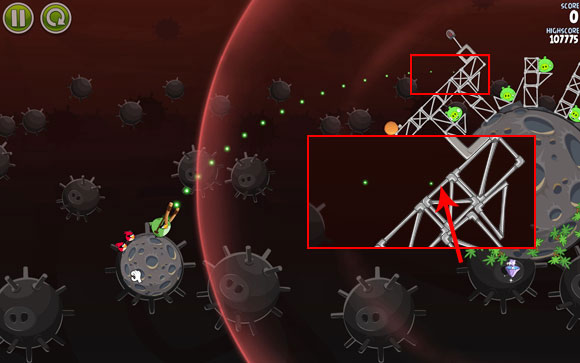
A pretty difficult level, as it's hard to receive the highest score even after destroying almost everything. Launch the first bird as illustrated (the angle is not important; what matters is that it flies over the first pig), and then turn it in the direction of the box of explosives, trying to aim at the wooden supports.
Launch the second bird in almost an identical way, but this time turn it toward the small pig marked above (you need to do this a bit faster than before). Thanks to that, the whole structure will collapse.
Launch the last bird on the other side in such a way that it flies over the whole structure (you can also launch it clockwise), and then turn it in the direction of the box of explosives. Try to change the course of the flight almost at the last moment, when the bird can still reach the pig.
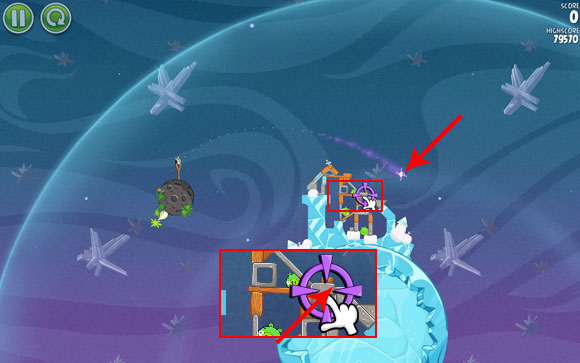
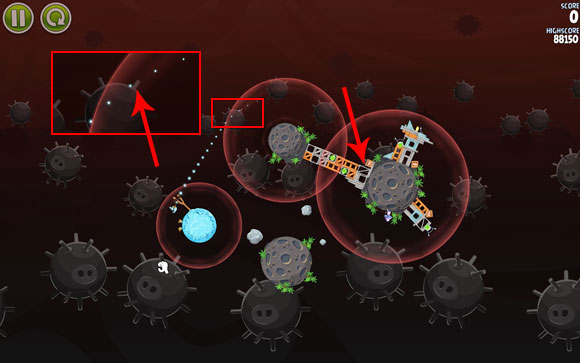
Available birds: Ka-Boom; Zzzt; Zzzt
Number of launched birds: 1/3
Estimated score: 52000+ (+2x 10000) = 72000+

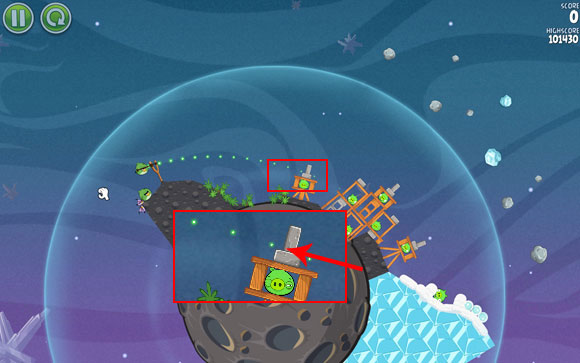
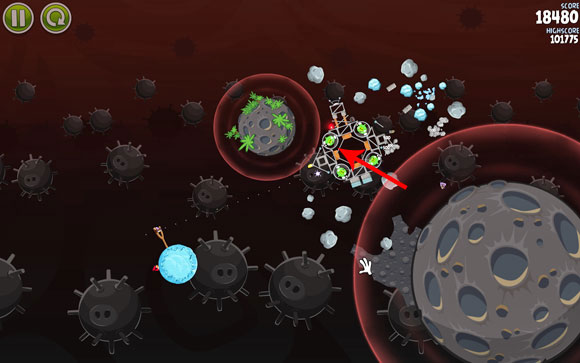
This level is pretty difficult, requiring a lot of attempts in order to achieve the best result using only one bird. You need to launch the bird at the fortified bird (more details in the next paragraph); you can use the small star in the background (zooming out as far as possible) to arrange the flight trajectory to go through it. It will help you achieve the proper course.
The bird has to reach the indicated spot by breaking through the first wooden column. When it shakes the structure of the other one (close-up on the screen), detonate it.
Your goal is most of all to get a ball (it was lying on the roof of the detonated fortification) or a single plank to fall down toward the lonely pig on the left (at the bottom of the planet). The rest of the pieces will most likely hit the pigs at the top of the planet. This explosion requires a lot of effort and good precision in order to "force" the pieces to go where you want them to go.
Available birds: BipBapBop; Ca-Caw; Ca-Caw
Number of launched birds: 1/3
Estimated score: 27000+ (+2x 10000) = 47000+
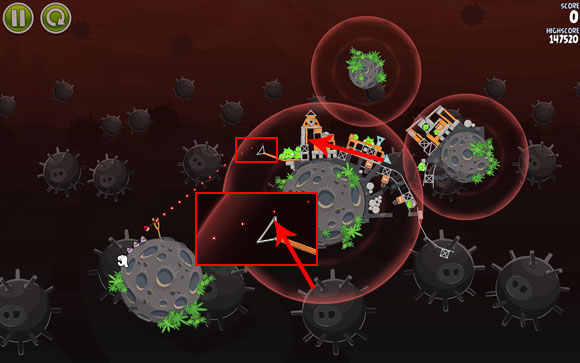
Another lever requiring precision and good timing. Arrange up the flight path as illustrated above - the trajectory has to go a little over the glass shield. Split the birds more or less when they're in a straight line with the triangular block.
The birds should behave as presented above - one them hits the asteroid, the two others take care of at least one pig.
Available birds: Ca-Caw; Ca-Caw; Ca-Caw
Number of launched birds: 1-2/3
Estimated score: 60000+ (+2x 10000) = 80000+
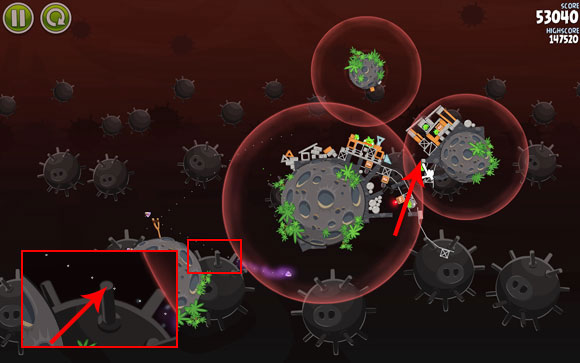
Your goal is to create a chain reaction that destroys everything around, while using only one bird. Of the three boxes of explosives, your best choice is definitely the one at the bottom, as shown on the screen. To maximize the chances of creating the chain reaction, try to arrange the flight trajectory so that its end points at the corner illustrated on the screen (and to be more precise, a little bit above the corner) - you'll probably need to correct the height, because the planks behave in a very random manner.
If one of the boxes isn't destroyed in the chain reaction, launch another bird at it - the margin of error allows for one box to be missed, with two you probably won't achieve the required score.
Available birds: BipBapBop; BipBapBop; BipBapBop; BipBapBop
Number of launched birds: 1/4
Estimated score: 45000+ (+3x 10000) = 75000+

Your goal is to destroy one of the boxes of explosives, which will automatically detonate the other one. You can try to "shoot" the box nearest to you, but it may not cause enough damage. Launch the bird toward the smaller planet. On the close-up you can see the trajectory of the flight - try to aim it at the small crater on the surface (a little spot between two larger ones). When the bird is near the glass structure, split into three at the indicated spot. Remember - you need to do it more or less at that point, not later.
This way, the glass structure will collapse on the other planet, and the two birds will fly past the planet, as illustrated above.
If the two birds circle around the planet, the probability that at least one of them will detonate the box is almost certain, thus allowing for the destruction of the area as well as a successful extermination of the pigs.
Available birds: BipBapBop; Zzzt; BipBapBop
Number of launched birds: 1/3
Estimated score: 22000+ (+2x 10000) = 42000+
A difficult level requiring many attempts in order to achieve the goal with one shot. Adjust the flight path a little below the indicated star in the background (zooming out to the maximum level). Split the bird almost immediately after the launch.
The above screen illustrates the expected behavior of two birds - they should break the glass blocks.
The third bird should circle around the whole structure and also break several glass blocks, considerably shaking the whole thing - the pigs should be killed either by the pressure of the rest of the structure, or by the birds who will get inside.
Available birds: Zzzt; Zzzt; Zzzt; Zzzt
Number of launched birds: 3/4
Estimated score: 90000+ (+1x 10000) = 100000+
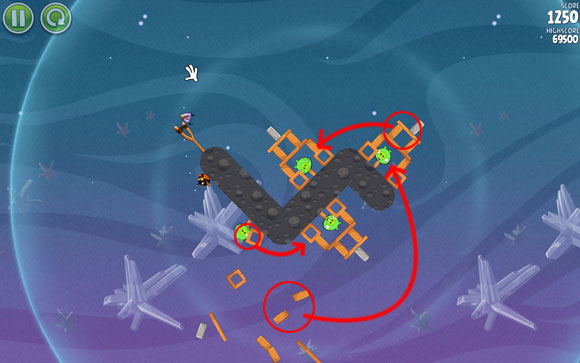
You can reach the limit of the required score even with three birds, but this level is very unpredictable and it may happen that you will need to use the fourth one. The are many possible configurations and sequences in which to destroy the boxes of explosives. Launch the first bird almost straight at the upper right corner, but immediately after you pass the pig, change the course toward the box in the lower right corner - it's possible to destroy the pig's spacesuit as you pass it, but in this solution I suggest to omit it.
There should be 4-5 pigs left on the screen. Launch the second bird at an almost the same course - watch out for the flying blocks. Change the course by directing the bird toward the box on the right - this time, break the spacesuit of the pig you omitted earlier.
With any luck, you should eliminate all the pigs. Regardless of whether you've cleared the level or there are any pigs left - launch another bird toward the box in the upper left corner. Your goal is to achieve around 90000 points - if the score doesn't show it, you can try launching the last bird toward the box in the upper right corner. Be careful, thought, because the screen will be probably full of blocks and it and may be difficult to get there.
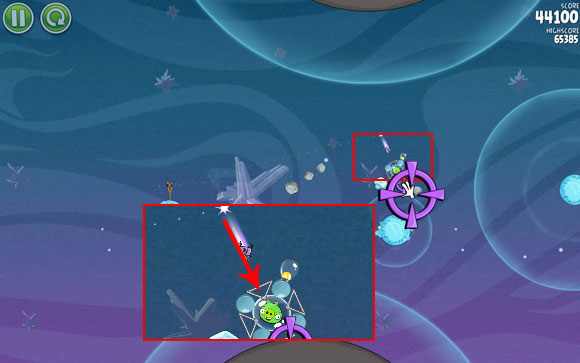
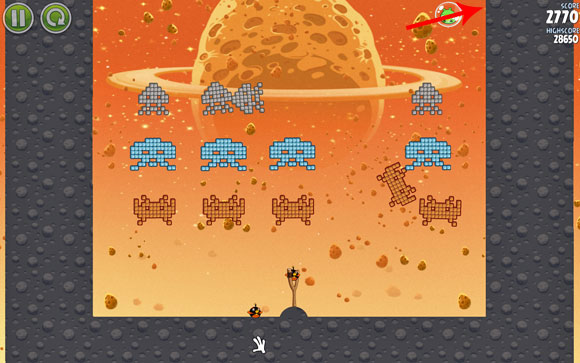
Available birds: Ca-Caw; BipBapBop; Ka-Boom; Zzzt; Ca-Caw; BipBapBop; Ka-Boom
Number of birds launched: 2/7
Estimated score: 25000+ (+5x 10000) = 75000+
The boss fight isn't hard, but many things are a matter of luck. First, wait until the pig releases a considerable number of vegetables and asteroids - then, launch the first bird, trying to aim at the asteroid and the middle of the vehicle, as everything that can bounces off of it - this way you'll increase your chances of releasing more asteroids.
Your goal is to destroy the vehicle by "manipulating" the asteroids in such a way that they fall in the vicinity of the wheels. You need four hits. The more asteroids (and vegetables) you release, the more points you score, using only two birds at the same time.
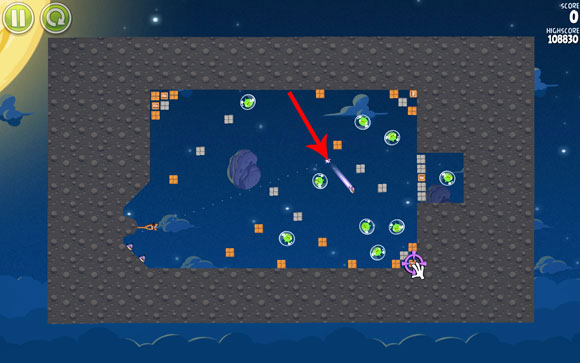
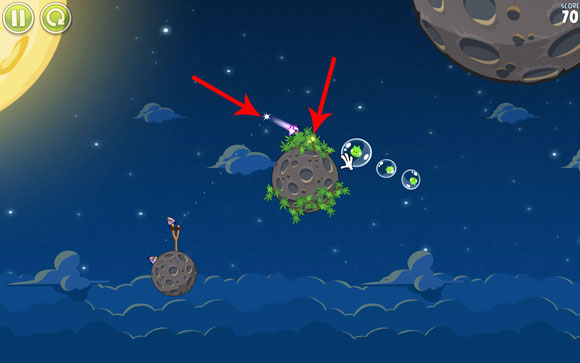
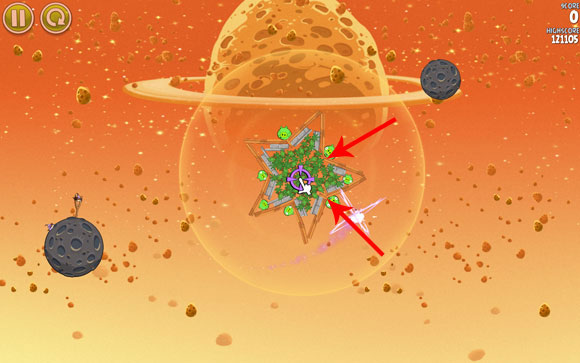
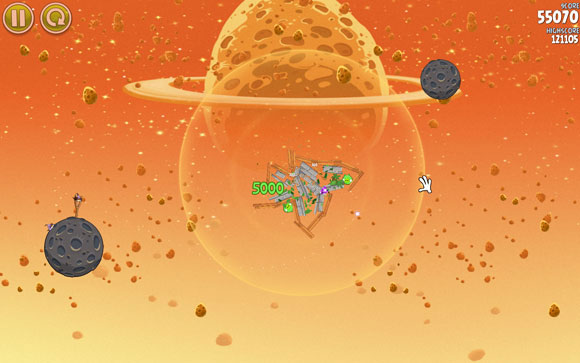
Available birds: Ca-Caw; Ca-Caw; Ca-Caw
Number of launched birds: 1/3
Estimated score: 26000+ (+2x 10000) = 46000+
There is a frozen asteroid here; when you hit it, a chain reaction will occur and everything will be destroyed. Try to make the flight path go right under the smaller asteroid so that the bird flies under it and doesn't brush against it.
As a result, you should get the total annihilation as pictured above.
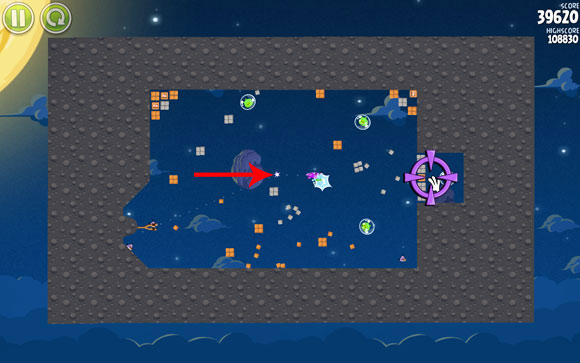
Available birds: Ca-Caw; BipBapBop; Ca-Caw
Number of launched birds: 2/3
Estimated score: 39000+ (+1x 10000) = 49000+
Launch the first bird just above the asteroid (make sure not to touch it) - pay attention to the flight path, because if you curve it up even minimally, the bird will be pulled in by the gravity field. That bird should eliminate one pig.
Aim the second shot at the smaller planet, as pictured above. Split the bird more or less before leaving the gravity field, allowing one of the birds to successfully get rid of the pig in helmet.
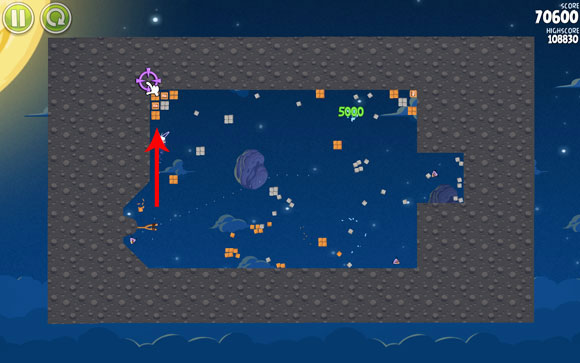
Available birds: Ka-Boom; Zzzt; BipBapBop
Number of launched birds: 2/3
Estimated score: 48000+ (+1x 10000) = 58000+
Adjust the trajectory of the first bird to go right above the first asteroid - it has to fly past it without hitting it. It has to reach the asteroid shown on the close-up - that's when you need to detonate it. The pig at the top should fly towards the upper planet and be pulled in by the gravity field, while the piglet below, with the other one linked by a glass chain, should be pushed towards the smaller one.
There is only one pig left - launch another bird at the space more or less above it, and once it's at the right spot, change its course so that it breaks through the metal supports shown on the screen - you cannot hit the balls, because then you probably won't eliminate the pig.
Available birds: Froshh; BipBapBop; BipBapBop
Number of launched birds: 2/3
Estimated score: 23000+ (+1x 10000) = 33000+

Launch the first bird at the indicated small block. When the birds hits the structure, activate freezing, but only after some of the bricks have been destroyed - don't freeze everything too soon.
Zoom-out - launch the second bird at the indicated frozen block (the one right below the previous block). Split the bird more or less where shown; this will make the birds shake the unfrozen parts of the structure and it will collapse to the right.
Available birds: Froshh; BipBapBop; Zzzt; BipBapBop; Froshh
Number of launched birds: 4/5
Estimated score: 40000+ (+1x 10000) = 50000+
Your first goal is to destroy the wooden block in the second hoop and fly inside it - to freeze the blocks at the bottom.
Launch the second bird on an almost identical trajectory (close to the first hoop), splitting just before it reaches the second hoop. The birds should destroy the frozen blocks, and the right part of the hoop should expose the whole of the third.
The next bird has it easy - launch it above the first hoop and, when it passes it, change the course so that it crosses paths with the wooden blocks and the piglet.
Launch another bird at the third hoop (having destroyed the second one, you shouldn't have more obstacles in your way), and to be more precise, at the wooden block. Now, there are two possible scenarios - either it works out and the bird flies inside, moving the hoop, which will fall down on the boxes of explosives, or it doesn't. In the latter case, you'll need to use the last bird and go over the same procedure as two shots before - using three birds to destroy the frozen part of the hoop. If the birds fly inside, their weight should force the hoop on the boxes.
Available birds: Froshh; BipBapBop; Ka-Boom
Number of launched birds: 3/3
Estimated score: 41000+
With the first shot, it's difficult to refer to anything to help with the launch. Nevertheless, it shouldn't be hard to adjust the flight path a little above the pig, so that the bird hits the indicated block. It should also touch the box of explosives, clearing that part of the level.
Launch the second bird on an almost identical path. Its job is to eliminate the other pigs. Split the birds before you reach both gravity fields.
Lastly, it's worth launching the last bird to get the required score. The shot is very easy - aim at the only cluster of blocks left, and when some of them are destroyed, detonate the bird.
Available birds: Froshh; BipBapBop; Ca-Caw; BipBapBop
Number of launched birds: 3/4
Estimated score: 75000+ (+1x 10000) = 85000+
Launch the first bird between the two indicated planks. When it reaches them, it should destroy and freeze those which are presently an obstacle.
Launch the second bird so that its flight path goes a bit above the frozen triangle indicated on the above screen. Split the bird a moment before it hits it.
The last bird may cause a little trouble, because there's nothing to refer to when aiming. You need to adjust the flight path in such a way so that the bird eliminates all the pigs or the balls under the first two.
Available birds: Ka-Boom; BipBapBop; BipBapBop
Number of launched birds: 1-2/3
Estimated score: 60000+ (+1x 10000) = 70000+
With the first solution, you only need to use one bird, but it's very demanding and requires a bit of luck, too. Adjust the flight path to go through the area where the gravity fields are the closest to each other. The bird has to travel right under the first structure, and be detonated just before it hits it. The indicated blocks should move towards the first and the second tree - the task is very difficult, so if you don't succeed after several attempts, use the solution described below.
Adjust the flight path to go through the area where the gravity fields are the closest to each other. The bird has to reach the first cluster of blocks and ram into it. You can wait until it detonates on its own.
Launch the second bird on a slightly lowered trajectory; where to split is indicated above - it can't happen too late, because one of the birds won't make it to the second tree.
Available birds: BipBapBop; Froshh; BipBapBop
Number of launched birds: 1/3
Estimated score: 45000+ (+2x 10000) = 65000+
Adjust the flight path to go right above the ice support, pictured on the close-up above. It also shows when to split the bird - refer to the unchanging background. The image is zoomed out.
The most important bird of the three is the one who should release the three balls locked on the smaller planet. The damage they do should be enough to get the required score.
Available birds: Zzzt; Froshh; BipBapBop
Number of launched birds: 1/3
Estimated score: 50000+ (+2x 10000) = 70000+
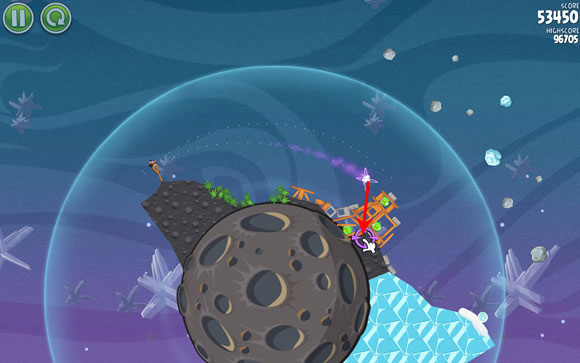
This is a very easy level, thought it might also cause some trouble. Launch the bird high above the structure and wait until it's at 45 degrees angle from the vertical/horizontal, which is more or less the spot pictured above. The new course has to be picked very specifically - it's the spot linking the wooden block and two concrete blocks beneath and next to it, as seen on the close-up. You need to hit the corner if you want to collapse the whole structure without any problems.
Available birds: Froshh; BipBapBop; Froshh; BipBapBop
Number of launched birds: 1/4
Estimated score: 64000+ (+3x 10000) = 94000+
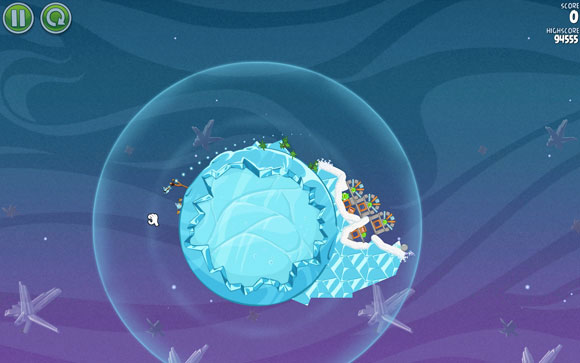
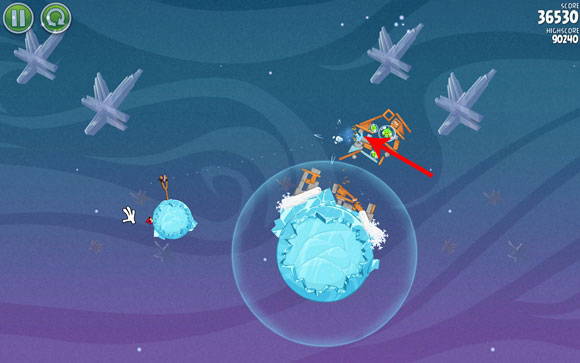
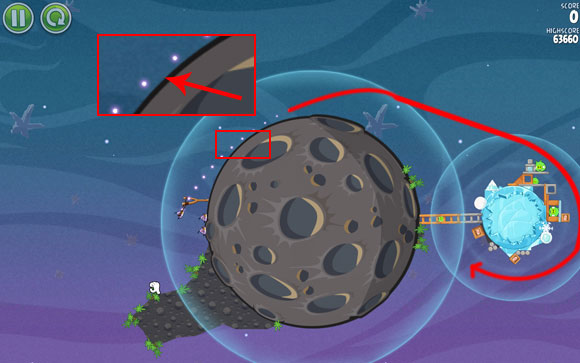
A very easy level which requires only launching the proper bird. Adjust the flight path as pictured above - the bird has to fly right over the planet, right above the first obstacle.
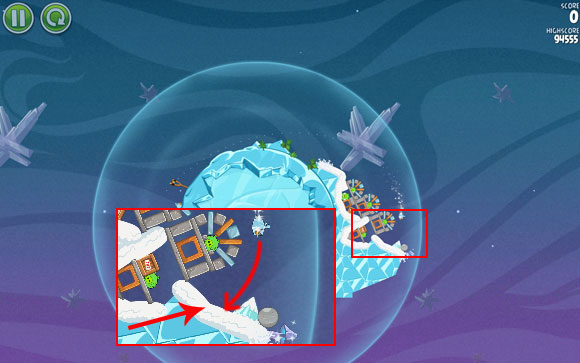
As a result, it will fly past all the pigs and hit the snow at the back. You don't even need to freeze anything. What's more, the boxes of explosives will take care of everything and the whole thing will blow up to little pieces.
Available birds: Zzzt; Zzzt; Zzzt
Number of launched birds: 1/3
Estimated score: 64000+ (+2x 10000) = 84000+
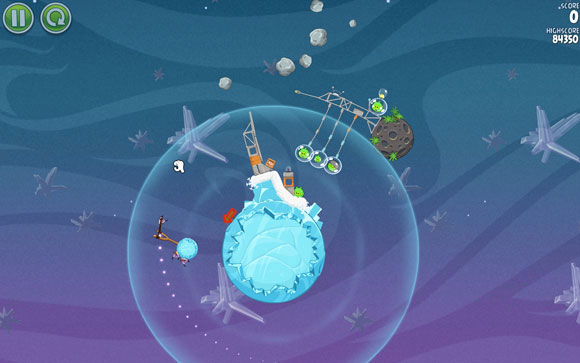
The angle of the shot isn't too important - what is not to launch the bird beyond the gravity field. As the arrow hints, you need to launch the bird down.
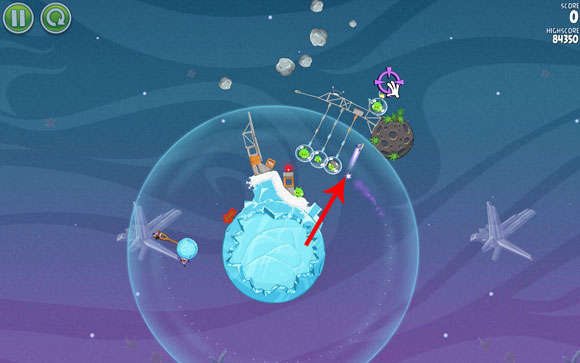
Eventually, the bird should find itself in the area with the three pigs strapped to some kind of scaffold. Your job is to the change its course at the indicated spot so that it could eliminate the pig at the top - the rest will be taken care of by the gravity.
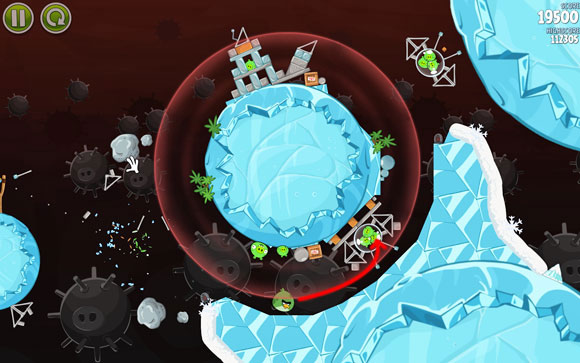
Available birds: Zzzt; BipBapBop; BipBapBop
Number of launched birds: 2/3
Estimated score: 55000+ (+1x 10000) = 65000+

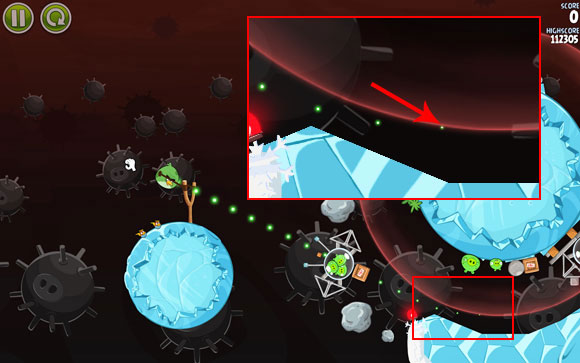
Launching the first bird may cause a little trouble, because you'll need to be very precise. As the planet you're launching birds from is a bit in the way, you have to adjust the flight path to go right next to the border of the planet (the trajectory should go minimally above the border). When the bird passes the bigger ice planet, change its course, directing it at the box of explosives. If you can't launch the bird down, you can always try to launch it clockwise and wait until it's in the position that allows it to hit the box.
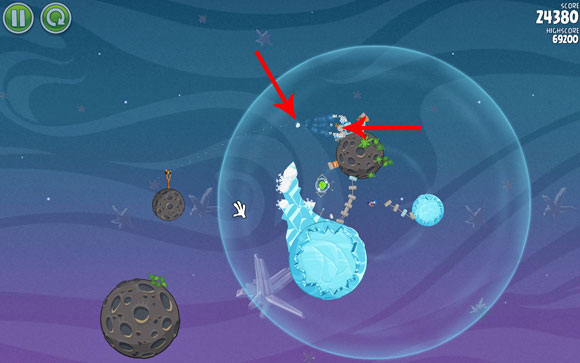
Aim the second bird at locked balls and the middle planet. Split the birds accordingly early - at least one of them should be able to eliminate the pig and hit the box, the rest should unlock the balls, which, pulled inside, will hit the box.
Available birds: BipBapBop; BipBapBop; Zzzt; Ca-Caw
Number of launched birds: 3/4
Estimated score: 65000+ (+1x 10000) = 75000+
Adjust the first bird's flight path to go right above the pointy spike of the first ice triangle. Just before it reaches it, split it into three - one of them should reach the indicated ball and destroy the box of explosives.
Launch the second bird at a slightly higher angle - your goal is to hit the ice shields, which, once destroyed, will unlock the way to the rest of the pigs.
You can launch the last bird on an almost identical path - you need to collapse the last structure. You can aim at the wood tower show on the screen above.
Available birds: Ka-Boom; Zzzt; Ka-Boom
Number of launched birds: 1/3
Estimated score: 45000+ (+2x 10000) = 65000+
Your goal is to cause an explosion that will start a chain reaction, allowing for the destruction of every structure and the extermination of all the pigs. Adjust the flight path in such a way so that the line goes through the plank, as seen on the close-up. Detonate roughly a moment before the bird levels with the first wooden block.
As a result, you should cause a chain reaction likely like the one above.
Available birds: Bash; Bash; Bash
Number of launched birds: 2/3
Estimated score: 50000+ (+1x 10000) = 60000+
This level introduces a new type of bird - the bulky Bash, capable of breaking through even the concrete blocks. The level is actually quite difficult, because it's hard to adjust the proper flight path. Nevertheless, try to aim the trajectory of the first bird more or less at the corner of the "square", pictured on the above close-up. The bird should push the marked pig towards the gravity field.
Consequently, there should be only two pigs left. Launch the second bird roughly in their direction, so that the blocks could eliminate them, or push them towards the gravity field.
Available birds: Bash; Bash; Bash
Number of launched birds: 2/3
Estimated score: 90000+ (+1x 10000) = 100000+
Launch the first bird by adjusting the flight path to go through the spot indicated on the above screen - this will collapse the first structure.
The second bird has to be send a little lower, which will make adjusting the flight path a little more difficult. What's certain is that you need to set it a little higher than before - try to shoot the bird at the ice block so that it could break through to the pigs on the other side.
Available birds: Bash; Bash; Bash
Number of launched birds: 2/3
Estimated score: 115000+ (+1x 10000) = 125000+
Launch the first bird towards the middle tower, adjusting the flight path a little above the corner of the indicated pattern in the background (you need to zoom-out). It should knock the middle structure down, collapsing the one of the left with it (and killing all the pigs, of course).
The second bird you need to send all the way to the end. Aim the trajectory of the flight at the point where the pattern in the background and the border of the gravity field meet. The bird has to knock down the blocks, which will kill the pigs, and manage to destroy the mushroom at the same time.
Available birds: Bash; Bash; Bash
Number of launched birds: 1/3
Estimated score: 38000+ (+2x 10000) = 58000+

Launch the first bird so that the dots go through the spots indicated on the close-up - below the middle of the plank and on the ski jump on the other side (also, roughly through the pig's left brow).
The bird should eliminate the first pig and reach the second planet, where it will hit the box of explosives. The circled ball should take care of the last piglet.
Available birds: Bash; BipBaoBop; Ca-Caw
Number of launched birds: 1/3
Estimated score: 36000+ (+2x 10000) = 56000+
This is a difficult level, additionally requiring a bit of luck. Adjust the flight path to go through the first pig's right ear - that will make the bird brush against it (killing it) and fly further.
Your goal is to get the bird to make almost a full circle around the planet and kill the last piglet, while releasing the remaining planks to get rid of the rest of them.
Available birds: Froshh; Zzzt; BipBapBop
Number of launched birds: 2/3
Estimated score: 56000+ (+1x 10000) = 66000+
Launch the first bird in such a way that it hits the pig and flies inside the structure through the plank. There is no reference point here to help adjust the path, but it shouldn't be too difficult for you.
The second bird has to be launched much higher - the upper part of the structure should have been destroyed at least a little in the previous strike, making the second launch much easier. If it hasn't been destroyed, though, you can still try, as the bird will fly over the "spike" at a much stronger angle. Once you reach the indicated spot, change the course so that the bird attacks the mushroom; the whole thing should collapse.
Available birds: Ka-Boom; Ka-Boom; Zzzt
Number of launched birds: 1/3
Estimated score: 90000 (+2x 10000) = 110000+
It may be difficult to adjust the flight path, but your target is the indicated pig - the line has to go just next to the meteorite right before it. As soon as the bird hits the pig and kills it, detonate it.
As a result, you should be able push the cluster of joined asteroids towards the gravity field (which will destroy everything, including the two pigs), while one of the pigs should fly straight up and out of the screen (or be killed by the "chain").
Available birds: Froshh; BipBapBop; Zzzt
Number of launched birds: 2/3
Estimated score: 90000+ (+1x 10000) = 100000+

Adjust the first bird's flight path a little above the indicated edge of the pattern in the background. It should reach the indicated spot by the second planet and destroy a part of the structure, as well as eliminate two pigs.
As for the second bird, shooting it in a perfect way is a bit difficult. Adjust the trajectory to go through the edge of the pattern in the background. Split the bird in the area between the two gravity fields. One of the birds should
Available birds: Froshh; BipBapBop; Zzzt; Ca-Caw
Number of launched birds: 2/4
Estimated score: 62000+ (+2x 10000) = 82000+
At this level, the first step is the most important. If you're able to launch the bird properly, the rest is very easy. Adjusting the flight path is not easy and will probably require a lot of attempts. Your goal is to make the bird grind to a halt on the plank and slide down towards the indicated spot.
You should see roughly the same view as pictured above. If you notice that the rest of the structure starts to melt too much, send the second bird as quickly as you can towards the ice blocks and split it before the hit. You should be able to knock the pigs or a block down towards the box, causing an explosion.
Available birds: BipBapBop; BipBapBop; Zzzt
Number of launched birds: 2/3
Estimated score: 54000+ (+1x 10000) = 64000+
The sequence of birds doesn't really matter, as each of them takes care of one part of the planet. Send one of them up - try to adjust the flight path as close to the border of the first gravity field as possible (from the inside), but in such a way as to create another collapse in the second area. You need to split the bird right before it hits the obstacle. This way, you should be able to break through far enough to eliminate the second pig as well.
Launch the second bird the other way. You can use the corner of the indicated pattern in the background for help. The trajectory of the flight should aim at the ice blocks of the first structure. Same as before - split the bird right before the hit. One of the birds or a block should hit the box of explosives.
Available birds: Bash; Bash; Zzzt; Zzzt
Number of launched birds: 3/4
Estimated score: 75000+ (+1x 10000) = 85000+
Launch the first bird at the indicated vertical block (right above the horizontal one).

Send the second bird far at the end, adjusting the flight path to cover the line drawn in the background (zoom-out). It will enable to knock down the second vertical block, which should destroy the smaller structure and kill the pig. If the block fell down earlier, don't worry, because the bird will probably slip down, as pictured above, and destroy the structure.
Launch another bird without much aiming, so that you could easily change its course towards the indicated planks - destroying the main structure and exterminating the remaining pigs.
Available birds: Zzzt; Zzzt; Zzzt
Number of launched birds: 1/3
Estimated score: 40000+ (+2x 10000) = 60000+
A very easy level that's only about two simple moves - first, adjust the flight path to go very closely to the big planet. That will make the bird fly on the trajectory very much as the one pictured above.
The second thing is to change the course to make the bird destroy the box explosives. Consequently, there will be a chain reaction which will blow everything up and eliminate all the pigs.
Available birds: Froshh; BipBapBop; Zzzt; BipBapBop
Number of launched birds: 1-2/4
Estimated score: 46000+ (+2x 10000) = 66000+
Adjust the first bird's flight path a little below the point where the gravity field and the pattern in the background meet (zoom-out as much as possible). The bird should hit the indicated snowball - with any luck, the whole structure will fall, completing the level.
If the structure doesn't fall with the first attempt, send the second bird, using a slightly lesser angle. Split it right before it hits the obstacle - that should do the trick.
Available birds: Ka-Boom; Ka-Boom; Bash
Number of launched birds: 2/3
Estimated score: 75000+ (+1x 10000) = 85000+
Launch the first bird at the closest planet - adjust the flight path so that the dots go through the line connecting the two blocks shown on the close-up. When the bird breaks through, eliminates the first pig and touches the remaining blocks - detonate it.
At the best-case scenario, you should have only one pig left; at a worse case - three, but arranged in such a way that launching another bird at the indicated spot and detonating it will take care of them.
Available birds: Ca-Caw; Zzzt; Froshh; Ka-Boom; BipBapBop; Bash
Number of launched birds: 1-2/5
Estimated score: 90000+
As before, the boss fight isn't difficult, but requires more luck than the previous levels, because the flying machine of the Pig King behaves in an unpredictable and random way. Launch the first bird at the dangling frozen planet - the flight path should cross the spot where the border of the gravity field and the pattern in the background meet (zoom out). The asteroid should cause a small avalanche of little flying "pebbles", which can damage the pig's flying machine.
If the King suffers, but the machine isn't entirely destroyed, you can use the second bird and aim it at one the boxes of explosives. In order to achieve the best score, try to limit yourself to 1-2 birds.
Available birds: Froshh; BipBapBop; BipBapBop
Number of launched birds: 2/3
Estimated score: 78000+ (+1x 10000) = 88000+
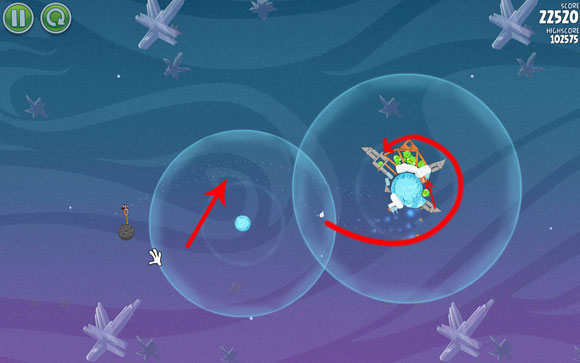
The first level is quite easy and requires only a slight effort. The first bird has to destroy the structure hanging between the planets. To do that, adjust the flight path to go through the prong of the mine marked on the above screen. The bird should reach the box of explosives, which will take care of the rest.
Launch the second bird the other way - adjust the trajectory to go right next to the small asteroid. As soon as you're inside the gravity field, split the bird right at the edge. One of them should be able to reach the farther structure, fall on the box of explosives and eliminate the remaining pigs.
Available birds: Zzzt; BipBapBop; Zzzt
Number of launched birds: 1/3
Estimated score: 90000+ (+2x 10000) = 110000+
A pretty difficult level. First, launch the bird towards the mine shown on the close-up (zoom out first), so that the flight path goes between the two prongs. The closer to the left, the more probable that the bird won't make it into the gravity field.
Once the bird leaves the gravity field, that's when the hard part begins. You need to change the course in a very specific way. Aim roughly at the center of the plank that holds the box of explosives - the course correction has to allow the bird to brush against the concrete block on top of the box. This way, the box should start swaying to the right, which will make it easier to collapse the tower on the right.
Available birds: Bash; BipBapBop; BipBapBop
Number of launched birds: 2/3
Estimated score: 100000+ (+1x 10000) = 110000+
Adjust the first bird's flight path to barely line with the gravity field (the last dot should bend minimally).
Bash should break through the first pig and fly easily towards the spot indicated on the above screen. There, if you're lucky, apart from eliminating the pigs at the bottom of the planet, you should also kill the remaining ones - the ice ball may, or may not, roll towards the box of explosives.
If you don't clear everything out, though, you need to launch the second bird. The trajectory should pass close to the border of the gravity field. Split the bird early so that one of them eliminates the drifting group of pigs, while the other two travel towards the box.
Available birds: Froshh; Ka-Boom; Froshh
Number of launched birds: 2/3
Estimated score: 80000+ (+1x 10000) = 90000+
Zoom out to the maximum range, and you can easily adjust the trajectory of the first bird's flight to go through the prong indicated on the above close-up.
Your aim is to break through the whole structure, freezing everything as much as you can. As a result, a lot of pieces should be destroyed by being pulled in the center.
Launch the second bird on pretty much the same path - see where the most blocks are so that the bird could break through without trouble. The explosion will cause the pigs to break loose from the planks and die easily.
Available birds: BipBapBop; BipBapBop; Ca-Caw
Number of launched birds: 2/3
Estimated score: 88000+ (+1x 10000) = 98000+
Launch the first bird using a flight path going roughly through the middle of the indicated prong. Split the bird a while later, before another prong. All three of the birds should hit the pictured clusters of pigs.
Launch the second bird the other way - the flight path should go through the indicated prong on the mine, and you have to split the bird a moment before it hits the two pigs on the stands.
Available birds: Zzzt; Zzzt; Ca-Caw
Number of launched birds: 1/3
Estimated score: 68000+ (+2x 10000) = 88000+
Launch the bird towards the indicated mine - more or less at the "pig's nostrils". Changing the course is a little hard and will probably require several attempts. Aim the bird at the two meteorites, roughly between them.
Your goal is to pull the meteorite towards the gravity field so that it destroys the box of explosives, which will push it further towards the structure. The meteorite should push everything in the direction of the smaller planet, and the planet should pull everything inside, thus eliminating all the pigs.
Available birds: Zzzt; BipBapBop; BipBapBop
Number of launched birds: 1/3
Estimated score: 125000+ (+2x 10000) = 135000+
A very easy level - launch the bird above the houses (adjust the flight path between the prongs of the closed-up mine).
As soon as the bird passes beyond the second house, change its course towards the indicated block. As a result, the whole thing should collapse and kill of the pigs while at it.
Available birds: BipBapBop; Zzzt; BipBapBop
Number of launched birds: 1-2/3
Estimated score: 54000+ (+1x 10000) = 62000+
This level is very difficult, because as opposed to the majority of them, it requires less force on the slingshot. The most important reference spots you should use to adjust the trajectory are shown on the above screen - through the point where the two gravity fields meet towards the box of explosives. Split the bird a moment before it hits the planet.
If you're lucky, a piece of the meteorite should hit the smaller structure on the other side of the planet with the first shot. Otherwise, launch another bird the same way and change its course towards the last pig.
Available birds: Ca-Caw; Ca-Caw; Ca-Caw
Number of launched birds: 1/3
Estimated score: 40000+ (+2x 10000) = 60000+
This is one o few levels where luck plays a bigger part than usually. It's very hard to adjust the flight path to make the small blocks behave in the same way - the differences are of a pixel scale. Your target is the plank supporting the first pig. You can see the exact spot you need to hit on the close-up. It's practically the sole edge of the plank. Your goal is to get the bird to roll towards the first box, which will throw at least one block at the next one, shaking the structure and leading to an explosion, thus creating an chain reaction and eliminating the last pig.
Available birds: Bash; Ca-Caw; Ca-Caw
Number of launched birds: 1/3
Estimated score: 85000+ (+2x 10000) = 105000+
A difficult level, because it's hard to find a perfect reference spot to aim at. It's best to adjust the flight path at maximum zoom in. It should go just a little above the middle of the indicated "scaffold" fragment.
Once it breaks through, the bird should reach the tall tower and collapse it (which, in turn, should shake the structure on the right). At the same time, the indicated ball will roll towards the pig sitting on the slim rod - it will fall on the box and fly towards the mushroom.
Available birds: Froshh; Ka-Boom; BipBapBop
Number of launched birds: 1/3
Estimated score: 78000+ (+2x 10000) = 98000+
Another level on which everything should go smoothly on its own as long as you launch the bird properly. At maximum zoom in you can see a mine in the background, which will be your reference spot. Adjust the flight path to pass right under the indicated prong.
The bird should fly inside the indicated spot, causing a chain reaction - everything should start to fall down.
Available birds: BipBapBop; Bash; Ca-Caw
Number of launched birds: 1/3
Estimated score: 78000+ (+2x 10000) = 98000+
This level is all about luck and precision. Adjust the flight path so that the line barely enters the gravity field. When the bird flies inside it, it will immediately turn, and this is when the hard part begins - the split. It should happen at the border of the field, right before leaving it (the spot is marked on the screen). Each bird has to fly towards a different spot, destroying the boxes of explosives and causing a chain reaction.
Available birds: Zzzt; Frosh; BipBapBop
Number of launched birds: 1/3
Estimated score: 80000+ (+2x 10000) = 100000+
Zoom out and adjust the flight path to go through the prong indicated on the close-up.
When the bird passes the planet and finds itself roughly at the indicated spot, change its course by pointing it at the wooden block on the close-up. The whole structure should collapse, and the asteroid "attached" to the pig should fall in such a way as to be pulled in by the smaller planet. The only problem may be the lack of a box of explosives - you may have to correct the course change or the destination spot.
Available birds: Ka-Boom; Zzzt; Zzzt
Number of launched birds: 2/3
Estimated score: 110000+ (+1x 10000) = 120000+
Launch the first bird above the indicated terrain. The bird should break through the planks and hit the pig. After a while, it should also explode.
At best, you'll get rid of all the pigs, but if not, you'll have to use the second bird. Launch it at a much higher angle. When it gets further in the open space, change its course, hitting the closed-up planks. You should be able to hit the box, the explosion will eject the remains, and the remains should hit the structure on the other side and eliminate the rest of the pigs.
Available birds: Zzzt; Bash; Zzzt
Number of launched birds: 3/3
Estimated score: 120000+

Quite a difficult level, as there's no sure way to affect, even by a margin, the behavior of the planks the way we would want to. You need to use three shots. Launch each Zzzt either at the right or the left structure. Try to hit the spot next to the pig so as to destroy the plank as well as the snow. Parts of the plank should collapse to the left and destroy a piece of the indicated snow support.
Send Bash straight up.
Use the last bird to destroy the second structure (depending on which you have destroyed first). Part of it should collapse to the right and destroy a piece of the indicated snow support.
Available birds: Ca-Caw; Zzzt; Ca-Caw
Number of launched birds: 2/3
Estimated score: 43000+ (+1x 10000) = 53000+
In truth, with the first bird you don't need to adjust the shot to any particular angle - just try to overlap the flight path roughly with the gravity field. The bird should knock down several blocks, which will fall towards the box of explosives (they may also hit the bird directly).
The second bird has to be send around the bigger planet. Adjust the trajectory to go a little above the prong shown on the close-up. When the bird is pretty close to the obstacle, change its course to go through the planks, while being slightly turned towards the border of the gravity field - the bird has to break through and practically hit the other bird, or even fly further.
Available birds: Bash; Bash; Bash
Number of launched birds: 2/3
Estimated score: 70000+ (+1x 10000) = 80000+
A difficult level, because it's pretty hard to make out the perfect reference spot. At maximum zoom in, try to adjust the trajectory to go through the closed-up prong - closer to the mine than to the end of the prong. The bird should shake the whole thing in such a way that one of the blocks hits the box of explosives, causing a chain reaction.
With any luck, you should be able to eliminate the pig on the first planet. If you're out of luck, though, use the second bird - aim at the structure with the first ball; gravity should take care of the rest.
Available birds: Ka-Boom; Bash; Zzzt
Number of launched birds: 2/3
Estimated score: 125000+ (+1x 10000) = 135000+
Luck is a minor factor here, but you'll need it nevertheless. Launch the first bird inside the narrow fissure - adjust the flight path to go through the tip of the indicated prong. The bird should knock down the first pig and ram into the farther structures. After the explosion, the four remaining pigs should turn to memory as well. The key elements are the two mushrooms the first pig is sitting on - try to correct both the course and the detonation so that any block could destroy them.
Send the second bird the other way, adjusting the flight path between the two prongs shown on the close-up. The bird should hit the smaller cabin, under which the second pig is hiding, and fly further all the way to the box of explosives.
Available birds: Ca-Caw; Zzzt; Zzzt; Ca-Caw
Number of launched birds: 3/4
Estimated score: 105000+ (+1x 10000) = 115000+
Launch the first bird in such a way that the end of the flight path enters the gravity field. Consequently, you should be able to hit the indicated spot, and several blocks should be pulled in by the nearby planet.
Launch the second bird the other way, adjusting the flight path through the point where the prong and the mine cross. The bird should pass right next to the planet, and once it's at a spot where it can destroy the box of explosives - change its course right towards it. One of the indicated blocks should slide down, killing the pig that's hiding inside the ice tower.
Launch the last bird on the same path. Change its course only when it levels with the second box so that it can break through the planks easily. It should destroy the rest of the structure and eliminate the pigs.
Available birds: BipBapBop; Zzzt; BipBapBop
Number of launched birds: 2/3
Estimated score: 83000+ (+1x 10000) = 93000+
The first bird's flight path should go roughly between the two prongs shown on the closed-up screen. Split into three more or less at the intersection of the gravity fields. As a result, one of the towers should be destroyed.
This will also clear the further path. This time, send the second bird through the prong indicated on the close-up. When the bird reaches the planet and leaves the gravity field, change its course, directing it at the indicated chain that supports the balloon with the pig. The balloon should hit the box, which will play a large role in destroying anything left and eliminating the pigs.
Available birds: Ca-Caw; Zzzt; Zzzt
Number of launched birds: 2/3
Estimated score: 55000+ (+1x 10000) = 65000+
The first shot is very difficult and, additionally, everything depends on it. Adjust the flight path, correcting where needed, so that its end enters the gravity field. The bird should hit the long block and fly between the structures, without changing the position of the long block. That should be taken care of by the tower collapsing on the right, which should get rid of the pig to the left.
You should only have one pig left. To eliminate it, launch the second bird at it and right before it hits the planks, change its course to break through towards the pig.
Available birds: Froshh; BipBapBop; Zzzt
Number of launched birds: 1-2/3
Estimated score: 90000+ (+1x 10000) = 100000+
The first bird has to reach the box of explosives. To do this, adjust the flight path to go a little above the first obstacle in the way (the triangle) - you can use the close-up and the prong for help.
When the bird hits the proper spot, you should practically have it over with. It may happen that even with the first shot the small ball gets inside the fissure and hits the other box. If not, launch the second bird and choose a high trajectory. Split it fairly quickly - one of the birds should reach the fissure without problem and destroy the box, which in turn will kill the two remaining pigs.
Available birds: Froshh; BipBapBop; Zzzt; Zzzt
Number of launched birds: 3/4
Estimated score: 100000+ (+1x 10000) = 110000+
Your first goal is to blow up the structure between the first two planets. Zoom in to help you adjust the flight path. Aim so that the dotted line goes between the gravity fields. The bird should destroy the first part of the scaffold and, after the freezing explosion, destroy the box of explosives as well.
Send the other bird up; you can refer to the close-up where the flight path goes through one of the prongs. Split the birds a short while after passing another mine - one of them should hit the pig on the opposite planet, while another should activate the box of explosives.
You should only have one pig left. Launch the third bird beneath the largest planet. As soon as you have a clear shot, change its course to hit the last pig.
Available birds: Froshh; BipBapBop; Zzzt; BipBapBop
Number of launched birds: 2/4
Estimated score: 80000+ (+2x 10000) = 100000+
A pretty easy level. Launch the first bird as seen on the close-up - with the line going between the prongs of the closest mine. The bird should fly all the way to the indicated tower. You can activate the freezing at once or let the bird explode on its own.
Launch the second bird the other way - its trajectory has to go right above the indicated fragment of the planet. When the bird starts flying towards the pigs, split it when it's at the tower destroyed earlier. One of the birds should hit the indicated ice block, collapsing everything and exterminating the remaining pigs.
Available birds: Froshh; BipBapBop; Zzzt; BipBapBop
Number of launched birds: 3/4
Estimated score: 88000+ (+1x 10000) = 98000+
Aim the first bird's flight path right above the prong shown on the close-up. It should reach the indicated spot - as soon as it hits it, activate the freezing. Your goal is to freeze the long block the pig is sitting on.
Launching the second bird isn't so easy. First, adjust the flight path to go through the end of the indicated prong. You have to split the birds pretty quickly - so that one of them could hit the top of the first tower, while another the frozen block the pig is sitting on.
As a result, everything should collapse and you'll only have two pigs left. Launch the third bird and as soon as it passes the hill, change its course, directing it at the box of explosives.
Available birds: Zzzt; Zzzt; Froshh; BipBapBop
Number of launched birds: 2/4
Estimated score: 52000+ (+2x 10000) = 72000+
Launch the first bird towards the smaller planet - the flight path passing right next to the gravity field. When the bird reaches the nostrils of the mine, change its course right before the holes, directing it at the wooden triangle. The bird should fly all the way to the second structure, shake its foundation and thus collapsing it at the box of explosives.
Launch the second bird towards the gravitational pull. As soon as it comes near the second, bigger planet, change its course by setting the marker right above the top of the first pyramid. The bird should both brush against that top and collapse the second pyramid.
Available birds: Ca-Caw; Zzzt; Zzzt; Zzzt
Number of launched birds: 3/4
Estimated score: 140000+ (+1x 10000) = 150000+
The first bird, even though is the weakest and not always capable of breaking through concrete blocks, has to be launch towards them this time. Adjust the flight path a little above the protruding triangle pictured on the close-up. The bird should land more or less between two blocks, making it easier for it to break through. Your goal is to destroy the boxes of explosives.
Send the other bird down - the trajectory has to go through the indicated prong. When the bird comes near the small fissure, change its course - your goal is to make it break through towards the smaller planet so that it could destroy the structure there. The flying blocks should also kill the pig hiding under the cursor, as pictured above.
If everything went according to plan, the last bird should be only a formality - launch it the same way as before, but this time make it hit the box of explosives.
Available birds: Zzzt; Zzzt; Zzzt
Number of launched birds: 2/3
Estimated score: 40000+ (+1x 10000) = 50000+
A difficult level, requiring a good eye. First, launch the first bird on a flight path that passes right next to the gravity field. When the bird is roughly in a straight line with the spot indicated on the close-up, change its course by clicking on the marked pig. The bird should be able to destroy most of the scaffold.
Nevertheless, the most important element is one particular block - shown on the screen. It has to roll down as far as it can, revealing a narrow passage between the planets. The second shot isn't any different from the first one - again, launch the bird next to the gravity field, but change its course only when it reaches the asteroid. The bird has to fly all the way to the pig with the box of explosives next to it.
Available birds: Zzzt; Zzzt; Zzzt
Number of launched birds: 2/3
Estimated score: 64000+ (+1x 10000) = 74000+
Launch the first bird towards the small planet. Before it hits it, change its course by aiming at the box of explosives. Part of the structure should drift away towards one of the pigs and the ice planet.
Don't wait too long before launching the second bird at the asteroid, which you have to knock down towards the small piglet. The boulder should slowly slide down towards another pig, until it's pulled in, killing the last pig.
Available birds: Zzzt; Zzzt; Zzzt
Number of launched birds: 2/3
Estimated score: 105000+ (+1x 10000) = 115000+
This level doesn't give you any help with the first shot or with when to change the course. First, launch the bird by adjusting the flight path right next to the gravity field of the first planet. The bird will fly a little past the screen - this is the moment when you need to figure out when to change the course (either by sensing it or after several previous attempts) so that by aiming at the indicated spot, it could push the pig next to it and drift towards the box of explosives.
When everything blows up into little pieces, ready the second bird. It may happen that you won't have a clear shot - then it's better to repeat the level. Launch the second bird at the spot indicated on the close-up. When it passes above the tower, change its course and attack the box of explosives - as a result, you'll eliminate the remaining pigs.
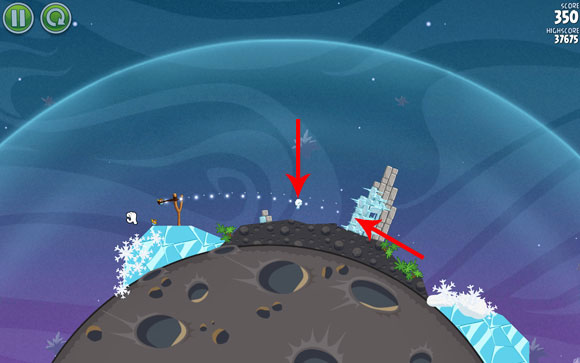
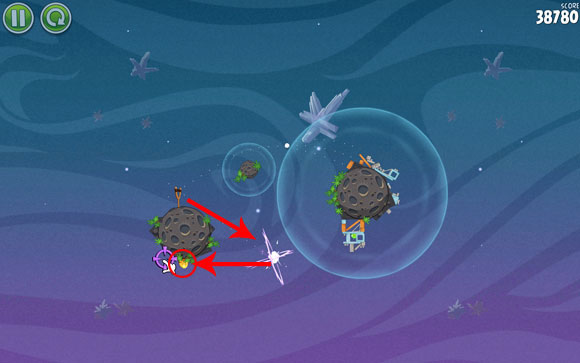
World: Pig Bang
Level: 1-9
In order to unlock the hidden level, launch the first bird roughly towards the egg. Splitting the bird a moment before it enters the gravity field will increase your chances of success.
Available birds: Ka-Boom; Ka-Boom; Ka-Boom
Number of launched birds: 1/3
Estimated score: 8000+ (+2x 10000) = 28000+

Aim the bird at the indicated "pixel" of the closed-up alien. Wait with the launch until the alien with the pig on top starts moving to the right. The bird should bounce off and fly towards the pig.
When it explodes, the trajectory of the pig's flight should slightly change - it should head towards the side wall, where, upon hitting, it will be killed.
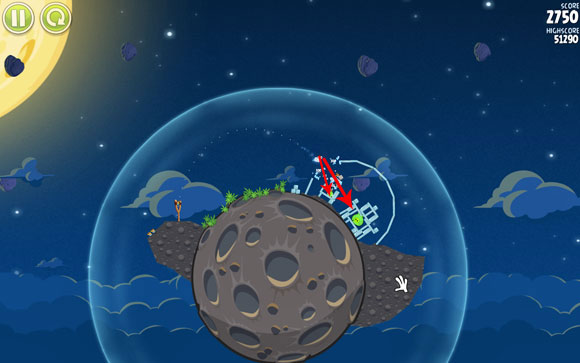
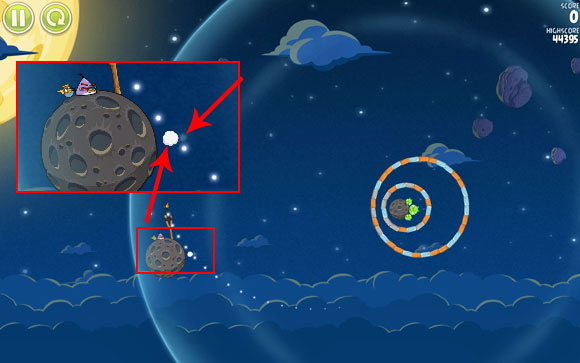
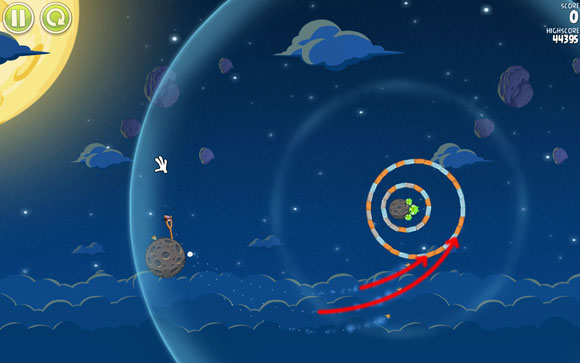
World: Pig Bang
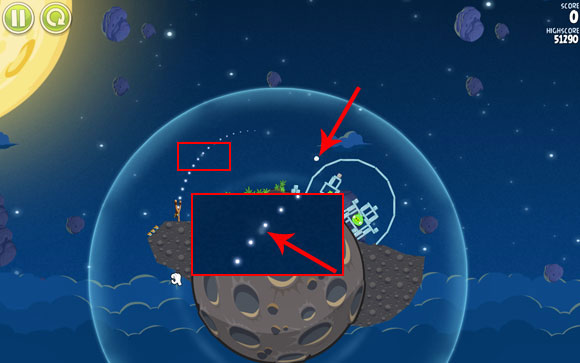
Level: 1-20
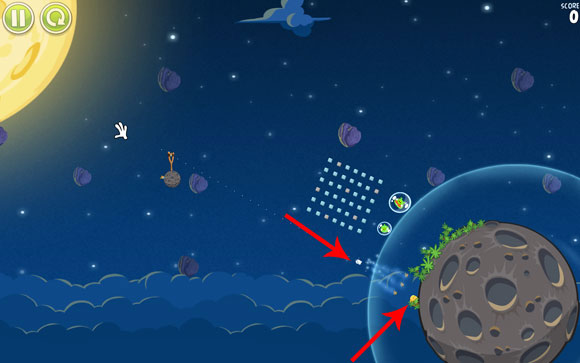
In order to unlock the hidden level, launch the first bird up. The egg is hidden on the planet right behind the bushes. At the right moment, change the course by aiming at the egg.
Available birds: Ca-Caw; BipBapBop
Number of launched birds: 1/2
Estimated score: 5000+ (+1x 10000) = 15000+
Zoom out and adjust the flight path to go through the spot indicated on the close-up.
The bird should hit the indicated block and eliminate the pig that jumps from it.
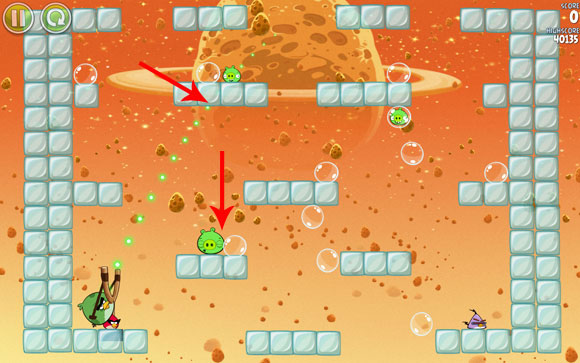
World: Cold Cuts
Level: 2-13
In order to unlock the hidden level, launch the first bird the other way than usually. The egg is hidden on the planet at the bottom, right behind the bushes. At the right moment, change the course by aiming at it.
Available birds: Ca-Caw; BipBapBop; BipBapBop; Zzzt
Number of launched birds: 2/4
Estimated score: 30000+ (+2x 10000) = 50000+

Because of the highest amount of random elements among all the levels in the game, this level is very difficult. One of the techniques is to launch the first bird to unlock a path leading to the upper part of the screen. You can wait until it eventually falls down before launching the second bird, or launch it at once.
Try to aim at the hole you just made so that at least one of the birds (split them at the last moment) could reach the upper part, where it can easily score a lot of points. Again - because of the random elements, you're facing a lot of attempts.
World: Cold Cuts
Level: 2-25
In order to unlock the hidden level, you need to use the last bird. The egg is hidden on the other side of the small planet you're shooting birds from.
Available birds: Bash; Zzzt; Ca-Caw
Number of launched birds: 2/3
Estimated score: 30000+ (+1x 10000) = 40000+
Launch the first bird roughly at the middle of the indicated block - it will destroy three other blocks and the pig with them. The bird will fall down immediately, killing another pig on the way.
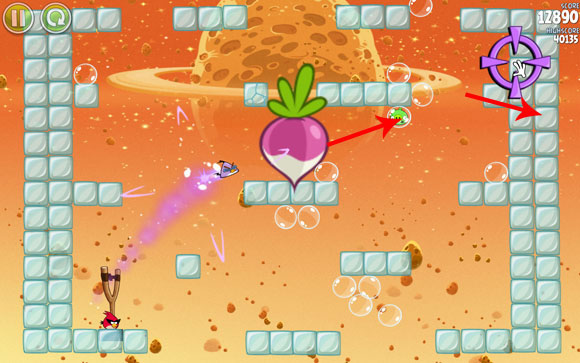
After a while a huge radish appears - launch the bird and as soon as it levels with the pig, change its course, aiming as high as possible, so that it could destroy seven additional blocks.
World: Cold Cuts
Level: 2-28
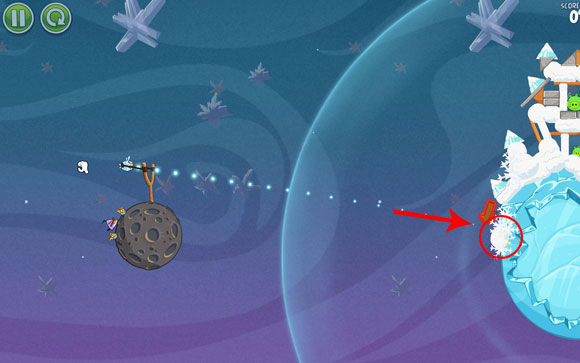
In order to unlock the hidden level, simply launch the bird towards the indicated spot, right next to the arrow showing you the way.
Available birds: Zzzt; Zzzt; Zzzt
Number of launched birds: 1/3
Estimated score: 78000+ (+2x 10000) = 98000+
The level is very easy - after launching the bird, change its course to get it inside the center of the structure. You can do it at two spots, only there aren't any additional concrete blocks blocking your way.
Once the bird breaks inside, after a while everything will be sucked up in the center, resulting in the destruction of almost everything around.


 Alone in the Dark Game Guide & Walkthrough
 Army of Two Game Guide & Walkthrough
 Assassins Creed Walkthrough Memory Block 1
 Alien: Isolation Game Guide & WalkthroughAlan Wakes American Nightmare Walkthrough Act I: The Mechanic