The Secret Order: Masked Intent Walkthrough, Guide, & Tips
The Secret Order: Masked Intent Walkthrough
Welcome to the The Secret Order: Masked Intent Walkthrough
Someone in the Order has turned traitor, murdering one of the Secret Five! Only Sarah can prevent the Order’s destruction!
Whether you use this document as a reference when things get difficult or as a road map to get you from beginning to end, we’re pretty sure you’ll find what you’re looking for here.
This document contains a complete The Secret Order: Masked Intent game walkthrough featuring annotated screenshots from actual gameplay!
We hope you find this information useful as you play your way through the game. Use the walkthrough menu below to quickly jump to whatever stage of the game you need help with.
Remember to visit the Big Fish Games Forums if you find you need more help. Have fun!
This walkthrough was created by Lucky Smile, and is protected under US Copyright laws. Any unauthorized use, including re-publication in whole or in part, without permission, is strictly prohibited.
General Tips

- This is the official guide for The Secret Order: Masked Intent.
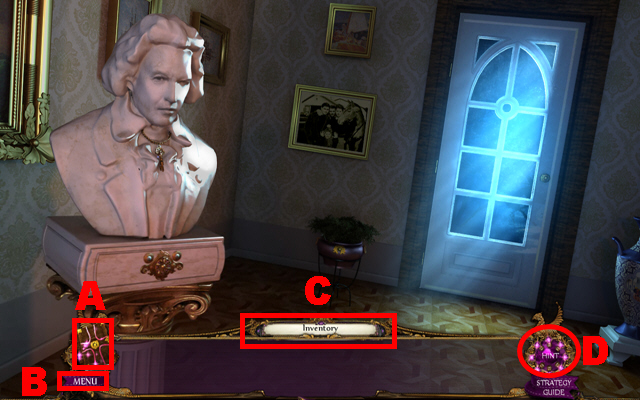
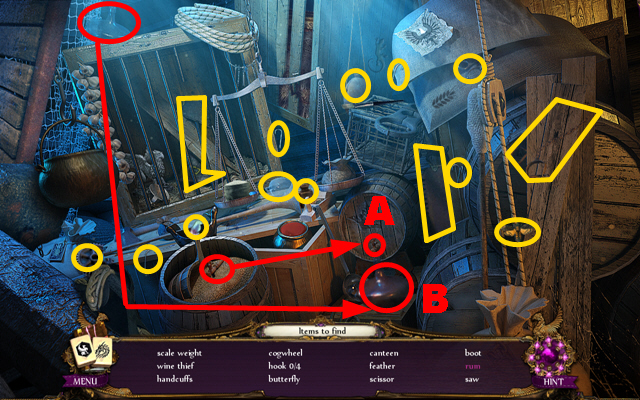
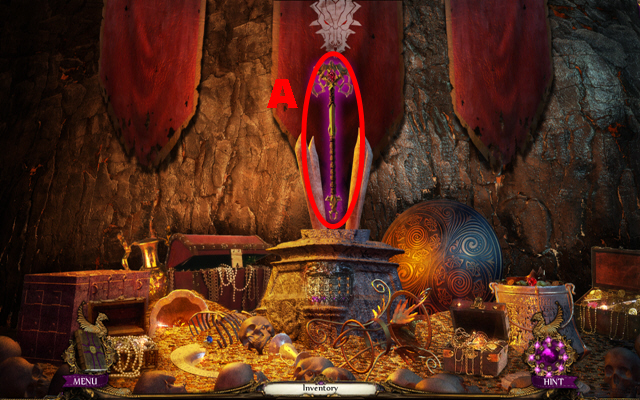
- Access the journal (A) to review your investigation and to use the map.
- Select the menu (B) to leave the game and to adjust the sound and the display mode.
- Items that you collect will be stored in the inventory (C); they can be used from there later on.
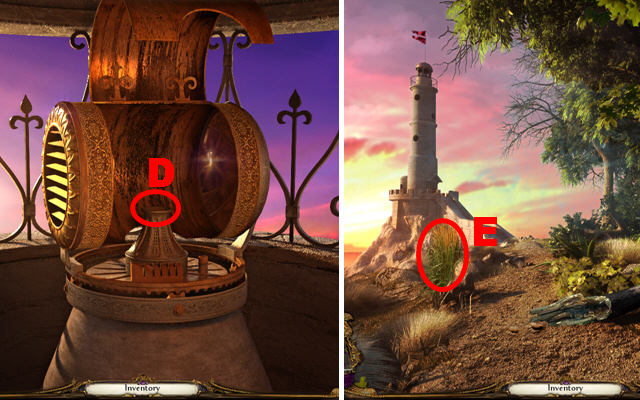
- Press the hint button (D) whenever you get stuck.
- You can choose from three grades of difficulty in the beginning: casual, advanced, and expert mode.
- Hidden-object scenes will be referred to as HOS throughout this guide.
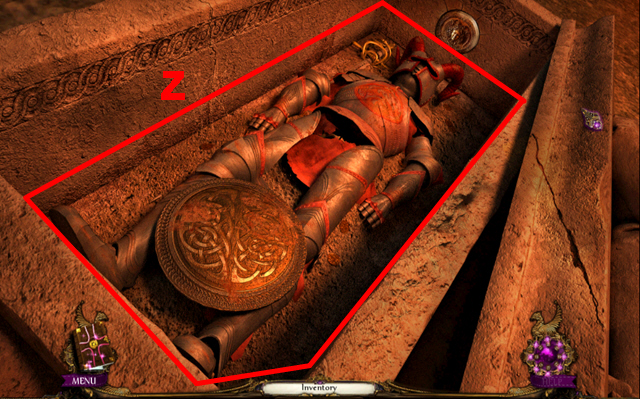
Chapter 1: Your Father’s House
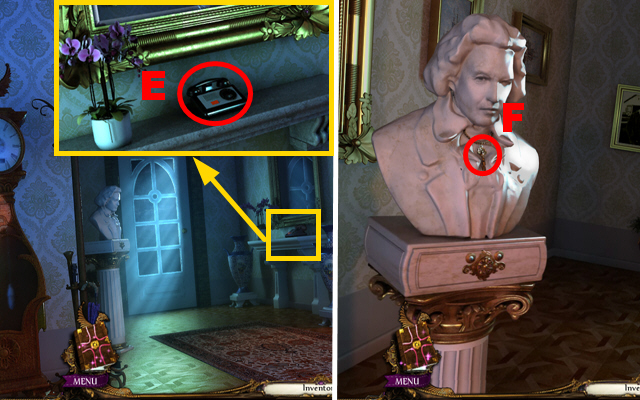
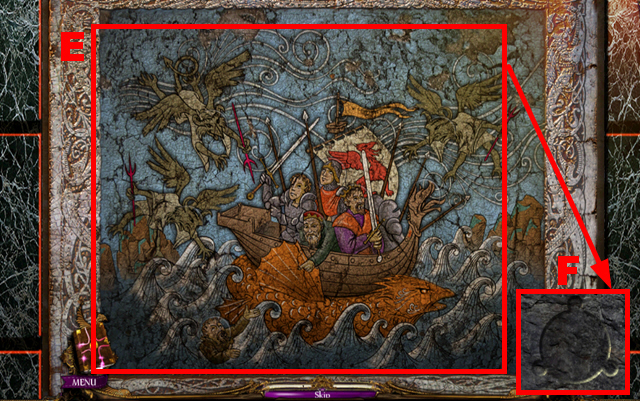
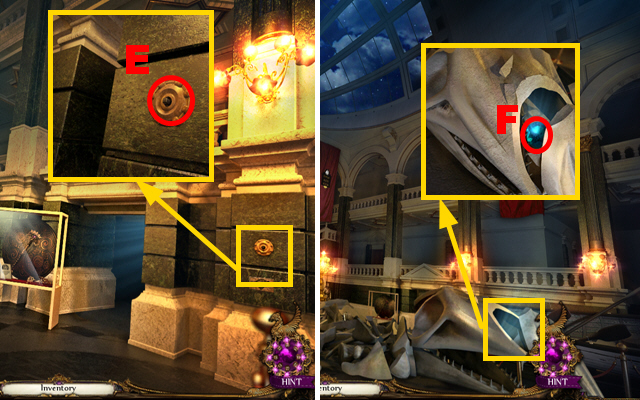
- Zoom into the phone; answer the phone (E).
- Move forward.
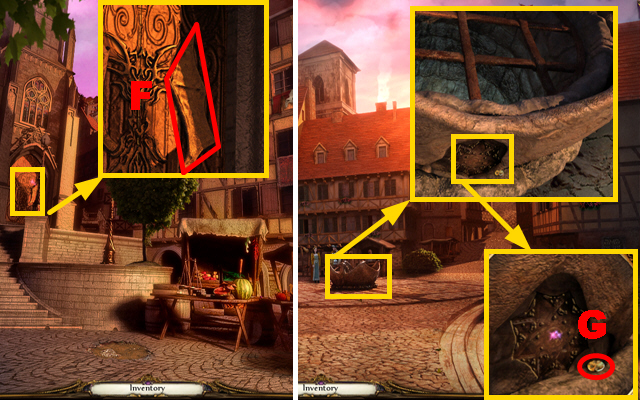
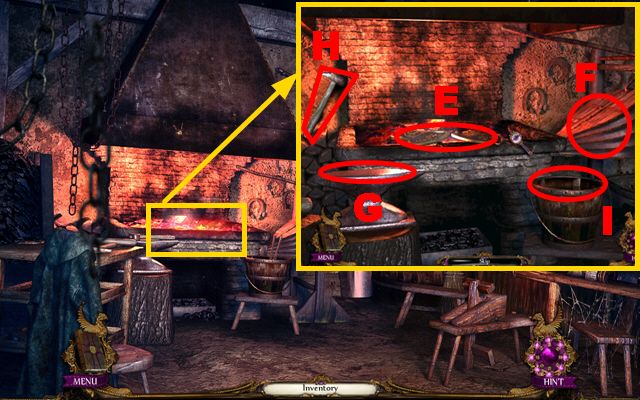
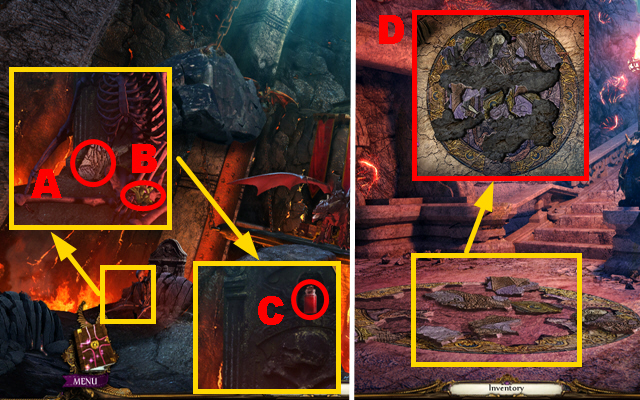
- Take the GOLDEN KEY (F).
- Walk down and turn right.
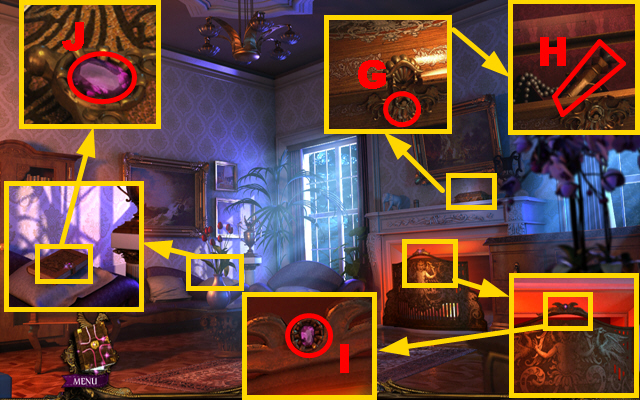
- Zoom into the casket; put the GOLDEN KEY into the lock (G), turn the key once, and take back the GOLDEN KEY.
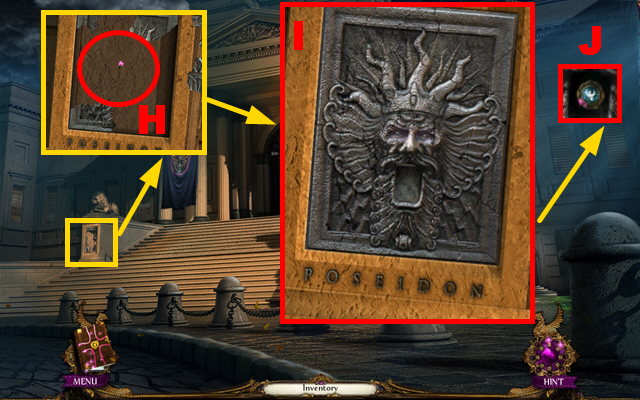
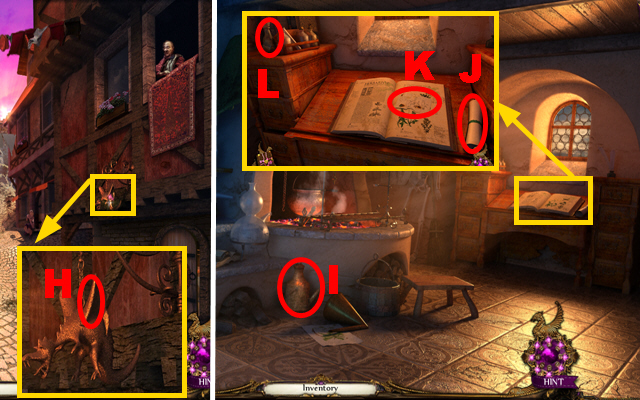
- Take the JEWELER’S TOOL (H).
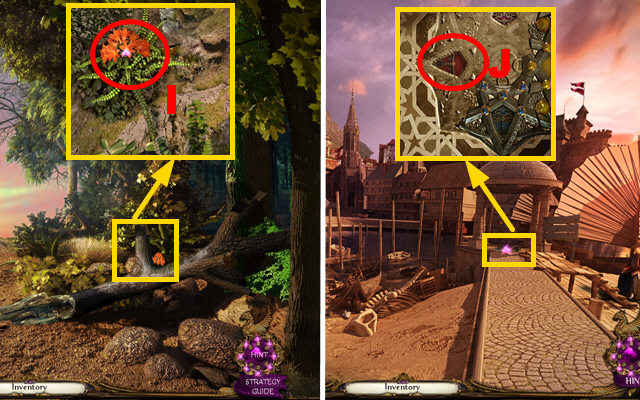
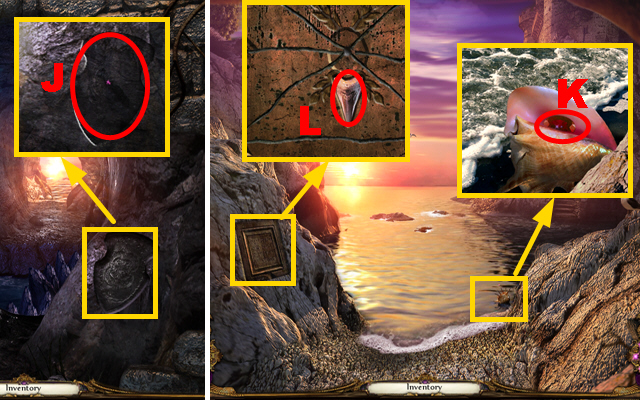
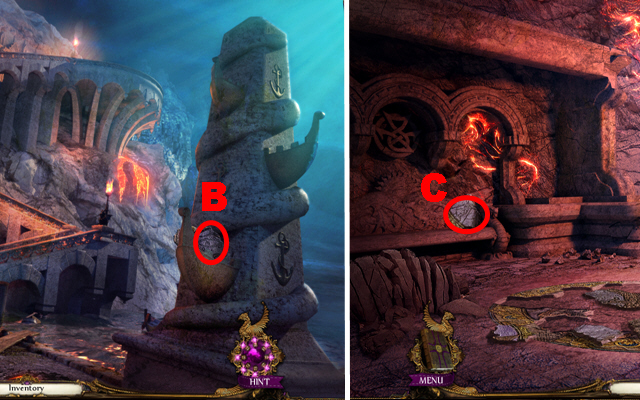
- Zoom into the fireplace and then zoom into the gem; acquire the 1/4 GEM with the JEWELER’S TOOL (I).
- Zoom into the sofa and then zoom into the book; acquire the 2/4 GEM with the JEWELER’S TOOL (J).
- Walk down.
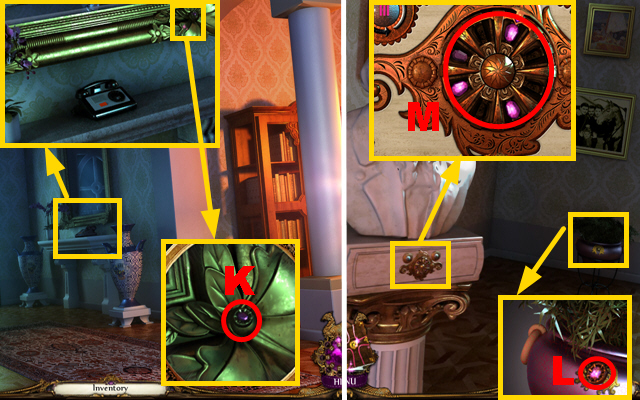
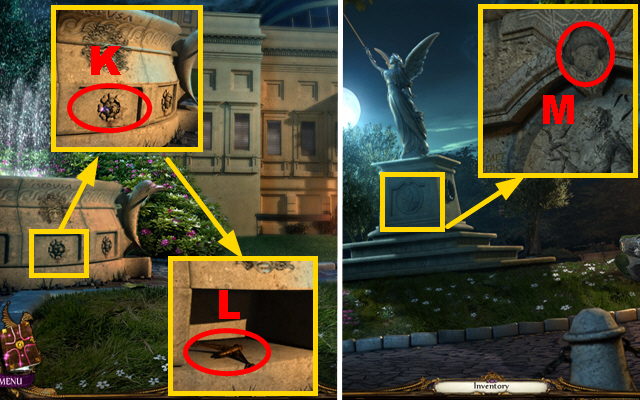
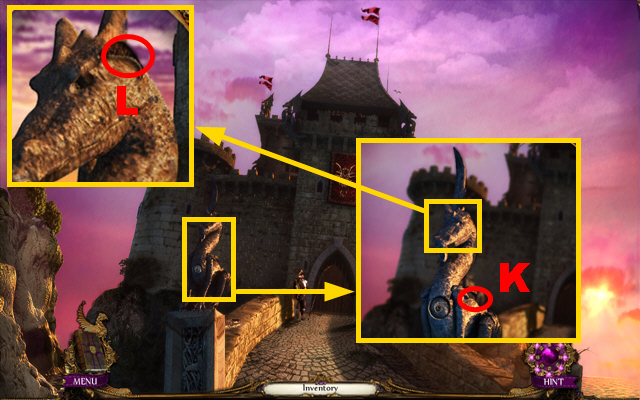
- Zoom into the phone and then zoom into the mirror frame; acquire the 3/4 GEM with the JEWELER’S TOOL (K).
- Move forward.
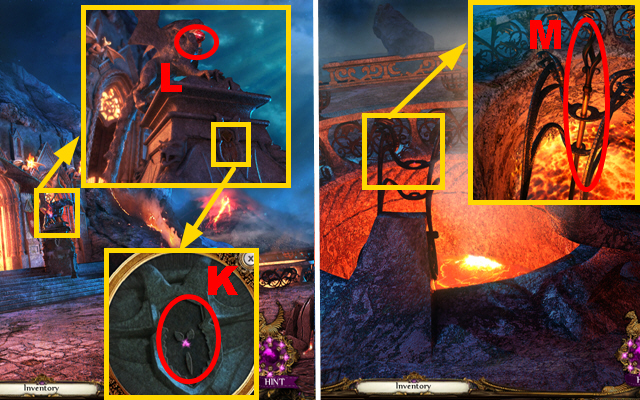
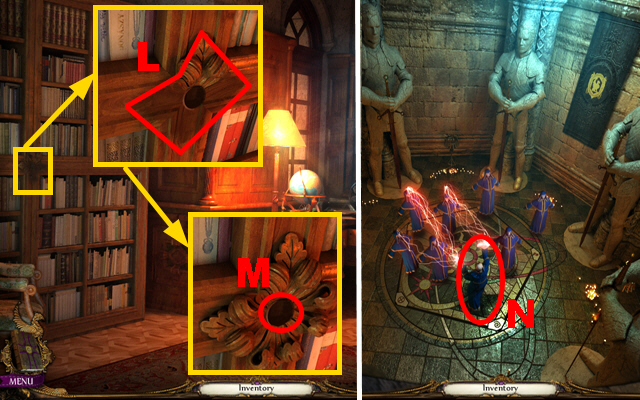
- Zoom into the flowerpot; acquire the 4/4 GEM with the JEWELER’S TOOL (L).
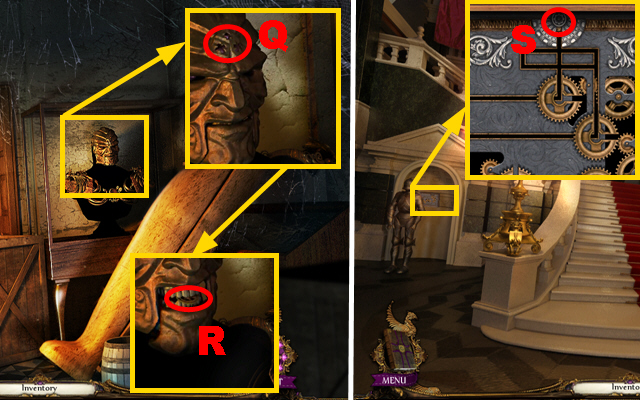
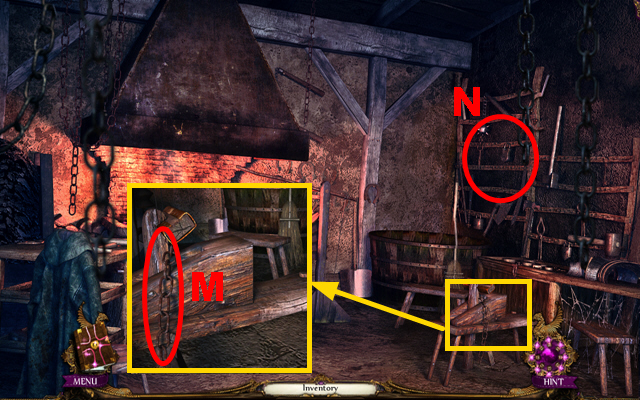
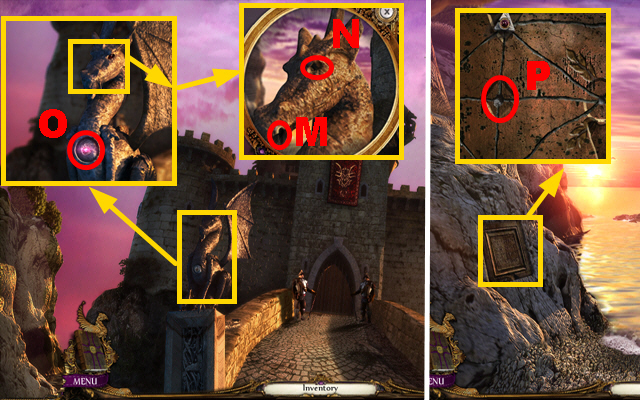
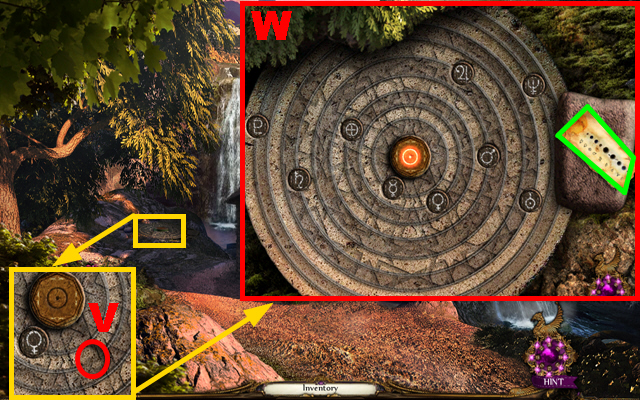
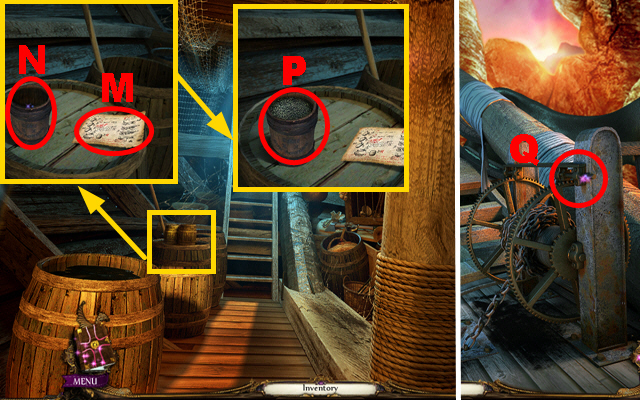
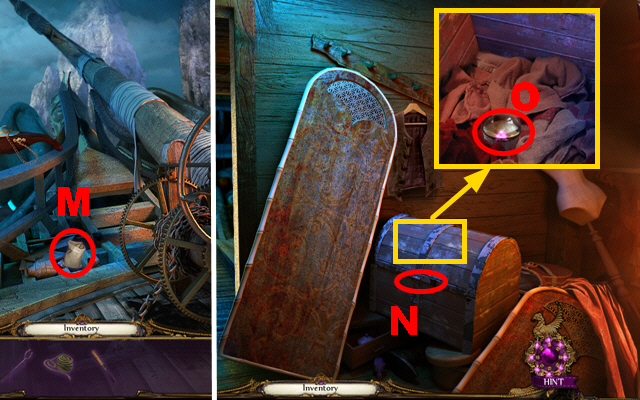
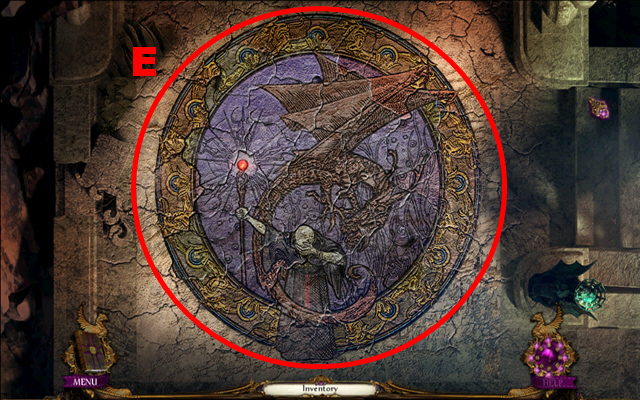
- Zoom into the bust; put down the 4 GEMS (M).
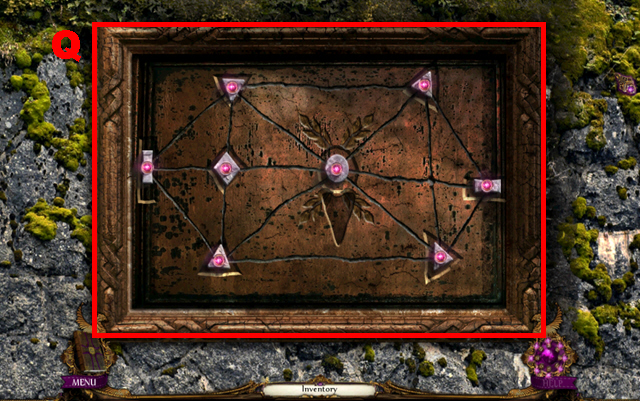
- Play the mini-game.
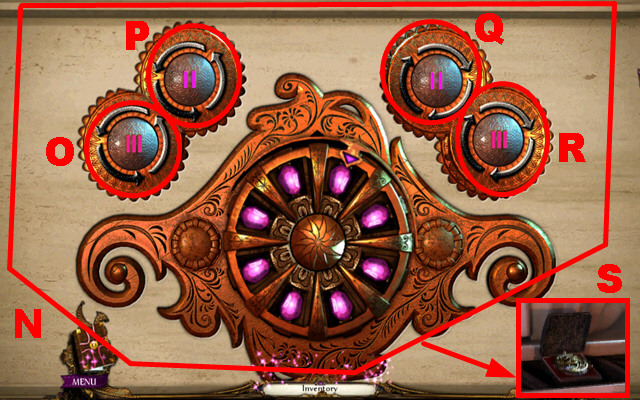
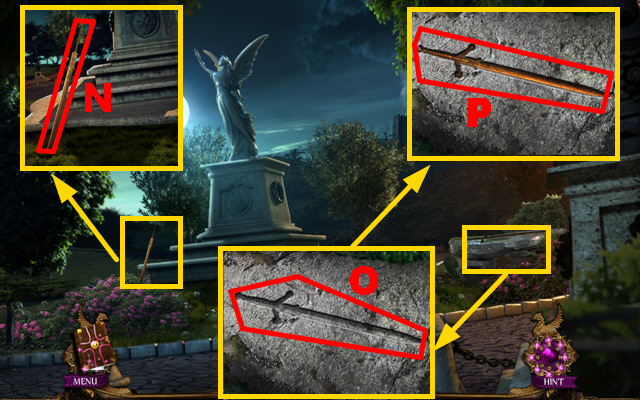
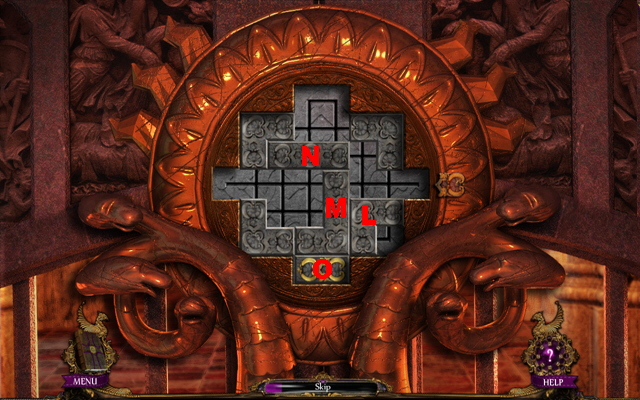
- To solve this puzzle (N), press the buttons in the following sequence: Ox3, Q, R, Q, O, Q, and P.
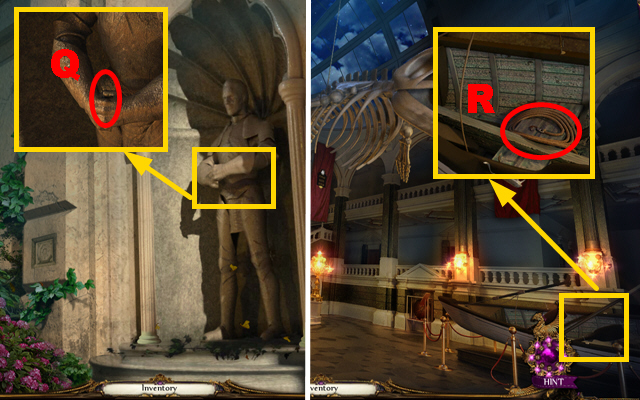
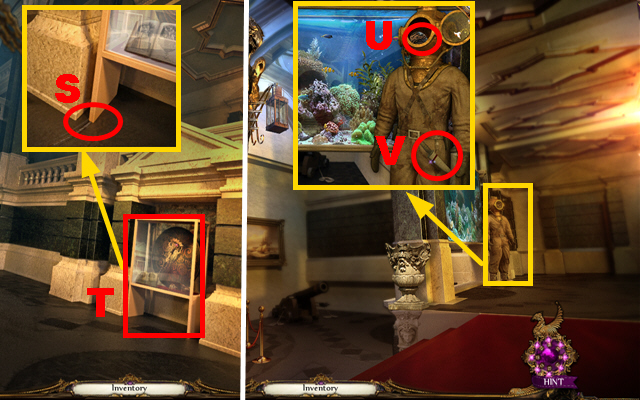
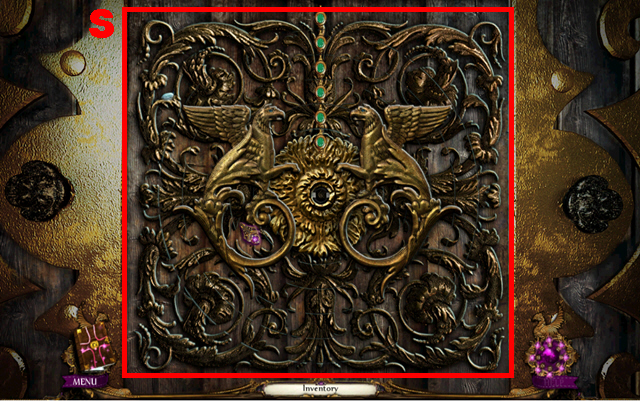
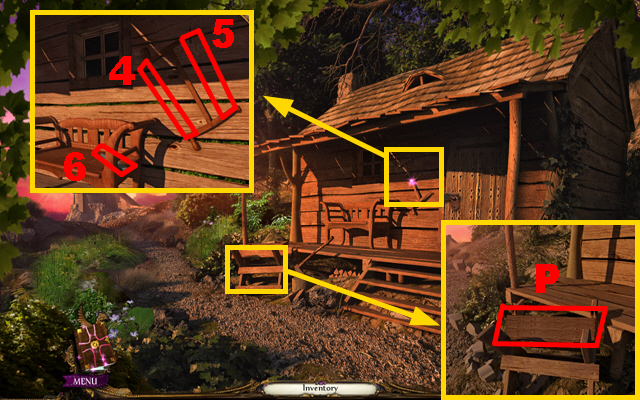
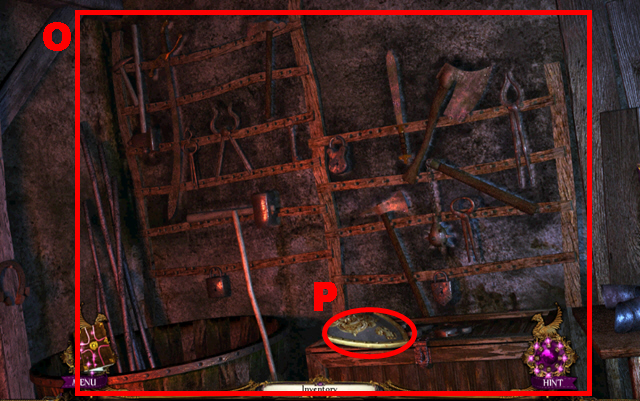
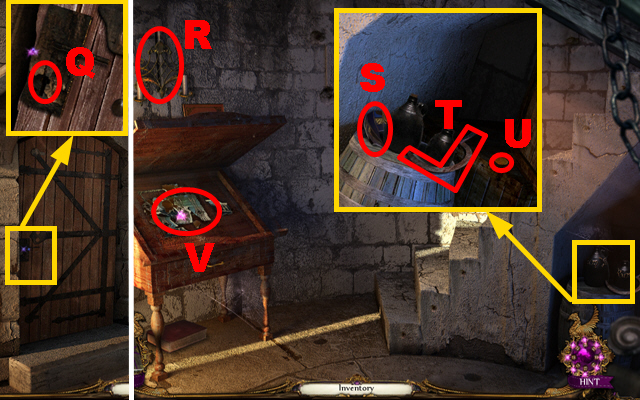
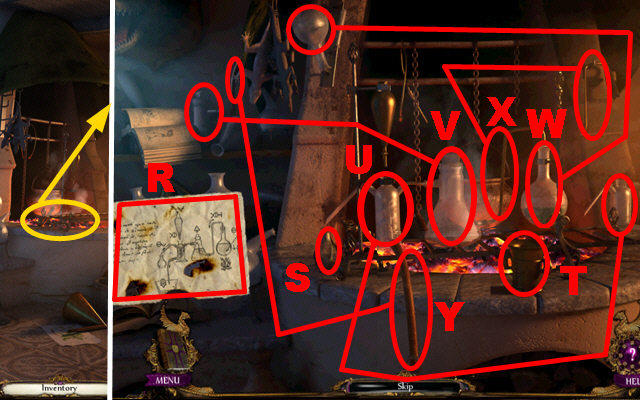
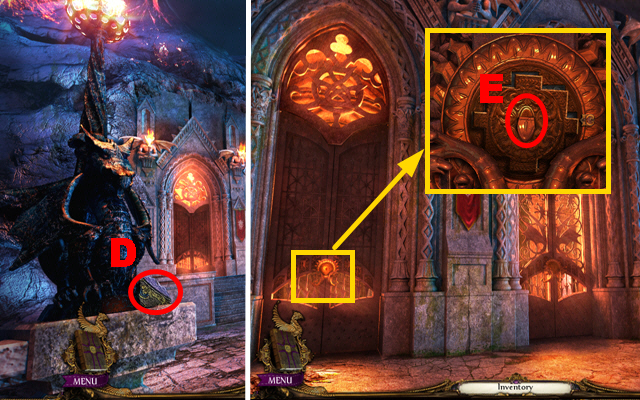
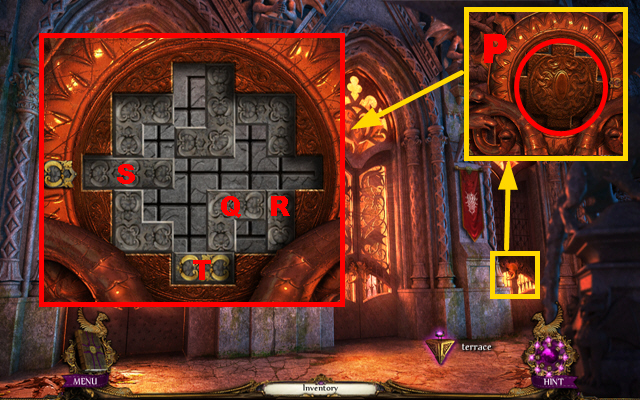
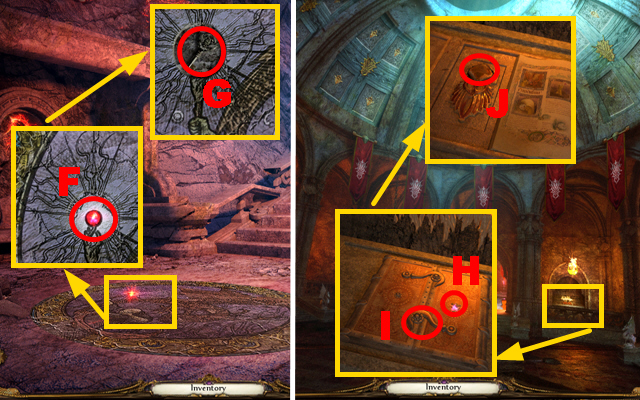
- Take the BROOCH (S).

- Zoom into the bench; take the OIL CAN (T) and the RAG (U).
- Turn right.
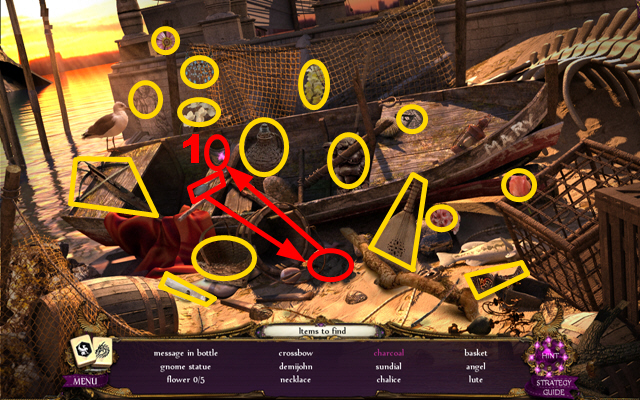
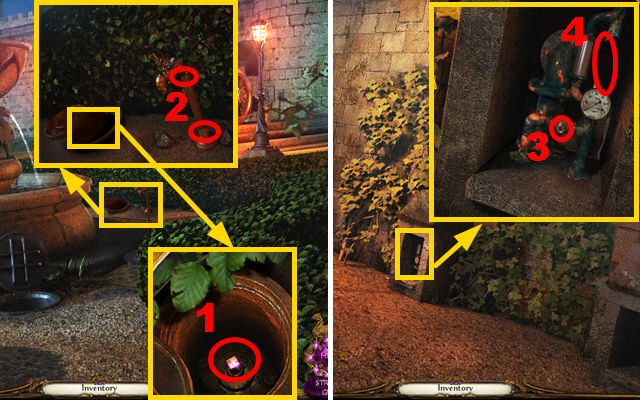
- Take the 1/5 PUZZLE PIECE (V).
- Go to the Fountain.
- Play the HOS.
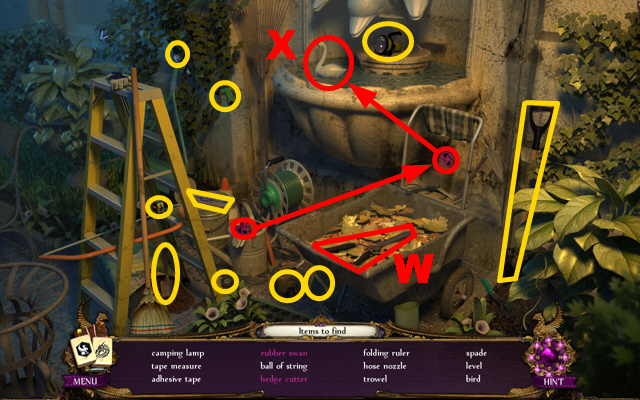
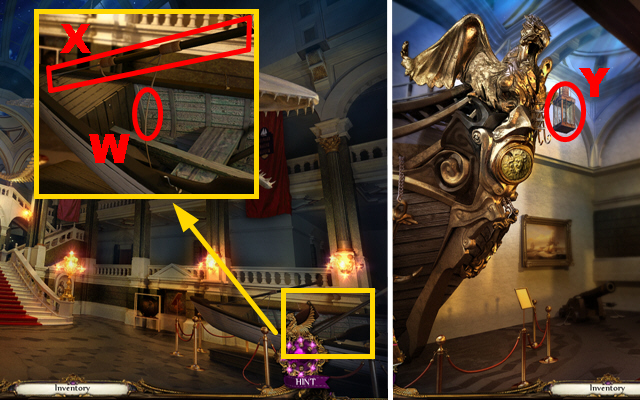
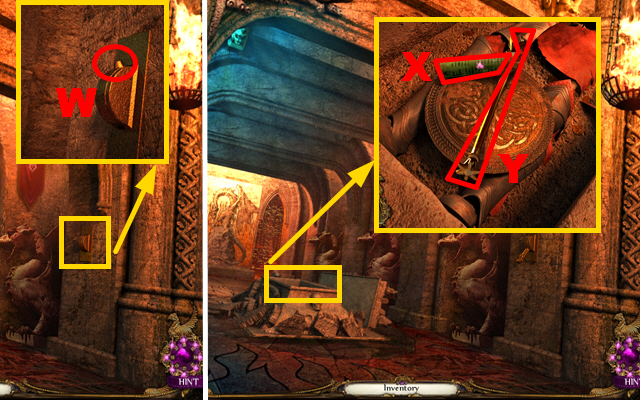
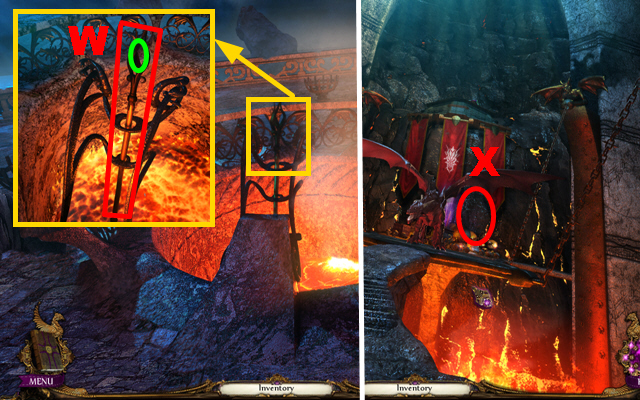
- Remove the leaves and take the hedge cutter (W).
- Take the valve, put it on the pipe, and take the rubber swan (X).
- You will receive the HEDGE CLIPPERS.
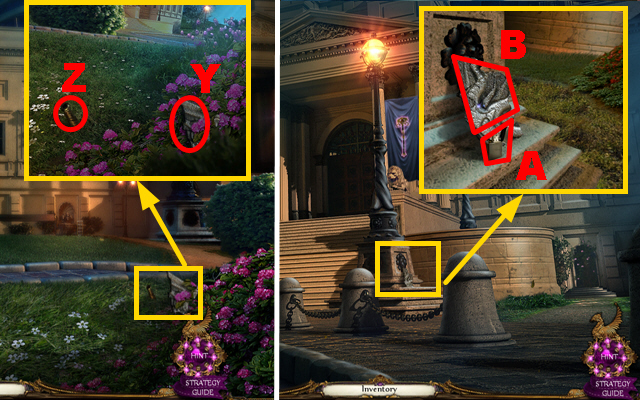
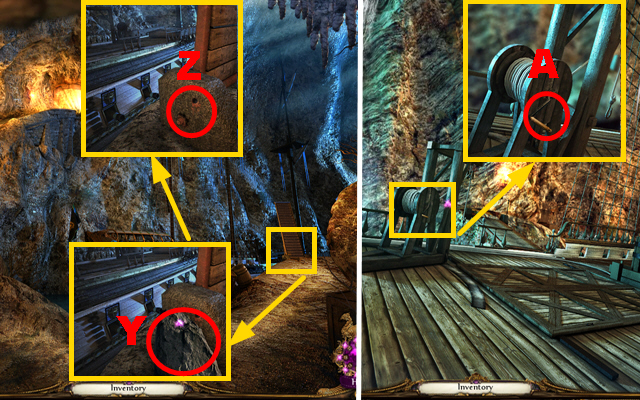
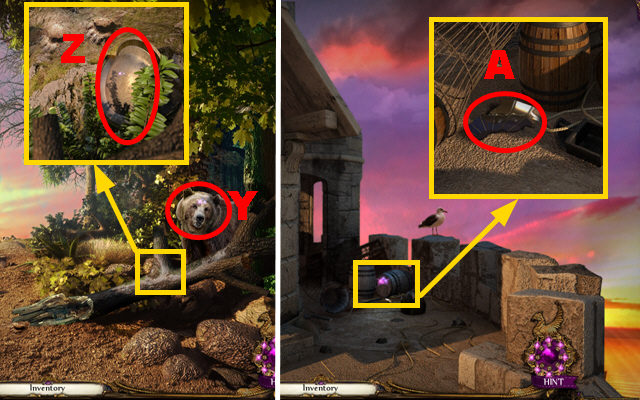
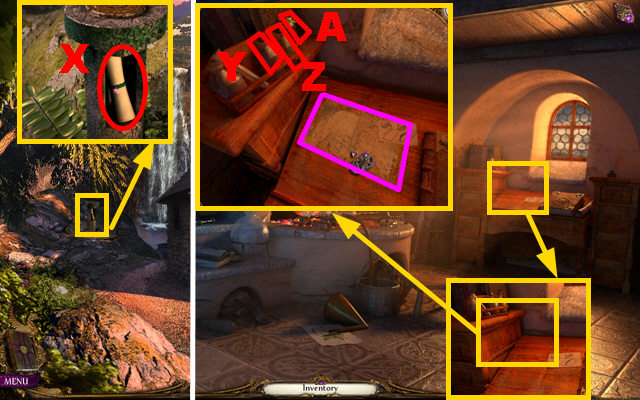
- Zoom into the grass; take the 2/5 PUZZLE PIECE (Y) and the HILT (Z).
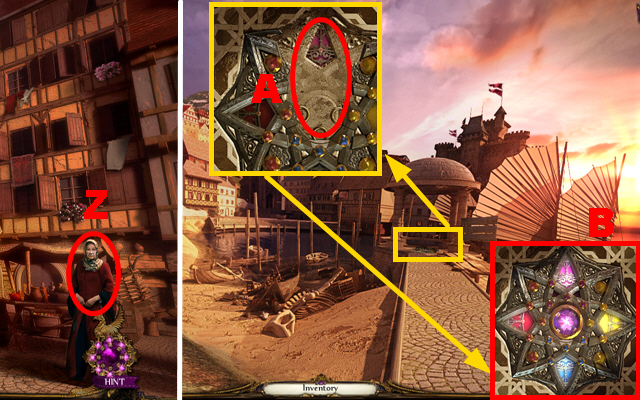
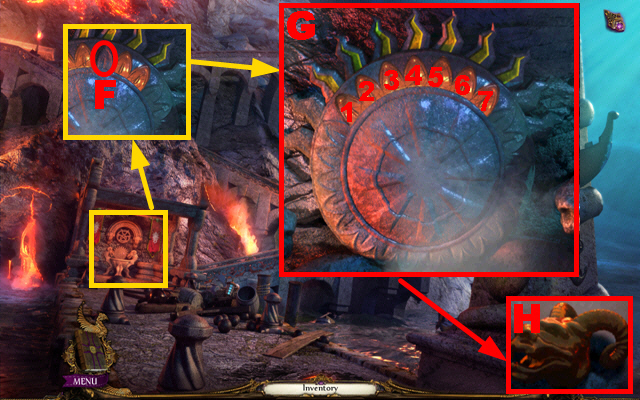
- Go to the Museum Entrance.
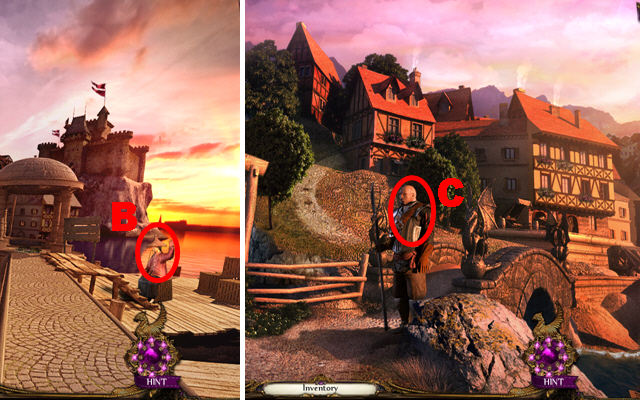
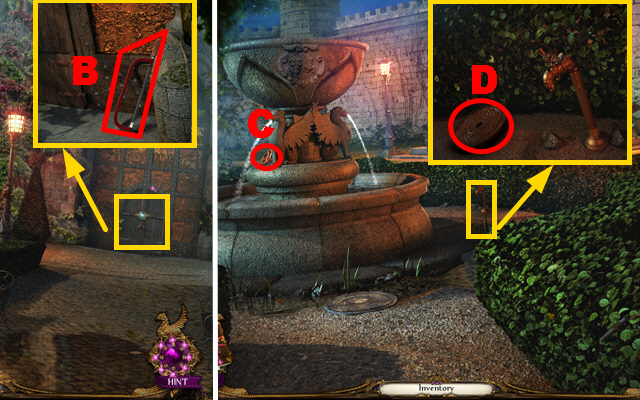
- Zoom into the streetlight; take the LIGHTER (A) and the 3/5 PUZZLE PIECE (B).
- Go to the Warrior Statue.

- Remove the leaves and take the 4/5 PUZZLE PIECE (C).
- Use the HEDGE CLIPPERS three times to free the statue from leaves (D).
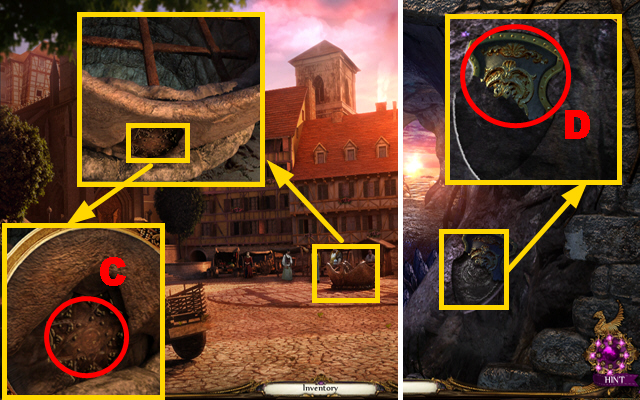
- Go to the Museum Door.
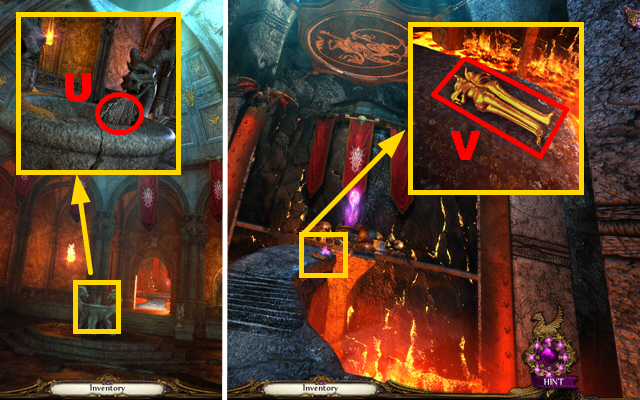
- Zoom into the wall; take the 5/5 PUZZLE PIECE (E).
- Zoom into the floor; take the SPEARHEAD (F).
- Clean the floor with the RAG and take the BEZEL (G).
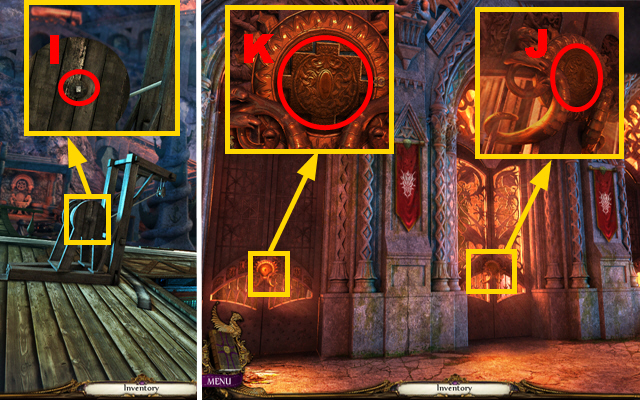
- Walk down.
- Zoom into the left area of the stairs; put down the 5 PUZZLE PIECES (H).
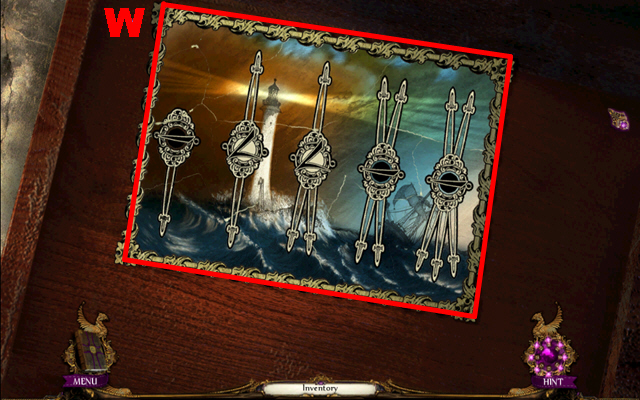
- Play the mini-game.
- To solve this puzzle (I), rotate the picture pieces and put them back into their correct place.
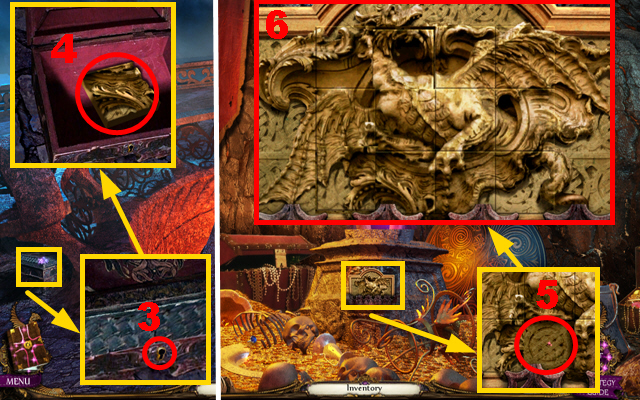
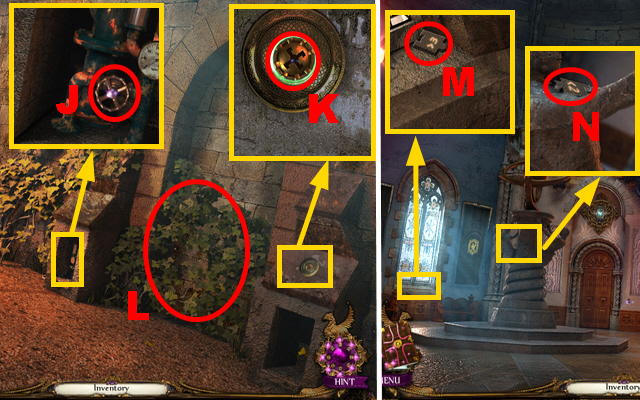
- Take the POMMEL (J).
- Go to the Fountain.
- Zoom into the fountain and use the SPEARHEAD to open the compartment (K); take the SWORD GUARD (L).
- Go to the Aphrodite statue.
- Zoom into the bottom of the statue; put the BEZEL and the BROOCH into the slot (M).
- Zoom into the sword blade; take the SWORD BLADE (N).
- Zoom into the stone; put the SWORD BLADE, the SWORD GUARD, the HILT, and the POMMEL into the niche (O).
- Take the SWORD (P).
- Go to the Warrior Statue.
- Zoom into the statue; put the SWORD into the statue’s hands (Q).
- Move forward twice.
- The man will talk to you.
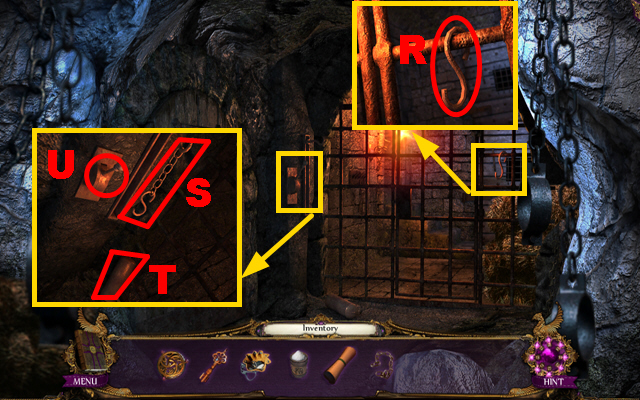
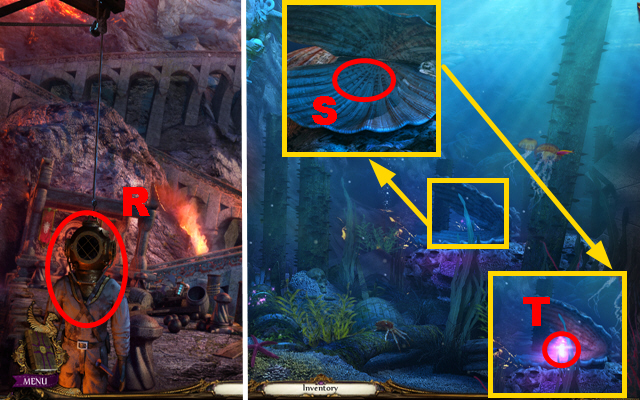
- Zoom into the boat; take the ROPE WITH HOOK (R).
- Go to the Cabinet.
- Zoom into the cabinet; pour the OIL CAN over the floor (S).
- Pull the cabinet (T).
- Go to the Museum Upstairs.
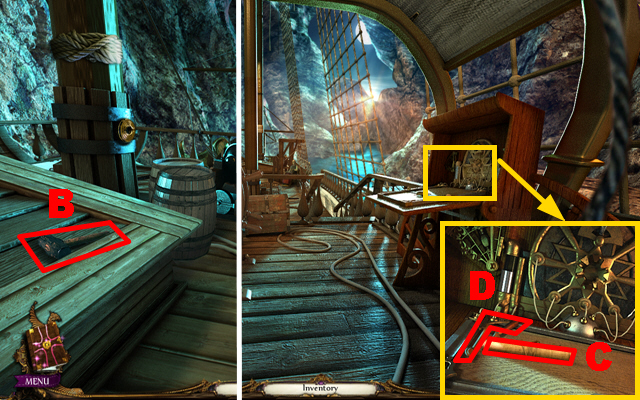
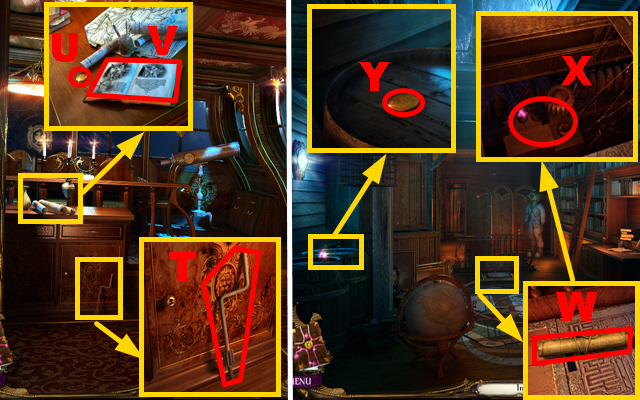
- Zoom into the diving suit and open the helmet; take the 1/2 RELIEF PIECE (U) and the DIVER’S KNIFE (V).
- Walk down twice.
- Zoom into the boat and cut the rope (W) with the DIVER’S KNIFE; take the HARPOON (X).
- Go to the Museum Upstairs.
- Use the HARPOON to acquire the LANTERN (Y).
- Go to the Dark Room.
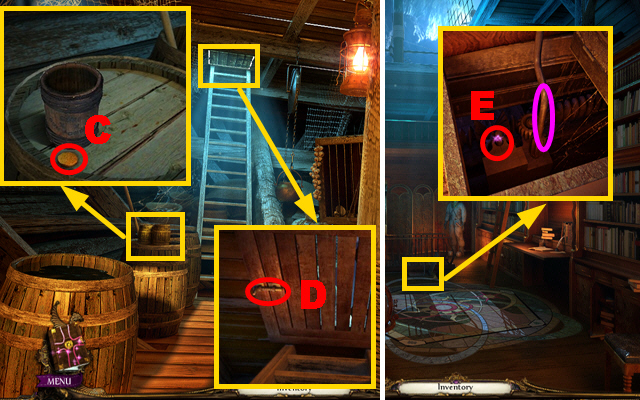
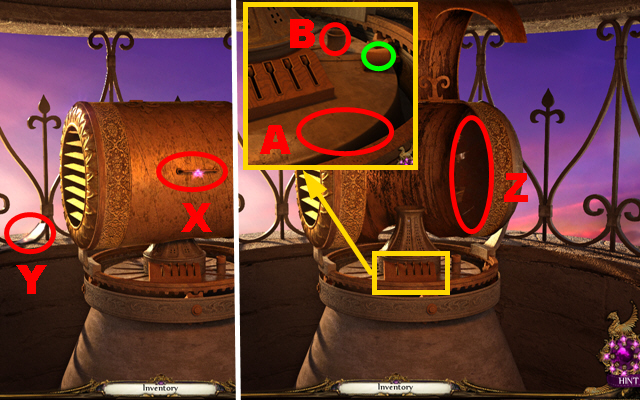
- Put down the LANTERN (Z) and light it with the LIGHTER.
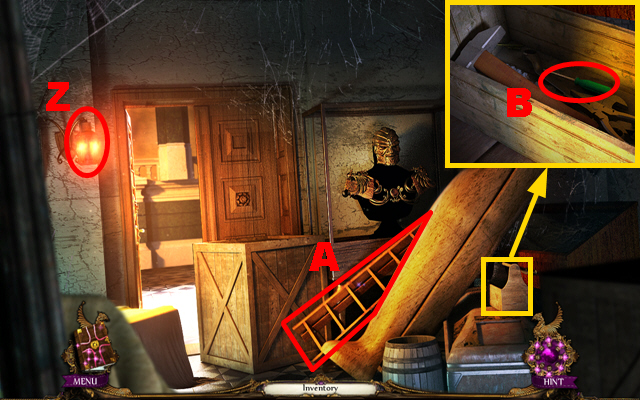
- Take the LADDER (A).
- Zoom into the toolbox and move aside the tools; take the SCREWDRIVER (B).
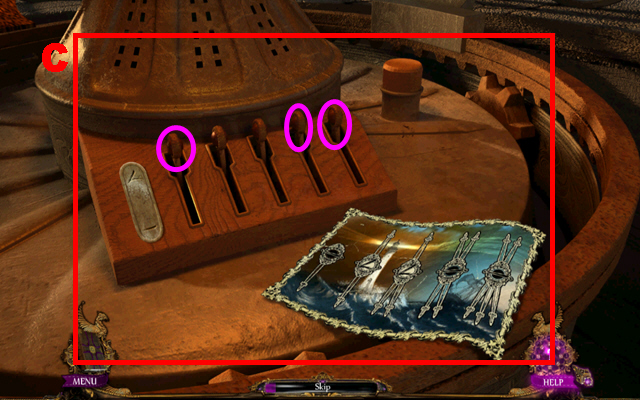
- Move forward.
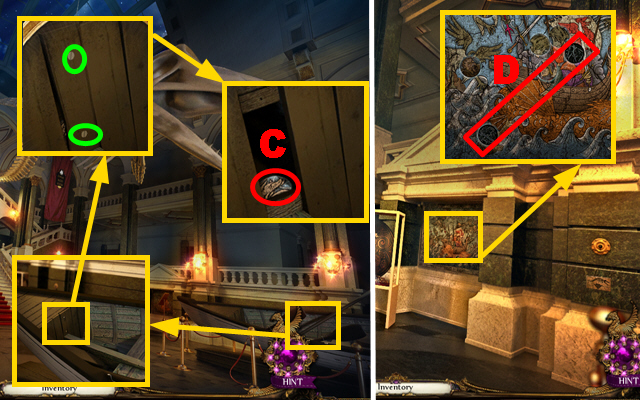
- Zoom into the boat and then zoom into the boards; remove the two screws marked in green with the SCREWDRIVER.
- Remove the board and take the 2/2 RELIEF PIECE (C).
- Go to the Cabinet.
- Zoom into the wall; put down the 2 RELIEF PIECES (D).
- Play the mini-game.
- To solve this puzzle (E), swap the head pieces so that each head is in the right slot.
- Put the BROOCH into the slot (F).
- Enter the Secret Room.
Chapter 2 : The Secret Room
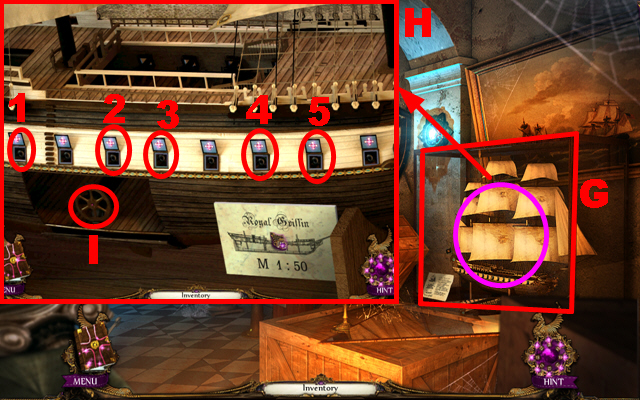
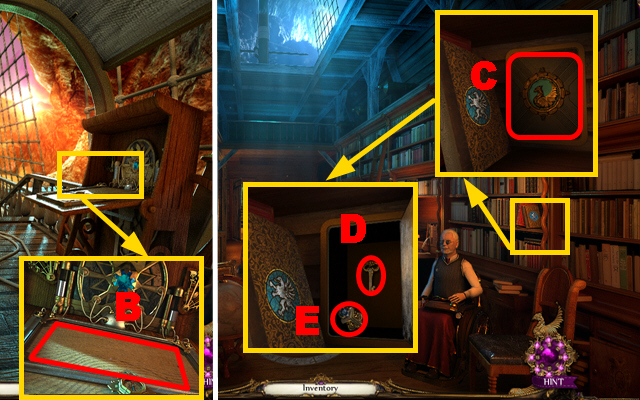
- Open the showcase (G).
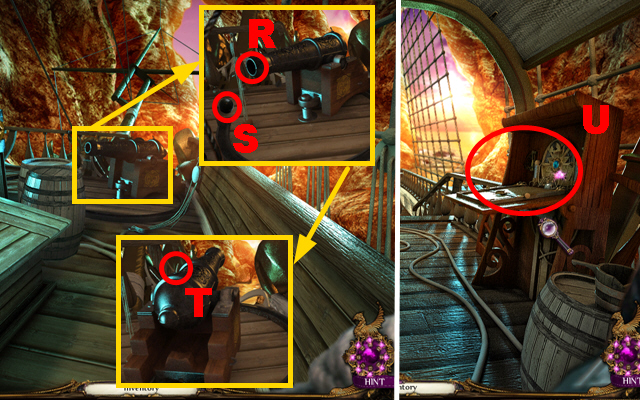
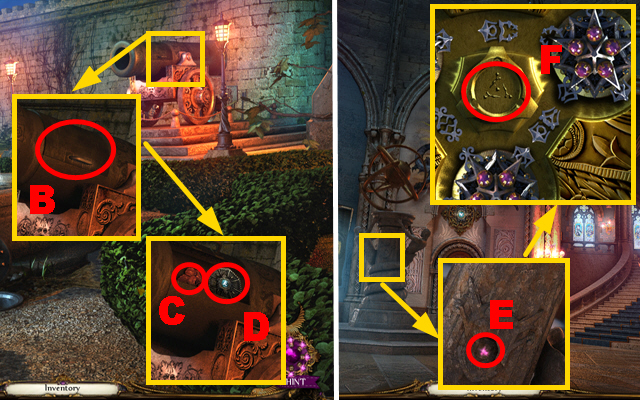
- Zoom into the ship marked in purple to play a mini-game.
- To solve this puzzle (H), press the cannons in the right order (1-5).
- Take the TINY COG WHEEL (I).
- Play the HOS.
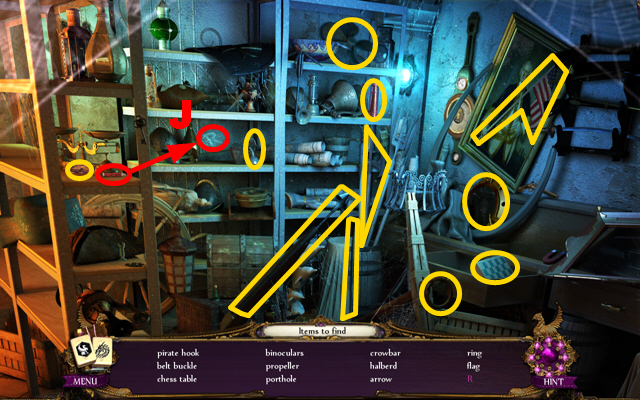
- Take the chalk, complete the letter with it, and take the letter ‘R’ (J).
- You will receive the CROWBAR.
- Go to the Museum Hall.
- The man will talk to you.
- Go to the Museum Upstairs.

- Put down the LADDER (K).
- Zoom into the ship’s front and remove the plaster; put the GOLDEN KEY into the lock (L), turn the key once, and take back the GOLDEN KEY.
- Walk down.
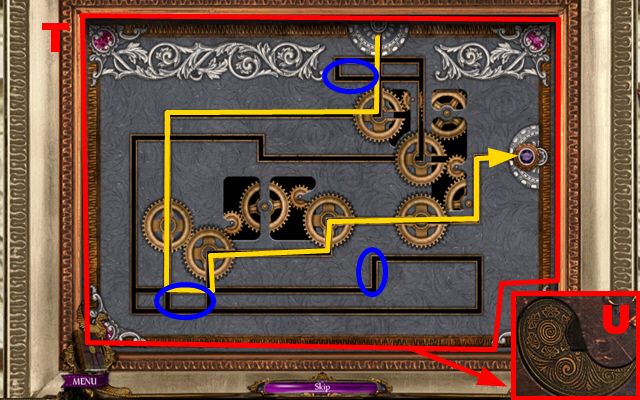
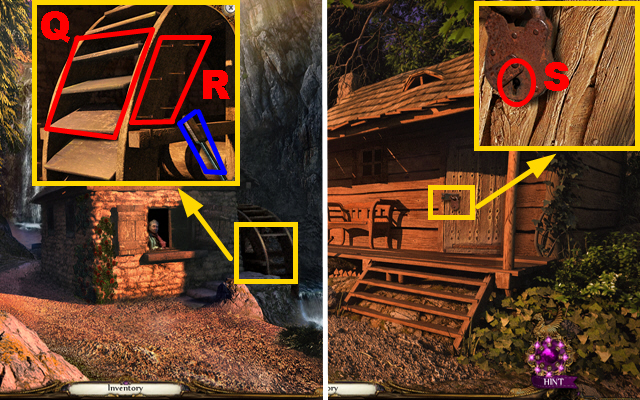
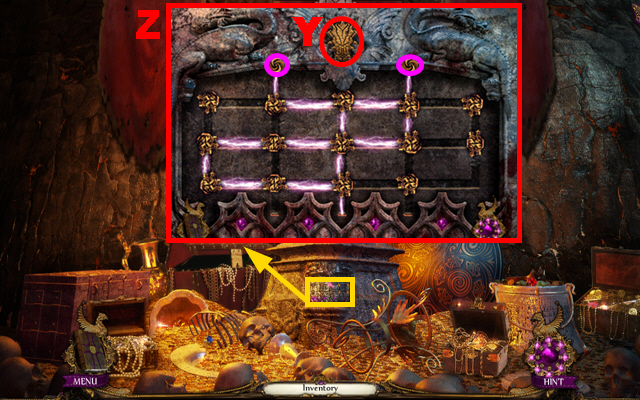
- Zoom into the wall behind the right knight; put down the TINY COG WHEEL (M).
- Play the mini-game.
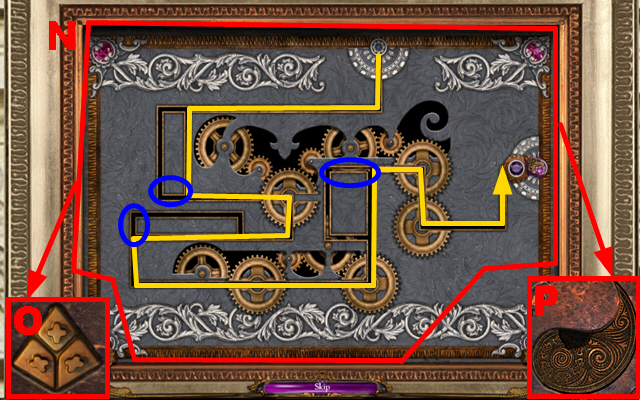
- To solve this puzzle (N), move the pin along the yellow line towards the end of the maze.
- Moving the pin, around the edges marked in blue, rotates the cog wheels.
- Take the THREE-POINTED KEY (O) and the SOCKET UPPER PART (P).
- Go to the Dark Room.
- Zoom into the showcase, put the THREE-POINTED KEY into the slot (Q), and turn the key once; take the BIG COG WHEEL (R).
- Go to the Museum Stairs.
- Zoom into the wall behind the left knight; put down the BIG COG WHEEL (S).
- Play the mini-game.
- To solve this puzzle (T), move the pin along the yellow line towards the end of the maze.
- Moving the pin around the edges marked in blue rotates the cog wheels.
- Take the SOCKET LOWER PART (U).

- Zoom into the door; put the SOCKET UPPER PART and the SOCKET LOWER PART into the slot (V).
- Put the BROOCH into the slot (W).
- Move forward.
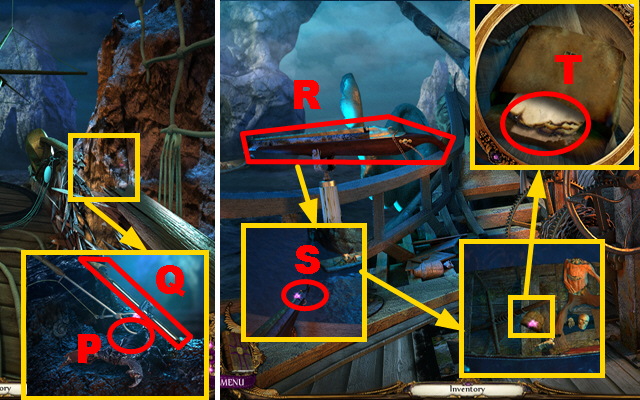
- Zoom into the cliff; acquire the RAMP LEVER (X) with the ROPE WITH HOOK.
- Move forward.
- Zoom into the ramp and remove the rock with the CROWBAR (Y); connect the RAMP LEVER to the ramp (Z) and turn the lever.
- Enter the ship.
- Zoom into the device; take the CRANK (A).
- Go to the Prow.
- Take the HAMMER (B).
- Go to the Ship Stern.
- Open the cabinet and zoom into it; read the scroll (C) and take the THROTTLE HANDLE (D).
- Go to the Shipboard.
- The man will talk to you.
- Go to the Cabinet.
- Zoom into the wall; connect the CRANK to the mechanism (E) and turn it.
- Walk down.
- Zoom into the skeleton; take the TIME STONE (F).
- Go to the Secret Room.
- Play the HOS.
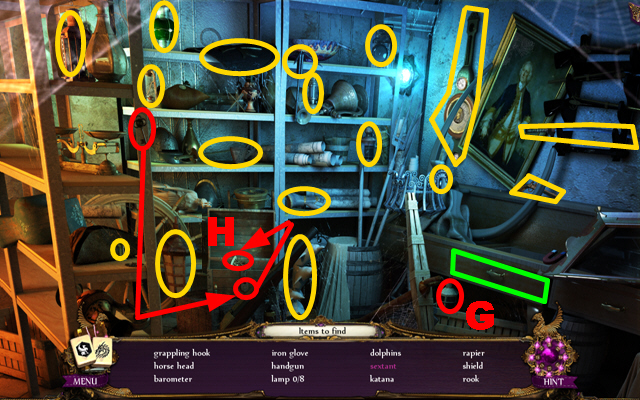
- Close the drawer (green) and take the lamp (G).
- Take the key, put it into the padlock, and take the sextant (H).
- You will receive the SEXTANT.
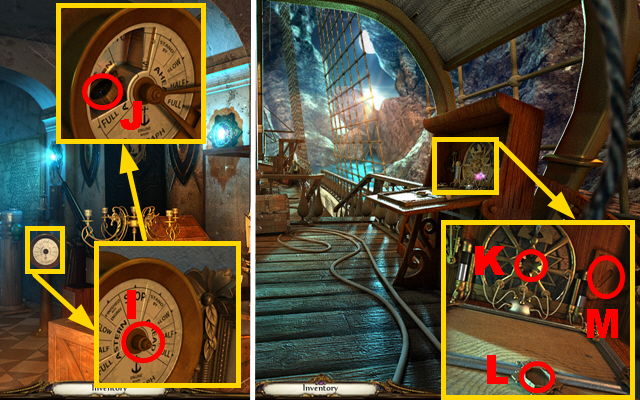
- Zoom into the device; put down the THROTTLE HANDLE (I) and turn it.
- Take the COMPASS (J).
- Go to the Ship Stern.
- Zoom into the navigation panel; put down the TIME STONE (K), the COMPASS (L), and the SEXTANT (M).
- Zoom into the navigation panel; take the 1/2 SHIP KEY (N).
- Go to the Shipboard. The man will talk to you.
- Zoom into the cargo and then zoom into the key; take the 2/2 SHIP KEY (O).
- Go to the Cave Hall.
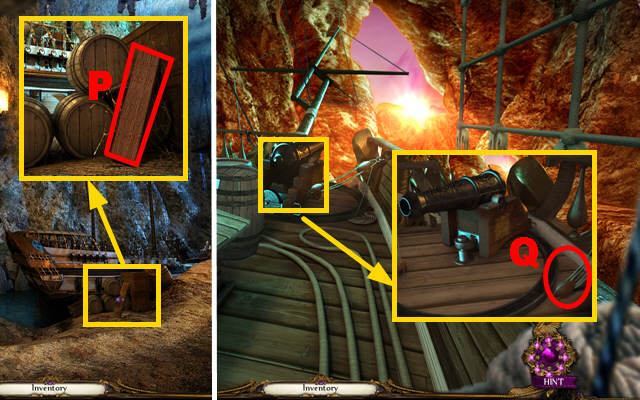
- Zoom into the barrels; take the BOARD (P).
- Go to the Prow.
- Zoom into the cannon; remove the rope (Q) from the cannon and turn the cannon around.
- Go to the Ship Door.

- Zoom into the door; put down the 2 SHIP KEYS (R).
- Play the mini-game.
- To solve this puzzle (S), rotate and adjust the rings to create the correct picture.
- Enter the Captain’s Room.
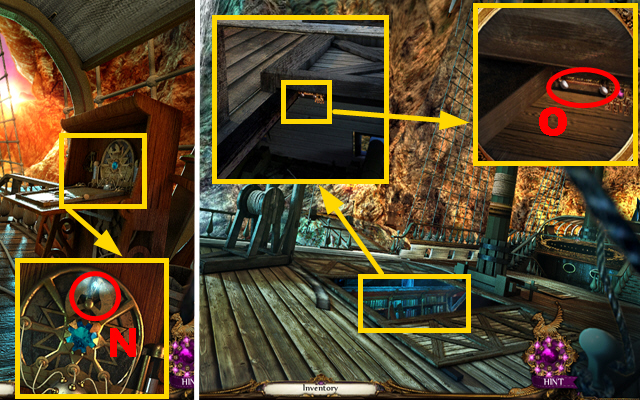
- Zoom into the cabinet; take the COGWHEEL ARM (T).
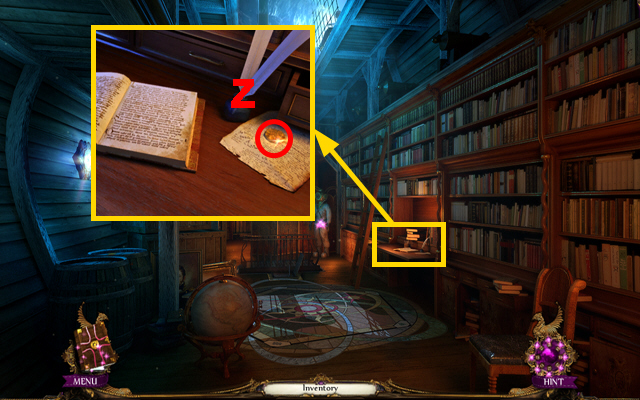
- Zoom into the scrolls; take the 1/7 COIN (U) and take a look at the book (V).
- Go to the Library.
- Zoom into the trapdoor; take the scroll (W) and open the trapdoor.
- Put down the COGWHEEL ARM (X).
- Zoom into the barrels; take the 2/7 COIN (Y).
- Zoom into the desk; take the 3/7 COIN (Z).
- Go to the Ship’s Storage.
- Play the HOS.
- Take the spigot and put it into the barrel (A); take the pot, put it below the barrel, turn the spigot, and take the rum (B).
- You will receive the COGWHEEL.
- Zoom into the barrel; take the 4/7 COIN (C).
- Zoom into the ceiling; remove the hinge with the HAMMER (D).
- Go to the Library.
- Zoom into the trapdoor; put down the COGWHEEL (E) and turn the lever marked in purple.
- Go to the Dressing Corner.
Chapter 3: The Dressing Corner
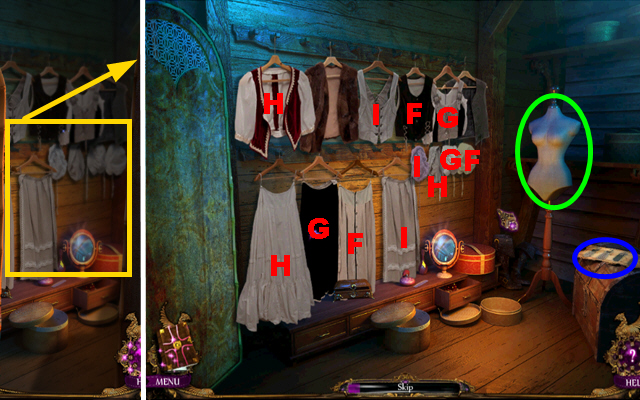
- Zoom into the dressing corner to play the mini-game.
- To solve this puzzle, assemble the period costumes F-I, on the mannequin marked in green.
- The paper marked in blue displays the correct costume combinations.
- Go to the Cave Entrance.
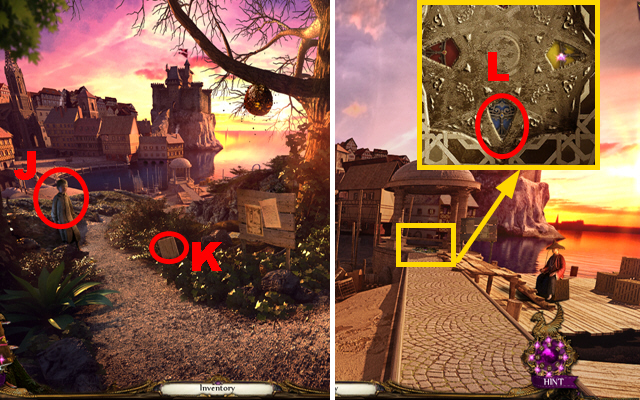
- Talk to the boy (J); you will receive the BLUE MEDALLION PIECE.
- Take the 1/3 WATERMILL BLADE (K).
- Go to the Harbor.
- Zoom into the floor; put down the BLUE MEDALLION PIECE (L).
- Play the HOS.
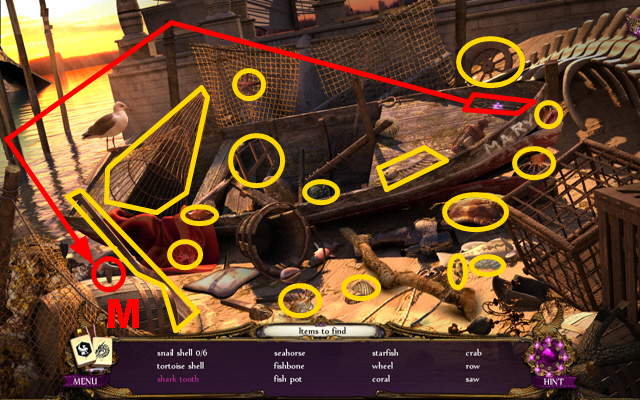
- Take the tongs, loosen the shark tooth with the tongs, and take the shark tooth (M).
- You will receive the SAW BLADE.
- Go to the Bridge.
- The man will talk to you.
- Go to the Watermill.
- Talk to the man (N).
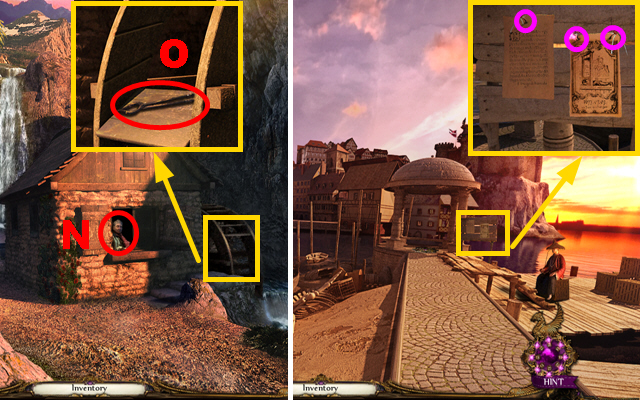
- Zoom into the waterwheel; take the PLIERS (O).
- Walk down twice.
- Zoom into the billboard; remove the three nails marked in purple with the PLIERS to acquire the 3 NAILS.
- Go to the Watermill.
- Play the HOS.
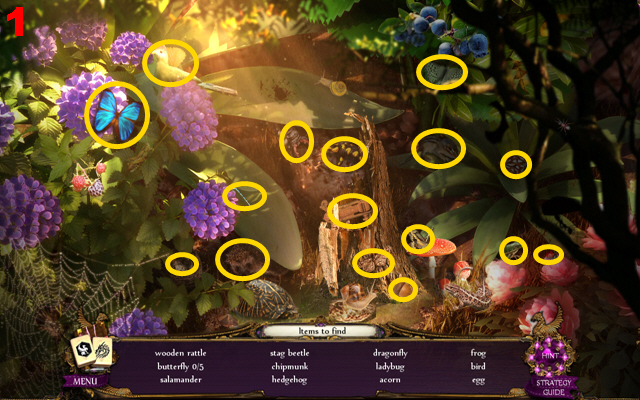
- Collect the 16 items marked in yellow (1).
- You will receive the WOODEN RATTLE.
- Walk down.
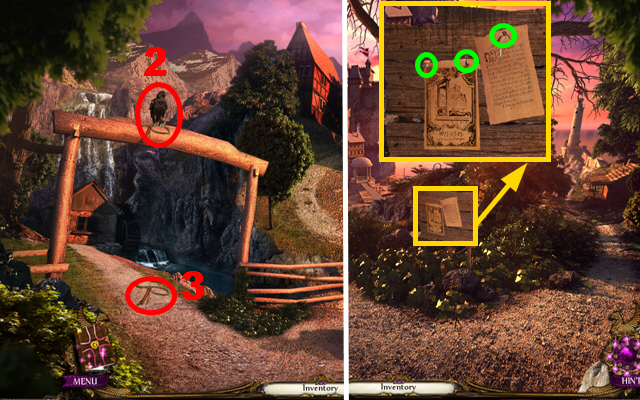
- Use the WOODEN RATTLE to chase way the crow (2).
- Take the STRING (3).
- Go to the Cave Entrance.
- Zoom into the billboard; remove the three nails marked in green with the PLIERS to acquire the 3 NAILS.
- Go to the Hunter’s House.
- Zoom into the wall and put down the SAW BLADE (4); tighten the saw frame with the string (5).
- Sharpen the blade with the grindstone (6) and take the SAW.
- Zoom into the boards; put down the BOARD (P) and cut it with the SAW to acquire 2 WATERMILL BLADES.
- Go to the Watermill.
- Zoom into the waterwheel; put down the 3 WATERMILL BLADES (Q) and the 6 NAILS (R).
- Use the HAMMER six times to fix the nails and pull the lever marked in blue.
- You will receive the HUNTER’S HOUSE KEY.
- Go to the Hunter’s House.
- Zoom into the lock; put the HUNTER’S HOUSE KEY into the lock (S) and turn the key once.
- Enter the Hunter’s House.
- Play the HOS.
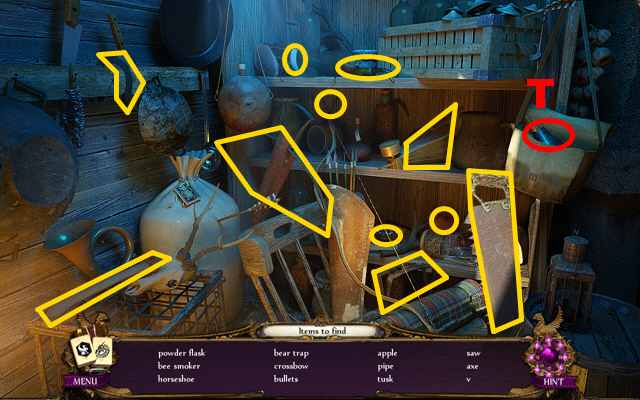
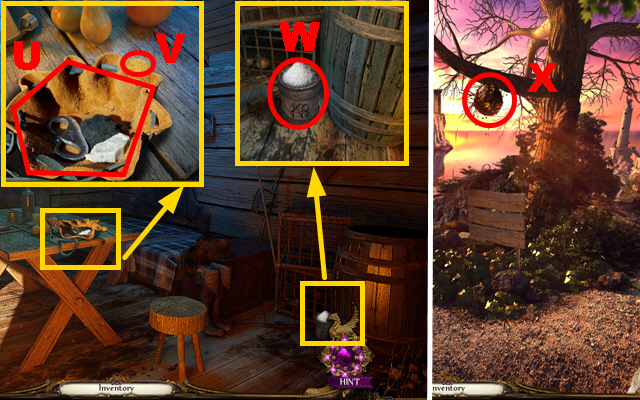
- Open the bag and take the powder flask (T).
- You will receive the BEE SMOKER.
- Zoom into the table; take the FLINT AND STEEL (U) and the 5/7 COIN (V).
- Zoom into the barrel; take the SALTPETER (W).
- Walk down twice.
- Hold the BEE SMOKER next to the honeycomb (X) and take the HONEYCOMB.
- Go to the Coastal Passage.
- Give the HONEYCOMB to the bear (Y).
- Zoom into the trunk; take the HELMET (Z).
- Go to the Lighthouse Door.
- Zoom into the barrels; take the 1/3 MIRROR SHARD (A).
- Go to the Harbor.
- Talk to the man (B); you will receive the LOCKPICK.
- Go to the Bridge.
- Give the HELMET to the guard (C).
- Go to the Vendor.
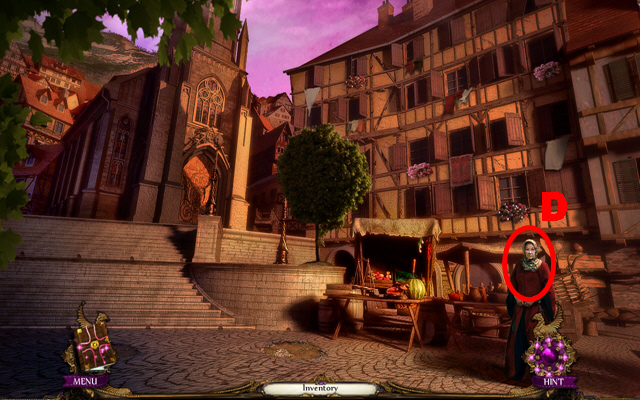
- Talk to the woman (D).
- Play the HOS.
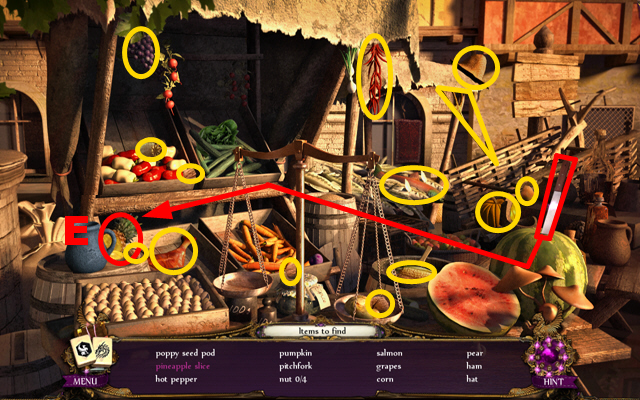
- Take the knife, cut the pineapple with it, and take the pineapple slice (E).
- You will receive the POPPY SEED POD.
- Zoom into the door; take the DRAGON WING (F).
- Walk down.
- Zoom into the fountain and then zoom into the niche; take the 6/7 COIN (G).
- Go to the Fort Road.
- Zoom into the wall; take the DRAGON HORN (H).
- Enter the Alchemist.
- Take the PETROLEUM (I).
- Zoom into the desk; take the GUNPOWDER RECIPE (J), the DISTILLERY GUIDE (K), and the POTION BOTTLE (L).
- Go to the Smithy.
- Zoom into the workbench; take the CHAIN (M).
- Zoom into the shelf (N).
- Play the mini-game.
- To solve this puzzle (O), put each tool into the correctly shaped place.
- Take the 1/2 SHIELD PIECE (P).
- Go to the Lighthouse Door.
- Zoom into the lock; use the LOCKPICK to open the lock (Q).
- Enter the Lighthouse.
- Press the candlestick (R) to open the desk.
- Zoom into the barrel; take the 2/3 MIRROR SHARD (S), the REAPING HOOK (T), and the 7/7 COIN (U).
- Zoom into the desk (V).
- Play the mini-game.
- To solve this puzzle (W), rotate and move the pieces into the correct position.
- Take the SIGNAL CODE (W).
- Go upstairs.
Chapter 4: The Top of the Lighthouse
- Open the cover (X) and take the 3/3 MIRROR SHARD (Y).
- Put down the 3 MIRROR SHARDS (Z).
- Zoom into the panel; put down the SIGNAL CODE (A), pour the PETROLEUM into the container (B), and put the cover marked in green on the container.
- Play the mini-game.
- To solve this puzzle (C), pull the three levers marked in purple.
- Put down the FLINT AND STEEL (D).
- Walk down three times.
- Cut the reed with the REAPING HOOK (E) to acquire the REED BUNDLE.
- Go to the Harbor.

- Talk to the man (F); you will receive the YELLOW MEDALLION PIECE.
- Zoom into the floor; put down the YELLOW MEDALLION PIECE (G).
- Go to the Bridge.
- Give the 7 COINS to the guard (H); you will receive the RED MEDALLION PIECE.
- Go to the Coastal Passage.
- Zoom into the trunk; cut the herb with the REAPING HOOK (I) to acquire the MEDICAL HERB.
- Go to the Harbor.
- Zoom into the floor; put down the RED MEDALLION PIECE (J).
- Go to the Fort.
- Zoom into the dragon; put down the DRAGON WING (K).
- Zoom into the dragon head; put down the DRAGON HORN (L).
- Go to the Alchemist.
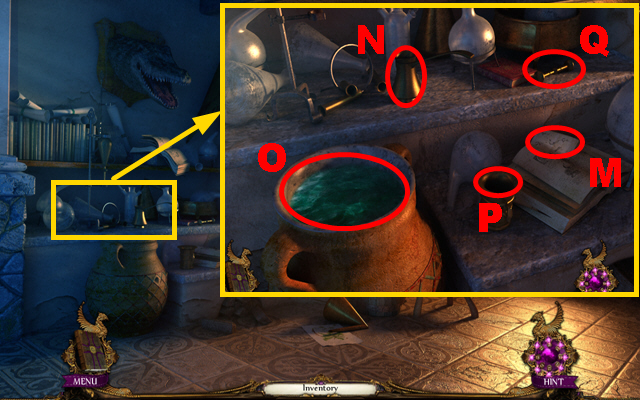
- Zoom into the alchemical tools; take the recipe (M) and use the ladle (N) to fetch water (O).
- Put the REED BUNDLE, the POPPY SEED POD, and the MEDICAL HERB into the can (P).
- Use the pestle (Q) to pound the ingredients in the can.
- Pour the ladle with water into the can.
- Take the BASIC POTION (P).
- Zoom into the oven; put down the DISTILLERY GUIDE (R), the POTION BOTTLE (S), and the BASIC POTION (T).
- Put the equipment parts U-Y into the correct places. Pour the basic potion into (W). Place the equipment parts (X) and (Y).
- Take the HEALING POTION (S).
- Go to the Vendor.
- Give the HEALING POTION to the woman (Z); you will receive the PURPLE MEDALLION PIECE.
- Go to the Harbor.
- Zoom into the floor; put down the PURPLE MEDALLION PIECE (A).
- Take the MEDAL (B).
- Go to the Town Square.
- Zoom into the fountain and then zoom into the empty niche; put the MEDAL into the niche (C).
- Go down the Tunnel.
- Zoom into the broken shield; take the 2/2 SHIELD PIECE (D).
- Go to the Smithy.
- Zoom into the oven; put down the 2 SHIELD PIECES (E).
- Press the pump (F) and put the shield on the anvil (G).
- Hit the shield with the hammer (H).
- Put the shield into the bucket (I) and take the COMPLETE SHIELD out of the bucket.
- Go down the Tunnel.
- Zoom into the niche; put the COMPLETE SHIELD into the niche (J).
- Move forward.
- Zoom into the water and turn over the shell; take the DRAGON EYE (K).
- Zoom into the wall; take the DRAGON TOOTH (L).
- Go to the Fort.
- Zoom into the dragon and then zoom into the dragon face; put down the DRAGON TOOTH (M) and the DRAGON EYE (N).
- Take the STONE PIECE (O).
- Go to the Step Bridge.
- Zoom into the wall; put down the STONE PIECE (P).
- Play the mini-game.
- To solve this puzzle (Q), move the pieces into the similarly shaped slots.
- Move forward.
- The man in the jail cell will talk to you.
- Zoom into the bars; take the S HOOK (R).
- Zoom into the lever; put down the CHAIN and the S HOOK (S).
- Connect the weight (T) to the hook.
- Pull the lever (U).
- The man will talk to you; you will receive the SOLUTION KEY.
- Go to the Watermill.
- Zoom into the structure; put down the SOLUTION KEY (V).
- Play the mini-game.
- To solve this puzzle (W), swap the stone pieces so that they are aligned accordingly to the solution marked in green.
- Zoom into the column; take the EMPTY MAP (X).
- Go to the Alchemist.
- Zoom into the table and the zoom into the bottles; put down the EMPTY MAP marked in purple.
- Pour the bottle (Y) over the map and then pour the bottle (Z) over the map.
- Take the SULFUR (A) and the DECODED MAP marked in purple.
- Go to the Ship Stern.
- Zoom into the navigation panel; put down the DECODED MAP (B).
- Go to the Library.
- The man will talk to you.
- Zoom into the secret compartment and open the door (C); take the CABINET KEY (D) and the STEERING SYMBOL (E).
- Walk down.

- Zoom into the cabinet and put the CABINET KEY into the lock (F); take the note (G) and the ANCHOR WHEEL (H).
- Go to the Ship Stern.
- Put the STEERING SYMBOL into the niche (I).
- Go to the Ship Storage.
- Play the HOS.
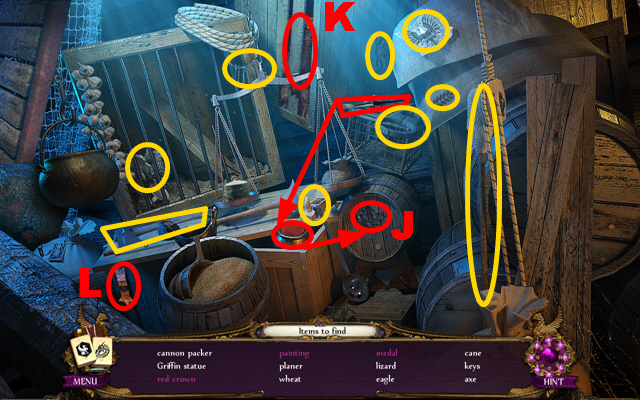
- Take the brush; dip it into the red paint, take the brush again, paint the crown with it, and take the red crown (J).
- Remove the boards and take the painting (K).
- Remove the cloth and take the medal (L).
- You will receive the CANNON PACKER.
- Go to the Harbor.
- Play the HOS.
- Take the spoon and take some charcoal with it; pour the spoon with charcoal into the mug, and take the charcoal (1).
- You will receive the CHARCOAL.
- Go to the Ship Storage.
- Zoom into the barrel; put down the GUNPOWDER RECIPE (M).
- Pour the CHARCOAL, the SULFUR, and the SALTPETER into the mug (N).
- Take the GUNPOWDER (P).
- Go to the Bowsprit.
- Put down the ANCHOR WHEEL (Q) and turn it.
- Go to the Prow.
- Zoom into the cannon and pour the GUNPOWDER into the cannon (R); push the CANNON PACKER into the cannon.
- Put the cannonball (S) into the cannon and push the CANNON PACKER into the cannon.
- Turn the cannon around.
- Light the fuse (T) with the FLINT AND STEEL.
- Go to the Ship Stern.
- Zoom into the navigation panel (U).
Chapter 5: On Track Again
- Take the TONGS (J) and the ROPE (K).
- Go to the Library.
- The man will talk to you.
- Go to the Ship Storage.
- Zoom into the barrels; take the CHISEL (L).
- Go to the Bowsprit.
- Take the SACK (M).
- Go to the Dressing Corner.
- Open the chest with the CHISEL (N).
- Zoom into the chest; take the TELESCOPE LENS (O).
- Go to the Prow.
- Zoom into the broken railing; hold the TONGS next to the scorpion (P), remove the scorpion with the SACK, and take the HARPOON (Q).
- Go to the Bowsprit.
- Put the HARPOON and the ROPE on the device (R).
- Zoom into the harpoon; shoot the harpoon (S).
- Zoom into the bag and open it; take the note and the PORTING GUIDE below it (T).
- Go to the Captain’s Room.
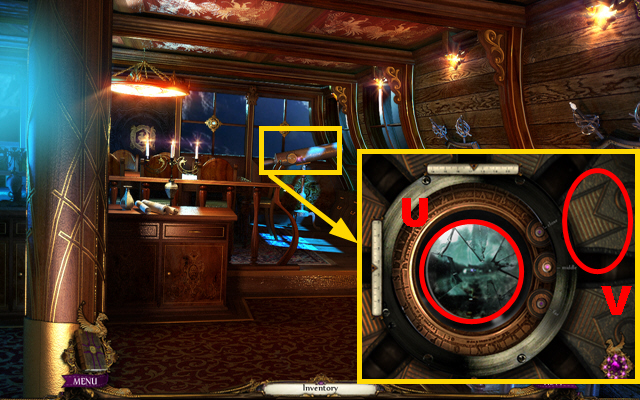
- Zoom into the telescope; put down the TELESCOPE LENS (U) and the PORTING GUIDE (V).
- Play the mini-game.
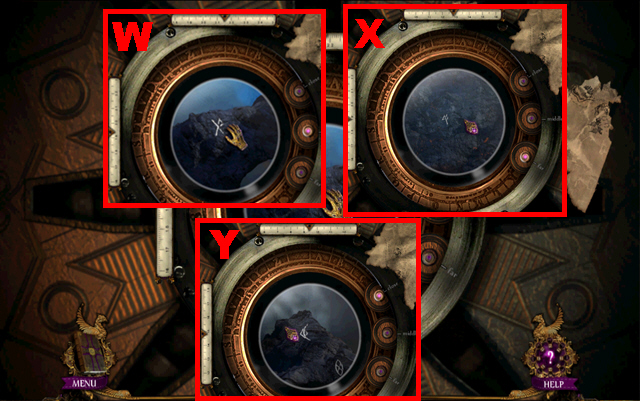
- To solve this puzzle to locate the three correct symbols; one symbol can be found in middle (W), one symbol can be found far away (X), and one symbol can be found close by (Y).
- Go to the Pier.
- Play the HOS.
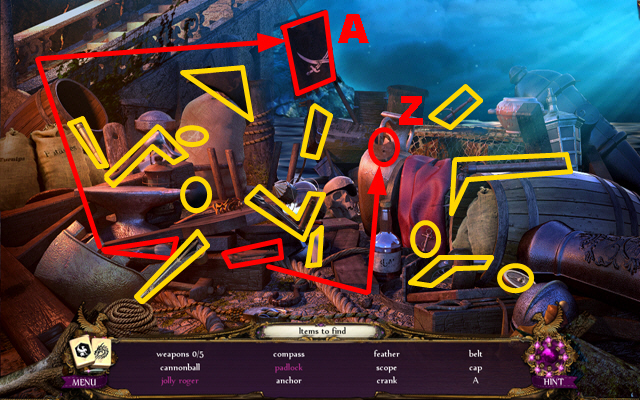
- Take the key, put it into the padlock, and take the padlock (Z).
- Take the brush, paint the flag with it, and take the jolly roger (A).
- You will receive the CRANK.
- Take the 1/5 PUZZLE PIECE (B).
- Move forward.
- Take the 2/5 PUZZLE PIECE (C).
- Go to the Terrace.
- Take the 3/5 PUZZLE PIECE (D).
- Go to the Gates.
- Zoom into the left door; take the WELL SWITCH (E).
- Go to the Pier.
- Zoom into the fountain; put down the WELL SWITCH (F).
- Play the mini-game.
- To solve the first round of this puzzle (G), select the switches 1, 4, and 7.
- For the second round solution, select these switches: 1, 4, 7, and 2.
- For the third round solution, select these switches: 1, 4, 7, 2, and 5.
- Take the STATUE HEAD (H).
- Walk down.
- Zoom into the device; connect the CRANK to it (I).
- Go to the Gates.
- Zoom into the central door; put down the STATUE HEAD (J).
- Zoom into the left door; remove the cover (K).
- Play the mini-game.
- To solve this puzzle, move the sliders in the following sequence: L up, L right, M right, N down, N left x2, M left, M up x3, L left x3, O up, O right x2, O up x2, and O right.
- Zoom into the right door; remove the cover (P).
- Play the mini-game.
- To solve this puzzle, move the sliders in the following sequence: Q left, R left, R up x2, Q right x2, T up x3, Q left x2, Q down, R down x2, T down, S right x5, T up, and T left x3.
- Enter the Monastery Hall.
- Zoom into the statue; take the 4/5 PUZZLE PIECE (U).
- Enter the Treasure Chamber.
- Zoom into the bridge; take the SARCOPHAGUS HANDLE (V).
- Go to the Sarcophagus.
- Zoom into the device and connect the SARCOPHAGUS HANDLE to it (W); pull the handle.
- Zoom into the sarcophagus; take the note (X) and the TORCH HANDLE (Y).
- Play the mini-game.
- To solve this puzzle (Z), put each armor piece back into its correct place.
- Go to the Treasure Chamber.
- Zoom into the skeleton; take the 5/5 PUZZLE PIECE (A), the DRAGON RING (B), and the DRAGON BLOOD (C).
- Go to the Monastery Stairs.
- Zoom into the floor; put down the 5 PUZZLE PIECES (D).
- Play the mini-game.
- Rotate and move the puzzle pieces into the correct position to solve this puzzle (E).
- Zoom into the floor and remove the plate (F); take the ALMANAC KEY (G).
- Go to the Monastery Hall.
- Zoom into the table, put the ALMANAC KEY into the lock (H), and turn the key; take the HOOK (I).
- Take the DRAGON SYMBOL (J).
- Go to the Terrace.
- Zoom into the statue and then zoom into the niche; put the DRAGON SYMBOL into the niche (K) and put the DRAGON RING on the dragon symbol.
- Take the DRAGON HEART (L).
- Go to the Altar.
- Zoom into the mechanism and put down the TORCH HANDLE (M).
- Go to the Shipboard.

- Zoom into the device; connect the HOOK to it (N) and turn the lever (O).
- Go to the Library. The man will talk to you.
- Zoom into the diving suit; connect the hook to the diving suit (P).
- Go to the Shipboard.
- Turn the lever (Q).
- Go to the Pier.
Chapter 6: Under Water
- Go underwater (R).
- Zoom into the shell; put the DRAGON HEART into it (S).
- Open the shell and take the PEARL (T).
- Play the HOS.

- Open the chest.
- Take the tongs, pull out the golden tooth with it, and take the gold tooth (U).
- Take the spade, dig out the trophy, and take the trophy (V).
- You will receive the GOLDEN DRAGON SYMBOL.
- Go to the Altar.
- Zoom into the mechanism; put the PEARL into the slot marked in green and pour the DRAGON BLOOD over the pearl.
- Push the dragon torch (W).
- Take the DRAGON TORCH.
- Go to the Treasure Chamber.
- Hold the DRAGON TORCH next to the dragon (X).
- Play the HOS.
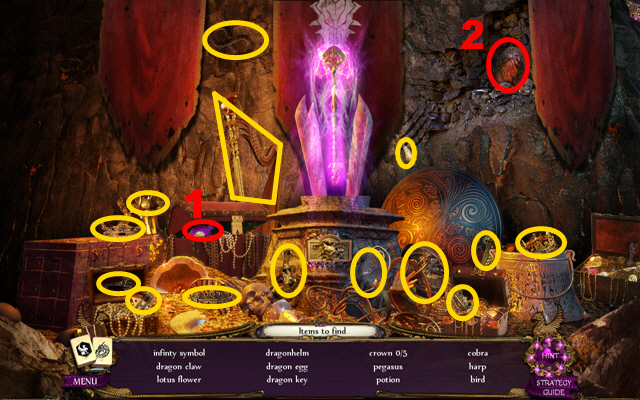
- Open the chest and take the potion (1).
- Remove the flag and take the dragon egg (2).
- You will receive the DRAGON KEY.
- Go to the Altar.
- Zoom into the chest and put the DRAGON KEY into the lock (3); take the SWAP PIECE (4).
- Go to the Scepter.
- Zoom into the panel; put down the SWAP PIECE (5).
- Play the mini-game.
- To solve this puzzle (6), swap the pieces to create the correct relief.
- Zoom into the panel; put the GOLDEN DRAGON SYMBOL into the slot (Y).
- Play the mini-game.
- To solve this puzzle (Z), rotate the conductors so that the electricity flows towards the 2 spots marked in purple.

- Take the SCEPTER (A).
- Zoom into the wall and remove the plate (1); take the LEVER (2).
- Zoom into the gate mechanism; put down the LEVER (3) and pull it.
- Enter the Courtyard.
- Zoom into the door; take the HACKSAW (B).
- Go to the Well.
- Take the TAP (C).
- Zoom into the pipe; remove the cover (D).
- Go to the Secret Gate.

- Zoom into the compartment; take the HOOK (E).
- Go to the Well.
- Zoom into the drain and open the drain with the HOOK (F); take the T-KEY (G).
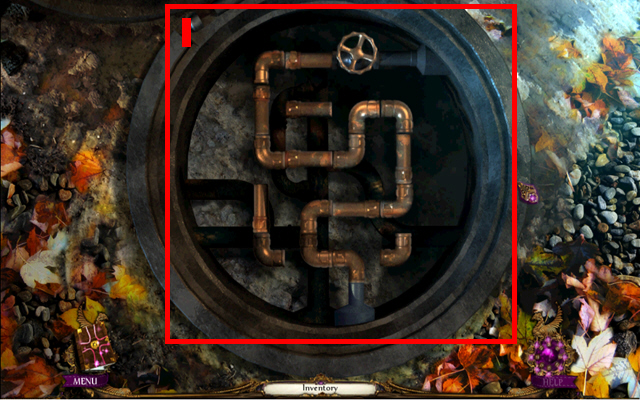
- Play the mini-game.
- To solve this puzzle (I), rotate the pipes to connect the tap to the manifold.
- Zoom into the pipe and then zoom into the opening; put down the T-KEY (1) and turn it.
- Cut the pipe with the HACKSAW twice (2) to acquire the PIPE.
- Go to the Secret Gate.
- Zoom into the compartment; put down the TAP (3) and the PIPE (4).
- Zoom into the compartment; turn the tap (J).
- Zoom into the lock; put the UPGRADED KEY into the lock (K) and turn it once.
- Remove the leaves (L).
- Go through the opening.
- Zoom into the window; take the 1/4 CODE PIECE (M).
- Zoom into the statue; take the 2/4 CODE PIECE (N).

- Zoom into the door; take the 3/4 CODE PIECE (O) and the SMART CARD (P).
- Go to the Corridor.
- Zoom into the bench; take the GLOVE (Q).
- Zoom into the table; take the KNIFE (R) and the 4/4 CODE PIECE (S).
- Zoom into the door; put down the 4 CODE PIECES (T).
- Play the mini-game.

- To solve this puzzle (U), turn the dial (blue) in the following sequence: ’4′ counterclockwise, ’2′ counterclockwise, ’3′ clockwise, ’1′ counterclockwise, and ’1′ clockwise.
- Insert the SMART CARD into the slot (V).
- Enter Nathan’s Study.
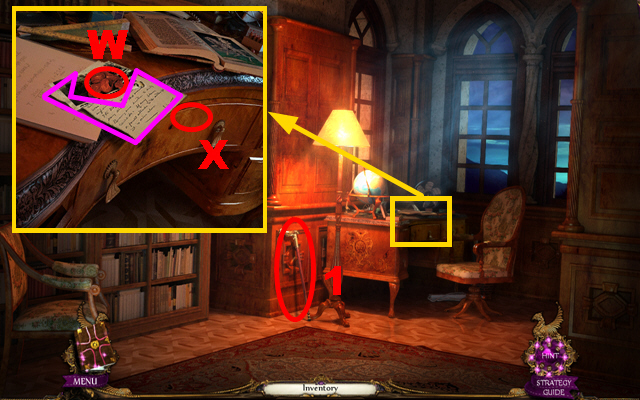
- Zoom into the desk; take the 1/3 WOODEN PETAL (W) and the note marked in purple.
- Take the CANE (1).
- Open the drawer with the KNIFE (X).
- Play the HOS.
- Turn the globe and take the equator (Y).
- You will receive the LION TRIANGLE.
- Go to the Well.
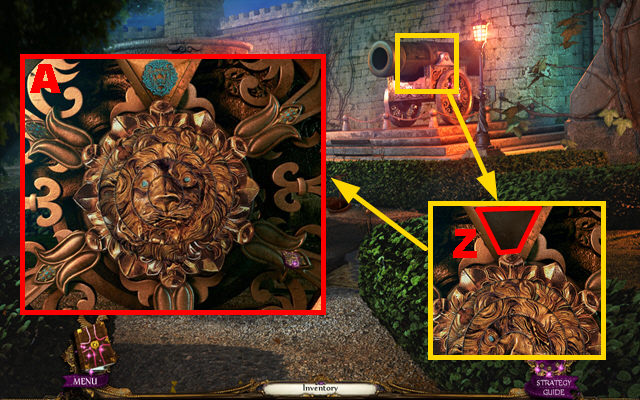
- Zoom into the cannon; put the LION TRIANGLE into the niche (Z).
- Play the mini-game.
- To solve this puzzle (A), rotate the rings to create the correct image.
- Go to the Gate.
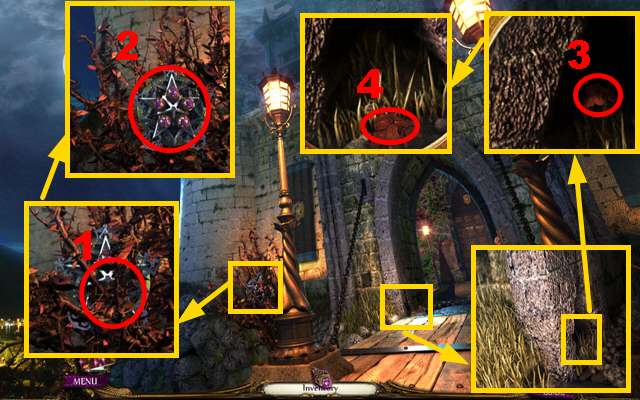
- Zoom into the bush; remove the thorns with the GLOVE (1) and take the DIAL (2).
- Zoom into the wall and then zoom into the crack; use the CANE to pull out the petal (3); take the 2/3 WOODEN PETAL (4).
- Go to the Well.
- Zoom into the cannon and open the cover (B); take the 3/3 WOODEN PETAL (C) and the OCTAGONAL SYMBOL (D).
- Go to the Hall.
- Zoom into the statue; put the OCTAGONAL SYMBOL into the niche (E).
- Zoom into the globe; put down the BROOCH and the DIAL (F).
- Play the mini-game.
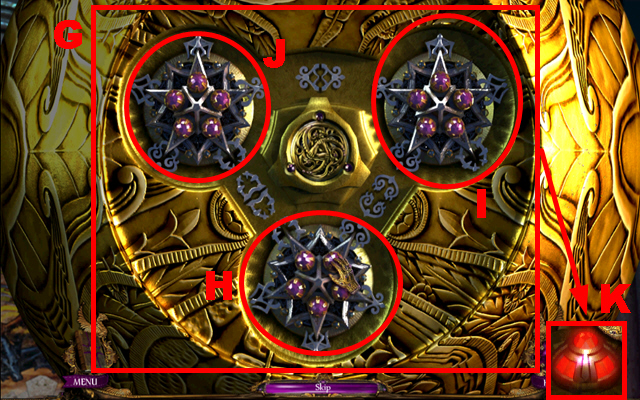
- To solve this puzzle (G), rotate the circle (H) three times, the circle (I) twice, and the circle (J) once.
- Take the CENTER CRYSTAL (K).
- Go to Nathan’s Study.
- Zoom into the bookshelf and put down the 3 WOODEN PETALS (L); put the CENTER CRYSTAL into the slot (M).
- Enter the Ceremony Hall.
- Hold the SCEPTER next to Nathan (N).
- Congratulations, you have completed The Secret Order: Masked Intent.


 Serpent of Isis: Your Journey Continues Walkthrough, Guide, & Tips
 Phenomenon Meteorite Walkthrough, Guide, & Tips
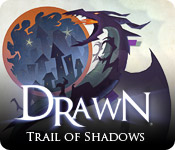 Drawn: Trail of Shadows Walkthrough, Guide, & Tips
 Small Town Terrors: Livingston Walkthrough, Guide, & Tips
 Lost Chronicles: Fall of Caesar Walkthrough, Guide, & Tips