The Torment of Mont Triste Walkthrough, Guide, & Tips
The Torment of Mont Triste Walkthrough

Welcome to the The Torment of Mont Triste Walkthrough
No one dares fall asleep in the village of Mont Triste… for when sleep arrives, so does the mysterious Lord of Nightmares.
Whether you use this document as a reference when things get difficult or as a road map to get you from beginning to end, we’re pretty sure you’ll find what you’re looking for here.
This document contains a complete The Torment of Mont Triste game walkthrough featuring annotated screenshots from actual gameplay!
We hope you find this information useful as you play your way through the game. Use the walkthrough menu below to quickly jump to whatever stage of the game you need help with.
Remember to visit the Big Fish Games Forums if you find you need more help. Have fun!
This walkthrough was created by SeverineSnape, and is protected under US Copyright laws. Any unauthorized use, including re-publication in whole or in part, without permission, is strictly prohibited.
General Tips
- This is the official guide for The Torment of Mont Triste.
- This guide will not mention each time you need to zoom into a scene; the screenshots will show each zoom scene.
- We will use the acronym HOP for Hidden-object puzzles. Interactive items will be color-coded.
- HOPs are random; our lists may vary from yours.
Chapter 1: The Coachman’s Dream

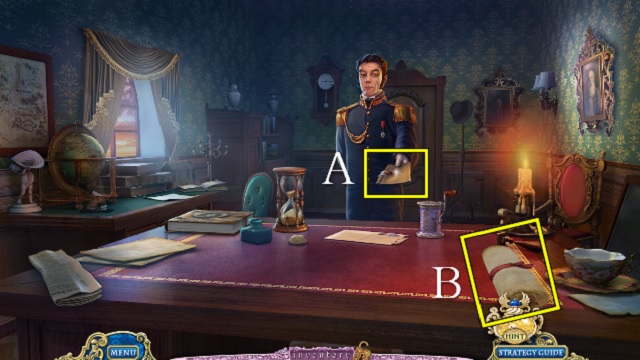
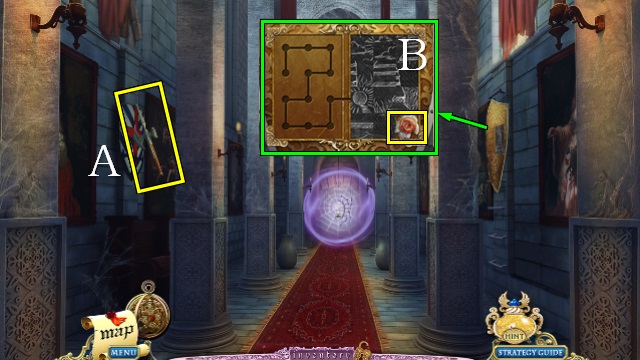
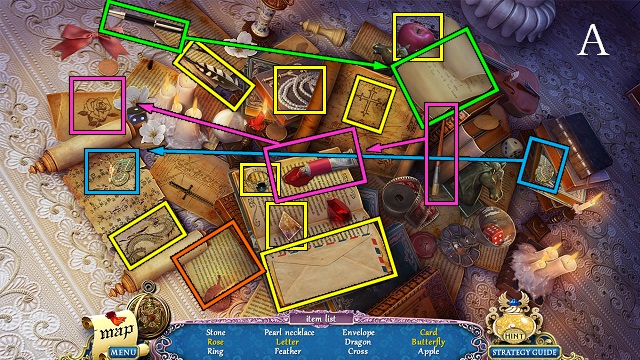
- Take the case file (A).
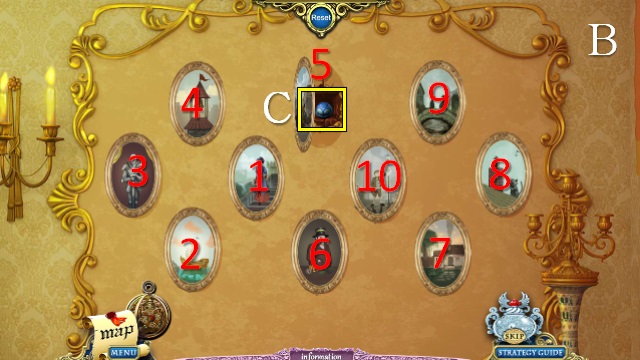
- Open the map (B).
- Talk to the coachman.
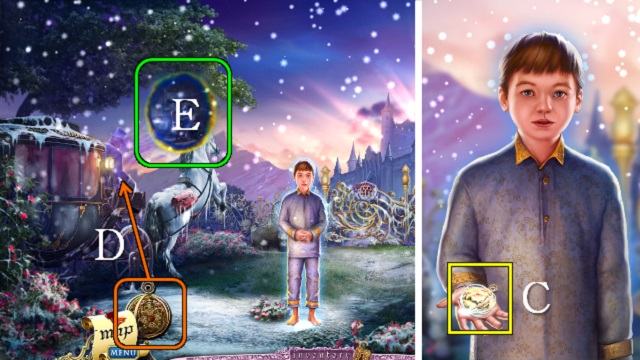
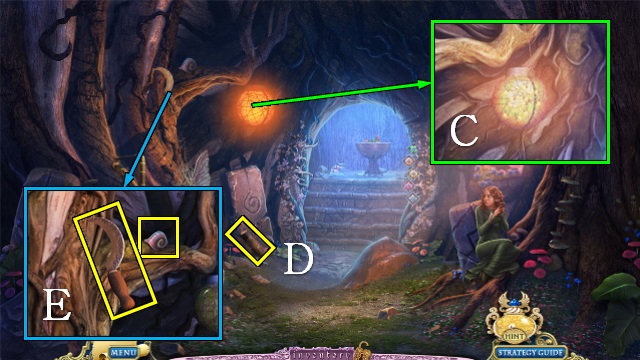
- Take the Amulet of Dreams (C).
- Use the Amulet of Dreams on the coachman (D).
- Go through the portal (E).

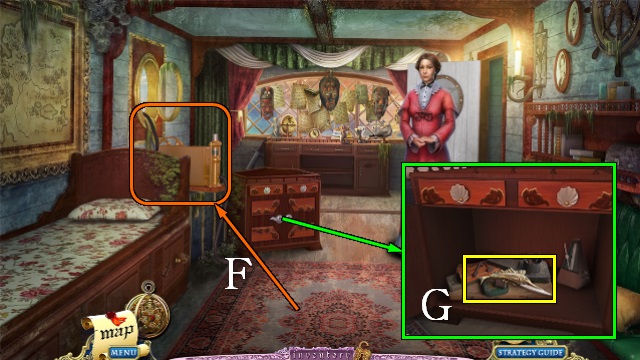
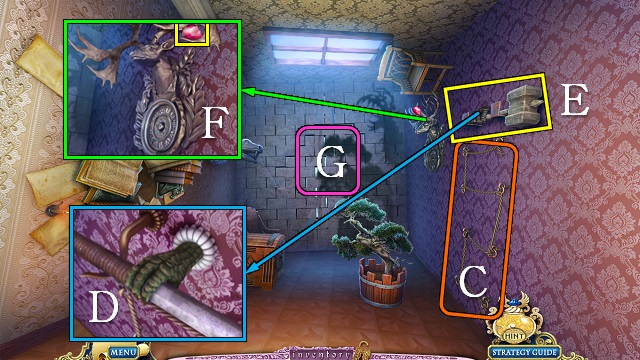
- Take the ICE BUTTERFLY (F).
- Pour the water into the mold and freeze it with the ICE BUTTERFLY; take the ICE FORM (G).
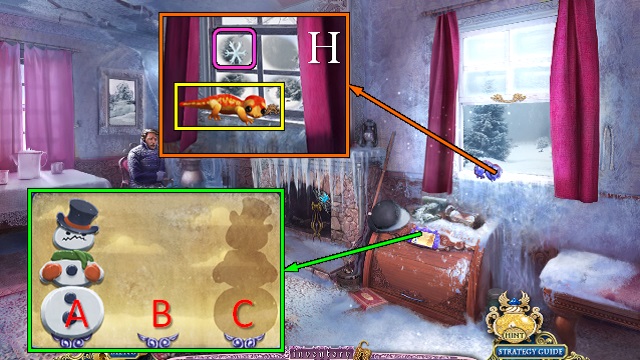
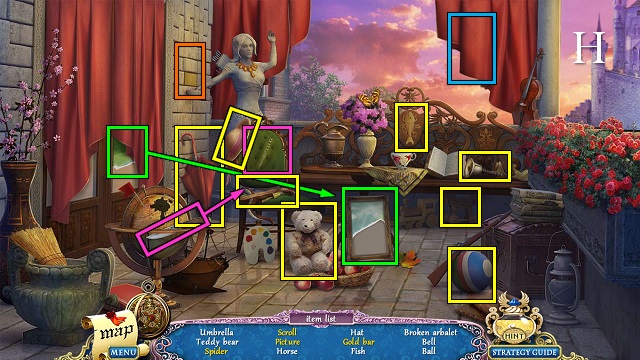
- Close the window and put the ICE FORM in the hole; take the SALAMANDER (H).
- Play the mini-game.
- Move the snowman from left to right; you can only move one piece at a time and pieces can only be stacked on top of larger pieces.
- Solution: A-C, A-B, C-B, A-C, B-A, B-C, A-C.
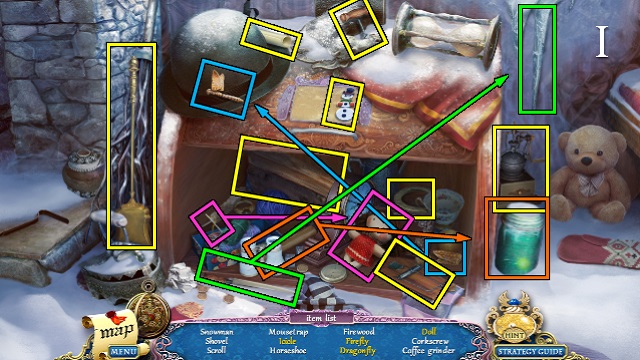
- Play the HOP (I).
- You receive the FIREWOOD.
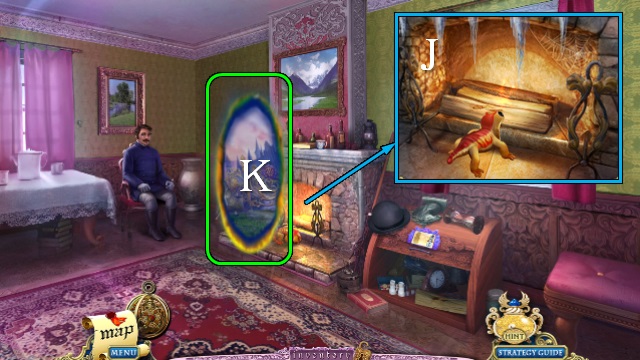
- Put the FIREWOOD on the grate and light it with the SALAMANDER (J).
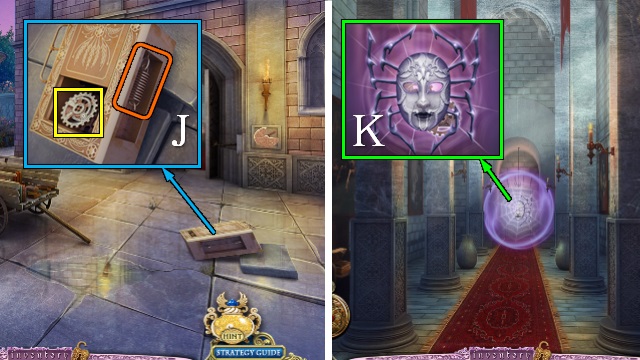
- Talk to the coachman.
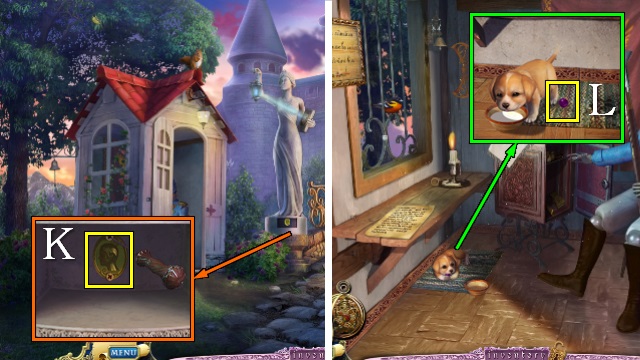
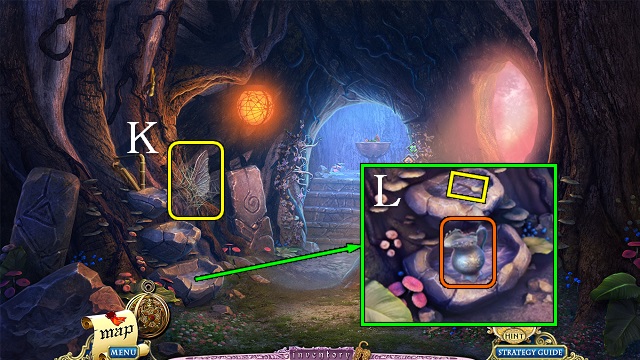
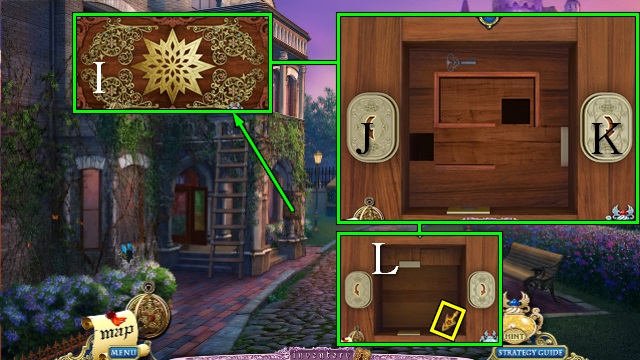
- Go through the portal (K).

- Talk to Blanc.
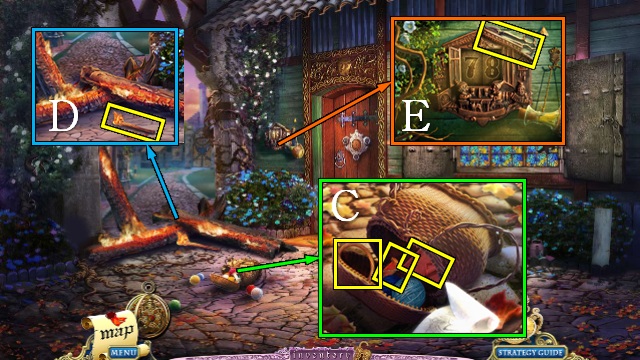
- Take the BREAD and RAZOR (L).
- Open the sack with the RAZOR; take PUZZLE PART 1/3 (M).
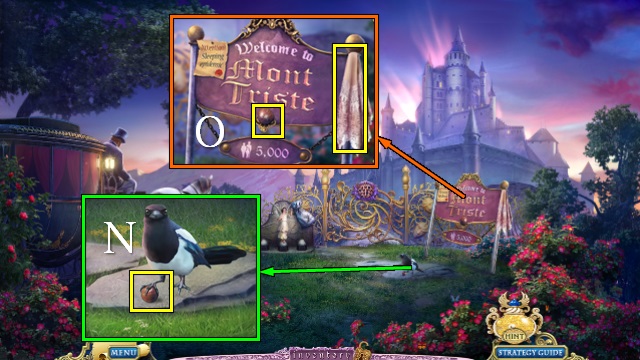
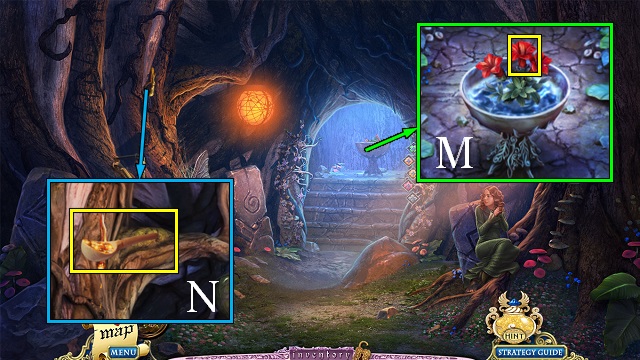
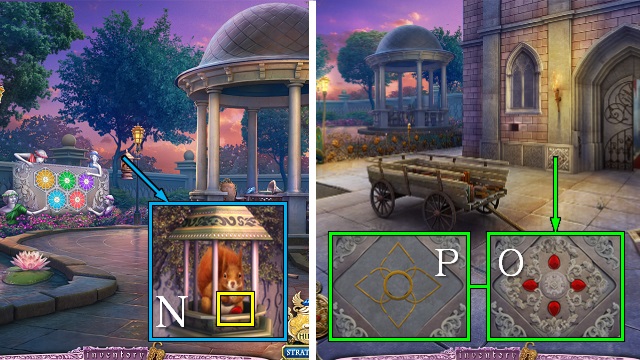
- Give the BREAD to the magpie; take PUZZLE PART 2/3 (N).
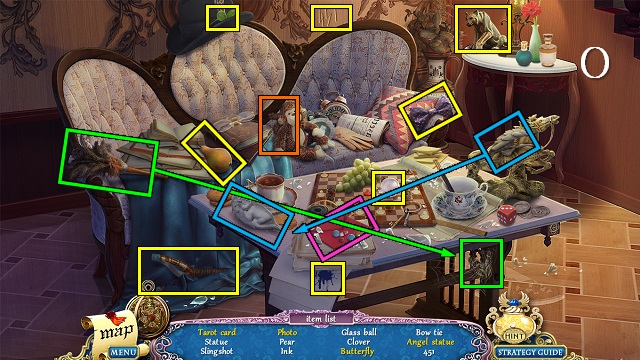
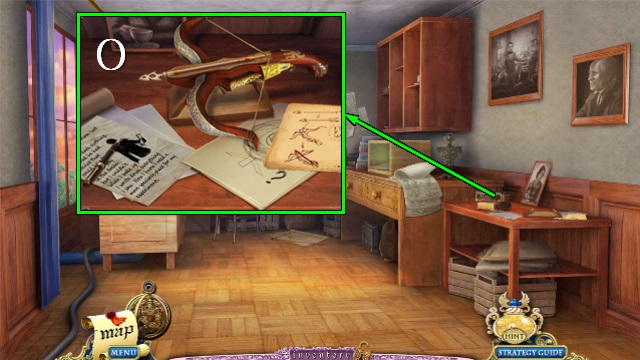
- Take the HANDKERCHIEF and PUZZLE PART 3/3 (O).
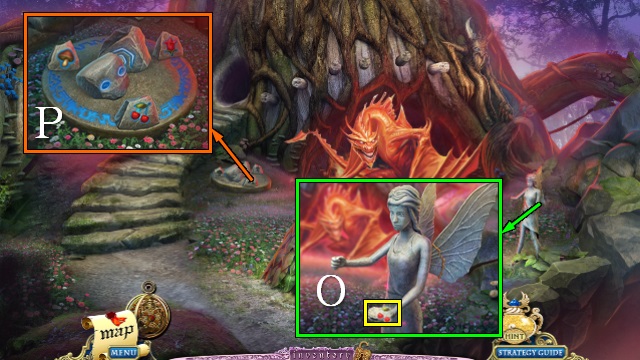
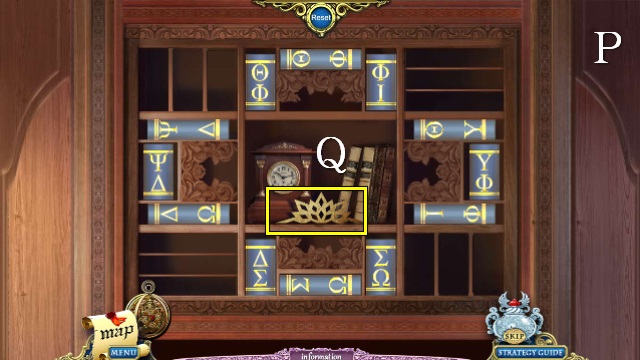
- Put the PUZZLE PARTS on the gate for a mini-game.

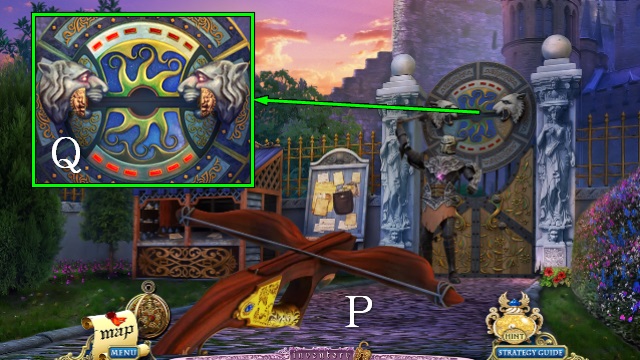
- Find pairs of identical eyes (P); if you open eyes that don’t match, all the others will close too.
- Walk forward.
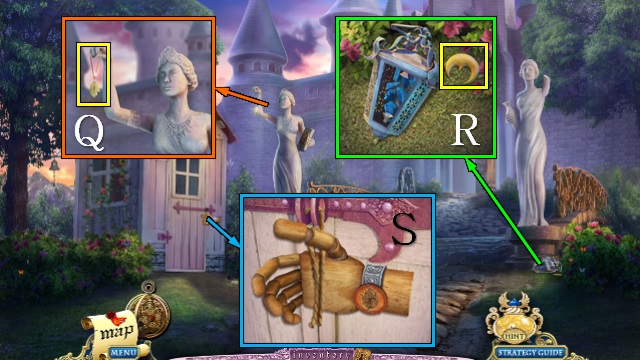
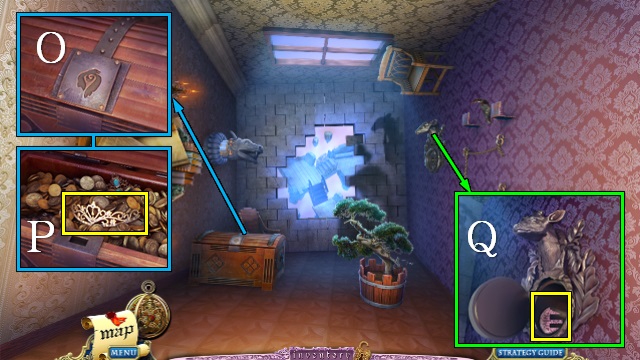
- Take the HAND SYMBOL (Q).
- Interact with the lantern.
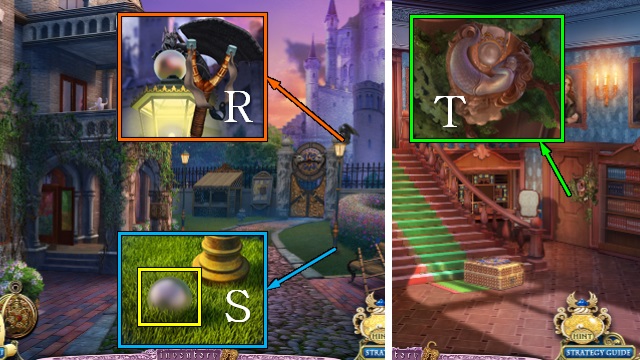
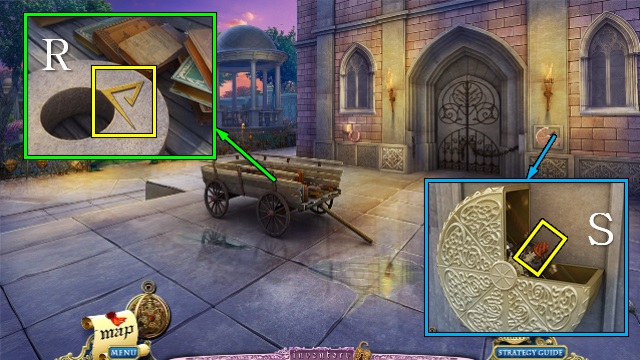
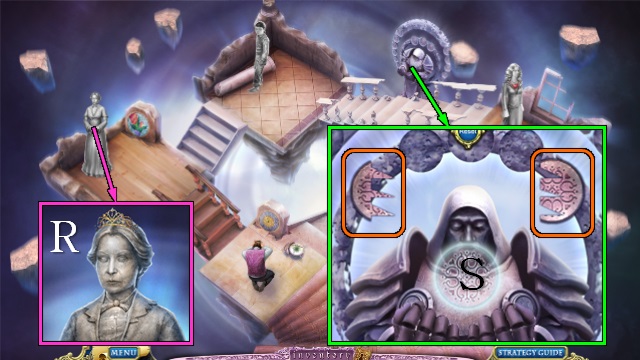
- Take the MOON SYMBOL (R).
- Put the HAND SYMBOL on the lock and take the WOODEN HAND (S).
- Go into the Guard House.
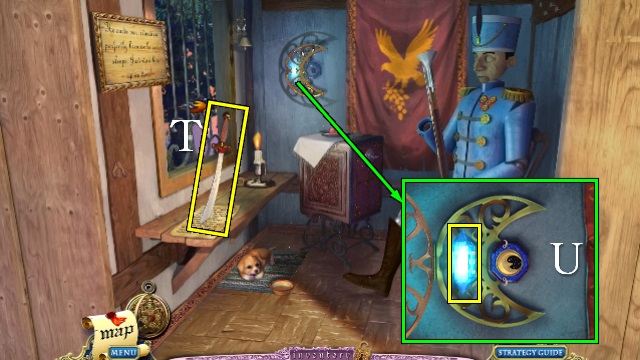
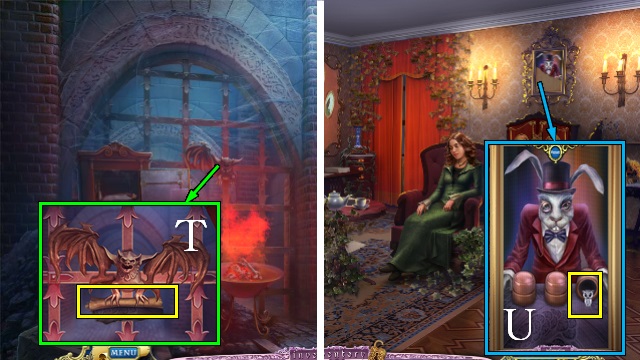
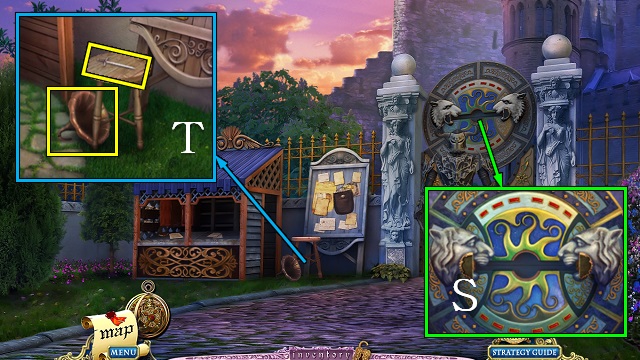
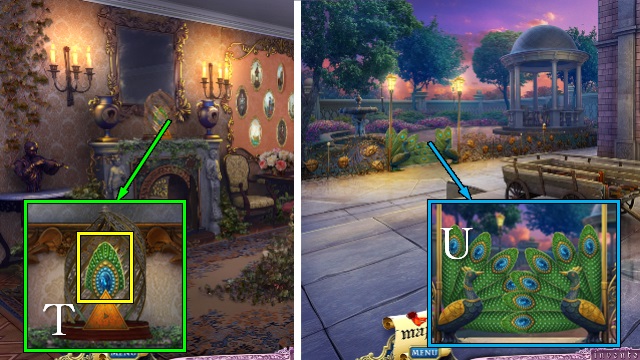
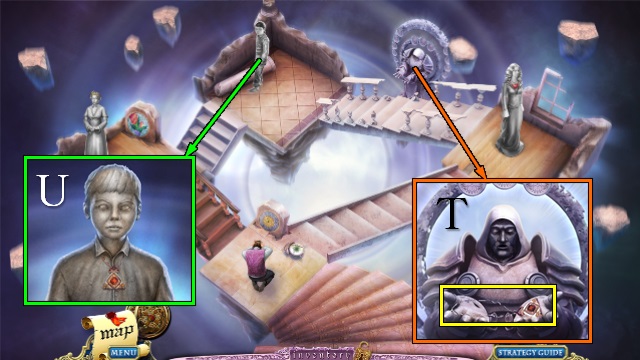
- Take the MACHETE (T).
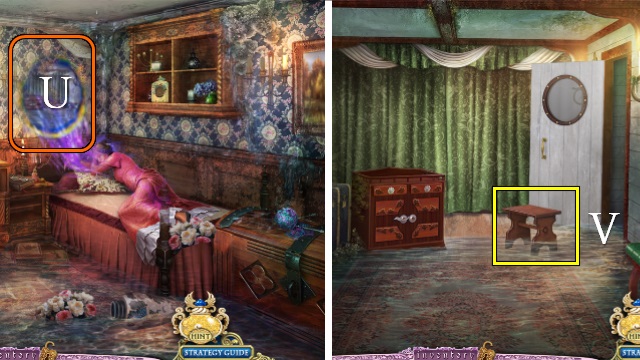
- Put the MOON SYMBOL on the lantern and take the LIGHTING ELEMENT (U).
- Walk down.
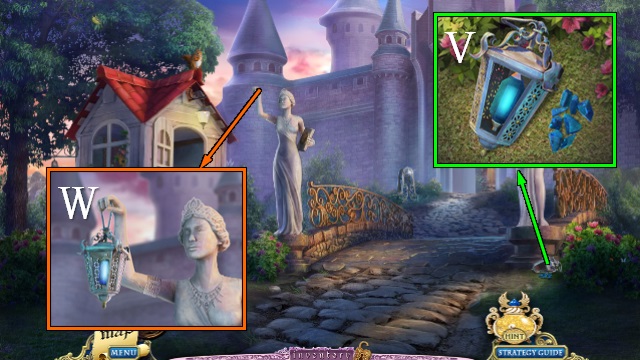
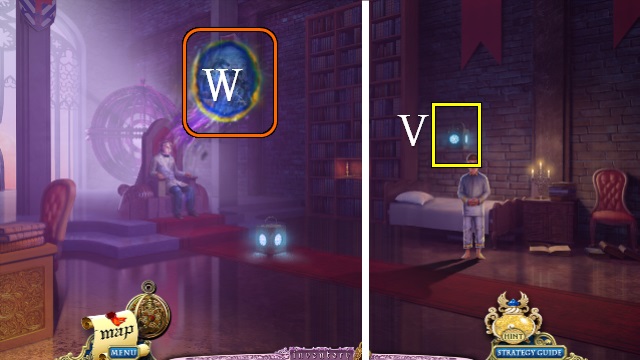
- Remove the broken lamp and put the LIGHTING ELEMENT in the lantern (V); take the LANTERN.
- Give the LANTERN to the other statue (W).
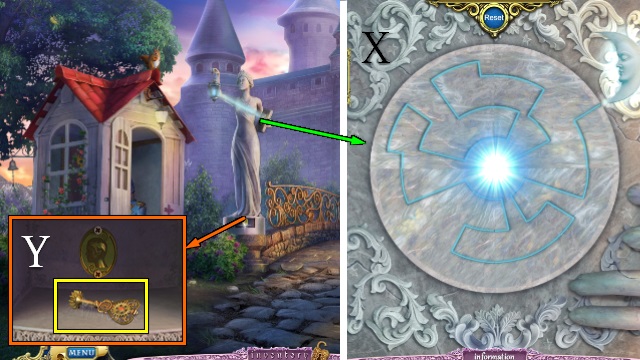
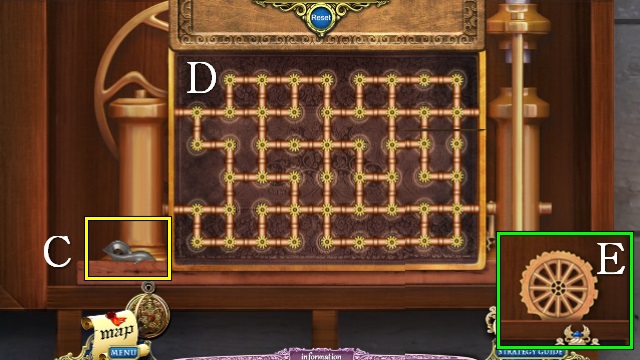
- Play the mini-game.
- Swap adjacent segments to create one continuous blue line (X).
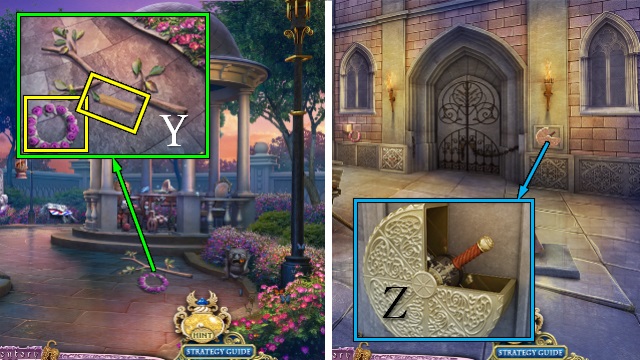
- Take the WINDING KEY (Y).
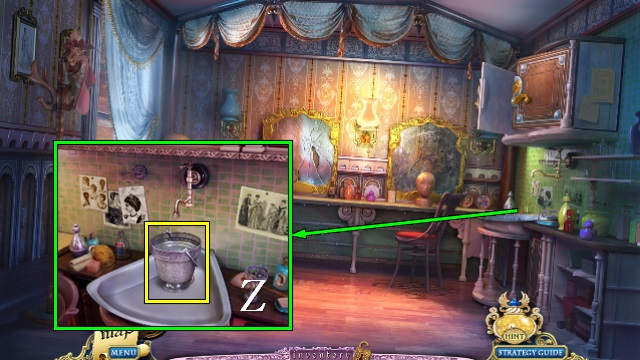
- Go into the Guard House.
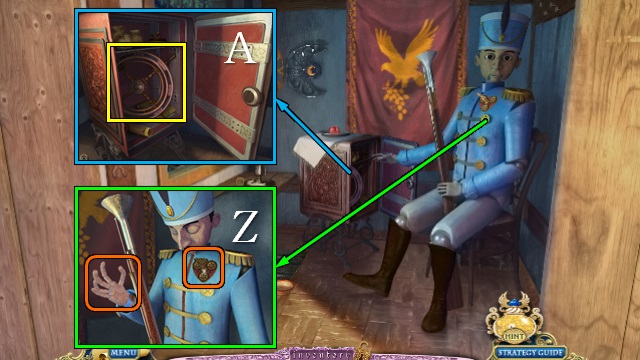
- Give the WOODEN HAND to the guard and wind him up with the WINDING KEY (Z).
- Take the MECHANISM HANDLE (A).
- Walk down. Inspect the gate.
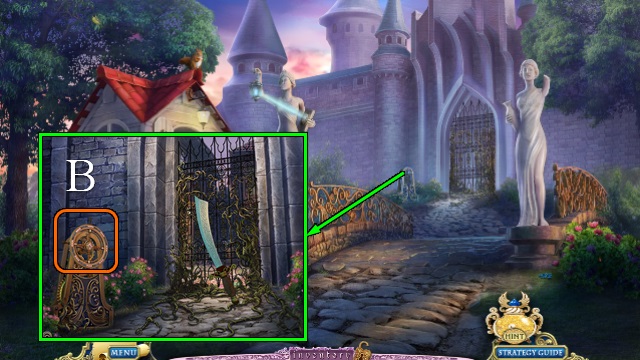
- Put the MECHANISM HANDLE on the mechanism, cut the vines with the MACHETE and turn the handle (B).
- Walk forward to the Town Square.
Chapter 2: The Town of Mont Triste
- Go left to the Salon.
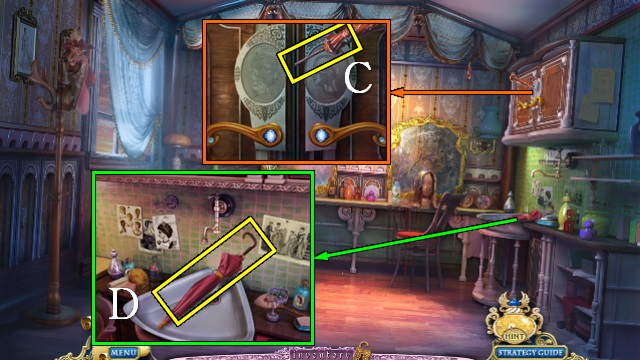
- Take the SCREWDRIVER (C).
- Take the UMBRELLA (D).
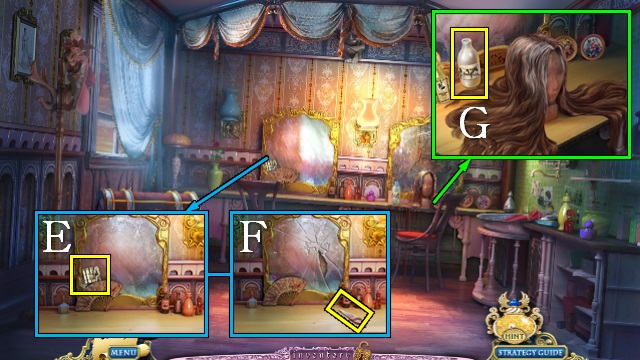
- Take the PUZZLE PART (E); wrap the HANDKERCHIEF around the shard and take the MIRROR SHARD (F).
- Take the MILK (G).
- Walk down.
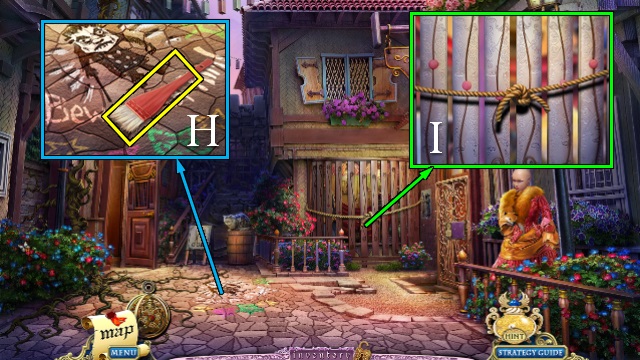
- Take the BRUSH (H).
- Cut the rope with the MIRROR SHARD (I).
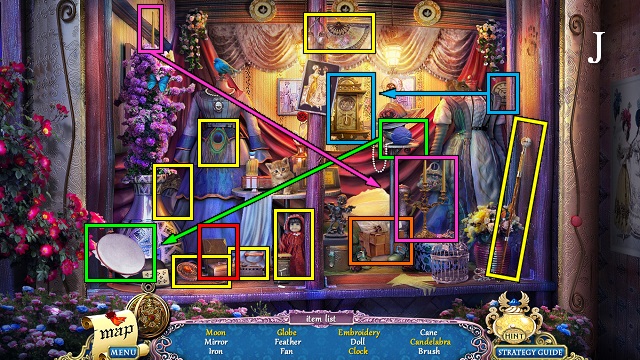
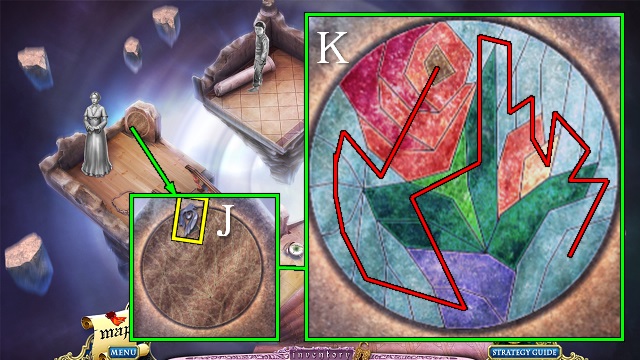
- Play the HOP (J).
- You receive the BRUSH.
- Walk down.
- Remove the screws with the SCREWDRIVER and take the GOLDEN CAMEO (K).
- Go left.
- Put the MILK in the bowl and take the TOY BALL (L).
- Go to the Town Square.
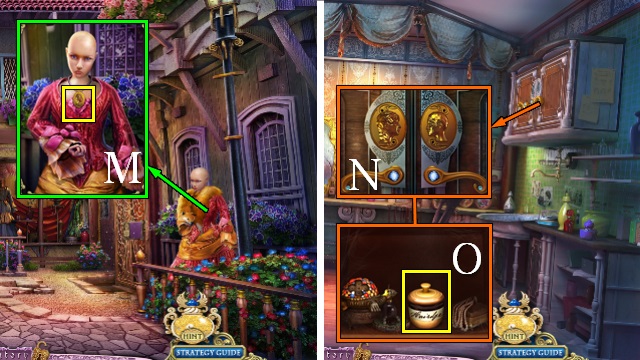
- Give the TOY BALL to the fox and take the second GOLDEN CAMEO (M).
- Go left.
- Put the two GOLDEN CAMEOS on the cabinet (N); take the HAIR DYE (O).
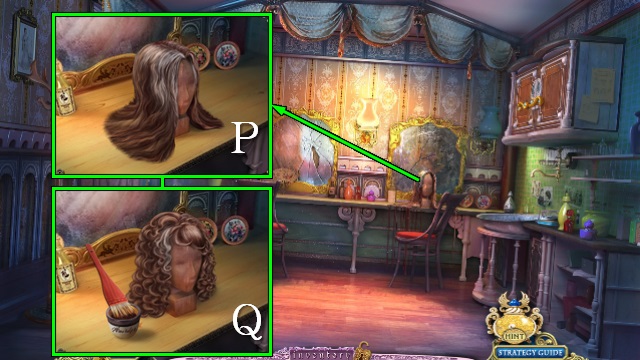
- Cut the wig with the MIRROR SHARD and brush it with the hair BRUSH (P); put down the HAIR DYE, use the small BRUSH to dye the wig and take the WIG (Q).
- Walk down.
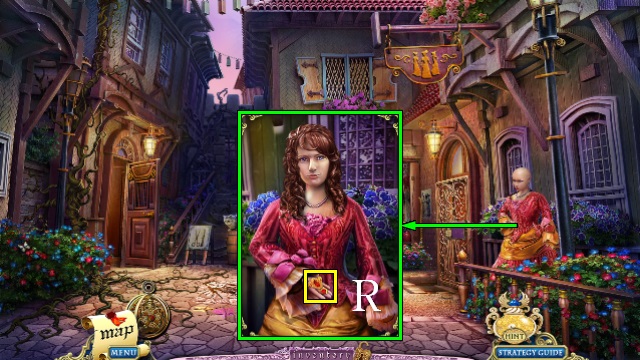
- Put the WIG on the mannequin and take the LOCK DETAIL (R).
- Go left.
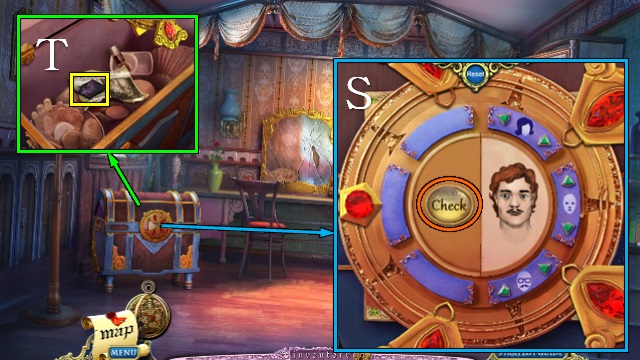
- Put the LOCK DETAIL on the chest for a mini-game.
- Use the arrows to scroll through the images to recreate the image on the left; push Check to check your choices (S).
- Take the PUZZLE PART (T).
- Walk down.
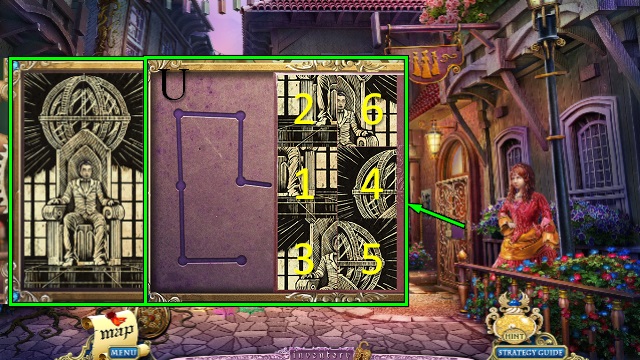
- Put the black-and-white PUZZLE PART on the door for a mini-game.
- Restore the scrambled image by selecting the tiles in the right order; the tiles will slide into place along the purple line (U).
- Put the other PUZZLE PART on the lock for another mini-game.
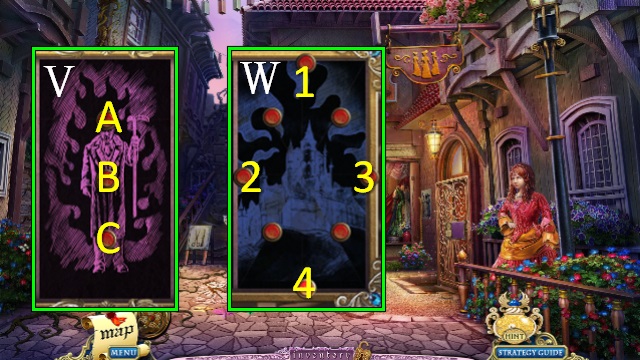
- Push the buttons to rotate groups of four tiles (V).
- Solution: Bx2, Ax3, B, A, Cx2, Bx2, Cx2, B, C, B, Cx2.
- Play the third mini-game.
- Use the buttons to flip pairs of tiles to recreate the image (W).
- Solution: 1, 2, 3, 4.
- Go right into the Boutique.
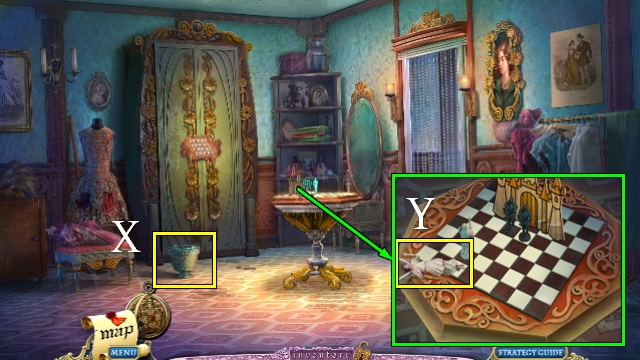
- Take the BUCKET (X).
- Take the ANGEL STATUE (Y).
- Go to the Salon.
- Put the BUCKET under the tap and take the FULL BUCKET (Z).
- Go to the Boutique and go right.
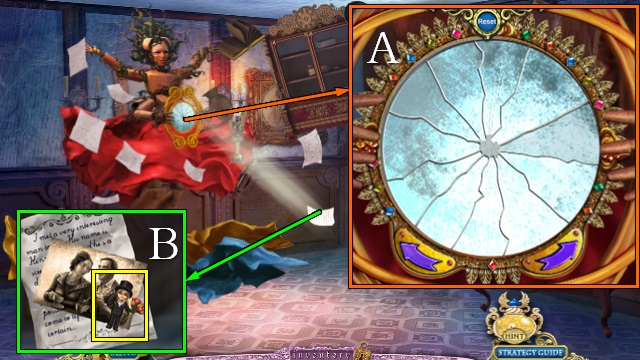
- Interact with anything in the room.
- Play the mini-game.
- Restore the mirror by dragging-and-dropping shards into place; you can rotate the mirror with the arrows (A).
- Take the PUZZLE PIECE (B).
- Use the UMBRELLA on the cabinet.
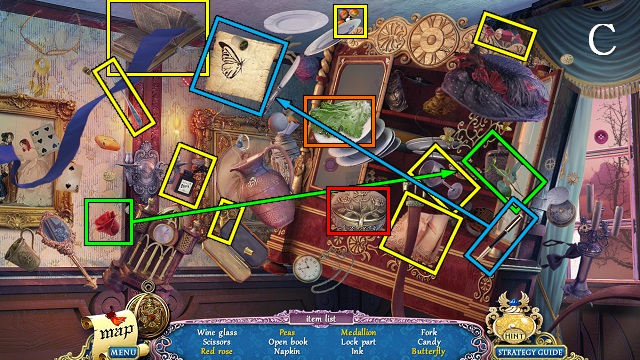
- Play the HOP (C).
- You receive the LOCK PART.
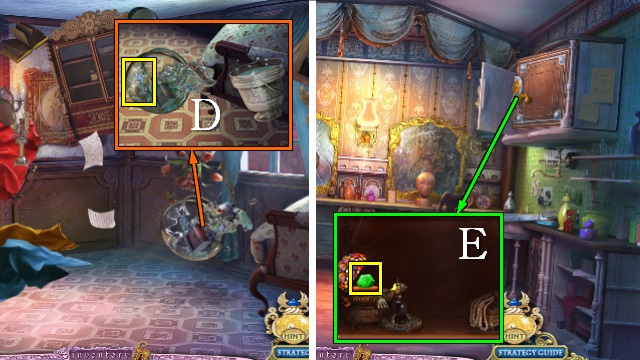
- Put the piranha in the FULL BUCKET and take the WHITE KNIGHT (D).
- Go to the Salon.
- Put the LOCK PART on the jeweled box and take the GEM (E).
- Go to the Boutique.
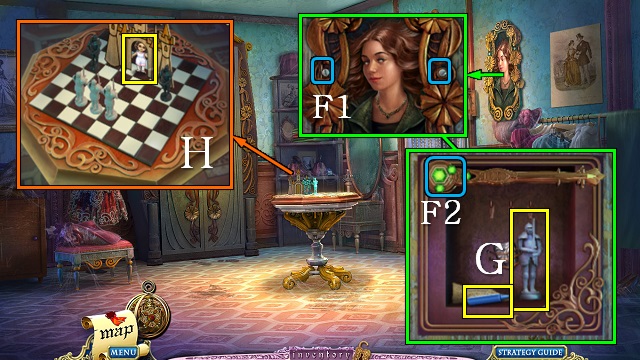
- Remove the screws with the SCREWDRIVER (F1) and try to take the knight; put the GEM on the fan (F2) and take the CHALK and the WHITE KNIGHT (G).
- Put the two WHITE KNIGHTS on the chess board and move them; take the PUZZLE PIECE (H).

- Put the two PUZZLE PIECES on the cupboard for a mini-game.
- Move the girl to her suitor by selecting different outfits; you can only use each style of outfit once (I).
- Go through the door to the Lion Gate.
Chapter 3: The Paper Boy’s Dream
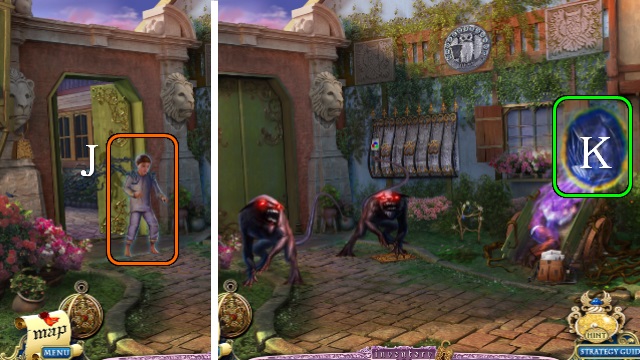
- Interact with Blanc (J).
- Use the Amulet of Dreams on the paper boy and go through the portal (K).

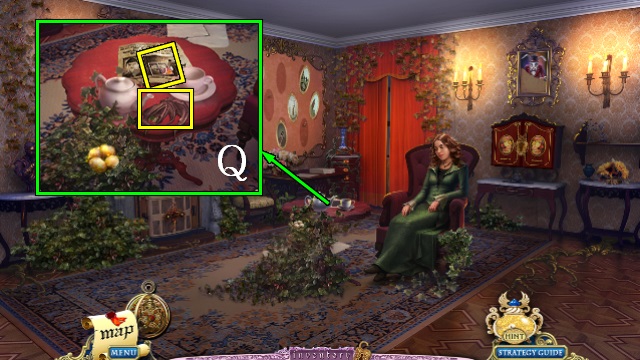
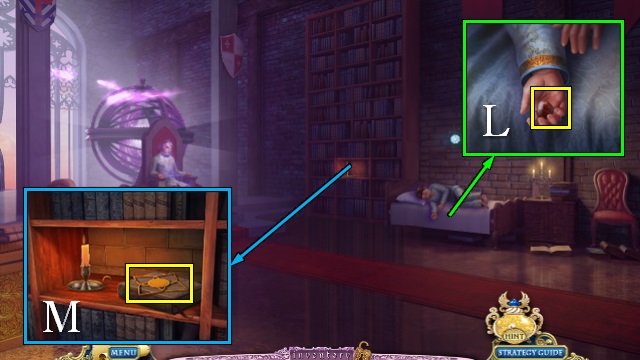
- Play the HOP (L).
- You receive the FILE.
- Move the poster for a mini-game.
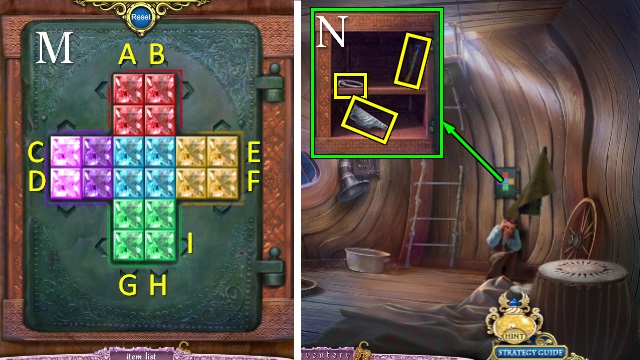
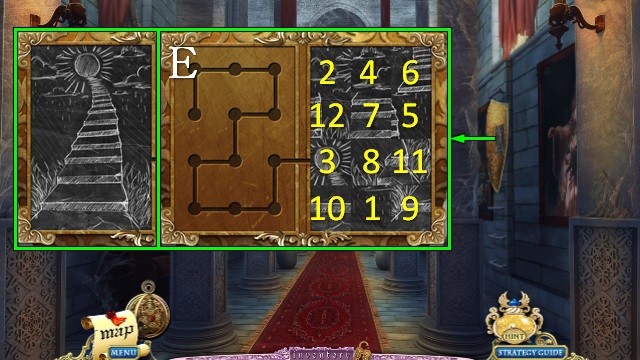
- Create blocks of the same color in the corners of the cross; use the arrows to slide rows and columns (M).
- Solution: E, F, Bx2, Cx3, Dx3, Ax2, Bx2, Cx2, Dx2, Gx2, Bx2, I, G, H, I, G, Bx2, I, G, B, I, Ax3.
- Take the WOLF FACE HALF, IRON RING and TOY GUN (N).
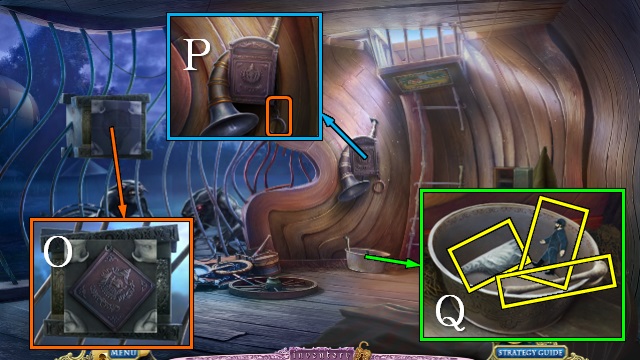
- Remove the PANEL with your SCREWDRIVER (O).
- Put the PANEL and IRON RING on the mechanism and pull the chain (P).
- Take the BONE, HUNTER and WOLF FACE HALF (Q).
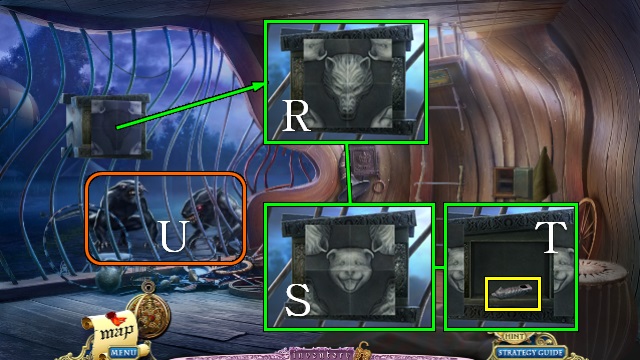
- Put the two WOLF FACE HALVES on the box (R) and turn all four corners (S); take the WHISTLE (T).
- Use the WHISTLE on the wolf creatures (U).
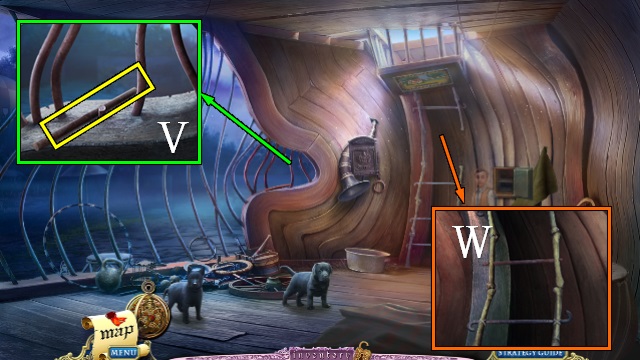
- Remove a bar with the FILE and take the IRON BAR (V).
- Put the BONE and IRON BAR on the ladder (W).
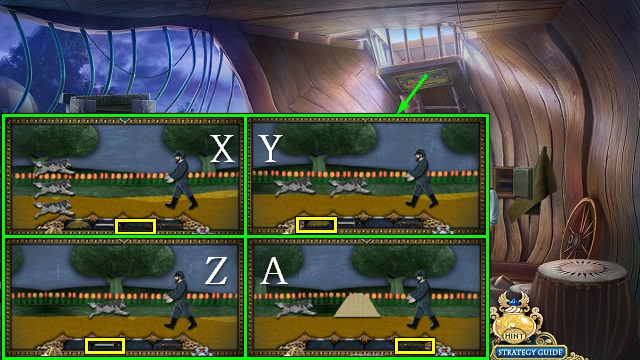
- Put the TOY GUN and HUNTER on the painting for a mini-game.
- Select the correct weapon to dispatch the wolves.
- Solution: gun (X), net (Y), sword (Z), crossbow (A).
- Go up the ladder.
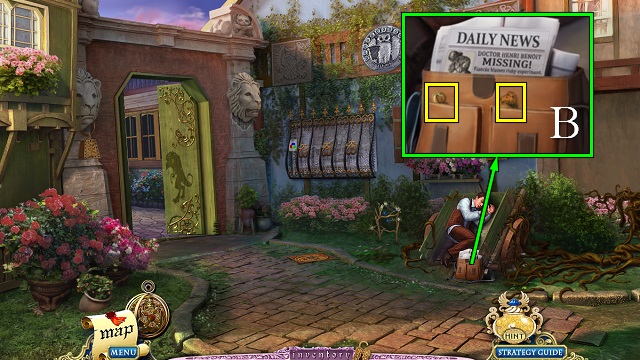
- Take the LION LEVER and 8 (B).
- Open the gate and go left.
- Take the NEEDLE, CLOTH and RING (C).
- Take the FLINT (D).
- Take the PLIERS (E).
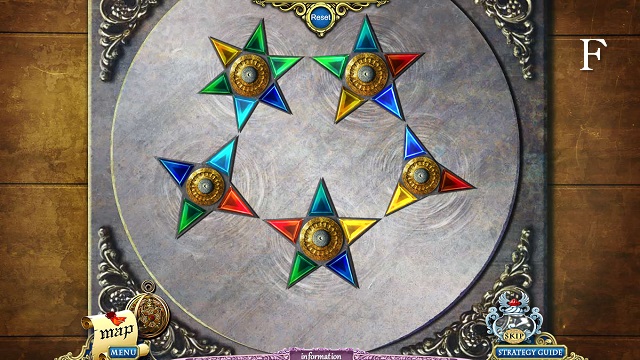
- Play the mini-game.
- Rotate the stars until all points touch another point of the same color (F).
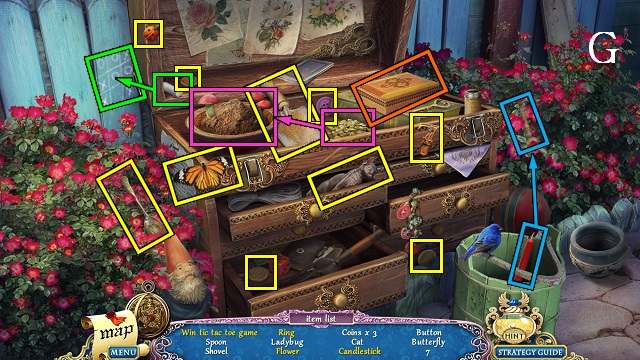
- Play the HOP (G).
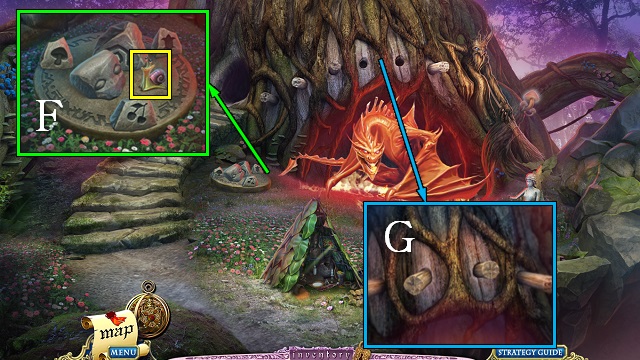
- You receive the 7.

- Put the 7 and 8 on the mailbox; take the FROG (H).
- Walk down.
- Put the FROG on the manhole cover (I).
- Go down the manhole.
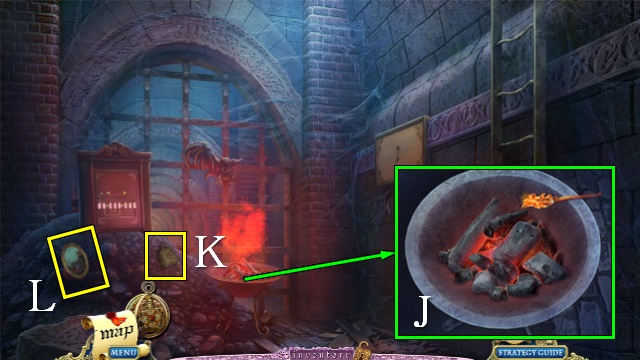
- Light the fire with the FLINT (J).
- Take the WEIGHT (K) and the SECOND PICTURE (L).
- Play the mini-game.
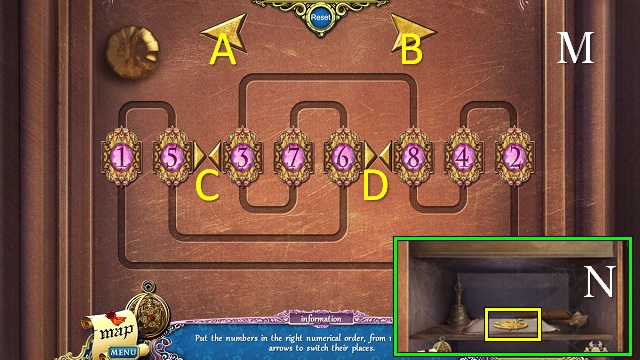
- Organize the tiles in numerical order from left to right (M).
- Use arrows A and B to slide the numbers along the grooves and arrows C and D to swap numbers on either side.
- Solution: Bx2, D, Ax2, C, Ax2, D, B, C, Bx3, D, A, D, A, D, Ax2, C, Bx2, D, Bx3, D,Ax3.
- Take the PALETTE (N).
- Go up.
- Put the LION LEVER on the lion head and pull it; put the RING in its mouth and hang the WEIGHT from the ring (O).
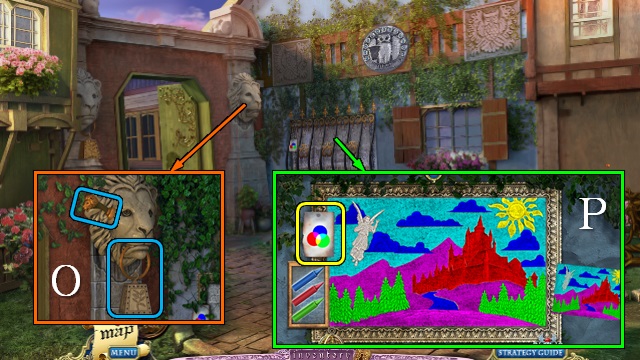
- Put the CHALK on the mural for a mini-game.
- Color in the mural, mixing the colors according to the color guide on the left (P).
- You receive an ANGEL STATUETTE.
- Walk down.
- Cut the strings with the WIRE CUTTERS and receive the MASK (Q).
- Go back to the Coach at the start.
- Place the ANGEL STATUE and ANGEL STATUETTE next to the other angel and take the HARP (R).
- Go to the square outside the house.
- Put the PALETTE, HARP and MASK on the door (S).
- Go into Lillian’s House.
Chapter 4: Lillian’s Dream
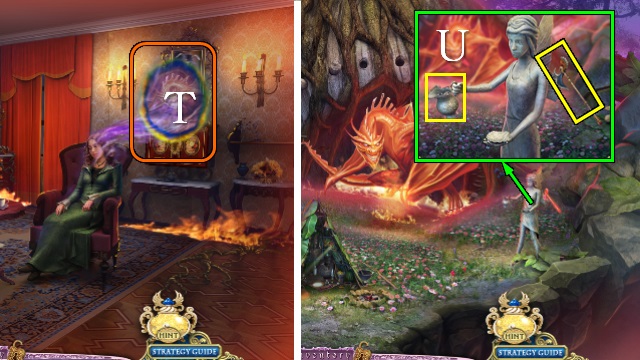
- Use the Amulet of Dreams on Lillian and go through the portal (T).
- Cool the axe with the ICE BUTTERFLY; take the AXE and the POT (U).
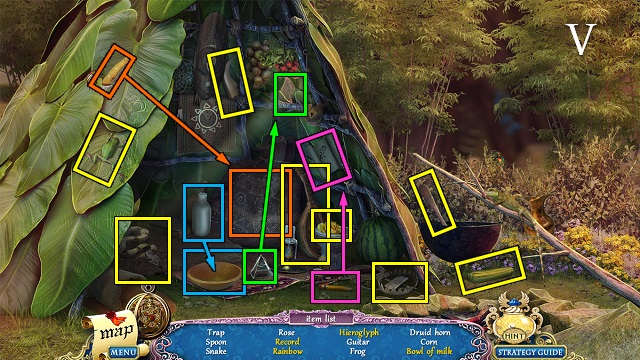
- Play the HOP (V).
- You receive the DRUID HORN.
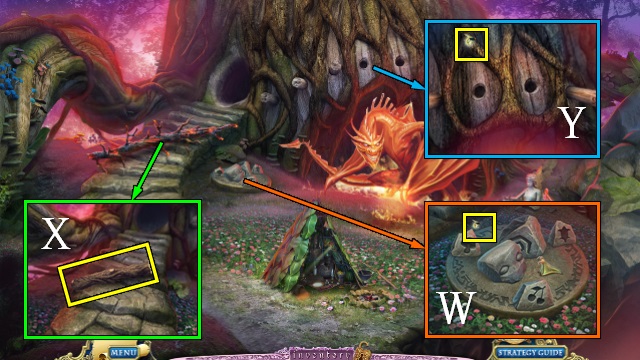
- Take FIREFLY 1/4 (W).
- Chop the log with the AXE and take LOGS 1/2 (X).
- Take FIREFLY 2/4 (Y).
- Go into the cave.
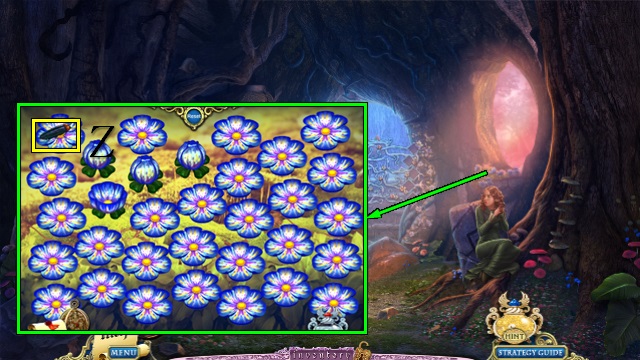
- Play the mini-game.
- Force the firefly into a corner and block it in with closed flowers.
- Take FIREFLY 3/4 (Z).
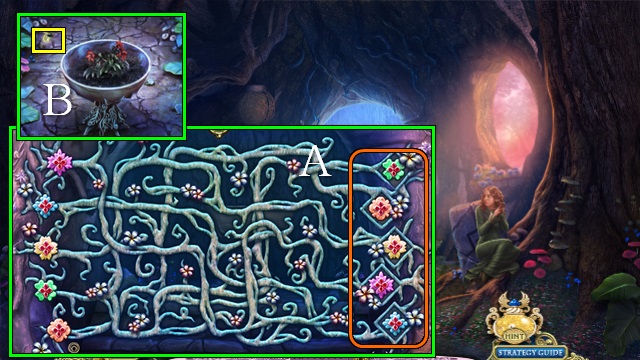
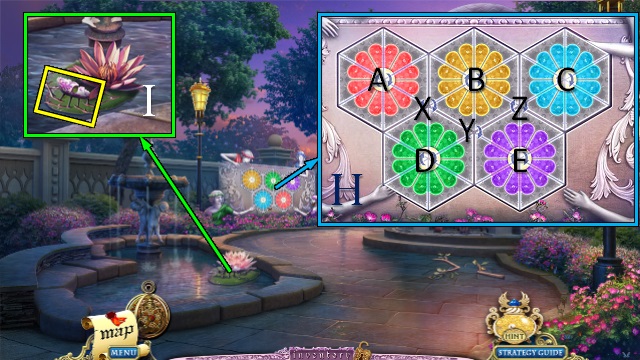
- Play the second mini-game.
- Move the flowers to the right; follow the vines to find out which flower goes where (A).
- Take FIREFLY 4/4 (B).
- Put the FIREFLIES in the lamp (C).
- Take LOGS 2/2 (D).
- Take the SICKLE and SHELL (E).
- Walk down.
- Put the SHELL on the snail and take the SNAIL (F).
- Put the LOGS in the holes (G).

- Take the BROOM (H); give the DRUID HORN and SICKLE to the druid to receive an ENCHANTED MUSHROOM (I).
- Go into the Cave.
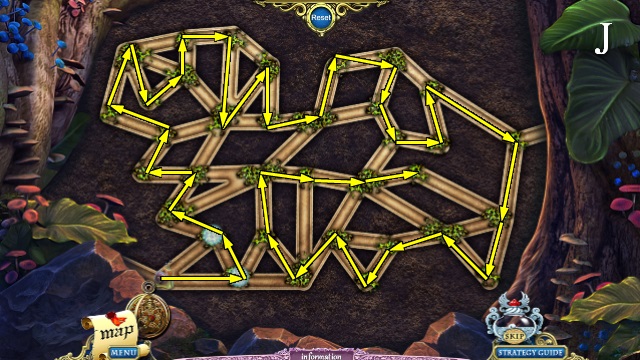
- Put the SNAIL on the pipes above the well for a mini-game.
- Guide the snail through the pipes until he has eaten all the moss; intersections may only be passed once (J).
- Use the BROOM on the cobwebs.
- Take the WING (K).
- Take the SPOON; fill the POT with water to get a POT WITH WATER (L).
- Use the POT WITH WATER on the flowers and take a MAGIC FLOWER (M).
- Use the SPOON on the resin to get a SPOON WITH RESIN (N).
- Walk down.
- Put the SPOON WITH RESIN on the statue, followed by the WING; take the CHERRIES (O).
- Put the MAGIC FLOWER, ENCHANTED MUSHROOM and CHERRIES on the altar (P).
- You receive the FOREST SPIRIT.
- Talk to Lillian.
Chapter 5: Benoit Mansion
- Take the BAT’S WING and MOSAIC PART (Q).
- Walk down.

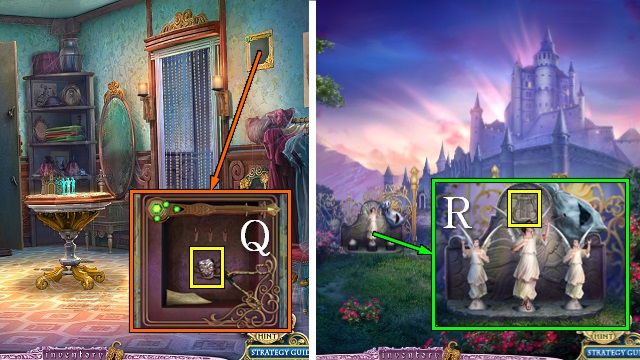
- Put the MOSAIC PART on the window for a mini-game.
- Rotate the four segments of the image, then select the hole in the window to check if the segments are turned correctly (R).
- Solution from start: Ax3, Bx3, Cx2, Dx2; from reset: Ax3, Bx1, Cx1, Dx3.
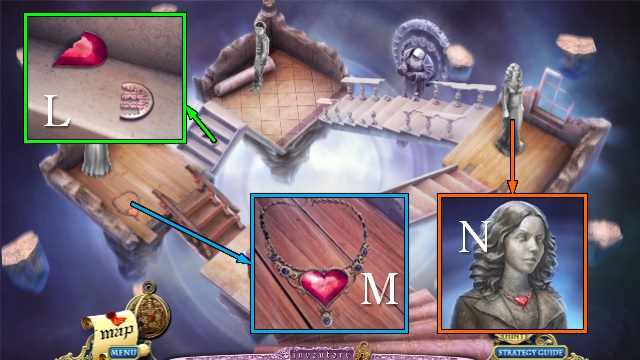
- Take the FIRST PICTURE (S).
- Walk down and go down the manhole.
- Put the BAT’S WING on the bat to receive a PART OF PICTURE (T).
- Go to Lillian’s House.
- Put the PART OF PICTURE on the painting and sew it together with the NEEDLE for a mini-game.
- Follow the cup with the ball under it.
- Take the BABY OWL (U).
- Go to the Lion Gate.
- Use the FOREST SPIRIT on the vine ladder (V).
- Put the BABY OWL with its mother; take the GRAPES KEY (W).
- Go to Lillian’s House.
- Open the cabinet with the GRAPES KEY (X).
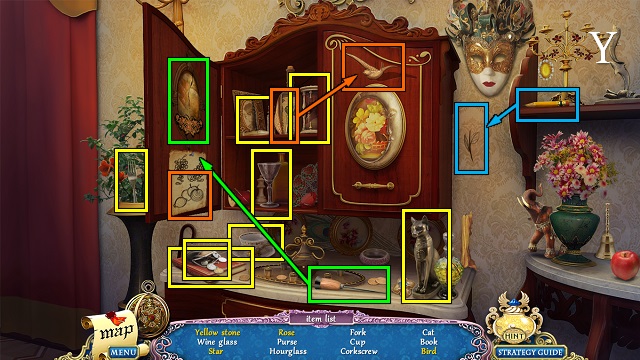
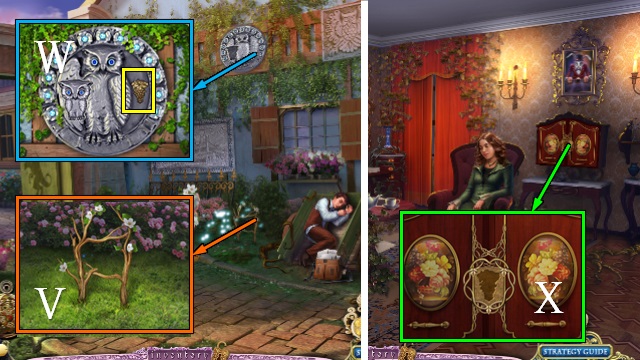
- Play the HOP (Y).
- You receive the CORKSCREW.
- Walk down.
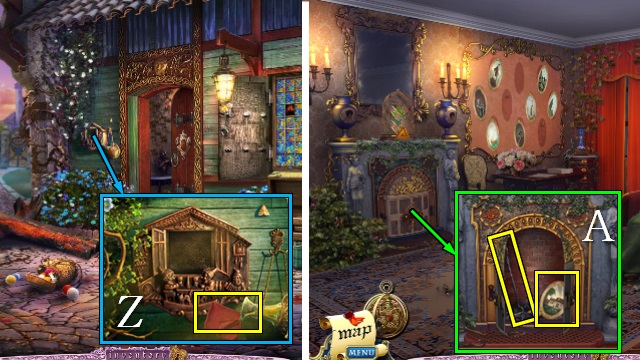
- Open the bottle with the CORKSCREW; use the CLOTH on the bottle to get an OILED CLOTH (Z).
- Go into Lillian’s House.
- Oil the fire grate with the OILED CLOTH; take the THIRD PICTURE and the POKER (A).
- Hang the FIRST PICTURE, SECOND PICTURE and THIRD PICTURE on the wall for a mini-game.
- Adjust the pictures in the correct order to straighten them all; select a wrong one and you have to start again (B).
- Take the BLUE TALISMAN (C).
- Walk down.
- Remove the burning logs with the POKER (not shown).
- Go through the gate to the Street.

- Take the LOCK PICK (D).
- Move the vines; take the MOUSE, YELLOW TALISMAN and WATER FLASK (E).
- Walk forward to the Castle Gate.
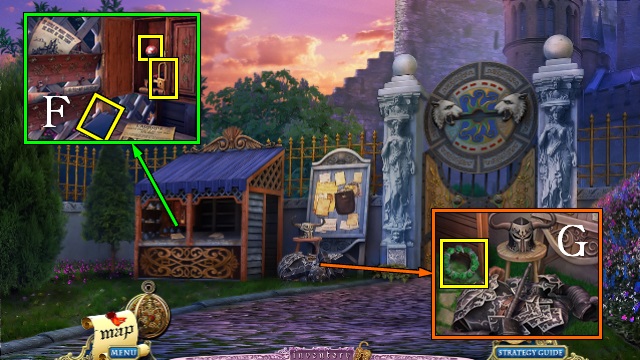
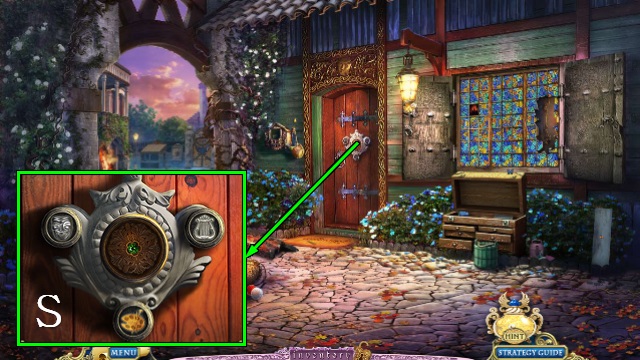
- Pick the lock with the LOCK PICK; take the BOOK, RED TALISMAN and LOCK (F).
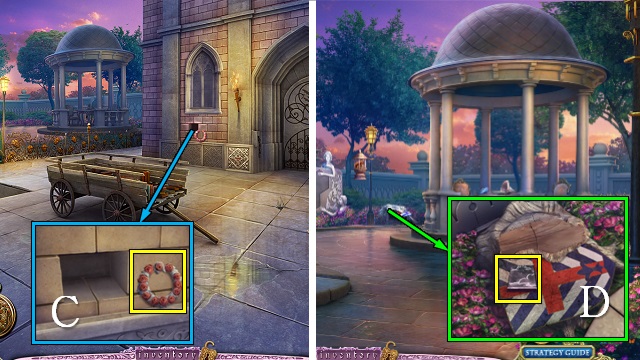
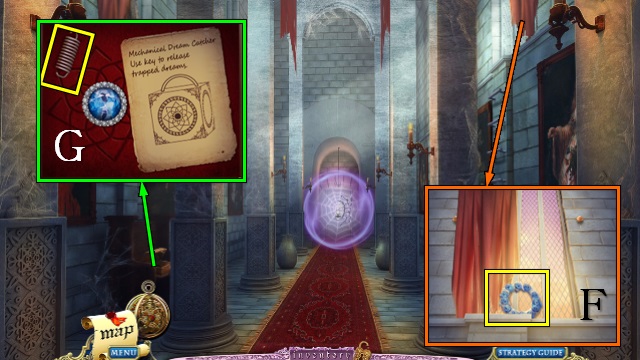
- Take the GREEN WREATH (G).

- Take the FLOWER PATTERN (H).
- Put the MOUSE in the hole and take the GREEN TALISMAN (I).
- Walk down.
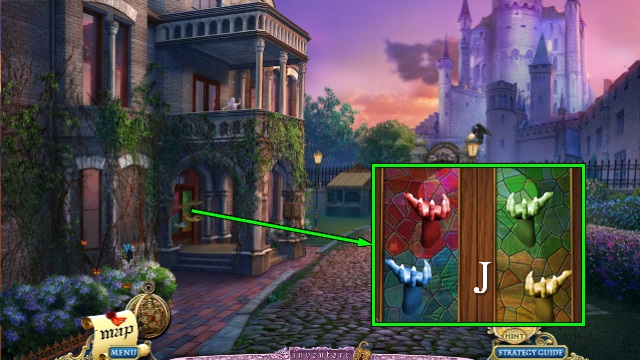
- Put the RED TALISMAN, BLUE TALISMAN, GREEN TALISMAN and YELLOW TALISMAN in the hands on the door (J).
- Go into the Mansion.
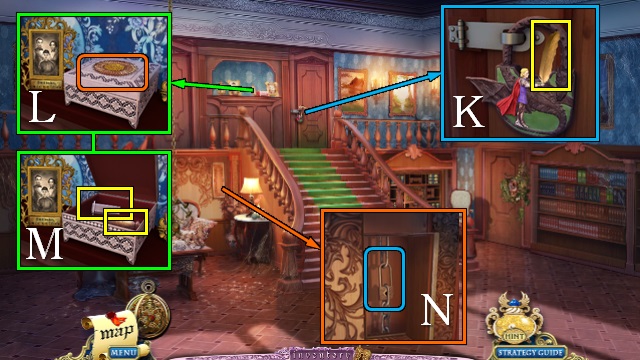
- Take the PLUME (K).
- Put the FLOWER PATTERN on the box (L); take the CLOCK WEIGHT and CHIMNEY (M).
- Open the panel and pull the chain; fix the chain with the LOCK (N).
- Play the HOP (O).
- You receive the SLINGSHOT.
- Put the BOOK on the shelves for a mini-game.
- Place the books in the slots along the sides, making sure that the symbols on the corners of the books match (P).
- Take STAR 1/2 (Q).
- Walk down.
- Shoot the demon with the SLINGSHOT (R).
- Take the PEARL (S).
- Go into the Mansion.
- Put the PEARL in the lock (T).
- Go into the Nursery.
Chapter 6: Nanny Gabriela’s Dream
- Use the Dream Amulet on Nanny Gabriela and go through the portal (U).
- Take the STOOL (V).
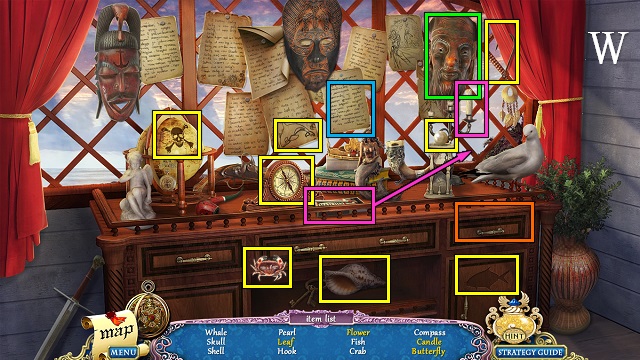
- Open the curtain and play the HOP (W).
- You receive the CRAB.
- Go right.
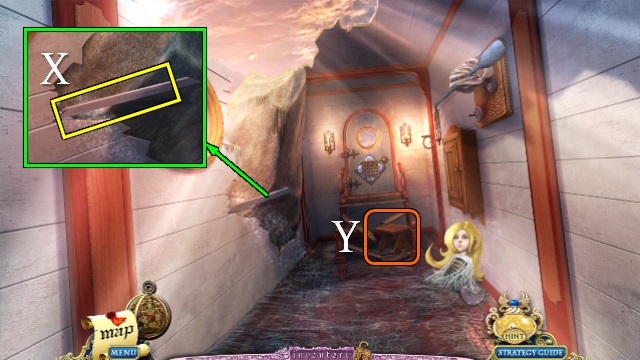
- Take the PLANK (X).
- Put the STOOL under the broken stairs (Y).
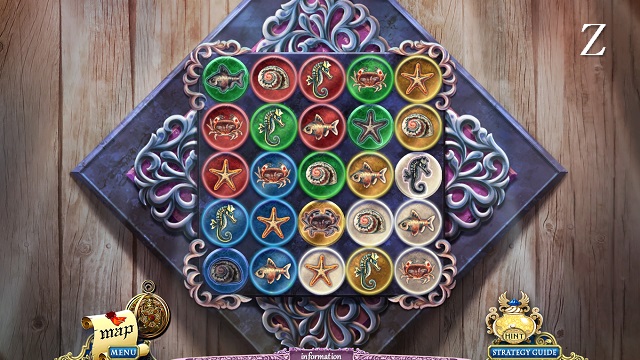
- Put the CRAB on the board for a mini-game.
- Rearrange the symbols so rows and columns only contain one of each (Z).
- Walk forward.
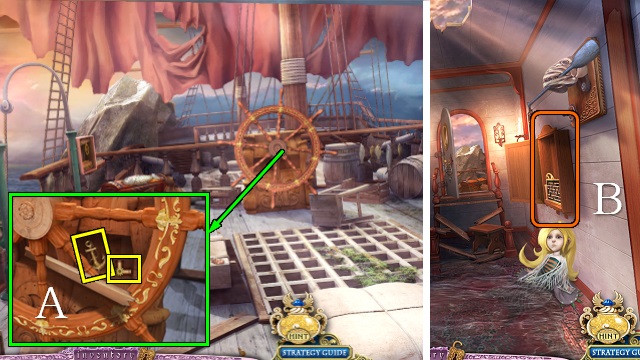
- Put the PLANK in the wheel; take the PUMP PART and ANCHOR (A).
- Walk down.
- Open the cabinet (B).
- Take the DOLPHIN (C); put the PUMP PART on the pipes for a mini-game.
- Rotate the pipes until they form one, completely closed system (D).
- Take the PUMP and FIRST GEAR (E).
- Walk down.
- Put the PUMP on the carpet (F).
- Open the cabinet with the DOLPHIN; take the FOLDING KNIFE (G).
- Go right.
- Cut the net with the FOLDING KNIFE and take the 1ST SHIP PIECE (H).
- Walk forward.
- Cut the ropes with the FOLDING KNIFE, move the tarp and take the 2ND SHIP PART (I).
- Walk down twice.
- Move the carpet.
- Put the 1ST SHIP PIECE and 2ND SHIP PART on the lock for a mini-game.
- Rotate the center disc and move the colored pieces to the outside slots with the same color (J).
- Solution: Yx2, Dx2, Yx2, A, Yx2, E, X, B, Y, E, Yx2, A, Y, E, X, E, X, C, Y, E, Y, Bx2, Yx2, E, Yx2, E, Yx2, Cx2, Yx2, E, Yx2, Ex2.
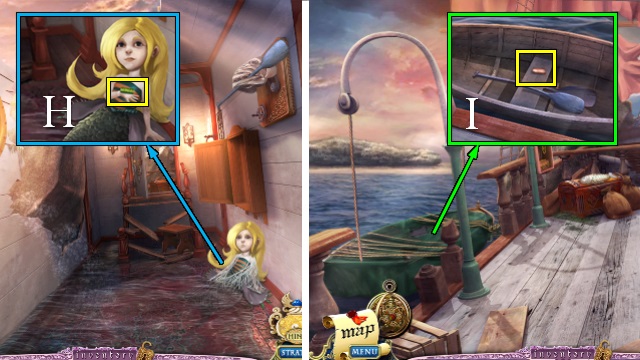
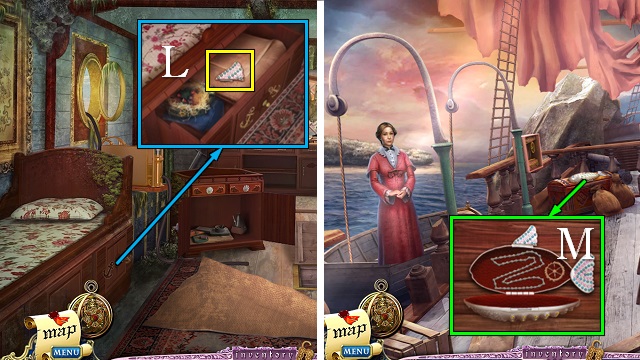
- Take the LIFEJACKET (K).
- Put the ANCHOR on the drawer; take the FIN (L).
- Go to the Deck.
- Put the FIN on the fish; take the CHAIN and SECOND GEAR (M).
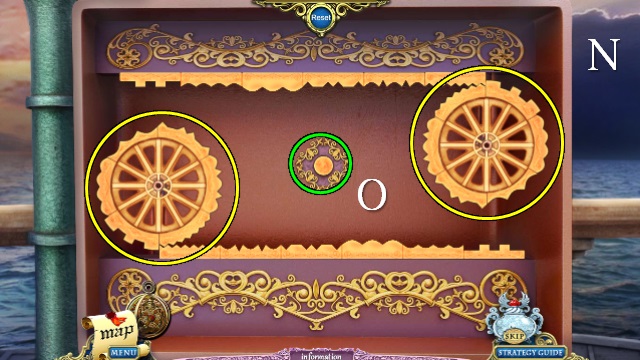
- Put the FIRST GEAR and SECOND GEAR on the mechanism for a mini-game (N).
- Change the gear segments to match the profiles at the top and bottom; push the button (O) to activate and check your progress.
- Walk down.
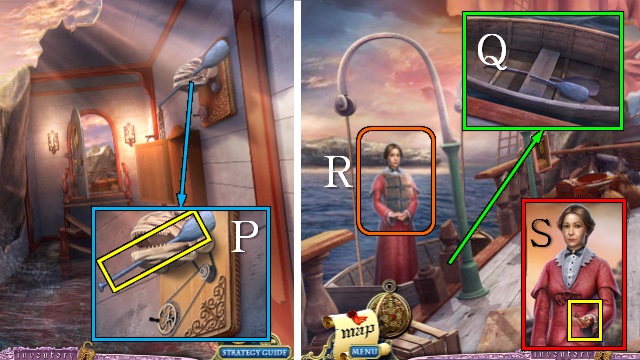
- Put the CHAIN on the shark mechanism and take the PADDLE (P).
- Walk forward.
- Put the PADDLE in the boat (Q).
- Give the LIFEJACKET to Nanny Gabriela (R).
- Talk to Nanny Gabriela and take the LAB KEY (S).
Chapter 7: The Dream Machine
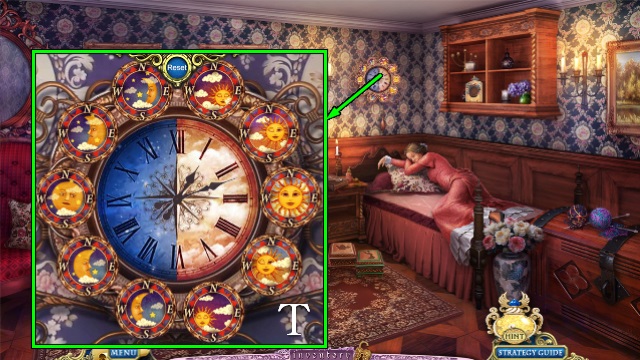
- Put the CLOCK WEIGHT on the clock for a mini-game.
- Arrange the suns and moons in order; the sun starts ascending at noon (T).
- You receive the CODE.
- Walk down.
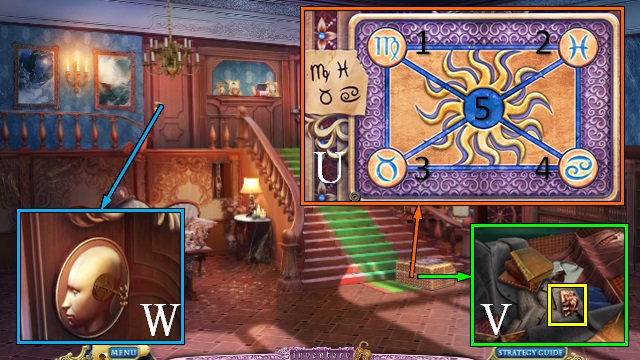
- Put the CODE on the box for a mini-game.
- Slide the symbols into the configuration shown on the code (U).
- Solution: move 4, 2, 1, 3, 5.
- Take the FIRST GATE PART (V).
- Open the door with the LAB KEY (W).
- Go into the Laboratory.
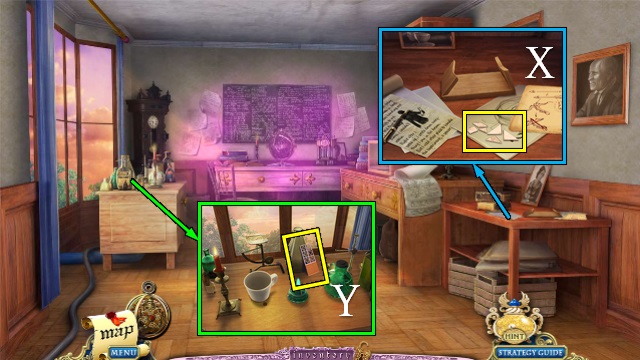
- Take the WHITE PUZZLE PIECES (X).
- Take the BALCONY DOOR (Y).
- Go to the Nursery.
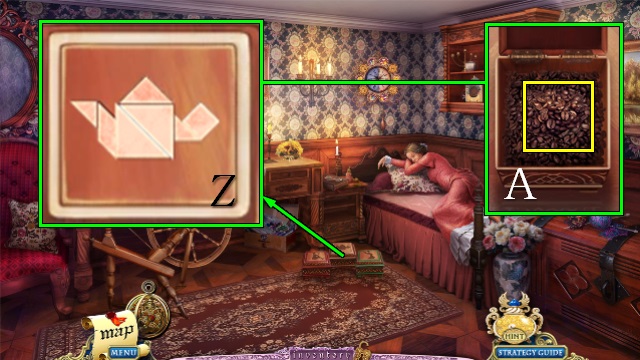
- Put the WHITE PUZZLE PIECES on the box for a Tangram mini-game.
- Fill the shape on the white box with the puzzle pieces; right-click to rotate a piece (Z).
- Take the COFFEE BEANS (A).
- Go to the Laboratory.
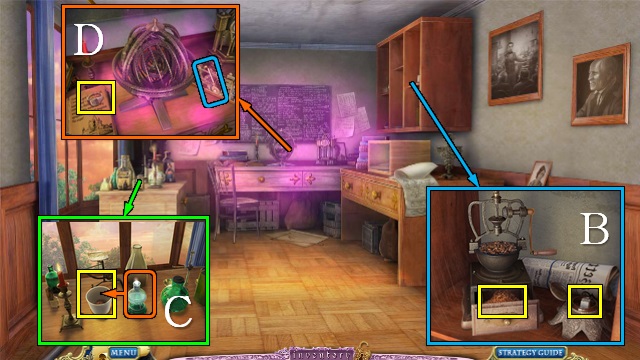
- Open the coffee grinder and put the COFFEE BEANS in; grind and take the GROUND COFFEE and SUGAR (B).
- Put the GROUND COFFEE in the mug and the WATER FLASK on the burner; pour the water in the mug, and take the coffee (C).
- Take the SIGNET RING and pull the lever (D).

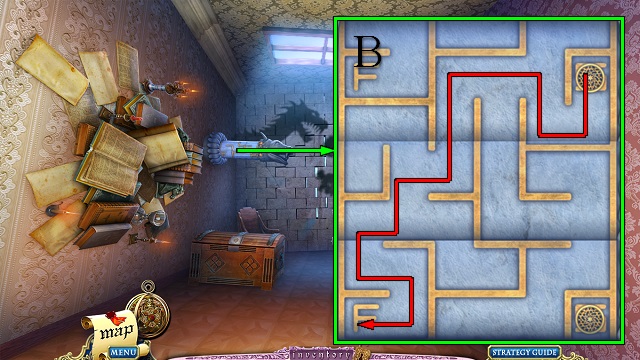
- Put the MOUSE in the cage for a mini-game.
- Move the mice through the maze to the three buttons at the top.
- Mouse 1 to E, 2 to F, 1 off E, 1 to H, 3 to E, 2 off F and on to G, 1 to I, 3 off E, 2 to H, 1 to L, 2 to I, 3 to H, 2 to K, 3 to J.
- Take the WINDOW (M).
- Walk down twice.
- Put the SUGAR by the bird and take the BIRD (N).
- Walk forward.
- Open the bag with the SIGNET RING and take the RED PUZZLE PIECES (O).
- Go to the Nursery.
- Put the BIRD on its perch and take the MUSICAL NOTE (P).
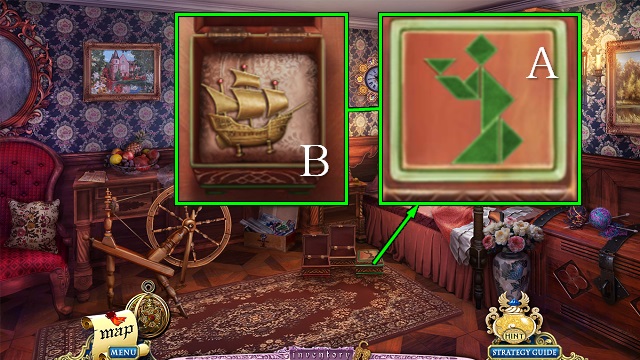
- Put the RED PUZZLE PIECES for another Tangram mini-game.
- Play as before (Q).
- Take the SECOND GATE PART (R).
- Go to the Castle Gate.
- Try to put one of the gate parts on the gate (S).
- Take the SWORD and TRUMPET (T).
- Go back to the manhole by the Lion Gate.
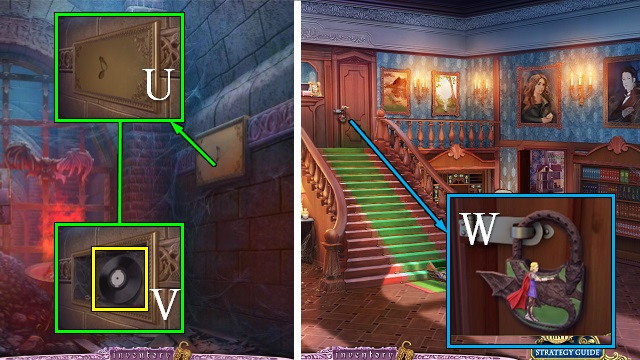
- Put the MUSICAL NOTE on the wall (U); take the RECORD (V).
- Go to the Mansion Hallway.
- Give the SWORD to the knight (W).
- Go into Blanc’s Bedroom.
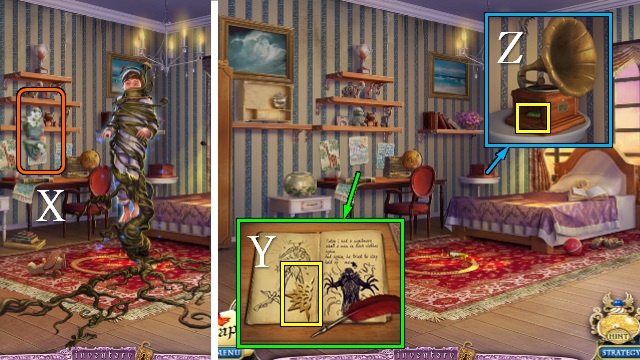
- Use the FOREST SPIRIT on the vines (X).
- Take STAR 2/2 (Y).
- Put the RECORD and TRUMPET on the gramophone; take the GREEN PUZZLE PIECES (Z).
- Go to the Nursery.
- Put the GREEN PUZZLE PIECES on the boxes for another Tangram mini-game.
- Play as before (A).
- Take the SHIP (B).
- Go to Blanc’s Bedroom.

- Put the SHIP next to the other; take the STEPS, SCREWS and ARROW SHAFT (C).
- Go to the NURSERY.
- Put the STEPS, WINDOW, BALCONY DOOR and CHIMNEY on the doll’s house (D).

- Play the HOP (E).
- You receive the GLOVES.
- Go to the Street.
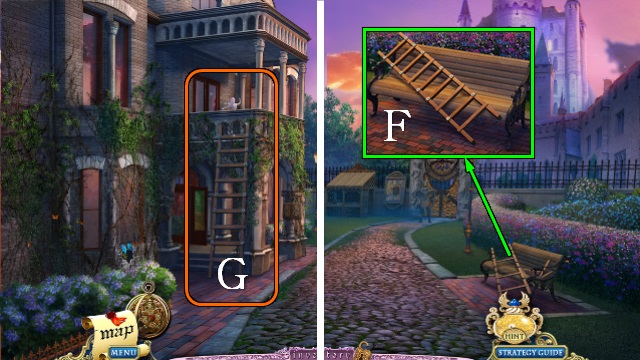
- Put the rungs and SCREWS on the ladder and fasten them with the SCREWDRIVER; take the LADDER (F).
- Put the LADDER against the balcony (G).
- Play the HOP (H).
- You receive the BROKEN ARBALET.
- Put the STAR on the mini-game (I).
- Use the arrows to rotate the box until the key falls into the lock.
- Solution: J, Kx3, Jx3.
- Take the CROSSBOW (L).
- Go to Lillian’s House.

- Take the COTTON with the GLOVES (M).
- Go to the Nursery.
- Put the COTTON on the spinning wheel to receive GOLD THREAD (N).
- Go to the Laboratory.
- Put items on the table in this order: BROKEN ARBALET, ARROW SHAFT, CROSSBOW, PLUME, GOLD THREAD; take the CROSSBOW (O).
- Go to the Castle Gate.
- Shoot the guard with the CROSSBOW (P).
- Put the FIRST GATE PART and SECOND GATE PART on the gate (Q).
- Go through the gate to the Castle Courtyard.
Chapter 8: The Castle
- Take the TRIANGLE (R).
- Turn the wheel and take the BROKEN HANDLE (S).
- Go to Lillian’s House.
- Put the TRIANGLE on the ornate box and take the FEATHER (T).
- Go to the Castle Courtyard.
- Put the FEATHER on the gate (U).
- Go through to the Gazebo.
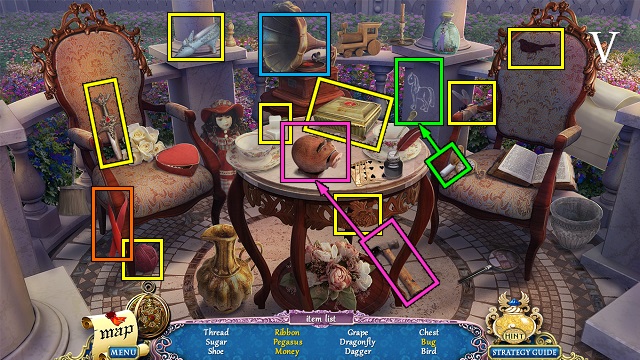
- Play the HOP (V).
- You receive a DULL KNIFE.
- Walk down.
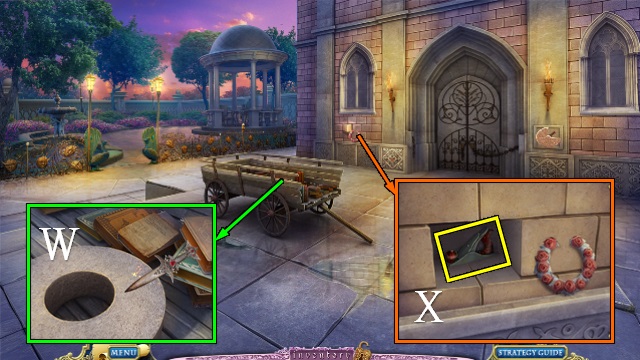
- Sharpen the DULL KNIFE on the stone to receive a KNIFE (W).
- Remove the stone with the KNIFE and take the JOINTER (X).
- Go to the Gazebo.
- Take the PURPLE WREATH; cut the branch with the KNIFE, shape it with the JOINTER and attach the BROKEN HANDLE to it to receive a HANDLE (Y).
- Walk down.
- Put the HANDLE on the wheel (Z).
- Go into the Castle.
- Take the HEAVEN’S HALBERD (A).
- Remove the ROSE with the KNIFE (B).
- Walk down.
- Put the ROSE on the wreath and take the RED WREATH (C).
- Go to the Gazebo.
- Chop the tree trunk with the HEAVEN’S HALBERD and take the SHIELD PART (D).
- Go into the Castle.
- Put the SHIELD PART on the shield for a mini-game.
- Select the tiles in the correct order, as indicated by the groove (E).
- Remove the ROPE and take the BLUE WREATH (F).
- Open the box and take the SPRING (G).
- Go to the Gazebo.
- Put the GREEN WREATH, PURPLE WREATH, BLUE WREATH and RED WREATH on the statues for a mini-game.
- Rotate the groups of tiles to create flowers of one color next to the statues with the same color (H).
- Purple: Ax3, X, Bx3, Zx2, B, Zx2, Ex2, Cx2, Z, Ex2, Cx2, Z.
- Red: Bx2, Xx2, Zx2, Bx2, Ax2, Xx2, Z, Cx4, Zx2, Bx2, A, D, X, A, X, Z.
- Blue, yellow and green: Bx2, Z, Cx2, Bx2, Z, Cx2, Bx4, Zx2, Bx4, X, Dx2, Xx2, B, Zx2, Bx3, Xx2, Bx4, X, Bx3, X, D, Xx2, Bx4, Z, Dx3, Bx3, X, D, Xx2.
- Take the FACE HALF (I).
- Walk down.
- Put the SPRING on the box and take the GEAR (J).
- Go into the Castle.
- Put the FACE HALF and GEAR in the vortex (K).
- Walk forward.
- Take the NUT (L).
- Take the FIRST KEY PART (M).
- Go to the Gazebo.
- Give the NUT to the squirrel and take the GEM (N).
- Walk down.
- Put the GEM on the mosaic (O) and take the SECOND KEY PART (P).
- Go into the Castle.
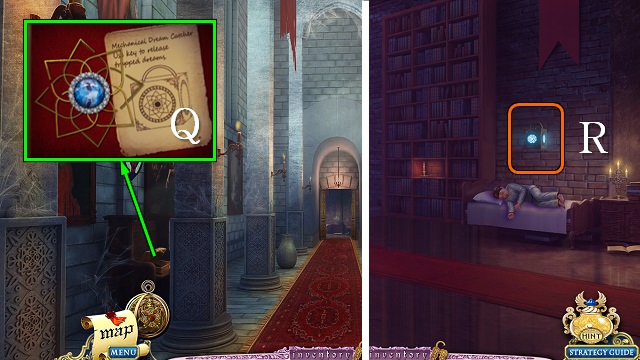
- Put the FIRST KEY PART and SECOND KEY PART in the box; take the DREAM CATHER KEY (Q).
- Walk forward.
- Put the DREAM CATCHER KEY on the lantern (R) for a mini-game.

- Move the colored gems to either side of the larger gem with the same color.
- You can move a gem by selecting it and then selecting the spot you want it to move to.
- A gem can only move to a selected spot if there is a clear, continuous path to it.
- Step 1: move as many gems as possible to a spot in the inner ring close to them (S).
- Step 2: fill in the star points that have a dead end (T).
- Step 3: fill in the other points (U).
- Take the DREAM CATCHER (V).
- Use the DREAM CATCHER on Henri.
- Use the Dream Amulet on Henri and enter the portal (W).
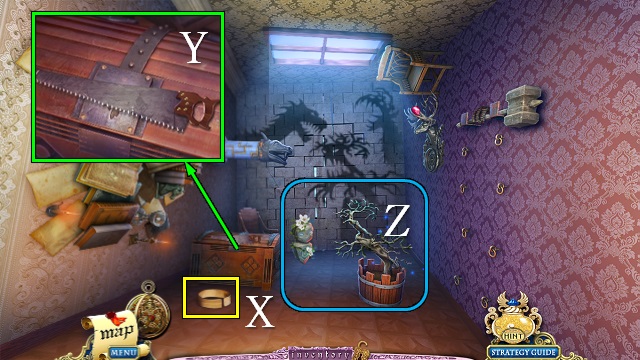
- Take the BRACELET (X).
- Take the SAW (Y).
- Use the FOREST SPIRIT on the tree (Z).
- Play the HOP (A).
- You receive the STONE.
- Play the mini-game.
- Move the token from S to F; use the arrows to scroll through the maze (B).
- Put the ROPE on the hooks (C).
- Put the BRACELET on the arm (D).
- Take the HAMMER (E).
- Take the PART OF NECKCLACE and remove the horns with the SAW (F).
- Break the wall with the HAMMER (G).
- Walk forward.
- Take the CLOCK HANDS (H).
- Play the mini-game.
- Move the segments to make a continuous pattern (I).
- Take the CHEST KEY (J) and put the STONE on the panel for a mini-game.
- Color all the pieces; you can only select pieces that are adjacent to the last one you colored (K).
- Take SPHERE PIECE 1/2 and the PIECE OF NECKLACE (L).
- Put the PART OF NECKLACE and PIECE OF NECKLACE on the necklace and take the LILLIAN NECKLACE (M).
- Give the LILLIAN NECKLACE to Lillian (N).
- Walk down.
- Put the CHEST KEY on the chest (O); take the GOVERNESS TIARA (P).
- Put the CLOCK HANDS on the clock; take SPHERE PIECE 2/2 (Q).
- Go forward.
- Give the GOVERNESS TIARA to Nanny Gabriela (R).
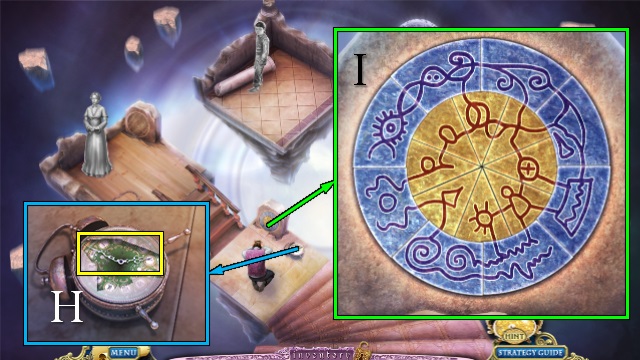
- Put the SPHERE on the statue.
- Scroll through the sphere halves to find pairs that match; select the sphere in the middle to check if you’re correct (S).
- Take the BLANC NECKLACE (T).
- Give the BLANC NECKLACE to Blanc (U).
- Congratulations, you have completed The Torment of Mont Triste.


 Myths of the World: The Whispering Marsh Walkthrough, Guide, & Tips
 Fear for Sale: Endless Voyage Walkthrough, Guide, & Tips
 Spirits of Mystery: The Silver Arrow Walkthrough, Guide, & Tips
 Dead Reckoning: The Crescent Case Walkthrough, Guide, & Tips
 The Missing: Island of Lost Ships Walkthrough, Guide, & Tips