Mayan Prophecies: Blood Moon Walkthrough, Guide, & Tips
Mayan Prophecies: Blood Moon Walkthrough
Welcome to the Mayan Prophecies: Blood Moon Walkthrough
A Mayan god is turning people into jaguars! Can you stop him before the world falls into chaos?
Whether you use this document as a reference when things get difficult or as a road map to get you from beginning to end, we’re pretty sure you’ll find what you’re looking for here.
This document contains a complete Mayan Prophecies: Blood Moon game walkthrough featuring annotated screenshots from actual gameplay!
We hope you find this information useful as you play your way through the game. Use the walkthrough menu below to quickly jump to whatever stage of the game you need help with.
Remember to visit the Big Fish Games Forums if you find you need more help. Have fun!
General Tips
- This is the official guide for Mayan Prophecies: Blood Moon.
- Hidden-object puzzles are referred to as HOPs. This guide will not show screenshots of the HOPs, however, it will mention when an HOP is available and the inventory item you’ll collect from it.
- This guide will not mention each time you have to zoom into a location; the screenshots will show each zoom scene.
- Use the map to travel to a location.
Chapter 1: At Home

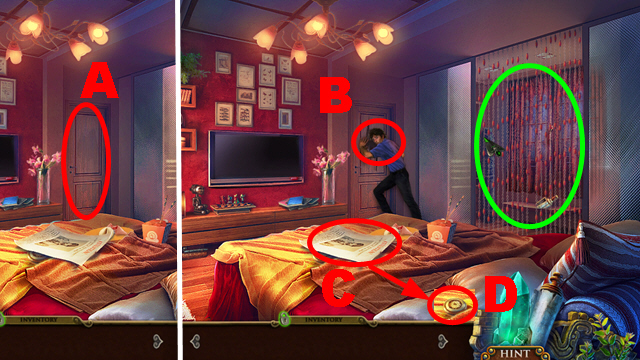
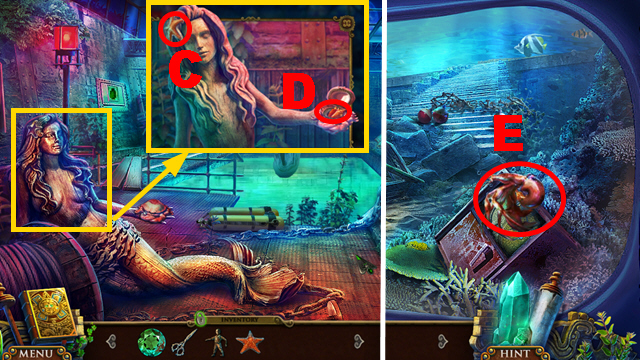
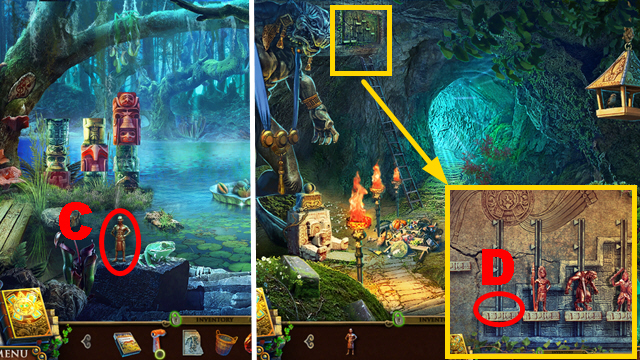
- Open the door (A); talk to the man (B).
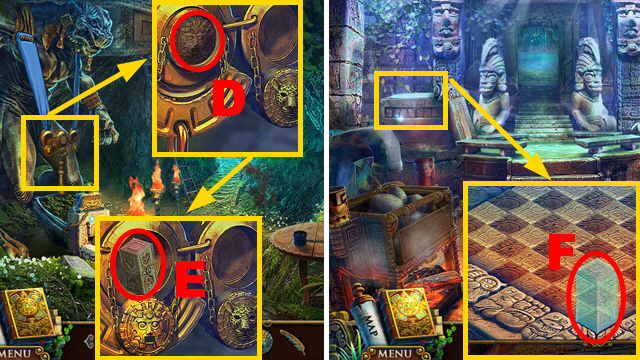
- Take the poster (C) and WHEEL (D).
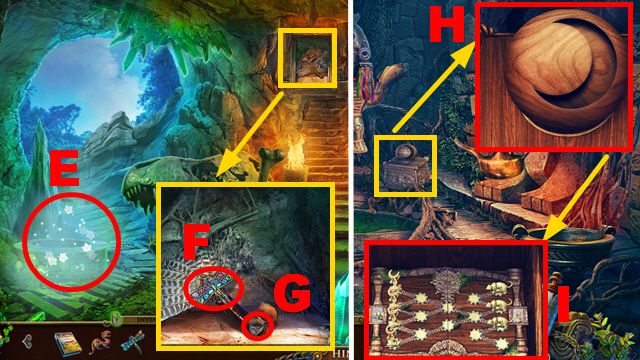
- Move aside the curtain (green).
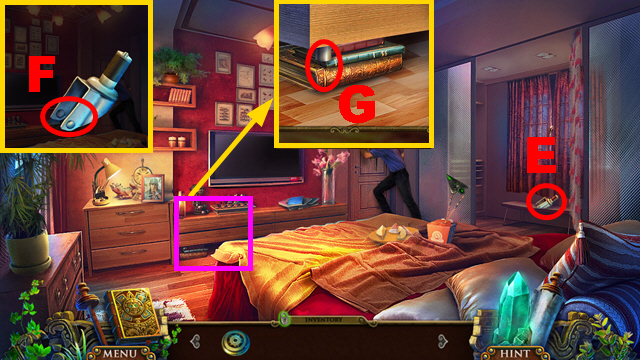
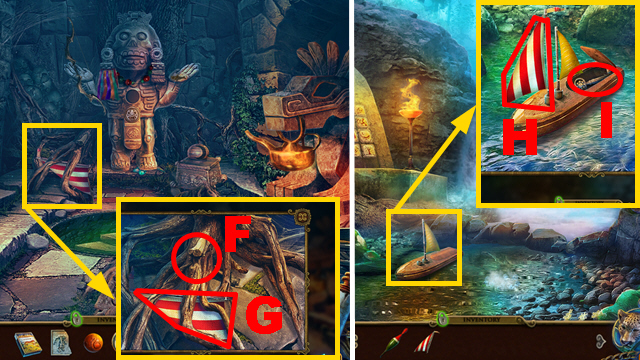
- Take the METAL HOUSING (E).
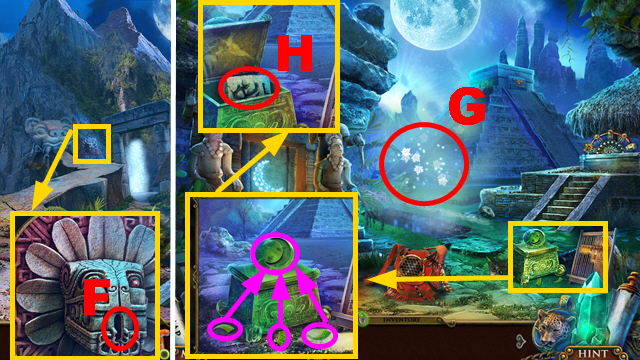
- Combine the METAL HOUSING and WHEEL (F) to acquire the FIXED WHEEL.
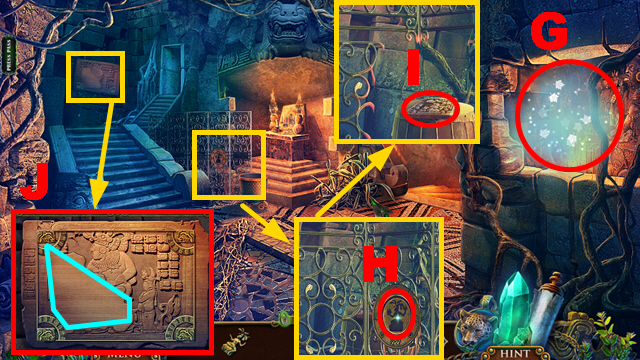
- Place the FIXED WHEEL (G).
- Move the shelf (purple) to acquire the BLOODY EMERALD.
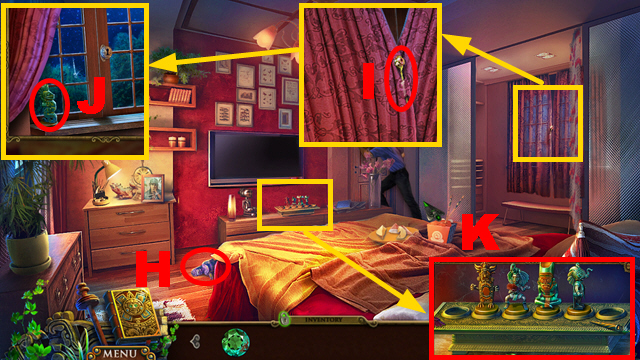
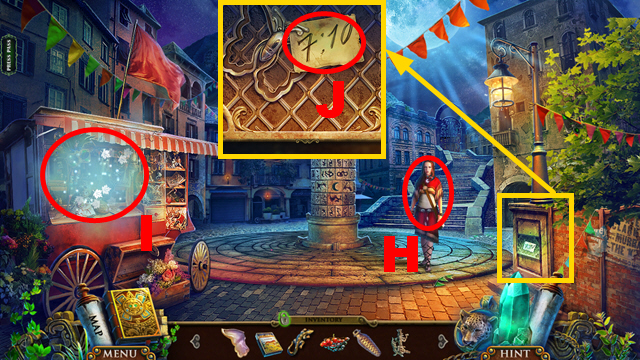
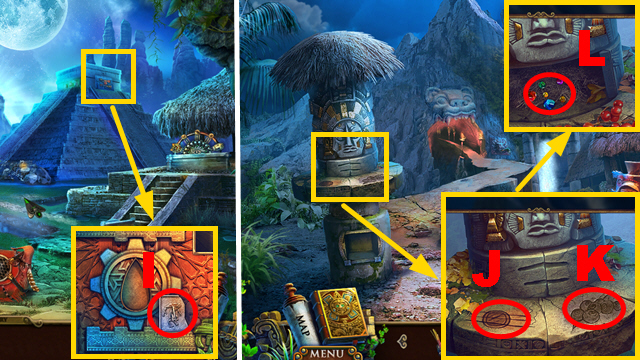
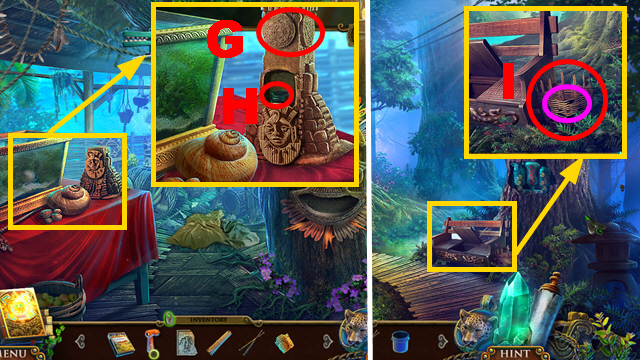
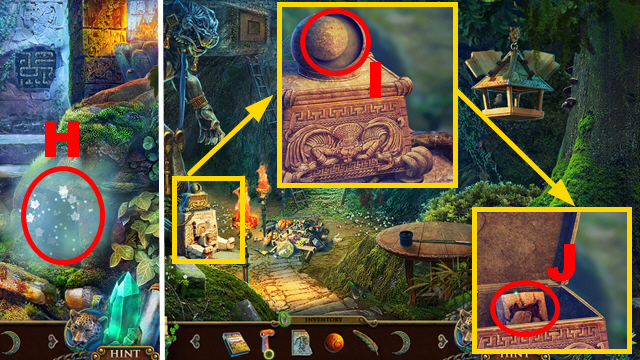
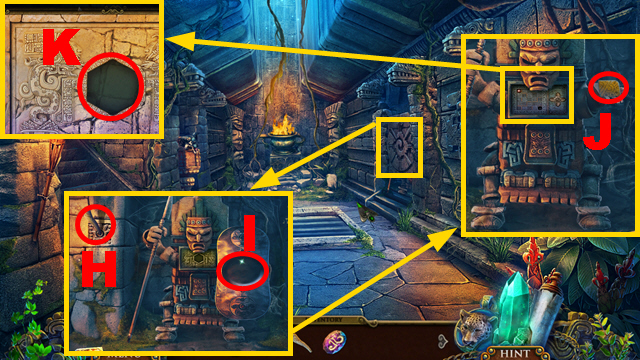
- Take the GOD OF BALANCE FIGURINE (H).
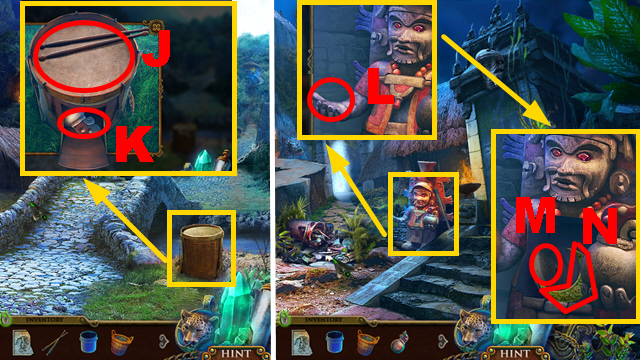
- Take the PIN (I); open the curtain.
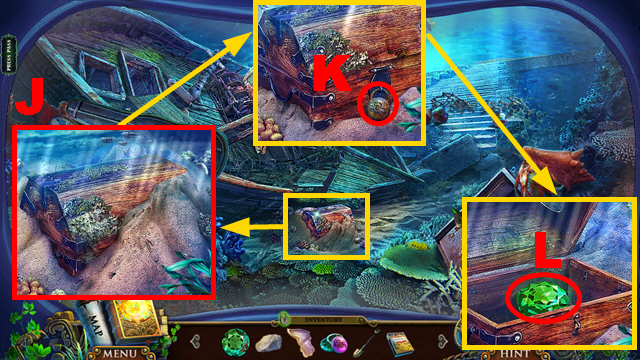
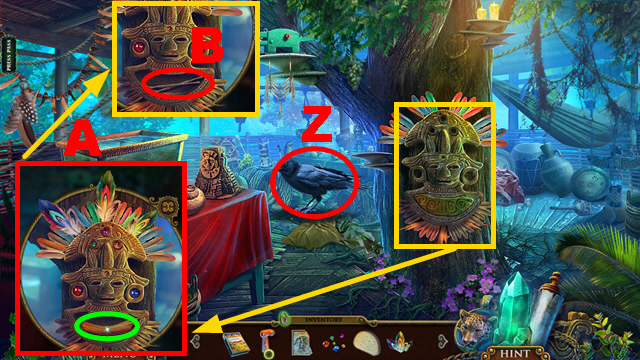
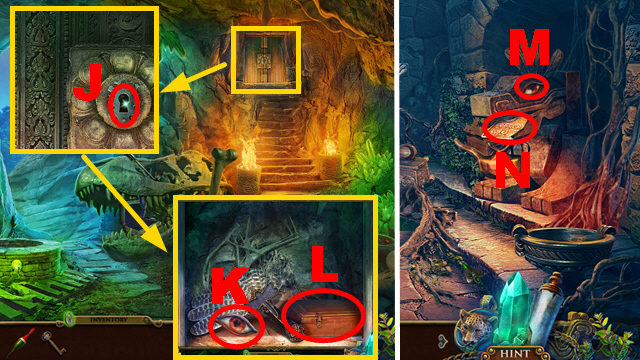
- Take the WIND GOD FIGURINE (J).
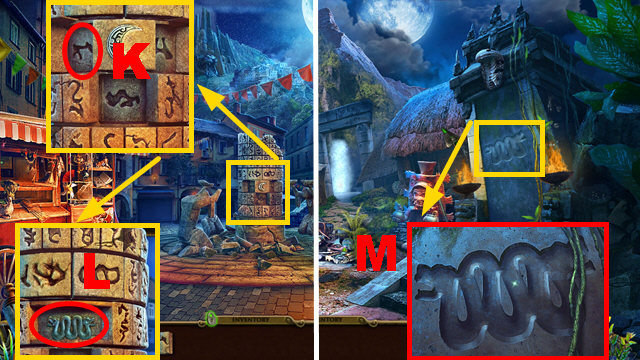
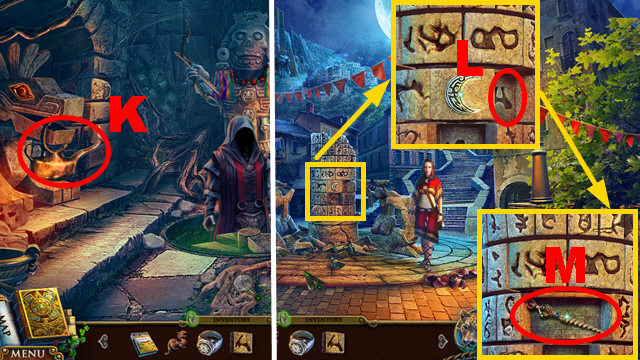
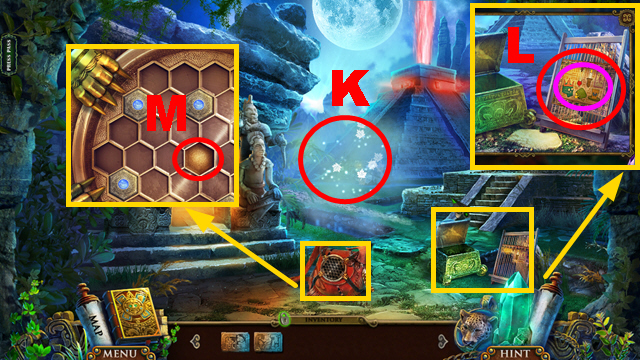
- Place the GOD OF BALANCE FIGURINE and WIND GOD FIGURINE (K).
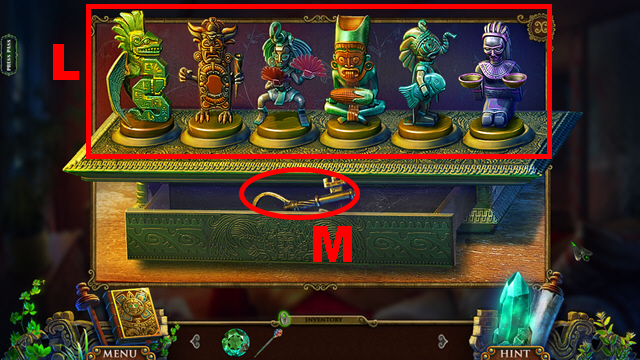
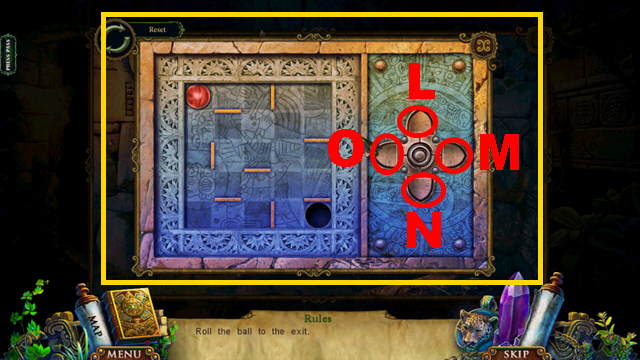
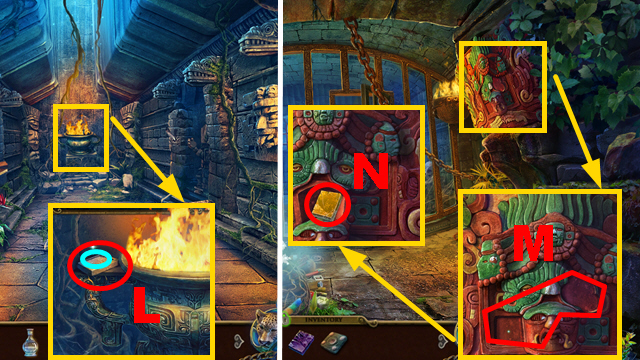
- Place the appropriate items on the figurines (L).
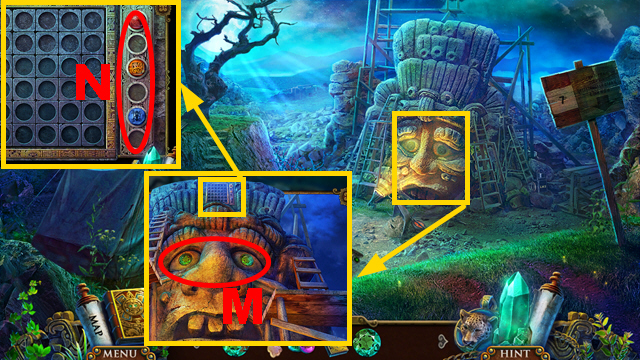
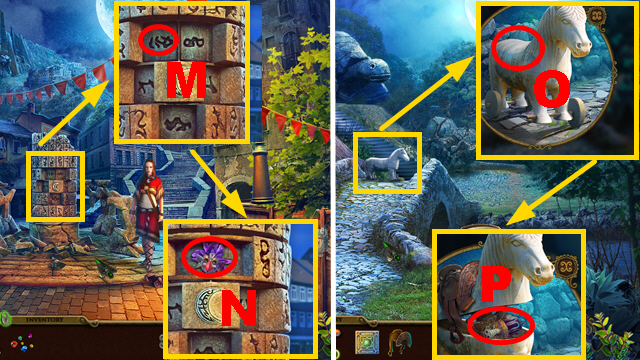
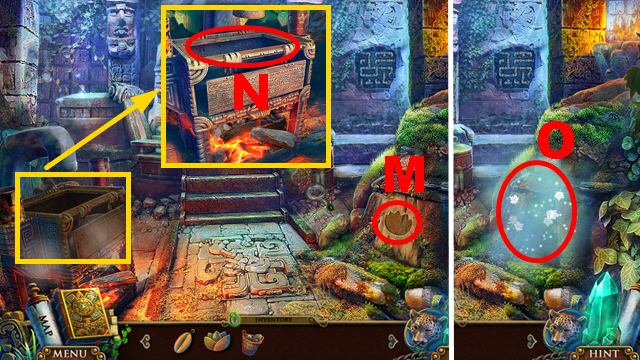
- Take the KEY (M).
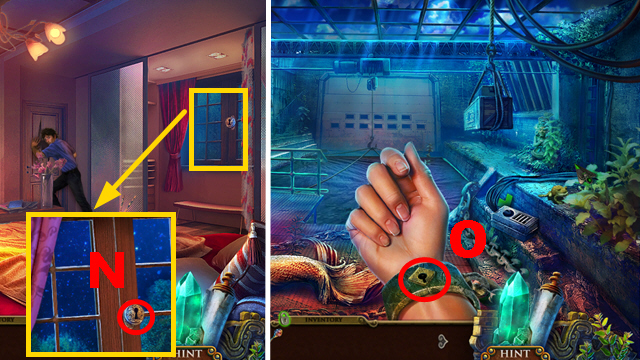
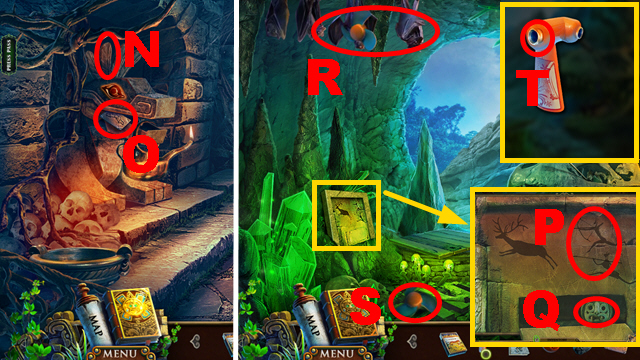
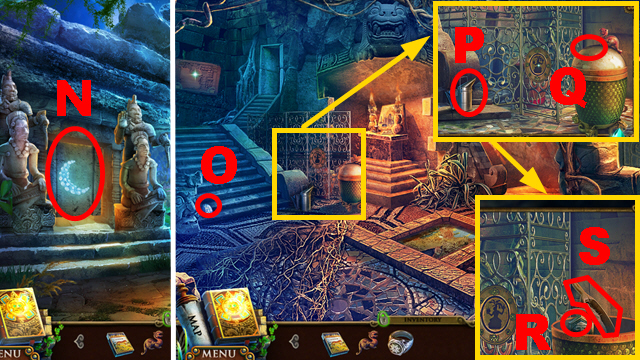
- Place the KEY (N); turn it.
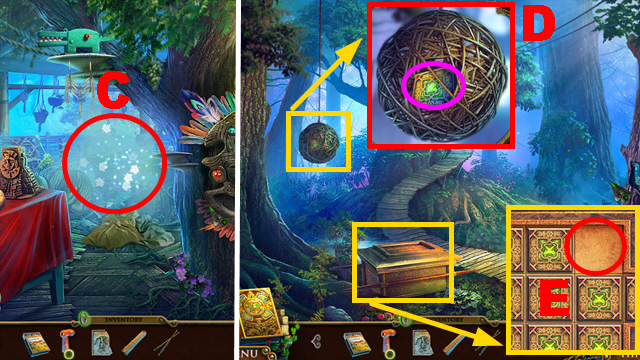
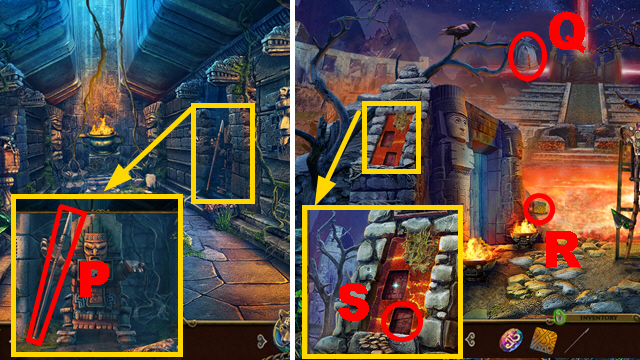
- Go through the window.
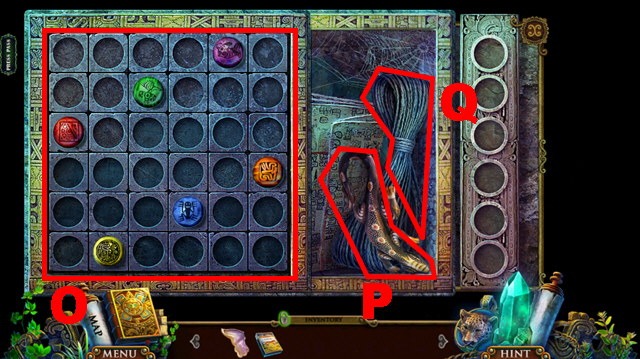
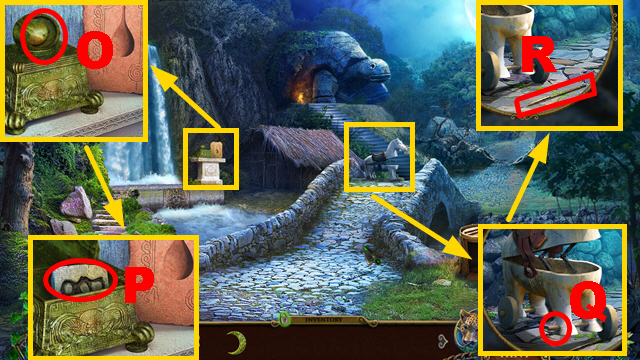
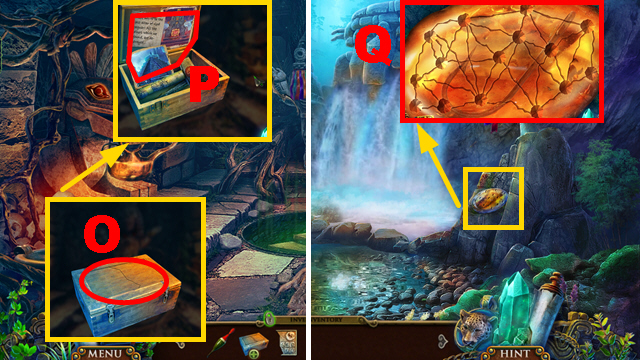
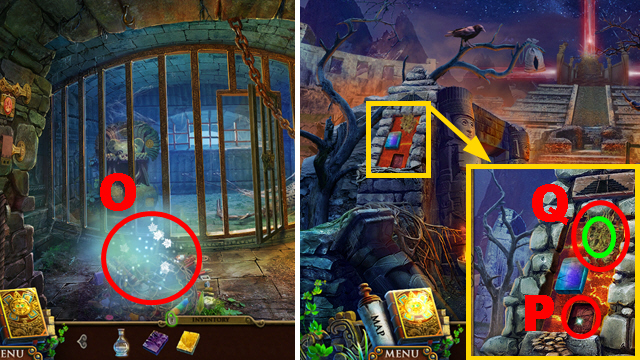
- Use the PIN (O).
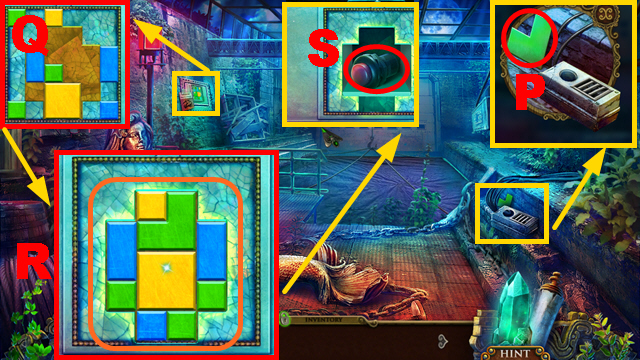
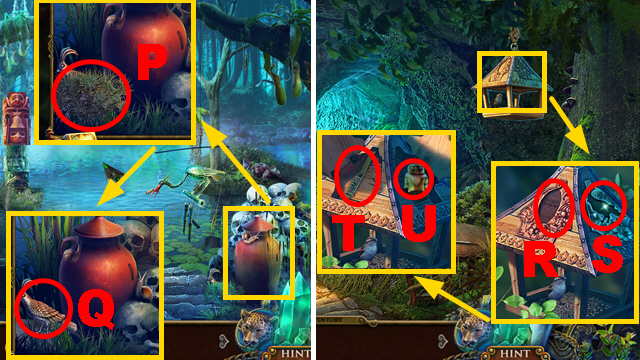
- Take the GREEN TILE (P).
- Remove the note; place the GREEN TILE (Q).
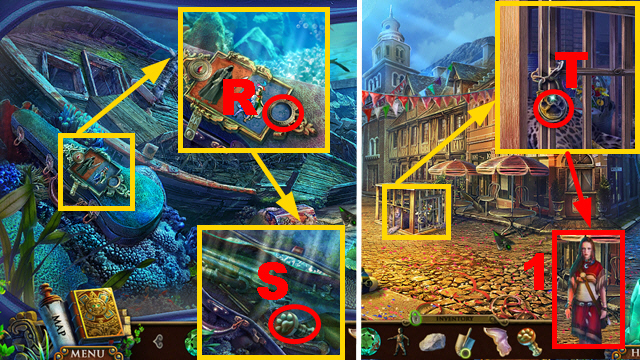
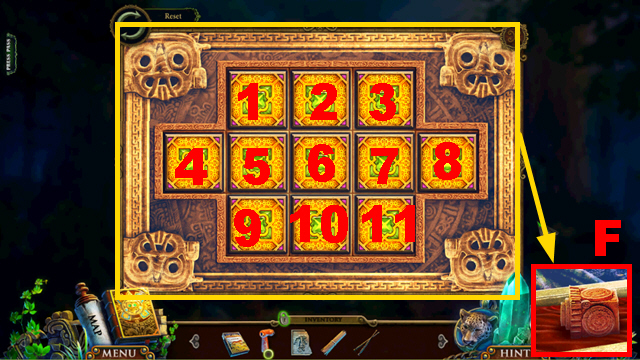
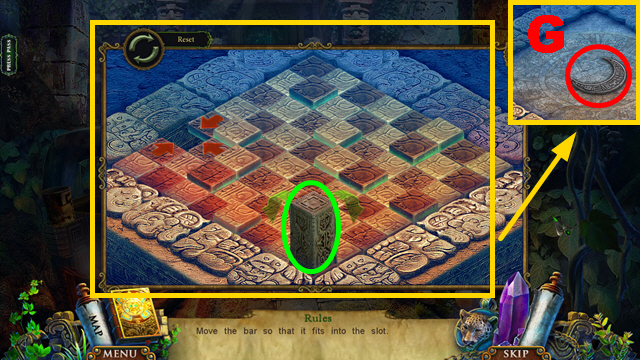
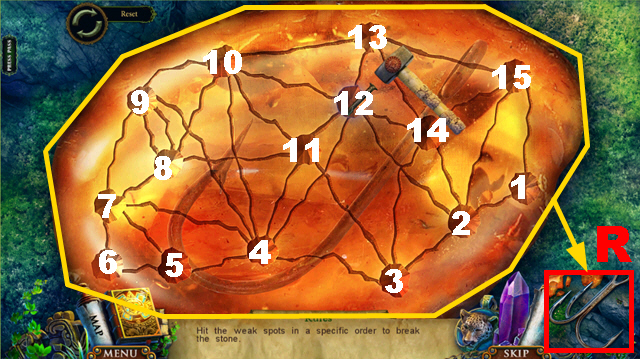
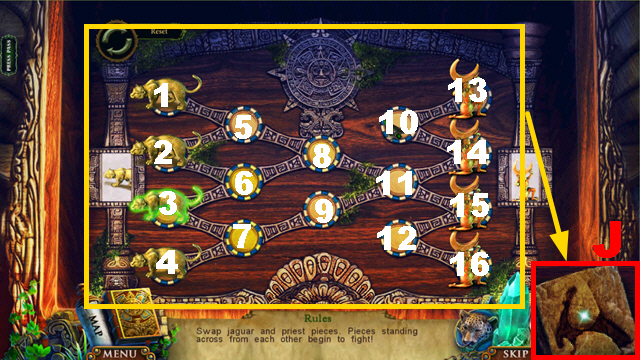
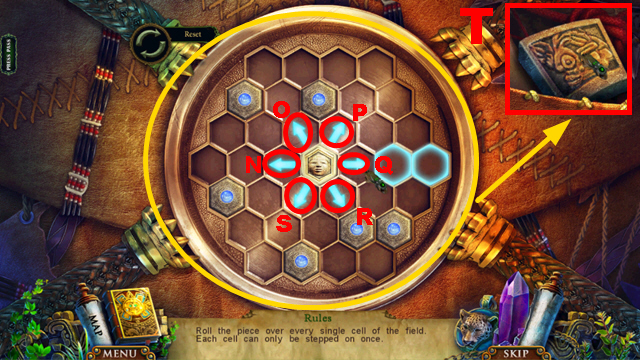
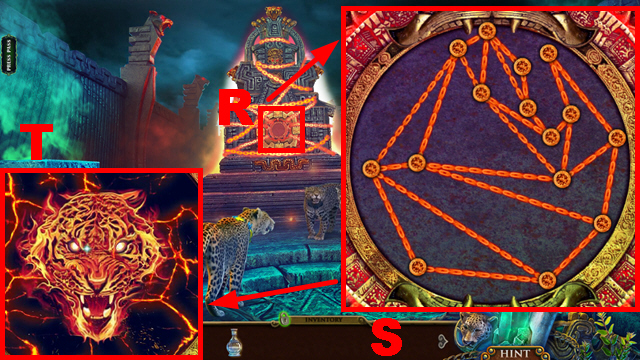
- Play the mini-game.
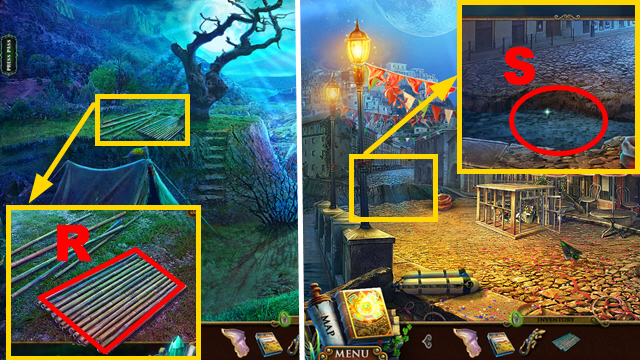
- Solution: (R).
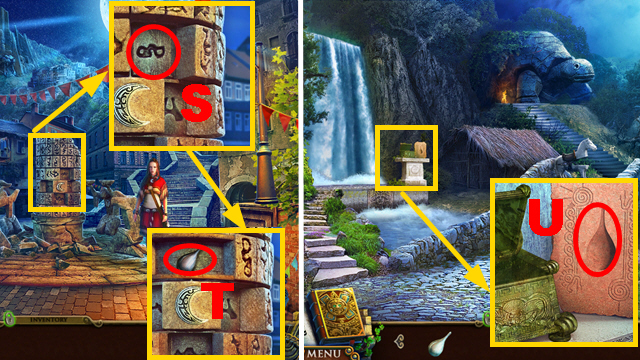
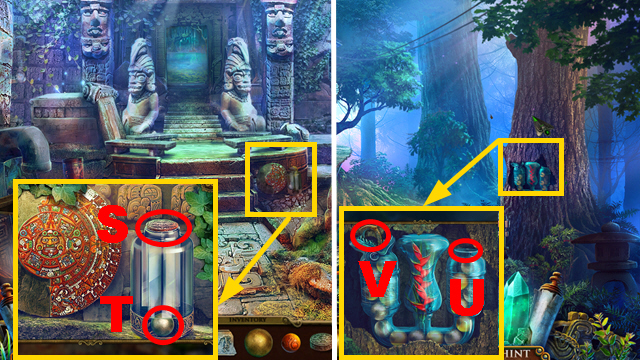
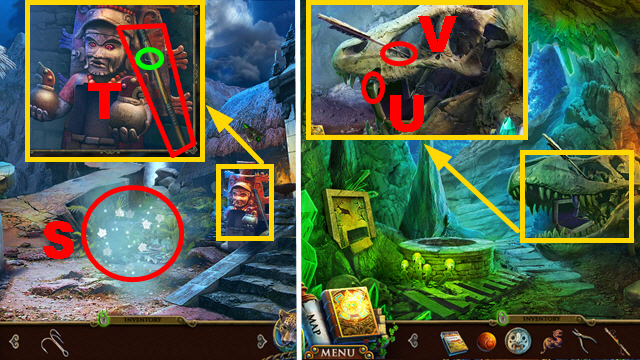
- Take the COLORFUL CROSS (orange) and STARTER BUTTON (S).

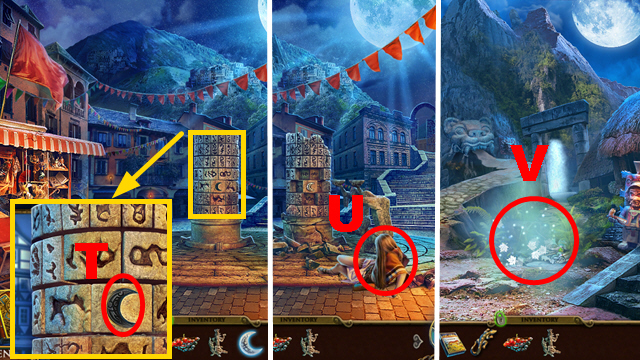
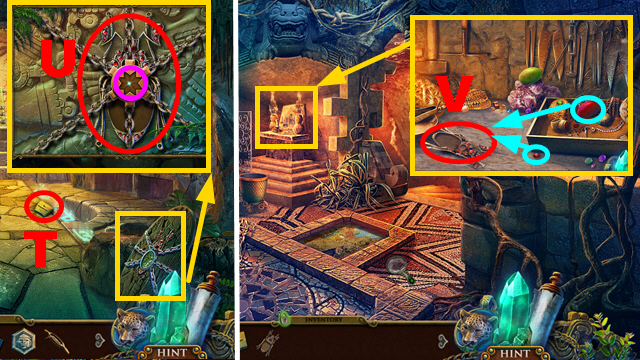
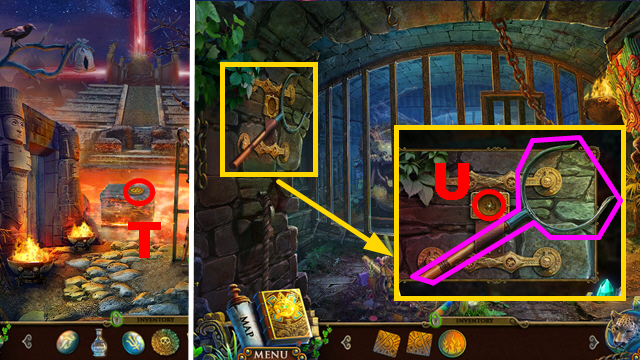
- Place the STARTER BUTTON (T); push it.
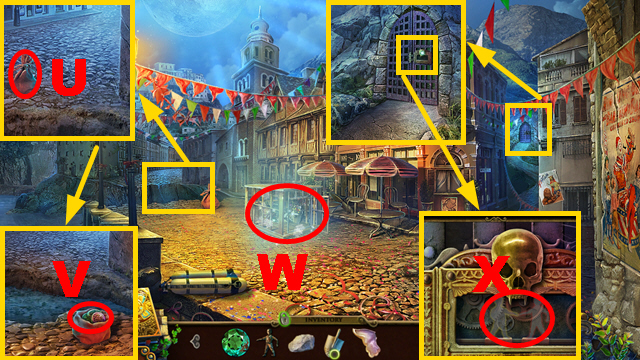
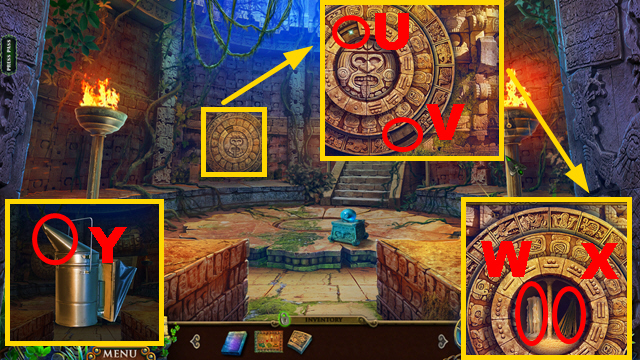
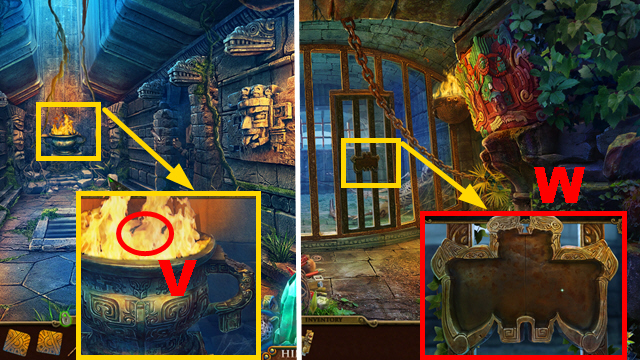
- Place the COLORFUL CROSS (U); take the note (blue) and SCUBA TANKS (V).
- Place the SCUBA TANKS (W).
- Move forward.
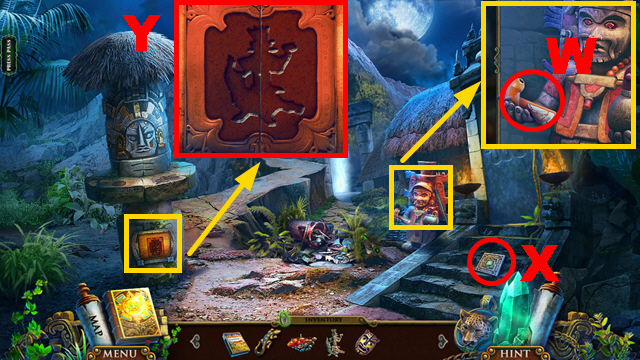
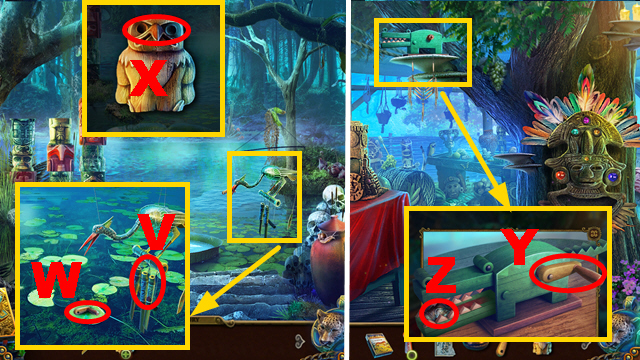
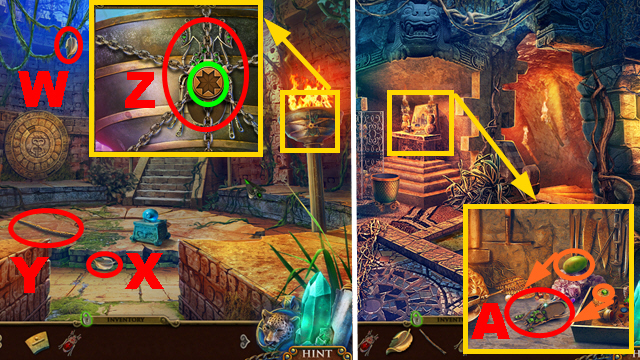
- Open the door (X).
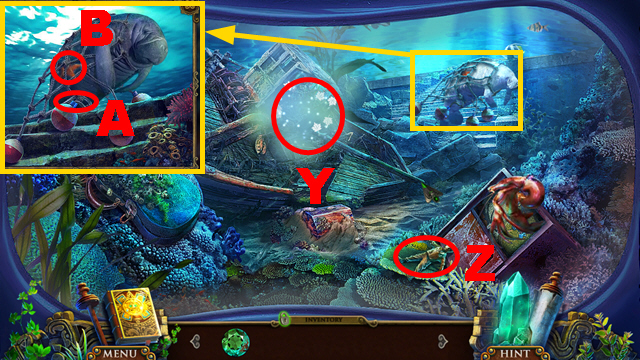
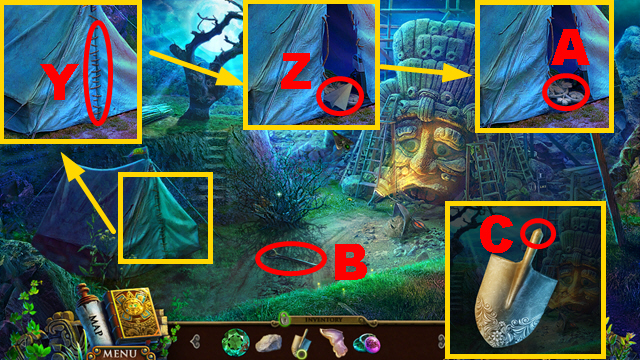
- Play the HOP (Y) to receive the SCISSORS.
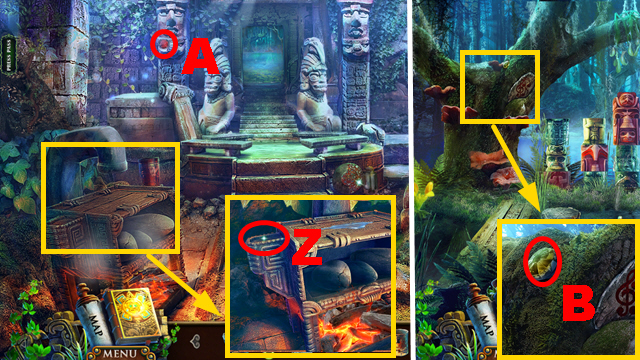
- Take the BAD BOY (Z).
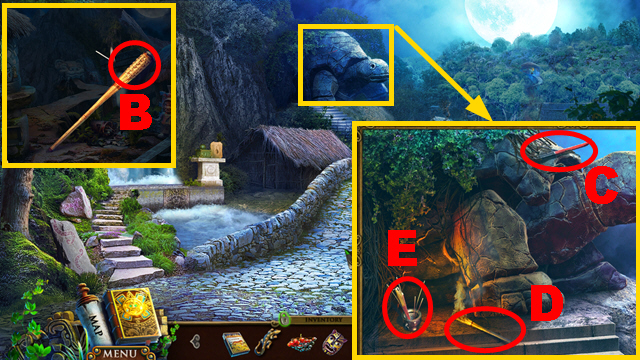
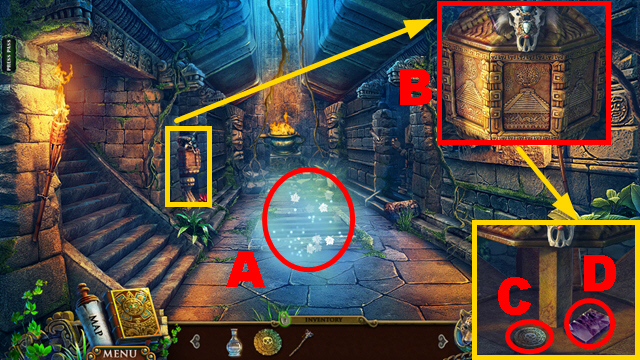
- Use the SCISSORS (A).
- Take the STARFISH (B); remove the net.
- Walk down.
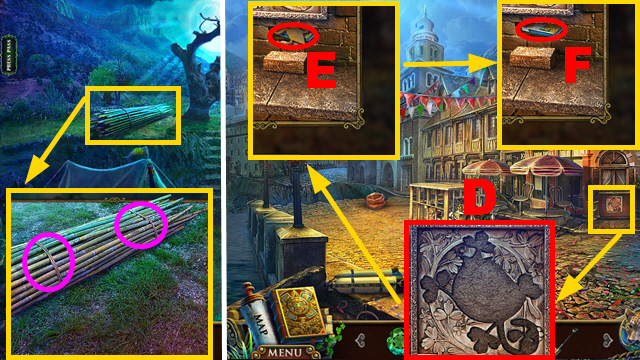
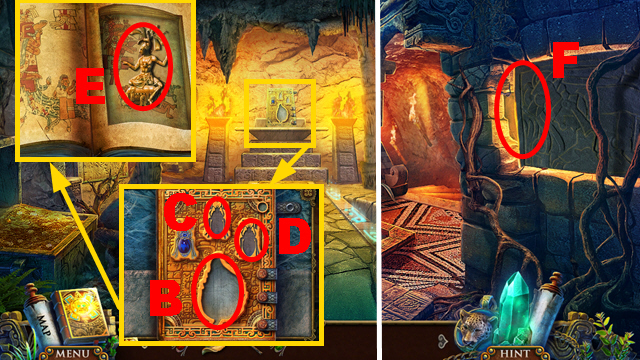
- Place the STARFISH (C); take the SEASHELL (D).
- Move forward.
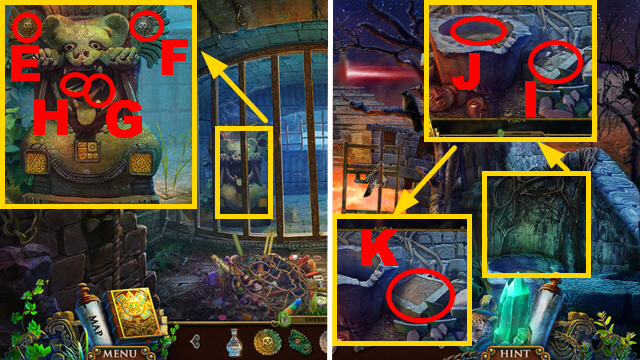
- Use the SEASHELL (E).
- Move forward.
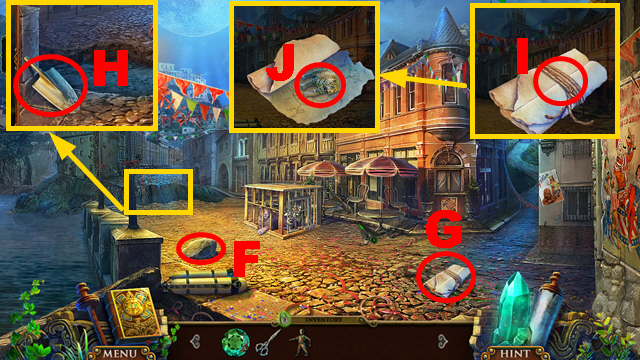
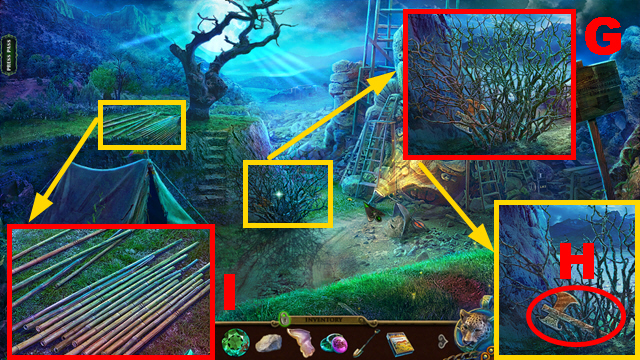
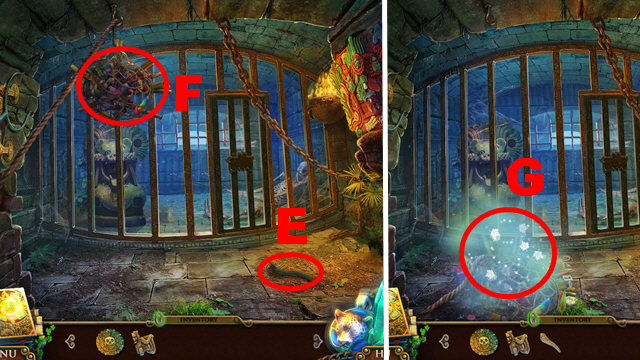
- Take the ROCK (F), BUNDLE (G), and SHOVEL HEAD (H).
- Open the BUNDLE with the SCISSORS (I); unfold it.
- Take the JAGUAR FIGURINE (J); you acquire the map.
- Walk down.
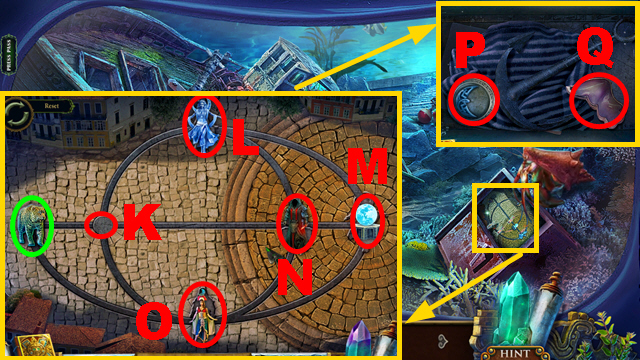
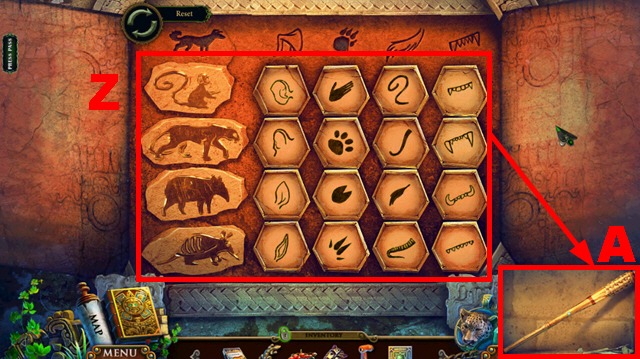
- Place the JAGUAR FIGURINE (green).
- Play the mini-game.
- Solution: N-O-M-L-N-O-K.
- Take the MOON TOKEN (P) and LEFT BUTTERFLY WING (Q).
- Remove the plants four times; place the MOON TOKEN (R).
- Take the PAW KEY (S).
- Move forward.
- Place the PAW KEY (T); open the padlock.
- Talk to the woman (1); you receive the jaguar medallion.
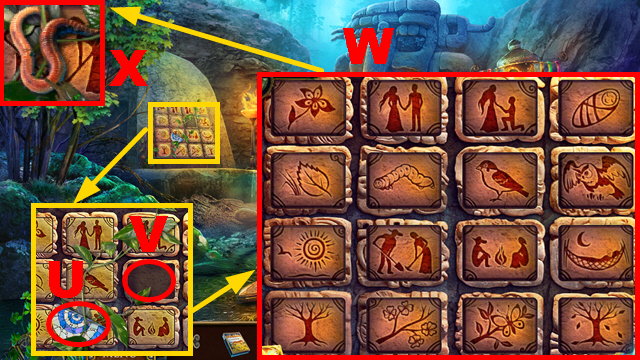
- Use the jaguar medallion (U).
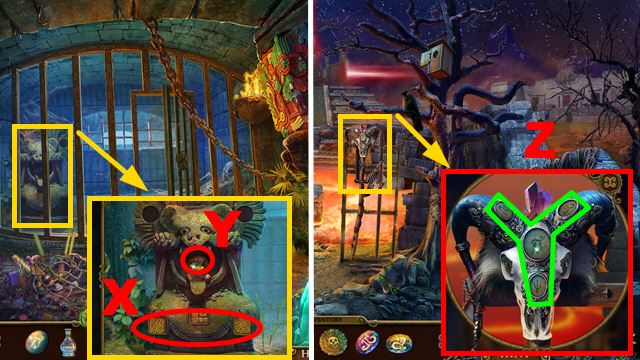
- Open the bag; take the COLORED TOKENS (V).
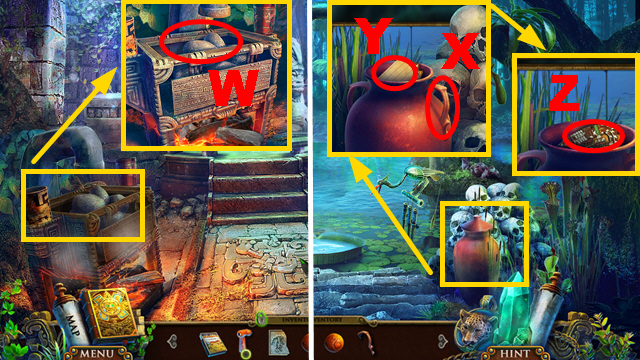
- Play the HOP (W) to receive the GOOD BOY.
- Place the GOOD BOY and BAD BOY (X).
- Turn right.
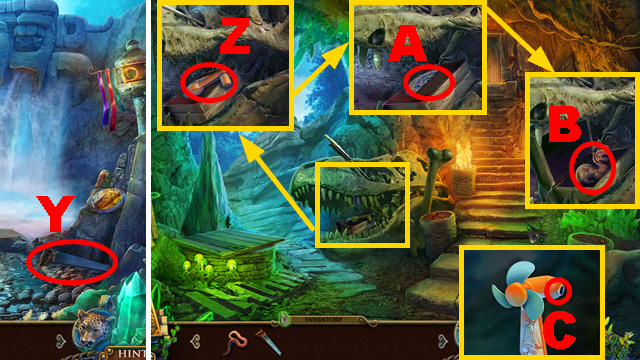
- Use the jaguar medallion (Y); take the note (Z) and BAS-RELIEF PART (A).
- Take the HANDLE (B).
- Place the HANDLE on the SHOVEL HEAD (C) to acquire the SHOVEL.
- Remove the ties (purple).
- Walk down.
- Place the BAS-RELIEF PART (D); take the note (E) and MATCHES (F).
- Turn right.
- Use the MATCHES (G); take the AXE (H).
- Use the AXE (I).
- Walk down twice.
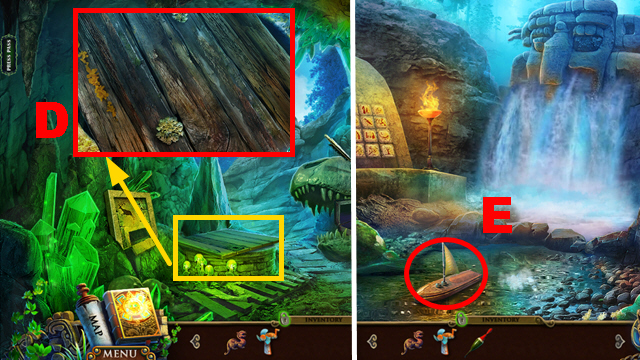
- Use the SHOVEL (J) and ROCK (K); open the chest.
- Take the EMERALD (L).
- Move forward, turn right.
- Place the BLOODY EMERALD and EMERALD (M).
- Place the COLORED TOKENS (N).
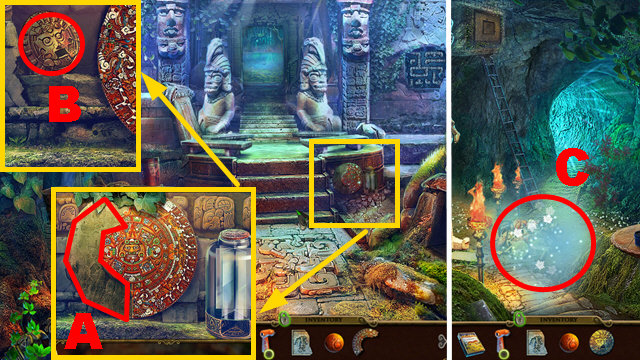
- Play the mini-game.
- Solution: (O).
- Take the WOODEN LIZARD (P) and ROPE (Q).
- Use the ROPE; take the BAMBOO BRIDGE (R).
- Walk down.
- Place the BAMBOO BRIDGE (S).
- Turn left.
Chapter 2: The Main Street
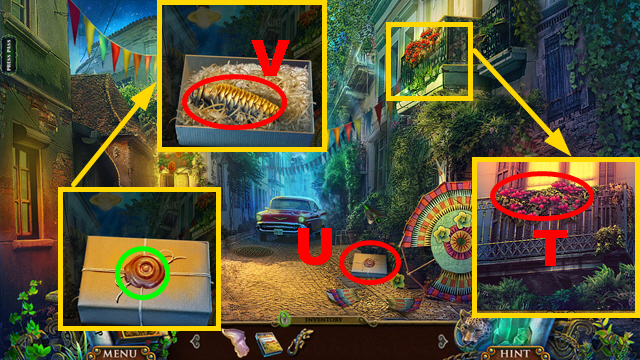
- Use the jaguar medallion (T) to acquire the BERRIES.
- Take the PARCEL (U).
- Open the PARCEL with the MATCHES (green); take the COUNTERWEIGHT (V).
- Turn left.
- Use the jaguar medallion (W).
- Play the HOP (X) to receive the PUZZLE PIECE.
- Take the GARDEN SHEARS (Y).
- Use the GARDEN SHEARS (Z); take the IDOL FIGURINE (A).
- Walk down.
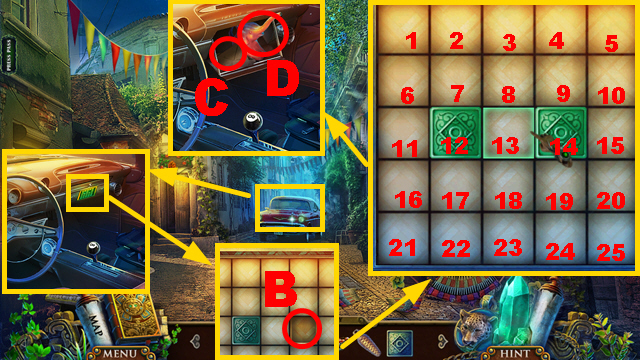
- Place the PUZZLE PIECE (B).
- Play the mini-game.
- Solution: 13-13-8-17-12-8-13-11-12-13-14-15.
- Take the note (C) and WATERING CAN (D).
- Turn left.
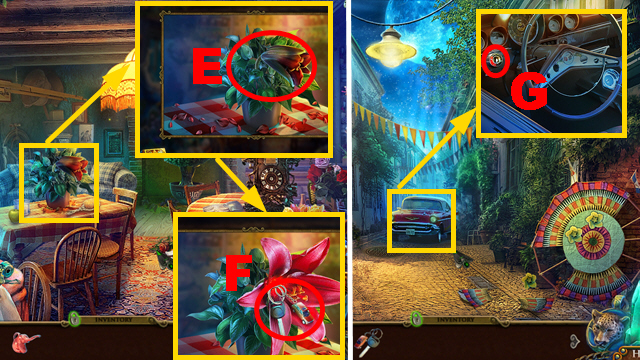
- Use the WATERING CAN (E); take the CAR KEY (F).
- Walk down.
- Place the CAR KEY (G); turn it.
- Move forward.
- Talk to the woman (H).
- Play the HOP (I) to receive the PAPER FLOWER.
- Take the TIME NOTE (J).
- Walk down.

- Arrange the broken parts correctly (K); place the PAPER FLOWER (blue).
- Take the RIGHT BUTTERFLY WING (L).
- Move forward.
- Place the RIGHT BUTTERFLY WINGS and LEFT BUTTERFLY WING (M).
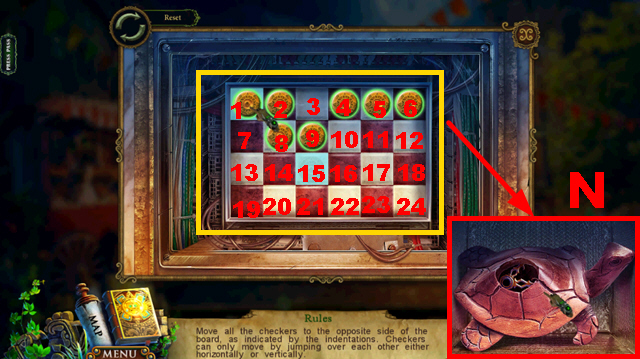
- Play the mini-game.
- Solution: 20-8-13-15-21-9-15-3-17-15-8-10-16-4-9-11-10-12-18-6-12-10-11-9-3-5-15-3-10-8-14-2-3-1.
- Grab the turtle (N).
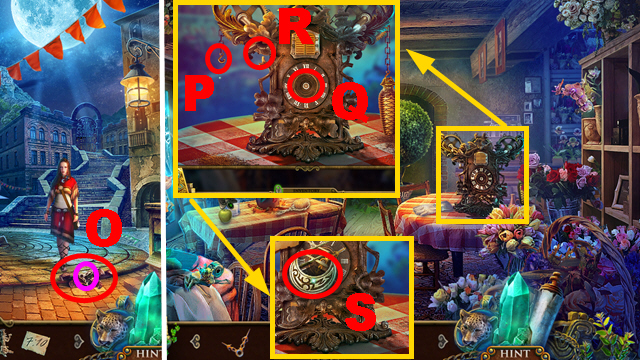
- Use the jaguar medallion (O); take the CLOCK HANDS (purple).
- Walk down, turn left.
- Place the COUNTERWEIGHT (P), CLOCK HANDS (Q), and TIME NOTE (R); turn both clock hands once.
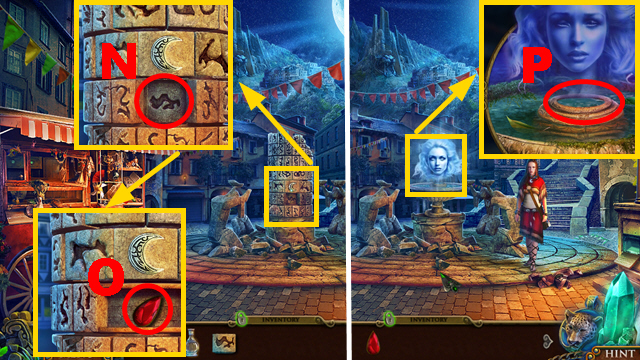
- Take the CRESCENT (S).
- Walk down, move forward.
- Place the CRESCENT (T).
- Talk to the woman (U).
- Move forward.
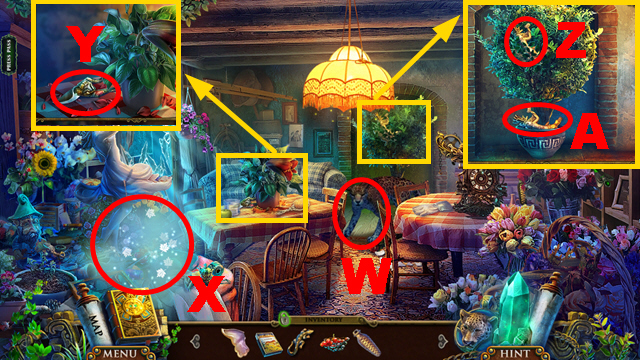
- Play the HOP (V) to receive the JAGUAR MASK.
- Take the HANDY FAN BASE (W) and JEWELED TILE (X).
- Place the IDOL FIGURINE (Y).
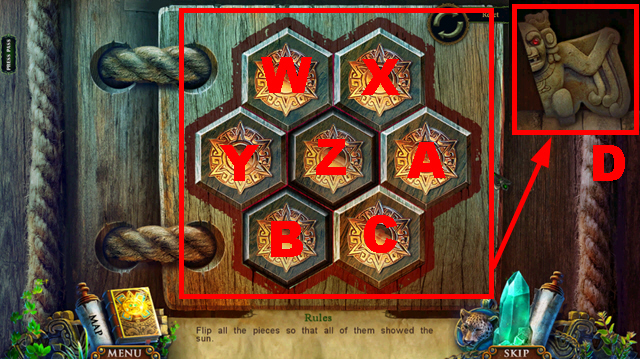
- Play the mini-game.
- Solution: (Z).
- Take the TORCH (A).
- Move forward.
- Light the TORCH with the MATCHES (B) to receive the LIT TORCH.
- Use the jaguar medallion to acquire the CROWBAR (C).
- Place the LIT TORCH (D); take the INCENSE (E).
- Walk down.
- Place the CROWBAR (F); pull it.
- Enter the Cave.
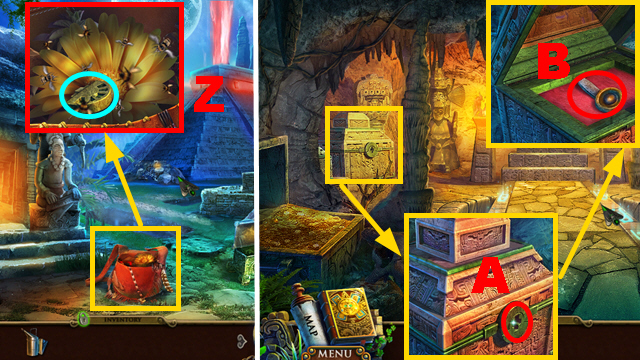
- Play the HOP (G) to receive the SADDLE.
- Place 3 crescent pieces (purple); take the FRESCO PART (H).
- Take the ARCHAEOLOGIST’S SET PART 1 (I).
- Walk down.
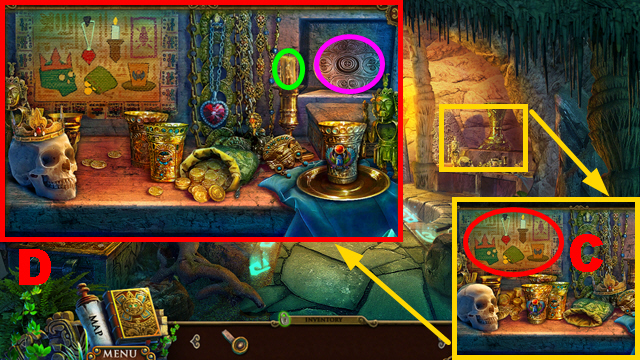
- Place the INCENSE (J) and BERRIES (K); take the COLORFUL STONES (L).
- Walk down.
- Place the FRESCO PART (M); take the BIRD MASK (N).
- Move forward twice.
- Place the SADDLE (O); take the BOAR MASK (P).
- Walk down, turn left.
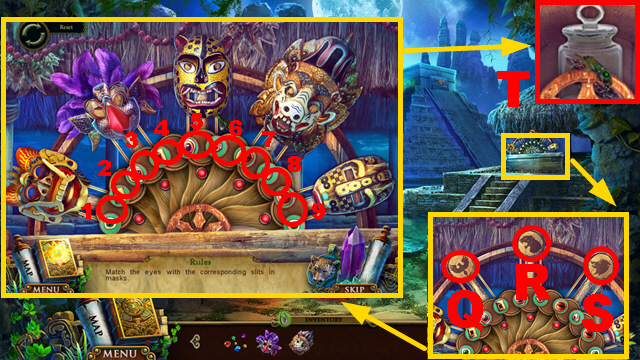
- Place the BIRD MASK (Q), JAGUAR MASK (R), and BOAR MASK (S).
- Play the mini-game.
- Solution: 4-5-6-7-8-9-2-3-4-5-6-7-8-6-7-4-5-6-1-2-3-4-9-7-2-3-1-2-3-1.
- Take the TERMITES (T).
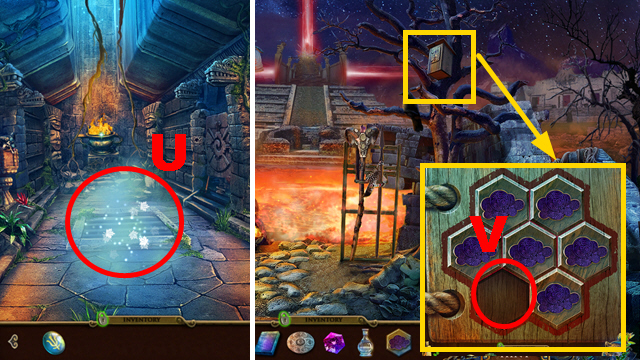
- Walk down, move forward.
- Use the TERMITES (U).
- Turn right.
- Place the JEWELED TILE (V).
- Place the WOODEN LIZARD (W); take the BREAD (X) and COLORFUL FEATHERS (Y).
- Move forward.
Chapter 3: The Tree House
- Use the BREAD (Z).
- Place the COLORFUL STONES and COLORFUL FEATHERS (A); take the WILLOW RODS (green) and DRUMSTICKS (B).
- Play the HOP (C) to receive the SHARP SHARD.
- Walk down.
- Use the SHARP SHARD (D); take the JEWELED TILE (purple).
- Place the JEWELED TILE (E).
- Play the mini-game.
- Solution: 3-8-5-11.
- Take the PYRAMID PART (F).
- Move forward.
- Place the PYRAMID PART (G); take the BLACK PAINT (H).
- Walk down.
- Place the WILLOW RODS (purple); take the BASKET (I).
- Walk down.
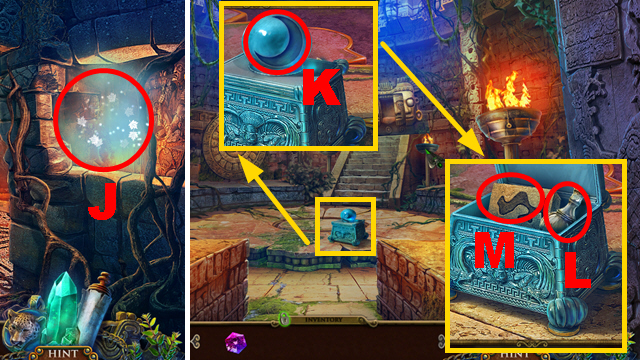
- Use the DRUMSTICKS (J); take the SPHERE (K).
- Walk down.
- Place the SPHERE (L); take the HORSE WHEEL (M) and METAL CRESCENT (N).
- Move forward.
- Place the HORSE WHEEL (Q); move the horse.
- Take the PAINTBRUSH (R).
- Place the METAL CRESCENT (O); take the FRESCO PART (P).
- Walk down twice.
- Place the FRESCO PART (S); take the GLASS TEARDROP (T).
- Move forward twice.
- Place the GLASS TEARDROP (U).
- Turn left.

- Play the HOP (V) to receive the STICK WITH HOOK.
- Place the BLACK PAINT (W) and PAINTBRUSH (X).
- Dip the brush into the paint; paint the vase (blue) with it.
- Take the VASE (Y).
- Move forward.
- Place the VASE (Z).
- Use the STICK WITH HOOK (A) to acquire the TOTEM’S RIGHT EYE.
- Move forward.
- Take the TOTEM’S LEFT EYE (B).
- Take the HUMAN FIGURINE (C).
- Walk down twice.
- Place the HUMAN FIGURINE (D).

- Play the mini-game.
- Arrange the figurines correctly (E).
- Take the FROG ON A SPRING (F) and BOWL (G).
- Move forward twice.

- Use the FROG ON A SPRING (H); take the WHEAT FIGURINE (I) and LOTUS (J).
- Place the BASKET (K); put the stones (L) into the basket to acquire the STONES.
- Walk down.
- Place the LOTUS (M) and STONES (N).
- Play the HOP (O) to receive the SICKLE.
- Move forward.
- Use the SICKLE (P); take the BIRD FIGURINE (Q).
- Walk down twice.
- Place the WHEAT FIGURINE (R) and BIRD FIGURINE (S).
- Take the WIND CHIME (T) and WOODEN TOTEM BASE (U).
- Move forward twice.
- Place the WIND CHIME (V); take the CROCODILE HANDLE (W).
- Place the TOTEM’S LEFT EYE and TOTEM’S RIGHT EYE on the WOODEN TOTEM BASE (X) to receive the WOODEN TOTEM.
- Walk down three times, turn right, move forward.
- Place the CROCODILE HANDLE (Y); take the PIPE PIECE (Z).
- Walk down twice, turn left, move forward.
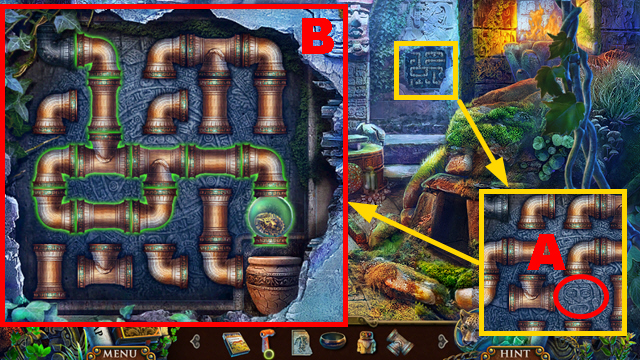
- Place the PIPE PIECE (A).
- Play the mini-game.
- Arrange the pipes correctly (B).
- You receive the GOLDEN EMBLEM.
- Walk down.

- Place the GOLDEN EMBLEM (C); take the OCARINA (D).
- Move forward twice.
- Use the OCARINA (E); take the GOLDEN EMBLEM (F).
- Walk down twice.
- Place the GOLDEN EMBLEM (G); take the WOODEN SQUARE (H).
- Move forward.
- Place the WOODEN SQUARE (I).
- Move forward.
- Place the BOWL (orange).
- Put five snails (green) into the bowl; take the SNAILS.
- Walk down three times, turn right, move forward.
- Place the SNAILS (J); take the GOLDEN BALL (purple).
- Play the HOP (K) to receive the BEAD.
- Walk down twice, turn left, move forward twice.
- Place the WOODEN TOTEM (L).
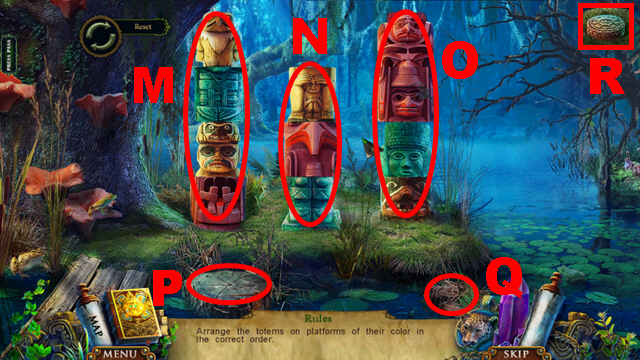
- Play the mini-game.
- Solution: M-N-M-P-M-Q-O-M-O-M-N-O-N-O-N-M-P-N-Q-N-M-N-M-P-M-Q-P-M-N-M-Q-M-N-P-O-Q-O-N-Q-N-O-Q-N-O-N-O-Q-N-O-Q-P-O-Q-O.
- Take the WOODEN BUTTON (R).
- Walk down.
- Place the WOODEN BUTTON (S); push it.
- Take the SILVER BALL (T).
- Walk down twice, turn right.
- Place the GOLDEN BALL and SILVER BALL (U); take the MUDDY HANDLE (V).
- Walk down, turn left, move forward.
- Place the MUDDY HANDLE (W) to acquire the CLEAN HANDLE.
- Move forward.
- Place the CLEAN HANDLE (X); take the note (Y) and ORNAMENT HALF (Z).
- Walk down.
- Place the ORNAMENT HALF (A); take the GOLDEN EMBLEM (B).
- Walk down.
- Play the HOP (C) to receive the STONE FEATHER.
- Place the GOLDEN EMBLEM (D); take the BLOCK (E).
- Move forward.
- Place the BLOCK (F).
- Play the mini-game.
- To solve this puzzle, move the block (green): left-right-left-right-left-right-left-right-left-down-down.
- Take the STONE CRESCENT (G).
- Play the HOP (H) to receive the COAL.
- Walk down.
- Place the STONE CRESCENT (I); take the FRESCO PART (J).
- Walk down three times.
- Place the FRESCO PART (K); take the SNAKE (L).
- Move forward.
- Place the SNAKE (M).
- Turn right.
Chapter 4: The Crypt
- Place the STONE FEATHER (N); take the STONE PAINTING (O).
- Move forward.
- Use the COAL (P); take the ROUND EMBLEM (Q).
- Use the jaguar medallion (R); take the HANDY FAN PROPELLER (S).
- Place the HANDY FAN PROPELLER on the HANDY FAN BASE (T).
- Move forward.
- Take the MOSAIC PART (U); place the STONE PAINTING (V).
- Play the mini-game.
- Solution: (W).
- Take the WORM (X).
- Take the SAW (Y).
- Walk down.
- Take the HANDY FAN HANDLE (Z); place the MOSAIC PART (A).
- Take the PANTHER FIGURINE (B).
- Place the HANDY FAN HANDLE on the HANDY FAN BASE (C) to acquire the FAN.
- Use the SAW (D) to play the HOP; you receive the FLOAT.
- Move forward.
- Use the FAN (E).
- Walk down twice.
- Use the SAW (F); take the SAIL (G).
- Move forward twice.
- Place the SAIL (H); take the KEY (I).
- Walk down.
- Use the KEY (J); turn it.
- Take the STONE EYE (K) and ARCHAEOLOGIST’S SET BOX (L).
- Walk down.
- Place the STONE EYE (M); take the ARCHAEOLOGIST’S SET PART 2 (N).
- Place ARCHAEOLOGIST’S SET PART 1 and ARCHAEOLOGIST’S SET PART 2 on the ARCHAEOLOGIST’S SET BOX (O).
- Take the pictures (P) to acquire the HAMMER AND CHISEL.
- Move forward twice.
- Use the HAMMER AND CHISEL (Q).
- Play the mini-game.
- Solution: 1-15.
- Take the FISH HOOK (R).
- Walk down three times.
- Play the HOP (S) to receive the PLIERS.
- Place the FLOAT, FISH HOOK, and WORM (green); take the FISHING ROD (T).
- Turn right, move forward.
- Use the PLIERS to collect the DINOSAUR TOOTH (U) and ARROW (V).
- Move forward.

- Use the DINOSAUR TOOTH (W) to acquire the RIBBONS.
- Use the FISHING ROD (X) to acquire the FISH.
- Walk down twice.
- Place the ARROW (Y), BEAD (Z), RIBBONS (A), ROUND EMBLEM (B), and FISH (C); take the DRAGONFLY (D).
- Move forward.
- Place the DRAGONFLY (F); take the RING (G).
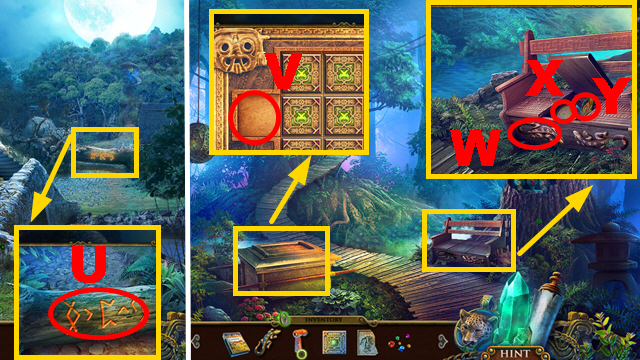
- Play the HOP (E) to receive the WOODEN CRESCENT.
- Walk down.
- Place the WOODEN CRESCENT (H).
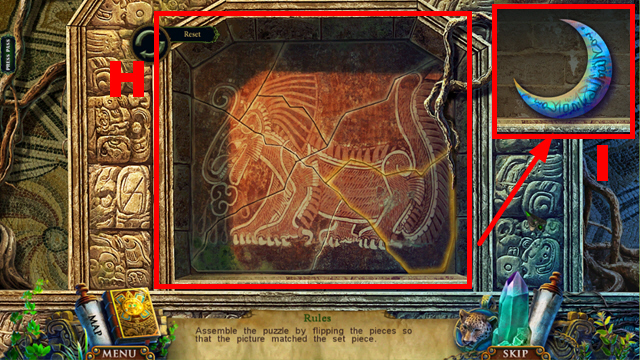
- Examine the board (I).
- Play the mini-game.
- Solution: 3-6-6-8-4-7-7-3-3-6-8-5-15-11-11-9-14-11-9-7-7-4-11-9-13-10-10-14-14-11-11-15-15-12-9-7-6-8-8-11-11-14-14-10-10-13-5-8-8-11-11-14-14-10-7-3-12-15-15-11-11-9-9-7-1-5-16-12-12-15-15-11.
- 5-1-2-5-11-9-5-8-1-5-5-2-8-5-9-11-7-9-3-7-11-15-5-8-2-5-15-12-7-3-9-7-8-11-5-8-12-16-11-14-8-11-3-6-6-2-2-5-5-1-7-3-3-6-6-2-4-7-7-3-3-6-2-5-6-2-11-9-9-7-14-11-11-9-7-4-9-7-16-12.
- 12-15-15-11-11-8-7-9-4-7-8-6-9-11-11-15-15-12-12-16-7-9-9-11-11-15-10-14-6-3-3-7-7-4-5-8-8-6-6-3.
- Take the FRESCO PART (J).
- Move the lamp (K).
- Walk down twice.
- Place the FRESCO PART (L); take the SACRED STAFF (M).
- Move forward, turn left.
- Use the SACRED STAFF (N).
- Turn left.
- Take the STONE WITH SYMBOL (O) and SMOKER (P).
- Place the PANTHER FIGURINE (Q); take the FACE TOKEN (R) and WEAVING SHUTTLE (S).
- Turn left.
Chapter 5: The Treasury
- Take the NUMBERED STONE (T).
- Use the RING (purple); take the RED BUG (U).
- Walk down.
- Place the RED BUG (V).
- Put 2 stones (blue) into the red bug; take the JEWELED RED BUG.
- Move forward.
- Grab the leaf (W).
- Take the GOLDEN LEAF (X) and BRANCH (Y).
- Use the RING (green); take the GREEN BUG (Z).
- Walk down.
- Place the GREEN BUG (A).
- Put 2 stones (orange) into the green bug; take the JEWELED GREEN BUG.
- Turn left.
- Place the GOLDEN LEAF (B), JEWELED RED BUG (C), and JEWELED GREEN BUG (D).
- Take the GOLDEN FIGURINE (E).
- Walk down.
- Use the BRANCH (F).
- Play the HOP (G) to receive the CARVING KNIFE.
- Place the GOLDEN FIGURINE (H); take the WOODEN PANEL (I).
- Use the CARVING KNIFE (blue); take the WOODEN PANEL (J).
- Walk down.
- Play the HOP (K) to receive the AQUAMARINE.
- Use the WEAVING SHUTTLE (purple); take the TAPESTRY (L).
- Place the FACE TOKEN (M).
- Play the mini-game.
- Solution: R-Q-P-N-O-Q-O-S-O-N-R-N-S-Q-S-R-P-R-Q.
- Take the STONE WITH A GLYPH (T).
- Turn left, move forward.
- Place the NUMBERED STONE (U) and STONE WITH A GLYPH (V).
- Take the CANDLE (W) and STICKS (X).
- Use the STICKS and MATCHES on the SMOKER (Y) to acquire the SMOKER.
- Walk down twice.
- Use the SMOKER (Z); take the HANDLE (blue).
- Turn left twice.
- Place the HANDLE (A); turn it.
- Take the EAR (B).
- Place the TAPESTRY (C).
- Arrange the treasures correctly (D).
- Place the CANDLE (green).
- Take the SHIELD PART (purple).
- Walk down, move forward.

- Place the EAR (E); take the PUZZLE PIECE (F).
- Walk down.
- Place the PUZZLE PIECE (G).
- Play the mini-game.
- Solution: (H).
- Take the CRYSTAL CRESCENT (I).
- Play the HOP (J) to receive the RUBY.
- Move forward.
- Place the CRYSTAL CRESCENT (K); take the EMPTY BOTTLE (L) and FRESCO PART (M).
- Walk down four times.
- Place the FRESCO PART (N); take the BLOOD SYMBOL (O).
- Place the EMPTY BOTTLE (P) to acquire the TEARS OF THE GODDESS.
- Move forward, turn left.
- Place 2 WOODEN PANELS (blue) and the BLOOD SYMBOL (Q).
- Move forward.
- Take the CLOUD TOKEN (R) and STONE WITH SYMBOL (S).
- Remove the cover (T).
- Play the HOP (U) to receive the GOLDEN COIN.
- Turn left.
- Place the CLOUD TOKEN (V).
- Play the mini-game.
- Solution: Z-Y-A-A-C-B-Y-Z-B-B-C-C-A-Z-X-A-A-X-X-B-C-C-B.
- Take the BAT PART (D).
- Turn left.
Chapter 6: The Dungeon
- Take the LEVER (E).
- Use the jaguar medallion (F).
- Play the HOP (G) to receive the STONE WITH SYMBOL.
- Walk down twice.
- Place the LEVER (H); push it.
- Place the SHIELD PART (I); take the CLAY TILE (J).
- Place the RUBY (K).
- Play the mini-game.
- Solution: M-N-O-L-M-L-O-N-M-O-L-M-L-O-N-M-L-M.
- Take the SPEAR (P).
- Turn left.
- Use the SPEAR (Q); take the CLAY TILE (R).
- Place the AQUAMARINE (S).
- Take the FLAME SYMBOL (T).
- Turn left.
- Place the FLAME SYMBOL (U); take the TONGS (purple).
- Walk down twice.
- Use the TONGS (V) to acquire the BAT PART.
- Turn left twice.
- Place 2 BAT PARTS (W).
- Place 2 CLAY TILES (X); take the STONE WITH SYMBOL (Y).
- Walk down.
- Place 4 STONES WITH SYMBOL (green); take the PRIEST’S WAND (Z).
- Walk down.
- Play the HOP (A) to receive the STUCCO PART.
- Use the PRIEST’S WAND (B); take the SILVER COIN (C) and AMETHYST (D).
- Turn left twice.
- Place the GOLDEN COIN (E) and SILVER COIN (F); take the LADLE (G) and MOLD FORM (H).
- Walk down.
- Place the MOLD FORM (I) and LADLE (J); take the WHOLE MOLD (K).
- Walk down.
- Place the WHOLE MOLD (L); take the STUCCO PART (blue).
- Turn left twice.
- Place 2 STUCCO PARTS (M); take the HELIODOR (N).
- Play the HOP (O) to receive the SCRAPER.
- Walk down.
- Place the AMETHYST (P).
- Use the SCRAPER (Q); place the HELIODOR (green).
- Move forward.
- Examine the panel (R).
- Play the mini-game.
- Solution: (S).
- Use the TEARS OF THE GODDESS (T).
- Congratulations, you have completed Mayan Prophecies: Blood Moon.


 Love Chronicles: Salvation Walkthrough, Guide, & Tips
 Sable Maze: Twelve Fears Walkthrough, Guide, & Tips
 Tearstone Walkthrough, Guide, & Tips
 Mystery Agency: A Vampire's Kiss Walkthrough, Guide, & Tips
 Unsolved Mystery Club™: Amelia Earhart™ Walkthrough, Guide, & Tips