Phantasmat: Behind the Mask Walkthrough, Guide, & Tips
Phantasmat: Behind the Mask Walkthrough

Welcome to the Phantasmat: Behind the Mask Walkthrough.
Your long-lost relatives are excited to welcome you to the family… or are they?
Whether you use this document as a reference when things get difficult or as a road map to get you from beginning to end, we’re pretty sure you’ll find what you’re looking for here.
This document contains a complete Phantasmat: Behind the Mask game walkthrough featuring annotated screenshots from actual gameplay!
We hope you find this information useful as you play your way through the game. Use the walkthrough menu below to quickly jump to whatever stage of the game you need help with.
Remember to visit the Big Fish Games Forums if you find you need more help. Have fun!
This walkthrough was created by prpldva, and is protected under US Copyright laws. Any unauthorized use, including re-publication in whole or in part, without permission, is strictly prohibited.
General Tips
- This is the official guide for Phantasmat: Behind the Mask.
- This guide will not mention each time you have to zoom into a location; the screenshots will show each zoom scene.
- Hidden-object puzzles are referred to as HOPs. This guide will not show HOP solutions. It will identify the location of the HOP and the inventory item acquired.
- This guide will show solutions for non-random puzzles. Please read the in-game instructions for each puzzle.
- In this game, you will sometimes have to select the new scene to trigger dialog, cut-scenes, or tasks prior to interacting with the scene.
Chapter 1: The Family

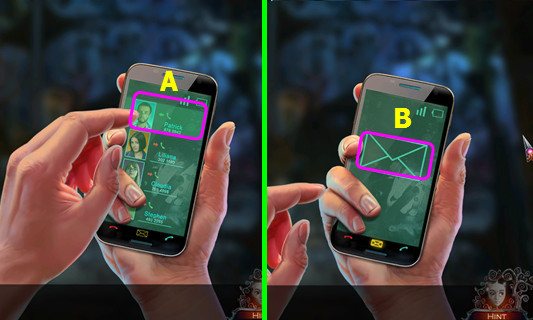
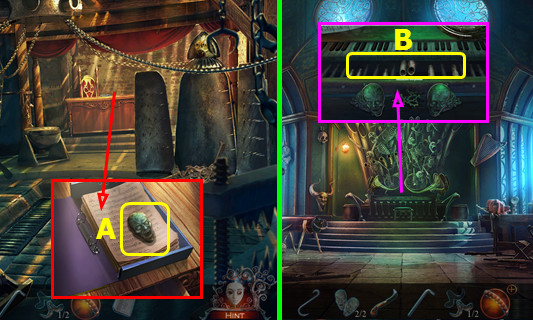
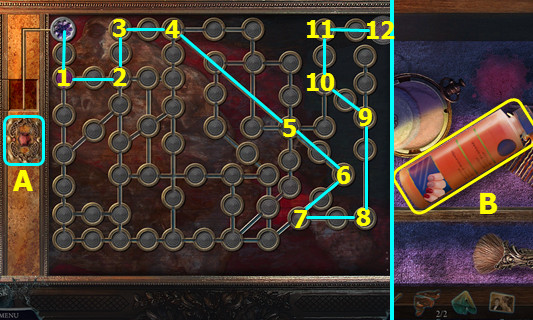
- Select (A).
- Select (B).
- The CELL PHONE will go into your inventory.

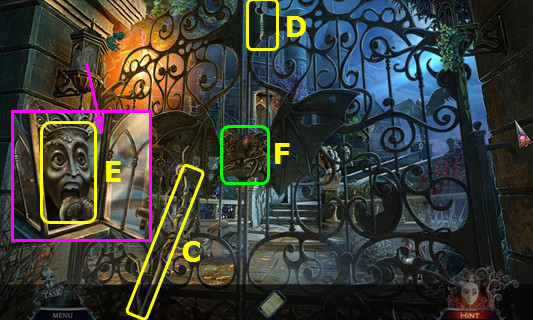
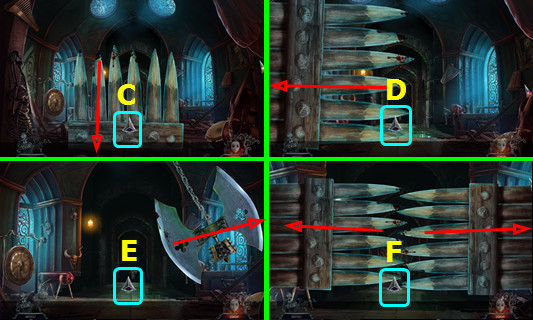
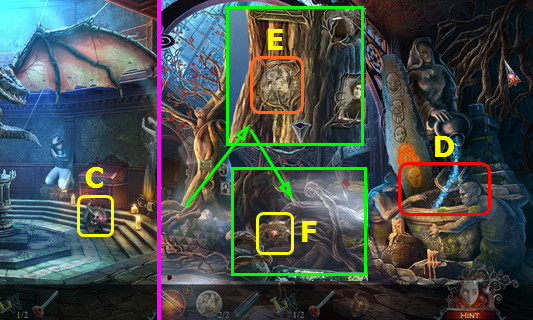
- Take the BRANCH (C).
- Use the BRANCH to take the KEYCHAIN (D).
- Use the KEYCHAIN; take the FACE IN AGONY (E).
- Place the FACE IN AGONY (F).

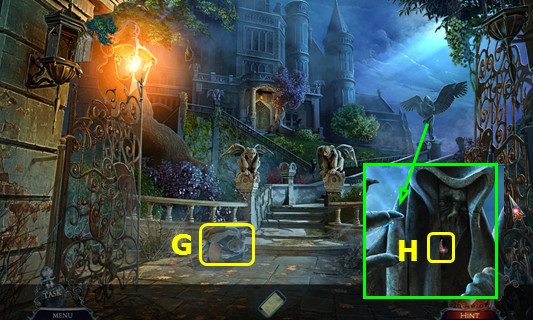
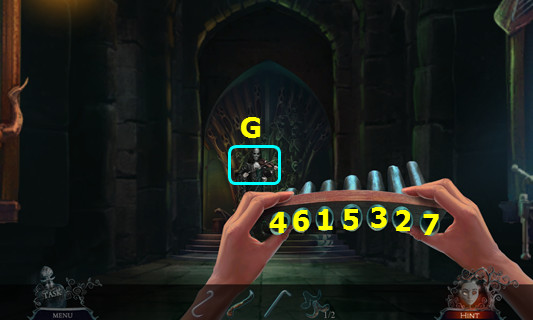
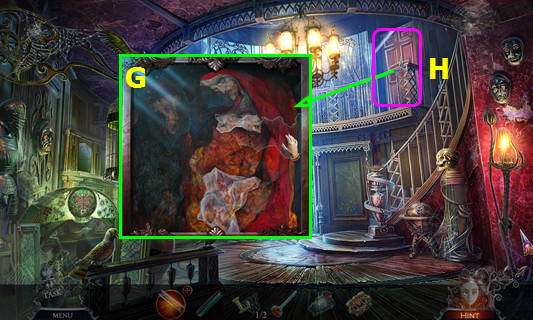
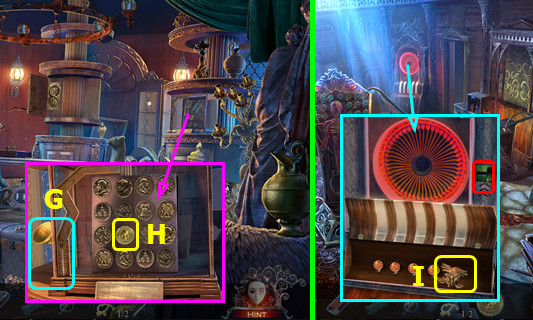
- Read the note and take the GARGOYLE (G).
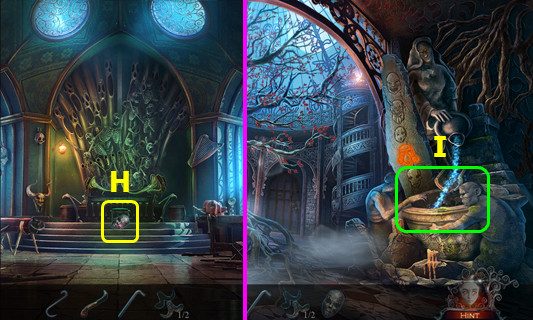
- Remove the vines 3x; take the SHARP TOOTH (H).
- Go forward.

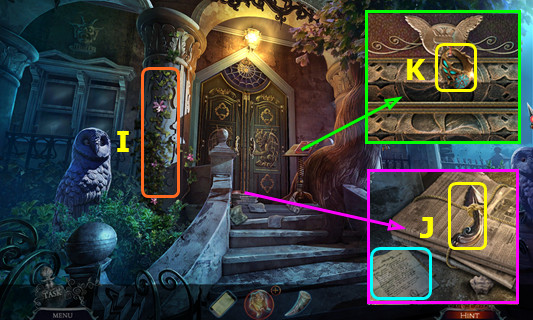
- Touch the vines (I).
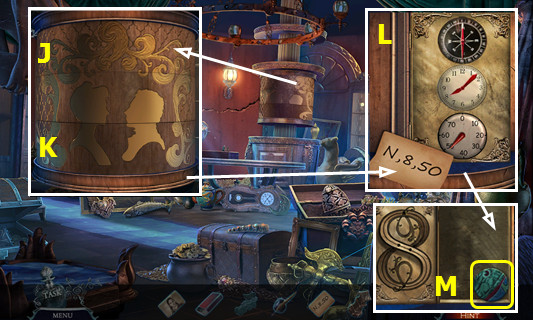
- Read the letter; use the SHARP TOOTH to take the ARROW EMBLEM (J).
- Take the RING (K).
- Walk down.

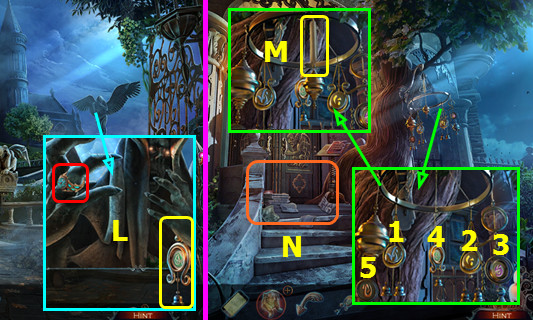
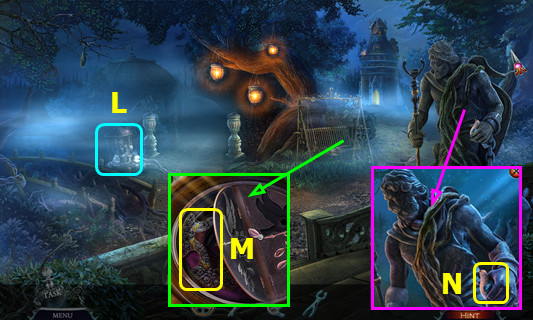
- Place the RING; take the BELL (L).
- Walk forward.
- Place the BELL and select (1-5).
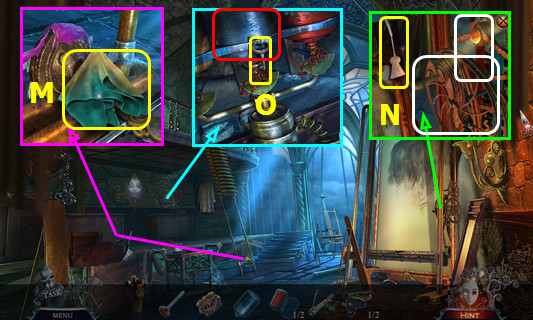
- Take the SHEET MUSIC (M).
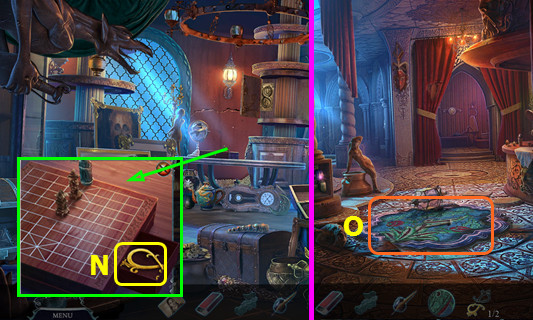
- Play the HOP; earn the STONE WING (N).
- Combine the GARGOYLE and STONE WING to make the REPAIRED GARGOYLE (inventory).
- Walk down.

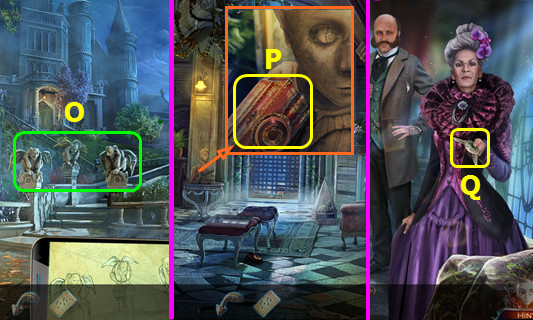
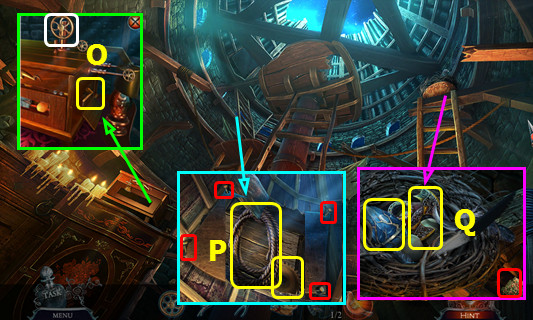
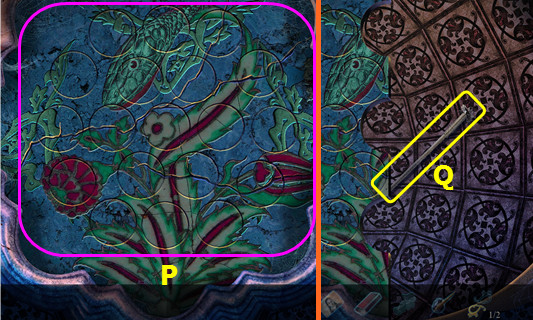
- Use the REPAIRED GARGOYLE and CELL PHONE; arrange the wings as shown (O).
- Go forward 2x.
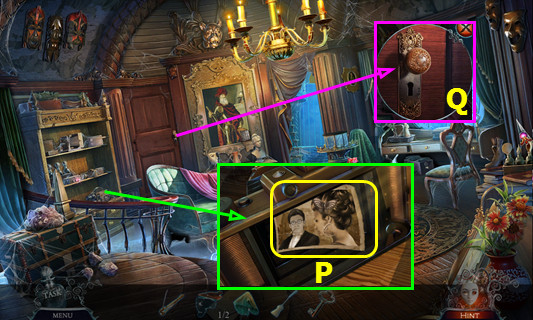
- Take the MAHOGANY BOX (P).
- Walk right.
- Talk to the family; take the WINGED EMBLEM (Q).
- Walk down 2x.

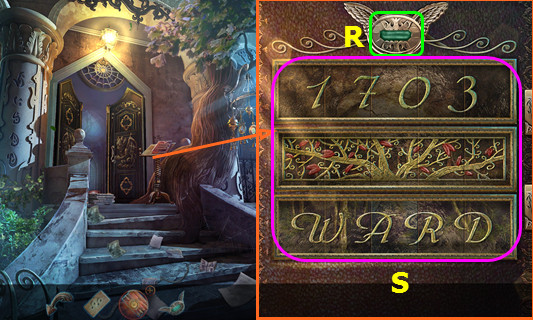
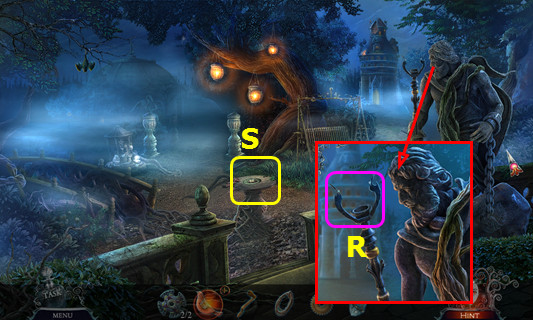
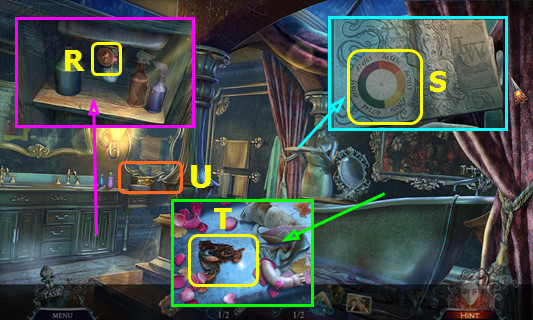
- Place the WINGED EMBLEM (R).
- Restore the 3 panels (S).

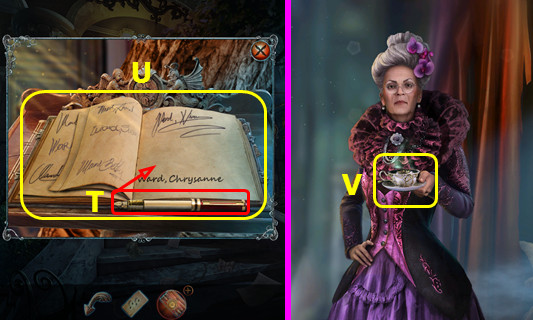
- Select the pen (T) and use it on the page; take the GUESTBOOK (U).
- Walk forward.
- Talk to Abigail; reach for the tea (V).
- Walk right.

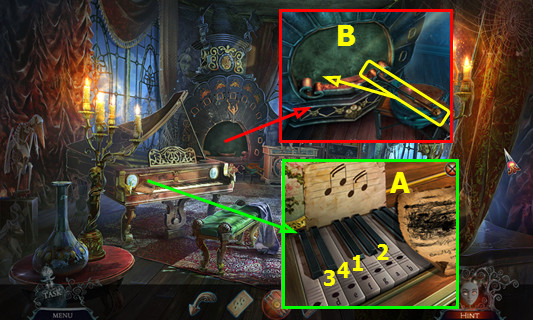
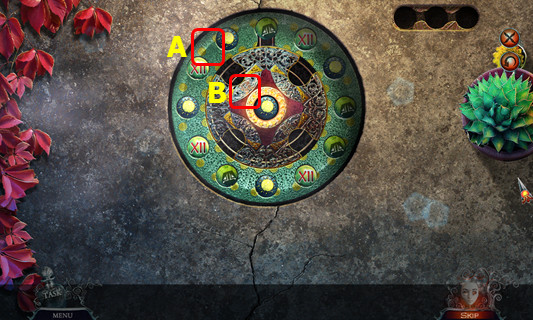
- Read the note; place the SHEET MUSIC (A).
- Select F-A-D-E (1-4); receive the CODE.
- Use the poker to open the stove; earn the POKER (B).

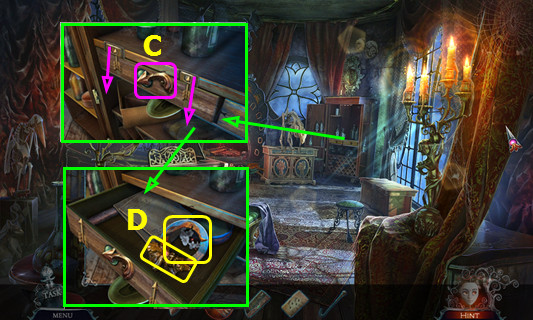
- Place the ARROW EMBLEM (C); slide the 2 arrows.
- Take the LEFT GREEN MAN and 1/2 PAINTED RINGS (D).
- Walk down.

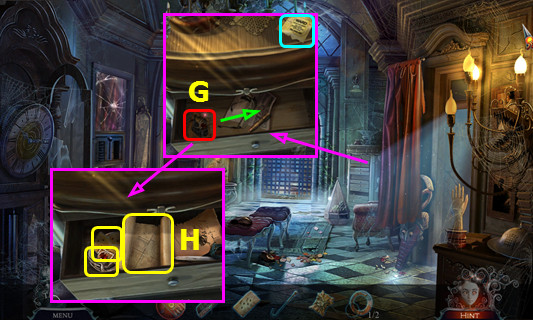
- Open the drawer and move the items. Read the pages, and use the POKER (G).
- Take the MAP, 2/2 PAINTED RINGS, and PLANT ORNAMENT (H).

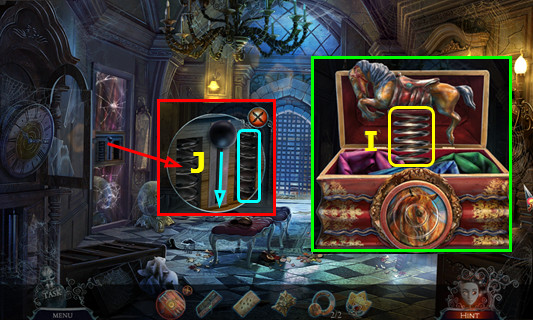
- Add the 2 PAINTED RINGS to the MAHOGANY BOX (inventory).
- Restore the picture, remove the horse, and take the SPRING (I).
- Place the SPRING and pull the lever (J).

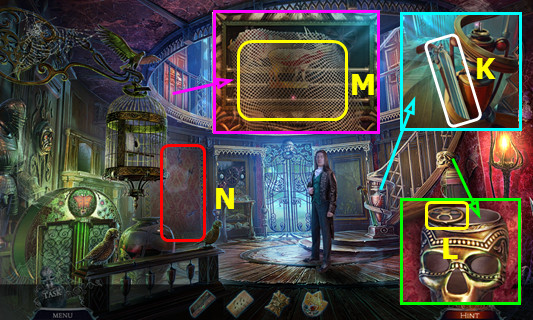
- Select and open the pistol; earn the SEALED SCROLL HOLDER (K).
- Take the VALVE (L).
- Take the NETTING (M).
- Open the door and walk left (N).

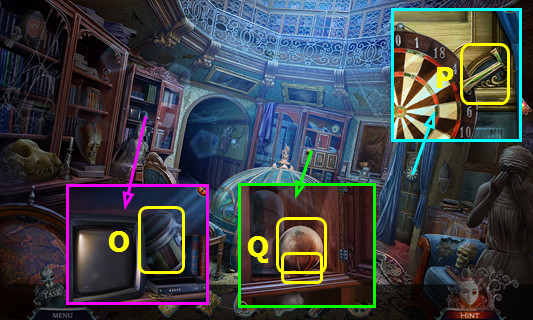
- Take the BONGO DRUM (O).
- Take the 1/2 JADE ANKH (P).
- Read the clipping and place the LEFT GREEN MAN; take the WIRES and MECHANICAL SPHERE (Q).
- Walk forward.

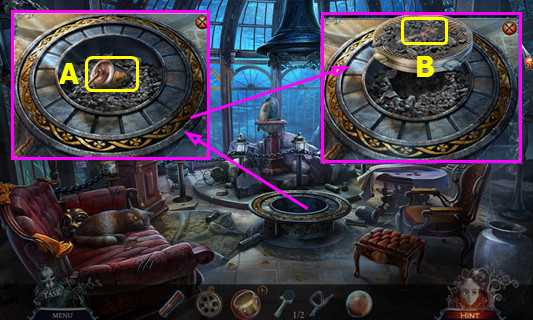
- Take the LIGHTER FLUID (A).
- Combine the BONGO, LIGHTER FLUID, and NETTING to make the IMPROVISED SIEVE (inventory).
- Use the IMPROVISED SIEVE; take the SILVER SPOON (B).
- Walk down 2x.

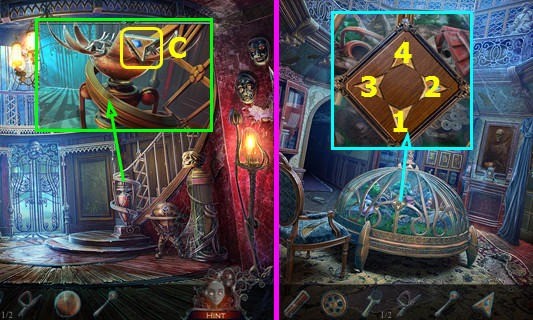
- Place the MECHANICAL SPHERE; take the ARROW BUTTON (C).
- Walk left.
- Place the ARROW BUTTON; press 1-4.
- Play the HOP; earn the MECHANICAL BIRD.
- Walk down.

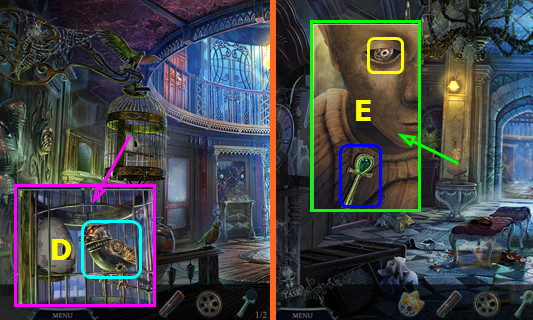
- Open the cage and place the MECHANICAL BIRD; earn the 2/2 JADE ANKH (D).
- Walk down.
- Place the 2 JADE ANKH; use the SILVER SPOON to take the COG STAMP (E).
- Walk forward, left, and forward.

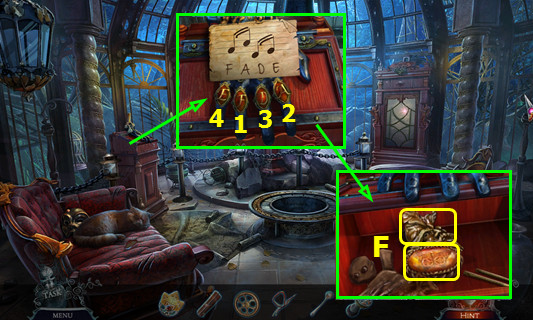
- Place the COG STAMP and CODE; select 1-4.
- Move the items; take the AMBER ORNAMENT and RIGHT GREEN MAN (F).
- Walk down.

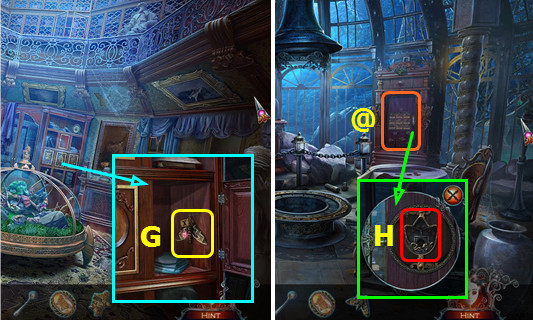
- Place the RIGHT GREEN MAN; take the MOTH (G).
- Walk forward.
- Place the PLANT ORNAMENT (H).
- Select (@).

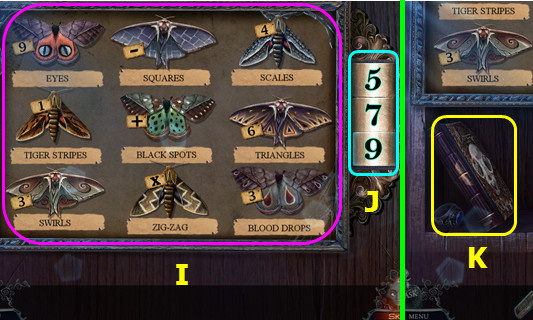
- Place the MOTH; arrange as shown (I).
- Set the numbers (J).
- Take the BOOK OF THE DEAD (K).
- Walk down 3x; go right.

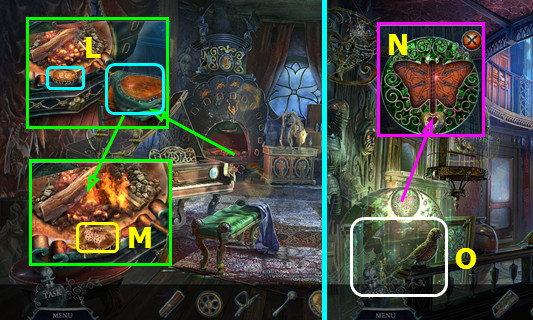
- Place the AMBER ORNAMENT and press the bellows 3x (L).
- Use the SILVER SPOON to take the METAL BUTTERFLY (M).
- Walk down and forward.
- Place the METAL BUTTERFLY (N).
- Play the HOP; earn HERBAL POISONS (O).
- Walk left.

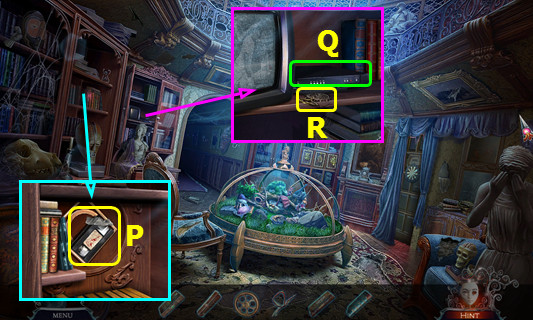
- Place the GUESTBOOK, HERBAL POISONS, and BOOK OF THE DEAD; remove the tape and take the VIDEOTAPE (P).
- Place the VIDEOTAPE (Q).
- Take the METAL TREE (R).
- Walk down.

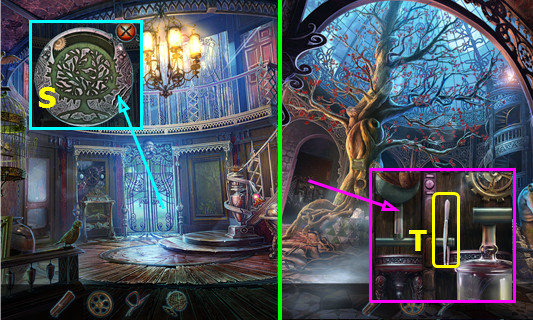
- Place the METAL TREE (S).
- Walk forward.
- Take the TWEEZERS (T).

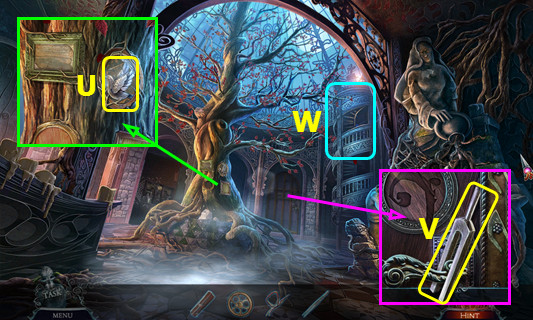
- Take the SILVER DOVE (U).
- Take the TUNING FORK (V).
- Walk right (W).

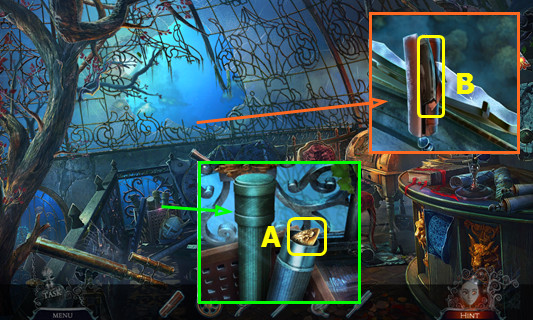
- Remove the cap; use the TWEEZERS to take the METAL SCALP (A).
- Use the SEALED SCROLL HOLDER; take 1/3 FATHER’S PICTURE (B).
- Walk down 2x.

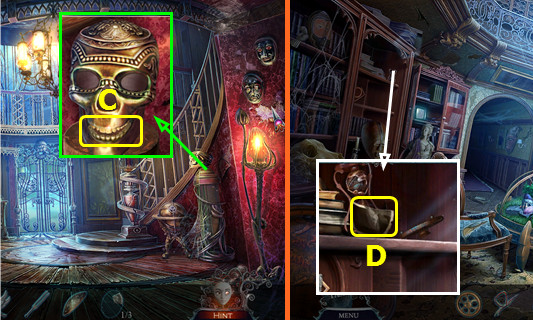
- Place the METAL SCALP; take the PROSTHETIC JAW (C).
- Open the PROSTHETIC JAW; take the 2/3 FATHER’S PICTURE (inventory).
- Walk left.
- Use the TUNING FORK; take the 3/3 FATHER’S PICTURE (D).
- Walk down and forward.

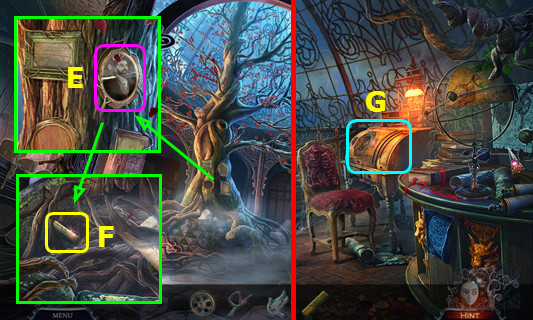
- Place FATHER’S PICTURE (E).
- Take the COLORED BAR (F).
- Go right.
- Select (G).

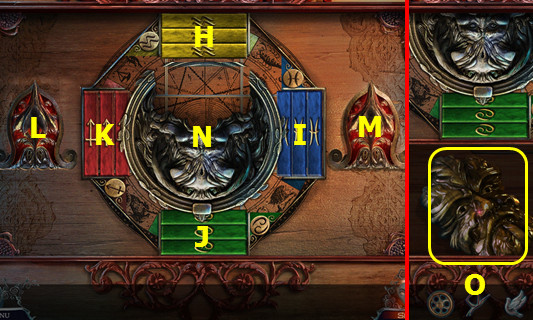
- Place the COLORED BAR (K).
- Solution: Kx2-Lx2-I-Lx2-N-Lx2-I-Lx2-N-M-J-M-N-L-N-Lx2-Hx2-L-N-Lx2-K-L-Nx2-Lx2-Jx2-L-N-L-H-Mx2-Nx2-Lx2-N.
- Read the book and note; take the MIDDLE GREEN MAN (O).
- Walk down 2x; go left.

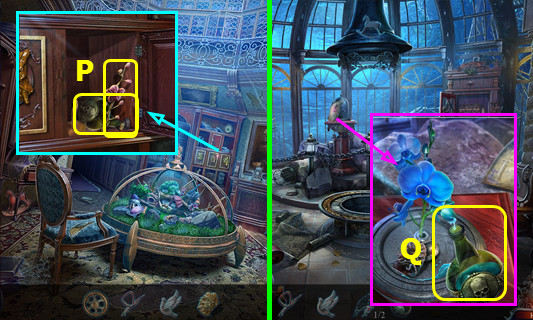
- Place the MIDDLE GREEN MAN; take the 1/2 CLOCK HANDS and the EMPTY BOTTLE (P).
- Go forward.
- Read the award, remove the glass, and use the EMPTY BOTTLE to collect the POISON (Q).
- Walk down 2x; go forward.

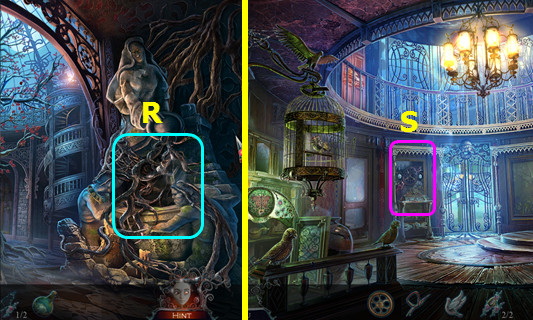
- Use the POISON; play the HOP and earn the 2/2 CLOCK HANDS (R).
- Select (S).

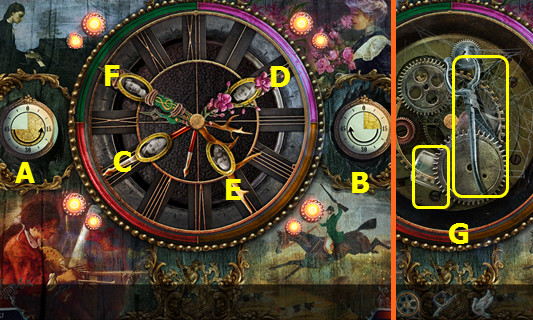
- Place the two CLOCK HANDS.
- Solution: E-Bx3-C-Bx7-F-Ax10-D-Ax4.
- Open the clock face; take the NAIL PLIERS and GLASS PIPE (G).
- Walk forward.
Chapter 2: Abigail

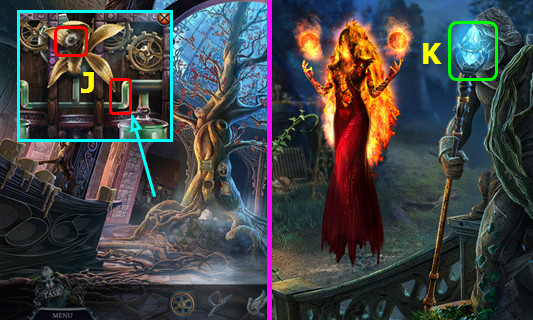
- Place the GLASS PIPE; turn the knob (J).
- Walk left.
- Select (K).

- Play the HOP; earn the BIRD FOOD (L).
- Place the SILVER DOVE; take the 1/2 SUNDIAL PLATE (M).
- Take the BROKEN DOVE (N).
- Walk right.

- Place the VALVE; take the GRINDER HANDLE (O).
- Use the NAIL PLIERS 4x; take the ROPE and COGWHEEL (P).
- Use the BIRD FOOD; take the 2/2 SUNDIAL PLATE and BRIGHT CRYSTAL (Q).
- Walk down.

- Place the BRIGHT CRYSTAL (R).
- Select (S).


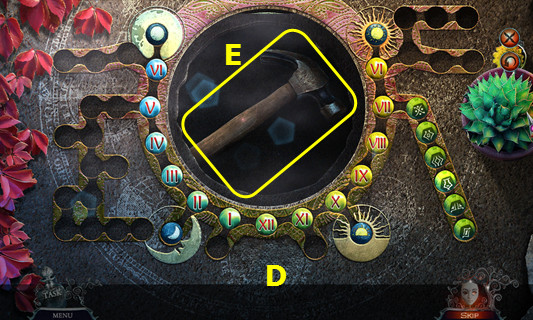
- Place the 2 SUNDIAL PLATE.
- Solution select: Ax2-B-Ax4-Bx2-Ax3-Bx2-Ax2-Bx3-Ax2-B-Ax4-Bx2-Ax3-Bx2-Ax2-Bx2-Ax2-Bx2-Ax3-Bx2-A-Bx2-Ax3.
- Arrange the tokens as shown (D).
- Take the HAMMER (E).
- Walk forward.

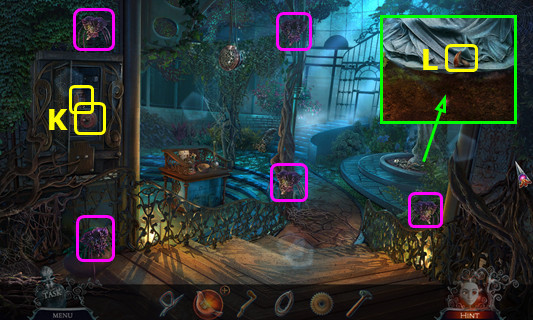
- Collect the 5 FLOWERS (pink).
- Open the door, use the HAMMER, and take the SWITCH and SEEDS (K).
- Take the MUSHROOM (L).
- Walk forward.

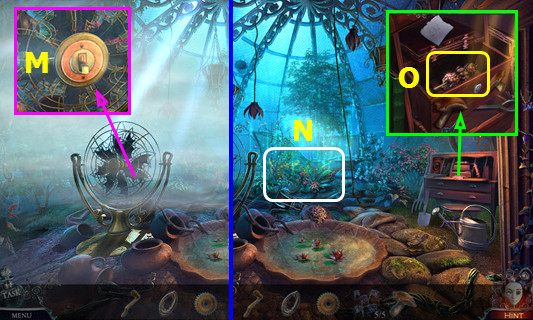
- Place the WIRES and SWITCH; select the switch (M).
- Play the HOP; earn the GARDENING GLOVE (N).
- Place the MUSHROOM; read the note and take the CANDY (O).

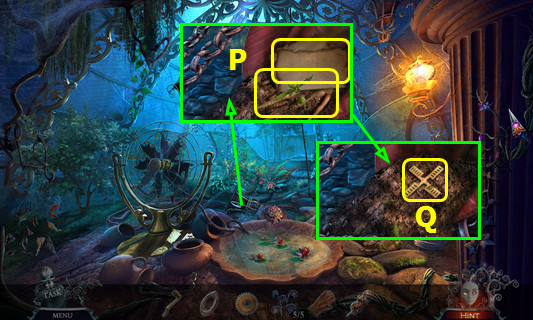
- Take the PARTIAL INSTRUCTIONS and SKELETON HAND (P).
- Move the soil 4x; take the WINDMILL SAIL (Q).
- Walk down.

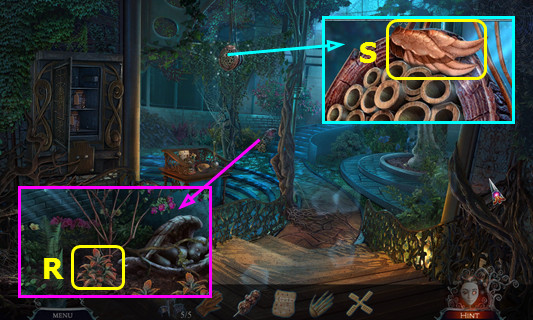
- Use the GARDENING GLOVE to take the MANDRAKE ROOTS (R).
- Use the CANDY; take the DOVE WINGS (S).
- Combine the BROKEN DOVE and DOVE WINGS to make the BRONZE DOVE (inventory).
- Walk down.

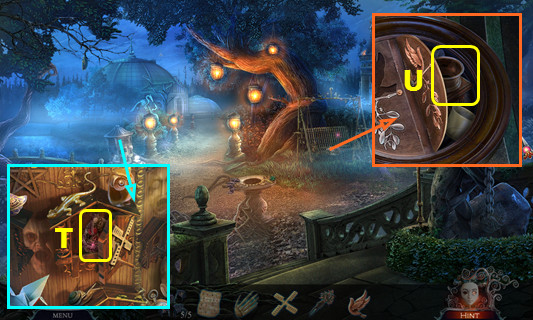
- Place the WINDMILL SAIL; take the SKULL WITH THORNS (T).
- Place the BRONZE DOVE; take the COFFEE GRINDER (U).
- Go forward 2x.

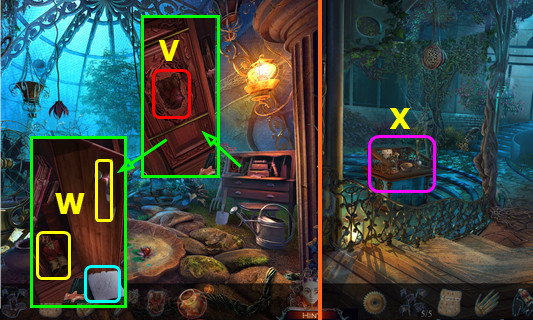
- Place the SKULL WITH THORNS (V).
- Read the note; take the 1/3 MARIONETTES and GRINDER BLADE (W).
- Combine the COFFEE GRINDER, GRINDER HANDLE, GRINDER BLADE, and MANDRAKE ROOTS to make the GROUND ROOTS (inventory).
- Walk down.
- Select (X).

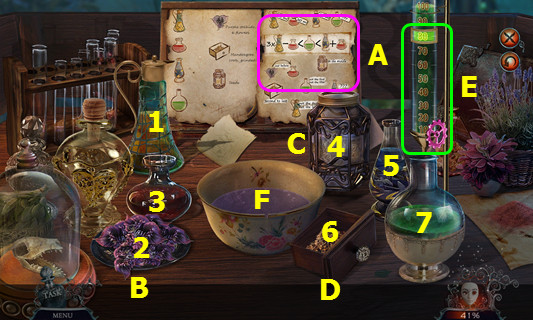
- Read the note and place the PARTIAL INSTRUCTIONS (A), 5 FLOWERS (B), SEEDS (C), and GROUND ROOTS (D).
- Set the measure to 80 and turn the valve (E).
- Place the ingredients into the bowl (F) in numerical order 1-7.
- Take the bowl of FERTILIZER.

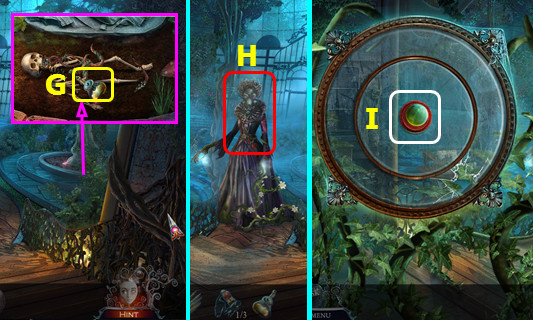
- Use the FERTILIZER; take the BOTTLE WITH TEARS (G).
- Use the BOTTLE WITH TEARS (H).
- Click when the green spheres are in the center 3x (I).

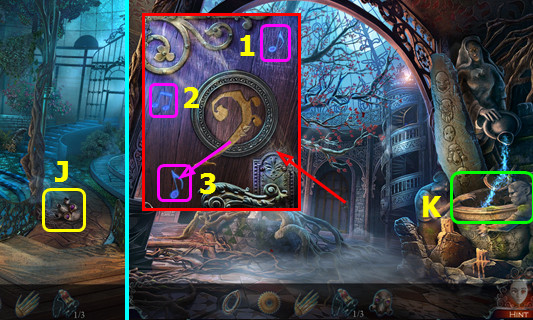
- Take ABIGAIL’S MASK (J).
- Walk down 2x.
- Place ABIGAIL’S MASK; play the HOP to earn the BASS CLEF (K).
- Place the BASS CLEF; rotate the clef so the tail points at (1-3).
- Walk forward.
Chapter 3: Claude

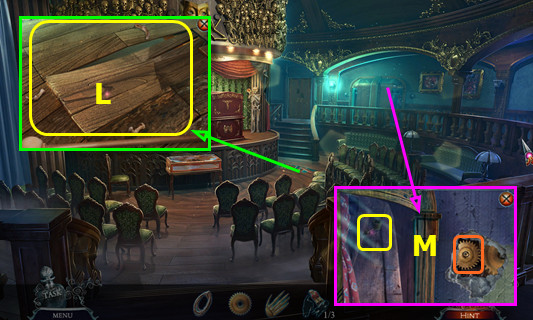
- Select and take the SKELETON FINGERS (L).
- Place the COGWHEEL; take the STRING WINDER (M).
- Walk forward.

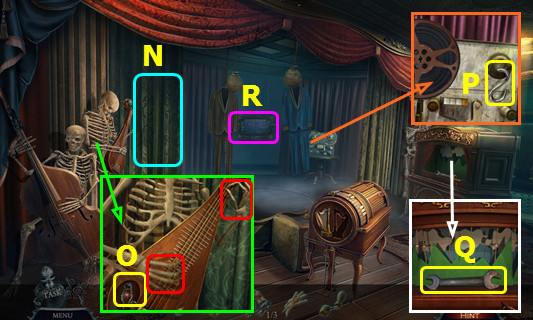
- Open the curtain (N).
- Place the SKELETON HAND and SKELETON FINGERS; take the DRAWER KEY (O).
- Take the HOOK (P).
- Take the WRENCH (Q).
- Select (R).

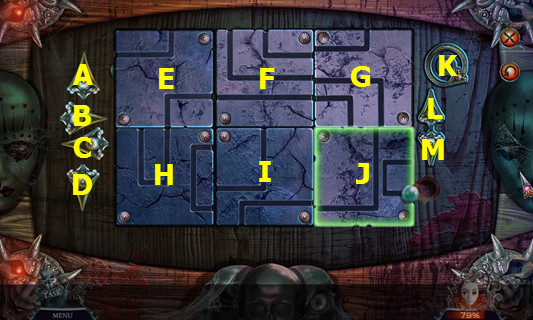
- Solution: B-Dx2-E-Kx3-B-Ax2-Bx2-G-Kx2-Bx2-J-Kx2-Dx2-Kx3-D-Bx2.
- Enter the floor.

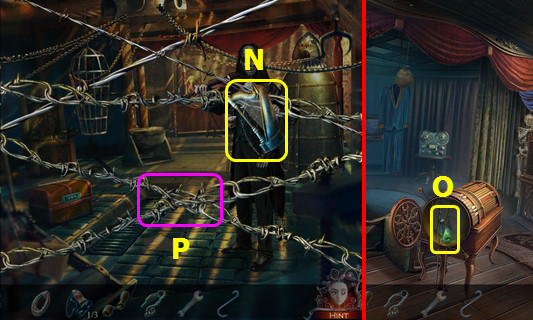
- Take the ORNATE LYRE (N).
- Walk down.
- Place the ORNATE LYRE; take the ACID (O).
- Enter the floor.
- Use the ACID (P).

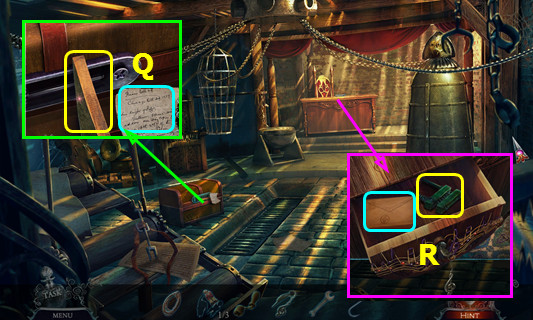
- Read the notes; take the WEDGE (Q).
- Use the DRAWER KEY; read the letter and take the THUMBSCREW (R).

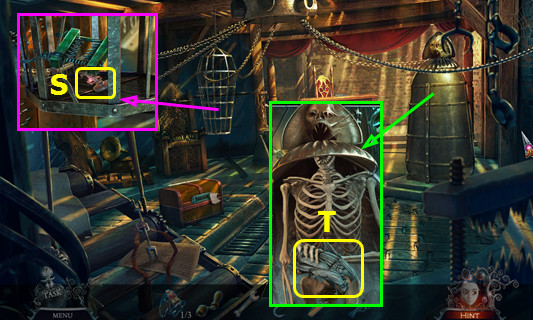
- Use the THUMBSCREW; take the VIOLIN (S).
- Use the WRENCH, open the doors and take the 1/2 ANGELS OF DEATH (T).
- Walk down 2x.

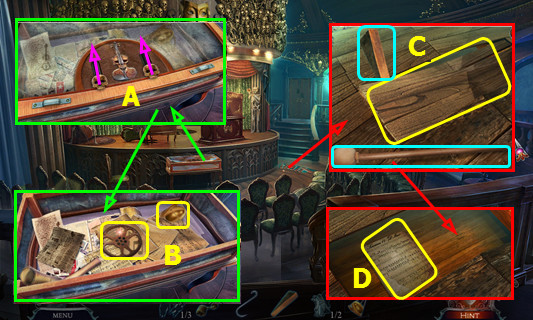
- Place the VIOLIN and move the 2 skulls up (A).
- Read the notes; take the MAGNETOPHON REEL and SCALE PAN (B).
- Place the WEDGE and select the baton; take the FLOORBOARDS (C).
- Take the SYMPHONY (D).
- Go forward.

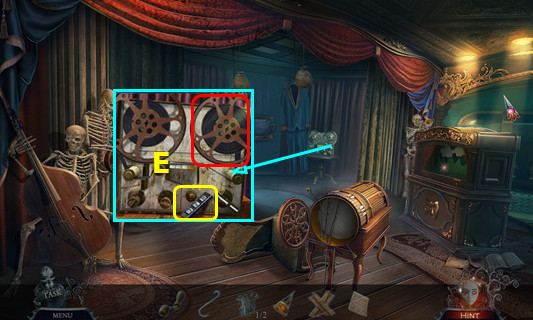
- Place the MAGNETOPHON REEL; take the DIAL (E).
- Enter the floor.

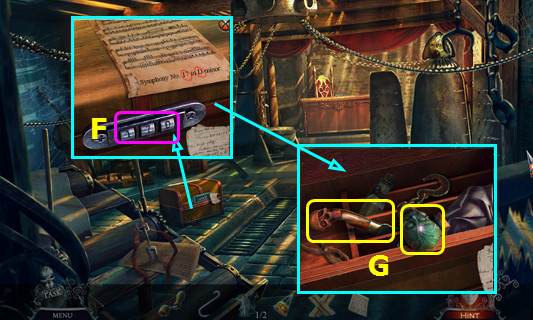
- Place the DIAL and SYMPHONY; set the dial to 1-7-D (F).
- Take the 1/2 SCREAMING FACES and CURVED KNIFE (G).
- Walk down 3x; go left and right.

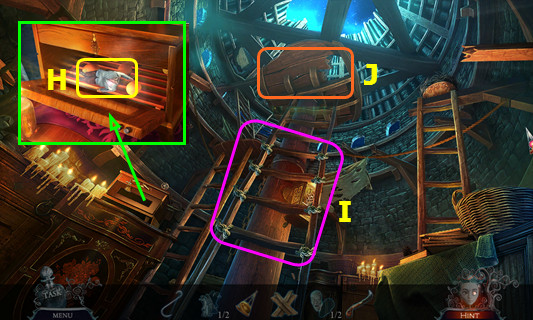
- Place the SCALE PAN; take the 2/3 MARIONETTES (H).
- Use the FLOORBOARDS and ROPE (I).
- Play the HOP; earn MOTHER’S PICTURE (J).
- Walk down 2x.

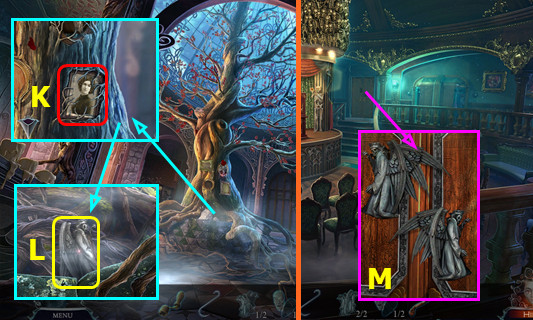
- Pan up; place MOTHER’S PICTURE (K).
- Read the clipping; take the 2/2 ANGELS OF DEATH (L).
- Go forward.
- Place the 2 ANGELS OF DEATH (M).
- Go right.

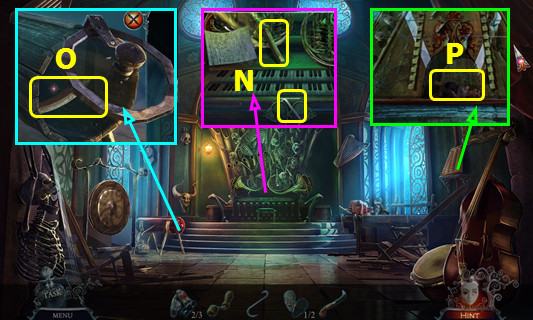
- Read the note; take the PIECE OF WOOD and ALLEN KEY (N).
- Open the door and place the PIECE OF WOOD; take the CURVED WOOD (O).
- Use the STRING WINDER; take the 3/3 MARIONETTES (P).

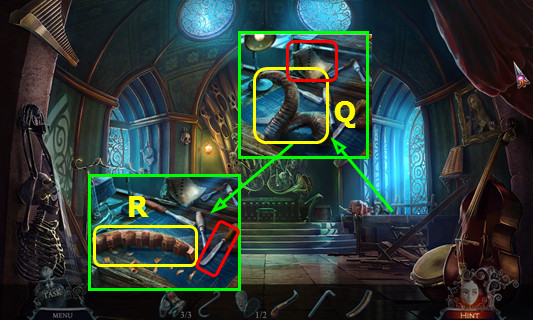
- Read the instructions; take the 1/2 ANTLERS (Q).
- Place the CURVED WOOD and select the carving tool; take the INSTRUMENT BASE (R).
- Walk down and forward.

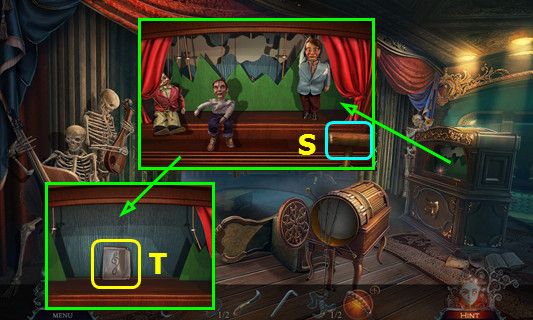
- Place the 3 MARIONETTES, select the pieces, and push the lever (S).
- Take the REGISTER LOCK (T).
- Enter the floor.

- Place the REGISTER LOCK; take the 2/2 SCREAMING FACES (A).
- Walk down 2x; go right.
- Place the 2 SCREAMING FACES; take EMILY’S BONES (B).

- Select (C) when the spikes go down the second time.
- Select (D) when the spikes go left.
- Select (E) when the blade stops on the left or right.
- Select (F) when the spikes recede.

- Combine the INSTRUMENT BASE and EMILY’S BONES to make the RESONATING INSTRUMENT (inventory).
- Use the RESONATING INSTRUMENT (G).
- Select 1-7.

- Take CLAUDE’S MASK (H).
- Walk down 2x.
- Place CLAUDE’S MASK; play the HOP to earn the LION (I).
- Walk down.
Chapter 4: Norman

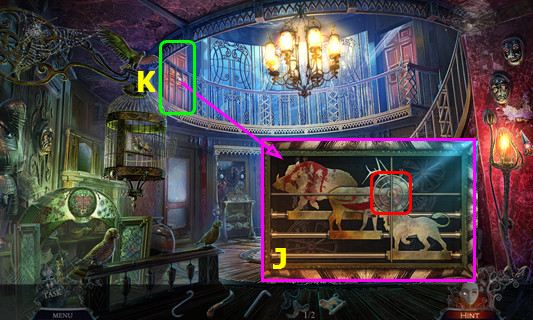
- Place the LION; drag the target and shoot all three animals (J).
- Enter the Study (K).

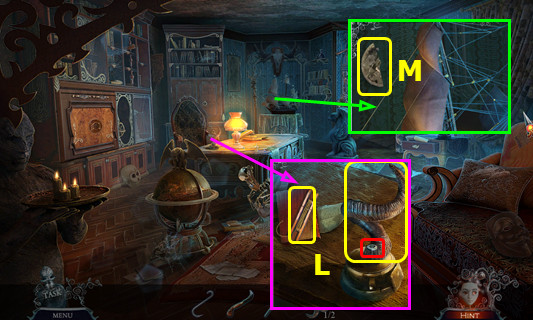
- Use the ALLEN KEY; take the 2/2 ANTLERS and FISHING SPOOL (L).
- Take the 1/2 of THOMAS’S PICTURE (M).
- Walk forward.

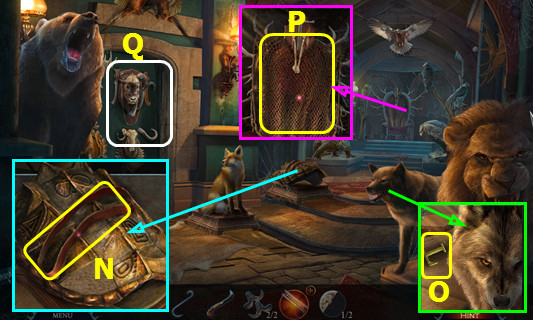
- Take the LEATHER BELT (N).
- Take the 1/2 LETTERS (O).
- Use the CURVED KNIFE; take the WEIGHTED NET (P).
- Select (Q).

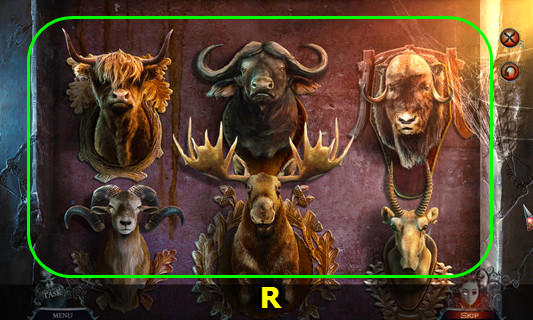
- Place the 2 ANTLERS; restore the horns as shown (R).
- Walk left.

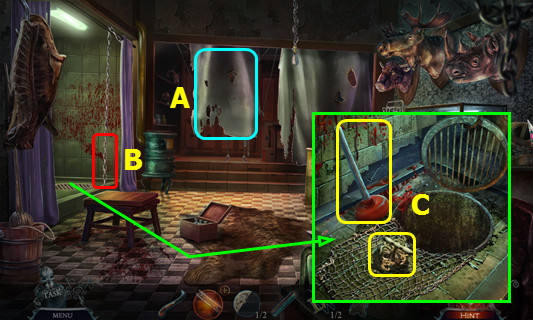
- Remove the sheet (A).
- Use the HOOK (B).
- Take the PLUNGER; use the WEIGHTED NET and take the CABINET HANDLE (C).

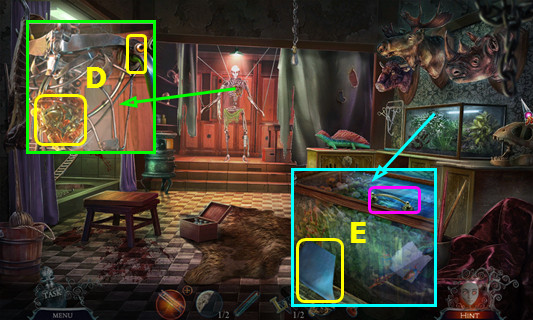
- Take the WOLF EYE; use the CURVED KNIFE and take the SHELL PLATE (D).
- Take the SAIL and open the terrarium (E).
- Walk down.

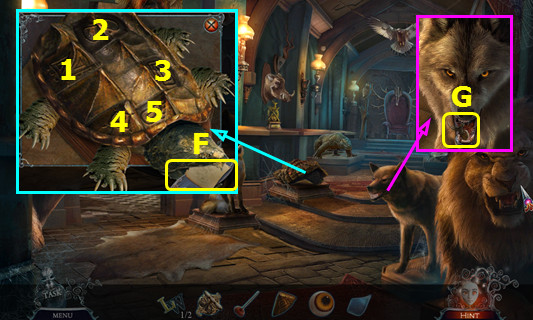
- Place the SHELL PLATE and press 1-5; read the note and take the HUNTER ILLUSTRATION (F).
- Place the WOLF EYE; take the DEER INSIGNIA (G).
- Walk left.

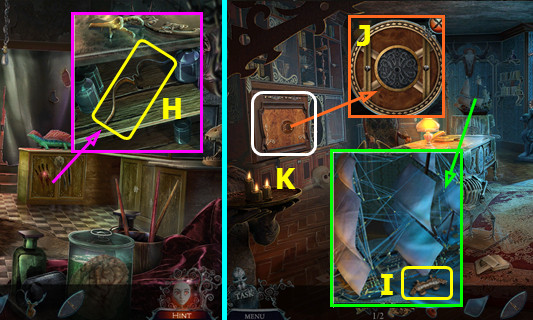
- Place the DEER INSIGNIA; read the note and take the CROSSBOW LATH (H).
- Walk down 2x.
- Place the SAIL; take the CARVED HANDLE (I).
- Use the CABINET HANDLE (J).
- Play the HOP; earn the DEER SKULL (K).
- Go forward.

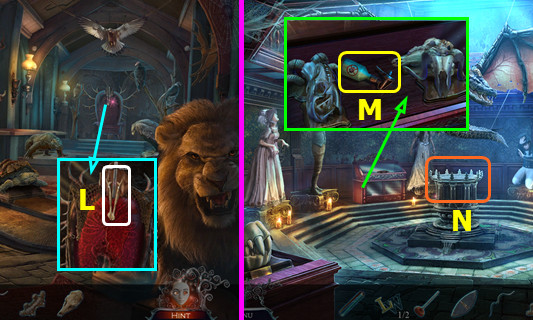
- Place the DEER SKULL (L).
- Walk forward.
- Place the CARVED HANDLE; move the items and take the INSECT REPELLENT (M).
- Select (N).

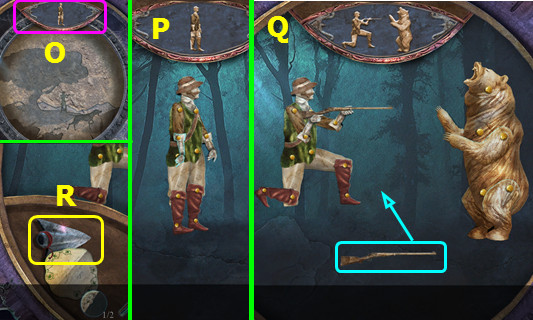
- Place the HUNTER ILLUSTRATION (O).
- Move the marionettes as shown (P-Q).
- Take the BOLT TIP (R).
- Walk down and left.

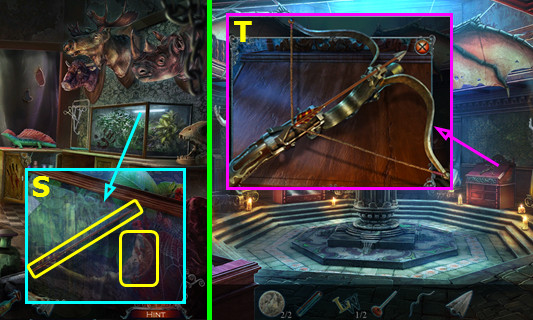
- Use the INSECT REPELLENT; read the note and take the CROSSBOW BOLT and 2/2 THOMAS’S PICTURE (S).
- Walk down and forward.
- Replace the CROSSBOW LATH and attach the string; add the CROSSBOW BOLT and BOLT TIP. Take the CROSSBOW (T).

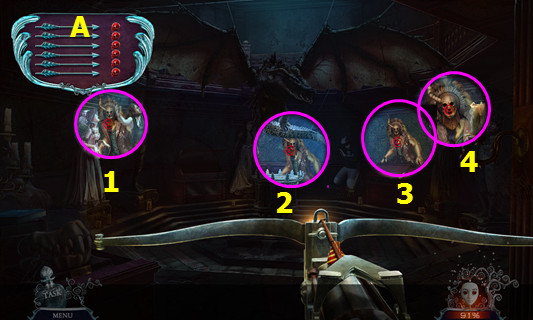
- Take the CROSSBOW from inventory; select the scene.
- Find and shoot Norman 6 times; he will appear randomly in positions 1-4.
- Track your hits (A).

- Take NORMAN’S MASK (C).
- Walk down 3x; go forward.
- Place NORMAN’S MASK; play the HOP and earn the CANVAS FRAGMENT (D).
- Pan up; place THOMAS’S PICTURE (E).
- Take the ORNATE EMBLEM (F).
- Walk down.
Chapter 5: Lisbeth

- Place the CANVAS FRAGMENT; restore the painting (G).
- Enter the Portrait Room (H).

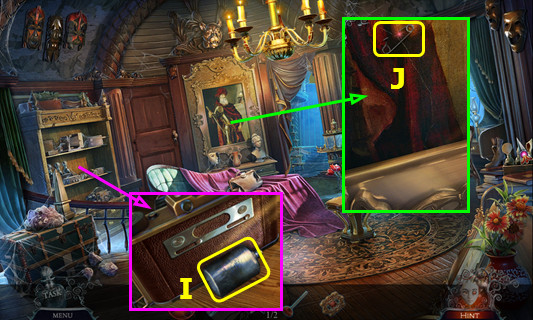
- Take the PAINT CANISTER (I).
- Take the SAFETY PIN (J).
- Combine the FISHING SPOOL and SAFETY PIN to make the FISHING RIG (inventory).

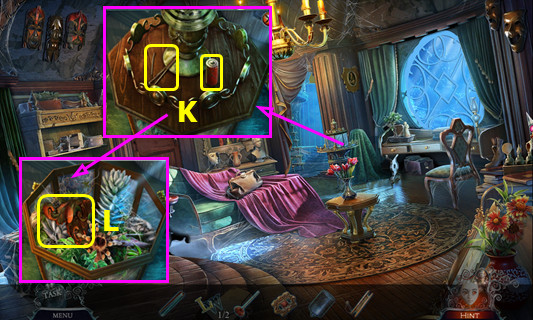
- Take the NAIL CLIPPERS and 1/2 BATTERIES; remove the lid (K).
- Use the FISHING RIG to take the 1/2 FRAME PIECES (L).
- Walk right.

- Take the RAG (M).
- Place the LEATHER BELT and select the WHEEL; take the PAINTING SPATULA (N).
- Take the BATHROOM KEY and place the PAINT CANISTER (O).
- Walk down.

- Use the PAINTING SPATULA; take the PHOTO (P).
- Use the BATHROOM KEY and turn the handle (Q).
- Walk left.

- Open the cabinet; take the COPPER TOKEN (R).
- Take the COLOR WHEEL (S).
- Use the PLUNGER, move the items, and take the 2/2 FRAME PIECE (T).
- Select (U).

- Place the ORNATE EMBLEM (A).
- Select 1-16.
- Take the NAIL POLISH REMOVER (B).
- Walk down and right.

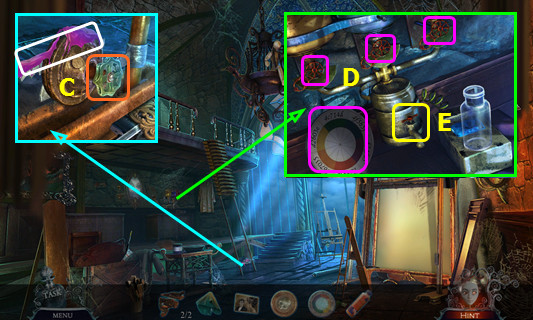
- Use the NAIL POLISH REMOVER; turn the valve 2x (C).
- Place the COLOR WHEEL and select each valve (D).
- Select the tap and earn the COLOR CODE (E).

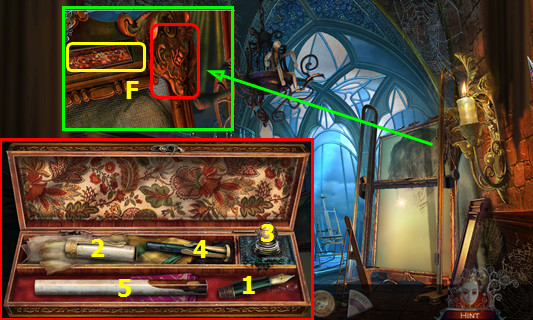
- Place the 2 FRAME PIECES; take the FOUNTAIN PEN (F).
- Open the FOUNTAIN PEN (inventory).
- Select (1-5) to take the PEN.
- Walk left.

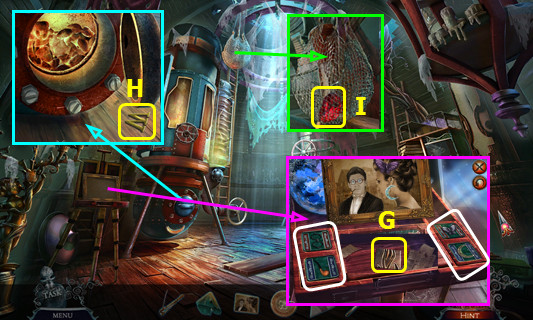
- Place the PHOTO and change the tiles as shown; take the 1/4 PAINTED TILES (G).
- Use the RAG; take the 2/2 LETTERS (H).
- Use the NAIL CLIPPERS; take the 1/3 RUBIES (I).
- Walk down 2x.

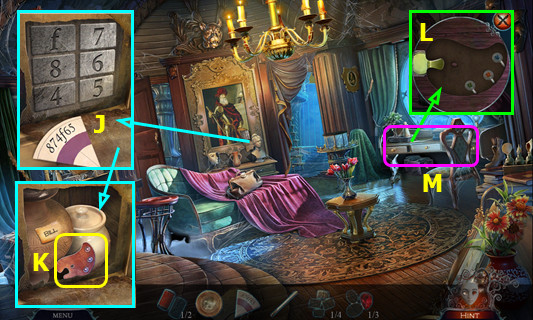
- Place the COLOR CODE; press 8-7-4-f-6-5 (J).
- Read the letter and take the PALETTE (K).
- Place the PALETTE (L).
- Play the HOP; earn the 2/4 PAINTED TILES (M).
- Walk left.

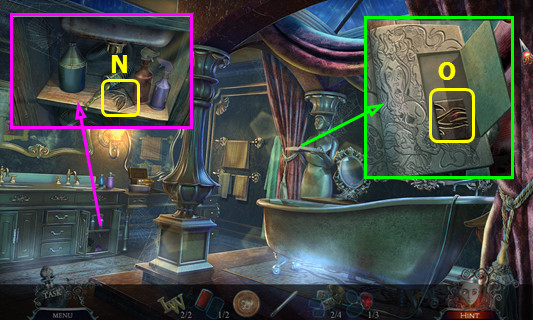
- Use the PEN; take the 3/4 PAINTED TILES (N).
- Place the 2 LETTERS; take the 4/4 PAINTED TILES (O).
- Walk down, right, and left.

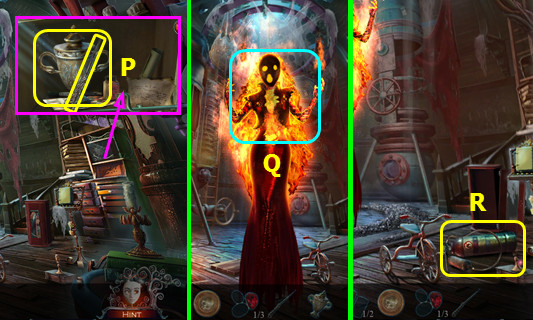
- Place the 4 PAINTED TILES. Read the note; take the BUTTONHOOK and LOVER’S URN (P).
- Use the LOVER’S URN (Q).
- Take the FIRE EXTINGUISHER (R).

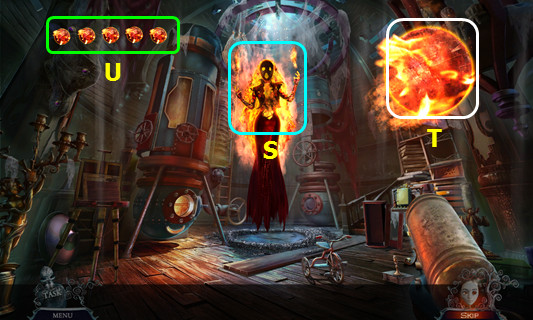
- Use the FIRE EXTINGUISHER (S).
- Select and hold to extinguish each fireball (T).
- Try not to miss any as they regenerate.
- The number of fireballs remaining (U).

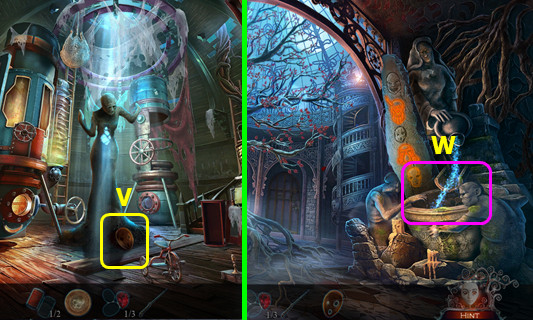
- Take LISBETH’S MASK (V).
- Walk down 3x; go forward.
- Place LISBETH’S MASK; play the HOP to earn the DARTS (W).
- Walk down and left.
Chapter 6: Patrick

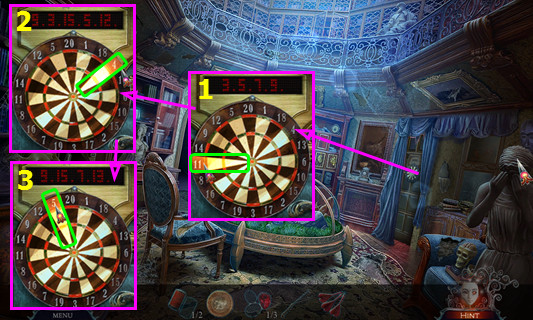
- Use the DARTS; select 11-4-5 (1-3).
- Walk right.

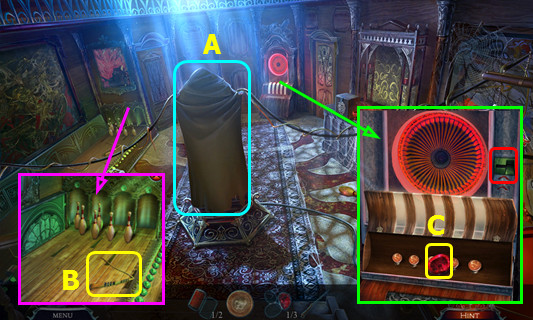
- Remove the cover (A).
- Take the PHARAOH’S WHIP (B).
- Use the COPPER TOKEN; take the 2/3 RUBIES (C).

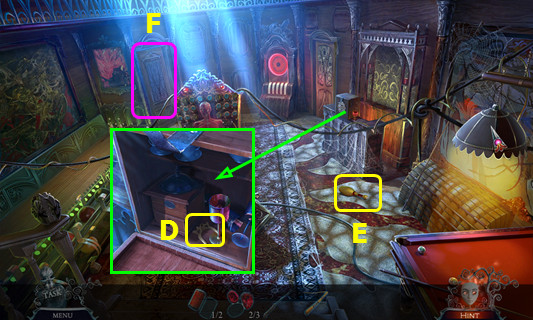
- Use the BUTTONHOOK, remove the lock, open the box, and take the CUE REST (D).
- Take the 1/2 BOWLING PINS (E).
- Walk left (F).

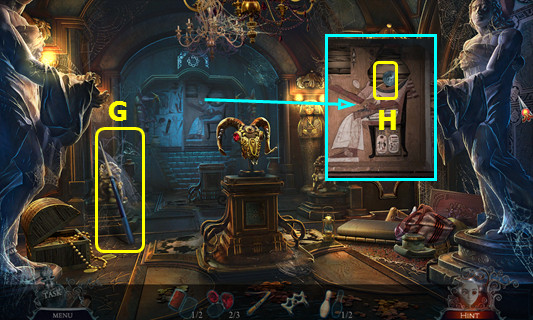
- Take the ROD (G).
- Combine the ROD and CUE REST to make the SNOOKER REST STICK (inventory).
- Take the SILVER TOKEN (H).

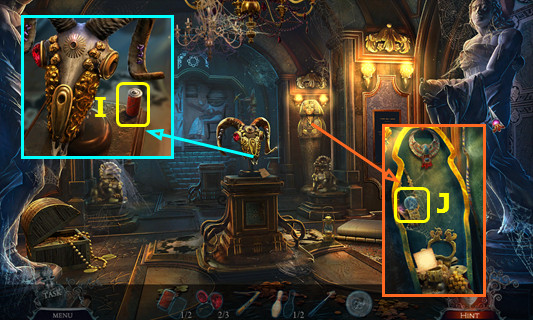
- Take the 2/2 BATTERIES (I).
- Place the PHARAOH’S WHIP and open the sarcophagus; read the note and take the MARBLE (J).
- Walk down.

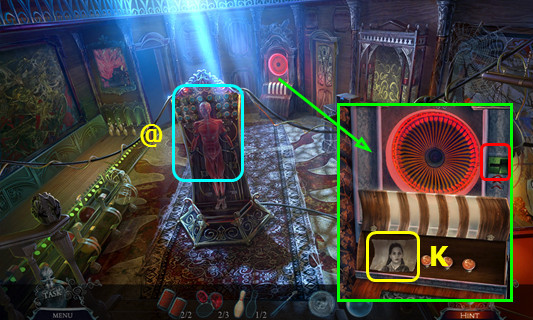
- Use the SILVER TOKEN; take the STEPMOTHER’S PICTURE (K).
- Select (@).

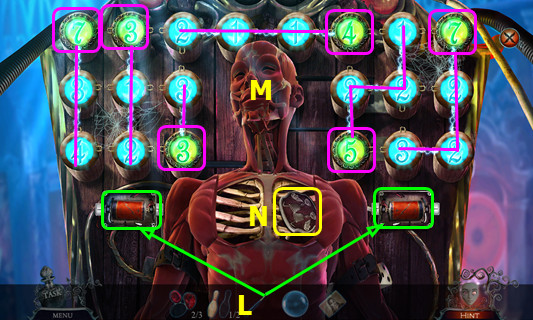
- Place the 2 BATTERIES (L).
- Connect the fuses (M).
- Take the SLIDER (N).
- Walk right.

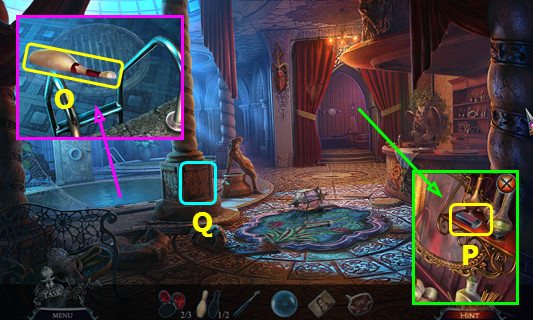
- Use the SNOOKER REST STICK; take the 2/2 BOWLING PINS (O).
- Take the MATCHES (P).
- Press the panel (Q).

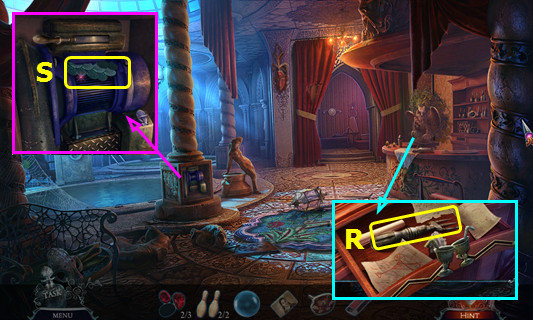
- Place the SLIDER; move the papers and take the ICE PICK (R).
- Take the FISH SCALES (S).
- Walk down.

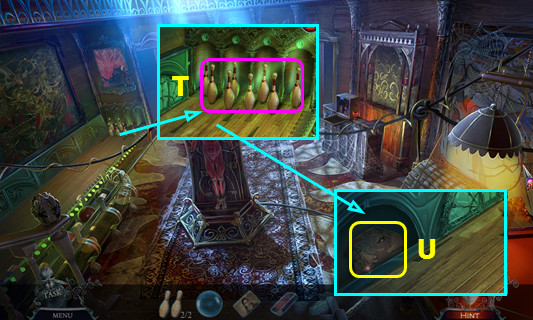
- Place and select the 2 BOWLING PINS (T).
- Take the MURAL FRAGMENT (U).
- Walk left.

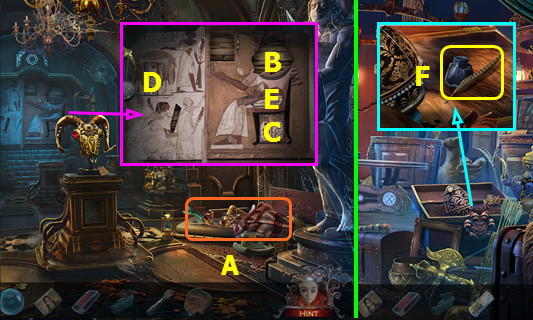
- Use the ICE PICK; play the HOP to earn the ORNATE CUP (A).
- Place the MURAL FRAGMENT (B).
- Select C-D-E.
- Walk forward.
- Take the QUILL AND INK (F).
- Walk down 2x; go right.

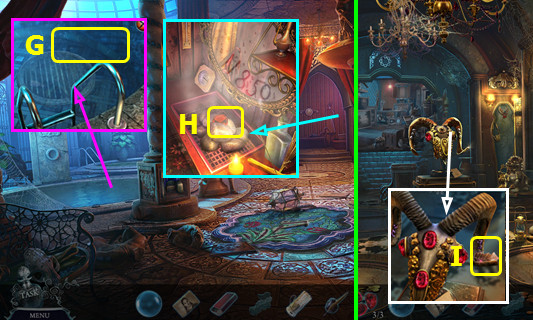
- Use the ORNATE CUP to take the CUP OF WATER (G).
- Use the CUP OF WATER; earn the DIAL SETTINGS and take 3/3 RUBIES (H).
- Walk down and left.
- Place the 3 RUBIES; read the note and take the CHESS PIECE (I).
- Walk forward.

- Rotate Jx4 and Kx3.
- Place the DIAL SETTINGS; set the dials as shown (L).
- Take the MOSAIC PART (M).

- Place the CHESS PIECE; take the 1/2 ORNATE DECORATIONS (N).
- Walk down 2x; go right.
- Select (O).

- Place the MOSAIC PART.
- Restore the mosaic (P).
- Take the PIPE CLEANER (Q).
- Walk down, left, and forward.

- Use the MARBLE and PIPE CLEANER (G).
- Open the case and take the GOLD TOKEN (H).
- Walk down 2x.
- Use the GOLD TOKEN; take the WINDING KEY (I).
- Walk left and forward.

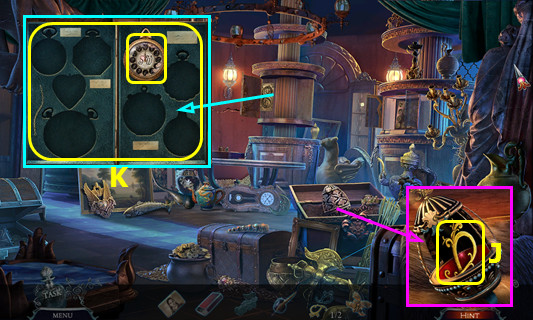
- Use the WINDING KEY; take the 2/2 ORNATE DECORATIONS (J).
- Place and select the 2 ORNATE DECORATIONS; take the 1/8 WATCH COLLECTION and COLLECTION CASE (K).

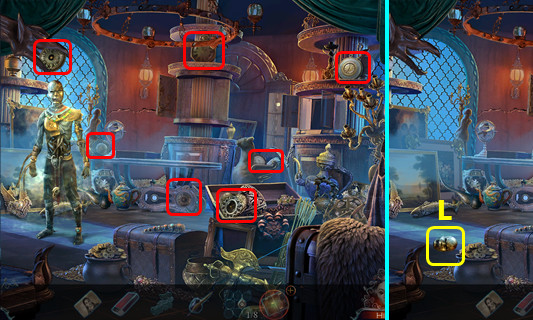
- Select the 7 parts of the WATCH COLLECTION (red).
- Combine the COLLECTION CASE and 8 WATCH COLLECTION (inventory).
- Take PATRICK’S MASK (L).
- Walk down 4x; go forward.

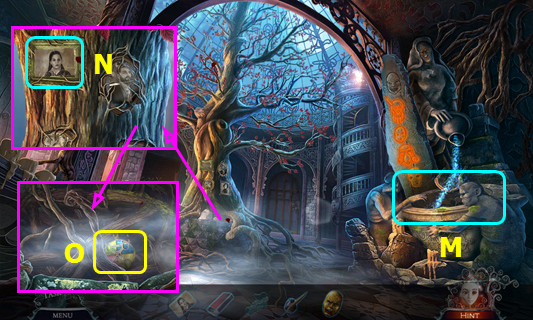
- Place PATRICK’S MASK; play the HOP and earn the GASOLINE (M).
- Pan up and place STEPMOTHER’S PICTURE (N).
- Take the BROOCH (O).
- Walk down and left; go right 2x.
Chapter 7: Thomas

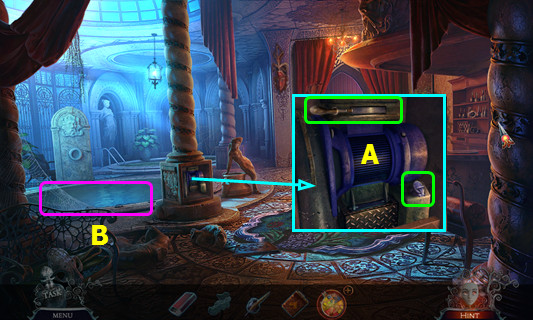
- Pour the GASOLINE and pull the switch (A).
- Enter the Water Reservoir (B).

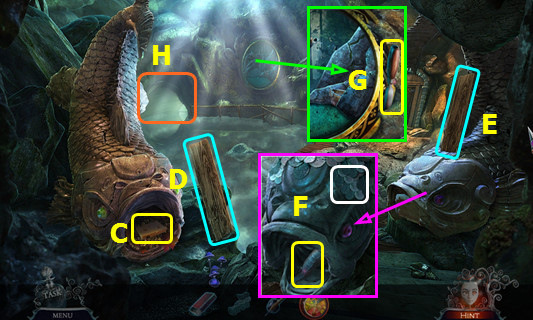
- Move the leaves 2x; take the CHEESE (C).
- Select (D-E).
- Place the FISH SCALES; take HYDRA’S HORN (F).
- Take the STONE CHISEL (G).
- Go left (H).

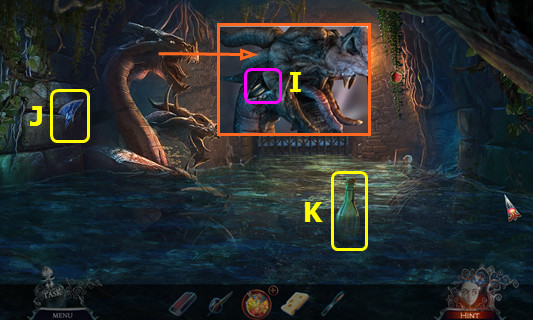
- Place HYDRA’S HORN (I).
- Use the STONE CHISEL; take the RELIEF FRAGMENT (J).
- Take the MESSAGE BOTTLE (K).

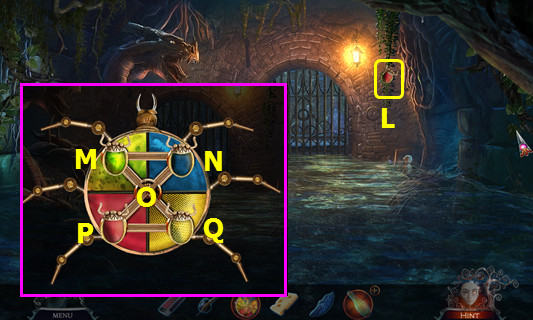
- Take the ORNATE BUG (L).
- Combine the BROOCH and ORNATE BUG (inventory).
- Select M-N-O-P-Q-O; take the BUG EMBLEM.
- Walk down.

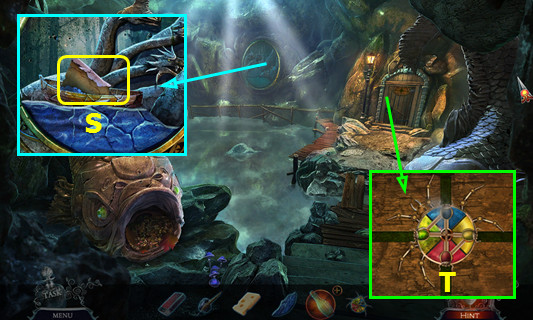
- Place the RELIEF FRAGMENT; take the FANG BASE (S).
- Place and select the BUG EMBLEM (T).

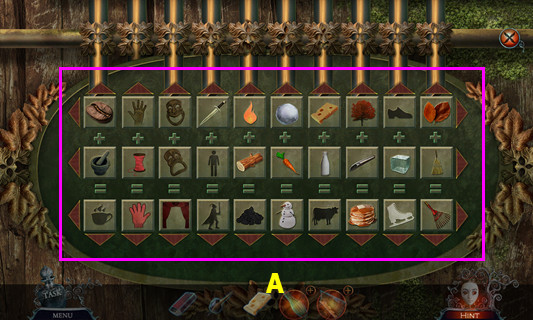
- Move the tiles to form the sets (A).
- The location of the sets does not matter.
- Walk forward.

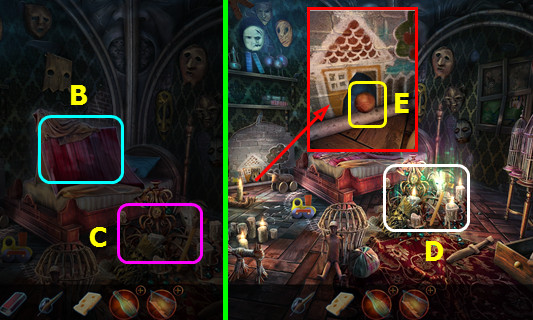
- Select (B).
- Use the MATCHES (C).
- Play the HOP; earn the FISH FIN (D).
- Place the CHEESE; take the RED NOSE (E).

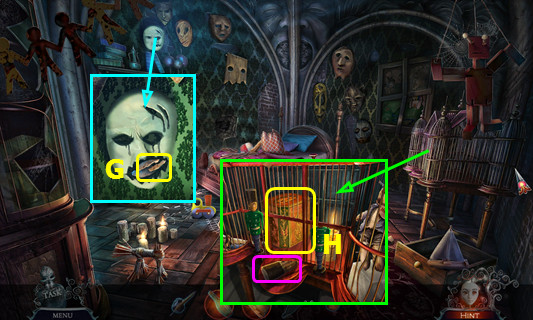
- Use the QUILL AND INK; take the FANG PIECES (G).
- Select the head, open the gate, and take the JACK-IN-THE-BOX (H).
- Combine the JACK-IN-THE-BOX and RED NOSE; take the GLUE (inventory).
- Walk down.

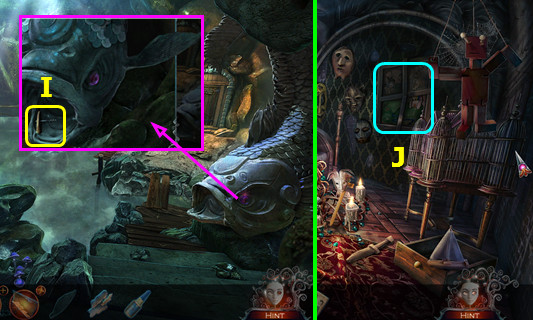
- Place the FISH FIN; take the CORKSCREW (I).
- Combine the MESSAGE BOTTLE and CORKSCREW; take the DRAWING (inventory).
- Go forward.
- Select (J).

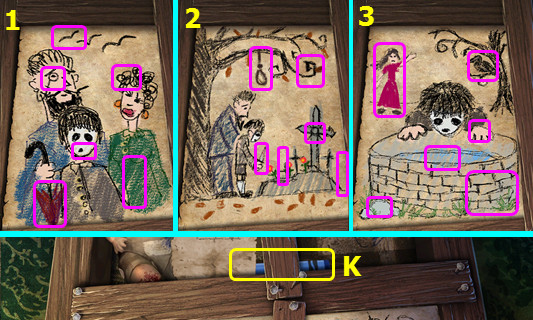
- Place the DRAWING.
- Find the differences (1-3).
- Read the note; take the BLUE CRAYON (K).

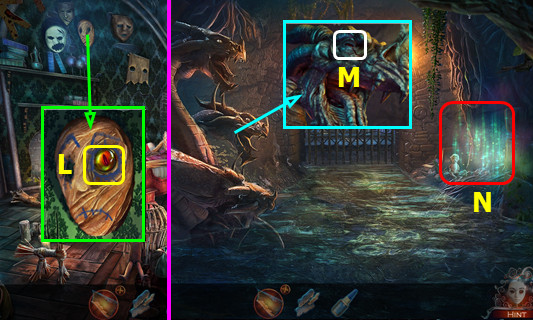
- Use the BLUE CRAYON; take HYDRA’S EYE (L).
- Walk down and left.
- Place HYDRA’S EYE (M).
- Play the HOP; earn the MAGNET (N).
- Walk down and forward.

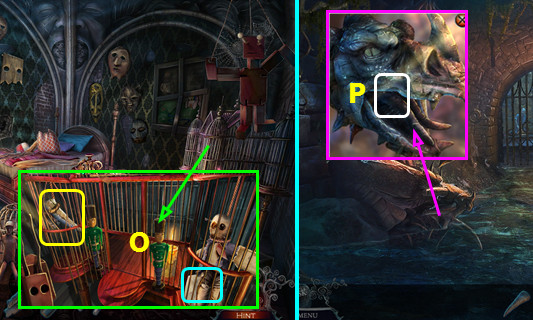
- Use the MAGNET; take the FANG TIP (O).
- Combine the FANG BASE, FANG PIECES, FANG TIP, and GLUE to make the FANG (inventory).
- Walk down and left.
- Place the FANG (P).
- Walk forward.

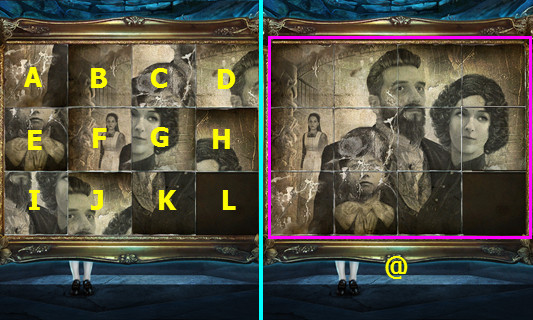
- Restore the picture.
- Select K-G-C-D-H-L-K-J-I-E-A-B-C-D-H-L-K-J-I-E-F-J-K-L-H-D-C-G-k-J-F-G-K-J-I-E-A-B-F-G-C-B-A-E-I-J-F-G-H-L-K-J-I-E-F-G-K-L-H-G-F-E-I-J-K-G-H-L.
- Final solution (@).

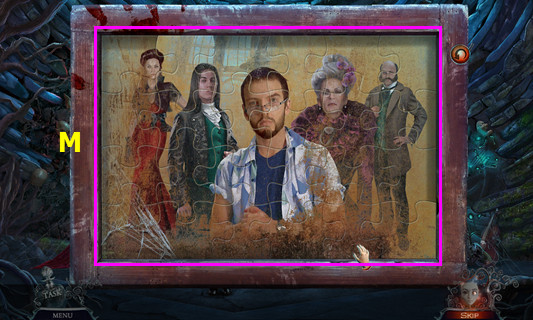
- Restore the jigsaw puzzle (M).
- You earn LISBETH’S MASK, CLAUDE’S MASK, PATRICK’S MASK, ABIGAIL’S MASK, and NORMAN’S MASK.

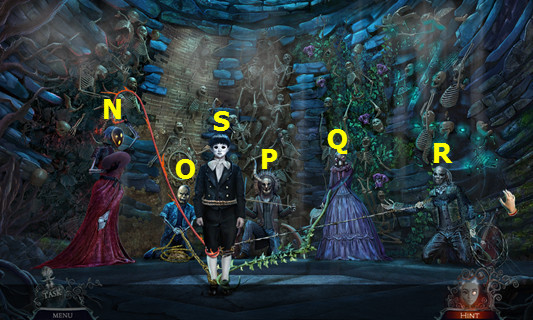
- Place LISBETH’S MASK (N), PATRICK’S MASK (O), NORMAN’S MASK (P), ABIGAIL’S MASK (Q), and CLAUDE’S MASK (R).
- Select Thomas and remove his mask (S).
- Congratulations! You have completed Phantasmat: Behind the Mask!


 The Scruffs: Return of the Duke Walkthrough, Guide, & Tips
 The Tudors Walkthrough, Guide, & Tips
 Revived Legends: Titan's Revenge Walkthrough, Guide, & Tips
 Incredible Dracula: Chasing Love Walkthrough, Guide, & Tips
 Shaolin Mystery: Revenge of the Terracotta Warriors Walkthrough, Guide, & Tips