Ominous Objects: Trail of Time Walkthrough, Guide, & Tips
Ominous Objects: Trail of Time Walkthrough
Welcome to the Ominous Objects: Trail of Time Walkthrough.
The mountain town of Glockenverk is in the grip of a dramatic and deadly cold spell. Set out with your trusty feline friend, Mr. Jenkins, to crack the case!
Whether you use this document as a reference when things get difficult or as a road map to get you from beginning to end, we’re pretty sure you’ll find what you’re looking for here.
This document contains a complete Ominous Objects: Trail of Time game walkthrough featuring annotated screenshots from actual gameplay!
We hope you find this information useful as you play your way through the game. Use the walkthrough menu below to quickly jump to whatever stage of the game you need help with.
Remember to visit the Big Fish Games Forums if you find you need more help. Have fun!
This walkthrough was created by prpldva, and is protected under US Copyright laws. Any unauthorized use, including re-publication in whole or in part, without permission, is strictly prohibited.
General Tips
- This is the official guide for Ominous Objects: Trail of Time.
- This guide will not mention each time you have to zoom into a location; the screenshots will show each zoom scene.
- Hidden-object puzzles are referred to as HOPs. This guide will not show HOP solutions. It will identify the location of the HOP and the inventory item acquired.
- This guide will show solutions for non-random puzzles. Please read the in-game instructions for each puzzle.
- In this game, you will sometimes have to select the new scene to trigger dialog, cut-scenes, or tasks prior to interacting with the scene.
Chapter 1: The Bridge

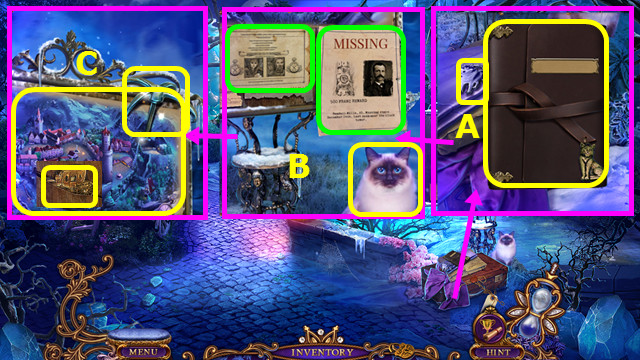
- Take and open the DIARY; take the ANIMAL EMBLEM (A).
- Read the 2 notices and take MR. JENKINS (B).
- Take the HOOK, MAP, and CARRIAGE EMBLEM (C).
- Walk forward; select the scene.

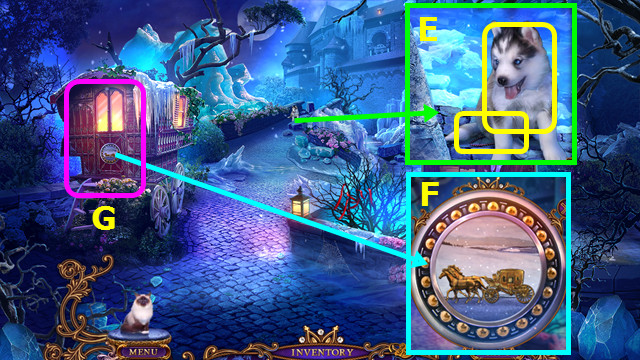
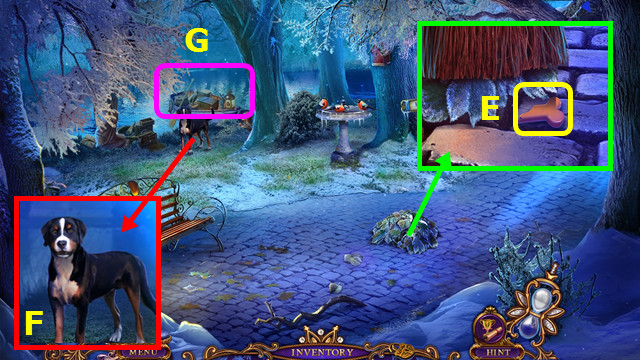
- Take the PUPPY and LOCKET (E).
- Take the BALL BEARINGS from the LOCKET (inventory).
- Place the CARRIAGE EMBLEM and BALL BEARINGS (F).
- Play the HOP; earn the ROPE (G).
- Combine the HOOK and ROPE to make the GRAPPLING HOOK (inventory).

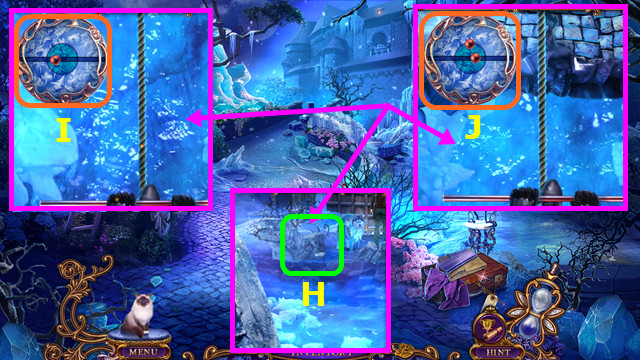
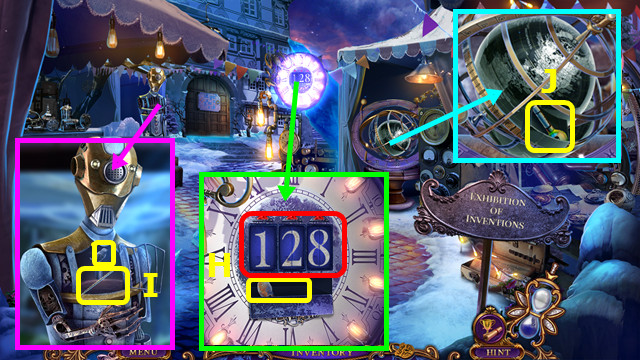
- Use the GRAPPLING HOOK (H).
- Click when the ball is in the center (I).
- Do the same for 2 balls (J).

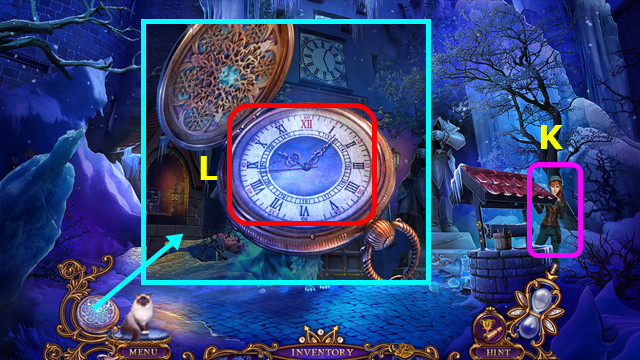
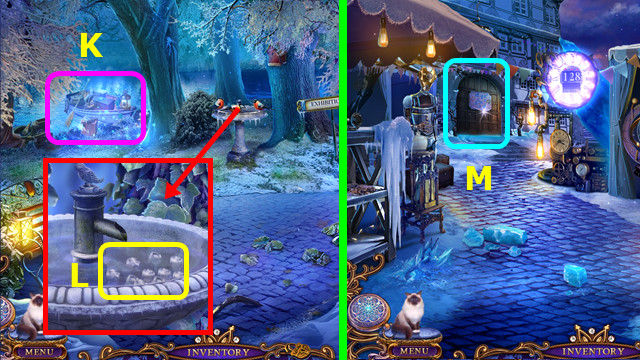
- Talk to Kate; earn the WATCH (K).
- Open the WATCH; remove the face (L).

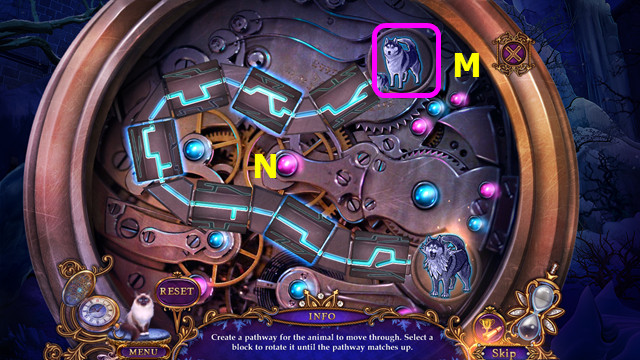
- Place the ANIMAL EMBLEM (M).
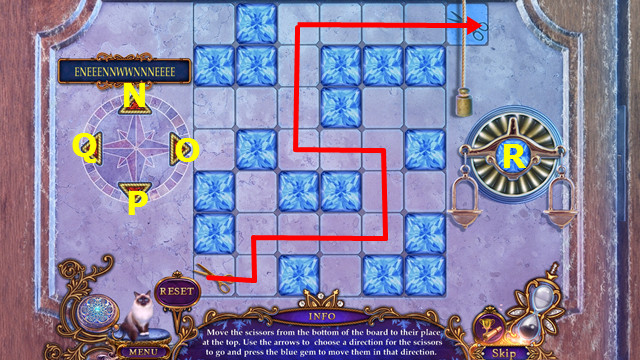
- Restore the path (N).

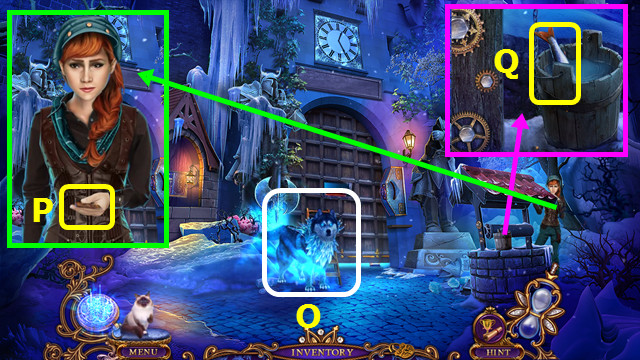
- Use the WATCH (O).
- Talk to Kate; take the SUITCASE EMBLEM (P).
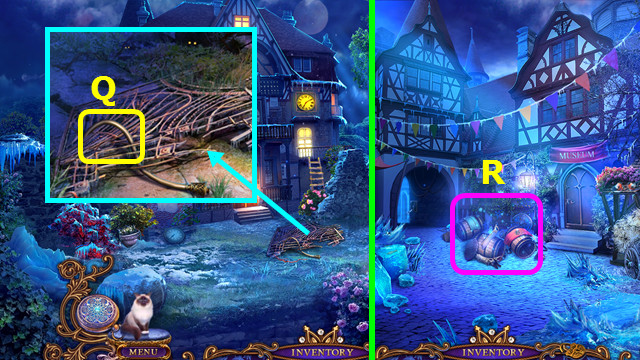
- Take the FISH (Q).
- Give the FISH to MR. JENKINS (inventory).

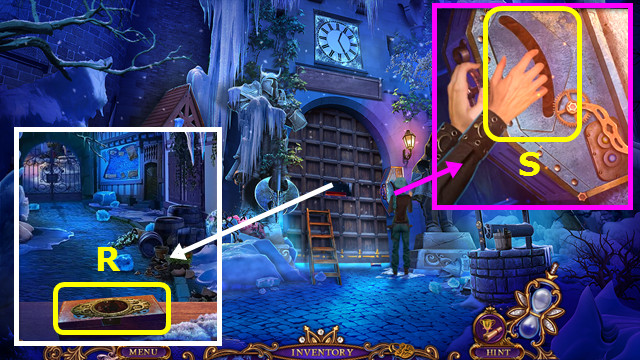
- Take the TOOLBOX (R).
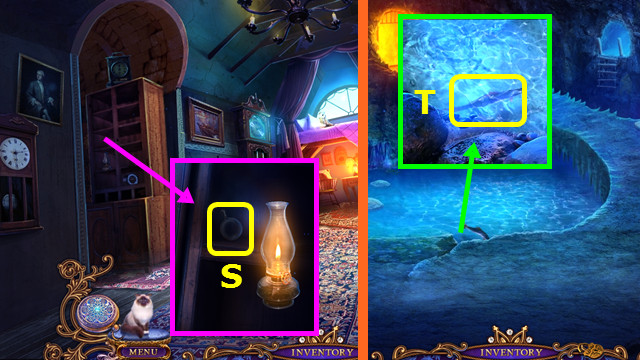
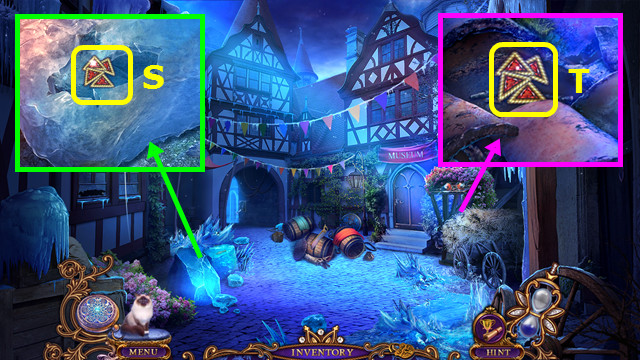
- Take the BROKEN PANEL (S).

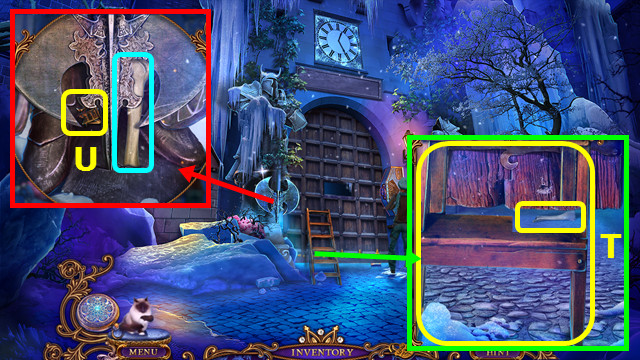
- Take the LADDER; use MR. JENKINS to take the BONE (T).
- Use the BONE; take the WATCHMAKER EMBLEM (U).
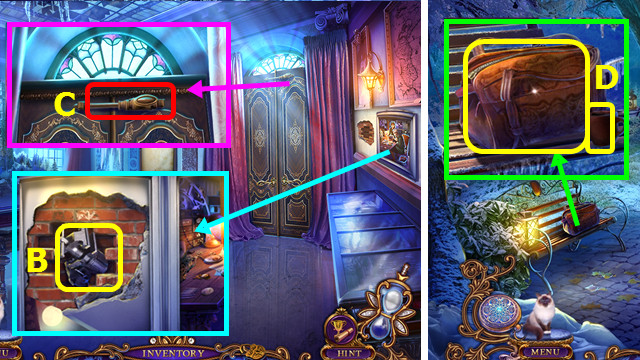
- Combine the TOOLBOX and WATCHMAKER EMBLEM; move the items and take the WRENCH (inventory).

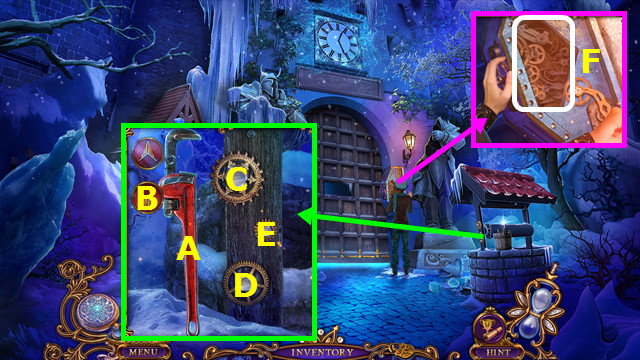
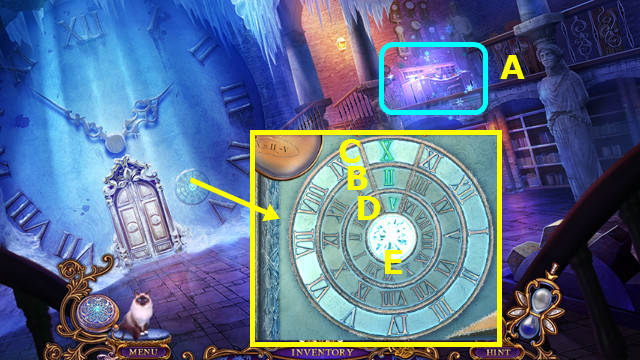
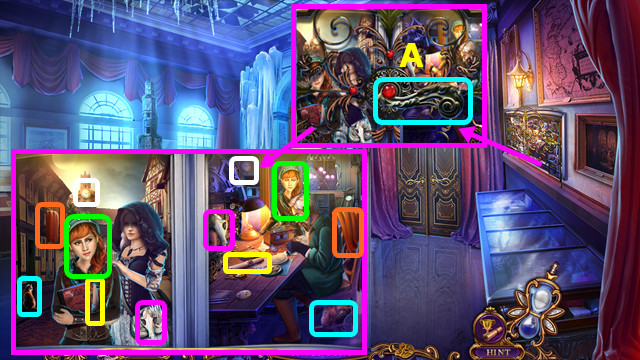
- Place the WRENCH (A).
- Select Bx2-C, Bx2-D, B-E.
- You earn the 3 GEARS.
- Combine the BROKEN PANEL and 3 GEARS to make the MECHANISM PANEL (inventory).
- Place the MECHANISM PANEL (F).

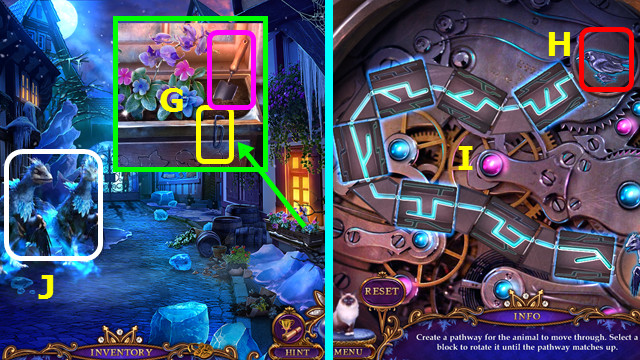
- Take the PAPERCLIP and select the trowel (G).
- Combine the LOCKET and PAPERCLIP to find the WATCH TILE (inventory).
- Select the WATCH; place the WATCH TILE (H) and restore the path (I).
- Use the WATCH (J).

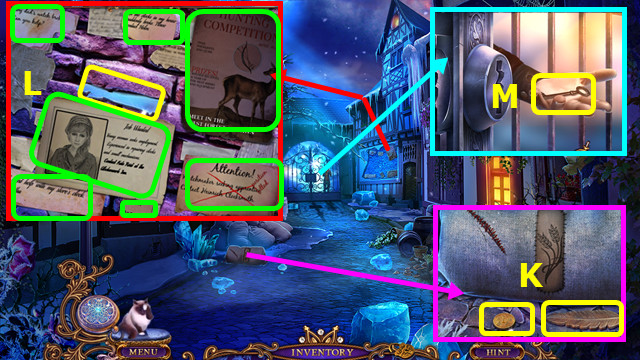
- Take the 1 FRANC and FEATHER (K).
- Read all the notices (green) and take the GLASS WOMAN (L).
- Take the 1/3 KEY (M).

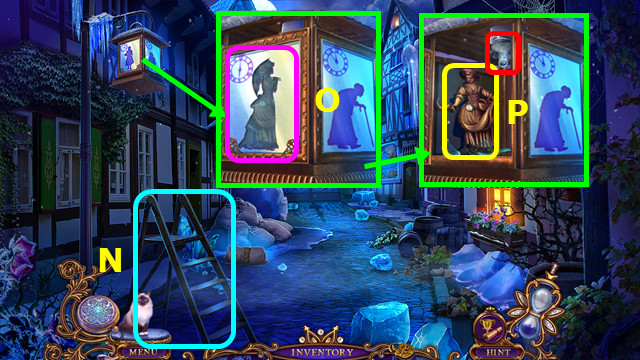
- Place the LADDER (N).
- Turn the lamp and place the GLASS WOMAN (O).
- Take the GARDENER EMBLEM and remove the broken bulb (P).
- Walk down 2x.

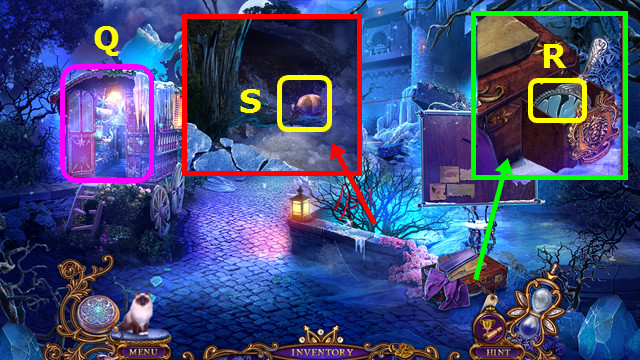
- Play the HOP; earn the 2/3 KEY (Q).
- Place the SUITCASE EMBLEM; take the SHARP GLASS (R).
- Use MR. JENKINS to take the EMPTY FLASK (S).
- Go forward.

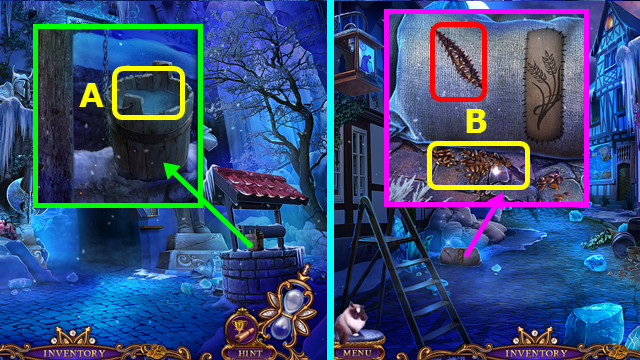
- Use the EMPTY FLASK to take the FLASK WITH WATER (A).
- Go forward.
- Use the SHARP GLASS; take the SEEDS (B).

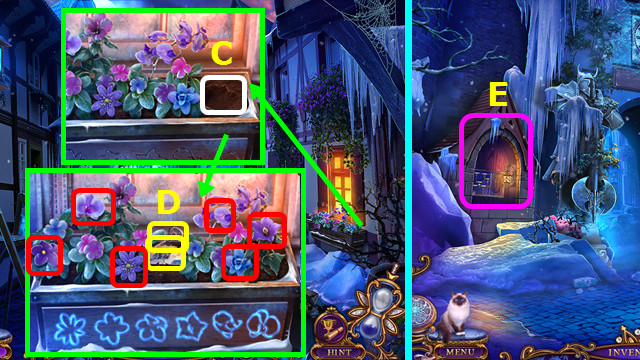
- Use the SEEDS and FLASK WITH WATER (C).
- Select the 6 flowers (red).
- Take the 1/3 PART OF MAP and 3/3 KEY (D).
- Walk down.
- Select (E).

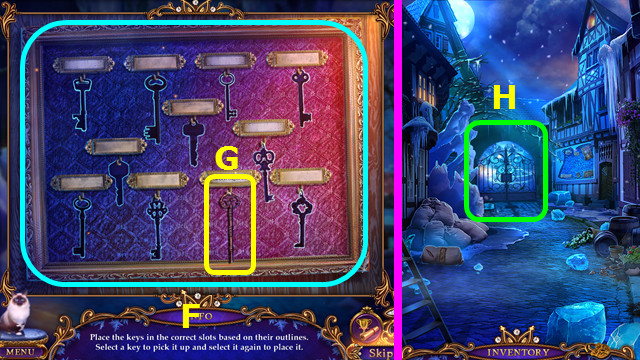
- Read the note and place the 3 KEYS on the board.
- Solution (F).
- Take the GATE KEY (G).
- Walk forward.
- Select (H).

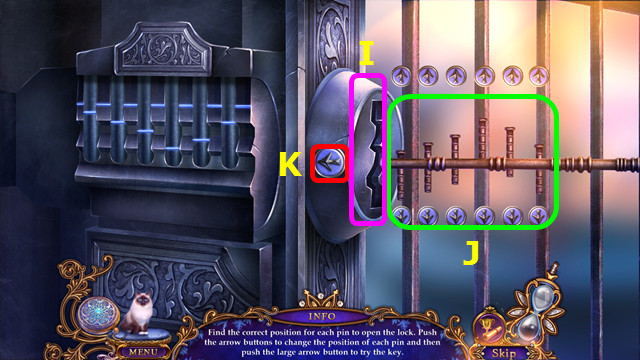
- Place the GATE KEY (I).
- Arrange the prongs (J).
- Select (K).
- Walk forward.
Chapter 2: The Square

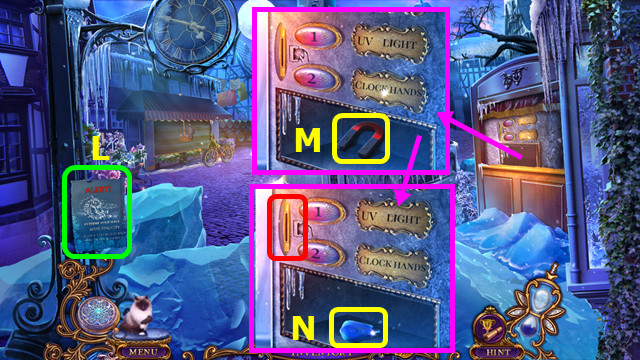
- Read the notice (L).
- Take the MAGNET (M).
- Use the 1 FRANC; take the UV LIGHT (N).

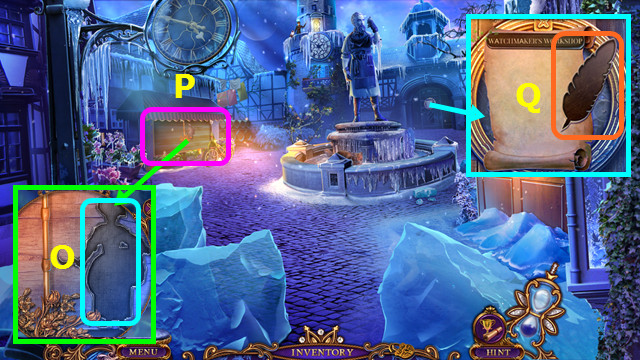
- Place the GARDENER EMBLEM (O).
- Play the HOP; earn the LAMP (P).
- Place the FEATHER (Q).
- Go forward.

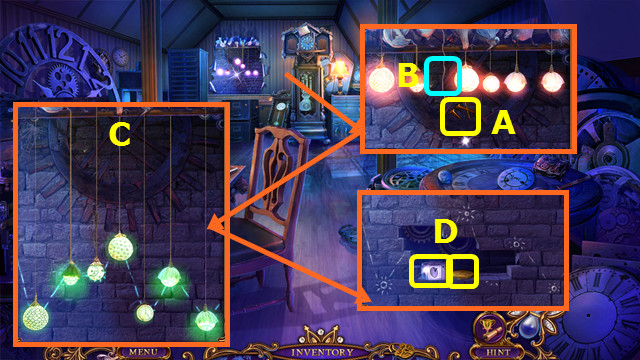
- Take the 1/2 NUMBER (A).
- Place the LAMP (B).
- Arrange the lamps (C).
- Take the LOCK CYLINDER and 2 FRANCS (D).
- Walk down.

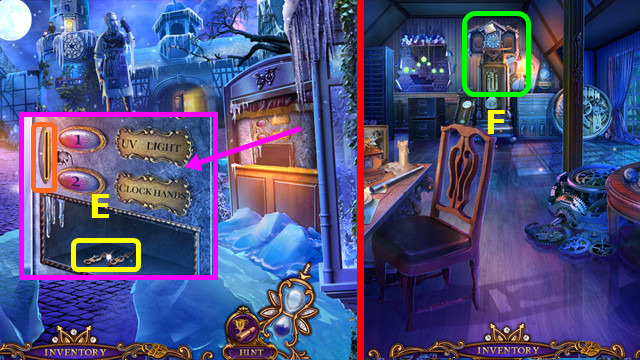
- Use the 2 FRANCS; take the CLOCK HANDS (E).
- Go forward.
- Select (F).

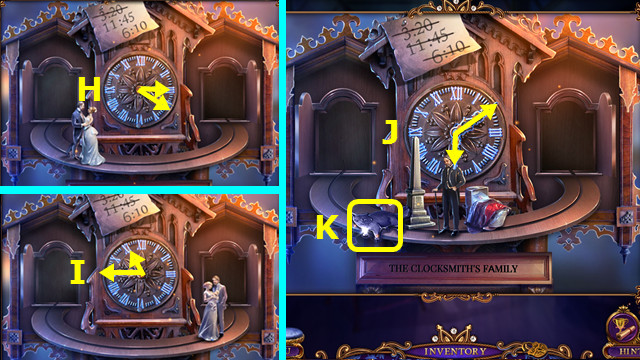
- Place the CLOCK HANDS.
- Set the clock to 3:20 (H), 11:45 (I), and 6:10 (J).
- Take the ANIMAL EMBLEM (K).
- Walk down.

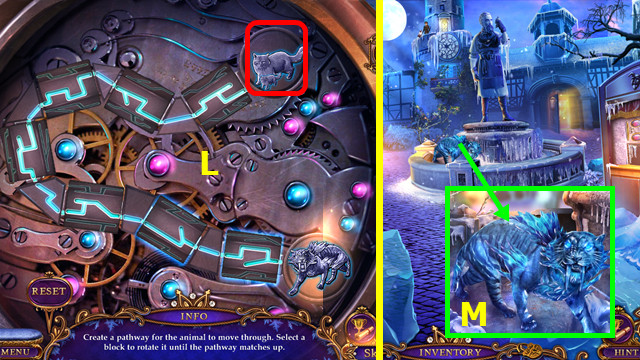
- Place the ANIMAL EMBLEM; restore the path (L).
- Use the WATCH (M).

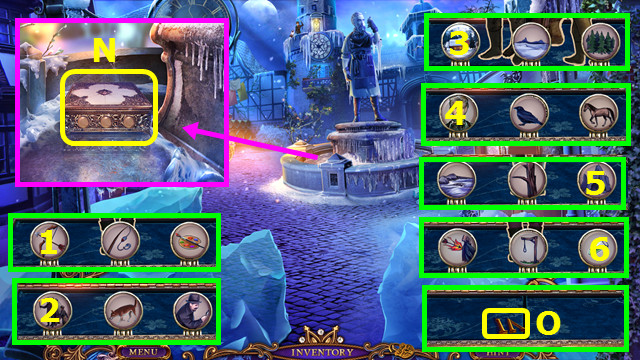
- Take the THEATER BOX (N).
- Open the THEATER BOX (inventory); select 1-6.
- Take the 2/2 NUMBERS (O).
- Walk down.

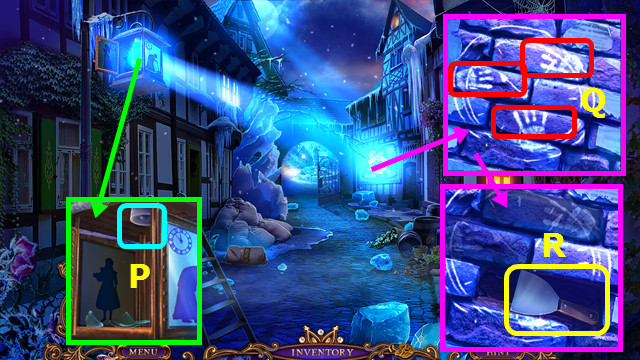
- Place the UV BULB (P).
- Press the 3 handprints (Q).
- Take the SCRAPER (R).
- Go forward 2x.

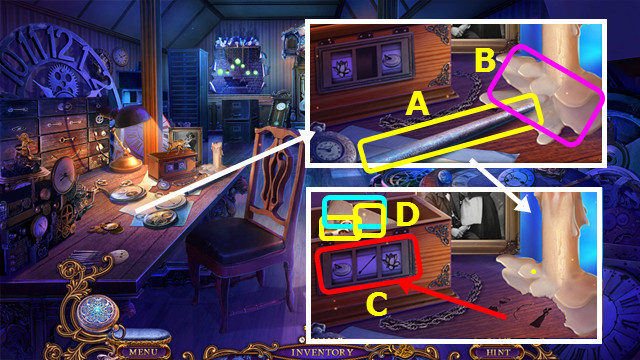
- Take the METAL ROD (A).
- Use the SCRAPER (B).
- Place the LOCK CYLINDER; set the code (C).
- Take the SMALL KEY, note, and 1/4 WEIGHTS (D).
- Walk down.

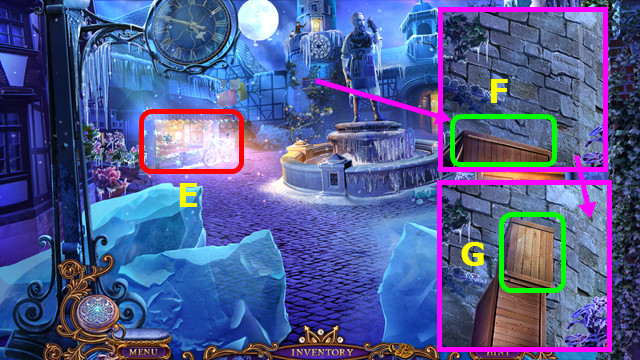
- Play the HOP; earn the BOX (E).
- Select (F).
- Place the BOX (G).

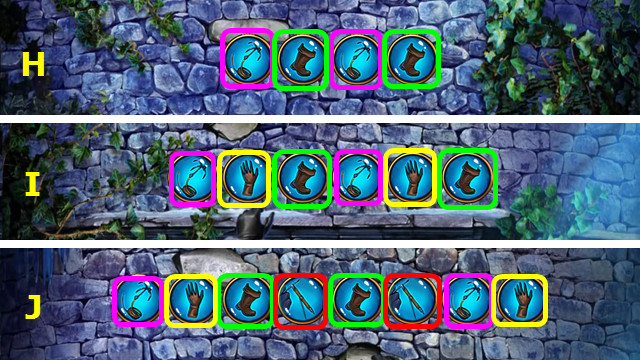
- Select the pairs (H).
- Select the pairs (I).
- Select the pairs (J).

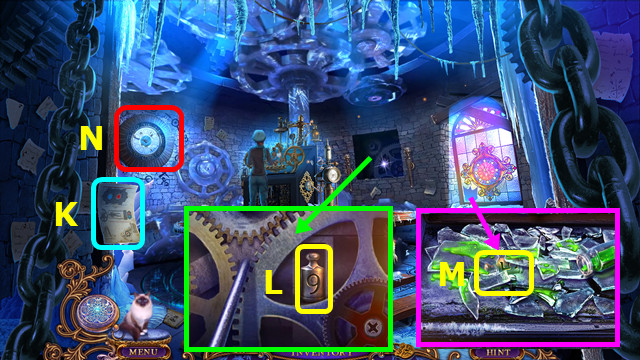
- Read the note (K).
- Use the METAL ROD; take the 2/4 WEIGHT (L).
- Use the MAGNET to take the 3/4 WEIGHT (M).
- Select (N).

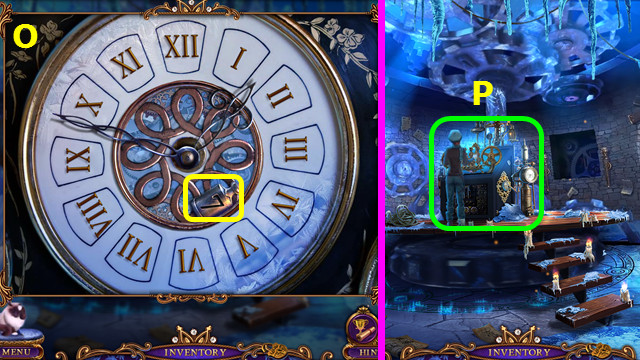
- Place the 2 NUMBERS on the clock.
- Restore the numerals; take the 4/4 WEIGHT (O).
- Select (P).

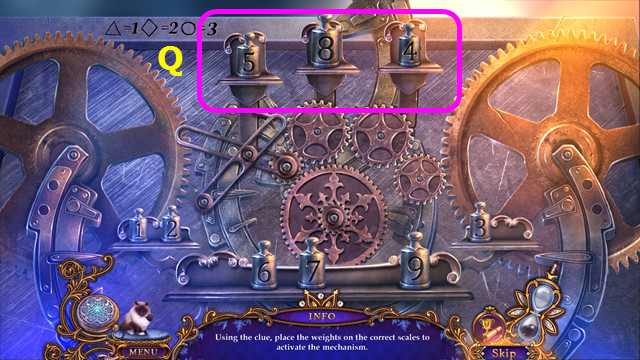
- Place the 4 WEIGHTS on the machinery.
- Solution (Q).
Chapter 3: The Forest

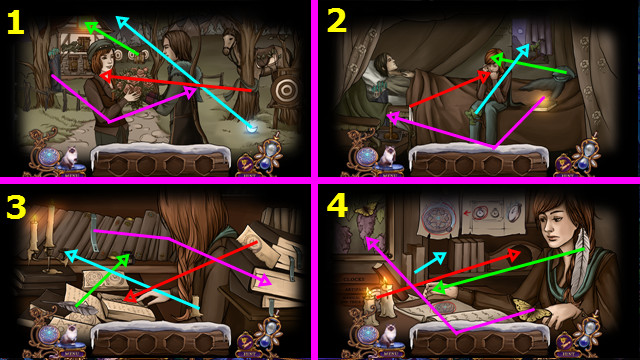
- Talk to Kate.
- Restore the items 1-4.
- Talk to Kate again.

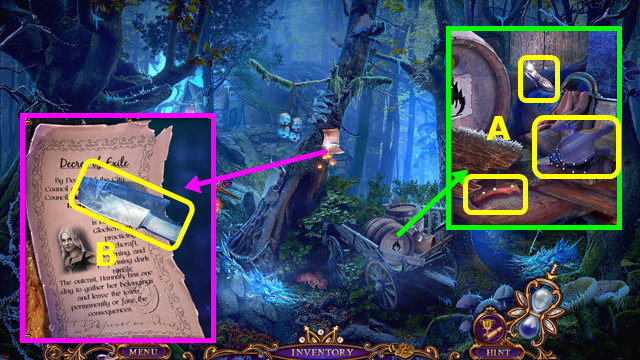
- Take the DAGGER HANDLE, BELLOWS, and TWEEZERS (A).
- Take the notice; use the DAGGER HANDLE to take the DAGGER (B).

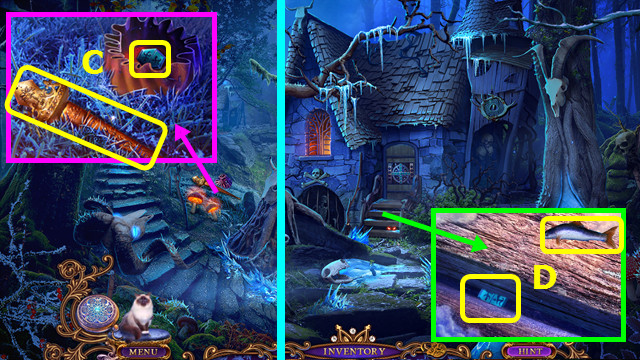
- Take the TORCH; use the DAGGER and take the 1/2 TILE (C).
- Try to walk right.
- Walk left.
- Take the FISH; use the TWEEZERS to take the 2/2 TILE (D).
- Give the FISH to MR. JENKINS (inventory).

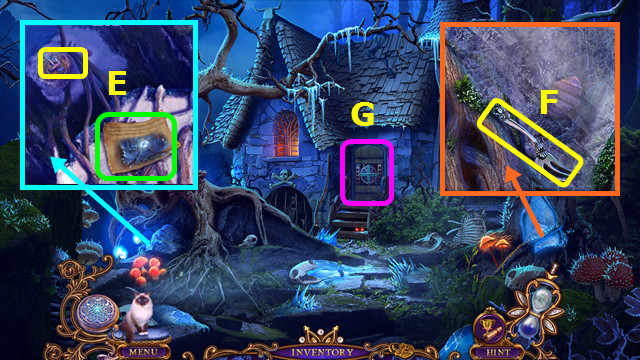
- Take the notice and use MR. JENKINS to take the CORKSCREW (E).
- Take the FORK (F).
- Select (G).

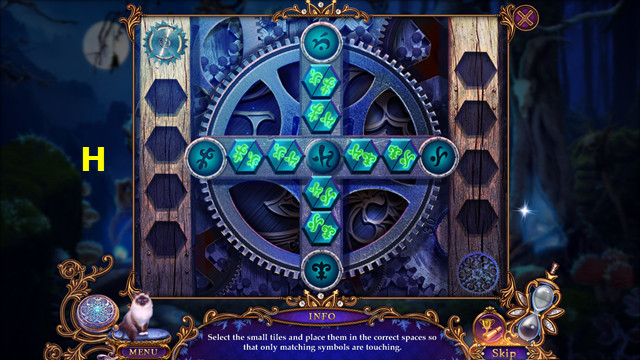
- Place the 2 TILES.
- Solution (H).
- Walk forward.

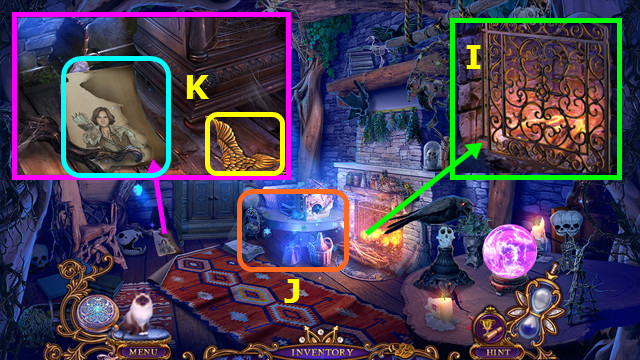
- Use the BELLOWS (I).
- Play the HOP; earn the EMPTY BOTTLE (J).
- Take the note and use the FORK to take the BIRD KEY (K).

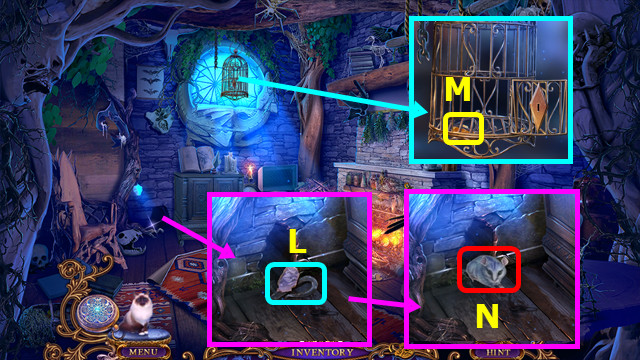
- Try to take the flint (L).
- Place the BIRD KEY; take the CHEESE (M).
- Give the CHEESE; take the FLINT (N).
- Walk down 2x.

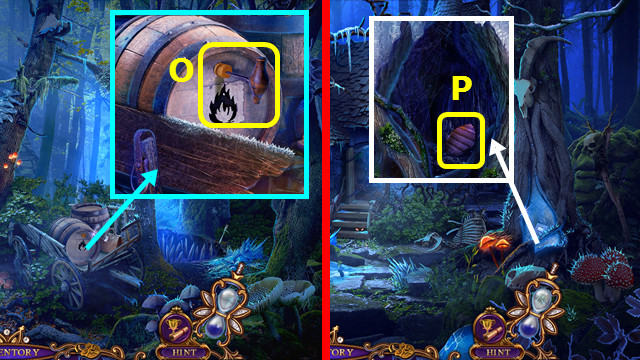
- Use the CORKSCREW and EMPTY BOTTLE to earn the KEROSENE (O).
- Combine the TORCH, KEROSENE, and FLINT to make the BURNING TORCH (inventory).
- Walk left.
- Use the BURNING TORCH; take the FIGURE (P).
- Go forward.

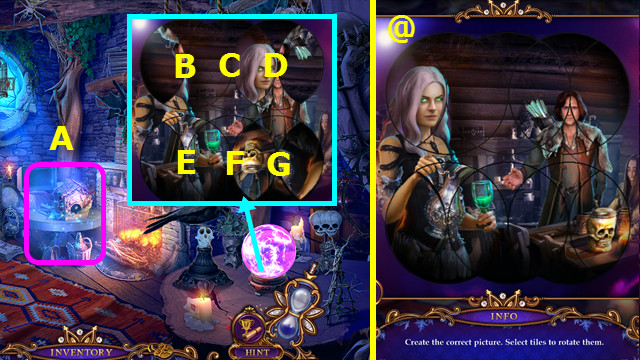
- Play the HOP; earn the BOARDS (A).
- Place the FIGURE; select D-C-B-C-D-C-B-C-E-F-G-F-G-E.
- Final solution (@).

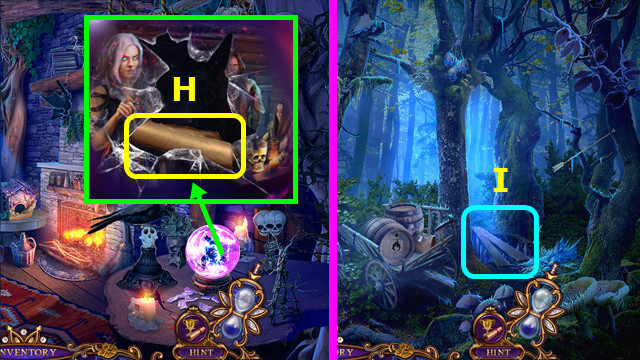
- Take the 2/3 PART OF MAP (H).
- Walk down 2x.
- Place the BOARDS (I).
- Walk right.

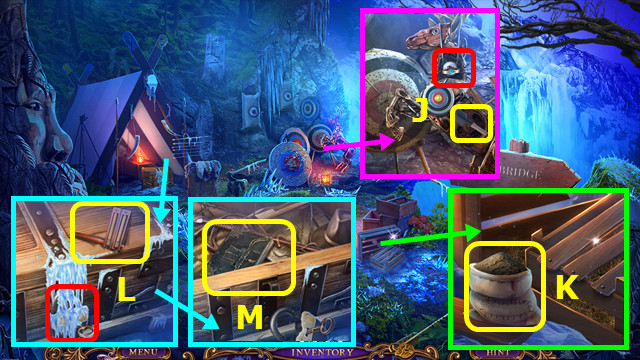
- Place and turn the SMALL KEY; take the SHOVEL (J).
- Take the SAND (K).
- Take the CLAPPER and use the BURNING TORCH on the lock (L).
- Remove the lock, open the chest, and take the diary (M).

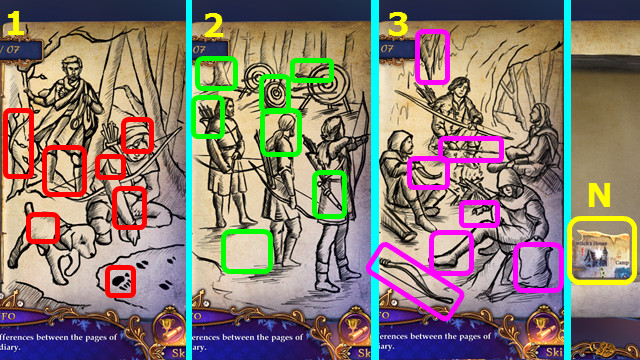
- Find the differences 1-3.
- Take the 3/3 PART OF MAP (N).
- Walk right.

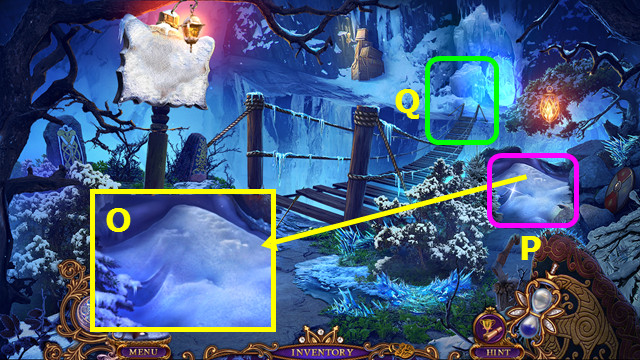
- Use the SHOVEL (O).
- Play the HOP; earn the ROPE (P).
- Try to cross the bridge (Q).

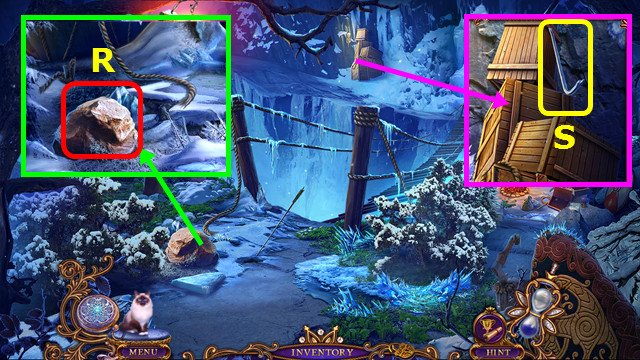
- Use the ROPE (R).
- Use MR. JENKINS to take the CROWBAR (S).
- Walk down.

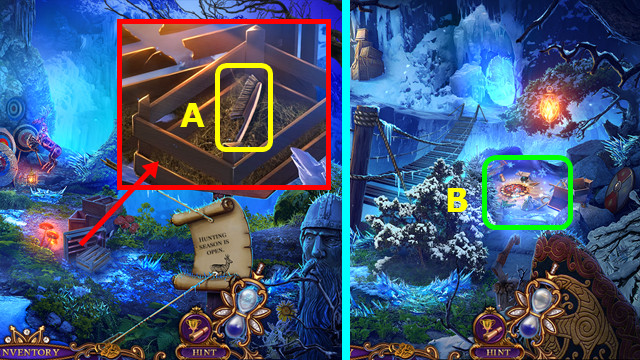
- Use the CROWBAR; take the BRUSH (A).
- Walk right.
- Play the HOP; earn the NET (B).

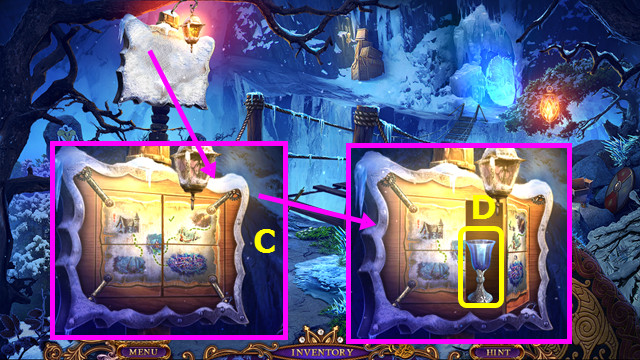
- Use the BRUSH; place the 3 PARTS OF MAP (C).
- Open the case; take the EMPTY GOBLET (D).
- Go forward.

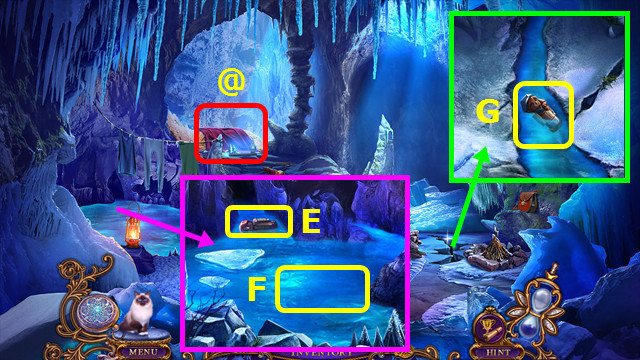
- Use the NET to take the ALEXANDER FIGURE (E).
- Use the EMPTY GOBLET to take the GOBLET WITH WATER (F).
- Use the GOBLET WITH WATER; take the KATE FIGURE (G).
- Select (@).

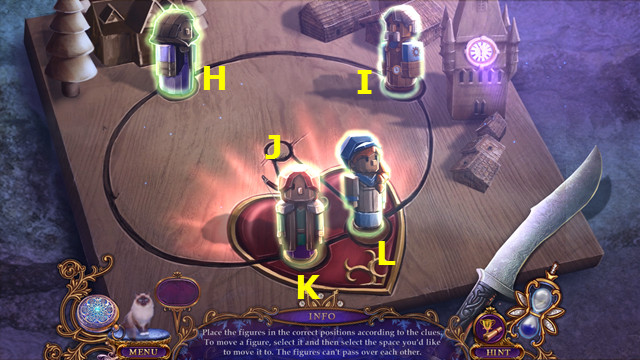
- Place the KATE FIGURE and ALEXANDER FIGURE.
- Solution HI-KH-JK-LK-IL-HI-KH-JK.
Chapter 4: The Dungeon Entrance

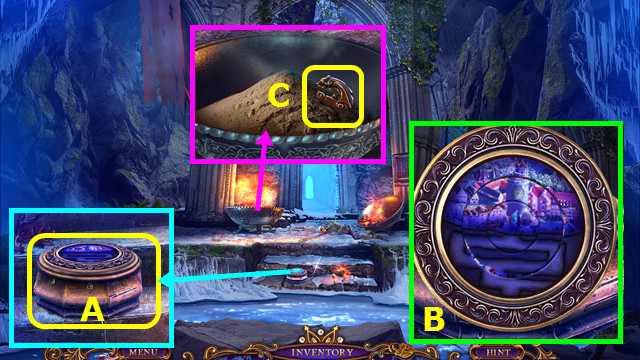
- Take the CASKET (A).
- Look at the CASKET (inventory); restore the picture (B) and take the RULER.
- Use the SAND; take the 1/2 FIGURE (C).
- Walk forward.

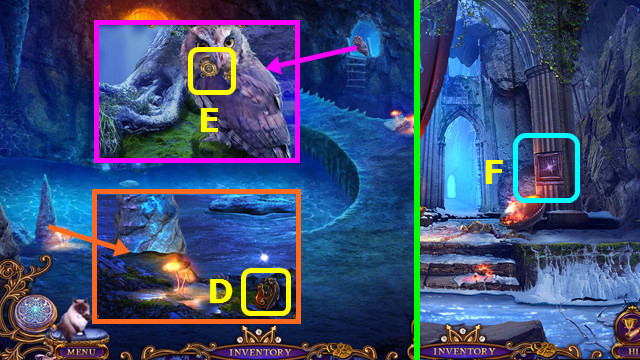
- Take the 2/2 FIGURE (D).
- Use the CLAPPER to take the 1/2 HEART PART (E).
- Walk down.
- Select (F).

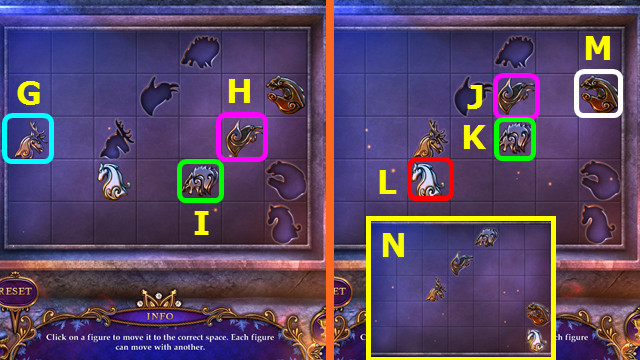
- Place the 2 FIGURES on the board.
- Select Gx2-H-I.
- Select J-Kx2-Lx4-Mx2.
- Final solution (N).
- Take the STICK and PANEL.
- Walk forward.

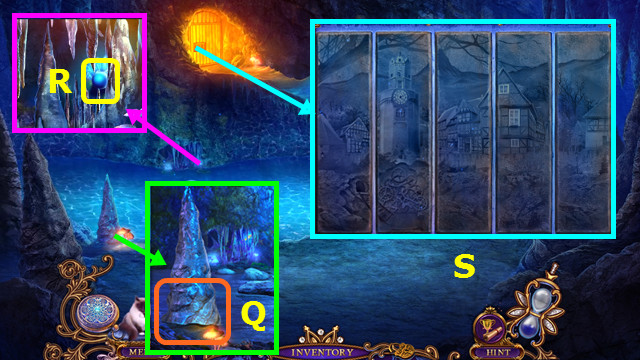
- Use the STICK (Q).
- Use MR. JENKINS to take the SPHERE (R).
- Place the PANEL; restore the picture (S).
- Go forward.

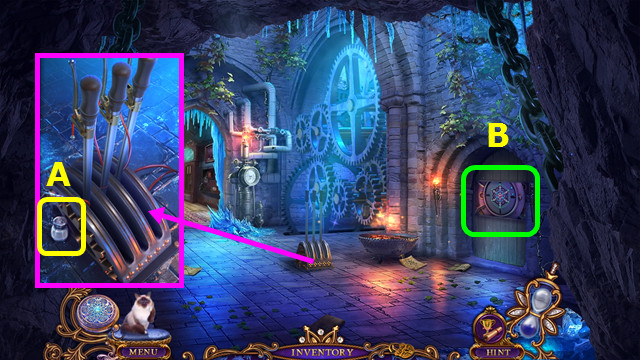
- Take the SALT (A).
- Try to walk forward.
- Select (B).

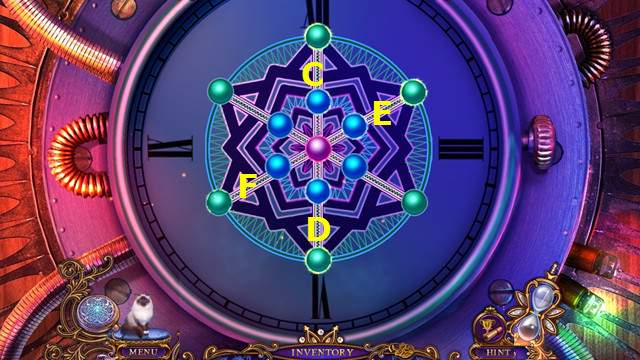
- Place the SPHERE.
- Select Cx2-Dx2-E-F-Ex2-Fx2.
- Walk right.

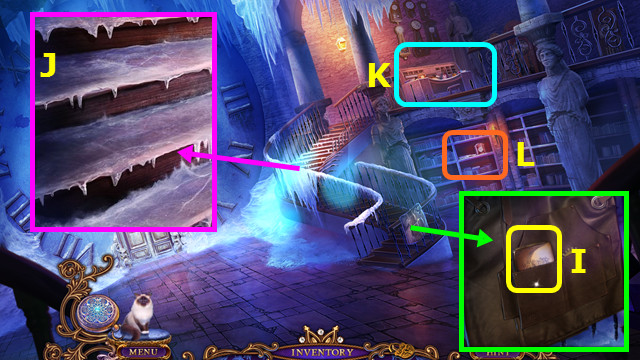
- Take the CIGARETTE CASE (I).
- Use the SALT (J).
- Play the HOP; earn the CORK (K).
- Select (L).

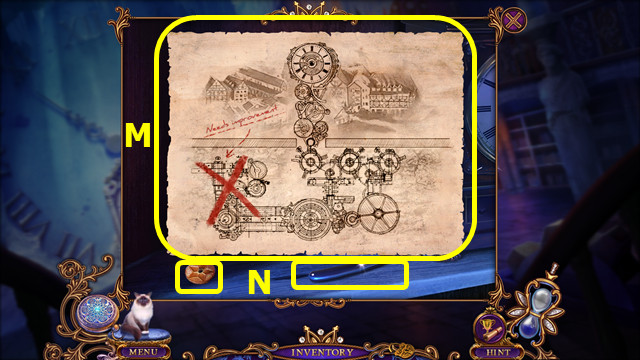
- Restore and take the diagram (M).
- Take the ADJUSTING KNOB and RAZOR (N).
- Walk down.

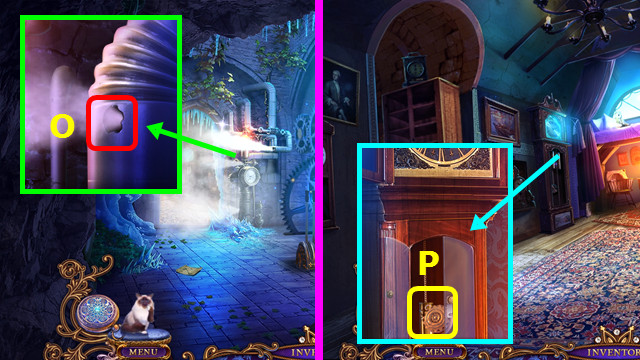
- Place the CORK (O).
- Walk forward.
- Use the RULER; take the 2/2 HEART PART (P).

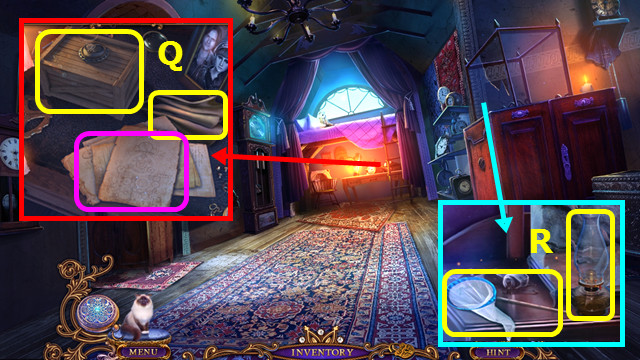
- Take the BOX, diagram, and SHAWL (Q).
- Combine the BOX and 2 HEART PARTS, enter 1-2-4-5, and take the photo, note, and 1/3 GEARS (inventory).
- Use the SHAWL; take the NET and LAMP (R).
- Combine the LAMP and ADJUSTING KNOB to make the LIT LAMP (inventory).

- Use the LIT LAMP; take the MONOCLE (S).
- Combine the CIGARETTE CASE and MONOCLE to make the MONOCLE WITH CODE (inventory).
- Walk down 2x.
- Use the NET to take the FISH (T).
- Give the FISH to MR. JENKINS (inventory).
- Walk forward and right.

- Play the HOP; earn the 2/3 GEARS (A).
- Turn the rings to the correct numeral in the order B-C-D.
- Push (E).
- Go forward.

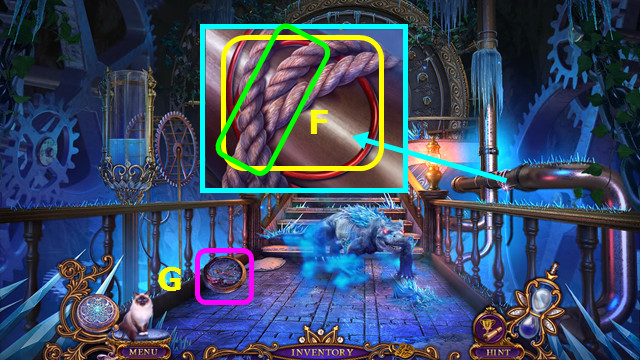
- Remove the rope and take the CABLE (F).
- Select (G).

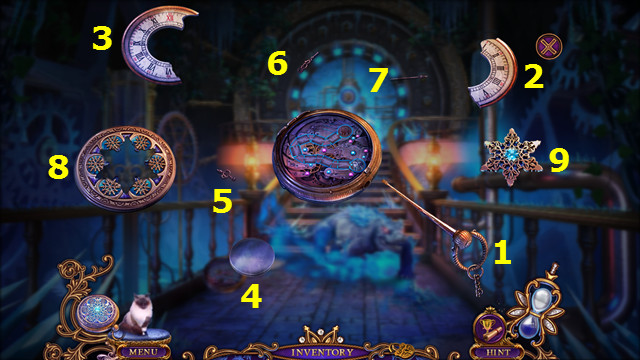
- Select the parts 1-8.
- Walk down 2x.

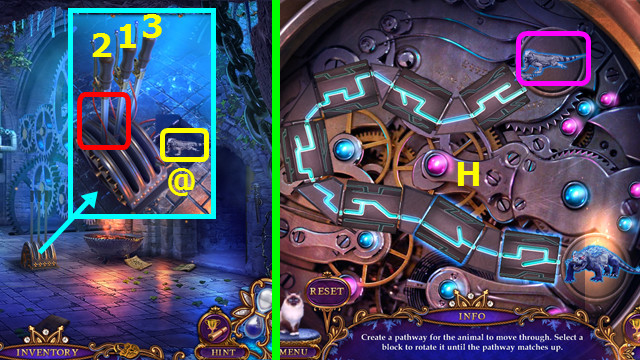
- Place the CABLE; select 1-3.
- Take the ANIMAL EMBLEM (@).
- Open the WATCH; place the ANIMAL EMBLEM and restore the path (H).
- Walk right and forward.

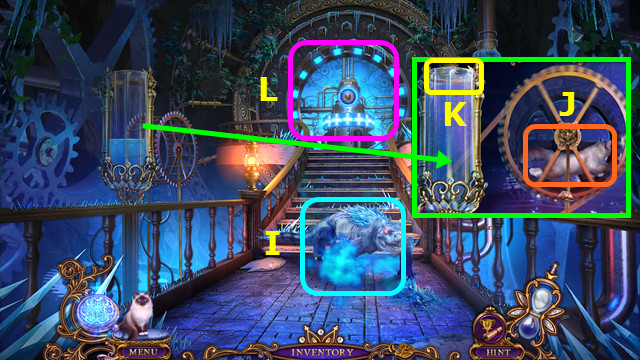
- Use the WATCH (I).
- Use MR. JENKINS (J).
- Take the 3/3 GEARS (K).
- Select (L).

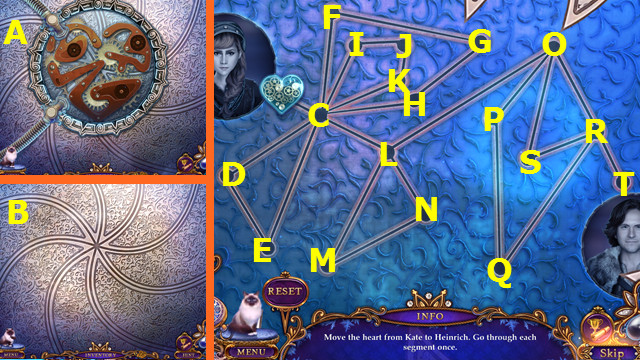
- Place the 3 GEARS (A).
- Open the door (B).
- Select C-D-E-C-F-G-H-C-I-J-K-C-L-M-N-L-O-P-Q-R-S-O-R-T.
- Walk forward.
Chapter 5: The City Street

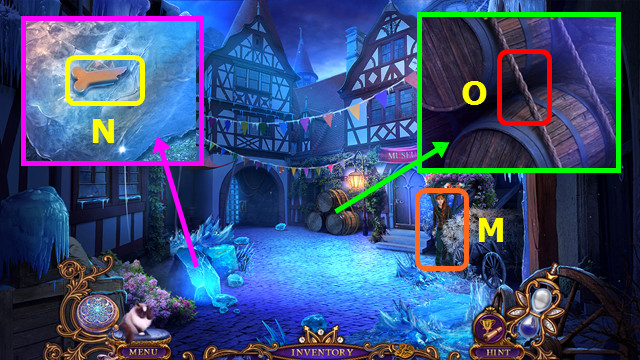
- Talk to Kate (M).
- Take the 1st PART OF BONE (N).
- Use the RAZOR (O).

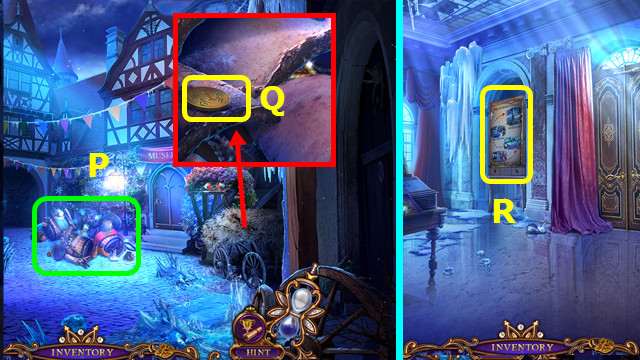
- Play the HOP; earn the KEY (P).
- Take the COIN (Q).
- Walk right.
- Take the map (R).

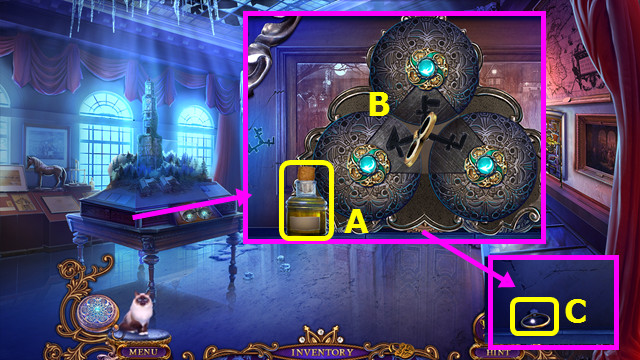
- Take the OIL and place the KEY (A).
- Set the buttons as shown (B).
- Take the DIAMOND RING (C).
- Walk down.

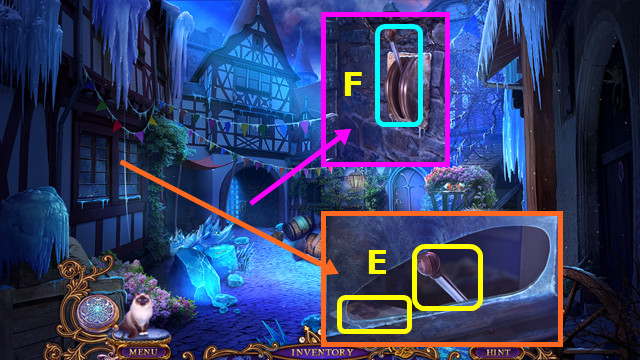
- Use the DIAMOND RING; take the note and LEVER (E).
- Place and pull the LEVER (F).
- Go forward.

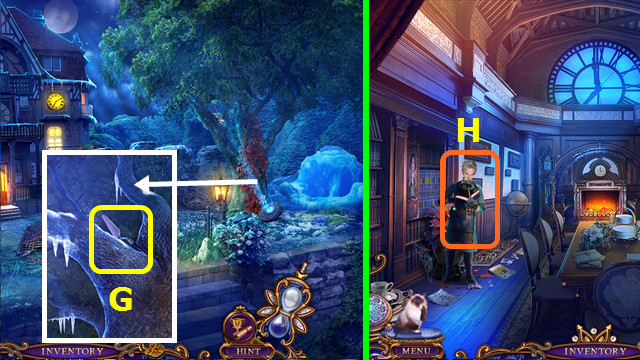
- Use MR. JENKINS to take the TROWEL (G).
- Go forward.
- Talk to Heinrich; earn the 1/4 CONTROL BUTTONS (H).

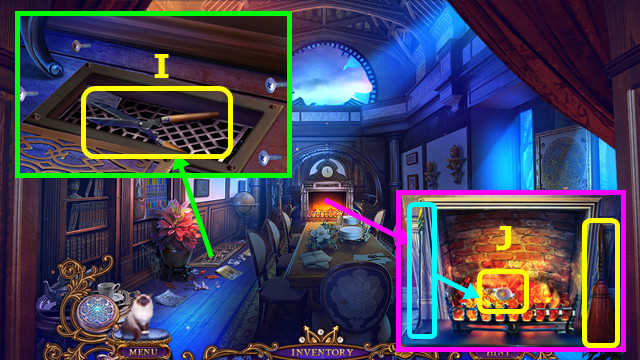
- Use the COIN 4x; remove the grate and take the GARDEN SHEARS (I).
- Take the BROOM; use the poker to take the MAGNIFYING LENS (J).
- Walk down.

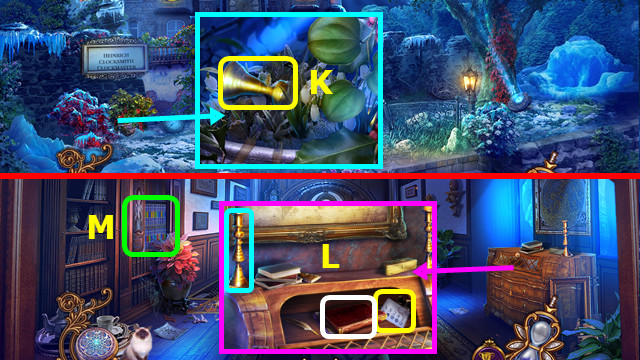
- Use the GARDEN SHEARS; take the CANDLESTICK (K).
- Walk forward.
- Place the CANDLESTICK; read the diary and take the INSTRUCTION (L).
- Select (M).

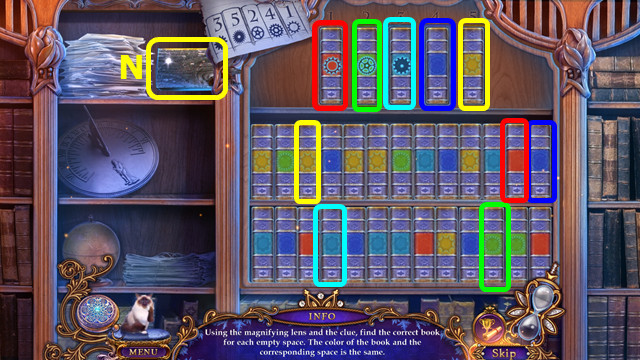
- Place the MAGNIFYING LENS.
- Move the books to the slots (color-coded).
- Take the BROKEN PLANK (N).
- Walk down.

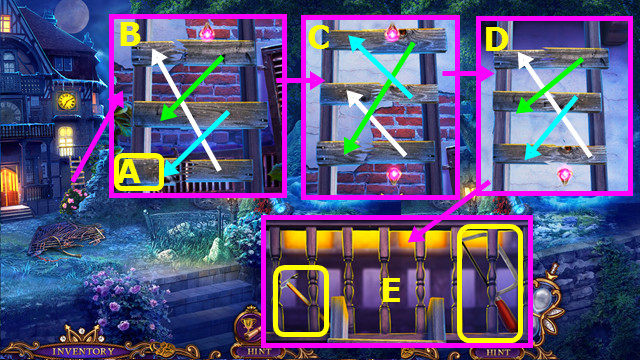
- Place the BROKEN PLANK (A).
- Swap the planks to the tier indicated; pan up (B).
- Swap the planks to the tier indicated; pan up (C).
- Swap the planks to the tier indicated; pan up (D).
- Take the ICE PICK and HAND SAW (E).

- Use the HAND SAW to take the CURVED METAL ROD (Q).
- Walk down.
- Play the HOP; earn the HANDLE (R).

- Use the ICE PICK to take the 2/4 CONTROL BUTTONS (S).
- Use the TROWEL; take the 3/4 CONTROL BUTTONS (T).
- Walk right.

- Use the HANDLE (A).
- Select the 6 pairs (color-coded).

- Take the VICE (B).
- Combine the CURVED METAL ROD and VICE to make the LONG METAL ROD (inventory).
- Use the LONG METAL ROD (C).
- Walk forward.
- Take the BAG and EMPTY CUP (D).

- Use the BROOM; take the 2nd PART OF BONE (E).
- Combine the 2 PARTS OF BONE to make the BONE (inventory).
- Give the BONE (F).
- Play the HOP; earn the PAPER CLIP (G).
- Combine the BAG and PAPER CLIP; take the HALF OF NUMBER (inventory).
- Walk right.

- Place the HALF OF NUMBER; restore the numbers and take the RUSTY MECHANICAL ARM (H).
- Combine the RUSTY MECHANICAL ARM and OIL to make the MECHANICAL ARM (inventory).
- Place the MECHANICAL ARM and open the panel; take the SPOKE and FAUCET (I).
- Place the SPOKE; take the CLOSED ACID (J).
- Walk down.

- Play the HOP; earn the 4/4 CONTROL BUTTONS (K).
- Place the FAUCET; take the ICE (L).
- Walk right.
- Select (M).

- Place the 4 CONTROL BUTTONS; select O-N-Ox3-Nx2-Qx2-Nx3-Ox4.
- Select (R).
- Walk forward.
Chapter 6: The Outside Tower

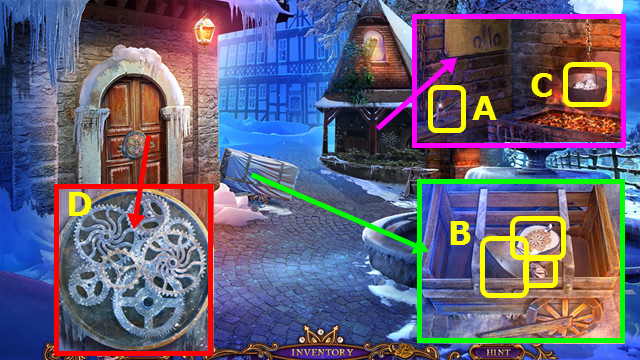
- Take the METAL SHEARS (A).
- Use the METAL SHEARS and remove the tarp; take the LEATHER POUCH, POT, and BELLOWS (B).
- Open the LEATHER POUCH to find the 1/3 WHITE CRYSTALS and SMALL CLOCK (inventory).
- Use the BELLOWS, POT, ICE, and EMPTY CUP to make the CUP OF HOT WATER (C).
- Remove the cover and use the CUP OF HOT WATER (D).
- Walk left.

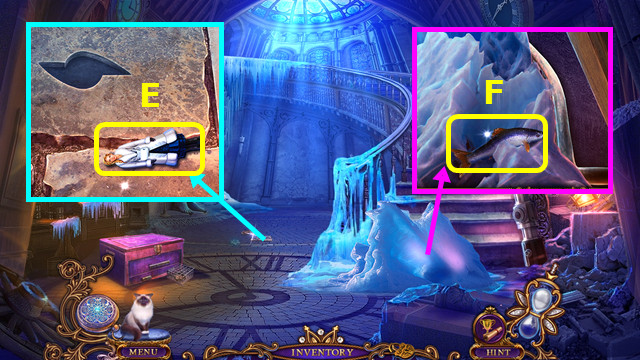
- Take the LEIA FIGURE (E).
- Take the FISH (F).
- Give the FISH to MR. JENKINS (inventory).
- Walk down.

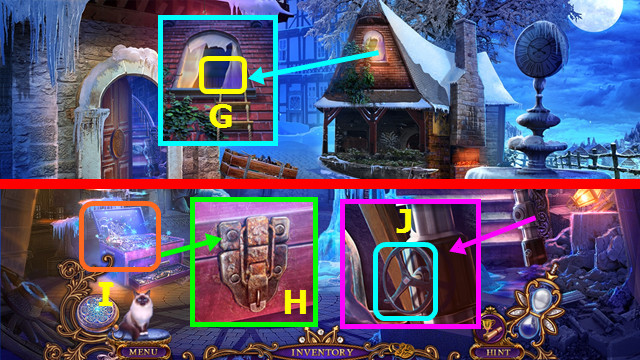
- Use Mr. JENKINS to take the CORKSCREW (G).
- Combine the CLOSED ACID and CORKSCREW to find the ACID (inventory).
- Walk left.
- Use the ACID (H).
- Play the HOP; earn the VALVE (I).
- Place and turn the VALVE (J).
- Go up the stairs.

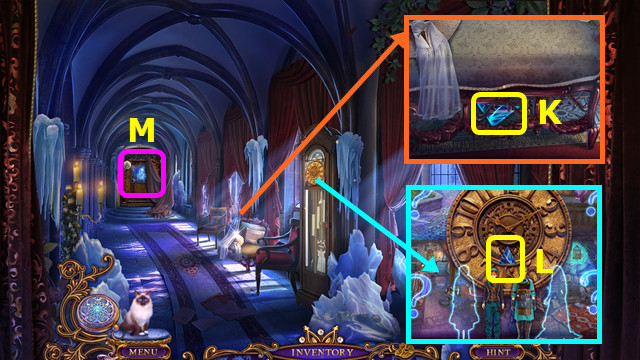
- Use MR. JENKINS to take the 1/2 ICE TRIANGLE (K).
- Take the 2/2 ICE TRIANGLE (L).
- Select (M).

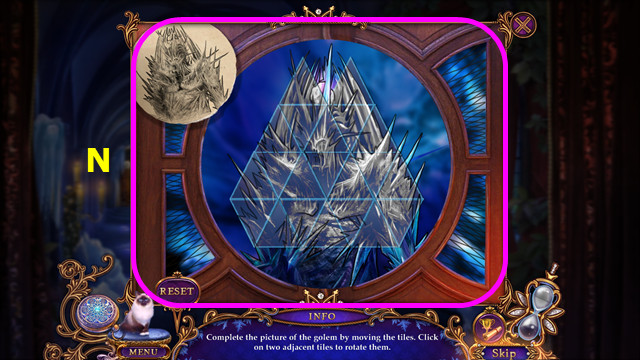
- Place the 2 ICE TRIANGLES.
- Restore the picture (N).
- Walk forward.

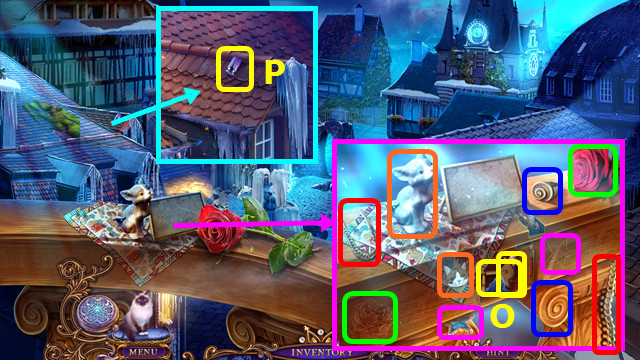
- Select the pairs (color-coded); take the WITCH FIGURE and FIGURED KEY (O).
- Use MR. JENKINS to take the WEIGHT (P).
- Walk down.

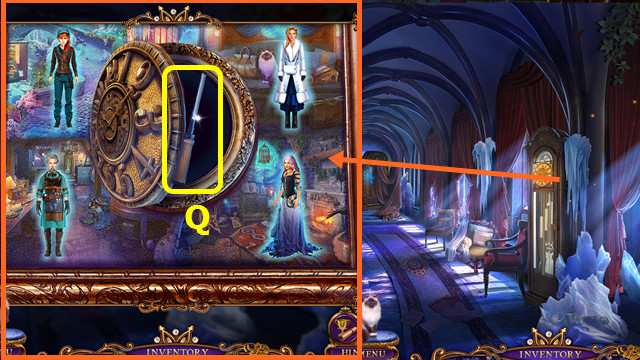
- Place the LEIA FIGURE and WITCH FIGURE.
- Move the figures as shown; take the CHISEL (Q).
- Walk down.

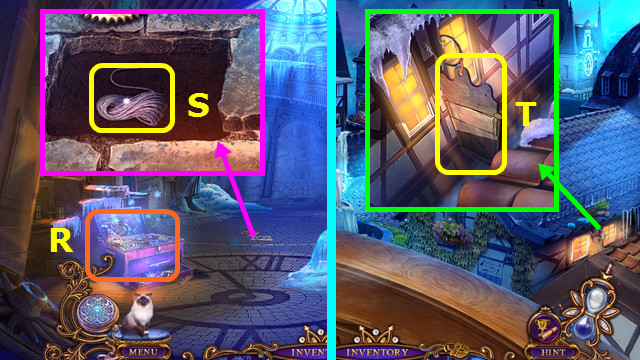
- Play the HOP; earn the RED CLOCK (R).
- Use the FIGURED KEY; take the ROPE (S).
- Combine the ROPE and WEIGHT to make the WEIGHTED ROPE (inventory).
- Go forward 2x.
- Use the WEIGHTED ROPE to take the SIGN (T).
- Remove the CHAIN from the SIGN (inventory).

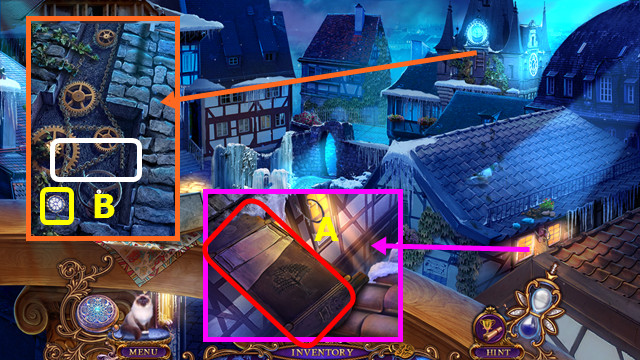
- Place the SIGN (A).
- Take the 2/3 WHITE CRYSTALS and place the CHAIN (B).

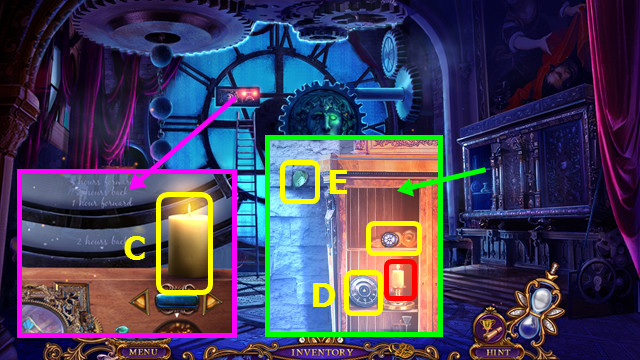
- Take the BURNING CANDLE (C).
- Place the BURNING CANDLE; take the 3/3 WHITE CRYSTALS and DIAL (D).
- Use the CHISEL to take the GREEN STONE (E).
- Combine the SMALL CLOCK and GREEN STONE to find the GREEN CLOCK (inventory).

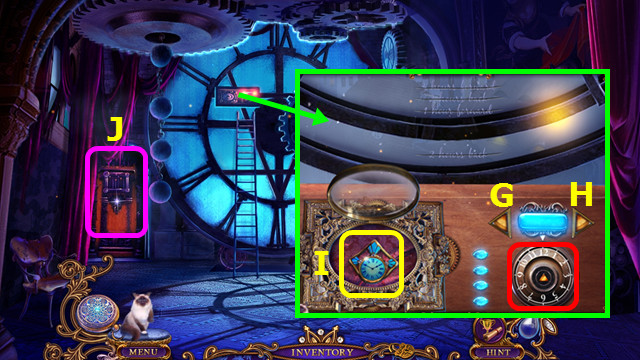
- Place the DIAL; press Hx3-Gx2-H-Gx2.
- Take the BLUE CLOCK (I).
- Select (J).

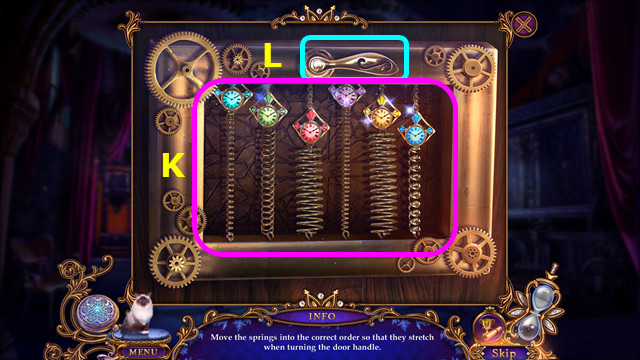
- Place the RED CLOCK, GREEN CLOCK, and BLUE CLOCK; swap the springs as shown (K).
- Select (L).
- Walk left.

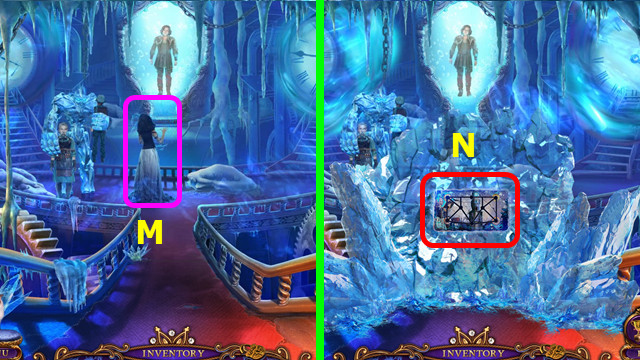
- Talk to Magdalena (M).
- Select (N).

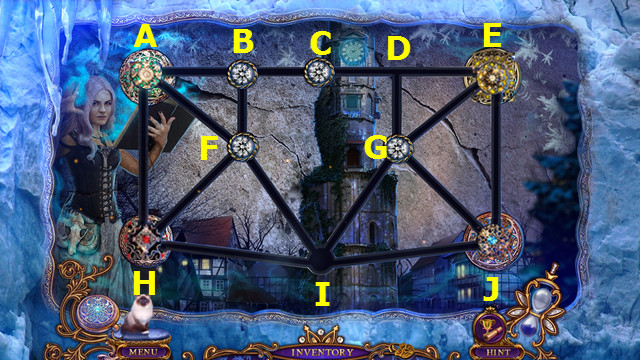
- Place the 3 WHITE CRYSTALS.
- Solution: CD-AB-BC-HA-AB-IH-HA-GI-IH-FI-IG-AF-HA-JI-EJ-DE-GD-IG-JI-IH-EJ-DE.
- Congratulations! You have completed Ominous Objects: Trail of Time!


 The Crop Circles Mystery Walkthrough, Guide, & Tips
 Life Quest™ Walkthrough, Guide, & Tips
 The Sultan's Labyrinth: A Royal Sacrifice Walkthrough, Guide, & Tips
 Mystery Trackers: Winterpoint Tragedy Walkthrough, Guide, & Tips
 House M.D. Walkthrough, Guide, & Tips