Pathfinders: Lost at Sea Walkthrough, Guide, & Tips
Pathfinders: Lost at Sea Walkthrough

Welcome to the Pathfinders: Lost At Sea Walkthrough!
Follow a mysterious signal to the middle of the Atlantic Ocean with Professor John Darby and explore an island that has magically appeared!
Whether you use this document as a reference when things get difficult or as a road map to get you from beginning to end, we’re pretty sure you’ll find what you’re looking for here.
This document contains a complete Pathfinders: Lost At Sea game walkthrough featuring annotated screenshots from actual gameplay!
We hope you find this information useful as you play your way through the game. Use the walkthrough menu below to quickly jump to whatever stage of the game you need help with.
Remember to visit the Big Fish Games Forums if you find you need more help. Have fun!
This walkthrough was created by Philip J.
General Tips
- There are unlimited hints, and they recharge in a reasonable amount of time.
- Areas that sparkle should be investigated.
- There are no time limits of any sort.
- There are no chapters; the game moves at a scene to scene pace.
- Five consecutive incorrect clicks will cause your mouse cursor to travel in a spiraling motion for a few seconds.
- You can skip any puzzle without consequence by pressing the Skip button. You will have to wait until it is fully charged to use it again.
Mini-screenshots

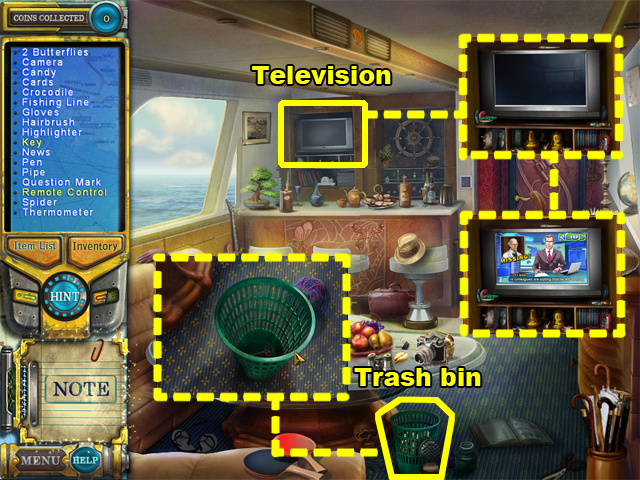
- Mini-screenshots are highlighted with a yellow dotted line.
- Notice the mini-screenshot that is connected to the TRASH BIN via a dotted line. It is displaying what the TRASH BIN will look like if you zoom into it.
- When multiple mini-screenshots are connected to each other, it means that they are directly related.
- In this case, the TELEVISION is connected to 2 mini-screenshots. The first is displaying what the TELEVISION looks like after you zoom in. The second is displaying what the TELEVISION will look like after you turn it on.
- Follow the course of the dotted line to discover in what order the mini-screenshots should be viewed. For example, this time the order was from top to bottom, because of the course of the dotted line.
Scenes

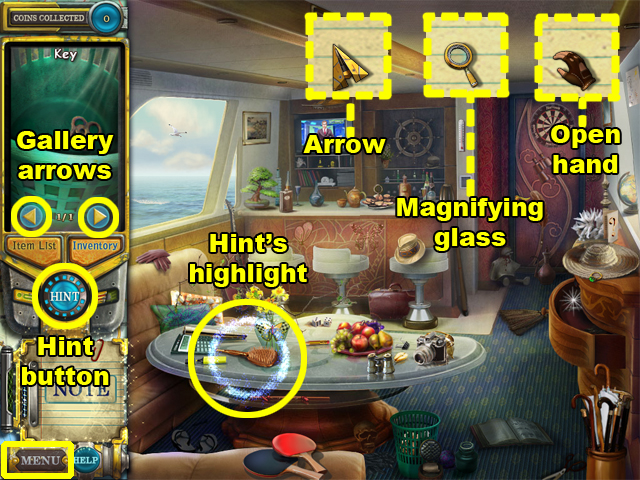
- The cursor in this game has 3 different forms; an arrow, an open hand, and a magnifying glass. The cursor will change its appearance when it is hovered over certain action items, or areas, in a scene.
- The arrow cursor appears when there is nothing suspicious in the area that your mouse is focused on. However, you should still be on the lookout for hidden items, as they will not affect the cursor.
- The magnifying glass indicates that the area can be zoomed into. To zoom out, click on the red “X” in the upper right corner of the window that appears after you have zoomed in.
- The open hand cursor indicates that you can physically interact with the current object, or area. In some cases, an item from your inventory is needed for that particular interaction.
- Click on the Inventory button on your phone to access the inventory list gallery.
- While viewing the gallery, you can use the 2 arrow buttons to scroll through the list of items in your possession. The arrow buttons are located directly above the Inventory button.
- When the Hint button is pressed, an item from your item list will be highlighted for a few seconds.
First Coin
Scene 1

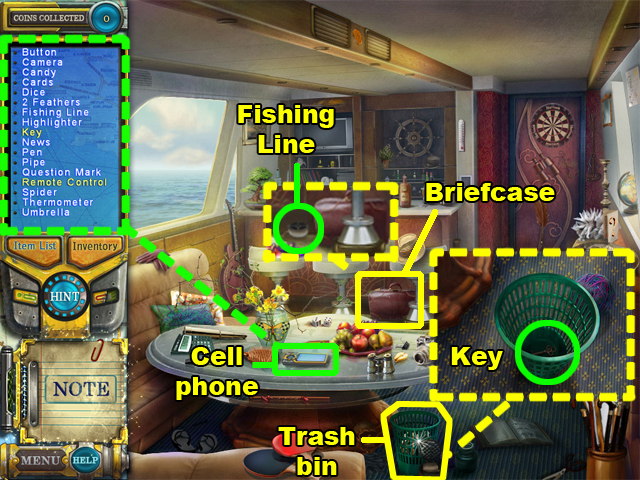
- Collect the CELL PHONE on the table in the center of the room. Your CELL PHONE will go to the left side of your screen, and display an item list.
- Afterwards, you will receive a message asking if you would like a tutorial. If it is your first time playing this game, it is recommended that you use the tutorial for this scene.
- Move the briefcase, and then click on the FISHING LINE behind it. The briefcase is located in the center of this scene.
- Take a closer look at the green trash bin at the bottom of the room.
- Collect the KEY at the bottom of the trash bin.

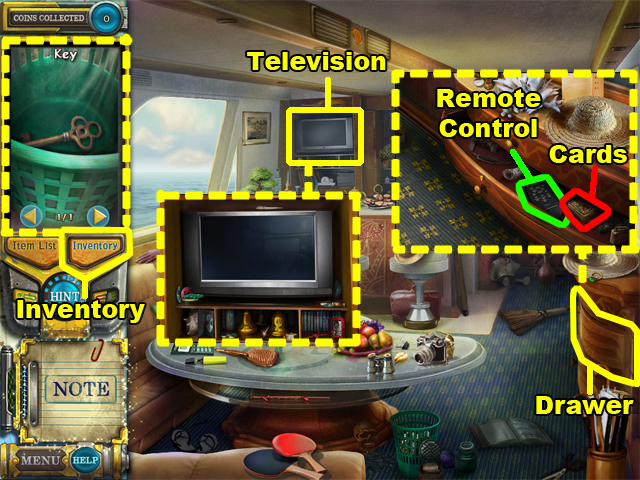
- Click on the Inventory tab, under your item list, to view your inventory.
- Click on the picture of the KEY displayed in your inventory to attach it to your cursor.
- Use the KEY on the second drawer of the dresser to open it. The dresser is located above the bottom right corner of this scene.
- Take a closer look at the drawer you previously opened.
- Collect the REMOTE CONTROL inside the drawer. Do not click on the deck of CARDS just yet.
- Take a closer look at the television above the center of this scene.
- Use the REMOTE CONTROL from your inventory on the television to turn it on.
- Collect the CARDS from the drawer you opened earlier to initiate the mini-game.
Puzzle 1

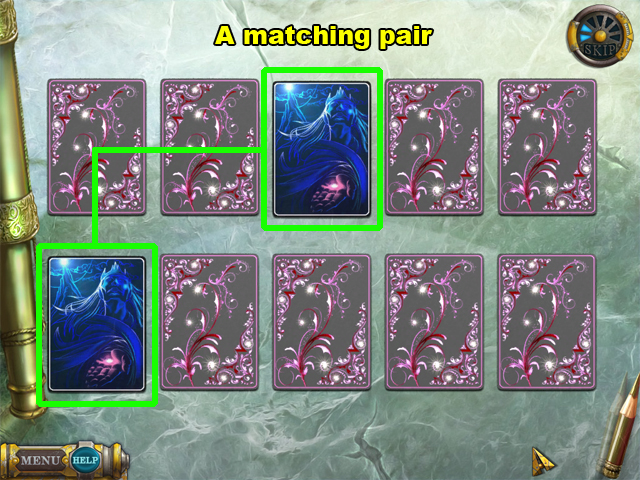
- Pair up the matching cards to complete this mini-game.
- Click on a card to reveal the picture it is hiding on its reverse side.
- You can only select 2 cards at a time. If the pair of cards you select does not match, the cards will swap positions. Otherwise, the pair will be removed from the game.
Scene 2

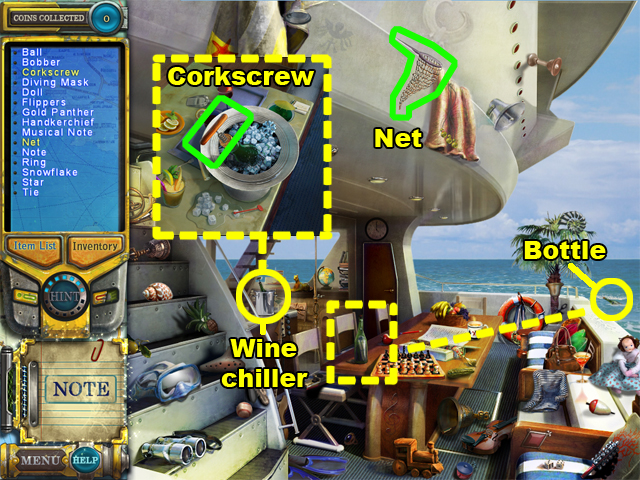
- Collect the NET from above the center of this scene.
- Use the NET on the bottle in the ocean to transfer it to the table in the center of this scene. The bottle floating in the ocean is above the bottom right corner of this scene.
- Take a closer look at the wine chiller, located to the left of the center in this scene.
- Collect the CORKSCREW attached to the top of the wine bottle.

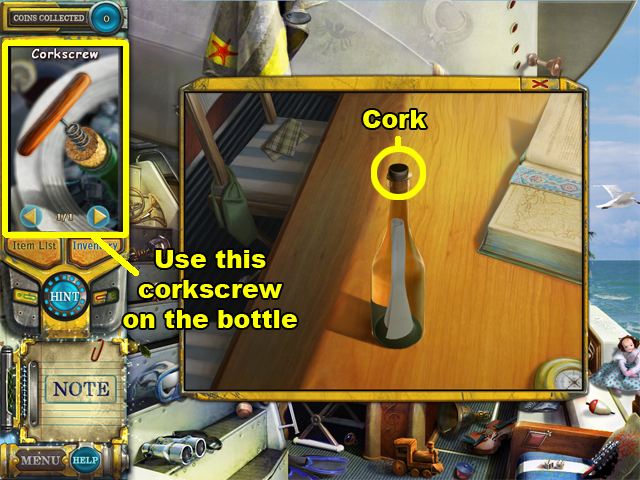
- Use the CORKSCREW on the cork of the bottle on the table to remove it.
- Click on the paper in the bottle once the cork has been removed to initiate the puzzle.
Puzzle 2

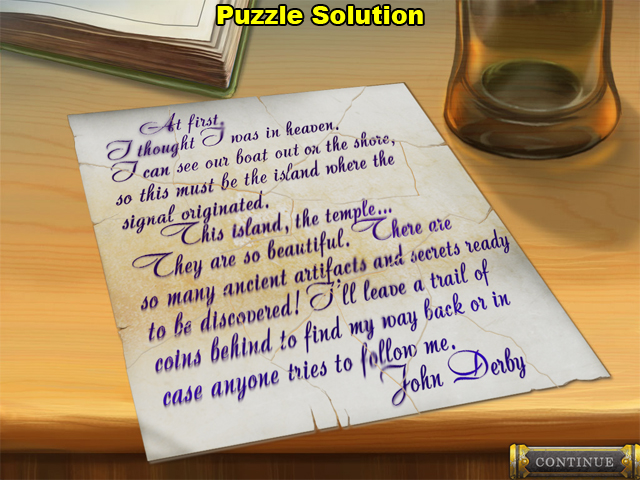
- Assemble the note by placing the pieces into their correct positions within the outline of this puzzle.
- Left-click on a puzzle piece without releasing the left mouse button to carry it. Release the left mouse button after you have picked up a puzzle piece to drop it.
- Right-click while carrying a puzzle piece to rotate it.
Scene 3

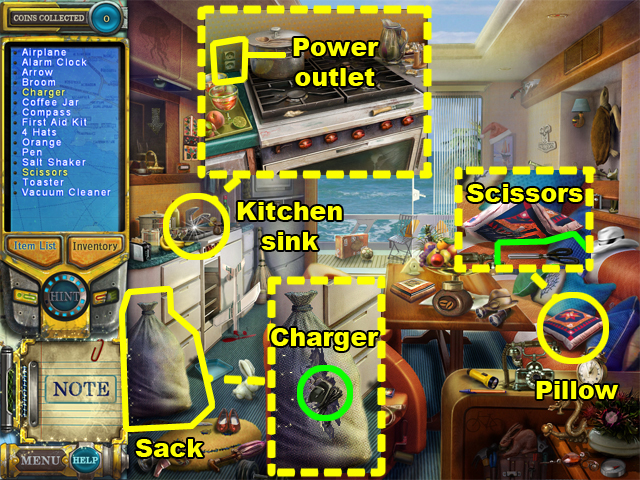
- Click on the pillow to reveal the pair of SCISSORS underneath it. The pillow is located above the bottom right corner of this scene.
- Collect the SCISSORS after moving the pillow.
- Use the SCISSORS to cut open the sack in the lower left corner of this scene.
- Collect the CHARGER within the torn area of the sack.
- Take a closer look at the kitchen sink.
- Use the CHARGER on the power outlet to charge your phone. The power outlet is beside the pot on the stove.
- When your phone is fully charged, click on it to collect it.
Scene 4

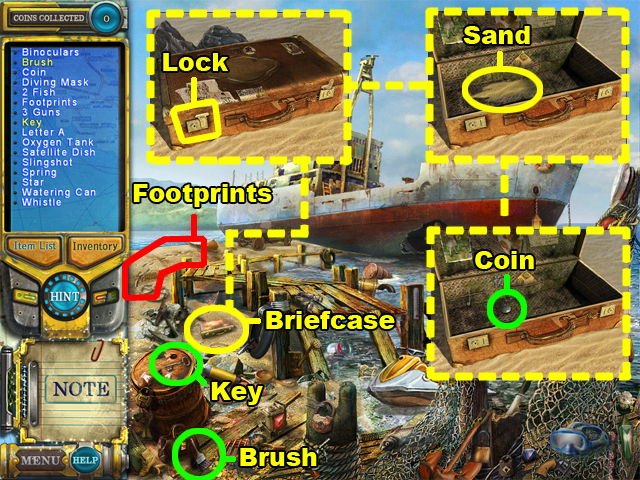
- Collect the KEY and the BRUSH. These 2 items are located in the lower left corner of this scene.
- Take a closer look at the briefcase above the bottom left corner of this scene.
- Use the KEY on the left lock of the briefcase to open it.
- Use the BRUSH on the pile of sand in the briefcase to uncover the COIN.
- Collect the COIN that was buried under the sand.
- Take a closer look at the FOOTPRINTS to initiate a puzzle. The FOOTPRINTS are in the center of the left side of this scene.
Puzzle 3

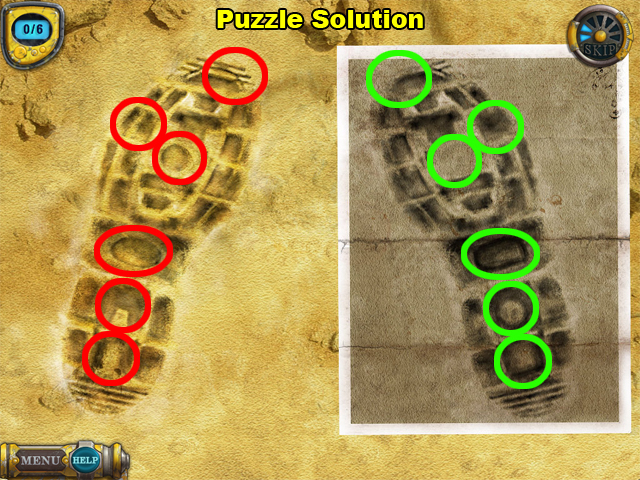
- Find the 6 differences between the footprints.
- The differences of both footprints have been highlighted in this screenshot.
- Click on the differences to highlight them on your screen.
Second Coin
Scene 1

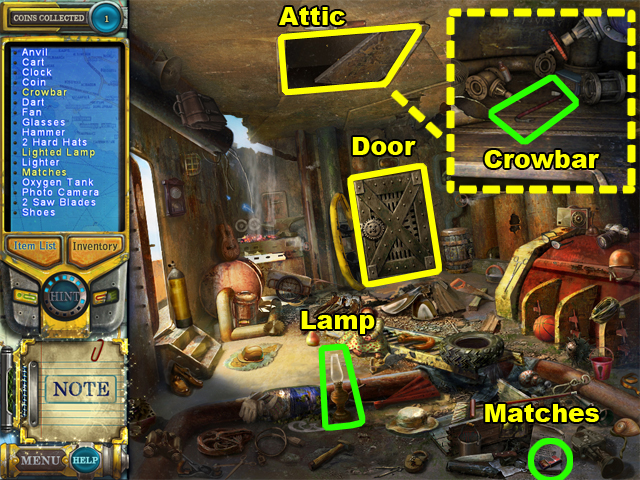
- Collect the MATCHES in the bottom right corner of this scene.
- Use the MATCHES on the lamp to create a LIGHTED LAMP. The lamp is located below the center of this scene.
- Collect the LIGHTED LAMP.
- Click on the open attic in the ceiling to take a closer look.
- Use the LIGHTED LAMP in the attic to illuminate the room.
- Collect the CROWBAR inside of the attic.
- Use the CROWBAR on the iron door to open it. The door is located in the center of this scene.

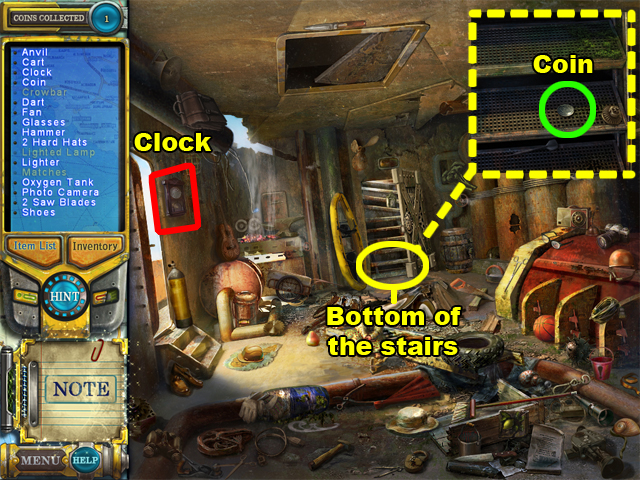
- Take a closer look at the bottom of the stairs behind the iron door.
- Collect the silver COIN.
- Click on the CLOCK to initiate the next puzzle. The CLOCK is by the door in the left side of this room.
Puzzle 1

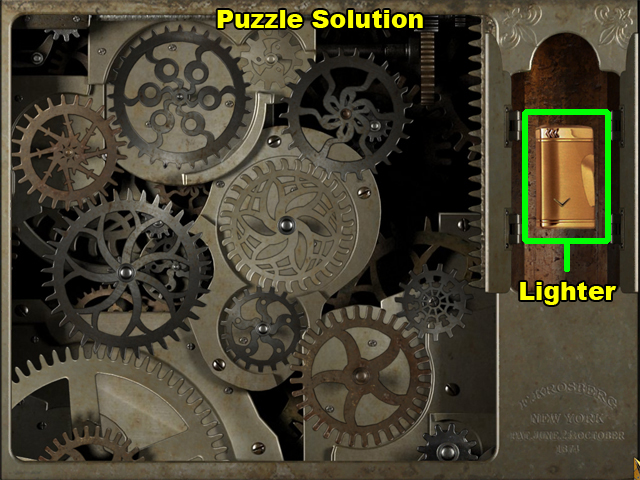
- Place each gear into its proper position to fix the clock.
- The gear in the bottom left corner will rotate all of the other gears in this puzzle. Begin by placing the correct gear onto the bolt directly above the rotating gear.
- There are round bolts and grooves that serve as hints to where each gear should go. Some bolts have a color that matches the color of its corresponding gear.
- This screenshot shows where each of the gears belongs.
- Collect the gold LIGHTER after you have completed this puzzle.
Third Coin
Scene 1

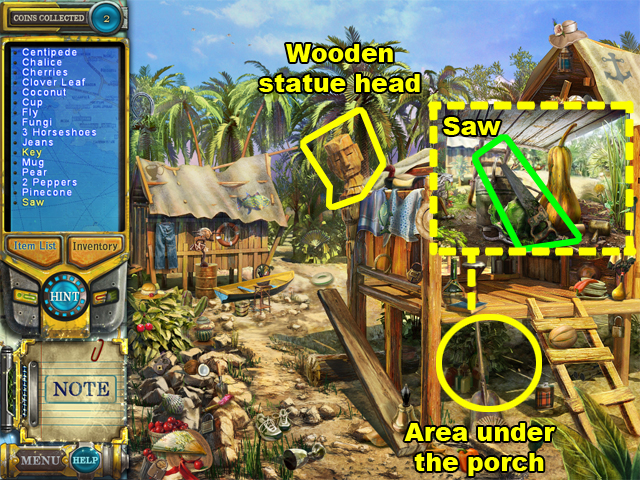
- Take a closer look at the area below the porch of the house to the right.
- Collect the SAW underneath the porch.
- Use the SAW on the wooden statue head to saw it off. The head is located near the center of this scene.
- The head will fall onto the plank below it and catapult an item through the roof of the house in the distance.

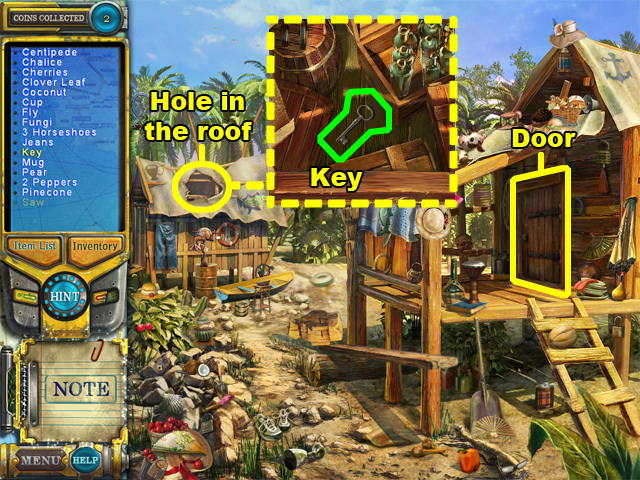
- Take a closer look at the hole that was made in the roof of the house.
- Collect the KEY inside of the house.
- Use the KEY on the door of the house to the right.
Scene 2

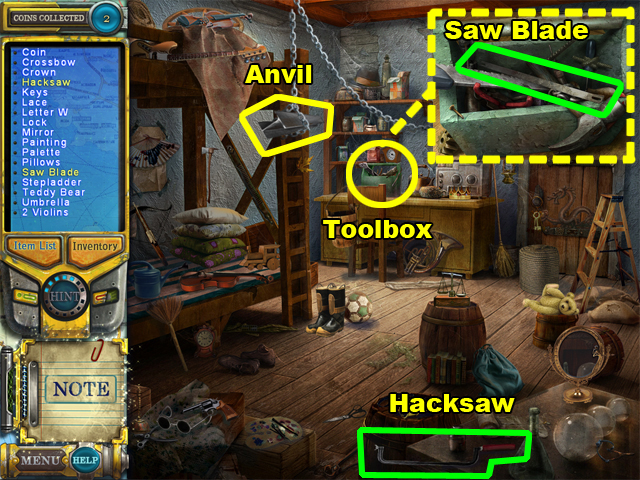
- Take a closer look at the toolbox. The toolbox is on the desk near the center of this scene.
- Collect the SAW BLADE inside of the toolbox.
- Use the SAW BLADE on the bladeless HACKSAW to create a HACKSAW. This item is at the bottom of the room.
- Use the HACKSAW on the anvil hanging from the ceiling.
- The anvil will crash through the wooden floor below it.

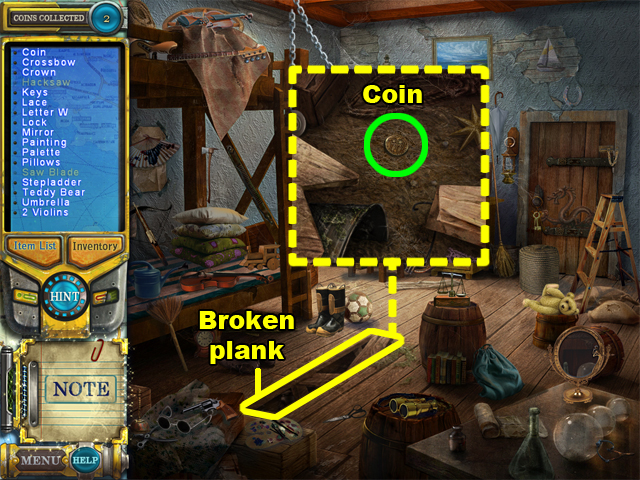
- Take a closer look at the wooden planks through which the anvil fell.
- Collect the COIN inside.
Fourth Coin
Scene 1

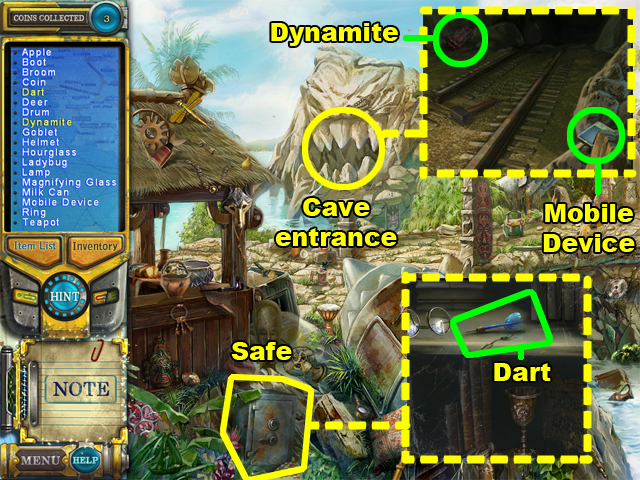
- Take a closer look at the cave entrance near the center of this scene.
- Collect the DYNAMITE; then click on the MOBILE DEVICE. A lizard will appear and take the device away.
- Use the DYNAMITE on the safe to blow a hole through its door. The safe is located near the bottom left corner of this scene.
- Take a closer look at the damaged safe.
- Collect the DART inside of the safe.

- Use the DART on the black and white dartboard.
- When the board falls, take a closer look at the stone figure it was hanging on earlier.
- Click on the stone figure to initiate the puzzle.
Puzzle 1

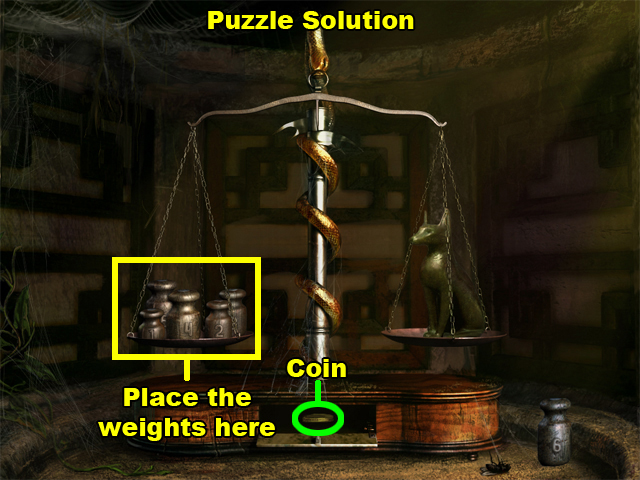
- Place the numbered weights, from the bottom of the screen, on the left scale until both of the scales are perfectly balanced.
- Place all of the weights on the left scale, except for weight number 6, to complete this puzzle.
- A secret compartment will open at the bottom of the scales.
- Collect the COIN in the compartment.
Fifth Coin
Scene 1


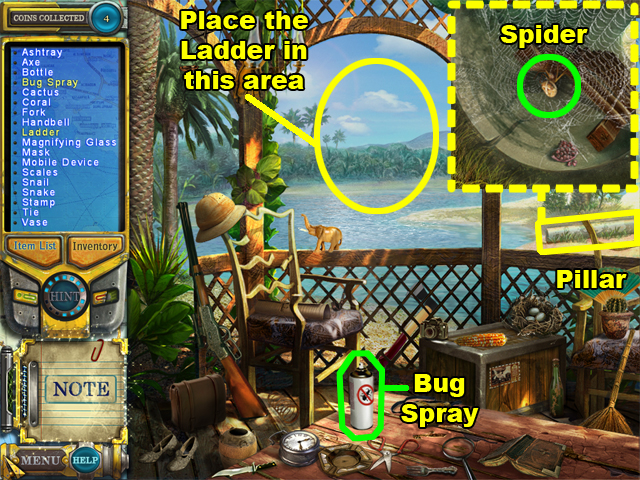
- Collect the BUG SPRAY at the bottom of this scene.
- Take a closer look at the fallen pillar in the sand.
- Use the BUG SPRAY on the spider occupying the web to make it move. After the spider moves, the spider web will disappear.
- Collect the LADDER inside of the pillar.
- Use the LADDER in the area above the balcony near the center of this scene.

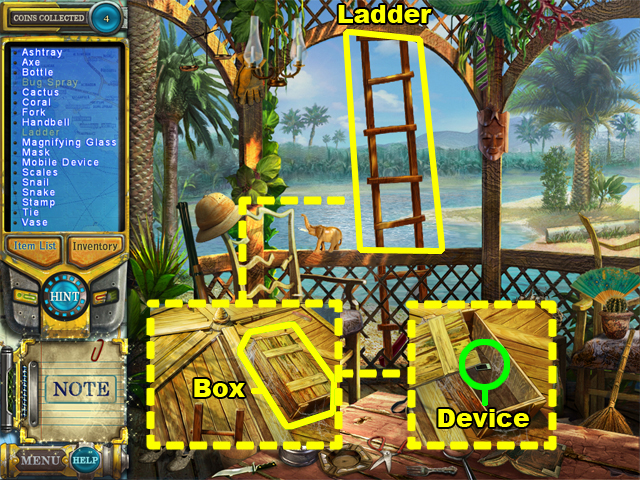
- Take a closer look at the upper half of the LADDER.
- Click on the box at the top of the ladder to open it.
- Collect the MOBILE DEVICE inside the box.
Scene 2

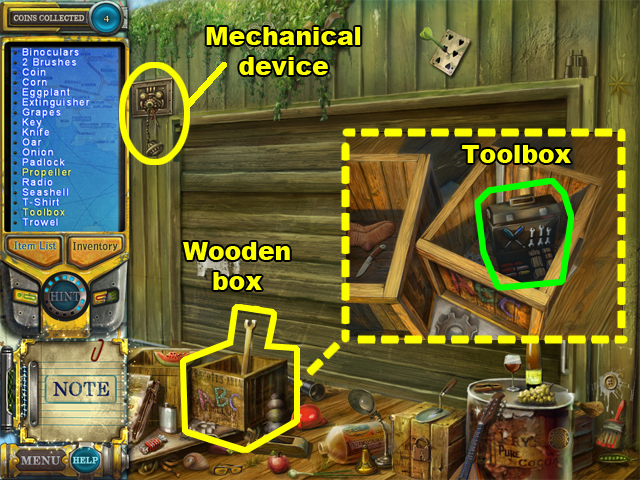
- Take a closer look at the wooden box near the lower left corner of this scene.
- Collect the TOOLBOX inside of the wooden box.
- Use the TOOLBOX on the mechanical device to open the garage door. The mechanical device is located in the upper left corner of this scene.

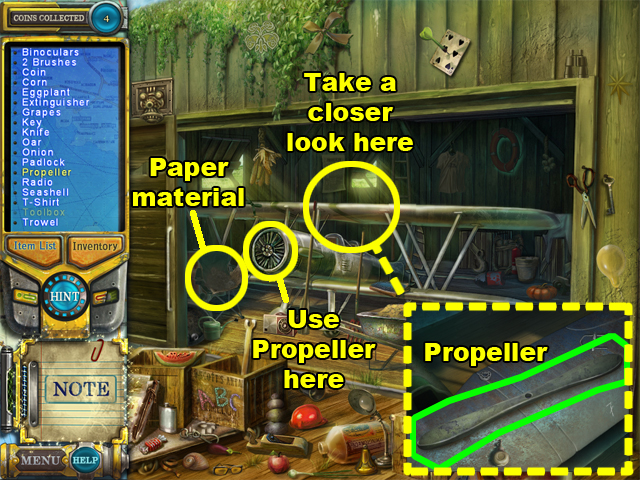
- Take a closer look at the center of the biplane’s upper wing.
- Collect the PROPELLER on the upper wing.
- Use the PROPELLER on the front of the biplane to make it spin.
- The propeller will blow the paper material off of the chair in front of it.
- Collect the gold COIN that was underneath the paper material. This item is on the chair to the left of the PROPELLER.
Sixth Coin
Scene 1

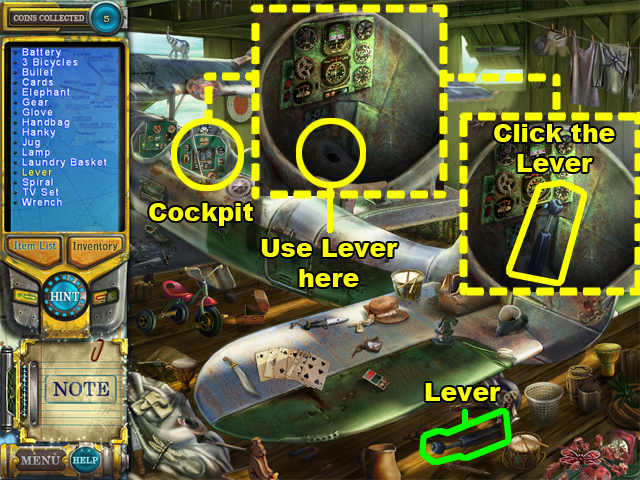
- Collect the LEVER at the bottom of this scene.
- Take a closer look at the cockpit towards the back of the biplane.
- Place the LEVER into the slot below the control panel.
- Click on the LEVER to open the small compartment on the side of the biplane.

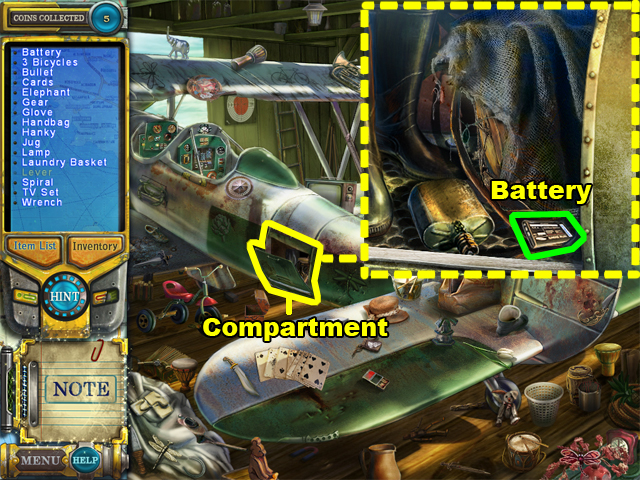
- Take a closer look at the compartment.
- Collect the BATTERY inside of the compartment.
- A message from your PDA will appear on your screen; click your mouse to read through the messages.
Scene 2

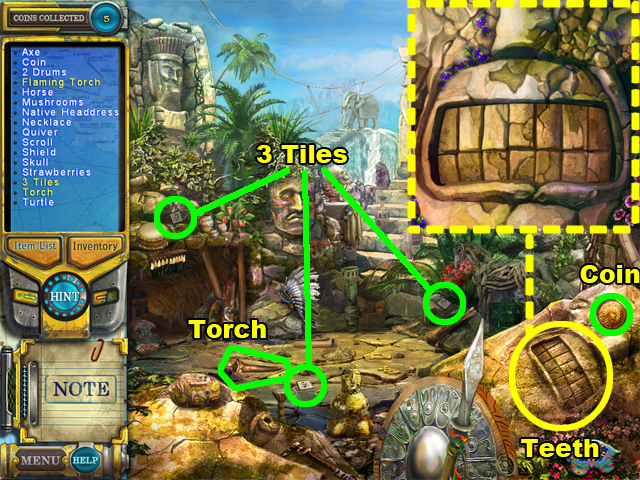
- Collect the COIN above the lower right corner of this scene.
- Collect the 3 TILES scattered around this scene. There are 2 near the center of the lower half of this scene, and 1 above the cave entrance on the left side of this scene.
- Collect the TORCH near the lower left corner of this scene.
- Click on the giant stone statue’s teeth for a closer look.
- You will have to click on its teeth in a specific order to open its mouth.
- This puzzle is special, because the pattern will always be unique. You can select random teeth, or try to find the hidden pattern.
- Once all of the teeth have been retracted, fire will begin to blaze from the mouth of the statue.

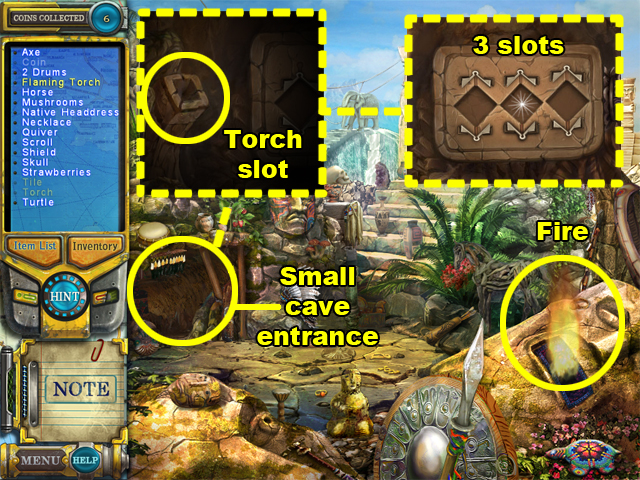
- Use the TORCH on the fire to create a FLAMING TORCH.
- Take a closer look at the small cave entrance above the lower left corner of this scene.
- Place the FLAMING TORCH into the torch slot to light the room.
- Place the 3 TILES into the 3 diamond-shaped slots in any order.

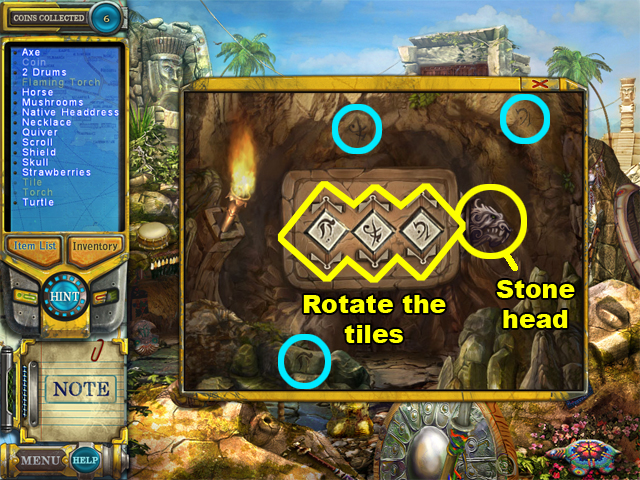
- Rotate the TILES so that they match the 3 symbols hidden around the cave.
- This screenshot shows the tiles correctly rotated; however, you can also refer to the 3 symbols which are highlighted in blue.
- After the TILES have been rotated correctly, click on the stone head to open the front gates of this location. The stone head is on the right side of the puzzle.
Seventh Coin
Scene 1

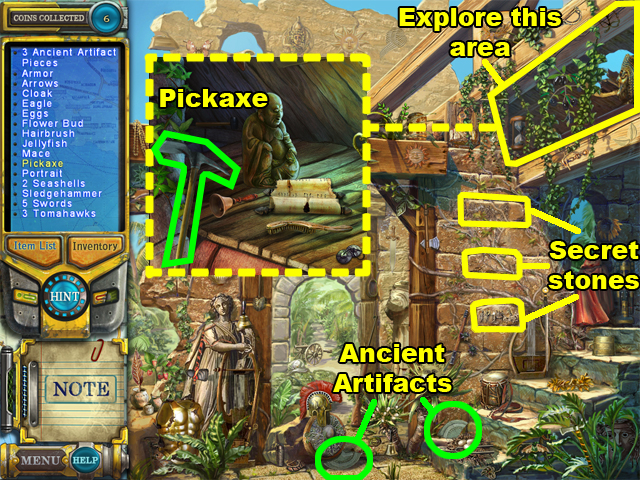
- Collect the 2 ANCIENT ARTIFACTS at the bottom of this scene.
- Pull the 3 secret stones out of the wall in the right side of this scene. The 3 stones cannot be seen, but your mouse cursor will react to them by changing into a hand icon.
- Take a closer look at the area above the secret stones: the upper right corner of this scene.
- Collect the PICKAXE from that area.

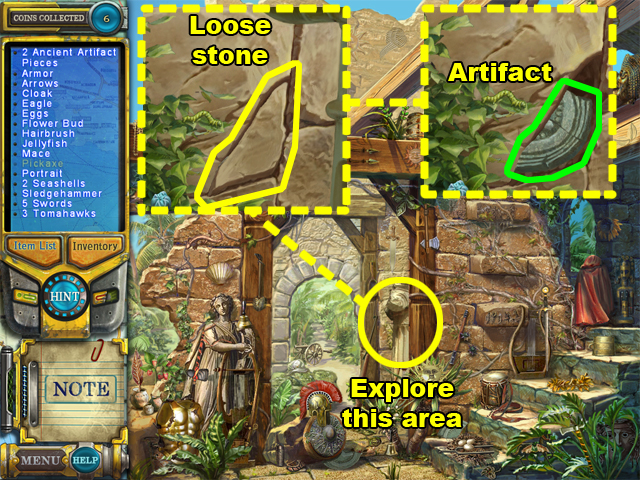
- Explore the area to the left of the lowest secret stone.
- Use the PICKAXE on the loose stone to remove it. The loose stone is indistinguishable from the other stones, but your mouse cursor will react to it.
- Collect the ARTIFACT that was hidden behind the removed stone.
Scene 2

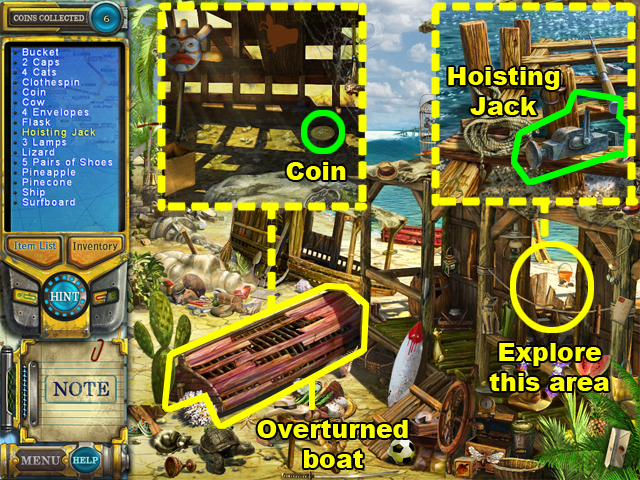
- Explore the area under the doorway near the right side of this scene.
- Collect the HOISTING JACK.
- Use the HOISTING JACK on the red overturned boat to lift it slightly off of the ground.
- Take a closer look at the overturned boat.
- Collect the COIN under the boat.
Eighth Coin
Scene 1

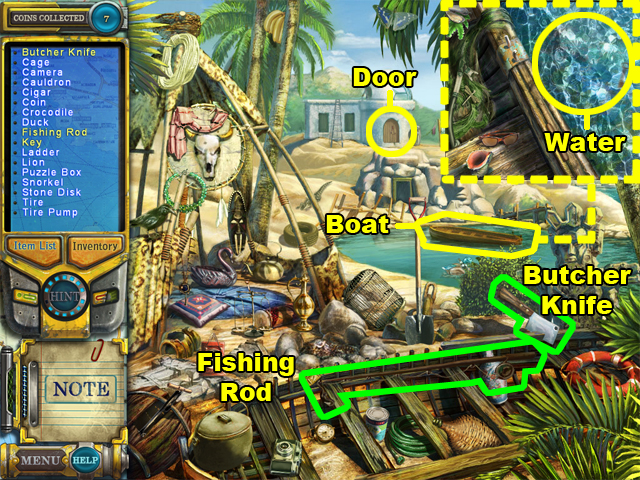
- Collect the FISHING ROD and the BUTCHER KNIFE. These 2 items are near the bottom right corner of this scene.
- Take a closer look at the boat in the water.
- Use the FISHING ROD in the water beside the boat to collect the KEY.
- Use the key on the door in the distance to open it. The door is above the center of this scene.

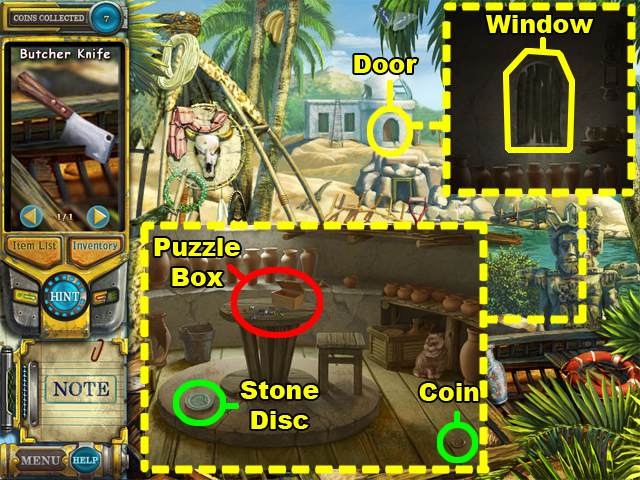
- Take a closer look at the door you opened earlier.
- Use the BUTCHER KNIFE on the board blocking the window 3 times to break it down.
- Collect the COIN and the STONE DISC inside of the room.
- Click on the PUZZLE BOX to initiate the puzzle. This item is on the table.
Puzzle 1

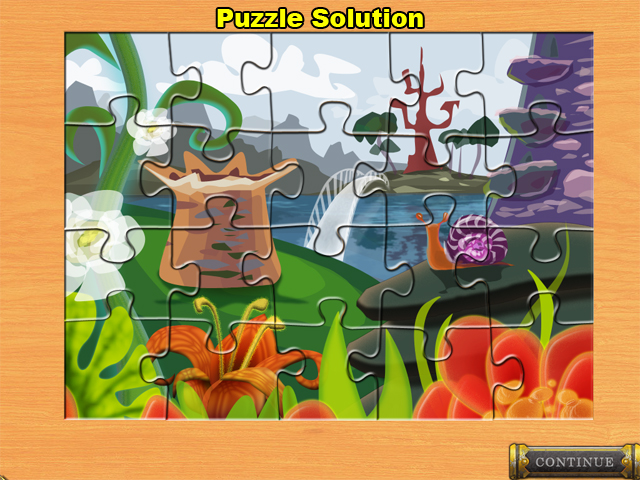
- Reassemble the puzzle pieces into their proper positions. Similar to one of the previous puzzles, you can rotate a piece via right-clicking.
Ninth Coin
Scene 1

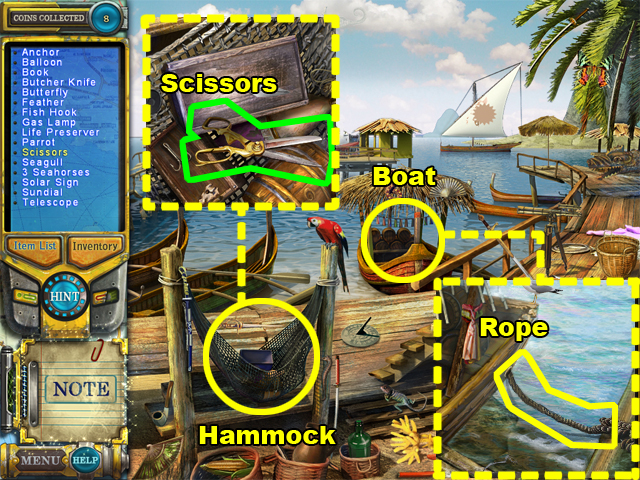
- Take a closer look at the hammock in the left side of this scene.
- Collect the gold SCISSORS in the hammock.
- Take a closer look at the sheltered boat docked in the port.
- Use the SCISSORS to cut the rope connecting the boat to the dock post.
Scene 2

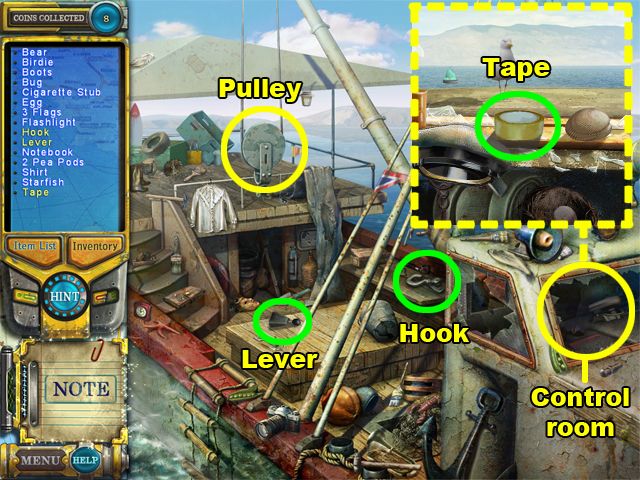
- Collect the HOOK and LEVER near the center of this scene.
- Click on the pulley hanging from the top of this scene; then connect the HOOK to it.
- Take a closer look at the control room of the ship. This room is located in the front of the ship.
- Collect the yellow roll of TAPE.

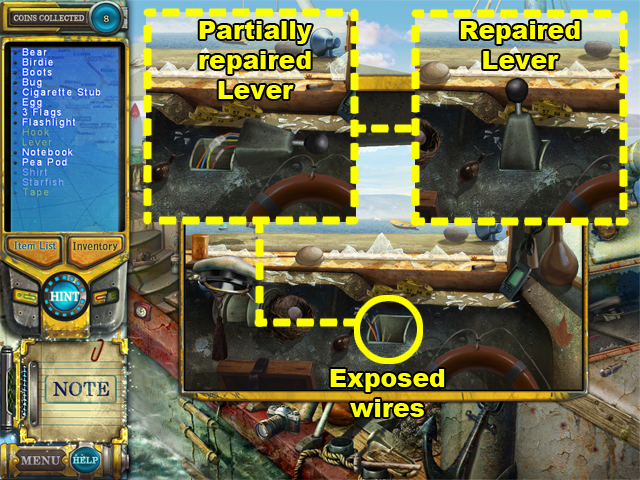
- Use the LEVER on the exposed wires.
- Use the TAPE on the exposed wires. The LEVER should appear partially repaired now.
- Click on the wires to fully repair the LEVER.
- Click on the fully repaired LEVER to activate the crane of the ship. The crane will lift open the hatch in the center of the ship.

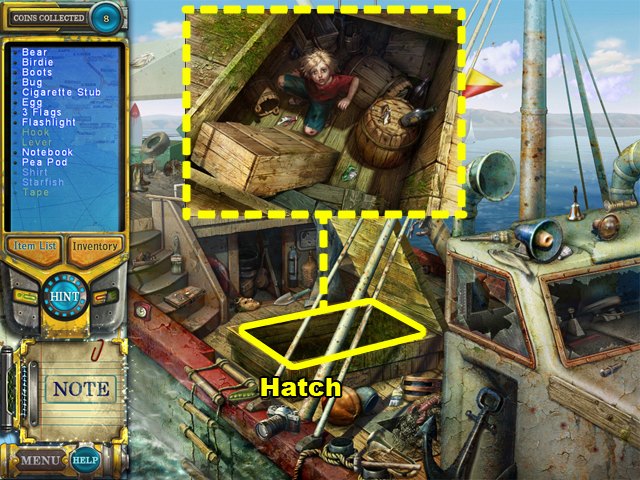
- Take a closer look at the hatch to find the survivor.
Scene 3

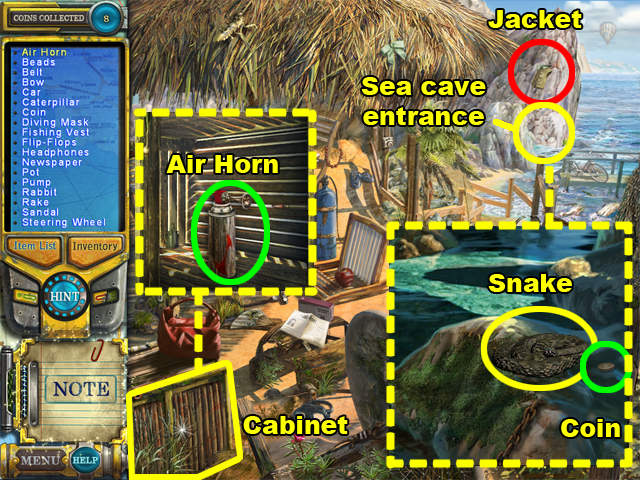
- Open the cabinet in the lower left corner of this scene and take a closer look at it.
- Collect the AIR HORN inside of the cabinet.
- Take a closer look at the sea cave entrance off in the distance.
- Use the AIR HORN in the cave to scare away the snake. Collect the COIN that was beside the snake.
- Take a closer look at the jacket hanging above the sea cave’s entrance to initiate a puzzle.
Puzzle 1

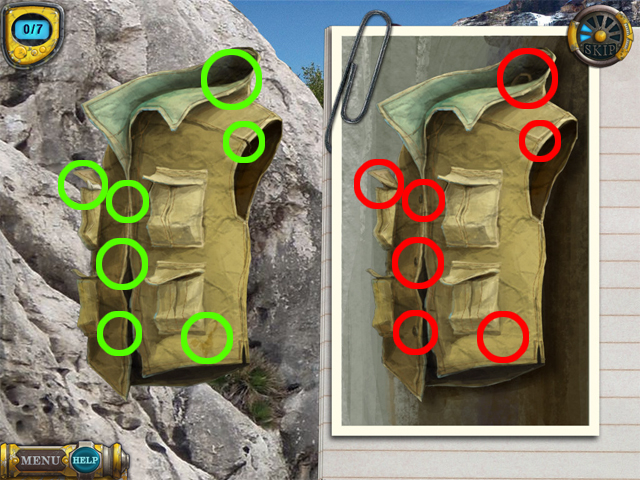
- Find the 7 differences between the jackets to complete this puzzle.
- The 7 differences are highlighted in this screenshot.
Tenth Coin
Scene 1

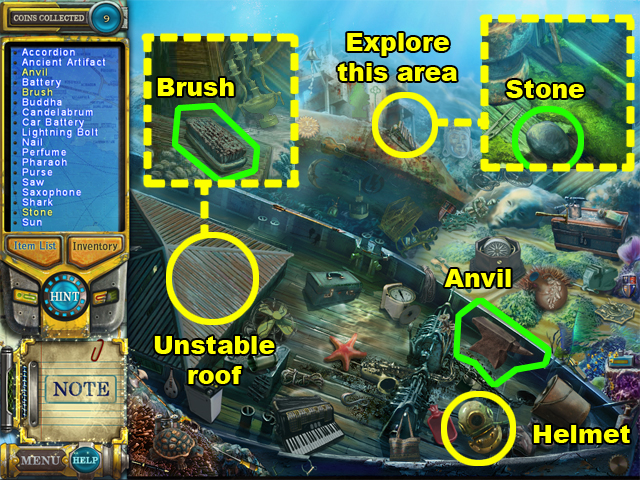
- Collect the ANVIL near the bottom right corner of this scene.
- Take a closer look at the area near the center of the ship in the distance.
- Collect the STONE inside of the ship.
- Use the ANVIL on the unstable roof of the ship in the foreground to make a hole in it.
- Take a closer look at the hole in the roof of the ship.
- Collect the BRUSH from that area.
- Take a closer look at the diver’s helmet near the lower right corner of this scene.

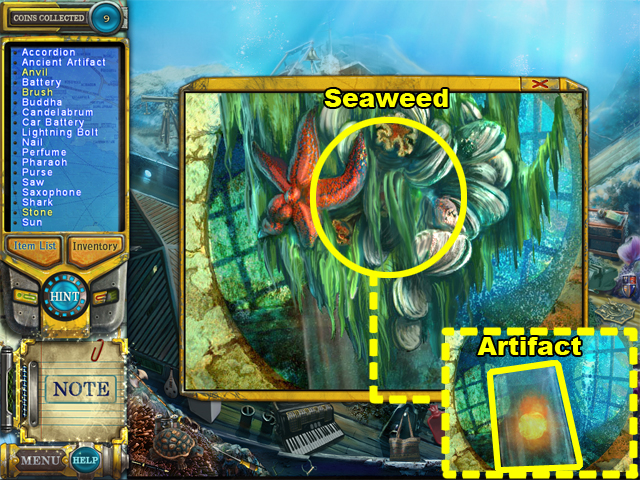
- Use the BRUSH 3 times on the seaweed to brush it out of the way of the ARTIFACT.
- Use the STONE 3 times near the area where the ARTIFACT is to break the glass.
- Collect the ARTIFACT.
Scene 2

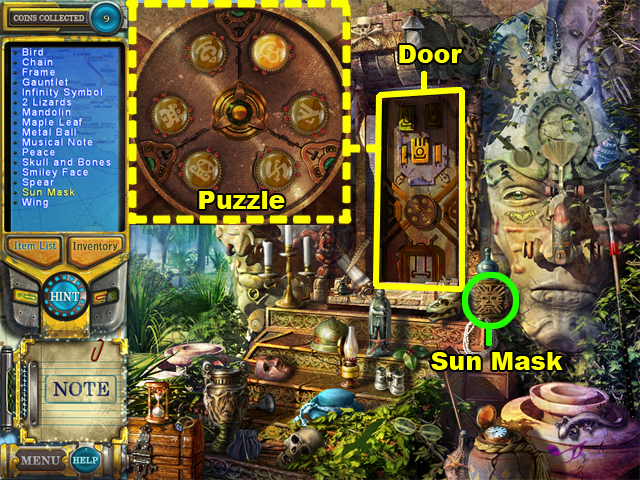
- Collect the SUN MASK beside the bottom right corner of the door.
- Take a closer look at the door to see the puzzle.
- Correctly copy the sequence of flashing symbols 3 times to advance.
- Each time you complete a sequence, the number of symbols that flash will increase by 1.
- Each time you copy a sequence incorrectly, the sequence will change, and you will have to try again.
- When this puzzle is complete, the door will open.

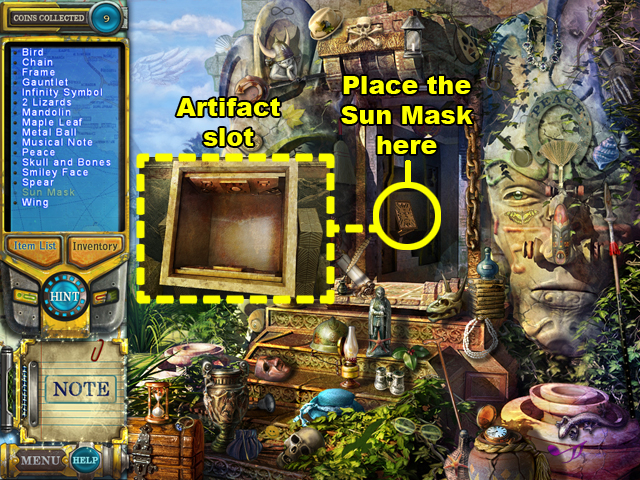
- Use the SUN MASK on the gold plate that resembles the mask in the door.
- Take a closer look at the area wherein you placed the SUN MASK.
- Place the ARTIFACT into the slot to continue onward.
Scene 3

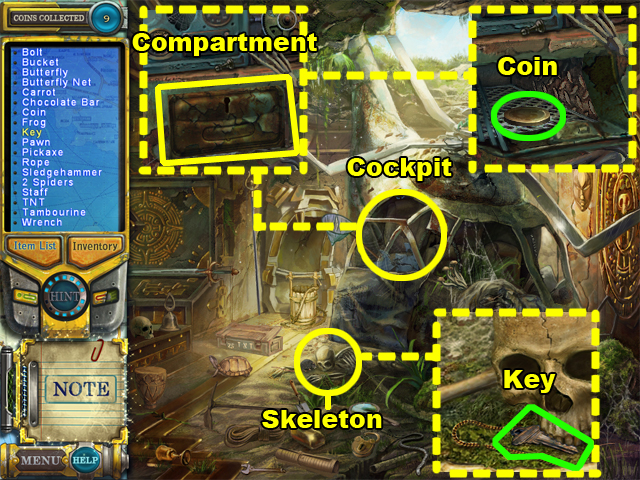
- Take a closer look at the skeleton beside the helicopter.
- Collect the KEY under the skull of the skeleton.
- Take a closer look at the helicopter’s cockpit in the center of this scene.
- Use the KEY on the compartment to open it.
- Collect the gold COIN inside the compartment.
Eleventh Coin
Scene 1

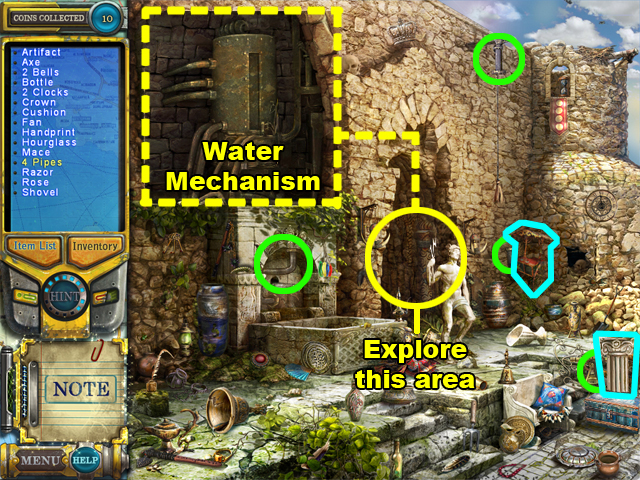
- Collect the 4 PIPES highlighted in green. One is near the upper right corner of this scene. Another is near the lower right corner. Another is on the left, and another is just right of the center of this scene.
- The 2 items highlighted in blue are covering 2 of the pipes. Click on these items to move them out of the way.
- Take a closer look at the hallway entrance in the center of this scene.
- Use all 4 PIPES on the water mechanism to initiate the puzzle.
Puzzle 1

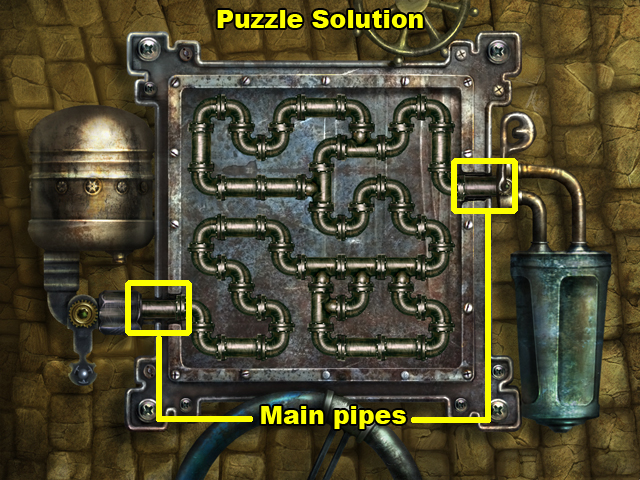
- Rotate the pipes until they are all connected. The pipes must also be connected to the 2 main pipes which are to the left and right of this puzzle.
- Once the circulation is complete, water will begin to pour into the fountain.

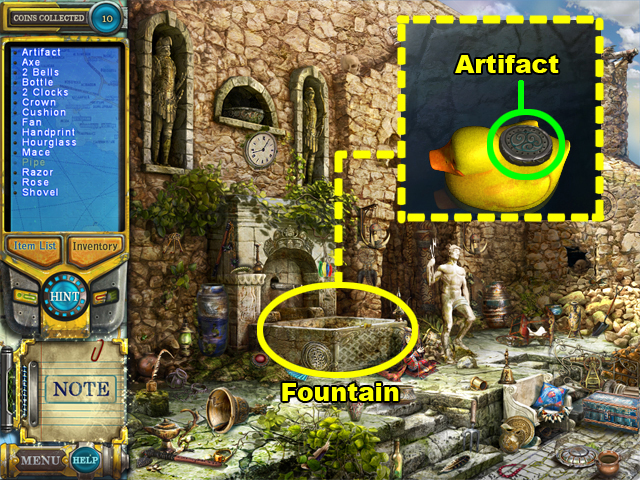
- Take a closer look at the Fountain near the center of this scene.
- Collect the ARTIFACT on the duck’s back.
Scene 2

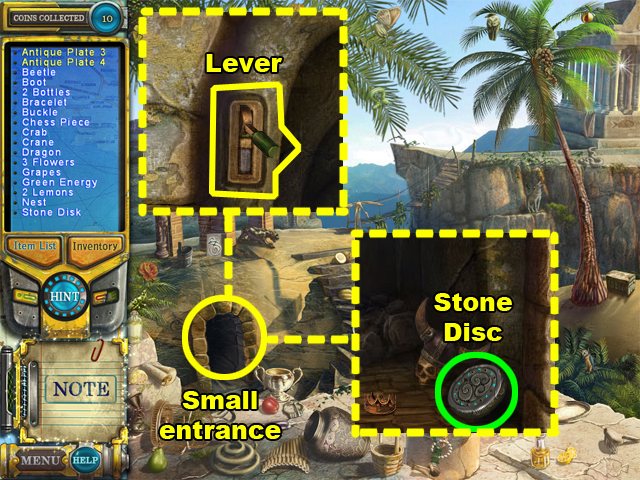
- Take a closer look at the small entrance near the bottom left corner of this scene.
- Collect the STONE DISC.
- Click on the lever to turn on the fountain.

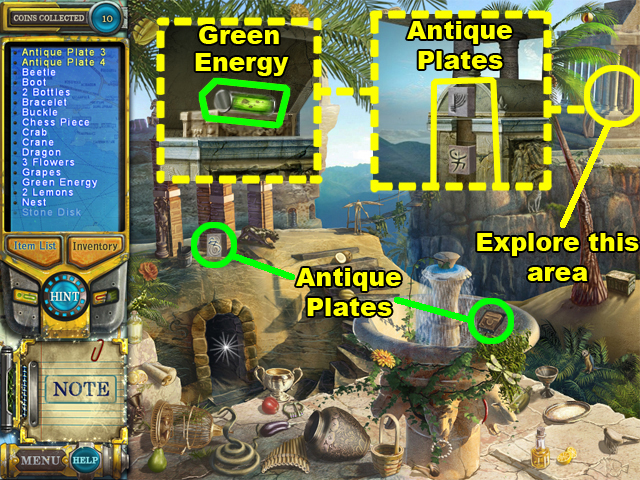
- Collect the 2 ANTIQUE PLATES. One is in the fountain; the other is above the small entrance.
- Take a closer look at the columns of the structure in the upper right corner of this scene.
- Use the ANTIQUE PLATES in the area where the other antique plates are.
- Collect the GREEN ENERGY that rises from the stone vault.
Scene 3

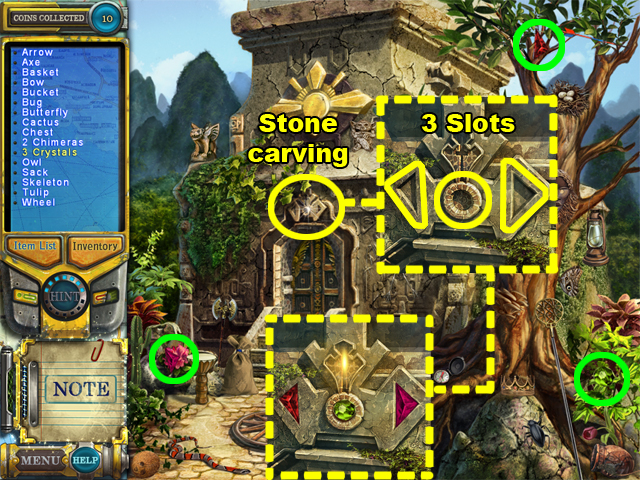
- Collect the 3 CRYSTALS, highlighted in green. One is near the upper right corner of this scene. Another is in the lower right corner of this scene. Another is in the lower left corner of this scene.
- Take a closer look at the carving above the door.
- Place the 3 CRYSTALS into the 3 slots. Make sure that the shape of the CRYSTAL matches the slot that you are setting it into.
- Afterwards, the door will open.
Scene 4

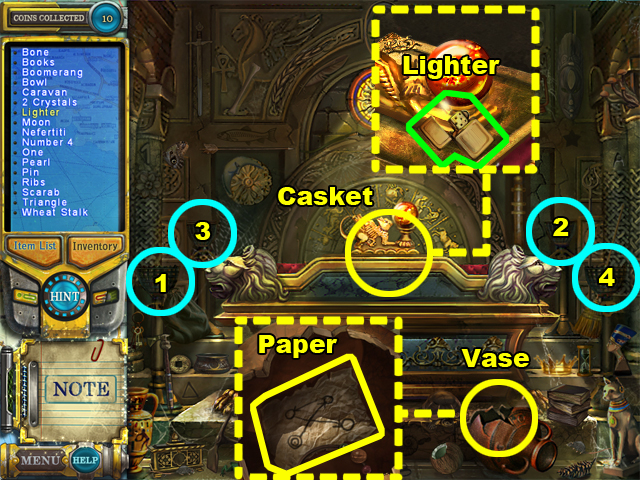
- Take a closer look at the top half of the casket.
- Collect the gold LIGHTER.
- Take a closer look at the broken vase at the bottom of this scene.
- Click on the paper inside of the vase to trigger the torches.
- Use the LIGHTER to rekindle the 4 torches in the correct order.
- The torches have been highlighted in blue and numbered. Light the torches in numerical order (bottom left, upper right, upper left, and bottom right) to open the casket.

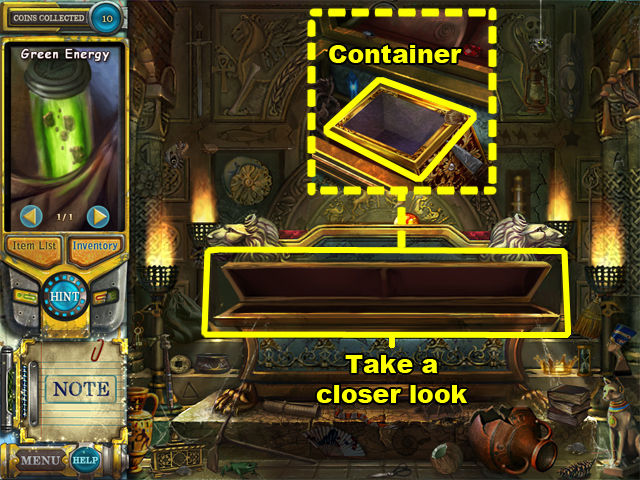
- Take a closer look at the opened casket.
- Place the GREEN ENERGY into the empty container in the casket.
- You will meet the young survivor again.
Scene 5

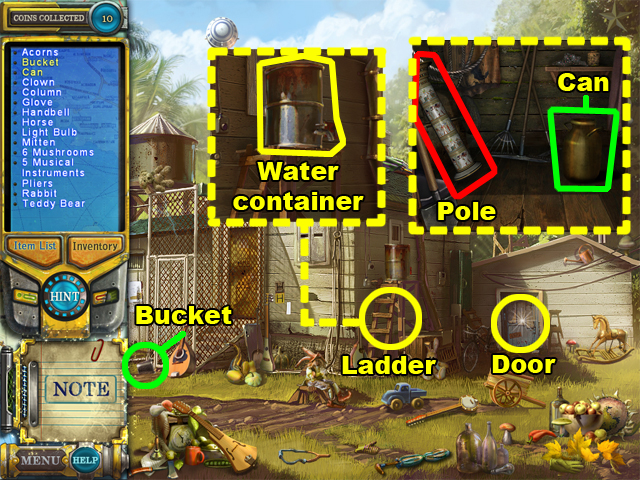
- Collect the BUCKET above the bottom left corner of this scene.
- Take a closer look at the door to the shack on the right side of this scene.
- Collect the CAN inside of the shack.
- Take a closer look at the ladder near the center of this scene.
- Use both the CAN and the BUCKET on the water container to extract the water.
- Click on the empty water container to knock it over.
- Click on the pole in the shack you visited earlier to initiate the puzzle.
Puzzle 2

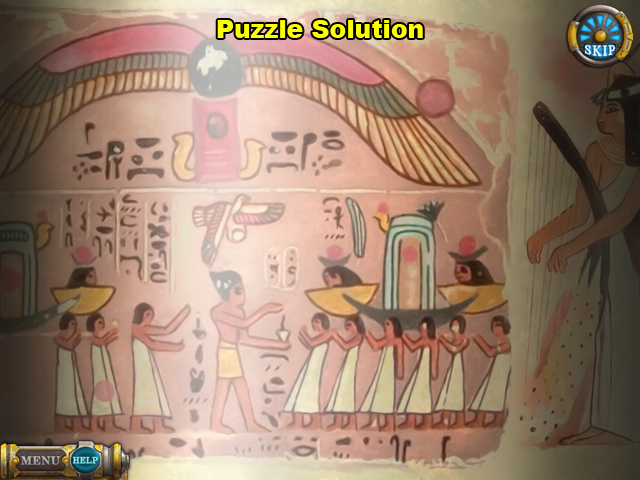
- Rotate the stripes of the pole until the picture is completely aligned.
- Click and drag the different stripes of the puzzle to the left or right to rotate them. The direction of the rotation depends on the direction in which you drag your mouse.
- Once all of the stripes have been aligned, the puzzle will be complete.
Scene 6

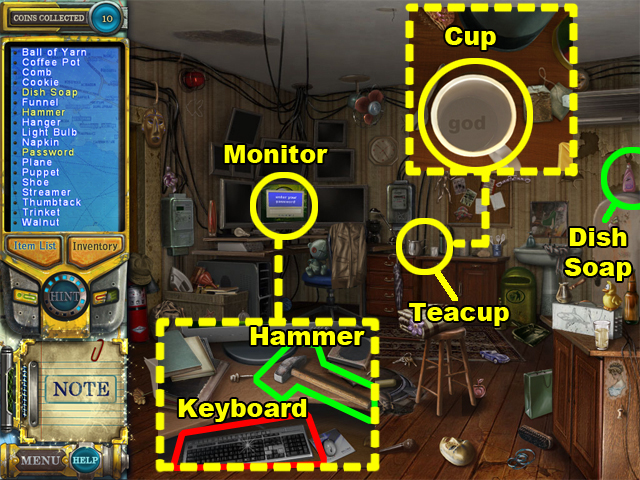
- Collect the pink DISH SOAP below the upper right corner of this scene.
- Take a closer look at the teacup on the cabinet in the center of this scene.
- Use the DISH SOAP on the teacup to clean it. After the cup has been cleaned, the word “god” will appear at its bottom.
- Collect the PASSWORD “god.”
- Take a closer look at the switched on computer monitor.
- Collect the HAMMER beside the keyboard.
- Use the PASSWORD on the keyboard to hack into the computer.

- Take a closer look at the 2 top right monitors.
- You will notice that the survivor is being confronted by the imposter.
- Use the HAMMER on the computer 3 times to shut down the monitors. The computer is below the monitors under the desk.
Scene 7

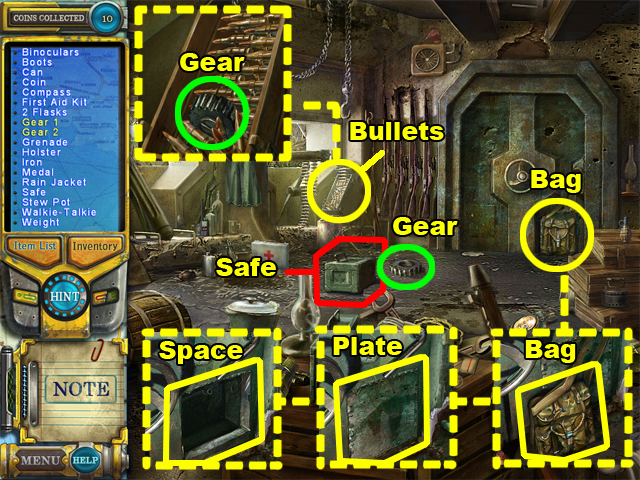
- Collect the GEAR in the center of the room.
- Take a closer look at the container of bullets near the center of this scene.
- Click on the bullets until you uncover the GEAR that is underneath them.
- Take a closer look at the bag by the vault door.
- Remove the bag, and the iron plate behind it, to reveal an empty space.
- Place the 2 gears into the empty space to open the door.
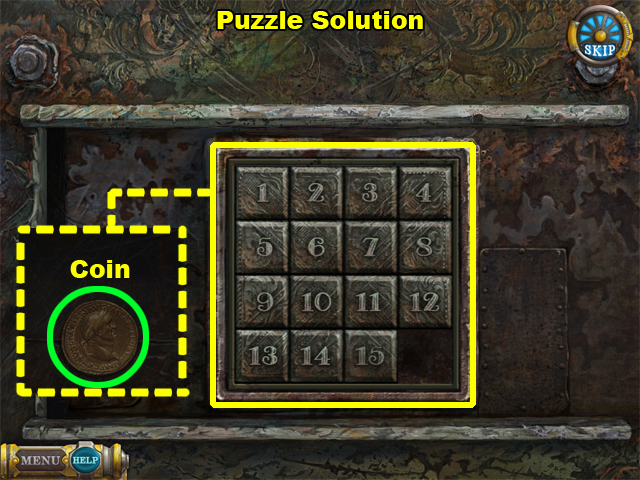
- Click on the SAFE in the center of this scene to initiate the puzzle.
Puzzle 3


- Shift the numbered pieces until they are positioned in numerical order. The order must be from 1 to 15; the blank space must follow after 15.
- Click on a number adjacent to the blank space to move that number to the blank space’s position.
- Upon completion, the numbers will slide to the right, revealing a COIN.
- Collect the COIN.
Scene 8

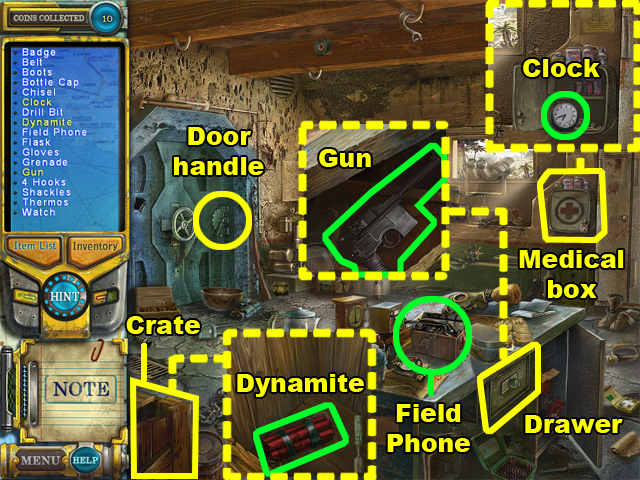
- Take a closer look at the wooden crate in the lower left corner of the room.
- Remove the lid covering the crate to locate the DYNAMITE.
- Collect the DYNAMITE in the crate.
- Click on the desk drawer to open it; then click it again to take a closer look.
- Collect the GUN inside the drawer.
- Use the GUN on the medical box below the top right corner of this scene to open it.
- Collect the CLOCK inside the medical box.
- Use both the DYNAMITE and the CLOCK on the handle mechanism of the door.
- Collect the field phone to talk to the imposter. The field phone is on the desk.
Scene 9

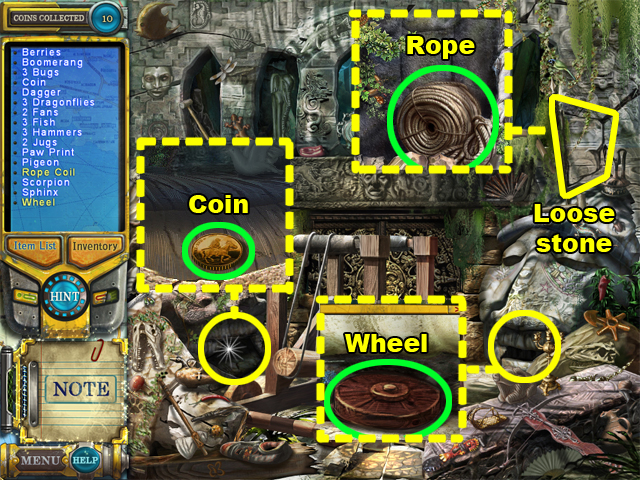
- Take a closer look at the mouth of the statue on the left side of this scene.
- Collect the COIN inside.
- Take a closer look at the mouth of the statue on the right side of this scene.
- Collect the WHEEL inside.
- Remove the loose stone below the top right corner of this scene.
- Take a closer look at the area where the stone was.
- Collect the ROPE COIL.

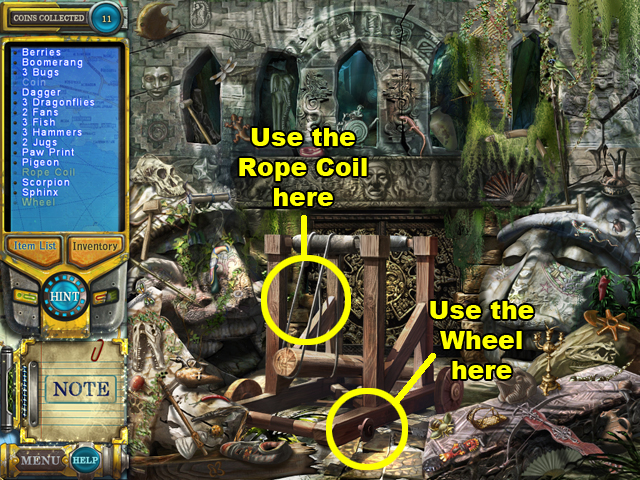
- Use the ROPE COIL near the center of the battering ram.
- Use the WHEEL on the bottom center area of the battering ram.
- Click on the battering ram to use it.
Twelfth Coin
Scene 1

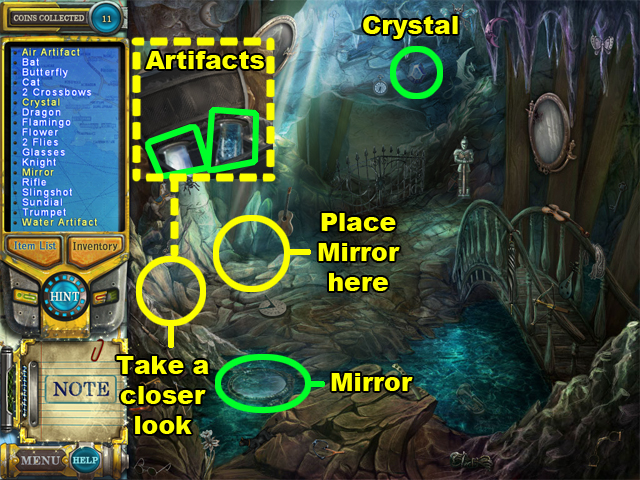
- Collect the MIRROR in the puddle of water nearest to the lower left corner of the room.
- Place the MIRROR where the rays of light from the ceiling meet the floor.
- Collect the CRYSTAL near the top center of the cave.
- Take a closer look at the area left of where you placed the MIRROR.
- Collect both the AIR ARTIFACT and the WATER ARTIFACT.

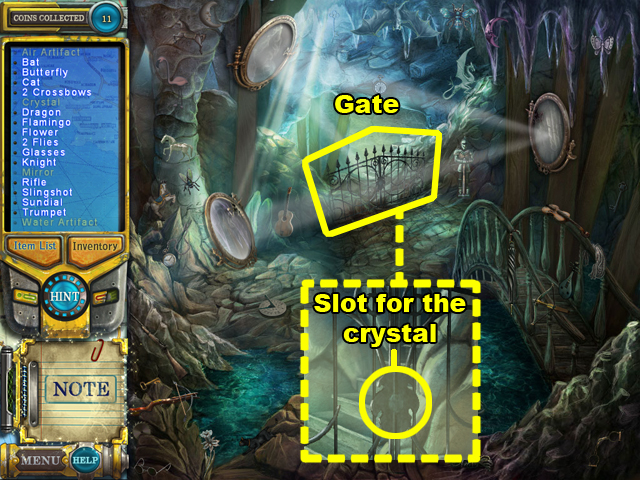
- Take a closer look at the gate.
- Place the CRYSTAL into the slot in the center of the gate to move on to the next temple.
Scene 2

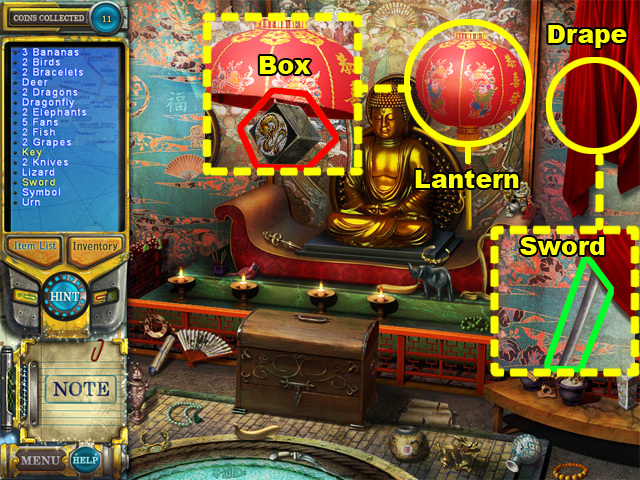
- Move the red drape in the upper right corner of this scene.
- Collect the SWORD that was concealed by the drape.
- Use the SWORD on the lantern to reveal the box in it. The lantern is to the left of the drape.
- Click on the box to initiate the next puzzle.
Puzzle 1

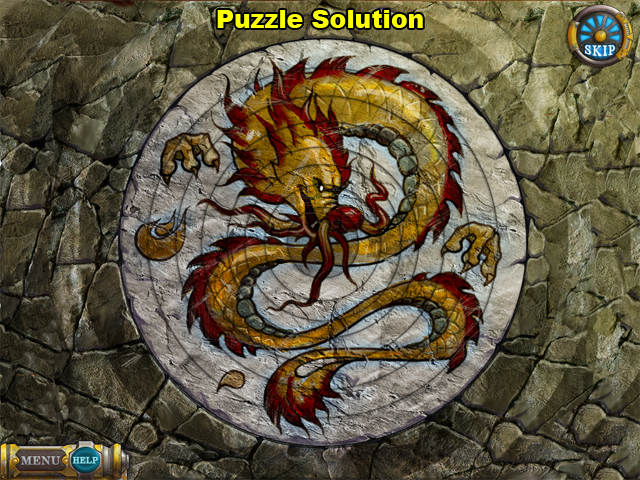
- Rotate the rings of this puzzle until the picture of the dragon is complete.
- Click and drag a ring in any direction to rotate it.
- The circle piece in the center of this puzzle cannot be rotated, so the outer rings must be aligned according to the center piece’s angle.
- The rings will not snap into place until they have all been accurately aligned.
- When this puzzle is complete, the KEY inside of the box will be added to your inventory.

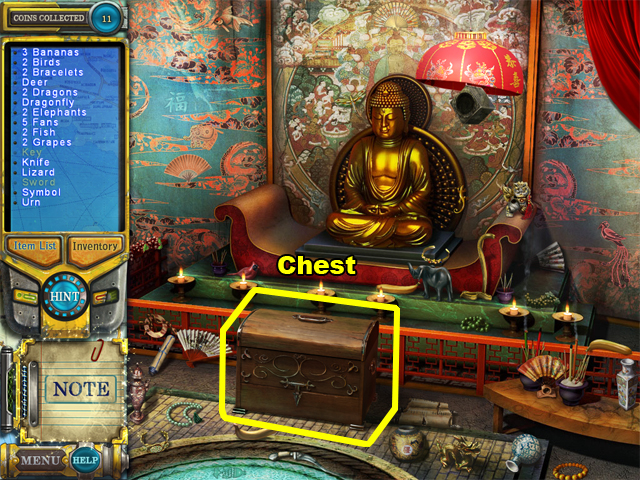
- Use the KEY on the chest to open it.
- Place the AIR ARTIFACT into the chest.
Scene 3

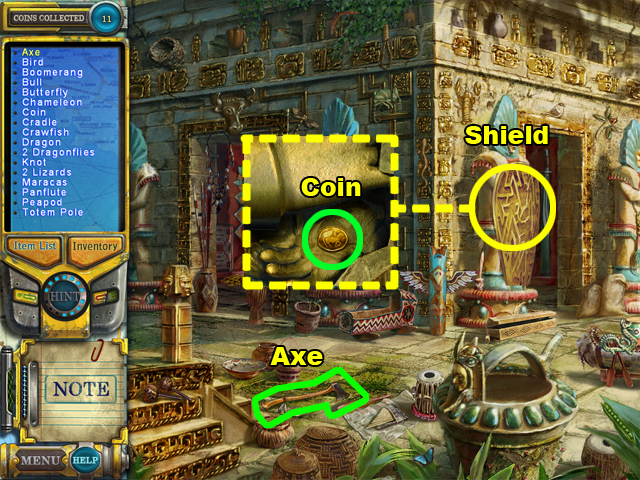
- Collect the AXE to the right of the lower left corner of this scene.
- Take a closer look at the statute with the golden shield.
- Use the AXE on the shield to break a piece of it off. A gold COIN in the hand of the statue will be revealed.
- Collect the COIN in the statue’s hand.
The Exchange
Scene 1

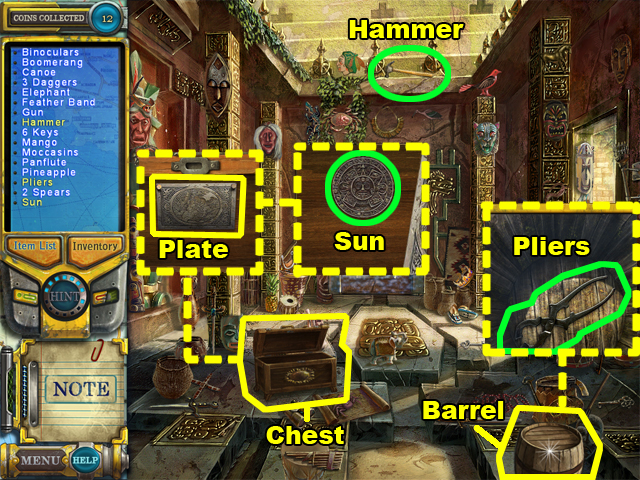
- Collect the HAMMER at the top of this scene.
- Use the HAMMER on the barrel in the lower right corner to open it.
- Take a closer look at the barrel.
- Collect the PLIERS inside of the barrel.
- Take a closer look at the opened chest near the center of this room.
- Use the PLIERS on the metal plate in the chest to rotate it.
- Collect the SUN item that was covered by the metal plate.

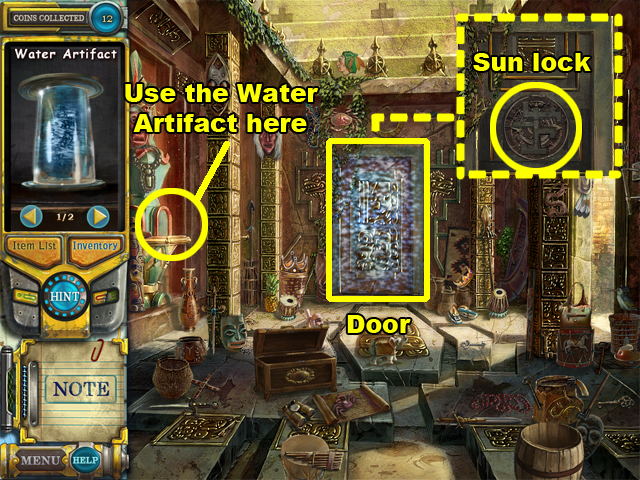
- Use the WATER ARTIFACT in the center of the statue which is against the left wall of the room.
- The room will begin to fill with water, and the energy covering the door will dissipate.
- After the door returns to normal, use the SUN item in the center of the door to initiate the puzzle.
Puzzle 1

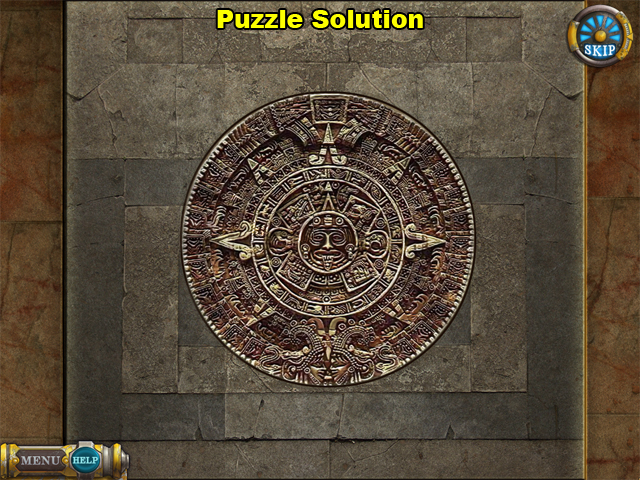
- Complete this puzzle by setting the puzzle pieces into their correct places.
- The pieces will snap into place once they are set in their proper positions.
- Unlike previous puzzles, you do not need to rotate the puzzle pieces.
Scene 2

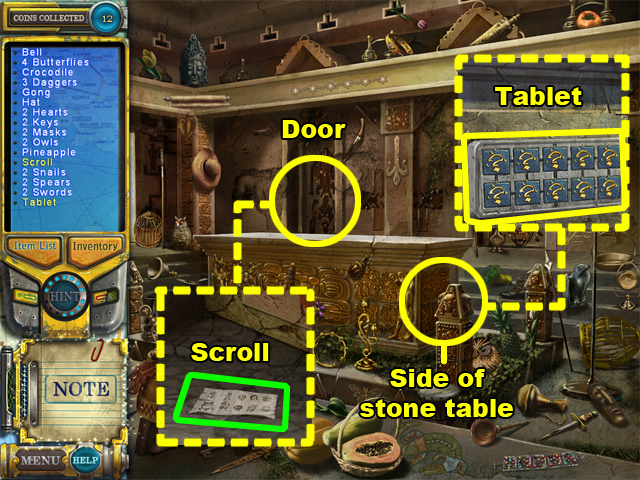
- Take a closer look at the right side of the stone table in the center of the room.
- Click on the TABLET of question marks to engage in a sequence of dialogue.
- Look more closely at the door to the left of the room.
- Collect the SCROLL on the floor.
- Use the SCROLL on the TABLET of question marks to initiate the next puzzle.
Puzzle 2

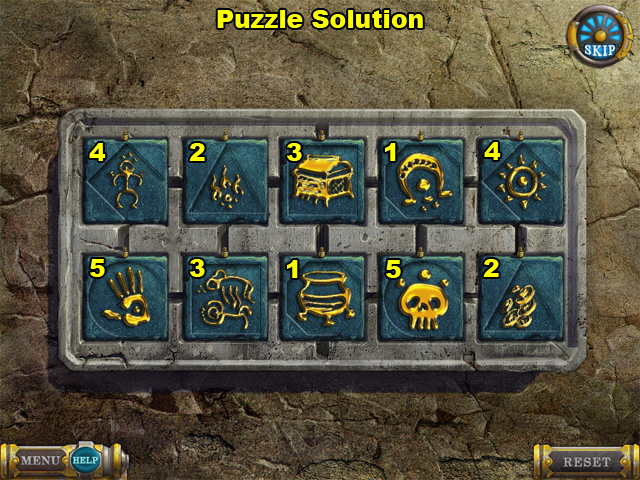
- Pair up the concealed symbols to complete this puzzle.
- Whenever you select 2 puzzle pieces that do not match, the puzzle pieces will shuffle in a clockwise motion.
- The symbols on the puzzle pieces are not identical to their matching pairs. Use the screenshot to find the proper corresponding pairs.
- The matching pairs have been labeled with matching numbers.
- After completing this puzzle, the pieces will remain revealed; however, the rules will change.
Puzzle 3

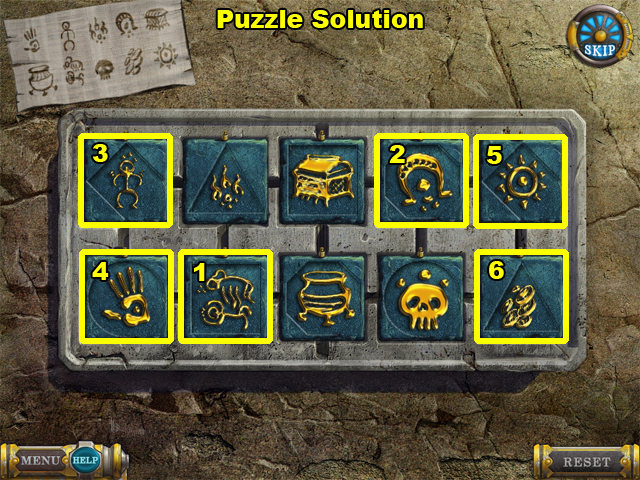
- For this puzzle the symbols must be in the same order as the symbols shown on the scroll in the upper left corner. In addition, you must do this within 3 shuffle moves.
- You can press the reset button in the bottom right corner to start again if you make a mistake.
- In this screenshot, 6 of the puzzle pieces have been highlighted and numbered. Click on the highlighted puzzle pieces in numerical order to solve the puzzle within 3 moves.

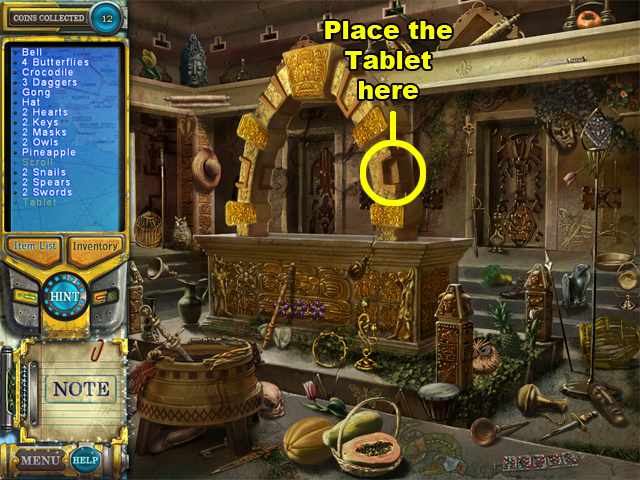
- Place the TABLET into the slot on the right side of the arch that arose from the stone table.
Congratulations! You’ve Completed Pathfinders: Lost at Sea


 Nevertales: Legends Walkthrough, Guide, & Tips
 Dangerous Game: Illusionist Walkthrough, Guide, & Tips
 Haunted Hotel: The X Walkthrough, Guide, & Tips
 Revived Legends: Road of the Kings Walkthrough, Guide, & Tips
 Mystery Chronicles: Betrayals of Love Walkthrough, Guide, & Tips