Otherworld: Shades of Fall Walkthrough, Guide, & Tips
Otherworld: Shades of Fall Walkthrough

Welcome to the Otherworld: Shades of Fall Walkthrough
Explore a world of magic to stop an ancient evil!
Whether you use this document as a reference when things get difficult or as a road map to get you from beginning to end, we’re pretty sure you’ll find what you’re looking for here.
This document contains a complete Otherworld: Shades of Fall game walkthrough featuring annotated screenshots from actual gameplay!
We hope you find this information useful as you play your way through the game. Use the walkthrough menu below to quickly jump to whatever stage of the game you need help with.
Remember to visit the Big Fish Games Forums if you find you need more help. Have fun!
This walkthrough was created by BrownEyedTigre, and is protected under US Copyright laws. Any unauthorized use, including re-publication in whole or in part, without permission, is strictly prohibited.
General Tips

- This is the official guide for Otherworld: Shades of Fall.
- This guide will not mention each time you have to zoom into a location; the screenshots will show each zoom scene.
- We will use the acronym HOP for Hidden-object puzzles. Interactive items will be color-coded.
- The HOP lists may be random; our lists may vary from yours.
- The majority of the puzzles are random and will reset to a new layout if you close and restart them. Those that are not random will have step-by-step solutions.
- There are 60 Fay Dragons to collect. The locations can be found at the end of the guide.
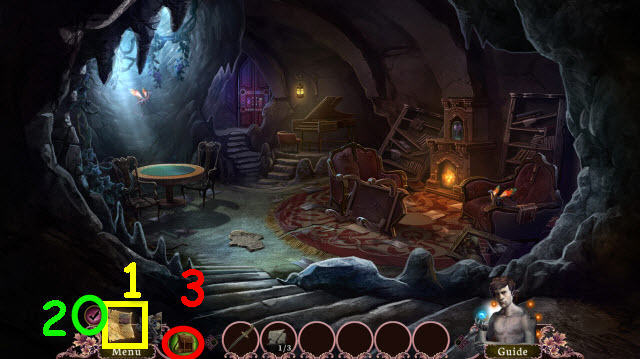
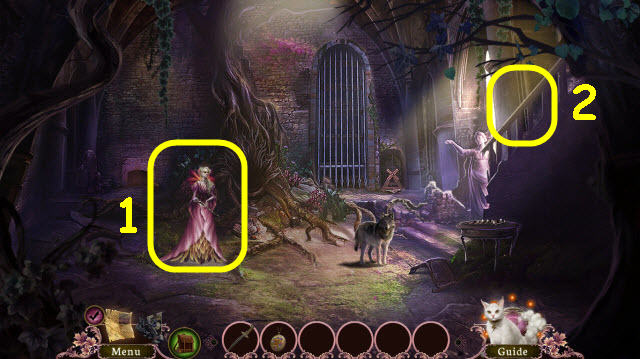
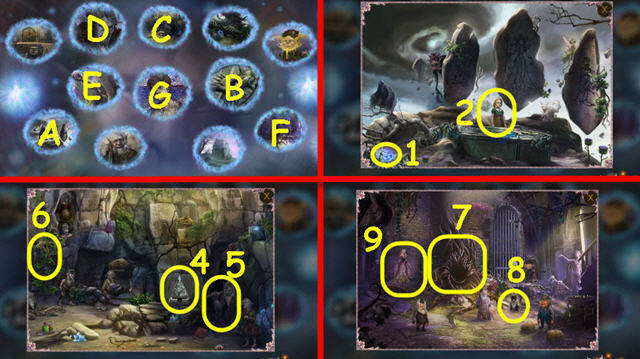
- Use the map (1) to fast travel to a location.
- Select the check mark (2) to check your current task.
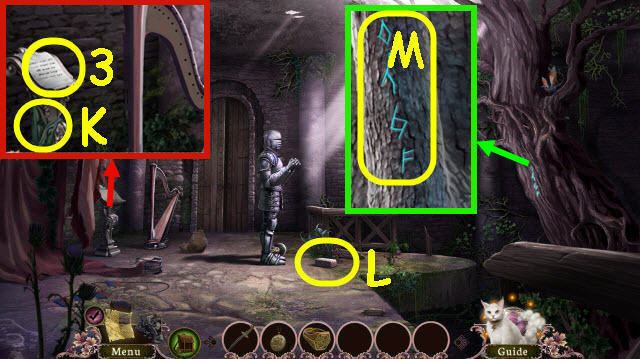
- There are two Inventory bars. Select the button (3) to toggle between Clues Inventory and Items Inventory.
Chapter 1: Twilight at the Moore
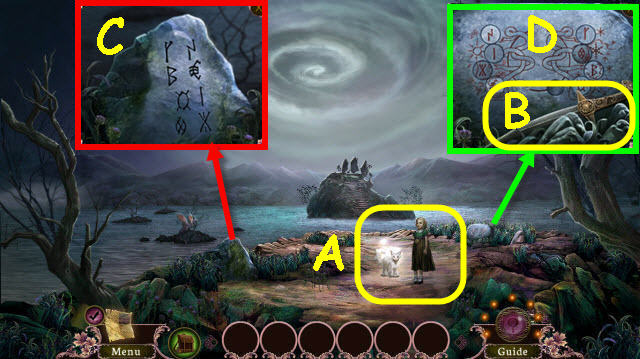
- Speak to the cat and Fiona (A).
- Take the DAGGER (B).
- Use the DAGGER on the rock 3x (C); select the runes to get a RUNE INSCRIPTION.
- Examine the rock to trigger a puzzle (D).
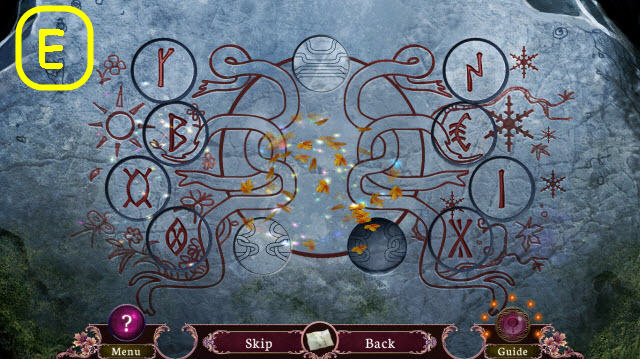
- Swap the runes to arrange them per the RUNE INSCRIPTION.
- See screenshot for solution (E).
- Go forward.
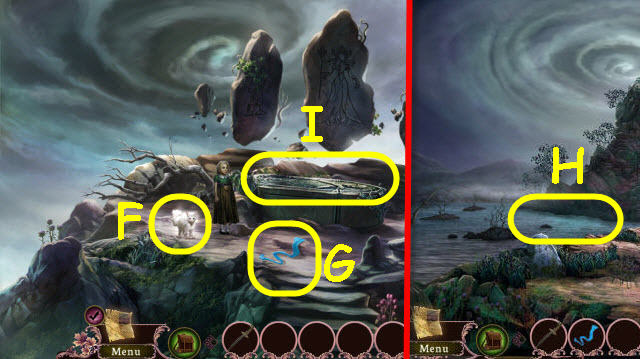
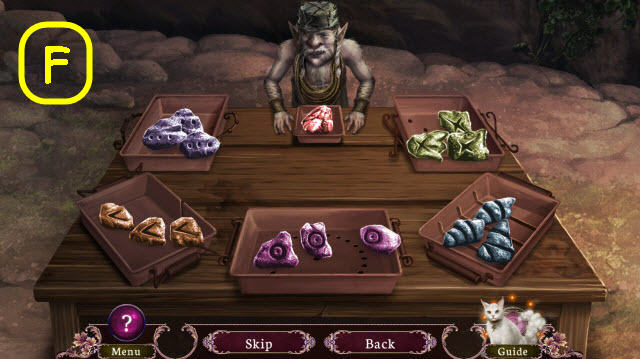
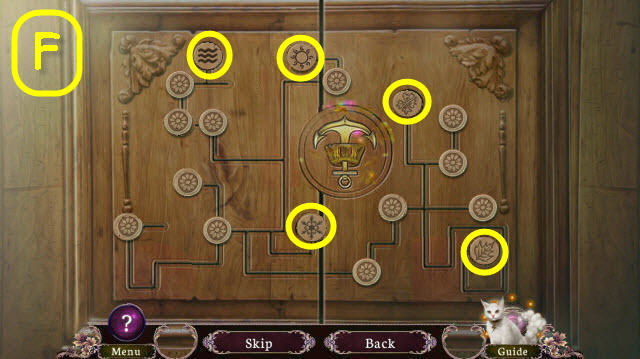
- Speak to the cat (F).
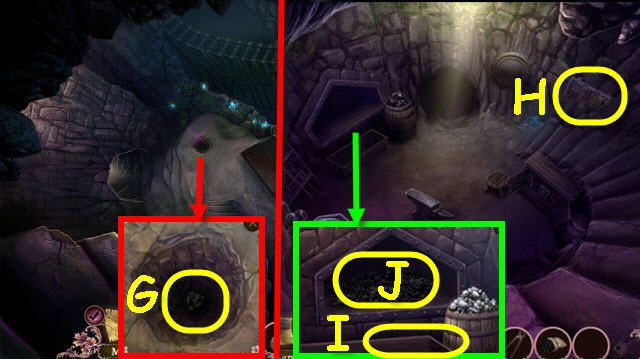
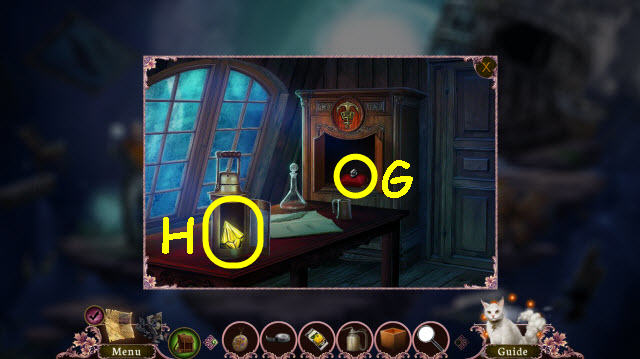
- Take the SCARF (G).
- Back out.
- Use the SCARF in the water; receive a WET SCARF (H).
- Go forward.
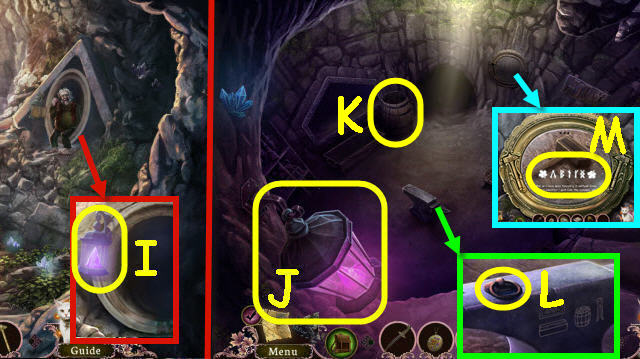
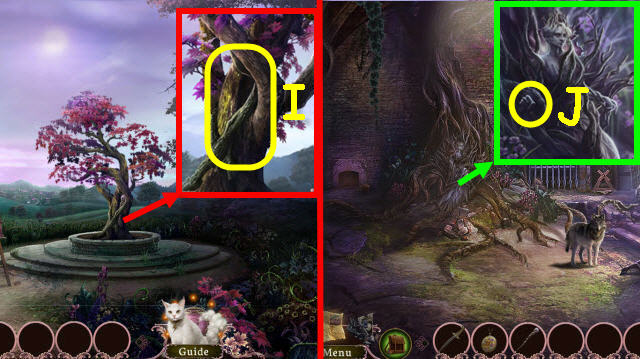
- Use the WET SCARF 3x on the sarcophagus to trigger a HOP (I).
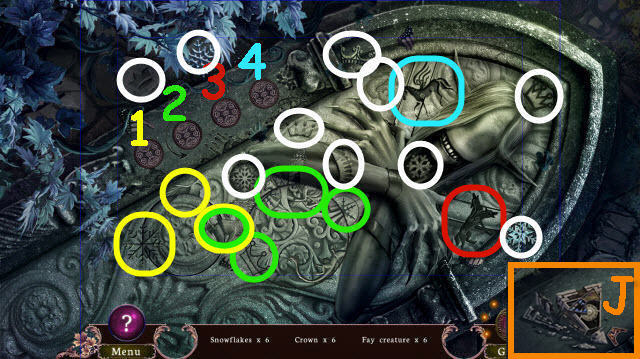
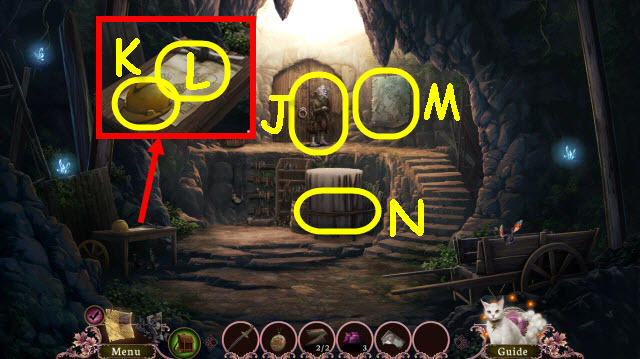
- Play the HOP.
- Turn the numbered dials to create items. The matching colored areas are item locations when turned.
- Select the pieces (J).
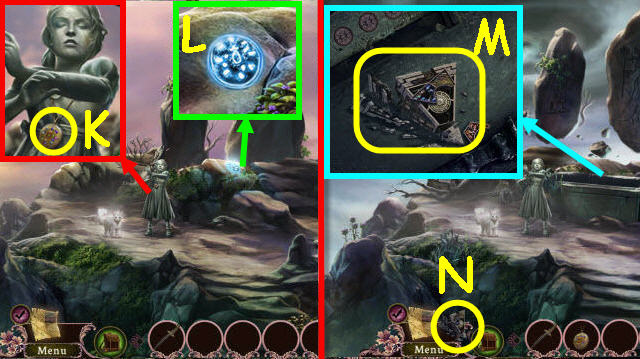
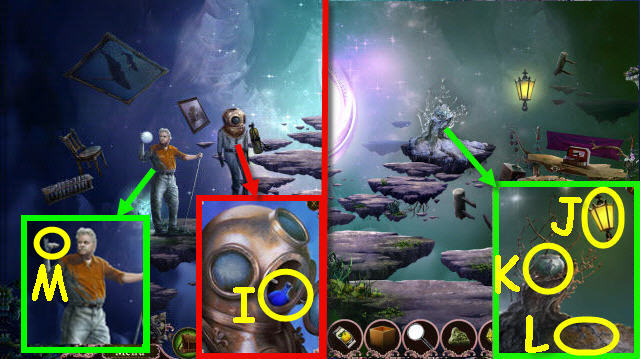
- Take the LOCKET (K).
- Use the LOCKET on the symbol (L).
- Take the Perpetual Prison and select it (M); it is now added to your toolbar (N).
- Speak to the cat.
Chapter 2: Hand of the Forge
- Select anywhere and receive an EARTHQUAKE NOTE.
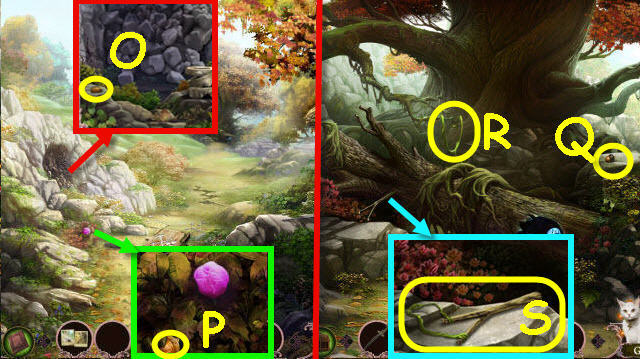
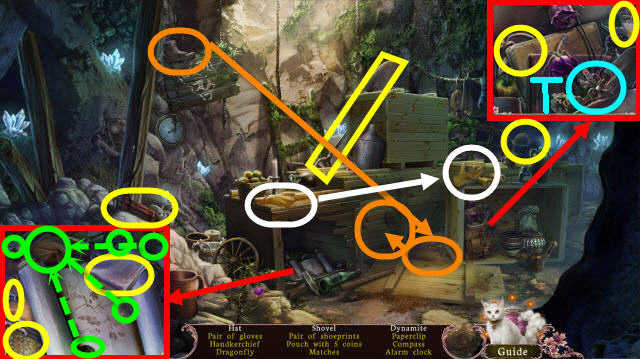
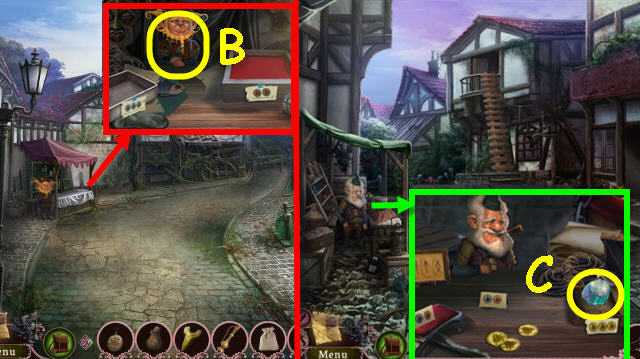
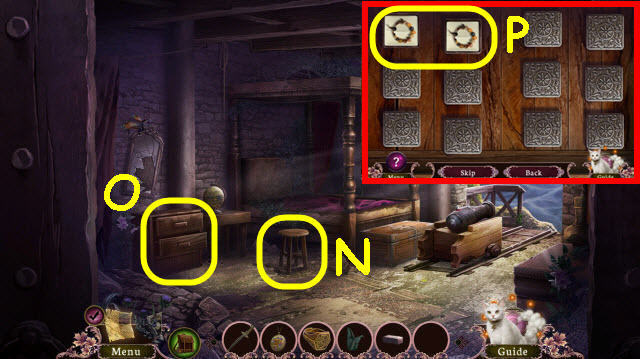
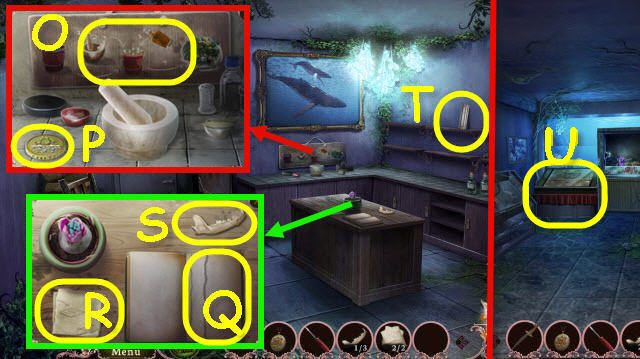
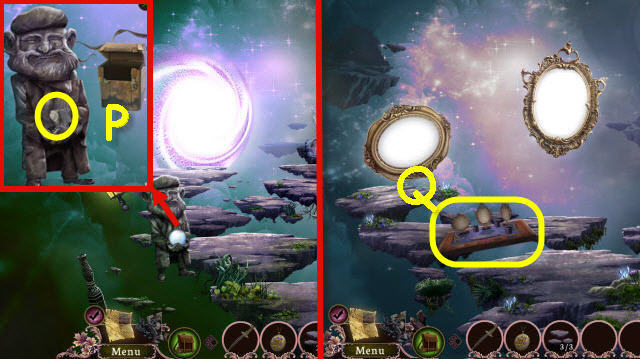
- Take the PEBBLE (O).
- Take the ACORNS 1/4 (P).
- Go forward.
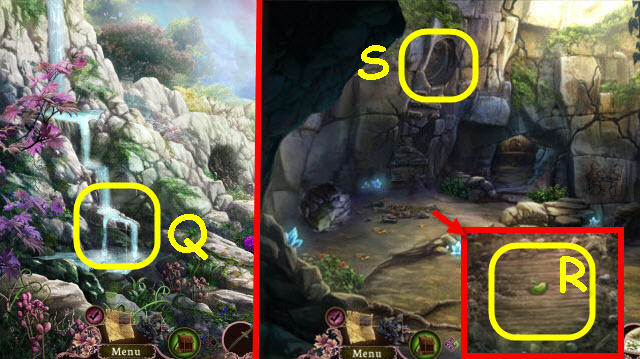
- Take the ACORNS 2/4 (Q).
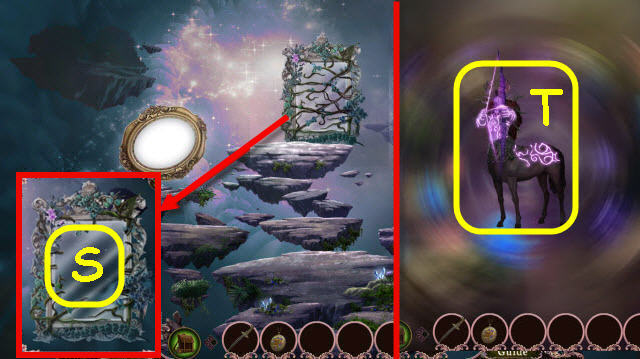
- Use the DAGGER to get the VINE (R).
- Use the DAGGER on the branch; place the VINE and PEBBLE on the branch. Receive a SLINGSHOT (S).
- Back out.
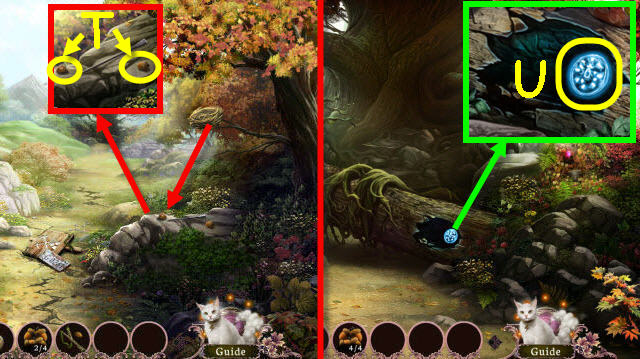
- Use the SLINGSHOT on the nest; take the ACORNS 3-4/4 (T).
- Go forward.
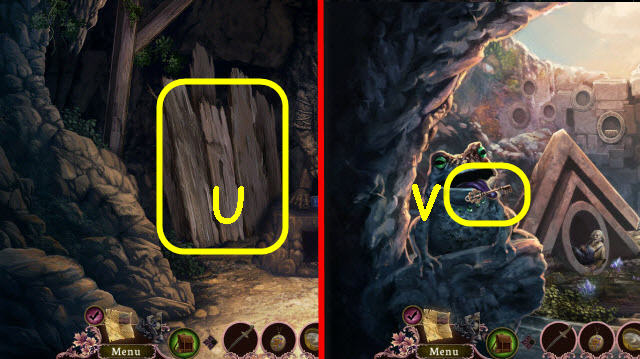
- Select the symbol twice; give the 4 ACORNS to the porcupine. Use the LOCKET on the symbol (U).
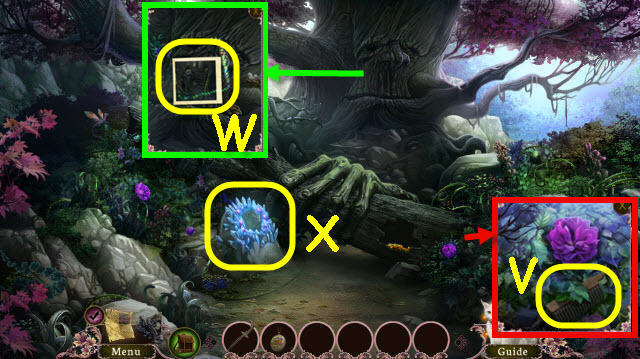
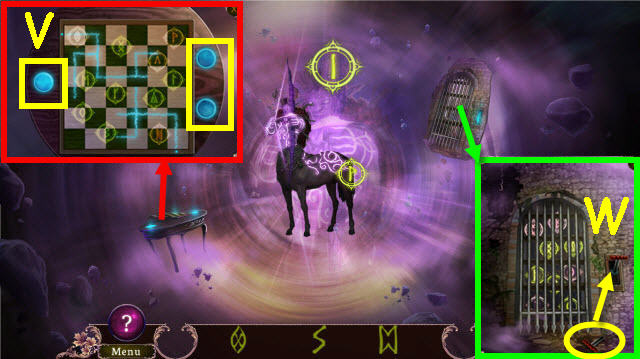
- Take the RAKE PARTS 1/2 (V).
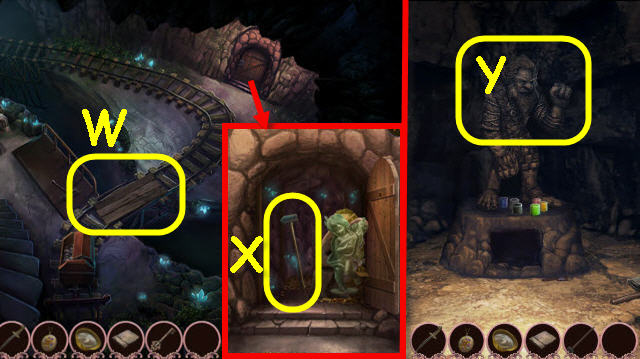
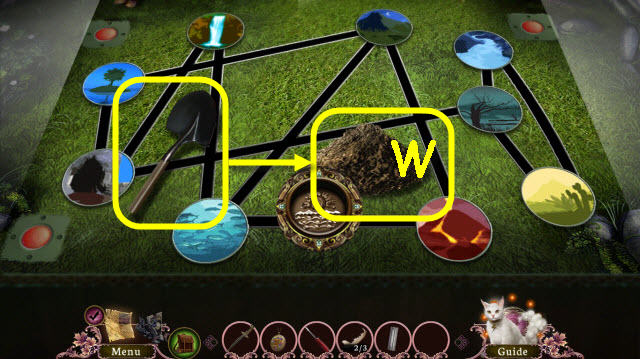
- Select the tree twice; get a TREE PICTURE (W).
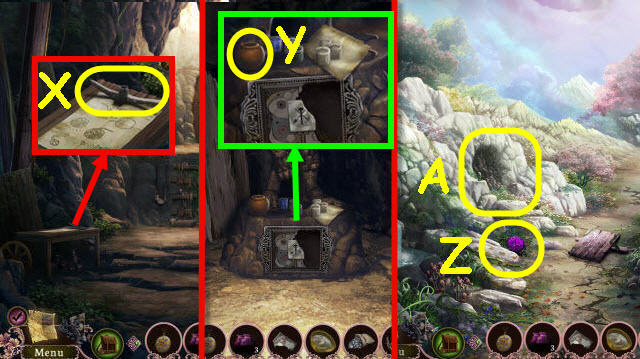
- Examine the crystals to trigger a puzzle (X).
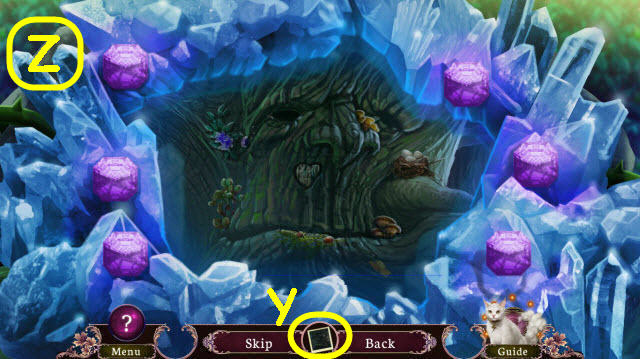
- Select the gems to duplicate the TREE PICTURE (Y).
- See screenshot for solution (Z).
- Go forward.
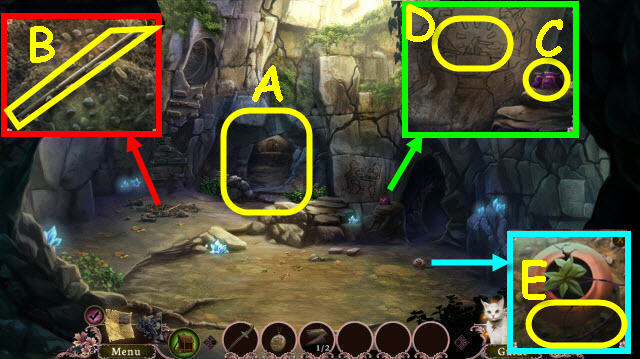
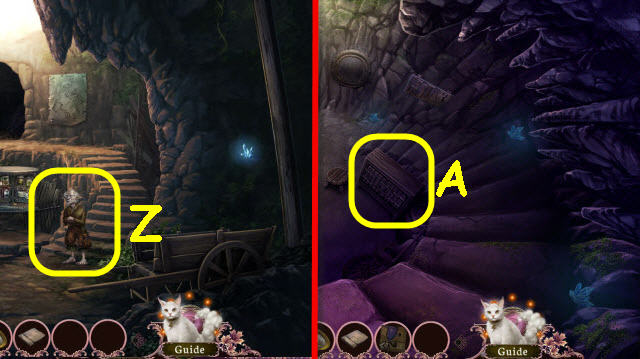
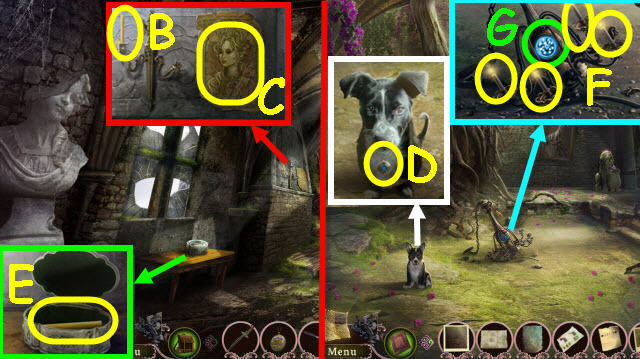
- Select the doorway twice (A).
- Take the STICK (B).
- Take the 3 POUCHES (C).
- Select the drawing to get a CAVE DRAWING (D).
- Use the DAGGER to get TWINE (E).
- Back out twice.
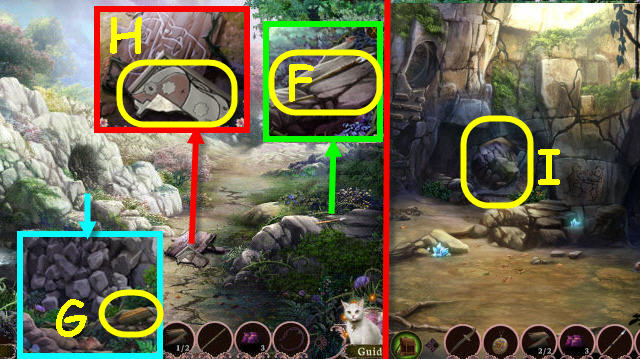
- Place the STICK and TWINE on the TWINE on the spearhead; receive a SPEAR (F).
- Take the RAKE PARTS 2/2 (G).
- Take the BROKEN PLAQUE (H).
- Go forward twice.
- Use the SPEAR on the boulder (I).
- Go forward.
- Speak to the kobold (J); give the 2 RAKE PARTS to him and receive a RAKE.
- Take the MINING HAT (K) and select the drawing twice to receive POLLEN AND RESIN (L).
- Select the drawing twice to receive a BEANSTALK (M).
- Use the DAGGER on the rope to trigger a HOP (N).
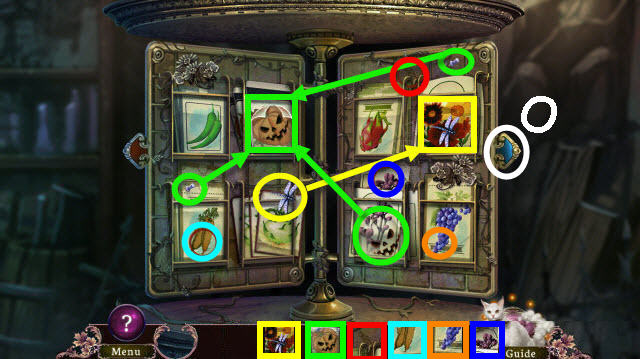
- Play the HOP.
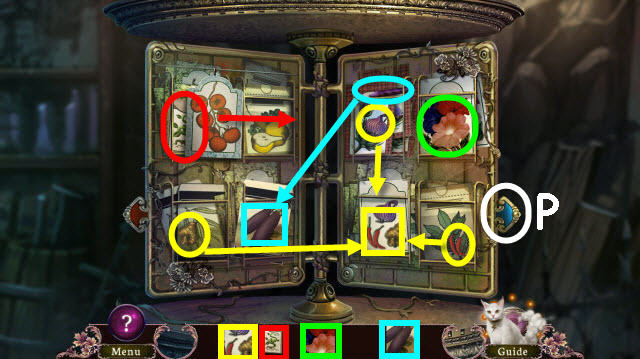
- Select the tab for part 2 (O).
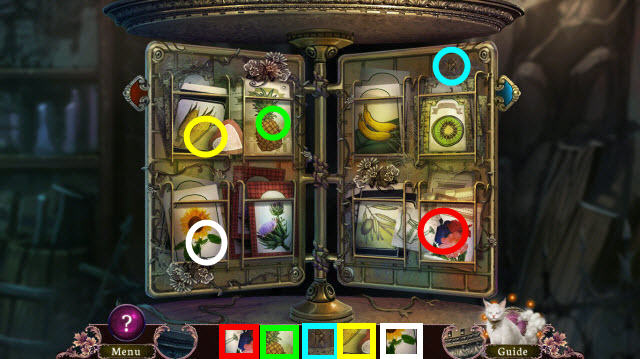
- Select the tab for part 3 (P).
- You receive a SEED.
- Back out 3x.
- Use the MINING HAT on the waterfall; receive a CAP WITH WATER (Q).
- Go forward twice.
- Use the RAKE, SEED and CAP WITH WATER on the dirt (R).
- Go through the opening (S).
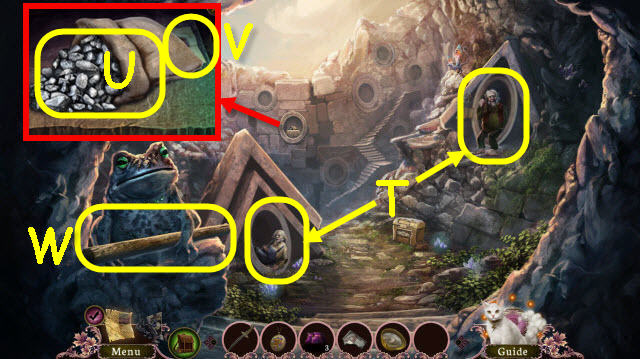
- Speak to the 2 kobolds (T).
- Take the ORE (U) and select the note twice to get MIXING PAINT (V).
- Take the HANDLE (W).
- Back out and go forward.
- Place the HANDLE on the head; receive a PICKAXE (X).
- Speak to the kobold.
- Go forward.
- Take the POT (Y) and note.
- Back out 4x.
- Use 1 POUCH on the flower to get POLLEN 1 (Z).
- Use the PICKAXE on the rocks to trigger a HOP (A).
- Play the HOP.
- The remaining item (5) is random.
- You receive a LIGHT CRYSTAL (B).
- Go forward.
- Use 1 POUCH on each flower to get POLLEN 2-3 (C-D).
- Use the POT on the resin to get POT WITH RESIN (E).
- Go forward 3x.
- Place the POLLEN on the right jars (F). Use the POT WITH RESIN and BROKEN PLAQUE on the plaque (G) to trigger a puzzle.
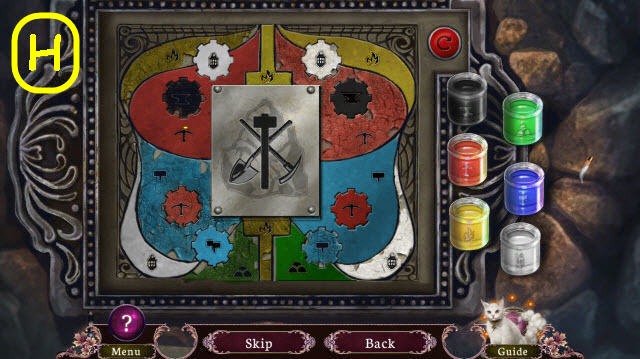
- Complete the painting.
- See screenshot for solution (H).
- Take the HAMMER ORNAMENT.
- Back out 2x; go up the beanstalk.
- Give the LIGHT CRYSTAL to the kobold; take the LANTERN (I).
- Back out and go through the right doorway.
- Use the LANTERN and select anywhere in the room.
- Hang the LANTERN on the hook (J).
- Use the ORE on the barrel; get a SACK (K).
- Take the DRAWER PULL (L).
- Use the HAMMER ORNAMENT on the mirror. Press the right arrow 3x; select the runes to get a SMITH’S NAME (M).
- Back out; go up the beanstalk.
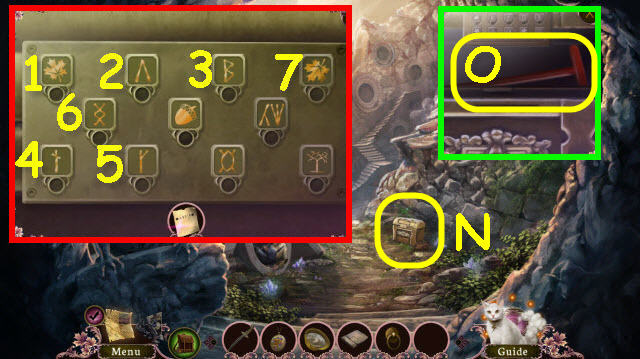
- Examine the chest to trigger a puzzle (N).
- Select the runes to match SMITH’S NAME.
- See screenshot for order (1-7).
- Take the LEVER (O).
- Back out; go straight on the right and forward.

- Select the kobold twice (P).
- Place the LEVER in the slot (Q).
- Place the DRAWER PULL on the lock; take the SAW (R).
- Examine the doorway to access a HOP (S).
- Play the HOP.
- You receive a DRAGONFLY ORNAMENT (T).
- Back out twice; go forward twice.
- Use the SAW on the boards; receive PLANKS (U).
- Back out twice; go up the beanstalk.
- Give the DRAGONFLY ORNAMENT to the toad; take the KEY (V).
- Back out; go straight on the right and forward.
- Place the PLANKS over the ravine (W).
- Use the KEY in the lock. Move the statues; take the SMITH’S HAMMER (X).
- Back out twice; go forward twice.
- Give the SMITH’S HAMMER to the smith (Y).
- Speak to the kobold; receive a TILE (Z).
- Back out; go forward on the right.
- Place the TILE on the cabinet to trigger a puzzle (A).
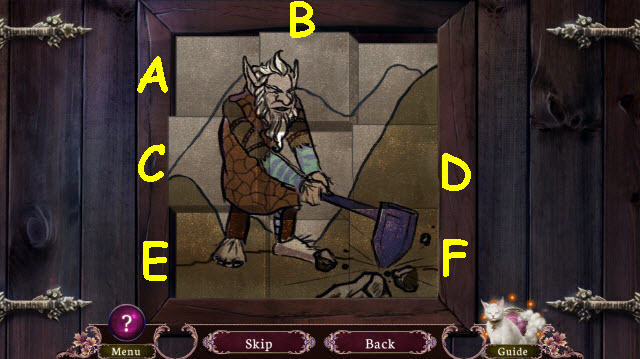
- Complete the picture.
- Press all the tiles in as far as they go and then press the tiles as follows: Bx2, A, Cx3, D, E and Fx2.
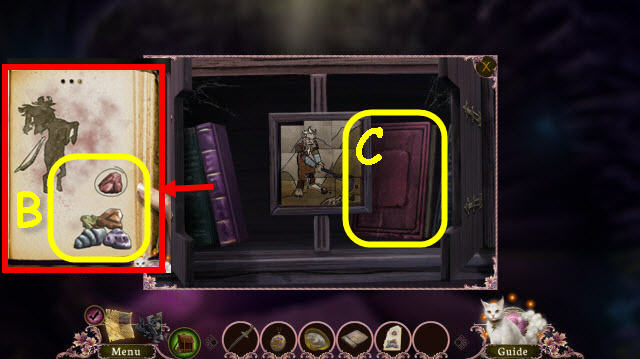
- Open the book and flip the pages 2x; take the GUIDE TO MAGIC ORE (B).
- Take the BEDTIME STORIES (C).
- Back out; go up the beanstalk.
- Give the BEDTIME STORIES to the kobold; take the TONGS (D).
- Back out; go forward on the right 2x.
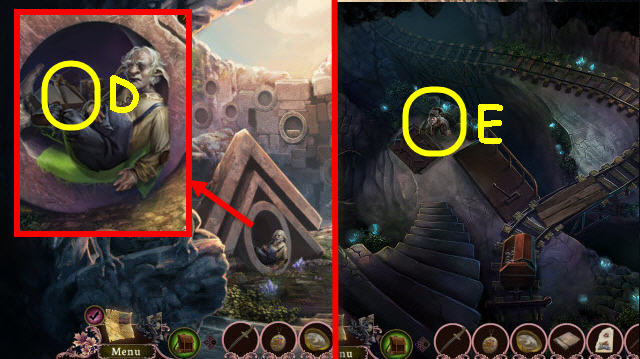
- Give the GUIDE TO MAGIC ORE to the kobold to trigger a puzzle (E).
- Sort the ore.
- See screenshot for solution (F).
- Use the SACK to get COAL (G).
- Back out.
- Hang the TONGS on the rack (H).
- Use the CAP WITH WATER on the trough (I) and the COAL in the furnace (J).
- Speak to the Smith.
Chapter 3: Forgotten Legend
- Take the BROKEN TOY SWORD (K).
- Go forward; receive ALMOST AN ACCIDENT.
- Take the FOODSTUFFS 1-2/4 (L-M).
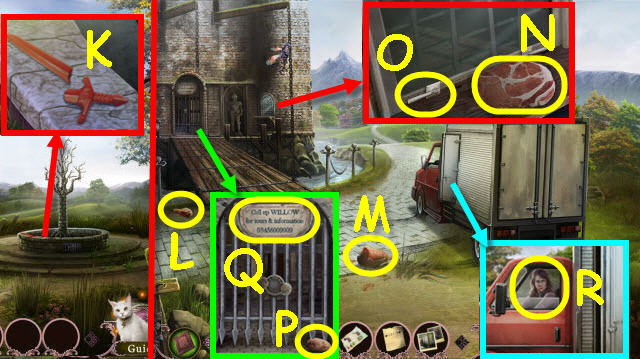
- Take the FOODSTUFFS 3/4 (N) and open the latch (O).
- Take the FOODSTUFFS 4/4 (P) and note the sign (Q).
- Select the van and speak to the driver (R).
- Go up the path.
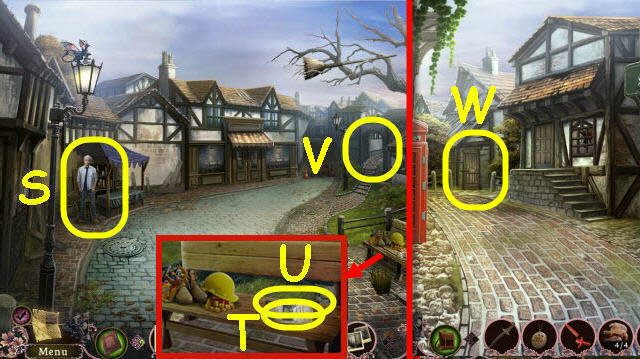
- Speak to the vender (S).
- Take the BROCHURE (T) and HAMMER (U).
- Go up the path (V).
- Use the HAMMER on the padlock to trigger a HOP (W).
- Play the HOP.
- You receive a MANHOLE OPENER (X).
- Back out.
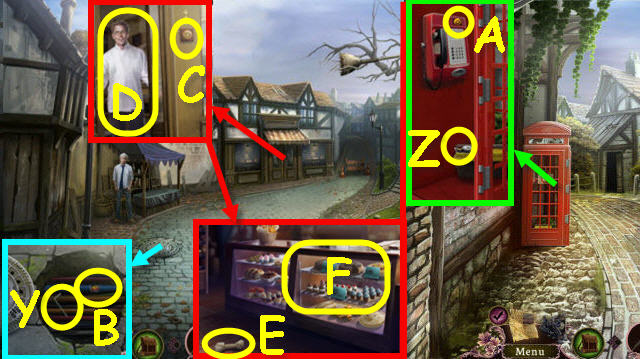
- Use the MANHOLE OPENER on the manhole; take the ALLEN WRENCH (Y).
- Go forward.
- Use the ALLEN WRENCH and HAMMER on the hinge; take the ELECTRICAL TAPE (Z).
- Use the DAGGER to get the DOORBELL BUTTON (A).
- Back out.
- Use the ELECTRICAL TAPE on the wires (B).
- Place the DOORBELL BUTTON on the hole; ring it (C).
- Speak to the baker (D).
- Take the CHEW TOY (E).
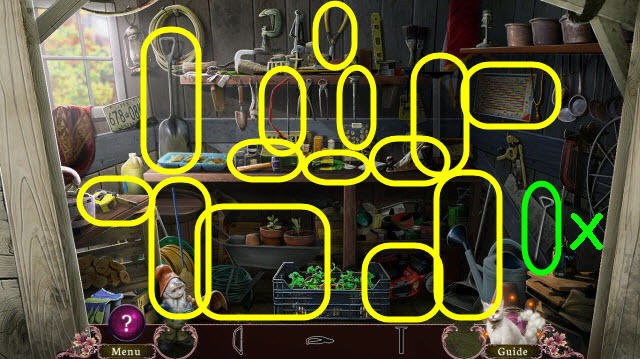
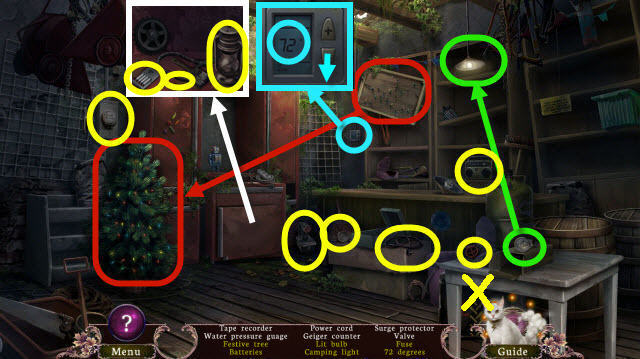
- Select the display to trigger a HOP (F).
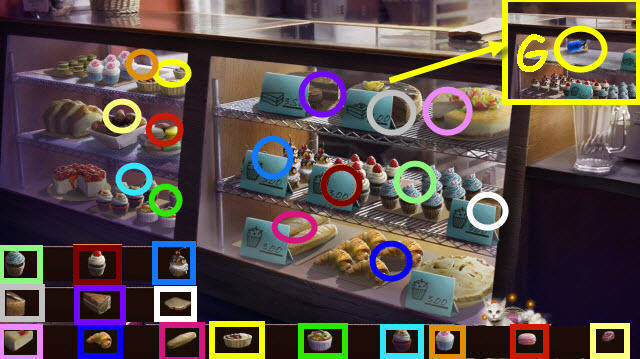
- Play the HOP.
- Move the signs as needed.
- Take the PASTRY TORCH (G).
- Back out.
- Give the CHEW TOY to the dog (H).
- Take the BANNER (I).
- Use the PASTRY TORCH on the bracket (J).
- Use the HAMMER on the shelf; place the 4 FOODSTUFFS on it (K).
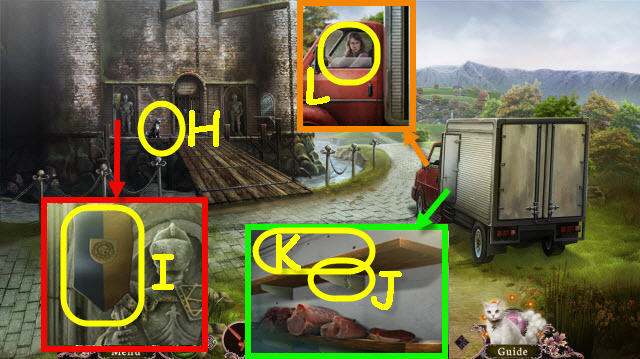
- Speak to the driver; receive a TOY SHIELD (L).
- Go up the path twice.
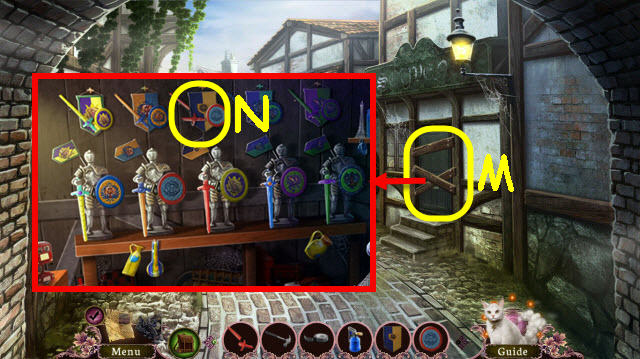
- Use the HAMMER on the boards (M).
- Place the BANNER, TOY SHIELD and BROKEN TOY SWORD on the wall; use the ELECTRICAL TAPE on the broken toy sword to trigger a puzzle (N).
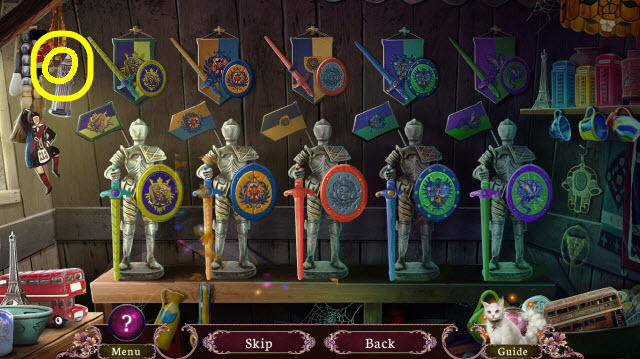
- Swap the pieces to complete the knights.
- See screenshot for solution (O).
- Receive a KNIGHT.
- Back out.
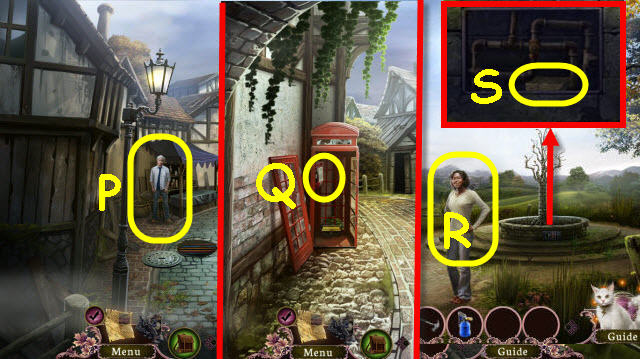
- Give the KNIGHT to the gentleman (P); receive a COIN.
- Go forward.
- Use the COIN on the phone (Q).
- Back out 3x.
- Speak to Willow (R).
- Take the HALF A BRICK (S).
- Go up the path twice.
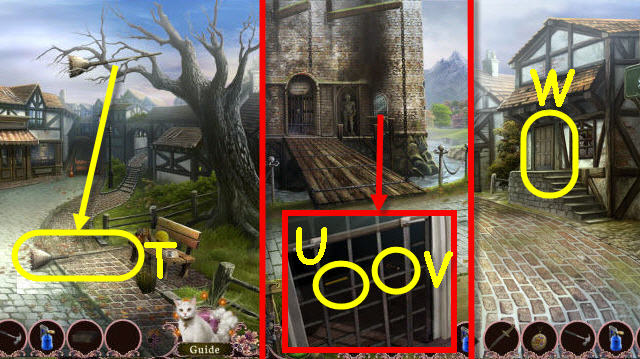
- Use the HALF A BRICK on the picker; take the FRUIT PICKER (T).
- Back out.
- Use the FRUIT PICKER to retrieve the CANDLES 1 (U) and KEY (V).
- Go up the path twice.
- Use the KEY on the lock to trigger a HOP (W).
- Play the HOP.
- You receive a VALVE (X).
- Back out 3x.
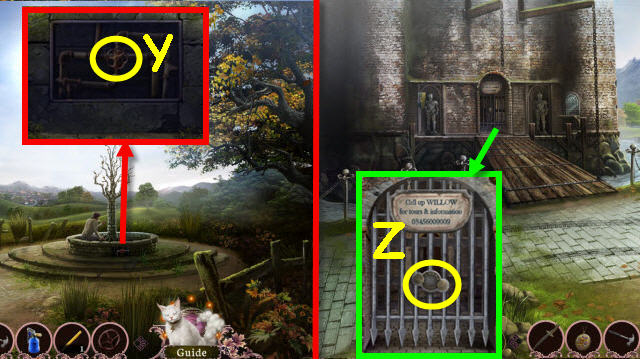
- Place the VALVE on the stem and turn it (Y); receive a DOOR ORNAMENT.
- Go forward.
- Place the DOOR ORNAMENT in the slot to trigger a puzzle (Z).
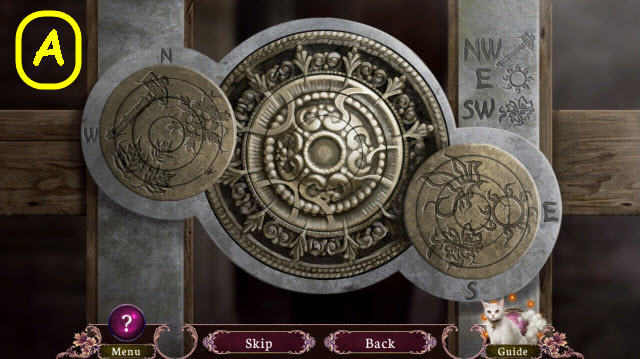
- Rotate the rings to complete the images.
- See screenshot for solution (A).
- Take the CANDLES 2 (B) and LEGEND OF THE QUEEN (C).
- Go forward.
- Take the PENDANT (D).
- Back out.
- Place the PENDANT on the lid; take the CANDLES 3 (E).
- Go forward.
- Place the 3 CANDLES in the holders; light all 4 candles with the PASTRY TORCH (F).
- Use the LOCKET on the symbol (G).
Chapter 4: Queen and Enchantress

- Speak to the wolf (H).
- Take the CLOTH SWATCH (I).
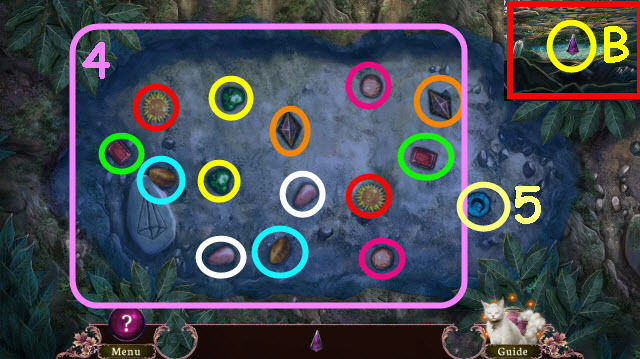
- Examine the chessboard to trigger a puzzle (J).
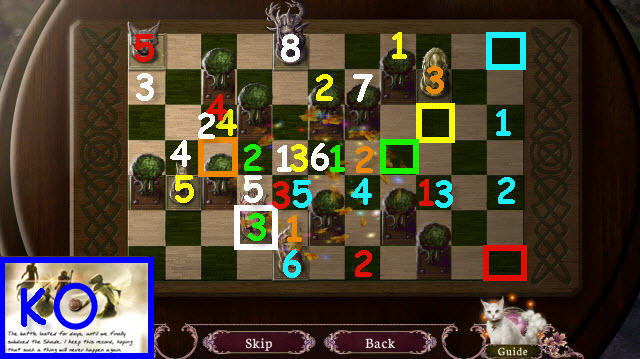
- Move the pieces to their proper base.
- Move them in numerical order in the following order: Yellow, white, green, red, orange and cyan.
- Select the story 4x; take the BRONZE COINS 1 (K).
- Back out.
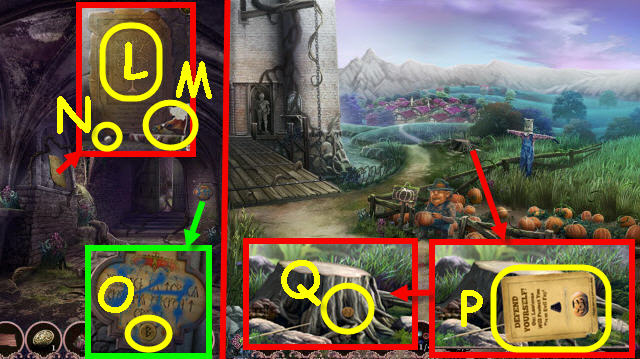
- Select the poster and receive a LEGEND OF THE QUEEN (L).
- Take the HALF A DESIGN (M) and GLASS BEADS 1/4 (N).
- Take the RUNE LETTERS 1/3 (O).
- Back out.
- Take the JACK O ‘LANTERNS (P) and RUNE LETTERS 2/3 (Q).
- Go up the path.
- Select the plaque; receive WISHFUL THINKING (R).
- Take the NAILS (S).
- Take the RUNE LETTERS 3/3 (T) and GLASS BEADS 2-3/4 (U).
- Go up the path.
- Speak to the vender and give him the 3 RUNE LETTERS; receive BRONZE COINS 2 (V).
- Back out.
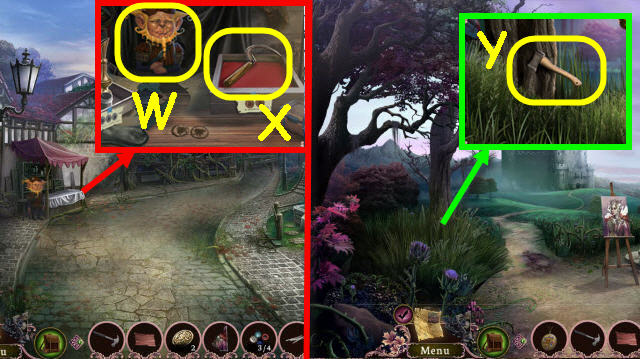
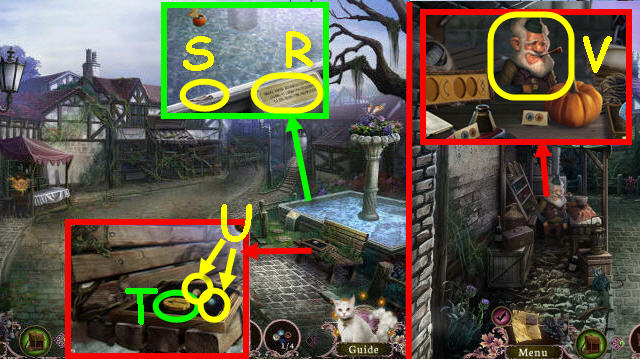
- Speak to the jeweler and receive THE JEWELER (W).
- Place the 2 BRONZE COINS on the counter; take the SCYTHE (X).
- Back out twice.
- Use the SCYTHE 4x on the grass; take the HATCHET (Y).
- Go forward.
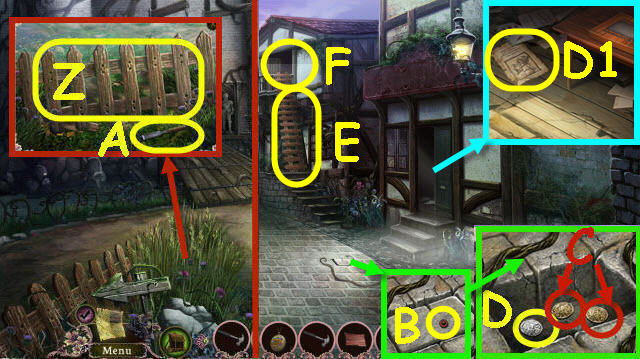
- Use the SCYTHE on the grass 4x. Use the NAILS, HAMMER and HATCHET on the fence; take the LADDER (Z) and CHISEL (A).
- Go up the path twice.
- Take the GLASS BEADS 4/4 (B).
- Use the CHISEL on the cobblestone and HAMMER on the CHISEL; take the BRONZE COINS 1-2 (C) and SILVER COINS 1 (D).
- Take HOBGOBLIN’S FAVORITE (D1).
- Place the LADDER against the balcony (E).
- Examine the balcony to access a HOP (F).
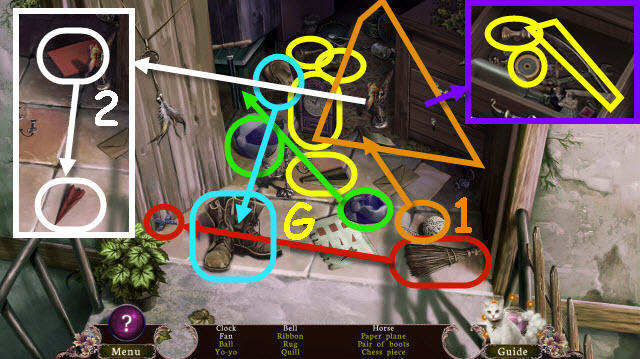
- Play the HOP.
- You receive a FAN (G).
- Select the note to get A FINAL LETTER.
- Back out.
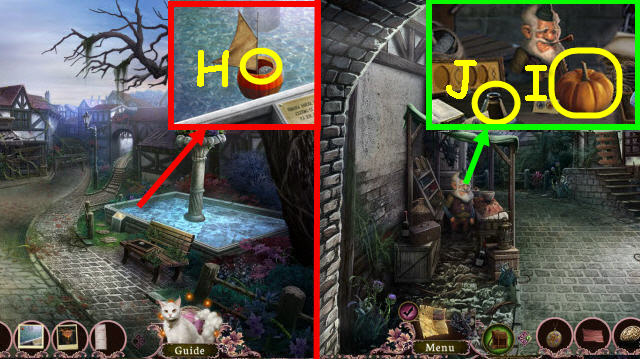
- Use the FAN on the boat; take the SILVER COINS 2 (H).
- Go forward.
- Place 1 BRONZE COINS and 1 SILVER COINS on the counter; take the PUMPKIN (I).
- Place 1 BRONZE COINS and 1 SILVER COINS on the counter; take the INKWELL (J).
- Back out twice.
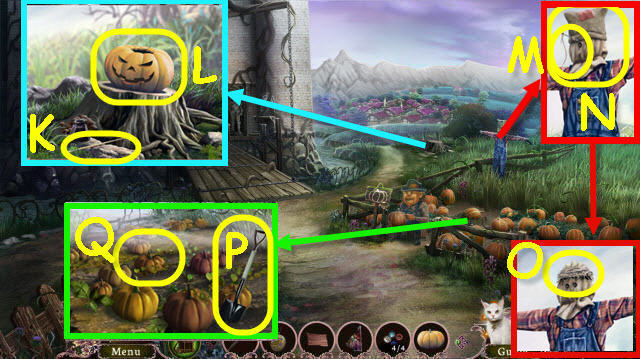
- Place the PUMPKIN and INKWELL by the stump. Use the brush (K) on the inkwell and then on the pumpkin. Use the DAGGER on the pumpkin; and select it (L).
- You receive 3 SILVER COINS.
- Place the CLOTH SWATCH on the sack; use the needle (M) on the swatch. Take the SACK (N).
- Take the ROTTEN EGG (O).
- Take the SHOVEL (P).
- Examine the pumpkins to trigger a puzzle (Q).
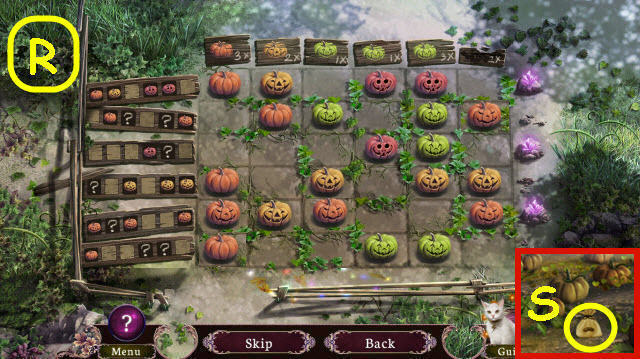
- Change the pumpkins per the clues.
- See screenshot for solution (R).
- Take the ENCHANTED SEEDS (S).
- Go forward into the Castle.
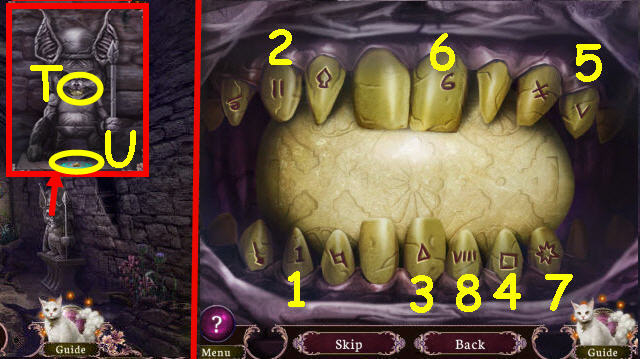
- Give the ROTTEN EGG to the hobgoblin; examine his teeth to trigger a puzzle (T).
- Select the teeth in the correct order.
- See screenshot for solution (1-8).
- Take the HOBGOBLIN TOOTH (U).
- Back out; go up the path.
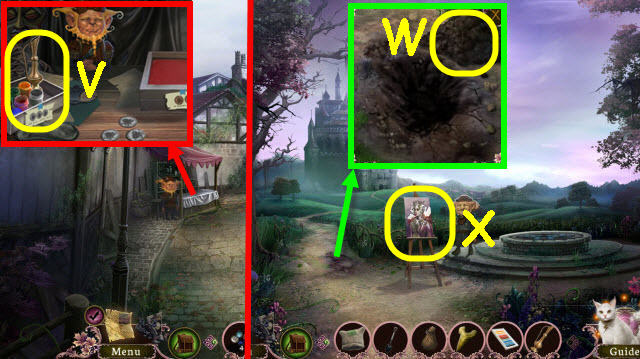
- Place 3 SILVER COINS on the counter; take the COLOR PASTELS and WATER OF QUICKENING (V).
- Back out twice.
- Use the SHOVEL on the dirt and use the SACK on the pile; receive a SACK OF SOIL (W).
- Place the COLOR PASTELS and HALF A DESIGN on the painting to trigger a puzzle (X).
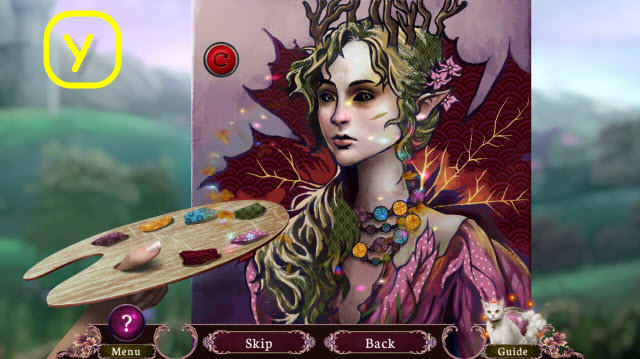
- Complete the painting.
- See screenshot for solution (Y).
- You receive JEWELRY DESIGN.
- Go up the path 3x.
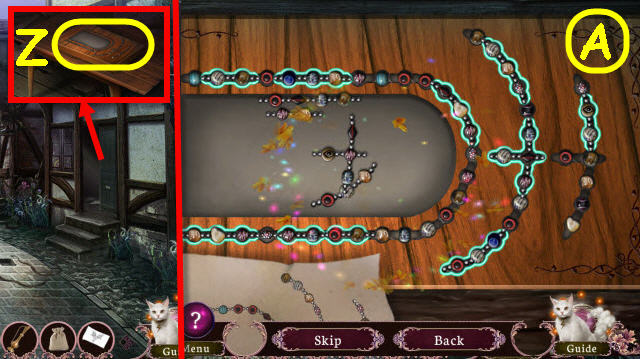
- Place the 4 GLASS BEADS and JEWELRY DESIGN on the board to trigger a puzzle (Z).
- Place the beads in the correct order.
- See screenshot for solution (A).
- Receive a NECKLACE.
- Back out.
- Give the NECKLACE to the jeweler; receive 3 GOLD COINS (B).
- Go forward.
- Place the 3 GOLD COINS on the counter; take the MERMAIDS SCALE (C).
- Back out 3x.
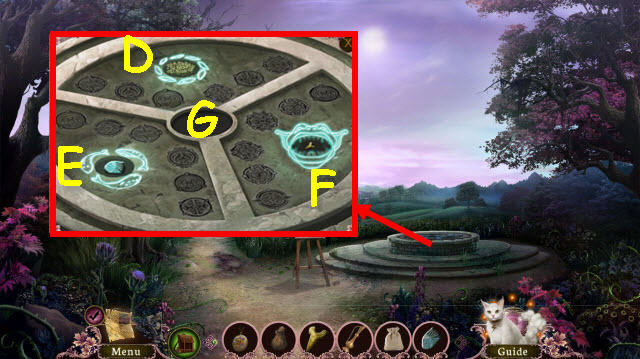
- Place the following in the slots: ENCHANTED SEEDS (D), MERMAIDS SCALE (E), HOBGOBLIN TOOTH (F).
- Select the center (G) when complete to trigger a puzzle.
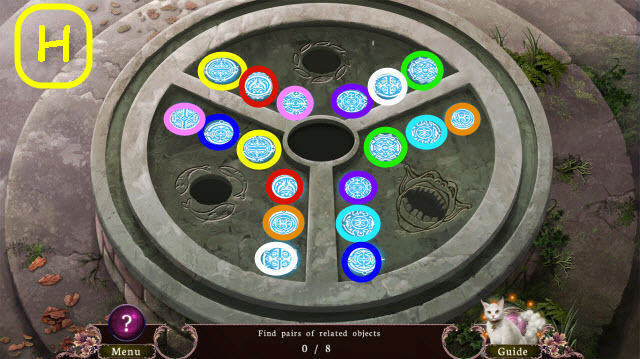
- Find the matching pairs.
- See screenshot for solution (H).
- Place the SACK OF SOIL and WATER OF QUICKENING in the center.
- Use the DAGGER on the vines; receive a SCEPTER (I).
- Go forward into the Throne Room.
- Give the SCEPTER to the queen (J).
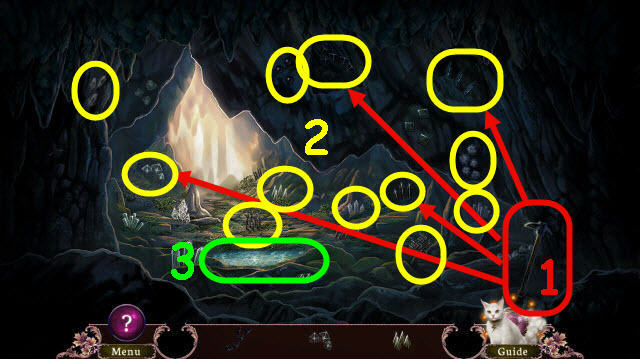
Chapter5: Within the Oak
- Speak to the queen; receive a SIGNET RING (1).
- Go upstairs (2).
- Take the NOTE (3) and DIRTY CLOTH STRIPS (K).
- Take the BRICK (L).
- Select the RUNES to get RUNES (M).
- Go forward.
- Take the STOOL (N).
- Examine the dresser to trigger a puzzle (O).
- Find matching pairs (P).
- You receive a KEY.
- Back out.

- Use the KEY on the lock; take the BALL AND CHAIN (Q).
- Back out.
- Place the STOOL on the rock (R) and hang the BALL AND CHAIN from the hook (S).
- Turn the lever (T).
- Go forward.

- Use the left and right arrows to duplicate the RUNES code (U).
- Use the DAGGER 3x on the vines; take the CREST (V).
- Place the DIRTY CLOTH STRIPS on the end of the stick; receive an UNLIT TORCH (W).
- Back out.
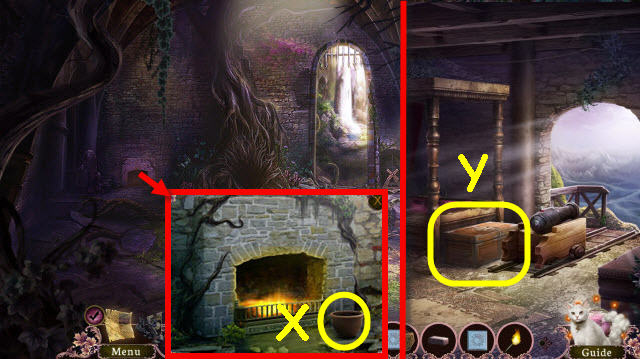
- Dip the UNLIT TORCH in the pot (X) and then in the fire; receive a TORCH.
- Go upstairs and forward.
- Use the CREST on the chest to trigger a puzzle (Y).
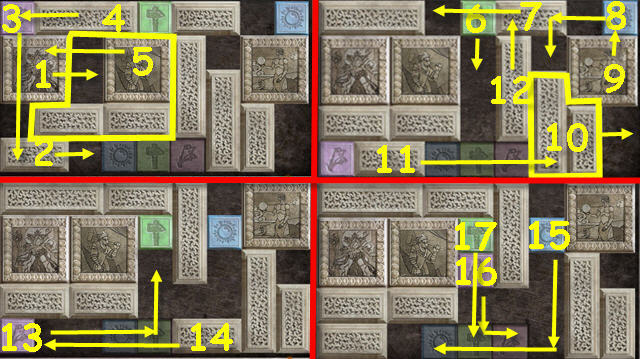
- Move the tiles to their base.
- See screenshot for solution (1-17).
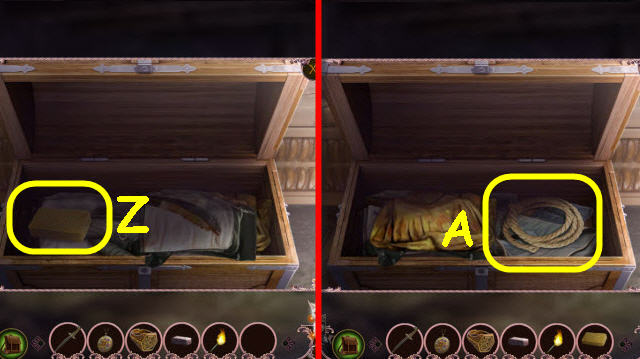
- Move the clothes; take a SPONGE (Z) and ROPE (A).
- Back out twice; go forward.
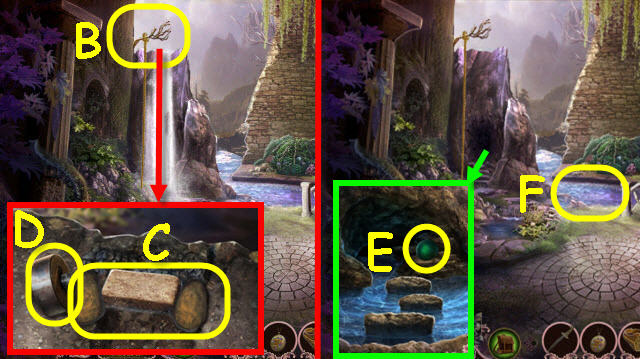
- Use the ROPE on the branch (B).
- Place the BRICK on the waterfall; move the BRICK and two smaller rocks to block the water (C).
- Take the WHEEL (D).
- Take the CANNONBALL (E).
- Use the SPONGE on the water; receive a WET SPONGE (F).
- Back out; go upstairs and forward.
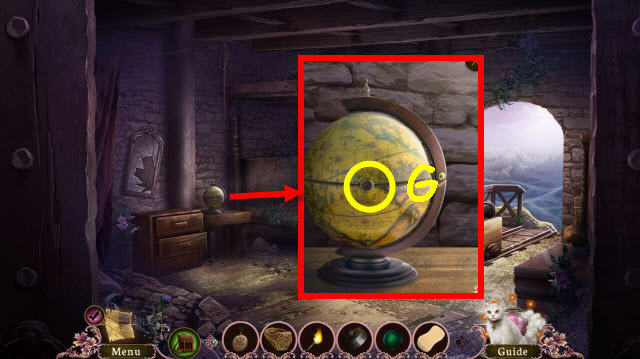
- Use the WET SPONGE on the globe 3x; use the SIGNET RING on the lock (G).
- You will trigger a puzzle.
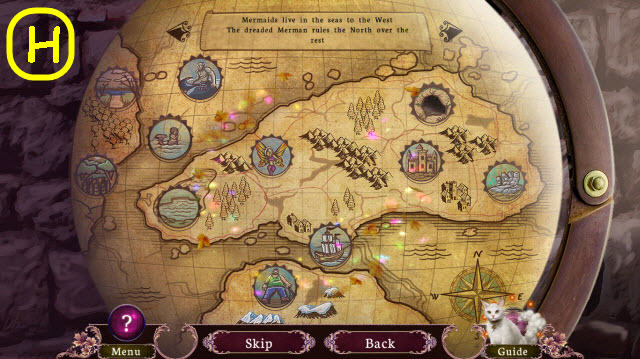
- Drag to swap the pieces to complete the map.
- See screenshot for solution (H).
- Take the HARP STRINGS.
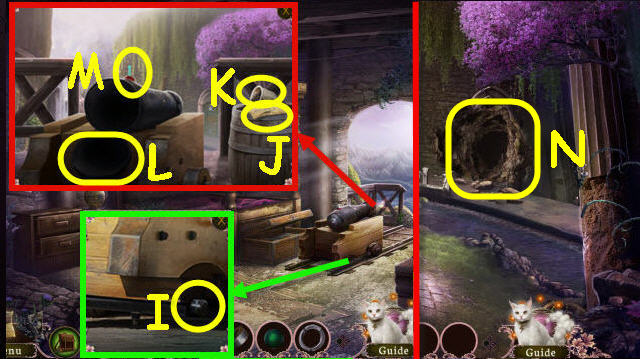
- Place the WHEEL on the cannon (I); push the cannon.
- Take the POSTER (J).
- Place the CANNONBALL and gunpowder (K) in the cannon.
- Close the cap (L); use the TORCH on the fuse (M).
- Back out twice; go forward.
- Use the TORCH twice in the room to trigger a HOP (N).
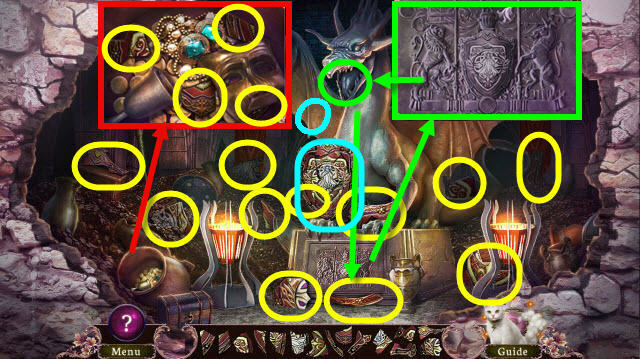
- Play the HOP.
- You receive a SHIELD (O).
- Back out; go upstairs.
- Place the SHIELD on the knight (P).
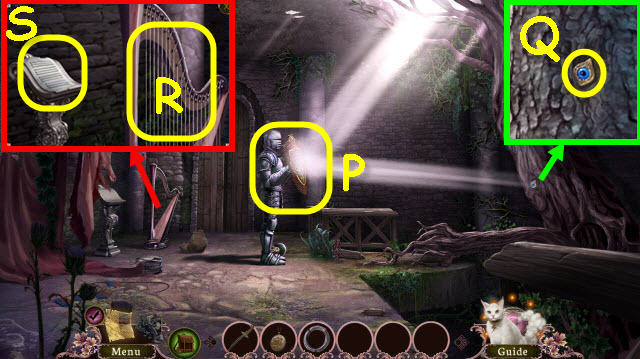
- Take the EYE-SHAPED LENS (Q).
- Place the HARP STRINGS on the harp (R).
- Use the EYE-SHAPED LENS on the music to trigger a HOP (S).

- Play the HOP.
- Move the lens to find 15 butterflies (T).
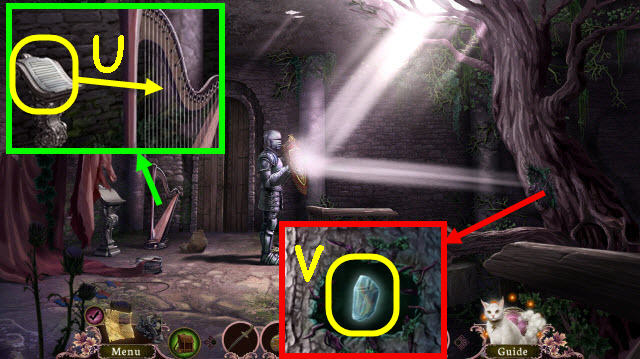
- Place the music sheet on the harp (U).
- Use the DAGGER 3x on the vines; select the chrysalis and receive a BUTTERFLY (V).
- Back out.
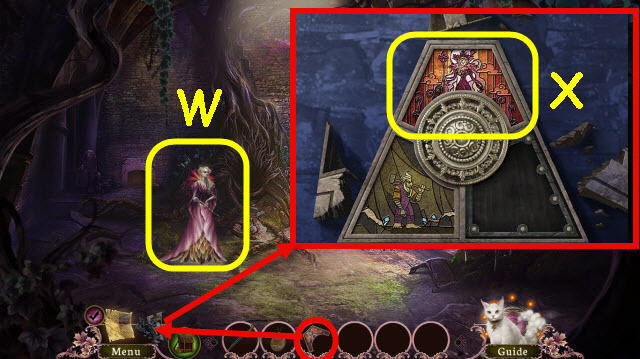
- Give the BUTTERFLY to the queen: receive a QUEEN’S PIECE (W).
- Take the QUEENS PIECE and place it on the Perpetual Prison (X).
Chapter 6: Corridors of Memory
- Remove the cloth and open the cabinet door; take the KEY (Y).
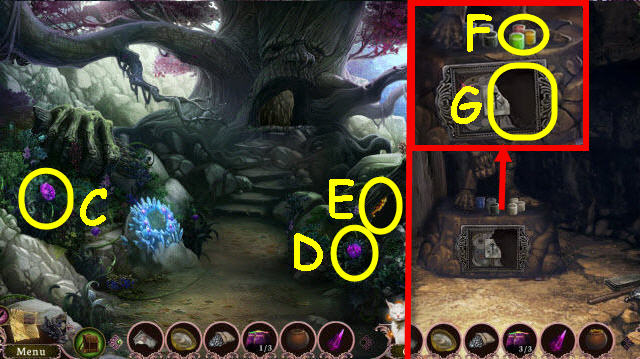
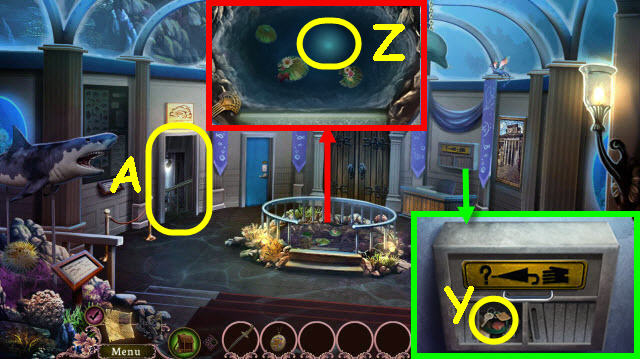
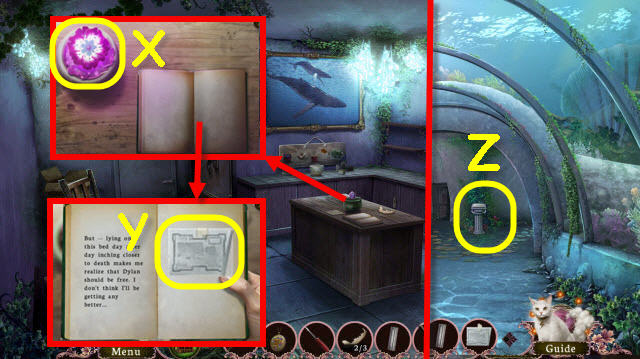
- Move the water lilies and select the glow; receive an UNDER THE FOUNTAIN (Z).
- Go to the basement (A).
- Use the KEY on the door (B).
- Place the notes in the book. Turn the pages 3x and take the ID CARD (C) and SILHOUETTE (D).
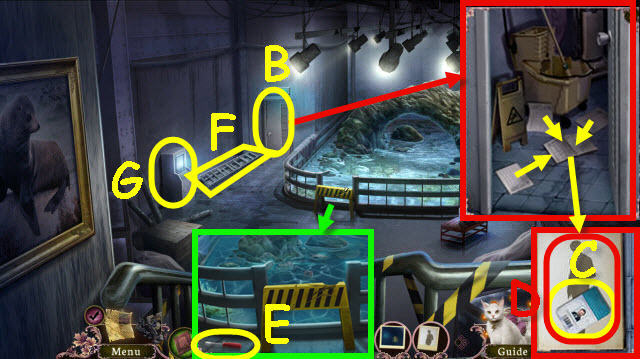
- Take the SCREWDRIVER (E).
- Take the LADDER (F).
- Examine the terminal to access a HOP (G).
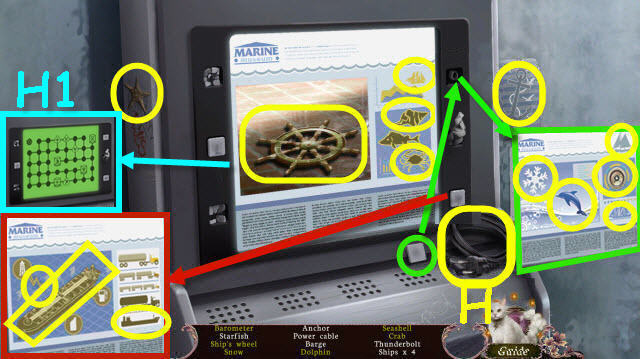
- Play the HOP.
- You receive a POWER CABLE (H).
- Select the screen after the HOP to get the WATER FLOW DIAGRAM (H1).
- Back out.
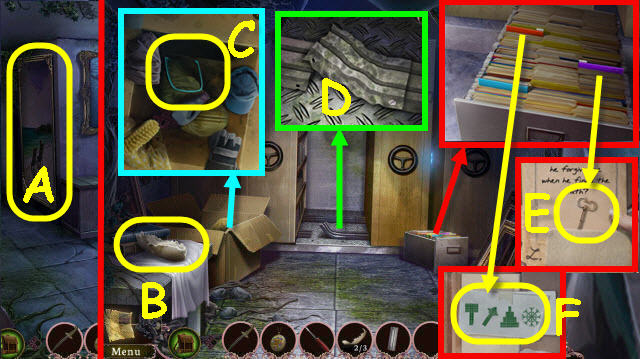
- Use the ID CARD or SCREWDRIVER on the cabinet door; take the CD (I).
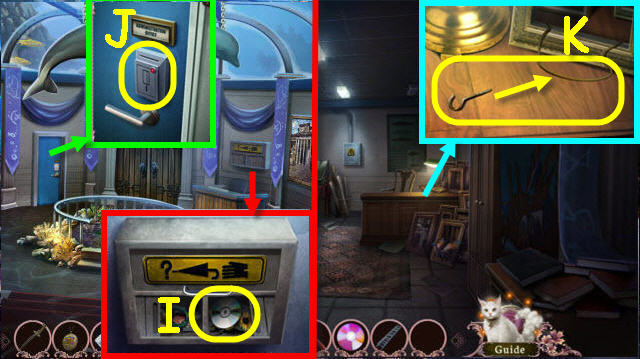
- Use the ID CARD on the reader (J).
- Enter the office.
- Use the DAGGER on the wire and place the hook on the wire; receive a WIRE AND HOOK (K).
- Go to basement.
- Use the WIRE AND HOOK to get the BUTTON (L).
- Return to the office.
- Plug the POWER CABLE in the power strip (M).
- Place the CD in the drive (N). Select the monitor to get the COMPUTER CODE (O).
- Use the SCREWDRIVER on the panel; place the BUTTON in the slot (P).
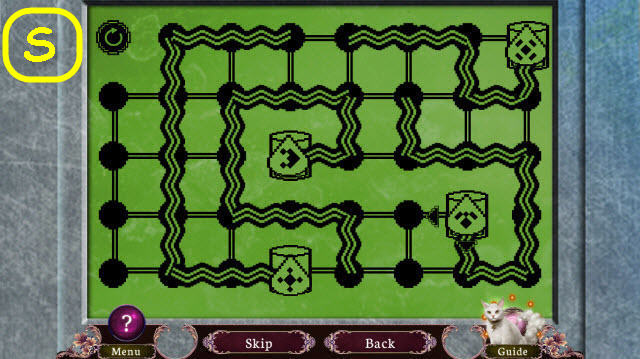
- Punch in the COMPUTER CODE; 03695. Select the arrow (Q) and screen (R) to trigger a puzzle.
- Move the water drops to their matching containers.
- See screenshot for solution (S).
- Back out.
- Place the LADDER in the pond (T).
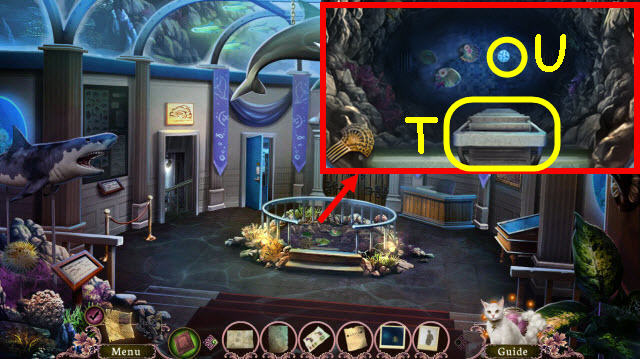
- Use the LOCKET on the symbol (U).
- Take the TILES 1 (V).
- Select the picture to get a PAINTING (W).
- Take the TILES 2 (X).
- Go forward.

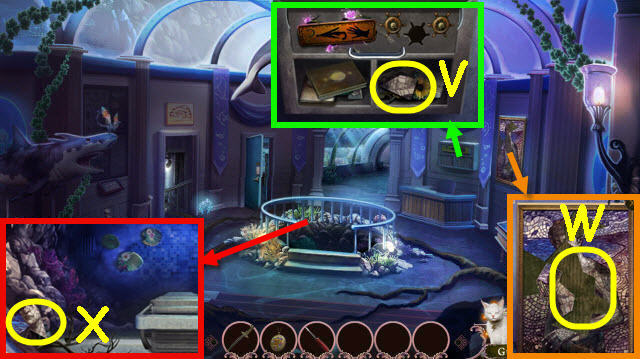
- Use the LOCKET on the barrier (Y).
- Take the LIGHTBULB (Z).
- Use the DAGGER on the vines 4x (A).
- Back out; go through the left door.
- Take the BONES 1/3 (B).
- Examine the wooden disk to trigger a puzzle (C).
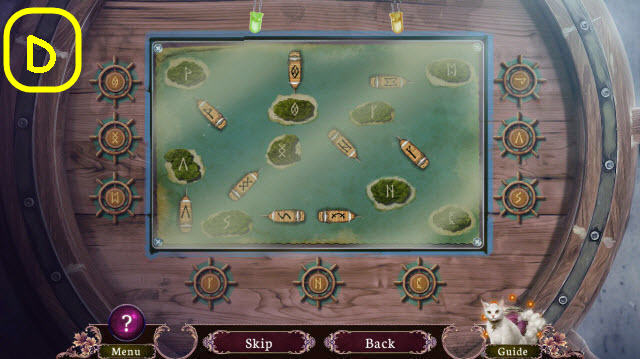
- Turn the wheels to face the ships to their matching islands.
- See screenshot for solution (D).
- You receive a SHIP’S WHEEL.
- Back out.

- Use the SHIP’S WHEEL on the cabinet; take the CORKSCREW (E) and TILES 3 (F).
- Return to basement.
- Use the CORKSCREW on the cork; take the PAGES 1/2 (G) and TILES 4 (H).
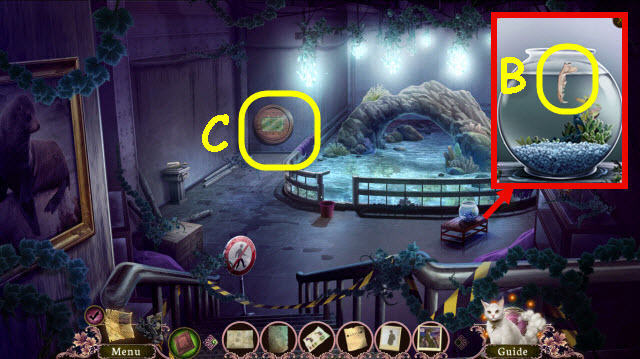
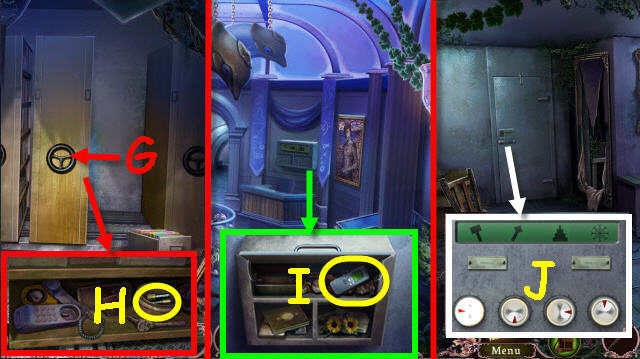
- Back out and go through the blue door.
- Flip the switch; place the LIGHTBULB in the socket and flip the switch again (H1).
- Take the TILES 5 (I).
- Move the curtain and select the figure; take the TILES 6 (J).
- Back out.
- Place the 6 TILES on the painting; enter it (K).
Chapter 7: Return to the Ocean
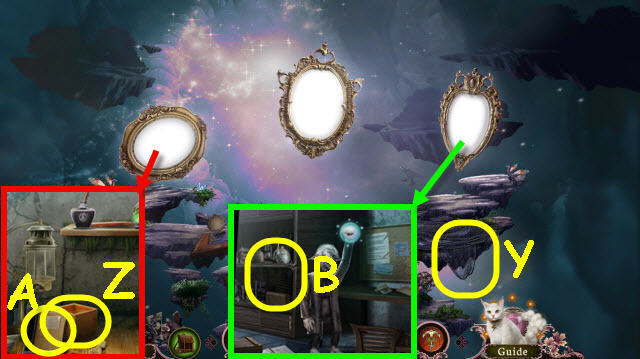
- Select anywhere to trigger a puzzle.
- Find the answers to the questions.
- Move the glowing balls to uncover all the options.
- Select the following: A, 1, 2, B, C, 4, D, C, 5, 6, F, 7, 8, E, F, 9, and G.
- You receive a MIRROR.
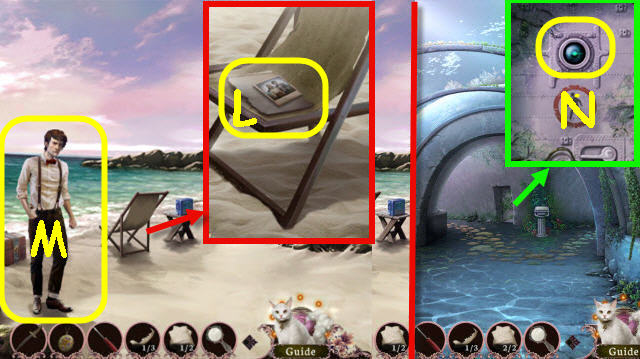
- Look at the photo and select it to receive PHOTO; take the PAGES 2/2 (L).
- Speak to the Selkie (M).
- Back out and go forward.
- Use the MIRROR on the scanner (N).
- Go forward.
- Select the diagram to receive TURTLE’S CURE (O).
- Take the SEAL (P).
- Place the 2 PAGES in the book (Q).
- Select the note twice; receive ALCHEMIST’S LOAM (R).
- Take the BONES 2/3 (S).
- Take the RAILING (T).
- Back out twice; go through the blue door.
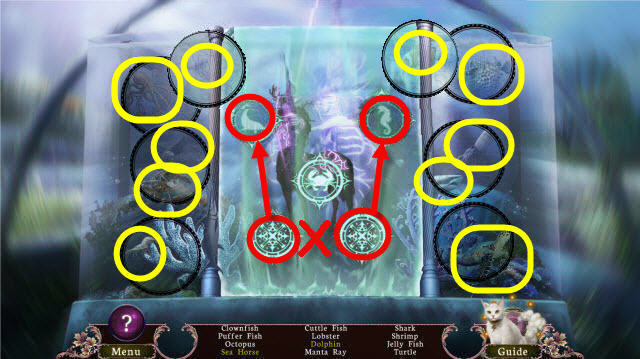
- Place the SEAL on the display lock to trigger a puzzle (U).
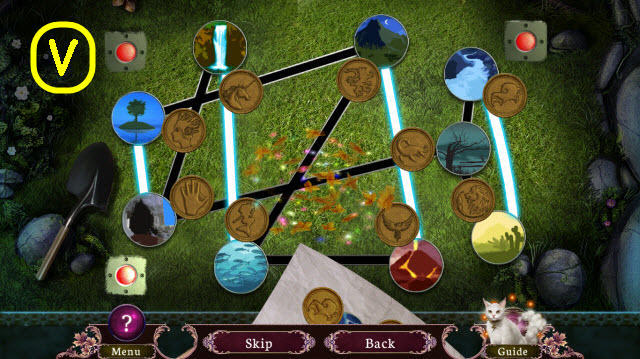
- Move the seals to their correct locations.
- See screenshot for solution (V).
- Use the shovel on the dirt to get ALCHEMIST’S LOAM (W).
- Back out; go forward twice.
- Place the ALCHEMIST’S LOAM in the pot (X).
- Read the book and turn the pages 4x; take the OLD MAP (Y).
- Back out.
- Place the OLD MAP on the map; receive a COMPLETE MAP (Z).
- Go forward.
- Use the COMPLETE MAP anywhere in the room.
- Use the DAGGER on the picture 2x (A); go through it.
- Take the BONES 3/3 (B).
- Move the items; take the HANDLE (C).
- Use the SCREWDRIVER on the track (D); place the RAILING down and use the SCREWDRIVER on the screws.
- Take the KEY (E).
- Take the FREEZER CODE (F).
- Move the shelves over (G).
- Use the SCREWDRIVER on the tin; take the BATTERIES (H).
- Back out 3x.
- Place the BATTERIES in the remote; receive a TEMPERATURE CONTROLS (I).
- Go forward twice.
- Enter the FREEZER CODE on the door (J); use the TEMPERATURE CONTROLS on it to trigger a HOP.
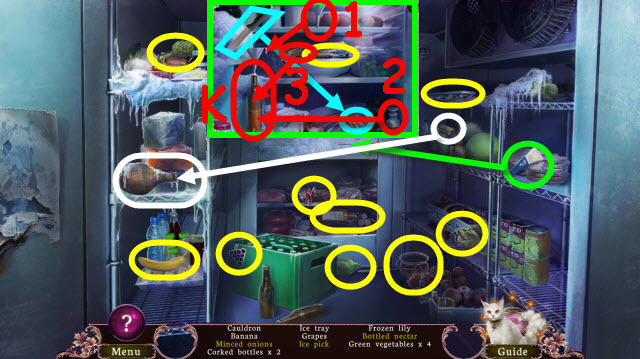
- Play the HOP.
- You receive BOTTLED NECTAR (K).
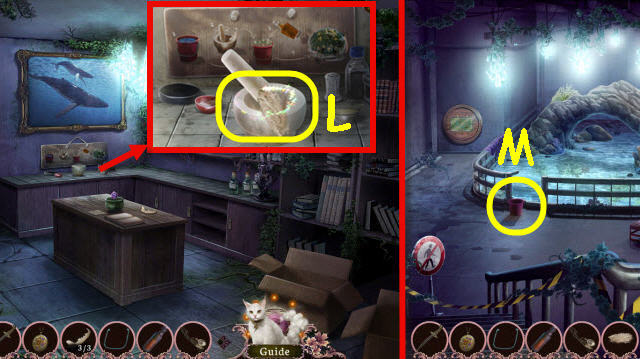
- Place 3 BONES in the mortar; grind the BONES with the pestle to receive GROUND WURM’S TOOTH (L).
- Back out twice; go through the left doorway.
- Place the HANDLE on the bucket; receive an EMPTY BUCKET (M).
- Back out; go through the painting.
- Use the KEY on the chest; take the LADY STATUETTE (N).
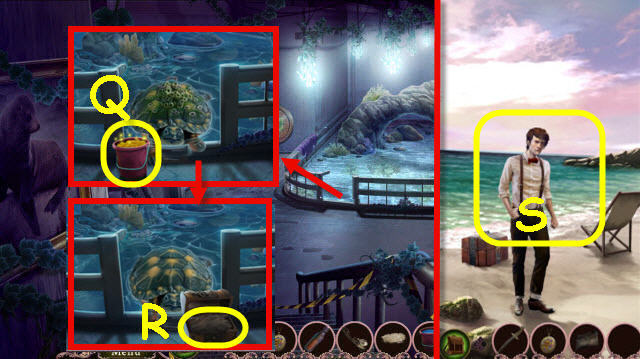
- Use the EMPTY BUCKET on the water; receive SPRING WATER (O).
- Back out; go through the blue door.
- Place the LADY STATUETTE on the post in the diorama; take the PENDANT (P).
- Back out; go through the left door.
- Place the SPRING WATER by the tortoise. Place the GROUND WURM’S TOOTH and BOTTLED NECTAR in it; select the bucket (Q).
- Use the DAGGER on the chest 3x and open it. Use the PENDANT on the orb; take the FUR (R).
- Back out; go through the painting.
- Give the FUR to the selkie (S).
Chapter 8: Hunting the Hunter
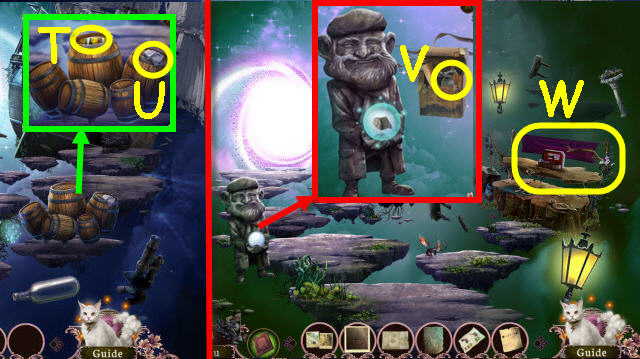
- Use the DAGGER on the barrel; take the PUMPKIN SEEDS (T) and RAG (U).
- Go forward.
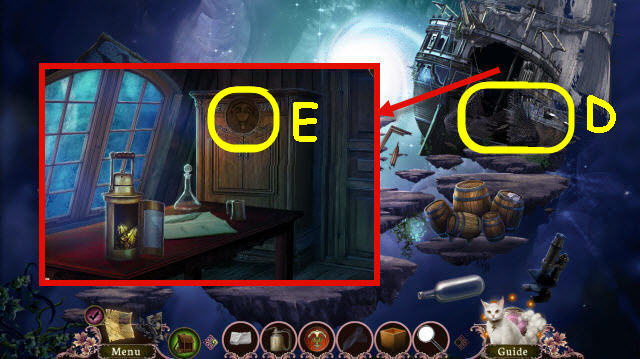
- Use the DAGGER on the pack; take the note and OILCAN (V).
- Examine the trinkets to access a HOP (W).
- Play the HOP.
- You receive an ANCHOR SEAL (X).
- Go forward to the portal.
- Take the NETTING (Y).
- Take the EMPTY POT (Z); select the notebook twice (A).
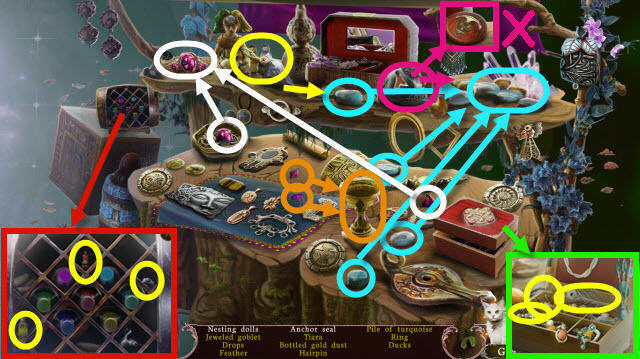
- Select the shelves to access a HOP (B).
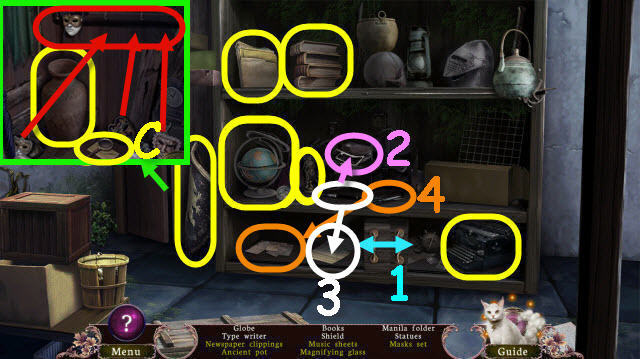
- Play the HOP.
- Receive a MAGNIFYING GLASS (C).
- Back out twice.
- Place the NETTING on the ship (D).
- Use the ANCHOR SEAL on the cabinet and examine it to trigger a puzzle (E).
- Move the symbols on top of their matching spaces.
- See screenshot for solution (F).
- Take the ORE (G).
- Use the RAG on the crystals; take the SUN CRYSTAL (H).
- Use the OIL CAN on the wing nut; take the ELIXIR OF GROWTH (I).
- Go forward.
- Use the SUN CRYSTAL and MAGNIFYING GLASS on the lamp (J); take the TURTLE (K).
- Use the EMPTY POT on the dirt; receive a POT OF SOIL (L).
- Back out.
- Give the TURTLE to the caretaker; take the BOARD PIECES 1/3 (M).
- Go forward twice.
- Give the ORE to the archivist; take the BOARD PIECES 2/3 (N).
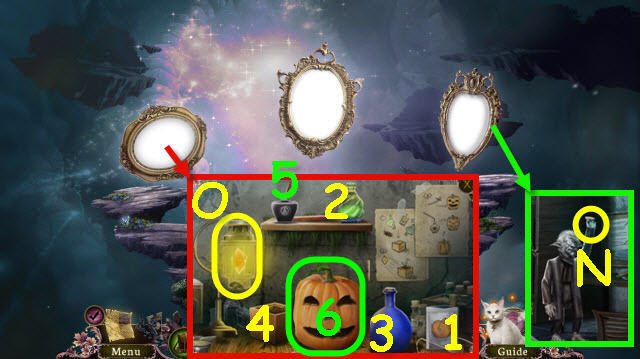
- Place the POT OF SOIL, PUMPKIN SEEDS, and ELIXIR OF GROWTH on the table. Place the SUN CRYSTAL in the lamp (O).
- Place the following: 1, 2, 3 in 4, 5 and the DAGGER on 6.
- Take the JACK O ‘LANTERN (6).
- Back out.
- Give the JACK O ‘LANTERN to the man; take the BOARD PIECES 3/3 (P).
- Go forward.
- Place the 3 BOARD PIECES on the board to trigger a puzzle (Q).
- Change all the pieces to rock.
- Select the symbol on the bottom to change all connecting symbols to that one.
- See screenshot for completed board (R).
- Go forward.
- Use the DAGGER on the vines twice (S).
- Enter the portal.
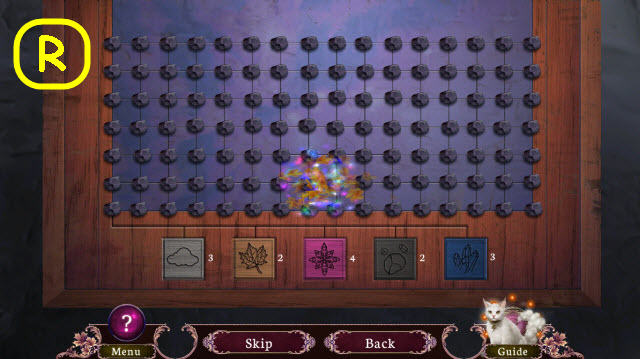
- Use the LOCKET on the huntsman to trigger a HOP (T).
- Play the HOP.
- Move the rocks out of the way to expose all crystals.
- See screenshot for solution (U).
- Use the LOCKET on the huntsman to trigger a HOP.
- Play the HOP.
- The runes will float around; you will need to release them to find them all.
- Turn each button 3x (V).
- Place the lever on the mechanism; pull down (W).
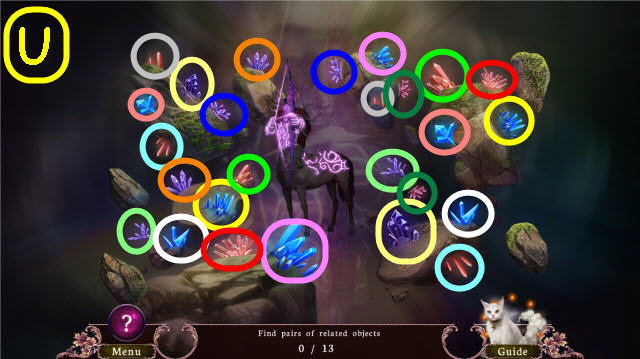
- Use the LOCKET on the huntsman to trigger a HOP.
- Play the HOP.
- Push the buttons (X) to change the images.
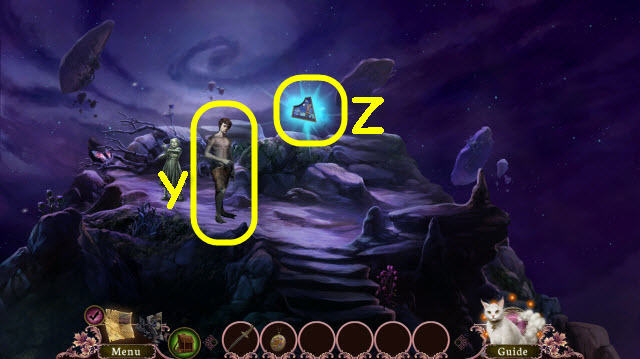
- Speak to selkie (Y).
- Take SELKIE’S PIECE (Z); place it on the Perpetual Prison.
- Give the LOCKET to selkie.
- Congratulations, you have completed Otherworld: Shades of Fall.


 Resurrection New Mexico Walkthrough, Guide, & Tips
 Strangestone Walkthrough, Guide, & Tips
 Mystery Trackers: Raincliff Walkthrough, Guide, & Tips
 Mayan Prophecies: Ship of Spirits Walkthrough, Guide, & Tips
 Dark Romance: Heart of the Beast Walkthrough, Guide, & Tips