~ Getting The Sun’s Song ~
Hyrule Field The next dungeon is up on Death Mountain, but before we go up there, there’s a few things we need. For now, continue on towards Kakariko Village, just like Impa told you to.
Kakariko Village There’s tons of stuff we can accomplish in this town and the surrounding areas, but a lot of them are dependant on the time of day. That being said, continue on through this area to the Graveyard (exit on the far right side of the village).
Graveyard This place is rainy and mysterious during the day, with a kid walking around slowly with a stick attempting to imitate Dampe, the grave keeper. At night, ghosts called Poes will appear. Their easily defeated, but its easier to simply avoid them.
Head to the complete opposite side of the graveyard and you’ll find three large graves. If you read the ones on either side, one of the two deceased Composer Brothers will appear (who kinda look like Mario and Luigi). By defeating them, you can learn that they composed a mystical song that makes the sun rise and set at a whim.
Stand on top of the Triforce symbol in front of the largest of the three graves and play our new song: Zelda’s Lullaby. This will cause a storm, which strikes the tombstone with lightning, making it explode and revealing a hidden hole into the secret grave. Hop down into it.
Royal Family’s Tomb This place is littered with skeletons. You’d think the royal family would have wonderful burials for these wealthy royalty. Anyway, head down the ramp and you’ll find a new enemy that look much like bats: Keese. Kill all five of them in this room with your Slingshot to open the opposing door. Climb up the massive steps and go through.
In this next room, you’ll meet another new enemy, one which freezes you with its eerie gaze: ReDeads. They’re obnoxious to get close to and only safely defeated from behind, so for now, just try to avoid them. Work your way around the creepy, poisonous pools of death and get to the other side of the room.
In this final passage, go up to the large stone and press A to “check” it. You’ll witness a short clip in which Navi reads the poetic inscription and you learn the Sun’s Song, perhaps one of the handiest songs in the game.
Work your way out of the grave, using the Sun’s Song to stun the ReDeads. Once you get back to the first room, step on the colorful pad to return to the surface.
~ Goodies In The Graveyard ~
Graveyard Head to the back of the Graveyard, between the last row of graves and the Royal Family’s Tomb. Now face towards the entrance. Pull back the fourth grave from the left to reveal a hole. Fall in.
Inside, play the Sun’s Song to stun the ReDead, then get behind him and slash him to bits. After he’s taken care of, stand on the steps of the platform and play the Sun’s Song again to make a large chest appear, containing our first Piece of a Heart [#1]!
Next up, in the first row of graves (towards the entrance to the area), there’s a single grave with three flowers in front of it. Pull back the grave and jump in.
There’s just a lone small chest in here containing the Hylian Shield. We’ll need one for the next dungeon, and we can get a discounted price at the Market for 50 Rupees, but this one’s free!
~ Hyrule Field ~
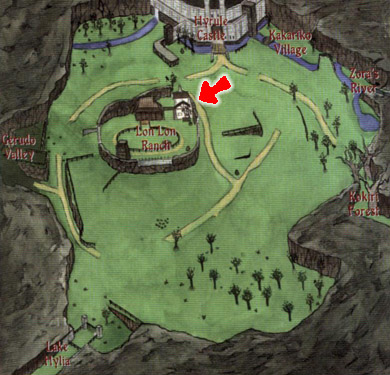
While there’s several things we can do in Kakariko Village, let’s leave for now. It’s nice to have the Sun’s Song for the next couple parts just so you don’t have to wait in the fields until morning, which is why we got it first. The next thing on the to-do list is entirely optional, but there’s some cool goodies to get there. If you’re up for it now, head to Lon Lon Ranch in the center of Hyrule Field. Just your use mini-map, you can’t miss it.
~ Lon Lon Ranch ~
As soon as you arrive, enter the door on your left to meet up again with Talon, the fat farmer we met at Hyrule Castle awhile back. He has a little game prepared for you, involving chickens no less. You’ll have to bring some Rupees though, as it may take a few tries to get the hang of it.
Mini-Game: Super Cuccos!
As soon as the game starts, Talon will shoo the chickens away, which land in the other three corners of the room. Search each of those areas in general, and toss each of the wrong chickens you pick up in a safe direction so you don’t end up picking them up again. Once you’ve found one, move to another corner, etc. You should easily be able to win within the time limit.
To make this game immensely easier, you can toss all of the stray Cuccos into the area at the base of the stairs before you even talk with Talon. This way the only chickens left to pick up are the right ones! It’s practically cheating! I guess he’s too sleepy to notice though, eh? =P
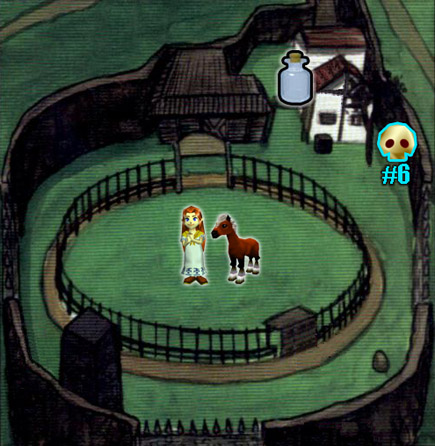
Once you’ve caught all three Super Cuccos, Talon will insinuate the possibility of you wedding his daughter. After listening to his chuckling rambles, he’ll finally gift you with the first bottle, which is filled with Lon Lon Milk. Exit the building, then round the corner on the left. You’ll find a single tree all by its lonesome. Roll into it to cause a Gold Skulltula [#6] to fall down.
After collecting the token, head for the center of the corral, where you will find Malon. She engages you in small talk about the castle and her father, then introduces you to the horse, who immediately runs away from you. Speak with her multiple times until she starts asking about the “song her mother wrote.” Pull out your Ocarina while standing in front of her and she’ll teach you Epona’s Song.
Well that’s simply splendid! The potential free milk is a pretty sweet deal for a little while, until you get too many hearts anyway… Otherwise, for now, all it’s good for is making Epona follow you within the corral. If you’re really bored and persistent, you can play the song repeatedly to get her near the exit, then stuck on the outside of the corral; heh heh heh… >=D
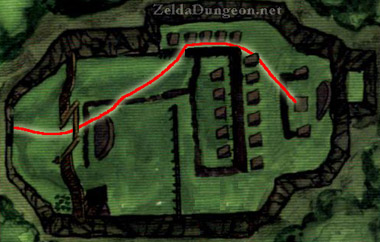
That’s all the necessities here, but there’s a few more goodies if you’d like to stick around. Next, play the Sun’s Song to make it night. Get on the outside of the corral and follow it clockwise, avoiding the Guays (crows) as you go. You’ll quickly come to the feeding trough (that single wooden overhang thing in the lower right corner of the corral on your map), which happens to have a Gold Skulltula [#7] on it! This one is only here at night.
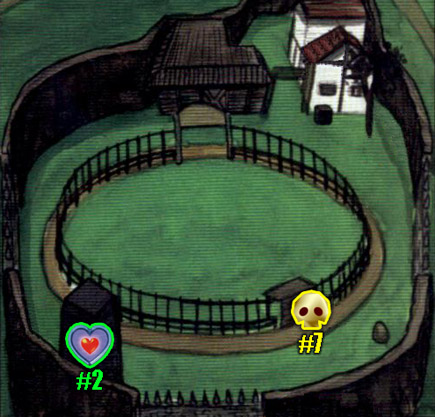
Now head for the feed silo (the big tower thing in the bottom left corner of your map). I suggest waiting to play that Sun’s Song, cause it’ll make you reappear in the center of the corral. Once inside the silo, move the crates by pushing and pulling them as well as climbing over them until you can get to the far corner. Once there, you’ll find a small hole that you can crawl through, inside which is our next Piece of a Heart [#2]! That’s it for Lon Lon Ranch.
~ Hyrule Field ~
Our next goal is head for Kokiri Forest. After exiting Lon Lon Ranch, it will be on your right. Go around the ruined wall and you’ll see it in the distance. On your way there, you’ll probably have an encounter with the nearby PeaHat. We’re never required to fight these annoying enemies, so I suggest you just avoid it altogether. Although it looks intimidating, you’re quite capable of defeating it, should you choose to do so.
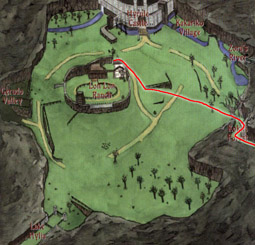
~ Kokiri Forest ~
And here you thought we were done with the starting area, ha! Before we head for our objective, play the Sun’s Song to make it night, then head for that fenced area where we got the sword. The lone building in this upper area (the Know-It-All-Brothers’ House) has a Gold Skulltula against the backside of it. Wind your way around and kill it, then use a Jump Attack while Z targeting it to grab the token [#8].
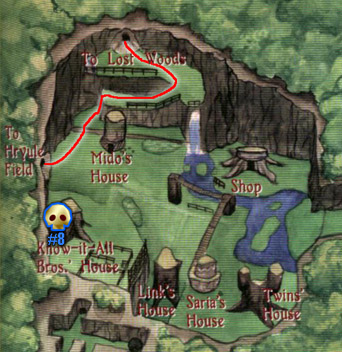
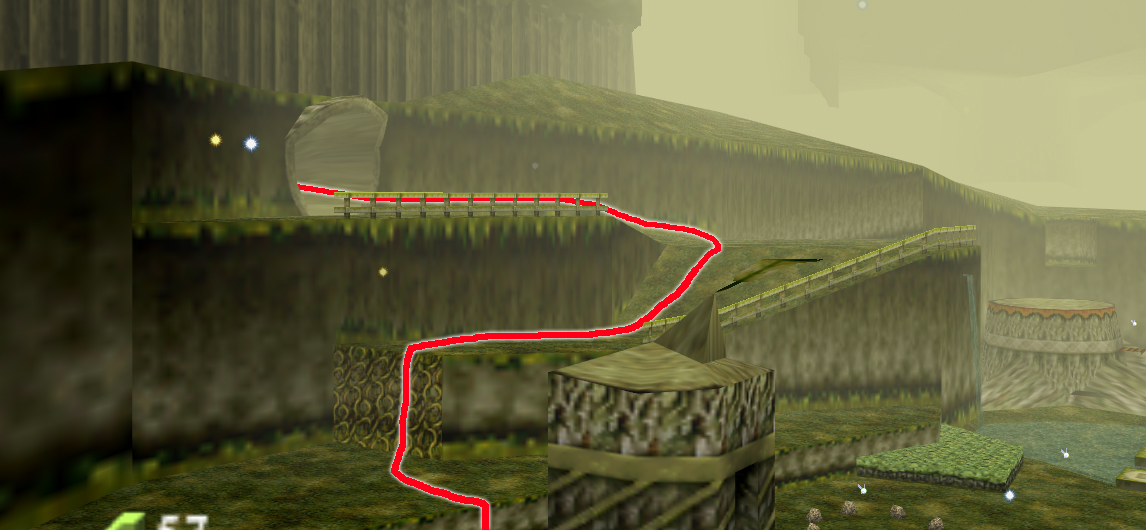
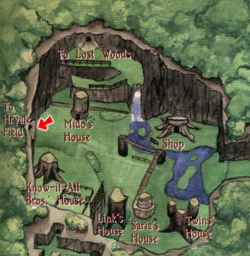
Now, onward! If you were standing in the entrance to the area, head left and climb up that little ledge (behind to Mido’s House). Climb up the vines up here, then make your way around to the hollowed log which leads to…
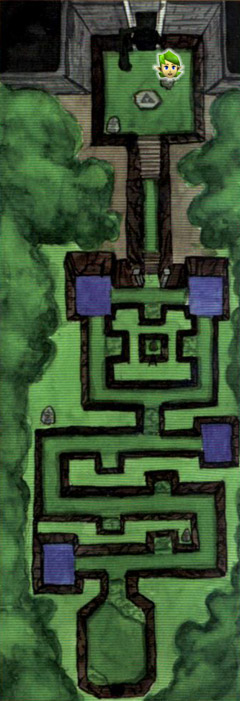
~ Lost Woods ~
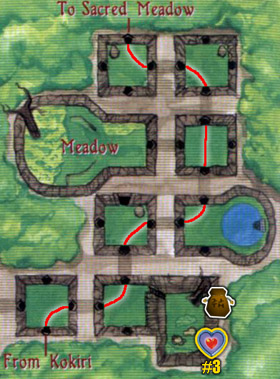
This area is a maze, which will kick you out if you make a wrong turn. There’s a couple goodies we can get along the way, so let’s get those as well. First off, take the right passage, which leads to a big area with a single tree straight ahead. Shoot the “target” thing hanging off the lone branch. If you get it in the middle three times in a row (100 points each), a Deku Scrub will appear and gift you with something special.
Nice. Next up, jump down and go stand on top of the stump to the right. Two Imps with reed flutes will appear, playing music atop the other nearby stumps. Whip out your Ocarina and they’ll let you join in their little game.
Mini-Game: Follow Along
This mini-game greatly resembles the electronic game “Simon” where you have to repeat the pattern they play on their flutes using your Ocarina. They steadily add one note at a time and if you can successfully complete the song, they’ll move on to the next one. If you manage to complete thee songs in a row without messing up, you’ll get the prize.
It’s pretty easy to beat it once you get used to it. If you manage to get the prize, the first time you’ll get a Piece of a Heart [#3]!
With those two goodies out of the way, we’ll continue on our merry way through the Lost Woods. Since this is your first time through, it’s immensely easy. All you have to do is follow the music. Crank up the sound if you like and stand close to each exit until you find the right ones. After only going two screens, Kaepora Gaebora (the owl) will pop up and hint at what I just told you. Ignore the fool bird who states the obvious and continue on my friend!
From the start, the correct path is: Right, left, right, left, forward, left, right.
~ Sacred Forest Meadow ~
As soon as you enter this new area, head forward, which causes a new enemy then appears: a Wolfos. You’ll encounter many of these monsters throughout your journey, so get used to them now. Simply target it and keep your shield up to get close, then either wait either right after it attacks or when it’s back is turned to stab it. He should be pretty easy for you.
After our fuzzy foe has been defeated, the bars blocking the way to the rest of the area will disappear. Round the next corner and we’ll encounter another new enemy, which is a variation of the Deku Scrub: the Mad Scrub. This variety shoots three seeds at a time, so it’s best to Z target them and walk towards them with your shield raised. You can either get close and use Deku Nuts or your sword, or simply shoot from afar with the Slingshot. Personally, I think the last option is much harder…
Using any of the strategies listed above, make your way to the other side of the area using your mini-map. There’s several dead ends along the way, but you should have no problem figuring it out. On the far side, you’ll eventually come to a ladder and a set of stairs. Take the steps, which leads to an enormous archway with two more Mad Scrubs guarding it. Defeat them quickly before they both cause trouble, then go the final distance to the most sacred part of the Sacred Forest Meadow…
You’ll witness a clip in which Link and Saria are reunited. It turns out she’s been the one playing that song we hear in the woods the whole time. She briefly comments that she feels this place will be important to the two of you later. She then teaches you her song, the same one as the woods.
On your way back, you can take a shortcut to avoid all of the Mad Scrubs. Simply climb the ladder at the bottom of the temple-like ramp to get on top of all of these grassy walls. From here, you can simply jump along the tops of these walls until you get back to the beginning and right on out.
As long as you’re up here though, make note of the ladder in the middle here that leads down to a hole. Inside is a fairy fountain, one of many in Hyrule. This is perhaps the easiest to get to throughout the game, so it’s a good place to stock up on Fairies later on.
~ Lost Woods ~
 That annoying owl (Kaepora Gaebora) will appear once again. Although he makes me yawn, he does have some good advice. If you ever get stuck, try whipping out your Ocarina at certain locations to see if a musical staff appears. If it does, it means you’re supposed to play a song. After our feathered companion of sorts flies off, go ahead and get lost to return to Kokiri.
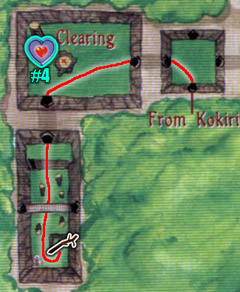
If you’d like some extra goodies, enter the Lost Woods again and take a left. You’ll see another Skull Kid playing a flute. If you get too close, he’ll run away, but if you stand on the stump, he’ll watch you expectantly. Alike the others, whip out your Ocarina. This time however, you get to play whatever you like. Playing one of the songs you learned will make him happy, but if you play Saria’s Song, he’ll give you our next Piece of a Heart [#4]!
Next, head left once more. In this final area (below the bridge) jump down into the lowest area and go to the other side. You’ll encounter a new enemy called a Business Scrub. Z target it and reflect its Deku Nut back at it to defeat it. Afterwards, it’ll be willing to sell you a fancy upgrade. Like all of the upgrades in Ocarina of Time, they can be gotten in either order. This is simply one of the two upgrades for the Deku Sticks found in the game. Do it, do it now!
Well, that’s all we have to do here, so make your way for Hyrule Field.
~ Hyrule Field ~
At long last, we’re returning to Kakariko Village. I know, it’s a pain to get the Sun’s Song and come back, but this way we could use the Song as we did our errands. I like to think it saves time instead of hanging out with the Stalchildren in Hyrule Field until night comes in order to get the tokens.
There’s a lady near the entrance to the graveyard standing in front of a small fenced area who waves her arms about pointlessly. She’s known as “The Cucco Lady” and she’s willing to give you a reward for putting the chickens back in the pen. Lazy woman…
They’re scattered across the village and some of them are nearly impossible to get to unless you practically cheat. Also, for this quest, try not to harm them too much with any of your weapons, otherwise they’ll pronounce a war cry of a cockle-doodle-doo and reign doom down upon you until you either leave the area or die.
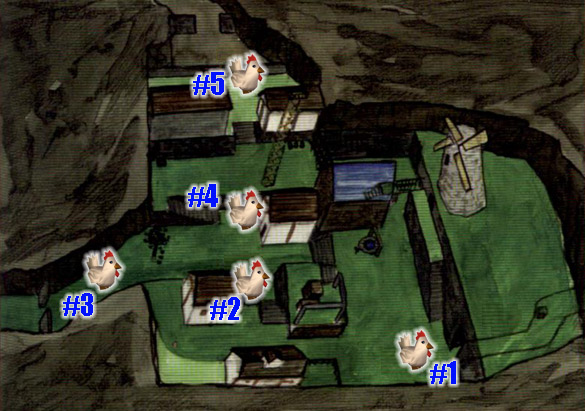
1. Between the Cucco Lady and the entrance to the Graveyard. Simple.
2. On the ledge next to the Skulltula House in the center of the village. Either use another chicken and jump off the higher ledge of the unfinished building to float over to it, shoot it with your Slingshot, or use a Deku Nut. If you do either of the latter, chase it down and grab it.
3. At the entrance to the village.
4. There is a crate near the stairs leading up towards the upper area of Kakariko Village. Roll into it to reveal a Cucco spy, the fiend!
5. Right in front of the guard at the entrance to Death Mountain, there is a Cucco chillin’ near the ramp.
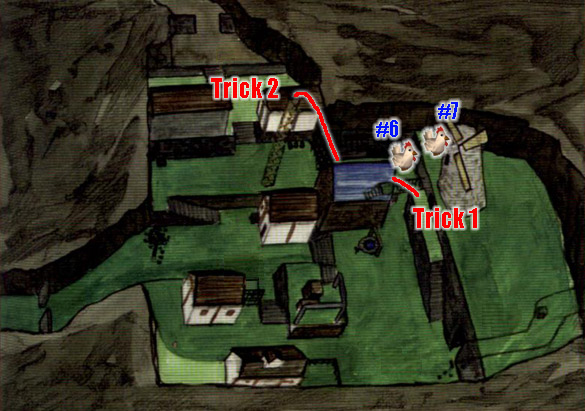
The remaining two Cuccos are in the northeast corner of the village, which you can’t even get to unless you practically cheat. Why Nintendo decided to have such an obnoxious and awkward mini-game puzzle is beyond me. They don’t even give you any hints on how to do this! Anyway, there’s two ways to get to this “secret area.”
Trick 1 Grab another Cucco, get up on the platform near the entrance to the windmill and jump off the ledge at an angle so you land on the skinny looking fence on the LEFT (closest to the potion shop).
Trick 2 Get on top of the lookout tower, hold Z while facing the center of the village, and side jump to the left. You’ll land on top of a fence. Jump down into the “secret area”. At this point, you can actually cheat and get a Piece of a Heart early (by talking to the guy on the roof). I won’t do it now, for the sake of the walkthrough.
Once you finally make it into the “secret area,” toss each of the Cuccos you find over the fence so you can retrieve them later.
6. This one is in the lower part of the area, near a hole. Be careful not to fall in, though! Throw this one over the fence and get the final chicken…
7. For the last one, once you get into the secret area, climb up the ladder and grab the unsuspecting Cucco. I like to fly back to the lady with this one.
Once you’ve finally gathered them all and put them in the pen, speak with the Cucco Lady to receive an Empty Bottle! She then explains she couldn’t get them herself because she’s allergic to her own chickens. Why do you have them, then?! Crazy woman…
Now we’re off to get some Gold Skulltulas. If you don’t care and aren’t planning to collect them, go ahead and skip this section. For now though, I think it’s important to at least get the Adult Wallet at this point in the game.
Graveyard
Now that we have some empty bottles, go to the patch of bushes at the entrance to this area and lift the lone rock, which reveals some bugs that scurry away. Quickly swipe at one with a bottle to catch it. Next, take it over to the left side of the area with the five graves by themselves, where you’ll find a soft patch of soil. Drop the bottle of bugs on it to make a Gold Skulltula pop out. Collect the token and return to the village.
First of all, play the Sun’s Song to make it night. We have five Gold Skulltulas to collect here, so turn up the sound and follow your ears… or just read my guide. =P
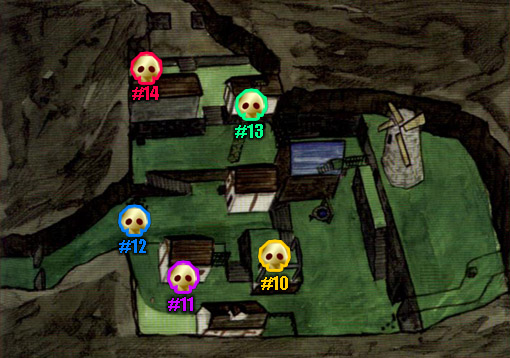
10. On one of the unfinished walls of the construction area. 11. On the side of the Skulltula House… Figures…
12. Roll into the tree in the center of the village. Just don’t let it fall on you =P
13. On the ladder of the lookout tower. Shoot it and climb up to snag the token.
14. Against the side of the building closest to the base of Death Mountain.
Next, we’re going to enter the House of Skulltula, which is right across from the construction area. Inside, you can speak with the cursed spider person in the center to learn about this family’s plight. They are under the “Curse of the Spider” which will progressively lift as you collect the Skulltula Tokens. Well that sucks… Anyway, they will slowly return to normal one at a time and the following number of tokens collected: 10, 20, 30, 40, 50 and 100.
If you’ve been following the walkthrough thus far, we’ve collected fourteen in total. Speak with the ugly kid on the right side doing jumping-jacks to receive the Adult Wallet.
Before we head onward, I should mention something about the prizes: The first few prizes are important, but it’s only worth collecting the tokens up through the 50 prize, as the final prize is completely useless. Anyway, I suggest at least collecting as many as possible for the first half of the game so you get the good prizes early on.


 Mario Kart 8: Characters Guide
 Darksiders II Guide: Locations of the Book of the Dead Pages
 Guide: How to Get the Most Out of Super Smash Bros. Tourneys
 Guides: How to Get Your Musical Creations Off Your DS
 The Wonderful 101 – Tips & Tricks Guide