

OBS is a free and easy way to start streaming.
Open Broadcaster Software (OBS) is free, easy to use and has the ability to stream high-quality and professionally on Twitch. This guide will cover the basics as to how to get your stream up and going, and also include a few tips to help with overall quality.
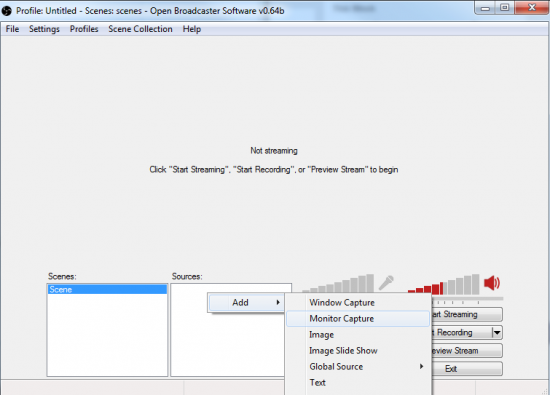
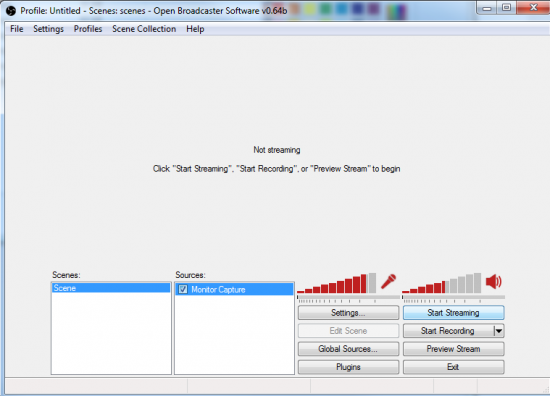
Opening OBS for the first time will present you with a semi-blank screen where you can organise scenes and sources to stream directly to Twitch. Everything that you will see here is what your viewers will be seeing when you stream online. So firstly add a ‘Scene’ by right-clicking and then do the same on ‘Sources’ to add the source of your game – whether it be on PC or even on your console.
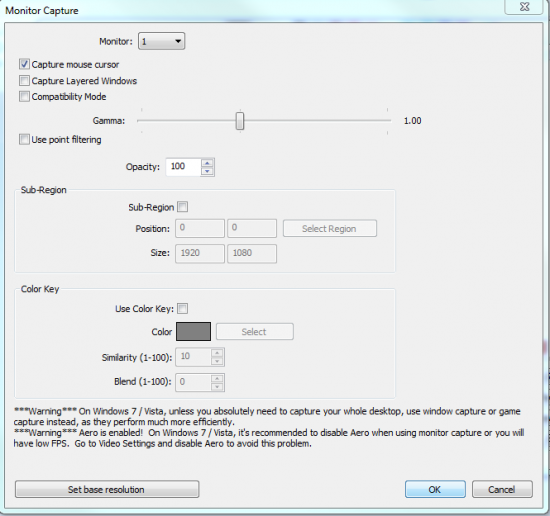
Selecting ‘Monitor Capture’ will immediately capture your desktop and you can edit this on the pop-up screen for opacity and colour. Once done, you can return to the original screen and select “Preview Stream” for the image to immediately appear.
Go ahead and add your webcam or any other game sources you require, and press “Edit Scene” to re-shape or rearrange your various sources.
To know your Upload/Download speed, try checking on speedtest.net
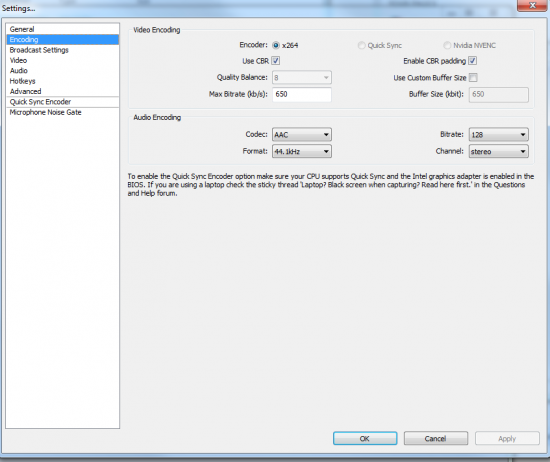
Now things get slightly technical, and it would be good to have an idea of your average upload speeds. Click “Settings” on top of the screen and head down to “Encoding”. Don’t be alarmed by the various numbers and gibberish, and focus on the ‘Max Bitrate’ figure that should be adjusted to your appropriate upload speed. Quality of the stream depends on Bitrate and whether you can handle a HD livestream is down to your upload speeds.
It would be wise to adjust this figure to about 80% of your overall upload speed, or even a bit lower, for the best quality and connection. In my case, I have an upload speed of 0.8mb/s, and so I’ve set the “Max Bitrate” around 650 kb/s.
Streaming at too high a Bitrate can lead to a slow and laggy result.
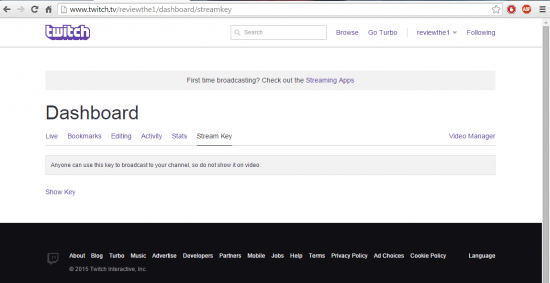
Next up is “Broadcast Settings” which is all the administration work to actually connect your stream to the global Twitch servers. Select your nearest location on “FMS URL” and then discover your “Stream Key.”
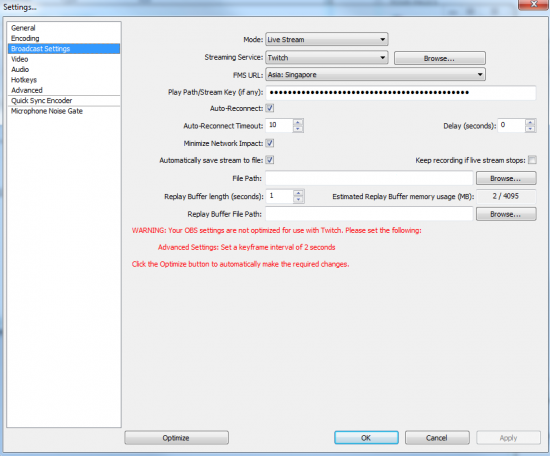
Your Stream Key can change every time you stream so be wary!
To discover this code, head over to your Twitch account dashboard and select Stream Key for it to appear. This won’t always stay the same, so make sure to double-check it each time you decide to stream.
Twitch has grown to become the primary source of gaming live streaming on the internet.
The “File Path” is where the livestream will be saved. OBS automatically saves your streams locally so you can re-watch and test the quality of your overall stream. Keep in mind this also allows you to upload and use the footage elsewhere, such as YouTube.
Streaming can take a while! Be patient and trial different settings.
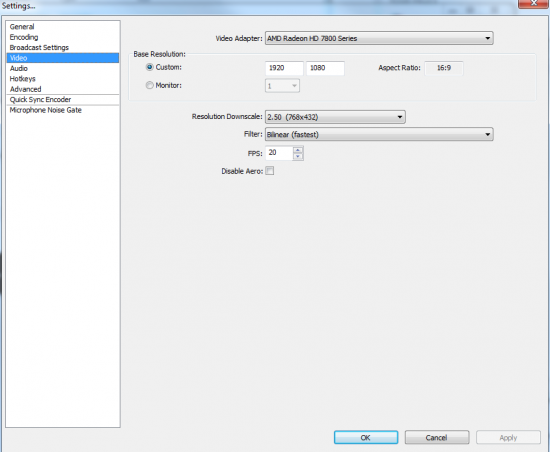
Next on the list is “Video” which will help improve overall stream quality based on your computer and internet capabilities. As my upload speed is too slow to stream in HD, I’ve downscaled the Resolution to 768×432, and this is worth experimenting with in your streams. Select the “FPS” appropriate to your capabilities, the higher obviously resulting in higher quality, and see what works for you.
Remember to not be afraid to experiment with and tweak your settings. Just like when you put in your stream key nothing is set in stone. This means you can, and sometimes have to, change things and make adjustments. So if you feel the need to lower or raise this setting, feel free to do so.
Choose your settings in accordance to your microphone type.
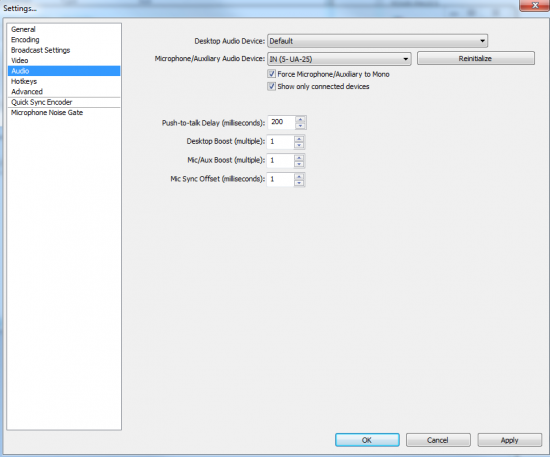
Nearly there! Select the “Audio” option and select your default desktop and microphone device (if you have one). OBS allows you to put a delay on your voice and edit any gain or audio boosts you require. Selecting “Microphone Noise Gate” gives more control over how loud different audio sources are, and is worth experimenting with to perfect your stream quality. If you do know a bit about streaming, and OBS, there is also an “Advanced” area to really fine tune specific areas, however this guide will not be covering that.
Streaming can be a lot fun! OBS makes it just that bit easier.
Now you will be able to stream directly to Twitch. Just head back to the main screen, simply select “Start Streaming”, and you’ll be ready to go! It’s important to remember that streaming takes a lot of trial and error, and perfecting the quality will come down to changing settings accordingly to fit your own capabilities.
You can download OBS here.


 Halo 5 Errors Guide: Fix For Pre-order and Warzone Req Pack Not Displaying, Slow Installation & More
 Yoshis Woolly World: All amiibo designs in pictures
 Super Smash Bros Brawl Guide
 5 ways to complete the Silent Hills P.T. Demo
 Open A Scent is the Key Chest in Destiny TTK - guide