The year is 2171, and mankind is expanding into space with the help of massive orbital elevators. When one elevator is mysteriously sabotaged, an engineer named Dylan Ramsey is embroiled in an epic struggle between two heavily-armed factions, the USN and the OCU. Front Mission Evolved puts you on the front lines of a futuristic war, while providing you with all the hardware you need to lay waste to anything in your path.
The most important part of this arsenal is the Wanzer (adapted from Wanderpanzer), a giant killing machine/mech/robot that players will be able to pilot during some of the game‘s levels. Third-person combat is the name of the game, regardless.
The Front Mission series has been around since the 80′s, and Square Enix is hoping that an appearance on next-generation consoles will give it a new lease on life. Regardless of whether they’re successful or not, we’re providing a detailed walkthrough for the game. Check back on release day for a step-by-step guide to the full game.
Title: Front Mission Evolved Developer: Double Helix Games Publisher: Square Enix Rating: Teen Platforms: Xbox 360, PS3, PC Release Date: 9/28/2010
Long Island Research Facility
Head through the door and enter the testing area. Walk through the green arrow marker. Press and hold B to ignite your rockets and skate through the seven green markers
Move to the next marker in the far right corner of the area. Press A to jump and tap it again to hover over the cement barricade and hover through the three green markers.
Hop over the lowered gate and the cement barricade before shooting straight ahead to the next marker. Use RT to shoot the targets as they pop up. Once done, turn to the right and pick up the ammunition.
When the Wanzer drone pops up, shoot his arms first, then his legs. Fire a few rounds at its head and torso to destroy it. The next Wanzer will appear in the far left corner––skate toward it and destroy it with a melee attack by hitting LT.
Turn around to view the two oncoming helicopters. Press and hold LB to while aiming at the ‘copters and release to fire a round of missiles to destroy them.
Pick up the cases of ammo near the gate, then turn around and head through the green marker. Turn back around and head through the next one before pressing X to evade the fire of the Wanzer drone. Use a melee attack to destroy it.
ACHIEVEMENT: Use a melee attack to destroy the Wanzer and earn the “The Show” achievement for completing the chapter.
Battle For New York
Head down the tunnel and turn left. Destroy the enemy at the end of the street. Jump and hover up onto the street above.
Turn right down the street and destroy the tank and solider down to the right. Turn right and jump down. Destroy the enemy Wanzer with a round of missiles.
Skate down the street and pick up the ammo. Turn left and destroy the group of enemy soldiers. Pick up the ammo to the right, then turn right down the hallway to pick up some health.
Turn around and head across the street. Continue down the street and destroy the tank that will be coming from the right. Turn right and jump up onto the roof of the building on the corner.
Look down and help your ally destroy the enemy Wanzer. Jump down and skate down the street to the right. Destroy the tank, then head up the ramp to the top of the parking structure.
Jump down, turn right and skate towards the end of the street. Turn left and destroy the enemy Wanzer up ahead. Watch out for the one up and to the left on the platform.
Skate up the ramp and grab the health bar to your left. Continue back up the ramp and turn right. Take out the two turrets before hovering over the barricade.
Jump onto the building just ahead and take out the two warships in front of you. Then take out the two enemy Wanzers below and another turret gun to the right.
Jump over to the building to your right and pick up the ammo before heading down to the street. Walk past the center piece of architecture and pick up the ammo in front of you.
Follow the street around to the right and destroy the group of Wanzers around the corner. Follow your map and continue down the same street until you reach the gates and blue screens.
Once Wiz lowers the gates, skate down the freeway and pick up the ammo and health packs. Destroy the enemy Wanzers around the turn, but be careful because as soon as they spot you, they will hit you with a ton of missiles.
Turn left after the gates and turn right down the street. Help your allies destroy the two enemy Wanzers. Turn right at the end of the street.
Destroy the three enemy Wanzers in front of the bridge. Pick up the ammo and turn right before crossing the bridge. Take out the enemy Wanzers before jumping down into the shipping dock.
Make your way to the back of the dock and destroy the turret behind the last set of shipping containers. Turn to the right and lock onto the other turret gun across the way and destroy it with a round of missiles.
Head back toward the other end of the dock and hop on one of the shipping crates. Turn toward the bridge and lock on to and destroy as many enemies as possible so you won’t have to mess with them when you cross the bridge.
Head up the ramp and across the bridge to complete the mission.
Apollo’s Chariot
Follow Adel and help her destroy the attacking Wanzers and tanks. Make sure to get the Wanzer up on the platform to the left. Turn left up the street and destroy the tank and Wanzer up ahead.
Turn right and jump up onto the building to the left. Look down and to the right and destroy the Wanzers and tankers down below.
Jump down and head down the street. Destroy the turrets to the right and left of you. Turn left and destroy the three Wanzers that come through the big blue door.
Head inside of the hangar and destroy all twenty sensors. You can’t really see them, so just move your scope across the lower level on both sides of the hangar and keep shooting until all twenty have been destroyed.
After you meet up with Hamilton, quickly destroy the nearly Wanzers with a melee attack or two. Use X to avoid their attacks and make sure to take the one on the far roof.
Grab the health and ammo packs in one of the alcoves to the right before advancing down the road and destroying the rest of the Wanzers.
Continue down the road, picking up all of the ammo, before heading up the stairs to the right. Jump down into the courtyard area. Take out the two Wanzers up on bridge to the left first, then take out the two at ground level.
Hover over to the bridge and pick up the ammo. Turn right and grab the health pack. Turn left and jump down onto the street. Turn right and skate under the bridge.
For your fight against Marcus, constantly have your finger on X to avoid his attacks. As you continue to dodge him, hit him with a steady dose of missiles and bullets.
ACHIEVEMENT: Just keep moving to stay alive, while inflicting some damage against Marcus, and you’ll earn the “Percival” achievement.
Percival’s Fall
Follow Hamilton around to the right. Destroy the turrets on the tracks to the right and the helicopter overhead. Turn left down the street and destroy another turret near Hamilton.
Head into the shipping yard and destroy all of the Wanzers. Follow Hamilton, who will lead you into the next area.
Skate down the street and make the first right. Destroy the four Wanzers in this area before heading through the opening in the left of the area. Follow Hamilton down to the area with Adela.
Before jumping down, take out the two Wanzers up on the ledge. Next, take out the rest of the Wanzers down below. Pick up the health pack and follow Adela and Hamilton.
Once you exit the tunnel, make sure you stick close to Adela and Hamilton. You only have two minutes to clear the area, so stay close and watch out for falling debris. Also, make sure to pick up all of the yellow packs to give your jets a steady speed burst throughout the area.
Once you make it through the tunnel, follow Hamilton’s orders and shoot the gate to break it down. Before you follow Hamilton up the ramp, watch out for the falling pipes. Once you make it over the ramp, jump to cross the bridge.
Fort Monus
The first part of this mission is easy: simply destroy everything in your path as the Albatross makes its way to Fort Monus. Remember that you get extra cash for the extra stuff you blow up, so take out as many buildings and towers as possible.
Once you clear the landing area and make it on the ground, turn right and head down the road. Destroy all of the oncoming Wanzers. Follow the path around and head across the bridge.
Destroy all of the Wanzers in this area. Most of them will come from around the buildings, but make sure you get the one up ahead on the ledge. Pick up any ammo and health before turning right and skating down the road.
After the turn, destroy the tanks and take out the turrets. There will be one hidden around the big boulder to the right and two up on big rocks on both sides of the gate. Head through the gate to enter the next area.
When you start off in front of the base, use your E.D.G.E. power to slow things down and easily take out the tank and nearby turrets. Head down the path towards the base and take out the rest of turrets. Also, watch out for the ships that will try to take you out from overhead.
Destroy all of the turrets to open the front gate. Stand back — as soon as the gate opens up, two Wanzers will be waiting for you.
Once inside, move around to the right and walk along the wall. Destroy the Wanzers in this area. Turn left at the landing pad and get the health pack just across the way. Destroy the last two nearby Wanzers, then head to the depot.
ACHIEVEMENT:Here you’ll have to fight Jed and Yun, but don’t be intimidated. Don’t worry about Yun and his EMP blasts, just focus on Jed. Hopefully your E.D.G.E. meter will be relatively high — engage it and unload a round of missiles toward Jed’s chest to scare both of them off and complete the chapter.
War Hero
Follow Hamilton’s orders and hit RT to fire your weapon so that you get the hang of shooting a “real” weapon. As soon as the gate opens, press B to crouch behind some containers and take out the soldiers across the way.
After you take out the first three soldiers, advance, grab some cover, and take out the two guards to your right. Advance to the position where you just killed the two soldiers and head through the big gate.
Stay in a crouched position and grab some cover behind the little yellow truck. Take out the soldier directly across from you on the second level first, then move up and take out the one to the right.
Sprint up the stairs and across to catwalk to get into the control room. As soon as you make the turn to enter the room, take out the two soldiers with melee attacks, then grab the ammo on the container to the right.
Turn around and use the right side of the control panel to open the door down below. Walk back onto the catwalk and chuck a few grenades at the soldiers coming through the newly opened gate.
Take out all of the soldiers and head downstairs and through the gate. Head through the next gate and take out the two soldiers. Grab the ammo on the left and head down the hallway.
After the turn, take cover behind the crates and kill the guards that appear when the gate opens. Use another grenade to take them out or force them to come out from their own cover.
Advance and turn left up the little ramp. Take out the two soldiers. Turn right and take cover behind the control panel. Help Hamilton take out the rest of the soldiers in the center area. (Remember that if you run low or completely out of ammo, you can pick up the weapons of a fallen enemy.)
Move to the center area and take out the rest of the charging soldiers just ahead. Once they are dead, head upstairs.
Take out the two unsuspecting guards around the corner. Take cover and shoot the rest of the soldiers down and across the way (don’t shoot your allies!).
After you meet Mosley, you will be ambushed by attacking soldiers. Get to the other side of the area by walking along the right side of the fountain and up the right side of the building.
Take out the soldier in the control room and the two soldiers out on the catwalk. Head back out through the doorway, pass the stairs, and turn right along the path. Head down the path and pick up the ammo along the way.
Help Hamilton by flanking and killing the two unsuspecting soldiers. Once all of the soldiers have been killed, head back down the ramp and head past the fountain toward the other side of the area.
Walk down the steps and through the gate. Turn right, then left to get to the next open gate. Take cover behind the nearby crate and take out the soldiers up ahead.
Sprint down the hallway and take cover behind the large containers. Peek around the right side and take out the soldiers coming down on the platform elevator. Take out the other two soldiers up on the catwalk before heading through the next gate.
Take out the one soldier just up ahead first, then the one who will be moving around up on the catwalk to your right. Turn back around toward the gate that you entered from and climb up the ladder located on the right side.
Turn left, then right through the doorway, then right again through the next doorway. Take out the two soldiers charging at you. Make your way around the catwalk and head downstairs.
Take out the two soldiers at ground level, then use the two control panels on left side of the area. Turn around and take out the group of soldiers coming across the catwalk and down the stairs.
Head up those same stairs and turn into the control room. Cross over through the other doorway and head across the lighted catwalk. Take out the two soldiers on the right.
Make your way through the next control room and turn left after you exit. Turn right so that you are standing in front of a control board.
Press Y to switch to a rocket launcher and fire as many as you can to quickly destroy the oncoming Wanzer.
Turn right and head down the stairs. Once on ground level, turn left and use the two control panels.
Call of the Chariots
This mission is pretty straight forward. Begin by following Marcus and destroy any Wanzers that you see coming down the road.
Once you reach the Fort Monus Dam, take out the two missile turrets on either side first. After they have been destroyed, take out the Osprey Dropship overhead using your E.D.G.E. power.
Take out the next Osprey that you will seeing coming from below the dam. Once it has been destroyed, follow the road down to Marcus and then drop down into the river (if you continue to follow the road, then you’ll have to face twice as many Wanzers).
As you head down the river you’ll come across lightning quick Wanzers — don’t worry, they are easy to destroy. Continue to follow the river and take out the sniper Wanzers at the end.
Hop back onto the road and head through the tunnel. Take out the Wanzers who will be waiting for you once the tunnel gates open.
Turn right and take that road up the hill to your next boss scene.
Here you will have to fight Marcus again, but this time he has his parter, Gloria, helping him out. If your dash and hover dash skills are up to par, then you shouldn’t have a problem with these two. Gloria is only capable of melee attacks, so don’t worry about any sort of fire power coming from her.
Take Marcus out first. Duck his missile blasts, then unleash your own firepower on him while using E.D.G.E. to take him out fairly easily. Next, get close enough to Gloria so that she will drop her shield and fire away until she is disposed of.
ACHIEVEMENT: Once you beat both Marcus and Gloria you will earn “The Canyon” achievement.
Providence
As you start this mission back on foot, you’ll be barraged by gunships. Your shotgun won’t you do you any good here — switch to your rocket launcher and take them out. They tend to move around quite a bit, so wait for them to slow down before firing a rocket.
Once most of the attacking gunships have been destroyed, head down the nearby ladder and follow Godwin to the hangar.
Take out all of the soldiers along the way and continue to follow Godwin till you reach a balcony outside of the Providence. Switch back to your rocket launcher again and take out the newly-arrived gunships.
When you have a clear path, sprint for the north door just up ahead. Stay close to Godwin through the hallways and he’ll lead you to the hangar.
Following the cutscene, you’ll be back in your Wanzer in the midst one of the most hectic fight scenes yet. The best way to go about protecting the Providence is to take out the turrets surrounding the base first.
Once all turrets have been destroyed, unleash a combo of missiles and rifle shots up at those annoying gunships. Eventually, an Osprey dropship will appear. Engage your E.D.G.E. power and blow it away. Take out any surrounding Wanzers if you have enough time while in E.D.G.E. mode.
After Amy informs you that you can go after the fortress buildings, more Wanzers will appear. You can earn some more cash by blowing up the Wanzers, but all you need to do is destroy the two fortress buildings to end the mission.
Promise
This mission starts out with you aboard the Albatross once again; your job is to clear the iceberg field so you can land. After you take out enough Wanzers that come into view the Albatross will land.
Now back in your Wanzer, it is your job to protect the Albatross. Unfortunately, you won’t be able to use E.D.G.E. for this mission. Nevertheless, help Adela, Hamilton and Godwin take out the enemy forces.
Feel free to wander away from the Albatross if you are under siege. Quickly take out the Osprey dropship once it arrives, unless you want some extra cash — if so, you can allow it to drop a few Wanzers.
Once you’ve destroyed enough of the enemy forces, the Albatross will depart. Follow your team as you make your long trek to Fort Ju Ku.
You should be a pro at taking out Wanzers along the way by now, but watch out for a new type of Wanzer. They shouldn’t be too hard to spot––they’ll be the ones wearing repair backpacks and firing EMP’s. Always take these guys out first.
Fight your way to Ju Ku, where a huge group of Wanzers will be waiting for you. Make sure to grab cover if ever needed and make sure to let Adela, Hamilton and Godwin help you out.
ACHIEVEMENT: After you destroy the Wanzer squad, another group of strange Wanzers will appear. They may look little, but they are still Wanzers, nevertheless. Take these guys out to complete the mission and earn the “Antarctica” achievement.
Fafnir
Now that you have arrived at Fort Ju Ku, it is your job to go after Cornelius. This mission is pretty straightforward, but remember that you won’t have E.D.G.E. at your disposal.
As you make your ascent up to the Fort, remember to kill all of the Wanzers with repair packs first. Allow Adela and Hamilton to engage with the brawler Wanzers so you don’t take all of the damage.
Follow the path, which will lead you through several tunnels and across several elevator lifts. You will eventually come to a wide open area just past the fort. Once you reach it, pick up the surrounding ammo and health to get ready for the upcoming boss fight with Fafnir.
The first thing you’ll have to do to defeat this monstrosity is destroy the three power cells on its front left and right sides. Once they have been destroyed, a smaller power cell will appear right below the fortress’ stomach. Destroy them all to defeat it.
Fafnir is heavily armed and can even call out Wanzers to help him during the fight. Watch out especially for its laser cannons, which can lock on to your position and deal a lot of damage. Remember to dash a lot and keep moving.
When you see it kneel down, then you know that the Wanzers will be deployed. Always take care of them first before going back to Fafnir. Other then that, just keep moving and aim for the power cells.
Once Fafnir has been destroyed, you have the difficult task of fighting Cornelius. The first thing you’ll notice is that this guy’s Wanzer is capable of hovering during the entire fight! He also has his own E.D.G.E. power, so be prepared.
When you see his a light emitting from his Wanzer, get ready to dash away from an onslaught of missiles. Once the E.D.G.E. wears off, you need to make your attack. Unload a combo of missiles and bullets, and once you get get about 75% of his armor destroyed, the fight will be over.
Chorus of Destruction
Back in New York, take out all of the gunships and tanks that are surrounding you. Once they have all been destroyed, jump around the destroyed buildings to reach Times Square and face off against two Apollo’s Chariots members.
Watch out for Megan’s shotguns at close range — they pack a punch and will inflict quite a bit of damage on your armor. Don’t use melee attacks! Simply pick your spots and blow her away first, then take out Pia to end this short mission.
Father and Son
Follow Adela through the subway and take out all enemy forces along the way. You will eventually have to blow up a few subway walls along the way to continue down the path. Be prepared!! As soon as you blow them up, Wanzers will come charging at you from the other side.
Repeat this process until you reach a dead end, from where you will continue the mission on foot. Head through the nearby door and take cover immediately.
Use your grenades to take out small groups of enemy soldiers. Take out all enemy soldiers and head down either of the two hallways. Once you reach the elevator, take out the next group of enemy soldiers.
Take out the soldiers and take the elevator up to the next level. Once you exit the elevator, another large group of soldiers will be waiting for you. Take care of the soldiers, advance and turn left into the only open room, where Alan will be waiting for you.
Switch to your rocket launcher and take out the gunships. As soon as you do, you’ll have to deal with the soldiers bursting through the exit door. Get out the door and quickly throw a grenade at the nearby car to take out the two soldiers with machine guns. Use a rocket launcher to take out the third one.
Head down the stairs. Ignore the machine gun soldiers and use your rocket launcher to take out the Wanzer. This one moves around quite a bit, so find some cover and wait for the Wanzer to stop firing to pick your spot. Unleash a few rockets to his chest to destroy him and complete the mission.
Defense of Constantine
Take out the enemy Wanzers and Osprey dropships, but save your E.D.G.E. because you will probably need it for later. Destroy all enemy forces and head for the bridge.
Destroy the next group of Wanzers and gunships that will be waiting for you. Head for the gates. Destroy the next wave of Wanzers once the gates open, then head inside of the building.
Wait for Amy to unlock the gate, then help your allies destroy the five Wanzers. Advance to the next area and take the elevator up to the next level.
Nothing new here: more Wanzers and another Osprey. Take out all enemy forces and prepare for another boss fight.
You’ll have to battle Cornelius again, so remember to have your finger ready on the X button to evade his missile attacks. Pick your spots to attack and once you get his armor down to around 70%, he’ll stop hovering and drop to his feet.
This time Cornelius has a new E.D.G.E. melee attack with his sword that can kill you in two to three hits. Stay as far away as possible and pick up any nearby health packs to ensure our safety.
Once his armor is about half gone, Cornelius will start hurling bigger-than-average missiles. These missiles move slowly, so if you see them coming toward you, shoot them down with your guns.
Again, keep moving and pick your spots. Once his armor nearly three-quarters gone, the fight will be over, along with the game
Liked this walkthrough? Like other, Japanese-produced action titles? Check out our step-by-step MindJack guide!


 Dropsy Review - A Heartbreaking Work of Staggering Clownness
 Batman - Arkham Knight: beginners guide
 Batman: Arkham Knight Costumes Guide: How and Where To Get All Costumes/Skins For Batman, Nightwing and Robin
 Thief achievements and trophies
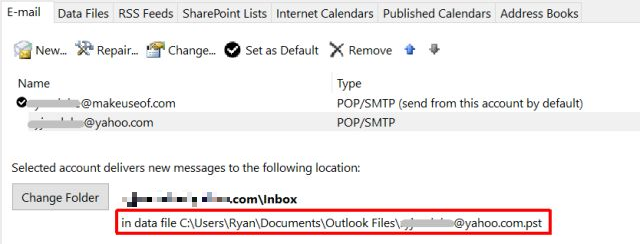 Backing Up Your Microsoft Outlook Emails Made Simple