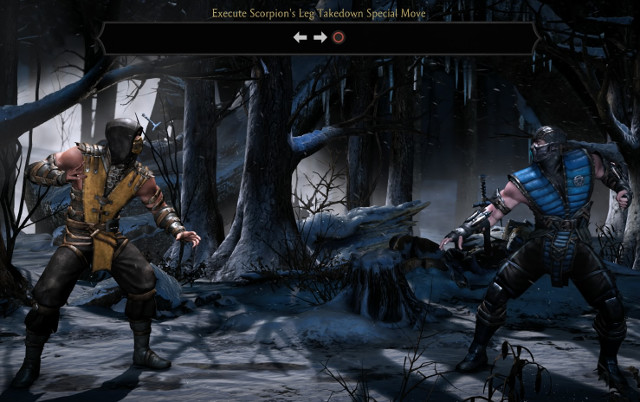
First-person shooters on the Wii have a checkered history, but the Conduit 2 arrives this week with some impressive features in store. Scripted events, rather than cutscenes, will deliver the story, and a the game boasts an arsenal of intriguing weapons, like the Phase Gun (which can shoot through walls) or the Aegis Device (which collects rounds fired by others and sends them hurtling back).
Returning for the second installment are a number of distinctive touches like destructible player armor and scenery that can be repurposed as cover (expect a lot of furniture shaped suspiciously like chest-high walls). The game will feature a full singleplayer campaign, along with local and online multiplayer, and support a variety of control apparatus. We also have a Cheats page, which will tabulate all the useful information about the game we can get our hands on.
Trust Platform
Leviathan
Atlantis
Washington D.C
Atlantis 2
China
Li
Siberia Crash
Siberia
Siberia Crash
Lost City
Adams
Agartha
Trust Platform
As the cutscene ends, you’ll find yourself on a helipad. Look for the large letters spelling out “Helipad” against a blue corrugated wall. A worker armed with a pistol is waiting near the gate.
Jump down, or take the stairs to the lower level. Aim down the sights using the secondary function of the pistol and take down the worker before he notices you. Approach the gate; you’ll see a Hackable Object to the left of the door. Take out the ASE and use it to open the door.
Walk with the ledges toward two more workers. One of them will slip and fall, shoot the other as he tries to run away. Follow the path around the catwalks towards the stairs, toward the landing with a red explosive barrel. Once you’re close enough, two soldiers will run down armed with submachine guns. Shoot the explosive barrel to make quick work of them.
Collect a submachine gun and use the stairs. Wait in front of the door until it opens – every door in Conduit 2 works roughly the same way, like a mini-loading screen. Don’t move until the door opens, otherwise you’ll have to wait again.
Through the door is a short dialogue between our hero Ford and his nemesis Adams. As poison gas pours into the chamber, shoot out the glass once it cracks. Jump into the control room and into safety.
Take this moment to use the ASE. Look for the glowing yellow objects, and scan them for extra points to purchase new upgrades or weapons for the single player and multiplayer portions of the game. The ASE’s secondary function is like SONAR, and will help you easily locate any scan-able objects nearby. Check every room, as conspiracy objects are everywhere.
Exit the door marked with a green glowing light. Any door marked green is unlocked; any door marked red is locked. Through the door, turn right as two soldiers run into the room. The desk in the center of the room can be flipped over for some extra cover.
Look left as you move to the back end of the room, another soldier and two workers are waiting in the open. Clear out the room, and head towards the three-paned window. Just beneath the glass is another hackable object, so get hacking with the ASE.
With the computer hacked, continue forward through the now open door just to the computer’s left. Outside three guards will be startled by a large explosion and turn to fight you. Use the crates as cover and clear the group out.
Use the stairs at the back end of the walkway along the platform’s wall to find an unlocked door. As the door opens, a guard down the hall will pull down a soda machine and use it as cover. Take the guard out before entering the hall, another guard is waiting down the right side behind cover.
Through the door and over a catwalk, follow the pointers labeled “Captain’s Quarters” into a room with stairs. Two soldiers will attack with energy weapons. They have Deatomizer Mk.4s – they have two modes of fire: blue fires a wide energy shot while red fires a stream of energy shots like a submachine gun. Enter the Captain’s Quarters if you want, or continue forward with the stairs marked with an ammo crate at its base.
Keep an eye out for ammo crates; they will automatically refill your ammo. Moving on, inside the Officer’s Cabin are three soldiers. Get rid of them and follow the labels toward “Crew Berthing”. Outside again, turn left and walk up the stairs. Shoot the soldier and watch a big explosion.
Turn around and head back down the stairs. A soldier will pop out of another stairwell opposite you. Go ahead up the stairs he just came through.
Ahead, you’ll hear gunfire. Three soldiers are shooting at the Leviathan inside the partially destroyed quarters. The Leviathan can’t hurt you yet. These soldiers can hurt you, so take one out while they’re preoccupied. Keep an eye on the gas canister at the end of the row of lockers; shoot it if one of the soldiers tries to rush you.
Look out the hole in the room for something cool, and continue through the green door to the right of the wreckage. Turn right to engage a soldier waiting behind cover with a Deatomizer. To get closer to your objective, use the door opposite the entrance to the room and follow the stairs down. Turn right as you enter the new room, a guard is waiting behind an overturned table.
Inside the cafeteria anteroom is a worker and a soldier. Engage them, until three more soldiers join in on the fun. With that much fire, take this section slow and don’t expose yourself to too much gunfire at once. Take cover and target each soldier one at a time. Don’t forget to use grenades; the ammo crates refill your stock of grenades too.
Often guards will try to take cover behind a couch against the left wall. You can easily pick them off when they hide there. Once the room is clear, continue into the cafeteria proper. You may also want to pick up the shotgun, the Spas12, which works exactly like a shotgun. It is obviously handy in close quarters combat, and enemies carrying them are a real pain.
Inside the wrecked cafeteria, head to the back towards the kitchen counter. Flip the switch behind it, and turn around to head back the way you came. As you leave, three guards will ambush you. Take cover behind the stacked up tables and throw grenades to keep their minds off you. Pick them off and continue towards the stairs you used to get here.
The stairs are now locked, but the door to the right of the stairs is now open. On the catwalk, look left for some action, and continue inside through the green door ahead. Inside, two workers are waiting for you. Turn right and use the door near the ammo crate.
Down the stairs, three workers are fighting the Leviathan. Shoot the worker on the left behind the crate and head down. Across the gap, soldiers will shoot at you. Take cover on your side and wait for them to try and get across. Your big problem is the armored soldier carrying a shotgun. Toss grenades when you see a large guy covered in red slowly walking towards you. Use the SMG and target his head, through the Shotgun or any other weapon works in a pinch at close range. If he gets close, circle strafe around and behind cover while taking pot shots at him, and eventually his armor will break and make him vulnerable.
With the guards clear, move across the catwalk and up the stairs. Through the door a worker will get a nasty surprise. Turn right and sprint through the fires down the hallway.
Inside the engine room, three soldiers will ambush you in this first section. Take cover and fight them one at a time, they won’t gang up on you too much, and some may retreat into the adjoining room filled with three workers. Blow by the workers and follow the computers towards the green door.
Climb the ladder into an armory. Three unaware guards are patrolling, so take out your shotgun and clean up. Just to the right of the ladder you came from, you’ll find the objective switch. Pull it and move through the green lit door.
Two soldiers stand just to your left behind the glowing surface. Follow the room right and another worker will attack with no hope for success. Look to the left of him to find the next green door.
In the back corner is a ladder down. A worker might shoot you in the back, but he’s no threat. Follow the path left through plastic tarps where more hopeless workers will attack. Don’t feel too sorry for them, and jump on the elevator beyond the plastic.
Follow the markers pointing towards the generator. Eventually you’ll find yourself in a large room covered in catwalks and guards. Stay near the entrance and find the four workers and two soldiers milling around, spot them when they start shooting. Take everyone out, then follow the leftmost catwalk up and around towards the high landing at the backend of the generator room.
Every so often the generator will arc electricity around the room. Just wait for it to stop and move forward. Move towards the row of computers and flip the next switch. Return to the catwalks and jump down to the floor below to find the green door. Run past the ugly electrical tubes and back outside. Turn right and enter the first door to your right, it’s the one glowing green.
Shoot the bad guy standing near the stairs, and follow those stairs down. Let the arrows guide you into the Machine Bay. Restock your ammo with the ammo crate behind the stairs.
Blow up the barrels, because no one can resist shooting explosive barrels, and walk alongside the glass structure. Follow it until you find a narrow passage and duck under the pipes until you reach the other side of the bay.
Enter the anteroom and turn right, moving through the dark passage towards a ladder. Up the ladder, you’ll come out into a navigation room with three workers standing in the open. Use the green door to your left, enter the following room, and use the green door to your right.
Outside, turn left. Instead of using the stairs, you should walk towards the crane through the open gate.
Leviathan
Look out for the soldier near the crane and two soldiers waiting near the switch. Pick one of them off while they’re oblivious, and take on the rest. The workers really can’t harm you, but get rid of them too. Flip the switch when you’re mentally prepared for a boss fight.
The Leviathan shows itself and will begin to attack. During phase 1, the Leviathan will shoot a beam of energy at you over a gradual arc, leaving behind residue that burns if you touch it. Run behind cover or predict the arc and stay out of the red glowing energy to stay safe. Workers will continuously spawn to harass you, but they’re not much of a threat.
The Leviathan will appear around the platform and try to attack the three generators scattered around. If the Leviathan destroys all three, it’s game over. To hurt it and stop it from attacking the generators, jump onto one of three turrets and fire at the protruding spines glowing yellow. If the Leviathan attacks with its beam breath, jump off the turret and take cover before jumping back on.
Aim for the yellow spines. It will retreat after destroying one. Look around the arena and try to follow the Leviathan; every turret can’t shoot it from every angle. If a generator is destroyed, don’t bother covering that direction, just stay near the working generators.
Destroy all six spines and the Leviathan will enter phase 2. Now its mouth glows yellow, so shoot it as it powers up. The only trick to this part is making sure your turret does not overheat, keep shooting, and lay off the fire for a moment before shooting again. As long as you don’t overheat, you should be able to shoot the Leviathan enough to stop it.
During phase 3, the turrets change form into harpoon guns. Aim for the neck of the Leviathan, it may take a few tries but just keep at it and you’ll land a shot. After hitting the Leviathan with one harpoon, jump off the turret and enter a different one to fire a second harpoon into the Leviathan’s neck. Pull that off and you’ve won.
Atlantis
After that unpleasant ride, you’ll wake up in the Atlantis. Follow the ramp up and left until you reach a door to your right. Little robots called Fixers will attack, but a few quick shots or melee strikes will put them down.
Through the door, three fixers are waiting to pounce. Shoot them down and continue through the next room.
Inside the next chamber, a ramp follows the outer rim of the room up into a hallway. More fixers will run down the ramp to attack. Upwards on the catwalk, another row of fixers will charge towards you. Melee them if you’re low on ammo.
On the catwalk, be careful not to slip as you cross it. In the second section of catwalks, a new enemy will attack. These are sentries, flying robots that shoot at you. In numbers they can hurt you: either destroy them quickly or take cover. They are very weak, so a burst of SMG fire should take care of them.
Jump down after entering the vertical chamber. Fixers will run down a ramp along the back wall. Use the same ramp to climb upwards. As you reach a bridge, two more fixers will attack from above and below you, while a sentry floats to your right. Destroy the sentry and fight off the fixers.
Cross the bridge, and walk up the left ramp to find an ammo crate. Refill your ammo, turn around, taking the right ramp up. Through the door is a hallway, fight two fixers as you continue forward past a dead Trust worker. At the end of the hallway is another door leading into a horizontal chamber. As the door opens, four fixers will charge you. Shoot then melee the survivors.
Take advantage of the ammo crate inside, and jump onto the fixture against the right wall of the chamber. A spinning disk rotates around with a hole just large enough to squeeze through. Wait at the peak of the fixture until the hole rotates into position, allowing you to crawl through.
On the other side, shoot the crystal to deactivate the shield blocking your progress. After destroying the shield, fixers will attack in groups of two. So many spawn, it might be infinite, so destroy the first two and run up the left side of the spinning fixture. Walk onto the ramp in the center, and wait for the opening to rotate into position. Crawl through and enter the two doors forward.
Finally, you’ve found the hackable console. Use the ASE to hack it, and jump on the floating platform to your left. Fight off the sentries, and then enter the large door in the center of the chamber.
Down the large hallway sloping downward, four fixers will charge. You’ve got plenty of time to line up your shots and kill off the group before they get close. Walk on down and ignore the door to your left at the bottom. Continue forward into a strange glowing area. Hack the console directly forward, and step into the blue pedestal in the center.
With your snazzy new duds, exit and turn right. Walk towards the door above, stairs will rise as you cross the water. Inside the command center, use the ASE to hack the pod holding Andromeda.
Behind Andromeda’s pod is a large conduit. Walk towards it to start another cutscene. After the cutscene ends, jump into the conduit to start your next mission.
Washington D.C.
Now you’re in a bunker. Run forward and turn right to find an open vent at the top of a pile of debris. Crawl up the debris and into the vent, as you turn left a Drudge bug monster will attack in the vent. Kill it and continue on.
Jump out the broken vent, and immediately turn around to shoot another Drudge bug before it attacks you. Against the left wall you’ll see a strange pod; this thing spawns more of the Drudge bugs and will quickly become a problem as the mission escalates. For now, destroy the pod with a healthy dose of bullets. Look out — even after they’re destroyed the pods will sometimes spawn one last Drudge bug.
Push open the brown door forward, and shoot the four bugs that attack. Duck backwards if you’re outnumbered, as the bugs can’t easily get through these doors. Once they’re clear, continue into the room and bypass the burning gas rupture. As you turn left you’ll be fired upon by Drudge soldiers.
These ugly creatures are armed with Strike Rifles, which are weird biological guns that fire an accurate beam. Secondary uses a scope feature while holding down the fire button charges a shot – a charged shot is three times more powerful than a regular shot.
Take down the Drudge soldiers and continue up the slope into a destroyed office building. A single clever soldier is waiting next to an explosive barrel. Blow up the barrel, he’s just asking for it.
Stepping out into the bombing out building, Drudge soldiers will take cover above you. Use the strike rifle to accurately exchange fire and clear them out. When it’s safe, step onto the wooden boards set up like bridges to your right.
As you step onto the first platform, look left to take out a Drudge soldier waiting beyond a destroyed wall. Enter the doorway using the wooden planks as a guide, and turn left to find a staircase. Up the staircase, follow the hallway until you spot a Drudge soldier duck through a doorway. Follow it inside, but be ready to retreat.
Inside, take note of a doorway to your right and a passage left where a wall has been knocked down. Drudge soldiers will stream into the hallway and shoot through any one of these directions. Toss grenades as they pop up and retreat if you’re overwhelmed. Run back into the previous hallway and wait for Drudge to pop out where they are easy targets.
On one of the dead soldiers you’ll find a new weapon; the Hive Cannon. This is a handy weapon with a huge magazine size and fast reload time, so keep it handy for the remainder of the mission. The Hive Cannon is indispensable later in the mission, so keep it.
When you’re ready, return to the room and clean up any remaining soldiers while looking out for bugs. The bugs are spawning from a pod upstairs – climb up the fallen ceiling and turn around to take out more hiding soldiers.
Follow the room right around a destroyed wall. Look for an ammo crate marking the door forward, head into the hall and turn left as you exit into the destroyed building interior. Use the desks as cover while taking out the Drudge soldiers, and use a narrow chunk of floor to circle around to the next room. More soldiers will take cover behind couches on the opposite end of the room, don’t let them take you by surprise.
As you move along the left wall using the partially fallen floor, look for a tall desk that can be interacted with just where the walls stop. Push the desk over to get a look at an armored Drudge soldier carrying a Hive Cannon. These monsters are tough, unload with grenades and anything else powerful. These things can take multiple clips of ammo, so just keep shooting and ducking behind cover whenever you’re hurt.
When the armored Drudge monster is dead, grab his Hive Cannon if you haven’t picked one up yet. Keep it for later, seriously. Turn and follow the walls right, past two couches and through the blasted wall. Cross into the adjoining building through the hole and turn left.
Inside this room, a Drudge bug will attack. Luckily no pod is spawning them here, but more Drudge soldiers and an armored Drudge are waiting in a chamber to the left just ahead. Wait for them to come out and use the partially destroyed wall as cover. Chuck grenades at the armored Drudge and use the Hive Cannon in short bursts to fire accurately.
Use the door against the right wall of the hallway. Take out the Drudge soldier and use the rubble as a ramp to the next floor.
Turn left and head down the hallway, entering the door to your right, but be careful. It is loaded with soldiers, as you enter bombs will drop and begin to beep. Wait outside until the bombs go off and clean up any remaining monster soldiers. Then head down using the destroyed floor as a ramp. Be ready, another armored Drudge is waiting around the corner.
Use grenades. Stun grenades work wonders on stopping these guys. If you have to retreat, run all the way back upstairs and take cover while shooting the armored Drudge.
After destroying the armored Drudge, jump out the smashed open wall onto the streets below. Following the streets, you’ll see a Trust soldier being killed by a Drudge soldier. Shoot the one still alive and continue down the alley. Another Drudge soldier with five or so bugs is waiting around the corner. Use the Hive Cannon to cut the bugs down easily.
Out on the disaster-stricken streets, three Drudge soldiers will jump in front of you. Use the cover as rubble to take care of them, then continue moving forward, looking left for a passage through the destruction.
Around the bend are three more Drudge soldiers in a shoot-out with Trust forces. Clear out the Drudge and take out the remaining Trust soldiers from a distance. Jump into the broken window at the alley entrance, continuing down the path.
Through the fallen building, you’ll come out into a courtyard. Right as you turn left, two Trust soldiers will fast rope in front of you. Take them out and grab a new gun – the SCAR. This assault rifle is very useful at close to medium range and is a mainstay for the rest of the game. Normally, the rifle has a twenty round magazine that fires fully automatic. Secondary activates a medium-ranged scope and the rifles fires semi-auto. The rifle makes up with power where it lacks ammunition.
Take an assault rifle and use the scope to take out the sniper standing in a window around the back center of the courtyard. Follow his red laser sight back to him to take him out. A Trust soldier will shoot at you below the sniper’s perch; and more soldiers with an armored soldier will pour out of the building left of the road. Shoot the cars and explosive barrels as they get near for some easy kills.
Once the courtyard is clear, enter the building through the arched stone entrance to the left of the huge metal doors. Some helpful stairs are embedded in the rubble, follow those up and engage the Trust soldiers waiting inside. An armored trooper will charge with a shotgun, sprint away if he gets too close.
Use the ammo crate along the left wall, and turn left with the hallway. More soldiers will fast rope in further up, using raised desks and soda machines for cover. Shoot through them and move on.
Keep a stun grenade handy or the Hive Cannon as you walk near the destroyed roof at the end of the hall. Two shotgun-carrying Trust troopers will ambush you by fast roping a few steps ahead of you. Sprint away if you’re unprepared, or drop a stun grenade and take them out.
Turn left and take out the soldiers at long range. Carefully walk across the destroyed walkway, it’s full of holes, so don’t fall down. Once you’ve made it to the opposite building, finish off the remaining soldiers and hack the console at the end of the hall.
With the large metal doors open, walk back to the pot-marked walkway you used to get inside this building. Three Trust soldiers will attack, with more inside the previous building as you backtrack. Finish off the first group, then jump down into the courtyard to bypass a few headaches.
Walk to the green metal door closing off the road. As it opens, fight off the three Trust soldiers, two of which carry Deatomizers. Enter the mobile command center, looking out for two more soldiers. A grenade will work in these tight quarters. Hack the console inside the glorified RV to open the next large door.
The large metal doors open out into another disastrous block. Shoot down the sniper in the tower before continuing on. Trust soldiers will exit the destroyed façade of a building and take cover around the extremely volatile cars strewn about. Shoot the cars or set them off with a grenade to easily take care of them.
Before climbing the debris to enter the destroyed building, two Trust soldiers will attack near the next locked metal blockade. Shoot them down before entering, as you’ll encounter another two carrying shotguns just inside past the cubicles.
Moving past the cubicles, look for a well-lit hallway in the destroyed structure. Go inside for a short cutscene, letting you in and setting up a desk allowing you to jump into the vent above.
Inside the vent, crawl until dropping out into another dark room filled with cubicles. Turn right and look outside the windows to spy three unaware snipers lining the outer wall. Use the assault rifle to take them down or shoot the explosive barrels nearby. Another Trust soldier is waiting inside near the windows – shoot him down before heading outside.
Just outside the building is a large lot with several more soldiers milling around. Aim for the destructible cars and snipe the rest, grenades work well too. After making the jump down, take cover behind a planter or pillars as more Trust soldiers enter from the left-most street, including an armored trooper. Keep your distance and pick them off before moving forward.
As you round the bend into another street, look out for a sniper waiting in the center window of the building opposite your position. Bombs will drop and six or more troopers will rush onto the streets.
Back into the previous lot and make sure the streets are clear. More Trust troops are waiting, hiding behind the stately building’s walls and shooting through the open façade. Carefully pick them off before entering.
Look out for the soldiers exiting a door on the right side of the destroyed interior. Jump down when you’re clear into the crater to find a basement door. Enter it and look left, taking out hiding Trust soldiers near some stacks and filing cabinets.
Nearing the piled up cabinets, Drudge bugs will attack. Round the barricade and walk down the hall through an open doorway. Keep your eyes left to find another pile of rubble leading up. Two pods are spawning bugs — kill off the bugs and finish the pods with the Hive Cannon before running up the ramp.
Up the ramp and towards the destroyed wall an armored Trust trooper will attack at very close range. Sprint away or use a stun grenade to be safe. Through the destroyed wall are sand bag shelters crawling with Trust soldiers. Carefully clear them out, heading left towards the rubble on the opposite end of the street.
Nearing the Ammo Crate, another soldier will attack. Get rid of him and turn around the bend. Trust soldiers are fighting a group of Drudge outside. Wait for them to finish or help out – if you want to help, target the armored Drudge as the most dangerous of the group. Take note, the Armored Drudge is carrying a Hive Cannon. Grab it now if you don’t have it.
Across the courtyard is a wrecked subway train, that’s your goal. Move toward it and three Drudge soldiers will attack from an alcove in the left corner ahead of you. Clear them out and dive into the spooky subway tunnels through the wrecked train.
Inside, the train tunnels are so dark your flashlight will automatically flip on. Near the end of the wrecked train, a group of Drudge bugs will attack. Jump onto the subway platform off the tracks, more Drudge bugs will attack. This is where the Hive Cannon’s huge magazine comes in handy – destroying hordes of bugs and the pods they spawn from.
Jump onto the weird metallic vines and spiral upwards, using it as a bridge to cross the rubble below. More Drudge bugs will attack, just melee if you’re in trouble or sprint away. At the top of the metallic vines, look for the pods lining the back wall of the subway platform. If you can’t see them, look for two glowing red lights. Shoot between the red lights and try to destroy all the pods before continuing forward or else you’ll be constantly harassed by these annoying bugs.
Follow the vines down and return to the tracks once all the bugs are gone. On the tracks, more bugs will attack in two groups of two. Continue down the tracks, shooting bugs, looking right. There are two alcoves containing two pods each spawning bugs along the ride concrete wall of the tunnel.
With those things cleaned up, enter the first door on the left wall off the tunnel. Inside the maintenance room, more bugs will attack from four spawn points strewn around the room. Using the Hive Cannon, kill the initial spawn, then follow the wall left, circling the entire room and destroying the pods. Don’t go near the double doors in the back of the maintenance area until you’re ready to move forward.
Through the double doors, you’ll get a short cutscene before being assaulted by bugs. Turn left and immediately destroy the first pod across the room after fighting off the first wave of bugs. Follow the right wall, heading to the opposite end of the room to destroy another pod waiting near the metal vines.
After destroying the two ground floor pods, the other four hang just below the orange glowing spheres. Fight through the bugs and destroy all four pods before targeting the orange spheres. Once all four spheres are destroyed, shoot the center sphere.
Standing on the metal vines, walk towards the back left corner to find an entrance into a broken vent. Crawl through until jumping into another concrete passage. Restock ammo with the ammo crate and walk towards the door. Be prepared with a Hive Cannon.
As you open the door, a fire alarm sounds, and bugs will be alerted. Immediately run forward and up the stairs, shooting down the bugs in your way. Upstairs, destroy both pods spawning bugs and clear any stragglers.
With the pods cleared, return to the ground floor and enter the destroyed subway train. Crawl through one of the back windows and exit through the door in the back right corner.
Turn left in the dark tunnel to see sunlight. As you walk forward, stay pressed against the right or left wall of the tunnel. Far enough down, the train car will burst into flames and roll towards you.
Stay on the sides to safely avoid the run-away train, and engage the armored Trust soldiers coming for you. They have shotguns, so sprint to the back end of the tunnel to distance yourself if need be.
Up top, you’ll come out on the National Mall. Cool! It’s swarming with Trust soldiers hiding around barricades to your left and right. Slowly ferret the troops out of cover with grenades and clear the scene. When you’re clear, use the ASE on the bomb.
A timer will activate. Trust soldiers will drop behind the barricades facing the Senate. Shoot the four soldiers, and stay away from the nuke. Bombs will drop near the nuke, so stay away as more Trust soldiers fast rope in on the steps of the National Institute. Shoot them, and the next bombs will fall in the center of the mall with troops dropping in on the crater opposite the nuke.
Clear out the soldiers, staying close to the nuke. Once they’re all gone, the nuke timer will have only a dozen seconds. Sprint to it and use the ASE to disarm it. Now the National Institute is open.
Enter the front door. Two Trust soldiers are hiding behind the left and right corners. Turn right as you enter the arches and take out the snipers. They’re waiting on a balcony center back of the Institute showroom.
Once the snipers are clear, move forward and use the fallen showcases as cover. Shoot through the assorted Trust soldiers, turning left at the corner to face off against another spawn of Trust goons.
Into the next room, two Trust soldiers wait behind cover. Take care of them and scan the tomb with your ASE. The tomb will open, so head down the stairs and start scanning everything down there.
With the coordinates scanned, return up top find Drudge helping you. Let them fight the three waiting Trust and move towards the Mayan Calendar. As the conduit opens, jump inside to complete the mission.
Atlantis 2
Returning to the Atlantis, walk towards your lady friend standing at the console ahead for new directions. Exit through the door opposite the conduit and take the ramp up. Reaching the pool of water, walk over the techno-bridge and turn right. Five fixers will attack from the left and right, so fix their problem and move on.
Back in the docking chamber, follow Prometheus’ advice and use the left platform. Sentries and fixers will attack – avoid the fixers by jumping onto the platform, then you’ve just got the floating sentries to deal with.
On the upper balcony, use the only door. Stop by the ammo crate if you need to top up, and continue into the next room. A short cutscene introduces a new enemy – large robots that periodically shoot lasers from their eyes. These enemies are not too complicated; they’ll stand in place, charge their laser, and fire it.
Back into the previous chamber with the ammo crate and take cover behind the wall. The explosive effect of the laser’s impact may hurt if you’re too close to the wall, so stand a step back. To defeat the big bot, just keep shooting it. The head may be the weak spot, but shooting anywhere is just as effective. Unload a few clips of the SCAR into the robot to destroy it.
Four sentries will appear further down the chamber, beyond the door against the right-most wall. Just shoot them down before hopping onto the bridge.
Reload at the ammo crate, and step back into the water-filled area. Look for the section of balcony marked with yellow runes – turn left as you head inside. The glowing yellow runes mark where the bridge begins and ends. Walk forward to activate floating stones, creating a path. Once you’re near the balcony set against the right wall, turn right while walking. Keep your eyes on the pathway to follow where the bridge changes direction.
Through the door, follow the ramp up and towards another door. Use the ammo crate — you’ll find more big robots inside. Open the door and look right, this room is mostly constructed from glowing blue barriers and the submerged bridge. To get across, you’ll have to navigate the bridge, which can be tricky while trying to dodge laser blasts.
Shoot the dormant robot and wait near the door to take cover. Shooting the sleeping robot will wake it up and let you destroy it at your leisure. Take this time to destroy the various sentries that pop up to shoot at you.
Once the first robot is destroyed, look for the second sleeping robot further down. Look for the blue ramp opposite your position, the robot is crouched in front.
Shoot the second robot until it’s a goner, and safely walk across the techno-bridge. Take a right, a right, and a left to safely navigate the bridge – the easiest way is to look down. Without all those pesky machines to annoy you, navigating the bridge is only a small hassle.
Reach the raised platform, and walk into the open tube. Fixers will naturally attack in this cramped space. Continue into the twisty tunnel until you come out in the engine room. Don’t jump out of the tube just yet, stay here to get a lay of the land.
The engine room is distinguished by the spinning gear assemblies in the previous Atlantis mission. Like before, wait for the opening to rotate into position to cross the gear. For now, don’t worry about that, just stay in the tube and shoot at the dormant big robots in the pools of water below.
There isn’t much cover in the actual engine room, so destroying both robots before jumping down is your priority. Just unload of them, taking your time not to waste too much ammo. Any weapon will do, including grenades.
Once the sentries and robots are defeated, step onto the spinning gear and hop down onto the platform to your right. Follow the platform to another spinning gear, and cross it when you have the opportunity.
Continue across towards another spinning gear, still following the catwalk along the wall until you reach a hackable console. Hack it with the ASE, and exit out the blue door forward.
Through the set of doors, you’ll return to the docking bay. Follow the ramp down to the central door, follow the ramp down and turn left to return to the control center with Andromeda.
Talk with Andromeda, then use the coordinates console and choose “China”. When you’re ready, enter the conduit for your next mission.
China
Step onto the cliff’s ledge to get a glimpse of Trust dropships entering the area. To find some enemies, turn right and walk down the canyon pass. Eventually, jump down into a area with conspicuous cover.
A Trust soldier carrying a new gun will open fire. This new gun, when used by enemies, isn’t especially terrifying. It fires a single shot of energy like a rifle, similar to the strike rifle without the power. Shoot the invisible commando standing in the alcove above before moving on.
Two Trust soldiers will attack, stay behind cover and pick them off then continue forward. Turn left and use the steps to enter the ruined courtyard. Three soldiers are hiding behind cover inside, one of which carries another new gun – the shrieker.
The shrieker is another Drudge bio-weapon. It fires balls of pus that are slow but gently track enemies – switching firing mode to red removes the tracking. This weapon is mostly carried by another new enemy that you’ll meet later.
Take the steps up and into the entrance hallway. Down a set of stairs, turn right and follow the stone path. Reaching a cliff, jump down into the stone canyon and use the oblong boulders for cover.
A flying Drudge attacks from the air using a shrieker. Wait for it to stop shooting and take it out with your own arsenal. The flying Drudge are just another annoyance — their upgraded firepower over other enemies is dangerous but they are very vulnerable. Pick it off, then deal with the Trust sniper.
Trust soldiers armed with assault rifles and shotguns line the canyon behind various cover. More Drudge soldiers and flying Drudge will begin to appear as you kill. The best strategy is always to play carefully, and hold up near the boulders on your end of the canyon.
Stay low and wait for the lowly soldiers to rush your position. The assault rifle is the most versatile and useful weapon, at close range or at range the rifle can take care of most problems.
Use the Trust crates to maneuver forward, look for a Trust mobile command center located nearby an entrance to your left – next to the open conduit. An invisible commando will open fire from the roof of the Trust RV.
One of the Trust soldiers will also carry another new weapon – the warp pistol. The warp pistol is another Drudge energy weapon. Primary fire shoots a ball of energy that moves slower but is more powerful than the normal ballistic pistol, the USP45. The warp pistol can be charged to fire a shotgun blast of energy pellets.
Closing in on the Trust RV, Trust soldiers will pour out of the conduit. Take them out and enter the RV for yet another new weapon. The new weapon is waiting near the ammo crate inside. The AR-C Eclipse is an energy rifle without ammo – instead it runs off a battery. Primary fire shoots accurate energy bullets, while holding primary fire activates invisibility. Invisibility can only be help for a handful of seconds before the weapon overheats.
Leave the RV and clear up any straggler Drudge or Trust soldiers. Make your way towards the fortress entrance marked by a glowing blue turret attached to the ceiling. The auto-turrets are deadly, use the AR-C Eclipse to turn invisible to sneak by the turret.
Invisibility doesn’t last long, release primary fire just as you pass the turret; luckily, these turrets can’t swivel backwards. Follow the entrance hallway, and activate invisibility to bypass the next two waiting turrets.
Reaching a balcony through a green door, flying Drudge will attack. Clear them out with an automatic weapon, or immediately run right into a narrow passage to recover.
Down the aforementioned narrow passage, you’ll reach a grand staircase. Invisible commandos, Drudge, and Trust soldiers will attack from behind cover down the way. From your vantage, they make easy targets. Pick them all off before continuing on.
A sniper is waiting on a tower to the left, near the back of the chamber. Snipers are always the most dangerous enemies so far, taking out the sniper is priority. Try shooting down soldiers from your position where the sniper can’t see you to make the job easier.
Scan the glowing yellow rune and cross the raised stone bridge. A jade golem will attack – the jade golems are powerful but only if they’re able to reach you. If they are close, sprint away and just unload on them. The ballistic assault rifle, the SCAR is effective.
After destroying the first jade golem, Trust soldiers will attack from their previous positions down the grand staircase. Immediately take cover and pick them off one by one. A Trust soldier is carrying a rocket launcher; if you hear the distinctive squeal of a rocket launch, stay behind cover and wait for the explosion before continuing the fight.
Once the Trust soldiers are defeated, a second jade golem will attack. Run away, keep your distance, and shoot it. The door forward will finally open.
Through the second door, you’ll enter a courtyard. Three trust soldiers will attack with a variety of weapons, so pay attention to cover as you clear them out.
You’ll need to enter each of the four chambers and scan an elemental rune before moving forward. Start with the door that’s the first left from the entrance and continue clockwise from there.
Navigate the twisting entrance hallway, two staircases up and a sloping hallway lead into a vast chamber. Down the steps is a platform where the first elemental rune is located. Fight off the Trust soldiers surrounding the rune and scan it with the ASE.
After scanning the rune, the exit doors will lock and jade golems will attack one by one. The best strategy for defeating these monsters is to return up the stairs and camp there while picking the slow moving golems off as they waddle towards you.
Destroy five golems, and the doors will open. Backtrack to the central chamber linking the four elemental rune doors together. You’ll face Trust reinforcements as you return, don’t rush and look out for a large group when you’re back in the middle.
Moving clockwise, enter the door that’s second left from the original entrance. Follow the winding pathway into a complicated room where Trust soldiers are in combat with jade golems. Take out the Trust soldier on the catwalk with you to your left, then pick off the remainder below.
Downstairs, find the rune against the back wall. Just as you scan it, Trust soldiers will ambush above with energy grenade launchers. The easiest way to deal with these soldiers is to immediately sprint under one of the staircases and hide; the thin pillars near the rune are inadequate protection.
One of the soldiers will rush down the stairs, take him out and look up the staircase to take out another waiting soldier; just be careful of the TPC-Launcher he wield. Once the rest of the troops are finished, backtrack to the central chamber.
The new weapon is the TPC-Launcher, it’s an automatic energy grenade launcher. It fires a grenade that explodes on impact in primary, while switching to secondary fires grenades that stick to surfaces and explode in close proximity to enemies.
The third rune room is empty of Trust soldiers. Just scan the rune and fight off the jade golems the same way you did the first time. Then backtrack, where you’ll face a large contingent of Trust soldiers waiting, including invisible commandos hiding on the balcony above.
When you’re ready, enter the final rune chamber and navigate the straightforward halls. Inside, you’ll face more Trust soldiers, with one unique exception. One of the Trust soldiers fires extremely accurate machine gun fire from his perch, using a laser sight. He should be your first target, then take your time taking apart the remaining Trust goons.
Scan the rune on the second floor and more Trust soldiers will rush inside. For this ambush, your perch is actually pretty good. Shoot at the incoming soldiers, if they run across the platform and onto your end of the room, just wait near the stairs to shoot them.
Take out the invisible commando waiting on the opposite balcony, and return to the central chamber with all four runes scanned. The doors into the inner sanctum are finally open, so get inside.
Walk up, then down steps towards a walkway. Look across the chasm and snipe the soldiers hiding behind crates below. When they’re clear, take the stairs down. Don’t step off into the bottomless pit, the final section of stairs is broken. For your one and only jumping puzzle in Conduit 2, make this jump count. Run and jump. It can be tricky.
For completing the jump, you’re awarded with a Phase Rifle. The Phase Rifle is a sniper rifle; primary shoots wildly inaccurate shots, while secondary turns on an X-ray scope. Aim at bad guys behind cover and hold down primary fire to lock onto them, and release to shoot through walls.
Look down the cliff to spy four Trust soldiers hiding behind four large pillars. Target them one by one, and look out for the two carrying rocket launchers. When those four are clear, follow the narrow cliff path down and onto the fortress steps.
Just as you jump down, enemies will pour out of the conduit against the cliff. Run towards the fortress entrances immediately and take cover behind the fallen rubble and pillars. If you can find one, grab a rocket launcher off the ground. The rocket launcher will take care of the armored Trust soldiers nicely.
After the first wave, a second wave composed of Drudge and Trust will exit the conduit. A third wave of Drudge and Trust will pop out once most of the previous wave are killed, followed by another armored soldier and two more Drudge. Keep fighting them off, stay back, and shoot them as they exit the conduit while they’re easy pickings.
Once the soldiers stop appearing, enter the fortress and scan all four rune pedestals – one left, one right, and two forward. With all four scanned, the door into Li’s inner chamber will open. Follow your waypoint inside to face Li.
Bring a rocket launcher and a SCAR before entering the chamber for best results.
Li
Li may be the most difficult boss in Conduit 2. Come prepared with a rocket launcher and a SCAR. Jump into the arena for a short cutscene, then let the games begin. Turn around to find an inactive conduit. To the left and right of the conduit are two ammo crates. Refill ammo here as needed throughout the fight.
Li will randomly teleport around the room. He attacks through two primary methods. If you’re close, he’ll stomp on the ground for a large chunk of damage. Stay at length, keep as much distance from Li as possible at all times.
The second attack is it’s most common. At range, Li will collect red balls of energy that swirl over his head. He’ll throw these energy balls at that explode on contact. Just as he’s about to attack, strafe left or right while sprinting. You’ll always take some damage, but running to avoid the brunt of the attack.
During his first phase, after launching the energy attack, he’ll fall to the ground and begin to grow. This is your chance to do damage, shoot him with your assault rifle. After doing enough damage, he’ll switch attack patterns.
The second phase of the fight adds another move to Li’s repertoire. Like before, he’ll teleport and throw energy balls.
After throwing energy, Li will create a vortex to pull you into melee range where he’ll pull a ground stomp. Sprint away until Li stops. After he stops, he’ll fall to the ground and begin to grow. Like before, this is your chance to attack.
Do enough damage, and Li will enter the third and final phase. Li will start by summoning a jade golem to help. During the chaos of this fight, being caught by a jade golem’s foot stomp and any one of Li’s attacks will cause instant death.
If you have enough time, destroy the jade golem, otherwise just sprint. Li will throw fireballs then use his vortex before he’s vulnerable again.
While Li is vulnerable here, pull out the rocket launcher and aim carefully. Fire it near his center mass to finish Li off for good. On harder difficulty levels, the extra damage still helps take down Li faster.
Scan Li’s body with the ASE, activate the conduit, and teleport back to the Atlantis.
Siberia Crash
Return to the coordinate selection console and choose “Siberia Crash”. Return to the conduit and you’re on your way.
Appearing inside a cave, destroy the wall of ice boxing you in. A grenade or a clip of assault rifle bullets should be enough. Trek outside to watch a transport crash – your goal is to investigate the crash.
Follow the partially cleared path towards an outcropping of rocks. Below, Trust soldiers will engage you. Stay back and take them out before moving into the outcropping.
Nearing the rocks, you’ll be attacked by robot dogs. These things are a pain in numbers. They absorb plenty of damage before dropping. Shoot them with an automatic weapon and melee once they attack.
Among the Trust soldiers is another new enemy, a strange alien support creature. You won’t see many of these things. They may be armed, but they opt to hang back and support other soldiers. They also tend to hang out in the open, making them an easy target.
Continue down the hill, facing more Trust soldiers. Into the stone canyon, two more robot dogs will attack. Push past them and enter the cave entrance marked by your waypoint.
Navigate the rocks to meet a new Drudge friend. After the cutscene, walk up the ramp and out of the cave. Jump down the slope until reaching a rode blocked on one side by large metal doors.
Ahead, a sniper and a swarm of Trust soldiers is waiting. Take out the sniper inside the anti-aircraft bunker before focusing on the remaining soldier. Stay put and patiently pick them off if you’re having trouble.
An armored trooper carrying the energy launcher will charge forward. Aim for his head for a quick kill. Although energy grenades seem dangerous, the shotgun is liable to kill you faster.
Clear out the enemies, and follow the road up the slope. To the right is a small bunker containing an ammo crate and a new weapon. The Widowmaker turret is a cool number, set it down with primary fire, then use secondary to aim and fire the turret remotely. While awesome in theory, there’s very little use for this unwieldy weapon during the campaign.
Run back down the road, looking for a red generator on the road. Turn right to find a pathway leading behind the AA Bunker. Turn around while facing the bottomless pit to find a ladder. Climb it and jump down into the control room. Hack the console to shut down the cannon and open the doors forward.
Outside, Trust soldiers will close in on you. Hang back and wait inside the bunker to pick off any soldier dumb enough to walk into your line of sight. When you’re ready, exit through the door and look left on the road.
Inside the tunnel, more Trust soldiers and robot dogs will attack. Walk backwards while shooting the dogs and take cover from the Trust soldiers. When you’re recovered and the dogs are done for, continue back into the tunnel to take care of the rest.
Now you have two options; left or right. Turn left and enter the snow cave, coming out on a narrow path next to the bottomless pit. Continue towards the AA Bunker, climbing onto the roof with the ladder and jumping into the Bunker itself. Shoot the waiting guard and hack the console.
Down the ramp, turn left to find a door leading into a bunker cut into the rock wall. Hack the console inside the array to call for help. After a short dialogue, Trust soldiers will ambush you from both doors. Prepare to throw grenades as both doors open, taking care of the right-most soldiers first where you’ll be free to run through the door and take cover.
The other set of two soldiers will lose interest in you and fight the free Drudge. Exit and take out the remaining Trust Soldiers while following the waypoint to the crashed ship.
Another ship will drop by and take you to your destination; the Siberian prison.
Siberia
Follow the ramps up, passing the door, and hopping down onto the cliff side path. Carefully navigate the path, taking out the Trust soldier, and continue up the sloping path up. Another Trust soldier is patrolling ahead.
Take him out, then jump down onto a small ledge under the bunker. Crawl into the tube, where vents are spraying flame. Wait for the flames to cut out before crawling by. After two vents, a horizontal vent is waiting ahead around the corner.
Crawl out of the tube and into an armory. Take out the worker and take any weapons you might need here. Exit through the green door. In the hall is a security camera. Security cameras are a problem during this mission: if one sees you a robot dog will spawn. Destroy the security camera to avoid more problems.
The hall continues left; use the door forward. Inside, take cover behind the shields and engage Trust soldiers. The orange Trust soldiers soak up more damage than normal, but otherwise they aren’t different.
Follow the ramps up and hack the console. Large metal doors opposite your position will open, with robot dogs and Trust soldiers rushing in. Wait for the duo of dogs to reach you, take them out, and then clear the two Trust soldiers.
Through the doors, you’ll reach a helipad platform. Four regular, non-cyborg Trust soldiers will fast rope down onto the platform. Back up and shoot the troopers down while throwing grenades.
Stepping out onto the platform, turn left and follow the path up. Jump onto the balcony and enter the large doors. Left is another group of orange Trust soldiers. Head left instead, into an ice cave. Take out the workers, and hack the generator with your ASE.
With the generator active, turn around and approach the orange shield blocking the hall. Look out for robot dogs. Clear out the Trust cyborgs and shoot the camera above the doorway.
Through the door, enter the elevator and ride it down. Through the hallway, open the door and shoot down the camera across the room. Before entering the room, shoot the camera directly above.
Look right to see four inactive Trust cyborgs. Pummel the lower level with grenades and focus your fire on them one at a time. Once they activate, the robots will charge and overwhelm you if you’re not ready.
In the next hallway, destroy both cameras hanging above the entrance and exit. Shoot the waiting Trust cyborgs from afar, and continue forward. Hack the console and enter the door, then into the large vertical chamber.
Walk towards cover to hide as several Trust soldiers fast rope into the room. Step onto the lift to reach the second level. This is where the level gets tricky. Two robot dogs and two Trust cyborgs attack from left and right.
Focus on the attackers to your left or right while moving forward to escape being stuck between the two groups. The shotgun comes in handy here. Step onto the next lift to reach the third floor, where another ambush of cyborgs and robot dogs attack.
Step onto another lift to reach the fourth floor. Follow the walkway around to reach an open door. Rush through the next two halls to reach your goal. Shoot down the workers, hack the console, and hack the tube.
When the door opens, three robot dogs will rush inside. Take them out with melee, and shoot your way through both hallways of soldiers. Use the lift down to the third floor to find a newly unlocked door.
Shoot the camera through the door. Left, there’s a ramp flanked by two cyborgs. Up the ramp, there’s another camera. Shoot the watchful eye and turn left again. Two more cyborgs take cover behind a shield.
Turn right into another antechamber where three inactive cyborgs are waiting. Activate them and throw grenades, picking them off as they try to navigate the railing.
Through another door, take out the soldier on the balcony. Up left across the chasm is a sniper waiting. Step to the ledge, step onto the transport, and continue through the large metal doors.
Head down the hall and into the door, turning left. Hack the console on the right side of the metal door, and take out both Trust soldiers waiting on the other side. Enter the door on the left side of the room to find the waiting free Drudge.
Prepare for a fight. Hack the refueling device near the transport to activate an ambush. A timer will appear at the top of the screen, and reinforcements will continually pour in until the timer hits zero.
Soldiers will enter through the one door into the hangar. Don’t worry about the soldiers there, the free Drudge can handle it. One soldier will fast rope down to the left and right of the transport, usually armed with shotguns. Finally, two snipers appear on a cliff outside across the chasm.
Run to either the left or right side of the flier and hide from the snipers’ laser sights. Take out the fast roping soldier nearest you, then shoot both snipers with a good accurate weapon like the assault rifle. The snipers do not respawn, making your job significantly easier once they’re gone.
Now, simply wait for the time to tick down, shooting the fast roping soldier as he comes down nearest you while you hide under the left or right wing of the transport. It’s just that easy.
Once the timer is up, the level is complete.
Siberia Escape
Enjoy the obligatory rail-shooting section required by every FPS. This part takes the form of a boss. Armed with a machine gun, you have infinite ammo; just make sure you don’t let the gun overheat. Pressing “A” also activates a shield that absorbs damage, which is a neat trick.
A HAVOC Gunship is on your tail. Aim for the engines on the left and right wings that glow bright red. The Gunship will fire missiles, just shoot them down as they get close.
The Gunship will fly out of view, cueing jetpack cyborgs to attack. These guys can barely scratch your ship, and only take one hit from your guns. Shoot the jetpack grunts down and the Gunship will return.
Continue to shoot the engines, periodically shooting down missiles as they’re launched. If the engines of the enemy Gunship go black, focus on the other engine.
More jetpack troops will attack before the Gunship returns. Just keep shooting until the last engine breaks. Fight through another group of jetpack soldiers to target the Gunship’s new weak point – a red vent above the cockpit.
As you do more damage to the Gunship, it will fire more and more missiles while jetpack soldiers will continue to harass you. If the amount of missiles becomes overwhelming, activate your shields just before impact.
Otherwise, just keep shooting the vent. Don’t hold down the fire button too long, shoot down the missiles quickly, and eventually you’ll win.
Lost City
Instead of returning to the Atlantis, you’re taken directly to South America from Siberia. Right away a sniper will hone in on you with his laser sight.
Take him out if you have a good long range weapon, or jump off the platform to find a better weapon. Several more Trust soldiers are milling around the area, many of them near the scattered explosive barrels. Notably, a soldier carrying a rocket launcher is waiting near the large stone wall down the pass.
Pick up the rocket launcher and enter a cave bypassing the stone wall just to the right. Hack the console to shut down the forcefield. At the cave exit, two Trust soldiers will sidestep into view. Don’t leave the cave just yet.
In these ruins, two snipers are waiting. One is left of your position while the other is right. Crawl carefully along the right wall, looking left to spot the sniper. The second sniper is waiting in a camouflaged alcove just to your right. He’s tricky — he’ll almost always get in a quick shot before you even see him. Try stun grenades or the RC-Eclipse to get the drop on him.
Ahead the cave is a stone platform. Beyond that is a waiting armored Drudge with a Hive Cannon. Shoot the Drudge monster with your rocket launcher once it steps out from hiding.
More Trust soldiers litter the area, stay near cover and pick them off.
To the left of the stone platform you’ll find a crater and some workers. Shoot them down and scan the corpse.
The waypoint now points to a conduit and your exit. Run backwards through the cave and follow the left-most path. Use a scoped weapon or the rocket launcher to get some attention. Four armored Trust soldiers and two armored Drudge are waiting on the hill ahead. Draw them out and pick them off, you have plenty of room to work with for retreat if you’re overwhelmed.
Back to the hill leading to the conduit, a sniper is waiting. Pick him off and climb the ladder up onto the scaffolding holding the conduit. Scan the device to turn it on, and head through to complete this short mission.
Adams
This is it, the duel with Adams. Hide behind one of the destructible pillars before Adams blasts you with his Phase Rifle. Lucky for you, he won’t shoot through the pillars, but he will shoot the pillars to destroy them.
Two Trust soldiers will constantly spill out of the conduit behind Adams and try to flush you out, providing a constant annoyance. If you need ammo, ammo crates are located to the right and left of the steps leading up to the huge conduit.
Your goal is to simply shoot Adams, but with that forcefield in the way it’s impossible. To shut down the forcefield, aim at the four purple crystals located in the four corners of the grid.
Shoot the Trust soldiers if they get close, and take out the crystals. Once the forcefield is down, unload your assault rifle or any other suitably powerful weapon in Adams.
Take your time, duck behind the pillars if Trust soldiers wing you or Adams gets in a hit with his rifle. Wait for three shots and he’ll reload, giving you some time to shoot.
Once his health is down to two-thirds, you’ll be taken to phase two.
Agartha
Adams transforms into his alien self. The new arena is lined with statues along the edges which are perfect to use as cover. First off, run behind one of the statues before Adams can charge you.
This is the easy part. Adams will charge headfirst towards you, and your goal is to hide behind a statue and wait for Adams to hit it. Once Adams headbutts a statue, he’ll be stunned. Circle around him and shoot the glowing yellow weak point on his back.
Keep it up, just standing near a statue is practically good enough for this fight. After he hits a statue, circle around and shoot. Two ammo crates are located near the conduit if you need a refill.
After his health falls down to one-third, he’ll enter into his third phase. Now he’ll throw fireballs like Li. To dodge, just run right or left parallel to Adams. Make sure to keep sprinting until he stops.
Adams will also shoot a beam of energy from his hands. If you’re close by, strafe right around to shoot at his exposed back while he’s shooting energy.
The energy beam leaves a burning residue above the scorch marks – it goes without saying that touching it hurts. To avoid damage, hide behind a statue.
After a few beam attacks, Adams will walk to the center of the arena and power up. This is another good chance to shoot his weak spot, just don’t get too close.
Repeat the process a few times, and you’ve won. Scan Adams’ body to win the game.
Congratulations! You’ve finished the singleplayer portion of Conduit 2. Time to conquer multiplayer.


 How to fix Ryse: Son of Rome PC Crash, team_api64.dll error, unarc.dll error, 0xc0000142, 0xc000007b, 0xc00007b errors and FPS limit
 Mario & Luigi: Dream Team is Out Today in the UK
 Take Back Control Over Driver Updates in Windows 10
 Splinter Cell Blacklist Wiki : Everything you want to know about the game .
 Saints Row 4s Enter the Dominatrix Smashes the Fourth Wall to Deliver Ridiculous Fun