Witch Hunters: Stolen Beauty Walkthrough, Guide, & Tips
Witch Hunters: Stolen Beauty Walkthrough

Welcome to the Witch Hunters: Stolen Beauty Walkthrough
Help Angelica get her witch-stolen beauty back! Save a young woman suffering from the witch’s sorcery for over 100 years!
Whether you use this document as a reference when things get difficult or as a road map to get you from beginning to end, we’re pretty sure you’ll find what you’re looking for here.
This document contains a complete Witch Hunters: Stolen Beauty game walkthrough featuring annotated screenshots from actual gameplay!
We hope you find this information useful as you play your way through the game. Use the walkthrough menu below to quickly jump to whatever stage of the game you need help with.
Remember to visit the Big Fish Games Forums if you find you need more help. Have fun!
This walkthrough was created by Rebekah, and is protected under US Copyright laws. Any unauthorized use, including re-publication in whole or in part, without permission, is strictly prohibited.
General Tips

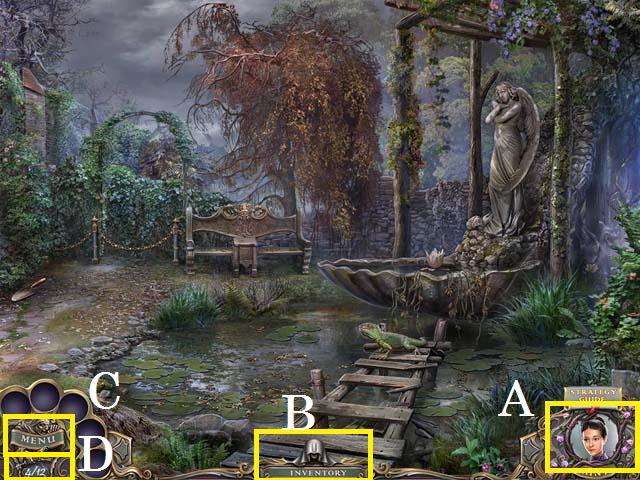
- This is the official guide for Witch Hunters: Stolen Beauty Standard Edition.
- Once you collect it, you can use the Hint Button (A) if you get stuck.
- Your inventory bar (B) will hold items until they are needed.
- Zoom into sparkling scenes to trigger Hidden Object Scenes. In this guide we will use the acronym ‘HOS’ for Hidden Object Scenes.
- The items in the HOS are random.
- Click on the Menu (C) button to exit, pause, or resume the game. You can also adjust your options (sound, music, and screen size).
- Collect 12 Snake Keys throughout the game; you can view the number of keys you’ve collected below the Main Menu (D). The locations of the Keys can be found throughout the guide.
- You will not need to follow the exact path of this guide; however some actions are required before HOS are available.
Chapter 1: The Hunt Begins

- Shoo away the bird (E) and pick up the Hint Button (F).
- Pick up the first HEXAGON (G), STATUE FACE (H), STATUE’S HAND (Z), and the STATUE FOOT (I).
- Zoom into the sign; pick up the note (J) and the second SNAKE KEY (K).
- Zoom into the plaque; pick up the RED RING (L).


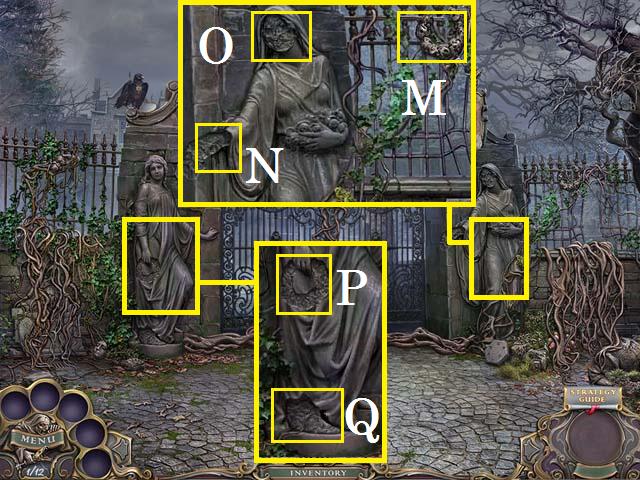
- Zoom into the right statue; pick up the STATUE WREATH (M). Place the STATUE’S HAND (N) and the STATUE FACE (O).
- Zoom into the left statue; place the STATUE WREATH (P) and the STATUE FOOT (Q).

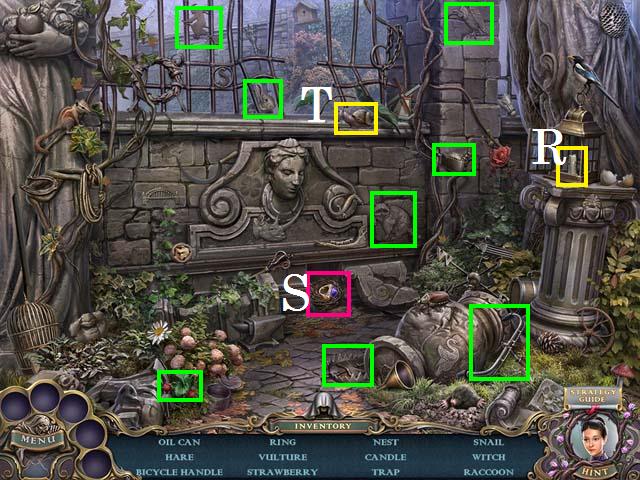
- Zoom into the sparkles to trigger a HOS.
- Open the lamp to reveal the Candle (R).
- Move the stone to reveal the Ring (S) and the Nest (pink).
- Move the leaf to reveal the Snail (T).
- Collect the remaining items (green) to receive the BLUE RING.

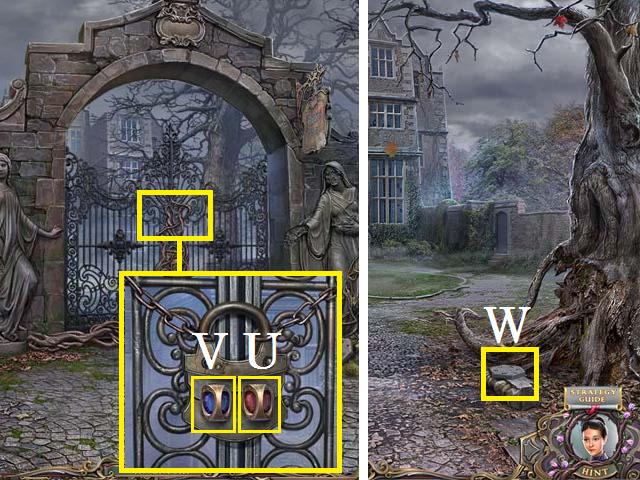
- Zoom into the gate; place the RED RING (U) and the BLUE RING (V) on the door and enter the gate to the school grounds.
- Pick up the second HEXAGON (W).
- Take a right to the garden gate.

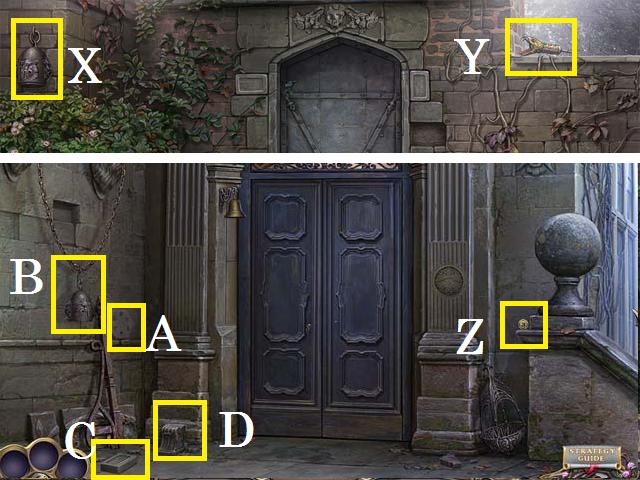
- Pick up the WEIGHT (X) and the third SNAKE KEY (Y).
- Back up one scene and move forward to the front door.
- Pick up the first BUTTON (Z), the third HEXAGON (A).
- Hang the WEIGHT on the chain (B) and pick up the BRICK (C).
- Move the stone (D) and zoom into the revealed hole.
- Return to the garden gate.

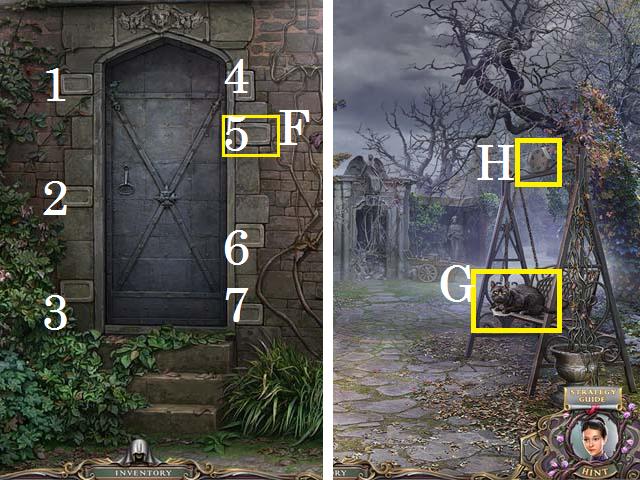
- Place the BRICK in the slot (F). Use the following sequence to open the gate: 1, 7, 3, 2, 5, 4, and 6.
- Enter the garden.
- Shoo the cat away and examine the note (G).
- Pick up the fourth HEXAGON (H).

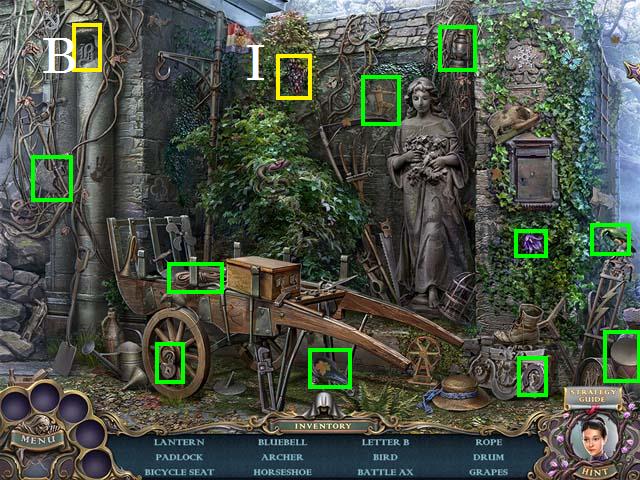
- Zoom into the sparkles to play a HOS.
- Move the vine to reveal the Grapes (I).
- Move the stone to reveal the Letter B (J).
- Collect the remaining items (green) to receive the TOY DRUM.

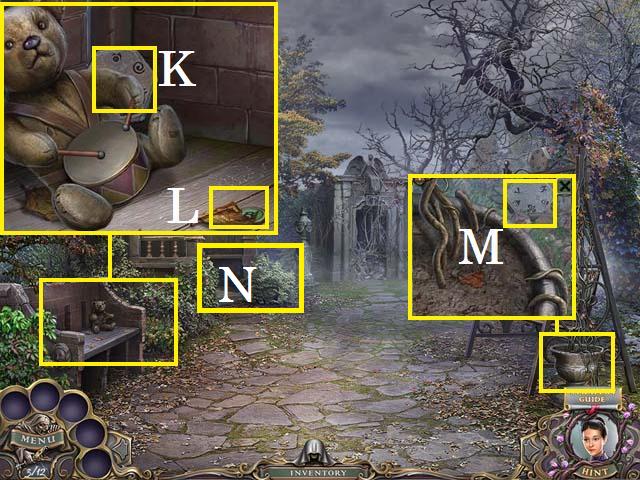
- Zoom into the teddy bear; place the TOY DRUM with the bear and move the leaf. Pick up the fifth HEXAGON (K) and the second BUTTON (L).
- Zoom into the planter; pick up the sixth HEXAGON (M).
- Enter the gazebo (N).

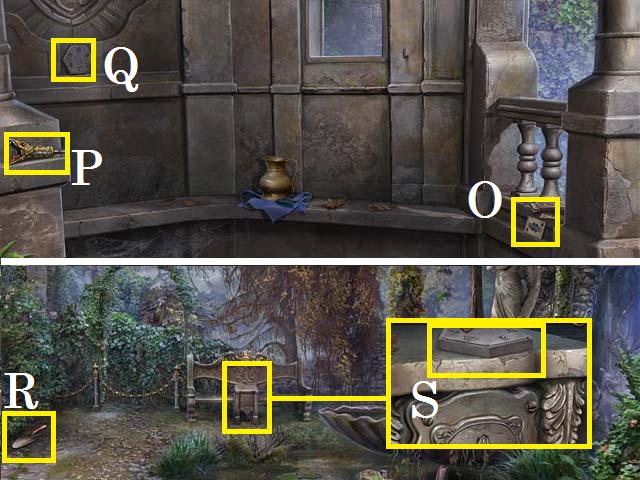
- Examine the card (O).
- Pick up the fourth SNAKE KEY (P) and seventh HEXAGON (Q).
- Exit the gazebo and move forward to the fountain.
- Pick up the TROWEL (R).
- Zoom into the valve housing; pick up the eighth HEXAGON (S).
- Return to the gazebo.

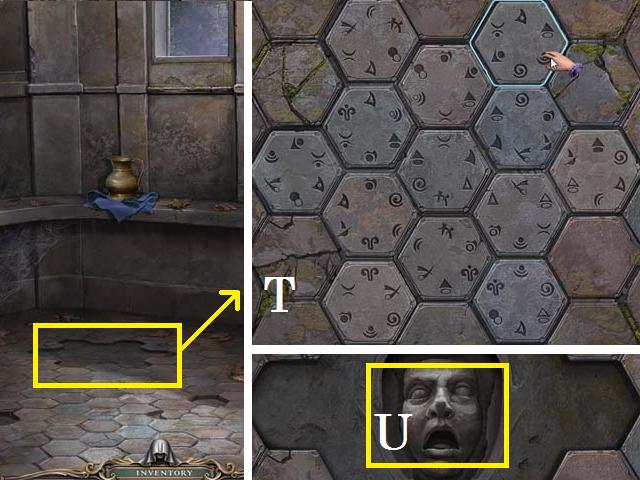
- Zoom into the floor; add the eight HEXAGONS to the rest.
- Use the screenshot (T) as a key for this puzzle.
- Pick up the ORNAMENT PIECE (U).
- Exit the gazebo.

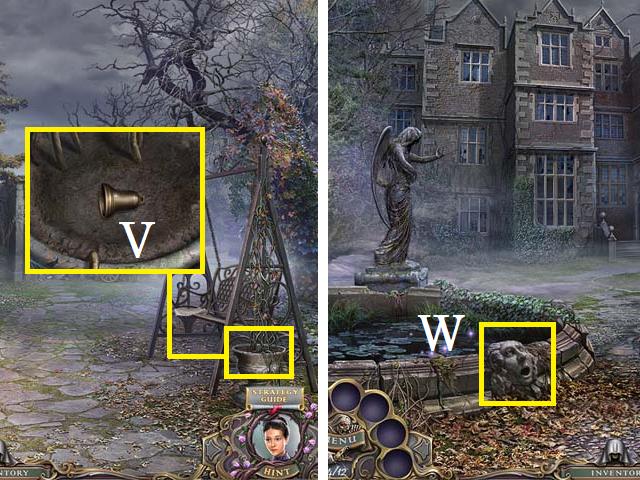
- Zoom into the planter; use the TROWEL to dig out the BELL (V).
- Return to the school grounds just inside the gate.
- Place the ORNAMENT PIECE on the pool (W) and zoom into the sparkles to trigger a HOS.

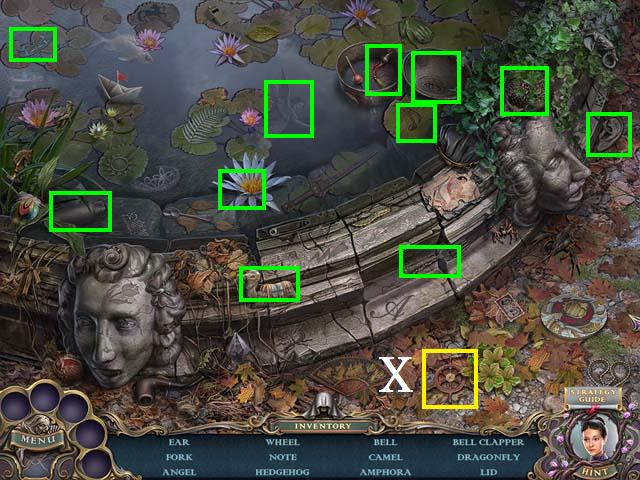
- Move the leaves to reveal the Wheel (X).
- Collect the remaining items (green) to receive the BELL CLAPPER.
- Return to the front door.

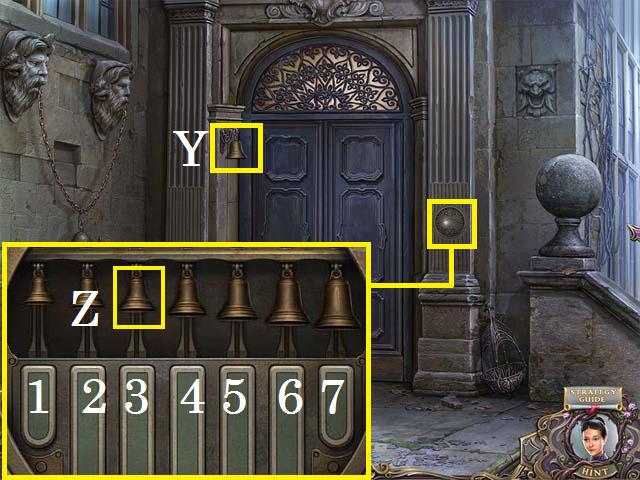
- Hang the BELL CLAPPER in the bell (Y). Ring the bell.
- Zoom into the lock; place the BELL (Z) and press the bars in the following order: (3, 5, and 2); (2, 1, 7, and 4); (4, 2, 3, 7, and 1); (2, 1, 2, 6, 5, and 4).
- Enter the door to the foyer.
Chapter 2: Reveal Power

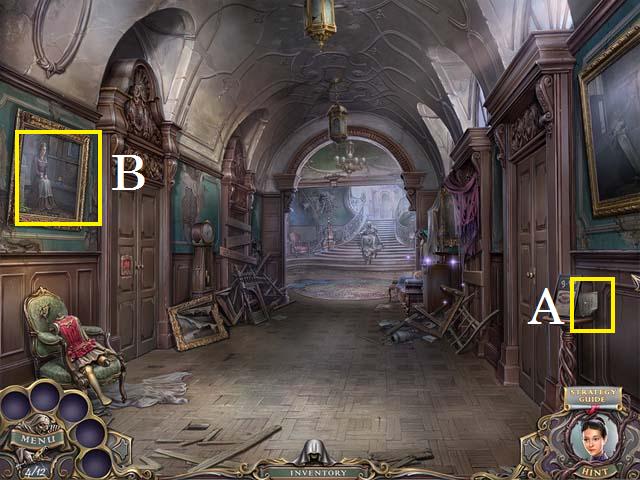
- Examine the note (A).
- Examine the painting (B) and speak with the woman.

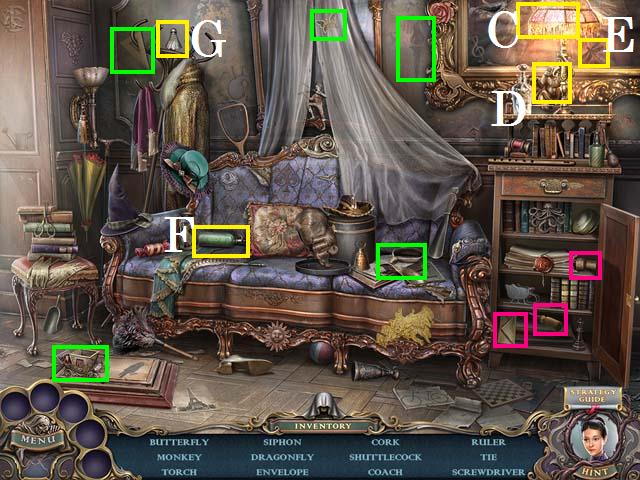
- Zoom into the sparkles to play a HOS.
- Open the cabinet to reveal the Envelope, Cork, and Screwdriver (pink).
- Turn on the lamp (C) to reveal the Monkey (D) and the Dragonfly (E).
- Move the pillow to reveal the Siphon (F).
- Move the hat to reveal the Shuttlecock (G).
- Collect the remaining items (green) to receive the SCREWDRIVER.
- Return to the fountain.

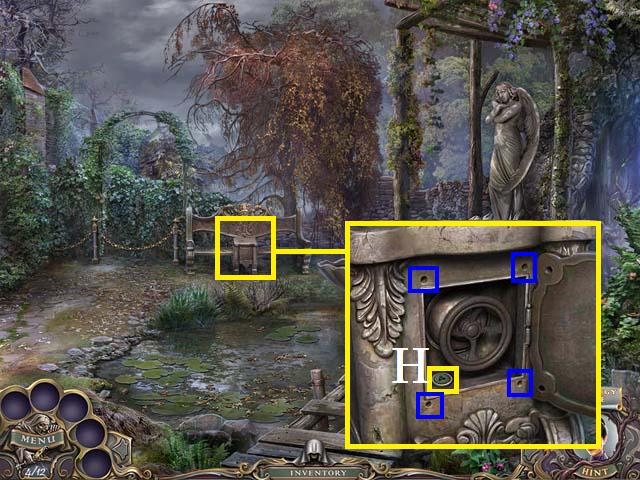
- Zoom into the valve housing; remove the four screws (blue) with the SCREWDRIVER; pick up the third BUTTON (H).
- Return to the foyer and move forward to the staircase. Move forward one more time and try to climb the staircase.

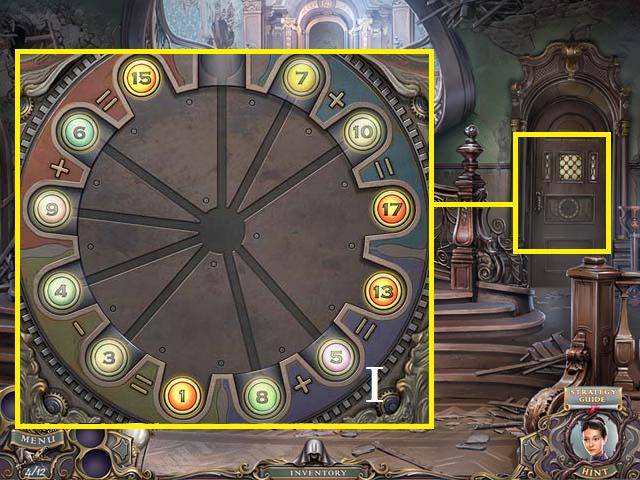
- Zoom into the door; place the BUTTONS on the lock, you can use the screenshot (I) as a key to unlock the door.
- Enter the classroom.

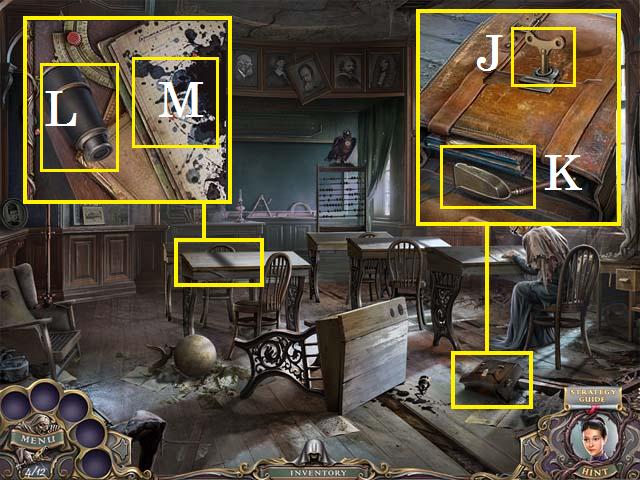
- Zoom into the briefcase; pick up the CLOCK KEY (J). Open the case and pick up the SCOOP (K).
- Zoom into the desk; pick up the SPYGLASS (L) and examine the notebook (M).
- Speak with the woman, and then return to the foyer.

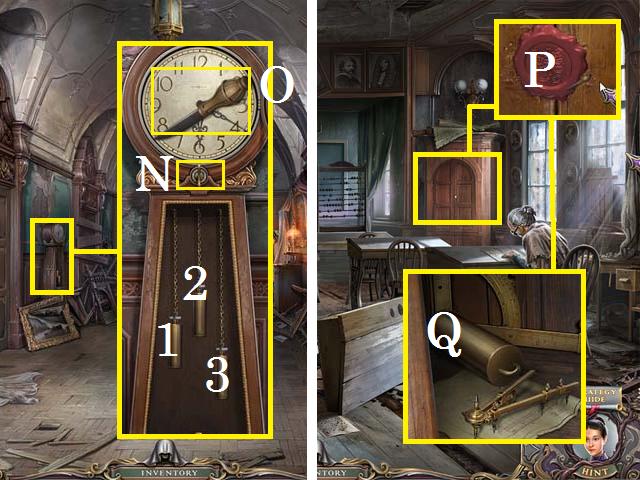
- Zoom into the clock and use the CLOCK KEY (N) to open the face; collect the KNIFE (O).
- Return to the classroom.
- Zoom into the cabinet; remove the seal (P) with the KNIFE.
- Pick up the CLOCK WEIGHT (Q).
- Return to the foyer.
- Place the CLOCK WEIGHT in the clock; use the following sequence to set the weights properly: 1, 1, and 3.
- Go through the open door to the dining room.

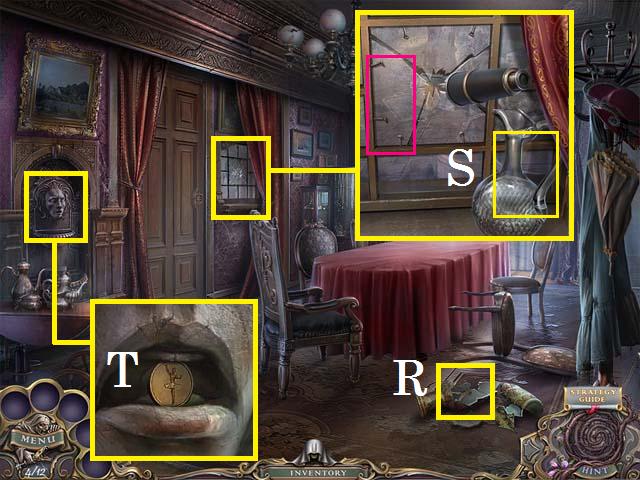
- Remove the broken piece from the vase; pick up the NIPPERS (R).
- Open the curtain and zoom into the window; pick up the PITCHER (S) and place the SPYGLASS in the window.
- Remove the nails (pink) with the NIPPERS.
- Zoom into the SPYGLASS to see the clue.
- Zoom into the fountain; remove the COIN (T) with the NIPPERS.
- Put the PITCHER in the fountain to get the PITCHER WITH WATER.

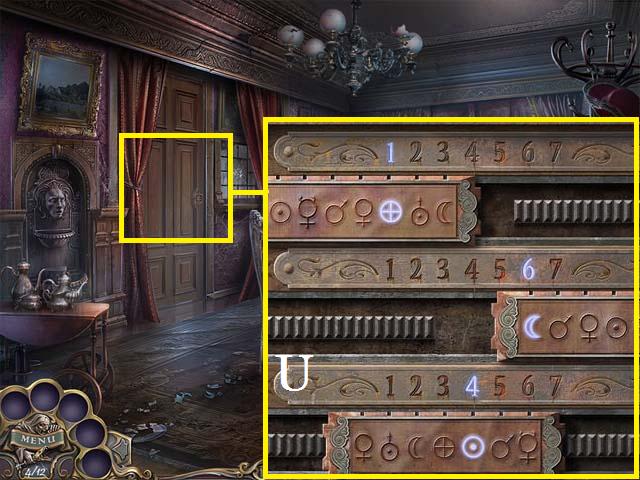
- Zoom into the door; use the screenshot (U) as a key to set the lock.
- Enter the Kitchen.

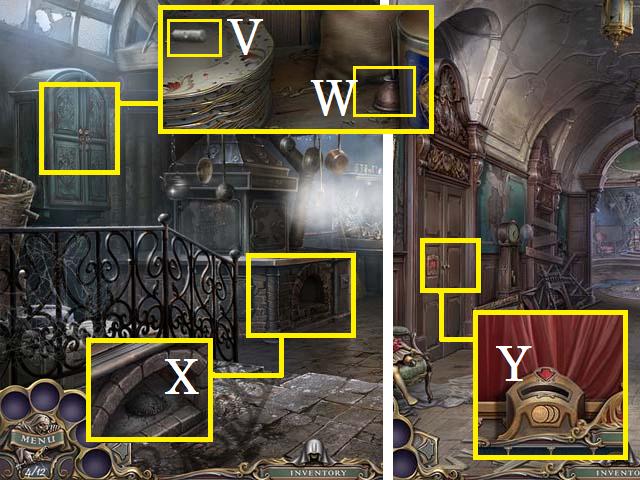
- Zoom into the cupboard; open the latch with the KNIFE; pick up the CHALK (V) and the OIL CAN (W).
- Zoom into the oven; use the SCOOP to receive the SCOOP WITH ASH (X).
- Return to the foyer.
- Zoom into the door lock; place the COIN in the slot (Y).

- Return to the fountain.
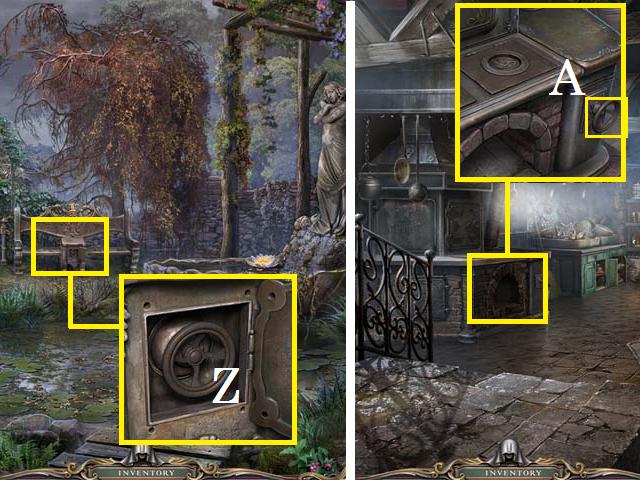
- Zoom into the valve housing; use the OIL CAN on the VALVE (Z) and then pick it up.
- Return to the kitchen.
- Zoom into the oven; place the VALVE (A).

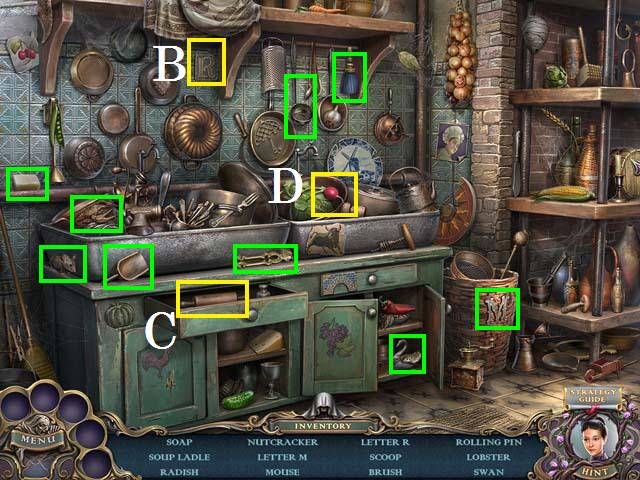
- Zoom into the sparkles to play a HOS.
- Move the towel to reveal the Letter R (B).
- Open the drawer to reveal the Rolling pin (C).
- Move the pot lid to reveal the Radish (D).
- Collect the remaining items (green) to receive the BRUSH.

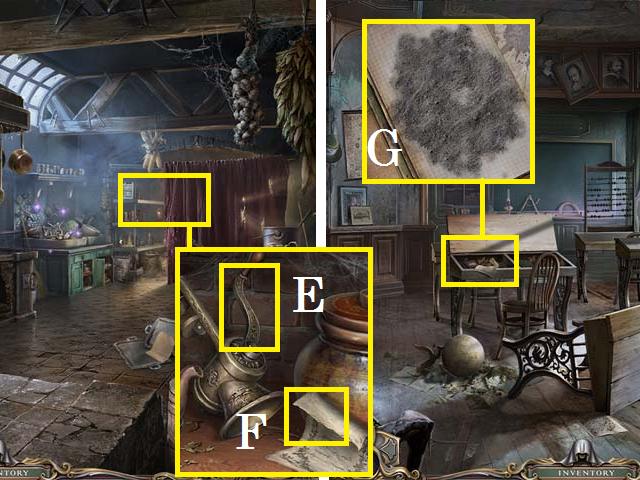
- Open the curtain and zoom into the back shelf; pick up the HANDLE (E) and examine the note (F).
- Return to the classroom.
- Zoom into the desk; place the ASH on the paper (G) and remove with the BRUSH.

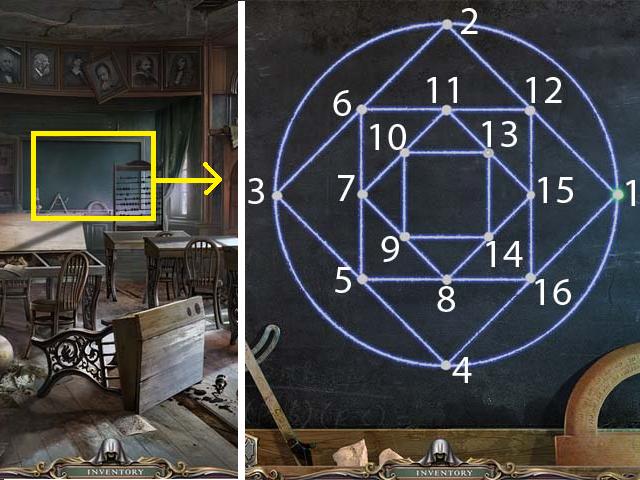
- Zoom into the chalkboard.
- Use the CHALK to trace the design in the following order: 1, 2, 3, 4, 5, 3, 6, 7, 5, 8, 9, 7, 10, 11, 6, 2, 12, 11, 13, 10, 9, 14, 13, 15, 14, 8, 16, 15, 12, 1, 16, 4, and 1.

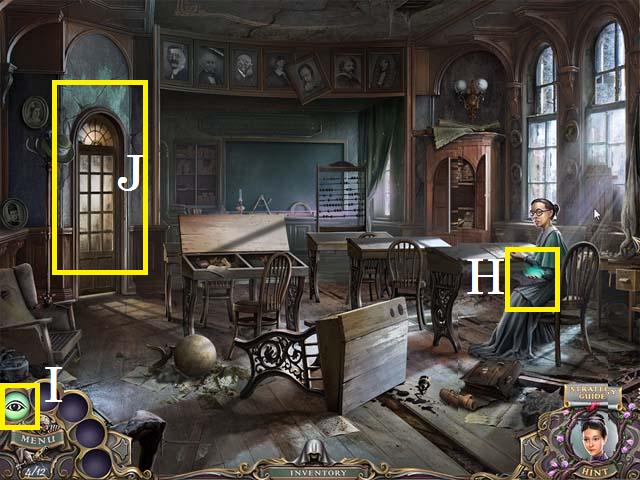
- Take the Reveal Power (H) from the lady.
- Highlight the Reveal Power Button (I), and use it on the wall (J) to reveal a hidden doorway.
- Return to the gazebo.

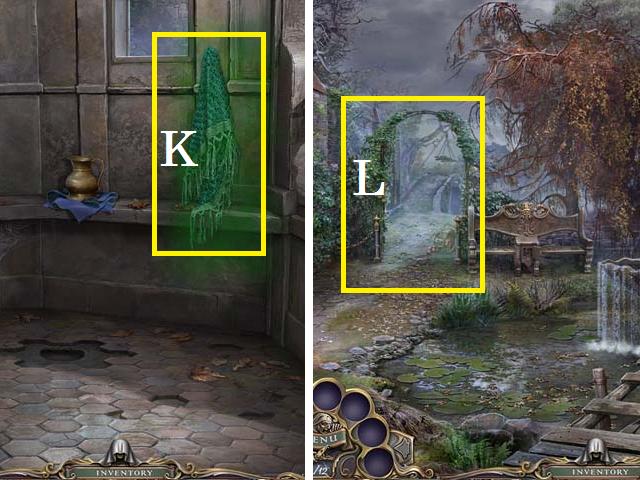
- Use the Reveal Power on the Shawl and then take the SHAWL (K).
- Move to the fountain.
- Use the Reveal Power on the overgrown path (L).
- Move forward to the bridge.
Chapter 3: The Kitchen

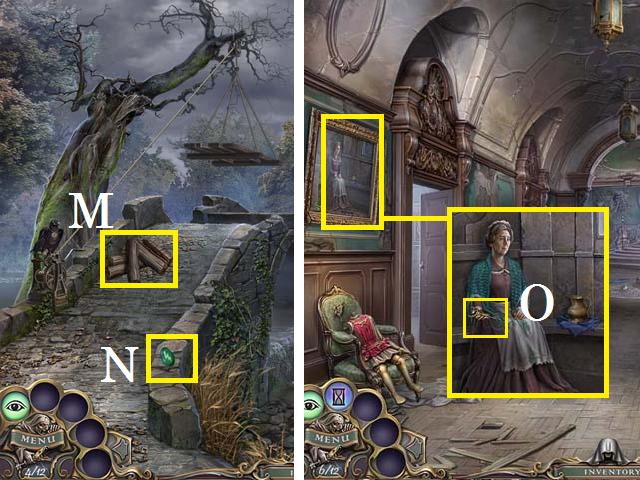
- Pick up the FIREWOOD (M) and the SWORD GEM (N).
- Return to the foyer.
- Zoom into the painting; give the SHAWL to the lady and collect the fifth SNAKE KEY (O).
- Return to the dining room.

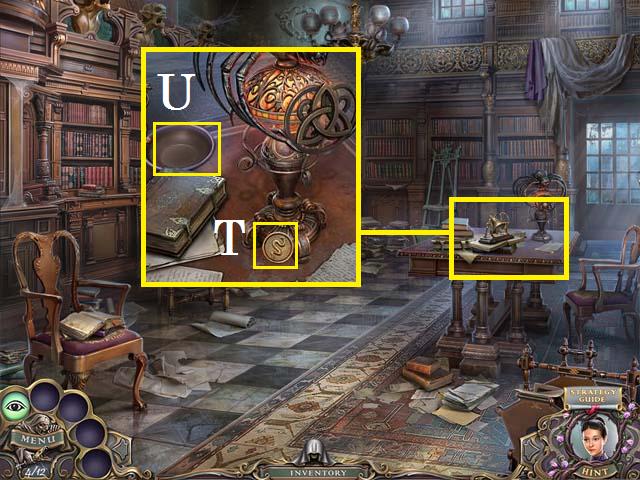
- Use the Reveal Power on the table and zoom in; move the lid (Q) to reveal the slingshot.
- Pick up the first PLATE (R) and read the note (S).
- Enter the kitchen.
- Place the FIREWOOD in the oven (T).
- Return to the staircase.

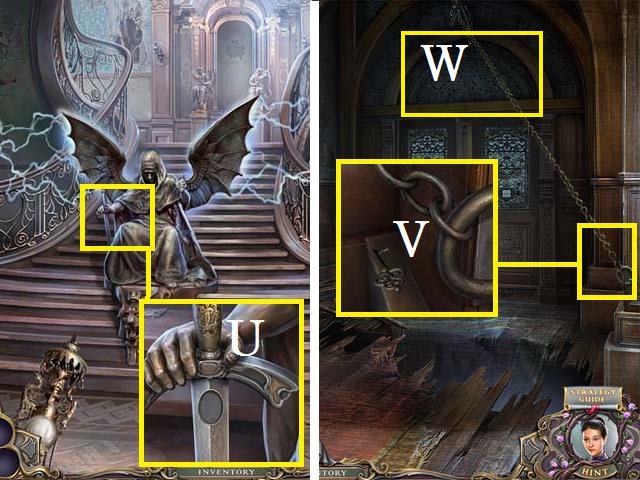
- Zoom into the statue; place the SWORD GEM (U).
- Climb to the top of the stairs and take a left.
- Zoom into the chain; pick up the POTTERY ROOM KEY (V).
- Use the Reveal Power over the door (W).
- Return to the classroom.

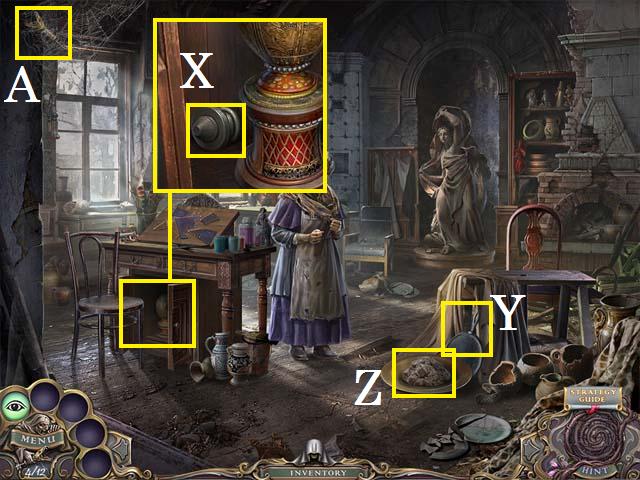
- If you haven’t already, use the Reveal Power on the door; unlock it with the POTTERY ROOM KEY, and enter the pottery room.
- Scare the cat away and speak with the old woman.
- Use the reveal on the desk and zoom in; pick up the OVEN HANDLE (X).
- Move the sheet; pick up the BAKER’S PADDLE (Y).
- Pour the PITCHER WITH WATER on the CLAY (Z) and pick it up.
- Pick up the sixth SNAKE KEY (A).
- Return to the kitchen.

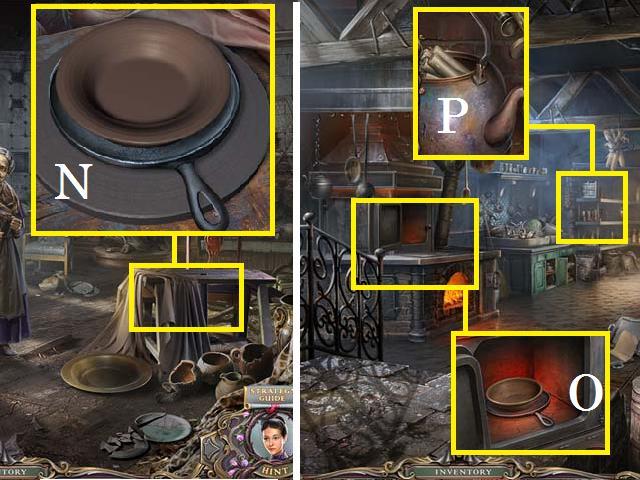
- Zoom into the oven; place OVEN HANDLE (B) to open the door and pick up the MUSIC BOX TOP (C).
- Return to the pottery room.
- Zoom back into the desk; place the MUSIC BOX TOP (D) and then pick up the BALLET DANCER (E).
- Return to the foyer.

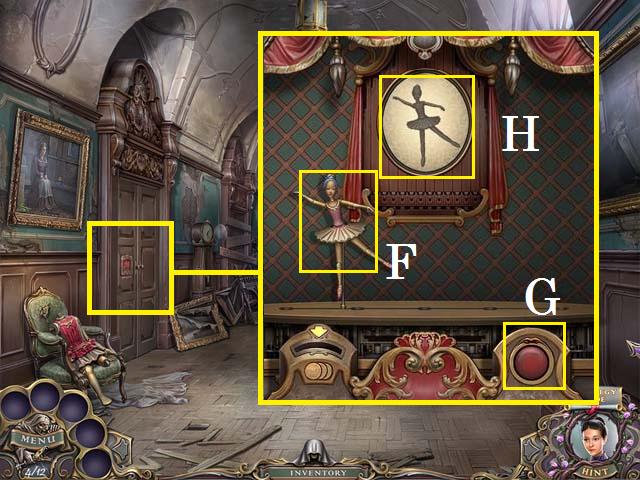
- Zoom into the door lock and place the BALLET DANCER (F).
- Press the button (G) when the ballerina’s position mirrors that shown in the window (H) until the door opens.
- Enter the salon.

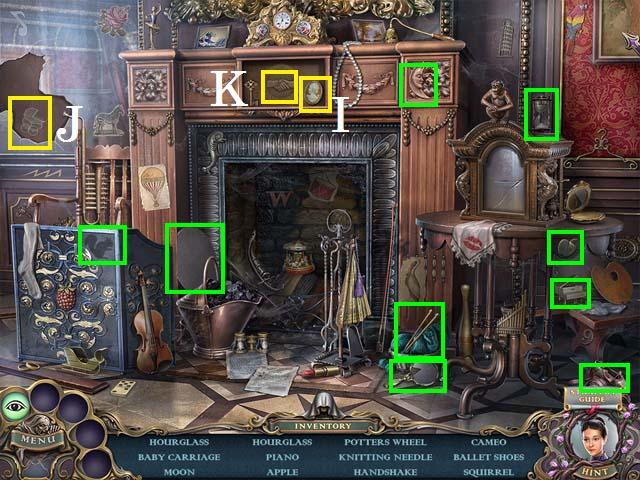
- Zoom into the sparkles to play a HOS.
- Open the fireplace panel to reveal the Handshake (K) and Cameo (I).
- Tear down the wallpaper to reveal the Baby carriage (J).
- Collect the remaining items (green) to receive the POTTER’S WHEEL.

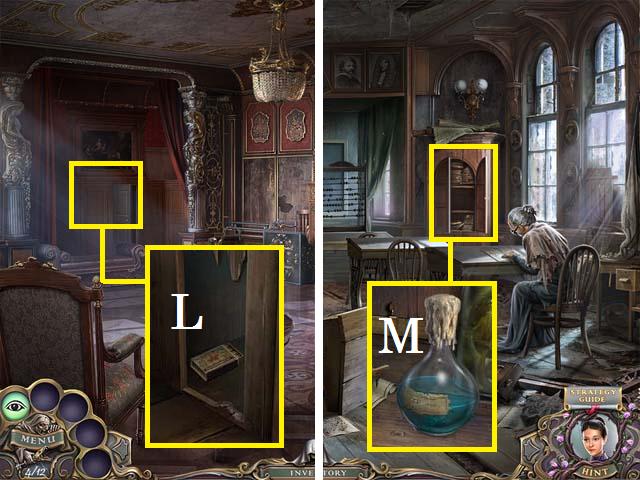
- Zoom into the doorway; use the KNIFE to remove the wood and pick up the MATCHES (L).
- Return to the classroom.
- Zoom into the cabinet; use the MATCHES to melt the candle wax and pick up the ACID (M).
- Enter the pottery room.


- Zoom into the table; place the POTTER’S WHEEL and CLAY.
- Spin the clay until it forms the CLAY POT (N); place the BAKER’S PADDLE under the CLAY PLATE and pick it up.
- Return to the kitchen.
- Zoom into the oven; light the firewood with the MATCHES and place the CLAY POT in the oven (O) and pick it up as the second PLATE.
- Zoom into the shelf; pour the ACID on the teapot and pick up the CANDLES (P).
- Return to the top of the stairs and take a right.

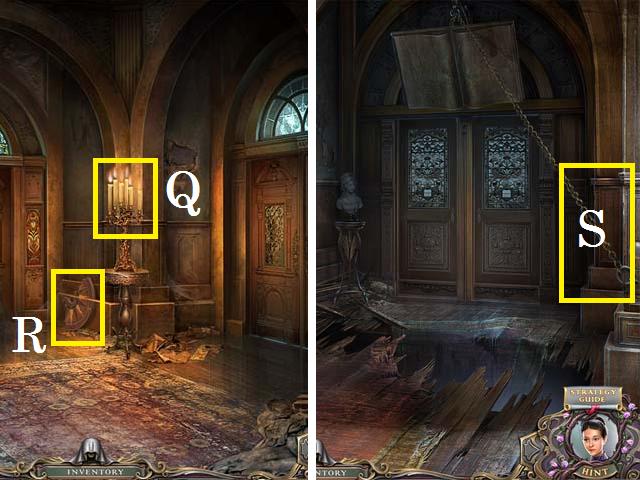
- Place the CANDLES in the candelabra (Q) and light with the MATCHES.
- Pick up the first COMPASS PARTS (R).
- Exit back one scene and take a left.
- Pour the ACID on the chain (S) and enter the library.


- Zoom into the desk; pick up the SNAKE MEDALION (T) and the third PLATE (U).
Chapter 4: Freeze Motion Power

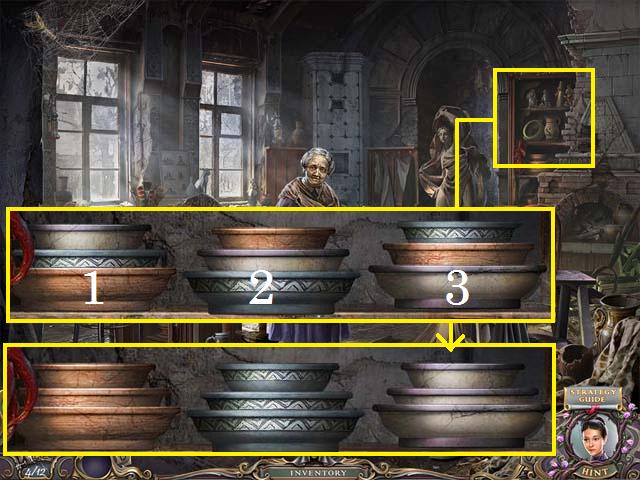
- Return to the pottery room.
- Zoom into the shelf; place the three PLATES in it and use the following sequence to solve the puzzle:
- Move the small plates from 1, then 2 to tower 3, then the medium plate from tower 1 to 2.
- Move all of the small plates to tower 2 and the medium plate from tower 3 to 1. Move all three small plates to tower 3 and the medium plate from 2 to 1.
- Move all three small plates to tower 1 and the medium plate from 2 to 3. Move the first small plate to tower 2, the second one to tower 3, and then place the small plate from 2 to 3 followed by the small plate from 1 to 3.
- Place the medium plate from tower 1 to 2 then place the last two small plates to complete the puzzle.

- Pick up the Freeze Motion Power from the woman.
- Return to the kitchen.
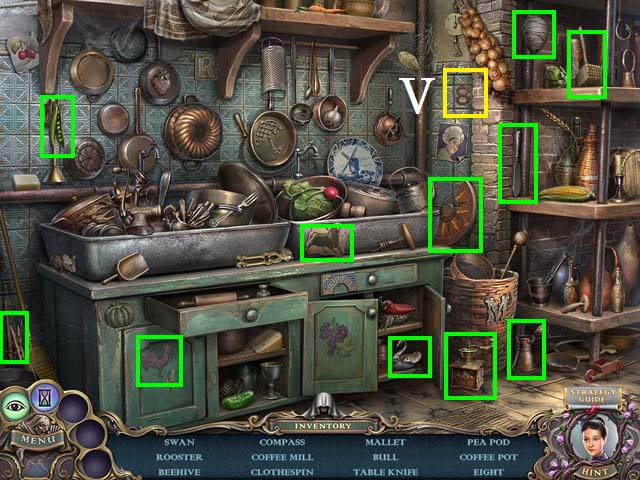
- Zoom into the sparkles to play a HOS.
- Move the garlic to reveal the Eight (V).
- Collect the remaining items to receive the second COMPASS PART.
- Return to the top of the stairs and take a left.

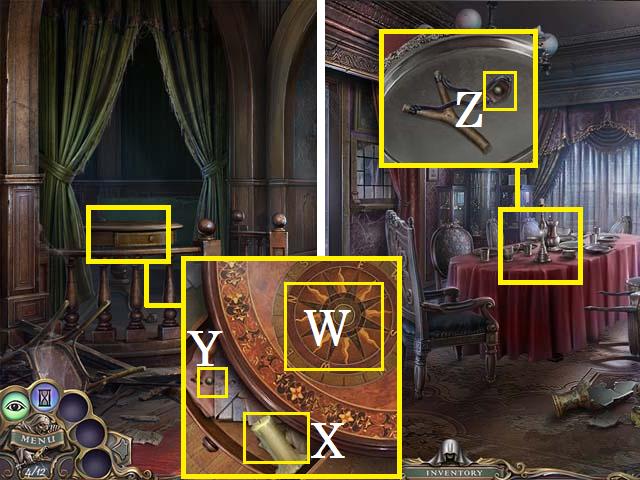
- Open the curtain and then zoom into the table; place both COMPASS PARTS (W) and pick up the CANDLE (X) and PEA (Y).
- Return to the dining room.
- Zoom into the table; place the PEA (Z) and pick up the SLINGSHOT.
- Return to the bridge.

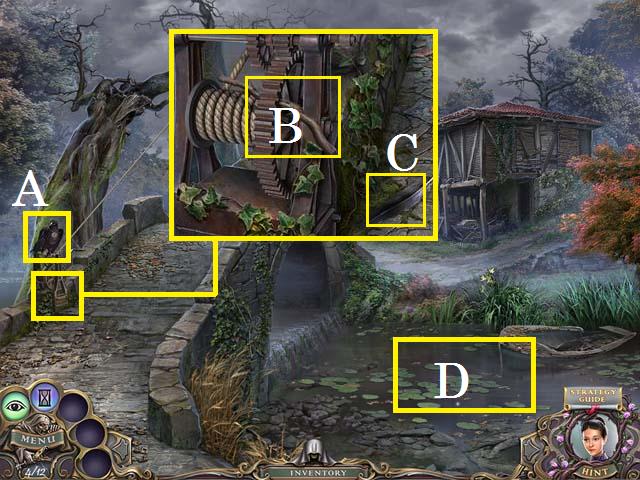
- Use the SLINGSHOT on the bird (A).
- Zoom into the crank; after pulling out the stick (B), use the OIL CAN on the crank and then pick up the first FEATHER (C).
- Use the Freeze Motion Power on the water (D).

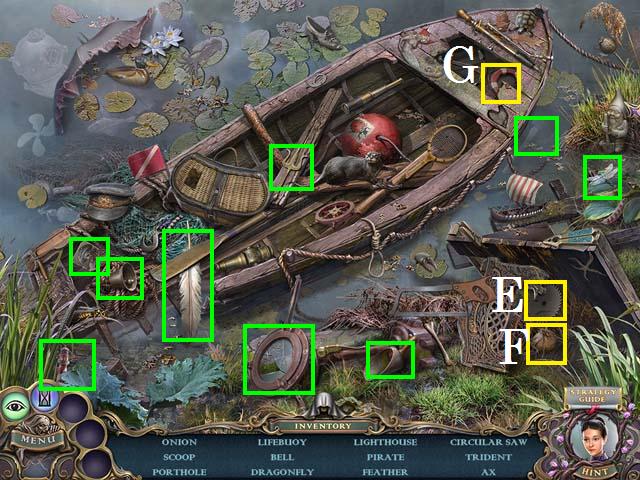
- Zoom into the sparkles to play a HOS.
- Move the grate to reveal the Circular saw (E) and Onion (F).
- Move the boards to reveal the Lifebuoy (G).
- Collect the remaining items (green) to receive the second FEATHER.
- Cross the bridge to the shack exterior.

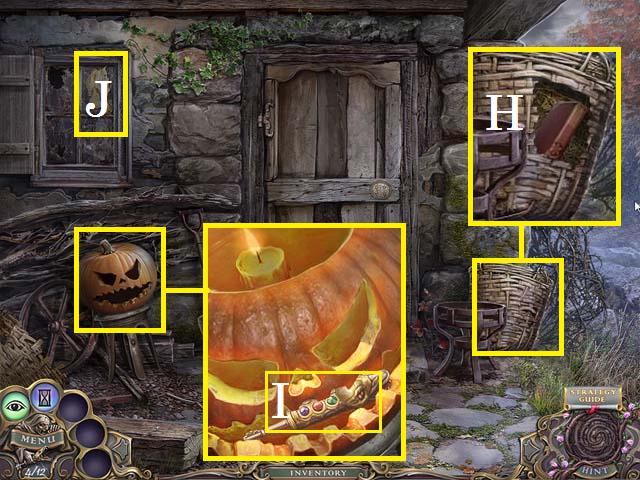
- Zoom into the basket; use the KNIFE to reveal the first BOOK (H).
- Zoom into the pumpkin; remove the top and place the CANDLE inside. Light the candle with the MATCHES and pick up the seventh SNAKE KEY (I).
- Pick up the first PIECE OF GLOBE (J).
- Return to the school grounds.

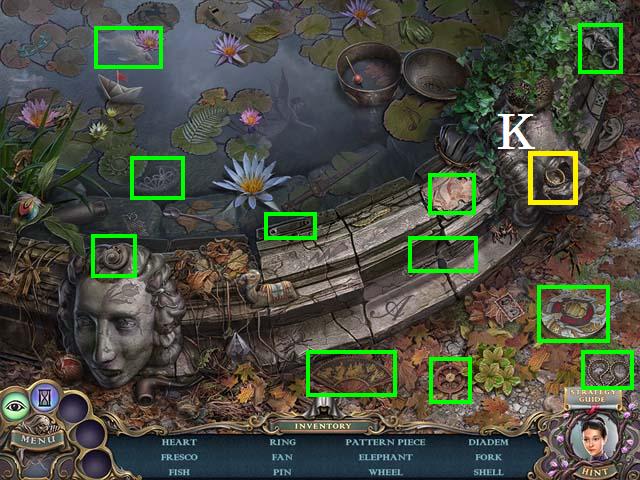
- Zoom into the sparkles to play a HOS.
- Move the piece of statue to reveal the Ring (K).
- Collect the remaining items (green) to receive the PATTERN PIECE.
- Return to the Shack exterior.

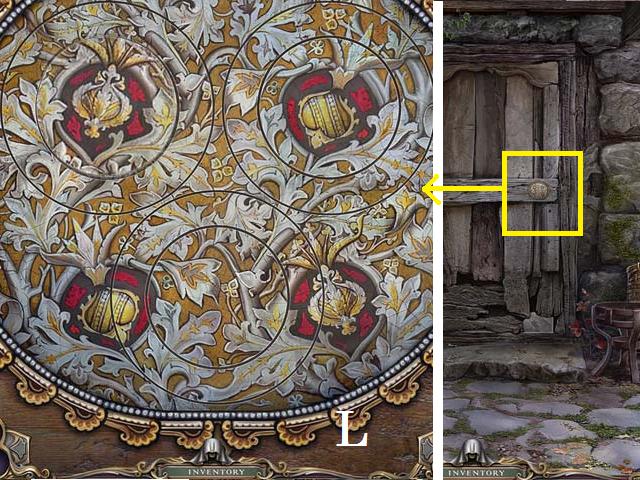
- Zoom into the door lock; place the PATTERN PIECE and spin the pieces as shown in the screenshot (L).
- Enter the shack.

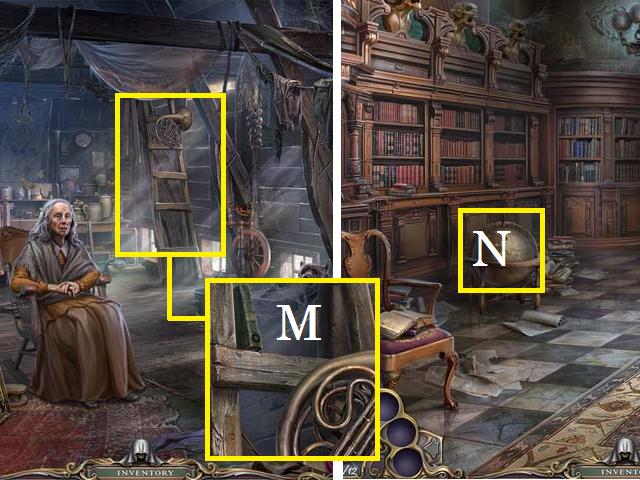
- Speak with the woman.
- Use the Reveal Power on the ladder and zoom in; pick up the second BOOK (M).
- Return to the library.
- Place the first PIECE OF GLOBE (N).

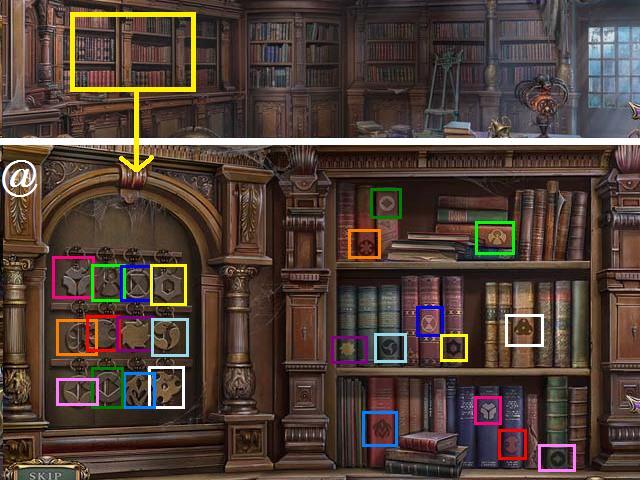
- Zoom into the shelf; place the two BOOKS on the shelf.
- Place the matching keys on the appropriate books (color coded) to open the attic door (@).
- Enter the attic.

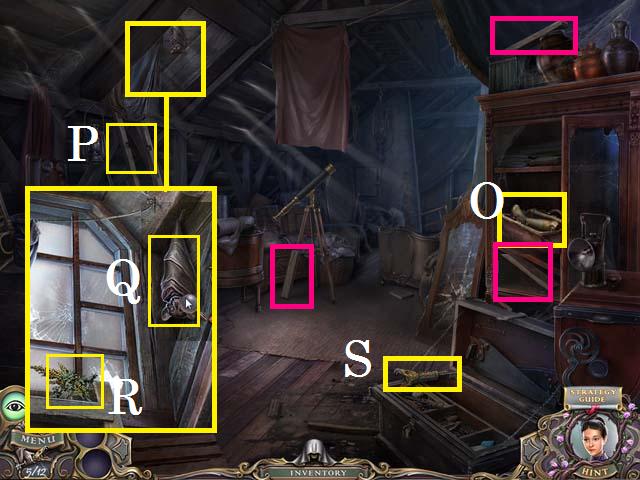
- Open the bag; pick up the PUPPET LEG (O).
- Pick up the three STEPS (pink) and the eighth SNAKE KEY (S).
- Place the STEPS on the ladder (P).
- Zoom into the window; open the curtain to move the bat (Q) and then pick up the SAGEBRUSH (R).

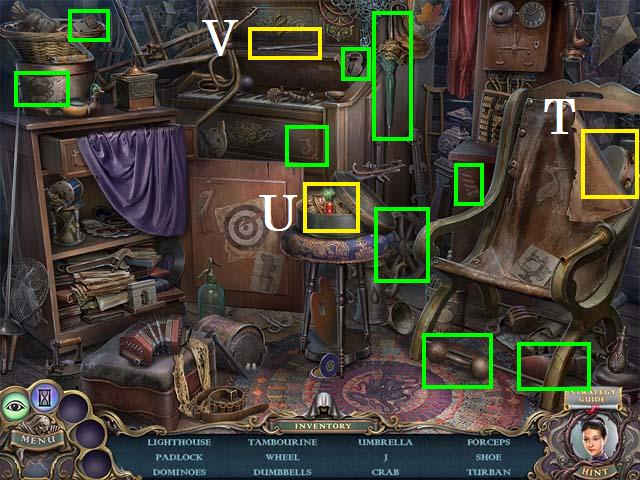
- Zoom into the sparkles to play a HOS.
- Tear the chair to reveal the Tambourine (T).
- Open the hat box to reveal the turban (U).
- Move the piano cover to reveal the Forceps (V).
- Collect the remaining items (green) to receive the UMBRELLA.
- Move to the foyer.
Chapter 5: Tame Power

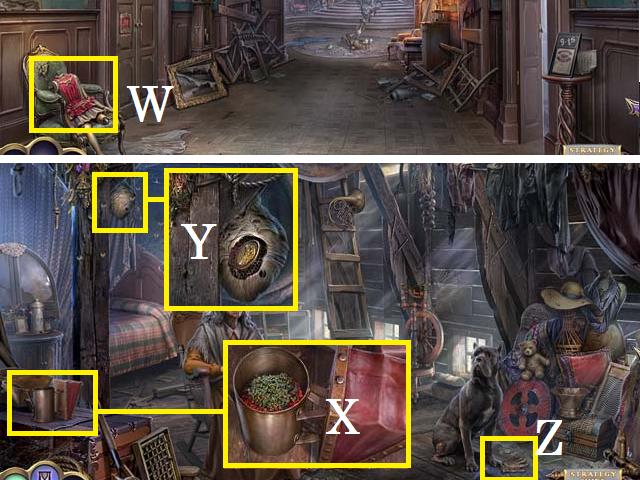
- Place the PUPPET LEG on the doll (W).
- Return to the Shack.
- Zoom into the chest; place the SAGEBRUSH in the BEE SMOKER (X). Close the lid and pick it up.
- Use the BEE SMOKER on the beehive and zoom in; remove the side of the beehive with the KNIFE, and pick up the EAGLE MEDALLION (Y).
- Use the UMBRELLA to move the GLOVE (Z) and pick it up.
- Return to the Foyer.

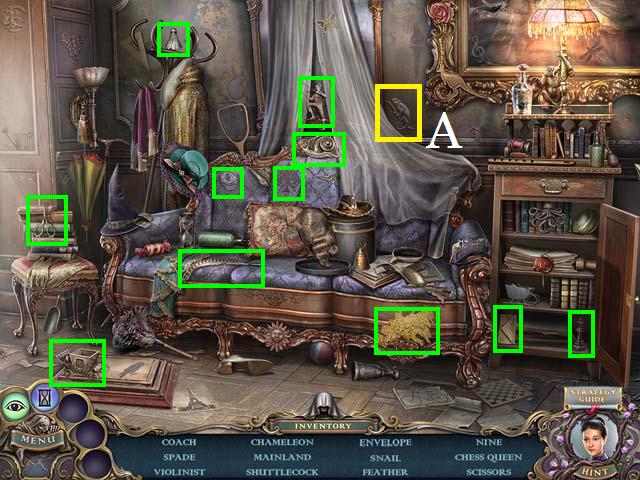
- Zoom into the sparkles to play a HOS.
- Move the curtain to reveal the Chameleon (A).
- Collect the remaining items (green) to receive the second PIECE OF GLOBE.
- Return to the Library.

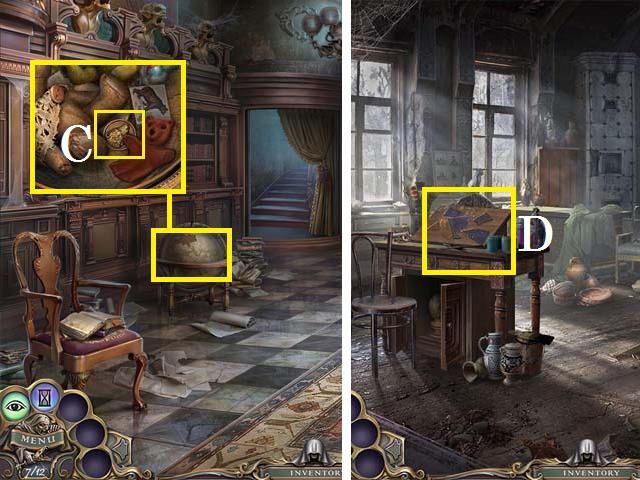
- Place the second PIECE OF GLOBE on the globe and then zoom into the globe; pick up the (C) BEAR MEDALLION.
- Return to the pottery room.
- Use the GLOVE to pick up the STAINED-GLASS PIECE (D).
- Exit back two scenes.

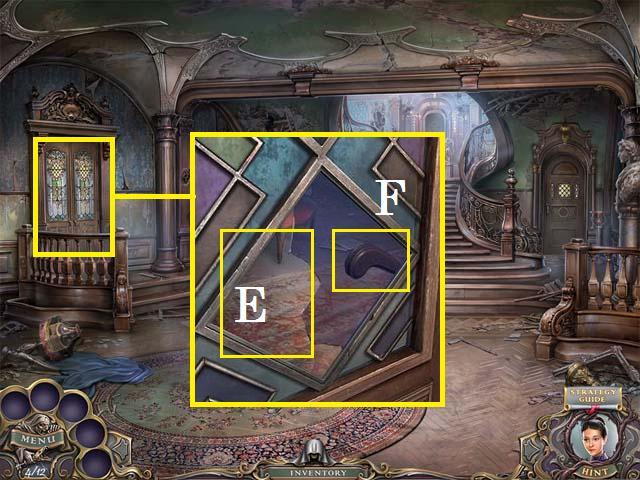
- Zoom into the door; place the STAINED-GLASS PIECE (E) and pull the handle (F).
- Enter the Study.

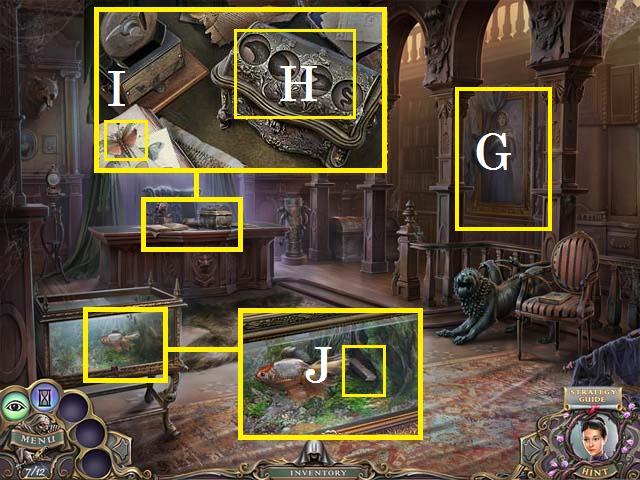
- Zoom into the painting (G) and then back out.
- Use the Reveal Power on the desk and zoom in; place the EAGLE MEDALLION, BEAR MEDALLION, and SNAKE MEDALLION (H) in the slots.
- Pick up the BAIT (I).
- Zoom into the fish tank; place the BAIT in the tank and pick up the PIANO KEY (J).
- Return to the salon.

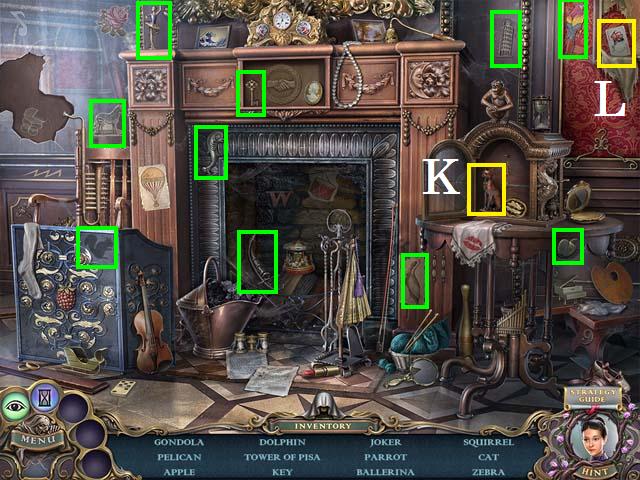
- Zoom into the sparkles to play a HOS.
- Open the clock to reveal the Cat (K).
- Tear the painting to reveal the Joker (L).
- Collect the remaining items (green) to receive the BEAR KEY.

- Return to the study.
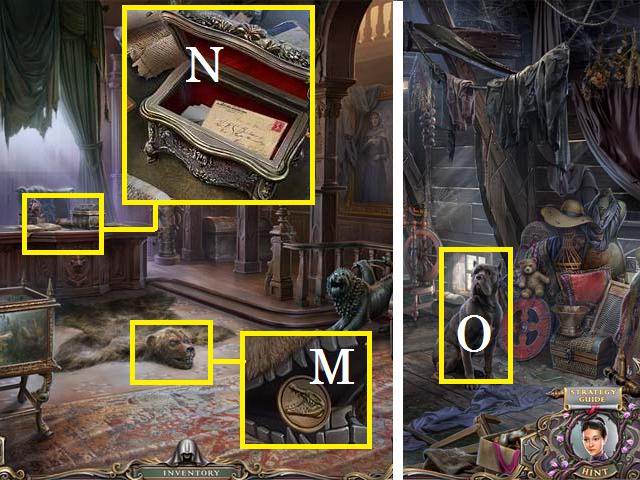
- Zoom into the bear rug; unlock the bear with the BEAR KEY and pick up the CROCODILE MEDALLION (M).
- Zoom into the desk; place the CROCODILE MEDALLION in the last slot and pick up the LETTERS (N).
- Return to the shack.
- Give the LETTERS to the woman and take the Tame Power from her.
- Use the Tame Power on the dog (O).

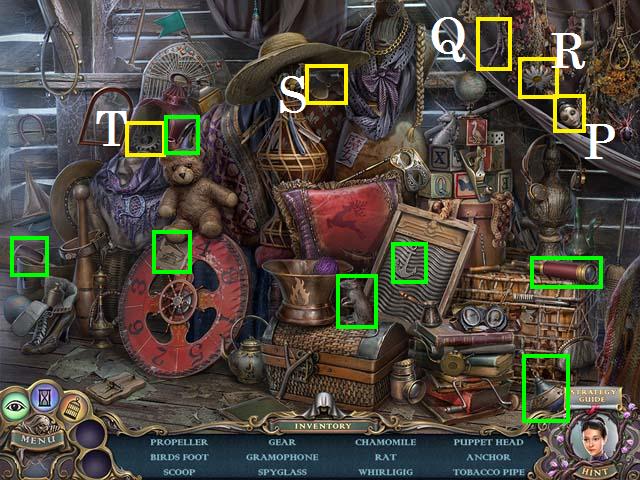
- Zoom into the sparkles to play a HOS.
- Move the cloth to reveal the Puppet Head (P), Bird’s foot (Q), and Chamomile (R).
- Move the hat to reveal the Propeller (S).
- Open the lantern to reveal the Gear (T).
- Collect the remaining items (green) to receive the PUPPET HEAD.
- Exit back to the fountain.

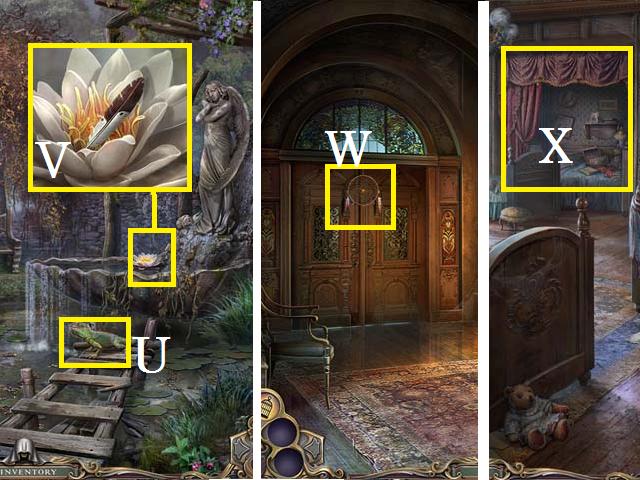
- Use the Tame Power on the lizard (U).
- Zoom into the fountain and pick up the third FEATHER (V).
- Stop in the foyer and place the PUPPET HEAD on the doll.
- Climb the stairs and take a right.
- Place the three FEATHERS on the dream catcher (W) and enter the dormitory.
- Use the Reveal Power on the wall to see the curtain (X).

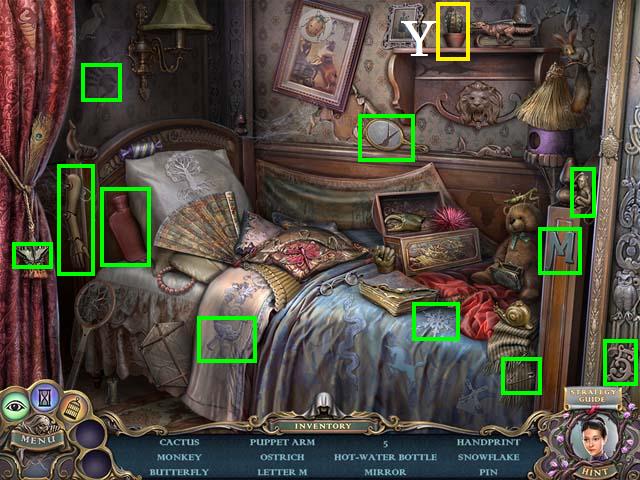
- Zoom into the sparkles to play a HOS.
- Move the frame to reveal the Cactus (Y).
- Collect the remaining items (green) to receive the PUPPET ARM.

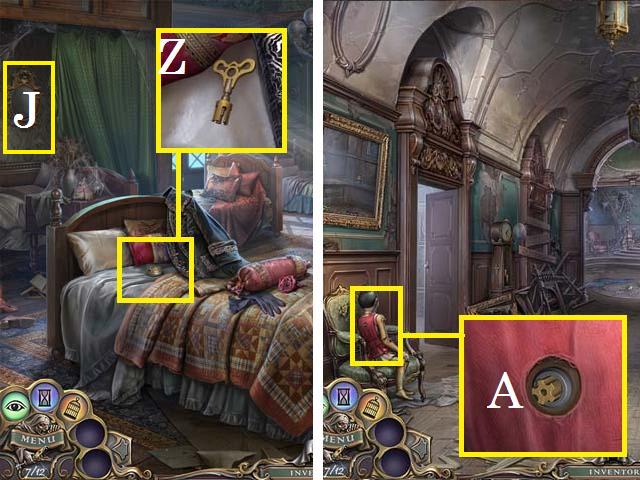
- Open the curtain (J) and zoom into the mirror.
- Zoom into the bed; pick up the PUPPET KEY (Z).
- Return to the foyer.
- Place the PUPPET ARM on the puppet and zoom in; use the PUPPET KEY (A) in the lock.
- Pick up the PUPPET.
- Climb the stairs.

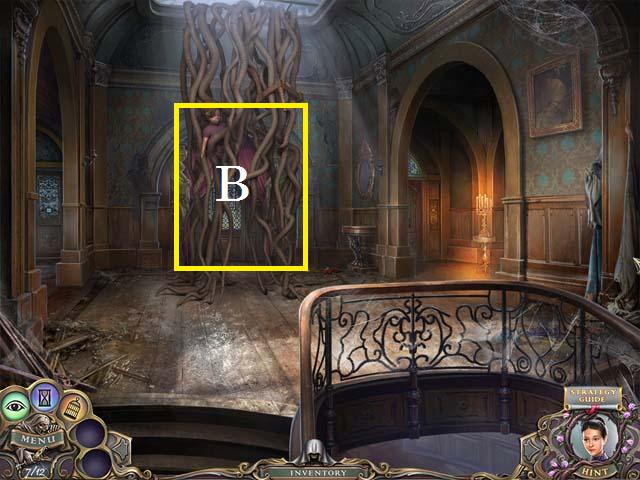
- Place the PUPPET in the vines (B) and enter the Master Suite.
- Return to the bridge.

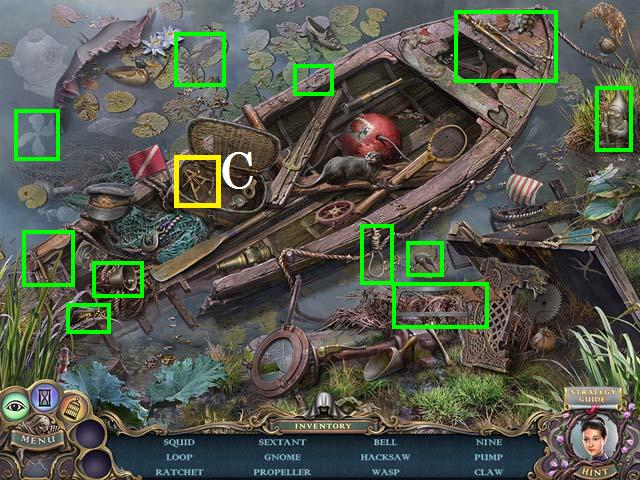
- Zoom into the sparkles to play a HOS.
- Open the basket to reveal the Sextant (C).
- Collect the remaining items (green) to receive the HACKSAW.
- Enter the shack.

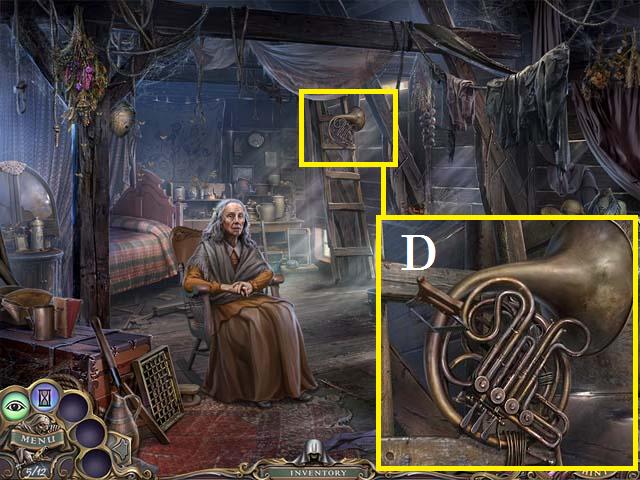
- Zoom into the ladder; use the HACKSAW on the French Horn and take the FRENCH HORN (D).
- Return to the salon.

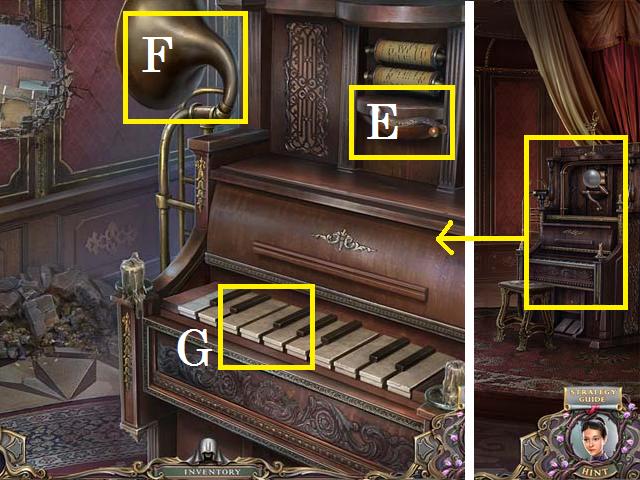
- Zoom into the piano; place the HANDLE (E), the FRENCH HORN (F), and the PIANO KEY (G) on the piano.
- Spin the HANDLE and replay the sequences in this Simon Says style puzzle to bust down the wall.
- Enter the art room.

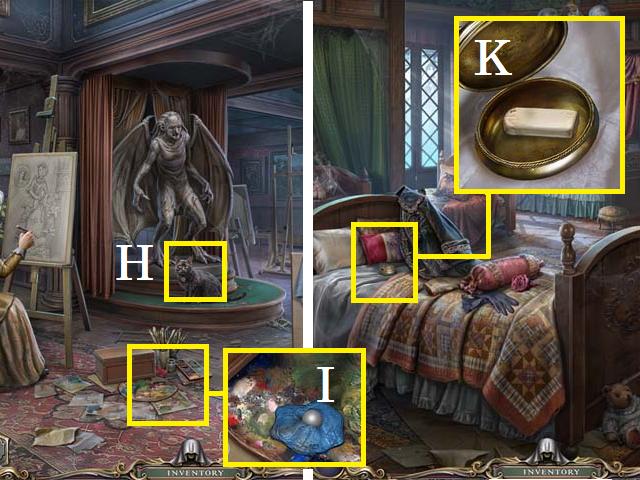
- Speak with the woman.
- Open the curtain and then use the Tame Power on the cat (H).
- Zoom into the art supplies; use the KNIFE to break the paint and pick up the PEARL (I).
- Return to the dormitory.
- Zoom into the bed; place the PEARL on the case top and then pick up the ERASER (K).

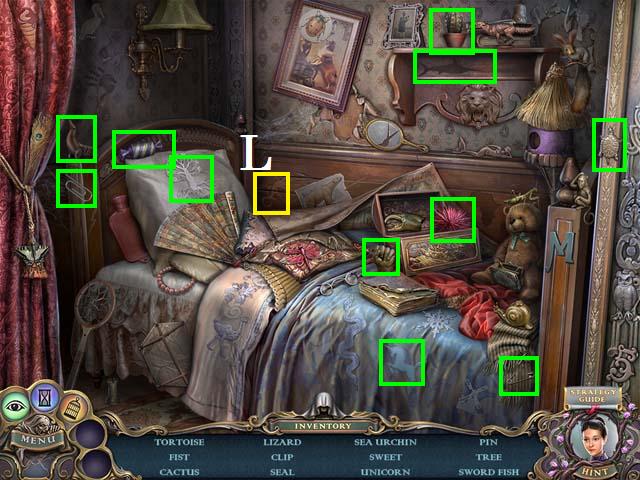
- Zoom into the sparkles to play a HOS.
- Move the sheet to reveal the Lizard (L).
- Collect the remaining items (green) to receive the CLIP.
Chapter 6: Turn Good Power

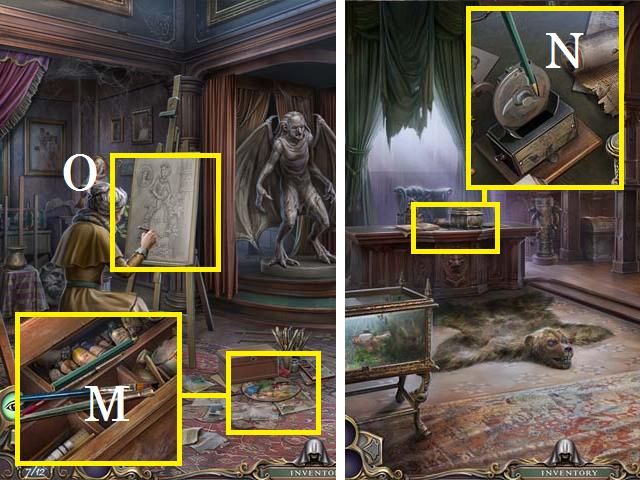
- Return to the art room.
- Zoom back into the art supplies; use the CLIP to open the case and pick up the BROKEN PENCIL (M).
- Return to the study.
- Zoom into the desk; place the BROKEN PENCIL in the sharpener and spin the blades (N). Pick up the PENCIL.
- Return to the art room.
- Zoom into the easel (O); place the ERASER and the PENCIL on the picture.

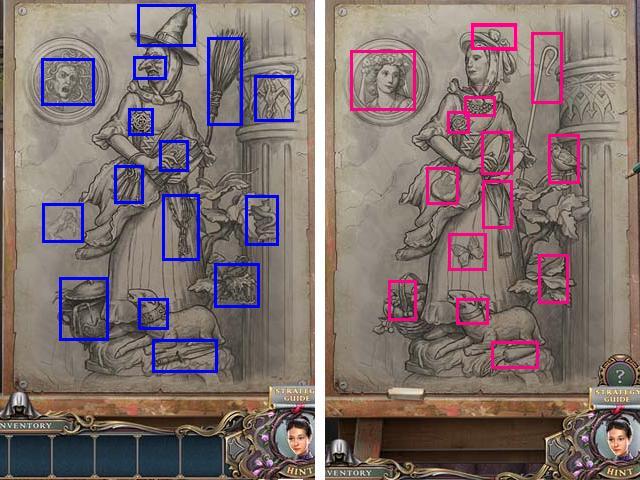
- Remove all of the wrong items (blue) with the ERASER.
- Add in all of the correct items (pink) with the PENCIL.
- Take the Turn Good Power from the woman.

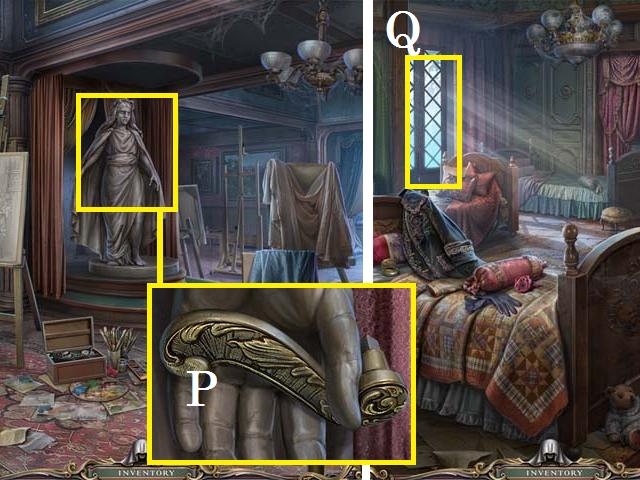
- Use the Turn Good Power on the statue and zoom in; pick up the DOOR HANDLE (P).
- Return to the dormitory.
- Open the door (Q) using the DOOR HANDLE.
- Exit to the balcony.

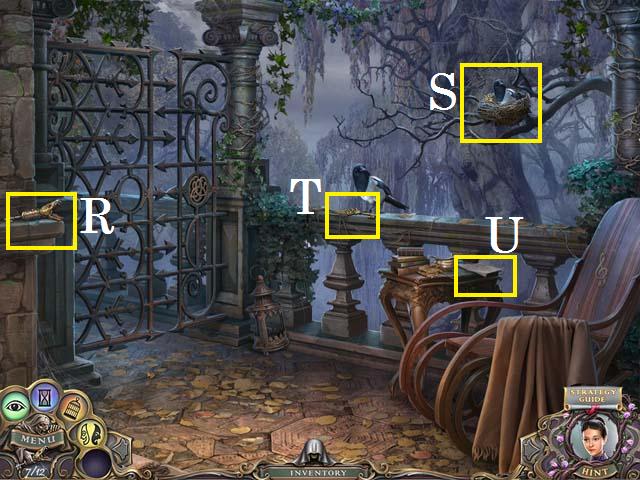
- Pick up the ninth SNAKE KEY (R).
- Use the Tame Power on the bird (S) and pick up the MUSIC ROOM KEY (T).
- Pick up the RECIPE PART (U).
- Exit the dormitory.

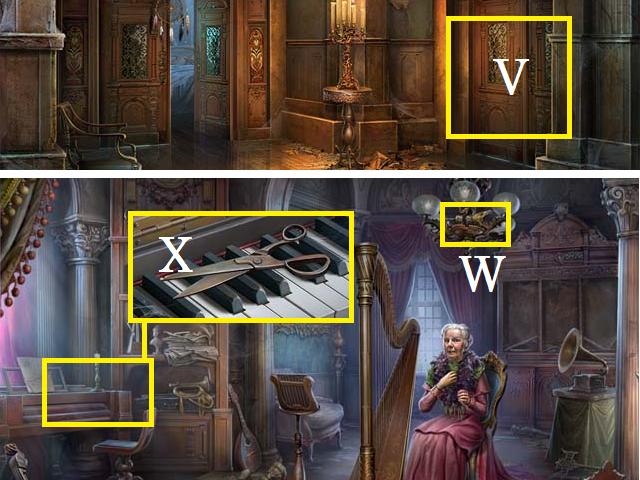
- Use the MUSIC ROOM KEY to open the door (V) and enter the music room.
- Pick up the tenth SNAKE KEY (W).
- Zoom into the piano; pick up the SCISSORS (X).
- Return to the dormitory.

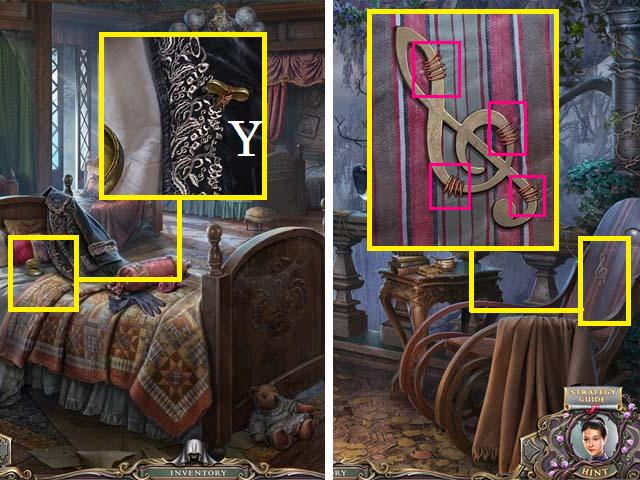
- Zoom into the bed; remove the PEG (Y) with the SCISSORS.
- Exit to the balcony.
- Zoom into the chair; remove the threads (pink) and pick up the TREBLE CLEF.
- Return to the Music room.

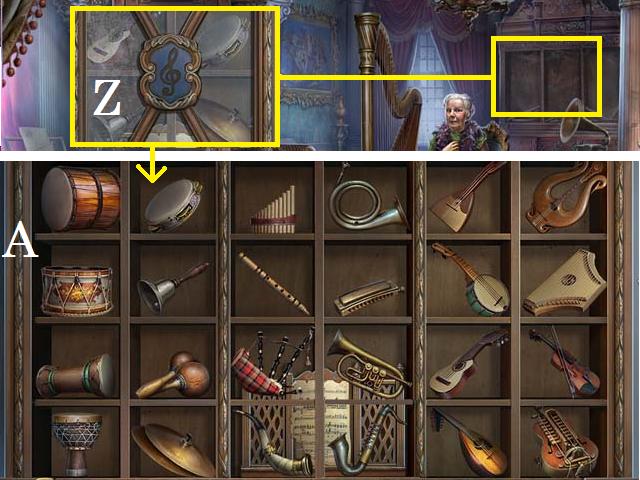
- Zoom into the shelf; use the Reveal Power and place the TREBLE CLEF in the lock (Z).
- Use screenshot (A) as a key to arrange the instruments correctly.
- You will receive the SHEET MUSIC.

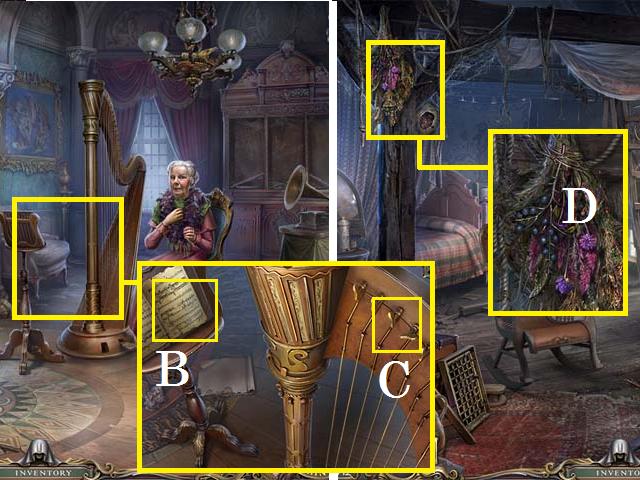
- Zoom into the harp; place the SHEET MUSIC (B), and the PEG (C).
- Return to the shack.
- Zoom into the dried plants; use the SCISSORS to remove the BLACKTHORN (D).
- Exit the shack.

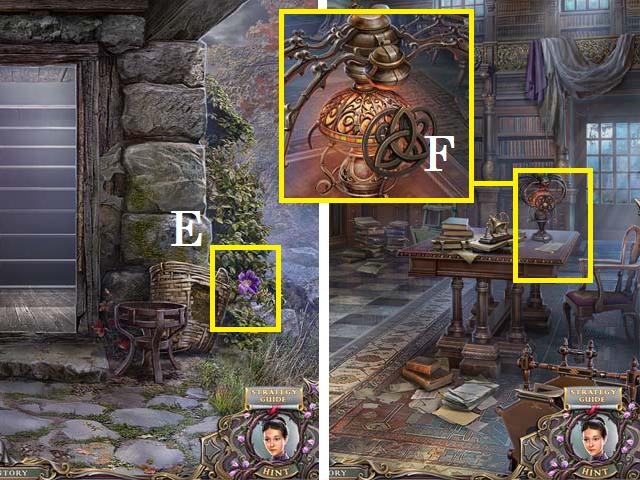
- Use the Turn Good Power on the bush and pick up the FLOWER (E).
- Return to the library.
- Zoom into the desk; use the Turn Good Power on the spider and pick up the ORNAMENT PIECE (F).
- Return to the balcony.

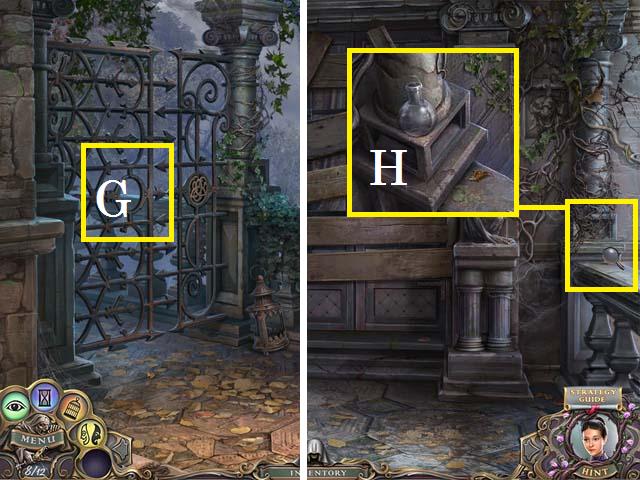
- Place the ORNAMENT PIECE in the gate (G) and move to the back balcony.
- Zoom into the banister; burn the vines with the MATCHES and pick up the FLASK (H).
- Return to the study.

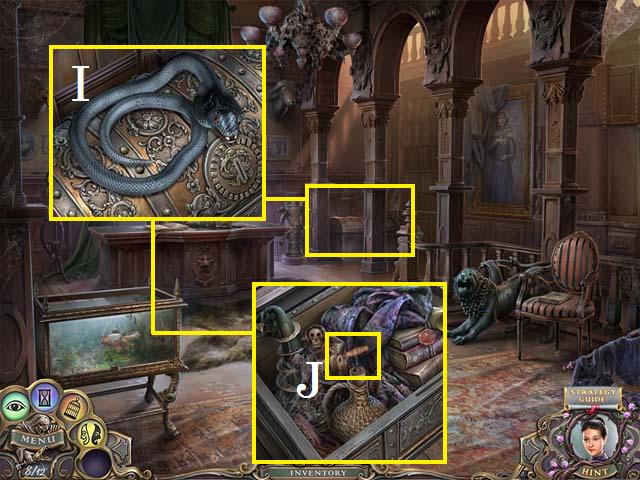
- Zoom into the chest; use the Tame Power on the snake (I).
- Open the chest and pick up the CORKSCREW (J).
- Move to the attic.

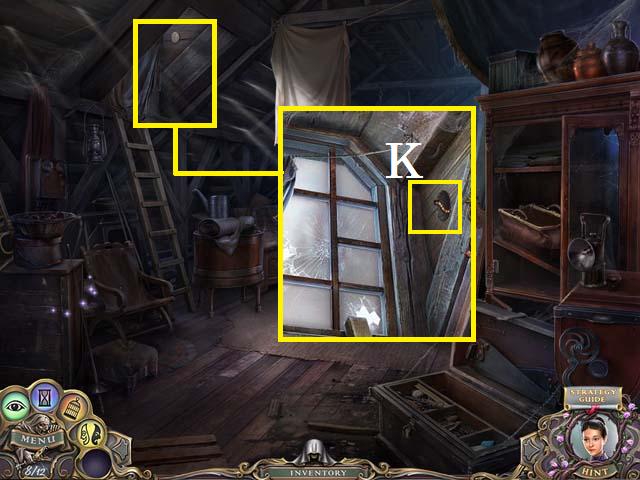
- Zoom into the window.
- Remove the cork with the CORKSCREW and pick up the CATERPILLAR (K).

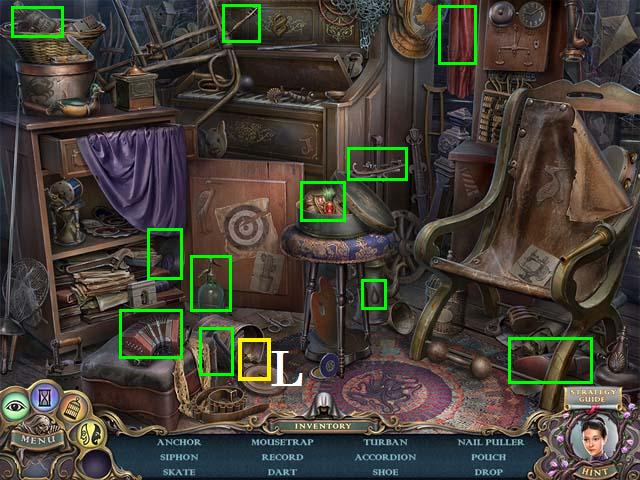
- Zoom into the sparkles to play a HOS.
- Open the can to reveal the Mousetrap (L).
- Collect the remaining items (green) to receive the NAIL PULLER.
- Return to the back balcony.

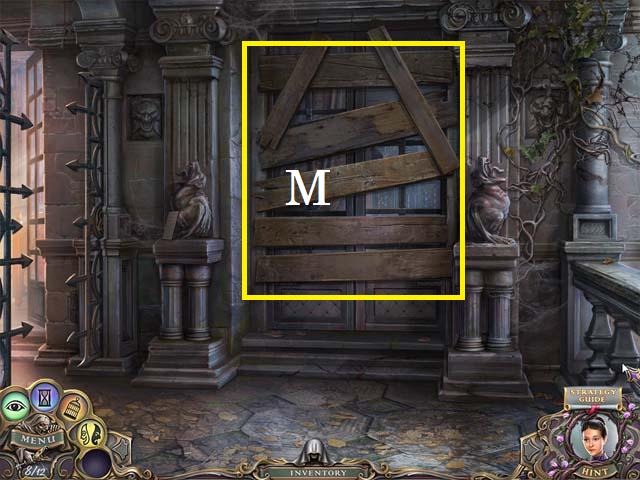
- Remove the boards (M) with the NAIL PULLER.
- Return to the top of the stairs and enter the master bedroom.

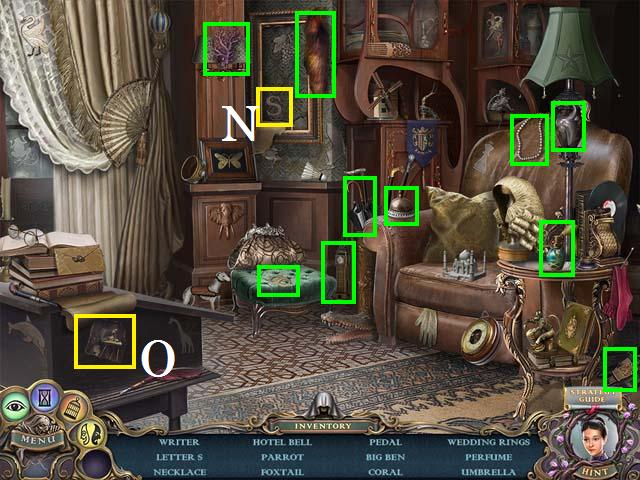
- Zoom into the sparkles to play a HOS.
- Tear the painting to reveal the Letter S (N).
- Move the paper to reveal the Writer (O).
- Collect the remaining items (green) to receive the PEDAL.
Chapter 7: Animate Power

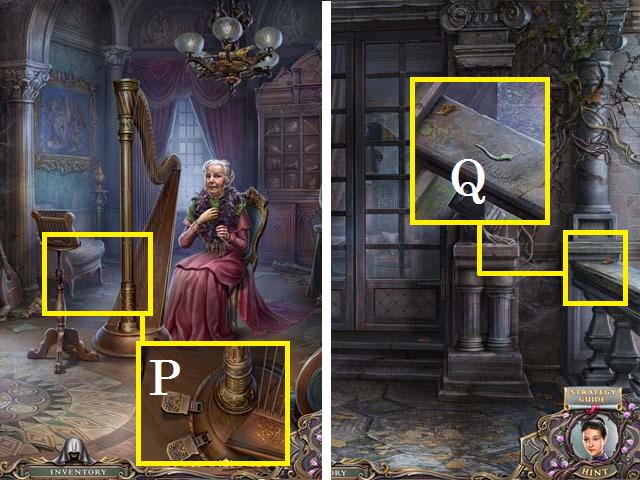
- Return to the music room.
- Zoom into the harp; place the PEDAL (P).
- Take the Animate Power from the woman.
- Return to the back balcony.
- Zoom into the banister; use the Animate Power on the lizard and pick up the TAIL (Q).
- Return to the master bedroom.

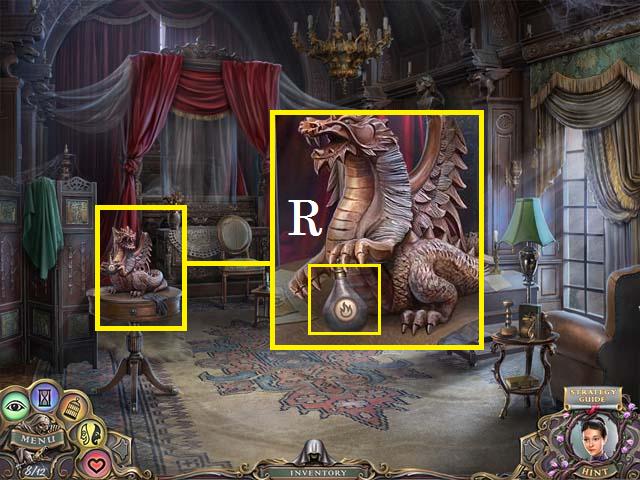
- Zoom into the table.
- Use the Animate Power on the statue and pick up the BOTTLE OF FUEL (R).

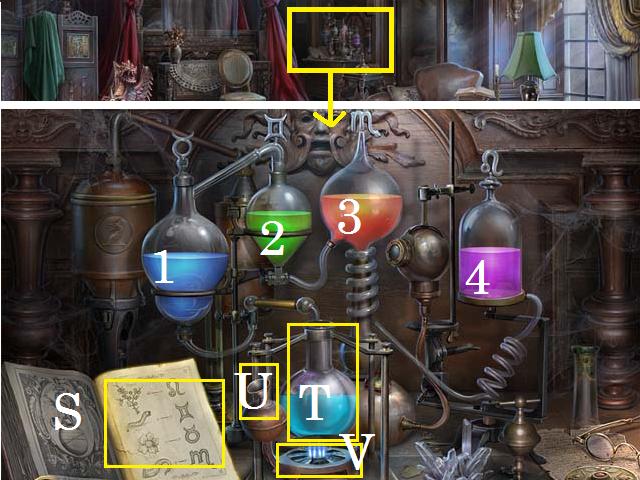
- Zoom into the desk; place the RECIPE PART (S), the FLASK (T), and the BOTTLE OF FUEL (U) on the device.
- Place the FLOWER in the first vial 1, the CATERPILLAR in vial 2, the TAIL in vial 3, and the BLACKTHORN in vial 4.
- Light the burner (V) with the MATCHES.
- Pick up the flask with the POTION.

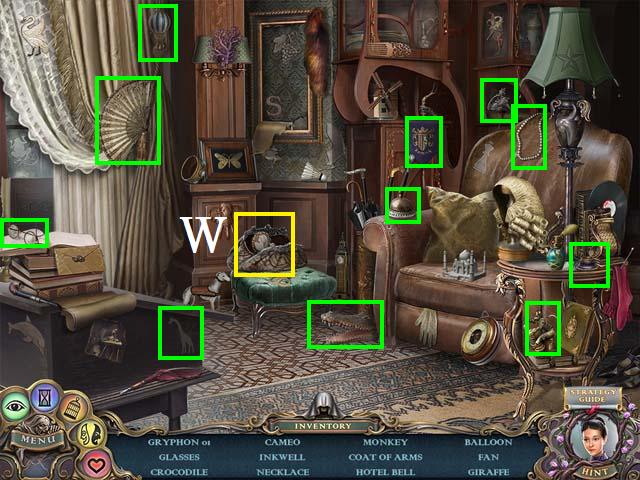
- Zoom into the sparkles to play a HOS.
- Open the purse to locate the Cameo (W).
- Collect the remaining items (green) to receive the first GRYPHON.
- Move to the art room.

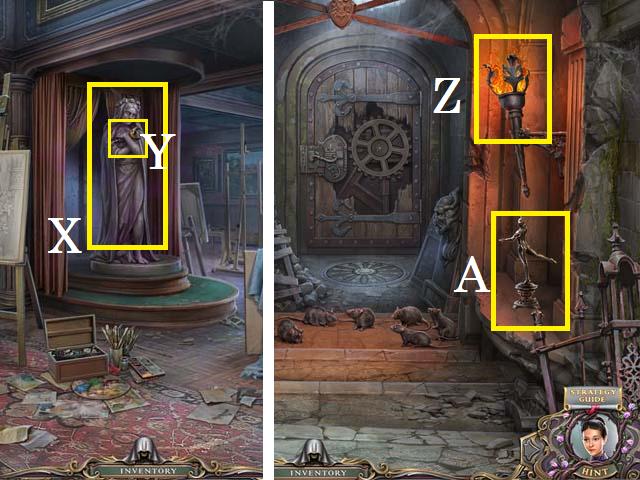
- Use the Animate Power on the statue (X).
- Pick up the eleventh SNAKE KEY (Y) and enter the secret passage.
- Light the torch (Z) with the MATCHES.
- Pick up the STATUETTE (A).
- Exit back to the salon.

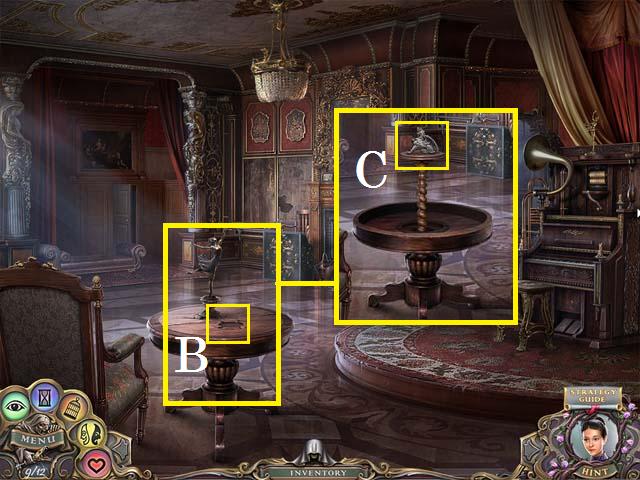
- Place the STATUETTE on the table (B) and pick up the second GRYPHON (C).
- Return to the front gate.

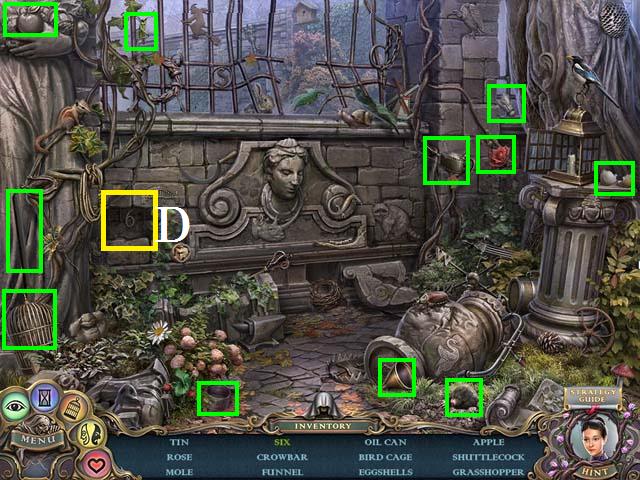
- Zoom into the sparkles to play a HOS.
- Move the bricks to reveal the Six (D).
- Collect the remaining items (green) to receive the CROWBAR.

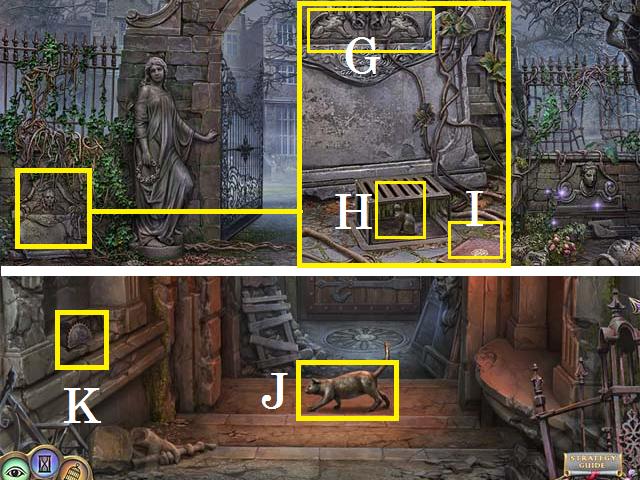
- Zoom into the plaque; place both GRYPHONS (G) on it and pick up the CAT (H).
- Review the file (I).
- Return to the secret passage.
- Place the CAT (J) and use the Animate Power on it to scare the rats.
- Use the CROWBAR on the alcove and pick up the BOOK SYMBOL (K).
Chapter 8: Defeat Flemet

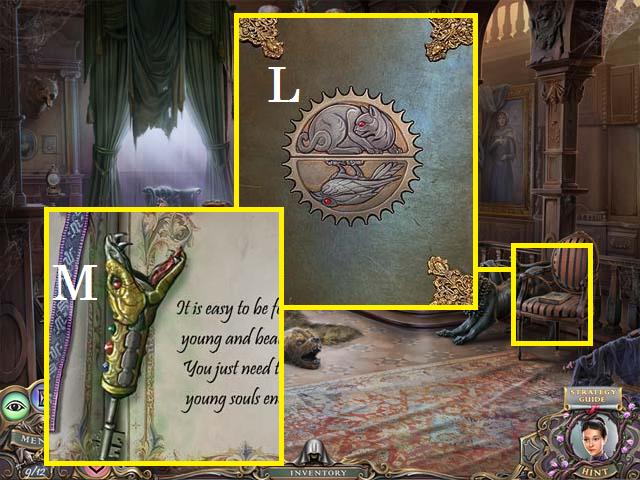
- Return to the Study.
- Zoom into the chair; place the BOOK SYMBOL (L) to open the book.
- Use the Reveal Power on the page and pick up the twelfth SNAKE KEY (M) to receive all of the SNAKE KEYS in your inventory.

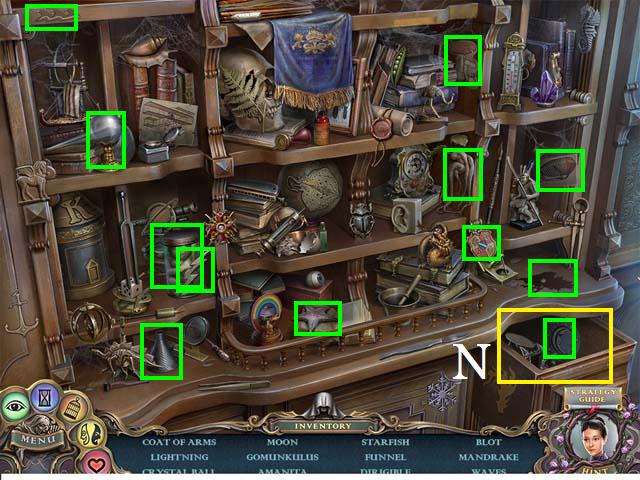
- Zoom into the sparkles to play a HOS.
- Open the drawer (N) and all the doors to reveal all of the hidden items.
- Collect the items (green) to receive the LIGHTNING.
- Return to the school grounds.

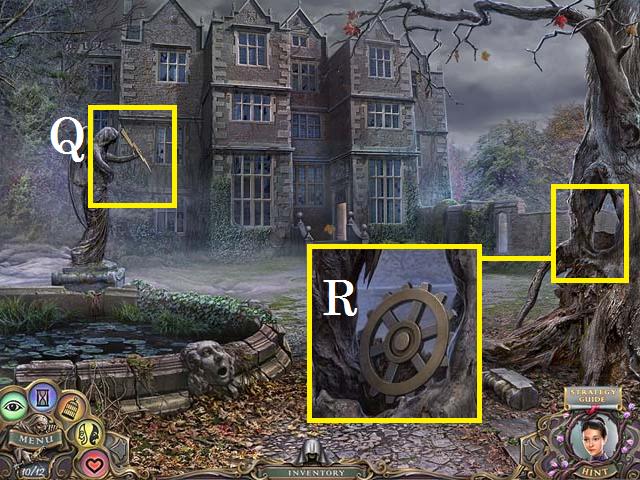
- Place the LIGHTNING in the statue’s hands (Q) and use the Animate Power on her.
- Zoom into the tree; pick up the GEAR (R).
- Return to the secret passage.

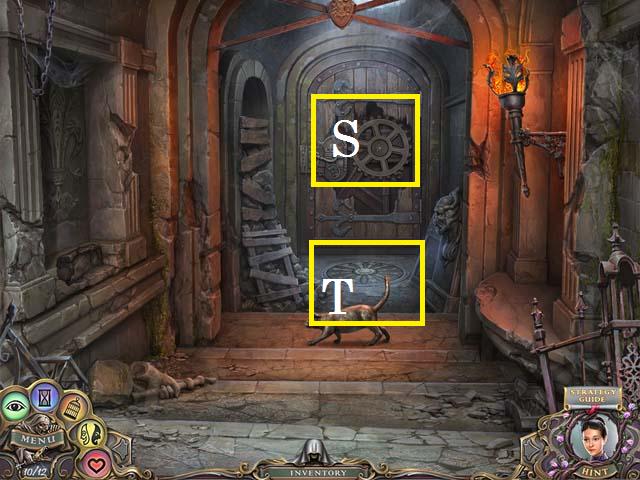

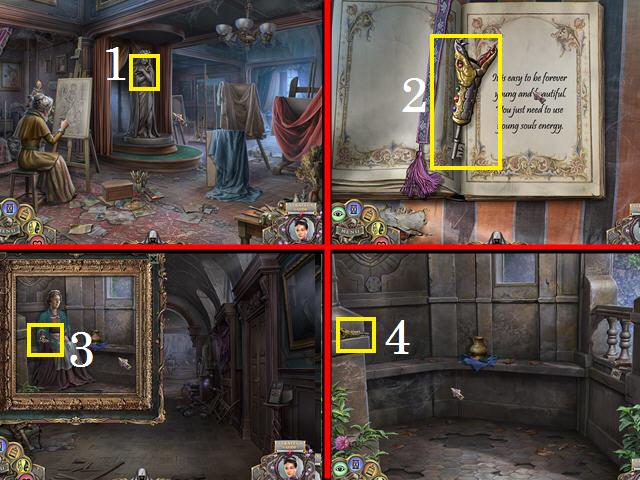

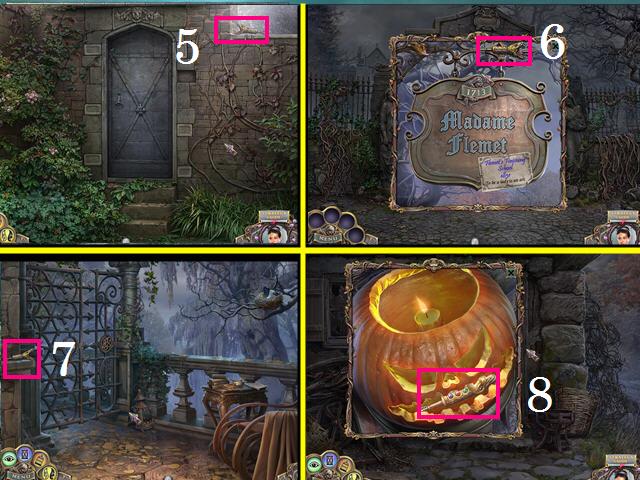

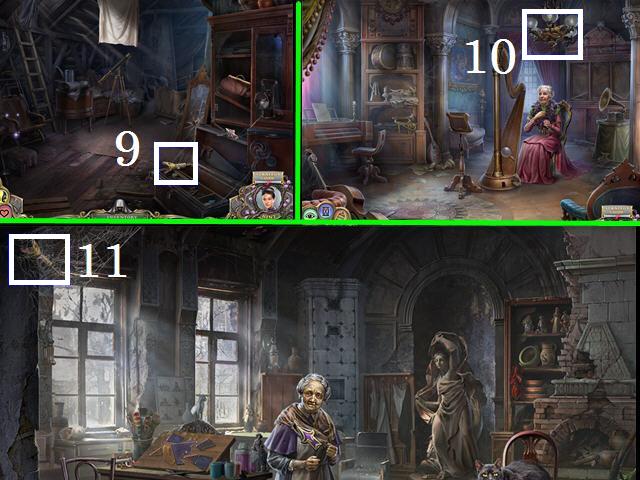
- Zoom into the door (S); place the GEAR.
- You will get the first Snake Key automatically, the rest of the keys can be found in these locations: Art Room (1), Office (2), Foyer Painting (3), Gazebo (4).
- Garden Gate (5), Front Gates (6), Balcony (7), Shack Exterior (8).
- Attic (9), Music Room (10), and the Pottery Room (11).
- Zoom into the ground (T); place the twelve SNAKE KEYS in the lock.
- Enter the secret chamber.

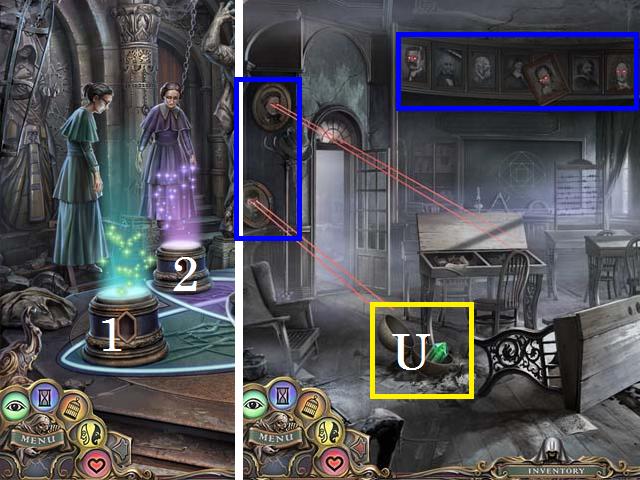
- Zoom into the first pillar (1).
- Use the Reveal Power on all of the frames (blue).
- Aim all of the lasers at the globe and pick up the FIRST PORTAL STONE (U).
- Place the FIRST PORTAL STONE in the first portal and zoom into the second portal (2).

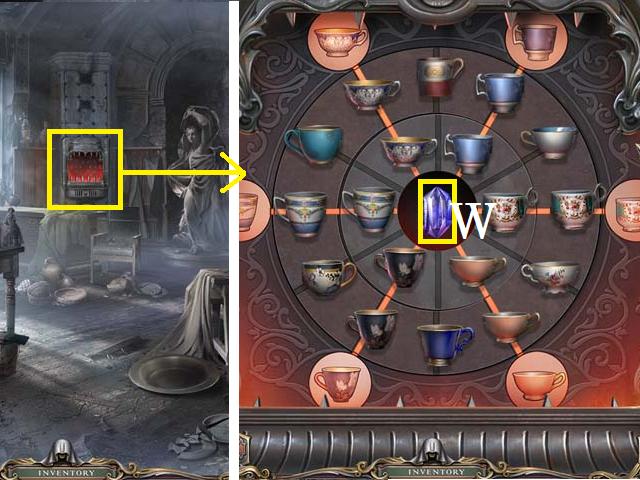
- Zoom into the kiln; use the Freeze Motion Power on the bars. Arrange the tea cups as shown in the screenshot.
- Pick up the SECOND PORTAL STONE (W).

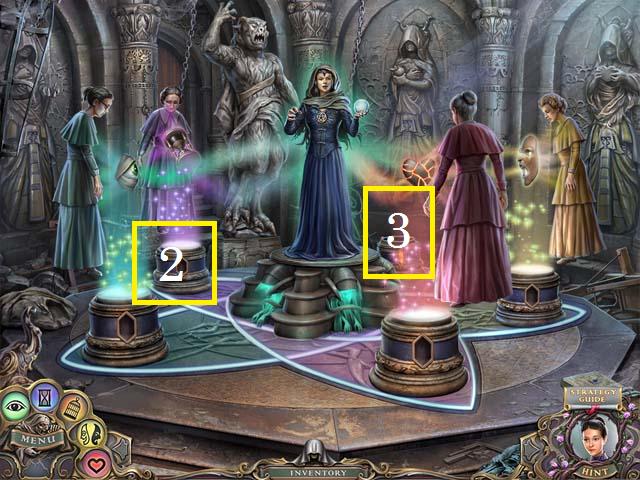
- Place the SECOND PORTAL STONE in the second portal and zoom into the third portal (3).

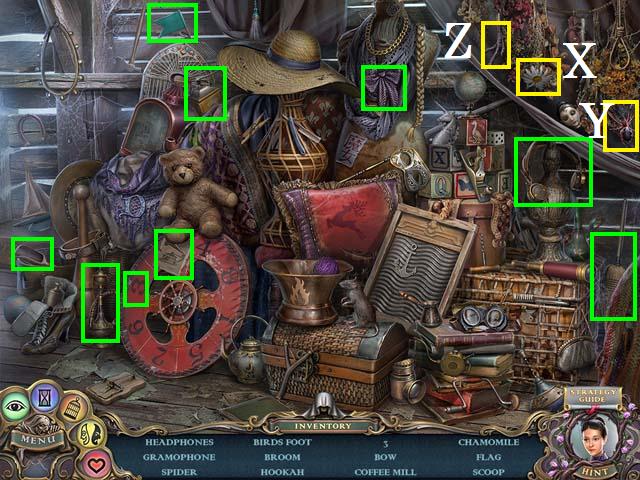
- Zoom into the sparkles to play a HOS.
- Move the sheet to reveal the Chamomile (X), Bird’s foot (Y), and Spider (Z).
- Collect the remaining items (green) to receive the BROOM.

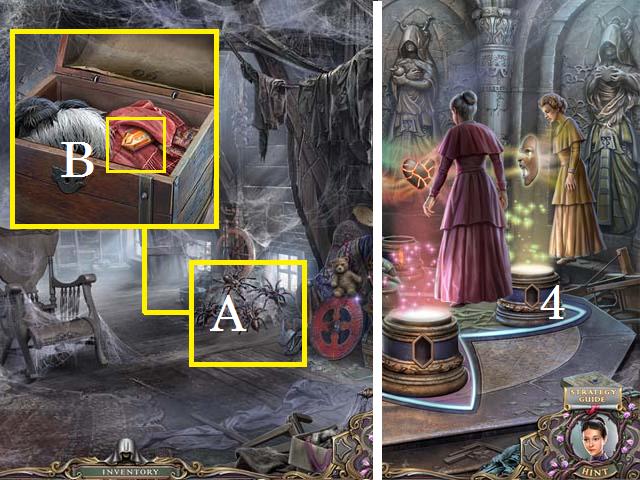
- Use the Tame Power on the spiders (A) and zoom in.
- Use the BROOM to remove the spider webs. Open the chest and pick up the THIRD PORTAL STONE (B).
- Place the THIRD PORTAL STONE in the third portal and zoom into the fourth portal (4).

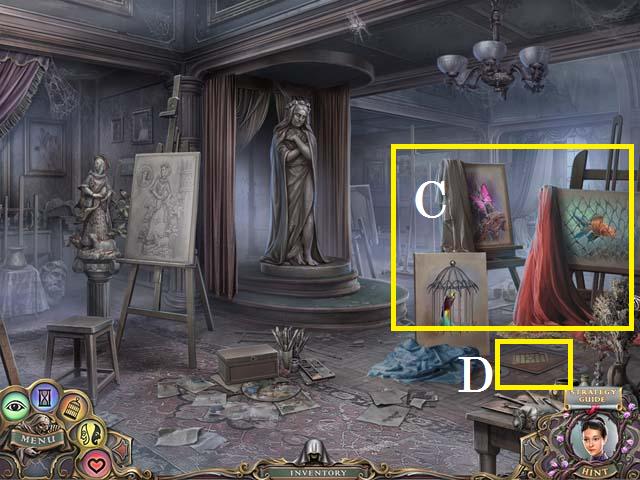
- Remove the sheets from the three paintings (C). Use the Turn Good Power on all three canvases.
- Zoom into the floor (D).

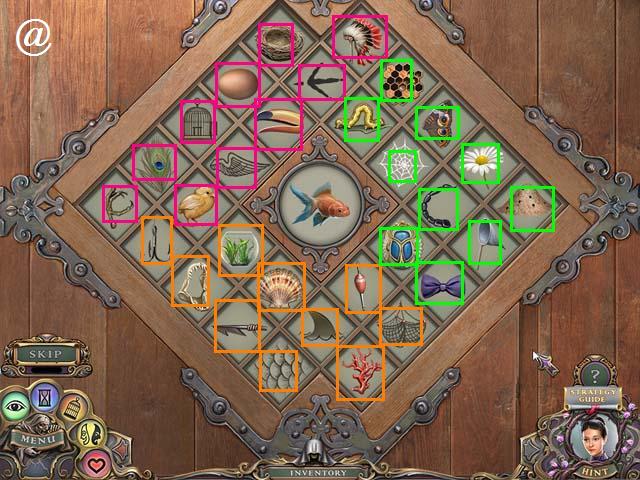
- Highlight all of the items (orange) that match the fish.
- Continue with the items (pink) that match the bird.
- Finish with the items (green) that match the butterfly (@).

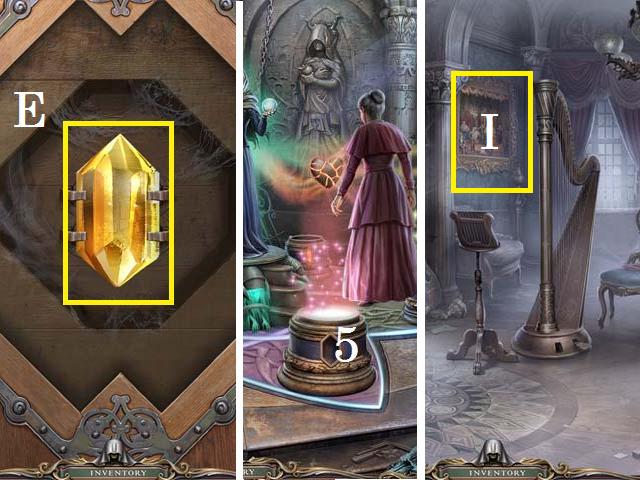
- Collect the FOURTH PORTAL STONE (E).
- Place the FOURTH PORTAL STONE in the fourth portal and zoom into the fifth (5) portal.
- Zoom into the painting (I).

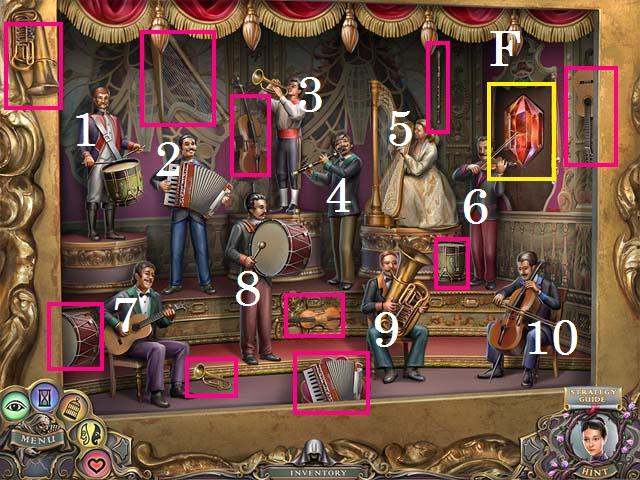
- Place the instruments (pink) in the correct musician’s hands.
- Use the Animate power on the players.
- Play the instruments in the following order: 6, 2, 8, 10, 7, 1, 3, 4, 5, and 9.
- Pick up the FIFTH PORTAL STONE (F).

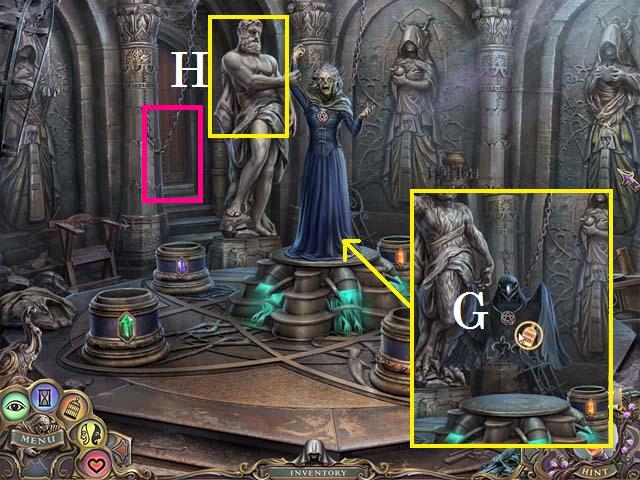
- Place the FIFTH PORTAL STONE in the fifth portal.
- Use the Tame Power on the bird (G).
- Use the Turn Good Power on the statue (H), followed by the Animate Power.
- Use the Freeze Motion Power followed by the POTION on Flemet.
- Exit through the open door (pink).
- Congratulations, you have completed Witch Hunters: Stolen Beauty!





 Fantastic Creations: House of Brass Walkthrough, Guide, & Tips
 Unsolved Mystery Club™: Amelia Earhart™ Walkthrough, Guide, & Tips
 3 Cards to Dead Time Walkthrough, Guide, & Tips
 Flux Family Secrets: The Book of Oracles Walkthrough, Guide, & Tips
 The Secret Order: Ancient Times Walkthrough, Guide, & Tips