Midnight Mysteries: Witches of Abraham Walkthrough, Guide, & Tips
Midnight Mysteries: Witches of Abraham Walkthrough

Welcome to the Midnight Mysteries: Witches of Abraham Walkthrough
One night the ghost of President Lincoln appears, asking for your help. Can you find the hidden Confederate treasure?
Whether you use this document as a reference when things get difficult or as a road map to get you from beginning to end, we’re pretty sure you’ll find what you’re looking for here.
This document contains a complete Midnight Mysteries: Witches of Abraham game walkthrough featuring annotated screenshots from actual gameplay!
We hope you find this information useful as you play your way through the game. Use the walkthrough menu below to quickly jump to whatever stage of the game you need help with.
Remember to visit the Big Fish Games Forums if you find you need more help. Have fun!
This walkthrough was created by prpldva, and is protected under US Copyright laws. Any unauthorized use, including re-publication in whole or in part, without permission, is strictly prohibited.
General Tips

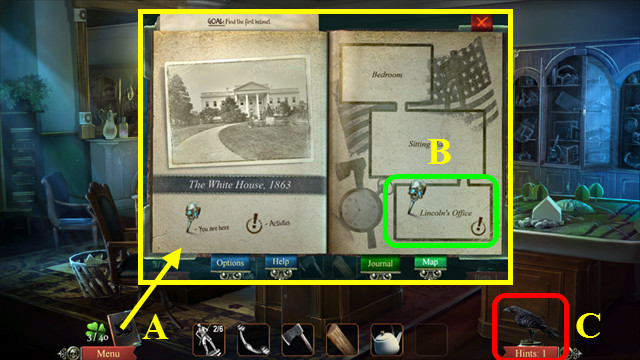
- This is the official guide for Midnight Mysteries: Witches of Abraham.
- This guide will not mention each time you have to zoom into a location; the screenshots will identify each location.
- Hidden-object puzzles are referred to as HOPs in this guide. Items listed in blue are hidden; green items require additional actions to locate. Interactive items in HOPs are color-coded.
- Mini-games and HOPs are sometimes randomized; your solution may vary.
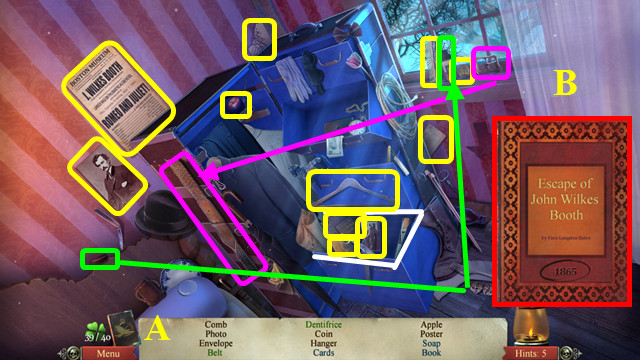
- Refer to your Journal for clues and objectives (A).
- Use your map to see where you have something to accomplish (B).
- Select the raven for a hint (C).
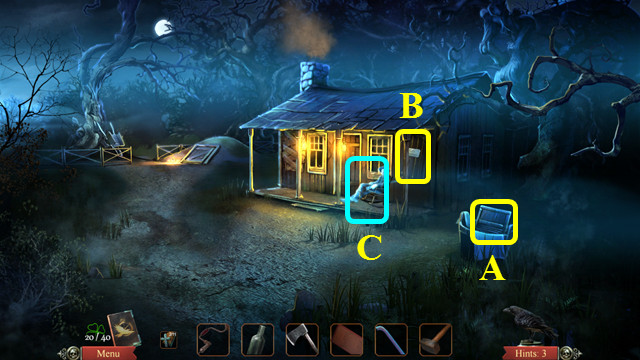
Chapter 1: The White House, 1863
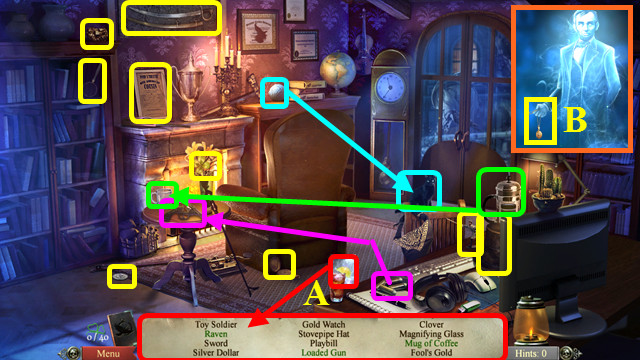
- You will have the option of a brief tutorial.
- Use the LEMON on the HOP list (A).
- Play the HOP, and then take the LOCKET (B).
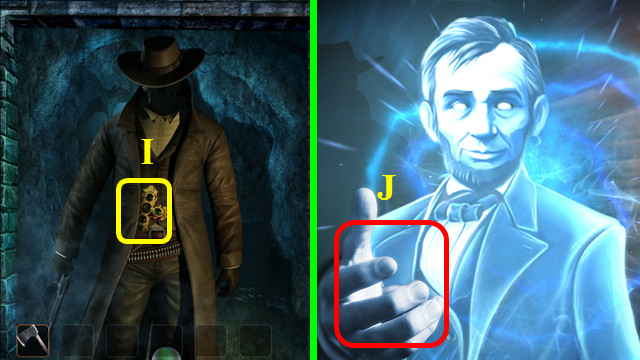
- After talking to Lincoln, take his hand.
- Talk to Pinkerton (C).
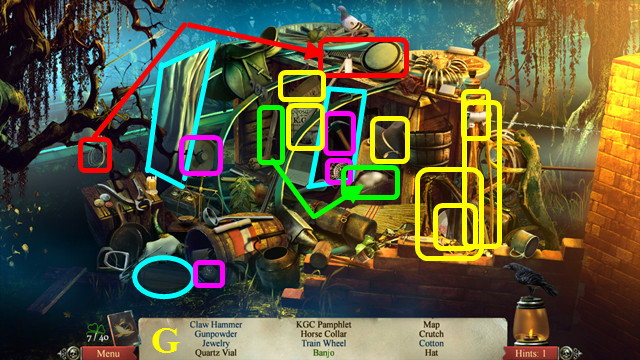
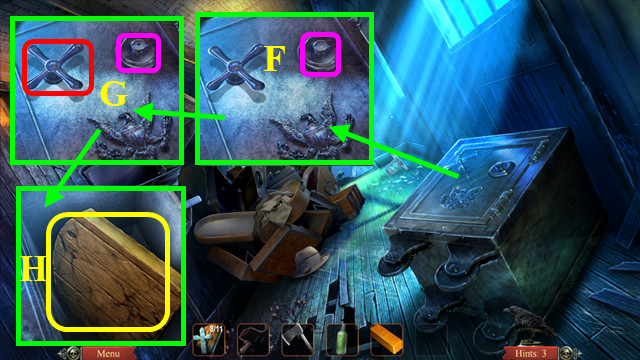
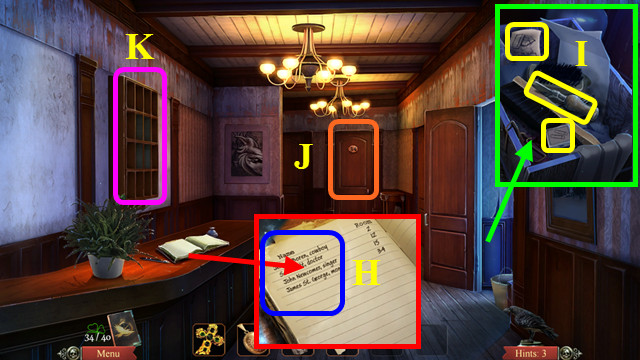
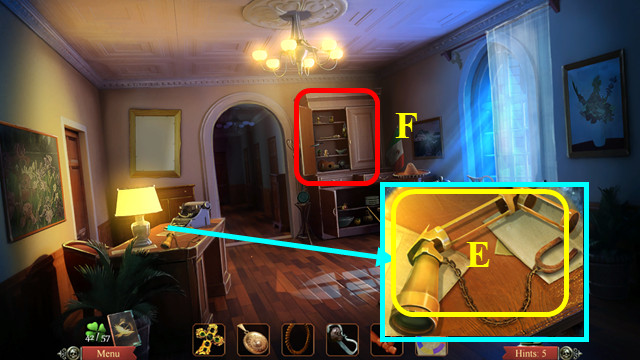
- Take the DRAWER KEY (D), LINCOLN’S AXE (E) and the 1/6 SOLDIER (F).
- Note the battlefield mini-game (G).
- Use the DRAWER KEY in the lock, and then select the mini-game (H).
- Move the buttons in numerical order to solve (1-5).
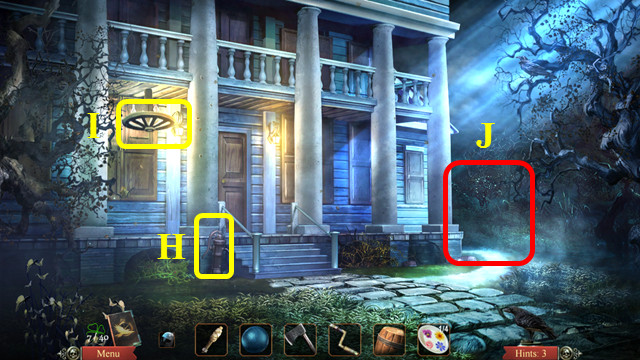
- Flip the switch (I).
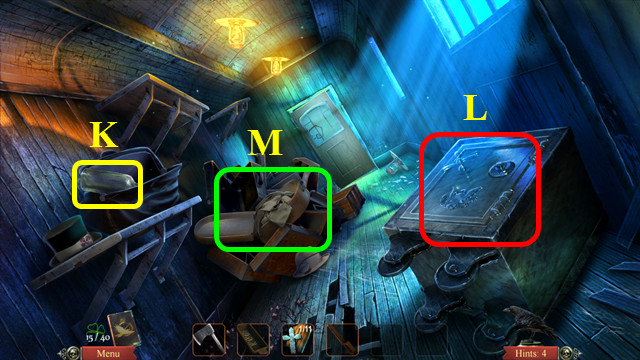
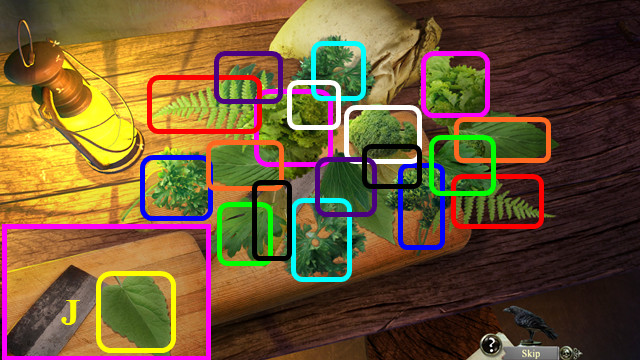
- Select the cabinet (J).
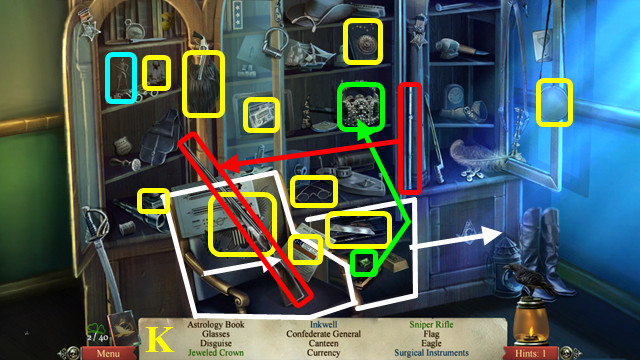
- Play the HOP to earn the 2/6 SOLDIER (K).
- Walk forward.
- Talk to Mary Lincoln; give her the LOCKET (L).
- Take the DESK HANDLE (M).
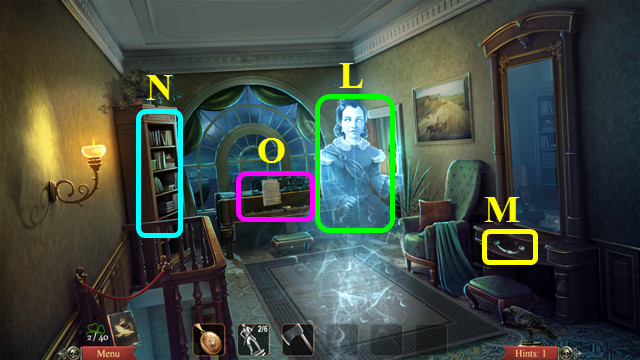
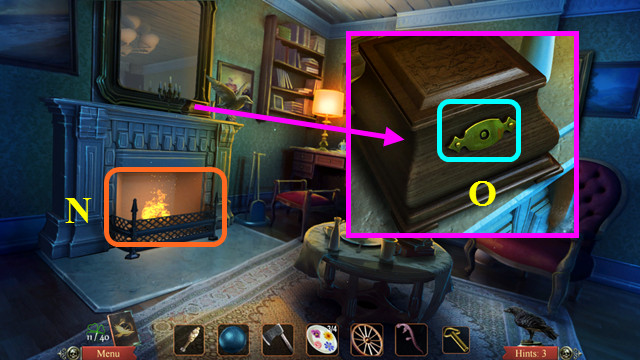
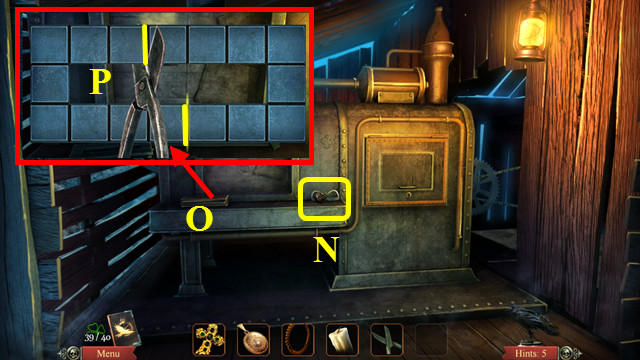
- Note the bookcase mini-game (N) and the piano mini-game (O).
- Enter the bedroom.
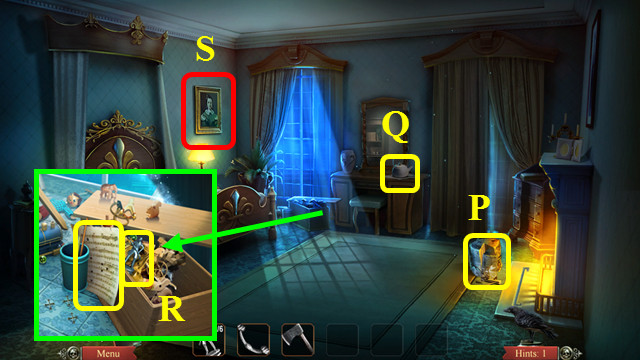
- Use LINCOLN’S AXE to cut, and then take a piece of WOOD (P).
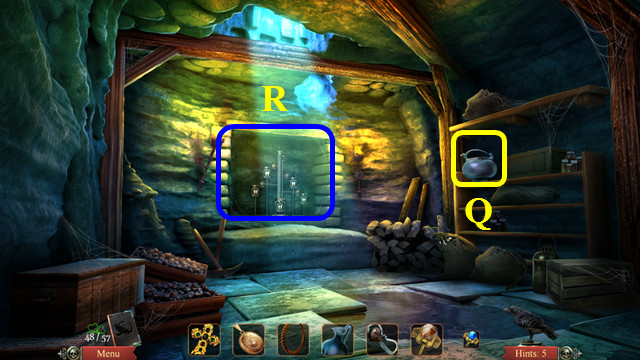
- Take the KETTLE (Q).
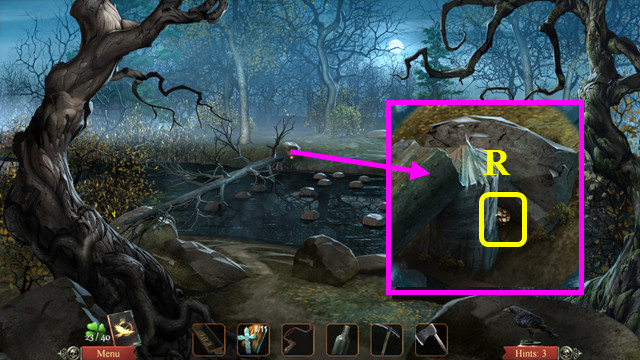
- Take the SHEET MUSIC HALF and the 3/6 SOLDIER (R).
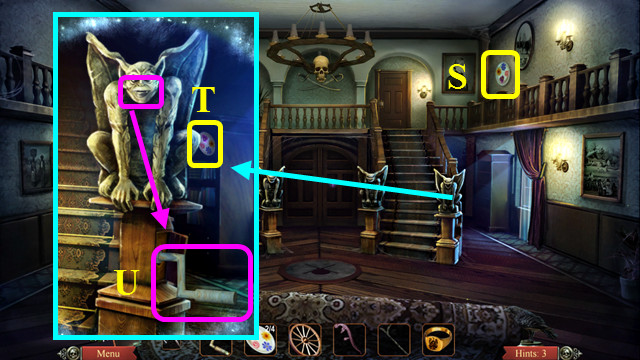
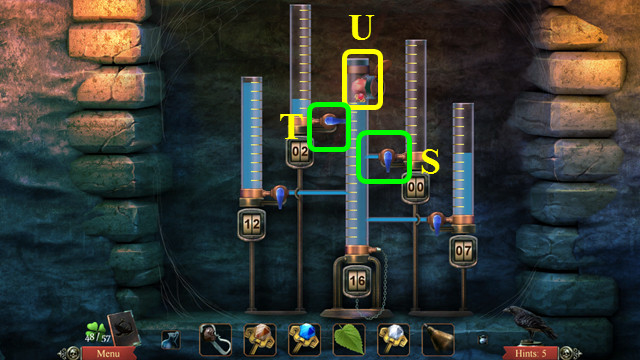
- Remove the portrait for a mini-game (S).
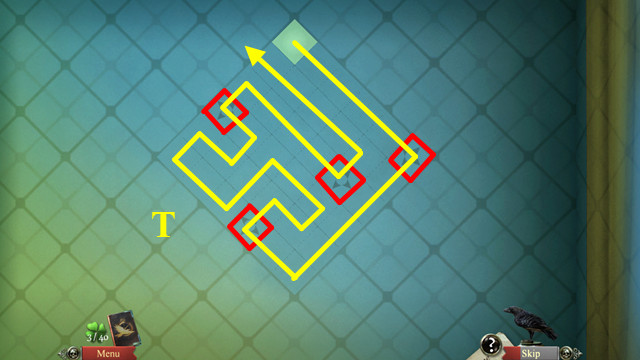
- Make a path that covers all the squares once (T).
- You can turn at any square, but you must turn at the marked squares (red).
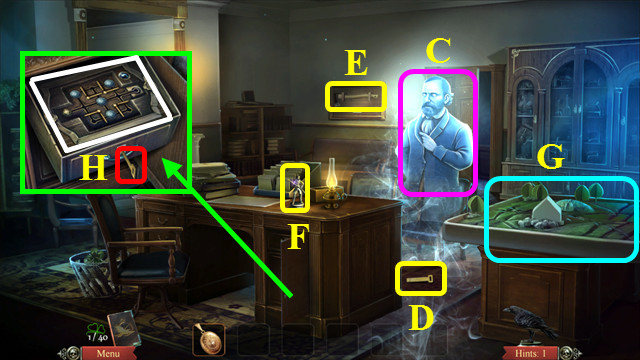
- Walk down twice.
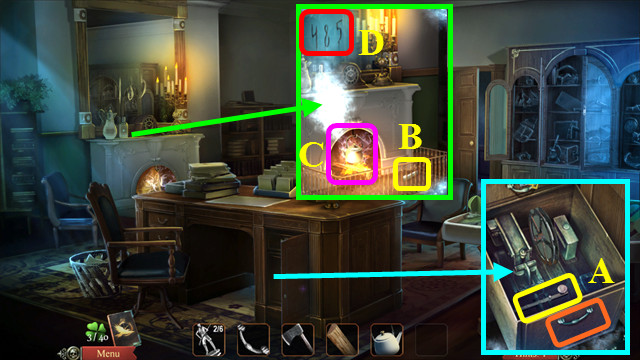
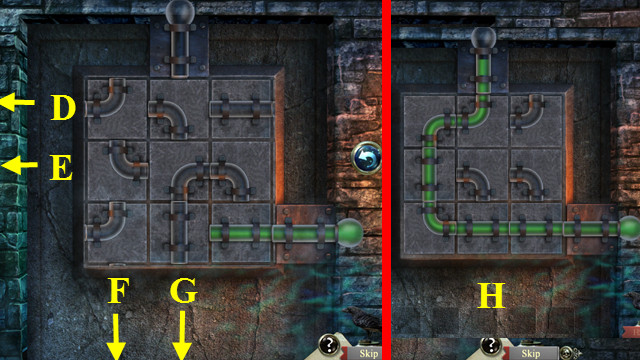
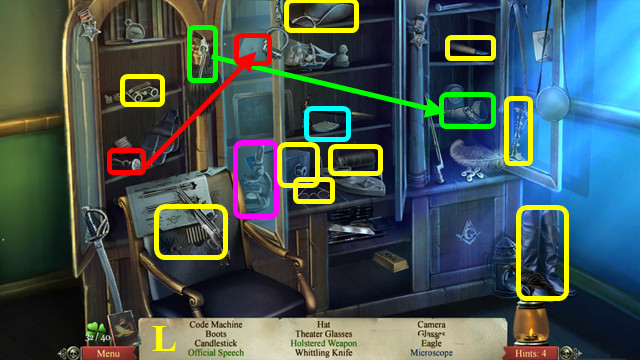
- Place the DESK HANDLE on the drawer, open the drawer, and touch the Morse code key to get the MORSE CODE (A).
- Take the PIANO KEY (B).
- Hang the KETTLE on the hook and place the WOOD in the fireplace (C).
- Read the 485 code on the mirror (D).
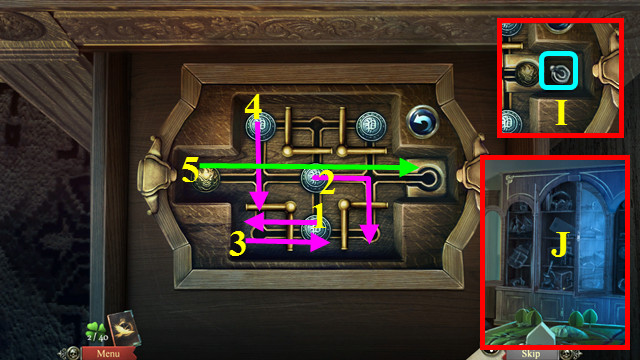
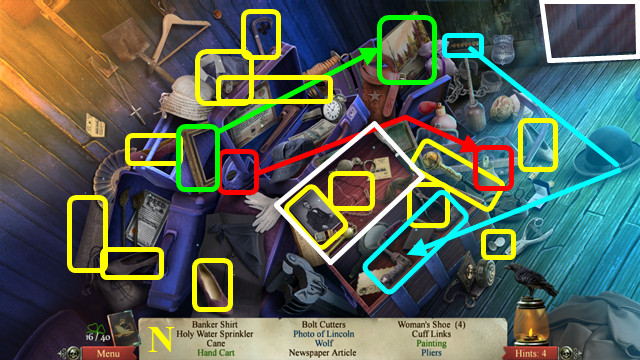
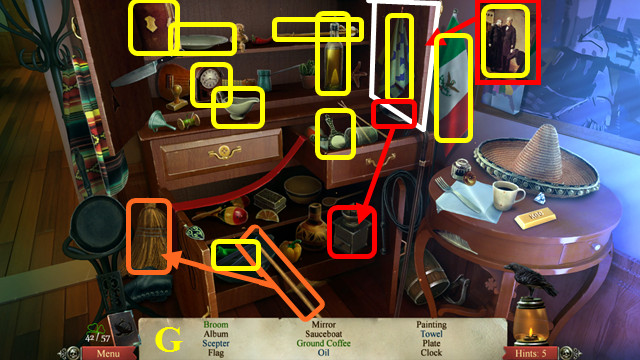
- Walk forward and select the bookcase mini-game.
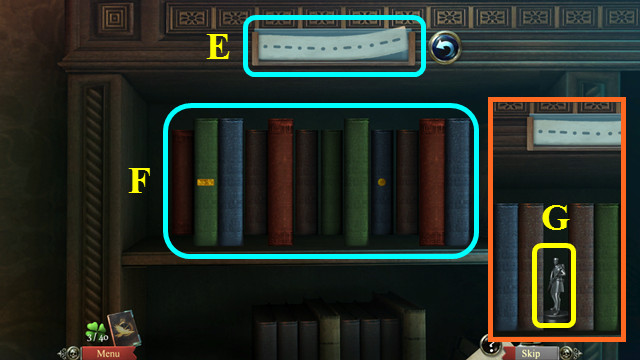
- Place the MORSE CODE in the holder (E).
- Push books in for dots; pull books out for dashes to match the code (F).
- Take the 4/6 SOLDIER (G).
- Select the piano mini-game.
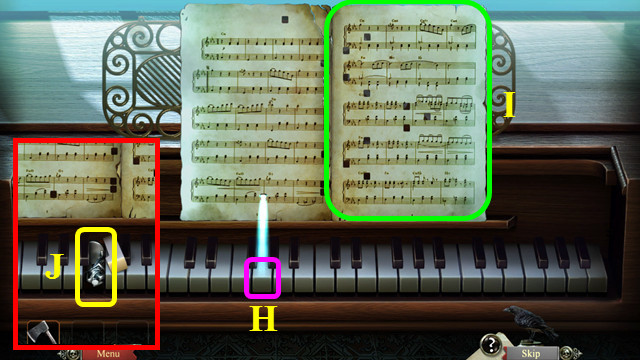
- Replace the PIANO KEY (H) and place the SHEET MUSIC HALF on the stand (I).
- Play the keys as the light hits them; some keys are played more than once.
- Take the 5/6 SOLDIER (J).
- Enter the bedroom.
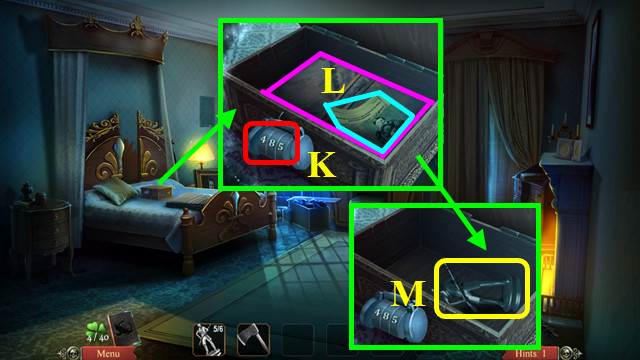
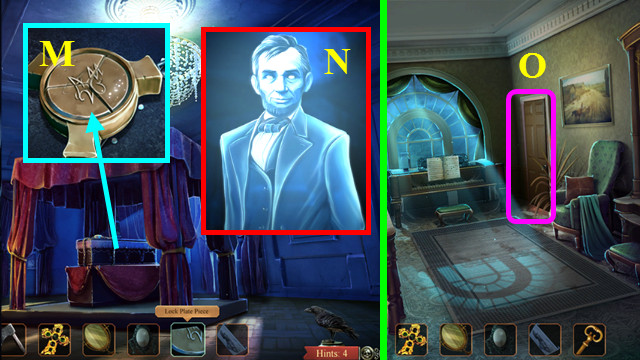
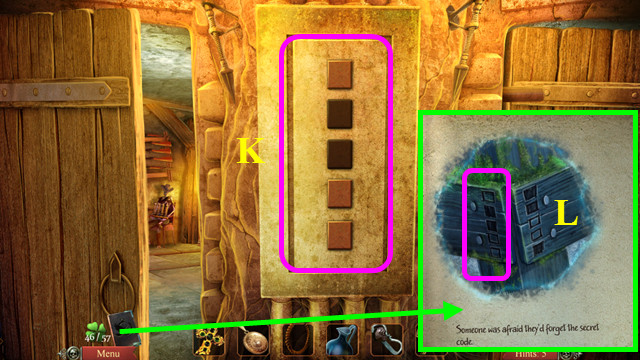
- Enter the 485 code on the lock (K).
- Read the death certificate and journal (L).
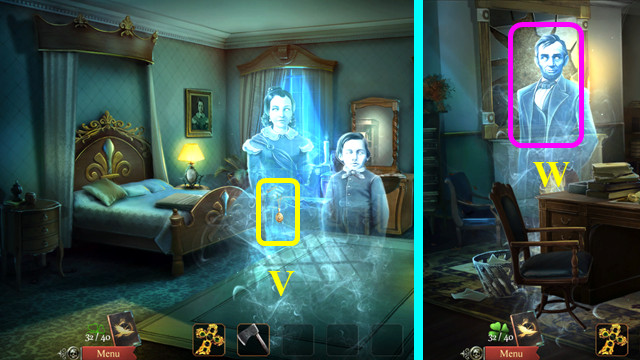
- Take the 6/6 SOLDIER (M).
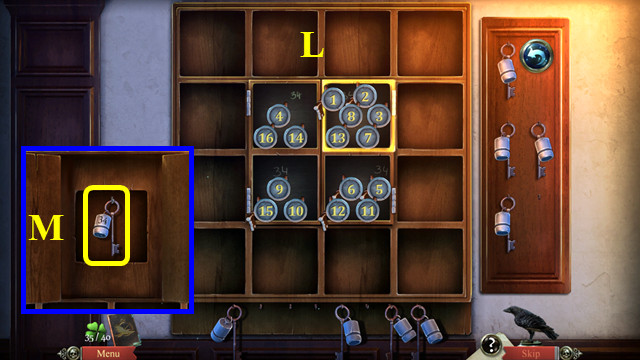
- Walk down twice and look at the battlefield mini-game.

- Place the 6 SOLDIERS in the tray (N).
- Place the soldiers so all the lines are lit (O).
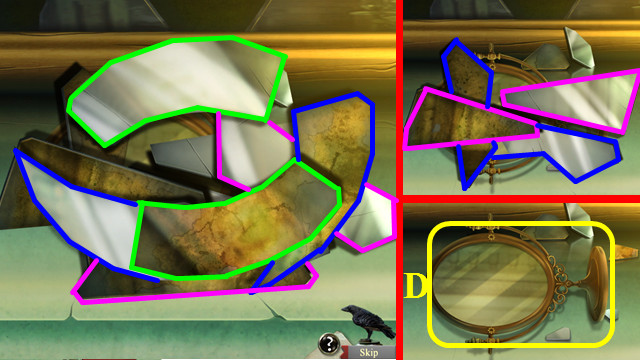
- Take the 1/6 HELMET (P).
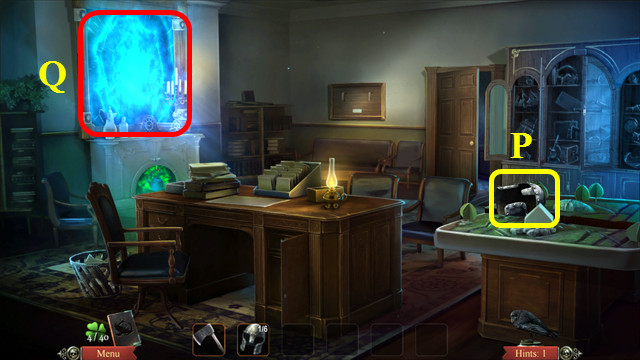
- Enter the MIRROR (Q).
Chapter 2: Albert Pike’s Mansion, 1863
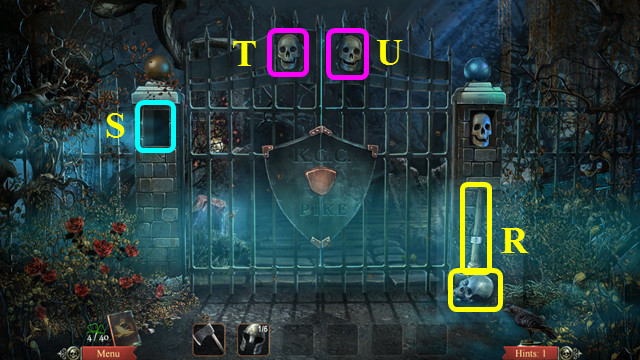
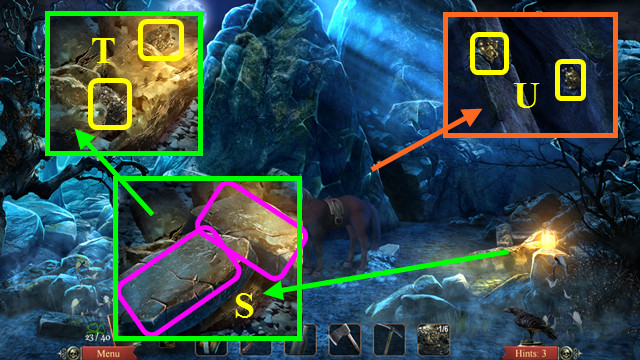
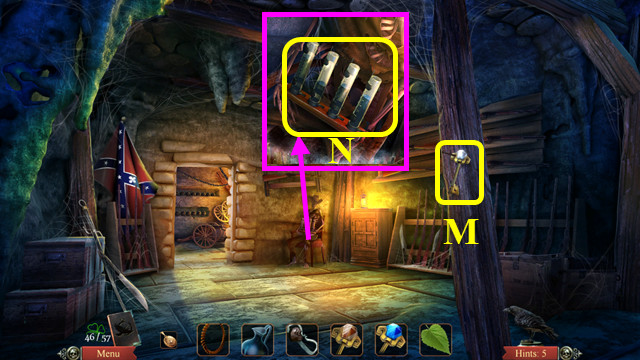
- Use LINCOLN’S AXE on the vines; take the UNLIT TORCH and the SKULL (R).
- Place the SKULL in the opening (S).
- Press Tx3 and Ux3.
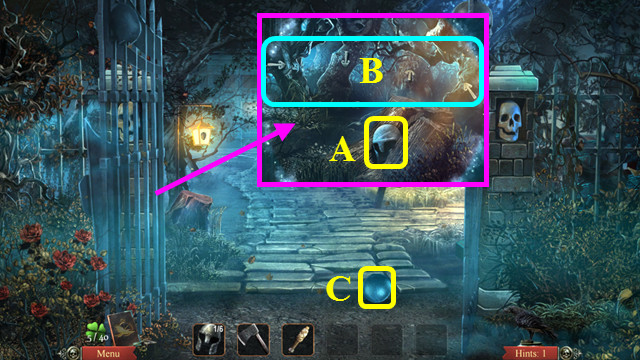
- Use LINCOLN’S AXE on the stump and take the 2/6 HELMET (A).
- Note the arrows code (B).
- Take the CANNONBALL (C).
- Walk right.
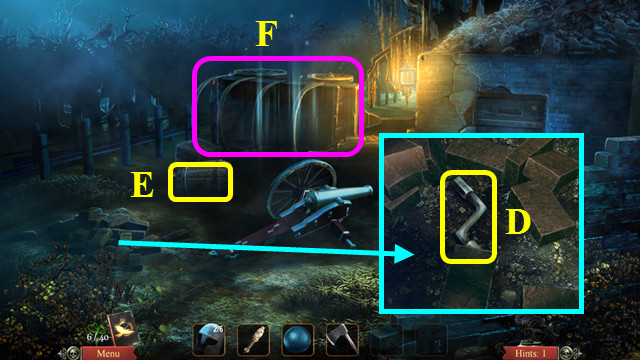
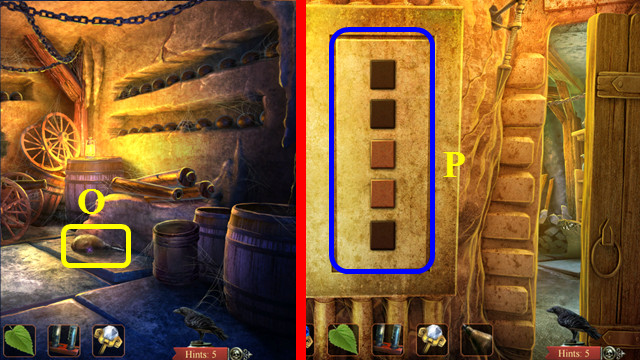
- Remove the bricks and take the CRANK (D).
- Take the BARREL (E).
- Select the wagon (F).
- Play the HOP to earn the 1/4 PLATE (G).
- Walk down and go forward.
- Take the WATER PUMP HANDLE (H).
- Take the WHEEL (I).
- Walk to the patio (J).
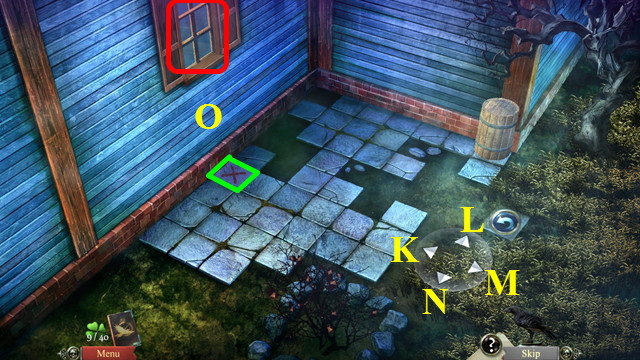
- Place the BARREL on the tiles.
- Use the arrows to move the barrel under the window.
- Press Kx2, N, K, Nx2, M, N, K, L, and K.
- Enter the window (O).
- Take the POKER (P).
- Move the rug (Q).
- Press the arrows: right down, up, and up left (1-4).
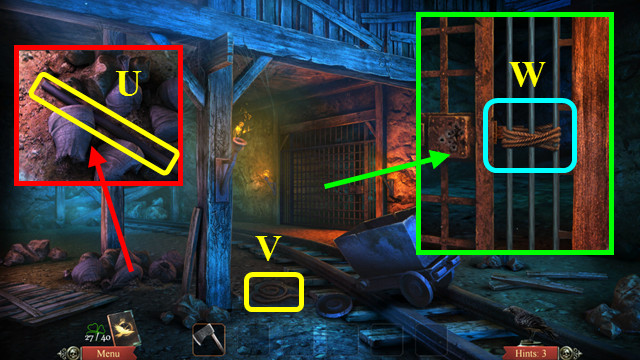
- Take the SIGNET RING (R).
- Take the 2/4 PLATE (S).
- Take the 3/4 PLATE (T).
- Close the gargoyle’s mouth and use the CRANK in the opening (U).
- Walk forward.
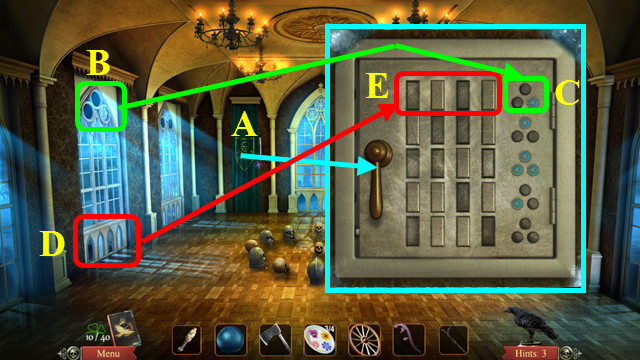
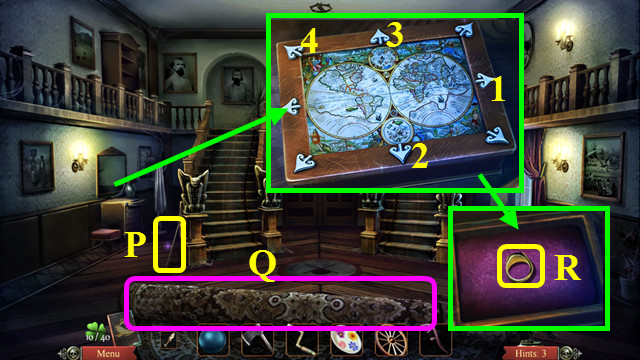
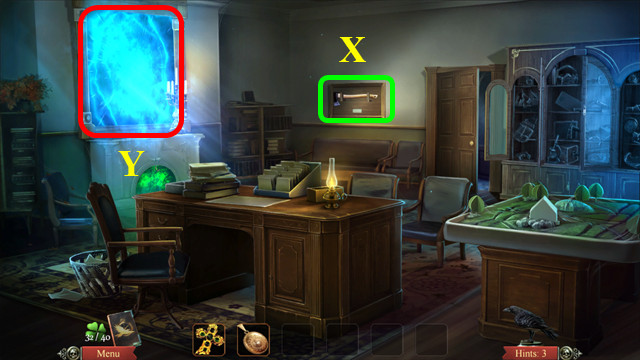
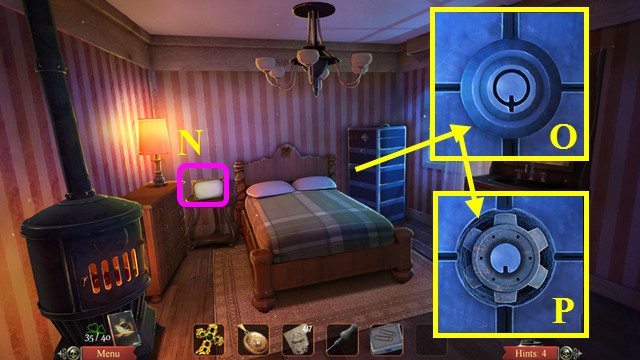
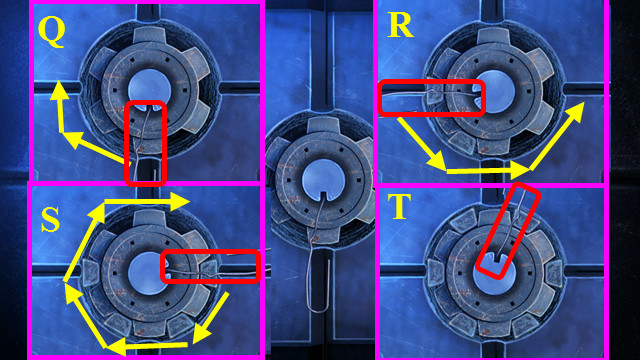
- Open the curtain and look at the safe (A).
- Find the window that has the 3 upper panes (B) that match the dots in the first row (C) and push the rectangular buttons (D) to match the panes at the bottom of that window (E).
- Do this for all 5 rows.
- Take the 3/6 HELMET from inside the safe.
- Walk down and look at the door on the upper floor.
- Place the SIGNET RING in the center (G).
- Select 2 matching symbols that are in the same column or row to remove those symbols and the ones between (H).
- Remove enough to have a full space below the laser line (I).
- There are 3 boards to complete.
- Take the 2 JEWELS and place them in the door (J).
- Enter the sitting room.
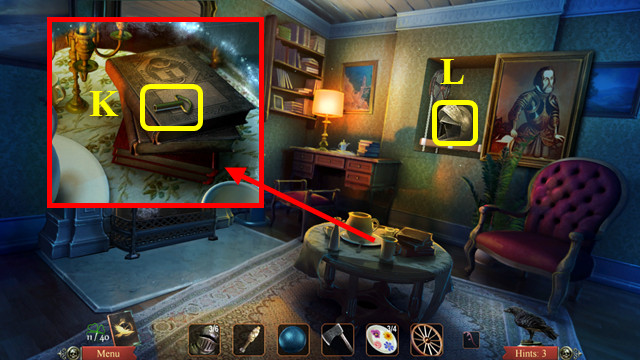
- Take the MUSIC BOX KEY (K).
- Move the painting, pull the rope, and take the 4/6 HELMET (L).
- Use the POKER in the fireplace and then use the UNLIT TORCH on the fire to get the LIT TORCH (N).
- Use the MUSIC BOX KEY on the lock (O).
- Walk down 3 times and then go right.
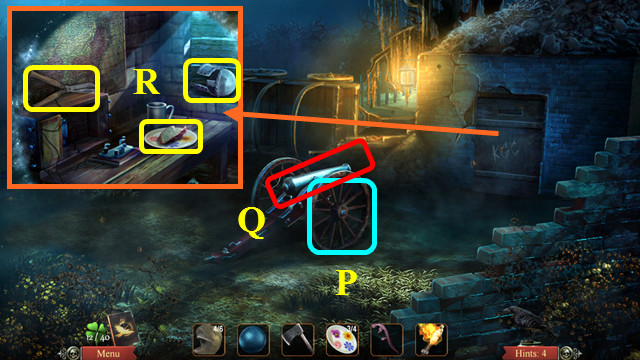
- Place the WHEEL on the cannon (P).
- Put the CANNONBALL in the cannon and use the LIT TORCH on it (Q).
- Take the GARDEN SHEARS, the 5/6 HELMET, and the 4/4 PLATE (R).
- Exit the close-up, walk down, and go forward.
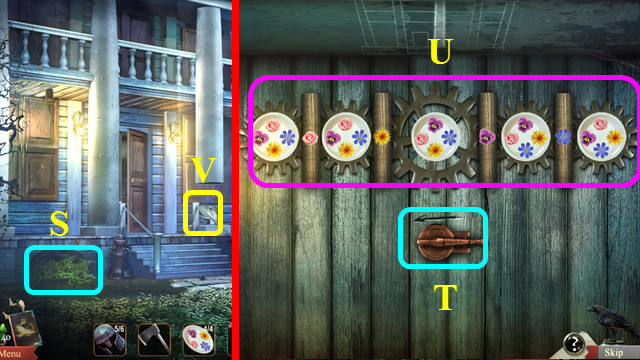
- Use the GARDEN SHEARS on the rose stems (S).
- After the rats run off, look in the window and use the LIT TORCH on the darkness.
- Place the 4 PLATES on the mechanism.
- Place the WATER PUMP HANDLE to make the lever (T).
- Swap the plates so the flowers match horizontally when the lever is pulled (U).
- Take the 6/6 HELMET (V).
- Walk forward twice and look at the skulls.
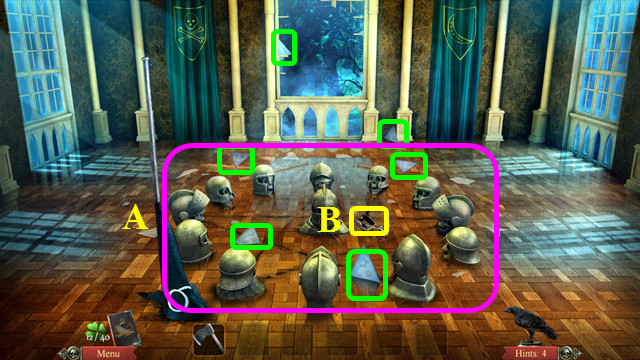
- Place the 6 HELMETS on the skulls (A).
- After the cut scene, look at the helmets again.
- Take the SPUR (B).
- Take the 6 STAINED GLASS (green).
- Walk down and enter the upper door.
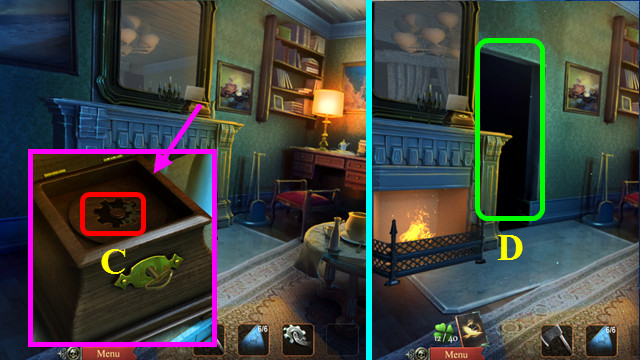
- Place the SPUR in the music box (C).
- Walk forward (D).
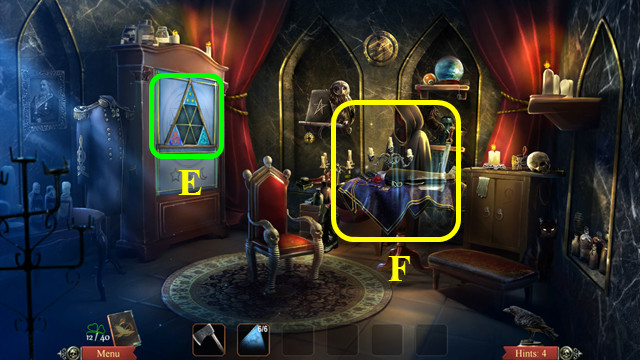
- Note the mini-game on the cabinet (E).
- Select the table (F).
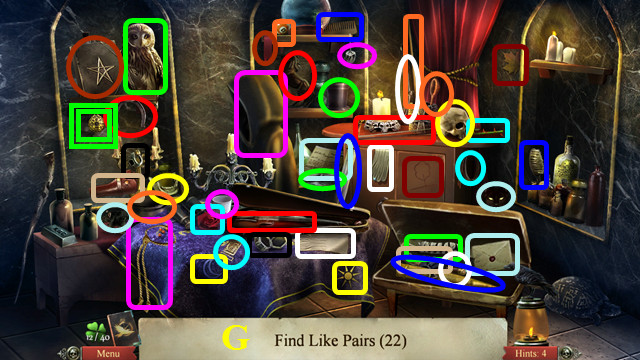
- Locate 22 pairs of items and then take the TALISMAN (G).
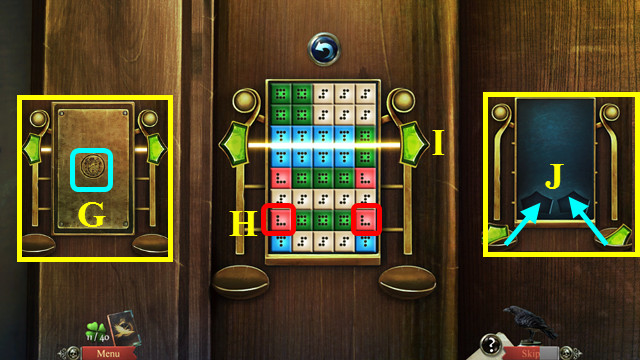
- Select the cabinet mini-game.
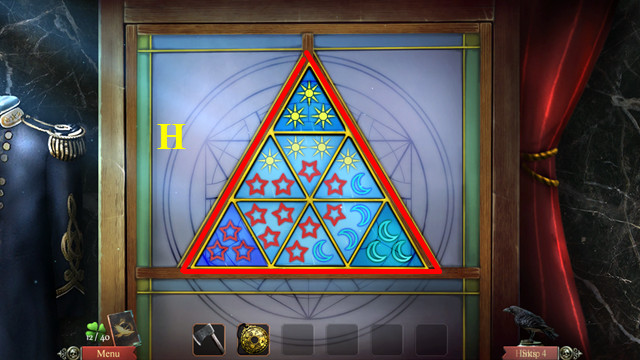
- Place the 6 STAINED GLASS on the board.
- Place the panes so all touching symbols match (H).
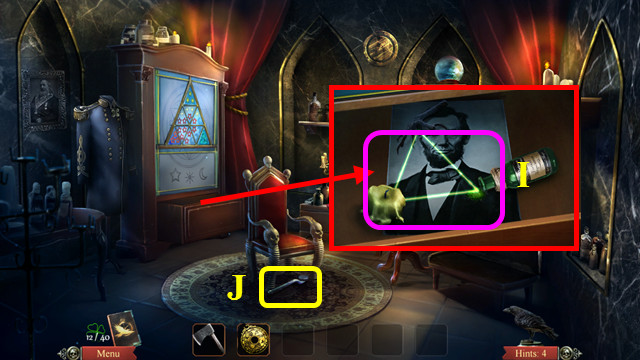
- Use the TALISMAN on the curse (I).
- Take the TELEGRAPH KEY (J).
- Walk down 4 times and go right.
- Use the TELEGRAPH KEY on the telegraph (K).
- Get on the train (L).
Chapter 3: South Central Missouri, 1876
- Note the tombstone mini-game (A).
- Note the paths to the River Bank (B), the Train Crash (C), and the Sentry’s House (D).
- Select the Barn (E).

- Play the HOP to earn the GOLD BULLION MOLD (F).
- Go to the Train Crash.
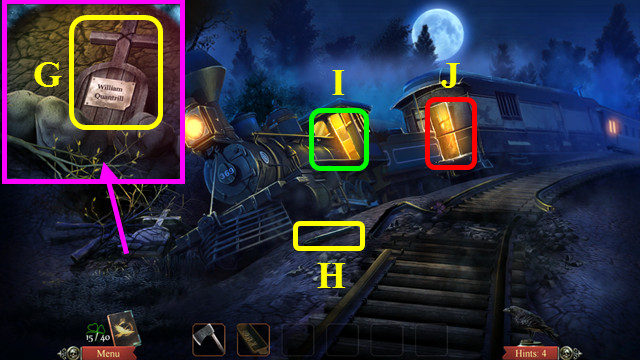
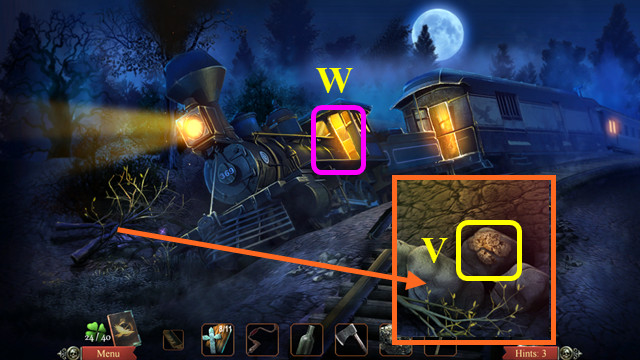
- Move the 2 branches and take the 1/11 TOMBSTONE (G).
- Take the FURNACE HANDLE (H).
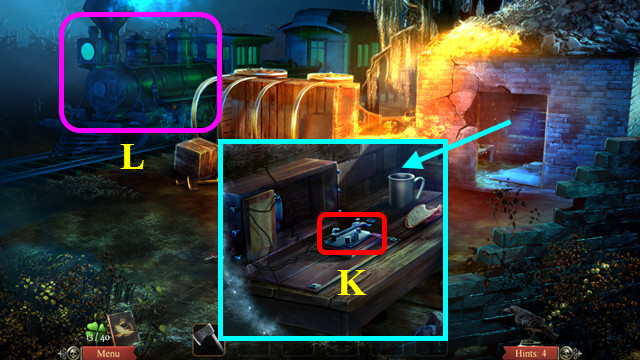
- Note the entrance to the Locomotive (I).
- Enter the Baggage Car (J).
- Take the GLASS BOTTLE (K).
- Look at the safe (L).
- Select the debris (M).
- Play the HOP to earn the HAND DRILL (N).
- Open the door and walk forward.
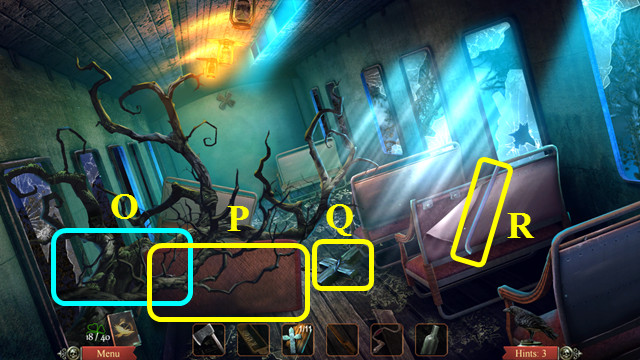
- Use LINCOLN’S AXE on the branches (O).
- Take the SEAT CUSHION (P).
- Take the 2/11 TOMBSTONE (Q) and the SEAT SUPPORT (R).
- Walk down twice and enter the engine.
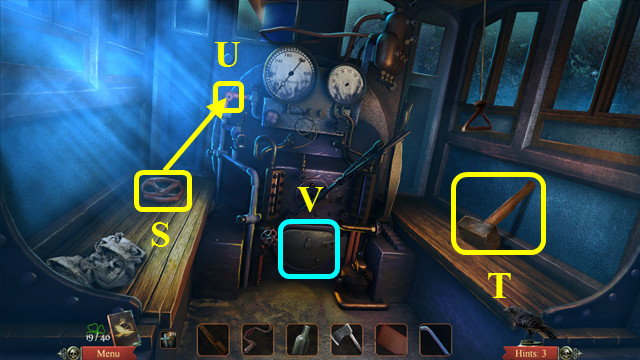
- Take the VALVE (S) and the SLEDGEHAMMER (T).
- Place the VALVE on the pipe (U).
- Place the FURNACE HANDLE on the door (V).
- Walk down twice and go to the Sentry’s House on the right.
- Take the WASHBOARD (A).
- Take the 3/11 TOMBSTONE (B).
- Talk to the Sentry (C).
- Walk forward.
- Use the SLEDGEHAMMER to take the 4/11 TOMBSTONE (D).
- Take the PICKAXE (E).
- Use the SEAT SUPPORT to break the lock (F).
- Take the note and the WIRE CUTTERS (G).
- Walk down twice.

- Use the WIRE CUTTERS on the fence (H).
- Take the 5/11 TOMBSTONE and COOP PLANK (I).
- Take the PITCHFORK (J).
- Use the PITCHFORK on the hay; take the 6/11 TOMBSTONE (K).
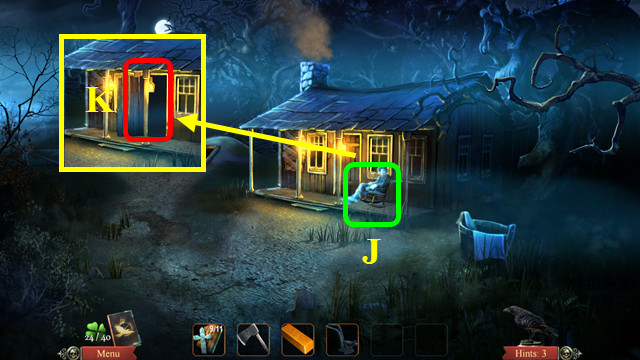
- Walk left to the River Bank.
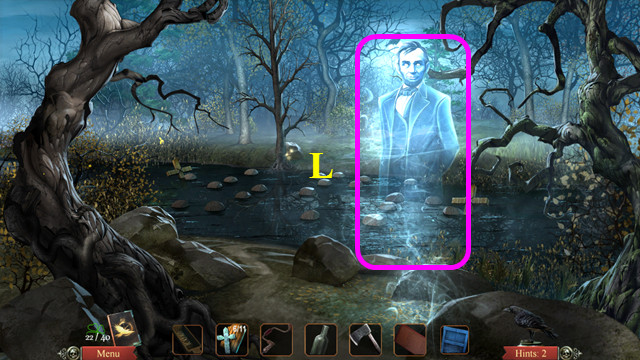
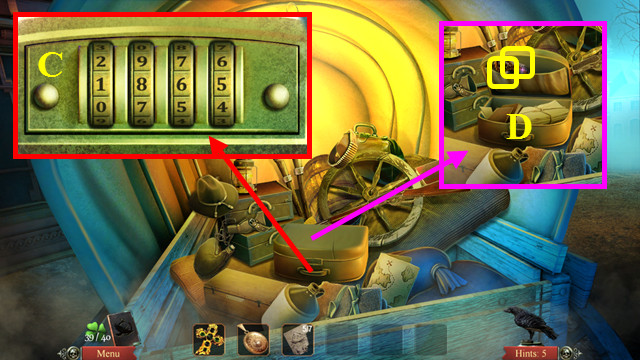
- Talk to Lincoln; give him the SEAT CUSHION, the WASHBOARD, and the COOP PLANK (L).
- Give him LINCOLN’S AXE last.
- Move Lincoln to collect the 2 tombstones. He can only move if he has a walkway for the distance.
- Make sure you do not abandon any boards or you will be stuck.
- Select the stones in this order: Ax2, Bx2, Cx2, Dx2, E, C, Fx2, Gx2, Hx2, I, Jx2, Kx2, Lx2, M, K, J, Hx2, I, Gx2, F, C, Nx3, O, Px2, Qx2.
- Use the PICKAXE to take the 1/6 FOOL’S GOLD (R).
- Walk forward.
- Move the 2 rocks (S).
- Use the PICKAXE to take the 2/6 and 3/6 FOOL’S GOLD (T).
- Use the PICKAXE to take the 4/6 and 5/6 FOOL’S GOLD (U).
- Walk down twice and go to the Train Crash.
- Use the PICKAXE to take the 6/6 FOOL’S GOLD (V).
- Enter the Locomotive (W).
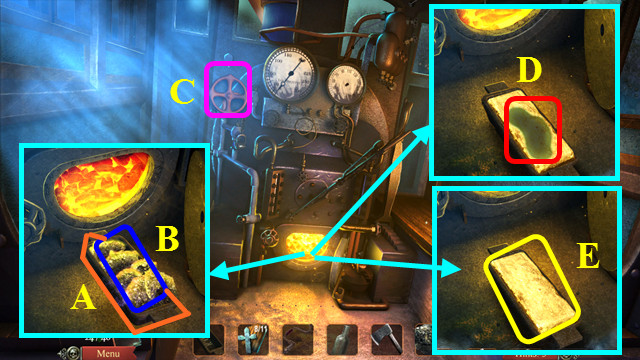
- Place the GOLD BULLION MOLD on the floor (A).
- Place the 6 FOOL’S GOLD in the mold (B).
- Turn the valve (C).
- Use the GLASS BOTTLE to get the SULPHURIC ACID (D).
- Take the FOOL’S GOLD INGOT (E).
- Walk down and enter the Baggage Car.
- Use the HAND DRILL on the dial (F).
- Use the SULFURIC ACID on the hole, and then turn the valve (G).
- Remove the box and poster; take the 9/11 TOMBSTONE (H).
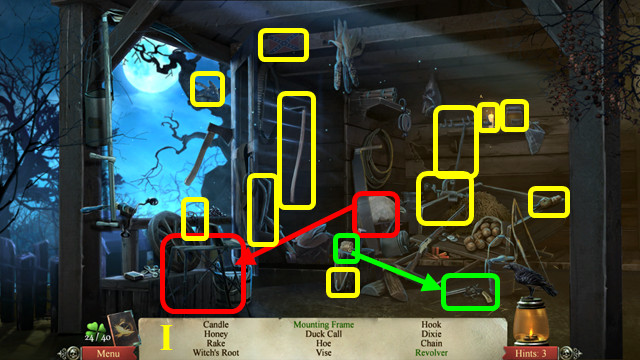
- Walk down twice and select the barn.
- Play the HOP to earn the PLOW (I).
- Go right to the Sentry’s House.
- Give the FOOL’S GOLD INGOT to the Sentry (J).
- Enter the Sentry Room (K).
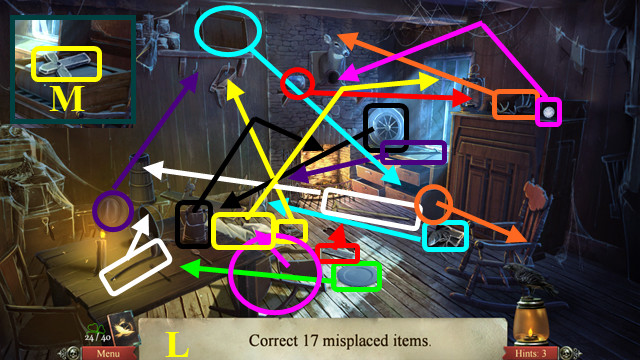
- Restore the 17 misplaced items (L).
- Take the 10/11 TOMBSTONE (M).
- Walk down, go to the River Bank, and forward.
- Use the PLOW on the horse (N).
- Take the 11/11 TOMBSTONE (O).
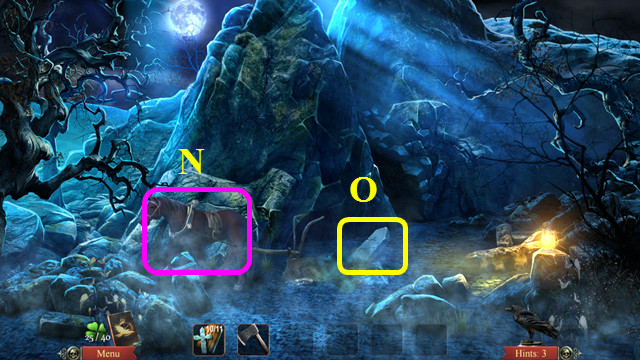
- Walk down twice and look at the tombstone mini-game.
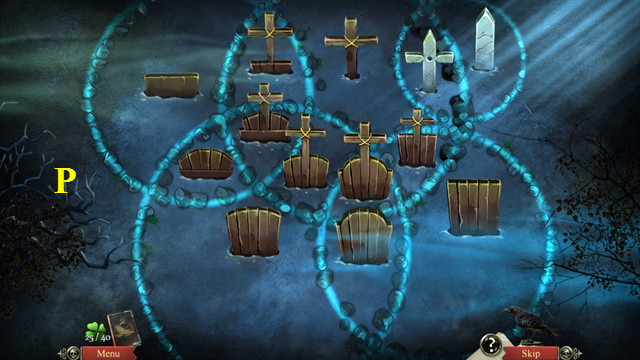
- Place the 11 TOMBSTONES on the circles to begin.
- Arrange the tombstones so that those in the same circle have similar elements (P), like having a rectangular base or a cross.
- Some will belong to several circles.
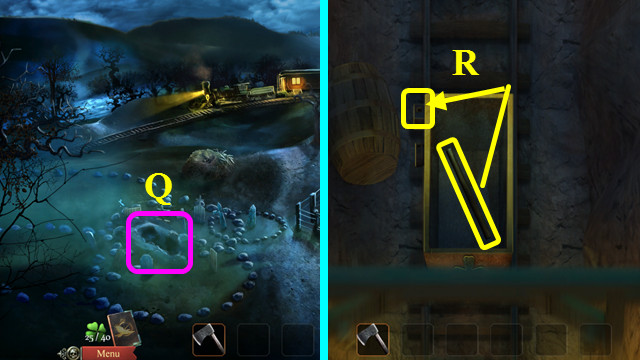
- Enter the hole (Q).
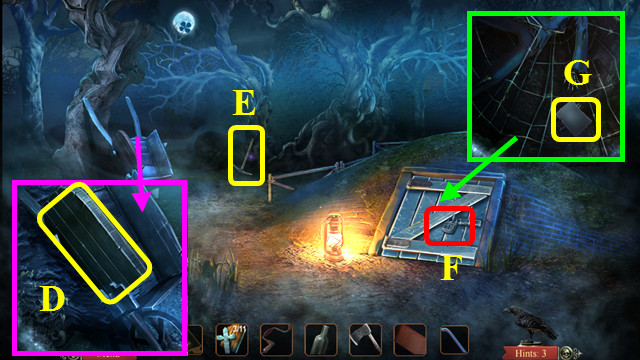
- Take the iron pipe and use it on the brake (R).
- Take the KNIFE (S).
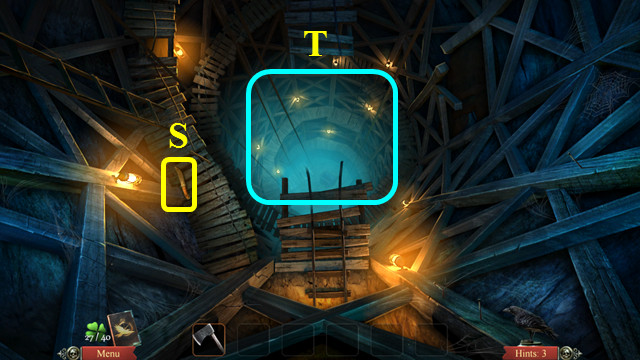
- Enter the tunnel (T).
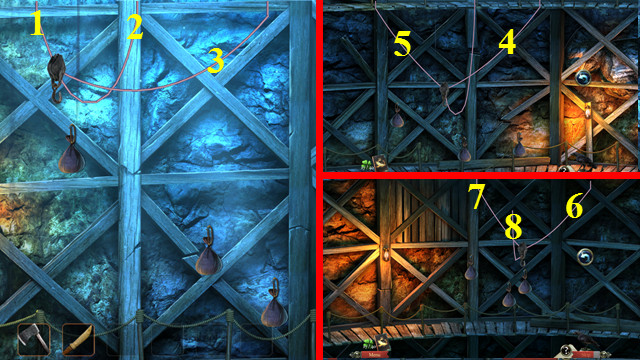
- Use the KNIFE to cut the ropes in numerical order so they knock down the bags (1-8).
- Wait for the rope to stop swinging before making cut number 8.
- There are 3 levels.
- Take the IRON PIPE (U).
- Take the WET ROPE (V).
- Use the WET ROPE on the bars followed by the IRON PIPE (W).
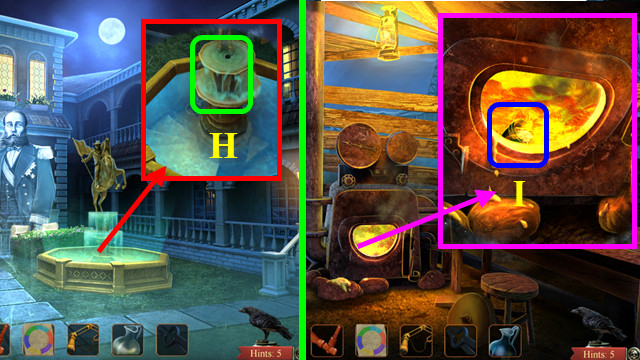
- Walk forward and look at the crates in the water.

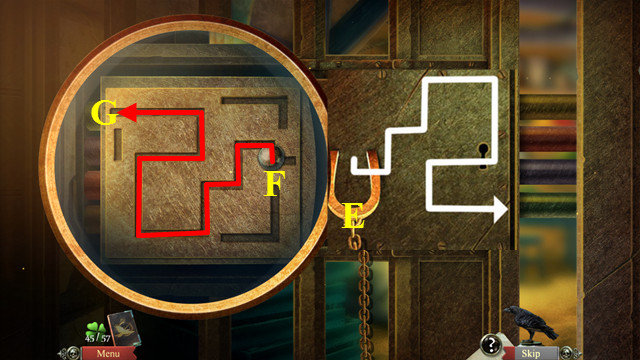
- Move from the starting point (A) to the crystal (B) by tipping the boxes.
- The number on the box tells how many boxes are stacked.
- Press the arrows right x 2, up, right x 5, down x 2, left x 4, up x 2, right, up, left x 2, up, right x 4, up, right, down x 2, right x 2, and up x 2.
- See the screenshot for the path and pattern of the boxes (C).
- Drag the tiles to create a continuous path.
- Drag row D left 1 tile, column G down 2 tiles, column F down 1 tile, row E left 1 tile, and row D left 1 tile.
- Out solution is shown here (H).
- Take the HABSBURG CROSS (I).
- Take Lincoln’s hand (J).
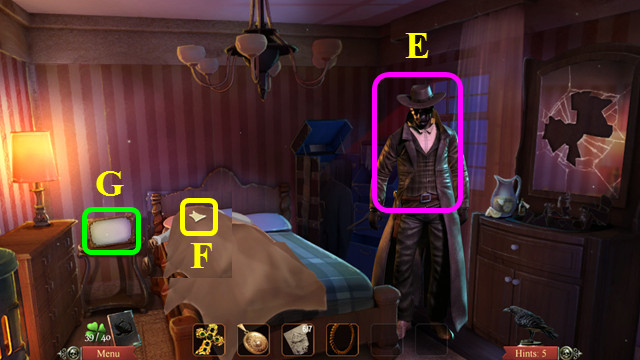
Chapter 4: The White House, 1876
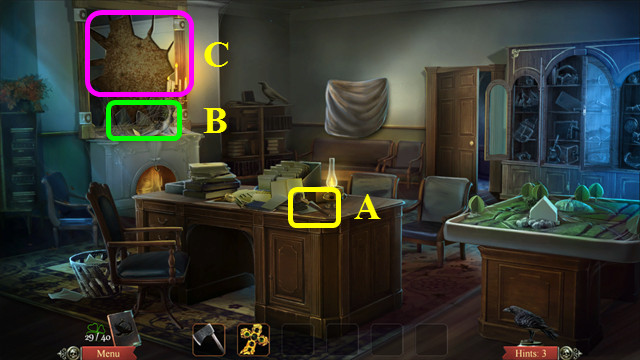
- Take the BRUSH (A).
- Use the BRUSH on the web (B).
- Look at the mirror (C).
- Select pieces with the same shape (color-coded).
- Take the SMALL DESKTOP MIRROR (D).
- Walk forward.
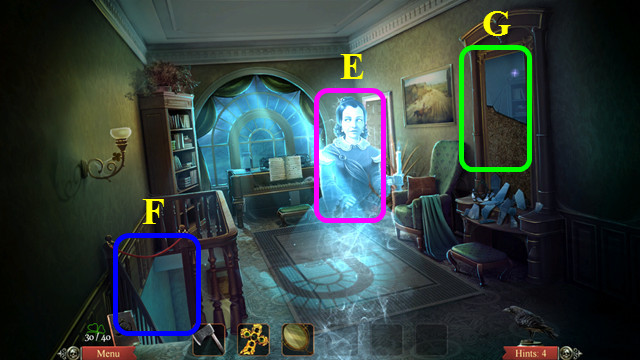
- Talk to Mary (E).
- Note the stairs (F).
- Look at the mirror (G).
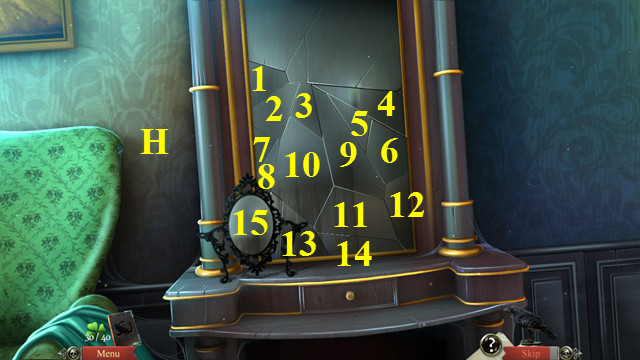
- Restore the 2 mirrors (H).
- Drag and place the pieces in numerical order (1-15).
- You will earn the LARGE DESKTOP MIRROR.
- Go down the stairs.
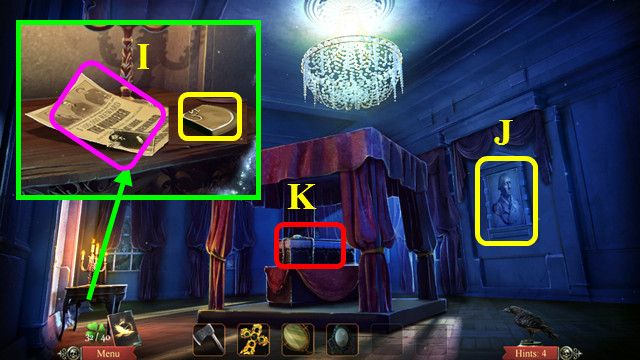
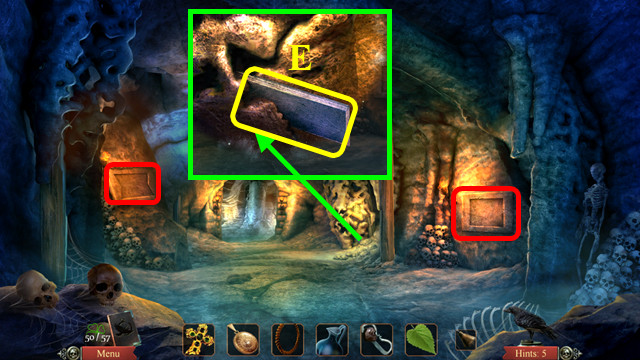
- Take the reward poster and the 1/2 LOCK PLATE (I).
- Take the BAS-RELIEF (J).
- Look at the lock (K).
- Walk down twice and select the cabinet on the right.
- Play the HOP to earn the 2/2 LOCK PLATE (L).
- Walk forward and go down the stairs.
- Place the 2 LOCK PLATES in the lock (M).
- Talk to Lincoln to receive the BEDROOM KEY (N).
- Walk down.
- Use the BEDROOM KEY on the door and enter (O).
- Use the HABSBURG CROSS on the shadows (P).
- Use LINCOLN’S AXE on the stump (Q).
- Place the BAS-RELIEF by the fireplace (R).
- Place the SMALL DESKTOP MIRROR on the mantle (S).
- Place the LARGE DESKTOP MIRROR on the nightstand (T).
- Pull the cloth from the mirror (U).
- Take the LOCKET from Mary (V).
- Walk down twice.
- Talk to Lincoln (W).
- Place LINCOLN’S AXE in the frame (X).
- Enter the portal in the mirror (Y).
Chapter 5: Enid, 1905
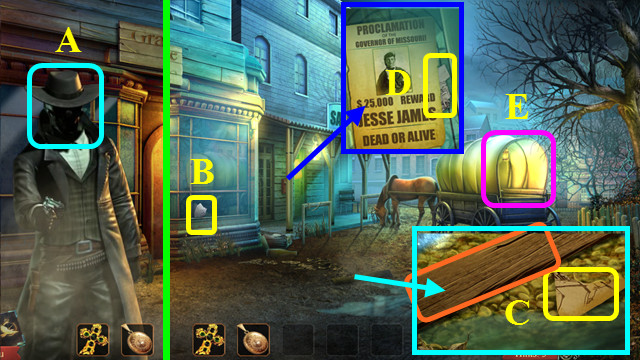
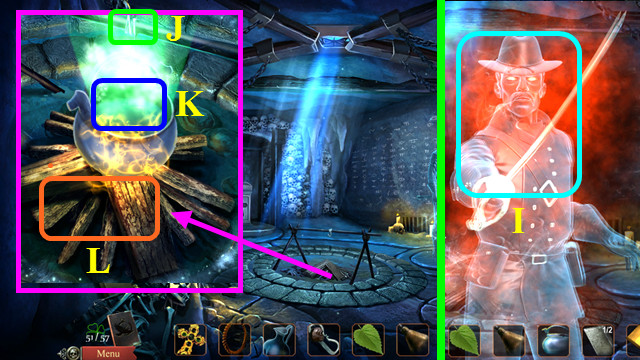
- Show the LOCKET to Jesse James (A).
- Take the 1/7 PIECE OF SKETCH (B).
- Move the board and take the 2/7 PIECE OF SKETCH (C).
- Take the 3/7 PIECE OF SKETCH (D).
- Enter the Wagon (E).
- Read the note and take the SCRAP (F).
- Note the combination lock (G).
- Walk down and enter the hotel.
- Place the SCRAP in the register (H).
- Take the 4/7 PIECE OF SKETCH, BOX OF PAPERCLIPS, and SCREWDRIVER (I).
- Note the door to room 34 (J).
- Look at the key box (K).
- Move the keys so the each of the 4 center boxes add up to 34 (L).
- Take the ROOM 34 KEY (M).
- Use the ROOM 34 KEY in the door lock and go forward.
- Note the frame (N).
- Use the SCREWDRIVER on the trunk lock (O).
- Use the BOX OF PAPERCLIPS on the trunk lock (P).
- Turn the paperclip to find the combination.
- From the starting point (Q), drag the paper clip 2 notches clockwise.
- The paperclip should be positioned at 9 o’clock (R).
- Drag it 3 notches counterclockwise to 3 o’clock (S).
- Last, drag the paperclip 5 notches clockwise (T).
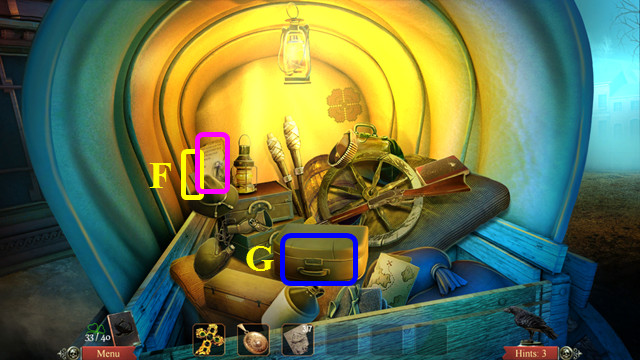
- Select the chest.
- Play the HOP to earn the 5/7 PIECE OF SKETCH (A).
- Note the date on the book, 1865 (B).
- Walk down twice and enter the wagon.
- Enter 1865 on the lock (C).
- Take the ROSARY and the 6/7 PIECE OF SKETCH (D).
- Walk down, go left, and then forward.
- Talk to Jesse James (E).
- Move the blanket and take the 7/7 PIECE OF SKETCH (F).
- Look at the frame (G).
- Place the 7 PIECES OF SKETCH on the frame to activate the mini-game.
- Select a piece to rotate it, and then drag it into position to complete the sketch (H).
- Enter the portal that appears.
Chapter 6: Maxi Oil Company, 1905
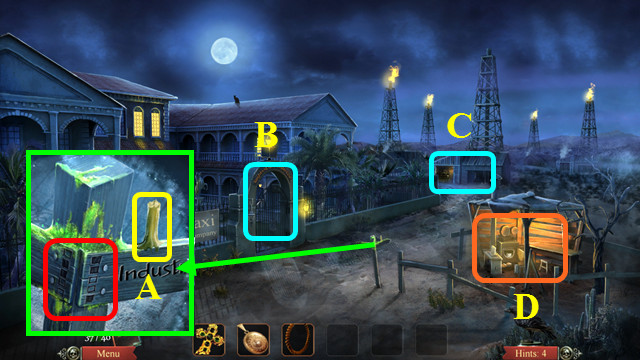
- Note the pattern and take the CANDLE (A).
- Note the paths to the Hacienda Gates (B) and the Oil Well (C).
- Go to the Smithy (D).
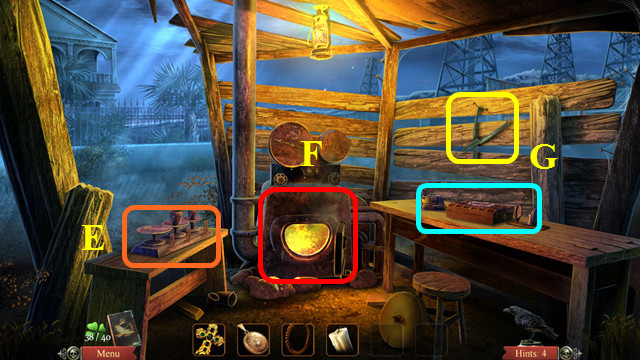
- Note the scales mini-game on the table (E).
- Look at the furnace (F).
- Take the SHEARS and note the mini-game beneath (G).
- Walk down and go forward to the Oil Well.
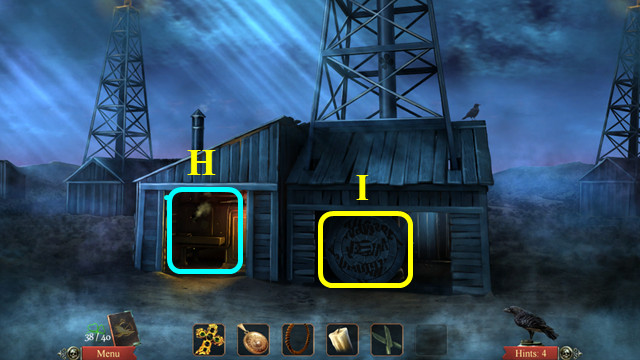
- Note the entrance to the Oil Well Pump (H).
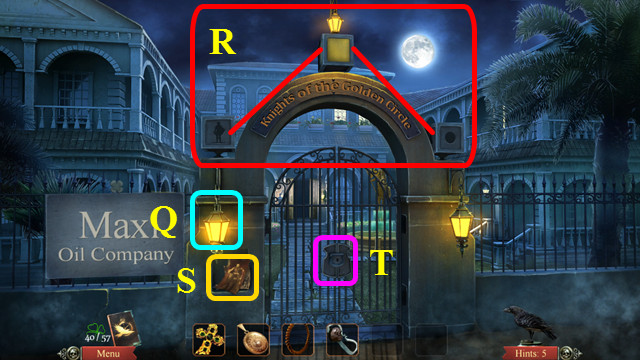
- Select the sign (I).
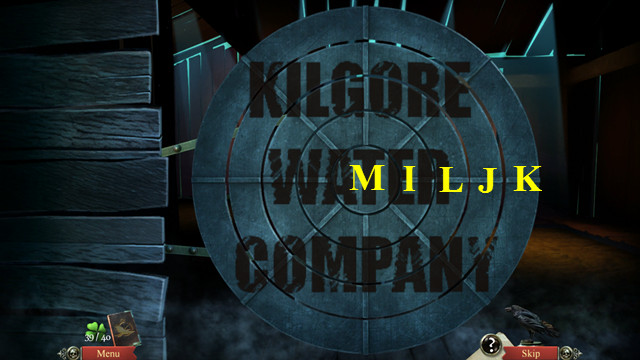
- Rotate the rings to restore the sign.
- Moving one ring may cause others to move.
- Rotate the rings so the text is right side up in this order: I, J, K, L, and M.
- Enter the Oil Well Pump.
- Take the FLINT AND STEEL (N).
- Use the SHEARS on the tile (O).
- Make 2 cuts so the pieces will form a square when put together (P).
- Walk down twice and go left to the Hacienda Gates.
- Place the CANDLE in the lantern and use the FLINT AND STEEL to light it (Q).
- Turn the 3 cubes on the gate to match the screenshot (R).
- Take the photographs and the KEY (S); use the KEY in the lock (T).
- Go forward.
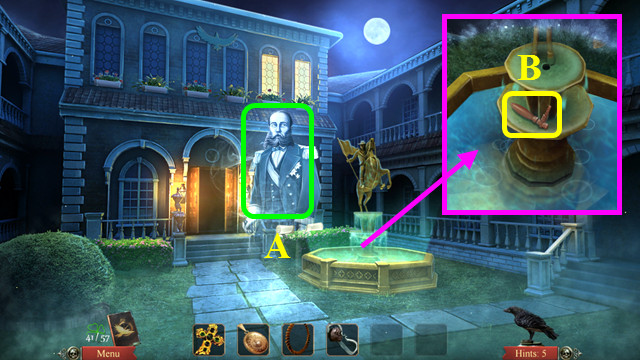
- Talk to John Maxi (A).
- Take the LEVER (B).
- Walk forward.
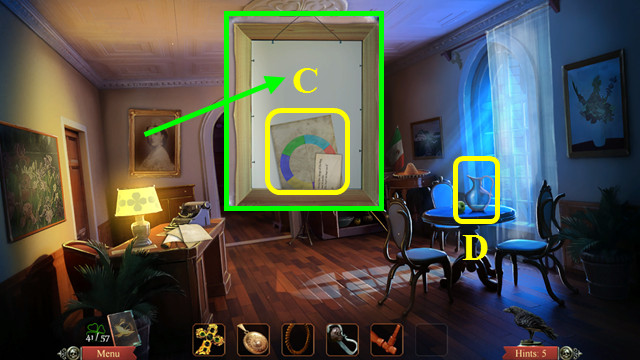
- Turn over the portrait; take the note and the BLUEPRINT (C).
- Take the PITCHER (D).
- Move the 3 pieces of paper and take the SPY DEVICE (E).
- Select the cupboard (F).
- Play the HOP to earn the TONGS (G).
- Walk down.
- Use the PITCHER on the fountain to get the PITCHER OF WATER (H).
- Walk down twice and enter the Smithy.
- Use the TONGS to take the 8 UNITS OF GOLD (I).
- Select the scales mini-game on the left.
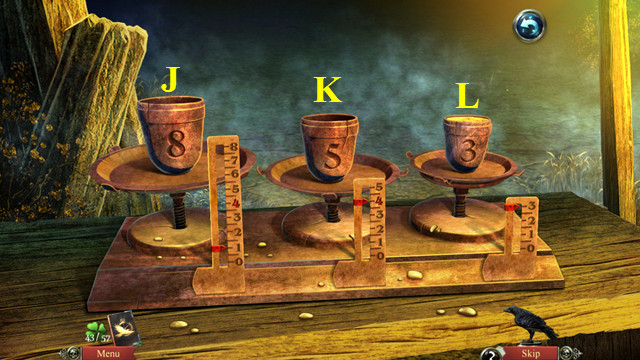
- Place the 8 UNITS OF GOLD on the left platform (J).
- Move the crucibles to get 4 units in one of the containers.
- Move J to K, K to L, L to J, K to L, J to K, and K to L.
- You will earn the 4 UNITS OF GOLD.
- Select the table mini-game on the right.

- Place the LEVER on the device and close the lid (M).
- Use the 4 UNITS OF GOLD on the opening (N).
- Turn the lever, and then use the PITCHER OF WATER on the opening.
- Open the lid, release the lever, and take the RING BLANK (O).

- Place the BLUEPRINT in the device (P).
- Place the RING BLANK in the center (Q).
- Use the FLINT AND STEEL on the candle (R).
- Look at the chart (S), and then select the 2 colored gems (T) that make the color in the lighted area (U).
- The pairs in order are (green, blue), (yellow, purple), (red, blue), (green red), (light blue, purple), and (yellow, light blue).
- You will earn the WEDDING RING.
- Walk down, go to the Hacienda Gates, and walk forward.
- Give the WEDDING RING to John Maxi (V).
- You will receive the ENGINE KEY.
- Walk down twice, go to the Oil Well, and enter the Oil Well Pump.
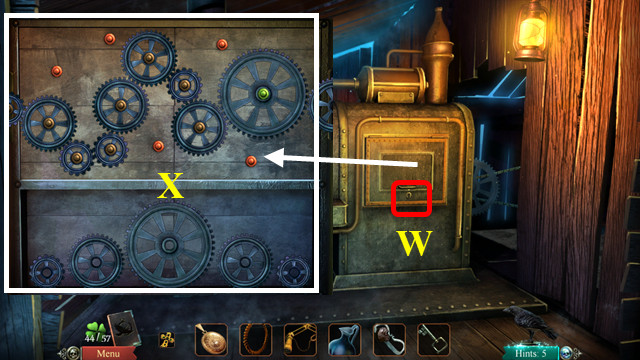
- Use the ENGINE KEY on the lock (W).
- Place the gears to make both side gears turn (X).
- Walk down twice, and go left twice.
- Take the potion recipe (Y).
- Enter the fountain (Z).
Chapter 7: Den of Witches, 1905

- Take the ONYX KEY (A).
- Note the Lock Mechanism (B) and the path to the Wall of Elements (C).
- Use the SPY DEVICE on the lock (D).
- Drag the magnet (E) in the opposite direction of how you want the ball to move.
- Release the magnet if you run out of room.
- Move the ball (F) to the end (G).
- Enter the Pantry.
- Take the SAPPHIRE KEY (H).
- Select the table (I).
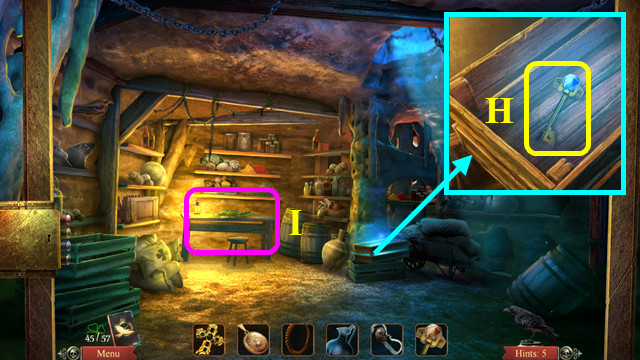
- Select matching pieces of greenery (color-coded).
- Take the HYSSOP LEAVES (J).
- Walk down and look at the Lock Mechanism.
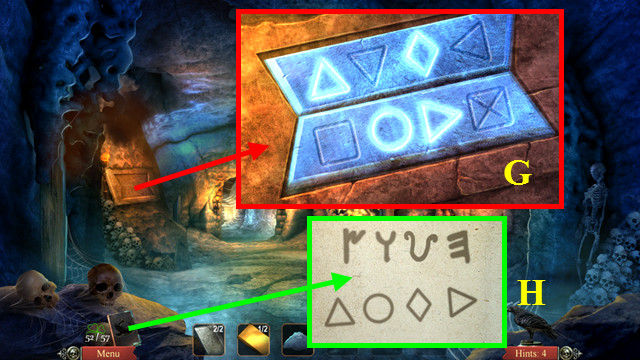
- Enter the pattern from the left signpost to open the left door (K).
- Refer to your journal for the code (L).
- Enter the left door.
- Take the DIAMOND KEY (M).
- Take the VESSELS (N).
- Walk forward.
- Take the POUCH OF GUNPOWDER (O).
- Walk down twice and look at the Lock Mechanism.
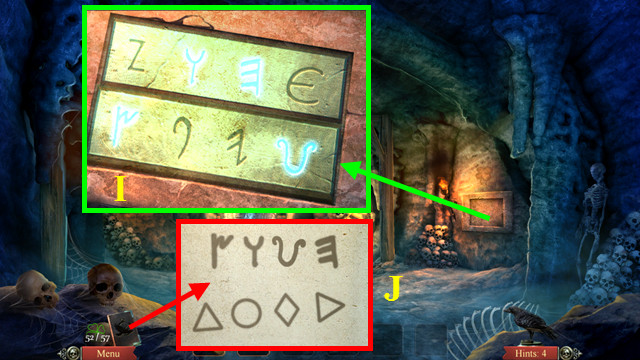
- Enter the pattern from the right signpost (P) and enter the right door.
- Take the SILVER POT (Q).
- Select the niche (R).
- Place the VESSEL on the mechanism.
- Turn the valves to move 16 units of water in to the center tube.
- Turn Sx2 and Tx1.
- Take the RUBY KEY (U).
- Walk down and go forward to the Wall of Elements.
- Place the DIAMOND KEY in the wind symbol (A) and the SAPPHIRE KEY in the water symbol (B).
- Place the RUBY KEY in the fire symbol (C) and the ONYX KEY in the earth symbol (D).
- Walk forward.
- Take the 1/2 SILVER PLATES (E).
- Note the 2 frames (red).
- Walk forward.
- Take the 1/2 GOLDEN PLATE (F).
- Note the path to the Statue Room (G).
- Walk right to Quantrill’s Room (H).
- Show the LOCKET to Quantrill (I).
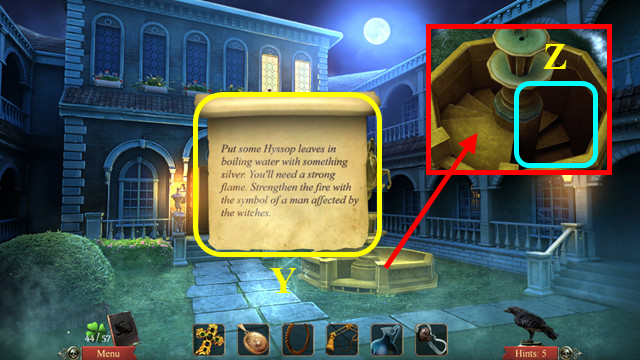
- Hang the SILVER POT on the hook (J).
- Use the PITCHER OF WATER on the pot (K).
- Use the FLINT AND STEEL on the wood (L).
- Use the POUCH OF GUNPOWDER on the wood, and then add the HYSSOP LEAVES to the pot.
- Place the ROSARY BEADS on the wood.
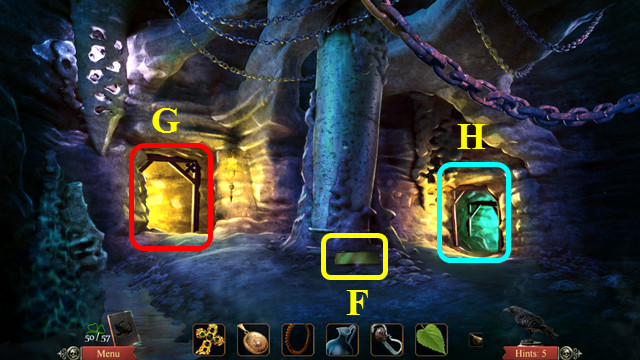
- Take the 2/2 SILVER PLATE (A) and the ASHES (B).
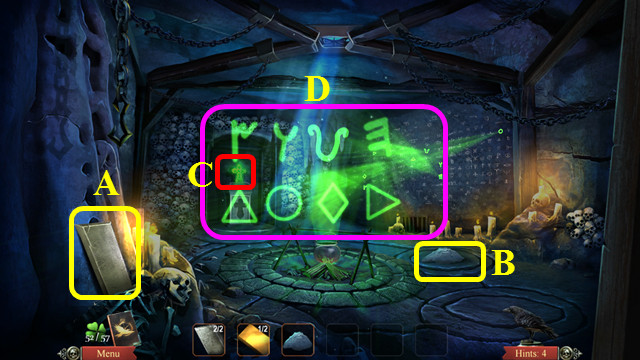
- Place the HABSBURG CROSS on the stand (C).
- Note the code that appears (D).
- Walk down and go left to the Statue Room.
- Take the 2/2 GOLDEN PLATE (E).
- Note the door in the floor (F).
- Walk down twice.
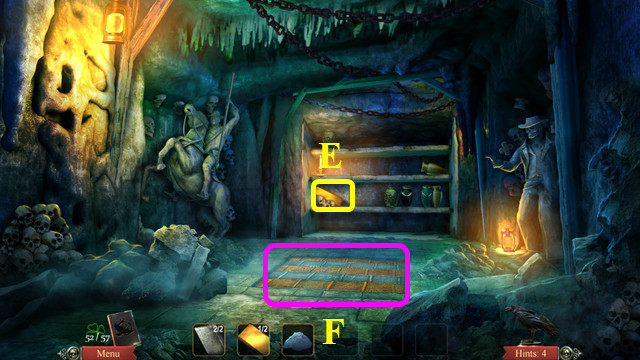
- Place the 2 SILVER PLATES in the left frame and use the ASHES on the plates (G).
- Select the 4 symbols from the code (H).
- Place the 2 GOLD PLATES in the right frame followed by the ASHES (I).
- Select the 4 symbols from the code (J).
- Walk forward, go left, and enter the door in the floor.
- Congratulations! You have completed Midnight Mysteries: Witches of Abraham!


 House of 1000 Doors: The Palm of Zoroaster Walkthrough, Guide, & Tips
 Unsolved Mystery Club™: Amelia Earhart™ Walkthrough, Guide, & Tips
 Ghost Encounters: Deadwood Walkthrough, Guide, & Tips
 White Haven Mysteries Walkthrough, Guide, & Tips
 Nat Geo Adventure: Ghost Fleet Walkthrough, Guide, & Tips