Mystery Trackers: Rancliff's Phantoms Walkthrough, Guide, & Tips
Mystery Trackers: Rancliff’s Phantoms Walkthrough

Welcome to the Mystery Trackers: Raincliff’s Phantoms Walkthrough
Return to Raincliff, where what you see isn’t always what you get!
Whether you use this document as a reference when things get difficult or as a road map to get you from beginning to end, we’re pretty sure you’ll find what you’re looking for here.
This document contains a complete Mystery Trackers: Raincliff’s Phantoms game walkthrough featuring annotated screenshots from actual gameplay!
We hope you find this information useful as you play your way through the game. Use the walkthrough menu below to quickly jump to whatever stage of the game you need help with.
Remember to visit the Big Fish Games Forums if you find you need more help. Have fun!
This walkthrough was created by SeverineSnape, and is protected under US Copyright laws. Any unauthorized use, including re-publication in whole or in part, without permission, is strictly prohibited.
General Tips
- This is the official guide for Mystery Trackers: Raincliff’s Phantoms.
- This guide will not mention each time you need to zoom into a scene; the screenshots will show each zoom scene.
- We will use the acronym HOP for Hidden-object puzzles. Interactive items will be color-coded.
- HOPs may be random: our lists may vary from yours.
- Use the Map to travel to locations.
Chapter 1: Finding Emilie White

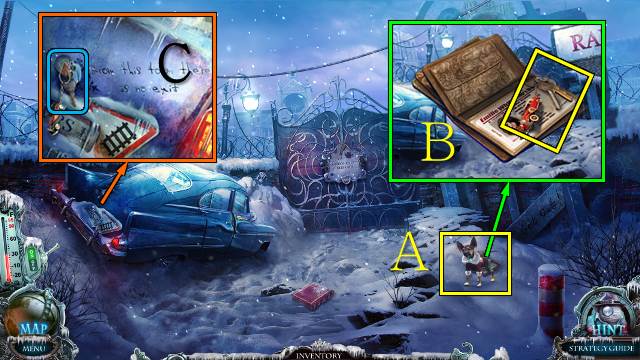
- Pick up ELF (A).
- Open the wallet, take the CAR KEY and read the note (B).
- Uncover the lock and open the trunk with the CAR KEY (C).

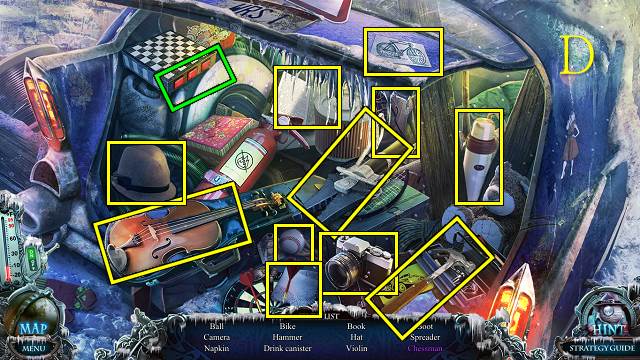
- Play the HOP (D).
- You receive the SPREADER.

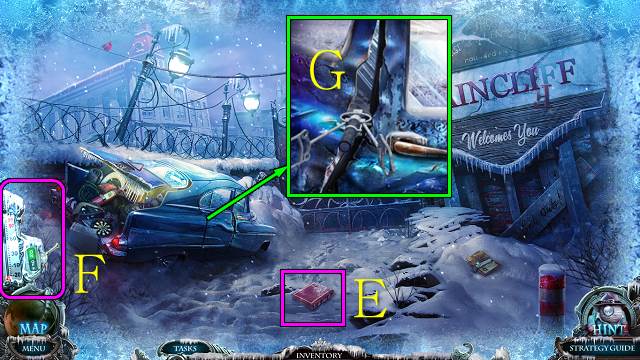
- Pick up the object for Frost Mode (E).
- You can switch off Frost Mode by flicking the switch next to the thermometer (F).
- Morphing objects are listed in the collectables.
- Open the car door with the SPREADER (G).
- Enter the car.

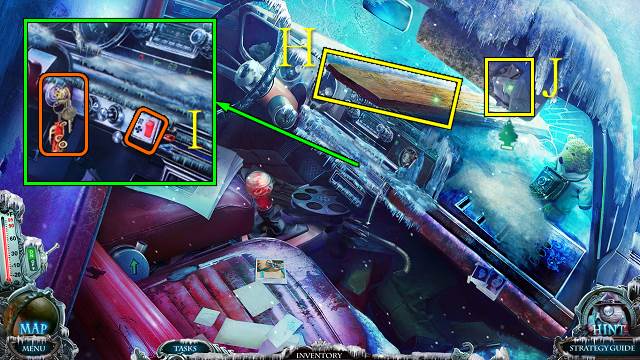
- Take the BOARD (H).
- Put the CAR KEY in the ignition and turn it; push the red button (I).
- Move the sun visor and take the PAPER (J).

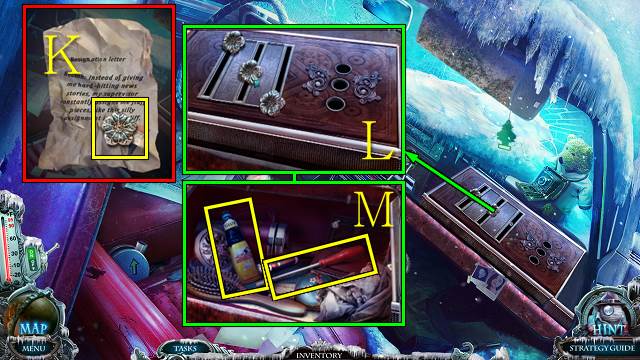
- Access the PAPER, unfold it and take the GLOVE BOX LATCH (K).
- Put the GLOVE BOX LATCH on the glove box for a mini-game.
- Move the three sliders until all three holes are open (L).
- Take the GLUE and SCREWDRIVER (M).
- Walk down.

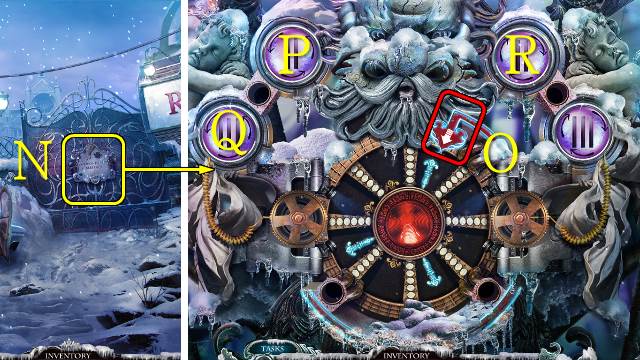
- Remove the screws from the door panel with the SCREWDRIVER for a mini-game (N).
- Use the buttons to rotate the disc; a blue spoke will be added to or removed from the wedge facing the red arrow (O) each time the wheel stops.
- Fill all wedges with spokes.
- Solution: P, P, P, Q, R.
- Walk forward.

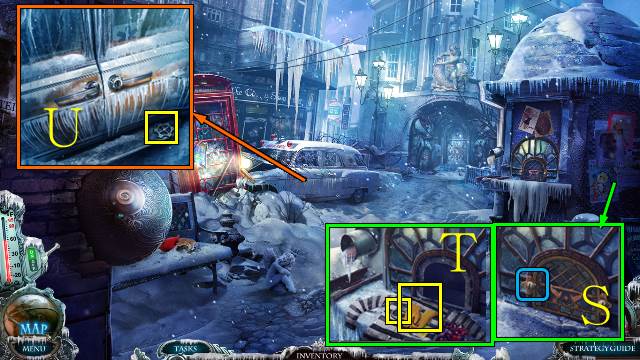
- Remove the screws with your SCREWDRIVER and send ELF through the window to retrieve the items (S); take the GLOVES and HANDCUFFS (T).
- Take the GEAR (U).
- Walk forward.

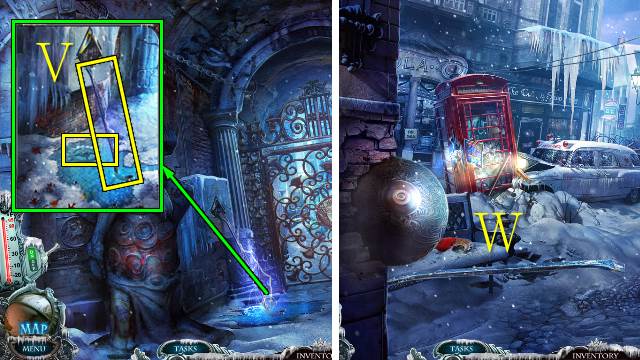
- Take the CROWBAR with the GLOVES; take the GEAR (V).
- Walk down.
- Remove the COPPER BALL with the CROWBAR (W).
- Walk forward.

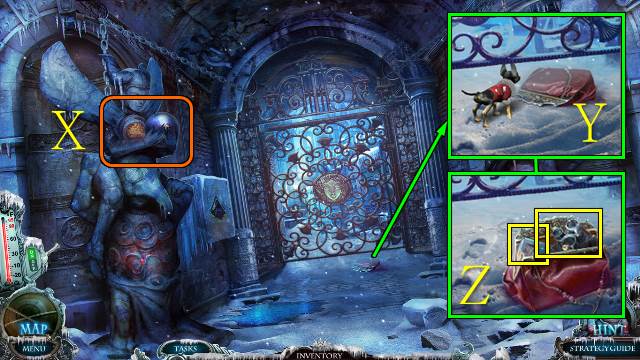
- Put the COPPER BALL on the left statue (X).
- Send ELF through the gate (Y); take the VIDEO CAMERA and tape (Z).
- Walk down twice.

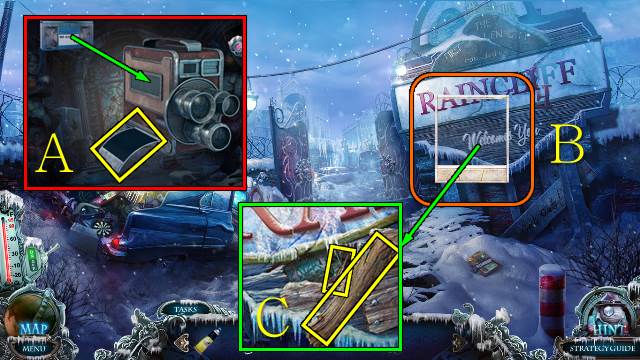
- Access the VIDEO CAMERA and play the tape; take the PHOTO (A).
- Align the image on the PHOTO with the correct place on the screen (B).
- Take the BOARD and TWEEZERS (C).
- Walk forward twice.

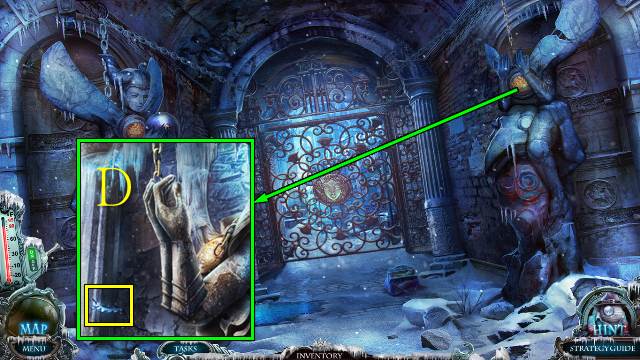
- Take the GEAR with the TWEEZERS (D).
- Walk down.

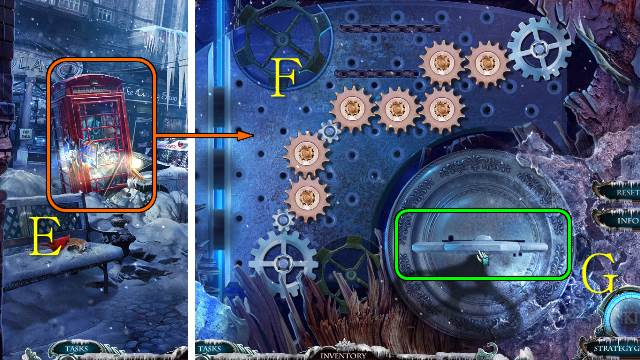
- Put the three GEARS on the phone box for a mini-game (E).
- Put all gears on the pins on the board to connect the large gears on either side (F); turn the handle (G) to check if all gears are moving.

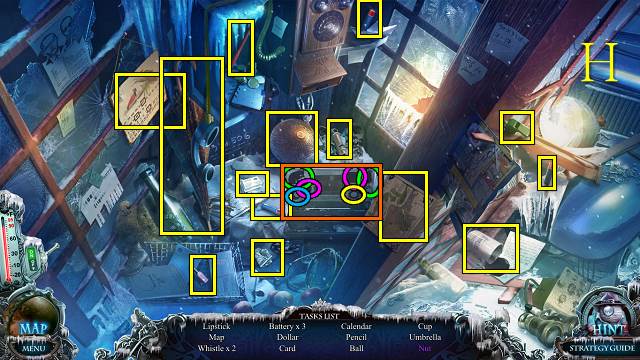
- Play the HOP (H).
- You receive a BRONZE BALL.
- Walk forward.

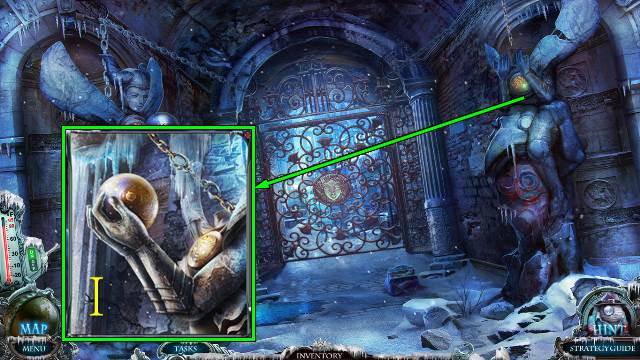
- Fix the chain with the HANDCUFFS; put the BRONZE BALL on the statue (I).
- Walk forward.

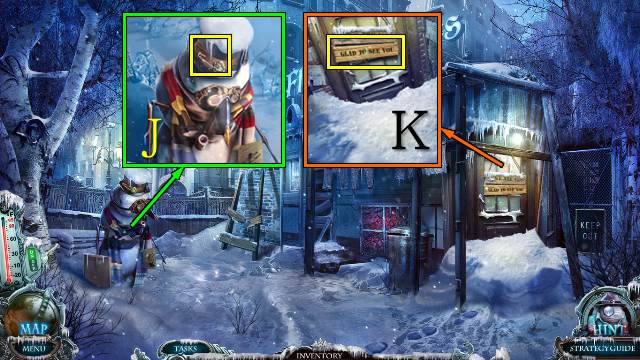
- Take the PIN (J).
- Take the BOARD (K).
- Go to the Town Entrance.

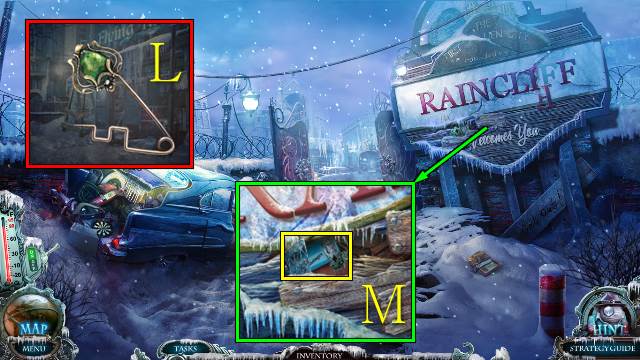
- Access the PIN and bend it into a LOCK PICK (L).
- Pick the lock with the LOCK PICK; take the tape (M).
- Go to the Bar Entrance.

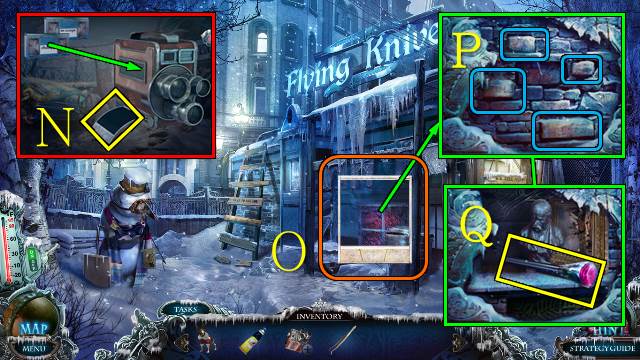
- Play the ‘stranger’ tape on your VIDEO CAMERA; take the PHOTO (N).
- Align the PHOTO with the image on the screen (O).
- Push the four bricks (P); take the LEVER (Q).
- Go to the Car Interior.

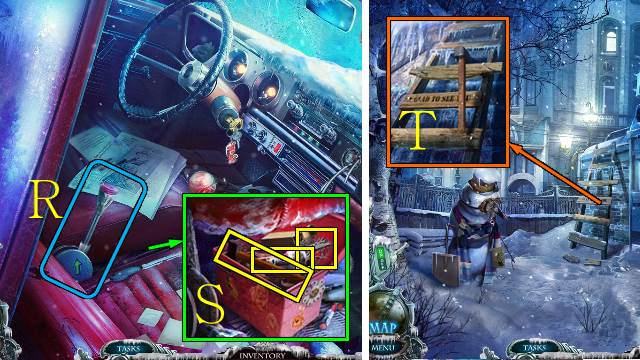
- Put the LEVER in the holder and move it (R).
- Take the HAMMER, FLASHLIGHT and NAILS (S).
- Go to the Bar Entrance.
- Remove the broken rung and put the three BOARDS, NAILS and HAMMER on the ladder (T).
- Go up the ladder.

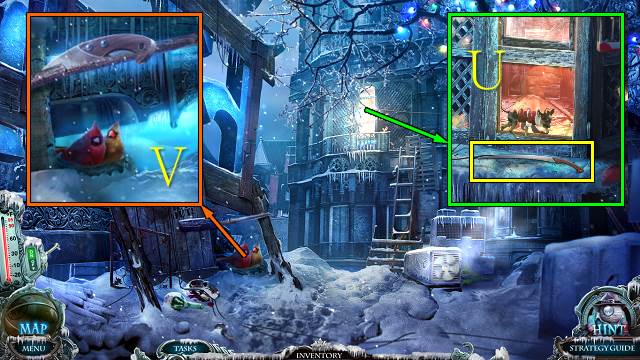
- Send ELF through the window; take the HANDSAW (U).
- Cut the branch with the HANDSAW and take the STICK (V).
- Walk down.

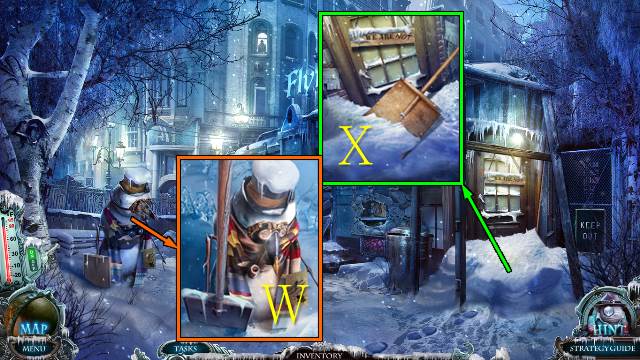
- Put the STICK on the blade and take the SHOVEL (W).
- Clear the snow with the SHOVEL and open the door (X).
- Go to the Bar Interior.
Chapter 2: The Bar

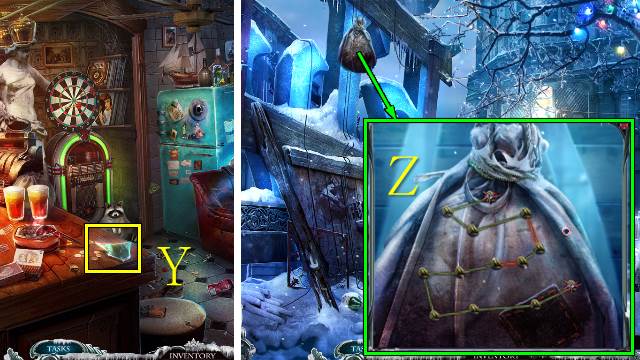
- Take the SHARP GLASS (Y).
- Go to the Bar Roof.
- Cut the string with the SHARP GLASS for a mini-game.
- Move the knots to empty spaces until the strings are untangled (Z).

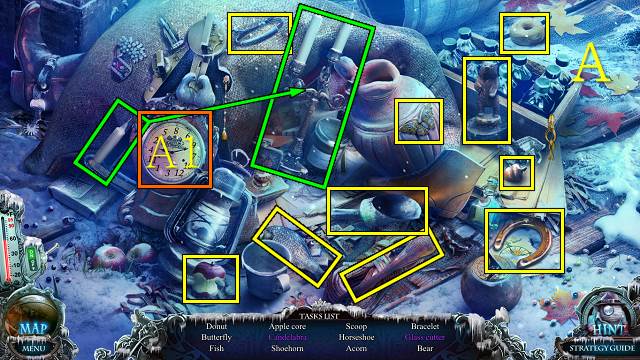
- Play the HOP (A).
- Put the numbers in the right order (A1).
- You receive the GLASS CUTTER.

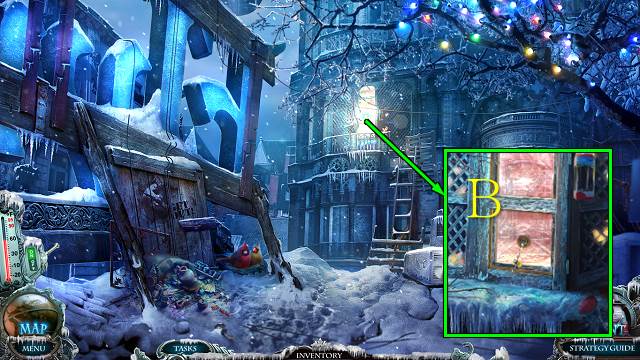
- Cut the window with the GLASS CUTTER (B).
- Walk forward.

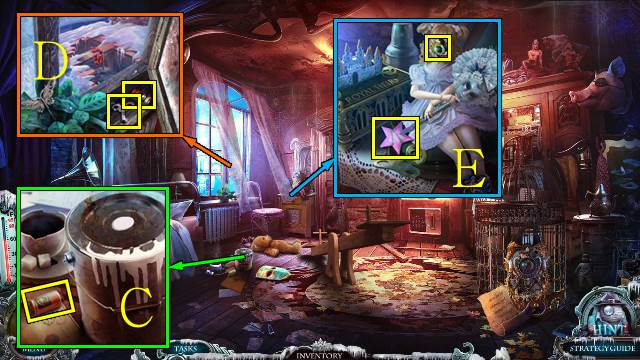
- Take the battery for the FLASHLIGHT (C).
- Take the battery for the FLASHLIGHT and WINDUP KEY (D).
- Take the FAIRY WAND, wind the puppet with the WINDUP KEY and take the PET CAGE KEY part (E).

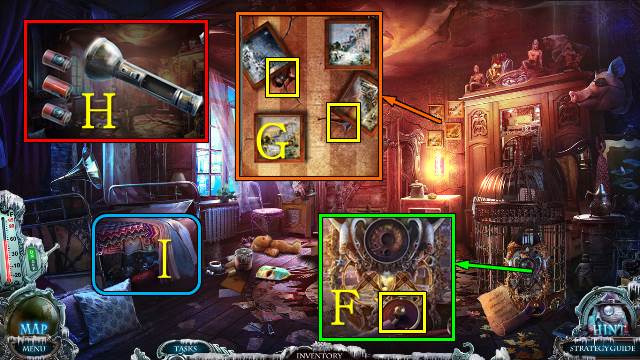
- Take the PET CAGE KEY part (F).
- Move the paintings, take the battery for the FLASHLIGHT and take the PASS CARD with the TWEEZERS (G).
- Access your FLASHLIGHT and put the batteries in it (H).
- Use the FLASHLIGHT under the bed (I).

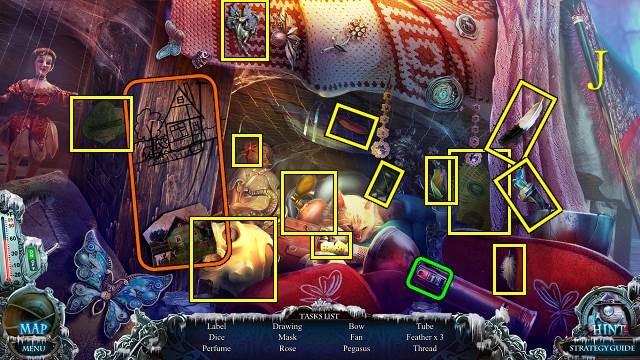
- Play the HOP (J).
- You receive the MASK.

- Take the STONE, put the PASS CARD in the slot and enter 38761 (K); take the BIG ELEPHANT, PET CAGE KEY part and the tape (L).
- Walk down.


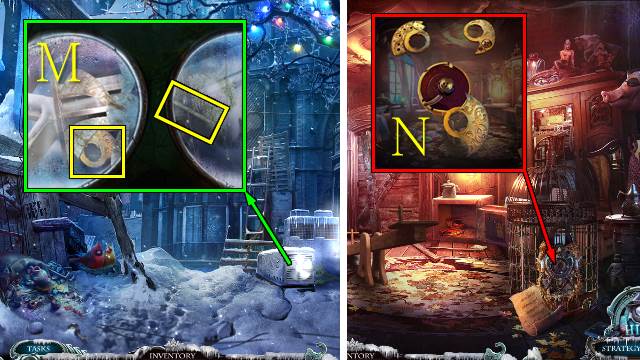
- Use the MASK on the steam; use the FAIRY WAND on the fan and take the PET CAGE KEY part (M).
- Walk forward.
- Access the PET CAGE KEY and assemble it to receive the CAGE KEY (N).

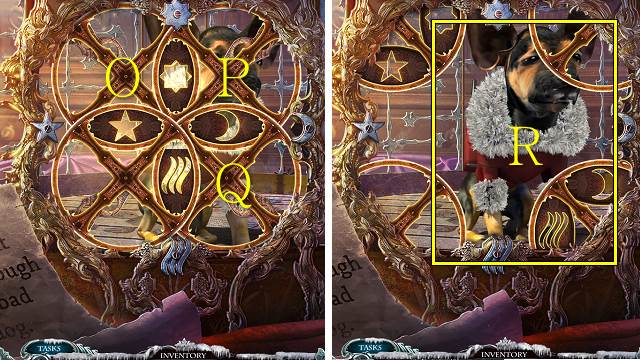
- Put the CAGE KEY on the cage for a mini-game.
- Solution: Px2, Q, Px2, O, Px2, Ox2, Qx2, Px3, Ox2.
- Take ELF (R).

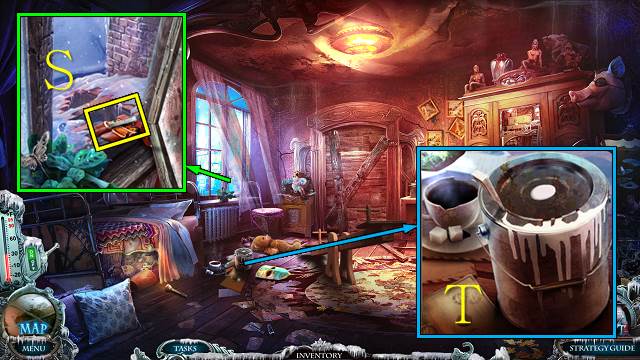
- Send ELF through the window; take the CHISEL (S).
- Open the paint can with the CHISEL and STONE; take the PAINT CAN (T).
- Go to the Bar Interior.

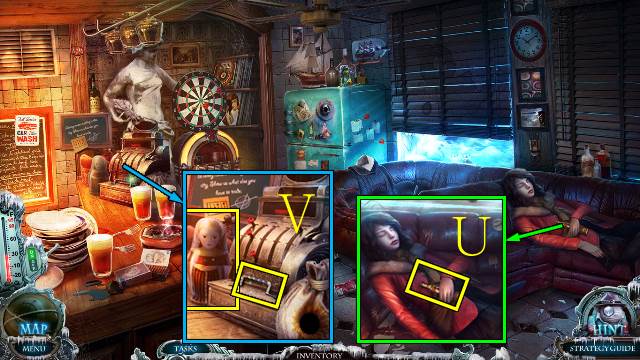
- Throw the PAINT CAN at the invisible man.
- Move Emilie’s arm; take the PRINCE STATUE (U).
- Take the DOLL and HANDLE (V).
- Go to the Apartment.

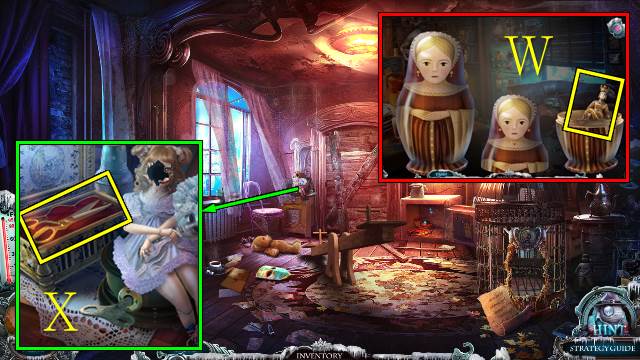
- Access the DOLL and keep opening it until you find the PRINCESS STATUE (W).
- Put the PRINCE STATUE and PRINCESS STATUE on the box; take the SCISSORS (X).
- Go to the Bar Interior.

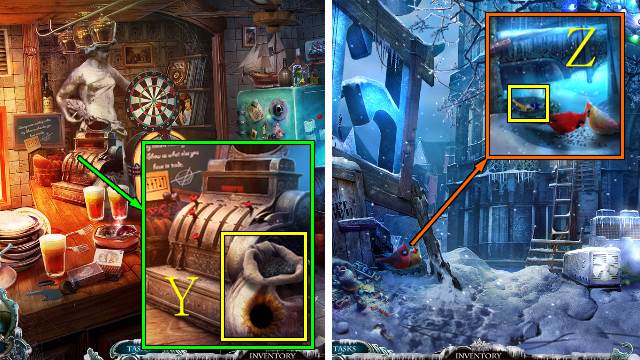
- Cut the string with the SCISSORS; take the SUNFLOWER SEEDS (Y).
- Go to the Bar Roof.
- Feed the SUNFLOWER SEEDS to the birds; take the AMBULANCE KEY (Z).
- Go to the Street.

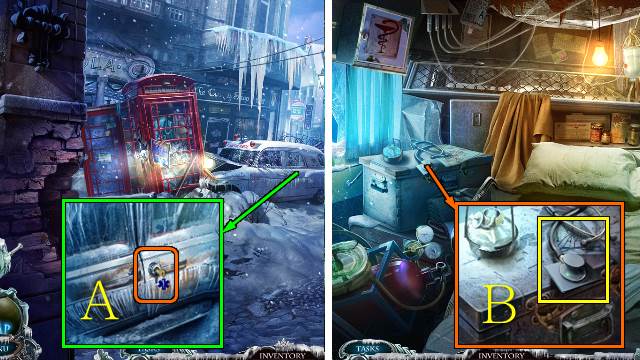
- Try to enter the ambulance; you receive VETTORI’S KEY.
- Open the door with the AMBULANCE KEY (A).
- Enter the Ambulance.
- Take the STETHOSCOPE (B).
- Go to the Bar Interior.

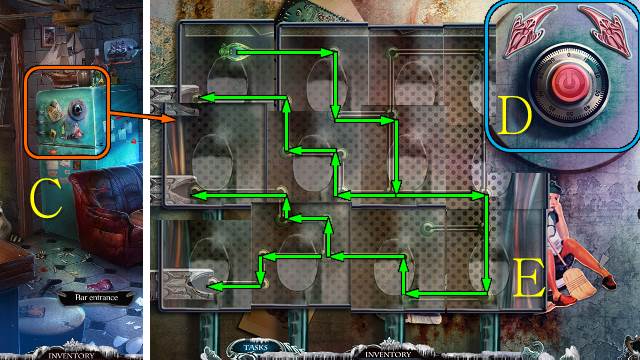
- Put the STETHOSCOPE on the fridge for a mini-game (C).
- Move the stethoscope over the fridge to find the green arrow; use the red arrow buttons to change the direction of the arrow and the round button to move the green arrow to the next junction (D).
- Move the green arrow along the tracks to each of the three locks (E).

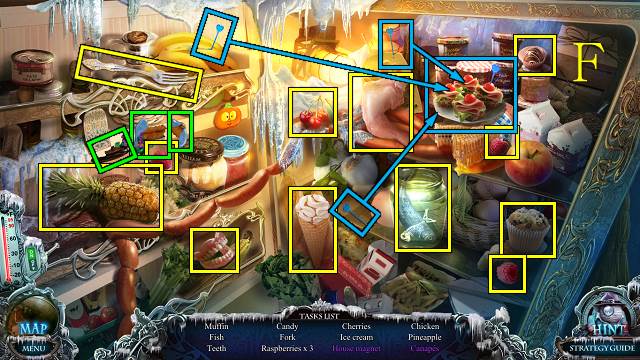
- Play the HOP (F).
- You receive the FISH.

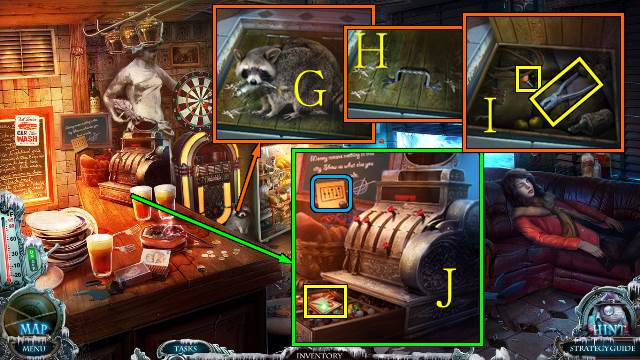
- Give the FISH to the raccoon (G); put the HANDLE on the hatch (H), open it and take the CASH REGISTER BUTTON and PLIERS (I).
- Put the CASH REGISTER BUTTON on the cash register; move the buttons to the formation shown in the diagram and take the MATCHBOOK (J).
- Go to the Ambulance.

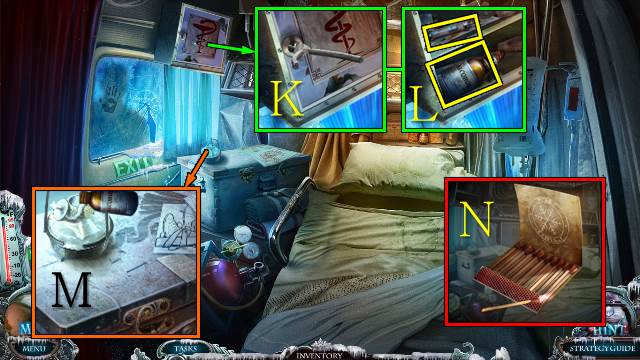
- Open the cabinet with the PLIERS (K); take the ALCOHOL and SYRINGE (L).
- Pour the ALCOHOL in the burner and close it (M).
- Access the MATCHBOOK, take a match and strike it; you receive a MATCH (N).
- Light the burner with the MATCH; take the BUNSEN BURNER (M).
- Walk down.

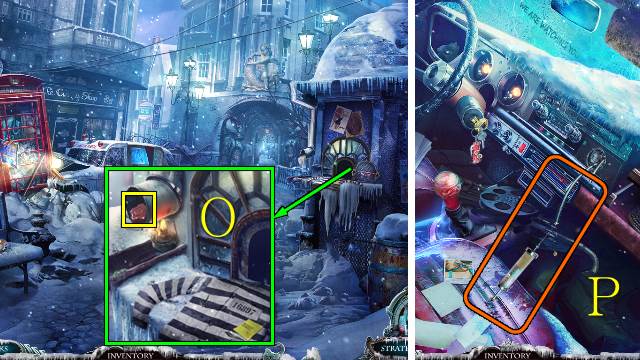
- Put the BUNSEN BURNER under the pipe; take the VALVE (O).
- Go to the Car Interior.
- Take some oil with the SYRINGE; you get a SYRINGE WITH OIL (P).
- Go to the Ambulance.

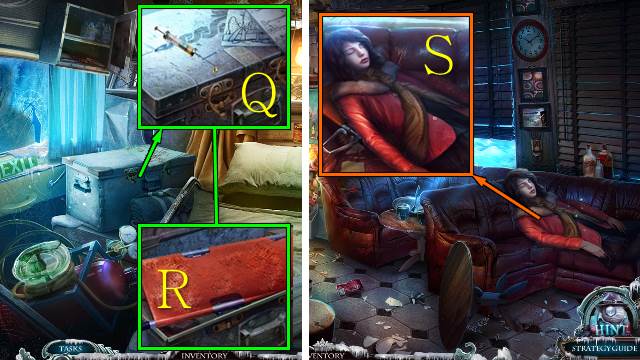
- Grease the latches with the SYRINGE WITH OIL (Q); open the box and take the STRETCHER (R).
- Go to the Bar Interior.
- Put Emilie on the STRETCHER and take EMILIE (S).
- Go to the Ambulance.

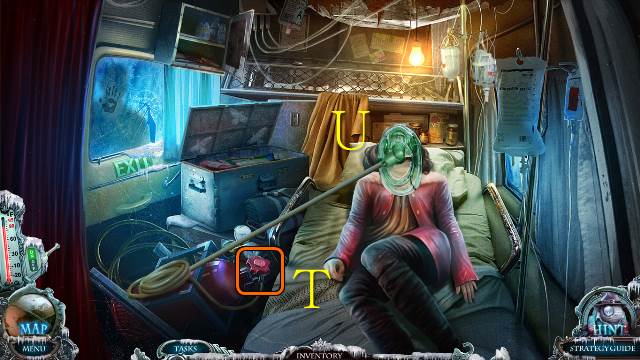
- Put EMILIE on the bed.
- Put the VALVE on the oxygen tank and turn it (T).
- Put the mask on Emilie’s face (U).
Chapter 3: Jail Break

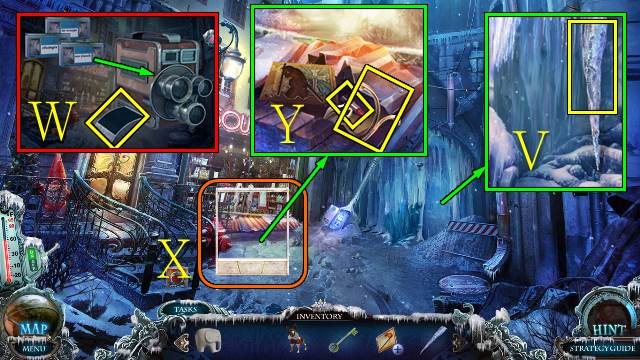
- Walk forward to the Side Street.
- Take the ICICLE (V).
- Play the ‘new friends’ tape on your VIDEO CAMERA; take the PHOTO (W).
- Align the PHOTO (X).
- Raise the corrugated iron with the ICICLE; take the DOOR HANDLE and LIPSTICK (Y).

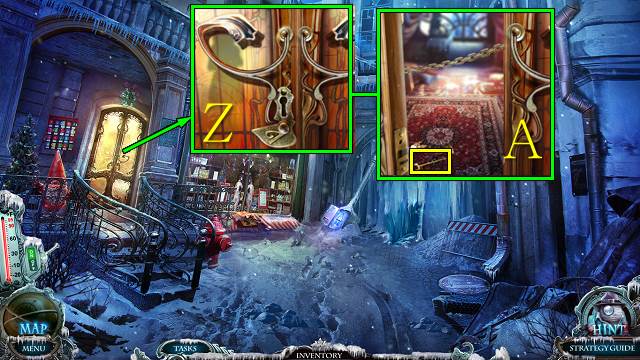
- Put the DOOR HANDLE on the door and open it with VETTORI’S KEY (Z); take the FORK (A).

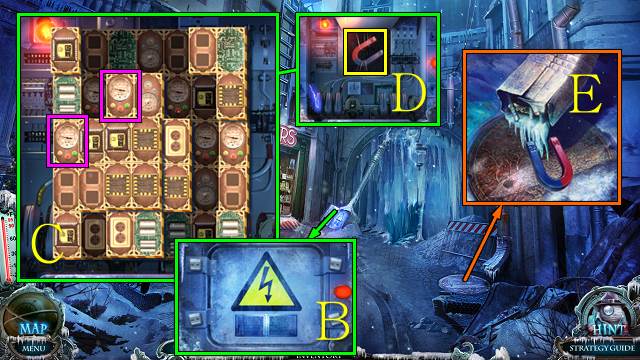
- Remove the bolts with the FORK for a mini-game (B).
- Remove all pieces from the board by selecting pairs of matching pieces (C).
- Take the MAGNET (D).
- Take the ZIPPER PULL with the MAGNET (E).
- Walk down.

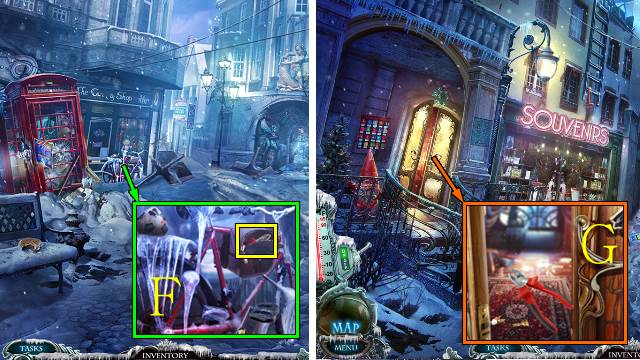
- Open the bag with the ZIPPER PULL; take the CUTTERS (F).
- Go to the Side Street.
- Cut the chain with the CUTTERS (G).
- Go left.

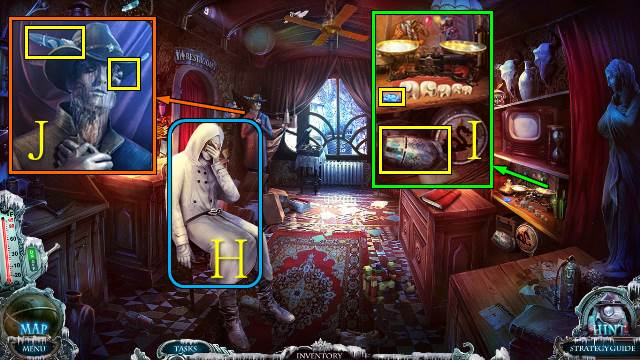
- Talk to Prince Andre (H); you receive a NET GUN and a tape.
- Take the STATUE HEAD and AZURE EYE (I).
- Move the mask; take the ELECTRIC COIL and FEATHER (J).

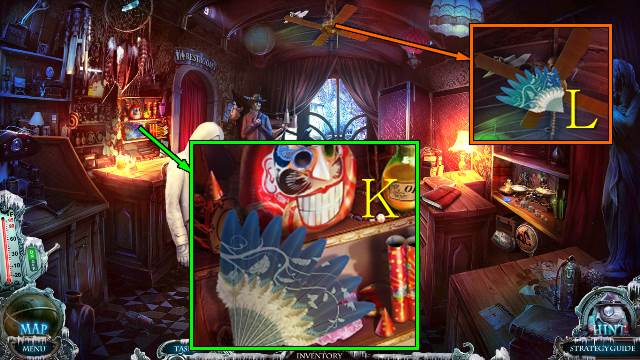
- Put the FEATHER on the fan for a mini-game.
- Move the feathers to make one continuous pattern (K).
- Take the FAN.
- Retrieve the PAPER PLANE with the FAN (L).
- Walk down.

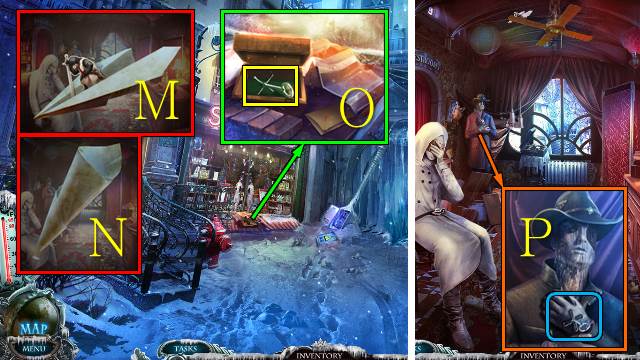
- Access the PAPER PLANE and take the KNIGHT (M); turn the paper into a PAPER CONE (N).
- Open the box with the KNIGHT; take the CROSS KEY (O).
- Go left.
- Move the mannequin’s hand with the CROSS KEY (P).

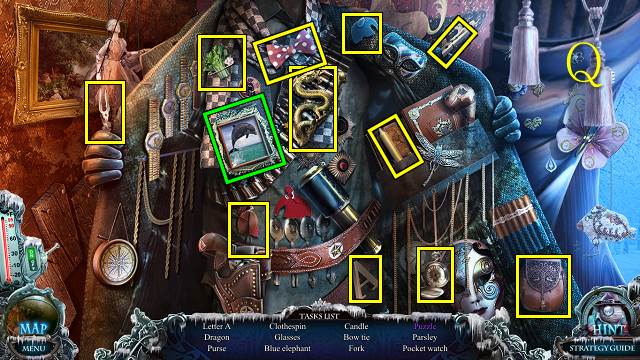
- Play the HOP (Q).
- You receive the DRAGON.

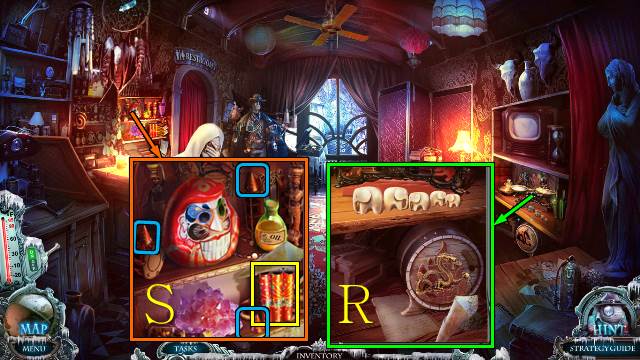
- Open the barrel with the DRAGON; use the PAPER CONE to get a CONE OF GUNPOWDER (R).
- Use the CONE OF GUNPOWDER on the fireworks; put the three caps on the cylinders and take the FIREWORKS (S).
- Walk down.

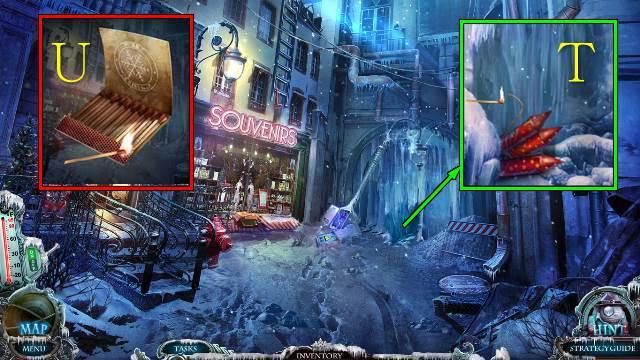
- Place the FIREWORKS among the ice (T).
- Open the MATCHBOOK and strike a MATCH (U).
- Light the fireworks with the MATCH (T).
- Walk forward.

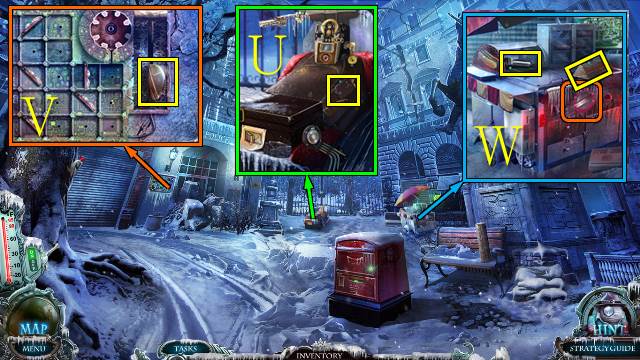
- Take the PATCH (U).
- Take the HEATING DIAL (V).
- Put the HEATING DIAL on the cart and turn it; open the box, feed ELF and take the TONGS and BAR (W).

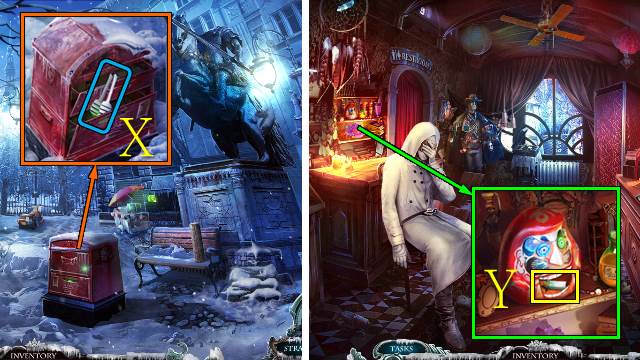
- Open the two drawers and take the EMERALD EYE with the TONGS (X).
- Go to the Souvenir Shop.
- Put the AZURE EYE and EMERALD EYE on the doll; take the BROKEN DAGGER (Y).
- Go to the Square.

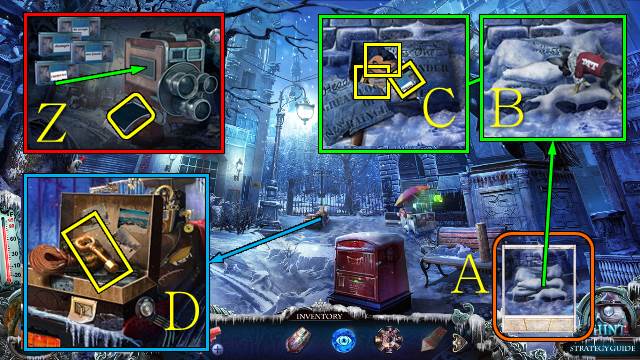
- Play the ‘criminals’ tape on your VIDEO CAMERA; take the PHOTO (Z).
- Align the PHOTO (A).
- Have ELF remove the snow (B); remove the stone with the BROKEN DAGGER and STATUE HEAD and take the tape, LETTER R and TRUNK LEVER (C).
- Open the trunk with the TRUNK LEVER; take HEX KEY (D).
- Go to the Souvenir Shop.

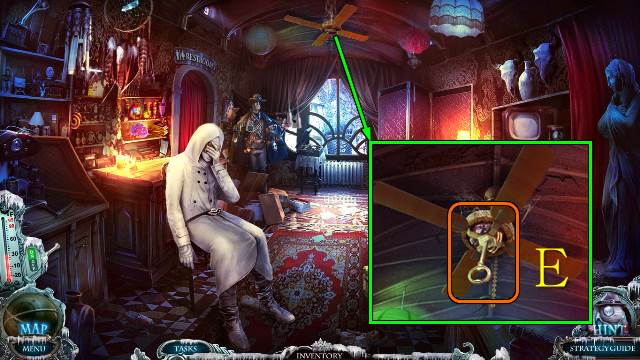
- Pull the chain and open the fan with the HEX KEY; take the ELECTRIC MOTOR (E).
- Go to the Square.

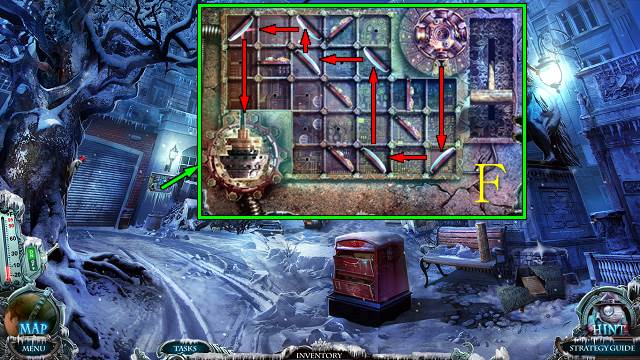
- Put the ELECTRIC COIL and ELECTRIC MOTOR on the panel for a mini-game.
- Place mirrors in the squares and rotate them to guide the current to the motor; pull the lever to check your progress (F).
- Go left.

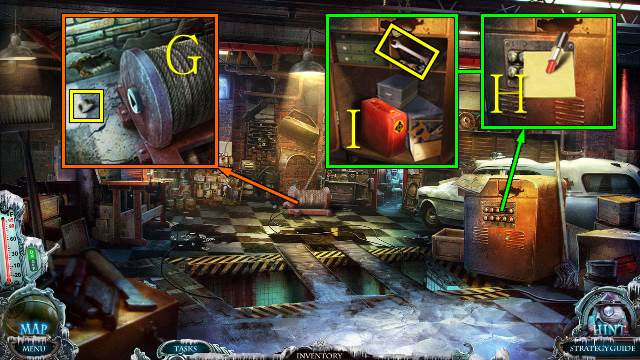
- Take the BUTTON (G).
- Put the BUTTON on the safe; take the paper and rub it with the LIPSTICK for a mini-game (H).
- Enter 120764.
- Take the WRENCH (I).
- Go to the Street.
Chapter 4: The Garage

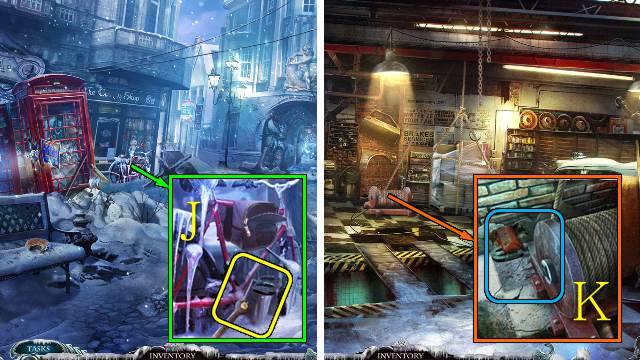
- Remove the bolt with the WRENCH; take the PEDAL (J).
- Go to the Garage.
- Put the PEDAL on the winch and turn it; put the BAR under it to try again (K).
- Walk forward.

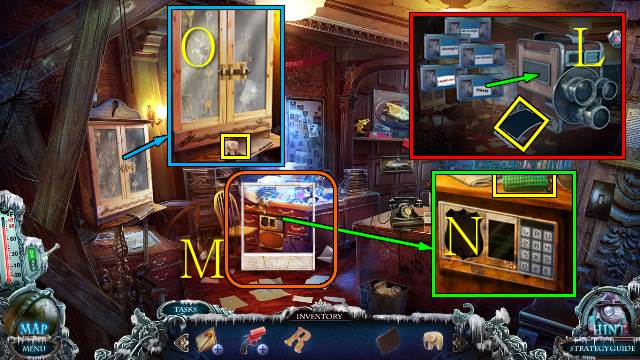
- Watch the ‘tyrant’ tape on your VIDEO CAMERA; take the PHOTO (L).
- Align the PHOTO (M).
- Take the net for the NET GUN (N).
- Take the LITTLE ELEPHANT (O).
- Go to the Souvenir Shop.

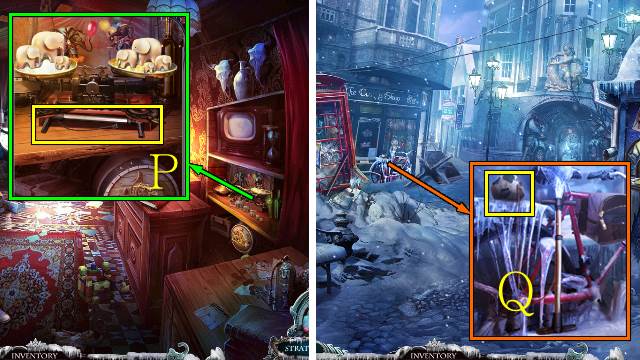
- Put the BIG ELEPHANT and LITTLE ELEPHANT on the shelf for a mini-game (P).
- Put the elephants on the scales to balance the scales.
- Starting at the biggest elephant, place the elephants on the following scales: left, right, right, left, left, right, right.
- Take the PUMP.
- Go to the Street.
- Put the GLUE, PATCH and PUMP on the ball; take the BALL (Q).
- Go to the Side Street.

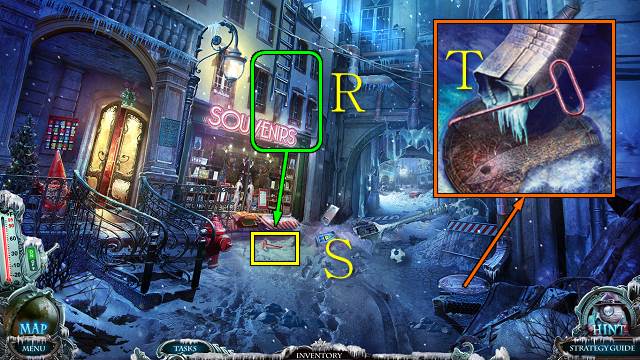
- Throw the BALL at the ladder (R); take the LID HOOK (S).
- Remove the manhole cover with the LID HOOK (T).

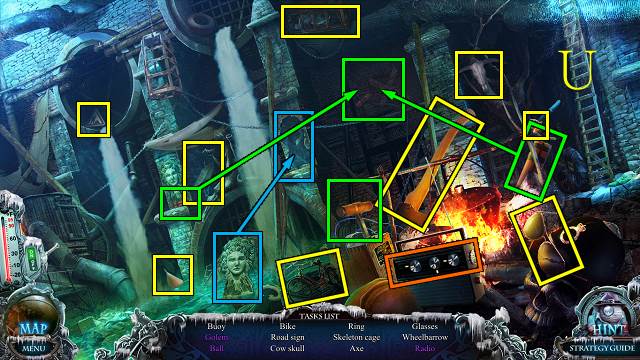
- Play the HOP (U).
- You receive the SIGNET RING.
- Go to the Garage.

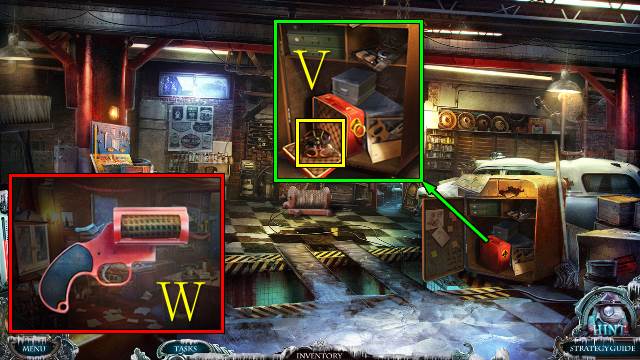
- Open the suitcase with the SIGNET RING; take the THERMAL VISOR (V).
- Access the NET GUN, open it, put the net in it, close it and cock the hammer; take the LOADED NET GUN (W).
- Walk forward.

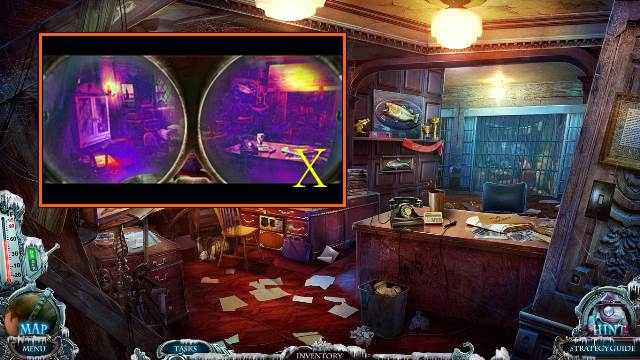
- Use the THERMAL VISOR and shoot the LOADED NET GUN (X).
- Walk forward.

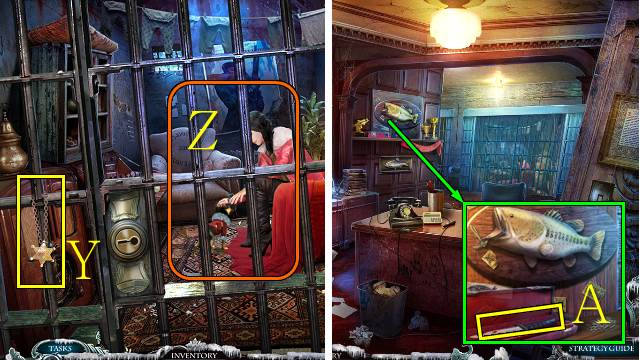
- Take the SHERIFF’S BADGE (Y); send ELF through the bars to receive a RIBBON (Z).
- Walk down.
- Open the box with the SHERIFF’S BADGE; take the POLICE KNIFE (A).
- Walk down.

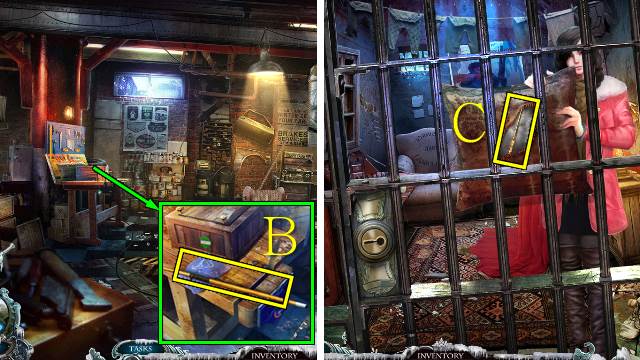
- Repair the cue with the RIBBON; take the CUE (B).
- Go to the Cell.
- Give the CUE to Emilie.
- Cut the cushion with the POLICE KNIFE; take the NEEDLE (C).
- Walk down.

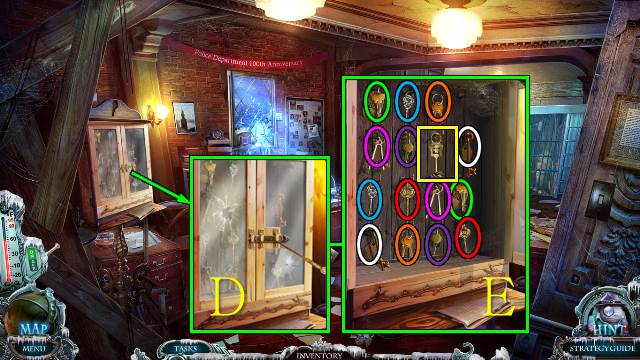
- Open the latch with the NEEDLE for a mini-game (D).
- Find pairs of keys (E).
- Take the CELL KEY.
- Walk forward.

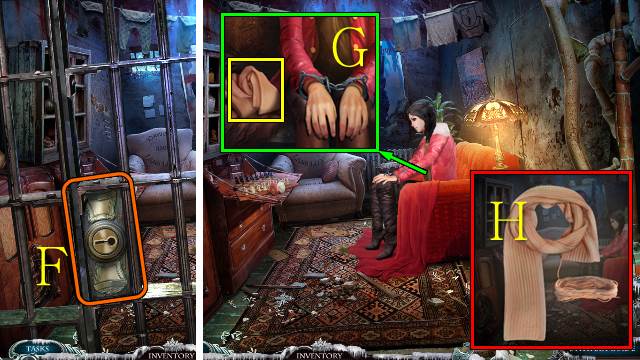
- Open the cell with the CELL KEY (F).
- Take the SCARF (G).
- Access the SCARF and unravel it; take the YARN (H).
- Walk down.

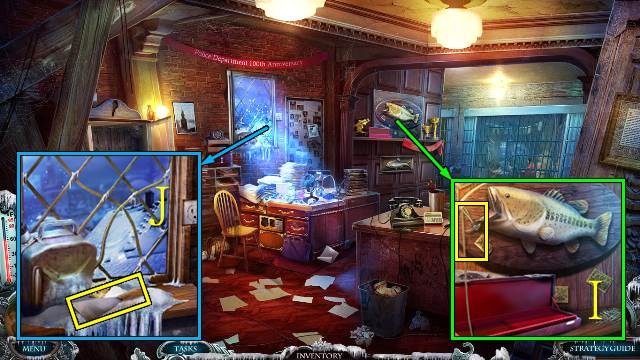
- Attach the YARN to the hook; take the HOOK (I).
- Send ELF through the window; take the PALETTE KNIFE (J).
- Walk forward.

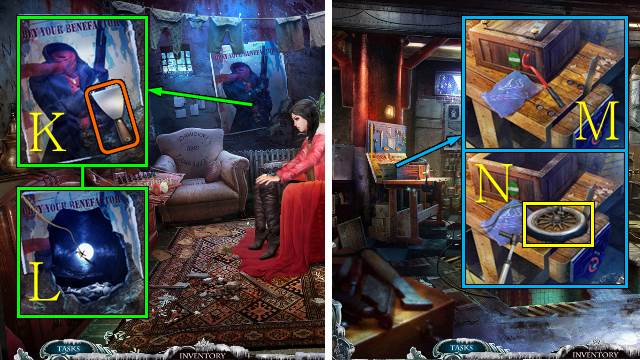
- Remove the poster with the PALETTE KNIFE (K); remove the boards and retrieve the NAIL PULLER with the HOOK (L).
- Go to the Garage.
- Remove the nails with the NAIL PULLER (M); open the box, take the tire, PUMP it up and take the WHEEL (N).
- Walk down.

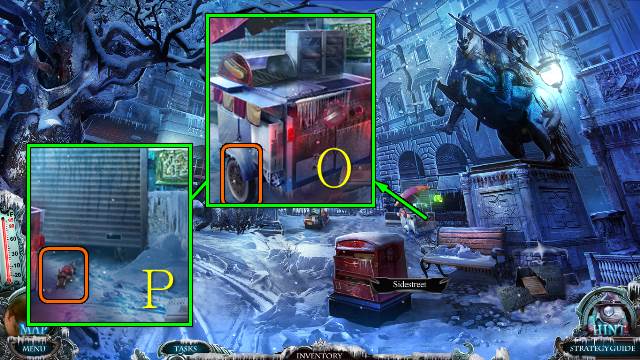
- Put the WHEEL on the cart and move it (O); send ELF through the door (P).

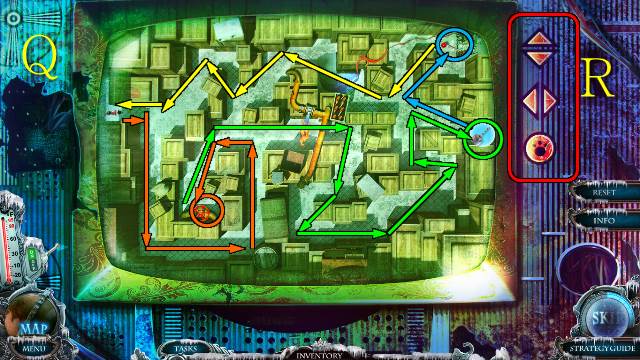
- Play the mini-game (Q).
- Move Elf through the maze with the arrows; push the round button to make him interact with objects (R).
- You receive a DRILL.

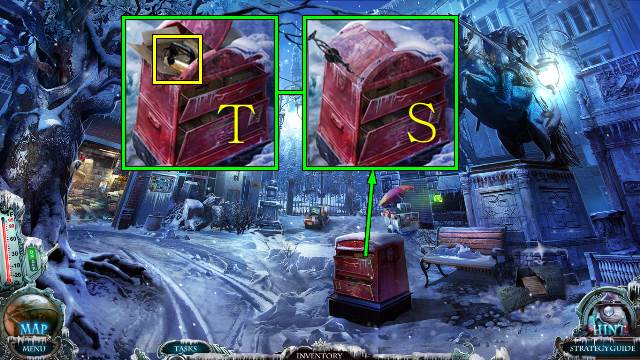
- Open the mailbox with the DRILL (S); cut the string with the POLICE KNIFE and take the IRON (T).
- Go to the Police Station.

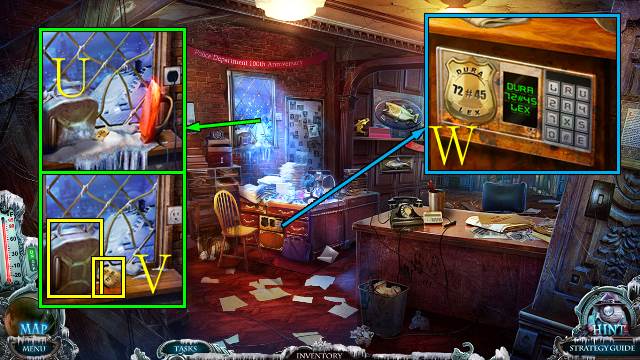
- Plug in the IRON (U); iron the snow and take the BADGE and EMPTY JERRY CAN (V).
- Put the BADGE on the desk for a mini-game.
- Enter DURA 72#45 LEX (W).

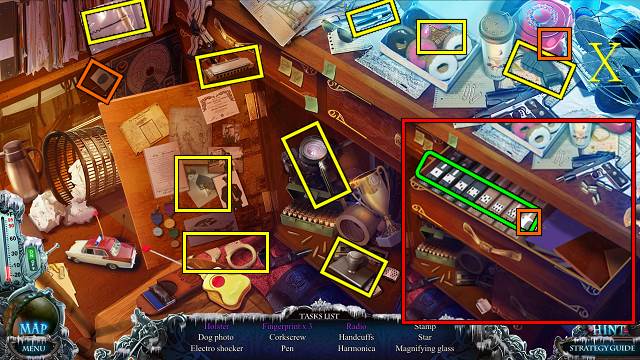
- Play the HOP (X).
- You receive the CORKSCREW.
- Go to the Souvenir Shop.

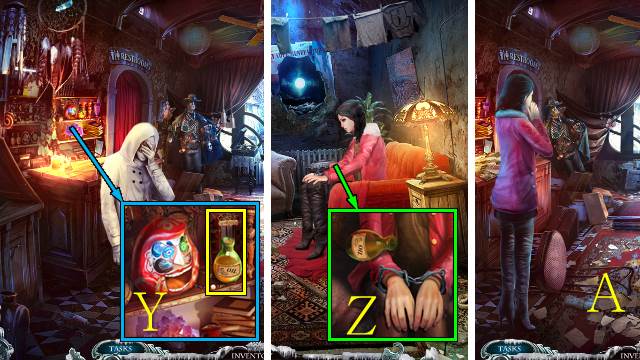
- Use the CORKSCREW to get the CORK; take the OIL BOTTLE (Y).
- Go to the Cell.
- Use the OIL BOTTLE on Emilie’s hands (Z).
- Go to the Souvenir Shop.
- Talk to Emilie (A).
Chapter 5: The Police Van

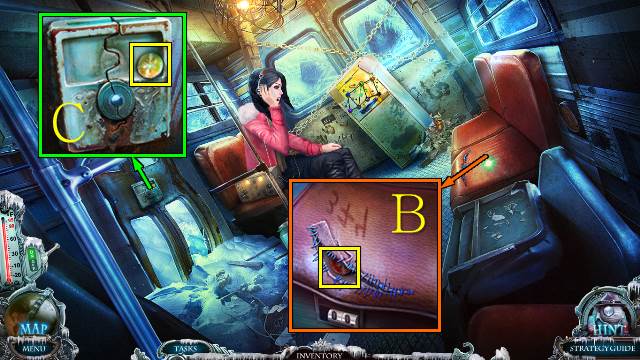
- Cut the seat with the POLICE KNIFE; take the BULB (B).
- Take the BULB (C).

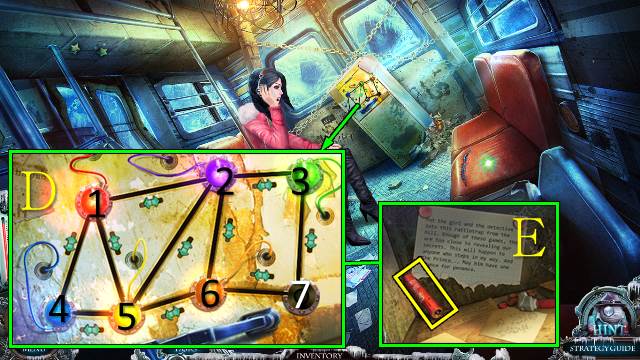
- Put the BULBS on the box for a mini-game (D).
- Slide the bulbs to empty slots until all bulbs are connected to a wire of the same color.
- Solution: 5, 1, 4, 5, 6, 7, 3, 2, 1, 5, 6, 7.
- Take the EXPLOSIVE (E).

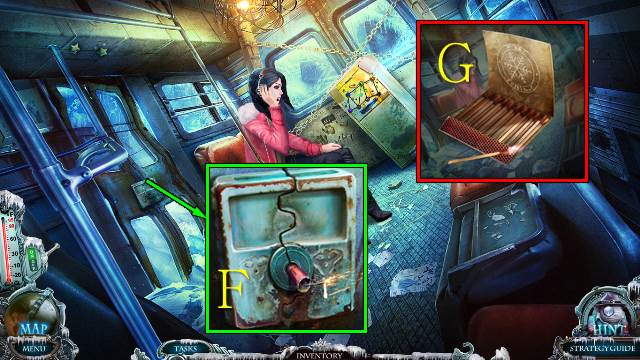
- Put the EXPLOSIVE in the lock (F).
- Open the MATCHBOOK and light a MATCH (G).
- Light the explosive with the MATCH (F).
- You receive a tape.
- Go left.

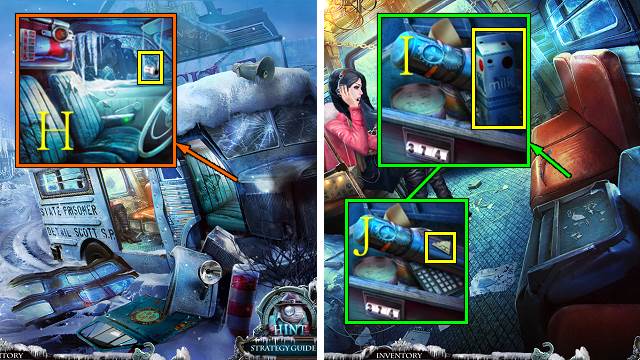
- Take the LOCK DISC (H).
- Go into the Police Van.
- Put the LOCK DISC on the lock, enter 374 and take the MILK (I); take the CODE PIECE (J).
- Go to the Arch.

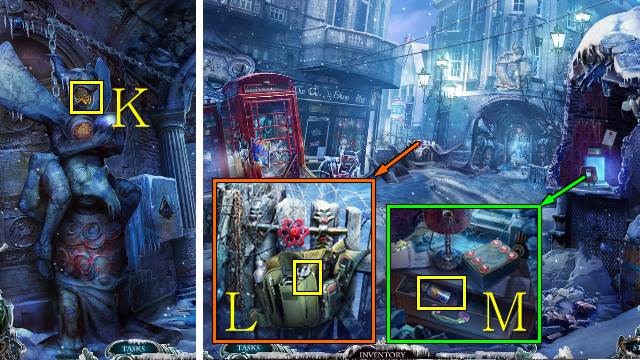
- Open the helmet; take the EAGLE (K).
- Walk down.
- Open the bag with the EAGLE; take the CAN OPENER (L).
- Open the drawer and take the SLEEPING PILLS (M).
- Go to the Police Van.

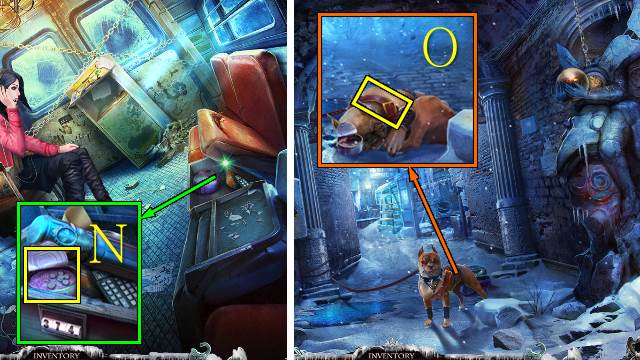
- Open the can with the CAN OPENER, put the SLEEPING PILLS in it and take the FOOD WITH SLEEPING PILLS (N).
- Go to the Arch.
- Give the FOOD WITH SLEEPING PILLS to the dog; take the LEATHER BELT (O).
- Go to the Bar Roof.

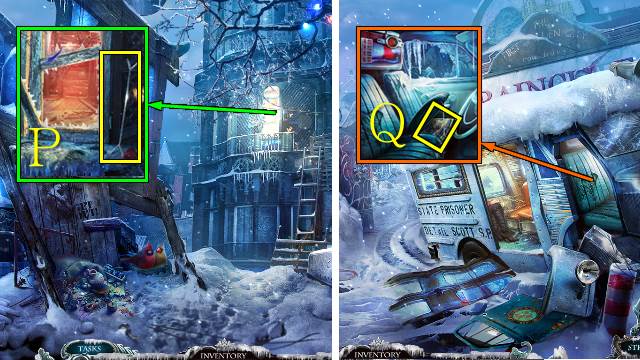
- Take the BRACE (P).
- Go to the Town Entrance.
- Prop the seat up with the BRACE; take the LEATHER COAT (Q).
- Go to the Bar Roof.

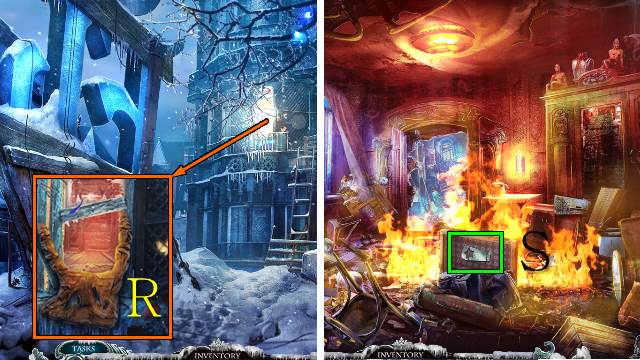
- Put the LEATHER COAT over the broken glass (R).
- Walk forward.
- Trip the wire.
- Take the STAR WRENCH (S).
- Go to the Police Van.

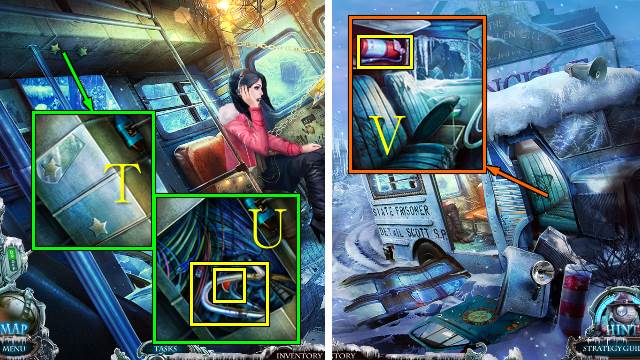
- Open the compartment with the STAR WRENCH (T); cut the hose with the POLICE KNIFE, and take the HOSE and RED BUTTON (U).
- Go left.
- Put the RED BUTTON on the box, open it and take the EXTINGUISHER (V).
- Go to the Apartment.

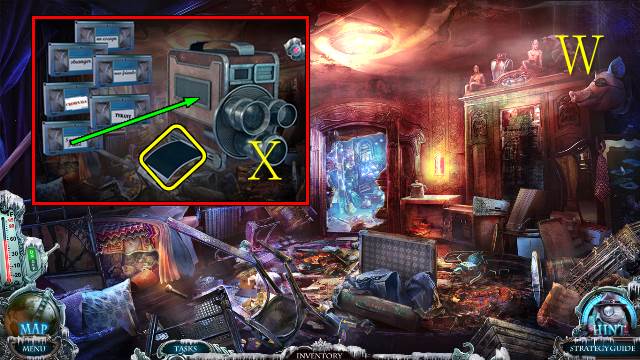
- Use the EXTINGUISHER (W).
- Play the ‘special place’ tape on your VIDEO CAMERA; take the PHOTO (X).

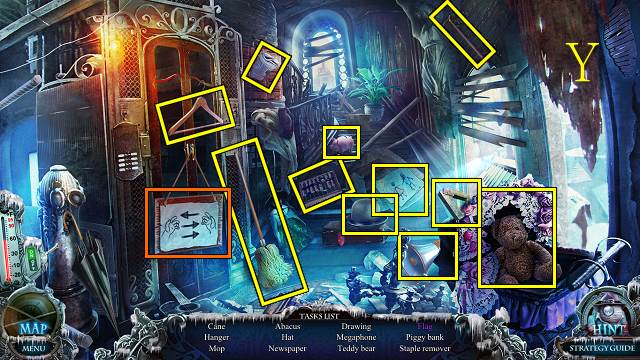
- Play the HOP (Y).
- You receive the STAPLE REMOVER.

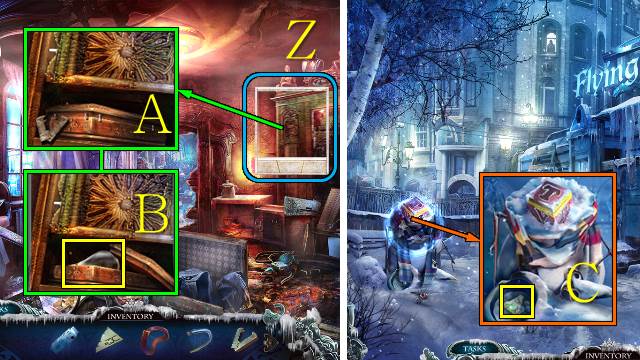
- Align the PHOTO (Z).
- Remove the staples with the STAPLE REMOVER (A); take the BULB (B).
- Walk down twice.
- Take the CODE PIECE (C).
- Go to the Street.

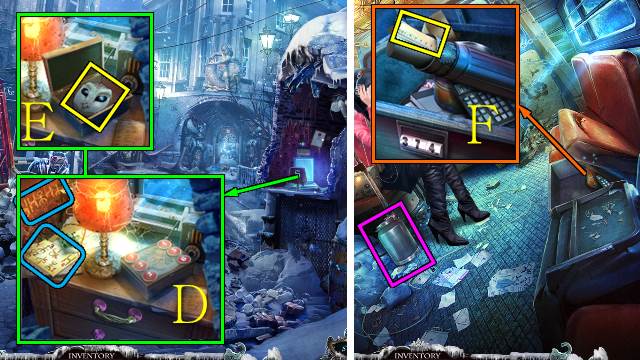
- Put the two CODE PIECES down and put the BULB in the lamp for a mini-game.
- Match the code on the wall with the one on the paper (D).
- Enter 642531.
- Take the OWL (E).
- Go to the Police Van.
- Put the OWL on the cylinder; take the RULER (F).
- Go to the Apartment.

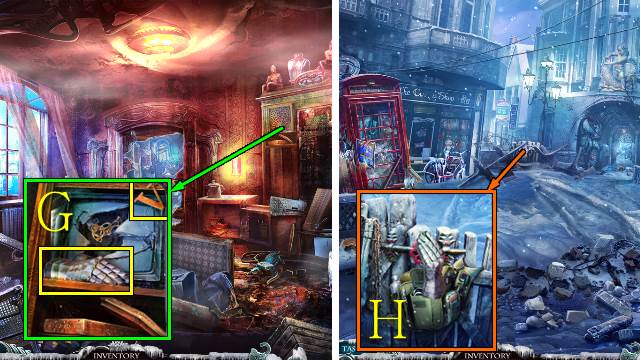
- Open the cupboard with the RULER; take the GAUNTLET and LETTER V (G).
- Go to the Street.
- Remove the barbed wire with the GAUNTLET; open the gate (H).
- Go to the Souvenir Shop.

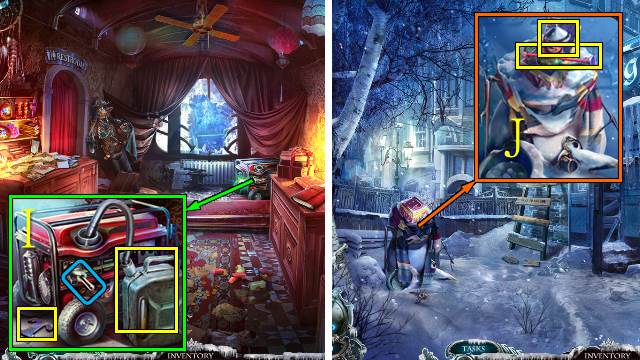
- Turn off the generator and take the LETTER T; put the HOSE down the hole, put the EMPTY JERRY CAN under it and take the FULL JERRY CAN(I).
- Go to the Bar Entrance.
- Put the LETTER R, LETTER V and LETTER T on the block; take the SUCTION ARROW and FUNNEL (J).
- Go to the Street.

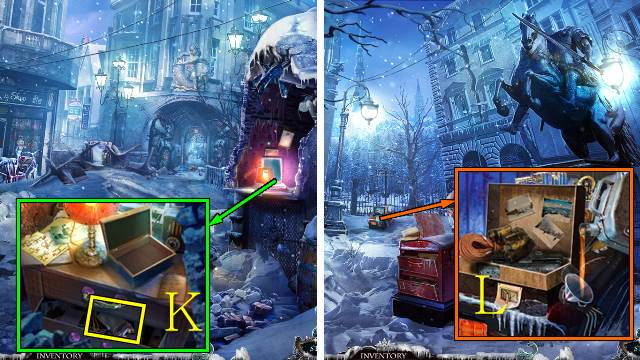
- Open the drawer with the SUCTION ARROW; take the STUN GUN (K).
- Go to the Square.
- Open the fuel tank, and put the FUNNEL and FULL JERRY CAN on it; turn the key (L).
- Go forward.

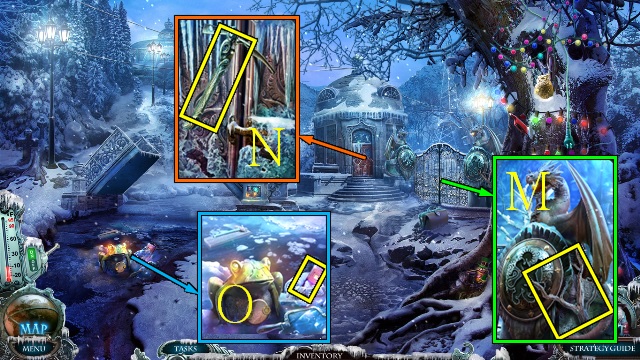
- Take the BRANCH (M).
- Take the ICE AXE (N).
- Remove the ice with the ICE AXE and take the ENERGY CELL (O).

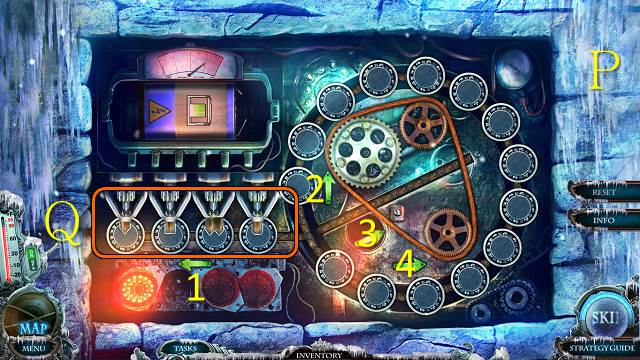
- Replace the torn belt with your LEATHER BELT, put the ENERGY CELL on the panel and zap it with the STUN GUN for a mini-game (P).
- Use the arrows to move the shaped discs to the rods with the same shape (Q).
- Solution: 4, 1, 2, 1, 4, 3, 2, 1, 1, 1, 1.
- Go left.

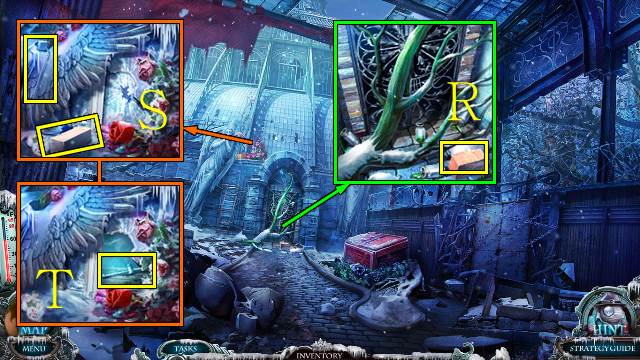
- Take the BRICK (R).
- Take the BAR and EXTENSION CORD (S); smash the window with the BRICK, send ELF through and take the WORKBENCH HANDLE (T).
- Go to the Garage.

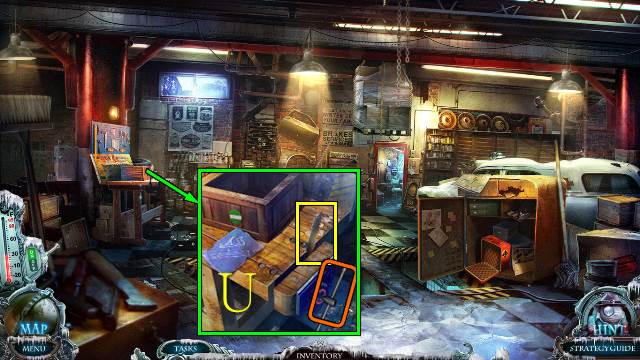
- Put the WORKBENCH HANDLE on the bench, turn it and take the HANDSAW BLADE (U).
- Go to the Garden.
Chapter 6: The Garden

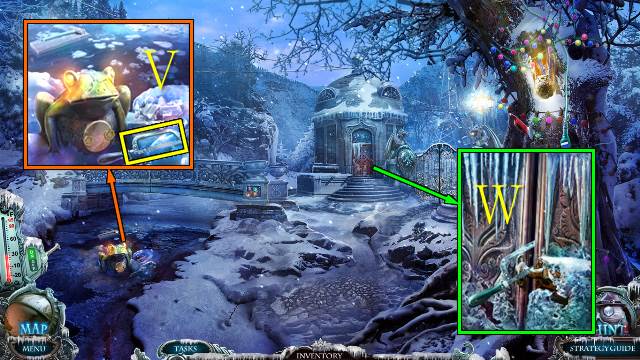
- Put the HANDSAW BLADE on the saw; take the HANDSAW (V).
- Saw through the latch with the HANDSAW (W).

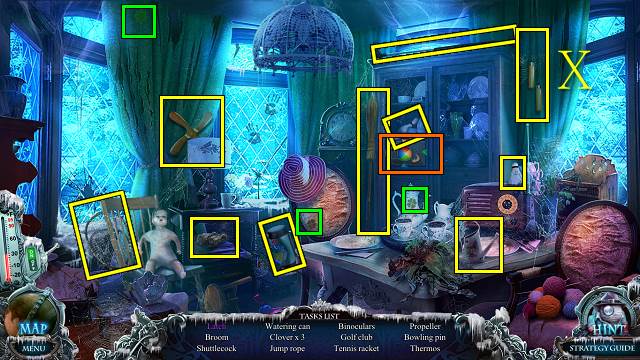
- Play the HOP (X).
- You receive a LATCH.
- Go left.

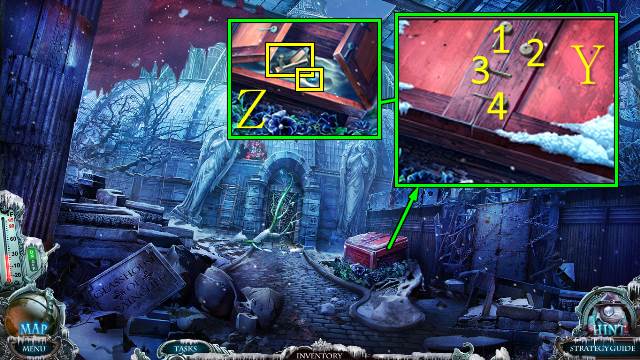
- Put the LATCH on the hatch for a mini-game.
- Turn the latches until they’re all open (Y).
- Solution: 3, 3, 4.
- Take the COIN and JACKPLANE (Z).
- Go to the Garage.

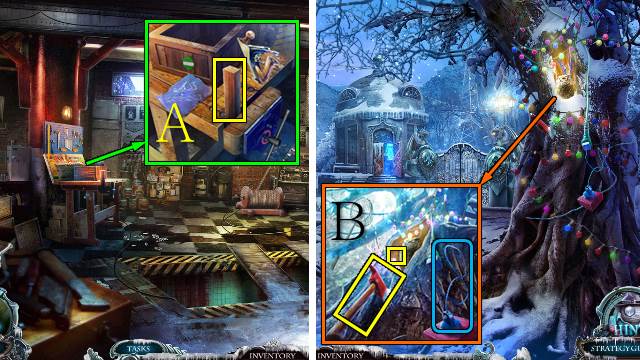
- Put the BAR in the vice and shape it with the JACKPLANE; take the HANDLE (A).
- Go to the Garden.
- Put the EXTENSION CABLE on the cable and take the LION; put the HANDLE on the axe and take the AXE (B).
- Go left.

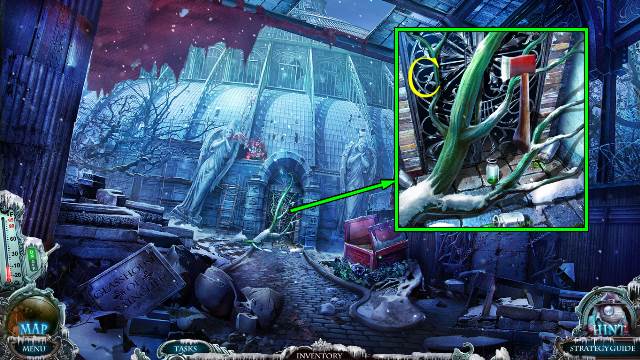
- Remove the branch with the AXE (C).
- Walk forward.

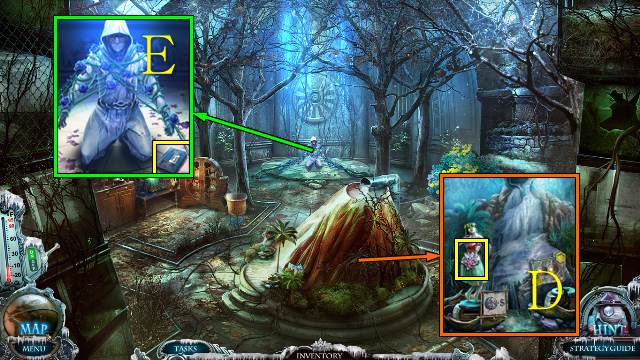
- Give the COIN to the Hula girl; take the flower, which will be added to the BRANCH (D).
- Take the tape (E).
- Walk down.

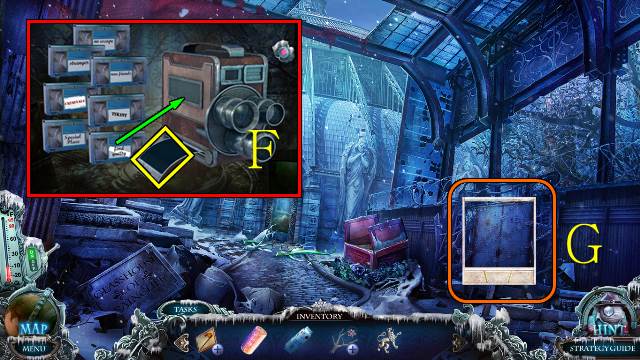
- Play the ‘find guilty’ tape on your VIDEO CAMERA; take the PHOTO (F).
- Line up the PHOTO (G).

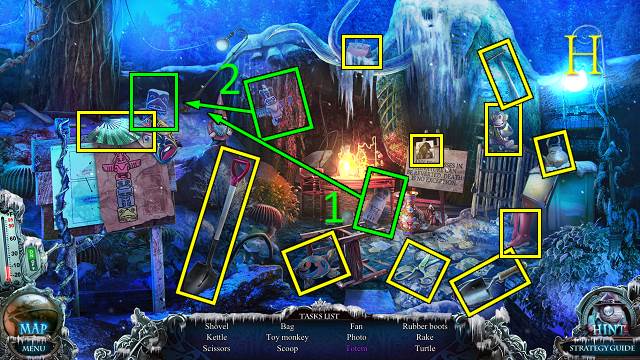
- Play the HOP (H).
- You receive the SCOOP.

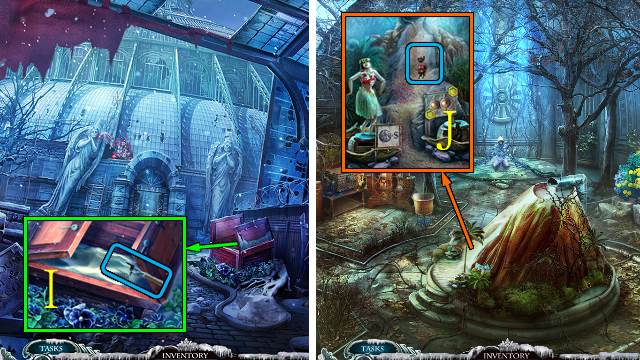
- Take some sand with the SCOOP to receive a SCOOP WITH SAND (I).
- Walk forward.
- Put the SCOOP WITH SAND on the ice and send ELF up the slope; you receive the LAB TABLE KEY (J).

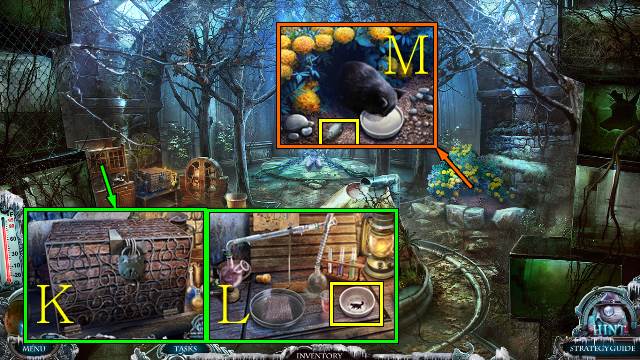
- Open the chest with the LAB TABLE KEY (K).
- Take the BOWL (L).
- Put the BOWL by the flowers and put MILK in it; take the TOY MOUSE (M).
- Go to the Garden.

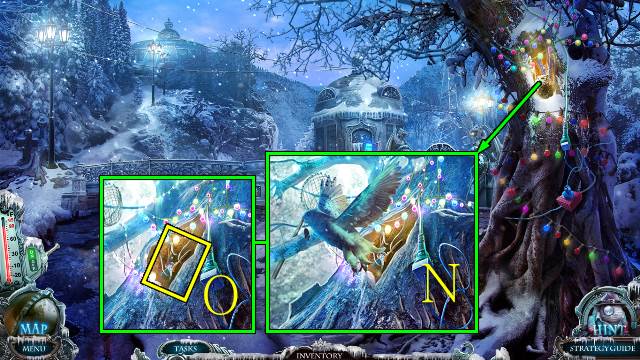
- Give the TOY MOUSE to the owl (N); take the SMALL PRUNING SHEARS (O).
- Go left.

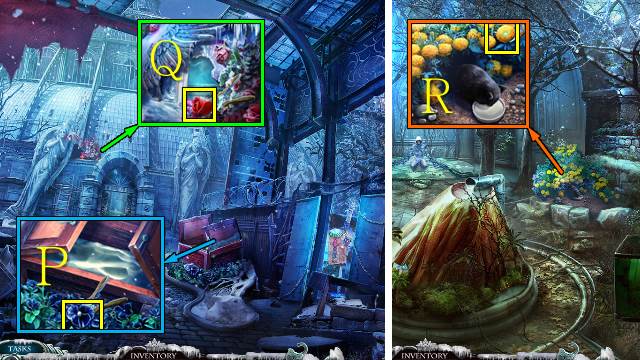
- Cut a BLUE FLOWER with the SMALL PRUNING SHEARS (P).
- Cut a RED FLOWER with the SMALL PRUNING SHEARS (Q).
- Walk forward.
- Cut a YELLOW FLOWER with the SMALL PRUNING SHEARS (R).

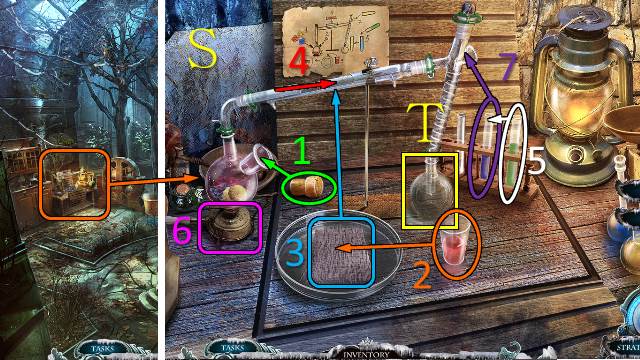
- Put the BLUE FLOWER, YELLOW FLOWER and RED FLOWER in the retort for a mini-game (S).
- Follow the instructions on the paper.
- Take the HERBICIDE (T).

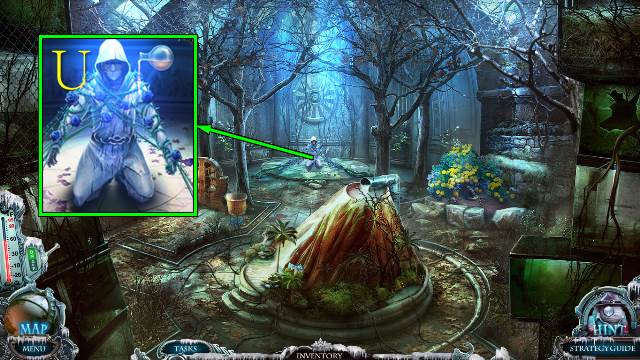
- Pour the HERBICIDE over Prince Andre; you receive a SUN (U).
- Go to the Garden.

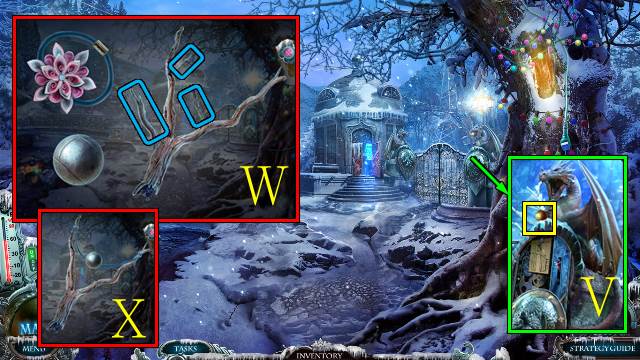
- Put the SUN and LION on the shield; take the ball, which will be added to the BRANCH (V).
- Access the BRANCH, snap off the extra twigs, remove the flower from the rubber band, attach the rubber band to the branch and add the ball (W); take the SLINGSHOT (X).


- Retrieve the NET with the SLINGSHOT (Y).
- Get the LEVER with the NET (Z).
- Put the LEVER in the holder and pull it (A).
- Go right.
Chapter 7: The Visibility Potion

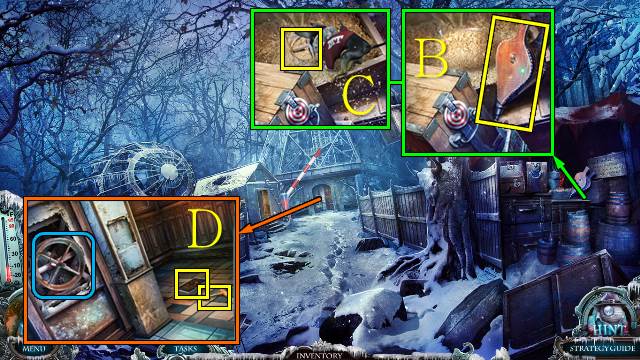
- Take the BELLOWS (B); release ELF on the sawdust and take the BIG VALVE (C).
- Put the BIG VALVE on the elevator doors; take the BROKEN ELEVATOR PANEL and BOLT REMOVER (D).
- Go to the Glasshouse.

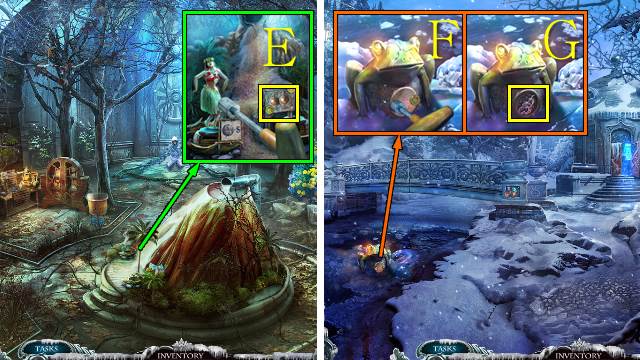
- Remove the bolts with your BOLT REMOVER; take the part of the BROKEN ELEVATOR PANEL (E).
- Walk down twice.
- Remove the bolts with your BOLT REMOVER (F); take the part of the BROKEN ELEVATOR PANEL (G).
- Go to the Apartment.

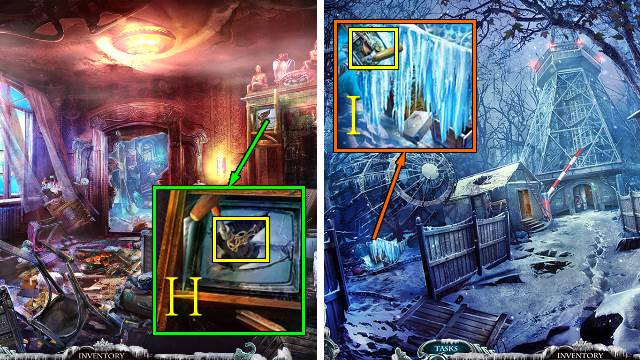
- Remove the bolts with your BOLT REMOVER; take the part of the BROKEN ELEVATOR PANEL (H).
- Go to the Tower Entrance.
- Remove the bolts with your BOLT REMOVER; take the part of the BROKEN ELEVATOR PANEL (I).

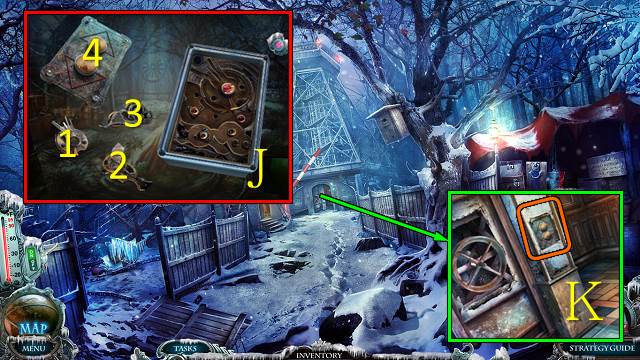
- Access the BROKEN ELEVATOR PANEL and put the pieces together; take the ELEVATOR PANEL (J).
- Put the ELEVATOR PANEL on the elevator (K).
- Walk forward.

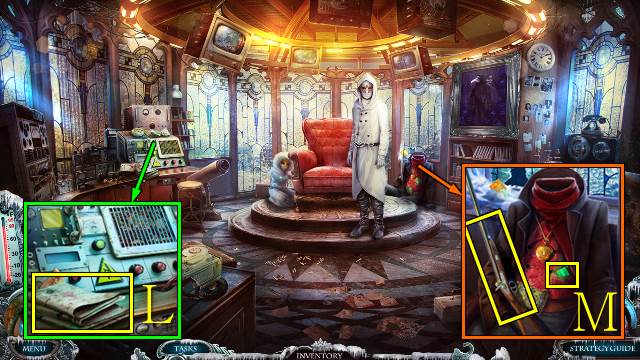
- Take the NEWSPAPERS (L).
- Take the STASH PART and UNLOADED GUN (M).
- Walk down.

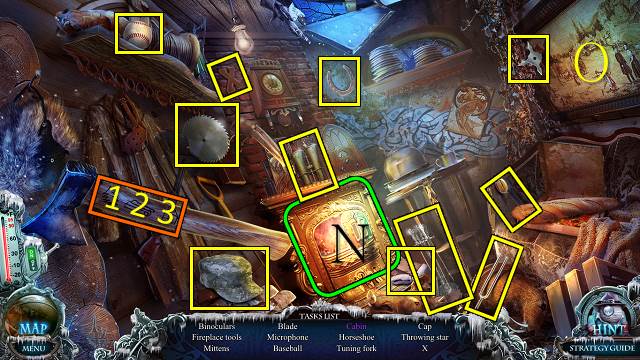
- Open the stove in the shed and put the NEWSPAPERS in it (N).
- Light a MATCH in your MATCHBOOK.
- Light the paper with the MATCH and use the BELLOWS.
- Play the HOP (O).
- You receive the TUNING FORK.

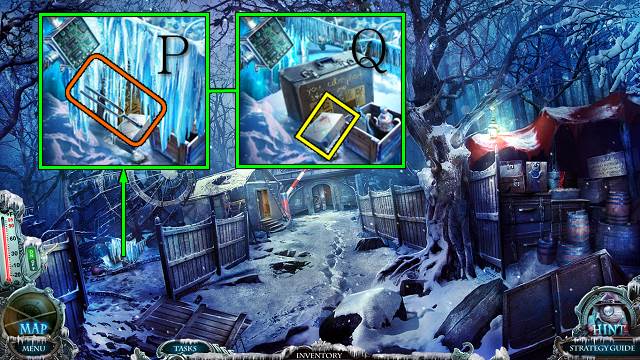
- Break the ice with the TUNING FORK (P); take the SALT (Q).
- Walk forward.


- Put the SALT on the windowsill; take the GOLDEN KEY CARD (R).
- Open the shackle with the GOLDEN KEY CARD; take the MANICURE SCISSORS (S).
- Cut the chain with the MANICURE SCISSORS; take the CLOCK (T).
- Walk down.

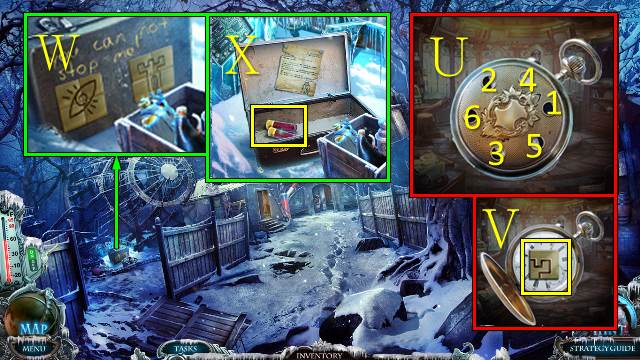
- Access the CLOCK and push the buttons according to the moon phases (U); take the TILE (V).
- Put the TILE on the box for a mini-game.
- Swap the tiles to restore the images (W).
- Take the shells for the UNLOADED GUN (X).

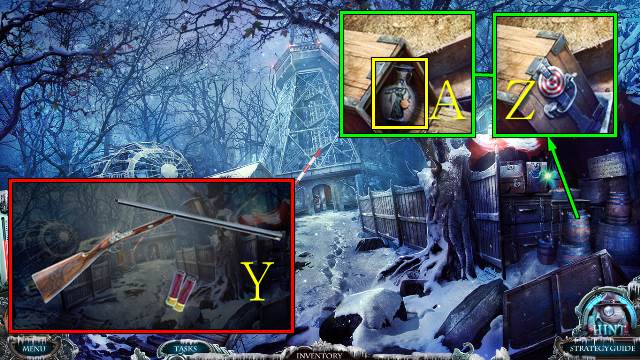
- Access the UNLOADED GUN, put the shells in it, cock the hammer and take the SHOTGUN (Y).
- Shoot the target with the SHOTGUN (Z); put the CORK in the vase and take the JUG (A).
- Go to the Garden.

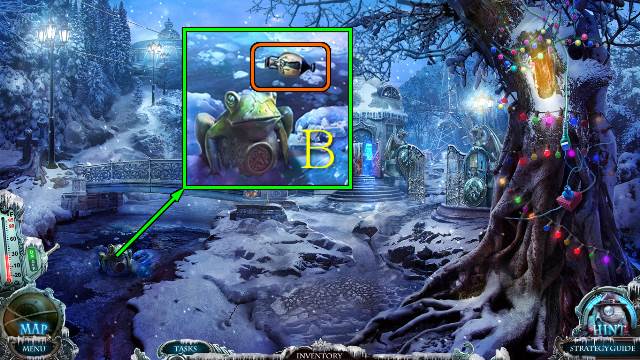
- Fill the JUG with water to get a FULL WATER JUG (B).
- Go to the Broadcast Tower.

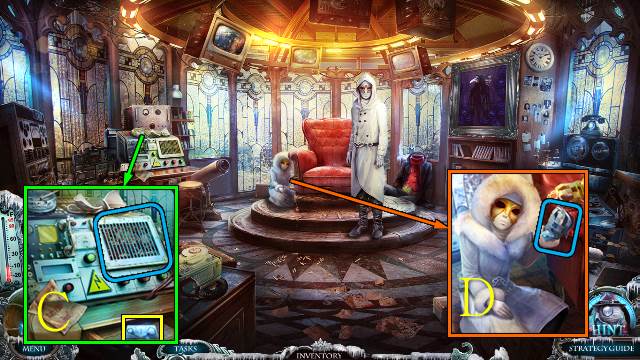
- Pour the FULL WATER JUG over the generator; take the SILVER KEY CARD (C).
- Open the shackle with the SILVER KEY CARD; you receive a STASH PART (D).

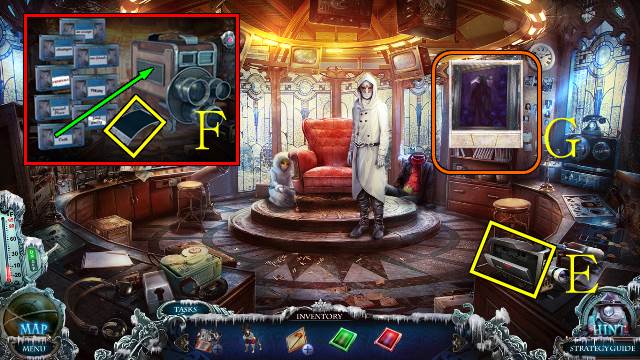
- Take the tape (E).
- Play the ‘oath’ tape on your VIDEO CAMERA; take the PHOTO (F).
- Align the PHOTO (G).
- Put the STASH PARTS on the safe for a mini-game.

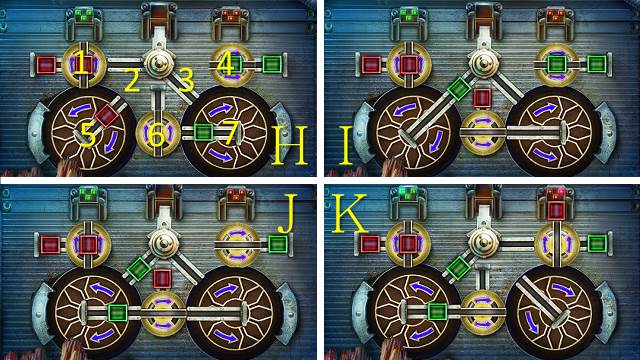

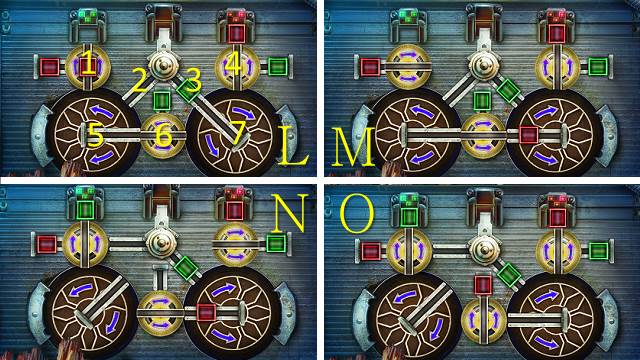
- Rotate the discs and move the shoots to move the colored buttons to the locks of matching color.
- Turn the parts and slide the green and red buttons in the following order:
- (H) 5, 6, red, 6, red, 6, green, green, 5, 2, green; (I) 3, green, 3, 7, green 5, 7, green, green; (J) 6, red, 6, red, 7, red, 3, red, 4, red; (K) green on 5, 6, green, 5, green, 5, 6, 7, green, green, 7, 3, green.
- (L) 1, 2, red, 2, 5, red, 5, 7, red, red; (M) 6, green, 6, green, 5, green, 2, green, 1, green; (N) red on 7, 6, red; (O) you can now move all greens to the lock, followed by all reds.

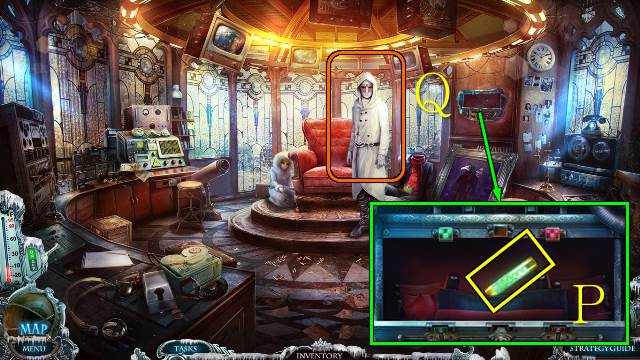
- Take the VISIBILITY FORMULA (P).
- Give the VISIBILITY FORMULA to Prince Andre (Q).
- Congratulations, you’ve completed Mystery Trackers: Rancliff’s Phantoms.



 Forgotten Books: The Enchanted Crown Walkthrough, Guide, & Tips
 Strangestone Walkthrough, Guide, & Tips
 White Haven Mysteries Walkthrough, Guide, & Tips
 Spirits of Mystery: The Dark Minotaur Walkthrough, Guide, & Tips
 Drawn: Trail of Shadows Collector's Edition Walkthrough, Guide, & Tips