In the beginning there was Fallout. The game that spawned a series looked like most any other late '90s RPG. On the surface it had a familiar RPG isometric viewpoint and the interface wasn't particularly revolutionary. What set the game apart was the innovative storyline, the atmosphere, and most importantly, the freedom to choose whether you wanted to be good or evil, and to face the consequences of your actions accordingly. Set in a post-apocalyptic alternate reality during the late 22nd century, and heavily infused with a 1950s 'atomic age' theme, Fallout quickly became a firm favorite among RPG gamers and went on to generate even more praise with the release of Fallout 2. It's safe to say that when Bethesda Softworks - makers of the famous Elder Scrolls series - took over the Fallout franchise, they had a very heavy burden of expectation weighing on their shoulders.

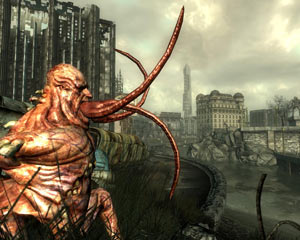
There is controversy among Fallout fans as to whether Fallout 3 remains faithful to the Fallout legacy. There can be no doubt that it takes the franchise in a bold new direction which some fans of the series will not like. In many ways it's a totally unique game that should be judged on its own merits. To start with, it uses the time-tested Gamebryo game engine that all Elder Scrolls IV: Oblivion players should be completely familiar with. Add to that equal parts of the atmosphere from games like BioShock, STALKER: Shadow of Chernobyl and Half Life 2, and movies like 28 Days Later and The Omega Man. Finish off with a general feel that's not quite RPG, not quite FPS, but thoroughly addictive and has the refreshing freedom of an Elder Scrolls game, and you might have some idea of what Fallout 3 is like. To say that it's "Oblivion with guns" is nonsense - the game goes far beyond any simple summation and stands on its own as a unique and fascinating experience. If forced to categorize Fallout 3, I'd call it more of an Action-Adventure game than simply a Role Playing Game, First Person Shooter, or some hybrid of the two.
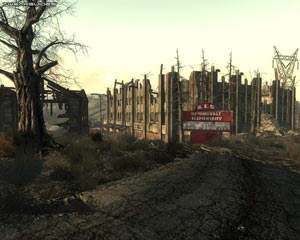
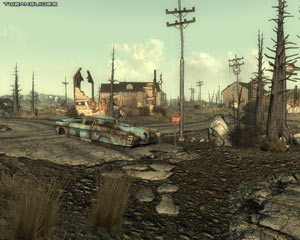
There are a couple of things about Fallout 3 that are almost exactly the same as Oblivion however, and they are the attention to detail inherent in the game world, and the almost total freedom to explore it at your leisure. In a truly sprawling, hand-crafted environment you will find so many new and interesting locations, items and people, that you may be forgiven for feeling that the game is actually a little too vague in what it is you must do. Some people will find this annoying, but the game is intended to simulate the way your character would be feeling: having lived his whole life underground in Vault 101, he has now reached the surface and is experiencing an entirely new world for the first time. He's confused and curious; it's only natural for him to want to explore and see all there is to see without restriction - and Fallout 3 lets you do that right from the get-go. There is no invisible hand steering you towards making the 'right' choices; you have to make decisions on the run and live with the consequences of your actions. Some people will hate this, while others will love it.
In the end Fallout 3 offers a unique experience that once again demonstrates Bethesda Softworks' skills in creating games which go above and beyond in terms of providing innovative and immersive gameplay.
This guide is designed to complement Fallout 3 by providing a full range of resources relevant to the game, including detailed troubleshooting, tweaking, modding and gameplay information. Even though Fallout 3 has a similar game engine to Oblivion, many of the tweaks have changed, and there are also various new in-game settings to consider. To make sure you get the most out of Fallout 3, I recommend you set aside some time to give the guide a good run-through.
Note: This guide refers to the latest version of Fallout 3 Version 1.7. Most of the guide also applies to Fallout: New Vegas, since it is based on the same engine.
Before getting into any game-specific settings and tweaks, this section covers the obligatory system optimization information I include in all my guides. If you've followed this advice recently, you can skip this section.
Many people report problems with this game and in almost all cases these are due to general system issues and not the game itself. With that in mind I strongly urge you to take some time and follow the advice below if you truly want this game, and indeed every other game you own, to run at its fastest and most trouble-free.
The place to start is with the TweakGuides Tweaking Companion. It is the complete system optimization guide for Windows users. Designed for novice and advanced users alike, it is written in plain English to help you genuinely understand all aspects of Windows and your PC. The guide covers every major topic, from the correct installation of Windows and critical drivers and software, through to recommendations for every significant setting and feature, all the major performance and convenience tweaks and customizations, as well as detailed troubleshooting advice. There are also links to a range of reliable free applications which can enhance your system and give you viable alternatives to purchasing commercial software. There are separate versions available for Windows XP, Windows Vista and Windows 7.
If you've ever wondered what common graphics and display settings like FPS, VSync, Refresh Rate, Antialiasing and Anisotropic Filtering are, and how they really work, then check out my Gamer's Graphics & Display Settings Guide for all the details in an easy to understand format. The guide also gives you a rundown on exactly how a game goes from a being a set of files on your hard drive to a 3D image on your screen, including relevant performance tips.
Finally, if you run an ATI or Nvidia graphics card, I have written two comprehensive guides which you should check out: the ATI Catalyst Tweak Guide and the Nvidia Forceware Tweak Guide. These guides cover absolutely everything about the latest graphics drivers, how to set them up correctly, as well as advanced tweaking, overclocking and benchmarking tips. They're a must-read for configuring your graphics card correctly.
The above information really will serve you well in the long run, not just in this game. If you don't optimize your system and keep everything updated and maintained correctly you will keep running into "mysterious" problems time and time again. Do yourself a favor and when you get a chance spend an afternoon or two optimizing your machine the right way with the guides above.
The next section goes into more detail about specific troubleshooting tips which address common performance issues with the game.

This section contains specific troubleshooting tips which address many of the common problems experienced by Fallout 3 players. I can't stress enough the importance of taking the time to go through the checklist of advice below if you're having a problem with the game.
Official Support: The first place to look for official support details is in the Readme.txt file in your \Program Files\Bethesda Softworks\Fallout 3 directory. Importantly you should check out the minimum system requirements in the Readme.txt file, and the supported hardware list, since if any of your hardware is below the requirements or not supported then it's highly like that you will experience problems with the game, or quite simply won't be able to run it (See the OldFallout Project if that's the case). You should also check the Official Bethesda Fallout 3 FAQ for your OS for details of how to resolve specific error messages and other issues. In terms of community support, there are a wide range of forums which provide varying degrees of tech help, but the best one to start with is the Official Fallout 3 Forums.
Game Bugs: Fallout 3 does indeed have a range of gameplay and engine bugs, which is inevitable in an open-ended game as complex as this. However there are not nearly as many bugs as people would like to think. To start with, consult this list of suspected bugs and fixes which the community is compiling to see if your issue is covered. There are also a range of solutions found in this thread on the Official Forums. Keep in mind though that most crashes and general issues are the result of unoptimized systems: conflicts with background programs, codec pack conflicts, overheating hardware, overclocking, outdated or incorrectly installed drivers, and of course hardware which is not supported just to name a few common causes of problems. See the Conclusion section of this guide for a discussion on PC gaming. In the meanwhile I strongly encourage you to read this guide carefully, as well as using a comprehensive system optimization guide like the TweakGuides Tweaking Companion. Finally, make sure you've installed the latest patch for the game, as Bethesda has said it is working on patches to resolve identified and verified issues.
Mouse Acceleration Issues: As of the 1.1.0.35 patch (See Page 4), you will experience a noticeably accelerated mouse when in 2D interfaces such as the main game menu. This appears to be caused by some change in the patch, and you can alter the level of acceleration by adding several variables under the [controls] section of the Fallout.ini file - see the Advanced Tweaking section on page 8 for details.
Game Launch/SecuROM Issues: There may be some problems launching the game due to Fallout 3's disk check protection provided by the SecuROM system. Full details of how to troubleshoot SecuROM-related problems are provided here and in the SecuROM FAQ. Note however that as covered later in this guide, you can bypass the disk check component quite easily and legally - see page 4 for details; this should help resolve SecuROM-related issues as well.
Windows 7/Vista: If you find that Vista Sidebar widgets keep periodically flashing up in the background when the game is running, create a new desktop shortcut to Fallout 3 by going to your \Program Files\Bethesda Softworks\Fallout 3 directory, right-clicking on the Fallout3.exe file and selecting Send To>Desktop. Right-click on this new shortcut, select Properties, and under the Compatibility tab tick the 'Disable visual themes' and 'Disable desktop composition' boxes, so that the desktop is properly disabled when Fallout 3 is running.
Important Update: Some people with newer quad core CPUs and/or using Windows 7 or 8 may find that Fallout 3 crashes randomly. Feedback suggests that inserting the iNumHWThreads=2 command under the General section of the Fallout.ini file, as covered in the Update on Page 10 of the guide, can resolve this on some systems.
Games for Windows Live: Fallout 3 includes and installs Games for Windows Live, a service long used by XBox players and now available for PC gamers. However because Fallout 3 is a single player game, the Live service isn't vital to the game, as there is no multiplayer component. At best it simply allows people to record and share their achievements online, get notifications of game updates and get additional Downloadable Content (See page 4). Since some users have said that disabling Live has resolved lag and some crash issues for them in Fallout 3, if you want to remove/disable Live successfully, use this Games for Windows Live Disabler Mod to disable Games for Windows Live.
Important Update: If you have a problem launching Fallout 3 after installation, and receive an error message along the lines of "the ordinal 5359 could not be located", this is related to Games for Windows Live. To resolve this issue, you must disable Games for Windows Live, particularly as it is a service that is no longer being offered by Microsoft. To do so, follow these steps:
1. Go to your \Program Files (x86)\Bethesda Softworks\Fallout 3 directory.
2. Copy the Medium.ini file, and paste it into your \Users\[username]\Documents\My Games\Fallout3 directory.
3. Rename this newly copied Medium.ini file to Fallout.ini.
4. Run the Games for Windows Live Disabler Mod, as linked further above.
5. Launch Fallout 3, and it should start as normal now given Games for Windows Live has been disabled.
Uninstalling/disabling Live as covered above should be trouble-free, but if you do run into problems, reinstall Fallout 3 and Live will be reinstalled along with it. In the end there's no real reason why you should uninstall Live, but as noted, it's not completely necessary and some people do claim that removing it resolves various issues, so try it at your own risk. If you want to keep Games for Windows Live and instead have some other kind of problem with it, check this Official Support Page. Note that there may be saved game issues if you use Live - if you can't see your saved games, check under your (My) Documents/My Games/Fallout3/Saves directory and if there is a subfolder with your Live profile name there, your Live saves will be there. You can copy your saves into/out of your Live folder if you want to play them using Live.
Lag/Freezes/Stuttering: Many people are complaining about stuttering in Fallout 3 and the momentary freezes and performance drops that come with it. Since Fallout 3 is based on the same engine as Oblivion, the causes of this stuttering and the solutions are pretty much the same: the Fallout 3 game world is extremely large, open, and relatively detailed. There are a lot of different objects, textures and sounds which need to be loaded up as you wander around the game world, and these have to be constantly loaded up from your hard drive into your system RAM and video RAM and back again onto the drive as required. This means that for systems with slower hard drives and/or less system RAM and/or less Video RAM, there will be noticeable periods of stutter and inconsistent FPS as you wander around, even moments when the game will appear to freeze for a bit. This is not a bug as such, this is the way the game engine is designed to handle the loading of data in a large open game world; it simply can't preload every piece of information about the game world at the start of the game as there's too much data to preload, so it loads the data piece by piece as necessary - you will often see your drive light on when these stutters/pauses occur, confirming that it is related to data loading.
Aside from defragmenting and general system optimization (see below), reducing your settings is one way of reducing stuttering - see the In-Game Settings and Advanced Tweaking sections for specific settings which affect stuttering. In some cases however, only a hardware upgrade will reduce this type of stuttering. If you're considering a hardware upgrade, I would strongly recommend getting a fast hard drive such as a Western Digital Raptor or a Solid State Drive (SSD). Combine that with at least 2GB of RAM, preferably 4GB or more, and a graphics card with 512MB or more of Video RAM, and this will provide the best method of virtually eliminating data loading stuttering in any game, not just Fallout 3.
Note: There is another type of stuttering which can occur, often referred to as micro-stuttering, juddering or skipping. It usually appears as tiny skips, like missing frames in a movie. This is not the same as the normal type of stuttering mentioned above, it is not caused by loading new data, it appears to be an actual bug related to graphics synchronization in the Gamebryo engine, possibly made more noticeable by certain graphics drivers. A video demonstration of the problem is shown here. To confirm the problem, use the iFPSClamp=60 setting as covered in the Advanced Tweaking section - if that removes the skipping then you are experiencing this issue. However changing iFPSClamp does not properly resolve this problem as it will then ruin your overall game speed at certain times. At the moment the only known solutions you can try are to firstly force enable VSync both in the game as well as in your graphics card's control panel - see the VSync option in the In-Game Settings section for instructions. If changing VSync doesn't work, try using a different version of your graphics driver. If that still doesn't work, there is a fix which some users claim works in removing this type of stutter: The Fallout 3 Stutter Remover mod (and this mod for Fallout: New Vegas users). If none of these things work then you will have to wait for either a patch and/or a new graphics driver version to resolve the issue. It's an issue that's been present in the Gamebryo engine at least since Oblivion so it is not new, and so far there is no real solution.
The Latest Graphic Drivers: Graphics card manufacturers are constantly updating their graphics drivers to take into account the most popular recent games and any issues there may be with them. Given some issues (such as the micro-stutterng mentioned above) could be related to certain graphics drivers, making sure you're using the absolute latest drivers is one of the easiest and quickest ways to resolve problems and gain performance in Fallout 3. For ATI users, using the latest 'hotfix' version can help, and for Nvidia users using the latest beta version is equally useful in more quickly resolving issues. See the ATI Catalyst Tweak Guide or Nvidia Forceware Tweak Guide for details on where to download the latest drivers and how to install them properly.
Defragmenting: The sheer size of the game files (around 5.6GB of data) mean that you must run a defragmentation program after installing the game to reduce stuttering and loading issues. The normal Windows defragmenter is fine, however to get an even better result consider a third party defragmentation package. More details are in the Drive Optimization chapter of the TweakGuides Tweaking Companion. It may take quite a while to defragment but it is a critical step in reducing stuttering.
Background Programs: The game's developers recommend that you disable all background applications - especially virus, trojan and spyware scanners and messaging utilities. These applications can and do use up valuable CPU resources, take up precious RAM, cause memory conflicts and crashes to desktop, but most importantly they interfere with read/writes to your hard drive effectively slowing it down and causing even more in-game stuttering and freezes. Full instructions on how to identify your startup programs and services and how to correctly disable unnecessary ones are in the TweakGuides Tweaking Companion. This is a critical step you should not miss as it has a major impact on Fallout 3's performance, especially in relation to reducing stuttering and preventing crashes to desktop.
Overclocking: Fallout 3, as with most games, can be extremely sensitive to overclocking. If you've overclocked any components on your system and are having problems such as crashes, reboots and graphical anomalies, the first thing to do is set everything back to default speeds and try running the game. If you don't experience the same problems at default speed, or they're reduced in severity, then your overclock is the primary culprit. Either permanently reduce your overclock and/or increase cooling to regain stability. Don't ever assume that because other games run with stability at a particular speed (even Oblivion) that Fallout 3 will do the same. Each and every game is different in how it tolerates overclocking, and overclocking is one of the most common causes of problems on gaming PCs. Note that aggressive RAM timings can also be considered 'overclocking' for the purposes of causing things such as crashes to desktop - try setting your RAM timings to 'By Spd' (the default timings) in your BIOS and see if problems persist.
Heat Issues: Even if you don't overclock your system you will have to keep an eye on temperatures to make sure that your system doesn't crash or experience graphical anomalies through excessive heat. You must ensure that plenty of cool air runs through your case so all your components can remain cool while playing Fallout 3.
I cannot urge you strongly enough to follow the advice above, and to make absolutely sure that you take the time to go through the TweakGuides Tweaking Companion, because that alone will make the biggest different to the stability, performance and smoothness of Fallout 3 - and indeed most any other game. I realise most of you are after a patch or a magic tweak which will make all these issues go away, but this simply will not occur as past history has shown over and over again. Unless you optimize your entire system you will keep experiencing problems with this and most every other recent game. It may be boring to go through something like the TweakGuides Tweaking Companion, but it will give the biggest rewards to those who do, and you will end up saving a lot of time in the long run if you learn how to operate, maintain and optimize your PC properly once and for all.
The remainder of this guide goes into more specific settings and tweaks which can help improve your performance and resolve any problems.
Official Patch
Bethesda has released several patches for Fallout 3, the latest being Version 1.7. This patch is a relatively minor update which provides support for a new Downloadable Content (DLC) pack by adding new achievements. It also appears to fix a common crash/freeze on exit problem.
Note that you can check for new patches at any time using the Live option in the in-game menu. As soon as any more patches are released I will update this section with the details accordingly.
Copy Protection
Fallout 3 employs the SecuROM copy protection system (however StarForce is used in the Russian version). The particular implementation of SecuROM used in Fallout 3 doesn't incorporate any other DRM or online activation requirements - the only noticeable aspect is the disk check component which can easily be bypassed legally. This is because the disk check component seems to be tied specifically to the game's Launcher, so by directly accessing the game's main executable instead, you can bypass the disk check. First configure the game appropriately using the Launcher's Options menu as detailed in the In-Game Settings section of this guide. Then when you're satisfied with your settings and don't need to use the launcher again, follow the steps below.
To bypass the disk check component on Fallout 3, all you need to do is change your game's launch icon, or your Vista Games Explorer's launch icon to point to the following executable: \Program Files\Bethesda Softworks\Fallout 3\Fallout3.exe. To do this, in Windows XP right-click on the Fallout 3 launch icon, select Properties, and change the Target box to point to the file above. In Vista's Games Explorer, right-click on the Fallout 3 launch icon, select Customize, highlight the second Play command in the list and click the Add button, then browse to the location of the Fallout3.exe file as noted above and select it. When done, highlight the item again and use the 'Move Up' button to move it to the top of the list so it becomes the default launch method for Fallout 3.
Now whenever you launch the game it will skip the disk check, skip the launcher and launch into the main game menu. There is no need for any No-CD or other cracked executables, and this method also doesn't hinder patching of the game in the future. If you don't use this method and/or you are having problems launching the game due to SecuROM errors, see the Troubleshooting Tips section on page 3 for more details.
Official DLC / Expansion Packs
Bethesda has released additional downloadable content (DLC) for Fallout 3, similar to the Knights of the Nine expansion pack for Oblivion. These DLC packs are being released via the Games for Windows Live service and are not free.
The first DLC for Fallout 3 Operation Anchorage has been released and is available for purchase via the Games for Windows Marketplace. It requires that the 1.1 Patch or newer be installed for it to work.
The second DLC for Fallout 3 The Pitt has been released and is available for purchase via the Games for Windows Marketplace. It requires that the 1.4.0.6 Patch be installed for it to work. Note that if you have freezing problems after installing the pitt, download the updated version from Games for Windows Live, or try this file.
The third DLC for Fallout 3 Broken Steel has been released and is available for purchase via the Games for Windows Marketplace. It requires the 1.5 Patch to be installed for it to work. It had major issues upon first release, so for those who downloaded it early on and are having problems, follow these instructions to redownload the new version.
The fourth DLC for Fallout 3 Point Lookout has been released and is available for purchase via the Games for Windows Marketplace. It requires the 1.6 Patch to be installed for it to work.
The fifth DLC for Fallout 3 Mothership Zeta has been released and is available for purchase via the Games for Windows Marketplace. It requires the 1.7 Patch to be installed for it to work.
For more details of how to get started with downloadable content, and to resolve any problems you may be having with DLCs, see the instructions here. Note that there is a known crash/lockup on exit issue with Fallout 3 when some of the DLC packages are installed - the 1.7 Patch resolves these issues.
Update: Disk sets containing the DLCs are also being released - Game Add-on Pack #1 has been released and has Operation Anchorage and The Pitt on disc; Game Add-on Pack #2 will have Broken Steel and Point Lookout on disc, and will be released in late August 2009.
Update 2: A Fallout 3 Game of the Year Edition has been released which contains Fallout 3 and all 5 DLCs covered above, and hence does not require additional purchase or downloading from Games for Windows Live to play the full game and its DLCs.
Mods
If there's one thing that kept Elder Scrolls IV: Oblivion at the top of peoples' 'favorite games' lists for so long, it's the way in which it could be almost infinitely modified. A veritable mountain of mods have been made for Oblivion, and given Fallout 3 is based on the same engine, and has garnered much the same sort of fan interest as Oblivion, then it seems likely that it too will receive a large number of mods.
Bethesda has recently released the Garden of Eden Creation Kit (GECK), which is the free software that allows users to create mods for Fallout 3. There are detailed tutorials in the link above to give you all the information you need to begin creating mods. For now I personally don't have any 'highly recommended' mods which I am using, however below are some popular mods which you might like to try out:
Essential UI Mod - Resizes and adjusts the user interface to be less large and hence fit more on the screen, especially at higher resolutions.
Compass Mod - Removes Waypoint and NPC indicators from the compass on the lower left of the HUD, which increases realism and game difficulty.
Remove Compass Mod - Use this mod if you want to remove the compass from your HUD altogether.
1st Person Resolution for 3rd Person Guns Mod - Ensures that all weapons whether viewed in first or third person use the highest resolution textures.
Radiation Re-Redux - Removes detailed information about your radiation level to make things more similar to that in Fallout 1 and 2.
No Repair Mod - Removes the need to constantly repair weapons; their condition will not deteriorate over time.
Classic Music Mod - Replaces the ambient music in Fallout 3 with that used in Fallout 1 and 2.
No Bad Karma Noise - Removes the noise heard whenever you receive Bad Karma.
Slower Levelling Mod - Increases the XP required to gain levels, and reduces XP awarded.
Level Cap Increaser Mod - In Fallout 3 characters are capped to a maximum of Level 20, this mod removes the cap though be warned that it can cause problems. Note: If you want to remove the cap and progress to Level 30 properly, you can buy the official Broken Steel DLC instead (see Official DLC section above).
High Definition Texture Pack - A texture replacement pack which contains higher definition textures for Fallout 3. Can reduce performance/increase stuttering.
That's really only a sample of the mods coming out, as new ones are being released on a daily basis. To keep on top of all the mods being released for Fallout 3, I recommend regularly checking these sites:
Fallout 3 Nexus
Official Fallout 3 Mods Forum
Planet Fallout
No Mutants Allowed
Fallout: New Vegas Update: check Fallout New Vegas Nexus for mods.
To install a mod, usually you can follow the instructions which are included with the mod itself in a Readme.txt file, or failing that, on the page where you downloaded the mod. Where instructions may not be provided the procedure typically involves extracting the contents of the mod archive directly into your \Program Files\Bethesda Softworks\Fallout 3\Data directory. Then edit the Fallout.ini file under your \(My) Documents\My Games\Fallout 3\ directory, changing the value of the bInvalidateOlderFiles=0 line to bInvalidateOlderFiles=1. This allows the game to detect and run the modified file(s) under your \Fallout 3\Data folder instead of using the original version stored in the game's main archives. For some mods you may also need to open the Fallout 3 Launcher, click the 'Data Files' option and tick the mod name (aside from Fallout3.esm which should always be ticked).
Note: Installing the official patch may break some mods simply because of differences in the file dates. More details of this, and solutions, can be found here. Of course some older mods are also incompatible with the latest patch as well, so if in doubt, when troubleshooting any new problems after installing a patch, always uninstall/remove any mods first to make sure they're not the cause of the problem.
As I warned users of Oblivion, so too I'll warn Fallout 3 players - be very careful about how many modified files you download and use. This is not so much about security as it is about game stability and also the unintended/unknown consequences that some mods may have on both gameplay and performance. I strongly urge you not to go crazy with mods and install lots of them. If you run into problems with Fallout 3, make sure you temporarily remove/disable all mods as part of your troubleshooting procedures. As talented as modders may be, and as much as we're grateful for their efforts, there is no guarantee that a modification will not cause problems with the game, so exercise common sense and caution, and only install a few specific mods you consider truly essential.
The next section begins our look at Fallout 3's In-Game settings in detail.
In this section of the guide I provide detailed descriptions and recommendations for all the in-game settings to allow you to achieve a good balance between image quality and performance. It is virtually impossible to provide a specific measure of the performance impact of any particular setting, as it varies significantly based on different types of hardware, as well as your chosen resolution and the interaction of a whole range of other settings. However a general indication of the impact is given for all settings which affect performance. Note that to make best use of the screenshot comparisons provided, open each shot up in a separate tab in your browser and then use CTRL+TAB to quickly flick between the tabs and better notice the differences. Alternatively you can save the screenshots to your drive and flick between them that way.
To access the main game settings, start Fallout 3 and click the Settings item. However Importantly, to access all the graphics settings, you will need start the Fallout 3 Launcher. If you're using the trick on page 4 of the guide to bypass the Launcher (and hence the disk check component), then you can manually open the Launcher at any time by running the FalloutLauncher.exe file in your \Program Files\Bethesda Softworks\Fallout 3\ directory. Once the launcher is open, click the Options item to access the settings. There are a range of graphics settings in the launcher which are unavailable in the in-game Display section of the settings, so it's essential to adjust your graphics settings in both the Launcher and the in-game settings.
Gameplay
Difficulty: This slider controls the overall difficulty of the game. In particular it determines to a certain extent how challenging your enemies are in combat. However unlike Oblivion, Fallout 3 does not automatically scale its difficulty according to what level you are, it has a more complex method than that - read this page for a description of how the level scaling system is designed to work in Fallout 3. In short there is scaling of sorts, but it is more complex and resolves many of the level scaling issues people complained about in Oblivion.
Save on Rest: If set to On, whenever you rest in a bed, the game will automatically be saved over your latest autosave at the start of your rest.
Save on Wait: If set to On, whenever you Wait (i.e. try to rest outside of a bed), the game will automatically be saved over your latest autosave at the start of your wait.
Save on Travel: If set to On, whenever you use the map to quick travel from place to place, the game will automatically be saved over your latest autosave before you arrive at your destination.
If you want to reduce loading times and/or stutter, you can disable any or all of the above options for a reduction in hard drive usage, though obviously you should then make sure to manually save regularly. In fact as a general piece of advice, I strongly recommend that you not only save often, but that you save to several different slots so that if something goes wrong with one save game - whether due to a quest bug or tweaking mishap - you have another relatively recent save to fall back on.
Display - Launcher Options
Whenever you launch Fallout 3 from the default desktop icon, you will see a small Launcher menu appear. In this menu screen, click the Options item, and you can adjust all of the graphics-related settings here. As noted further above, many of these options can also be adjusted using the in-game Settings>Display menu (see further below), however the settings covered in the Launcher menu are much more comprehensive, so it is strongly recommended you configure all your graphics options in the Launcher first and foremost before adjusting or fine tuning additional settings in the in-game Settings menu.
Graphics Adapter: This allows you to select your graphics device, and should show the correct description for the main graphics card in your system. If the information is incorrect and you can't select the correct card, then make sure to check your BIOS settings as well as installing the latest graphics drivers for your card - see the TweakGuides Tweaking Companion for more information on correct system setup.
Aspect Ratio: This setting determines the ratio of width to height for your monitor. If you are running a non-widescreen traditional CRT or LCD monitor, then the correct ratio will be 'Standard (4:3 or 5:4)'. If you are running a widescreen monitor then you should select either 16:9 or 16:10 options. If you're unsure as to which is correct, select each one and test to see whether round objects like car wheel hubs or the buttons on your Pip-Boy 3000 appear perfectly round (correct) or oval (incorrect) in the game.
Resolution: This determines the width and height of the game image displayed on your screen - for example 1280x1024 is 1,280 pixels wide by 1,024 pixels high. The higher the resolution, the more detailed the image will appear on your screen because there are more pixels showing, but the more power it takes to display it. The list of available resolutions shown is limited firstly by the maximum possible for your monitor and graphics card together, as well as what you have selected under the Aspect Ratio setting above. The number of resolutions shown is also affect by whether you've ticked the 'Show All Resolutions' option in the lower right of the screen. Your choice of resolution alone can have a major impact on performance, so if necessary lower it if nothing else works to improve your average FPS. You can also set custom resolutions - see the iSize W and iSize H settings under the Advanced Tweaking section. Note: if you have a widescreen monitor, Fallout 3 has native support for all widescreen resolutions, however there are some minor glitches/issues; you can find a detailed report regarding Fallout 3's widescreen support here. If certain screen elements are not correctly in view at your chosen aspect ratio and resolution, you should also refer to the fDefaultWorldFOV, fPipboy1stPersonFOV and fRenderedTerminalFOV .ini variables in the Advanced Tweaking section.
Antialiasing: Anti-Aliasing (AA) is a method used to smooth the appearance of jagged lines in a game; the higher the sample rate, the smoother the image. It's described in more detail on this page. This option allows you to choose whether to enable this function or not, and the sample rate of the AA if used. The higher the sample rate chosen, the greater the performance impact in return for smoother edges on graphics.
Anisotropic Filtering: Anisotropic Filtering (AF) is explained in more detail near the bottom of this page, and is essentially a method of making textures sharper as they recede into the distance. This setting controls the sample rate of AF used, up to 15x AF. The higher the sample rate used, the crisper and more distinct surfaces will appear in the distance, at the cost of some performance. This setting is of major importance in Fallout 3 because even at the highest Texture settings, the game uses somewhat low resolution textures in many instances, and this can result in somewhat blurry visuals. By using a reasonable amount of AF, e.g 8x (8 Samples), most systems should notice a minimal performance drop in return for noticeably improved image quality. If necessary lower other settings to accommodate at least some AF, because Fallout 3 benefits greatly from it.
Detail: Here you can select the overall level of graphics detail used in the game. The preset options are Low, Medium, High and Ultra, and if you're curious, you can see precisely what settings are altered at each of these presets by examining the contents of the Low.ini, Medium.ini, High.ini and VeryHigh.ini files found under the \Program Files\Bethesda Softworks\Fallout 3 directory. In practice however I strongly recommend ignoring the presets and clicking the 'Advanced...' button to manually adjust all the various settings as per this section of the guide, as this will yield the best combination of image quality and performance to suit your tastes.
Windowed: If ticked, this box forces Fallout 3 to run in a window as opposed to fullscreen mode. In Windowed mode the game only takes up a portion of the screen - however make sure that the in-game resolution you choose is equal to or less than your desktop resolution, otherwise there will be portions of the game screen which will be off the edges of your display. Some people claim they get better performance and/or enhanced stability when running Fallout 3 in a smaller window, however bear in mind that in practice it can reduce performance in Windows Vista because of the Aero rendering overhead which applies to non fullscreen applications. I strongly recommend Fullscreen mode (i.e. untick this box) for optimal performance. Note that the developers warn that in Fullscreen mode if you ALT+TAB back to the desktop, this may destabilize your system, again because of Windows memory management issues.
VSync: Vertical Synchronization (VSync) is the synchronization of your graphics card and monitor's abilities to redraw an image on the screen a number of times each second, measured in Hz - for full details, see this page. Whether LCD or CRT, your monitor will have a maximum rating in Hz for each resolution (e.g. 1280x1024 at 75Hz). When VSync is enabled (ticked), your maximum FPS will be capped at your monitor's maximum refresh rate at your chosen resolution, and more importantly in some areas your FPS may drop by as much as 50% if the graphics card has to wait to display a whole frame. Thus enabling VSync can have a negative performance impact. To offset this impact, you can enable Triple Buffering.
Unfortunately in Fallout 3 VSync is enabled at all times, even if this box is unticked. You can force VSync off by editing the iPresentInterval=1 variable in the Fallout.ini file to iPresentInterval=0 (See the Advanced Tweaking section). You should also check to make sure your graphics card's control panel doesn't have VSync forced on - whether via a specific Fallout 3 game profile or in the global options (see the Nvidia Forceware Tweak Guide or ATI Catalyst Tweak Guide for more details). Disabling VSync should be the optimal option, as it can increase framerates and more importantly, it will reduce mouse lag. However unfortunately in Fallout 3 it can also increase the micro-stuttering/juddering/skipping issue (as covered in the Troubleshooting Tips section). In any case experiment to see what your results are with this setting, though again, remember that it can only be turned off properly by manually editing the relevant line in the .ini file mentioned above. If you just want to reduce mouse lag without disabling VSync, see the Max Frames to Render Ahead tweak on the last page of this guide.
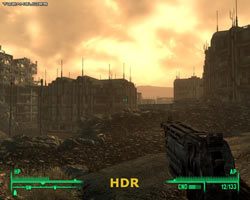

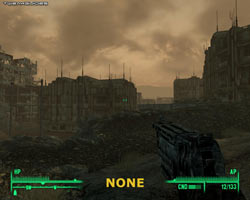
Screen Effects: This option determines the level of post-processing effects applied to the game image. There are three options available here - HDR, Bloom, and None. When set to HDR, the game will use full High Dynamic Range lighting, a form of lighting effect which dynamically alters based on the way it interacts with various objects and surfaces, as well as the environment in which the light source is portrayed. As the screenshot comparison above shows, the most noticeable impact is that HDR lighting makes the scene much more vivid. However what the screenshot can't show is that HDR makes contrasts in lighting more noticeable and dynamic, so for example looking at a bright scene after looking at a dark scene suddenly makes the light even brighter. The HDR in Fallout 3 is a bit exaggerated at times, but generally looks good. HDR is mutually exclusive with the Bloom option - one cannot be enabled at the same time as the other. Bloom is a lighting effect which, similar to HDR, alters the appearance of lighting in an attempt to make it seem more realistic. However unlike HDR, bloom is not dynamic and can be considered less realistic. Again, refer to the screenshot comparison further above. However interestingly, in Fallout 3 there appears to be little use of Bloom lighting, because when the None setting is chosen, the image quality looks much the same as when Bloom is chosen. In terms of framerate, HDR is more intensive than Bloom and None, however again, in my testing the difference didn't appear to be major.
Display - Advanced Launcher Options
When you click the Advanced button under the details section of the main Launcher options screen, you will be shown a large number of additional graphics-related settings which you can adjust. They are each covered below in detail, separated under the relevant tab headings:
[Detail]
Texture Quality: The options here are High, Medium and Low, and note that this setting is identical to the in-game 'Texture Size' setting. Textures are the 2D images placed on the surface of all 3D objects in the game. When this option is set to High, the resolution of the 2D texture images used is at the best possible, meaning the textures appear more crisp and real, especially when examined close up. At Medium and Low respectively these textures progressively drop in quality, losing a lot of detail - see an animated screenshot comparison by clicking this link: F3_Textures.gif (1.1MB). Note in particular that in the comparison you can see that from High to Medium, the detailing on the ground as well as on the wheel hub of the car is most noticeably reduced. By Low virtually all detailing in all visible objects has been removed or greatly blurred, significantly reducing realism.
In Fallout 3, even at the highest setting, the textures can appear somewhat pixellated and blurry at the best of times. Unfortunately there's not much that can be done to improve them except to use Anisotropic Filtering (See further above) to make medium and long distance textures much clearer, and also install texture mods of various kinds (See the Mods section on page 4). Indeed because of the relatively poor quality of the textures in the game, I don't recommend lowering this setting below Medium unless you absolutely have to. Lowering Texture Quality will not improve FPS as such anyway, the main reason to lower this setting would be to reduce stuttering. This is because textures load from your hard drive into your graphics card's Video RAM (VRAM), and the larger the texture resolution, the larger the texture data and hence the more swapping your graphics card has to do to constantly load new texture data from the hard drive into VRAM to decompress and display them. Whenever you enter new areas or see new objects/creatures/buildings, the higher this setting the more loading pauses/stutter you will get, especially if you have less VRAM, less system RAM and especially if you have a slower hard drive. See the Troubleshooting Tips section for more details on stuttering.
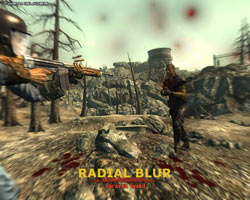
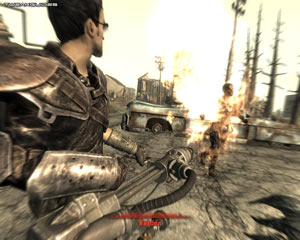
Radial Blur Quality: This setting controls the degree to which the 'radial blur' effect occurs, visible when you are hit in combat for example. An example of radial blur is provided in the screenshot above - the edges of the screen are blurred more than the center to simulate action and disorientation. The available options for this setting are High, Medium and Low, and in practice while altering the setting only lessens its visual effect slightly, it can improve performance, especially during combat. For those who dislike radial blur, or indeed the other blur effects particularly during combat, it appears you cannot disable them completely, even via advanced tweaking.

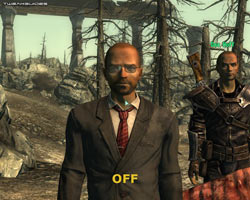
Depth of Field: This option controls whether Depth of Field is enabled or not in Fallout 3. In practice what this means is that when ticked (on), you will notice that in certain circumstances, such as when speaking with people or during VATS combat, objects further away from your focus will appear slightly blurry while those in focus remain clear and distinct. A screenshot comparison is provided above - note the background is blurred when Depth of Field is enabled, accentuating the people in the foreground. Enabling this option can reduce FPS, and also may not be to some peoples' tastes, but it does make things look more 'cinematic' in some regards.
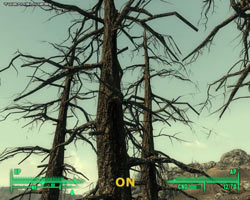
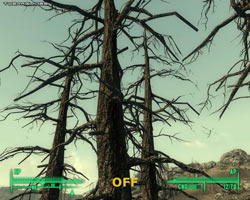
Transparency Multisampling: Transparency Multisampling is a form of Antialiasing (See further above) which is applied only to transparent textures, in other words textures which have see-through portions, such as trees, bushes, chain-link fences or objects with glass or clear plastic portions. When enabled (ticked), and you also have the Antialiasing option enabled, this setting applies Transparency Multisampling on top of regular AA, making transparent objects less jagged. As the image comparison above shows, interestingly not only does Transparency Multisampling smooth out the jagged twigs on the tree branches, you can also see additional twigs not otherwise visible when it's disabled; the same goes for other foliage such as bushes - using Transparency Multisampling gives them slightly more volume. Enabling Transparency Multisampling will reduce performance, however the precise FPS impact and visual quality will depend on your graphics card and AA level, as the newer card series provide both better image quality and less of a drop in FPS when AA is applied.
Decal Cap: This slider determines the maximum number of decals - primarily blood splatters on the ground - which are visible at any one time. The more decals are allowed, the more potential FPS drop you will experience. The maximum possible here is 10 decals, however you can increase this limit, or disable blood splatters altogether, by using the iMaxDecalsPerFrame .ini variable. You can also further adjust decal usage with the fDecalLOD2 and uMaxDecals variables, or disable all types of gore by using the bDisableAllGore variable. All of these are covered in the Advanced Tweaking section.
The next page continues the In-Game setting descriptions.
[Water]
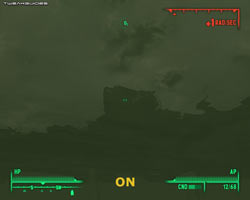
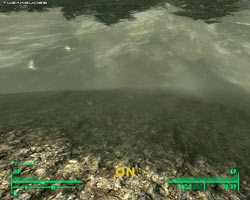
Water Refractions: Refraction occurs when rays of light are bent. This gives objects which are seen through water a shimmery and distorted appearance. As the screenshot comparison above shows, when this option is ticked, looking up while under water will result in being able to see wavy, distorted buildings; when the option is unticked, you can't see anything beyond the rippling surface of the water. Disabling water refractions can improve FPS in water areas, however it also makes things much less realistic and much more disorientating when under water for example.

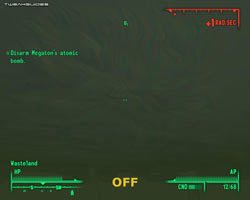
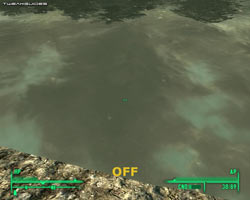
Water Reflections: Water reflections show mirror images of nearby objects on the surface of bodies of water. If this option is ticked, such reflections are shown - with the quality of the reflection determined by a combination of the Reflection Quality, Soft Reflections, Full Scene Reflections and Full Detail Reflection settings below. If unticked, all reflections are removed from the surface of water as shown in the final 'Off' screenshot in the comparison above - this will noticeably improve FPS around water areas at the cost of realism. If Water Reflections is disabled (unticked), all reflection-related settings as noted above will also become greyed out as they will no longer have any effect.
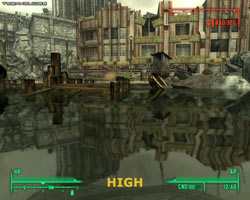
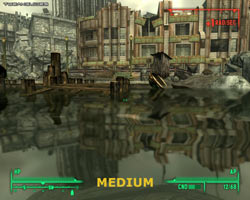
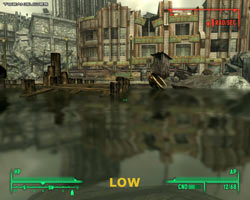
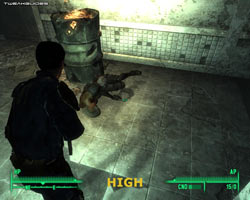
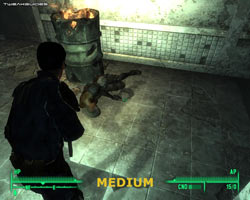
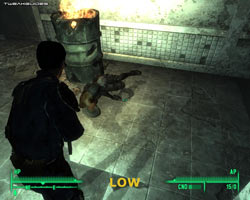
Reflection Quality: This setting determines the quality (detailing) of reflections cast on the surface of water, if the Water Reflections option is ticked. The available options are High, Medium and Low, and as the screenshot comparison further above shows, the lower this setting, the more blurry and indistinct reflections will appear, though FPS will improve in water areas. Notice in particular that even at Low Reflection Quality, the image appears more realistic than when Reflections are completely disabled, so if you're struggling for FPS, reducing Reflection Quality might be a better compromise than disabling it altogether. Note that you can further adjust the quality of water reflections using the iWaterReflectWidth and iWaterReflectHeight variables covered in the Advanced Tweaking section.
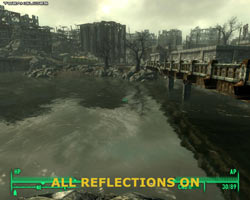
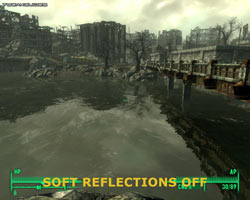

Soft Reflections: When enabled (ticked), this option softens water reflections, making them hazier. This will lower FPS and also reduce the apparent reflection quality, but can look more realistic. When disabled, it removes the softening effect - see the screenshot comparison above, noting the reflection of the bridge on the right in particular is much more jagged with soft reflections off. If you prefer crisp and more 'mirror-like' reflections, then disable this option.
Full Scene Reflections: When enabled (ticked), all scenery is reflected in the water. When disabled, only more distant and more significant objects and landscape will be reflected; nearby objects will not reflect in the water. While this can significantly improve FPS, it obviously also greatly reduces realism, but perhaps is still a better compromise than disabling Water Reflections altogether. Again, see the screenshot comparison above, noting that when this option is disabled, the bridge reflection on the right is completely removed, as are the tree reflections for example - only the indistinct reflections of distant buildings remain.
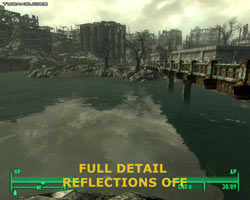
Full Detail Reflections: When enabled (ticked), water reflections show a lot of the detailing of the original objects being reflected; when disabled, water reflections become somewhat bland, mostly just blurry outlines of the reflected objects as the screenshot comparison further above shows. This will improve FPS, but in general it is not recommended as the performance benefit is not significant enough to compensate for the image quality drop compared to the other options available.
Obviously there are a range of variations possible for water reflections based on the five settings above, giving a variety of performance and image quality outcomes - you'll need to experiment to see which combination suits your tastes (and graphics capabilities) the best. For example, if you want a bit more FPS without greatly sacrificing eye candy, try the following: enable Water Reflections, set Reflection Quality to Low, disable Soft Reflections to increase the crispness and hence compensate for the more blurry quality of reflections, and leave the other two options ticked. This will look almost identical to having all the reflection options enabled and at their maximum, but provides up to ~10-20% more FPS around water.
Water Displacement: If enabled (ticked), whenever you move through water, you will leave a rippling trail behind you. If for some reason you wish to disable this effect, untick this option, though bear in mind the FPS improvement may not be noticeable on all but low end systems.
Depth Fog: This setting controls the level of murkiness of the water, though oddly it doesn't seem to affect the murk/visibility level while you're actually in the water; it affects the level of fogging visible when you peer into water. The screenshot comparison above illustrates the difference in the same scene. Disabling this option will reduce realism, but it will noticeably improve FPS around water areas.
Water Multisampling: Multisampling is a form of Antialiasing (see the Antialiasing setting), so in other words this setting is essentially designed to reduce the jaggedness of water. This setting can be set to High, Medium or Low, however in my experimentation I didn't see any real difference in the jaggedness (or otherwise) of water. Lowering this setting will improve FPS, so experiment for yourself to see if you can detect the difference in quality, and if you can't, lower it to gain performance.
[Shadows]
Enable Shadows: When this option is enabled (ticked), Fallout 3 will allow shadows to be displayed. However it appears that there are no environment shadows at all in the game - namely shadows cast by objects. Most objects will react to lighting in a generic way: for example the side of a building facing sunlight will be brighter, while the other side will be darker. But there are no actual object shadows, not even any static shadows, so the only visible impact of enabling or disabling this option is on shadows cast by characters, such as your own shadow when in third person view. Hence while disabling shadows can improve performance, it is primarily only when you're in third person view and/or when there are other characters around. This means that disabling shadows will net you a few more FPS in combat situations, without otherwise noticeably reducing the overall image quality of the game world. Note that if you disable this option then all the remaining shadow-related options under this tab will become disabled as well.
Shadow Quality: If shadows are enabled, this option determines the overall resolution of Shadow Maps used. In practical terms the visual difference is barely noticeable given the sparse use of shadows in the game, so if you want to keep shadows enabled but reduce the FPS impact, lower this setting from High to Medium or Low for a small boost. You can further customize this setting by adjusting the iShadowMapResolution .ini variable as covered in the Advanced Tweaking section.
Shadow Filtering: This option can be set to High, Medium or Low, and controls the way in which the edges of shadows blend with the surroundings. The screenshot comparison above demonstrates the difference - note that at High the shadow edges are very soft and blurry; at Medium they become slightly more distinct; at Low the edges are hard and crisp, which is a bit unrealistic. Lowering this setting will improve FPS when shadows are visible.
Max Interior Shadows
Max Exterior Shadows
The two settings above control the maximum number of shadows which are allowed on screen at any one time. The Max Interior Shadows setting controls, as the name suggests, the maximum number of shadows possible when inside buildings; the Max Exterior Shadows setting controls the maximum shadows cast when outdoors. Lowering the slider(s) will reduce the number of shadows visible on screen in return for a potential increase in FPS in situations where there are multiple characters with visible shadows - in practice this is usually during combat. Where there are more characters than shadows allowed, the shadows cast will actively switch to the character(s) which have moved most recently. Note that you can further adjust the maximum number of interior shadows beyond the limit of 6 by using the iActorShadowCountInt .ini variable, and similarly boost exterior shadows beyond 6 by using the iActorShadowCountExt variable - see the Advanced Tweaking section.
The next section continues the In-Game Settings descriptions.
[View Distance]
The distance sliders affect the way various objects and characters fade into and out of view. The main impact of lowering these sliders is on your framerate and object pop-in rather than on stuttering. However note that in all cases, the fade-in/fade-out effect is variable; you typically have to move closer to something before it fades into view, whereas moving away from it seems to take a greater distance (usually about twice as far) before it finally vanishes out of view. Keep this in mind, since the screenshot comparisons below can't really demonstrate this effect.
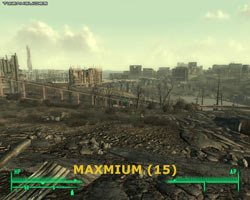
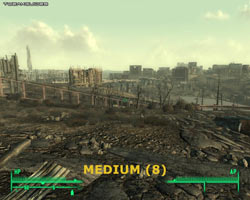
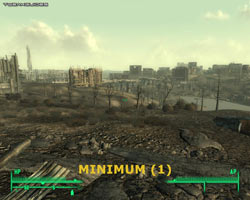
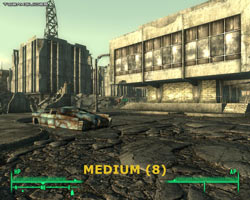
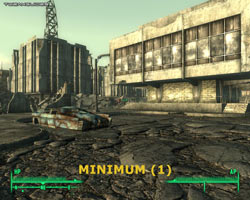
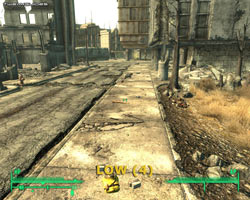
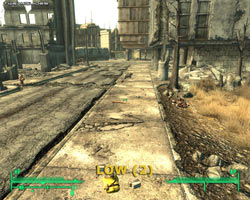
Object Fade: This slider controls the distance at which non-major objects such as fences, boxes, wrecked cars etc. are visible. As you move the slider to the left, many less important objects will be faded out of view. See the screenshot comparison above for an indication of the effects of this slider at its maximum (15), middle (8) and minimum (1) positions. As you can see, as the Object Fade distance drops to the mid-point, only a few minor items in the distance are removed. However by the time the slider reaches the far left, more prominent items such as the fence as well as various mounds of rubble and the guard rail to the right are all removed. While this will improve FPS, objects such as street lamps, cars, rubble, railings, fences and so forth suddenly popping into view just as you come to a few feet away from them while wandering the game world will really detract from immersion and reality, and will also annoy you, because an area which seems open from a distance might suddenly be completely blocked off by wreckage or a fence upon closer inspection. On balance I really don't recommend lowering this below the mid-point of the slider, if at all. It can be adjusted further using the fLODFadeOutMultObjects .ini variable in the Advanced Tweaking section.
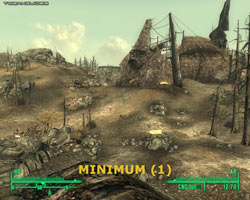
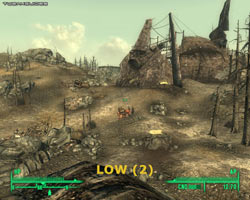
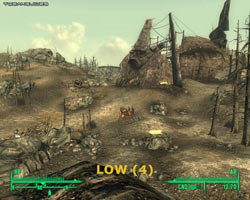
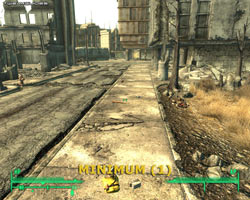
Actor Fade: This slider controls the distance at which other characters and creatures are visible. The screenshot comparison above shows that at the minimum value of 1, all NPCs except the dead ants are invisible; at a low value of 2 on the slider, the caravan in the middle of the screen (two people and a brahmin) becomes visible, and still at a relatively low value of 4, and at all values above, the Deputy Weld robot to the right, and Mickey the bum to the left are in view. Reducing this slider can boost FPS, however obviously if it removes characters from view then that also has gameplay disadvantages, because you may miss seeing enemies or friendlies even at moderate distances, so once again it is not recommended that this slider be lowered, certainly not below around halfway. The fLODFadeOutMultActors .ini variable can be used to further adjust this option beyond the slider limits - see the Advanced Tweaking section.
Grass Fade: This slider controls the distance at which grass fades in or out of view, however the effects are only really visible in large outdoor areas at longer distances, and even then it's still not particularly noticeable. The lower the setting, the less grass is visible. If you want to adjust this setting beyond that allowed by the Launcher options, and see a more visible difference, check the fGrassStartFadeDistance variable as covered in the Advanced Tweaking section.

Specularity Fade: This slider controls the level of specularity in the game world, which in other words is how shiny reflective surfaces appear to be. In practice the only obvious impact of changing this setting is that some metallic objects will lose their shine. The screenshot comparison above demonstrates that as the slider is lowered from far right (maximum) to midway to far left (minimum), the shine on the building to the right, the lampost in the mid distance, and the side of the blue car are gradually reduced or removed. Also note that oddly enough, if you select the 'Ultra' preset in the main Launcher menu page, that will set this option to a value of 20, which is beyond the limit of 15 allowed by the slider itself. However you can also manually adjust the value of this setting by editing the fSpecularLODStartFade .ini variable, and if you want to disable specularity altogether, either to further boost performance, or if you believe the game world is too shiny, then see the bDoSpecularPass variable covered in the Advanced Tweaking section.
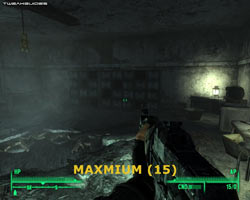
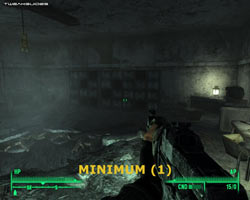
Light Fade: This slider controls the distance at which light begins to fade out. Testing the setting outside I find it difficult to see a difference, but indoors, as the screenshot comparison above shows at the two extremes of minimum and maximum ends of the slider, the lamp on the right side casts less light when the slider is set to the far left than when it is at the far right. This can improve FPS slightly but it will make some scenes darker. It can be further adjusted using the fLightLODStartFade variable, covered in the Advanced Tweaking section.

Item Fade: This slider controls the distance at which items such as guns, armor, mines, grenades, stimpacks etc. are visible. As you move the slider to the left, more distant items will no longer be visible - see the screenshot comparison above for an example, noting all the weapons and armor strewn along the sidewalk into the distance. In the screenshots it's only really when you take the slider to the far left, starting at a low position of 4 on the slider and moving downwards towards the minimum of 1 in single increments, that most visible items will start disappearing from the ground. While there is a relatively minor FPS boost from lowering this slider, in terms of gameplay disadvantage I strongly recommend against lowering this slider from its maximum, lest you miss seeing important objects, especially mines and booby traps, from a short distance away while wandering the game world. Remember that fade-in/fade-out is variable, so the screenshots above don't do justice to just how close you have to be to new items when you first approach them for them to fade into view. Can be further adjusted using the fLODFadeOutMultItems variable, see the Advanced Tweaking section.
Shadow Fade: This slider controls the distance at which shadows fade out. However because there are virtually no shadows aside from those cast by characters in Fallout 3, there is no noticeable performance or visual impact from lowering this slider. In fact even at the lowest level on the slider, and at the longest zoom possible for third person view, you will still see your own shadow cast on the ground for example. Use the fShadowLODStartFade .ini variable to further adjust this setting as detailed in the Advanced Tweaking section.
[Distant LOD]
LOD is short for 'Level of Detail', and all three of these sliders control the distance at which trees, terrain and major geometry can be seen. This can have an impact on stuttering, since the higher the LOD settings, the more details have to be loaded as you wander the game world, so if stuttering is a major issue for you, consider experimenting with these sliders. Note firstly that I strongly recommend changing the LOD settings in the Launcher rather the using the in-game settings of the same name, because otherwise you will not see their effects properly until you restart the game. Secondly, you may notice the grass position changes in the comparison screenshots - this is normal, the grass is generated each time a saved game is loaded, it never stays in the same location. See the descriptions below for what particular LOD aspects each setting affects.
Tree LOD Fade: This slider controls the distance at which trees can be seen. An animated screenshot comparison is provided to make the difference easier to spot - click this link: F3_TreeLOD.gif (926KB). As you can see, between the maximum setting (40) and the mid-point of the slider (20), the change is virtually unnoticeable. Between 20 and 10, there's a sudden loss of all trees in the mid to far distance; and by 0 some of the trees in the near distance are also removed. Reducing Tree LOD can improve FPS, but not in any significant way due to the relative lack of trees. It can however make the wasteland look even more lifeless, which may or may not suit your tastes. Note: if you want to increase the view distance for trees even further than allowed by this slider, use the fTreeLoadDistance variable as covered in the Advanced Tweaking section.
Object LOD Fade: This slider controls the distance at which objects large and small can be seen. Because the difference can be hard to spot in static screenshots, an animated comparison can be viewed by clicking this link: F3_ObjectLOD.gif (985KB). The comparison shows that from the maximum setting (50) to the mid-point (38), several unimportant buildings in far left distance and middle right are removed; from 38 to 30, three more generic buildings on the far right, middle and far left are removed; from 30 to the minimum setting (25), a whole range of generic ruined buildings are removed from the center of the screen. While lowering Object LOD can improve FPS, the improvement will not be major, and lowering this option may be of greater benefit to those looking to reduce stutter marginally. Note: you can use the fBlockLoadDistanceLow .ini variable to increase the view distance for buildings and objects even further than allowed here - see the Advanced Tweaking section.
Land Quality: This slider controls the appearance of terrain, however in experimenting with it I noticed virtually no change between the various levels here. Some extremely distant landscape changed shape a slight amount, and FPS also changed a fraction, but in reality the change was very minor. However the fSplitDistanceMult .ini variable controls this setting, and if it is raised to a very high level, the improvement in distant land quality becomes more noticeable; see the Advanced Tweaking section for details.
Display
Brightness: This gamma slider controls how bright or dark the overall screen image will be. Adjust it so that at night the image is visible but not washed out. It has no impact on performance, so set to suit your taste. If you need to increase gamma to be much brighter than the maximum on the slider allows (e.g. on very old monitors), see the fGamma-related variables in the Advanced Tweaking section.
HUD Opacity: This setting controls how transparent your Heads Up Display (HUD) elements are; namely the various indicators on your screen such as your compass on the bottom left. There's no significant performance impact from changing this setting, so set to suit your taste. If you want to remove the HUD altogether move the slider to the far left. Further HUD customization options are available in the Advanced Tweaking section.
HUD Color: This setting allows you to change the color of all the HUD elements. The default is Green, however you can change them to Blue, Amber, or White. Has no performance impact so set to suit your taste.
Pip-Boy Color: The Pip-Boy 3000 is the small computer you wear on your left arm and access using the TAB key by default. This setting allows you to change the color of the text and images in the Pip-Boy, from the default of Green, to Blue, Amber or White.
Note that you can directly edit your HUD and Pip-Boy interface colors using the uHUDColor and uPipboyColor variables as covered in the Advanced Tweaking section.
Texture Size: This is the same as the Texture Quality setting in the Fallout 3 Launcher, and is covered earlier in this section.
Fade Options: The various Fade and LOD-related options here are all exactly the same as the settings of the same name available in the Fallout 3 Launcher, and are covered earlier in this section.
Crosshair: If enabled, a small crosshair appears in the middle of the screen and provides color-coded hints as to the actions you can undertake with particular objects or characters. Enabling or disabling this option has no significant performance impact, however while it is more realistic with the crosshair disabled, it can also be very difficult to aim with some weapons as most don't have accurate iron sights. It's best that new players at least start out with the crosshair enabled until they have a better grasp of how to aim. Note that disabling this option doesn't remove the context-sensitive action prompts shown at the bottom of the screen (e.g. E) Search).
Dialog Subtitles: If enabled this option displays subtitled text for all words spoken by characters who you actually choose to start a conversation with. However anything they say outside of an actual direct conversation with you will not be subtitled. Neither this option, nor the one below affects other forms of subtitles or text prompts such as location text which appears at the top left of screen, or reply options during conversations. This setting has no performance impact so set to suit your tastes.
General Subtitles: This setting controls whether dialog subtitles appear outside of direct conversations. For example, when you pass by a talking character, their spoken words will be written as text at the bottom of the screen. However if you actually engage in a conversation with that character, this option will not show the conversation subtitles - the Dialog Subtitles setting above must be enabled for that to occur. This setting has no performance impact so set to suit your tastes.
Audio
Volume Sliders: There are six separate volume sliders here. The Master slider controls all sound volume in the game; the Music slider controls in-game (but not Menu) music volume; the Footsteps slider controls the level of footstep sounds in the game; the Voice slider affects how loud character voices are; the Effects slider controls special effects volume; and the Radio slider affects the volume of the Radio channels which you can access in your Pip-Boy 3000 under the Radio tab. Set these to suit your tastes, as they have no impact on game performance. Note that to adjust the main menu music volume independently, as it is not affected by the Music slider, you can either adjust the Master volume slider, or better yet, you can use the fMainMenuMusicVolume variable as covered in the Advanced Tweaking section. Note that setting the sliders to the far left does not provide a performance boost, because it does not actually disable music/sounds.
If you're experiencing audio-related glitches or problems, firstly make sure you have installed the latest audio drivers for your sound card. Appropriate links and details are in the Driver Installation/Windows Drivers chapter of the TweakGuides Tweaking Companion, along with further instructions in that chapter for correct driver installation and general driver tips. Note that for Creative SoundBlaster Audigy and X-Fi series sound card users under Windows Vista, Fallout 3 uses DirectSound audio, which means that it will require the ALchemy software for correct trouble-free hardware accelerated audio on your setup. Also try these instructions if you continue to have problems with audio after installing ALchemy.
Note that a temporary fix to the severely stuttering audio for the music in the Radio channels you can access in the Pip-Boy (e.g. Galaxy News Radio) is to press ESC into the main menu, wait a few moments, then continue with the game; alternatively, ESC into the menu and back into the game quickly several times. A more permanent fix is to install this particular DirectShow audio filter - copy the MADFilter.ax file into your \Windows\System32 directory, then open an Admin command prompt and type regsvr32 MADFilter.ax to install it. It may cause problems with playback of other multimedia such as videos, so if you want to uninstall it, use the regsvr32 -u MADFilter.ax command and then delete the file.
In general if you are having lots of stuttering, audio glitches and crashes which you suspect are due to audio-related issues, there are other tweaks you can undertake to adjust the audio system, although in practice I found that changing some of the audio-related variables can make the game unstable. The best possibility for resolving problems is to adjust the audio cache using the iAudioCacheSize and iMaxSizeForCachedSound variables, covered in the Advanced Tweaking section.
Controls
Mouse Sensitivity: This slider controls how sensitive the mouse is in the game. The further right the slider, the more sensitive your mouse will be to movements while playing. Note however that mouse lag - that is, the slowing down and general 'lagginess' of your mouse while playing the game is not as affected by this setting. Mouse lag is usually caused by low FPS in certain areas - use a free utility like Fraps to measure your framerate and any time your FPS dips below the mid-to-low 20s, you will likely experience increased mouse lag. You should consider reducing some of your settings to increase your framerate if that's the case. Another major cause of mouse lag is VSync - see the VSync setting earlier in this section for details of how you can disable it properly, as it will help reduce mouse lag. There is one more fix for mouse/control lag - see the 'Max Frames to Render Ahead' tweak at the end of this guide which may also help reduce it.
Invert Y: If set to Off, moving your mouse back makes your character look down, moving your mouse forward makes him look up. If set to On, the opposite happens. Has no impact on performance, so set to suit your taste.
Action Mapping: Clicking this option takes you to a screen where you can assign keys and buttons to various functions in the game. These should be set to suit your taste as they have no performance impact. Note that by default the control listing is for Keyboard; to see and alter the Mouse bindings you need to click the Device item at the bottom right of the screen.
The next section goes into the Advanced Tweaking possible in Fallout 3, of which there is plenty.
Fallout 3 is based on the same Gamebryo engine as Elder Scrolls IV: Oblivion, which means that it has a lot of scope for tweaking and customization. There are three main ways to customize Fallout 3 outside of the regular in-game settings: Mods, .ini (initialization) file tweaks, and console commands. Mods are covered on page 4 of this guide, and console commands are covered in the next section, so this section looks at how you can alter a range of additional settings which will impact on Fallout 3's user interface, gameplay and performance via the .ini files.
Fallout 3 has two main .ini files which hold all of its key settings. These are the Fallout.ini and FalloutPrefs.ini files, both found under the \Documents and settings\[username]\My Documents\My Games\Fallout3\ directory in Windows XP, or the \Users\[username]\Documents\My Games\Fallout3\ directory in Windows Vista. You can edit these files using a standard text editor like Windows Notepad. Before altering either of these files, I strongly recommend making backup copies of each and storing them somewhere safe. Note that if at any time you wish to return your .ini files to their default settings, simply delete them and the next time you launch Fallout 3 it will automatically recreate them with the default options - though obviously you will lose all your customizations. If you just want to see what the default settings are at any time, refer to the Fallout_default.ini file found under the \Program Files\Bethesda Softworks\Fallout 3 directory, however do not delete or edit this file in any way.
Interestingly, and somewhat confusingly, the contents of the Fallout.ini and FalloutPrefs.ini files are very similar. In general whenever you alter a setting using the Launcher or the in-game settings, the change will be recorded in FalloutPrefs.ini. But most general system settings will only work if they are changed in Fallout.ini. So to ensure there is no confusion, I clearly note at the end of each variable description below which specific .ini file to change the setting in, e.g. (Fallout.ini) or (FalloutPrefs.ini). If in doubt, or you experience any problems, change the setting in both files just to make sure it's applied correctly.
Fallout: New Vegas Update: Most tweaks which would normally go in the Fallout.ini file in Fallout 3 actually need to be made in the Fallout_default.ini file found under the \Program Files (x86)\Steam\steamapps\common\fallout new vegas directory in Fallout: New Vegas. This is because when the game is launched via Steam, it opens the launcher first, which overwrites your Fallout.ini file with the contents of the Fallout_default.ini file, along with your launcher settings. Make a backup of Fallout_default.ini, then edit it with a text editor.
Importantly: I have tested all the major variables in both the .ini files, and those which seem to have no discernable or useful impact, and those which can be fully adjusted using the in-game settings, are not included below. Just because a variable has a name which appears tempting or obvious, doesn't mean it actually has any impact at all when altered. Some of the variables relate to general functionality in the Gamebryo engine which has not have been specifically implemented in Fallout 3, or which the developers have disabled for some reason. For example some of the variables which worked in Oblivion do nothing at all in Fallout 3, despite what you may read elsewhere. If in doubt, test a variable for yourself by doing screenshot and FPS comparisons.
If you're having problems finding any of these commands in your .ini file, first make sure you're using the right .ini file (read the information above again carefully), then go to the top of the file, press CTRL+F to open a search box, type or paste part or all of the variable name into there, and it will find it for you. All commands below should be in everyone's .ini file, and all major working commands which actually do something useful are covered here. Remember, the correct .ini file to edit is mentioned at the end of the command, but if not noted, or if in doubt, change the setting in both .ini files.
Below are listed all the main .ini variables, categorized by their general functionality.
General
iPresentInterval=0 - This variable controls Vertical Synchronization (VSync) in the game, as covered in the In-Game Settings section. If set =1, VSync is enabled, and if set =0 VSync is disabled. VSync should first be adjusted in the Launcher settings screen, but if it fails to be implemented properly, it can be force enabled or disabled using this setting (Fallout.ini).
fForegroundMouseMult=4.0 - This variable controls the level of mouse acceleration in 2D interfaces such as in-game menus. Lowering the value of this variable will reduce mouse acceleration, while raising it will increase acceleration. It doesn't exist by default, so it needs to be inserted under the [controls] section of the Fallout.ini file. Better yet, if you want to remove all traces of mouse acceleration, copy and paste the following four lines under the [controls] section of Fallout.ini:
fForegroundMouseAccelBase=0
fForegroundMouseAccelTop=0
fForegroundMouseBase=0
fForegroundMouseMult=0
bDisableAllGore=1 - If set to =1, this variable will disable all gore in the game. This includes removing all blood decals and splatter marks, and all forms of dismemberment. Note: This setting does not exist by default in the .ini file, it must be manually created exactly as shown above and placed under the [General] section of the Fallout.ini file (e.g. insert it under the last sLanguage=ENGLISH line). If on the other hand you want more control over the level gore, try a mod such as this Gore Tweak Mod (Fallout.ini).
bAllowScreenShot=1 - When set to 1 allows you to take a screenshot at any time by pressing the PRINT SCREEN key. Screenshots will be in BMP format and stored in your \Program Files\Bethesda Softworks\Fallout 3 directory, or \Users\[username]\AppData\Local\VirtualStore\Program Files\Bethesda Softworks\Fallout 3 if you're using Windows Vista with UAC enabled. Alternatively, you can use Fraps to take JPG screenshots, which is my preference (Fallout.ini).
SScreenShotBaseName=ScreenShot - This determines the name given to every .bmp screenshot file taken using the PRINT SCREEN button as covered above, e.g. Screenshot3.bmp. The number at the end of the screenshot name is determined by the iScreenShotIndex variable, which indicates what the next number in the series will be (Fallout.ini).
iConsoleTextYPos=940
iConsoleTextXPos=30
iConsoleVisibleLines=15
rDebugTextColor=255,251,233
The variables above control the position, number of visible lines and color of the font used for the Command Console (See Console Commands section). Adjusting the iConsoleTextYPos and iConsoleTextXPos values will shift the console text around the screen, with the YPos value determine how far from the top the text is (higher values will shift it further down), and the XPos value determine how far from the left it is (higher values will shift it further right). The iConsoleVisibleLines variable controls the maximum number of text lines shown on screen at any one time in the console. The rDebugTextColor value determines the color of the console font, with the value expressed in RGB - use this RGB Calculator and enter the three numerical values in the top right and click Calculate to determine the color, or click the Table button at the top to select from a preset list of values. Note: the iConsoleFont=2 variable doesn't seem to change the font size or type, and setting it to 0 can cause a startup crash (Fallout.ini).
fDefaultFOV=75.0000 - Shows the default Field of View in degrees for the game, which is 75 degrees. Changing the Field of View using this variable doesn't seem to work properly as it is not applied when the game starts, so instead you will need to use the FOV console command (See Console Commands section) each time you start them game to set a different field of view.
Update: It has been discovered that by inserting the line fDefaultWorldFOV=75.0 at the bottom of the Display section of the Fallout.ini file, and assigning it a value equal to the FOV you want, you can now permanently change the default Field of View in the game. Remember however that if you change the default FOV, you may also need to change the FOV for other screen elements - see the fRenderedTerminalFOV and fPipboy1stPersonFOV commands below. Note also that you can alter the fDefault1stPersonFOV=55.0000 value to alter how much of your body/weapon is shown in front of you (Fallout.ini).
bShowQuestMarkers=1 - If set to =0, this variable will disable the quest markers which appear at the very bottom of your compass, pointing in the direction of your active quest (FalloutPrefs.ini).
bBorderRegionsEnabled=1 - If set to =0, this option removes the invisible barriers around the outer edges of the game world, though not much is beyond (Fallout.ini).
bInvalidateOlderFiles=0 - This variable needs to be changed to =1 when installing any mods, as covered in the Mods section on page 4. When set to =1, it will use the latest version of any files found under the \Program Files\Bethesda Softworks\Fallout 3\Data\ directory; in other words it will use the modified files rather than the original files in its archives (Fallout.ini)
bForceReloadOnEssentialCharacterDeath=1
bEssentialTakeNoDamage=1
The above variables determine whether you can kill 'essential' characters, i.e. characters which have a major role in the storyline and are normally prevented from being killed. If you set both these variables to =0 you can now kill such characters, however obviously down the track you may then not be able to complete various quests, and may even ruin the main storyline, so it is not recommended. Back up your saved games regularly if you do use this (Fallout.ini).
iFPSClamp=0 - This variable appears to control the synchronization between game physics and graphics, or something similar of that nature. By default it's set so that they're synchronized (=0), however this is known to cause 'micro-stuttering', or more aptly, frame skipping - see the Troubleshooting Tips section for a discussion of this and some solutions. The skipping seems to occur because certain frames are dropped to keep up with the physics tic rate. In any case by setting this variable to =60 for example, you can remove micro-stuttering, however in places where your framerate is below 60FPS the game physics will slow down, and in places where your FPS rises above the iFPSClamp value, the game physics will speed up. For that reason it is recommended that you do not alter this from its normal value of =0, and again see page 3 for other solutions to micro-stutter/skipping (Fallout.ini).
bDisablePlayerCollision=0 - If set to =1, this variable disables player collision, which effectively means that your character can walk through any solid object. This is not recommended as it will glitch the game, instead if you want to temporarily disable player collision at any time, use the TCL console command (See Console Commands section) (Fallout.ini).
Interface
iSafeZoneXWide=15
iSafeZoneYWide=15
iSafeZoneX=15
iSafeZoneY=15
The above settings determine the 'safe zone' within the screen for the placement of your Heads Up Display (HUD) elements. By reducing the values, such as to a value of =5 each, this will move the HUD elements further towards the edges of the screen, making them seem less intrusive. If you want to further resize, customize or remove various HUD elements, see the Interface mods under the Mods section on page 4 (Fallout.ini).
sWelcomeScreen1=loading_screen01
sWelcomeScreen2=loading_screen_bethsoft
sWelcomeScreen3=loading_screen_BGS
sWelcomeScreen4=loading_screen_legal
fLoadingInitUpdateInterval=5.0000
There is a series of four title slides which play before you reach the main Fallout 3 menu screen - these are each named in the four sWelcomeScreen variables shown above. Unfortunately there doesn't appear to be any way at the moment to bypass them entirely; deleting them for example will just result in blank purple slides loading at the start. The best that can be done is to speed up their transitions by changing the fLoadingInitUpdateInterval=5.0000 variable to =0.0000. In practice though it's quicker and easier just to press a key or click the mouse a few times during the initial slides and get to the main menu in a couple of seconds (Fallout.ini).
fLoadingTextUpdateInterval=10.0000
fLoadingBkgdUpdateInterval=10.0000
fMainMenuBkgdUpdateInterval=10.0000
These variables control the frequency with which background slides and text overlays are updated on the main menu screen and on the general loading screens while loading saved games for example. The fLoadingTextUpdateInterval=10.0000 variable controls how often the text is cycled (in seconds); the fLoadingBkgdUpdateInterval=10.0000 variable controls how often background slides are changed on loading screens; and the fMainMenuBkgdUpdateInterval=10.0000 variable controls how often background slides are updated on the main menu screen. If you want to eliminate the constant changing of slides and text you can raise these values - for example raising the fMainMenuBkgdUpdateInterval=10.0000 value to =180 (3 minutes) means the main menu screen will effectively become static (Fallout.ini).
fRenderedTerminalFOV=0.15 - Sets the Field of View for the computer terminal screens within the game. Altering this setting effectively determines the size of the screens - higher values will make the terminal screens fill less of your screen, lower values will make the terminal screens larger (Fallout.ini).
fPipboy1stPersonFOV=47.0 - This variable determines the Field of View when you open your Pip-Boy 3000. The lower the value, the more of the screen the Pip-Boy will take up (and parts of the Pip-Boy may also become obscured); the higher the value, the smaller the Pip-Boy will be compared to the rest of the screen (Fallout.ini).
fBlurIntensityPipboy=0.25 - This variable determines how bright and blurry the readout is on the Pip-Boy. Higher values will increase the general haziness and brightness of the readout, while setting it to a value of =0 will make the interface clearer but less bright (Fallout.ini).
uPipboyColor=452952319
uHUDColor=452952319
While you can alter the Pip-Boy and HUD colors using the in-game settings, they are limited to four preset colors (Green, Blue, White and Amber). Here you can alter the Pip-Boy and HUD colors further. The color code used is a decimal representation of RGBA Hex code (Red, Green, Blue, Alpha in Hexadecimal). Basically, to get the correct numerical code for the color you want, you first have to work out its Hex value - again, use this RGB Calculator, click the Table link at the top, select a color, and see the resulting Hex code in the top left of the calculator. Copy this code and add a fourth set of digits for the Alpha (transparency) value, typically FF for solid, lower hex values will be more transparent. Then plug the final 8-digit code into a Hex to Decimal converter such as this one and the resulting string of numbers in Decimal view can be used as values for the variables above. Note: the code for Default Blue is 785383423, Default Green is 452952319, Default White is 3321888767, and Default Amber is 4290134783 (FalloutPrefs.ini).
The next page continues the .ini tweaks, looking at Graphics-related variables.
Graphics
iSize W=1280
iSize H=1024
The above two values determine the screen width and height in pixels respectively - you can specify a custom screen resolution by changing these values, though it may only work in Windowed mode (FalloutPrefs.ini).
fGamma=1.0000
fGammaMax=0.6000
fGammaMin=1.4000
The above variables are useful particularly for those with older monitors. They are the same as the in-game Brightness slider, however here you can adjust both the overall brightness level with fGamma as well as altering the upper and lower limits allowed, in case you need to adjust Brightness beyond the limits allowed in the game (FalloutPrefs.ini).
iShadowMapResolution=1024 - This variable determines the resolution of the shadow maps used in the game, and is the same as the Shadow Quality Launcher setting (See In-Game Settings section). The preset values as assigned by the Launcher are =1024 for High, =512 for Medium and =256 for Low. However here you can assign a custom value (always using a multiple of 8), to further adjust the quality of shadows in the game. For example try a value of =2048 to further improve shadow quality above High, or a value of =128 to reduce shadow quality below Low to gain extra FPS (FalloutPrefs.ini).
bUseRefractionShader=1 - This setting controls the shimmery/invisibility effect sometimes used in the game. Setting it to =0 can noticeably boost FPS in areas where this effect is used, such as around invisible characters (e.g. when using the Stealth Boy), or when firing weapons which give off a heat haze (e.g. missile explosions). However obviously this can also ruin realism and prevent appropriate special effects (Fallout.ini).
bDoSpecularPass=1 - If set to =0, removes the shiny effect on most surfaces. While you can adjust the level of shine to some degree using the Specularity Fade in-game setting (See In-Game Settings section), this variable is very useful for those who think the game world is too shiny on the whole; by disabling this option you can change the appearance of the game world by removing the shine, and also noticeably improve FPS on many systems (Fallout.ini).
iMaxDecalsPerFrame=10 - This value determines the maximum number of decals (mainly blood splatters on the ground) visible on screen at any time. It is the same as the 'Decal Cap' Launcher setting (See In-Game Settings section). However here you can assign values above or below the normal 2 - 10 scale allowed by the Launcher options slider. For example you can set it to =0 to disable all blood splatters on the ground, or raise it above 10 to make things much more messy. Note that decals can have an impact on performance, so raising this value can reduce FPS during combat (FalloutPrefs.ini).
fDecalLOD2=1500.0000 - In my testing, many of the decal-related settings seem to have no impact at all on decals (blood splatters and bullet impact holes), whether it be on their size, frequency, life time, etc. However this variables does have a very noticeable impact on decals. The lower the value for this setting, there will effectively be less decals shown. For example if you set it to =0, no blood splatters, bullet holes or scorch marks will be generated when firing your weapons. This can improve FPS during heavy combat for some people, but is obviously unrealistic (FalloutPrefs.ini).
uMaxDecals=100 - This variable seems to determine how many decals will remain on screen for longer than a few seconds. It won't prevent multiple decals from being shown, but if you lower the number, additional decals above the value you set for this variable will fade out very quickly (FalloutPrefs.ini).
uGridsToLoad=5 - Increasing the uGridsToLoad value (always in odd steps of 5,7,9,11 etc.) will increase the number of grids around the character in which full texture and object data will be loaded up and visible as they wander around. This improves overall visual quality by increasing graphical detail on more distant game world elements. Indeed certain objects and structures which were otherwise not visible before will now be visible. The higher the value, the more you will see of the game world in return for a sharp drop in framerate, and noticeably longer loading times. There may even be more prominent stuttering as well, not to mention the possibility of visual glitches and the greater likelihood of crashes due to the extra memory usage. Unlike Oblivion, in my testing using a value of =11 I didn't see any visual glitches in Fallout 3 at all, however my performance fell by more than half, and I eventually experienced a crash to desktop. As you increase the uGridsToLoad value, you may want to also increase the uExterior Cell Buffer value to accommodate the greater cell data and prevent crashes and stuttering. Note: It appears that if you save a game with a higher value for this variable, you cannot then lower the value again as your saved game will no longer load properly. So on balance the default value of 5 for uGridstoLoad is a good compromise between visual detail, performance and loading pauses, though high-end machines can try higher values, but make sure your system can handle it in a range of areas before committing to it by saving your game (Fallout.ini).
fBlockLoadDistanceLow=50000
fTreeLoadDistance=40000These two variables are actually quite important for overall Level of Detail. They correspond to the Object LOD Fade and Tree LOD Fade settings available in the Launcher options and are covered in the In-Game Settings section. In effect they determine the visible distance for buildings and trees respectively. In the Launcher they're restricted as to how high you can raise them, however here you can raise them to very high values (e.g. to =500000) and thus increase the number of buildings, objects and trees visible in the distance. Furthermore the performance impact seems minimal at best, and certainly is nowhere near as high as the uGridsToLoad variable which does something similar (FalloutPrefs.ini).
fSplitDistanceMult=1.5 - This variable is the same as the Land Quality Launcher option (See In-Game Settings section). However while the Launcher slider only goes up to a value of 1.5, by raising it further here (e.g. to a value of =10), you will get a more noticeable increase in the level of detail in distant landscapes, although FPS will similarly be reduced by a noticeable amount (FalloutPrefs.ini).
fSunGlareSize=800.0000
fSunBaseSize=750.0000
These two variables effectively control how large the Sun appears to be in the sky, and how much glare it has. Lowering the values lowers the size of the Sun, raising them makes it bigger (Fallout.ini)
bAllow30Shaders=0 - If set to 1, this option will allow (but not force) the use of Shader Model 3.0 on graphics cards which support it, namely Nvidia GeForce 6600 or newer, or ATI X1000 series or newer. This can potentially improve performance when using HDR rendering for example. However to force the actual use of 3.0 Shaders after making the above change, you will also need to check your RenderInfo.txt file, found under the same directory as your .ini files, and near the bottom the file check which shader package it uses (e.g. Shader Package : 13). Then go to the \\Program Files\Bethesda Softworks\Fallout 3\Data\Shaders\ folder and rename that particular package to something else (e.g. rename shaderpackage013.sdp to shaderpackage013._bak. Now copy shaderpackage019.sdp and paste it back into the same directory, and rename this new copy to the package name your card uses (e.g. rename it to shaderpackage013.sdp in this example). This will supposedly force Fallout 3 to use the Shader Model 3.0 shaders in the game. In practice this doesn't appear to noticeably alter image quality or performance, so at best it might be used for troubleshooting purposes (Fallout.ini).
iActorShadowCountInt=6
iActorShadowCountExt=6
The above two options allow you to raise the maximum number of Interior and Exterior Shadows possible. Normally you can adjust these using the Max Interior Shadows and Max Exterior Shadows options in the Launcher (See In-Game Settings section), however here you can set them beyond their normal maximum of 6 if you wish (FalloutPrefs.ini).
fLODFadeOutMultActors=15
fLODFadeOutMultObjects=15
fSpecularLODStartFade=2000
fLightLODStartFade=3500
fLODFadeOutMultItems=15
fShadowLODStartFade=1000
The variables above can all be adjusted under the View Distance tab of the Fallout 3 Launcher options. From top to bottom above, they relate to: Actor Fade, Object Fade, Specularity Fade, Light Fade, Item Fade and Shadow Fade respectively, and are all covered in more detail in the In-Game Settings section. However here you can adjust them beyond the maximums allowed by the Launcher sliders (FalloutPrefs.ini).
The next page continues the .ini tweaks.
Grass
iMinGrassSize=80 - This setting controls the density of grass clumps. The higher the value, the less tightly packed grassy areas will be; the lower the value, the more grass there will be. In other words, lowering this value will significantly reduce FPS in most outdoor areas, but can make the game world seem more lush and overgrown. For example, try a value of 10 and it will radically alter what the wasteland looks like. Alternatively if you're after a performance boost or just want less grass for visual reasons, raise it to a value such as 140 to greatly thin out the grass (Fallout.ini).
bForceFullLOD=0 - If set to =1, this variable increases the visible number of bushes, especially in the distance. The performance impact is minor, so if you want a bit of additional foliage in the game world, enable this setting (Fallout.ini).
fGrassStartFadeDistance=7000 - This variable controls the spread of grass into the distance, and is normally controlled via the Grass Fade Launcher option (See In-Game Settings section). Here you can adjust the grass range beyond the limits possible in the Launcher menu (FalloutPrefs.ini).
bDrawShaderGrass=1 - If set to 0 removes all grass from the wasteland, which obviously improves FPS in outdoor areas at the cost of realism (Fallout.ini).
fGrassWindMagnitudeMax=125.0000
fGrassWindMagnitudeMin=5.0000
These settings determine the extent to which wind affects grass swaying. For example, if you set both variables to =0, this will eliminate all grass swaying, which can improve FPS to some degree but reduces realism. Alternatively, you can raise both variables to make grass sway much more (Fallout.ini).
Water
iWaterReflectWidth=1024
iWaterReflectHeight=1024
The above variables control the width and height (i.e. the resolution) of water reflections. The higher the value for each, the more crisp and detailed reflections will be; the lower the value, the lower the detail. For example setting both of these to =256 will greatly reduce reflection detail in return for a boost in FPS around water areas. Conversely, you can raise these values to something like =2048 for an increase in reflection quality above the maximum normally possible using the in-game settings, however there will be a very sharp drop in performance around water (FalloutPrefs.ini).
Audio
fMainMenuMusicVolume=0.6000 - The volume of the music which plays in the background when in the game's main menu can't be adjusted anywhere in the game, except by using the Master Volume slider, which then in turn affects all sound and music. To alter just the menu music volume independently, change the value of this variable. Note that if you try to disable the main menu music altogether using the sTitleMusic=MainTitle variable, it will likely result in a crash, so instead just set this variable to =0.0000 to effectively disable the menu music (Fallout.ini).
bEnableAudioCache=1
iAudioCacheSize=2048
iMaxSizeForCachedSound=256
bEnableAudioCache=1 - The audio cache should be enabled to ensure a reduction in stuttering, however you can fine tune how much memory the game uses to cache audio with the iAudioCacheSize=2048 variable. The cache size is in KB, so a value of 2048 = 2MB for caching audio data. You can experiment with raising this value, e.g. double it to 4MB (=4096) to see if it further improves stuttering and audio performance in the game. You can also alter the iMaxSizeForCachedSound=256 value to change how many sounds are cached; higher values should mean more sounds are cached. Note however that the audio system in Fallout 3 seems very sensitive, and raising these variables too high, or indeed changing other audio-related variables can result in crashes at startup or exit (Fallout.ini).
Memory, Loading & Multi-threading
uInterior Cell Buffer=3
uExterior Cell Buffer=36
The above values determine how many cells (for interior or exterior areas as relevant) are buffered into RAM. Altering these values may help make performance smoother. For example, for 1GB of RAM you can try doubling the values (6 and 72 respectively). For 2GB of RAM, try 16 and 102 respectively. For higher amounts of RAM, try raising them higher, however note that you should also raise the iPreloadSizeLimit value below (Fallout.ini).
iPreloadSizeLimit=26214400 - This setting appears to determine the maximum amount (in bytes) of RAM allowed for preloading game data. Raising the value may reduce stuttering. The default value equates to around 25MB (divide the value of this variable by 1024 to get KB, then by 1024 again to get MB). For those with 1GB of system RAM, try doubling the variable to 52428800. For those with 2GB, try double again at 104857600 (100MB). You can raise these values even further to experiment, however note that raising this to a large amount doesn't force all the game data to sit in RAM, and can actually cause crashes. I suggest the maximum anyone should set this to should be around 262144000 (250MB), even for 4GB of RAM or more. Also make sure to raise your Cell Buffer values accordingly (see above) (Fallout.ini).
bPreemptivelyUnloadCells=0 - If set to 1, this variable attempts to unload cell data it thinks you won't need. This may help those with only 1GB of RAM, however for those with more RAM I recommend leaving it at =0 for greatly reduced stuttering. Setting this variable to =1 can also work against the benefits brought about by the other buffering/preload tweaks in this section, so again, it is not recommended (Fallout.ini).
bSelectivePurgeUnusedOnFastTravel=0 - If set to 1, this option removes a range of unnecessary data when you Fast Travel to another location. This can help keep memory usage down for those with less RAM, so it is recommended such people set this to =1, otherwise leave it at =0 for optimal performance on most systems (Fallout.ini).
bUseHardDriveCache=1 - Although Windows should already be using your hard drive cache by default for all drive operations, setting this variable to =1 should ensure it does. Note that some people report that enabling this setting can increase stuttering, so experiment to see if it helps or makes things worse for you. If in doubt, leave it at =0 (Fallout.ini).
bBackgroundLoadLipFiles=1
bLoadBackgroundFaceGen=1
bBackgroundCellLoads=1
bLoadHelmetsInBackground=1
iBackgroundLoadLoading=1
bBackgroundPathing=1
bBackgroundNavmeshUpdate=1
bCloneModelsInBackground=1
All of the above options relate to background loading to attempt to smooth FPS and reduce stutter. I recommend setting them all to =1 if they aren't already. At worst this will do no harm, and at best it may reduce stuttering and improve performance (Fallout.ini).
bUseThreadedBlood=1
bUseThreadedMorpher=1
bUseThreadedTempEffects=1
bUseThreadedParticleSystem=1
bUseThreadedAI=1
bUseMultiThreadedFaceGen=1
bUseMultiThreadedTrees=1
bMultiThreadAudio=0
iNumHavokThreads=5
All of the above variables relate to the use of the GameBryo engine's multithreading capabilities. Multithreading splits tasks into 'threads' where possible, and runs them in parallel across the cores of multi-core CPUs to potentially improve performance. Fallout 3 is already multi-threaded by default, however by enabling all these options you may gain additional performance if you run a multi-core CPU. In my testing I didn't see a dramatic improvement in CPU usage across both cores by enabling these options, nor an increase in FPS, but by the same token it can't hurt to enable them in case they provide marginal improvement. Note however that I found that setting bMultiThreadAudio=1 would cause a freeze upon exiting the game every time, so you may wish to keep this variable disabled for that reason. Indeed if you find you're having any other new problems after applying the above tweaks then revert them all to their original values as part of your troubleshooting (Fallout.ini).
bUseBackgroundFileLoader=0 - This variable may improve stuttering performance on some machines if set to =1, but in the past in games like Oblivion, it was known to cause issues on some machines. In my testing in Fallout 3 it seems to have no negative impacts, however experiment with it first and if in doubt, leave it at =0 (Fallout.ini).
Update: Some dual core and quad core CPU users have said that by inserting a new command iNumHWThreads=2 under the General section of Fallout.ini, and setting it to a value of 1, 2 or 4 (typically 2), this prevents freezing at certain points in the game. In practice this setting should not be required, as it appears to restrict the number of threads used by the game, however you can experiment with different values depending on how many cores of your CPU you want the game to use.
Update 2: In recent times many people have written to me and/or have also posted around the Internet that the tweaks in the [Memory, Loading & Multi-threading] section of the guide are either useless or harmful. I have clearly noted from day one that that these tweaks may have no impact, and having tested them myself to ensure that they aren't harmful, I mention that you can experiment with them if you wish, and reset them if you run into any problems. The reason they are still listed here is for the sake of completeness, so I don't receive hundreds of emails telling me that my guide is 'incomplete' because I don't cover these famous tweaks.
That covers the list of the most useful .ini variables I have found. Remember that I have tested all of the main variables in both .ini files, and in most cases the variables either do nothing useful, or nothing at all. That's why there are many seemingly important variables missing from the list above. If you know of any important .ini tweaks not listed above which do something useful, and importantly, you have actually tested them properly yourself (i.e. direct screenshot and FPS comparisons), then please Email Me and I will consider including them. Again, some of the popular Fallout 3 tweaks doing the rounds right now don't actually do anything at all - people have simply taken a guess at what an option in the .ini file does based on its name and then neglect to actually test the tweak under a consistent reproducible environment.
Also note that many people want 'pre-tweaked' .ini files which supposedly contain all the major customizations and optimizations. As always, my advice to such requests is that this is totally inappropriate; using other peoples' .ini files and settings will only lead to instability and/or graphical anomalies, since many of the entries are designed specifically for each system's capabilities, and/or the .ini file author hasn't tested the .ini file out on various systems, and/or they are simply not well aware of what all the .ini settings actually do and are just guessing on the impacts based on the names of the settings. Smart tweakers who want good image quality, performance along with system stability will familiarize themselves with the variables in this section and only apply the relevant tweaks after testing them on their system. There is no 'one size fits all' or automated approach to tweaking.
The next section covers the Console Commands available for use in Fallout 3.
Aside from .ini tweaking, one of the other ways you can adjust various engine parameters dynamically is to use the Command Console available in Fallout 3. To activate the in-game console, the bAllowConsole variable in your Fallout.ini file must be set to =1, which it should be by default (See Advanced Tweaking section). Next, start Fallout 3, and to open or close the console at any time, press the '~' key (the key above TAB). This may vary on some european keyboards, in which case try the ' button, or the button next to 1.
Whenever the console is open, the game will be paused, and your HUD will also temporarily disappear. There should be a cursor prompt shown in the bottom left hand corner of the screen, and if you type anything the text will start appearing at that prompt. If you can't see the cursor prompt and/or portions of the text you are typing, then the cursor is positioned somewhere to the far bottom left off the edge of the screen. You will need to edit your Fallout.ini file to reposition the console cursor to make it visible, using the iConsoleTextYPos and iConsoleTextXPos variables as covered in the Advanced Tweaking section.
Once the console is open and visible, you can type in any of the console commands below, either in long form or using the short form if one is provided (in brackets). For example, you can either type in togglewireframe or twf and press ENTER, and the command to turn wireframe mode on/off will be executed. You can also scroll through recently used commands by using the Up Arrow key. See the next page for detailed instructions on how to use some of the more useful console and script commands.
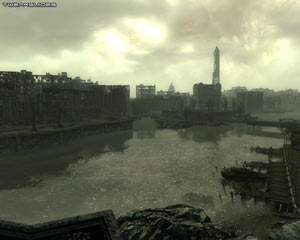
Below are all the main console commands for Fallout 3 in alphabetical order in the format: Fullname (shortname) - Description. The descriptions provided are simply those that the developers have written with a few minor modifications by me. Note that there are also a range of Script Commands which you can also use in the console, however these are not reproduced here, and the most useful of them is covered on the next page.
AddDecal -
AddFaceAnimNote (afan) -
AddOcclusionPlane (aop) - Add Occlusion plane (x size, y size).
BeginTrace (bt) - Creates a trace file (Xenon only).
BetaComment (bc) - Add comment to [General] 'sBetaCommentFile' file.
CalcLowPathToPoint (lp2p) - ignore locks, allow disabled doors, ignore min use.
CalcPathToPoint (p2p) -
CenterOnCell (coc) -
CenterOnExterior (coe) -
CenterOnWorld (cow) - [e.g. COW worldname -10 5]
ClearAdaptedLight (cal) - Clears the HDR adapted light texture.
ClearLocationMarkers (clm) -
ClearScreenBlood (csb) - Clear screen blood.
CloseAllMenus (cam) - Closes all open menus.
CloseFile -
CompleteAllQuestStages (caqs) - Sets all quest stages
CopySaves - Copy save games from the host machine or a memory stick (ms).
DamageWeapon -
DeactivateAllHighlights (dah) - Remove all VATS highlights.
DebugCombatPlan (dcp) - Debugs the combat plan on an actor.
DebugMilesPS3 (dm3) - Enumerates Miles samples and streams.
DeleteReference (zap) - Deletes the specified object ref.
DrawSkeleton (das) - Enables skeleton drawing.
DumpMenuPackingInfo (dpmi) - Dump menu packing information.
DumpModelMap (dmm) - Dump model map contents to file.
DumpNiUpdates (dnu) - Dumps the next frame's calls to NiNode/NiAVObject::UpdateDownwardPass to NiDump*.xls (only Debug/PIX 360 builds).
DumpTexturePalette (dtp) - Dump texture palette contents to file.
EvalActorTextures (eat) -
FlushNonPersistActors (flush) - Deletes all the actors in High who are not persistant.
ForceFileCache (ffc) - Enumerates Miles samples and streams.
ForceGroupStrategy (fgs) - Forces a combat group strategy.
ForceRSXCrash (frsx) - Forces an RSX crash.
FreezeRenderAccumulation (fra) - Only re-render geometry visible during this frame.
GetActorValueInfo (getavinfo) - Get detailed an actor value info [e.g. player.getav luck].
GetINISetting (getini) - [e.g. Getini "setting:category"].
GetWeaponHealth -
HairTint - [e.g. Hairtint R,G,B].
Help - Show console help.
HighlightAdditionalReference (har) - Highlight a reference.
HighlightBodyPart (hbp) - Highlight body part.
IgnoreRenderPass (irp) - Ignore the given renderpass.
LoadGame (load) - [e.g. LoadGame filename].
ModifyFaceGen (mfg) - Modify FaceGen Functionality.
ModWaterShader (mws) - Modifies water shader settings.
MovePipboyKnob (mpk) - Move pipboy knob.
MoveToQuestTarget (movetoqt) - Move player to current quest target (optional param: target number).
OutputArchiveProfile (oap) - Output Archive profile info to a file.
OutputLocalMapPictures (olmp) - Writes out the current local map.
OutputMemContexts (omc) - Output Mem Context info to a file.
OutputMemStats (oms) - Output Mem Stats info to a file.
OutputMemStats (omsfw) - Output Mem Stats info to a file.
OutputTextureUseMap (otum) - Writes out texture use map data to file.
PickRefByID (prid) - Select a reference by id for the console.
PlaceLocationMarker (plm) - PlaceLocationMarker x y z (optional name) (optional color ).
PlayerSpellBook (psb) - Add all spells to player.
PlayExplosion - Plays explosion seq in selected obj.
PlayVATSCameras (pvc) - Play this set of VATS cameras for the next VATS playback.
PrintAiList (pai) - Printed Ai Lists.
PrintHDRParam (php) - Prints current HDR settings.
PrintNPCDialog (pdialog) - Prints NPC dialog.
QuitGame (qqq) - Exit game to desktop without going through menus.
RefreshINI (refini) - Refresh INI settings from file.
RefreshShaders (rs) - Reload HLSL shaders from disk.
ReloadCurrentClimate (rcc) - Reloads values from the current climate.
ReloadCurrentWeather (rcw) - Reloads values from the current weather.
RenderTestCell (rtc) - Runs Render Test on player's current parent cell.
RenderTestHere (rth) - Runs Render Test on player's current position.
ResetAllTerminals (rat) - Debug resets all hacked/locked terminals.
ResetDialogueFlags (rdf) - Debug resets SayOnce, TalkedToPc, etc.
ResetMemContexts (rmc) - Reset Max Mem Contexts.
ResetPerformanceTimers (rpt) - Resets the performance timers.
RevertWorld (rw) - Revert the world.
RunCellTest (rct) - Runs a cell test.
RunMemoryPass (rmp) - Runs a cleanup memory pass.
SaveGame (save) - [e.g. SaveGame filename].
SaveIniFiles (saveini) - Writes all the .ini files.
SaveWorld - [e.g. SaveWorld filename].
ScreenBloodTest (tsbtest) - Toggle screen blood debugging.
SendSherlockDebugText (ssdt) -
SetCameraFOV (fov) - Change the camera's field of view (in deg): default 75.
SetClipDist - Set new clip distance with floating point value.
SetCombatActionCost (scc) - Sets the cost on a combat action.
SetConsoleOuputFile (scof) - Sets the given file as target for console output.
SetDebugText (sdt) - Sets which debug text is shown.
SetDepthOfFieldRange (sdofr) - Sets Depth of Field range.
SetEmitterParticleMax - Sets the maximum number of particles emitted by a non-master particle system emitter.
SetFog - Set fog with floating point values; start and end depths.
SetGameSetting (setgs) -
SetGamma (sg) - Sets new gamma ramp.
SetGlobalRadialBlur (sgrb) - Set parameters for the global radial blur.
SetHDRParam (shp) - Sets various values for the HDR shader.
SetHudGlowConstants (shgc) - Set parameters for HUD glow.
SetImageSpaceGlow (sisg) -
SetImageSpaceModifiersEnable (sisme) - Set imagespace modifiers enable: 0-Off, 1-On.
SetINISetting (setini) - [e.g. SetIni "setting:category" value].
SetLightingPasses (slp) - Set lighting passes with amb, diff, tex, spec toggle values set 0 or 1.
SetLODObjectDistance (slod) -
SetMaxAniso - Sets Depth of Field focal distance.
SetMotionBlur (smb) - Set the motion blur params.
SetMPSParticleMax - Sets the maximum number of particles emitted by master particle system emitter set.
SetSkyParam (ssp) - Sets various values for the sky.
SetTargetDOF (stdof) - Sets the depth of field based on the target.
SetTargetFalloff (stfo) - Sets the falloff of the target.
SetTargetRefraction (str) - Sets the refractive value of the target.
SetTargetRefractionFire (strf) - Sets the refractive fire value of the target.
SetTaskThreadSleep - Sets the task thread sleep value (-1 to disable).
SetTaskThreadUpdateSleep - Sets the task thread update sleep value (-1 to disable).
SetTerminalMenuPos (stmp) -
SetTreeMipmapBias (stmb) - Set mipmap LOD bias values for tree billboards.
SetUFOCamSpeedMult (sucsm) - Set speed mult for UFO cam.
SetVel - Sets Velocity on a reference.
Show (tst) - Show global scripts and variables.
Show1stPerson (s1st) - Show the 1st person Model from the 3rd person camera. If in 3rd person mode it will show both.
ShowAnim (sa) - Show Animation and Actor status.
ShowFullQuestLog (sfql) - Show all log entries for a single quest.
ShowHeadTrackTarget (sheadt) - Show the head track target if set from look function.
ShowInventory (inv) - Shows reference inventory.
ShowPivot (sp) - Puts a temporary yellow plus at the pivot point of the selected reference.
ShowQuestLog (sql) - Show Quest Log.
ShowQuests (sq) - List quests.
ShowQuestTargets (sqt) - Show current quest targets.
ShowQuestVars (sqv) - Show quest variables. [svq QuestID].
ShowRenderPasses (srp) - Display render passes for the next frame.
ShowScenegraph (sfsg) - Create a window with the full game scene graph, open to the node corresponding to the selected reference (if any).
ShowScenegraph (ssg) - Create a window with the full game scene graph or the scene graph of the selected reference.
ShowSubtitle - Show all dialog subtitles (1 shows always, 0 hides always).
ShowVars (sv) - Show variables on object. [player->sv]
ShowWhoDetectsPlayer (swdp) - Show who detects the player.
SpeakSound -
StartAllQuests (saq) - Starts all quests.
TestAllCells (tac) - Test All Cells (0 - stop, 1 - start, 2 - interiors, 3 - current world).
TestCode -
TestDegrade - Degrades the specified number of MB of textures. negative values degrade all possible. (only 360 builds).
TestLocalMap (tlm) - Simulates the local map. (1 or 0 for FOW on or off).
TestRaceSexTerimnal (trst) - Test race/sex menu rendered terminal.
TestSeenData (tsd) - Visually displays the current seen data.
ToggleActorMover (tam) - Toggles actor movement through pathing system.
ToggleAI (tai) -
ToggleAiSchedules (tais) -
ToggleBorders (tb) - Show border lines for each cell.
ToggleBoundVisGeom (tbvg) - Toggles bound visualization for a ref.
ToggleCastShadows (tsh) -
ToggleCellNode (tcn) - Toggle 3D for a Cell child node: 0-Actor, 1-Marker, 2-Land, 3-Water, 4-Static, 5-Active.
ToggleCharControllerShape (tccs) - Toggle char controller shape type.
ToggleCollision (tcl) -
ToggleCollisionGeometry (tcg) - Show collision geometry.
ToggleCombatAI (tcai) - Toggles ALL Combat AI.
ToggleCombatDebug (tcd) Toggles combat debug info.
ToggleCombatStats (tcs) -
ToggleConversations (tconv) - Toggle conversation stats.
ToggleDebugDecal (tdd) - Toggle debug displays for decal creation : 0-Wireframe, 1-Solid, 2-Occlusion Query, 3-Transform.
ToggleDebugText (tdt) - Show debug numbers on the screen.
ToggleDecalRendering (tdr) - Toggle decal rendering.
ToggleDepthBias (tdb) - Toggles depth bias for decals on or off.
ToggleDetection (tdetect) -
ToggleDetectionStats (tds) - Show the detection stats of the current seletected Ref.
ToggleEmotions (temo) - Toggle NPC facial emotions.
ToggleEOFImageSpace (teofis) - Toggles end of frame imagespace effects.
ToggleFlyCam (tfc) - Toggles the Free Fly camera (UFO cam).
ToggleFogOfWar (tfow) - Turns fog of war on or off.
ToggleFootIK (tfik) - Toggles Foot IK system.
ToggleFullHelp (tfh) - Toggle Full Help.
ToggleFullScreenMotionBlur (tfsmb) - Toggles Full screen motion blur.
ToggleGodMode (tgm) - Toggle God mode.
ToggleGrabIK (tgik) - Toggles Grab IK system.
ToggleGrass (tg) - Toggle grass display.
ToggleGrassUpdate (tgu) -
ToggleHDRDebug (thd) - Toggles HDR debug textures.
ToggleHighProcess (thighprocess) -
ToggleLeaves (tlv) -
ToggleLiteBrite (tlb) - Toggles lite brite render mode.
ToggleLODLand (tll) -
ToggleLookIK (tlik) - Toggles Look IK system.
ToggleLowProcess (tlowprocess) -
ToggleMagicStats (tms) -
ToggleMaterialGeometry (tmg) - Show material geometry.
ToggleMenus (tm) - Hide all the menus. Used for taking screen shots.
ToggleMiddleHighProcess (tmhighprocess) -
ToggleMiddleLowProcess (tmlowprocess) -
ToggleMultiboundCheck (mbc) - Toggle all Multibound check functionality.
ToggleNavMesh (tnm) - Toggle blocked display.
ToggleOcclusion (tocc) - toggle occlusion query for geometry.
TogglePathingInfoFunction (tpi) - Toggle pathing information.
TogglePathLine (tpl) - Toggle path display.
TogglePrimitives (tpr) -
ToggleRagdollAnim (tra) - Toggles Ragdoll Anim system.
ToggleRefractionDebug (trd) - Toggles refraction debug render texture.
ToggleSafeZone (tsz) - Display the television 85%% safe zone.
ToggleScripts (tscr) - Turn Script processing on/off.
ToggleShadowVolumes (tsv) -
ToggleSky (ts) -
ToggleSPURenderBatch (tspurb) - Toggles the SPU render batch on or off.
ToggleSPUTransformUpdate (tsputu) - Toggles the SPU transform update on or off.
ToggleTestLight (ttl) - Toggle test light (radius, magnitude).
ToggleTrees (tt) - Turn trees on/off .
ToggleVATSLight (tvl) - Toggle VATS Light.
ToggleWaterRadius (twr) -
ToggleWaterSystem (tws) - Toggles the water system.
ToggleWireframe (twf) - Show the world as wireframe.
Verbose - Toggle verbose combat/AI messages.
WasteMemory (wm) - Allocates some memory (in MB).
WaterDeepColor (deep) - Modifies water deep color.
WaterReflectionColor (refl) - Modifies water reflection color.
WaterShallowColor (shallow) - Modifies water shallow color.
The next page takes a look at how we can use the most useful of the above commands to do some neat things and resolve common problems.
Useful Console Commands
As you can see from the previous page, there are plenty of console commands, and indeed a whole bunch more script commands, which you can use to alter Fallout 3 at any time during the game. While you can experiment with any of them if you wish, this page will help you sort out which commands are the most useful for common requirements. Note that these commands are not case sensitive, and furthermore, as some of them are essentially cheats, or may have unintended consequences on the game world or your character, I strongly recommend backing up your saved games before messing around with some of the more complex commands.
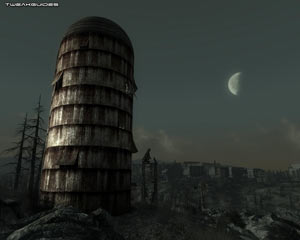
Get Unstuck: If you become stuck inside or behind a piece of scenery or between objects, you can use the TCL command, which will toggle collision. This will allow you to walk through any object, or even fly by walking straight upwards while collision is disabled. Be careful not to re-enable collision while high in the air or inside another object for obvious reasons.
Clear Screen Blood: If you have blood splatters all over your screen during combat and you're finding it hard to see through them, you can use the CSB command to instantly clear the screen of all existing blood splatters. This won't prevent new ones from appearing though.
Remove the HUD: There are times you may want to take a nice screenshot, but don't want the HUD visible. Use the TM command to toggle the HUD off and remove all menus without pausing the game, take the shot, then TM again to reenable the HUD. Be aware that TM actually toggles off all menus, not just the HUD. Note that if you're taking a screenshot of a creature or person and want it not to move and/or attack you, then use the TAI command or TCAI command(s) below as relevant.
Turn off AI: If you want to turn off the enemy Artificial Intelligence, for example to take a close-up screenshot of a creature, use the TAI command to toggle off the AI. All characters/creatures in the game world will remain motionless, but will continue breathing and sometimes repeating the last action they were doing before being frozen. If you just want to disable the Combat AI, but leave the creature/character otherwise functioning normally, then use the TCAI command instead.
Fallout: New Vegas Update: If you experience slowdowns in areas where there are one or more NPCs, you can use the ToggleEmotions console command to disable facial emotions which appears to be the source of these performance issues. Use the TEMO command to toggle these facial emotions off or on at any time during each session.
Change Field of View: Some people don't like the default 75 degree field of vision in the game, and prefer something like 90 degrees which is normal for many first person games. Use the FOV command to set a new field of vision, e.g. fov 90. Note that this is reset every time you start Fallout 3, and on most transition loads, so you must manually set it each and every time. Update: You can now permanently set the FOV in the game by adding the fDefaultWorldFOV variable to Fallout.ini as detailed in an update on page 8.
Fly Cam: If you want to take a scenic tour of the environment, you can use the TFC command to toggle the Fly Cam mode, allowing you to fly around the game world. Use the SHIFT key to speed up the fly rate.
God Mode: Enabling God Mode means that your character can't take any damage, and you won't run out of ammo - use the TGM command to toggle this option.
Remove Grass: If you're outdoors and you're in a heavily grassy area which is causing slowdowns or obscuring your view, you can quickly use the TG command to toggle all grass off temporarily, and toggle it back on later as necessary.
Wireframe Mode: To see just how complex the Fallout 3 game world is, and to also see what objects and characters have been loaded up in your immediate area (regardless of whether they're in direct line of sight or not), use the TWF command to toggle Wireframe Mode. As you will see, the game uses a huge amount of polygons to display the detailed objects and characters in the game world.
Rapid Quit: If you want to exit the game quickly without having to click through menus and answer any prompts, open the console and use the QQQ command - the game will instantly exit to desktop.
Speed Up/Slow Down Time: You can alter the rate at which time passes in the game world by using the SET TIMESCALE TO [Minutes] command. The [Minutes] parameter refers to the number of minutes which pass in the game world for each real minute. For example try SET TIMESCALE TO 3600 to see a rapid sunrise/sunset sequence, or SET TIMESCALE TO 15 to slow down the game day and make it longer.
Unlock Objects: If you want to unlock any object such as a door or a computer terminal regardless of your skill level, open the console, left-click on the object in question and use the UNLOCK command.
Modify Your Character Stats & Skills: You can modify any of your seven S.P.E.C.I.A.L character stats by using the ModPCAttribute (MODPCA) script command - see the link to all script commands on the previous page. For example MODPCA Strength 10 will raise your strength up to the maximum of 10. Similarly, you can use the ModPCSkill (MODPCS) command to increase any of your skills, e.g. MODPCS Sneak 10. If instead you just want to increase your experience points and allocate them to your skills yourself, use the REWARDXP [amount] command to give yourself additional XP by the amount you specify.
Modify Your Gender: If at any time you want to go from being a male to a female character or vice versa, open the console and use the SEXCHANGE command.
Add or Remove Objects and NPCs: If you want to instantly remove an object or character which is bothering/blocking you, make sure the Object/NPC is in your view, then open the console, left-click once on the object/NPC with your mouse - make sure to note down the object/NPC ID number at the top of the screen as you'll need this if you ever want to re-enable them again. Now use the DISABLE command to instantly remove that object or NPC from the game world. If you want to add it/them back, use the ENABLE [ID Number] command. If you just want to kill an NPC but leave their corpse, highlight the NPC and use the KILL command instead; to resurrect them, highlight them and use the RESURRECT command. If an NPC or object is missing altogether, you can summon a copy of it/them in front of you by using the PLAYER.PLACEATME [ID Number] console command - see this List of ID Numbers.
Executing Batch Console Commands
If you want to execute a number of console commands in one go without having to retype them every time you run Fallout 3, you can use a Batch file. Create a new text file (right click in an empty area and select New>Text Document). Give this text file a simple name, like mycom.txt. Now edit the document with Notepad and enter all your desired console commands, one per line. For example the contents of mycom.txt might look like this:
fov 90
set timescale to 180
tgm
Now close and save this text document, and move it to your \Program Files\Bethesda Softworks\Fallout 3 directory. Open Fallout 3 and to execute this batch file at any time, open the console and type Bat [batchfilename] then press ENTER. For example, to execute the contents of mycom.txt, open the console and type:
Bat mycom
All the commands in the batch file will be implemented at once - as long as they're correct working commands. Create as many separate batch files as you like to do particular things, and execute them whenever you want within the game.
The next page brings the guide to a conclusion with some handy tips.
This section brings the guide to a close with some useful information and advice. You've made it this far, so don't skip the last page.
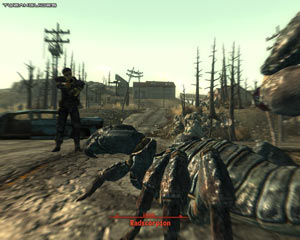
Quicker Startup
To speed up the time it takes to get into the Fallout 3 main menu, there are a couple of things you can do. To start with, the biggest tip is to avoid using the game's Launcher and use the game's main executable instead. This does two things - it reduces loadup time, and it also bypasses the need to keep your game DVD in the drive. Full details of this method are under the Copy Protection section on page 4 of the guide, but the quick way to do this is to go to your \Program Files\Bethesda Softworks\Fallout 3 directory, right-click on the Fallout3.exe file and select Send To>Desktop. This will create a new shortcut on your desktop which you can use to launch Fallout 3 more quickly and minus the disk check.
Next up, fortunately Fallout 3 doesn't have any long fancy introductory movies or screens. There are however four title 'slides' which will play before you reach the main menu. Unfortunately at the moment there is no easy way to simply skip all these slides. One method of speeding things up using .ini variables is covered under Interface area of the Advanced Tweaking section. However in practice the easiest and quickest method is just to click your mouse or press a key during these slides. There is no other method to properly bypass these slides at the moment, and really, the difference is only a few seconds in practice.
Max Frames to Render Ahead
This tweak became popular when Elder Scrolls IV: Oblivion first came out. The setting in question was originally called 'Max Frames to Render Ahead', and it is now accessible in the main graphics control panel of the Forceware drivers for Nvidia users (Force 174 series and newer) as a setting called 'Maximum Pre-rendered frames'. For ATI users, you can adjust the 'Flip Queue' setting in the free ATI Tray Tools to do the same thing. The same advice below applies to both methods.
Basically, the Gamebryo engine may have issues with noticeable mouse and/or keyboard lag, even when your FPS is reasonably high enough not to usually suffer from this (e.g. 25+ FPS). By reducing the maximum number of frames to render in advance, you can help reduce mouse lag, although make sure to also see the VSync setting under the In-Game Settings section as that has a major impact on mouse/control lag regardless of this setting. In any case, this tweak is not about improving performance, it simply reduces mouse/control lag, so if you're not suffering from these then don't apply it. The general recommendation is to set 'Maximum Pre-rendered frames' (Nvidia) or 'Flip Queue' (ATI) from its default of 3 down to a value of 2 or 1. If this doesn't work in reducing lag, then try a value of 0, but remember that lowering this setting can actually reduce your FPS. If these changes don't work in reducing lag, then again, keep in mind that most mouse and control lag in virtually any game is due to low framerates and/or VSync. If you've noticed by measuring your FPS that it dips down into the low 20s or below when you suffer the most lag, then you will have to consider reducing your graphics settings to increase overall FPS.
Gameplay Tips
Fallout 3 is a massive and often complex game. Certain quests may be very difficult to complete, and indeed some features of the game may also annoy or confuse you at first. I stress that first and foremost you should make every effort to read the game's manual, as it contains a lot of valuable information and tips on how to best use all of Fallout 3's features. Steam users can access the online version of the manual here by clicking the 'View the manual' link at the bottom right.
However for those who need even more help, there are several free guides you can use to get assistance with quests and general game features, as well as more background information:
Fallout 3 Strategy Guide
Planet Fallout Fallout 3 Wiki
Wikia Fallout 3 Portal
Use these guides with caution as certain sections of them will obviously contain major spoilers which could ruin various surprises and hence your enjoyment of the game.
Measuring Framerate & Capturing Gameplay Videos
In Oblivion you could check your FPS by using the TDT console command; in Fallout 3, this doesn't appear to work in bringing up an FPS counter. However there's an easy way to check FPS, and that's to use the free Fraps utility. Fraps also has video recording functionality, although the free version is restricted to 30 seconds of video, allowing you to capture in-game footage in high quality .AVI format, such as this video I recorded earlier. Note however that while using Fraps to measure FPS has no performance impact, using it to record videos will have a noticeable performance impact.
The Woes of PC Gaming
Upon its release, Fallout 3 has received much praise, and paradoxically, also much damnation and anger. The praise is understandable, however the anger is not. It appears that a lot of people are having problems running the game, experiencing a range of problems, and in some ways, this is very unfortunate and I can sympathize. Nothing is more frustrating than buying a game you really want to play, only to be confronted with lots of crashes and issues which prevent you from enjoying it. However as someone who has been gaming for over 20 years, over half of that on the PC, as a person who has been tweaking and tinkering with computers for equally as long, and having written over 40 game guides, I feel I have to point out certain facts to some people.
No game is completely optimal or bug free. Virtually every game in existence has some bugs or quirks, many of which may never be resolved. However in the many hours I've been playing and testing Fallout 3 while writing this guide, changing every setting in the game, sometimes many times over, starting and restarting it literally hundreds of times, I have not yet experienced more than a handful of crashes. Of these, several were crashes on exit which is a known issue with the game, and was recently patched; all the others were 'expected' crashes due to changes I made to certain .ini variables as part of my testing. Otherwise, the game has performed flawlessly on my very modest system. In fact my longest session of Fallout 3 has lasted for over 2 hours without a single glitch; I've not had a single crash during normal gameplay, and it plays very smoothly at maximum settings - here's the Video proof. Now before you get all upset and start yelling that just because one person has no problems, doesn't mean a game is problem-free, take a look at this Performance Review of Fallout 3 over at Techspot, where the author specifically states: "I am yet to encounter a single crash while playing Fallout 3, and more remarkable was the fact that we were able to vigorously test 18 different graphics cards without a single glitch."
While Fallout 3 is not perfect by any means, and there are indeed some known issues with the game which will require patching (e.g. the 'micro-stuttering'/skipping bug), it is nowhere near as buggy or crash-prone as people are claiming it to be. Indeed every single major game which is released these days is labelled as being the "buggiest game ever", with hundreds of people flooding the game's forums to complain about how shoddy that particular game is, demanding patches and refunds in angry post after angry post. I'm not exaggerating either, it's now occurring for every single major game released, and quite frankly, it's become somewhat of a joke in my opinion. When I play every single one of these games, and write guides for them, testing them for hours and hours, I'm thoroughly confused as to how people can claim they are so buggy when I see no evidence of it. Either I'm the luckiest person alive, or there's something else at work here.
The simple truth of the matter is that PC gaming is a dual-edged sword. The very fact that a PC allows us so much freedom of choice as to what type of hardware we use, and what type of software we install on it, also results in much greater potential for a wide range of problems. PCs are not a 'plug and play' gaming machine, and never have been. If you want to just pop your game in the drive and play without a second thought, you'll need to do your gaming on a console. As a PC owner you need to be under no illusion that a PC requires regular optimization, maintenance and great care as to what you install on it. That's where I've tried as much as possible to give PC users the resources to do exactly that through my free guides. Ultimately however, as a gamer you have two choices: complain endlessly, blame the 'greedy developers', constantly beg for help and keep scratching your head over 'mysterious' crashes and issues. Or bite the bullet, learn more about your PC, learn how to configure, optimize and troubleshoot it properly, and wave goodbye to your PC gaming woes.
Conclusion
Well that brings us to the end of a very long and hopefully comprehensive guide for Fallout 3. I will keep the guide updated with all of the major changes which occur for this game. I believe I've included all the major tested and verified tweaks in the guide, so if an .ini variable is missing for example, it's because I tested it and it had no impact, rather than because I somehow didn't see it. Again, keep in mind that a lot of the tweaks people spread around for this (and other) games is often simply based on false information and a complete lack of testing. A lot of the.ini variables, tempting as they may sound, are actually completely non-functional. Still, if you see anything important that's missing from the guide, or something is incorrect, and you have tested and confirmed that this is the case, you can Email Me with the details and I'll update the guide accordingly. I should also mention that as always, I can't provide any tech support or tweaking advice under any circumstances, so please don't write to me for that purpose.
In any case, I hope you've found the guide useful, and I thank you for reading it.

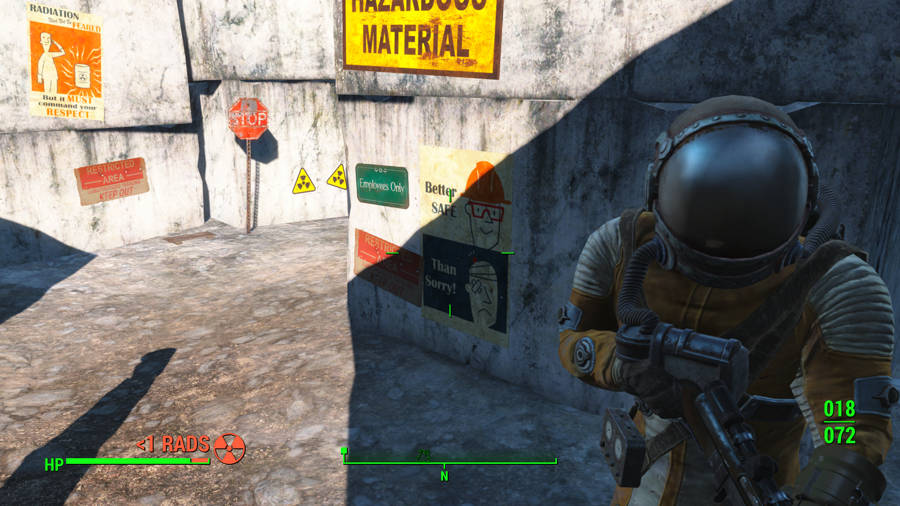

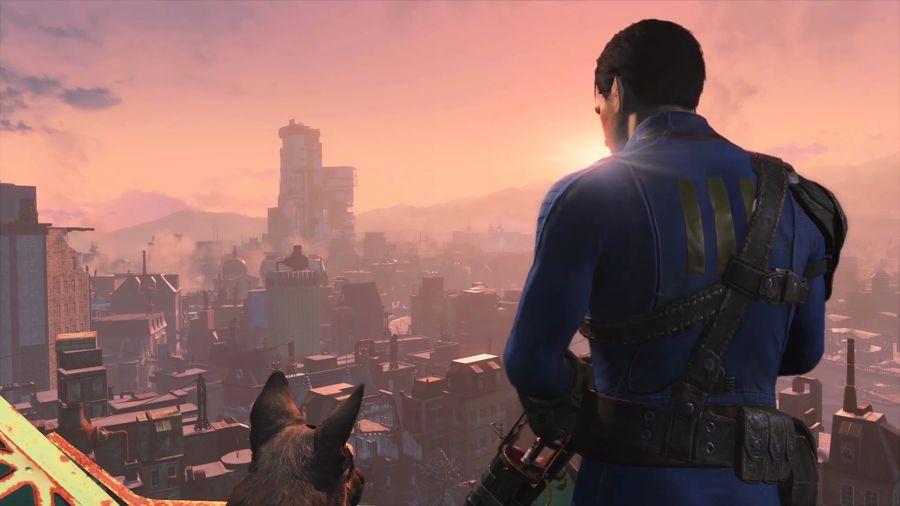
 Uncharted 3 Floor Tile Puzzle
 Is Batman better in 3D?
 The Cave Guide - The Zoo Puzzle Guide - GamersHeroes
 The Cave Guide – The Adventurer’s Quest Guide - GamersHeroes
 No More Room in Hell - 10 Tips to save your brains - AlterGamer