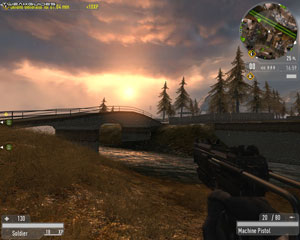
Back in 2001 a WWII-themed game called Return to Castle Wolfenstein came out, to much hype and applause. I remember enjoying many hours of first the singleplayer and then the multiplayer aspects of the game. Then, just as RTCW multiplayer was dying, the developers suddenly released a free standalone expansion called Wolfenstein: Enemy Territory in 2003. It was a surprising move, and even more surprising was the fact that Wolf: ET went on to become a very popular online game.
As expected the popularity of Wolf: ET did not go unnoticed. id Software, the co-developer of the Wolfenstein games, as well as the Quake series, had a brainwave: why not merge the two? So was born Enemy Territory: Quake Wars, a game which attempts to blend much of the mechanics of Wolf: ET with the futuristic game world of Quake, and a dash of EA's popular Battlefield series.

To refine the game, ET:QW went through first a closed, then a public beta cycle, and having been involved since public beta 1, I can confirm that the game has indeed changed quite a bit due to the betas. Furthermore although the reaction to the betas has been mixed, in general the game has proven to be quite popular. So it seems the concept of combining Quake with Enemy Territory has worked for the most part. If you have any doubts, download the demo and try it for yourself.
Although the Doom 3/Quake 4 engine on which ET:QW is based is very solid and performs quite well, this guide is a compilation of all the important information players of the game will need to maximize their gameplay advantage. From full coverage of the in-game settings through to all the major advanced tweaking required both to optimize and customize the game, it's well worth checking out whether you're a new or experienced player.

Note: This guide refers to the latest version of ET:QW which is Version 1.5. Make sure to check back regularly for updates.
Before getting into any game-specific settings and tweaks, this section covers the obligatory system optimization information I include in all my guides. If you've followed this advice recently, you can skip this section.
Many people report problems with this game and in almost all cases these are due to general system issues and not the game itself. With that in mind I strongly urge you to take some time and follow the advice below if you truly want this game, and indeed every other game you own, to run at its fastest and most trouble-free.
The place to start is with the TweakGuides Tweaking Companion. It is the complete system optimization guide for Windows users. Designed for novice and advanced users alike, it is written in plain English to help you genuinely understand all aspects of Windows and your PC. The guide covers every major topic, from the correct installation of Windows and critical drivers and software, through to recommendations for every significant setting and feature, all the major performance and convenience tweaks and customizations, as well as detailed troubleshooting advice. There are also links to a range of reliable free applications which can enhance your system and give you viable alternatives to purchasing commercial software. There are separate versions available for Windows XP, Windows Vista and Windows 7.
If you've ever wondered what common graphics and display settings like FPS, VSync, Refresh Rate, Antialiasing and Anisotropic Filtering are, and how they really work, then check out my Gamer's Graphics & Display Settings Guide for all the details in an easy to understand format. The guide also gives you a rundown on exactly how a game goes from a being a set of files on your hard drive to a 3D image on your screen, including relevant performance tips.
Finally, if you run an ATI or Nvidia graphics card, I have written two comprehensive guides which you should check out: the ATI Catalyst Tweak Guide and the Nvidia Forceware Tweak Guide. These guides cover absolutely everything about the latest graphics drivers, how to set them up correctly, as well as advanced tweaking, overclocking and benchmarking tips. They're a must-read for configuring your graphics card correctly.
The above information really will serve you well in the long run, not just in this game. If you don't optimize your system and keep everything updated and maintained correctly you will keep running into "mysterious" problems time and time again. Do yourself a favor and when you get a chance spend an afternoon or two optimizing your machine the right way with the guides above.
The next section goes into more detail about specific troubleshooting tips which address common performance issues with the game.

This section contains specific troubleshooting tips which address many of the common problems experienced by Enemy Territory: Quake Wars players. It's important to take the time to go through the checklist of advice below if you're having a problem with the game.
Official Support: The first place to look for official support details is in the Readme.txt file in your \Program Files\id Software\Enemy Territory - QUAKE Wars\Docs directory. Importantly, check out the minimum system requirements in that file, as well as the supported hardware list, since if any of your hardware is not supported or doesn't meet the requirements then you may experience problems with the game or quite simply won't be able to run it. Read through the list of compatibility issues and suggested fixes as well. If you want to read the game manual which has details of both gameplay and technical help, run the index.html file in the same directory as above. If you're still having problems you should visit the Official ET:QW Forums to look for solutions or post a question.
In particular make sure to check out this list of Common Problems and Solutions, and if your issue is related to an apparent 30FPS framerate cap, see the last page of this guide for a detailed explanation of how to resolve this.
Windows Vista Users: If you're having problems running this game under Windows Vista, first make sure that you're using the absolute latest Vista graphics and audio drivers for your hardware, and the latest version of this game (see page 4 for patch details). Next, make sure you don't change your UAC settings after the game has been installed, as due to Virtualization this can change the location of the game files and settings. I strongly recommend that you refer to the TweakGuides Tweaking Companion for Windows Vista for more information about how things work under Vista.
The Latest Graphic Drivers: Make absolutely certain you have updated to the latest graphics card drivers; in particular ATI users must use the 7.10 Catalysts or newer for the game to work properly, but Nvidia users will also benefit from the latest Beta or Official Forceware drivers which are specifically optimized for ET:QW. See my ATI Catalyst Tweak Guide or Nvidia Forceware Tweak Guide for details on where to download the latest drivers and how to install them and configure them properly.
Background Programs: The game's developers recommend that you disable all background applications - especially virus, trojan and spyware scanners and messaging utilities. These applications can and do use up valuable CPU resources, take up precious RAM, cause memory conflicts and crashes to desktop, but most importantly they interfere with read/writes to your hard drive effectively slowing it down and causing even more in-game freezes and stuttering. Full instructions on how to identify your startup programs and services and how to correctly disable unnecessary ones are in my TweakGuides Tweaking Companion. This is an important step you should not miss.
Overclocking: While ET:QW is not overly sensitive to overclocking, if you are experiencing graphical glitches or crashing in the game, set everything back to its default speeds and see if this impacts on the problem. If you don't experience the same problems at default speed, or they're reduced in severity, then your overclock is the primary culprit. Either permanently reduce your overclock and/or increase cooling to regain stability. Don't just assume that because other games run with stability at a particular speed that ET:QW will do the same.
If you follow the advice in this guide, and indeed also take the time to troubleshoot and optimize your system properly using the TweakGuides Tweaking Companion, you should be able to play the game without any issues, as the Quake 4/Doom 3 engine on which ET:QW is based is extremely solid.
Read the remainder of this guide for specific settings and tweaks which can help improve your performance and resolve any problems. The next section looks at patches, maps and mods.
Official Patch
Another major patch for ET:QW has been released, bringing the game up to Version 1.5. This patch contains a large number of bug fixes, gameplay tweaks, new features and improvements as covered in the link above. For details of the new setting options and command variables added as of the latest patch, see the prominent updates on Pages 5, 8 and 9.
It is strongly recommended that you keep ET:QW updated by installing patches whenever you are prompted by the in-game updater. You can also manually check for updates to the game at any time by clicking the 'Check for Updates' link at the top of the main menu screen. I will provide further details of any new patches here as soon as they come out, so keep an eye on this section.
Copy Protection
Fortunately the retail version of Enemy Territory: Quake Wars does not have any intrusive copy protection. Given it's a predominantly multiplayer game, it is only protected via an online serial number check required to play the game. Because of this, you don't need to keep the game disk in your drive to play ET:QW, which is a good move by Activision.
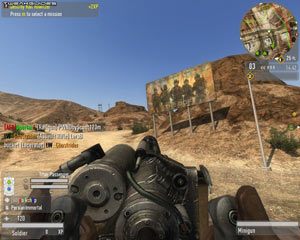
In-Game Advertising
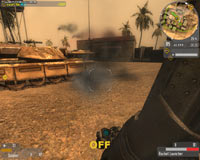
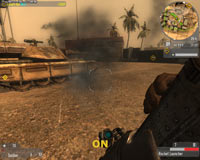
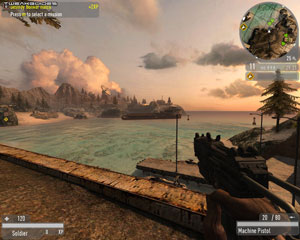
It should be noted that if you're considering purchasing ET:QW, the game has In-Game Advertising. The screenshot above shows the type of billboard which will hold ads in the game. As with previous games which incorporate in-game ads, like Battlefield 2142, the excuse used is that it will help cover the costs of providing "ongoing support" for ET:QW. Of course just as the in-game ads in BF2142 saw no improvement in the quality or quantity of support provided to customers, it's likely that ET:QW's ads are merely being used to increase revenue with no real benefit to consumers whatsoever. Fortunately the ads are not very intrusive, and it also seems to be the case that in Australia, as with BF2142, the anti-spyware laws prevent these ads from being displayed. If these ads are a concern to you, you should not purchase the game.
Maps and Mods
The Quake series has spawned many mods and maps, and it's quite likely ET:QW will do the same. If you're interested in developing mods for ET:QW, you can download the free ET:QW SDK and MegaTexture Media Pack and get to work on creating something interesting.
For those who are simply interested in downloading user-made mods, I will post the most prominent ones here as I become aware of them. Note that as of the 1.4 Patch, a new 'Mods' button has been added to the bottom right corner of the main menu screen, allowing easier mod management.
The next section of the guide covers In-Game Settings for ET:QW.
This section contains full descriptions, and where possible recommendations, for Enemy Territory: Quake Wars' in-game settings. You can use these to get a good balance between image quality and performance, or to provide you with a gameplay advantage. However I can't give you specific instructions on what to turn on and what to turn off, nor can I specify the exact performance impact - it all depends on your particular hardware combination, and more importantly your personal taste for the trade-off between performance, image quality and gameplay.
To access the in-game settings, start ET:QW and under the Main Menu first click the Options link, and from there you access a range of settings which are explained in detail below:

Game Settings
You can alter a range of general game settings here, and all of them depend on your personal preference, as they have negligible performance impact.
Simple
Player Name: Set your unique in-game player name, up to 20 characters maximum. You can also assign different colors to any portion(s) of the name by right-clicking in front of the portion you wish to color and select from the color list which pops up.
Clan Tag: Add a clan tag either before or after your player name. Once again you can assign colors to the text here by right-clicking in front of the relevant portion and picking a color.
Rotate command map around player: If ticked, the Command Map which is shown at the top right corner of the screen will rotate according to the direction you're facing.
Bob and roll when moving: If ticked, your view will bob and roll around as you move to increase realism. However this may be annoying and can reduce the steadiness of your aim, so you can disable it for a gameplay advantage.
Show cockpits in vehicles: If ticked, the full cockpit will be shown when you're inside a vehicle for greater realism. If unticked then depending on the vehicle the cockpit won't be shown, which means you can see much more of your surroundings, which can provide a gameplay advantage.
Lock camera view behind vehicles: When inside a vehicle you can switch between internal and external vehicle view (default is Home key). In external view if this option is ticked the camera will be stuck in a fixed position directly behind and just above the vehicle. If unticked you can rotate the camera around the vehicle.
Remember vehicle camera settings: If this option is ticked, if you switch between interior and exterior view for a vehicle or vice versa, the game will remember to use that same view the next time you use the vehicle.
Auto switch when out of ammo: If ticked, when you run out of ammo, pressing the fire button will mean you will automatically be switched to the next available weapon which has ammunition. This is usually recommended, especially in conjunction with the setting below.
Ignore explosive weapons when auto switching: If you've enabled the auto switch setting above, then you may be accidentally auto switched to an explosive weapon which might kill you and your teammates if the enemy is close. Ticking this option prevents that from occurring, but it doesn't prevent you from manually switching to an explosive weapon.
Update: The following options were added to this section as of the 1.4 Patch:
Draw advanced HUD: If ticked, this option streamlines your HUD slightly to reduce the space used by death messages, and moves or removes some of the text and popup indicators. If you've played ET:QW for a while you might prefer this option.
Show respawn text on screen while unconscious: If ticked, whenever you die you will see the generic text telling you how to respawn shown in the center of the screen. If unticked this text is not shown, and this might be preferable for more advanced players.
Always draw fireteam list: If ticked you will always see a Fireteam list on the HUD; if unticked this is removed.
Show complaint popup after you are team-killed: If ticked, whenever you are team killed this option automatically shows the popup which provides you with the option to complain; if unticked the popup is not shown.
HUD
Hit Feedback: When you're hit by weapons fire you can select how that is represented on screen, either as No Feedback at all; an audible Beep and a brief Flash; just a Beep; or just a Flash.
Crosshair Style & Color: Under the Crosshair area of the HUD settings you can alter opacities (see below), and importantly you can alter the appearance and color of your crosshair. Scroll through the list of crosshair styles and colors shown and choose one that suits you best. In general the default 'dot' crosshair in a prominent color like white, red or green is recommended, but it is up to you.
Opacity: There are a range of opacity settings in the HUD section, and these relate to how transparent you wish to make your Crosshair and various HUD elements. The further to the right the slider is for each element, the more visible it will be. If the slider is moved all the way to the left, that HUD element will effectively be removed from the screen. Given how busy the ET:QW HUD usually is, I recommend starting an offline game and adjusting the opacities until you're happy with the amount of information in the HUD. Remember to also check the HUD Commands under the Advanced Tweaking section for more details of ways you can customize your HUD and display elements.
Show mission waypoints on the HUD: If ticked, this option displays your current mission objective in a white square, with the distance to the objective and underneath it the name of the objective. This helps you get your bearings and quickly find the objective, but if you find it annoying you can remove this.
Update: The following options were added to this section as of the 1.5 Patch:
APT Warning: This option allows you to enable or disable or modify the prominent warning shown on the screen when within range of an Anti Personnel Turret (APT). Aside from simply turning this option On or Off, you can choose to have just a text warning (HUD Notification Only) or just hear a warning beep (Warning Beep Only).
Show mine trigger warning: This option allows you to enable or disable the display of mine trigger warnings.
Advanced
Context Menu Style: Here you can select whether to make the context menu options - that is the menu of common options which appear when you press the V key by default - appear as a radial menu around your crosshair, or shown at the right side of the screen. Note that this setting only refers to the main context menu, not additional menus such as the full communications menu you can access by pressing the middle mouse button by default.
Mouse: This option lets you determine how the mouse is used when context menus are open - this is not to be confused with general mouse usage in ET:QW, to which these settings don't apply. As an example, when you press the middle mouse button you can bring up the communications menu. When this option is set to 'No Input', the mouse can't be used to scroll through or select comms items (default is the scroll wheel); when it's set to 'Mouse + Locked View' you can use the mouse to select comms items but you cannot use the mouse to move your view at the same time - it will remain locked until a selection is made; the default of 'Mouse + View Movement' lets you use the mouse to select comms and you can also change your view at the same time. Finally you can set the sensitivity of the mouse when using context menus using the Sensitivity slider here.
Shortcuts: When you open a context menu, such as the main context menu (default is V key), you can choose to either use a number or a letter shortcut to make a selection instead of using the mouse.
Tooltips: Tooltips are the small pieces of information you will see at the top center of the screen. These usually appear when you switch to a new weapon or use a new vehicle for example. You can set whether or not sounds accompany tooltips, and how long tooltips remain visible using the slider. You can disable tooltips altogether by moving the slider to the far left. Note that if you reenable tooltips and want to see all of them again, click 'Reset Tooltips'.
Advanced Flight Controls: If enabled, this option allows greater control over airborne vehicles, but also increases the risk of destabilizing the vehicle and crashing. In essence when this option is not selected, a form of automatic vehicle stability control is used to help control the vehicle. So if you're new to vehicles you might want to leave this option off, but once you've had some practice you can tick this option to let you have full maneouverability in airborne vehicles and thus be able to perform more skillful moves.
Once you've adjusted these settings, it's important to note that there are several other option screens which are accessible by clicking the Controls or Settings links at the top of the screen.
Controls
Under this section you can alter all the key/mouse bindings for your various controls, from Movement to Weapons, to Vehicles and Misc. categories. None of them have an impact on performance so go through this list carefully and alter the settings as you wish. If you want to undertake more complex keybinds however, see the Advanced Tweaking Section.
Toggle Sprinting/Boosting: If ticked, when you press the sprint key while running (boost key when in a vehicle), the sprint/boost will remain in effect until you press the same key again.
Invert: These three options allow you to choose whether to invert the mouse or not. Ticking the 'Invert Mouse' option for example means that pushing your mouse forward will make the character look down, and pulling the mouse backward will make him look up.
Mouse Sensitivity: This slider controls the overall mouse sensitivity in the game. Note that if you are having problems with a sluggish or 'laggy' mouse response, you should first make sure Vertical Sync is disabled, then check your framerates using the com_showFPS 1 command, and if it's dipping below 20FPS you need to alter your settings to raise the FPS, as low framerates result in mouse lag. You can also look at the conclusion of this guide to lock or unlock the 30FPS framerate cap the game has, if you feel that is contributing to mouse lag or control jerkiness. Finally check the Control Commands under the Advanced Tweaking section for more mouse tweaking options.
Update: As of the 1.2 Patch, ET:QW now uses the RAW Input API, which supports a wider range of peripheral inputs. If you find that you don't like this input method for some reason, experiment by disabling the m_rawInput variable in the Advanced Tweaking section.
Update: As of the 1.5 Patch, you can now set mouse sensitivities on an individual vehicle basis. That is, each vehicle can have a different mouse sensitivity to suit your tastes. To set these, you will need to use the following new command variables (see the Advanced Tweaking section). Note that Pitch is vertical sensitivity, Yaw is horizontal sensitivity:
Bumblebee: m_bumblebeePitchScale, m_bumblebeeYawScale
Titan, Cyclops and Desecrator: m_heavyVehiclePitchScale, m_heavyVehicleYawScale
Anansi and Tormentor: m_helicopterPitchScale, m_helicopterYawScale
Trojan, Armadillo, Hog and Husky: m_lightVehiclePitchScale, m_lightVehicleYawScale
Infantry and Icarus: m_playerPitchScale, m_playerYawScale
Settings
This section contains the main graphics and audio settings, and almost all the settings here have an impact on performance.
Simple
Volume, Music Volume: These sliders control the overall volume and the music volume in the game and have no performance impact, so can be adjusted to taste.
Use Compressed Sounds: When ticked, the game uses compression to reduce the amount of system memory that sounds take up. This can help if you're low on RAM. Sound compression can result in some loss in audio quality, though in practice I could not notice the difference. If you want the absolute best quality audio untick this option, but for the most part leaving it ticked is optimal.
Speaker Setup: Select the correct speaker mode to match your current configuration. If you're having problems and audio glitches, first check the s_numberOfSpeakers setting under the Advanced Tweaking section, and if all else fails select the '2 Speakers/Headphone' mode. If you've changed your sound device recently or are having problems, click the 'Redetect Audio Devices' button.
Note that by default ET:QW uses the DirectSound audio API, which should be fine for all Windows XP users, but means that Windows Vista users running Creative sound cards will need to use the Creative ALchemy patch to enable full hardware accelerated audio features on their system. There is an option to enable OpenAL mode in ET:QW using the s_driver and s_libOpenAL commands, covered under the Advanced Tweaking section. This method can be buggy, but is worth a try.
Brightness, Gamma: These sliders control the overall brightness of the image. Adjust to suit your taste, as they have no performance impact.
Fullscreen: If ticked the game runs in fullscreen mode, if unticked the game runs in windowed mode. For optimal performance and stability, fullscreen mode is recommended to prevent any issues with Windows Memory Management. Note that in fullscreen mode you cannot ALT+TAB out of the game, and in windowed mode there are glitches with the brightness slider.
Aspect Ratio: This setting determines the ratio of width to height of the onscreen image. Most display devices are 4:3 aspect ratio, which is the traditional TV/monitor aspect ratio. However newer Widescreen HDTV's and LCD monitors have a 5:4, 16:9 or even 16:10 aspect ratio. If you run a normal display device, 4:3 is the correct aspect ratio choice. However if you run a widescreen device, or are outputting to an HDTV such as a plasma display panel, select 16:9 to reduce/remove the black bars around the image or any odd stretching. If this doesn't work and you need to set a custom aspect ratio refer to the r_aspectRatio and g_fov commands in the Advanced Tweaking section.
Resolution: This setting determines the Resolution of the game image, shown in pixels wide by pixels high, at a particular aspect ratio. The higher the resolution, the more pixels shown and the more detailed and clearer the game image, but it takes more graphics card power and hence you will see less frames per second (FPS). The highest resolution available in this list of resolutions is limited to what your graphics card and monitor are actually capable of rendering, as well as your chosen aspect ratio. The resolution has an important impact on your peformance. If nothing else helps you improve your FPS you will have to reduce the resolution. To set a custom resolution see the r_mode command in the Advanced Tweaking section.
Quality: This setting is just an overall indication of the level of specific settings under the Advanced section. You can click the 'Auto Detect' button so that the game can attempt to detect your hardware and set the quality level automatically. However it is strongly recommended that you configure the advanced settings individually as detailed on the next page rather than using a particular preset quality level which is usually not optimal.
Voice
As of the 1.2 Patch, ET:QW now has in-game Voice Over IP (VOIP) support, meaning you can simply connect a microphone to your system and be able to communicate with other players from within the game. The settings here are relatively self-explanatory, however if you're not interested in using VOIP, I recommend unticking all the 'Receive...' boxes.
The next page continues the in-game settings by looking at the advanced video settings in detail.
Advanced
The Advanced section deals with a range of graphics settings which can have a significant impact on performance. The first three Texture Quality sliders control the different aspects of textures, which cover the surfaces of all the objects in the game world:
Diffuse: This slider controls the level of detail on grainy/matte surfaces.
Bump: This slider controls the level of depth on raised or indented surfaces.
Specular: This slider controls the level of reflectivity on shiny surfaces.
In general simply reducing one slider doesn't necessarily have a significant performance or visual impact, so to see an animated screenshot comparison of the different texture levels when all three sliders are at 100%, 50% and 0% click this link: ETQW_Textures.gif (780KB). As you can see, the textures become progressively blurrier, flatter and less shiny as these settings are reduced. As with most games, lowering texture settings doesn't necessarily change the FPS as such, it mainly reduces stuttering. However ET:QW, due to megatexturing (See Conclusion section) doesn't stutter greatly, so there's usually no need to reduce these sliders unless you feel it will give you a gameplay advantage for example, or you're running a low-end system and genuinely struggling for FPS. Note: see the image_PicMipEnable variable in the Advanced Tweaking section if you want to improve texture quality even more.
Anisotropy: Anisotropic Filtering (AF) is explained in more detail at the bottom of this page of my Gamer's Graphics & Display Settings Guide. Essentially it's a method of making textures sharper as they recede into the distance. This slider controls the sample rate of AF used, up to 16x AF. Most recent graphics cards can handle a reasonable level of AF, such as 4x AF, which provides a good level of image quality without any real drop in FPS. However a very high level of AF can reduce performance so if you're struggling for FPS, set this slider to the far left. Note that you can also use the various Level of Detail (lod) variables, such as image_lodbias, to further sharpen textures and game detail - see the Advanced Tweaking section.

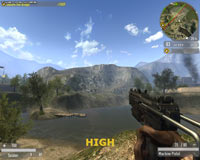
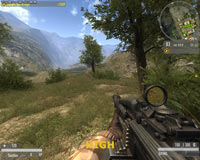
Lighting Quality: This setting can either be on Normal or High, and in general controls the accuracy of lighting in the game. As the screenshot comparison above shows, at Normal the lighting is quite bland and lacks a lot of depth and color, even making distant objects harder to distinguish precisely because it all tends to blend together a lot more. At High there is a noticeable reduction in FPS, but in return the game is much more vivid, colorful and clear. If you're struggling for FPS set this to Normal. Note that this setting is the same as the r_megadrawmethod variable covered in the Advanced Tweaking section.
Foliage Quality: This setting is meant to affect the quality of foliage, namely the trees, grass and bushes. However in my experimentation it seems to have no impact at all, whether on the amount or density of foliage. Strangely though, the Effects Level setting does have an impact on foliage - see further below.
Terrain Quality: This setting is meant to control the quality of the terrain, but once again at the moment it appears to have no impact at all.
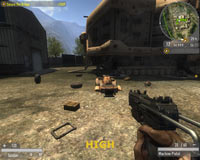
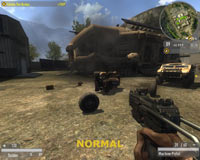
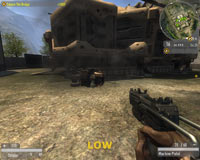
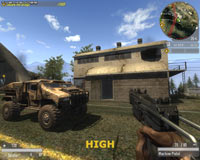
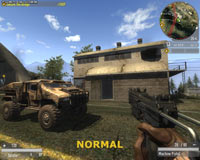
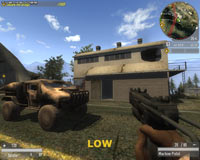
Debris/Weather: This setting supposedly controls a combination of both weather effects and debris. However in my testing the setting appears to have no noticeable impact on weather on maps such as Salvage or Outskirts which have rain and snow. It does however impact on the amount of debris shown from explosions. A screenshot comparison is provided above, and as can be seen the same exploded vehicle has differing levels of debris at High, Normal and Low. This means that in heavy combat by reducing this setting you can improve your FPS and possibly remove distracting bits of debris at the same time at the cost of some realism.
Shader Effects: It must be noted that this setting seems linked to the Shader Level setting, as altering Shader Effects to High for example sets the Shader Level to Ultra as well, altering Shader Effects to Low sets the Shader Level to Low, etc. Thus both settings will be covered in combination, as they effectively control the way Shaders are used to alter image quality. The screenshot comparison above shows that between High and Normal the difference is indistinguishable, however at Low there is a clear decline in image quality, but an improvement in FPS.
Effects Level: This setting doesn't affect the in-game special effects from weapons and so forth. As the screenshot comparison above shows, the most noticeable impact of lowering the setting is the complete removal of all grass at the Low level. This improves performance and can also be a gameplay advantage, but it does reduce realism. If instead you want to customize how much grass you can see, and the way it fades into and out of view, see the r_stuffFadeStart and r_stuffFadeEnd variables in the Advanced Tweaking section. However importantly, lowering this setting can also remove vehicles from view in the distance, so for strategic reasons you should keep this setting at at Medium or High.
Shader Level: See Shader Effects above.
Anti-Aliasing: Antialiasing is a method of smoothing the jaggedness of lines in 3D graphics. For more details see this page of my Gamer's Graphics & Display Settings Guide. This setting has up to five options depending on your graphics card's capabilities: Off, 2x, 4x, 8x and 16x. When set to Off, there is no additional Antialiasing used, and this provides the fastest performance. When set to 2x Antialiasing, this uses your graphics card to smooth out jagged lines at the cost of some FPS. Higher levels of Antialiasing will reduce FPS even more, but smooth out jaggedness considerably, particularly for distant objects. Note that if you have any level of Antialiasing enabled in your graphics card control panel, they can add to or override these settings. If you want to use Antialiasing in ET:QW I recommend disabling any forced Antialiasing in your graphics card's control panel and then setting the AA level in-game here.
Vertical Sync: Vertical Synchronization (also called Vertical Sync, or simply VSync) is the synchronization of your graphics card and monitor's abilities to redraw the screen a number of times each second. It is covered in more detail on this page of my Gamer's Graphics & Display Settings Guide. If VSync is unticked you may see some image 'tearing' as your monitor and graphics card go slightly out of synchronization at times, however this will give you the best performance and also reduce mouse lag. When VSync is enabled (ticked), your FPS will be capped at your monitor's refresh rate, but more importantly your overall FPS can also be reduced by up to half, though you can offset this impact by enabling Triple Buffering. Note that ET:QW is an OpenGL game, so you need only enable Triple Buffering in the graphics card control panel for it to work.
Importantly in ET:QW the game engine is effectively capped at 30FPS on most machines, and you cannot normally exceed this framerate regardless of your VSync setting. You can however remove/adust this framerate cap and increase your framerate - see the last page of this guide for more details, as well as the com_unlockFPS, com_unlock_timingMethod and com_unlock_maxFPS variables under the Advanced Tweaking section.
Shadows: This setting controls whether dynamic shadows are enabled or not. As with most games, this can have a noticeable impact on performance, as dynamic shadows require additional calculation. However as the screenshot comparison above shows, disabling shadows does not disable all shadows, as static shadows cast by fixed objects such as buildings remain. So disabling shadows does not necessarily give a major gameplay advantage, but if you need extra FPS it is worth unticking this setting.
Soft Particles: This option controls whether soft particle effects are used to make things like smoke, steam and dust appear more realistic, softening their edges when they clip other objects for example. The screenshot comparison above shows this - with Soft Particles disabled on the left, the smoke from the explosion shows clear clipping against the ground, with it enabled the smoke blends cleanly with its surroundings. However in practice it's difficult to note any difference, as the effect is extremely subtle. If you want maximum FPS with no significant decline in image quality untick this option. Note that this option doesn't work for ATI graphics cards at the moment, and is a known issue, so it is greyed out for ATI users.
Smooth Foliage: When enabled, this option makes the edge of foliage such as grass and trees slightly hazy, to enhance realism. It is normally difficult to see, but in the screenshot comparison above the difference is quite clear - look at the blades of grass and you can clearly see that with this setting enabled, the edges are not as harsh as with it disabled. In general it should be left on for optimal image quality, but it can reduce FPS in outdoor areas so disable it if you need the extra performance without any major decline in image quality.
Once you've adjusted all your settings, make sure to click the Apply button and restart your system if required. Remember however that there are a large number of tweaks you can undertake using command variables which can further customize the settings in the game, and these are covered starting on the next page.
The next section looks at advanced tweaking for Enemy Territory: Quake Wars.
Enemy Territory: Quake Wars is, as the name suggests, based on the Quake series. This not only applies to its game world, but also the game engine used, which is a recent build of the same engine used in Quake 4, which itself was based on the excellent Doom 3 engine before it. In this section we delve into all the advanced tweaking possible with this build of the game engine, and if you've read either my Doom 3 or Quake 4 tweak guides in the past, this section will look very familiar to you, as many of the tweaks from those games carry over to ET:QW. There are a range of notable differences however, so make sure to read the instructions carefully and go through the variables in detail.
Using the Advanced Tweaks
The most common mistake made in tweaking is to quickly apply several tweaks without knowing what exactly they do, or apply them incorrectly and wonder why they don't work, especially if you're new to tweaking the ET:QW/Quake 4/Doom 3 engine. Read this section carefully and pay close attention to the descriptions of how tweaks are applied in ET:QW and what they do. I've tested all of them and only working tweaks and methods have been provided.
There are three main ways in which you can access and alter Command Variables (cvars) in ET:QW: through the game Console; through .cfg (Config) files; and via the Command Line. I detail all the major commands one by one starting on the next page, and you can then decide the best method to use to implement particular ones. The methods are essentially interchangeable, meaning changing the variable using one method has much the same impact as doing it another way - the only difference is which is more convenient for you, or which is most appropriate to that particular type of command.
ET:QW Console
The console is the closest you can get to having direct real-time access to the powerful game engine. Through the console you can enter commands to change engine variables during the game, and usually see their impacts immediately. This is a great way to experiment with certain tweaks before implementing them permanently via other methods. To open the console, start ET:QW and then press the CTRL ALT and ~ keys together at once. You will see the console come down, and you can enter text at the command prompt. A list of commands you can enter are covered on the next page. To make regular access to the console easier, enter the following line into the console:
seta com_allowconsole 1
This means that you can now open and close the console by simply pressing the '~' key (the key above TAB), and not three keys at once.
ET:QW Config Files
Although you can alter many variables by entering them into the console, most command variables need to be set each and every time you start ET:QW. This is because the game engine usually resets these variables to their default state as the engine initializes at startup, or they need to be implemented before the game engine loads up to be effective. Fortunately by default, when the game engine starts, it automatically detects the presence of, and runs the command variables from two specific files: etqwbinds.cfg and etqwconfig.cfg, both of which can be found under your \Documents and Settings\User\My Documents\id Software\Enemy Territory - QUAKE Wars\base directory in Windows XP, or \Users\User\Documents\id Software\Enemy Territory - QUAKE Wars\base in Windows Vista. The file etqwbinds.cfg holds the general key bindings and control configuration, while etqwconfig.cfg holds your in-game settings such as audio and video configuration. There are also two more files which hold additional control and UI settings specific to your player profile, called bindings.cfg and profile.cfg, found under the \Documents and Settings\User\My Documents\id Software\Enemy Territory - QUAKE Wars\sdnet\profilename\base directory in XP, or \Users\User\Documents\id Software\Enemy Territory - QUAKE Wars\sdnet\profilename\base in Vista. These are loaded up when you login to that particular profile in ETQW.
You can edit cfg files using a text editor like Windows WordPad or Notepad. However typically changing the settings in the existing config files will see them reset to default values again the next time you restart ET:QW and hence is not the recommended method. Rather than editing any of these files, the best thing to do is create a new text file, rename it to autoexec.cfg (not autoexec.cfg.txt), and place it in your \Documents and Settings\User\My Documents\id Software\Enemy Territory - QUAKE Wars\sdnet\profilename\base directory in XP, or \Users\User\Documents\id Software\Enemy Territory - QUAKE Wars\sdnet\profilename\base in Vista. You can now edit this file and enter all your custom tweaks and settings into it, and they'll automatically come into effect each and every time you start ET:QW. This makes it easier to keep track of what you've tweaked, and if ever you want to remove your custom tweaks, you can simply delete this autoexec.cfg file, or see which commands need to have their values manually reset to the default.
Note: If you ever want to reset all your settings to their defaults, delete all the .cfg files above; the next time you start the game it will create new copies of them and all your customizations will be removed.
There is another way of executing a config file, and that is to firstly create a config file with any name you wish (e.g. mytweaks.cfg), place it in the same directory as the etqwconfig.cfg and etqwbinds.cfg files, and then in the ET:QW console at any time type exec [filename.cfg], e.g.:
exec mytweaks.cfg
This will immediately run all the command variables in your new .cfg file, however unless you actually execute this file it will not be automatically run at startup - only the config files named further above are automatically detected and run by the game at startup.
ET:QW Command Line
There is one more way you can run command variables for ET:QW - enter them as part of the command line for the game's launch icon. To do this, first right-click on the icon you use to launch ET:QW, and then select Properties. In the Target box, you will see something similar to this - it varies depending on where you installed the game:
"C:\Program Files\id Software\Enemy Territory - QUAKE Wars\etqw.exe"
You can add command variables to the end of this line by using a space and then a '+' sign in front of each command. For example, to fully unlock the game's rendering mode (as covered on the last page of this guide), change the target line to the following:
"C:\Program Files\id Software\Enemy Territory - QUAKE Wars\etqw.exe" +set com_unlockFPS 1 +set com_unlock_timingmethod 0
Note that there are quotes around the target to the game executable file, but after that, simply add a space and a plus sign before each command. Also if you're wondering what the 'set' command used after the + sign means, and why it's necessary, see the top of the next page.
So Which Way Is Best?
Now you know the different ways to apply command variables in the ET:QW engine, as I mentioned before, there is no single 'best' way. Each method works, it just depends on what you find more convenient or appropriate to the particular command. I personally prefer to place all my tweaks in a single autoexec.cfg file, because that way I can see at a glance all the settings I've changed, and if need be I can remove the file (e.g. for troubleshooting purposes), or change each setting back to default. I can also easily back up this file so I can quickly reapply the same tweaks if ever I reinstall the game or if my settings are lost after I patch the game.
However, I suggest that you first use the in-game console to try out most commands and see what effect they have on the game. Then you can insert them into your autoexec.cfg file once you've determined if they're worth using, and which values work best for you. For the commands which don't come into effect until the game is restarted, you may have to experiment by temporarily placing them in your autoexec.cfg first to see what they do, but do this carefully, and depending on the results determine whether you want to keep them or not.
The next two pages provide a list of all the game's most useful commands/command variables along with relevant descriptions.
This section lists all the major Enemy Territory: Quake Wars commands and command variables (cvars) by general function, and provides descriptions and recommendations for the important ones. The list is by no means exhaustive since there are literally almost 1,800 different commands and variables for ET:QW; I've only tried to cover the most useful working commands. To see a full list of the ETQW commands for yourself, type listcvars and listcmds in the in-game console. To get a saved list of the cvars with descriptions, type htmlcvars and a copy will be saved as cvars.html under the directory which holds your etqwconfig.cfg and etqwbinds.cfg files (See previous page).
Usage rules
Config and Console Usage: In the ET:QW engine, when you want to use a command - whether in a config file or in the console - you can simply type the name of the command, and then any values or parameters if required, however you must place exactly one space after the command and any following value or parameter. E.g: r_displayrefresh 85. You don't have to use "" (quotes) around the value, nor do you have to use the Set or Seta command in front of them.
Set vs. Seta: You will see in certain places, like the etqwconfig.cfg file, that a command is prefaced with the words Set or Seta. You can also insert these in front of your commands in the console or config file or in the command line, however they aren't absolutely necessary for a command to work. The Set command is used to tell the game engine to set a cvar to a particular value. Seta is more useful in that it tells the game engine to set the cvar value, and then archive it (store it) so it becomes permanent. So don't use Seta unless you want a value to 'stick', as it will remain there until you either manually change its value again.
Current and Default Values: If at any time you want to see the current value for a cvar, open the console and type the name of the variable without a value. For example, type r_displayrefresh and you will see the current value for this variable on your system. More importantly, you will also see the default value. There are different current and defaults for the commands depending on your particular system hardware configuration, that's why I don't provide the defaults here.
Note: if you can't remember the exact name of a command, type the first few letter(s) of it in the console and then press the TAB key - the console will show you all commands beginning with the same letter(s).
The following is a list of all the major commands for ET:QW, grouped by function, and with relevant descriptions. Note that I have tested all of these, and the following settings have been purposely excluded:
Finally remember that some of these commands are considered cheats on certain servers, and may not be able to be used without the net_allowcheats command being enabled, or may result in being kicked by PunkBuster - it all depends on what the server administrator has set as being acceptable.
Common Commands
com_showFPS [0,1] - If set to 1, shows the current frame rate in Frames Per Second (FPS) at the top right of the screen. If set to 0, disables the counter.
com_allowConsole [-1, 0,1] - If set to 1, allows the command console to be opened by using only the '~' key, rather than CTRL + ALT + ~ (when set to 0). If set to -1, disables the console.
bind [keyname, command] - Binds a command to a key. For example:
bind F10 com_showFPS 1
bind F11 com_showFPS 0
Binds the F10 key to the command com_showfps 1 (which turns on the FPS counter), and the next line binds the F11 key to the command com_showfps 0 (which turns off the FPS counter). If you want to make a key binding 'toggle', that is pressing the same key turns a command on or off, then use the Toggle command instead, for example:
bind F10 toggle com_showFPS
Which means the F10 key alone will turn the FPS counter on and off, freeing up the F11 key.
unbind [keyname] - Unbinds any existing commands from the single key named.
unbindall - Unbinds any commands from all keys. This command is used most commonly as a starting command before setting bindings, so that you can be sure the keys you are binding are not already in use by another command.
echo [text] - Prints the specified text onto the screen.
exec [filename] - Executes the commands in the config filename provided.
screenshot - Takes a screenshot and places it in your \base\screenshots directory as a .tga file.
condump [filename.txt] - Dumps the entire contents of the console for the current session to the text filename specified and places it in your default .cfg directory.
clear - Clears the console of all text to date. Useful if you want to clear the console before generating specific text (e.g. listcmds) then condump them cleanly.
kill - Kills the player.
timescale [0 - x] - Sets the rate at which time passes, with 1 being normal time, and the higher the value the quicker time passes.
g_skipintro [0,1] - Skips any startup movies if set to 1.
net_allowcheats [0,1] - This is an important command which when set to 1 allows the use of the 'cheat' commands, such as god, noclip and notarget below, and those tagged with (cheat) in this guide.
god - Enables God mod, useful for troubleshooting or just having fun (cheat).
noclip - Toggles clipping on/off. By default clipping is on. When clipping is turned off, you can walk through solid objects (cheat).
notarget - Removes you as a target for the enemy (cheat).
exit - Immediately exits to the Windows Desktop.
HUD/User Interface/Display Commands
g_showHud [0,1] - If set to 1, this enables the Heads Up Display (HUD). If set to 0, this removes the HUD from view.
g_fov [angle] - Specifies the angle for the Field of View (FOV). The wider the angle, the larger the field of vision for the player, giving a 'fish eye' view in return for possibly lower performance. The smaller the angle, the less can be seen but the higher the performance. The default of 90 may not suit everyone.
ui_showgun [0,1] - If set to 0 hides the gun model on the screen, but still allows the gun to be fired. This can improve performance and increase general visibility.
g_chatDefaultColor [RGBA]
g_chatFireTeamColor [RGBA]
g_chatTeamColor [RGBA]
The settings above adjust the color for various chat text shown on screen: the in-game chat, fireteam color, and team chat text respectively. These settings all use RGBA color values; RGB colors for the first three numbers, and an Alpha (transparency) value for the last number.
g_chatLineTimeout [seconds] - Adjusts the time in seconds for each chat line to stay visible after new text is shown.
g_weaponSwitchTimeout [seconds] - Adjusts the time in seconds for the weapon display on the right side of the HUD to stay visible after you switch/select a weapon.
g_playTooltipSound [0,1] - If set to 0, disables the sound when a tooltip is displayed.
g_commandMapZoom [%] - Determines the zoom level of the command map shown in the top right corner of the screen, from 0.00 (close) to 1.00 (far).
g_enemyColor [RGBA] - Sets the color of enemy unit indicators in RGBA color value.
g_friendColor [RGBA] - Sets the color of friendly unit indicators in RGBA color value.
gui_doubleClickTime [seconds] - Amount of time in seconds between two clicks for them to be considered a doubleclick. If you find you're accidentally double-clicking often, raise this value.
r_aspectRatio [0,1,2,3,-1] - Sets the Aspect Ratio of the display. Best adjusted via the In-Game Settings, however using a value of -1 allows you to set a custom aspect ratio with the r_customAspectRationH (Horizontal Ratio) and r_customAspectRatioV (Vertical Ratio) commands.
r_mode [1-13,-1] - This setting determines the resolution of the game. It is best adjusted via the In-Game Settings, however using a value of -1 allows you to set a custom resolution using the r_customHeight (Pixel Height) and r_customWidth (Pixel Width) commands.
r_displayRefresh [Hz] - Determines the refresh rate used for the game. If you want to set this manually, determine the maximum supported refresh rate on your monitor for the resolution you've chosen for ET:QW, and set this variable to that value.
Control Commands
m_rawInput [0,1] - This variable determines whether the RAW Input API is enabled for mouse input. This is enabled by default as of the 1.2 Patch onwards, but you can disable it to see if it improves your mouse input.
m_smooth [value] - This variable determines the level of mouse smoothing applied. The higher the value, the smoother, but more laggy, mouse movements will feel. Set to 0 if you want to disable mouse smoothing altogether.
m_pitch [value] - Determines the relative speed of up and down (pitch) mouse movements. The higher this value, the greater the sensitivity of the mouse to pitching vs. yawing.
m_yaw [value] - Determines the relative speed of side to side (yaw) mouse movements. The higher this value, the greater the sensitivity of the mouse to yawing vs. pitching.
sensitivity [value] - This value represents your mouse sensitivity, as set by the slider in the in-game menus (See In-Game Settings). Here you can assign higher values if you wish.
Update: As of the 1.5 Patch the following control cvars have been added:
m_bumblebeePitchScale [value], m_bumblebeeYawScale [value] - Control the Vertical and Horizontal mouse sensitivity respectively of the Bumblebee.
m_heavyVehiclePitchScale [value], m_heavyVehicleYawScale [value] - Control the Vertical and Horizontal mouse sensitivity respectively of the Titan, Cyclops and Desecrator.
m_helicopterPitchScale [value], m_helicopterYawScale [value] - Control the Vertical and Horizontal mouse sensitivity respectively of the Anansi and Tormentor.
m_lightVehiclePitchScale [value], m_lightVehicleYawScale [value] - Control the Vertical and Horizontal mouse sensitivity respectively of the Trojan, Armadillo, Hog and Husky.
m_playerPitchScale [value], m_playerYawScale [value] - Control the Vertical and Horizontal mouse sensitivity respectively of Infantry and the Icarus.
The next page continues the command listing.
Performance Commands
Before examining the list below, it's important to note that I have excluded a large number of commands which are already set to their optimal values by default in ET:QW. For example settings such as r_useVertexBuffers and r_useOptimizedShadows are already enabled and working optimally in the game, and should not be changed from their defaults as there is no benefit in doing so.
[Unlocking Framerate]
com_unlockFPS [0,1] - When this is set to 0, the ET:QW engine is effectively locked to a 30FPS maximum to help maintain smoothness. However if you want your framerate to exceed this limit, you must first make sure this variable is set to 1, which it should be by default. However by itself that won't necessarily do anything - you should also check and adjust the com_unlock_timingMethod and com_unlock_maxFPS variables below as well.
com_unlock_timingMethod [0,1,2] - ET:QW tries to smooth out your framerate using a timing method which is specified here. By default the timing method is 2, which is the most conservative approach and effectively the smoothest, but provides the lowest framerates, typically leaving most people at 30FPS. Setting this variable to 1 sacrifices some smoothness in return for higher FPS. Using both 1 or 2 still limits your framerates to multiples of 30, but setting it to 0 completely frees up system to provide the highest possible FPS, but in return you may experience FPS spikes and jerky gameplay.
com_unlock_maxFPS [FPS rate] - If you've unlocked your framerate using com_unlockFPS 1 and you're using a com_unlock_timingMethod of 1 or 2, then you will still be bound to a maximum framerate specified using this setting, the default being 60FPS. If the game can't reach the new framerate cap, it will round down in multiples of 30, so if you notice your FPS is still sitting around 30 after unlocking your framerate, either lower this framerate cap, lower your settings to improve your average FPS, or switch to using the 0 timing method which effectively ignores this framerate cap.
Importantly, refer to the last page of this guide for more detailed advice on how to correctly use the above three settings and what they do.
[Dual/Multi-Core Tweaks]
r_useThreadedRenderer [0,1,2 ] - Added as of the 1.2 Patch, this option allows you to enable multithreading if you have a dual or multi-core CPU, and this can improve the performance of ET:QW. By default it's disabled (set to 0), but you can set it to either 1 or 2, with a value of 1 locking the renderer to your in-game frames, while 2 allows it to run unlocked. The developers recommend a value of 2 for this variable if you wish to enable it. Note that you must enable it either by inserting it in your autoexec.cfg file, or by entering it in the console prior to the start of a game; it can't be changed during a game.
[Graphics Tweaks]
r_megadrawmethod [0,1,2,3] - This command is exactly the same as the Lighting Quality setting in the main menu (See In-Game Settings section). A value of 0 is the same as High, a value of 3 is the same as Normal. You can try values in between to see if it improves image quality or performance, but in general a value of 1, 2 or 3 all appear much the same.
image_filter [GL_LINEAR_MIPMAP_NEAREST, GL_LINEAR_MIPMAP_LINEAR] - Determines the base OpenGL texture filtering method to use on textures by default. GL_LINEAR_MIPMAP_LINEAR is Trilinear Filtering, however if you want a performance boost without any noticeable image quality loss, change this setting to GL_LINEAR_MIPMAP_NEAREST which is Bilinear Filtering.
r_skip - There are a range of commands starting with r_skip, e.g. r_skipDiffuse. If these are set to 1, they will remove the relevant feature from the game. So r_skipDiffuse 1 would remove all diffuse surfaces, resulting in them being blank (white); r_skipBump 1 removes all bumpmapping detail from surfaces, resulting in flat surfaces, etc. Aside from the potential for visual anomalies with some of the settings, and the fact that some may be considered cheats, this can improve performance and may give a gameplay advantage (some are cheat).
image_PicMipEnable - This setting is on by default and allows you to control a range of PicMip-related settings which determine the detail level of Mipmaps, and hence the quality of surfaces. However the related settings image_bumpPicMip, image_diffusePicMip and image_specularPicMip are exactly the same as those under the in-game Texture Quality sliders (See In-Game Settings section) and can be fully adjusted there. Importantly though, if you just want the highest level of image quality, you can force this by setting image_picMipEnable 0 which disables the use of mipmaps and thus ensures the highest quality images are always used.
image_useCompression [0,1] - By default ET:QW uses compression to reduce the size of textures and lightmaps, improving performance but reducing image quality slightly. If you want the absolute highest image quality, set this option to 0, though note that you will require a graphics card with a decent amount of Video RAM to prevent hitching (e.g. 320MB VRAM or higher).
r_visDistMult [0.8-1.2] - Determines the maximum visible viewing distance in the game, the higher the value the further you can see, but the lower your performance. For gameplay purposes you shouldn't lower this below its default, and it's best to set it to 1.2 for maximum advantage.
g_decals [0,1] - If set to 0, disables all decals (e.g. bullet holes). This can improve performance, especially in heavy combat, at the cost of realism.
r_lightScale [value] - All light sources are multiplied by this value. Increasing this value increases the intensity of all visible light sources, lowering it reduces them (cheat).
r_detailTexture [0,1] - If set to 0, disables Detailed Textures, which are the detailed surface effects shown on a texture, such as the gravel on a road. This can improve performance at the cost of image quality.
r_detailRatio [value] - Determines the ratio of detail textures to main textures. The higher this value, the more detail textures are shown per unit of main texture, however at very high values (and very low values) textures will look blurry. A moderate value of between 4 and 14 can look good, but has varying impact on performance.
r_detailFade [0-1] - Determines the way in which detail textures fade in the distance, the lower the value the sharper closer details will be.
g_showPlayerShadow [0,1] - If set to 1, the player will cast a shadow when standing near light sources. If set to 0, the player casts no shadow, which improves performance.
image_lodbias [-1-1] - Determines the Level of Detail (LOD) bias for mipmapped images. The higher the number, the less detail is visible on surrounding objects. This can improve performance, but reduces image quality. The default is 0, and values approaching 1 reduce detail quite heavily, while negative values approaching -1 increase detail, so experiment with fractional values such as 0.2 or -0.5.
image_lodDistance [value] - This determines the distance at which images don't need to be shown at full resolution, with the higher the value the better the image quality but the lower the performance.
r_md5LodBias [value] - Determines the Level of Detail (LOD) bias for mipmapped images. The higher the number, the less detail is visible on surrounding objects, such as vehicles. This can improve performance, but reduces image quality. The default is 0, and a value such as 1 reduces detail quite heavily, while negative values increase detail, so experiment with fractional values such as 0.2 or -0.5.
r_md5LodScale [value] - This determines the rate at which higher level of detail becomes visible on objects. The higher the value the more detail is visible on distant objects but the lower the performance.
r_renderProgramLodDistance [value] - Determines the distance at which general rendering details are shown, such as bump mapping on surfaces. The higher the value the more detail and effects will be shown in the distance but the lower the performance.
r_stuffFadeStart [value] - Sets the distance at which 'stuff' (i.e. mainly grass) begins to fade out of view.
r_stuffFadeEnd [value] - Sets the maximum visible distance for 'stuff' (i.e. mainly grass). Using a combination of r_stuffFadeStart and r_stuffFadeEnd you can in effect have more or less grass visible. For example try r_stuffFadeStart 0 and r_stuffFadeEnd 1000 together to give a thinned out grass effect for better performance without removing grass altogether.
r_stuffCacheMegs [MegaBytes] - Determines the amount of memory to use for caching stuff effects. The default is fine, however if you raise the r_stuffFadeEnd value above in particular, you may need to increase the cache to prevent stuttering and errors.
[Sound Tweaks]
s_driver [best, openal, dsound] - Determines the audio API used for the game. The default of dsound is DirectSound which is optimal in Windows XP, however you can set this to openal to attempt to force OpenAL audio, either to try to fix audio glitches on your system, or in particular for Windows Vista users who want to have full hardware audio acceleration. If you want to force OpenAL mode, see s_libOpenAL below for details.
s_libOpenAL [path/file] - Determines the path and filename of the correct OpenAL32.dll file to use if OpenAL sound mode is chosen using the s_driver variable. Most sound cards have hardware support for OpenAL, and thus you should have an OpenAL32.dll file under your \Windows\System32 directory. So you would use the s_libOpenAL command in this way: s_libOpenAL C:\Windows\System32\OpenAL32.dll. You would then make sure to use the s_driver openal command, and if doing so during an active game, use the s_restart command to restart the sound system.
s_force22kHz [0,1] - If set to 1, this forces lower quality (22kHz) audio, which reduces sound quality but can improve performance (cheat).
s_numberOfSpeakers [2,4,5,6] - This value shows the number of speakers the game has detected, based on the your general Windows settings and In-Game settings. You can manually alter this value, however make sure it matches your current speaker setup otherwise you will have missing audio channels.
s_maxSoundsPerShader [value] - This setting determines the maximum number of sounds to use per shader, that is how diverse the sounds effects are. Increasing this value may increase sound variety but also increases memory usage and can reduce performance.
s_useOcclusion [0,1] - Occlusion is a basic audio method which muffles sounds which aren't clearly heard, such as those behind walls and objects. If set to 0, this method is disabled reducing realism and losing many distant sounds but it may increase performance (cheat).
s_noSound [0,1] - If set to 1, disables all sounds. Should be used primarily to troubleshoot potentially sound-related problems.
Update: As of the 1.4 Patch, the multiplayer stereo sound separation algorithm from Quake 4 has been added, and can be enabled via s_earSeperationAlgo 1. You can also control its parameters using the s_esa1_minVolume and s_esa1_maxWindow cvars.
Bot Commands
There are a large number of commands starting with bot_ which you can view and experiment with. For the most part they are for server administrators who wish to fine-tune how bots (non-human players) behave on their server. However if you start an offline game with bots, you can also try to alter parameters like bot_noChat 1 to disable bots chatting, or bot_useVehicles 0 to prevent bots using vehicles.
View Commands
pm_thirdPerson [0,1] - If set to 1, shows the player in third person view (cheat).
pm_thirdPersonAngle [angle] - If third person view is being used (i.e. pm_thirdPerson 1), this determines the angle of the third person view. 0 is from behind the player, while 180 is looking directly at the player's face. Other values view the player from various angles (cheat).
pm_thirdPersonHeight [value] - If using third person view, this determines the height of the camera from normal view height. Positive values raise the camera above normal view height, negative values below normal view height (cheat).
pm_thirdPersonRange [value] - If using third person view, determines the distance of the camera from the player. 80 is the default, and 0 is right inside the players head (cheat).
Demo Commands
The following commands record and play back in-game demos. The recorded demos are stored by default under your \Documents and Settings\User\My Documents\id Software\Enemy Territory - QUAKE Wars\base\demos directory.
recordDemo [demoname] - Records a demo of your current (singleplayer) gameplay with the name specified.
stopRecording - Stops recording the current singleplayer demo.
playDemo [demoname] - Plays back a singleplayer demo with the name specified.
recordNetDemo [demoname] - Records a demo of your current gameplay on a multiplayer server.
stopNetDemo - Stops recording the current multiplayer demo.
playNetDemo [demoname] - Plays back a multiplayer demo with the name specified.
pauseNetDemo - Pauses/unpauses the playback of a network demo.
timeNetDemo [demoname] - Runs a timedemo on the demo name provided and provides framerate results in the console after the demo is finished.
com_preloadDemos [0,1]- Preloads all demos before playing them. Set to 0 will reduce memory usage, but loading demos will take longer.
com_compressDemos [0,1] - If set to 1 will compress demo files recorded, reducing their size. These files may take longer to load.
demoShot [demoname] - Creates a screenshot for the demo file specified.
demo_noclip [0,1] - If set to 1 allows you to noclip through a demo, so you can fly around while the demo is playing back.
g_showDemoHud [0,1] - Toggles the display of useful information on the HUD during the playback of a demo.
Update: As of the 1.5 Patch the following demo-related commands have been added:
g_autoScreenshot - Automatically takes a screenshot of the scoreboard at the end of a map.
g_autoRecordDemos - Automatically starts & stops demos at the start & end of a map.
g_autoScreenshotNameFormat [format] - Determines the format in which auto screenshots are saved when using the g_autoScreenshot command. Type the command without any value to see the default format, and the types of arguments you can use to construct a new format.
g_autoDemoNameFormat [format] - Determines the format in which auto demos are recorded when using the g_autoRecordDemos command. Type the command without any value to see the default format, and the types of arguments you can use to construct a new format
Information/Diagnostic Commands
com_videoRam [MB] - Shows the detected amount of video memory on your graphics card in MB. If this value is incorrect, set it to the correct value at startup to improve performance.
sys_cpuSpeed [GHz] - Shows the detected CPU Speed. If this value is incorrect, set it to the correct value at startup to improve performance. Remember that for mult-core CPUs the speed is per core, not the sum of all cores.
sys_cpuPhysicalCount [value] - Shows the number of separate physical CPU cores the game has detected. If you have a multi-core CPU make sure this matches the number of cores you actually have. Note that the sys_cpuLogicalCount value may differ, since a single core hyperthreading CPU for example can have two 'logical' cores, but only one physical core.
com_showMemoryUsage [0,1] - If set to 1, shows the amount of memory allocated to the game and various assets.
The following commands all reload particular aspects of the game, such as sounds, images, decals and GUIs. Use these commands to either reload a particular aspect of the game engine after tweaking a relevant setting, or to help any graphical anomalies or glitches you are experiencing. Note, some aspects may take a while to reload, so be careful if using these commands during an online game.
reloadAnims
reloadDecls
reloadEngine
reloadGuiGlobals
reloadImages
reloadModels
reloadScript
reloadSounds
reloadSurface
s_restart
vid_restart
Multiplayer Commands
The following are useful multiplayer commands which can be used by clients (players on servers). I've excluded Server Administrator commands, but you can see these yourself in the console by viewing all commands starting with net_ and si_.
connect [servername] - Connects to a multiplayer server with the given name
disconnect - Closes the current game map.
reconnect - Reconnects to the last server connected to successfully.
say [text] - Says the provided text in Global Chat in multiplayer.
sayFireTeam [text] - Says the provided text in Fireteam Chat in multiplayer.
sayTeam [text] - Says the provided text in Team Chat in multiplayer.
serverInfo - Shows information about the current server when in multiplayer.
net_clientLagOMeter [0,1] - If set to 1, a small graphical display is shown at the bottom of the screen only during multiplayer games. It looks like a set of green, yellow or red blocks, and tells you various things about your connection. In essence however the main thing is for you to note whether it is predominantly green, which is good, or if there are lots of yellow and/or red blocks which indicate connection problems. If you switch to another server and these go away, then the problem is likely with the server and/or you may be quite far away from the server. If it happens on all servers however the problem is likely with your connection.
net_clientMaxRate [Bytes] - This setting controls the maximum amount of data in bytes per second you can receive from a server every second. By default, most servers only provide 16000 bytes per second. If you're having connection problems or lag, first try lowering this value to see if it reduces and stabilizes your ping when playing ET:QW online. Try values such as 10000 or 12000. Note that just as values which are too high can cause problems, so too can values which are too low - ET:QW multiplayer is not designed for dialup speeds (i.e. values of 6000 or less).
net_clientPrediction [milliseconds] - Determines the number of additional milliseconds by which the client (your machine) will try to predict and offset any ping lag. The default is 20ms, but if you're experiencing connection problems and lag and/or have a high ping, raising this value may improve things. Remember however that your ping is the round-trip time to a server (e.g. a 150 ping means 75ms taken for your data to get to a server, 75ms for it to get back). So your ping divided by 2 will give you the best prediction value, and usually only if your ping is higher than 150ms.
That's the current list of the Enemy Territory: Quake Wars command variables which I've tested and believe to be the most useful to players. If you know of any major working commands which are missing, and which would be of benefit to most players, please Email Me so I can update the list. Please keep in mind there are a lot of deliberate omissions for commands which are of limited practical value, or which can be adjusted using the in-game settings, or are already optimal by default.
The next section has some important tips and information, and wraps up the guide.
This guide is almost at its conclusion, but below is some valuable information which you might find useful, along with my concluding thoughts.
Gameplay and Strategy Tips
If you're new to Enemy Territory: Quake Wars, and you need some guidance on what exactly you should be doing, how the weapons work, what the objectives are, and so forth, then the easiest thing to do is to go to your \Program Files\id Software\Enemy Territory - QUAKE Wars\Docs directory and launch the file index.html to open the game's detailed Player Guide. You can then see information on all aspects of the game, from classes to objectives, to vehicle and weapon descriptions.
If you're after even more detailed information to really give you a gameplay advantage, check out this ETQW for Newbies guide which contains a lot more detailed gameplay and strategic information. If you're an avid ET:QW player, make sure to also visit the Official ET:QW Statistics Site which records and stores a range of statistics for all ET:QW players.
Skipping Introductory Movies
To skip the introductory movie shown before the game reaches the main menu, you can use the g_skipIntro 1 command, preferably adding it to your launch icon's command line as demonstrated below:
"C:\Program Files\id Software\Enemy Territory - QUAKE Wars\etqw.exe" +set g_skipIntro 1
Alternatively you can rename or delete the intro_1024x512.bik movie file found under the Program Files\id Software\Enemy Territory - QUAKE Wars\base\video directory, but this is not recommended.
Framerate Unlocking
One of the first things most Enemy Territory: Quake Wars players will notice is that the game appears to be effectively stuck at a framerate cap of 30FPS, and most people will immediately want to do something about this. Before attempting anything however, it's important to understand why this cap has been put in place and how it works. I cover the relevant commands to unlock and adjust your maximum FPS at the top of page 9 of this guide, but for those who want more details straight from the developers of the game, check out this thread. Basically the developers want to make sure that the in-game framerate remains as smooth as possible under a variety of circumstances, and doesn't fluctuate wildly, so they implemented the 30FPS cap. This framerate cap should not be confused with the game trying to maintain an average framerate of 30FPS - that's not what it does, it doesn't dynamically alter game details for example to try to keep your FPS at 30, it just caps the maximum possible FPS at 30.
It turns out that while there was a hard cap of 30FPS in the early beta builds of the game, in recent beta, demo and retail builds, the cap has been removed, since the com_unlockFPS variable now defaults to 1, which means the game is not hard capped to 30FPS. However even without the hard cap, you'll probably find that your FPS still sits around 30 most of the time. This is because the developers also implemented another variable called com_unlock_timingMethod which determines how and when the game calculates and shows new frames. A value of 1 or 2 (and 2 is the default) for this variable means that the game will still try to smooth out your framerate, rounding it down to the nearest multiple of 30. So if you can't reach a consistent 60FPS+, the timing method means you'll still sit at 30FPS.
So the next step if you want to truly unlock your framerate is to set com_unlock_timingMethod 0, which completely frees up your system to pump out as many frames as it possibly can - as long as you've also disabled Vertical Sync (see the In-Game Settings section). You should now see your framerate reach the actual maximum that your system can render at any time, fluctuating a lot more and not necessarily sitting at 30FPS. Now play the game online for a while and see if you can handle the framerate fluctuations. If you find the game is jerky or framerate spikes are making things feel awkward, I recommend you set com_unlock_timingMethod 1 and then make use of the com_unlock_maxFPS variable to set a new framerate cap which prevents major framerate spikes but still provides more FPS than the 30FPS cap.
In the end the choice is yours as to how you approach this and what settings you use, because some people value smoothness over higher FPS, and others just want the most frames they can get, so you will need to experiment to see what suits you; if you just want the highest possible FPS, set com_unlockFPS 1 and com_unlock_timingMethod 0.
Importantly: All of the above only applies when you are on a multiplayer server, not in offline mode where FPS is capped at 30FPS no matter what you do with the any of the above settings. So to experiment properly I recommend you join an online multiplayer server.
MegaTextures
One of the interesting new features of ET:QW is the use of MegaTexture technology which helps to both improve image quality and game world variety, and also reduces in-game stuttering, especially on graphics cards with lower amounts of Video RAM. Textures are the images which cover the surfaces of all objects in a 3D game world. Traditionally most games with large outdoor areas, such as Oblivion or Unreal Tournament 2004, have tiled textures which are lots of repeating tiles of a particular texture image joined together to form larger surface areas. Not only can this tiling look repetitive and obvious, it also often means that as your Video RAM is filled up with textures you will start to get pauses, hitches and stuttering as they're constantly swapped into and out of the VRAM. Both Oblivion and UT2004 had quite prominent stuttering and pausing issues when they first came out because of this.
Enemy Territory: Quake Wars on the other hand has one large (mega) texture which contains all the details needed for the game world - MegaTexturing is used for terrains only in ET:QW - and the relevant pieces of the game world are streamed from this megatexture in full detail rather than being a patchwork of tiles. The megatexture files (.mega) are held under your \Program Files\id Software\Enemy Territory - QUAKE Wars\base\megatextures directory, and as you can see they're quite large, and there is one for every level.
The end result is that MegaTexturing is one of the major reasons why large outdoor areas in ET:QW run relatively smoothly, along with the fact that it's based on a very solid game engine first used in Doom 3 over 3 years ago, and constantly updated and refined since then.
Measuring FPS, Taking Screenshots & Benchmarking
Measuring your frames per second is quite simple in ET:QW, simply use the built-in com_showFPS command, as covered in the Advanced Tweaking section. For convenience you can bind this command as a toggle to a particular key, and again this is covered at the top of page 8 of the guide.
Taking screenshots in ET:QW is also straightforward - press the F11 key and a screenshot is placed in your \Documents and Settings\User\My Documents\id Software\Enemy Territory - QUAKE Wars\base\screenshots directory in XP, or \Users\User\Documents\id Software\Enemy Territory - QUAKE Wars\base\screenshots in Vista. This screenshot is quite large and in .TGA format, but you can view it in Photoshop or by using the free IrfanView utility.
However if you want a simpler way of both measuring FPS and taking screenshots, try the free Fraps utility. Fraps can take screenshots in several different formats, it accurately measures FPS, and can also record in-game video in .AVI format.
If you also want a utility which automates the benchmarking of ET:QW, you can use the HardwareOC ET:QW Benchmark tool along with this Registration Utility.
Conclusion
That brings the ET:QW Tweak Guide to a close. As always I would appreciate constructive feedback on the guide, so please Email Me if you have an important tip or tweak to share. However please keep in mind that I can't offer any tech/tweak support of any kind, as this guide and my other guides such as the TweakGuides Tweaking Companion are packed with everything you need to help yourself to optimize and troubleshoot your system.
Until next time, take care!