The pursuit of quality, attention to detail: these things are fast becoming a rarity in today's world. This is doubly true when it comes to modern PC games. The formula-driven first person shooters just keep coming, each more inane than the last, each promising great gameplay, but instead delivering only flashy graphics and proving to be ever-more uncreative and repetitive.
It was in this environment of unoriginality that I first played an Elder Scrolls game - Elder Scrolls III: Morrowind. I spent literally hundreds of hours playing Morrowind and its two expansions, Tribunal and Bloodmoon, exploring its farthest corners, witnessing new landscapes, creating new enchanted items, and sometimes just walking along the ocean's shore at sunset marvelling at the sights, sounds and sheer atmosphere of the game. I was so inspired by what was an entire vast living, breathing, beautifully constructed game world that I decided to write a guide for the game to help others enjoy it, and thus my very first tweak guide was written and first distributed on the official Morrowind forums in July 2002 as a word document.
To say that Elder Scrolls IV: Oblivion has been a much-anticipated sequel to Morrowind is a huge understatement. As wonderful as Morrowind was, it had many small, and sometimes large, flaws. Fans all hoped that the next iteration of the Elder Scrolls series would bring with it the subtle improvements required to make the game even more immersive.
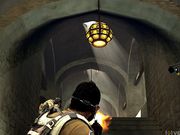
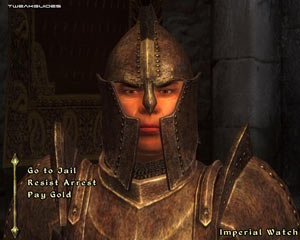
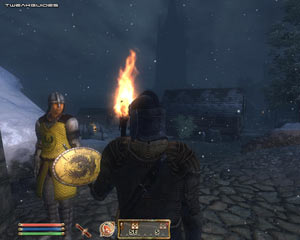
Well Oblivion has finally been released, and I can genuinely vouch for the fact that it is not only a worthy successor to Morrowind; it ups the stakes to a whole new level. Gone are the rather polygonal, sometimes barren landscapes: Oblivion has lush forests and highly realistic looking creatures. Gone is the simplistic combat system: Oblivion has true FPS-style combat. Gone are the long generic text dialog boxes: every character has unique spoken dialog, voiced by actors such as Patrick Stewart (Captain Picard from Star Trek).
You'll probably hear a lot of people say this over and over again about the game, but I truly believe Oblivion is one of the best PC games ever. It has such a striking blend of cutting-edge graphics and gameplay, so much attention to detail and such richness of atmosphere that it is a game I believe virtually anyone would enjoy regardless of their genre preference.
However, by the same token given how beautiful and complex Oblivion is, it is only natural that it be a very demanding game on most systems. There are a wide range of people experiencing performance issues, and there's been a mad scramble by players to find any and every means of increasing their framerates and resolving crashes. Fortunately, we have also seen some great efforts by the community as a whole to rapidly come up with tips and tweaks for Oblivion. This guide has been compiled to draw together all the working tips and tweaks, describe all the in-game settings in detail, provide all the useful console commands and give a range of troubleshooting and general performance advice in an effort to provide a single easy-to-use accurate reference source for Oblivion tweaking. Read on and see if it will help you get the most out of this amazing game.

Note: This guide refers to the latest version of Oblivion Version 1.2.0416, including The Shivering Isles and Knights of the Nine expansions. Make sure to check back regularly for updates.
Before getting into any game-specific settings and tweaks, this section covers the obligatory system optimization information I include in all my guides. If you've followed this advice recently, you can skip this section.
Many people report problems with this game and in almost all cases these are due to general system issues and not the game itself. With that in mind I strongly urge you to take some time and follow the advice below if you truly want this game, and indeed every other game you own, to run at its fastest and most trouble-free.
The place to start is with the TweakGuides Tweaking Companion. It is the complete system optimization guide for Windows users. Designed for novice and advanced users alike, it is written in plain English to help you genuinely understand all aspects of Windows and your PC. The guide covers every major topic, from the correct installation of Windows and critical drivers and software, through to recommendations for every significant setting and feature, all the major performance and convenience tweaks and customizations, as well as detailed troubleshooting advice. There are also links to a range of reliable free applications which can enhance your system and give you viable alternatives to purchasing commercial software. There are separate versions available for Windows XP, Windows Vista and Windows 7.
If you've ever wondered what common graphics and display settings like FPS, VSync, Refresh Rate, Antialiasing and Anisotropic Filtering are, and how they really work, then check out my Gamer's Graphics & Display Settings Guide for all the details in an easy to understand format. The guide also gives you a rundown on exactly how a game goes from a being a set of files on your hard drive to a 3D image on your screen, including relevant performance tips.
Finally, if you run an ATI or Nvidia graphics card, I have written two comprehensive guides which you should check out: the ATI Catalyst Tweak Guide and the Nvidia Forceware Tweak Guide. These guides cover absolutely everything about the latest graphics drivers, how to set them up correctly, as well as advanced tweaking, overclocking and benchmarking tips. They're a must-read for configuring your graphics card correctly.
The above information really will serve you well in the long run, not just in this game. If you don't optimize your system and keep everything updated and maintained correctly you will keep running into "mysterious" problems time and time again. Do yourself a favor and when you get a chance spend an afternoon or two optimizing your machine the right way with the guides above.
The next section goes into more detail about specific troubleshooting tips which address common performance issues with the game.

This section contains specific troubleshooting tips which address many of the common problems experienced by Oblivion players. I can't stress enough the importance of taking the time to go through the checklist of advice below if you're having a problem with the game.
Official Support: The first place to look for official support details is in the Readme.txt file in your \Program Files\Bethesda Softworks\Oblivion directory, and also read the Bethesda.txt file in the same directory for tech support contact details. Importantly you should check out the minimum system requirements in the Readme.txt file, and the supported hardware list, since if any of your hardware is not supported then you will experience problems with the game, or quite simply won't be able to run it (e.g. GeForce4 or lower graphics cards are not supported). You should also check the Official Bethesda Oblivion FAQ for your OS for details of how to resolve specific error messages and other issues. In terms of community support, there are a wide range of forums which provide varying degrees of help for Oblivion problems. The best one to start with is the Official Oblivion Forums. Almost every other major tech forum has an Oblivion section or a major thread devoted to the game. There's plenty of valuable advice out there if you spend some time searching for it.
Quest Glitches & Bugs: Try the latest patch for the game - see Page 4 of this guide for more details. There is also an Unofficial Patch compiled by modders which may help if all else fails.
Update: There is a major Shivering Isles bug as explained here which can be fixed by using the latest 1.2.0416 Patch (See page 4).
Unsupported Graphics Cards: If you have a graphics card which is below the minimum requirements for the game, try the 'Oldblivion' application which lets you run Oblivion on older graphics cards. Generally speaking however any card made in the last few years will run Oblivion, and with a small outlay you will get the greatest benefit simply by updating your graphics card.
Windows Vista Users: If you're having problems running this game under Windows Vista, first make sure that you're using the latest Vista graphics and audio drivers for your hardware, and the latest version of this game (see page 4 for patch details). Next, make sure you don't change your UAC settings after the game has been installed, as due to Virtualization this can change the location of the game files and settings. If you can't launch the game successfully when UAC is enabled, you will need to run the game with full Admin privileges. To do this either right-click on the launch icon and select 'Run as Administrator', or right-click on the launch icon, select Properties and under the Compatibility tab tick 'Run this program as an administrator' then click OK. I strongly recommend that you refer to the TweakGuides Tweaking Companion for Windows Vista for more information on how to get optimal trouble-free performance in Vista.
In-Game Lag/Freezes/Stuttering: Most people are complaining about 'stuttering' in Oblivion, and the cause is fairly straightforward: the Oblivion game world is very large, detailed and complex one. As you walk around, any time you encounter a new area, new object, new sound effect, new music etc. a fair chunk of information will be loading from your hard drive into your system RAM and video RAM and back again onto the drive. This means that for systems with slower hard drives and/or less system RAM and/or less video RAM, there will be noticeable periods of stutter and inconsistent FPS as you wander around. See the In-Game Settings and Advanced Tweaking sections for ways of reducing this, but I must stress that this is not an engine flaw - Oblivion handles this situation admirably considering the sheer amount of information around you (e.g. in large outdoor areas). One of the best things to do whenever you enter a new area, or load up a save game, is to do a quick 360 degree turn around on the spot, as this will load much of the data before you start moving.
In some cases, only a hardware upgrade will reduce the stuttering. If you are considering an upgrade, I would recommend a newer, faster SATA or SSD hard drive. Combined with at least 2GB of RAM, this will provide the best method of reducing stuttering in any game. However you will also need a balanced system to get the most out of Oblivion. I built a system over four years ago which played Oblivion very smoothly at close to maximum settings, as detailed in my Hardware Confusion article. If you have a bigger budget and want to build a modern system, see my latest Hardware Confusion 2009 article instead.
Update: The latest patch also helps reduce stuttering by improving file loading throughout the game.
Defragmenting: The sheer size of the game files (around 5GB of data) mean that you must run a defragmentation program after installing the game to reduce stuttering and loading issues. The normal Windows defragmenter is fine, however to get an even better result consider a commercial defragmentation package. More details in the Drive Optimization chapter of my TweakGuides Tweaking Companion. It may take quite a while to defragment but it is a critical step in reduce stuttering.
The Latest Graphic Drivers: Given the continued popularity of Oblivion, and the fact that the popular and more recent Fallout 3 game is also based on the same Gamebryo game engine, both ATI and Nvidia have incorporated many optimizations and fixes into their graphics drivers for the game over time. As such I strongly recommend using the latest release drivers with Oblivion. These drivers may not only provide better performance in Oblivion, they will correct bugs and glitches and provide proper support for SLI/Crossfire configurations. See my ATI Catalyst Tweak Guide or Nvidia Forceware Tweak Guide for details on where to download the latest drivers and how to install them 'cleanly'.
CPU Issues: Oblivion is a CPU-intensive game. There is a great deal of complex physics, quest states, weather states, and artifical intelligence data for example which is being crunched by your CPU at all times, much of which cannot be scaled back. As such, many systems are currently limited in performance by their CPU - i.e. even with a high-end graphics card, you may be experiencing reduced performance because your graphics card ultimately has to wait for information from the CPU. The best way to determine this is if you notice that changing the graphics settings has no major impact on your performance. See the In-Game Settings and Advanced Tweaking section for more details of settings you can adjust to reduce CPU load and make better use of Dual Core/HyperThreading CPUs. In the end, some people may have to consider a CPU upgrade, particularly as Oblivion is not kind to overclocked CPUs which can generate a lot of instability due to the excessive load (see below).
Background Programs: The game's developers recommend that you disable all background applications - especially virus, trojan and spyware scanners and messaging utilities. These applications can and do use up valuable CPU resources, take up precious RAM, cause memory conflicts and crashes to desktop, but most importantly they interfere with read/writes to your hard drive effectively slowing it down and causing even more in-game stuttering. Full instructions on how to identify your startup programs and services and how to correctly disable unnecessary ones are in my TweakGuides Tweaking Companion. This is an important step you should not miss as it has a major impact on Oblivion performance and stuttering in particular.
Overclocking: Oblivion is sensitive to overclocking. If you've overclocked any components on your system and are having problems such as crashes, reboots and graphical anomalies, the first thing to do is set everything back to default speeds and try running the game. If you don't experience the same problems at default speed, or they're reduced in severity, then your overclock is the primary culprit. Either permanently reduce your overclock and/or increase cooling to regain stability. Don't just assume that because other games run with stability at a particular speed that Oblivion will do the same.
I cannot urge you strongly enough to follow the advice on this, and the previous page. In particular make absolutely sure that you take the time to go through the completely free downloadable PDF TweakGuides Tweaking Companion, because that alone will make the biggest different to the stability, performance and smoothness of Oblivion. I realise most of you are after a patch or a tweak which will make all these issues go away but Oblivion is incredibly stressful on all the components of your system, and unless you optimize your entire system you will keep experiencing problems. It may be boring to go through the TGTC, but it will give the biggest rewards to those who do.
The remainder of this guide goes into more specific settings and tweaks which can help improve your performance and resolve any problems.
Official Patch
Bethesda has released a third patch for Oblivion, almost a year after the first patch. This patch brings the game up to Version 1.2.0416. The patch contains all the fixes from the previous patches, and the full list of changes is here. The latest changes include a range of bug and quest fixes, including fixing a major Form ID bug caused by the Shivering Isles expansion. Most notably the patch implements some optimizations to LOD (Level of Detail), so that as you wander the game world the blurry distant LOD Textures transition more smoothly to the sharper Detail Textures as you get closer to them. For more details of this see the new bLandscapeBlend variable under the Advanced Tweaking section, as well as the Highly Recommended Mods section further below for details of the new 'pepper' effect applied to landscapes, and how you can change/remove it.
Note: There are two versions of the 1.2.0416 patch - one for people who have Shivering Isles installed, and one for other Oblivion users which is listed further down the patch download page. Make sure to select the appropriate one for your version and locality.
It should be noted that some of your mods may not work properly once you have patched the game to a newer version. Typically you need to wait for the mod author to release a newer version if it is a complex mod. However if the mod simply contains replacement textures for example (such as the LOD Texture Replacement mods below), then instead of waiting for a new version, you can fix them yourself - see the Updating Mods section at the bottom of this page for instructions.
Also, make sure you defragment your system after installing this (or any) patch, to ensure smoother gameplay. Patching files with new information means that portions of them will become fragmented across your drive. People mistakenly believe stuttering has increased after a patch due to engine flaws, when it's quite simply due to important files becoming fragmented.
Update: There is also an Unofficial Patch put together by modders and regularly updated which addresses a large number of quest bugs. I personally don't use this patch, but if you find nothing else works to fix your quest issues then you may like to try it.
Copy Protection
Oblivion avoids many of the problems associated with copy protection methods by simply having a basic DVD check in place. I can't provide you with the details of how to obtain a No-DVD patch for Oblivion for legal reasons, but I can say that keeping the disc in the drive does not impact on your performance at all. Furthermore, I want to stress that since Oblivion is arguably one of the best PC games available to date, no-one has any excuse for pirating this game. If you can afford a PC, and the game is available in your country, you can afford this game. A lot of people constantly whine about SecuROM or StarForce, but here we have a major games studio which has taken the gamble of not using restrictive protection systems on such an amazing game. Purchase a legitimate copy of the game as it will give you literally hundreds of hours of amazing gameplay, and given the way it can scale upwards, it has remained replayable and still looks fantastic several years after its release.
Mods
One of the things which really makes the Elder Scrolls games popular is the way in which they accommodate official and user-made modifications, or 'Mods' for short. These mods can add new areas to the game, new dungeons, new features, new objects, and entirely new storylines/quests. Mods mean that Oblivion, like Morrowind before it, has almost limitless gameplay potential. If you're interested in developing mods or plugins for Oblivion, or altering any of the Oblivion files to add your own customizations or game world adjustments, you can download the free TES Construction Set (6.5MB), and then refer to the TES CS Wiki, where there is a range of information on how to use the construction set. Since it's a Wiki, you can even add your own information to it, to make it an excellent resource for all Oblivion modders.
If you're not in the mood to make any mods yourself, well then as you might expect Oblivion is already stirring up a lot of excellent mod action. Check these places for mods you can download:
TES Nexus (was TESSource)
Oblivion Source Mods
Planet Elderscrolls Mods
Elder Scrolls Files
ES-Oblivion Mods
Fileshack Oblivion Mods
Official Elder Scrolls Mods forum
Official Elder Scrolls Site Links
Oblivion Multiplayer Mod
For a list of my recommended mods, see further below.
Official Plugins / Expansion Packs
Bethesda have released a range of Official Plugins for Oblivion, however they are not free. While it may be controversial for Bethesda to charge users for each plugin (usually $US1.89 - $2.99 each), these are not essential modifications to Oblivion, and there are plenty of great free mods available (like those below) which are far more useful, so if you don't want to spend your money, you don't have to buy the plugins.
An official Expansion Pack/Plugin called Knights of the Nine has also been released, and contains new gameplay. You can either download this pack or purchase a boxed set containing this expansion plus all the plugins released to date. It is recommended that you purchase the boxed set, as the downloadable plugins have an Internet activation system which can be quite troublesome and limiting, whereas the boxed set does not.
A full expansion pack called The Shivering Isles has been released. It contains over 30 hours of gameplay set in a new Realm of Madness. I've prepared some short videos which show you basic gameplay in The Shivering Isles.
A plugin called Fighter's Stronghold has now been released, and is free for a limited time after which purchase is required. Note that this plugin introduces a bug, which is detailed (including a workaround) here.
The plugins and the boxed sets require that you be patched to the latest version of the game for them to work properly. If you've installed the Shivering Isles Expansion Pack, I strongly recommend patching to the latest version of Oblivion even if you don't plan on playing through the Expansion just yet, as it has a major bug which impacts on all Oblivion gameplay.
Update: If you've purchased the Oblivion Game of the Year (GOTY) Edition, it already comes with Knights of the Nine and Shivering Isles expansions, so you don't need to purchase or install them separately.
Highly Recommended Mods
The following are free mods I highly recommend that you install. These are mods I have installed on my own system, and are safe and effective. From time to time I will add to this list of 'must-have' mods:
Texture Noise Replacement (2.6MB) - This mod replaces the new TerrainNoise.dds file which was added to the \Program Files\Bethesda Softworks\Oblivion\Data\textures\Effects directory as of the 1.2 Patch. This file controls the 'Pepper' Effect on more distant landscapes, which supposedly adds more detail, but can look odd at middle to close distances. You can either install this mod to make it look more realistic, or instead you can just rename or delete the TerrainNoise.dds file in the directory noted above if you want to remove the effect altogether.
Importantly, Bethesda has not altered any of the LOD textures as of the latest patch, so the LOD Texture Replacements below are still recommended. Keep in mind their appearance can be hindered by the new Terrain Noise effect, so either remove that effect or mod it - as discussed above - to get the maximum benefit from these LOD Texture Replacements.
Landscape LOD Replacement 1.1 (28MB) - This mod replaces all the distant blurry LOD landscapes with better looking higher resolution textures. This means you don't have to use the uGridsToLoad command, and hence you won't experience any major performance reductions or visual glitches. Note that Version 1.1 of this mod provides improved performance over the original version, so it is recommmended that you upgrade to it - more details here.
Landscape LOD Replacement (Border Regions) 1.1 (48MB) - By the same author as the mod above, this mod fixes all the blurry landscapes from the border regions as well. Note that Version 1.1 of this mod provides improved performance over the original version, so it is recommmended that you upgrade to it.
Normal Map LOD Replacement (25MB) - This mod replaces all the normal maps for distant land - basically it improves the shadows in all distant terrain, and is a great complement to the Landscape LOD Replacement mods further above.
Note: These LOD replacement mods may not work properly if you have certain optimizations enabled in your graphics card control panel - See 'Graphics Control Panel Settings' under the Neat Stuff & Conclusion section of this guide for details. They also may not work once you patch the game to a newer version - see Updating Mods at the bottom of this page for a fix.
High Resolution Texture Replacement Pack (2GB+) - If you're not happy with the appearance of the textures in the game, especially when up close, you can try Qarl's high resolution texture replacement pack which replaces a wide range of textures, including those on buildings, landscapes, rocks, dungeons, even snowflakes and blood. It uses much higher resolution replacement textures which will only work on Nvidia 6 series or ATI X1000 series graphics cards or newer. While it can make Oblivion look even more detailed, it will generally increase stuttering and may reduce FPS by up to 10-20%. Only recommended for those with decent graphics cards which have 512MB or more of Video RAM.
Better Grass Without Tiling (151KB) - This mod replaces the standard distant grass texture which shows very obvious tiling. This mod removes that tiling and hence grassy hills in the middle distance look much better. If you want to replace all your tiling textures - not just the grass - with non-tiling versions, you can try this Texture Tiling Replacement Pack (22MB). I personally prefer just the grass mod, as removing tiling from everything makes it look far too smooth in my opinion.
No More Annoying Messages Mod (3KB) - This simple mod removes the made-for-console periodic 'Loading Area' text message, as well as 'Your Horse is stabled outside the city gate' and 'The Dark Brotherhood is watching you' text prompts, but keeps the important ones. If you just want to remove the 'Loading Area' only, use the Lite Version of this mod. Highly recommended, as the 'Loading Area' messages totally ruin immersion while wandering around outdoors.
Color Map Mod (2.5MB) - This mod replaces the in-game world map with a color version; a nice visual touch.
I'm aware that there are plenty of other mods out there at the moment, however the list above will only contain those mods I consider "essential" and would personally install on my system due to safety and compatibility reasons. Feedback on some of the other mods indicates that they can have unusual effects on the game, including visual glitches and even crashes, so I will only provide the "safe" must-have mods here. Make sure to check out the Mod sites further above yourself to see what else is out there if you're after a particular modification for Oblivion.
Installing Mods
Installation instructions for each mod are usually included with the mod itself in a Readme.txt file. Where instructions may not be provided (perhaps a sign the mod isn't very professional), the procedure typically involves extracting the contents of the mod archive into your \Program Files\Bethesda Softworks\Oblivion\Data directory (and subdirectories as required), then if necessary using the Oblivion Launcher, selecting 'Data Files' and ticking the mod from the listing shown there. Note that you should make sure to run Defrag after installing larger mods to reduce stuttering in the game.
Next, to make sure your mods are always detected by Oblivion, even after being patched, see the instructions under 'Updating Mods for New Version of Oblivion' further below. That method is quite simple and should work for most basic texture replacement mods, such as those I've recommended above. However, I've found that for the 'Grass Without Tiling' mod, I needed to create an empty text file, rename it to ArchiveInvalidation.txt, paste the path to the 'Grass Without Tiling' mod file into it (i.e paste the following into there: textures/landscape/terrainhdgrass01su.dds), and then place this Archiveinvalidation.txt file into into my \Program Files\Bethesda Softworks\Oblivion\Data\ directory. This isn't always necessary, but basically it tells Oblivion to always check for subdirectories under the default directories for added texture, sound, music and image mods, and load up whatever is in there.
Based on further research by members of the Oblivion community, it turns out that due to a bug in Oblivion, the ArchiveInvalidation.txt method doesn't necessarily work properly for all mods. The solution involves using the Oblivion Mod Manager utility. This utility makes the appropriate changes to your Oblivion files, but note that you need to make sure you've installed .NET 2.0 or newer for it to work. If you're still having problems installing your mod and getting it to work correctly, try this Oblivion Mod FAQ for more detailed instructions. The instructions I provide above (and below) will work for the mods I recommend.
A final word of warning about mods - be careful, not all modders are experts, and sometimes installing a mod can bring with it odd effects or unexpected problems down the track. Choose mods carefully based on lots of user feedback and don't install many different mods at once - some are incompatible with each other. A badly installed mod can thoroughly ruin your saved games, so once again make sure to keep plenty of save points before installing a mod. The mods I recommend above are all proven to be relatively safe and thus I can recommend them for you to install. I do want to urge you though not to go nuts with mods.
Updating Mods For New Versions of Oblivion
Some mods need to be updated each time a new patch is released for Oblivion, otherwise they may not work properly or at all. In such cases, it is wise to check the mod sites for a new version of the mod shortly after a patch is released. Otherwise changes to certain gameplay parameters may conflict with that in the new patch, and cause unintended consequences.
However, for simple mods which only have replacement textures, sounds or images, and hence no chance of actually conflicting with the latest patch update, you can resolve this easily yourself. Oblivion usually considers any replacement file 'old' if the file dates are older than that of the main Oblivion.esm file, and doesn't load them up. You can change the dates on your existing mod files yourself quickly and easily, following these instructions:
1. Download the free FileDate Changer utility (20KB).
2. Extract the contents and run FileDate.exe
3. In the program, click 'Add Files', then browse to the mod directory where replacement textures reside. For example, for the LOD Texture Replacement files this should be \Program Files\Bethesda Softworks\Oblivion\Data\textures\landscapelod\generated.
4. Select all the mod files there (hold down SHIFT and highlight all the files), then click Open.
5. Back in the main program window, change the Creation and Modified dates to some new date, such as tomorrow's date (i.e. newer than the day you patched Oblivion).
6. Click 'Change File Dates' and it's done.
This method only works for mods which are simple replacements of existing Oblivion data, primarily mods based on texture, sound and image changes. I don't recommend this for any other type of mod which affects gameplay for example, and if you find it doesn't work properly for you, see further above for links to more detailed instructions.
The next section starts our look at the Oblivion In-Game settings in detail.
In this section of the guide I provide detailed descriptions and recommendations for all the in-game settings to allow you to achieve a good balance between audio-visual quality and performance. It is virtually impossible to provide a specific measure of the performance impact of any particular setting, as it varies significantly based on different types of hardware and their support for shader effects for example, or your chosen resolution and the interaction of various other settings. However a general indication of the impact is given for all settings which affect performance.
To access the in-game settings, start Oblivion and click on the Options item in the main menu, or press ESC during a game and click the Options item. Note that the first time you launch Oblivion, it will automatically adjust your settings to what it feels is best for your type of system. While these auto-detected settings aren't too bad, I strongly recommend that you take the time to adjust each individual setting below until you have a good balance of performance and visual quality.
Note: For people running older graphics cards, or those who are in dire need of FPS, as of the 1.5 patch onwards the Oblivion Launcher has a 'Very Low Quality' setting it can enable to improve performance at the cost of image quality. After installing the patch, start the Oblivion Launcher, select Options and click 'Reset to Defaults' to allow it to detect and set this new mode.
Gameplay
Difficulty: This slider controls the overall difficulty of the game. It determines how challenging your enemies are for example. However note that because of the way Oblivion automatically scales its difficulty, most enemies and objects will be tailored to approximately match your current level. This prevents level 1 players from facing incredibly difficult level 50 characters for example, and also prevents things from getting to be too easy if you steal an overly powerful object. The difficulty slider cannot change this limitation significantly. To alter difficulty/game balance further, you can use a popular mod like Oscuro's Overhaul (See the Patches & Mods section).
General Subtitles: This setting controls whether dialogue subtitles appear outside of actual conversations. For example, when you pass a talking character, their muttered words will be written as text at the bottom of the screen. Note that at times it doesn't seem to capture all such dialogue. However if you actually engage in a conversation with a character, this option will not show the conversation subtitles (the Dialogue Subtitles setting below does). Does not have any performance impact so set to suit your tastes.
Dialogue Subtitles: To complement the option above, if enabled this option displays subtitled text for all words spoken by characters who you actually choose to start a conversation with. However anything they say outside of an actual conversation will not be subtitled. Neither this option, nor the one above affects other forms of subtitles or text prompts such as location text. Does not have any performance impact so set to suit your tastes.
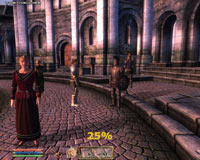
Crosshair: If enabled the crosshair appears in the middle of the screen and provides context-sensitive hints as to the actions you can undertake with particular objects or characters. The full list of crosshair icons is detailed in the manual. If you want a more immersive Oblivion experience and/or if you are an experienced Morrowind/Oblivion player I recommend turning off the crosshair. This option has no significant performance impact.
Save on Rest: If set to On, whenever you rest in a bed, the game will automatically be saved over your latest autosave at the start of your rest.
Save on Wait: If set to On, whenever you Wait (i.e. try to rest outside of a bed), the game will automatically be saved over your latest autosave at the start of your wait.
Save on Travel: If set to On, whenever you use the map to quick travel from place to place, the game will automatically be saved over your latest autosave before you arrive at your destination.
If you want to reduce loading times and/or stutter, you can disable any or all of the above options for a reduction in hard drive usage. Also see the bSaveOnInteriorExteriorSwitch command in the Advanced Tweaking section.
Launcher Options
Whenever you launch Oblivion from the default desktop icon, you will see a small Launcher menu appear. In this menu screen, click the Options item, and you can adjust some of your Video-related settings here. Note that most of these options can be adjusted using the in-game options menu (see further below), however, there are two options that you can't access in the normal in-game menus, and they're actually quite important:
VSync: Video Synchronization (VSync) is the synchronization of your graphics card and monitors' abilities to redraw an image on the screen a number of times each second, measured in Hz. Your monitor will have a maximum rating in Hz for each resolution (e.g. 1280x1024 at 85Hz). When VSync is enabled (ticked), your graphics card will synchronize with your monitor and only display whole frames - this means your maximum FPS will be capped at your monitor's maximum refresh rate at your chosen resolution, and more importantly in some areas your FPS may drop by as much as 50% if the graphics card has to wait to display a whole frame. Thus enabling VSync can have a major negative performance impact.
By disabling VSync, not only do you uncap your maximum FPS, your overall FPS will also improve as your graphics card no longer has to wait to synchronize with the monitor before display each frame. This may result in some image 'tearing' (i.e. the top and bottom portions of the screen may go slightly out of alignment), however this is totally harmless and usually not very noticeable. Note that you should check your graphics card's control panel for the VSync setting there and make sure it is set to 'Application preference' (or similar) to allow this setting to work correctly. For more details, see this page of my Gamer's Graphics & Display Settings Guide. Also check the 'Max Frames to Render Ahead' tweak in the last section of this guide.
Fullscreen/Windowed: In Fullscreen mode, the game takes up the entire display area. In Windowed mode the game only takes up a portion of the screen - however make sure that the in-game resolution you choose is equal to or less than your desktop resolution, otherwise there will be portions of the game screen which will be off the edges of your display. While you can get better performance if you run Oblivion in a smaller game window, and you can also set custom resolutions in this mode (See the Advanced Tweaking section), you may also experience some problems, especially crashes related to memory management issues. If this is the case, switch back to Fullscreen mode. Finally, while in Fullscreen mode, you cannot ALT+TAB properly back to the desktop, and attempting to do so can destabilize your system, again because of Windows memory management issues.
The remaining settings in the Launcher Options section match those covered below. Once you have set the above options using the Launcher, I recommend you check the last section of this guide for details of how to bypass the Oblivion Launcher and hence start Oblivion much more quickly each time you want to play.
Video
Resolution: This determines the width and height of the game image displayed on your screen - for example 1280x1024 is 1,280 pixels wide by 1,024 pixels high. The higher the resolution, the cleaner the image which will appear on your screen because there are more pixels showing, but the more power it takes to display it. The list of available resolutions shown is limited by the maximum possible for your monitor and graphics card together. Your resolution can have a significant impact on performance, so if necessary lower it if nothing else works to improve your average FPS. You can also set custom resolutions - see the Advanced Tweaking section. Finally, if changing resolutions doesn't alter your FPS much then chances are your CPU is limiting your performance - see the Troubleshooting Tips section for more details, as well as the 'Max Frames to Render Ahead' tweak in the last section of this guide. Note: you will have to quit and restart Oblivion for resolution changes to take effect.
Brightness: This gamma slider controls how bright or dark the overall screen image will be. Adjust it so that at night the image is visible but not washed out. It has no impact on performance, so set to suit your taste. If you need to increase gamma to be much brighter than the maximum on the slider allows (e.g. on very old monitors), see the fGammaMax command in the Advanced Tweaking section.
Texture Size: The options here are Large, Medium and Small, and changing them will require a restart to reload all the appropriate textures. Textures are the 2D images placed around all 3D objects in the game. A boulder for example is a wireframe skeleton in 3D, with a 2-dimensional boulder surface texture covering it (to see this, use the twf Console Command). When set to Large, the resolution of the 2D texture images used is highest, meaning the textures appear more crisp and real, especially when examined close up. At Medium and Low respectively these textures progressively drop, losing a lot of detail - see an animated screenshot comparison by clicking this link: Obl_Textures.gif (488KB).
The texture setting can have a significant impact on performance and stuttering, because these textures load into your graphics card's Video RAM (VRAM), and the larger the texture resolution, the bigger the size of the texture files and hence the more swapping your graphics card has to do to constantly load new textuyre data from the hard drive into VRAM to decompress and display them. Whenever you enter new areas or see new objects/creatures/buildings, the higher this setting the more loading pauses/stutter you will get, and the lower your FPS will drop, especially if you have less VRAM, system RAM and/or a slower hard drive. For those with less than 256MB of VRAM, I recommend Medium as a good balance of visual quality and performance. For those with slow hard drives and/or less than 1GB of RAM, Low is recommended if you constantly find the game stuttering or slowing down. See the settings below, the Troubleshooting Tips and the Advanced Tweaking sections for a range of other tweaks and settings which in combination with each other can significantly reduce stutter. There is no single magic fix to this issue.
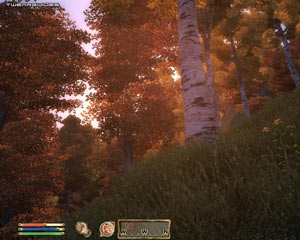
Tree Fade: This slider controls the amount of detail visible on trees into the distance. As you move the slider to the left, the less branches and leaves will be shown on trees. This will improve FPS in areas with trees, such as heavily forested areas. See an animated screenshot comparison by clicking this link: Obl_TreeFade.gif (403KB).
The next page continues the In-Game setting descriptions.
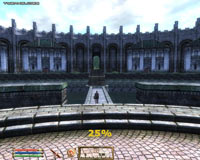

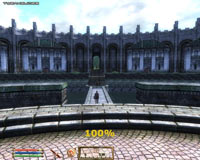
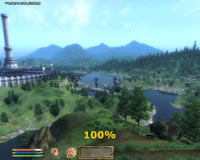
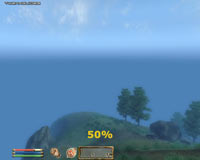
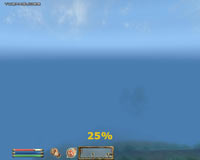
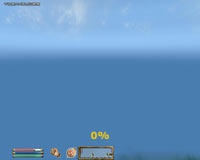
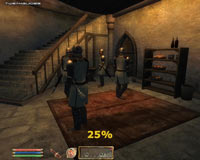
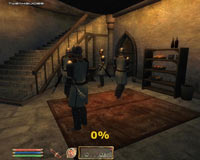
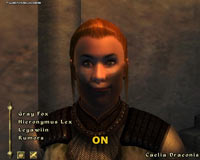
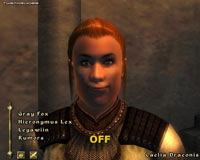
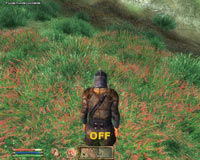
Actor Fade: This slider controls the distance at which other characters/creatures are visible. As you move the slider to the left, more distant characters/creatures will not be visible - see the images above for a comparison. Note that as the slider is lowered from 100% down to 0%, distant characters simply disappear from view without a trace. While reducing the slider can give you performance boost, particularly in crowded areas, it can also give you a gameplay disadvantage if set too low. I recommend at least 25% for most people just so you can see characters/creatures which are of a more immediate threat to you, or worth interacting with.
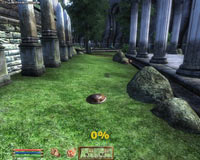

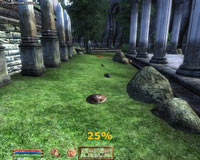
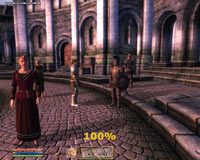
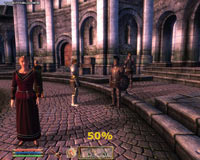
Item Fade: This slider controls the distance at which items such as swords, shields, bottles etc. are visible. As you move the slider to the left, more distant items will no longer be visible - see the images above for a comparison. Note that this option does not make a significant difference to performance in most areas, and the slider also needs to be set fairly low (i.e. below 25%) to start having any noticeable impact. If set too low (e.g. 12%) it can give a distinct gameplay disadvantage by making it harder to find items near you in the game world. Therefore I recommend keeping this slider fairly high (e.g. 50%).
Object Fade: This slider controls the distance at which objects such as buildings, boxes, etc. are visible. As you move the slider to the left, many objects will be completely removed from sight. Note that moving this slider also moves the 'Item Fade' slider (see above) as well - that is, the maximum fade distance for objects also becomes the maximum fade distance for items. See an animated screenshot comparison by clicking this link: Obl_ObjFade.gif (640KB). Note that as the fade distance drops, some fairly prominent pieces of scenery are removed such as the pathway, the border around the tree and the stone wall to the right. While this can improve FPS, particularly in and around towns, buildings and dungeons, it also makes things very unrealistic and awkward looking if set too low.
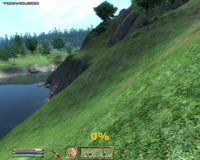
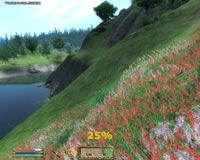
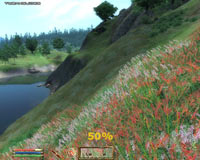
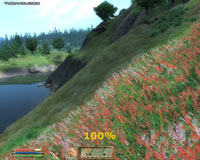
Grass Distance: This slider controls the distance at which tall grass is visible. As you move the slider to the right, the amount of visible grass increases - see the images above for a comparison. As visible grass is removed, performance can significantly increase in larger outdoor areas. This is because grass/flowers/weeds are quite detailed and animated, and may also have associated shadow effects (e.g. see 'Shadows on Grass' further below). In particular if you are noticing a lot of lag in outdoor areas, reducing this setting can have a significant impact - see the iMinGrassSize variable in the Advanced Tweaking section as well as the ToggleGrass command in the Console Commands section for more information on reducing the performance hit from grass.
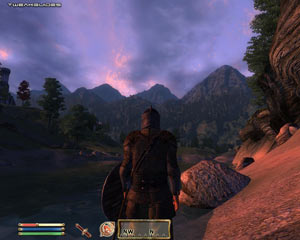
View Distance: This slider controls the distance to which your character can see. However as soon as you reduce the slider slightly below the maximum (100%), the 'Distant Land' setting (see below) will automatically be set to Off and a heavy 'fog effect' will come into play as well. The further you move the slider to the left, the less will be visible within this fog. See the images above for a comparison. While this can notably increase FPS in large outdoor areas, it can clearly reduce the visible distance significantly, and thus make finding your way around the game world more difficult, as well as discovering new buildings and objects in the distance.
Distant Land: When set to Off, all distant objects, land and environments are removed, and replaced by a thick fog. For a screenshot comparison, look at the 100% and 50% screenshots for View Distance further above, as the effect is exactly the same. Turning Distant Land off can noticeably improve performance by removing a lot of visual elements from the screen, but again it can introduce a gameplay disadvantage and is not recommended unless you are truly struggling with framerates outdoors.
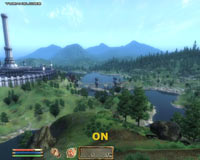
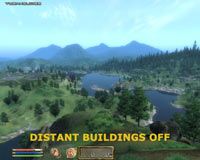
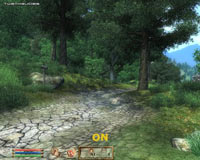
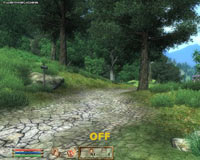
Distant Buildings: When set to Off, even with 100% View Distance and Distant Land set to On, most distant buildings/structures will not be visible. See the screenshots above for a comparison, and note that when set to Off the Imperial City's base is visible in the grass, but the building itself has been removed. This can improve framerates while wandering around outdoors, but obviously it also makes finding structures or using them as landmarks to get your bearings much more difficult. Note that changing this option requires a restart to take effect.
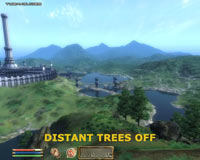
Distant Trees: When set to Off, all distant trees are removed from view in outdoor areas. See the screenshot further above for a comparison. This can improve framerates significantly as trees can use a lot of resources, especially if Tree Canopy Shadows are also enabled (See further below), at the cost of some realism. Note that changing this option requires a restart to take effect.

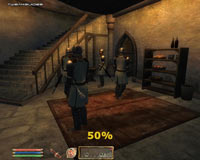
Int. Shadows: This slider controls the number of shadows cast by characters indoors, including your own (when in 3rd person view). The further to the left the slider, the fewer characters cast shadows - see the screenshot comparisons above. Note that at 50%, only 3 out of the 4 characters is casting a shadow for example. Character shadows can have a significant impact on performance, particularly when there are several characters/creatures in an indoor area, as well as setting for the Shadow Filtering option (See below).

Ext. Shadows: Similar to the Interior Shadows option above, this slider controls the number of shadows cast by characters, including yourself, when in outdoor areas - see the screenshot comparisons above. Once again, this option can have a significant performance impact, particularly in scenes with multiple characters, and depending on the Shadow Filtering option chosen.
The next section continues the In-Game settings descriptions.
Self Shadows: If set to On, this option allows characters to cast shadows on themselves. That is, depending on the position of the local lighting relative to their body, characters will cast accurate shadows on themselves based on the contour of their body, faces, clothing and worn items in relation to the strongest light source. Importantly, this setting does not affect whether characters cast shadows on the ground, only on themselves. See the screenshot comparison above, and note that with Self Shadows enabled (left image), the character's head casts a shadow on the body, and her face has additional shadows. With it set to Off, the character still has some shadows on her face. The quality of the shadows cast depends on the Shadow Filtering setting (see below), however even at High quality, the shadows may be unrealistic and have funny edges to them - at times. There is also a noticeable performance impact, so on balance I recommend disabling Self Shadows both to boost performance and also to remove potential visual glitches.
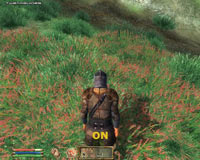
Shadows on Grass: When set to On, characters will cast shadows onto grass (if the Grass Distance slider also allows the display of grass). This setting only affects shadows cast by characters, not trees for example. See the screenshot comparison above, and note that the shadows cast by your own character on grass can only be seen while you are in 3rd person mode (as in the screenshot above), not when you are in 1st person mode. In general I strongly recommend disabling this option as it can noticeably reduce performance when walking or fighting in grassy areas. Note of course that the precise performance impact and visual quality of the shadows is affected by the Shadow Filtering option (see below).
Tree Canopy Shadows: This setting controls whether trees cast realistic shadows on the surrounding objects/ground around them. The screenshot comparison above demonstrates the difference. While adding to the richness of atmosphere in forested areas, it can also noticeably reduce performance outdoors. As always, the quality and hence the performance impact of the shadows cast depend on the Shadow Filtering option below.
Shadow Filtering: This is a very important setting if you have enabled any of the shadow-related options above. See an animated screenshot comparison by clicking this link: Obl_ShadowFilter.gif (556KB) - pay close attention to the outlines of the horse's shadow at each setting. Essentially this option controls how smooth the edges of shadows are, and thus how realistic and visually pleasing they appear. However this setting can take quite a bit of graphics processing power if enabled and hence can have a significant performance impact. Shadow Filtering affects all shadows cast as a result of the Int Shadows, Ext Shadows, Self Shadows, Shadows on Grass and Tree Canopy Shadows settings (all covered further above). Its most noticeable impact is on Self Shadows, whereby if set to Off, the shadows cast by characters on their own faces will appear very jagged and unpleasant. In most other instances, the difference between the High and Low settings is difficult to distinguish, and thus Low is recommended for most people who have any shadows enabled. If you have no shadows enabled, or if you really need the additional performance, setting this option to Off is recommended. Also check the iShadowMapResolution and iCanopyShadowScale variables in the Advanced Tweaking section for more ways of adjusting general shadow quality to gain performance.
Specular Dist: This slider controls the distance at which Specular effects are visible - namely the shininess/reflectivity of the surface of appropriate objects, like metal swords, shields, armor, glazed bricks, etc. See an animated screenshot comparison by clicking this link: Obl_Specular.gif (668KB). As the slider is moved to the right, objects further away start to show more reflective characteristics (especially noticeable in HDR mode). Pay close attention to the shields and armor of the characters in the animated comparison for example. Specular effects can have a noticeable performance impact on many graphics cards, and thus moving this slider to far left to disable specular can help increase FPS in most areas, as well as in combat. Note that if you operate in 3rd person view, removing the specular effects on your own armor/weaponry (i.e. moving the slider to the far left) can also give a noticeable performance boost. Also see the bDoSpecularPass variable in the Advanced Tweaking section.

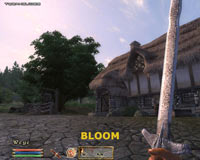
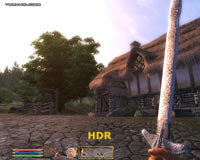
HDR Lighting: High Dynamic Range (HDR) lighting is a form of lighting effect which dynamically alters based on the way it interacts with various objects and surfaces, as well as the environment in which the light source is portrayed. Look at the screenshots above for a comparison of the same scene using the default Oblivion lighting, then with Bloom only, then finally with HDR only. It is difficult to capture the true impact of these lighting effects in a compressed JPG screenshot as by definition HDR is dynamic, has a wide color range and is constantly altering. However essentially you can see that the HDR-enabled scene exhibits greater illumination of certain surfaces/light sources, and can be a (arguably) more realistic portrayal of how the human eye interprets light in certain situations (e.g. the added glare of light at the end of a dark tunnel, or when staring at the sun). While being more atmospheric, HDR lighting is more graphics card intensive, and furthermore can only be enabled on the GeForce 6600 series or above, or the ATI X1000 series or newer. HDR is also mutually exclusive with Bloom - one cannot be enabled at the same time as the other. Finally, you also can't enable HDR and Antialiasing at the same time unless you have an ATI X1000 series card or a GeForce 8 series card or newer, and recent Catalyst or Forceware drivers - in both cases you must first enable HDR in the game, and then force enable Antialiasing in your graphics card's control panel for it to work. See the Advanced Tweaking section for ways in which you can alter the visual parameters of HDR to alter its appearance.
Bloom Lighting: Bloom is a lighting effect which, similar to HDR, alters the appearance of lighting in an attempt to make it seem more realistic. However unlike HDR, bloom is less dynamic and some would say less realistic. Again, refer to the screenshot comparison further above. Bloom is a lot less graphically intensive than HDR lighting, and is also supported on a wider range of graphics cards, thus it is preferred by many people as a performance-enhancing substitute to HDR. Furthermore, unlike HDR, Bloom can be enabled along with Antialiasing on almost any card thus making it preferable for those who wish to use Antialiasing (see further below). See the Advanced Tweaking section for ways in which you can alter the visual parameters of Bloom, including ways of making it more 'HDR-like'.
Water Detail: If set to High, this option allows the water's surface to appear slightly more realistic. The difference is very difficult to see in screenshots - at Normal the reflections are slightly less detailed and more blocky than High due to the lower surface resolution of the water. The performance impact is not significant by itself, however neither is the visual impact, so if you're struggling for FPS in outdoor areas with water, set this to Normal. Note that the blockiness of distant reflections on water can't be resolved with this setting - see the uGridsToLoad variable in the Advanced Tweaking section.
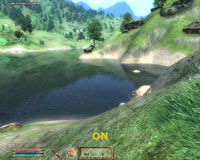
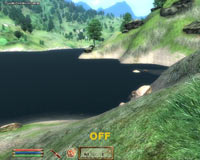
Water Reflections: This setting enables or disables reflections on the surface of water. The screenshot comparisons above show the obvious impact: when set to Off, water appears much less realistic because it appears as a solid block of color. The performance difference should not be significant enough to warrant turning this option Off, however if you experience a lot of mouse lag/low FPS around water, turning this Off will help. Note that you can use several bUseWaterReflections variables to add more objects which can be reflected in the water - see the Advanced Tweaking section.
Water Ripples: This setting controls the appearance of ripples on the surface of water when objects interact with it. It has no impact on the general ripples displayed on the water's surface, only the ripples initiated by characters (including your own) when swimming/wading through water. Once again the performance impact of this options should not be significant on most systems, however if you find that swimming or wading - particularly in 3rd person view - is giving you lower FPS, then disable this option.
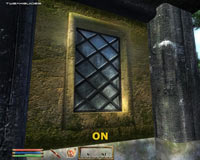
Window Reflections: When set to On, glass windows on buildings will show rough active reflections of their surrounding environment. Screenshot comparisons are shown above, and while most systems would not find this effect particularly stressful, in areas where several windows are visible and/or in combination with other effects (e.g. Specular lighting), this can contribute to reduced FPS, so disable it if you want a small performance boost in such areas without a noticeable visual quality difference.
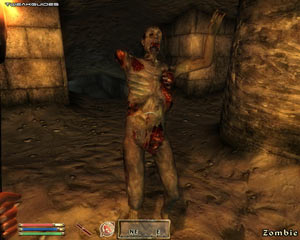
Blood Decals: Blood splatters (or 'decals') are displayed on the ground, on characters/creatures and on weaponry during combat, and depending on this setting, more or less will be displayed. By default up to 10 separate decals can be displayed at the same time, each lasting 10 seconds. At High, decals can stick to characters; at Low they only appear on landscape; and at Off no blood marks will be displayed at all. Setting this option to Low or Off can help improve FPS during heavy combat scenes at the cost of some realism. Conversely, if you want even more blood you can raise the maximum possible decal value and the time it stays visible - see the fDecalLifetime and iMaxDecalsPerFrame variables under the Advanced Tweaking section.
Antialiasing: Antialiasing is described in more detail on this page of my Gamer's Graphics & Display Settings Guide. The higher the sample rate (i.e. 2x, 4x), the smoother jagged lines will appear, however the greater the performance impact, which can be significant. Note that you should either set the level of Antialiasing here, or in your graphics card's control panel, but not in both. I recommend using your graphics card's control panel to set the level of Antialiasing, and set it to Off here for the least potential conflicts/problems. Furthermore, Antialiasing is not compatible with HDR lighting unless you're using an ATI X1X00 series or higher graphics card or GeForce 8X00 cards or newer - however most recent graphics cards can support HDR and AA together in Oblivion. The use of Antialiasing in Oblivion can make the graphics appear much more realistic, so it is recommended that you experiment with this setting in your graphics card control panel to see how it impacts on Oblivion in terms of both image quality and performance.
Audio
Volume Sliders: There are four separate volume sliders here for controlling the level of Voices, Sound Effects, Footsteps, and Music. The Master Volume slider controls the overall volume level. Set these to suit your tastes, as they have no impact on game performance. To adjust the main menu music volume independently, you can use the fMainMenuMusicVolume variable in the Advanced Tweaking section. Note that setting the sliders to the far left does not provide a performance boost, because it does not actually disable music/sounds.
If you are experiencing audio-related glitches or problems, firstly make sure you have installed the latest audio drivers for your sound card. Details of these are in the Driver Installation/Windows Drivers chapter of the TweakGuides Tweaking Companion, along with further instructions in that chapter for correct driver installation and general driver tips. Disable all additional audio effects or enhancements. For example, if you run a Creative sound card, go into the Audio HQ/Audio Console and in the EAX Control Panel click the 'All Effects Off' option or select 'No Effects' for all the presets. You should also consider disabling CMSS 3D, and indeed any other audio effect options which may be conflicting with Oblivion's sound. You should also consider uninstalling any 'codec packs' you may have installed, as these are known to cause audio problems in a range of games. Contrary to popular belief, most sound cards and even recent onboard audio solutions do not have a conflict with Oblivion, so typically the problem is with the audio settings and/or other audio codecs installed on the system.
If you are still having lots of stuttering, audio glitches and crashes, you can undertake certain tweaks to disable Sound Hardware Acceleration or disable the background music in Oblivion - see the bDSoundHWAcceleration and bMusicEnabled variables in particular under the Advanced Tweaking section. The reason for this is that the background music is dynamic, and responds to your location and situation. While it is indeed very beautiful music, it is constantly loading in the background, changing whenever combat is initiated for example, so it can use up additional RAM and accesses hard drive resources adding to stuttering on many systems.
Controls
Mouse Sensitivity: This slider controls how sensitive the mouse is in the game. The further right the slider, the more sensitive your mouse will be to movements while playing. Note however that mouse lag - that is, the slowing down and general 'lagginess' of you mouse or crosshair while playing the game is not affected by this setting. Mouse lag is usually caused by low FPS in certain areas, so you should consider reducing some of your settings to increase your framerate. There is also a specific fix for mouse/control lag - see the 'Max Frames to Render Ahead' tweak at the end of this guide which has helped a lot of people reduce it.
Invert Y: If set to Off, moving your mouse back makes your character look down, moving your mouse forward makes him look up. If set to On, the opposite happens. Has no impact on performance, so set to suit your taste.
Stick Controls: If you use a joystick or stick-type controllers, these options control the way they behave. Set to suit your taste. If you use a regular mouse and keyboard combination, these options are unavailable, and you should see the bUseJoystick variable in the Advanced Tweaking section for a potential performance tweak based on this.
Controls: Clicking this button takes you to a screen where you can assign keys and buttons to various functions in the game. These should be set to suit your taste as they have no performance impact, but note that to select the control input to alter (e.g. to select Keyboard or Mouse), use the left/right arrows at the top of this box, and make sure to assign a key/mouse button to all the important functions.
The next section goes into the Advanced Tweaking possible in Oblivion, of which there is plenty.
While Oblivion has many in-game options for adjusting visual quality and performance, that's not where the tweaking stops. Fortunately, Oblivion has been designed for user modification (or 'Mods' - see page 4 of the guide), which make complex gameplay or graphics adjustments relatively simple to implement. Furthermore, there are a range of parameters users can access and alter to change the way the game looks and acts. There are two main ways to tweak Oblivion variables - the initialization (.ini) file; and the in-game console. This section deals with the .ini file adjustments, while the Console Commands section deals separately with using the in-game console.
Please pay careful attention to how to implement these tweaks, and read the instructions on what they do closely. While you are free to experiment, and I have tried to only include "safe" working tweaks here, bear in mind that you can get some unusual results and perhaps experience odd problems by making too many changes, so take things slowly and test the effects of the tweaks using a few different saved locations to see if they are working correctly for you - different systems will exhibit differing results. This may be tedious, but it will give you the best results.

Oblivion.ini
By default, each time Oblivion loads up, it reads the values held in the Oblivion.ini file stored under your \Documents and Settings\[username]\My Documents\My Games\Oblivion directory (or Users\[username]\Documents\My Games\Oblivion in Vista). This file can be opened and edited using a text editor like Windows Notepad or Wordpad, however before editing it, first change all of your in-game settings to the way you want them, then close Oblivion and make a backup copy of this file. If at any time you want to find the default values for any of the .ini variables, open the Oblivion_default.ini file under your \Program Files\Bethesda Softworks\Oblivion directory. This file contains all the defaults for Oblivion on your system, and should never be edited or deleted. If you want the game to quickly restore all the default values for your Oblivion.ini file, simply delete the Oblivion.ini file and it will be recreated with the default values the next time you start Oblivion. This can help to quickly resolve any problems you may be having as a result of incorrectly tweaking variables, however obviously you will lose all your customizations as well as your in-game settings preferences.
The performance impact of these tweaks will vary from machine to machine, sometimes significantly, but the general impact is indicated. Note that I have tested every variable in the Oblivion.ini file, and those which seem to have no discernable or useful impact, or which can cause crashes or odd behavior are not included below. Some of the variables people have been using do not do what they think they do, so if you see some notable exceptions, bear in mind that it is likely they are either not useful, or can be adjusted in-game - settings which can be fully altered using the in-game settings aren't shown below, unless they can be tweaked further.
Note: If you're having problems finding any of these commands in your Oblivion.ini file, first make sure you're using the right .ini file (read the info above again carefully), then go to the top of Oblivion.ini, press CTRL+F to open the search box, type or paste the name of the command into there, and it will find it for you. All commands below are in everyone's .ini file.
Below are all the major variables you can edit in the Oblivion.ini file, and a description of what each does based on my research and testing to date. They are sorted into categories based on their common purpose:
[General Variables]
bAllowConsole=1 - This setting allows you to use the in-game console (See Console Commands section) if set to 1. There is no reason to set it to 0.
bAllowScreenShot=1 - If set to 1, allows you to take a screenshot at any time by pressing the PRINT SCREEN key. Screenshots will be in BMP format and stored in your \Program Files\Bethesda Softworks\Oblivion directory. Alternatively, you can use Fraps, which is my preference.
SScreenShotBaseName=ScreenShot - This determines the name given to every screenshot file (followed by a number as determined below), e.g. Screenshot12.bmp.
iScreenShotIndex=7 - This determines the number given to the next screenshot taken.
iDebugText=12 - Sets the level of detail of the debug text visible when you use the TDT command (See Console Commands section). You can also use the SCROLL LOCK key to manually scroll through the various debugtext screens while TDT is active. DebugText=2 provides the most compact but useful text.
fDefaultFOV=75.0000 - Determines the default Field of View whenever you start Oblivion. If set differently from the default of 75 degrees, can put screen elements out of synch and also insert borders around the screen. Use the FOV Console Command instead (See Console Commands section), and also see the methods discussed here.
fGlobalTimeMultiplier=1.0000 - Raising the value above 1 speeds up the rate at which world time passes, lowering it below 1 slows down time. This setting is interesting for watching rapid-motion sunsets/sunrises for example.
bBorderRegionsEnabled=1 - If set to 0, this option removes the invisible barriers around the outer parts of the game world, though not much is beyond.
iMaxDecalsPerFrame=10 - This value determines the maximum number of decals (blood marks) visible on screen at any time. Note that decals can have a noticeable impact on performance, so raising this value can reduce FPS during combat.
fDecalLifetime=10.0000 - This value determines the time in seconds before decals (blood marks) disappear. The higher the value, the longer the blood marks will take to fade away. Note again that decals can have a noticeable impact on performance.
fMinBloodDamage=1.0000 - This value determines the minimum amount of damage you must inflict to draw blood.
bUse Joystick=0 - Set to 0 if you don't have a joystick connected, some people claim this improves FPS and resolves mouse/input lag.
bInstantLevelUp=0 - If set to 1 allows your character to instantly level up without having to rest in a bed.
bSaveOnInteriorExteriorSwitch=1 - Controls whether to autosave whenever you enter/exit buildings. Setting to 0 can reduce loading pauses during entry and exit of buildings.
bPrecipitation=1 - If set to 0, disables rain effects.
Update: The following setting was added to this section as of the 1.2 Patch:
bCheckIDsOnInit=0 - This variable appears to be for troubleshooting purposes, in that it checks to make sure object/NPC IDs are correct as the game loads. There is no impact from setting this to 1, so it is best left at 0 unless you are having quest problems for example.
[Graphics Variables]
bFull Screen=1 - Determines whether to start Oblivion in Fullscreen/Windowed mode - see In-Game Settings section. Useful for changing here in case you have problems with the Oblivion Launcher.
iSize W=1280
iSize H=1024
The above two values determine the screen width and height in pixels respectively - you can specify a custom screen resolution (in Windowed mode only) by changing these values.
fGammaMax=0.6000
fGammaMin=1.4000
The above settings are useful particularly for those with older monitors - you can alter the limits on the gamma (Brightness slider), and hence allow further adjustment of the brightness slider to suit your monitor.
iShadowMapResolution=1024 - This variable determines the resolution of the shadow maps. By lowering this value (always using a multiple of 8), you can gain significant FPS in areas with dynamic shadows in return for much 'rougher' looking shadows. For example, try a value of 128 to see the performance and image quality impact.
bAllow30Shaders=0 - If set to 1, this option allows (but does not force) the use of Shader Model 3.0 on graphics cards which support it, namely Nvidia GeForce 6600 or newer, or ATI X1000 series or newer. This can potentially improve performance when using HDR rendering for example. Check your RendererInfo.txt file in your \Documents and Settings\User\Documents\My Games\Oblivion directory to see if your card supports SM3.0 next to the option '3.0 Shaders'. Note however that even by enabling this option, Oblivion still appears to use 2.0 shaders (check the 'PSTarget' and 'VSTarget' lines in Rendererinfo.txt). In any case, if you have one of the cards mentioned above, it cannot hurt to enable this option.
Update: To force the actual use of 3.0 Shaders after making the above change, you will also need to check your RenderInfo.txt file (see above), and on the last line of the file check which shader package it uses (e.g. Shader Package : 13). Then go to the \Program Files\Bethesda Softworks\Oblivion\Data\Shaders\ folder and rename that particular package to something else (e.g. rename shaderpackage013.sdp to shaderpackage013._bak. Now copy shaderpackage019.sdp and paste it back into the same directory, and rename this new copy to the package name your card uses (e.g. rename it to shaderpackage013.sdp in this example). This will force Oblivion to use the Shader Model 3.0 shaders in the game, which may increase (or reduce) performance and typically shows no image quality difference.
iActorShadowIntMax=10
iActorShadowExtMax=10
The above two options allow you to raise the maximum number of Interior and Exterior Shadows possible (as set by your in-game sliders). The normal maximum is 10, and obviously raising this can reduce FPS.
fSpecualrStartMax=1000.0000 - This option determines the maximum range of specular lighting, if enabled (See Specular Distance in the In-Game Settings section). Lowering this value may provide some additional FPS in outdoor areas, without having to turn off Specular altogether. Alternatively you can raise it further to gain specular lighting on distant objects. Note that the word specular has been misspelled as 'specualr' in the name of this variable - don't correct it as the misspelled version is the one the engine detects.
fShadowFadeTime=1.0000 - Determines how many seconds it takes for shadows to fade in/out as you approach/retreat from objects/characters which cast shadows.
bAllowPartialPrecision=1 - This setting determines whether the shaders run in Partial Precision DX9 mode. Essentially this should be kept at 1, since partial precision provides the best FPS for minimal or no noticeable image quality loss, particularly on Nvidia FX graphics cards. However if you want the best possible image quality, set this to 0 at the cost of some FPS.
bUseRefractionShader=1 - This setting controls the shimmery/invisibility effect. Setting it to 0 can noticeably boost FPS in areas where this effect is used, such as around invisible characters, or at an Oblivion gate. Note in particular that ATI users who have major problems in such areas in particular should set this to 0, though that in turn may cause other problems.
bDoTexturePass=1 - Setting this to 0 removes textures from most objects. It can improve FPS but is obviously not recommended.
bDoSpecularPass=1 - If set to 0, removes the shiny effect on most appropriate surfaces (See Specular Distance in the In-Game Settings section). This can noticeably improve FPS on many systems, but can also cause crashes in certain areas (e.g. Weynon Priory). You can try to reduce these crashes using this mod.
bDoDiffusePass=1 - If set to 0, removes all dynamic lighting and hence is not recommended.
bDoCanopyShadowPass=1 - If set to 0, removes all tree shadows, which can improve FPS in forested outdoor areas.
bLocalMapShader=1 - If set to 0, removes the brown hazy overlay on the local area world map, making the colors much brighter but also highlighting the relatively low resolution of the map. Consider a high resolution map mod to fix this - see page 4 for mod site details.
Update: The following two new graphics variables were added to Oblivion.ini as of the 1.1 Patch, likely the settings which are enabled when 'Very Low Quality' mode is chosen for older graphics cards:
bFullBrightLighting=0 - If set to 1, alters the global lighting method to one which is far less detailed and doesn't use complex shaders, hence is much less strenuous for older cards. The results are graphically unpleasant as most textures look terrible, and there will be some graphical glitches, but this should allow older cards to run Oblivion more smoothly.
MaxLandscapeTextures=0 - If set to 1, this setting appears to increase the use of generic landscape texture in place of more specific ones. This saves on texture memory, but can cause graphical oddities, such as roads being replaced with grass textures, or clear lines where different types of textures should blend into each other. It may also cause problems with the LOD Texture Replacement mods, and hence is only recommended for those with very low-end graphics cards struggling with stuttering and low FPS.
Update 2: The following graphics variable was added as of the 1.2 Patch:
bLandscapeBlend=1 - If set to the default of 1, it provides smoother blending of distant LOD textures with closer detail textures as you approach objects/terrain. This setting should be left enabled, as it prevents the previously unrealistic way in which distant textures went from being very blurry to suddenly becoming sharp and distinct as you approached them. It should also result in less dramatic loading pauses as you move around.
The next page continues the .ini tweaks.
[Audio Variables]
bDSoundHWAcceleration=1 - If set to 1, uses hardware acceleration (i.e. your sound card) to reproduce audio. This provides the best audio quality, however if you are having problems such as odd crashes, you can try a value of 0 to disable hardware sound acceleration.
bMusicEnabled=1 - If set to 0, turns off all background music. This will detract from the atmosphere of the game, but can noticeably improve stuttering on some systems, as background music dynamically loads throughout the game.
bSoundEnabled=1 - If set to 0, turns off all sound effects, but does not affect music. This would be an extreme way of gaining performance or reducing crashes and is not recommended for anything other than troubleshooting purposes.
fMainMenuMusicVolume=0.6000 - The main menu music volume can't be adjusted anywhere in the game, except by using the Master Volume slider (which then affects all sound/music). To alter the menu music volume independently, change the value here.
iMaxImpactSoundCount=32 - This option determines the maximum number of channels used for different sound effects. Reduce it 24 or 16 to remove some of the sound effects in return for a performance boost and stuttering reduction. Note however that this setting can crash your system if set too low, particularly with hardware acceleration enabled.
[Memory, Loading & Multithreading Variables]
All users should implement the Memory and Loading tweaks (with appropriate values) below, but the Multithreading tweaks are best used on Dual Core or HyperThreading CPUs.
Memory Tweaks:
uInterior Cell Buffer=3
uExterior Cell Buffer=36
The above values determine how many cells (whether for interior or exterior areas) are buffered into RAM. Note that usually the value of the Exterior Cell Buffer variable is automatically set by the engine based on the size of the uGridstoLoad variable. The higher that variable is, the higher the engine will raise this value. However if you want to smooth out your FPS, try manually setting a higher value for both of these, depending on how much RAM you have. For 1GB I recommend doubling the values (6 and 72 respectively). For 2GB of RAM, I use 16 and 102 respectively. For higher amounts of RAM, try raising them higher, however note that you should also raise the iPreloadSizeLimit value below.
iPreloadSizeLimit=26214400 - This setting appears to determine the maximum amount (in bytes) of RAM allowed for preloading game data. The higher the value, the more chance you have of reducing stuttering. The default value equates to around 25MB (divide the setting by 1024 to get KB, then by 1024 again to get MB). For those with 1GB of system RAM, try doubling the variable to 52428800. For those with 2GB, try double again at 104857600 (100MB). You can raise these values even further to experiment, however note that raising this to a large amount doesn't force all the game data to sit in RAM, and can actually cause crashes. I suggest the maximum anyone should set this to should be around 262144000 (250MB), even for 2GB of RAM. Make sure to raise your Cell Buffer values accordingly (see above).
bPreemptivelyUnloadCells=0 - If set to 1, this setting attempts to unload cell data it thinks you won't need. This can help those with less than 1GB of RAM, however with 1GB or more of RAM, I recommend leaving it at 0 for greatly reduced stuttering.
Importantly: As you raise the values of iPreloadSizeLimit and the Cell Buffer variables further above, you should make sure bPreemptivelyUnloadCells is set to 0 to take advantage of such additional memory allocation, otherwise it will actively work against the benefits brought about by the other tweaks.
bSelectivePurgeUnusedOnFastTravel=0 - If set to 1, this option removes a range of unnecessary data when you Fast Travel to another location. This can help keep memory usage down for those with less RAM, so it is recommended such people set this to 1, otherwise leave it at 0.
Loading Tweaks:
bUseHardDriveCache=1 - Although Windows should be using your hard drive cache by default for all drive operations, setting this variable to 1 should ensure it does. Note that some people report that enabling this setting can increase stuttering, so experiment to see if it helps or makes things worse for you. If in doubt, leave it at 0.
bBackgroundLoadLipFiles=1
bLoadBackgroundFaceGen=1
bBackgroundCellLoads=1
bLoadHelmetsInBackground=1
iBackgroundLoadLoading=1
bBackgroundPathing=1
Update: As of the 1.1 Patch, the bUseBackgroundPathing=1 option was also added to this section, and should be set to 1 for optimal performance.
All of the above options relate to background loading to attempt to smooth FPS and reduce stutter. I recommend setting them all to 1. This may increase some transitional loading times (e.g. loading cities, crossing indoors/outdoors), but should generally reduce random loading stutter as you wander around. If you experience any problems, set them back to their defaults.
bUseBackgroundFileLoader=0 - This setting may improve stuttering performance on some machines if set to 1, but I have noticed that it can also cause crashes and long loading times for some people, so on balance I recommend leaving it at 0.
Update 2: As of the 1.2 Patch the following loading-related settings have been added to the Oblivion.ini file:
iPostProcessMillisecondsEditor=50
iPostProcessMillisecondsLoadingQueuedPriority=20
iPostProcessMilliseconds=5
I'm not certain of what the above settings do, but they seem to relate to the loading of post process effects such as HDR which are applied after a scene is rendered. By changing these values you can fine-tune the way their loading impacts on stuttering in the game world. I tried various values, but the most noticeable impact was reducing the iPostProcessMillisecondsLoadingQueuedPriority value from its default of 20 to a lower value, such as 5. It will depend on your particular system as to whether changing this will have the same impact.
Multithreading Tweaks:
bUseThreadedBlood=1
bUseThreadedMorpher=1
bUseThreadedTempEffects=1
bUseThreadedParticleSystem=1
bUseMultiThreadedTrees=1
bUseMultiThreadedFaceGen=1
iNumHavokThreads=5
iThreads=9
iOpenMPLevel=10
All of the above settings seem to relate to the use of the GameBryo engine's multithreading capability. Multithreading splits tasks into 'threads' where possible, and runs them in parallel across both cores of multi core or HyperThreading (virtual multi core) CPUs to improve performance. Note that raising the values of the iThreads, iNumHavokThreads and iOpenMPLevel settings very high doesn't automatically mean it uses that many threads - it all depends on how many threads are actually possible based on the information being processed. Experiment with these variables but if you experience problems reset them back to their defaults.
Update: In recent times many people have written to me and/or have also posted around the Internet that the tweaks in the [Memory, Loading & Multithreading Variables] section of this guide are either useless or harmful. I have clearly noted from day one that that these tweaks may have no impact, and having tested them myself to ensure that they aren't harmful, I mention that you can experiment with them if you wish, and reset them if you run into any problems. The reason they are still listed here is for the sake of completeness, so I don't receive hundreds of emails telling me that my guide is 'incomplete' because I don't cover these famous tweaks.
[Cell Visibility/Loading Variables]
uGridsToLoad=5 - Increasing the uGridsToLoad value (always in odd steps of 5,7,9,11 etc.) will increase the number of grids around the character in which full texture data will be loaded up and visible as he/she wanders around. This clearly improves visual quality - removing blurry distant LOD textures for example when set to 11 or above - however it also noticeably increases loading times and loading pauses, introduces visual anomalies (particularly around water areas) and reduces performance significantly. Interestingly, as uGridsToLoad increases, the system automatically increases the uExterior Cell Buffer value to accommodate the greater cell data. Furthermore, if you use an even value, the engine will automatically raise it to the nearest odd value (e.g. entering 10 means the engine will set it to 11). On balance the default value of 5 is a good compromise between performance and loading pauses.
Importantly: Instead of using the above variable to improve distant textures, particularly the blurry land textures, it is strongly recommended that you instead use the Landscape LOD Replacement Mods as detailed in the Patches & Mods section of this guide on Page 4. These mods provide far less of a performance decrease for a similar effect, and don't result in the types of glitches which altering the uGridsToLoad variable can bring with it.
uGridDistantTreeRange=15
uGridDistantCount=25
The above settings when combined can be used to increase the visibility of distant trees. Increasing the uGridDistantTreeRange setting by itself has no visible impact. Yet if you also increase the uGridDistantCount value as well, you will start to see trees further out towards the horizon, on mountain ranges for example. Very high values will reduce performance and dramatically increase level loading times. For example experiment with a value of 200 for both to see the image quality and performance impact on your system, though I would recommend you leave these at their default for the best performance/image quality balance.
uGridDistantTreeRangeCity=4
uGridDistantCountCity=4
The above settings work in much the same way as uGridDistantTreeRange and uGridDistantCount except they apply to tree visibility within cities.
fLandTextureTilingMult=2.0000 - Decreasing this value can reducing the obvious tile pattern which occurs on land textures, but unfortunately also distorts textures close to the character. You can also use this mod for a much better fix to grass tiling.
The next page continues the .ini tweaks.
[Tree & Grass Variables]
iMinGrassSize=120 - This setting controls the density of grass clumps. The higher the value, the less tightly packed grassy areas will be, resulting in more empty spaces in grassland, and thus noticeably higher FPS in heavily grassed areas. I suggest a value of 120 to improve FPS without overly thinning out grass.
Update: You can also use this Low Poly Grass Mod to reduce the polygon count (complexity) of grass, boosting FPS further.
fGrassEndDistance=8000.0000
fGrassStartFadeDistance=7000.0000
The above settings control the distance at which grass ends, and the distance shortly before that which it starts to fade away. You can lower these values to increase performance, and also by reducing the difference between the FadeDistance and EndDistance.
bGrassPointLighting=0 - Setting to 1 provides more accurate lighting on grass at the cost of reduced FPS.
bDrawShaderGrass=1 - If set to 0 removes all grass which obviously improves FPS in such areas at the cost of realism.
iTreeClonesAllowed=0 - If set to a particular value, appears to determine in part the number of possible tree clones (copies of the same basic tree type) which are generated. The higher the value, the greater the potential to improve FPS and stuttering by reducing texture types and processing time, however I have not seen a major performance or visual difference from various values of this setting.
iCanopyShadowScale=512 - This value determines the appearance of tree shadow textures - lowering the resolution value (in multiples of 8) will make the tree shadows appear finer and more detailed, but this will also introduce a visible tiling pattern to the shadows. See an animated screenshot comparison by clicking this link: Obl_CanopyShadowScale.gif (768KB). Altering this value doesn't appear to have a significant impact on FPS, but may do on older graphics cards.
bEnableTrees=1 - If set to 0, turns off all trees, boosting FPS but making things highly unrealistic outdoors.
bForceFullLOD=0 - If set to 1 uses full Level of Detail (LOD) for trees, making them appear slightly better at the cost of a small FPS drop.
[Water Variables]
bUseWaterReflectionsMisc=1
bUseWaterReflectionsStatics=1
bUseWaterReflectionsTrees=1
bUseWaterReflectionsActors=1
The above settings control the additional reflections possible on the surface of water areas. When set to 1, they allow nearby trees, objects, and other characters to reflect in the water. Note that this reduces FPS in busy areas, and that the additional reflections are only visible when you and the objects are closer to the water.
uDepthRange=125 - This option controls the depth of water visibility from above. The higher the value, the clearer the water appears, however some water glitches may also start becoming apparent, and FPS may be reduced as well.
bUseWaterDepth=1 - If set to 0, water becomes completely opaque (i.e. you cannot see into it at all from above). This can resolve some of the visual glitches which result from changing the uGridsToLoad value, and can also improve FPS, at the cost of some realism.
uNumDepthGrids=3 - Also appears to control the depth of water visible, with lower values making water less transparent. If set too high this results in glitches, but if set to 1 can resolve issues with the uGridsToLoad value being higher than 5 and improve FPS as well.
bUseWaterLOD=1 - If set to 0 removes all water.
fSurfaceTileSize=2048.0000 - Controls the size of the water texture grids. The smaller this value, the smaller the size of texture tiles, and the faster and more tightly packed the water ripples will appear.
[Actor Variables]
bUseEyeEnvMapping=1 - If set to 0, disables environment mapping on character eyes. This makes eyes look slightly less natural and not influenced by the character's surroundings, but can improve FPS slightly.
bDisableHeadTracking=0 - If set to 1, stops characters' heads swiveling to track other characters, including your own (when in 3rd person view). Does not seem to influence performance much, and is not recommended.
bFaceGenTexturing=1 - If set to 0, Face Generator textures are removed from faces - this means they will all look smooth and lack things like age lines. There will be a slight performance improvement by doing this.
bFaceMipMaps=1 - If set to 0, character faces are slightly less detailed but FPS may improve slightly.
[Movie Variables]
SMainMenuMovieIntro=Oblivion iv logo.bik
SIntroSequence=bethesda softworks HD720p.bik,2k games.bik,game studios.bik,Oblivion Legal.bik
The above two settings control the bulk of the introductory movies which are loaded up each time you start Oblivion. By setting each of these options to blank (e.g. SMainMenuMovieIntro=), you will prevent the intro movies from starting up, thus getting to the main menu quicker, reducing memory usage as well.
SMainMenuMovie=Map loop.bik - This is optional, but for those who also want to disable the animated map in the background of the main menu, set this option to = blank as well. This can also improve mouse responsiveness in the main menu.
[Interface Variables]
fDlgFocus=2.1000 - This setting determines the level of camera zoom on people's faces when you enter into conversation with them. A value of 4.0000 is equivalent to no zoom at all, while something like 3.0000 gives a mild zoom which I feel is better than the extreme level of zoom provided by the current setting.
bHealthBarShowing=0 - If set to 1, shows a small yellow health bar above an enemy in combat, rather than the normal curved health bar in the center of the screen.
iSafeZoneX=5
iSafeZoneY=5
iSafeZoneXWide=5
iSafeZoneYWide=5
The above settings determine the 'safe zone' for the placement of your Heads Up Display (HUD). By reducing the values, such as to a value of 5, this will move the HUD elements at the bottom of the screen even lower, making them less intrusive.
[HDR & Bloom Variables]
BlurShaderHDRInterior
BlurShaderHDR
BlurShader
The above sections in the .ini file relate to HDR lighting effect parameters (the first two being interior and exterior HDR lighting), and the third being Bloom lighting parameters. You can alter these values in an attempt to make the lighting effects better suit your tastes. For example, some people suggest that using the following settings for the Bloom (BlurShader) lighting makes it look more 'HDR-like' without the same performance impact as real HDR:
fSkyBrightness=0.7000
fAlphaAddInterior=0.8500
fBlurRadius=0.0600
iNumBlurpasses=3
iBlendType=2
Obviously you will have to experiment or find someone who has values which you may find desirable, but note that varying these can result in strange visual glitches in certain areas, such as an oversaturated sky or odd water colors.
That covers the list of useful .ini variables I have found. Remember that I have tested all of the .ini settings, however if you know of any more .ini tweaks not listed above which actually do something useful, and you have tested them properly, please Email Me and I will consider including them. Note that some of the popular tweaks doing the rounds do not work as people believe. People often take a wild guess at what an option in the .ini file does and then neglect to test the tweak under a consistent reproducible environment. Certain tweaks are sometimes credited with fantastic properties which are virtually impossible based on what they actually can do. So please, while I would love to hear more about working tweaks, including any corrections to the list above, make sure you have tested the tweak out properly and have a good idea of what it does.
'Pre-Tweaked' .ini File
The most common request from people playing Oblivion is for a 'pre-tweaked' .ini file which contains all the optimizations required to make the game run well. No doubt people are wanting the same thing from this guide. My answer is that unfortunately no such thing is possible. Using other peoples' .ini files will only lead to instability (i.e. crashes) and/or graphical anomalies, since many of the entries are designed specifically for each system's capabilities, and can't just be swapped with others unless they have an almost identical system, and similar visual quality vs. performance preferences.
I recommend that you use the listing above to wisely administer only a few tweaks at a time in your Oblivion.ini file, testing them out to see how they perform on your system. I have provided my recommendation where I feel a tweak can generally be applied to most systems. I strongly advise against using other peoples' .ini files, but in the end it is obviously up to you. As with all my other guides, I can only point out that there is no 'one size fits all' .ini file, as many of the choices are up to peoples' tastes as to the performance vs. visual quality trade off, as well as your graphics card's hardware capabilities.
The next section covers a range of very important performance tips, tweaks and advice which should not be skipped.
This section contains all the console commands for Oblivion. To activate the in-game console, first check that the bAllowConsole setting in your Oblivion.ini file is set to 1, which it should be by default (See Advanced Tweaking section above). Next, start Oblivion and load up a game. To open or close the console at any time, press the '~' key (the key above TAB). This may vary on some european keyboards, in which case try the ' button, or the button next to 1 to open your console.
While the console is open the game will be paused, your HUD will disappear, and you will notice a thin white horizontal cursor prompt in the bottom left hand corner of the screen. You can type in any of the console commands below in long form or use the short form if one is provided (in brackets). For example, you can either type in togglewireframe or twf and press ENTER, and the command to turn wireframe mode on/off will be executed. See the next page for details of how to use specific useful commands.
Below are all the major console commands for Oblivion. You can also download the full list from here: OblivionCommands.zip (4KB). Note that the descriptions are those that the developers have written with a few minor modifications by me:
AddDecal -
AddFaceAnimNote (afan) -
Autosave - Saves current game to your Autosave slot
Bat - Executes batch file [e.g. bat test.txt]
BeginTrace (bt) - Creates a trace file (XBox only)
BetaComment (bc) -
CalcLowPathToPoint (lp2p) -
CenterOnCell (coc) -
CenterOnExterior (coe) -
CenterOnWorld (cow) - [e.g. COW worldname -10 5]
ClearAdaptedLight (cal) - Clears the HDR adapted light texture
ClearScreen (cls) - Clears text from console
CloseFile -
CompleteAllQuestStages (caqs) - Sets all quest stages
Disable - The selected NPC or Object will be removed from the game. Use Enable command to add them back
DumpTexturePalette (dtp) - Dump texture palette contents to warning file
Enable - Adds back an NPC or Object removed using the Disable command
EnableFast - EnableFastTravel
FlushNonPersistActors (flush) - Deletes all the actors in High who are not persistant
ForceWeather (fw) - Forces the active weather to the specified type, without transition
FreezeRenderAccumulation (fra) - Only re-render geometry visible during this frame
GetIgnoreFriendlyHits (gifh) -
GetINISetting (getini) -
HairTint -
Help - Shows some help dialog
Kill -
KillAllActors (killall) -
LoadGame (load) - Loads a saved game [e.g. load
ModPCAttribute (modpca) - Modify an actor value [e.g. modpca luck, 10]
ModPCSkill - (modpcs) - Modify the player's skill [e.g. modpcs blunt, 10]
ModScale - Modify the scale of an object
ModWaterShader (mws) - Modifies water shader settings
MoveToQuestTarget (movetoqt) - Move player to current quest target (optional param: target number)
OutputArchiveProfile (oap) - Output Archive profile info to a file
OutputLocalMapPictures (olmp) - Writes out the current local map
OutputMemContexts (omc) - Output Mem Context info to a file
OutputMemStats (oms) - Output Mem Stats info to a file
PickRefByID (prid) - Select a reference by id for the console
PlayBink - Plays Bink movie file
Player.payfine - Pays off all outstanding bounties
Player.placeatme - Summons an NPC with the stated ID Number
PlayerSpellBook (psb) - Add all spells to player
PlayMagicEffectVisuals (pme) -
PlayMagicShaderVisuals (pms) -
PrintAiList (pai) - Printed Ai Lists
PrintHDRParam (php) - Prints current HDR settings
PrintNPCDialog (pdialog) - Prints NPC dialog
PurgeCellBuffers (pcb) - Forcibly unloads all unattached cells in cell buffers
QuiteGame (qqq) - Exit game without going through menus
Refreshini (refini) - Refresh INI settings from Oblivion.ini file
RefreshShaders - Reload HLSL shaders from disk
ReloadCurrentClimate (rcc) - Reloads values from the current climate
ReloadCurrentWeather (rcw) - Reloads values from the current weather
ReleaseWeatherOverride (rwo) -
ReloadCurrentClimate (rcc) - Reloads values from the current climate
ReloadCurrentWeather (rcw) - Reloads values from the current weather
Reset3DState -
ResetHealth -
ResetMemContexts (rmc) - Reset Max Mem Contexts
ResurrectActor (resurrect) - Resurrects the selected NPC
RevertWorld (rw) - Revert the world
RunCellTest (rct) - Runs a cell test
RunMemoryPass (rmp) - Runs a cleanup memory pass
SaveGame (save) - Saves current game with a the
SaveIniFiles (saveini) - Writes all the .ini files
SetActorAlpha (saa) -
SetActorRefraction (sar) -
SetCameraFOV (fov) - Change the camera's field of view (in deg): default 75
SetClipDist - New clip distance
SetDebugText (sdt) - Sets which debug text is shown
SetFog - 2 floats, start and end depths
SetGameSetting (setgs) -
SetGamma (sg) - Sets new gamma ramp
SetHDRParam (shp) - Sets various values for the HDR shader
SetIgnoreFriendlyHits (sifh) -
SetImageSpaceGlow (sisg) -
SetIniSetting (setini) - Sets an .ini value, parameters are "setting:category" value [e.g. "bAllowScreenShot:Display" 1]
SetLightingPasses (slp) - 4 (0/1) values. amb|diff|tex|spec ex: 1010
SetScale - Set the scale of an object
SetShowQuestItems -
SetSkyParam (ssp) - Sets various values for the sky
SetSTBBColorConstants (sscc) - Show speedtree billboard color tweak constants
SetTargetRefraction (str) - Sets the refractive value of the target
SetTargetRefractionFire (strf) - Sets the refractive fire value of the target
SetTreeMipmapBias (stmb) - Set mipmap LOD bias values for tree billboards
SetWeather (sw) - Sets the active weather to the specified type
SexChange - Selected npc male become female or female becomes male
Show (tst) - Show values of script variables [e.g. show gamedayspassed]
Show1stPerson (s1st) - Show the 1st person Model from 3rd person camera. If in 3rd person it will show both
ShowAnim (sa) - Show Animation and Actor status
ShowBirthSignMenu - Lets you change character birthsign
ShowClassMenu - Lets you change character class
ShowQuestLog (sql) -
ShowFullQuestLog (sfql) - Show all log entries for a single quest
ShowHeadTrackTarget (sheadt)- Show the head track target if set from look function
ShowPivot (sp) - Puts a temporary yellow plus at the pivot point of the selected reference
ShowQuests (sq) - List quests
ShowQuestTargets (sqt) - Show current quest targets
ShowQuestVars (sqv) - Show quest variables. [e.g. svq QuestID]
ShowRaceMenu - Displays character face customization menu
ShowRenderPasses (srp) - display render passes for the next frame
ShowScenegraph (ssg) - Create a window with the full game scene graph
ShowSubSpaces (sss) - Temporarily displays subspaces
ShowSubtitle (srp) - show all dialog subtitles (1 shows always, 0 hides always)
ShowVars (sv) - Show variables on object. [e.g. player->sv]
ShowViewerStrings (svs) -
ShowWhoDetectsPlayer (swdp) -
SpeakSound -
StartAllQuests (saq) - Starts all quests
StopCombat - Stops combat for current enemy
StopMagicEffectVisuals (sme) -
StopMagicShaderVisuals (sms) -
TakeCover - Forces a actor to move away from the target actor for a period of time
TestAllCells (tac) - Test All Cells (0 - stop, 1 - start, 2 - interiors, 3 - current world)
TestCode -
TestLocalMap (tlm) - Simulates the local map (1 or 0 for FOW on or off)
TestSeenData (tsd) - Visually displays the current seen data
ToggleAI (tai) -
ToggleAiSchedules (tais) -
ToggleBorders (tb) -
ToggleCastShadows (tsh) -
ToggleCellNode (tcn) - Toggle 3D for a Cell child node: 0-Actor, 1-Marker, 2-Land, 3-Water, 4-Static, 5-Active
ToggleCharControllerShape (tccs) - Toggle char controller shape type
ToggleCollision (tcl) -
ToggleCollisionGeometry (tcg) - Show collision geometry
ToggleCombatAI (tcai) - Toggles all Combat AI
ToggleCombatStats (tcs) -
ToggleConversations (tconv) - Toggle conversation stats
ToggleDebugText (tdt) - Show debug numbers on the screen, including FPS
ToggleDetection (tdetect) -
ToggleDetectionStats (tds) - Show the detection stats of the current seletected Ref
ToggleEmotions (temo) - Toggle NPC facial emotions
ToggleFlyCam (tfc) - Toggles the Free Fly camera (UFO cam)
ToggleFogOfWar (tfow) - Turns fog of war on or off
ToggleFullHelp (tfh) - Toggle Full Help
ToggleGodMode (tgm) - Toggle God mode
ToggleGrass (tg) - Toggle grass display
ToggleGrassUpdate (tgu) -
ToggleHDRDebug (thd) - Toggles HDR debug textures
ToggleHighProcess (thighprocess) -
ToggleLeaves (tlv) -
ToggleLiteBrite (tlb) - Toggles lite brite render mode
ToggleLODLand (tll) -
ToggleLowProcess (tlowprocess) -
ToggleMagicStats (tms) -
ToggleMapMarkers (tmm) - Toggle map markers (1 shows all, 0 hides all)
ToggleMaterialGeometry (tmg) - Show material geometry
ToggleMenus (tm) - Hide all the menus. Used for taking screen shots
ToggleMiddleHighProcess (tmhighprocess) -
ToggleMiddleLowProcess (tmlowprocess) -
ToggleOcclusion (tocc) - toggle occlusion query for geometry
TogglePathGrid (tpg) -
TogglePathLine (tpl) -
ToggleRefractionDebug (trd) - Toggles refraction debug render texture
ToggleSafeZone - Display the television 85% safe zone
ToggleScripts (tscr) - Turn Script processing on/off
ToggleShadowVolumes float (tsv) -
ToggleSky (ts) -
ToggleTrees (tt) - Turn trees on/off
ToggleWaterRadius (twr) -
ToggleWaterSystem (tws) - Toggles the water system
ToggleWireframe (twf) - Show the world as wireframe
TriggerHitShader (ths) -
Unlock - unlocks targeted doors or chests
Verbose - Toggle verbose combat/AI messages
WasteMemory (wm) - Allocates some memory (in MB)
WaterDeepColor (deep) - Modifies water deep color
WaterReflectionColor (refl) - Modifies water reflection color
WaterShallowColor (shallow) - Modifies water shallow color
If you know of any genuinely useful commands which are missing from the list above, please Email Me with the command and what it does, and I will update this list to include it. Please make sure to only submit working, tested console commands.
The next page provides more information on how to use the more useful of these commands, as well as how to use batch files for easy execution of multiple console commands.
Useful Console Commands
As you can see from the previous page, there are a lot of console commands you can use, and I encourage you to experiment as for the most part all of them are fairly safe and won't do any permanent harm. At worst you may have to quit Oblivion or reboot your PC, but they should not permanently alter anything in the game. However, to help you sort out which commands you should use to meet most of your normal needs, below are those commands I would recommend people familiarize themselves with as they come in quite handy while playing Oblivion. Note that the term 'toggle' means that the same command can be used to turn something on or off. For example, use TDT to turn on the FPS counter, and use TDT again to turn it off. The case of the command text is not important - both lower and upper case text work.
Displaying Framerate: To display your Frames Per Second (FPS) at any time, use the TDT command. This command will put a FPS counter in the top right corner of the screen. Note that you can then go through a range of highly informative information pages, such as your current memory usage, which sounds and textures are currently loaded, etc. by repeatedly pressing the SCROLL LOCK key on your keyboard while using TDT.
Getting Unstuck: If you become 'stuck' in a piece of scenery or between objects, you can use the TCL command, which will toggle collision. This will allow you to walk through any object, or even fly by walking straight upwards while collision is disabled. Be careful not to re-enable collision while high in the air or inside another object for obvious reasons.
Modifying Your Character: If you want to modify your character's appearance, class or birthsign just as you did when you first started Oblivion, use the SHOWRACEMENU, SHOWCLASSMENU and/or SHOWBIRTHSIGNMENU commands to bring up the character customization panels. Once finished, press ESC and save your game, and your new character customizations should be saved. Note however that there is the significant chance that your major and minor skills might be reset, or other quirky behavior may occur, so be aware this is a risky command to use! Thanks to Mikea117 for this tip.
Changing Field of View: Some people don't like the default 75 degree field of vision in the game, and prefer something like 90 degrees which is normal for many first person games. Use the FOV command to set a new field of vision, e.g. fov 90. Note that this is reset every time you start Oblivion, and on most transition loads, so you must manually set it each and every time.
Severe Grass Slowdowns: If you're outdoors and you're in a heavily grassy area which is causing serious slowdowns, you can quickly use the TG command to toggle all grass off temporarily and make moving around easier, and toggle it back on later as necessary.
Turning off AI: If you want to turn off the enemy Artificial Intelligence, for example to take a close-up screenshot of a monster, use the TAI command to toggle off the AI. All characters/creatures in the game world will remain motionless, but will continue breathing and sometimes repeating the last action they were doing before being frozen.
God Mode: Enabling 'God Mode' means that your character can't take any damage, use the TGM command to toggle this option.
Wireframe Mode: To see just how complex the Oblivion game world is, and to also see what objects and characters have been loaded up in your immediate area (regardless of whether they're in direct line of sight or not), use the TWF command to toggle Wireframe Mode. As you will see, Oblivion uses a huge amount of polygons to display the detailed objects and characters in the game world, and this explains in part why the game requires so much CPU and GPU grunt.
Removing/Adding Objects or NPCs Quickly: If you want to quickly remove an object or NPC which is bothering you, make sure the Object/NPC is in your view, then open the console, click on the object or NPC with your mouse - note the object/NPC ID number at the top of the screen as you'll need this if you want to enable them again. Now use the DISABLE command to instantly remove that object or NPC. If you want to add them back, use the ENABLE [ID Number] command.
Adding or Resurrecting Dead NPCs: Often during a quest, some glitch or accident may mean an important NPC is killed or disappears. To fix this there are two main methods depending on your problem. If the NPC is missing, you can summon a copy of them in front of you by using the player.placeatme [ID Number] console command - see this List of NPC IDs. If the NPC is dead, open the console, left-click on the NPC to select them, then use the Resurrect command to resurrect them.
Setting Fog: If you want to set a custom fog effect for large outdoor views, or if you want to remove all fog for example, use the SETFOG command. The Setfog command requires both a start range and an endrange for the fog, so try setfog 100 8000 for example and see how that looks. Experiment with other values to see what works best for you. To remove all fog, use setfog 0 0.
Rapid Quit If you want to exit the game quickly without having to answer any prompts, open the console and use the QQQ command - the game will instantly exit without prompting you to save or confirm.
Executing Batch Console Commands
If you want to execute a number of console commands in one go without having to retype them every time you run Oblivion, you can use a Batch file. Go to your \Program Files\Bethesda Softworks\Oblivion directory and create a new text file (right click in an empty area>New>Text Document). Give this file a simple name, like mycommands.txt. Now edit the document with Notepad or Wordpad, and enter all your desired console commands, one per line. For example the contents of mycommands.txt might look like this:
tdt
setdebugtext 2
fov 90
Now close and save this text document. Open Oblivion, and to execute this batch file at any time, open the console and type Bat
Bat mycommands.txt
The contents of the batch file will be implemented - as long as they are correct working commands - all in one go. Create as many separate batch files as you like to do particular things, and execute them as desired.
The next section covers a wide range of important performance tweaks and general performance information.
This section deals with a wide range of important performance and convenience tips and advice. Do not skip this section, as these tips are just as important as any .ini tweak.
Max Frames to Render Ahead
This tweak gained prominence as being the first major performance tip discovered and widely circulated for Oblivion. After much testing, and based on what I know, I can hopefully provide some genuine guidance on how this tweak works, and what setting to actually use. This is an important tweak if used correctly, you just need to be aware of what it does, as abusing it can also cause problems and reduce performance on many systems.
The setting in question is called 'Maximum Pre-Rendered Frames', and it is available in the Forceware Control Panel for Nvidia graphics cards, or by using RivaTuner to change the 'Prerender limit' setting which is the same thing. You can find out more about this setting as well as RivaTuner in the Nvidia Forceware Tweak Guide. For ATI users, you can adjust the 'Flip Queue' setting which is the equivalent setting to the one above by installing and using ATI Tray Tools. The same values apply to both brands of cards.
Basically, the Gamebryo engine (discussed further below) seems to have an issue which means it can saturate your CPU and/or Video RAM with pre-rendered frames (whole screens ready to be displayed). On most systems this results in very noticeable mouse and/or keyboard lag, even when your FPS is reasonably high enough not to usually suffer from this (e.g. 25-30FPS+). By reducing the maximum number of frames to render in advance, you reduce this bottlenecking effect and hence significantly reduce or remove the mouse lag.
However, here's the important part: this is not a tweak for improving FPS as such. The general recommendation to set 'Max Frames to Render Ahead' (or 'Flip Queue') from its default of 3 down to 0 will actually reduce performance on many systems, particularly Dual Core or HyperThreading CPUs. Secondly, even on single core systems, you may notice reduced performance in certain areas. So on balance I strongly recommend setting this value to 2 to start with, and if you still have mouse lag, dropping it down to 1. Remember, not all mouse lag is due to this setting: in areas where you have very low FPS (i.e. below 10-15FPS), you will get lagginess - this occurs in virtually any game where your FPS drops down to the low teens or single digits. You will have to consider changing other settings to increase overall FPS.
Oblivion Quick Startup
To get to the main Oblivion menu much more quickly, you should firstly stop using the Oblivion Launcher, which is launched when using the default Oblivion icon. Instead go to your \Program Files\Bethesda Softworks\Oblivion directory, right-click on the Oblivion.exe file and select Send to>Desktop to create a new desktop icon for Oblivion. Now delete your original Oblivion icon and use this one instead to launch the game - it will skip the launcher and immediately start loading Oblivion.
Next, you can remove all the Oblivion startup movies very easily, saving both time and RAM. See the SMainMenuMovieIntro and SIntroSequence variables in the Advanced Tweaking section. By blanking out the names of the movie files for these variables, Oblivion will skip all the intro movies and get straight to the main menu. In fact you can also remove the animated map in the background of the main menu as well if you want to save a bit more memory and make the mouse more responsive in the main menu, by editing the SMainMenuMovie variable.
Finally, some people claim that setting the iIntroSequencePriority and bPreloadIntroSequence variables to both =0 also removes the small loading pause prior to the main menu screen. It doesn't do anything on my system, but you can give it a try.
Anisotropic Filtering in Oblivion
Oblivion doesn't have any in-game or .ini options for enabling Anisotropic Filtering (AF). AF allows the textures in the game to look much more detailed as they fade into the distance, so if you're after an improvement in image quality with a minor drop in performance, you can enable Anisotropic Filtering in your graphics card control panel - see the bottom of this page for details, and my ATI Catalyst Tweak Guide or Nvidia Forceware Tweak Guide as relevant for full instructions of how to do this. Using a high level of Anisotropic Filtering can make Oblivion seem much crisper and clearer, and is often a better alternative than using any high resolution texture packs, as it does not result in as much stuttering or other issues.
Oblivion Game Engine
Oblivion is based on the original engine used for Morrowind called NetImmerse. The new version of this engine is now called GameBryo. Having spent over a week exploring the engine's capabilities and quirks in great deal as part of experimenting with .ini options and in-game settings, I can honestly say that although it is by no means perfect, it is not a "faulty" engine at all. It is apparent that Bethesda Softworks have tried as hard as they could to optimize the game engine and the default parameters to balance loading times, in-game loading pauses, visual quality and complexity. This is not an easy juggling act, and explains for example why the distance textures appear so out of place and blurry and don't transition more smoothly. Or why objects often suddenly pop up instead of fading smoothly into view. These things were done to reduce the massive amount of texture data and hence even greater loading pauses and performance slowdowns on most systems - although I'm not suggesting that they couldn't possibly have been done better if there had been more time.
Check the Anandtech Oblivion Performance Article for more details of how the engine is working, and just how stressful it really is. Quite frankly, those of you expecting this game to run smoothly on systems which barely meet the CPU minimum requirement (2GHz Intel or 2GHz AMD equivalent), or have relatively poor shader support (e.g. the FX series) I would suggest that it is an unrealistic expectation. People tend not to realize that it is very difficult to program a game which scales downward and upward perfectly - and even if you could reduce visible objects, textures, AI and polygons to extremely low levels, you're essentially no longer playing Oblivion in many respects.
In areas where you are getting poor performance, use the twf console command (See the Console Commands section), and you'll see the massive amount of detail which is being calculated by your computer. And of course that doesn't even touch on the invisible load on the CPU to manage all the physics, weather, character and quest states for example. Oblivion is a genuinely next-generation game, and while not perfect, certainly beats FEAR, Call of Duty 2 or any other recent system-intensive game in terms of complexity of features, eye candy, usage of shaders (including HDR), AI and physics. Furthermore, unlike most single-player FPS's which load up artificially small self-contained areas, Oblivion has enormous outdoor areas with vast views of lots of varied vegetation and objects through which you can wander in any direction and which load up 'on the fly'. This is all very demanding.
All in all, while I'm sure that the game's performance - as well as quest glitches and the like - will receive some minor boosts through official patches, as well as graphics driver optimizations, for the most part the game engine feels quite robust to me, and having launched and relaunched the game literally hundreds of times and played with it in often unusual circumstances, not once did I get a crash (except when using an unstable .ini variable). It's not perfect, but it's not as flawed as people are commonly crying out about. I don't want to blame the user, but to minimize problems you need to optimize your system properly - try the instructions in my TweakGuides Tweaking Companion, and the instructions throughout this guide. Every time a new system-intensive game comes out (e.g. BF2, FEAR, COD2, UT2004, Far Cry, etc.), people will say the engine is buggy, rather than spending time finding the sources of problems on their own machines.
Update: For those who insist on saying that Oblivion cannot be run smoothly on a modest machine, please see this video I made in May 2006 using FRAPS on this old system put together in 2005. Clearly with appropriate tweaking and hardware - and using relatively old and inexpensive hardware - this game can run very smoothly at high settings and a reasonable resolution.
Gameplay Tips
If you're after gameplay tips, as opposed to just performance tips, I recommend reading the game manual closely as it really does contain valuable information. However for additional gameplay advice, check this Oblivion Gameplay Guide as it seems to have some valuable tips. If you're really stuck trying to resolve a particular quest, try the Unofficial Elder Scrolls Pages.
Conclusion
Phew, the end of a rather long guide! This guide is the culmination of a lot of research and weary nights of testing. However I obviously can't take credit for discovering all the tweaks in this guide; most of the information herein is sourced from the existing material available on the Internet. This is a credit to the tweaking spirit of the gaming community - within a day of Oblivion being released, people had already discovered several major tweaks for the game. Within several days, a wide range of tweaks and mods were pouring out, and because I have been quite busy with my day job, it was all I could do to even keep track of all the new tweaks and tips. The bulk of them were discovered on places like the Oblivion Forums and the NVNews Oblivion Forums. Fortunately, our own TweakGuides Forums was up there riding the wave of useful tech tidbits.
In any case my main aim in writing this guide was to sort out the fact from fiction by testing out all the tweaks and tips, documenting all the in-game settings correctly, and drawing them all together into a single reference source which will remain up to date as we find out more about this amazing game. I must stress that unfortunately I can't provide any tech support/advice. If you want Oblivion to run at its best, all the information you need is already in this guide and in the associated guides mentioned in the Essential Optimization section, particularly the completely free TweakGuides Tweaking Companion downloadable PDF guide.
In any case, I hope you've found the guide useful, and until next time, take care!