I’ll start off by saying that Pearl River is the most interesting map in World of Tanks currently. It has a ton of different elements, elevations, and areas all smashed into one map that provides quite the challenge to any player. At first glance the map is overwhelming and rightfully so since it has dozens of individual paths to take. This map strategy guide will outline some general routes to take and areas to focus on for both side 1 and side 2. The images you see here were drawn up on MapTactic which is an excellent website to use to draw up strategies for clan wars and tournaments as well as other online games.
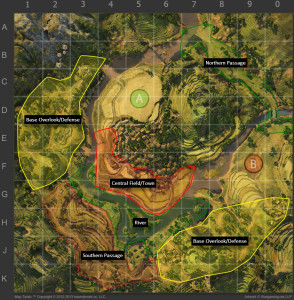
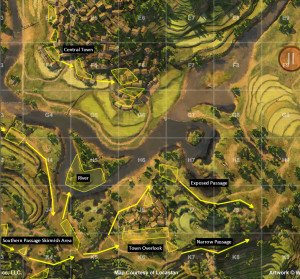
I’ve broken Pearl River down into several key areas to make the map somewhat easier to understand. The Northern Passage is the shortest and most protected from artillery route to get to the enemy base. However, taking this route will put you in direct contact with enemies since there is only one route in and out. Both bases have defensive positions at the entrances of the Northern Passage and also located further back behind each base allowing a team to focus less on the highly contested north. This might seem slightly risky but if your team is capable of setting up a layered defense and catch the enemy in the wide open base area they will be easily taken care of.
The Central Town area might seem wide open but the various buildings and small nooks provide great cover from both tanks and artillery. The main counter to the town is if your team has absolutely no presence in the Southern Passage allowing enemy tanks/artillery to flank. The River area is very risky and shouldn’t be used at the start of the match as it’s main role is to be a buffer between the town and the south. The final two areas are the most difficult due to the terrain and elevations. The Southern Passage has few defensible positions and many flanking routes. The Skirmish Area located in the middle of both team’s path provides small mounds/rocks to hide behind but should be pushed through quickly or else artillery will rain hell down upon your team.
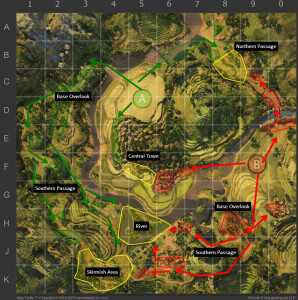
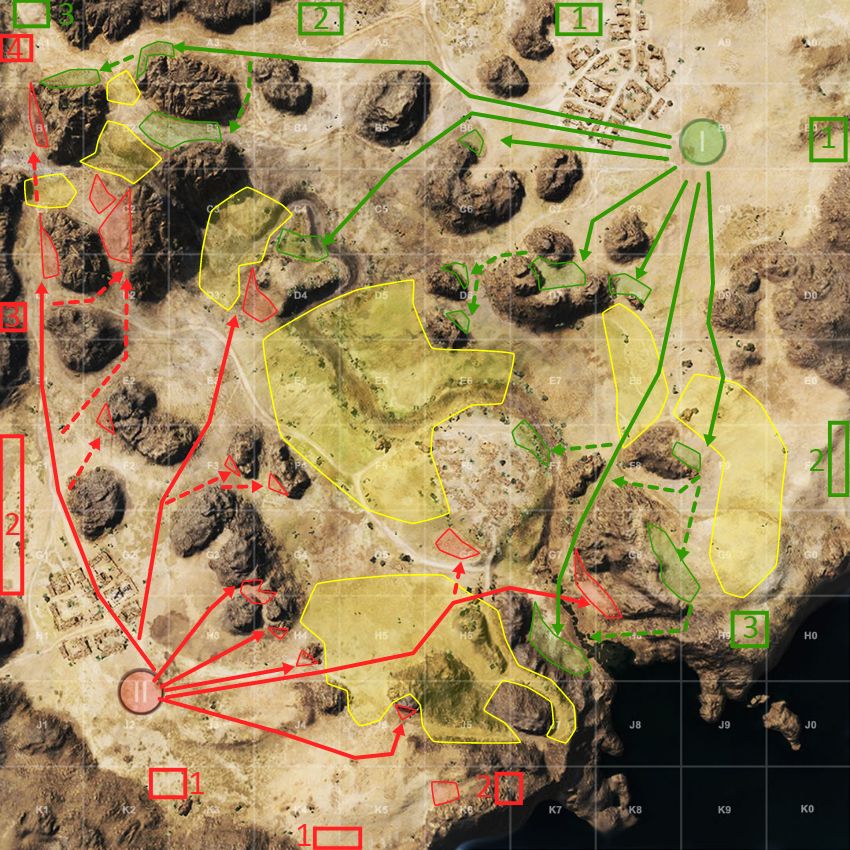
Below are some close up shots for each side of specific areas/routes to take. Side 1 is in yellow since green is harder to see on this map and side 2 is red.

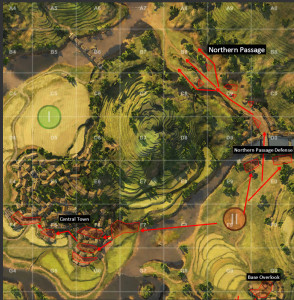
For side 1 the Northern Passage has a few good defensible positions underneath the bridge and also at the entrance of the passage. If you sit further back near the bridge you can be supported better from your teammates in the overlook spots and artillery. If you choose to push ahead you will want to get C8 rather quickly since you want to pin enemy tanks down before they pass through C9. Side 1 has an easier time taking the north than side 2 does if played aggressive.
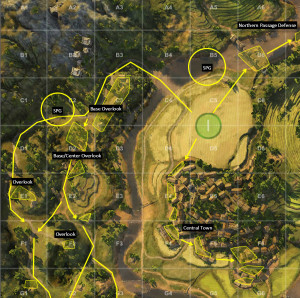
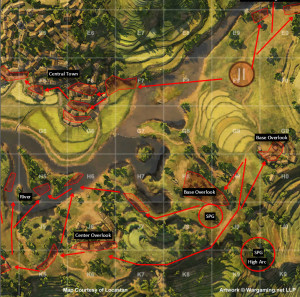
There are many locations around the base area for tanks to set up in and be useful. The two base overlook locations provide cover either by foliage or buildings and have great coverage of the flag/town areas. E1/F1 have two elevated hills for mobile tanks to spot ahead but provide limited defensible locations. If you plan on pushing south and/or defending this area it is best to keep moving further south to at least H2 or else the enemy has the advantage. For those looking to move through the town hug the buildings and slowly advance alongside your teammates further south of you.
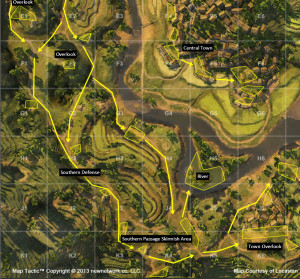
H2 and J3 provide a choke point with some cover to defend against advancing enemies. The enemy will either have to push directly through you or relocate and take the routes located closer to the river/center of the map leaving them exposed. More mobile tanks can either dart through into the skirmish area if they have support or take the G3 route slightly delayed to flank the enemy tanks in the south. Keep in mind that if you decide to push into the skirmish area that it is open to outside artillery fire and you should play aggressive to get to the other side. Advancing through the south/middle is best if your team can focus on at least two of the routes on this side of the map(Southern Passage, River Area, Central Town) or else you run the risk of being flanked/stuck.
If your team has made it this far you most likely are in a good position to win the match. Keep in mind that the enemy also has a narrow choke point in K7/K8 that is easily defended and sometimes it is best to have tanks go through the central town area/exposed passage to make it through.
Like side 1 this side has locations at the entrance of the Northern Passage to defend but unlike side 1 they are more exposed to artillery. If your team commits to the north you must play it fast since you can be easily stuck in D0 with nowhere to go. Making it to the C9 nook and then into C8/B8 to the rocks before the enemy sets up will give you the upper hand. Alternatively your team can set up in F7(central town area) or further south in G0/H8 and catch the enemy in the wide open field around the base. Side 2 has a more difficult time taking the northern passage especially if it is not played aggressively and even then side 1 has a slight advantage.
Side 2 has an easier time defending the southern/central portions of the map due to the added central overlook spot with the small town in J6. Like side 1 this side has a base overlook spot with a lot of foliage in H8 capable of providing long range support. The central town area is slightly better protected than side 1 as well and is easier to advance through up to the western side of F5 since the central overlook in J6 can provide great covering fire.
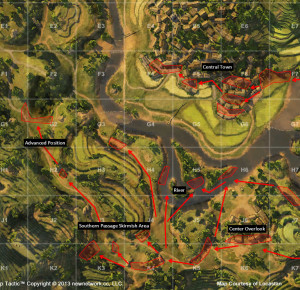
If your team decides to advance through the southern passage it is important to not get stuck in K5 since you will be bottled in. Side 2 is best when your team can quickly take the skirmish area and most of the central town since it pins the enemy in at J3, G2, and further back. Once this happens side 1 has limited hardcover from artillery aside from the J3 area and will be on their heels. It is best if side 2 plays the south very aggressively and to take as much of the map as possible until the enemy provides resistance. Keep in mind that since the Northern Passage is difficult for side 2 that you have a high possibility of being capped quickly and having a path to return to base is very important.

 World of Tanks Guide - T1 Cunningham
 Weak Spot Guide: AT-15A - World of Tanks Guru
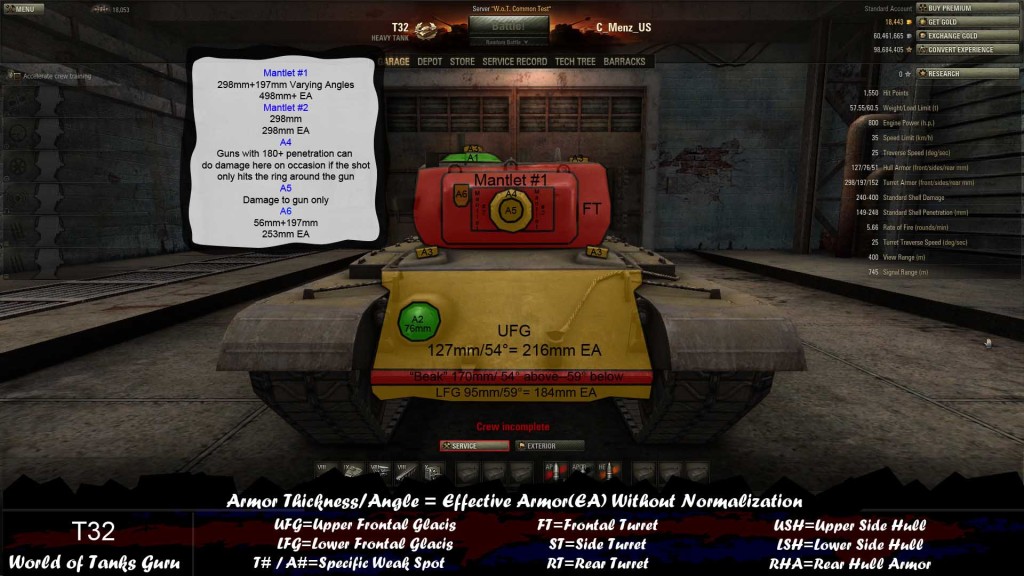 Weak Spot Guide: T32 - World of Tanks Guru
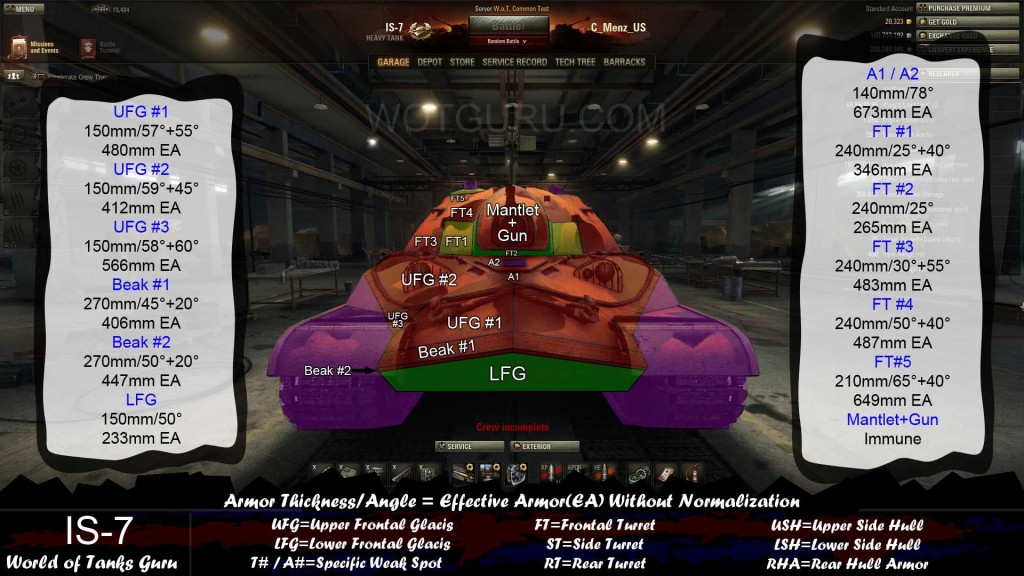 Weak Spot Guide: IS-7 - World of Tanks Guru
 Tank Guide: T95 - World of Tanks Guru