The tier 3 premium German light tank Pz.Kpfw. II Ausf. J is a behemoth at tier 3 with its insane amount of armor across all sides of the tank. Frontally it is covered by mostly 80mm of armor and the sides/rear of the tank is covered with 50mm of armor. While the armor isn’t angled for much of the tank the sheer thickness makes it difficult to penetrate the Pz.Kpfw. II Ausf. J and it allows drivers of the tank to angle horizontally to make up for the lack of a vertical angle on their armor. For non tank destroyers at tier 3 and tier 2 this tank is very difficult to deal with due to the lack of penetration many tanks facing the Pz.Kpfw. II Ausf. J have. This weak spot guide will give you the best possible areas to aim for on the Pz.Kpfw. II Ausf. J for the frontal armor and sides/rear.
Frontally the Pz.Kpfw. II Ausf. J is almost impossible for a tank that is not capable of penetrating 70mm of armor reliably to damage the Pz.Kpfw. II Ausf. J. Every red section on the frontal armor is covered by 80mm of armor aside from the angled areas on the turret and frontal driver view port boxes. Even then the angled armor on the turret is 50mm and the driver view port “boxes” are 70mm. For tank destroyers this armor is not impossible to penetrate but for many tier 2 and tier 3 tanks it is extremely difficult. The only chance you have to damage this tank frontally if you cannot go through 70mm of armor is the green view ports that have 0 armor assigned to them. There are also 0 armor view ports on the commander’s cupola.
For tanks that can penetrate the 70mm armor sections stick to the two boxes on the frontal hull highlighted in yellow since they are only 70mm thick and have no angle on them. If you can go through 80mm of armor reliably then the large lower glacis is very flat and easy to damage, as well as the two rectangles on the gun mantlet that have o armor behind them. At tier 2-4 75mm+ guns are very rare but the Pz.Kpfw II Ausf. J does see some tanks with guns this size and in this case the yellow areas signifying overmatching can be used to easily penetrate that area with a 75mm+ gun.
The easiest way to damage a Pz.Kpfw II Ausf. J is actually on the side instead of the rear of the tank, like most tanks. This is because the side and rear armor have the same armor thickness, however the side armor is flat and contains more weak spots. Avoid shooting the hull armor covered by tracks and also the frontal turret armor since it is angled. The commander’s cupola is also difficult to damage since it is 80mm thick on the side like the frontal armor. The yellow/green hatches on the side hull are only 40mm thick compared to the 50mm armor around them, making it possible for many tanks to penetrate in these areas. The frontal hatch has a zero armor hole on it and the commander’s cupola also has 0 armor view ports on it like the frontal view.
If your tank still has difficulties penetrating the side armor(if you are a tier 2 or low penetrating tier 3) then it is not worth the trouble flanking to the rear of the tank. Either run away from the Pz.Kpfw. Ausf. J or try your luck with the 0 armor holes on the front/sides.
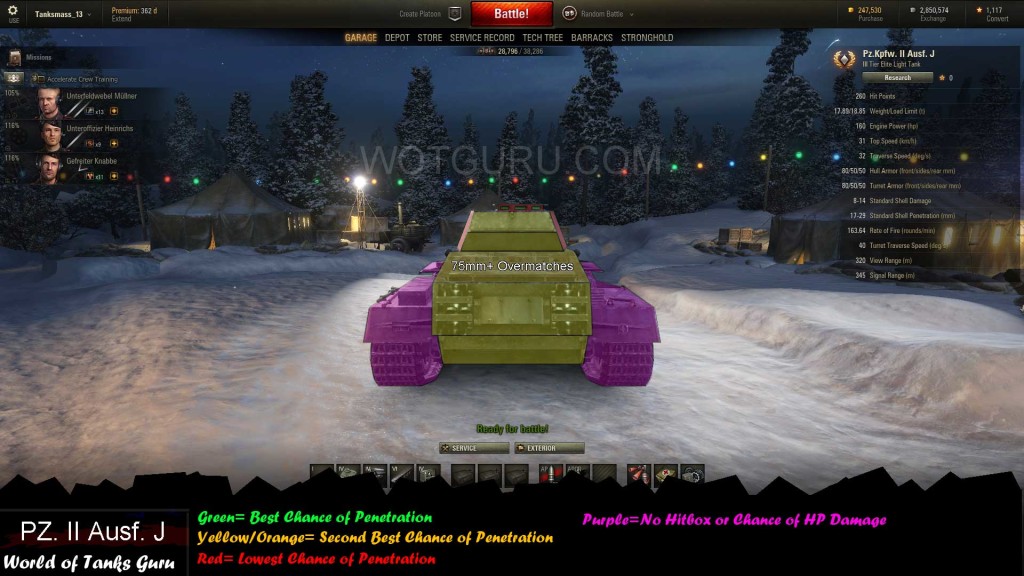
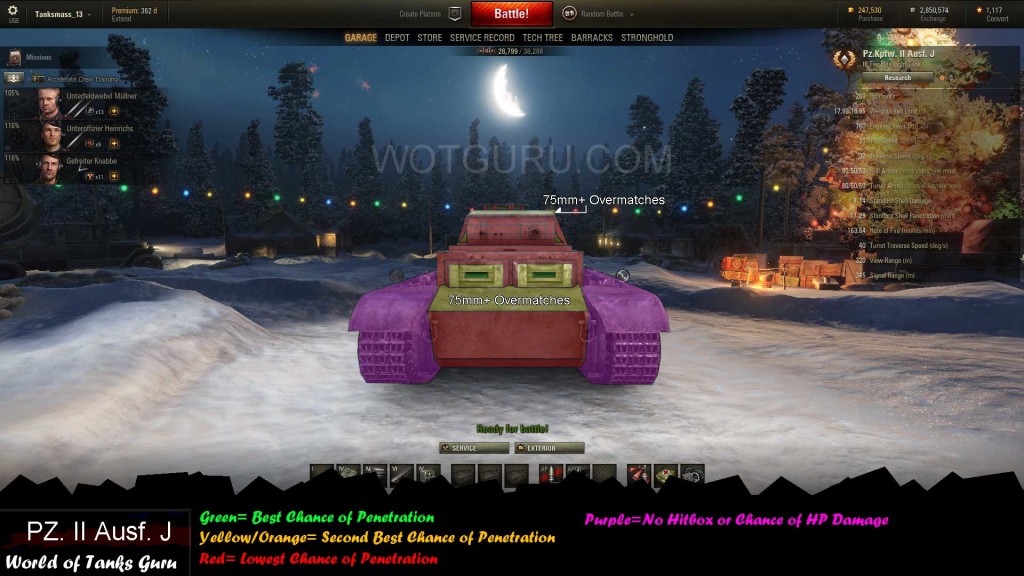
As mentioned earlier the rear of the Pz.Kpfw. II Ausf. J is actually stronger than the side armor unlike most tanks. The entire rear is covered by 50mm of armor and it has no 40mm hatches or additional 0 armor view ports to aim at like the frontal/side views. The commander’s cupola has view ports capable of being penetrated and there is also another overmatch area for 75mm+ guns. If your tank is not capable of dealing with penetrating 50mm of armor then it is best to run away or go for the side/frontal armor ports.
 Weak Spot Guide: Object 704 - World of Tanks Guru
 Weak Spot Guide: AT 2 - World of Tanks Guru
 Map Strategy: Erlenberg - World of Tanks Guru
 Map Strategy: Pearl River - World of Tanks Guru
 Weak Spot Guide: T110E3 - World of Tanks