

Erlenberg can be a very tricky map to figure out since it incorporates many different areas onto the same map, unlike other maps that generally favor one type of gameplay over another. You have plenty of wide open areas, elevated ridges, choke points in the form of the three bridges crossing the river that divides the map, and plenty of buildings to take cover behind. This leads to a difficult challenge for those looking to break the “lets go camp the south” or “rush north and die” crowds that approach this map.
The key to this map is to get great positioning in the beginning of the match to spot either the northern or southern enemy blob pushing across the map. This helps give your team and edge in picking them off quick or by having them freeze and lose map control. The northern spawn has an easier time at darting south to stop them from advancing to far over the bridge while the southern spawn is better at stopping the northern enemies from pushing to far west.
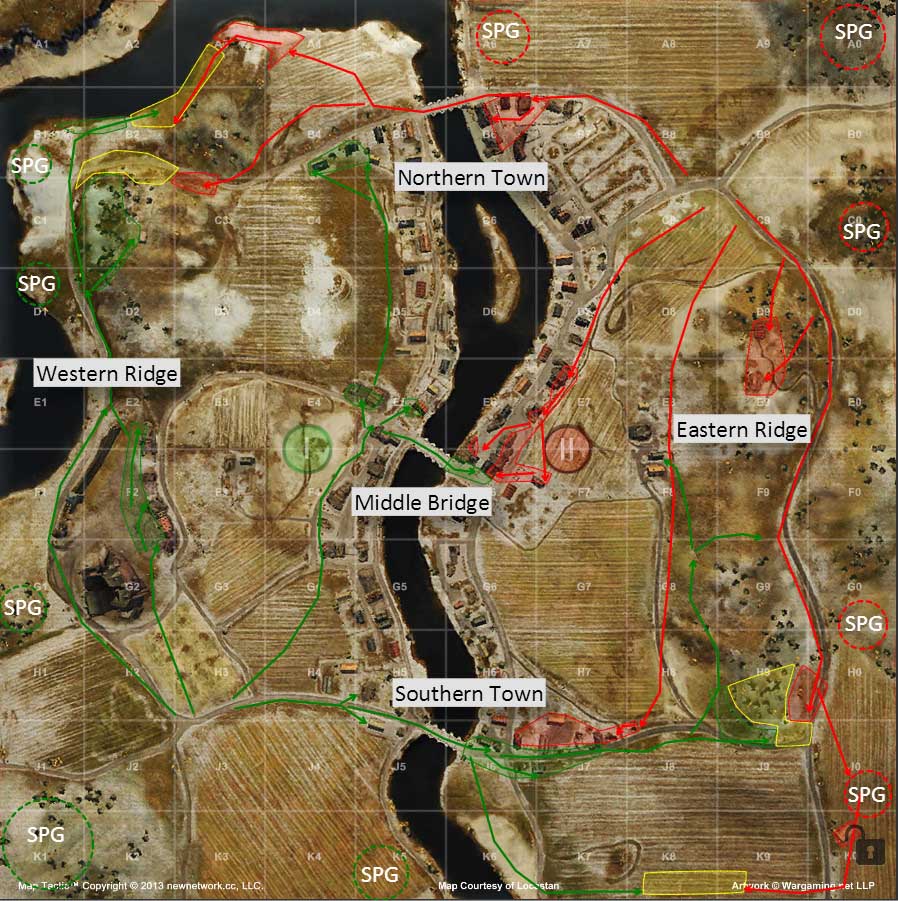
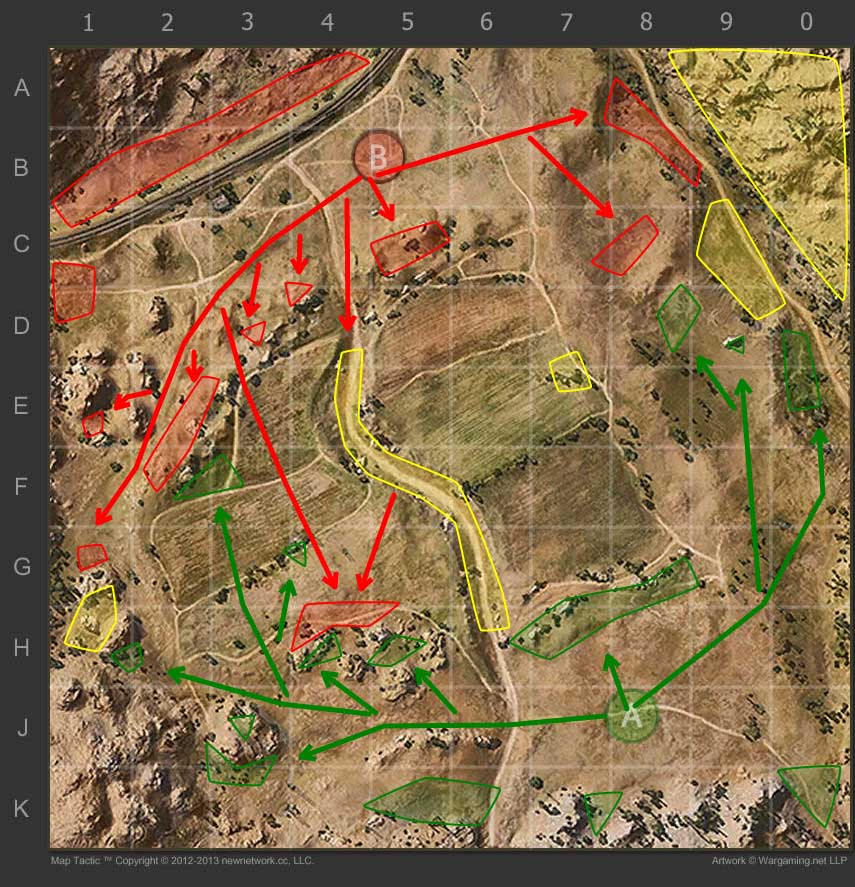
I’ve broken the map down into five areas(essentially based around the four corners plus the central river) and this guide will give pointers onto how to best play Erlenberg. I used MapTactic to create the layout of the map you see here and it is a great tool to design strategies for several online games.
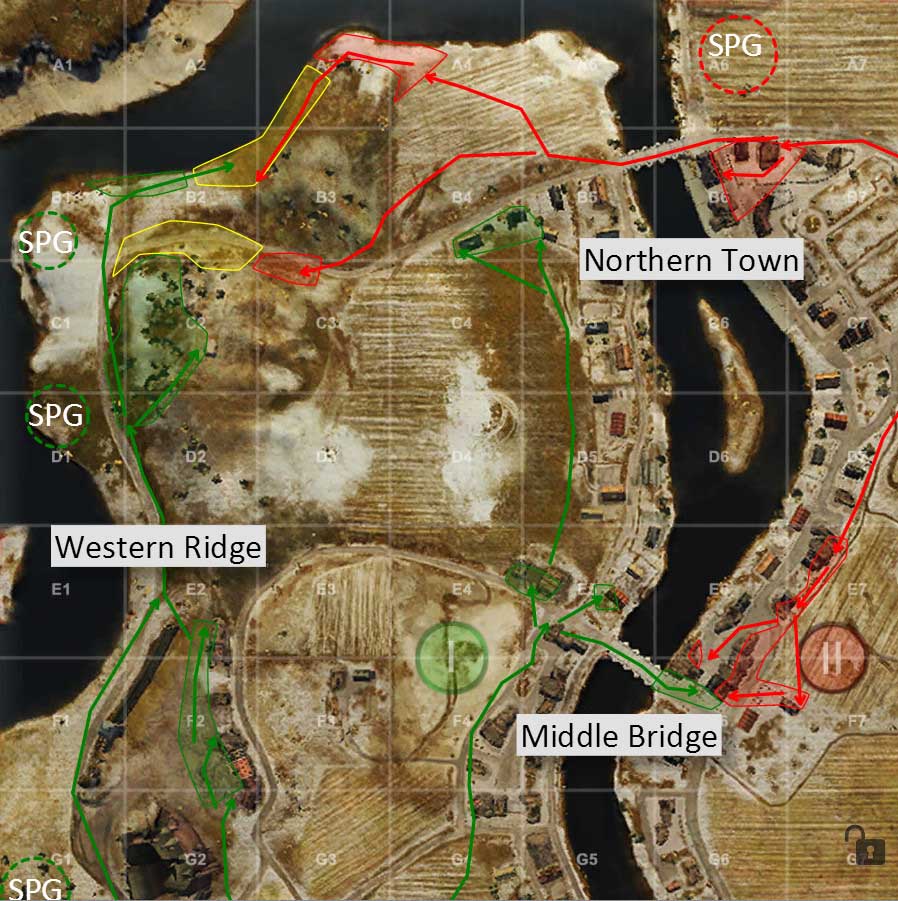
The Northwest section of the map centers around the C2->A3 area. It is critical for either team wanting to control this ridge/area to get there quickly, take care of enemies, and then disappear before artillery whacks you. It is easier for the southern spawn(green) to take control of the B2/B3 ridge if any mobile tanks go there at the start of the match since the northern spawn’s(red) tank destroyers are the closest spawn to this area.
Generally it is very difficult for the red side to win up here unless the green team does not have a lot of tanks. This is because the red team has to advance across the 3/4/5 lines with little cover while being spotted. Usually this leads to massive amounts of damage being thrown at you before you reach the limited cover in A3/C3. The green side can easily set up in E2(slower tanks) and pick you off while spotters spot you from further north. Scout tanks from the southern green team can also dart up the 4/5 line, spot your team before it crosses the bridge completely, and then hide in B4 while being supported by team mates on the 2 line. It’s typically best to have a “cover screen” or spotters patrolling west of the bridge for the red team since they can fall back if the green team pushes.
In the end the Western Ridge is the southern spawn’s easily defended area of the map(which a lot of people like to camp) and it isn’t easily taken without a proper force. The red team gets a easily defended choke point in B5/B6 in the form of the bridge and the Northern Town provides good cover.
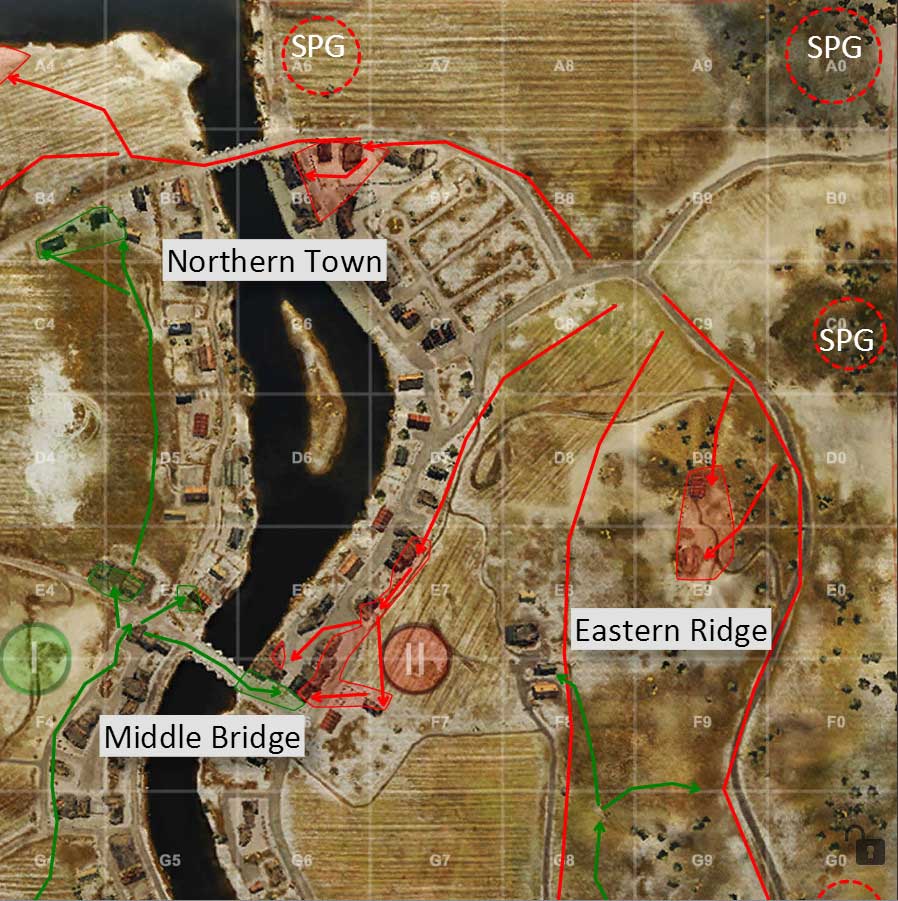
The northeast section of Erlenberg is where the northern team(red) spawns. Your flag is easily watched over by the D9/E9 Eastern Ridge while the northern bridge can become a bunker and easily defended. The main route to take for tanks looking to push ahead is either in the center of the map(E6/F6) which only has enough value for 1-2 tanks to venture out to(to spot and give flanking shots to the south/north) or to head to the southern part of the map.
A great tactic is for mobile tanks(mediums or lights) to take the 8 line south to reach the southern town. By cutting out the added time it takes to venture down the 9/0 lines you will often beat the main enemy force down there while you light up plenty of targets for your team to fire at.
For the most part this section of the map doesn’t receive much fighting in until later in the match if the red team is losing or has lost the northern bridge.
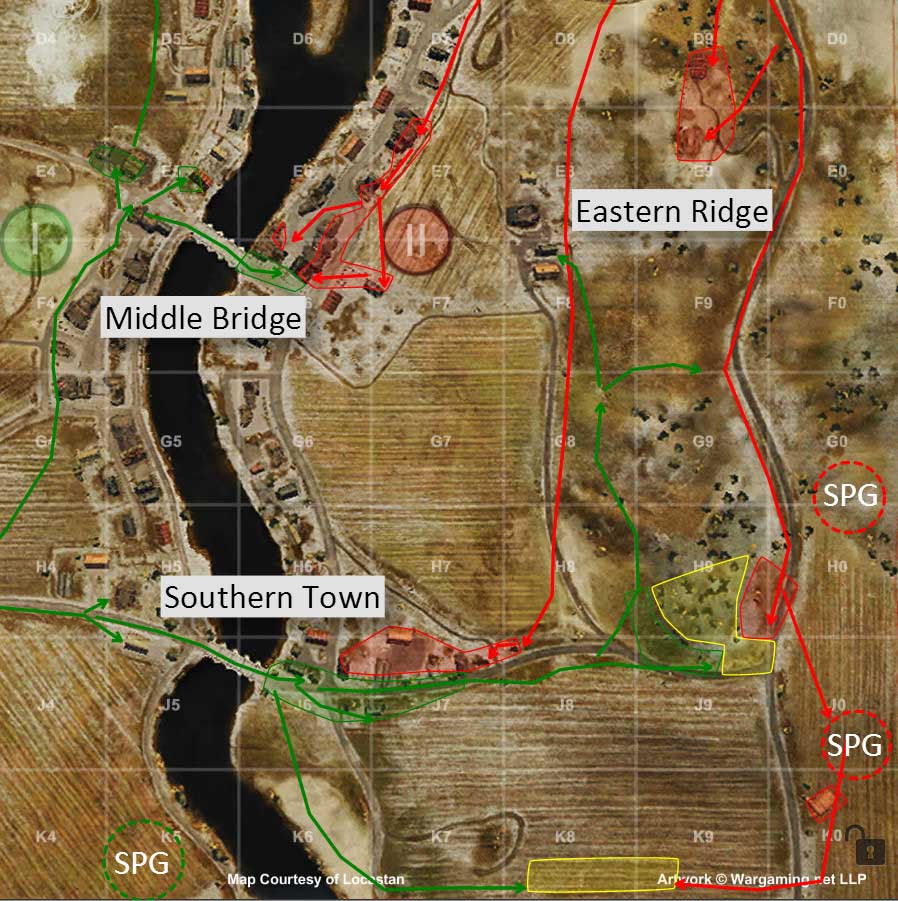
The fighting picks back up in the southeast where like the northwest the red team gets a slight advantage here if capitalized on. As stated before highly mobile tanks can take the 8 line down into J7/J8(shoot for the end building in J8 so your team can support you first) to light up the enemy.
For slower tanks supporting from D9/E9 is a stretch for most since the shots are not that great. However moving down into H9/J9 provides decent artillery cover while allowing you to engage any tanks that have made it that far across. It is not advised to pile more than 3-4 tanks here and moving further south for mobile heavies/mediums into the K line provides another flank to work.
The house in K0 is reached easily by the red team and gives you room to either work the field(to spot and take a few pot shots) as a medium or to fire back up north at J8/J9. You do not want the green team to take control of K0 since it is very difficult to weed them out.
Overall the general premise is that the red team has an easier time beating down the green team on the eastern side of the river much like the northwest where the green team has the advantage on their side of the river.
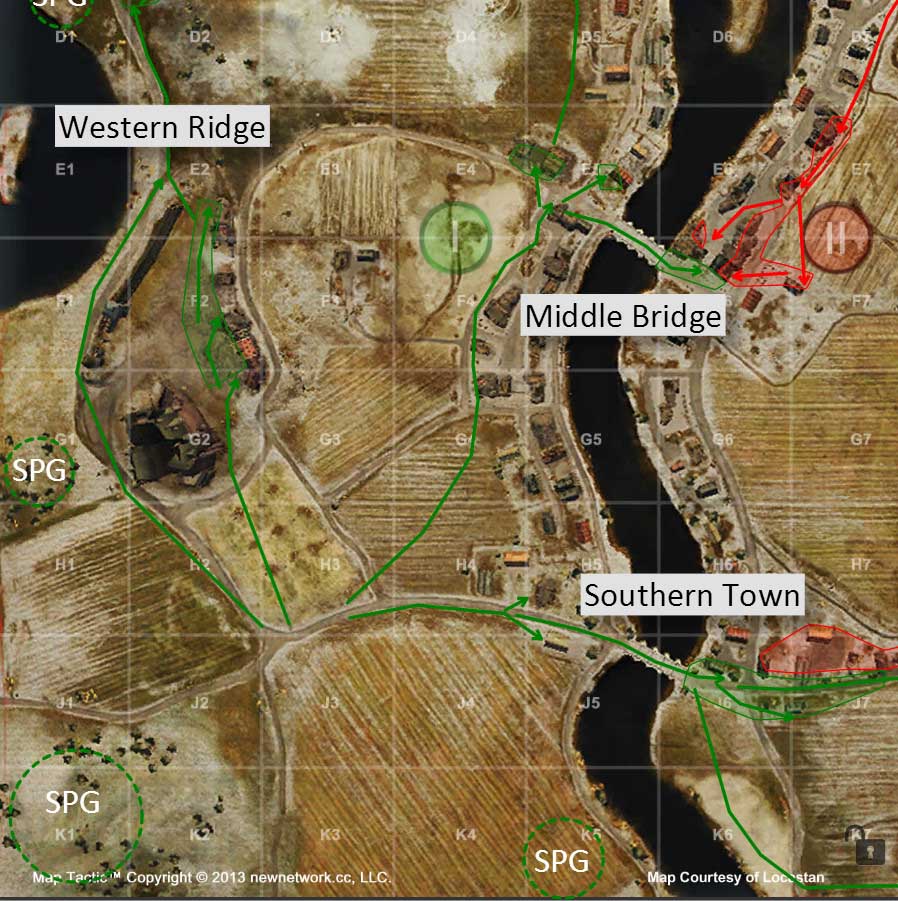
Much like the northeast section of the map this area sees little action unless the green team loses the southern flank. Starting off the green team has a great defensive position around the southern bridge with the F2/G2 area overlooking(as well as the K1 forested hill) the bridge. This leaving moving north for most tanks if you do not plan on pushing east across the bridge.
The central route will bring you close to your flag and having 1-2 tanks here to spot/provide flanking shots for north or south is vital. It is very difficult to move north past the bridge without being seen however so sticking below that main road is best unless you have good camouflage.
Like the red team the green team also has a quick route to dart up to block the enemy team from pushing across the northern bridge without being seen. If you have a zippy scout tank taking the 4/5 line up will light up a good chunk of the team and then allow you to dart into B4 cover.

At first glance you will notice the large river dissecting the map down the middle. This river is not passable(you can cross from D7 into D6 onto the island but it is pointless) unlike other maps. The buildings and cover flanking both sides of the river are valuable to each team but are biased as to how helpful they are depending on which side you start on. The southern spawn(green team) has the better cover on the south part of the river while the northern spawn(red team) has the better cover north of the river on their side. Knowing this will save you from stupidly pushing to far south on the red team from F6 to H6 or from pushing to far north in a non-scout tank from E5 to B5.
Both flags are also located in the center of the map and appear to be very unprotected. You might be thinking, “why hasn’t he mentioned the flags yet?” Well….for the most part the flags are largely useless for this map unless you are down to a handful of tanks on each side. With the flags being in the open in the center of the map they are virtually suicide until later on in a match. It is best to just ignore them and focus on other important things that have guns pointing at you.
 Map Strategy: Steppes - World of Tanks Guru
 Map Strategy: Swamp - World of Tanks Guru
 World of Tanks Guide - M5 Stuart
 Weak Spot Guide: VK 72.01 (K) - World of Tanks Guru
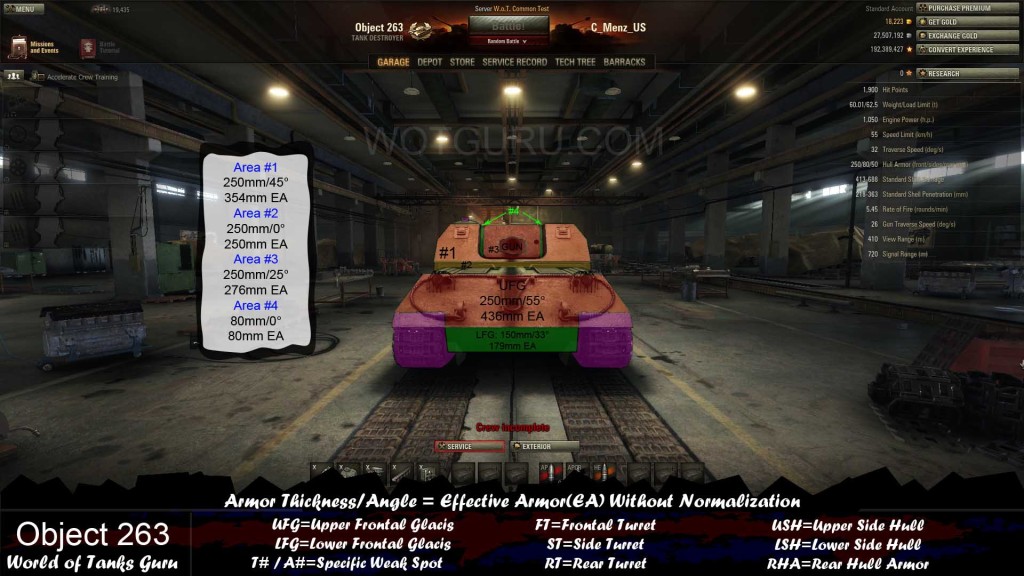 Weak Spot Guide: Object 263 - World of Tanks Guru