The tier 10 British heavy tank the FV215b went from being a very flimsy tier 10 heavy tank prior to the 8.2 update to now having a decent amount of protection on its upper frontal glacis and turret. But do the glaring weak spots ruin this increased armor?
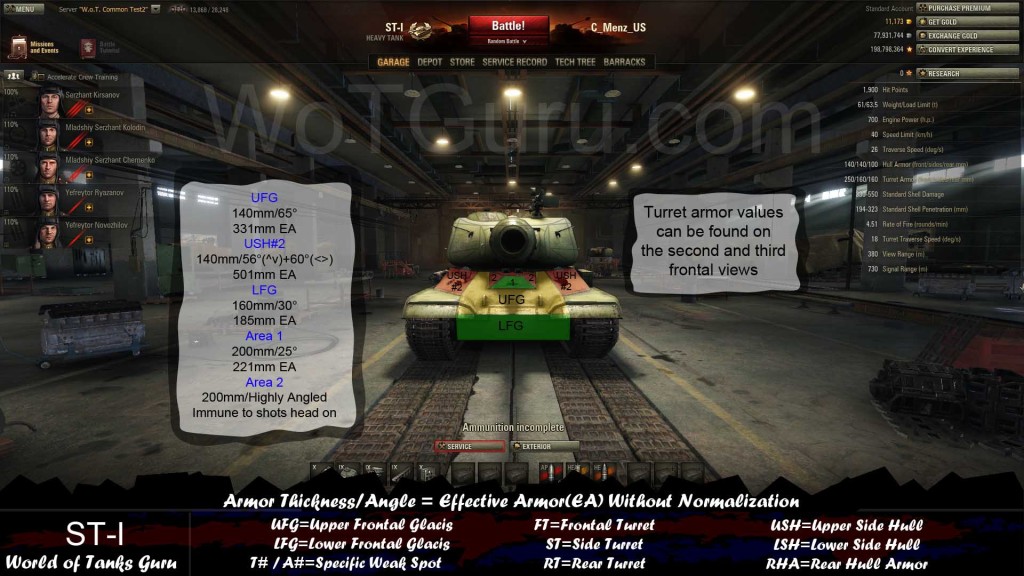
The index at the bottom of each picture describes a few abbreviations used and also the format in which the armor details are described in. Effective Armor (EA) refers to the overall effectiveness of the armor without normalization.
The armor values are presented in three different scenarios for the angled view of the tank.15° frontal(75° side), 25° frontal(65° side), 35° frontal(55° side), and 45° frontal(45° side). Due to the complexity of the FV215b’s turret I also included areas listed as “T#” that refer to the turret armor while “A#” refers to specific hull locations.
Frontal View
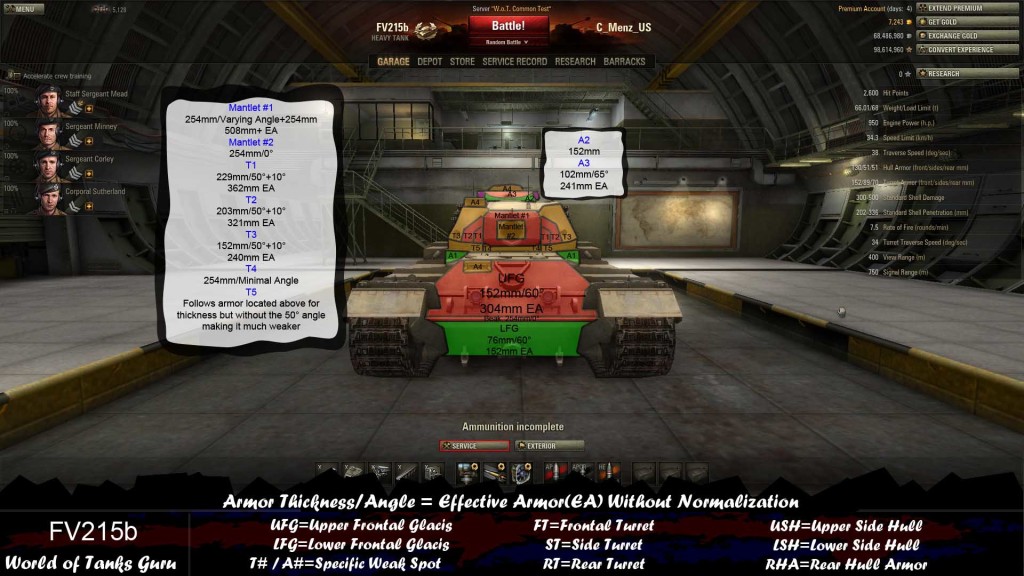
Frontally the FV215b has overall decent armor now since the 8.2 update when it’s armor received signifcant changes. The UFG and turret are now much stronger frontally and provide decent protection.
UFG
The upper frontal glacis is 152mm thick and is at 60° making it capable of bouncing a decent amount of rounds. The armor values are 304 EA / 265 AP. The driver and fuel tanks are damaged by penetrating hits.
LFG
The lower frontal glacis isn’t any better than the upper frontal glacis since it is a mere 76mm/60°. This gives this location only 152 EA / 133 AP and much like the upper glacis the driver and fuel tanks can be damaged here.
A1
These two areas underneath the turret are parts of the side hull armor and are only 102mm thick. The angle doesn’t add enough armor value to it to make a difference.
Mantlet #1/#2
The strongest part of the FV215b is the mantlet but doesn’t exactly cover much of the frontal turret…. Mantlet #1 consists of the 254mm mantlet armor and the additional 254mm of frontal turret armor making it immune to anything that is thrown at it. Mantlet #2 only consists of the 254mm mantlet with no additional armor making it capable of being damaged.
T1/
T2/
T3
These locations vary in thickness(getting thinner the further back) but stay roughly at a 50° vertical and 10° horizontal angle. The T1 area is the thickest at 229mm, T2 is 203mm, and T3 drops down to 152mm. Since the armor changes these areas now provide excellent protection against tier 10 tanks aside from the outer T3 area.
T4/T5
The bottom part of the turret is also easy to damage since the majority of the angles found above these areas are thrown away. T4 consists of the 254mm frontal turret armor and has minimal angles making it able to be damaged if you are stuck in a face hugging situation. T5 consists of the 229mm/202mm/152mm armor corresponding to the armor values above the location. The T5 does see the angle increase the further towards the side of the turret you get from this view.
A2/A3
The commander’s hatch on top of the FV215b is large but now more heavily armored. The armor around the bottom part in A2 is 152mm thick but minimally angled(besides the outer edges). The A3 area drops down to 102mm thick but has a 65° angle on it making it much more difficult to damage(especially at close range).
A4
Various view ports located around the FV215b that only do crew/module damage and no HP damage.
Angled View
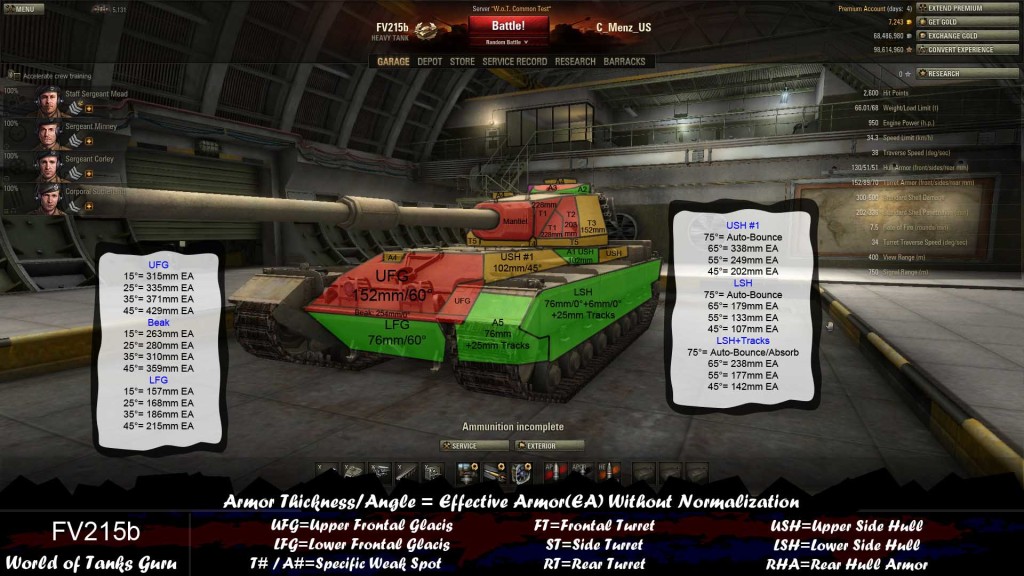
An angled FV215b does gain enough armor on it’s UFG to bounce quite a few rounds….However at the same time it opens up its very weak side armor.
UFG
The upper frontal glacis gains a considerable amount of armor with angling. Simply avoid shooting here if the angle is to much for your tank and aim elsewhere.
15°= 315 EA / 289 AP
25°= 335 EA / 292 AP
35°= 371 EA / 324 AP
45°= 429 EA / 375 AP
LFG
Even with angling the lower frontal glacis remains an easy weak spot to exploit
15°= 157 EA / 131 AP
25°= 168 EA / 146 AP
35°= 186 EA / 162 AP
45°= 215 EA / 187 AP
USH #1
This area on the upper side hull is where the engine is located(right infront of turret) and is difficult to damage if the FV215b driver doesn’t over angle. If he does however and the additional angle drops below 60° then it becomes vulnerable to T9+ tanks.
75°= Auto-Bounce
65°= 338 EA / 286 AP
55°= 249 EA / 222 AP
45°= 202 EA / 186 AP
USH
102mm/0° makes these areas of the FV215b an open wound to simply point and click at if they are presented to you without steep angles on them.
LSH
The lower side hull is still only 76mm/0° but has a whopping 6mm of spaced armor added on top.
75°= Auto-Bounce
65°= 179 EA / 152 AP
55°= 133 EA / 118 AP
45°= 107 EA / 99 AP
LSH+Tracks
75°= Auto-Bounce/Absorb
65°= 238 EA / 202 AP
55°= 177 EA / 157 AP
45°= 142 EA / 132 AP
Turret
See the frontal view for more specific details about the turret armor. From this view the only thing that changes are the angles for the turret cheeks(T1-T3) which become much easier to damage.
A5
The frontal track wheel area located here is very easy to damage and takes out the additional 6mm of spaced armor added if you shoot the LSH.
Side View
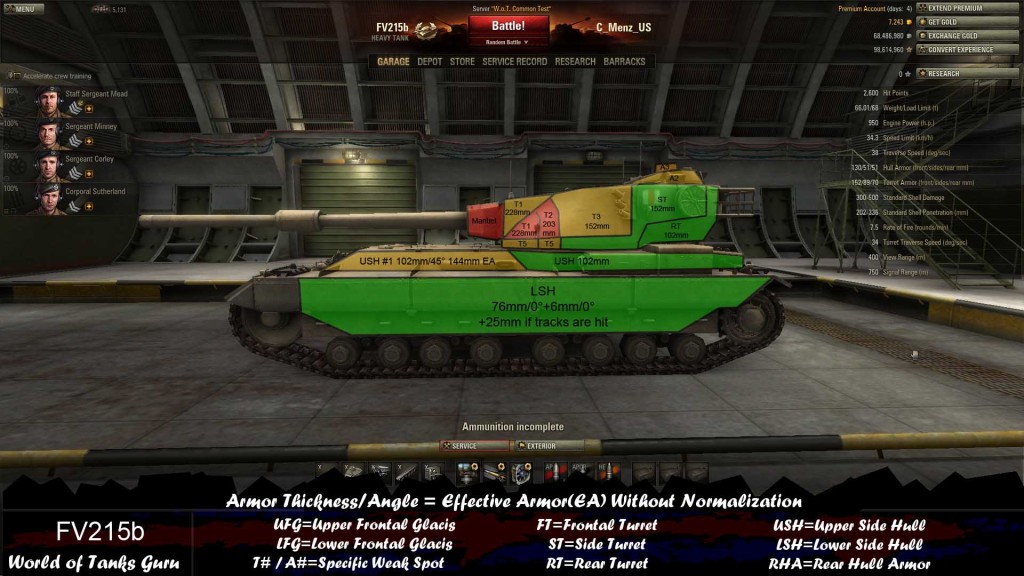
The side of the FV215b is nothing special and is very easy to damage. Simply avoid the mantlet andhe frontal/side parts of the turret at have angles on them. The commander’s hath becomes slightly more difficult to damage since the 152mm armor spans the entire part and has a decent amount of angling added to it.

 Tank Guide: T95 - World of Tanks Guru
 Weak Spot Guide: O-I Experimental - World of Tanks Guru
 Weak Spot Guide: Type 5 Heavy - World of Tanks Guru
 Weak Spot Guide: Pz.Kpfw. II Ausf. J - World of Tanks Guru
 Weak Spots Guide: Type 59 - World of Tanks Guru