The tier 9 medium E-50 and the tier 10 medium E-50 Ausf. M are largely the same tank aside from some buffs the Ausf. M model receives since it is a tier higher. Armor wise both are virtually identical aside from the shorter and more elongated hull of the Ausf. M and engine/transmission being moves to the rear of the tank’s hull. Looking over the basic listed values of the armor scheme the hull armor is 150mm/80mm/80mm with good angles on the frontal hull. The turret armor for the E-50M-Turm Ausf. F turret which is the top turret for the E-50 and the only turret for the E-50 Ausf. M is listed as 185mm/80mm/80mm with an additional 120mm on the frontal mantlet armor. For a medium tank the E-50 series has above average armor for the frontal portion of the tank.
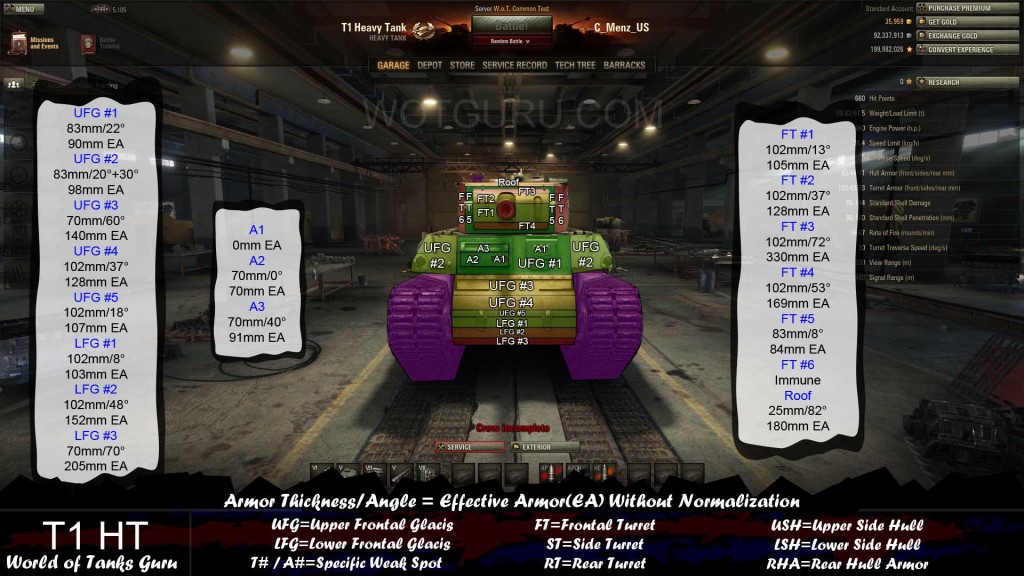
The index at the bottom of each picture describes a few abbreviations used and also the format in which the armor details are described in. Effective Armor (EA) refers to the overall effectiveness of the armor without normalization.
The armor values are presented in three different scenarios for the angled view of the tank. 25° frontal(65° side), 35° frontal(55° side), and 45° frontal(45° side).
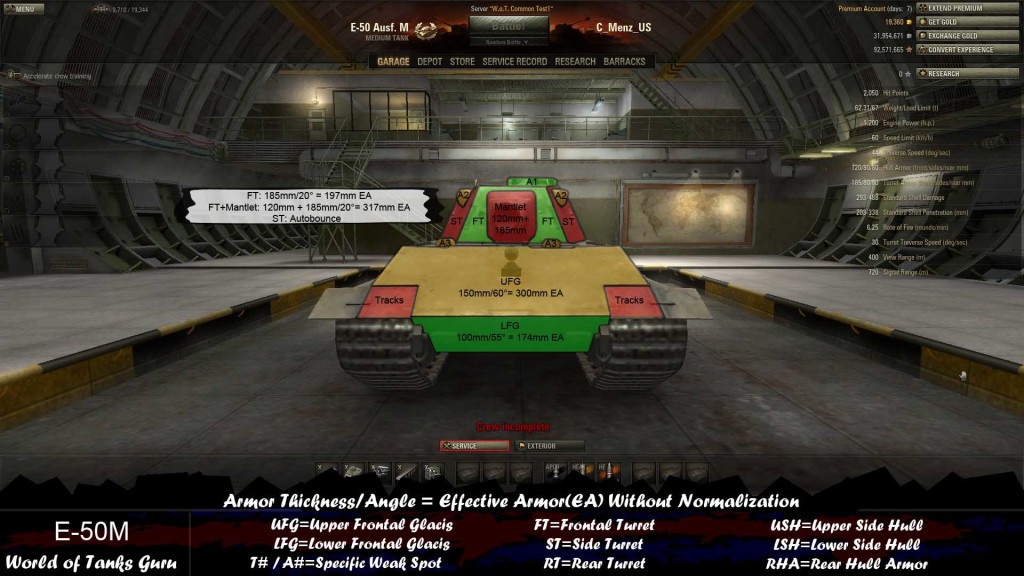
Frontally the E-50/E-50M is much tougher than the standard medium tank due to it’s 60° and 55° slopes on the upper and lower glacis. However the frontal turret armor and lower hull are still weak against 200mm+ penetration guns.
The Upper Frontal Glacis(UFG) is 150mm/60° making it tougher for the lower tier tanks facing the E-50/E-50M. Due to it only being 150mm if the angle is negated due to terrain or another situation the armor becomes much easier to penetrate.
The Lower Frontal Glacis(LFG) is also 100mm thick and at a 55° making it weaker than the UFG however at closer ranges it becomes much harder to penetrate due to it’s angle increasing.
The Frontal Turret is 185mm/20° making it tougher than the lower glacis since it is 197 EA / 192 AP. Since both of these tanks face many tanks that easily surpass 200mm of penetration aiming at the frontal turret armor that doesn’t include the mantle is a viable option.
From a head on approach the Side Turret is at such an angle that auto bounces regularly take place and shooting at this area is not suggested.
The commander’s cupola has roughly 150mm of effective armor on it making it easy pickings for almost every tank facing the E-50/E-50M.
These rangefinders hanging off each side of the turret aren’t exactly weak spots and won’t do HP damage unless you are firing from the side and hitting the turret armor behind them.
HP damage at the two view ports above the upper frontal glacis won’t do HP damage but will kill the driver. Good for any scouts looking to make an E-50 driver waste a med-kit.

Once an E-50/E-50M starts to angle it’s armor values improve drastically for it’s frontal armor but at the cost of exposing it’s side armor the more it angles. The side armor being only 80mm thick means that once it drops below the 70° auto bounce angle they become vulnerable on the non-spaced armor locations.
This part of the E-50/E-50M will be the most difficult to penetrate once it starts to angle.
The Upper Side Hull is a mere 80mm thick at a small 15° making it easy to penetrate even with some heavy angles added to it.
The 20mm spaced armor for this area is at 80° making it much harder to penetrate. Due to over match and it only being 20mm thick shells will still penetrate here but will find it difficult to then go through the hull armor.
This part of the spaced armor is still 20mm thick and is not angled at all making it much easier to penetrate than the spaced armor located above it.
The Lower Side Hull like the USH is only 80mm thick but is not angled making it the weakest part of the side armor.
The Frontal Turret and Side Turret armor if angled can be difficult to penetrate. If they are presented without any additional angles they become easy to penetrate using their base armor values found on the other views on this guide.
The commanders hatch(A1) and the driver view ports(A2) are still viable options from this view. The small A3 location can be used to do engine damage but is very small and hard to hit so only use it if you are confident you will land the shot.
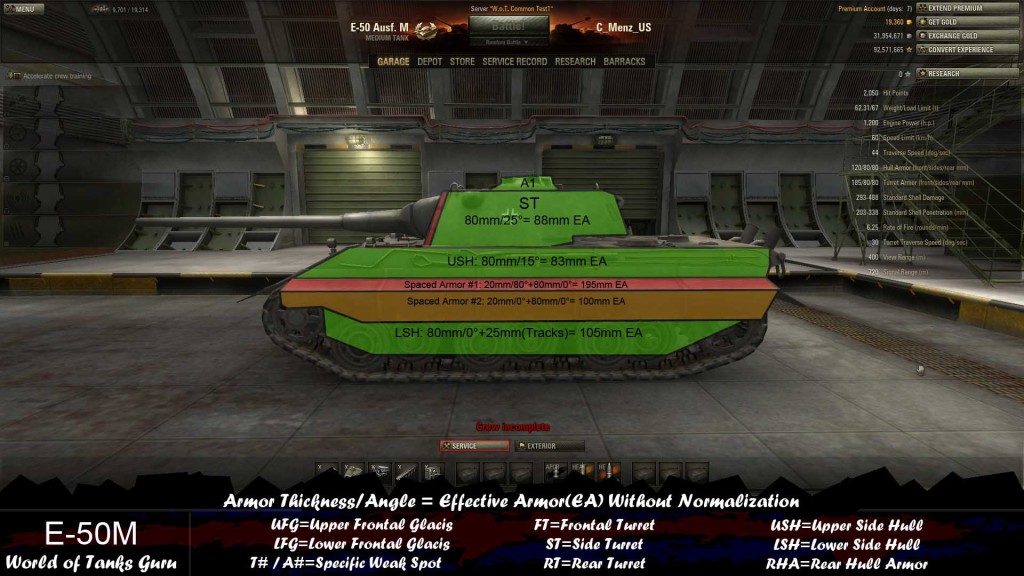
The side of the E-50/E-50M is basically auto-penetrate for any tank normally facing it besides two spots. The Spaced Armor #1 area is still somewhat difficult to penetrate for scouts or smaller tanks and also the red strip on the front part of the turret is overlapping armor which is 185mm thick and produces a lot of odd bounces even for higher pen guns. Aside from those two area the rest of the side armor is easy going.
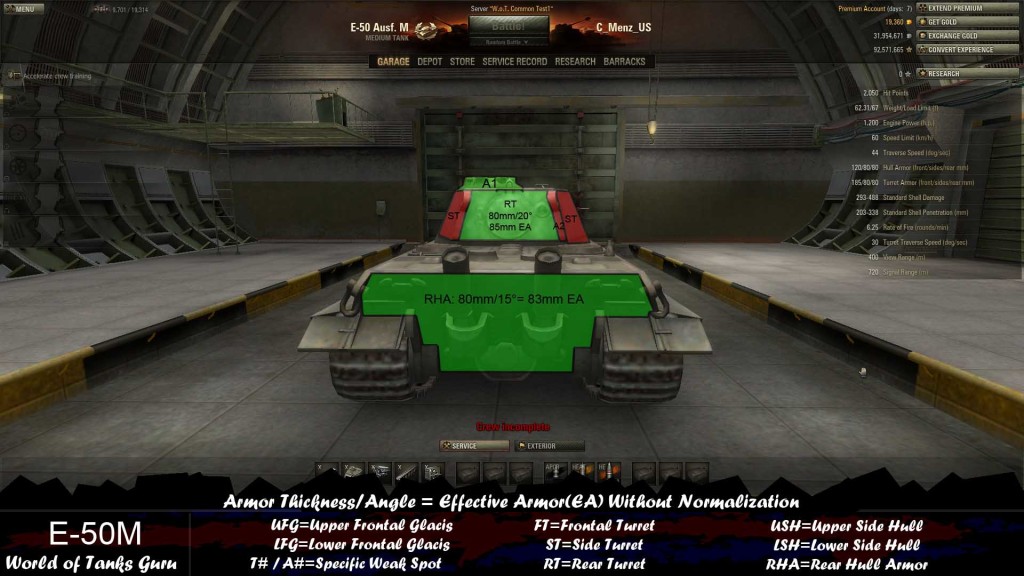
Much like the side armor the rear armor is also very easy to handle on the E-50/E-50M. The only area to keep in mind are the side turret plates which are visible but are at a very steep angle making bouncing highly likely. Also the A2 area which has the strip of armor protruding from the rear of the turret can produce some odd bounces if you are trying to shoot through it from the back but it’s such a small area it can be avoided.

 Weak Spot Guide: Renault FT
 Weak Spot Guide: M4 Sherman - World of Tanks Guru
 Map Strategy: Murovanka - World of Tanks GuruWorld of Tanks Guide - Churchill I
 Tank Guide: T95 - World of Tanks Guru