The E-100 is a double edge sword for it’s drivers when it comes to the armor. The top half of the tank is very well armored(aside from the turret sides/rear if they aren’t angled) while the lower half is not as well protected. This guide will go over the effective armor of the E-100 from a few different angles and point out a few other small spots to aim for in each situation.
The index at the bottom of each picture describes a few abbreviations used and also the format in which the armor details are described in. Effective Armor (EA) refers to the overall effectiveness of the armor without normalization.
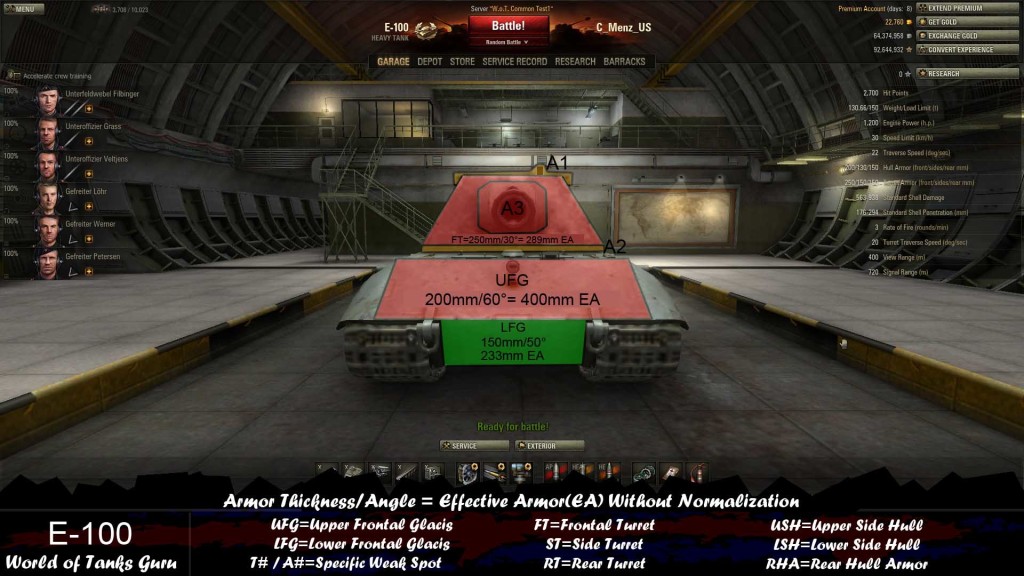
Frontally the E-100 is no slouch when it comes to armor besides the lower frontal hull(LFH) which really hinders it’s capability of deflecting many incoming rounds when facing directly at an enemy.
The Upper Frontal Glacis is 200mm thick and at 60° making it quite difficult to penetrate since it’s effective armor is 400mm . Generally it is best to simply avoid shooting here and go for the lower glacis.
The Lower Frontal Glacis is 150mm at 50° making it a gigantic weak spot for most tanks facing the E-100 since it’s effective armor is only 233mm. Do not shoot here however if you are within 50m of an E-100 as the angle is greatly increased and you will auto-bounce.
The Frontal Turret armor is an impressive 250mm thick at a 30° making it a tough nut to crack. It’s effective armor is 289mm making it weaker than the Upper Frontal Glacis and vulnerable to gold rounds or tier 10 tank destroyers. In all other situations though its best to avoid shooting the frontal turret.
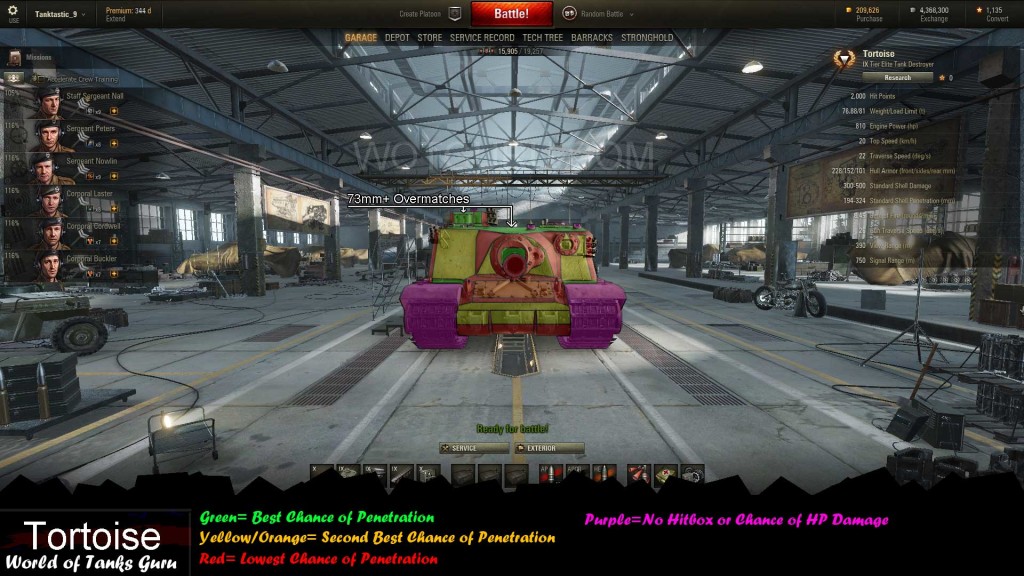
The view port sticking up out of the top of the turret is easy to damage however does not do HP damage the majority of the time. The “police bar” running along the top used to be a very exploitable weak spot as well but has since been fixed. Shooting at it will not get you very far in doing HP damage.
This flat piece of armor running along the entire bottom portion of the E-100’s turret is a weak spot for those with 250mm+ penetration. The armor here is no as weak as most other turret rings on other tanks but rather hovers around 245mm effective armor. Useful for those times when you are to close to shoot the lower frontal glacis.
The turret mantlet and gun are very tough and should be avoided.
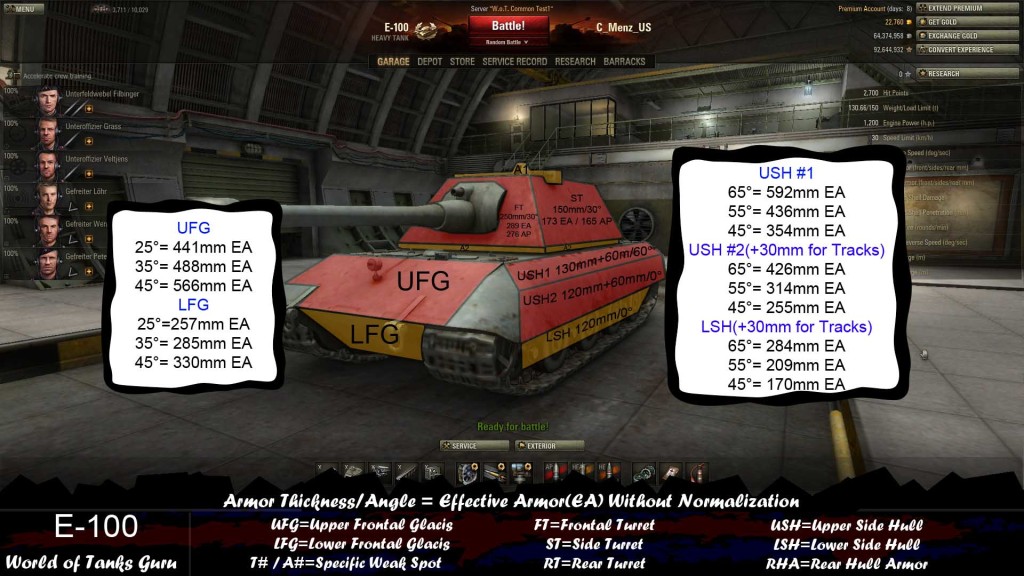
An angled E-100 much like the E-75 is a very difficult opponent to face and it’s weak spots that are easy to hit from the front or sides become much tougher. The armor values are presented in three different scenarios. 25° frontal(65° side), 35° frontal(55° side), and 45° frontal(45° side).
The Upper Frontal Glacis becomes even more badass when angled.
This once easy to penetrate weakspot becomes a much harder place to penetrate as the angle increases. Still remains a viable weak spot however at lesser angles.
The Upper Side Hull (#1) is the most difficult place to penetrate the side armor as it is the side 130mm/0° armor with a 60mm/60° spaced armor plate on top of it.
Moving down on to the Upper Side Hull (#2) it becomes slightly easier… However the armor is still 120mm/0° with a 60mm/0° spaced armor plate on top of it along with track armor.
The Lower Side Hull is simply 120mm/0° with additional track armor with no spaced armor on top of it.
If either the frontal or side armor of the turret angled it becomes very difficult to penetrate due to it’s thickness and angles already present. Avoid shooting the FT like before, and only shoot the ST if it is not angled.
Same as the frontal view both locations can be penetrated but HP damage is highly unlikely. The view port is your best chance but typically only crew/module damage occurs.
Depending on where the turret faces this location can be penetrated with 250mm+ penetration guns if this location is not angled.
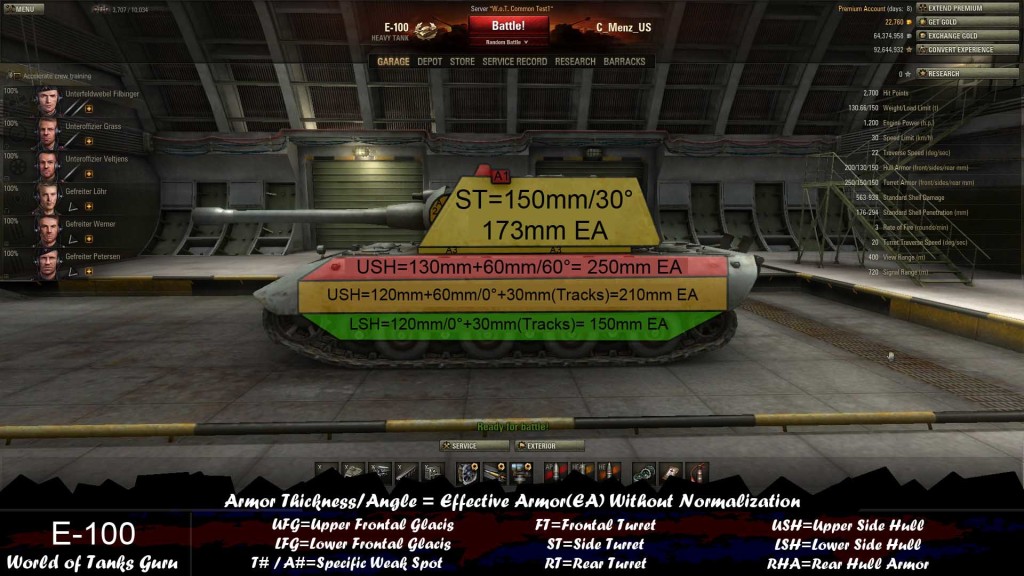
The overall armor of the E-100’s side armor is rather poor while facing the typical tier 9-10 guns on it’s opponents but there are still a few spots to hesitate shooting at.
The top portion of the USH is 130mm/0° covered by 60mm/60° spaced armor making 240mm EA. Tier 10 tanks may bounce with a very low penetration roll and tier 8/9 tanks struggle a bit more against this area but it is easy enough to just aim at the weaker armor around here. The lower portion that is 120mm/0° covered by 60mm/0° spaced armor/track armor making it 205mm of EA armor which is easy for most tanks facing the E-100 to penetrate.
The Lower Side Hull is the weakest part of the side armor of the E-100 since it is simply 120mm/0° with no spaced armor(and track armor) allowing low penetrating guns to cut through whereas in other locations they cannot.
The Side Turret armor is 150mm/30° making it 173mm EA / 165mm AP. Very easily damaged while flat.
These locations become incredibly difficult damage even for crew/module damage from this viewpoint.
The small gap behind the gun mantlet can be damaged by guns with over 180mm penetration.
The turret ring section on the side is still roughly 245mm of effective armor making it stronger than the side and turret armor around it. Still damageable by tier 10 tanks and there if you absolutely need it but not the best option available.
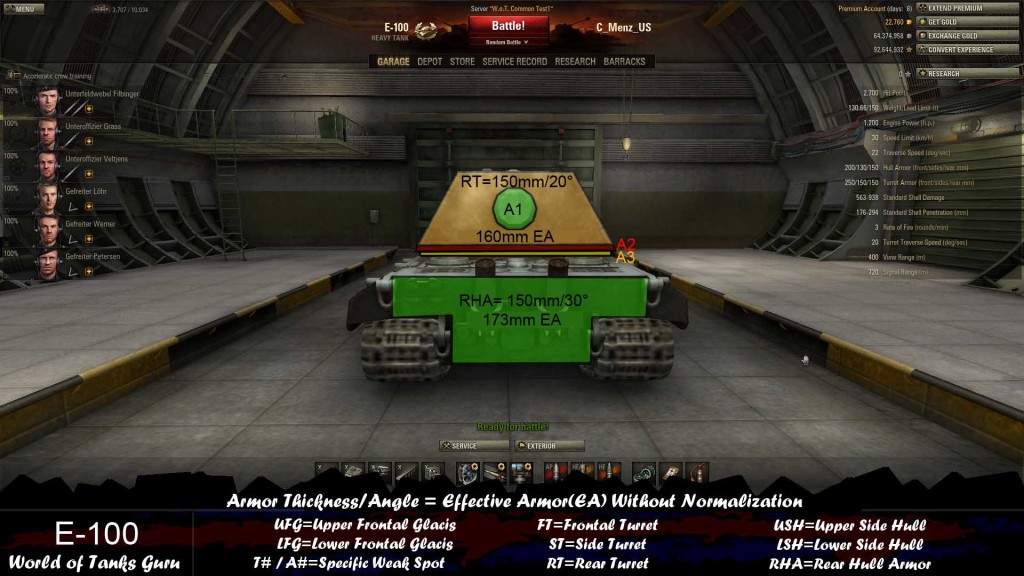
The backside of the E-100 is very easy to handle. It’s Rear Hull Armor(RHA) is 150mm/30° only making it 176mm EA.
The Rear Turret armor(RT) is only 150mm/20° making it 160mm EA.. I included it as orange since the angle on it will most likely be shifting and as the angle increases the armor will become harder to penetrate for lower penetration guns.
A1(circle on rear of turret) is easier to damage than the surrounding turret armor and tanks such as scouts should aim here. A2 on the other hand is difficult to penetrate since it is a highly angled plate leading the A3 which is the 245mm effective turret ring armor should be avoided only because the armor around it is much easier to damage.

 World of Tanks Guide - 59-16
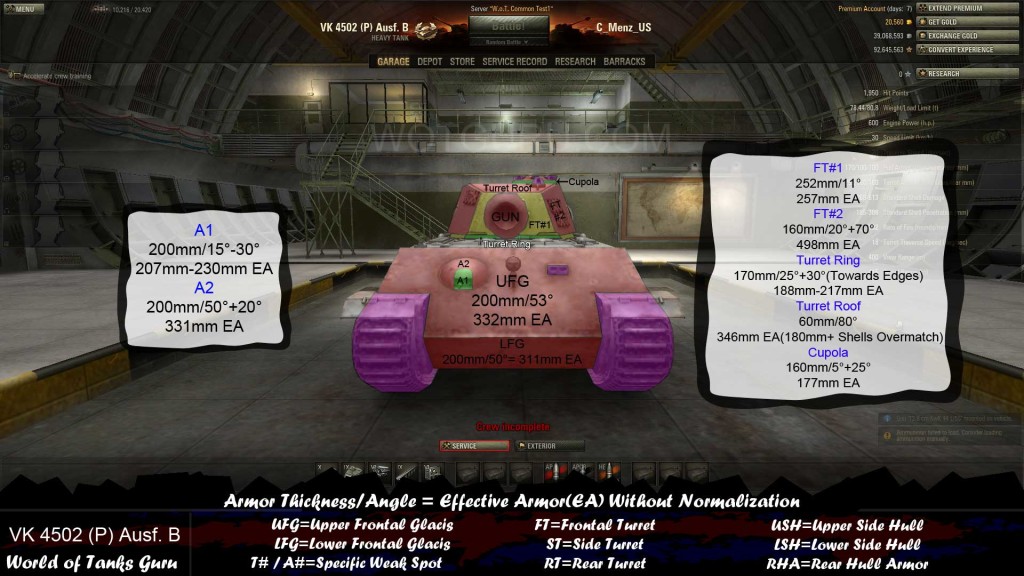 Weak Spot Guide: VK 4502 (P) Ausf. B - World of Tanks Guru
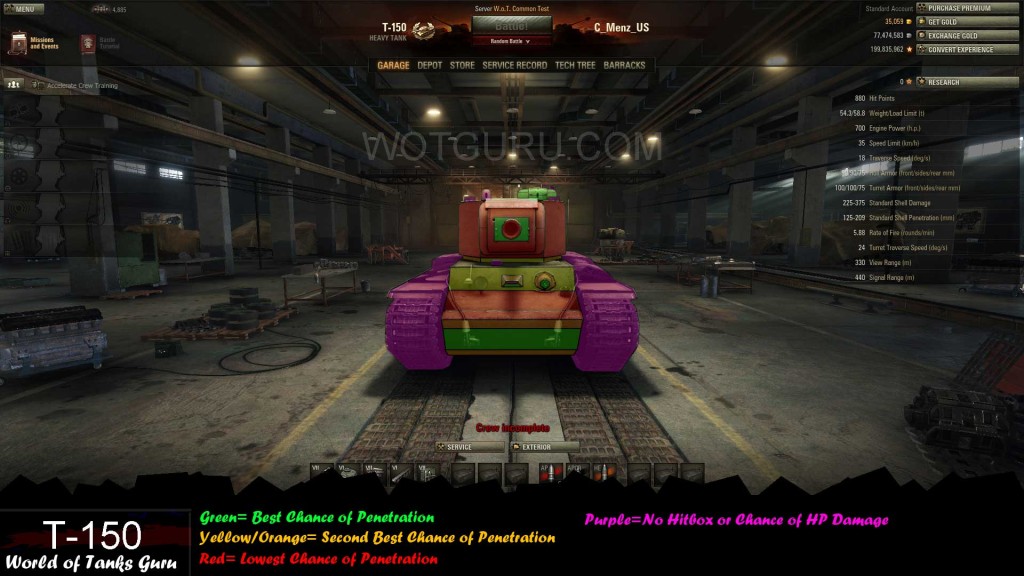 Weak Spot Guide: T-150 - World of Tanks Guru
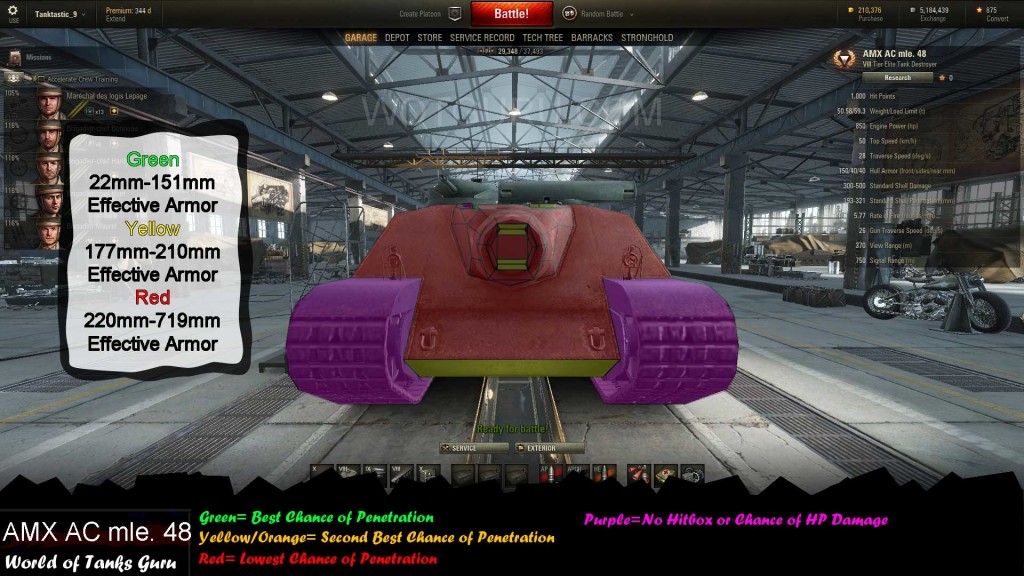 Weak Spot Guide: AMX AC mle. 48 - World of Tanks Guru
 Tank Guide: M24 Chaffee - World of Tanks Guru