This guide to Divinity II: Ego Draconis contains a complete description of the path which awaits all those who dare to become a Dragon Knight. There's a description of the story and side missions and a list of achievements. Each location you will visit is shown on a map. The whole guide is built in a clear and uncomplicated way, so you shouldn't have any problems with using it.
Artur "Arxel" Justynski
Translated to English by Jakub "cilgan" Lasota
Naberius M2.6(1) - this means that you can find Naberius in the Old Cave (map M2.6) in the spot marked with 1.
Not every character/place is marked on the map - only those most important.
Brown colour - quests
Blue colour - maps and specific points on the map
Orange colour - characters
Green colour - items

Passages to other locations.

Chests (also the golden ones).

Keys.

Books etc.

Normal teleport - it allows you to choose the destination point from those that you have already visited.

Special teleport - it works only in one way and you can't choose the destination point.

Important targets (for example - magician/archer/warrior in Damian's Flying Fortresses).

A zone in which you can't turn into a dragon.
You can create your creature in the early part of the game. Later you will get your own necromancer in the Battle Tower. Additionally you'll receive a trader who sells better parts for your creature.
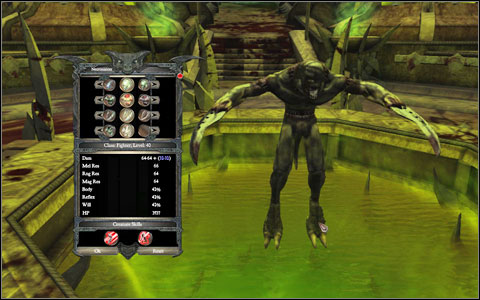 Creature creation screen
Each of the four body parts is responsible for different parameters:
Head: creature's class, skills;
Torso: damage resistance;
Claws: health, damage;
Lower limbs: stamina, reflex, magic resistance.
Try to update your creature systematically, it's very useful in battle. It effectively draws enemy attention and depending on the class, attacks from afar or in close quarters.
The Farglow Connection M1
Chasing the Dragon M2
To Lay a Ghost to Rest M2.1(1)
Looking for Lovis M2(1)
Paper Trail M2(2)
Dragon No More M2.11(1)
Hall of Echoes Bound M2.11(4)
The Prophecy M3(1)
Candles in the Wind M3(4)
The Second Coming M3(4)
Breaking an Entry M3(4)
What's in a Name? M3.3(6)
Laiken in his Lair M3.3(9)
Hall of Echoes Bound - Revelation M4(3)
Hall of Echoes Bound - X marks the Spot M5.2(5)
Reaping the Seeds M5.2(3)
Hall of Echoes Bound - Lock and Key M5.20(2)
Hall of Echoes Bound - Come to no Harm cz.1 M5(13)
Hall of Echoes M5(18)
Hall of Echoes Bound - Come to no Harm cz.2 M6
Band of Brutes M2.1(7)
For a Pound of Flesh M2.1(7)
The Fugitive M2.1(7)
The Greater Hunger M2.1(7)
Lovis' Loot M2(4)
Saving the Bacon M2.1(5)
Bad Blood M2.1(10)
A Private Delivery M2.1(14)
Feast or Famine M2.1(8)
Skeletons in the Closet M2.1(14)
High and Dry M2.1(13)
A Hunting We Shall Go M2.1(1)
Into the Bandit's Den M2.1(1)
Vigor Mortis M2.6(1)
Lost Soul M2(2)
Couple Trouble M2.9(1)
An Axe to Find M2.9(2)
Daylight Robbery M2.9(4)
The Temple of Doom M2.9(5)
Method or Madness M2(5)
A Tale of Two Tomes M2.11(2)
In Cold Blood M2.11(3)
The Hunt For Red Ore M2(9)
Lost for Words M2(12)
Stuck in a Hole M2(14)
From Soup To Nuts M3(2)
The Old Ghost and the Sea M3(3)
Ghostbuster M3(5)
The Writing on the Whale M3(12)
Man Overboard M3(14)
Legend of the Ancient Mariner M3(14)
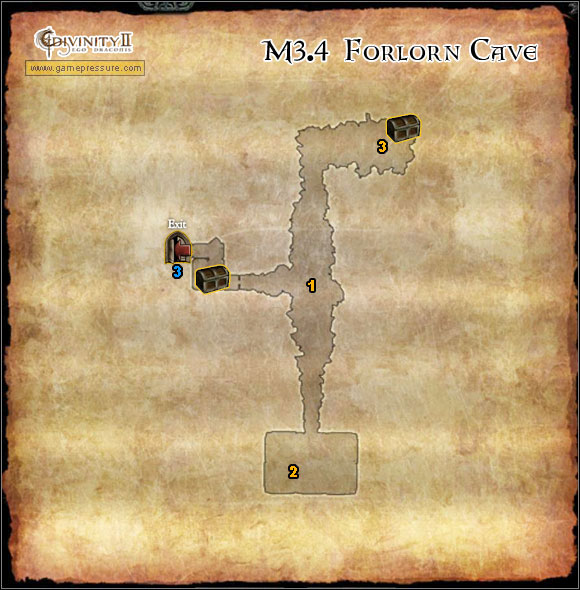
Sibling Rivalry M3.4(1)
Out on a Limb M4(Jonelath)
Risk Life for Limb M4(Jonelath)
The Book of the Dead M4(Igor)
Black Ring's Ring M4(Igor)
Allan Brew Confidential M4(Allan)
Wisdom in a Bottle M4(Allan)
Borrowed Book M4(Barbatos)
An Alchemist's Apparel M4(Barbatos)
Apprentice and Adversary M4(Kenneth)
By the Book M4(Kenneth)
Dear John M4(Hermosa)
Murder for Myrthos M4(Hermosa)
Short Supply M4(Wesson)
Riging Raze M4(Wesson)
Delicate Affairs M4(Radcliff)
Red Ore Alert M5(1)
Grave Robbers M5.5(2)
Sight For Sore Eyes M5(4)
Stood Up M5(1)
Down the Hatch M5(10)
Thorn in the Side M5(14)
Between Troll and a Hard Place M5(13)
The Runes of Wrath M5(15)
A Hunting We Shall go Again M5(13)
A Shaman's Ransom M5(13)
On The Road Again M5(13)
Death Of a Champion M5.13(2)
Much Ado About Goblins M5.13(3)
Divine Descendant M5(15)
The Horror of High Hall M5(15)
A Guild without a Master M5.1(1)
Mysterious Cave M5(10)
Close to the Bone M5.28(1)
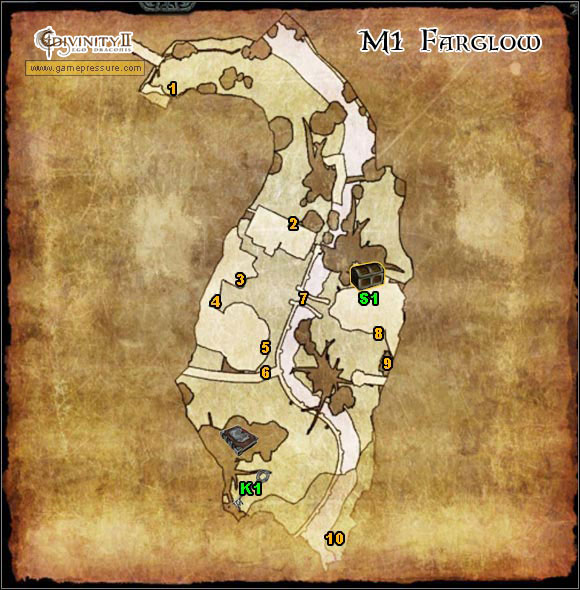
1. Rhode / Marius
2. Edmund
3. Aravir (archery teacher)
4. Alberic (magic teacher)
5. Gawain (melee combat teacher)
6. Sonja
7. Isobel
8. Tiresias (trader)
9. Gerald (trader)
10. Morgana / Toral
K1 Key to chest S1
After talking with Rhode M1(1) you will be sent to the town with a mission to learn how to become a Dragon Slayer On your way you will meet Edmund M1(2), who will send you to Morgana M1(14). She will perform the first part of the ritual, thanks to which you will learn the secrets of the dragons - their speech, weaknesses, powers and so on. The colour of your eyes will change - you will be marked as a slayer and will gain the ability to see the dead. You will also lose all your ability points. Your next target is Isobel M1(8), who will teach you the ability to read minds - one of the more useful in the game. Thanks to it you will be able to learn interesting things from other people, for example some hidden places, chests etc.
It's time to choose one of the three professions. Go to one of the local teachers - Aravir M1(4) will teach you how to be an archer, thanks to Albericow M1(5) you will become a mage, while Gawain M1(6) will turn you into a warrior. The choice is up to you. You can change your choice as many times as you want, but only during your stay in Farglow. After leaving the location, you won't be able to make any changes. Your choice gives you access to only one of the initial skills (you'll also get a weapon). Later on you can freely choose from the whole tree, but it's wise to choose in which way your character will develop at the very beginning. After completing the task, return to Rhode and Marius M1(1).
Prize: 50 experience points, 200 gold, 1 additional option.
Edmund M1(2), you will learn about the chest which you can find right next to one of the cottages. The key can be found on the training square right next to the goblins camp. Head to Sonja to unlock the passage and begin the training M1(7). In the chest you will find a vial that will increase your intelligence and a scroll that will increase your defence.
Afterwards take the skill book from the top of the mountain. Thanks to it you will increase your lockpicking skill. Open the chest by the magic teacher, Alberic M1(5). Inside you will find a weapon.
1. Rhode
2. Carlin (trader) / Toshan
3. Noryfundus (trader)
4. Christopher
5. Eugene
6. ZixZax
7. Bellegar
8. Sosostra
9. Dreavan
10. Filip / Jenae
11. Tagos Axe
12. George Gremory
13. Viper
14. Rothman
15. Yup'ik
16. Williams
P Parchment
M2.1 Village
M2.4 Secret Passage
M2.8 Derelict Tunnels
M2.9 Bandit Camp
M2.11 Maxos Temple
M2.12 New Miners' Dig
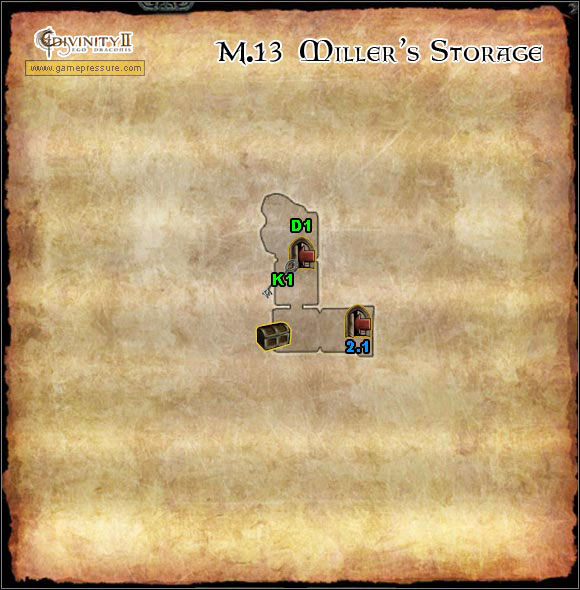
M2.13 Miller's Storage
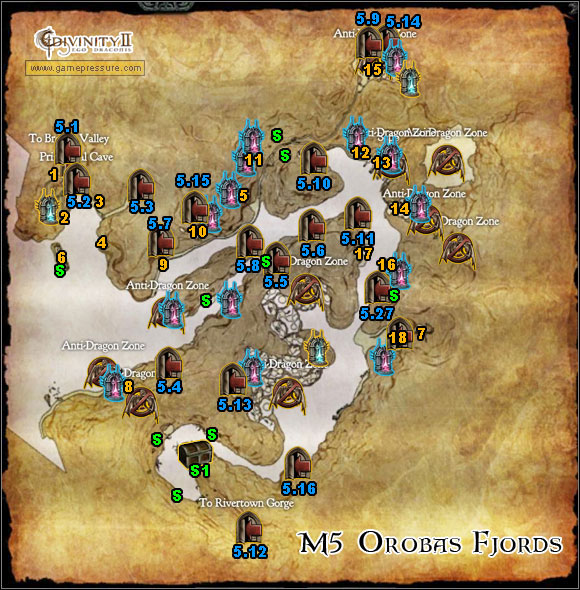
M5 Orobas Fjords
1. Rhode / Louis / Captain Rodney / Peavey
2. Keane / Wellesly
3. Merchant Lamotte (trader)
4. Arnold / Romon
5. Folo (trader)
6. Derk (blacksmith)
7. Ollie / Bermaid Elsa / Tim / Doctor Needleman / Locke (trader) / Brave Sir Robin / David
8. Richard
9. Elisabeth
10. Winthrop / Linda / Upton (miller)
11. Sean
12. Lock's wagon
13. Quincy
14. Lomax / Dana
15. Mouse
16. Hjalmar
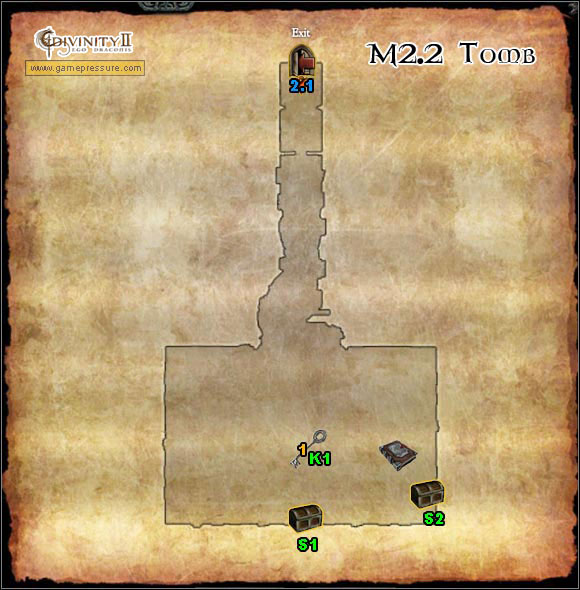
M2.2 Tomb
M2.3 Watermill Basement
M2.4 Secret Passage
M2.5 Lost Cavern
M2.6 Old Cave
M2.7 Forgotten Outpost
1. Arben Ghost
K1 key to chest S1
S2 Golden chest
M2.1 Village

1. Abanayabar (alchemist)
M2.1 Village
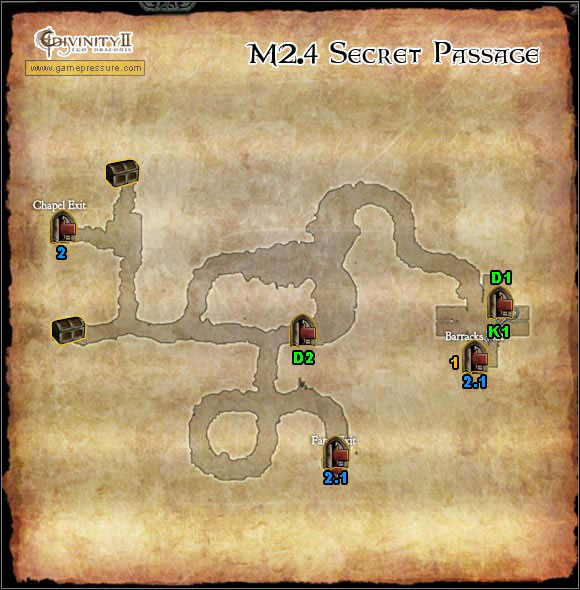
1. Martis
K1 key to door D1
D2 The door to which Martis has the key M2.4(1)
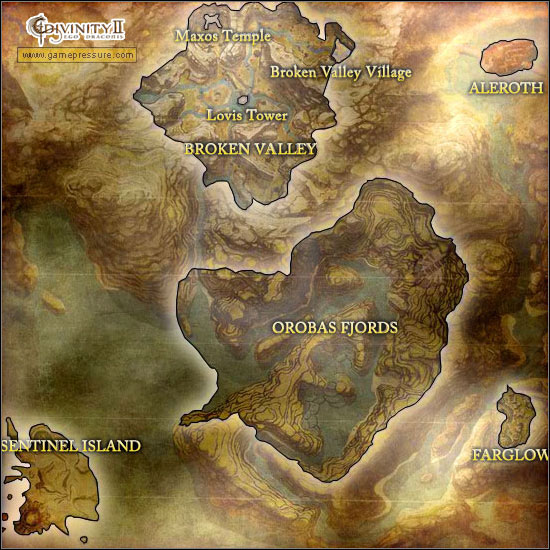
M2 Broken Valley
M2.1 Village
K1 Key to door D1
M2.1 Village
1. Naberius (necromancer)
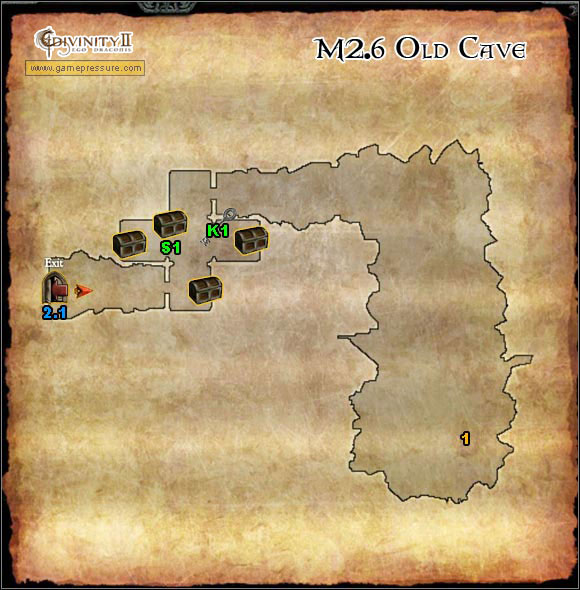
K1 Key to chest S1
M2.1 Village
K1 Key to chest S1
S2 Golden chest (more in Secrets)
M2.1 Village
1. Hallorn
2. Broken Valley M2
1. Clement / Sybille
2. Tagos
3. Martis (trader)
4. Rangar
5. Leda
6. Jagon
7. Christopher
8. Rum bottle
M2 Broken Valley
M2.10 Dark Cave
1. Jagon
M2.9 Dark Cave

1. Book
2. The Librarian
3. Abalam
4. Amdusias
5. Amdusias' lair
6. Damian
M2 Broken Valley
M3 Sentinel Island

An important place related with opening the teleport.

1. Crystal Skull
K1 Key to chest S1
M2 Broken Valley
K1 Key to door D1
M2 Broken Valley
Follow the path and you will reach a village. Your task is to ask the locals about the presence of a dragon. The villagers who can tell you something interesting are: Elisabeth M2.1(9), Ollie M2.1(7), Romon M2.1(4), Winthrop M2.1(10), Sean M2.1(11), Louis M2.1(1). After gaining enough information, head to the barracks to inform Rhode about what you've learned M2.1(1).
Prize: 500 experience points, 480 gold, 1 additional option.
You will receive a key to the tomb at the back of the chapel M2.1(2.2). Try to level up before you go there or else you'll probably die rather quickly. Inside, right after entering, some skeletons will await you in the corridor. In the end, Arben's Ghost will show up next to the altar M2.2(1). Defeat him in melee combat - look out for the skeletons he summons. You will receive a sword in reward. Return to Rhode, she'll be waiting for you in the altar M2.2(2.1). The leader will tell you that you're not yet ready to search for the last Dragon Knight - Talan. You'll hand over the sword and receive your prize.
Prize: 1500 experience points, 480 gold, 1 additional option.
After getting to the meeting place, Talan will appear instead of Rhode M2(1). After the conversation you will fall into sleep, during which you will change into a dragon. Fly straight while eliminating the enemy dragons. A little further you will face some ballistas. Once you're awake, Damian will show up and after a while Zandalor too. You will learn that Talana has given you her power and therefore you're no longer a Dragon Slayer, but a Dragon Knight. Head to Lovis' Tower M2(2), where you will find his ghost. He will give you some more info.
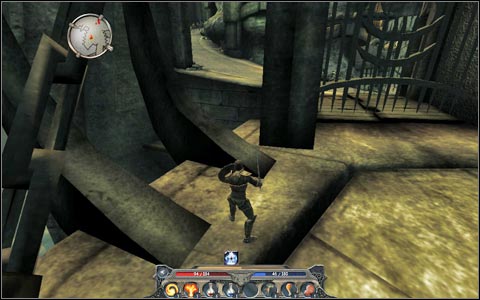
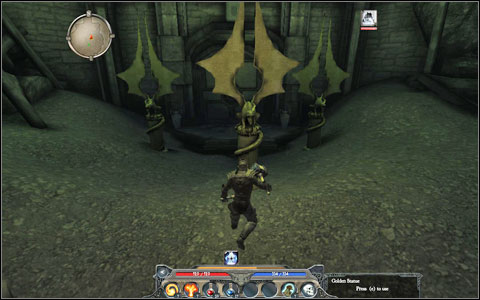
After fighting your way through the gate - I wouldn't suggest trying to cross the main bridge if your character's level not high enough - you'll have to jump a little. The gate is closed, so jump from the left side onto the outer part of the tower (look out for numerous groups of skeletons) and afterwards head to the wooden stairs on the left. Use the ladder and get to the very top. The next gate will be locked. To open it, you must activate the dragon monuments in the right order. After activating the first one (closest to the ladder) head to the next one - each dragon is looking at another monument - you have to activate them in the order in which they're looking at each other. After getting through the gate, choose the right path.
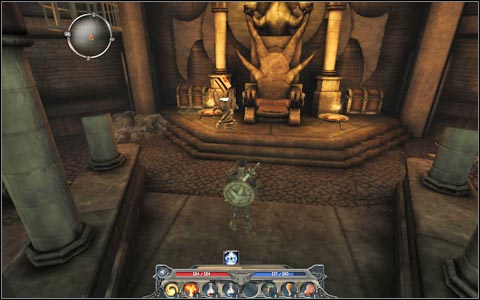
After getting down the next ladder, you'll notice a gate - if you can't defeat all the skeletons, just go through the door. On the left you will find a dead body covered in rubble. After searching them, examine closer with the Reveal Spell and a lever will appear - use it to go down a few levels, to Lovis' chamber. Approach the throne - you will have to answer some questions before being able to talk to the ghost. If you answer all of them correctly, you'll receive Monk's Lovis' Pedant. You can get the answers from books and villagers.
To whom was Lord Lovis born? - Anastas, queen of ancient Ferol;
Who does Lord Lovis serve? - Ouroboros, god of Dragons;
What was Lord Lovis' greatest victory? - The battle of Ten Thousand;
Who was the fiend that set in motion Lord Lovis' downfall? - Ba'al;
What was Broken Valley called when Lord Lovis still ruled supreme? - Temple Valley
Ask Lovis about everything, you will be sent to Maxos temple M2(2.11). You will also receive the key to the main gate.
Prize: 2250 experience points, 720 gold, 1 additional option.
Right before the temple M2(2.11) you will be welcomed by your old friends. After the conversation, you will regain Arben's sword and will be attacked by Marcus and his two minions - this can be quite a hard battle if your character isn't at a high enough level. After dealing with them, head to the temple gates. Talk to Zandalor.
To advance the plot, you must complete the Lost Soul quest M2(2).
Prize: 3000 experience points, 1080 gold, 1 additional option.
Received from: Book on the pedestal M2.11(1)

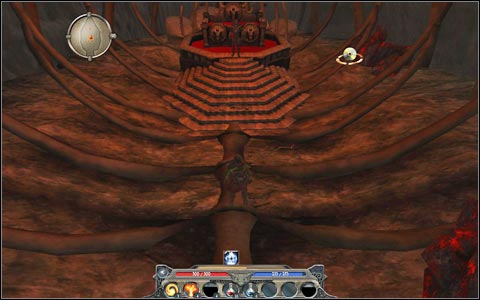
Inside there will be some riddles waiting for you. You can get some hints from books lying on the pedestal. If you can't figure out how to solve a riddle, just follow the guide. First, you have to use the vase (you will find it in the right corner of the room) - you'll open the gate that way. You will find yourself in a room with inactive portal. Each time you solve a riddle, three soldiers will attack. Approach the book on the left - the room filled with gold - you have to take the pumpkin. The middle book - a cup on the left. The book on the right - you'll have to jump a little here. Jump onto the lowest platform and go up using the ladder. Jump to the next one - here you'll find a lever which will activate another platform. Go to the other side, to another lever. It will activate the teleport below. You will get onto a platform with three levers. Press: 1-1-2-3, you'll get to the other side. The last lever will activate the portal in the main room - head there.
You will be moved to another room set. Talk with Sassan, he will tell you that there is a hard task ahead of you. Your destination is the passage on the other side. Fight your way through - you will be attacked by a group of soldiers in each room. You will find two hidden rooms and levers behind them. You'll open them with bricks sticking out of the wall. In the round room - after going through the previously blocked door - go all the way down, there you will find another book M2.11(1).
You have to defeat Amdusias M2.11(3), taking away his dragon form first. It'd be wise to equip a big amount of health potions. Before the fight, head to the little room M2.11(5), search the rooms upstairs, you will find some keys, books and what's most important, a Phial with Blood. Finish the A Tale of Two Tomes quest M2.11(2) to receive a special spell. The last item can be found on the bridge where the dragon sleeps. The task is quite hard. Once you pick it up, quickly open your inventory and use the Orbis Arcesso book. Amdusias will change into human form, so you shouldn't have problems with defeating him. However look for one of his spells, thanks to which he takes control over you and moves you away from himself. After getting rid of him, pick up the book which will appear on the altar. You will receive the Hall of Echoes Bound quest M2.11(4), which consists of 4 smaller missions, described in detail in the subsequent regions. Head to the teleport M2.11(6). You will bump into Damian and will have to fight with a couple of his soldiers. Teleport to Santinel Island M2.11(M3).
Prize: 1100 experience points, 180 gold, 1 additional option.
Received from: Tim / Bermaid Elsa M2.1(7)
You will be asked to deal with some guards who are scaring the tavern's customers. Approach the Seekers sitting by the table and try to talk some sense into them. It turns out that brute force is the only thing that will work here, but Louis will show as you draw your sword. He will send the drunken soldiers back to the barracks. You can now get the prize from Tim. Additionally you will get a discount. New people will appear in the tavern
Prize: 113 experience points, 80 gold, 1 additional option.
Received from: Locke M2.1(7)
One of the guards, Keane M2.1(2) was obligated to deliver rabbits to the shop keeper. Unfortunately he hasn't delivered them to this day. If you decide to let the guard free, the mission will end with a failure. Push him a little and he will give you Keane's Wallet. Take it back to the tavern and return it to Lock M2.1(7). Apart from the discount, you can also choose gold or experience points as an additional prize.
Prize: 1 option to choose from.
Received from: Brave Sir Robin M2.1(7)
An arrogant hunter boasts about hunting down a huge boar. Your task is to find and kill a creature big enough to show Robin who's the real hunter around here. Set off and look for Bellegar M2(7), you can find him in various places. Once he summons a demon, you have to kill it, take the Demon Claw and show your trophy to Robin in the tavern.
Prize: 1500 experience points, 320 gold, magical gloves, 1 additional option.
Received from: Romon M2.1(4)
The Priest asks you to investigate the tower in the middle part of the valley M2(2), maybe there still are some magical artifacts there. A mysterious item - Lovis' Scrying Stone, can be found on the top. During the mission To Lay a Ghost to Rest M2(1) once you go through the gate (you'll open it by solving a simple puzzle), choose the path leading left. Once one the top, you will encounter a skeleton-trader. Go to the burning room and push the lever on the wall. The stone you're searching for will appear in the middle. Take the item to the priest. If you take a closer look at the item, you will be taken to tower's dungeon, where you will have to face several enemies. Activate all the pedestals and some platforms will appear - after getting to the top and pushing the lever, you will be able to take one of the four weapons.
Prize: 1350 experience points, 240 gold, 1 additional option.
Received from: Folo M2.1(5)
The villager wants to save his three pigs, which were taken and are to be turned into food. There are two possibilities in this quest.
1. You can help the poor villager. He will tell you to whisper something to the pig named Kevin. Head to Jackson's farm, you will be stopped by three guards. You have two options of taking care of them - you can use force and fight all three at once, or you can send them to Rhode. That way you will buy yourself some time and you will be able to save the pigs without having to fight. Return to Folo M2.1(5) to receive the prize.
2. If you refuse to help, head to Louis M2.1(1) and tell him about Folo's attempt to save the pigs and your refusal. In return you will receive a prize.
Prize: 450 experience points, 160 gold, 1 additional option.
Received from: Upton (Buad) M2.1(10)
To be able to take this quest, you must first read the miller's thoughts, find the key to his basement and talk to the tree which you will find there. The assassins want to catch Upton. Talk to Linda - she will give you the names of three people who she suspects. Talk to each of them. Rose (Folo's wife) can be found in the house M2.1(5), Romon is by the chapel M2.1(4) and captain Rodney in the barracks M2.1(1). You will learn of their probable hideout, head to the ruined chapel M2.1(2.4). There you will encounter Jesse. You will have to kill him either way. Return to the mill, Antumbra will also be there.
1. You can kill her, saving the miller and his daughter.
Prize: 450 experience points, 160 gold, 1 additional option.
2. If you choose to help the bandit, you will kill the miller.
Prize: 450 experience points, 1 additional option.
Received from: Richard M2.1(8)
The paladin will pay you for each goblin heart you bring him. Get out of the camp and go along the path - you will encounter lots of goblins on your way. Some of them will drop the hearts. The quest renews itself after giving the hearts to Richard.
Prize: 50 experience points, 50 gold.
Received from: Dana M2.1(14)
The young lady will ask you to deliver a letter to Derk, the blacksmith M2.1(6). In return the blacksmith will give you a discount on his products. You can also read the letter and give it to the husband, who you will find in a prison cell in the barracks M2.1(1).
Prize: 450 experience points, 160 gold, 1 additional option.
Received from: Richard M2.1(8)
The food which is meant for Rivertown could be useful in Aleroth. Head to the farm and talk with Lomax M2.1(14) about changing the destination point. You can solve this problem in two ways.
1. Without shedding blood, by bribing the guards with 100 gold.
2. Fight with the three guards and take the food by force.
After choosing one of the above, go to Mouse M2.1(15) and tell him that the package can be taken. In the end return to Richard and tell him about completing the task.
Prize: 450 experience points, 160 gold, 1 additional option.
Received from: Jackson's Diary found in his basement (check out Secrets)
After reading the diary, you will learn that Carl has killed Dana's ex-boyfriend. You can solve this quest in two ways.
1. Head to captain Rodney M2.1(1), who you will find in the barracks. You will be rewarded with experience points and the farmer will be arrested for murder.
2. Speak yourself with the farm owner, Carl M2.1(14). You can hand over the diary or force him to pay you for staying quiet. However if you will say that you'll go to the captain, you will get attacked and receive half of the experience points!
Prize: 450 experience points, (alternatively 160 gold) 1 additional option.
Received from: Quincy M2.1(13)
A poor man has been surrounded by a group of goblins and his companion ran away, leaving him behind. Deal with the enemies and help the man by throwing him the line, which you will find by one of the goblin corpses. Head to the observation platform located on the barracks, there you will find Quincy's companion - Peavey M2.1(1). After a short conversation Rodney will show up and the coward will be punished.
Prize: 450 experience points, 160 gold, 1 additional option.
Received from: Captain Rodney M2.1(1)
Your task is to find and neutralize a couple of foes. To prove they're dead, you have to bring their items to the captain. You get a reward for every person you kill, more and more as you progress. You'll get an additional prize for eliminating everyone from the list.
Hjalmar: location: M2.1(16), proof: Hjalmar Mask
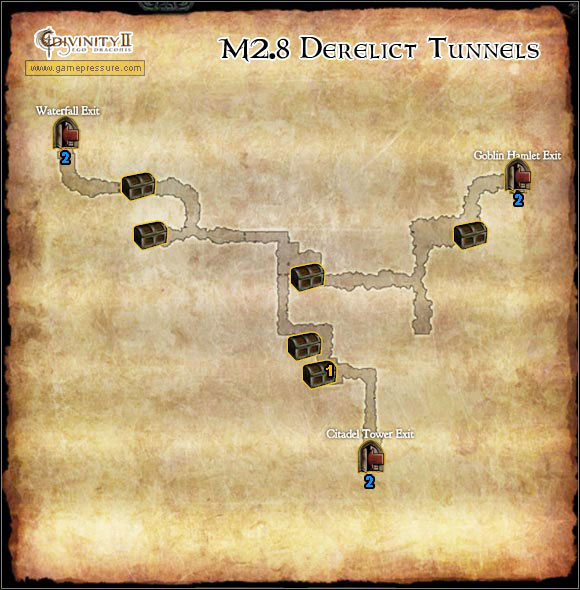
Hallorn: location: M2.8(1), proof: Hallorn's Ring
Yup'ik: location: M2(15), proof: Yup'ik's Staff
Viper: location: M2(13), proof: Viper's Sword
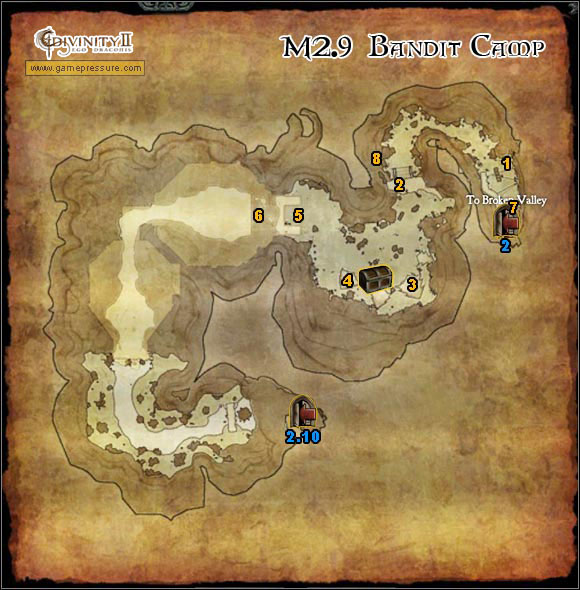
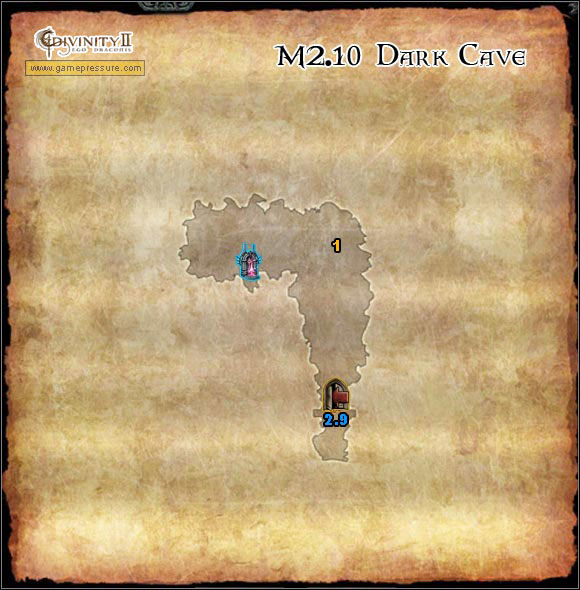
Jagon: location: M2.9(6) / M2.10(1), proof: Jagon's Necklace
Prize: 450/1350/1500/1500/1500 experience points, 160/240/320/320/320 gold, 1 additional option.
Prize: 1500 experience points, 960 gold, Enchanter's Cuirass of Jurak of Vengeance, 2 additional options.
Received from: Louis M2.1(1)
A group of bandits is robbing the traders and their hideout is still left unfound. Head to the ruined chapel, where you will find the Secret Passage M2.1(2.4). On your way you will find a goblin camp. Head to the cell of one of the bandits, Martis M2.4(1), while eliminating the skeletons. After a short conversation, head back the same way as you got there. One of the passages will collapse, so head to the exit by Jackson's farm M2.4(2.1). Martis will open the first door and you will unlock the second using the lever next to them. In return for saving him, the man will tell you the location of the bandits camp M2(2.9) and the password: beetroot. Go to Louis M2.1(1) and tell him about the hideout. Once you arrive there, you will notice some soldiers who will help you in getting rid of the bandits.
ATTENTION: If you decide to postpone telling the captain about the hideout, you can go there on your own and complete a few additional quests.
Prize: 450 experience points, 160 gold, 1 additional option.
Received from: Naberius M2.6(1)
The necromancer specializes in creating monsters that will fight alongside us. To create such a creature, he needs parts from other monsters. Some recent experiments haven't gone well and some creatures escaped. Head to the mine M2(2.12). In one of the corridors M2.12(1) you will find the missing runaways. One of them has a Crystal Skull - take the artifact back to the necromancer. From now on you can create your own minions.
Prize: 1500 experience points, 960 gold, 1 additional option.
Received from: Lord Lovis M2(2)
Head to Maxos' Temple M2(2.11). To get to Lovis' soul, you have to solve some riddles which are described in the Dragon No More quest M2.11(1). On your way to the stone you will bump into Abalam M2.11(3), who will ask you to destroy the item in search - the In Cold Blood quest M2.11(3). Once you're done with Amdasius M2.11(4) you will get the stone. Take Lovis' Soul Stone and return to Lord Lovis M2(2) to give him his soul back. Additionally, one of the chests by the throne will be unlocked.
Prize: 1650 experience points, 360 gold, 1 additional option.
Received from: Clement / Sybille M2.9(2)
One of the couples staying in the camp wants to leave it and begin a normal life. Christopher stands in their way, as he won't let them through. Go to him M2.9(7) and read his mind to find out that the want to drink the Rimmel rum. You will find it nearby to big gate, on which you can get using the ladders M2.9(8). Take the bottle to Christopher and after he leaves the post you can inform the couple that they can get out of the cam safely. In return they will give you their weapons.
Prize: 1500 experience points, Light Steel Mace, Heavy Kings Sword, 1 additional option.
Received from: Tagos M2.9(3)
Head to the passage leading to Orobas Fjords, you will find Tagos' Axe by one of the bodies M2(11). Return to the camp.
1. If you decide to keep the axe you will be attacked. Tagos will give up after he acknowledges that you're stronger.
Prize: 1 option to choose.
2. You can return the weapon to its rightful owner.
Prize: 1500 experience points, 1 additional option.
Received from: Ragnar M2.9(4)
Your task is to help or stop the bandits from a robbery. Head to the pass M2(11) where you will find some bandits and traders.
1. If you choose to kill the bandits, you will fail the quest, but receive a prize from the grateful traders.
Prize: 1500 experience points, 1 additional option.
2. If you help the bandits, you will earn their gratitude and a prize.
Prize: 1500 experience points, 320 gold, 1 additional option.
Received from: Leda M2.9(5)
In order to meet with Laiken, you must first pass a test. Go through the door in front of you. Talk with Jagon M2.9(6). To pass the test, you have to simply defeat him. However the task isn't easy. As soon as you accept the challenge, run to the other side of the room. You will get poisoned, so you have to be quick. Begin attacking Jagon. After a while another door will open - go through them as fast as you can. In the next room you will bump into some skeletons. After getting rid of them go up the ladder and your enemy will once more teleport to a distant spot. This time you have to be careful, because the surface will cause you to burn. The safest route is obviously the river. Head to the next door Dark Cave M2.9(2.10). Jagon will be waiting for you there M2.10(1). Once you defeat him, head to the mysterious teleport. After the conversation with Laiken you will return to the cave and the teleport will be buried under rocks.
Prize: 1 option to choose.
Received from: Eugene M2(5)
Head to the village, to the tavern to be precise. In one of the upper floor rooms you will find Doctor Needleman M2.1(7). He will give you the medicine which will allow you to get rid of one of the voices which are controlling Eugen.
1. You can choose Clyde.
Prize: 1500 experience points, 240 gold, Axe of Firebat, 1 additional option.
2. Or Jackal.
Prize: 1500 experience points, 240 gold, Ring of Aleroth, 1 additional option.
Received from: The Librarian M2.11(2)
Your task is to find the first volume of Orbis Arcesso, which can be found somewhere in the temple. Head to the room M2.11(5), on the upper floor you will find a key opening the chest below, under the stairs. Take the book and return it to the librarian after reading it yourself. In return you will receive a special spell.
Prize: 1500 experience points, 320 gold, Dragon Skill Book, 1 additional option.
Received from: Abalam M2.11(3)
You will be asked to destroy Lovis' Soul Stone, thanks to which he won't be able to regain his soul. Complete the Dragon No More quest M2.11(1), you will receive Lovis' Soul Stone. Destroy it at the altar, to complete the ghost's request. Thereby the Lovis' Soul quest will end in failure.
Prize: 1 additional option.
Received from: Dreavan M2(9)
In order to upgrade items and armours, the sorcerer needs the Red Ore. Head to the mine M2(2.13) where you will find the ore you're searching for.
Prize: 1500 experience points, 320 gold, 1 additional option.
Received from: George Gremory M2(12)
The archaeologist will ask you for help in reading some old notes. Head north to Maxos' temple, where you will find an imp - ZixZax M2(6). He will give you a dictionary containing an old language. It will summon a demon - you have to be cautious, as it can take control over you and move away from itself.
Prize: 2200 experience points, 360 gold, 1 additional option.
Received from: Rothman M2(14)
The man has fallen into a troll trap and asks you for help. You have to obtain a line, which you can find for example in the village cellars. Once you get the man out, you will be attacked by a troll. In return for saving the man's life, you will receive a bow.
Prize: Rothman's Bow, 1 additional option
Merchant Lamotte M2.1(3) will lower his prices!
Arnold M2.1(4), you will get to know about the belt, which he left in the barracks.
Derk M2.1(6) he will lower his prices. He will also mention about a key to his cellar, which you can find in the stable, next to Tim's tavern M2.1(7).
Winthrop M2.1(10), he will guide you to his weapon, which he lost near Jackson's farm.
Linda - the miller's daughter M2.1(10), you will get to know about the pouch lost in the chapel M2.2.
Upton M2.1(10), she will guide you to a key in a pot, thanks to which you will open the cellar in the water mill. There you will meet the alchemist Abanayabar M2.3(1). After the conversation you will be able to prepare potions from the plants found in the game.
Abanayabar M2.3(1), will give you the password to the storehouse M2(2.13), "Illuminatus".
Furmank Locke M2.1(12), you will get to know that the password is "Gold, more Gold!". Once you say it, you will gain access to a couple of items.
Tim M2.1(7), not only will the merchant lower his prices, but he will also reveal a pouch hidden between some plants in the chapel 2.2!
Locke M2.1(7), will lower his prices!
David M2.1(7), you will get to know that he's at loggerheads with Richard. If you decide to stay silent, you will receive Champion Gloves and 1 additional option (you can't promise to say nothing right at the start, first you have to frighten the boy a little). While after reporting the case to Richard the boy will run away and you will be left with just one option, minus the gloves.
Brave Sir Robin M2.1(7), you will learn that "Rats" is the password to the warehouse.
Dana M2.1(14), she will tell you about the key to the cellar, which her husband is keeping high in one of the beams in the house. You will find Jackson's Diary there.
Quincy M2.1(13) in return you will receive an additional stats point.
Naberius M2.6(1), you will learn his warehouse password.
Arben Ghost M2.2(1), you will learn about the shield lost in one of Orobas caves, into which a dragon flew.
Toshan M2(2), you will receive an additional stats point.
Lord Lovis M2(2), the chest by his throne will open.
Christopher M2(4), you will receive an additional stats point and will learn about his favourite rum.
Tagos M2.9(2), you will receive an additional stats point.
ZixZax M2(6), you will receive two skill points!
The Librarian M2.11(2), in return you will learn a new alphabet. Read the book on the pedestal, which you will find on the lower level and you will receive two stats points.
Amdusias M2.11(4), he will give away the password the chest with his armour, which you will find in the room nearby the ghosts M2.11(5).
Dreavan M2(9), you will get the password to his cellar M2(2.14).
Filip / Jenae M2(10), you will get an additional stats point.
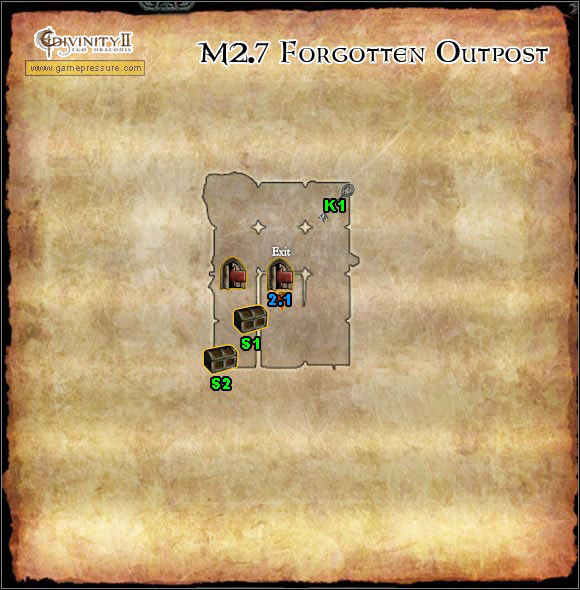
To get to the chest M2.7(S1) you have to press the button on one of the walls. The key M2.7(K1) to the chest in on the table.
Encounter Bellegar in each of the marked places M2(7) and kill the monsters he will summon. Afterwards head to the spot in which you were to meet with Rhode M2(1), you will once more have to face all the monsters and will receive a big amount of gold as a reward.
Collect all four parchments M2(P) and take it to ZixZax M2(6). Once he reads them, you will learn the password to the special teleports.
Pick up the three Dragon Crystal (two on the sides of Maxos Temple entrance, one right next to the teleport to the temple) and afterwards place them in the statue near ZixZax M2(6). A chest will appear.
Once Sosostra M2(8) tells you your future, head down the stream where you will see a white rabbit - follow it until you reach a treasure. Return to the fortune teller once more, this time you will have to face a soldier standing on the bridge on the south of the region. The last prophecy will fulfill once you become a dragon.
1. Island
2. Hermit (trader)
3. Jonah
4. Tombstone
5. Vacca
6. Wyvern Mother Egg
7. Necromancer totem
8. Wesson (enchanter)
9. Alchemist totem
10. Jonelath (necromancer) / Igor (necromancer)
11. Allan (alchemist)
12. Catherine
13. Enchanter totem
14. Hermosa (trainer) / Barbatos (alchemist) / Radcliff (enchanter) / Turgoyn / Sam (trader)
15. Kenneth (trainer)
16. Elfrith
17. Trainer totem
18. Ancient Journal
19. Battle Tower M4
20. Michael's Raft
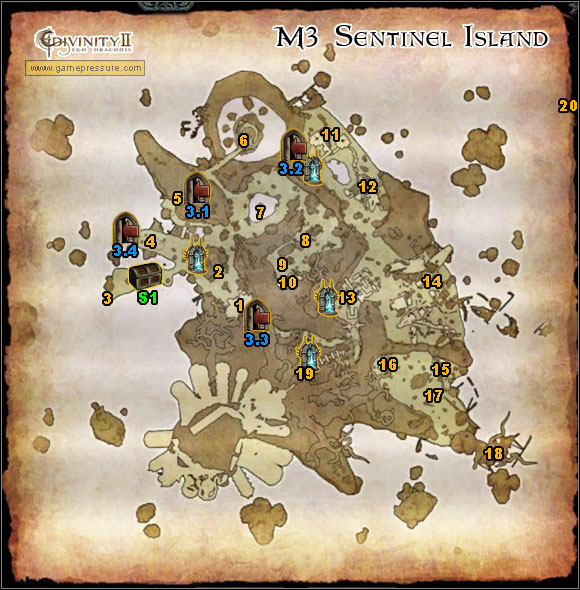
M3 Sentinel Island
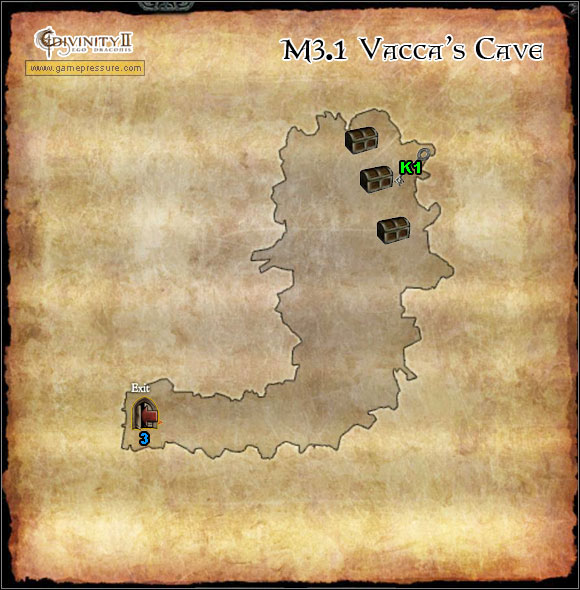
K1. Key to chest M3(S1)
1. Sassan
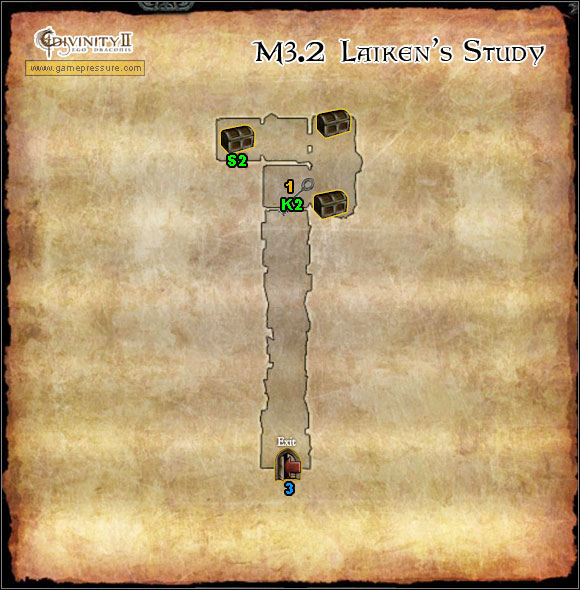
M3 Sentinel Island
K1 Key to chest S2
1. Hidden passage
2. Explosive charges
3. Elijah
4. Buried passage
5. Buried passage
6. Sassan
7. Erlking
8. Grimm (level 0)
9. Razakel
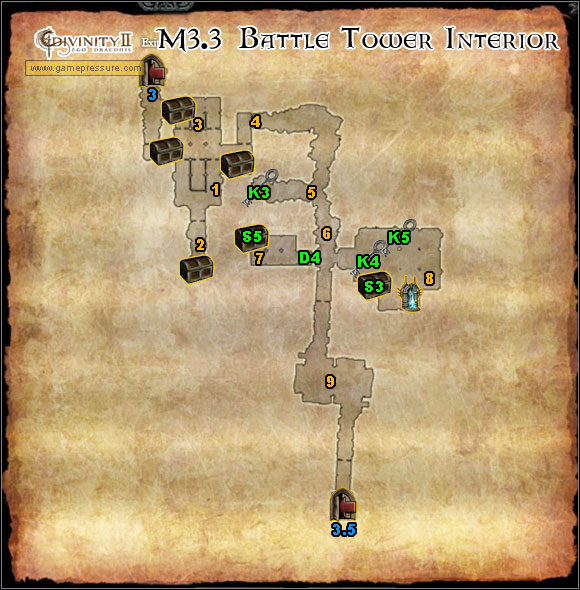
M3 Sentinel Island
K3 Key to chest S3
K4 Key to door D4
K5 Key to chest S5
1. Mahalath / Adah
2. Mahalath
3. Adah
M3 Sentinel Island
Island will order you to bring his teachers into the Battle Tower. First you have to talk to each of the teachers and then approach the corresponding totem and choose it. Think twice before choosing, because you can't undo this. Each teacher offers a different specialization. You'll receive a prize after choosing each teacher and completing the whole task.
Alchemist: Totem M3(9); Allan (a liar, he's no alchemist) M3(11), Barbatos (potions) M3(14);
Prize: 750 experience points, 400 gold, 1 additional option.
Necromancer: Totem M3(7); Joneloth (resistance: arrows, blades) M3(10), Igor (resistance: magic) M3(10);
Prize: 750 experience points, 400 gold, 1 additional option.
Enchanter: Totem M3(13); Wesson (armours) M3(8), Radcliff (weapons) M3(14);
Prize: 750 experience points, 400 gold, 1 additional option.
Trainer: Totem M3(17); Hermosa (melee weapons) M3(14), Kenneth (ranged weapons) M3(15);
Prize: 750 experience points, 400 gold, 1 additional option.
Additionally you'll receive a prize for completing the task.
Prize: 3750 experience points, 1 additional option.
The mysterious tombstone M3(4) surrounded by three candles has a message on it, asking to soften the wind. To do that, you have to first obtain a spell. You will get the Spell Book from Elfrith, after completing the Man Overboard quest M3(14). After reading the spell the wind will die away. Light up the three candles which you will find near the tombstone. Sassan Ghost will appear.
Prize: 1 additional option.
In order to get Sassan to help you in getting to Laiken, you have to firstly return her to a mortal form. Head to the cave M3(M3.2), where you will have to find a ring. You will also receive a password, using which you will open the gate. Head to the room at the end, where you'll find Sassan's Jewellery Box, with the ring inside. On your way back you'll bump into Sassan's evil copy M3.2(1), which will summon some monsters to attack you. After clearing yourself the way head back to the ghost M3(4) and give back the ring.
Prize: 1 additional option.
Follow Sassan to the barrier blocking the path to the tower - nearby the portal ant the enchanter totem M3(13). Once Laiken unblocks the passage, fight your way to the bandits barracks M3(M3.3) - the main gate to the tower M3(19) will be locked. After entering the underground, head forward. You can open the first passage by using the left button. You will bump into evil Sassan, who will bury the passage ahead. Deal with the bandits and continue ahead. Enter one of the cells M3.3(1), at the end of which you will find a button, revealing a further passage. At the end of the corridor you will find some explosive charges M3.2(2). Place one of them by the buried passage M3.3(4) and back off to a safe place.
Prize: 1 additional option.
An easier way to get rid of Laiken is to summon a demon with which our enemy's soul is bounded - if the demon falls, so will he. Unfortunately, you don't know the monster's name. However you can get some help from a goblin named Erlking M3.3(7), though he is mute. In front of you there is an elevator (you're on level 0).
Level 0
Go to the very bottom, kill the monster which will drop key K4, you will also find a teleport there. The key will be used to open door D4 leading to the goblin, on level 2. You can also talk to Grimm M3.3(8), who will gladly return to the platform, as soon as you kill Laiken.
Level 1
You entered the elevator on this level.
Level 2
You can open Door D4 with key K4, which you can find by the monster on level 0. Approach the Goblin, Erlking M3.3(7) and read his mind. Afterwards go to the bookshelf and take right title. A secret room will open, inside of which you will find a case S5. Inside there are information on the demon's name.
Level 3
Fight your way through the horde of monsters. After defeating the last, which has been previously lying on the table, you will gain key K5 opening case S5.
Level 4
Go to Sassan, tell her about the demon's name and head to the room M3.3(9), in which you will summon it. In there you will meet Sassan's evil copy for the final time. When you'll be ready fight Razakel, speak with Sassan.
NOTICE: If you accept to summon the demon, every unfinished side quest from Broken Valley will be automatically cancelled.
Prize: 1 additional option.
Once Razakel flees, being near death, you won't have any other choice but to confront Laiken himself. Apart from him you will also have to defeat the demon as well as lots of other monsters. You'll probably have quite a hard time. Sassan will offer to help you and you'll have to choose one out of three possibilities - she can concentrate on Laiken, heal you or summon undead. Head to the elevator M3.3(M4), take it to the throne room. After defeating the demon and in effect, Laiken himself, Damian and Zandalor will show up. After the conversation ends, hurry to the stone M3.5(1), thanks to which you will take the form of a dragon.
Prize: 3750 experience points, 1 additional option.
Get rid of the nests scattered around the Island (they're marked on the map) and kill all the wyverns. A cutscene will play, in which you will see Damian spreading havoc in Broken Valley.
If you press the "U" button, a menu will appear on the right, using which you can move to one of the teacher's chamber or to the throne room at any time.
Use the "Q" button to change into a dragon and the other way round.
Received from: Hermit M3(2)
Hermit needs an ingredient for his soup - a Wyvern Mother Egg. Before you head to the nest M3(6) go to Vacc M3(5), from whom you will receive a potion which deceives the wyvern's sense of smell. They will think that you're one of them, in other case you would get attacked. You can accept the Ghostbuster quest M3(5) or kill the Dragon Elf. After obtaining the egg, take it to the trader.
Prize: 1875 experience points, 400 gold, 1 additional option.
Received from: Jonah M3(3)
A sailor's ghost wants to catch a whale. To help him achieve this, head to Catherine M3(12), she will give you an amulet, which she has found inside a whale. Take it to the ghost.
Prize: 1875 experience points, 1 additional option.
Received from: Vacca M3(5)
Your task is to get rid of the ghosts that are hunting Vacca's M3(M3.1) cave. If you refuse the quest, you will be attacked.
Prize: 1875 experience points, 400 gold, 1 additional option.
Received from: Catherine M3(12)
Miss palaeontologist asks you to give her any additional info you've got on the whale skeleton that she's researching. She will give you an amulet which is a part of The old Ghost and the Sea quest M3(3). Once you finish that quest, you will receive Jonah's journal. Take it to Catherine.
Prize: 1875 experience points, 400 gold, 1 additional option.
Received from: Hermosa M3(14)
One of captain Hermos' sailors is gone. Go and save him, Elfrith is waiting for help on the columns M3(16). After freeing him, go back to the captain.
Prize: 1875 experience points, 400 gold, 1 additional option.
Received from: Turgoyn M3(14)
The historian wants you to recover the journal of a legendary pirate. The problem is that his ship is located on a huge tree M3(18). In order to get there, you have to firstly turn into a dragon. Continue completing the main quests, after defeating Laiken and taking over the Battle Tower you will gain the ability to transform into a flying beast. You will find Turgoyn before the tower entrance. You can also read the journal and receive two skill points.
Prize: 1 additional option.
Received from: Mahalath / Adah M3.4(1)
Your task is to settle an argument, which woman's army is stronger. You can finish this quest in a couple of ways.
1. You can convince the sisters that in fact you're the strongest one around here. In effect they will both attack you. Once you kill them, you'll receive the prize.
Prize: 1 additional option.
2. You can take Mahalath's side, go talk to her M3.4(2). Before you get to know the plan of eliminating the second sister you have to carry out a favour of getting Wolfsbane poison. You will find it near the ship wreck, close to Allan M3(11). Thanks to the substance, one of Adah's beasts will get poisoned. Your task is to bring her to the others, so that they get poisoned too. If you turn in the second sister you will get attacked and the quest won't be cleared.
Prize: 1875 experience points, 400 gold, 1 additional option.
3. You can take Adah's side, go talk to her M3.4(3). Before you get to know the plan of eliminating the second sister you have to carry out a favour getting a fake red ore. You will find it nearby the ship, close to Kenneth M3(15). Take the fake to Mahaleth, thanks to which strength will be drained out of her army's weapons. If you turn in the second sister you will get attacked and the quest won't be cleared.
Prize: 1875 experience points, 400 gold, 1 additional option.
Hermit M3(2), the trader will lower his prices.
Jonah M3(3), you will learn about the last this that Laiken has left on the island. You will find it in the cave M3(M3.1).
Vacca M3(5), you will learn that you can find Hermit's magic bow in the chest.
Catherine M3(12), you will get the password to the gate M3(M3.2).
Sam M3(14), the trader will lower his prices; he'll also do it if you bring him Desert Roots.
Island, you will get and additional skill point.
Elijah M3.3(3), you will learn about the secret passage M3.3(2).
Erlking M3.3(7), choose the ballad book, you'll reveal a secret room.
Sassan M3.3(9), you will get an additional stats point.
After killing the monsters summoned by Sassan M3.2(1) during The Second Coming quest M3(4), one of them will drop key K2, which opens chest S2 in the room from which you'll be going back.
Plant the explosive charge under the buried passage M3.3(5), at the end of the corridor you will find key K3 which opens chest S3.
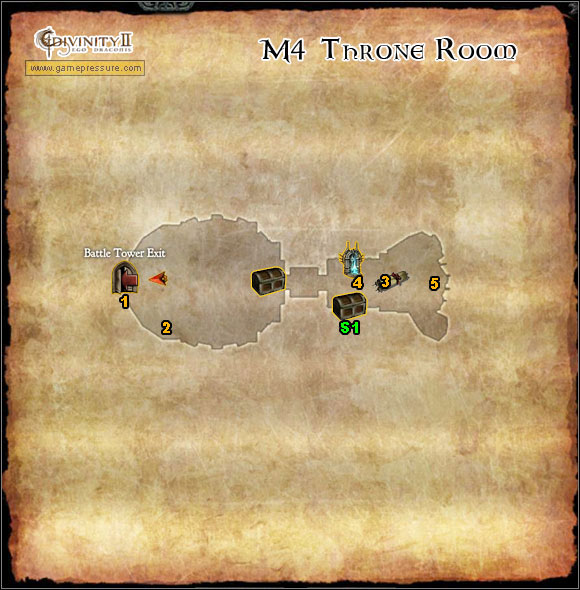
1. Battle Tower Terrace
2. Harry / Tom / Dick (searchers)
3. Maxos' scroll
4. Hermaphroditus (illusionist)
5. Sassan (trader)
S1 Chest (more in Secrets)
You will find Maxis' scroll, which is needed to enter the Hall, on the table. M4(3).
Prize: 3750 experience points, 1320 gold, 1 additional option.
Received from: Joneloth (necromancer's platform)
In order to improve the necromancer's platform, you have to get a limb of a certain creature that you will find in Orobas Fjords. Go to the cave M5(M5.16). Clear your way on the left side on the cave where you will find a monster called Ultimate Creature Boss M5.16(1). After you kill it, you'll gain one of its limbs.
Prize: 6000 experience points, 600 gold, 1 limb.
Return to your teacher. After completing the task head to Sassan M4(5) and she will improve the platform.
Prize: 6000 experience points, 560 gold, skill book, 1 additional option.
Received from: Joneloth (necromancer's platform)
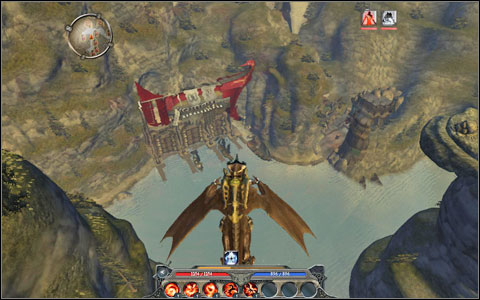
To improve the platform even more, you have to gain a limb from Xanlosch. You will find him in one of Damian's Flying Fortresses M5(M5.8). Fight your way to Xanlosch M5.8(1) while destroying the generators you come across M5.8(G) in order to shut down the barriers blocking the way. Also remember to get rid of the ballistas and most of all destroy the nests. Take the north-west passage M5.8(M5.18) and you will get to second generator and Xanlosch. Kill him as well as his creature - Isabelle.
Prize: 1 limb to choose from.
Return to your teacher Joneloth, you will receive a prize for completing the quest. Go to Sassan M4(5), so that she can upgrade the platform once again.
Prize: 6000 experience points, 560 gold, skill book, 1 additional option.
Received from: Igor (necromancer's platform)
In order to upgrade the necromancer's platform you have to find and bring to your teacher a book, which, at the moment, is in Barnabus' possession. You will find your target is a cave situated in between the mountains M5(M5.2). Once you get to the cliff, a cutscene will play, showing a necromancer hidden below the barrier. Change into a dragon and fly to the teleport T3 placed in the highest place. There's a horde of undead awaiting you, the fight can be quite hard. Once you make it to the end in one piece, you will find the desired Book of the Dead. During the way back you will be attacked once more, the gate will open only after you kill every monster. Return to your teacher and give him the book. After completing the task head to Sassan M4(5) and she will improve the platform.
Prize: 4500 experience points, 520 gold, skill book, 1 additional option.
Received from: Igor (necromancer's platform)
To further improve the platform, you have to get a ring from Stone. You will find her in one of Damian's Flying Fortresses M5(M5.8). Fight your way to Xanlosch M5.8(1) while destroying the generators you come across M5.8(G) in order to shut down the barriers blocking the way. Also remember to get rid of the ballistas and most of all destroy the nests. Take the north-west passage M5.8(M5.18) and you will get to second generator and Xanlosch. After killing him and his creatures, head to Stone M5.8(M5.19). Your target will await you at the very beginning M5.19(1). Once his health drops down critically, she will decide to make a run for it. Finish off the remaining soldiers and follow her to the teleport. You will find yourself on a big arena where you will have to face a couple waves of enemies before you can fight your main target. After eliminating her, take the ring and return to your teacher . Go to Sassan M4(5), so that she can upgrade the platform once again.
Prize: 6000 experience points, 600 gold, skill book, 1 additional option.
Received from: Allan (alchemist's platform)
In order to improve the alchemist's platform you have to bring your teacher some plants, which you will find in Orobas Fjords. If you don't have the required items (if you've been randomly collecting plants during the game you should have quite a number of them), the easiest way to get them will be to send one of your searchers, Harry M4(2). The plants you have to find are: Whisperwood, Black Rose, Earth Root and Holy Basil. After delivering the ingredients you will find out that you are still missing one - Dragon Nail. Once you get the last plant, you'll receive an Allan Brew potions. After completing the task head to Sassan M4(5) and she will improve the platform.
Prize: 4500 experience points, 2 additional options.
Received from: Allan (alchemist's platform)
To further improve the platform, you have to get the Potion of Wisdom from Geshniz. He's in one of Damian's Flying Fortresses, in the deserted land in Broken Valley to be precise M5(M5.1). In order to get to him, you first have to shut down the main generator M5.1(G2), and then head to the west teleport in order to shut down the next one M5.1(G3). Also remember to get rid of the ballistas and most of all destroy the nests. Now you can head north to the teleport M5.1(M5.21) and meet Geshniz M5.21(1). Take the potions and return to your teacher. Go to Sassan M4(5), so that she can upgrade the platform once again.
Prize: 6000 experience points, 560 gold, skill book, 1 additional option.
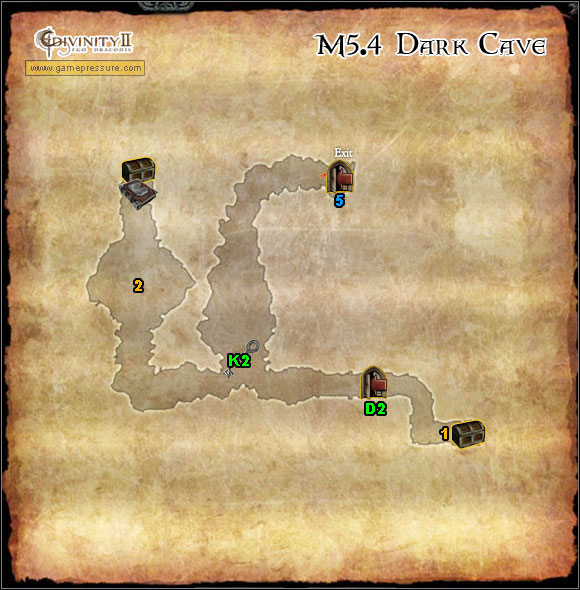
Received from: Barbatos (alchemist's platform)
In order to upgrade the alchemist's platform you have to bring your teacher a book which is in possession of a very powerful alchemist who you will find in one of the caves in Orobas Fjords. You will find the book in the bandit's hideout M5(M5.4). One of the bandits will drop a key M5.4(K2), thanks to which you will open the gate M5.4(D2). A bit further you will find four platforms M5.4(1). Activating them in the right order will disable the barrier which is blocking your way to the book. The right order is: [3][1][4][2] (looking at the platforms from the chest's side). Head to the other side of the cave where you will have to face Ragonow M5.4(2). After killing him and the other bandits, you will have to turn the three statues for a chest to appear. Take the book and return to Barbatos. After completing the task head to Sassan M4(5) and she will improve the platform.
Prize: 4500 experience points, 520 gold, skill book, 1 additional option.
Received from: Barbatos (alchemist's platform)
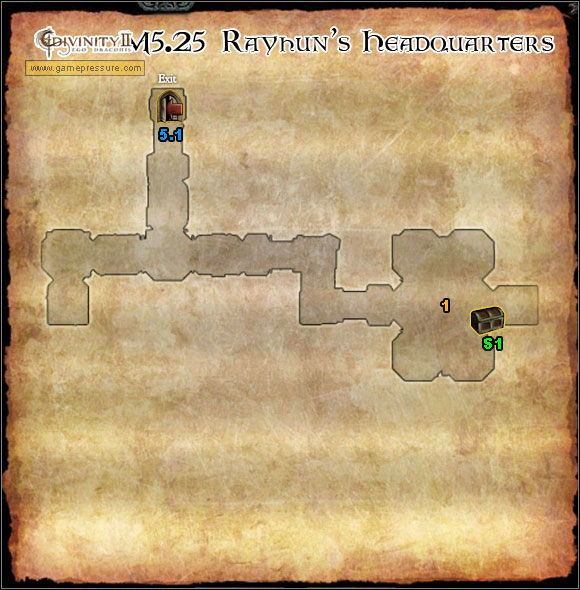
To further improve the platform, you have to obtain the Amulet of Alchemy, which is in Rayhun's possession. You will find him in one of Damian's Flying Fortresses, in the deserted land in Broken Valley to be precise M5(M5.1). In order to get to him, you first have to shut down the main generator M5.1(G2), and then head to the west teleport in order to shut down the next one M5.1(G3). Also remember to get rid of the ballistas and most of all destroy the nests. You can disable the barrier blocking the way to Rayhun's fortress by shutting down the generator in the north M5.1(G4), while the barrier to the headquarters itself with the generator M5.1(G5). The path is very difficult, in case of losing health rapidly you can turn into a human and use a potion, which will recover your health much faster. Use the teleport M5.1(M5.25) and move to the headquarters. Rayhun is at the very end M5.25(1). Kill him and take the amulet. Return to your platform and talk with Barbatos. Go to Sassan M4(5), so that she can upgrade the platform once again.
Prize: 6000 experience points, 600 gold, skill book, 1 additional option
Received from: Kenneth (trainer's platform)
In order to upgrade the trainer's platform you have to complete a small request, namely checking on your teacher's ex-student - Saul, who you will find in the camp in Orobas Fjords M5(14). After talking with Montagu you will learn that Saul is in prison for killing a dragon slayer. You can convince the prison guard in a couple of ways: you can bribe him, challenge him to a fight or scare him that you'll tell his commander about what he has done (read his mind to learn about his bad deeds). Eventually the gate will be opened. Use the teleport to get into the prison. Pick up the key lying on the bench and open Saul's cage. After completing the task head to Sassan M4(5) and she will improve the platform.
1. If you decide to carry out the Thorn in the Side quest M5(14), the prisoner will die. Return to Kenneth.
Prize: 1 additional option.
2. To free the prisoner, you have to redirect the teleport to a safe place. If you weren't there yet, go to High Hall M5(15). Activate the teleport there and return to the cell. Change the destination point of the teleport and save Saul. Return to Kenneth.
Prize: 4500 experience points, 560 gold, 2 additional options.
Received from: Kenneth (trainer's platform)
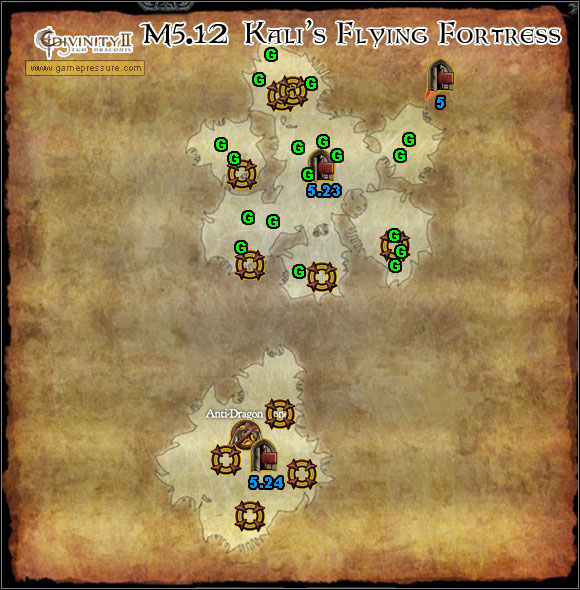
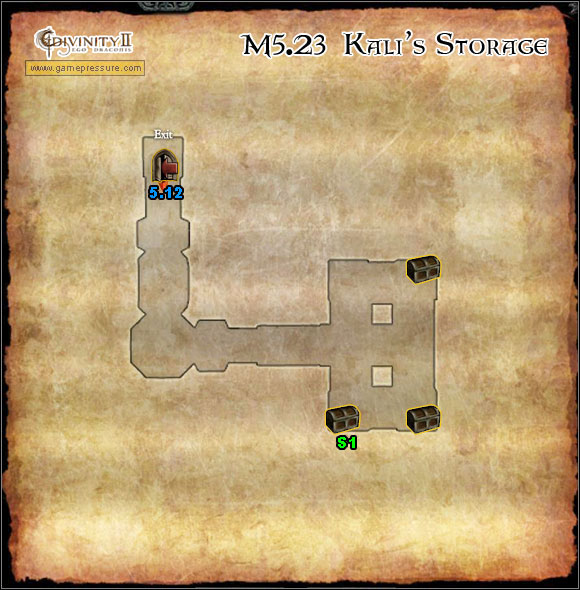
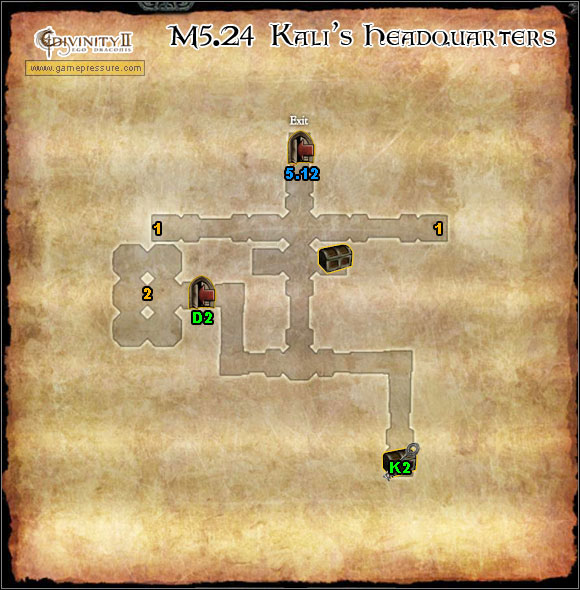
To further improve the platform, you have to obtain The Demon Wars book which is in Kali's possession. You will find her in one of Damian's Flying Fortresses M5(M5.12). Once you're inside, your main task will be to destroy all the generators M5.12(G). Also remember to get rid of the ballistas and most of all destroy the nests. It will allow you to safely get to Kali M5.12(M5.24). Open the first two gates with the levers M5.24(1) located on both side of the location. You will find the book requested by your teacher after killing the leader M5.24(2). Return to your tower and hand it over. Go to Sassan M4(5), so that she can upgrade the platform once again.
Prize: 1 additional option.
Received from: Hermosa (trainer's platform)
In order to upgrade the trainer's platform you have to carry out a simple task - break up with Morgan and give him back the necklace that he gave to Hermosa. You'll find the admirer in the port M5(13), the entrance is right next to the elevator. The man will somehow get over the whole situation and in the end will give you a book, for which your teacher has been looking for quite a long time. Return to the platform, inform about completing the mission and hand over the book. After completing the task head to Sassan M4(5) and she will improve the platform.
Prize: 4500 experience points, 520 gold, skill book, 1 additional option.
Received from: Hermosa (trainer's platform)
To further improve the platform, you must obtain the Myrthos sword which is in possession of Hemros' sister - Kali. You will find her in one of Damian's Flying Fortresses M5(M5.12). Once you're inside, your main task will be to destroy all the generators M5.12(G). Also remember to get rid of the ballistas and most of all destroy the nests. It will allow you to safely get to Kali M5.12(M5.24). Open the first two gates with the levers M5.24(1) located on both side of the location. You will obtain the sword your teacher asked for after killing the leader M5.24(2). Return to your tower and hand over the item. Go to Sassan M4(5), so that she can upgrade the platform once again.
Prize: 6000 experience points, 600 gold, skill book 1 additional option.
Received from: Wesson (enchanter's platform)
In order to upgrade the enchanter's platform, you have to find one of the suppliers - Lister. You will find him M5(9) seriously wounded by the entrance to one of the mines M5(M5.7). You will learn that the goblins have taken his package. Enter the mine, you will find the supplier's items in the chest M5.7(S1) and the key M5.7(K1) to it after killing Alutiiq M5.7(2). He's also a part of A Hunting We Shall go Again quest M5(13). Take the delivery from the chest and return to Wesson. After completing the task After completing the task head to Sassan M4(5) and she will improve the platform. You will be able to choose what kind of enchanting machine you want: armour, weapon or jewellery.
Prize: 4500 experience points, 480 gold, skill book, 1 additional option.
Received from: Wesson (enchanter's platform)
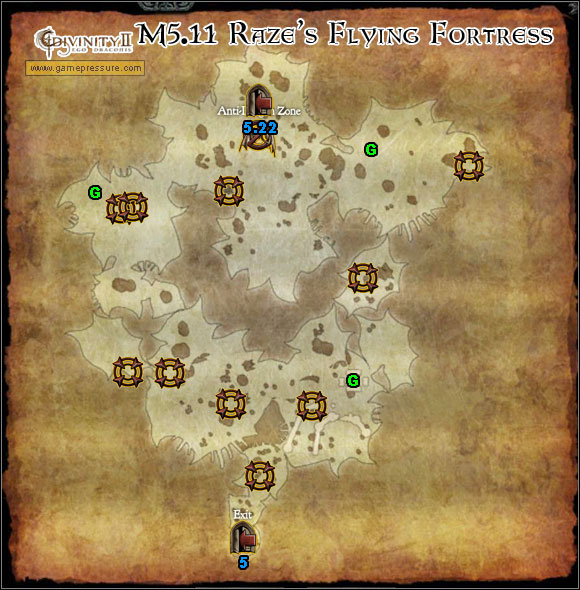
To further improve the platform, you have to obtain Raze's Cuirass, which is in Raze's possession. You will find him in one of Damian's Flying Fortresses M5(M5.11). Once you're inside, your main task is to destroy all three generators M5.11(G), thanks to which the barrier blocking your way to the teleport M5.11(M5.22) will be deactivated. Move to Raze's headquarters, your target awaits at the end of it M5.21(1). Each time his health drops low enough he'll run to one of the generators to regenerate. Disable both of them with the levers and then take care of Raze. Go to Sassan M4(5), so that she can upgrade the platform once again.
Prize: 6000 experience points, 600 gold, skill book, 1 additional option.
Received from: Radcliff (enchanter's platform)
In order to upgrade the enchanter's platform you have to get your teacher a jewel that he himself has hidden in a shipwreck in Orobas Fjords. You will find it at the very end of the region, right before the entrance to one of the Flying Fortresses M5(M5.12). On a small island there is a chest and inside of it the Goblin Stone. Two goblins will show up: Raj and Khan. After completing the task head to Sassan M4(5) and she will improve the platform.
1. You can return them the stone and in return they'll give you two other.
Prize: 6000 experience points, 600 gold, 2 Malachites, 1 additional option.
2. You can refuse and kill the goblins. Return to Radcliff and return the gem to him.
Prize: 1 additional option.
Sassan M4(4), you will receive an additional skill point.
Jonelath / Igor (necromancer's platform), you will receive an additional skill point.
Allan / Barbatos (alchemist's platform), you will receive an additional skill point.
Kenneth / Hermosa (trainer's platform), you will receive an additional skill point.
Wesson / Radcliff (enchanter's platform), you will receive an additional skill point.
Thoroughly search the teacher locations, you'll find quite a lot of books adding dragon skill points. You will also find them in the throne room.
In order to obtain the key to chest S1 head to the alchemist, take the key from the table. Go to the necromancer, where you will open the chest in which there will be a key to a chest at the trainer's. Inside you'll find another key. Head to the enchanter. In the chest you will find a key to the chest in the throne room.
1. Crabbe
2. Cadby
3. Laura
4. Simeon
5. Jievaras
6. Yggdragsil
7. Irminsul
8. Beird (trader) / Abram (trader)
9. Lister
10. Artemas (trader) / Tibus / Jedediah
11. Jack Bolton (corpse)
12. Jimmy Dean (corpse)
13. Mullet (trader) / Zeppelin Master Page / Sepp / Irwin (trader) / Aurelius / Morgan / Leon (trader) / Brutus / Sejanus
14. Tilian / Montagu
15. Quintus / Gwyn / Eamon / Gobie / Mona / Nicolas (trader) / Beatrice
16. Moor
17. Alrik
18. Hall of Echoes
S Airship parts
S1 Gremor's family chest (more in Secrets)
M5.1 Broken Valley
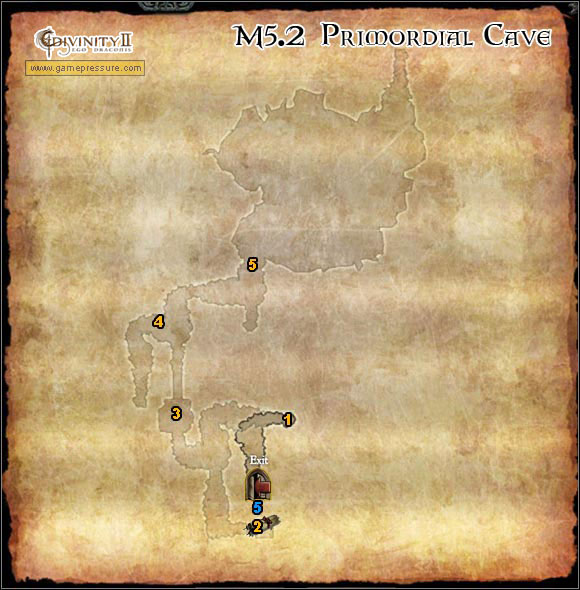
M5.2 Primordial Cave
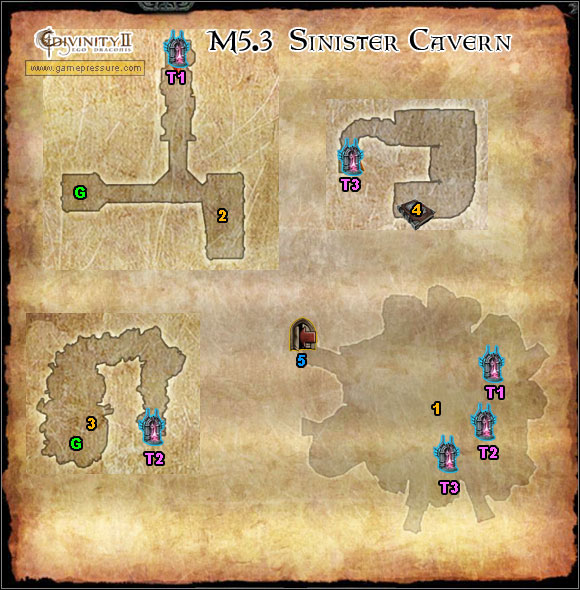
M5.3 Sinister Cavern
M5.4 Dark Cave
M5.5 Imps' Lair
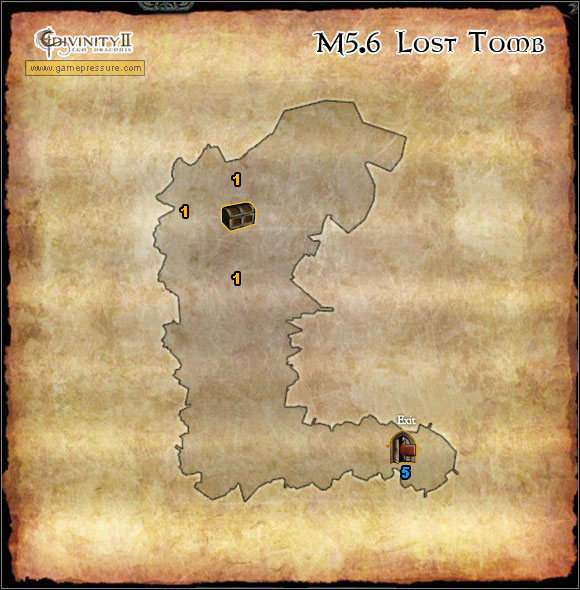
M5.6 Lost Tomb
M5.7 Depleted Ore Mine
M5.8 Stone's Flying Fortress
M5.9 High Hall Mines
M5.10 Mysterious Cave
M5.11 Raze's Flying Fortress
M5.12 Kali's Flying Fortress
M5.13 Red Hammer Tribe
M5.14 Well Cave
M5.15 Orobas Crypt
M5.16 Bone Burrow
M5.27 Keara's Flying Fortress

1. Williams
2. Doctor Needleman
G Generators
M5 Orobas Fjords
M5.8 Stone's Flying Fortress
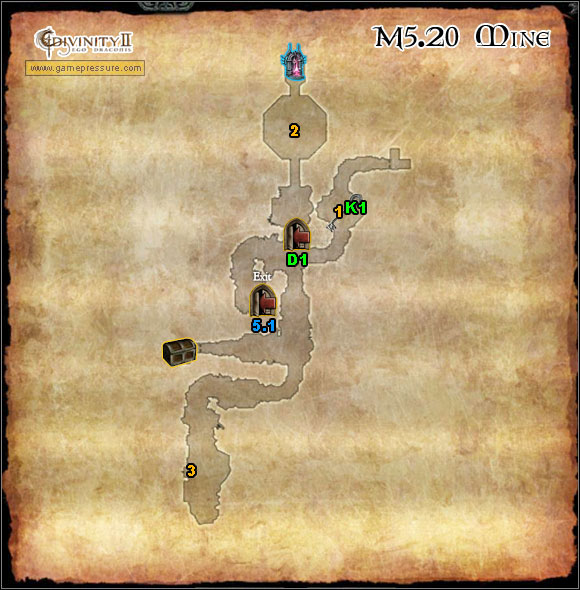
M5.20 Mine
M5.21 Geshniz's Headquarters
M5.25 Rayhun's Headquarters
M5.26 Needleman Storage
1. Elevator
2. Chicken Rune
3. Golden Statue
4. Lever
5. Patriarch
M5 Orobas Fjords
1. Barnabus
2. Lever
3. Lever
4. Book of the Dead
G Generator
M5 Orobas Fjords
1. Platforms
2. Ragon
K2 Key to chest S2
M5 Orobas Fjords

1. Imp Boss
2. Arthur Gremory
K1 Key to chest D1
M5 Orobas Fjords
1. Lever
M5 Orobas Fjords
1. Elevator
2. Alutiiq
3. Lever
4. Pedestal (level -1)
K1 Key to chest S1
S2 Chest (more in Secrets)
M5 Orobas Fjords
1. Xanlosch / Isabelle
G Generators
M5 Orobas Fjords
M5.1 Broken Valley
M5.17 Stone's Greenery
M5.18 Stone's Passage
M5.19 Fortress Headquarters

A complete mage set
1. Barrier
2. Elevator
3. Mundus
M5 Orobas Fjords
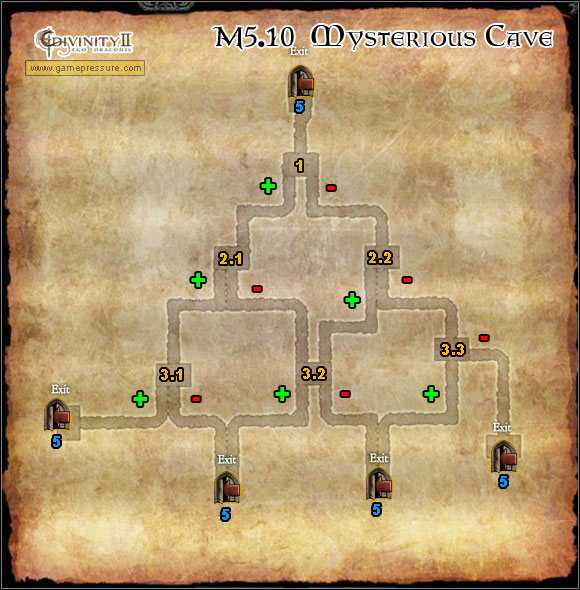
A thorough description in the Mysterious Cave quest M5(10)
M5 Orobas Fjords
G Generators
M5 Orobas Fjords
M5.22 Raze's Headquarters

Complete archer set
G Generators
M5 Orobas Fjords
M2.23 Kali's Storage
M5.24 Kali's Headquarters

Complete warrior set
1. Timpuk (trader)
2. Svadilfari
3. Groth
K1 Key to chest S1
M5 Orobas Fjords
1. Kezzz
2. Elevator
3. Zagan
K1 Key to chest D1
M5 Orobas Fjords
1. Orobas
S1 Chest (more in Secrets)
M5 Orobas Fjords
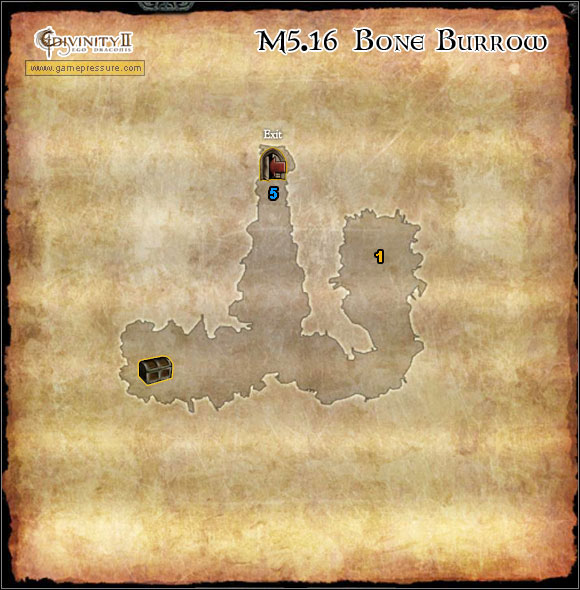
1. Ultimate Creature Boss
M5 Orobas Fjords
1. Fountain
S1 Golden chest
M5.8 Stone's Flying Fortress
M5.8 Stone's Flying Fortress
1. Stone
M5.8 Stone's Flying Fortress
1. Amon
2. Ba'al
3. Lever
K1 Key to chest D1
M5.1 Broken Valley
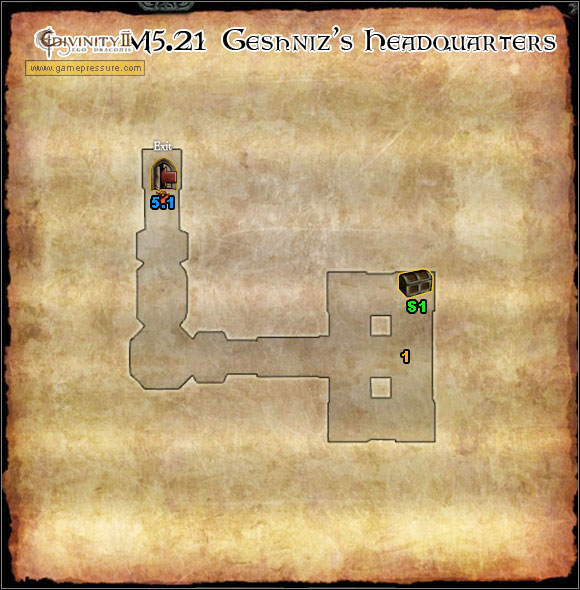
1. Geshniz
S1 Golden chest
M5.1 Broken Valley
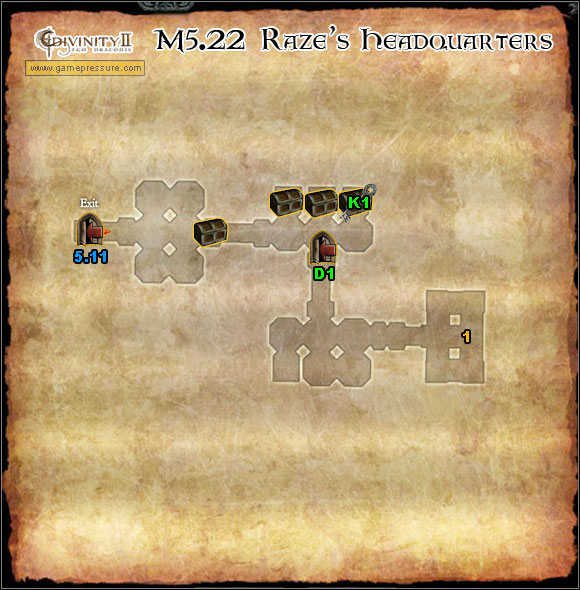
1. Raze
K1 Key to chest D1
M5.11 Raze's Flying Fortress
S1 Golden chest
M5.12 Kali's Flying Fortress
1. Lever
2. Kali
K2 Key to chest D1
M5.12 Kali's Flying Fortress
1. Rayhun
S1 Golden chest
M5.1 Broken Valley

K1 Key to door D1
M5.1 Broken Valley
G Generators
M5 Orobas Fjords
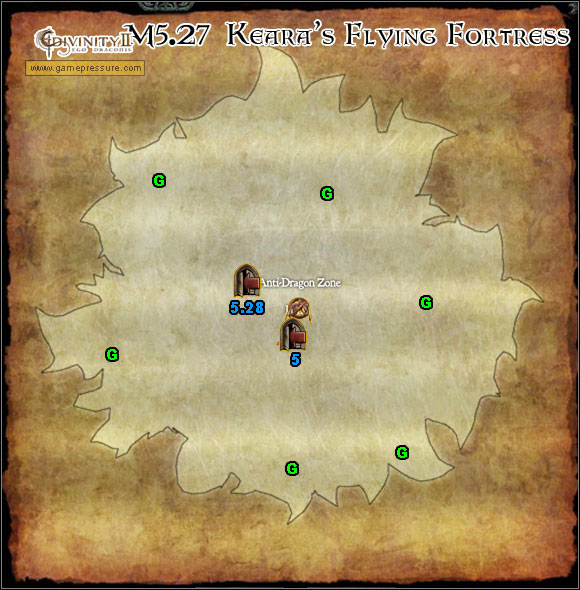
M5.28 Keara's Headquarters
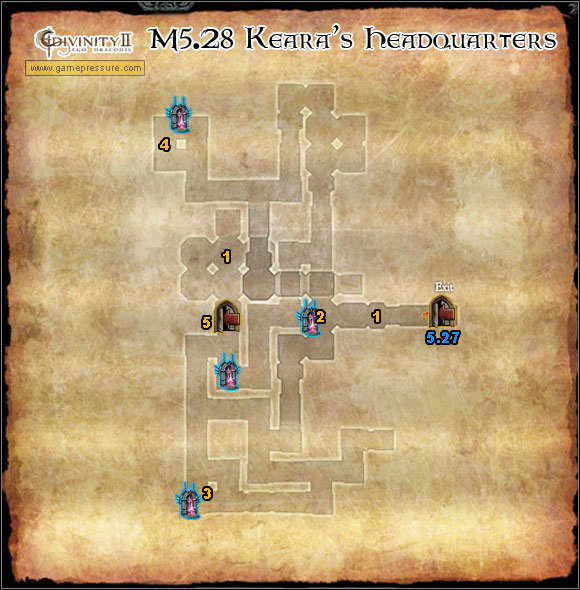
1. Keara / Valanir
2. Statue
3. Statues
4. Statues
5. Gate
M5.27 Keara's Flying Fortress
After teleporting to Orobas Fjord, make your way to the mysterious cave hidden behind the waterfall M5(M5.2). Fight your way to the elevator M5.2(1), which you will find on the lower level. Go forward all the time, take the right path at the fork and continue until you get to three statues M5.2(3). In order to open the gate, you have to complete the Reaping the Seeds quest M5.2(3). After crossing the door you will have to cross a small obstacle course of fireballs. On the left, behind a wall, you will find a chest M5.2(4) with a lever inside. Put it in the machine after crossing the course. You will deactivate the barrier blocking the further path. Go up the stairs and get rid of the last monsters in the cave. You will reach a dragon - Patriarch M5.2(5). He will open the entrance to the Hall M5.2(x). During your way back, you'll get attacked by Damian's men.
Prize: 7500 experience points, 1560 gold, 1 additional option.
Each of the three statues requests a seed from the tree which you will find in Orobas Fjords. Exit the cave, on the map you will notice the places where you have to go. In order to get to the further part of the map, you have to shut down the force fields forming a barrier. The bunker M5(8) is also behind the barrier, so head to the nearest teleport, which will move you right in front of the entrance. After going upstairs you will meet Lady Kara and Lord John. Take them out and the passage to the upper part will open. There you will bump into two more Damian's subordinates - Beird and Abram. If you decide to spare them, they will both become traders from whom you will be able to buy a couple useful items. You will also find levers which switch off the barriers.
The First Hungry Statue
Jievaras M5(5), talk to the tree, you will be asked to get rid of wyverns that have made themselves a nest on the tree. In return you will receive the seed.
Prize: 1 additional option.
The Second Hungry Statue
Yggdragsil M5(6), talk to the tree, you will be asked to get rid of a goblin which has built himself a hut on the tree. In return you will receive the seed.
Prize: 1 additional option.
The Third Hungry Statue
Irminsul M5(7), talk to the tree, you will be asked to solve a riddle. The answer is Amfora. You lose some energy for a mistake. In return you will receive the seed.
Prize: 1 additional option.
After collecting all the seeds return to the statues M5.2(3) and place them in. The door will be opened.
Prize: 1 additional option.
In order to open the Hall entrance, you need a special seal which Maxos has hidden in one of Broken Valley mountains. Head to the deserted land, to the mine entrance to be precise M5.1(M5.20). However firstly you have to turn off the barrier which blocks the further path using the lever. The generator is not far from the mine M5.1(G). You will obtain the key by completing the A Guild without Master quest M5.1(1). After getting inside, head forward all the time. You will reach a closed door M5.20(D1). The key M5.20(K1) is in Amon's hands M5.20(1). Get rid of him and the other soldiers. Open the door and go to the big room, where you will meet Ba'al M5.20(2). Finish off his subordinates and then take care of him. After killing him, you will acquire the seal. Leave the area using the teleport.
Prize: 11250 experience points, 1800 gold, 1 additional option.
In order to obtain the last item needed to get into the Hall of Echoes, you have to head to the capital - Aleroth. The only way of transport is by a zeppelin, which you will find in the port. There are some barriers blocking your way that you have to disable. You can do it by the bunker M5(8). By using one of the special teleport you are able to move right next to the entrance. Take the ladder upstairs and clear the area. After shutting down the barriers head to Sepp M5(13). You will learn that none of the zeppelins can take off. Firstly you have to complete the On the Road Again quest M5(13). Once your transport is ready, head to Aleroth, where you will complete the rest of the Hall of Echoes Bound - Come to no Harm part 2 quest M6. After returning you will be able to unlock the entrance to the Hall M5(18). Read Maxos' scroll and go inside.
NOTICE: Bring as much potions as you can, they will really come in handy.
Prize: 11250 experience points, 1920 gold, 1 additional option.
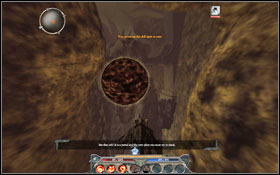
As you enter the Hall, your character will transform into a dragon and you won't be able to turn back into a human. Destroy the four nests to unlock the passage #1, you can ignore the wyverns if you can't handle them. Hurry and fly to the big sphere #2.
Go along the path, you will arrive at an arena #1. Your task is to make it through six waves of enemies that you have met before. You'll have quite a hard time, try to use your creatures to turn your enemies' attention away. Below is a list of foes you will have to kill with their levels in the brackets.
1. Marius (31), Gene (30);
2. Sassan (31);
3. Amdusias (31);
4. Laiken (31), Razakel (30);
5. Lady Kara (31), Lord John (31);
6. Ba'al (32).
A passage will open, there will be a teleport #2 - use it. You will become a dragon once again. Fly into another sphere in front of you.
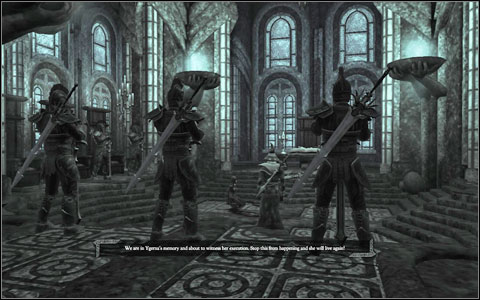
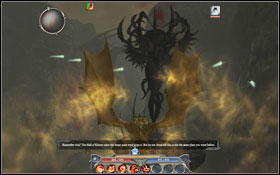
You will move into a room which is in fact Ygern's memories. Divine is about to kill her. Your old friend - Zandalor the mage - is also here. You of course cannot let the woman die. This is the last fight in the game, a real nightmare. Try to use everything that you have learned during the game, every skill might be useful. After killing everyone you can watch the ending which will clear out the things you haven't understood.
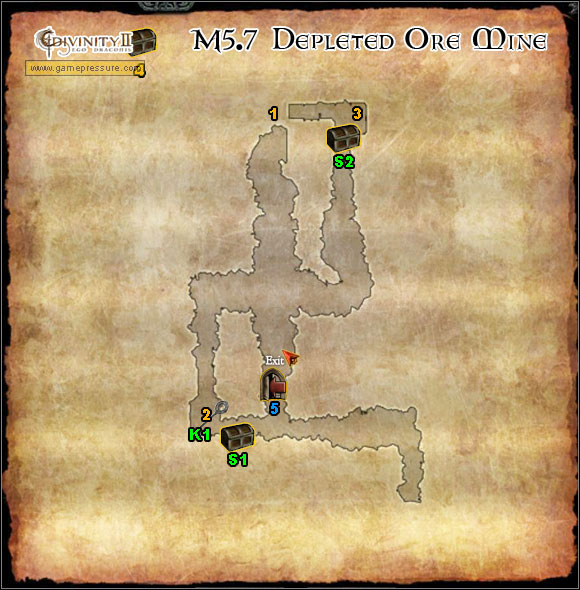
Received from: Crabbe M5(1)
You have to clear the mine M5(M5.7) of imps, so that the miners can return to work. After completing the task return to Crabbe.
Prize: 1 additional option.
Received from: Arthur M5.5(2) / Laura M5(4)
Your task is to find four searchers scattered thorough the whole region:
Jimmy Dean M5(12);
Jack Bolton M5(11);
Laura M5(4);
Arthur Gremory M5.5(2).
They were searching for a cave with a precious treasure in it. After finding all four of them go to the entrance M5(M5.6) and talk to Laura about assembling the key. Once you reach the treasure, your companion will find a note saying that there is in fact no treasure at all. Once the quest ends, pull the three levers M5.6(1) in the cave. Some platforms will show up, go to the very top by jumping from one to another to get the chest with the treasure inside.
Prize: 1 additional option.
Received from: Simeon M5(4)
A blind philosopher asked you to find two malachites, thanks to which he will be able to restore his eyesight. You can find those very rare crystals in one of the caves M5(M5.14). To get into it, you have to accept The Horror of High Hall M5(15) or Delicate Affairs quest M4(Radcliff), for which you will receive the needed stones. Return to the blind man and give him them.
Prize: 7500 experience points, 1 additional option.
Received from: Crabbe M5(1)
A zeppelin was meant to fly for the man, but it still hasn't arrived. Head to the harbour, where you will find the person responsible for the zeppelins - Zeppelin Master Page M5(13). The zeppelin needs to be repaired before taking off. Complete the On the Road Again quest M5(13). Eventually Crabbe will be in the port, go to him to claim your reward.
Prize: 2000 gold, 1 additional option.
Received from: Jedediah M5(10)
One of the knights has been imprisoned and you will be asked to save him. Firstly you have to obtain Chalice of the Dragon and a plant called Drudanae.
Chalice of the Dragon
The artifact is in Tilian's possession M5(14).
1. You can take the artifact by force, by informing that you want to free Orobas - everyone in sight will attack you. You will find the key opening the Chalice Chest.
2. You can say that you want it for yourself and offer Arben's sword in return. You will receive the key opening the Chelice chest.
Prize: 4500 experience points, 480 gold, 1 additional option.
A Puff of Drudanae
The plant you need to get is banned, so getting it might be quite troublesome. You will receive a hint to head to the High Hall in the north M5(15).
1. You can buy the plant from a man named Nicolas, for 3750 gold.
2. You can steal the plant from the garden in his basement.
Prize: 4500 experience points, 480 gold, 1 additional option.
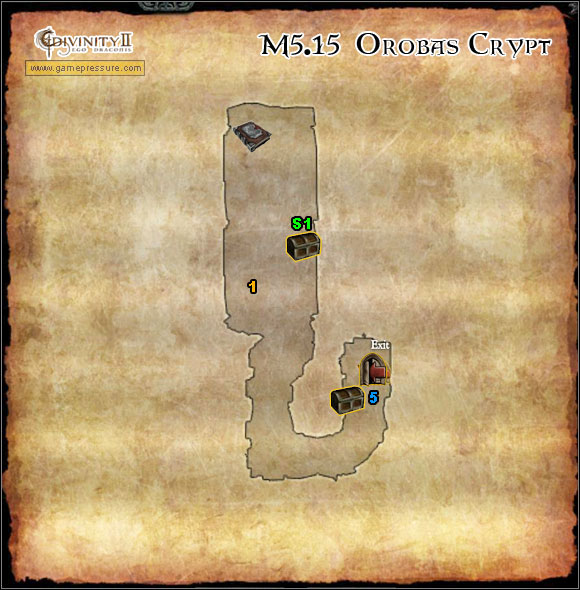
Afterwards return to Jedediah to perform the ritual of opening M5(M5.15). Inside you will find a dragon skeleton, Orobas has died. Nearby you will find chest S1 which will open after you correctly answer three questions. Exit the crypt and tell Jedediah the sad news.
Prize: 1 additional option.
Received from: Tilian M5(14)
The commander will ask you to kill Saul, who currently is in prison for murdering one of the slayers. In order to get to the prison, you have to pass the guard: you can bribe him, challenge to a fight or intimidate him (read his mind and you will get to know about his dirty deeds). Eventually the door will be opened. Use the teleport to get into the prison. Pick up the key lying on the bench and open Saul's cage. Kill the bastard and return to Tilian.
Prize: 6000 experience points, 560 gold, 1 additional option.
Received from: Brutus M5(13)
Your task is to check what happened with a patrol sent to defeat a troll roaming in the High Hall area M5(15). Head to the spot, you will begin a conversation and automatically accept The Runes of Wrath quest M5(15). After completing it, return to Brutus.
Prize: 4500 experience points, 480 gold, 2 additional options.
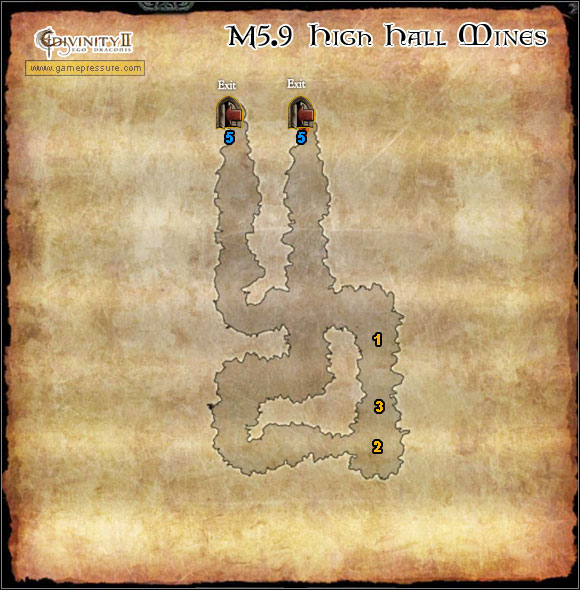
Received from: Quintus M5(15)
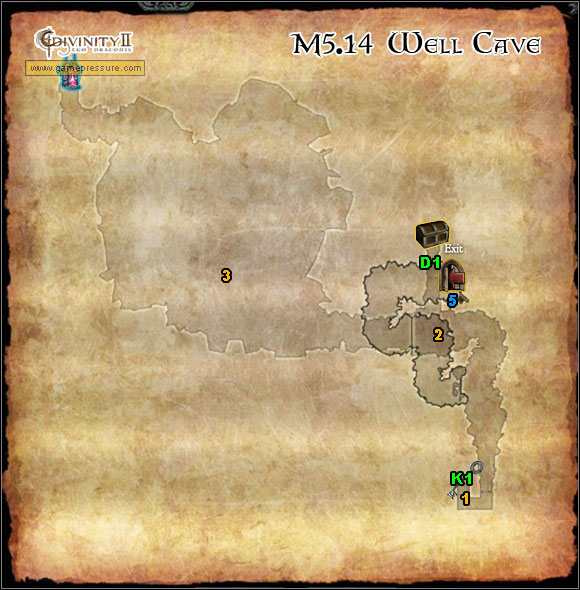
During the conversation some trolls will attack the village. Help the soldiers deal with the monsters. Your task is to force the mage hiding in the mine - Mundus - to stop sending trolls on the village. Two soldiers will go with you as backup. Head to the mine M5(M5.9). Go left on the intersection, you will reach a magical barrier M5.9(1), with Mundus behind it. Also be sure to take the two Magical Runes which one of the trolls will drop. You have to find another way. Head left to go round the whole mine and approach the mage from behind. You will find yourself in front of another barrier, but this time use the rune you have found on the platform to open the passage. Go to the elevator M5.9(2) and ride it up. Talk to the mage M5.9(3).
1. You can kill Mundus.
Prize: 4500 experience points, 480 gold, 1 additional option.
2. You can convince him to stop attacking the village, however you will have to do something that will allow him to peacefully sit in his mine and never see another person from the village. Your task is to find a rune which will allow to make food. The Chicken Rune can be found in the cave beneath the waterfall M5.2(2).
Prize: 6750 experience points, 720 gold, 1 additional option.
Received from: Sejanus M5(13)
Your task is to localize and eliminate a few enemies. As proof of defeating them you have to bring and show Sejanus an appropriate item. You will receive a prize for every enemy killed.
Barnabus: location: M5.3(x), proof: Barnabus' Ring
Ragon: location: M5.4(2), proof: Ragon's Ring
Alutiiq: location: M5.7(2), proof: Alutiiq's Mask
Moor: location: M5(16), proof: Moor's Ledger
Alrik: location: M5(17), proof: Alrik's Necklace
Prize: 1 additional option.
You will receive an additional prize for dealing with everyone from the list.
Prize: 4500 experience points, 520 gold, Tiberius' Bow, 2 additional options.
Received from: Aurelius M5(13)
Your task is to eliminate the leader of a local gang called Red Hammer, who's a goblin shaman named Svadilfarier. Head in the direction of the cave M5(M5.13). You won't be able to reach your destination because of the barriers. Destroy all of the generators to shut it down. You can also get rid of the ballistas and nests so that they won't cause you any trouble in the future. After entering the cave, head to the shaman M5.13(1).
1. You can try diplomacy, thanks to which you will receive the Death of a Champion quest M5.13(2).
2. You can kill the giant goblin and give his head to Aurelius. During the fight your enemy will run away - leave the cave and finish him outside, this time in your dragon form.
Prize: 6000 experience points, 2000 gold, 1 additional option.
Received from: Zepellin Master Page M5(13)
You have to collect the parts needed to start the Zeppelin, there are nine of them in total. You will find them scattered thorough the whole land M5(S). If a barrier is still blocking you, destroy all the generators, ballistas and nests.
Prize: 6000 experience points, 560 gold, 1 additional option.
Received from: Svadilfarie M5.13(2)
A goblin-shaman will ask you to kill one of the champions - Aurelius M5(13). You will receive a faked, poisoned head of the goblin, so that the Champion will think that you have completed A Shaman's Ransom quest M5(13). Once he touches the trophy he will be poisoned and in effect die. Return to the goblin. As you're no longer needed, he will attack you. During the fight your enemy will run away - leave the cave and finish him outside, this time in your dragon form.
Prize: 1 additional option.
Received from: Groth M5.13(3)
Groth want you to find a man who knows the goblin language so that he can write down their history. Someone fitting those requirements is Gwyn M5(15), who thinks of himself as a goblin. Offer him to go to the goblin cave and afterwards go there yourself to collect the prize.
Prize: 3000 experience points, 300 gold, 1 additional option.
Received from: Gobie / Eamon / Mona M5(15)
A poor peasant complains about ghosts haunting his house. Two lying pretenders: Eamon and Mona are offering to take care of the problem for a small charge.
1. Offer to pay for the ritual (1000 gold).
Prize: 1 additional option.
2. You can offer your help in getting rid of the ghost. The other pretenders will run away and the ghost will turn out to be a normal person who changed its appearance using magic. He will run away after a while, so go back to the farmer.
Prize: 4500 experience points, 480 gold, 1 additional option.
3. You can demand half of the sum the peasant offers in return for keeping quiet and not revealing the fraud.
Prize: 4500 experience points, 960 gold, 1 additional option.
4. You can summon the ghost, after which Eamon will run away.
Prize: 1 additional option.
Received from: Beatrice M5(15)
A young woman will ask you for help in repairing a well that has been dry for several days. After reading her mind you will find out what really awaits you. Head to the other side of the village and enter the cave by the well. Go forward all the time, down the stairs. Once you get to the lava, turn right. You will come across one of the demons, Kezzz M5.14(1). However he will disappear after a while. Take the key K1 from the desk and go back. Go straight now, you will get to an elevator M5.14(2), use it to get to the lower level. You will arrive at a closed passage D1, open it using the newly gained key. Inside you will find a chest and in it a lever. Return to the elevator M5.14(2) and put the missing lever into the slot - go to the lower level. You will once again meet Kezzz, who this time will attack you. Go left and you will finally reach Zagan M5.14(3). After the initial conversation you will change into a dragon - kill the bastard. Once he's down the passage you used to get here will get buried. You will have to have some wyverns, destroy their nest so they don't respawn. Afterwards fly upwards and use the teleport to return to the village. Collect your prize from Beatrice.
Prize: 4500 experience points, 480 gold, 2 malachites, 1 additional option.
Received from: Williams M5.1(1)
In return for fighting off Damian's forces from the mine, Williams offers you the key to the hidden passage M5.1(M5.20) - because the main passage has been blocked. Take the stairs down the tower and eliminate any Black Ring troops on your way. After killing everyone the Champion will join you and you'll receive a reward your help.
Prize: 1500 experience points, 320 gold, 1 additional option.
Received from: Bellegar M5(10)
The cave is a choice test, in which you will have to choose one of two options during a three-step journey. Your good and bad decisions will determine at which exit you end up. Each ending has a prize. If you choose a completely good/bad path, you will be able to choose one weapon from the stand in addition to the standard prize. Green marks the good path/choice and red the bad.
Decisions:
M5.10(1)
1. Save the woman and fight off the man;
2. Let the woman get robbed.
M5.10(2.1)
1. Persuade the woman to send her husband to war;
2. Give the man a stats point.
M5.10(2.2)
1. Use the key to open the cage;
2. Use the key to open the chest.
M5.10(3.1)
1. Leave the man alone;
2. Give the man a health and resistance point.
M5.10(3.2)
1. Draw the guard's attention so that the man can escape;
2. Suggest a torture method.
M5.10(3.3)
1. Use the lever on the left and set the peasant on fire;
2. Use the lever on the right and set the peasants free.
Received from: Valanir M5.28(1)
While being in Orobas Fjords head to one of Damian's Flying Fortresses M5(5.27). Destroy all the generators M5.27(G) to turn off the barrier. You can clear out the whole fortress or head to the teleport M5.27(M5.28), which will lead you straight to Keara's headquarters. You will decide to help her husband's ghost which wants to leave the fortress. In order to do this, you have to solve a small riddle - talk to five statues which you can find thorough the location and then name them properly. Each statue can give you some hints. (L - left statue; P - right statue; while looking at the portal)
Hints:
2. Mayhem is not in the same room as Havoc; Devastation is in the same room as Chaos.
3L. I'm neither Chaos nor Havoc; Chaos is not in my room or Waste's.
3P. I'm in the same room as Waste; I'm neither Mayhem nor Waste.
4L. I'm Devastation or Chaos; Waste is in the same room as Mayhem.
4P. Mayhem is alone in his room; Havoc is in this room.
Proper names:
2. Devastation
3L. Havoc
3P. Mayhem
4L. Waste
4P. Chaos
Use the teleport to get to the door M5.28(5). If all your answers are correct, the gate will open. You will play a mediator between Keara and the ghost. Your decision will determine if the ghost leaves the fortress.
Prize: 7500 experience points, 600 gold, 1 additional option.
Crabbe M5(1), you will increase you jewel finding skills, from now on you will find them more often.
Laura M5(3), you will receive an additional skill point.
Abram M5(8), will lower his prices after you tell him about his intentions toward yourself.
Beird M5(8), will lower his prices and show the localization of the key Olivia's cage. You will find the key outside, under the bunker.
Lister M5(9), you will receive an additional skill point.
Patriarch M5.2(5), you will receive an additional skill point.
Artemas M5(10), the trader will lower his prices.
Arthur Gremory M5.5(2), you will learn that before you open the chest with Gremory family's treasure, you have to press the button in the back.
Mundus M5.9(3), you will learn that one of the runes has been painted thanks to which the trolls are under full control.
Gwyn M5(15), you will learn the password to his chest which you will find right next to him.
Irwin M5(13), the trader will lower his prices.
Leon M5(13), the trader will lower his prices.
Moor M5(16), the key to the chest is a little higher, in one of the nests.
Sepp M5(13), you will receive an additional skill point.
Timpuk M5.13(1), the trader will lower his prices.
Svadilfari M5.13(2), you will learn about a part of the dragon armour, which you will find in the chest behind the goblin.
Beatrice M5(15), you will learn that the woman is sending the warriors right in the demon's mouth. When you will tell her about this, you'll receive two more malachites!
Nicolas M5(15), the trader will lower his prices. Additionally you will learn that the key to his chest is under the pillow.
Williams M5.1(1), the man will admit that he'll easily give away the code to his chest if someone will force him to talk.
Doctor Needleman M5.1(2), you will learn the password to his warehouse M5.1(26).
Keara M5.28(1), you will learn that all the statues are lying.
Raze M5.21(1), Stone M5.19(1), Kali M5.24(2), Xanlosch M5.8(1), you will complete the Ulthringa set.
Ba'al M5.20(2), you will receive an additional skill point.
Charon (Hall of Echoes), you will receive an additional skill point.
Marius (Hall of Echoes), you will receive an additional skill point.
Sassan (Hall of Echoes), you will receive an additional skill point.
Amdusias (Hall of Echoes), you will receive an additional skill point.
Ba'al (Hall of Echoes), you will receive an additional skill point.
You will receive 1000 gold for helping Cadbi M5(2).
To make the chest appear M5.7(S2) you have to get to the lever M5.7(3) which you will find at the very top of the room. Get there by using the platforms that will slowly move upwards. After pulling the lever two additional platforms will appear. Once you step onto the highest one, a chest will show up below. Quickly jump down, as it will disappear after a while.
Take the elevator to level -2, at the end of the corridor you will find three book pedestals. Remember the order (blue, red, dark) and the number of candles by each of them. They are placed randomly. Head to level -1, where you will be able to place the books M5.7(4). Remember to place the books accordingly to what you saw downstairs. A chest will appear.
At the top of one of the towers M5(10), you will find a case with a key to the chest at the top of the second tower.
The key M5.13(K1) to the chest M5.13(S1) can be found in the closed part of the mine after completing the Much Ado About Goblins M5.13(3) or Death Of a Champion M5.13(2) quest.
In order to open the chest M5.15(S1) you have to answer three questions testing your memory:
1. Three skulls;
2. 1 health potion, 2 apples, 1 Droxlerites;
3. Four candles.
You will open the Golden Chest M5(S1) after reading the mind of all three Gremory family members: George M2(12), Catherine M4(12) and Arthur M5.5(2). You will learn the location of the chest, the password and get to know about the safety button behind. Firstly press the secret button, then give the password.

1. Elevator
2. Pilcher (trader)
3. Zarniyar (trader)
4. Augustus
This is the second part of the Hall of Echoes Bound - Come to no Harm quest M5(13) which you begin in Orobas Fjords M5.
After flying to the island you will be welcomed by Zachariah. You will learn that Zandalor and Deodatus have opened a portal through which a wave of undead came to the town. Afterwards you will come across a couple of Slayers, including your old friend Rhode. She knows that you're a Dragon Knight and will want to kill you but Angharad will stop her. You can go to meet the mage in the north part of the town. Use the elevator M6(1) to get to the higher level. You will come across an enraged crowd wanting to get out of the town through the portal. Talk to Augustus, who's standing on the stairs M6(4). He'll allow you to use the teleport. Choose the location at the end of the list - Ministry.
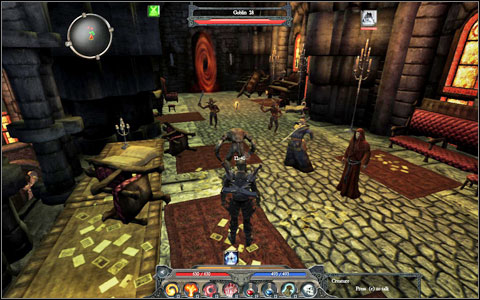
Once you're inside, go to the centre of the room to talk with Zandalor. You will learn that the mage has obtained the shield you need in another dimension, but the portals didn't close after his return. Your task is to help him close all (5) the portals by keeping the enemies away from him. Once you're ready, head with the master to the first portal. The first two won't be too demanding. You have to keep the monsters away from him for 15 second. Each time you have to tell Zendalor that you're ready. After closing the two, you will return to the centre of the room and will have to face enemies coming in from three sides at the same time. Additionally you have to keep them busy for 1 minute. You definitely won't make it yourself, call your Creature and an additional demon or undead. Having a team like this, Zandalor should be able to close the portal without any problems. In return you will receive the Shield. Use the teleport and return to Orobas Fjords, where you will finish the rest of the Hall of Echoes Bound quest M5(18).
Pilcher M6(2), the trader will lower his prices.
Zarniyar M6(3), the trader will lower his prices.
Augustus M6(4), you'll receive an additional stats point.
Zandalor M6(teleport), you'll receive an additional skill point.
Picture
Name
Requirements

Peeping Tom
You have read someone's mind.

All Aboard!
You finished Farglow. Happy hunting!

Gaining Power
You have leveled up. Congratulations!

Shop Till You Drop
You have traded with someone.

The Damned One
You met Damian.

Mirror, Mirror
You have made use of an illusionist's services.

Master Brewer
You have created a potion.

Hold the Key
You have obtained the key to the Maxos Temple.

Lovis Lore-Master
You correctly answered all of the questions about Lord Lovis.

Path of the Pious
You have gained entry to the Maxos Temple

Off the Leash
You have summoned your creature.

The Feral Fjords
You have discovered the Orobas Fjords.

The Maxos Baedeker
You have found the book that will lead you to the Hall of Echoes.

The Great Escape
You have made it out of the Maxos Temple.

The Dragon Roars
You have destroyed Damian's armada and successfully protected your Battle Tower.

Spell-Struck
You have found the spell that will reveal the Hall of Echoes.

Master Studiorum
You have made use of your skill trainer.

Shape of the Dragon
You have morphed into a Dragon.

Adrift
You have found Michael's raft.

Enchante
You have enchanted an item.

You're Going to Die, Charlie
You have killed Charlie the goblin.

Dragon Ho!
You have found a true Dragon: the Patriarch.
Cave in
You have found Adah and Mahalath's secret cave.

On the Run
You have sent one of your runners on a mission.

Family Fortune
You have read the mind of the three Gremory siblings.

Turn a Blind Eye
You have cured blindness.

Bounty Hunter
You have brought to justice all of Rivellon's most wanted criminals.

Divinity
You have reached an epic level.

Saint or Satan
You have shown you are either utterly good or evil in Bellegar's cave.

The Sigil, the Seal
You have found the seal that will open the gate to the Hall of Echoes.

Dim Lights, Dark City
You have discovered Aleroth.
Shielded
You have obtained the shield that will protect you in the Hall of Echoes.

Past the Gates
You have reached the Hall of Echoes

Pillar of Strength
You have upgraded all your Battle Tower platforms to their maximal potential.

Dragon Knight
You have finished the game.

A Dragon Stone's Throw Away
You have used the Dragon Stone.

Chicken Out
You have killed Caspar.

She Never Saw it Coming
You scared away the fortune teller.

Prince Charming
You have charmed an item.

Castle Thrasher
You have destroyed all of Damian's Flying Fortresses.

Bunny Bagger
You have killed the Killer Bunny.
The Divinity II: Ego Draconis atlas contains all the materials that weren't included in the basic guide. Here you will find a description of the skills, potions and spells - that means an enormous amount of charts. Additionally there are maps with marked enemy territories and a bestiary containing most of the characters and enemies which you will meet during the game.
Artur "Arxel" Justynski
Translated to English by Jakub "cilgan" Lasota

Passages to other locations.

Chests (also golden).

Keys.

Books etc.

Normal teleport - it lets you choose the destination point from among the places that you have already visited.

Special teleport - it works in one way only and you can't choose the destination point.

Important places (for example magician/archer/warrior sets in Damian's Flying Fortresses).

A zone in which you can't transform into a dragon.

0-5th level enemies

6-10th level enemies

11-15th level enemies

16-20th level enemies

21-25th level enemies

26+th level enemies
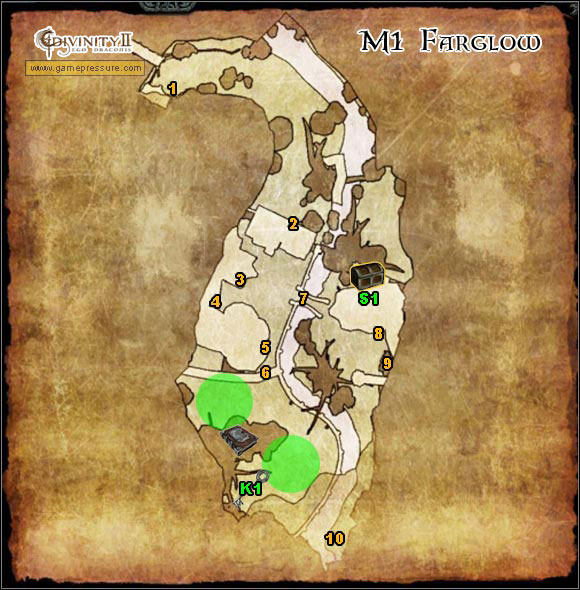
1. Rhode / Marius
2. Edmund
3. Aravir (archery trainer)
4. Alberic (magic trainer)
5. Gawain (melee trainer)
6. Sonja
7. Isobel
8. Tiresias (trader)
9. Gerald (trader)
10. Morgana / Toral
K1 key to chest S1
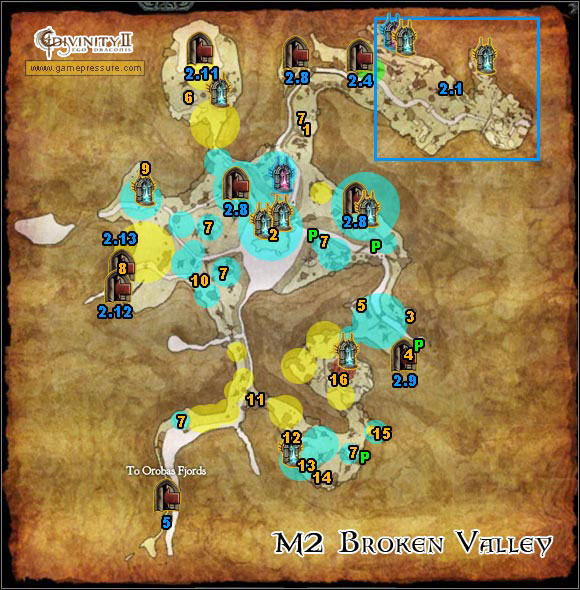
1. Rhode
2. Carlin (trader) / Toshan
3. Noryfundus (trader)
4. Christopher
5. Eugene
6. ZixZax
7. Bellegar
8. Sosostra
9. Dreavan
10. Filip / Jenae
11. Tagos Axe
12. George Gremory
13. Viper
14. Rothman
15. Yup'ik
16. Williams
P Scrolls
M2.1 Village
M2.4 Secret Passage
M2.8 Derelict Tunnels
M2.9 Bandit Camp
M2.11 Maxos Temple
M2.12 New Miners' Dig
M2.13 Miller's Storage
M5 Orobas Fjords
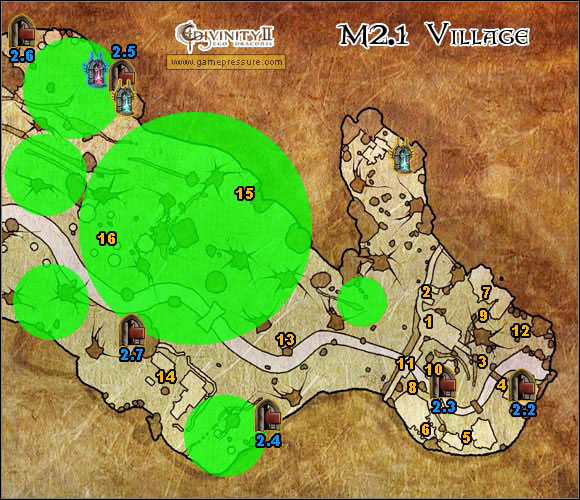
1. Rhode / Louis / Captain Rodney / Peavey
2. Keane / Wellesly
3. Merchant Lamotte (trader)
4. Arnold / Romon
5. Folo (trader)
6. Derk (blacksmith)
7. Ollie / Bermaid Elsa / Tim / Doctor Needleman / Locke (trader) / Brave Sir Robin / David
8. Richard
9. Elisabeth
10. Winthrop / Linda / Upton (miller)
11. Sean
12. Lock's wagon
13. Quincy
14. Lomax / Dana
15. Mouse
16. Hjalmar
M2.2 Tomb
M2.3 Watermill Basement
M2.4 Secret Passage
M2.5 Lost Cavern
M2.6 Old Cave
M2.7 Forgotten Outpost
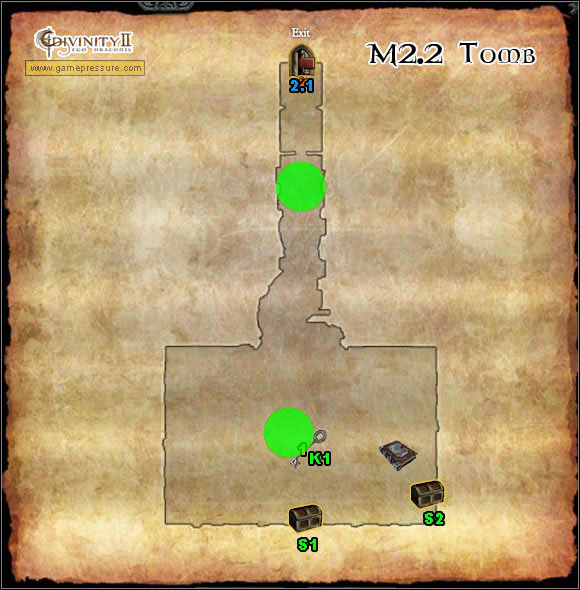
1. Arben Ghost
K1 Key to chest S1
S2 Golden chest
M2.1 Village
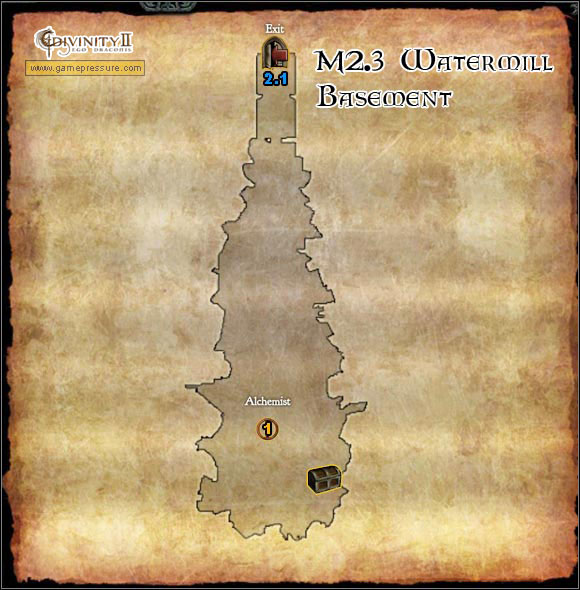
1. Abanayabar (alchemist)
M2.1 Village
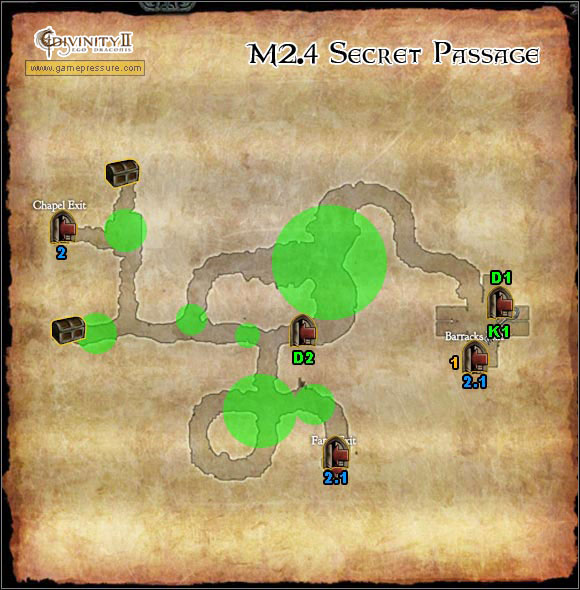
1. Martis
K1 Key to door D1
D2 A door, Martis has the key M2.4(1)
M2 Broken Valley
M2.1 Village
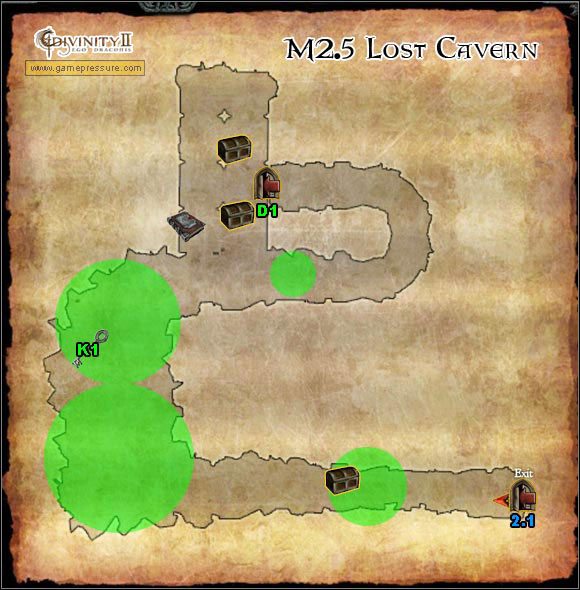
K1 Key to door D1
M2.1 Village
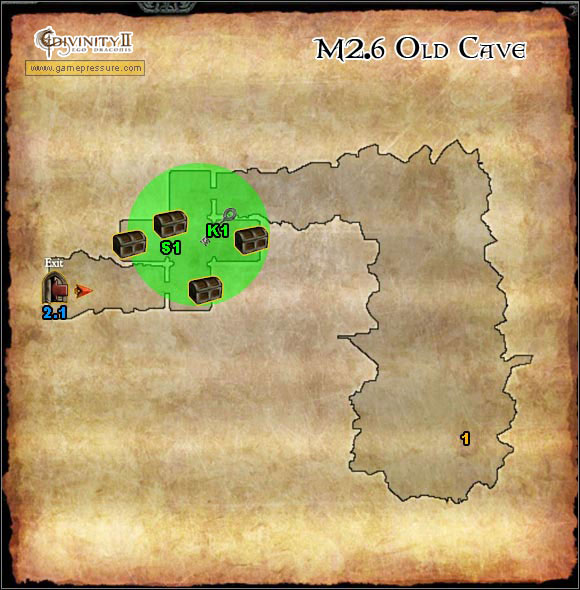
1. Naberius (necromancer)
K1 Key to chest S1
M2.1 Village
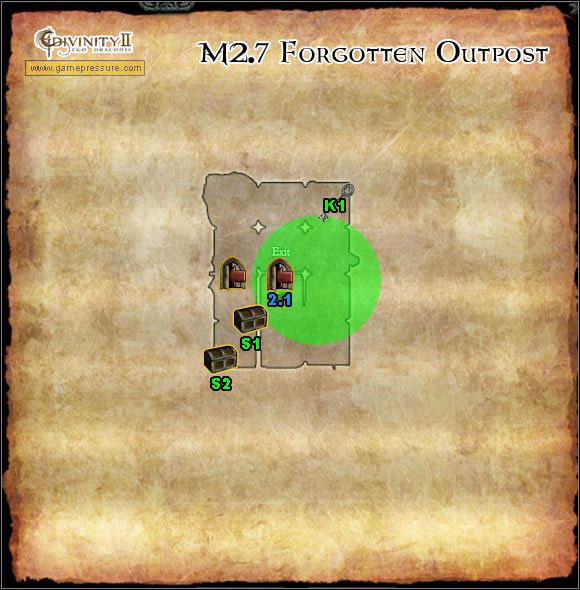
K1 Key to chest S1
S2 Golden chest (more in Secrets)
M2.1 Village

1. Hallorn
2. Broken Valley M2

1. Clement / Sybille
2. Tagos
3. Martis (trader)
4. Rangar
5. Leda
6. Jagon
7. Christopher
8. Bottle of rum
M2 Broken Valley
M2.10 Dark Cave
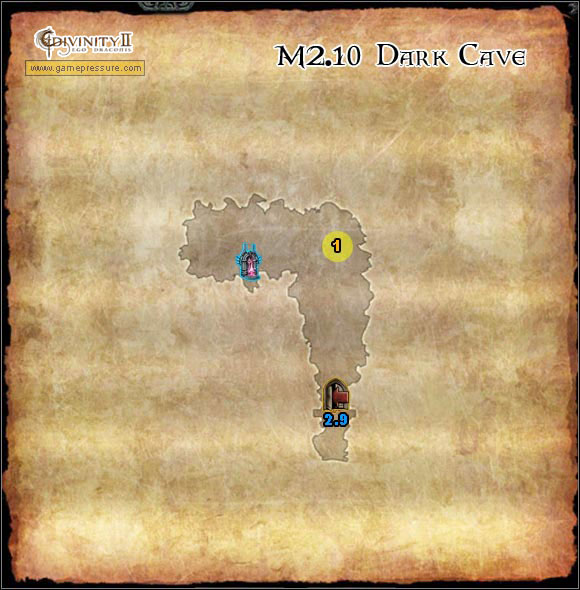
1. Jagon
M2.9 Dark Cave
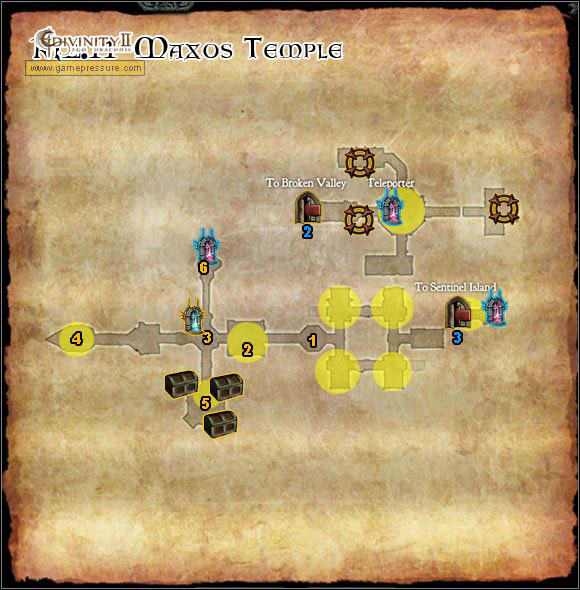
1. A book
2. The Librarian
3. Abalam
4. Amdusias
5. Amdusias' headquarters
6. Damian
M2 Broken Valley
M3 Sentinel Island

An important place connected with opening the teleport.
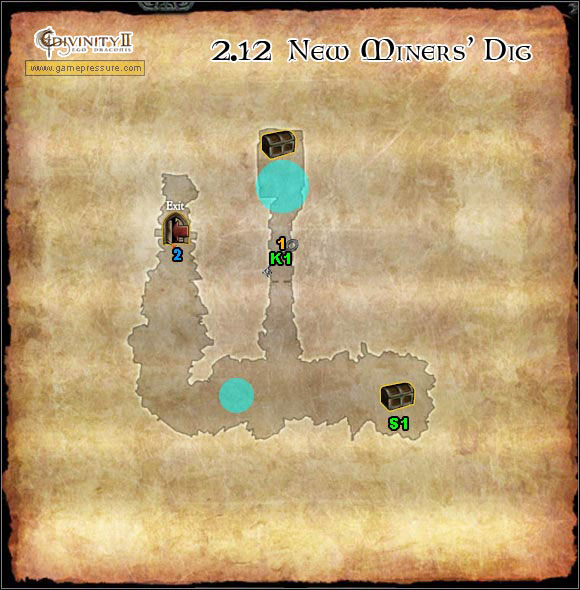
1. Crystal Skull
K1 Key to chest S1
M2 Broken Valley

K1 Key to door D1
M2 Broken Valley
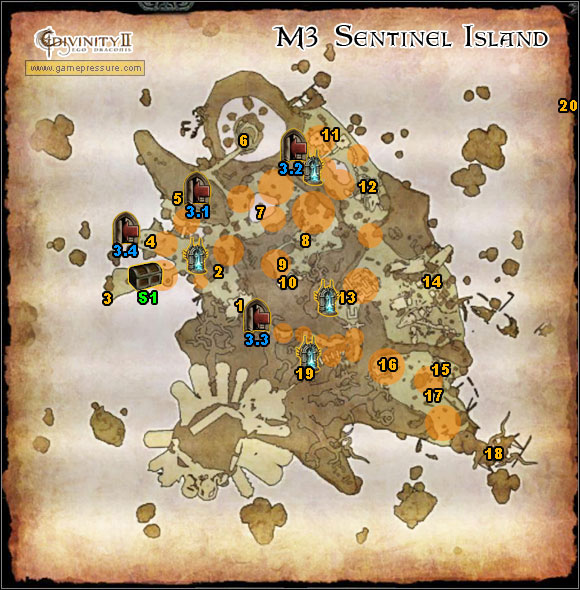
1. Island
2. Hermit (trader)
3. Jonah
4. Tombstone
5. Vacca
6. Wyvern Mother Egg
7. Necromancer totem
8. Wesson (enchanter)
9. Alchemist totem
10. Jonelath (necromancer) / Igor (necromancer)
11. Allan (alchemist)
12. Catherine
13. Enchanter totem
14. Hermosa (trainer) / Barbatos (alchemist) / Radcliff (enchanter) / Turgoyn / Sam (trader)
15. Kenneth (trainer)
16. Elfrith
17. Trainer totem
18. Ancient Journal
19. Battle Tower M4
20. Michael's raft
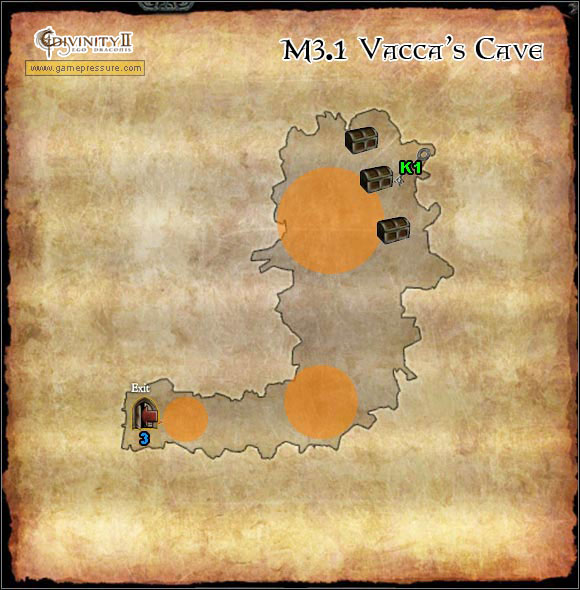
M3 Sentinel Island
K1. Key to chest M3(S1)
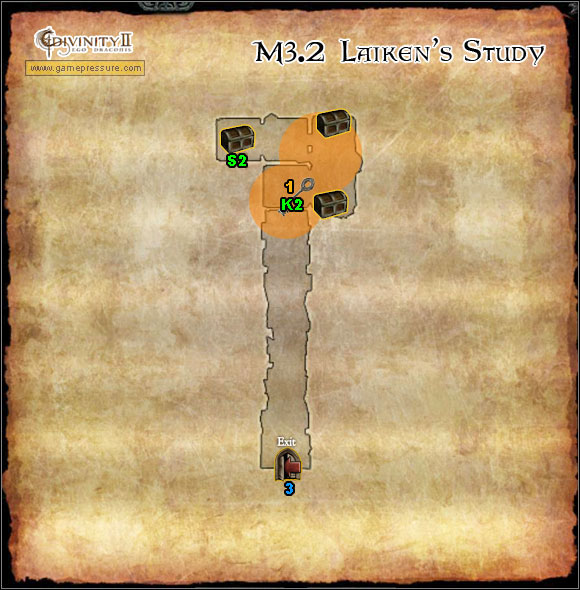
1. Sassan
M3 Sentinel Island
K1 Key to chest S2
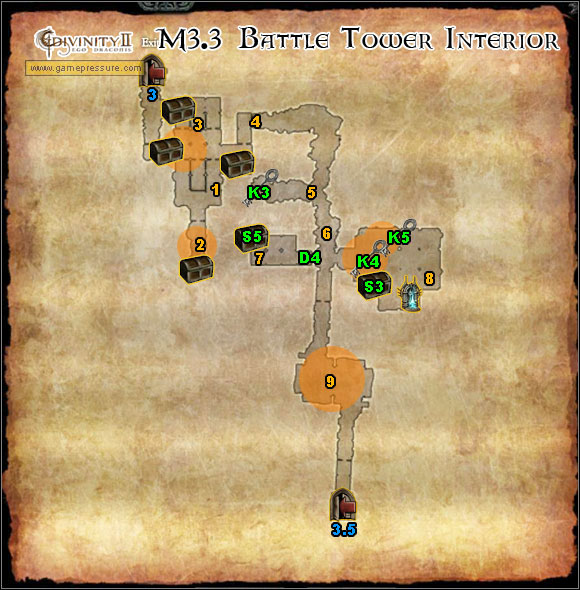
1. Hidden passage
2. Explosive charges
3. Elijah
4. Buried passage
5. Buried passage
6. Sassan
7. Erlking
8. Grimm (level 0)
9. Razakel
M3 Sentinel Island
K3 Key to chest S3
K4 Key to door D4
K5 Key to chest S5
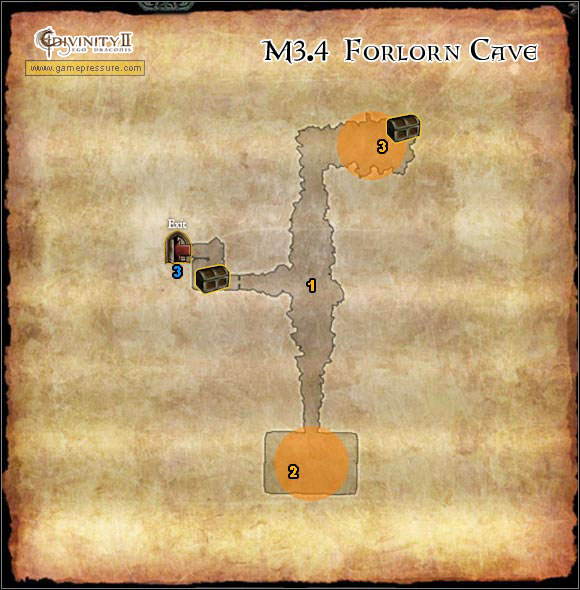
1. Mahalath / Adah
2. Mahalath
3. Adah
M3 Sentinel Island
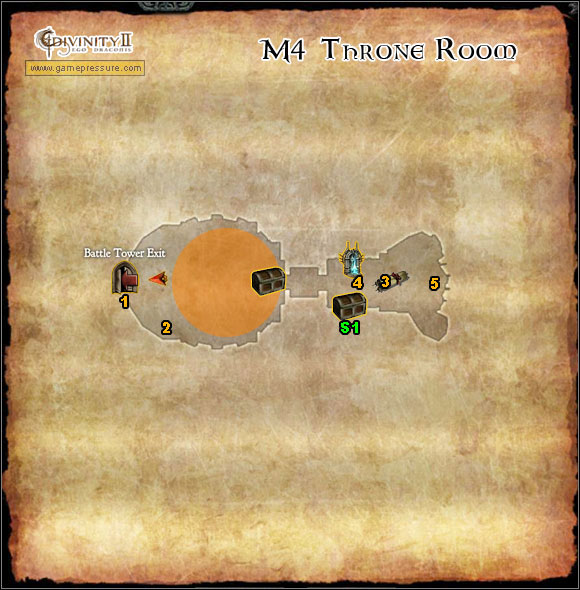
1. Battle Tower Terrace
2. Harry / Tom / Dick (searchers)
3. Maxos' scroll
4. Hermaphroditus (illusionist)
5. Sassan (trader)
S1 Chest (more in Secrets)
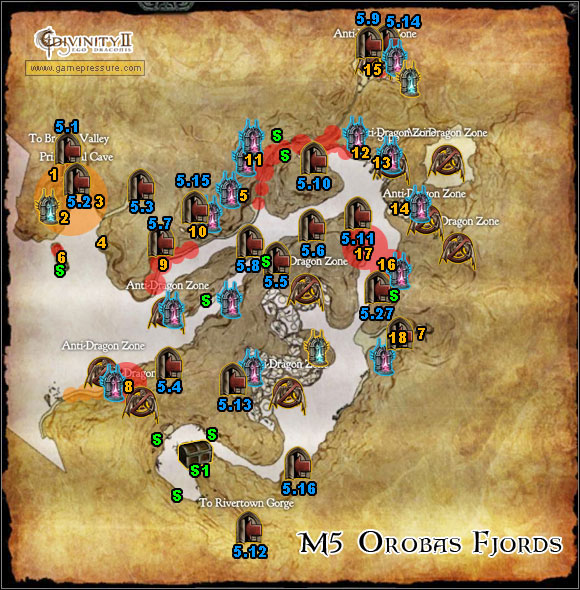
1. Crabbe
2. Cadby
3. Laura
4. Simeon
5. Jievaras
6. Yggdragsil
7. Irminsul
8. Beird (trader) / Abram (trader)
9. Lister
10. Artemas (trader) / Tibus / Jedediah
11. Jack Bolton (corpse)
12. Jimmy Dean (corpse)
13. Mullet (trader) / Zeppelin Master Page / Sepp / Irwin (trader) / Aurelius / Morgan / Leon (trader) / Brutus / Sejanus
14. Tilian / Montagu
15. Quintus / Gwyn / Eamon / Gobie / Mona / Nicolas (trader) / Beatrice
16. Moor
17. Alrik
18. Hall of Echoes
S Airship parts
S1 Gremor's family chest (more in Secrets)
M5.1 Broken Valley
M5.2 Primordial Cave
M5.3 Sinister Cavern
M5.4 Dark Cave
M5.5 Imps' Lair
M5.6 Lost Tomb
M5.7 Depleted Ore Mine
M5.8 Stone's Flying Fortress
M5.9 High Hall Mines
M5.10 Mysterious Cave
M5.11 Raze's Flying Fortress
M5.12 Kali's Flying Fortress
M5.13 Red Hammer Tribe
M5.14 Well Cave
M5.15 Orobas Crypt
M5.16 Bone Burrow
M5.27 Keara's Flying Fortress
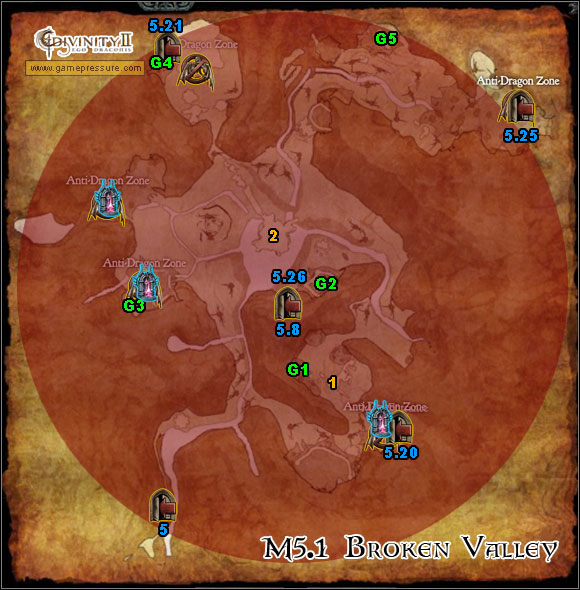
1. Williams
2. Doctor Needleman
G Generators
M5 Orobas Fjords
M5.8 Stone's Flying Fortress
M5.20 Mine
M5.21 Geshniz's Headquarters
M5.25 Rayhun's Headquarters
M5.26 Needleman Storage
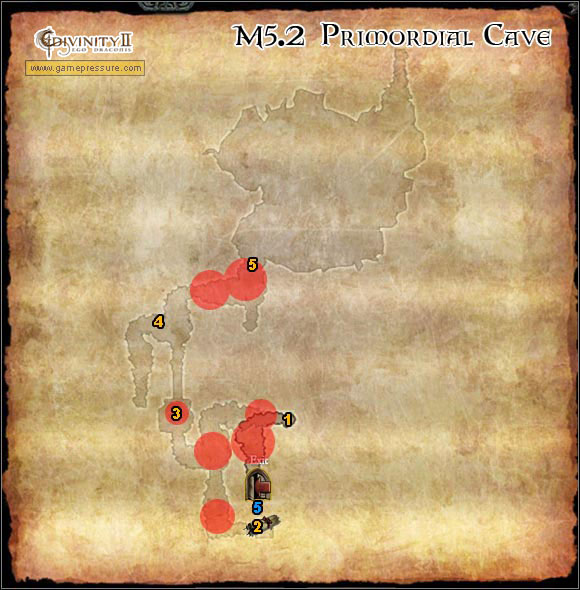
1. Elevator
2. Chicken Rune
3. Golden Statue
4. Lever
5. Patriarch
M5 Orobas Fjords
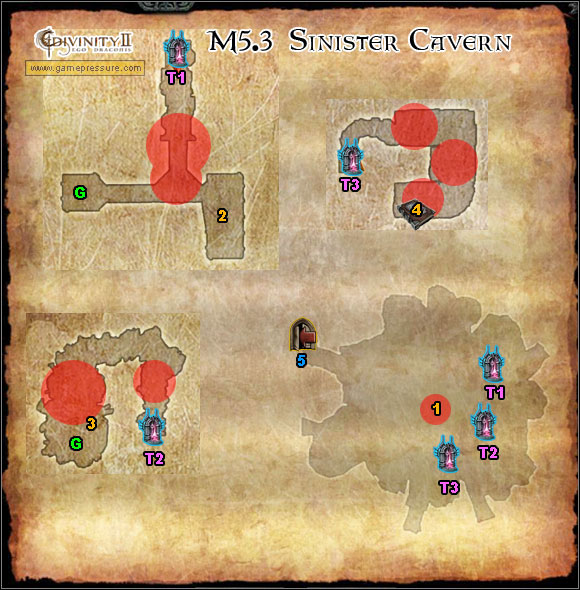
1. Barnabus
2. Lever
3. Lever
4. Book of the Dead
G Generator
M5 Orobas Fjords

1. Platforms
2. Ragon
K2 Key to chest S2
M5 Orobas Fjords
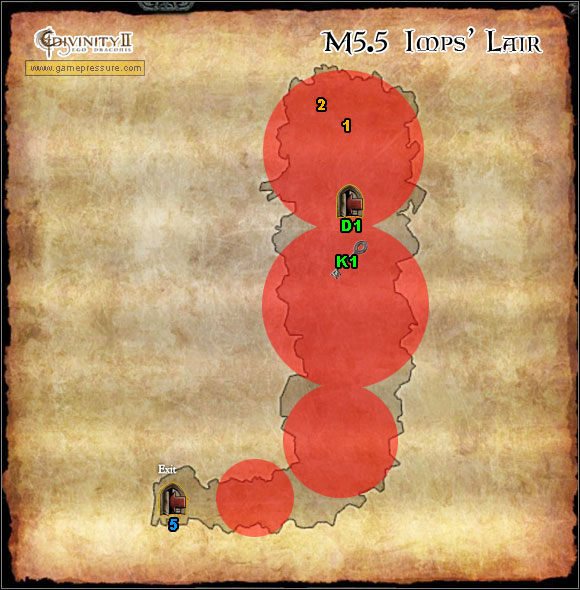
1. Imp Boss
2. Arthur Gremory
K1 Key to door D1
M5 Orobas Fjords
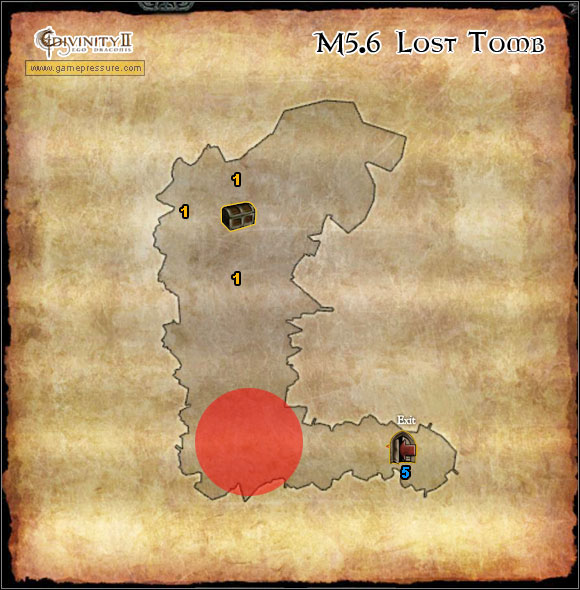
1. Lever
M5 Orobas Fjords
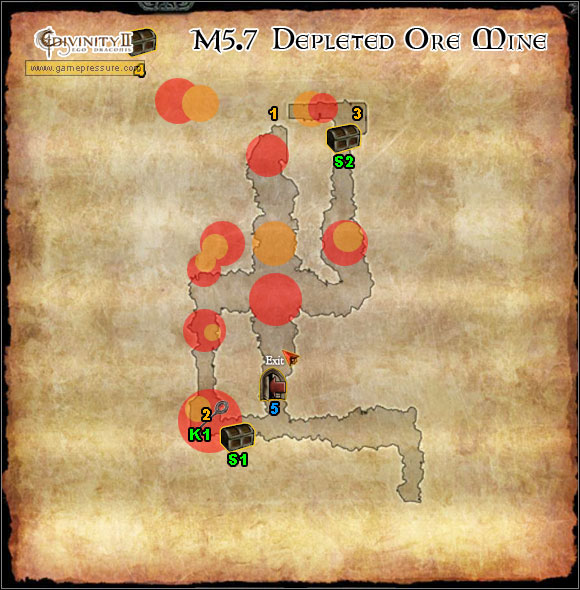
1. Elevator
2. Alutiiq
3. Lever
4. Pedestal (level -1)
K1 Key to chest S1
S2 Chest (more in Secrets)
M5 Orobas Fjords

1. Xanlosch / Isabelle
G Generators
M5 Orobas Fjords
M5.1 Broken Valley
M5.17 Stone's Greenery
M5.18 Stone's Passage
M5.19 Fortress Headquarters

A complete mage set
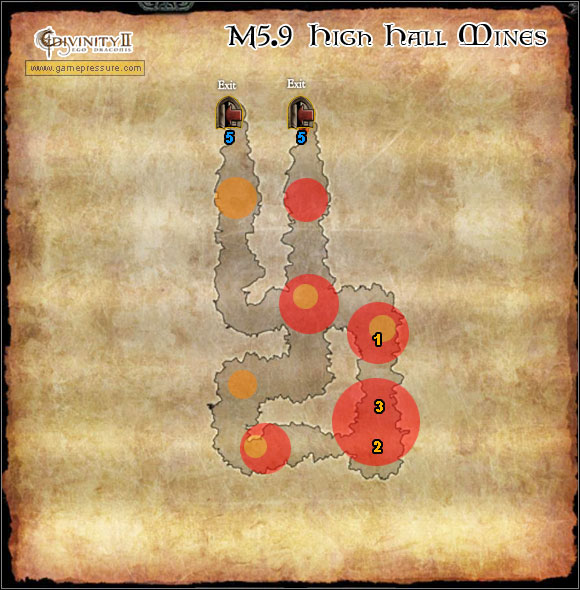
1. Barrier
2. Elevator
3. Mundus
M5 Orobas Fjords
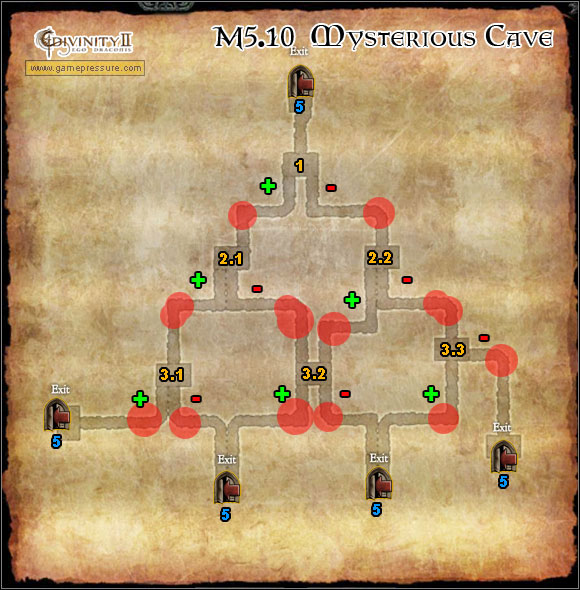
A thorough description in the Mysterious Cave quest M5(10)
M5 Orobas Fjords
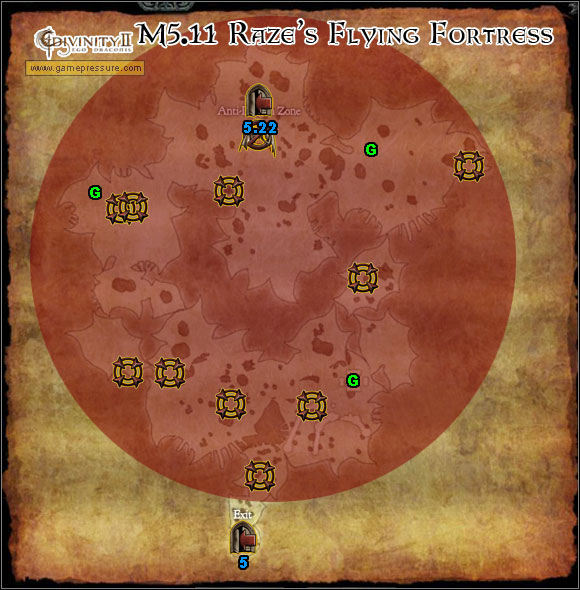
G Generators
M5 Orobas Fjords
M5.22 Raze's Headquarters

Complete archer set
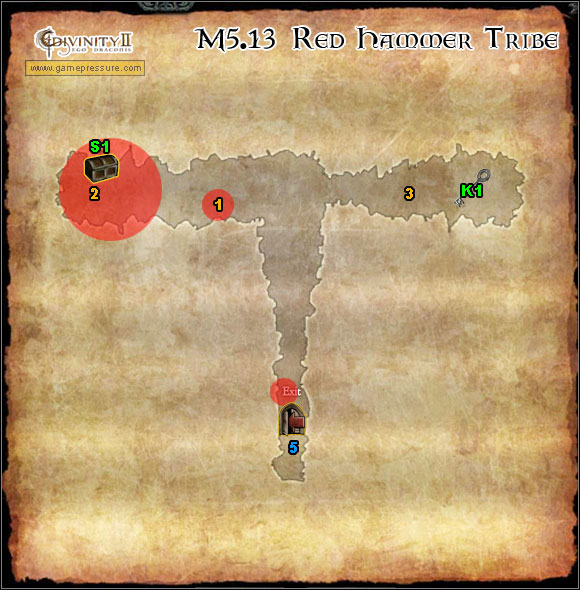
G Generators
M5 Orobas Fjords
M2.23 Kali's Storage
M5.24 Kali's Headquarters

Complete warrior set
1. Timpuk (trader)
2. Svadilfari
3. Groth
K1 Key to chest S1
M5 Orobas Fjords
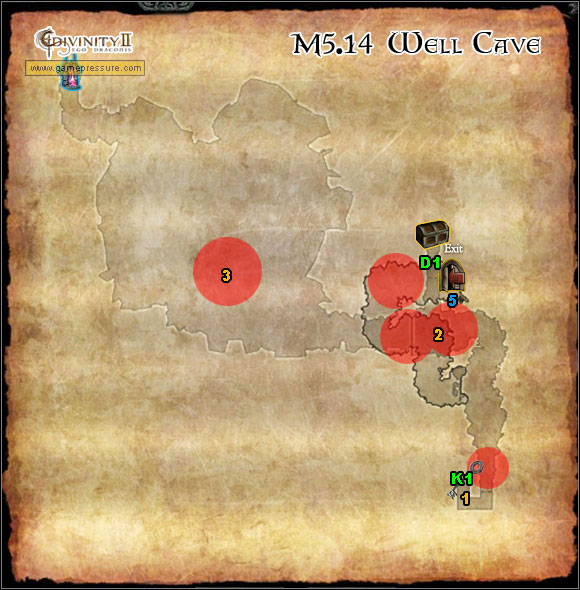
1. Kezzz
2. Elevator
3. Zagan
K1 Key to door D1
M5 Orobas Fjords

1. Orobas
S1 Chest (more in Secrets)
M5 Orobas Fjords
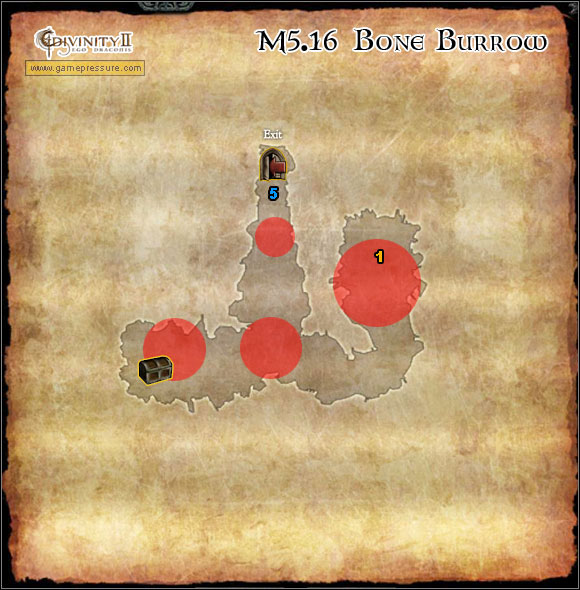
1. Ultimate Creature Boss
M5 Orobas Fjords
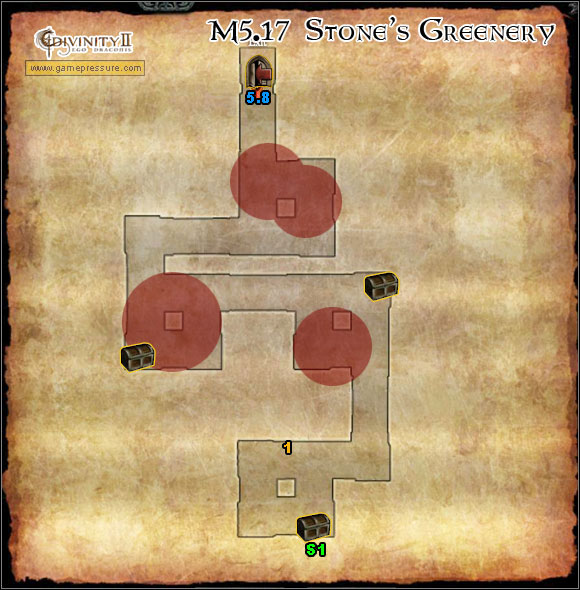
1. Fountain
S1 Golden chest
M5.8 Stone's Flying Fortress

M5.8 Stone's Flying Fortress
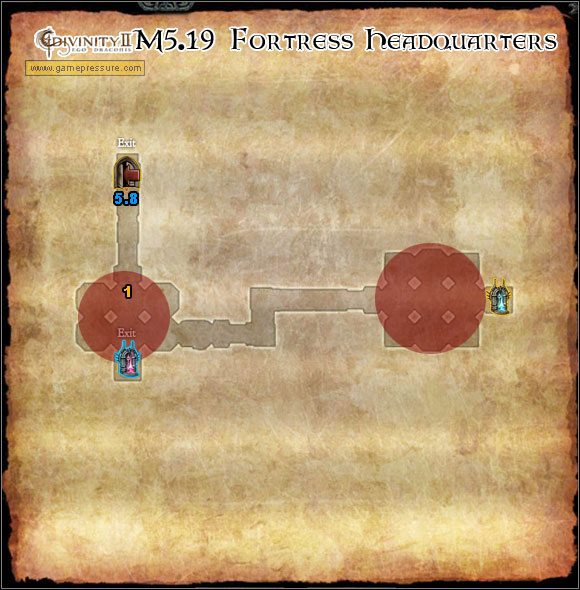
1. Stone
M5.8 Stone's Flying Fortress
1. Amon
2. Ba'al
3. Lever
K1 Key to door D1
M5.1 Broken Valley
1. Geshniz
S1 Golden chest
M5.1 Broken Valley

1. Raze
K1 Key to door D1
M5.11 Raze's Flying Fortress
S1 Golden chest
M5.12 Kali's Flying Fortress
1. Lever
2. Kali
K2 Key to door D1
M5.12 Kali's Flying Fortress
S1 Golden chest
M5.12 Kali's Flying Fortress
1. Rayhun
S1 Golden chest
M5.1 Broken Valley
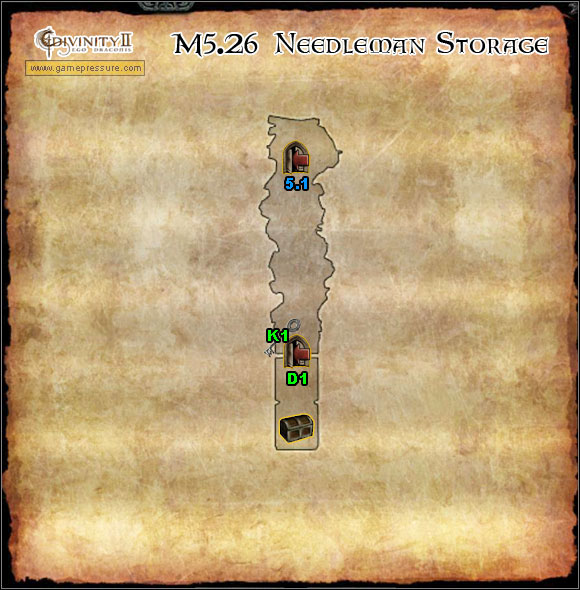
K1 Key to door D1
M5.1 Broken Valley
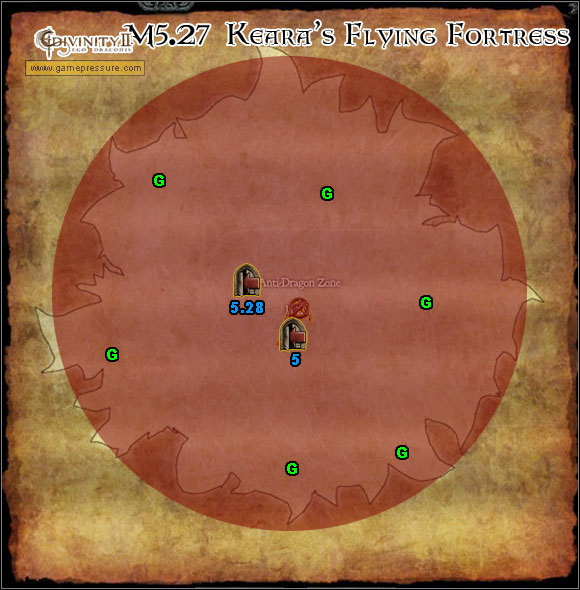
G Generators
M5 Orobas Fjords
M5.28 Keara's Headquarters
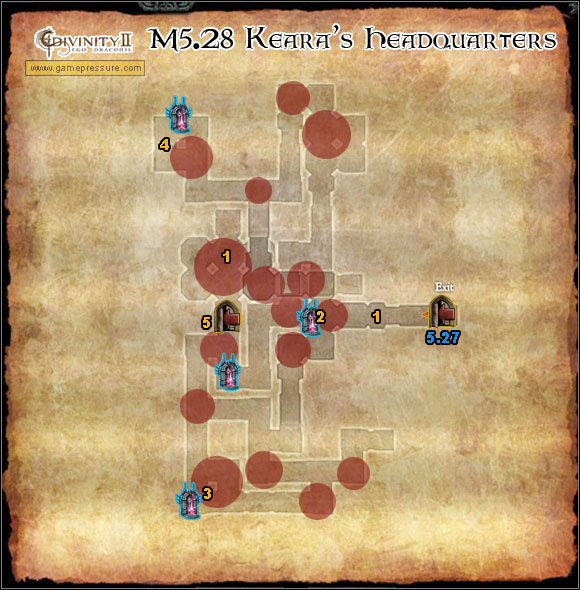
1. Keara / Valanir
2. Statue
3. Statues
4. Statues
5. Gate
M5.27 Keara's Flying Fortress
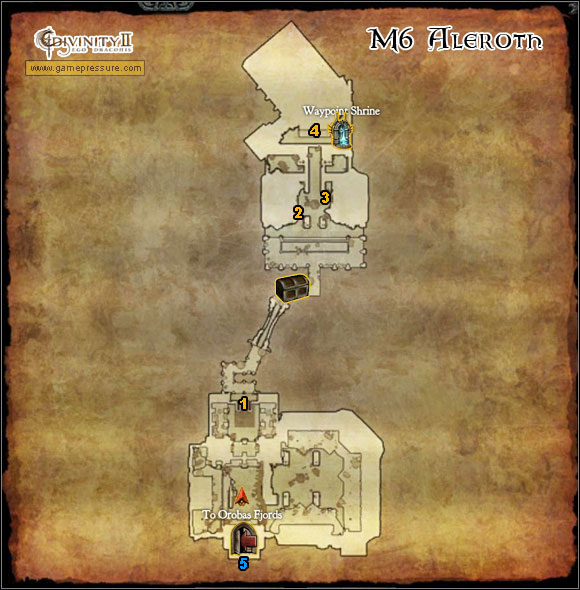
1. Elevator
2. Pilcher (trader)
3. Zarniyar (trader)
4. Augustus
Recommended: Summon Undead, Summon Ghost, Fear, Summon Mastery.
Notice: In the beginning you can raise your skills to level 5 max. Once you have the obtained the Battle Tower, your trainer will allow you to raise your skills up to level 15.
Picture
Name
Comment

Summon undead
One of the more useful skills. The summoned undead will effectively draw the enemies attention.

Summon Ghost
Useful in the beginning when you don't have the gold to buy enough potions. Its role is to heal you and attack the enemies. Long cooldown.

Fear
Useful when fighting against a large group of enemies. It causes the enemies to retreat for a while.

Hide In Shadows
Not a very useful ability. It allows you to become invisible for a given period of time.

Charm
It lets you to charm an enemy so that he will fight on your side; each enemy has to be charmed individually. Not very useful.

Summon Mastery
Increases the damage done by your summoned monsters.

Curse
Curses the enemies around us, lowering the damage they inflict and their defence.

Blind
You can blind an enemy, not very useful.

Life Tap
Sacrifice a part of your health and gain mana. Now very useful, it's better to use skills that decrease mana usage and buy potions.

Master Herbalist
Lowers the amount of components you need to prepare potions. If you have enough gold, you don't need this.

Summon Demon
Summons a high level Demon, the undead is very good.

Way of the Wise Wizard
Temporarily increases your defence against magic.
Recommended: Magic Missile, Fireball, Mana Efficiency/Mana Leech, Healing.
Notice: In the beginning you can raise your skills to level 5 max. Once you have the obtained the Battle Tower, your trainer will allow you to raise your skills up to level 15.
Picture
Name
Comment

Magic Missile
Shoots a couple of fireballs at your enemies. A very useful skill, it hits multiple enemies at once.

Fireball
A fireball which damages enemies around the target - a must have!

Mana Efficiency
Lower the amount of mana needed to use a spell. If you don't have enough gold to buy potions, it's worth investing.

Polymorph
Turns the enemy into a ladybird, not useful.

Confusion
The target stands still for a couple of seconds, not very useful while fighting multiple enemies.

Magic Blast
A couple of quick attacks, unfortunately it hits only a single enemy.

Mana Leech
A successful attack on an enemy turns a certain percentage of the damage into mana.

Destruction
Increases the damage of your magical attacks.

Firewall
Creates a wall of fire, unfortunately it lasts only for a little while.
Healing
A healing skill. Useful if you don't have the gold to buy enough potions.

Way of the Battle Mage
Temporarily increases your defence against magical attacks.
Recommended: Fatality, Life Leech, Regenerate, Thousand Strikes, Reflect.
Notice: In the beginning you can raise your skills to level 5 max. Once you have the obtained the Battle Tower, your trainer will allow you to raise your skills up to level 15.
Picture
Name
Comment

Whirlwind
Damages the enemies around, useful on lower levels.

Rush Attack
Attacks a single enemy from a distance with a multiplied damage. Not very useful because of the individual aspect.

Jump Attack
Increases the damage dealt with a jump (also consumes mana). Works on an individual enemy only. Useful in the early part of the game.

Fatality
Allows you to instantly kill an enemy after his health drops to a given level. Useful in the early part of the game.

Defensive Posture
Temporarily increases your defence against melee and distance attacks.

Battle Rage
Temporarily increases the damage done with melee attacks.

Life Leech
A successful attack on an enemy turns a certain percentage of the damage into health points.

Bleed
A chance that the enemy bleeds out, additionally inflicts double damage.

Regenerate
A must have skill! Automatic health recovery.

Thousand Strikes
Series of quick strikes at, unfortunately, a single enemy. The damage is increased.

Death Blow
Increases the chances for a critical strike.

Reflect
Deflects a percentage of the damage dealt by the enemies onto themselves.
Recommended: Potion Efficiency, Splitting Arrows, Evade, Explosive Arrows.
Notice: In the beginning you can raise your skills to level 5 max. Once you have the obtained the Battle Tower, your trainer will allow you to raise your skills up to level 15.
Picture
Name
Comment

Poison Arrows
Shoots poisoned arrows that damage the enemy over time. Useful in the beginning of the game.

Ranger Surprise
Shoots an arrow which lowers the enemy's defence.

Ranger Strength
Increases the damage done with ranged weapons.

Stun Arrows
Shoots an arrow which immobilises the enemy for a certain time, works on individual targets.

Ranger Stealth
Increases the distance from which you can attack for the 1st time.
Potion Efficiency
Increases the efficiency of potions, very useful!

Splitting Arrows
Allows to attack and damage a quite big group of enemies at once, useful.

Evade
Increases the chance of evading melee attacks.

Explosive Arrows
Shoots an arrow which additionally explodes and damages the enemies around the blast. A great solution for big groups of foes.

Way of the Ranger
Temporarily increases the damage done by ranged weapons and defence against them.
Recommended: Mindread, Wisdom, Lockpick.
Increase the skills connected with the weapon you use the most/prefer.
Notice: In the beginning you can raise your skills to level 5 max. Once you have the obtained the Battle Tower, your trainer will allow you to raise your skills up to level 15.
Picture
Name
Comment

Unarmed Expertise
Increases the damage dealt while unarmed - completely useless.

Single-Handed Weapon Expertise
Increases the damage done while fighting with a single weapon.

Dual-Wielding Expertise
Increases the damage done while fighting with two weapons.
Sword and Shield Expertise
Increases the damage done while fighting with a weapon and a shield.

Two-Handed Weapon Expertise
Increases the damage done when attacking with a two-handed weapon.

Mindread
Lowers the amount of experience points you have to spend on reading someone's mind - very useful.

Wisdom
Increases the amount of experience gained - very useful.

Lockpick
Lets you open chests with higher security. It's useful if you want to open every chest you come across.

Encumbrance
Increases the capacity of your backpack - useful in the later part of the game, when you'll be running out of space, although only till you gain the Battle Tower, which provides you with a chest capable of holding 400 items.
Recommended: Firebreath, Fire Sphere, Dragon Burst, Summon Friend, Dragon Spirit.
Picture
Name
Comment

Firebreath
A basic ability, breathing fire is always useful.

Fire Sphere
Another basic ability, a fireball. It doesn't work of towers.

Dragon Polymorph
Transforms another dragon into a ladybird, a definitely useless ability.

Dragon Burst
A huge fireball which spreads around - useful against a large group of enemies, doesn't work on towers.

Summon Friend
A second dragon which turns the enemy attention but dies quite easily. However the cooldown is short.

Dragon Shield
A shield which takes away stamina.

Dragon Spirit
A very useful healing skill. It's less useful than potions, but there's not always time to change into human form.
Below is a list of all the potions in the game, including the effects they give and ingredients needed to create them. The whole thing has been divided into categories according to the attribute that the potion affects. The most optimal choice is to have Allan as your alchemist (you'll be able to create awesome potions) and develop the Master Herbalist skill to the max (5/5), it will lower the amount ingredients needed by 80%.
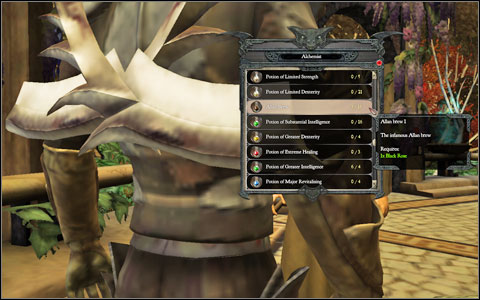 Potion creation screen
You will be able to create this potion only if you choose Allan as your alchemist in the Battle Tower.
Level
Ingredients
Effect
1
4x Whisperwood
4x Holy Basil
4x Earth Root
4x Dragon Nail
4x Black Rose
Increases every resistance by 36 points for 360 seconds.
Level
Ingredients
Effect
1
1x Ginseng
Heals 74 hit points over 5 seconds.
2
2x Ginseng
Heals 98 hit points over 5 seconds.
3
2x Ginseng
1x Black Rose
Heals 134 hit points over 5 seconds.
4
3x Ginseng
2x Black Rose
Heals 170 hit points over 5 seconds.
5
4x Ginseng
3x Black Rose
Heals 206 hit points over 5 seconds.
6
3x Ginseng
1x Dragon Nail
Heals 242 hit points over 5 seconds.
7
4x Ginseng
2x Dragon Nail
Heals 278 hit points over 5 seconds.
8
5x Ginseng
3x Dragon Nail
Heals 314 hit points over 5 seconds.
9
4x Ginseng
1x Fanny Blossom
Heals 350 hit points over 5 seconds.
10
5x Ginseng
2x Fanny Blossom
Heals 386 hit points over 5 seconds.
Level
Ingredients
Effect
1
1x Earth Root
Regenerates 62 mana over 5 seconds.
2
2x Earth Root
Regenerates 82 mana over 5 seconds.
3
2x Earth Root
1x Black Rose
Regenerates 112 mana over 5 seconds.
4
3x Earth Root
2x Black Rose
Regenerates 142 mana over 5 seconds.
5
4x Earth Root
3x Black Rose
Regenerates 172 mana over 5 seconds.
6
3x Earth Root
1x Dragon Nail
Regenerates 202 mana over 5 seconds.
7
4x Earth Root
2x Dragon Nail
Regenerates 232 mana over 5 seconds.
8
5x Earth Root
3x Dragon Nail
Regenerates 262 mana over 5 seconds.
9
1x Fanny Blossom
4x Earth Root
Heals 292 mana over 5 seconds.
10
2x Fanny Blossom
5x Earth Root
Regenerates 322 mana over 5 seconds.
Level
Ingredients
Effect
1
1x Ginseng
1x Earth Root
Regenerates 62 mana and hit points over 5 seconds.
2
2x Ginseng
2x Earth Root
Regenerates 82 mana and hit points over 5 seconds.
3
2x Ginseng
2x Earth Root
1x Black Rose
Regenerates 112 mana and hit points over 5 seconds.
4
3x Ginseng
3x Earth Root
2x Black Rose
Regenerates 142 mana and hit points over 5 seconds.
5
4x Ginseng
4x Earth Root
3x Black Rose
Regenerates 172 mana and hit points over 5 seconds.
6
3x Ginseng
3x Earth Root
1x Dragon Nail
Regenerates 202 mana and hit points over 5 seconds.
7
4x Ginseng
4x Earth Root
2x Dragon Nail
Regenerates 232 mana and hit points over 5 seconds.
8
5x Ginseng
5x Earth Root
3x Dragon Nail
Regenerates 262 mana and hit points over 5 seconds.
9
4x Ginseng
2x Fanny Blossom
4x Earth Root
Regenerates 292 mana and hit points over 5 seconds.
10
5x Ginseng
2x Fanny Blossom
5x Earth Root
Regenerates 322 mana and hit points over 5 seconds.
Level
Ingredients
Effect
1
1x Farhangite
Increases your strength with 3 for 180 seconds.
2
2x Farhangite
Increases your strength with 5 for 180 seconds.
3
2x Farhangite
1x Black Rose
Increases your strength with 8 for 180 seconds.
4
3x Farhangite
2x Black Rose
Increases your strength with 11 for 180 seconds.
5
4x Farhangite
3x Black Rose
Increases your strength with 14 for 180 seconds.
6
3x Farhangite
1x Dragon Nail
Increases your strength with 17 for 180 seconds.
7
4x Farhangite
2x Dragon Nail
Increases your strength with 20 for 180 seconds.
8
5x Farhangite
3x Dragon Nail
Increases your strength with 23 for 180 seconds.
9
4x Farhangite
1x Fanny Blossom
Increases your strength with 26 for 180 seconds.
10
5x Farhangite
2x Fanny Blossom
Increases your strength with 29 for 180 seconds.
Level
Ingredients
Effect
1
1x Fatfern
Increases your dexterity with 3 for 180 seconds.
2
2x Fatfern
Increases your dexterity with 5 for 180 seconds.
3
2x Fatfern
1x Black Rose
Increases your dexterity with 8 for 180 seconds.
4
3x Fatfern
2x Black Rose
Increases your dexterity with 11 for 180 seconds.
5
4x Fatfern
3x Black Rose
Increases your dexterity with 14 for 180 seconds.
6
3x Fatfern
1x Dragon Nail
Increases your dexterity with 17 for 180 seconds.
7
4x Fatfern
2x Dragon Nail
Increases your dexterity with 20 for 180 seconds.
8
5x Fatfern
3x Dragon Nail
Increases your dexterity with 23 for 180 seconds.
9
4x Fatfern
1x Fanny Blossom
Increases your dexterity with 26 for 180 seconds.
10
5x Fatfern
2x Fanny Blossom
Increases your dexterity with 29 for 180 seconds.
Level
Ingredients
Effect
1
1x Stardust
Increases your intelligence with 3 for 180 seconds.
2
2x Stardust
Increases your intelligence with 5 for 180 seconds.
3
2x Stardust
1x Black Rose
Increases your intelligence with 8 for 180 seconds.
4
3x Stardust
2x Black Rose
Increases your intelligence with 11 for 180 seconds.
5
4x Stardust
3x Black Rose
Increases your intelligence with 14 for 180 seconds.
6
3x Stardust
1x Dragon Nail
Increases your intelligence with 17 for 180 seconds.
7
4x Stardust
2x Dragon Nail
Increases your intelligence with 20 for 180 seconds.
8
5x Stardust
3x Dragon Nail
Increases your intelligence with 23 for 180 seconds.
9
4x Stardust
1x Fanny Blossom
Increases your intelligence with 26 for 180 seconds.
10
5x Stardust
2x Fanny Blossom
Increases your intelligence with 29 for 180 seconds.
Level
Ingredients
Effect
1
1x Whisperwood
Increases all your resistances with 4 for 180 seconds.
2
2x Whisperwood
Increases all your resistances with 6 for 180 seconds.
3
2x Whisperwood
1x Black Rose
Increases all your resistances with 8 for 180 seconds.
4
3x Whisperwood
2x Black Rose
Increases all your resistances with 10 for 180 seconds.
5
4x Whisperwood
3x Black Rose
Increases all your resistances with 12 for 180 seconds.
6
3x Whisperwood
1x Dragon Nail
Increases all your resistances with 14 for 180 seconds.
7
4x Whisperwood
2x Dragon Nail
Increases all your resistances with 16 for 180 seconds.
8
5x Whisperwood
3x Dragon Nail
Increases all your resistances with 18 for 180 seconds.
9
4x Whisperwood
1x Fanny Blossom
Increases all your resistances with 21 for 180 seconds.
10
5x Whisperwood
2x Fanny Blossom
Increases all your resistances with 23 for 180 seconds.
You will gain the ability to enchant items quite early in the game. A bit later you will receive your own enchanter in the Battle Tower. You can enchant every item - only those with empty slots. You can also take enchants out of the items. This gives you virtually limitless modification options, depending on your needs. In order to enchant an item, you first need to have the needed ingredients, you can send out your searchers to find the ingredients you need, it's probably the best and fastest method. There's an enormous amount of enchant formulas in the game, many of them also have higher levels available and that means better effects and more ingredients needed to create them.
 Item enchanting screen
Level
Ingredients
Effect
Price
1
1x Iron
1x Amber
5% chance of converting 5% of damage done into hit points.
150
2
2x Iron
1x Amber
6% chance of converting 7% of damage done into hit points.
250
3
1x Fossile
1x Droxlerite
1x Amber
7% chance of converting 9% of damage done into hit points.
400
4
1x Red Ore
2x Fossile
2x Droxlerite
2x Amber
8% chance of converting 11% of damage done into hit points.
550
5
1x Red Ore
1x Gold
2x Amber
9% chance of converting 13% of damage done into hit points.
700
6
2x Red Ore
2x Gold
2x Amber
10% chance of converting 15% of damage done into hit points.
850
7
2x Red Ore
1x Droxlerite
3x Amber
11% chance of converting 17% of damage done into hit points.
1000
8
3x Red Ore
2x Droxlerite
3x Amber
12% chance of converting 19% of damage done into hit points.
1150
9
3x Red Ore
1x Black Rock
3x Amber
13% chance of converting 21% of damage done into hit points.
1300
10
4x Red Ore
1x Malachite
2x Black Rock
4x Amber
15% chance of converting 25% of damage done into hit points.
1450
Level
Ingredients
Effect
Price
1
1x Venom Stone
1x Iron
1x Aquamarine
5% chance of poisoning your enemy on a successful hit doing 2 damage over 1 second.
150
2
1x Venom Stone
2x Iron
1x Aquamarine
6% chance of poisoning your enemy on a successful hit doing 6 damage over 3 seconds.
250
3
2x Venom Stone
1x Fossile
1x Droxlerite
1x Aquamarine
7% chance of poisoning your enemy on a successful hit doing 12 damage over 6 seconds.
400
4
2x Venom Stone
1x Red Ore
2x Fossile
2x Droxlerite
2x Aquamarine
8% chance of poisoning your enemy on a successful hit doing 18 damage over 9 seconds.
550
5
3x Venom Stone
1x Red Ore
1x Gold
2x Aquamarine
9% chance of poisoning your enemy on a successful hit doing 24 damage over 12 seconds.
700
6
3x Venom Stone
2x Red Ore
2x Gold
2x Aquamarine
10% chance of poisoning your enemy on a successful hit doing 30 damage over 15 seconds.
850
7
4x Venom Stone
2x Red Ore
1x Droxlerite
3x Aquamarine
11% chance of poisoning your enemy on a successful hit doing 36 damage over 18 seconds.
1000
8
4x Venom Stone
3x Red Ore
2x Droxlerite
3x Aquamarine
12% chance of poisoning your enemy on a successful hit doing 42 damage over 21 seconds.
1150
9
5x Venom Stone
3x Red Ore
1x Black Rock
3x Aquamarine
13% chance of poisoning your enemy on a successful hit doing 48 damage over 24 seconds.
1300
10
5x Venom Stone
4x Red Ore
1x Malachite
2x Black Rock
4x Aquamarine
15% chance of poisoning your enemy on a successful hit doing 54 damage over 27 seconds.
1450
Level
Ingredients
Effect
Price
1
1x Iron
1x Crystal
5% chance of igniting your enemy on a successful hit doing 2 damage over 1 second.
150
2
2x Iron
1x Crystal
6% chance of igniting your enemy on a successful hit doing 6 damage over 3 seconds.
250
3
1x Fossile
1x Droxlerite
1x Crystal
7% chance of igniting your enemy on a successful hit doing 12 damage over 6 seconds.
400
4
1x Red Ore
2x Fossile
2x Droxlerite
2x Crystal
8% chance of igniting your enemy on a successful hit doing 18 damage over 9 seconds.
550
5
1x Red Ore
1x Gold
2x Crystal
9% chance of igniting your enemy on a successful hit doing 24 damage over 12 seconds.
700
6
2x Red Ore
2x Gold
2x Crystal
10% chance of igniting your enemy on a successful hit doing 30 damage over 15 seconds.
850
7
2x Red Ore
1x Droxlerite
3x Crystal
11% chance of igniting your enemy on a successful hit doing 36 damage over 18 seconds.
1000
8
3x Red Ore
2x Droxlerite
3x Crystal
12% chance of igniting your enemy on a successful hit doing 42 damage over 21 seconds.
1150
9
3x Red Ore
1x Black Rock
3x Crystal
13% chance of igniting your enemy on a successful hit doing 48 damage over 24 seconds.
1300
10
4x Red Ore
1x Malachite
2x Black Rock
4x Crystal
15% chance of igniting your enemy on a successful hit doing 54 damage over 27 seconds.
1450
Level
Ingredients
Effect
Price
1
1x Iron
1x Diamond
5% chance of igniting enemies that are close doing 2 damage over 1 second.
150
2
2x Iron
1x Diamond
6% chance of igniting enemies that are close doing 6 damage over 3 seconds.
250
3
1x Fossile
1x Droxlerite
1x Diamond
7% chance of igniting enemies that are close doing 12 damage over 6 seconds.
400
4
1x Red Ore
2x Fossile
2x Droxlerite
2x Diamond
8% chance of igniting enemies that are close doing 18 damage over 9 seconds.
550
5
1x Red Ore
1x Gold
2x Diamond
9% chance of igniting enemies that are close doing 24 damage over 12 seconds.
700
6
2x Red Ore
2x Gold
2x Diamond
10% chance of igniting enemies that are close doing 30 damage over 15 seconds.
850
7
2x Red Ore
1x Droxlerite
3x Diamond
11% chance of igniting enemies that are close doing 36 damage over 18 seconds.
1000
8
3x Red Ore
2x Droxlerite
3x Diamond
12% chance of igniting enemies that are close doing 42 damage over 21 seconds.
1150
9
3x Red Ore
1x Black Rock
3x Diamond
13% chance of igniting enemies that are close doing 48 damage over 24 seconds.
1300
10
4x Red Ore
1x Malachite
2x Black Rock
4x Diamond
15% chance of igniting enemies that are close doing 54 damage over 27 seconds.
1450
Level
Ingredients
Effect
Price
1
1x Iron
1x Emerald
5% chance of converting 2% of damage done into mana.
150
2
2x Iron
1x Emerald
6% chance of converting 3% of damage done into mana.
250
3
1x Fossile
1x Droxlerite
1x Emerald
7% chance of converting 4% of damage done into mana.
400
4
1x Red Ore
2x Fossile
2x Droxlerite
2x Emerald
8% chance of converting 5% of damage done into mana.
550
5
1x Red Ore
1x Gold
2x Emerald
9% chance of converting 6% of damage done into mana.
700
6
2x Red Ore
2x Gold
2x Emerald
10% chance of converting 7% of damage done into mana.
850
7
2x Red Ore
1x Droxlerite
3x Emerald
11% chance of converting 8% of damage done into mana.
1000
8
3x Red Ore
2x Droxlerite
3x Emerald
12% chance of converting 9% of damage done into mana.
1150
9
3x Red Ore
1x Black Rock
3x Emerald
13% chance of converting 10% of damage done into mana.
1300
10
4x Red Ore
1x Malachite
2x Black Rock
4x Emerald
15% chance of converting 12% of damage done into mana.
1450
Level
Ingredients
Effect
Price
1
1x Iron
1x MoonStone
Increases your normal damage with 1 point
150
2
2x Iron
1x MoonStone
Increases your normal damage with 3 points
250
3
1x Fossile
1x Droxlerite
1x MoonStone
Increases your normal damage with 6 points
400
4
1x Red Ore
2x Fossile
2x Droxlerite
2x MoonStone
Increases your normal damage with 9 points
550
5
1x Red Ore
1x Gold
2x MoonStone
Increases your normal damage with 12 points
700
6
2x Red Ore
2x Gold
2x MoonStone
Increases your normal damage with 15 points
850
7
2x Red Ore
1x Droxlerite
3x MoonStone
Increases your normal damage with 18 points
1000
8
3x Red Ore
2x Droxlerite
3x MoonStone
Increases your normal damage with 21 points
1150
9
3x Red Ore
1x Black Rock
3x MoonStone
Increases your normal damage with 24 points
1300
10
4x Red Ore
1x Malachite
2x Black Rock
4x MoonStone
Increases your normal damage with 27 points
1450
Level
Ingredients
Effect
Price
1
1x Iron
1x Diamond
Increases your magical damage with 1 point
150
2
2x Iron
1x Diamond
Increases your magical damage with 3 points
250
3
1x Fossile
1x Droxlerite
1x Diamond
Increases your magical damage with 6 points
400
4
1x Red Ore
2x Fossile
2x Droxlerite
2x Diamond
Increases your magical damage with 9 points
550
5
1x Red Ore
1x Gold
2x Diamond
Increases your magical damage with 12 points
700
6
2x Red Ore
2x Gold
2x Diamond
Increases your magical damage with 15 points
850
7
2x Red Ore
1x Droxlerite
3x Diamond
Increases your magical damage with 18 points
1000
8
3x Red Ore
2x Droxlerite
3x Diamond
Increases your magical damage with 21 points
1150
9
3x Red Ore
1x Black Rock
3x Diamond
Increases your magical damage with 24 points
1300
10
4x Red Ore
1x Malachite
2x Black Rock
4x Diamond
Increases your magical damage with 27 points
1450
Level
Ingredients
Effect
Price
1
1x Iron
1x Obsidian
Increases your critical hit chance with 2 points
150
2
2x Iron
1x Obsidian
Increases your critical hit chance with 6 points
250
3
1x Fossile
1x Droxlerite
1x Obsidian
Increases your critical hit chance with 12 points
400
4
1x Red Ore
2x Fossile
2x Droxlerite
2x Obsidian
Increases your critical hit chance with 18 points
550
5
1x Red Ore
1x Gold
2x Obsidian
Increases your critical hit chance with 24 points
700
6
2x Red Ore
2x Gold
2x Obsidian
Increases your critical hit chance with 30 points
850
7
2x Red Ore
1x Droxlerite
3x Obsidian
Increases your critical hit chance with 36 points
1000
8
3x Red Ore
2x Droxlerite
3x Obsidian
Increases your critical hit chance with 42 points
1150
9
3x Red Ore
1x Black Rock
3x Obsidian
Increases your critical hit chance with 48 points
1300
10
4x Red Ore
1x Malachite
2x Black Rock
4x Obsidian
Increases your critical hit chance with 54 points
1450
Level
Ingredients
Effect
Price
1
1x Iron
1x Opal
Increases your mana with 1 point
150
2
2x Iron
1x Opal
Increases your mana with 3 points
250
3
1x Fossile
1x Droxlerite
1x Opal
Increases your mana with 6 points
400
4
1x Venom Stone
2x Fossile
2x Droxlerite
2x Opal
Increases your mana with 9 points
550
5
1x Venom Stone
1x Gold
2x Opal
Increases your mana with 12 points
700
6
2x Venom Stone
2x Gold
2x Opal
Increases your mana with 15 points
850
7
2x Venom Stone
1x Droxlerite
3x Opal
Increases your mana with 18 points
1000
8
3x Venom Stone
2x Droxlerite
3x Opal
Increases your mana with 21 points
1150
9
3x Venom Stone
1x Black Rock
3x Opal
Increases your mana with 24 points
1300
10
4x Venom Stone
1x Malachite
2x Black Rock
4x Opal
Increases your mana with 27 points
1450
Level
Ingredients
Effect
Price
1
1x Iron
1x Pearl
Increases your hitpoints with 1 points
150
2
2x Iron
1x Pearl
Increases your hitpoints with 3 points
250
3
1x Fossile
1x Droxlerite
1x Pearl
Increases your hitpoints with 6 points
400
4
1x Venom Stone
2x Fossile
2x Droxlerite
2x Pearl
Increases your hitpoints with 9 points
550
5
1x Venom Stone
1x Gold
2x Pearl
Increases your hitpoints with 12 points
700
6
2x Venom Stone
2x Gold
2x Pearl
Increases your hitpoints with 15 points
850
7
2x Venom Stone
1x Droxlerite
3x Pearl
Increases your hitpoints with 18 points
1000
8
3x Venom Stone
2x Droxlerite
3x Pearl
Increases your hitpoints with 21 points
1150
9
3x Venom Stone
1x Black Rock
3x Pearl
Increases your hitpoints with 24 points
1300
10
4x Venom Stone
1x Malachite
2x Black Rock
4x Pearl
Increases your hitpoints with 27 points
1450
Level
Ingredients
Effect
Price
1
1x Iron
1x Pyrite
Increases your melee armour rating with 2 points
150
2
2x Iron
1x Pyrite
Increases your melee armour rating with 3 points
250
3
1x Fossile
1x Droxlerite
1x Pyrite
Increases your melee armour rating with 4 points
400
4
1x Venom Stone
2x Fossile
2x Droxlerite
2x Pyrite
Increases your melee armour rating with 5 points
550
5
1x Venom Stone
1x Gold
2x Pyrite
Increases your melee armour rating with 6 points
700
6
2x Venom Stone
2x Gold
2x Pyrite
Increases your melee armour rating with 7 points
850
7
2x Venom Stone
1x Droxlerite
3x Pyrite
Increases your melee armour rating with 8 points
1000
8
3x Venom Stone
2x Droxlerite
3x Pyrite
Increases your melee armour rating with 9 points
1150
9
3x Venom Stone
1x Black Rock
3x Pyrite
Increases your melee armour rating with 10 points
1300
10
4x Venom Stone
1x Malachite
2x Black Rock
4x Pyrite
Increases your melee armour rating with 11 points
1450
Level
Ingredients
Effect
Price
1
1x Iron
1x Quartz
Increases your ranged armour rating with 2 points
150
2
2x Iron
1x Quartz
Increases your ranged armour rating with 3 points
250
3
1x Fossile
1x Droxlerite
1x Quartz
Increases your ranged armour rating with 4 points
400
4
1x Venom Stone
2x Fossile
2x Droxlerite
2x Quartz
Increases your ranged armour rating with 5 points
550
5
1x Venom Stone
1x Gold
2x Quartz
Increases your ranged armour rating with 6 points
700
6
2x Venom Stone
2x Gold
2x Quartz
Increases your ranged armour rating with 7 points
850
7
2x Venom Stone
1x Droxlerite
3x Quartz
Increases your ranged armour rating with 8 points
1000
8
3x Venom Stone
2x Droxlerite
3x Quartz
Increases your ranged armour rating with 9 points
1150
9
3x Venom Stone
1x Black Rock
3x Quartz
Increases your ranged armour rating with 10 points
1300
10
4x Venom Stone
1x Malachite
2x Black Rock
4x Quartz
Increases your ranged armour rating with 11 points
1450
Level
Ingredients
Effect
Price
1
1x Iron
1x Ruby
Increases your magic armour rating with 2 points
150
2
2x Iron
1x Ruby
Increases your magic armour rating with 3 points
250
3
1x Fossile
1x Droxlerite
1x Ruby
Increases your magic armour rating with 4 points
400
4
1x Venom Stone
2x Fossile
2x Droxlerite
2x Ruby
Increases your magic armour rating with 5 points
550
5
1x Venom Stone
1x Gold
2x Ruby
Increases your magic armour rating with 6 points
700
6
2x Venom Stone
2x Gold
2x Ruby
Increases your magic armour rating with 7 points
850
7
2x Venom Stone
1x Droxlerite
3x Ruby
Increases your magic armour rating with 8 points
1000
8
3x Venom Stone
2x Droxlerite
3x Ruby
Increases your magic armour rating with 9 points
1150
9
3x Venom Stone
1x Black Rock
3x Ruby
Increases your magic armour rating with 10 points
1300
10
4x Venom Stone
1x Malachite
2x Black Rock
4x Ruby
Increases your magic armour rating with 11 points
1450
Level
Ingredients
Effect
Price
1
2x Gold
1x Sapphire
1x Malachite
Heals you slowly with 0.05 points per second.
150
2
2x Gold
1x Sapphire
1x Malachite
Heals you slowly with 0.1 points per second.
250
3
3x Gold
1x Sapphire
1x Malachite
Heals you slowly with 0.15 points per second.
400
4
3x Gold
2x Sapphire
1x Malachite
Heals you slowly with 0.2 points per second.
550
5
4x Gold
2x Sapphire
1x Malachite
Heals you slowly with 0.25 points per second.
700
6
4x Gold
2x Sapphire
1x Malachite
Heals you slowly with 0.3 points per second.
850
7
5x Gold
3x Sapphire
1x Malachite
Heals you slowly with 0.35 points per second.
1000
8
5x Gold
3x Sapphire
1x Malachite
Heals you slowly with 0.4 points per second.
1150
9
6x Gold
3x Sapphire
1x Malachite
Heals you slowly with 0.45 points per second.
1300
10
7x Gold
4x Sapphire
1x Malachite
Heals you slowly with 0.5 points per second.
1450
Level
Ingredients
Effect
Price
1
2x Gold
1x Spinel
10% chance of automatic retaliations against those that harm you for 20% of the damage done to you.
150
2
2x Gold
1x Spinel
12% chance of automatic retaliations against those that harm you for 23% of the damage done to you.
250
3
3x Gold
1x Spinel
14% chance of automatic retaliations against those that harm you for 26% of the damage done to you.
400
4
3x Gold
2x Spinel
16% chance of automatic retaliations against those that harm you for 29% of the damage done to you.
550
5
4x Gold
2x Spinel
18% chance of automatic retaliations against those that harm you for 32% of the damage done to you.
700
6
4x Gold
2x Spinel
20% chance of automatic retaliations against those that harm you for 35% of the damage done to you.
850
7
5x Gold
3x Spinel
22% chance of automatic retaliations against those that harm you for 38% of the damage done to you.
1000
8
5x Gold
3x Spinel
24% chance of automatic retaliations against those that harm you for 41% of the damage done to you.
1150
9
6x Gold
3x Spinel
25% chance of automatic retaliations against those that harm you for 44% of the damage done to you.
1300
10
7x Gold
4x Spinel
1x Malachite
27% chance of automatic retaliations against those that harm you for 47% of the damage done to you.
1450
Level
Ingredients
Effect
Price
1
2x Gold
1x Topaz
Enemies that harm you with weapons or magic have a 5% chance of suffering 1 shock(s) of 2 magic damage.
150
2
2x Gold
1x Topaz
Enemies that harm you with weapons or magic have a 6% chance of suffering 3 shock(s) of 6 magic damage.
250
3
3x Gold
1x Topaz
Enemies that harm you with weapons or magic have a 7% chance of suffering 6 shock(s) of 12 magic damage.
400
4
3x Gold
2x Topaz
Enemies that harm you with weapons or magic have a 8% chance of suffering 9 shock(s) of 18 magic damage.
550
5
4x Gold
2x Topaz
Enemies that harm you with weapons or magic have a 9% chance of suffering 12 shock(s) of 24 magic damage.
700
6
4x Gold
2x Topaz
Enemies that harm you with weapons or magic have a 10% chance of suffering 15 shock(s) of 30 magic damage.
850
7
5x Gold
3x Topaz
Enemies that harm you with weapons or magic have a 11% chance of suffering 18 shock(s) of 36 magic damage.
1000
8
5x Gold
3x Topaz
Enemies that harm you with weapons or magic have a 12% chance of suffering 21 shock(s) of 42 magic damage.
1150
9
6x Gold
3x Topaz
Enemies that harm you with weapons or magic have a 13% chance of suffering 24 shock(s) of 48 magic damage.
1300
10
7x Gold
4x Topaz
1x Malachite
Enemies that harm you with weapons or magic have a 15% chance of suffering 27 shock(s) of 54 magic damage.
1450
Level
Ingredients
Effect
Price
1
1x Venom Stone
2x Gold
1x Aquamarine
Enemies that approach have a 5% chance of suffering 2 poison damage over 1 second.
150
2
1x Venom Stone
2x Gold
1x Aquamarine
Enemies that approach have a 6% chance of suffering 6 poison damage over 3 seconds.
250
3
2x Venom Stone
3x Gold
1x Aquamarine
Enemies that approach have a 7% chance of suffering 12 poison damage over 6 seconds.
400
4
2x Venom Stone
3x Gold
2x Aquamarine
Enemies that approach have a 8% chance of suffering 18 poison damage over 9 seconds.
550
5
3x Venom Stone
4x Gold
2x Aquamarine
Enemies that approach have a 9% chance of suffering 24 poison damage over 12 seconds.
700
6
3x Venom Stone
4x Gold
2x Aquamarine
Enemies that approach have a 10% chance of suffering 30 poison damage over 15 seconds.
850
7
4x Venom Stone
5x Gold
3x Aquamarine
Enemies that approach have a 11% chance of suffering 36 poison damage over 18 seconds.
1000
8
4x Venom Stone
5x Gold
3x Aquamarine
Enemies that approach have a 12% chance of suffering 42 poison damage over 21 seconds.
1150
9
5x Venom Stone
6x Gold
3x Aquamarine
Enemies that approach have a 13% chance of suffering 48 poison damage over 24 seconds.
1300
10
5x Venom Stone
7x Gold
1x Malachite
Enemies that approach have a 15% chance of suffering 54 poison damage over 27 seconds.
1450
Below you will find a list of characters and enemies which you will encounter while travelling through Rivelon. Because of the lack of any information on the levels and health of the monsters in the game, the list is limited to a picture and a name.
 Goblin
 FroblinFroblin Beholder
 Froblin Boss
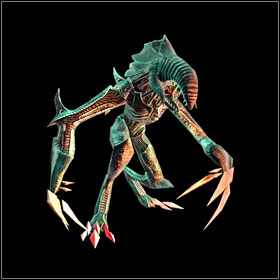 Demon
Demon Forrest Troll
 Flying Froblin
 Flying Undead
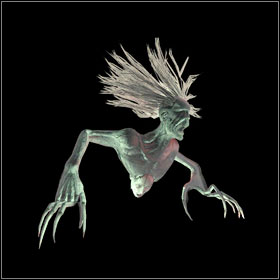 Crawler
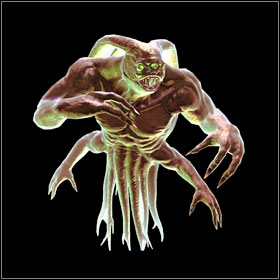 Memory Eater
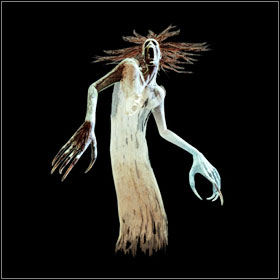 Real Ghost
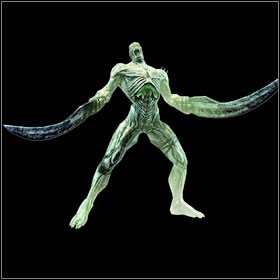 Undead
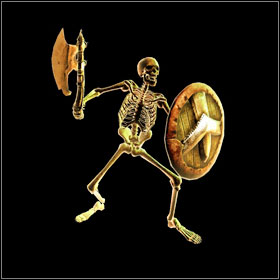 Skeleton
 Walking Armor
 Dragon Elf
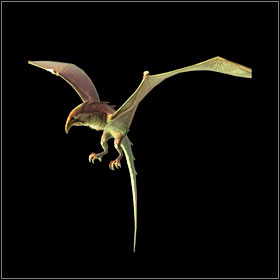 Wyvern
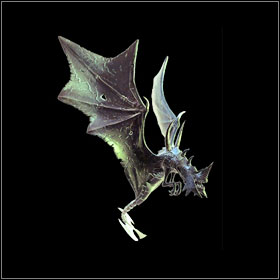 Damian's Dragon
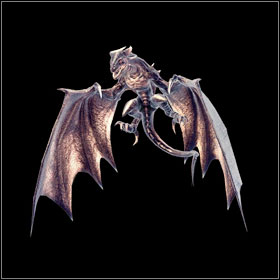 Patriarch
 Creature - Pet
 Creature - Undead
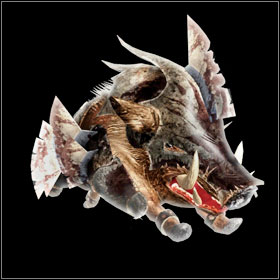 Armored Boar
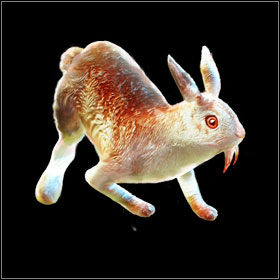 Killer Rabbit
 Zandalor
 Laiken
 Bandit
 Black Ring
 Mine guard
 New Order
 Champion
 Divine Champion
 Dragon Slayer
 Sassan
 Citizen
 Priest


 Dont Starve Game Guide & Walkthrough
 Dragon Age: Origins - Return to Ostagar Game Guide & Walkthrough
 Dragon Age: Origins - Awakening Game Guide & Walkthrough
 Dreamfall: The Longest Journey Game Guide & Walkthrough
 Divinity: Dragon Commander Game Guide & Walkthrough