Tales of Terror: Estate of the Heart Walkthrough, Guide, & Tips
Tales of Terror: Estate of the Heart Walkthrough

Welcome to the Tales of Terror: Estate of the Heart Walkthrough.
Terror strikes deep into the heart of this family’s cursed estate!
Whether you use this document as a reference when things get difficult or as a road map to get you from beginning to end, we’re pretty sure you’ll find what you’re looking for here.
This document contains a complete Tales of Terror: Estate of the Heart game walkthrough featuring annotated screenshots from actual gameplay!
We hope you find this information useful as you play your way through the game. Use the walkthrough menu below to quickly jump to whatever stage of the game you need help with.
Remember to visit the Big Fish Games Forums if you find you need more help. Have fun!
This walkthrough was created by prpldva, and is protected under US Copyright laws. Any unauthorized use, including re-publication in whole or in part, without permission, is strictly prohibited.
General Tips
- This is the official guide for Tales of Terror: Estate of the Heart.
- This guide will not mention each time you have to zoom into a location; the screenshots will show each zoom scene.
- Hidden-object puzzles are referred to as HOPs. This guide will not show HOP solutions. It will identify the location of the HOP and the inventory item acquired.
- This guide will show solutions for non-random puzzles. Please read the in-game instructions for each puzzle.
- In this game, you will sometimes have to select the new scene to trigger dialog, cut-scenes, or tasks prior to interacting with the scene.
Chapter 1: The Estate Entrance

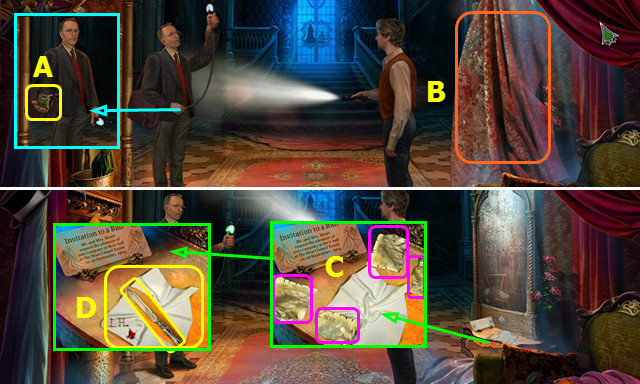
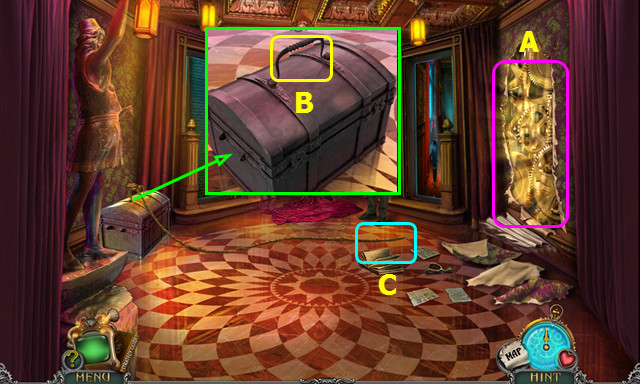
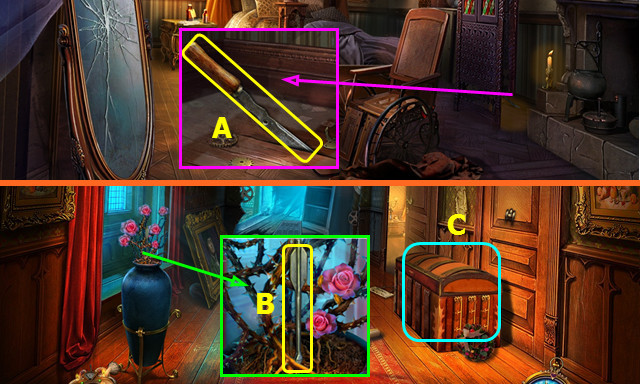
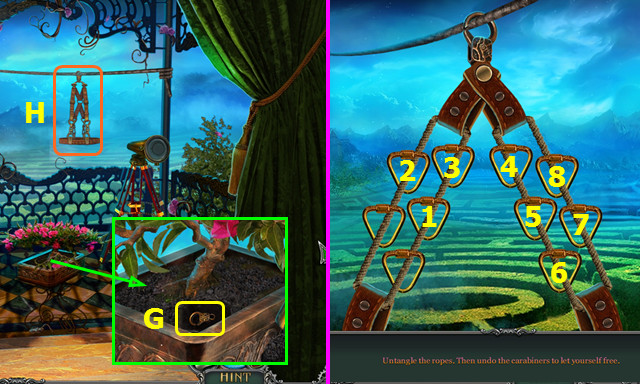
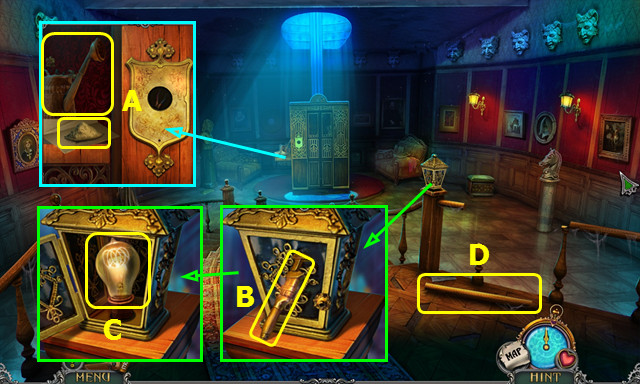
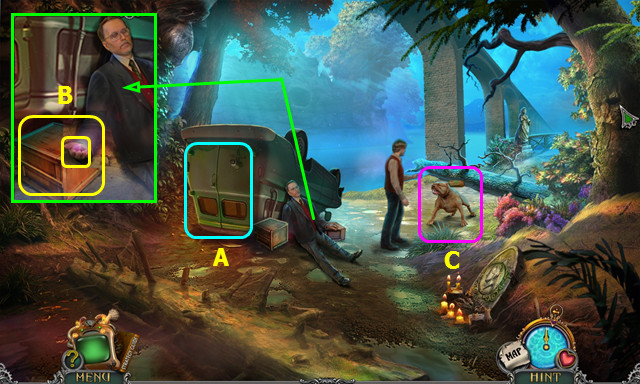
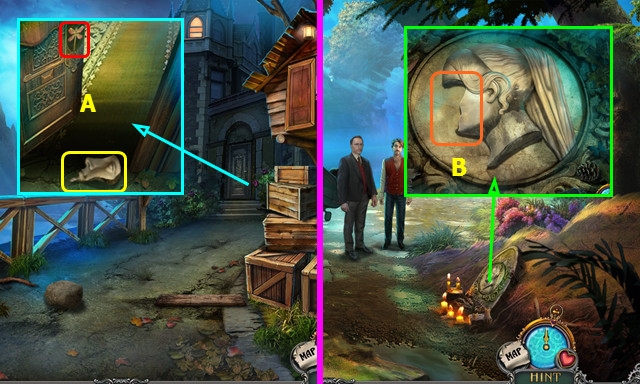
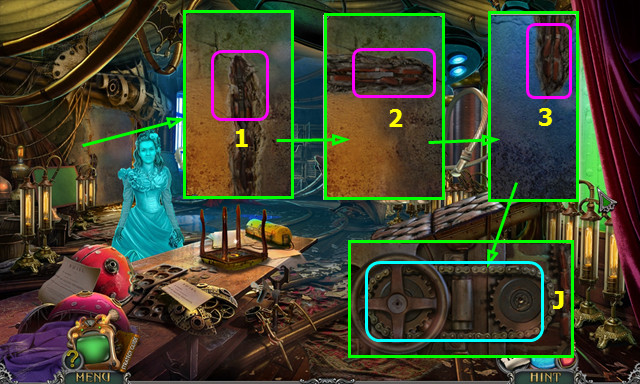
- Take the UNCHARGED DETECTOR (A).
- Remove the drape (B).
- Select the 4 pieces; take the MAP (C).
- Take the CLOTH, and LETTER KNIFE (D).

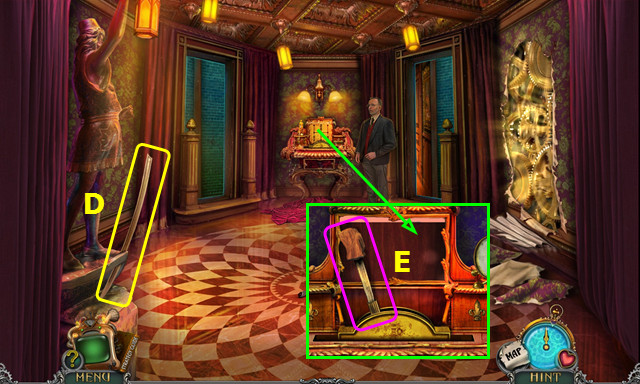
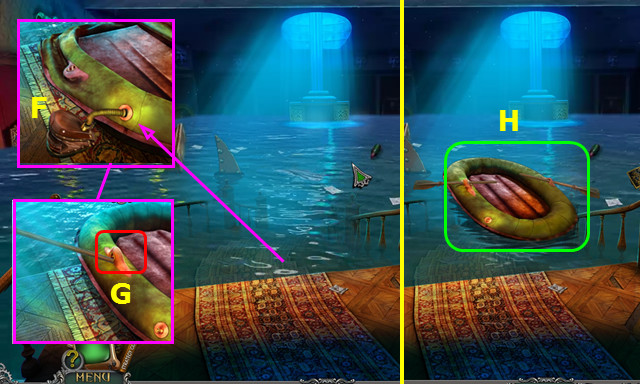
- Take the UMBRELLA (E); use it on the locket (F).
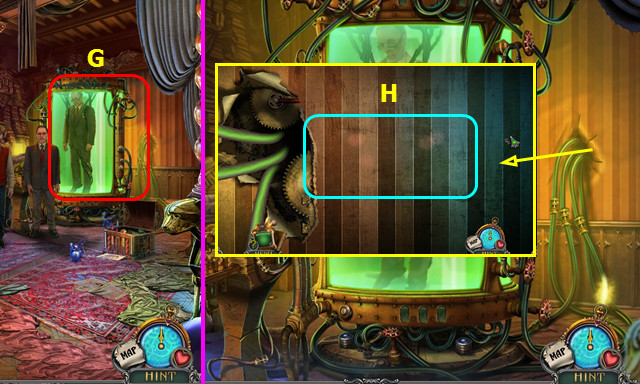
- Use the LETTER KNIFE; take the LOCKET (G).
- Open the LOCKET; take IMAGE OF LUISA (inventory).
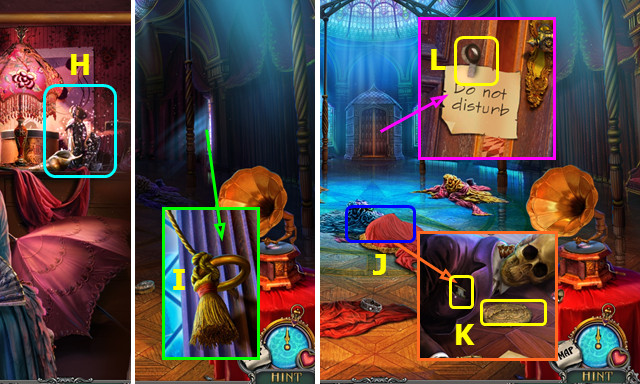
- Select (H).
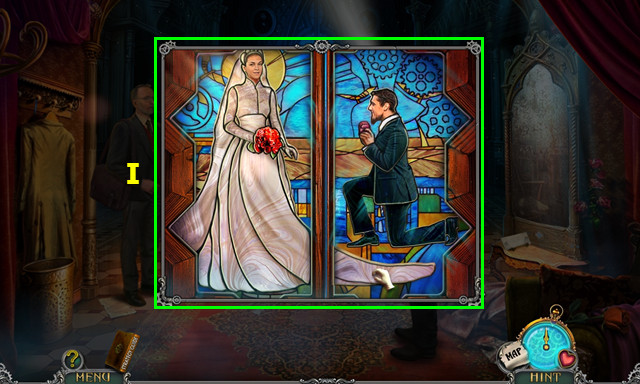
- Place IMAGE OF LUISA and restore the stained glass (I).
- Walk forward.
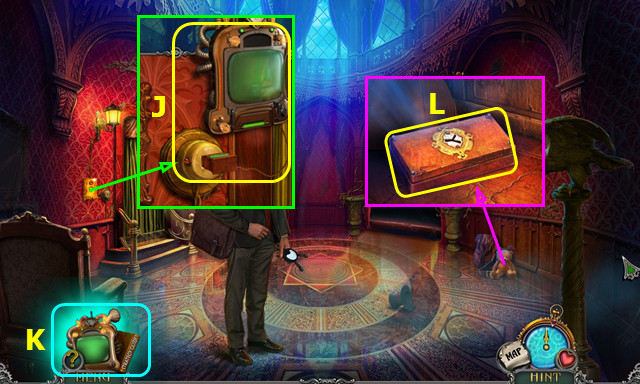
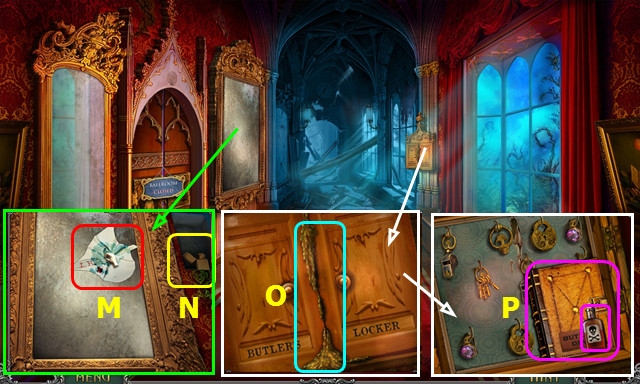
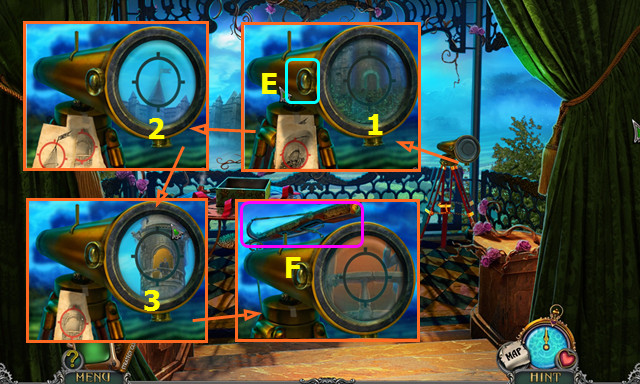
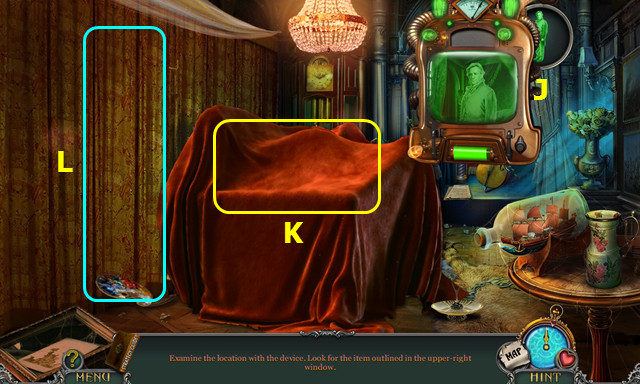
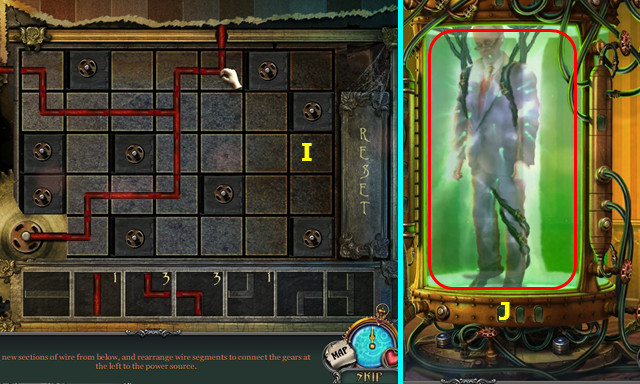
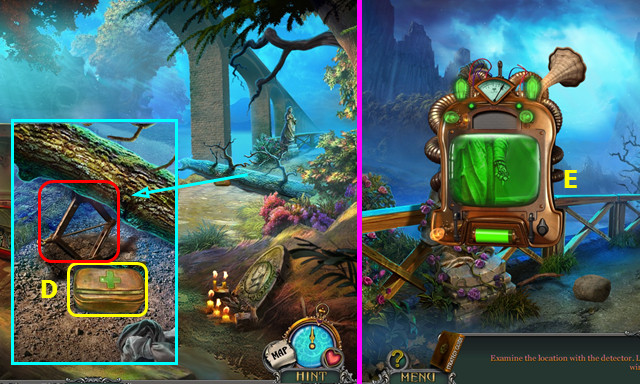
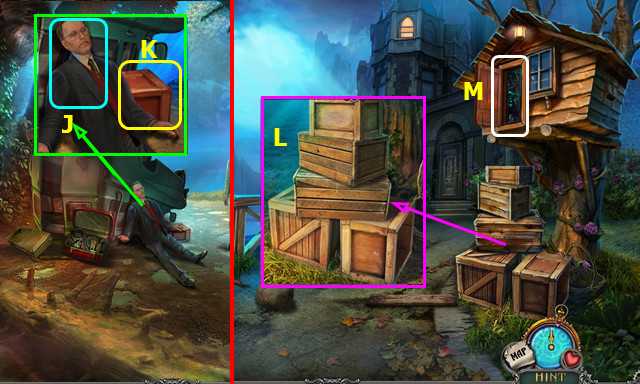
- Use the UNCHARGED DETECTOR to make the DETECTOR (J). The DETECTOR will now sit on your menu bar (K).
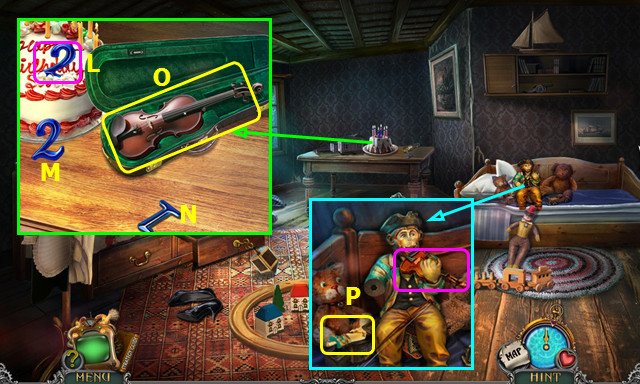
- Move the items; take the REPAIR KIT (L).
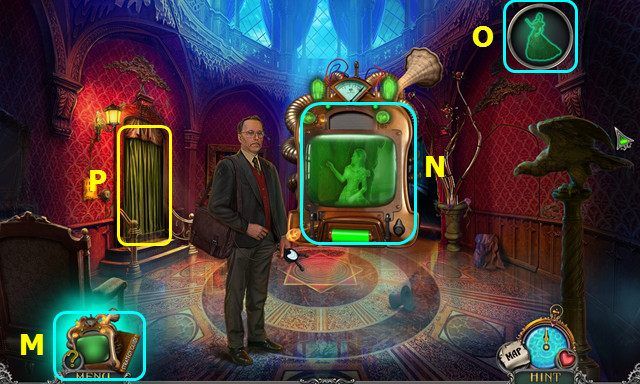
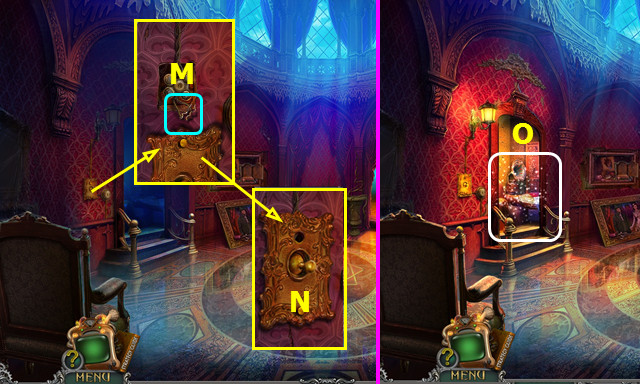
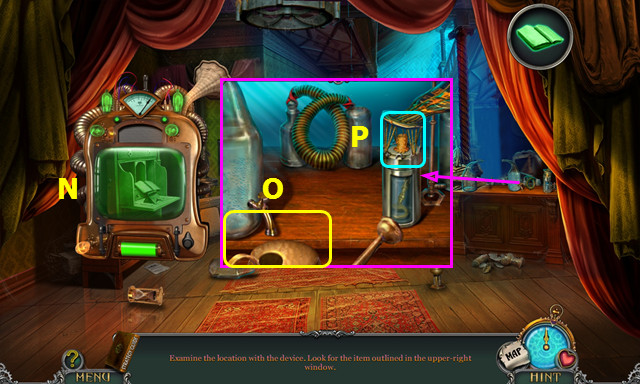
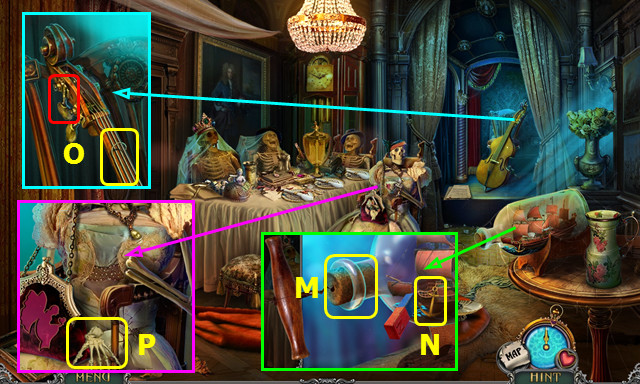
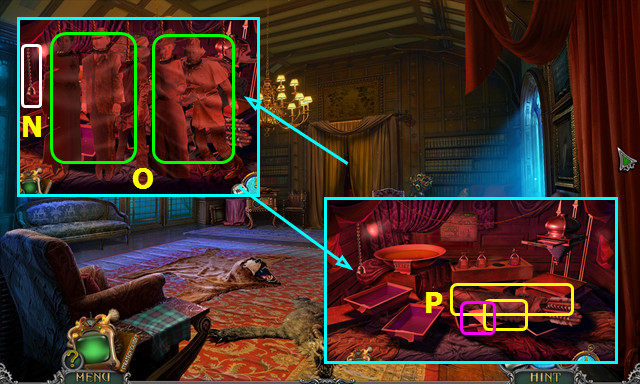
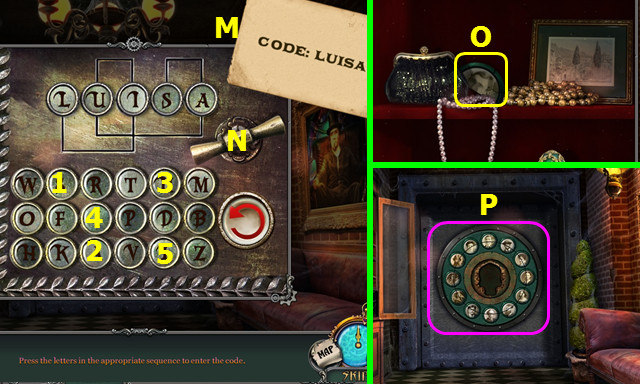
- Select the DETECTOR (M).
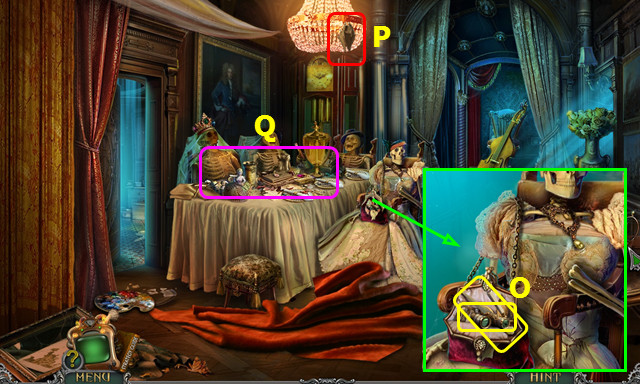
- Find and select the image (N) that matches the window (O).
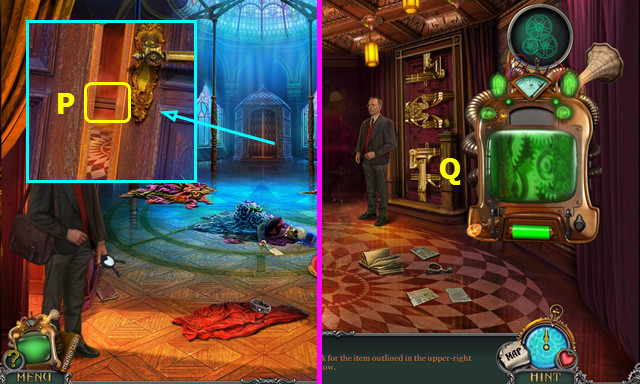
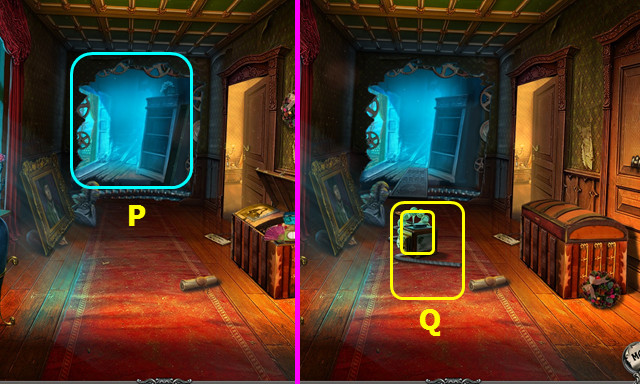
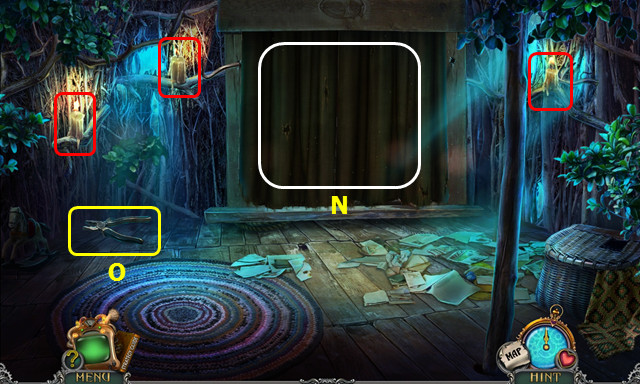
- Remove the curtain; play the HOP to earn the PHOTO (P).
- Examine the PHOTO; take the SKELETON KEY (inventory).
- Walk forward.
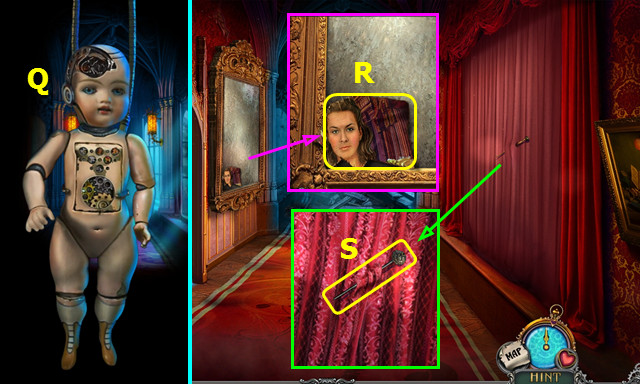
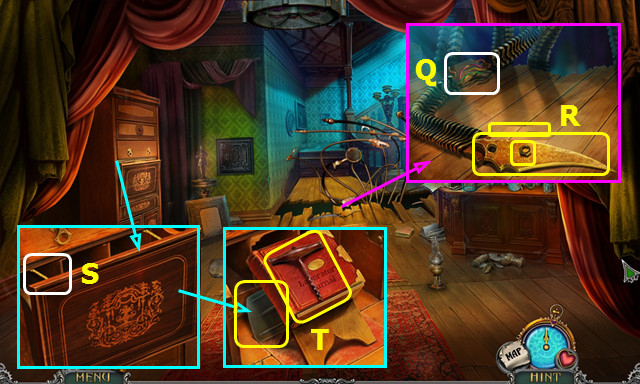
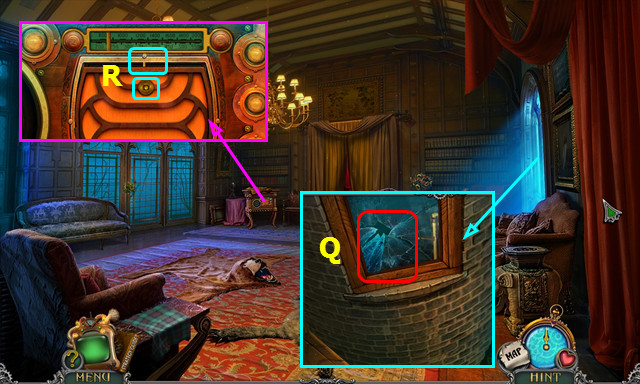
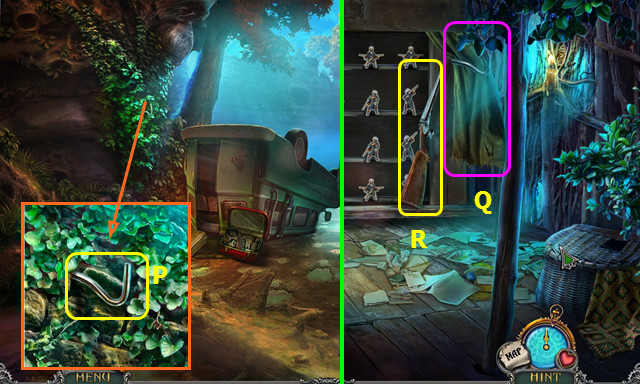
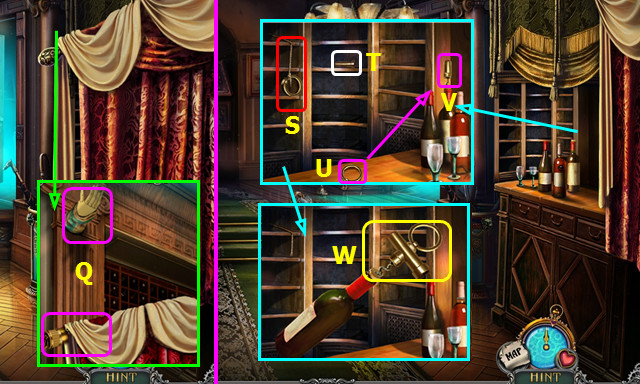
- Try to take the doll (Q).
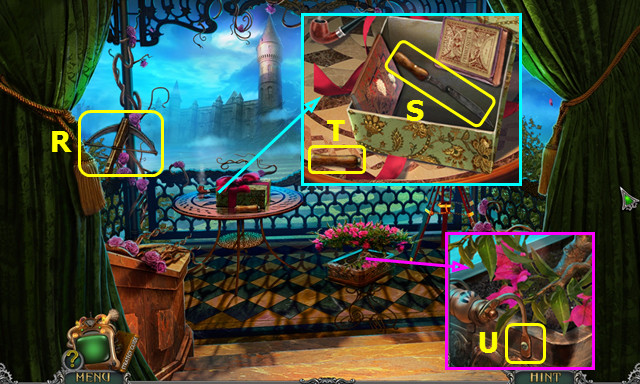
- Take the CANVAS PIECE (R).
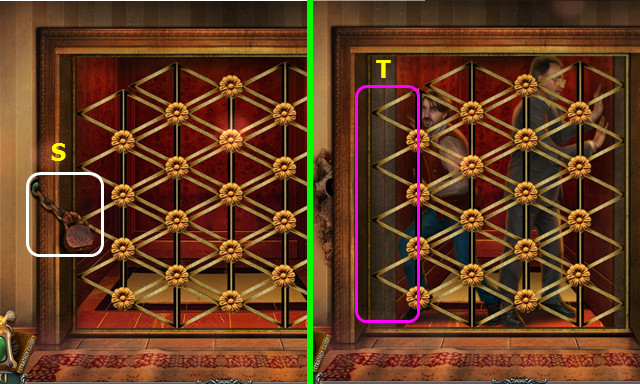
- Take the PIN and open the curtains (S).
- Select the PIN 5x to make the LOCK PICK (inventory).
- Use the LOCK PICK on the REPAIR KIT; remove the items and take the SOCKET WRENCH (inventory).
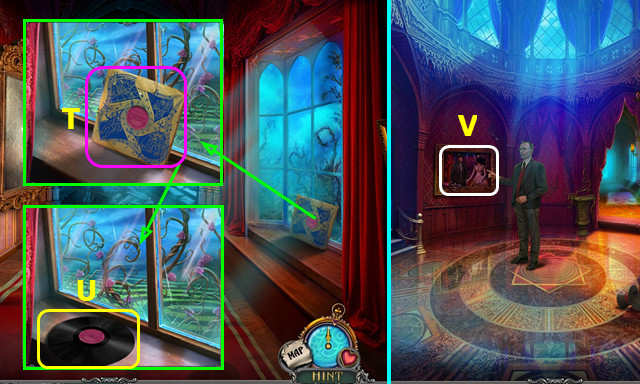
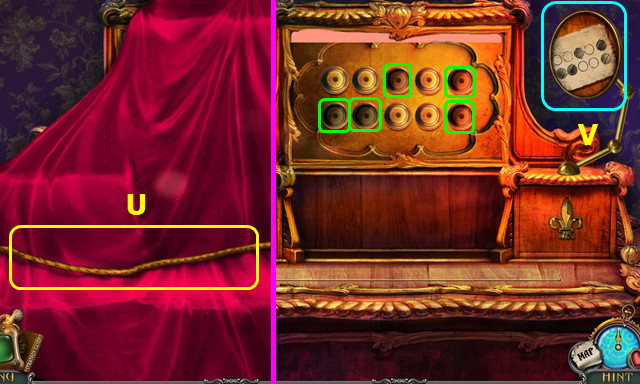
- Play the HOP and remove the record (T).
- Take the RECORD (U).
- Walk down.
- Select (V).
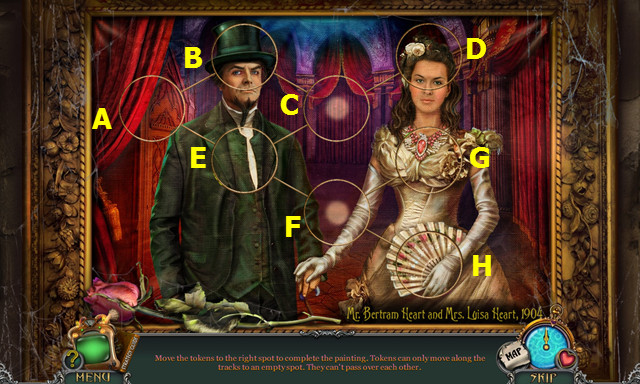
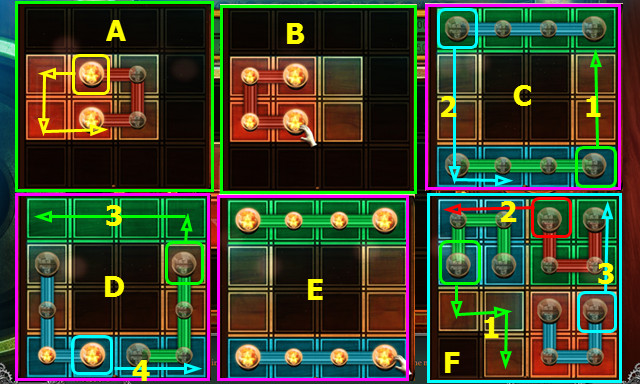
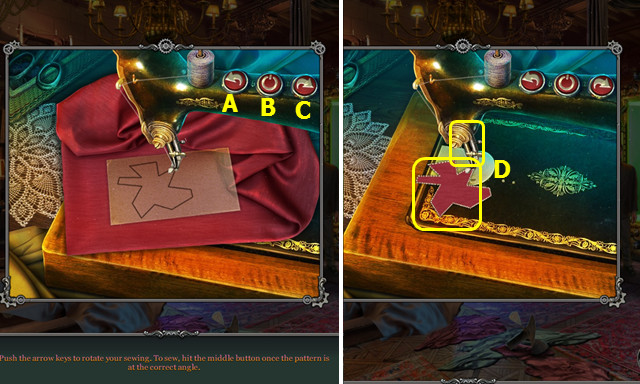
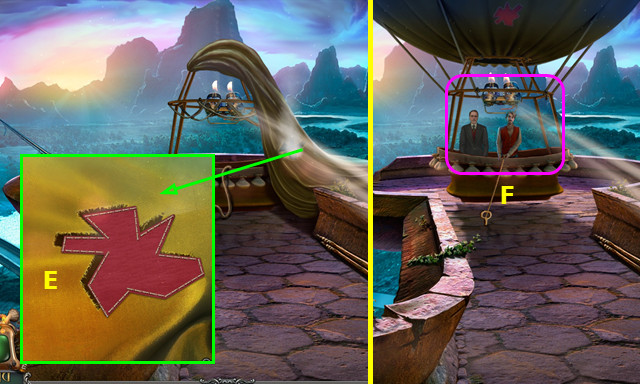
- Place the CANVAS PIECE.
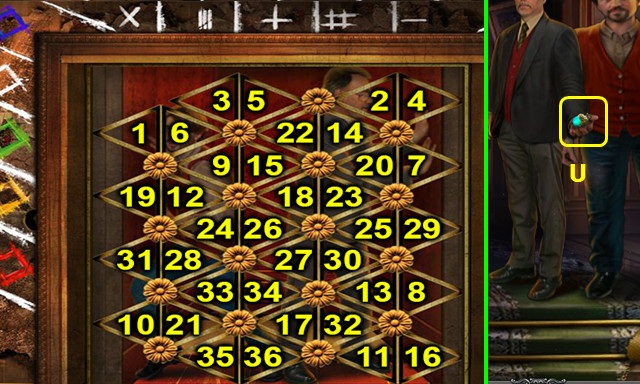
- Select FC-GA-CG-DF-AD-FC-HA-CH-BE-AB.
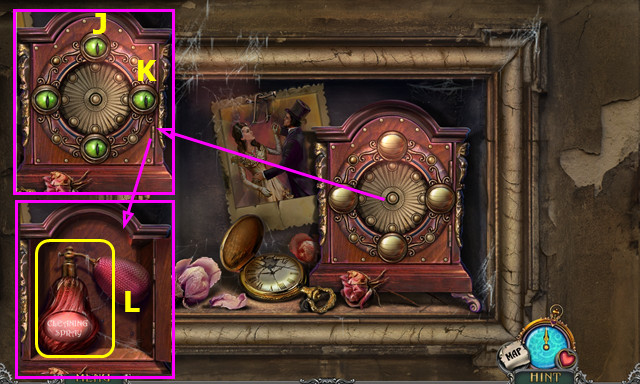
- Select J-K.
- Take the CLOTH and CLEANING SPRAY to make the WET CLOTH (inventory).
- Walk forward.
- Use the WET CLOTH; drag across the mirror until clean (M).
- Remove the grill; take the LIGHTER (N).
- Use the LIGHTER (O).
- Open the doors: move the bottle and read the diary (P).
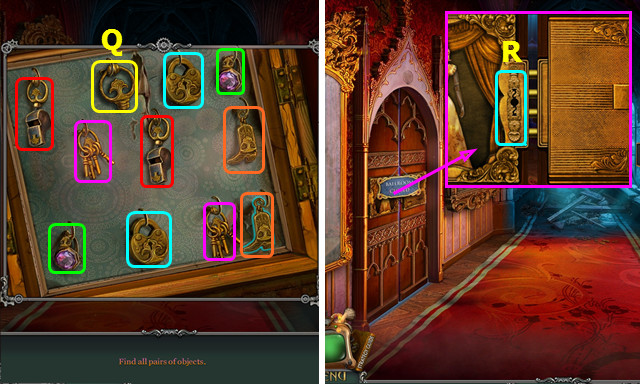
- Select pairs (color-coded).
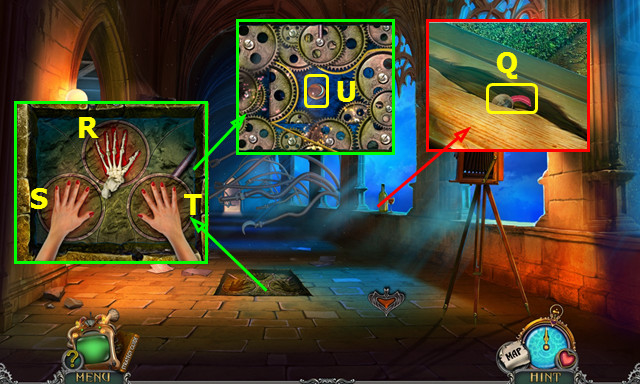
- Take the KEY PART (Q).
- Combine the SKELETON KEY and KEY PART; select several times to make the BALLROOM KEY (inventory).
- Remove the sign and use the BALLROOM KEY (R).
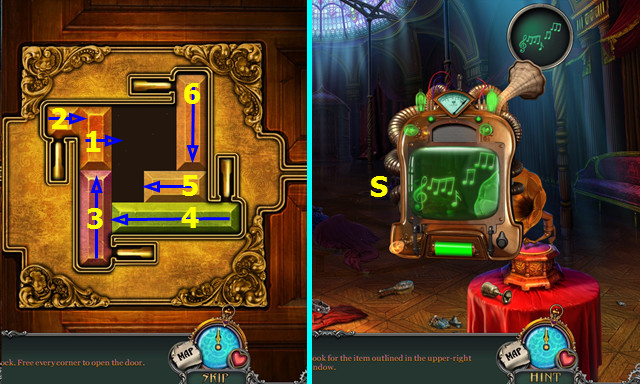
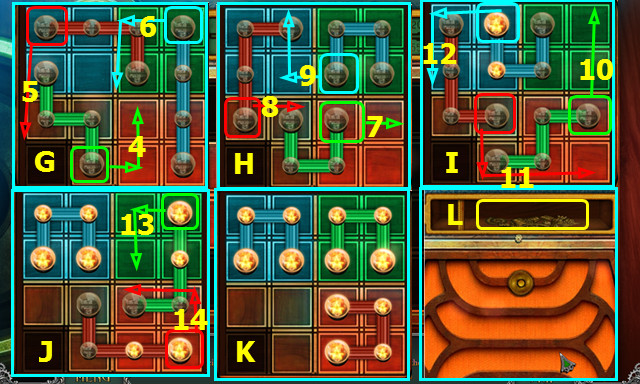
- Slide the bars (1-6).
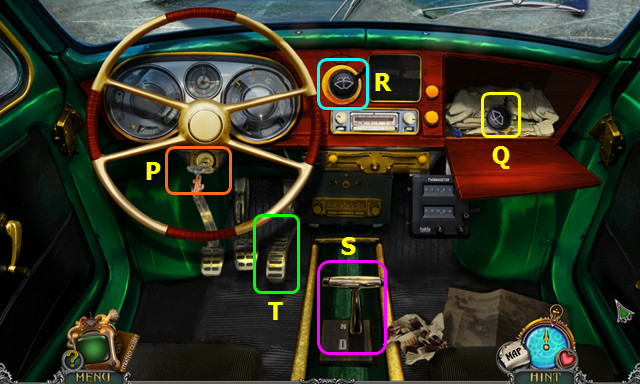
- Use the DETECTOR (S).
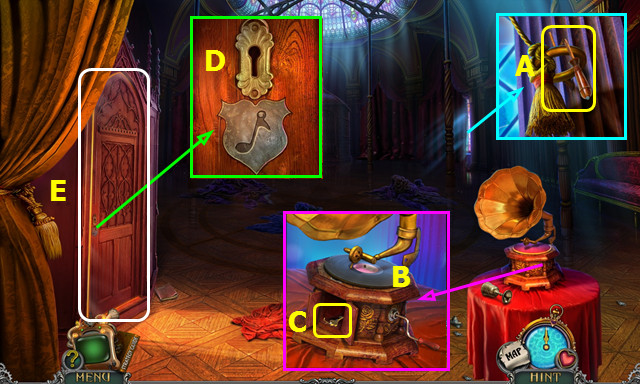
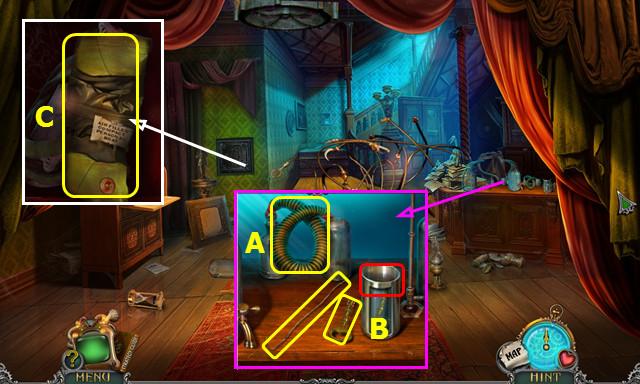
- Take the GRAMOPHONE CRANK (A).
- Place the RECORD and GRAMOPHONE CRANK; turn the crank (B).
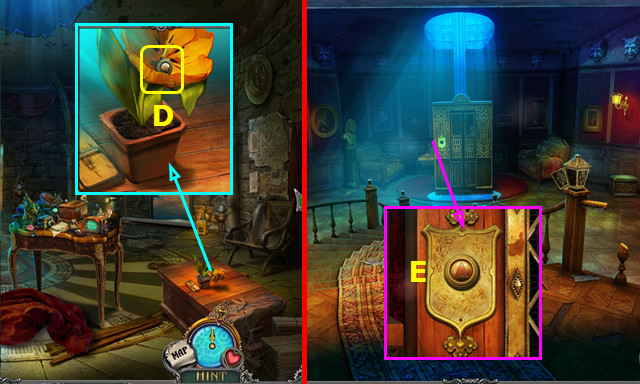
- Take the WARDROBE KEY (C).
- Use the WARDROBE KEY (D).
- Select (E).
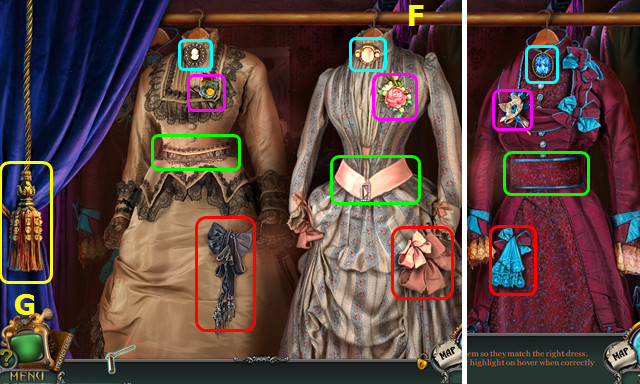
- Swap the items on the 3 dresses (F).
- Use the pull cord to rotate the dresses (G).
- Play the HOP; earn BERTRAM’S CANE (H).
- Use BERTRAM’S CANE (I).
- Select (J).
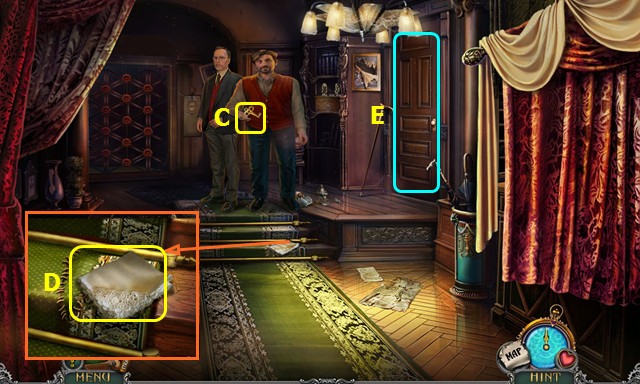
- Remove the items; take the BROKEN ETUI and CIGAR GUILLOTINE (K).
- Open the BROKEN ETUI, move the comb pieces, and take the ROUND MIRROR (inventory).
- Take the note and INSULATION TAPE (L).
- Walk down 2x.
- Use the SOCKET WRENCH, and then use the INSULATION TAPE (M).
- Flip the switch (N).
- Play the HOP; earn the TRIANGLE RING (O).
- Combine the CIGAR GUILLOTINE and TRIANGLE RING to find the THIN BLADE (inventory).
- Walk forward and left.
- Use the THIN BLADE (P).
- Go forward.
- Use the DETECTOR and select the item (Q).

- Read the note and take the GLOVE (R).
- Select (S).
- Select (T).
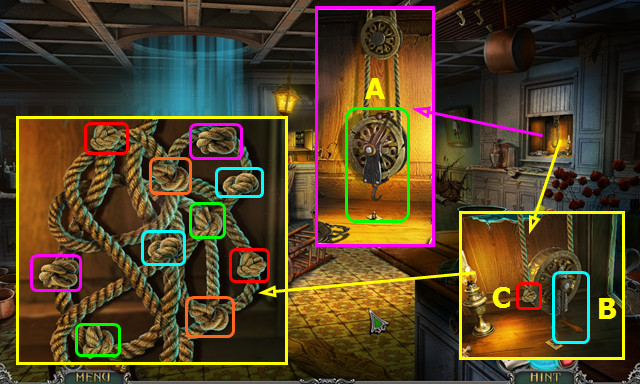
- Use the THIN BLADE; take the ROPE (U).
- Place the ROUND MIRROR; select it 2x (V).
- Push the marked buttons (green).
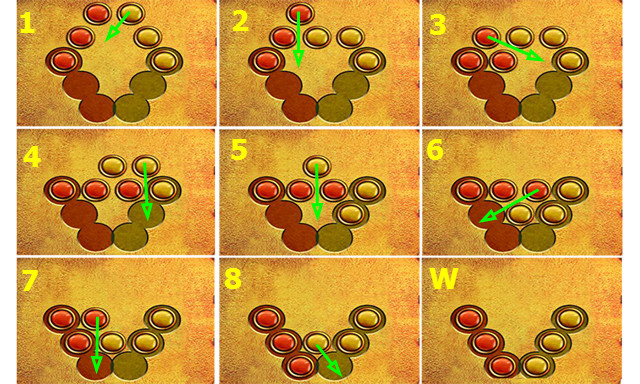
- Make the moves (1-8); final solution (W).
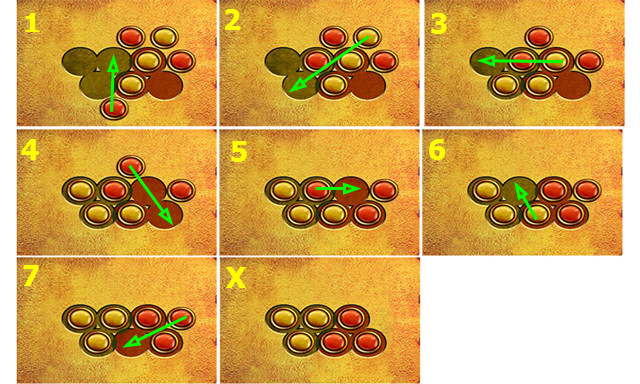
- Make the moves (1-7); final solution (X).
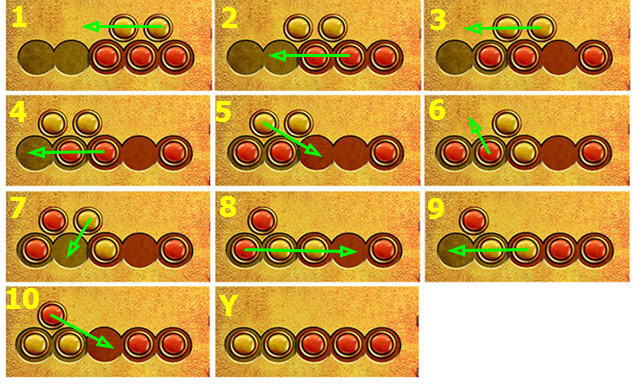
- Make the moves (1-10); final solution (Y).
- Exit the scene.
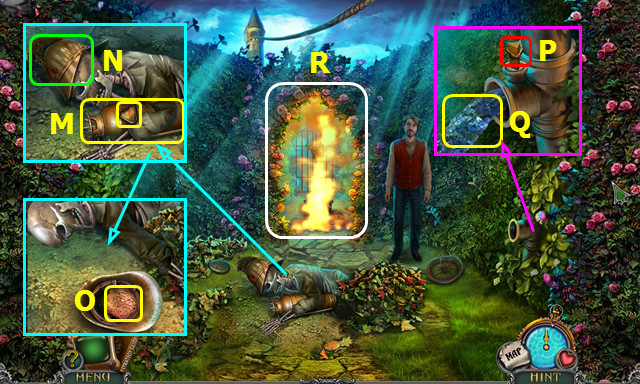
- Use the THIN BLADE (A).
- Use the ROPE (B).
- Select the rope end (C).
- Use the GLOVE; take the BENT SABER (D).
- Place and select the BENT SABER (E).
Chapter 2: The Corridor
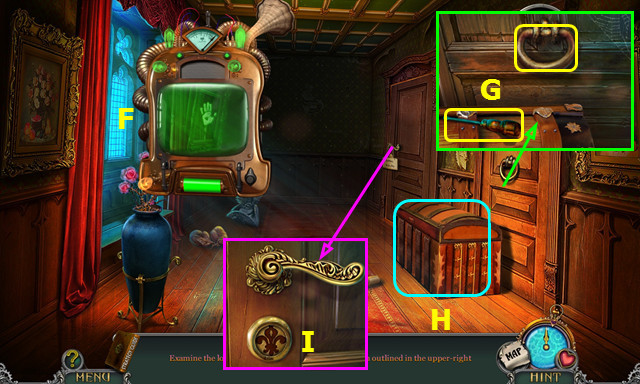
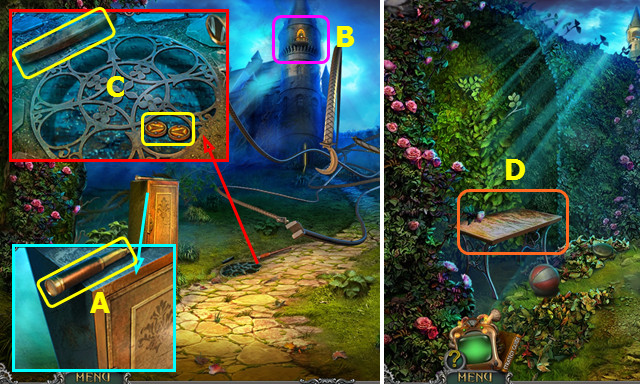
- Use the DETECTOR (F).
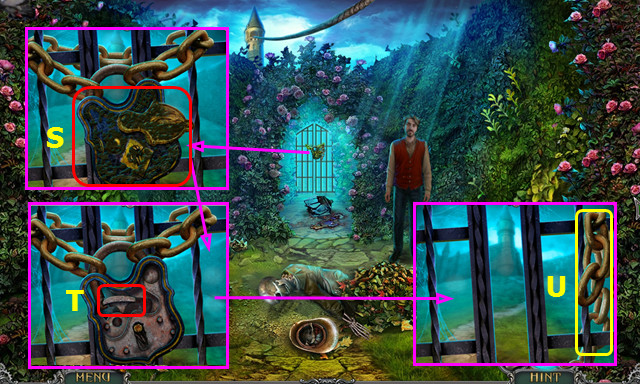
- Take the SCREWDRIVER; select and take the DOOR KNOCKER (G).
- Open the chest and play the HOP; earn the ZOETROPE (H).
- Turn the crank on the ZOETROPE; take the BEDROOM KEY (inventory).
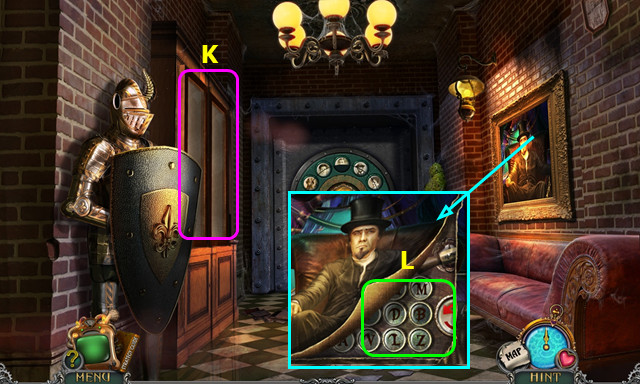
- Remove the sign; use the BEDROOM KEY (I).
- Walk right.

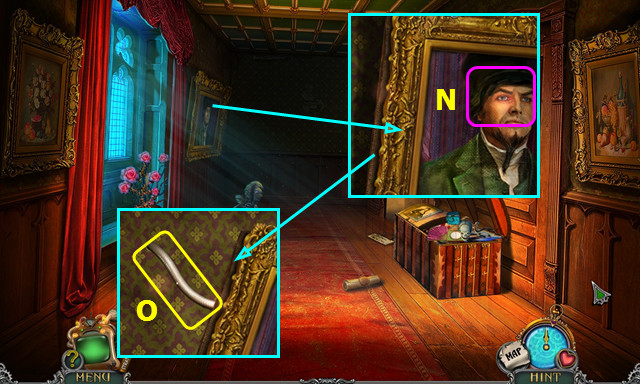
- Use the DETECTOR (J).
- Take the SCOOP (K).
- Take LUISA’S DIARY (L).
- Read LUISA’S DIARY; take the GLOVES (inventory).
- Take the MACHINE SCHEMATIC (M).
- Open the MACHINE SCHEMATIC to find the MONOCLE (inventory).
- Walk down.
- Use the MONOCLE (N).
- Take the LONG CABLE (O).
- Combine the DOOR KNOCKER and LONG CABLE to make the GRAPPLING HOOK (inventory).
- Use the GRAPPLING HOOK (P).
- Take the SLIDE VIEWER and GRAPPLING HOOK (Q).
- Select the SLIDE VIEWER several times to view the slides; take the TELESCOPE ADJUSTOR (inventory).
- Walk forward.
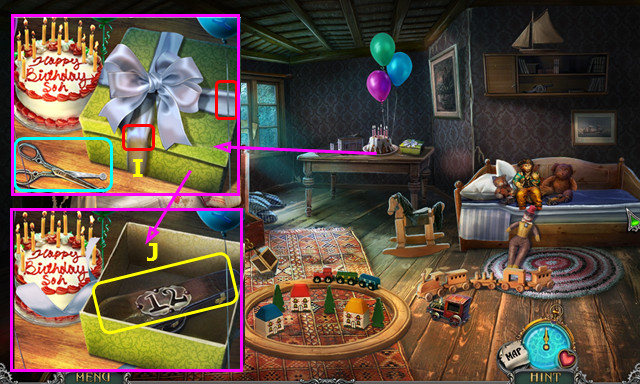
- Take the CROSSBOW (R).
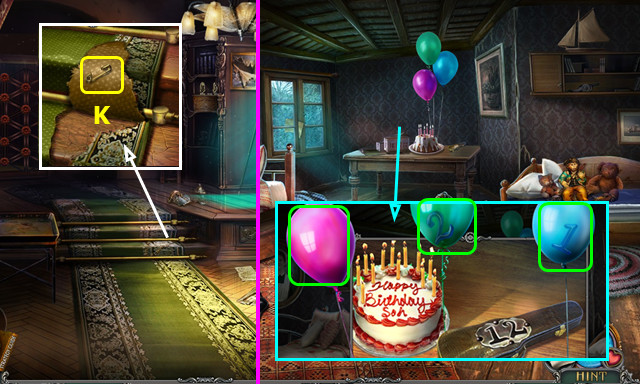
- Read the note and open the gift. Move the books and take the BROKEN CLIPPERS (S).
- Take the CLIPPER HANDLE (T). Use the SCREWDRIVER; take the SCREW (U).
- Walk down and right.
- Use the CLIPPER HANDLE and GLOVES; take the CLIPPER HALF (A).
- Combine the BROKEN CLIPPERS, CLIPPER HALF, SCREW, and SCREWDRIVER to make the CLIPPERS (inventory).
- Walk down.
- Use the CLIPPERS; take the BOLT (B).
- Open the chest and play the HOP; earn the PARCEL (C).
- Open the PARCEL, look at the photos, and take the ZIP LINE HARNESS (inventory).
- Combine the CROSSBOW, BOLT, and GRAPPLING HOOK to make the CROSSBOW WITH HOOK (inventory).
- Go forward.
- Place the TELESCOPE ADJUSTOR (E).
- Use your mouse to guide the telescope to find the 3 places (1-3).
- Place the CROSSBOW WITH HOOK (F).
- Use the CLIPPERS and SCOOP; take the CARABINER (G).
- Add the CARABINER to the ZIP LINE HARNESS (inventory).
- Place the ZIP LINE HARNESS (H).
- Go forward.
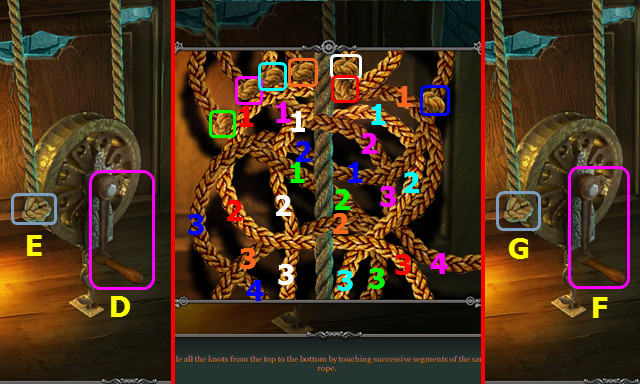
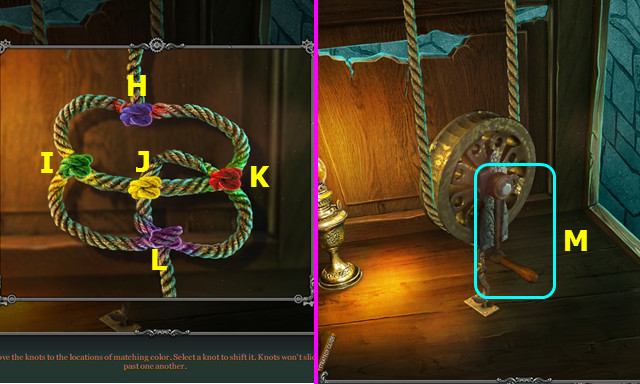
- Untangle the ropes, and then select 1-8.

- Use the DETECTOR (J).
- Take the TOOL HANDLE (K).
- Use the CLIPPERS (L).
- Try to go forward.
- Take the CARABINER; move the arm and take the EMPTY EXTINGUISHER (M).
- Select (N).
- Remove the items and take the DRY SPONGE (O).
- Use the CARABINER (P).
- Use the DRY SPONGE to make the WET SPONGE; use the EMPTY EXTINGUISHER to make the EXTINGUISHER (Q).
- Use the EXTINGUISHER (R).
- Use the WET SPONGE and SCREWDRIVER (S).
- Open and remove the lock (T).
- Take the CHAIN (U).
- Go forward.
- Take the SPYGLASS (A).
- Use the SPYGLASS (B).
- Use the EXTINGUISHER; take the WOODEN TILES and GRINDSTONE (C).
- Walk down.
- Select (D).
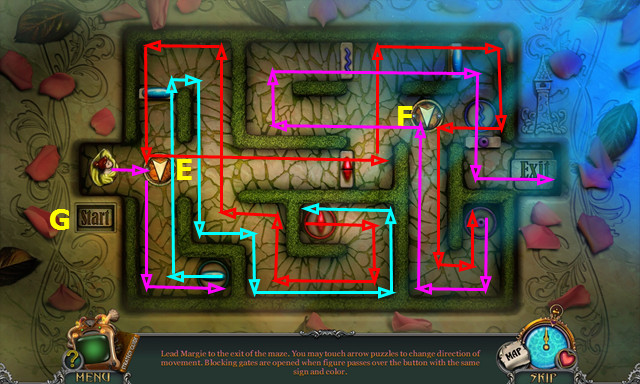
- Place the WOODEN TILES.
- Select Ex3, Fx2; press start (G).
- Once Margie passes it, press Ex2.
- Once Margie passes it, press Ex3.
- Once Margie passes it, press Fx2.
- Take the INTRICATE KEY.
- Go forward.
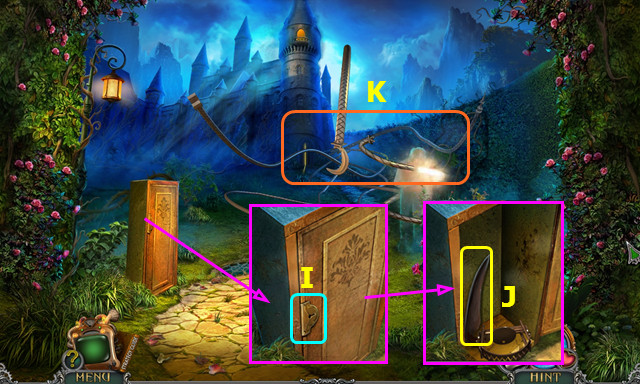
- Use the INTRICATE KEY (I).
- Use the CHAIN; take the BLUNT SCYTHE (J).
- Combine the TOOL HANDLE, BLUNT SCYTHE, and GRINDSTONE to make the SCYTHE (inventory).
- Use the SCYTHE (K).
- Go forward.
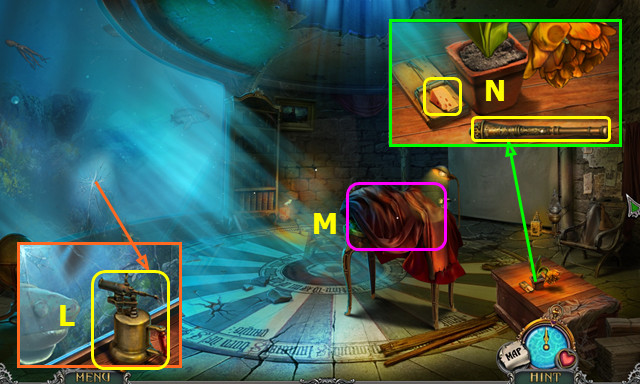
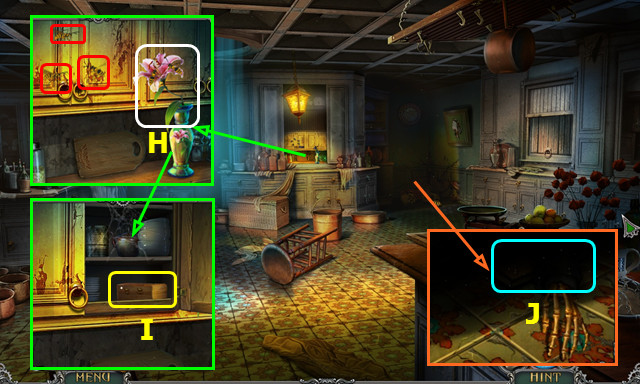
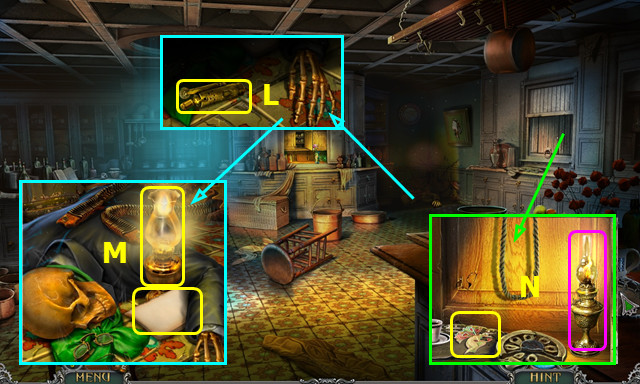
- Take the BLOWTORCH (L).
- Remove the drape and play the HOP; earn the LEVER (M).
- Use the LEVER; take the CHEESE and LEVER (N).
- Place the CHEESE (O).
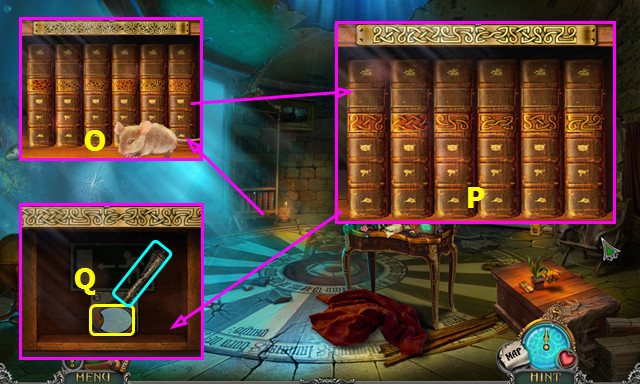
- Arrange the books as shown (P).
- Take the 1st MOON AMULET; place and use the LEVER (Q).
- Go right.
- Take the POWDER and EMPTY WATERING CAN (A).
- Take the WRENCH (B).
- Open the lantern: read the note and take the LIGHTBULB (C).
- Take the SHAFT (D).
- Walk down.
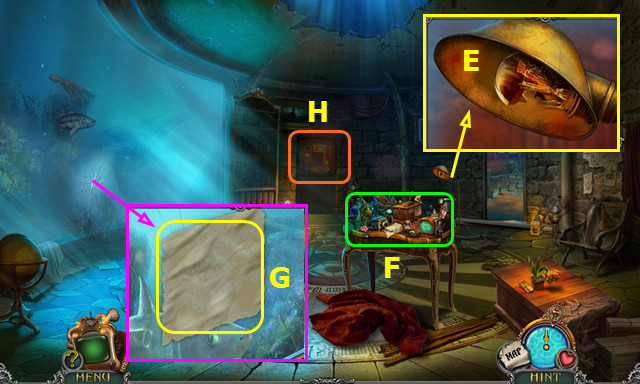
- Replace the LIGHTBULB (E).
- Play the HOP; earn the PUMP PILLOW (F).
- Use the POWDER; take the SYMBOL SKETCH (G).
- Select (H).
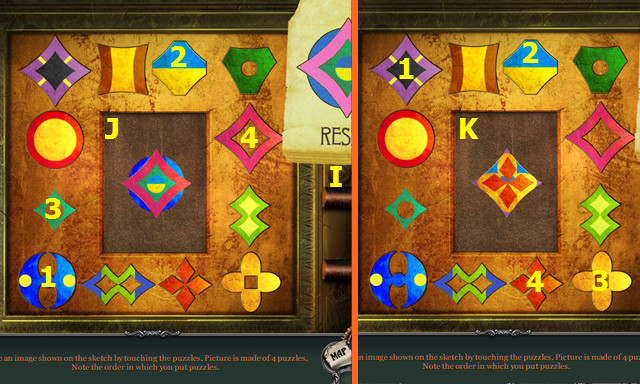
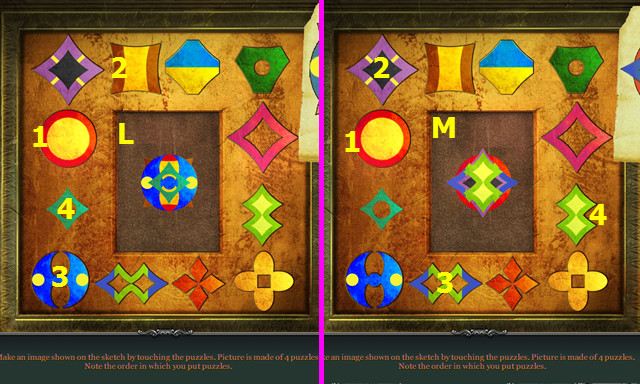
- Place the SYMBOL SKETCH (I).
- Select 1-4 for each image (J-M).
- Go forward.
- Use the DETECTOR (N).
- Use the EMPTY WATERING CAN; take the WATERING CAN (O).
- Use the BLOWTORCH (P).
- Try to go forward.
- Use the WATERING CAN (Q).
- Use the WRENCH; take the NUT, CLAW BLADE, and LONG HOOK (R).
- Use the CLAW BLADE (S).
- Take the CORKSCREW, read and remove the book, and take the PADDLE BLADE (T).
- Use the CLAW BLADE; take the HOSE (A).
- Combine the PUMP PILLOW and HOSE to make the PUMP (inventory).
- Use the LONG HOOK; take the PIN KEY and WIRE (B).
- Combine the SHAFT, PADDLE BLADE, and WIRE to make the PADDLE (inventory).
- Use the PIN KEY; read the notes and take the RUBBER BOAT (C).
- Walk down.
- Use the WATERING CAN; take the ELEVATOR BUTTON (D).
- Go right.
- Place and press the ELEVATOR BUTTON (E).
- Place the RUBBER BOAT. Place, attach, and select the PUMP (F).
- Place the PADDLE (G).
- Select (H).
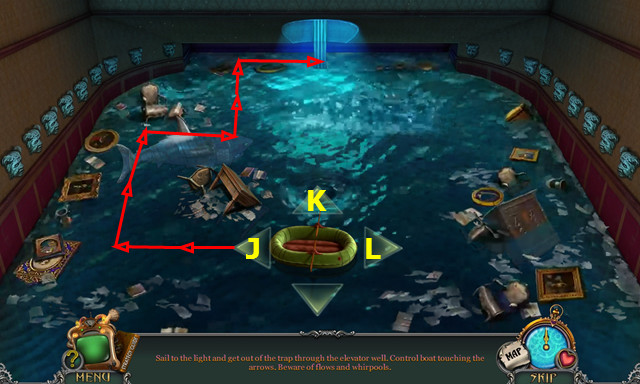
- Select Jx2-Kx2-L-Kx2-L.
- There are several solutions to this mini-game.
Chapter 3: The Garden Maze
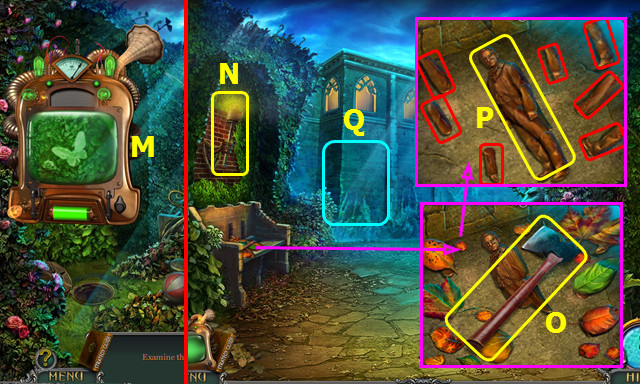
- Use the DETECTOR (M).
- Walk left.
- Take the TORCH (N).
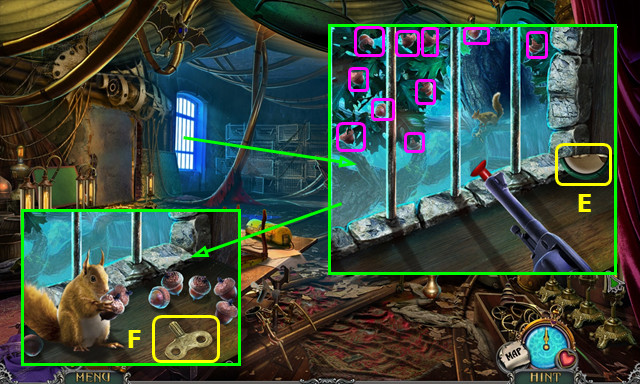
- Take the AXE and remove the leaves (O).
- Select the 7 wood pieces (red); take the MECHANICAL FIGURE (P).
- Select (Q).

- Use the ROPE (A).
- Select 1-5; select (B).
- Use the AXE (C).
- Select pairs (color-coded); select (D).
- Use the TORCH (E).
- Select (6-8).
- Place and arrange the MECHANICAL FIGURE (F).
- Move the items to the left (G).
- Pull the switch (H).
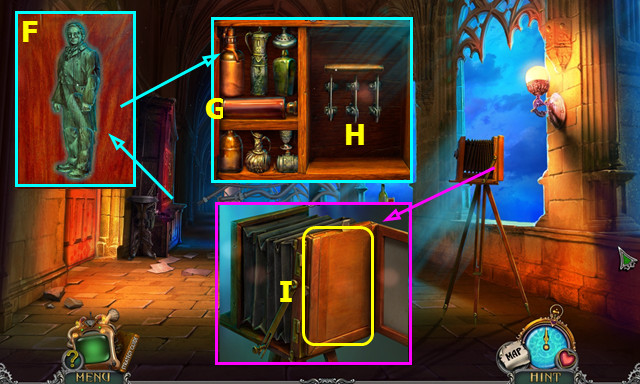
- Open the camera; take the PHOTO PLATE (I).
- Open the door and walk left.
- Use the DETECTOR (J).
- Remove the drape and play the HOP; earn the MAGNET (K).
- Open the curtain (L).
- Use the CORKSCREW; take the CORK (M).
- Use the MAGNET; drag the ANCHOR to the opening and take it (N).
- Turn the tuning knobs; take the STRING (O).
- Touch and take the SKELETON HAND (P).
- Walk down.
- Move the bottle and glass; use the ANCHOR to take the RADIO BULB (Q).
- Place the SKELETON HAND (R); select (S-T).
- Use the STRING; take the 2nd MOON AMULET (U).
- Walk down.
- Place the NUT and turn the valve (A).
- Place the CORK; take the 3rd MOON AMULET (B).
- Go forward and left.
- Select (C).
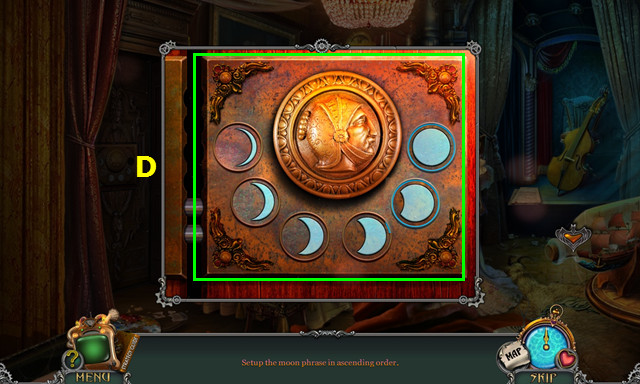
- Place the 3 MOON AMULETS; arrange as shown (D).
- Walk left.
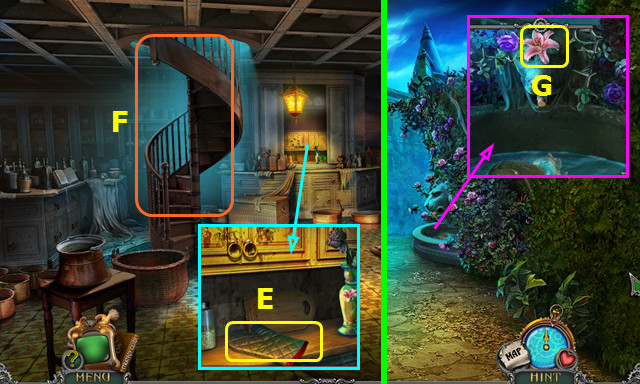
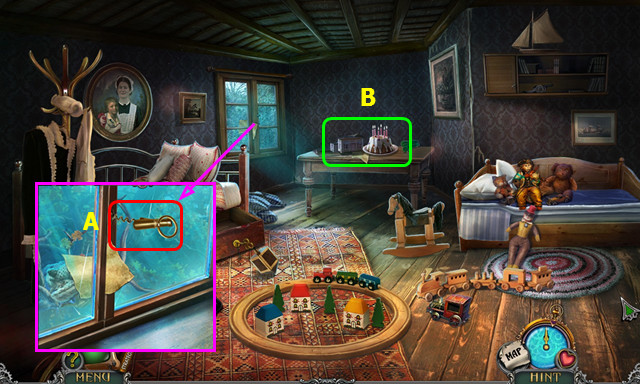
- Take the OVEN MITT (E).
- Select the stairs (F).
- Walk down 3x.
- Use the OVEN MITT; take the SWEET LILY (G).
- Go forward; go left 2x.
- Remove the dead flower; place the SWEET LILY (H).
- Select the bees (red).
- Open the cupboard and move the items; take the SMOKING SET (I).
- Open the SMOKING SET; read the note and take the LIGHTER (inventory).
- Use the LIGHTER (J).
- Select the lighter (L).
- Open the paper and take the DEFENSE AMULET; take the LIT KEROSENE LAMP (M).
- Open the dumb waiter; place the LIT KEROSENE LAMP. Take the HANDBAG ORNAMENT (N).
- Walk down.
- Place the HANDBAG ORNAMENT; take the OPERA GLASSES and NAIL FILE (O).
- Select (P).
- Play the HOP; earn the PULLEY (Q).
- Walk left.
- Move the items; place and select the PULLEY (A).
- Turn the crank (B). Select (C).
- Select matching pairs (color-coded).
- Turn the crank (D). Select (E).
- Remove the knots by selecting the ropes in numerical order (color-coded).
- Turn the crank (F). Select (G).
- Select K-H-I-L-K-H-I-J.
- Select (M).
- Go right.
- Select (N).
- Move the paper dolls 2x (O).
- Take the QUIVER and PHOTO; select the paper (P).
- Exit the darkroom.
- Use the OVEN MITT 2x (Q).
- Remove the knob and use the NAIL FILE (R).
- Place the RADIO BULB.
- Drag the chain (A); final position 1st puzzle (B).
- Drag the chain in numerical order (C-D); final position 2nd puzzle (E).
- Drag the chain in numerical order (F-J); final position 3rd puzzle (K).
- Remove the glass; take the SEAHORSE PARTS (L).
- Restore the SEAHORSE PARTS to make the SEAHORSE (inventory).
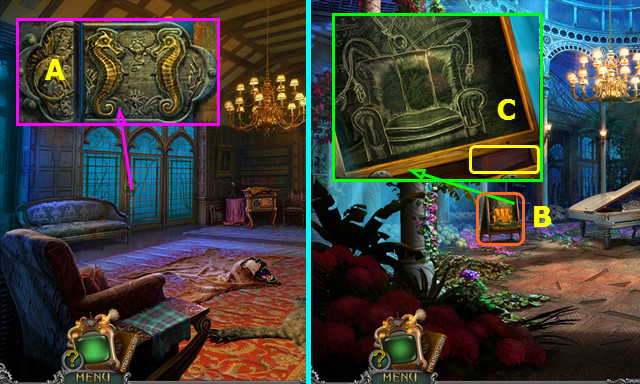
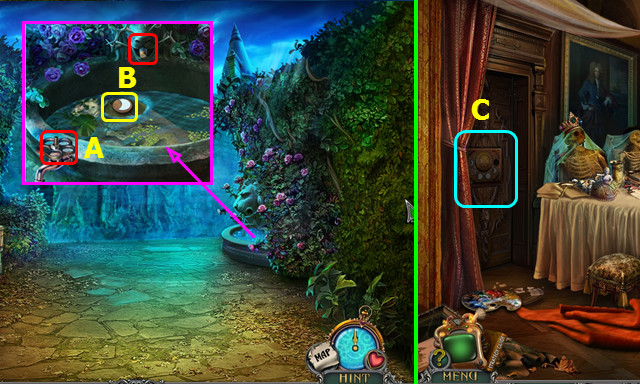
- Remove the ivy 3x; place the SEAHORSE (A).
- Walk left.
- Stand up the easel (B).
- Restore the chair; take the CARVED BOX (C).
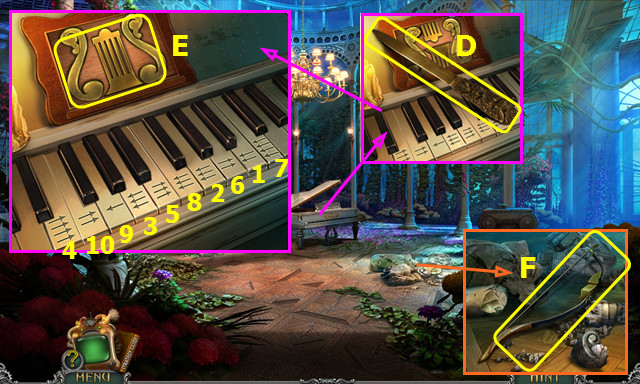
- Take the PAPER KNIFE (D).
- Select 1-10; take the HARP (E).
- Combine the CARVED BOX and HARP; take the DEVELOPER (inventory).
- Remove the rubble; take the RECURVE BOW (F).
- Combine the RECURVE BOW and QUIVER to make the BOW AND ARROWS (inventory).
- Walk down and look forward.
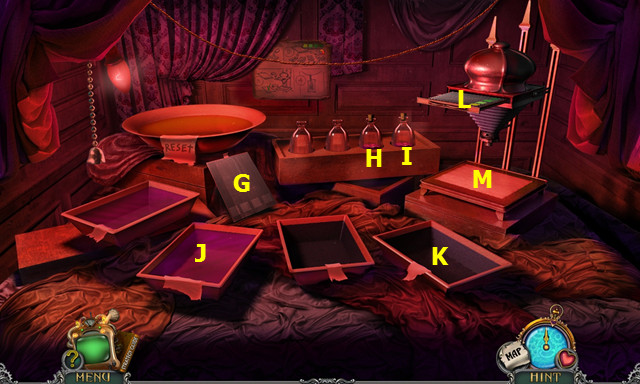
- Place the PHOTO PLATE (G) and DEVELOPER (H).
- Select H, then I.
- Use G on J and Kx2; select the plate to move it to L.
- Select L, then M.
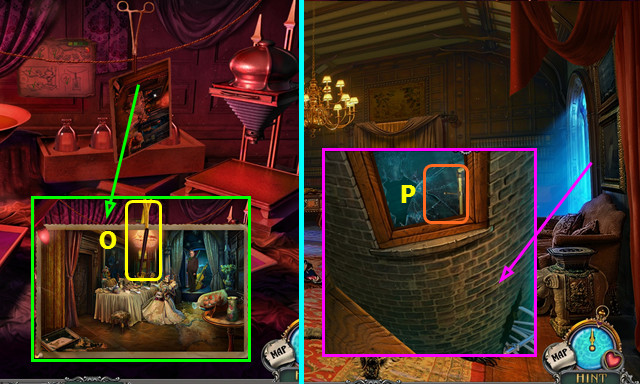
- Look at the photo; take the LONG TWEEZERS (O).
- Use the LONG TWEEZERS (P).
- Enter the window.
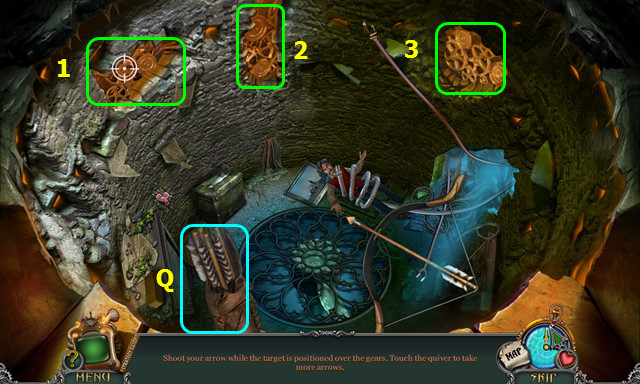
- Place the BOW AND ARROWS.
- Fire when the target is over each set of gears (1-3).
- Select the quiver to load an arrow (Q).
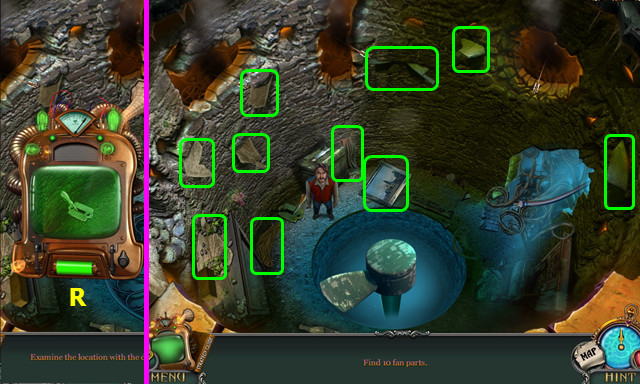
- Use the DETECTOR (R).
- Locate the parts (green).
- Go forward.
Chapter 4: The Tower
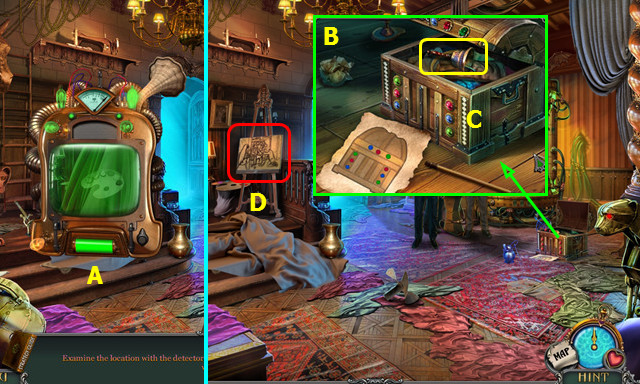
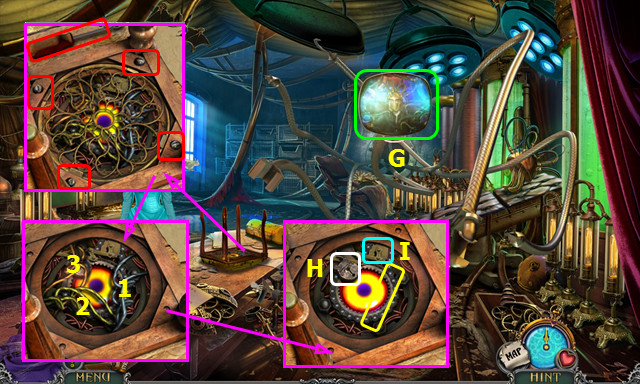
- Use the DETECTOR (A).
- Move the items and select the paper (B).
- Change the colors to match the diagram; take the BELL (C).
- Select (D).
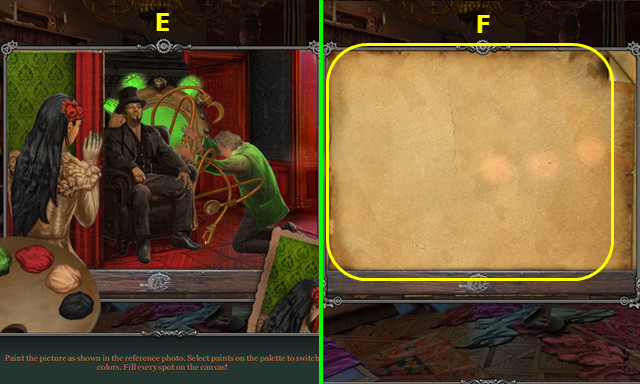
- Place the PHOTO.
- Use the brush and paints to match the canvas to the photo (E).
- The PAINTBRUSH will go into your inventory.
- Take the PAPER (F).
- Select (G).
- Use the PAPER KNIFE (H).
- Arrange the wires as shown (I).
- Use the DEFENSE AMULET (J).
- Walk forward.
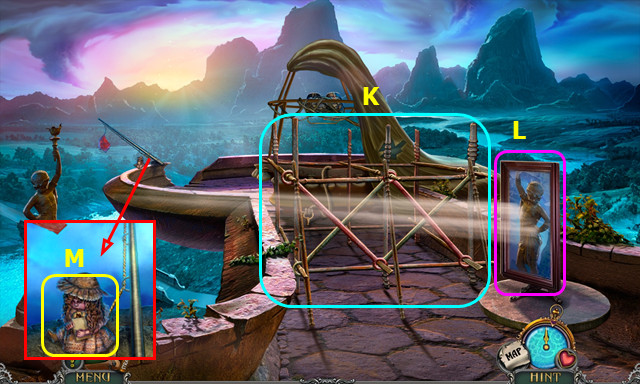
- Select the poles 5x (K).
- Select the mirror 3x (L).
- Take the DOLL (M).
- Open the DOLL and take the SUCTION CUP (inventory).
- Combine the OPERA GLASSES and the SUCTION CUP to find the LENS (inventory).
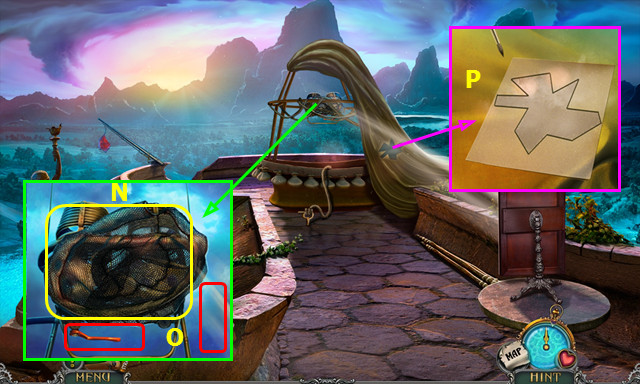
- Take the NET (N).
- Turn the lever and use the LENS (O).
- Use the PAPER and PAINTBRUSH: take the PATTERN (P).
- Walk down.

- Move the items and select the net frame (Q).
- Place the NET; take the SCOOP NET (R).
- Go forward.
- Use the SCOOP NET and untie the rope; take the FLAG (S).
- Walk down.
- Select (T).
- Place the FLAG and PATTERN.
- Select B-Cx7-B-Ax4-B-Ax5-B-Ax3-B-Cx4-B-Ax7-B-Ax4-B-Cx7-B-Ax7-B-Ax4-B-Cx9-B-Ax9-B-Ax5-B-Cx6-B.
- Take the NEEDLE AND THREAD and the PATCH (D).
- Go forward.
- Use the PATCH and NEEDLE AND THREAD (E).
- Go forward (F).
- Open the door and play the HOP (H).
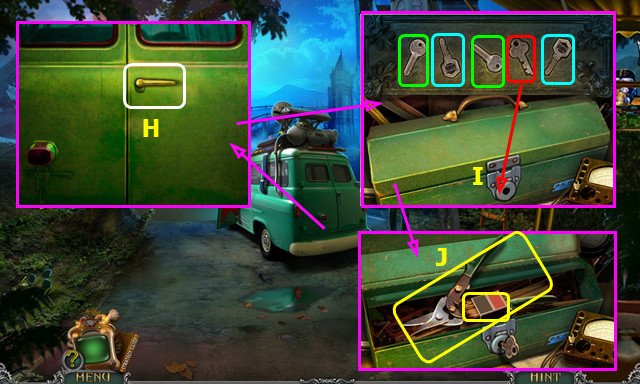
- Select the 2 pairs (color-coded); use the remaining key on the lock (I).
- Take the MATCHES and PRUNER (J).
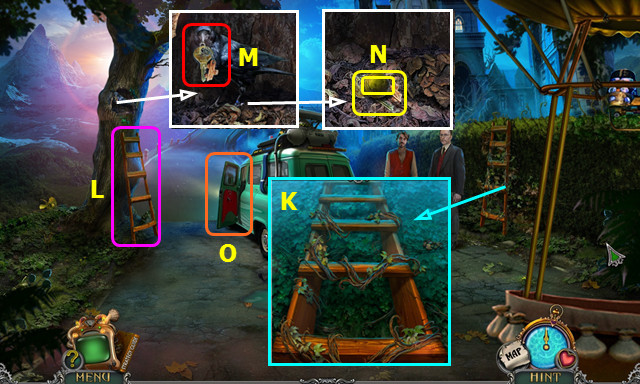
- Use the PRUNER; take the LADDER (K).
- Place the LADDER (L).
- Use the BELL (M).
- Move the leaves 3x; take the BALL and CAR KEY (N).
- Select (O).
- Use the CAR KEY (P).
- Open the glove box, move the postcard, and take the WIPER SWITCH (Q).
- Place and select the WIPER SWITCH (R).
- Select (S).
- Remove the garbage and select (T).
- Open the doors and play the HOP; earn the CAR JACK (A).
- Take the 1st BOX and 1st GEM (B).
- Use the BALL (C).
- Take the MEDICAL KIT; place and select the CAR JACK (D).
- Walk right.
- Use the DETECTOR (E).
- Take the 2nd GEM (F).
- Take the 2nd BOX (G).
- Take the DRAGONFLY KEY (H).
- Place the 2 GEMS; take the BRACELET (I).
- Open the BRACELET; take the CLASP (inventory).
- Combine the MEDICAL KIT and CLASP; remove the items and take the SMELLING SALTS (inventory).
- Walk down.
- Use the SMELLING SALTS (J).
- Take the 3rd BOX (K).
- Walk forward.
- Place the 3 BOXES (L).
- Select (M).
- Use the MATCHES 3x (red).
- Open the curtain (N).
- Move the 5 toys; take the PLIERS (O).
- Walk down 2x.
- Move the ivy; use the PLIERS to take the HOOK (P).
- Return to the treehouse.
- Place the HOOK and select the curtain (Q).
- Select the rifle (R).
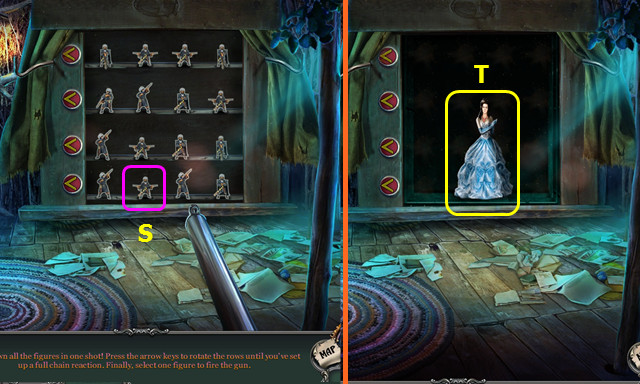
- Arrange the figures as shown; select (S).
- Take LUISA’S STATUETTE (T).
- Open LUISA’S STATUETTE; take the DRAGONFLY HALF (inventory).
- Add the DRAGONFLY HALF to the DRAGONFLY KEY (inventory).
- Use the DRAGONFLY KEY; take the BAS-RELIEF FRAGMENT (A).
- Walk down.
- Place the BAS-RELIEF FRAGMENT (B).
- Play the HOP; earn the DEATH’S HEAD.
- Go forward 2x.
Chapter 5: The Corridor
- Take the DRAWER KEY (C).
- Take the NAPKIN (D).
- Open the door and walk right (E).

- Use the DETECTOR (F).
- Use the DRAWER KEY; take the COILED ROPE (G).
- Take the TOY REVOLVER (H).
- Use the SCISSORS (I) on the ribbon 2x (red).
- Remove the ribbon and lid; read the note and remove the case (J).
- Walk down.
- Use the SCISSORS; take the SAFETY PIN (K).
- Walk right.
- Use the SAFETY PIN 3x (green).
- Use the NAPKIN (L).
- Select (M-N).
- Take the CHILD’S VIOLIN (O).
- Place the CHILD’S VIOLIN; take the MONKEY HAND (P).
- Walk down.
- Place the MONKEY HAND; select the curtain rod (Q).
- Open the curtain and remove all the shelved bottles; use the SCISSORS (S); select (T).
- Move U to V.
- Take the CORKSCREW (W).
- Walk right.
- Remove the handle; use the CORKSCREW (A).
- Select (B).

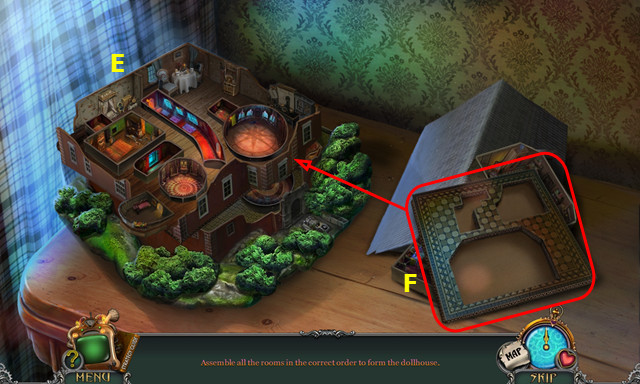
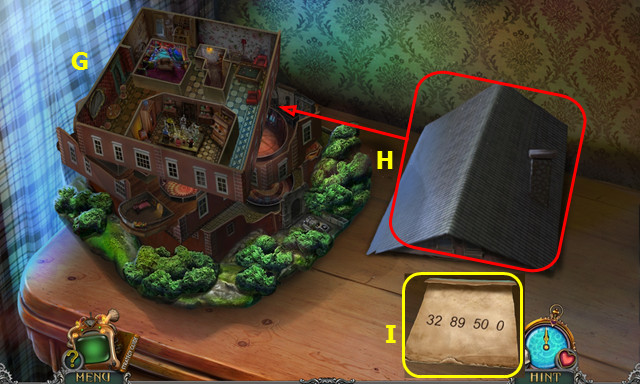
- Restore the rooms (C).
- Move the 2nd floor over the 1st (D).
- Restore the rooms (E).
- Move the 3rd floor over the 2nd (F).
- Restore the rooms (G).
- Move the roof onto the 3rd floor (H).
- Take the SAFE COMBINATION (I).
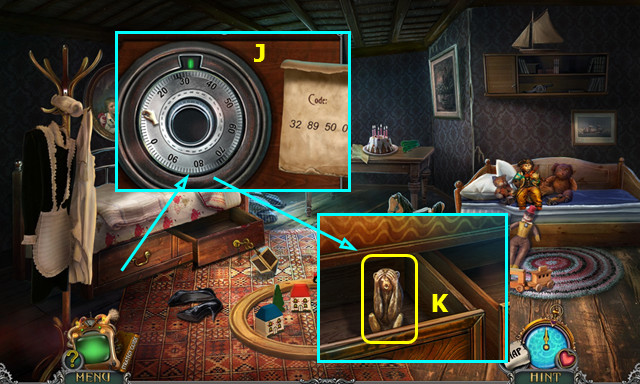
- Turn the dial right to 32, left to 89, right to 50, left to 0 (J).
- Take the MONKEY STATUETTE (K).
- Walk down.
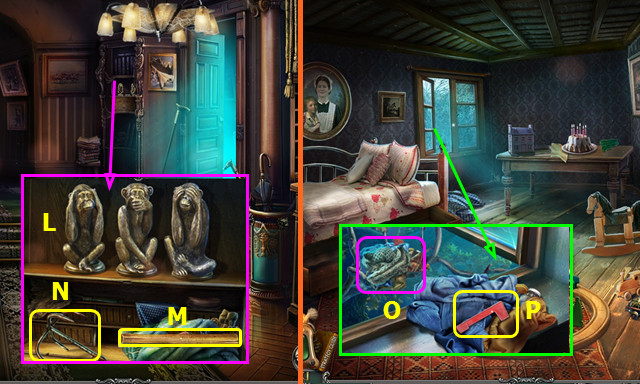
- Place the MONKEY STATUETTE; change them as shown (L).
- Take the HAFT (M).
- Move the items and take the GRAPPLING HOOK (N).
- Combine the COILED ROPE and GRAPPLING HOOK to make the GRAPPLING HOOK (inventory).
- Go right.
- Use the GRAPPLING HOOK (O).
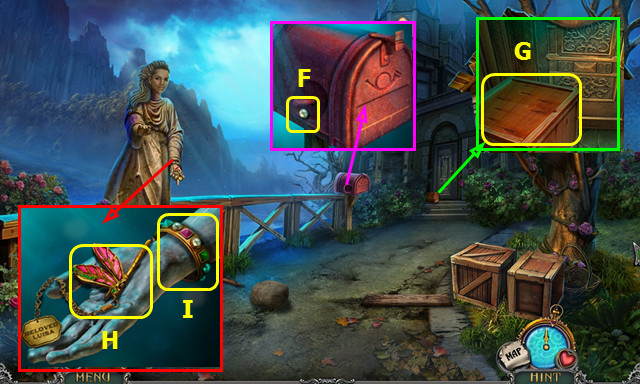
- Move the items; take the MAILBOX FLAG (P).
- Walk down 2x.
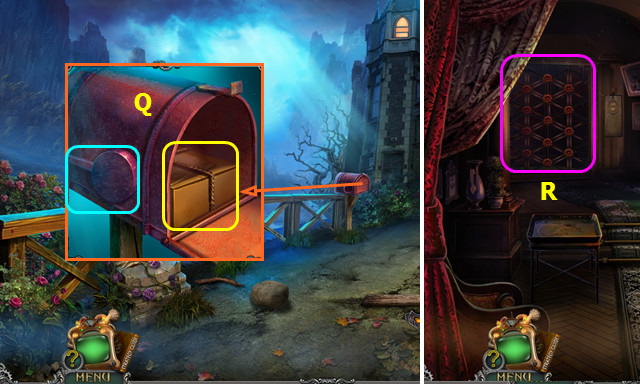
- Place and lower the MAILBOX FLAG; take the PACKAGE (Q).
- Read the note on the package; use the SCISSORS on the string. Take the BLOWTORCH (inventory).
- Go forward.
- Select (R).
- Use the BLOWTORCH (S).
- Go forward 2x.
- Use the HALF-EMPTY BLOWTORCH (T).
- Select 1-36.
- Take the DEFENSE AMULET (U).
- Go forward.

- Use the DETECTOR (A).
- Select (B).
- Open the cage; take the PICKAX HEAD (C).
- Combine the PICKAX HEAD and HAFT to make the PICK (inventory).
- Use the SCISSORS; take the LARGE NET (D).
- Take the 1st HALF PORTRAIT (E).
- Place the TOY REVOLVER; select the 10 acorns (pink).
- Take the CLOCK KEY (F).
- Use the DEFENSE AMULET (G).
- Take and use the screwdriver 4x (red).
- Remove the grill; pull the 3 wires (1-3).
- Use the CLOCK KEY (H).
- Select the arm and take the CHAIN (I).
- Use the PICK (1-3).
- Place the CHAIN (J).
- Walk left.
- Open the cabinet and play the HOP; earn the SAFE CODE (K).
- Use the SCISSORS; select the safe (L).
- Place the SAFE CODE (M).
- Select 1-5.
- Select (N).
- Take the 2nd HALF PORTRAIT (O).
- Select (P).
- Place the 2 HALF PORTRAITS and the DEATH’S HEAD.
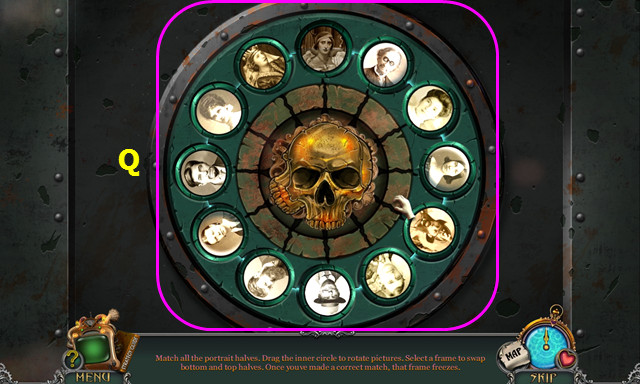
- Restore the photos as shown (Q).
- Walk forward.
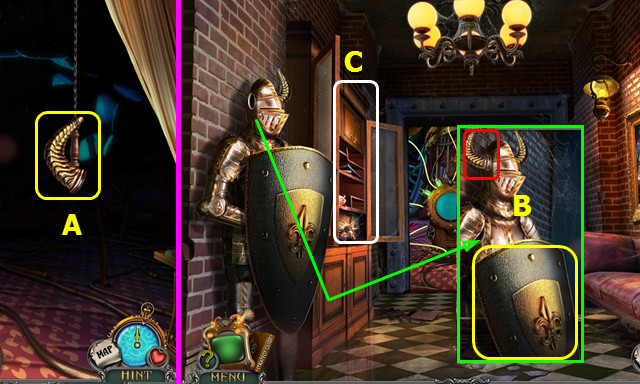
- Take the HORN (A).
- Walk down.
- Place the HORN; take the SHIELD (B).
- Play the HOP; earn the SHIELD STRAPS (C).
- Add the SHIELD STRAPS to the SHIELD (inventory).
- Walk forward.
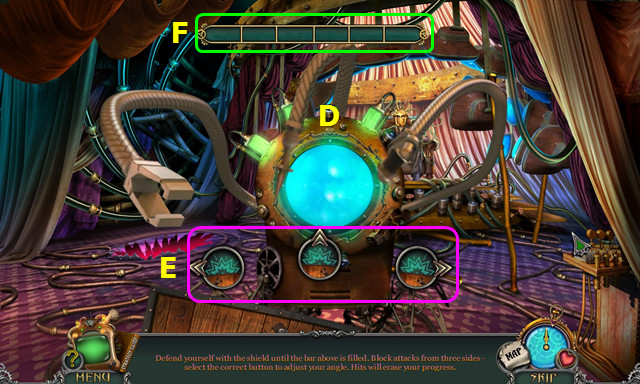
- Use the SHIELD on the machine (D).
- Select the buttons based on the machine’s attack (E).
- The arm will raise slightly before attacking; select the corresponding button.
- Track your progress; you will lose ground if you are hit (F).
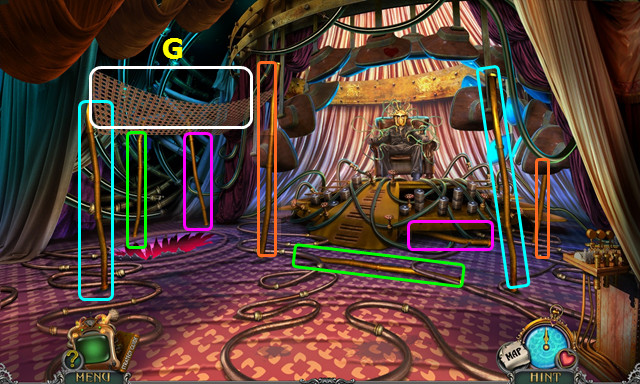
- Restore the 4 pipes (color-coded).
- Place the LARGE NET (G).
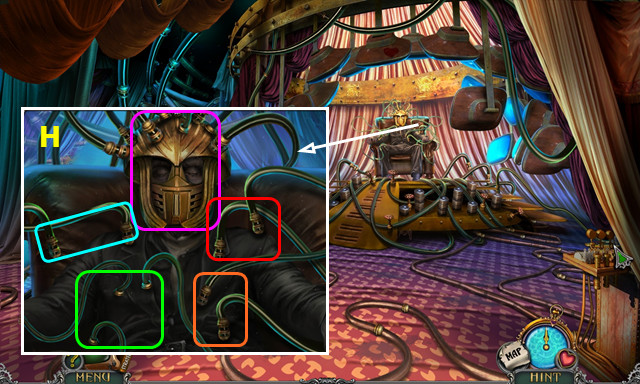
- Remove all the wires and mask (H).
- Congratulations! You have completed Tales of Terror: Estate of the Heart!


 AGON: The Lost Sword of Toledo Walkthrough, Guide, & Tips
 Fear for Sale: Endless Voyage Walkthrough, Guide, & Tips
 Forbidden Secrets: Alien Town Walkthrough, Guide, & Tips
 Grim Facade: Sinister Obsession Walkthrough, Guide, & Tips
 My Beautiful Vacation Walkthrough, Guide, & Tips