Danse Macabre: Lethal Letters Walkthrough, Guide, & Tips
Danse Macabre: Lethal Letters Walkthrough

Welcome to the Danse Macabre: Lethal Letters Walkthrough.
Your own mind can be your worst enemy.
Whether you use this document as a reference when things get difficult or as a road map to get you from beginning to end, we’re pretty sure you’ll find what you’re looking for here.
This document contains a complete Danse Macabre: Lethal Letters game walkthrough featuring annotated screenshots from actual gameplay!
We hope you find this information useful as you play your way through the game. Use the walkthrough menu below to quickly jump to whatever stage of the game you need help with.
Remember to visit the Big Fish Games Forums if you find you need more help. Have fun!
This walkthrough was created by Margie B, and is protected under US Copyright laws. Any unauthorized use, including re-publication in whole or in part, without permission, is strictly prohibited.
General Tips
- This is the official guide for Danse Macabre: Lethal Letters.
- This guide will not tell you when you have to zoom into a location; the screenshots will show each zoom scene.
- Hidden-object puzzles are referred to as HOPs. This guide will not show screenshots of the HOPs, however, it will mention when an HOP is available and the inventory item you’ll collect from it.
- Use the Map to fast travel to a location.
- Use the reset button (arrows) in the upper-right corner of each puzzle scene.
Chapter 1: The Theater

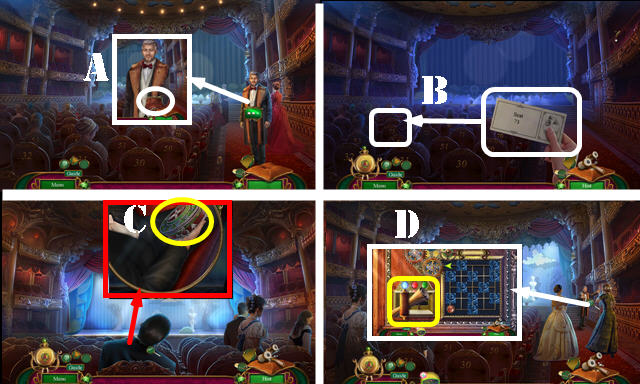
- Talk to Yuri; take the PURSE (A).
- Open the PURSE; look at the note; take the Opera Glasses, Pocket Watch and SEAT NUMBER (inventory).
- Place the SEAT NUMBER, then select seat 73 (B).
- Talk to the Count; take the DECORATED BOX (C).
- Open the DECORATED BOX; look at the note (inventory).
- Go right.
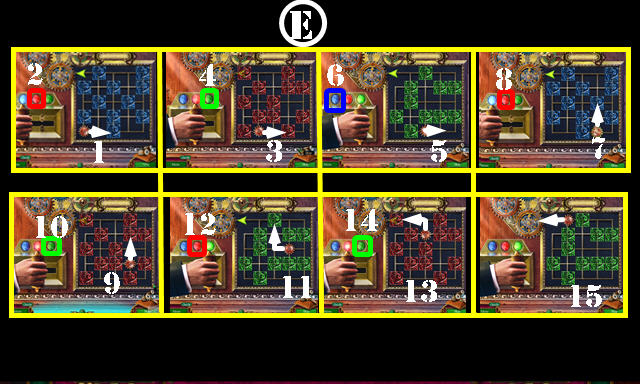
- Take the Map (D) and play the puzzle.


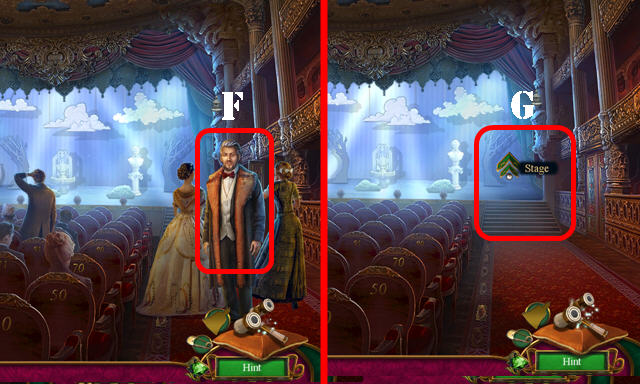
- Talk to Yuri (F).
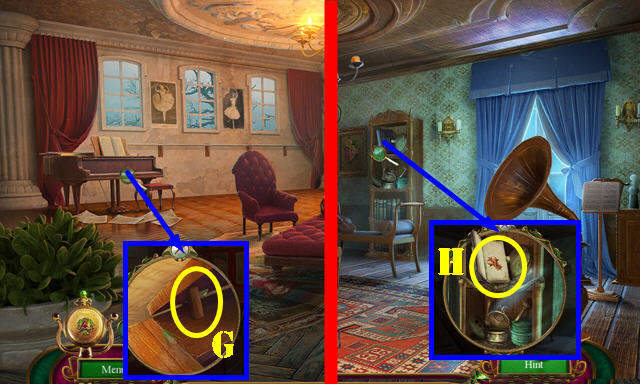
- Go to the Stage (G).

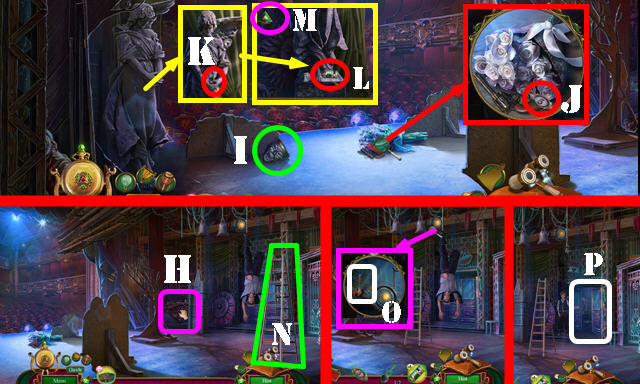
- Remove the cloth for an HOP (H); play it to get the LEVER.
- Go left.
- Take the THEATER MASK 1/2 (I).
- Open the letter; read the note; take the ROW PLATE (J). You receive the RED ENVELOPE.
- Try to take the pendulum (K); take the CLOCK PENDULUM 1/2 and ORNAMENTAL CYLINDER (L). Arrow up (M).
- Go right.
- Move the ladder (N). Place the LEVER (O) and pull it. Go Backstage (P).

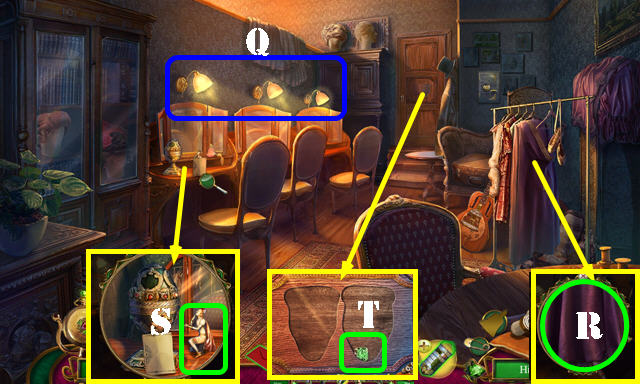
- Turn on the lights (Q).
- Move the clothes (R) for an HOP; play it to get the PACKAGE.
- Look at the note; take the ROMEO FIGURINE (S).
- Look at the note on the PACKAGE; open the box and take the ANGEL WING (inventory).
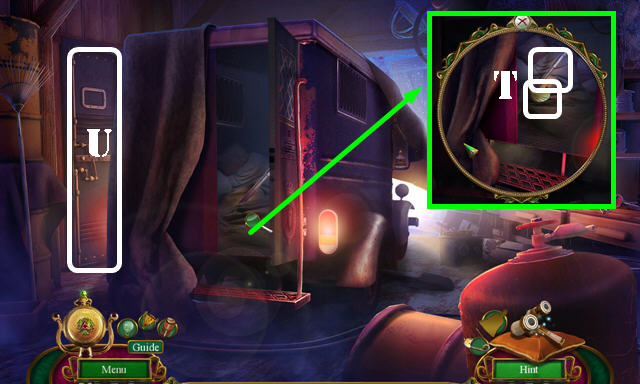
- Take the GREEN GEMSTONE (T).
- Walk down; go left.

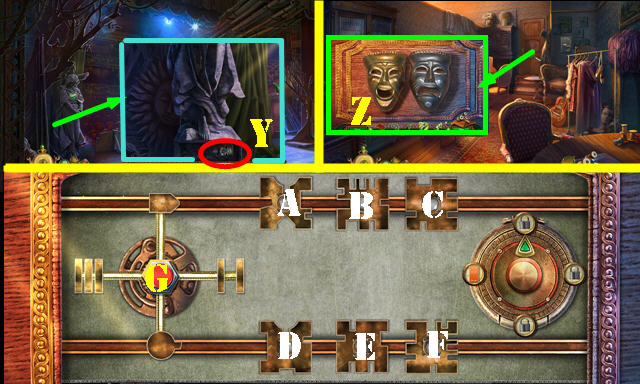
- Place the ANGEL WING; take the THEATER MASK 2/2 (Y).
- Return Backstage.
- Place the 2 THEATER MASKS for a puzzle (Z).
- Solution: D-A-G-B-Ex2-B-E-B-G-C-Fx2-C-G.
- Enter the Prop room.

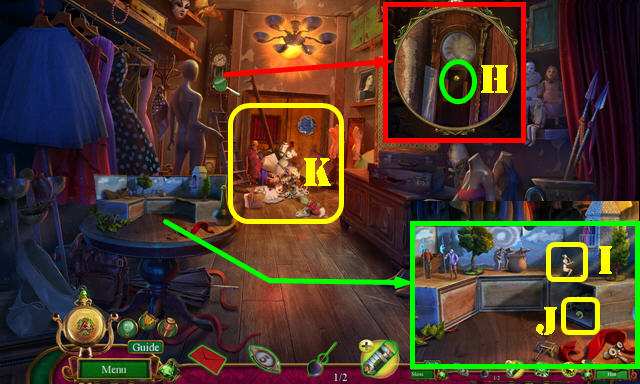
- Open the door; take the YELLOW GEMSTONE (H).
- Place the ROMEO FIGURINE (I); take the REGISTER BUTTON 1/2 (J).
- Select the items 3x; go to the Alley (K).

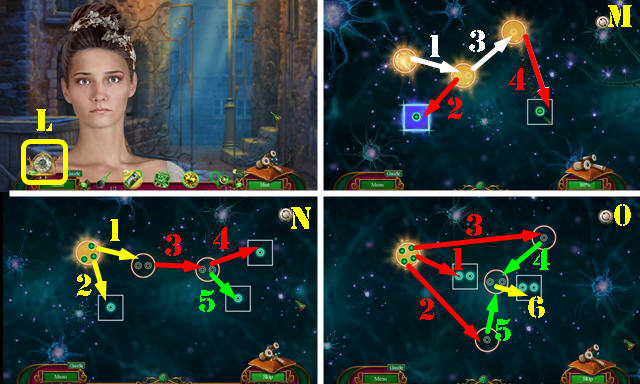
- Select the Pocket Watch (L) for a puzzle.
- Connect 1-4 (M).
- Connect 1-5 (N).
- Connect 1-6 (O).

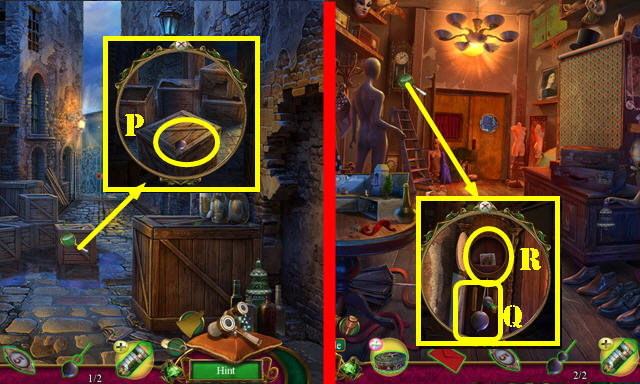
- Take the CLOCK PENDULUM 2/2 (P).
- Walk down.
- Place the 2 CLOCK PENDULUMS (Q); take the PHOTO (R).
- Return to the Theater staircase.

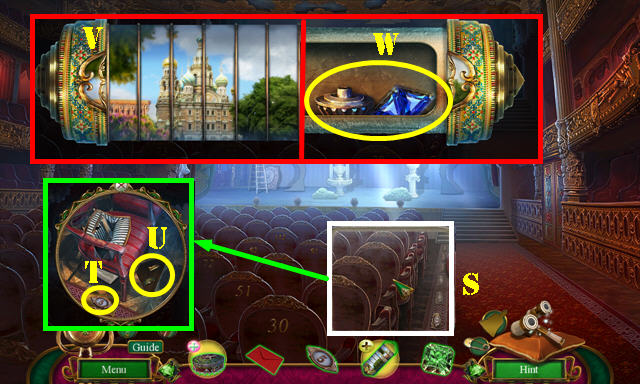
- Place the PHOTO (S); look at the newspaper and place the ROW PLATE (T). Take the ORNAMENTAL RING and LIGHTER (U).
- Place the ORNAMENTAL RING on the ORNAMENTAL CYLINDER (inventory) for a puzzle. Solution (V). Take the BLUE GEMSTONE and GEAR (W).
- Return to the Prop room.

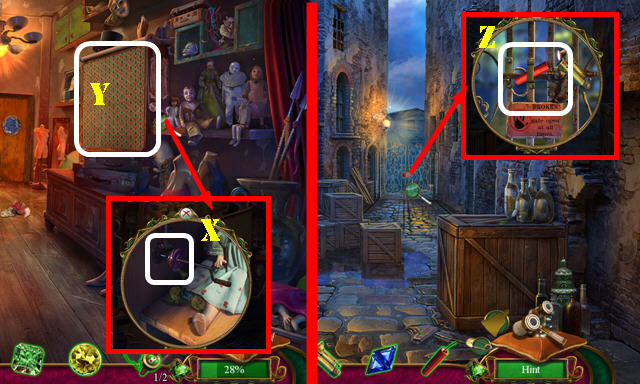
- Place the GEAR (X) for an HOP; play it (Y) to get the FIRECRACKER.
- Go to the Alley.
- Place the FIRECRACKER (Z); use the LIGHTER on it and go forward.

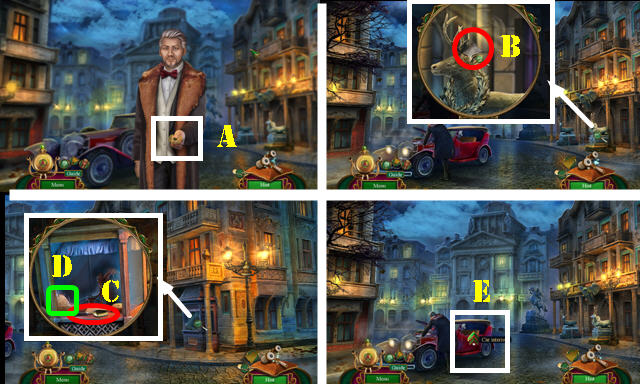
- Give the RED ENVELOPE; take the MINIATURE WHEEL (A).
- Read the note (B).
- Go right.
- Take the SMALL SHOVEL (C). Select the register (D).
- Go left and then go to the Car Interior (E).

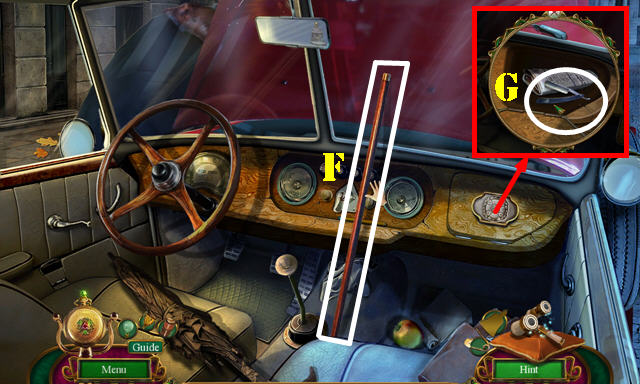
- Take the CANE (F).
- Place the MINIATURE WHEEL; take the RAZOR (G).
- Return to the Alley.

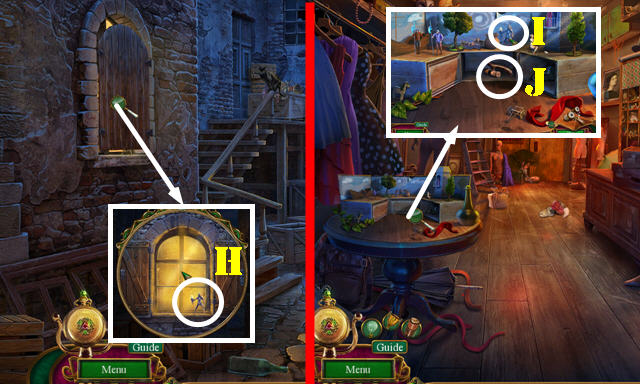
- Use the RAZOR; take the MACBETH FIGURINE (H).
- Walk down.
- Place the MACBETH FIGURINE (I); take the BRUSH and CANE TOP (J).
- Return to the Alley.

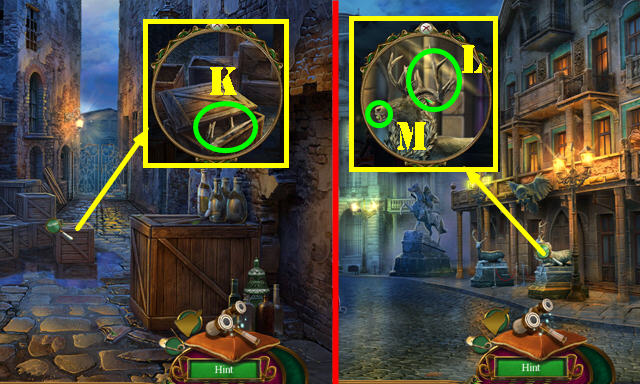
- Place the CANE TOP on the CANE to get the CANE DAGGER (inventory).
- Use the CANE DAGGER; take the ANTLER and SHIP SAILS (K).
- Go to the Theater front.
- Place the ANTLERS (L); take the REGISTER BUTTONS 2/2 (M).
- Go right.

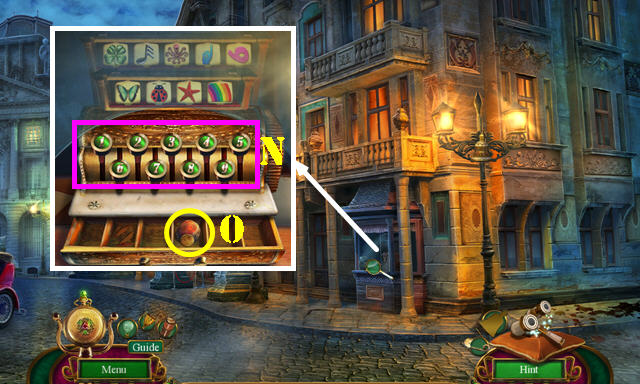
- Select the register; place the 2 REGISTER BUTTONS for a puzzle. Solution: 4-3-8-1-9-2-6-5-7 (N).
- Take the COIN and SMALL BALL (O).
- Walk down.

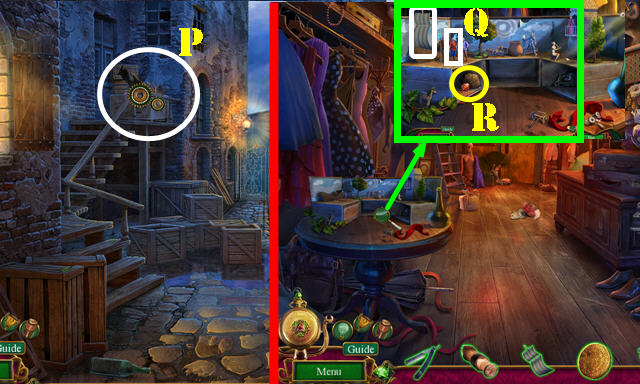
- Throw the SMALL BALL for an HOP (P); play it to get the OTHELLO FIGURINE.
- Walk down.
- Place the OTHELLO FIGURINE and SHIP SAILS (Q); take the RED GEMSTONE (R).
- Walk down.

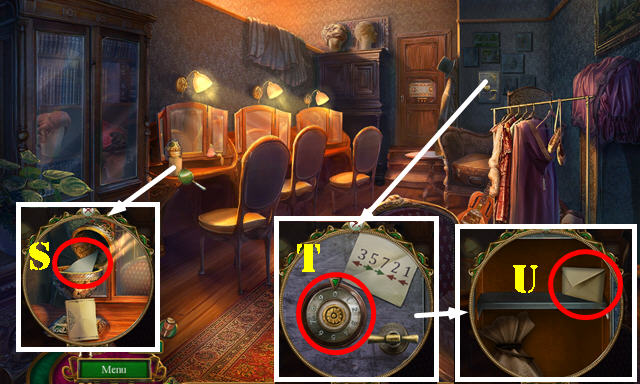
- Place the GREEN GEMSTONE, YELLOW GEMSTONE, BLUE GEMSTONE and RED GEMSTONE in the DECORATED BOX; look at the note and take the COMPLETED CREST (inventory).
- Place the COMPLETED CREST; take the SAFE CODE (S).
- Place the SAFE CODE; go counterclockwise to 3, clockwise to 5, clockwise to 7, counterclockwise to 2 and counterclockwise to 1 (T). Take the LETTER (U).
- Open the LETTER; look at the note; take TARASOV’S BUSINESS CARD (inventory).
- Return to the Theater front.

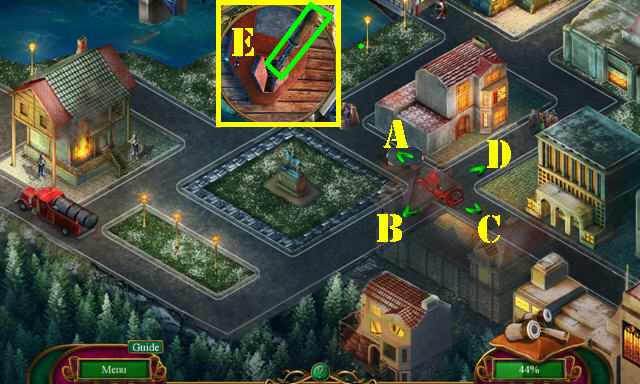
- Give Yuri TARASOV’S BUSINESS CARD (V).


- Solution: A-B-A-C-A-B-A-C-D-C-D-E-D-B-D-C-D-C-D-C-A-B-A-C-A-B-D-B-D-Bx2-A-B-A.
Chapter 2: The Asylum

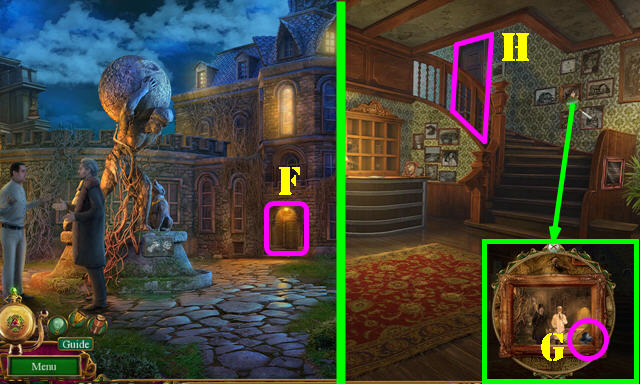
- Go to the Asylum foyer (F).
- Tear the painting; look at the note; use the RAZOR and take the CARD SUITS 1/3 (G).
- Go to the Auditorium (H).

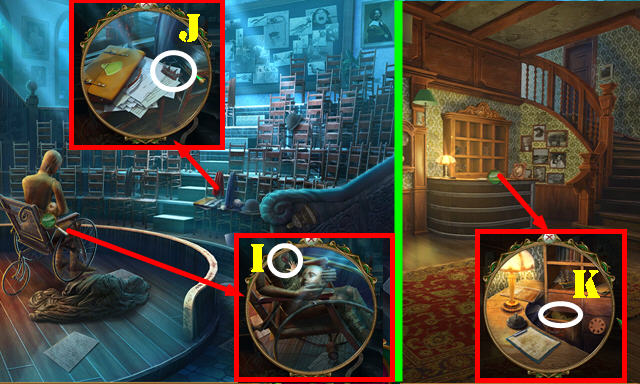
- Remove the sheet; take the CARD SUITS 2/3 (I).
- Take the CROWN SIGIL (J).
- Walk down.
- Place the CROWN SIGIL; take the BONE PENDANT (K).
- Walk down.

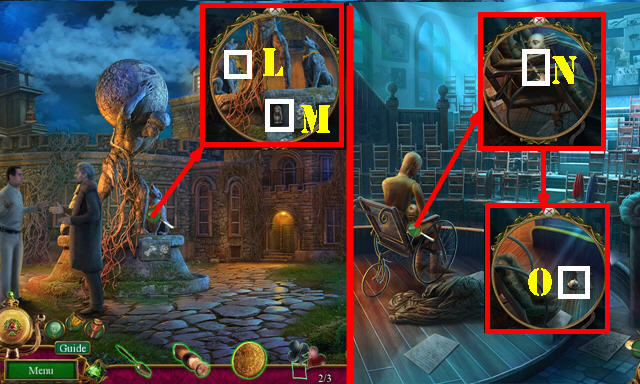
- Place the BONE PENDANT (L); take the BABUSHKA (M).
- Return to the Auditorium.
- Select the BABUSHKA twice; take the BRAKE HANDLE (inventory).
- Place the BRAKE HANDLE (N); select it and take the BELL TOP (O).
- Walk down.

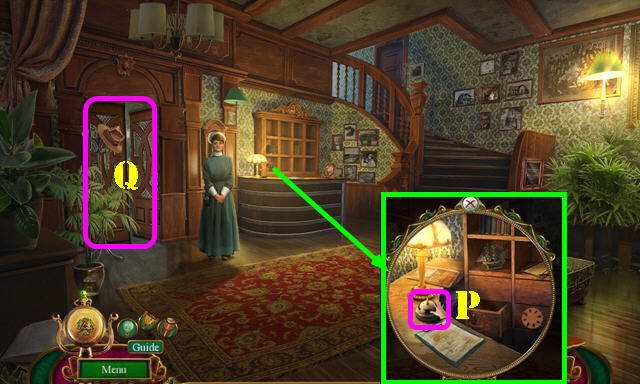
- Place the BELL TOP (P); ring the bell.
- Go to the Hallway (Q).

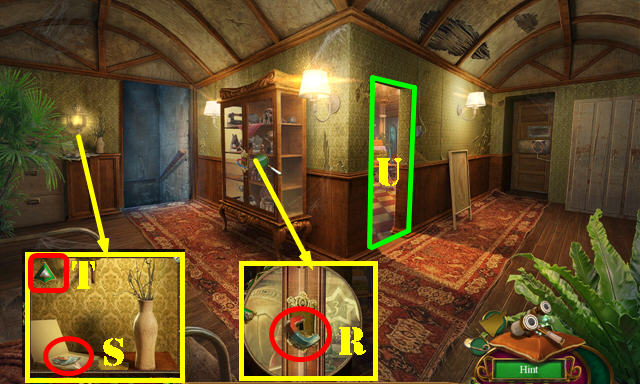
- Take the MAGNET (R).
- Open the folder; take the MOSAIC PIECE 1/4 (S). Arrow up (T).
- Enter the Game room (U).

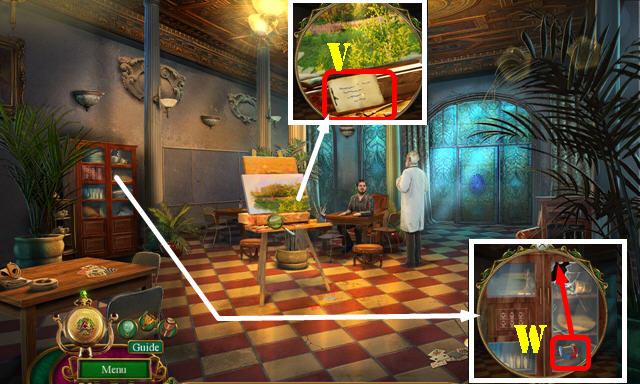
- Once Peter is done talking, you’ll automatically receive the WOODEN CASE.
- Read the note (V).
- Use the MAGNET; slide it all the way up to get the SHOWCASE KEY (W).
- Walk down.

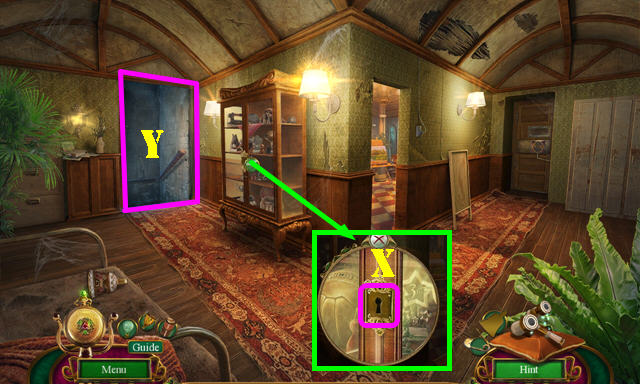
- Insert the SHOWCASE KEY (X) for an HOP; play it to get the CARD SUITS 3/3.
- Go to the Garage (Y).

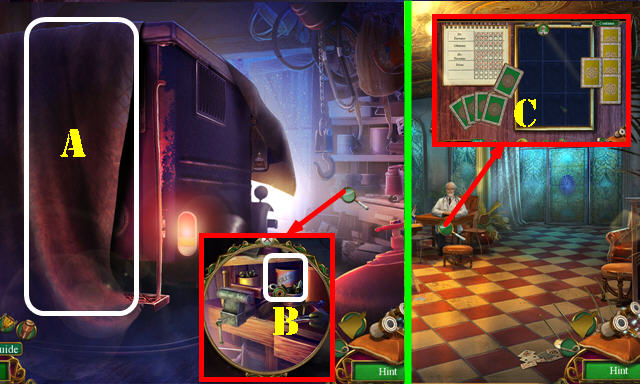
- Pull the curtain (A).
- Dip the BRUSH (B) to get the BRUSH WITH GLUE.
- Return to the Game room.
- Place the 3 CARD SUITS on the WOODEN CASE; drag each suit in its matching spot; take the PLAYING CARDS (inventory).
- Place the PLAYING CARDS (C) for a puzzle.

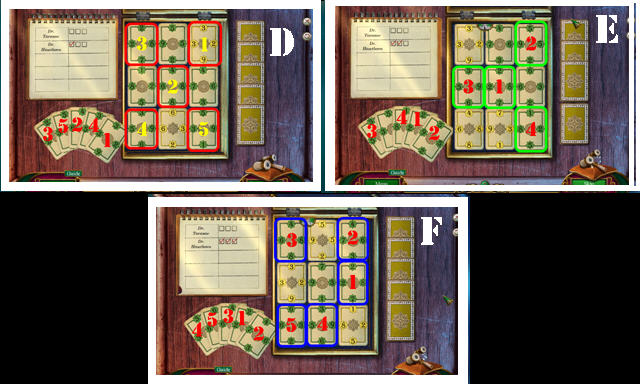
- Solution one (D).
- Solution two (E).
- Solution three (F).
- You receive the MAZE BOTTOM.
- Return to the Asylum foyer.

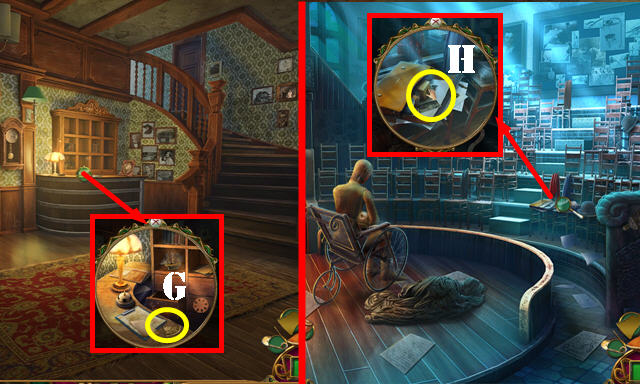
- Look at the note; take the BUCKLE PIECE (G).
- Go to the Auditorium.
- Place the BUCKLE PIECE; look at the note; take the SEALED CUBE (H).
- Return to the Garage.

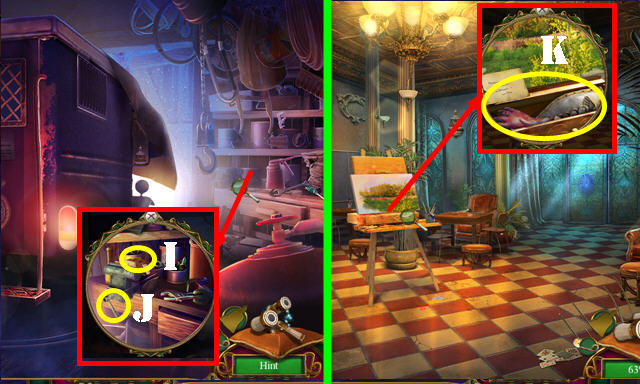
- Place the SEALED CUBE (I); flip the lever (J); take the PAINTER’S PALETTE.
- Return to the Game room.
- Place the PAINTER’S PALETTE; take the GLOVES and CREST BASE (K).
- Return to the Asylum courtyard.

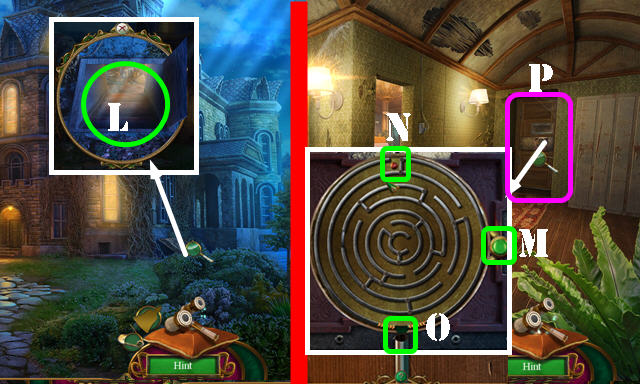
- Use the GLOVES (L) for an HOP; play it to get the MAZE TOP.
- Return to the Hallway.
- Place the MAZE BOTTOM and MAZE TOP for a puzzle. Drag the button (M) to rotate the maze in order to guide the ball (N) to the exit (O). The solution is random.
- Go to Solitary (P).

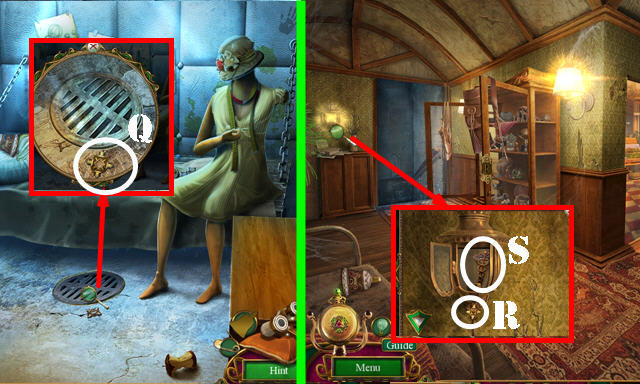
- Take the GAS VALVE (Q).
- Walk down.
- Open the lamp; place the GAS VALVE (R); take the CADUCEUS (S).
- Go to the Garage.

- Place the CADUCEUS on the CREST BASE to get the SHIELD CREST (inventory).
- Place the SHIELD CREST take the BRACELET and LEAD PIPE (T).
- Go to the Coal room (U).

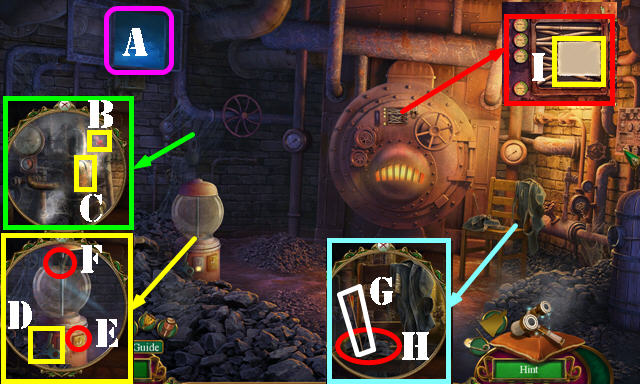
- Use the LEAD PIPE (A).
- Turn the valve (B). Use the BRUSH WITH GLUE (C); turn the valve again.
- Take the WINDING KEY (D). Insert the COIN (E); take the ARROWHEAD (F).
- Take the ARROW SHAFT (G); move the cloth (H); take the MANHOLE OPENER.
- Place the ARROWHEAD on the ARROW SHAFT to get the ARROW (inventory).
- Read the note (I).
- Return to Solitary.

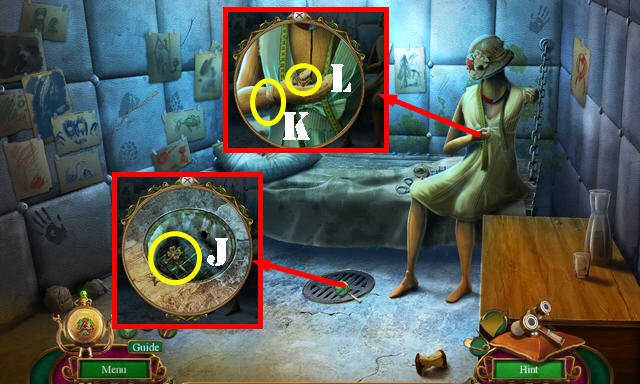
- Use the MANHOLE OPENER; take the CLOVER PENDANT (J).
- Place the BRACELET (K); take the SNOWFLAKE TRINKETS 1/3 (L).
- Return to the Asylum courtyard.

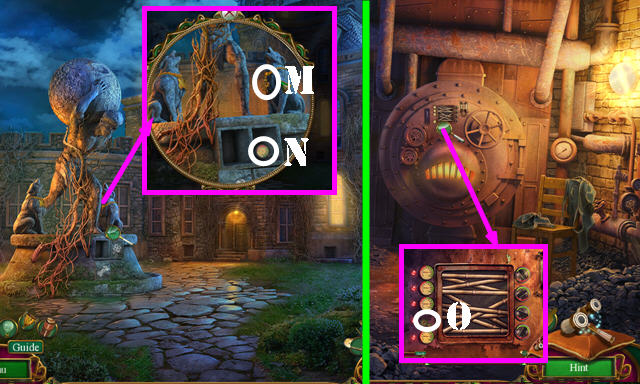
- Place the CLOVER PENDANT (M); take the HEAT SENSOR (N).
- Return to the Coal room.
- Place the HEAT SENSOR (O) for a puzzle.

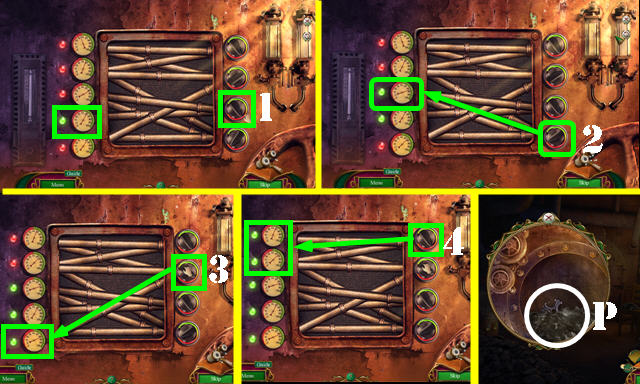
- Move the knobs in order (1-4) until the sensor (or sensors) it’s pointing to turns green.
- Use the SMALL SHOVEL to get the SNOWFLAKE TRINKETS 2/2 (P).
- Return to the Asylum foyer.

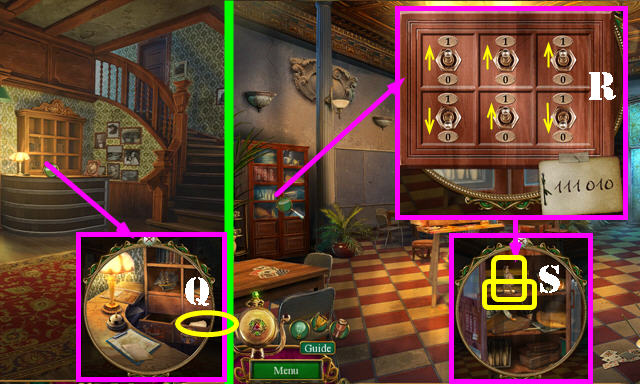
- Place the 2 SNOWFLAKE TRINKETS; take the CABINET CODE (Q).
- Return to the Game room.
- Place the CABINET CODE; flip the switches as shown (R). Take the SPARTAN WARRIOR and SEAM RIPPER (S).
- Return to Solitary.

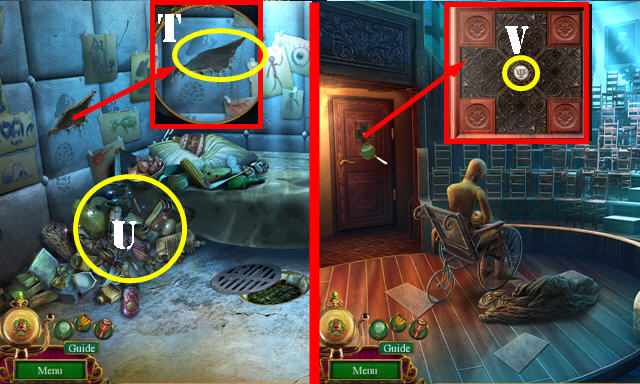
- Use the SEAM RIPPER for an HOP (T); play it (U) to get the PSI SYMBOL.
- Return to the Auditorium.
- Place the PSI SYMBOL (V) for a puzzle.

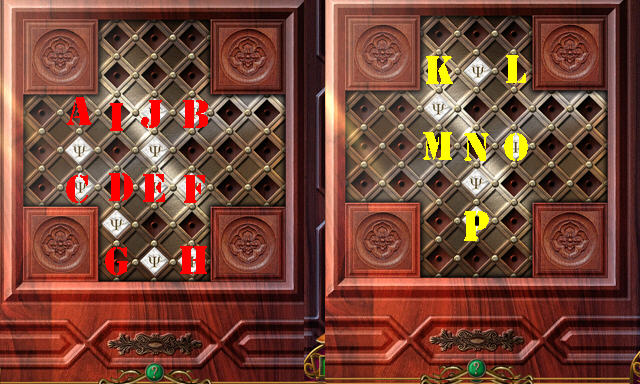

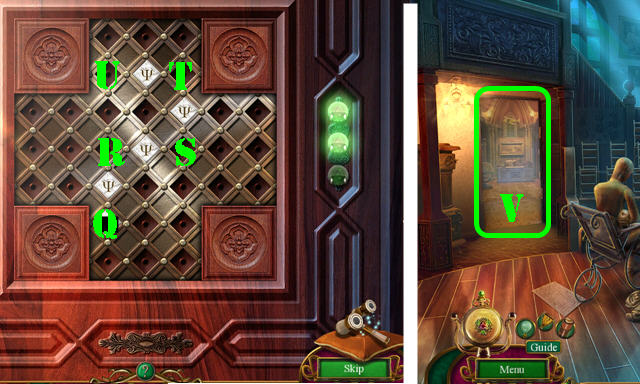
- Solution one: (H-G)-(C-A)-(B-I)-(G-D)-(A-J)-(E-C)-(J-E)-(F-D)-(C-E).
- Solution two: (P-N)-(O-M)-(M-K)-(K-L).
- Solution three (Q-R)-(R-S)-(S-T)-(T-U).
- Enter Tarasov’s office (V).
Chapter 3: Tarasov

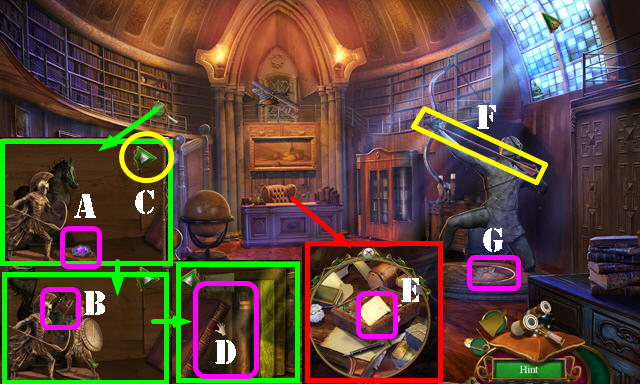
- Take the PINK TILE (A). Place the SPARTAN WARRIOR; take the DAGGER HILT (B). Arrow right (C). Move two books (D).
- Look at the note (E).
- Place the ARROW (F); select it to get the PLANE MODEL. Take the MOSAIC PIECE 2/4 (G).
- Insert the WINDING KEY on the PLANE MODEL (inventory).
- Return to the Game room.

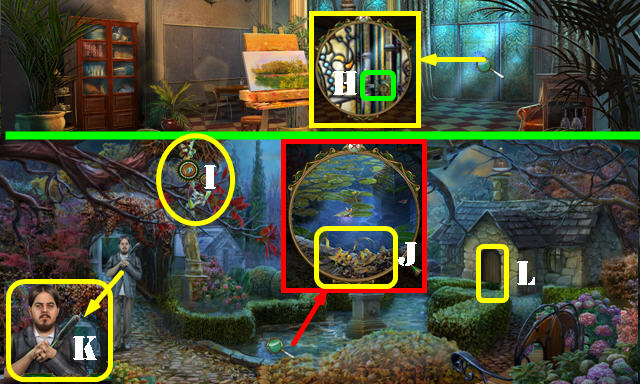
- Use the DAGGER HILT (H); go to the Garden.
- Throw the PLANE MODEL (I); select the YELLOW RIBBON 3x to acquire it, then take the GRAPES TOKEN 1/3 (J).
- Talk to the man (K).
- Go to the Garden shack (L).

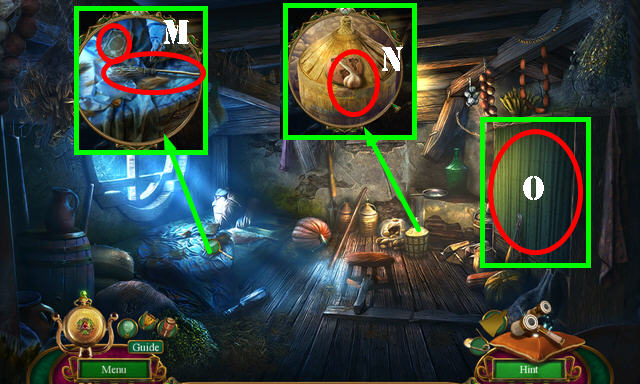
- Take the BROOM and ANATOMY TEXTBOOK (M).
- Take the GARLIC (N).
- Use the YELLOW RIBBON (O) and zoom in for an HOP; play it to get the FOOD STRAINER.
- Walk down.

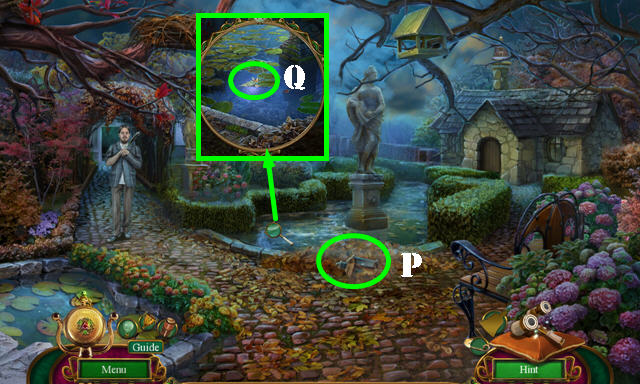
- Use the BROOM 2x; take the LANTERN (P).
- Use the FOOD STRAINER to get the MOSAIC PIECE 3/4 (Q).
- Open the LANTERN; take the GRAPES TOKEN 2/3 (inventory).
- Return to Tarasov’s office.

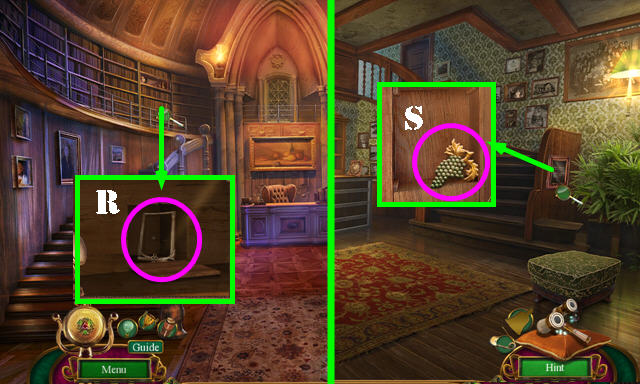
- Place the ANATOMY TEXTBOOK; take the PLAQUE SEGMENT (R).
- Return to the Asylum foyer.
- Place the PLAQUE SEGMENT; take the GRAPES TOKEN 3/3 (S).
- Return to the Garden shack.

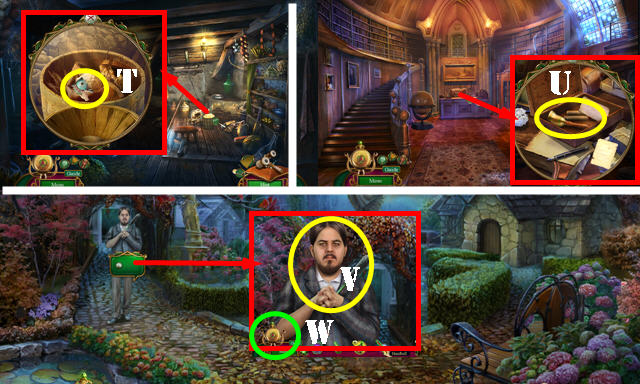
- Place the 3 GRAPES TOKENS; take the MOSAIC PIECE 4/4 (T).
- Return to Tarasov’s office.
- Place the 4 MOSAIC PIECES; look at the note and take the HANDBELL (U).
- Return to the Garden.
- Use the HANDBELL (V) and select the Pocket Watch (W) for a puzzle.

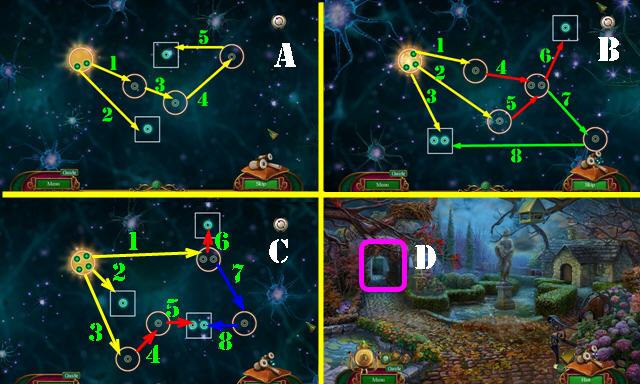
- Solution one (A).
- Solution two (B).
- Solution three (C).
- You receive the REED.
- Go to the Cemetery entrance (D).

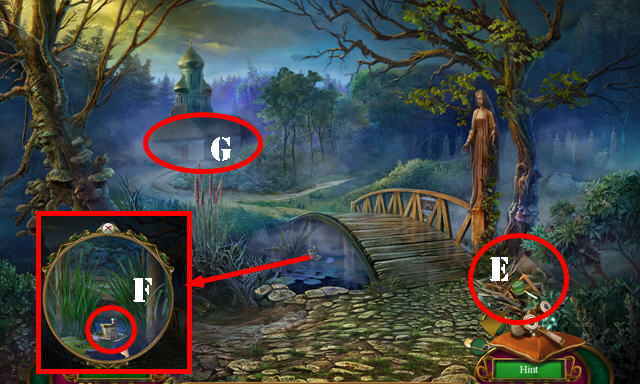
- Play the HOP (E) to get the HORSE.
- Take the TOY BOAT (F).
- Take the HARVEST SYMBOL 1/3 from the TOY BOAT (inventory).
- Go to the Church front (G).

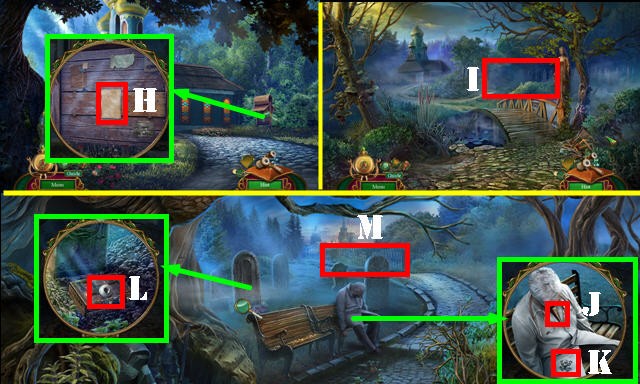
- Read the note (H).
- Walk down; go right (I).
- Open and take DUKE’S LETTER (J). Take the FROG (K).
- Take the PENDANT (L).
- Go to the Cemetery gates (M).

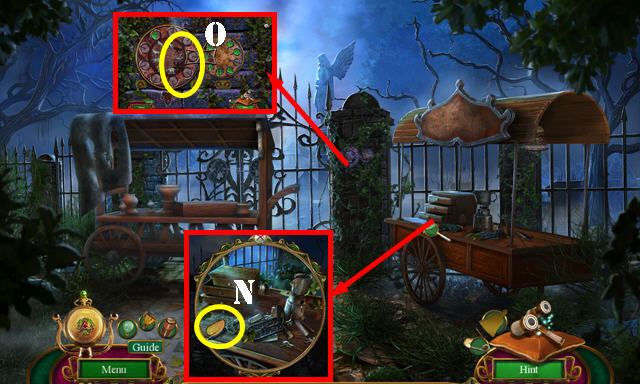
- Take the HARVEST SYMBOL 2/3 (N).
- Place the FROG and HORSE for a puzzle (O).

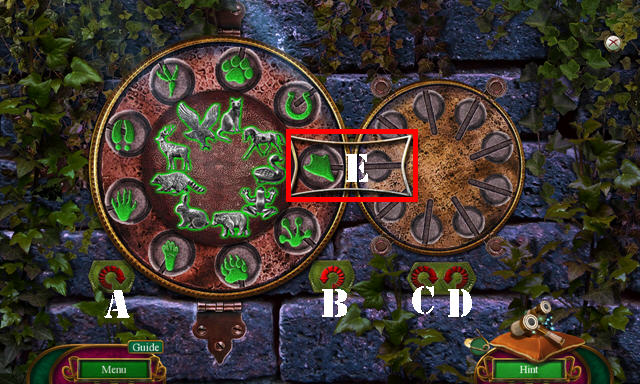
- Solution: B-Cx3-E-B-Cx3-E-Bx2-Cx3-E-B-Dx2-E-B-C-E-B-Cx2-E-B-C-E-B-Cx3-E-B.
- Take the MINIATURE WHEEL.
- Return to the Church front.

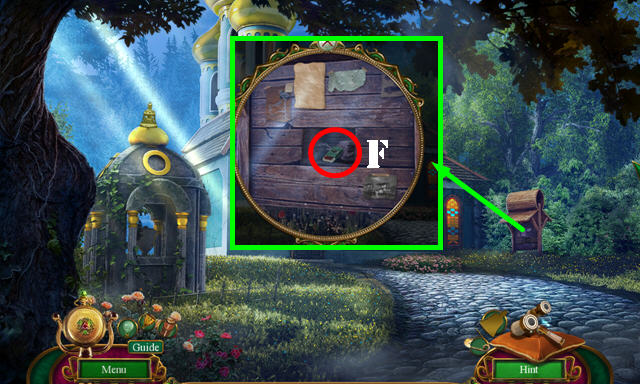
- Place the MINIATURE WHEEL on the TOY BOAT; take the TONGS (inventory).
- Use the TONGS; take the MATCHES (F).
- Use the MATCHES on the LANTERN to get the LIT LANTERN (inventory).
- Return to the Cemetery.

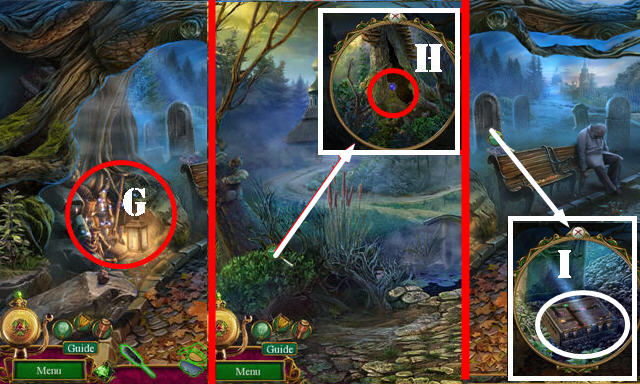
- Use the LIT LANTERN (G) for an HOP; play it to get the BELL HAMMER.
- Walk down.
- Use the BELL HAMMER; take the BLUE TILE (H).
- Go to the Cemetery.
- Place the PINK TILE and BLUE TILE for a puzzle (I).

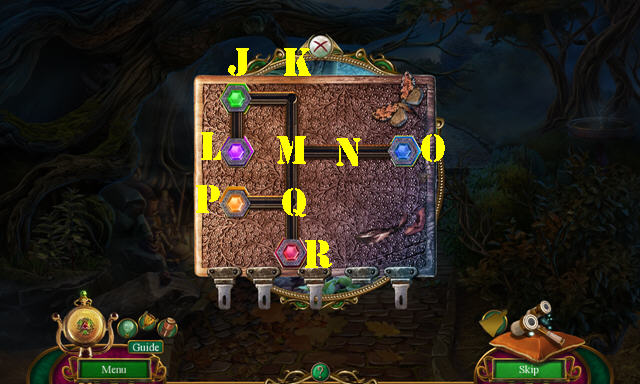
- Solution: (N-O)-(Q-M-N)-(P-Q-R)-(K-M-Q-P)-(J-L)-(N-M-K-J)-(O-N-M-Q)-(J-K-M-N-O)-(Q-M-N)-(L-J-K-M-Q)-(N-M-K-J-L)-(O-N-M-K-J)-(Q-M-N-O).
- Take the CLIPBOARD and STONE DOVES 1/2.
- Return to the Church front.

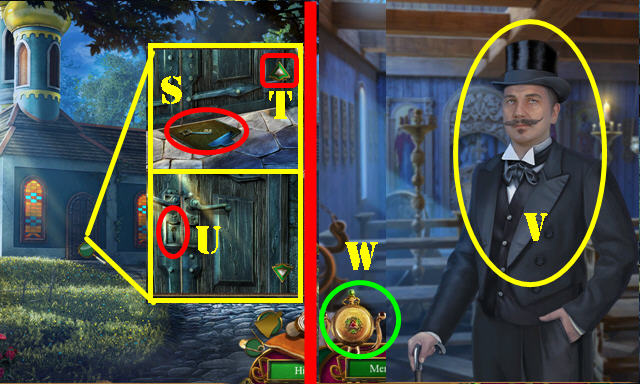
- Use the CLIPBOARD (S). Arrow up (T). Use the REED (U). Take the CHURCH KEY (S). Arrow up (T). Use the CHURCH KEY (U). Enter the Church.
- Give DUKE’S LETTER (V). Select the Pocket Watch for a puzzle (W).

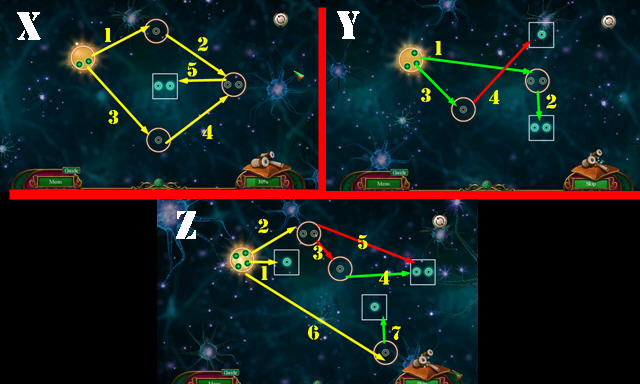
- Solution one (X).
- Solution two (Y).
- Solution three (Z).

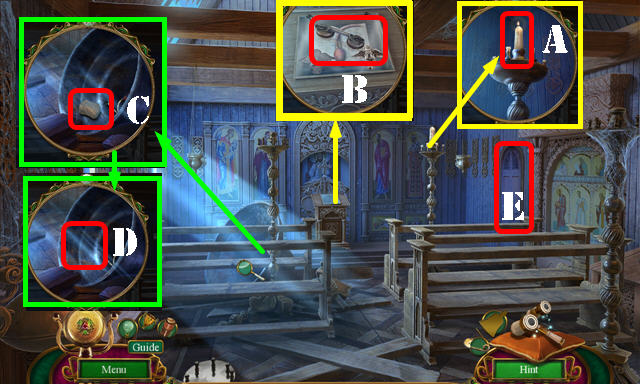
- Use the MATCHES; take the CANDLE (A).
- Take the SUCTION CUP (B) and SPONGE (C).
- Use the BELL HAMMER (D); take the TRUMPET CREST 1/3.
- Go to the Caretaker’s room (E).

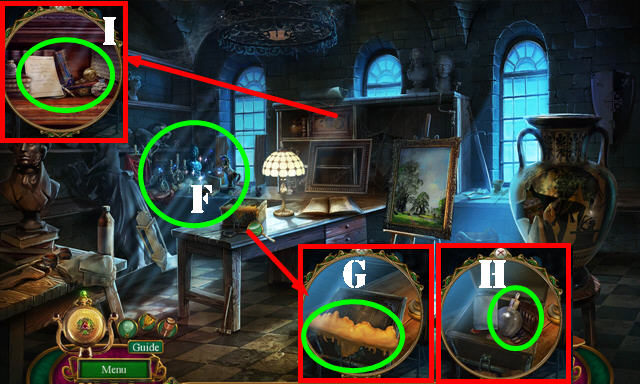
- Play the HOP (F) to get the BEAR PAW TRINKET.
- Use the CANDLE to get the MOLTEN WAX (G). Open the box; look at the note and take the BROKEN PERFUME BOTTLE (H).
- Place the BEAR PAW TRINKET on the PENDANT; take the HARVEST SYMBOL 3/3 (inventory).
- Place the 3 HARVEST SYMBOLS; take the REPORT, STONE DOVES 2/2 and C-CLAMP (I).
- Return to the Church front.

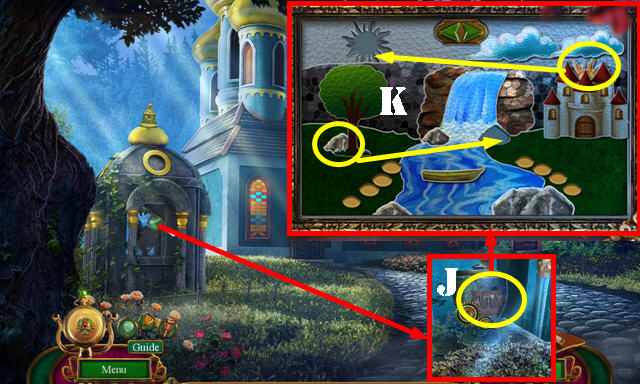

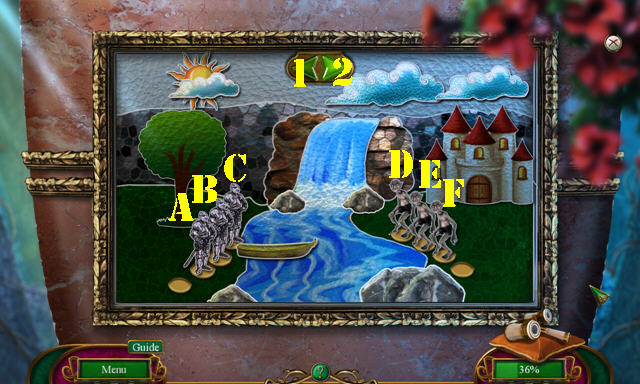
- Place the 2 STONE DOVES for a puzzle (J).
- Place the Sun and the Stone (K). Solution: C-2-F-1-F-2-E-1-E-2-D-C-1-B-D-A-2-B-A.
- Take the WAX MOLD.
- Walk down.

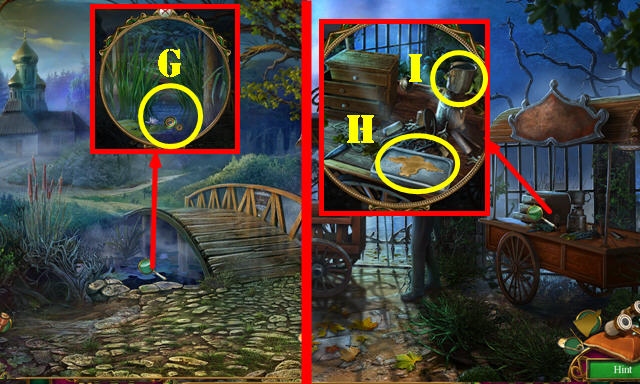
- Use the SPONGE to get the WET SPONGE (G).
- Return to the Cemetery gates.
- Put down the WAX MOLD (H); place the MOLTEN WAX (I) and pour it. Take the WAX ORNAMENT.
- Return to Church hall.

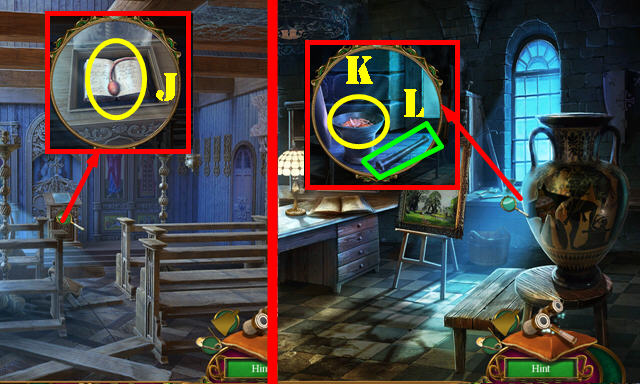
- Place the WAX ORNAMENT; take the PERFUME ATOMIZER (J).
- Go to the Caretaker’s room.
- Place the GARLIC (K); use the pestle (L). Use the WET SPONGE (K); take the FILLED MORTAR.
- Use the FILLER MORTAR in the BROKEN PERFUME BOTTLE; place the PERFUME ATOMIZER on it to get the PESTICIDE (inventory).
- Return to the Cemetery.

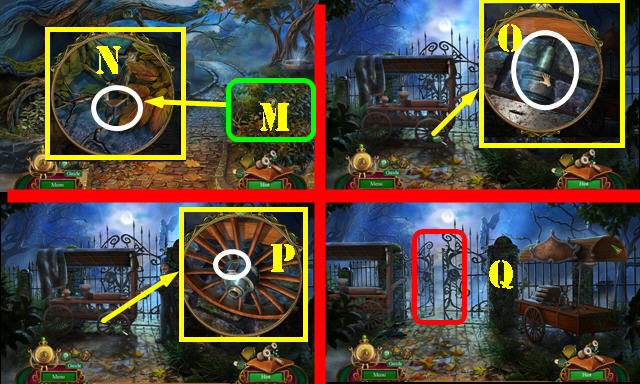
- Use the PESTICIDE (M); take the WHEEL AXLE (N).
- Go to the Cemetery gates.
- Select the mechanism (O); place the WHEEL AXLE (P).
- Go to the Police station front (Q).
Chapter 4: Police Station

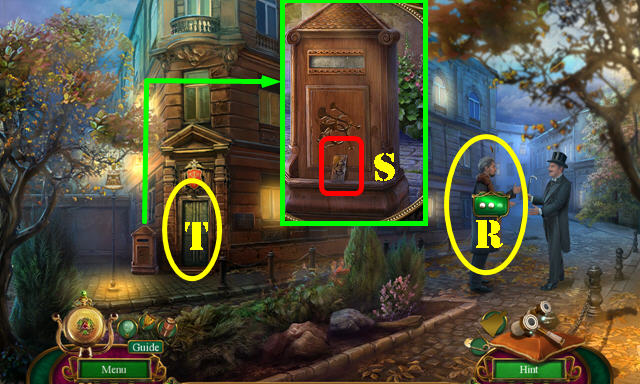
- Give the REPORT to Yuri (R) to receive the ARCHIVES DIAL.
- Take the KEY SIGNS 1/3 (S).
- Enter the Police HQ (T).

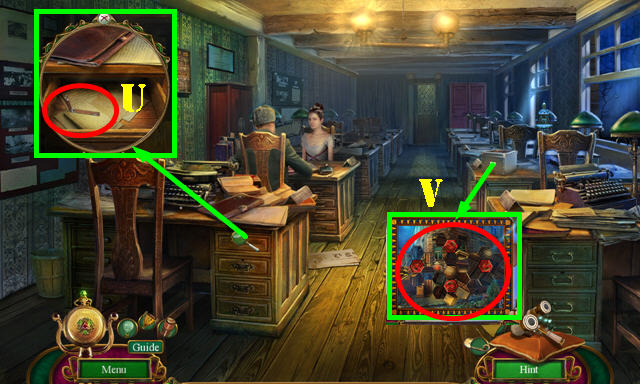
- Use the SUCTION CUP; take the ANGLE BRACKET (U).
- Place the ARCHIVES DIAL for a puzzle (V).

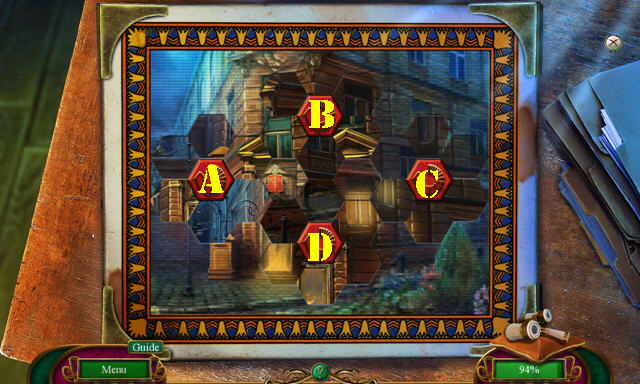

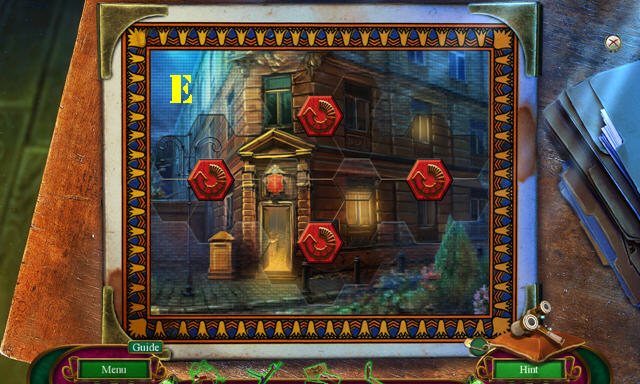
- Solution: Cx4-D-Ax3. Then swap the pieces into place as shown (E).
- Take the FIGURINE MEDALLION and EVIDENCE.
- Walk down.

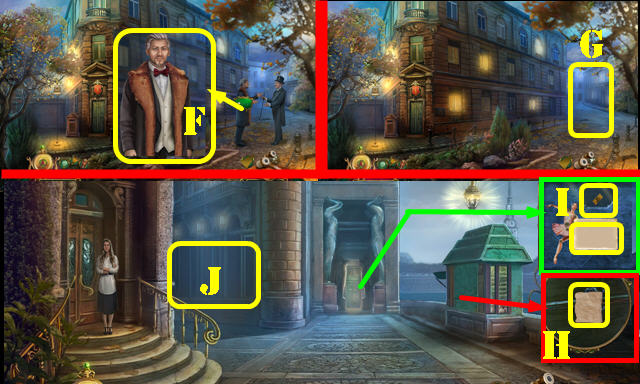
- Give the EVIDENCE (F).
- Go to the Ballet school front (G).
- Look at the note (H).
- Look at the note; take the KEY SIGNS 2/3 (I).
- Go to the Back alley (J).

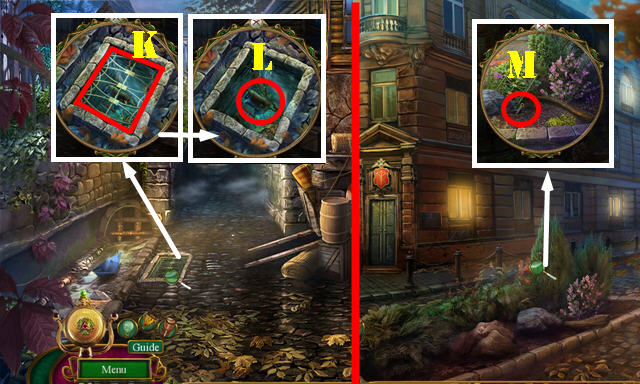
- Take the METAL GRILL (K); move the two branches; take the GASOLINE TANK (L).
- Go to the Police station front.
- Use the METAL GRILL; take the LOCK RODS 1/3 and BLOWTORCH PART (M).
- Place the BLOWTORCH PART on the GASOLINE TANK to get the BLOWTORCH (inventory).
- Go to the Ballet school front.

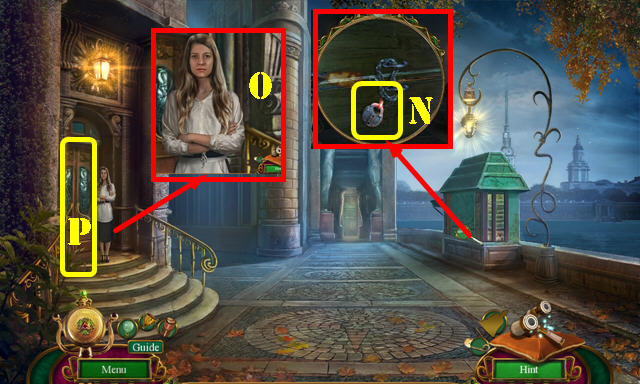
- Use the BLOWTORCH for an HOP (N); play it to get the PUB KEY.
- Give the PUB KEY (O).
- Enter the Pub (P).

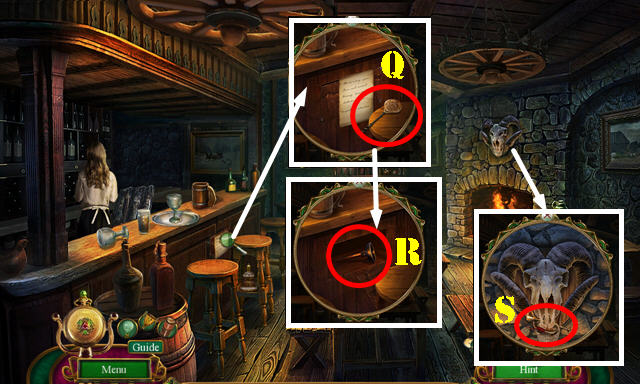
- Look at the note; take the WINE OPENER (Q). Use the ANGLE BRACKET; take the PLUNGER (R).
- Use the C-CLAMP; take the TRUMPET CREST 2/3 (S).
- Return to the Back alley.

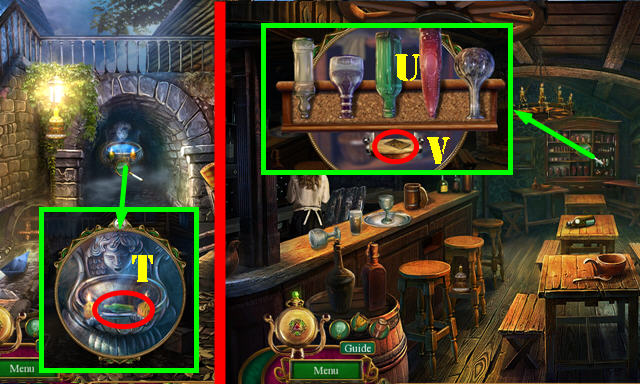
- Use the PLUNGER; take the SMALL BOTTLE (T).
- Return to the Pub.
- Place the SMALL BOTTLE for a puzzle. Solution (U). Take the KEY SIGNS 3/3 (V).
- Return to Police HQ.

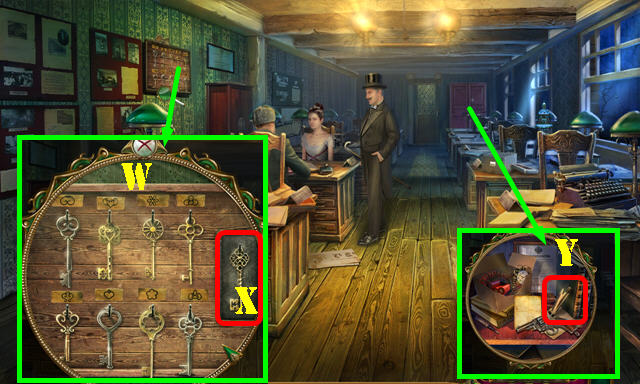
- Place the 3 KEY SIGNS for a puzzle. Solution (W). Take the ARCHIVE KEY (X).
- Use the ARCHIVE KEY; look at the note; take the NAIL CLIPPER (Y).
- Return to the Back alley.

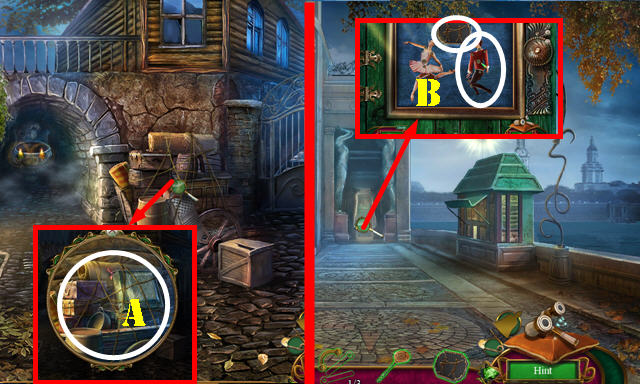
- Use the NAIL CLIPPER for an HOP (A); play it to get the STAGE MEDALLION.
- Walk down.
- Place the FIGURINE MEDALLION and STAGE MEDALLION for a puzzle (B).

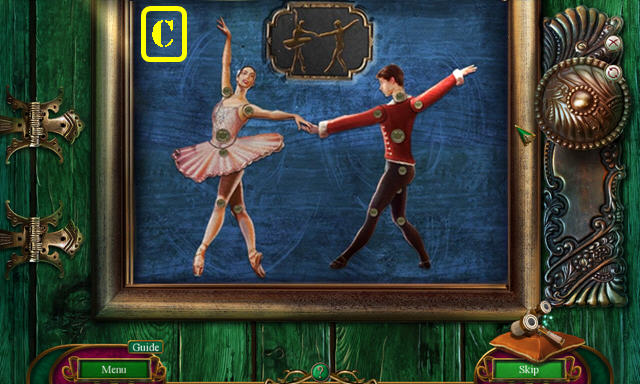
- Solution (C).
- Go to the School hallway.
Chapter 5: School

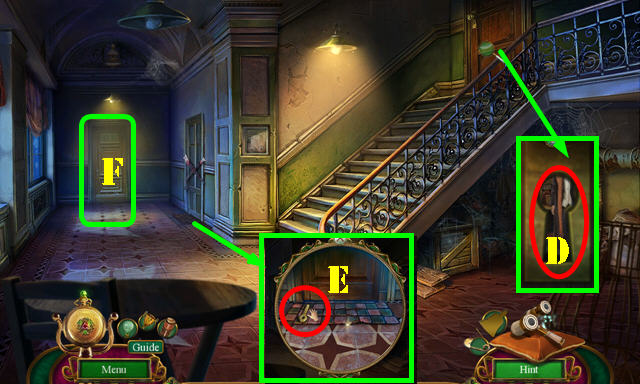
- Look through the peephole (D).
- Take the LOCK RODS 2/3 (E).
- Go to the Classroom (F).

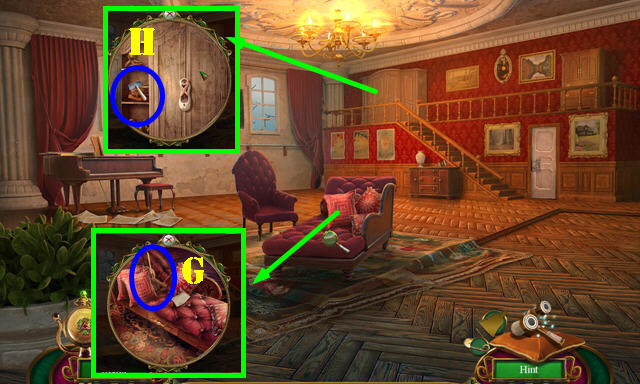
- Move the pillow; look at the note; take the FEATHER DUSTER (G).
- Open the door; take the ICE SCRAPER (H).
- Walk down.

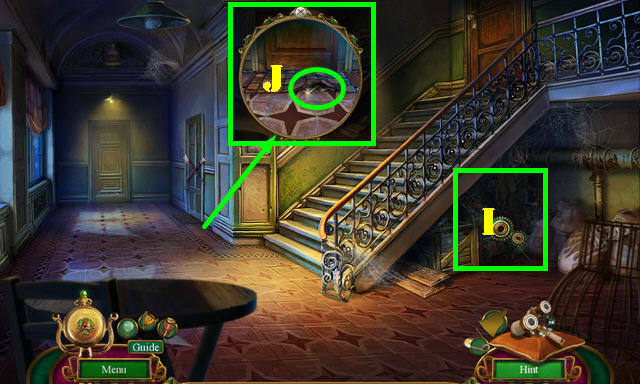
- Use the FEATHER DUSTER (I) for an HOP; play it to get the TRUMPET CREST PART 3/3.
- Use the ICE SCRAPER; take the BALLERINA BROOCH (J).
- Return to the Police station front.

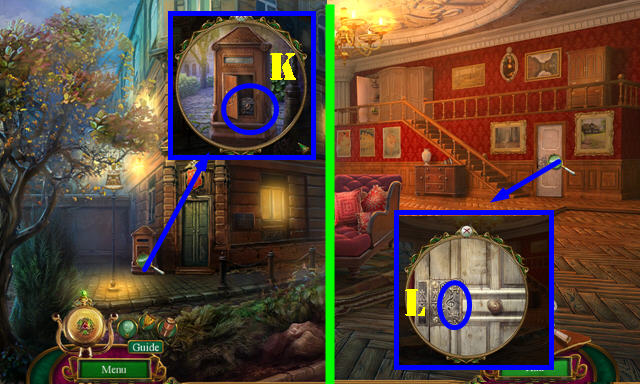
- Place the 3 TRUMPET CRESTS; take the BROKEN NECKLACE and CLEF (K).
- Return to the Classroom.
- Place the CLEF (L) and enter the Music room.

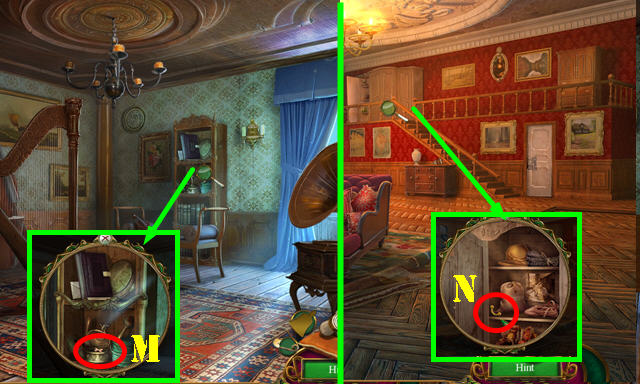
- Place the BALLERINA BROOCH; take the BOW (M).
- Walk down.
- Place the BOW; take the LOCK RODS 3/3 (N).
- Walk down.

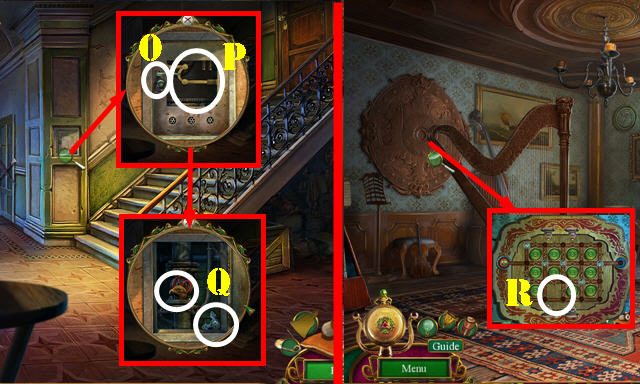
- Pull the handle (O); place the 3 LOCK RODS (P) and pull the handle. Take the EAGLE HEAD and PUZZLE SEGMENT (Q).
- Return to the Music room.
- Place the PUZZLE SEGMENT (R) for a puzzle.

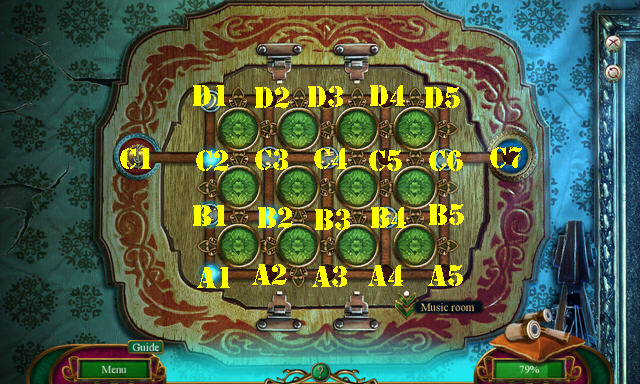
- Solution: (B1-A1)-(B4-B3)-(D1-C2-B1)-(C3-D2)-(C1-C2-C3)-(B3-B4-B5-A5)-(C4-B3)-(C3-C4-C5)-(C6-B5)-(C5-C6-C7).
- Take the OFFICE KEY.
- Return to School hallway.

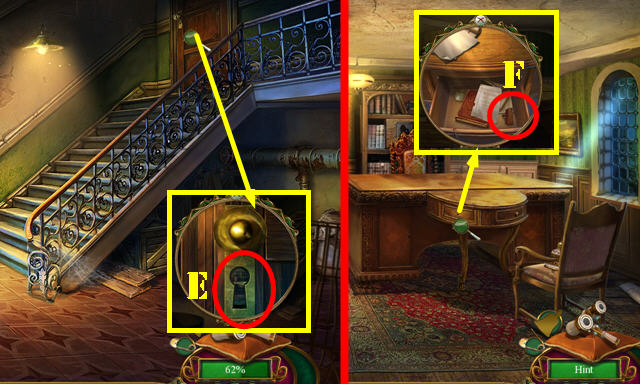
- Use the OFFICE KEY (E). Enter Oksana’s office.
- Use the WINE OPENER; look at the note; take the WEDGE (F).
- Return to the Classroom.

- Use the WEDGE (G) for an HOP; play it to get the BOOK KEY.
- Go to the Music room.
- Place the BOOK KEY; look at the note and take the THORNS INSIGNIA (H).
- Walk down.

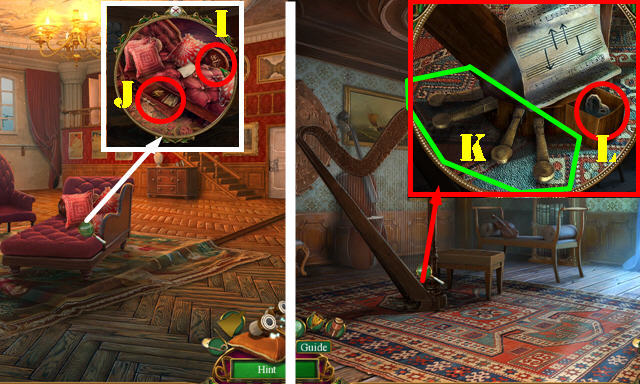
- Place the THORNS INSIGNIA (I); take the MUSIC SHEET and BEAR HEAD (J).
- Go to the Music room.
- Place the MUSIC SHEET; arrange the pedals as shown (K); take the PHONOGRAPH MOTIF (L).
- Return to Oksana’s office.

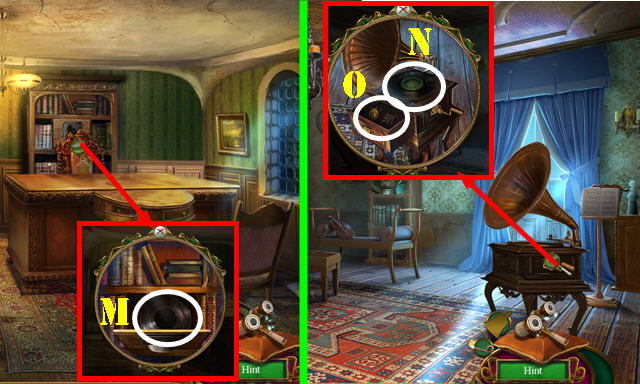
- Place the PHONOGRAPH MOTIF; take the RECORD (M).
- Return to the Music room.
- Place the RECORD (N); take the BRICK ORNAMENT and WOLF HEAD (O).
- Return to Oksana’s office.

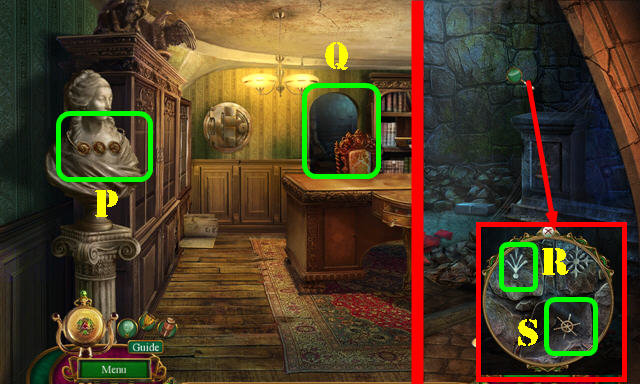
- Place the EAGLE HEAD, BEAR HEAD and WOLF HEAD on the BROKEN NECKLACE to get the THREE-HEADED NECKLACE (inventory).
- Place the THREE-HEADED NECKLACE (P).
- Enter the Secret room (Q).
- Place the BRICK ORNAMENT (R); open and read the letter; take the SAFE WHEEL (S).
- Walk down.

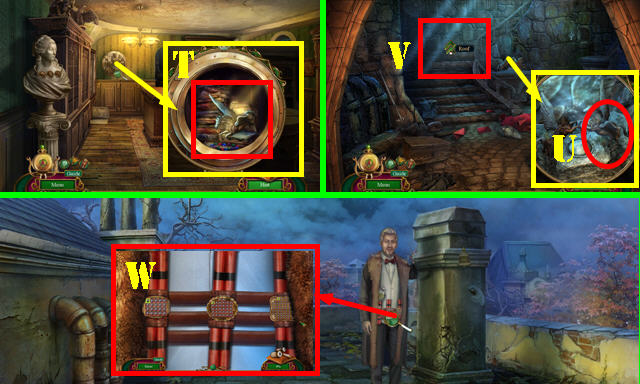
- Place the SAFE WHEEL; take the PEGASUS FIGURINE (T).
- Return to the Secret room.
- Place the PEGASUS FIGURINE (U).
- Go to the Roof (V).
- Play the puzzle (W).

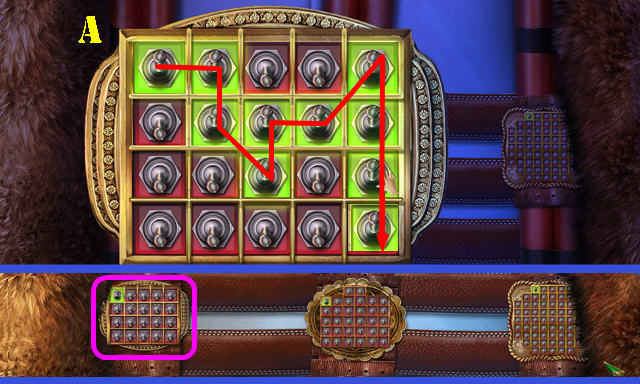

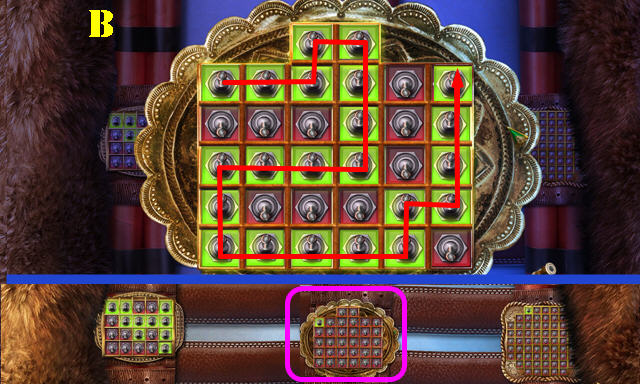

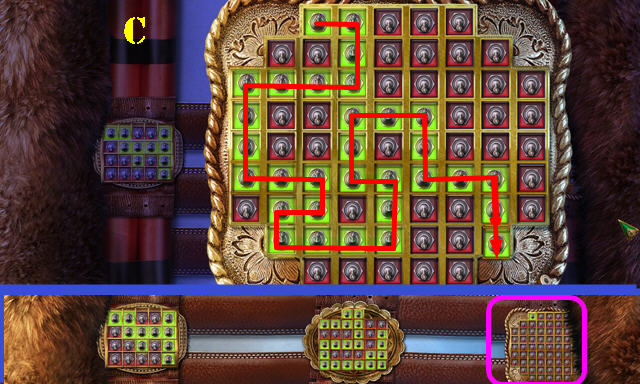
- Solution one (A).
- Solution two (B).
- Solution three (C).

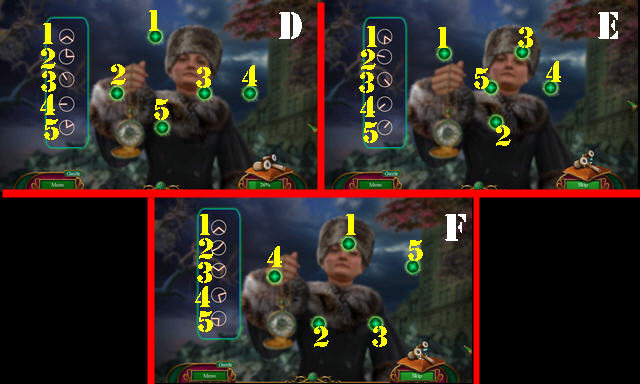
- Clock solution one (D).
- Clock solution two (E).
- Clock solution three (F).
- Congratulations, you’ve completed Danse Macabre: Lethal Letters.



 Love Story: The Beach Cottage Walkthrough, Guide, & Tips
 Natural Threat Ominous Shores Walkthrough, Guide, & Tips
 Myths of the World: Black Rose Walkthrough, Guide, & Tips
 Left in the Dark: No One on Board Walkthrough, Guide, & Tips
 Syberia, Part 2 Walkthrough, Guide, & Tips