Mystery Case Files: Ravenhearst Unlocked Walkthrough, Guide, & Tips
Mystery Case Files: Ravenhearst Unlocked Walkthrough

Welcome to the Mystery Case Files: Ravenhearst Unlocked Walkthrough
A great evil unlocks deep within Ravenhearst!
Whether you use this document as a reference when things get difficult or as a road map to get you from beginning to end, we’re pretty sure you’ll find what you’re looking for here.
This document contains a complete Mystery Case Files: Ravenhearst Unlocked game walkthrough featuring annotated screenshots from actual gameplay!
We hope you find this information useful as you play your way through the game. Use the walkthrough menu below to quickly jump to whatever stage of the game you need help with.
Remember to visit the Big Fish Games Forums if you find you need more help. Have fun!
This walkthrough was created by Margie B, and is protected under US Copyright laws. Any unauthorized use, including re-publication in whole or in part, without permission, is strictly prohibited.
General Tips
- This is the official guide for Mystery Case Files Ravenhearst Unlocked.
- This guide will not tell you when you have to zoom into a location; the screenshots will show each zoom scene.
- Hidden-object puzzles are referred to as HOPs. This guide will not show screenshots of the HOPs, however, it will mention when an HOP is available and the inventory item you’ll collect from it.
- Use the Map to fast travel to a location.
- On the Master Puzzles, select ‘Info’ to view a clue for the next step. You can select ‘skip this part’ to skip only that part of the puzzle.
Chapter 1: The Asylum

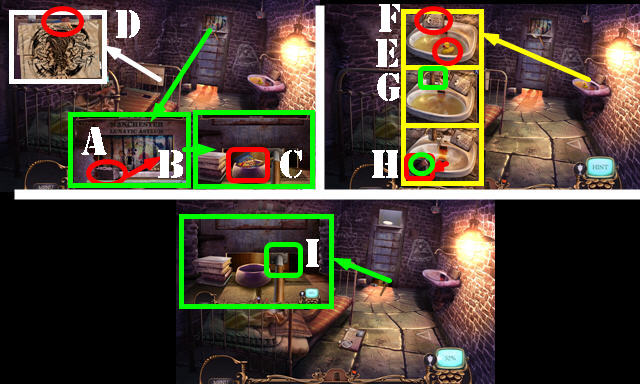
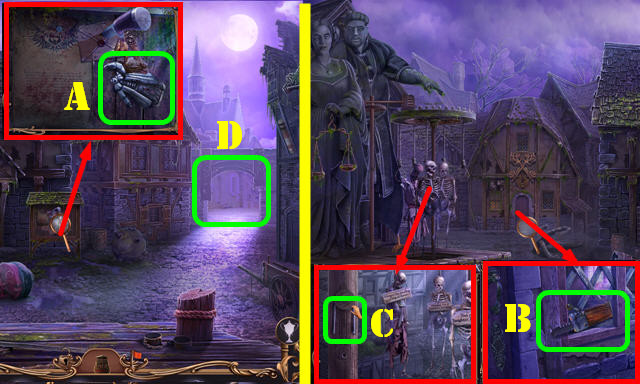
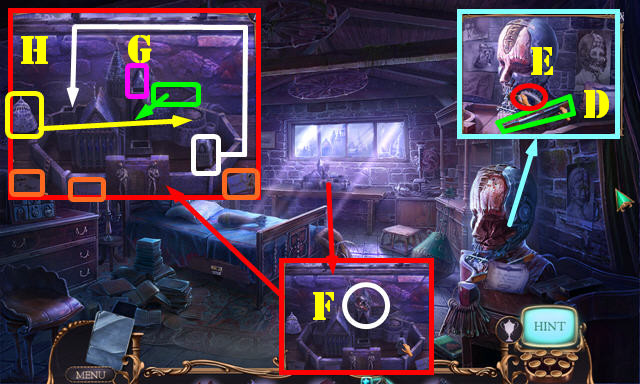
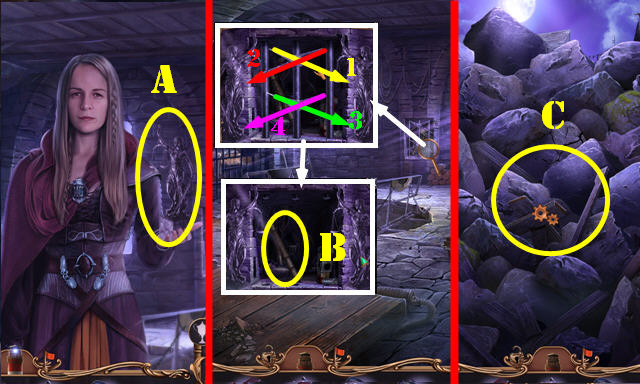
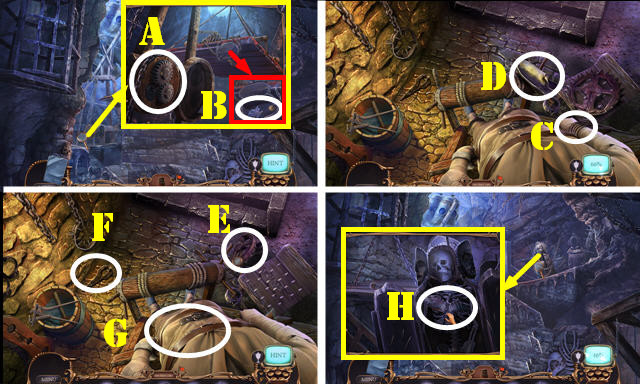
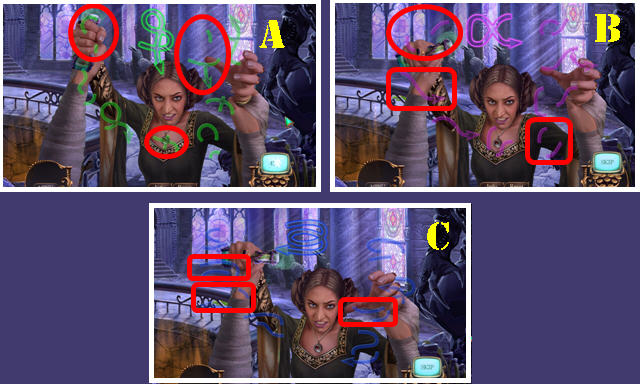
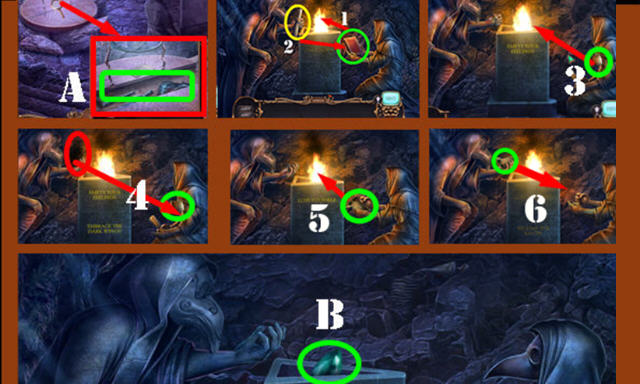
- Take the ROCK (A); use it twice (B); slide the door open.
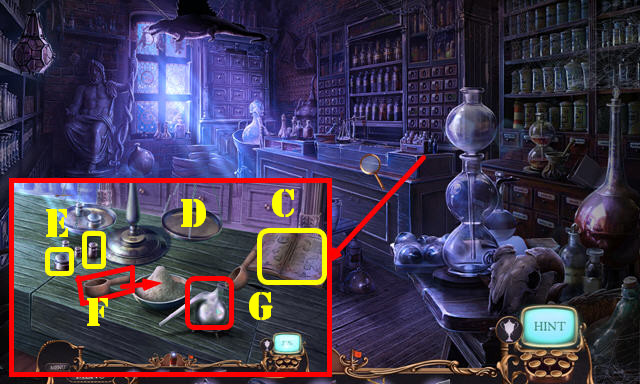
- Select the handle twice; pour the bag; take the CANDY and SPORK (C).
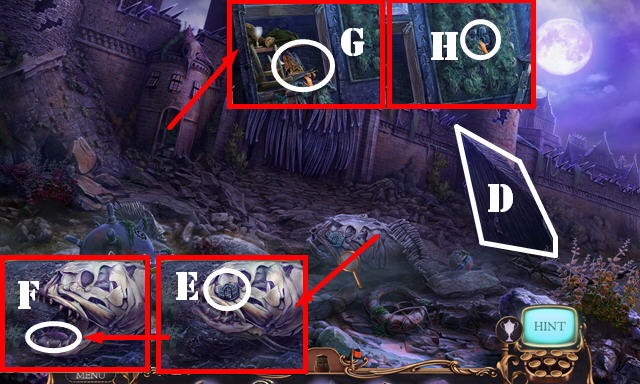
- Look at the chart; take the HOLDING MAGNET (D).
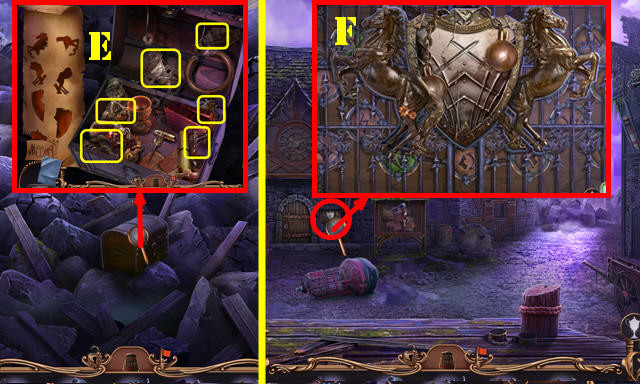
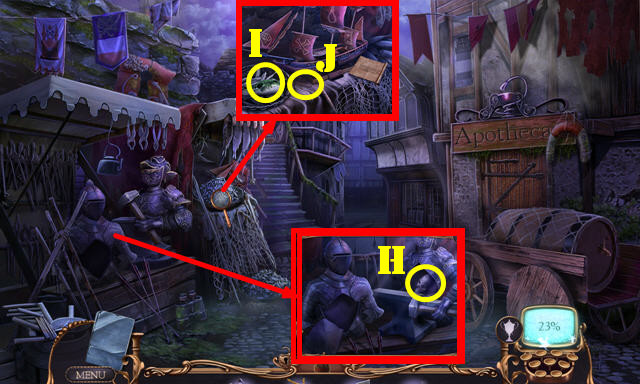
- Take the RUBBER DUCK (E); look at the journal (F) and the left page. Turn off the water (G). Use the SPORK in the water to get the HANDKERCHIEF. Use the HOLDING MAGNET; take the ANCIENT COIN (H).
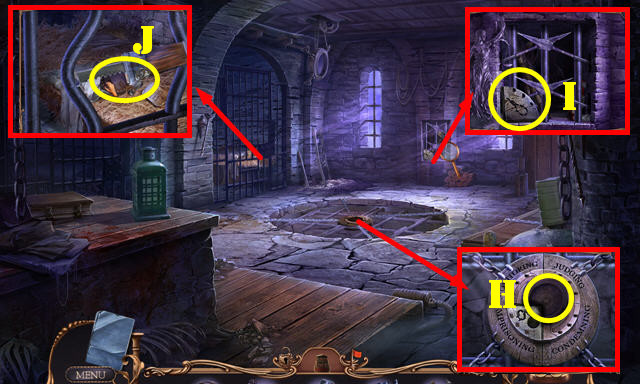
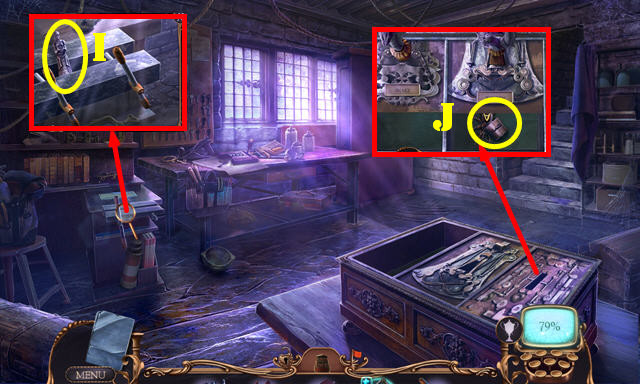
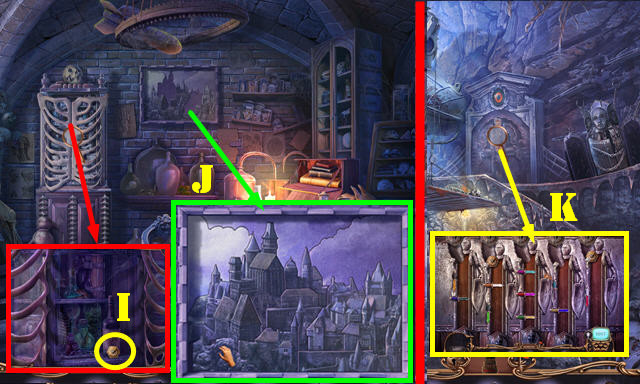
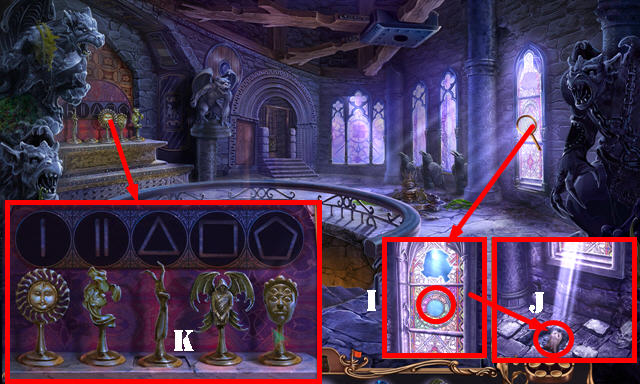
- Use the ANCIENT COIN to get the MOP STICK (I).
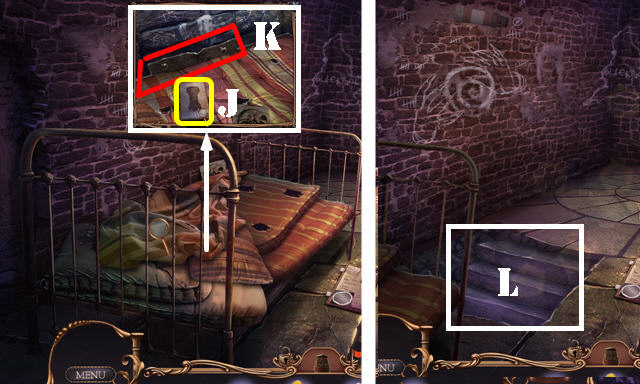
- Remove the sheet, note and pillow; look at the book (J).
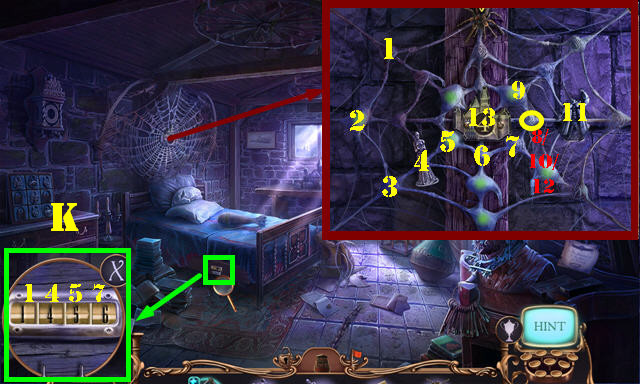
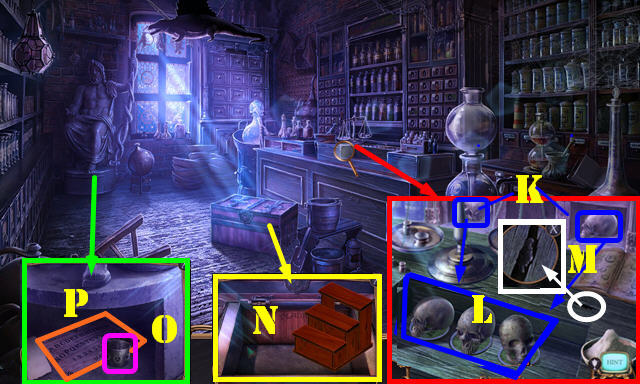
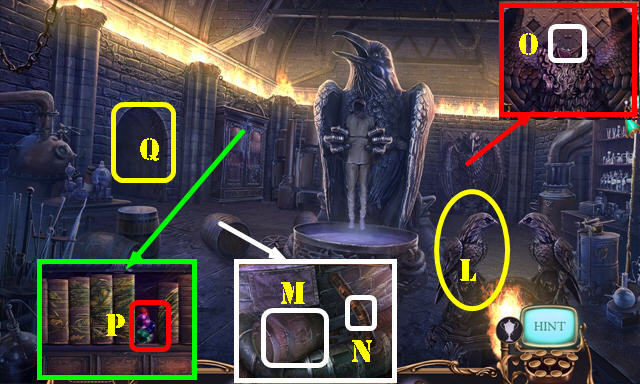
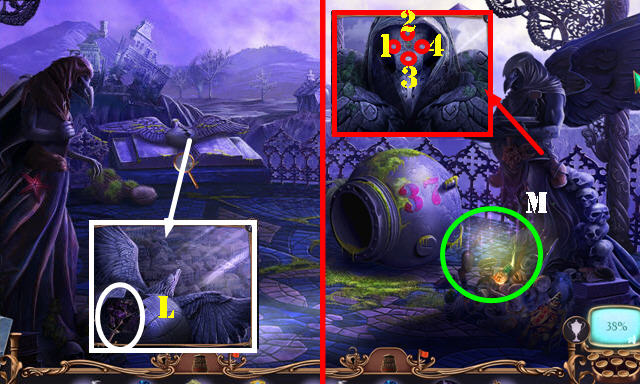
- Use the MOP STICK (K); move the bed twice. Select the ground and go to the Alister’s lair (L).
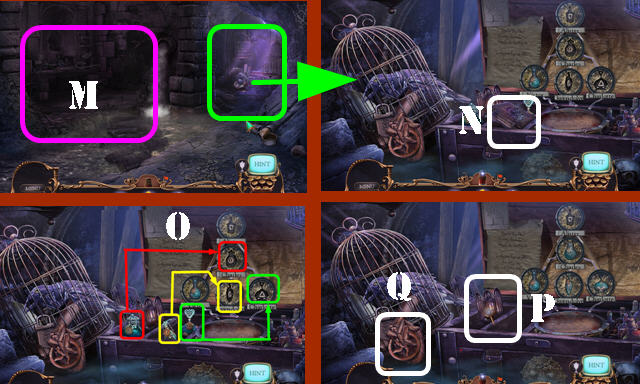
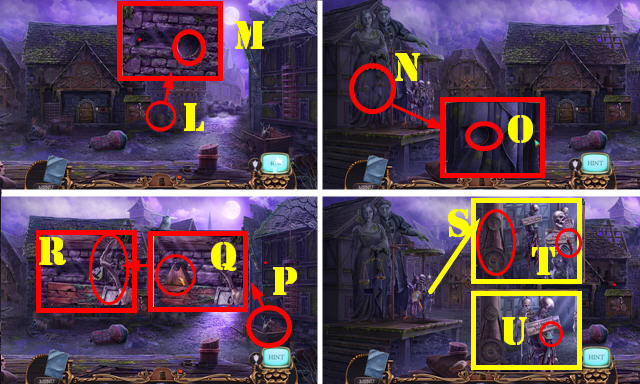
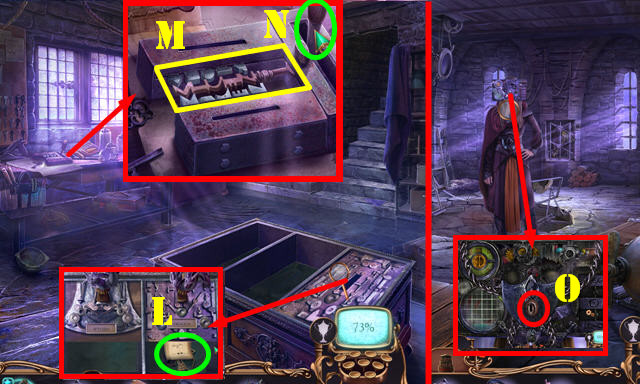
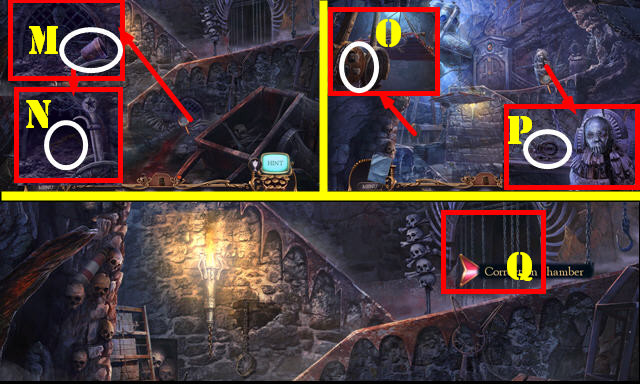
- Select the wall 3x (M).
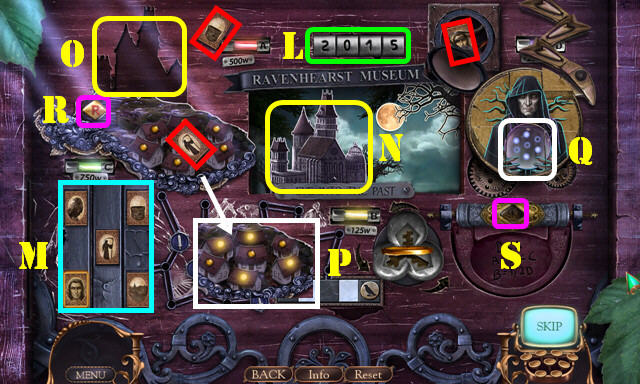
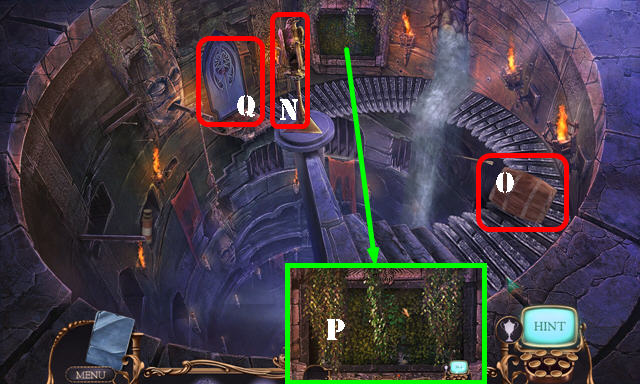
- Open both latches and look at the note. Open the book (N) and flip all the pages.
- Place the bottles in the right spots (O).
- Select the ALCHEMICAL LANTERN twice (P).
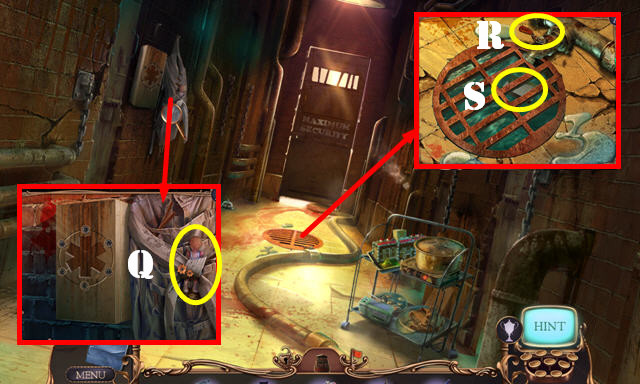
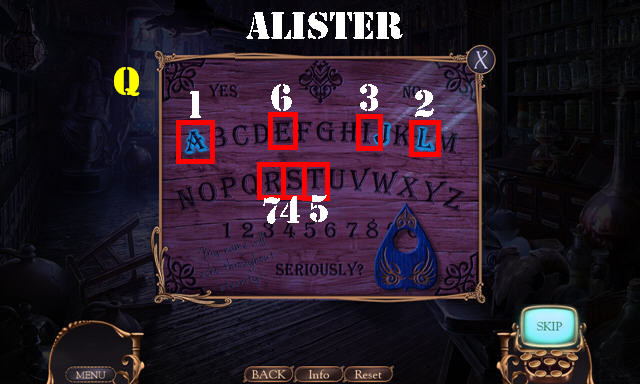
- Take the PALM-READING MODEL (Q).
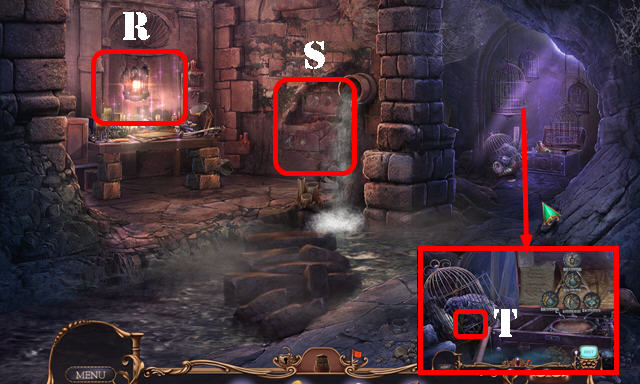
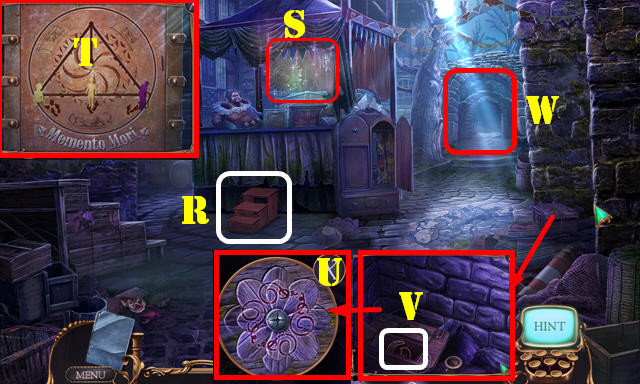
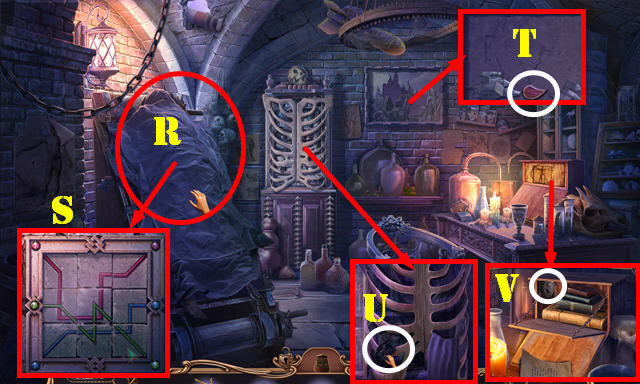
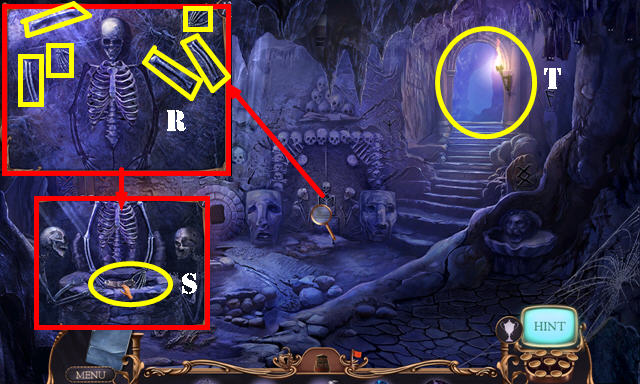
- Place the ALCHEMICAL LANTERN (R) for an HOP. Play the HOP to get the SKELETON RAVEN.
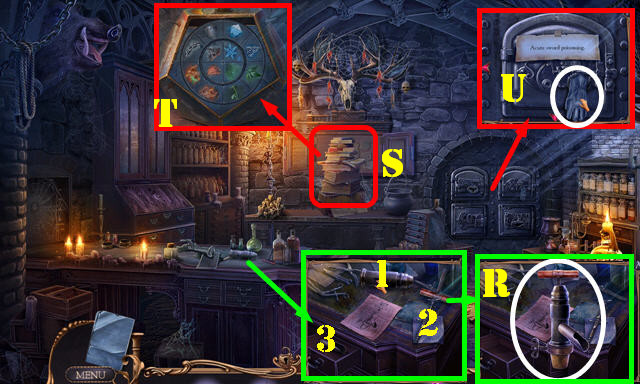
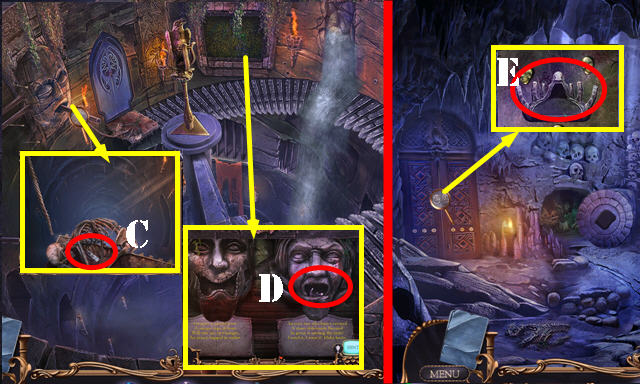
- Select the wall twice (S).
- Place the SKELETON RAVEN. Look at the scroll; take the WINDER (T); you receive the CUTTLEBONE POWDER.
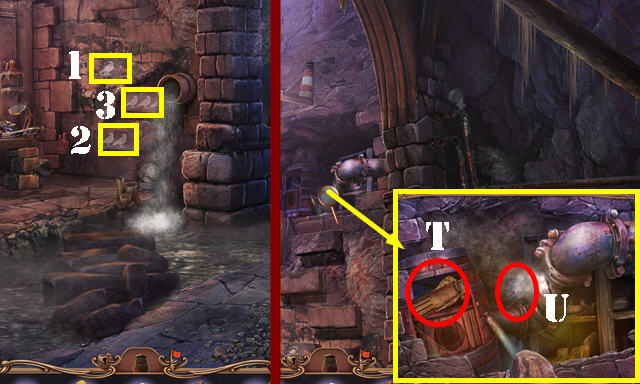
- Use the CUTTLEBONE POWDER; select 1-3.
- Remove the two items; look at the paper and flip it; take the MANNEQUIN FOREARM (T).
- Place the PALM-READING MODEL on the MANNEQUIN FOREARM. Select each button; take the VALVE and REACHING ARM (inventory).
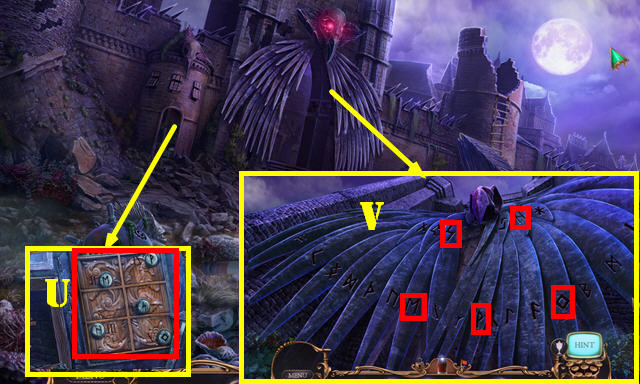
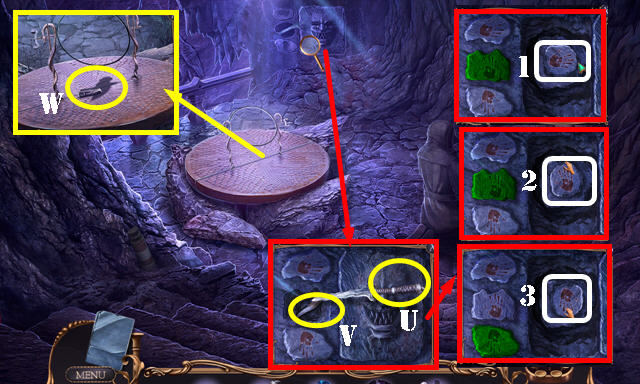
- Use the REACHING ARM (U) to get the BURNED DOLL and ALISTER’S BLOOD VIAL.
- Go down.
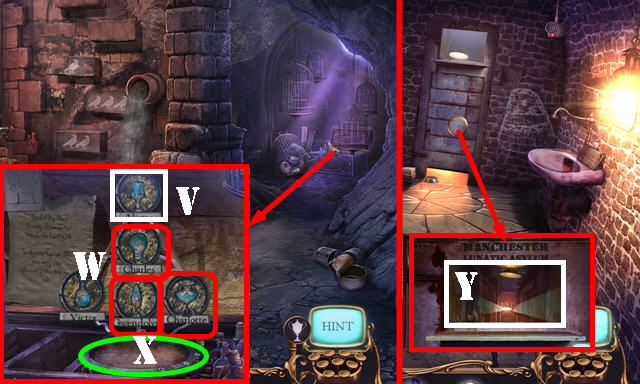
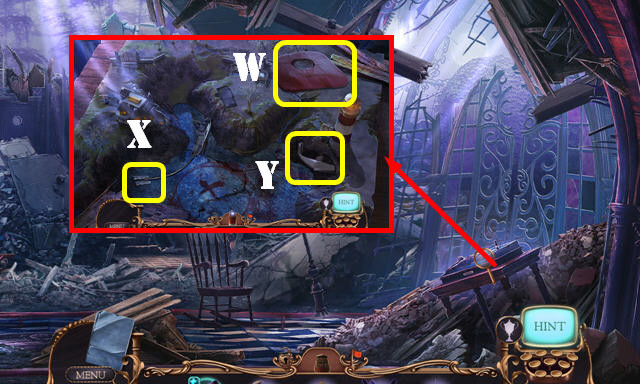
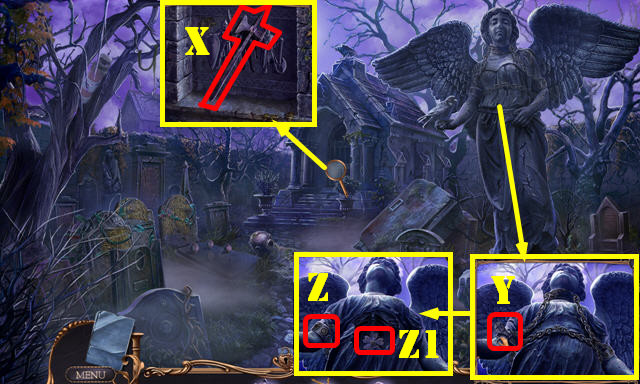
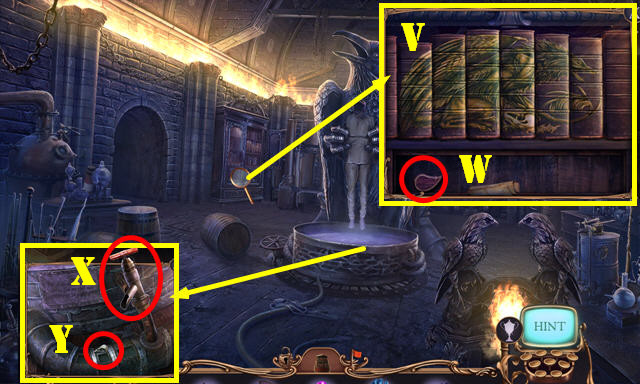
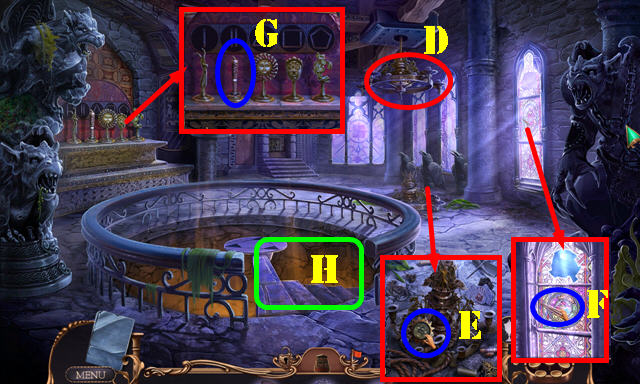
- Place ALISTER’S BLOOD VIAL (V). Select Charles, Gwendolyn and Charlotte (W); take the METAL PLATE (X).
- Use the HANDKERCHIEF on the METAL PLATE to get the POLISHED PLATE (inventory).
- Walk down.
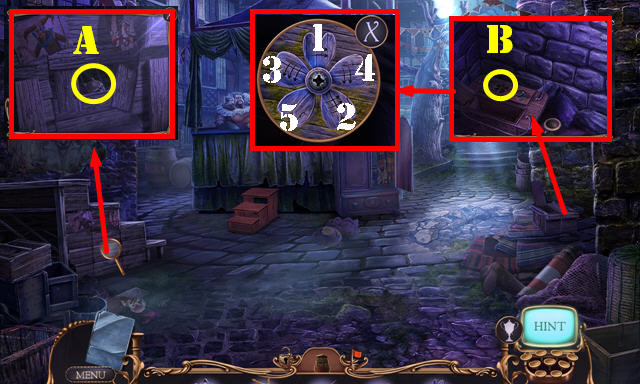
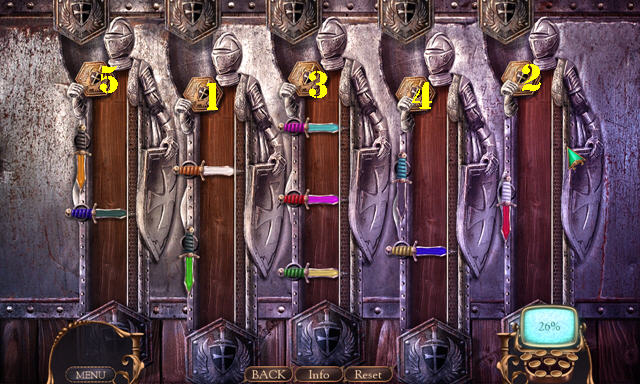
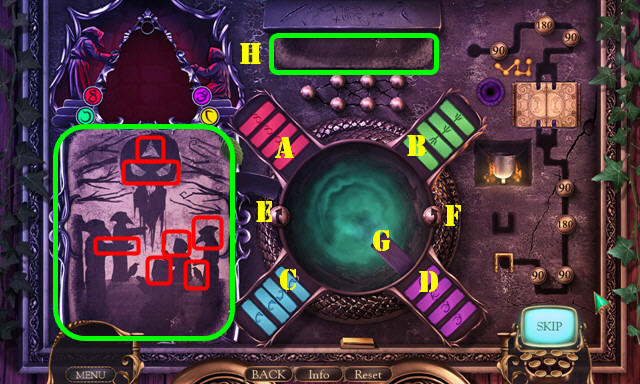
- Use the POLISHED PLATE for a puzzle (Y).
- Solution one: A-Bx2.
- Solution two: D-B-C-Ax2.
- Solution three: Dx2-C-Ax2.
- Solution four: Dx2-Ax2.
- Enter the Hallway and try to go forward.

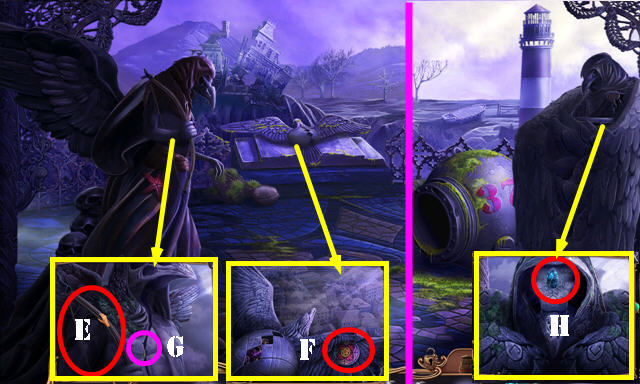
- Touch the arm (E); go forward.
- Give the RUBBER DUCK (F); go forward.
- Give the CANDY (G). Select the four blue pills (H) to receive the Map.
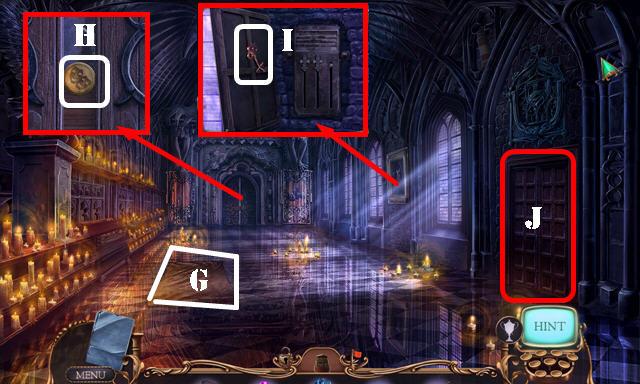
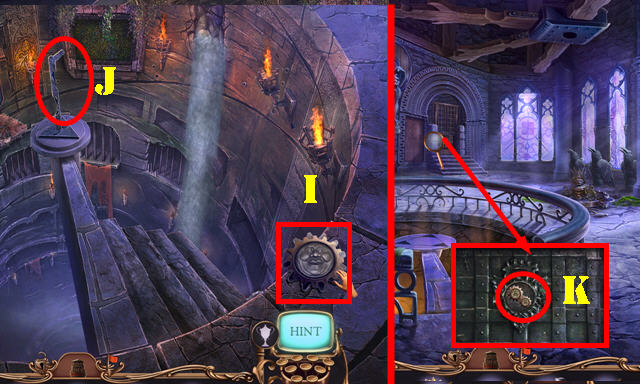
- Take the STAR OF LIFE 1/3 (I).
- Take the SWITCH (J). Look at the card (K).
- Go to Asylum hall (L).
- Play the HOP (M) to get the LIGHTER FLUID.
- Select the handle (N); look at the note and take the SHREDDER OIL (O).
- Go right.
- Take the BATON (P).
- Walk down.
- Use the BATON to get the WIND-UP DOLL (Q).
- Place the WINDER on the WIND-UP DOLL; select the winder; take the ASYLUM INSIGNIA and TWO-FACED DOLL (inventory).
- Use the SHREDDER OIL (R); turn the valve; take the ID CARD (S).
- Go to the Asylum hall.
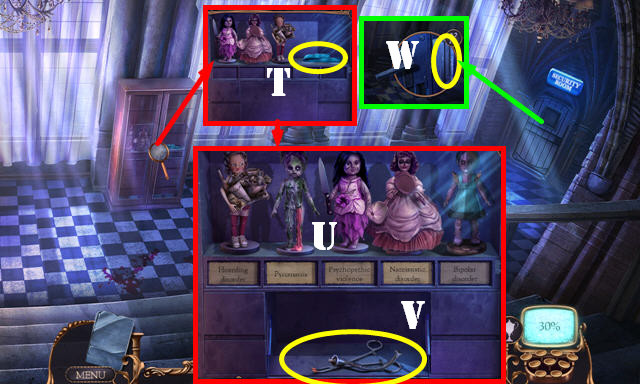
- Place the ASYLUM INSIGNIA; take the TOURNIQUET RUBBER (T).
- Place the BURNED DOLL and TWO-FACED DOLL for a puzzle. Solution (U).
- Take the BURNER WICK and RUBBER-COATED FORCEPS (V).
- Use the ID CARD (W); enter the Security room.

- Take the SILICONE STICK (X).
- Look at the note (Y); take the OXYGEN TANK (Z).
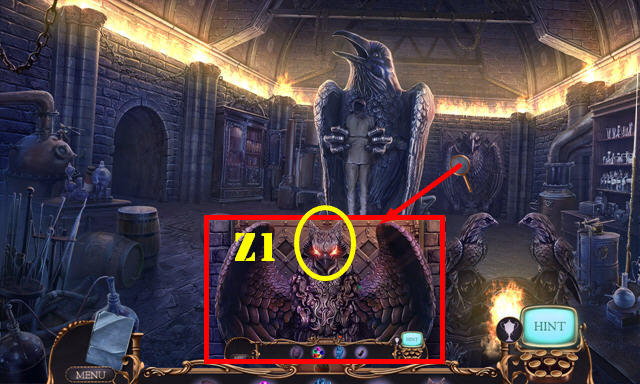
- Use the RUBBER-COATED FORCEPS and place the SWITCH (Z1). Select the switch 2x for a puzzle.
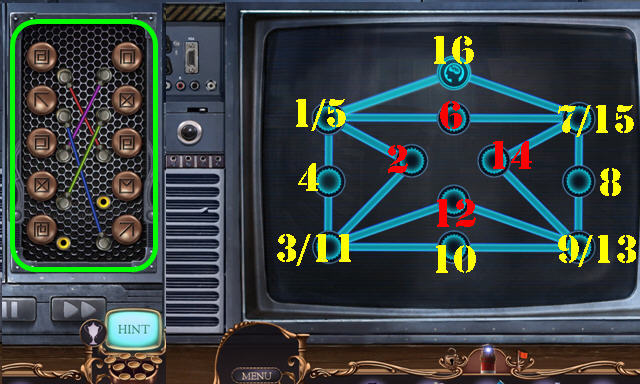
- Solution one (A). Select the screen.
- Solution two (1-16).
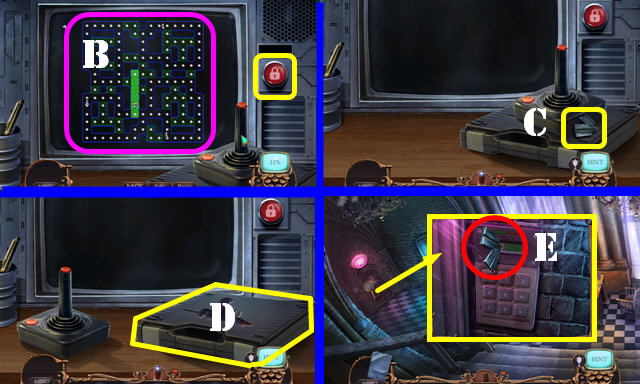
- Select the screen and then choose the Mad-man character, then easy or hard. Collect all the pills on the board. Press the red button (B).
- Take the STAR OF LIFE 2/3 (C).
- Move the joystick; take the GLUE GUN CASE (D).
- Walk down.
- Take the STAR OF LIFE 3/3 (E); remove the panel.
- Walk down.
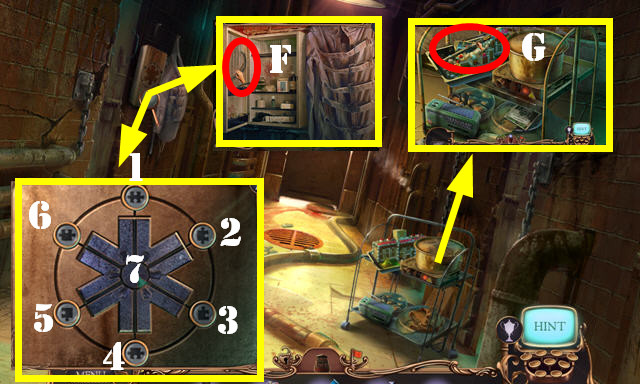
- Place the 3 STARS OF LIFE for a puzzle. Solution: 5-6-1-7-5-6-7-1-2-3-7-1-2-3-7-4-3-2-7.
- Take the OXYGEN TUBE (F).
- Place the VALVE and OXYGEN TUBE on the OXYGEN TANK to get the OXYGEN SPRAY (inventory).
- Use the OXYGEN SPRAY; take the FILE (G).
- Go to Asylum hall.

- Use the FILE for a HOP (H); play it to get the BATTERY. HOP solution one (I). HOP solution two (J).
- Open the two latches on the GLUE GUN CASE; place the SILICONE STICK and BATTERY Assemble the GLUE GUN as shown (K) (inventory).
- Use the GLUE GUN (L); select the handle. Look at the calendar; take the REMOTE CONTROL and KEY BUNDLE.
- Go to the Security room.
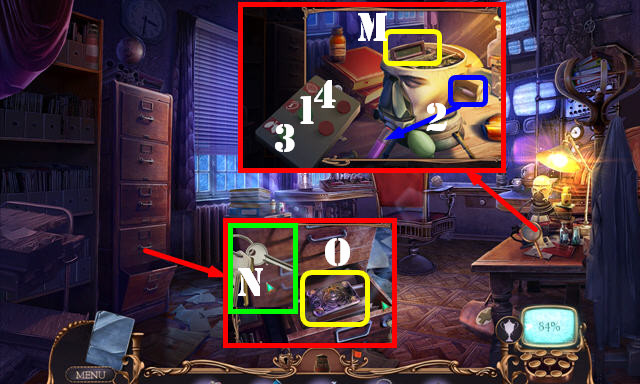
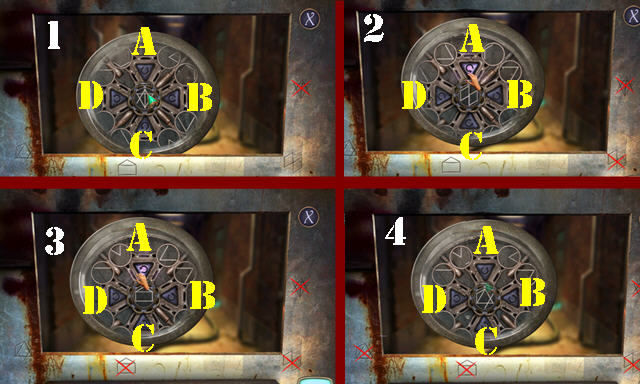
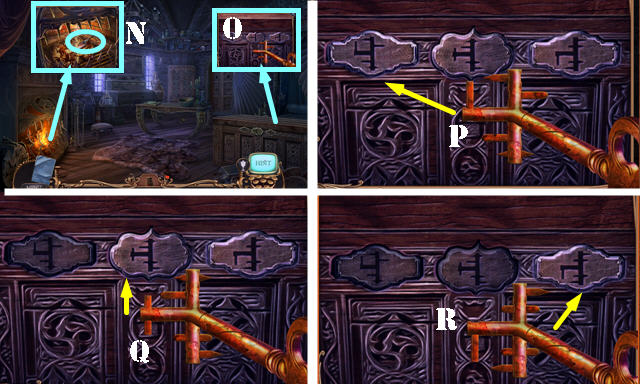
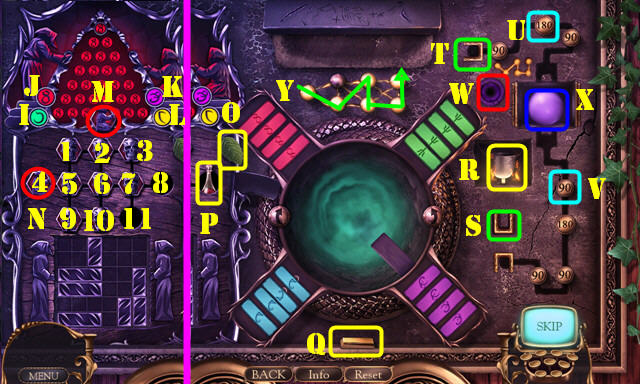
- Place the REMOTE CONTROL for a puzzle. Solution (1-4). Take the LED DISPLAY (M).
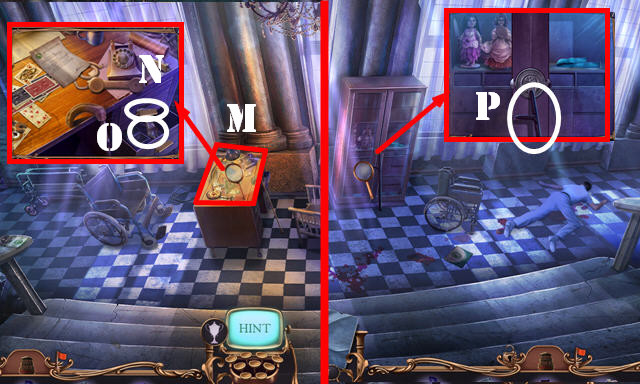
- Use the KEY BUNDLE; select all three keys (N). Take ALISTER’S ENIGMA (O). Look at all the folders; take the KEYPAD CODE.
- Open ALISTER’S ENIGMA; select the four skulls (inventory).
- Walk down and go left.
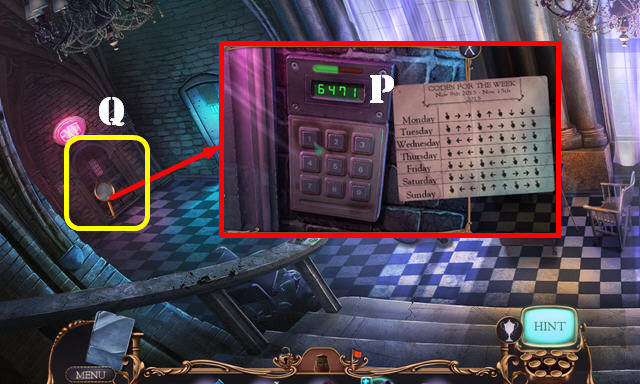
- Place the LED DISPLAY and KEYPAD CODE for a puzzle (P).
- Solution (6471).
- Return to Ravenhearst (Q).
Chapter 2: Return to Ravenhearst
- Take the SOLVENT (R); look at the note.
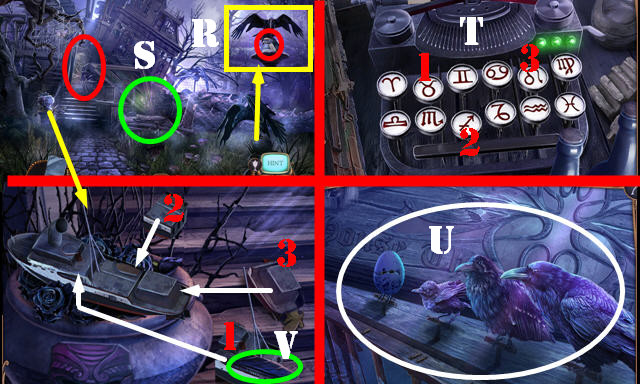
- Select the wood pile twice (S) for a HOP; play it to get the PUNCH CARD. HOP solutions one 1-2-3 (T). HOP and two (U).
- Take the FEATHERS 1/3 (V). Arrange the ship as shown; take the SHIP MODEL (1-3).
- Go to the Museum ruins.
- Take the SELF-INFLATING VEST (W). Place the SHIP MODEL (X); take the SMALL ANCHOR (Y).
- Go left.
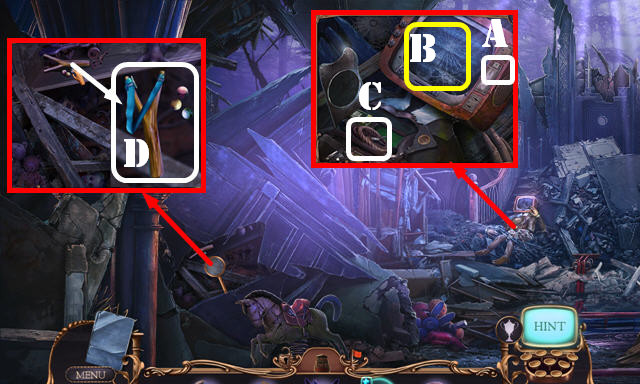
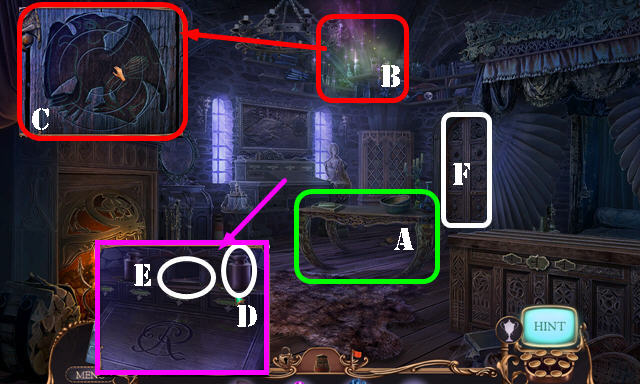
- Move the hand; place the PUNCH CARD (A) and select the TV (B). Take the NYLON CORD (C).
- Place the TOURNIQUET RUBBER on the stick (D) to get the SLINGSHOT.
- Walk down.
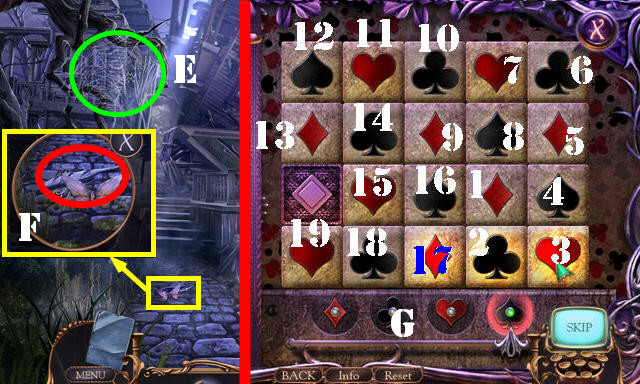
- Use the SLINGSHOT (E); take the MOTH and FEATHERS 2/3 (F).
- Place the MOTH on ALISTER’S ENIGMA for a puzzle (inventory). Solution (G).
- Take the FEATHERS 3/3.
- Place the 3 FEATHERS; take the SHACKLE LINK (H).
- Place the NYLON CORD and SHACKLE LINK on the SMALL ANCHOR; select it to get the GRAPPLING HOOK (inventory).
- Go to the Museum ruins; go right.
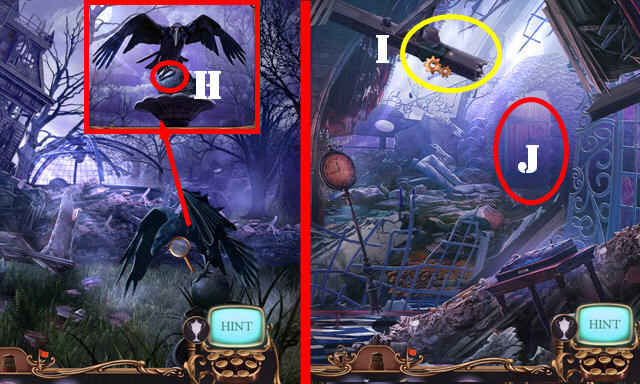
- Use the GRAPPLING HOOK (I).
- Go to the Memorial garden (J).
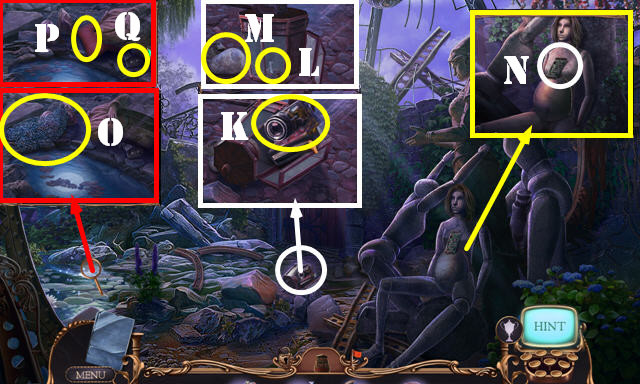
- Select the camera 3x to get the SCOPE (K). Place the BURNER WICK; select the lantern and use the LIGHTER FLUID (L). Use the flint (M); take the PARAFFIN LAMP.
- Take the CIRCUIT BOARD (N) and NET (O).
- Place the SELF-INFLATING VEST (P) and select it; take VICTOR’S COTTAGE (Q).
- Walk down; go left.
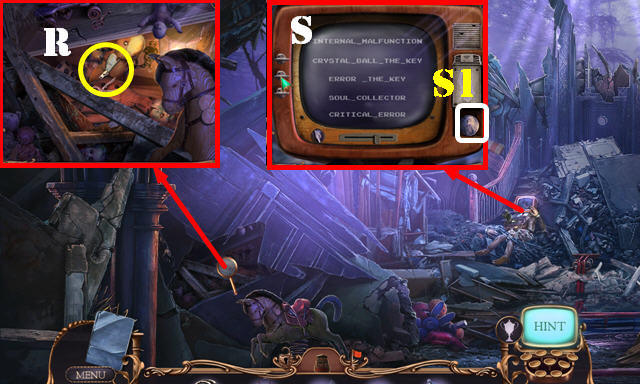
- Place the PARAFFIN LAMP; select the zipper 2x (R) to get the ZIPPER HEAD.
- Place the CIRCUIT BOARD. Select the dials to make the choices (S). Take the RAVEN TWINS 1/3 (S1).
- Go right.
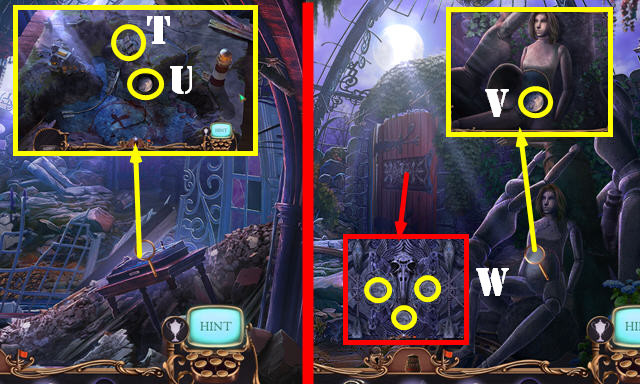
- Place VICTOR’S COTTAGE (T); take the RAVEN TWINS 2/3 (U).
- Go to the Memorial garden.
- Place the ZIPPER HEAD; take the RAVEN TWINS 3/3 (V).
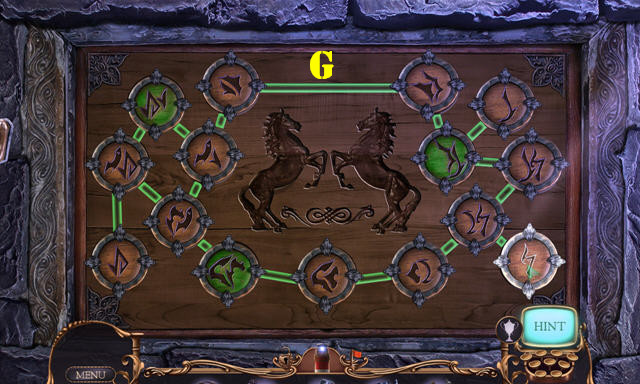
- Place the 3 RAVEN TWINS for a puzzle (W).
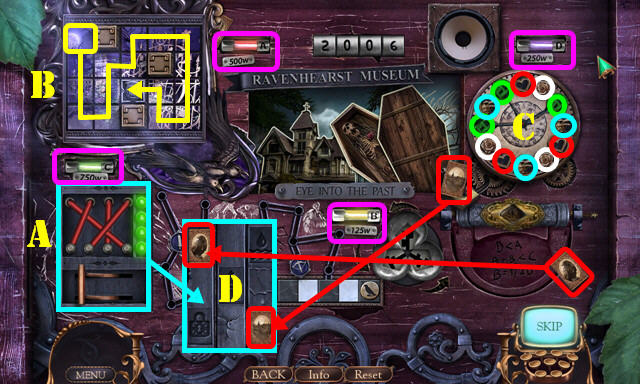

- Arrange the wires as shown; pull the lever (A).
- Swap the fuses as shown (pink).
- Move the token on the path (B).
- Find the matching pieces on the clock (C-color-coded).
- Place the two cards as shown (D).
- Place the wings (E) on the caterpillar (F).
- Set the clock to (10:10) using the clue provided (G) by dragging the two cogs (H).
- Use the arrows to change the lock (I) to fit the key. Place the key (J) in the lock.
- Select the tiles until they are the right height (K).
- Select the dial (L).
- Place the 3 cards (red) as shown (M).
- Take the manor (N); place it (O).
- Select the lights as shown (P) by using the clue (Q).
- Place the seal (R) on the scroll (S).
- Place the coins (green) in the right spots (T).
- Select 1-14.
- Select the five souls (U).
- Go through the door for the Cemetery.
Chapter 3: City Gate
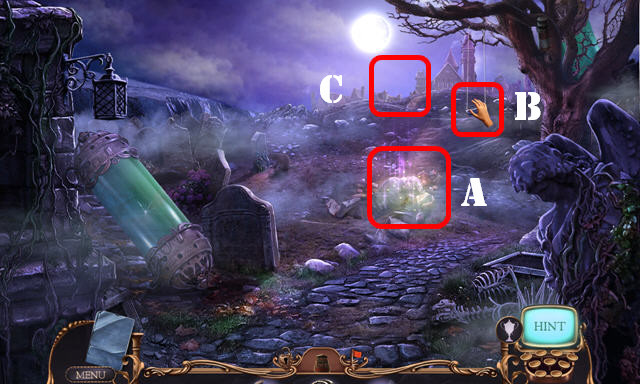
- Play the HOP (A) to get the LOCKPICK SET.
- Take the SWING PLANK (B).
- Go to the City gate (C).
- Select the boat (D).
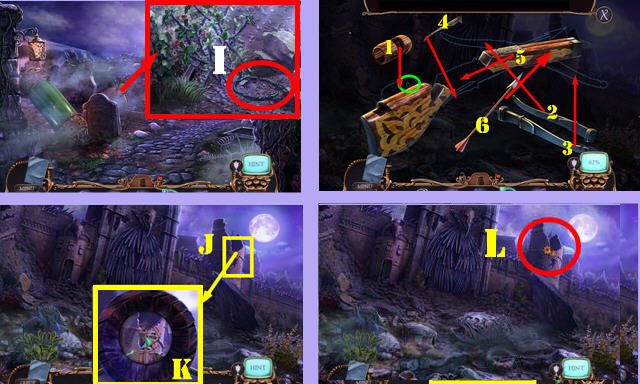
- Take the SHIELD PARTS 1/3 (E).Use the SWING PLANK; take the FISH (F).
- Use the LOCKPICK SET on the lock; move the bottle; take the BROKEN CROSSBOW (G).
- Take the SHIELD PARTS 2/3 (H). Select the moss twice.
- Walk down.
- Give the FISH to the cat; take the STRING (I).
- Go to the City gate.
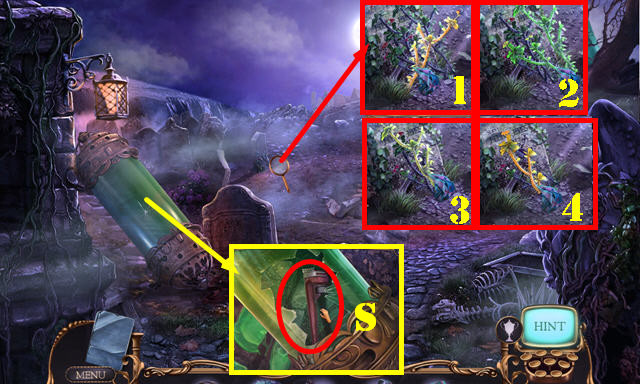
- Assemble the BROKEN CROSSBOW (1-6), then place the SCOPE and STRING to get the CROSSBOW (inventory).
- Place the CROSSBOW (J); aim and shoot (K).
- Go to the Tower (L).
- Take the SHIELD PARTS 3/3 (M).
- Take the LEATHER BELT (N). Place the 3 SHIELD PART; select the crown and two towers (O) to get the SHIELD. Take the CRANK HANDLE (P).
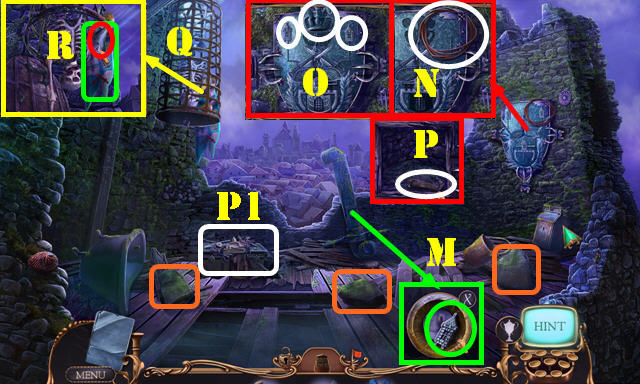
- Remove the debris (P1).
- Place the NET (Q); select the three rocks (orange). Look at the note; take the SNAKE and BANNER (R).
- Return to the Cemetery.
- Use the SHIELD 3x; take the CLAW WRENCH (S).
- Use the BANNER (1-4); take the WRENCH PIECE.
- Place the WRENCH PIECE on the CLAW WRENCH to get the WRENCH (inventory).
- Return to the Tower.
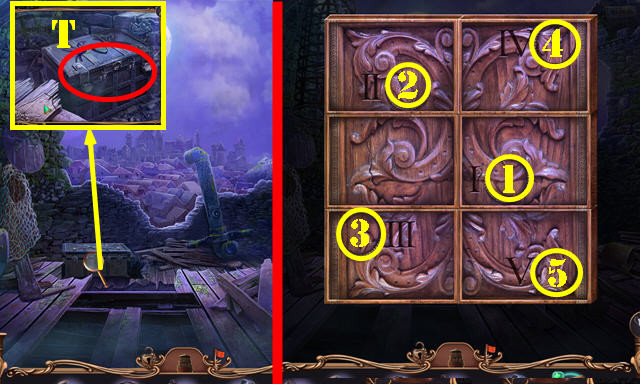
- Use the WRENCH for an HOP (T); play it to get the HOP to get the WOOD TILES.
- Select the WOOD TILES, then select the circles I, II, III, IV and V to get the PERFORATED BOARD (inventory).
- Walk down.
- Place the PERFORATED BOARD (U).
- Select the symbols (V).
- Enter Gallows square.
Chapter 4: The City
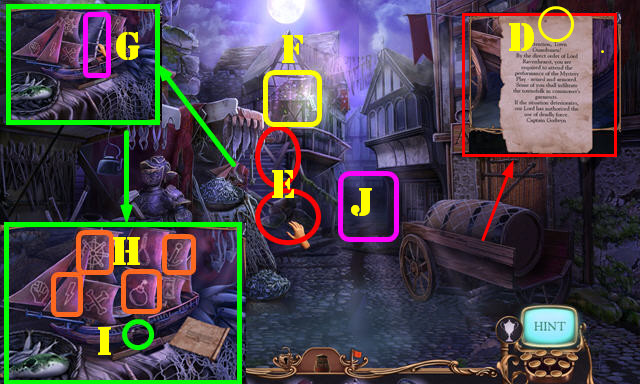
- Look at the note. Use the SOLVENT; take the LORD CEDRIC and EMBLEM PARTS 1/2 (A).
- Go left.
- Select the lattice twice; take the WAGON JACK (B).
- Remove the chains (C).
- Go right and then to the Street fair (D).
- Read the note. Take the EMBLEM PARTS 2/2 (E).
- Walk down.
- Place the 2 EMBLEM PARTS and assemble them for a puzzle (F).
- Solution (G).
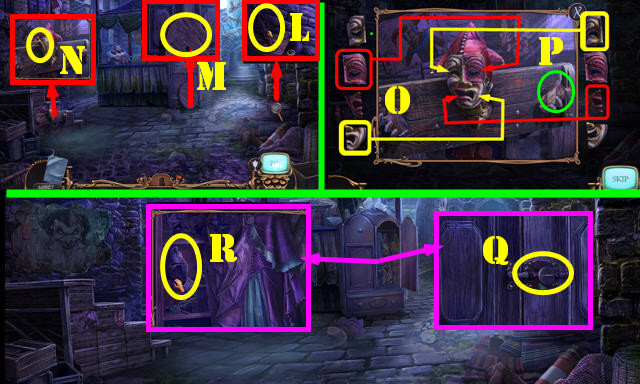
- Enter the Bailiff’s office.
- Take the PULLEY WHEEL (H) and PLAQUE 1/3 (I).
- Use the WAGON JACK; read the note and take the COPPER ENGRAVING (J).
- Walk down.
- Place the COPPER ENGRAVING (L); remove the rocks; take the COPPER ENGRAVING (M).
- Go left.
- Place the COPPER ENGRAVING (N); remove the stone; take the COPPER ENGRAVING (O).
- Go right.
- Place the COPPER ENGRAVING (P); move the shield; take the SUPPORTER (Q). Select the rocks; take the PLAQUE 2/3 (R).
- Go left.
- Place the PULLEY WHEEL, CRANK HANDLE and LEATHER BELT (S). Take the SEAL WAX (T); crank the handle twice; take the PLAQUE 3/3 (U).
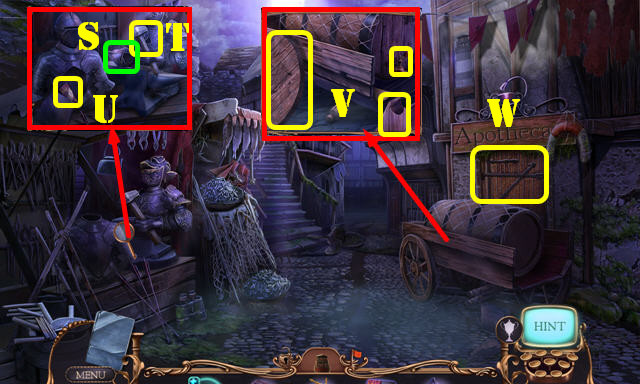
- Enter the Bailiff’s office.

- Place the 3 PLAQUES and arrange them as shown (V) for an HOP; play it to get the LOCKSMITH TOKEN.
- Walk down.
- Place the LOCKSMITH TOKEN; select the four keys (W).
- Enter the Locksmith’s workshop.
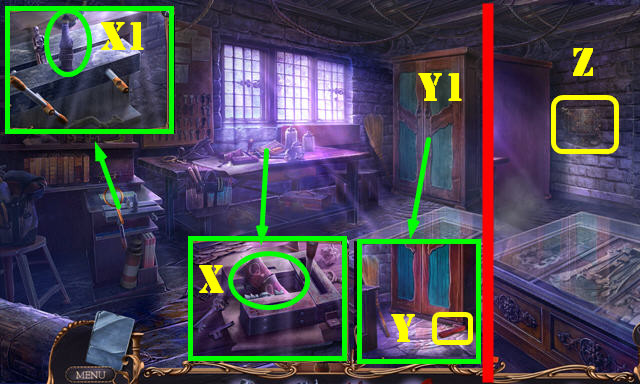
- Take the SHIP SAILS (X) and RAVENHEARST TOWER (X1).
- Use the SEAL WAX (Y); move the cabinet (Y1). Play the puzzle (Z).

- Solution: U-D-L-D-Ux2-R-Ux3-L-Dx5-R-D-U-R-U-R-U-R-Ux2-Dx4.
- Look At the note. Take the BLANK KEY BOX.
- Lift the glass; place the SNAKE (A) and take the JAW MECHANISM (B).
- Go to Alister’s dwelling (C).
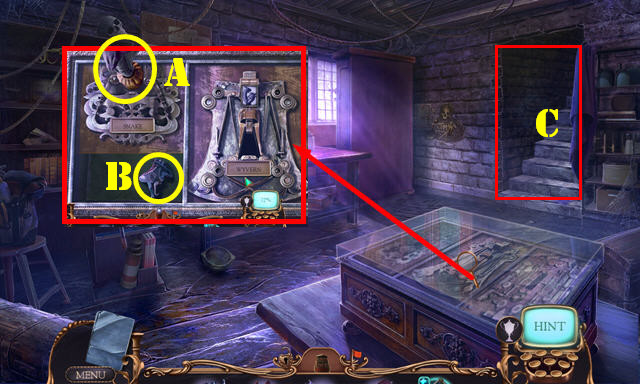
- Read the note; take the VICE BAR (D). Place the JAW MECHANISM; take the WYVERN 1/2 (E).
- Take the GARGOYLE 1/3 (F). Place the RAVENHEARST TOWER (G). Look at the three notes (orange). Place the building pieces as shown (H). Take the WYVERN 2/2.
- Walk down.
- Use the VICE BAR; take LADY MORWYN (I).
- Place the 2 WYVERNS; take the ROTATING DIAL and MECHANICAL SPIDER (J).
- Return to Alister’s dwelling.
- Place the ROTATING DIAL; change the dates to 1457 for an HOP; play it to get the KEY DRAWING (K).
- Place LORD CEDRIC, LADY MORWYN and the MECHANICAL SPIDER () for a puzzle.
- Solution (1-13).
- Take the SCALE PAN and DRAGON.
- Walk down.
- Place the DRAGON; look at the note and take the BOX PARTS (L).
- Place the BOX PARTS in the BLANK KEY BOX. Put the pieces in the right spots and take the BLANK KEY (inventory).
- Place the KEY DRAWING and BLANK KEY for a puzzle. Solution (M). Pull the handle (N); take the FACE-LOCK KEY.
- Return to the Bailiff’s office.
- Place the FACE-LOCK KEY for a puzzle (O).
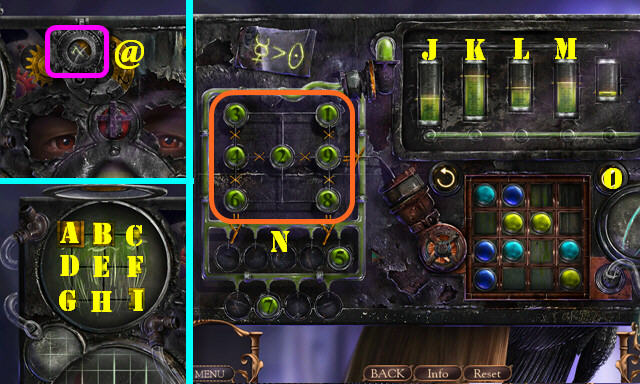
- Set the dial to 7 (@).
- Solution: G-D; I-H; H-G; F-I; I-H; C-F; F-I; E-F; F-I; I-H; D-E; H-E; G-H; H-I; I-F; E-F; F-E; E-B; A-D; D-E; B-E.
- Select Kx2-L-Mx3-K-Lx2-K-M-J.
- Place the numbers as shown (N).
- Select Ox7.
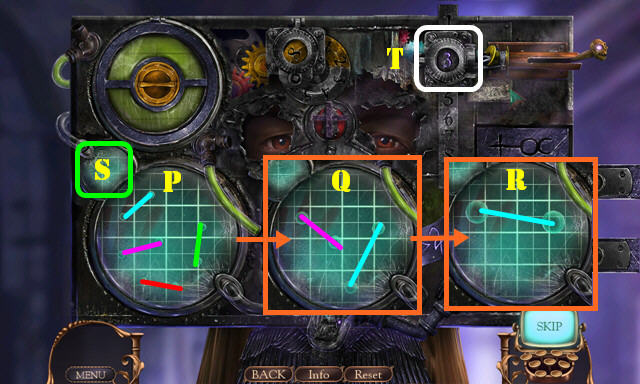
- Combine pairs of bubbles (P-R).
- Move the single bubble to (S) and select it.
- Set the dial to 3 (T).
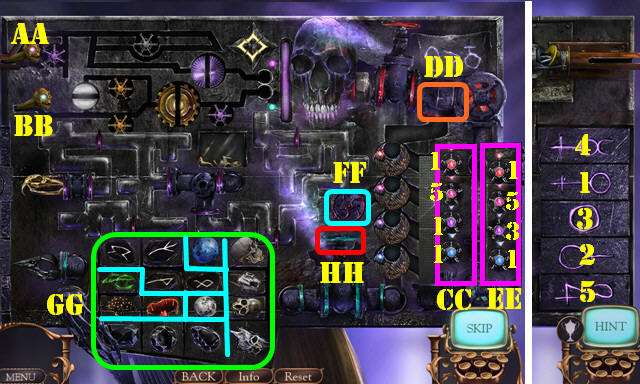
- Move AA right x3. Move BB right x2-up-left-down-right x2. Move AA left-down x2-right.
- Set the dials (CC); select (DD).
- Set the dials (EE); select (DD).
- Select (FF).
- Divide the items as shown (GG).
- Select (HH).
- Select the symbols 1-5.
- Take the JUSTICE SCALES (A).
- Place the JUSTICE SCALES; pull in the swords as shown (1-4). Select the handle; take the SLEDGEHAMMER (B).
- Return to the Street fair.
- Use the SLEDGEHAMMER 3x on the scene (C).
- Read the note; take the SPINNING TOP (D).
- Remove the planks (E). Play the HOP (F) to get the JESTER MASK.
- Select the mast (G) to get a note; remove the mast. Place the SHIP SAILS.
- Select the sails (H). Take the VINEGAR (I).
- Go to the Mystery play (J).
- Take the PEG LEG (L), BARREL TOP (M) and HALF MAN (N).
- Place the JESTER MASKS; assemble as shown (O); take the FAMILY CREST 1/2 (P).
- Place the SPINNING TOP (Q).
- Move all the clothes aside; take the DAMAGED HELMET (R).
- Walk down.
- Place the DAMAGED HELMET (S); select the hammer twice (T). Take the FAMILY CREST 2/2 (U).
- Place the 2 FAMILY CRESTS on the PEG LEG; read the note and take the TAP (inventory).
- Place the SUPPORTER, TAP and BARREL TOP; select the tap. Move the supporter and the wheel (V).
- Move the cart.
- Enter the Apothecary (W).
Chapter 5: The Apothecary
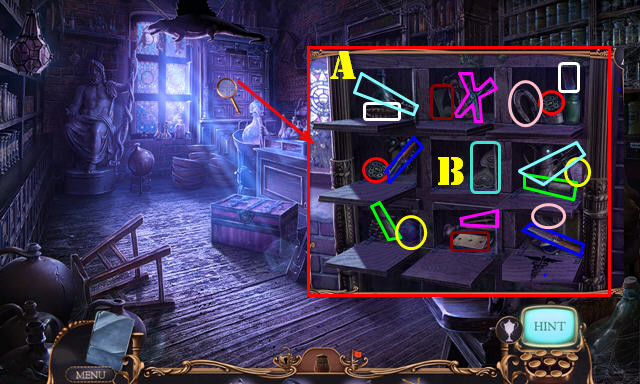
- Find the matching pairs (A). Read the note. Take the ARMOR EMBLEM (B).
- Look at the book (C) and flip all the pages. Place the SCALE PAN (D). Select the 3 and 5 weights; remove weight 1 from scale (E). Use the spoon (F) to get the flour. Use the spoon to remove the flour on the scale pan. Place the flour in the beaker (G).
- Add VINEGAR to the beaker. Take the INFLATING GAS.
- Walk down.
- Place the ARMOR EMBLEM; take the METAL SKULL (H).
- Use the INFLATING GAS (I); take the FISHING LURE (J).
- Enter the Apothecary.
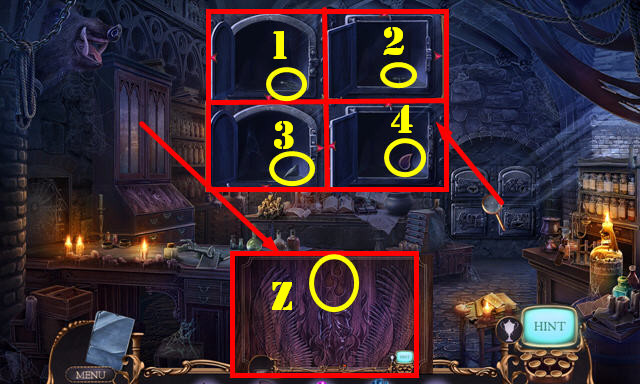
- Remove the panel; open the three compartments. Place the 2 skulls (K) and METAL SKULL. Face the skulls as shown (L); take the WOODEN ANEMONE.
- Use the FISHING LURE to get the CHEST TOKEN (M).
- Place the CHEST TOKEN; arrange the pieces as shown to get the APOTHECARY STEPS (N).
- Read the note. Take the ORNATE BRACELET (O); play the puzzle (P).
- Solution (Q).
- Go to Mystery play.
- Place the APOTHECARY STEPS (R) for a HOP; play the HOP (S) to get the EMBLEM HALF. HOP puzzle solution (T).
- Place the WOODEN ANEMONE for a puzzle. Solution (U). Take the GRAVEYARD EMBLEM (V).
- Place the EMBLEM HALF on the GRAVEYARD EMBLEM (inventory).
- Go to the Graveyard (W).
- Place the GRAVEYARD EMBLEM on the gate.
- Take the HALBERD (X) and LEVER (Y).
- Place the ORNATE BRACELET (Z); select it twice; take the WOODEN CAMPION (Z1).
- Walk down.
- Use the HALBERD; take the GARGOYLE 2/3 (A).
- Place the WOODEN CAMPION (B) for a puzzle. Solution (1-5). Take the RAVEN NUT and GUARDIAN.
- Return to the Graveyard.
- Place the GUARDIAN; take the GARGOYLE 3/3 (C).
- Return to the Apothecary.
- Place the 3 GARGOYLES; take the GRAVE DESCRIPTION and GEAR 1/2 (D).
- Return to the Graveyard.
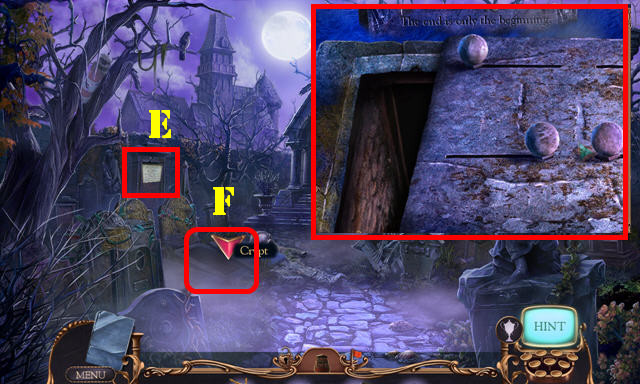
- Place the GRAVE DESCRIPTION for a HOP (E).
- Go to the Crypt (F).
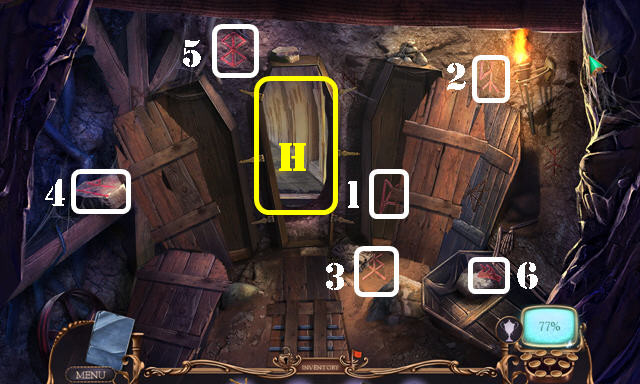
- Select the symbols (1-6).
- Enter the Passage (H).
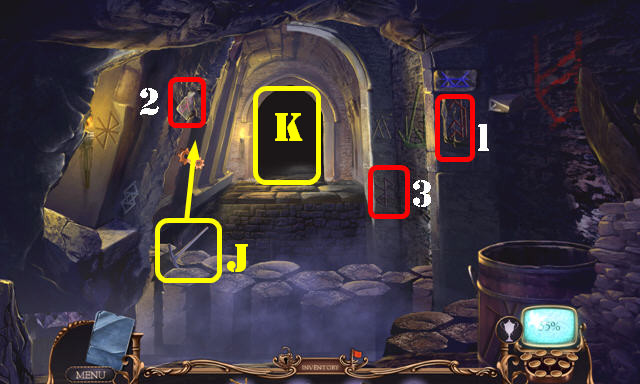
- Select the symbol (1).
- Use the pick (J). Select the symbols (2 and 3).
- Go forward (K).
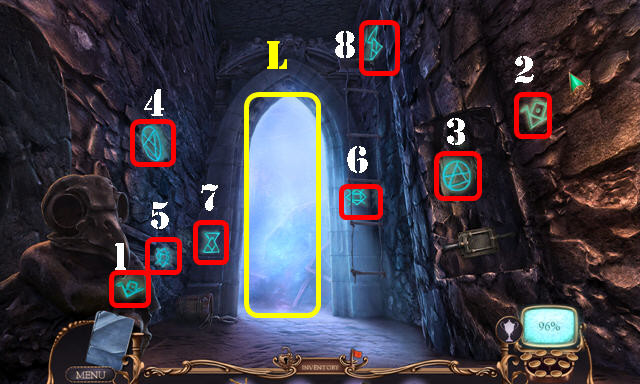
- Select the symbols (1-8).
- Go to the Body pit (L).
- Take the PIPE (M). Place the LEVER and pull it; take the SKELETON HALF (N).
- Slide up.
- Open the mechanism; select the gears (O).
- Select the device; place the RAVEN NUT; take the WRIST CRUSHER (P).
- Slide down and enter the Correction chamber (Q).
- Remove the sheet (R) for a HOP; play it to get the EYE. HOP Puzzle solution (S).
- Take the DROPLETS 1/4 (T) and RAVEN FLINT (U).
- Look at the note; place the SKELETON HALF and HALF MAN; take the GEAR 2/2 (V).
- Walk down and slide up.
- Place the 2 GEARS (A); close the compartment. Take the GOLDEN EMBLEMS 1/3 and MOSAIC TILE (B).
- Select the arm (C) and shoe (D). Play the HOP (E) to get the HOOK WHIP.
- Use the HOOK WHIP (F) to get the BELT CHEWER.
- Use the BELT CHEWER (G).
- Slide up.
- Place the EYE; take the SPREADER (H).
- Select the SPREADER 4x (inventory).
- Return to the Correction chamber.
- Use the SPREADER; take the GOLDEN EMBLEMS 2/3 (I).
- Place the MOSAIC TILE for a puzzle. Solution (J).
- Take the LORD’S SEAL and GOLDEN EMBLEMS 3/3.
- Walk down and slide up.
- Place the 3 GOLDEN EMBLEMS for a puzzle (K).
- Solution (1-5).
- Enter the Distillery.
- Place the RAVEN FLINT (L).
- Take the BARREL (M). Remove the pipe piece (N).
- Remove the scarf; take the DROPLETS 2/4 (O).
- Use the LORD’S SEAL; look at the note; take the JEWELS (P).
- Go to the Preparation room (Q).
- Select the pieces 1-3. Place the PIPE and WRIST CRUSHER to get the HAND PUMP (R).
- Select the stack of books (S) for a HOP; play it to get the BOOK. HOP puzzle solution (T).
- Take the LEATHER GLOVE (U).
- Walk down.
- Place the BOOK and arrange as shown (V). Look at the note and take the DROPLETS 3/4 (W).
- Place the HAND PUMP (X); take the METAL BEAK (Y).
- Go to the Preparation room.
- Place the METAL BEAK; take the CLAW EMBLEM (1).
- Select the left and down arrows; place the CLAW EMBLEM; take the RAVEN EMBLEM (2).
- Select the up arrow; place the RAVEN EMBLEM; take the RAVEN BODY EMBLEM (3).
- Select the right and down arrows; place the RAVEN BODY EMBLEM; take the DROPLETS 4/4 (4).
- Place the 4 DROPLETS (Z) for a puzzle.
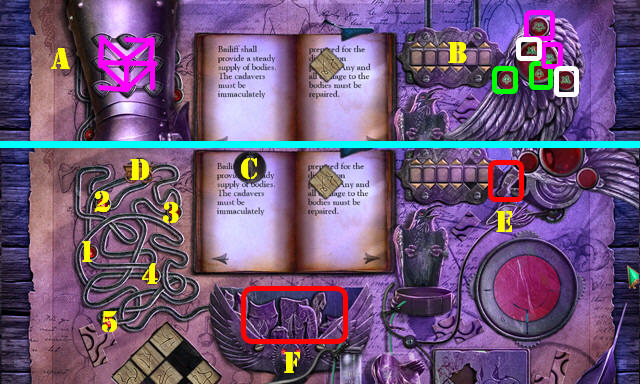

- Connect the numbers as shown (A).
- Rotate the inner circle to match up each of the 3 symbols (B).
- Take the disk (C) and place it (D).
- Select 1-5.
- Move (E) to (F) and select.
- Select 1-12.
- Move (G) to (H).
- Connect the colored squares (I).
- Take the piece (J) and place it (K).
- Move the 5 pieces (green) to the frame (L).
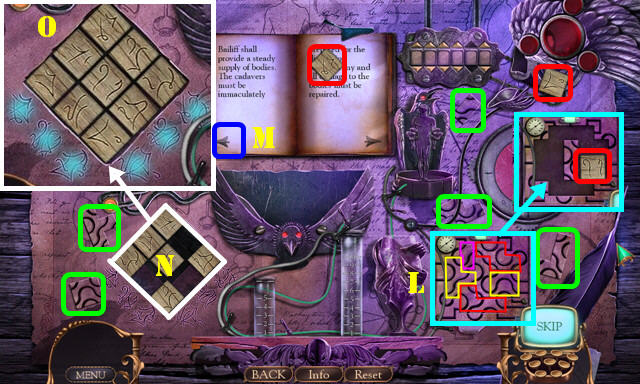
- Turn the left page 3x (M).
- Place the 3 tiles (red) in the grid (N); arrange as shown (O).
- Take the test tube (P); place it (R).
- Select 1-4.
- Select (S-R)-(R-Q)-(Q-S)-(R-Q)-(S-R).
- Take (S) and pour it (T).
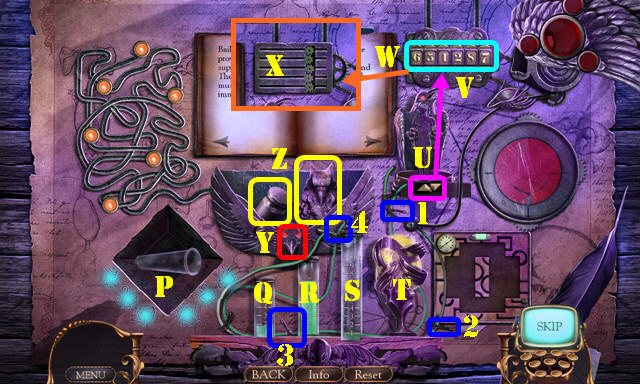
- Move the 2 arrows (U) to (V).
- Enter the code 6-5-1-2-8-7 (W).
- Select the gears when all 5 are over the opening (X).
- Use (T) on (Y).
- Take the WEIGHT and GRYPHON HEAD (Z).
- Walk down.
- Place the GRYPHON HEAD (Z1).
- Enter Lord Cedric’s Bedroom.
Chapter 6: Lord Cedric’s Bedroom
- Move the table (A); play the HOP (B) to get the FRAME CORNER. HOP puzzle solution (C).
- Place the WEIGHT (D); take the SMALL QUIVER (E).
- Go to the Palace hallway (F).
- Take the TAPESTRY (G) and BOX TOKEN 1/3 (H).
- Place the FRAME CORNER; take the TRANSFORMABLE KEY (I).
- Go to Lady Morwyn’s boudoir (J).

- Take MORWYN’S BOX (K) and RIBCAGE (L).
- Select the bone that’s in the cauldron. Place the pin (M) in the cauldron; take the INITIALS 1/2.
- Return to the Lord Cedric’s bedroom.
- Use the TAPESTRY and LEATHER GLOVE to get the ASH SHOVEL (N).
- Place the TRANSFORMABLE KEY for a puzzle (O). Solution (P-Q-R). Take the BOX TOKEN 2/3 and WALL DECORATION.
- Go to the Palace hallway.
- Place the WALL DECORATION; slide all three pieces down; take the MINIATURE HEADDRESS (S).
- Use the ASH SHOVEL; open the drawer; take the BOX TOKEN 3/3 and INITIALS 2/2 (T).
- Place the 3 BOX TOKENS on MORWYN’S BOX for a puzzle. Solution (1-4). Take the COLORED FAN (inventory).
- Walk down.
- Place the 2 INITIALS; take the ENGRAVED WOOD and SCROLL DRAWING 1/2 (U).
- Return to Lady Mowry’s boudoir.
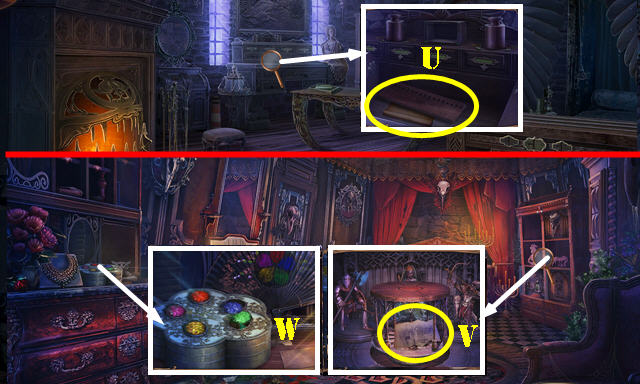
- Place the SMALL QUIVER and MINIATURE HEADDRESS; take the SCROLL DRAWING 2/2 ( V).
- Place the JEWELS and COLORED FAN; arrange the gems as shown (W). Look at the note and take the TRIPTYCH PANEL.
- Walk down twice.
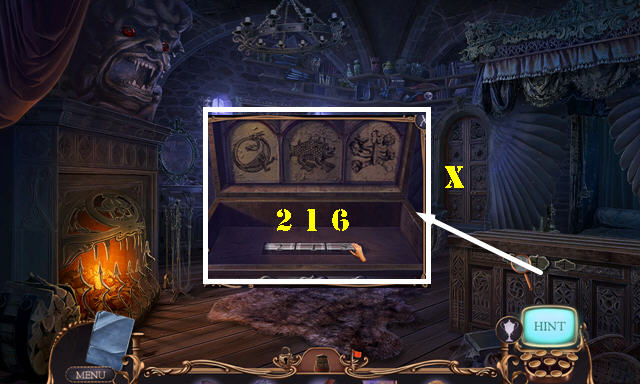
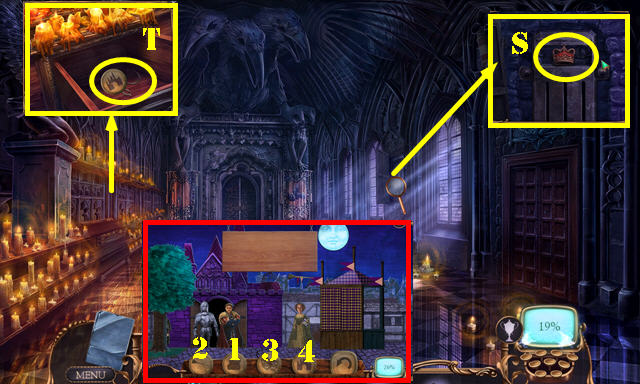
- Place the TRIPTYCH PANEL; change the number to 216 (X). Take the SCROLL CASE and SHARP RING.
- Place the 2 SCROLL DRAWINGS on the SCROLL CASE to get the BOUDOIR CLUE (inventory).
- Go to lady Morwyn’s boudoir.
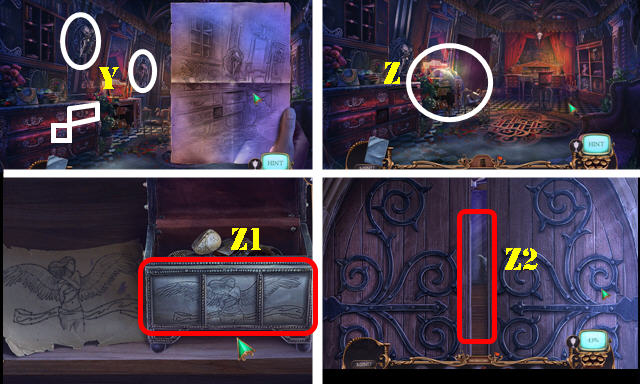
- Place the BOUDOIR CLUE on the scene. Select the items shown (Y).
- Play the HOP (Z) to get the SWORD. HOP puzzle solution (Z1).
- Walk down.
- Use the SAW SWORD 3x for a puzzle (Z2).
- Solution one (A).
- Solution two (B).
- Solution three (C).
- Throw the SHARP RING (D); take the MECHANISM PART 1/2 (E) and play the HOP to get the PICTOGRAPH.
- Take the SPEARHEAD (F) and BLADE HANDLE (G).
- Go to the Spiral Staircase (H).
- Take the MECHANISM PART 2/2 (I).
- Select the handle (J).
- Walk down.
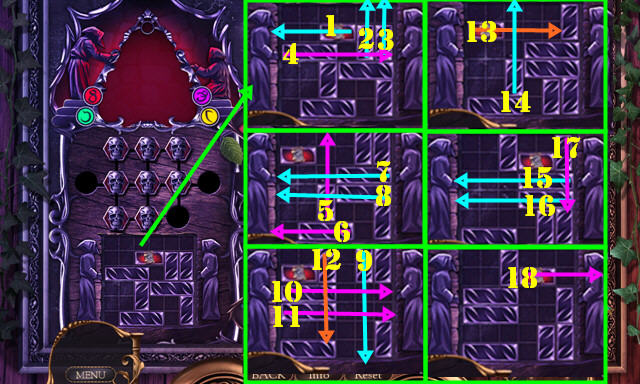
- Place the 2 MECHANISM PARTS for a puzzle (K).

- Solution: D – left, down; 17×2; A – down, right; 10×3; A-up; 17; 19×3.
- A-down, right x2, down;16; 17×2; D-up, left, down; 17×2.
- C-left x3; down, right; 17; C-left, down; 2; 15×3; 16×2; 9×3; 10; 17×3; 19; 12; 5×3;7×3; 14×2; 13×3; 20.
- B-left x3, down x2, right, up, right, down, right x2, up x2, right x2, down, left, down x2.
- Enter the Balcony.
- Take the BOW (E) and STAINED GLASS (F).
- Use the SPEARHEAD to get the STATUETTE (G).
- Slide right.
- Take the SHARP CRYSTAL (H).
- Walk down.
- Place the STAINED GLASS and select it (I). Touch the ground and take the POWDER POUCH (J).
- Place the STATUETTE for a puzzle. Solution (K). Take the STAKE and HERALD.
- Go to the Balcony and slide left.
- Place the ENGRAVED WOOD and STAKE on the BOW to get the BOW DRILL (inventory).
- Place the POWDER POUCH and BOW DRILL; take the OBSIDIAN PIECES and RAVEN FIGURINE (L).
- Slide right.
- Place the HERALD; select 1-4 for a HOP (M); play it to get the SCEPTER BASE.
- Return to the Spiral staircase.
- Place the RAVEN FIGURINE on the SCEPTER BASE to get the SCEPTER (inventory).
- Place the SCEPTER (N) and touch it. Try to go forward.
- Throw the BARREL on the steps (O).
- Remove the vines (P).
- Go to the Cave (Q).
- Place the RIBCAGE and select the bones (R); take the SIGIL OF THE WELL 1/3 (S).
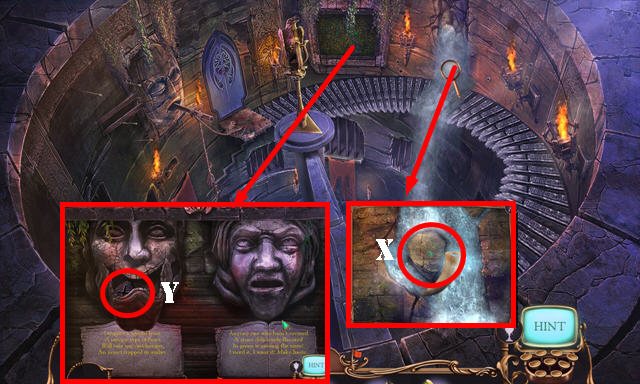
- Go to the Priest’s terrace (T).
- Place the BLADE HANDLE (U); take the HOLLOW HORN (V).
- Place the PICTOGRAPH; slide the hand to the three positions (1-2-3); take the FLY IN AMBER.
- Take the SIGIL OF THE WELL 2/3 (W).
- Return to the Spiral staircase.
- Use the HOLLOW HORN; take the WATER-FILLED HORN (X).
- Place the FLY IN AMBER; take the RUNE (Y).
- Go to the Cave.
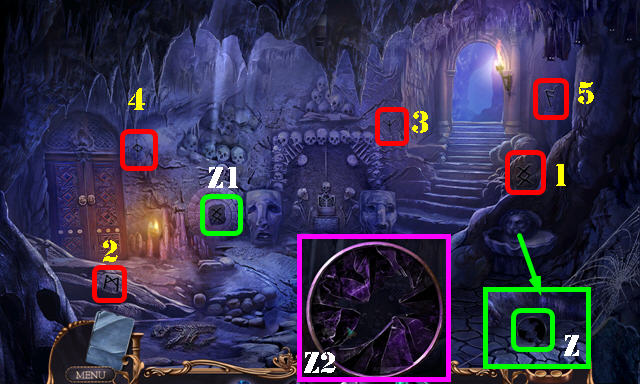
- Use the WATER FILLED HORN; take the OBSIDIAN SILHOUETTE (Z).
- Place the RUNE (Z1). Select the runes (1-5) for an HOP; play it to get the RITUAL MASK.
- Place the OBSIDIAN PIECES on the OBSIDIAN SILHOUETTE for a puzzle (inventory). Solution (Z2) the puzzle to get the RAVEN SILHOUETTE.
- Return to the Priest’s terrace.
- Place the RAVEN SILHOUETTE and select it 2 times; look at the note and select all the pieces to get the STAFF OF OSCILLATIONS (A).
- Place the RITUAL MASK. Place items as shown 1-6.
- Take the EMERALD (B).
- Return to the Spiral staircase.
- Use the STAFF OF OSCILLATIONS and SHARP CRYSTAL; take the SIGIL OF THE WELL 3/3 (C).
- Place the EMERALD; take the ACTIVATOR BASE (D).
- Place the 3 SIGILS OF THE WELL on the ACTIVATOR BASE to get the SIGIL OF THE WELL (inventory).
- Go to the Cave.
- Place the SIGIL OF THE WELL for a puzzle (E).
- Solution: Ax2-Ex2-D-Ex2-G-Ex2-G-E-Cx2-E-G-E-B-Ex2-G-Ex2-G-E-Dx2-E-G-F-Gx2-F-Bx2-E-D-F-Gx2-E-D-F-B-E-G-F-B-E-G-F-Gx2.
- Look at the picture (H); find the differences (red).
- Slider solution (1-18).
- Solution: L-J-L-K-I-L-K-J.
- Place the token (M) in the slot (N).
- Solution: (7-11)-(6-7)-(7-8)-(5-6)-(6-7)-(4-5)-(5-6)-(1-5)-(5-4)-(2-1)-(1-5)-(3-2)-(2-1)-(7-3)-(3-2)-(8-7)-(7-3)-(6-7)-(7-8).
- Place the leaf (O), potion (P), and gold bar (Q) in the cauldron (R).
- Place the book lock (S) in the slot (T).
- Select the numbers (U-V), then select (W).
- Select the ball (X), then the nodes (Y).
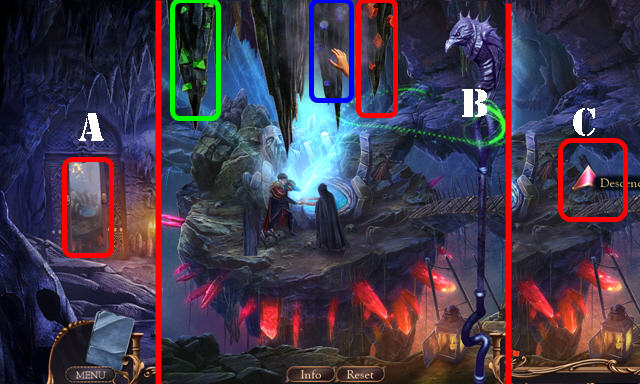
- Go to the Well of Souls (A).
- Place the STAFF OF OSCILLATIONS (B). Select the green-red-blue-green.
- Descend the stairs (C).
- Talk to the lady (D).
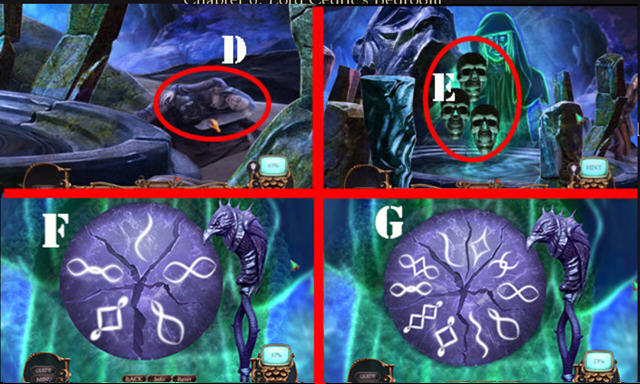
- Select all the skulls on the scene for a puzzle (E). Solution is random (F).
- Select the skulls on the screen for a puzzle. Solution is random (G).
- Congratulations, you’ve completed Mystery Case Files: Ravenhearst Unlocked!.


 Queen's Tales: The Beast and the Nightingale Walkthrough, Guide, & Tips
 Shattered Minds: Encore Walkthrough, Guide, & Tips
 Whisper of a Rose Walkthrough, Guide, & Tips
 Echoes of the Past: The Castle of Shadows Walkthrough, Guide, & Tips
 Campgrounds: The Endorus Expedition Walkthrough, Guide, & Tips