Untold History: Descendant of the Sun Walkthrough, Guide, & Tips
Untold History: Descendant of the Sun Walkthrough

Welcome to the Untold History: Descendant of the Sun Walkthrough
Confront an ancient evil and uncover your true! After a startling revelation changes your world forever, you must embark on an epic journey to save mankind.
Whether you use this document as a reference when things get difficult or as a road map to get you from beginning to end, we’re pretty sure you’ll find what you’re looking for here.
This document contains a complete Untold History: Descendant of the Sun game walkthrough featuring annotated screenshots from actual gameplay!
We hope you find this information useful as you play your way through the game. Use the walkthrough menu below to quickly jump to whatever stage of the game you need help with.
Remember to visit the Big Fish Games Forums if you find you need more help. Have fun!
This walkthrough was created by MargieB, and is protected under US Copyright laws. Any unauthorized use, including re-publication in whole or in part, without permission, is strictly prohibited.
General Tips

- This is the official guide for Untold History: Descendant of the Sun.
- The Hidden-object puzzle scenes will be referred to as HOP throughout the guide. Items labeled in yellow in the find list require an extra step to find.
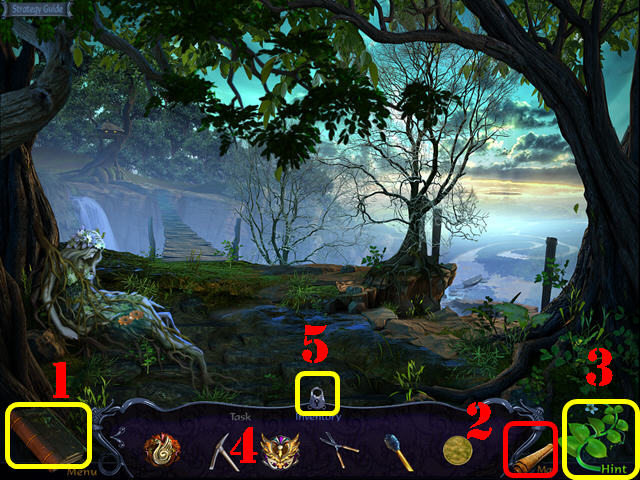
- Open your Diary (1) to view your story updates and stored clues.
- Select the Map (2) to see what locations have tasks to complete. You can also fast travel to any location by selecting the desired area on the map.
- You may select the Hint button (3) for help in game play or HOP areas.
- Move your cursor to the bottom of the screen to pull up the Toolbar (4). You may lock the toolbar in the raised position by locking the padlock (5).
- Puzzles may be skipped after a short wait. You can reset a puzzle by exiting it.
- Select the question mark in the upper right corner of the puzzles to get the instructions.
Chapter 1: The Tale of the Old Man
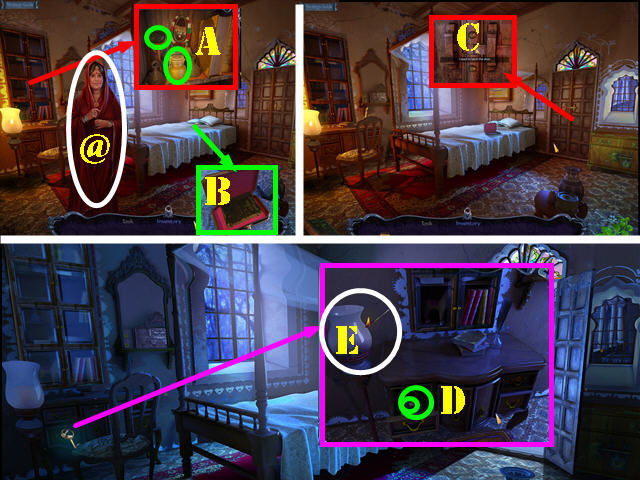
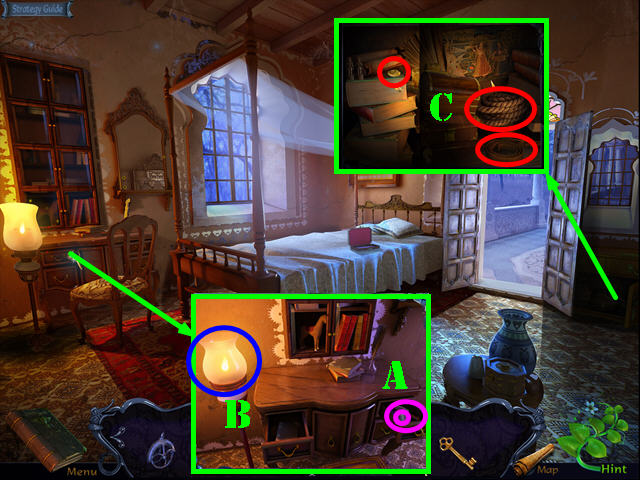
- Talk to the lady (@).
- Zoom into the cabinet and open its doors; take the PENDANT and the FLAMMABLE OIL (A).
- Zoom into the bed; place the PENDANT in the slot and take the diary (B).
- Zoom into the door and pull the latch (C). The man will appear and the room will go dark. You will receive the OWL TALISMAN.
- Take a closer look at the desk drawer and open it; take the MATCHBOX and the MAGNIFYING GLASS (D).
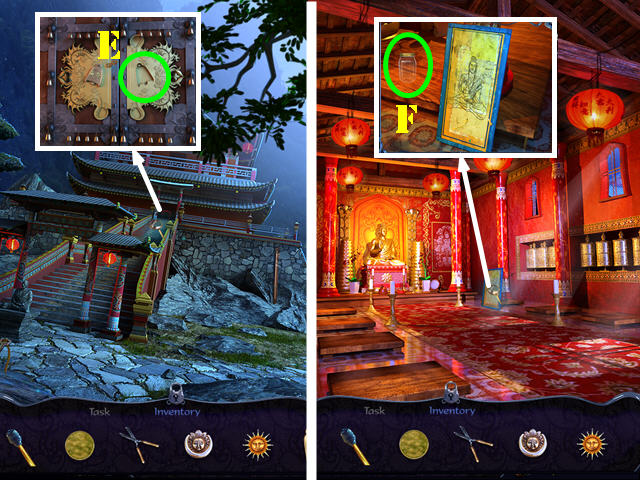
- Use the MATCHBOX on the lamp (E).
- Go through the door to access the Veranda.
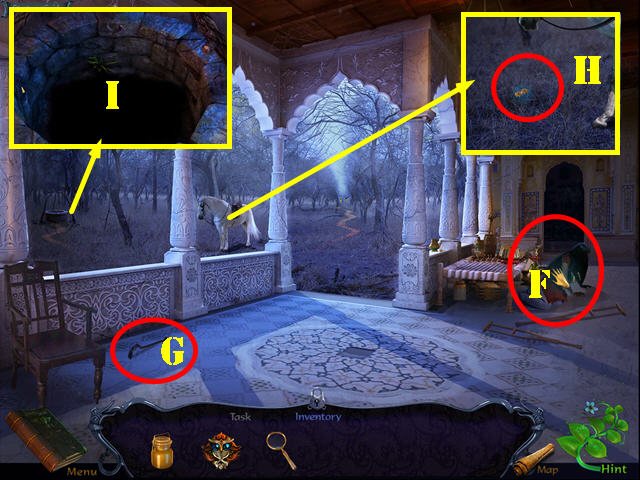
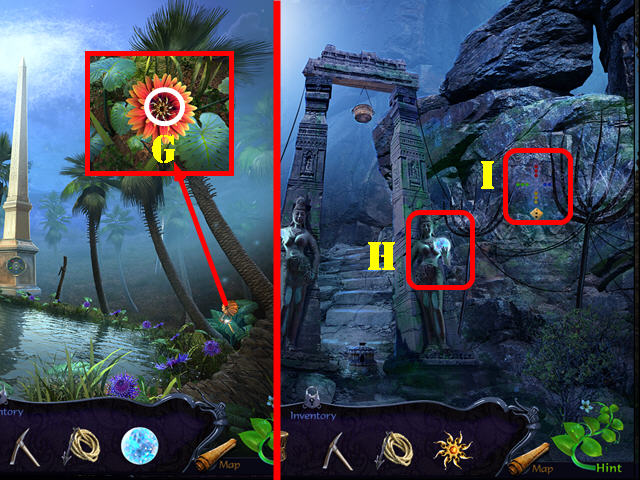
- Touch the lady and then talk to her to receive an objective (F).
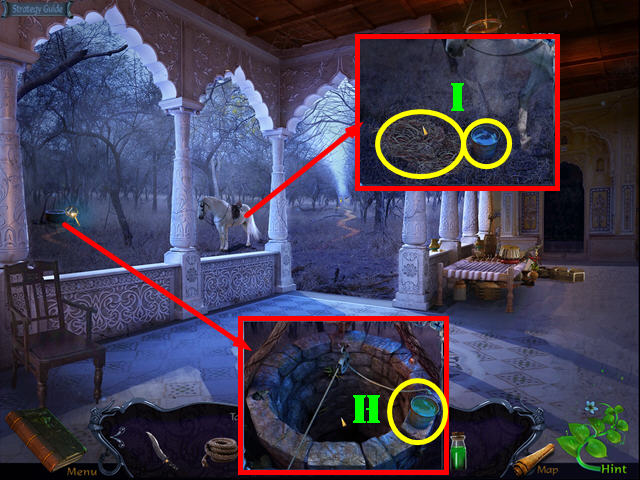
- Take the CROWBAR (G).
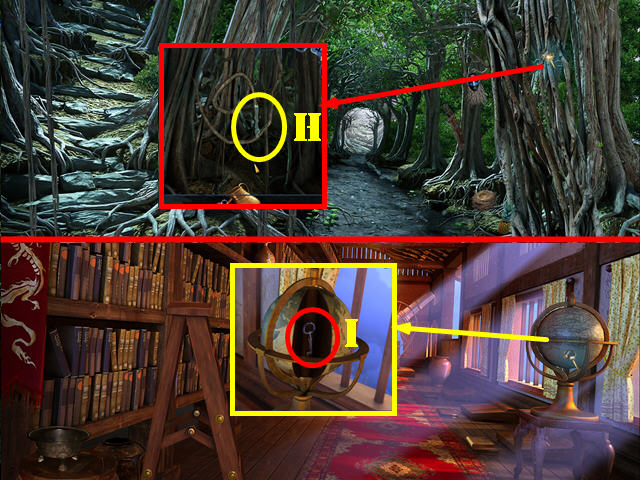
- Zoom into the horse and touch the grass for an objective (H).
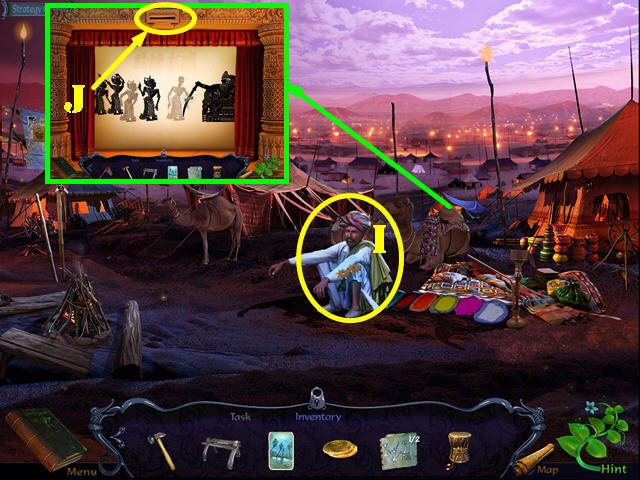
- Take a closer look at the well (I).
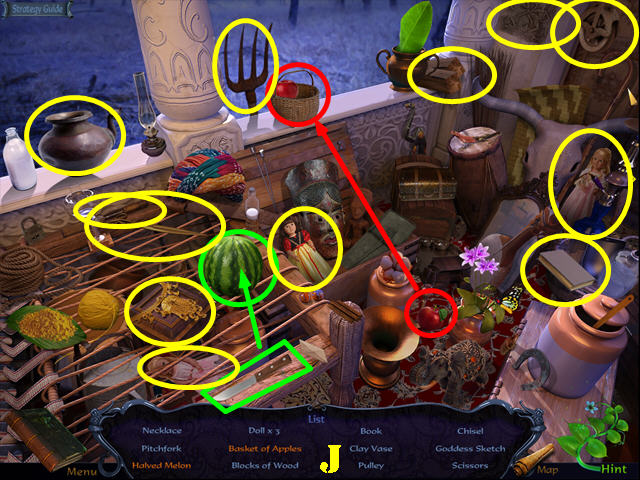
- Play the HOP.
- Interactive items are color-coded (J).
- You will receive the PITCHFORK and the PULLEY.
- Go forward to the Village Center.
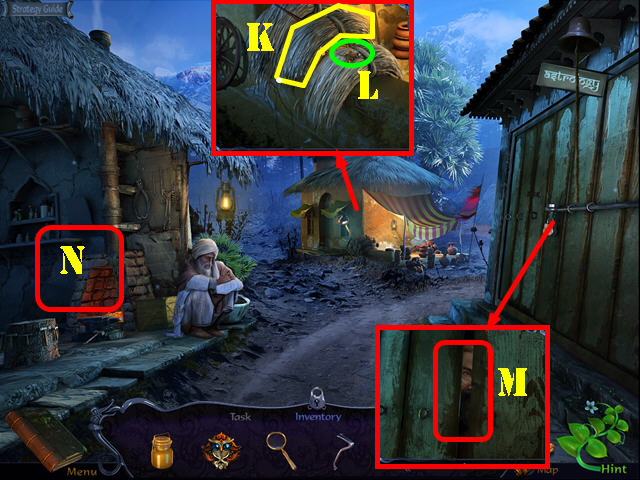
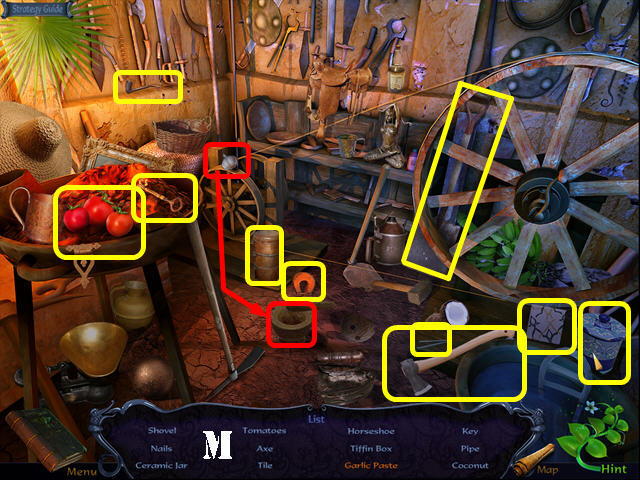
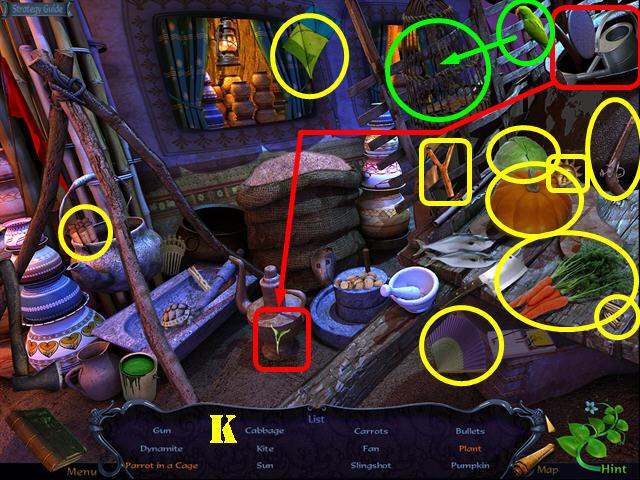
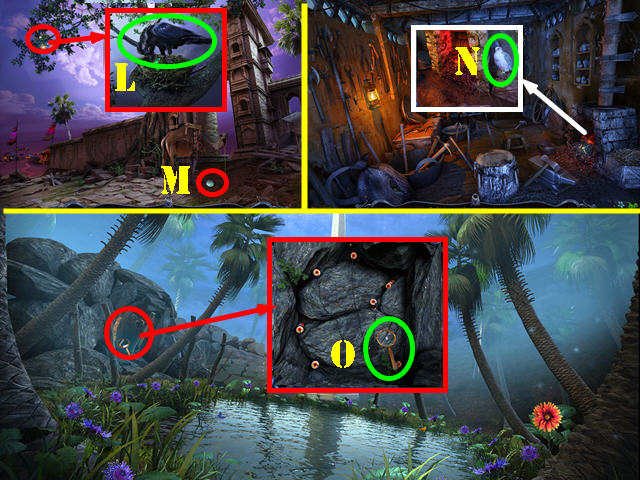
- Zoom into the hay and use the PITCHFORK on the it to get the PILE OF HAY (K). Take the KEY RING (L).
- Zoom into the door for an objective (M).
- Enter the Blacksmith’s Stall (N).
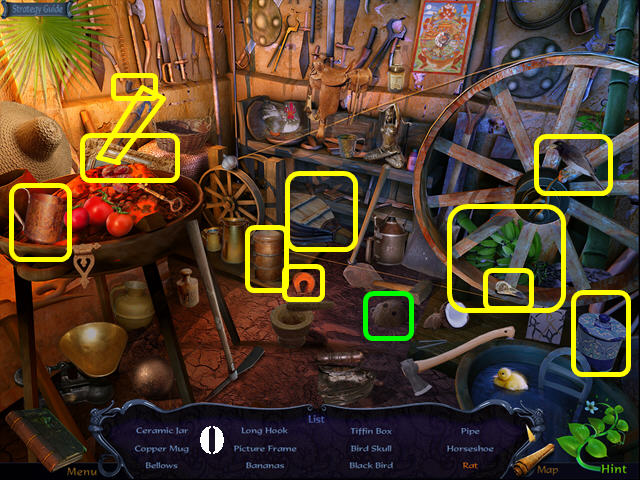
- Play the HOP.
- Interactive items are color-coded (O).
- You will receive the BELLOWS and the LONG HOOK.
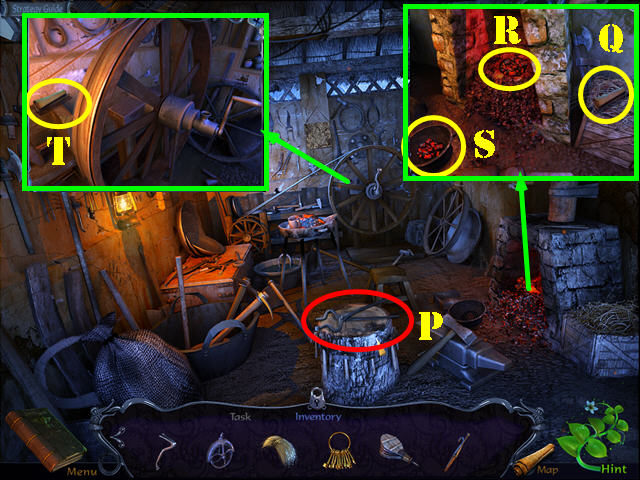
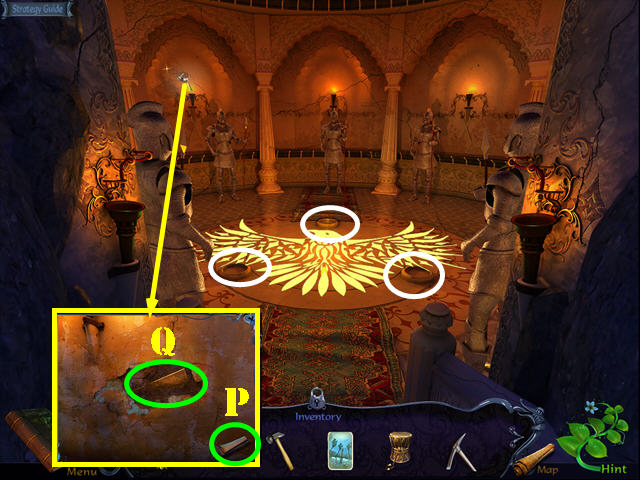
- Grab the TONGS (P).
- Zoom into the forge; take the note (Q).
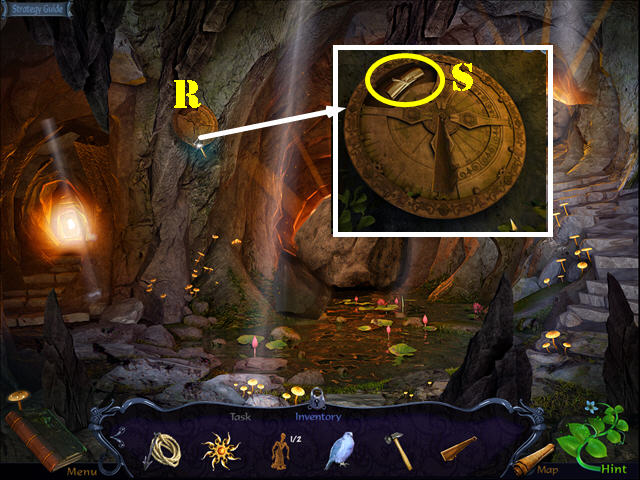
- Use the TONGS on the coals (R) and then take the BURNING COALS (S).
- Zoom into the forging device and take the note (T).
- Walk down three times.
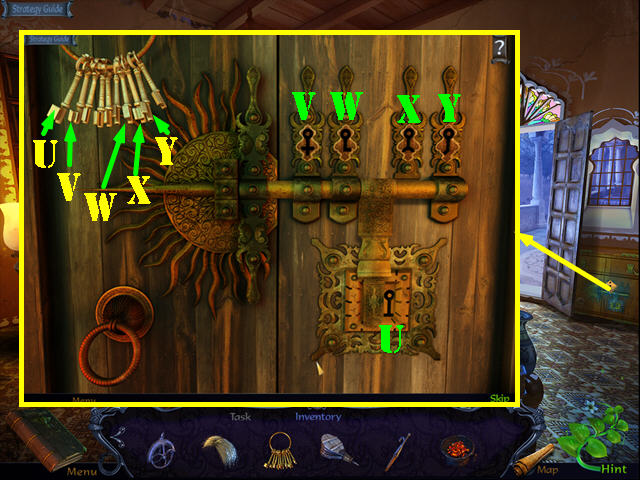
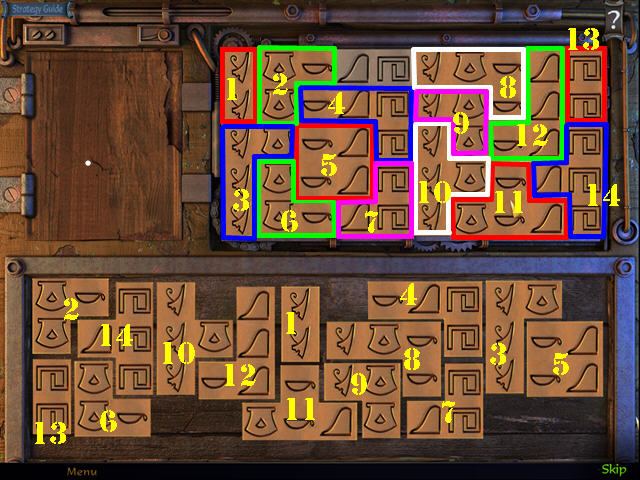
- Zoom into the cabinet and place the KEY RING on the locks to activate a puzzle.
- Put the keys into the correct locks.
- Please look at the screenshot for the solution (U-Y).
- You will receive the DRAWER KEY.
- Zoom into the desk and use the DRAWER KEY in the lock; take the KNIFE and the CANDLE (A).
- Put the CANDLE on the lamp to get the LIT CANDLE (B).
- Zoom back into the cabinet and use the LIT CANDLE in it. Take the ROPE, the LEATHER STRAP and the GOLD COINS (C).
- Return to the Village Center.
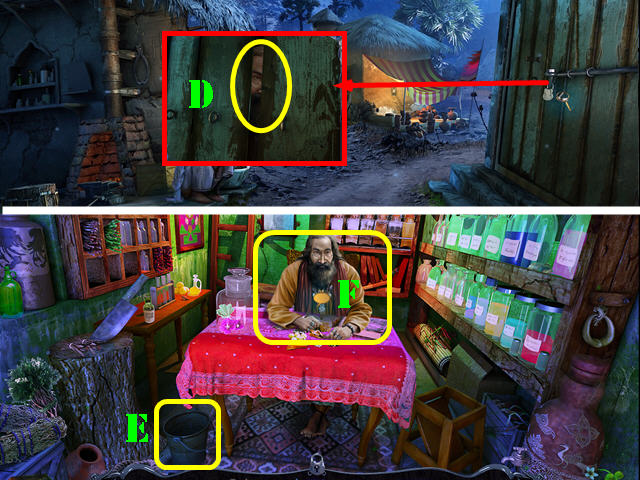
- Zoom into the door; give the GOLD COINS to the man and then enter the Astrologer’s Store (D).
- Take the EMPTY BUCKET (E).
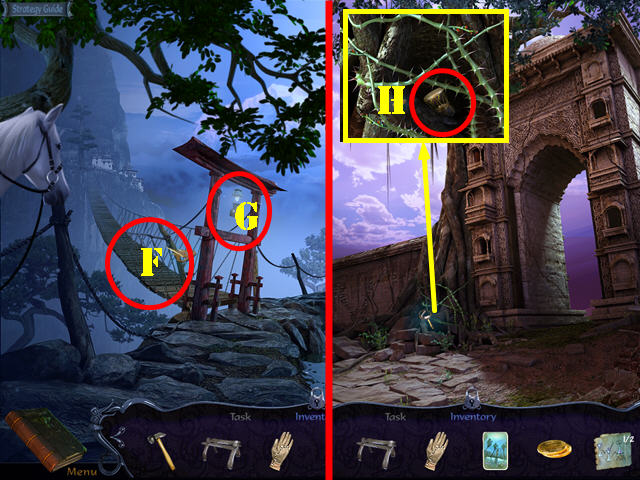
- Talk to the astrologer and then zoom into him again to trigger a puzzle (F).
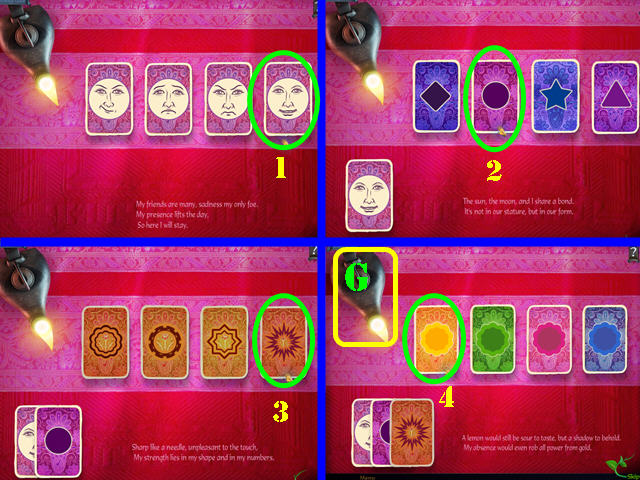
- Select the card that best describes the saying at the bottom.
- Please look at the screenshot for the solution (1-4).
- Drag the card to the lamp to receive the SUN CARD (G).
- You automatically receive a new objective.
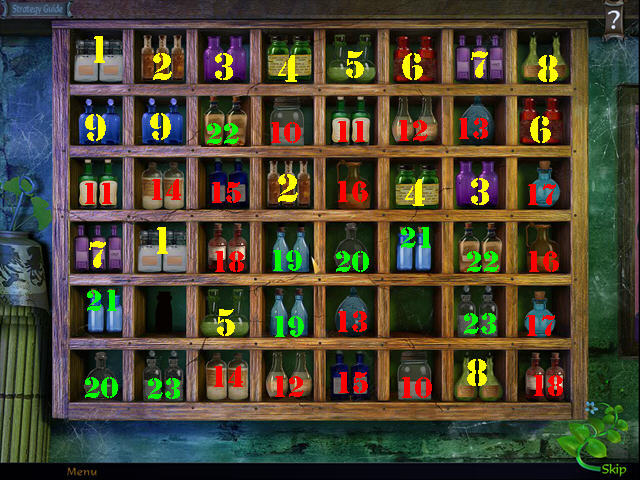
- Examine the shelves to access a puzzle.
- Select the matching sets of bottles by selecting the two correct cubicles.
- Please look at the screenshot for the solution. Matching items are marked with the same numbers (1-23).
- You will receive the LIFE POTION.
- Return to the Veranda.
- Zoom into the well; place the PULLEY on the rope and then attach the EMPTY BUCKET to the hook. Take the BUCKET OF WATER (H).
- Zoom into the horse; put down the PILE OF HAY and the BUCKET OF WATER (I).
- Follow the horse to the Cliffside.
Chapter 2: The Temple of the Sun
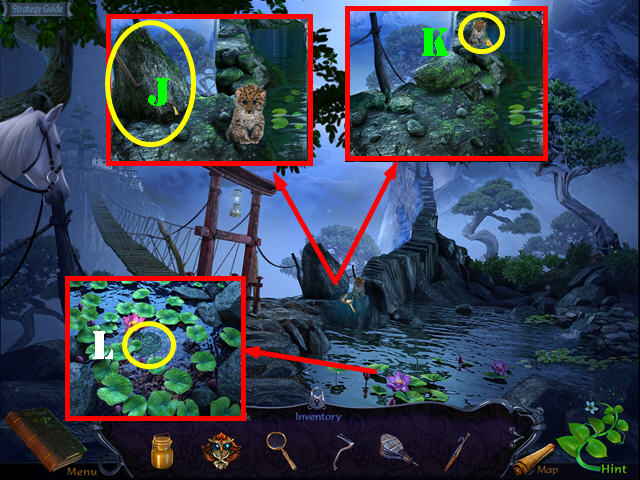
- Zoom into the boulder and use the CROWBAR on it (J); take the CUB (K).
- Examine the pond; use the LONG HOOK to retrieve the MOON AMULET PIECE (L).
- Go forward to the Temple Archway.
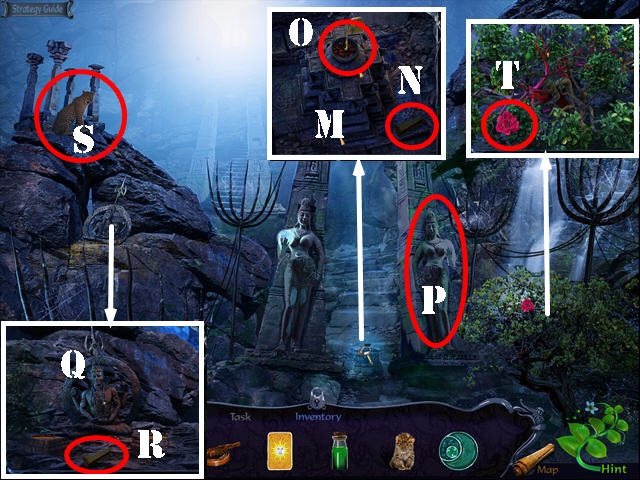
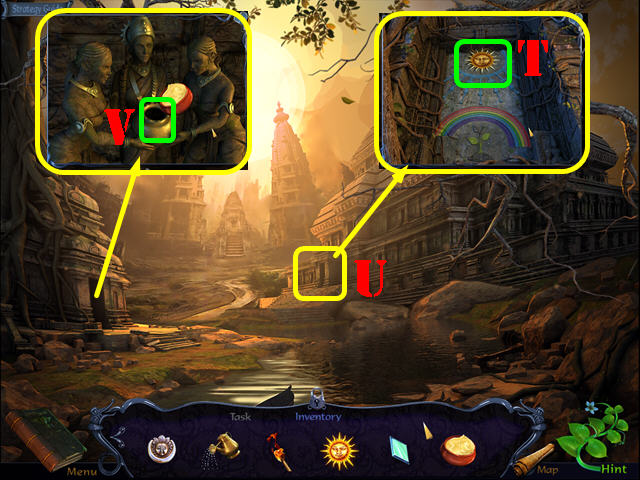
- Zoom into the pedestal (M) and touch it for an objective. Take the note (N).
- Place the BURNING COALS and the FLAMMABLE OIL in the pot (O).
- Touch the statue for an objective (P).
- Zoom into the statue (Q) and then touch the statue for a new objective. Take the note (R).
- Give the CUB to the leopard (S).
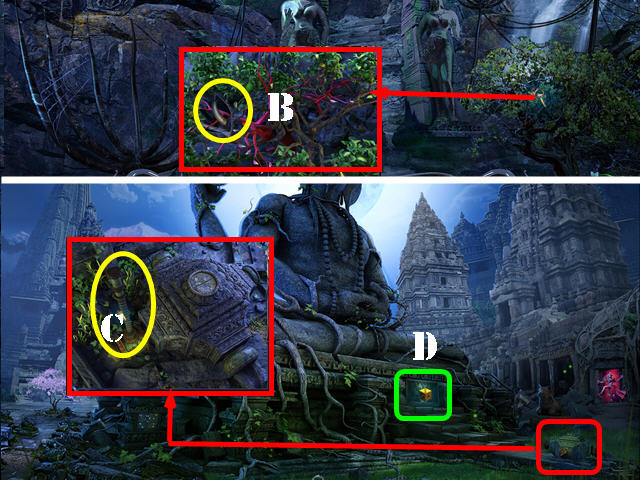
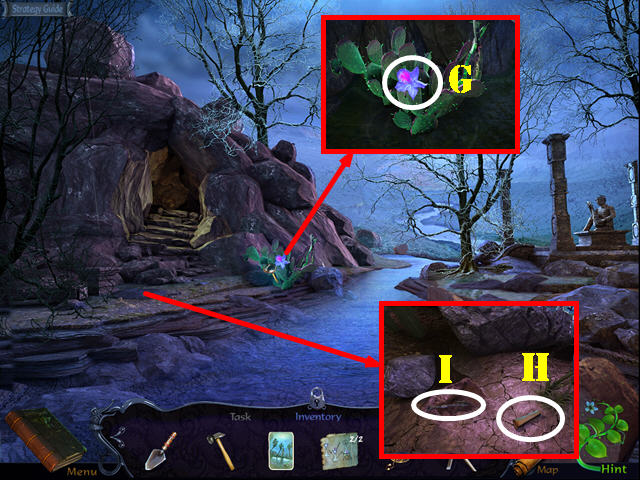
- Zoom into the bushes and take the POTION INGREDIENTS 1/7 (T).
- Go forward to the Temple Premises.
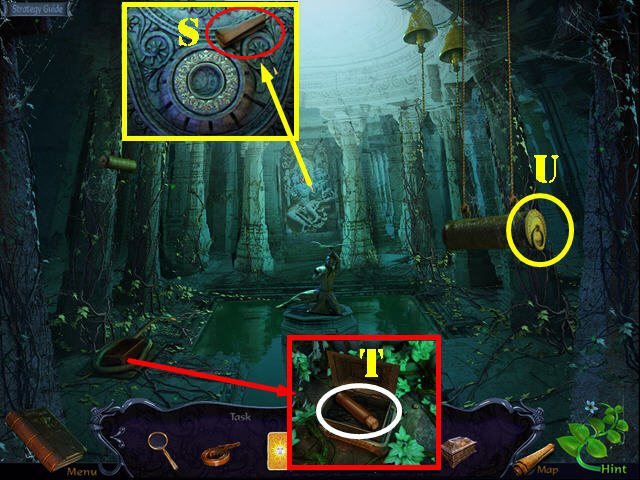
- Examine the swiveling mechanism; take the GRAPPLING HOOK (U) and it will automatically combine with the ROPE to form the ROPE WITH GRAPPLING HOOK.
- Take the note (V).
- Examine the sunsnare plant; use the LIFE POTION on it (W). Take the note (X).
- Go forward to the Temple Ruins.
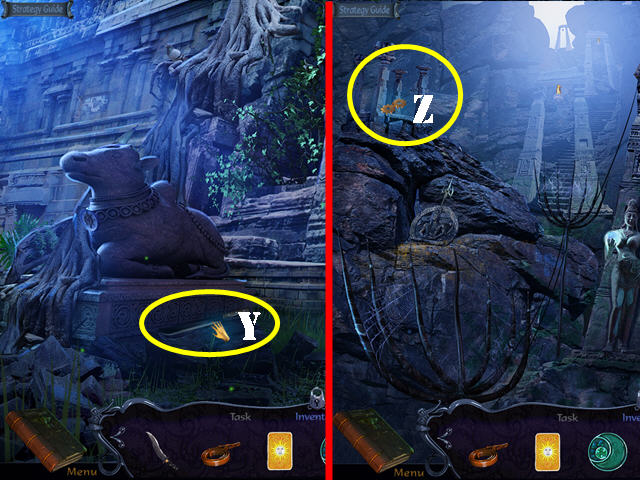
- Take the MACHETE (Y).
- Walk down twice to the Temple Archway.
- Use the ROPE WITH GRAPPLING HOOK on the structure to activate a HOP (Z).

- Play the HOP.
- Interactive items are color-coded (A).
- You will receive the STONE LEVER and the TORCH.
- Zoom into the bushes and use the MACHETE on them; take the HORN OF NANDI (B).
- Return to the Temple Premises.
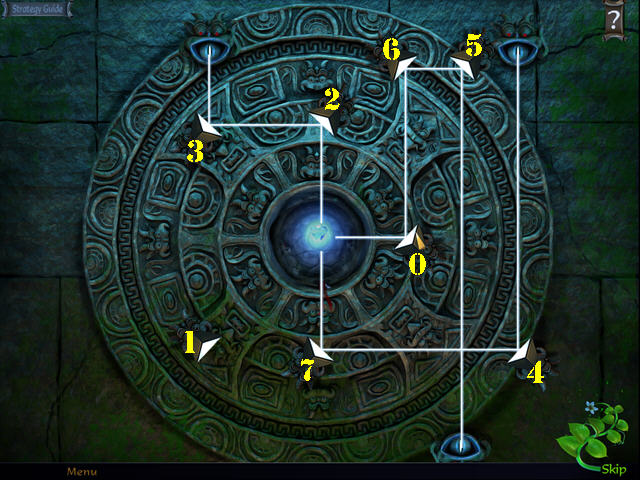
- Zoom into the swiveling mechanism; place the STONE LEVER on the mechanism and pull the lever (C), then zoom into the stone to activate a puzzle (D).
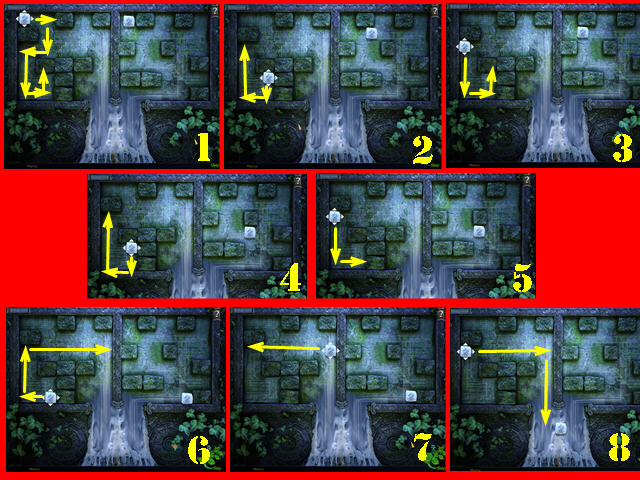
- Use the arrows on the left block to move itself and the piece on the right, until both pieces fall at the bottom.
- Please follow the steps on the screenshot (1-8) to receive the BLOCK OF WAX.
- Go forward.
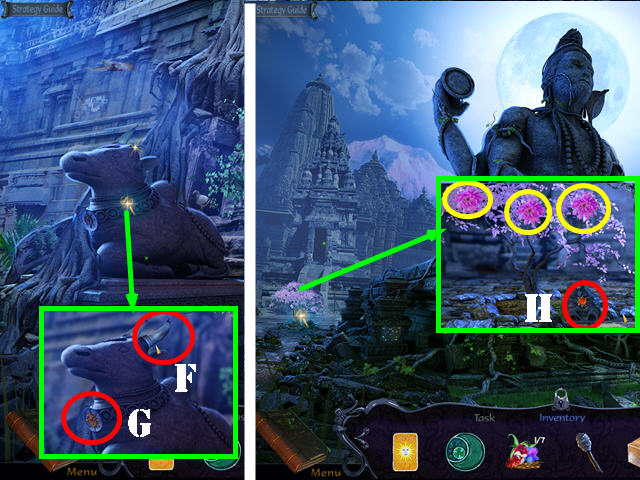
- Zoom into the statue; place the HORN OF NANDI on the statue (F) and take the SUN AMULET (G).
- Walk down.
- Zoom into the sunsnare plant and place the SUN AMULET in the slot (H).
- Take the 1/3, 2/3, and the 3/3 SUNSNARE FLOWERS (yellow).
- Return to the Blacksmith’s Stall.
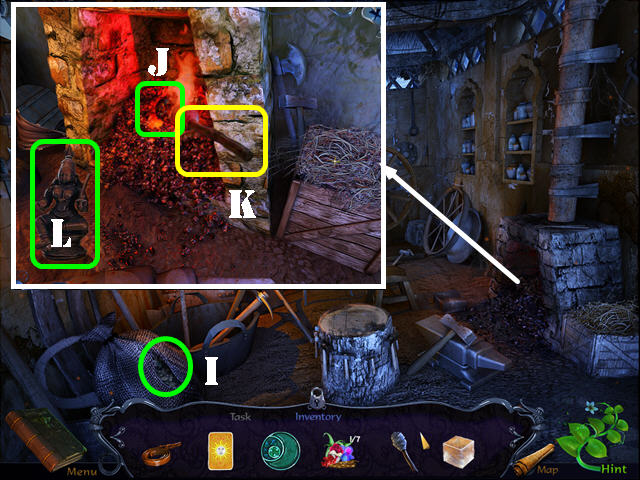
- Cut the sack with the KNIFE and take the FRESH COAL (I).
- Zoom into the forge and place the FRESH COAL in it (J); use the BELLOWS on the coals and place the TORCH in it to receive the LIT TORCH (K).
- Place the BLOCK OF WAX on the hot coals; take the PARVATI STATUE (L).
- Play the HOP.
- Interactive items are color-coded (M).
- You will receive the TILE and the SHOVEL.
- Return to the Veranda.
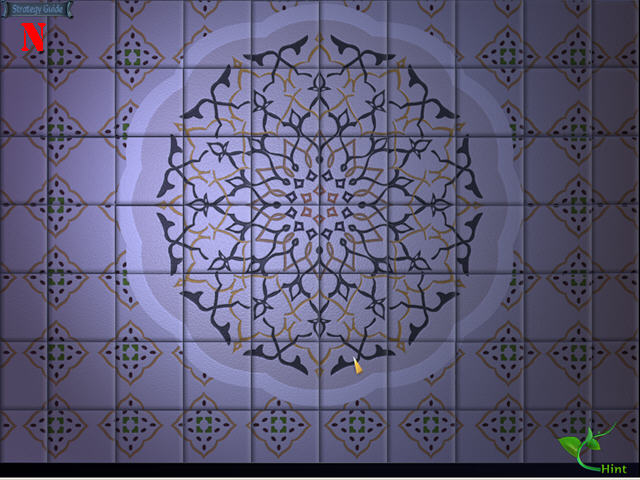
- Place the TILE on the floor to activate a puzzle.
- Touch anywhere on the puzzle to begin. Select two tiles to swap their positions.
- Please look at the screenshot for the solution (N).
- You will receive the SATI STATUE.
- Return to the Astrologer’s Store.
- Give the 3 SUNSNARE FLOWERS to the astrologer and then take the DIAMOND (O).
- Return to the Temple Archway.
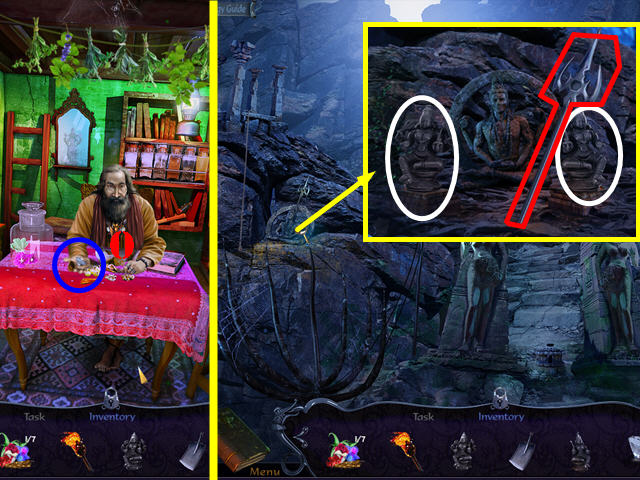
- Zoom into the statue and put down SATI STATUE and the PARVATI STATUE (white).
- Take the TRIDENT (red).
- Walk down.
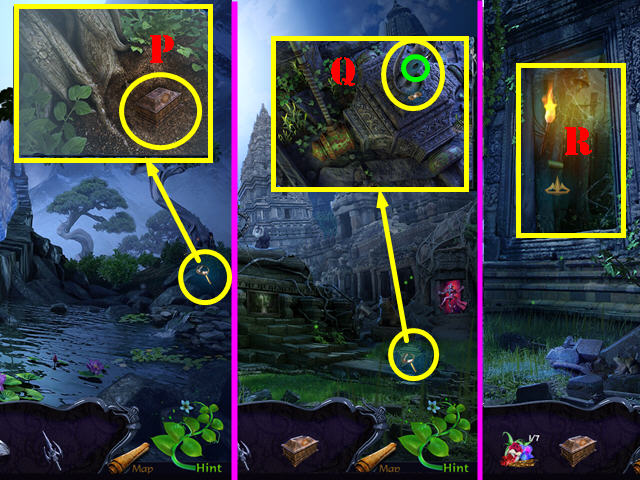
- Zoom into the soil and use the SHOVEL in it; take the MAGIC BOX (P).
- Return to the Temple Premises.
- Zoom into the swiveling device; place the TRIDENT in the slot (Q) and then place the DIAMOND in the slot on the trident (green).
- Return to the Temple Ruins.
- Use the LIT TORCH in the doorway (R). Go through the doorway to access the Hidden Chamber.
Chapter 3: The Lost Oasis
- Zoom into the back wall and take the note (S).
- Zoom into the snake and place the MAGIC BOX in the niche. Place the SUN CARD on top of the box and take the SUN SPELL (T).
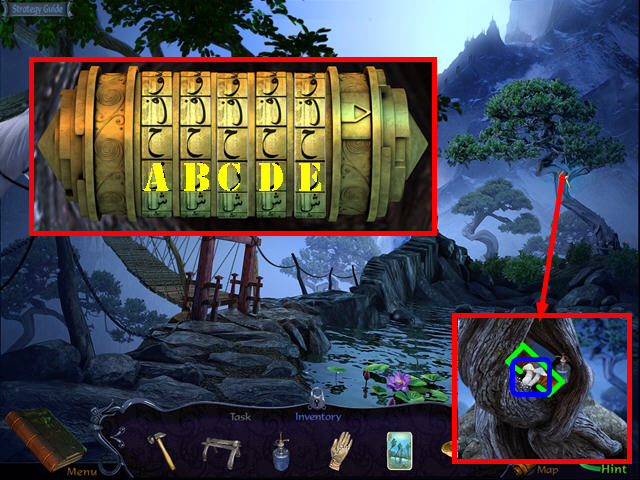
- Put the SUN SPELL on the cylinder to activate a puzzle (U).
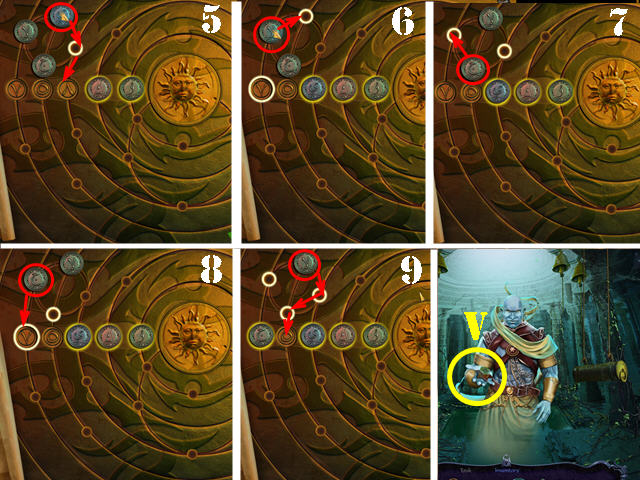
- Move the disks to the right spots, using the parchment as a clue.
- Select a disk, and then one of the glowing circles to move it to move to that spot.
- Please look at the screenshot for the solution (1-9).
- Talk to the spirit and then take the ORNATE KEY (V).
- Return to Aarya’s Bedroom.
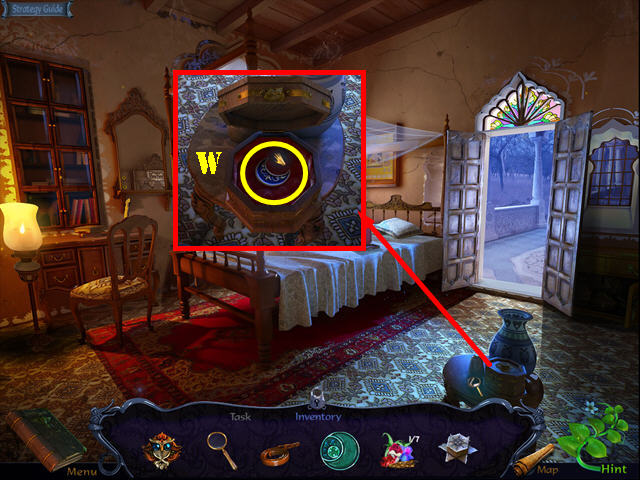
- Examine the table and place the ORNATE KEY in the slot.
- Take the MOON AMULET PIECE (W).
- Return to the Hidden Chamber.
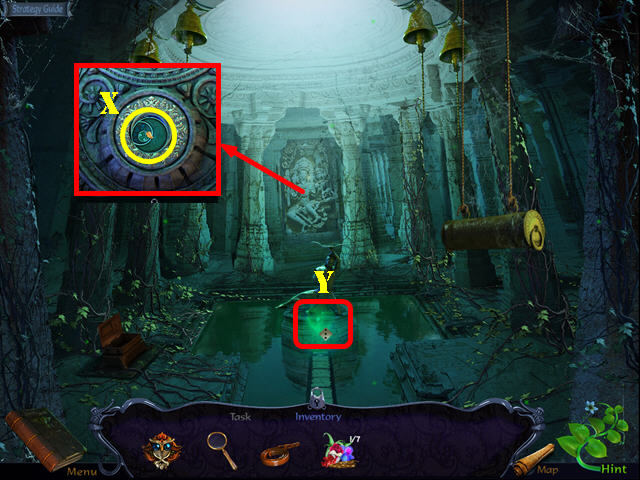
- Zoom into the back wall. Place the2 MOON AMULET PIECES in the slot (X).
- Zoom into the glowing light for a puzzle (Y).
- Redirect the light beams to the central orb by adjusting the mirrors correctly.
- To solve the puzzle, adjust the mirrors in this order: 4, 3, 3, 4, 4, 5, 7, 0, 6, 6, 0, and 0.
- You will receive the SWAN TALISMAN and will be taken back to Aarya’s Bedroom.
- Go to the Veranda.
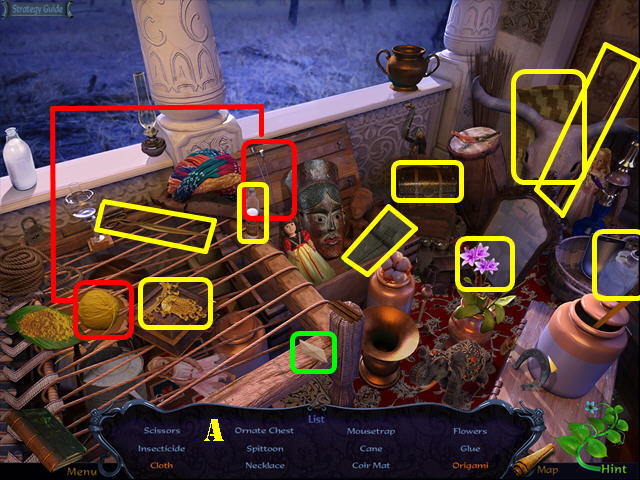
- Play the HOP.
- Interactive items are color-coded (A).
- You will receive the GLUE and the INSECTICIDE.
- Go forward.
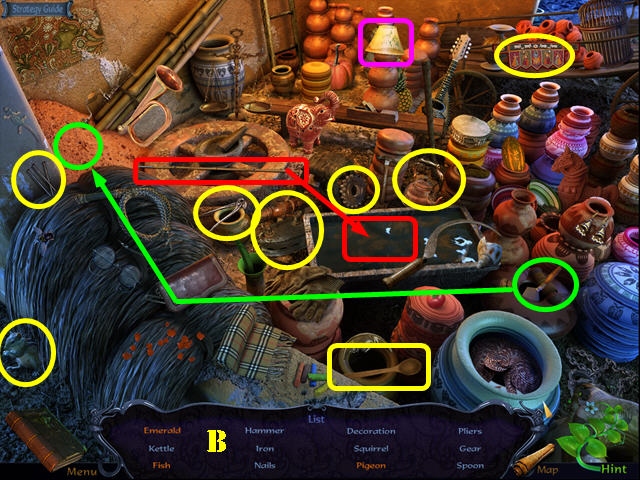
- Play the HOP.
- Interactive items are color-coded (B).
- You will receive the HAMMER and the NAILS.
- Head right to reach the Gnarled Tree.
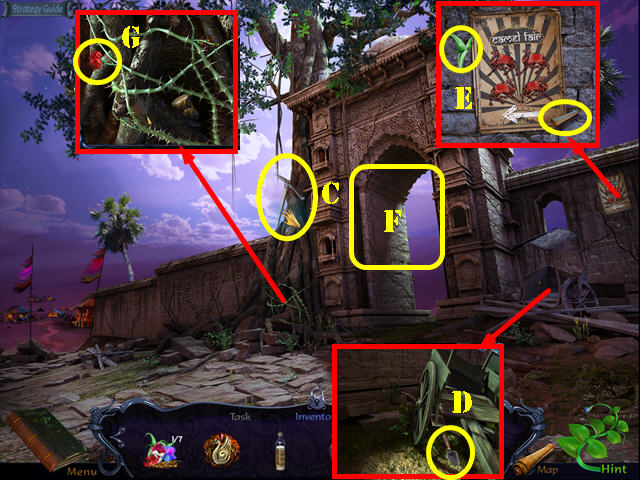
- Take the PICKAXE (C).
- Zoom into the cart and take the TROWEL (D).
- Look at the poster and take the POTION INGREDIENTS 2/7 and the note (E).
- Touch the doorway for an objective (F).
- Zoom into the tree hole and take the POTION INGREDIENTS 3/7 (G).
- Head left to the Camel Fair.
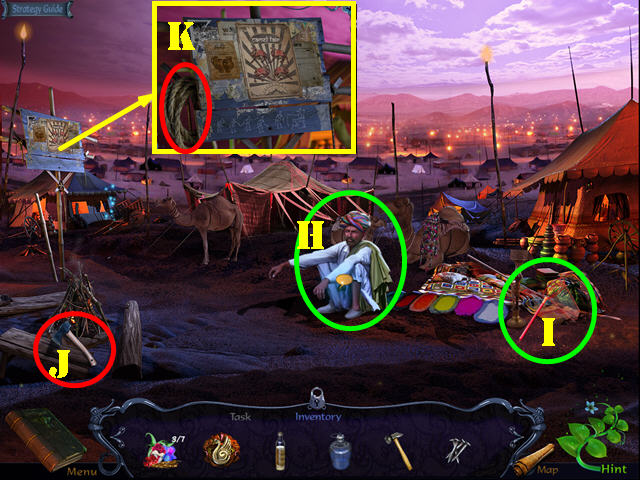
- Talk to the man (H).
- Take the NET (I) and the AXE (J).
- Look at the board and take the ROPE (K).
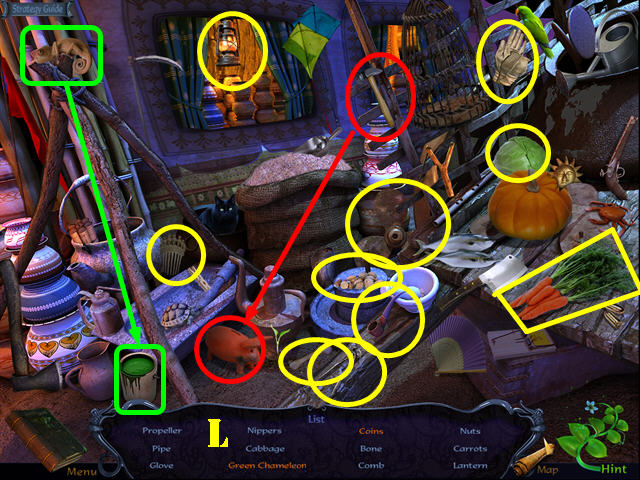
- Play the HOP.
- Interactive items are color-coded (L).
- You will receive the NIPPERS and the TORN GLOVE.
- Walk down.
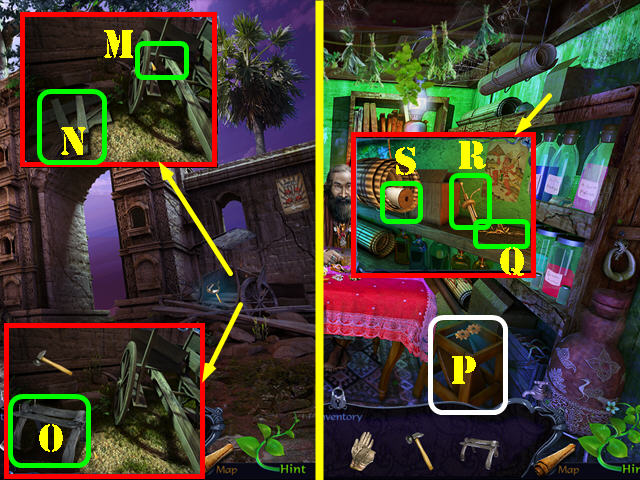
- Zoom into the cart and use the AXE on the cart (M); use the NAILS on the planks (N) and then use the HAMMER on the nails.
- Take the SADDLE (O).
- Return to the Astrologer’s Store.
- Use the GLUE on the stool (P).
- Zoom into the top shelf; take the POTION INGREDIENTS 4/7 (Q).
- Grab the SPRAYER (R); it will automatically combine with the INSECTICIDE to create the BUG SPRAYER.
- Take the SPOOL (S); it will automatically combine with the TORN GLOVE to create the GLOVE.
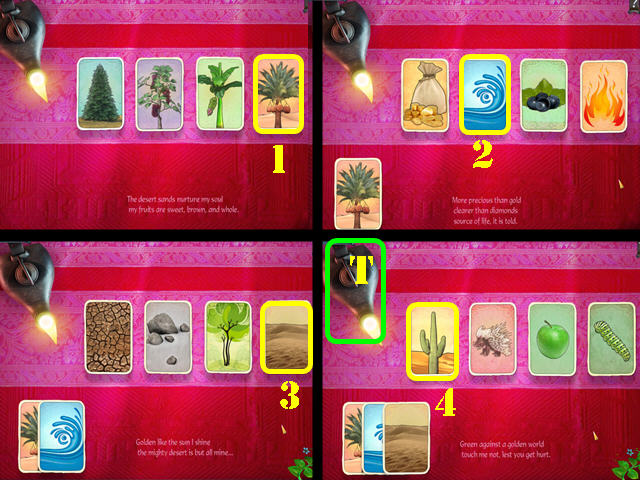
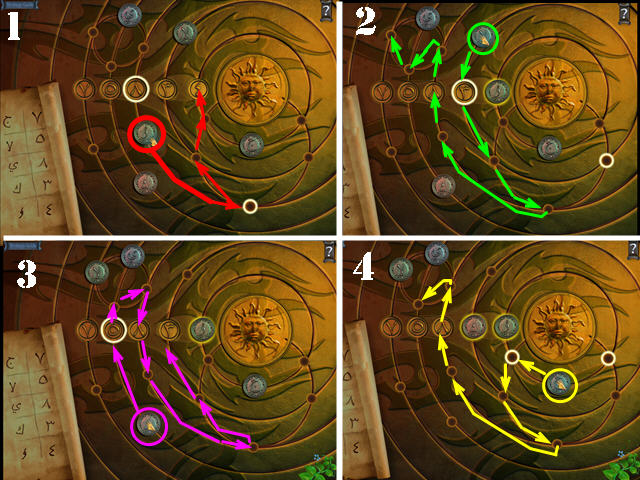
- Talk to the astrologer and then zoom into him again to activate a puzzle.
- Choose the right cards.
- To solve the puzzle, select the cards in the order shown on the screenshot (1-4).
- Drag the card to the lamp (T) to receive the OASIS CARD.
- Take the GOLD COINS from the astrologer’s hand.
- Return to the Cliffisde.
- Zoom into the tree; use the BUG SPRAYER on the bugs and take the POTION INGREDIENTS 5/7 (blue).
- Use the NIPPERS on the wire to activate a puzzle (green).
- Rotate the cylinders to get the same symbols on all 5 of them.
- To solve the puzzle, rotate the cylinders in this order: D, Bx11, Ax13, and Cx11.
- You will receive the POTION RECIPE HALF 1/2.
- Try to take the bridge (F) and then touch the frame (G) for an objective.
- Return to the Gnarled Tree.
- Zoom into the tree hole and use the GLOVE to get the DESTROYER’S DRUM (H).
- Go left to the Camel Fair.
- Give the GOLD COINS to the man and then take the COPPER COIN (I). Note: If you haven’t talked to him yet, you may have to do that first.
- Zoom into the tent and put the COPPER COIN in the slot for an objective (J).
- Return to the Gnarled Tree.
- Place the SADDLE on the camel and then add the LEATHER STRAP to it (K).
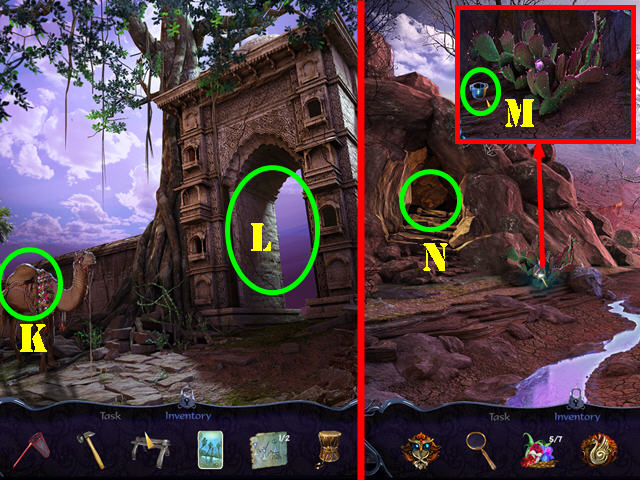
- Go forward to the Desert (L).
- Zoom into the plant and take the CRUCIBLE (M).
- Go into the Underground Cave (N).
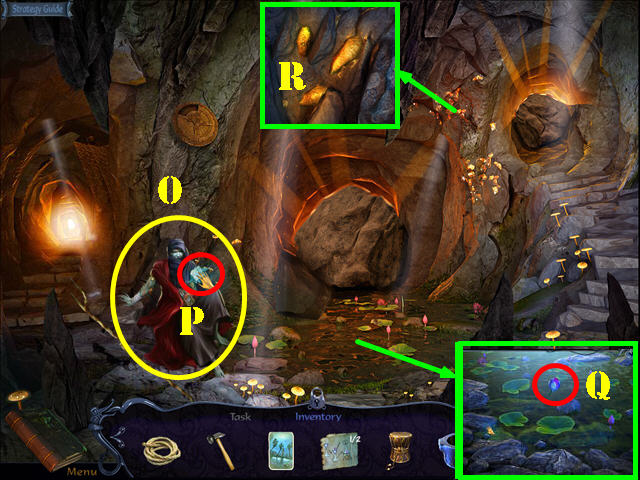
- for an objective (O), then take the POTION RECIPE HALF 2/2 (P) from his hand.
- Examine the water; use the NET to get the POTION INGREDIENTS 6/7 (Q).
- Zoom into the wall; use the PICKAXE to get the GOLD ORE (R).
- Return to the Blacksmith’s Stall.
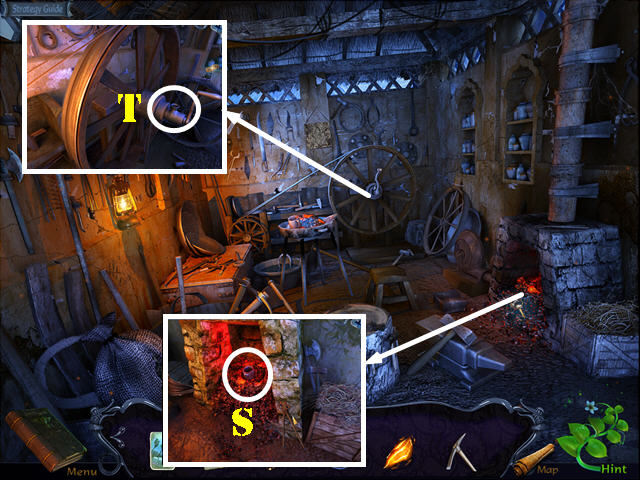
- Examine the forge.
- Place the CRUCIBLE on the coals and then add the GOLD ORE to it to receive the MOLTEN GOLD (S).
- Zoom into the forging device; place the MOLTEN GOLD in the pot to receive the GOLD STRINGS (T).
- Return to the Desert.
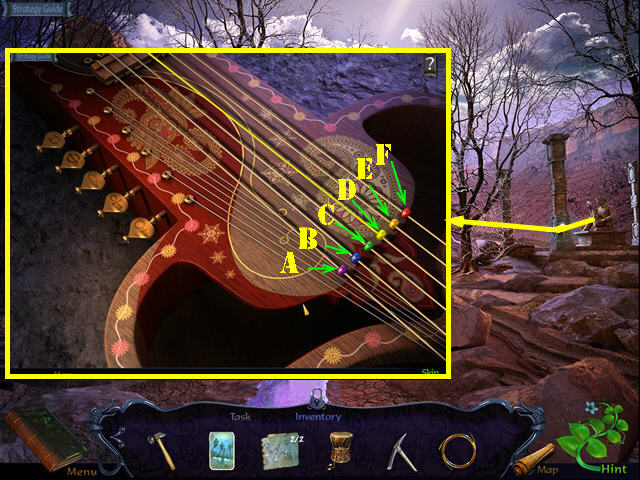
- Zoom into the statue and place the GOLD STRINGS on the instrument to activate a puzzle.
- Duplicate the sequence played by the violin.
- Sequence 1: D, F, A, and B.
- Sequence 2: B, A, F, E, and C.
- Sequence 3: A, E, E, B, and F.
- Sequence 4: C, A, B, F, E, and C.
- Sequence 5: C, F, D, B, E, and A.
- Zoom into the plant and take POTION INGREDIENTS 7/7 (G).
- Zoom into the ground and take the note (H).
- Use the TROWEL on the ground and then take the ARROW (I); it will automatically combine with the ROPE to create the ARROW WITH ROPE.
- Return to the Astrologer’s Store.
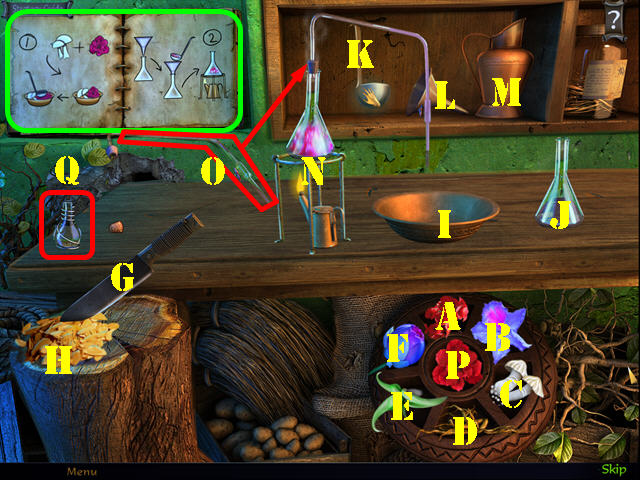
- Zoom into the left table; put down the 7 POTION INGREDIENTS and the 2 POTION RECIPE HALVES to activate the puzzle. Follow the instructions on the recipe (green); flip the pages as needed to view all the steps.
- Step 1: Place the Red flower (P) and the mushrooms (C) in the bowl (I); use ladle (K) to mix them.
- Step 2: Place the funnel (L) over the beaker (J) and transfer the ladle’s contents into the beaker.
- Step 3: Place the beaker on the burner (N).
- Step 4: Place the Root (D) on the chopping block and then chop it with the knife (G).
- Step 5: Place the chopped roots (H), red flowers (A), and the violet flower (B) into the bowl. Use the distillation tube (O) on the beaker to transfer the content in the beaker to the bowl.
- Step 6: Use the ladle to mix the bowl ingredients; place the funnel over the beaker.
- Step 7: Transfer the ladle’s contents to the beaker and place the beaker on the burner.
- Step 8: Use the distillation tube to transfer the content in the beaker to the bowl. Place the remaining ingredients to the bowl (E and F).
- Step 9: Pour the water (M) into the bowl.
- Step 10: Use the ladle in the bowl. Place the funnel over the bottle (Q).
- Step 11: Transfer the ladle’s contents to the bottle (Q) to receive the HEALING POTION.
- Return to the Underground Cave.
- Give the HEALING POTION to the man and then take the COMPASS (R).
- Examine the cave for a maze. Place the COMPASS on the maze to activate a puzzle.
- Use the arrows on the compass (green) to move through the maze in such a way that the bugs do not catch up to you, if they do, the puzzle will reset. Guide the feet (S) to the exit in the upper right (T). The solution is random.
- You will get the COMPASS back after you solve the puzzle. You will end up in the Lost Oasis.
Chapter 4: The Trinity Artifacts
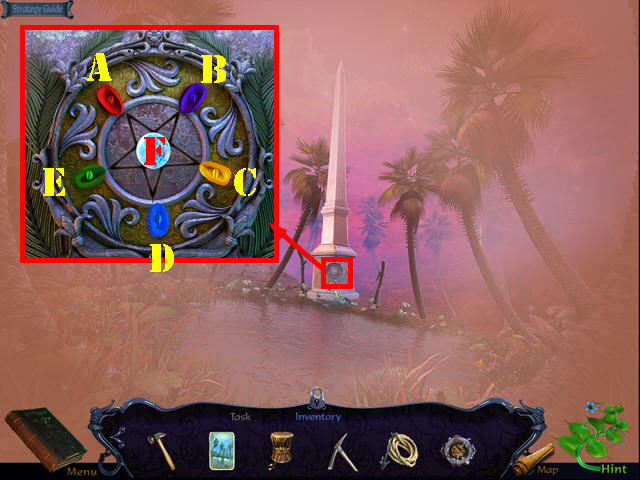
- Examine the niche and place the COMPASS in the slot to activate the puzzle.
- Select two seeds to swap their positions until they are all in their matching spots.
- To solve the puzzle, please swap the seeds in this order: B-D, B-D, and B-E.
- Take the STONE ORB (F).
- Examine the plant; open it and take the PROTECTOR’S CHAKRA (G).
- Return to the Temple Archway.
- Give the STONE ORB to the statue on the right (H).
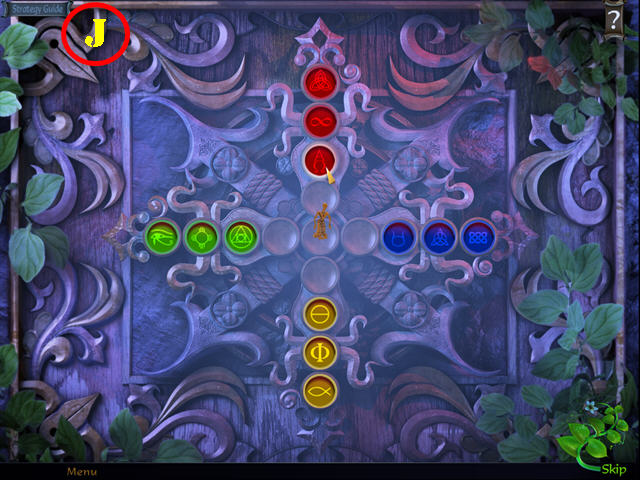
- Zoom into the wall for a puzzle (I).
- Select a disc and then select an empty adjacent spot to move it there.
- Place all the discs in the right spots. The solution is random; the screenshot shows you the final image (J). Note: the order of the symbols in each color is irrelevant; just concentrate on placing the colors in the right spots.
- You will receive the PUPPET 1/2.
- Return to the Camel Fair.
- Play the HOP.
- Interactive items are color-coded (K).
- You will receive the DYNAMITE and the SLINGSHOT.
- Walk down.
- Zoom into the bird; use the SLINGSHOT on it (L) and take the FALCON EGG on the ground (M).
- Return to the Blacksmith’s Stall.
- Zoom into the forge; place the FALCON EGG on the nest and take the FALCON (N).
- Return to the Lost Oasis.
- Zoom into the stones and put down the DYNAMITE. Use MAGNIFYING GLASS on the wick (O).
- Go through the passage to reach the Tomb of the Kings.
- Touch any of three bowls for an objective (white).
- Examine the wall and take the note (P).
- Use the HAMMER on the wall and take the SUNDIAL POINTER (Q).
- Return to the Underground Cave.
- Zoom into the sundial (R) and place the SUNDIAL POINTER on it.
- Take the note (S) and it will automatically combine with the FALCON to create the FALCON WITH NOTE.
- Return to the Lost Oasis.
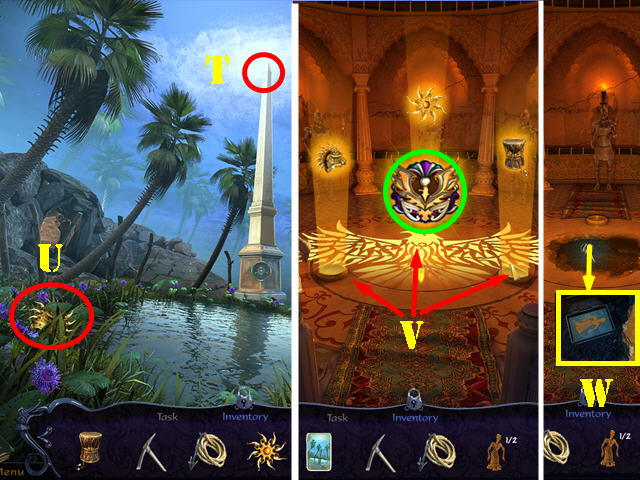
- Use the FALCON WITH NOTE on the top of the obelisk (T). Take the CREATOR’S CROWN (U).
- Return to the Tomb of the Kings.
- Put down the DESTROYER’S DRUM, the PROTECTOR’S CHAKRA, and the CREATOR’S CROWN on the plates (V).
- Take the FALCON TALISMAN (green).
- Zoom into the ground; use the OASIS CARD on the box and take the PUPPET 2/2 (W).
- Return to the Camel Fair.
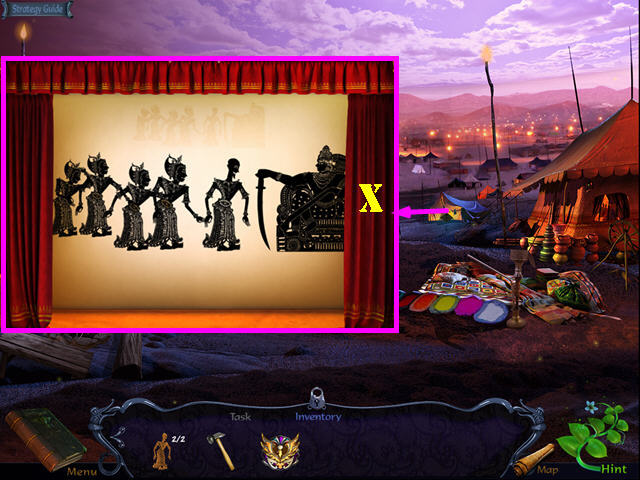
- Zoom into the tent and put the COPPER COIN in the slot in the upper center (if you haven’t done so already).
- Adjust each puppet to match their shadows in the background.
- Please look at the screenshot for the solution (X).
- You will receive the CROSSBOW.
- Return to the Cliffside.
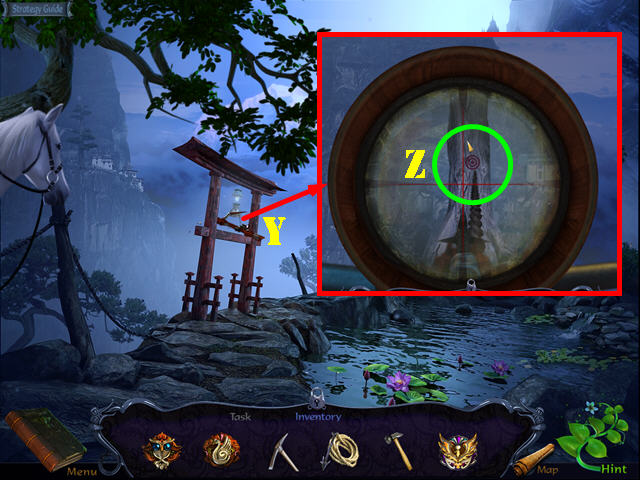
- Place the CROSSBOW on the frame. Put the ARROW WITH ROPE on the crossbow and then zoom into it to activate a puzzle (Y).
- Aim the crossbow at the bull’s-eye and then shoot it once it’s on the right spot (Z).
- Go across to the other side of the cliff to reach the Mountain Palace, and then go left to reach the Swamp.
Chapter 5: The Monastery
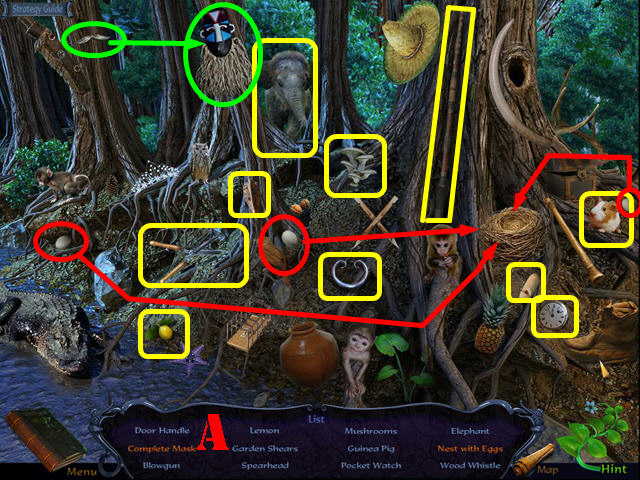
- Play the HOP.
- Interactive items are color-coded (A).
- You will receive the DOOR HANDLE and the GARDEN SHEARS.
- Take the left path to reach the Path to Condor Cave.
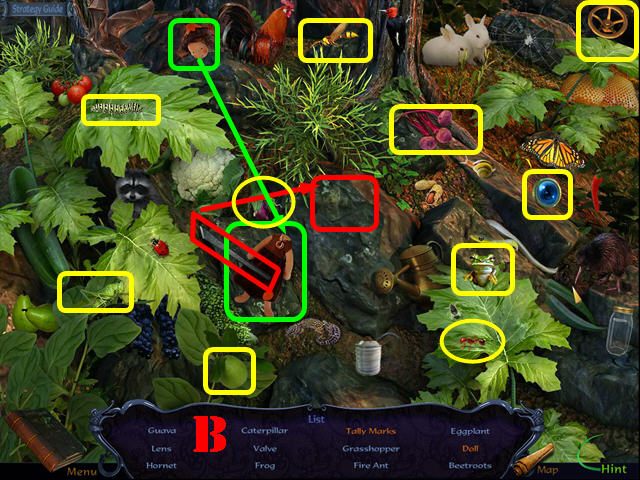
- Play the HOP.
- Interactive items are color-coded (B).
- You will receive the LENS and the VALVE.
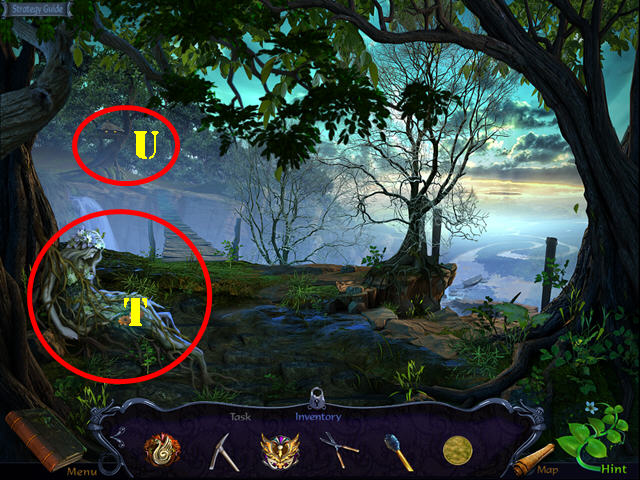
- Examine the statue for an objective (C).
- Examine the leaves and take the note (D); use the GARDEN SHEARS on the leaves to receive the COLOCASIA LEAVES (E).
- Return to the Mountain Palace.
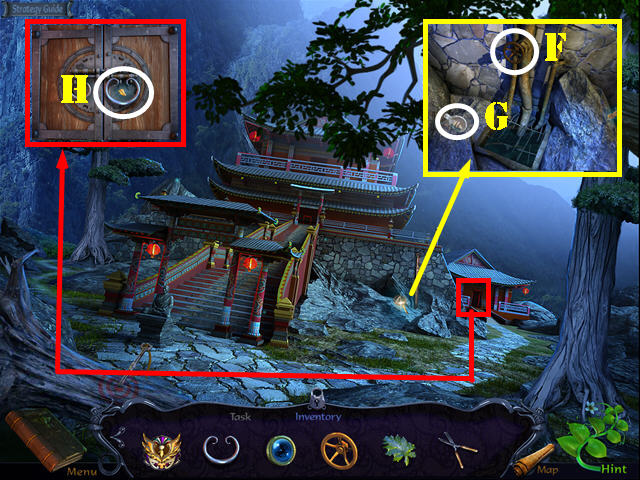
- Zoom into the pipes and place the VALVE on them (F).
- Use the HAMMER on the bottle; you will receive a note and then take the XYLEM FRAGMENT (G).
- Zoom into the door; place the DOOR HANDLE on it and enter the Library (H).
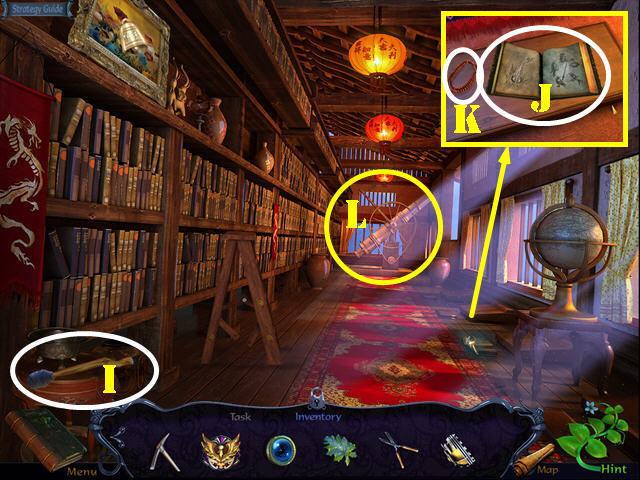
- Grab the TORCH (I).
- Examine the ground; open the book (J) and take the PRAYER CHAIN (K).
- Zoom into the telescope (L) and place the LENS on it to activate a puzzle.
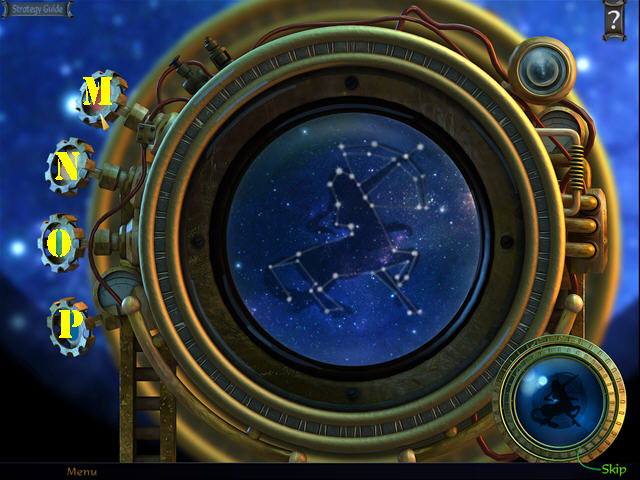
- Use the dials to adjust the orientation of the constellation.
- To solve the puzzle, select the dials in this order: O, N, O, N, and M.
- The XYLEM FRAGMENT will merge with the one you just received to create the XYLEM.
- Walk down.
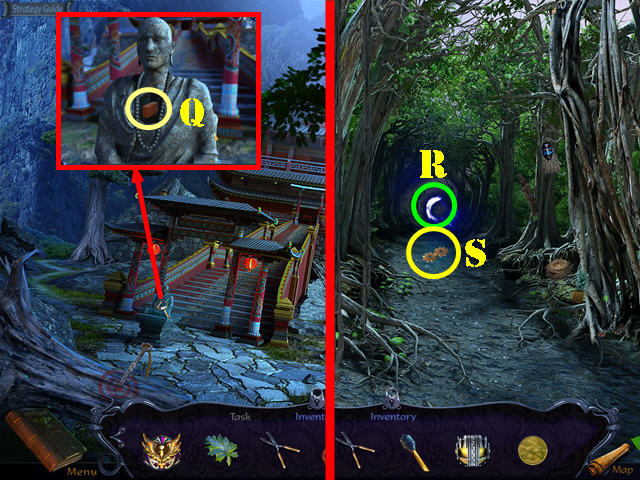
- Examine the statue; place the PRAYER CHAIN on it and take the TOKEN (Q).
- Return to the Swamp.
- Place the XYLEM on the spirit (R).
- Put down the COLOCASIA LEAVES and go forward to the Jungle Stream (S).
- Use the GARDEN SHEARS on the forest nymph; talk to her twice to get an objective (T).
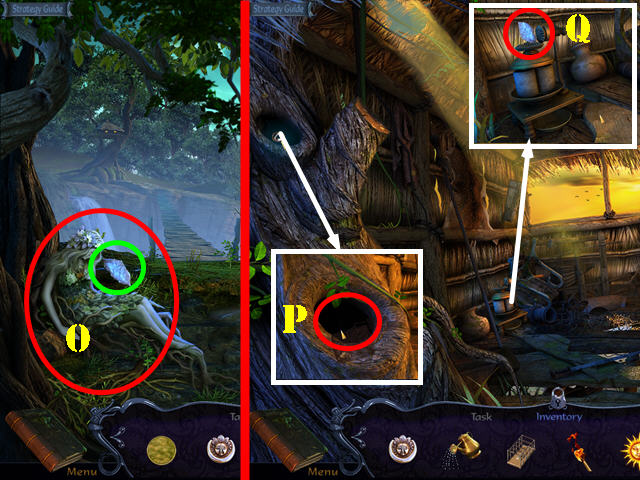
- Go to the Tree House (U).
- Play the HOP.
- Interactive items are color-coded (V).
- You will receive the LADDER SCREW and the DUAL EMBLEM.
- Examine the crate for a puzzle.
- Put all the pieces in the right spots (1-14).
- You will receive GARUDA’S EYE.
- Return to the Path to Condor Cave.
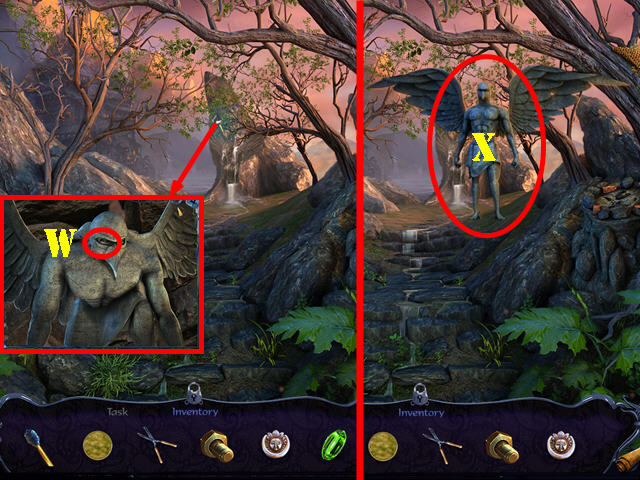
- Examine the statue and place GARUDA’S EYE in the socket (W).
- Talk to Garuda (X) and go forward to reach the Cave of the Condor.
- Examine the ground; use the PICKAXE on the brick and take the ROYAL INSIGNIA (A).
- Zoom into the wall; place the ROYAL INSIGNIA in the slot (B) and take the SUN INSIGNIA (C).
- Return to the Library.
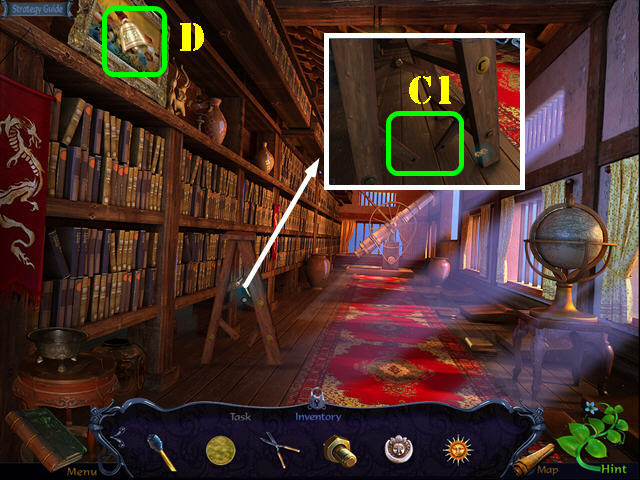
- Zoom into the ladder; place the LADDER SCREW on it (C1).
- Take the BELL (D).
- Walk down.
- Zoom into the door; place the BELL in the slot (E) and enter the Shrine.
- Examine the ground and take the JAR (F).
- Return to the Path to Condor Cave.
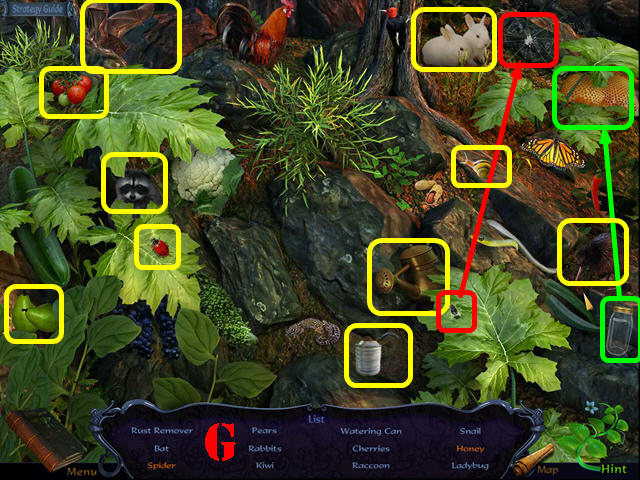
- Play the HOP.
- Interactive items are color-coded (G).
- You will receive the RUST REMOVER and the WATERING CAN.
- Walk down.
- Zoom into the tendrils and use the GARDEN SHEARS on them. Place the WATERING CAN under the water to receive the FILLED WATERING CAN (H).
- Return to the Library.
- Zoom into the globe; use the RUST REMOVER on it and then take the PADLOCK KEY (I).
- Return to the Jungle Stream.
Chapter 6: The Sword of the Descendant

- Zoom into the boat and use the PADLOCK KEY on the padlock (J).
- Take the boat to the Temple Entrance.
- Take the DRIED TWIGS (K).
- Return to the Swamp.

- Play the HOP.
- Interactive items are color-coded (L).
- You will receive the TRAP and the POINTED STICKS.
- Return to the Path to Condor Cave.

- Zoom into bees; place the DRIED TWIGS on the pit and the use the POINTED STICKS on the twigs (M).
- Place the JAR on the honeycomb to get the JAR OF HONEY (N).
- Use the TORCH in the fire to get the LIT TORCH.
- Place the SUN INSIGNIA over the fire to get the RADIANT SUN INSIGNIA.
- Return to the Jungle Stream.
- Give the JAR OF HONEY to the forest nymph (O).
- Take the ROUGH MOONSTONE (green).
- Return to the Tree House.
- Zoom into the tree hole; place the TRAP in the hole to get the SQUIRREL (P).
- Zoom into the grinder; place the ROUGH MOONSTONE on it (Q) to obtain the MOONSTONE MIRROR.
- Return to the Shrine.
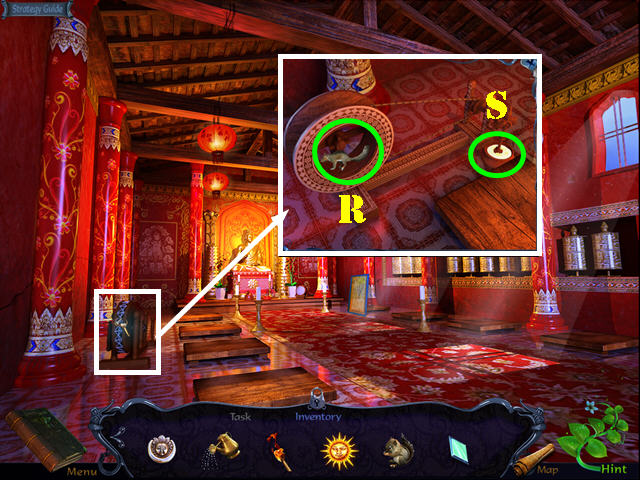
- Zoom into the contraption and place the SQUIRREL on the wheel (R). Take the BUTTER (S).
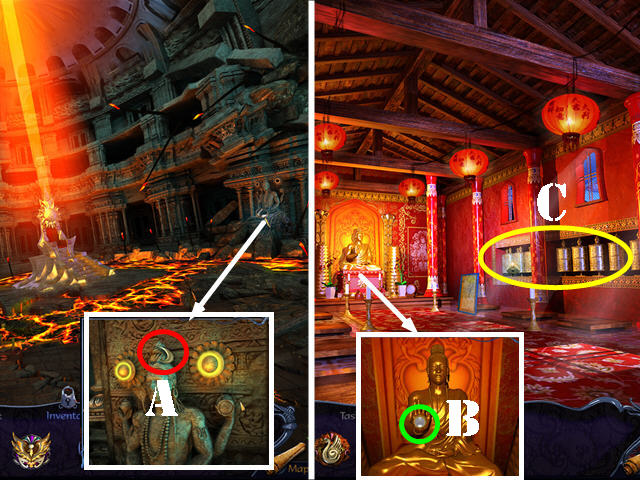
- Return to the Temple Entrance.
- Zoom into the building; place the RADIANT SUN INSIGNIA in the slot (T).
- Use the FILLED WATERING CAN on the plants; use the LIT TORCH in the entrance (U).
- Examine the statues. Put the BUTTER in the container (V) and go through the entrance to reach the Temple Ruins.
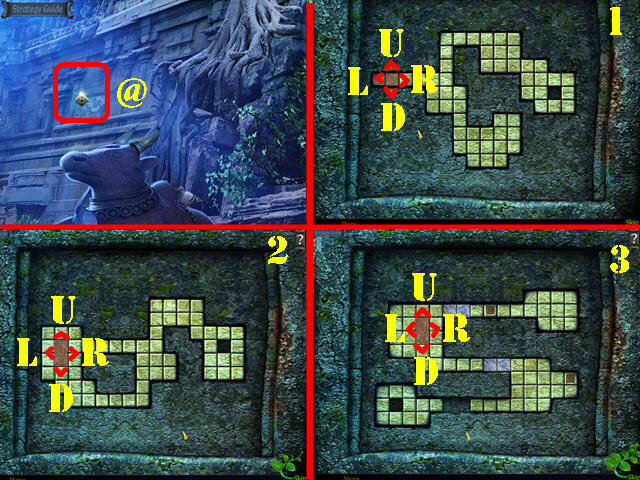
- Zoom into the wall and place the TOKEN on it to activate a puzzle (@).
- Use the arrows to move the block to the hole.
- To solve the puzzle, follow these steps:
- Solution for Level 1: Rx2, D, R, Ux3, Rx2, D, Rx2, U, L, Dx2, Rx2, Dx2, and R (1).
- Solution for Level 2: U, R, D, L, Ux2, R, D, L, D, R, D, Rx3, Ux2, R, D, L, U, R, Ux2, Rx3, D, R, D, R, D, L, and U (2).
- Solution for Level 3: Lx6, D, Lx2, D, R, D, Rx5, D, Rx3, Lx4, D, and Lx6 (3).
- You will receive the MOON INSIGNIA.
- Walk down.
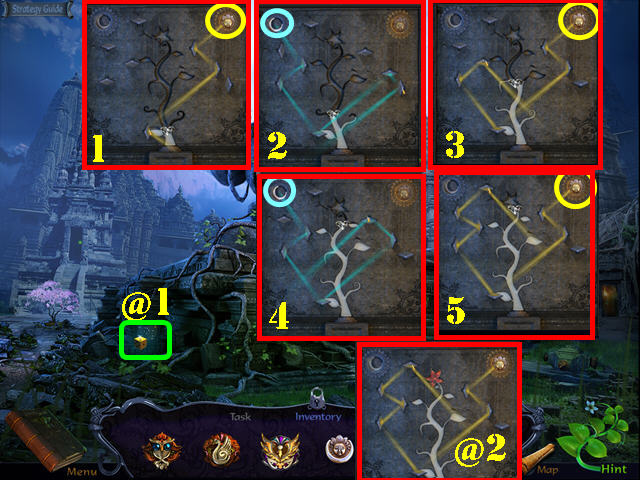
- Zoom into the plaque (@1); place the MOONSTONE MIRROR and the DUAL EMBLEM to activate a puzzle.
- Adjust the mirrors to direct the light to the diamond on the tree outline. You must switch between the sun and the moon emblems to solve the puzzle.
- Please look at the screenshot for the solution (1-5). Section (@2) shows the final image.
- You will receive the FLOWER GEM.
- Return to the Cave of the Condor.
- Zoom into the statue; place the MOON INSIGNIA on it (A).
- Return to the Shrine.
- Zoom into the statue; place the FLOWER GEM on it and take the MOONSTONE (B).
- Examine the puzzle on the wall and place the MOONSTONE to activate a puzzle (C).
- Select the buttons in the correct order to rotate the disks until you match the image in the upper left.
- To solve the puzzle, select the buttons in this order: Cx3, H, J, I, D, Ix2, Ex3, Ax2, F, J, Fx2, A, Fx3, Ax3, F, Ax3, F, A, F, and Ax3.
- You will receive the SWALLOW TALISMAN.
- Return to the Cave of the Condor.
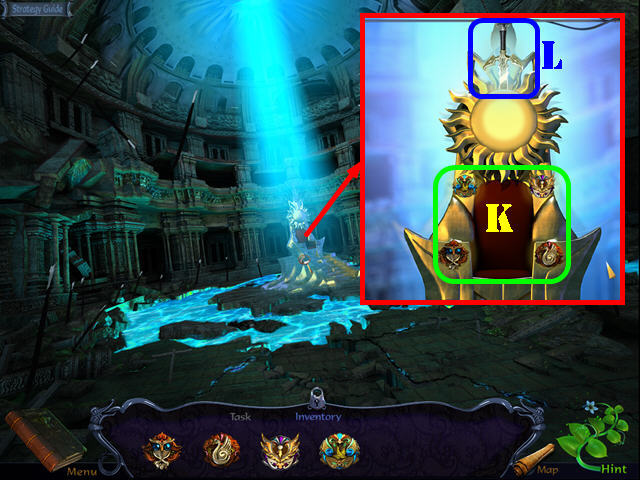
- Zoom into the altar; place the FALCON TALISMAN, the SWAN TALISMAN, the OWL TALISMAN, and the SWALLOW TALISMAN in the slots to get a new objective (K).
- Take the SWORD (L). Close the vignette.
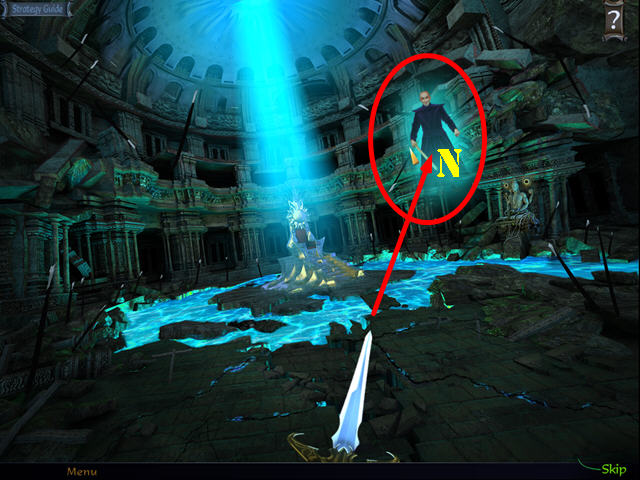
- A puzzle will auto-generate.
- Aim the sword and attack the man (M).
- You will get the SWORD back after you defeat the man.
- Return to the Temple Entrance.
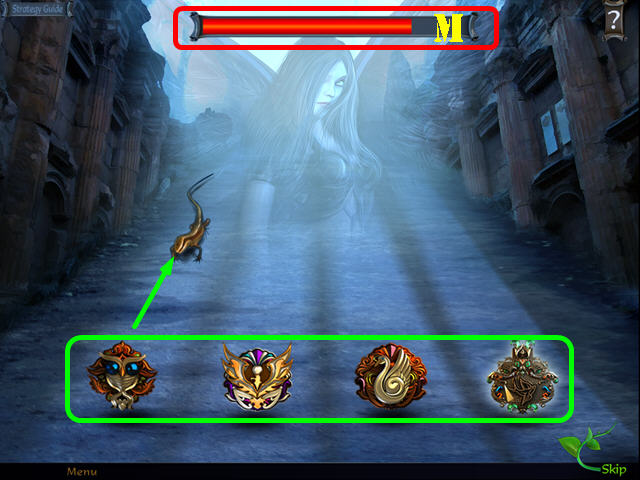
- Zoom into the building on the right. Use the SWORD on the scene to activate a puzzle. Note: make sure you use the LIT TORCH on the entrance first, if you haven’t done so already.
- Select the talismans (green) to shoot and destroy the creatures that are coming at you. The creatures will switch lanes unexpectedly, so you have to move quickly.
- The solution is random, but you will beat the game once the red bar (M) disappears.
- You will receive the RAVEN TALISMAN and you will get back the SWORD.
- Return to the Cave of the Condor.
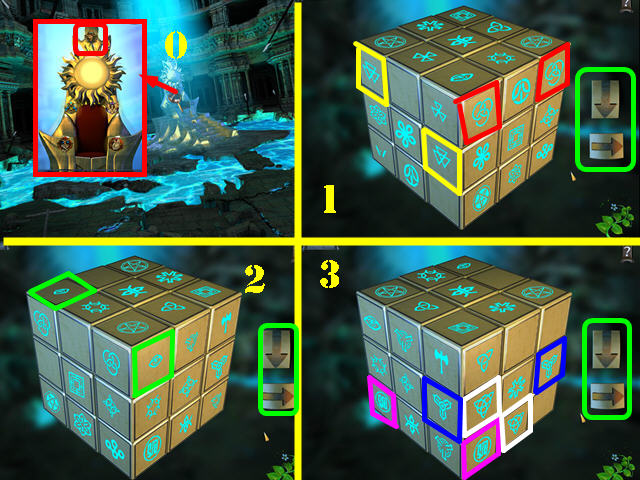
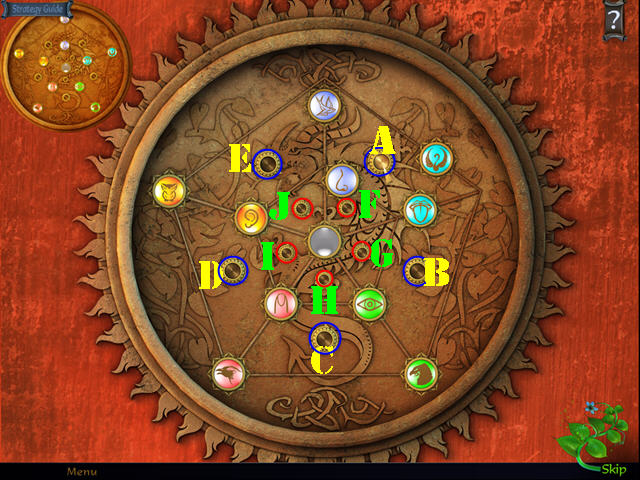
- Zoom into the altar and place the RAVEN TALISMAN on it to activate a puzzle.
- Use the arrows (green) to rotate the cube. Match all pairs and symbols.
- The screenshot shows some color-coded matches (1-3) from different angles. You will solve the puzzle, once all the matches are done.
- Congratulations, you have completed Untold History: Descendant of the Sun.


 Mystery of Unicorn Castle: The Beastmaster Walkthrough, Guide, & Tips
 Rite of Passage: Hide and Seek Walkthrough, Guide, & Tips
 Amulet of Time: Shadow of la Rochelle Walkthrough, Guide, & Tips
 Death at Cape Porto: A Dana Knightstone Novel Walkthrough, Guide, & Tips
 The Scruffs: Return of the Duke Walkthrough, Guide, & Tips