Haunted Legends: The Curse of Vox Walkthrough, Guide, & Tips
Haunted Legends: The Curse of Vox Walkthrough
Welcome to the Haunted Legends: The Curse of Vox Walkthrough
Uncover the true murderer as you investigate a haunted house!
Whether you use this document as a reference when things get difficult or as a road map to get you from beginning to end, we’re pretty sure you’ll find what you’re looking for here.
This document contains a complete Haunted Legends: The Curse of Vox game walkthrough featuring annotated screenshots from actual gameplay!
We hope you find this information useful as you play your way through the game. Use the walkthrough menu below to quickly jump to whatever stage of the game you need help with.
Remember to visit the Big Fish Games Forums if you find you need more help. Have fun!
This walkthrough was created by LuckySmile, and is protected under US Copyright laws. Any unauthorized use, including re-publication in whole or in part, without permission, is strictly prohibited.
General Tips


- This is the official guide for Haunted Legends: The Curse of Vox.
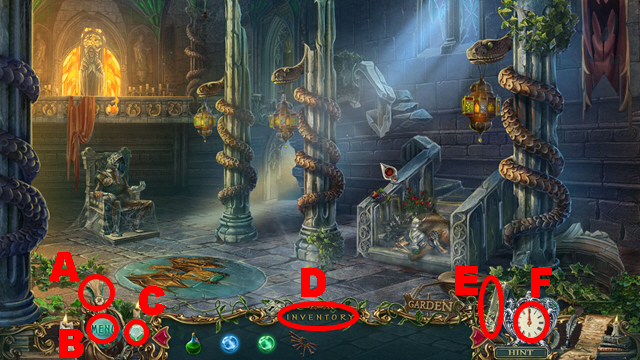
- Access the map (A) to review available locations.
- Select the menu (B) to leave the game or to adjust sound and display mode.
- Use the necklace (C) to destroy seals throughout the game.
- Collected items will be stored in the inventory (D).
- Access the diary (E) to review the information you have gathered.
- Press the hint button (F) whenever you need help.
- Hidden Object Puzzles will be referred to as HOP throughout this guide.
- There are three modes of difficulty you can choose from: Casual, Advanced, and Hard modes. The difficulty mode can be changed anytime in the Options menu.
Chapter 1: The Filler’s House

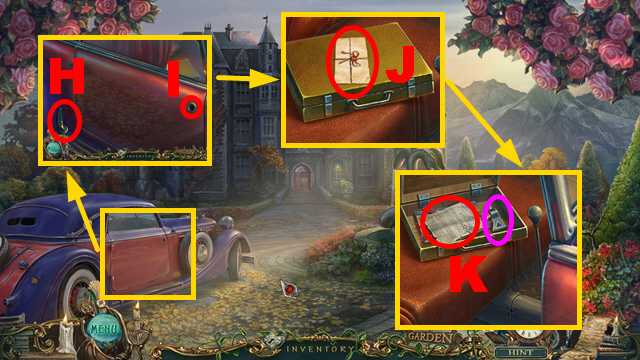
- Read and store the note.
- Zoom into the car, take the HANDLE (H), connect the HANDLE to the niche (I), and press the handle; take the letter (J) and open the suitcase.
- Take the report (K) and the SMALL AXE (purple).
- Move forward towards the mansion.

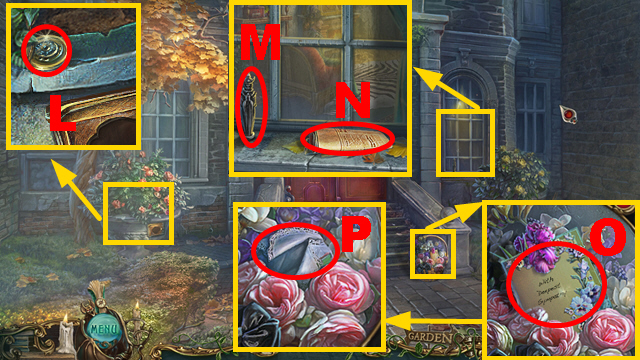
- Zoom into the flower pot; take the SMALL WHEEL (L).
- Zoom into the window; take the CHESS QUEEN (M) and the article (N).
- Zoom into the basket; take the book (O) and the HANDKERCHIEF (P).
- Walk down and turn right.

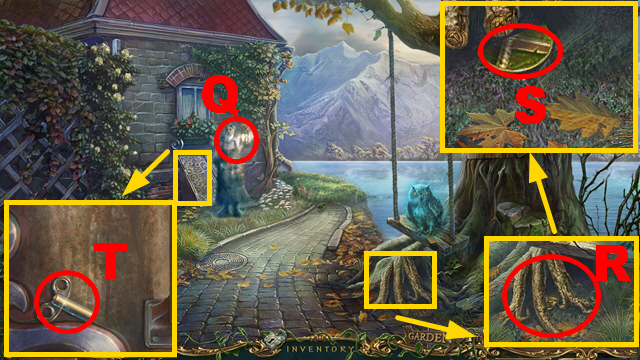
- Try to talk to the ghost (Q).
- Zoom into the swing and remove the roots with the SMALL AXE (R) three times; take the KEY PART (S).
- Zoom into the trapdoor; take the SMALL KEY (T).
- Walk down and move towards the mansion.

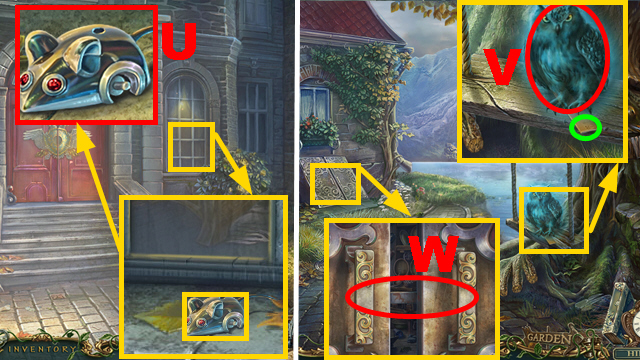
- Zoom into the window and then zoom into the mechanical mouse; connect the SMALL WHEEL and the SMALL KEY to the mechanical mouse (U) and turn the key to acquire the MECHANICAL MOUSE.
- Walk down and turn right.
- Zoom into the swing and use the MECHANICAL MOUSE to chase away the owl (V); take the RULER (green).
- Zoom into the trapdoor; open it with the RULER (W).
- Play the HOP.

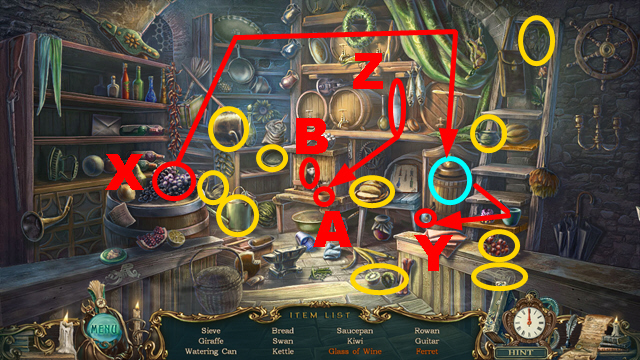
- Take the grapes (X), put them into the barrel (light blue), and take the glass of wine (Y).
- Take the bottle (Z), pour it into the bowl (A), and take the ferret (B).
- You will receive the EMPTY WATERING CAN.
- Walk down.

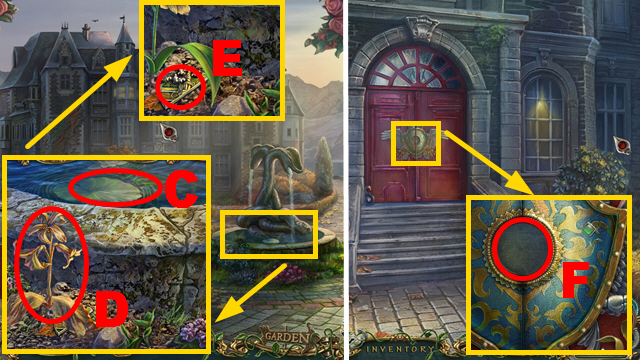
- Zoom into the fountain; put the EMPTY WATERING CAN into the water (C) to acquire the FILLED WATERING CAN.
- Pour the FILLED WATERING CAN over the flower (D), clean the key part with the HANDKERCHIEF (E), and take the KEY PART.
- Move forward towards the mansion.
- Zoom into the door; put the 2 KEY PARTS into the niche (F).
- Play the mini-game.

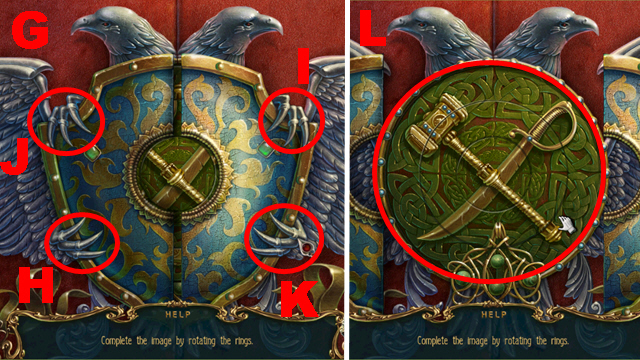
- To solve the first part of this puzzle (G), activate the claws in the following order: H, I, J, and K.
- To solve the second part of this puzzle (L), rotate the two outer rings to create the correct picture.
- Move forward.

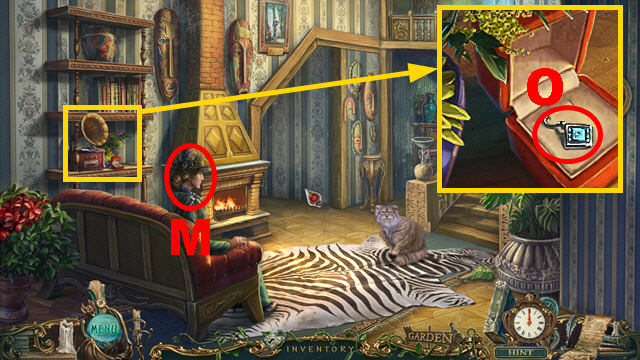
- Talk to the woman (M).
- Zoom into the shelf; take the EARRING (O).
- Play the HOP.

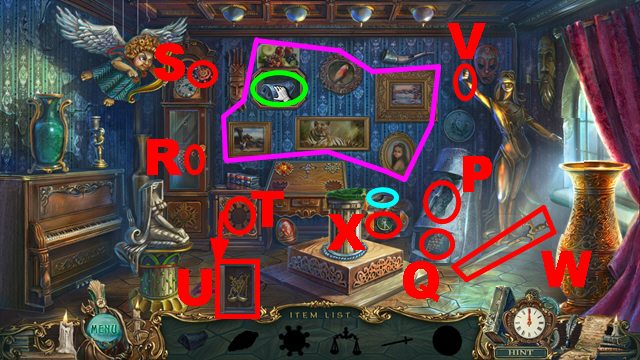
- Rearrange the portraits correctly (purple) and take the nose (green).
- Put the nose on the statue (P) and take the clock weight (Q).
- Open the clock, connect the clock weight to it (R), and take the valve wheel (S).
- Insert the valve wheel into the niche (T) and take the scales (U).
- Connect the scales to the statue (V) and take the sword (W).
- Insert the sword into the stone (light blue) and take the emblem (X).
- You will receive the SCISSORS EMBLEM.
- Go upstairs.

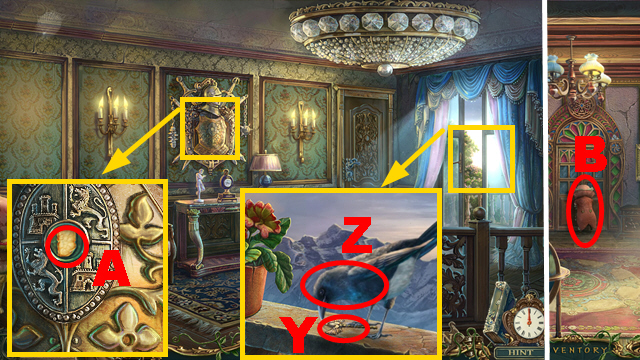
- Zoom into the balcony and try to grab the bird (Y); give the EARRING to the crow (Z) and take the BIRD.
- Zoom into the armor; take the PAPER EMBLEM (A).
- Walk down and turn left.
- Try to grab the man (B).

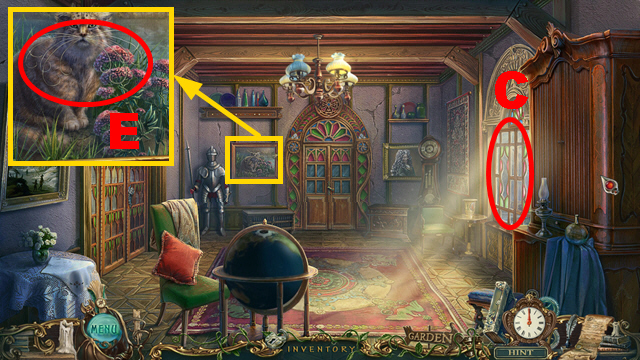
- Take a look out of the window (C).
- Zoom into the left painting; take the STRINGS (E).
- Walk down three times.

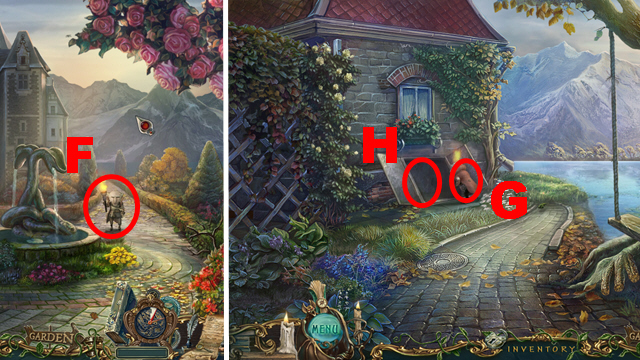
- Try to catch the man (F).
- Turn right.
- Try to catch the man (G).
- Zoom into the trapdoor (H) and open it.
- Play the HOP.

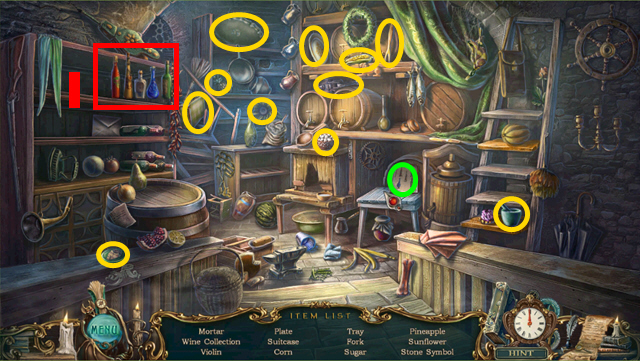
- Zoom into the note (green) to collect information about the wines.
- Zoom into the wines and rearrange them correctly (I) to receive the wine collection.
- You will receive the STONE EMBLEM.
- Walk down, move forward twice, and turn left.

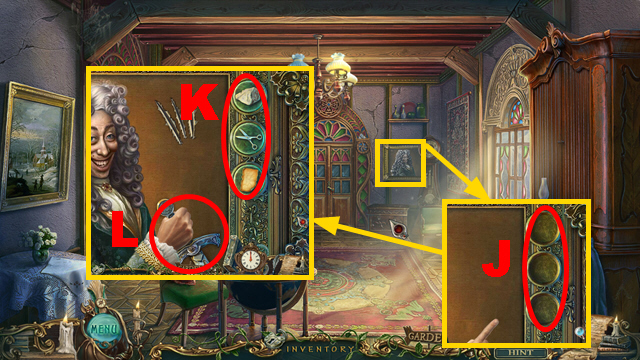
- Zoom into the right painting; insert the STONE EMBLEM, the PAPER EMBLEM, and the SCISSORS EMBLEM into the slots (J).
- Play the mini-game.
- To solve this mini-game, win three games of rock-paper-scissors.
- Choose one of the symbols (K) at the beginning of each game.
- The choice of your opponent is random.
- Rock beats scissors, scissors beats paper, and paper beats rock.
- Take the SWORD (L).
- Walk down three times and turn right.
Chapter 2: The Town

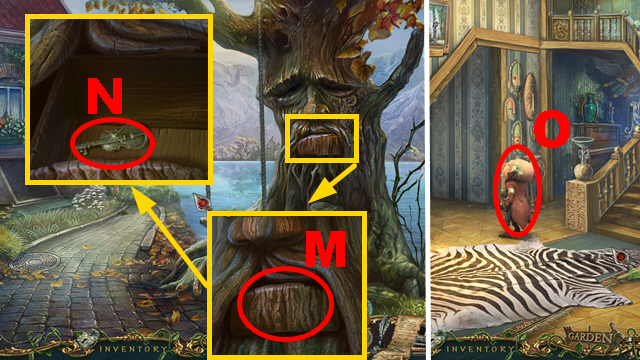
- Zoom into the tree and open the compartment with the SWORD (M); take the VIOLIN KEY (N).
- Walk down and move forward twice.
- Talk to the man (O).
- Turn left.

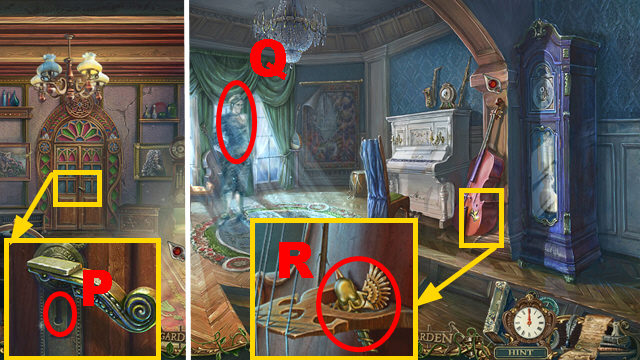
- Zoom into the door; insert the VIOLIN KEY into the lock (P) and turn it.
- Move forward.
- Talk to the ghost (Q).
- Zoom into the cello; take the BIRD (R).
- Walk down.

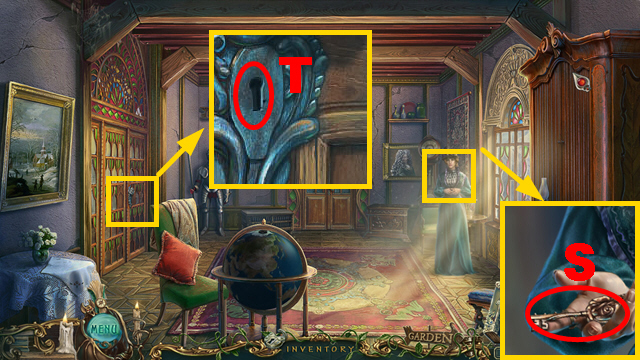
- Talk to the woman; take the ROSE KEY (S).
- Zoom into the left door; insert the ROSE KEY into the lock (T) and turn it.
- Turn left.

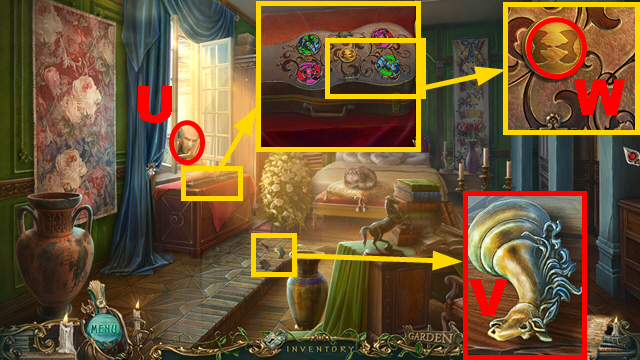
- Try to grab the man (U).
- Zoom into the floor; take the KNIGHT (V).
- Zoom into the violin case and then zoom into the niches; insert the 2 BIRDS into the niches (W).
- Play the mini-game.

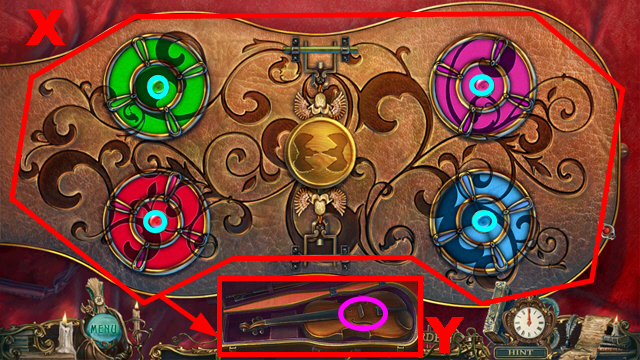
- To solve this puzzle (X), swap the pieces and rotate the disks so that the patterns and the colors are aligned correctly.
- Select two pieces from any disk that are closest to the birds to swap them.
- Press the buttons (light blue) to rotate the disks.
- Connect the STRINGS to the violin (purple) and take the VIOLIN (Y).
- Walk down and move forward.

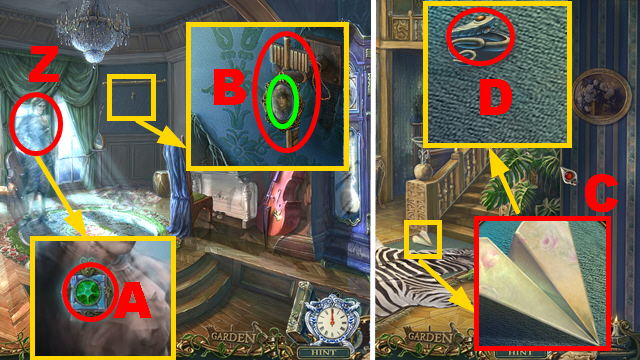
- Give the VIOLIN to the ghost (Z); take the necklace (A).
- Zoom into the wall; take the PORTRAIT (green) and the LIBRARY KEY (B).
- Walk down twice.
- Zoom into the floor; take the letter (C) and the ring (D).
- Go upstairs.

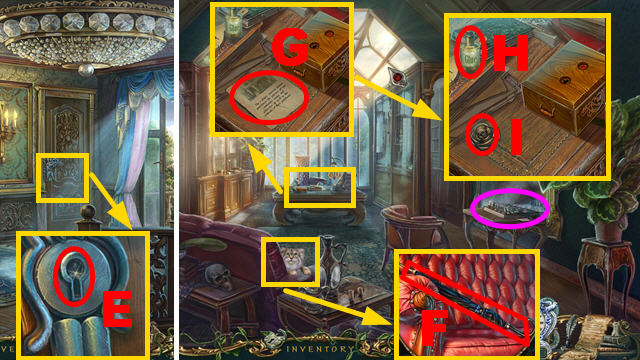
- Zoom into the door; insert the LIBRARY KEY into the lock (E) and turn it.
- Move forward.
- Zoom into the sofa; take the UMBRELLA (F).
- Zoom into the table and take the letter (G); take the GLUE (H) and the GOLD ROSE (I).
- Take a look at the chessboard (purple).
- Walk down twice.
- Play the HOP.

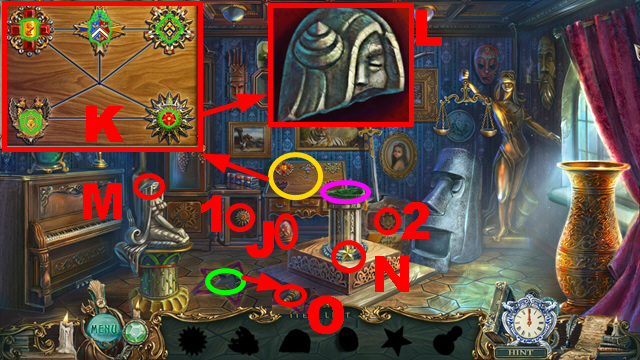
- Take the 2 war medals (1) and (2).
- Take the decorative egg (J) and put it on the pedestal (purple).
- Zoom into the medals and put down the 2 war medals; rearrange them in the correct order (K) and take the head (L).
- Put the head on the statue (M).
- Take the star (N) and insert the star into the niche (green).
- Take the pawn (O).
- You will receive the PAWN.

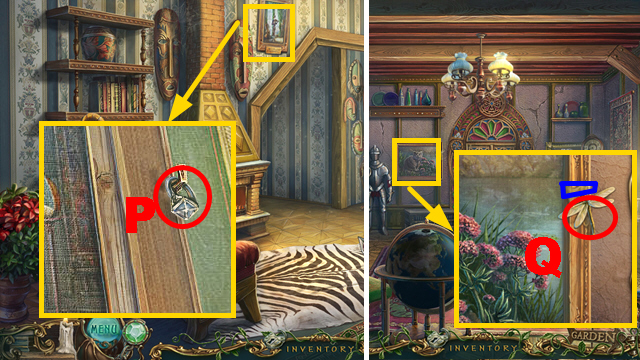
- Zoom into the painting; acquire the ring (P) with the UMBRELLA.
- Turn left.
- Zoom into the left painting and apply the GLUE to the painting (dark blue); take the DRAGONFLY (Q).
- Walk down twice.

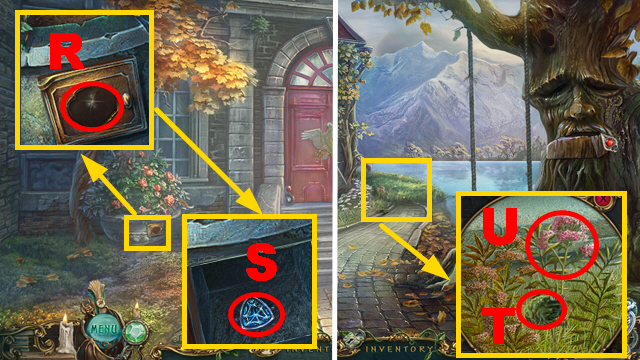
- Zoom into the flower pot and insert the GOLD ROSE into the niche (R); take the ring (S).
- Walk down and turn right.
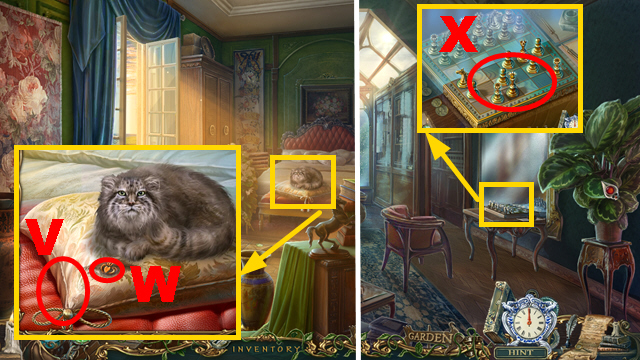
- Zoom into the grass and chase away the frog with the DRAGONFLY (T); take the VALERIAN BRANCH (U).
- Walk down, move forward twice, and turn left twice.

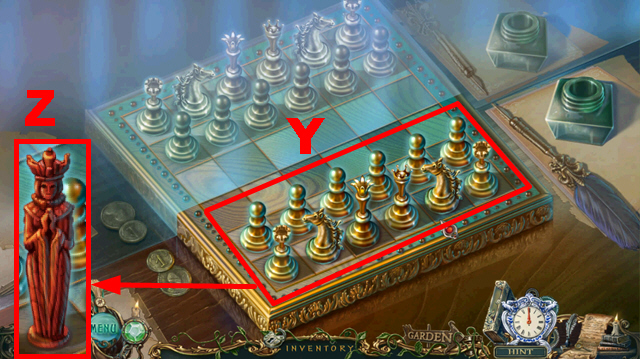
- Zoom into the cat and hold the VALERIAN BRANCH in front of it (V); take the ring (W).
- Walk down twice, go upstairs, and move forward.
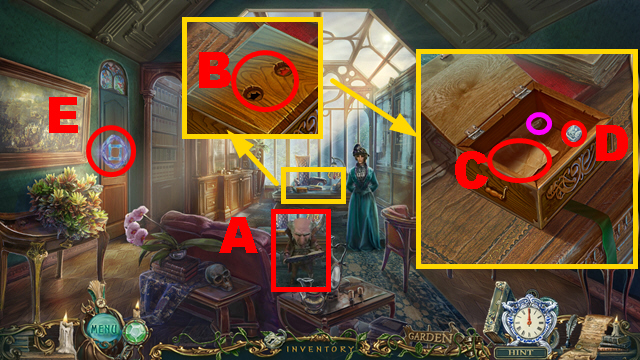
- Zoom into the chessboard; put down the PAWN and the KNIGHT (X).
- Play the mini-game.

- To solve this puzzle (Y), put each white chess piece into its correct position.
- Take the CHESS QUEEN (Z).

- Try to grab the man (A).
- Zoom into the table and insert the 2 CHESS QUEENS into the slots (B); take the note (C), the HORSESHOE KEY (purple), and the ring (D).
- Zoom into the door (E).
- Select the necklace.

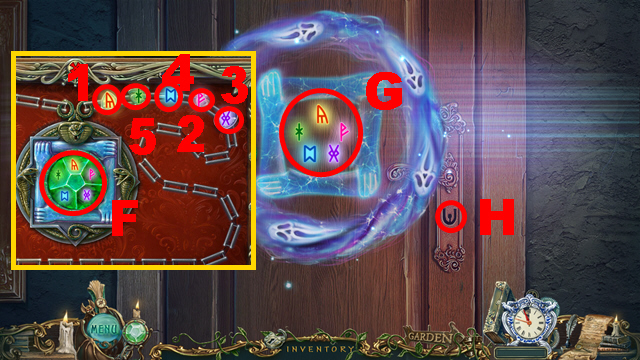
- Select the rings in this order: 1, 2, 3, 4, and 5. Take the necklace (F), and use it to break the symbols (G).
- Insert the HORSESHOE KEY into the lock (H) and turn it once.
- Turn left.

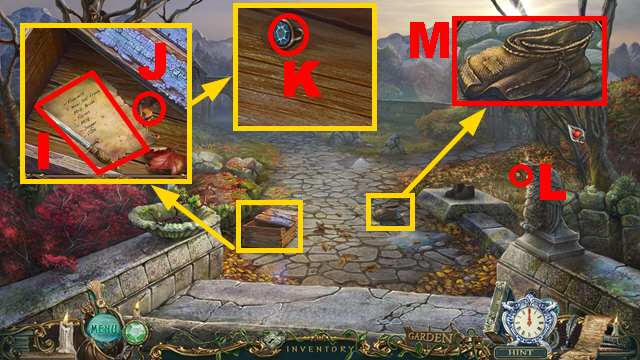
- Zoom into the crate and take the note (I) and the FIGURINE (J); move the board aside and take the ring (K).
- Take the ring (L).
- Zoom into the pouch; take the POUCH (M).
- Turn left.
Chapter 3: The Graveyard

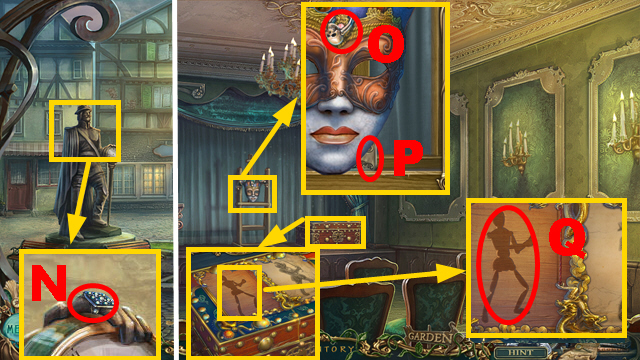
- Zoom into the statue; take the ring (N).
- Turn right.
- Zoom into the mask and take the ring (O); move aside the mask and take the LIGHTER (P).
- Zoom into the chest and then zoom into the niches; insert the FIGURINE into the niche (Q).
- Play the mini-game.

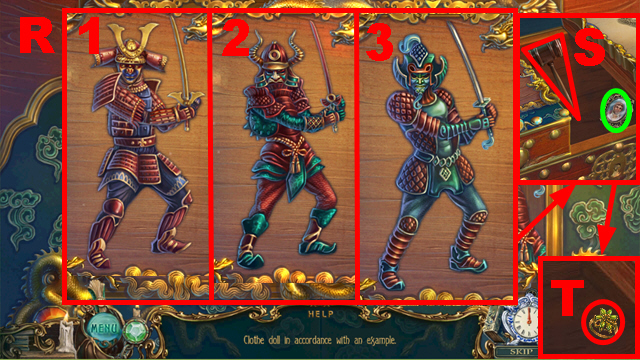
- To solve this puzzle (R), dress the figurines 1-3 correctly.
- Take the GAVEL (S) and connect the PORTRAIT to the other portrait (green); take the ring (T).

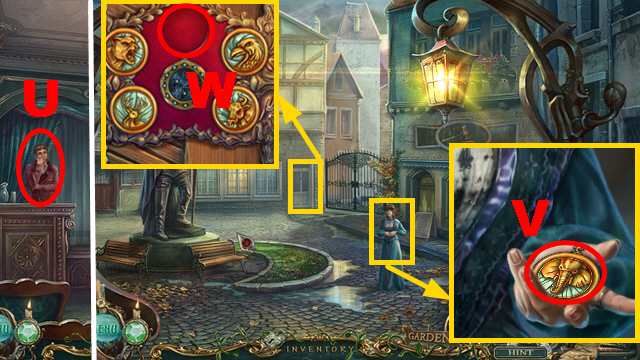
- Talk to the man and give the GAVEL to him (U).
- Walk down.
- Talk to the woman; take the STORE KEY (V).
- Zoom into the door; insert the STORE KEY into the niche (W).
- Play the mini-game.

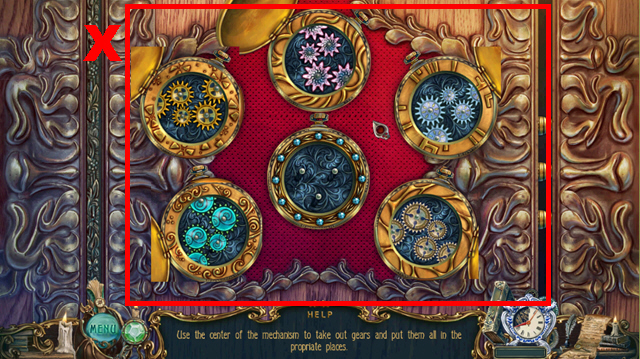
- To solve this puzzle (X), put each gear into the correct position and the correct compartment.
- Enter the store.
- Play the HOP.

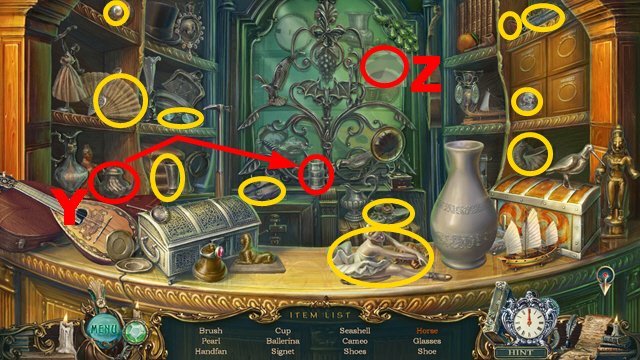
- Take the kettle (Y), pour it into the jug, and take the horse (Z).
- You will receive the NOTEBOOK.

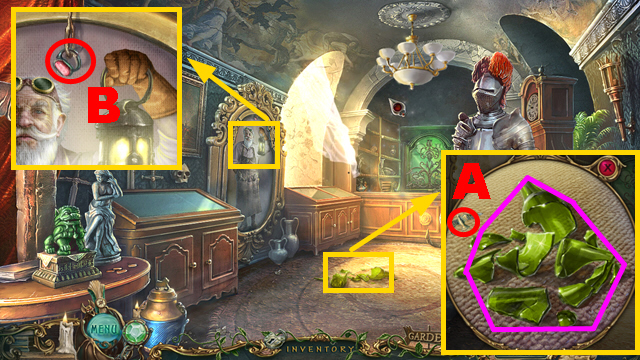
- Zoom into the broken glass; take the ring (A) and collect the broken glass with the POUCH (purple) to acquire the BROKEN GLASS.
- Zoom into the portrait; take the ring (B).
- Play the HOP.

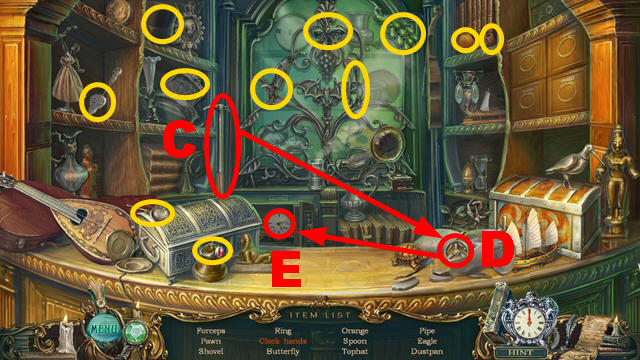
- Take the hammer (C), destroy the vase with it, take the valve (D), put it onto the safe, and take the clock hands (E).
- You will receive the CLOCK HANDS.
- Walk down.

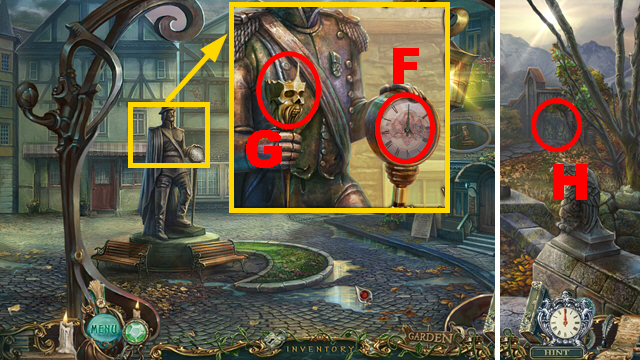
- Zoom into the statue and connect the CLOCK HANDS to the clock (F); light the torch with the LIGHTER (G) and take the TORCH.
- Walk down.
- Zoom into the gate (H).
- Access the necklace.

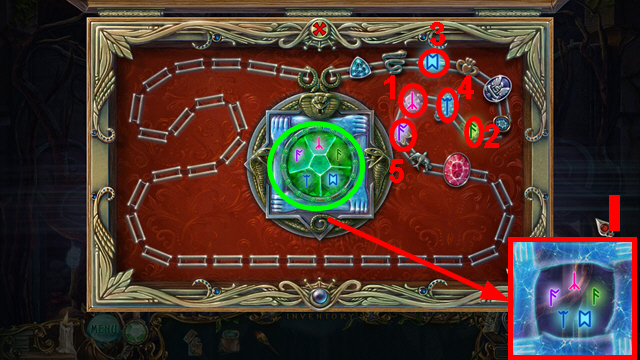

- Select the rings in this order: 1, 2, 3, 4, and 5. Take the necklace (green), and destroy the seal with it (I).
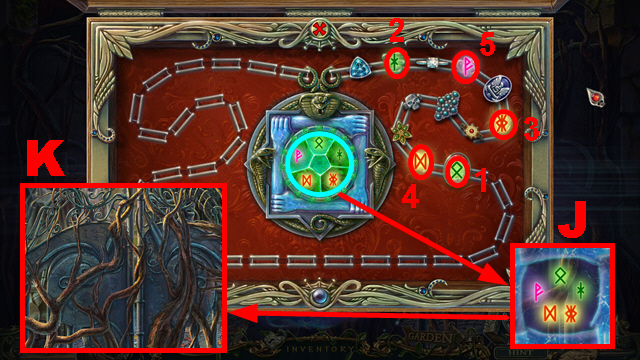
- Access the necklace once more.
- Select the rings in this order: 1, 2, 3, 4, and 5. Take the necklace (light blue), and destroy the seal with it (J).
- Burn the roots with the TORCH (K).
- Turn right.

- Zoom into the tree stump; take the MEDALLION HALF (L).
- Turn left.
- Zoom into the horse; take the ring (M).
- Turn left.

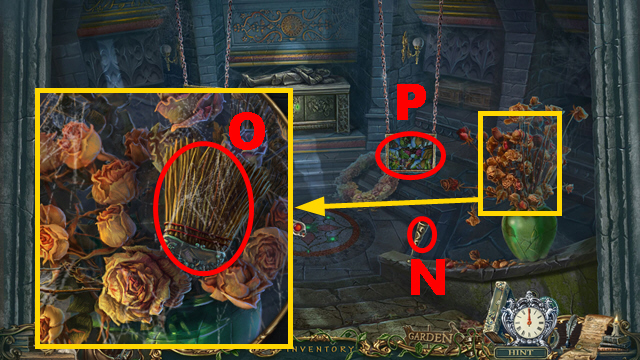
- Insert the TORCH into the holder (N).
- Zoom into the vase; take the DUSTER (O).
- Zoom into the right painting (P).
- Play the mini-game.


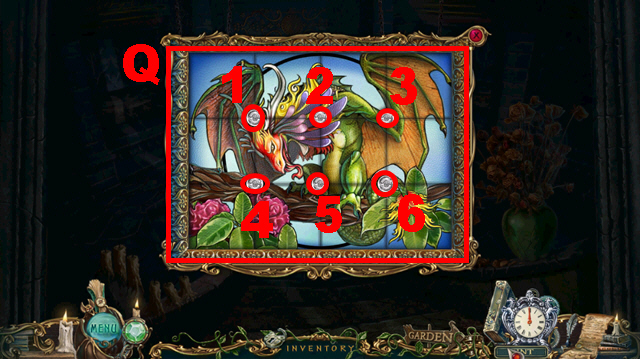
- To solve this puzzle (Q), turn the buttons, 1-6 in the following order: 4, 1, 2, 1, 1, 1, 1, 2, 2, 2, 2, 1, 2, 1, 3, 3, 3, 1, 2, 1, 1, 2, 2, 2, 5, 5, 5, 4, 4, 4, 5, 1, 4, 5, 5, 5.
- 1, 1, 1, 2, 3, 2, 3, 3, 6, 6, 6, 6, 3, 6, 3, 3, 3, 6, 6, 3, 3, 6, 3, 6, 2, 3, 2, 2, 2, and 3.
- Walk down twice and turn right.

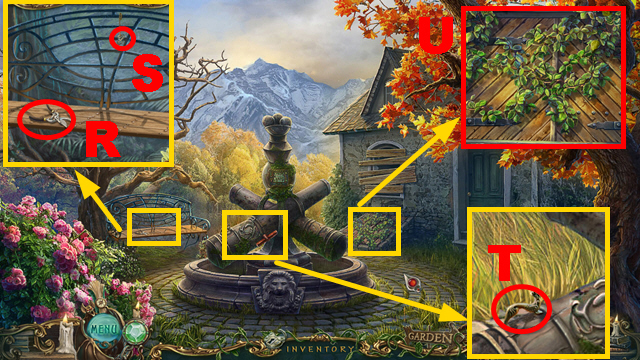
- Zoom into the bench; take the GARDEN PRUNER (R) and the ring (S).
- Zoom into the fountain; pull the handle (T).
- Zoom into the trapdoor; remove the leaves with the GARDEN PRUNER (U) four times.
- Move forward.
Chapter 4: The Zeppelin

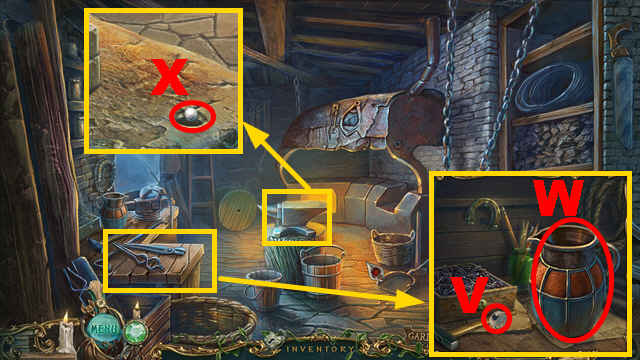
- Zoom into the table; take the ring (V) and the CARAFE (W).
- Zoom into the anvil; take the ring (X).
- Go up the ladder.
- Play the HOP.

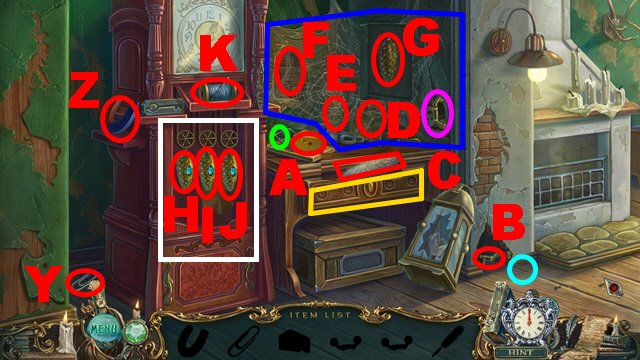
- Take the paperclip (Y) and the magnet (Z).
- Insert the paperclip into the trap (green); take the cheese (A).
- Put the cheese next to the hole (light blue); take the grip (B).
- Hold the magnet next to the crack (purple) to acquire the grip.
- Connect both grips to the drawer (yellow).
- Take the duster (C).
- Remove the cobwebs with the duster (dark blue).
- Take the bas-relief (D) and the clock weight (E).
- Insert the bas-relief into the niche (F) and take the clock weight (G).
- Connect both clock weights to the clock (white).
- Press the clock weights in the following sequence: H, I, J, and Ix2.
- Take the needle and cotton (K).
- You will receive the NEEDLE AND COTTON.

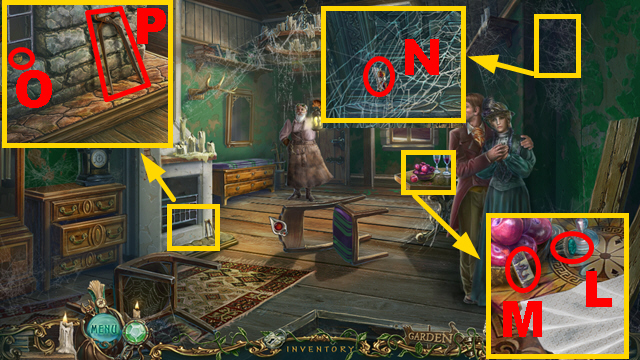
- Zoom into the table; take the ring (L) and the DECORATIVE NUT (M).
- Zoom into the wall and remove the cobwebs with the DUSTER; take the MEDALLION HALF (N).
- Zoom into the fireplace; take the ring (O) and the PLIERS (P).
- Walk down.

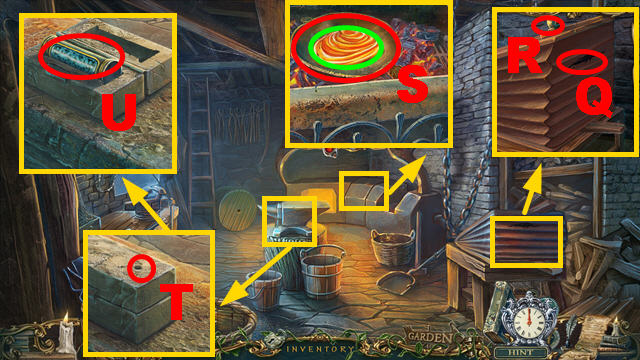
- Zoom into the bellows; fix the hole with the NEEDLE AND COTTON (Q) and press it (R).
- Zoom into the oven and pour the BROKEN GLASS into the bowl (S); receive the POUCH and acquire the MELTED GLASS with the PLIERS (green).
- Zoom into the anvil and pour the MELTED GLASS into the mold (T); open the mold and take the PIPE (U).
- Walk down three times.

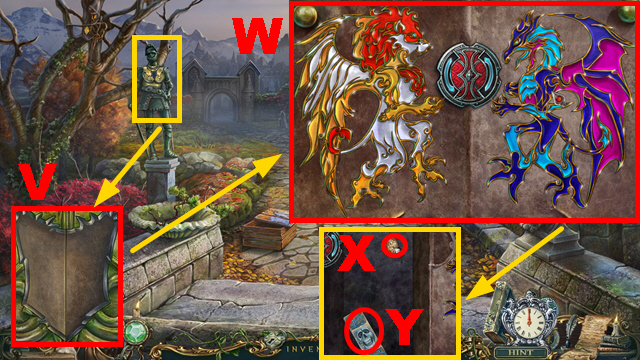
- Zoom into the statue; insert the 2 MEDALLION HALVES into the niche (V).
- Play the mini-game.
- To solve this puzzle (W), rotate the puzzle pieces and put them into the correct position.
- Take the ring (X) and the DECORATIVE NUT (Y).
- Turn right and turn left.

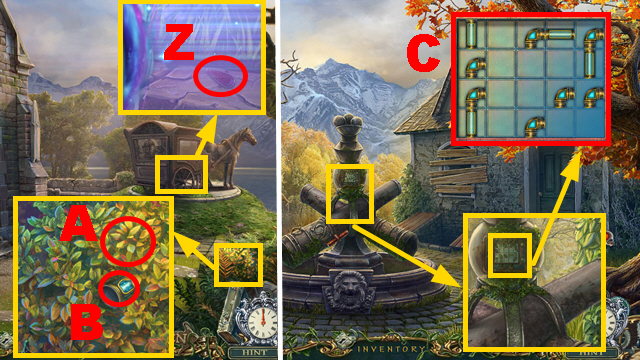
- Zoom into the carriage; take the ring (Z).
- Zoom into the bush and remove the leaves with the GARDEN PRUNER (A); take the PIPE (B).
- Walk down and turn right.
- Zoom into the fountain and then zoom into the panel; connect the 2 PIPES to it (C).
- Play the mini-game.

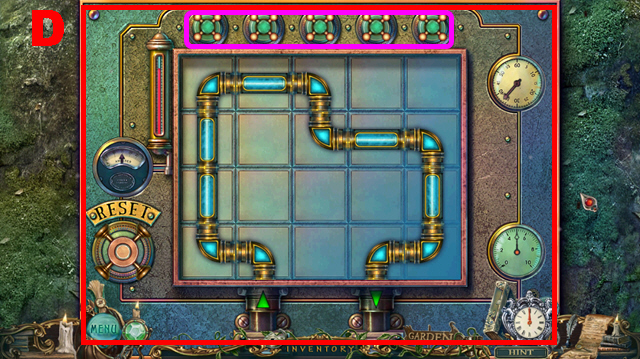
- To solve this puzzle (D), move the pipes to connect both water outlets.
- Each column can be moved by pressing the top buttons (purple).
- Press bent pipes to rotate them.
- Walk down.

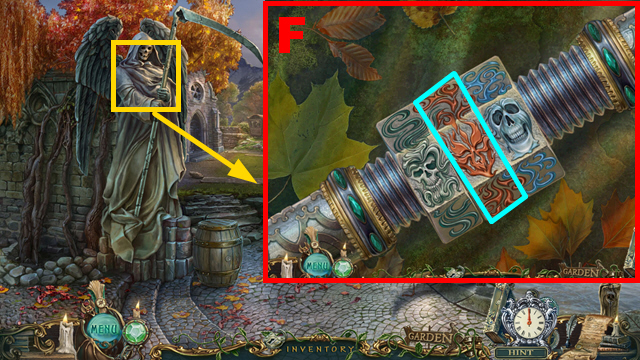

- Zoom into the statue; connect the DECORATIVE NUT to the sword (light blue).
- Play the mini-game.
- To solve this puzzle (F), move the puzzle pieces until you have created the correct picture. Move the puzzle pieces to the top or the bottom to rotate them without moving them.
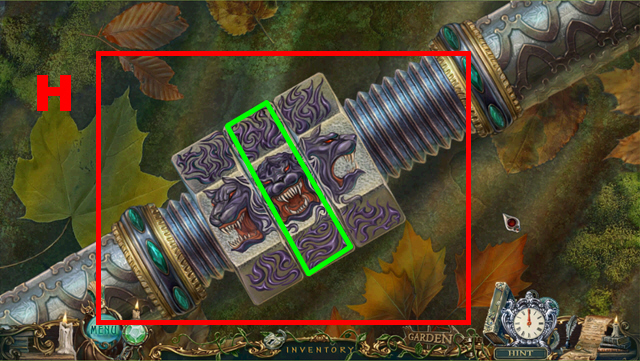
- Connect the DECORATIVE NUT to the sword (green).
- Play the mini-game.
- To solve this puzzle (H), move the puzzle pieces until you have created the correct picture. Move the puzzle pieces to the top or the bottom to rotate them without moving them.

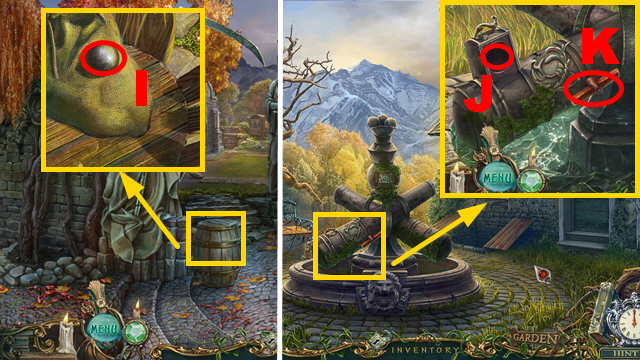
- Zoom into the barrel; take the CANNONBALL (I).
- Turn right.
- Zoom into the fountain; insert the CANNON BALL into the hole (J) and turn the handle (K).
- Move forward twice.

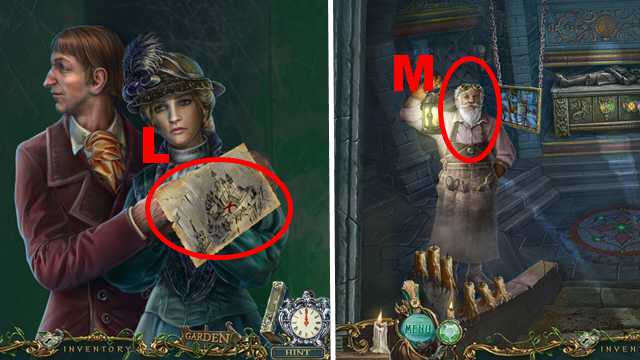
- Take the MAP (L).
- Move forward, walk down, turn left, and move forward.
- Talk to the man (M).
- Walk down twice.

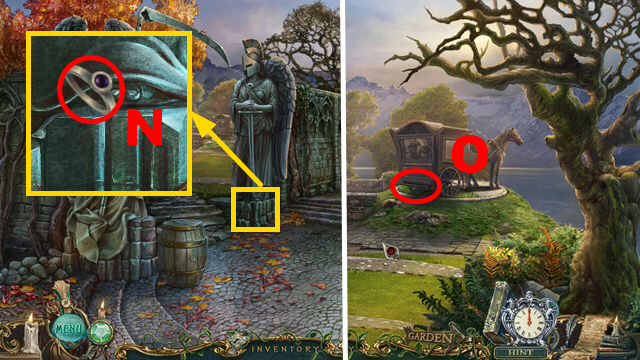
- Zoom into the statue; take the ring (N).
- Turn left.
- Zoom into the carriage (O).
- Access the necklace.

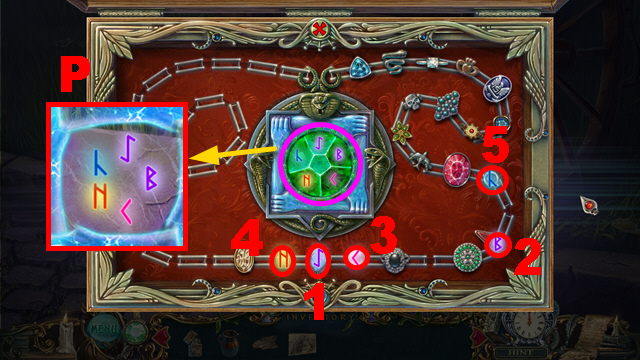
- To solve the puzzle, select the rings in this order: 1, 2, 3, 4, and 5.
- Take the necklace (purple) and use it to destroy the seal (P).
- Walk down, turn right, and enter the house.
- Play the HOP.

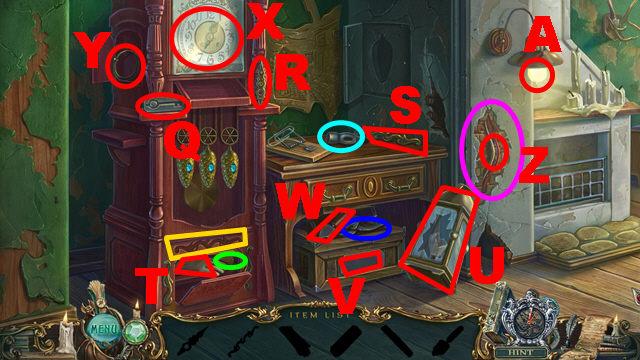
- Take the key symbol (Q), the clock hand (R), and the decoration (S). Insert the decoration into the niche (yellow); take the gloves (T) and the hammer handle (green).
- Connect the hammer handle to the hammer head (light blue); remove the broken glass from the lantern with the gloves (U) and take the hammer. Break the wall with the hammer (purple).
- Insert the key symbol into the niche (V); take the cutting pliers (dark blue) and the glass cutter (W).
- Cut the glass from the clock (X) with the glass cutter, take the glass, and insert the clock hand into the clock.
- Take the lantern handle (Y).
- Cut the wire (Z) with the cutting pliers.
- Take the light bulb (A). Insert the light bulb into the lantern. Connect the lantern handle and the glass to the lantern. Take the lantern.
- You will receive the LANTERN.
- Walk down three times, turn left, and move forward.
Chapter 5: Helping the Ghost

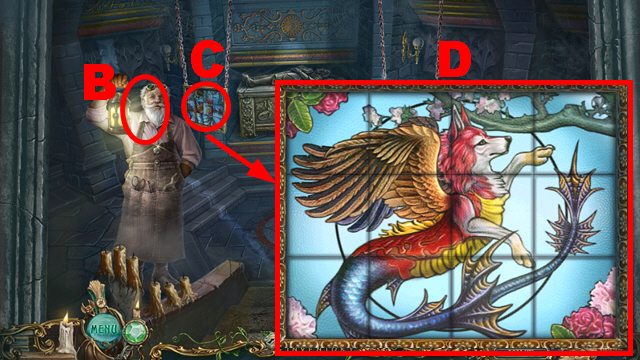
- Give the LANTERN to the man (B).
- Zoom into the left painting (C).
- Play the mini-game.
- To solve this puzzle (D), rotate each puzzle part until the correct picture is created.

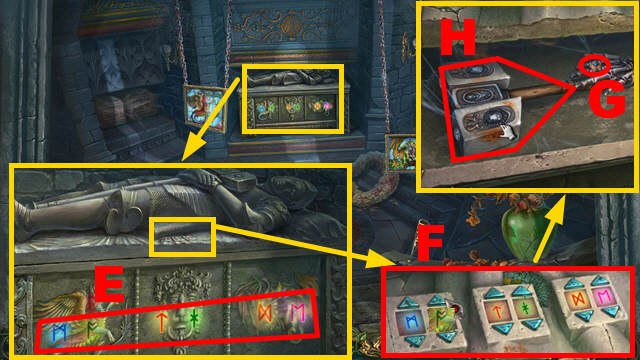
- Zoom into the statue; make note of the symbols (E).
- Zoom into the panel; enter the symbols into the panel (F).
- Take the ring (G) and the HAMMER (H).
- Walk down.

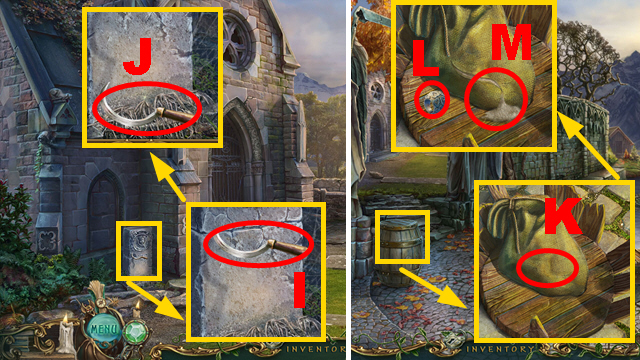
- Zoom into the pedestal and hit the with the HAMMER (I); take the SICKLE (J).
- Walk down.
- Zoom into the barrel and cut the sack open with the SICKLE (K); take the ring (L) and the GRAIN (M).
- Turn left.

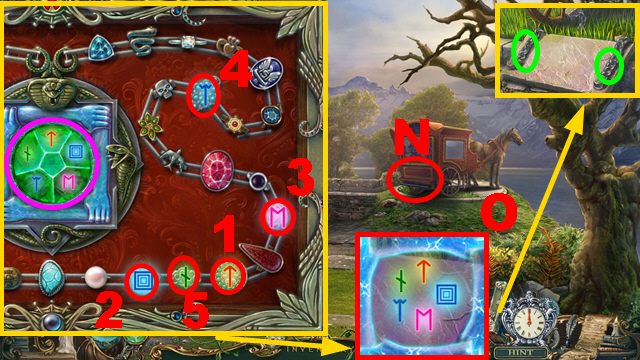
- Zoom into the carriage (N).
- Access the necklace.
- Select the rings in this order: 1, 2, 3, 4, and 5.
- Take the necklace (purple) and use it to destroy the seal (O).
- Break the 2 chains with the HAMMER (green).

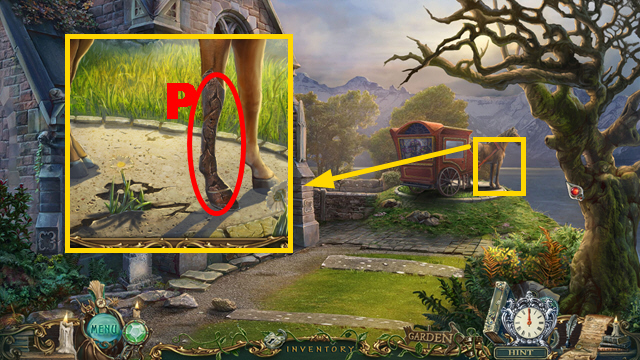
- Zoom into the horse; free the horse with the HAMMER (P).
- Move forward.

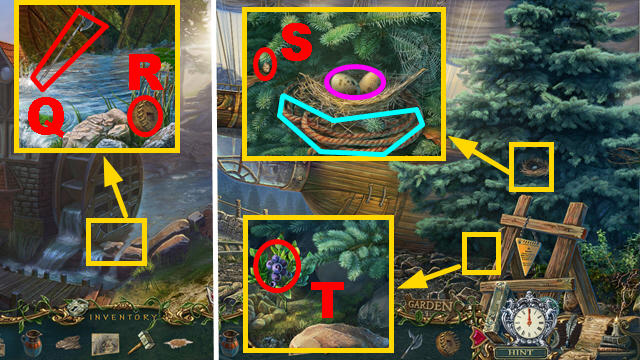
- Zoom into the water wheel; take the HALBERD (Q) and the GEAR (R).
- Turn right.
- Zoom into the nest; take the EGGS (purple), the ROPE WITH HOOK (light blue), and the ring (S).
- Zoom into the ground; take the BERRIES (T).

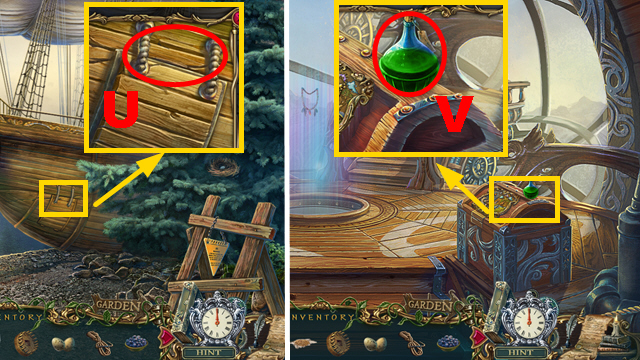
- Zoom into the ship; cut the 2 ropes with the HALBERD (U).
- Move forward twice.
- Zoom into the chest; take the ACID (V).
- Walk down three times.

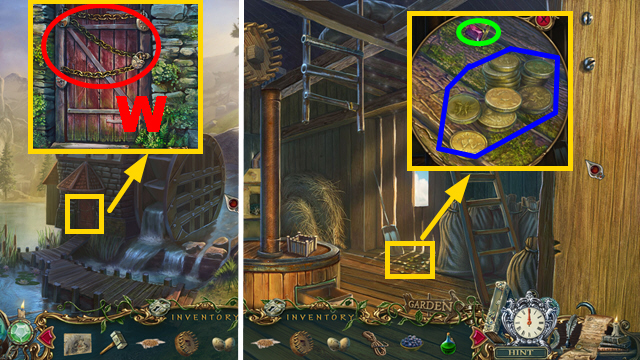
- Zoom into the door; remove the three chains with the ACID (W) and open the door.
- Enter the house.
- Zoom into the floor; take the ring (green) and acquire the COINS with the POUCH (dark blue).
- Play the HOP.

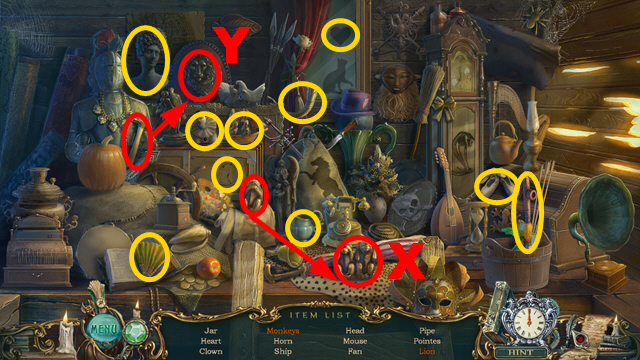
- Take the monkey, put it next to the 2 monkeys (X), and take the monkeys.
- Hit the lion with the hammer (Y) to acquire the lion.
- You will receive the TOBACCO PIPE.

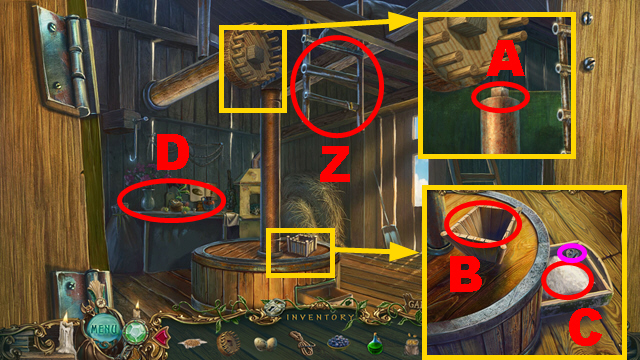
- Connect the ROPE WITH HOOK to the ladder (Z).
- Zoom into the gear; connect the GEAR to the wooden beam (A).
- Zoom into the wooden crate and pour the GRAIN into the crate (B); take the ring (purple) and the FLOUR (C).
- Zoom into the table (D).

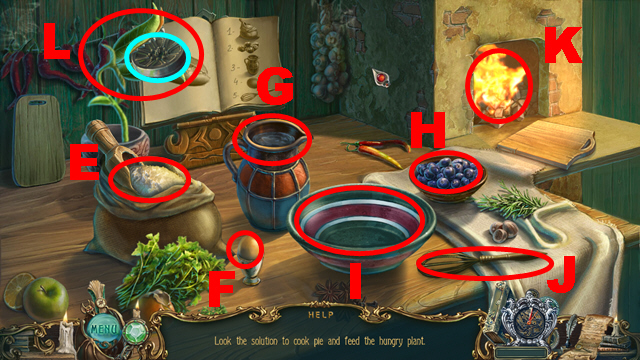
- Put down the FLOUR (E), the EGGS (F), the CARAFE (G), and the BERRIES (H).
- Pour the flour, the berries, the carafe, and the eggs into the bowl (I).
- Mix the dough with the whisk (J).
- Knead the dough.
- Put the dough into the oven (K).
- Give the bread from the bowl to the plant (L).
- Take the WHEEL (light blue).
- Walk down.

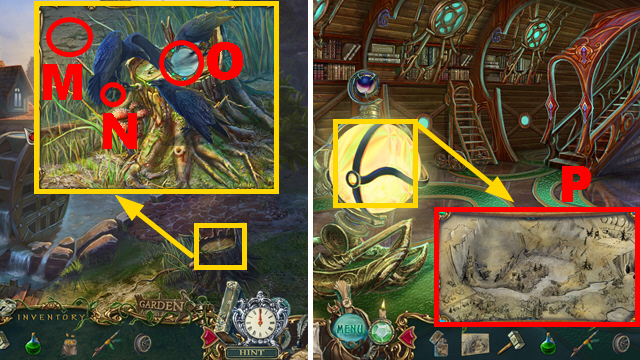
- Zoom into the tree stump and put down the COINS (M); take the ring (N) and the COMPASS (O).
- Move forward twice.
- Zoom into the device; put down the MAP and the COMPASS (P).
- Play the mini-game.

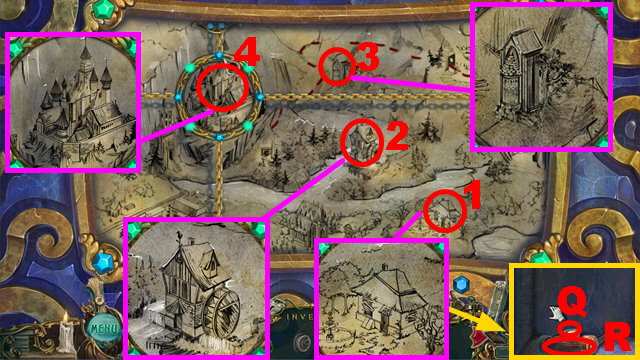
- To solve this puzzle, activate the locations 1-4, and complete the corresponding pictures (purple).
- Take the ring (Q) and the LEVER (R).
- Move forward.

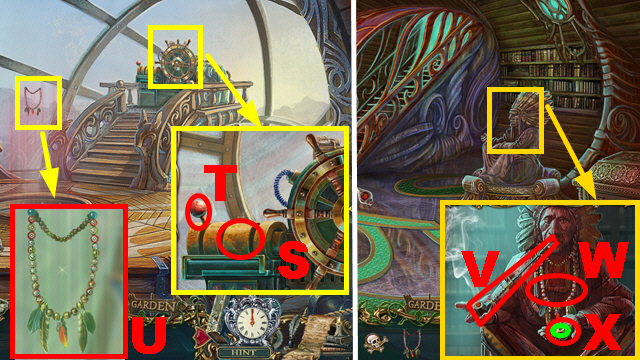
- Zoom into the steering wheel; insert the LEVER into the slot (S) to acquire the SKULL SYMBOL and pull the red lever (T).
- Zoom into the necklace; take the INDIAN NECKLACE (U).
- Walk down.
- Zoom into the Indian and give the TOBACCO PIPE (V) and the INDIAN NECKLACE (W) to him; take the ring (green) and the PHOENIX SYMBOL (X).
- Move forward.

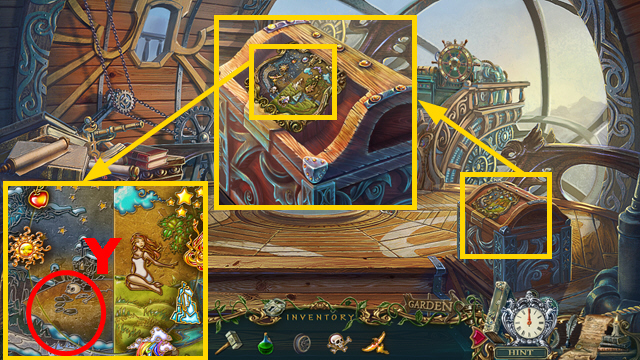
- Zoom into the chest and then zoom into the panel; connect the SKULL SYMBOL and the PHOENIX SYMBOL to it (Y).
- Play the mini-game.

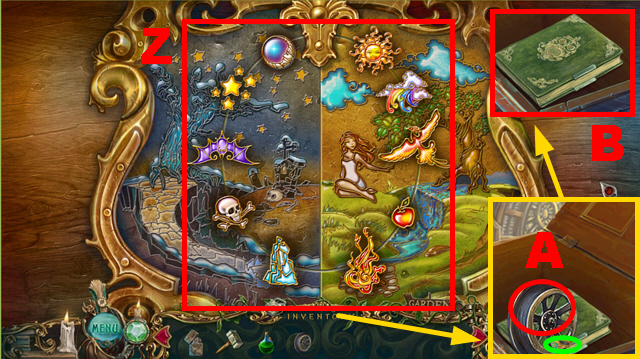
- To solve this puzzle (Z), swap the symbol pieces until they are arranged correctly.
- Take the WHEEL (A) and the ring (green).
- Take the book (B) and talk to the man.
- Walk down twice.
Chapter 6: The Zeppelin Departs

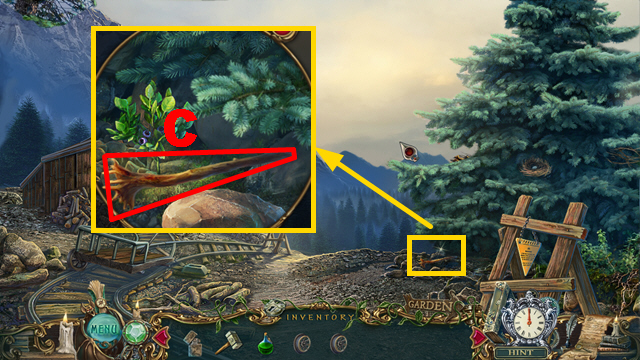
- Zoom into the ground; take the BRANCH (C).
- Walk down and enter the house.
- Play the HOP.

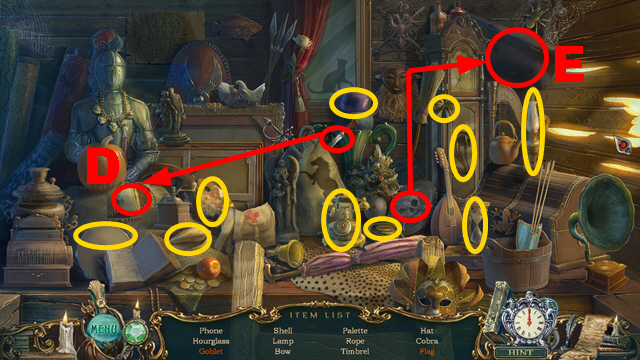
- Take the knife, cut open the blanket with it, and take the goblet (D).
- Take the skull, put it on the flag (E), and take the flag.
- You will receive the SPEARHEAD.
- Walk down.

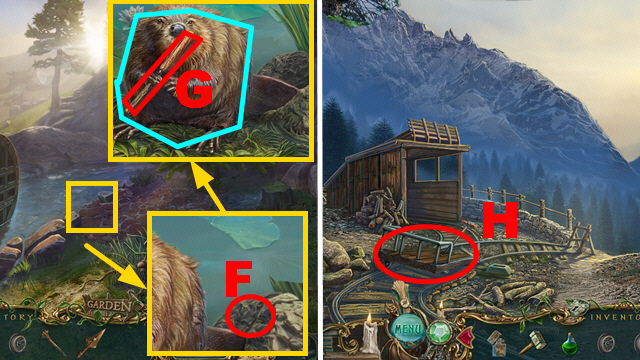
- Zoom into the river, insert the SPEARHEAD into the stone (F), and hit the spearhead with the HAMMER; give the BRANCH to the beaver (light blue) and take the LEVER (G).
- Move forward.
- Zoom into the broken cart (H).
- Access the necklace.

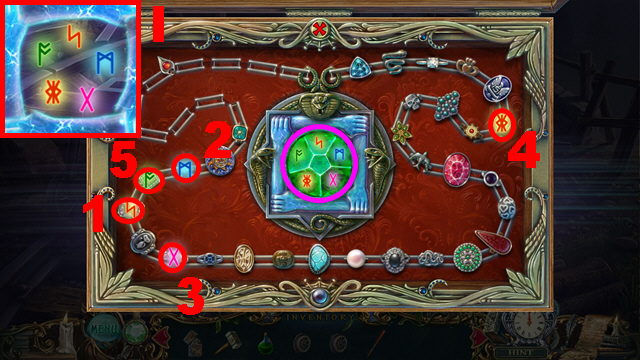

- Select the rings in this order: 1, 2, 3, 4, and 5.
- Take the necklace (purple) and use it to destroy the seal (I).
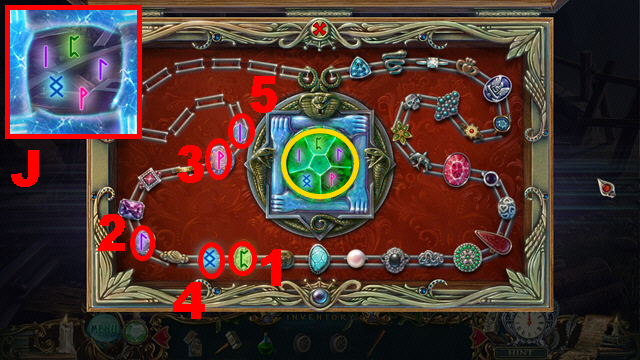
- Access the necklace.
- Select the rings in this order: 1, 2, 3, 4, and 5.
- Take the necklace (yellow) and use it to destroy the seal (J).

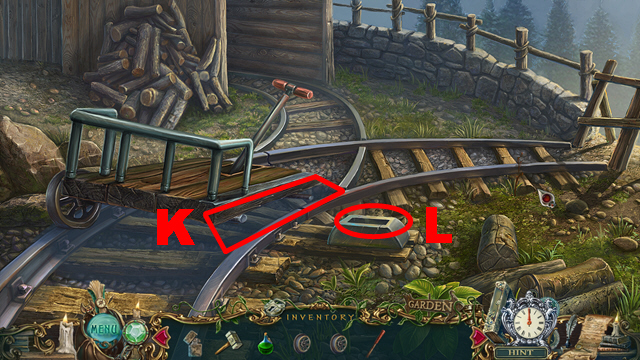
- Connect the 2 WHEELS to the cart (K).
- Insert the LEVER into the slot (L) and pull the lever.
- Push the cart.
- Move forward through the mine.

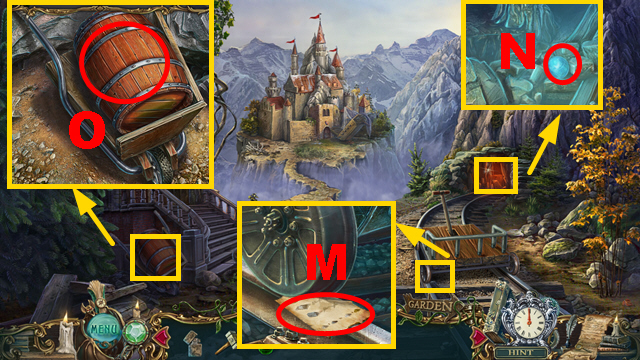
- Zoom into the cart; take the dynamite recipe (M).
- Zoom into the cave and remove the stones twice; take the SPHERE OF WATER (N).
- Zoom into the wheelbarrow; break the barrel with the HAMMER (O).
- Turn left.

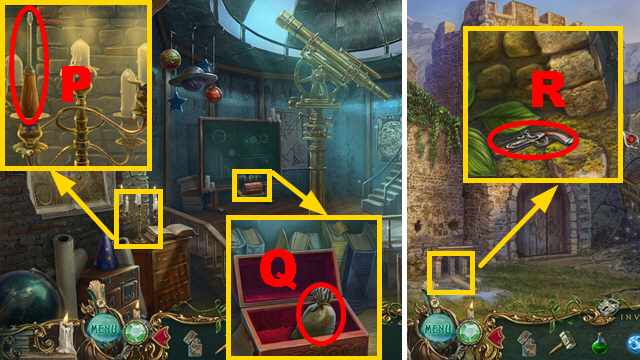
- Zoom into the candles; take the SCREWDRIVER (P).
- Zoom into the box and open it; take the SULFUR (Q).
- Walk down and move towards the castle.
- Zoom into the drain; take the GUN (R).
- Play the HOP.

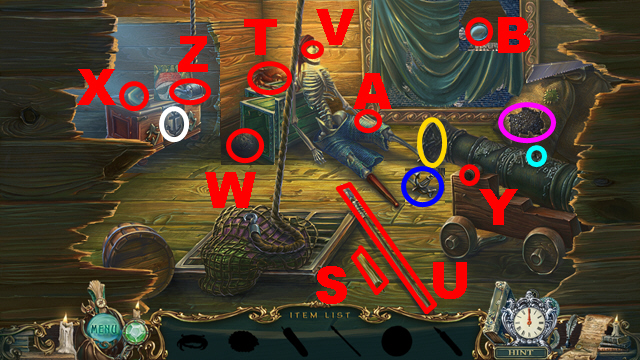
- Take the candle (S), the crab (T), and the harpoon (U).
- Insert the candle into the skull (V) to acquire the lit candle.
- Open the bag with the crab and take the gunpowder (purple).
- Open the crate with the harpoon and take the cannonball (W).
- Insert the gunpowder and the cannonball into the cannon (yellow) and light the fuse with the lit candle (light blue). Take the cannon handle (X).
- Connect the cannon handle to the cannon (Y) and pull it.
- Take the anchor (dark blue). Insert the anchor into the niche (white).
- Take the hook (Z). Connect the hook to the skeleton (A).
- Take the lens (B).
- You will receive the LENS.

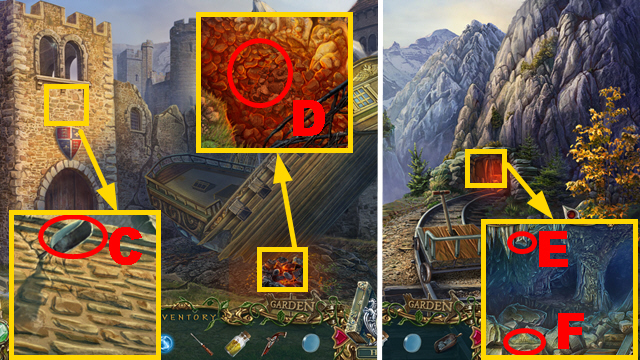
- Zoom into the tower; shoot the GUN at the scoop (C) to acquire the SCOOP.
- Zoom into the lava and remove the branches; put the SCOOP into the lava (D) to acquire the COAL.
- Walk down.
- Zoom into the cave; hit the wall with the SCREWDRIVER (E) to acquire the SALTPETER (F).
- Turn left.

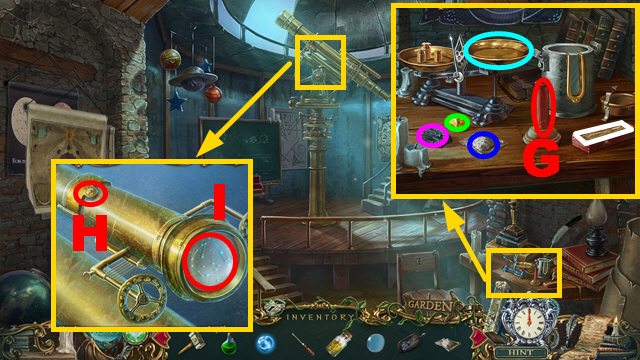
- Zoom into the table; put down the COAL (purple), the SULFUR (green), and the SALTPETER (dark blue). Put one piece of coal, one piece of sulfur, and two pieces of saltpeter on the scales (light blue).
- Put the fuse (white) into the explosive (G) and take the EXPLOSIVE.
- Zoom into the telescope and remove the screw with the SCREWDRIVER (H); insert the LENS into the telescope and zoom into it (I).
- Play the mini-game.

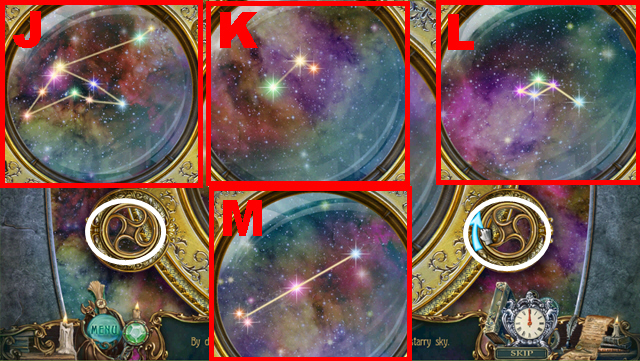
- To solve this puzzle, find the correct constellation J-M, by pressing the levers (white).
- You will receive the CONSTELLATION.
- Walk down and move forward.

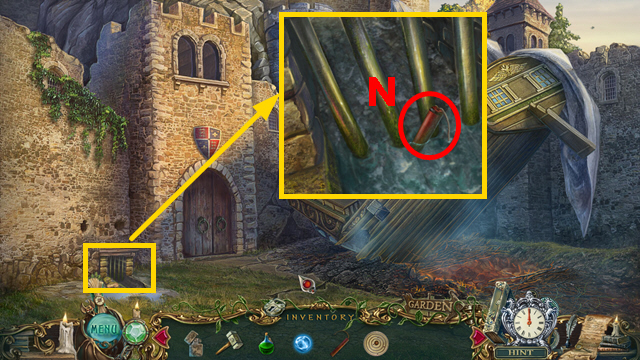
- Zoom into the outlet and put down the EXPLOSIVE (N); light the explosive with the LIGHTER.
- Move forward.

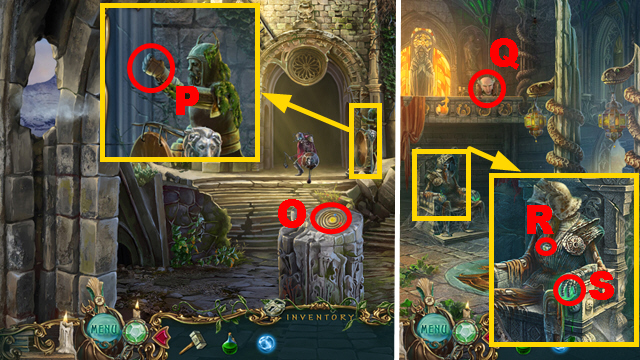
- Insert the CONSTELLATION into the niche (O).
- Zoom into the statue; give the HAMMER to it (P).
- Move forward.
- Talk to the man (Q).
- Zoom into the throne; take the ring (R) and the SPHERE OF POISON (S).
- Play the HOP.

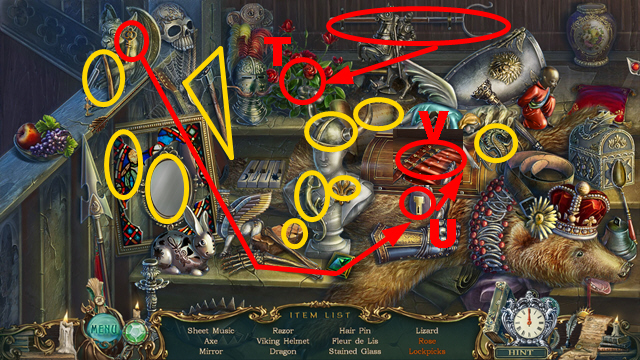
- Take the stick, remove the snake from the roses with it, and take the rose (T).
- Take the key, insert it into the lock (U), and take the lockpicks (V).
- You will receive the LOCKPICKS.
- Walk down and turn left.

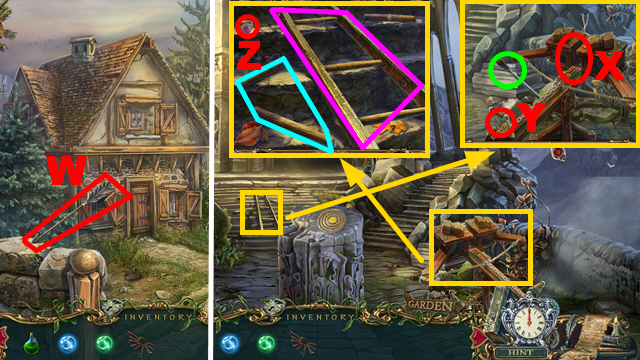
- Take the ARROW (W).
- Walk down.
- Zoom into the crossbow and turn the handle (green); connect the ARROW to it (X) and pull the lever (Y).
- Zoom into the ladder; take the LADDER (purple), the PEGS (light blue), and the ring (Z).
- Turn left.

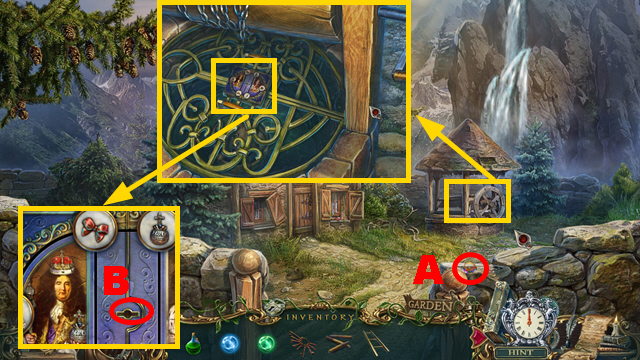
- Take the ring (A).
- Zoom into the well and then zoom into the panel; insert the LOCKPICKS into the lock (B).
- Play the mini-game.

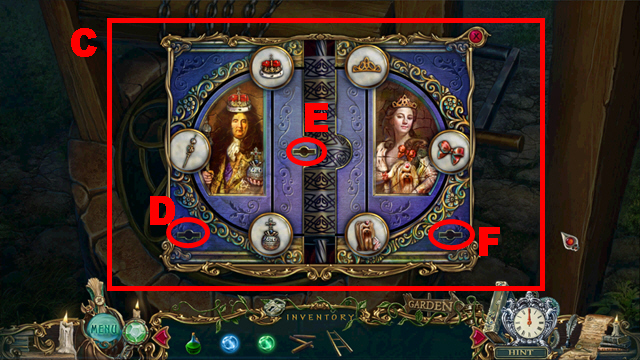
- To solve this puzzle (C), turn the keys in the following sequence: D, Ex2, D, F, Ex3, F, D, E, F, E, D, E, F, D, E, F, Ex2, Dx2, E, Fx3, Ex3, Dx2, Ex2, Dx2, F, E, F, Ex2, F, E, and D.
- Walk down and turn right.

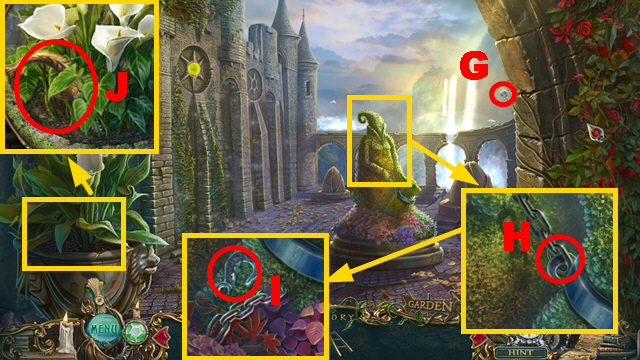
- Take the ring (G).
- Zoom into the bush and pour the ACID over the chain (H); take the HOOK (I).
- Zoom into the flower and move the leaves; take the SAW (J).

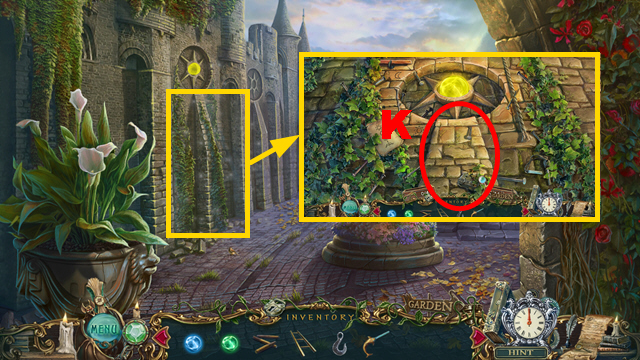
- Zoom into the wall; put down the LADDER and the PEGS (K).
- Play the HOP.

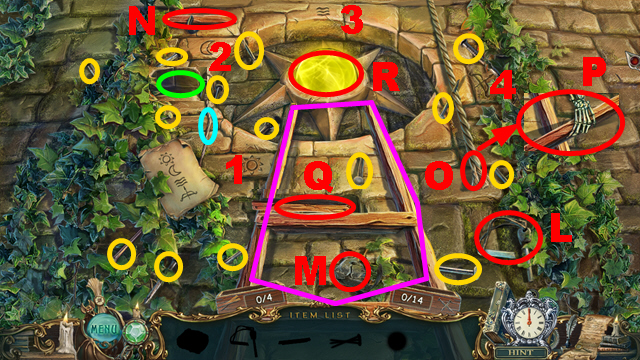
- Take the flint (L) and the stone (M).
- Set the fuse (green) on fire with the flint and take the 1/4 plank (light blue).
- Collect the 14 nails (yellow).
- Throw the stone at the plank (N) to acquire the 2/4 plank.
- Pull the rope (O) and take the 3/4 plank (P).
- Press the stones 1-4 and take the 4/4 plank (Q).
- Connect the 14 nails and the 4 planks to the ladder (purple).
- Take the sphere of light (R).
- You will receive the SPHERE OF LIGHT.
- Walk down and turn left.
Chapter 7: The Fire

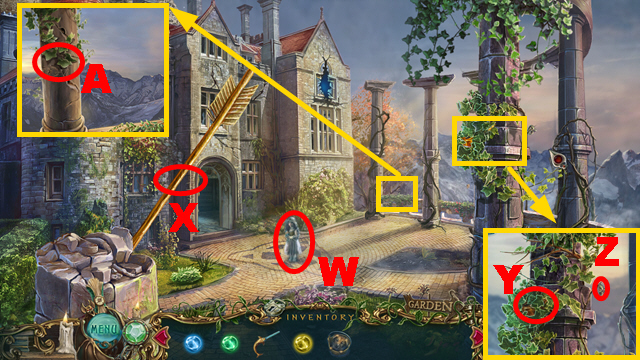
- Zoom into the well; connect the HOOK to the chain (S) and turn the handle (T) twice.
- Take the PUPPY (U) and the ring (V).
- Walk down and move forward twice.


- Talk to the girl (W).
- Cut the rod with the SAW (X) to acquire the METAL ROD.
- Zoom into the column and remove the leaves; take the EMPTY OILER (Y) and the ring (Z).
- Zoom into the wall; break the column with the METAL ROD (A).
- Go through the window.

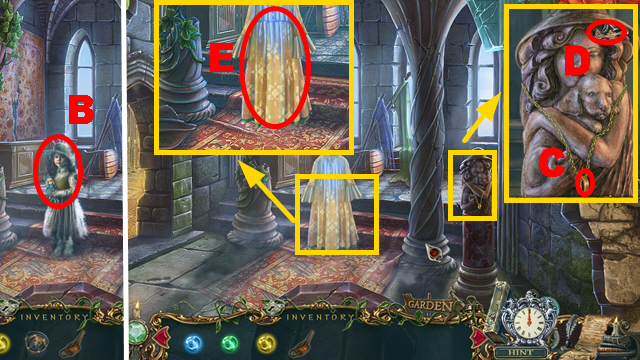
- Give the PUPPY to the girl (B).
- Zoom into the statue; take the ring (C) and the SPEARHEAD (D).
- Zoom into the nightgown; remove the nightgown (E).
- Turn left.

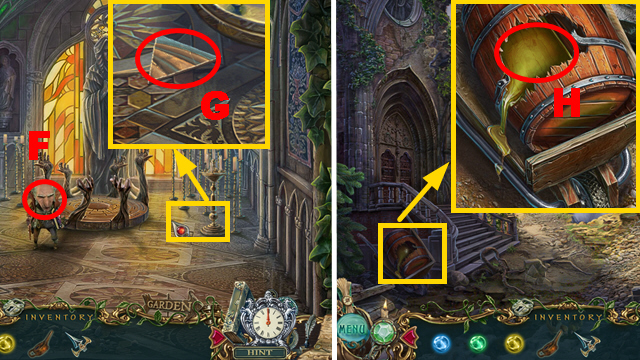
- Talk to the man (F).
- Zoom into the candleholder and move it aside; take the PUZZLE PIECE (G).
- Walk down twice and go through the gate, and walk down three times.
- Zoom into the barrel; put the EMPTY OILER into the oil (H) to acquire the OIL.
- Move forward twice and turn left.

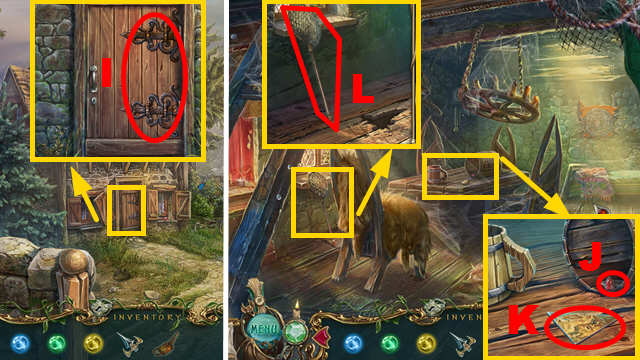
- Zoom into the door; pour the OIL over the 2 rusty hinges (I).
- Move forward.
- Zoom into the table; take the ring (J) and the PUZZLE PIECE (K).
- Zoom into the window; take the BUTTERFLY NET (L).
- Walk down three times.
- Play the HOP.

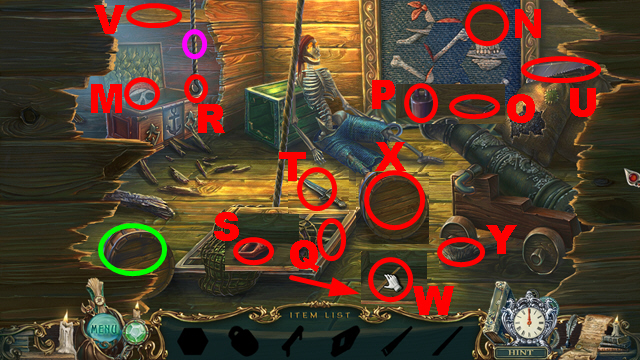
- Take the canvas piece (M) and put it into the canvas (N).
- Swap the canvas pieces to create the skull; take the hatch handle (O) and the weight (P).
- Connect the hatch handle to the hatch (Q) and the weight to the hook (R).
- Open the hatch; take the saw handle (S) and the knife (T).
- Connect the saw handle to the saw (U) and take the saw. Cut the plank with the saw (V).
- Move the barrel aside (green) and take the plank (W). Place the plank on the barrel (X).
- Cut the rope (purple) with the knife. Take the brush (Y).
- You will receive the BRUSH.
- Move forward, turn left, and move forward.

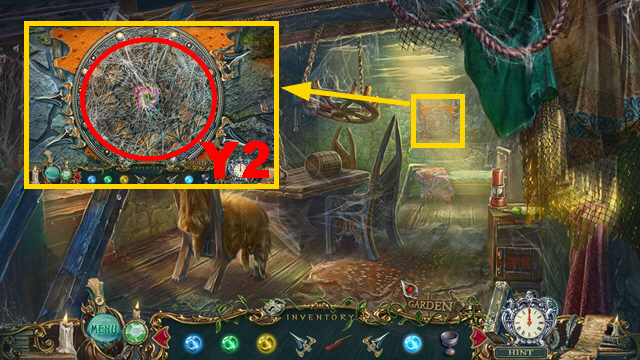
- Zoom into the wall; remove the cobwebs with the BRUSH (Y2).
- Walk down twice and move forward.
- Play the HOP.

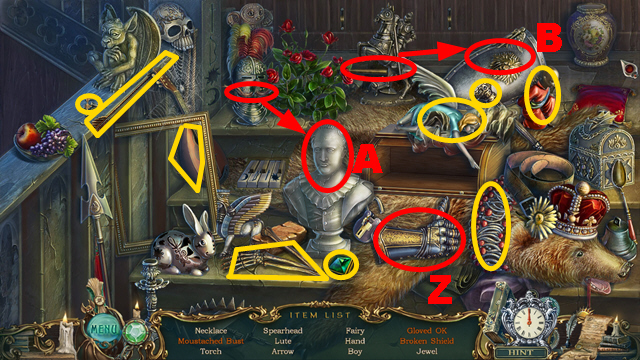
- Turn the glove twice and take the gloved OK (Z).
- Take the moustache, put it on the bust, and take the mustached bust (A).
- Take the mace, hit the shield with it, and take the broken shield (B).
- You will receive the SPEARHEAD.
- Turn right and go through the window.

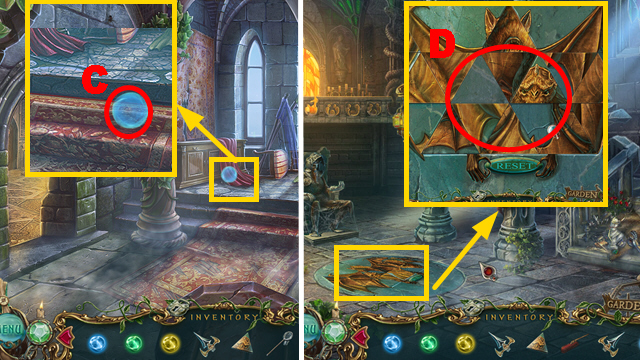
- Zoom into the sphere; catch the sphere with the BUTTERFLY NET (C) to acquire the SPHERE OF AIR.
- Walk down and go through the gate.
- Zoom into the floor; put down the 2 PUZZLE PIECES (D).
- Play the mini-game.

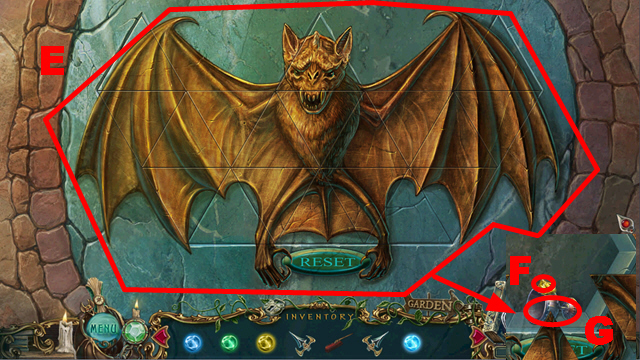
- To solve this puzzle (E), rotate the pieces to create the correct image.
- Take the ring (F) and the INCENSE BURNER (G).
- Walk down, turn left, and move forward.

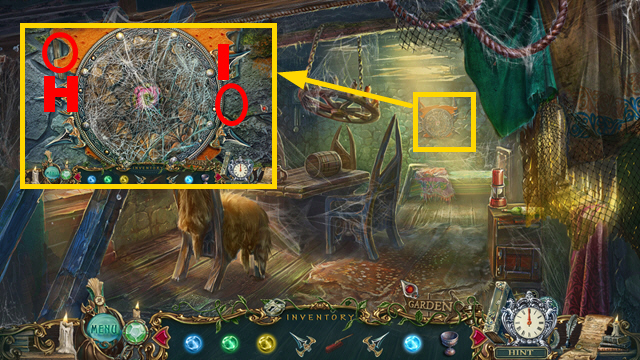
- Zoom into the wall; into the wall; connect the 2 SPEARHEADS to the device (H) and (I).
- Play the mini-game.

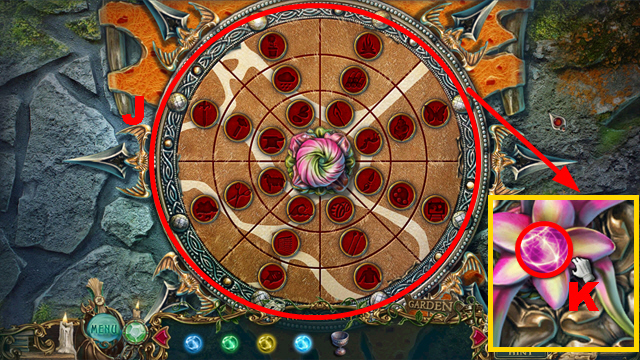
- To solve this puzzle (J), swap the symbols until they are arranged correctly.
- Take the SPHERE OF EARTH (K).
- Walk down twice, move forward, turn right, go through the window, and turn left.

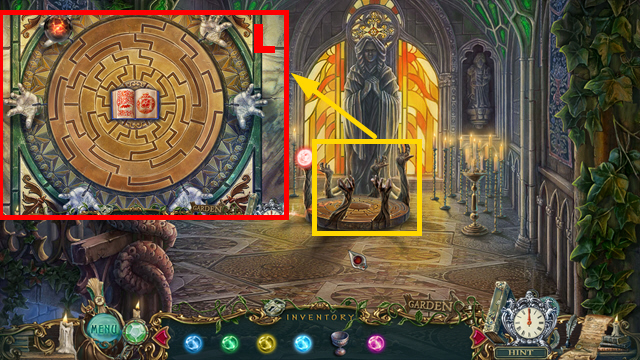
- Zoom into the altar; put down the SPHERE OF AIR, the SPHERE OF EARTH, the SPHERE of WATER, the SPHERE OF LIGHT, and the SPHERE OF POISON (L).
- Play the mini-game.

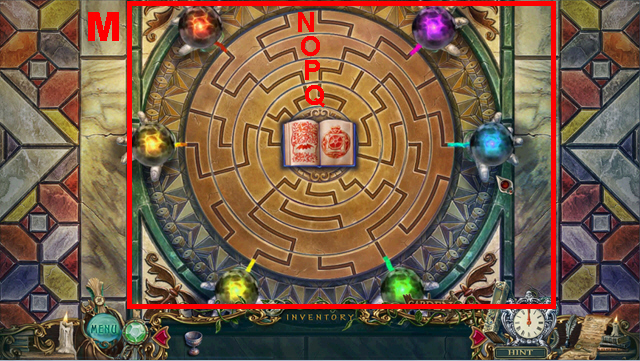
- To solve this puzzle (M), switch the rings N and Q and then O and P.
- Rotate the rings to connect all the spheres to the book.

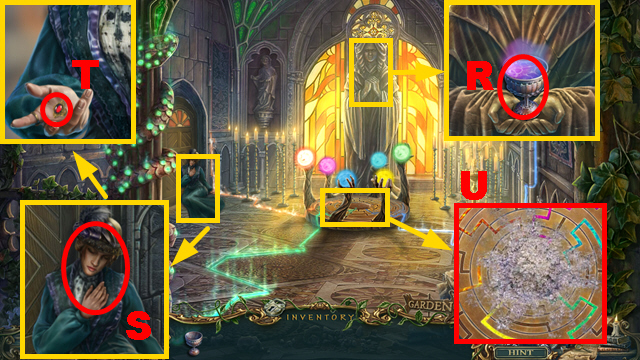
- Zoom into the statue and give the INCENSE BURNER to it; take the POTION (R).
- Zoom into the woman; give the POTION to her (S).
- Take the ring (T); you will receive the FILLER’S AMULET.
- Zoom into the floor; throw the FILLER’S AMULET on the ashes (U).
- Congratulations, you have completed Haunted Legends: The Curse of Vox.




 Dark Cases: The Blood Ruby Walkthrough, Guide, & Tips
 Christmas Eve: Midnight's Call Walkthrough, Guide, & Tips
 The Treasures of Mystery Island: The Gates of Fate Walkthrough, Guide, & Tips
 Empress of the Deep: Legacy of the Phoenix Walkthrough, Guide, & Tips
 Little Noir Stories: The Case of the Missing Girl Walkthrough, Guide, & Tips