Rite of Passage: Hide and Seek Walkthrough, Guide, & Tips
Rite of Passage: Hide and Seek Walkthrough

Welcome to the Game Name Walkthrough
Twenty years ago, the children of Greystone were taken by a mysterious fog – only you escaped. It’s time to find out why…
Whether you use this document as a reference when things get difficult or as a road map to get you from beginning to end, we’re pretty sure you’ll find what you’re looking for here.
This document contains a complete Game Name game walkthrough featuring annotated screenshots from actual gameplay!
We hope you find this information useful as you play your way through the game. Use the walkthrough menu below to quickly jump to whatever stage of the game you need help with.
Remember to visit the Big Fish Games Forums if you find you need more help. Have fun!
This walkthrough was created by Nathaniel Apgar, and is protected under US Copyright laws. Any unauthorized use, including re-publication in whole or in part, without permission, is strictly prohibited.
General Tips
- This is the official guide for Rite of Passage: Hide and Seek.
- This guide will not mention each time you have to zoom into a location; the screenshots will identify each location.
- Hidden-object puzzles are referred to as HOPs. This guide will not show screenshots of the HOPs; however, it will mention when a HOP is available and the inventory item you’ll collect from it.
- This guide will give step-by-step solutions for all puzzles which are not random. Please read the instructions in the game for each puzzle.
Chapter 1: Greystone

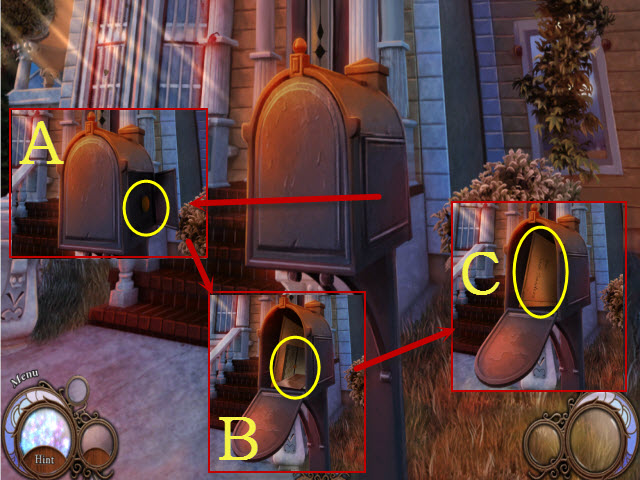
- Open the mailbox panel; press the button (A).
- Read the letter and invitation (B).
- Take the package; open it (C).

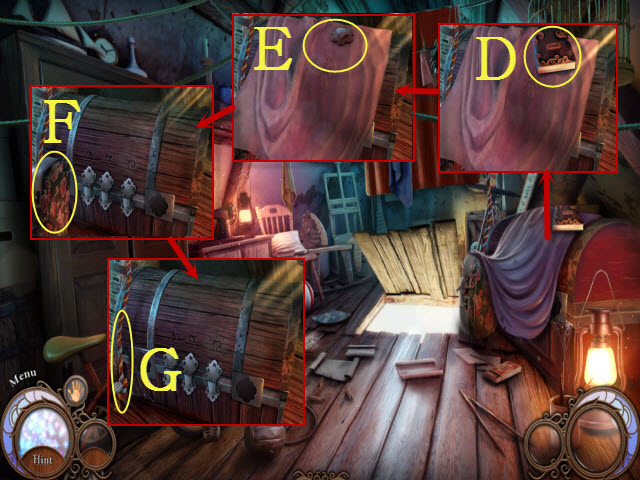
- Take the journal (D).
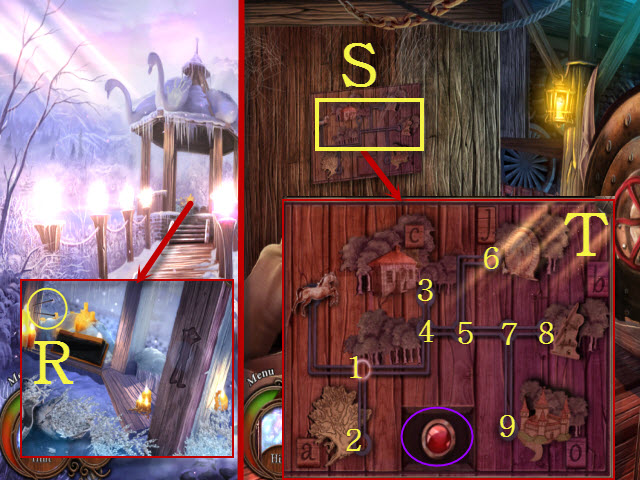
- Grab the 1/2 CHEST DIAL (E).
- Move the blanket; take the VANITY CASE (F).
- Pull the rope (G).

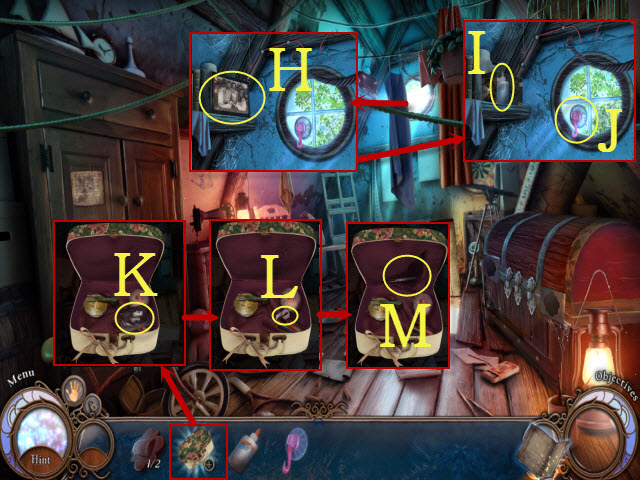
- Take the picture (H) and GLUE (I).
- Pull the hook three times; receive the VACUUM HOOK (J).
- Open the VANITY CASE; take the picture (K).
- Select the blade (L).
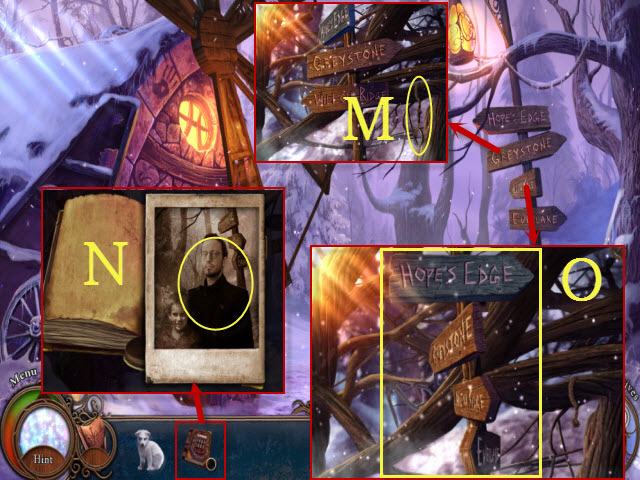
- Move the flap; take the TWEEZERS (M).

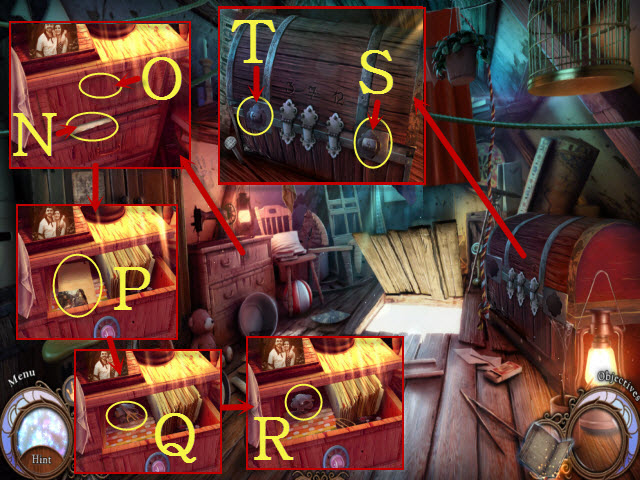
- Use the TWEEZERS; read the letter (N).
- Place the VACUUM HOOK (O); open the drawer and take the letter (P).
- Move the items aside (Q).
- Take the 2/2 CHEST DIAL (R).
- Place the 1/2 CHEST DIAL (S) and the 2/2 CHEST DIAL (T) to activate a mini-game.
- Solution: 1-2, 3-4, and 4-8.

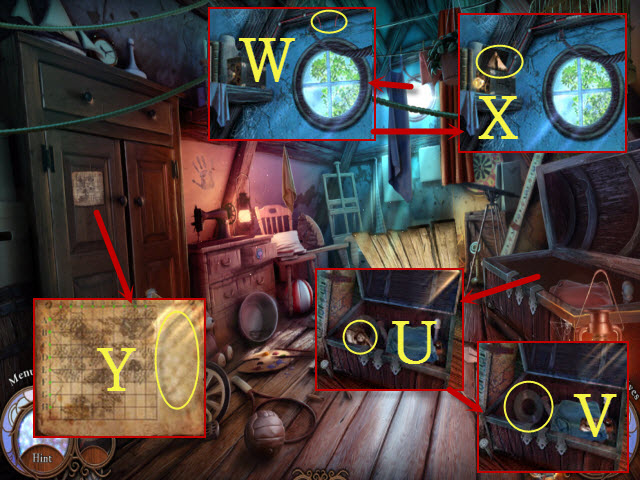
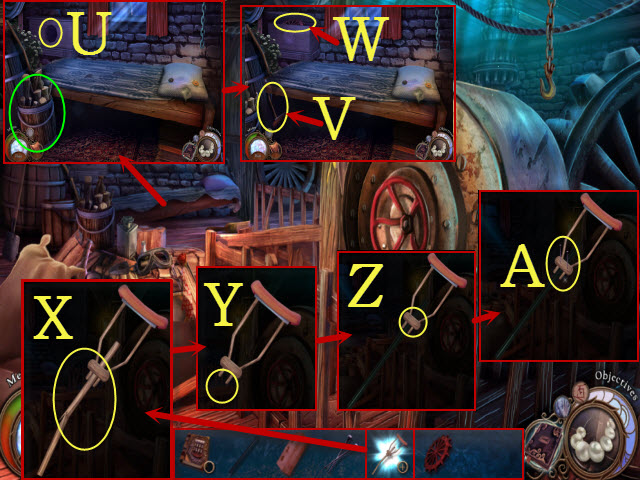
- Open the chest; move the photo (U).
- Take the INSULATING TAPE (V); place it on the wires (W).
- Take the POSTCARD (X); place it on the map to activate a mini-game (Y).

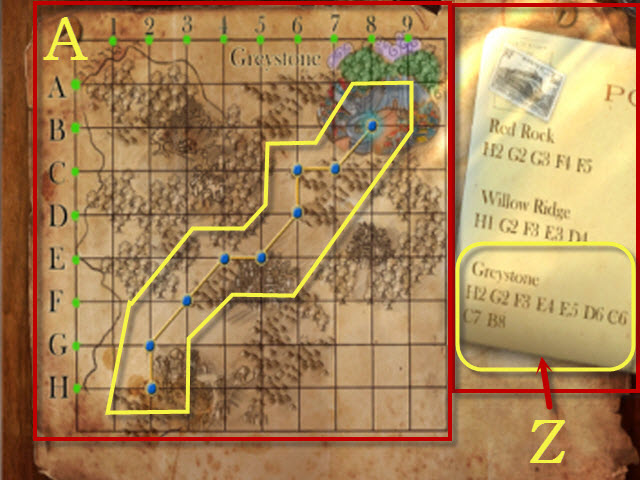
- Plot the coordinates (Z).
- Solution (A).

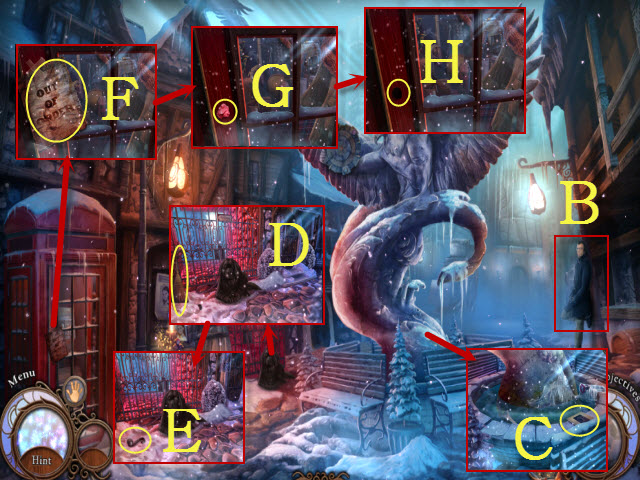
- Select the man (B).
- Take the 1/4 SLIDE (C).
- Select the broom (D); take the HANDLE (E).
- Move the sign (F) and the gum (G).
- Place the HANDLE; select it to activate a HOP (H).

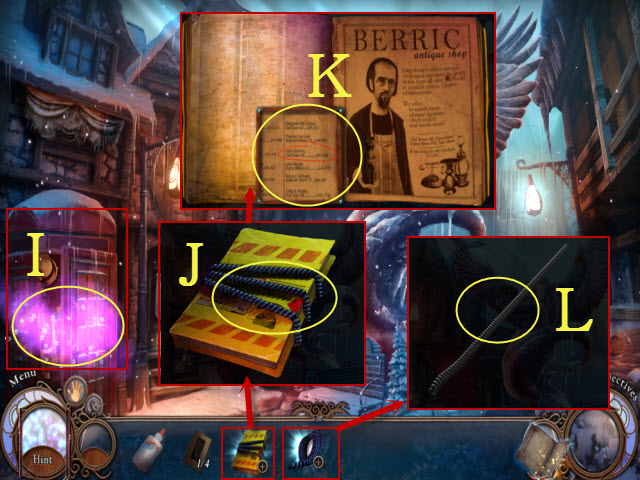
- Play the HOP (I); receive the PHONE BOOK.
- Examine the PHONE BOOK; take the PHONE CABLE (J).
- Open the PHONE BOOK; locate Jack Sanders (K).
- Examine the PHONE CABLE; select it to receive the LASSO (L).

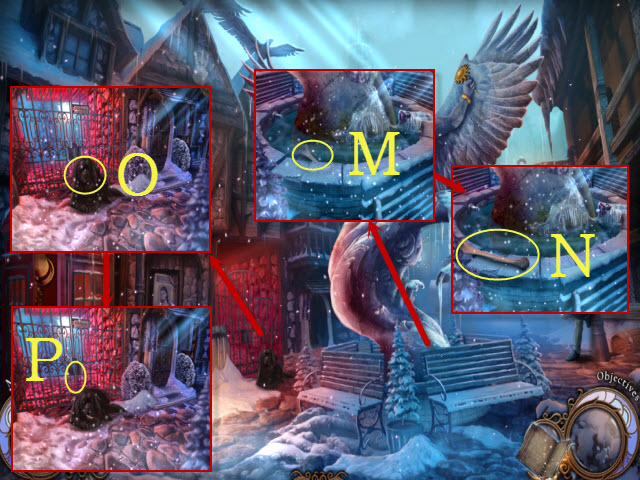
- Use the LASSO (M); take the BONE (N).
- Give the dog the BONE (O).
- Move the chain; open the gate (P).
- Walk left.

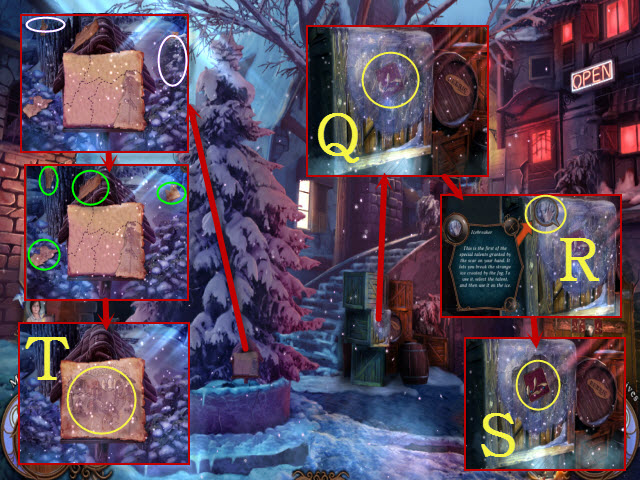
- Touch the ice twice (Q).
- Select icebreaker to break the ice (R).
- Take the ORNAMENTAL TILE (S).
- Move the items (white).
- Collect the map pieces (green).
- Use the GLUE on the map; take the map (T).

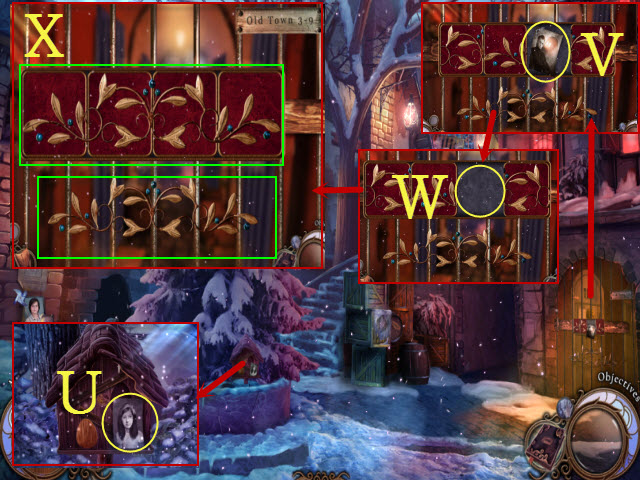
- Take the 1/6 and 2/6 PHOTO (U-V).
- Place the ORNAMENTAL TILE to activate a mini-game (W).
- Solution (X).

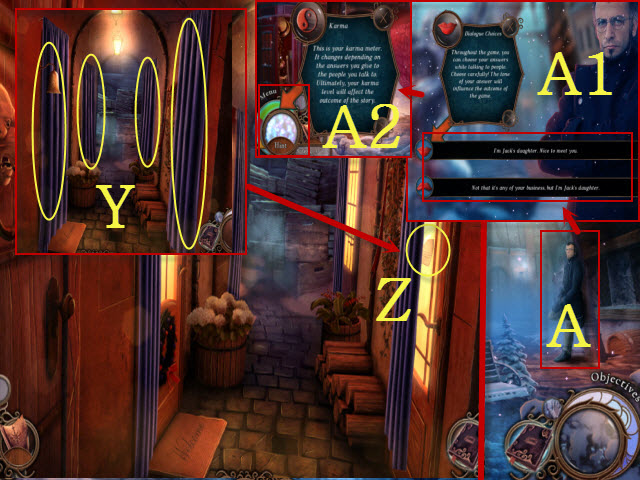
- Move the drapes (Y); take the DOOR NOTE (Z).
- Walk down twice.
- Give the DOOR NOTE to Victor (A).
- Select a conversation choice when interacting with characters (A1).
- The choices you make alter your karma level (A2), which changes how the story plays out.
- Walk forward.
Chapter 2: The Great Gate

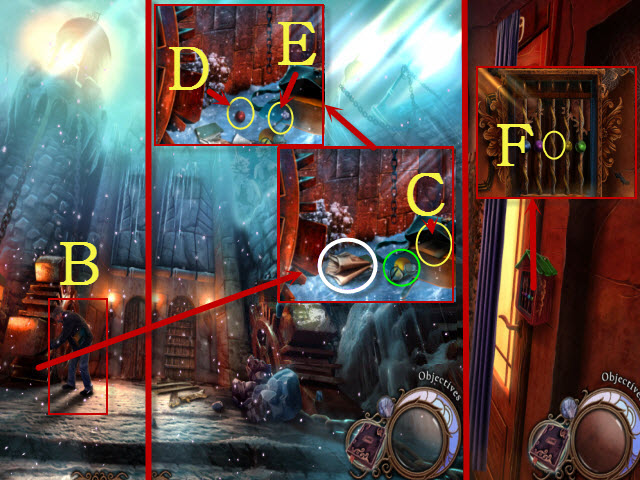
- Talk to your father (B).
- Move all the items (green and white).
- Take the 2/4 SLIDE (C), the WOODEN BALL (D) and the 1/4 PLANET (E).
- Return to Old Town and walk right.
- Place the WOODEN BALL to activate a puzzle (F).

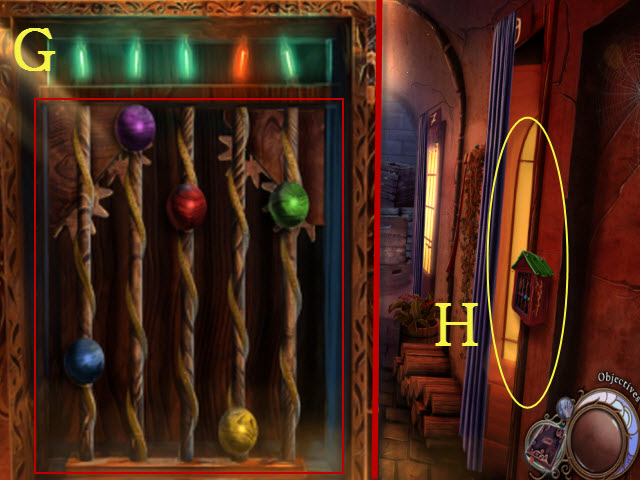
- Solution (G).
- Enter Jack’s House (H).

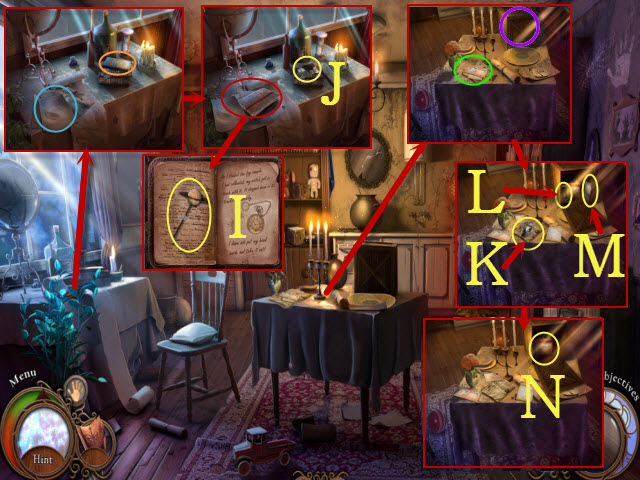
- Move the page; read the note (blue).
- Move the book (orange).
- Read the notebook; take the 2/4 PLANET (I).
- Take the 3/6 PHOTO (J).
- Move the mail (green); open the crate (purple).
- Take the 3/4 SLIDE (L) the 4/6 (K) and 5/6 PHOTO (M).
- Take the SLIDE VIEWER (N).

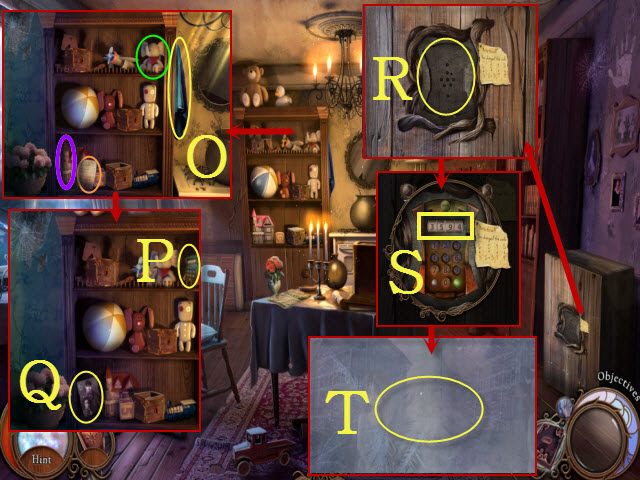
- Read the note (orange).
- Move the elephant (green) and dollhouse (purple); take the TOWEL (O).
- Take the KEYPAD (P) and 6/6 PHOTO (Q).
- Place the KEYPAD (R) and select it; enter 3594 (S).
- Open the door; touch the fog and the ice twice to activate a puzzle (T).

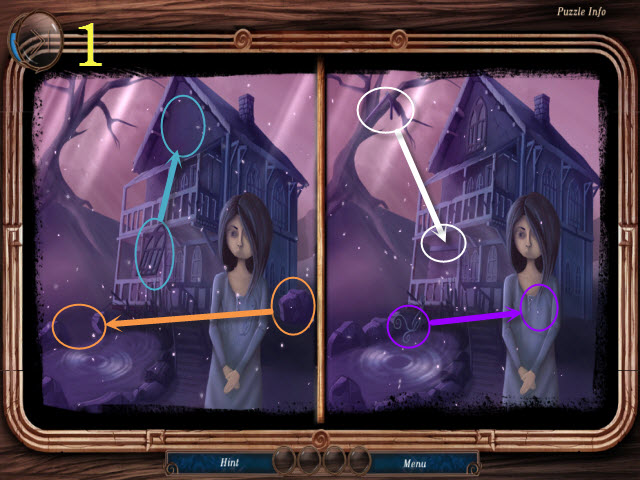

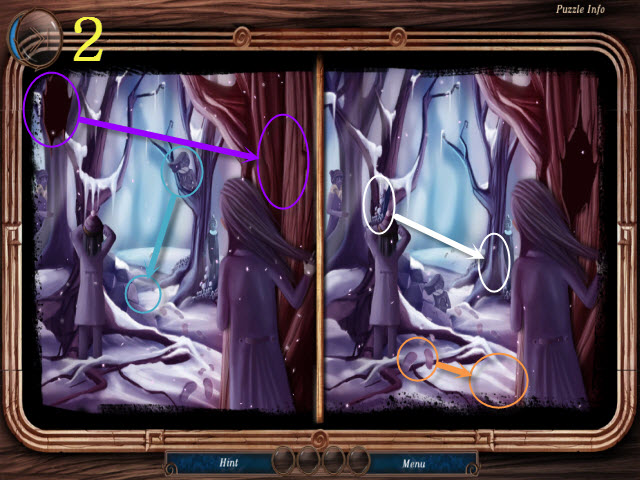

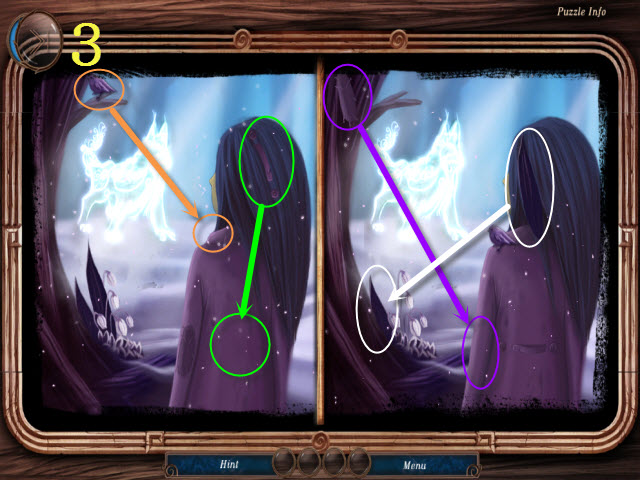
- Restore the incorrect elements.
- Solution: (1-3).

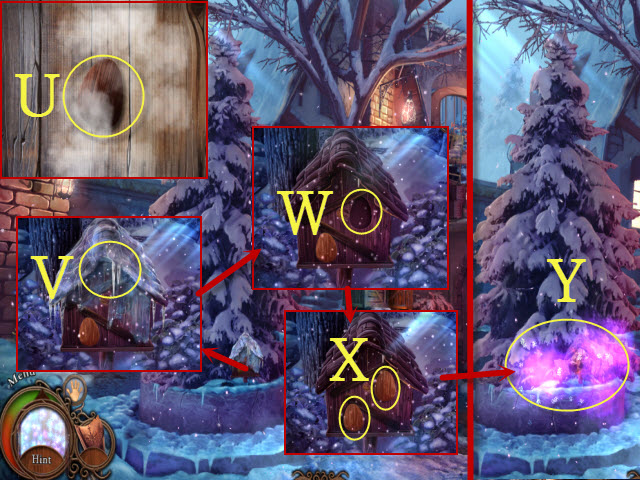
- Take the WOODEN EGG (U).
- Walk down.
- Use icebreaker (V). Place the WOODEN EGG (W).
- Select the eggs (X); open the door to activate a HOP.
- Play the HOP (Y) to receive the BALLERINA SHOES.

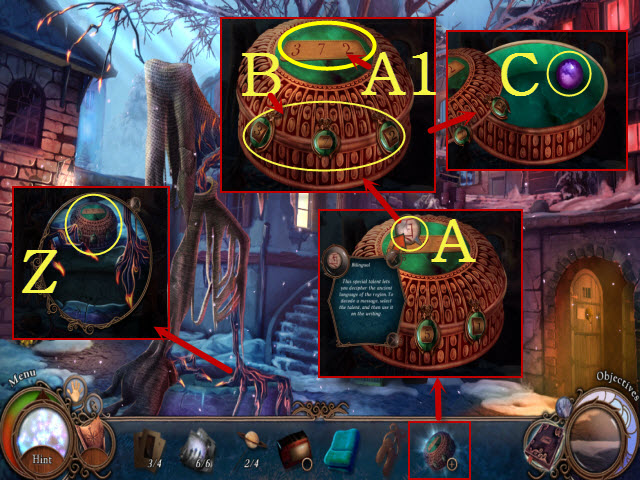
- Take the INTRICATE BOX (Z).
- Examine the INTRICATE BOX; select the lid to get the translator talent (A). Use translator (A1).
- Align the numbers: 372 (B).
- Open the box; take the GEMSTONE (C).
- Walk upstairs.

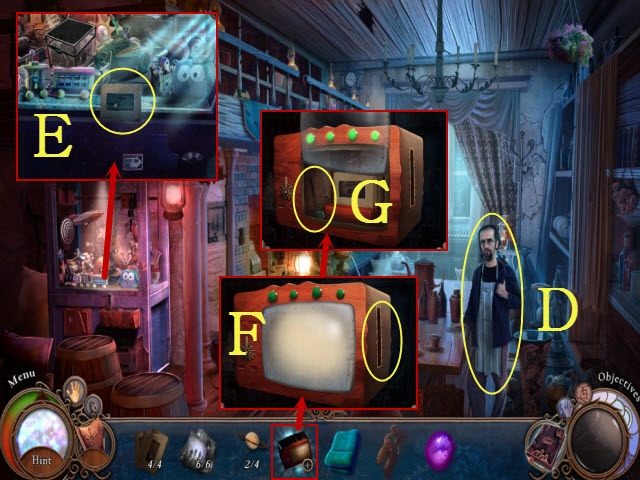
- Talk to the Owner (D).
- Take the 4/4 SLIDE (E).
- Examine the SLIDE VIEWER and place the 4/4 SLIDE in the slot; leaf through the slides (F).
- Move the glass; take the 3/4 PLANET (G).

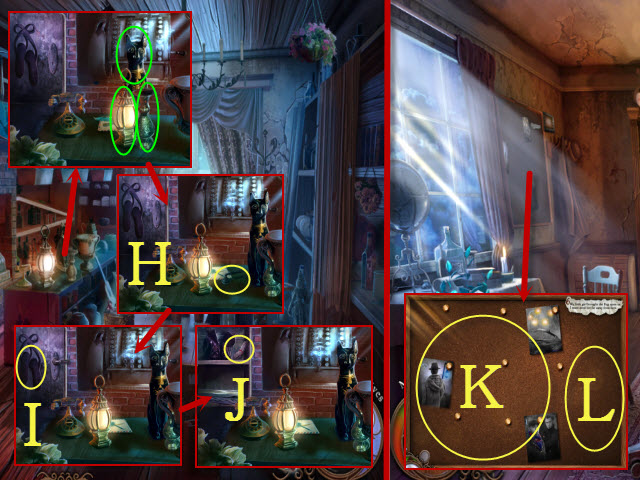
- Move the items (green).
- Select the handle (H).
- Place the BALLERINA SHOES (I).
- Open the door; take the BUNDLE OF NOTES (J).
- Return to Jack’s House.
- Place the PHOTOS (K) and the BUNDLE OF NOTES (L) to activate a mini-game.

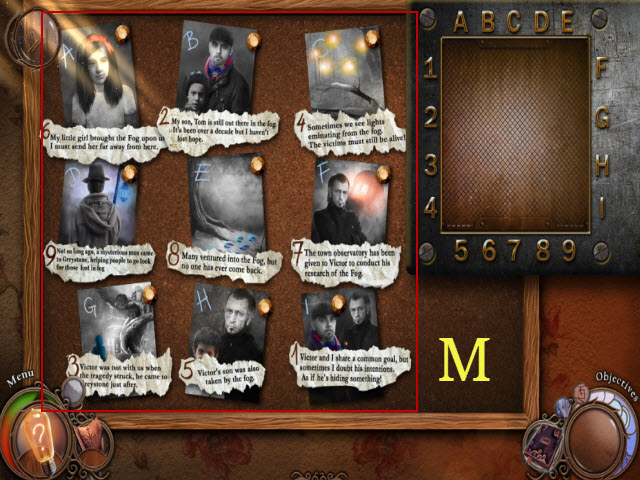
- Place each note with the correct photo (M).
- Play the puzzle.

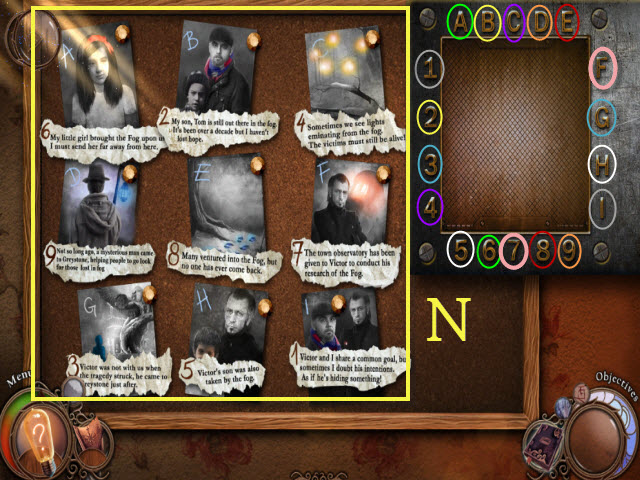
- Select the corresponding letters and numbers.
- Solution (N).

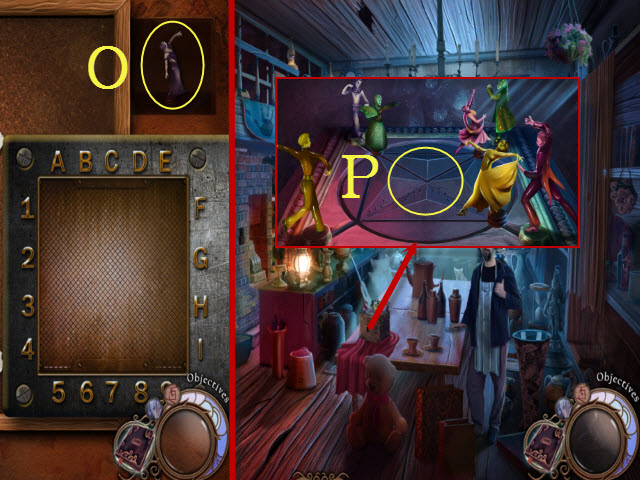

- Take the DANCER FIGURINE (O).
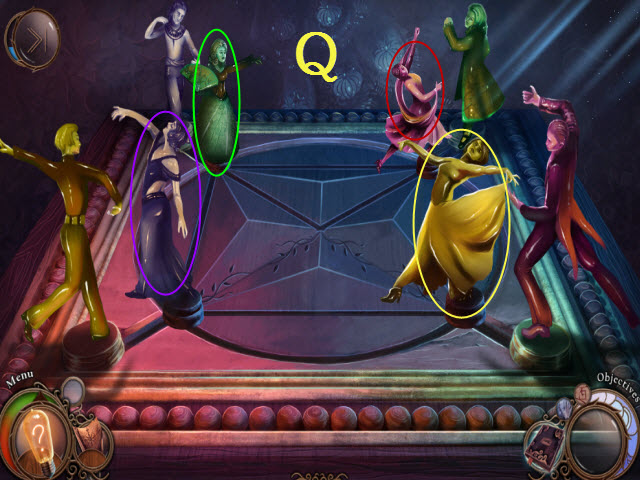
- Return to the Greystone Shop.
- Place the DANCER FIGURINE to activate a puzzle (P).
- Solution: green, purple, yellow, red, and green (Q).

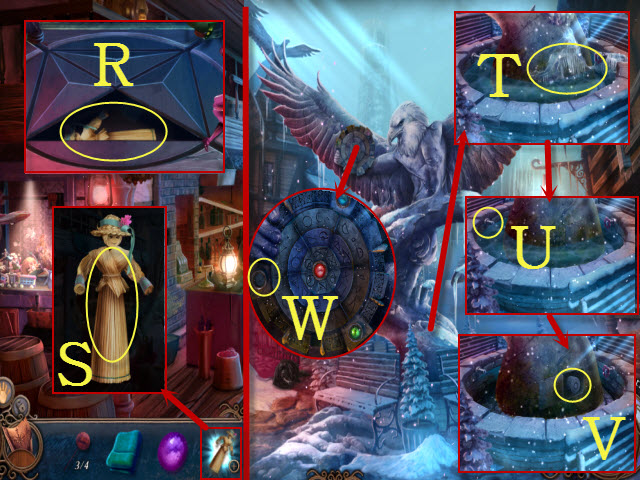
- Take the DOLL (R).
- Examine the DOLL; select it repeatedly (S); receive the T-SHAPED WRENCH.
- Return to the Town Square.
- Use icebreaker (T).
- Use the T-SHAPED WRENCH (U).
- Open the panel; press the button (V).
- Place the GEMSTONE to activate a puzzle (W).

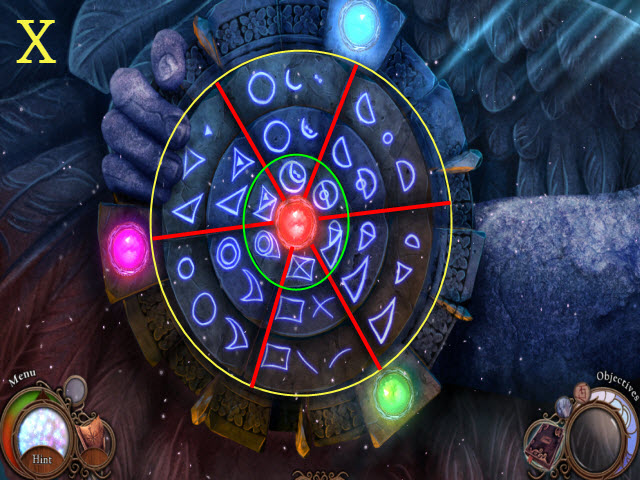
- Align the symbols so each section includes the elements of the center.
- Solution (X).

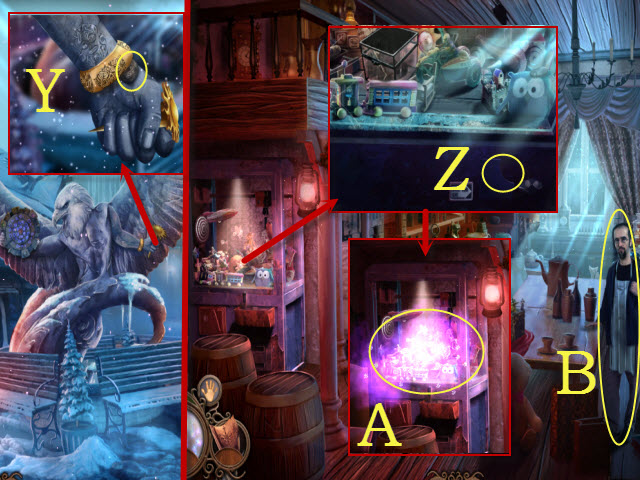
- Take the COIN (Y).
- Return to the Greystone Shop.
- Place the COIN to activate a HOP (Z); play it (A) to receive the GATE KEY.
- Give the GATE KEY to the owner (B).
- Walk under the arch.
Chapter 3: Observatory

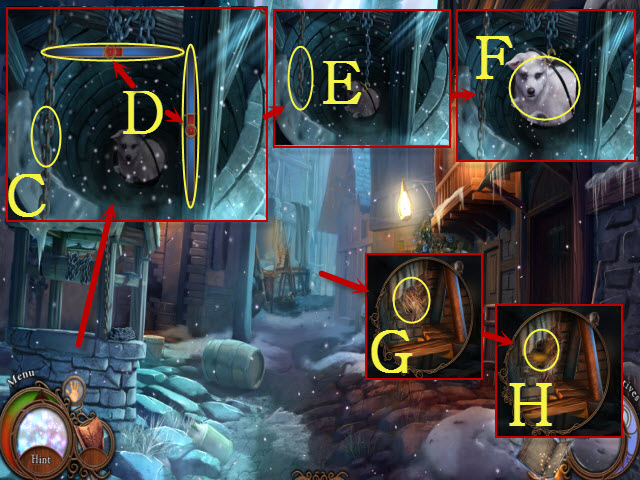
- Select the chain (C) to activate a mini-game.
- Select the meters when the targets are in the center (D).
- Pull the chain (E).
- Take the WOLF CUB (F).
- Move the straw (G) and gloves (H).

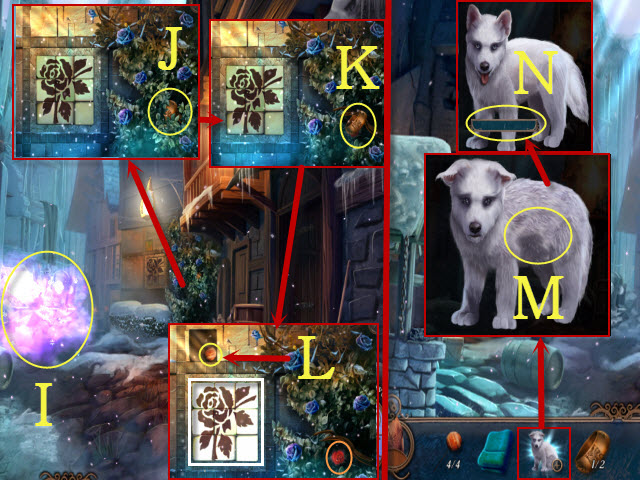
- Play the HOP (I) to receive the GARDENING GLOVES.
- Use the GARDENING GLOVES (J); take the 1/2 BRACELET SECTION (K).
- Press the button (orange); select the nine tiles (white).
- Take the 4/4 PLANET (L).
- Examine the WOLF CUB; use the TOWEL (M).
- Name the WOLF CUB (N).
- Walk down.

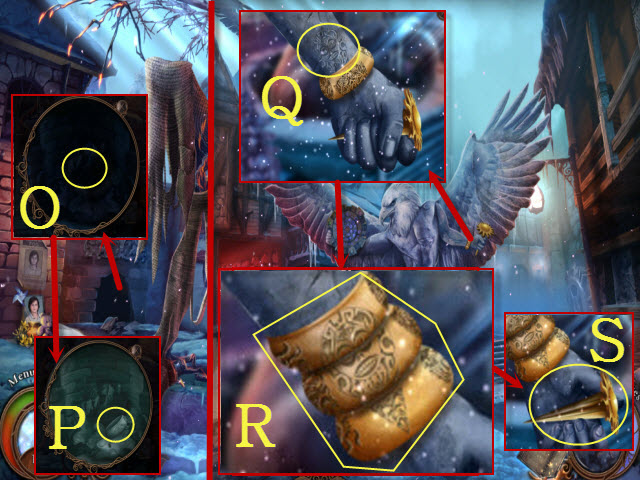
- Use the WOLF CUB (O).
- Take the 2/2 BRACELET SECTION (P).
- Walk down.
- Place the 2/2 BRACELET SECTION to activate a mini-game (Q).
- Align the image (R).
- Take the SUN KEY (S).
- Walk forward.

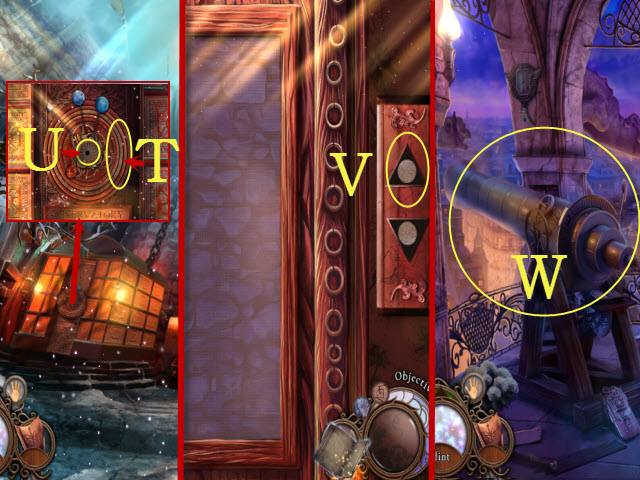
- Place the 4/4 PLANET (T); place the SUN KEY (U) and select it.
- Enter the Observatory.
- Press the button (V). Step out of the elevator.
- Look at the telescope to activate a puzzle (W).

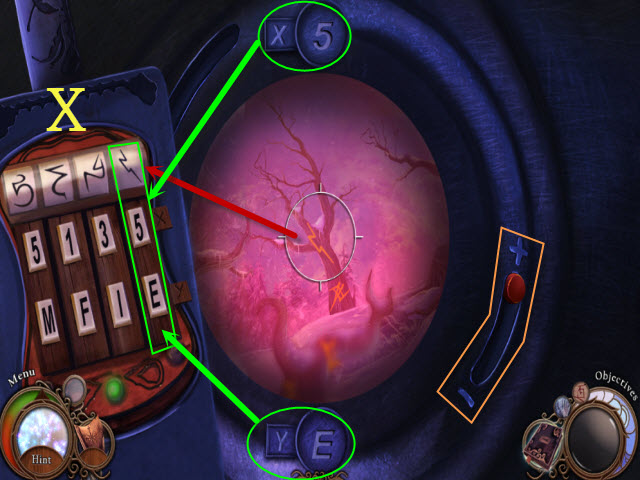
- Locate the symbols with the telescope and then enter the coordinates (green).
- The sliders (orange) will correct the focus.
- Solution (X).

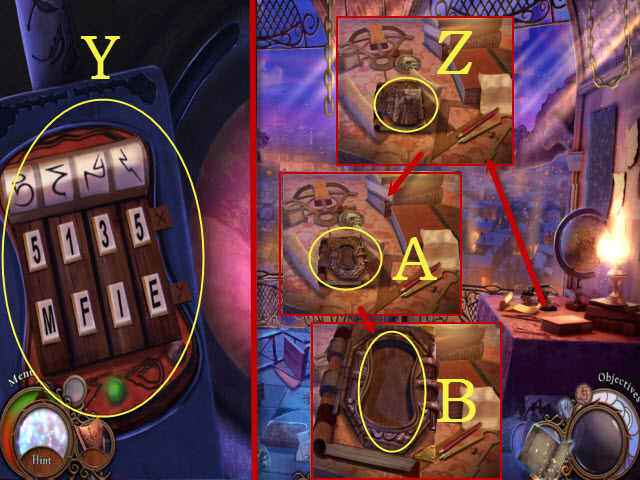
- Take the CODED CALCULATOR (Y).
- Examine the desk photo (Z) and book (A).
- Place the CODED CALCULATOR to get VICTOR’S NOTEBOOK (B).
- Walk left; walk forward twice.

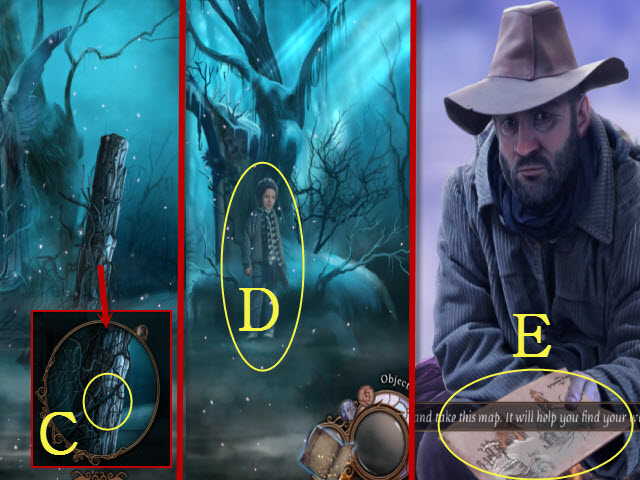
- Move the three branches (C).
- Walk forward.
- Talk to the boy (D).
- Take the map (E).

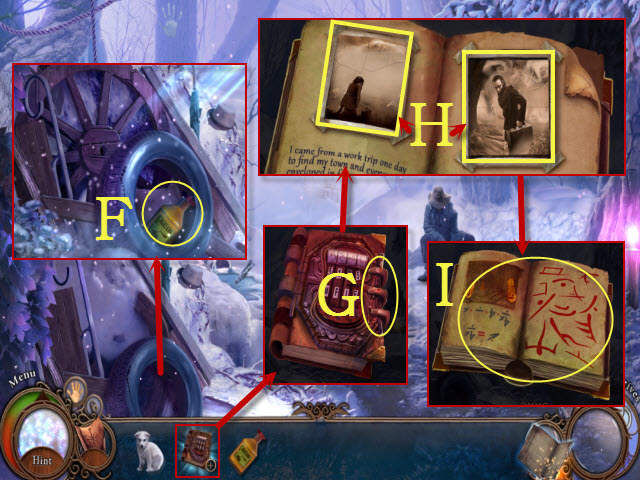
- Take the ACID (F).
- Examine the VICTOR’S NOTEBOOK; use the ACID (G).
- Open the notebook; restore the photos (H).
- Turn the page; take the NOTEBOOK PAGE (I).

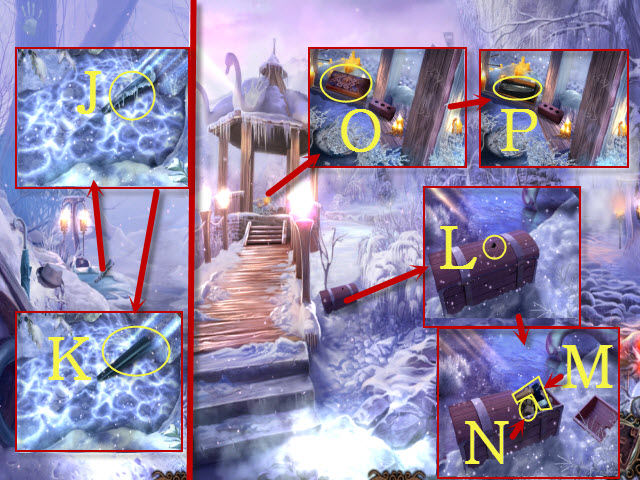
- Use icebreaker (J); take the POLE (K).
- Walk forward.
- Use the pole (L).
- Take the AXE (M) and BROKEN LANTERN (N).
- Open the box (O); take the RAZOR (P).
- Walk down.

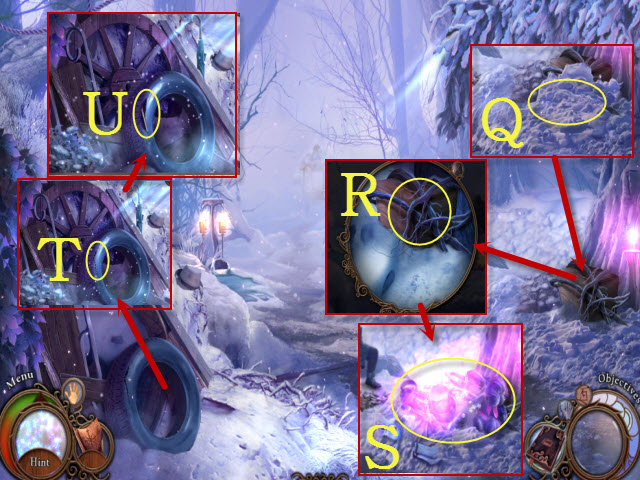
- Use the WOLF CUB (Q).
- Use the AXE to activate a HOP (R).
- Play the HOP (S) to receive the LAMP OIL.
- Use the RAZOR (T).
- Move the flap; take the WICK (U).

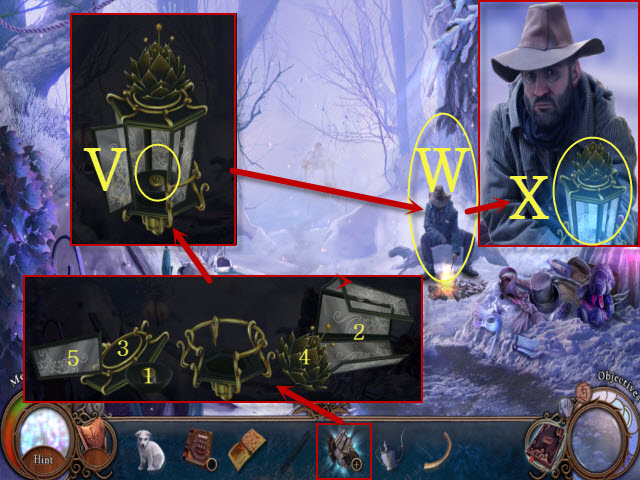
- Examine the BROKEN LANTERN; repair the pieces (1-5).
- Place the LAMP OIL and WICK (V) on the aseembled lantern to receive the UNLIT LANTERN.
- Give the UNLIT LANTERN to the man (W).
- Take the LIT LANTERN (X).
- Walk forward.

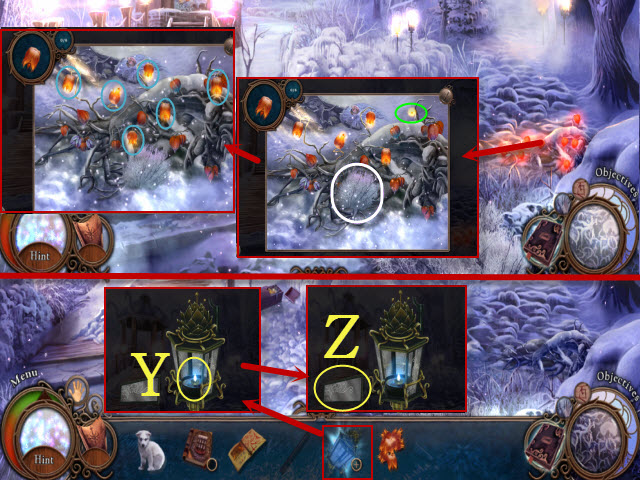
- Move the plant (white) and select the firefly three times (green).
- Obtain the six fireflowers (blue); receive the FIREFLOWERS.
- Examine the LIT LANTERN; open it and place the FIREFLOWERS (Y).
- Select the glass (Z); receive the LANTERN.
- Walk right.

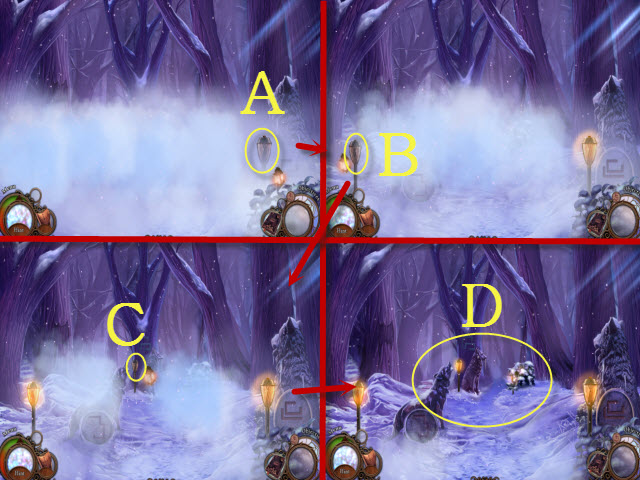
- Select the lamps in order: A-B-C.
- Use the NOTEBOOK PAGE anywhere (D) to activate a puzzle.

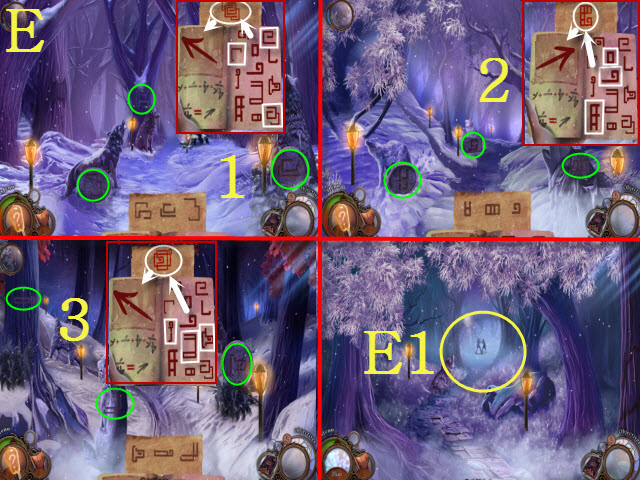
- Locate each symbol (green) and then find the three symbols on the note (white) to navigate the forest.
- Solution: 1-3 (E).
- Walk forward (E1).
Chapter 4: The Windmill

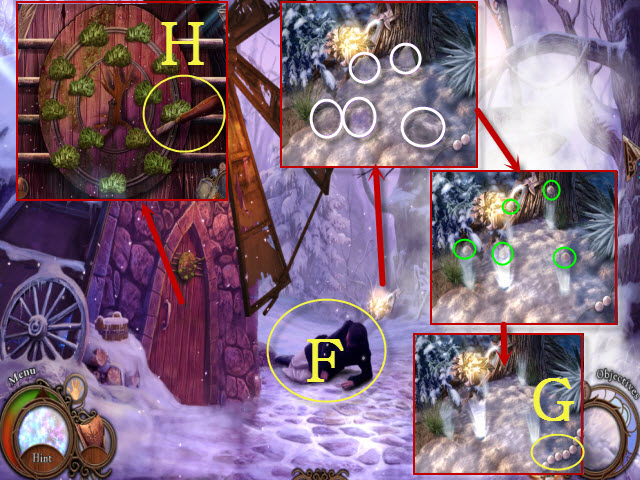
- Talk to Victor (F).
- Select the ice patches (white); take the beads (green).
- Take the pearl necklace (G).
- Move the handle three times; receive the CHISEL (H).
- Walk down twice.

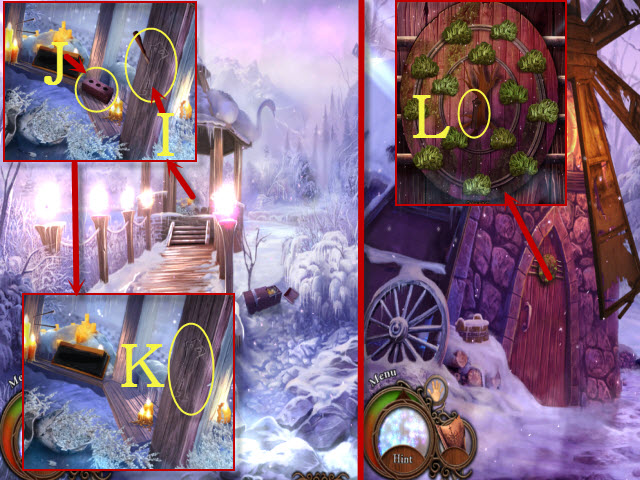
- Use the CHISEL (I).
- Select the brick (J); receive the BRICK.
- Take the BOY (K).
- Walk right.
- Place the BOY to activate a mini-game (L).

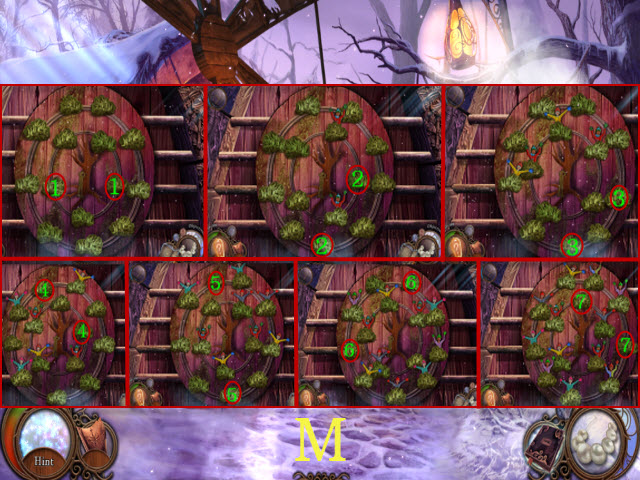
- Uncover the pairs of matching children; the puzzle will be jumbled after each turn.
- This puzzle is random; here is one possible solution: 1-7 (M).
- Enter the Windmill Interior.

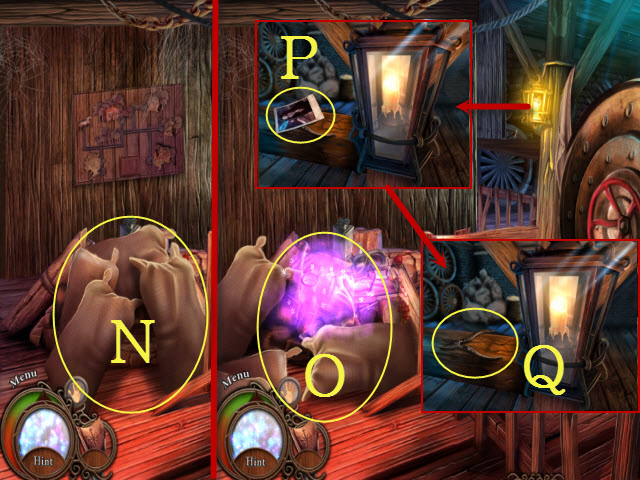
- Move the sacks (N); play the HOP (O) to receive the OCTAGONAL BLOCK.
- Look at the photo (P); take the PLIERS (Q).
- Walk down twice.

- Use the PLIERS to get the NAILS (R).
- Return to the Windmill Interior.
- Examine the board to activate a mini-game (S).
- Solution: 1-4-5-6-5-4-1-2-1-4-3-4-5-7-9-7-8 (T).
- Press the button (purple).

- Move the barrel (green); place the OCTAGONAL BLOCK (U).
- Take the BROKEN CRUTCH (V) and COGWHEEL (W).
- Examine the BROKEN CRUTCH; select it (X).
- Place the POLE and NAILS (Y-Z).
- Use the BRICK to receive the CRUTCH (A).
- Walk down.

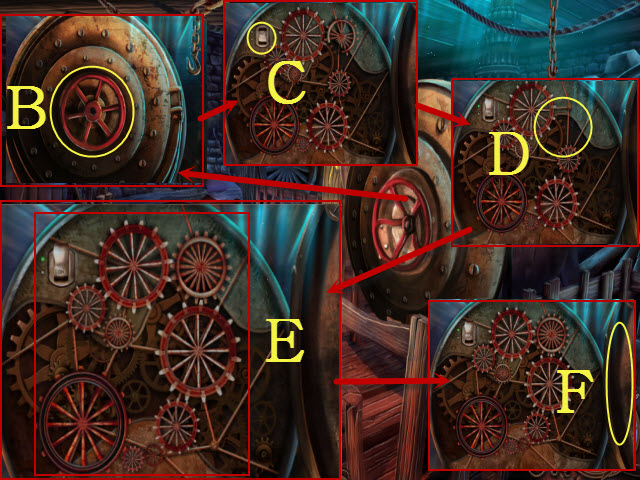
- Open the hatch (B); press the switch (C).
- Place the COGWHEEL with the cogs to activate a mini-game (D).
- Solution (E).
- Close the hatch (F).
- Walk down.

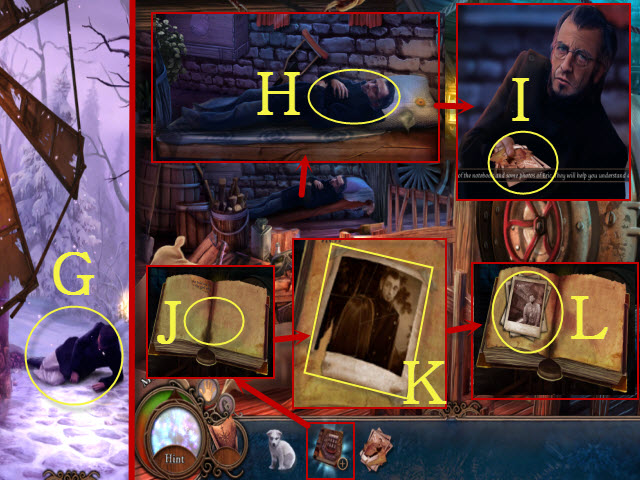
- Give the CRUTCH to Victor (G).
- Enter the Windmill Interior.
- Talk to Victor (H); take VICTOR’S PAPERS (I).
- Examine VICTOR’S NOTEBOOK; place VICTOR’S PAPERS (J).
- Reassemble the photo (K).
- Turn the page; look through the photos (L).
- Walk down.

- Take the MAGNIFYING GLASS (M).
- Examine VICTOR’S NOTEBOOK; use the MAGNIFYING GLASS (N).
- Look at the signpost to activate a mini-game (O).

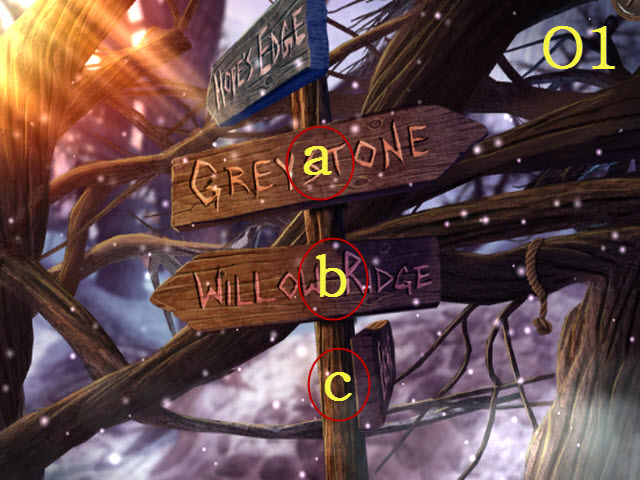
- Solution: ax3, bx3, and cx2 (O1).
- Walk right to the Cathedral of the Lost.

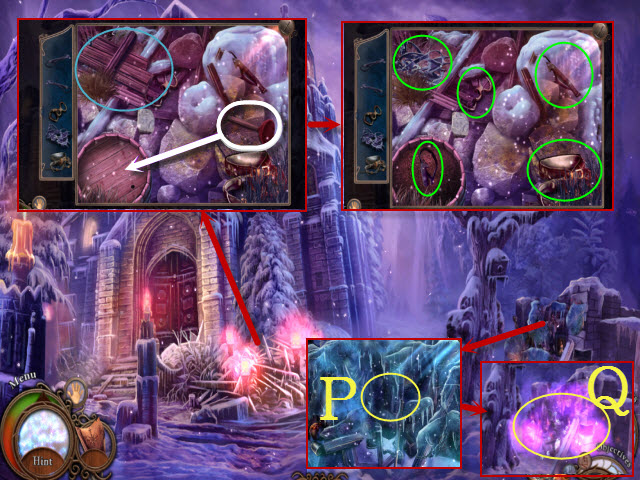
- Move the board (blue); use the plunger (white).
- Find the objects (green); receive the CLIMBING GEAR.
- Use the icebreaker (P).
- Play the HOP (Q) to receive the HAMMER.
- Walk forward.

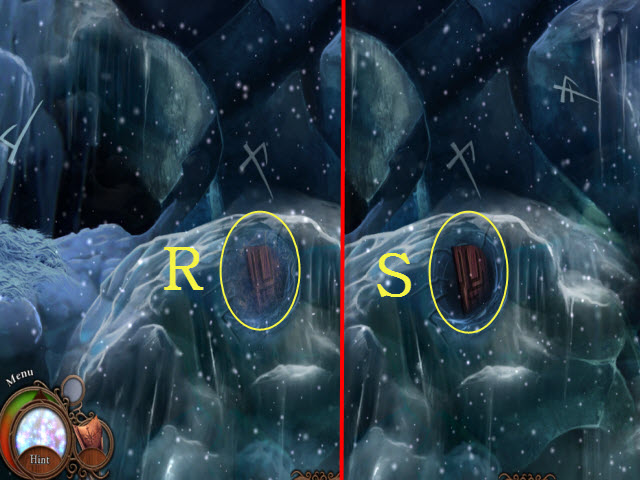
- Use the icebreaker (R); take the WOODEN PLATE (S).
- Walk down; enter the Cathedral Interior.

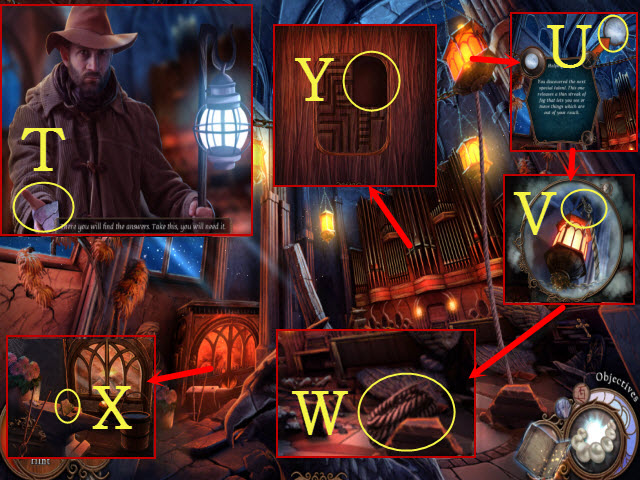
- Take the 1/2 LOST SYMBOL (T); you receive the PEARL.
- Touch the lantern and select the summoner talent; use summoner on the lantern (U).
- Select the rope (V); take the ROPE (W).
- Take the 2/2 LOST SYMBOL (X).
- Place the WOODEN PLATE to activate a puzzle (Y).

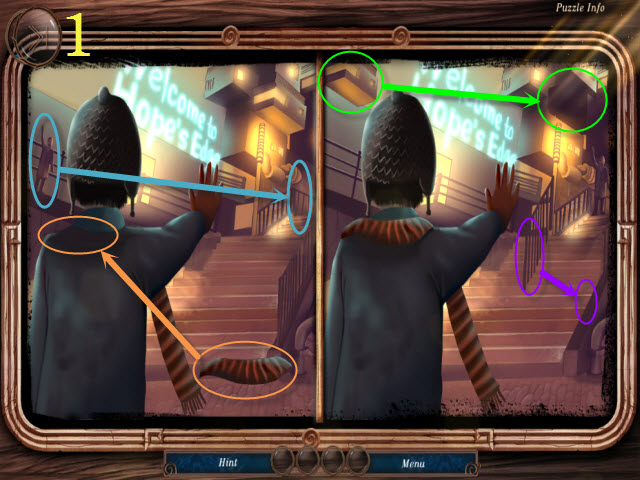

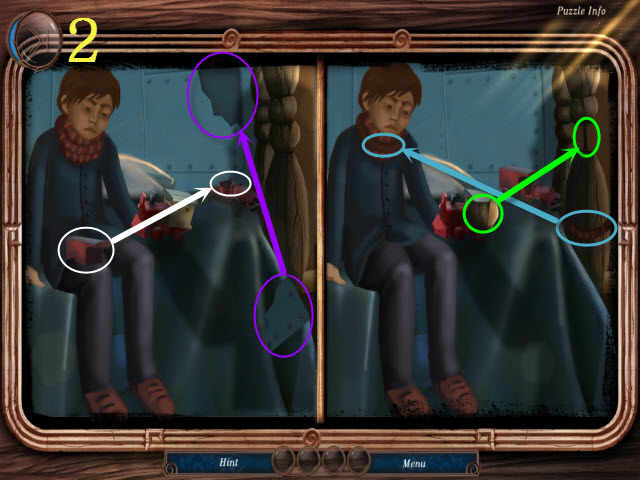

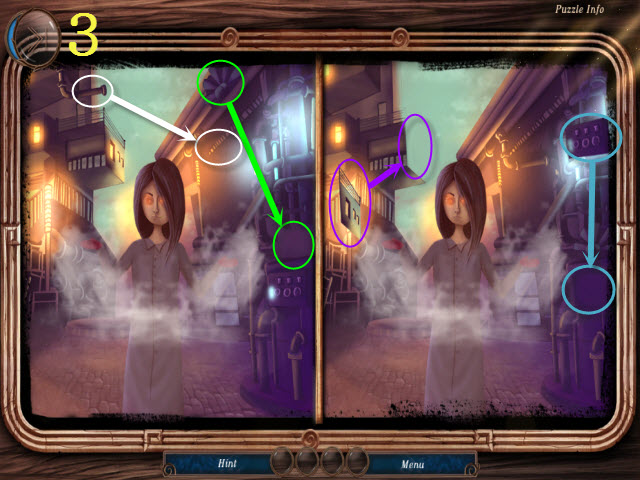
- Restore the incorrect elements.
- Solution (1-3).

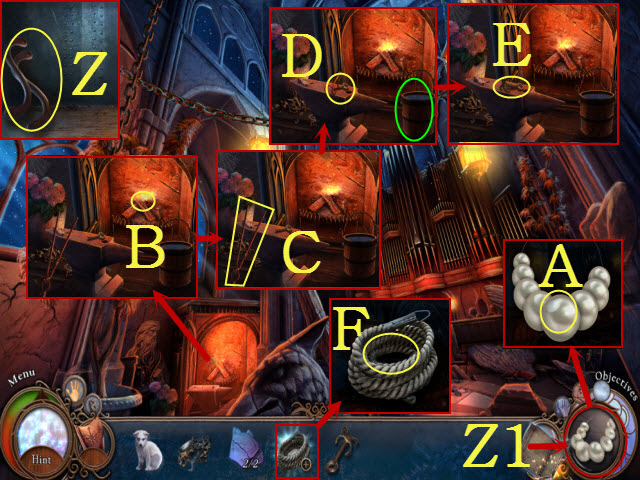
- Take the METAL PIECE (Z).
- View the necklace (Z1); place the PEARL (A).
- Open the fireplace; place the METAL PIECE (B).
- Select the grips (C).
- Use the HAMMER (D); select the bucket (green).
- Take the IMPROVISED HOOK (E).
- Examine the ROPE; use the IMPROVISED HOOK (F) to get the GRAPPLING ROPE.
- Return to the Cave.
Chapter 5: Up the Mountain

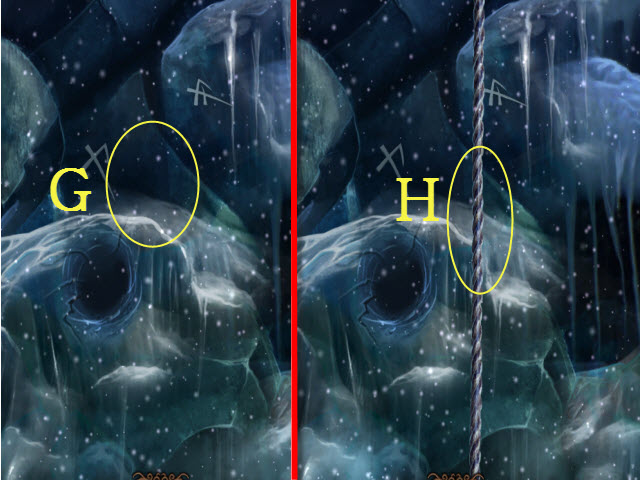
- Use the GRAPPLING ROPE (G).
- Use the CLIMBING GEAR to activate a mini-game (H).

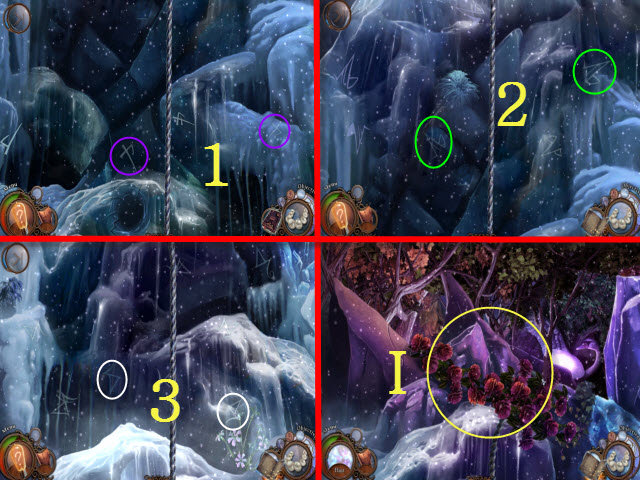
- Solution (1-3).
- Select the ledge (I).

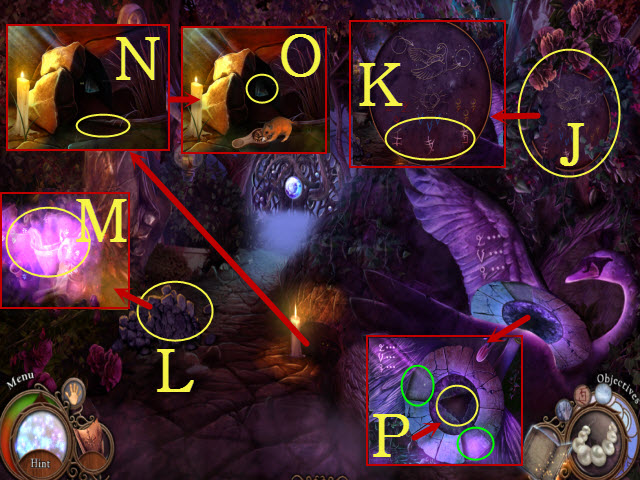
- Move the branch; use translator (J).
- Select the clue (K).
- Use the WOLF CUB (L).
- Play the HOP (M) to receive the GRAIN.
- Place the GRAIN (N).
- Take the GLASS PRISM (O).
- Place the GLASS PRISM (P) and the 2/2 LOST SYMBOLS (green) to activate a mini-game.

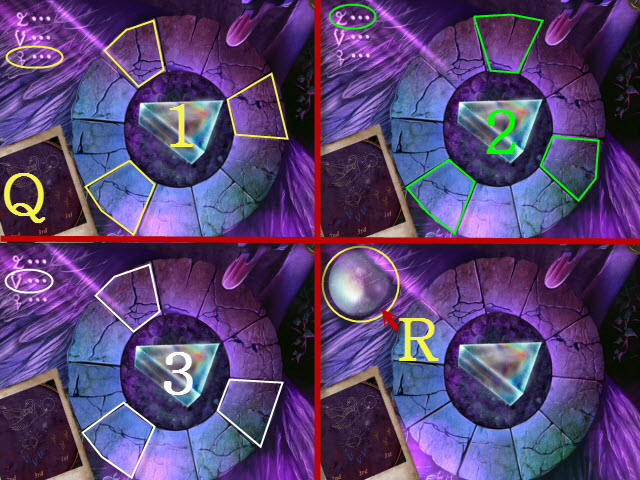
- Solution: 1-3 (Q).
- Take the CARVED LENS (R).

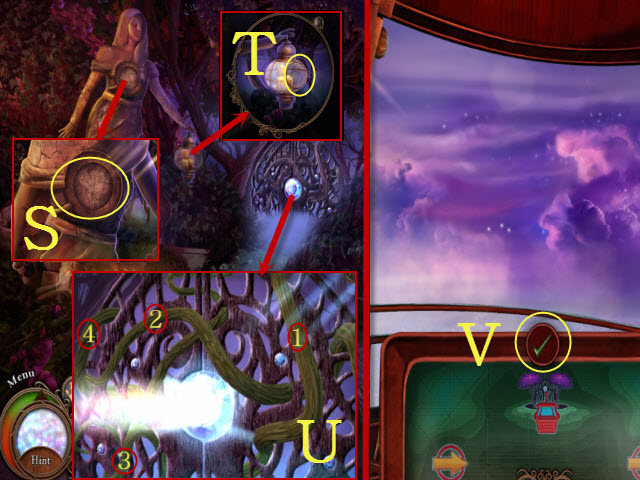
- Rotate each disc (S); place the CARVED LENS (T).
- Move the vines: 1-4 (U).
- Walk forward.
- Select the check mark to activate a mini-game (V).

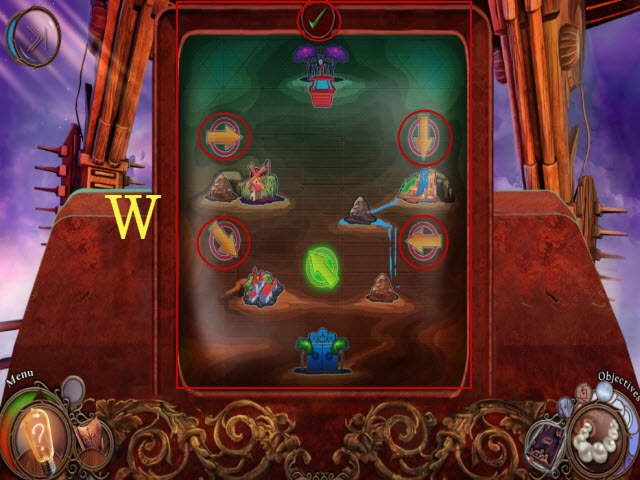
- Rotate the arrows (red) to create a path; select check mark (green) to try a path.
- Solution (W).
- Exit the cable car.

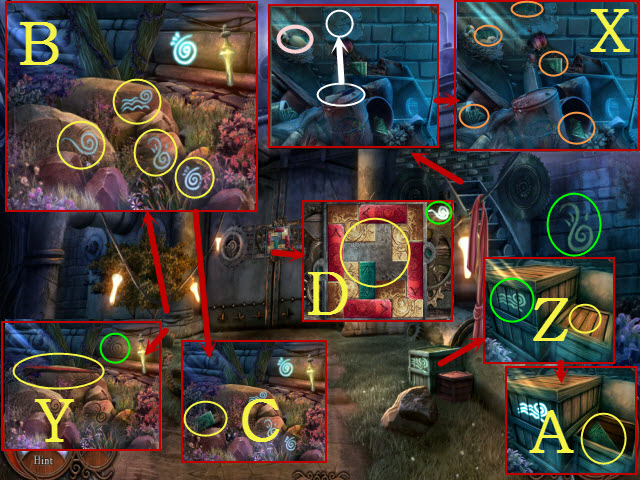
- Move the eggs (pink); use the scraper (white).
- Find the tiles (X) to receive the 1/3 STONE TILE.
- Take the CROWBAR (Y); use the CROWBAR; move the lid (Z).
- Take the 2/3 STONE TILE (A).
- Select the four symbols (green).
- Cycle the four symbols so they match the four located previously (B).
- Take the 3/3 STONE TILE (C).
- Place the 3/3 STONE TILE to activate a puzzle (D).

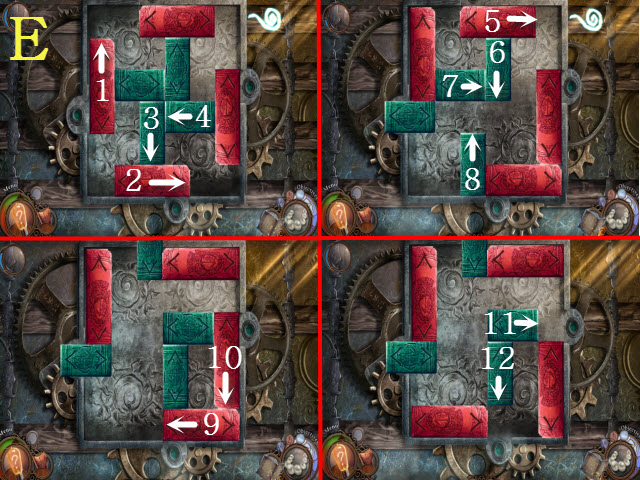
- Solution: 1-12 (E).
- Walk forward.

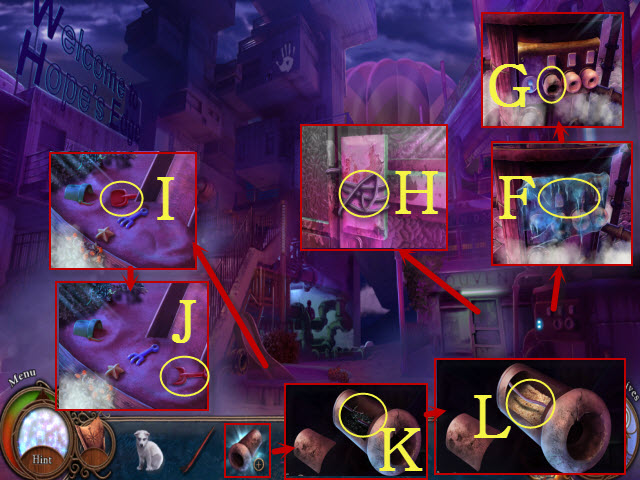
- Use the icebreaker (F).
- Take the BLOWN FUSE (G) and WIRE (H).
- Select the shovel (I); take the SAND (J).
- Examine the BLOWN FUSE and open the panel; remove the wire and sand (K).
- Place the WIRE and SAND (L); close the panel to receive the FUSE.

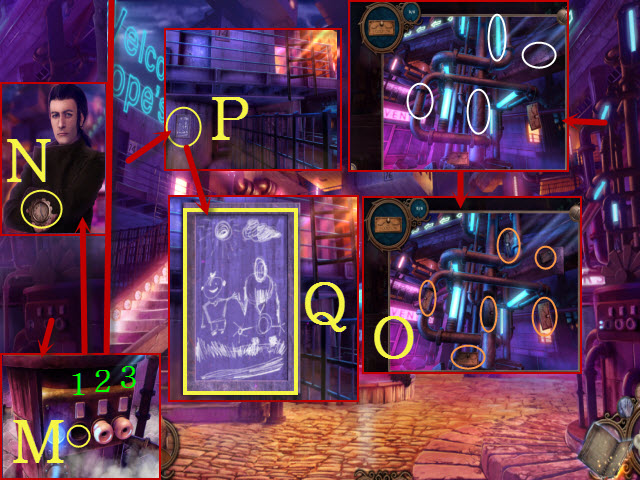
- Place the FUSE (M); select switches: 2, 3, and 1.
- Take the WOODEN CLOCK (N).
- Open the three panels; take the light bulb (white).
- Collect the coupons; receive the 6 COUPONS (O).
- Look at the chalkboard (P); restore the image (Q).
- Select the ladder and enter House No. 14.

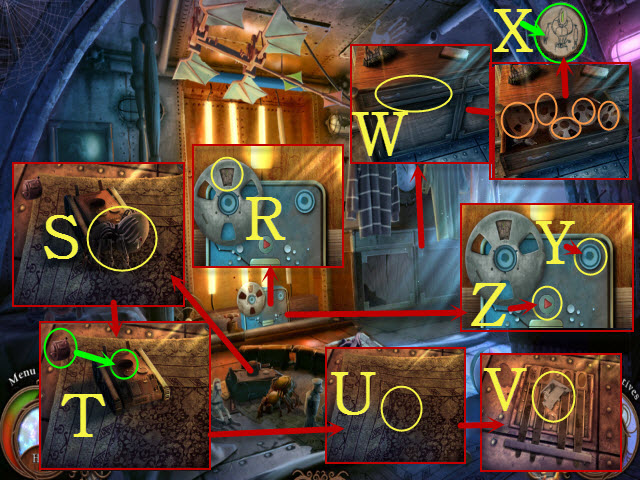
- Look at the film reel; select the film (R).
- Press the switch (S). Place the toy part (T). Move the rug (U).
- Take the TORN NOTEBOOK PAGE (V).
- Open the drawer (W) and examine the reels (orange); locate the one with the robot and select it (X) to receive the TAPE RECORDING.
- Place the TAPE RECORDING (Y); press the button (Z) to activate a mini-game.
- Play the mini-game.

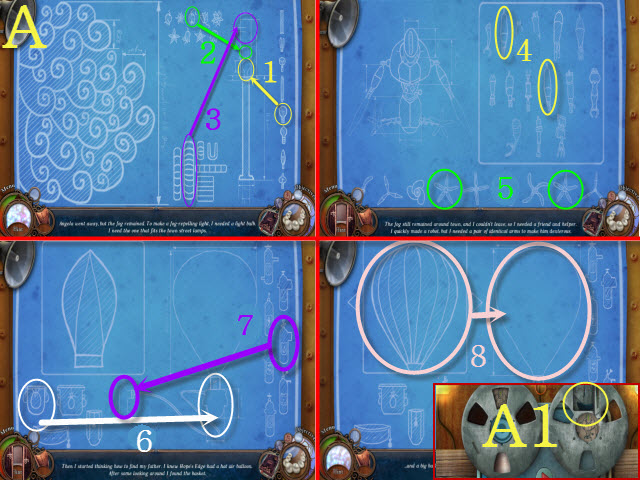
- Solution: 1-8 (A).
- Open the panel; take the BOAT (A1).

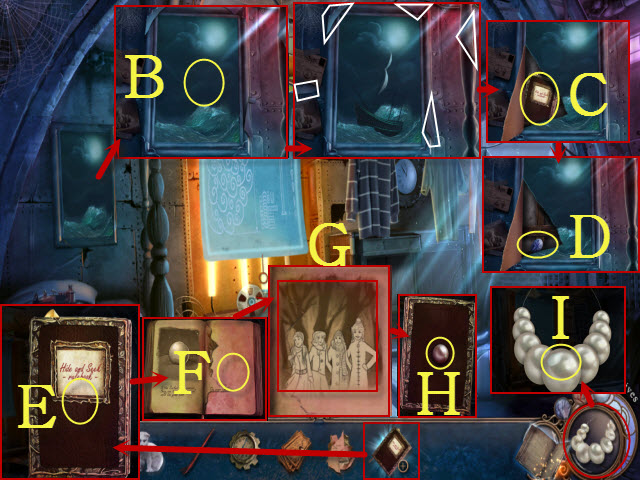
- Place the BOAT (B).
- Select the sails (white); take the HIDE-AND-SEEK RULEBOOK (C).
- Take the 1/3 OVAL TOKEN (D).
- Open the HIDE-AND-SEEK RULEBOOK (E). Turn the page; place the TORN NOTEBOOK PAGE (F).
- Restore the page (G). Turn the page; take the PEARL (H). Place the PEARL (I).
- Walk down.

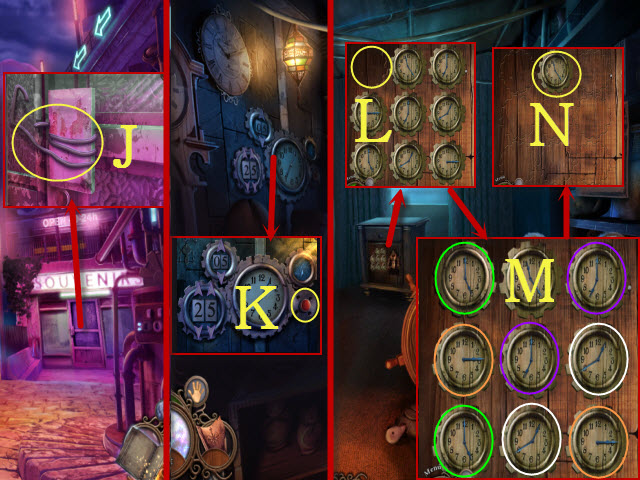
- Move three wires; open the door (J).
- Enter the Souvenir Shop.
- Press the button (K).
- Place the WOODEN CLOCK (L).
- Select matching pairs (M).
- Select the clock to activate a puzzle (N).

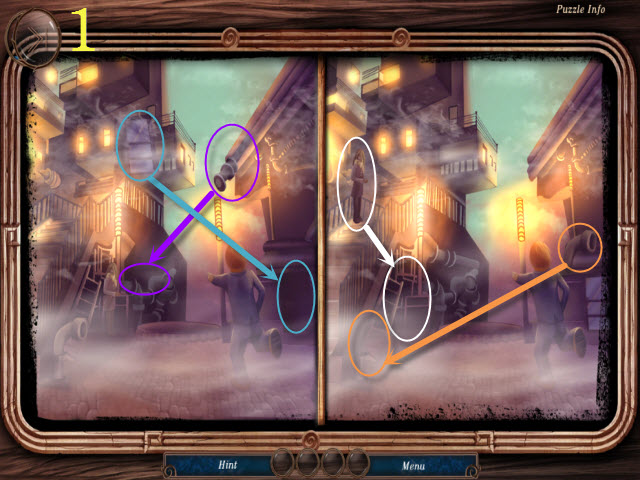

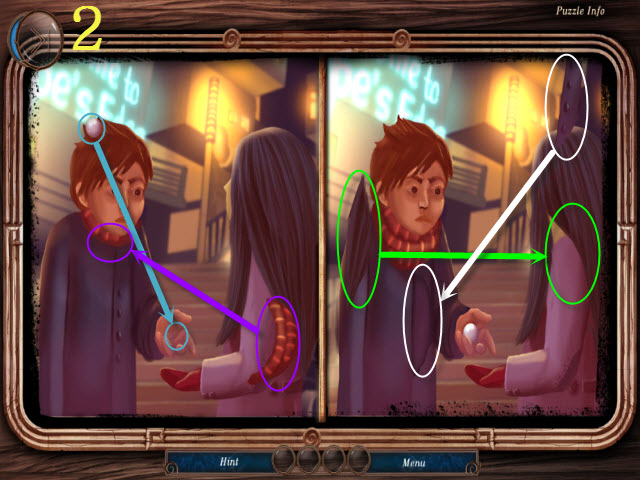

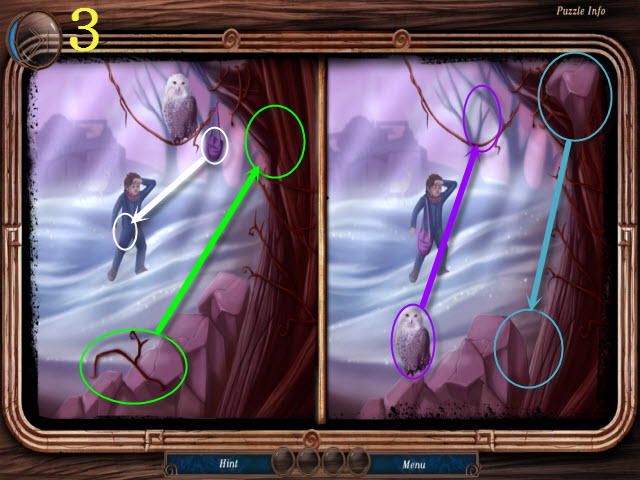
- Restore the incorrect elements.
- Solution (1-3).
Chapter 6: Repairing the Balloon

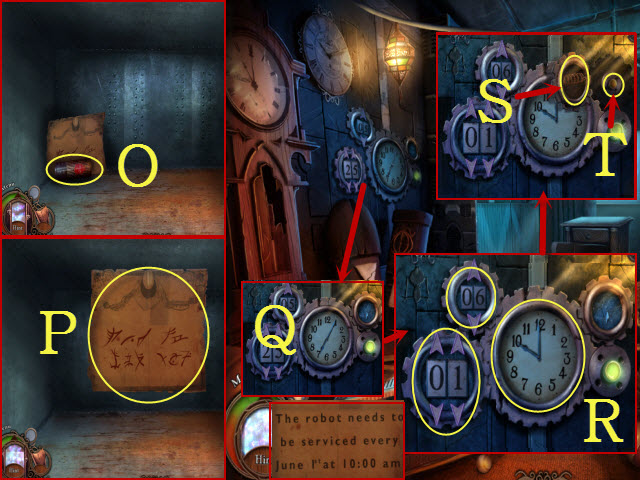
- Take the BATTERY (O).
- Look at the note; use translator (P).
- Examine the clocks to activate a mini-game (Q).
- Enter the date and time (R).
- Take the SPRING COIL (S).
- Push the button (T).
- Walk down.

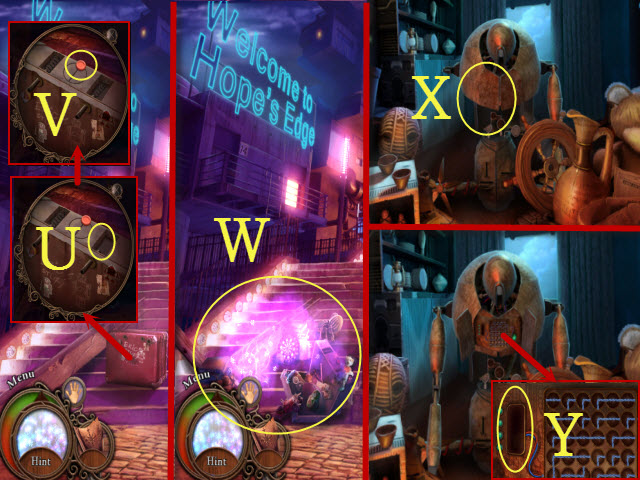

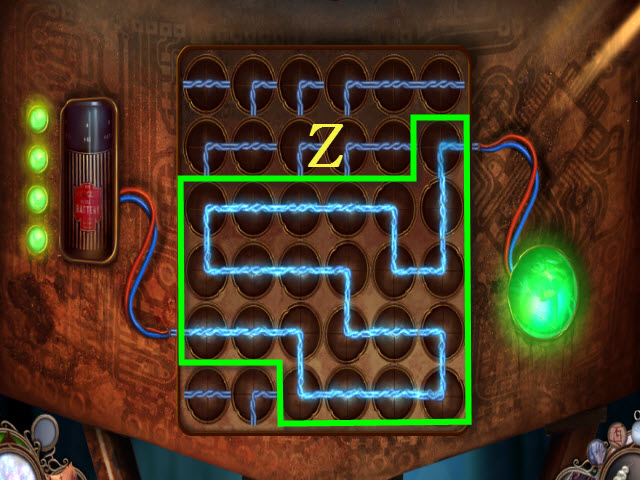
- Place the SPRING COIL (U).
- Slide the button (V).
- Play the HOP (W) to receive the ROBOT ARM.
- Return to the Souvenir Shop.
- Place the ROBOT ARM (X).
- Place the BATTERY to activate a mini-game (Y).
- Solution (Z).

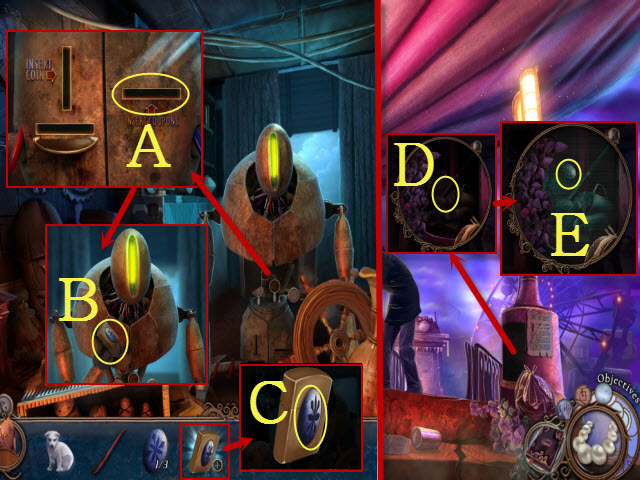
- Place the 6 COUPONS (A); take the SOUVENIR LIGHTER (B).
- Examine the SOUVENIR LIGHTER; take the OVAL TOKEN 2/3 (C); receive the LIGHTER.
- Walk down and then forward.
- Use the WOLF CUB (D).
- Take the 3/3 OVAL TOKEN (E).
- Return to House No. 14.

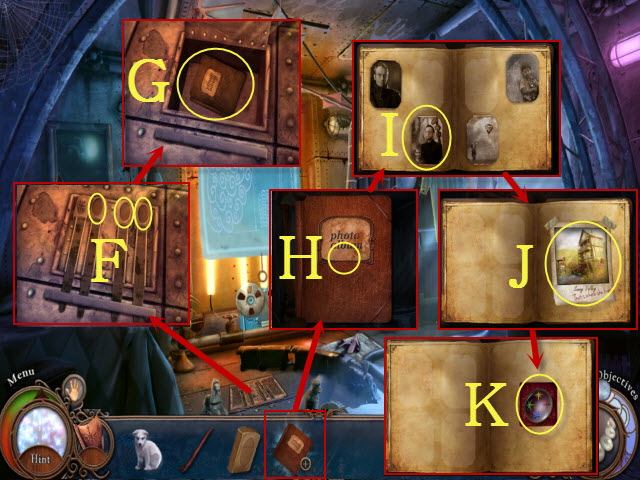
- Place the 3/3 OVAL TOKEN; open the hatch (F).
- Take the ALBUM (G).
- Examine the ALBUM; open it (H).
- Look at the photo (I).
- Turn the page; examine the picture and receive the FAMILY-PHOTO ALBUM (J).
- Take the STAR DISK (K).
- Return to the Balloon Plateau.

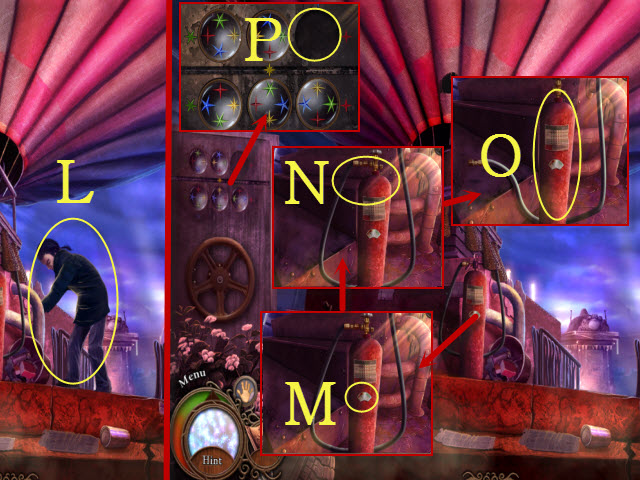
- Give the FAMILY-PHOTO ALBUM to the man (L).
- Look at the meter; select it (M).
- Select the tank (N); take the EMPTY PROPANE BOTTLE (O).
- Place the STAR DISK to activate a mini-game (P).

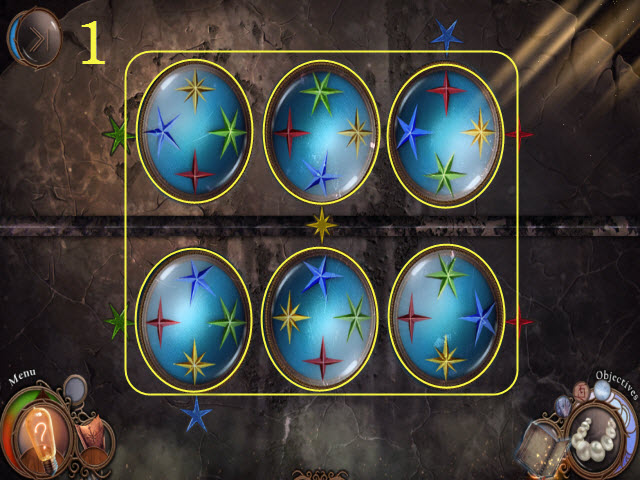

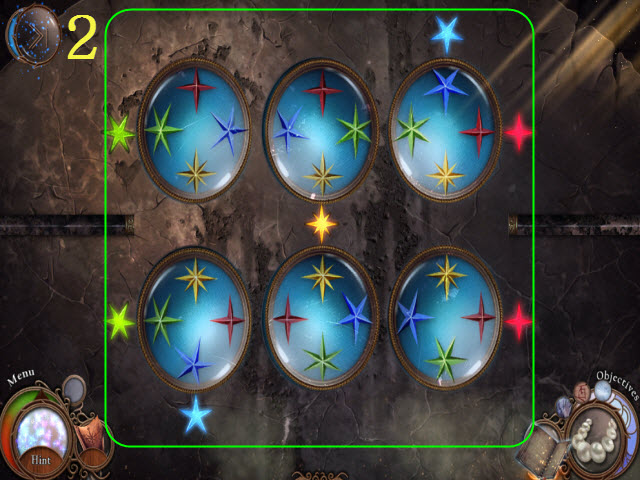
- Align the colors of the stars.
- Solution: (1-2).
- Walk downstairs to the Auxiliary Room.

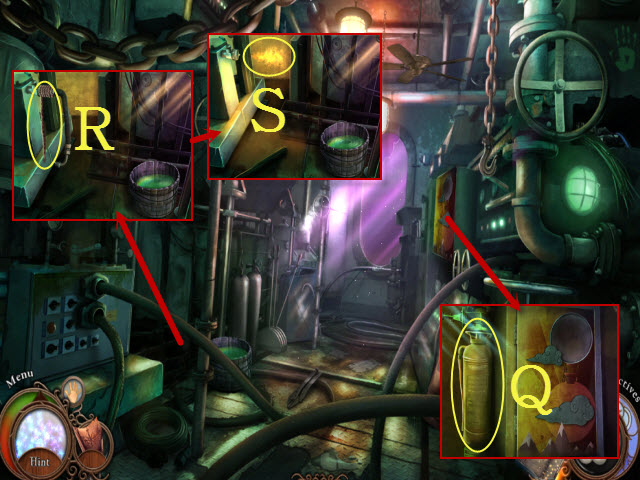
- Take the FIRE EXTINGUISHER (Q).
- Take the ROPE (R).
- Use the FIRE EXTINGUISHER (S).
- Walk back and then forward.

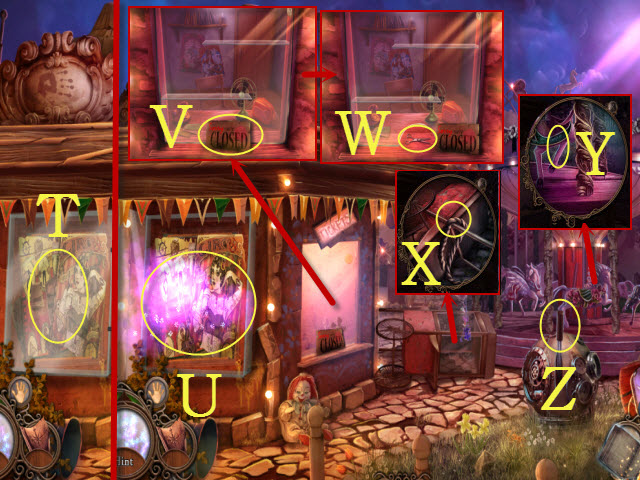
- Move the glass (T).
- Play the HOP (U) to receive the VALVE.
- Move the sign (V); take the SCISSORS (W).
- Attach the ROPE (X).
- Attach the rope (Y); pull the lever (Z).
- Walk forward.

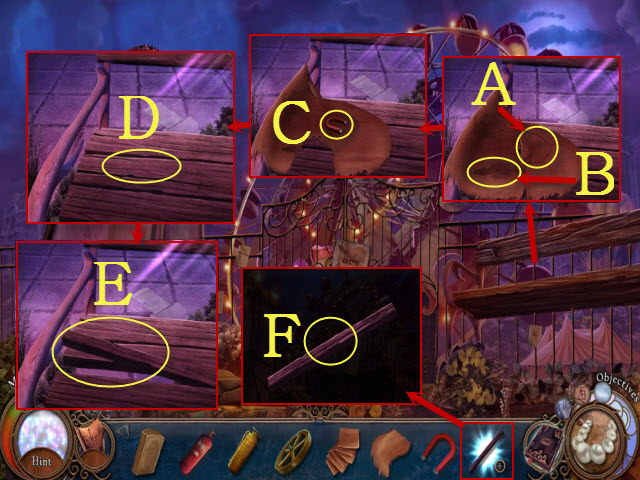
- Tale the PATCH (A).
- Use the SCISSORS (B) to get the PIECE OF CLOTH.
- Take the MAGNET (C).
- Move the cloth; use the CROWBAR (D).
- Get the STICK (E).
- Examine the STICK; use the PIECE OF CLOTH (F) with it; receive the STICK WITH CLOTH.
- Walk down.

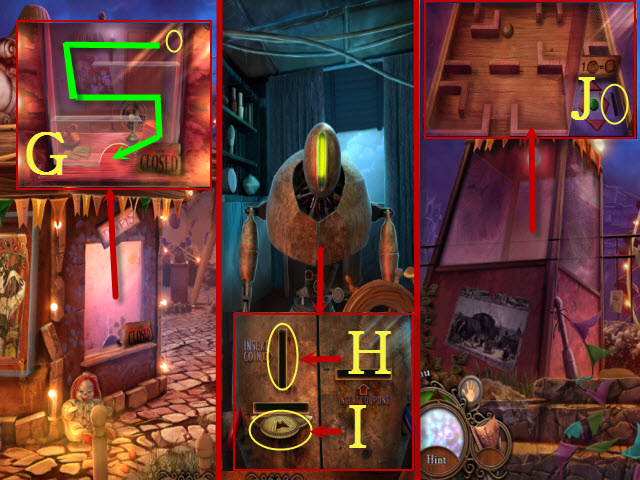
- Use the MAGNET to get the COIN; guide it around the shelves towards the opening (G).
- Return to the Souvenir Shop.
- Place the COIN (H); take the GAME TOKEN (I).
- Return to Luna Park.
- Place the GAME TOKEN (J) to activate a mini-game.

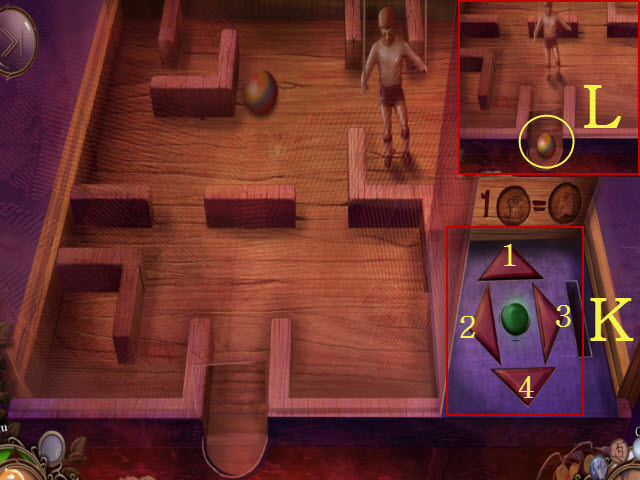
- Solution: 1-2-1-2-4-1-2-4-2-4-3-3-1-3-4-4-3-4-2-1-2-4 (K).
- Take the MARBLE (L).
- Return to the Auxiliary Room.

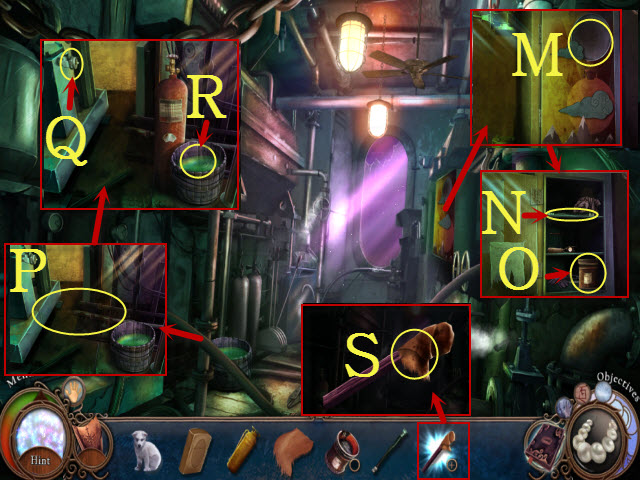
- Place the MARBLE; open the cupboard (M).
- Take the TUBE (N) and the TAR (O).
- Place the EMPTY PROPANE BOTTLE (P).
- Place the VALVE (Q); use the STICK WITH CLOTH (R) to get the UNLIT TORCH.
- Examine the UNLIT TORCH; use the LIGHTER (S) to get the TORCH.

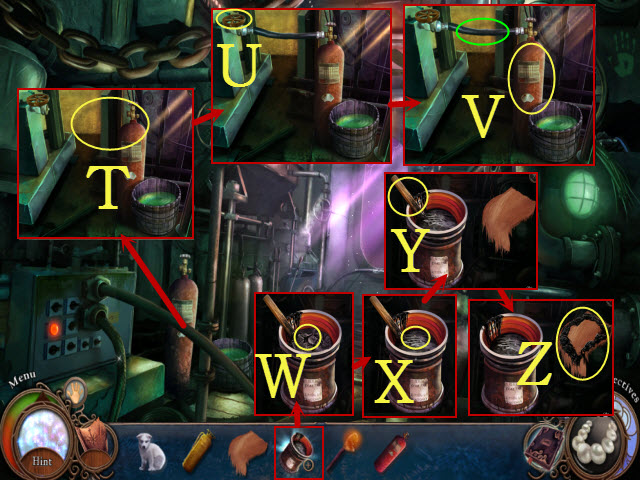
- Place the TUBE (T). Turn the valve (U).
- Move the tube (green); take the FILLED PROPANE BOTTLE (V).
- Examine the TAR; use the TORCH (W).
- Place the PATCH (X).
- Select the spoon (Y); take the STICKY PATCH (Z).
- Walk back.

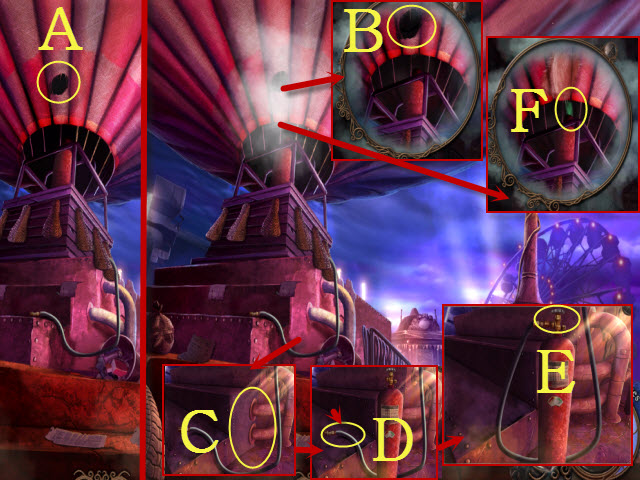
- Use summoner (A).
- Place the STICKY PATCH (B).
- Place the FILLED PROPANE BOTTLE (C).
- Move the hose (D); turn the valve (E).
- Use the TORCH (F).
- Enter the Balloon.
Chapter 7: Taking Flight

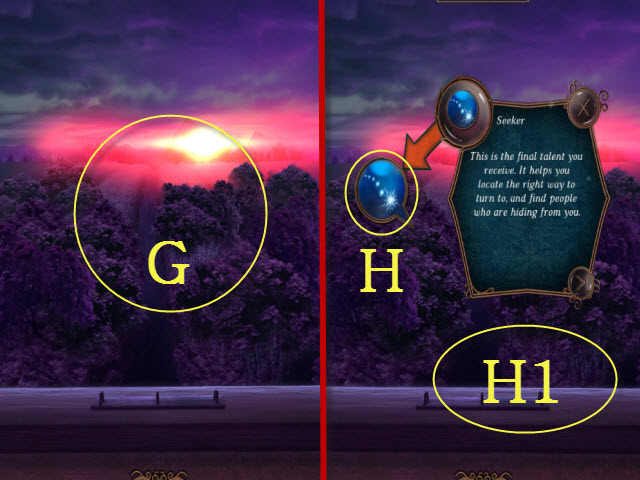
- Select anywhere (G).
- Select the seeker talent anywhere (H1).
- Go right to activate a mini-game.

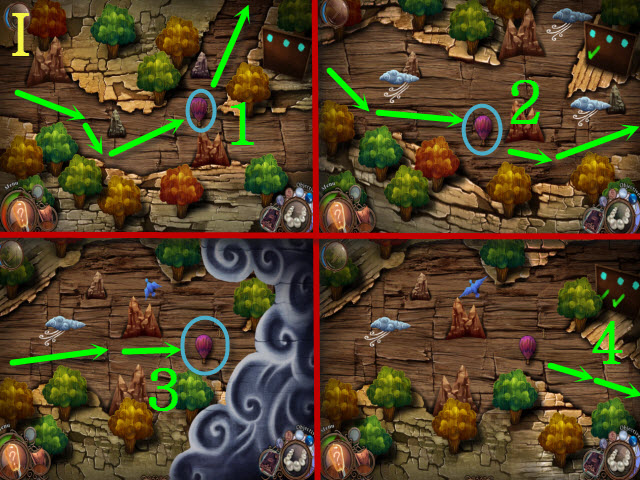
- Guide the balloon around the obstacles (green); use the seeker ability on the balloon if you hit an intersection (blue).
- Solution: 1-4 (I).

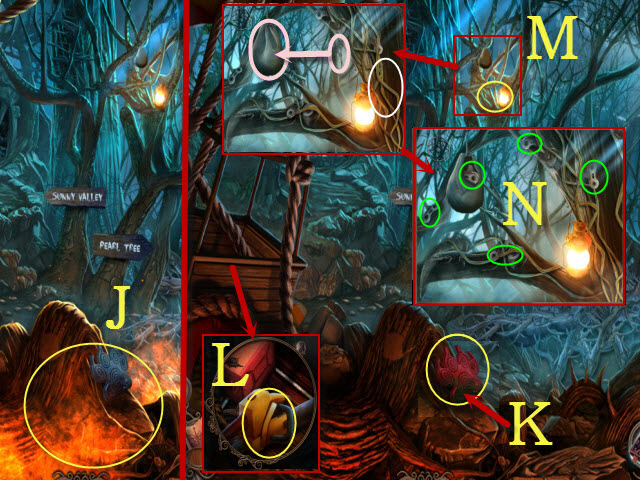
- Use the FIRE EXTINGUISHER (J).
- Take the RED MEDALLION (K).
- Take the BROKEN CHAINSAW (L).
- Use summoner on the light; examine it (M).
- Use the scissors (pink); move the vine (white).
- Find the items to receive the CHAIN (N).
- Walk right.

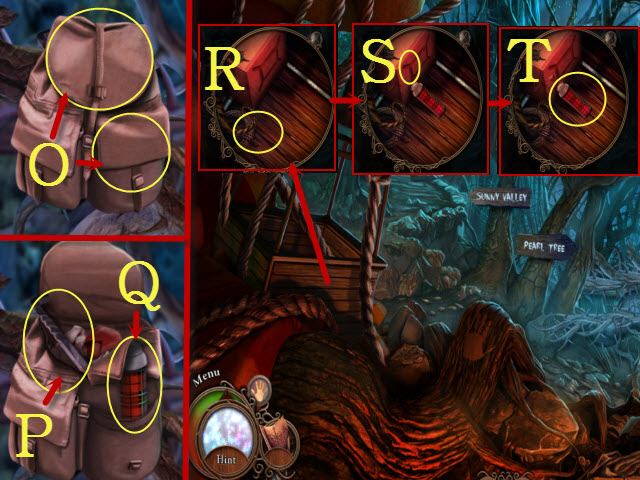
- Open the pockets (O).
- Take the METAL SPIKE (P) and VACUUM BOTTLE (Q).
- Walk back.
- Place the VACUUM BOTTLE (R).
- Use the METAL SPIKE (S).
- Take the GASOLINE (T).
- Walk right.

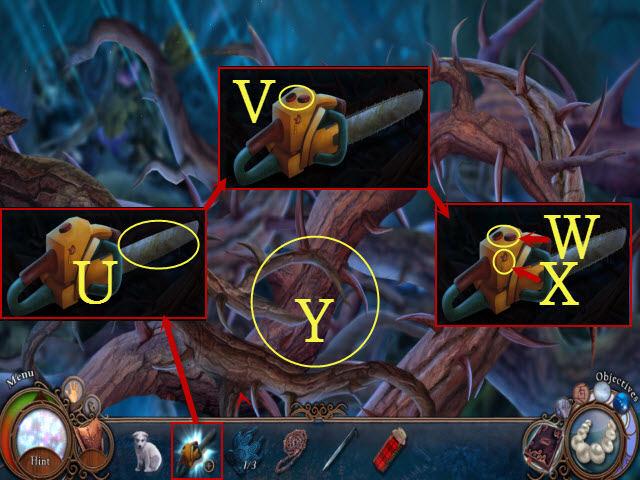
- Examine the BROKEN CHAINSAW; place the CHAIN (U).
- Move the cap; use the GASOLINE (V).
- Close the cap (W); pull the starter three times (X) to receive the CHAINSAW.
- Use the CHAINSAW to activate a mini-game (Y).

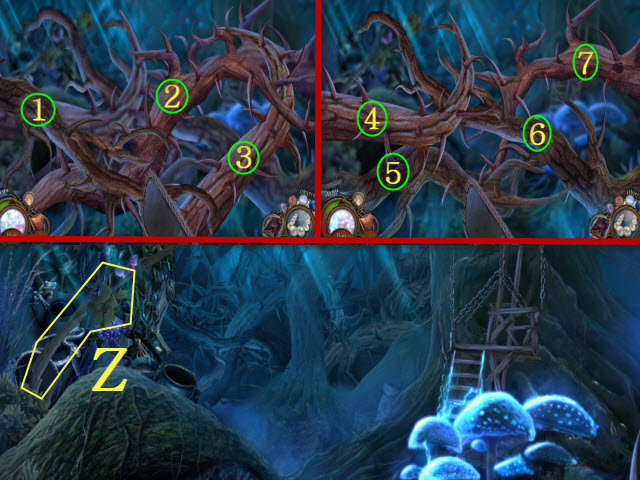
- Cut the branches in order (1-7).
- Take the BRANCH (Z).

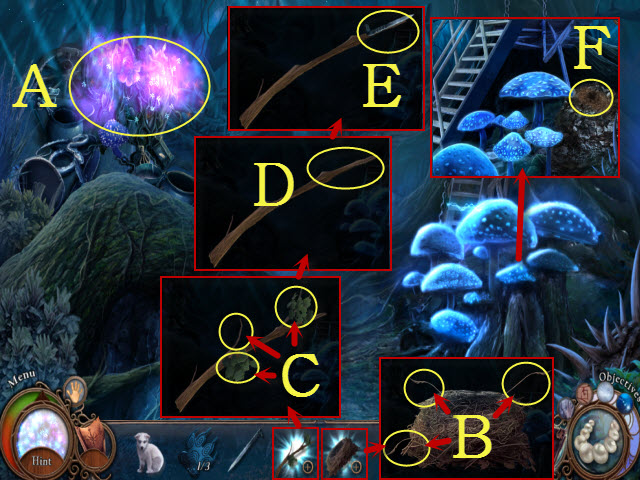
- Play the HOP (A) to receive the BIRD’S NEST.
- Examine the BIRD’S NEST; select the strings (B) to get the LONG STRING.
- Examine the BRANCH; remove the leaves and the stick (C).
- Use the METAL SPIKE with the BRANCH (D).
- Use the LONG STRING with the BRANCH (E) to receive the IMPROVISED LIGHTNING ROD.
- Place the IMPROVISED LIGHTNING ROD (F).
- Enter the Treehouse; walk forward and then left.

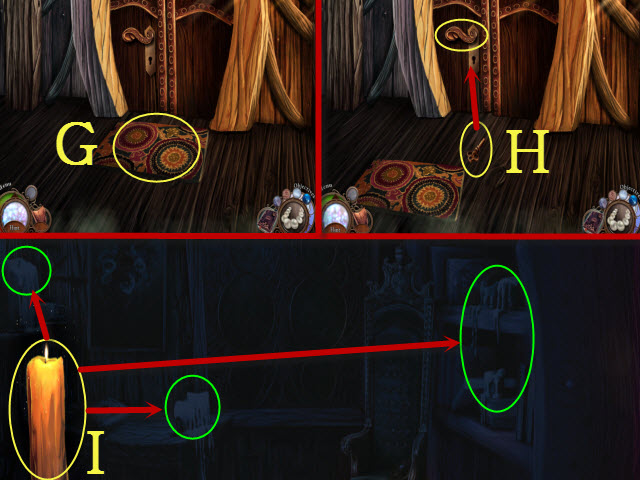
- Move the doormat (G).
- Select the key (H); open the door.
- Walk forward.
- Select the candle (I); move it over the unlit candles (green).

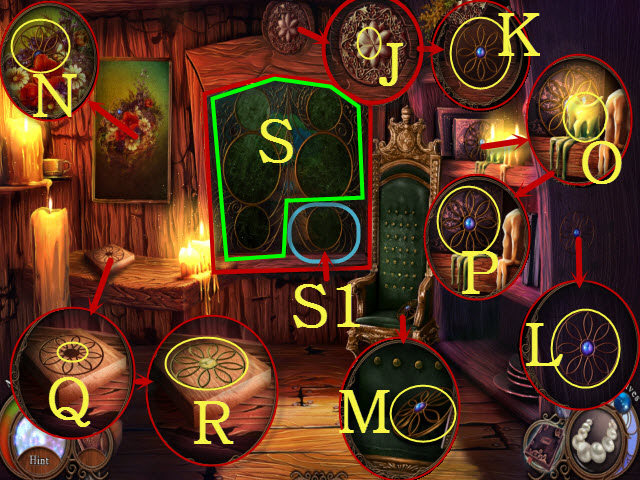
- Open the lid (J); take the 1/5 FLOWER ORNAMENT (K).
- Take the 2/5 FLOWER ORNAMENT (L), the 3/5 FLOWER ORNAMENT (M), and the 4/5 FLOWER ORNAMENT (N).
- Take the CANDLE (O) and the 5/5 FLOWER ORNAMENT (P).
- Use the CANDLE (Q); take the WAX FLOWER ORNAMENT (R).
- Place the 5/5 FLOWER ORNAMENT (S) and the WAX FLOWER ORNAMENT (S1); select the ornaments.

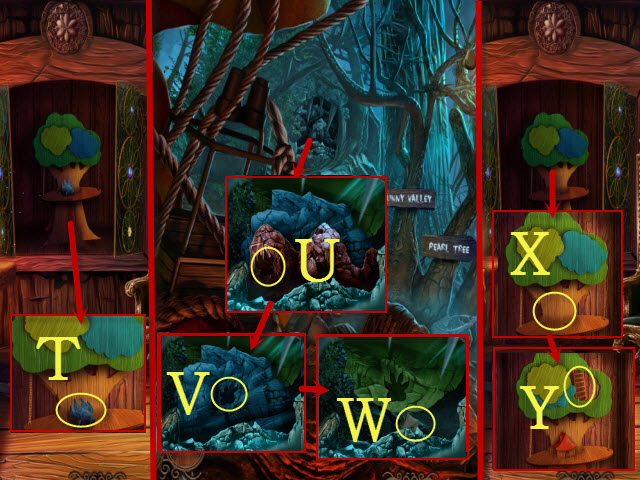
- Open the door; take the BLUE MEDALLION (T).
- Walk down three times.
- Place the RED MEDALLION (U) and BLUE MEDALLION (V).
- Take the WOODEN HOUSE (W).
- Return to the Treehouse Interior.
- Place the WOODEN HOUSE (X).
- Select the ladder (Y).
- Walk back; walk upstairs.

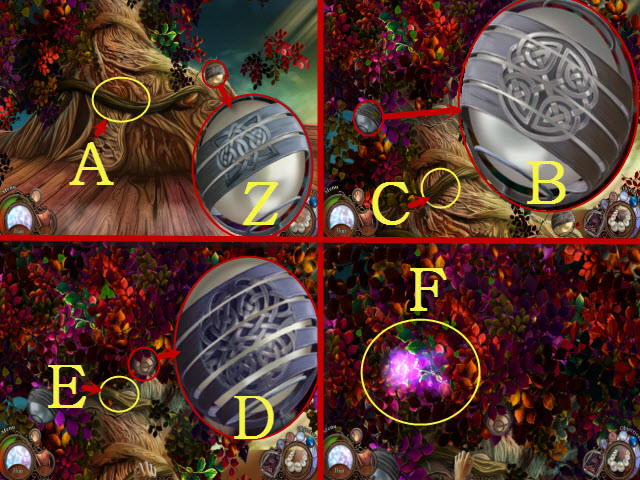
- Align the metal bars (Z); select the branch (A).
- Move the leaves; align the metal bars (B); select the branch (C).
- Move the leaves; align the metal bars (D) and select the branch (E).
- Select the tree to activate a mini-game (F).

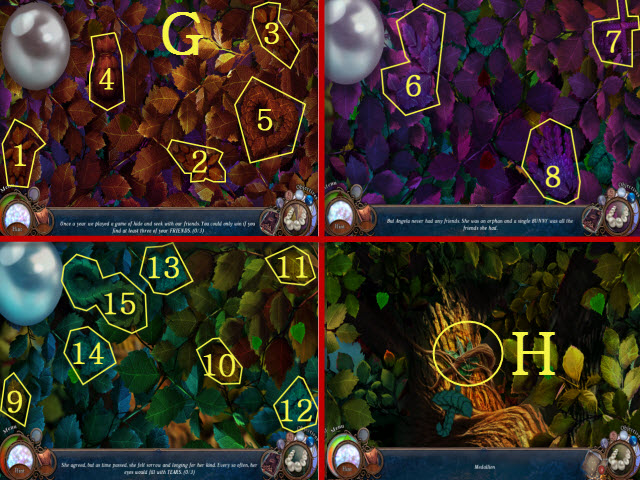
- Solution: 1-15 (G).
- Move the branches; take the GREEN MEDALLION (H).
- Walk back three times.
Chapter 8: The Mystery House

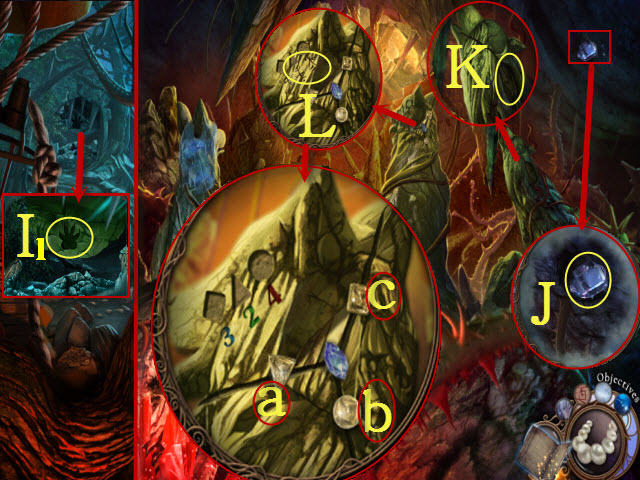
- Place the GREEN MEDALLION (I).
- Walk left to the Cave of Mind.
- Use the summoner (I2); take the CRYSTAL (J).
- Place the CRYSTAL (K).
- Use the translator (L) to activate a mini-game.
- Select each symbol the number of times indicated.
- Solution: ax2, bx4, cx3.

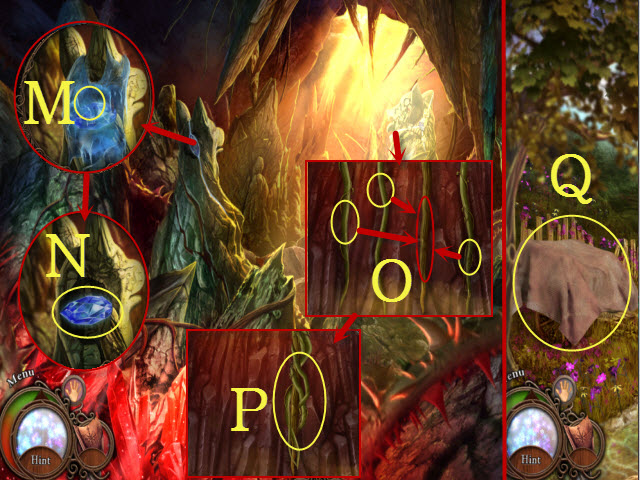
- Use the icebreaker (M); turn the crystal (N).
- Place the vines together (O).
- Select the vine (P).
- Walk forward.
- Move the cloth (Q).

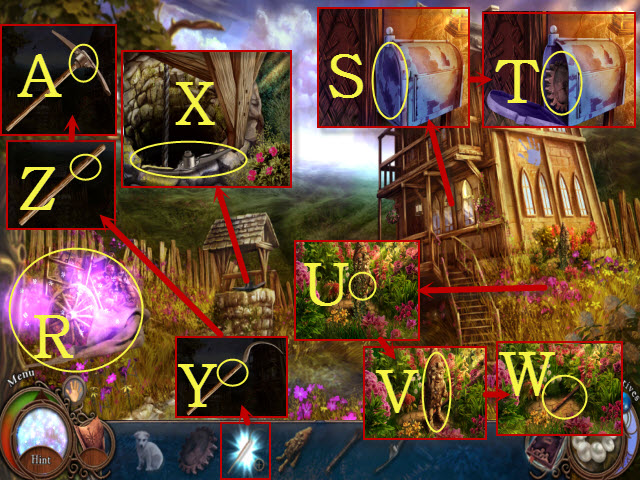
- Play the HOP (R) to receive the SICKLE.
- Open the mailbox (S); take the WINCH PART (T).
- Use the SICKLE (U).
- Take the STONE GNOME (V) and WELL LEVER (W).
- Take the PICKAXE HEAD (X).
- Examine the SICKLE; select the handle (Y).
- Place the PICKAXE HEAD (Z); use the STONE GNOME (A) to receive the PICKAXE.
- Walk down.

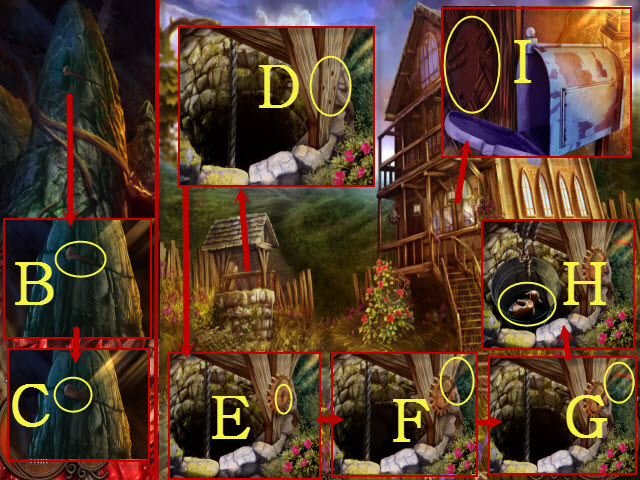
- Use the PICKAXE (B).
- Select the HANDLE three times (C).
- Walk forward.
- Place the WINCH PART (D).
- Place the WELL LEVER (E).
- Place the HANDLE (F); select it (G).
- Take the GOLDEN GIRL (H).
- Place the GOLDEN GIRL; open the door (I).
- Enter Angela’s House.

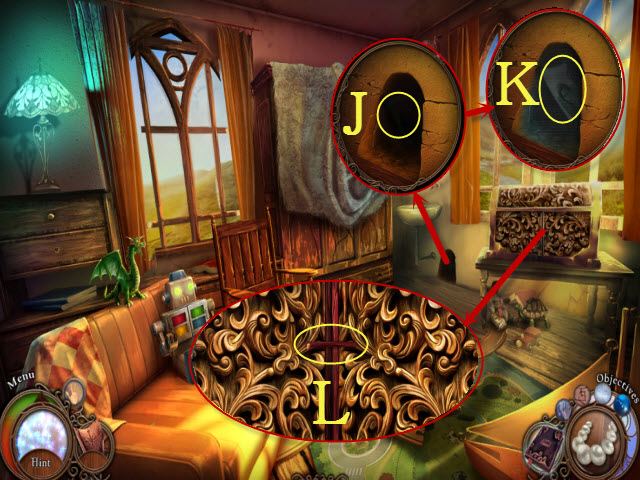
- Use the WOLF CUB (J).
- Take the 1/3 PHOTO PIECE (K).
- Move the latch to activate a puzzle (L).

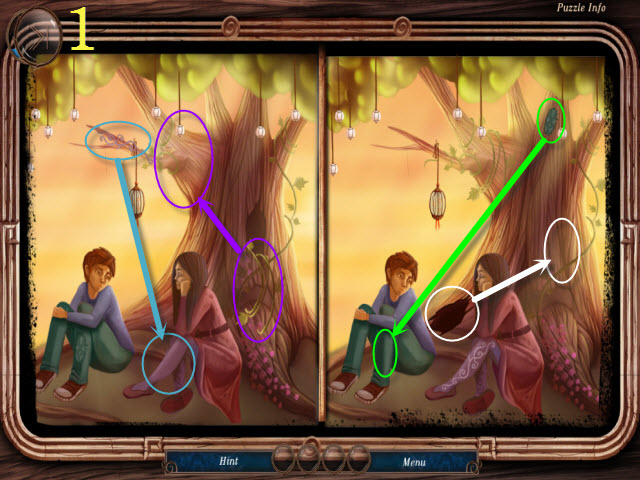

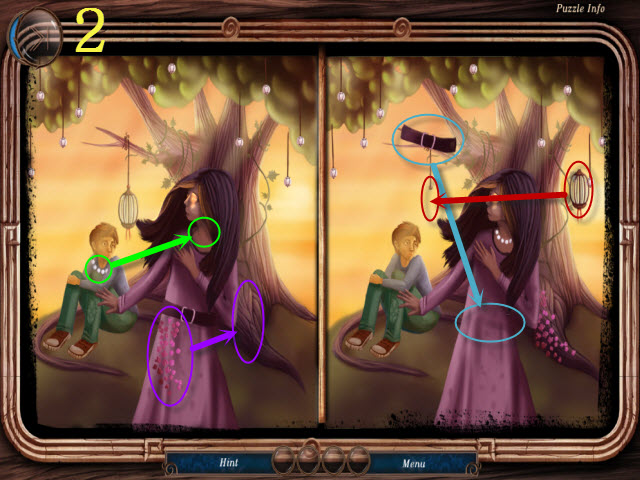

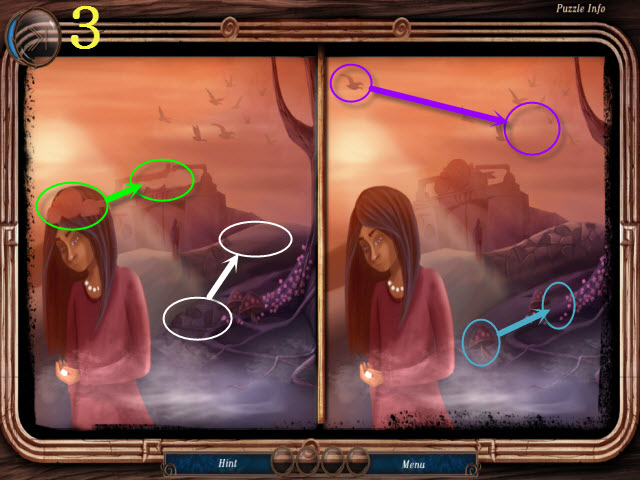
- Restore the incorrect elements.
- Solution (1-3).

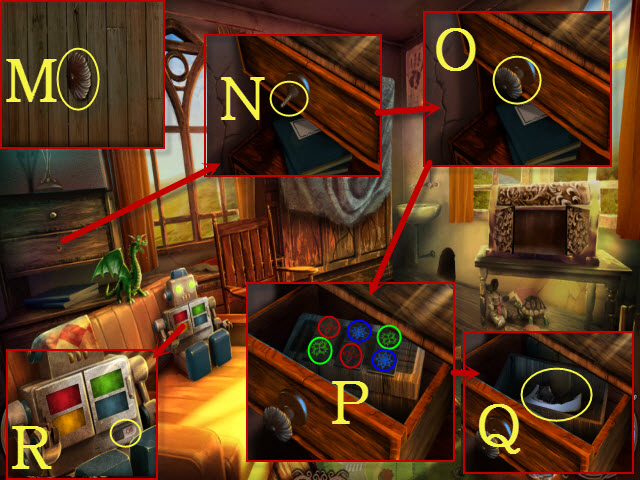
- Take the DRAWER HANDLE (M) and place it (N).
- Open the drawer to activate a mini-game (O).
- Select matching symbols (P).
- Move the lid; take the 2/3 PHOTO PIECE (Q).
- Turn the robot on to activate a puzzle (R).

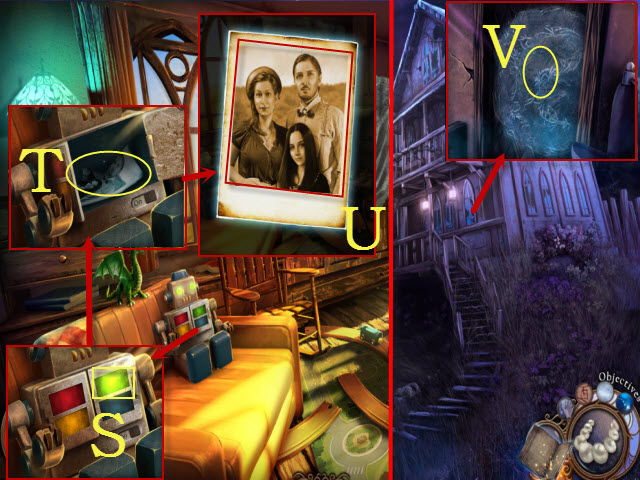
- Select the buttons to repeat the patterns (S); this puzzle is random.
- Open the robot; take the 3/3 PHOTO PIECE (T).
- Restore the old photo (U).
- Use the icebreaker three times (V).
- Enter Angela’s House.

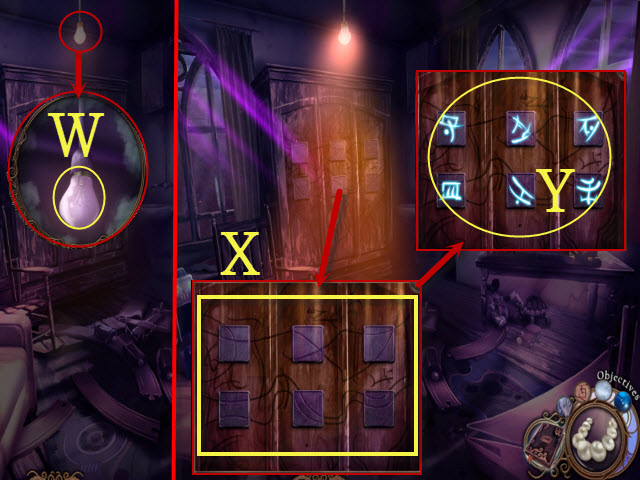
- Use the summoner; select the light bulb to activate a puzzle (W).
- Solution (X).
- Use translator to activate a puzzle (Y).

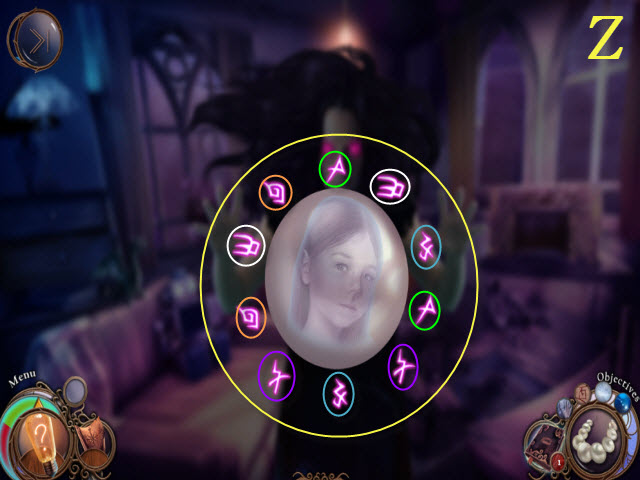
- Find matching pairs (Z).
- Walk down.

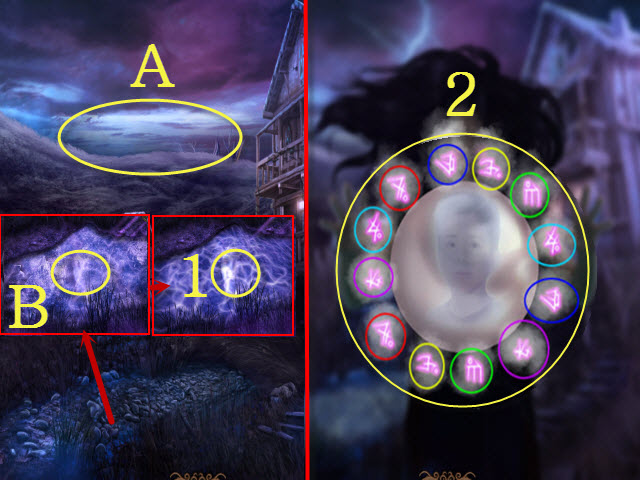
- Use the seeker anywhere (A).
- Use the icebreaker (B); examine the water to activate a puzzle (1).
- Find matching pairs (2).
- Enter Angela’s House to activate a puzzle.

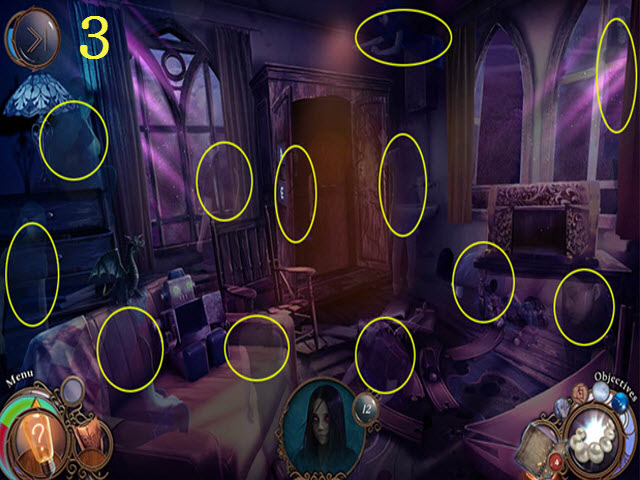
- Locate the illusions.
- Solution (3).

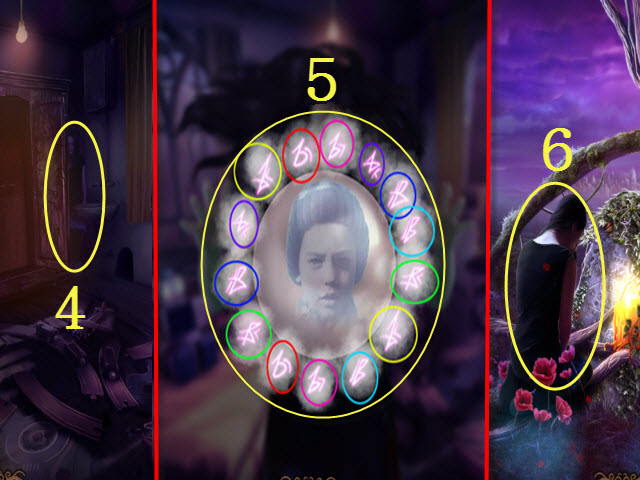
- Select Angela to activate a puzzle (4).
- Solution: (5).
- Walk back and then forward.
- Select Angela (6).
- Congratulations! You have completed Rite of Passage: Hide and Seek!




 Small Town Terrors: Pilgrim's Hook Walkthrough, Guide, & Tips
 1 Moment of Time: Silentville Walkthrough, Guide, & Tips
 Lamp of Aladdin Tips & Tricks, Guide, & Tips
 Virtual City Walkthrough, Guide, & Tips
 Sable Maze: Sullivan River Walkthrough, Guide, & Tips