Sable Maze: Sullivan River Walkthrough, Guide, & Tips
Sable Maze: Sullivan River Walkthrough

Welcome to the Sable Maze: Sullivan River Walkthrough
Reveal the secret of the ancient labyrinth in this eerie Hidden Object Puzzle Adventure game.
Whether you use this document as a reference when things get difficult or as a road map to get you from beginning to end, we’re pretty sure you’ll find what you’re looking for here.
This document contains a complete Sable Maze: Sullivan River game walkthrough featuring annotated screenshots from actual gameplay!
We hope you find this information useful as you play your way through the game. Use the walkthrough menu below to quickly jump to whatever stage of the game you need help with.
Remember to visit the Big Fish Games Forums if you find you need more help. Have fun!
This walkthrough was created by BrownEyedTigre, and is protected under US Copyright laws. Any unauthorized use, including re-publication in whole or in part, without permission, is strictly prohibited.
General Tips

- Select Options to adjust the Sound, Music, Full-Screen, and Custom Cursor.
- You may select between Casual, Advanced, and Hard Mode.
- Throughout the guide, we will use the acronym ‘HOS’ for Hidden Object Scenes.
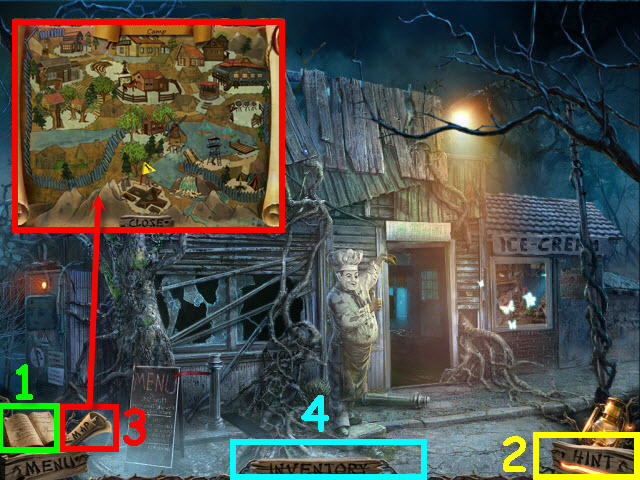
- All notes, photos, and clues will be added to your journal (1).
- Select the Info button on the bottom right to get the objectives for the puzzles.
- Many of the puzzles are random.
- If you have not activated a HOS where the guide indicates, you may have not completed an action required to trigger it. Please check the guide to see what you may have missed.
- Select the Hint button (2) on the bottom right to get a hint in HOS and in the main quest.
- Select the map (3) to move to locations quickly.
- Move your cursor down to the bottom of the screen to raise the Inventory bar (4).
- Inventory items will be marked in all CAPS in the strategy guide.
Chapter 1 – Sullivan River
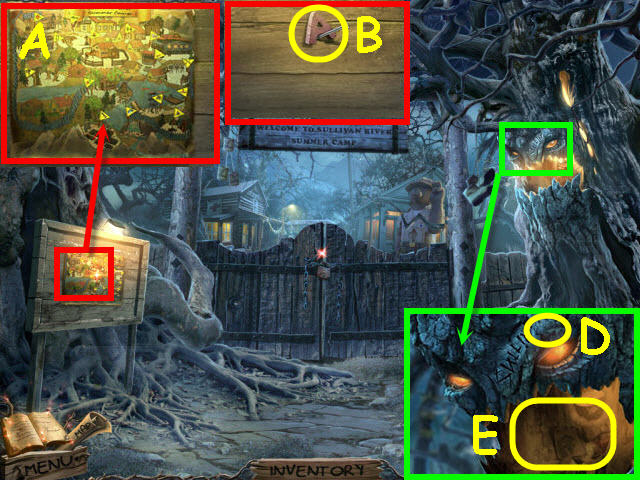
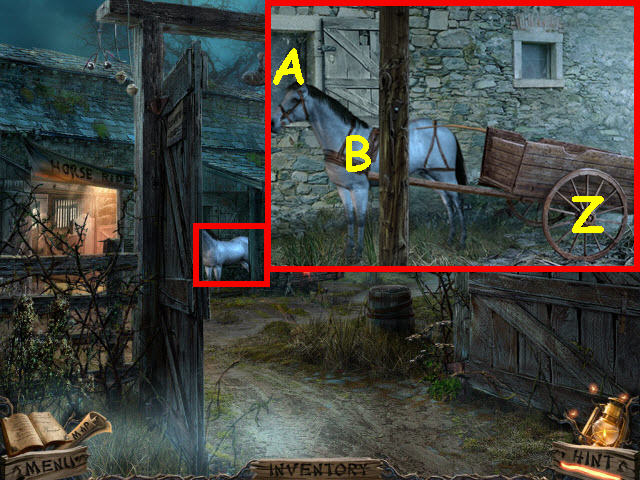
- Examine the bulletin board; take the map (A), which will be added to your task bar.
- Take the WOODEN LETTER A (B).
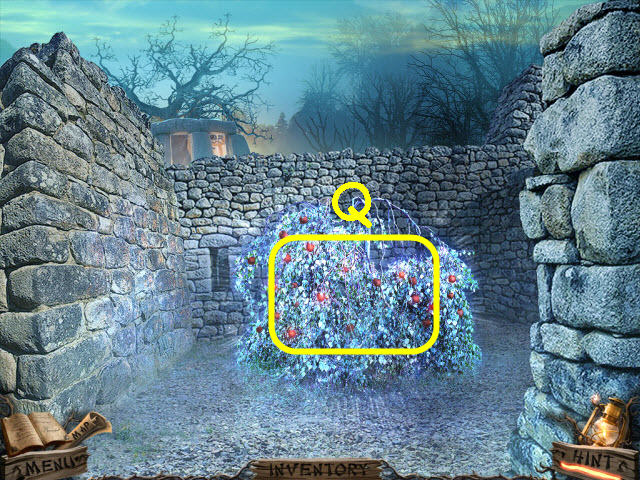
- Examine the tree and place the WOODEN LETTER A on it (D).
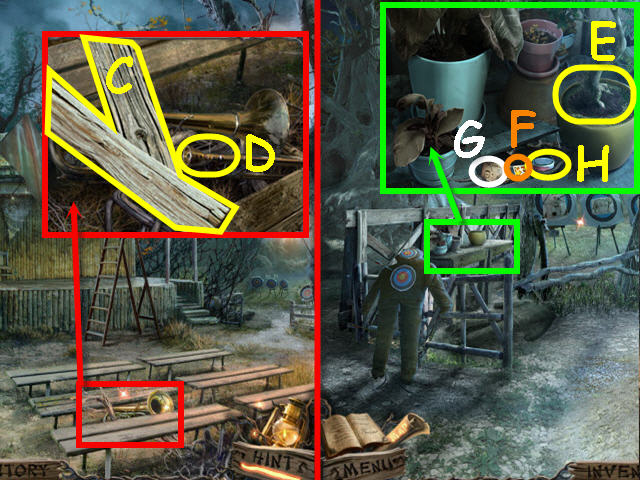
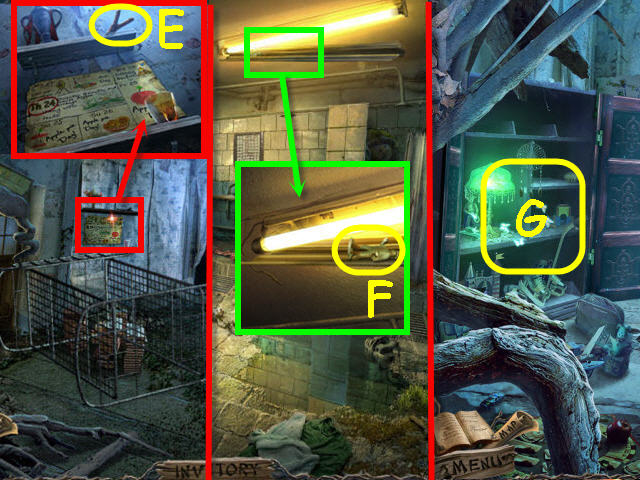
- Examine the hole in the tree to access a HOS (E).
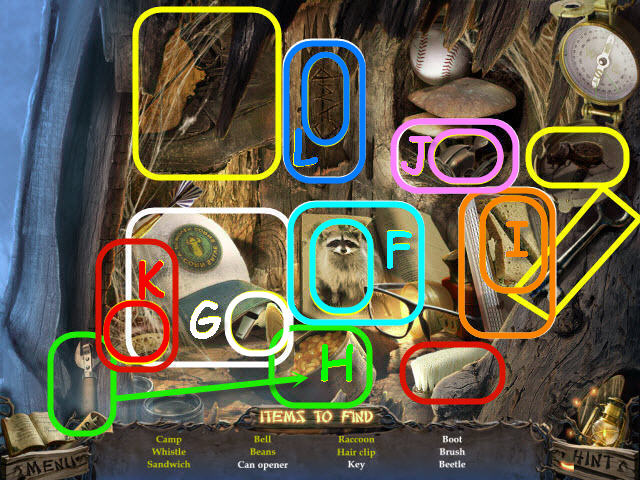
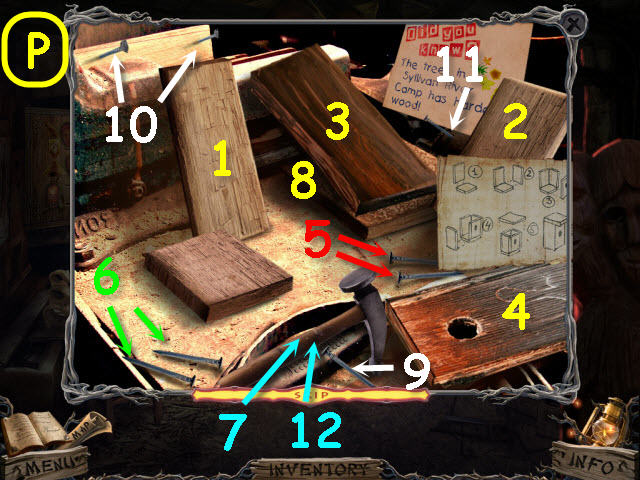
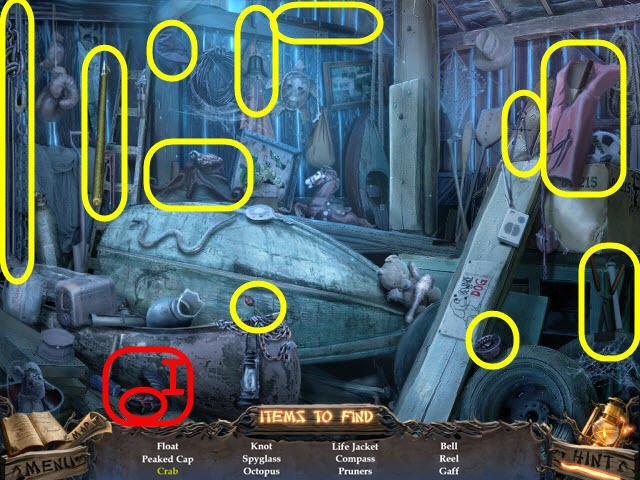
- Find the items listed.
- Open the book to get the raccoon (F).
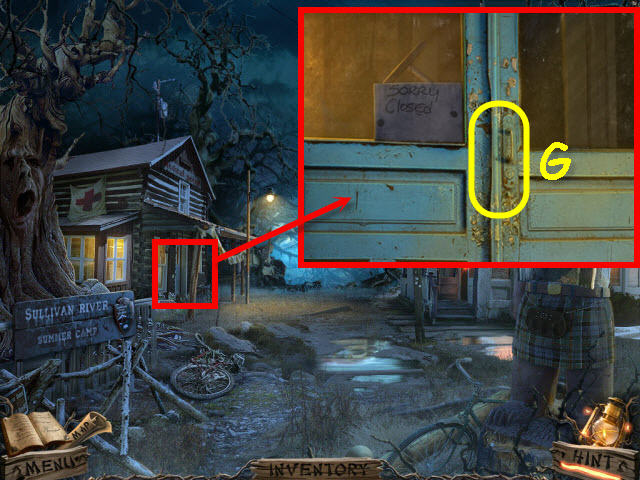
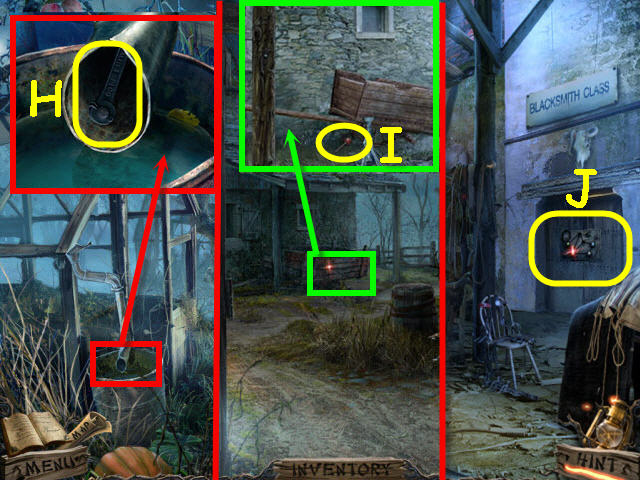
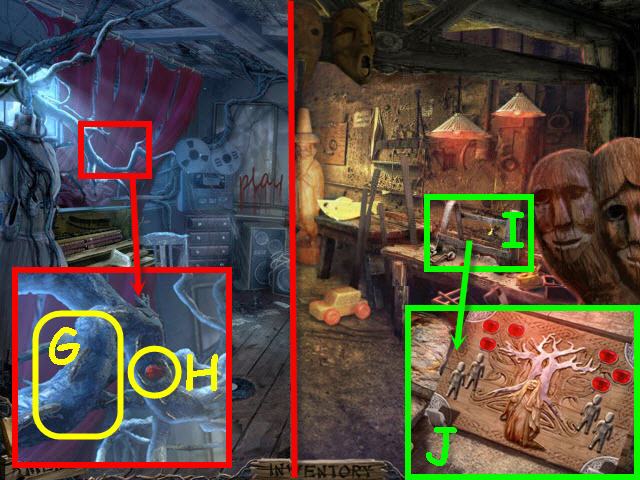
- Move the cap to get a whistle (G).
- Use the can opener on the can to get the beans (H).
- Open the container to get a sandwich (I).
- Move the grass to get a bell (J).
- Use the brush on the cobwebs to get the hair clip (K).
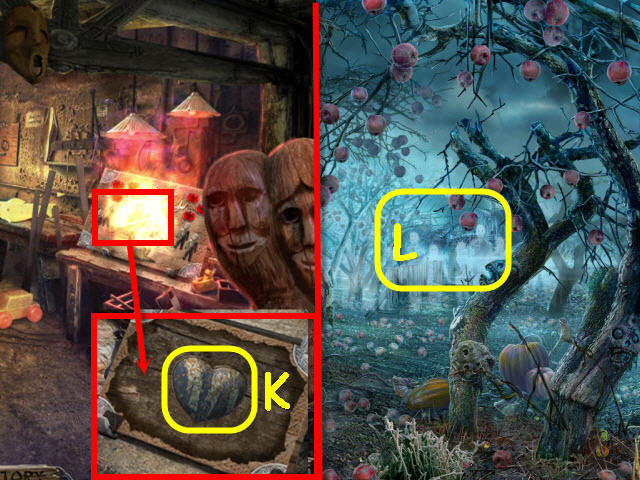
- Remove the bark to get camp (L).
- You will earn a GATE KEY.
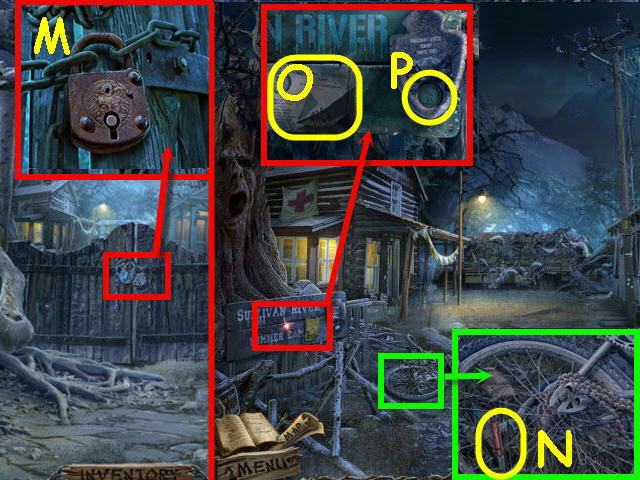
- Examine the gate; use the GATE KEY on the lock (M).
- Go forward.
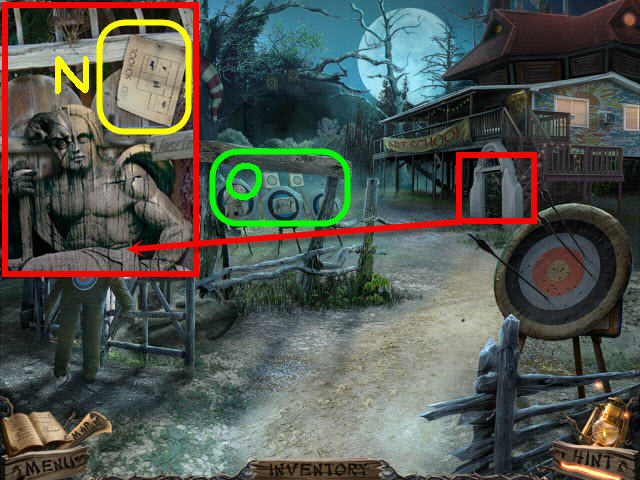
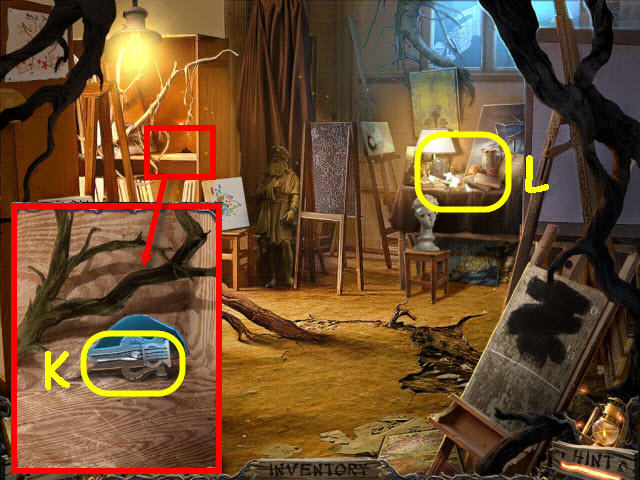
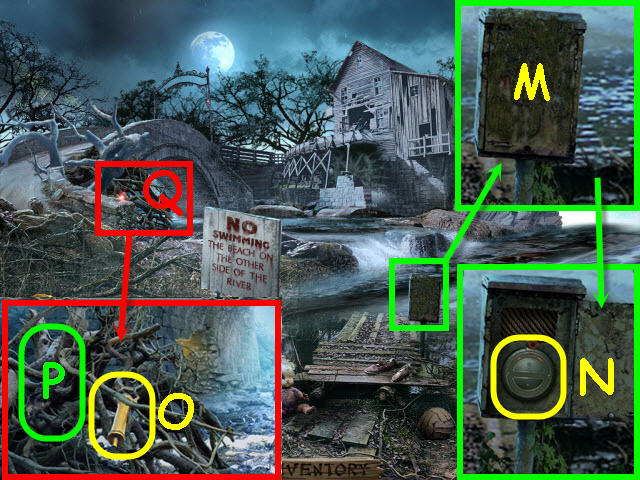
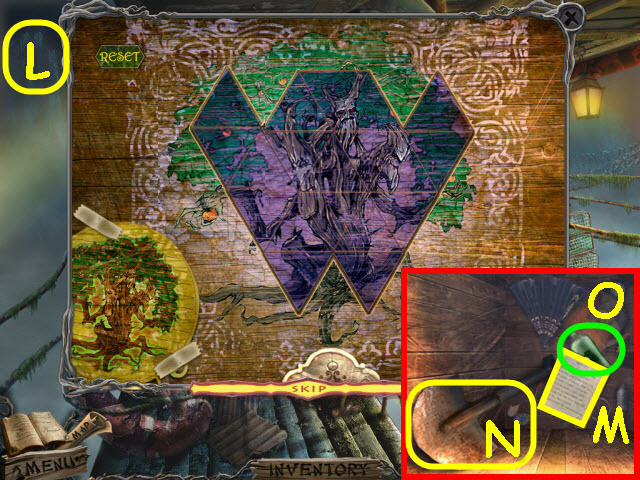
- Examine the bicycle; take the POCKET KNIFE (N).
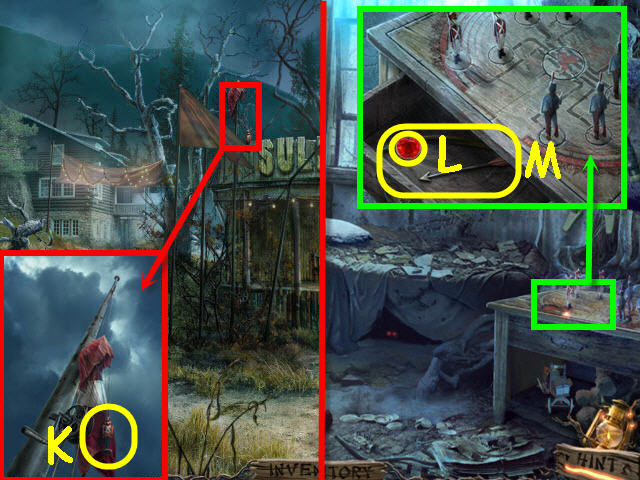
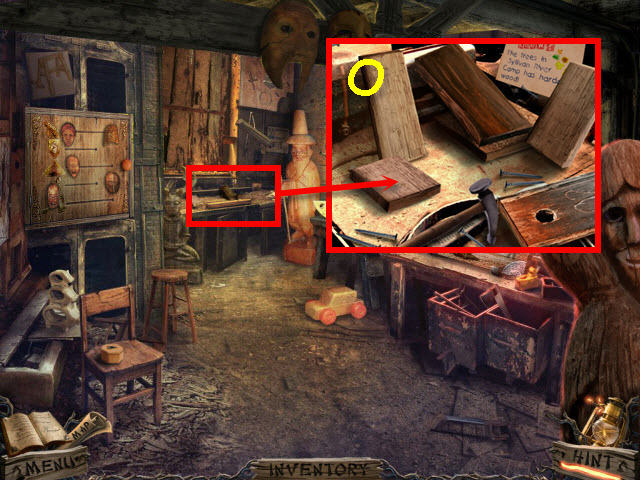
- Examine the sign; take the note (O) and use the POCKET KNIFE to get the WOODEN BADGE (P).
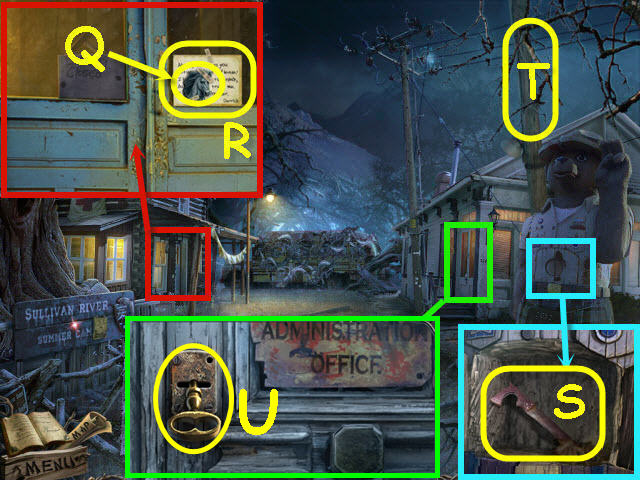
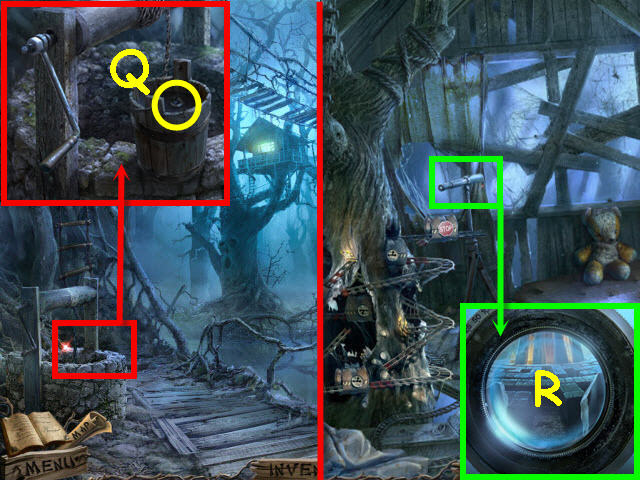
- Examine the nurse’s office door; take the HORSE EMBLEM (Q) and the note (R).
- Examine the bear; place the WOODEN BADGE in the slot and take the HACKSAW (S).
- Select the pole to knock it over (T).
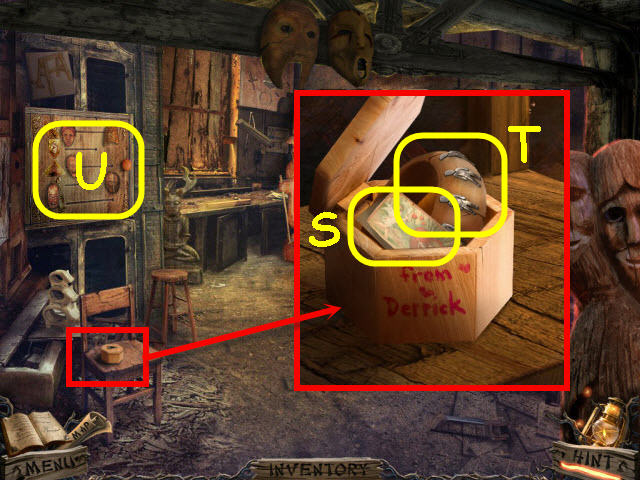
- Examine the office door and turn the key (U).
- Enter the newly-opened director’s office.
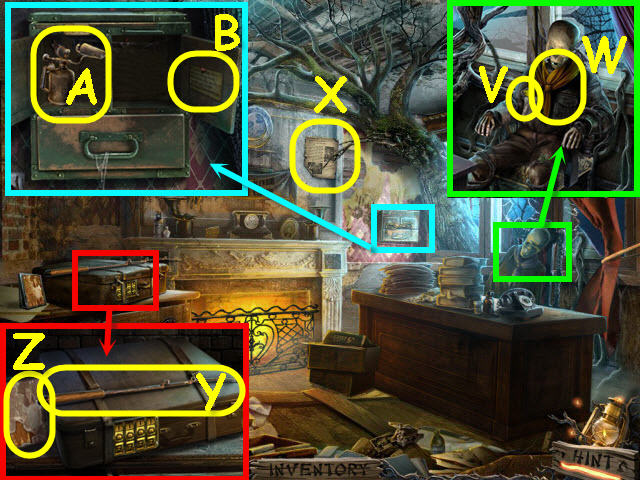
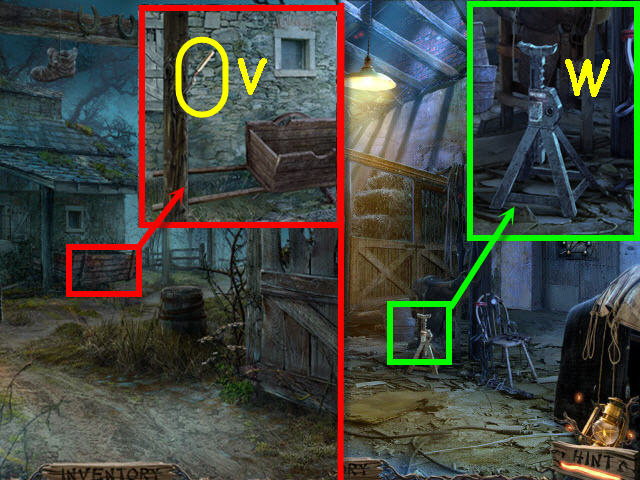
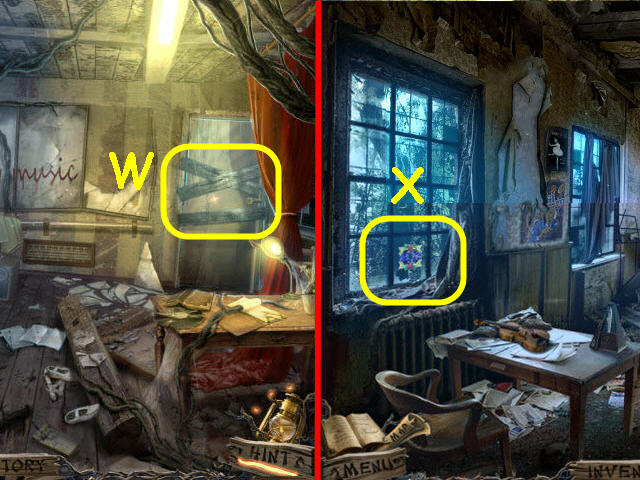
- Examine the skeleton; select the skeleton and take the SCARF (W), and the note (V).
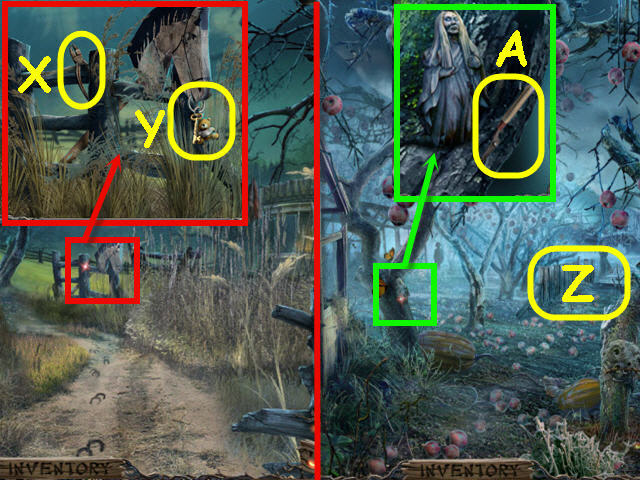
- Take the note (X).
- Examine the suitcase; take the FISHING POLE (Y).
- Select the glass in the frame and take the photo (Z).
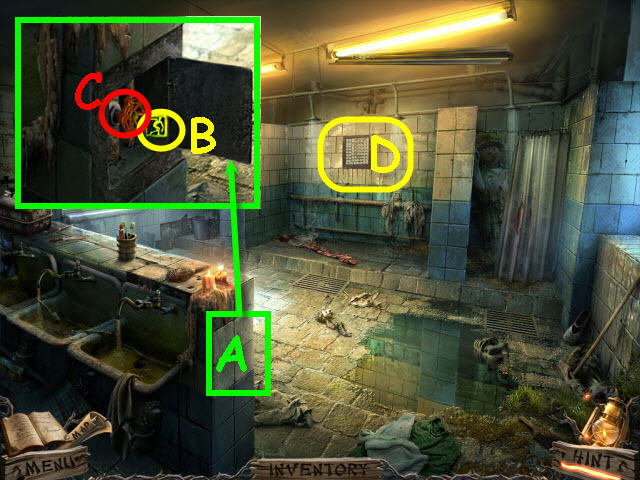
- Examine the safe and use the HACKSAW on the chains. Open the safe; take the BLOWTORCH (A) and the note (B).
- Back out.
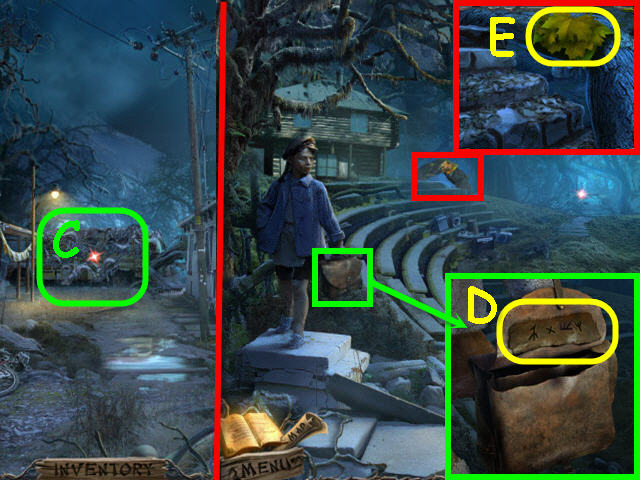
- Examine the brambles and use the BLOWTORCH on them (C).
- Attempt to go forward and then go forward after the cutscene.
- Examine the bag; use the POCKET KNIFE on the buckle; select the code (D).
- Examine the large root; take the DRY LEAVES (E).
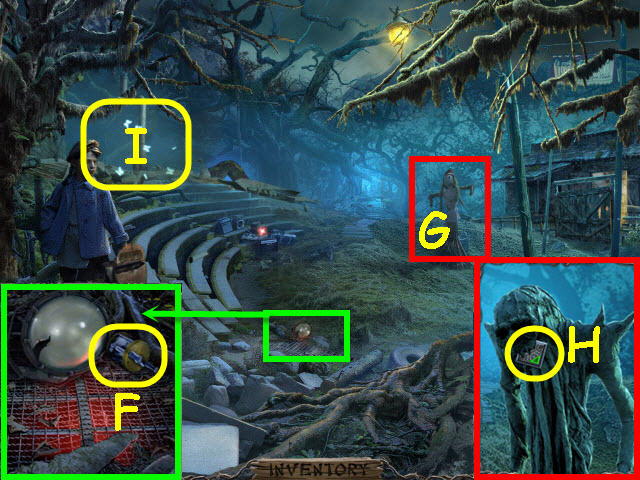
- Examine the grate; take the REEL (F). It will automatically combine with the FISHING POLE to create a FISHING ROD.
- Examine the effigy; use the DRY LEAVES and BLOW TORCH on the base (G).
- Examine the burnt effigy; take the GREEN TILE (H).
- Examine the collapsed house to access a HOS (I).
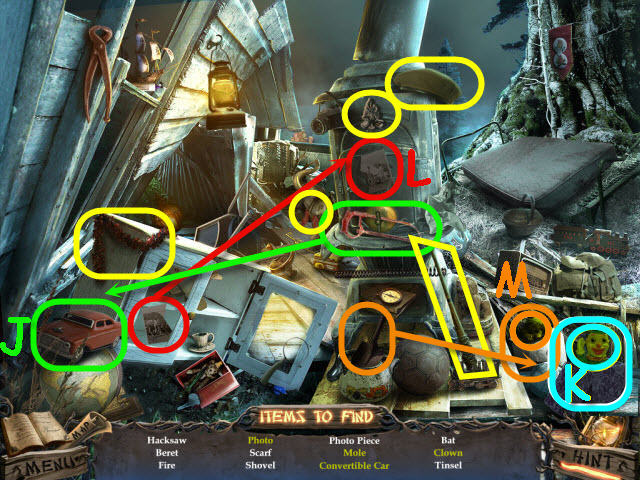
- Find the items listed.
- Use the hacksaw on the car to get a convertible (J).
- Select the box top get a clown (K).
- Place the photo piece by the other photo piece to get a photo (L).
- Use the shovel on the dirt to get a mole (M).
- You will earn a FIRE EMBLEM.
- Go forward to the forest boardwalk.
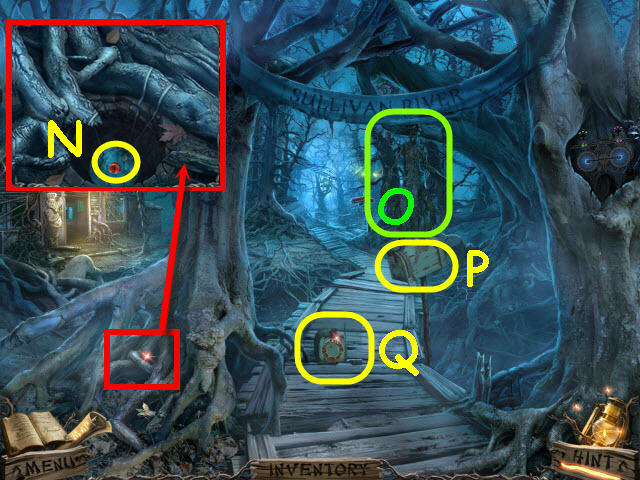
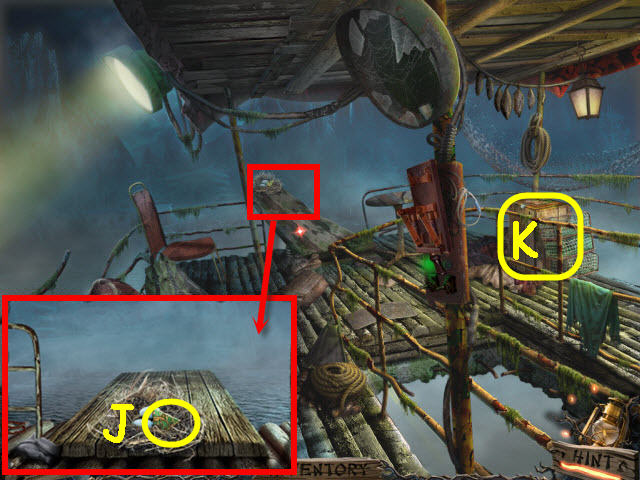
- Examine the tree roots; use the FISHING ROD to get the BUTTON 3 (N).
- Select the walking tree (O).
- Knock the mailbox over (P).
- Examine the fallen mailbox and use the SCARF on it twice to trigger a puzzle (Q).
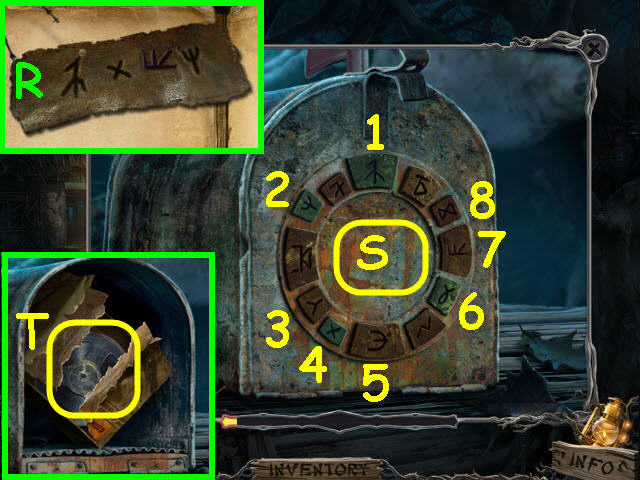
- Light up the matching runes from the suitcase code (R).
- Select the runes in the order marked in the screenshot (S).
- Use the POCKET KNIFE on the package; take the note and the TAPE REEL 1/2 (T).
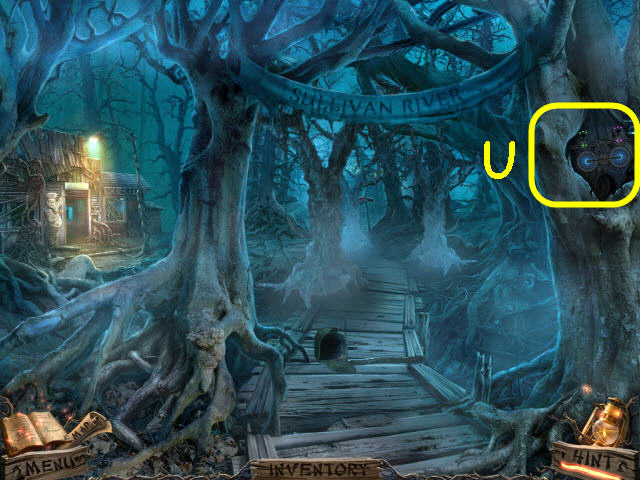
- Examine the tree.
- Use the GREEN TILE on the disks to trigger a puzzle (U).
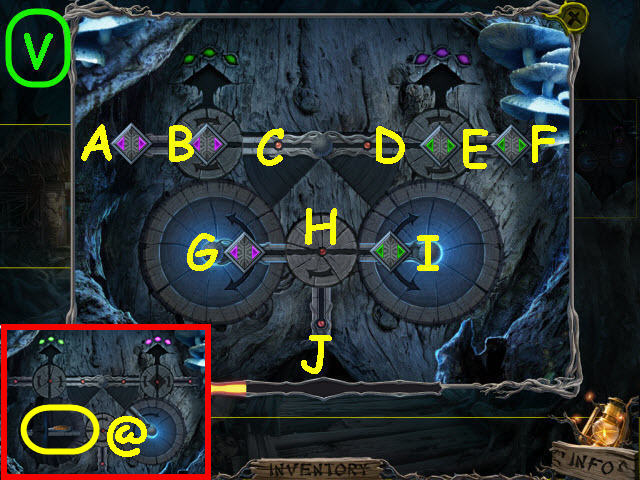
- Move the tiles to the matching colored slots.
- To solve the puzzle, move the disks or tiles in the following order. Rotating or pivoting refers to the disk or bar, and directional moves refer to the tile on the disk or bar: I – Left, rotate H and go down, rotate H, G – right 2 x, rotate I, pivot D, move I to D, B – right, pivot C, rotate G, move C – G, rotate G, rotate I, G right x 2, rotate H, J – up, rotate H, H – left, rotate G, move G – C, pivot C, C – left, rotate B, B – up into the slot.
- I – left, rotate H, H – down, rotate H, rotate I, move D to I, rotate I, pivot C, rotate G, I – left 2 x, rotate G, move G to C, pivot D, E – left, pivot D, rotate I, move D to I, rotate I, rotate G, I – left 2 x, rotate H, J – up, rotate H, H – right, rotate I, move I – D, pivot D, D – right, rotate E, E – up into the slot.
- G – right, rotate H, H – down, rotate H, rotate G, move C to G, rotate G, rotate I, G – right 2 x, pivot D, rotate I, move I to D, pivot D, rotate E, D – right, rotate E, E – up into the slot. Rotate E, F – left 2 x, pivot D, move D to I, rotate I, I left 2 x, rotate G, move G to C, pivot C, rotate B, C – left, rotate B, B – up into the slot.
- Rotate B, A – right 2 x, pivot C, move C to G, rotate G, G – right 2 x, rotate I, move I to D, pivot D, D – right, rotate E, E – up into the slot. Rotate H, J – up, rotate H, H – left, rotate G, move G to C, pivot C, C – left, rotate B, B up into the slot (V).
- Take the SCREWDRIVER (@).
- Go left to the mess hall.
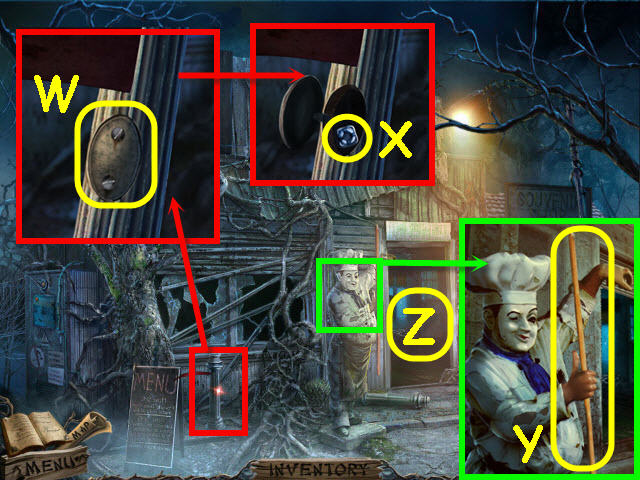
- Examine the pedestal; use the SCREWDRIVER on the 2 screws (W).
- Open the compartment; take the LIFE PRESERVER EMBLEM (X).
- Examine the statue; take the WOODEN STICK (Y).
- Attempt to enter the door (Z).
- Go to the director’s office.
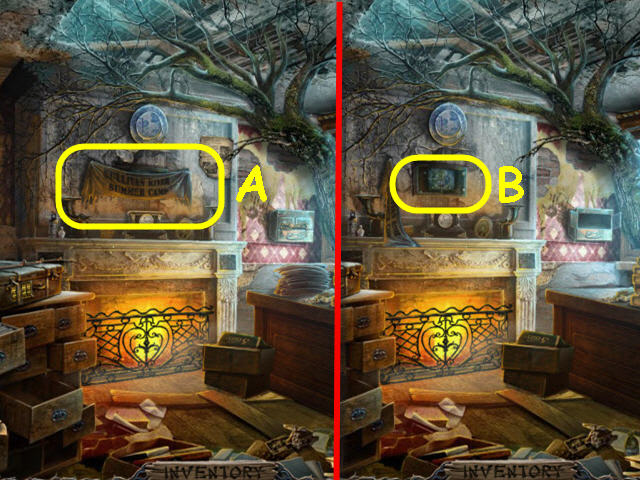
- Move the banner (A).
- Examine the safe; place the HORSE EMBLEM, LIFE PRESERVER EMBLEM, and FIRE EMBLEM on the door to trigger a puzzle (B).
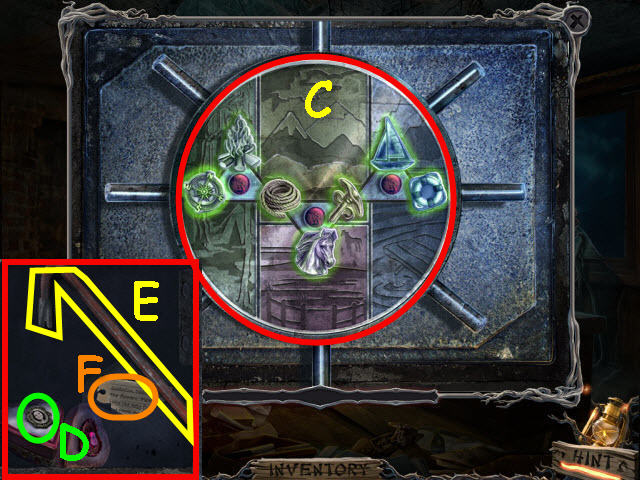
- Place the tiles by their corresponding backgrounds.
- The starting layout is random.
- See screenshot for solution (C).
- Open the box; take the trinket (D), CROWBAR (E), and the note (F).
- Back out.
- Examine the door; use the CROWBAR on the center (G).
- Enter the nurse’s office.
Chapter 2 – Nurse’s Office
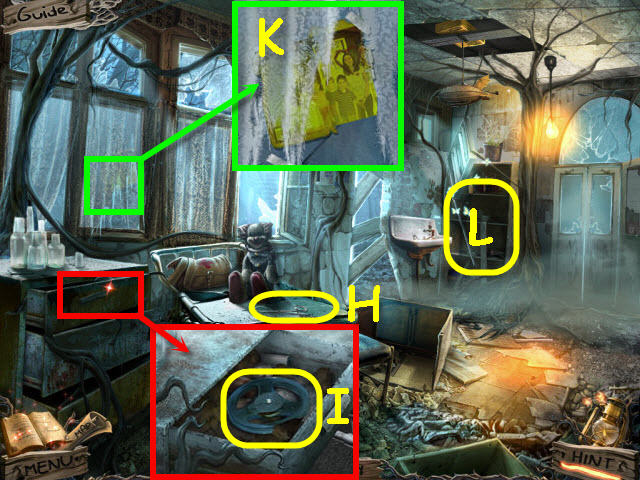
- Select the foot end of the gurney to trigger a cutscene (H).
- Examine the top drawer of the cabinet; open the drawer and take the TAPE REEL 2/2 (I).
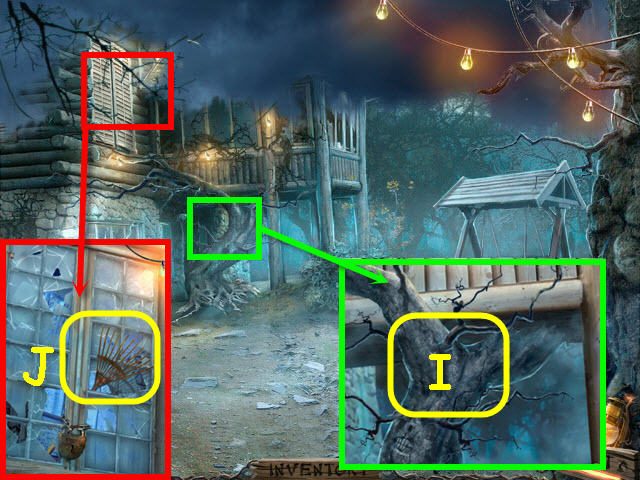
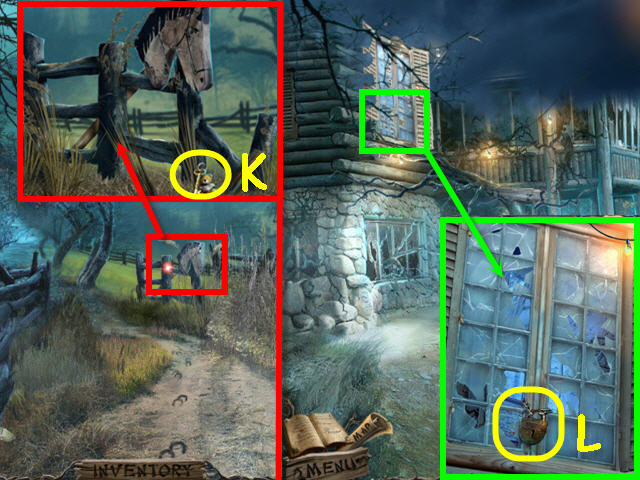
- Examine the window; take the photo (K).
- Examine the shelves to access a HOS (L).
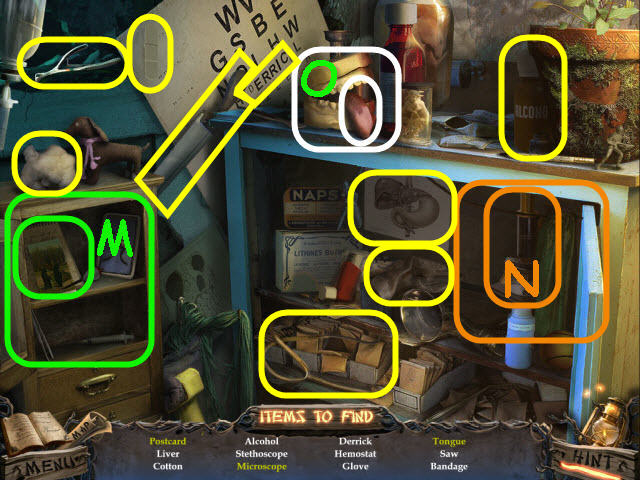
- Find the items listed.
- Open the cabinet and then open the book to get the postcard (M).
- Move the curtain to get the microscope (N).
- Separate the top row of teeth to get the tongue (O).
- You will earn a BANDAGE.
- Go to the firepit.
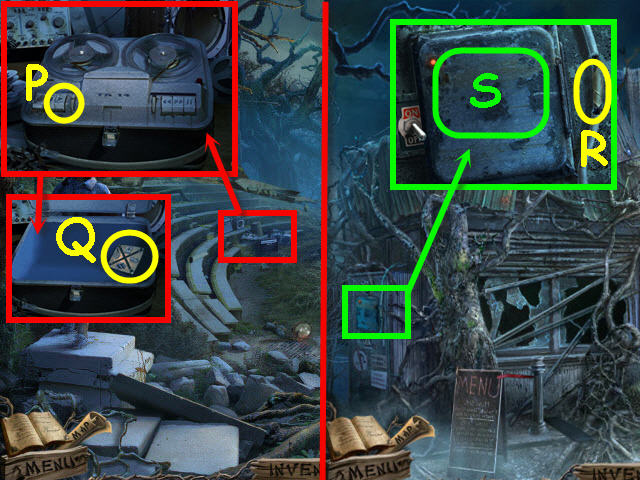
- Examine the tape deck; place the 2 TAPE REELS on the spindles and press the play button (P).
- Take the TILE WITH SYMBOLS (Q).
- Go to the mess hall.
- Examine the electrical panel; place the BANDAGE on the wires (R).
- Open the electrical panel to trigger a puzzle (S).
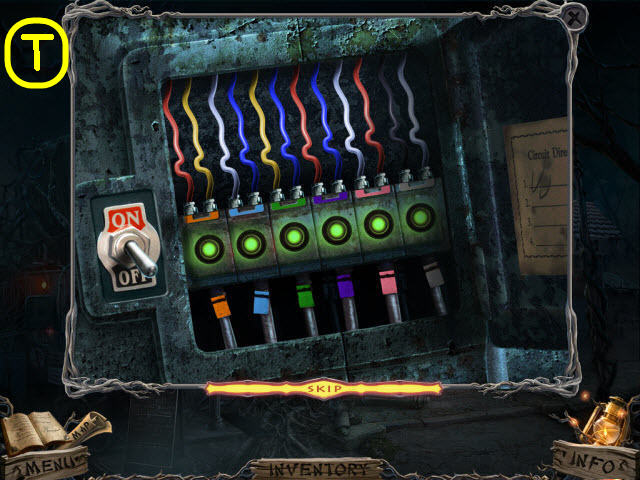
- Arrange the colored wires so that the combination of the two colors matches the colors of the connectors.
- Flip the switch and the lights will turn green when correct.
- See screenshot for solution (T).
- Enter the mess hall.
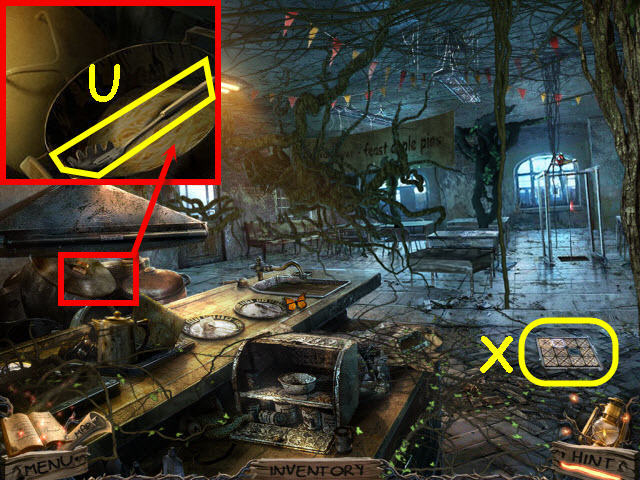
- Examine the pots; open the lid, move the pasta, and take the SPOON (U).
- Select the table (W).
- Examine the hatch; place the TILE WITH SYMBOLS on the hatch door to trigger a puzzle (X).
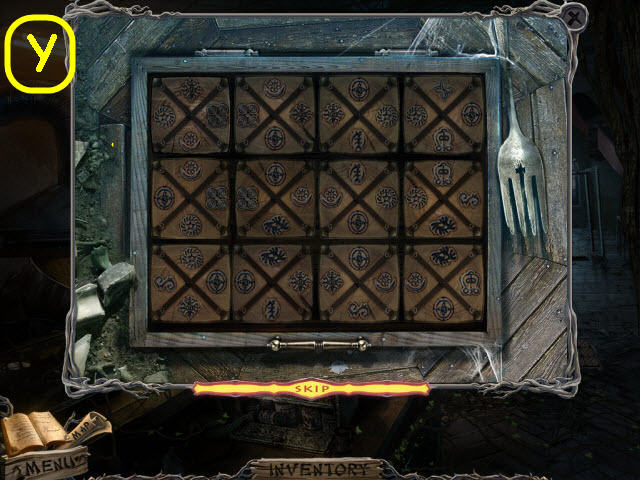
- Arrange the tiles so that all tiles touching have a matching symbol.
- See screenshot for solution (Y).
- Take the BROOM HEAD; the WOODEN STICK and the BROOM HEAD will automatically combine to create a BROOM.
- Back out.
- Examine the window; use the BROOM on the cobwebs three times (Z).
- Examine the window to access a HOS.
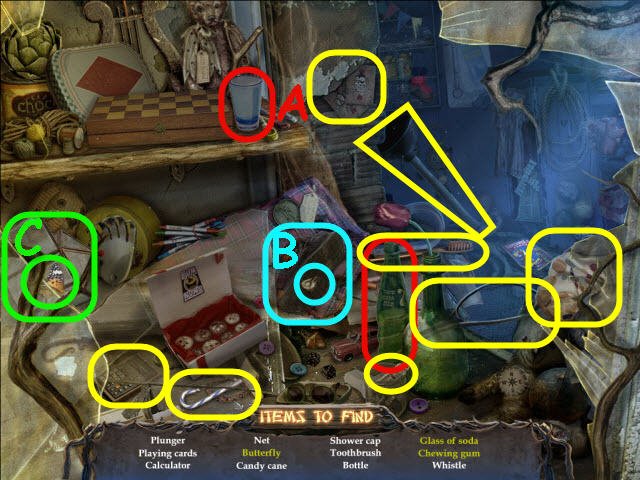
- Find the items listed.
- Use the bottle on the glass to get a glass of soda (A).
- Turn over the boot to get the chewing gum (B).
- Open the display case to get a butterfly (C).
- You will earn a PLUNGER.
- Enter the mess hall.
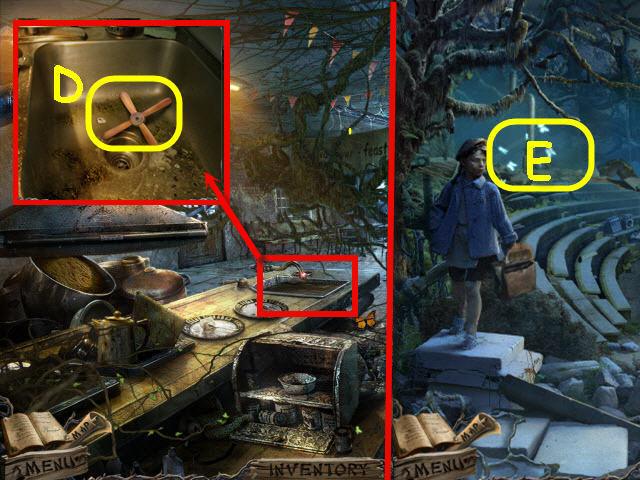
- Examine the sink; use the PLUNGER on the drain and take the TOY PROPELLER (D).
- Go to the firepit.
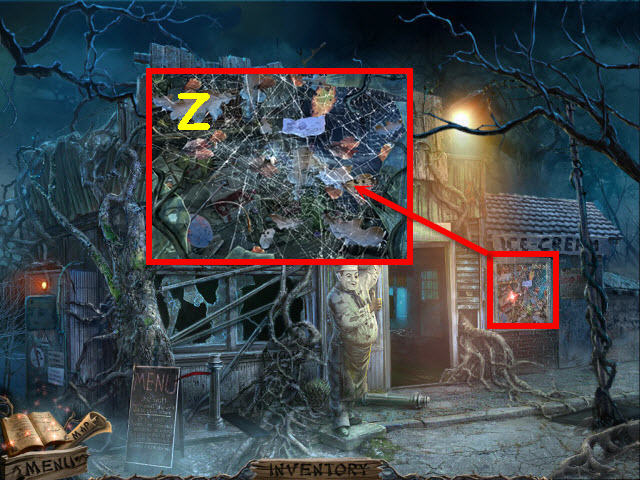
- Examine the collapsed house to access a HOS (E).
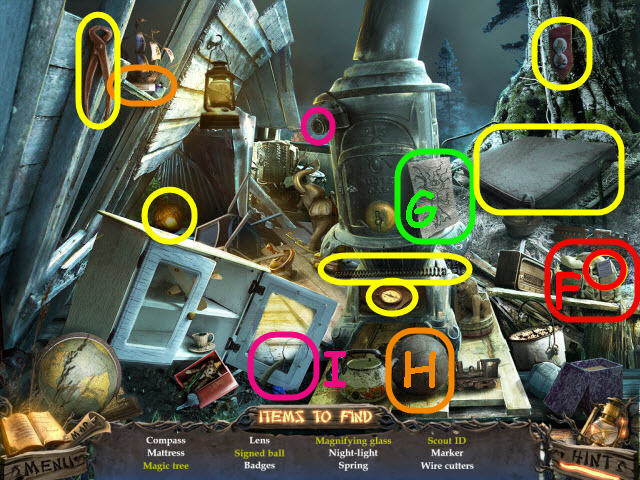
- Find the items listed.
- Open the backpack to get a scout ID (F).
- Un-crumple the paper to get a magic tree (G).
- Use the marker on the ball to get a signed ball (H).
- Place the lens in the holder to get a magnifying glass (I).
- You will earn WIRE CUTTERS.
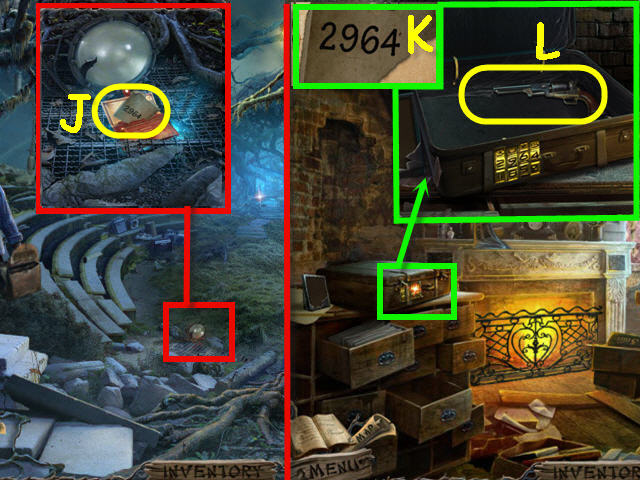
- Examine the grate; use the WIRE CUTTERS on the bars three times and take the code (J).
- Go to the director’s office.
- Examine the suitcase; use the code (2964) from the grate (K) on the lock (K).
- Open the case and take the REVOLVER (L).
- Back out and go left into the nurse’s office.
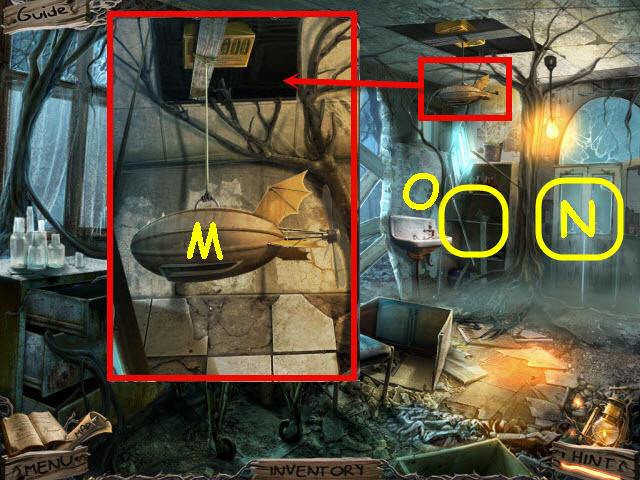
- Examine the hole in the ceiling; hang the TOY PROPELLER on the blimp and select the blimp (M) to get the BULLETS.
- The BULLETS and the REVOLVER will automatically combine to create a LOADED REVOLVER.
- Examine the door and use the LOADED REVOLVER on it (N).
- Examine the shelves to access a HOS (O).
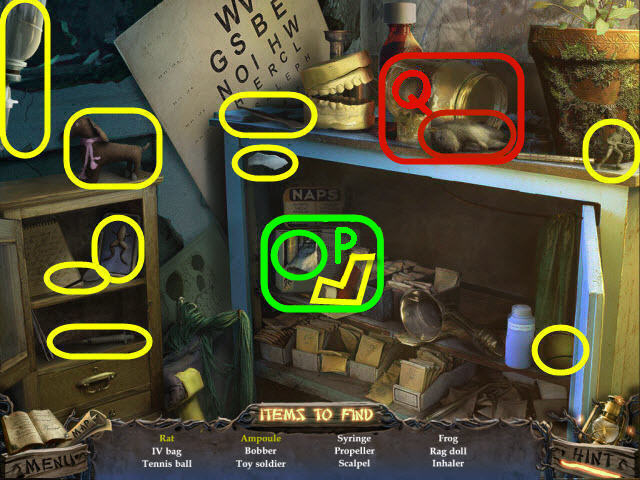
- Find the items listed.
- Open the box to get an ampoule (P).
- Knock over the jar to get a rat (Q).
- You will earn a GLASS SHARD.
- Go through the newly-opened door to the infirmary.
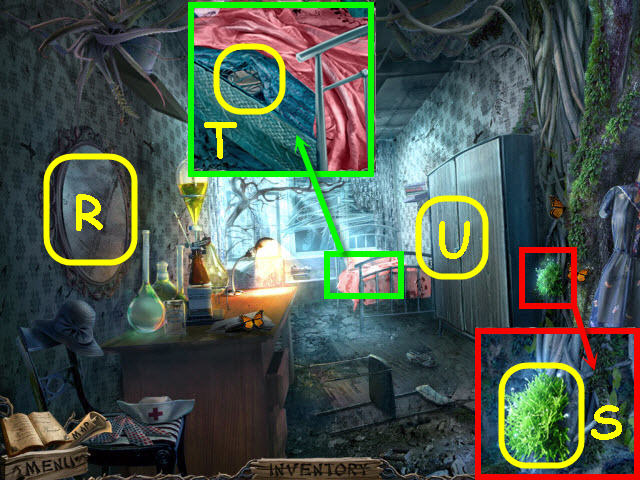
- Select the mirror (R).
- Examine the moss; use the GLASS SHARD to get the MOSS (S).
- Examine the bed; take the notes, move the sheets and take the MORTAR (T).
- Open the cabinet (U).
- Examine the opened cabinet; place BUTTON 3 in the slots to trigger a puzzle.
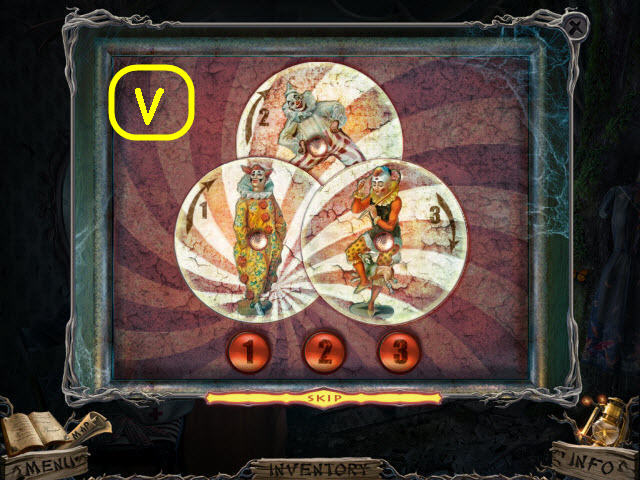
- Rotate the disks to complete the pattern.
- To solve the puzzle, push Button 1 – 11x; see screenshot (V).
- Take the RED NOSE and the PESTLE.
- The PESTLE will automatically combine with the MORTAR to create a MORTAR WITH PESTLE.
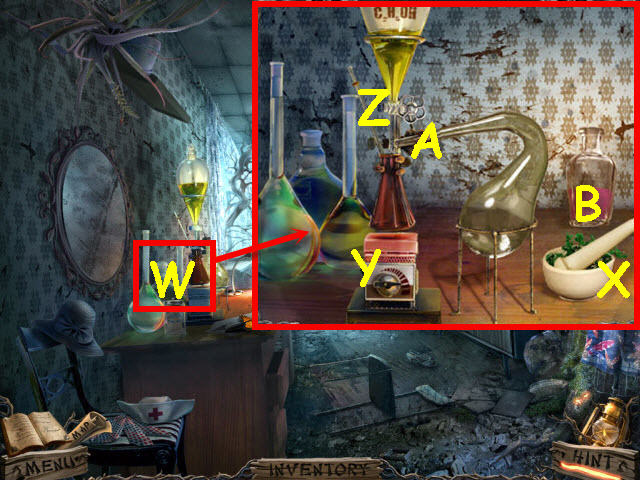
- Examine the top of the dresser; place the MORTAR WITH PESTLE by the lab equipment (W) and then place the MOSS in the MORTAR AND PESTLE.
- Use the pestle to grind the moss and then take the ground moss (X).
- Turn the dial (Y) and rotate the valve (Z). Select the beaker after the fluid gets in it (A) and take the TREE-FIGHTING ELIXIR (B).
- Back out.
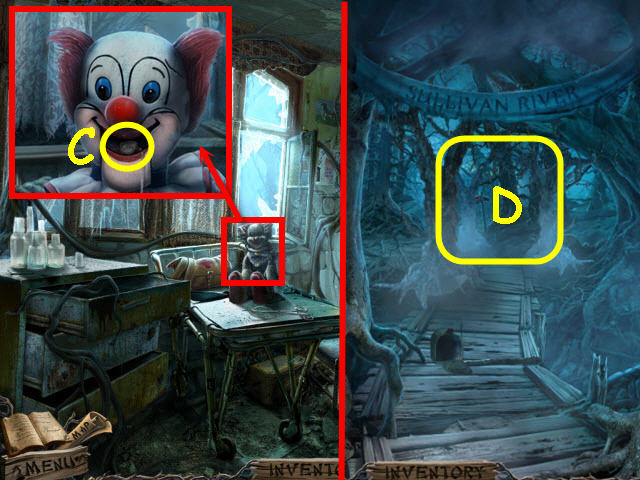
- Examine the clown and place the RED NOSE on the face; take the SILVER PENDANT (C).
- Go to the forest boardwalk.
- Use the TREE-FIGHTING ELIXIR on the trees (D).
- Go forward to the tree houses.
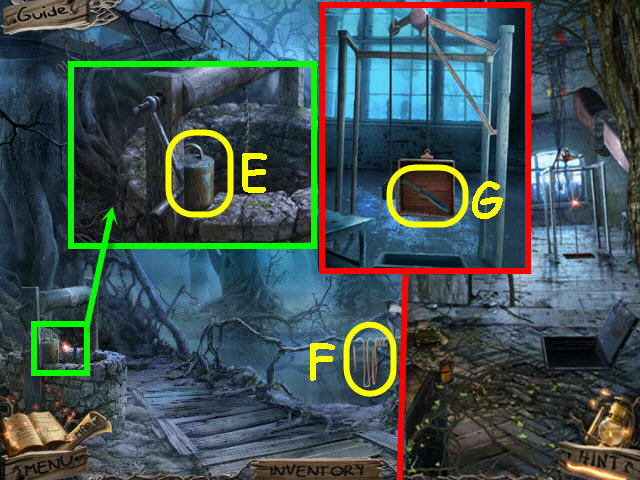
- Examine the well; take the WEIGHT (E).
- Take the ROPE (F).
- Go into the mess hall.
- Examine the pulley and place the weight on the hook; take the MACHETE (G).
- Back out.
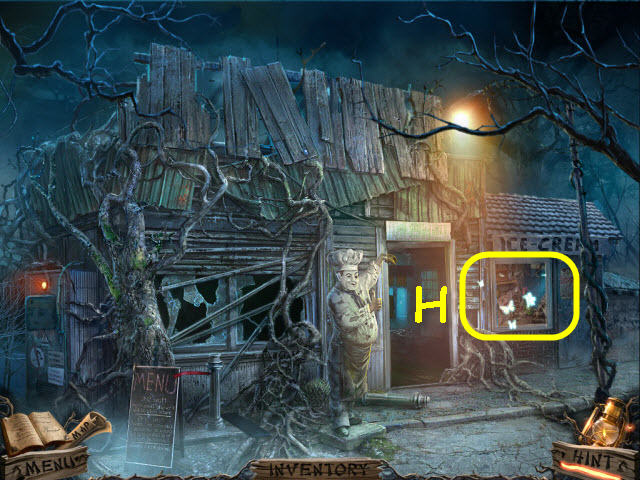
- Examine the window (H).
- You will access a HOS.
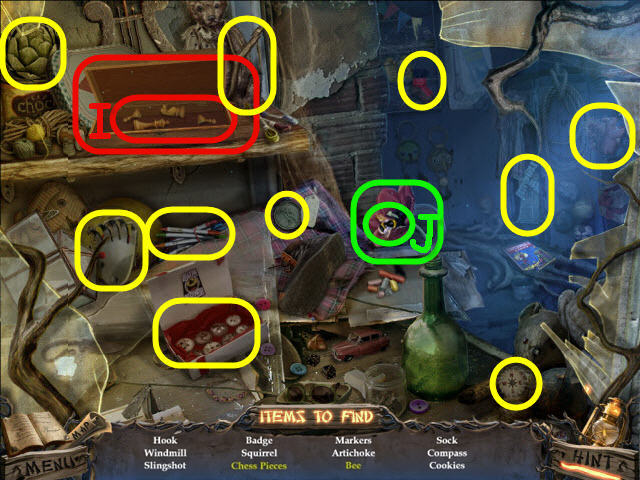
- Find the items listed.
- Open the chess case to get the chess pieces (I).
- Open the tulip to get a bee (J).
- You will earn a HOOK.
- The HOOK will automatically combine with the ROPE to create a CLIMBING TOOL.
- Go to the tree houses.
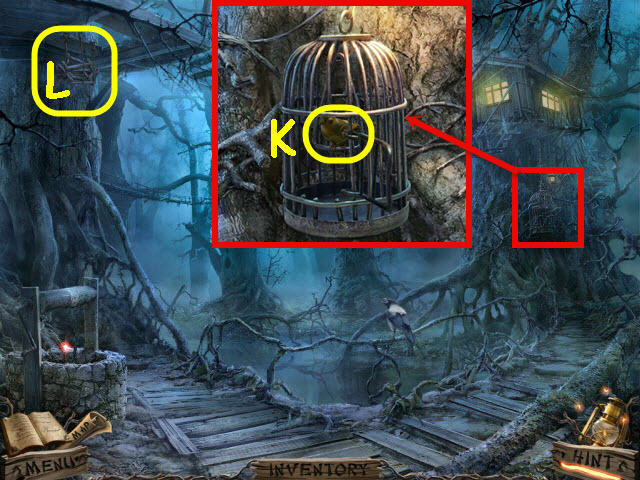
- Examine the cage and use the MACHETE on the lock. Open the cage door; take the MECHANICAL BIRD (K).
- Use the CLIMBING TOOL on the ladder (L).
- Go up to the treehouse.
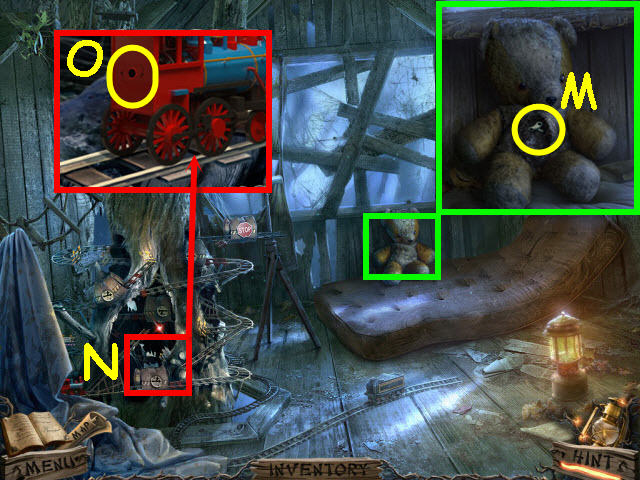
- Examine the teddy bear; select the stitching three times and take the WIND-UP KEY (M).
- Move the cloth and examine the train (N).
- Place the WIND-UP KEY on the train to trigger a puzzle (O).
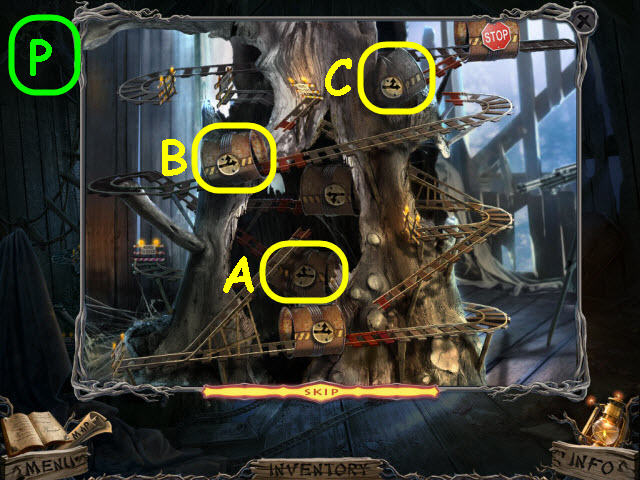
- Arrange the tracks so that the train goes through the upper right tunnel.
- To solve the puzzle, move the following tracks: Raise A, lower B, raise C after the train goes through (P).
- You will earn a NUT.
- Back out.
- Examine the well; place the NUT on the handle, crank it and take the LENS (Q).
- Go up to the tree house.
- Examine the telescope and place the LENS on it; select the LENS (R).
- Examine the hole in the tree; take the HORSESHOE (S), and DRYAD SPROUT (T).
- Go to the firepit and then right to the stables.
- Examine the gate and place the horseshoe in the slot; select the HORSESHOE to open the gate (U).
Chapter 3 – Stables
- Examine the cart; take the HALF OF SHEARS 1/2 (V).
- Go forward into the stables.
- Examine the BROKEN JACK (W) and take it.
- Back out and go right to the horse trail.
- Examine the hobbyhorse; take the PLIERS (X).
- Use the PLIERS on the keys (Y).
- Go forward to the apple orchard.
- Select the path to trigger a cutscene (Z).
- Examine the tree; take the 2nd PART OF SCISSORS (A).
- The 2 PARTS OF SCISSORS will automatically combine to create the DULL SHEARS.
- Back out twice and go into the stables.
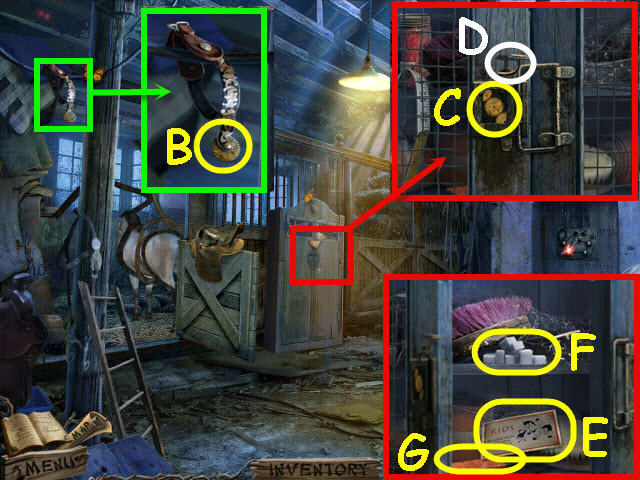
- Examine the spur; use the PLIERS on the wheel to get a GEAR (B).
- Examine the cabinet and place the GEAR on the lock (C); turn the handle (D), and select the door to open.
- Take the note (E), the SUGAR CUBES (F), and the MAGNET (G).
- Go to the apple orchard.
- Examine the downspout and select it; use the MAGNET in the spout and take the CRANK (H).
- The BROKEN JACK and the CRANK will automatically combine to create a JACK.
- Go to the stable gate.
- Examine the cart and use the JACK on it; take the RED LEVER (I).
- Enter the stables.
- Examine the door and place the RED LEVER on it to trigger a puzzle (J).
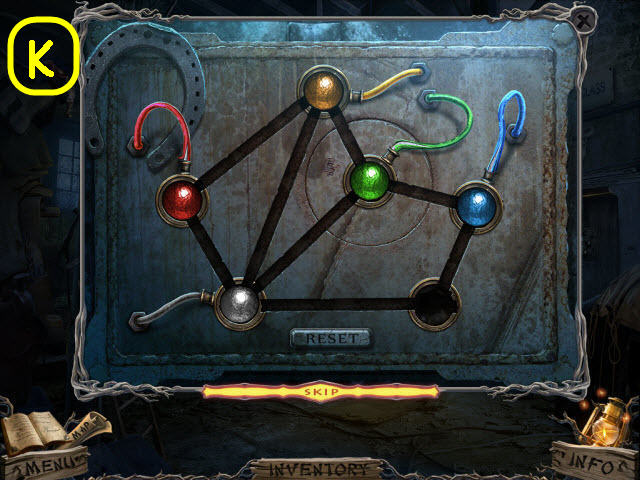
- Move the colored circles to the matching colored wires.
- To solve the puzzle, select the following balls: yellow, green, red, yellow, green, and white (K).
- Go through the newly-opened door to the blacksmith class.
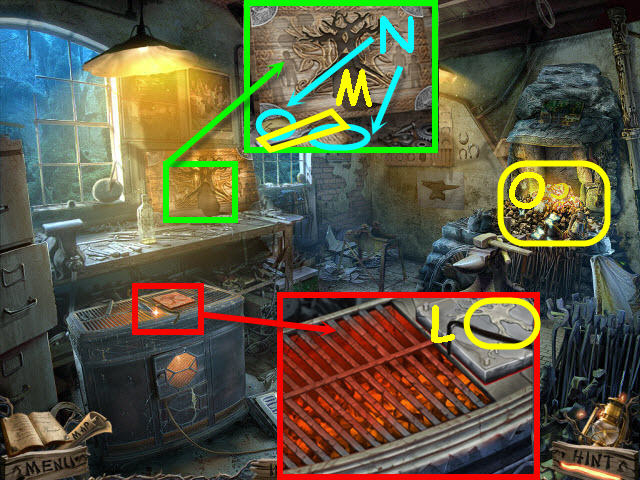
- Examine the furnace; place the SILVER PENDANT on the plate and select the crowbar. Take the SILVER TREE (L).
- Examine the workbench; take the CHISEL (M), and the 2 notes (N).
- Examine the fireplace to access a HOS (O).
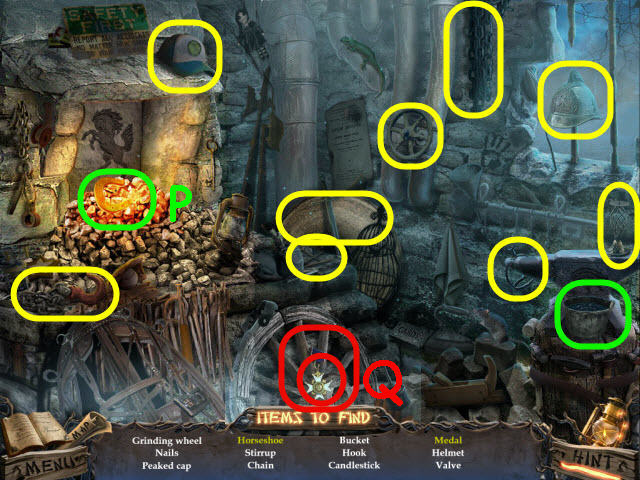
- Find the items listed.
- Use the bucket in the furnace to get the horseshoe (P).
- Move the gloves to get the medal (Q).
- You will earn a GRINDING WHEEL.
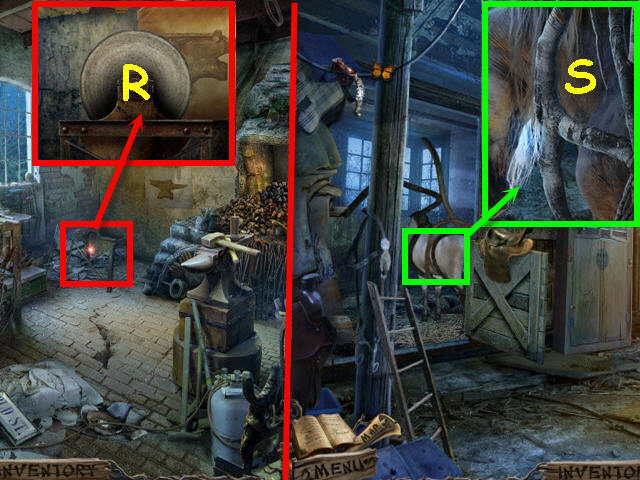
- Examine the grinder and place the GRINDING WHEEL on it (R).
- Turn the wheel and use the DULL SHEARS on it to get the SHEARS.
- Back out.
- Examine the horse; use the SHEARS three times on the branches (S).
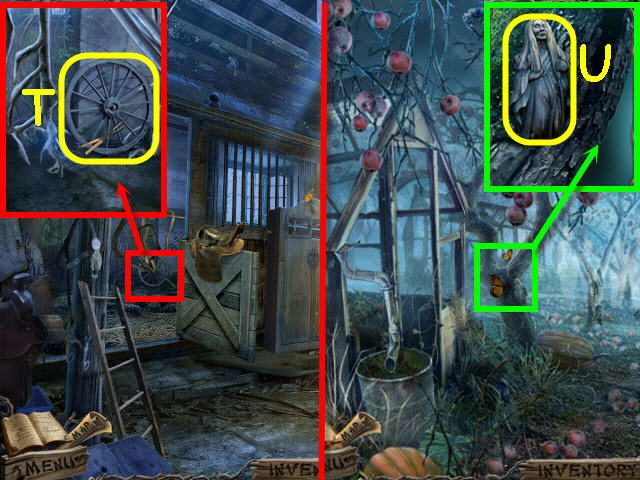
- Examine the empty stall; take the WHEEL (T).
- Go to the apple orchard.
- Examine the tree; use the CHISEL to get the WOODEN FIGURE (U).
- Go to the blacksmith class.
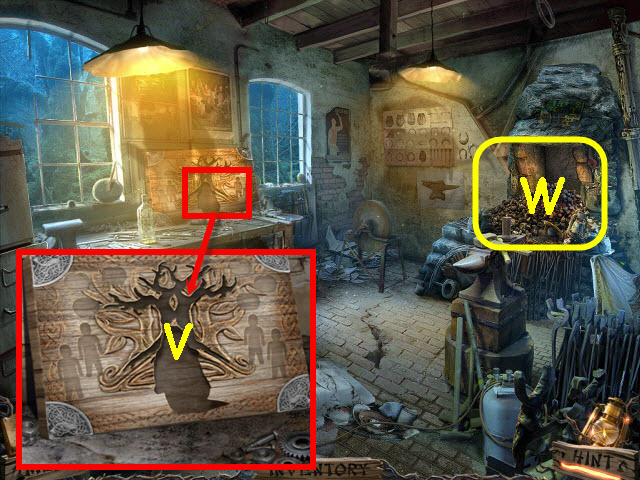
- Examine the workbench; place the WOODEN FIGURE and SILVER TREE on the picture (V).
- You will get a PICTURE after the apparition.
- Examine the fireplace to access a HOS (W).
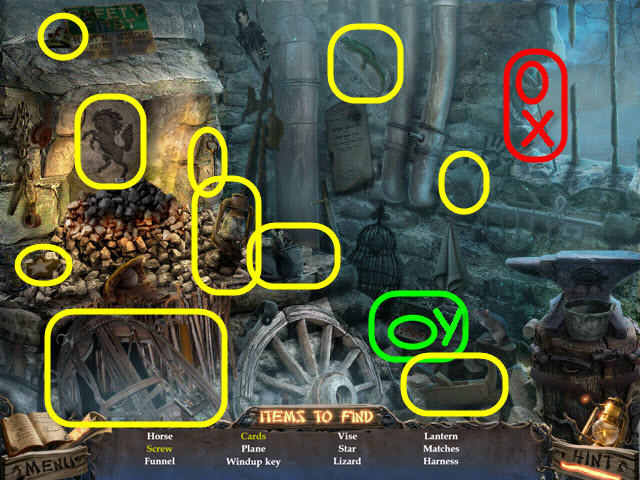
- Find the items listed.
- Open the bud to get a screw (X).
- Open the card case to get cards (Y).
- You will earn a HARNESS.
- Go to the stable gate.
- Examine the cart and place the WHEEL on it (Z).
- Give the SUGAR CUBES to the horse (A).
- Place the HARNESS on the horse (B); select the horse to get him to take off.
Chapter 4 – The Stage
- Examine the trumpet; take the BOARDS (C) and use the PLIERS to get the MOUTHPIECE (D).
- Go right to the archery range.
- Examine the pots; use the PASTA LADLE and DRYAD SPROUT in the pot (E).
- Take the TILE (F), the note (G), and the POWDER (H).
- Back out and go forward on the left to the dormitories.
- Examine and place the BOARDS on the tree (I).
- Examine the shutter and open it; take the RAKE (J).
- Back out twice to the horse trail.
- Examine the hobbyhorse; use the RAKE on the grass and take the TEDDY KEY (K).
- Go to the dormitories.
- Examine the window; use the TEDDY KEY on the lock (L).
- Enter through the window to the kid’s house.
- Examine the shelves; take the ICE PICK (M) and the ROCKET (N).
- The ROCKET and the POWDER will automatically combine to create a BOTTLE ROCKET.
- Examine the clock; take the MATCHES (O) and the note (P).
- Go towards the boy to trigger a cutscene (Q).
- Examine the bed frames; place the BOTTLE ROCKET in the bottle and use the MATCHES on the BOTTLE ROCKET (R).
- Go forward to Derrick’s bunk.
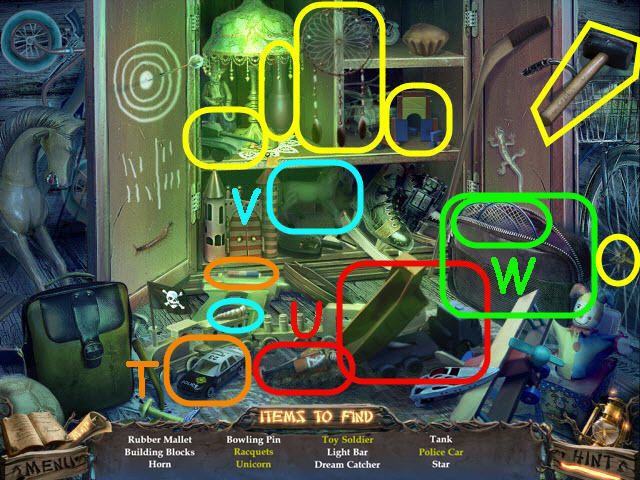
- Open and examine the cabinet to access a HOS (S).
- Find the items listed.
- Put the light bar on the car to get a police car (T).
- Dump the truck to get a toy soldier (U).
- Place the horn on the horse to get a unicorn (V).
- Open the case to get racquets (W).
- You will earn a RUBBER MALLET.

- Examine the pillow; take the RUBBER BAND (X).
- Move the pillow; open the book (Y) and take the note.
- Examine the table; take the 2nd TILE (Z).
- Back out and go left into the shower room.
- Examine the tiles and use the RUBBER MALLET and ICE PICK on them (A).
- Open the compartment; take the 3rd TILE (B) and turn the valve (C) to shut off the water.
- Examine the shower stall and place the 3 TILES on the board to trigger a puzzle (D).
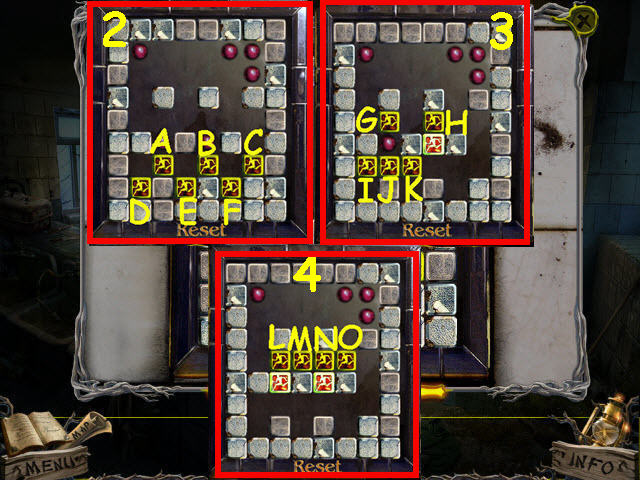
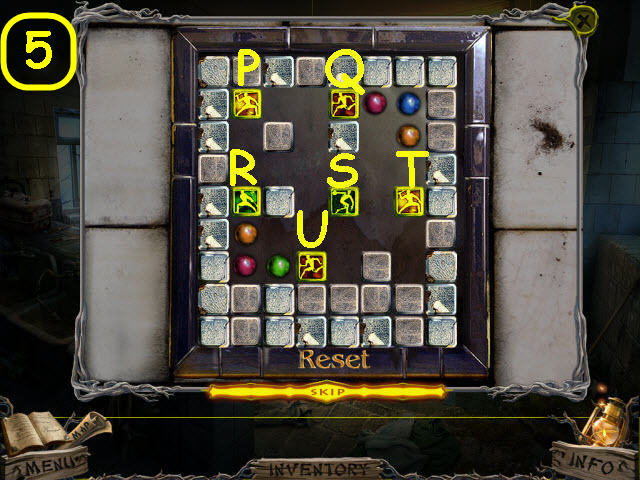
- Move the tiles to their matching colored circles.
- To solve the first puzzle, move all four tiles straight down (1).
- To solve the second puzzle; move the following tiles: A – up, B – up, D – up, E – up, left, F – up, left, C – left, and up (2). J – up, H – left, K – right, up, left, I – right, up, and left (3). M – up, right, N – left, up, right, O – up, right, L – left, and up (4).
- To solve the third puzzle; move the following tiles: S – up, right, up, P – down, right, up, R – down, right, U – up, left, down, Q – right, T – left, up, left, and down (5).
- Take the SQUIRT GUN.
- Back out.
- Examine the shelves; use the SQUIRT GUN to get the SLINGSHOT (E).
- The SLINGSHOT and the RUBBER BAND will automatically combine to create a SLINGSHOT.
- Go left to the shower room.
- Examine the lights; use the SLINGSHOT to get the BLUE SOLDIER (F).
- Back out and go forward to Derrick’s bunk.
- Examine the shelves to access a HOS (G).
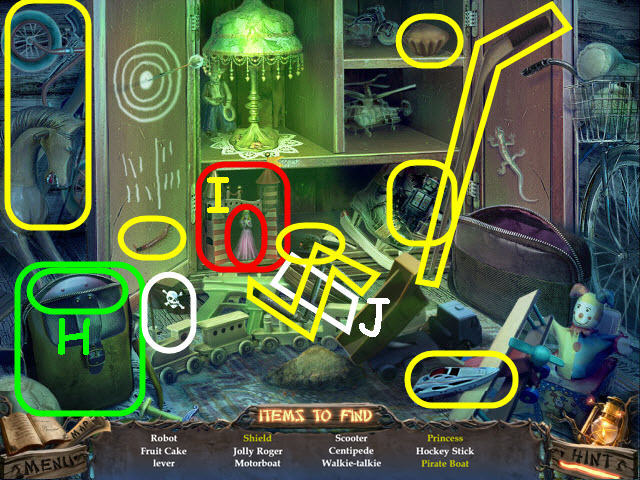
- Find the items listed.
- Open the suitcase to get the shield (H).
- Open the castle doors to get the princess (I).
- Place the Jolly Roger on the boat to get a pirate boat (J).
- You will earn a CRANK.
- Go to the stage.
- Examine the pole and place the CRANK on the winch; take the RED SOLDIER (K).
- Go back to Derrick’s bunk.
- Examine the table and place the BLUE SOLDIER and RED SOLDIER in the slots; take the APPLE 1/6 (L), and the BOW AND ARROW (M).
- Go to the archery range.
- Examine the gate and take the note (N).
- Examine the targets and use the BOW AND ARROW on them to trigger a puzzle (O).
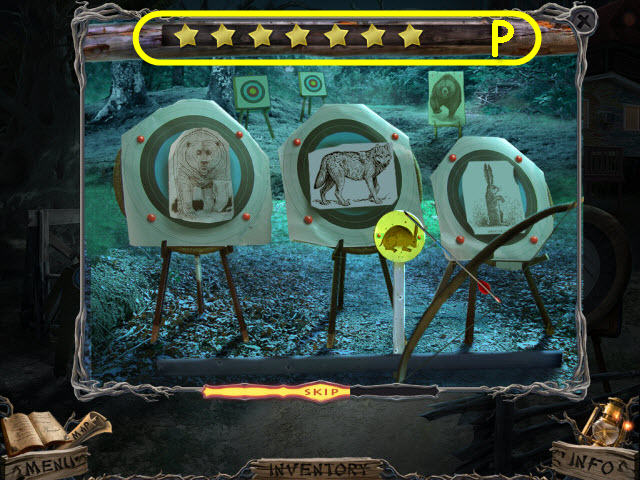
- Shoot the targets as they appear or flash until you fill the row with stars (P).
- You will earn a CLOCK WINDER.
- Go to the dormitories and up to the kid’s bunks.
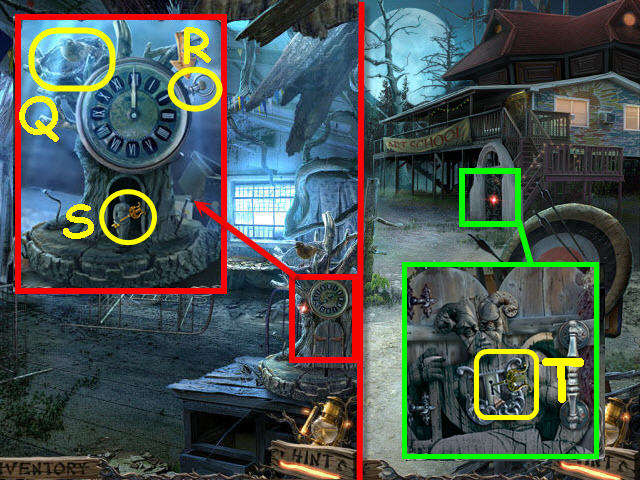
- Examine the clock and place the MECHANICAL BIRD in the nest (Q).
- Place the CLOCK WINDER in the hole (R).
- Set the clock to noon based on the art class note.
- Take the KEY (S).
- Go to the archery range.
- Examine the gate; place the KEY in the lock (T).
- Enter through the newly-opened gate to the art house.
Chapter 5 – Classrooms
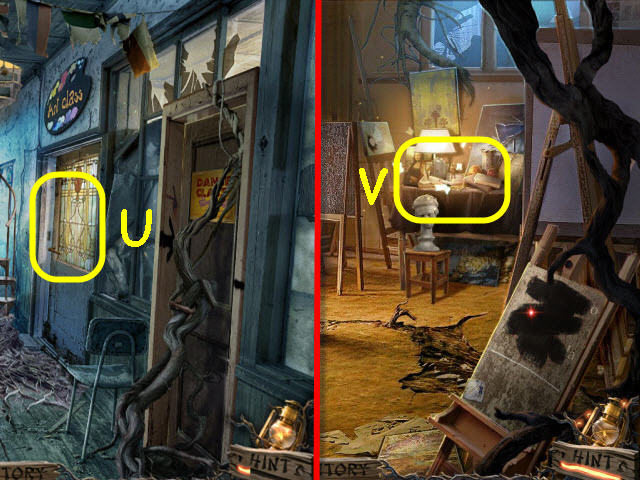
- Open the art classroom door and enter (U).
- Examine the table to access a HOS (V).
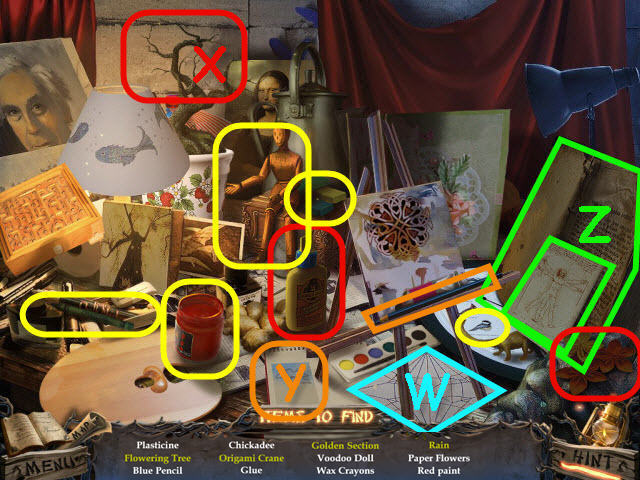
- Find the items listed.
- Fold the paper to get an origami crane (W).
- Use the glue on the tree and then place the paper flowers on it to get a flowering tree (X).
- Use the pencil to draw by the clouds to get rain (Y).
- Open the box to get a golden section (Z).
- You will earn RED PAINT.
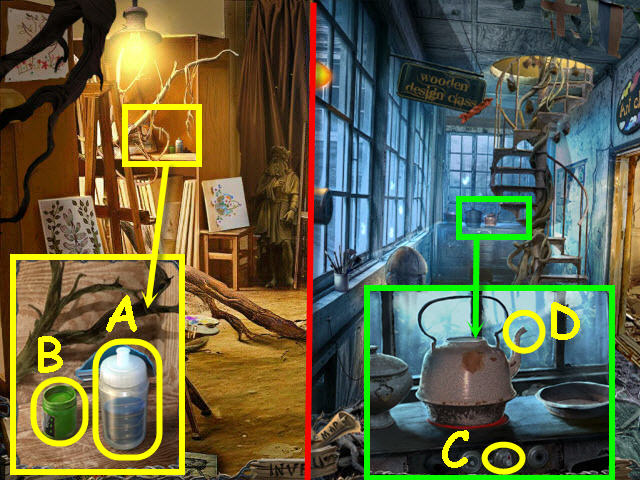
- Examine the shelf; take the WATER (A) and GREEN PAINT (B).
- Back out.
- Examine the stove and place the WATER in the kettle; turn on the burner (C), and place the MOUTHPIECE on the spout (D).
- Go up the winding stairs to the woodworking class.
- Turn on the lamps (E).
- Examine the chair; take the YELLOW PAINT (F).
- Examine the workbench; take the DRILL PART (G) and the APPLE 2/6 (H).
- Examine the board; take the note (I).
- Back out and go right to the art classroom.
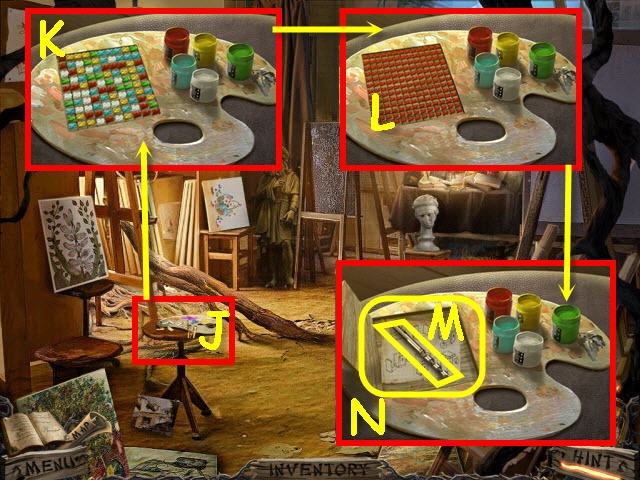
- Examine the table (J).
- Place the GREEN PAINT, RED PAINT, and YELLOW PAINT on the palette to trigger a puzzle (K).
- The layout of colors is random.
- The colors start in the upper left corner. Choose a paint jar of a connecting color to change them all to that color. Continue until all tiles are one color (L).
- You will need to do two boards.
- Take the DRILL BIT (M) and the BLUEPRINT (N).
- The DRILL BIT and the DRILL PART will automatically combine to create a DRILL.
- Back out and go up to the woodworking class.
- Examine the workbench (O).
- Place the BLUEPRINT by the wood to trigger a puzzle.
- Assemble the nesting box.
- To solve the puzzle, select the pieces in the order numbered on the screenshot (P).
- Take the NESTING BOX.
- Go to the stage.
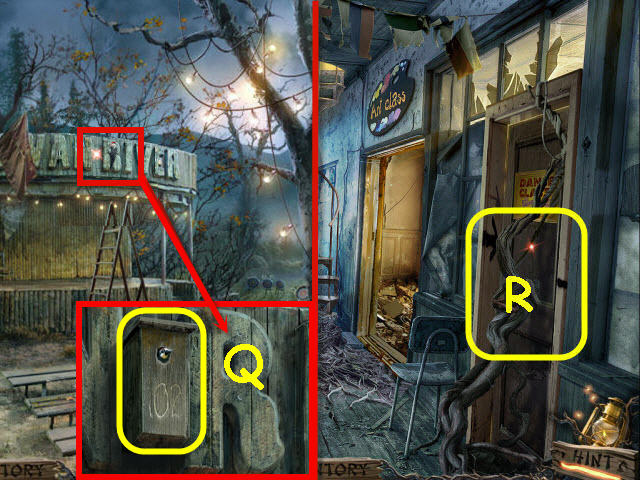
- Examine the sign above the ladder and place the NESTING BOX on the nail; take the WOODPECKER (Q).
- Go to the art house.
- Examine the door and use the WOODPECKER on the branch (R).
- Go right into the dance class.
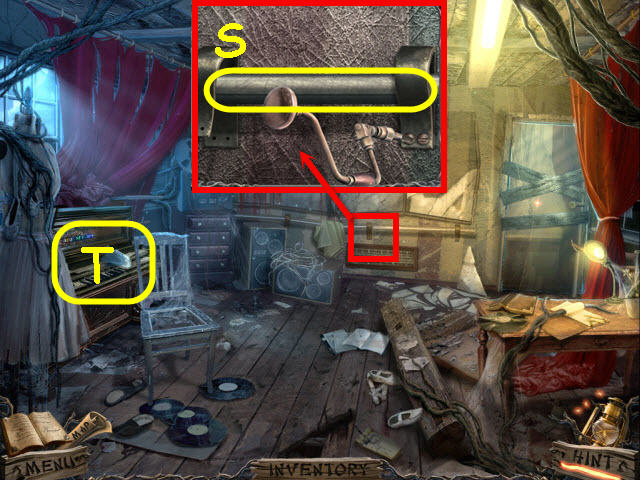
- Examine the railing and use the DRILL on each of the four screws; take the HANDRAIL (S).
- Examine the piano to trigger a puzzle (T).
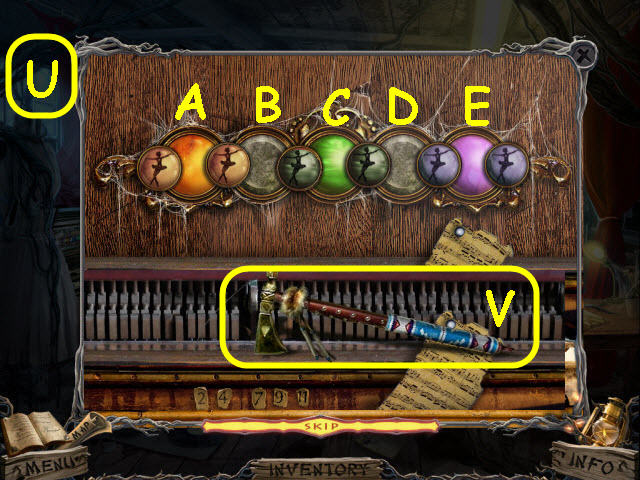
- Arrange the ballerinas to their matching colored centers.
- To solve the puzzle, select the following buttons: A, C, B, A, D, E, C, D, C, and B (U).
- Take the TOMAHAWK (V).
- Examine the door and use the TOMAHAWK on the boards (W).
- Enter through the newly-opened door to the orchestra class.
- Examine the stained glass to trigger a puzzle (X).
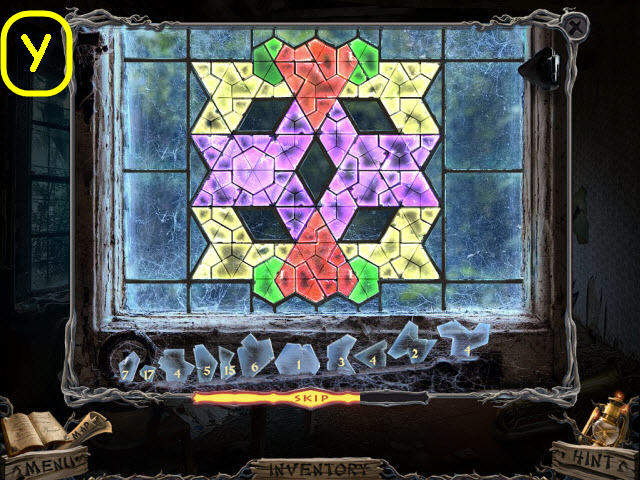
- Assemble the stained glass.
- Find and place the piece that matches the pattern in the area that is flashing until all pieces are placed. The number on the pieces represent how many of those remain to be placed.
- See screenshot for solution (Y).
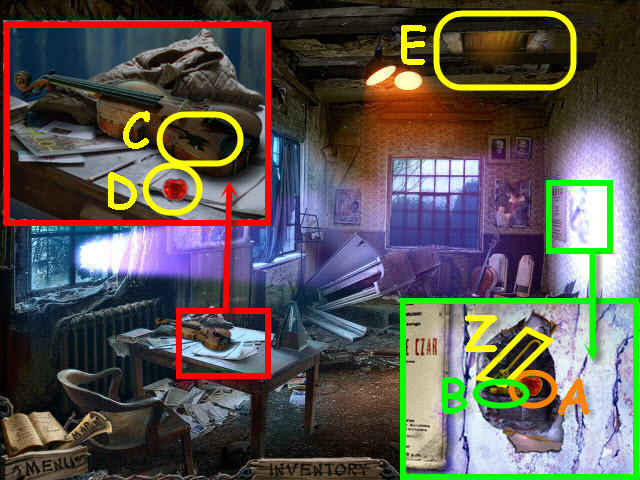
- Examine the wall and use the RUBBER MALLET on the hole; take the HOOK (Z), the APPLE 3/6 (A), and the book (B).
- Examine the table and use the HOOK on the hole in the violin (C); get a HEART KEY.
- Take the APPLE 4/6 (D).
- Examine the hatch and use the HANDRAIL to open it (E).
- Go up the opened hatch to access a HOS.
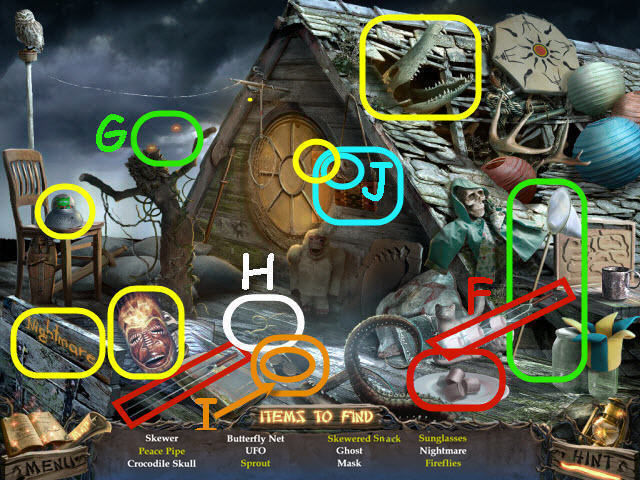
- Find the items listed.
- Use the skewer on the marshmallows to get the skewered snack (F).
- Use the butterfly net to get the fireflies (G).
- Select the sprout twice to get a sprout (H).
- Open the case to get sunglasses (I).
- Open the purse to get a peace pipe (J).
- You will earn a MASK.
- Back out twice and go right into the art classroom.
- Examine the shelf and use the HOOK to get the PIANO BRACE (K).
- Examine the table to access a HOS (L).
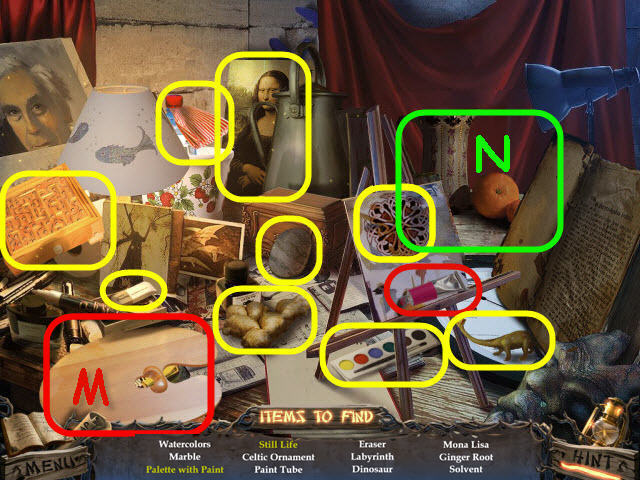
- Find the items listed.
- Use the paint tube on the palette to get a palette with paint (M).
- Move the picture to get the still life (N).
- You will earn a SOLVENT.
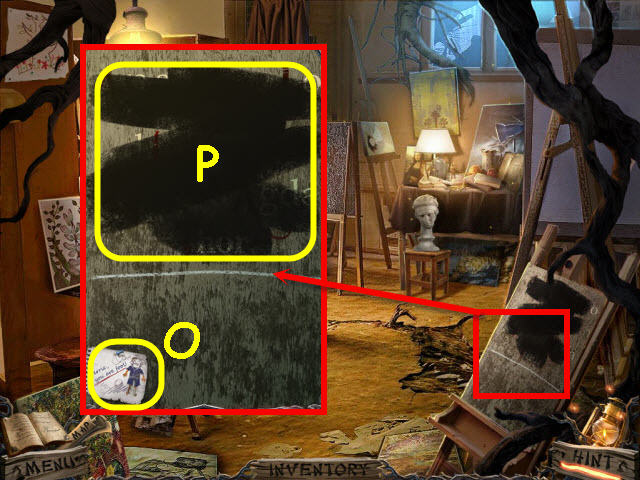
- Examine the easel; take the note (O).
- Use the SOLVENT on the black paint three times to trigger a puzzle (P).
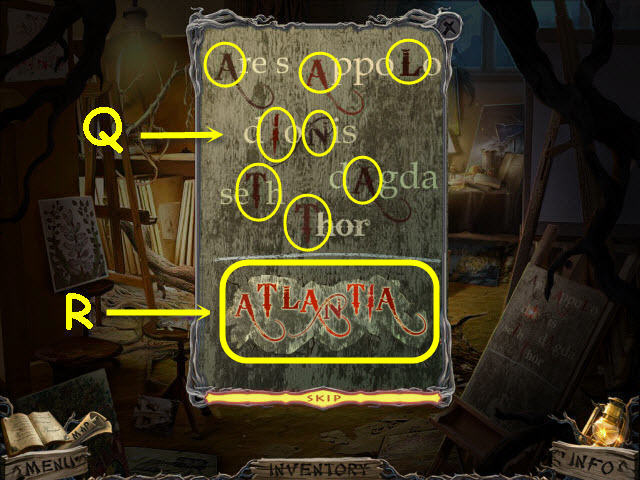
- Discover the secret name.
- To solve the puzzle, you must first select the accented letters (Q).
- Arrange the letters to spell the secret name: ATLANTIA.
- Take the DRYAD NAME (R).
- Back out and go up to woodworking class.
- Examine the chair and use the HEART KEY on the box lock; take the note (S) and the BRACELET (T).
- Examine the compartment door; place the MASK on the door to trigger a puzzle (U).
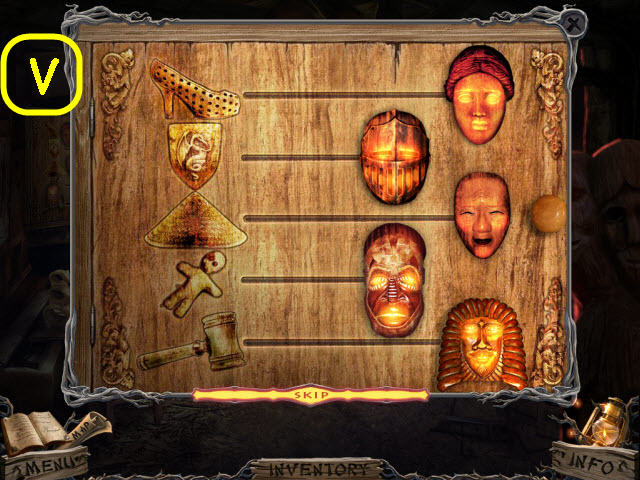
- Place the masks in the line with their corresponding items.
- See screenshot for solution (V).
- Take the TOOLS.
- Back out; go right into the dance class and then into the orchestra class.

- Examine the piano and place the PIANO BRACE on the lid; take the PIANO STRING (W), the APPLE 5/6 (X), and the RAZOR BLADE (Y).
- The RAZOR BLADE and the BRACELET will automatically combine to create FIGURINE 4/4.
- Go up the hatch to access a HOS (Z).
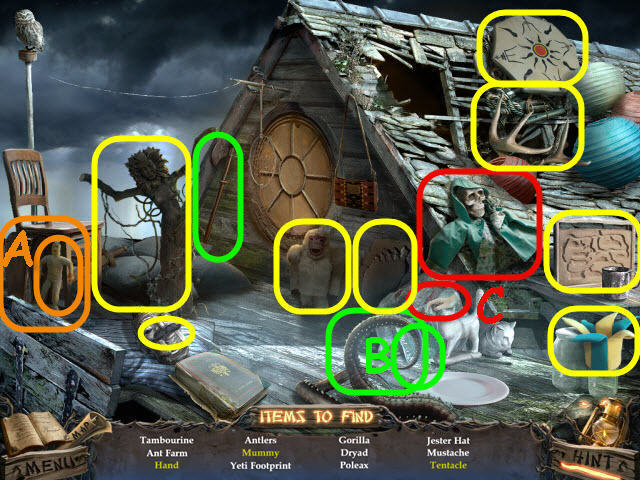
- Find the items listed.
- Open the coffin to get a mummy (A).
- Use the poleax to get the tentacle (B).
- Select the raincoat to get the hand (C).
- You will earn an ANT FARM.
- Back out.
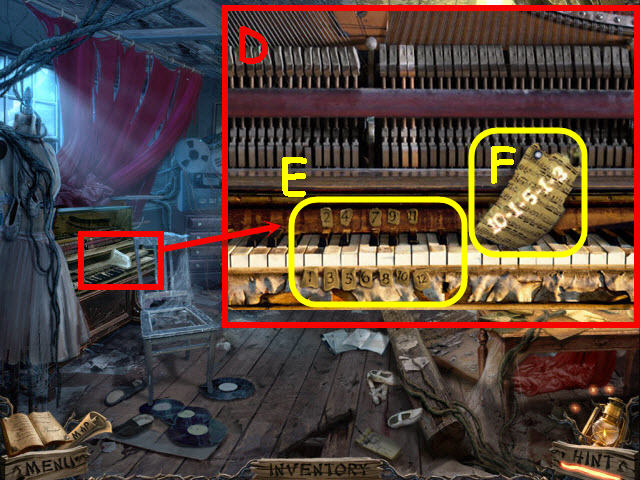
- Examine the piano and place the PIANO STRING on it (D).
- Press the piano keys (E) corresponding to the numbers on the note: 10-1-5-1-3 (F).
- Examine the branch and use the ANT FARM on the termites to get TERMITES (G).
- Take the APPLE 6/6 (H).
- Back out and go up to the woodworking class.
- Examine the easel and place the PICTURE on it (I).
- Use the TOOLS, all 6 APPLES, each of the 4 FIGURINES, and the DRYAD NAME on the picture (J).
- Examine the picture; take the HEART (K).
- Go to the apple orchard.
- Examine the ghost children (L); give them the HEART.
- Go forward to the bridge to the mill.
Chapter 6 – The Tower
- Examine the control panel and use the SOLVENT on it (M).
- Open the control panel door and turn the winch (N).
- Examine the branches; take the BROKEN PUMP (O).
- Use the TERMITES on the branches (P).
- Examine under the bridge to access a HOS (Q).
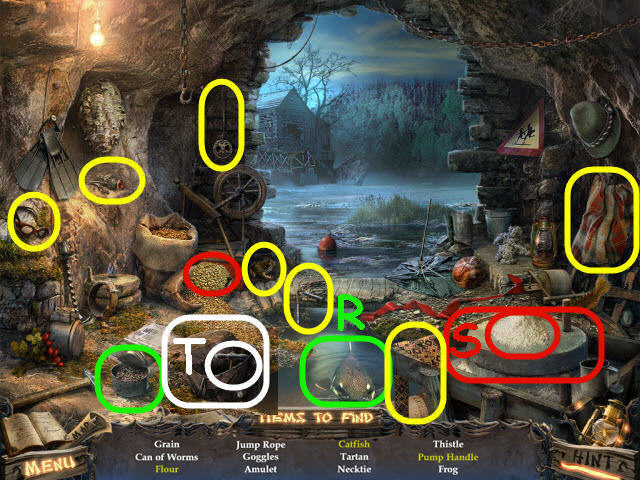
- Find the items listed.
- Use the can of worms on the water to get a catfish (R).
- Place the grain on the mill to get flour (S).
- Open the bag to get a pump handle (T).
- You will earn a HANDLE.
- The BROKEN PUMP and the HANDLE will automatically combine to create an AIR PUMP.
- Use the AIR PUMP on the boat (U).
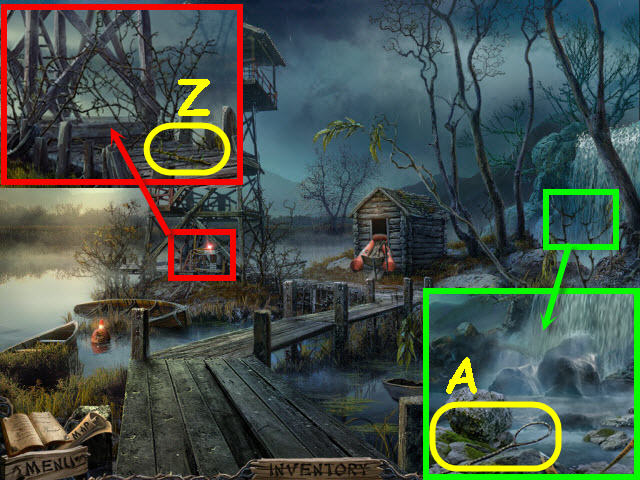
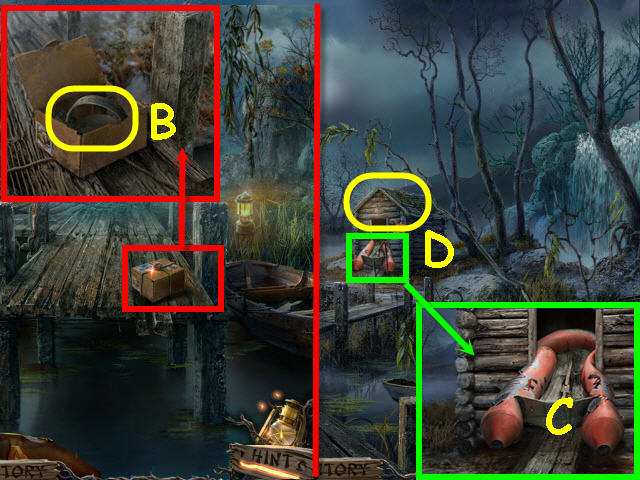
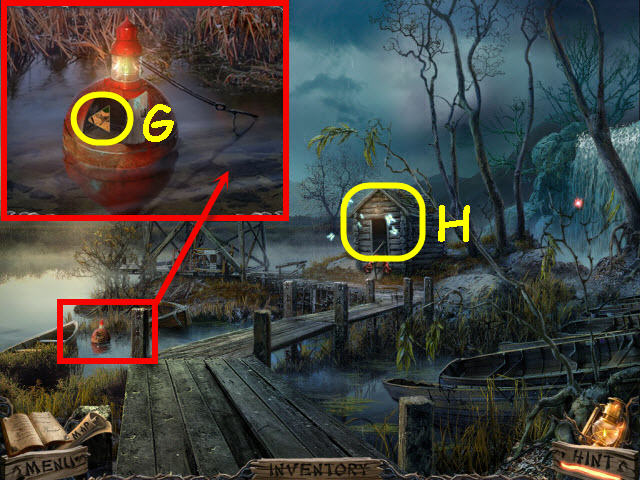
- Go to the dock (V).
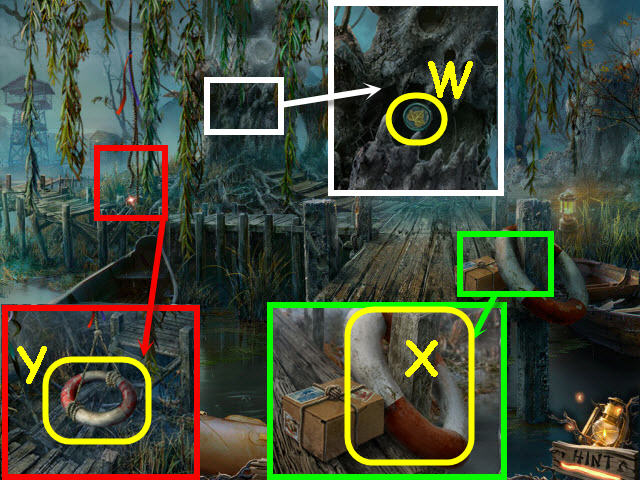
- Examine the tree and open the trunk; take the LEAF BUTTON 1/2 (W).
- Examine the pier; take the LIFE BUOY (X).
- Examine the rope and tie the LIFE BUOY on it; select the LIFE BUOY (Y) to get across.
- Examine the tower; take the THORN (Z).
- Examine the waterfall; take the NET PART (A).
- Back out to the dock.
- Examine the package and use the THORN to open it; take the ANIMAL TRAP (B).
- Go to the watch tower via the upper left.
- Examine the boat and use the ANIMAL TRAP on it (C).
- Select the shed to access a HOS (D).
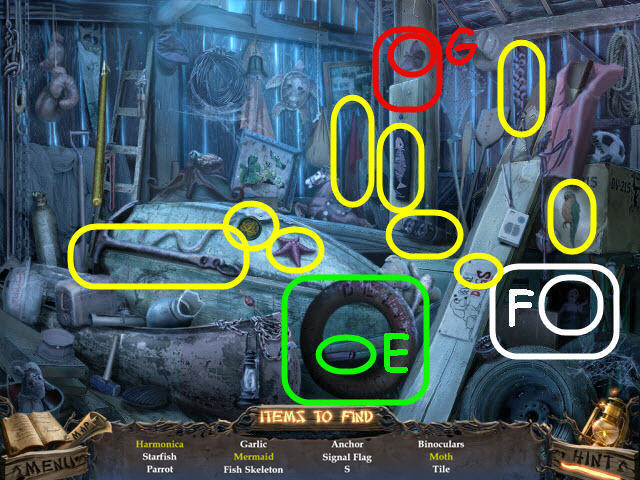
- Find the items listed.
- Move the life buoy to get the harmonica (E).
- Move the panel to get the mermaid (F).
- Remove the paper to get the moth (G).
- You will earn a LEAF BUTTON 2/2.
- Back out.
- Examine the end of the wharf (H).
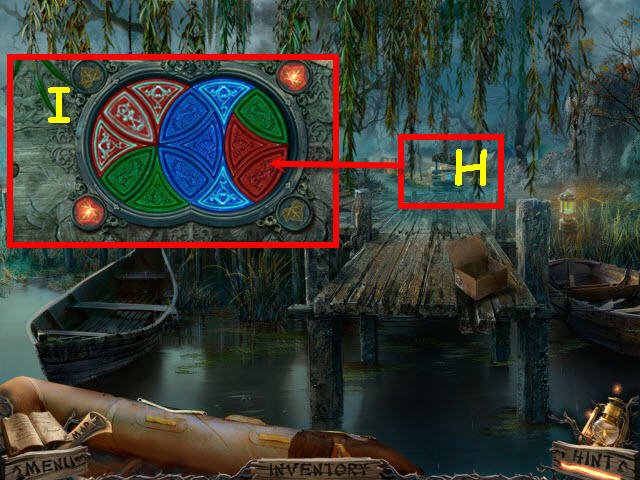
- Place the 2 LEAF BUTTONS on the gate to trigger a puzzle (I).
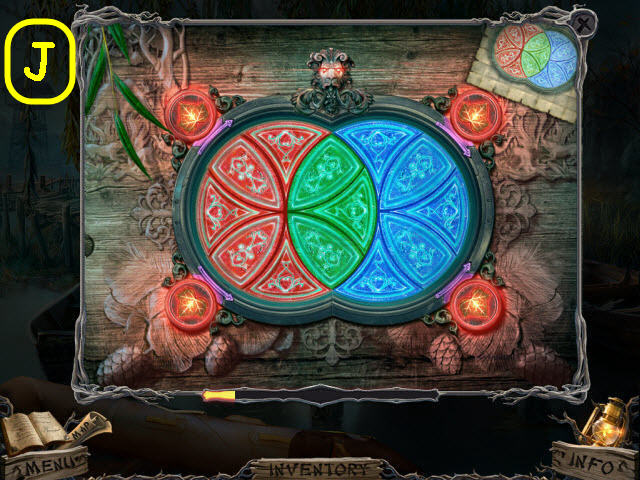
- Rotate the disks to duplicate the pattern in the upper right.
- The starting layout is random.
- See screenshot for solution (J).
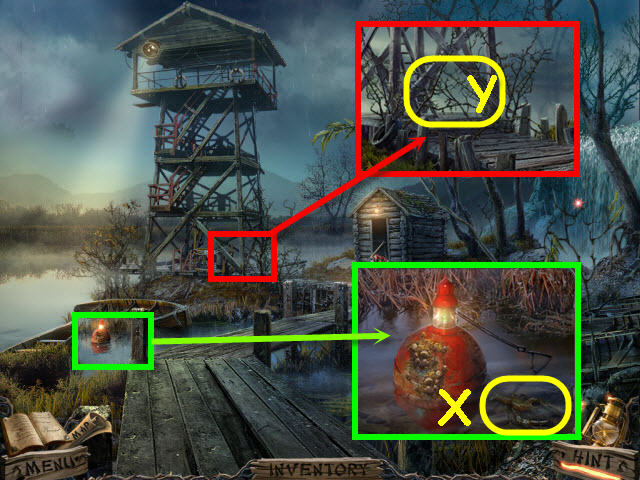
- Go forward to the campground.

- Examine the left tent; take the SMOKE BOMB (K), and the note (L).
- Examine the campfire and open the backpack; take the note (M), the LEVER (N), and the TRIGGER RING (O).
- Back out twice.
- Examine the life jacket and place the TRIGGER RING on it (P).
- Pull the TRIGGER RING and take the BUOY KEY (Q).
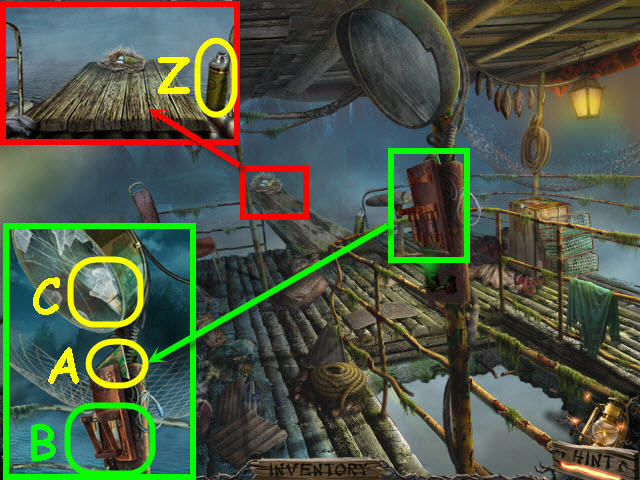
- Examine under the bridge to access a HOS (R).
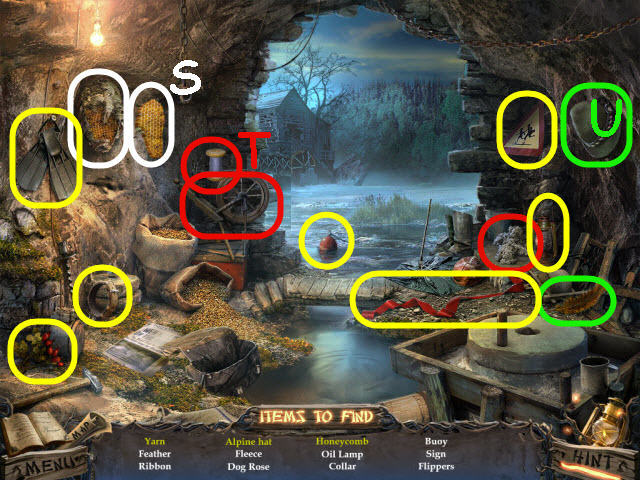
- Find the items listed.
- Open the hive to get a honeycomb (S).
- Use the fleece on the spinning wheel to get yarn (T).
- Place the feather on the hat to get an alpine hat (U).
- You will earn a LANTERN.
- Go to the campground.
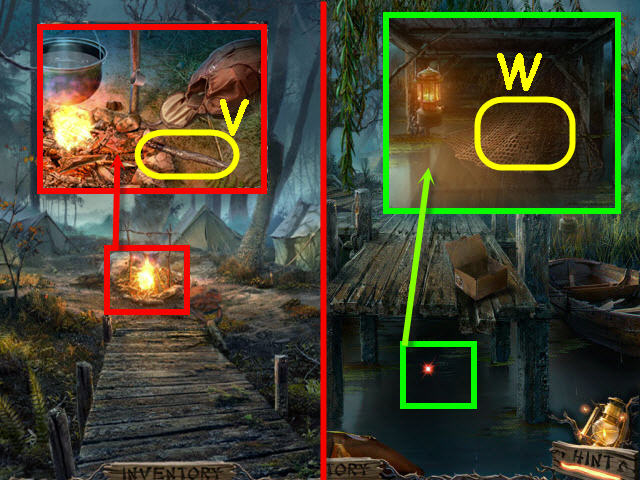
- Examine the campfire; use the LANTERN on the hot stick (V) to get a LIT LANTERN.
- Back out.
- Examine the area under the pier and hang the LIT LANTERN under it; take the NETTING (W).
- The NET PART and the NETTING will automatically combine to create a NET.
- Go left to the watch tower.
- Examine the buoy; use the NET to get the LOBSTER (X).
- Examine the tower; use the LOBSTER on the thorns (Y).
- Go forward to the viewing platform.
- Examine the planks and take the INSULATED FLASK (Z).
- Examine the spotlight controls; take the PICTURE PART 1/3 (A).
- Place the LEVER on the center brackets and pull down (B); take the BROKEN LIGHT BULB (C).
- Go to campground.
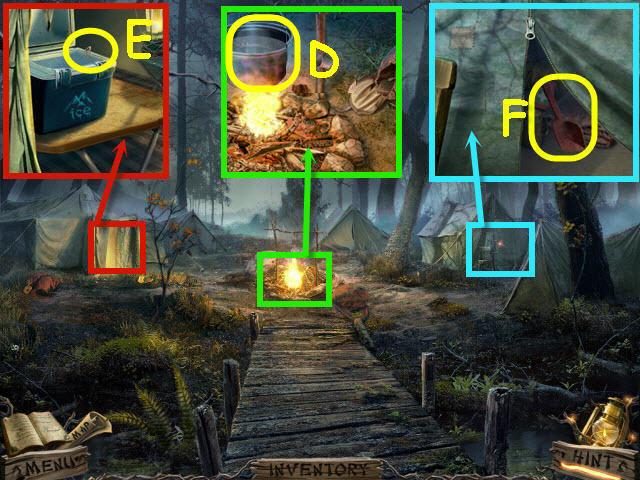
- Examine the campfire; use the INSULATED FLASK on the pot to get HOT WATER (D).
- Examine the left tent and use the HOT WATER on the ice; take the PIN (E).
- Examine the right tent and attempt to open the zipper; use the PIN on the stuck zipper and take the SCRAPER (F).
- Go to the watch tower.
- Examine the buoy and use the SCRAPER three times on the shells; use the BUOY KEY on the lock. Open the door and take the PICTURE PART 2/3 (G).
- Examine the shed to access a HOS (H).
- Find the items listed.
- Open the shell to get a crab (I).
- You will earn a HOOK.
- Go up to the viewing platform.
- Examine the nest and use the HOOK on it; take the PICTURE PART 3/3 (J).
- Examine the chest and place the 3 PICTURE PARTS on the board to trigger a puzzle (K).
- Switch the pieces to complete the picture.
- The starting layout is random.
- See screenshot for solution (L).
- Take the note (M), the SHOVEL (N), and the EMPTY BOTTLE (O).
- Back out.
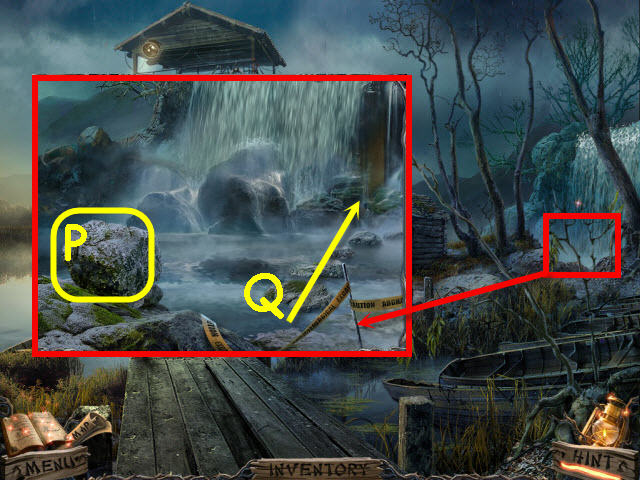
- Examine the waterfall and use the SHOVEL on the rock (P).
- Cross the rocks to get behind the waterfall (Q).
- You will automatically get an APPLE HALF.
Chapter 7 – The Labyrinth
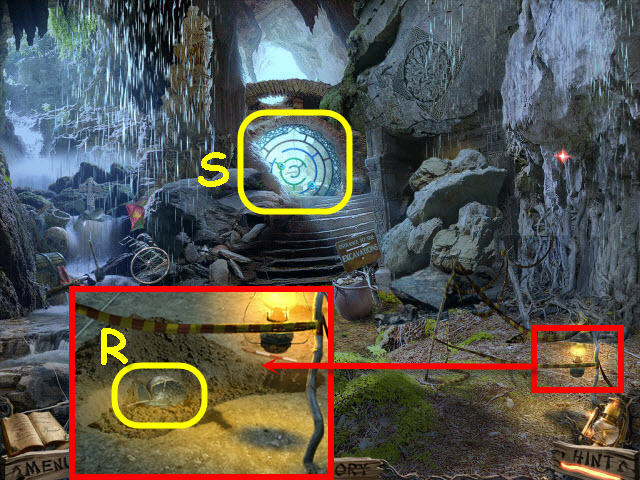
- Examine the cordoned area and use the SHOVEL on the ground; take the 2nd APPLE HALF (R).
- The 2 APPLE HALVES to get an APPLE.
- Examine the labyrinth entrance; place the APPLE on the top to trigger a puzzle (S).
- Rotate the rings to permit the apple to enter the center.
- Press the start button when ready.
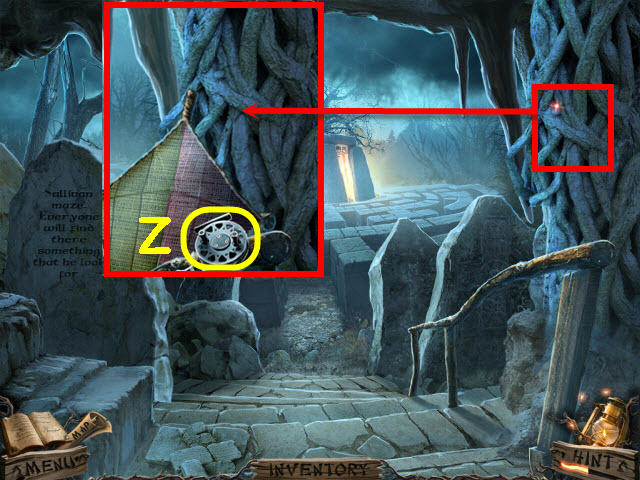
- To solve the puzzle, press the arrow on the red ring three times clockwise (T).
- Go up to the labyrinth.
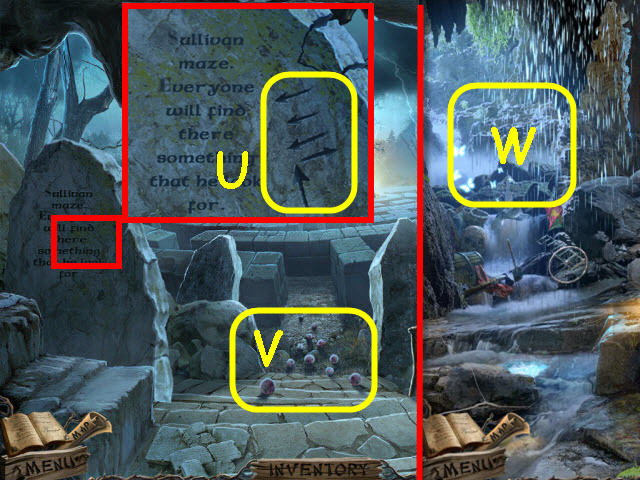
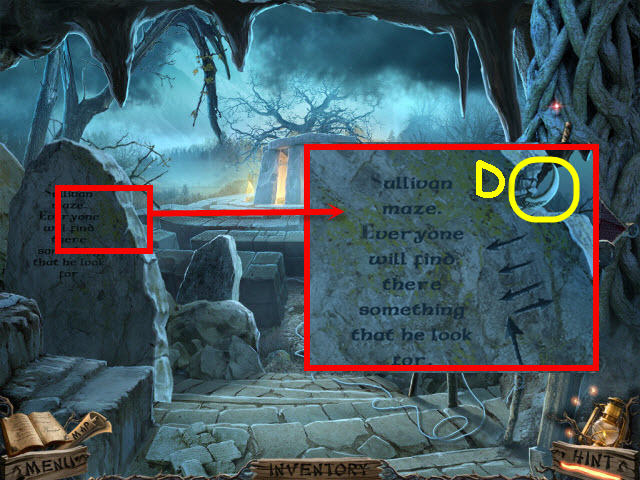
- Examine the writings; use the BROKEN LIGHT BULB on the stone (U) to get a clue.
- Examine the stairs; take the APPLES (V).
- Back out to the waterfall cave.
- Examine the left waterfall to trigger a HOS (W).
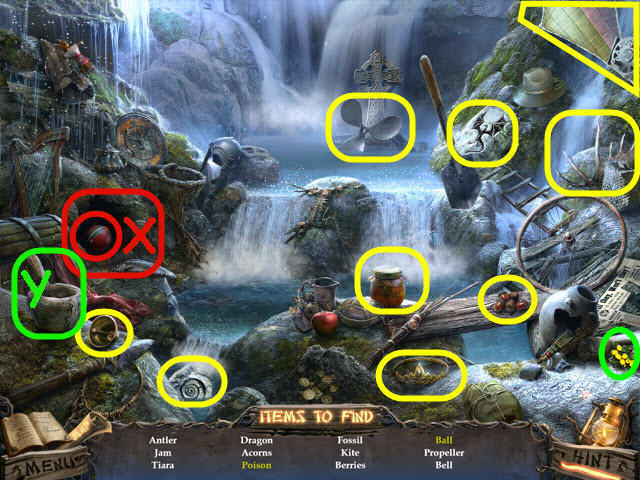
- Find the items listed.
- Move the stone covering to get the ball (X).
- Place the berries in the mortar and pestle to get poison (Y).
- You will earn a KITE WITH STRING.
- Go forward to the labyrinth.
- Examine the twisted roots and place the KITE WITH STRING on it; take the KITE STRING (Z).
- Go forward into the labyrinth.
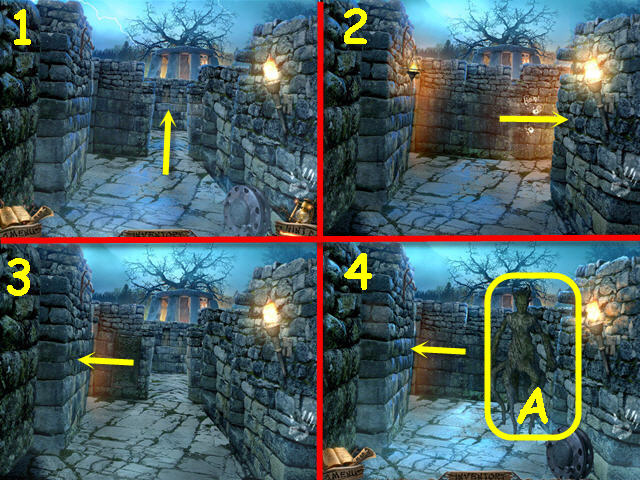
- Go forward (1), go right (2), and then go left (3).
- Use the SMOKE BOMB on the Dryad (A).
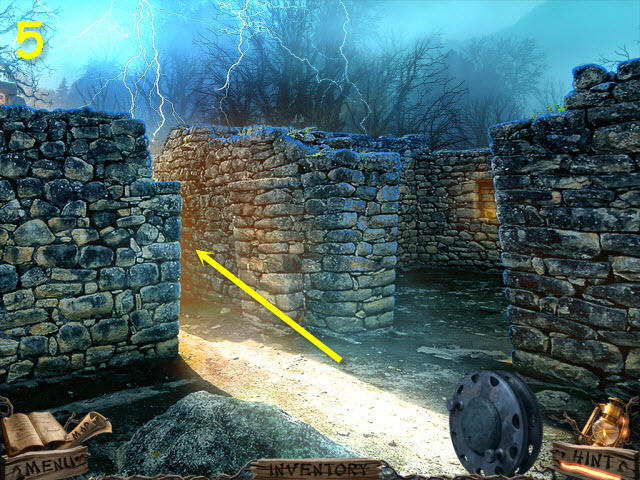
- Go left (4) and then go up the left path (5).
Chapter 8 – The Finale
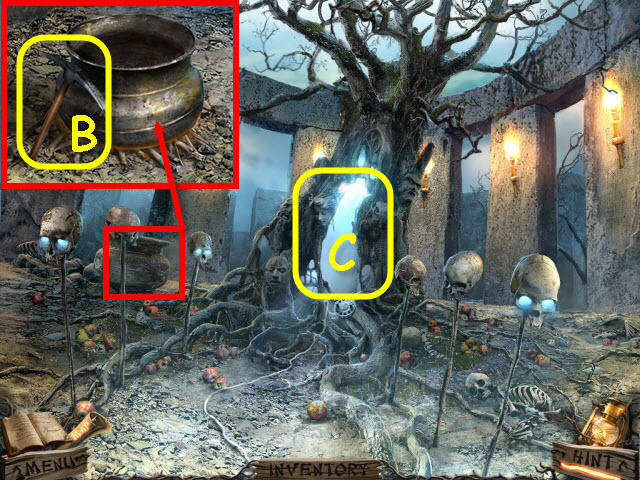
- Examine the pot; take the PICKAXE (B).
- Examine the tree trunk (C); use the EMPTY BOTTLE on the tears and get a BOTTLE OF TEARS.
- Back out to the steps of the labyrinth.
- Examine the stone and use the PICKAXE on the broken piece; take the SICKLE BLADE (D).
- Go forward 2 x, and then left 2 x.

- Examine the skeleton; take the STAFF (E).
- Back out to the labyrinth stairs.
- Examine the kite and use the STAFF on the roots; take the note (F), the BUCKET PIECE (G), and the SICKLE HANDLE (H).
- The SICKLE BLADE and the SICKLE HANDLE will automatically combine to create a SICKLE.
- Back out.
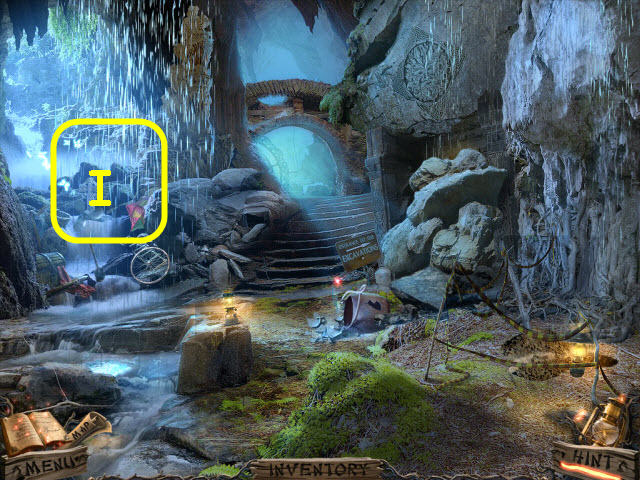
- Examine the left waterfall (I).
- You will access a HOS.
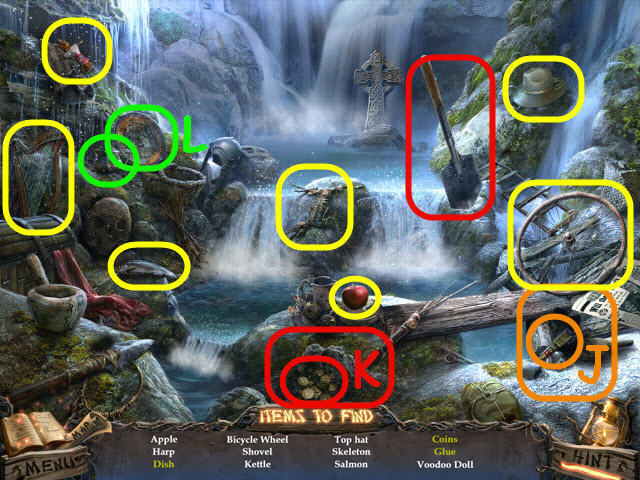
- Find the items listed.
- Knock over the pot to get the glue (J).
- Use the shovel on the dirt mound to get the coins (K).
- Use the teapot on the plate to get a dish (L).
- You will earn GLUE.
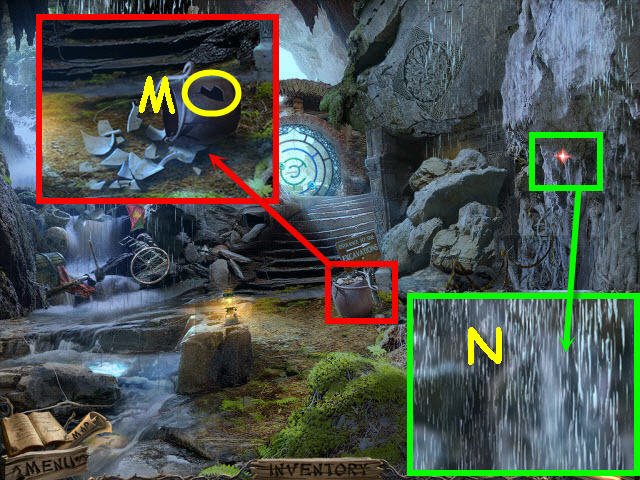
- Examine the bucket and tip it over; use the GLUE and BUCKET PIECE on the hole (M). Take the EMPTY BUCKET.
- Examine the right waterfall; use the EMPTY BUCKET on the water (N) to get a BUCKET WITH WATER.
- Go forward three times, go right, left two times, and up the left path.
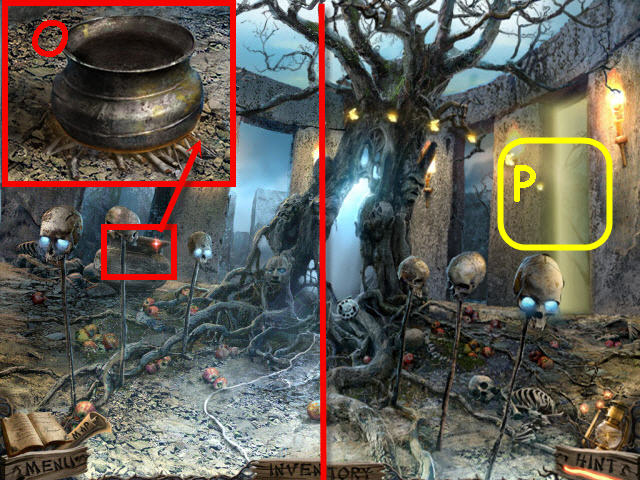
- Examine the pot and place the BUCKET WITH WATER, the BOTTLE OF TEARS, and the APPLES in it (O).
- Go right through the newly-opened passage (P).
- Follow the butterflies and go forward two times.
- Examine the tree and use the SICKLE on it (Q).
- Congratulations! You have successfully completed Sable Maze: Sullivan River.


 Elementals: The Magic Key Walkthrough, Guide, & Tips
 Black Circle: A Carol Reed Mystery Walkthrough, Guide, & Tips
 Forbidden Secrets: Alien Town Walkthrough, Guide, & Tips
 Break the Curse: The Crimson Gems Walkthrough, Guide, & Tips
 Phantasmat: The Dread of Oakville Walkthrough, Guide, & Tips