Rite of Passage: The Lost Tides Walkthrough, Guide, & Tips
Rite of Passage: The Lost Tides Walkthrough

Welcome to the Rite of Passage: The Lost Tides Walkthrough
Why has the Everlast returned after twenty years at sea?
Whether you use this document as a reference when things get difficult or as a road map to get you from beginning to end, we’re pretty sure you’ll find what you’re looking for here.
This document contains a complete Rite of Passage: The Lost Tides game walkthrough featuring annotated screenshots from actual gameplay!
We hope you find this information useful as you play your way through the game. Use the walkthrough menu below to quickly jump to whatever stage of the game you need help with.
Remember to visit the Big Fish Games Forums if you find you need more help. Have fun!
This walkthrough was created by Amanda Barrera, and is protected under US Copyright laws. Any unauthorized use, including re-publication in whole or in part, without permission, is strictly prohibited.
General Tips
- This is the official guide for Rite of Passage: The Lost Tides.
- This guide will not show when you have to zoom into a location; the screenshots will show each zoom scene.
- Hidden-object puzzles are referred to as HOPs. This guide will not show screenshots of the HOPs, however, it will mention when an HOP is available and the inventory item you’ll collect from it.
- Use the Map to fast travel to a location.
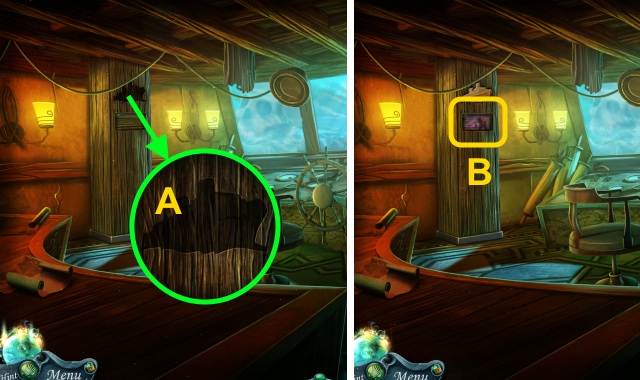
Chapter 1: Lost at Sea

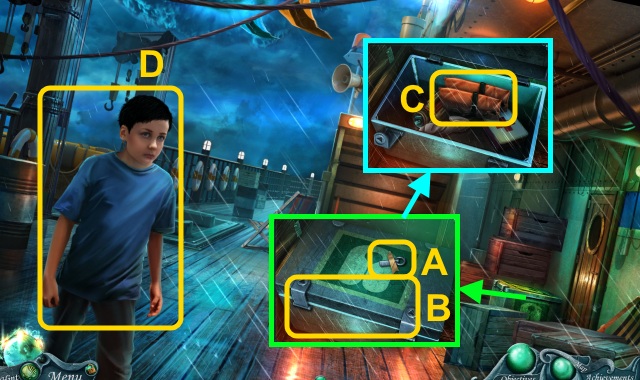
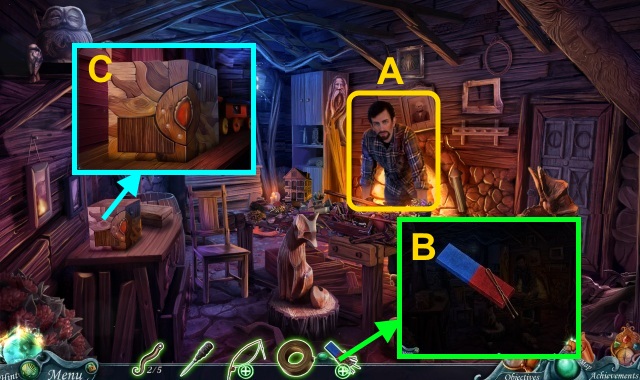
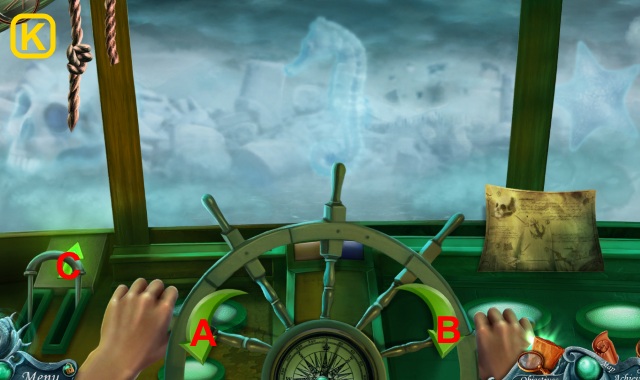
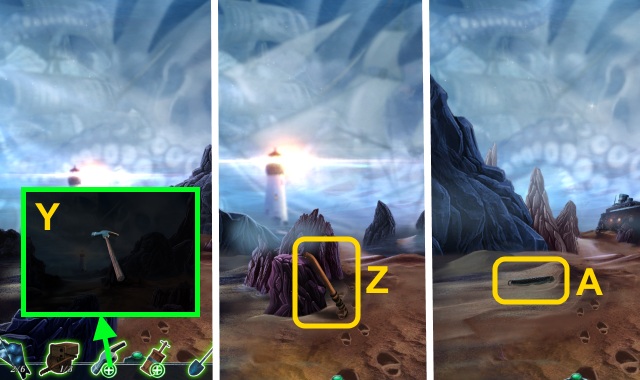
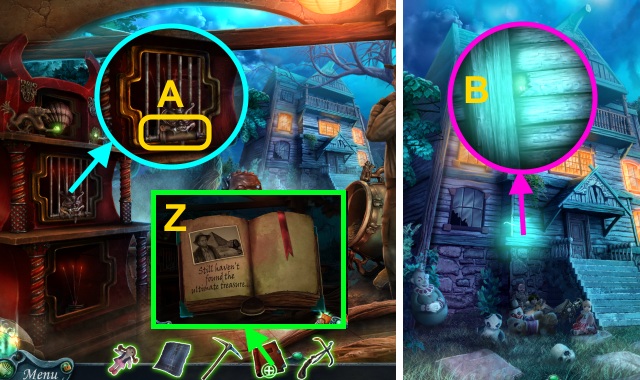
- Remove the tape; take the EMERGENCY KEY (A).
- Use the EMERGENCY KEY (B); open the box.
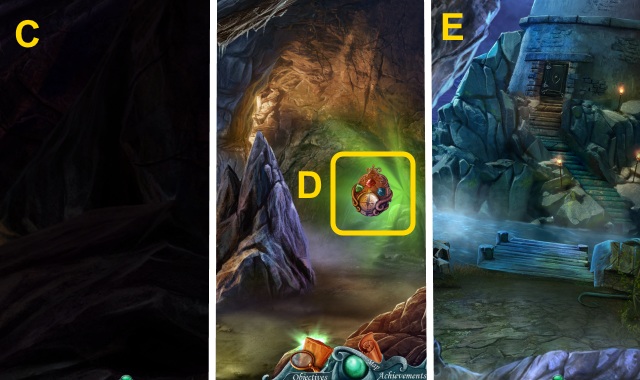
- Put on the life vest; take the LIFE VEST (C).
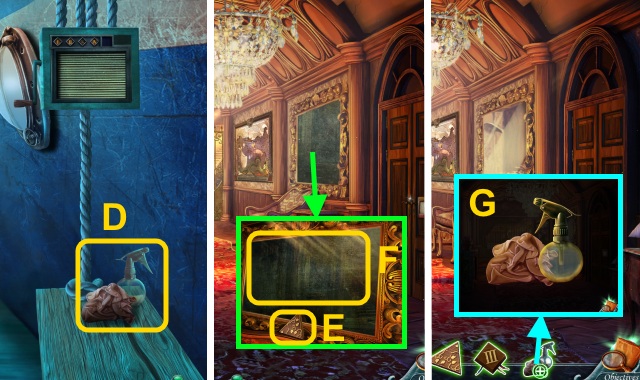
- Give the LIFE VEST (D).
- Walk left, down, then forward.
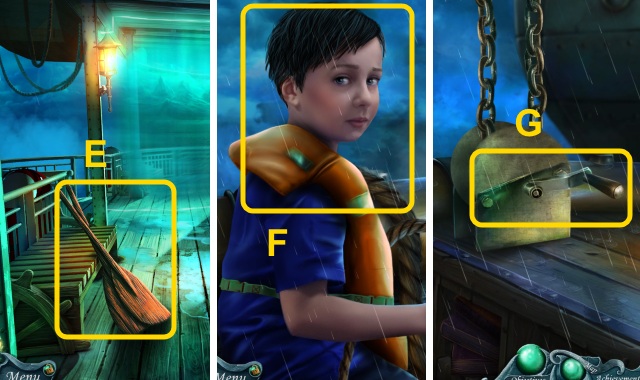
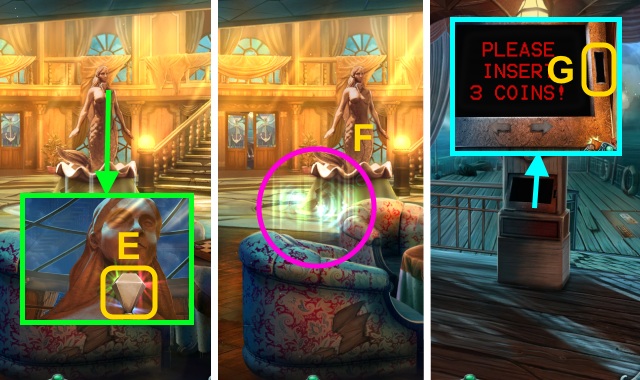
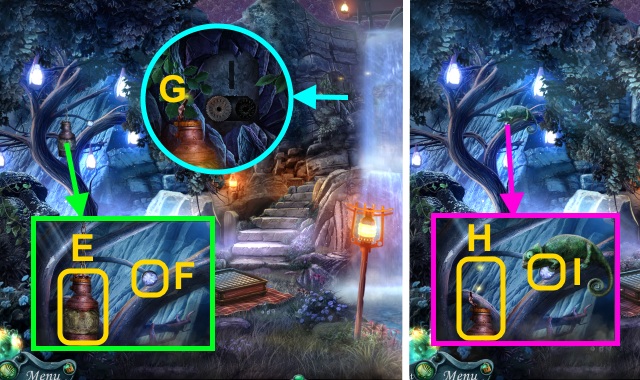
- Take the OARS (E).
- Walk left.
- Give the OARS (F).
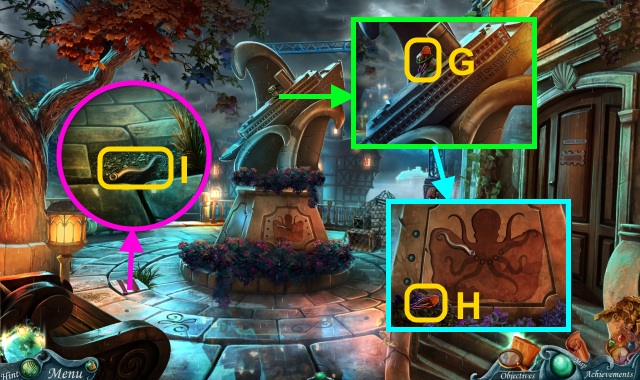
- Turn the handle three times (G).

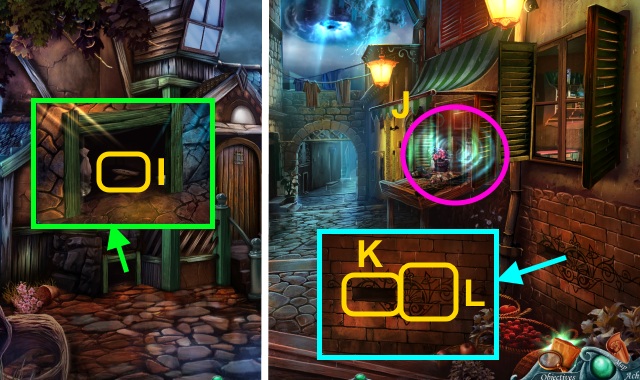
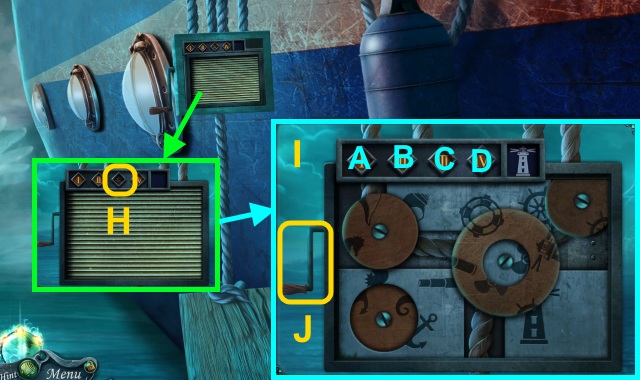
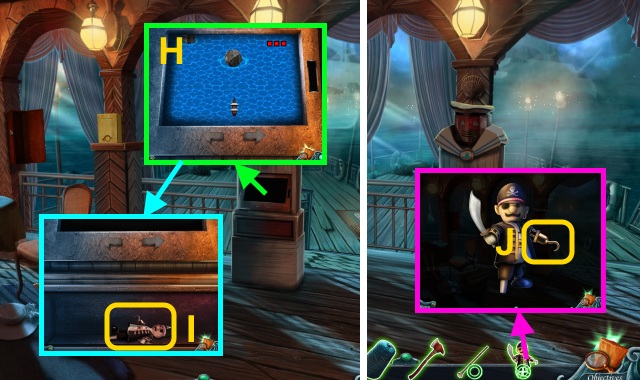
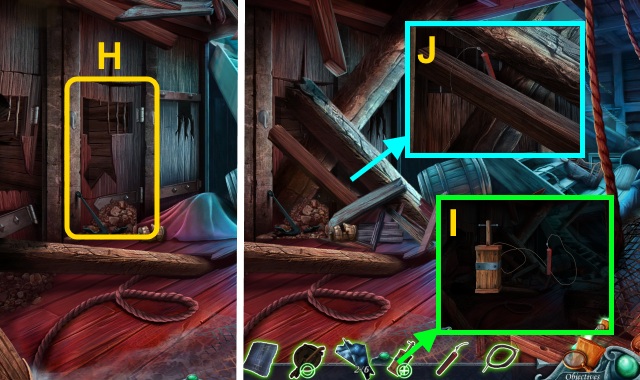
- Use the brush (H); place the piece (I).
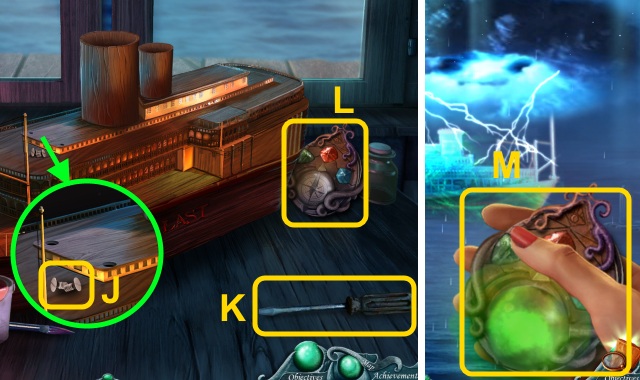
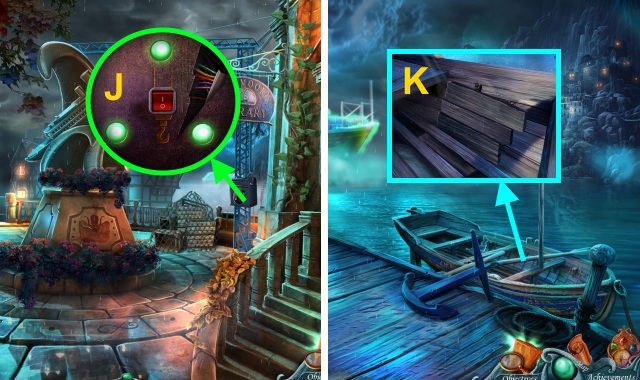
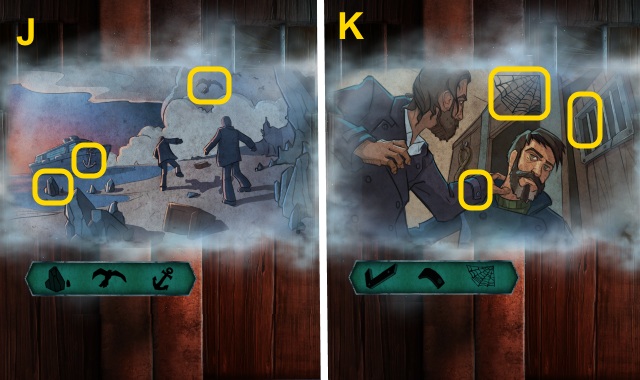
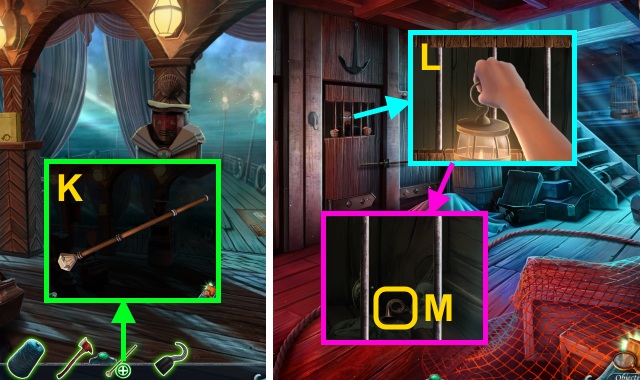
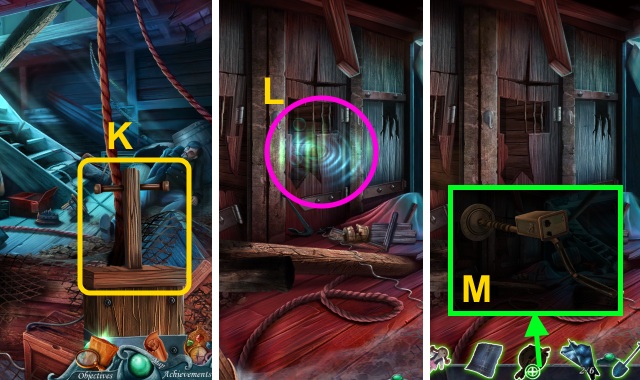
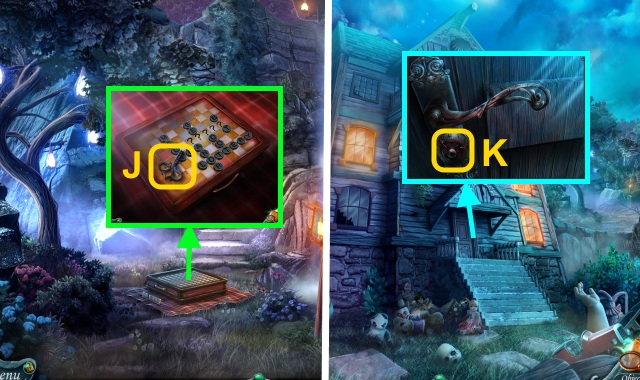
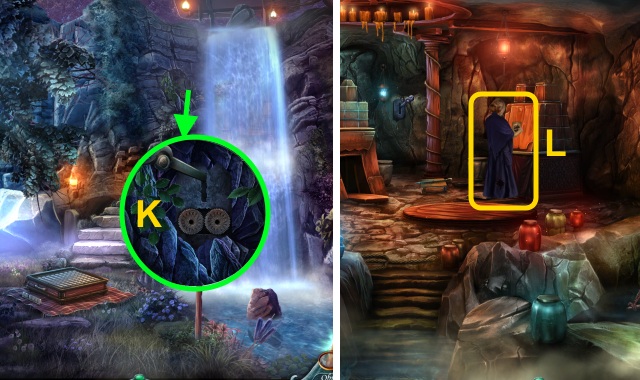
- Place the screws (J); use the screwdriver (K).
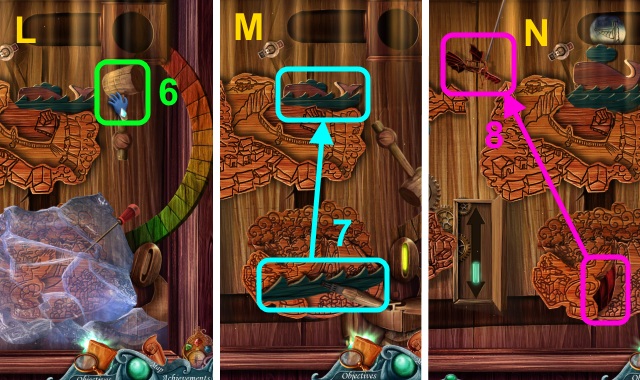
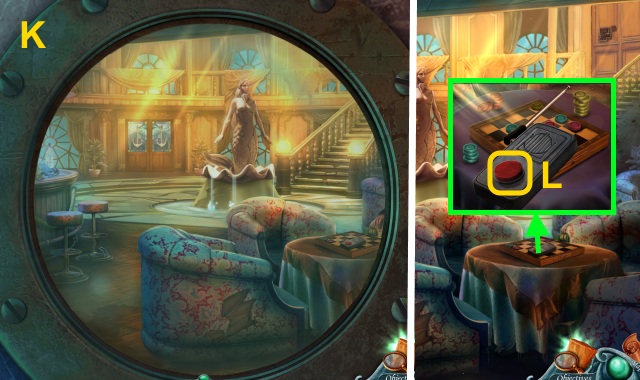
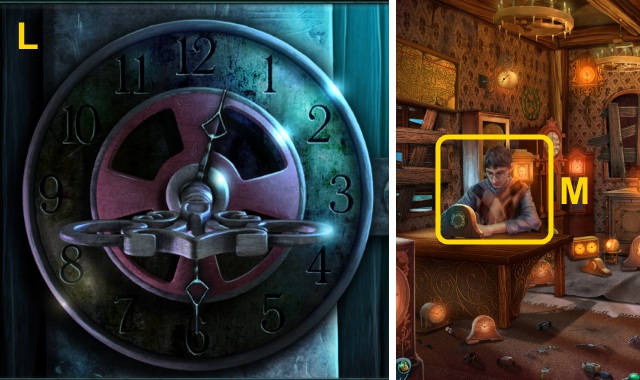
- Examine the Compass (L).
- Take the Compass (M).
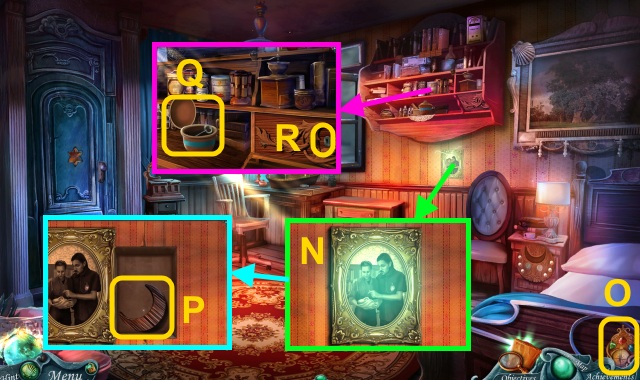
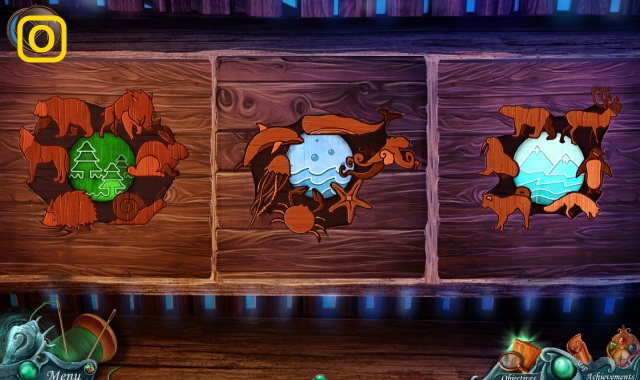
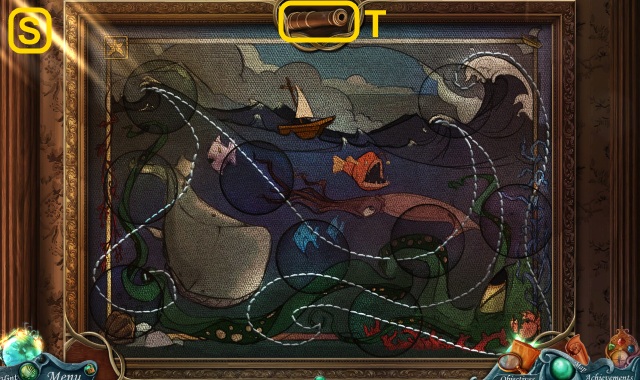
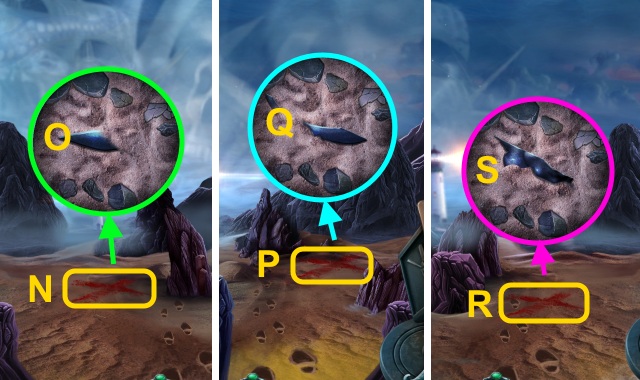
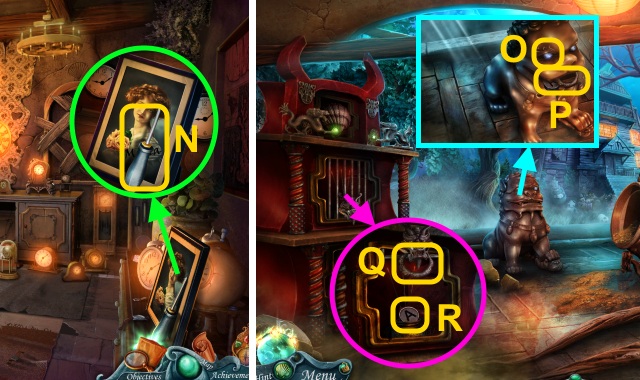
- Examine the photo (N); use the Compass (O).
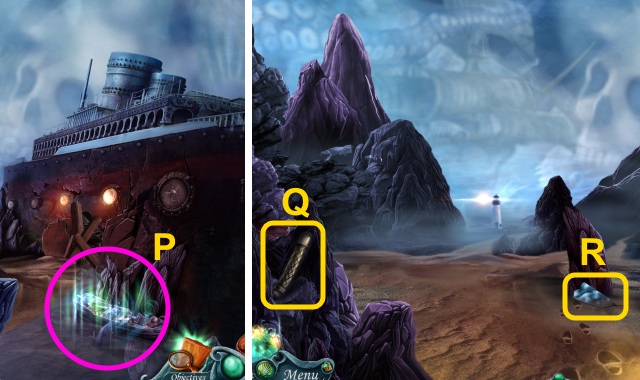
- Move the photo; take the TOWN-CREST PIECE (P).
- Open the jar (Q); use the key (R).
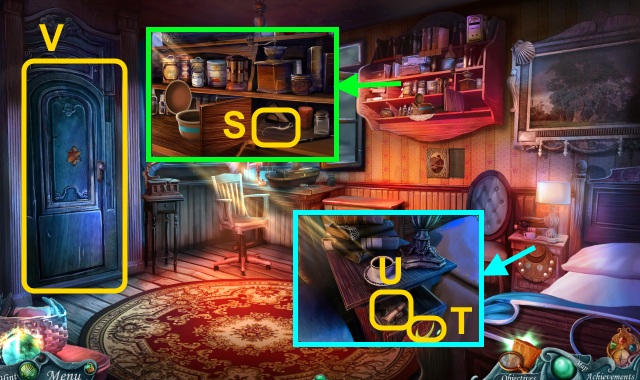
- Take the TENTACLE (1/5) (S).
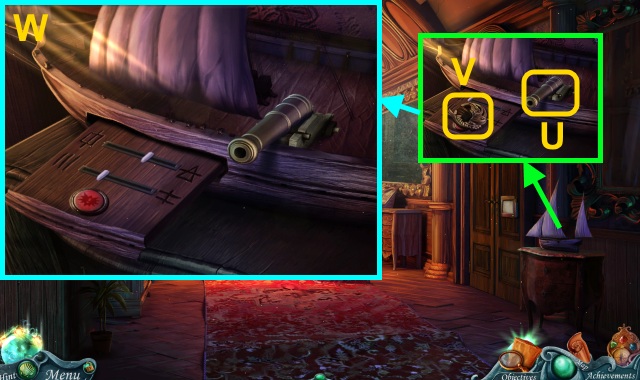
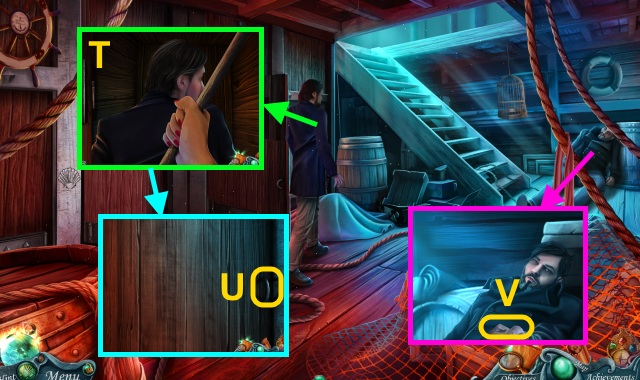
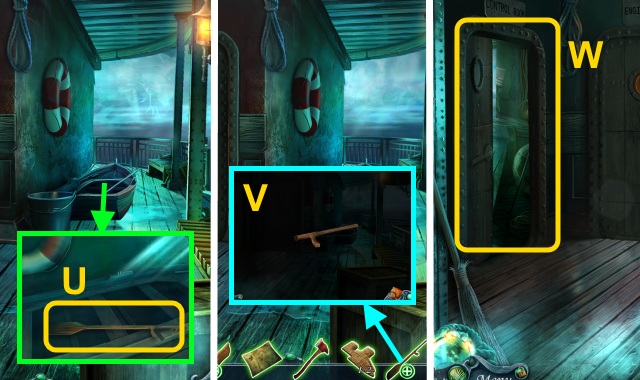
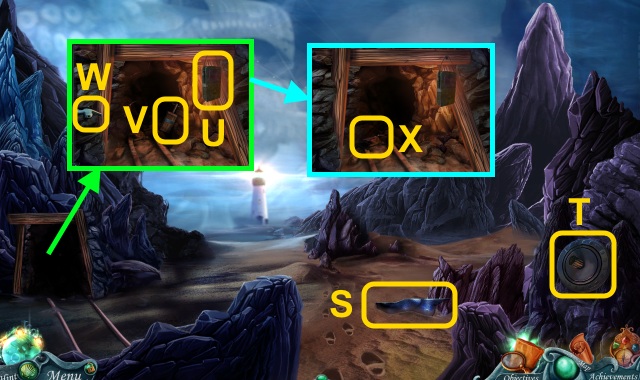
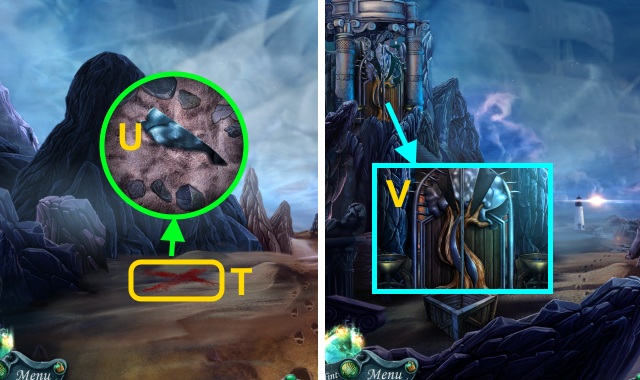
- Place the TOWN-CREST PIECE (T); take the Map and GRAMOPHONE ARM (U).
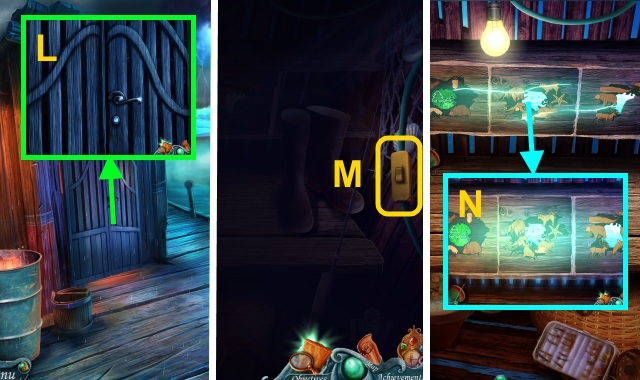
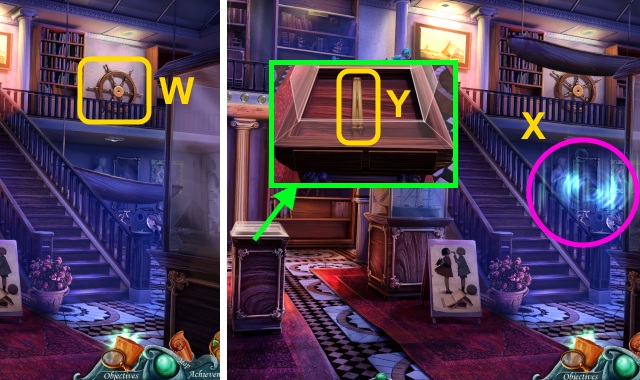
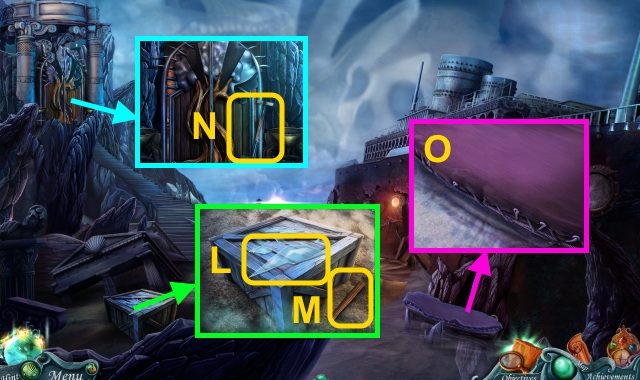
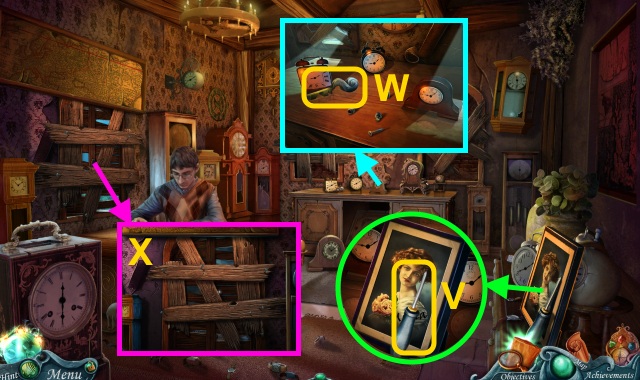
- Open the door (V).
- Walk left.
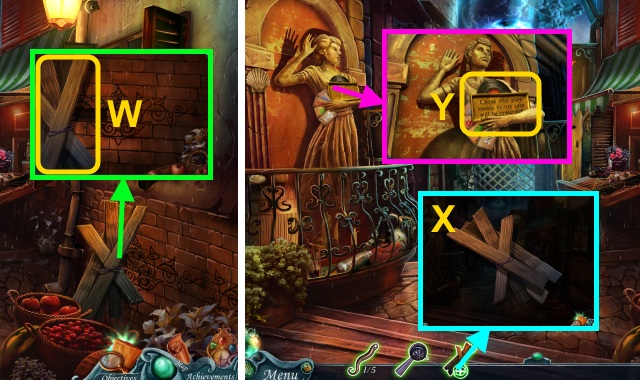
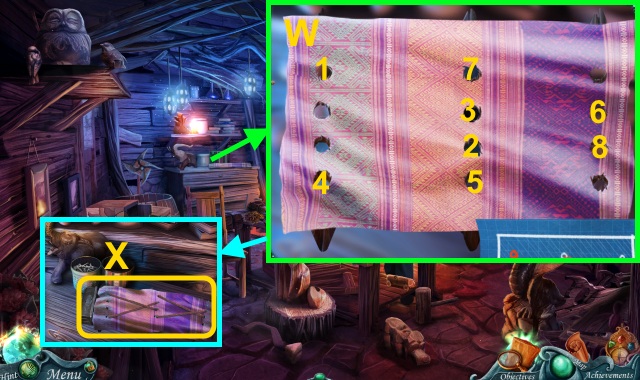
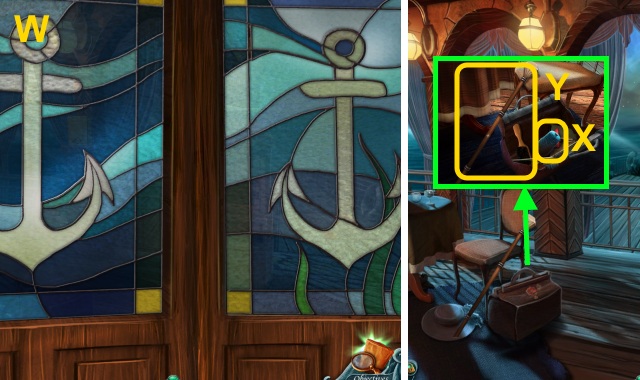
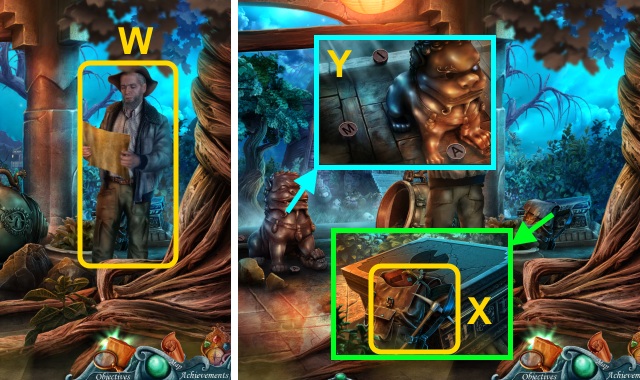
- Take the TIED PLANKS (W).
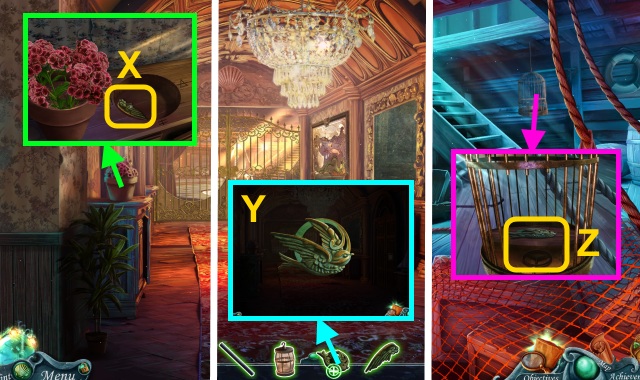
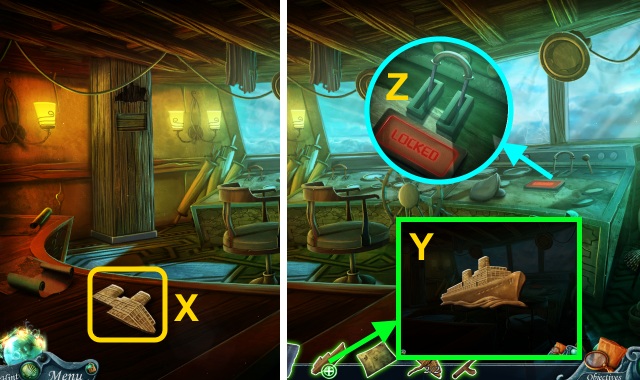
- Examine the TIED PLANKS; take the PURPLE WIRE (1/2) and PLANKS (X).
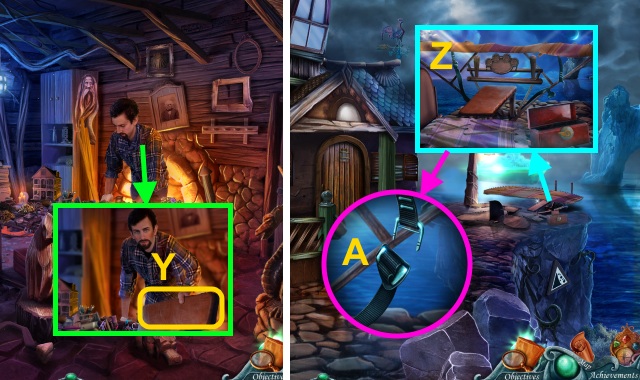
- Take the sign and RECORD (Y).
- Walk down.
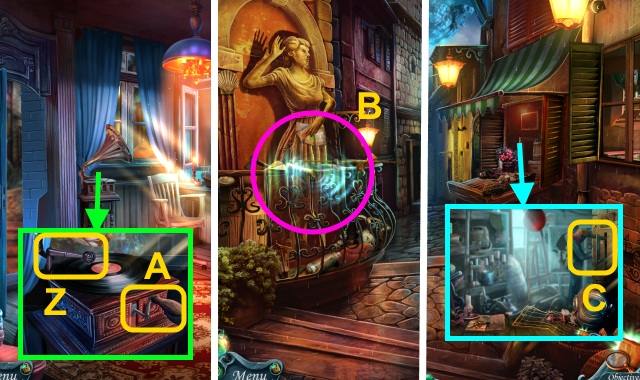
- Place the GRAMOPHONE ARM and RECORD.
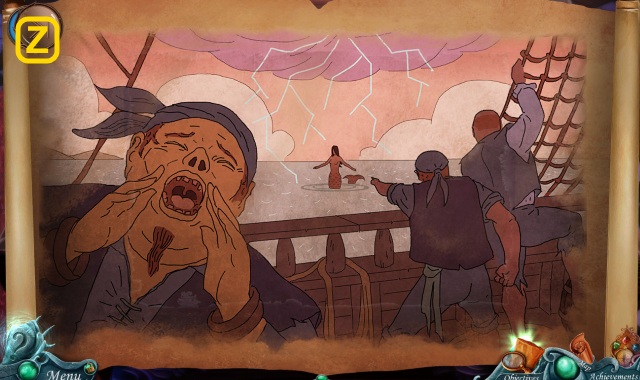
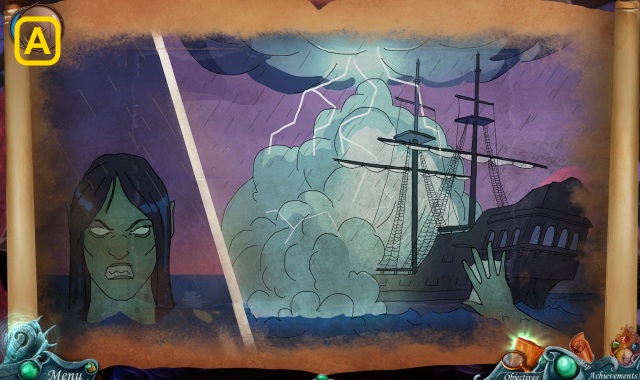
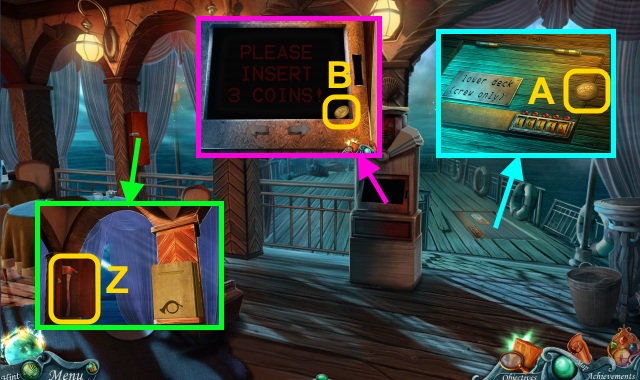
- Move the needle (Z); turn the handle (A).
- Walk left.
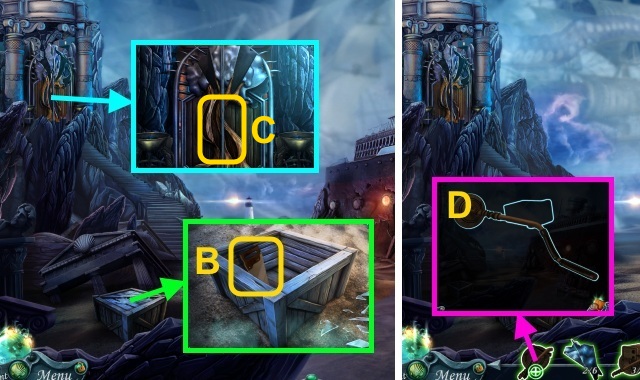
- Play the HOP to receive the LEVER CONNECTOR (B).
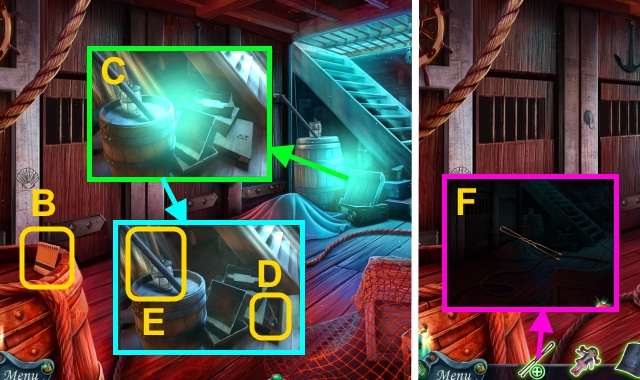
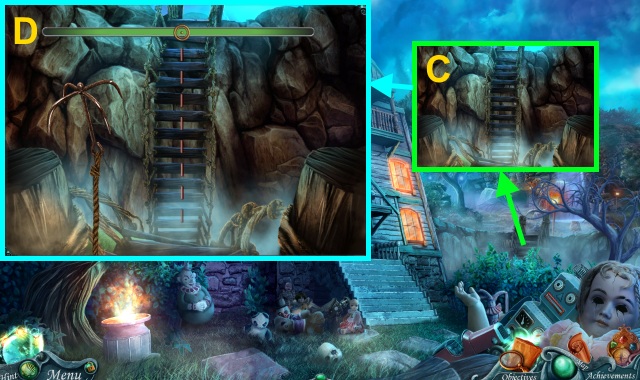
- Place the LEVER CONNECTOR; pull the handle (C).
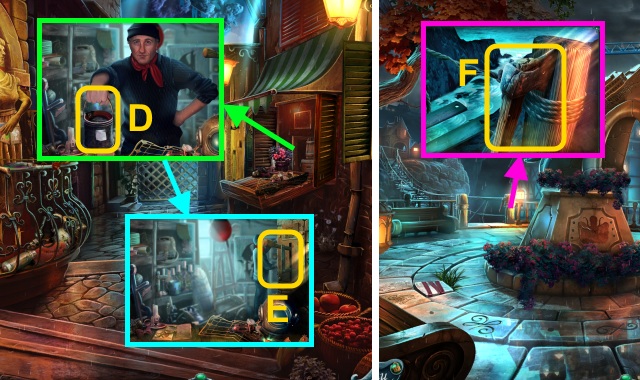
- Take the TAR BUCKET (D).
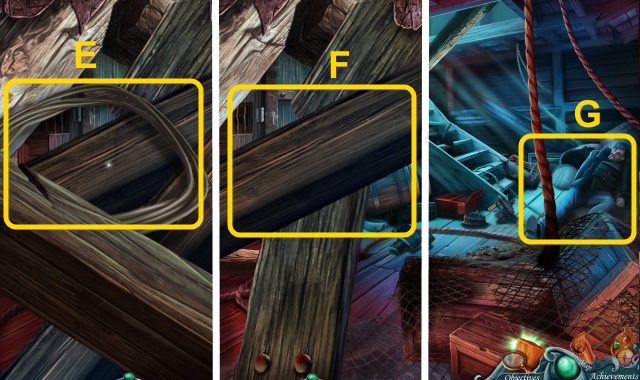
- Move the connector; pull the handle (E).
- Walk forward.
- Take the AXE (F).
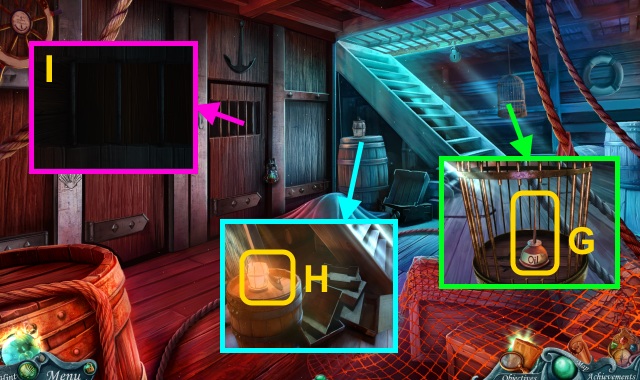
- Take the WIRES (2/2) (G); take the JELLYFISH CUT OUT (H).
- Move the stone; take the TENTACLE (2/5) (I).
- Place the WIRES (2/2); press the button (J).
- Walk forward.
- Use the TAR BUCKET and PLANKS (K).
- Use the AXE (L).
- Go forward.
- Press the switch (M).
- Use the Compass (N); place the JELLYFISH CUT OUT for a mini-game.
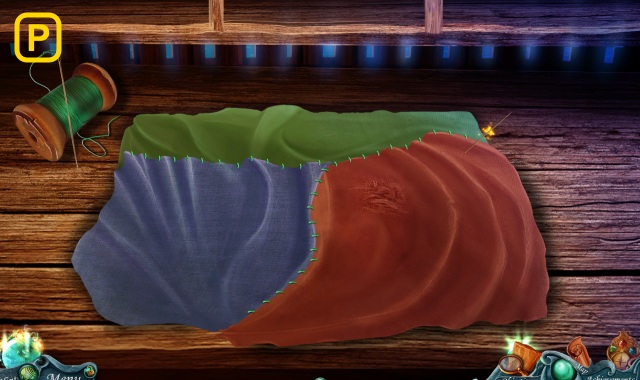
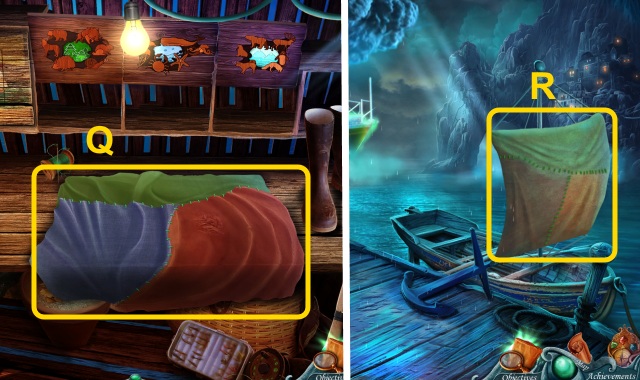
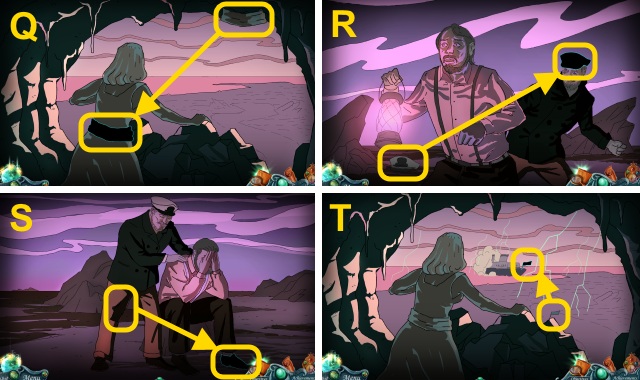
- Take the STITCHED SAIL (Q).
- Place the STITCHED SAIL (R).
- Go forward; go up four times.
Chapter 2: Oakmoore
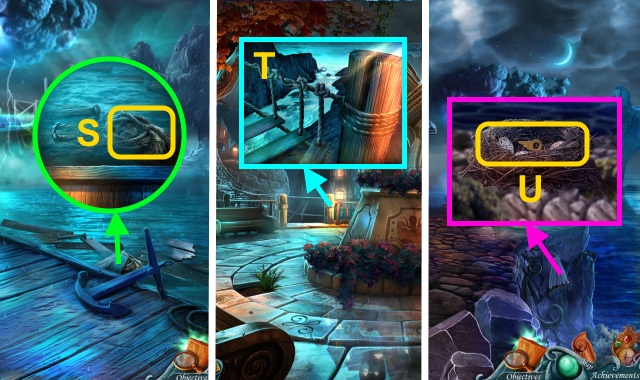
- Move the planks; take the ROPE (S).
- Walk down.
- Place the ROPE (T).
- Walk left.
- Examine the nest; move the eggs (U).
- Take the TOOLBOX KEY.
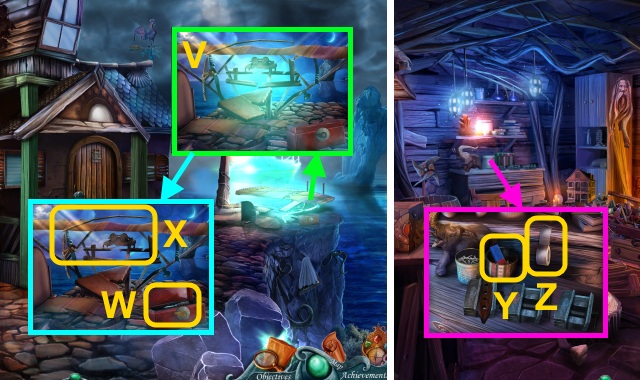
- Use the Compass (V).
- Place the TOOLBOX KEY; take the AWL (W) and BROKEN FISHING ROD (X).
- Walk forward.
- Open the lid; take the MAGNET BAR (Y) and DUCT TAPE (Z).
- Talk to Bill (A).
- Examine the MAGNET BAR; move the nails.
- Take the HAIRPIN and MAGNET BAR (B).
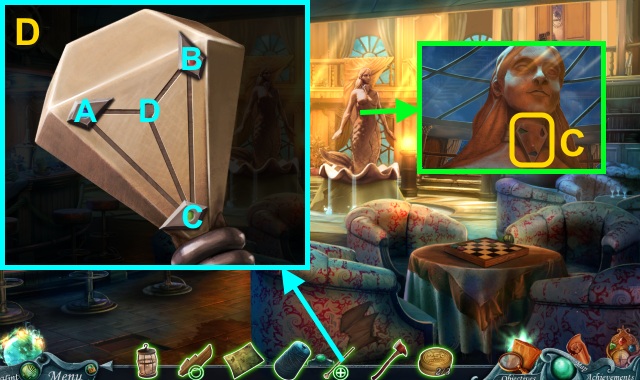
- Examine the box for a mini-game (C).
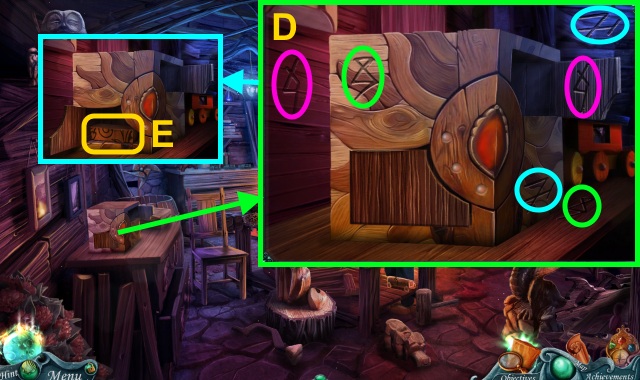
- Solution (D).
- Take the BRICK (E).
- Walk down.
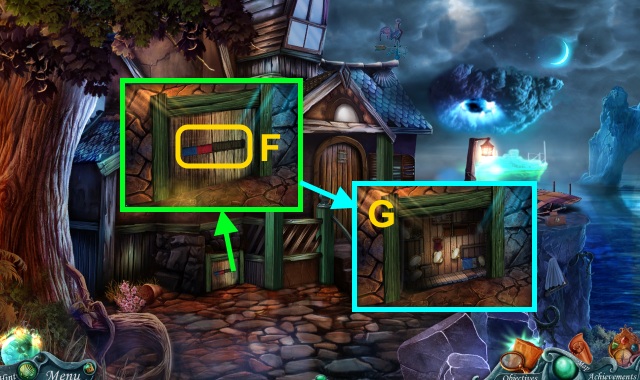
- Place the MAGNET BAR (F); turn it.
- Open the door; examine the hole for a mini-game (G).
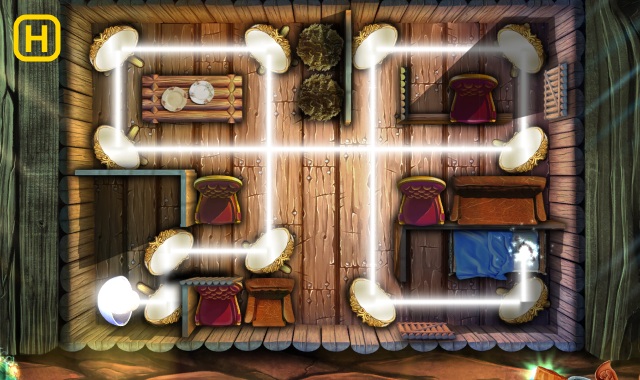
- Move the objects; take the WING-TEMPLATE TOOLS (I).
- Walk down twice.
- Play the HOP to receive the LIGHT WOOD (J).
- Place the BRICK (K); move the bricks (L).
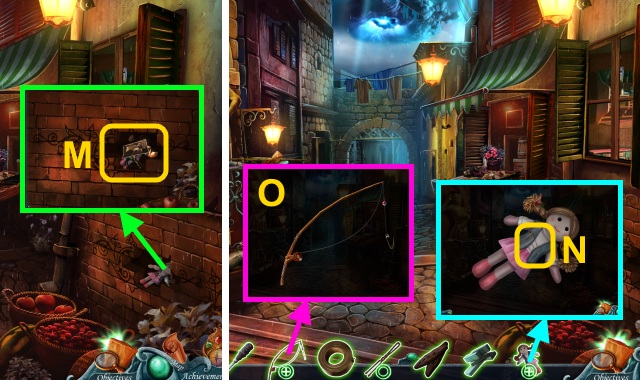
- Move the objects; take the RAG DOLL (M).
- Examine the RAG DOLL; take the SAFETY PIN (N).
- Place the DUCT TAPE and SAFETY PIN on the BROKEN FISHING ROD to make the FISHING ROD (O).
- Walk forward, then left.
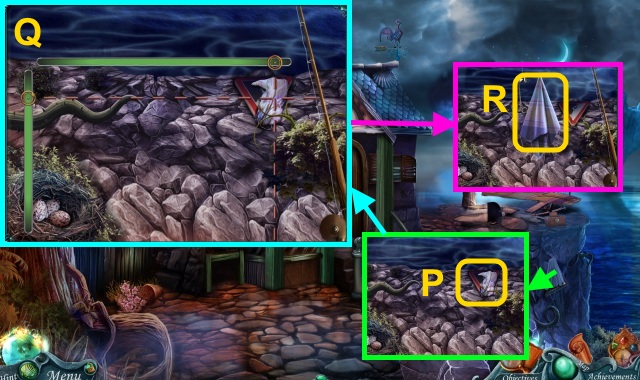
- Use the FISHING ROD for a mini-game (P).
- Solution (Q).
- Take the WING CLOTH (R).
- Walk forward.
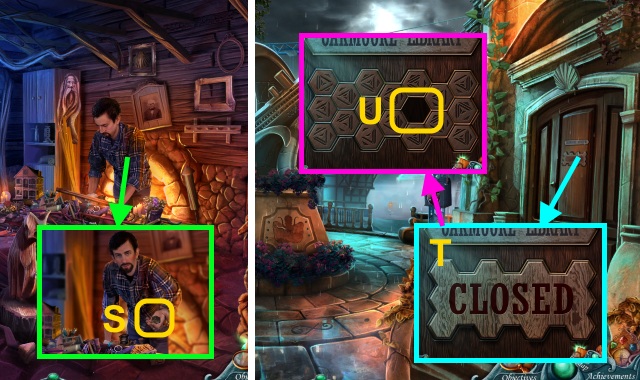
- Give the LIGHT WOOD; take the HEXAGONAL TILE (S).
- Walk down twice.
- Move the sign (T); place the HEXAGONAL TILE for a mini-game (U).
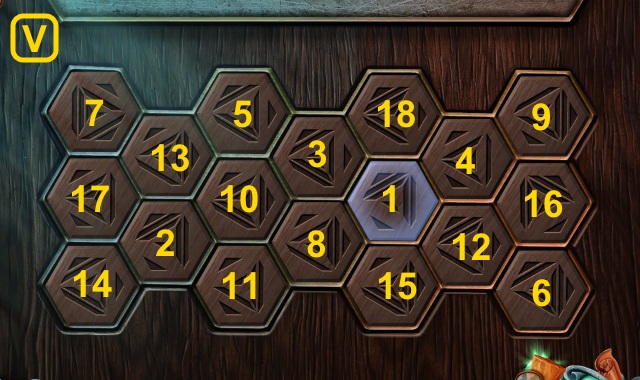
- Solution (V).
- Walk right.
- Turn the wheel three times (W).
- Play the HOP to receive the TENTACLE (3/5) (X).
- Open the case; take the scroll for a mini-game (Y).
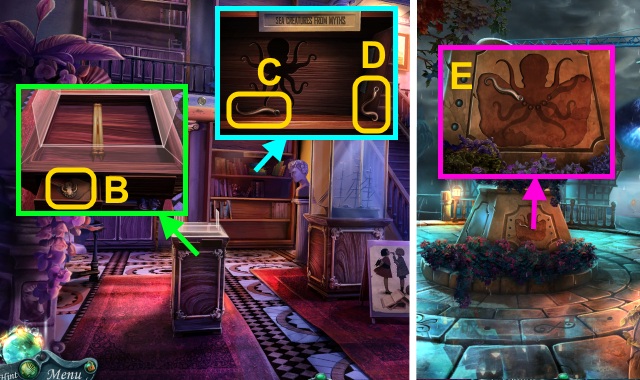
- Take the OCTOPUS HEAD (B).
- Move the books and bottle; take the TENTACLE (4/5) (C) and TENTACLE (5/5) (D).
- Walk down.
- Place the OCTOPUS HEAD and TENTACLE (5/5) for a mini-game (E).
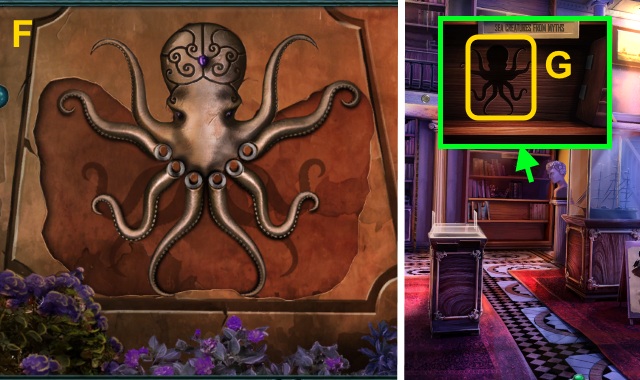
- Solution (F); take the OCTOPUS.
- Walk right.
- Place the OCTOPUS for a mini-game (G).
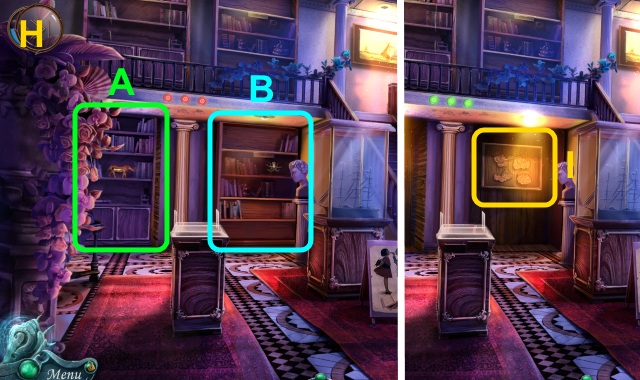
- Solution (H): A, B, A.
- Examine the wall for a mini-game (I).
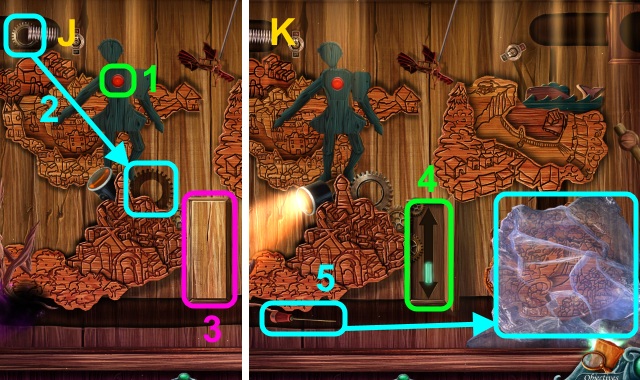
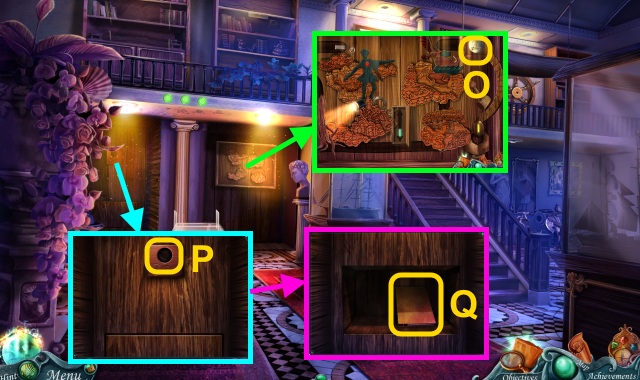
- Take the CIRCULAR INSERT (O).
- Place the CIRCULAR INSERT (P); take the ENGINEERING MANUAL (Q).

- Flip through the ENGINEERING MANUAL; take the GLIDER BLUEPRINTS (R).
- Go to Bill’s House.
- Give the GLIDER BLUEPRINTS for a mini-game (S).
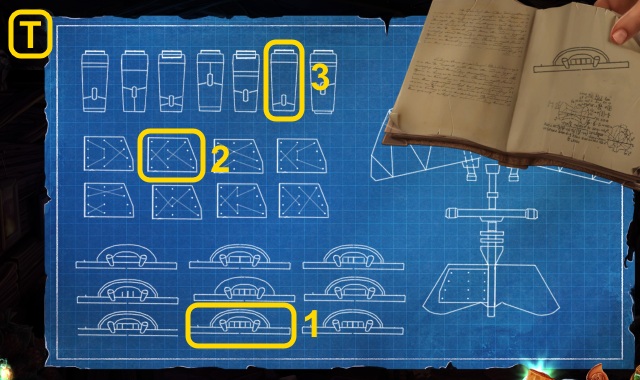
- Solution (T).
- You receive the GLIDER BLUEPRINTS.
- Enter the HOP and use the GLIDER BLUEPRINTS; play the HOP to receive the CONTROL BOARD (U).
- Use the WING-TEMPLATE TOOLS, WING CLOTH and AWL; place the GLIDER BLUEPRINTS for a mini-game (V).
- Solution (W).
- Take the TAIL WING (X).
- Take the FIXED FRAME (Y).
- Walk down.
- Remove the parts; place the FIXED FRAME, CONTROL BOARD, and TAIL WING (Z).
- Connect the buckle (A).
- Go right.
Chapter 3: The Everlast
- Take the MATCHBOOK (B).
- Use the Compass (C); open the box.
- Take the PINCERS (D) and IRON BAR (E).
- Use the PINCERS on the HAIRPIN to make the BENT PIN (1/2) (F).
- Use the PINCERS; take the OILCAN (G).
- Open the lantern; use the OILCAN and MATCHBOOK (H).
- Place the lid; take the LANTERN.
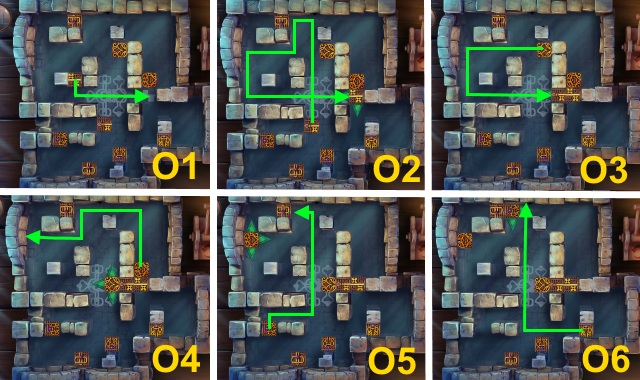
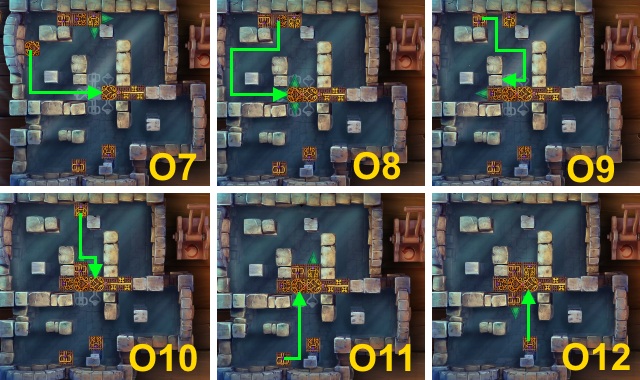
- Use the LANTERN for a mini-game (I).
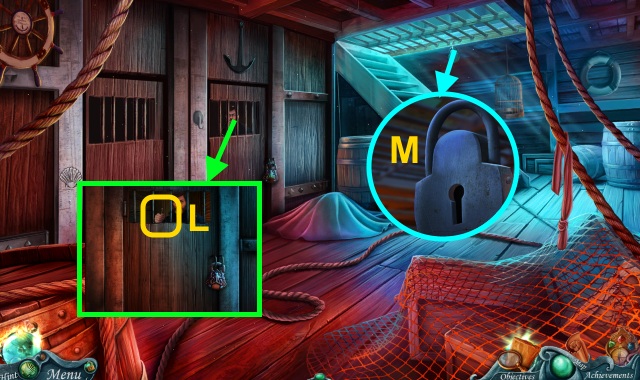
- Take the BENT PIN (2/2) (L).
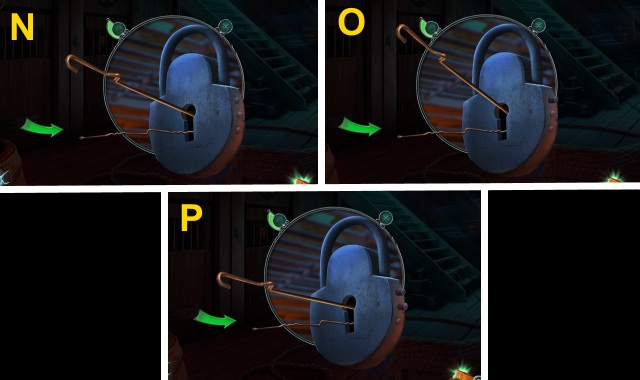
- Examine the lock; use the BENTPIN (2/2) for a mini-game (M).
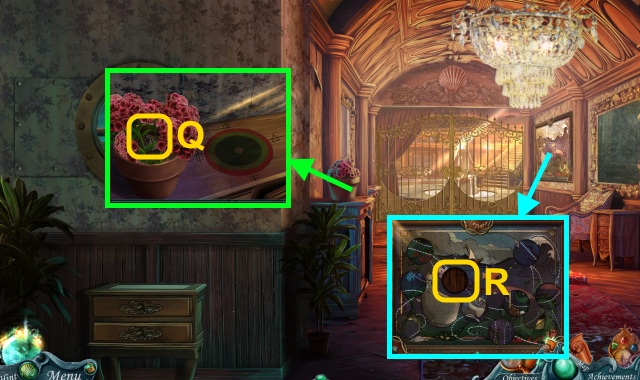
- Move the flowers; take the TAPESTRY PIECE (Q).
- Place the TAPESTRY PIECE for a mini-game (R).
- Solution (S).
- Take the MINIATURE CANNON (T).
- Scroll right.
- Place the MINIATURE CANNON (U); take the BIRD MEDALLION for a mini-game (V).
- Solution (W).
- Take the BIRD-MEDALLION PART (X).
- Place the BIRD-MEDALLION PART on the BIRD MEDALLION; take the BIRD MEDALLION (Y).
- Walk down.
- Place the BIRD MEDALLION; take the VALVE (Z).
- Go up; scroll left.
- Move the panel; take the RED CHIP (A).
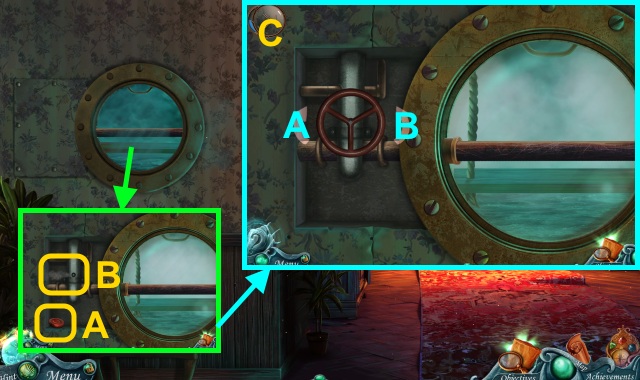
- Place the VALVE for a mini-game (B).
- Solution (C): B, A, B, B, A.
- Open the porthole.
- Go forward.
- Take the CLEANING SOLUTION (D).
- Go down; scroll right.
- Take the TRIANGLE (E).
- Use the CLEANING SOLUTION (F); play the HOP to receive the BUTTON.
- Examine the CLEANING SOLUTION (G).
- Take the CLOTH; try to use the bottle.
- Scroll left; go left.
- Place the BUTTON for a mini-game (H).
- Solution (I): Cx15, Ax3, Bx3, Cx9, Dx12.
- Turn the crank (J).
- Go forward.
- Examine the porthole (K); open it.
- Examine the remote; press the button (L).
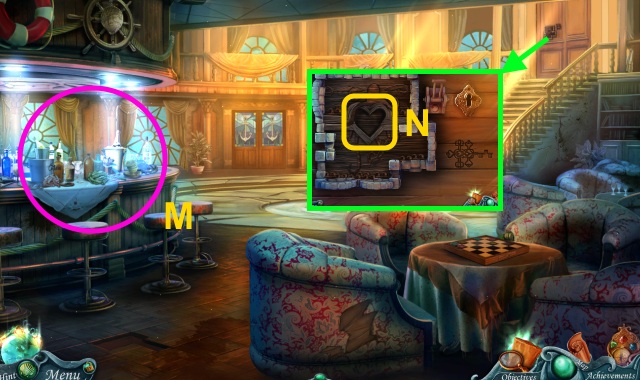
- Play the HOP to receive the HEART (M).
- Place the HEART for a mini-game (N).
- Use the key (P).
- Walk right.
- Use the Compass (Q).
- Move the patch; take the EVERLAST CUTOUT and ROLLED FOILS (R).
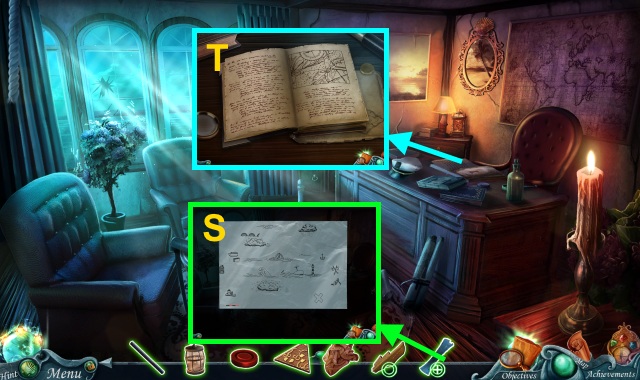
- Open the ROLLED FOILS; take the MAP FOIL (S).
- Read the book for a mini-game (T).
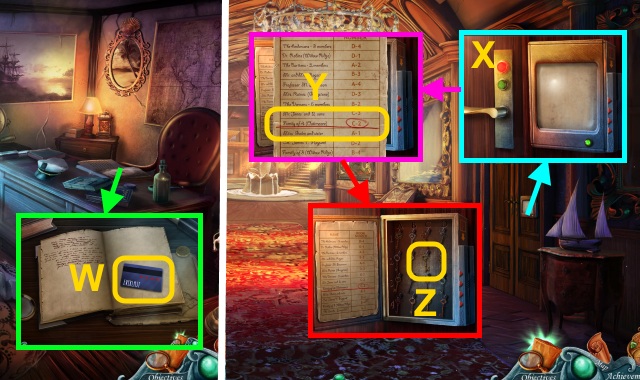
- Turn the page; take the KEY CARD (W).
- Walk down twice; scroll right.
- Use the KEY CARD (X).
- Open the box; examine the list (Y).
- Take the ROOM KEY (Z); open the door.
- Walk right, then left.
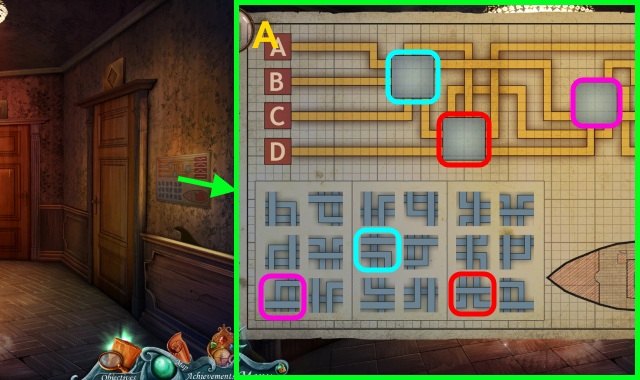
- Examine the map for a mini-game.
- Solution (A).
- Walk down, then go through the second door from the right.
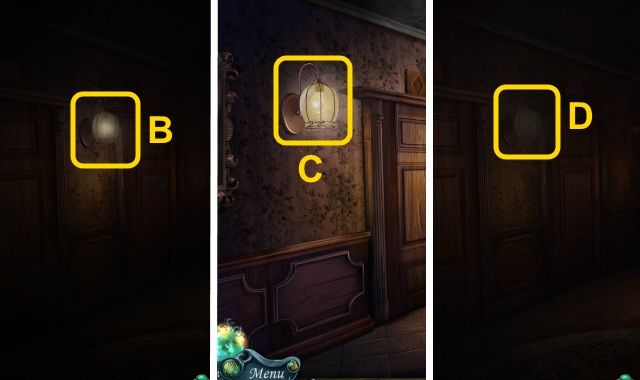
- Examine the light (B).
- Walk down, then right.
- Use the CLOTH to take the BULB (C).
- Walk down, then go through the second door from the right.
- Place the BULB (D).
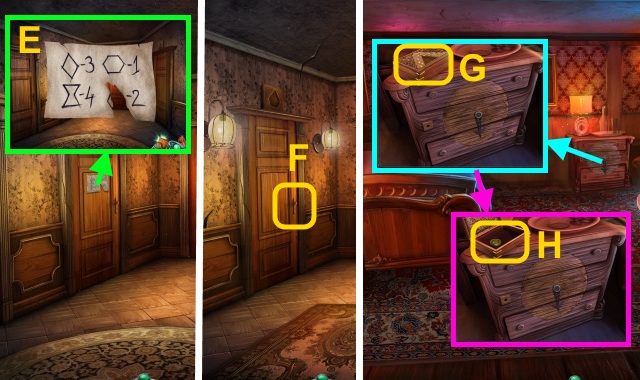
- Examine the paper (E).
- Walk down, then go through the second door from the left.
- Use the ROOM KEY (F).
- Place the TRIANGLE (G); open the box.
- Take the CHIPS (2/3) (H).
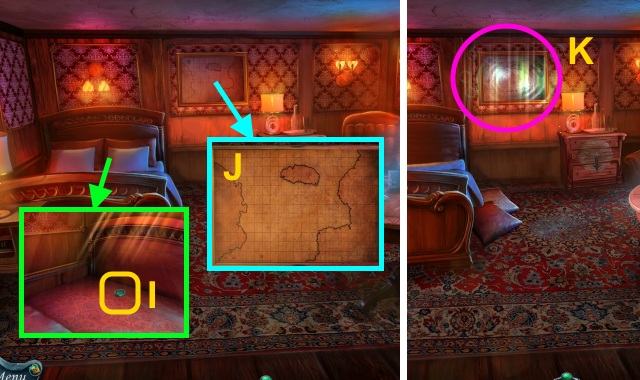
- Move the pillows; take the CHIPS (3/3) (I).
- Place the MAP FOIL (J).
- Play the HOP to receive the CLOCK HAND (K).
- Walk down, then forward.
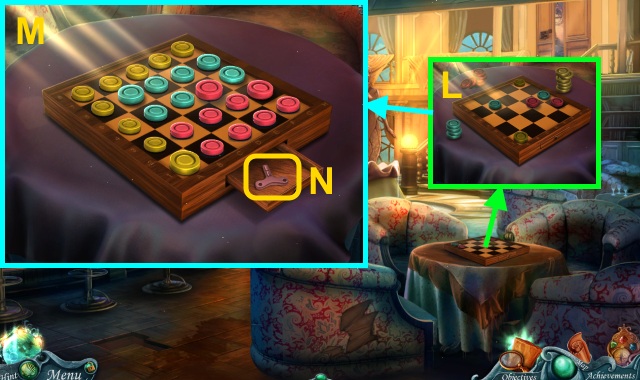
- Place the CHIPS (3/3) for a mini-game (L).
- Solution (M).
- Take the CLOCK WINDER (N).
- Go to the Guest Room.
- Place the CLOCK HAND (O) and CLOCK WINDER (P); turn the winder three times.
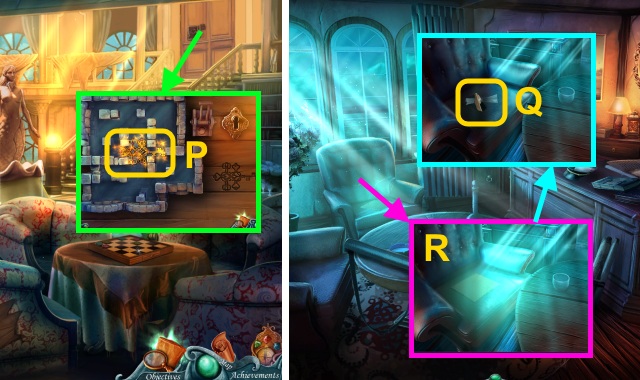
- Open the drawer; examine the box (Q).
- Open the box; take the CELL KEY (R).
- Walk down twice.
- Place the CELL KEY (S).
Chapter 4: Shipwrecked
- Use the IRON BAR (T).
- Close the door; place the IRON BAR (U).
- Talk to the Captain; take the NAVIGATION CHART (V).
- Go forward three times.
- Open the door (W).
- Open the bag; move the objects.
- Take the YARN (X) and CANE (Y).
- Open the case; take the FIRE AXE (Z).
- Take the COIN (1/3) (A).
- Take the COIN (2/3) (B).
- Walk down.
- Examine the statue (C).
- Examine the CANE for a mini-game.
- Solution (D): B, C, A, D.
- Use the CANE (E); you receive the CANE.
- Play the HOP to receive the COIN (3/3) (F).
- Walk forward.
- Insert the COIN (3/3) for a mini-game (G).
- Solution (H): Use the arrows to steer the ship.
- Take the PIRATE DOLL (I).
- Examine the PIRATE DOLL; take the HOOK (J).
- Place the HOOK and YARN on the CANE to receive the CANE WITH HOOK (K).
- Walk down three times.
- Use the LANTERN (L).
- Use the CANE WITH HOOK; take the HORN (M).
- Walk forward three times.

- Place the HORN; open the case (N).
- Take the SHIP’S MAIL (O).
- Examine the SHIP’S MAIL; open the letter (P).
- Move the letters; take the EVERLAST PART (1/2) (Q).
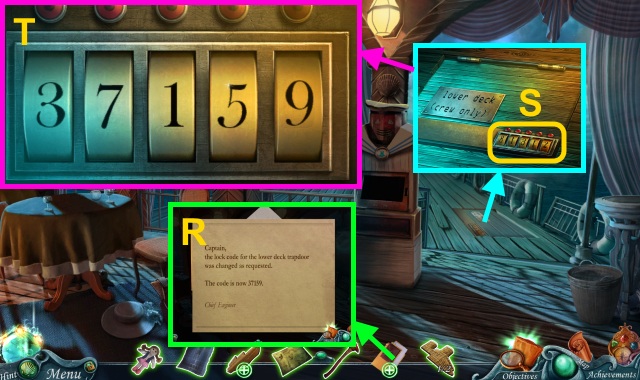
- Open the letter; take the note (R).
- Examine the trapdoor for a mini-game (S).
- Solution (T).
- Go forward.
- Take the PADDLE (U).
- Use the FIRE AXE on the PADDLE.
- Remove the paddle; take the IMPROVISED HANDLE (V).
- Open the door (W).
- Walk left.
- Take the EVERLAST PART (2/2) (X).
- Place the EVERLAST PART (2/2) on the EVERLAST CUTOUT; take the EVERLAST CUTOUT (Y).
- Try to flip the switch (Z).
- Place the EVERLAST CUTOUT (A).
- Examine the pillar for a mini-game (B).
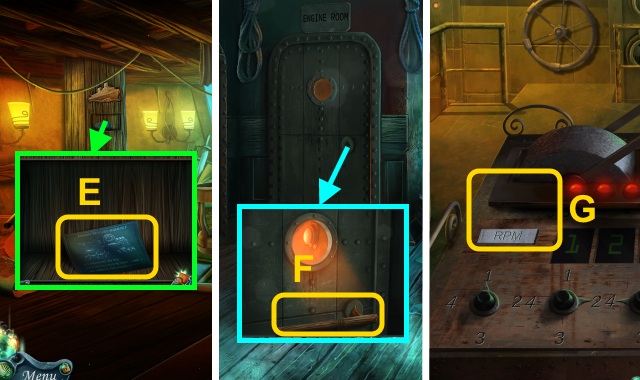
- Take the RESTART SEQUENCE (E).
- Walk down.
- Use the IMPROVISED HANDLE (F).
- Walk forward.
- Place the RESTART SEQUENCE for a mini-game (G).
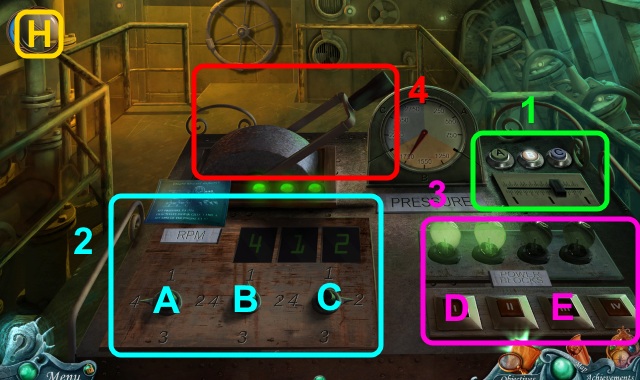
- Solution (H): Set controls as in 1, Cx2, B, Ax2, D, E.
- Walk left.
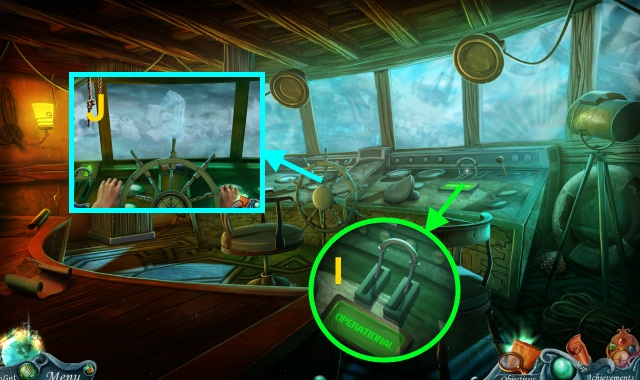
- Flip the switch (I).
- Place the NAVIGATION CHART for a mini-game (J).
- Solution (K): A, C, Bx3, C, Ax3, C, A, C.
- Take the GLASS SHARD (L) and HANDLE (M).
- Take the SHOVEL (N).
- Use the GLASS SHARD (O).
- Play the HOP to receive the EMERGENCY LAMP (P).
- Walk forward.
- Take the METAL DETECTOR (Q).
- Take the TERRACE-GATE PIECE (1/6) (R).
- Walk forward.
- Take the TERRACE-GATE PIECE (2/6) (S).
- Take the METAL-DETECTOR PARTS (1/3) (T).
- Place the EMERGENCY LAMP (U); take the DETONATOR (V) and HAMMERHEAD (W).
- Use the SHOVEL; take the DYNAMITE (X).
- Place the HANDLE on the HAMMERHEAD to receive the PRYING TOOL (Y).
- Walk forward.
- Take the METAL-DETECTOR PARTS (2/3) (Z).
- Walk forward.
- Take the METAL-DETECTOR PARTS (3/3) (A).
- Walk forward.
- Use the PRYING TOOL; take the SAW (B).
- Place the TERRACE-GATE PIECE (2/6) (C).
- Place the METAL DETECTOR PARTS (3/3) ON THE METAL DETECTOR (D).
- Walk right.
- Take the WIRE (E); use the SAW.
- Use the SHOVEL (F).
- Walk forward.
- Talk to the Captain (G).
- Place the DYNAMITE and WIRE on the DETONATOR to receive the RIGGED EXPLOSIVE (H).
- Try to examine the cell (I).
- Place the RIGGED EXPLOSIVE (J).
- Press the detonator twice (K).
- Play the HOP to receive the DETECTOR DISPLAY (L).
- Place the DETECTOR DISPLAY on the METAL DETECTOR (M).
- Walk down, then forward.
- Use the METAL DETECTOR; use the SHOVEL (N).
- Move the sand; take the TERRACE-GATE PIECE (1/4) (O).
- Walk forward.
- Use the SHOVEL (P).
- Move the sand; take the TERRACE-GATE PIECE (2/4) (Q).
- Walk forward.
- Use the SHOVEL (R).
- Move the sand; take the TERRACE-GATE PIECE (3/4) (S).
- Walk forward.
- Use the SHOVEL (T).
- Move the sand; take the TERRACE-GATE PIECE (4/4) (U).
- Walk forward.
- Place the TERRACE-GATE PIECE (4/4) (V).
- Walk left.
Chapter 5: The Island of the Forgotten
- Talk to the Adventurer (W).
- Open the bag; take the PICKAXE, ADVENTURER’S JOURNAL, and GRAPPLING HOOK (X).
- Take the LETTER TILES (3/5) (Y).
- Open the ADVENTURER’S JOURNAL (Z); flip the pages.
- Take the scroll (A).
- Walk forward.
- Use the Compass and PICKAXE (B).
- Use the GRAPPLING HOOK for a mini-game (C).
- Solution (D).
- Walk right.
- Take the EMPTY LANTERN (E); examine the gem (F).
- Use the EMPTY LANTERN; gather the fireflies (G).
- Take the FIREFLIES.
- Place the FIREFLIES; open it (H).
- Take the LION’S EYE (I).
- Take the WINDING KEY (J).
- Walk down.
- Place the WINDING KEY for a mini-game (K).
- Solution (L).
- Walk forward.
- Talk to the Clockmaker (M).
- Try to take the screwdriver (N).
- Walk down twice.
- Place the LION’S EYE (O); take the LETTER TILES (4/5) and KNOCKER (P).
- Use the KNOCKER (Q); take the LETTER TILES (5/5) (R).
- Walk forward, then right.
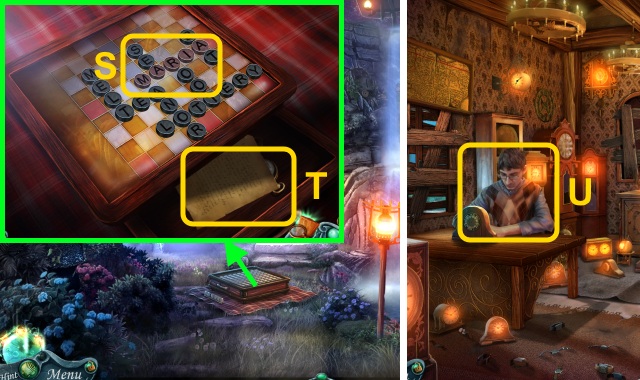
- Place the LETTER TILES (5/5); arrange them (S).
- Read the letter; take MARIA’S WATCH (T).
- Walk down, then forward.
- Give MARIA’S WATCH (U).
- Take the SCREWDRIVER (V).
- Take the LEVER (W).
- Use the PICKAXE (X); open the window.
- Walk left.
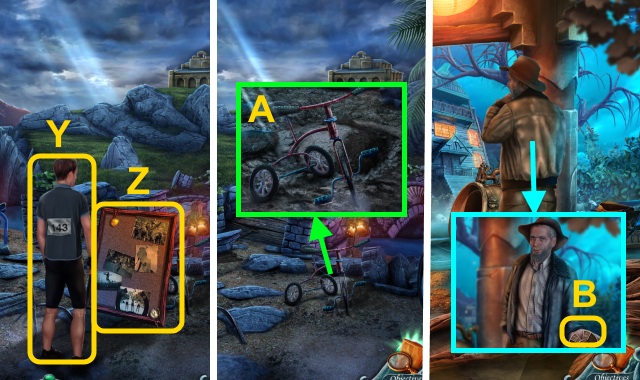
- Talk to the Cyclist (Y).
- Take the board (Z).
- Take RED LIGHTNING (A).
- Walk down three times.
- Give RED LIGHTNING; take the EMBLEM (B).
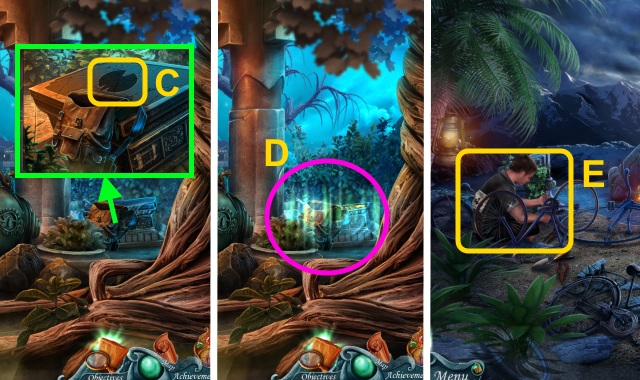
- Place the EMBLEM (C).
- Play the HOP to receive the TROPHY (D).
- Go to the End of the Road.
- Give the TROPHY (E).
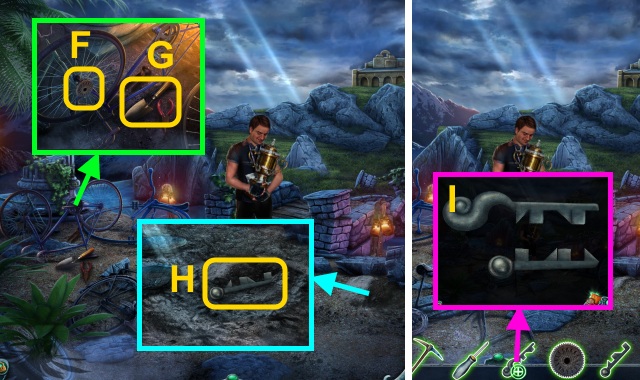
- Use the SCREWDRIVER; take the GEAR (F) and SHOVEL (G).
- Use the SHOVEL; take the LEVER PART (H).
- Place the LEVER PART on the LEVER for a mini-game (I).
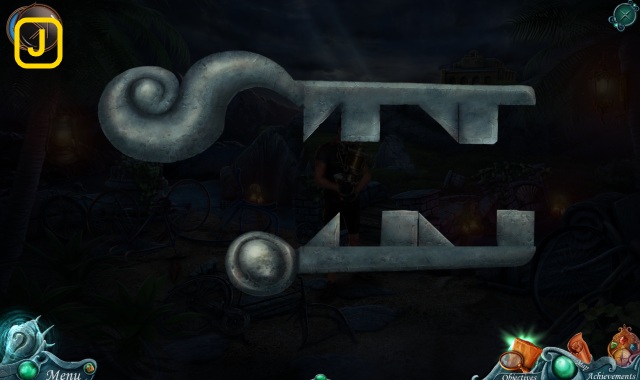
- Solution (J).
- You receive the LEVER.
- Go to the Waterfall.
- Place the GEAR and LEVER (K); pull the lever.
- Walk forward.
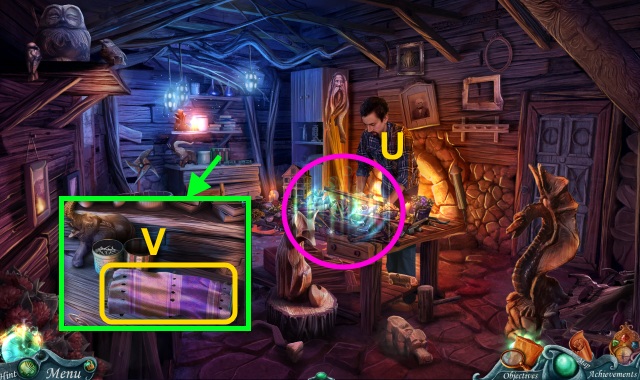
- Talk to the woman for a mini-game (L).

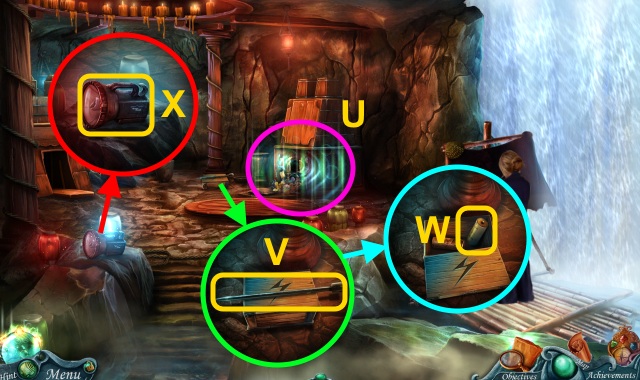
- Move the curtain; play the HOP to receive the LIGHT BULB (U).
- Take the ROD (V); open the box.
- Take the BATTERY (W).
- Take the MINER’S LAMP (X).

- Use the SCREWDRIVER on the MINER’S LAMP; move the cover, lid, battery, and bulb (Y).
- Place the LIGHT BULB (Z) and BATTERY (A); take the MINER’S LAMP.
- Walk left.
- Try to walk forward (B).
- Use the MINER LAMP and PICK AXE (C).
- Use the Compass (D).
- Walk right, left, and then right.
- Go forward for a mini-game (E).
- Solution (F-H).
- Go forward.
- Place the ROD (I).
- Use the Compass (J).
- Use the Compass (K).
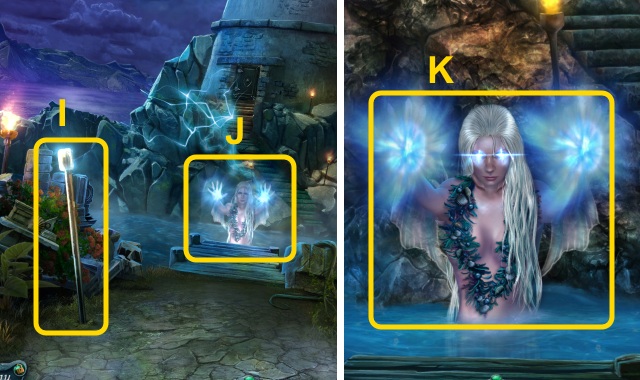
- Walk forward.
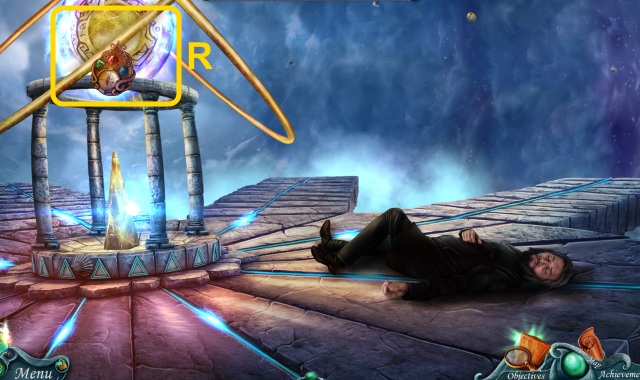
- Examine your father and the beacon (L).
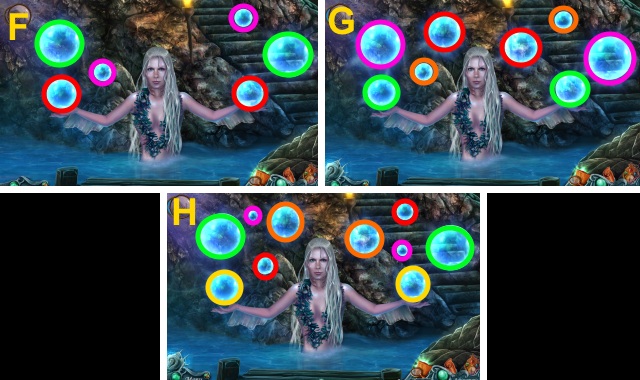
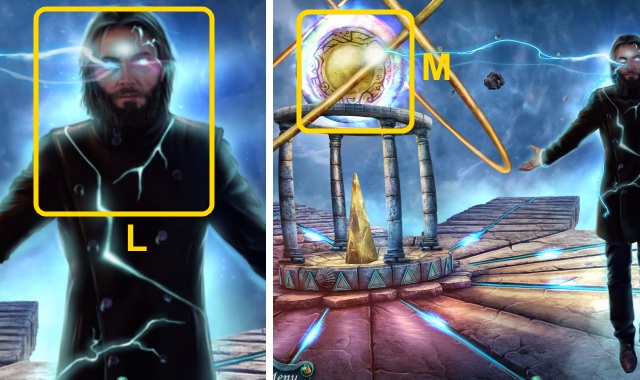
- Use the Compass for a mini-game (M).
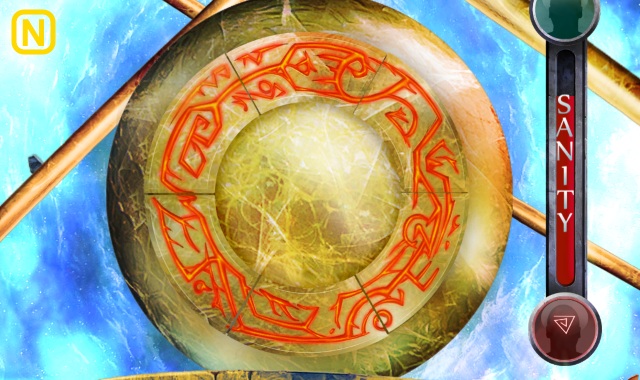
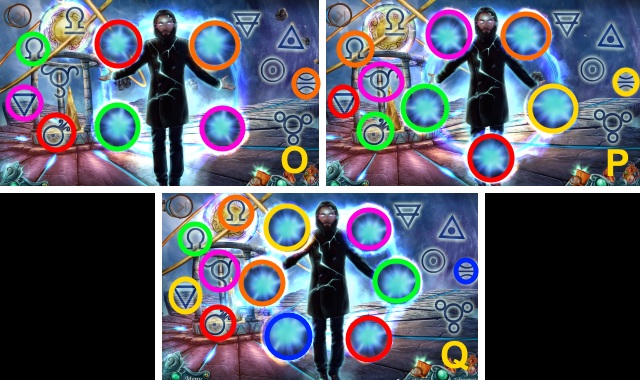
- Use the Compass three times (R).
- Congratulations! You have completed Rite of Passage: The Lost Tides.


 Zombie! Zombie! Zombie! Tips and Tricks, Guide, & Tips
 Myths of the World: Black Rose Walkthrough, Guide, & Tips
 Weird Park: Broken Tune Walkthrough, Guide, & Tips
 Fetch Walkthrough, Guide, & Tips
 Brink of Consciousness: Dorian Gray Syndrome Walkthrough, Guide, & Tips