The tier 5 Japanese battleship Kongo isn’t as well armored as a true battleship since in reality it was a battlecruiser and not a full fledged battleship. Being a battlecruiser the Kongo mounted battleship caliber guns while sacrificing armor protection to maintain the resemblance of the speed and mobility of a cruiser. At tier 5 the Kongo’s armor still stacks up well for a battlecruiser and will provide adequate protection against most non-battleships the Kongo regularly faces. Against other battleships however the Kongo is vulnerable unless its driver angles since if it presents its broadside to an opposing battleship its citadel area is capable of being penetrated.
This World of Warships Kongo armor guide breaks down the Kongo’s armor based on armor thickness and angles. It also outline the critical citadel areas, propulsion system, and powder magazines which are crucial for causing maximum damage. The way armor values are listed for multiple layers of armor the first listed value is the out most armor plate, followed by the next armor plate, and ending with the inner most plate. For example on the Kongo it has a 19mm torpedo bulkhead protecting the amidships area starting at the waterline, therefore being the first piece of armor a shell would come into contact with it will be listed first.
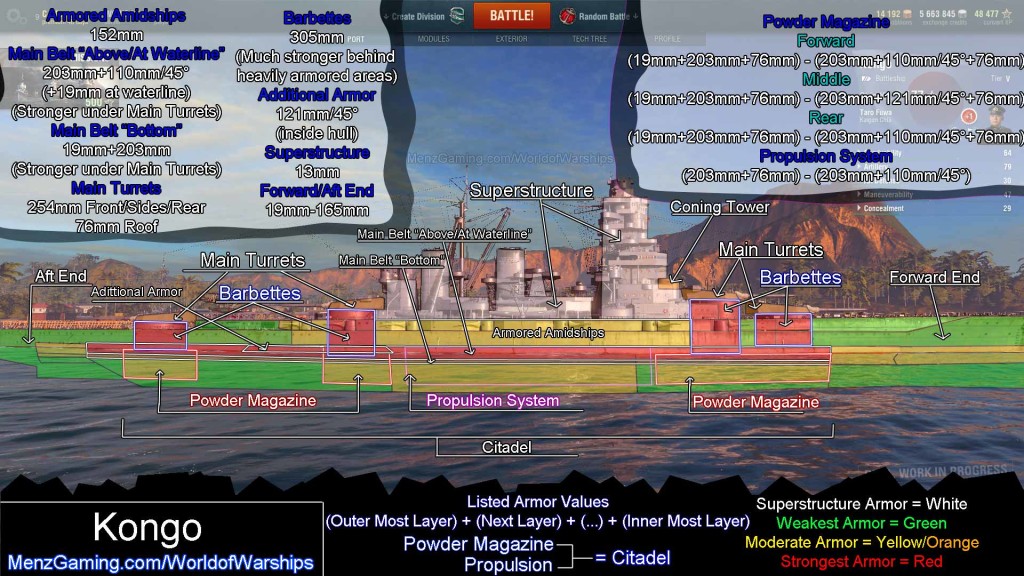
The Kongo despite being a battlecruiser has surprisingly good armor where it counts and has a complex armor layout giving it great protection around the barbettes and powder magazines. Due to to the many layers of armor the armor guide above has been color coded to help see the different sections of the Kongo. Highlighted in red are the powder magazines, blue are the barbettes that connect the main turrets to the powder magazines, and purple is the propulsion system.
Starting in amidships you have the armored amidships area that is protected by 152mm of armor and sits between the main turrets and below the superstructure. This area does not count as a citadel area but will receive more damage if damaged than if you hit the forward/aft ends. Below the armored amidships area is the main belt that runs along most of the Kongo around the waterline. Above and extending just below the waterline is the “main belt above/at waterline section that is protected by 203mm hull armor with an additional 110mm armor plate angled at 45°. Additionally at the waterline this area gains an additional 19mm due to the torpedo bulkhead. Below the waterline is the “main belt bottom” area that is only protected by the 19mm torpedo bulkhead and the 203mm hull armor but due to its depth below the water it is not easy to hit(if impossible by most shots). The main belt area on the Kongo is tough to penetrate unless enemy battleships get a clear shot broadside into it and/or miss the additional 110mm/45° armor plate inside the hull. Keep in mind that beneath the main turrets the armor is much stronger in the main belt area and also any penetrations in the main belt area will cause massive damage.
Moving outside of the main belt you have the forward and aft ends that will not receive full damage due to them not having vital components housed in them. These areas are very poorly protected with a minimal 19mm of armor and a maximum 165mm(76mm+89mm) found in the aft end. Shooting at the forward/aft end is viable if you are unable to penetrate the Kongo amidships but isn’t the most effective at sinking the ship. The superstructure is protected by a paltry 13mm armor and the coning tower is shielded by 254mm of armor.
Focusing now on the main turrets, barbettes, and vital systems you now face the strongest armor found on the Kongo. The main turrets are protected by armor 254mm thick on the fronts/sides/rear and 76mm on the roof. This leaves the Kongo susceptible to damage from plunging fire and/or dive bombers if it hits the roof of a main turret. The barbettes are protected by armor 305mm thick that also have additional armor from the hull adding even more protection to them. Actually penetrating a barbette is very difficult since outside of the portion above deck it has the very thick armor plus whatever armor is outside of it from the hull of the ship. Unlike a lot of other battleships the Kongo does not have barbettes that fail to “connect” to the powder magazine and thus does not have a very weak citadel area underneath 1-2 main turrets. This is a huge advantage since many other battleships(especially USN BB’s) have the main turret in front of the coning tower fail to extend all the way down to the powder magazine.
The powder magazines are the most protected area on the Kongo for very obvious reasons and they can be found under the four main turrets. The forward and rear powder magazines share the same protection of 19mm+203mm+76mm as a minimal value found on the “main belt bottom” area. However, the top portion jumps up to 203mm+110mm/45°+76mm which is virtually immune to most shells thrown at it. The middle powder magazine extends a little further up than the others(making it easier to hit) but is stronger on the top portion since it has a 121mm/45° armor plate inside instead of 110mm/45°.
Finally, for plunging fire the Kongo battlecruiser’s aerial/deck protection has several layers. First off there is 19mm of deck armor outside the perimeter of the superstructure area that extends to the forward/aft ends. Running across the entire citadel area(from both ends of the main belt) is a 38mm armored deck with an additional 38mm deck in the superstructure area. Finally there is a 120mm armored deck sitting over all vital areas running from both ends of the main belt(entire citadel area). This gives the Kongo a minimal 158mm of armor and a maximum 196mm in the vital citadel area from plunging fire/aerial attacks which for tier 5 battlecruiser is adequate enough to protect it from most incoming fire.

 Armor Guide: North Carolina - Menz Gaming | World of Warships
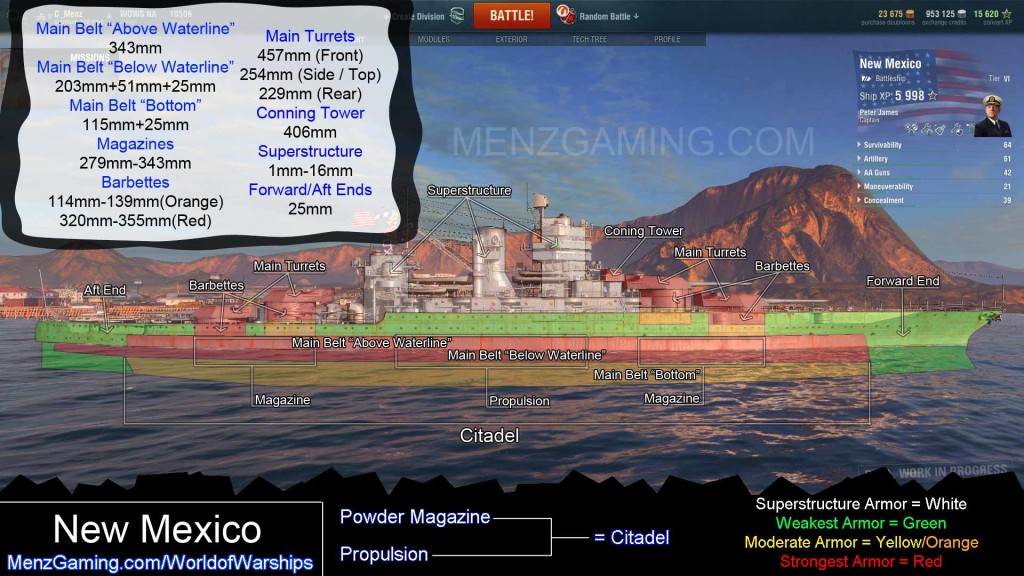
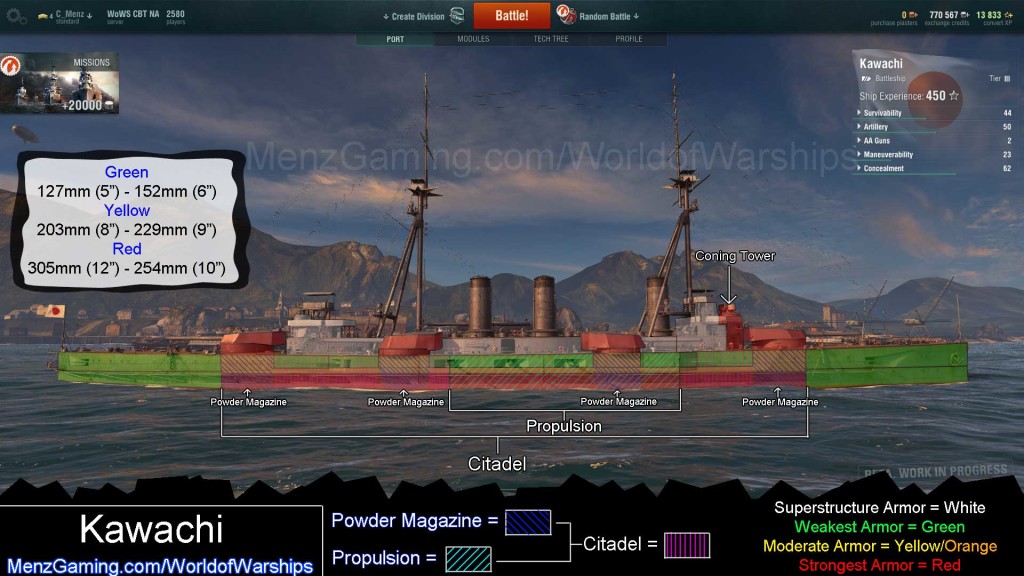 Armor Guide: Kawachi - Menz Gaming | World of WarshipsArmor Guide: New Mexico - Menz Gaming | World of Warships
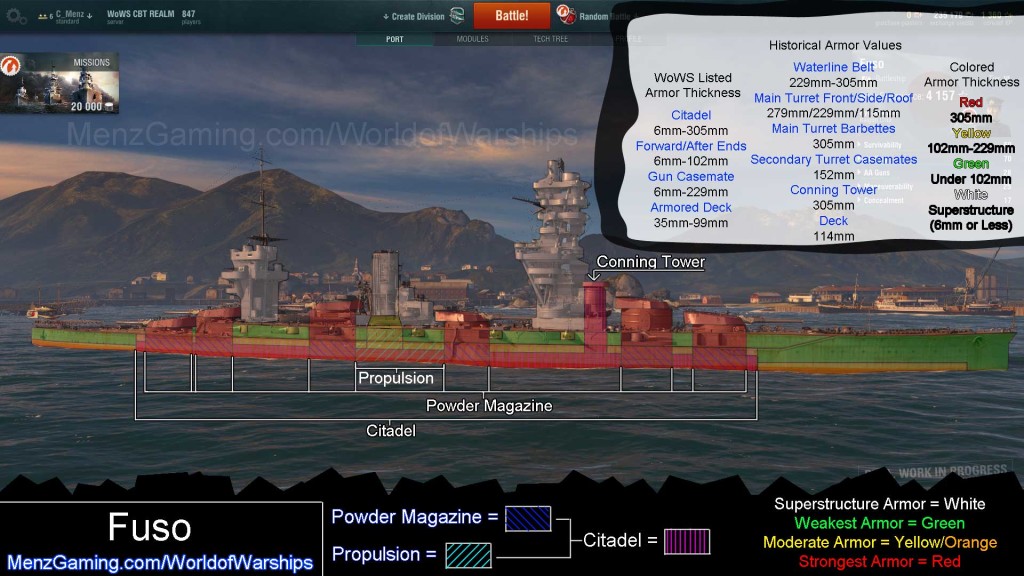 Armor Guide: Fuso - Menz Gaming | World of Warships
 Armor Guide: Colorado - Menz Gaming | World of Warships