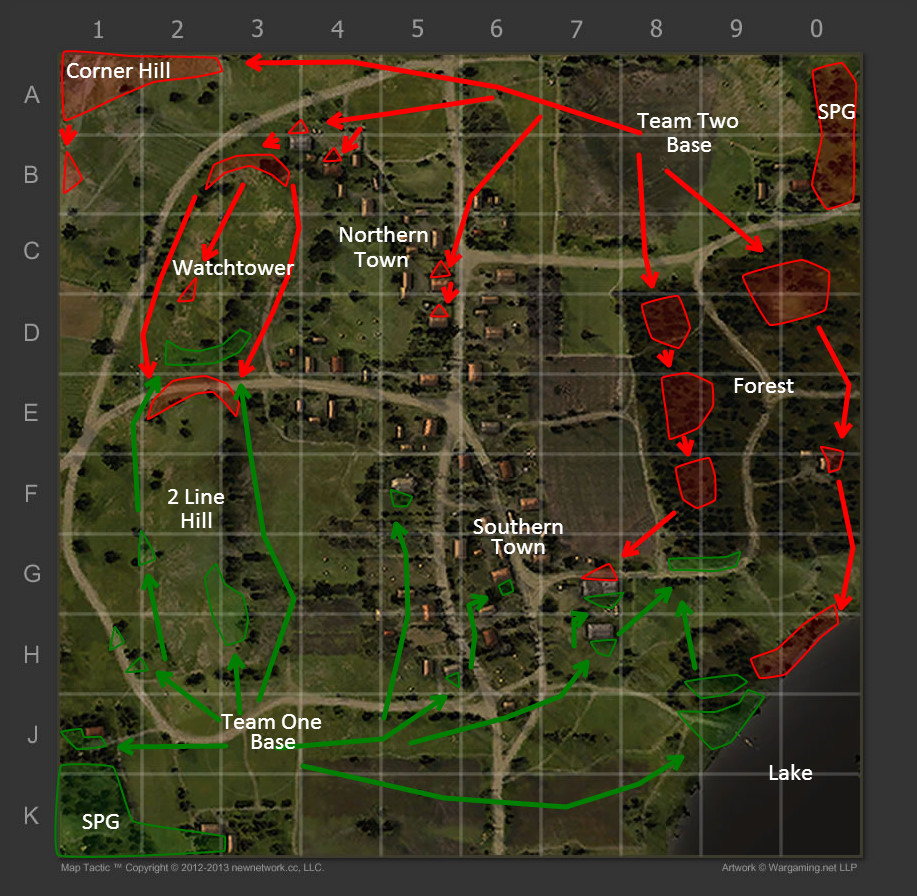
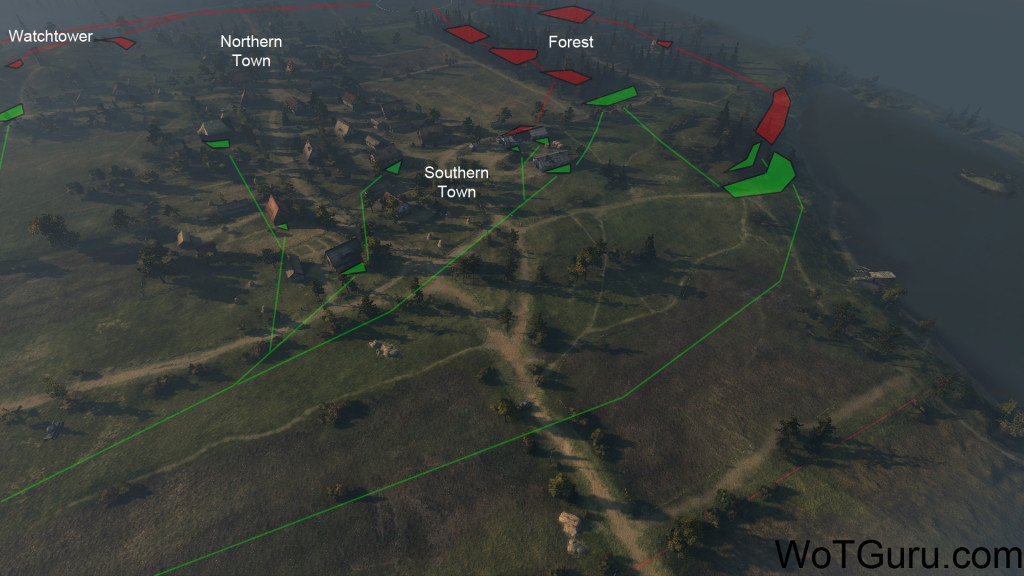
Murovanka looks like a very straight forward map but when you dive deeper you will see that many approach this map the wrong way. This map gives each starting team a strong side to push on and the opposite side of the map being easier to defend. Unlike other maps however both teams are capable of attacking the same side easily if played correctly while defending another very easily.
For team one(green) you start off in the southern part of the map. Moving up the 1-3 lines grants you a great set up to push aggressively north to prevent the enemy from making it into the corner hill and defensive locations that are tough to get them out of. On the opposite side of the map near the lake/southern town you get great hard cover to set up behind and also a small hill by the lake to spot by. Team two receives the same 1-3 line advantage if they push aggressively to pin the southern team by their base since there is less hard cover for team one to hide behind. On the opposite side of the map team two receives much less hard cover than team one to defend with, however they do have great soft cover in the form of the forest. Knowing how to abuse camouflage and spotting mechanics here pays off a lot.
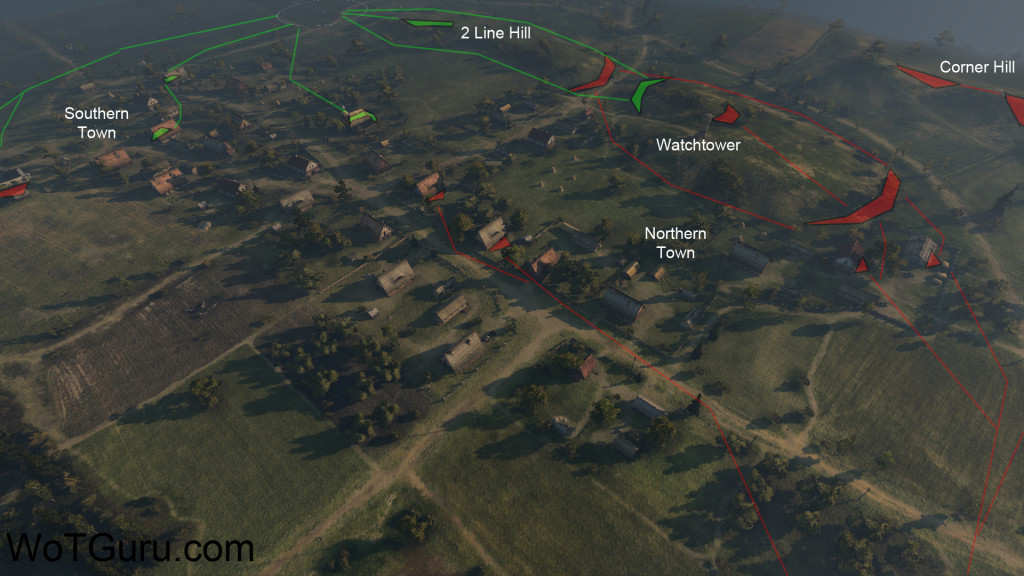
The center of the map is covered by scattered houses which some are destructible whiles others are not. Overall the town plays more of a buffer at the start of the match and also as a decent route for light tanks to do a quick pass before turning around to spot. Later in the match it becomes more important since it gives hard cover to more across to either the forest or 1-2 lines where the remaining enemies are.
The mini map was made using MapTactic which is a great tool for coming up with strategies for World of Tanks and other games.
For team one this part of the map is slightly more crucial than for team two. This is because the end of the enemies push winds up inside of base of team one. Due to this you also receive a better starting location that allows you to aggressively push up to the D2 area just below the watchtower. If you have more than a few tanks that come with you then do not stop and continue pushing to B2 to prevent the enemy from getting into the corner hill. The defensive spots near your spawn are somewhat effective at providing covering fire, but they simply do not work if you let the enemy push into E2 since you have no hard cover available. You can also move up the 3 line to flank enemies in E2 or if you spawn further east at the start of the match.
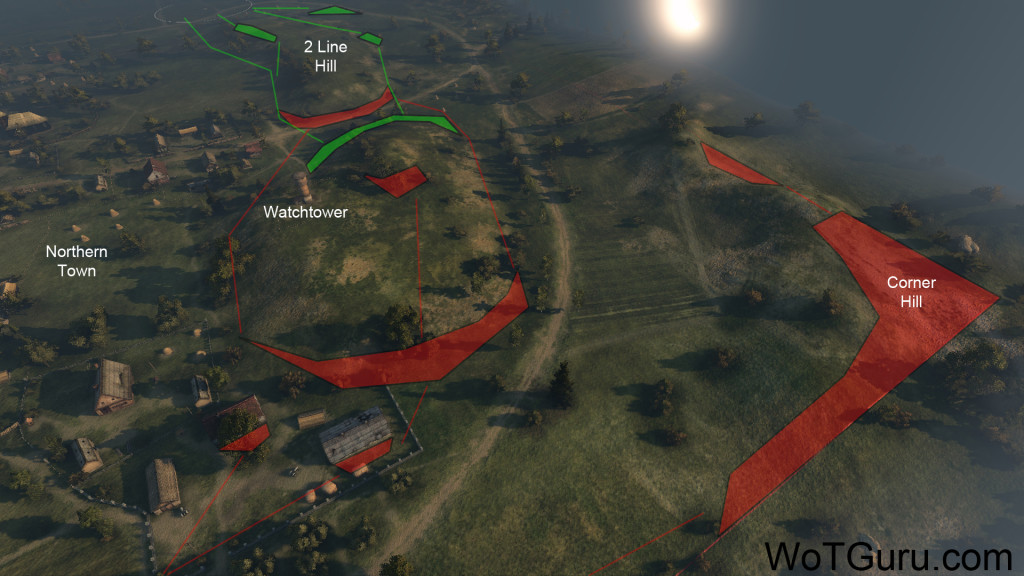
Team two starts further away from this area of the map than team one and it is also slightly less important since it is further away from their base. However, they do receive a slight advantage in defending if need be than team one due to some hard cover and more importantly the corner hill. Starting out if you are in a medium or a tank with good gun depression(8+) then getting into the corner hill in A1 is key since it allows you to fire down the 1-2 lines and also into D2/E2 safely. For other tanks the B3 area is great for defending if your team did not send many tanks over here. Like team one you have a very good opportunity to push down either route to E2 and thus pinning team one into bad defensive positions as your support chews them apart.
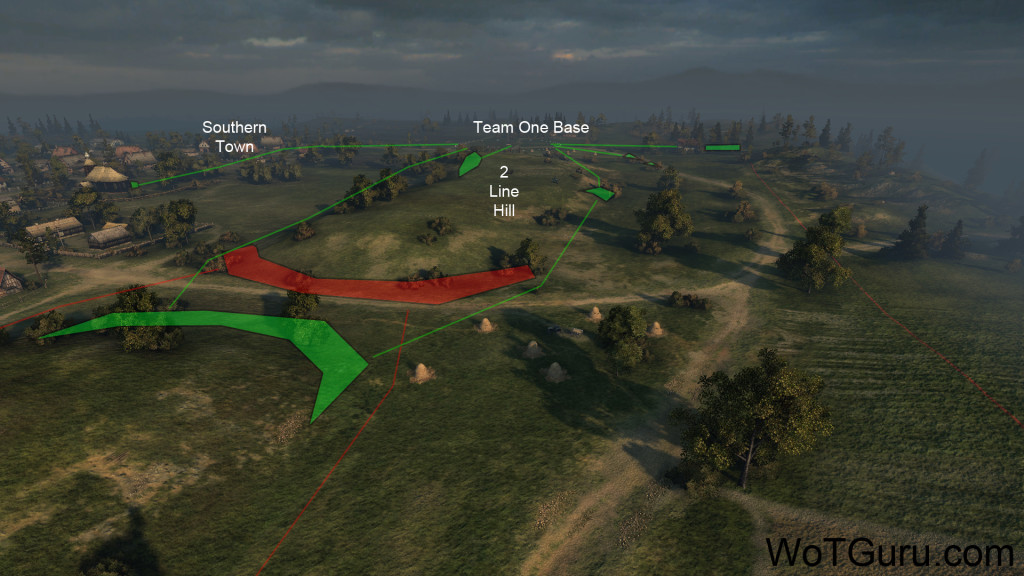
Team one gets a decent spot in F5 capable of protecting 1 tank from most incoming fire. From here you can fire towards the watchtower and at enemies trying to push into E2. Be careful of moving another further north or east from here since the forest has good shots on you without you being able to actually see them. Further south are the G6/H5 locations that are not near the warehouses by the lake but rather provide a slightly easier location to defend this section of the map while being able to escape if need be. G6 provides decent shots into enemies into the forest while H5 is great for defending if you are short on tanks on this side of the map. If you are in a light tank you also have a good chance at darting up through the town and then turning back towards the 1/2 line for a quick spotting run at the start of the match.
Much like team one’s location to fire into the watchtower area on team two you get two building suitable to do the same task. The one closest to your base is better protected but has less firing lanes while the one further south exposes you to return fire but grants a wide open firing lane. Defensive wise you shouldn’t need to set up anywhere in the central town area unless if it is later on in the match and your team loses the watchtower/corner hill area. Also, like team one a light tank is able to quickly spots south in the town and then wrap back into the watchtower area with a high success rate.
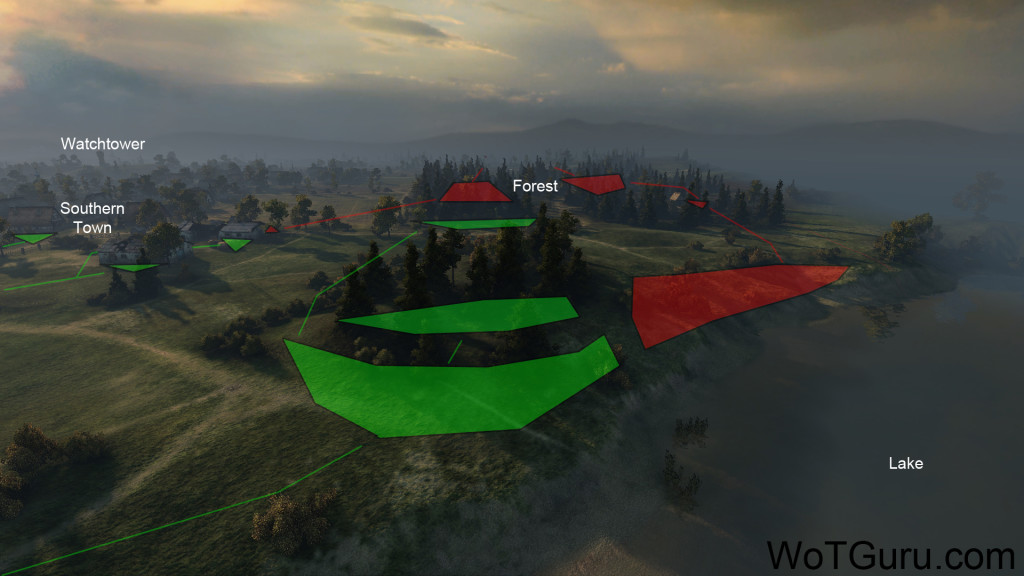
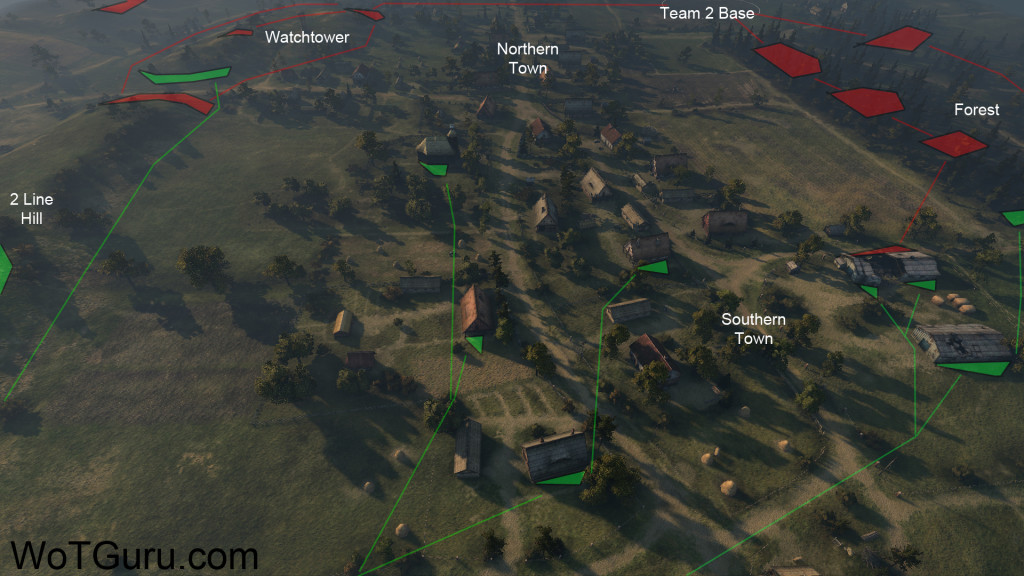
For team one this side can be very difficult for most players to properly play this side since they want to push-push-push when they should sit there and spot/defend until you know what is in the forest. You start out with two great warehouses to set up behind in H7/G7 to fire on anything coming out of the town as well as the G6/H5 locations for additional support. The H7 location is better protected and allows your allies to help you if you are flanked easier. G7 on the other hand provides slightly better shots if the enemy makes it out of the forest but has windows that you can be shot through if you are not careful.
Closer to the lake is a small hill with some bushes/trees to provide soft cover. Do not go here if you are not mobile, have good gun depression, are gigantic, or have great frontal armor. This location is great for spotting the forest if anything emerges but is very hard to defend since you cannot crest the hill without being annihilated by tanks in the forest/spgs. If you see yourself here then simply spot and if enemies are approaching then move back south the J8 so that your allies can help you. If the enemy does not make a move then that changes things since your team can send a spotter to the edge of the forest in G8/G9 to slowly prod and light up enemies for others to kill. This location has a very small incline that hides most tank’s hulls but does not provide 100% cover.

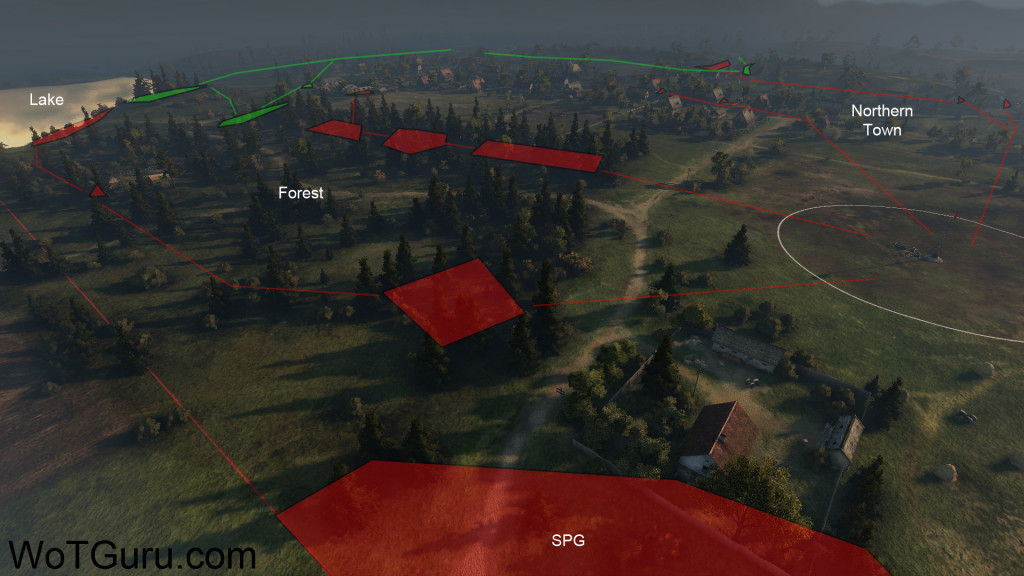
Team two gets a slightly easier time on this side of the map since they spawn closer and have a large amount of soft cover to work with. However, this can also prove to be a huge negative if your team simply moves into the forest and plops the entire force in one location by your base. You will not be able to see any advancing enemies at all and will find yourself at a disadvantage. While you do not have hard cover like team one you do benefit from having a layered approach on this side. Having tanks in each of the marked locations in the 8 line(part of forest closest to the town) allows you to spot advancing enemies without having your entire team spotted. Additionally sending a couple tanks to the lake to spot and catch the enemy off guard is recommended. Sending to many tanks to quick however can lead to your team being stuck in a bad spot by the lake with no where to go!
An alternative spot to go to is at G7 on the northern side of the warehouse team one uses to defend. You can be hit by the 2 line hill near the enemies base and also through the windows if you are not careful. On the plus side you will freeze any enemies heading to the lake most times and also it gives you the opportunity to move south between the warehouses to break the enemies defense. Only go here if you have good frontal armor and are mobile at the start of the match(tanks like a T110E5, T-54, etc). If you are in a tank like an E-100/Maus you can still push to here from the 8 line if the enemy does not have a huge force unseen on the hill by the lake. The number one rule for this spot is to keep your strongest armor facing towards the 2 line hill since you will be shot from there.
Artillery on this map is limited at first since the best location is usually the corner in which you spawn near. However, after your first 1-2 shots you should start to move behind your main force since this map is prone to your weak flank failing very quickly(resulting in your base falling). Just stick to the edges of the map behind your main force of tanks and you’ll benefit greatly.
 Weak Spot Guide: Lowe - World of Tanks Guru
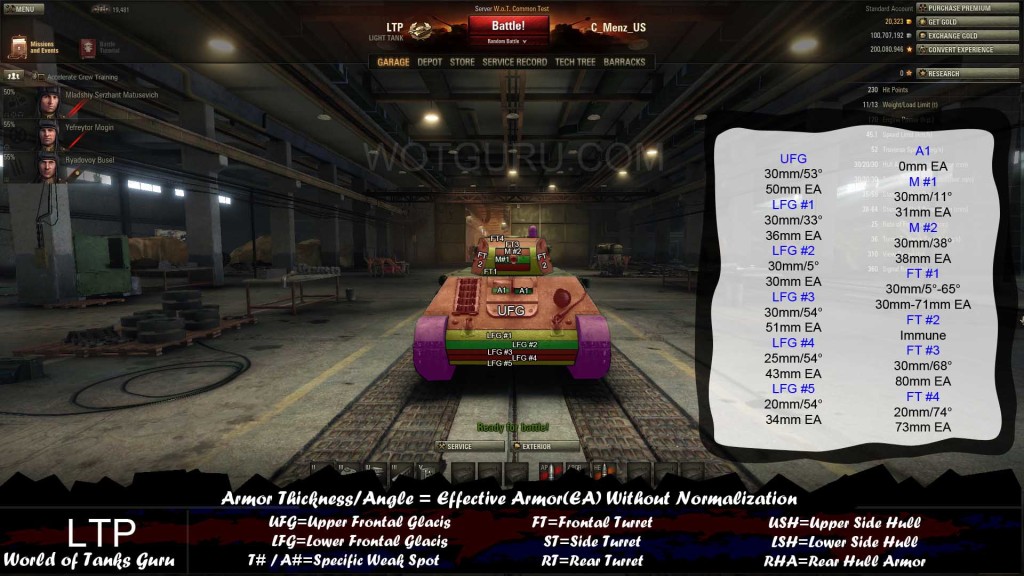 Weak Spot Guide: LTP - World of Tanks Guru
 World of Tanks Guide - T1 Cunningham
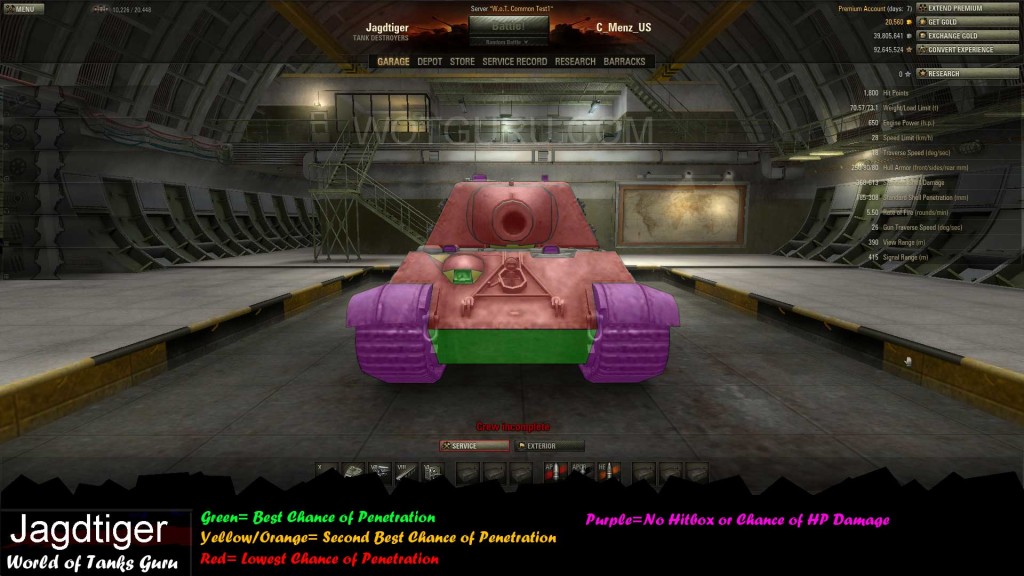 Weak Spot Guide: Jagdtiger - World of Tanks Guru
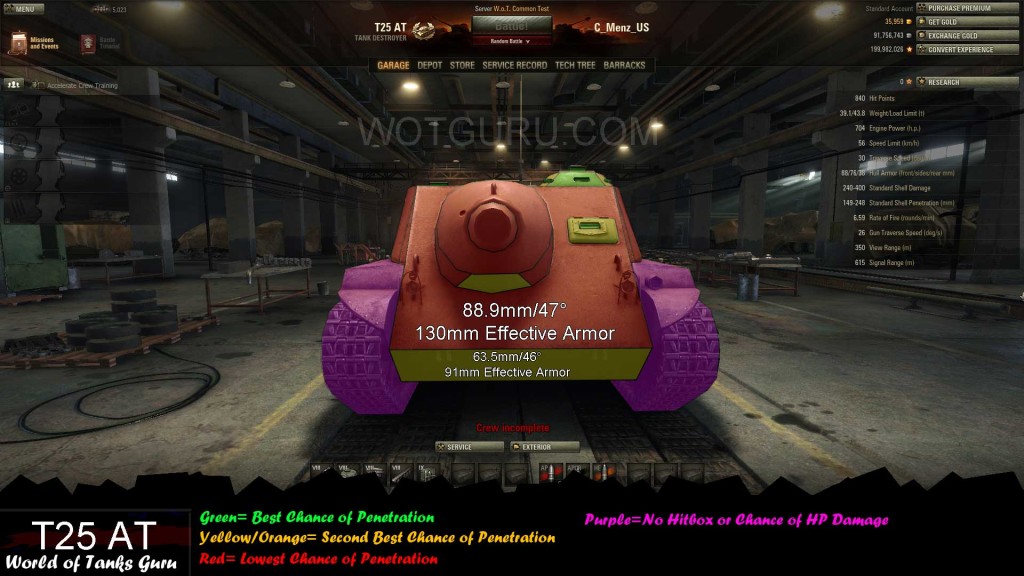 Weak Spot Guide: T25 AT - World of Tanks Guru