
Welcome to the guide to Lord of the Rings: Conquest PC video game. This material consists mostly of a very detailed walkthrough of the singleplayer mode of the game. That's sixteen levels, divided into two main campaigns (good side and bad side). Description of each level has a detailed map of the surroundings, but I've also focused a lot of attention on describing how to fulfill given tasks. In most cases it's also important to choose a correct class for the current assignment, so I've also put a lot of effort in choosing best characters to the situation on the battlefield. In addition to the main walkthrough section my guide also contains useful hints for less experienced players. They should help in understanding how the game works by telling how to avoid mission failures, when to choose heroes and what are the advantages of playing using different character classes. Good luck and have fun playing the game!
Stranger
MAP OF THE AREA:
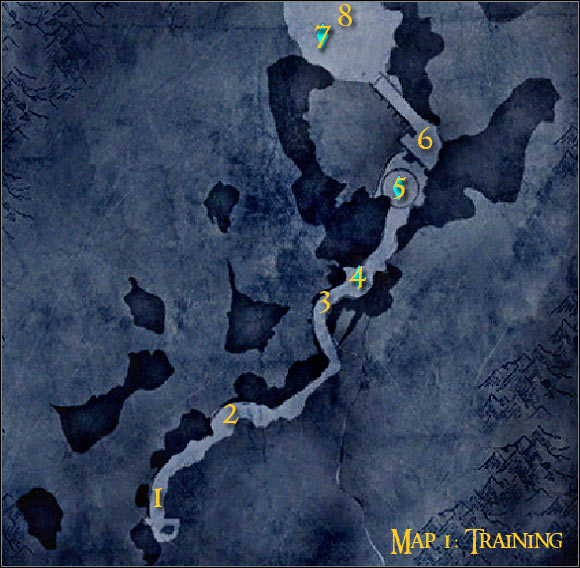
Map legend: 1 - starting area; 2 - crest; 3 - area where you'll be attacked by a large group of orcs; 4 - first checkpoint; 5 - second checkpoint; 6 - passageway to the third checkpoint; 7 - third checkpoint; 8 - main battlefield
Additional info: This is a training mission, so you shouldn't expect any major difficulties. The gameplay will focus on showing you the differences between using four main character classes. You'll also find out how to take control over checkpoints and how to use heroes to your advantage.
First assignment: Go to the crest
Suggested class: warrior
You'll have to start the game as a warrior, because other classes won't be available right away. You'll begin your exploration in the southern areas (1 on the map) and your first assignment will be to get to the crest (2 on the map). Once you've arrived at your destination [#1] proceed downwards and await further commands.
![[#1] - Campaign - Forces of good - Training mission - part 1 - Campaign - Forces of good - The Lord of the Rings: Conquest - Game Guide and Walkthrough](https://game.lhg100.com/Article/UploadFiles/201512/2015121715511210.jpg)
[#1]
Second assignment: Defeat the orcs
Suggested class: warrior
A nearby barricade is going to be destroyed by orcs very soon and a result you'll have to be ready to engage them in an open combat [#2]. You can't use warrior's special attacks just yet, so instead rely solely on the standard ones. In order to do that you must be using all three mouse buttons (left click - fastest attack, middle - medium attack, right - powerful attack). Thankfully you don't have to worry about being knocked down and killed by the orcs, because the health bar isn't active just yet. You'll soon be asked to perform a few combo moves. This is also an easy task - follow the instructions on the screen and watch as your character takes down large numbers of orcs.
![[#2] - Campaign - Forces of good - Training mission - part 1 - Campaign - Forces of good - The Lord of the Rings: Conquest - Game Guide and Walkthrough](https://game.lhg100.com/Article/UploadFiles/201512/2015121715511206.jpg)
[#2]
Third assignment: Perform a dashing sword attack
Suggested class: warrior
You'll be finally informed that you're allowed to test one of the special attacks of your current character. This is a slightly more complicated action. You must first press and hold the SHIFT key and only then you can start pressing mouse buttons for various attacks. Read the additional info about the possibility of attacking enemy units even when they're blocking. You should also know that you won't be allowed to use special moves without having to worry about any restrictions. They will become available only if you manage to fill up a power bar. Defeat the remaining orcs and don't forget to use your new moves to speed up this process [#3].
![[#3] - Campaign - Forces of good - Training mission - part 1 - Campaign - Forces of good - The Lord of the Rings: Conquest - Game Guide and Walkthrough](https://game.lhg100.com/Article/UploadFiles/201512/2015121715511244.jpg)
[#3]
Fourth assignment: Proceed up the path
Suggested class: warrior
When you get rid of the orcs proceed to a path where a new barricade has been recently destroyed [#4]. Test a move allowing you to throw an axe if you want to. Otherwise approach the orcs right away and use your sword to kill them. Keep pushing forward and eventually you'll find out about the possibility of using a Crowd Breaker move (3 on the map). Don't forget to get closer the orcs before activating it, because otherwise it won't do you any good. Deal with the remaining forces and proceed forward.
![[#4] - Campaign - Forces of good - Training mission - part 1 - Campaign - Forces of good - The Lord of the Rings: Conquest - Game Guide and Walkthrough](https://game.lhg100.com/Article/UploadFiles/201512/2015121715511281.jpg)
[#4]
Fifth assignment: Capture a checkpoint
Suggested class: warrior
You may finally proceed towards the first checkpoint (4 on the map). In order to take control over this area you must stay within the designated zone for nearly a minute. That's not all. You must also prevent the orcs from getting inside the large circle. All the monsters will be arriving from one of the cliffs [#5]. I would recommend that you attack them right away, before they get too close to the checkpoint. Use special moves against larger groups and be patient while trying to gain full control over this zone.
![[#5] - Campaign - Forces of good - Training mission - part 2 - Campaign - Forces of good - The Lord of the Rings: Conquest - Game Guide and Walkthrough](https://game.lhg100.com/Article/UploadFiles/201512/2015121715511264.jpg)
[#5]
Sixth assignment: Change class to archer
Suggested class: warrior
This is going to be strictly a formality. Get closer to the flag, press the E key and choose an archer from the list.
Seventh assignment: Defeat enemy archers
Suggested class: archer
You'll now be given an opportunity to find out how is it to play the game as an archer. Just as before, you won't be allowed to use any special moves right away, but on the other hand you will have to watch out for the energy bar. Enemy orcs will be arriving on the nearby cliffs [#6]. You can just keep pressing the left mouse button or you can also start using the CTRL key to zoom in the view.
![[#6] - Campaign - Forces of good - Training mission - part 2 - Campaign - Forces of good - The Lord of the Rings: Conquest - Game Guide and Walkthrough](https://game.lhg100.com/Article/UploadFiles/201512/2015121715511386.jpg)
[#6]
Eighth assignment: Seize control over the second checkpoint
Suggested class: archer
You must wait for the game to unlock you access to a new route. This is how you'll be able to get to the second checkpoint (5 on the map). Head down and meet up with other archers. They should be already standing within the circle and I would recommend that you join them. Now you must start taking control over this zone and this means shooting at anything that tries to get closer to your position [#7].
Ninth assignment: Shoot special arrows
Suggested class: archer
You'll soon gain access to archer's special attacks and in addition to that you will be allowed to use them without any restrictions for a short period of time. I would strongly recommend using fire arrows against enemy troops. Notice that archer doesn't have to fill up any power bars. Instead you must wait for all three attacks to recharge. Deal with the remaining orcs and seize control over this new zone of the map.
![[#7] - Campaign - Forces of good - Training mission - part 2 - Campaign - Forces of good - The Lord of the Rings: Conquest - Game Guide and Walkthrough](https://game.lhg100.com/Article/UploadFiles/201512/2015121715511371.jpg)
[#7]
Tenth assignment: Change class to scout
Suggested class: archer
This is also only a formality - approach the flag and choose a scout from the list of available characters.
Eleventh assignment: Backstab leaders of the orcs
Suggested class: scout
Your first task in a body of a scout is going to be a very interesting one. Backstabbing is by far the biggest attribute of using this character. In order for this action to work you must first activate camouflage and this can be done by pressing the SHIFT key. Notice that you'll now partially invisible, but sadly you can't stay in hidden forever. Now you'll have to attack a few orcs from the back and perform a deadly blow by pressing the E key [#8]. Remember that you should only do this when you see a confirmation on the screen, because otherwise not only you won't kill an orc but you also leave yourself exposed to counterattacks. If this happens, make sure to move back quickly and retry after a short while. Get rid of at least two orcs using this method.
![[#8] - Campaign - Forces of good - Training mission - part 2 - Campaign - Forces of good - The Lord of the Rings: Conquest - Game Guide and Walkthrough](https://game.lhg100.com/Article/UploadFiles/201512/2015121715511428.jpg)
[#8]
Twelfth assignment: Perform a dodge maneuver
Suggested class: scout
Couldn't be any easier - press and hold the CTRL key and practice these actions in all four directions. I wouldn't call this move a useful one.
Thirteenth assignment: Defeat garrison of orcs
Suggested class: scout
You're still playing as a scout, however this time you'll have to engage a larger group of orcs. You can practice backstabbing them if you want to, but it won't be necessary. I would recommend using the first attack (left button), because it seems to be the most effective one.
Fourteenth assignment: Use special attacks and defeat the orcs
Suggested class: scout
Not much will change here, besides the fact that you can now use scout's special attacks. If you forgot - you must be holding the SHIFT key. Test out all three special moves on your opponents [#9]. Kill all the orcs to get a new task.
![[#9] - Campaign - Forces of good - Training mission - part 3 - Campaign - Forces of good - The Lord of the Rings: Conquest - Game Guide and Walkthrough](https://game.lhg100.com/Article/UploadFiles/201512/2015121715511490.jpg)
[#9]
Fifteenth assignment: Defeat the remaining orcs from the garrison
Suggested class: scout
Your final big challenge using a scout is going to be test out how to use satchel bombs. They can be deployed using the F key. Use them to get rid of the remaining enemy troops or ignore these items entirely and rely only on your special attacks [#10]. Either way, you must kill all the orcs.
Sixteenth assignment: Change character class
Suggested class: scout
You are finally allowed to choose a class, instead of using the one forced by the game. Just as before, you must approach the flag of the nearest checkpoint. I would recommend switching to an archer, however you may play as a warrior if you don't have anything against close combat situations.
![[#10] - Campaign - Forces of good - Training mission - part 3 - Campaign - Forces of good - The Lord of the Rings: Conquest - Game Guide and Walkthrough](https://game.lhg100.com/Article/UploadFiles/201512/2015121715511408.jpg)
[#10]
Seventeenth assignment: Capture Orodruin's fields
Suggested class: archer or warrior
Start running towards a nearby tunnel (6 on the map) and join the fights already taking place near the final third checkpoint (7 on the map). If you're playing as an archer, make sure to keep a safe distance by attacking the orcs before they get too close [#11]. Don't forget to keep using the special attacks of the archer whenever they become available. Ignore only enemy mages, because their force fields will protect them against your arrows. If you're playing as a warrior you'll have to find yourself among orc troops as soon as possible. Keep attacking large numbers of beasts at the same time and go back to the checkpoint each time you've dealt with a new wave. Keep fighting until the checkpoint has been conquered.
![[#11] - Campaign - Forces of good - Training mission - part 3 - Campaign - Forces of good - The Lord of the Rings: Conquest - Game Guide and Walkthrough](https://game.lhg100.com/Article/UploadFiles/201512/2015121715511423.jpg)
[#11]
Eighteenth assignment: Change class to a mage
Suggested class: archer or warrior
There's only one more main class for you to test and that is a mage. Make the change at the newly unlocked third checkpoint.
Nineteenth assignment: Fire a bolt of lightning
Suggested class: mage
Couldn't be any easier. Get to the main area of the battlefield (8 on the map). In order to fire a bolt of lightning you must only press the left mouse button. Try using this attack to injure and eventually kill at least a few orcs.
Twentieth assignment: Use mage's special attacks
Suggested class: mage
I guess you won't be too surprised to hear that after testing mage's standard attack you'll be allowed to use his special moves. Follow the instructions on the screen and use mostly the fireball to dispose of enemy creatures [#12]. Attack them with a shock wave if they manage somehow to get closer to your position. Also - don't forget to see how the force field works. You can activate it by pressing and holding the CTRL key.
Twentieth-first assignment: Use the mage to defeat the orcs
Suggested class: mage
There isn't much I could say here - use all mage's attacks to deal with a few large groups of enemy troops and eventually you'll get a new assignment.
![[#12] - Campaign - Forces of good - Training mission - part 3 - Campaign - Forces of good - The Lord of the Rings: Conquest - Game Guide and Walkthrough](https://game.lhg100.com/Article/UploadFiles/201512/2015121715511586.jpg)
[#12]
Twentieth-second assignment: Return to the checkpoint
Suggested class: mage
You will soon receive an information that you should return to the nearest checkpoint (7 on the map). It appears that Sauron himself has appeared on the map and you'll have to get rid of him. Wait for a question to appear on your screen and confirm that you want to play as a hero - Isildur.
Twentieth-third assignment: Defeat Sauron
Suggested class: Isildur, mage or archer
This is going to be your first "boss" battle and in this case you'll be going against Sauron. Sadly Isildur is not the best choice of a hero for this particular duel, mostly because Sauron is capable of defending himself in close range. I would recommend that you keep using your middle special move [#13]. The biggest advantage of activating this move is that most of Sauron's counterattacks will fail and so you won't have to worry about getting knocked down.
![[#13] - Campaign - Forces of good - Training mission - part 3 - Campaign - Forces of good - The Lord of the Rings: Conquest - Game Guide and Walkthrough](https://game.lhg100.com/Article/UploadFiles/201512/2015121715511504.jpg)
[#13]
If your hero loses more than 2/3 of his health bar you should consider retreating as soon as possible. Find a mage and get closer to him in order to receive free healing [#24]. Go back to fighting Sauron when you're fully regenerated. If you lose Isildur entirely, choose a mage or an archer. The main reason is that you'll want to attack Sauron from a distance, however you'll still have to acknowledge the fact that he'll be able to approach you very quickly. Keep attacking Sauron until he's defeated.
![[#14] - Campaign - Forces of good - Training mission - part 3 - Campaign - Forces of good - The Lord of the Rings: Conquest - Game Guide and Walkthrough](https://game.lhg100.com/Article/UploadFiles/201512/2015121715511587.jpg)
[#14]
MAP OF THE AREA:
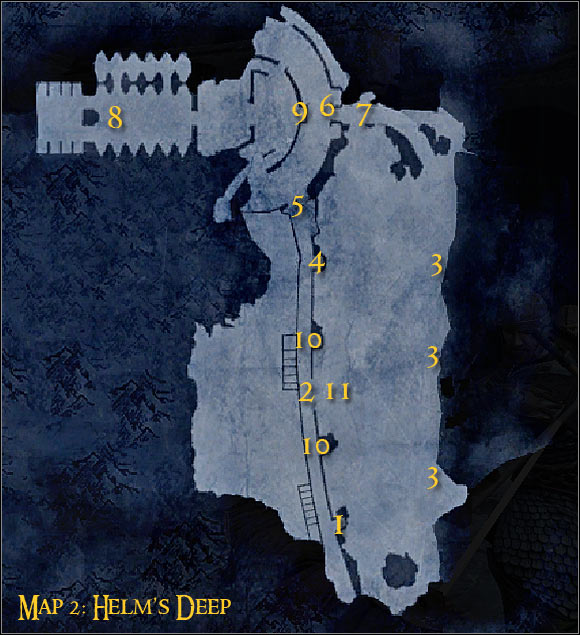
Map legend: 1 - starting area and first checkpoint; 2 - Deeping Wall - area in need of protection; 3 - areas where the torchbearers appear; 4 - checkpoint; 5 - pathway leading to the keep; 6 - checkpoint; 7 - causeway - area in need of protection; 8 - throne room - enemy commanders; 9 - checkpoint; 10 - Deeping Wall - area that needs to be secured; 11 - breach - area in need of protection
Additional info: The first true mission of the campaign of forces of good is not particularly hard, however you will have to defend a few important areas against massive enemy attacks. I guess you'll be thrilled to hear that you'll be allowed to play as Aragorn near the end of the level.
First assignment: Defend the Deeping Wall
Suggested class: warrior
You start the game near the southern checkpoint (1 on the map) and your first assignment is to defend a large part of the Deeping Wall (2 on the map). I would strongly advise that you choose a warrior for this particular assignment, mostly because you'll be operating at short range and this means you'll have to defeat many uruk-hai warriors in close combat [#15]. The beasts will be arriving at the opposite ends of a large shining rectangle and this means that after dealing with one group you'll have to immediately travel to the other one. Prevent too many uruk-hai from staying inside the rectangle and you should be fine. The game will require you to defend this area for 90 seconds which shouldn't be a major problem.
![[#15] - Campaign - Forces of good - Mission 1 - Helm's Deep - part 1 - Campaign - Forces of good - The Lord of the Rings: Conquest - Game Guide and Walkthrough](https://game.lhg100.com/Article/UploadFiles/201512/2015121715511680.jpg)
[#15]
Second assignment: Defeat the torchbearers
Suggested class: archer
The second this task was activated, go to one of nearby checkpoints (1 and 4 on the map) in order to change class to an archer. Now you should focus on locating higher sections of the wall. Go there and notice that you have a great view of the battlefield [#16]. Obviously you should deal with orcs on the Deeping Wall before focusing on this mission goal. Your objective is to take out torchbearers before they're able to place a bomb near the wall. The beasts will be appearing to the east of your position (3 on the map). In each case you should aim at them with a zoom function turned on. Don't forget to use fire arrows to take them out even with less precise shots. Keep clearing out the wall until new waves of torchbearers arrive in the area.
![[#16] - Campaign - Forces of good - Mission 1 - Helm's Deep - part 1 - Campaign - Forces of good - The Lord of the Rings: Conquest - Game Guide and Walkthrough](https://game.lhg100.com/Article/UploadFiles/201512/2015121715511736.jpg)
[#16]
Third assignment: Move back to the keep
Suggested class: warrior
Change the class to a warrior on your way to the keep. I would recommend choosing the second checkpoint (4 on the map). Once this is done, go to a nearby passageway (5 on the map).
Fourth assignment: Defend the main gate
Suggested class: warrior
Proceed to the main gate which is located to the north-east of your current position. If you had skipped the previous checkpoint, you'll find a new one next to the gate (6 on the map). Wait for the gate to be destroyed and proceed to the causeway in order to engage monsters attacking the keep [#17]. I would strongly recommend that you keep using a move activated with a middle mouse button, because it's very effective against large groups of foes. Don't forget that you don't have to protect the entire causeway, but only the area near the gate (7 on the map). Remain there for 90 seconds and await further commands.
![[#17] - Campaign - Forces of good - Mission 1 - Helm's Deep - part 1 - Campaign - Forces of good - The Lord of the Rings: Conquest - Game Guide and Walkthrough](https://game.lhg100.com/Article/UploadFiles/201512/2015121715511738.jpg)
[#17]
Fifth assignment: Meet with Theoden
Suggested class: warrior or archer
You will now have to travel towards the throne room which can be found in the western section of Helm's Deep (8 on the map). You can continue playing as a warrior or you can switch to an archer right away, especially since you won't be dealing with narrow passageways for the time being. A large group of monsters is fighting the allies near the steps [#18]. Deal with them, BUT before you enter the throne room, make sure that you're playing as an archer. You can make the change near the main gate (6 on the map) or on a nearby wall (9 on the map).
![[#18] - Campaign - Forces of good - Mission 1 - Helm's Deep - part 2 - Campaign - Forces of good - The Lord of the Rings: Conquest - Game Guide and Walkthrough](https://game.lhg100.com/Article/UploadFiles/201512/2015121715511845.jpg)
[#18]
Sixth assignment: Kill the orc leaders
Suggested class: archer
This objective will appear on your list of main assignments the moment you enter the throne room. All four leaders are very skilled at fighting close range, so as a result you should be attacking them with an archer [#19]. Remember to keep moving, so you won't be an easy target for other monsters. Keep using archer's special moves to dispose of the targets and confirm that you want to play as Aragorn when the leaders have been eliminated.
![[#19] - Campaign - Forces of good - Mission 1 - Helm's Deep - part 2 - Campaign - Forces of good - The Lord of the Rings: Conquest - Game Guide and Walkthrough](https://game.lhg100.com/Article/UploadFiles/201512/2015121715511840.jpg)
[#19]
Seventh assignment: Retake the Deeping Wall
Suggested class: Aragorn or warrior
Start off by going back to the previously used passageway (5 on the map), leading to the Deeping Wall. There are two zones for you to take back (10 on the map), however you should begin with the closer one. Use Aragorn's special moves and notice that he's extremely powerful in close combat. Nevertheless prevent the beasts from knocking him down and track down mostly larger groups of monsters. Remain inside the first zone [#20].
![[#20] - Campaign - Forces of good - Mission 1 - Helm's Deep - part 2 - Campaign - Forces of good - The Lord of the Rings: Conquest - Game Guide and Walkthrough](https://game.lhg100.com/Article/UploadFiles/201512/2015121715511854.jpg)
[#20]
You'll have to keep fighting inside the small rectangle until this zone has been regained by the forces of good. Watch out for the stairs area in the meantime, because that's where most of the beasts will show up. Once you've taken the first zone you'll have to use the stairs to get to the second target area [#21]. Not much will change here, so focus on eliminating larger groups and try to stay inside the rectangle to speed up the process. If Aragorn dies during these fights consider switching to a warrior.
![[#21] - Campaign - Forces of good - Mission 1 - Helm's Deep - part 2 - Campaign - Forces of good - The Lord of the Rings: Conquest - Game Guide and Walkthrough](https://game.lhg100.com/Article/UploadFiles/201512/2015121715511957.jpg)
[#21]
Eighth assignment: Defend the breach
Suggested class: Aragorn or warrior
You should continue playing as Aragorn or a standard warrior, because a mage or an archer wouldn't be able to handle a huge assault which is going to take place here in a short while. Proceed to the ground floor and start off by eliminating monsters in the vicinity of the breach [#21]. Once they're gone make a few steps forward to find a new area in need of protection (11 on the map). You'll have to get rid of a few large waves of enemy beasts. Use some of the most powerful attacks of Aragorn or a warrior to get rid of the creatures and make sure to stay within the designated area all the time. You'll have to defend this zone for 90 seconds, but to be honest only the final 30-40 seconds is a bigger effort. If you die respawn at the start area (1 on the map) and go back down as soon as possible.
![[#22] - Campaign - Forces of good - Mission 1 - Helm's Deep - part 2 - Campaign - Forces of good - The Lord of the Rings: Conquest - Game Guide and Walkthrough](https://game.lhg100.com/Article/UploadFiles/201512/2015121715511948.jpg)
[#22]
MAP OF THE AREA:
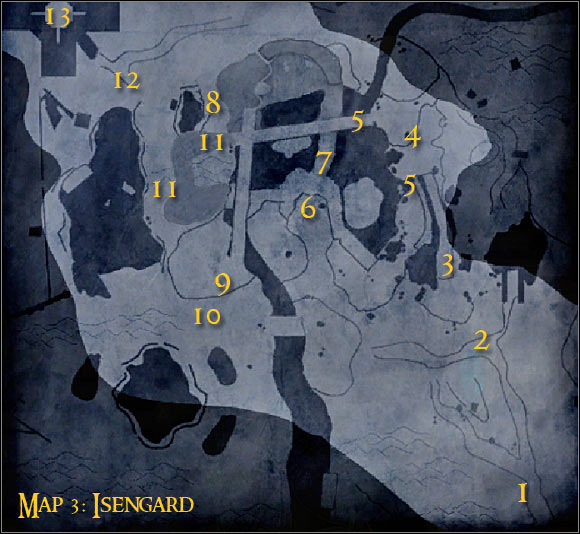
Map legend: 1 - starting area and checkpoint; 2 - checkpoint - area that needs to be secured; 3 - passageway further into the map; 4 - uruk-hai captain and a new checkpoint; 5 - passageways leading to the war machine; 6 - war machine; 7 - passageway leading to ent's campsite; 8 - checkpoint; 9 - Treebeard; 10 - other ents and a checkpoint; 11 - military towers; 12 - gates of Orthanc - area that needs to be secured; 13 - Saruman's tower
Additional info: The second mission is far more challenging than the first one, mostly because a lot will rely on choosing the correct class, depending on the situation on the battlefield. The toughest part is the destruction of the war machine where you'll have to deal with a huge advantage of hostile troops.
First assignment: Capture the checkpoint
Suggested class: mage
In most cases the game will present you with the best character for the first assignment and this isn't an exception. Mage will be an ideal choice for this particular task and you shouldn't change classes, even if you don't like playing as these characters. You start the game near the southern edge (1 on the map) and obviously this means you'll have to begin moving north. Keep heading towards the checkpoint (2 on the map). You'll probably notice some orcs to your left, but you may as well ignore them, because they'll be handled by your allies. Instead focus on eliminating beasts from the vicinity of the checkpoint [#23].
![[#23] - Campaign - Forces of good - Mission 2 - Isengard - part 1 - Campaign - Forces of good - The Lord of the Rings: Conquest - Game Guide and Walkthrough](https://game.lhg100.com/Article/UploadFiles/201512/2015121715511973.jpg)
[#23]
Prevent the orcs from getting too close to your character. Mage is capable of defending himself, however hostile units may kill him within a manner of seconds if you're not careful enough. As a result it's best to play it safe. You'll soon hear a warning that enemy archers have arrived in the area. Get closer to your troops and hold the CTRL key to include them within the range of your force field, protecting them against arrows [#24]. You'll now have to deal with the remaining enemy troops. When they're gone enter a large circled area and begin taking over this zone. Once this is done get to the flag and switch to a scout.
![[#24] - Campaign - Forces of good - Mission 2 - Isengard - part 1 - Campaign - Forces of good - The Lord of the Rings: Conquest - Game Guide and Walkthrough](https://game.lhg100.com/Article/UploadFiles/201512/2015121715512018.jpg)
[#24]
Second assignment: Kill uruk-hai captain
Suggested class: scout
There's a very narrow passageway (3 on the map) leading to the location of the uruk-hai captain, so you'll have to be extremely careful from now on. If you fall, you'll not only lose time, but also one "life". Activate scout's camouflage when you're close enough to enemy troops and you'll be allowed to move past them quite easily. As for the enemy captain, he will be standing near a new checkpoint (4 on the map), but he'll probably move south when he sees your allies heading his way. Surprise him from the back and a single attack will be more than enough to kill him [#25]. You should also use this method to dispose of enemy mages, especially since they'll be making things very hard for your colleagues.
![[#25] - Campaign - Forces of good - Mission 2 - Isengard - part 1 - Campaign - Forces of good - The Lord of the Rings: Conquest - Game Guide and Walkthrough](https://game.lhg100.com/Article/UploadFiles/201512/2015121715512082.jpg)
[#25]
Third assignment: Destroy the war machine
Suggested class: archer, mage or scout
I would recommend that you change classes and that you do this near the area where the captain was standing (4 on the map). If this checkpoint is still under orc's control, try securing pathway leading to it. As for the war machine (6 on the map), you won't be able to destroy it from the upper ledge and a result you'll have to get much closer. There are two distinctive routes leading to that location (5 on the map), but I would recommend that you choose a draw bridge. You now have two options - you can pick an archer or a mage right away and keep attacking the machine [#26] or you can use scout in the first place and clear the area ahead, mostly of enemy mages. Sadly even if you kill a lot of orcs that way, new monsters will eventually appear on the map. There's also a ballista near the war machine, but I'm afraid they'll be too many monsters in the area for you to use it. Either way, you should rely mostly on special attacks made by archers or mages and eventually you'll destroy your primary target.
![[#26] - Campaign - Forces of good - Mission 2 - Isengard - part 1 - Campaign - Forces of good - The Lord of the Rings: Conquest - Game Guide and Walkthrough](https://game.lhg100.com/Article/UploadFiles/201512/2015121715512050.jpg)
[#26]
Fourth assignment: Kill Grima Wormtongue
Suggested class: warrior
A warrior is definitely the best class for this particular task. Grima can sense invisible characters, so you can't play as a scout. As for a mage or an archer, they would have to attack Grima from a very large distance and you would have to focus too much attention in not falling into the abyss. Obviously you should be using warrior's special attacks during the course of this duel [#27]. I would recommend fighting Grima near the checkpoint, so you'll be far away from the dangerous cliffs. Once he's gone change class to a scout.
![[#27] - Campaign - Forces of good - Mission 2 - Isengard - part 2 - Campaign - Forces of good - The Lord of the Rings: Conquest - Game Guide and Walkthrough](https://game.lhg100.com/Article/UploadFiles/201512/2015121715512006.jpg)
[#27]
Fifth assignment: Deliver a key to Treebeard
Suggested class: scout or warrior
In this case a scout will get the job done without you having to worry about too many things. If you don't have anything against defeating a lot of foes, you may also consider staying in warrior's body, but it would take a lot of time to get to your destination. The only route leading to the ent's encampment is located to the north of the war machine (7 on the map). You'll encounter a lot of monsters there - avoid them (scout) or kill them (warrior). Notice that you've gone past a new checkpoint (8 on the map). You won't be able to use it right away, but it'll become active in the near future. Once you've reached the ground level, find Treebeard (9 on the map) and approach him [#28]. It's important to move aside when he has the key, so you won't become an object of constant attacks.
![[#28] - Campaign - Forces of good - Mission 2 - Isengard - part 2 - Campaign - Forces of good - The Lord of the Rings: Conquest - Game Guide and Walkthrough](https://game.lhg100.com/Article/UploadFiles/201512/2015121715512148.jpg)
[#28]
Sixth assignment: Take control over a sleeping ent
Suggested class: scout or warrior
Easy stuff - approach one of the sleeping ents from the back and press the action key to take control over this giant.
Sixth assignment: Destroy two guard towers
Suggested class: ent or archer
I would strongly recommend that you solve this task by staying inside ent's body all the time, because otherwise you may have some problems fulfilling this goal. If you lose the ent during the course of the battle, you'll find more of them near a southern checkpoint (10 on the map). As for your current objective, you must destroy two guard towers (11 on the map) and this can be done by using ent's standard attacks [#29]. Aside from the towers you should also spend some time killing enemy mages, because their spells can kill your creature quite easily. I recommend smashing into your opponents (one of the special attacks), because grabbing them only looks nice and it's not that practical.
![[#29] - Campaign - Forces of good - Mission 2 - Isengard - part 2 - Campaign - Forces of good - The Lord of the Rings: Conquest - Game Guide and Walkthrough](https://game.lhg100.com/Article/UploadFiles/201512/2015121715512179.jpg)
[#29]
Eighth assignment: Capture gates of Orthanc
Suggested class: ent or mage
There's only one more checkpoint for you to conquer (12 on the map) and in this case you should also consider using an ent. If you don't feel too comfortable controlling a giant, switch to a mage, but it'll be harder to win. Just as before, focus on eliminating enemy mages [#30] before they inflict too much damage. You should also target larger groups of uruk-hai warriors and use ent's special attacks against them. Keep fighting inside the designated zone until it's yours. You should confirm that you want to play the final part of the mission in the body of hero Gandalf.
![[#30] - Campaign - Forces of good - Mission 2 - Isengard - part 2 - Campaign - Forces of good - The Lord of the Rings: Conquest - Game Guide and Walkthrough](https://game.lhg100.com/Article/UploadFiles/201512/2015121715512234.jpg)
[#30]
Ninth assignment: Kill Saruman
Suggested class: Gandalf or mage
Obviously Gandalf is the best choice for this final task. Due to the fact that you control most of the area by now, he shouldn't sustain any major injuries on his way to the tower. Use the main entrance and get ready to defeat a new uruk-hai captain. I would recommend getting closer to him and activating middle special attack (You shall not pass). As a result he'll be knocked down, becoming an easy target for your other attacks. Once he's gone heal yourself and use the stairs to get to the top of the tower (13 on the map). Attack Saruman and just as before focus on knocking him down with one of your special moves [#31]. Now you may attack him with lightning bolts or fire. Remember to stay on the move, so you won't be an easy target. Winning this duel should be fairly easy.
![[#31] - Campaign - Forces of good - Mission 2 - Isengard - part 2 - Campaign - Forces of good - The Lord of the Rings: Conquest - Game Guide and Walkthrough](https://game.lhg100.com/Article/UploadFiles/201512/2015121715512293.jpg)
[#31]
MAP OF THE AREA:
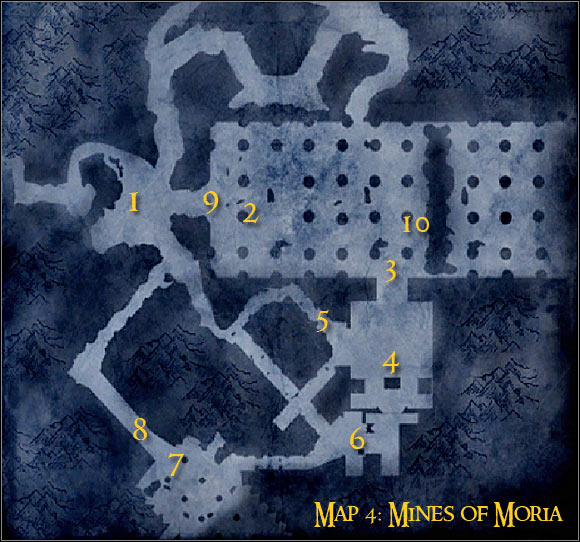
Map legend: 1 - starting area and first checkpoint; 2 - checkpoint; 3 - allied units; 4 - two checkpoints and Balin's tomb - area in need of protection; 5 - passageway leading to troll pens; 6 - lever used to close pens and a new checkpoint; 7 - bridge - area that needs to be secured; 8 - pathway leading back to the start area; 9 - Gandalf's original location; 10 - area where Balrog appears on the map
Additional info: The third mission of the campaign is much shorter than the previous two, however you're going to have deal with cave trolls for the first time. The good news is that you'll be allowed to control heroes for a longer period of time than before and there's going to be two of them (Gimli and Gandalf).
First assignment: Meet Gimli near Balin's tomb
Suggested class: scout
I guess you may be a little surprised to hear that a scout is a man for this job, mostly because there won't be a requirement to defeat enemy creatures along the way. The mines are a vast place, so it should be very easy for you to avoid enemy creatures, even if you're not using camouflage all the time. Don't forget about allied mages, because they will also be able to heal you if you suffer some major injuries. You begin the exploration of the mines near the western edge (1 on the map). Travel east and notice a new checkpoint along the way (2 on the map). You must now start moving towards allied troops (3 on the map). Ignore them [#32] and proceed directly into the tomb (4 on the map). Approach Gimli and await further commands.
![[#32] - Campaign - Forces of good - Mission 3 - Mines of Moria - Campaign - Forces of good - The Lord of the Rings: Conquest - Game Guide and Walkthrough](https://game.lhg100.com/Article/UploadFiles/201512/2015121715512366.jpg)
[#32]
Second assignment: Defend Balin's tomb
Suggested class: Gimli or scout
Obviously you should confirm that you want to start playing as a hero Gimli, because his skills will come in handy very soon. You must now wait for the main gate of the tomb to be destroyed and of course this means you'll be dealing with enemy trolls. The easiest way to get rid of the trolls is to attack them from the back. When you're standing behind the beasts wait for a confirmation to be displayed on your screen and press the action key. This will allow your current character to hop on the back of the troll and perform a gruesome execution [#33]. You'll have to defeat at least two trolls using this method. If Gimli dies during this battle, make sure to choose a scout, because it'll be very easy to surprise the trolls using the camouflage feature. There are also going to be other monsters in the area, but focus only on defending the tomb. Ignore the balconies and try to survive for at least 90 seconds.
![[#33] - Campaign - Forces of good - Mission 3 - Mines of Moria - Campaign - Forces of good - The Lord of the Rings: Conquest - Game Guide and Walkthrough](https://game.lhg100.com/Article/UploadFiles/201512/2015121715512390.jpg)
[#33]
Third assignment: Close troll's pens
Suggested class: Gimli or scout
Ignore the initial bearings given to you by the game, because you won't be presented with the exact location of the pens right away. In order to get to them you must choose a narrow passageway located to the north-west of the tomb (5 on the map). Obviously you'll have to be very careful here, because one false move or a surprise attack made by the easts may result in your character losing his life. There are going to be a few palisades along the way, but destroying them should be fairly easy. Get ready to eliminate two new trolls [#34]. I would recommend that you wait for the beasts to attack your allies, so you'll have an easier task surprising them. When they're gone approach the lever quickly (6 on the map) and pull it to close the pens.
![[#34] - Campaign - Forces of good - Mission 3 - Mines of Moria - Campaign - Forces of good - The Lord of the Rings: Conquest - Game Guide and Walkthrough](https://game.lhg100.com/Article/UploadFiles/201512/2015121715512337.jpg)
[#34]
Fourth assignment: Capture the bridge
Suggested class: Gimli, scout or warrior
Once again, you'll be dealing with a large number of narrow passageways. If Gimli has died recently, keep fighting as a scout, mostly because there's going to be one more troll for you to take care of. Once the beast has been killed, move back to the closest checkpoint and switch to a warrior. You'll have to take control over a small outpost located near the bridge (7 on the map). It shouldn't be difficult, because the beasts will have more problems staying inside the small circled area. Focus on eliminating enemy mages and commanders before getting to the zone [#35]. Enemy reinforcements will arrive in a short while, but by the time they organize the attack, this area should be under your command.
![[#35] - Campaign - Forces of good - Mission 3 - Mines of Moria - Campaign - Forces of good - The Lord of the Rings: Conquest - Game Guide and Walkthrough](https://game.lhg100.com/Article/UploadFiles/201512/2015121715512463.jpg)
[#35]
Fifth assignment: Meet Gandalf
Suggested class: Gimli or scout
You may act here in a similar manner to the beginning of the mission and this means reaching your goal area using a scout and without having to attack enemy troops. Thankfully if you don't like being stealthy you can always continue playing as Gimli or switch to a warrior. You will have to defeat a lot of beasts that way, but none of them will pose a serious threat to your safety. Start off by choosing a bridge (8 on the map) located to the north of the previously taken checkpoint [#36]. Now you'll just have to keep heading towards the start area (1 on the map). Gandalf will be waiting for you a little to the east (9 on the map). Meet him and confirm that you want to take control over his movements, even if you're still playing as Gimli.
![[#36] - Campaign - Forces of good - Mission 3 - Mines of Moria - Campaign - Forces of good - The Lord of the Rings: Conquest - Game Guide and Walkthrough](https://game.lhg100.com/Article/UploadFiles/201512/2015121715512508.jpg)
[#36]
Sixth assignment: Kill Balrog
Suggested class: Gandalf or archer
Thankfully, defeating Balrog (10 on the map) won't be as difficult as it might seem. The only thing you'll have to remember about is to maintain safe distance, because if you decide to rely on close range combat, you're going to be crushed by the demon or set on fire. If you're playing as Gandalf, start off by using lightning bolts [#37] and when the demon gets a little closer don't forget to throw fireballs. If Gandalf dies, switch to an archer and use similar tactics by maintaining a large distance between the demon and your character. Killing Balrog will allow you to win this mission.
![[#37] - Campaign - Forces of good - Mission 3 - Mines of Moria - Campaign - Forces of good - The Lord of the Rings: Conquest - Game Guide and Walkthrough](https://game.lhg100.com/Article/UploadFiles/201512/2015121715512537.jpg)
[#37]
MAP OF THE AREA:
Map legend: 1 - starting area and first checkpoint; 2 - checkpoint; 3 - meeting point - orc attack; 4 - sanctuary - area that needs to be secured; 5 - area where you meet other guards; 6 - pathway leading to the market; 7 - market and a new checkpoint; 8 - area where the trolls appear
Additional info: The fourth mission of the good campaign consists of a large number of battles played out as a warrior. The most difficult assignment of the entire mission is having to defend Frodo against flying Nazguls and orcs. Nevertheless you shouldn't encounter any other major problems and the level is also quite short.
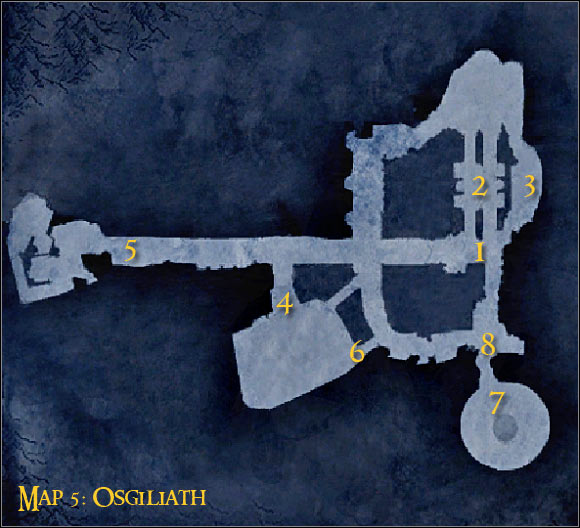
First assignment: Get to the eastern shore
Suggested class: warrior
You start the game in the middle of the battlefield (1 on the map). Thankfully you don't have to follow other knights right away, because orcs won't appear on the map unless you've reached your first destination. Notice a new checkpoint located to the north of where you're standing (2 on the map). Using it is optional, because even if you die, you can easily start at the same spot as you did before. Proceed to the north-east (3 on the map) and get ready to defend yourself against the first orc attack [#38]. Keep attacking the beasts and don't forget to use warrior's special moves to get rid of the beasts quickly and without any major problems. If you're seriously wounded, take your time and find a mage in order to receive free healing.
![[#38] - Campaign - Forces of good - Mission 4 - Osgiliath - Campaign - Forces of good - The Lord of the Rings: Conquest - Game Guide and Walkthrough](https://game.lhg100.com/Article/UploadFiles/201512/2015121715512620.jpg)
[#38]
You will soon receive an information about a pending enemy attack. You'll have to act quickly by taking cover next to a destroyed wall [#39]. Doing this will allow you to avoid attacks made by orc archers. Don't worry about your allies, because eventually they'll join you near the wall. Wait for the attack to end and get ready to kill more "standard" beasts. This time focus mostly on neutralizing enemy mages. Kill all monsters to receive a new task.
Second assignment: Await further commands
Suggested class: warrior
When you hear a new warning about an upcoming siege attack start running towards the start area (1 on the map). Don't change the class and wait for the siege to end.
![[#39] - Campaign - Forces of good - Mission 4 - Osgiliath - Campaign - Forces of good - The Lord of the Rings: Conquest - Game Guide and Walkthrough](https://game.lhg100.com/Article/UploadFiles/201512/2015121715512616.jpg)
[#39]
Third assignment: Saddle a horse
Suggested class: warrior
Approach the horse and saddle it by pressing the action key. Take your time to read the instructions on how to give commands to the animal. Start moving forward. There are going to be a lot of orcs in the area [#40] and you may use both mouse buttons to attack them. Thankfully if you land on the ground as a result of their counterattacks you won't lose a lot of health. The only thing you'll have to watch out for are the flying Nazguls. They will remain above you to the end of the mission and occasionally they'll try attacking your character or your allies. Don't stop for nothing and you should be fine. Use the main bridge and keep heading west.
![[#40] - Campaign - Forces of good - Mission 4 - Osgiliath - Campaign - Forces of good - The Lord of the Rings: Conquest - Game Guide and Walkthrough](https://game.lhg100.com/Article/UploadFiles/201512/2015121715512777.jpg)
[#40]
Fourth assignment: Capture the sanctuary
Suggested class: warrior
Continue moving towards your current destination (4 on the map) which is located next to a large sanctuary. Your first objective here will be to clear out the area of enemy monsters, however you must acknowledge the fact that more beasts will arrive near the sanctuary very soon. Try to find a good compromise between fighting the beasts and taking control over this new checkpoint [#41]. Leave the designated area only for short periods of time and don't forget to heal yourself whenever you sustain major injuries. Take control over the sanctuary and confirm that you want to play as hero Faramir.
![[#41] - Campaign - Forces of good - Mission 4 - Osgiliath - Campaign - Forces of good - The Lord of the Rings: Conquest - Game Guide and Walkthrough](https://game.lhg100.com/Article/UploadFiles/201512/2015121715512867.jpg)
[#41]
Fifth assignment: Meet with the guardians
Suggested class: Faramir or warrior
Head on to the main gate, located to the north-west of the sanctuary (5 on the map). Once you've arrived at your destination listen to new orders concerning Frodo.
Sixth assignment: Escort Frodo to the market
Suggested class: Faramir or scout
If you have to make the exchange, choose a checkpoint located next to the sanctuary (4 on the map). You'll have to make an important choice here on how to proceed. If you want to stay in the shadows choose scout. Otherwise choose Faramir or a standard warrior (only if the hero has died). I would recommend using a scout [#42]. Don't forget to turn on camouflage when you and Frodo get closer to enemy troops. Make sure to stay close to the hobbit and don't leave the camouflage in order to allow him to keep moving. Head on towards a small passageway to the south-east (6 on the map). You'll encounter at least two large groups of orcs along the way, but if you're skilled enough you'll only have to slay a few beasts. When you get to the market (7 on the map) don't leave Frodo alone, but instead stay with him and wait for new instructions.
![[#42] - Campaign - Forces of good - Mission 4 - Osgiliath - Campaign - Forces of good - The Lord of the Rings: Conquest - Game Guide and Walkthrough](https://game.lhg100.com/Article/UploadFiles/201512/2015121715512810.jpg)
[#42]
Seventh assignment: Kill the trolls
Suggested class: Faramir or scout
Be patient and allow the trolls to get to the area to the north of the market (8 on the map). You'll be dealing with two beasts, but you shouldn't leave Frodo's back too soon. The main reason is that he may be captured by the flying Nazguls in the meantime and that would be equal to instant mission failure. Wait for allied troops to surround Frodo and only then start moving towards the trolls. Assuming you're still playing as a scout, you'll have to backstab each troll TWICE [#43]. Don't forget to run away after completing the first move, so you won't be crushed by an angry troll. The mission will end with the death of the second troll.
![[#43] - Campaign - Forces of good - Mission 4 - Osgiliath - Campaign - Forces of good - The Lord of the Rings: Conquest - Game Guide and Walkthrough](https://game.lhg100.com/Article/UploadFiles/201512/2015121715512822.jpg)
[#43]
MAP OF THE AREA:
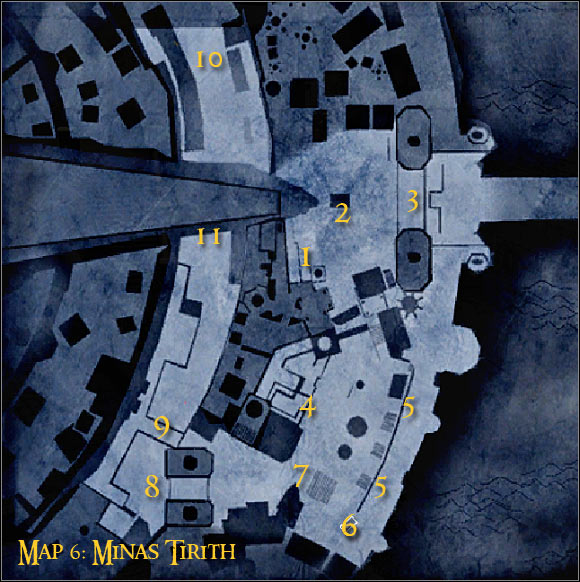
Map legend: 1 - starting area and first checkpoint; 2 - main gate - area in need of protection; 3 - gate that will be breached by enemy units; 4 - passageway leading to siege towers and a new checkpoint; 5 - siege towers; 6 - ballista; 7 - passageway to the second ring; 8 - second ring gate - area in need of protection; 9 - passageway to the third ring; 10 - third ring gate - area in need of protection; 11 - area where enemy units will show up
Additional info: Defense of Minas Tirith is by far one of the most difficult missions of this campaign. The biggest problem is that you'll have to defend a few key areas of the map against large number or enemy units. In order to prevail you'll have to use maximum potential of your character and think about the safe being of AI-controlled allies as well. The only good news is that you won't have to defeat any heroes of the dark side.
First assignment: Defend the main gate
Suggested class: mage
I'm sure that you'll have some major problems completing this first mission objective. First of all, you'll have to master avoiding enemy hits. In addition to that you'll have to use all the special moves flawlessly and when the time is right. It's EXTREMELY important that you choose a mage, because only then you can guarantee your win. You start the game near the main gate (1 on the map). Notice a checkpoint (2 on the map) in the vicinity, especially since you may have to use it in the near future. Relax for now and wait for the monsters to destroy the main gate (3 on the map). They'll start moving towards you very soon [#44]. Use the standard lightning attack to dispose of the orcs and use two special attacks (middle and right mouse button) to deal with larger groups. Don't forget that the middle attack is only effective if the main character is surrounded by hostile units. As for the fiery attack, make sure that your fireballs don't hit allied units. You wouldn't injure them, but you would put a good attack to waste.
![[#44] - Campaign - Forces of good - Mission 5 - Minas Tirith - part 1 - Campaign - Forces of good - The Lord of the Rings: Conquest - Game Guide and Walkthrough](https://game.lhg100.com/Article/UploadFiles/201512/2015121715512949.jpg)
[#44]
Healing your allies is a key to success here, especially since you can't defeat all the monsters on your own. Thankfully you don't have to try and figure out which characters are wounded, because small green icons will appear above their heads. After about 50 seconds of intense combat two large trolls will come through the main gate. Don't even think about switching to a scout, because you would lose too much time trying to attack them by surprise. The same goes with other classes, because you would have to backstab each troll twice. Instead remain in mage's body and focus on avoiding hits [#45]. Deal with the trolls using your offensive spells and then try to keep the monsters out of the circled area. The good news is that you'll receive reinforcements near the end, so it should make the final part of the battle much easier. Also - don't worry if enemy forces will start gaining advantage at about 15-20 seconds before the end, because that's a safe margin and you won't have to worry about them anymore when your clock reaches zero.
![[#45] - Campaign - Forces of good - Mission 5 - Minas Tirith - part 1 - Campaign - Forces of good - The Lord of the Rings: Conquest - Game Guide and Walkthrough](https://game.lhg100.com/Article/UploadFiles/201512/2015121715512975.jpg)
[#45]
Second assignment: Burn two siege towers
Suggested class: warrior or mage
You can now choose a warrior if you want to, however it's also fully possible to keep playing as a mage. Proceed to the south-west and eventually you'll get to the stairs (4 on the map). From now on a mage is a slightly better choice, especially if you don't want to encounter any life-threatening problems. Keep pushing towards the siege towers (5 on the map). As for means of destroying these objects, mage's fireball should do the trick [#46]. If you can't get close enough using a mage you may also think about an entirely different approach. You'd have to choose a scout and get closer to both targets using camouflage. You would then have two choices - to locate a ballista (6 on the map), mount it and begin firing at the siege towers, or to use satchel bombs in the vicinity of the towers. I think that the mage scenario is far safer and you only have to be patient for your allies to clear out the main path to the siege towers. Aside from the choice of class, make sure not to stay in one spot for more than a few seconds, because flying beasts will circle the area and you may end up getting caught.
![[#46] - Campaign - Forces of good - Mission 5 - Minas Tirith - part 1 - Campaign - Forces of good - The Lord of the Rings: Conquest - Game Guide and Walkthrough](https://game.lhg100.com/Article/UploadFiles/201512/2015121715513052.jpg)
[#46]
Third assignment: Go to the second ring
Suggested class: warrior or mage
You have a rather large choice while trying to pick the best character class for this particular assignment. You can go back to the previously unlocked checkpoint and choose a warrior or you can keep playing as a mage. The only passageway leading to the second ring is located to the west of the siege towers (7 on the map). You'll probably encounter a few beasts along the way [#47], but you won't have to kill all of them. Keep heading towards the stairs and then proceed to the upper level (8 on the map). Switch to a warrior when you get there.
![[#47] - Campaign - Forces of good - Mission 5 - Minas Tirith - part 2 - Campaign - Forces of good - The Lord of the Rings: Conquest - Game Guide and Walkthrough](https://game.lhg100.com/Article/UploadFiles/201512/2015121715513016.jpg)
[#47]
Fourth assignment: Defend gates of the second ring
Suggested class: warrior
This is also going to be a strictly defensive type of an assignment. Thankfully it's going to be much easier to survive this time, mostly because you won't have to kill any trolls. A warrior is by far the best choice here, because you'll be fighting at a very close range. In addition to that you'll be allowed to use warrior's special attacks to inflict serious injuries to large groups of enemies. Start off by neutralizing enemy mages and then focus on the area near the stairs [#81]. Remember that you don't have to kill all the monsters, however they will be coming only from one direction. You'll have to remain here for about two minutes, but that's not a problem and the gate will probably remain safe until the end.
![[#48] - Campaign - Forces of good - Mission 5 - Minas Tirith - part 2 - Campaign - Forces of good - The Lord of the Rings: Conquest - Game Guide and Walkthrough](https://game.lhg100.com/Article/UploadFiles/201512/2015121715513091.jpg)
[#48]
Fifth assignment: Go to the third ring
Suggested class: warrior or mage
You should continue playing as a warrior, however you could also switch to a mage if you prefer to attack your enemies from a distance. The only path leading to the third ring is located to the north of your current position (9 on the map). Just as before, you may decide to avoid attacking enemy creatures [#49] or you may kill all of them. You'll receive new orders upon reaching the third gate (10 on the map). It's crucial that you agree to play as hero Gandalf!
![[#49] - Campaign - Forces of good - Mission 5 - Minas Tirith - part 2 - Campaign - Forces of good - The Lord of the Rings: Conquest - Game Guide and Walkthrough](https://game.lhg100.com/Article/UploadFiles/201512/2015121715513073.jpg)
[#49]
Sixth assignment: Defend gates of the third ring
Suggested class: Gandalf or mage
Like I've already said, one of keys to success here will be to use Gandalf as an active character. The main reason is that he's far more powerful than a standard mage, so it'll be easier to complete this objective. Make sure to keep him alive to the end of the mission. Your primary task is to defend the gates (10 on the map), but I would recommend moving far away from the target, so you'll have a lot of space to work in. Enemy units will be arriving from the south-west (11 on the map). Use lightning bolts to dispose of standard troops [#50]. As for larger groups, use Gandalf's middle attack to dispose of them quickly. In most cases this will give a lot of breathing time before the next wave.
![[#50] - Campaign - Forces of good - Mission 5 - Minas Tirith - part 2 - Campaign - Forces of good - The Lord of the Rings: Conquest - Game Guide and Walkthrough](https://game.lhg100.com/Article/UploadFiles/201512/2015121715513192.jpg)
[#50]
You'll soon notice that aside from the typical units trolls have begun their assault on the gate [#51]. This is going to be a very similar situation to the one from the beginning of this mission, so you shouldn't switch to a scout, especially since you wouldn't be allowed to go back to playing as Gandalf. Instead use both lightning attacks and fireballs on each troll and eventually all the beasts will die. Make sure not to get too close to them or you may end up getting crushed. Aside from the orcs, you'll also have to defeat a few orc captains. You should focus on attacking them the second they appear on the battlefield, so they won't kill too many allied troops. Thankfully you'll receive reinforcements at about one minute before the end of the mission, so the final part should be relatively easy. Defending the third gate will allow you to win the entire mission.
![[#51] - Campaign - Forces of good - Mission 5 - Minas Tirith - part 2 - Campaign - Forces of good - The Lord of the Rings: Conquest - Game Guide and Walkthrough](https://game.lhg100.com/Article/UploadFiles/201512/2015121715513179.jpg)
[#51]
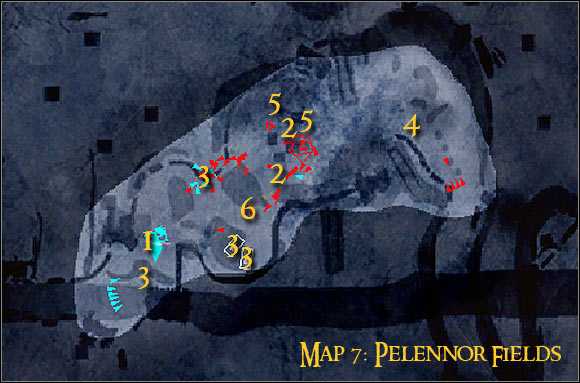
MAP OF THE AREA:
Map legend: 1 - starting area and first checkpoint; 2 - area where the siege towers appear; 3 - catapults; 4 - area where the oliphants appear; 5 - final tower and final oliphant; 6 - area where you have to meet Theoden and face off against the Witch King
Additional info: The battle on Pelennor Fields isn't a challenging mission, however you will have to spend reasonable amounts of time trying to avoid enemy troops. The only real exception is the final duel with the Witch King. It won't be easy to defeat the creature, especially since you'll be presented with a hero with mediocre powers.
First assignment: Destroy the siege towers
Suggested class: scout or warrior
This mission will begin near the western edge (1 on the map) and that's a good thing, because you'll have a lot of time trying to plan the next move. In addition to that you'll be much safer if you respawn here later on during the mission. There are two methods of completing this first objective and they're very different from each other. Two war machines appear in the center of the battlefield (2 on the map) and you won't be allowed to waste too much time trying to destroy them for obvious reasons. If you decide to play the mission as a warrior, you should consider proceeding towards the nearest catapult. You can find this object to the south of the start area (3 on the map). The catapult should be defended by your allies, but you must acknowledge the fact that monsters may get here in the near future. If they do use your sword attacks to kill them. Approach the catapult and press the action key to start using it. Destroying both siege towers won't be a problem [#52], but you should know that each tower must be hit three times before it's gone. Don't stay inside the catapult for too long, because orcs may arrive here in the meantime. You'll also have to watch out for flying Nazguls, so staying in one spot for more than a few seconds is not an option.
![[#52] - Campaign - Forces of good - Mission 6 - Pelennor Fields - Campaign - Forces of good - The Lord of the Rings: Conquest - Game Guide and Walkthrough](https://game.lhg100.com/Article/UploadFiles/201512/2015121715513206.jpg)
[#52]
If you want to play as a scout, destroying both siege towers may prove to be more challenging, mostly because you'll have to get to them on foot. Remember to use camouflage whenever possible and even then avoid enemy archers. The reason is that they can see you even if you think you're fully invisible. Notice that both siege towers are being pushed by trolls and this means you'll have to stop the beasts. Attack the first troll from the back to distract its attention and then take care of the siege tower. You'll have to plant an explosive device on the tower [#53]. Move back quickly when this is done and wait for the fireworks. Follow the exact same routine with the second tower, but prevent the structure from getting too close to the city.
![[#53] - Campaign - Forces of good - Mission 6 - Pelennor Fields - Campaign - Forces of good - The Lord of the Rings: Conquest - Game Guide and Walkthrough](https://game.lhg100.com/Article/UploadFiles/201512/2015121715513276.jpg)
[#53]
Second assignment: Kill the oliphants
Suggested class: Legolas or scout
Oliphants will appear near the area where you first saw the towers (4 on the map). I wouldn't recommend trying to get to them at all costs, because you'll soon be given an opportunity to switch to a hero named Legolas. I think it's rather obvious that you should agree to this proposal, however it would also be fully possible to complete this objective inside the body of a scout. Don't even think about going back to the catapults, because they're probably overrun by the orcs. Instead start moving towards the first oliphant and place yourself near the front left leg [#54].
![[#54] - Campaign - Forces of good - Mission 6 - Pelennor Fields - Campaign - Forces of good - The Lord of the Rings: Conquest - Game Guide and Walkthrough](https://game.lhg100.com/Article/UploadFiles/201512/2015121715513345.jpg)
[#54]
You must be extremely careful near the oliphant, because even a smallest mistake can result in your current character dying. Notice an information on your screen and press the action key. If you've done everything according to the plan, your current character will start climbing on top of the oliphant. This is a simple mini-game, because your job will be to press left and right mouse buttons according to the instructions on the screen [#55]. There are three stages here and if you win you'll kill the oliphant. Thankfully if you make a mistake and fall, you'll be allowed to retry without any serious repercussions. Follow the same deal with the second oliphant, preventing it from getting too close to Minas Tirith.
![[#55] - Campaign - Forces of good - Mission 6 - Pelennor Fields - Campaign - Forces of good - The Lord of the Rings: Conquest - Game Guide and Walkthrough](https://game.lhg100.com/Article/UploadFiles/201512/2015121715513398.jpg)
[#55]
Third assignment: Destroy the final siege tower and kill the final oliphant
Suggested class: Legolas or scout
Both targets will appear on the battlefield to the north of your current position (5 on the map). I would strongly recommend that you start with taking down the oliphant, because the beast can reach city walls much faster than the siege tower. In order to kill the oliphant you must solve the mini-game one more time, either in the body of Legolas or by playing as a scout. Once this is done, proceed to the final third siege tower [#56]. Get rid of the troll and plant the explosive charge to blow up this structure. Move back and wait for the explosion to occur.
Fourth assignment: Meet Theoden
Suggested class: Eowyn of Rohan or scout
It's a simple task - go to the designated area (6 on the map). You'll be presented with a short cut-scene, showing Theoden being killed by the Witch King. Obviously you should agree to start playing as Eowyn and the only exception is if Legolas is still alive.
![[#56] - Campaign - Forces of good - Mission 6 - Pelennor Fields - Campaign - Forces of good - The Lord of the Rings: Conquest - Game Guide and Walkthrough](https://game.lhg100.com/Article/UploadFiles/201512/2015121715513316.jpg)
[#56]
Fifth assignment: Kill the Witch King
Suggested class: Eowyn of Rohan or mage
The final duel of this mission is going to be a very challenging one, because Eowyn isn't a skilled character and she's not a worthy adversary to the Witch King. I would recommend that you move away from the other orcs, so your duel won't be interrupted by anyone [#57]. During the battle you should rely mostly on her special attacks. If Eowyn dies, try taking control over a mage. This is a very important issue, because the entire battlefield is swarming with enemy troops and you need to be able to heal yourself and your allies. Don't forget not to exit the battlefield during the duel and don't make any unnecessary stops, because you may be caught by a flying beast. This mission will end with the death of the Witch King.
![[#57] - Campaign - Forces of good - Mission 6 - Pelennor Fields - Campaign - Forces of good - The Lord of the Rings: Conquest - Game Guide and Walkthrough](https://game.lhg100.com/Article/UploadFiles/201512/2015121715513406.jpg)
[#57]
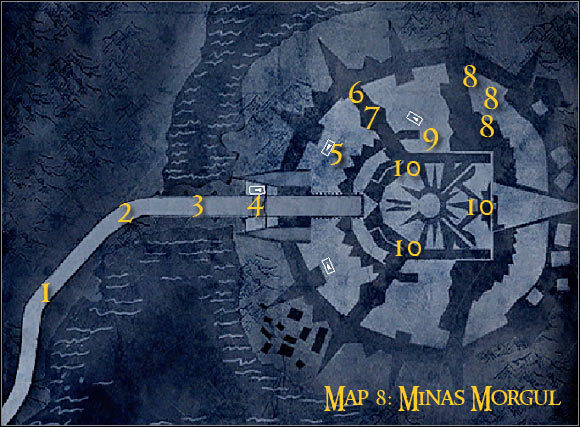
MAP OF THE AREA:
Map legend: 1 - starting area and first checkpoint; 2 - shore - area that needs to be secured; 3 - bridge; 4 - main gate; 5 - courtyard - area that needs to be secured; 6 - lever opening gate to the cells; 7 - gate; 8 - cells in which the prisoners are being held; 9 - passageway to the main chamber; 10 - sources of power
Additional info: The mission in Minas Morgul won't be an extremely difficult one, however you'll still have to be careful. The biggest problem is that you'll be dealing with large numbers of enemy creatures, so it's going to be easy to die. You'll also have to watch out for Nazguls near the end.
First assignment: Capture the shore
Suggested class: archer
The game will make a great suggestion about the starting class and a result you should choose an archer. The main reason is that you'll want to eliminate most of your enemies from a larger distance and the archer is a great character for such undertakings. You start to the west of the citadel (1 on the map) and your first objective will be to get to a checkpoint located to the north-east (2 on the map). Start moving forward [#58] and attack the orcs before they get too close to your character. Don't forget to use archer's special moves along the way, especially while going against orc captains. These beasts must die as quickly as possible.
![[#58] - Campaign - Forces of good - Mission 7 - Minas Morgul - part 1 - Campaign - Forces of good - The Lord of the Rings: Conquest - Game Guide and Walkthrough](https://game.lhg100.com/Article/UploadFiles/201512/2015121715513520.jpg)
[#58]
You will probably notice that aside from the allied units a large battering ram is being pushed towards the main gate of Minas Morgul. You won't have to defend the ram in any special way. Instead focus on keeping your character alive and retreat to allied mages each time you lose too much health. I wouldn't recommend foolishly losing lives here, because you're going to need them later on. Get to the checkpoint and get ready to defend yourself against the monsters coming from the bridge [#59]. Take control over this checkpoint, but stay in archer's body for a few more minutes. Heal yourself before you focus on completing the next assignment.
![[#59] - Campaign - Forces of good - Mission 7 - Minas Morgul - part 1 - Campaign - Forces of good - The Lord of the Rings: Conquest - Game Guide and Walkthrough](https://game.lhg100.com/Article/UploadFiles/201512/2015121715513522.jpg)
[#59]
Second assignment: Clear the bridge
Suggested class: archer
This time it's going to be even more important to keep playing as an archer, because the bridge (3 on the map) is not only protected by standard enemy units, but there are also archers on the citadel walls. Assuming you don't get too close to the main gate you should be fine and you won't have to worry about them. Keep pushing forward. Eliminate orcs and destroy palisades along the way [#60], but don't risk too much. Don't forget to use fire arrows against the palisades, so they'll catch on fire. Get rid of all enemy units guarding the main gate (4 on the map) and wait for the battering ram to be transported to that location. The gate is going to be destroyed in a manner of seconds.
![[#60] - Campaign - Forces of good - Mission 7 - Minas Morgul - part 1 - Campaign - Forces of good - The Lord of the Rings: Conquest - Game Guide and Walkthrough](https://game.lhg100.com/Article/UploadFiles/201512/2015121715513551.jpg)
[#60]
Third assignment: Take the courtyard
Suggested class: Aragorn or warrior
Obviously you should agree to the idea of playing as Aragorn. If he dies during the course of this mission, you should consider switching to a standard warrior. I would recommend that you keep Aragorn alive for as long as possible and this means going back to the mages each time he's suffered some major injuries. Before you'll be allowed to focus on taking over the courtyard, you'll have to kill a new troll near the main gate [#61]. I think it's rather obvious that you should attack the beast from the back in order to stab it with your knife. If Aragorn has died already, consider choosing a scout for this task, because a standard warrior may have some problems getting close enough to the troll to activate this move.
![[#61] - Campaign - Forces of good - Mission 7 - Minas Morgul - part 2 - Campaign - Forces of good - The Lord of the Rings: Conquest - Game Guide and Walkthrough](https://game.lhg100.com/Article/UploadFiles/201512/2015121715513675.jpg)
[#61]
Now you'll be finally allowed to focus on conquering the courtyard which is located to the north-east of the main gate (5 on the map). I would recommend that you go to the lower area of the citadel in the first place. Spend some time killing enemy mages and archers using Aragorn's most powerful attacks. You should also notice that you'll be allowed to send some of the beasts to the abyss quite easily. You can use a ballista if you want to dispose of larger groups of orcs, but it shouldn't be necessary. Go to the designated area when it's safer [#62]. Remember to stay on the move, because there are enemy scouts in the area and they may try backstabbing you.
![[#62] - Campaign - Forces of good - Mission 7 - Minas Morgul - part 2 - Campaign - Forces of good - The Lord of the Rings: Conquest - Game Guide and Walkthrough](https://game.lhg100.com/Article/UploadFiles/201512/2015121715513688.jpg)
[#62]
Fourth assignment: Open the prison gate
Suggested class: Aragorn or warrior
This is a rather easy assignment, even if you decide to play as a warrior. Find the stairs [#63] leading to the upper balconies. Eventually you'll end up standing somewhere above the main gate. There are mostly weaker orcs here, however the lever (6 on the map) is being guarded by the captain. Use Aragorn's or warrior's special moves to kill the captain and go back down if you're seriously injured. Approach the lever and press the action key to open the main gate (7 on the map). You may return to the ground level.
![[#63] - Campaign - Forces of good - Mission 7 - Minas Morgul - part 2 - Campaign - Forces of good - The Lord of the Rings: Conquest - Game Guide and Walkthrough](https://game.lhg100.com/Article/UploadFiles/201512/2015121715513664.jpg)
[#63]
Fifth assignment: Free the Gondorians
Suggested class: Aragorn or warrior
You will have to be extremely careful in this new section of the map, because the area around the cells is occupied by a very large group of enemy units. Don't try moving to the cells (8 on the map) too fast and instead allow your allies to breach this room and deal with at least some of the monsters. In each case you should target one of the cells and start off by securing the area around it. Only then you should make a decision to destroy the grating [#64]. Thankfully Aragorn's moves are very powerful, so it shouldn't take too long before each group of prisoners is released. Don't forget to retreat to your mages if you lose too much health, because you wouldn't want to lose Aragorn here. You must free the Gondorians from three cells before proceeding with the final challenge of this mission.
![[#64] - Campaign - Forces of good - Mission 7 - Minas Morgul - part 2 - Campaign - Forces of good - The Lord of the Rings: Conquest - Game Guide and Walkthrough](https://game.lhg100.com/Article/UploadFiles/201512/2015121715513719.jpg)
[#64]
Sixth assignment: Destroy three sources of power
Suggested class: Aragorn or archer
Move back to the courtyard and find a small passageway leading to the southern chamber (9 on the map). There are a few trolls there for you to take care of. Attack the beasts by backstabbing them or by using a ballista [#65]. As for the main objective, there are two ways for you to complete it. If you managed to keep Aragorn alive up until now, you may decide for a more courageous approach. You would have to travel to each source of power (10 on the map) and use Aragorn's special moves to destroy it. Sadly these objects are well-protected, because you'll not only be dealing with orcs, but you'll have to avoid Nazguls as well. Furthermore, you won't be able to defeat all the Nazguls, because more of them will keep coming. Try to find a compromise between defending yourself against monster attacks, healing Aragorn and destroying sources of power.
![[#65] - Campaign - Forces of good - Mission 7 - Minas Morgul - part 2 - Campaign - Forces of good - The Lord of the Rings: Conquest - Game Guide and Walkthrough](https://game.lhg100.com/Article/UploadFiles/201512/2015121715513775.jpg)
[#65]
If Aragorn is not with us anymore, you shouldn't even bother trying to replace him with a standard knight, because you would have probably died even before reaching the source of power, not to mention damaging it. In such case you'll have to choose between a mage and an archer. Stay close to your allies and try to destroy each source of power from a large distance [#66]. Obviously you should be using fire arrows and fireballs to speed up this process. Move back each time your character has lost 50% of his health or if you see a Nazgul heading your way. Destroying all three sources of power is probably going to take you a few minutes, but the good news is you won't lose too many lives. You couldn't say the same thing if you had decided to play as a warrior or a scout. This mission will end with the destruction of the third source.
![[#66] - Campaign - Forces of good - Mission 7 - Minas Morgul - part 2 - Campaign - Forces of good - The Lord of the Rings: Conquest - Game Guide and Walkthrough](https://game.lhg100.com/Article/UploadFiles/201512/2015121715513815.jpg)
[#66]
MAP OF THE AREA:
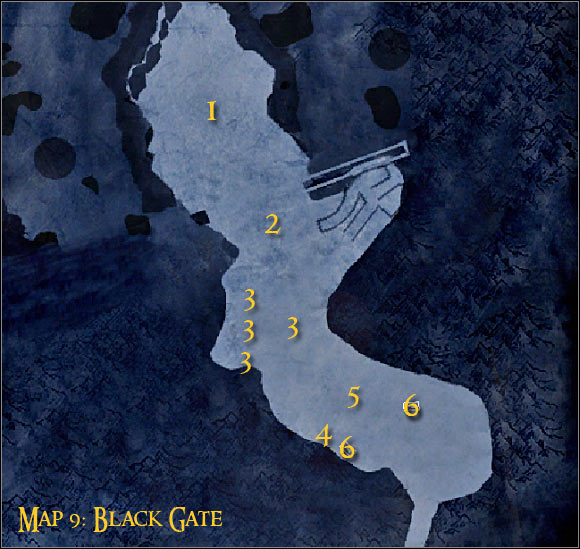
Map legend: 1 - starting area and first checkpoint; 2 - Black Gate - area that needs to be secured; 3 - towers occupied by enemy captains; 4 - area where Mouth of Sauron appears for the first time; 5 - campsite - area that needs to be secured; 6 - ballistae
Additional info: The final mission of the campaign of forces of good will surprise you with a very difficult start, because you'll have to defend a small area against MASSIVE enemy attacks. Thankfully you'll be playing as different heroes right from the start, without having to earn the possibility of controlling them. Furthermore, even if a hero dies on the battlefield, you'll be able to choose the same person again.
First assignment: Stand your ground
Suggested class: Gandalf
This mission will begin in a very similar manner to the defense of Minas Tirith. Thankfully it shouldn't be so difficult for you to win this time, because you'll be controlling one of the main heroes of the forces of good. The best choice for this assignment is Gandalf, because he's the only one capable of healing himself and his allies on the battlefield. You start the game in the northern section (1 on the map) and enemy units will be arriving from the south. Dealing with the first few groups shouldn't be a problem. Use lightning strikes to injure single units and special moves to eliminate larger groups of monsters. Don't forget to approach your wounded colleagues and heal them [#67], because otherwise you may end up standing alone.
![[#67] - Campaign - Forces of good - Mission 8 - Black Gate - part 1 - Campaign - Forces of good - The Lord of the Rings: Conquest - Game Guide and Walkthrough](https://game.lhg100.com/Article/UploadFiles/201512/2015121715513912.jpg)
[#67]
It's going to get much tougher at about 90 seconds before the deadline, because combat trolls will start showing up near the Black Gate [#68]. Remain inside Gandalf's body, because you would lose far too much time trying to surprise these beasts from the back. Don't worry if Gandalf dies, because you'll be allowed to choose him again right away. Focus on killing all the trolls, especially if they're standing inside the circled area. If you have a moment to breathe, target enemy mages, because they're the ones that will make your progress more difficult. Surviving three minutes is entirely possible as long as you follow my instructions, focus on the goal and don't risk too much.
![[#68] - Campaign - Forces of good - Mission 8 - Black Gate - part 1 - Campaign - Forces of good - The Lord of the Rings: Conquest - Game Guide and Walkthrough](https://game.lhg100.com/Article/UploadFiles/201512/2015121715513966.jpg)
[#68]
Second assignment: Capture the gate
Suggested class: Gandalf or Aragorn
This is a very offensive type of an assignment, so you don't have to keep using Gandalf as an active character, especially if you don't like playing as a mage. You should also know that you won't receive any penalties if you decide to change to a new hero, because this is a unique level. I would recommend choosing Aragorn, because Gimli is not as effective in close combat. Start pushing towards a checkpoint located next to the Black Gate (2 on the map). When you get there focus on securing the circled area [#69], but you'll also have to watch out for new orcs heading your way. Keep moving without making any unwanted stops, because otherwise you may be attacked by a scout. Remain here until the checkpoint is under your control.
![[#69] - Campaign - Forces of good - Mission 8 - Black Gate - part 1 - Campaign - Forces of good - The Lord of the Rings: Conquest - Game Guide and Walkthrough](https://game.lhg100.com/Article/UploadFiles/201512/2015121715514084.jpg)
[#69]
Third assignment: Kill orc captains
Suggested class: Legolas
Legolas in an ideal candidate for this task, because it'll be important to force all the captains to leave their towers (3 on the map). Approach the first tower and use fire arrows on the captain [#70]. Thankfully it'll get much easier when he touches the ground, because you won't have to put so many efforts in harming him. Keep using Legolas until the captain is gone and then repeat these actions with other captains. Watch out for standard orcs while trying to fulfill this mission objective and don't forget to ask for a free healing when you're seriously wounded. You'll receive a new task when you get rid of the fourth captain.
![[#70] - Campaign - Forces of good - Mission 8 - Black Gate - part 2 - Campaign - Forces of good - The Lord of the Rings: Conquest - Game Guide and Walkthrough](https://game.lhg100.com/Article/UploadFiles/201512/2015121715514094.jpg)
[#70]
Fourth assignment: Kill Mouth of Sauron
Suggested class: Aragorn or Gimli
Mouth of Sauron (4 on the map) behaves a lot like a standard mage, so you shouldn't be playing as Legolas anymore. Instead you should switch to one of the warriors, however once again I'd like to remind you that Aragorn is a more skilled fighter than Gimli. Locate the mage and use your special moves to begin inflicting injuries [#71]. Don't forget to retreat to your mages if your character is about to die, however you shouldn't take too long, because otherwise Mouth of Sauron may heal himself. You should also focus on knocking him down as often as possible and moving away from the main battlefield, so you'll only be interrupted by single orcs.
![[#71] - Campaign - Forces of good - Mission 8 - Black Gate - part 2 - Campaign - Forces of good - The Lord of the Rings: Conquest - Game Guide and Walkthrough](https://game.lhg100.com/Article/UploadFiles/201512/2015121715514022.jpg)
[#71]
Fifth assignment: Capture the campsite
Suggested class: Gandalf or Aragorn
Aragorn and Gandalf are among the best candidates for the assault on the campsite. They should both do reasonably wel and you can make the changes even when you've started completing this objective. The campsite can be found to the south-east (5 on the map). Notice more than one ballista in the area (6 on the map). Use these devices to dispose of large numbers of enemy troops [#72]. You can also ignore them if you want to, however you'd have to be more patient in taking control over this entire area. The orcs will be arriving mostly from the east and from the south-east. You can wait for them in the designated area if you don't want to risk your life. Keep fighting the beasts until the campsite is yours.
![[#72] - Campaign - Forces of good - Mission 8 - Black Gate - part 2 - Campaign - Forces of good - The Lord of the Rings: Conquest - Game Guide and Walkthrough](https://game.lhg100.com/Article/UploadFiles/201512/2015121715514011.jpg)
[#72]
Sixth assignment: Defend the campsite
Suggested class: Gandalf
This is the final objective of this mission, so you shouldn't be surprised to hear that it's going to be a very difficult battle. Enemy units will be coming from two directions and you should use Gandalf to attack them. Make sure that your allies are being healed regularly and use two remaining Gandalf's attack to inflict injuries to your opponents. Aside from the orcs you'll also be dealing with trolls [#73]. Focus on eliminating them as soon as possible, because otherwise you'll begin losing control over the zone very fast. You must survive for at least three minutes. If you do you'll end the mission and also the entire campaign.
![[#73] - Campaign - Forces of good - Mission 8 - Black Gate - part 2 - Campaign - Forces of good - The Lord of the Rings: Conquest - Game Guide and Walkthrough](https://game.lhg100.com/Article/UploadFiles/201512/2015121715514039.jpg)
[#73]
MAP OF THE AREA:
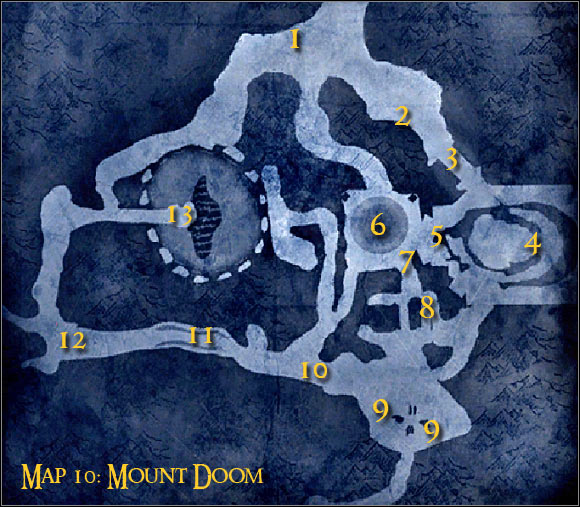
Map legend: 1 - starting area and first checkpoint; 2 - first lever; 3 - passageway leading to the location of the mask; 4 - mask and a new checkpoint; 5 - second lever; 6 - forge and a new checkpoint; 7 - third lever; 8 - passageway leading to the location of enemy captains; 9 - enemy captains; 10 - Sauron's path; 11 - fourth lever; 12 - checkpoint; 13 - area where you'll have to defeat Frodo
Additional info: The first mission of the campaign of the forces of evil is much more challenging than you might have anticipated and this trend will also continue with some of the upcoming levels. The most difficult moment is the battle in the forge. If you win it, you should be able to deal with all of the remaining objectives.
First assignment: Get the mask
Suggested class: Nazgul
Ignore the fact that you won't be allowed to choose a class on your own during the course of this mission, because all will soon return to normal. You start the game in the northern section (1 on the map). Spend some practicing how to steer the Nazgul and how to attack hostile creatures. My recommendation is the attack called "The power of Nine" which can be activated using SHIFT and the right mouse button. There's also a cool Black Breath move, but you must ensure that a lot of monsters are standing in front of you in order to get proper results. You'll meet a few hostile orcs along the way. Kill them only for practice, however it's also possible to avoid them entirely. Keep heading towards the only available passageway (2 on the map). Find the lever [#74] and press the action key to pull it. Now you must travel south-east (3 on the map).
![[#74] - Campaign - Forces of evil - Mission 1 - Mount Doom - part 1 - Campaign - Forces of evil - The Lord of the Rings: Conquest - Game Guide and Walkthrough](https://game.lhg100.com/Article/UploadFiles/201512/2015121715514137.jpg)
[#74]
Keep heading towards the location of the mask (4 on the map). You won't have to worry about encountering any enemies, because orcs will be stationed only in the vicinity of the object of your desire [#75]. Get closer to the archers as soon as possible and kill them using close combat moves. You could also throw a blade at one of the large bombs and the explosion should be more than enough to kill a few monsters. As for other enemies, you may ignore them and focus only on completing your current objective which is collecting the mask.
![[#75] - Campaign - Forces of evil - Mission 1 - Mount Doom - part 1 - Campaign - Forces of evil - The Lord of the Rings: Conquest - Game Guide and Walkthrough](https://game.lhg100.com/Article/UploadFiles/201512/2015121715514199.jpg)
[#75]
Second assignment: Deliver the mask
Suggested class: Nazgul
This objective will be added to your list of current assignment after you've collected the mask, but it may be cancelled if Nazgul dies in the meantime. If this happens, you must recollect the mask with a new Nazgul. Like I've already said, you can ignore the orcs along the way, especially since your character doesn't have any healing capabilities and you won't regain too much health from collecting balls of energy. Keep heading east until you've reached a new lever (5 on the map). Press the action key [#76] and enter the forge (6 on the map). Go to the designated area and await further instructions.
![[#76] - Campaign - Forces of evil - Mission 1 - Mount Doom - part 1 - Campaign - Forces of evil - The Lord of the Rings: Conquest - Game Guide and Walkthrough](https://game.lhg100.com/Article/UploadFiles/201512/2015121715514183.jpg)
[#76]
Third assignment: Kill 20 orcs in the forge
Suggested class: Nazgul
I've already mentioned it's going to be the most challenging objective of the mission. The main reason is because the Nazgul is a difficult character to master. Most of the attacks are weak and some of them have a slim chance of succeeding. In addition to that you only have two minutes to kill 20 beasts, so theoretically you should kill at least 10 monsters after 60 seconds of combat. Focus on attacking the weakest orcs, because mages and skilled warriors have longer health bars and they're more likely to fight back. You'll also have to avoid sustaining major injuries, because the death of your Nazgul would cost you about 20 seconds to get back to the forge. Use the Power of Nine attack whenever possible and focus on attacking larger groups of creatures [#77]. Thankfully there are other Nazguls in the forge, so you won't have to worry about all the orcs focusing their rage only on your character.
![[#77] - Campaign - Forces of evil - Mission 1 - Mount Doom - part 1 - Campaign - Forces of evil - The Lord of the Rings: Conquest - Game Guide and Walkthrough](https://game.lhg100.com/Article/UploadFiles/201512/2015121715514291.jpg)
[#77]
Fourth assignment: Kill two orc captains
Suggested class: Witch King or Nazgul
Obviously you should confirm that you want to start playing as the Witch King. He has very similar attacks to a Nazgul, but the main difference is that they're more powerful. It's important that you keep him alive for as long as possible, preferably to the moment when you have to fight Frodo. Proceed to the south [#78] and find a new lever near the gate (7 on the map). When you get to an unguarded cave (8 on the map) choose the passageway to your left in order to avoid minor problems. Eventually you should be able to get to an area occupied by a larger squad of orcs led by two captains (9 on the map).
![[#78] - Campaign - Forces of evil - Mission 1 - Mount Doom - part 2 - Campaign - Forces of evil - The Lord of the Rings: Conquest - Game Guide and Walkthrough](https://game.lhg100.com/Article/UploadFiles/201512/2015121715514258.jpg)
[#78]
Both captains operate in a similar manner to archers, but they're more powerful. Your primary concerns should be to close the distance to them and to begin using Witch King's special attacks [#79]. Don't forget that you can't heal on your own and that you can't rely on the help of any mages. Collect balls of energy and try to avoid being knocked down too often. Defeat both captains before moving on.
![[#79] - Campaign - Forces of evil - Mission 1 - Mount Doom - part 2 - Campaign - Forces of evil - The Lord of the Rings: Conquest - Game Guide and Walkthrough](https://game.lhg100.com/Article/UploadFiles/201512/2015121715514246.jpg)
[#79]
Fifth assignment: Take Sauron's path
Suggested class: Witch King or Nazgul
This time you'll have to begin moving west (10 on the map). Eventually you'll get to a new large cave where you'll come across a troll. You can't attack the monster with any spells, however you can throw your blade at nearby bombs [#80]. Each explosion should wound the creature. Wait for the troll to enter the cave where you fought both captains and surprise it from the back by using a well-known move. Make sure that it's safe and proceed to the exact same cave again.
![[#80] - Campaign - Forces of evil - Mission 1 - Mount Doom - part 2 - Campaign - Forces of evil - The Lord of the Rings: Conquest - Game Guide and Walkthrough](https://game.lhg100.com/Article/UploadFiles/201512/2015121715514317.jpg)
[#80]
You should soon reach the area where the last gate is located [#81]. Start off by dealing with a small and weak group of orcs. Once the beasts have been eliminated, use the lever (11 on the map) to open the gate. You may proceed to the next section. Keep heading west and you'll finally get to a small campsite (12 on the map). Here's where you should help other Nazguls in getting rid of a new group of orcs. Thankfully you won't have to capture this area, because it's going to happen automatically. Watch a short cut-scene, explaining that you need to hunt down and kill Frodo.
![[#81] - Campaign - Forces of evil - Mission 1 - Mount Doom - part 2 - Campaign - Forces of evil - The Lord of the Rings: Conquest - Game Guide and Walkthrough](https://game.lhg100.com/Article/UploadFiles/201512/2015121715514302.jpg)
[#81]
Sixth assignment: Kill Frodo Baggins
Suggested class: Witch King or Nazgul
Defeating Frodo won't be as easy as it might seem. The hobbit is a skilled warrior and he also uses camouflage to hide his current position from you. Thankfully he won't be entirely invisible, so you shouldn't lose him as long as you pay attention to his moves. You'll also see a large yellow arrow above his head, informing you about his position. You'll have to start the duel by taking away at least 1/3 of his health and this means using some of the most powerful attacks of a Witch King or a Nazgul. Watch a new cut-scene, informing you that Frodo has retreated to Mount Doom (13 on the map). The game will give you two minutes to finish him off. Enter the mountain and go to the far end of the path to find Frodo [#82]. Be careful not to fall here, because it's going to cost you at least 20-25 seconds to return here inside a body of a new Nazgul. Killing Frodo will guarantee your win.
![[#82] - Campaign - Forces of evil - Mission 1 - Mount Doom - part 2 - Campaign - Forces of evil - The Lord of the Rings: Conquest - Game Guide and Walkthrough](https://game.lhg100.com/Article/UploadFiles/201512/2015121715514451.jpg)
[#82]
MAP OF THE AREA:
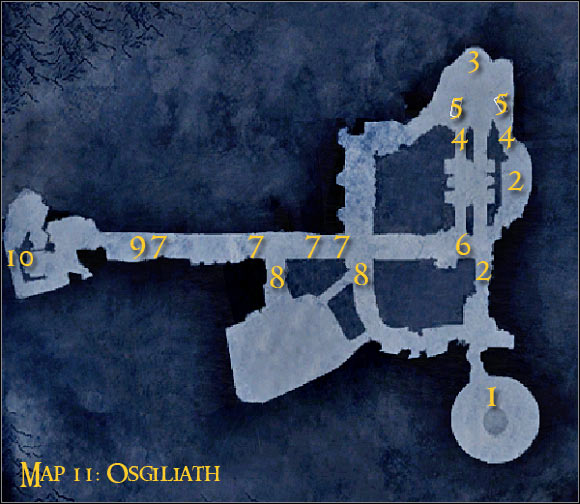
Map legend: 1 - starting area and first checkpoint; 2 - larger groups of enemy units; 3 - forum - area where you'll have to deliver the torch and area in need of protection; 4 - passageway where enemy forces show up; 5 - ballistae; 6 - battering ram and a checkpoint; 7 - bridge - area that needs to be secured; 8 - passageways used by enemy units; 9 - enemy forces; 10 - area where Faramir appears for the first time
Additional info: Osgiliath is the easiest mission of the campaign of forces of evil. This doesn't mean you shouldn't expect any problems nor that completing objectives will be something quick and easy. There are some challenging battles waiting for you near the bridge. The good news is that you'll be playing as Mouth of Sauron, so you won't have a lot of difficulties trying to get rid of enemy troops.
First assignment: Take the torch
Suggested class: warrior or scout
I would recommend that you choose a warrior for this first assignment, because even a fighter will be capable of avoiding enemy troops. You start the game near the market (1 on the map), so it's the same area where you had to escort Frodo. Make a few steps forward and locate a torch. Pick it up.
Second assignment: Take the torch to the forum
Suggested class: warrior or scout
You must now begin moving north. At least two large groups of enemy units will stand in your way (2 on the map). I would recommend that you avoid enemy units by running and maintaining a safe distance [#83]. As long as you don't get too close you should be fine. Obviously you could also try and engage them in an open combat. This would be risky, because you wouldn't be able to rely on anyone's help. Remember that your primary objective is to deliver the torch and the area you'll have to go to is located to the north (3 on the map). It shouldn't be a problem to get there, especially if you decide to be moving close to the eastern edge of the map.
![[#83] - Campaign - Forces of evil - Mission 2 - Osgiliath - part 1 - Campaign - Forces of evil - The Lord of the Rings: Conquest - Game Guide and Walkthrough](https://game.lhg100.com/Article/UploadFiles/201512/2015121715514511.jpg)
[#83]
Third assignment: Defend the forum
Suggested class: mage or warrior
You'll now have to defend the forum for two minutes and 30 seconds. I would recommend that you play as a mage, however you may also stay inside the body of a warrior. Still, mage seems like a better idea, especially since it's going to be important to attack enemy units from a distance [#84]. Don't forget to heal your units. There aren't going to be too many of them. This is crucial in the early part of the battle, because you'll receive reinforcements later on. If you lose too many allies, you'll be forced to defend the forum practically on your own and this can be a huge problem.
![[#84] - Campaign - Forces of evil - Mission 2 - Osgiliath - part 1 - Campaign - Forces of evil - The Lord of the Rings: Conquest - Game Guide and Walkthrough](https://game.lhg100.com/Article/UploadFiles/201512/2015121715514551.jpg)
[#84]
Enemy units will be coming from two directions. At first they'll only appear to the south-east of the forum, but later on you'll have to expect more to come out of the southern building (4 on the map). Focus on attacking larger groups, because other orcs will deal with single Gondorians. Notice a few ballistae in this area (5 on the map). Using them seems like a good idea [#85], especially since it's going to take your enemies some time to destroy them. Thankfully you won't be dealing with a lot of foes, so even if you rely only on your skills you shouldn't endanger safety of this zone.
![[#85] - Campaign - Forces of evil - Mission 2 - Osgiliath - part 1 - Campaign - Forces of evil - The Lord of the Rings: Conquest - Game Guide and Walkthrough](https://game.lhg100.com/Article/UploadFiles/201512/2015121715514673.jpg)
[#85]
Fourth assignment: Get to the battering ram
Suggested class: Mouth of Sauron or mage
Notice that you've been given a chance to control Mouth of Sauron - one of the final bosses of the first campaign. Sadly he's very similar to a standard mage, because you don't have any special attacks at your disposal. The only exception is a different middle mouse attack. You'll soon find out that this attack is very good when fighting at a close range and a result you should be using it often. I wouldn't recommend going to the battering ram (6 on the map) from the north, because it would take too much time. Instead approach the flag at the forum and confirm that you want to go back to the market (1 on the map). You may now start moving north [#86] and after only a few seconds you'll get to your destination. An enemy captain will appear near the ram. Use your newly unlocked character to kill him.
![[#86] - Campaign - Forces of evil - Mission 2 - Osgiliath - part 2 - Campaign - Forces of evil - The Lord of the Rings: Conquest - Game Guide and Walkthrough](https://game.lhg100.com/Article/UploadFiles/201512/2015121715514626.jpg)
[#86]
Fifth assignment: Clear the bridge
Suggested class: Mouth of Sauron or mage
You'll now have to fight your way through the middle of the map which is going to be a large bridge. Keep fighting as Mouth of Sauron, but if he dies, switch to a standard mage instead of controlling a warrior or a scout. It's extremely important here that you use your spells to heal other orcs, especially since there will be far more enemy units. Knights of Gondor will use mostly southern passageways (8 on the map) to get to you and that's where you'll have to be ready for them [#87]. Use your most powerful attacks to hunt them down.
![[#87] - Campaign - Forces of evil - Mission 2 - Osgiliath - part 2 - Campaign - Forces of evil - The Lord of the Rings: Conquest - Game Guide and Walkthrough](https://game.lhg100.com/Article/UploadFiles/201512/2015121715514756.jpg)
[#87]
Notice that the battering ram won't move unless all the surrounding enemy units have been eliminated. There are a few additional obstacles on the bridge itself (7 on the map) and they're pallisades. The easiest way to destroy these objects is to set them on fire with mage's fireballs [#88]. Thankfully enemy units will stop appearing when you're close enough to the main gate, so you'll be able to focus your attention on destroying objects blocking your way. Be patient and wait for the ram to be pushed all the way to the main gate (9 on the map). The gate will then be destroyed, allowing you to take on the final objective of this mission.
![[#88] - Campaign - Forces of evil - Mission 2 - Osgiliath - part 2 - Campaign - Forces of evil - The Lord of the Rings: Conquest - Game Guide and Walkthrough](https://game.lhg100.com/Article/UploadFiles/201512/2015121715514720.jpg)
[#88]
Sixth assignment: Kill Faramir
Suggested class: Mouth of Sauron or mage
The final "boss fight" is going to be a very easy one, especially if you've managed to keep the Mouth of Sauron alive. Start off by heading towards the courtyard. You'll have to eliminate a few additional enemy units there, including knights and archers. Faramir will appear near the stairs (10 on the map), but it would be a good idea to wait for him to get closer to your position. Start off by attacking him from a larger distance [#89] and use the middle attack if he gets too close. If you don't make any major mistakes, you should be able to kill him in less than 30 seconds.
![[#89] - Campaign - Forces of evil - Mission 2 - Osgiliath - part 2 - Campaign - Forces of evil - The Lord of the Rings: Conquest - Game Guide and Walkthrough](https://game.lhg100.com/Article/UploadFiles/201512/2015121715514827.jpg)
[#89]
MAP OF THE AREA:
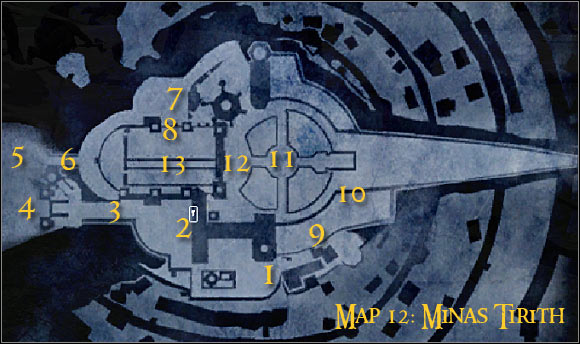
Map legend: 1 - starting area and first checkpoint; 2 - courtyard - area that needs to be secured, ballista and a checkpoint on the upper level; 3 - passageway leading to the crown and a new checkpoint; 4 - crown of Gondor; 5 - checkpoint; 6 - passageway leading to the location of the Nazgul; 7 - Nazgul and a new checkpoint; 8 - stairs; 9 - passageway that needs to be secured for the battering ram; 10 - main gate; 11 - white tree; 12 - passageway leading to the throne room; 13 - throne room - area that needs to be secured
Additional info: This is a slightly more challenging mission than the level in Osgiliath, however you still won't have too many things to worry about. To be honest your only concern should be to make wise class decisions. Thankfully the final part of the mission will be much easier, because you'll be playing as Saruman and you won't have to defeat any bosses.
First assignment: Capture the courtyard
Suggested class: mage
I would strongly recommend that you choose a mage for this first assignment, mostly because you'll be playing as a team and you'll want to heal your allies to prolong their lives. Thankfully that won't be a requirement, especially since you'll also receive backup from friendly cave trolls and they'll play a huge part in taking over certain sections of the map. If you don't like playing as a mage, you may decide to switch to a warrior, but you would have spend more time trying to complete certain objectives. The mission starts in the southern section (1 on the map). Follow your allies to the west and then turn to the north. Start attacking enemy units stationed near the courtyard (2 on the map). You should be using your standard lightning attack, as well as mage's fireballs [#90].
![[#90] - Campaign - Forces of evil - Mission 3 - Minas Tirith - part 1 - Campaign - Forces of evil - The Lord of the Rings: Conquest - Game Guide and Walkthrough](https://game.lhg100.com/Article/UploadFiles/201512/2015121715514862.jpg)
[#90]
Don't forget that you should keep moving, so you won't be considered an easy target. Heal your mage whenever he receives even minor injuries, mostly because he doesn't have a big health bar and you could lose him by mistake. Make the first sweep of the area and use a nearby ballista [#91] to deal with the remaining enemy troops. You may use this device not only to ensure your victory here, but also to attack new enemies (3 on the map). Obviously this isn't a requirement, however you should use the fact that you're in an advantage. Remain here until the courtyard is under your control.
![[#91] - Campaign - Forces of evil - Mission 3 - Minas Tirith - part 1 - Campaign - Forces of evil - The Lord of the Rings: Conquest - Game Guide and Walkthrough](https://game.lhg100.com/Article/UploadFiles/201512/2015121715514914.jpg)
[#91]
Second assignment: Steal the crown of Gondor
Suggested class: mage or scout
If you want to avoid unwanted complications, you must make the decision on which class should deliver the crown even before its in your possession. The main reason is that you won't be allowed to drop the crown, even by going to the checkpoint and trying to switch to a different class. The artifact can be found to the west of the courtyard (4 on the map). Wait for allied units to begin travelling to that location and join them. You'll probably come across at least one enemy captain along the way. Get rid of him and approach the crown [#92] in order to take it. You can also spend some trying to secure the checkpoints to the east (3 on the map) and to the north (5 on the map) before taking the crown, but it shouldn't be necessary.
![[#92] - Campaign - Forces of evil - Mission 3 - Minas Tirith - part 1 - Campaign - Forces of evil - The Lord of the Rings: Conquest - Game Guide and Walkthrough](https://game.lhg100.com/Article/UploadFiles/201512/2015121715514911.jpg)
[#92]
Third assignment: Deliver the crown to a Nazgul
Suggested class: mage or scout
The crown needs to be delivered to a Nazgul and the only available passageway is located to the north-east (6 on the map). You'll probably notice new enemy units near the stairs. You must eliminate them if you're playing as a mage before you decide to move forward. If you decide to play as a scout, you'll have a much easier task, because you can use camouflage [#93]. Remember that camouflage doesn't work on enemy archers, but you should still be able to get past most of the enemy units. Go to the Nazgul (7 on the map) and you'll lose the crown automatically when you're close enough to the demon.
![[#93] - Campaign - Forces of evil - Mission 3 - Minas Tirith - part 2 - Campaign - Forces of evil - The Lord of the Rings: Conquest - Game Guide and Walkthrough](https://game.lhg100.com/Article/UploadFiles/201512/2015121715515093.jpg)
[#93]
Fourth assignment: Go to the stairs
Suggested class: mage
Once again you should be controlling a mage, so make the exchange if you've been playing as a scout. Enter a large structure and head south (8 on the map). You will probably come across a few knights here [#94], but you don't have to kill them and there's even a possibility that they may be fighting someone else. Notice a new checkpoint along the way (2 on the map), however if you're playing as a warrior you don't have to use it. Keep heading towards the location of the battering ram and await further instructions when you get there.
![[#94] - Campaign - Forces of evil - Mission 3 - Minas Tirith - part 2 - Campaign - Forces of evil - The Lord of the Rings: Conquest - Game Guide and Walkthrough](https://game.lhg100.com/Article/UploadFiles/201512/2015121715515082.jpg)
[#94]
Fifth assignment: Clear a path for the battering ram
Suggested class: mage or archer
You've completed a very similar assignment during the course of the previous mission, so you should still remember how to play this out. Your primary objective will be to dispose of a few palisades (9 on the map). This will allow other orcs to push the battering ram towards the large gate (10 on the map). Sadly you must acknowledge the fact that you'll be dealing with a lot of strong opponents and eliminating them will be as important as destroying the obstacles. Only the final part of the approach is different - ignore new knights and archers because they'll be respawning endlessly [#95]. As a result focus only on eliminating the last set of the palisades and wait for the ram to destroy the main gate.
![[#95] - Campaign - Forces of evil - Mission 3 - Minas Tirith - part 2 - Campaign - Forces of evil - The Lord of the Rings: Conquest - Game Guide and Walkthrough](https://game.lhg100.com/Article/UploadFiles/201512/2015121715515056.jpg)
[#95]
Sixth assignment: Burn the White Tree
Suggested class: Saruman or archer
It's EXTREMELY important that you start playing as Saruman, because he's one of the most powerful characters in the game. If you lose him by any chance, switch to an archer, because there won't be too many enemy mages in the area and on the other hand you won't have problems receiving a healing. Head on to the opened gate and start moving towards the tree (11 on the map). Obviously you should now use Saruman's fire attack to set the tree on fire [#96]. This will probably catch attention of nearby enemy troops, so you'll have to spend reasonable amounts of time killing them. Don't forget to use Saruman's middle attack when you're surrounded. As for other orcs, you don't have to kill them, however you can help them if you're waiting for your fire attack to be regenerated.
![[#96] - Campaign - Forces of evil - Mission 3 - Minas Tirith - part 2 - Campaign - Forces of evil - The Lord of the Rings: Conquest - Game Guide and Walkthrough](https://game.lhg100.com/Article/UploadFiles/201512/2015121715515064.jpg)
[#96]
Seventh assignment: Capture the throne room
Suggested class: Saruman or mage
The entrance to the throne room is located to the west of the burnt tree (12 on the map). If Saruman has already died you should replace him with a standard mage, because otherwise you wouldn't be able to count on a free healing anymore. Enter the throne room (13 on the map) and notice that enemy captains have occupied this area [#97]. Start attacking them using Saruman's most powerful attacks and remember to keep standing inside the circled area. This will allow you to conquer the throne room much faster. You should also know that you won't have to worry about your enemy receiving any kind of reinforcements. Taking over the throne room will allow you to win the entire mission.
![[#97] - Campaign - Forces of evil - Mission 3 - Minas Tirith - part 2 - Campaign - Forces of evil - The Lord of the Rings: Conquest - Game Guide and Walkthrough](https://game.lhg100.com/Article/UploadFiles/201512/2015121715515140.jpg)
[#97]
MAP OF THE AREA:

Map legend: 1 - starting area and first checkpoint; 2 - passageway leading to the mines; 3 - checkpoint; 4 - ballista and mines - area that needs to be secured; 5 - bridge where enemy units show up; 6 - passageway leading to the warrior with the stone; 7 - warrior carrying a stone; 8 - altar; 9 - tomb gate; 10 - Balin's tomb; 11 - ballista; 12 - passageway leading to the mage with the stone; 13 - enemy archers; 14 - mage carrying a stone; 15 - area where Gimli appears for the first time
Additional info: This is a long and challenging level. Bad class choice can lead to losing a few lives within a short period of time. The only good news is that the final duel with Gimli is very easy to win.
First assignment: Get down to the mines
Suggested class: warrior
I'm sure that you won't have any major problems with this first assignment. You start in the middle of the mines (1 on the map). Follow other orcs by proceeding to the north (2 on the map). When you get to the ladders use one to get to the upper level. Notice a new checkpoint here (3 on the map). You can use it in the future if something doesn't go according to your plan.
Second assignment: Capture the mines
Suggested class: warrior
The zone you'll have to conquer for the purpose of this task can be found to the south-west (4 on the map) from where you're currently standing. Start moving to that location and eliminate anyone who stands in your way [#98]. It's going to be important here to use warrior's two strongest attacks, activated with the middle and the right mouse button. Ignore the fact that there aren't any mages in the area, because you'll be acting in an advantage.
![[#98] - Campaign - Forces of evil - Mission 4 - Mines of Moria - part 1 - Campaign - Forces of evil - The Lord of the Rings: Conquest - Game Guide and Walkthrough](https://game.lhg100.com/Article/UploadFiles/201512/2015121715515167.jpg)
[#98]
Focus on killing all the monsters within the designated area. When this is done get to the ballista quickly. You can find this object to the north of the checkpoint you want to capture. Use the ballista to attack enemy forces coming from the north (5 on the map). Look at my screen [#99] if you don't know how to set up the ballista for best effect. Prevent enemy units from getting to the zone, especially human captains. If they do, assist your allies in getting rid of them. Capture the mines that way and wait for new orders.
![[#99] - Campaign - Forces of evil - Mission 4 - Mines of Moria - part 1 - Campaign - Forces of evil - The Lord of the Rings: Conquest - Game Guide and Walkthrough](https://game.lhg100.com/Article/UploadFiles/201512/2015121715515245.jpg)
[#99]
Third assignment: Kill the warrior carrying a stone
Suggested class: warrior or scout
You'll now have to make an important decision. If you're planning to continue playing as a warrior, reaching the target is going to be more difficult, but you'll have less problems delivering the artifact to its new destination. As for the scout, it's going to be the other way around, so you won't have any major problems surprising the stonebearer, but it'll be difficult to deliver the stone safely and to increase its power. I would recommend that you find some kind of a compromise. Play as a scout until you've been able to hunt down the stonebearer and then switch to a warrior. Use the same bridge you've guarded before. Proceed to the west (6 on the map) and then turn south (7 on the map). Activate camouflage and use your backstabbing ability to dispose of the warrior carrying a stone [#100]. If you're successful, he'll die without even fighting back.
Fourth assignment: Pick up Balrog's stone
Suggested class: warrior
Before you decide to pick up the stone, you should switch to a warrior using one of the previously visited checkpoints. The stone will appear next to the body of the warrior who was carrying it or where he was standing before you attacked him.
![[#100] - Campaign - Forces of evil - Mission 4 - Mines of Moria - part 1 - Campaign - Forces of evil - The Lord of the Rings: Conquest - Game Guide and Walkthrough](https://game.lhg100.com/Article/UploadFiles/201512/2015121715515235.jpg)
[#100]
Fifth assignment: Kill 20 Gondorians
Suggested class: warrior or scout
This can be a rather difficult assignment if you're playing as a scout, even though you've became more powerful thanks to the magical stone. As a result you should focus your efforts on picking up the stone as a warrior [#101]. There are a few enemies near the place where you found the artifact, however you should proceed to the main hall right away. Remember to attack larger groups of enemy units, but prevent your foes from knocking you down too often. If you get injured, retreat to allied mages in order to receive a free healing. You can't die, because otherwise you would have to take the stone again and start off with the killing process. Thankfully if you're careful enough killing 20 Gondorians shouldn't be a problem.
Sixth assignment: Deliver the stone to the altar
Suggested class: warrior or scout
The altar is located near the area where you've started the game (8 on the map). Approach it and you'll automatically lose the magical stone.
![[#101] - Campaign - Forces of evil - Mission 4 - Mines of Moria - part 1 - Campaign - Forces of evil - The Lord of the Rings: Conquest - Game Guide and Walkthrough](https://game.lhg100.com/Article/UploadFiles/201512/2015121715515339.jpg)
[#101]
Seventh assignment: Destroy Balin's tomb
Suggested class: mage or archer
This is also going to be a difficult task. I would recommend that you start off by choosing an archer, however you should switch to a mage later on during the course of the mission. Your first step will be to destroy the gate (9 on the map) protecting access to the tomb (10 on the map). Use archer's fire arrows to get the job done [#102]. You may now approach the entrance to the tomb carefully. Notice a few captains in the distance. They're mostly archers, so you shouldn't charge at them, because you would probably die before getting to them. Instead attack them from here and if you're lucky they'll start moving towards your character.
![[#102] - Campaign - Forces of evil - Mission 4 - Mines of Moria - part 2 - Campaign - Forces of evil - The Lord of the Rings: Conquest - Game Guide and Walkthrough](https://game.lhg100.com/Article/UploadFiles/201512/2015121715515309.jpg)
[#102]
Try to secure as much of the tomb from the distance as you can. Don't enter this new area unless you've already killed all the captains. Switch to a mage and proceed forward. You shouldn't be in a lot of hurry and it'll also be important to heal your allies as you go. I would recommend that you try and fight your way to a ballista which is located to the east of the tomb (11 on the map). Kill all the guards and then use the ballista yourself [#103]. Fire a few rounds at the tomb and leave the ballista, because there are probably enemy units heading your way. Kill them and repeat all the previous actions. Eventually you'll destroy the tomb.
![[#103] - Campaign - Forces of evil - Mission 4 - Mines of Moria - part 2 - Campaign - Forces of evil - The Lord of the Rings: Conquest - Game Guide and Walkthrough](https://game.lhg100.com/Article/UploadFiles/201512/2015121715515443.jpg)
[#103]
Eighth assignment: Kill a mage carrying a stone
Suggested class: archer or warrior
If you don't anything against risking your life a few times, you may decide to choose a warrior for this particular assignment. Sadly you must acknowledge the fact that even a small mistake may get your character killed, either by the hostile archers (most likely scenario) or due to a large fall into the abyss. If you want to play it safe you should choose an archer instead. Proceed to the western exit from the tomb (12 on the map) and start moving south-west. You will soon notice enemy archers in the distance (13 on the map). Activate the zoom feature and use your bow to get rid of at least a few of them [#104].
![[#104] - Campaign - Forces of evil - Mission 4 - Mines of Moria - part 2 - Campaign - Forces of evil - The Lord of the Rings: Conquest - Game Guide and Walkthrough](https://game.lhg100.com/Article/UploadFiles/201512/2015121715515468.jpg)
[#104]
The mage you'll have to hunt down and kill can be found near the first group of archers (14 on the map). He may remain there until the end or he may decide to attack you. Either way, you will have to encourage him into leaving his post and to get closer to a narrow passageway leading to you [#105]. There's a high probability that he'll be eliminated thanks to a huge fall, however you mustn't forget not to attack him when he activates his force field. Shoot a fire arrow at him when he's not ready and the explosion should send him flying in the air. If you can't get him to attack you switch to a warrior and defeat him in an open combat. Sadly in this case you'll have to watch out for his guards.
![[#105] - Campaign - Forces of evil - Mission 4 - Mines of Moria - part 2 - Campaign - Forces of evil - The Lord of the Rings: Conquest - Game Guide and Walkthrough](https://game.lhg100.com/Article/UploadFiles/201512/2015121715515554.jpg)
[#105]
Ninth assignment: Get the second Balrog's stone
Suggested class: archer or warrior
The stone may appear in one of two spots - in the area where the mage was standing before you attacked him or next to his rotting corpse. Either way you'll have to take the stone using an archer or a warrior.
Tenth assignment: Kill 25 Gondorians
Suggested class: archer or warrior
You've fulfilled a very similar objective not long ago, however this time you'll have to kill five more Gondorians. It shouldn't be too difficult, as long as you're not playing as a scout. Three other classes will get the job done without any problems. Obviously you should move back to the main hall [#106], so you won't have to risk falling and losing the stone. Don't forget to heal yourself during the course of this assignment!
![[#106] - Campaign - Forces of evil - Mission 4 - Mines of Moria - part 2 - Campaign - Forces of evil - The Lord of the Rings: Conquest - Game Guide and Walkthrough](https://game.lhg100.com/Article/UploadFiles/201512/2015121715515559.jpg)
[#106]
Eleventh assignment: Deliver the stone to the altar
Suggested class: archer or warrior
You'll have to go back with the "loaded" stone to the exact same altar (8 on the map). Give away the artifact and confirm that you want to play as Balrog.
Twelfth assignment: Kill Gimli
Suggested class: Balrog or archer
The dwarf (15 on the map) is best to be killed using Balrog's superpowers [#107]. This shouldn't be a difficult duel, however you will have to eliminate as many enemy units as possible before engaging Gimli. As a result you won't have to worry about their surprise attacks while trying to get rid of the dwarf. Use Balrog's special moves and Gimli should die without inflicting any major injuries to the demon.
![[#107] - Campaign - Forces of evil - Mission 4 - Mines of Moria - part 2 - Campaign - Forces of evil - The Lord of the Rings: Conquest - Game Guide and Walkthrough](https://game.lhg100.com/Article/UploadFiles/201512/2015121715515514.jpg)
[#107]
MAP OF THE AREA:
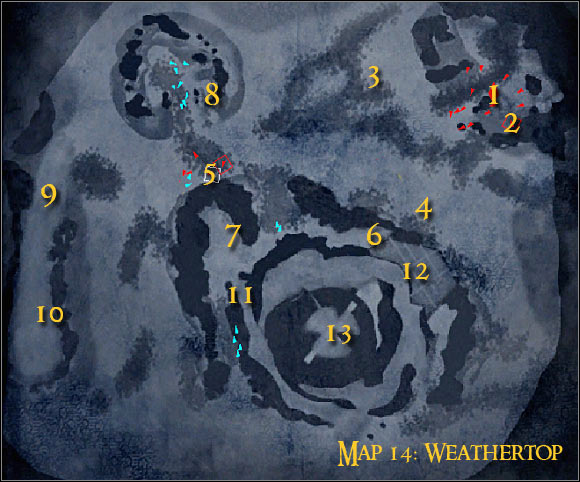
Map legend: 1 - starting area and first checkpoint; 2 - troll; 3 - oliphant; 4 - enemy armories and a checkpoint; 5 - enemy catapult; 6 - passageway leading to the barracks; 7 - enemy barracks; 8 - enemy catapult, checkpoint and a troll; 9 - passageway leading to the outpost; 10 - outpost - area that needs to be secured; 11 - passageway leading to the top of the hill; 12 - checkpoint; 13 - area where Aragorn appears for the first time
Additional info: This is a rather challenging mission. I'm sure that you'll have a lot of problems trying to destroy the barracks and take over one of the outposts. Thankfully you won't have to rely on the standard classes all the time, because you'll be given command of trolls and oliphants. Additionally, you'll play as Saruman near the end of the mission.
First assignment: Destroy Gondor's emplacements
Suggested class: oliphant (armories and the first catapult), scout (barracks) and archer (second catapult)
I would strongly recommend that you divide this objective into three smaller parts. The main reason is that you'll want to command someone else each time in order to get best results. You start the mission in the upper right corner (1 on the map). Notice a troll near the start point (2 on the map), however you should decide to take control over an oliphant (3 on the map). Use a mage to get to the beast, because eventually you'll have to leave it and it's going to be important to be able to heal yourself. Notice that the oliphant has become the main target for enemy catapults, so you'll have to be in a hurry and you won't be allowed to stop. Start off by moving towards two armories (4 on the map). Use oliphant's standard attacks to destroy these structures [#108]. Obviously you can also get rid of a few enemy units, but it won't be necessary.
![[#108] - Campaign - Forces of evil - Mission 5 - Weathertop - part 1 - Campaign - Forces of evil - The Lord of the Rings: Conquest - Game Guide and Walkthrough](https://game.lhg100.com/Article/UploadFiles/201512/2015121715515666.jpg)
[#108]
You'll have to move the oliphant to your right quickly and this means you'll be travelling west. Keep heading towards one of the catapults (5 on the map). I've already mentioned before that you'll be losing health, not only because of the catapult you want to destroy, but due to attacks made by distant targets as well. Get to the catapult as soon as possible and destroy it with a few standard attacks [#109]. You should now make a decision to leave the oliphant. Go back to the start area to change the class. Be careful, because enemy eagles are circling the area and you may be caught if you make an unnecessary stop. Obviously that would mean losing a life and some time. You should also remember about this later on during the course of this mission.
![[#109] - Campaign - Forces of evil - Mission 5 - Weathertop - part 1 - Campaign - Forces of evil - The Lord of the Rings: Conquest - Game Guide and Walkthrough](https://game.lhg100.com/Article/UploadFiles/201512/2015121715515797.jpg)
[#109]
You should now focus on destroying the barracks (7 on the map) and the safest route can be found near destroyed armories (6 on the map). I wouldn't recommend choosing offensive classes for this assignment, even a troll. The reason is that you'll be dealing with a lot of enemy units, including very powerful ents. As a result you should decide to sneak past enemy units in the body of a scout. Get to the vicinity of the barracks, activate camouflage and go to the back of the structure [#110]. Use your attacks on the barracks, including scout's satchel bombs (F key). Stop what you're doing from time to time, because single enemy units may arrive here to kill you. Thankfully there won't be too many of them. Destroy the barracks and retreat to the starting area using the same path as before. Don't forget to have camouflage turned on, so you won't have to fight any creatures along the way.
![[#110] - Campaign - Forces of evil - Mission 5 - Weathertop - part 1 - Campaign - Forces of evil - The Lord of the Rings: Conquest - Game Guide and Walkthrough](https://game.lhg100.com/Article/UploadFiles/201512/2015121715515744.jpg)
[#110]
You only have one more objective left and that's destroying the second catapult (8 on the map), located on top of a small hill. Once again I wouldn't recommend choosing the frontal approach, because you would only get far enough with a troll. The easier way to destroy the catapult will be to use an archer. Make a stop to the east of the target and start using fire arrows to set it on fire [#111]. Make sure not to stay in one spot, because you may be caught by an eagle. There are also going to be single enemy units in the area, however eliminating them should be very easy.
![[#111] - Campaign - Forces of evil - Mission 5 - Weathertop - part 1 - Campaign - Forces of evil - The Lord of the Rings: Conquest - Game Guide and Walkthrough](https://game.lhg100.com/Article/UploadFiles/201512/2015121715515711.jpg)
[#111]
Second assignment: Capture the outpost
Suggested class: troll
In this case you should definitely choose a troll. There are two reasons for that to happen - it's going to be important to eliminate larger groups of enemy forces quickly and the troll can't be captured by eagles. Start moving west (9 on the map). You'll soon notice that a large battle is taking place near the road leading to the outpost [#112]. Assist your allies in getting rid of enemy unites. I would recommend that you focus on eliminating archers and ents. It's best to wait for the ents to attack someone else, so you won't have to worry about them fighting back right away. Use troll's middle attack, because it's the most effective move in close combat and when dealing with groups.
![[#112] - Campaign - Forces of evil - Mission 5 - Weathertop - part 2 - Campaign - Forces of evil - The Lord of the Rings: Conquest - Game Guide and Walkthrough](https://game.lhg100.com/Article/UploadFiles/201512/2015121715515860.jpg)
[#112]
Before you decide to make the final assault on the outpost (10 on the map) you should spend some time looking for a mage and receiving a free healing. Eliminate a few knights along the way, but don't stay in one spot and instead keep moving. There are palisades blocking the path to the outpost and obviously you must destroy them [#113]. When they're gone step into a small circled area. Don't forget that enemy units will be appearing here constantly, so you can't feel safe. Thankfully you should be joined by allied units soon and it's going to make the entire process a lot easier.
![[#113] - Campaign - Forces of evil - Mission 5 - Weathertop - part 2 - Campaign - Forces of evil - The Lord of the Rings: Conquest - Game Guide and Walkthrough](https://game.lhg100.com/Article/UploadFiles/201512/2015121715515870.jpg)
[#113]
Third assignment: Kill the king's guard
Suggested class: Saruman or troll
Notice that Saruman has become an active character. Obviously you should choose him, because he's going to be better than a troll, not to mention standard mages. You should play as the troll only if you lose Saruman by mistake, but you would have to be very unlucky for that to happen. There are six members of the guard for you to eliminate, however at least two of them should be present on the lower battlefield. Attack them from a larger distance [#114] and don't forget to keep moving, so you won't be an easy target. You'll still have to watch out for the attacks from the air and your enemies will be using bows. You should also remain near other allied troops, so you'll be able to heal them whenever they receive major injuries.
![[#114] - Campaign - Forces of evil - Mission 5 - Weathertop - part 2 - Campaign - Forces of evil - The Lord of the Rings: Conquest - Game Guide and Walkthrough](https://game.lhg100.com/Article/UploadFiles/201512/2015121715520012.jpg)
[#114]
You'll probably have to start climbing to get to the other members of the guard and there's only one passageway (11 on the map) leading to the top of the hill. Don't forget to eliminate standard enemy units along the way, so they won't bother you in the future. It's extremely important that you keep moving. You won't have to worry about the eagles, but instead you'll find yourself under heavy artillery fire from the north [#115]. You can't be standing too close to each explosion, because the fireball can take up to 3/4 of your health bar. Heal Saruman whenever he's received major injuries. Thankfully there's a checkpoint nearby (12 on the map), so you'll be allowed to choose a new class quickly if he dies. Kill all the main targets and you'll be given the final objective.
![[#115] - Campaign - Forces of evil - Mission 5 - Weathertop - part 2 - Campaign - Forces of evil - The Lord of the Rings: Conquest - Game Guide and Walkthrough](https://game.lhg100.com/Article/UploadFiles/201512/2015121715520008.jpg)
[#115]
Fourth assignment: Kill Aragorn
Suggested class: Saruman or mage
I guess you may be a little surprised to hear that it's going to be easy to win the duel with Aragorn, however you will have to watch out for siege fire during the course of this battle. Aragorn will be waiting for you at the top (13 on the map), but I would recommend that you encourage him into following you back to the ground level. You should be able to kill him there without having to worry about the artillery fire so much [#116]. It's important to maintain safe distance here, because you probably remember from the previous campaign that he's very skilled at short range combat. Killing Aragorn will allow you to win the mission.
![[#116] - Campaign - Forces of evil - Mission 5 - Weathertop - part 2 - Campaign - Forces of evil - The Lord of the Rings: Conquest - Game Guide and Walkthrough](https://game.lhg100.com/Article/UploadFiles/201512/2015121715520069.jpg)
[#116]
MAP OF THE AREA:
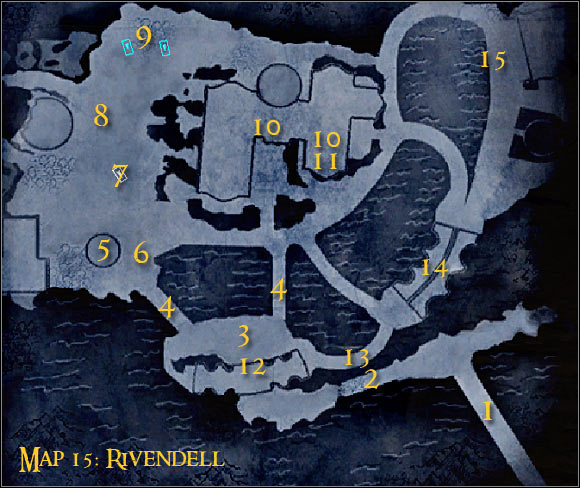
Map legend: 1 - starting area and first checkpoint; 2 - bridge leading to the front gate; 3 - front gate - area that needs to be secured; 4 - areas where enemy units show up; 5 - terrace - area that needs to be secured; 6 - signal fire; 7 - ballista; 8 - side passageway to the tower; 9 - area where you must deliver the signal fire; 10 - archives; 11 - area where Elrond appears for the first time; 12 - area where you must deliver the ring; 13 - passageway leading to the house by the water; 14 - house by the water - area that needs to be secured; 15 - area where Elrond and Legolas appear
Additional info: This is one of the most difficult missions of the entire game. You'll have to be ready to deal with a huge advantage of enemy troops and most of them are going to be archers. You'll also have to take part in two boss battles and the second battle will require you to fight two elves at the same time.
First assignment: Capture the front gate
Suggested class: mage
You start this mission in the lower right corner (1 on the map). I would recommend that you start playing as a mage, mostly because you'll have to heal yourself and some of the allied troops after every big battle. You'll also have to defend the orcs against enemy archers by setting up force fields. Start moving forward and then make a turn towards the left bridge (2 on the map). You'll be dealing with large groups of elf warriors and archers and you shouldn't move forward until each group has been eliminated [#117]. Watch out for additional archers on the northern wall. Turn on your force field whenever you see that your troops are exposed to the arrow attacks.
![[#117] - Campaign - Forces of evil - Mission 6 - Rivendell - part 1 - Campaign - Forces of evil - The Lord of the Rings: Conquest - Game Guide and Walkthrough](https://game.lhg100.com/Article/UploadFiles/201512/2015121715520121.jpg)
[#117]
Keep heading north-west until you get to a large gate. You will have to defend a small group of ents here [#118]. Don't forget that the ents are especially vulnerable to fire attacks and so use your fireballs to kill them. Make sure not to get too close to them at the same time, because otherwise you'll probably die as a result of their powerful attacks. Aside from the ents, you'll also have to defeat elven warriors separating you from the new checkpoint (3 on the map). Go with the other orcs to that location.
![[#118] - Campaign - Forces of evil - Mission 6 - Rivendell - part 1 - Campaign - Forces of evil - The Lord of the Rings: Conquest - Game Guide and Walkthrough](https://game.lhg100.com/Article/UploadFiles/201512/2015121715520153.jpg)
[#118]
You shouldn't have any other problems reaching a new checkpoint. Stand inside the circle and begin capturing this zone. Sadly you must acknowledge the fact that you'll become an object of constant attacks. Elves will be coming from two directions (4 on the map) - from the north-west [#119] and from the north. Make sure to eliminate mostly enemy archers, but you must also prevent the warriors from getting too close to your character. Remain here until this new checkpoint has been captured.
![[#119] - Campaign - Forces of evil - Mission 6 - Rivendell - part 1 - Campaign - Forces of evil - The Lord of the Rings: Conquest - Game Guide and Walkthrough](https://game.lhg100.com/Article/UploadFiles/201512/2015121715520269.jpg)
[#119]
Second assignment: Capture the terrace
Suggested class: troll or mage
It would be a good idea to switch to a troll before moving forward. One of these beasts should appear near this newly unlocked checkpoint. Head over to the left bridge leading north-west. You shouldn't have any major problems getting to the terrace, but don't forget to eliminate hostile units along the way. You should now focus on staying inside the large circle (5 on the map). There are probably going to be enemy units here and you should use troll's middle attack to crush them [#120]. This is a very useful method of getting rid of enemy troops. You may ignore the archers, because their attacks will result only in minor injuries and you can also move back to a friendly mage for healing. Stay inside the designated zone until it's been captured by the dark side.
![[#120] - Campaign - Forces of evil - Mission 6 - Rivendell - part 1 - Campaign - Forces of evil - The Lord of the Rings: Conquest - Game Guide and Walkthrough](https://game.lhg100.com/Article/UploadFiles/201512/2015121715520243.jpg)
[#120]
Third assignment: Take the signal fire
Suggested class: mage
I would recommend switching back to a mage, because the torch will remain with the character who picked it up and it can only be dropped when you die or complete the assignment. You can find the torch near the zone you've just conquered (6 on the map).
Fourth assignment: Deliver the signal fire
Suggested class: mage
You shouldn't even try to keep playing as a troll, because the area is swarming with enemy scouts and the beast would be an ideal target for them. An archer is also a bad idea, because you'll be dealing with a huge dominance of hostile troops and as a result you would have to spend too much time trying to keep him alive. Use the mage and start moving slowly to the north [#121]. Choose your targets carefully and don't forget to heal other orcs along the way, especially if they're almost dead. A good idea will be to neutralize a nearby ballista (7 on the map). Kill the elf operating the device, because otherwise your allies would suffer major injuries. You don't have to use the ballista yourself, however you would be able to kill a few targets with it.
![[#121] - Campaign - Forces of evil - Mission 6 - Rivendell - part 2 - Campaign - Forces of evil - The Lord of the Rings: Conquest - Game Guide and Walkthrough](https://game.lhg100.com/Article/UploadFiles/201512/2015121715520393.jpg)
[#121]
Keep pushing towards the northern tower. Watch out for enemy archers and scouts and avoid staying in one spot for more than a few seconds. Otherwise you may find yourself surprised and executed without being able to fight back. I would recommend that you approach the tower from the western side (8 on the map), mostly because the eastern side (near the stairs) is where new enemy units tend to show up. Use your fire attacks to set the palisades on fire [#122] and approach the tower quickly (9 on the map). Your character should lose the torch and this means you must move back as soon as possible. Wait for the artillery to score a successful hit.
![[#122] - Campaign - Forces of evil - Mission 6 - Rivendell - part 2 - Campaign - Forces of evil - The Lord of the Rings: Conquest - Game Guide and Walkthrough](https://game.lhg100.com/Article/UploadFiles/201512/2015121715520394.jpg)
[#122]
Fifth assignment: Destroy the archives
Suggested class: mage
There are four bookshelves for you to destroy - two objects on each floor (10 on the map). It's highly recommended that you keep playing as a mage and that you don't advance towards the archives until you're joined by allied troops. Otherwise you may end up surrounded by a lot of unfriendly elves and you wouldn't be able to handle all of them on your own. Use mage's fireballs to set each bookshelf on fire [#123]. Usually a single explosion should do the trick, but in some cases you'll have to fire a second fireball at your target. Don't forget to wait for the flames to consume the documents.
![[#123] - Campaign - Forces of evil - Mission 6 - Rivendell - part 2 - Campaign - Forces of evil - The Lord of the Rings: Conquest - Game Guide and Walkthrough](https://game.lhg100.com/Article/UploadFiles/201512/2015121715520426.jpg)
[#123]
Sixth assignment: Defeat Elrond
Suggested class: mage or archer
This objective is going to be added to your list of assignments when you get rid of the final archive. You'll have to be ready, because Elrond may appear somewhere near your position (11 on the map). If you notice that he's standing too close move back quickly and prevent him from surprising your character. Thankfully he won't be using a bow, so it should be relatively easy for you to defeat him, as long as you maintain safe distance [#124]. You'll only have to watch out not to bump into other elves while trying to get rid of him. It's also a good idea to move to where your allies are stationed.
[#124]
Seventh assignment: Get the ring
Suggested class: mage
The ring can usually be found next to Elrond's unconscious body. If you die in the meantime or if you die while trying to transport the ring, you'll probably find it in the area where Elrond has appeared for the first time.
Eighth assignment: Deliver the ring
Suggested class: mage
The artifact you've just taken has to be transported to the southern checkpoint (12 on the map). I guess you may be surprised to hear that it's going to be a relatively challenging objective, mostly because you'll be in the center of attention when you decide to pick up the ring. Don't even think about fighting enemy units, because you would have been surrounded and killed (scouts!) in just a few seconds. Instead focus on finding the shortest and the safest route to your current destination [#125]. Approach the designated area and confirm that you want to play as Sauron himself from now on.
![[#125] - Campaign - Forces of evil - Mission 6 - Rivendell - part 2 - Campaign - Forces of evil - The Lord of the Rings: Conquest - Game Guide and Walkthrough](https://game.lhg100.com/Article/UploadFiles/201512/2015121715520440.jpg)
[#125]
Ninth objective: Capture the house by the river
Suggested class: Sauron or mage
It's extremely important that you keep Sauron alive for as long as possible, at least to the moment when you begin the next assignment. The house by the river (14 on the map) is located nearby, however you should be moving slowly. Eliminate anyone who stands in your way [#126]. I would recommend choosing a passageway located to the east of the checkpoint (13 on the map). Use mostly Sauron's special attacks and the elves should die quickly. Taking over this zone shouldn't be too difficult, however you will have to watch out for enemy scouts. Prevent them from making surprise attacks and remain inside the large circle until the area is under your full control.
![[#126] - Campaign - Forces of evil - Mission 6 - Rivendell - part 3 - Campaign - Forces of evil - The Lord of the Rings: Conquest - Game Guide and Walkthrough](https://game.lhg100.com/Article/UploadFiles/201512/2015121715520583.jpg)
[#126]
Tenth assignment: Kill Elrond and Legolas
Suggested class: Sauron or troll
This is definitely the toughest assignment you've received so far. I would recommend that you try and divide this battle into two parts by fighting the bosses separately. Start off by focusing on Elrond, especially since luring him out of the area where he appeared (15 on the map) shouldn't be too difficult [#127]. Find a spot where you'll be surrounded by allied troops, so you'll be allowed to focus only on killing Elrond. Additionally he will be distracted by other orcs, allowing you to spend some time trying to heal Sauron.
![[#127] - Campaign - Forces of evil - Mission 6 - Rivendell - part 3 - Campaign - Forces of evil - The Lord of the Rings: Conquest - Game Guide and Walkthrough](https://game.lhg100.com/Article/UploadFiles/201512/2015121715520526.jpg)
[#127]
Sadly Legolas is a more skilled opponent and it's very likely that Sauron may die while trying to get rid of the famous archer. Before that happens, make sure to inflict as many injuries to Legolas as possible. Use your special attacks in order to knock him down often and avoid his fire arrows, because they'll take a lot of health points away from you. If Sauron dies, don't event think about playing as one of the standard characters, because they would all perish too quickly. Instead go back to the southern checkpoint (3 on the map) and gain control over a new cave troll. Return to the main battlefield and start using troll's middle attack to injure Legolas [#128]. If you're lucky, he will die after only a few successful hits and you'll end this very frustrating mission. Get ready for the big finale in the Shire!
![[#128] - Campaign - Forces of evil - Mission 6 - Rivendell - part 3 - Campaign - Forces of evil - The Lord of the Rings: Conquest - Game Guide and Walkthrough](https://game.lhg100.com/Article/UploadFiles/201512/2015121715520607.jpg)
[#128]
MAP OF THE AREA:
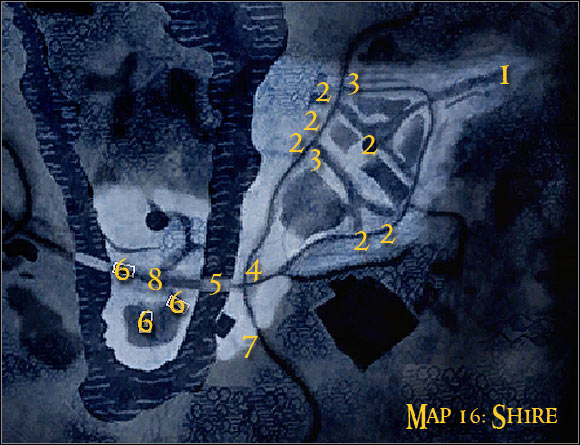
Map legend: 1 - starting area and first checkpoint; 2 - hobbit's homes; 3 - ballistae; 4 - area where the Treebeard appears for the first time; 5 - bridge leading to the western section of the map; 6 - ballistae; 7 - checkpoint; 8 - area where Gandalf appears for the first time
Additional info: You shouldn't be surprised to hear that the final mission of the game will be difficult. I assume that you may have some serious problems not only destroying the Hobbiton, but also getting rid of Gandalf. You'll also have to be careful not to lose too many lives or you'll fail the entire mission close to the end.
First assignment: Destroy the Hobbiton
Suggested class: mage or archer
Aside from the final part, you should consider completing this entire mission using only a mage. The main reason is that you'll be losing health quite often and so it's going to be important to heal your wounds regularly. You could try and play as an archer, however you would have to spend far too much time trying to avoid being attacked by the hobbits, ents, Gondorians and ballistae. You start the game in the upper right corner of the screen (1 on the map). Get ready, because the first group of enemy units will attack you near the junction [#129]. You can try to defeat the ents and the hobbits, but you should know that more of them will arrive in the area and so that would only be a waste of your time. As a result focus on eliminating only those who endanger your safety. Watch out for flying beasts. Thankfully you should be fine as long as you don't make any unnecessary stops.
![[#129] - Campaign - Forces of evil - Mission 7 - Shire - part 1 - Campaign - Forces of evil - The Lord of the Rings: Conquest - Game Guide and Walkthrough](https://game.lhg100.com/Article/UploadFiles/201512/2015121715520692.jpg)
[#129]
I would recommend that you begin completing this first objective by moving towards the central farm (2 on the map). You'll have a lot of space here to move, so you won't have to worry about being attacked so much. Use mage's fireballs on the farm building [#130] and watch as it starts to lose health points. You must defend yourself against enemy attacks in the meantime. Stay away from the ents and from the captains, because otherwise you'll die without being able to fight back. You can consider retreating after each use of the fireball or you can hide in the nearby fields waiting for this attack to recharge. Destroy the farm before focusing on other targets.
![[#130] - Campaign - Forces of evil - Mission 7 - Shire - part 1 - Campaign - Forces of evil - The Lord of the Rings: Conquest - Game Guide and Walkthrough](https://game.lhg100.com/Article/UploadFiles/201512/2015121715520663.jpg)
[#130]
Next up you should start moving towards two hobbit homes located to the south of the farm. I wouldn't recommend choosing the path leading from the start area, because it's being occupied by a lot of hobbits and ents. Instead head over to the farm again and then turn left [#131]. The tactics here stay the same, so you must approach one of your targets and use a fireball to set it on fire. Once this is done move back to a safe distance and wait for your attack to recharge itself. Use this method to destroy both homes and try not to die in the process.
![[#131] - Campaign - Forces of evil - Mission 7 - Shire - part 1 - Campaign - Forces of evil - The Lord of the Rings: Conquest - Game Guide and Walkthrough](https://game.lhg100.com/Article/UploadFiles/201512/2015121715520718.jpg)
[#131]
Finally, we have three hobbit homes located to the north-west of the farm. Once again, I wouldn't recommend choosing a path leading directly from the start area. Instead go back to the destroyed farm and use a small passageway to get to your current destination. Sadly you'll have to watch out for two ballistae (3 on the map). Destroy at least one of these objects, because a successful ballista hit can kill your character in an instant. As for the other ballista, secure the area around it and then use the device to destroy at least one of the homes [#132]. Use fireballs to deal with the remaining homes and don't forget to avoid ents and captains while trying to fulfill this objective.
![[#132] - Campaign - Forces of evil - Mission 7 - Shire - part 1 - Campaign - Forces of evil - The Lord of the Rings: Conquest - Game Guide and Walkthrough](https://game.lhg100.com/Article/UploadFiles/201512/2015121715520724.jpg)
[#132]
Second assignment: Kill Treebeard
Suggested class: Balrog or mage
You will now be given an opportunity to play as Balrog. You can agree to this proposal, however you should know that the demon isn't too skilled for this kind of a fight. Treebeard can be found to the south-west of the start area (4 on the map), but sadly he's going to be surrounded by a large group of other ents [#133]. This will probably make your approach as Balrog a lot more difficult, especially since you won't be able to encourage only Treebeard into following you. As a result try hitting him a few times and when Balrog dies switch to a mage. Obviously you can also deny playing as Balrog right from the start, especially if you don't have too many lives left and you don't want to risk failing the entire mission.
![[#133] - Campaign - Forces of evil - Mission 7 - Shire - part 2 - Campaign - Forces of evil - The Lord of the Rings: Conquest - Game Guide and Walkthrough](https://game.lhg100.com/Article/UploadFiles/201512/2015121715520798.jpg)
[#133]
Defeating Treebeard using only the mage should be much easier, but you must remember not to use any main paths. Instead proceed once again to the farm and then start moving towards Treebeard using the fields. Get closer to the ent and begin using your spells to wound him [#134]. Fireballs seem like the best choice here. Notice that other ents won't be able to jump over the fence to get to you and finding an alternative path is also going to be too much for them. The final result is that you won't be interrupted by the ents and you'll have to watch out for single hobbits and other smaller targets.
![[#134] - Campaign - Forces of evil - Mission 7 - Shire - part 2 - Campaign - Forces of evil - The Lord of the Rings: Conquest - Game Guide and Walkthrough](https://game.lhg100.com/Article/UploadFiles/201512/2015121715520745.jpg)
[#134]
Third assignment: Kill 50 hobbits to encourage Gandalf to show up
Suggested class: mage
You should continue playing as a mage. Notice that hobbits have stopped appearing in the eastern section of the map. As a result you will have to travel west to find more of them. Get to a small bridge (5 on the map) leading to a new village. Don't use the bridge right away, because you will have to defeat other ents from the Treebeard duel. It's best to get rid of them now, so you won't be interrupted by them later on. If you die here, use a new checkpoint located to the south (7 on the map). As for the hobbits, begin eliminating them from the bridge area [#135]. Use fireballs and your lightning attacks.
![[#135] - Campaign - Forces of evil - Mission 7 - Shire - part 2 - Campaign - Forces of evil - The Lord of the Rings: Conquest - Game Guide and Walkthrough](https://game.lhg100.com/Article/UploadFiles/201512/2015121715520842.jpg)
[#135]
Just as before, you will have to watch out for captains of Gondor, mostly because they won't pose only as warriors but as mages as well. If you want to enter the village area at all costs proceed south after you cross the bridge. There are a lot of buildings here [#136] and it would be wise to use them for cover. Now you'll only have to wait for the hobbits that find you. Eliminate them one by one and make sure not to expose your position to the captains and other stronger opponents. If you want to play it safe stay closer to the bridge to the end. Either way you must kill 50 hobbits. You should now confirm that you want to play as Sauron. Get ready for a final duel with Gandalf!
![[#136] - Campaign - Forces of evil - Mission 7 - Shire - part 2 - Campaign - Forces of evil - The Lord of the Rings: Conquest - Game Guide and Walkthrough](https://game.lhg100.com/Article/UploadFiles/201512/2015121715520802.jpg)
[#136]
Fourth assignment: Kill Gandalf
Suggested class: Sauron or mage
Sadly I'm afraid that Sauron might not be strong enough to kill Gandalf on his own, mostly because you'll be dealing with the effects of some very strong spells and additionally he won't leave the village area (8 on the map). Start off by eliminating at least some of your other foes, including captains and hobbits. You should then retreat to the bridge in order to receive a free healing. As for the duel itself, make sure to use Sauron's two most powerful attacks [#137] and that should allow you to prevent Gandalf from getting up and activating his spells. You should also remember that he has a very powerful move for close range combat and you can't allow him to use it too often.
![[#137] - Campaign - Forces of evil - Mission 7 - Shire - part 2 - Campaign - Forces of evil - The Lord of the Rings: Conquest - Game Guide and Walkthrough](https://game.lhg100.com/Article/UploadFiles/201512/2015121715520819.jpg)
[#137]
It's to get much more complicated if Sauron dies during the course of this duel. There are a few reasons for that and the most important one is that Gandalf will be capable of healing himself. If you leave him for a longer period of time, he'll regain full strength and you'll have to start from the beginning. You should also remember that it's going to be much easier to die while playing as a mage. I would recommend that you use one of the nearby ballistae (6 on the map). Fire a few rounds at Gandalf [#138], but this can only happen when you've secured most of the area. Otherwise you'll be knocked down even before taking the first shot. Death of Gandalf will end the mission and also this second campaign. Congratulations!
![[#138] - Campaign - Forces of evil - Mission 7 - Shire - part 2 - Campaign - Forces of evil - The Lord of the Rings: Conquest - Game Guide and Walkthrough](https://game.lhg100.com/Article/UploadFiles/201512/2015121715520927.jpg)
[#138]
DIFFICULTY LEVEL
Each level can be played on one of three available difficulty levels and the only exception to that rule is the tutorial mission of the campaign of forces of good. Conquest is not an easy game. If you don't feel like a good player, you should consider choosing the lowest difficulty setting. The heroic level is far more challenging, however there's even a bigger difference with the legendary level. As for the campaigns, you will usually have to deal with a few easier levels at the start, but on the other hand all the final missions will require you to master the abilities of the main characters. Especially the last two levels are usually very hard. There are a few exceptions, including the difficult start to the second campaign, however for most of the time you'll start off easy and with each completed mission you'll have to work harder for final success.
COMPLETING OBJECTIVES
Remember that you won't have to eliminate all enemy units present on the battlefield and in most cases it won't even be possible, because enemy reinforcements will keep showing up in the area. As a result you'll always have to focus only on what you've been ordered to do. You can do this by ignoring enemy movements entirely or by eliminating foes on your way to your current destination. There's also a thing about your allies - in most cases you won't have to assist them in any way, however if you're playing as a mage you can decide to heal them from time to time. They will repay you in staying active and help you in getting rid of the attackers.
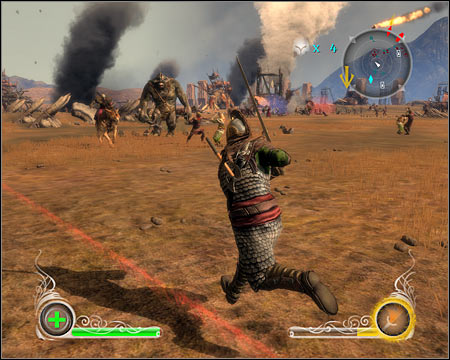
You won't have to take part in all the battles. Usually you should only focus on completing your current objectives.
FAILING THE MISSION
You should take some time to understand the basic rules of Conquest. Losing your active character doesn't necessarily mean failing the mission, because you'll be given a few chances. I've used the term "lives" in the walkthrough, but to be honest it's more a number of respawns. By respawning I mean appearing near a checkpoint and controlling a new character. Blue checkpoints are being used by the forces of good and red checkpoints are being used by the forces of evil. Losing all lives will result in failing the mission and so it's always crucial to choose the best character for your current assignment. Thankfully you won't have to win based on the number of lives you've been given at the start of the mission, because you'll earn additional respawns for completing objectives.
Failing can also come in the shape of not being able to protect a certain zone or even entire map from enemy units. You'll often deal with defensive type of missions and you should always put your efforts into not losing. Remember that if you fail to defend an area you will be forced to repeat the entire level, not just the last assignment!
USING HEROES
During the course of both campaigns you'll meet over a dozen of heroes. Some of them will be controlled by the AI, however you'll also be given a command of a few of these characters. You shouldn't deny such an opportunity, even if a hero doesn't seem fit for your current assignment. The main reason is that they're very powerful and it's going to be harder to lose them, even if they can't handle the situation perfectly. Saruman and Gandalf are by far the best heroes in the game, because not only can they inflict injuries from the distance, but they also can heal themselves and their allies. Read the main guide to find out more how to utilize each hero for best results.
Heroes are very powerful and you should always agree to use them. There are only a few situations when you shouldn't choose them and you'll find out more about these exceptions from the main guide.
COMMANDING OTHER CREATURES
Aside from standard characters and heroes, you will be allowed to control other beasts during the course of some missions. Most of these beasts will come in handy, however there are a few you'd want to avoid. I would recommend that you don't ignore the possibility of playing as a troll, ent or oliphant. You should choose them whenever they become available, however don't forget to read my guide, because in some rare occasions they may not be the best choice. One of these exceptions is the level Weathertop where you'll want to command them only while trying to complete some of the objectives. As for useless creatures, horses for example can be added to this category. You'll probably do more damage on foot, assuming that you've picked a good class for your current assignment.
WARRIORS
Warriors should be used in the early missions of each campaign, mostly because you won't have to pay too much attention to their state of health. I would recommend choosing them each time you plan on fighting your enemies in close quarters, because their special attacks are very effective (especially the middle one).
Warriors are great when fighting at close range, but they become less useful in the final missions of each campaign.
ARCHERS
Archers are very similar to mages, mostly because their biggest asset is the possibility of attacking enemy units from a large distance. You should focus mostly on their fire attacks, activated by the right mouse button. Fire arrows can stop most of your opponents and in addition to that they'll knock them down. The biggest disadvantage of controlling an archer is that they can't heal themselves. As a result you can't make any major mistakes and you must prevent enemy warriors and scouts from getting too close.
SCOUTS
I have to be honest that I wasn't using scouts too often throughout the course of both campaigns. They're useful only in two types of situations - when you plan on taking enemy units by surprises (especially trolls and ents) and when you want to get to an isolated area of the map without having to fight too many enemies. Otherwise you may ignore them and choose a more useful class.

The only true advantage of using a scout is to being able to surprise enemy units.
MAGES
Mages may seem like a mediocre class at first, but their abilities become priceless when you advance to more challenging levels of the game. The biggest advantage of controlling a mage is that you can heal and not only yourself but your allies as well. You won't have to worry about dying prematurely, however mages have a small health bar, so you can't feel too confident.


 The Sims 3 Game Guide & Walkthrough
 The Sims 4 Game Guide & Walkthrough
 The Amazing Spider-Man 2 Game Guide & Walkthrough
 The Sims Life Stories Game Guide & Walkthrough
 The Godfather Game Guide & Walkthrough