
More than 38000 words, 700 screenshots and detailed descriptions of 60 levels - welcome to a megaguide to The Chronicles of Riddick: Assault on Dark Athena! This text has been divided into three main chapters:
The first chapter consists of a very detailed walkthrough of a remake of Escape from Butcher Bay. Naturally I didn't copy-paste any old walkthroughs. Everything is new and my guide also contains information about possible changes, including new locations of some of the bonus items. As for its content, you'll find hints on how to get to other locations, how to solve main and optional quests and how to defeat your opponents. You'll also find out where to find all cigarette packs which are bonus items of this campaign. I've put most of my efforts into explaining how to act stealth, so you won't have to worry about taking part in open combat situations. The only exceptions are a few levels where you have to battle mutants, aliens or human bosses.
The second chapter of my guide contains a full description of an entirely new campaign of The Chronicles of Riddick, titled Assault on Dark Athena. Like before, you'll find out a lot of useful hints on how to complete the game. Sadly the new part takes more attention into combat rather than stealth. Obviously I've explained how to defeat toughest guards, machines and bosses. Some missions also contain maps of the surrounding area, helpful in finding your way to your current destination. There aren't any cigarette packs in Assault on Dark Athena, because bounty cards are bonus items in this game. Make sure to read descriptions of all missions in order to find them.
The third chapter should provide much needed help for rookie players, especially since both games have rather high difficulty settings. This chapter contains information on how to defeat enemies properly, how to stay in the shadows and how to keep Riddick alive. There's also a list of all weapons that can be used in the game to wreak havoc.
Four different colors have been used to mark some of the most important features of the game. They should provide assistance while reading the guide. Here's what they mean:
Orange color - This color marks encounters with human characters (friend or foe), as well as with all sorts of robots (including mechs, drones and little spiders).
Red color - This color marks locations of health cartridges, NanoMED stations and health increase stations.
Blue color - In Escape from Butcher Bay blue color marks locations of cigarette packs. As for Assault on Dark Athena, it marks locations of bounty cards.
Green color - I've used this color to mark some of the interactive items Riddick will be allowed to use. Some of them are collected from the environment and the rest is taken out directly from his inventory.
Have fun playing the game!
Stranger
Once you've been given control of Riddick approach Johns and talk to him. Choose one of two available dialogue options - it's doesn't really matter which one it's going to be. Wait for this conversation to end. Johns will turn around, allowing you to creep behind him. Approach him and press a left mouse button or a right mouse button to grab him and to snap his neck [#1]. Don't worry if he makes some noise, because there aren't any other guards around.
![[#1] - Escape from Butcher Bay - Escape - part 1 - Escape from Butcher Bay - The Chronicles of Riddick: Assault on Dark Athena - Game Guide and Walkthrough](https://game.lhg100.com/Article/UploadFiles/201512/2015121710044417.jpg)
[#1]
Don't even think about collecting an assault rifle, because they're DNA-protected. You can observe what happens when other inmate tries to take the gun. :-) You'll soon hear a siren and this means that nearby security turrets are now active. Turn around quickly and go back to the area where you've started the game. Notice that Lambert has opened a hatch for you [#2]. Head down before you're attacked by turrets. You won't have to grab the ladder, because it won't be a long fall.
![[#2] - Escape from Butcher Bay - Escape - part 1 - Escape from Butcher Bay - The Chronicles of Riddick: Assault on Dark Athena - Game Guide and Walkthrough](https://game.lhg100.com/Article/UploadFiles/201512/2015121710044449.jpg)
[#2]
Jump over a small obstacle using the SPACE key and head over to the opposite end of the hallway. This time you should use a ladder in order to get to a larger room. Inspect the area in front of you and collect a cigarette pack (35 - Butcher Bay) [#3]. Picking up these items will allow you to unlock hidden content of the game.
![[#3] - Escape from Butcher Bay - Escape - part 1 - Escape from Butcher Bay - The Chronicles of Riddick: Assault on Dark Athena - Game Guide and Walkthrough](https://game.lhg100.com/Article/UploadFiles/201512/2015121710044457.jpg)
[#3]
Proceed to the ground level. One of the workers is standing here and sadly you won't be able to surprise him in any way [#4], because apparently his hearing is perfect. I would recommend that you practice different types of hits on him, as well as how to use block. Once he's gone make sure to inspect his body. Collect a magnetic card. Don't forget not to take a nearby assault rifle, because you don't have to access to weapons at this point of the game.
![[#4] - Escape from Butcher Bay - Escape - part 1 - Escape from Butcher Bay - The Chronicles of Riddick: Assault on Dark Athena - Game Guide and Walkthrough](https://game.lhg100.com/Article/UploadFiles/201512/2015121710044438.jpg)
[#4]
Use the magnetic card to open a nearby passageway (a card reader can be found on the right wall). Start moving forward and you'll soon reach an area where a single guard is patrolling a dark corridor. Press the crouch key, hide in the shadows and wait for a right moment to make a move. Start following the guard carefully [#5]. Kill him with your stealth move by snapping his neck. The guard will leave a Vent Tool behind him. Add this item to your inventory.
![[#5] - Escape from Butcher Bay - Escape - part 1 - Escape from Butcher Bay - The Chronicles of Riddick: Assault on Dark Athena - Game Guide and Walkthrough](https://game.lhg100.com/Article/UploadFiles/201512/2015121710044557.jpg)
[#5]
The game will now suggest that you should hide the body somewhere and I would strongly recommend following these instructions. Hide the body in the dark corridor where you came from. Remember that this can only be done if you're crouching. Proceed to the next door and choose a passageway to your right once you to get to a larger room [#6]. Head down to a lower level.
![[#6] - Escape from Butcher Bay - Escape - part 1 - Escape from Butcher Bay - The Chronicles of Riddick: Assault on Dark Athena - Game Guide and Walkthrough](https://game.lhg100.com/Article/UploadFiles/201512/2015121710044550.jpg)
[#6]
You'll find yourself inside dark tunnels. I would recommend that you explore this entire area thoroughly, because you'll gain possession of credits and a new cigarette pack (1 - Inmate Working Suit) [#7]. Collect these items and go back to the large room using the exact same route as before.
![[#7] - Escape from Butcher Bay - Escape - part 2 - Escape from Butcher Bay - The Chronicles of Riddick: Assault on Dark Athena - Game Guide and Walkthrough](https://game.lhg100.com/Article/UploadFiles/201512/2015121710044514.jpg)
[#7]
Notice a stack of boxes to your right. You'll now have to start climbing upwards. Use the SPACE key to get on top of new crates or press the action key to display a short animation of Riddick performing this action. Once you're at the top use a hangrail [#8]. Press the action key and start moving forward while hanging on.
![[#8] - Escape from Butcher Bay - Escape - part 2 - Escape from Butcher Bay - The Chronicles of Riddick: Assault on Dark Athena - Game Guide and Walkthrough](https://game.lhg100.com/Article/UploadFiles/201512/2015121710044581.jpg)
[#8]
Once you're about half way through you should notice that a second guard has entered this room. You can decide to let go and to land on him [#9], however you wouldn't gain anything from killing him. You should also watch out, because if you don't land directly on him, you would have to defeat him in an open combat. Make sure NOT to take his assault rifle.
![[#9] - Escape from Butcher Bay - Escape - part 2 - Escape from Butcher Bay - The Chronicles of Riddick: Assault on Dark Athena - Game Guide and Walkthrough](https://game.lhg100.com/Article/UploadFiles/201512/2015121710044667.jpg)
[#9]
Go back up if you've decided to kill the guard and use the hangrail again to get to the other side safely. Your current objective is to open the hatch [#10] using a Vent Tool you've collected not long ago. Open the hatch and head inside. Go to the other end of the ventilation tunnel and press the action key to kick the grating. Exit the vents.
![[#10] - Escape from Butcher Bay - Escape - part 2 - Escape from Butcher Bay - The Chronicles of Riddick: Assault on Dark Athena - Game Guide and Walkthrough](https://game.lhg100.com/Article/UploadFiles/201512/2015121710044634.jpg)
[#10]
You'll find yourself standing inside a small room and next to a NanoMED health station [#11]. Collect a cartridge from the ground before you decide to use the station. Obviously it's optional, but you should always focus in keeping Riddick in perfect health. Once you're done healing go to your left and proceed to the next room.
![[#11] - Escape from Butcher Bay - Escape - part 2 - Escape from Butcher Bay - The Chronicles of Riddick: Assault on Dark Athena - Game Guide and Walkthrough](https://game.lhg100.com/Article/UploadFiles/201512/2015121710044613.jpg)
[#11]
One of the guards is cleaning his weapon in this room and you won't be allowed to surprise him. Thankfully his gun won't fire, so he'll be forced to engage you in an open combat. This is a perfect opportunity to test out how to disarm your opponents. All you have to do is to press the left mouse button while he tries to hit you with his gun [#12]. Once he's been taken care of take a shotgun (it's not loaded yet).
![[#12] - Escape from Butcher Bay - Escape - part 2 - Escape from Butcher Bay - The Chronicles of Riddick: Assault on Dark Athena - Game Guide and Walkthrough](https://game.lhg100.com/Article/UploadFiles/201512/2015121710044719.jpg)
[#12]
Approach the exact same table where you first saw the guard. There's a cigarette pack here (6 - Cryo Pyramids Detail) [#13]. Once you've collected the pack locate nearby boxes and start climbing towards the one on the top.
![[#13] - Escape from Butcher Bay - Escape - part 3 - Escape from Butcher Bay - The Chronicles of Riddick: Assault on Dark Athena - Game Guide and Walkthrough](https://game.lhg100.com/Article/UploadFiles/201512/2015121710044750.jpg)
[#13]
Once you're standing on top of the last crate press the action key to grab the railing above you. Now you'll have to move to the right in order to get to a large opening [#14]. Press the correct movement key to order Riddick to climb up and to hop over the railing. Enter the elevator, use the panel on the wall and wait to be transported to a new floor.
![[#14] - Escape from Butcher Bay - Escape - part 3 - Escape from Butcher Bay - The Chronicles of Riddick: Assault on Dark Athena - Game Guide and Walkthrough](https://game.lhg100.com/Article/UploadFiles/201512/2015121710044728.jpg)
[#14]
Start moving forward and you should end up standing outside the building. Notice a guard patrolling the area in front of you. Wait for the guard to move to your right. Approach him silently [#15] and use one of previously tested methods to get rid of him. Notice that you will be allowed to take ammunition for your shotgun.
![[#15] - Escape from Butcher Bay - Escape - part 3 - Escape from Butcher Bay - The Chronicles of Riddick: Assault on Dark Athena - Game Guide and Walkthrough](https://game.lhg100.com/Article/UploadFiles/201512/2015121710044739.jpg)
[#15]
Turn around and locate a nearby ladder to get down to a lower level. Proceed to your right and you should end up standing in front of a closed hatch. Fire at the hatch using your shotgun [#16] and you'll be allowed to head inside. Ignore a new hint concerning using a flashlight, because you'll want to remain hidden, at least for a few more seconds.
![[#16] - Escape from Butcher Bay - Escape - part 3 - Escape from Butcher Bay - The Chronicles of Riddick: Assault on Dark Athena - Game Guide and Walkthrough](https://game.lhg100.com/Article/UploadFiles/201512/2015121710044734.jpg)
[#16]
Start moving forward and you'll notice that the first guard has appeared in front of you. Holster your weapon and wait for him to go to your right. Follow the guard (make sure that you're crouching!) and perform a stealth kill [#17]. It's important to choose a silent execution here (right mouse button), so his death won't alarm other guards right away.
![[#17] - Escape from Butcher Bay - Escape - part 3 - Escape from Butcher Bay - The Chronicles of Riddick: Assault on Dark Athena - Game Guide and Walkthrough](https://game.lhg100.com/Article/UploadFiles/201512/2015121710044884.jpg)
[#17]
There are two more guards standing not far from your location. The easiest way to get rid of them will be to fire at a nearby explosive barrel [#18]. Kill the guard to your right if by some chance he survives the explosion. Inspect both bodies to collect more ammunition for your shotgun. Afterwards proceed forward and be ready to dispose of an another guard. He'll appear directly in front of you.
![[#18] - Escape from Butcher Bay - Escape - part 3 - Escape from Butcher Bay - The Chronicles of Riddick: Assault on Dark Athena - Game Guide and Walkthrough](https://game.lhg100.com/Article/UploadFiles/201512/2015121710044899.jpg)
[#18]
There's an explosive barrel just around the corner and it would be a good idea to destroy it right now. Proceed forward and get closer to a second corner. Lean out and aim for the head of the final guard [#19]. Head towards the bright tunnel to end this introductionary mission of the game.
![[#19] - Escape from Butcher Bay - Escape - part 3 - Escape from Butcher Bay - The Chronicles of Riddick: Assault on Dark Athena - Game Guide and Walkthrough](https://game.lhg100.com/Article/UploadFiles/201512/2015121710044882.jpg)
[#19]
This is more of an interactive cut-scene rather than a full level. All you will be allowed to do is to look around while you're being lead to your own cell. It shouldn't take too long to get there [#20]. Wait for the game to begin loading a proper mission from your stay in the prison block.
![[#20] - Escape from Butcher Bay - The Arrival - Escape from Butcher Bay - The Chronicles of Riddick: Assault on Dark Athena - Game Guide and Walkthrough](https://game.lhg100.com/Article/UploadFiles/201512/2015121710044815.jpg)
[#20]
You can spend a second or two looking through Riddick's diary if you want to. You'll find information here about your current quests here, as well as about collected items (including bonus objects like cigarette packs). Wait for Riddick's cell to open and head to the main corridor. Talk to Barber here [#21] and you'll find out that Mattsson wants to talk to you.
![[#21] - Escape from Butcher Bay - Prison Yard - Escape from Butcher Bay - The Chronicles of Riddick: Assault on Dark Athena - Game Guide and Walkthrough](https://game.lhg100.com/Article/UploadFiles/201512/2015121710044981.jpg)
[#21]
Before you go to talk to Mattsson, explore the corridor to your left. Ignore a prison guard by the large gate, as well as other inmates, because you won't have to initiate any conversations with them. The only person you'll want to talk to is covered in bandages - it's Shabby. He'll ask you to kill Molina for him, because apparently he has a grudge with him. Choose the last dialogue option from the list [#22] to agree to his proposal.
![[#22] - Escape from Butcher Bay - Prison Yard - Escape from Butcher Bay - The Chronicles of Riddick: Assault on Dark Athena - Game Guide and Walkthrough](https://game.lhg100.com/Article/UploadFiles/201512/2015121710044970.jpg)
[#22]
Go back to the area where Barber was standing and start moving forward. Turn left and enter the first cell to your left (A37) [#23]. Listen to an interesting conversation between Girsh and Waman. Afterwards talk to Waman. He'll also ask you to kill Molina for him. Agree to this proposal, exit the cell and go to your left.
![[#23] - Escape from Butcher Bay - Prison Yard - Escape from Butcher Bay - The Chronicles of Riddick: Assault on Dark Athena - Game Guide and Walkthrough](https://game.lhg100.com/Article/UploadFiles/201512/2015121710044982.jpg)
[#23]
Walk through a narrow corridor and ignore two inmates you encounter along the way. You'll soon end up standing inside a much bigger prison courtyard [#24]. Charlie Green is lying on the ground, but you may as well ignore him. Start off by talking to Mattsson. He's the man that was mentioned to you by Barber. You'll find out that Mattsson has left a gift for you in his cell.
![[#24] - Escape from Butcher Bay - Prison Yard - Escape from Butcher Bay - The Chronicles of Riddick: Assault on Dark Athena - Game Guide and Walkthrough](https://game.lhg100.com/Article/UploadFiles/201512/2015121710044925.jpg)
[#24]
There are also two other inmates here and you should talk to them. Red and Haley will both ask you to kill Rust for them. There aren't any other activities here at the moment, so go back to the narrow corridor. Once you've gone past it turn right and proceed to the nearest cell (A40) [#25].
![[#25] - Escape from Butcher Bay - Prison Yard - Escape from Butcher Bay - The Chronicles of Riddick: Assault on Dark Athena - Game Guide and Walkthrough](https://game.lhg100.com/Article/UploadFiles/201512/2015121710045097.jpg)
[#25]
Once you're inside the cell you won't find the blade promised to you by Mattsson (what a surprise ;-)). Instead you're going to be attacked by two goons [#26]. Try fighting one of them at a time and prevent them form surprising you from the back, so you won't sustain any major injuries. Make sure to use all kinds of attacks, not just the standard ones. Once both inmates are dead exit this cell and return to the courtyard.
![[#26] - Escape from Butcher Bay - Prison Yard - Escape from Butcher Bay - The Chronicles of Riddick: Assault on Dark Athena - Game Guide and Walkthrough](https://game.lhg100.com/Article/UploadFiles/201512/2015121710045096.jpg)
[#26]
Approach Mattsson and you should automatically initiate a new conversation with him. The inmate will apologize to you for trying to kill you. This time Mattsson will promise that the blade will be delivered to your cell. There's nothing more for you to do here, so return to the cell where you've started the game [#27]. Watch a new cut-scene.
![[#27] - Escape from Butcher Bay - Prison Yard - Escape from Butcher Bay - The Chronicles of Riddick: Assault on Dark Athena - Game Guide and Walkthrough](https://game.lhg100.com/Article/UploadFiles/201512/2015121710045050.jpg)
[#27]
Once you've regained control over Riddick, make a few steps forward and talk to Barber again. You'll find out that Rust is waiting for you in the Aquila Territory and that you'll need a blade in order to defeat him. Go to your right. Notice that cell A38 is now open [#28]. Enter the cell.
![[#28] - Escape from Butcher Bay - Prison Yard - Escape from Butcher Bay - The Chronicles of Riddick: Assault on Dark Athena - Game Guide and Walkthrough](https://game.lhg100.com/Article/UploadFiles/201512/2015121710045011.jpg)
[#28]
You should be able to find Molina here. Maybe you still remember that he's the guy two other inmates want to see dead. This is going to be a slightly more difficult duel, mostly because Molina will be using a knuckleduster [#29]. Make sure to take this weapon away from him once he's dead. Exit the cell, proceed left and to the opposite end of the corridor. Talk to Shabby again and he'll reward with a passcode for defeating Molina. You'll be able to use the code while you're in the Infirmary. Go back to the area where you've fought Molina and inspect the other cell. Talk to Waman and he'll give you a cigarette pack (25 - Large Alien).
![[#29] - Escape from Butcher Bay - Prison Yard - Escape from Butcher Bay - The Chronicles of Riddick: Assault on Dark Athena - Game Guide and Walkthrough](https://game.lhg100.com/Article/UploadFiles/201512/2015121710045031.jpg)
[#29]
You may exit Waman's cell. Go to your left and once again use the narrow passageway to get to the courtyard. Notice that a new passageway located in front of you is now accessible [#30]. Go there and wait for the game to load a new map.
![[#30] - Escape from Butcher Bay - Prison Yard - Escape from Butcher Bay - The Chronicles of Riddick: Assault on Dark Athena - Game Guide and Walkthrough](https://game.lhg100.com/Article/UploadFiles/201512/2015121710045021.jpg)
[#30]
Get ready to defeat more inmates here, because there aren't any guards in the area. Start off by moving forward and you'll soon get to an area where two bandits are attacking one of the inmates [#31]. Thankfully you'll be fighting them one at a time, so it shouldn't be difficult to succeed. The only thing worth mentioning of is that one of your enemies will be using a knuckleduster.
[#31]
Remember to inspect bodies of fallen enemies and you may find some cool items or credits. Having a lot of money is not an important issue right now, but they will come in handy in the future. Proceed forward and enter the left cell [#32]. Memorize the location of a new NanoMED station, because you may need to return here soon. There's also a cigarette pack (58 - The Riddick Team) hidden in the cell.
![[#32] - Escape from Butcher Bay - Aquilas Territory - Escape from Butcher Bay - The Chronicles of Riddick: Assault on Dark Athena - Game Guide and Walkthrough](https://game.lhg100.com/Article/UploadFiles/201512/2015121710045070.jpg)
[#32]
Be careful, because you're going to be surprised just around the corner. One of the inmates will throw a fire extinguisher at you and it would be wise to move back. Wait for this object to explode and deal with a new threat [#33]. Notice that your enemy is using a Shiv blade, so you can't let him stab you too many times. Once you've won take his blade. Don't worry if you can't find it, because you'll have a second chance at getting a blade very soon.
![[#33] - Escape from Butcher Bay - Aquilas Territory - Escape from Butcher Bay - The Chronicles of Riddick: Assault on Dark Athena - Game Guide and Walkthrough](https://game.lhg100.com/Article/UploadFiles/201512/2015121710045076.jpg)
[#33]
You may proceed to the next section. Kill a new inmate along the way and approach a small corridor. Wait for one of your enemies to light a fuse and remain in the exact same spot until you see a small explosion. There's only one more inmate for you to kill [#34]. He'll also be using a Shiv blade. Once he's been defeated you must decide whether you want to proceed forward or maybe or you want to heal your character using a med station.
![[#34] - Escape from Butcher Bay - Aquilas Territory - Escape from Butcher Bay - The Chronicles of Riddick: Assault on Dark Athena - Game Guide and Walkthrough](https://game.lhg100.com/Article/UploadFiles/201512/2015121710045191.jpg)
[#34]
Rust is waiting for you just around the corner and he should be treated as a miniboss [#35]. Your enemy will be using a Shiv blade, so make sure that you've chosen this weapon from your inventory. Otherwise you would have more problems taking him down. I would recommend blocking frequently and making a lot of counterattacks using the left mouse button. Avoid Rust's most powerful attacks, because even if you block you will still receive damage.
![[#35] - Escape from Butcher Bay - Aquilas Territory - Escape from Butcher Bay - The Chronicles of Riddick: Assault on Dark Athena - Game Guide and Walkthrough](https://game.lhg100.com/Article/UploadFiles/201512/2015121710045175.jpg)
[#35]
You can try to outsmart your opponent during the course of this duel. Whenever you lose a small portion of your health (square) go back to the previous corridor and stop near the stairs [#36]. Notice that you can heal your wounds here without having to worry about being injured. Rust will follow you to the stairs, but that's as far as he'll go. Continue attacking him with swift movies and eventually he'll die. Hide your blade by choosing only the fists, so you won't be attacked by guards. Wait for them to arrive.
![[#36] - Escape from Butcher Bay - Aquilas Territory - Escape from Butcher Bay - The Chronicles of Riddick: Assault on Dark Athena - Game Guide and Walkthrough](https://game.lhg100.com/Article/UploadFiles/201512/2015121710045126.jpg)
[#36]
Don't be afraid of all the guards surrounding you and waving their guns. As long as you remain calm and as long as you don't reveal your blade you should be fine. Start off by talking to Moondog. He can be found inside cell A11 [#37]. Moondog will give you a cigarette pack (59 - Pope Joe).
![[#37] - Escape from Butcher Bay - Aquilas Territory - Escape from Butcher Bay - The Chronicles of Riddick: Assault on Dark Athena - Game Guide and Walkthrough](https://game.lhg100.com/Article/UploadFiles/201512/2015121710045198.jpg)
[#37]
Start going back to the passageway leading to the courtyard. Ignore bodies of all fallen enemies, because you've checked them before. There are a few new inmates here, including Blueboy [#38]. Talk to him and as a result you will be given a new cigarette pack (57 - Riot Guard 1.1). Exit this prison block and wait for the game to load the previous location.
![[#38] - Escape from Butcher Bay - Aquilas Territory - Escape from Butcher Bay - The Chronicles of Riddick: Assault on Dark Athena - Game Guide and Walkthrough](https://game.lhg100.com/Article/UploadFiles/201512/2015121710045148.jpg)
[#38]
Once you've reached the courtyard go to your left and talk to Booger [#39]. He should be standing on the other side of the gate. Give him 20 credits and in return he will give you a cigarette pack (26 - Alien Mechanics). If you don't have enough money you can return to him later, but if you've followed my instructions and checked all bodies it shouldn't be an issue. Talk to Haley and listen to what he has to say. Finally, talk to Reda. He will reward you with some credits for killing Rust.
![[#39] - Escape from Butcher Bay - Prison Yard #2 - Escape from Butcher Bay - The Chronicles of Riddick: Assault on Dark Athena - Game Guide and Walkthrough](https://game.lhg100.com/Article/UploadFiles/201512/2015121710045219.jpg)
[#39]
Follow the instructions you've received not long ago and go back to Riddick's cell. Don't enter the cell but instead continue moving forward. Approach the large gate and talk to Builder [#40]. Say that you've been sent by Haley and he'll unlock this passageway for you. Proceed to your left and go through the door to reach a new area.
![[#40] - Escape from Butcher Bay - Prison Yard #2 - Escape from Butcher Bay - The Chronicles of Riddick: Assault on Dark Athena - Game Guide and Walkthrough](https://game.lhg100.com/Article/UploadFiles/201512/2015121710045211.jpg)
[#40]
Enter a small room and notice two guards standing in front of you. Naturally you're not interested in waiting for a doctor to arrive. As a result you'll have to get rid of them both. Start off by approaching a guard with a gun. You must stop directly in front of him, so he'll try to hit you with his weapon. Wait for a right moment to perform a countermove in order to kill him [#41]. Sadly you won't be allowed to take his weapon.
![[#41] - Escape from Butcher Bay - Infirmary - part 1 - Escape from Butcher Bay - The Chronicles of Riddick: Assault on Dark Athena - Game Guide and Walkthrough](https://game.lhg100.com/Article/UploadFiles/201512/2015121710045264.jpg)
[#41]
Choose your Shiv blade from your inventory quickly, assuming that you've been clever enough to smuggle this weapon from the prison block. Defeating the second guard [#42] shouldn't be a big problem, however prevent him from cornering you. Once he's gone inspect both bodies and pick up a magnetic card. You can also heal yourself using a nearby NanoMED station.
![[#42] - Escape from Butcher Bay - Infirmary - part 1 - Escape from Butcher Bay - The Chronicles of Riddick: Assault on Dark Athena - Game Guide and Walkthrough](https://game.lhg100.com/Article/UploadFiles/201512/2015121710045292.jpg)
[#42]
Start off by going towards the left door [#43]. If you've helped Shabby in getting rid of Molina, you will have the correct passcode needed to open this door. Thankfully Riddick will type in the numbers automatically. Explore your surroundings. You'll find a useless scalpel, as well as a cigarette pack (12 - Basilica Interior Detail 6).
![[#43] - Escape from Butcher Bay - Infirmary - part 1 - Escape from Butcher Bay - The Chronicles of Riddick: Assault on Dark Athena - Game Guide and Walkthrough](https://game.lhg100.com/Article/UploadFiles/201512/2015121710045393.jpg)
[#43]
Return to the main room of the infirmary and this time proceed to the door on your right. Use the recently obtained keycard to open the door. Be careful, though. The second you open the door you're going to be attacked by a third guard [#44]. I would recommend blocking frequently and looking for ways to perform counterattacks. This will allow you to end this duel without any health losses.
![[#44] - Escape from Butcher Bay - Infirmary - part 1 - Escape from Butcher Bay - The Chronicles of Riddick: Assault on Dark Athena - Game Guide and Walkthrough](https://game.lhg100.com/Article/UploadFiles/201512/2015121710045372.jpg)
[#44]
Proceed to a new room and once you're inside go to your right. You will soon reach an area where you'll find a very large medical station [#45]. Using this device will allow you to increase your health bar by one unit (square). Additionally, your current health will be restored. Once this is done use a nearby ladder to get to a new area.
![[#45] - Escape from Butcher Bay - Infirmary - part 1 - Escape from Butcher Bay - The Chronicles of Riddick: Assault on Dark Athena - Game Guide and Walkthrough](https://game.lhg100.com/Article/UploadFiles/201512/2015121710045305.jpg)
[#45]
Proceed forward and enter a small room. You will end up standing above the infirmary. Keep heading straight, BUT the second you notice a door opening in front of you take cover behind the nearest crate [#46]. Don't worry, because you'll perfectly safe, even though it's not dark here. Wait for the guard to move past you and surprise him from the back. Snap his neck and don't even bother hiding his body. Instead take a few credits.
![[#46] - Escape from Butcher Bay - Infirmary - part 1 - Escape from Butcher Bay - The Chronicles of Riddick: Assault on Dark Athena - Game Guide and Walkthrough](https://game.lhg100.com/Article/UploadFiles/201512/2015121710045339.jpg)
[#46]
Move towards the door where the guard has appeared for the first time. There's a small hatch to your right and you must open it. Notice a new guard patrolling an upper balcony to your left. Run forward and take cover behind a large pillar [#47]. Wait for the guard to move to your left and proceed to the next section.
![[#47] - Escape from Butcher Bay - Infirmary - part 2 - Escape from Butcher Bay - The Chronicles of Riddick: Assault on Dark Athena - Game Guide and Walkthrough](https://game.lhg100.com/Article/UploadFiles/201512/2015121710045420.jpg)
[#47]
You should be able to enter a new ventilation shaft in just a few seconds. Make a stop once you've reached a brighter area of the tunnel [#48]. There's a new guard above you and you must wait for him to leave this area. Keep going straight until you reach a ladder. Notice fights taking place inside the prison block. Head forward until you get to a new hatch.
![[#48] - Escape from Butcher Bay - Infirmary - part 2 - Escape from Butcher Bay - The Chronicles of Riddick: Assault on Dark Athena - Game Guide and Walkthrough](https://game.lhg100.com/Article/UploadFiles/201512/2015121710045452.jpg)
[#48]
Open the hatch and move forward quickly while stile crouching. There's a guard in front of you and should do your best in getting closer to him before he reaches a door [#49]. Surprise him and perform a well-known stealth kill. I would recommend hiding his body behind a large crate. Proceed towards a dark passageway and find the exit.
![[#49] - Escape from Butcher Bay - Infirmary - part 2 - Escape from Butcher Bay - The Chronicles of Riddick: Assault on Dark Athena - Game Guide and Walkthrough](https://game.lhg100.com/Article/UploadFiles/201512/2015121710045469.jpg)
[#49]
Notice that a new guard is standing on a nearby balcony, however there's a large spotlight to your right. Wait for the spotlight to end its run and move to the guard quickly [#50]. You could try leaving his body in the open, however I would recommend dragging it to the corridor where you came from. Inspect his body for a new keycard.
![[#50] - Escape from Butcher Bay - Infirmary - part 2 - Escape from Butcher Bay - The Chronicles of Riddick: Assault on Dark Athena - Game Guide and Walkthrough](https://game.lhg100.com/Article/UploadFiles/201512/2015121710045471.jpg)
[#50]
Wait for the spotlight to finish "scanning" the balcony and start running towards a card reader. Get ready for a very challenging moment of this mission. A new guard is stationed just around the corner and you must get to him before he starts firing at you [#51]. Once you're close to him it'll get easier. All you have to do is to wait for him to try and hit you. Perform a counterattack to kill him with his own weapon. Head on to a new door to complete this level.
![[#51] - Escape from Butcher Bay - Infirmary - part 2 - Escape from Butcher Bay - The Chronicles of Riddick: Assault on Dark Athena - Game Guide and Walkthrough](https://game.lhg100.com/Article/UploadFiles/201512/2015121710045424.jpg)
[#51]
You'll start this level standing on an upper balcony. Thankfully the surrounding area isn't guarded by any additional enemies. Keep heading forward until you reach a wall. Turn left and jump over the railing [#52]. Make sure to land on the crates and not on the ground, so you won't lose any health units. If you're lucky you'll also slow down your descent by hitting a few smaller bumps along the way.
![[#52] - Escape from Butcher Bay - Mainframe - part 1 - Escape from Butcher Bay - The Chronicles of Riddick: Assault on Dark Athena - Game Guide and Walkthrough](https://game.lhg100.com/Article/UploadFiles/201512/2015121710045498.jpg)
[#52]
As you've probably noticed, this room is being guarded by one of the scientists. You won't have to make any additional preparations, because he won't be hard to kill and you won't be allowed to surprise him. Land somewhere near the scientist and use your blade to get rid of him quickly [#53]. Prevent your character from losing health points here, because you'll need as many of them as possible to win some of the upcoming fights.
![[#53] - Escape from Butcher Bay - Mainframe - part 1 - Escape from Butcher Bay - The Chronicles of Riddick: Assault on Dark Athena - Game Guide and Walkthrough](https://game.lhg100.com/Article/UploadFiles/201512/2015121710045548.jpg)
[#53]
Ignore the weapon that was being used by the scientist, because the screwdriver is far worse than your current equipment. Approach the central computer [#54] and use it to upload Riddick's DNA into the system. This means you'll now be allowed to use weapons. Turn right and take an assault rifle from the ground. Get ready to defeat the first group of enemy units.
![[#54] - Escape from Butcher Bay - Mainframe - part 1 - Escape from Butcher Bay - The Chronicles of Riddick: Assault on Dark Athena - Game Guide and Walkthrough](https://game.lhg100.com/Article/UploadFiles/201512/2015121710045529.jpg)
[#54]
Wait for the door to your left to open. Two guards will arrive in this area. You could try hiding behind a crate and surprising one of your enemies [#55], however you would have to eliminate him almost immediately. Otherwise the guard would retreat to the door, making it impossible to kill him from cover. Either way you must kill both guards.
![[#55] - Escape from Butcher Bay - Mainframe - part 1 - Escape from Butcher Bay - The Chronicles of Riddick: Assault on Dark Athena - Game Guide and Walkthrough](https://game.lhg100.com/Article/UploadFiles/201512/2015121710045524.jpg)
[#55]
Approach the newly unlocked passageway and be ready to take out two additional guards. The easiest way to get rid of them is to fire at explosive objects located behind them [#56]. If they don't die right away, you must be ready to fight them in this room, because they'll eventually try storming it. Use long but controlled bursts, however prevent your assault rifle from running out of ammunition.
![[#56] - Escape from Butcher Bay - Mainframe - part 1 - Escape from Butcher Bay - The Chronicles of Riddick: Assault on Dark Athena - Game Guide and Walkthrough](https://game.lhg100.com/Article/UploadFiles/201512/2015121710045540.jpg)
[#56]
Make sure that all enemy guards have been killed and proceed towards a dark corridor. I would recommend using a flashlight here. Approach the corner carefully and wait for one of the guards to throw a grenade at you. Move back quickly and wait for an explosion to occur. Go back to the exact same spot and locate a NanoMED station on the wall [#57]. Memorize its location, because you may need to return here later on.
![[#57] - Escape from Butcher Bay - Mainframe - part 1 - Escape from Butcher Bay - The Chronicles of Riddick: Assault on Dark Athena - Game Guide and Walkthrough](https://game.lhg100.com/Article/UploadFiles/201512/2015121710045599.jpg)
[#57]
Inspect the area to the right of the health station. There's a lot of debris here and you can get rid of it by pressing the action key repeatedly. Enter the new area CAREFULLY and locate a guard with a shotgun. He should appear directly in front of you [#58]. Use the flashlight here, even it if means catching his attention. The main reason is that you'll want to find him as soon as possible.
![[#58] - Escape from Butcher Bay - Mainframe - part 1 - Escape from Butcher Bay - The Chronicles of Riddick: Assault on Dark Athena - Game Guide and Walkthrough](https://game.lhg100.com/Article/UploadFiles/201512/2015121710045619.jpg)
[#58]
Enter the large warehouse and inspect the area to your left. You should be able to find a switch and obviously you must use it. This will prevent a large fan located above you from working. Your next step is an obvious one. Start using the SPACEBAR or an action key to climb to the top [#59]. Once you're there walk through the inactive fan.
![[#59] - Escape from Butcher Bay - Mainframe - part 2 - Escape from Butcher Bay - The Chronicles of Riddick: Assault on Dark Athena - Game Guide and Walkthrough](https://game.lhg100.com/Article/UploadFiles/201512/2015121710045686.jpg)
[#59]
You'll find yourself standing on an upper balcony. Notice that the area beneath you is being patrolled by two enemy units. They shouldn't notice you, so it'll be easier to surprise them. Move to your right and start shooting at the metal grating [#60]. Some of the parts will fall down and you'll have a clean line of sight. Make sure that you're not standing on the grating, because this can work both ways. Get rid of both guards.
![[#60] - Escape from Butcher Bay - Mainframe - part 2 - Escape from Butcher Bay - The Chronicles of Riddick: Assault on Dark Athena - Game Guide and Walkthrough](https://game.lhg100.com/Article/UploadFiles/201512/2015121710045659.jpg)
[#60]
Make sure that both guards have been killed and slide down. Collect ammunition, turn around and start moving forward. Be careful - a new guard will appear in this area when you're close to a corner. I would recommend moving back and waiting for him inside a dark alcove [#61]. You can also approach him and perform a countermove on him if you want to end it quickly.
![[#61] - Escape from Butcher Bay - Mainframe - part 2 - Escape from Butcher Bay - The Chronicles of Riddick: Assault on Dark Athena - Game Guide and Walkthrough](https://game.lhg100.com/Article/UploadFiles/201512/2015121710045617.jpg)
[#61]
Approach a new large warehouse area CAREFULLY. Crouch by the left wall and lean out. There are two guards inside and you should be able to kill them from here [#62]. Aim for their heads, so it won't take too long for them to die. Once they're gone aim for the explosive barrels and destroy them. This will also destroy all of the surrounding lights. Use a NanoMED station before entering the warehouse.
![[#62] - Escape from Butcher Bay - Mainframe - part 2 - Escape from Butcher Bay - The Chronicles of Riddick: Assault on Dark Athena - Game Guide and Walkthrough](https://game.lhg100.com/Article/UploadFiles/201512/2015121710045632.jpg)
[#62]
Turn on your flashlight and begin moving forward. There are some crates here. Get on top of the largest crate and you should be able to get to a balcony from there. You'll end up standing near killed guards. Turn off your flashlight and notice that a new guard has appeared beneath you [#63]. You're standing in the dark, so you're safe until you begin firing. Aim for his head and kill him with only a single shot.
![[#63] - Escape from Butcher Bay - Mainframe - part 2 - Escape from Butcher Bay - The Chronicles of Riddick: Assault on Dark Athena - Game Guide and Walkthrough](https://game.lhg100.com/Article/UploadFiles/201512/2015121710045749.jpg)
[#63]
Inspect the opposite end of the balcony and eventually you'll come across a cigarette pack (13 - Basilica Interior Detail 7). Once you've acquired this item you may return to the ground floor by jumping over the railing. Proceed to a small corridor carefully and don't forget to turn off the flashlight.
![[#64] - Escape from Butcher Bay - Mainframe - part 2 - Escape from Butcher Bay - The Chronicles of Riddick: Assault on Dark Athena - Game Guide and Walkthrough](https://game.lhg100.com/Article/UploadFiles/201512/2015121710045750.jpg)
[#64]
One of the guards is hiding behind the crate and he will reveal his position when you get closer [#65]. Kill him before he's able to open fire. Inspect his body for ammunition and then open a nearby hatch. Proceed to the next corridor. Stand up and go to your right. Use a valve located on the left wall.
![[#65] - Escape from Butcher Bay - Mainframe - part 2 - Escape from Butcher Bay - The Chronicles of Riddick: Assault on Dark Athena - Game Guide and Walkthrough](https://game.lhg100.com/Article/UploadFiles/201512/2015121710045732.jpg)
[#65]
Start moving forward, but the second you hear someone shouting move back to the previous corridor. An enemy guard will throw a grenade at you. Wait for the explosion and position yourself near the right wall. Take out two enemy units from a larger distance [#66]. Keep heading forward until you find a large hole to your right.
![[#66] - Escape from Butcher Bay - Mainframe - part 2 - Escape from Butcher Bay - The Chronicles of Riddick: Assault on Dark Athena - Game Guide and Walkthrough](https://game.lhg100.com/Article/UploadFiles/201512/2015121710045708.jpg)
[#66]
Be careful, because one of the guards is hiding in the next room and it's not going to take him long to find you. Make sure he's been eliminated and proceed to the next section. I would strongly recommend crouching and staying in the shadows. A second guard should enter this room, however he won't even notice you if you're lucky [#67]. Kill him and continue your journey. You'll soon find a new NanoMED unit.
![[#67] - Escape from Butcher Bay - Mainframe - part 3 - Escape from Butcher Bay - The Chronicles of Riddick: Assault on Dark Athena - Game Guide and Walkthrough](https://game.lhg100.com/Article/UploadFiles/201512/2015121710045729.jpg)
[#67]
You'll soon have to take part in a new boss fight. Sadly, before you'll be allowed to do that, you'll have to dispose of a few standard enemy troops. Enter the room to your left [#68] and notice that you've been trapped here, without being able to return to the medical station. Get ready for some serious shooting!
![[#68] - Escape from Butcher Bay - Mainframe - part 3 - Escape from Butcher Bay - The Chronicles of Riddick: Assault on Dark Athena - Game Guide and Walkthrough](https://game.lhg100.com/Article/UploadFiles/201512/2015121710045710.jpg)
[#68]
Start off by running forward, because one of the guards will throw a grenade at you. I would recommend taking cover next to a large stack of crates [#69]. It shouldn't be too difficult to kill all enemy units from here, especially since the guards will be appearing directly in front of you. Fire longer bursts and don't forget to zoom in the view for better aim. If you're lucky and skilled enough, you won't lose a single health unit here.
![[#69] - Escape from Butcher Bay - Mainframe - part 3 - Escape from Butcher Bay - The Chronicles of Riddick: Assault on Dark Athena - Game Guide and Walkthrough](https://game.lhg100.com/Article/UploadFiles/201512/2015121710045873.jpg)
[#69]
Once you've defeated all enemy soldiers you'll have a few seconds to get ready for the boss fight. Collect ammunition from all the bodies and take cover in a dark area located in one of the corners of this room [#70]. You'll soon see your opponent - it's going to be a relatively large mech occupied by one of the hostiles.
![[#70] - Escape from Butcher Bay - Mainframe - part 3 - Escape from Butcher Bay - The Chronicles of Riddick: Assault on Dark Athena - Game Guide and Walkthrough](https://game.lhg100.com/Article/UploadFiles/201512/2015121710045829.jpg)
[#70]
The only weak spot of the mech is located on its back and it's marked by several red lamps [#71]. Wait for the mech to face in another direction and begin firing at it. Sadly it won't take too long for the opponent to turn around and fight back.
![[#71] - Escape from Butcher Bay - Mainframe - part 3 - Escape from Butcher Bay - The Chronicles of Riddick: Assault on Dark Athena - Game Guide and Walkthrough](https://game.lhg100.com/Article/UploadFiles/201512/2015121710045891.jpg)
[#71]
You'll now have to play a game of hide and seek. Occupy the dark corner and look for possibilities to attack the boss from the back [#72]. Avoid his attacks and direct confrontations, because these types of situations will result in your character dying very quickly. Once you've defeated the mech, you're going to be rewarded with a cigarette pack (27 - Light Guard).
![[#72] - Escape from Butcher Bay - Mainframe - part 3 - Escape from Butcher Bay - The Chronicles of Riddick: Assault on Dark Athena - Game Guide and Walkthrough](https://game.lhg100.com/Article/UploadFiles/201512/2015121710045847.jpg)
[#72]
Sadly you won't be allowed to regenerate even when you've defeated the mech, so focus only on replenishing your ammo supplies. Proceed towards a small elevator which was used by the boss before [#73]. Use the control panel and wait to be transported to a new floor. Head to the exit to end this level.
![[#73] - Escape from Butcher Bay - Mainframe - part 3 - Escape from Butcher Bay - The Chronicles of Riddick: Assault on Dark Athena - Game Guide and Walkthrough](https://game.lhg100.com/Article/UploadFiles/201512/2015121710045887.jpg)
[#73]
Keep going straight until you reach a wall. Turn right and eventually you'll get to a valve. Obviously you will have to interact with this object. Listen to a few short statements made by one of the guards. Once you've closed the valve turn around and find a NanoMED station on the left wall [#74].
![[#74] - Escape from Butcher Bay - Prison Yard Riot - Escape from Butcher Bay - The Chronicles of Riddick: Assault on Dark Athena - Game Guide and Walkthrough](https://game.lhg100.com/Article/UploadFiles/201512/2015121710045841.jpg)
[#74]
Proceed to the stairs. Approach one of the corners, make a stop and turn left. DON'T even think about heading towards the nearest corridor. Instead kill the first guard from here [#75]. His colleague should be standing to the right, but there's a good chance he'll die in a gunfight. Turn on your flashlight if you're having difficult locating enemy units, because you would have been spotted by the guards either way.
![[#75] - Escape from Butcher Bay - Prison Yard Riot - Escape from Butcher Bay - The Chronicles of Riddick: Assault on Dark Athena - Game Guide and Walkthrough](https://game.lhg100.com/Article/UploadFiles/201512/2015121710045910.jpg)
[#75]
You'll now have to take part in a series of very difficult fights, including the destruction of a few security turrets. The first turret is located directly in front of you and you must destroy it while still occupying the stairs [#76]. Don't get too close or the turret will kill you almost instantly, without giving you chance of retreating.
![[#76] - Escape from Butcher Bay - Prison Yard Riot - Escape from Butcher Bay - The Chronicles of Riddick: Assault on Dark Athena - Game Guide and Walkthrough](https://game.lhg100.com/Article/UploadFiles/201512/2015121710045958.jpg)
[#76]
Use the stairs to get down to a lower level and approach a new corner. Lean out to your left and destroy a second turret located to your right [#77]. You must perform this activity before your cover is blown. Once this is done inspect the area where you've killed a guard (or two) and pick up ammunition.
![[#77] - Escape from Butcher Bay - Prison Yard Riot - Escape from Butcher Bay - The Chronicles of Riddick: Assault on Dark Athena - Game Guide and Walkthrough](https://game.lhg100.com/Article/UploadFiles/201512/2015121710045977.jpg)
[#77]
Approach the corridor where you've disabled the second turret. Lean out once again, however this time you'll have to destroy a turret from a much larger distance. You'll find it at the opposite end of this corridor [#78]. Start moving forward (slowly!) and make sure that a shotgun is your current weapon of choice. Eliminate a single guard when he arrives in this area.
![[#78] - Escape from Butcher Bay - Prison Yard Riot - Escape from Butcher Bay - The Chronicles of Riddick: Assault on Dark Athena - Game Guide and Walkthrough](https://game.lhg100.com/Article/UploadFiles/201512/2015121710045998.jpg)
[#78]
Take cover in a small dark area to your right [#79]. You should be able to kill one of the guards from here without being noticed. Make a few steps forward and turn right. You'll find one more security turret on a nearby wall. Destroy this object before moving on.
![[#79] - Escape from Butcher Bay - Prison Yard Riot - Escape from Butcher Bay - The Chronicles of Riddick: Assault on Dark Athena - Game Guide and Walkthrough](https://game.lhg100.com/Article/UploadFiles/201512/2015121710045947.jpg)
[#79]
Be careful, because an additional guard may appear in your vicinity. Kill him before he's able to fight back. Keep going straight until you get to a narrow passageway which you've used during your first stay in the prison block. A second guard is hiding here [#80]. Lean out and take him out with a headshot.
![[#80] - Escape from Butcher Bay - Prison Yard Riot - Escape from Butcher Bay - The Chronicles of Riddick: Assault on Dark Athena - Game Guide and Walkthrough](https://game.lhg100.com/Article/UploadFiles/201512/2015121710045942.jpg)
[#80]
Keep moving forward, BUT watch out for the final turret which will be located to your right [#81]. Don't even think about approaching the closed gate unless you took out the turret. Listen to a short statement made by Riddick, after which begin retreating to some of the previously explored corridors. You should be able to find a cartridge along the way.
![[#81] - Escape from Butcher Bay - Prison Yard Riot - Escape from Butcher Bay - The Chronicles of Riddick: Assault on Dark Athena - Game Guide and Walkthrough](https://game.lhg100.com/Article/UploadFiles/201512/2015121710050012.jpg)
[#81]
I guess you won't be surprised to hear that some of the nearby corridors are going to be occupied by new guards and due to the fact that it's dark here you'll have some problems locating them [#82]. Try maintaining a large distance. One of the new guards should be waiting for you near the stairs you've used not along go. In addition to that - watch out for a grenade being thrown at you.
![[#82] - Escape from Butcher Bay - Prison Yard Riot - Escape from Butcher Bay - The Chronicles of Riddick: Assault on Dark Athena - Game Guide and Walkthrough](https://game.lhg100.com/Article/UploadFiles/201512/2015121710050064.jpg)
[#82]
Turn off your flashlight once you're close enough to a large gate where you've disabled the first guard. His colleague should arrive in this area very soon [#83]. Kill him with a single shot to his head. Afterwards approach his body and find a radio. Riddick will automatically pick it up and broadcast a short transmission. You may start going back to the closed gate located next to the last destroyed turret.
![[#83] - Escape from Butcher Bay - Prison Yard Riot - Escape from Butcher Bay - The Chronicles of Riddick: Assault on Dark Athena - Game Guide and Walkthrough](https://game.lhg100.com/Article/UploadFiles/201512/2015121710050053.jpg)
[#83]
You'll have to take out one more guard on your way to the gate. He will appear in the middle of the second corridor [#84]. Once he's gone head towards the narrow passageway and go through the opened gate. Proceed forward to end this level.
![[#84] - Escape from Butcher Bay - Prison Yard Riot - Escape from Butcher Bay - The Chronicles of Riddick: Assault on Dark Athena - Game Guide and Walkthrough](https://game.lhg100.com/Article/UploadFiles/201512/2015121710050089.jpg)
[#84]
You'll start the game in a very dark room and you'll be informed that you've got six minutes before battery in your shotgun runs out of power. Sadly you won't be allowed to turn off the flashlight on your own and the time limit will include not only this level but the next mission as well. There will be an alternative, because you'll be allowed to use the flares. I would recommend that you focus on finishing both levels as quickly as possible, because flares are very uneffective and you can't use them with your gun simultaneously. Thankfully if you follow my instructions you shouldn't run out of time. Start off by proceeding to a corridor located to your left [#85].
![[#85] - Escape from Butcher Bay - The Pit - Escape from Butcher Bay - The Chronicles of Riddick: Assault on Dark Athena - Game Guide and Walkthrough](https://game.lhg100.com/Article/UploadFiles/201512/2015121710050177.jpg)
[#85]
Turn right and make a few steps forward to get to a much larger tunnel. Sadly this is where you'll encounter the first group of mutants [#86]. A single shotgun hit will be more than enough to kill them, however the monsters will keep respawning endlessly. As a result you should focus only on eliminating closest targets. You should also stay on the run in order to prevent the monsters from catching up to you.
![[#86] - Escape from Butcher Bay - The Pit - Escape from Butcher Bay - The Chronicles of Riddick: Assault on Dark Athena - Game Guide and Walkthrough](https://game.lhg100.com/Article/UploadFiles/201512/2015121710050128.jpg)
[#86]
Keep heading forward and remain inside the biggest tunnel. Ignore smaller tunnels encountered along the way and try not to fall down through one of the smaller holes, because you would only lose more time and ammo trying to return to the tunnel. Turn right once you've reached a large junction [#87]. Make sure to kill the beasts pursuing you from time to time, but don't spend too much time trying to eliminate them.
![[#87] - Escape from Butcher Bay - The Pit - Escape from Butcher Bay - The Chronicles of Riddick: Assault on Dark Athena - Game Guide and Walkthrough](https://game.lhg100.com/Article/UploadFiles/201512/2015121710050195.jpg)
[#87]
You will soon get to a new junction. This time you'll have to turn left [#88]. Remain on the main path and you'll soon notice flares in the distance. Keep heading towards these objects. Approach a large gate and use the valve to open the gate (you don't have to search for the valve anymore like you did in the first game). This will allow you to get to a new area of the sewers.
![[#88] - Escape from Butcher Bay - The Pit - Escape from Butcher Bay - The Chronicles of Riddick: Assault on Dark Athena - Game Guide and Walkthrough](https://game.lhg100.com/Article/UploadFiles/201512/2015121710050133.jpg)
[#88]
You may proceed to the next section. It should be much safer here, however don't forget to keep moving in order to prevent the monsters from catching up to you. Eventually you'll see a man running away from you. Head towards him, HOWEVER inspect a left corridor along the way. There's a cigarette pack (15 - New Mecca Day) here [#89].
![[#89] - Escape from Butcher Bay - The Pit - Escape from Butcher Bay - The Chronicles of Riddick: Assault on Dark Athena - Game Guide and Walkthrough](https://game.lhg100.com/Article/UploadFiles/201512/2015121710050249.jpg)
[#89]
Once you've collected the pack turn around and kill new beasts. If you don't see any - you're in luck. Go back to the junction and go to your left [#90]. Enter a new corridor and wait for the game to begin loading a new map.
![[#90] - Escape from Butcher Bay - The Pit - Escape from Butcher Bay - The Chronicles of Riddick: Assault on Dark Athena - Game Guide and Walkthrough](https://game.lhg100.com/Article/UploadFiles/201512/2015121710050290.jpg)
[#90]
Thankfully you won't have to worry about encountering any new monsters for the time being. Follow your new ally and listen to his comments along the way. You'll soon get to a large elevator [#91]. Wait for the elevator to transport you to an upper level. Eventually you'll both end up standing inside Pope Joe's hideout.
![[#91] - Escape from Butcher Bay - Pope Joe's Den - Escape from Butcher Bay - The Chronicles of Riddick: Assault on Dark Athena - Game Guide and Walkthrough](https://game.lhg100.com/Article/UploadFiles/201512/2015121710050271.jpg)
[#91]
Talk to Joe. During the conversation you'll find out that you're going to have to do him a favor by finding his radio. Before you exit this room there are two activities you shouldn't ignore - heal Riddick using a nearby NanoMED station [#92] and pick up a dozen of flares from the basket. Thankfully if you haven't lost too much time during the course of the previous mission you will still be allowed to use a flashlight.
![[#92] - Escape from Butcher Bay - Pope Joe's Den - Escape from Butcher Bay - The Chronicles of Riddick: Assault on Dark Athena - Game Guide and Walkthrough](https://game.lhg100.com/Article/UploadFiles/201512/2015121710050237.jpg)
[#92]
Go back to the elevator using the same route as Joe did. Once you've arrived at your destination use the control panel and wait for the elevator to take you back into the worst area of the sewers. Exit the elevator and go to your left. A passageway is located next to radioactive barrels [#93].
![[#93] - Escape from Butcher Bay - Pope Joe's Den - Escape from Butcher Bay - The Chronicles of Riddick: Assault on Dark Athena - Game Guide and Walkthrough](https://game.lhg100.com/Article/UploadFiles/201512/2015121710050352.jpg)
[#93]
Choose the passageway located to your left and turn right TWICE. You should end up standing inside a long corridor. Proceed to the opposite end and carefully approach an opening located to your right. Monsters can be found in the next room. Deal with the first group by firing at the explosive barrels [#94]. Enter the room and kill the rest yourself.
![[#94] - Escape from Butcher Bay - Pope Joe's Den - Escape from Butcher Bay - The Chronicles of Riddick: Assault on Dark Athena - Game Guide and Walkthrough](https://game.lhg100.com/Article/UploadFiles/201512/2015121710050324.jpg)
[#94]
Make sure you're not surrounded by any other beasts and check a small alcove located to your right [#95]. A cartridge can be found here, as well as a cigarette pack (16 - Sarcophagus Interior). Turn around quickly in order to prevent new mutants from surprising you. Go back to the large room.
![[#95] - Escape from Butcher Bay - Pope Joe's Den - Escape from Butcher Bay - The Chronicles of Riddick: Assault on Dark Athena - Game Guide and Walkthrough](https://game.lhg100.com/Article/UploadFiles/201512/2015121710050376.jpg)
[#95]
Turn right and proceed towards a small opening [#96]. Eventually you'll find yourself standing inside a small room and defeating new monsters. Joe's radio can be found on the ground, to your right (near some barrels). Take this item as quickly as possible, before more mutants show up.
![[#96] - Escape from Butcher Bay - Pope Joe's Den - Escape from Butcher Bay - The Chronicles of Riddick: Assault on Dark Athena - Game Guide and Walkthrough](https://game.lhg100.com/Article/UploadFiles/201512/2015121710050330.jpg)
[#96]
You'll now have to return to the elevator. Use the same passageways as before. It shouldn't be a problem. Prevent new mutants from inflict major injuries to Riddick. Once you've arrived at your destination use the control panel and proceed to Joe's hideout. Initiate a new conversation with Joe [#97] and you'll be rewarded with a cut-scene.
![[#97] - Escape from Butcher Bay - Pope Joe's Den - Escape from Butcher Bay - The Chronicles of Riddick: Assault on Dark Athena - Game Guide and Walkthrough](https://game.lhg100.com/Article/UploadFiles/201512/2015121710050431.jpg)
[#97]
Notice that you've been rewarded with Eyeshine ability. Basically you can now see in the dark and you can activate this mode by pressing the upper arrow or the Q key. I would strongly recommend using Eyeshine here, because otherwise you would have some serious problems finding the exit. Start moving forward and choose a tunnel to your right [#98]. Kill the first mutant before moving on.
![[#98] - Escape from Butcher Bay - Dark Tunnels - Escape from Butcher Bay - The Chronicles of Riddick: Assault on Dark Athena - Game Guide and Walkthrough](https://game.lhg100.com/Article/UploadFiles/201512/2015121710050475.jpg)
[#98]
Keep heading forward and use single shots to eliminate other monsters in this area. Your current objective is to get to the opposite end of this passageway [#99]. Afterwards turn left TWICE and go straight. Kill a few other mutants along the way.
![[#99] - Escape from Butcher Bay - Dark Tunnels - Escape from Butcher Bay - The Chronicles of Riddick: Assault on Dark Athena - Game Guide and Walkthrough](https://game.lhg100.com/Article/UploadFiles/201512/2015121710050422.jpg)
[#99]
Don't change directions until you've reached a slightly larger area. Inspect the area to your left and you'll find a cigarette pack (28 - Attack Droid) [#100]. Take the pack and move back to the larger area.
![[#100] - Escape from Butcher Bay - Dark Tunnels - Escape from Butcher Bay - The Chronicles of Riddick: Assault on Dark Athena - Game Guide and Walkthrough](https://game.lhg100.com/Article/UploadFiles/201512/2015121710050416.jpg)
[#100]
In order to end this extremely short level you'll only have to perform one more action. Turn right and find a large ladder [#101]. Obviously you must use this object to get to a new area. This is where the level ends.
![[#101] - Escape from Butcher Bay - Dark Tunnels - Escape from Butcher Bay - The Chronicles of Riddick: Assault on Dark Athena - Game Guide and Walkthrough](https://game.lhg100.com/Article/UploadFiles/201512/2015121710050510.jpg)
[#101]
You'll find yourself standing in a very bright room, so it's important to turn off Eyeshine. Proceed towards a new corridor. Locate a light switch on the right wall [#102]. Press it and then press the crouch key. Turn on Eyeshine, move to the left and wait for one of the workers to get here. Kill him silently before switches the lights back on or turns around. Don't forget to take his pistol.
![[#102] - Escape from Butcher Bay - Showers - part 1 - Escape from Butcher Bay - The Chronicles of Riddick: Assault on Dark Athena - Game Guide and Walkthrough](https://game.lhg100.com/Article/UploadFiles/201512/2015121710050533.jpg)
[#102]
Proceed to the next section. A new room is being occupied by two enemy guards. I wouldn't recommend trying to kill the lights. The main reason is that a guy with a flashlight would appear in this corridor, making it very difficult to surprise him. As a result remain close to the left wall and kill the first guard who should be sitting on a bench [#103].
![[#103] - Escape from Butcher Bay - Showers - part 1 - Escape from Butcher Bay - The Chronicles of Riddick: Assault on Dark Athena - Game Guide and Walkthrough](https://game.lhg100.com/Article/UploadFiles/201512/2015121710050539.jpg)
[#103]
A second guard will probably panic a little bit, however it's unlikely for him to show up near your position. Use the light switch on the left wall to make matters easier for you. Lean out carefully and try to locate him using your Eyeshine ability [#104]. Kill him from a large distance and wait for a few seconds in order to check for possible reinforcements. If no one new shows up turn the lights again, so it'll be easier to explore this room.
![[#104] - Escape from Butcher Bay - Showers - part 1 - Escape from Butcher Bay - The Chronicles of Riddick: Assault on Dark Athena - Game Guide and Walkthrough](https://game.lhg100.com/Article/UploadFiles/201512/2015121710050564.jpg)
[#104]
I would recommend that you start off by examining both bodies. Collect much needed ammunition. You may now begin opening lockers located on both sides of this room. You'll gain possession of credits, two assault rifles and guard clothes [#105]. I would strongly recommend putting on the clothes, because you'll be allowed to move around the base more freely. One of the lockers will also contain a cigarette pack (29 - Civilian Guard).
![[#105] - Escape from Butcher Bay - Showers - part 1 - Escape from Butcher Bay - The Chronicles of Riddick: Assault on Dark Athena - Game Guide and Walkthrough](https://game.lhg100.com/Article/UploadFiles/201512/2015121710050590.jpg)
[#105]
You may proceed towards the next corridor. Remember that you don't have to stay in the shadows from now on. Instead you should start acting as one of the guards. As long as you don't attack other guards, they should leave you alone. Don't forget to avoid making stupid moves (crouching, jumping etc.). I would also recommend holstering your weapon, especially since you won't need one. Approach a new corridor and wait for one of the guards to move past you. Follow him [#106] and snap his neck. Leave his body here, because no one else will see it.
![[#106] - Escape from Butcher Bay - Showers - part 1 - Escape from Butcher Bay - The Chronicles of Riddick: Assault on Dark Athena - Game Guide and Walkthrough](https://game.lhg100.com/Article/UploadFiles/201512/2015121710050509.jpg)
[#106]
Proceed to your right and find a NanoMED unit on one of the walls. Use it if you're in need of healing. Enter the room located to your left. This area is being patrolled by a single guard [#107] and it would be a good idea to get rid of him. Don't forget to inspect bodies of fallen enemies, searching for ammo and credits. One of the guards should also leave a cartridge behind.
![[#107] - Escape from Butcher Bay - Showers - part 1 - Escape from Butcher Bay - The Chronicles of Riddick: Assault on Dark Athena - Game Guide and Walkthrough](https://game.lhg100.com/Article/UploadFiles/201512/2015121710050563.jpg)
[#107]
Explore the surrounding area. You can try talking to some of the residents if you want to, however it's optional. Notice that there's a small hole in one of the corners of the room [#108]. Use this to get to the lower level. Once you're down there focus on finding a Vent Tool. Use this object to open a nearby ventilation hatch and go back up using a ladder. Kick the grating and you'll return to a room with a dead guard.
![[#108] - Escape from Butcher Bay - Showers - part 1 - Escape from Butcher Bay - The Chronicles of Riddick: Assault on Dark Athena - Game Guide and Walkthrough](https://game.lhg100.com/Article/UploadFiles/201512/2015121710050675.jpg)
[#108]
Go back to the corridor where you found the medical station and where you've killed one of the guards. Proceed to the opposite end of the corridor and don't forget to have your gun holstered all the time. Once you've arrived at a much bigger area ignore a guard sitting on a bench, because his death would alarm other enemy units. Instead proceed directly towards a small corridor located to your right [#109].
![[#109] - Escape from Butcher Bay - Showers - part 1 - Escape from Butcher Bay - The Chronicles of Riddick: Assault on Dark Athena - Game Guide and Walkthrough](https://game.lhg100.com/Article/UploadFiles/201512/2015121710050657.jpg)
[#109]
You'll encounter two other enemies along the way, but you may as well ignore them unless you want to listen to a funny conversation. Get to a much larger area and focus on going after a guard who is on the move. Wait for him to move away from the stationery guard and take him by surprise [#110]. Perform a silent kill and his death shouldn't alarm his colleague. Don't even bother trying to hide his body.
![[#110] - Escape from Butcher Bay - Showers - part 1 - Escape from Butcher Bay - The Chronicles of Riddick: Assault on Dark Athena - Game Guide and Walkthrough](https://game.lhg100.com/Article/UploadFiles/201512/2015121710050648.jpg)
[#110]
Go back to the stationery guard and position yourself directly behind him. Press the crouch key and then the right mouse button to trigger an execution. Once he's gone make sure to collect ammunition and credits. Find a passageway with two Litter signs [#111].
![[#111] - Escape from Butcher Bay - Showers - part 2 - Escape from Butcher Bay - The Chronicles of Riddick: Assault on Dark Athena - Game Guide and Walkthrough](https://game.lhg100.com/Article/UploadFiles/201512/2015121710050721.jpg)
[#111]
You'll now find yourself exploring a series of narrow passageways. Notice a new guard standing in front of the armory and his colleague patrolling a nearby area. Ignore them both from now and proceed to the next section. Once you've arrived at a much bigger room turn left and proceed towards a dark area [#112]. Turn left there, turn on Eyeshine and use your newly acquired Vent Tool to open a hatch.
![[#112] - Escape from Butcher Bay - Showers - part 2 - Escape from Butcher Bay - The Chronicles of Riddick: Assault on Dark Athena - Game Guide and Walkthrough](https://game.lhg100.com/Article/UploadFiles/201512/2015121710050786.jpg)
[#112]
Use the ladder here and kick the grating when you get to the end of the ventilation system. You will find yourself standing inside a small armory. There's a cigarette pack (30 - Heavy Guard) to your left. Furthermore, collect a light guard armor [#113] just in case something may go wrong, as well as several assault rifles. Use the panel on the wall to open the door of the armory.
![[#113] - Escape from Butcher Bay - Showers - part 2 - Escape from Butcher Bay - The Chronicles of Riddick: Assault on Dark Athena - Game Guide and Walkthrough](https://game.lhg100.com/Article/UploadFiles/201512/2015121710050766.jpg)
[#113]
It would now be a good idea to get rid of both guards. Make sure that you're standing behind the first guard. He won't be moving, so it shouldn't be difficult to find the right spot [#114]. Wait for his colleague to leave this area. It's extremely important, because it won't be easy for you to hide the body. Execute the guard and hide his body in the ventilation shaft. You can also leave the body and proceed to the other guard right away, but you would have to kill him before he notices the body.
![[#114] - Escape from Butcher Bay - Showers - part 2 - Escape from Butcher Bay - The Chronicles of Riddick: Assault on Dark Athena - Game Guide and Walkthrough](https://game.lhg100.com/Article/UploadFiles/201512/2015121710050737.jpg)
[#114]
I assume you've decided to play it slow and hide the body of the first guard, so there's one more soldier for you to take care of. Focus your attention on surprising him. I would recommend that you wait until he gets closer to the armory [#115] before you make your move and kill him. Don't forget to do it silently!
![[#115] - Escape from Butcher Bay - Showers - part 2 - Escape from Butcher Bay - The Chronicles of Riddick: Assault on Dark Athena - Game Guide and Walkthrough](https://game.lhg100.com/Article/UploadFiles/201512/2015121710050847.jpg)
[#115]
Go back to the large room once again. There's only one more guard for you to kill and he's sleeping next to a metal gate [#116] Don't even think about trying to surprise him from the back. Choose your pistol and put a bullet in his brain. Once he's gone destroy ALL nearby lamps with one of your weapons. You'll soon find out why this had to be done.
![[#116] - Escape from Butcher Bay - Showers - part 2 - Escape from Butcher Bay - The Chronicles of Riddick: Assault on Dark Athena - Game Guide and Walkthrough](https://game.lhg100.com/Article/UploadFiles/201512/2015121710050860.jpg)
[#116]
Approach a retinal scanner which can be found next to a dead guard [#117]. Obviously Riddick won't be allowed inside, but the goal was to make a guard arrive here. Hide in the shadows and wait for the guard to show up. Snap his neck as soon as he enters the dark area. Thankfully due to the fact that you've destroyed all sources of light he won't see you.
![[#117] - Escape from Butcher Bay - Showers - part 2 - Escape from Butcher Bay - The Chronicles of Riddick: Assault on Dark Athena - Game Guide and Walkthrough](https://game.lhg100.com/Article/UploadFiles/201512/2015121710050832.jpg)
[#117]
You won't have to hide this new body anywhere, because this was the last opponent. Proceed to the corridor where the guard has appeared for the first time. Notice that you can go through [#118]. Use this passageway to get to a new area.
![[#118] - Escape from Butcher Bay - Showers - part 2 - Escape from Butcher Bay - The Chronicles of Riddick: Assault on Dark Athena - Game Guide and Walkthrough](https://game.lhg100.com/Article/UploadFiles/201512/2015121710050857.jpg)
[#118]
This is a similar level in terms of structure to the previous mission, mostly because you'll be allowed to pose as one of the guards. Thankfully you'll still be allowed to get rid of a few enemy units. Start off by going forward until you reach a larger marketplace [#119]. Talk to Jenkins who is one of the guards and you'll receive alcohol from him.
[#119]
You should now go and talk to shopkeeper Yu [#120]. Two activities can be performed here - you can agree to deliver a package to Abbott and you can buy a few things from him. If you decide to spend some credits, make sure that you purchase a cigarette pack (33 - Mining Worker) for 5 credits. I wouldn't recommend buying shotgun rounds (20 credits), assault rifle ammunition (20 credits) nor a uniform (130 credits). You can only do an exception with a combat knife (50 credits), but only if you're very bored with your current blade found in the prison block.
![[#120] - Escape from Butcher Bay - Guard Quarters - Escape from Butcher Bay - The Chronicles of Riddick: Assault on Dark Athena - Game Guide and Walkthrough](https://game.lhg100.com/Article/UploadFiles/201512/2015121710050825.jpg)
[#120]
Talk to Bondo if you can spare a moment, however you wouldn't receive any items nor useful intel. Once you're ready to move on with your main objective find a small passageway leading to a new location [#121]. Stand on the elevator and use the panel on the wall to be transported to a new area.
![[#121] - Escape from Butcher Bay - Guard Quarters - Escape from Butcher Bay - The Chronicles of Riddick: Assault on Dark Athena - Game Guide and Walkthrough](https://game.lhg100.com/Article/UploadFiles/201512/2015121710050917.jpg)
[#121]
There are two guards standing in front of you, but you may as well ignore them. Proceed to your right. Chancellor can be found just around the corner and you must talk to him [#122]. Agree to exchange alcohol given to you by Jenkins for 50 credits and you'll also gain possession of a new cigarette pack (31 - Hoxie's Personal Guard). Once the conversation has ended surprise Chancellor from the back and murder him. He should leave a cartridge behind. Make sure to drag his body to a safe location before leaving this area.
![[#122] - Escape from Butcher Bay - Guard Quarters - Escape from Butcher Bay - The Chronicles of Riddick: Assault on Dark Athena - Game Guide and Walkthrough](https://game.lhg100.com/Article/UploadFiles/201512/2015121710050903.jpg)
[#122]
Return to the area with two guards and the elevator, however this time choose a passageway located to your left. You should be able to come across a guard near the stairs [#123]. Kill him for more ammunition or ignore him. If you decide to murder him you may leave his body near the stairs, BUT not too close to a door. Proceed to a new location. You'll end up standing on a balcony above marketplace. Ignore a new guard and proceed forward.
![[#123] - Escape from Butcher Bay - Guard Quarters - Escape from Butcher Bay - The Chronicles of Riddick: Assault on Dark Athena - Game Guide and Walkthrough](https://game.lhg100.com/Article/UploadFiles/201512/2015121710050920.jpg)
[#123]
Keep heading forward and ignore apartments found along the way. Once you've arrived at a new junction, choose a passageway located to your right [#124]. There's a NanoMED health station nearby. You'll also be allowed to kill a guard (Sicher) and a technician (Soup). Ignore the service panel on the left wall, because shutting down the power would result in more problems than new possibilities.
![[#124] - Escape from Butcher Bay - Guard Quarters - Escape from Butcher Bay - The Chronicles of Riddick: Assault on Dark Athena - Game Guide and Walkthrough](https://game.lhg100.com/Article/UploadFiles/201512/2015121710050979.jpg)
[#124]
Go back to the junction, but this time inspect a corridor located to your left. Keep heading forward, ignoring other guards. Your objective will be to locate Aboott's apartment [#125]. It's at the end of the hall, to your left. Press the action key and when the conversation begins choose the last option from the list (package delivery). Enter Abbott's apartment.
![[#125] - Escape from Butcher Bay - Guard Quarters - Escape from Butcher Bay - The Chronicles of Riddick: Assault on Dark Athena - Game Guide and Walkthrough](https://game.lhg100.com/Article/UploadFiles/201512/2015121710050930.jpg)
[#125]
This level focuses only on a boss fight with Abbott. Don't even think about having a direct confrontation, because you would die quickly. I would recommend that you take cover behind the right wall [#126]. This means you won't even enter his apartment, because you'll be standing in the passageway. Don't worry - there aren't any bonus items inside.
![[#126] - Escape from Butcher Bay - Abbott - Escape from Butcher Bay - The Chronicles of Riddick: Assault on Dark Athena - Game Guide and Walkthrough](https://game.lhg100.com/Article/UploadFiles/201512/2015121710051035.jpg)
[#126]
Start firing at Abbott. I wouldn't recommend crouching, because you would have more problems hitting him. Keep using the assault rifle and don't forget to zoom in the view. Hide behind the wall each time you've taken a few hits in order to regenerate. If you're lucky you won't lose a single health unit during the course of this duel. Defeating Abbott will trigger a series of cut-scenes [#127].
![[#127] - Escape from Butcher Bay - Abbott - Escape from Butcher Bay - The Chronicles of Riddick: Assault on Dark Athena - Game Guide and Walkthrough](https://game.lhg100.com/Article/UploadFiles/201512/2015121710051014.jpg)
[#127]
Once you've regained control over Riddick leave the large container and turn right. Make sure not to fall down. Inspect the nearest container and flip the bed by pressing the action key [#128]. This will allow you to acquire a cigarette pack (5 - Homebox). Exit this container and proceed to your right.
![[#128] - Escape from Butcher Bay - Tower 17 - Escape from Butcher Bay - The Chronicles of Riddick: Assault on Dark Athena - Game Guide and Walkthrough](https://game.lhg100.com/Article/UploadFiles/201512/2015121710051041.jpg)
[#128]
Remember not to use any guns and to act as a normal prisoner. The main reason is that you're being observed by a lot of security turrets and you would have been shot on sight. Enter the elevator with two other prisoners [#129] and wait for it to reach a new level.
![[#129] - Escape from Butcher Bay - Tower 17 - Escape from Butcher Bay - The Chronicles of Riddick: Assault on Dark Athena - Game Guide and Walkthrough](https://game.lhg100.com/Article/UploadFiles/201512/2015121710051010.jpg)
[#129]
Exit the elevator and talk to Real. He should be standing to your left, next to a security turret [#130]. Once this conversation has ended turn right and proceed towards a narrow passageway located near the stairs. Eventually you'll get to a much larger prison block that's being occupied by several other inmates.
![[#130] - Escape from Butcher Bay - Tower 17 Base - Escape from Butcher Bay - The Chronicles of Riddick: Assault on Dark Athena - Game Guide and Walkthrough](https://game.lhg100.com/Article/UploadFiles/201512/2015121710051079.jpg)
[#130]
Start off by talking to Dogbone [#131]. He's the inmate mentioned to you by Rael. Dogbone will say that there are two ways to gain access to the mines. I'm sure that you plan on collecting all bonus items, so we'll cover both methods. The other person you need to talk to is Centurion. Choose the first dialogue option from the list and you'll find out about your first fight. Centurion will tell you that you must find someone to fight with on your own.
![[#131] - Escape from Butcher Bay - Tower 17 Base - Escape from Butcher Bay - The Chronicles of Riddick: Assault on Dark Athena - Game Guide and Walkthrough](https://game.lhg100.com/Article/UploadFiles/201512/2015121710051132.jpg)
[#131]
Continue exploring the surrounding area. A guard named Ropes will allow you to use a NanoMED station in exchange for 10 credits. Ignore his offer for now, however don't forget about this possibility, because you may need to heal your injuries later on. In order to arrange your first fight you must talk to Harman. He's standing next to a large gate [#132]. Harman will agree, so you can return with the good news to Centurion.
![[#132] - Escape from Butcher Bay - Tower 17 Base - Escape from Butcher Bay - The Chronicles of Riddick: Assault on Dark Athena - Game Guide and Walkthrough](https://game.lhg100.com/Article/UploadFiles/201512/2015121710051158.jpg)
[#132]
Make sure to familiarize yourself with rules of this right - it's extremely important not to step out of the ring. Thankfully Harman is a very weak opponent [#133], so you shouldn't lose any health points while trying to defeat him. Once he's gone talk to Centurion again and he'll arrange the next fight. Pay him 5 credits and you'll find out that your next opponent will be Bassim - he can be found in the Recreation Area.
![[#133] - Escape from Butcher Bay - Tower 17 Base - Escape from Butcher Bay - The Chronicles of Riddick: Assault on Dark Athena - Game Guide and Walkthrough](https://game.lhg100.com/Article/UploadFiles/201512/2015121710051175.jpg)
[#133]
There's nothing more for you to do here, so you can proceed directly to a large gate leading to the Recreation Area [#134]. The only exception is if you've suffered injuries during your first duel. In such case talk to Ropes. I would recommend holding on with paying him until you've advanced to more advanced challenges.
![[#134] - Escape from Butcher Bay - Tower 17 Base - Escape from Butcher Bay - The Chronicles of Riddick: Assault on Dark Athena - Game Guide and Walkthrough](https://game.lhg100.com/Article/UploadFiles/201512/2015121710051119.jpg)
[#134]
This is by far the biggest area of Tower 17 and it links all the surrounding levels. For now approach a huge gate [#135] and wait for it to be raised. You'll end up standing in the A section. Thankfully it's very easy to navigate, because there are small passageway between sections and large letters written on the ground telling you where you are.
![[#135] - Escape from Butcher Bay - Recreation Area - Escape from Butcher Bay - The Chronicles of Riddick: Assault on Dark Athena - Game Guide and Walkthrough](https://game.lhg100.com/Article/UploadFiles/201512/2015121710051232.jpg)
[#135]
There's only one important activity to do in section A. Talk to Cricket [#136] and he'll offer to sell you a Shiv blade. Remember that you've lost the previous blade when you were captured, so pay him 30 credits. You could buy the same blade for a lower price (25 credits) in the Feed Ward, however I wouldn't recommend waiting, especially since you'll want to fight Baasim soon. Besides, buying a blade from Cricket will trigger Asif into going to the Feed Ward and this will help you in completing several other subquests.
![[#136] - Escape from Butcher Bay - Recreation Area - Escape from Butcher Bay - The Chronicles of Riddick: Assault on Dark Athena - Game Guide and Walkthrough](https://game.lhg100.com/Article/UploadFiles/201512/2015121710051299.jpg)
[#136]
Don't even think about choosing the new blade from the list, because you would be targeted by turrets almost immediately. Instead proceed to a small passageway leading to section B. There are four inmates here, but you'll want to talk to with only three of them. Pink will offer to sell you a cigarette pack (56 - Jet Chopper [#137] for 10 credits.
![[#137] - Escape from Butcher Bay - Recreation Area - Escape from Butcher Bay - The Chronicles of Riddick: Assault on Dark Athena - Game Guide and Walkthrough](https://game.lhg100.com/Article/UploadFiles/201512/2015121710051203.jpg)
[#137]
In order to be able to talk to Jamal-Udeen [#138] you'll have to wait for him to stop braying. Jamal will ask you to eliminate all the "blueskins" from him. You won't be able to do this during your stay in the prison block, however it's good to have this quest on the list. Finally, talk to Baasim and he'll be more than happy to accept your challenge. Locate a passageway leading to section C.
![[#138] - Escape from Butcher Bay - Recreation Area - Escape from Butcher Bay - The Chronicles of Riddick: Assault on Dark Athena - Game Guide and Walkthrough](https://game.lhg100.com/Article/UploadFiles/201512/2015121710051207.jpg)
[#138]
Notice that the game has created a checkpoint when you first entered section C. You can use this to your advantage by trying to win more credits easily. Find an inmate called Craps and confirm that you want to try your luck playing his game [#139]. I would recommend betting 5 credits on 2, 3 or 12, because you can win 40 credits. If you lose all you have to do is to reload the checkpoint and try again. Good luck!
![[#139] - Escape from Butcher Bay - Recreation Area - Escape from Butcher Bay - The Chronicles of Riddick: Assault on Dark Athena - Game Guide and Walkthrough](https://game.lhg100.com/Article/UploadFiles/201512/2015121710051213.jpg)
[#139]
There are also three other inmates in this section of Tower 17. Wilkins will ask you to find Jagger Valance for him. Once again - you won't finish this quest right away, but make sure it's been added to your list of assignments. Talk to Gulag who should be standing nearby. Offer your help [#140] in finding his red tube.
![[#140] - Escape from Butcher Bay - Recreation Area - Escape from Butcher Bay - The Chronicles of Riddick: Assault on Dark Athena - Game Guide and Walkthrough](https://game.lhg100.com/Article/UploadFiles/201512/2015121710051330.jpg)
[#140]
The last person from this section you should talk to is a prisoner called The Nurse. Listen to his problem [#141] and offer help in applying poison to other inmate's meal. Ignore the fact that you didn't receive poison from The Nurse himself, because you'll find this object soon enough. Once you're done talking proceed to the final D section.
![[#141] - Escape from Butcher Bay - Recreation Area - Escape from Butcher Bay - The Chronicles of Riddick: Assault on Dark Athena - Game Guide and Walkthrough](https://game.lhg100.com/Article/UploadFiles/201512/2015121710051338.jpg)
[#141]
The only person you need to talk to in Section D is called Twotongue [#142]. He's tied directly to one of possible ways to get into the mines. Twotongue will ask you to do two things for him - to kill Baasim (you already have him on your list of "quests") and to find his stolen injector.
![[#142] - Escape from Butcher Bay - Recreation Area - Escape from Butcher Bay - The Chronicles of Riddick: Assault on Dark Athena - Game Guide and Walkthrough](https://game.lhg100.com/Article/UploadFiles/201512/2015121710051322.jpg)
[#142]
Ignore the passageway located at the other end of section D, because you don't have to use it right now. Instead return to the large gate which lead to section A. Start off by going back to Tower 17 Base. As a result choose a passageway located to your right [#143].
![[#143] - Escape from Butcher Bay - Recreation Area - Escape from Butcher Bay - The Chronicles of Riddick: Assault on Dark Athena - Game Guide and Walkthrough](https://game.lhg100.com/Article/UploadFiles/201512/2015121710051399.jpg)
[#143]
Go and talk to Centurion in order to begin the second fight. Defeating Baasim is also going to be easy, especially since he won't be using any melee weapons [#144]. Remember to equip your Shiv blade at the beginning of the fight. Block Baasim's attacks and prevent him from pushing you out of the ring. The main reward for defeating Baasim is a new cigarette pack (18 - New Mecca Day), but you'll also receive 20 credits. Ask Centurion to arrange a new fight by paying him 5 credits. You'll find that your next opponent is going to be Sawtooth and you can find him in the Feed Ward. Return to the Recreation Area.
![[#144] - Escape from Butcher Bay - Tower 17 Base #2 - Escape from Butcher Bay - The Chronicles of Riddick: Assault on Dark Athena - Game Guide and Walkthrough](https://game.lhg100.com/Article/UploadFiles/201512/2015121710051447.jpg)
[#144]
This time you're going to stop here only a few seconds. Locate a large gate leading to the Feed Ward. It can be found to your right [#145]. Don't forget to holster your melee weapon if you've used it during your duel with Baasim.
![[#145] - Escape from Butcher Bay - Recreation Area #2 - Escape from Butcher Bay - The Chronicles of Riddick: Assault on Dark Athena - Game Guide and Walkthrough](https://game.lhg100.com/Article/UploadFiles/201512/2015121710051484.jpg)
[#145]
Start off by approaching a large group of thugs. They can be found in front of you. The only person you want to talk to is Cuellas [#146]. This inmate will ask you to get your hands on the "snitch list" which is in the possession of the guards. Agree to his proposal and ignore this quest for the time being. Proceed to a large gate leading to the main area of the Feed Ward.
![[#146] - Escape from Butcher Bay - Feed Ward - Escape from Butcher Bay - The Chronicles of Riddick: Assault on Dark Athena - Game Guide and Walkthrough](https://game.lhg100.com/Article/UploadFiles/201512/2015121710051478.jpg)
[#146]
Once you've reached a junction you can choose the left corridor and you'll encounter Georgie [#147]. During the short conversation with him you'll find out that the area next to him is where the guards torture prisoners and that there aren't cameras there. Don't worry - you'll get there soon enough. :-)
![[#147] - Escape from Butcher Bay - Feed Ward - Escape from Butcher Bay - The Chronicles of Riddick: Assault on Dark Athena - Game Guide and Walkthrough](https://game.lhg100.com/Article/UploadFiles/201512/2015121710051520.jpg)
[#147]
When you'll try to enter the feed ward you're going to be attacked by one of the blueskins [#148]. It's EXTREMELY important to move back to the corridor where you talked to Georgie, so you won't be noticed by any security cameras. Otherwise you would have been shot during the fight or shortly after. Start using your Shiv blade to injure your opponent and he'll eventually die. It's important to inspect his body, because you'll find a bottle of poison. Take it.
![[#148] - Escape from Butcher Bay - Feed Ward - Escape from Butcher Bay - The Chronicles of Riddick: Assault on Dark Athena - Game Guide and Walkthrough](https://game.lhg100.com/Article/UploadFiles/201512/2015121710051595.jpg)
[#148]
Wait for Asif to show up near your position. He's the prisoner you may have encountered during your stay in the Recreation Area. I wouldn't recommend attacking Asif, because it would be a huge risk. Instead start following him and make sure to maintain a safe distance [#149]. Eventually he'll get to his secret hideout.
![[#149] - Escape from Butcher Bay - Feed Ward - Escape from Butcher Bay - The Chronicles of Riddick: Assault on Dark Athena - Game Guide and Walkthrough](https://game.lhg100.com/Article/UploadFiles/201512/2015121710051513.jpg)
[#149]
Wait for Asif to move away from his hideout before opening it on your own [#150]. There are going to be three items inside his stash - credits, red tube and an injector. Remember that you need the last two to complete some of the side missions, so it's important to collect them.
![[#150] - Escape from Butcher Bay - Feed Ward - Escape from Butcher Bay - The Chronicles of Riddick: Assault on Dark Athena - Game Guide and Walkthrough](https://game.lhg100.com/Article/UploadFiles/201512/2015121710051567.jpg)
[#150]
Go back to the corridor where you fought one of the blueskins. Asif should be standing here but the person you want to talk to is Gomer [#151]. He'll offer to sell you a few things. Here's what he's got:
1) first cigarette pack (7 - Basilica Interior Detail) which costs 10 credits
2) second cigarette pack (8 - Basilica Interior Detail 2) which costs 15 credits
3) third cigarette pack (9 - Basilica Interior Detail 3) which costs 20 credits
4) fourth cigarette pack (10 - Basilica Interior Detail 4) which costs 25 credits
5) fifth cigarette pack (11 - Basilica Interior Detail 5) which costs 30 credits
![[#151] - Escape from Butcher Bay - Feed Ward - Escape from Butcher Bay - The Chronicles of Riddick: Assault on Dark Athena - Game Guide and Walkthrough](https://game.lhg100.com/Article/UploadFiles/201512/2015121710051670.jpg)
[#151]
Go back to the main area of the ward. Sawtooth should be sitting to your left. Talk to him in order to confirm his participation in the duel. Once he's agreed turn right and press the action key to put the poison in Binks' plate [#152]. Thankfully no one will notice you doing that, so you won't have to pull any stealth maneuvers.
![[#152] - Escape from Butcher Bay - Feed Ward - Escape from Butcher Bay - The Chronicles of Riddick: Assault on Dark Athena - Game Guide and Walkthrough](https://game.lhg100.com/Article/UploadFiles/201512/2015121710051633.jpg)
[#152]
The last thing you can do here is to talk to Monster. He can be found near Asif's secret hideout. Monster will offer you three things. You can buy a club for 50 credits, a Shiv blade for 25 credits and a Vent Tool for 15 credits. The last object from this list is the only one you should be interested in, however you can also find a Vent Tool on your own. Go back to the passageway leading back to the Recreation Area.
![[#153] - Escape from Butcher Bay - Feed Ward - Escape from Butcher Bay - The Chronicles of Riddick: Assault on Dark Athena - Game Guide and Walkthrough](https://game.lhg100.com/Article/UploadFiles/201512/2015121710051684.jpg)
[#153]
It's time to finish some of the subquests. Proceed directly to section C, because you won't perform any new activities in sections A and B. Talk to The Nurse and he'll thank you for delivering the poison. The Nurse will reward you with a cigarette pack (32 - Cryo Inmate) [#154]. You can also ask him to loan you the money, but only if you have less than 10 credits. Be careful, though. If you don't pay him back you'll have to defeat his goons at some point of the game!
![[#154] - Escape from Butcher Bay - Recreation Area #3 - Escape from Butcher Bay - The Chronicles of Riddick: Assault on Dark Athena - Game Guide and Walkthrough](https://game.lhg100.com/Article/UploadFiles/201512/2015121710051663.jpg)
[#154]
You should also talk to Gulag while you're here. Give him back the red tube [#155] and he'll rewarded you with a... cigarette pack (3 - Narc Land)! What a surprise! ;-) Finally go to section D. Find Twotongue and give him the injector. One more cigarette pack (55 - Billy Bob) will be added to your inventory.
![[#155] - Escape from Butcher Bay - Recreation Area #3 - Escape from Butcher Bay - The Chronicles of Riddick: Assault on Dark Athena - Game Guide and Walkthrough](https://game.lhg100.com/Article/UploadFiles/201512/2015121710051752.jpg)
[#155]
Twotongue will now have a new assignment for you - collecting moths. Look around this section and you'll find a lot of moths flying around. Wait for one of the moths to get closer and catch it by pressing the action key [#156]. Once you have the insect return to Twotongue and give him the moth. You'll now be given three options:
1) you can buy poison for 10 credits (useless)
2) you can buy drugs for 10 credits (buy those if you plan on posing as a drug addict to reach the mines and not by defeating Bam)
3) you can buy a cigarette pack for 10 moths
![[#156] - Escape from Butcher Bay - Recreation Area #3 - Escape from Butcher Bay - The Chronicles of Riddick: Assault on Dark Athena - Game Guide and Walkthrough](https://game.lhg100.com/Article/UploadFiles/201512/2015121710051706.jpg)
[#156]
Obviously in order to get your hands on the cigarette pack you must begin collecting moths. Aside from the ones you've just caught, there are sixteen other moths in the Recreation Area. Most of the moths can be found in sections B and C [#157]. Try catching them all and then return to the dealer. Exchange 10 moths for a cigarette pack (22 -Basilica Interior Detail 9). Sadly, in order to get your hands on the final pack, you're going to need 20 moths. You can't find the sufficient number of them here, so we'll return to this quest later on. Head on to the passageway leading to Tower 17 Base.
![[#157] - Escape from Butcher Bay - Recreation Area #3 - Escape from Butcher Bay - The Chronicles of Riddick: Assault on Dark Athena - Game Guide and Walkthrough](https://game.lhg100.com/Article/UploadFiles/201512/2015121710051799.jpg)
[#157]
Once again you must go to Centurion in order to confirm that you want to begin your next fight. Sadly Sawtooth is by far the most difficult fighter you've had the chance to encounter so far. Make sure that you're moving all the time. Perform quick attacks [#158] and prevent him from hitting you too many times. Winning this duel will result in Centurion giving you credits and a new cigarette pack (19 - Basilica). Talk to him again and you'll find out that your next opponent is Cusa and that he can be found in the Recreation Area. Go there now, however you may also decide to heal using the med station unlocked to you by Ropes.
![[#158] - Escape from Butcher Bay - Tower 17 Base #3 - Escape from Butcher Bay - The Chronicles of Riddick: Assault on Dark Athena - Game Guide and Walkthrough](https://game.lhg100.com/Article/UploadFiles/201512/2015121710051772.jpg)
[#158]
Get ready for a long journey, because Cusa is walking around Section D. It shouldn't be too hard to find him. Initiate a new conversation [#159] and he'll confirm that he'll fight you in the ring. Return to Tower 17 Base.
![[#159] - Escape from Butcher Bay - Recreation Area #4 - Escape from Butcher Bay - The Chronicles of Riddick: Assault on Dark Athena - Game Guide and Walkthrough](https://game.lhg100.com/Article/UploadFiles/201512/2015121710051725.jpg)
[#159]
Once again you must talk to Centurion to start this fight. I guess you may be a little surprised to hear that Cusa is going to be a rather weak opponent. Keep blocking his attacks and perform countermoves when he tries to deliver the next punch [#160]. You'll probably need some time to practice, but when you get the hang of it you'll defeat him without any problems nor health losses. Centurion will give you credits and a cigarette pack (20 - Lensing Necro) for the win.
![[#160] - Escape from Butcher Bay - Tower 17 Base #4 - Escape from Butcher Bay - The Chronicles of Riddick: Assault on Dark Athena - Game Guide and Walkthrough](https://game.lhg100.com/Article/UploadFiles/201512/2015121710051830.jpg)
[#160]
You must now decide how you want to proceed. Remember that there are two ways for you to gain access to the mines. The first method will require you to go to the Recreation Area. Proceed to section A and approach a smaller gate with two guards [#161]. Wait for a short cut-scene to be displayed on your screen. Riddick will be caught carrying drugs bought from Twotongue and this will result in him being transported to the interrogation room.
![[#161] - Escape from Butcher Bay - Tower 17 Base #4 - Escape from Butcher Bay - The Chronicles of Riddick: Assault on Dark Athena - Game Guide and Walkthrough](https://game.lhg100.com/Article/UploadFiles/201512/2015121710051883.jpg)
[#161]
The second method will require you to defeat your final opponent in the ring. In my opinion this is a better outcome, because otherwise you wouldn't have a chance to collect one of the packs. Go to Centurion and you'll find out that your final opponent is a guard called Bam [#162]. Winning shouldn't be too difficult. Remember to keep moving. Attack Bam with swift blows and prevent him from making too many successful counterattacks. If you're skilled enough, you shouldn't lose more than one health unit. Wait for a cut-scene.
![[#162] - Escape from Butcher Bay - Tower 17 Base #4 - Escape from Butcher Bay - The Chronicles of Riddick: Assault on Dark Athena - Game Guide and Walkthrough](https://game.lhg100.com/Article/UploadFiles/201512/2015121710051804.jpg)
[#162]
Both scenarios end in the same way - with you being dragged into a interrogation room. Abbott will be waiting for you inside and this time you'll have to get rid of him once and for all. Notice that he's carrying a club, so move back the second this duel starts [#163].
![[#163] - Escape from Butcher Bay - Feed Ward #2 - Escape from Butcher Bay - The Chronicles of Riddick: Assault on Dark Athena - Game Guide and Walkthrough](https://game.lhg100.com/Article/UploadFiles/201512/2015121710051855.jpg)
[#163]
Abbott's attacks are going to be rather slow due to the fact that he's carrying a heavy weapon, so you shouldn't have problems performing successful counterattacks [#164]. Make sure that he hits only a few items, because you can't sustain too many blows. Don't think about restarting this duel if you have only a small portion of energy left at the end of the fight, because you'll regenerate for free soon enough. Inspect Abbott's body. Take his club, as well as a keycard.
![[#164] - Escape from Butcher Bay - Feed Ward #2 - Escape from Butcher Bay - The Chronicles of Riddick: Assault on Dark Athena - Game Guide and Walkthrough](https://game.lhg100.com/Article/UploadFiles/201512/2015121710051989.jpg)
[#164]
If you've strictly followed my instructions you should have only four quests on your list at the moment - The Mines (primary quest), Blueskins, Wilkins and Snitch-list. Start moving forward and then turn left. There's a medical station here [#165] and you can use it to extend your life bar by one square. Don't forget that you'll also heal Riddick by doing so.
![[#165] - Escape from Butcher Bay - Feed Ward #2 - Escape from Butcher Bay - The Chronicles of Riddick: Assault on Dark Athena - Game Guide and Walkthrough](https://game.lhg100.com/Article/UploadFiles/201512/2015121710051974.jpg)
[#165]
Georgie should be standing to your right. You can talk to him, but ignore his offer of distracting some of the nearby guards, because there are other ways of spending 50 credits. MAKE SURE you've holstered your weapon and approach a small console on the left wall [#166]. Travel to Recreation Area, after which go to Tower 17 Base.
![[#166] - Escape from Butcher Bay - Feed Ward #2 - Escape from Butcher Bay - The Chronicles of Riddick: Assault on Dark Athena - Game Guide and Walkthrough](https://game.lhg100.com/Article/UploadFiles/201512/2015121710051962.jpg)
[#166]
You'll only have to tie one loose end here and that is to collect the reward for defeating Bam. Go to Centurion and talk to him [#167]. He'll give you credits, as well as a cigarette pack (21 - Lord Marshals' Helmet). You may return to the Recreation Area.
![[#167] - Escape from Butcher Bay - Tower 17 Base #5 - Escape from Butcher Bay - The Chronicles of Riddick: Assault on Dark Athena - Game Guide and Walkthrough](https://game.lhg100.com/Article/UploadFiles/201512/2015121710052076.jpg)
[#167]
Start moving towards section D and ignore other inmates along the way. You can only make an exception for Craps if you're in need of more credits. This time you must use a passageway leading to Work Pass [#168]. Wait for the game to load a new level.
![[#168] - Escape from Butcher Bay - Recreation Area #5 - Escape from Butcher Bay - The Chronicles of Riddick: Assault on Dark Athena - Game Guide and Walkthrough](https://game.lhg100.com/Article/UploadFiles/201512/2015121710052057.jpg)
[#168]
Step through the first gate and turn right. There should be a new passageway up ahead [#169]. Don't use it just yet, because you'll want to perform a few other activities in the first place. Instead use the keycard to unlock the door. It'll make some of your next moves less complicated.
![[#169] - Escape from Butcher Bay - Work Pass - Escape from Butcher Bay - The Chronicles of Riddick: Assault on Dark Athena - Game Guide and Walkthrough](https://game.lhg100.com/Article/UploadFiles/201512/2015121710052096.jpg)
[#169]
Go back to the main area. Ignore a mech to your left, because you aren't carrying any real guns and so you wouldn't be able to eliminate this obstacle. Instead talk to one of the inmates called Shurik [#170]. During the conversation agree to help him in finding his glasses.
![[#170] - Escape from Butcher Bay - Work Pass - Escape from Butcher Bay - The Chronicles of Riddick: Assault on Dark Athena - Game Guide and Walkthrough](https://game.lhg100.com/Article/UploadFiles/201512/2015121710052094.jpg)
[#170]
Locate a door to the right of Shurik. Open the door using a magnetic card. Sadly, entering this room [#171] will trigger an alarm and the mechanical opponent will try to hunt you down from now on. Leave his line of sight quickly. Take your time and explore the room. You should be able to find a cartridge, as well as a new cigarette pack (34 - The Dweller).
![[#171] - Escape from Butcher Bay - Work Pass - Escape from Butcher Bay - The Chronicles of Riddick: Assault on Dark Athena - Game Guide and Walkthrough](https://game.lhg100.com/Article/UploadFiles/201512/2015121710052102.jpg)
[#171]
You'll now have to be very careful, because you may endanger Shurik's life by mistake, not to mention Riddick's. Exit the room and quickly take cover behind one of the pillars. Start moving towards an already unlocked passageway and prevent the mech from hitting you too many times. Once you're inside press the crouch key and take cover next to the crates [#172]. Move to the right a little, allowing the door to close.
![[#172] - Escape from Butcher Bay - Work Pass - Escape from Butcher Bay - The Chronicles of Riddick: Assault on Dark Athena - Game Guide and Walkthrough](https://game.lhg100.com/Article/UploadFiles/201512/2015121710052106.jpg)
[#172]
There are two guards inside this room, as well as a technician. Thankfully eliminating them is going to be very easy. Remain hidden behind the crates. Wait for the lights to go out, turn on Eyeshine and approach the closest target [#173]. Be careful, because one of your enemies may be using a flashlight - you can't let him see you. Perform a SILENT execution.
![[#173] - Escape from Butcher Bay - Work Pass - Escape from Butcher Bay - The Chronicles of Riddick: Assault on Dark Athena - Game Guide and Walkthrough](https://game.lhg100.com/Article/UploadFiles/201512/2015121710052144.jpg)
[#173]
Ignore the fact that the killed guard is going to be noticed by other enemies when the lights come back on. Instead you'll have to quickly return to the shadows. You may take cover behind the crates again or you can try squeezing yourself inside a dark passageway located beneath the large platform [#174]. You should be safe in both spots.
![[#174] - Escape from Butcher Bay - Work Pass - Escape from Butcher Bay - The Chronicles of Riddick: Assault on Dark Athena - Game Guide and Walkthrough](https://game.lhg100.com/Article/UploadFiles/201512/2015121710052158.jpg)
[#174]
When the lights come back on the other guard will probably notice that he's buddy is dead. Thankfully you won't have to worry about the alarm being raised nor reinforcements showing up in this area. Instead wait to become dark in here again. Leave your cover. Start off by dealing with the second guard [#175] and once he's gone eliminate one of the technicians. You won't have to act stealth around him, because he's not a serious threat. You can attack him right after you've eliminated the guard.
![[#175] - Escape from Butcher Bay - Work Pass - Escape from Butcher Bay - The Chronicles of Riddick: Assault on Dark Athena - Game Guide and Walkthrough](https://game.lhg100.com/Article/UploadFiles/201512/2015121710052227.jpg)
[#175]
Make sure to inspect bodies of all fallen enemies. Sadly once again you won't be allowed to pick up any weapons. I wouldn't recommend exchanging a screwdriver for a much better Shiv blade. Take the Vent Tool from technician's body if you haven't bought this item from Monster back in the prison block. Once you're done looting proceed to a large platform to your right. There's a NanoMED station here if you're in need of healing. Turn right and locate a small stash in the wall [#176]. There are some credits inside the stash, as well as the first part of the infamous "snitch-list", needed to complete one of the subquests.
![[#176] - Escape from Butcher Bay - Work Pass - Escape from Butcher Bay - The Chronicles of Riddick: Assault on Dark Athena - Game Guide and Walkthrough](https://game.lhg100.com/Article/UploadFiles/201512/2015121710052297.jpg)
[#176]
Go back to the area where you've attacked all enemies and this time inspect the platform located to your left. Once you're there start off by gaining access to a ventilation shaft located to your right. There are some credits inside the shaft. Go back out and proceed towards the left grating [#177]. Kick the grating and enter a new tunnel.
![[#177] - Escape from Butcher Bay - Work Pass - Escape from Butcher Bay - The Chronicles of Riddick: Assault on Dark Athena - Game Guide and Walkthrough](https://game.lhg100.com/Article/UploadFiles/201512/2015121710052234.jpg)
[#177]
Start moving forward. Thankfully you won't have to worry about encountering any additional enemy units. Eventually you'll get to a ladder [#178]. Use the ladder to get to an upper level. Keep moving forward until you end up standing on top of a large elevator. Wait for the elevator to begin moving and you'll be transported to a new area.
![[#178] - Escape from Butcher Bay - Work Pass - Escape from Butcher Bay - The Chronicles of Riddick: Assault on Dark Athena - Game Guide and Walkthrough](https://game.lhg100.com/Article/UploadFiles/201512/2015121710052394.jpg)
[#178]
You've got two choices here. You could use a large hole to land inside the elevator, however you would have to fight two guards. It's better to avoid them, because it would be difficult to kill them and you wouldn't be able to collect one of the packs. As a result turn on Eyeshine and find a new ventilation hatch [#179]. Use the Vent Tool to open the hatch.
![[#179] - Escape from Butcher Bay - Mine Entrance - Escape from Butcher Bay - The Chronicles of Riddick: Assault on Dark Athena - Game Guide and Walkthrough](https://game.lhg100.com/Article/UploadFiles/201512/2015121710052326.jpg)
[#179]
Enter the ventilation shaft and after a short walk you should be able to get to a new ladder [#180]. Obviously you must use the ladder to reach a higher floor. Keep pushing forward and make a stop once you've reached the grating. Don't kick the grating right away. Instead, wait for one of enemy guards to show up.
![[#180] - Escape from Butcher Bay - Mine Entrance - Escape from Butcher Bay - The Chronicles of Riddick: Assault on Dark Athena - Game Guide and Walkthrough](https://game.lhg100.com/Article/UploadFiles/201512/2015121710052302.jpg)
[#180]
Kick the grating when the guard is standing directly in front of it. If you're lucky, the grating will stun him for a little while, allowing you to exit the vents and to kill him yourself. You can perform a silent execution on the guard [#181] or you can wait for him to try and hit you with his weapon to perform a counterattack. I would recommend hiding his body in the vents just to make sure no one sees it.
![[#181] - Escape from Butcher Bay - Mine Entrance - Escape from Butcher Bay - The Chronicles of Riddick: Assault on Dark Athena - Game Guide and Walkthrough](https://game.lhg100.com/Article/UploadFiles/201512/2015121710052381.jpg)
[#181]
You'll have to be extremely careful here, because one of your enemies is guarding the opposite end of this corridor. He'll probably ignore your recent duel with his colleague, so it would be wise not to attract too much attention. Start moving forward and make sure to stay close to the right wall. Stop near the end and look up. Locate a new ventilation hatch [#182] and press the action key to open it. Thankfully this will all play out automatically.
![[#182] - Escape from Butcher Bay - Mine Entrance - Escape from Butcher Bay - The Chronicles of Riddick: Assault on Dark Athena - Game Guide and Walkthrough](https://game.lhg100.com/Article/UploadFiles/201512/2015121710052399.jpg)
[#182]
Keep heading forward. Turn left when you can and once you've reached a small junction inspect a tunnel located to your left. You should be able to find a new cigarette pack (30 - Container Router) here [#183]. Return to the junction and turn left. Keep moving straight until you reach a new grating. This time you can destroy it without any additional delays.
![[#183] - Escape from Butcher Bay - Mine Entrance - Escape from Butcher Bay - The Chronicles of Riddick: Assault on Dark Athena - Game Guide and Walkthrough](https://game.lhg100.com/Article/UploadFiles/201512/2015121710052488.jpg)
[#183]
Use the boxes to get down to the ground level. I would strongly recommend that you act stealth here, because one of the guards is occupying the surrounding area. Approach him slowly and surprise him from the back. Notice that by pressing the right mouse button Riddick won't snap his neck but he'll push him directly into a working fan [#184]. The good news is that guard's body will stop both fans.
![[#184] - Escape from Butcher Bay - Mine Entrance - Escape from Butcher Bay - The Chronicles of Riddick: Assault on Dark Athena - Game Guide and Walkthrough](https://game.lhg100.com/Article/UploadFiles/201512/2015121710052469.jpg)
[#184]
Before you decide to use this newly unlocked passageway you should spend some time first exploring nearby corridors. There are credits in one of the corners of the room. If you couldn't stop the fan using guard's body you can find a control panel on one of the walls [#185]. Afterwards return to the area where the guard was standing.
![[#185] - Escape from Butcher Bay - Mine Entrance - Escape from Butcher Bay - The Chronicles of Riddick: Assault on Dark Athena - Game Guide and Walkthrough](https://game.lhg100.com/Article/UploadFiles/201512/2015121710052441.jpg)
[#185]
Notice that you'll have to land on each fan in order to avoid having a huge fall [#186]. It's important here to be very precise, so you'll land exactly where you planned to. Notice that one of the guards is standing beneath you. Try landing directly on him. If you fail, you'll have to defeat him in direct melee combat.
![[#186] - Escape from Butcher Bay - Mine Entrance - Escape from Butcher Bay - The Chronicles of Riddick: Assault on Dark Athena - Game Guide and Walkthrough](https://game.lhg100.com/Article/UploadFiles/201512/2015121710052427.jpg)
[#186]
Ignore the corridor located to your right, because you would only return to the area with two guards mentioned by me before. Instead turn left and use a large gate to get to a new location [#187]. Wait for the game to finish loading a new level.
![[#187] - Escape from Butcher Bay - Mine Entrance - Escape from Butcher Bay - The Chronicles of Riddick: Assault on Dark Athena - Game Guide and Walkthrough](https://game.lhg100.com/Article/UploadFiles/201512/2015121710052502.jpg)
[#187]
Press the crouch key and start following a guard located in front of you. Once you're close enough to the stairs move slightly to your left, because you would make too much noise while crossing a metal platform [#188]. Take cover behind the crates and avoid being seen by enemy units. One of the guards will be standing in front of you and there's a mech to your right.
![[#188] - Escape from Butcher Bay - Security Checkpoint - Escape from Butcher Bay - The Chronicles of Riddick: Assault on Dark Athena - Game Guide and Walkthrough](https://game.lhg100.com/Article/UploadFiles/201512/2015121710052549.jpg)
[#188]
Start moving forward and use nearby crates for much needed cover. Don't make any unnecessary stops, especially if you're standing in the open. Eventually you'll have to get to a dark corner [#189]. Take cover in the shadows. Turn right and make sure that you're weren't noticed by the guards.
![[#189] - Escape from Butcher Bay - Security Checkpoint - Escape from Butcher Bay - The Chronicles of Riddick: Assault on Dark Athena - Game Guide and Walkthrough](https://game.lhg100.com/Article/UploadFiles/201512/2015121710052506.jpg)
[#189]
One of the enemy guards should be standing directly in front of you. Get closer to him [#190], wait for his colleague to leave and perform a silent execution on him. DON'T even think about trying to drag his body into the shadows, because you would have been spotted. Besides you want a second guard to discover this body.
![[#190] - Escape from Butcher Bay - Security Checkpoint - Escape from Butcher Bay - The Chronicles of Riddick: Assault on Dark Athena - Game Guide and Walkthrough](https://game.lhg100.com/Article/UploadFiles/201512/2015121710052559.jpg)
[#190]
Return to the shadows and wait for the second guard to arrive (the same one you were following when you first got here). He can act like he should and explore the surroundings after discovering the body or he can ignore the body entirely and continue patrolling the area like nothing happened [#191]. If he walks away, try to get his attention by hitting a nearby container with a club a couple of times. Either way you'll have to wait for him to get closer to your position.
![[#191] - Escape from Butcher Bay - Security Checkpoint - Escape from Butcher Bay - The Chronicles of Riddick: Assault on Dark Athena - Game Guide and Walkthrough](https://game.lhg100.com/Article/UploadFiles/201512/2015121710052574.jpg)
[#191]
Make sure that you've chosen a Shiv blade from your inventory and wait for the guard to arrive. He'll probably use a flashlight, so you should be crouching around the corner, ready to strike him [#192]. Don't worry if the mech arrives here in the meantime, because that's part of the plan.
![[#192] - Escape from Butcher Bay - Security Checkpoint - Escape from Butcher Bay - The Chronicles of Riddick: Assault on Dark Athena - Game Guide and Walkthrough](https://game.lhg100.com/Article/UploadFiles/201512/2015121710052558.jpg)
[#192]
Once you've killed the second guard take your time to find out where the mech is standing [#193]. The best position for him would be to maintain position somewhere close to the container. If he didn't move you would have to get his attention by leaving the shadows for a second or two and then going back into hiding.
![[#193] - Escape from Butcher Bay - Security Checkpoint - Escape from Butcher Bay - The Chronicles of Riddick: Assault on Dark Athena - Game Guide and Walkthrough](https://game.lhg100.com/Article/UploadFiles/201512/2015121710052684.jpg)
[#193]
Once you've distracted the mech you'll be allowed to focus on getting out of here. There are two passageways leading to the next location. One of them is on the ground level and to get to other one you must use an upper balcony. I would strongly recommend choosing the balcony, especially since you'll find a new pack along the way. Avoid the mech and proceed to the crates [#194]. Get to the shadows in case your opponent decides to turn around.
![[#194] - Escape from Butcher Bay - Security Checkpoint - Escape from Butcher Bay - The Chronicles of Riddick: Assault on Dark Athena - Game Guide and Walkthrough](https://game.lhg100.com/Article/UploadFiles/201512/2015121710052647.jpg)
[#194]
Make sure that the mech is looking the other way and start climbing the crates to get to the top. It would be a good idea to press the action key each time you want to move upwards, so you won't have to waste too much time trying to climb by yourself. Eventually you should be able to get to the railing [#195]. Jump over the railing to get to the balcony. Turn right, so you'll be facing the door with a green lamp.
![[#195] - Escape from Butcher Bay - Security Checkpoint - Escape from Butcher Bay - The Chronicles of Riddick: Assault on Dark Athena - Game Guide and Walkthrough](https://game.lhg100.com/Article/UploadFiles/201512/2015121710052776.jpg)
[#195]
You could leave this area right now, however I would strongly recommend that you spend some time trying to get to a cigarette pack. Make sure that you're standing in front of the door and turn right [#196]. Jump over the railing to land on a very small ledge. You can't miss, because you would have to climb the crates again.
![[#196] - Escape from Butcher Bay - Security Checkpoint - Escape from Butcher Bay - The Chronicles of Riddick: Assault on Dark Athena - Game Guide and Walkthrough](https://game.lhg100.com/Article/UploadFiles/201512/2015121710052746.jpg)
[#196]
Once you found yourself standing on the ledge make a few steps forward and turn left. This will allow you to climb to the top [#197]. Turn on Eyeshine and take your time to find a cigarette pack (39 - The Ship). Return to the upper balcony using the ledge. Afterwards turn right, open the door and use the stairs to get to a lower level.
![[#197] - Escape from Butcher Bay - Security Checkpoint - Escape from Butcher Bay - The Chronicles of Riddick: Assault on Dark Athena - Game Guide and Walkthrough](https://game.lhg100.com/Article/UploadFiles/201512/2015121710052768.jpg)
[#197]
You'll find yourself standing inside a dark passageway. This particular balcony isn't patrolled by anyone, however you may be discovered by enemies from the opposite balcony, located to your right [#198]. Focus on avoiding detention and keep moving forward. Take cover next to each opening, checking whether you may continue or not.
![[#198] - Escape from Butcher Bay - Upper Mines - part 1 - Escape from Butcher Bay - The Chronicles of Riddick: Assault on Dark Athena - Game Guide and Walkthrough](https://game.lhg100.com/Article/UploadFiles/201512/2015121710052755.jpg)
[#198]
Eventually you should be able to get to a corner. If you look to your right you'll notice that both guards stop in the same spot [#199]. Wait for one of them to turn around and for the other one to begin moving to your right. Additionally, a third opponent may reveal himself on an upper balcony. Avoid being seen by him as well.
![[#199] - Escape from Butcher Bay - Upper Mines - part 1 - Escape from Butcher Bay - The Chronicles of Riddick: Assault on Dark Athena - Game Guide and Walkthrough](https://game.lhg100.com/Article/UploadFiles/201512/2015121710052864.jpg)
[#199]
Turn left and start running towards a new dark section of this balcony [#200]. Thankfully if you do get noticed by the guards you'll be too far away before they even begin firing at you. Furthermore, you won't have to worry about them pursuing you nor sounding the alarm. Just make sure that you get to the dark area safely.
![[#200] - Escape from Butcher Bay - Upper Mines - part 1 - Escape from Butcher Bay - The Chronicles of Riddick: Assault on Dark Athena - Game Guide and Walkthrough](https://game.lhg100.com/Article/UploadFiles/201512/2015121710052893.jpg)
[#200]
Proceed to the opposite end of this balcony and turn right when you're stopped by a wall [#201]. You should notice a single guard patrolling the area in front of you. Head down and avoid being seen by him. It won't jeopardize your mission, however you would have to engage him in an open combat without making any preparations.
![[#201] - Escape from Butcher Bay - Upper Mines - part 1 - Escape from Butcher Bay - The Chronicles of Riddick: Assault on Dark Athena - Game Guide and Walkthrough](https://game.lhg100.com/Article/UploadFiles/201512/2015121710052815.jpg)
[#201]
Remain hidden behind the crates and wait for the guard to make a stop somewhere near your position. Take him by surprise [#202], but make sure he's facing the other way if you plan on making this a silent execution. I would recommend leaving his body in the open, so that you'll be allowed to trick his buddy in the near future.
![[#202] - Escape from Butcher Bay - Upper Mines - part 1 - Escape from Butcher Bay - The Chronicles of Riddick: Assault on Dark Athena - Game Guide and Walkthrough](https://game.lhg100.com/Article/UploadFiles/201512/2015121710052934.jpg)
[#202]
Proceed towards a small stack of crates located to your left [#203]. This should trigger a scene where a new guard will begin heading towards your location. Remain hidden behind the crates and wait for the second guard to discover his friend's body. Leave the cover quickly and kill him before he's able to fight back. Thankfully even if he does notice you coming, you should be able to perform a successful countermove.
![[#203] - Escape from Butcher Bay - Upper Mines - part 1 - Escape from Butcher Bay - The Chronicles of Riddick: Assault on Dark Athena - Game Guide and Walkthrough](https://game.lhg100.com/Article/UploadFiles/201512/2015121710052914.jpg)
[#203]
I would recommend that you now spend some trying to catch a few moths [#204]. The number of moths changes each time you reload the last checkpoint, however you should be able to find three to four insects without any problems. Thankfully you won't have to catch all the moths, because you'll soon get to an area with endless "supplies" of these insects.
![[#204] - Escape from Butcher Bay - Upper Mines - part 1 - Escape from Butcher Bay - The Chronicles of Riddick: Assault on Dark Athena - Game Guide and Walkthrough](https://game.lhg100.com/Article/UploadFiles/201512/2015121710052991.jpg)
[#204]
Proceed towards the alley where the second guard has appeared for the first time. Eventually you should be able to get to a small entrance to this building [#205]. Go there now and use the stairs to find yourself standing on an upper balcony. Keep heading forward and turn left once you're inside the building again.
![[#205] - Escape from Butcher Bay - Upper Mines - part 2 - Escape from Butcher Bay - The Chronicles of Riddick: Assault on Dark Athena - Game Guide and Walkthrough](https://game.lhg100.com/Article/UploadFiles/201512/2015121710053069.jpg)
[#205]
Once you're standing inside a new corridor press the crouch key and get to the left corridor carefully. You should notice a prisoner here, as well as a single guard [#206]. Approach the guard slowly and perform a stealth kill on him by snapping his neck. You can choose the louder execution, because his death won't alarm anyone.
![[#206] - Escape from Butcher Bay - Upper Mines - part 2 - Escape from Butcher Bay - The Chronicles of Riddick: Assault on Dark Athena - Game Guide and Walkthrough](https://game.lhg100.com/Article/UploadFiles/201512/2015121710053029.jpg)
[#206]
Once the guard has been taken care of, talk to the inmate. Mosely will tell you about a possible way to get into the mines [#207]. As you've probably noticed by now, he's one of the blueskins. As a result kill him when you end the conversation. This can be done easily by standing behind him and performing a standard execution.
![[#207] - Escape from Butcher Bay - Upper Mines - part 2 - Escape from Butcher Bay - The Chronicles of Riddick: Assault on Dark Athena - Game Guide and Walkthrough](https://game.lhg100.com/Article/UploadFiles/201512/2015121710053026.jpg)
[#207]
Go back to the junction and choose a door to your left. You'll have to be extremely careful here, because this entire corridor is being patrolled by one of the guards. Depending on your luck you may end up in front of him and unprepared, but on the other hand you may be given a chance to surprise him. If you're in a bad spot approach him as soon as possible and perform a countermove [#208]. Check his body for a much needed keycard.
![[#208] - Escape from Butcher Bay - Upper Mines - part 2 - Escape from Butcher Bay - The Chronicles of Riddick: Assault on Dark Athena - Game Guide and Walkthrough](https://game.lhg100.com/Article/UploadFiles/201512/2015121710053179.jpg)
[#208]
Ignore the door at the end of this hall, because you'll be visiting that area later on. Instead focus on exploring an upper balcony [#209], the same one you've seen at the beginning of this mission. Wait for the guards to turn around before you enter the balcony. Turn right and quickly take a cigarette pack (40 - Upper Mines) from the ground. Go back inside before the guards decide to attack you.
[#209]
You may now return to the corridor where you've killed a guard and one of the blueskins. There's a keypad nearby [#210]. Use your newly acquired keycard to unlock this passageway. Step inside and wait for the game to finish loading a new map.
![[#210] - Escape from Butcher Bay - Upper Mines - part 2 - Escape from Butcher Bay - The Chronicles of Riddick: Assault on Dark Athena - Game Guide and Walkthrough](https://game.lhg100.com/Article/UploadFiles/201512/2015121710053174.jpg)
[#210]
Go to your right and eventually you'll come across a NanoMED health station. Heal Riddick if you have to and turn right again. Look around and you should be able to find a new cigarette pack (42 - Police Vessel) [#21]. Add this item to your existing collection.
![[#211] - Escape from Butcher Bay - Cargo Transport - Escape from Butcher Bay - The Chronicles of Riddick: Assault on Dark Athena - Game Guide and Walkthrough](https://game.lhg100.com/Article/UploadFiles/201512/2015121710053113.jpg)
[#211]
Turn around and stand in front of the right elevator shaft [#212]. Wait for a small platform to appear above you and jump on it when it's close enough. You must now wait to be transported to a lower level. Exit the shaft and proceed to your right.
![[#212] - Escape from Butcher Bay - Cargo Transport - Escape from Butcher Bay - The Chronicles of Riddick: Assault on Dark Athena - Game Guide and Walkthrough](https://game.lhg100.com/Article/UploadFiles/201512/2015121710053195.jpg)
[#212]
You shouldn't have any major problems finding a new inmate called Armadaro [#213]. It's very important that you talk to him, because you'll be allowed to purchase a tranquilizer gun from him. Pay 30 credits and test your new toy on Armadaro if you want to. Notice that he's only been stunned, so must finish him off manually. Thankfully it's very easy - all you have to do is to stand near his body and to press the left mouse button. Leave this area by choosing a large passageway leading to the Mining Core.
![[#213] - Escape from Butcher Bay - Cargo Transport - Escape from Butcher Bay - The Chronicles of Riddick: Assault on Dark Athena - Game Guide and Walkthrough](https://game.lhg100.com/Article/UploadFiles/201512/2015121710053276.jpg)
[#213]
Once you've arrived at your new destination open the first door quickly. You should decide to attack a new guard before he goes to your right. As soon as the door opens fire your tranquilizer gun. If you're lucky he's going to be stunned while he's still standing near the stairs. If you can't see him it means you're too late and you should reload this level. Make sure that you've killed the guard by smashing him with your foot [#214].
![[#214] - Escape from Butcher Bay - Mining Core - part 1 - Escape from Butcher Bay - The Chronicles of Riddick: Assault on Dark Athena - Game Guide and Walkthrough](https://game.lhg100.com/Article/UploadFiles/201512/2015121710053201.jpg)
[#214]
If you feel the urge to heal Riddick don't forget to use a NanoMED health unit which can be found on the left wall. Otherwise move forward and take cover near a small railing [#215]. Take a few moments to observe what is happening in front of you. I would strongly recommend that you wait for an enemy mech to leave this area. He will go to your left. If you ignore this problem you may end up getting attacked by a mech and that would be a serious problem.
![[#215] - Escape from Butcher Bay - Mining Core - part 1 - Escape from Butcher Bay - The Chronicles of Riddick: Assault on Dark Athena - Game Guide and Walkthrough](https://game.lhg100.com/Article/UploadFiles/201512/2015121710053232.jpg)
[#215]
Make sure that you've been left alone with one of technicians using a machinery in front of you. Jump over the railing and remain in the shadows, behind large boxes [#216]. I wouldn't recommend using Eyeshine here, because you would have some problems looking past the dark zone.
![[#216] - Escape from Butcher Bay - Mining Core - part 1 - Escape from Butcher Bay - The Chronicles of Riddick: Assault on Dark Athena - Game Guide and Walkthrough](https://game.lhg100.com/Article/UploadFiles/201512/2015121710053268.jpg)
[#216]
Sooner or later the technician should arrive here, so you won't have to worry about trying to get to him yourself. He may end up standing inside the dark zone or directly in front of the crates. If he's in the shadows you only have to zap him [#217]. If he has decided to stay out of the dark zone tranq him, approach his body and drag it back into the shadows. Don't forget to kill him!
![[#217] - Escape from Butcher Bay - Mining Core - part 1 - Escape from Butcher Bay - The Chronicles of Riddick: Assault on Dark Athena - Game Guide and Walkthrough](https://game.lhg100.com/Article/UploadFiles/201512/2015121710053341.jpg)
[#217]
Your next objective will be to disable a few security cameras, because otherwise you wouldn't be able to continue your approach. Exit the dark zone and start running towards a fork lift truck. Turn left and locate a small control panel on the wall [#218] (that's where you saw the technician for the first time). Turn off security systems before an alarm is raised.
![[#218] - Escape from Butcher Bay - Mining Core - part 1 - Escape from Butcher Bay - The Chronicles of Riddick: Assault on Dark Athena - Game Guide and Walkthrough](https://game.lhg100.com/Article/UploadFiles/201512/2015121710053347.jpg)
[#218]
Make a few steps towards the long tunnel which was being patrolled by a mech not long ago. Move back to the shadows (where you've hidden technician's body) and wait for an enemy guard to arrive. Use your tranquilizer gun to immobilize him [#219]. Approach his body, kill the guard and hide his body in the exact same spot.
![[#219] - Escape from Butcher Bay - Mining Core - part 1 - Escape from Butcher Bay - The Chronicles of Riddick: Assault on Dark Athena - Game Guide and Walkthrough](https://game.lhg100.com/Article/UploadFiles/201512/2015121710053345.jpg)
[#219]
You can spend some time trying to catch new moths is you want to [#220]. I guess you'll be thrilled to hear that there are a lot of insects here and new moths will keep appearing constantly. As a result you shouldn't have enough problem collecting 20 of them, because that's how many insects you need (no less, no more) to acquire the last pack from Twotongue. If you don't want to collect moths now you can also do this while trying to exit this zone later on.
![[#220] - Escape from Butcher Bay - Mining Core - part 1 - Escape from Butcher Bay - The Chronicles of Riddick: Assault on Dark Athena - Game Guide and Walkthrough](https://game.lhg100.com/Article/UploadFiles/201512/2015121710053335.jpg)
[#220]
It would also be a good idea to inspect a long dark tunnel which is located to the right of the control panel where the technician was standing [#221]. Go to the other side of the tunnel and you should come across a cigarette pack (4 - Screamer Droid). Go back the same way you came. Climb on top of a crate and from there you should be able to jump over to the railing.
![[#221] - Escape from Butcher Bay - Mining Core - part 1 - Escape from Butcher Bay - The Chronicles of Riddick: Assault on Dark Athena - Game Guide and Walkthrough](https://game.lhg100.com/Article/UploadFiles/201512/2015121710053470.jpg)
[#221]
Proceed towards a large tunnel where you've encountered your last opponent. This time you won't be retreating. Instead focus on destroying all sources of light along the way [#222]. Thankfully this can be done using your tranquilizer gun which as you probably know has an unlimited number of charges.
![[#222] - Escape from Butcher Bay - Mining Core - part 2 - Escape from Butcher Bay - The Chronicles of Riddick: Assault on Dark Athena - Game Guide and Walkthrough](https://game.lhg100.com/Article/UploadFiles/201512/2015121710053410.jpg)
[#222]
Turn left and try destroying two new lamps from a larger distance. Start moving slowly and wait for a new guard to arrive in this area [#223]. Zap him as soon as possible, especially since he may be using a flashlight. Don't forget to get to his body quickly to finish him off. Once he's gone make sure that no one heard you (especially the mech).
![[#223] - Escape from Butcher Bay - Mining Core - part 2 - Escape from Butcher Bay - The Chronicles of Riddick: Assault on Dark Athena - Game Guide and Walkthrough](https://game.lhg100.com/Article/UploadFiles/201512/2015121710053439.jpg)
[#223]
If the mech will appear in the tunnel again move back to a safe distance and wait for it to leave. It can take a while, so you just have to be patient. If you're safe proceed directly to the exit, destroying other lamps as you go. Make sure you're safe and go to a small passageway located to the right of the exit [#224].
![[#224] - Escape from Butcher Bay - Mining Core - part 2 - Escape from Butcher Bay - The Chronicles of Riddick: Assault on Dark Athena - Game Guide and Walkthrough](https://game.lhg100.com/Article/UploadFiles/201512/2015121710053403.jpg)
[#224]
It shouldn't take you more than a few seconds to locate Jagger Vallance [#225]. DON'T kill him! Instead initiate a new conversation. Jagger will have a task for you. Your objective will be to deliver a package from a hazardous area. Jagger will also give you a passcode to the door leading to a room with the package.
![[#225] - Escape from Butcher Bay - Mining Core - part 2 - Escape from Butcher Bay - The Chronicles of Riddick: Assault on Dark Athena - Game Guide and Walkthrough](https://game.lhg100.com/Article/UploadFiles/201512/2015121710053415.jpg)
[#225]
End the conversation with Jagger, turn right and head on towards a narrow passageway located to the right of the container [#226]. Get ready for a few challenging moments. Thankfully avoiding the mech is going to be easier than it seems. Nevertheless you won't be allowed to make any mistakes.
![[#226] - Escape from Butcher Bay - Mining Core - part 2 - Escape from Butcher Bay - The Chronicles of Riddick: Assault on Dark Athena - Game Guide and Walkthrough](https://game.lhg100.com/Article/UploadFiles/201512/2015121710053581.jpg)
[#226]
Make a few steps forward and take cover next to a large container [#227]. Make sure that you're crouching and that you're hidden. You should be able to notice two inmates in front of you. Ignore them and wait for a guard to show up. Use your tranquilizer gun, BUT only when he is standing in a dark zone. Go to him quickly, finish him off and drag his body to a shadowed area if necessary.
![[#227] - Escape from Butcher Bay - Mining Core - part 2 - Escape from Butcher Bay - The Chronicles of Riddick: Assault on Dark Athena - Game Guide and Walkthrough](https://game.lhg100.com/Article/UploadFiles/201512/2015121710053539.jpg)
[#227]
Turn left for a moment and check the location of the mech. If it's heading the other way you should be fine. Otherwise wait for your opponent to finish his rounds. You can start moving forward right now or you can wait for a large container to be lowered in this area [#228]. If you wait for the container you'll have more cover. Keep going straight and head on towards other containers located in the distance.
![[#228] - Escape from Butcher Bay - Mining Core - part 2 - Escape from Butcher Bay - The Chronicles of Riddick: Assault on Dark Athena - Game Guide and Walkthrough](https://game.lhg100.com/Article/UploadFiles/201512/2015121710053583.jpg)
[#228]
Make sure that you're checking the position of the mech all the time, so you won't end up standing in its line of sight. Eventually you'll have to get to a dark area. You'll be surrounded by large containers here, but it's a good thing. Make a few steps forward and locate a narrow passageway between two containers [#229]. Go to your left here.
![[#229] - Escape from Butcher Bay - Mining Core - part 2 - Escape from Butcher Bay - The Chronicles of Riddick: Assault on Dark Athena - Game Guide and Walkthrough](https://game.lhg100.com/Article/UploadFiles/201512/2015121710053524.jpg)
[#229]
Proceed towards a large tunnel where you've encountered your last opponent. This time you won't be retreating. Instead focus on destroying all sources of light along the way [#222]. Thankfully this can be done using your tranquilizer gun which as you probably know has an unlimited number of charges.
![[#222] - Escape from Butcher Bay - Mining Core - part 3 - Escape from Butcher Bay - The Chronicles of Riddick: Assault on Dark Athena - Game Guide and Walkthrough](https://game.lhg100.com/Article/UploadFiles/201512/2015121710053580.jpg)
[#222]
Turn left and try destroying two new lamps from a larger distance. Start moving slowly and wait for a new guard to arrive in this area [#223]. Zap him as soon as possible, especially since he may be using a flashlight. Don't forget to get to his body quickly to finish him off. Once he's gone make sure that no one heard you (especially the mech).
![[#223] - Escape from Butcher Bay - Mining Core - part 3 - Escape from Butcher Bay - The Chronicles of Riddick: Assault on Dark Athena - Game Guide and Walkthrough](https://game.lhg100.com/Article/UploadFiles/201512/2015121710053664.jpg)
[#223]
If the mech will appear in the tunnel again move back to a safe distance and wait for it to leave. It can take a while, so you just have to be patient. If you're safe proceed directly to the exit, destroying other lamps as you go. Make sure you're safe and go to a small passageway located to the right of the exit [#224].
![[#224] - Escape from Butcher Bay - Mining Core - part 3 - Escape from Butcher Bay - The Chronicles of Riddick: Assault on Dark Athena - Game Guide and Walkthrough](https://game.lhg100.com/Article/UploadFiles/201512/2015121710053625.jpg)
[#224]
It shouldn't take you more than a few seconds to locate Jagger Vallance [#225]. DON'T kill him! Instead initiate a new conversation. Jagger will have a task for you. Your objective will be to deliver a package from a hazardous area. Jagger will also give you a passcode to the door leading to a room with the package.
![[#225] - Escape from Butcher Bay - Mining Core - part 3 - Escape from Butcher Bay - The Chronicles of Riddick: Assault on Dark Athena - Game Guide and Walkthrough](https://game.lhg100.com/Article/UploadFiles/201512/2015121710053622.jpg)
[#225]
End the conversation with Jagger, turn right and head on towards a narrow passageway located to the right of the container [#226]. Get ready for a few challenging moments. Thankfully avoiding the mech is going to be easier than it seems. Nevertheless you won't be allowed to make any mistakes.
![[#226] - Escape from Butcher Bay - Mining Core - part 3 - Escape from Butcher Bay - The Chronicles of Riddick: Assault on Dark Athena - Game Guide and Walkthrough](https://game.lhg100.com/Article/UploadFiles/201512/2015121710053741.jpg)
[#226]
Make a few steps forward and take cover next to a large container [#227]. Make sure that you're crouching and that you're hidden. You should be able to notice two inmates in front of you. Ignore them and wait for a guard to show up. Use your tranquilizer gun, BUT only when he is standing in a dark zone. Go to him quickly, finish him off and drag his body to a shadowed area if necessary.
![[#227] - Escape from Butcher Bay - Mining Core - part 3 - Escape from Butcher Bay - The Chronicles of Riddick: Assault on Dark Athena - Game Guide and Walkthrough](https://game.lhg100.com/Article/UploadFiles/201512/2015121710053746.jpg)
[#227]
Turn left for a moment and check the location of the mech. If it's heading the other way you should be fine. Otherwise wait for your opponent to finish his rounds. You can start moving forward right now or you can wait for a large container to be lowered in this area [#228]. If you wait for the container you'll have more cover. Keep going straight and head on towards other containers located in the distance.
![[#228] - Escape from Butcher Bay - Mining Core - part 3 - Escape from Butcher Bay - The Chronicles of Riddick: Assault on Dark Athena - Game Guide and Walkthrough](https://game.lhg100.com/Article/UploadFiles/201512/2015121710053786.jpg)
[#228]
Make sure that you're checking the position of the mech all the time, so you won't end up standing in its line of sight. Eventually you'll have to get to a dark area. You'll be surrounded by large containers here, but it's a good thing. Make a few steps forward and locate a narrow passageway between two containers [#229]. Go to your left here.
![[#229] - Escape from Butcher Bay - Mining Core - part 3 - Escape from Butcher Bay - The Chronicles of Riddick: Assault on Dark Athena - Game Guide and Walkthrough](https://game.lhg100.com/Article/UploadFiles/201512/2015121710053712.jpg)
[#229]
Approach the end of both containers, but make sure you're still in the dark. There should be a large ramp directly in front of you. I would strongly recommend that you wait for the mech to leave this area before moving on. Zoom in the view and fire at a human opponent. He will appear inside the large structure [#230].
![[#230] - Escape from Butcher Bay - Mining Core - part 4 - Escape from Butcher Bay - The Chronicles of Riddick: Assault on Dark Athena - Game Guide and Walkthrough](https://game.lhg100.com/Article/UploadFiles/201512/2015121710053848.jpg)
[#230]
Obviously you must start running towards the ramp. Remember that you have only a few seconds before the guard wakes up, however you can keep stunning him with your gun [#231]. Finish him off. As for his body, you can drag it somewhere where it's dark or dump it in a machine. Lean out and see if the mech isn't heading in your direction. If it is - wait for it to turn around. It can take up to a minute, so be patient.
![[#231] - Escape from Butcher Bay - Mining Core - part 4 - Escape from Butcher Bay - The Chronicles of Riddick: Assault on Dark Athena - Game Guide and Walkthrough](https://game.lhg100.com/Article/UploadFiles/201512/2015121710053845.jpg)
[#231]
Before you focus on completing your main objective you should spend some time trying to get to a bonus item. Stand in front of the ramp. Turn left and you should notice a narrow passageway to the left of the containers [#232]. Go there now and you'll soon find yourself standing in the dark. Explore this area and eventually you'll gain possession of a new cigarette pack (41 - Med Station).
![[#232] - Escape from Butcher Bay - Mining Core - part 4 - Escape from Butcher Bay - The Chronicles of Riddick: Assault on Dark Athena - Game Guide and Walkthrough](https://game.lhg100.com/Article/UploadFiles/201512/2015121710053866.jpg)
[#232]
Return to the narrow passageway. Once again - you must wait for the mechanical opponent to turn around before you decide to enter the building using the ramp. Once inside go to your right and eventually you should be able to get to a smaller door [#233]. Destroy the lamp before going inside.
![[#233] - Escape from Butcher Bay - Mining Core - part 4 - Escape from Butcher Bay - The Chronicles of Riddick: Assault on Dark Athena - Game Guide and Walkthrough](https://game.lhg100.com/Article/UploadFiles/201512/2015121710053834.jpg)
[#233]
Open the door, however don't enter the new corridor. Remain in the passageway and destroy two lamps from here. Start moving slowly and get ready to get rid of two enemy soldiers. Obviously in both cases you should use a tranquilizer gun [#234]. Be careful - the second guard may decide to use the flashlight, so you'll have to get rid of him before he notices you. Make sure that both guards have been killed.
![[#234] - Escape from Butcher Bay - Mining Core - part 4 - Escape from Butcher Bay - The Chronicles of Riddick: Assault on Dark Athena - Game Guide and Walkthrough](https://game.lhg100.com/Article/UploadFiles/201512/2015121710053912.jpg)
[#234]
You can now use a nearby NanoMED health station if you've suffered some injuries while trying to get here. There's a door nearby [#235] and you must use the passcode provided to you by Jagger to open it. I have to warn you - there's a gas leak inside, so you'll have to be moving quickly if you want to keep Riddick alive.
![[#235] - Escape from Butcher Bay - Mining Core - part 4 - Escape from Butcher Bay - The Chronicles of Riddick: Assault on Dark Athena - Game Guide and Walkthrough](https://game.lhg100.com/Article/UploadFiles/201512/2015121710053957.jpg)
[#235]
Notice that the door hasn't opened entirely, so as a result you'll have to be crouching to get inside. Stand up quickly and jump on top of a nearby crate [#236]. Press the crouch key again to get to a new room. Go to your left and head through a small opening in the wall. Run forward and it shouldn't take you too long to find the package (it's next to a body). Go back to the corridor before Riddick dies.
![[#236] - Escape from Butcher Bay - Mining Core - part 4 - Escape from Butcher Bay - The Chronicles of Riddick: Assault on Dark Athena - Game Guide and Walkthrough](https://game.lhg100.com/Article/UploadFiles/201512/2015121710053970.jpg)
[#236]
As you've probably suspected, you'll have to return with the package to Jagger. It's not going to be easy, however you don't have to spend so much time trying to avoid the mech. Just keep running and don't get too close to the machine. Once you've left the building take cover behind the containers [#237] and eventually you'll get to your colleague. Just as before, ignore other inmates along the way.
![[#237] - Escape from Butcher Bay - Mining Core - part 4 - Escape from Butcher Bay - The Chronicles of Riddick: Assault on Dark Athena - Game Guide and Walkthrough](https://game.lhg100.com/Article/UploadFiles/201512/2015121710053999.jpg)
[#237]
Talk to Jagger when you get to him and listen to his new plan. Once again you'll receive a passcode, however this one can start the elevator. You'll now have to return to the first area of this map, where you first saw the mech and killed the technician. Don't forget to catch the sufficient number of moths before leaving this sector. Once you've arrived go to a large elevator [#238] and press the button.
![[#238] - Escape from Butcher Bay - Mining Core - part 4 - Escape from Butcher Bay - The Chronicles of Riddick: Assault on Dark Athena - Game Guide and Walkthrough](https://game.lhg100.com/Article/UploadFiles/201512/2015121710054094.jpg)
[#238]
You'll finally return to a well-known location. Exit the elevator and inspect some of the crates located to your left [#239]. You should be able to find Shurik's glasses on top of the upper crate. Take this object if Shurik is still alive (I assume you didn't allow the mech to kill him during the last gunfight).
![[#239] - Escape from Butcher Bay - Upper Mines #2 - Escape from Butcher Bay - The Chronicles of Riddick: Assault on Dark Athena - Game Guide and Walkthrough](https://game.lhg100.com/Article/UploadFiles/201512/2015121710054076.jpg)
[#239]
Turn right. Don't even think about moving forward, because you would eventually get to the balcony with two guards. Instead inspect a wall to your right and you should be able to find a ladder [#240]. Use the ladder to go back to the corridor where you've killed one of the guards the last time you were here.
![[#240] - Escape from Butcher Bay - Upper Mines #2 - Escape from Butcher Bay - The Chronicles of Riddick: Assault on Dark Athena - Game Guide and Walkthrough](https://game.lhg100.com/Article/UploadFiles/201512/2015121710054026.jpg)
[#240]
Keep heading forward until you get to a new corridor where you'll be attacked by two other blueskins [#241]. I would strongly recommend using a tranquilizer gun to stun them as soon as possible. Prevent them from getting too close, because they're both using weapons (a club and a Shiv blade). Finish them off and notice that one of them has left the second part of the "snitch-list" behind. Proceed to a nearby control panel and use it to go back to Cargo Transport.
![[#241] - Escape from Butcher Bay - Upper Mines #2 - Escape from Butcher Bay - The Chronicles of Riddick: Assault on Dark Athena - Game Guide and Walkthrough](https://game.lhg100.com/Article/UploadFiles/201512/2015121710054077.jpg)
[#241]
Remember that you can use a NanoMED health station here which can be found on the right wall. This time you should consider stopping in front of the left shaft [#242]. Wait for a new platform to appear and land on it. This platform will transport you to an upper level. Locate a passageway there leading to Mine Entrance.
![[#242] - Escape from Butcher Bay - Cargo Transport #2 - Escape from Butcher Bay - The Chronicles of Riddick: Assault on Dark Athena - Game Guide and Walkthrough](https://game.lhg100.com/Article/UploadFiles/201512/2015121710054081.jpg)
[#242]
Start moving forward and turn right once you've reached a new corridor. Proceed to the opposite end of the corridor. You will now have to start climbing the crates [#243] which can be found to your left. Once you're at the top turn around and make a jump towards a ventilation shaft. Thankfully Riddick will grab the ledge without your help.
![[#243] - Escape from Butcher Bay - Mine Entrance #2 - Escape from Butcher Bay - The Chronicles of Riddick: Assault on Dark Athena - Game Guide and Walkthrough](https://game.lhg100.com/Article/UploadFiles/201512/2015121710054101.jpg)
[#243]
Turn right when you're standing on the shaft and begin moving forward. You should be able to reach a small hole which you can use to enter the shaft [#244]. Continue moving forward until you'll be given an opportunity to use a Vent Tool. Land on the ground and proceed to a corridor located to your right.
![[#244] - Escape from Butcher Bay - Mine Entrance #2 - Escape from Butcher Bay - The Chronicles of Riddick: Assault on Dark Athena - Game Guide and Walkthrough](https://game.lhg100.com/Article/UploadFiles/201512/2015121710054156.jpg)
[#244]
Press the crouch key and begin moving forward without making too much noise. Eventually you'll end up standing in a room with a prisoner and one of the guards. Perform a stealth kill or use the tranquilizer gun [#245] to get rid of the guard. Once he's gone talk to Valya. He will give you a passcode to his secret hideout.
![[#245] - Escape from Butcher Bay - Mine Entrance #2 - Escape from Butcher Bay - The Chronicles of Riddick: Assault on Dark Athena - Game Guide and Walkthrough](https://game.lhg100.com/Article/UploadFiles/201512/2015121710054169.jpg)
[#245]
You must now return to the area where you've started exploring this level. This means you must use the exact same corridors and ventilation shafts as you did before. Land on the ground and proceed forward. This time ignore the crates, because you won't have to climb again. Instead inspect the area in front of you and you should be able to find an entrance to a new ventilation shaft [#246].
![[#246] - Escape from Butcher Bay - Mine Entrance #2 - Escape from Butcher Bay - The Chronicles of Riddick: Assault on Dark Athena - Game Guide and Walkthrough](https://game.lhg100.com/Article/UploadFiles/201512/2015121710054184.jpg)
[#246]
Once you're inside the shaft head forward until you get to a ladder. Use the ladder to reach an upper level. Keep moving forward until you get to an exit [#247]. Make a few steps forward here and notice that part of the shaft has collapsed under your weight. Remain still and you should be fine. There's an entrance to a new shaft here. Use it.
![[#247] - Escape from Butcher Bay - Mine Entrance #2 - Escape from Butcher Bay - The Chronicles of Riddick: Assault on Dark Athena - Game Guide and Walkthrough](https://game.lhg100.com/Article/UploadFiles/201512/2015121710054162.jpg)
[#247]
Continue moving forward while inside the shaft and make a stop once you've reached a new hatch [#248]. Obviously you must use a Vent Tool here to unlock the exit. Leave the shaft and you'll end up standing on top of an elevator. Find a large hole and jump through it to land inside the elevator.
![[#248] - Escape from Butcher Bay - Mine Entrance #2 - Escape from Butcher Bay - The Chronicles of Riddick: Assault on Dark Athena - Game Guide and Walkthrough](https://game.lhg100.com/Article/UploadFiles/201512/2015121710054291.jpg)
[#248]
Make sure that you have chosen a tranquilizer gun from your inventory and start moving forward. There's a guard in front of you and zap him once you get closer [#249]. Get ready for his colleague to appear. He should arrive from your right. Stun him as well and don't forget to finish them off before they stand up.
![[#249] - Escape from Butcher Bay - Mine Entrance #2 - Escape from Butcher Bay - The Chronicles of Riddick: Assault on Dark Athena - Game Guide and Walkthrough](https://game.lhg100.com/Article/UploadFiles/201512/2015121710054235.jpg)
[#249]
You can now use a nearby elevator [#250]. Once you've reached a new platform enter the building and locate a health station to your left. Use the station to extend your health bar by one square. It's very important that you do this, because you'll need a lot of health units for some of the upcoming fights.
![[#250] - Escape from Butcher Bay - Mine Entrance #2 - Escape from Butcher Bay - The Chronicles of Riddick: Assault on Dark Athena - Game Guide and Walkthrough](https://game.lhg100.com/Article/UploadFiles/201512/2015121710054211.jpg)
[#250]
Don't leave this area just yet. Instead climb on top of a nearby crate [#251]. You should be able to find a new cigarette pack (37 - Tower 17-2) here. Once you have the pack in your possession go back down and return to the elevator (the one where you landed after leaving ventilation shafts). Locate a control panel and wait for the elevator to take you to a new floor.
![[#251] - Escape from Butcher Bay - Mine Entrance #2 - Escape from Butcher Bay - The Chronicles of Riddick: Assault on Dark Athena - Game Guide and Walkthrough](https://game.lhg100.com/Article/UploadFiles/201512/2015121710054225.jpg)
[#251]
Exit the elevator. Ignore an electrified fence, because you won't have to get to the other side. Instead proceed to your left. Start off by destroying a grating [#252] in order to get to a ventilation shaft. Explore the tunnel and you'll find a cigarette pack (36 - Tower 17).
![[#252] - Escape from Butcher Bay - Work Pass #2 - Escape from Butcher Bay - The Chronicles of Riddick: Assault on Dark Athena - Game Guide and Walkthrough](https://game.lhg100.com/Article/UploadFiles/201512/2015121710054219.jpg)
[#252]
Exit the shaft and locate a small box to your right. Get on top of the box. Approach the wall and press the action key. This should result in Riddick grabbing the ledge [#253]. You can climb up. Notice that there's a mech beneath your position, so you'll have to focus on avoiding this opponent in order to survive.
![[#253] - Escape from Butcher Bay - Work Pass #2 - Escape from Butcher Bay - The Chronicles of Riddick: Assault on Dark Athena - Game Guide and Walkthrough](https://game.lhg100.com/Article/UploadFiles/201512/2015121710054387.jpg)
[#253]
Go to your left and make sure to remain on the small platform. Eventually you should be able to locate a new hangrail [#254]. Use the hangrail to get to the other side and allow Riddick to land automatically instead of pressing the action key earlier.
![[#254] - Escape from Butcher Bay - Work Pass #2 - Escape from Butcher Bay - The Chronicles of Riddick: Assault on Dark Athena - Game Guide and Walkthrough](https://game.lhg100.com/Article/UploadFiles/201512/2015121710054343.jpg)
[#254]
It's EXTREMELY important that you hide your tranquilizer gun, because otherwise you would soon end up in a lot of trouble. Notice that you've returned to the area where you met Shurik. Sadly this only means you'll have to deal with a mech again [#255]. You can't land without him noticing you, so make sure not to injure Shurik. This also includes you not landing on him, because such an action would result in his death.
![[#255] - Escape from Butcher Bay - Work Pass #2 - Escape from Butcher Bay - The Chronicles of Riddick: Assault on Dark Athena - Game Guide and Walkthrough](https://game.lhg100.com/Article/UploadFiles/201512/2015121710054313.jpg)
[#255]
Once you've safely landed on the ground start RUNNING towards the passageway leading back to the Recreation Area [#256]. Don't think you'll be safe in a new corridor, because there's a high probability that you'll also have to avoid security turrets. Get to the exit as soon as possible in order to prevent Riddick from losing too many health units.
![[#256] - Escape from Butcher Bay - Work Pass #2 - Escape from Butcher Bay - The Chronicles of Riddick: Assault on Dark Athena - Game Guide and Walkthrough](https://game.lhg100.com/Article/UploadFiles/201512/2015121710054386.jpg)
[#256]
As you've probably noticed, you'll be given a chance to finish some of the subquests. Start off by taking to Twotongue in section D [#257]. Exchange your 20 moths for a cigarette pack (23 -Basilica Interior Design 10). Go to section C and find Wilkins. He won't give you any packs, but you can count on a few credits. Finally visit Jamal-Udeen in section B. He should give you a cigarette pack (24 - Small Alien) for completing his quest. Proceed to the Feed Ward.
![[#257] - Escape from Butcher Bay - Recreation Area #6 - Escape from Butcher Bay - The Chronicles of Riddick: Assault on Dark Athena - Game Guide and Walkthrough](https://game.lhg100.com/Article/UploadFiles/201512/2015121710054417.jpg)
[#257]
There's only one person here you need to talk to and that is Cuellas [#258]. In exchange for delivering him both parts of the "snitch-list" you'll receive a cigarette pack (17 - New Mecca Dawn). Check your journal once again to make sure that you've completed all of the subquests. Only two quests should be on your list right now - Shurik's Glasses and Get Bomb. Return to Recreation Area after which travel back to Work Pass.
![[#258] - Escape from Butcher Bay - Feed Ward #3 - Escape from Butcher Bay - The Chronicles of Riddick: Assault on Dark Athena - Game Guide and Walkthrough](https://game.lhg100.com/Article/UploadFiles/201512/2015121710054489.jpg)
[#258]
Notice that you've stopped being attacked by the mech, so you won't have to try and hide from it. Go to Shurik (if he's still alive) and give him his glasses [#259]. Sadly you won't receive any packs for your efforts. Shurik will only promise to distract the mechanical opponent when the time is right.
![[#259] - Escape from Butcher Bay - Work Pass #3 - Escape from Butcher Bay - The Chronicles of Riddick: Assault on Dark Athena - Game Guide and Walkthrough](https://game.lhg100.com/Article/UploadFiles/201512/2015121710054474.jpg)
[#259]
Go to your right and proceed towards a previously unlocked passageway [#260]. Just as before, you should consider taking cover next to the crates. Go to your right and find a new guard standing next to a door. Stun him with your tranquilizer gun, finish him off and proceed to the corridor he was guarding.
![[#260] - Escape from Butcher Bay - Work Pass #3 - Escape from Butcher Bay - The Chronicles of Riddick: Assault on Dark Athena - Game Guide and Walkthrough](https://game.lhg100.com/Article/UploadFiles/201512/2015121710054429.jpg)
[#260]
You'll find yourself standing in a small room. There's an entrance to a new ventilation shaft to your right [#261]. Open it using a Vent Tool, enter the shaft and use a nearby ladder. Keep heading forward. Once you've reached a room with a large fan enter a new ventilation shaft which should be located to your left. Exit this area.
![[#261] - Escape from Butcher Bay - Work Pass #3 - Escape from Butcher Bay - The Chronicles of Riddick: Assault on Dark Athena - Game Guide and Walkthrough](https://game.lhg100.com/Article/UploadFiles/201512/2015121710054454.jpg)
[#261]
Keep moving forward until you reach an exit from the ventilation shaft. Kick the grating and make sure you're crouching. You must act quietly here, because the upper platform is being patrolled by a single guard. You should avoid being seen by him as you'll be surprising him later on. Turn right when you have the chance and inspect a dark corridor to find a cartridge [#262].
![[#262] - Escape from Butcher Bay - Security Research 1 - Escape from Butcher Bay - The Chronicles of Riddick: Assault on Dark Athena - Game Guide and Walkthrough](https://game.lhg100.com/Article/UploadFiles/201512/2015121710054584.jpg)
[#262]
Go back to the main corridor and this time proceed to the end. Eventually you should be able to find a ladder. Notice that the camera has changed perspective, allowing you to monitor guard's movements [#263]. Wait for him to turn around, climb to the top and stun him with your tranquilizer gun. Finish him off right away.
![[#263] - Escape from Butcher Bay - Security Research 1 - Escape from Butcher Bay - The Chronicles of Riddick: Assault on Dark Athena - Game Guide and Walkthrough](https://game.lhg100.com/Article/UploadFiles/201512/2015121710054588.jpg)
[#263]
Proceed towards the left door. Once you've arrived at a much larger area stun one of the technicians from a larger distance [#264]. Obviously you'll now have to get to him in order to kill him. Once he's gone turn right and jump over the railing, landing in a very dark area.
![[#264] - Escape from Butcher Bay - Security Research 1 - Escape from Butcher Bay - The Chronicles of Riddick: Assault on Dark Athena - Game Guide and Walkthrough](https://game.lhg100.com/Article/UploadFiles/201512/2015121710054589.jpg)
[#264]
Proceed to your right. Look around a little and you should be able to find a ladder in the nearest corner of the room [#265]. Use the ladder to get to an isolated area. You'll now be given a unique opportunity to control a mech, similar to those you've encountered before. Press the action key to get inside the mech and fire the main cannon to break the glass. Notice that you have unlimited ammo supplies, however your guns may overheat.
![[#265] - Escape from Butcher Bay - Security Research 1 - Escape from Butcher Bay - The Chronicles of Riddick: Assault on Dark Athena - Game Guide and Walkthrough](https://game.lhg100.com/Article/UploadFiles/201512/2015121710054551.jpg)
[#265]
Two enemy guards should appear in the room and they will arrive from your right [#266]. Thankfully you won't have to worry about their attacks, because their guns won't penetrate your armor. You can't feel safe inside the mech, though. You'll soon encounter stronger foes and your mech will begin losing energy. Additionally - your armor won't regenerate in a similar manner to Riddick's health bar. Proceed towards the door where the guards have appeared for the first time.
![[#266] - Escape from Butcher Bay - Security Research 1 - Escape from Butcher Bay - The Chronicles of Riddick: Assault on Dark Athena - Game Guide and Walkthrough](https://game.lhg100.com/Article/UploadFiles/201512/2015121710054698.jpg)
[#266]
Make sure to destroy all the explosive barrels you encounter along the way, so you won't be surprised later on when they blow up in your vicinity and damage your mech. There are three new guards in the next corridor. One of them should be hiding to your left [#267], so don't miss him. Head on to the next section.
![[#267] - Escape from Butcher Bay - Security Research 1 - Escape from Butcher Bay - The Chronicles of Riddick: Assault on Dark Athena - Game Guide and Walkthrough](https://game.lhg100.com/Article/UploadFiles/201512/2015121710054681.jpg)
[#267]
Get ready, because you'll encounter an enemy mech soon enough. The machine should appear directly in front of you [#268]. Keep firing at your opponent, ignoring the fact that your guns may overheat. The goal here is to prevent the mech from firing back. It shouldn't take too long before it's destroyed. Kill a new guard (to your left) before leaving this area.
![[#268] - Escape from Butcher Bay - Security Research 1 - Escape from Butcher Bay - The Chronicles of Riddick: Assault on Dark Athena - Game Guide and Walkthrough](https://game.lhg100.com/Article/UploadFiles/201512/2015121710054658.jpg)
[#268]
Once you've won return to the previous gate. Turn right and locate a smaller passageway leading to a Briefing Room [#269]. I guess you won't be surprised to find a few guards inside, but they shouldn't pose a serious threat. Make sure it's safe and press the action key to exit your mech for a while.
![[#269] - Escape from Butcher Bay - Security Research 1 - Escape from Butcher Bay - The Chronicles of Riddick: Assault on Dark Athena - Game Guide and Walkthrough](https://game.lhg100.com/Article/UploadFiles/201512/2015121710054654.jpg)
[#269]
Your objective here will be to enter a smaller room where some of the guards were originally standing. This door leads to a Computer Room [#270]. Check your surroundings and you should be able to find a cigarette pack (60 - Riot Guard). You may return to your mech. Thankfully you won't be dealing with any new guards in the meantime.
![[#270] - Escape from Butcher Bay - Security Research 1 - Escape from Butcher Bay - The Chronicles of Riddick: Assault on Dark Athena - Game Guide and Walkthrough](https://game.lhg100.com/Article/UploadFiles/201512/2015121710054624.jpg)
[#270]
Choose another small passageway located directly in front of you. Get ready to defeat two other mechs here. The first opponent will appear to your right [#271]. Once he's been defeated turn left and find the second mech. Obviously you should be fighting one machine at a time, preventing your enemies from fighting back. Make sure it's safe here and locate a passageway leading to section E-12.
![[#271] - Escape from Butcher Bay - Security Research 1 - Escape from Butcher Bay - The Chronicles of Riddick: Assault on Dark Athena - Game Guide and Walkthrough](https://game.lhg100.com/Article/UploadFiles/201512/2015121710054769.jpg)
[#271]
Enter a new area and listen to a short transmission, informing you that power to this section of the facility has been shut off. Turn on Eyeshine and start firing at enemy troops. They should appear to your left [#272]. I would recommend that you stay on the move, because enemy guards may decide to use grenades and you would lose a lot of energy points as a result of an explosion.
![[#272] - Escape from Butcher Bay - Security Research 2 - Escape from Butcher Bay - The Chronicles of Riddick: Assault on Dark Athena - Game Guide and Walkthrough](https://game.lhg100.com/Article/UploadFiles/201512/2015121710054749.jpg)
[#272]
You should also watch out for explosive barrels. I would recommend destroying at least a few of these objects before you even enter this room. Once you've secured this floor focus on eliminating guards from the upper balconies [#273]. Make sure it's safe before you exit your mech. Leave the machine near the balcony where the first guard was standing.
![[#273] - Escape from Butcher Bay - Security Research 2 - Escape from Butcher Bay - The Chronicles of Riddick: Assault on Dark Athena - Game Guide and Walkthrough](https://game.lhg100.com/Article/UploadFiles/201512/2015121710054758.jpg)
[#273]
As you've probably noticed there's a stack of large crates near your position. You must get to the top of this tower. Once you're there look up and you should be able to locate a new hangrail [#274]. Use the hangrail to get to the opposite balcony.
![[#274] - Escape from Butcher Bay - Security Research 2 - Escape from Butcher Bay - The Chronicles of Riddick: Assault on Dark Athena - Game Guide and Walkthrough](https://game.lhg100.com/Article/UploadFiles/201512/2015121710054788.jpg)
[#274]
Once you've found your way to the balcony spend some time destroying nearby lamps. Once this is done go to your right and you should notice a single guard crouching inside a small room. Open the door and zap him with your tranquilizer gun [#275] before he has a chance to fight back. Kill the guard by smashing him with your foot and use the switch to turn the lights back on. This will also power up a nearby gate, allowing you to leave this area.
![[#275] - Escape from Butcher Bay - Security Research 2 - Escape from Butcher Bay - The Chronicles of Riddick: Assault on Dark Athena - Game Guide and Walkthrough](https://game.lhg100.com/Article/UploadFiles/201512/2015121710054791.jpg)
[#275]
Go back to the large warehouse area where you left your mech. Sadly new enemy units will arrive in this area. Ignore all the hostiles. Jump over the railing and focus on getting back to your mech as soon as possible [#276]. Once you're inside the mech destroy a mechanical opponent. Once he's gone deal with "standard" guards, however watch out for the grenades. Go to section E-13.
![[#276] - Escape from Butcher Bay - Security Research 2 - Escape from Butcher Bay - The Chronicles of Riddick: Assault on Dark Athena - Game Guide and Walkthrough](https://game.lhg100.com/Article/UploadFiles/201512/2015121710054709.jpg)
[#276]
You will find yourself standing inside a short corridor. Turn right and use the primary cannon to destroy a glass wall [#277]. Exit your mech one more time and proceed to a dark passageway. Climb on top of a crate, press the crouch key and use your tranquilizer gun to zap one of the guards. Proceed to that location, kill the guard and find a new cigarette pack (61 - Riddick Concept). Return to your mech when you have the bonus item.
![[#277] - Escape from Butcher Bay - Security Research 2 - Escape from Butcher Bay - The Chronicles of Riddick: Assault on Dark Athena - Game Guide and Walkthrough](https://game.lhg100.com/Article/UploadFiles/201512/2015121710054729.jpg)
[#277]
Head on to the next corridor. Be prepared to defend yourself against the attacks carried out by a few guards. There are two mechs waiting for you just around the corner [#278], but thankfully you'll be fighting with them one at a time. Proceed to a gate leading to section E-14. Open the gate and attack a new mech from a large distance. There's one more mechanical opponent to your right. Once he's gone find a single guard, preventing him from making a surprise attack.
![[#278] - Escape from Butcher Bay - Security Research 2 - Escape from Butcher Bay - The Chronicles of Riddick: Assault on Dark Athena - Game Guide and Walkthrough](https://game.lhg100.com/Article/UploadFiles/201512/2015121710054768.jpg)
[#278]
Ignore the large gate located in front of you, because it's locked. Instead find a smaller passageway which is to your right [#279]. Once you've opened the door you're going to be attacked by three guards. Kill them before moving on to the last warehouse.
![[#279] - Escape from Butcher Bay - Security Research 2 - Escape from Butcher Bay - The Chronicles of Riddick: Assault on Dark Athena - Game Guide and Walkthrough](https://game.lhg100.com/Article/UploadFiles/201512/2015121710054899.jpg)
[#279]
You're going to have to defeat two weird looking mechs here [#280]. I wouldn't recommend making any additional preparations, because you won't have to pay too much attention to your energy bar. Eliminate both mechs and check the upper balconies for possible human guards.
![[#280] - Escape from Butcher Bay - Security Research 2 - Escape from Butcher Bay - The Chronicles of Riddick: Assault on Dark Athena - Game Guide and Walkthrough](https://game.lhg100.com/Article/UploadFiles/201512/2015121710054857.jpg)
[#280]
You can exit your mech for the last time, because you'll be moving on foot from now on. There are a lot of boxes in this room, however you shouldn't try reaching the top box right away. Instead find an opening near the wall [#281] and climb a few crates to get there. Look inside and you'll find a cigarette pack (62 - Light Guard).
![[#281] - Escape from Butcher Bay - Security Research 2 - Escape from Butcher Bay - The Chronicles of Riddick: Assault on Dark Athena - Game Guide and Walkthrough](https://game.lhg100.com/Article/UploadFiles/201512/2015121710054863.jpg)
[#281]
Go back to the main area and proceed to the top. You shouldn't have any problems climbing the crates. Once you've arrived at the upper balcony you should notice that a single opponent has appeared inside the warehouse [#282]. You can try ignoring him or you can zap him and get back down to kill him.
![[#282] - Escape from Butcher Bay - Security Research 2 - Escape from Butcher Bay - The Chronicles of Riddick: Assault on Dark Athena - Game Guide and Walkthrough](https://game.lhg100.com/Article/UploadFiles/201512/2015121710054826.jpg)
[#282]
Either way you'll have to continue from the upper balcony. Look up and try to find a new hangrail. Use this object to get to an opposite balcony. Once you're there go to your left and you'll come across a ventilation hatch [#283]. Open the hatch, turn on Eyeshine and start moving forward. When you get to a room with a large fan proceed to a new ventilation shaft and wait for the game to begin loading a new map.
![[#283] - Escape from Butcher Bay - Security Research 2 - Escape from Butcher Bay - The Chronicles of Riddick: Assault on Dark Athena - Game Guide and Walkthrough](https://game.lhg100.com/Article/UploadFiles/201512/2015121710054919.jpg)
[#283]
You'll once again return to the Feed Ward, however this time you'll be exploring entirely different areas. Head forward and use a Vent Tool when you get to the other end of the ventilation shaft. Drop down to a lower level [#284] and disable some of the nearby lights before moving on. Go to your right.
![[#284] - Escape from Butcher Bay - Feed Ward #4 - Escape from Butcher Bay - The Chronicles of Riddick: Assault on Dark Athena - Game Guide and Walkthrough](https://game.lhg100.com/Article/UploadFiles/201512/2015121710054956.jpg)
[#284]
This area is being patrolled by one of the guards, but thankfully he shouldn't use his flashlight. Wait for him to stop in the shadows and stun him with your tranquilizer gun [#285]. Make sure to finish him off and prevent his body from staying in the open. You can now use a passageway located to the right.
![[#285] - Escape from Butcher Bay - Feed Ward #4 - Escape from Butcher Bay - The Chronicles of Riddick: Assault on Dark Athena - Game Guide and Walkthrough](https://game.lhg100.com/Article/UploadFiles/201512/2015121710054904.jpg)
[#285]
Destroy a lamp located in front of you and continue moving forward. Once you've reached a junction disable all nearby sources of light and go to your right. There's a control panel on the right wall [#286] and you should consider using it. This will allow you to cut the power to some parts of the facility. Turn around and begin moving forward.
![[#286] - Escape from Butcher Bay - Feed Ward #4 - Escape from Butcher Bay - The Chronicles of Riddick: Assault on Dark Athena - Game Guide and Walkthrough](https://game.lhg100.com/Article/UploadFiles/201512/2015121710054917.jpg)
[#286]
Make a stop once you're close enough to a grating located on the left wall. Move back a little and wait for the first guard to show up [#287]. Kill him using well-known methods. Once he's down approach the corner quickly and locate his colleague. Fire at him before he turns towards your position, because he may be using a flashlight. You could also try waiting for him hidden in the tunnel or somewhere else, but it shouldn't be necessary.
[#287]
You can now go back to the entrance to the ventilation shaft where you disabled the first guard. Enter the tunnel and go to the other end. It's going to be a long trip, but thankfully you won't encounter any additional enemy units. Exit the shaft and go to your right to find a cigarette pack (43 - Work Pass) [#288]. Return to the area where you've killed both guards.
![[#288] - Escape from Butcher Bay - Feed Ward #4 - Escape from Butcher Bay - The Chronicles of Riddick: Assault on Dark Athena - Game Guide and Walkthrough](https://game.lhg100.com/Article/UploadFiles/201512/2015121710055017.jpg)
[#288]
Head on to the corridor where you saw the second guard for the first time and you should end up above the dining area [#289]. I would recommend disabling at least one of the lamps from the dining hall. This should greatly increase your chances of remaining undetected. Head forward and disable a lamp when you get to a new corner.
![[#289] - Escape from Butcher Bay - Feed Ward #4 - Escape from Butcher Bay - The Chronicles of Riddick: Assault on Dark Athena - Game Guide and Walkthrough](https://game.lhg100.com/Article/UploadFiles/201512/2015121710055020.jpg)
[#289]
Wait for one of the guards to show up and eliminate him using a tranquilizer gun [#290]. Proceed to your right quickly and disable new sources of light along the way. Find and kill the second guard. Remember to hide both bodies in the shadows in order to prevent the alarm from being raised.
![[#290] - Escape from Butcher Bay - Feed Ward #4 - Escape from Butcher Bay - The Chronicles of Riddick: Assault on Dark Athena - Game Guide and Walkthrough](https://game.lhg100.com/Article/UploadFiles/201512/2015121710055018.jpg)
[#290]
There's only one more thing for you to do here and that is to locate a new ventilation hatch [#291]. Open the hatch using your Vent Tool. Enter a dark tunnel and you should be able to reach a new area after a short walk.
![[#291] - Escape from Butcher Bay - Feed Ward #4 - Escape from Butcher Bay - The Chronicles of Riddick: Assault on Dark Athena - Game Guide and Walkthrough](https://game.lhg100.com/Article/UploadFiles/201512/2015121710055028.jpg)
[#291]
Head on to the opposite end of the ventilation shaft and drop down when you get to a small hole [#291]. If you're lucky you should be able to land on one of the guards, eliminating him from the game. If you miss, you'll obviously have to defeat him in a direct confrontation. Examine his body afterwards and take his keycard. You must now use a nearby computer station in order to open a few containers.
![[#292] - Escape from Butcher Bay - Tower 19 - Escape from Butcher Bay - The Chronicles of Riddick: Assault on Dark Athena - Game Guide and Walkthrough](https://game.lhg100.com/Article/UploadFiles/201512/2015121710055121.jpg)
[#292]
There's a NanoMED health unit on the wall if you need one. Once you've healed Riddick use the keycard to open a nearby door. Make a few steps forward and talk to an inmate called Jupiter [#293]. You'll receive further instructions from him, as well as a home-made bomb.
![[#293] - Escape from Butcher Bay - Tower 19 - Escape from Butcher Bay - The Chronicles of Riddick: Assault on Dark Athena - Game Guide and Walkthrough](https://game.lhg100.com/Article/UploadFiles/201512/2015121710055160.jpg)
[#293]
Wait for this conversation to end and IMMEDIATELY take cover inside the nearest container. The main reason is that a mech will appear behind Jupiter, killing your friend on the spot. Wait for a large container to appear in front of you [#294]. Start running towards the container and make a jump when you're near the ledge. If you've done everything according to plan, you'll be rewarded with a short cut-scene.
![[#294] - Escape from Butcher Bay - Tower 19 - Escape from Butcher Bay - The Chronicles of Riddick: Assault on Dark Athena - Game Guide and Walkthrough](https://game.lhg100.com/Article/UploadFiles/201512/2015121710055151.jpg)
[#294]
I guess you won't be surprised to hear that you'll begin this mission standing on a container. Wait for the container to be stopped. Press the crouch key and lean out carefully. You should be able to stun at least one guard from here [#295], preferably both. If you can't find the other one, drop down and zap him before he notices Riddick. Make sure to execute both guards before they'll wake up.
![[#295] - Escape from Butcher Bay - Container Router - part 1 - Escape from Butcher Bay - The Chronicles of Riddick: Assault on Dark Athena - Game Guide and Walkthrough](https://game.lhg100.com/Article/UploadFiles/201512/2015121710055148.jpg)
[#295]
Turn around and inspect the area directly under the large container. Turn on Eyeshine if you're having problem navigating and find a ladder [#296]. I wouldn't recommend dropping down, because there's a risk of sustaining major injuries. Instead approach the ladder and press the action key. You'll end up standing in a dark hallway, so you should keep using Eyeshine here.
![[#296] - Escape from Butcher Bay - Container Router - part 1 - Escape from Butcher Bay - The Chronicles of Riddick: Assault on Dark Athena - Game Guide and Walkthrough](https://game.lhg100.com/Article/UploadFiles/201512/2015121710055149.jpg)
[#296]
Ignore new moths flying around in the tunnel, because you won't have to collect any new insects. One of the guards is patrolling this corridor and he may be using a flashlight, so you must surprise him somehow [#297]. Remember that he can blind you with the white beam if you're still using Eyeshine. Kill him and go to your right to find a new ladder.
![[#297] - Escape from Butcher Bay - Container Router - part 1 - Escape from Butcher Bay - The Chronicles of Riddick: Assault on Dark Athena - Game Guide and Walkthrough](https://game.lhg100.com/Article/UploadFiles/201512/2015121710055246.jpg)
[#297]
Once you're at the top take your time to explore your surroundings and you should be able to find a cigarette pack (44 - Large Door). Go back to the underground tunnels where you've killed the guard and head on towards the last room. There's a much bigger ladder here [#298]. Ignore a tranquilizer gun on the ground, because you already have this weapon. TURN OFF Eyeshine before using the ladder and climb to the top.
![[#298] - Escape from Butcher Bay - Container Router - part 1 - Escape from Butcher Bay - The Chronicles of Riddick: Assault on Dark Athena - Game Guide and Walkthrough](https://game.lhg100.com/Article/UploadFiles/201512/2015121710055266.jpg)
[#298]
MAKE A STOP once you're close enough to a new platform [#299]. Notice that you can move the camera around using your mouse. Wait for a new guard to go to your left or to turns his back on you. Quickly get to the platform and eliminate him. You can either perform a stealth kill or zap him with your tranquilizer gun. As for getting rid of his body, try dropping it by moving close to a ledge.
![[#299] - Escape from Butcher Bay - Container Router - part 1 - Escape from Butcher Bay - The Chronicles of Riddick: Assault on Dark Athena - Game Guide and Walkthrough](https://game.lhg100.com/Article/UploadFiles/201512/2015121710055206.jpg)
[#299]
Approach the ladder and press the action key to grab it [#300]. I would recommend that you begin by sliding down. Once you've arrived at your destination turn around and explore the dark tunnels searching for a cigarette pack (45 - Recreation Area). Return to the ladder with the pack and start climbing upwards.
![[#300] - Escape from Butcher Bay - Container Router - part 1 - Escape from Butcher Bay - The Chronicles of Riddick: Assault on Dark Athena - Game Guide and Walkthrough](https://game.lhg100.com/Article/UploadFiles/201512/2015121710055382.jpg)
[#300]
When you get to the top press the action key in order to destroy the grating. Enter the shaft and proceed to the other end. Kick a second grating. Wait for a new enemy guard to leave this area [#301]. Drop down to the crates, wait for him to come back again and use your tranquilizer gun to stun him. You can also disable nearby lamps in the meantime.
![[#301] - Escape from Butcher Bay - Container Router - part 1 - Escape from Butcher Bay - The Chronicles of Riddick: Assault on Dark Athena - Game Guide and Walkthrough](https://game.lhg100.com/Article/UploadFiles/201512/2015121710055398.jpg)
[#301]
Proceed towards a large elevator shaft and use a ladder to get to a higher level. Kick a new grating to get inside the tunnels. Head to the exit, kick the second grating and take your time destroying nearby sources of light. You shouldn't have any major problems zapping a new guard. He will appear to your left [#302]. Exit the tunnel and finish him off.
![[#302] - Escape from Butcher Bay - Container Router - part 1 - Escape from Butcher Bay - The Chronicles of Riddick: Assault on Dark Athena - Game Guide and Walkthrough](https://game.lhg100.com/Article/UploadFiles/201512/2015121710055311.jpg)
[#302]
Watch out for one of the technicians, because he may arrive here shortly. Thankfully he's not carrying any real weapons, so defeating him should be simple. Make sure to check his body when he's dead to collect his keycard [#303]. There's also a NanoMED health unit on the wall if you're in need of healing.
![[#303] - Escape from Butcher Bay - Container Router - part 2 - Escape from Butcher Bay - The Chronicles of Riddick: Assault on Dark Athena - Game Guide and Walkthrough](https://game.lhg100.com/Article/UploadFiles/201512/2015121710055356.jpg)
[#303]
Look around a little and find a hole in the ceiling [#304]. Climb on top of the red crate and from there you should be able to get to the attic. You can find a cigarette pack (46 - Tower 17-3) here, so I guess it's worth your time. Go back down and proceed to the corridor where you first saw the technician. Use a computer terminal and see what happens to your right.
![[#304] - Escape from Butcher Bay - Container Router - part 2 - Escape from Butcher Bay - The Chronicles of Riddick: Assault on Dark Athena - Game Guide and Walkthrough](https://game.lhg100.com/Article/UploadFiles/201512/2015121710055486.jpg)
[#304]
Turn around, head forward and after that go to your right. There's a new control panel on the wall [#305] and you must use it. Proceed to a room to your left and it'll turn out to be an elevator. Wait here for a few seconds to be transported to a new level. Use a control panel and you'll find yourself standing inside a well-known location. This time ignore both ladders and proceed forward. Use your newly acquired keycard to open a door.
![[#305] - Escape from Butcher Bay - Container Router - part 2 - Escape from Butcher Bay - The Chronicles of Riddick: Assault on Dark Athena - Game Guide and Walkthrough](https://game.lhg100.com/Article/UploadFiles/201512/2015121710055427.jpg)
[#305]
You'll have to be very careful here, because you'll soon come across one of the guards. Destroy the left light. You can wait for the guard here or you can hide somewhere to your left [#306]. Either way wait for him to get closer and stun him with your tranquilizer gun. Afterwards finish him off with a melee hit.
![[#306] - Escape from Butcher Bay - Container Router - part 2 - Escape from Butcher Bay - The Chronicles of Riddick: Assault on Dark Athena - Game Guide and Walkthrough](https://game.lhg100.com/Article/UploadFiles/201512/2015121710055438.jpg)
[#306]
Approach the next corner carefully and disable new lights from a larger distance. Turn on Eyeshine and notice a laser trap directly in front of you [#307]. Your objective will be to jump over the beam, however you won't die if you touch it. The main reason is that it's dark here, so the nearby security turrets won't be able to find a target. Sadly you can't rely on this tactics forever, so it would be a good idea to practice jumping right now, when it's relatively safe in the area.
![[#307] - Escape from Butcher Bay - Container Router - part 2 - Escape from Butcher Bay - The Chronicles of Riddick: Assault on Dark Athena - Game Guide and Walkthrough](https://game.lhg100.com/Article/UploadFiles/201512/2015121710055550.jpg)
[#307]
Watch out for a new opponent - he will appear around the corner. Kill him before your moves are noticed. Once you've reached a new corridor climb on top of one of the crates and disable all the lights [#308]. A third guard is standing nearby. Stun him and jump over the second laser beam to get to him. Obviously you must execute him before he wakes up.
![[#308] - Escape from Butcher Bay - Container Router - part 2 - Escape from Butcher Bay - The Chronicles of Riddick: Assault on Dark Athena - Game Guide and Walkthrough](https://game.lhg100.com/Article/UploadFiles/201512/2015121710055524.jpg)
[#308]
Proceed to a much larger room. You won't have to use your gun here to destroy other lamps, because you won't encounter any new guards in the vicinity. Focus on finding a ladder [#309] and use the ladder to get to the upper level. Once you're there get inside a ventilation shaft. Go to the other end and you shouldn't have any problems finding a cigarette pack (48 - Take-off Platform). Take the pack and go back to the big room.
![[#309] - Escape from Butcher Bay - Container Router - part 2 - Escape from Butcher Bay - The Chronicles of Riddick: Assault on Dark Athena - Game Guide and Walkthrough](https://game.lhg100.com/Article/UploadFiles/201512/2015121710055525.jpg)
[#309]
Head over to a larger gate and turn left to locate a small passageway. Be careful, because you may be attacked by one of the workers here [#310]. Get rid of the opponent and proceed to that hallway. Keep moving forward until you find a computer terminal. Sadly when you try to use the terminal you'll find out that it needs more power. As a result go back to the big door and head through there.
![[#310] - Escape from Butcher Bay - Container Router - part 2 - Escape from Butcher Bay - The Chronicles of Riddick: Assault on Dark Athena - Game Guide and Walkthrough](https://game.lhg100.com/Article/UploadFiles/201512/2015121710055617.jpg)
[#310]
Make sure you haven't moved forward. Use your tranquilizer gun to destroy some of the nearby lamps. Proceed to a new corridor, press the crouch key and wait for an armed guard to show up [#311]. Obviously you must use your weapon to stun him. Jump over a laser trap and get ready to defeat a second opponent. There's also a second laser beam in this area.
![[#311] - Escape from Butcher Bay - Container Router - part 3 - Escape from Butcher Bay - The Chronicles of Riddick: Assault on Dark Athena - Game Guide and Walkthrough](https://game.lhg100.com/Article/UploadFiles/201512/2015121710055601.jpg)
[#311]
Make a stop near the second laser trap and take your time trying to find a single crate [#312]. Get on top of this crate and from there you should be able to grab a ledge. Check the attic in order to find credits and a cigarette pack (47 - Cryo Pyramids). Go back down and proceed to the next section. You will soon find a NanoMED health station.
![[#312] - Escape from Butcher Bay - Container Router - part 3 - Escape from Butcher Bay - The Chronicles of Riddick: Assault on Dark Athena - Game Guide and Walkthrough](https://game.lhg100.com/Article/UploadFiles/201512/2015121710055645.jpg)
[#312]
Be careful here, because the next area is going to be patrolled by a guard and you'll have to eliminate him right away. Don't forget to destroy all nearby sources of light. When you get to a new door use the keycard. Press the crouch key and attack two new guards from a larger distance [#313]. Once they're gone approach their bodies and finish them off.
![[#313] - Escape from Butcher Bay - Container Router - part 3 - Escape from Butcher Bay - The Chronicles of Riddick: Assault on Dark Athena - Game Guide and Walkthrough](https://game.lhg100.com/Article/UploadFiles/201512/2015121710055748.jpg)
[#313]
Proceed to the opposite end of this platform and drop down. Check the surrounding area to find a large hole with a ladder [#314]. Naturally you must use the ladder to get to a small service area. There's only one objective here and that is to pull a lever. Go back up and return to the computer terminal where you killed one of the technicians. This time you'll have more than enough power to activate the machinery.
![[#314] - Escape from Butcher Bay - Container Router - part 3 - Escape from Butcher Bay - The Chronicles of Riddick: Assault on Dark Athena - Game Guide and Walkthrough](https://game.lhg100.com/Article/UploadFiles/201512/2015121710055718.jpg)
[#314]
Once again you must go to the large warehouse where you pulled the lever and killed two guards. Drop down and wait for one of the large containers to arrive. Stand next to a large hole [#315] and make a jump towards the container when it's being lowered. If you're lucky you'll land on top of the container.
![[#315] - Escape from Butcher Bay - Container Router - part 3 - Escape from Butcher Bay - The Chronicles of Riddick: Assault on Dark Athena - Game Guide and Walkthrough](https://game.lhg100.com/Article/UploadFiles/201512/2015121710055751.jpg)
[#315]
Wait for the container to be moved even lower, however it's going to be stopped after a short while. You must act quickly, because security turrets will activate in just a few seconds. Make a jump towards a small metal platform [#316], kick the grating and enter a small tunnel. Head on to the next area.
![[#316] - Escape from Butcher Bay - Container Router - part 3 - Escape from Butcher Bay - The Chronicles of Riddick: Assault on Dark Athena - Game Guide and Walkthrough](https://game.lhg100.com/Article/UploadFiles/201512/2015121710055738.jpg)
[#316]
You will find yourself standing inside the tunnel which was being patrolled by the mech and where you've disabled all the lamps. Don't forget that the mech hasn't gone anywhere. Thankfully you won't be dealing with any new guards. Proceed to the main cave, turn right and check the area where you talked to Jagger. He's not going to be here, so instead talk to Graham [#317].
![[#317] - Escape from Butcher Bay - Mining Core #2 - Escape from Butcher Bay - The Chronicles of Riddick: Assault on Dark Athena - Game Guide and Walkthrough](https://game.lhg100.com/Article/UploadFiles/201512/2015121710055792.jpg)
[#317]
Once again you'll have to reach a gas-filled room. It's the exact same area where you found the package during your last stay in the Mining Core. Obviously this means you'll have to avoid the mech along the way. Take cover behind the containers and wait for a right moment to start running towards the ramp [#318]. Turn right and get to the next corridor.
![[#318] - Escape from Butcher Bay - Mining Core #2 - Escape from Butcher Bay - The Chronicles of Riddick: Assault on Dark Athena - Game Guide and Walkthrough](https://game.lhg100.com/Article/UploadFiles/201512/2015121710055779.jpg)
[#318]
Remember that you can't stay inside the gas-filled room for too long. As a result proceed directly to the last room [#319], crouching and jumping along the way. Make a few steps forward and watch a cut-scene. Once it's over go back to the corridor using the exact same passageways. Here's where you'll be rewarded with a much longer cut-scene.
![[#319] - Escape from Butcher Bay - Mining Core #2 - Escape from Butcher Bay - The Chronicles of Riddick: Assault on Dark Athena - Game Guide and Walkthrough](https://game.lhg100.com/Article/UploadFiles/201512/2015121710055895.jpg)
[#319]
This level is going to begin with a very interesting cut-scene. Be patient, because you won't be given control over Riddick right away. Approach the guard standing in front of you and perform a countermove when he tries to hit you [#320]. Sadly you won't be allowed to collect his gun.
![[#320] - Escape from Butcher Bay - Cell Crash - Escape from Butcher Bay - The Chronicles of Riddick: Assault on Dark Athena - Game Guide and Walkthrough](https://game.lhg100.com/Article/UploadFiles/201512/2015121710055857.jpg)
[#320]
Exit the container and go to your right. Once you've reached a much larger cavern you'll witness a new cut-scene. Treat this scene as a taste of things to come. :-) For the moment all you have to do is to slide down into a large hole in the ground [#321].
![[#321] - Escape from Butcher Bay - Cell Crash - Escape from Butcher Bay - The Chronicles of Riddick: Assault on Dark Athena - Game Guide and Walkthrough](https://game.lhg100.com/Article/UploadFiles/201512/2015121710055890.jpg)
[#321]
Start off by making a few steps forward. Collect a shotgun from the ground [#322], as well as some grenades. You won't be using the grenades all the time. Instead they will come in handy while trying to take down larger creatures. For most of the time a shotgun will be more than enough to ensure your survival. Head forward.
![[#322] - Escape from Butcher Bay - Abandoned Equipment Center - part 1 - Escape from Butcher Bay - The Chronicles of Riddick: Assault on Dark Athena - Game Guide and Walkthrough](https://game.lhg100.com/Article/UploadFiles/201512/2015121710055894.jpg)
[#322]
I wouldn't recommend making any unnecessary stops here, because soon a large monster will appear to your left. You could try fighting the beast, but you would only lose ammo or grenades. Instead start running towards a small corridor [#323] where you'll notice one of the guards being dragged into. Collect more ammo for the shotgun.
![[#323] - Escape from Butcher Bay - Abandoned Equipment Center - part 1 - Escape from Butcher Bay - The Chronicles of Riddick: Assault on Dark Athena - Game Guide and Walkthrough](https://game.lhg100.com/Article/UploadFiles/201512/2015121710055837.jpg)
[#323]
Starting now you'll be taking part in a lot of fights will smaller alien creatures. It's the same deal as it was with the mutants from prison sewers, so new monsters will keep appearing constantly if you don't push forward. Thankfully their attacks will be weak and it'll be easy to kill them. Prevent Riddick from losing too many health units, because it may get harder to move on. Start off by moving forward and eliminate the first group of alien creatures [#324].
![[#324] - Escape from Butcher Bay - Abandoned Equipment Center - part 1 - Escape from Butcher Bay - The Chronicles of Riddick: Assault on Dark Athena - Game Guide and Walkthrough](https://game.lhg100.com/Article/UploadFiles/201512/2015121710055872.jpg)
[#324]
Once you've entered a much larger section of the cave proceed directly to your left and you should be able to find a narrow passageway [#325]. Keep heading towards a concrete wall. When you get there turn around and get rid of a few monsters. Notice that you can climb the wall by pressing the action key.
![[#325] - Escape from Butcher Bay - Abandoned Equipment Center - part 1 - Escape from Butcher Bay - The Chronicles of Riddick: Assault on Dark Athena - Game Guide and Walkthrough](https://game.lhg100.com/Article/UploadFiles/201512/2015121710055854.jpg)
[#325]
Continue moving forward, however turn right when you have the chance. Keep heading upwards and prevent Riddick from being surrounded by the monsters. Once you get to the crates collect much needed ammunition and climb to the top. You should be standing above a new corridor [#326]. Head down and go to your right.
![[#326] - Escape from Butcher Bay - Abandoned Equipment Center - part 1 - Escape from Butcher Bay - The Chronicles of Riddick: Assault on Dark Athena - Game Guide and Walkthrough](https://game.lhg100.com/Article/UploadFiles/201512/2015121710055964.jpg)
[#326]
I would strongly recommend going through this entire corridor quickly, because otherwise you may lose a lot of health and ammunition. It would also be a good idea to get rid of an entire first group of monsters by firing at the explosive barrels. Eventually you'll get to a single crate. Examine this object and you'll find a Vent Tool [#327].
![[#327] - Escape from Butcher Bay - Abandoned Equipment Center - part 1 - Escape from Butcher Bay - The Chronicles of Riddick: Assault on Dark Athena - Game Guide and Walkthrough](https://game.lhg100.com/Article/UploadFiles/201512/2015121710055925.jpg)
[#327]
Once you've collected the Vent Tool turn left and look up. Press the action key while standing directly under the ventilation hatch [#328]. You'll trigger an animation after which you'll end up crouching inside a dark tunnel. Turn left and head forward until you get to a grating. Kick your way out and drop down to find yourself in a new place.
![[#328] - Escape from Butcher Bay - Abandoned Equipment Center - part 1 - Escape from Butcher Bay - The Chronicles of Riddick: Assault on Dark Athena - Game Guide and Walkthrough](https://game.lhg100.com/Article/UploadFiles/201512/2015121710055976.jpg)
[#328]
Before you move forward you should spend some time examining a stack of crates to your right. There's a cigarette pack (51 - Riot Guard 1.0) [#329] hidden in the corner of this room. Once you've collected the pack proceed towards a hole in the wall. Use the hole to get to a new room. There's a NanoMED health unit here if you need one. Don't worry, because you won't have to use it right away - you'll return to this room later on during the game.
![[#329] - Escape from Butcher Bay - Abandoned Equipment Center - part 1 - Escape from Butcher Bay - The Chronicles of Riddick: Assault on Dark Athena - Game Guide and Walkthrough](https://game.lhg100.com/Article/UploadFiles/201512/2015121710060083.jpg)
[#329]
Ignore a large machine to your left, because you can't use it just yet. Instead proceed to a new corridor which can be found to your right. Get ready to kill new monsters along the way. Once you've reached a new cave take a key from the left shelf [#330]. You should also inspect the body for more ammunition.
![[#330] - Escape from Butcher Bay - Abandoned Equipment Center - part 1 - Escape from Butcher Bay - The Chronicles of Riddick: Assault on Dark Athena - Game Guide and Walkthrough](https://game.lhg100.com/Article/UploadFiles/201512/2015121710060048.jpg)
[#330]
Stand on top of the platform where you found the key and look up. I guess you know what has to be done here - use the hangrail to get to the other side of a destroyed bridge [#331]. A new creature will appear in the area in the meantime, but you shouldn't receive any injuries. Land on the other side, collect ammunition and kill a single beast which will appear in your vicinity.
![[#331] - Escape from Butcher Bay - Abandoned Equipment Center - part 2 - Escape from Butcher Bay - The Chronicles of Riddick: Assault on Dark Athena - Game Guide and Walkthrough](https://game.lhg100.com/Article/UploadFiles/201512/2015121710060037.jpg)
[#331]
Proceed towards an unexplored corridor. You'll have to open a door along the way, but it shouldn't be a problem. Eventually you'll reach familiar surroundings. As a result you'll have to once again climb on the wall and then proceed to the crates. The only difference is that you shouldn't choose the right corridor for the second time. Instead after jumping down turn left and open the door using the key taken from the bridge area [#332].
![[#332] - Escape from Butcher Bay - Abandoned Equipment Center - part 2 - Escape from Butcher Bay - The Chronicles of Riddick: Assault on Dark Athena - Game Guide and Walkthrough](https://game.lhg100.com/Article/UploadFiles/201512/2015121710060151.jpg)
[#332]
Step into a new room and you'll find yet another NanoMED medical station. Aside from healing you can also collect grenades. Press the crouch key and go to the other room. Once you're there locate a control panel on the wall and use it. Sadly, turning on the power will result in the arrival of new creatures. The first beast will appear behind you. Kill it and run to the left door to get to a new corridor.
![[#333] - Escape from Butcher Bay - Abandoned Equipment Center - part 2 - Escape from Butcher Bay - The Chronicles of Riddick: Assault on Dark Athena - Game Guide and Walkthrough](https://game.lhg100.com/Article/UploadFiles/201512/2015121710060174.jpg)
[#333]
Keep running forward and eliminate every creature that stands in your way. At about a half way through you should notice a single crate. Climb on top of the crate and from there grab the ledge. Climb to the top and move forward using very narrow beams to get through [#334]. Thankfully you'll be rewarded for your efforts with a cigarette pack (49 - Shotgun).
![[#334] - Escape from Butcher Bay - Abandoned Equipment Center - part 2 - Escape from Butcher Bay - The Chronicles of Riddick: Assault on Dark Athena - Game Guide and Walkthrough](https://game.lhg100.com/Article/UploadFiles/201512/2015121710060193.jpg)
[#334]
Head down and continue moving through the corridor. Once you've arrived inside a small room choose a door located to your left [#335]. Kill a single creature after which begin exploring your surroundings. There's a cigarette pack (50 - Minigun) hidden behind a crate. Aside from the pack you can collect grenades, ammunition for your shotgun and an experimental assault rifle.
![[#335] - Escape from Butcher Bay - Abandoned Equipment Center - part 2 - Escape from Butcher Bay - The Chronicles of Riddick: Assault on Dark Athena - Game Guide and Walkthrough](https://game.lhg100.com/Article/UploadFiles/201512/2015121710060154.jpg)
[#335]
Your final item of interest should be a power cell [#336]. Make sure that you've already collected other objects, because picking up the cell will result in new monsters attacking you. The first group will use a hole in the wall to get to you. Quickly return to the previous corridor and start running towards the room where you've interacted with a control panel.
![[#336] - Escape from Butcher Bay - Abandoned Equipment Center - part 2 - Escape from Butcher Bay - The Chronicles of Riddick: Assault on Dark Athena - Game Guide and Walkthrough](https://game.lhg100.com/Article/UploadFiles/201512/2015121710060123.jpg)
[#336]
Make sure you have the power cell with you, because you'll have to use this object on a large generator [#337]. This will allow you to recharge the cell for further purposes and you'll be allowed to continue your journey. Head on through a hole in the wall and go back to the previous tunnel. Eventually you'll have to return to the area where you've entered the ventilation shaft.
![[#337] - Escape from Butcher Bay - Abandoned Equipment Center - part 2 - Escape from Butcher Bay - The Chronicles of Riddick: Assault on Dark Athena - Game Guide and Walkthrough](https://game.lhg100.com/Article/UploadFiles/201512/2015121710060240.jpg)
[#337]
Once you're inside the shaft proceed towards the kicked out grating. Drop down to a small warehouse [#338] and get ready to defeat a much larger monster. I would recommend that you use a control panel to turn off the lights and climb on top of the crates while waiting for the beast to show up. In addition to that choose a shotgun or grenades from your inventory.
![[#338] - Escape from Butcher Bay - Abandoned Equipment Center - part 2 - Escape from Butcher Bay - The Chronicles of Riddick: Assault on Dark Athena - Game Guide and Walkthrough](https://game.lhg100.com/Article/UploadFiles/201512/2015121710060219.jpg)
[#338]
The easiest way to defeat the monster will be to get on top of the crates in order to avoid its attacks. As a result you should be standing next to a corner where you've found a cigarette pack during your last visit to this location. Choose grenades from your inventory and begin throwing them at the monster [#339]. They should explode when they hit the target. Three to four grenades later you'll have one problem less to worry about.
![[#339] - Escape from Butcher Bay - Abandoned Equipment Center - part 2 - Escape from Butcher Bay - The Chronicles of Riddick: Assault on Dark Athena - Game Guide and Walkthrough](https://game.lhg100.com/Article/UploadFiles/201512/2015121710060212.jpg)
[#339]
Once the monster has been defeated choose a passageway located to your right and you should end up standing next to a large drilling machine. Approach the machine and place the power cell in a slot [#340]. Activate the machine and wait for it to clear your path. Proceed towards a destroyed gate. Go to your right and head under a partially opened second gate. Go to the entrance to a ventilation shaft and get ready to defeat two other monsters along the way. Use the shaft to leave this hostile area.
![[#340] - Escape from Butcher Bay - Abandoned Equipment Center - part 2 - Escape from Butcher Bay - The Chronicles of Riddick: Assault on Dark Athena - Game Guide and Walkthrough](https://game.lhg100.com/Article/UploadFiles/201512/2015121710060228.jpg)
[#340]
Start off by moving forward. Ignore some of the fights taking place beneath your current position, even though some of the monsters may try attacking you. Once you've reached the end of the tunnel destroy a new grating and CAREFULLY exit the shaft. Notice new fights taking place below. Look up and press the action key to grab a hangrail [#341]. Obviously you must now use the hangrail to get to a new area.
![[#341] - Escape from Butcher Bay - Central Storage - Escape from Butcher Bay - The Chronicles of Riddick: Assault on Dark Athena - Game Guide and Walkthrough](https://game.lhg100.com/Article/UploadFiles/201512/2015121710060203.jpg)
[#341]
Make sure to land on a new platform and to fall down. Before you proceed to the exit locate a new ladder [#342]. Use the ladder to get to an area where you'll find a cigarette pack (52 - Butcher Bay). You may return to the lower floor. Use a nearby passageway which is located to the left of the ladder.
![[#342] - Escape from Butcher Bay - Central Storage - Escape from Butcher Bay - The Chronicles of Riddick: Assault on Dark Athena - Game Guide and Walkthrough](https://game.lhg100.com/Article/UploadFiles/201512/2015121710060322.jpg)
[#342]
Get ready to kill a few weaker creatures after which proceed towards a new ladder. Don't think about dropping down, because it would mean a quick death. Carefully enter a new room [#343]. Kill the guard, as well as new monsters around him. You can now choose how you want to get to the exit. You can keep going straight or you can open the door to your right. I would recommend proceeding forward, because you'll be allowed to heal along the way. Inspect guard's body before you leave in order to find ammunition and a cartridge.
![[#343] - Escape from Butcher Bay - Central Storage - Escape from Butcher Bay - The Chronicles of Riddick: Assault on Dark Athena - Game Guide and Walkthrough](https://game.lhg100.com/Article/UploadFiles/201512/2015121710060336.jpg)
[#343]
Carefully approach the entrance to a new room and notice that some of the guards are fighting alien creatures [#344]. I would recommend that you wait for a few seconds, so both sides can settle their problems and you'll have less targets to kill. The aliens will probably win, so defeat them when the battle has ended. Thankfully you won't have to worry about any new beasts showing up.
![[#344] - Escape from Butcher Bay - Central Storage - Escape from Butcher Bay - The Chronicles of Riddick: Assault on Dark Athena - Game Guide and Walkthrough](https://game.lhg100.com/Article/UploadFiles/201512/2015121710060389.jpg)
[#344]
Proceed towards two large containers located to your left. Get on top of one of the containers and turn right. You'll now have to make a jump towards a new box [#345]. Once Riddick has grabbed it make sure not to fall. Get on top of this box and continue moving upwards. Be careful, because new monsters may arrive in the area in the meantime. Finish off by making a few jumps while trying to get to a ventilation shaft.
![[#345] - Escape from Butcher Bay - Central Storage - Escape from Butcher Bay - The Chronicles of Riddick: Assault on Dark Athena - Game Guide and Walkthrough](https://game.lhg100.com/Article/UploadFiles/201512/2015121710060395.jpg)
[#345]
Get to the opposite end of the ventilation shaft. Begin by dropping to a new platform after which proceed to a lower level. Inspect the area to your left by going through a new door. You should be able to find a NanoMED health station here [#346]. Also - don't forget to collect much needed ammunition.
![[#346] - Escape from Butcher Bay - Central Storage - Escape from Butcher Bay - The Chronicles of Riddick: Assault on Dark Athena - Game Guide and Walkthrough](https://game.lhg100.com/Article/UploadFiles/201512/2015121710060472.jpg)
[#346]
Choose a door located to your right. It would be a good idea to destroy a few explosive barrels from where you stand [#347]. This action should result in deaths of a few nearby creatures. Locate a tunnel next to a guard's body. Enter the tunnel and head down when you get to a ladder.
![[#347] - Escape from Butcher Bay - Central Storage - Escape from Butcher Bay - The Chronicles of Riddick: Assault on Dark Athena - Game Guide and Walkthrough](https://game.lhg100.com/Article/UploadFiles/201512/2015121710060407.jpg)
[#347]
Eventually you should be able to reach a large warehouse. Notice that a mech is fighting one of the larger alien creatures. Avoid both participants of this duel, because you won't have to kill them. Instead proceed directly to your right. Drop down when you get to the ledge and locate a small door in front of you [#348]. Explore this new corridor to find a NanoMED health unit. Sadly it's not fully loaded.
![[#348] - Escape from Butcher Bay - Central Storage - Escape from Butcher Bay - The Chronicles of Riddick: Assault on Dark Athena - Game Guide and Walkthrough](https://game.lhg100.com/Article/UploadFiles/201512/2015121710060401.jpg)
[#348]
I would strongly recommend that you spend some time destroying nearby lamps. You can use an assault rifle and fire a single round at each lamp. Once this is done proceed to a new corridor. Open the door and disable some of the nearest lights. There's a new mech in front of you [#349] and you must hide in the previous corridor before the machine begins firing at you.
![[#349] - Escape from Butcher Bay - Central Storage - Escape from Butcher Bay - The Chronicles of Riddick: Assault on Dark Athena - Game Guide and Walkthrough](https://game.lhg100.com/Article/UploadFiles/201512/2015121710060498.jpg)
[#349]
Destroy two other lights inside the long corridor with the mech and each time retreat quickly to avoid its gunfire. Eventually it should get so dark in here that you'll be allowed to get past the mech unnoticed [#350]. If you see a standard guard make sure to kill him first. Once you've gone past the mech run towards a corridor which is going to be an exit.
![[#350] - Escape from Butcher Bay - Central Storage - Escape from Butcher Bay - The Chronicles of Riddick: Assault on Dark Athena - Game Guide and Walkthrough](https://game.lhg100.com/Article/UploadFiles/201512/2015121710060416.jpg)
[#350]
You could try defeating the mech in the previous mission and that would allow you to get a minigun, however I wouldn't recommend using this gun here. If you don't have the minigun - even better. Approach the first door and take cover to your left while still occupying the first corridor. Notice security turrets moving in front of you and to your right [#351]. You can destroy a few of those, however more turrets would appear in a short while. As a result you shouldn't take too long trying to clear the path to the next area.
[#351]
Choose a shotgun from your inventory and RUN to your left. Ignore small crates along the way and focus on eliminating one of the alien creatures [#352]. Don't take too long while trying to defeat the alien, because you can't stay in the open.
![[#352] - Escape from Butcher Bay - Loading Docks - part 1 - Escape from Butcher Bay - The Chronicles of Riddick: Assault on Dark Athena - Game Guide and Walkthrough](https://game.lhg100.com/Article/UploadFiles/201512/2015121710060592.jpg)
[#352]
Keep heading forward and you'll notice a single guard in front of you [#353]. Use the shotgun to kill him, so you won't have to be very precise with the shots. Once he's gone enter a new corridor located to your left and kill another enemy guard. Press the button to activate a small lift and wait for the elevator to take you to a new floor.
![[#353] - Escape from Butcher Bay - Loading Docks - part 1 - Escape from Butcher Bay - The Chronicles of Riddick: Assault on Dark Athena - Game Guide and Walkthrough](https://game.lhg100.com/Article/UploadFiles/201512/2015121710060551.jpg)
[#353]
Make sure to turn around while you're still standing inside the elevator, because the exit is located on the other side. One of the guards will be waiting for you here [#354] and he must die quickly in order to ensure your survival. Proceed to your left and eliminate other alien beings along the way. I would also recommend destroying one of the lights.
![[#354] - Escape from Butcher Bay - Loading Docks - part 1 - Escape from Butcher Bay - The Chronicles of Riddick: Assault on Dark Athena - Game Guide and Walkthrough](https://game.lhg100.com/Article/UploadFiles/201512/2015121710060549.jpg)
[#354]
Be careful, because an enemy soldier is standing in the next room [#355]. Kill him with your shotgun and don't forget to remain in the shadows in order to surprise him in the first place. Thankfully even you do suffer some injuries you'll find a NanoMED health unit nearby. Once you're fully healed press a button on the wall and use the second elevator.
![[#355] - Escape from Butcher Bay - Loading Docks - part 1 - Escape from Butcher Bay - The Chronicles of Riddick: Assault on Dark Athena - Game Guide and Walkthrough](https://game.lhg100.com/Article/UploadFiles/201512/2015121710060591.jpg)
[#355]
Thankfully this time you won't be surprised by anyone while trying to leave the elevator. It doesn't mean you can feel safe, because there are three enemy guards patrolling a nearby warehouse. Start off by killing two of them and once they're dead eliminate the third opponent. He will probably take cover behind one of the containers [#356].
![[#356] - Escape from Butcher Bay - Loading Docks - part 1 - Escape from Butcher Bay - The Chronicles of Riddick: Assault on Dark Athena - Game Guide and Walkthrough](https://game.lhg100.com/Article/UploadFiles/201512/2015121710060526.jpg)
[#356]
Make sure it's safe here and proceed towards a huge moving platform [#357]. Use the control panel to activate this elevator. I would recommend that you now take cover behind a large container, so you won't be noticed by enemy units when the platform reaches its final destination. It'll take some time by the way, so you must be patient.
![[#357] - Escape from Butcher Bay - Loading Docks - part 1 - Escape from Butcher Bay - The Chronicles of Riddick: Assault on Dark Athena - Game Guide and Walkthrough](https://game.lhg100.com/Article/UploadFiles/201512/2015121710060673.jpg)
[#357]
You should notice a few standard guards in front of you, as well as mech. Thankfully it's going to be easy to win here. Fire a single round at one of the explosive barrels [#358] and that should do the trick. If it doesn't - use grenades or a shotgun to destroy the mech (don't forget to surprise the machine from behind). Move forward and destroy all the lamps.
![[#358] - Escape from Butcher Bay - Loading Docks - part 1 - Escape from Butcher Bay - The Chronicles of Riddick: Assault on Dark Athena - Game Guide and Walkthrough](https://game.lhg100.com/Article/UploadFiles/201512/2015121710060639.jpg)
[#358]
Look up before you move any further. One of the guards will be occupying an upper balcony and he must die [#359], because otherwise he would have noticed Riddick. Proceed towards the exit and get ready to defeat new enemy units. Guards are stationed just around the corner. You can try destroying the lights to increase your chances of winning or you can throw a grenade at them if you're inpatient. I would recommend that you leave grenades for later, because they will come in handy in the near future.
![[#359] - Escape from Butcher Bay - Loading Docks - part 1 - Escape from Butcher Bay - The Chronicles of Riddick: Assault on Dark Athena - Game Guide and Walkthrough](https://game.lhg100.com/Article/UploadFiles/201512/2015121710060604.jpg)
[#359]
Watch out, because you're going to be attacked by new beasts very soon. Eliminate all monsters and proceed to your left, destroying all the lamps along the way. There are three guards stationed around the corner [#360], but since you're standing in the dark they shouldn't notice you. Eliminating them is going to be very easy.
![[#360] - Escape from Butcher Bay - Loading Docks - part 2 - Escape from Butcher Bay - The Chronicles of Riddick: Assault on Dark Athena - Game Guide and Walkthrough](https://game.lhg100.com/Article/UploadFiles/201512/2015121710060662.jpg)
[#360]
Get to the area where you first saw the guards. Inspect their bodies for ammunition and a precious cartridge. There's a medical station to your right [#361]. Use it to extend your health bar by one square. You can also take an assault rifle from the ground. Proceed to your right.
![[#361] - Escape from Butcher Bay - Loading Docks - part 2 - Escape from Butcher Bay - The Chronicles of Riddick: Assault on Dark Athena - Game Guide and Walkthrough](https://game.lhg100.com/Article/UploadFiles/201512/2015121710060770.jpg)
[#361]
Watch out, because you're going to be attacked by a guard when you get to a new corner. Move back in order to avoid a grenade explosion. Return to this area and kill him while staying in the shadows [#362]. Head forward once he's gone and don't forget to destroy other sources of light along the way.
![[#362] - Escape from Butcher Bay - Loading Docks - part 2 - Escape from Butcher Bay - The Chronicles of Riddick: Assault on Dark Athena - Game Guide and Walkthrough](https://game.lhg100.com/Article/UploadFiles/201512/2015121710060728.jpg)
[#362]
Eventually you should be able to get to a large warehouse which is being occupied by four guards. Stand in the entrance and destroy two large lamps from here. Move back in order to avoid enemy counterattacks and open the door again when it's safe. This time focus on eliminating two enemy guards [#363]. Make sure to take cover each time you've suffered some hits, because you wouldn't want to lose any health points here.
![[#363] - Escape from Butcher Bay - Loading Docks - part 2 - Escape from Butcher Bay - The Chronicles of Riddick: Assault on Dark Athena - Game Guide and Walkthrough](https://game.lhg100.com/Article/UploadFiles/201512/2015121710060724.jpg)
[#363]
Once you've eliminated the first group of enemy units destroy the final third lamp. This will allow you to move freely around the warehouse. There are two more guards for you to kill and they're both occupying upper balconies [#364]. Don't forget to stand under the first balcony when you kill the third guard. Once he's gone move forward, turn around and kill the final guard.
![[#364] - Escape from Butcher Bay - Loading Docks - part 2 - Escape from Butcher Bay - The Chronicles of Riddick: Assault on Dark Athena - Game Guide and Walkthrough](https://game.lhg100.com/Article/UploadFiles/201512/2015121710060755.jpg)
[#364]
Take some time finding a very large crate [#365]. Get on top of this object and then make a jump towards a large container. Once this is done approach the wall and press the action key in order to grab the railing. Eventually you'll end up standing on a balcony. Explore the area in order to find a cigarette pack (53 - Home Box 2). In addition to that you should also come across a new cartridge. Go back down, head to the large elevator and press a button.
![[#365] - Escape from Butcher Bay - Loading Docks - part 2 - Escape from Butcher Bay - The Chronicles of Riddick: Assault on Dark Athena - Game Guide and Walkthrough](https://game.lhg100.com/Article/UploadFiles/201512/2015121710060891.jpg)
[#365]
Ignore the fact that you don't have anywhere to hide, because it's going to be dark inside the elevator when you get to the new level. Try destroying a single lamp along the way if you still feel uncomfortable. Notice a new mech in front of you. Defeat your opponent using grenades [#366]. Sadly it you don't have any you'll have to start using the shotgun to surprise your opponent from the back. Once you've won examine mech's body and collect a MINIGUN!
![[#366] - Escape from Butcher Bay - Loading Docks - part 2 - Escape from Butcher Bay - The Chronicles of Riddick: Assault on Dark Athena - Game Guide and Walkthrough](https://game.lhg100.com/Article/UploadFiles/201512/2015121710060860.jpg)
[#366]
Notice that it's very hard to move while carrying the minigun and that's why I didn't recommend collecting this weapon in the previous mission. Begin by moving forward. Thankfully you won't encounter any hostile units for the time being. Make a stop once you've reached a new door [#367]. Destroy the lamp and move closer to this new passageway.
![[#367] - Escape from Butcher Bay - Loading Docks - part 2 - Escape from Butcher Bay - The Chronicles of Riddick: Assault on Dark Athena - Game Guide and Walkthrough](https://game.lhg100.com/Article/UploadFiles/201512/2015121710060841.jpg)
[#367]
One of the enemy soldiers will be standing in front of you and obviously you'll have to kill him. It shouldn't be a problem. Examine the area to your left to find a NanoMED health unit. Heal your injuries after which use a small control panel [#368]. Proceed towards a large gate and you'll get to an exit.
![[#368] - Escape from Butcher Bay - Loading Docks - part 2 - Escape from Butcher Bay - The Chronicles of Riddick: Assault on Dark Athena - Game Guide and Walkthrough](https://game.lhg100.com/Article/UploadFiles/201512/2015121710060890.jpg)
[#368]
Get ready to defeat a new miniboss. It's extremely important to leave the minigun on the ground as soon as you've started this level [#369]. You can do this by choosing a new weapon from your inventory. Avoid a rocket heading your way and take cover behind the nearest pillar.
![[#369] - Escape from Butcher Bay - Fuel Transport - Escape from Butcher Bay - The Chronicles of Riddick: Assault on Dark Athena - Game Guide and Walkthrough](https://game.lhg100.com/Article/UploadFiles/201512/2015121710060970.jpg)
[#369]
Thankfully it's going to be a rather straightforward duel. Focus most of your attention on avoiding the boss, because its attacks would result in Riddick losing a lot of health. Wait for one of the barrels to appear above the hostile machine and fire at it to let it go. You'll witness an explosion if you've done everything correctly [#370].
![[#370] - Escape from Butcher Bay - Fuel Transport - Escape from Butcher Bay - The Chronicles of Riddick: Assault on Dark Athena - Game Guide and Walkthrough](https://game.lhg100.com/Article/UploadFiles/201512/2015121710060962.jpg)
[#370]
If you're lucky the robot will be destroyed after three-four successful explosions. Once this is done go back to the corridor where you've started this level and pick up a minigun again. You may now proceed towards a large gate [#371].
![[#371] - Escape from Butcher Bay - Fuel Transport - Escape from Butcher Bay - The Chronicles of Riddick: Assault on Dark Athena - Game Guide and Walkthrough](https://game.lhg100.com/Article/UploadFiles/201512/2015121710060942.jpg)
[#371]
Approach a large entrance. Make sure you're standing to the left of the gate and begin firing at the first mech [#372]. A second machine will arrive from the left, but you should be fine as long as you're not exposed too much. Destroying some of the nearby lamps can also help in Riddick remaining a difficult target for his enemies. If you don't have the minigun it will be much more difficult to win. Destroy the lights and move closer to both mechs. You would have to use grenades and a shotgun to defeat them.
![[#372] - Escape from Butcher Bay - Hangar - Escape from Butcher Bay - The Chronicles of Riddick: Assault on Dark Athena - Game Guide and Walkthrough](https://game.lhg100.com/Article/UploadFiles/201512/2015121710060951.jpg)
[#372]
Once you've defeated both mechs begin moving forward. The landing pad is located to your left and it's going to be guarded by three soldiers [#373]. Eliminating them with a minigun should be a piece of cake, especially since you won't run out of ammo.
![[#373] - Escape from Butcher Bay - Hangar - Escape from Butcher Bay - The Chronicles of Riddick: Assault on Dark Athena - Game Guide and Walkthrough](https://game.lhg100.com/Article/UploadFiles/201512/2015121710061097.jpg)
[#373]
Make sure it's safe here and start moving towards the landing pad [#374]. Approach a large ship and wait for the ramp to be lowered. This will allow you to get on board of the flying machine. You'll be rewarded here with a series of interesting cut-scene.
![[#374] - Escape from Butcher Bay - Hangar - Escape from Butcher Bay - The Chronicles of Riddick: Assault on Dark Athena - Game Guide and Walkthrough](https://game.lhg100.com/Article/UploadFiles/201512/2015121710061032.jpg)
[#374]
This is more of an interactive cut-scene rather than a new level. Once you've regained control over Riddick move around a little [#375]. You won't have to do anything out of the ordinary and you won't find any interactive items. Wait for the main Riddick to fall asleep.
[#375]
You'll wake up once again, however this time you'll be joined by an another convict named Magico. DON'T even think about attack him, because Riddick would have been punished with a death sentence. Instead approach an opened capsule [#376] and press the action key. Watch a new cut-scene.
![[#376] - Escape from Butcher Bay - Exercise Area - Escape from Butcher Bay - The Chronicles of Riddick: Assault on Dark Athena - Game Guide and Walkthrough](https://game.lhg100.com/Article/UploadFiles/201512/2015121710061025.jpg)
[#376]
Once the cut-scene has ended familiarize yourself with updated objectives and collect a large club from the ground [#377]. Look around and ignore the fact that Riddick will fall asleep again, because everything is going according to the plan.
![[#377] - Escape from Butcher Bay - Cryo Pyramids - Escape from Butcher Bay - The Chronicles of Riddick: Assault on Dark Athena - Game Guide and Walkthrough](https://game.lhg100.com/Article/UploadFiles/201512/2015121710061103.jpg)
[#377]
Obviously you must wait for Riddick to return to the world of the living. Use your newly acquired club to destroy a small robot which will appear in your vicinity [#378]. Once this is done locate a door with a green lamp. Start moving towards that door, but the second you hear noises climb on top of the nearest "pyramid".
![[#378] - Escape from Butcher Bay - Cryo Pyramids - Escape from Butcher Bay - The Chronicles of Riddick: Assault on Dark Athena - Game Guide and Walkthrough](https://game.lhg100.com/Article/UploadFiles/201512/2015121710061172.jpg)
[#378]
Notice that new enemies, as well as robots have appeared in the area. Sadly you won't be allowed to destroy nearby sources of light, so you'll have to focus on avoiding hostile units. Wait for one of the mechs to turn around and run past it to get to a door [#379]. Thankfully once you're in a new passageway this level will come to an end.
![[#379] - Escape from Butcher Bay - Cryo Pyramids - Escape from Butcher Bay - The Chronicles of Riddick: Assault on Dark Athena - Game Guide and Walkthrough](https://game.lhg100.com/Article/UploadFiles/201512/2015121710061104.jpg)
[#379]
Once you've reached a new passageway ignore some of the bigger robots to your left. Instead proceed to your right. You'll soon hear an alarm and you're going to be attacked by two smaller robots [#380]. Use your club to destroy both machines after which drop down through a small hole. Head on to the opposite end of the tunnel and make sure to destroy other robots along the way.
![[#380] - Escape from Butcher Bay - Facility Control - Escape from Butcher Bay - The Chronicles of Riddick: Assault on Dark Athena - Game Guide and Walkthrough](https://game.lhg100.com/Article/UploadFiles/201512/2015121710061167.jpg)
[#380]
Approach the end of the tunnel carefully and grab the upper ledge. Make sure you're not noticed by a guard standing above you [#381]. I guess you shouldn't have any problems killing him. All you have to do is to wait for him to turn around. Climb up and approach him to perform a silent execution. Once you've won take a pistol and a cartridge. There's also a NanoMED health unit on a nearby wall.
![[#381] - Escape from Butcher Bay - Facility Control - Escape from Butcher Bay - The Chronicles of Riddick: Assault on Dark Athena - Game Guide and Walkthrough](https://game.lhg100.com/Article/UploadFiles/201512/2015121710061135.jpg)
[#381]
Drop down to a second hole. Just as again, you'll have to eliminate a few smaller robots along the way [#382]. The only difference is that you'll be allowed to speed up this process by using a pistol instead of a club. Get to the end of the tunnel and this time leave this area without any additional delays. Once you're at the top press the crouch key and proceed to the stairs.
![[#382] - Escape from Butcher Bay - Facility Control - Escape from Butcher Bay - The Chronicles of Riddick: Assault on Dark Athena - Game Guide and Walkthrough](https://game.lhg100.com/Article/UploadFiles/201512/2015121710061261.jpg)
[#382]
I would recommend that you choose a club again from your inventory, because you'll want to perform a few quick executions. Go to your left. The first opponent can be found inside a small room to your right [#383]. Don't forget that you should remain unnoticed. Take a cartridge and inspect a nearby table for a cigarette pack (54 - Rolling Slam).
![[#383] - Escape from Butcher Bay - Facility Control - Escape from Butcher Bay - The Chronicles of Riddick: Assault on Dark Athena - Game Guide and Walkthrough](https://game.lhg100.com/Article/UploadFiles/201512/2015121710061297.jpg)
[#383]
The second guard is standing at the end of the main corridor. Once again - perform a stealth kill to avoid unwanted attention. Make sure it's safe here and approach a large control panel which will be located to your right [#384]. Once this is done quickly return to a small room where you've killed the first guard. Hide in the shadows in order to surprise a new guard, as well as a few robots. Notice that the guard had a shotgun on him, so make sure to collect this new toy. You should also find a new cartridge.
![[#384] - Escape from Butcher Bay - Facility Control - Escape from Butcher Bay - The Chronicles of Riddick: Assault on Dark Athena - Game Guide and Walkthrough](https://game.lhg100.com/Article/UploadFiles/201512/2015121710061228.jpg)
[#384]
You must now return to the area where you first saw two large robots behind a glass wall (to the left of the start area). This means you'll have to go through two dark corridors again [#385] and obviously you'll encounter new robots along the way. Just as before, use your pistol to get rid of the robots. Once you've reached the end of the second tunnel choose a shotgun from your inventory and climb up.
![[#385] - Escape from Butcher Bay - Facility Control - Escape from Butcher Bay - The Chronicles of Riddick: Assault on Dark Athena - Game Guide and Walkthrough](https://game.lhg100.com/Article/UploadFiles/201512/2015121710061230.jpg)
[#385]
Sadly defeating the robots is not going to be easy. Take cover behind the right wall and wait for the first machine to get closer to your position [#386]. Use a shotgun to get rid of the robot. I assume you have enough shotgun rounds to finish the job, so don't stop shooting until your opponent is eliminated.
![[#386] - Escape from Butcher Bay - Facility Control - Escape from Butcher Bay - The Chronicles of Riddick: Assault on Dark Athena - Game Guide and Walkthrough](https://game.lhg100.com/Article/UploadFiles/201512/2015121710061290.jpg)
[#386]
Once you've defeated the first robot you'll probably run out of ammo, so you'll have to switch to a pistol. Lean out carefully and begin firing at the second machine from a larger distance [#387]. If you have done everything according to the plan you shouldn't lose more than half of your initial number of health units. Proceed forward in order to get to a new room.
![[#387] - Escape from Butcher Bay - Facility Control - Escape from Butcher Bay - The Chronicles of Riddick: Assault on Dark Athena - Game Guide and Walkthrough](https://game.lhg100.com/Article/UploadFiles/201512/2015121710061305.jpg)
[#387]
Ignore other robots found in this warehouse, because they're in an idle state. Instead proceed to the opposite end of this warehouse and you'll be given a unique opportunity to take control over a heavy mech [#388]. Once you're on board take your time to familiarize yourself with weird controls, especially when it comes to moving sideways.
![[#388] - Escape from Butcher Bay - Facility Control - Escape from Butcher Bay - The Chronicles of Riddick: Assault on Dark Athena - Game Guide and Walkthrough](https://game.lhg100.com/Article/UploadFiles/201512/2015121710061320.jpg)
[#388]
Begin firing at other robots [#389] and they'll wake up, immediately attacking Riddick. Notice that you can use not only a powerful minigun (left mouse button), but you can also fire missiles (right mouse button). In addition to that Riddick's mech has a very powerful armor, so you won't begin losing energy points right away.
![[#389] - Escape from Butcher Bay - Facility Control - Escape from Butcher Bay - The Chronicles of Riddick: Assault on Dark Athena - Game Guide and Walkthrough](https://game.lhg100.com/Article/UploadFiles/201512/2015121710061329.jpg)
[#389]
Once you've destroyed all robots proceed towards a corridor located to your right. Get closer to a large elevator and you're going to be attacked by a heavy mech similar to yours [#390]. Thankfully all you have to do is to begin firing constantly at the mech using your minigun, so the machine will have hard time fighting back. You can also fire a few rockets if you want to. Wait for the mech to be destroyed and get to the elevator which will start moving to a new floor automatically.
![[#390] - Escape from Butcher Bay - Facility Control - Escape from Butcher Bay - The Chronicles of Riddick: Assault on Dark Athena - Game Guide and Walkthrough](https://game.lhg100.com/Article/UploadFiles/201512/2015121710061350.jpg)
[#390]
This is going to be a rather straightforward level. Keep heading forward and from time to time you'll encounter a new group of guards. You'll only have to watch out for occasional snipers. They will occupy some of the upper hallways [#391]. You shouldn't lose more than one health unit here if you're skilled enough and if you take your time eliminating new targets.
![[#391] - Escape from Butcher Bay - Corporate Office - Escape from Butcher Bay - The Chronicles of Riddick: Assault on Dark Athena - Game Guide and Walkthrough](https://game.lhg100.com/Article/UploadFiles/201512/2015121710061384.jpg)
[#391]
The only real threat is a short corridor with a large chandelier hanging from the ceiling [#392]. Two groups of enemy guards will try to ambush Riddick here. Once they open the curtains and reveal their positions move back quickly and use your rocket launcher to get rid of them as soon as possible.
![[#392] - Escape from Butcher Bay - Corporate Office - Escape from Butcher Bay - The Chronicles of Riddick: Assault on Dark Athena - Game Guide and Walkthrough](https://game.lhg100.com/Article/UploadFiles/201512/2015121710061323.jpg)
[#392]
The final phase of this mission will require you to defeat a few other robots, however it shouldn't be a big problem. Proceed towards a new elevator [#393] in order to finish this level and to proceed with the next one.
![[#393] - Escape from Butcher Bay - Corporate Office - Escape from Butcher Bay - The Chronicles of Riddick: Assault on Dark Athena - Game Guide and Walkthrough](https://game.lhg100.com/Article/UploadFiles/201512/2015121710061367.jpg)
[#393]
Head left once you exit the elevator and make sure to kill all enemy guards along the way. Eventually you should be able to get to a much larger warehouse. Eliminate new soldiers and go to your right. Get ready to defend yourself against attacks made by a second large mech [#394]. Thankfully your mech should still be in a perfect condition, so it would be very hard to lose. :-)
![[#394] - Escape from Butcher Bay - Take Off Platform - Escape from Butcher Bay - The Chronicles of Riddick: Assault on Dark Athena - Game Guide and Walkthrough](https://game.lhg100.com/Article/UploadFiles/201512/2015121710061469.jpg)
[#394]
Notice that your mech will stop working once you defeat the final opponent. This isn't something you could prevent from happening. Exit your mech and explore this area. It shouldn't take you too long to find a cigarette pack (14 - Basilica Interior Detail 8). Proceed towards a small crate [#395] and use it to get to an upper platform. There's a new cigarette pack (2 - Corporate Offices) there.
![[#395] - Escape from Butcher Bay - Take Off Platform - Escape from Butcher Bay - The Chronicles of Riddick: Assault on Dark Athena - Game Guide and Walkthrough](https://game.lhg100.com/Article/UploadFiles/201512/2015121710061409.jpg)
[#395]
Head down and go to the passageway where the second large mech has appeared for the first time. You should be able to find a large red button here [#396]. Pressing it will trigger other mechs showing up in this area, so you must run to the exit QUICKLY in order to prevent Riddick from losing too many health units.
![[#396] - Escape from Butcher Bay - Take Off Platform - Escape from Butcher Bay - The Chronicles of Riddick: Assault on Dark Athena - Game Guide and Walkthrough](https://game.lhg100.com/Article/UploadFiles/201512/2015121710061484.jpg)
[#396]
Once you've seen a new cut-scene get ready for a final battle with two enemy robots. The interesting thing is that both machines will be using camouflage to make it harder to destroy them. The second you've gained control over Riddick move forward and collect a minigun [#397]. Take cover behind the nearest pillar.
![[#397] - Escape from Butcher Bay - Take Off Platform - Escape from Butcher Bay - The Chronicles of Riddick: Assault on Dark Athena - Game Guide and Walkthrough](https://game.lhg100.com/Article/UploadFiles/201512/2015121710061439.jpg)
[#397]
This shouldn't be a difficult fight for you, however you will probably lose 3-4 health points before both mechs are eliminated. Keep shooting using the minigun. You can locate robots easily, because bullets will stop hitting the walls. You can also wait for your opponents to drop camouflage for a short period of time [#398]. Focus on one target at a time. Once you've destroyed the first mech target the other one. Destroying both robots will end this campaign. Enjoy the final cut-scene!
![[#398] - Escape from Butcher Bay - Take Off Platform - Escape from Butcher Bay - The Chronicles of Riddick: Assault on Dark Athena - Game Guide and Walkthrough](https://game.lhg100.com/Article/UploadFiles/201512/2015121710061596.jpg)
[#398]
Map of the area:
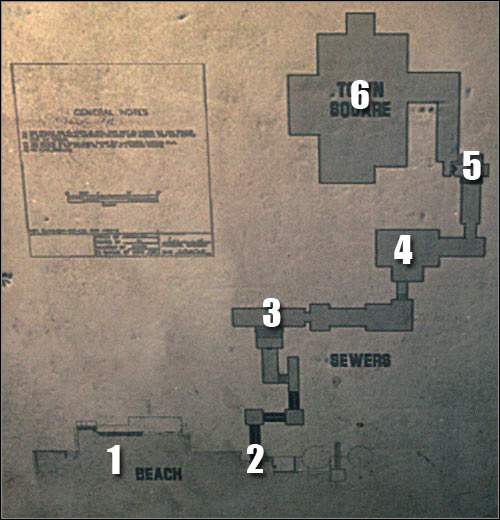
Map legend: 1 - starting area; 2 - entrance to the sewers; 3 - first Bounty Card; 4 - area patrolled by drones; 5 - medical station; 6 - final area of the map
Turn around and start moving forward. Ignore a door along the way, because you wouldn't be able to use it to get inside the building. Instead find a small entrance leading to the sewers [#399]. Turn on Eyeshine by pressing the Q key and proceed inside. Once you've reached the exit ignore Jemas, because you don't have to kill him and you won't gain anything from killing him.
![[#399] - Assault on Dark Athena - Tutorial - Assault on Dark Athena - The Chronicles of Riddick: Assault on Dark Athena - Game Guide and Walkthrough](https://game.lhg100.com/Article/UploadFiles/201512/2015121710061503.jpg)
[#399]
Go to your right and use a ladder to get to an upper level. Make a few steps forward and look around to find the first bounty card (Manje Curr) [#400]. This is a collectible, similar to cigarette packs from the first campaign. Proceed to your right.
![[#400] - Assault on Dark Athena - Tutorial - Assault on Dark Athena - The Chronicles of Riddick: Assault on Dark Athena - Game Guide and Walkthrough](https://game.lhg100.com/Article/UploadFiles/201512/2015121710061530.jpg)
[#400]
Watch out, because you're going to be attacked by a thug once you go through a door. It shouldn't be too hard to win here. Perform standard attacks [#441] or experiment with more powerful moves by using movement keys. You won't have to block any attacks, however it would be wise to prevent Riddick from losing health.
![[#401] - Assault on Dark Athena - Tutorial - Assault on Dark Athena - The Chronicles of Riddick: Assault on Dark Athena - Game Guide and Walkthrough](https://game.lhg100.com/Article/UploadFiles/201512/2015121710061618.jpg)
[#401]
Once you've won head forward until you get to a wall. Climb on top of a small crate. Press the action key to grab the ledge and move to your left to find an opening [#402]. Pressing the upper movement key will allow you to get to the next area. Keep heading straight until you reach a larger room. Notice a new enemy unit below your current position.
![[#402] - Assault on Dark Athena - Tutorial - Assault on Dark Athena - The Chronicles of Riddick: Assault on Dark Athena - Game Guide and Walkthrough](https://game.lhg100.com/Article/UploadFiles/201512/2015121710061691.jpg)
[#402]
The easiest way to eliminate this opponent will be to land on his head [#403]. It shouldn't be too hard to perform this action. All you have to do is to start running and Riddick will do the rest. Press the crouch key and grab his body. You'll want to hide it in the shadows, however you can ignore doing this if you're in a lot of hurry.
![[#403] - Assault on Dark Athena - Tutorial - Assault on Dark Athena - The Chronicles of Riddick: Assault on Dark Athena - Game Guide and Walkthrough](https://game.lhg100.com/Article/UploadFiles/201512/2015121710061682.jpg)
[#403]
Remain here for a few more seconds and you'll notice that a drone has arrived in the area. A drone is a combination between a human and a machine. Basically drones are going to be slower and dumber than normal guards, however they will become more violent when they notice you. Wait for the drone to turn its back on you and approach it quickly to perform a stealth kill [#404]. You can also try scoring a few direct melee hits, however it would be a more dangerous approach.
[#404]
Notice that defeating the drone has allowed you to grab his weapon. Fire a few shots and a second drone should arrive from the exact same location [#405]. Kill it as soon as possible. Sadly you won't be allowed to take the weapon with you. All you can do is to move around slowly while retreating.
![[#405] - Assault on Dark Athena - Tutorial - Assault on Dark Athena - The Chronicles of Riddick: Assault on Dark Athena - Game Guide and Walkthrough](https://game.lhg100.com/Article/UploadFiles/201512/2015121710061605.jpg)
[#405]
Proceed towards the corridor where both drones showed up in the first place. You will soon get to an area with a NanoMED health unit. There's also a cartridge on the ground. Heal only if you have to and once you're done use the ladder. Approach a new opponent and perform a countermove on him [#406]. Notice that a standard execution won't be possible here.
![[#406] - Assault on Dark Athena - Tutorial - Assault on Dark Athena - The Chronicles of Riddick: Assault on Dark Athena - Game Guide and Walkthrough](https://game.lhg100.com/Article/UploadFiles/201512/2015121710061608.jpg)
[#406]
Make sure to pick up the assault rifle from the dead guard. Start moving forward and find some ammunition by the left wall. Lean out carefully. Aim for the head of the first soldier [#407]. Once he's gone remain here and keep firing at other guards. They will be appearing directly in front of you.
![[#407] - Assault on Dark Athena - Tutorial - Assault on Dark Athena - The Chronicles of Riddick: Assault on Dark Athena - Game Guide and Walkthrough](https://game.lhg100.com/Article/UploadFiles/201512/2015121710061648.jpg)
[#407]
Remember to fire only with short bursts, because you'll want to eliminate enemy guards with precise shots. Prevent them from moving too close. Once they're gone move to the new area SLOWLY and make sure that it's safe. Proceed to the only available door [#408] and eventually you'll get to a long tunnel. This is where the first level of the new campaign will end.
![[#408] - Assault on Dark Athena - Tutorial - Assault on Dark Athena - The Chronicles of Riddick: Assault on Dark Athena - Game Guide and Walkthrough](https://game.lhg100.com/Article/UploadFiles/201512/2015121710061730.jpg)
[#408]
Map of the area:

Map legend: 1 - starting area; 2 - decontamination zone; 3 - control panel; 4 - area where the first drone appears; 5 - room with a glass wall; 6 - ventilation shaft; 7 - elevator shaft; 8 - medical station; 9 - corridor (cut-scene)
Once you've regained control over Riddick make sure to have a hairpin chosen from your inventory. Start moving forward. Thankfully you won't encounter any enemy units along the way, because Riddick will only try in catching up to the rest. Proceed towards a small room [#409] and wait for a decontamination procedure to end.
![[#409] - Assault on Dark Athena - Cargo Deck - part 1 - Assault on Dark Athena - The Chronicles of Riddick: Assault on Dark Athena - Game Guide and Walkthrough](https://game.lhg100.com/Article/UploadFiles/201512/2015121710061757.jpg)
[#409]
Head on to a much bigger room and proceed to your right. There's a large control panel here [#410] and obviously you'll have to use it. Doing this won't unlock the next passageway, but instead it'll trigger a safety procedure. Go back to the crates quickly and take cover in the shadows. Wait for a drone to enter this area.
![[#410] - Assault on Dark Athena - Cargo Deck - part 1 - Assault on Dark Athena - The Chronicles of Riddick: Assault on Dark Athena - Game Guide and Walkthrough](https://game.lhg100.com/Article/UploadFiles/201512/2015121710061702.jpg)
[#410]
I guess I don't have to remind you that you should wait for the drone to turn its back on you. Leave your cover and kill your opponent. Now you must drag the drone to your right, so you'll be standing near a glass wall. Use drone's weapon to destroy the wall [#411]. Go to that area, ignoring smaller creatures in the area, Look around a little to find a bounty card (Jaybird Fries).
![[#411] - Assault on Dark Athena - Cargo Deck - part 1 - Assault on Dark Athena - The Chronicles of Riddick: Assault on Dark Athena - Game Guide and Walkthrough](https://game.lhg100.com/Article/UploadFiles/201512/2015121710061743.jpg)
[#411]
Don't leave this area just yet. Instead start climbing on some of the nearby crates. Once you're standing on the last crate look up to find a railing [#412]. Use the railing to get to the other side safely and enter a new ventilation shaft. Get to the corner to be rewarded with a cut-scene. Proceed to the end of the shaft and perform a well-know move by kicking out the grating.
![[#412] - Assault on Dark Athena - Cargo Deck - part 1 - Assault on Dark Athena - The Chronicles of Riddick: Assault on Dark Athena - Game Guide and Walkthrough](https://game.lhg100.com/Article/UploadFiles/201512/2015121710061821.jpg)
[#412]
Make sure not to fall down, because Riddick would die on the spot. Press the action key and the main character should automatically grab a pipe. Start moving to your right. Watch a new cut-scene when you get to the end. Climb up to get to a new platform and proceed to your right. You should be able to find a cartridge here, as well as a NanoMED health station [#413].
![[#413] - Assault on Dark Athena - Cargo Deck - part 1 - Assault on Dark Athena - The Chronicles of Riddick: Assault on Dark Athena - Game Guide and Walkthrough](https://game.lhg100.com/Article/UploadFiles/201512/2015121710061858.jpg)
[#413]
Use a nearby ladder to get down to a lower level (slide down). Make a few steps forward and make sure to hide in the shadows. Wait for one of the drones to show up and surprise it from behind [#414]. Take over drone's cannon and fire a few rounds to attract the attention of the second opponent. Wait for him to show up and kill him on sight.
![[#414] - Assault on Dark Athena - Cargo Deck - part 1 - Assault on Dark Athena - The Chronicles of Riddick: Assault on Dark Athena - Game Guide and Walkthrough](https://game.lhg100.com/Article/UploadFiles/201512/2015121710061882.jpg)
[#414]
Proceed to the corridor which has been patrolled by the second drone not long ago. Once again you must use a ladder to get down to a lower level. Press the action key and start moving forward while holding on to one of the pipes [#415]. Keep moving in that direction until you'll be given a chance to climb to a new hallway. Watch a new cut-scene.
![[#415] - Assault on Dark Athena - Cargo Deck - part 1 - Assault on Dark Athena - The Chronicles of Riddick: Assault on Dark Athena - Game Guide and Walkthrough](https://game.lhg100.com/Article/UploadFiles/201512/2015121710061816.jpg)
[#415]
As you've probably suspected, Riddick's top priority at the moment will be to gain possession of the blades. Turn around and return to the elevator shaft. This time you don't want to grab the ledge. Instead drop down [#416]. Open the ventilation shaft and you'll be rewarded with an interesting cut-scene. The blades are yours! :-)
![[#416] - Assault on Dark Athena - Cargo Deck - part 1 - Assault on Dark Athena - The Chronicles of Riddick: Assault on Dark Athena - Game Guide and Walkthrough](https://game.lhg100.com/Article/UploadFiles/201512/2015121710061966.jpg)
[#416]
Start moving forward and eventually you'll end up standing inside a small room. Notice a NanoMED health station on the wall [#417]. Get ready for a very challenging section of the mission. You can decide how you to want to play this all out...
![[#417] - Assault on Dark Athena - Cargo Deck - part 1 - Assault on Dark Athena - The Chronicles of Riddick: Assault on Dark Athena - Game Guide and Walkthrough](https://game.lhg100.com/Article/UploadFiles/201512/2015121710061915.jpg)
[#417]
Map of the area:
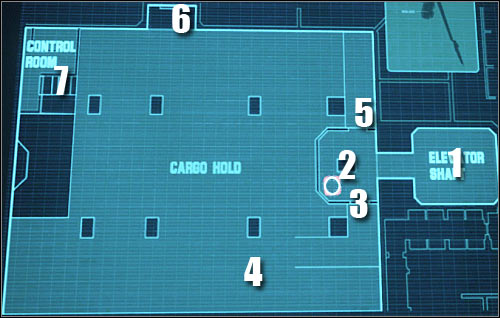
Map legend: 1 - elevator shaft; 2 - ladder; 3 - left exit; 4 - Bounty Card; 5 - Bounty Card; 6 - Bounty Card; 7 - destination
Collecting the first Bounty Card: Use the ladder to get to the top of a large structure. Don't jump over the barrier. Instead, approach the left wall and you should notice a pipe directly above you [#418]. Use the pipe to get to an upper platform with a bounty card ("Polarbear" Mygaw). Once you have the card you must go back to the area with the ladder. You can drop down and make a run for it or you can use the pipe again if you're patient enough.
![[#418] - Assault on Dark Athena - Cargo Deck - part 2 - Assault on Dark Athena - The Chronicles of Riddick: Assault on Dark Athena - Game Guide and Walkthrough](https://game.lhg100.com/Article/UploadFiles/201512/2015121710061944.jpg)
[#418]
Collecting two other Bounty Cards: Use the ladder again to get to a roof of the small room. Grab the pipe, however this time you should be moving left. Thankfully you won't have to look for areas where to drop, because eventually you'll get to a small balcony [#419]. Collect a bounty card (Jestin Thrints). It would probably take you too much time to return to the small room from here, so I would suggest that you reload the last checkpoint. Remember that by doing so you won't lose the card. The final third bounty card (Chugger Slich) can be found in the corner of a large room. When you use the ladder turn right, approach the ledge and look down. You shouldn't have any problems locating it.
![[#419] - Assault on Dark Athena - Cargo Deck - part 2 - Assault on Dark Athena - The Chronicles of Riddick: Assault on Dark Athena - Game Guide and Walkthrough](https://game.lhg100.com/Article/UploadFiles/201512/2015121710062098.jpg)
[#419]
Reaching your destination - taking it slowly: I won't lie to you - it will take you a lot of time to get through this area while remaining unnoticed. You would have to eliminate or avoid all the drones you'd encounter along the way. I would recommend to begin by going through the left door [#420].
![[#420] - Assault on Dark Athena - Cargo Deck - part 2 - Assault on Dark Athena - The Chronicles of Riddick: Assault on Dark Athena - Game Guide and Walkthrough](https://game.lhg100.com/Article/UploadFiles/201512/2015121710062095.jpg)
[#420]
Once you exit the booth turn right and remain close to the wall. Keep heading towards a very dark corner of the room [#421]. You shouldn't have any problems dealing with the drones, however you should remember that your enemies tend to turn around when it's least expected. Keep heading towards the exit and avoid stepping into brighter areas.
![[#421] - Assault on Dark Athena - Cargo Deck - part 2 - Assault on Dark Athena - The Chronicles of Riddick: Assault on Dark Athena - Game Guide and Walkthrough](https://game.lhg100.com/Article/UploadFiles/201512/2015121710062054.jpg)
[#421]
Reaching your destination - fast sprint: This is going to be a more difficult approach, but if all goes well you won't have to spend more than 30-40 seconds to leave this area. Use the ladder and jump over the barrier [#422]. Approach the ledge and spend some time observing the drones.
![[#422] - Assault on Dark Athena - Cargo Deck - part 2 - Assault on Dark Athena - The Chronicles of Riddick: Assault on Dark Athena - Game Guide and Walkthrough](https://game.lhg100.com/Article/UploadFiles/201512/2015121710062186.jpg)
[#422]
Start running and press the jump key once you're very close to the ledge. Try landing on a set of containers [#423]. Notice that you'll be fully exposed here, so you can't stay here for too long. Keep running forward and turn right when you have the chance.
![[#423] - Assault on Dark Athena - Cargo Deck - part 2 - Assault on Dark Athena - The Chronicles of Riddick: Assault on Dark Athena - Game Guide and Walkthrough](https://game.lhg100.com/Article/UploadFiles/201512/2015121710062175.jpg)
[#423]
Drop down to the ground and continue moving towards a dark corner of the room [#424]. If you're lucky you should be able to attract the attention of all nearby drones. Hide in one of the corners and wait for the drones to move somewhere towards the containers. Avoid them unless you want to be exposed.
![[#424] - Assault on Dark Athena - Cargo Deck - part 2 - Assault on Dark Athena - The Chronicles of Riddick: Assault on Dark Athena - Game Guide and Walkthrough](https://game.lhg100.com/Article/UploadFiles/201512/2015121710062133.jpg)
[#424]
The exit is located behind the large crates, however you can't reach it that easily. Go to your left and approach a smaller crate [#425]. Get on top of this crate, turn right quickly and start running forward in order to avoid unnecessary hits. Thankfully you'll be safe when you get to a small room.
![[#425] - Assault on Dark Athena - Cargo Deck - part 3 - Assault on Dark Athena - The Chronicles of Riddick: Assault on Dark Athena - Game Guide and Walkthrough](https://game.lhg100.com/Article/UploadFiles/201512/2015121710062195.jpg)
[#425]
Ignore a transmission being shown to you on a monitor. Inspect the area to your right and you should be able to find a NanoMED health station. Use it and proceed towards the exit. Press a button on the right wall when you get to a large gap [#426]. Wait for the bridge to be fully extended before moving on to the other side.
![[#426] - Assault on Dark Athena - Cargo Deck - part 3 - Assault on Dark Athena - The Chronicles of Riddick: Assault on Dark Athena - Game Guide and Walkthrough](https://game.lhg100.com/Article/UploadFiles/201512/2015121710062234.jpg)
[#426]
Approach the console when you get to a new platform and press the action key to witness a short animation. Afterwards use a ladder to get to a lower level. You must be extremely careful here, because it'll be easy to lose balance and fall. Approach a long metal beam [#427], go to the end and drop down. Make sure to hide in the shadows.
![[#427] - Assault on Dark Athena - Cargo Deck - part 3 - Assault on Dark Athena - The Chronicles of Riddick: Assault on Dark Athena - Game Guide and Walkthrough](https://game.lhg100.com/Article/UploadFiles/201512/2015121710062265.jpg)
[#427]
Reveal your position to enemy units for a short period of time and wait for one of the drones to show up [#428]. Surprise the drone from the back when it'll decide to turn around and take control over the cannon. If the guns overheats make sure to retreat and to wait for an another drone to show up, allowing you to try again.
![[#428] - Assault on Dark Athena - Cargo Deck - part 3 - Assault on Dark Athena - The Chronicles of Riddick: Assault on Dark Athena - Game Guide and Walkthrough](https://game.lhg100.com/Article/UploadFiles/201512/2015121710062276.jpg)
[#428]
I would recommend that you eliminate all nearby drones before moving on to the next section of the warehouse. Be on a look out for a narrow passageway to your left [#429]. Lean out carefully and memorize positions of other drones. Run forward and take cover under the large platform with one of the drones patrolling the area.
![[#429] - Assault on Dark Athena - Cargo Deck - part 3 - Assault on Dark Athena - The Chronicles of Riddick: Assault on Dark Athena - Game Guide and Walkthrough](https://game.lhg100.com/Article/UploadFiles/201512/2015121710062378.jpg)
[#429]
Use some of the well-known methods to surprise one of the drones and then take control over its gun in order to get rid of other enemy units. I would strongly recommend that you secure this entire warehouse. Spend some time exploring your surroundings. Go back to the large gap and you'll find a cartridge in one of the corners of the warehouse [#430].
![[#430] - Assault on Dark Athena - Cargo Deck - part 3 - Assault on Dark Athena - The Chronicles of Riddick: Assault on Dark Athena - Game Guide and Walkthrough](https://game.lhg100.com/Article/UploadFiles/201512/2015121710062306.jpg)
[#430]
You should also check the corner near a large platform where you've killed one of the drones. This time you can count on adding a new bounty card (Tagger Nills) [#431] to your inventory. There are some crates next to the card. Use them to get on top of the upper platform.
![[#431] - Assault on Dark Athena - Cargo Deck - part 3 - Assault on Dark Athena - The Chronicles of Riddick: Assault on Dark Athena - Game Guide and Walkthrough](https://game.lhg100.com/Article/UploadFiles/201512/2015121710062335.jpg)
[#431]
Thankfully you won't have to worry about any other drones appearing in this area. Move forward and then turn right. Get on top of a small crate [#432] and then enter a new ventilation shaft. Wait for the game to begin loading a new level.
![[#432] - Assault on Dark Athena - Cargo Deck - part 3 - Assault on Dark Athena - The Chronicles of Riddick: Assault on Dark Athena - Game Guide and Walkthrough](https://game.lhg100.com/Article/UploadFiles/201512/2015121710062315.jpg)
[#432]
Map of the area:

Map legend: 1 - starting area; 2 - medical station; 3 - entrance to the control room; 4 - prisoner cells; 5 - passageway to the next area
You start this level inside a ventilation shaft, however you'll be allowed to stand up after a few seconds. Keep moving forward until you get to a grating. Obviously you must kick it out before moving on. There's a NanoMED health unit to your right if you need one, but you'll probably want to return here later on. Notice a single guard below your current position [#433]. Try landing on him. If you fail you'll have to defeat him in a direct melee combat which shouldn't be a big problem.
![[#433] - Assault on Dark Athena - Celldecks - Assault on Dark Athena - The Chronicles of Riddick: Assault on Dark Athena - Game Guide and Walkthrough](https://game.lhg100.com/Article/UploadFiles/201512/2015121710062427.jpg)
[#433]
Proceed towards the nearest passageway. When you get to a larger room press the crouch key and drop down through the left hole [#434]. Explore the area around you to find a cartridge. This is a precious find, because the health station you've found not along ago wasn't charged. Go back up using the same hole, because you won't be able to attack enemy units from here.
![[#434] - Assault on Dark Athena - Celldecks - Assault on Dark Athena - The Chronicles of Riddick: Assault on Dark Athena - Game Guide and Walkthrough](https://game.lhg100.com/Article/UploadFiles/201512/2015121710062442.jpg)
[#434]
Sadly it's a bright room, so you won't have a lot of chances to stay in the shadows. Besides you don't have a tranquilizer gun, nor any real weapons for that matter. I would recommend that you expose yourself for a second or two. Allow one of thugs to notice Riddick and go back to the darker corridor [#435]. Try fighting only one opponent at a time if possible. Be careful, because one of the crew members will be carrying a club, so it won't be easy to perform countermoves while trying to defeat him. Thankfully he's the only one with that problem. Use counterattacks to defeat other bandits. Remember that you can know easily when to strike when your blades will flash for a fraction of a second.
![[#435] - Assault on Dark Athena - Celldecks - Assault on Dark Athena - The Chronicles of Riddick: Assault on Dark Athena - Game Guide and Walkthrough](https://game.lhg100.com/Article/UploadFiles/201512/2015121710062488.jpg)
[#435]
Once you've defeated all enemies MAKE SURE to examine their bodies, because one of the thugs will leave a keycard behind [#436]. You can also collect a club if you want to, however in my opinion blades are a better weapon when it comes to direct combat. Return to the large control room where you saw all three guards for the first time.
![[#436] - Assault on Dark Athena - Celldecks - Assault on Dark Athena - The Chronicles of Riddick: Assault on Dark Athena - Game Guide and Walkthrough](https://game.lhg100.com/Article/UploadFiles/201512/2015121710062531.jpg)
[#436]
Before you focus on completing your current objective make sure to examine a small dark area located under one of the balconies [#437]. It shouldn't take you too long to find a bounty card (George Homely). Return to a large room and use your newly acquired keycard on a central computer. This will allow Riddick to unlock access to a cell block.
![[#437] - Assault on Dark Athena - Celldecks - Assault on Dark Athena - The Chronicles of Riddick: Assault on Dark Athena - Game Guide and Walkthrough](https://game.lhg100.com/Article/UploadFiles/201512/2015121710062505.jpg)
[#437]
Head on to the next room which is located behind the console you've just used. Once inside use a new control panel in order to uncover all the cells. You now talk to some of the nearby inmates. Start off by talking to Bonner [#438]. You won't receive any useful intel from him, however you will listen to a few funny dialogues. You can ask him about the captain and about Dark Athena.
![[#438] - Assault on Dark Athena - Celldecks - Assault on Dark Athena - The Chronicles of Riddick: Assault on Dark Athena - Game Guide and Walkthrough](https://game.lhg100.com/Article/UploadFiles/201512/2015121710062580.jpg)
[#438]
Go to the other side of the room. The only person from this group of cells you can talk to at the moment is Dacher. I would recommend choosing the first option from the dialogue list [#439], so it won't take too long before he gets down to business. Notice that a new main quest has been added to your list of goals - you must obtain a Vent Tool.
![[#439] - Assault on Dark Athena - Celldecks - Assault on Dark Athena - The Chronicles of Riddick: Assault on Dark Athena - Game Guide and Walkthrough](https://game.lhg100.com/Article/UploadFiles/201512/2015121710062672.jpg)
[#439]
Go back to the other side of the room and go to the first cell from the right. Talk to a woman called Silverman [#440]. Ignore her weird responses at the beginning of the conversation, because everything will return to normal soon enough. You'll find out that Silverman needs a screwdriver and some parts in order to construct a Vent Tool.
![[#440] - Assault on Dark Athena - Celldecks - Assault on Dark Athena - The Chronicles of Riddick: Assault on Dark Athena - Game Guide and Walkthrough](https://game.lhg100.com/Article/UploadFiles/201512/2015121710062611.jpg)
[#440]
The last prisoner you have to talk to is Jaylor [#441]. In this case it would be a good idea to exploit all topic conversations, because he has some interesting information. Finish the conversation by choosing the first response from the list. It turns out that Jaylor can help you, but first you must kill Margo for him.
![[#441] - Assault on Dark Athena - Celldecks - Assault on Dark Athena - The Chronicles of Riddick: Assault on Dark Athena - Game Guide and Walkthrough](https://game.lhg100.com/Article/UploadFiles/201512/2015121710062614.jpg)
[#441]
Return to the main room and use the central computer again. Notice that this time Riddick has unlocked a passageway leading to Berthing. The exit is located to your left [#442]. Step through a large gate and wait for the game to begin loading a new map.
![[#442] - Assault on Dark Athena - Celldecks - Assault on Dark Athena - The Chronicles of Riddick: Assault on Dark Athena - Game Guide and Walkthrough](https://game.lhg100.com/Article/UploadFiles/201512/2015121710062663.jpg)
[#442]
Map of the area:
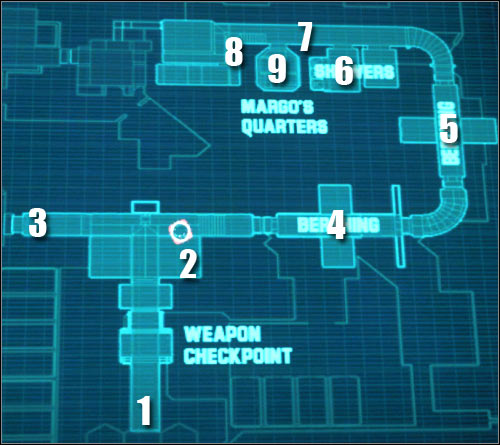
Map legend: 1 - starting area; 2 - medical station; 3 - Bounty Card; 4 - encounter with the first group of thugs and a Bounty Card; 5 - encounter with the second group of thugs; 6 - Bounty Card; 7 - miniboss; 8 - ventilation shaft; 9 - Margo's hideout and a Bounty Card
You must be patient, because you'll take part in a new decontamination procedure at the beginning of this level. Once you're inside a new room examine the wall to your right to find a NanoMED health unit. I would now recommend that you go your left and eventually you'll come across a bounty card - Treakin Badba) [#443].
![[#443] - Assault on Dark Athena - Crewquarters - Assault on Dark Athena - The Chronicles of Riddick: Assault on Dark Athena - Game Guide and Walkthrough](https://game.lhg100.com/Article/UploadFiles/201512/2015121710062777.jpg)
[#443]
Turn around once you've taken the card and head forward until you get to a small door. Sadly you're going to be attacked by three enemies here [#444]. Remain in front of the entrance or go back to the previous area. The most important thing here is to prevent them from surrounding Riddick. Just as before, watch out for a bandit equipped with a club. As long as you don't make any major mistakes you shouldn't lose more than one health unit.
![[#444] - Assault on Dark Athena - Crewquarters - Assault on Dark Athena - The Chronicles of Riddick: Assault on Dark Athena - Game Guide and Walkthrough](https://game.lhg100.com/Article/UploadFiles/201512/2015121710062718.jpg)
[#444]
Once you've taken out all the hostiles you can examine their bodies to find a combat knife. This weapon may come in handy when fighting a miniboss, so you should pick it up. Proceed to the narrow passageway once again. This time inspect the area to your right and you'll find a bounty card (Bracer Neglina) on a small round table [#445]. Go to the next corridor.
![[#445] - Assault on Dark Athena - Crewquarters - Assault on Dark Athena - The Chronicles of Riddick: Assault on Dark Athena - Game Guide and Walkthrough](https://game.lhg100.com/Article/UploadFiles/201512/2015121710062722.jpg)
[#445]
You'll have to defeat two other crew members in the next corridor [#446]. Make sure to avoid attacks of a guy with a large club. Once they're gone proceed forward, chasing after Margo. Choose your blades or a combat knife and prepare to go up against a miniboss.
![[#446] - Assault on Dark Athena - Crewquarters - Assault on Dark Athena - The Chronicles of Riddick: Assault on Dark Athena - Game Guide and Walkthrough](https://game.lhg100.com/Article/UploadFiles/201512/2015121710062764.jpg)
[#446]
You'll soon notice that a bouncer has appeared in front of Margo's room. Defeating him is not going to be easy and there are a few important things for you to remember about. I would strongly recommend that you return to the previous corridor [#447]. The boss will follow you, however he won't go through the door. This will allow you to regenerate easily. Start attacking him. A combat knife is a slightly better choice here, because he'll have more problems blocking your attacks. Avoid his strongest punch and eventually you'll kill him.
![[#447] - Assault on Dark Athena - Crewquarters - Assault on Dark Athena - The Chronicles of Riddick: Assault on Dark Athena - Game Guide and Walkthrough](https://game.lhg100.com/Article/UploadFiles/201512/2015121710062838.jpg)
[#447]
Once you've won the duel don't be so quick with trying to complete your current objective. Instead check both toilets located to your left [#448]. The first area contains a cartridge and in the other one you'll find a cigarette pack (Lawrence "Rendar" Unconscious). You should also consider going back to the health station in order to heal before the next battle.
![[#448] - Assault on Dark Athena - Crewquarters - Assault on Dark Athena - The Chronicles of Riddick: Assault on Dark Athena - Game Guide and Walkthrough](https://game.lhg100.com/Article/UploadFiles/201512/2015121710062814.jpg)
[#448]
Margo has barricaded himself in his quarters, but thankfully it won't be a big problem. Just keep moving forward until you get to a more open area. Turn left and locate an entrance to a ventilation shaft [#449]. Destroy the grating, head inside and use a small ladder. Make sure to choose the blades from your inventory before dropping down through a large hole.
![[#449] - Assault on Dark Athena - Crewquarters - Assault on Dark Athena - The Chronicles of Riddick: Assault on Dark Athena - Game Guide and Walkthrough](https://game.lhg100.com/Article/UploadFiles/201512/2015121710062873.jpg)
[#449]
The duel with Margo is going to be much easier than your previous challenge. As soon as you've landed face Margo and hold the block key. Wait for him to make a move and perform a successful counterattack [#450]. The interesting part is that if you time this right Riddick will only need this one move to perform a gruesome execution on Margo!
![[#450] - Assault on Dark Athena - Crewquarters - Assault on Dark Athena - The Chronicles of Riddick: Assault on Dark Athena - Game Guide and Walkthrough](https://game.lhg100.com/Article/UploadFiles/201512/2015121710062922.jpg)
[#450]
Approach Margo's body and press the action key. This will allow Riddick to "acquire" proof of Margo being dead - he'll take his gold tooth. Once this item is in your possession look around the cabin to find a bounty card ("Madhouse" Magee). Finish off by picking up a passcode from Margos' bed [#451]. Leave Margo's quarters through a small door.
![[#451] - Assault on Dark Athena - Crewquarters - Assault on Dark Athena - The Chronicles of Riddick: Assault on Dark Athena - Game Guide and Walkthrough](https://game.lhg100.com/Article/UploadFiles/201512/2015121710062930.jpg)
[#451]
Watch out, because you're going to be attacked by a bandit almost immediately and his colleague will arrive shortly from your right [#452]. Winning here shouldn't be too difficult, however you must prevent the main character from losing too much health. Return to the area where you've started exploring this level. Kill the third crew member and use the large passageway to go back to Celldecks.
![[#452] - Assault on Dark Athena - Crewquarters - Assault on Dark Athena - The Chronicles of Riddick: Assault on Dark Athena - Game Guide and Walkthrough](https://game.lhg100.com/Article/UploadFiles/201512/2015121710063026.jpg)
[#452]
Map of the area:
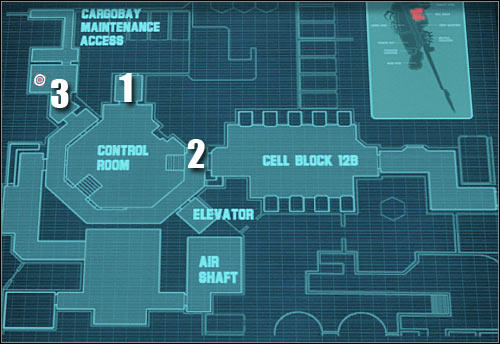
Map legend: 1 - starting area; 2 - Jaylor's stash; 3 - hatch that needs to be opened with a screwdriver
As you've probably suspected, you will have to return to Jaylor in order to inform him about your victory over Margo. Approach his cell and press the action key. As a result Riddick will give Jaylor the gold tooth. Jaylor will now share the combination to his stash. Go to your left and use the control panel on the wall [#453] to open the stash. Take a screwdriver.
![[#453] - Assault on Dark Athena - Celldecks #2 - Assault on Dark Athena - The Chronicles of Riddick: Assault on Dark Athena - Game Guide and Walkthrough](https://game.lhg100.com/Article/UploadFiles/201512/2015121710063059.jpg)
[#453]
You must now return to the area where you've found the med station and killed the first guard by landing on him. Inspect the floor and you'll find a small hatch [#454]. Pressing the action key will allow Riddick to unlock this new passageway. Head inside and begin moving forward.
![[#454] - Assault on Dark Athena - Celldecks #2 - Assault on Dark Athena - The Chronicles of Riddick: Assault on Dark Athena - Game Guide and Walkthrough](https://game.lhg100.com/Article/UploadFiles/201512/2015121710063156.jpg)
[#454]
Naturally this level will begin inside a ventilation shaft. Proceed to the other end and drop down carefully. Surprise one of the drones from the back and perform a stealth kill. Thankfully even if you fail in organizing a stealth approach you'll still be able to defeat the drone. Pick up drone's gun and use it to destroy some of the nearby glass walls [#455].
![[#455] - Assault on Dark Athena - Alternator - part 1 - Assault on Dark Athena - The Chronicles of Riddick: Assault on Dark Athena - Game Guide and Walkthrough](https://game.lhg100.com/Article/UploadFiles/201512/2015121710063172.jpg)
[#455]
Notice that destroying the glass walls allowed you to drop down to a small balcony. From here you must locate an upper ledge [#456]. Climb on top and proceed towards the containers located in the distance. Watch a cut-scene when you're close enough to a new area. You'll now have to take part in a rather challenging section where the biggest problem will be to avoid being seen by the spotlight. Thankfully even if you do fail in remaining hidden you won't die right away. Still - you should focus all of your efforts on finishing this area without triggering any alarms.
![[#456] - Assault on Dark Athena - Alternator - part 1 - Assault on Dark Athena - The Chronicles of Riddick: Assault on Dark Athena - Game Guide and Walkthrough](https://game.lhg100.com/Article/UploadFiles/201512/2015121710063165.jpg)
[#456]
Start off by heading towards a lower balcony. I would recommend that you wait for the spotlight to reach its lowest point after which it'll begin moving upwards. This is your chance to get to the first hideout. Use a ladder and once you've reached a new level perform a jump towards a nearby ledge [#457]. Head down and hide in the shadows. Wait for the spotlight to complete its cycle before moving on. Continue moving to the top of this huge structure.
![[#457] - Assault on Dark Athena - Alternator - part 1 - Assault on Dark Athena - The Chronicles of Riddick: Assault on Dark Athena - Game Guide and Walkthrough](https://game.lhg100.com/Article/UploadFiles/201512/2015121710063103.jpg)
[#457]
Exit the hideout, turn around and grab the upper ledge. Repeat this action twice and you should be able to get to a dead end [#458]. Turn around, start running and perform a jump at the very last second. This should allow Riddick to get on top of a new container. Once again hide in the shadows and wait for about 30 seconds before it's safe to move.
![[#458] - Assault on Dark Athena - Alternator - part 1 - Assault on Dark Athena - The Chronicles of Riddick: Assault on Dark Athena - Game Guide and Walkthrough](https://game.lhg100.com/Article/UploadFiles/201512/2015121710063272.jpg)
[#458]
Continue climbing upwards using available containers. You should be able to find one more hideout along the way. In this case it would be better to wait for the spotlight to begin descending, because you're already closer to the top of the structure. The most difficult moment will require you to grab a ledge and to move to the right [#459]. Don't take too long if you want to remain hidden!
![[#459] - Assault on Dark Athena - Alternator - part 1 - Assault on Dark Athena - The Chronicles of Riddick: Assault on Dark Athena - Game Guide and Walkthrough](https://game.lhg100.com/Article/UploadFiles/201512/2015121710063231.jpg)
[#459]
Take cover for the last time and wait for the spotlight to begin moving downwards. Start off by getting on top of a new container. Ignore the area in front of you and instead turn around. Perform a jump towards a new container [#460]. It's very important that you get there, because you'll find a bounty card (Helium Brown). Go back down, make a jump towards a small platform and enter a dark tunnel.
![[#460] - Assault on Dark Athena - Alternator - part 1 - Assault on Dark Athena - The Chronicles of Riddick: Assault on Dark Athena - Game Guide and Walkthrough](https://game.lhg100.com/Article/UploadFiles/201512/2015121710063286.jpg)
[#460]
Use the ladder and when you get to the exit wait for a right moment to perform an execution on a drone. Take some time trying to find a damaged grating [#461]. Press the action key to unlock a new passageway and head inside. You'll get to a new area after crossing a long tunnel. Use a health station here to increase your health bar by one unit (fifth square).
![[#461] - Assault on Dark Athena - Alternator - part 1 - Assault on Dark Athena - The Chronicles of Riddick: Assault on Dark Athena - Game Guide and Walkthrough](https://game.lhg100.com/Article/UploadFiles/201512/2015121710063266.jpg)
[#461]
I assume you may have some problems figuring your next move. Start off by going back to the previous room. Pick up the drone (remember that you must be crouching!) and drag him into the tunnel. Continue dragging his body to the other end of the tunnel and then use his weapon to destroy a nearby glass wall [#462].
![[#462] - Assault on Dark Athena - Alternator - part 1 - Assault on Dark Athena - The Chronicles of Riddick: Assault on Dark Athena - Game Guide and Walkthrough](https://game.lhg100.com/Article/UploadFiles/201512/2015121710063314.jpg)
[#462]
Drop the gun, exit the tunnel and proceed towards a newly unlocked passageway. Locate the stairs and get ready to defeat two standard guards [#463]. Thankfully you'll be fighting with one person at a time, so eliminating them shouldn't be a big problem. I would recommend using the blades and waiting for a chance to perform a counterattack on each enemy.
![[#463] - Assault on Dark Athena - Alternator - part 2 - Assault on Dark Athena - The Chronicles of Riddick: Assault on Dark Athena - Game Guide and Walkthrough](https://game.lhg100.com/Article/UploadFiles/201512/2015121710063390.jpg)
[#463]
Once you've defeated both enemies proceed to a small room where one of them was standing. Find a small opening [#464] and head inside the tunnel. There's a worker here and sadly you won't be allowed to surprise him. Defeating him shouldn't be a problem, HOWEVER make sure to exit the tunnel, so you will be able to perform successful attacks. Prevent him from hitting you too often and you shouldn't lose more than one health unit.
![[#464] - Assault on Dark Athena - Alternator - part 2 - Assault on Dark Athena - The Chronicles of Riddick: Assault on Dark Athena - Game Guide and Walkthrough](https://game.lhg100.com/Article/UploadFiles/201512/2015121710063337.jpg)
[#464]
It's EXTREMELY important that you look around once you've won this duel, because you'll find a tranquilizer gun nearby [#465]. If you've played the first campaign, you should know that it's the best weapon in the game! Test this new toy on a drone that will appear above your current position. Don't forget that you only have about ten seconds before the drone wakes up. Thankfully you can keep zapping him while trying to reach its location. Defeat your opponent by approaching the drone and pressing the left mouse button.
![[#465] - Assault on Dark Athena - Alternator - part 2 - Assault on Dark Athena - The Chronicles of Riddick: Assault on Dark Athena - Game Guide and Walkthrough](https://game.lhg100.com/Article/UploadFiles/201512/2015121710063328.jpg)
[#465]
Proceed to the next room. Notice a NanoMED health station nearby which you can use. Turn left once you've reached a much bigger room. Take cover in the shadows [#466] and wait for a new drone to appear directly in front of you. Stun your opponent and finish him off with a melee hit. Once this is done quickly hide before you're noticed by someone.
![[#466] - Assault on Dark Athena - Alternator - part 2 - Assault on Dark Athena - The Chronicles of Riddick: Assault on Dark Athena - Game Guide and Walkthrough](https://game.lhg100.com/Article/UploadFiles/201512/2015121710063432.jpg)
[#466]
Turn around and run towards a large stack of crates [#467]. Hide in the shadows and inspect the upper balconies from here. Target and stun two drones and afterwards climb to the top of the biggest crate. Once you're there use your tranquilizer gun to prevent your enemies from waking up. Jump over the railing and kill both drones.
![[#467] - Assault on Dark Athena - Alternator - part 2 - Assault on Dark Athena - The Chronicles of Riddick: Assault on Dark Athena - Game Guide and Walkthrough](https://game.lhg100.com/Article/UploadFiles/201512/2015121710063481.jpg)
[#467]
There's only one more drone in this area and it's patrolling a balcony on the other side of the room (above the area where you've killed the first opponent). Stun the drone using your tranquilizer gun and then perform a few jumps [#468] in order to get to him. Watch out not to fall down. Finish off the drone and proceed through a nearby door.
![[#468] - Assault on Dark Athena - Alternator - part 2 - Assault on Dark Athena - The Chronicles of Riddick: Assault on Dark Athena - Game Guide and Walkthrough](https://game.lhg100.com/Article/UploadFiles/201512/2015121710063421.jpg)
[#468]
The corridor you're about to enter is being patrolled by a single opponent. Thankfully you'll be standing far from each other and he'll be a slow target, so you shouldn't have any problems eliminating him from the game. Continue moving forward, but make sure to explore the left tunnel along the way [#469]. Collect a new bounty card (Horis Mondlion).
![[#469] - Assault on Dark Athena - Alternator - part 2 - Assault on Dark Athena - The Chronicles of Riddick: Assault on Dark Athena - Game Guide and Walkthrough](https://game.lhg100.com/Article/UploadFiles/201512/2015121710063484.jpg)
[#469]
Proceed to the exit, HOWEVER watch out for a single drone that will appear directly in front of you when you get to a staircase [#470]. You must act quickly here if you don't plan on sustaining any injuries. Thankfully even if you do get injured you'll come across a NanoMED health unit in a short while. Head upwards and proceed towards a large gate.
![[#470] - Assault on Dark Athena - Alternator - part 2 - Assault on Dark Athena - The Chronicles of Riddick: Assault on Dark Athena - Game Guide and Walkthrough](https://game.lhg100.com/Article/UploadFiles/201512/2015121710063580.jpg)
[#470]
You will find yourself standing inside a very large warehouse which is also going to be monitored by a spotlight. Thankfully you'll be allowed to disable the spotlight for short periods of time using your tranquilizer gun. Start off by examining crates located in the center of the room. There's a bounty card (Conyard Pudak) on top of a large crate [#471].
![[#471] - Assault on Dark Athena - Alternator - part 3 - Assault on Dark Athena - The Chronicles of Riddick: Assault on Dark Athena - Game Guide and Walkthrough](https://game.lhg100.com/Article/UploadFiles/201512/2015121710063510.jpg)
[#471]
Check your surroundings and you'll notice an elevator in one of the corners of the room. Get to the elevator and you're going to be transported automatically to a higher floor. You'll now have to get to the opposite end of this balcony without being spotted. Thankfully you can use nearby crates for cover [#472], as well as a tranquilizer gun to shut down the spotlight. Eventually you'll find a new elevator.
![[#472] - Assault on Dark Athena - Alternator - part 3 - Assault on Dark Athena - The Chronicles of Riddick: Assault on Dark Athena - Game Guide and Walkthrough](https://game.lhg100.com/Article/UploadFiles/201512/2015121710063522.jpg)
[#472]
Once you've reached a new balcony your objectives won't change, however this time you'll have to be ready to take out a few guards. There are going to be at least two of them [#473]. Stun and kill them both and watch out for the spotlight in the meantime. If you're caught by the beam hide or run away instead of being an easy target.
![[#473] - Assault on Dark Athena - Alternator - part 3 - Assault on Dark Athena - The Chronicles of Riddick: Assault on Dark Athena - Game Guide and Walkthrough](https://game.lhg100.com/Article/UploadFiles/201512/2015121710063528.jpg)
[#473]
Proceed towards a new corridor (where both enemy guards have appeared for the first time). Locate a NanoMED health station and once you're fully healed proceed through a small door. Use a tranquilizer gun to disable the lamp and approach the ledge. One of the drones is standing beneath your current position [#474] and you should stun it from a larger distance. Drop to the balcony, kill the drone and take the parts needed to make a Vent Tool.
![[#474] - Assault on Dark Athena - Alternator - part 3 - Assault on Dark Athena - The Chronicles of Riddick: Assault on Dark Athena - Game Guide and Walkthrough](https://game.lhg100.com/Article/UploadFiles/201512/2015121710063526.jpg)
[#474]
Press the large red button and notice that Riddick has automatically grabbed drone's weapon. You've got two choices here. If you haven't triggered any alarms recently there is a chance to reach the ground floor unnoticed. Thankfully if you do get spotted you shouldn't have any problems eliminating enemy units [#475]. There's going to be a large distance separating you from your enemies, so don't expect to take a lot of hits. You can kill up to four enemies.
![[#475] - Assault on Dark Athena - Alternator - part 3 - Assault on Dark Athena - The Chronicles of Riddick: Assault on Dark Athena - Game Guide and Walkthrough](https://game.lhg100.com/Article/UploadFiles/201512/2015121710063694.jpg)
[#475]
Wait for the elevator to reach its final destination and proceed towards a balcony located to your right. You may have to kill one of the guards if you haven't done that already. This will allow you to clear the path to a ladder. Use the ladder to return to one of the upper balconies and then use the small pipes [#476] to return to a previously explored area. Finish off by dropping down to a lower balcony.
![[#476] - Assault on Dark Athena - Alternator - part 3 - Assault on Dark Athena - The Chronicles of Riddick: Assault on Dark Athena - Game Guide and Walkthrough](https://game.lhg100.com/Article/UploadFiles/201512/2015121710063624.jpg)
[#476]
You must now return to the glass room where you've killed one of the drones. As a result get on top of a small platform. After that press the crouch key and slowly step through the glass wall [#477]. Get on top of the crate and return to a ventilation shaft. Go back to a previously visited location.
![[#477] - Assault on Dark Athena - Alternator - part 3 - Assault on Dark Athena - The Chronicles of Riddick: Assault on Dark Athena - Game Guide and Walkthrough](https://game.lhg100.com/Article/UploadFiles/201512/2015121710063678.jpg)
[#477]
Map of the area:
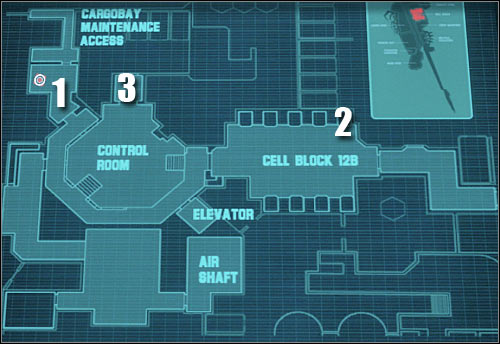
Map legend: 1 - starting area; 2 - Silverman's cell; 3 - passageway to Berthing
Exit the tunnel and make sure to destroy all nearby sources of light. Afterwards head on to the control room and destroy other lamps along the way. Be careful, because two new drones have arrived in the area [#478]. I would recommend leaving cover for a short period of time so the drones will arrive in the dark corridor. Prevent Riddick from taking part in direct combat, because both drones are very skilled at winning melee fights.
![[#478] - Assault on Dark Athena - Celldecks #3 - Assault on Dark Athena - The Chronicles of Riddick: Assault on Dark Athena - Game Guide and Walkthrough](https://game.lhg100.com/Article/UploadFiles/201512/2015121710063734.jpg)
[#478]
Once you took care of the drones return to the cell block. Obviously you must talk to Silverman, handing over all the parts she needed [#479]. It won't take too long before you'll receive a Vent Tool from her. You can talk to Senate if you want to before leaving this area. You'll find out that he was a captain of this ship before Revas took over.
![[#479] - Assault on Dark Athena - Celldecks #3 - Assault on Dark Athena - The Chronicles of Riddick: Assault on Dark Athena - Game Guide and Walkthrough](https://game.lhg100.com/Article/UploadFiles/201512/2015121710063780.jpg)
[#479]
Since you have the Vent Tool in your possession you can now talk to Dacher. You'll find out that he needs you to get a Data Pad for him. As a result leave the cell block and use the passageway leading to Berthing [#480].
![[#480] - Assault on Dark Athena - Celldecks #3 - Assault on Dark Athena - The Chronicles of Riddick: Assault on Dark Athena - Game Guide and Walkthrough](https://game.lhg100.com/Article/UploadFiles/201512/2015121710063728.jpg)
[#480]
Map of the area:
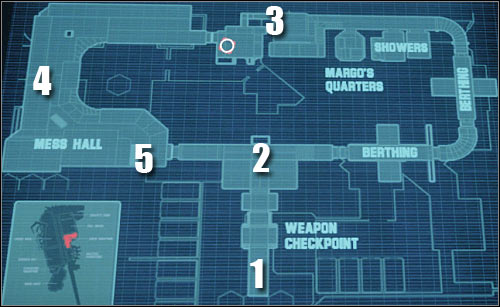
Map legend: 1 - starting area; 2 - Bounty Card; 3 - ventilation hatch; 4 - Bounty Card; 5 - ventilation hatch
Start off by destroying all nearby sources of light. Thankfully you won't have to take part in any decontamination procedures. Instead proceed directly towards a new room. Head on to your left and turn right. Wait for one of the guards to show up [#481]. Attack him from a larger distance and don't forget to finish him off.
![[#481] - Assault on Dark Athena - Red Alert - Assault on Dark Athena - The Chronicles of Riddick: Assault on Dark Athena - Game Guide and Walkthrough](https://game.lhg100.com/Article/UploadFiles/201512/2015121710063826.jpg)
[#481]
Make sure to explore this room in order to find a small grating [#482]. Fire at the grating with your tranquilizer gun and head inside. You should be able to find a cartridge there, as well as a new bounty card (Nedrick Veran). Go back up and proceed towards the hallway where you first saw the last opponent.
![[#482] - Assault on Dark Athena - Red Alert - Assault on Dark Athena - The Chronicles of Riddick: Assault on Dark Athena - Game Guide and Walkthrough](https://game.lhg100.com/Article/UploadFiles/201512/2015121710063825.jpg)
[#482]
You can find a second tranquilizer gun along the way, but you won't need it since you already have a similar weapon. Turn off Eyeshine and approach the next door carefully. Notice that enemy guards will be using flashlights [#483], so you must eliminate them quickly in order to avoid serious problems. You can't be using Eyeshine, because the lights would have blinded your movement. Get rid of both enemy units and proceed to the next section.
![[#483] - Assault on Dark Athena - Red Alert - Assault on Dark Athena - The Chronicles of Riddick: Assault on Dark Athena - Game Guide and Walkthrough](https://game.lhg100.com/Article/UploadFiles/201512/2015121710063985.jpg)
[#483]
The next corridor is also being occupied by two drones. Eliminate both enemies from a large distance and don't forget to finish them off. Keep heading towards the area where you've found two toilets during your last visit to this location. You'll have to get rid of the final group of drones. Just as before - keep using a tranquilizer gun and don't get too close. Once it's safe use the stairs and locate a hatch [#484]. This is where you'll have to use a Vent Tool.
![[#484] - Assault on Dark Athena - Red Alert - Assault on Dark Athena - The Chronicles of Riddick: Assault on Dark Athena - Game Guide and Walkthrough](https://game.lhg100.com/Article/UploadFiles/201512/2015121710063905.jpg)
[#484]
Go inside the ventilation tunnels. Once you've reached a large hole drop down and you'll find yourself standing next to a NanoMED health station [#485]. Proceed towards the nearest door. You'll have to be careful, because the surrounding area is swarming with new enemy units. Try eliminating at least one drone before you get closer to a larger group.
![[#485] - Assault on Dark Athena - Red Alert - Assault on Dark Athena - The Chronicles of Riddick: Assault on Dark Athena - Game Guide and Walkthrough](https://game.lhg100.com/Article/UploadFiles/201512/2015121710064092.jpg)
[#485]
You'll have to begin securing the surrounding area. Especially watch out for drones equipped with flashlights in order to remain hidden all the time. You shouldn't have any problems eliminating a few drones at a time [#486], assuming you don't forget to finish them off. There's total of about six drones for you to neutralize.
![[#486] - Assault on Dark Athena - Red Alert - Assault on Dark Athena - The Chronicles of Riddick: Assault on Dark Athena - Game Guide and Walkthrough](https://game.lhg100.com/Article/UploadFiles/201512/2015121710064084.jpg)
[#486]
Once you've secured this entire area you may begin exploring your surroundings. Start moving forward and stay close to the right wall. Eventually you'll get to a table with a new bounty card (Stoney Matheson) [#487].
![[#487] - Assault on Dark Athena - Red Alert - Assault on Dark Athena - The Chronicles of Riddick: Assault on Dark Athena - Game Guide and Walkthrough](https://game.lhg100.com/Article/UploadFiles/201512/2015121710064060.jpg)
[#487]
Proceed to the other section of the room. Make sure to stay close to the right wall and locate a small pipe [#488]. Grab the pipe, head to your left and climb up to get to a new platform. Make a few steps forward and use the Vent Tool again in order to unlock a ventilation hatch. Proceed inside and head forward.
![[#488] - Assault on Dark Athena - Red Alert - Assault on Dark Athena - The Chronicles of Riddick: Assault on Dark Athena - Game Guide and Walkthrough](https://game.lhg100.com/Article/UploadFiles/201512/2015121710064047.jpg)
[#488]
Map of the area:

Map legend: 1 - starting area and a Bounty Card; 2 - Bounty Card; 3 - Data Pad and a comm station; 4 - passageway to the control room; 5 - Dacher's cell; 6 - large fan
Drop down when you get to a new area and proceed towards the grating. Obviously you must press the action key in order to kick the grating. Use your tranquilizer gun to disable nearby sources of light and then stun one of the guards [#489]. You should be able to find a bounty card (Ethan "The Bullet" Fromere) on top of a nearby crate. Take it.
![[#489] - Assault on Dark Athena - Data Pad - Assault on Dark Athena - The Chronicles of Riddick: Assault on Dark Athena - Game Guide and Walkthrough](https://game.lhg100.com/Article/UploadFiles/201512/2015121710064136.jpg)
[#489]
Choose the corridor located to your right and don't forget to disable other lights along the way. Eventually you'll get closer to a room that's being occupied by two drones. Eliminating the drones shouldn't be a problem. Once they're gone inspect a dark corridor to your right [#490]. There's a bounty card (Jonny "The String" Casino) at the back of a small room.
![[#490] - Assault on Dark Athena - Data Pad - Assault on Dark Athena - The Chronicles of Riddick: Assault on Dark Athena - Game Guide and Walkthrough](https://game.lhg100.com/Article/UploadFiles/201512/2015121710064141.jpg)
[#490]
Go back to the main room where you've defeated the drones and locate a passageway leading to a comm station [#491]. Neutralize other lamps once you're inside and take care of a normal guard. Open the locker to find a shotgun (remember to have a passcode from Margo's locker!). There's also a Data Pad to the right of the large console.
![[#491] - Assault on Dark Athena - Data Pad - Assault on Dark Athena - The Chronicles of Riddick: Assault on Dark Athena - Game Guide and Walkthrough](https://game.lhg100.com/Article/UploadFiles/201512/2015121710064217.jpg)
[#491]
Obviously you must return with the Data Pad to Dacher and thankfully it's not going to be a problem. Head on to a dark corridor where you've defeated your first opponent upon your arrival to this zone. Notice a large door nearby [#492]. You can use it to return to the main control room.
![[#492] - Assault on Dark Athena - Data Pad - Assault on Dark Athena - The Chronicles of Riddick: Assault on Dark Athena - Game Guide and Walkthrough](https://game.lhg100.com/Article/UploadFiles/201512/2015121710064273.jpg)
[#492]
Proceed to the cell block, locate Dacher's cell and talk to him again. You'll now receive instructions on how to get to Main Decks. Return to the area where you've found the Data Pad (and the shotgun). This time you'll want to use the large console [#493] to talk to Dacher. After the conversation turn around and head down the large hole with a disabled fan. Watch a new cut-scene and wait for the game to load a new map.
![[#493] - Assault on Dark Athena - Data Pad - Assault on Dark Athena - The Chronicles of Riddick: Assault on Dark Athena - Game Guide and Walkthrough](https://game.lhg100.com/Article/UploadFiles/201512/2015121710064226.jpg)
[#493]
This level begins with Riddick maintaining a rather unusual position. Once you feel the conversation needs to end press the action key and the main character will automatically land on the guards, killing them on the spot. I would recommend disabling nearby lamps, however watch out for the third guard [#494], because his arrival may be rather unexpected. Once he's gone take your time disabling other lights in this room.
![[#494] - Assault on Dark Athena - Maindecks - part 1 - Assault on Dark Athena - The Chronicles of Riddick: Assault on Dark Athena - Game Guide and Walkthrough](https://game.lhg100.com/Article/UploadFiles/201512/2015121710064331.jpg)
[#494]
Proceed towards a small computer station and press the action key. This will allow you to talk to your inmate friend, as well as to Revas. Return quickly to the area where you've started exploring this room. A door to your right will open and two guards will show up. Eliminate them from a larger distance using your tranquilizer gun [#495]. Head on to the corridor where they appeared for the first time.
![[#495] - Assault on Dark Athena - Maindecks - part 1 - Assault on Dark Athena - The Chronicles of Riddick: Assault on Dark Athena - Game Guide and Walkthrough](https://game.lhg100.com/Article/UploadFiles/201512/2015121710064365.jpg)
[#495]
Examine the left corridor of this new passageway and you'll come across a new bounty card (Nexta Ignernt) [#496]. Once this is done disable a lamp near the door and approach the passageway. There will be a guard standing in front of you and he needs to die quickly. You'll soon encounter his colleague, so make sure to eliminate him as well.
![[#496] - Assault on Dark Athena - Maindecks - part 1 - Assault on Dark Athena - The Chronicles of Riddick: Assault on Dark Athena - Game Guide and Walkthrough](https://game.lhg100.com/Article/UploadFiles/201512/2015121710064369.jpg)
[#496]
Examine both bodies and you should be able to find a magnetic card. Once this object is in your possession find the stack of crates [#497]. You won't have to climb here. Instead stand close to the crate. Press the jump key and then press the action key while Riddick is in the air. This should allow you to collect a bounty card (Alain Isrea). Return to a large device in the center of the room and activate it using the magnetic card.
![[#497] - Assault on Dark Athena - Maindecks - part 1 - Assault on Dark Athena - The Chronicles of Riddick: Assault on Dark Athena - Game Guide and Walkthrough](https://game.lhg100.com/Article/UploadFiles/201512/2015121710064340.jpg)
[#497]
You'll now take part in a rather relaxing assignment during which you'll be controlling your very own drone. Don't worry if the drone dies, because you'll be allowed to take command of the next one without any other problems. Start off by attacking other drones located at the opposite end of the hallway [#498].
![[#498] - Assault on Dark Athena - Maindecks - part 1 - Assault on Dark Athena - The Chronicles of Riddick: Assault on Dark Athena - Game Guide and Walkthrough](https://game.lhg100.com/Article/UploadFiles/201512/2015121710064354.jpg)
[#498]
Use your primary weapon to destroy the grating [#499]. Once this is done get close enough to the large fan for your drone to be killed. His death will result in the destruction of the fan. Choose a new drone and inspect the area on the other side of the fan. Thankfully you won't encounter new enemy units right away. Get ready to get rid of new drones when you get to a corner.
![[#499] - Assault on Dark Athena - Maindecks - part 1 - Assault on Dark Athena - The Chronicles of Riddick: Assault on Dark Athena - Game Guide and Walkthrough](https://game.lhg100.com/Article/UploadFiles/201512/2015121710064487.jpg)
[#499]
I wouldn't recommend exposing your drone too much to enemy fire. Don't more attack more than two targets at a time. You'll have to defeat a large group of enemy drones, but thankfully you'll be allowed to keep sending new machines to that location. The final group of enemy units will appear behind you, near the pods [#500]. Kill them and wait for Riddick to leave the control station. You can speed up this process by trying to move towards a dark corridor.
![[#500] - Assault on Dark Athena - Maindecks - part 1 - Assault on Dark Athena - The Chronicles of Riddick: Assault on Dark Athena - Game Guide and Walkthrough](https://game.lhg100.com/Article/UploadFiles/201512/2015121710064405.jpg)
[#500]
Ignore a door being destroyed in your vicinity, because you won't be attacked by any hostile units here. Leave this room and go to your left. Don't forget to pick up an assault rifle along the way. Eventually you'll have to get to an area where you've disabled a fan while playing as a drone [#501]. Destroy all nearby lamps and wait for an enemy guard to show up. Kill him.
![[#501] - Assault on Dark Athena - Maindecks - part 2 - Assault on Dark Athena - The Chronicles of Riddick: Assault on Dark Athena - Game Guide and Walkthrough](https://game.lhg100.com/Article/UploadFiles/201512/2015121710064447.jpg)
[#501]
Proceed to a room located directly in front of you once you've gone past the fan. There's a large ammo storage inside, but you'll also find a cartridge. Leave the room. You can now leave inspect a long corridor to your left if you want to [#502] in order to find a NanoMED health unit. Otherwise proceed to your right and find a new door to get to a large warehouse.
![[#502] - Assault on Dark Athena - Maindecks - part 2 - Assault on Dark Athena - The Chronicles of Riddick: Assault on Dark Athena - Game Guide and Walkthrough](https://game.lhg100.com/Article/UploadFiles/201512/2015121710064519.jpg)
[#502]
I guess you shouldn't be surprised to hear that you must be moving slowly and that you must destroy all lamps along the way. Wait for one of the guards to appear on an upper balcony [#503]. Immobilize him using your tranquilizer gun and then use the ladder. Once you're at the top quickly turn around and get rid of his colleague.
![[#503] - Assault on Dark Athena - Maindecks - part 2 - Assault on Dark Athena - The Chronicles of Riddick: Assault on Dark Athena - Game Guide and Walkthrough](https://game.lhg100.com/Article/UploadFiles/201512/2015121710064580.jpg)
[#503]
Don't forget to finish off both guards before they wake up! Once this is done go the corridor where you first saw the second guard. There's a bounty card (Harry Pentwine) at the other end of this hallway [#504]. Take it and go back to the main area of this room. Take your time destroying other lamps.
![[#504] - Assault on Dark Athena - Maindecks - part 2 - Assault on Dark Athena - The Chronicles of Riddick: Assault on Dark Athena - Game Guide and Walkthrough](https://game.lhg100.com/Article/UploadFiles/201512/2015121710064521.jpg)
[#504]
Approach a small barrier CAREFULLY and you should notice several other guards patrolling a nearby corridor. I would strongly recommend that you start eliminating them with the help of your tranquilizer gun. Drop down after each hit to finish them off. Thankfully you can go back to upper balconies easily. Once it's safe look around to find a hangrail near the ceiling [#505]. Use the hangrail to get to a new area and find a bounty card ("Bouncer" Reckwin).
[#505]
Notice that collecting the card has resulted in new enemy units showing up in your vinicity. I would recommend that you use a tranquilizer gun to get rid of a few gratings [#506], so it'll be easier to target enemy soldiers or at least to monitor their movements. Try stunning all hostiles from here, however you can also drop down quickly and go to the exit without even fighting them.
![[#506] - Assault on Dark Athena - Maindecks - part 2 - Assault on Dark Athena - The Chronicles of Riddick: Assault on Dark Athena - Game Guide and Walkthrough](https://game.lhg100.com/Article/UploadFiles/201512/2015121710064566.jpg)
[#506]
There's a NanoMED health unit in the first room and you should decide to use it if you've suffered some injuries. Once you're fully healed take out all nearby lamps after which proceed to a door marked as Gravity Generator 2 [#507]. I have to warn you here about one important thing. In the next room you'll have to be careful while trying to get to the exit, because you'll notice that you're being pulled towards the generator. You shouldn't have any major problems maintaining balance, as long as you're careful enough.
![[#507] - Assault on Dark Athena - Dronemile - part 1 - Assault on Dark Athena - The Chronicles of Riddick: Assault on Dark Athena - Game Guide and Walkthrough](https://game.lhg100.com/Article/UploadFiles/201512/2015121710064660.jpg)
[#507]
Carefully open the door leading to the generator room and use your tranquilizer gun to stun two guards [#508]. Don't forget to finish them off as soon as possible. A third guard should arrive from your left and you'll have to take care of him as well. You can now destroy a few nearby lamps or you can start moving to the exit right away.
![[#508] - Assault on Dark Athena - Dronemile - part 1 - Assault on Dark Athena - The Chronicles of Riddick: Assault on Dark Athena - Game Guide and Walkthrough](https://game.lhg100.com/Article/UploadFiles/201512/2015121710064629.jpg)
[#508]
I would recommend that you examine bodies of those who weren't dragged away, because you'll be given an opportunity to collect a submachine gun. You'll soon notice a new group of guards heading your way [#509]. I wouldn't recommend using a tranquilizer gun. Instead choose an assault rifle or the submachine gun from your inventory. Don't forget to keep crouching while shooting and to stay as far away from the ledge as possible. Hide each time you've suffered a few hits, so you won't lose all health units.
![[#509] - Assault on Dark Athena - Dronemile - part 1 - Assault on Dark Athena - The Chronicles of Riddick: Assault on Dark Athena - Game Guide and Walkthrough](https://game.lhg100.com/Article/UploadFiles/201512/2015121710064650.jpg)
[#509]
Before you head to the exit move to the central area of the generator room and examine your surroundings. A bounty card (Kari Merrystar) can be found near the ledge [#510], so you'll have to be EXTREMELY careful while trying to get it. Press the crouch key and keep moving towards the card slowly. I would recommend that you keep pressing the opposite movement key rapidly. As soon as you've collected the card move away from the ledge and go to a new door.
![[#510] - Assault on Dark Athena - Dronemile - part 1 - Assault on Dark Athena - The Chronicles of Riddick: Assault on Dark Athena - Game Guide and Walkthrough](https://game.lhg100.com/Article/UploadFiles/201512/2015121710064661.jpg)
[#510]
This is also going to be a challenging section of the mission, mostly because you'll have to kill a lot of enemy units. There are a few lamps ahead, however destroying all of them won't do the trick. Still, you should focus on eliminating enemy units from the shadows whenever possible [#511]. At first you'll encounter three-four guards and two more will appear near the stairs. If you're having difficulties using a tranquilizer gun consider switching to an assault rifle.
![[#511] - Assault on Dark Athena - Dronemile - part 1 - Assault on Dark Athena - The Chronicles of Riddick: Assault on Dark Athena - Game Guide and Walkthrough](https://game.lhg100.com/Article/UploadFiles/201512/2015121710064607.jpg)
[#511]
Make sure that you've eliminated your opposition before moving on. Eventually you'll get to a new generator room. Once inside turn right. Approach a narrow ledge CAREFULLY [#512]. Begin moving forward and make sure that you're pressing W and D keys. This should allow you to remain safe. Once you've taken a bounty card (Clubber Brassbat) go back to the main platform without turning around, because it would be too risky.
![[#512] - Assault on Dark Athena - Dronemile - part 1 - Assault on Dark Athena - The Chronicles of Riddick: Assault on Dark Athena - Game Guide and Walkthrough](https://game.lhg100.com/Article/UploadFiles/201512/2015121710064788.jpg)
[#512]
Thankfully you won't encounter enemy units for the time being. As a result focus only on finding an entrance to a small tunnel [#513]. Head inside and start moving forward. Once you've reached the end of the tunnel all you have to do is press the action key. This will allow Riddick to perform an execution on one of the guards by throwing him at the generator.
![[#513] - Assault on Dark Athena - Dronemile - part 1 - Assault on Dark Athena - The Chronicles of Riddick: Assault on Dark Athena - Game Guide and Walkthrough](https://game.lhg100.com/Article/UploadFiles/201512/2015121710064703.jpg)
[#513]
It won't take long before other guards show up in this area [#514]. So far I've recommended using an assault rifle, however in this case you can consider choosing a tranquilizer gun again. The main reason is that you won't be dealing with large groups, so it won't be a problem to finish off all stunned guards before they come to senses. Once they're all gone exit this area through a small door.
![[#514] - Assault on Dark Athena - Dronemile - part 1 - Assault on Dark Athena - The Chronicles of Riddick: Assault on Dark Athena - Game Guide and Walkthrough](https://game.lhg100.com/Article/UploadFiles/201512/2015121710064754.jpg)
[#514]
Make sure to destroy a nearby lamp quickly upon your arrival to this new corridor. Take cover to your left and wait for two guards to show up [#515]. They won't be using any flashlights, so due to the fact that it's dark here killing them won't be a problem. After the fight examine their bodies, heal using a NanoMED unit and go to your right.
![[#515] - Assault on Dark Athena - Dronemile - part 2 - Assault on Dark Athena - The Chronicles of Riddick: Assault on Dark Athena - Game Guide and Walkthrough](https://game.lhg100.com/Article/UploadFiles/201512/2015121710064736.jpg)
[#515]
This is also going to be a bright room, so staying in the shadows will be nearly impossible. You could try destroying smaller lamps along the way, but in my opinion it would only be a waste of your time. Keep using a shotgun or an assault rifle and leave no one behind. Eventually you'll have to get to an opposite exit from this room [#516]. Make sure you're using a real weapon before you get closer to a new door.
![[#516] - Assault on Dark Athena - Dronemile - part 2 - Assault on Dark Athena - The Chronicles of Riddick: Assault on Dark Athena - Game Guide and Walkthrough](https://game.lhg100.com/Article/UploadFiles/201512/2015121710064878.jpg)
[#516]
More enemy guards are taking cover in the next room and there two ways of getting rid of them. You could try shooting at a glass object in the center of the room and they would have been sucked out into space. If you can't find the dome or if you don't want to risk too much, open the door, retreat to the previous room and wait for them to show up. Take cover to the right and use your shotgun to kill all enemy units [#517].
![[#517] - Assault on Dark Athena - Dronemile - part 2 - Assault on Dark Athena - The Chronicles of Riddick: Assault on Dark Athena - Game Guide and Walkthrough](https://game.lhg100.com/Article/UploadFiles/201512/2015121710064860.jpg)
[#517]
Go back to the room where you saw the guards and proceed to the next door. If you have decided to leave the dome untouched you'll have to be careful during some of the upcoming fights. If the dome gets destroyed you'll die without having a chance to escape. A new room is also being occupied by a few guards. Use your shotgun to kill closer targets and keep hiding behind the crates. Once you've dealt with the first group you can start using a tranquilizer gun again if you want to [#518].
![[#518] - Assault on Dark Athena - Dronemile - part 2 - Assault on Dark Athena - The Chronicles of Riddick: Assault on Dark Athena - Game Guide and Walkthrough](https://game.lhg100.com/Article/UploadFiles/201512/2015121710064898.jpg)
[#518]
Once it's safe to leave your cover make sure to explore this entire area and you should be able to find a new bounty card (Programmer Jay) [#519]. Proceed to the only available exit. Thankfully you won't encounter any other hostile units here. Instead you'll get to a much larger room without any additional problems.
![[#519] - Assault on Dark Athena - Dronemile - part 2 - Assault on Dark Athena - The Chronicles of Riddick: Assault on Dark Athena - Game Guide and Walkthrough](https://game.lhg100.com/Article/UploadFiles/201512/2015121710064828.jpg)
[#519]
Ignore one of the scientists for the time being, however maintain a crouching stance in order to avoid unwanted attention. Head forward and you shouldn't have any problems locating a bounty card (Hans Larsson) [#520]. Once you have the card approach the scientist. Use your tranquilizer gun to stun him and finish him off when he's lying on the ground.
![[#520] - Assault on Dark Athena - Dronemile - part 2 - Assault on Dark Athena - The Chronicles of Riddick: Assault on Dark Athena - Game Guide and Walkthrough](https://game.lhg100.com/Article/UploadFiles/201512/2015121710064837.jpg)
[#520]
You can use a nearby NanoMED health station if you've suffered some injuries during your last large fight. Approach a large console where you saw the scientist for the first time. Press the action key, turn around and make a few steps forward. Wait for a Drone-track to show up and press the action key once again to hop on board [#521].
![[#521] - Assault on Dark Athena - Dronemile - part 2 - Assault on Dark Athena - The Chronicles of Riddick: Assault on Dark Athena - Game Guide and Walkthrough](https://game.lhg100.com/Article/UploadFiles/201512/2015121710064836.jpg)
[#521]
The area where you start this level is being patrolled by three guards. I would strongly recommend using a tranquilizer gun to get rid of them [#522], however you won't be allowed to turn on Eyeshine. The main reason is that they'll be using flashlights. Still - if you're lucky and careful enough you won't lose any health units here.
![[#522] - Assault on Dark Athena - Recycle - part 1 - Assault on Dark Athena - The Chronicles of Riddick: Assault on Dark Athena - Game Guide and Walkthrough](https://game.lhg100.com/Article/UploadFiles/201512/2015121710064954.jpg)
[#522]
Use one of your guns to destroy a glass wall. Get to the other side and use some of the nearby crates to get to an upper level. Destroy all nearby lamps and then approach a new window. Notice enemy guards on the other side of the glass wall. Attack them with your assault rifle [#523] and if you were lucky only one of the guards will survive your initial attack. Hunt him down quickly before he has a chance to fight back.
![[#523] - Assault on Dark Athena - Recycle - part 1 - Assault on Dark Athena - The Chronicles of Riddick: Assault on Dark Athena - Game Guide and Walkthrough](https://game.lhg100.com/Article/UploadFiles/201512/2015121710064927.jpg)
[#523]
Once it's safe enter the new area and go to a large table. You'll find Miles here. During the conversation you'll find out that he's being turned into a drone. Miles will ask you to deliver a message to his family. Agree to his wish [#524]. You can now end his suffering by killing him or you can leave him lying on the table. Go to a new window and destroy it to get to a new section.
![[#524] - Assault on Dark Athena - Recycle - part 1 - Assault on Dark Athena - The Chronicles of Riddick: Assault on Dark Athena - Game Guide and Walkthrough](https://game.lhg100.com/Article/UploadFiles/201512/2015121710064947.jpg)
[#524]
It's extremely important to look around. There's a bounty card (Babcok Walters) to your left and you'll also come across a NanoMED health station. Once you're done exploring proceed to a small hatch [#525] located in the corner. Get inside and head on to the opposite end of the tunnel. Move the grating and enjoy a new cut-scene which is going to be a taste of things to come. :-)
![[#525] - Assault on Dark Athena - Recycle - part 1 - Assault on Dark Athena - The Chronicles of Riddick: Assault on Dark Athena - Game Guide and Walkthrough](https://game.lhg100.com/Article/UploadFiles/201512/2015121710064937.jpg)
[#525]
Start off by using a tranquilizer gun to disable some of the nearest sources of light. Sadly it'll result in enemy units being alarmed by your presence, so you won't be safe even while standing in the dark. Take cover behind the left crate and try to eliminate at least a few of them from here. Use an assault rifle during these fights. Especially watch out for enemies taking cover behind nearby pillars [#526].
![[#526] - Assault on Dark Athena - Recycle - part 1 - Assault on Dark Athena - The Chronicles of Riddick: Assault on Dark Athena - Game Guide and Walkthrough](https://game.lhg100.com/Article/UploadFiles/201512/2015121710064922.jpg)
[#526]
Once you've dealt with the first group slowly move forward and inspect the area to your left. More enemy units are standing behind a glass wall [#527]. Attack them as soon as possible, preferably before they open fire on Riddick. Get ready for the last group to arrive from your left. Don't forget to retreat to the tunnel if you feel overwhelmed by enemy forces. Keep fighting until you're the only guy standing.
![[#527] - Assault on Dark Athena - Recycle - part 1 - Assault on Dark Athena - The Chronicles of Riddick: Assault on Dark Athena - Game Guide and Walkthrough](https://game.lhg100.com/Article/UploadFiles/201512/2015121710065050.jpg)
[#527]
Make sure that you've killed the last group which arrived using a nearby door. If it's safe take your time to explore your surroundings. Proceed to the other end of the warehouse and you'll find a bounty card ("Big Daddy") behind small crates [#528].
![[#528] - Assault on Dark Athena - Recycle - part 1 - Assault on Dark Athena - The Chronicles of Riddick: Assault on Dark Athena - Game Guide and Walkthrough](https://game.lhg100.com/Article/UploadFiles/201512/2015121710065056.jpg)
[#528]
You should also consider going back to the health station if Riddick has suffered some injuries. Get closer to a destroyed glass wall and find a narrow passageway here. Head forward [#529]. Drop down to a new room and watch a cut-scene. As you've probably noticed by now, you'll have to defeat lots of new drones!
![[#529] - Assault on Dark Athena - Recycle - part 1 - Assault on Dark Athena - The Chronicles of Riddick: Assault on Dark Athena - Game Guide and Walkthrough](https://game.lhg100.com/Article/UploadFiles/201512/2015121710065019.jpg)
[#529]
It's very important that you choose a SHOTGUN from your arsenal. Position Riddick in a dark corner, next to a group of crates. You shouldn't have any major problems eliminating drones from here [#530]. Thankfully you won't be dealing with more than two drones at a time and you'll have plenty of time to act before they open fire. There's a total of about six drones for you to kill. Assuming you're good with weapons you shouldn't lose a single health unit here.
![[#530] - Assault on Dark Athena - Recycle - part 1 - Assault on Dark Athena - The Chronicles of Riddick: Assault on Dark Athena - Game Guide and Walkthrough](https://game.lhg100.com/Article/UploadFiles/201512/2015121710065059.jpg)
[#530]
Switch to an assault rifle once you've taken out all the drones. Lean out carefully, zoom in the view and eliminate one of the human guards. A single shot to his head will be more than enough to eliminate him from the game. Go to your right and find a large black crate [#531]. Use the crate to get to a small balcony with a bounty card (Drayson Grey).
![[#531] - Assault on Dark Athena - Recycle - part 2 - Assault on Dark Athena - The Chronicles of Riddick: Assault on Dark Athena - Game Guide and Walkthrough](https://game.lhg100.com/Article/UploadFiles/201512/2015121710065106.jpg)
[#531]
Return to the ground floor. This time you'll want to get to the balcony where the guard was standing. Just as before, you must use some of the nearby crates [#532] to get to the top safely. Once you're there perform three actions - use a NanoMED health station, destroy the lamp and use a control panel.
![[#532] - Assault on Dark Athena - Recycle - part 2 - Assault on Dark Athena - The Chronicles of Riddick: Assault on Dark Athena - Game Guide and Walkthrough](https://game.lhg100.com/Article/UploadFiles/201512/2015121710065165.jpg)
[#532]
Notice that using the panel has resulted in a new opponent showing up in this room. Jump over the railing and take cover in the shadows. Get to him carefully and use a shotgun to go for a quick kill [#533]. Don't hide this weapon in your jacket just yet, because it'll come in handy. Go to the next corridor and you'll find out that you must take part in a chase with an enemy mech!
![[#533] - Assault on Dark Athena - Recycle - part 2 - Assault on Dark Athena - The Chronicles of Riddick: Assault on Dark Athena - Game Guide and Walkthrough](https://game.lhg100.com/Article/UploadFiles/201512/2015121710065122.jpg)
[#533]
Start running forward as soon as you're given control over Riddick. I wouldn't recommend running in a straight line, because you would be an easy target. Nevertheless you must acknowledge the fact that you'll lose 2-3 health units. Kill two soldiers along the way [#534]. A shotgun is the best choice of weaponry here, because you won't have to make any stops.
![[#534] - Assault on Dark Athena - Recycle - part 2 - Assault on Dark Athena - The Chronicles of Riddick: Assault on Dark Athena - Game Guide and Walkthrough](https://game.lhg100.com/Article/UploadFiles/201512/2015121710065280.jpg)
[#534]
Once you've reached a large warehouse go to your right and this will allow you to find a new bounty card (Flamer Patrice). Notice that you don't have enough time to retreat, so it would be a good idea to reload the last checkpoint when you have the card in your possession.
![[#535] - Assault on Dark Athena - Recycle - part 2 - Assault on Dark Athena - The Chronicles of Riddick: Assault on Dark Athena - Game Guide and Walkthrough](https://game.lhg100.com/Article/UploadFiles/201512/2015121710065272.jpg)
[#535]
Finish the chance one more time, however this time choose the left ramp when you get to the warehouse. Once you're at the top press the crouch key and wait for the mech to stand on a large trap door in the center of the room. Use the red button [#536] to trigger a cut-scene. Get ready for a final phase of this confrontation.
![[#536] - Assault on Dark Athena - Recycle - part 2 - Assault on Dark Athena - The Chronicles of Riddick: Assault on Dark Athena - Game Guide and Walkthrough](https://game.lhg100.com/Article/UploadFiles/201512/2015121710065288.jpg)
[#536]
You'll now have to begin aiming at the guy who's operating the mech. It's going to be very risky, because you must attack him from the front [#537]. Keep using your assault rifle. In case you run out of ammunition look around this area to find more supplies. Once you've won approach the mech and press the action key to get on board.
![[#537] - Assault on Dark Athena - Recycle - part 2 - Assault on Dark Athena - The Chronicles of Riddick: Assault on Dark Athena - Game Guide and Walkthrough](https://game.lhg100.com/Article/UploadFiles/201512/2015121710065241.jpg)
[#537]
Get ready to take part in series of fights while operating a mech. You can't feel safe inside the machine, because unlike similar missions from the previous campaign your mech will be losing energy units rather rapidly. As a result it will be important to eliminate enemies quickly and without the main gun overheating. Start off by heading towards a large gate [#538].
![[#538] - Assault on Dark Athena - Recycle - part 2 - Assault on Dark Athena - The Chronicles of Riddick: Assault on Dark Athena - Game Guide and Walkthrough](https://game.lhg100.com/Article/UploadFiles/201512/2015121710065289.jpg)
[#538]
Get ready to defeat a few groups of enemy guards along the way. Take it slow and secure each area from a larger distance. Don't forget to move around, so you won't be an easy target. The last group will be waiting for you near the ramp. Kill them and you'll get to a mech repair station [#539]. Notice that not only your mech has been repaired, but you've also gained access to rockets. Head on towards a large gate.
![[#539] - Assault on Dark Athena - Recycle - part 2 - Assault on Dark Athena - The Chronicles of Riddick: Assault on Dark Athena - Game Guide and Walkthrough](https://game.lhg100.com/Article/UploadFiles/201512/2015121710065333.jpg)
[#539]
This is going to be a rather short level that will take place entirely in space. Wait for your mech to get close to a new gate and proceed to your left. You'll soon have to defeat an enemy mech [#540]. Don't lose too many energy units here and try not to use all rockets, because you might need them later on.
![[#540] - Assault on Dark Athena - Spacewalk - Assault on Dark Athena - The Chronicles of Riddick: Assault on Dark Athena - Game Guide and Walkthrough](https://game.lhg100.com/Article/UploadFiles/201512/2015121710065377.jpg)
[#540]
Continue moving forward and turn left when you have the chance. I would recommend that you spend some time destroying smaller robots [#541]. They won't attack you right away, but they would probably become hostile later on. There's a mech repair station nearby, however I wouldn't recommend using it right now unless it's absolutely necessary.
![[#541] - Assault on Dark Athena - Spacewalk - Assault on Dark Athena - The Chronicles of Riddick: Assault on Dark Athena - Game Guide and Walkthrough](https://game.lhg100.com/Article/UploadFiles/201512/2015121710065325.jpg)
[#541]
Proceed towards a smaller passageway and notice a second mech standing on top of a large gate [#542]. Start firing at your opponent from here and make sure to avoid rockets heading your way, because each hit will take somewhere around 1/3 of your energy points.
![[#542] - Assault on Dark Athena - Spacewalk - Assault on Dark Athena - The Chronicles of Riddick: Assault on Dark Athena - Game Guide and Walkthrough](https://game.lhg100.com/Article/UploadFiles/201512/2015121710065480.jpg)
[#542]
Head forward once you've defeated your opponent, but get ready to destroy two other mechs very soon. I would recommend that you focus on one mech and keep firing at it until it's destroyed. Only then attack the second mech. Don't forget that you can retreat to the repair station at any time. Once it's safe proceed to a large gate [#543].
![[#543] - Assault on Dark Athena - Spacewalk - Assault on Dark Athena - The Chronicles of Riddick: Assault on Dark Athena - Game Guide and Walkthrough](https://game.lhg100.com/Article/UploadFiles/201512/2015121710065413.jpg)
[#543]
Map of the area:
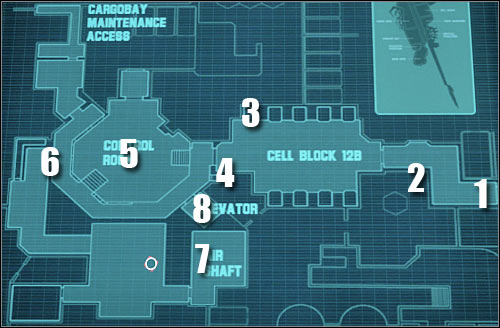
Map legend: 1 - starting area; 2 - mech repair station; 3 - Miles' cell; 4 - ventilation shaft; 5 - Jaylor (duel); 6 - large gate; 7 - communications center; 8 - elevator
This level will also begin on board of a small mech. Watch out, because you're going to be attacked by a hostile mech near the start. It shouldn't be too difficult to win, especially if you fire all remaining rockets. You don't have to worry about running out of rockets, because there's a mech repair station nearby [#544]. Repair the mech and continue to the next section.
![[#544] - Assault on Dark Athena - Celldecks Riot - Assault on Dark Athena - The Chronicles of Riddick: Assault on Dark Athena - Game Guide and Walkthrough](https://game.lhg100.com/Article/UploadFiles/201512/2015121710065451.jpg)
[#544]
Once the cut-scene had ended you'll have to defeat two enemy mechs. The easiest way to do that is to hide to the right of the gate [#545], so you'll be an object of attacks made by a single machine. Once the first mech has been destroyed focus on attacking the second target. You shouldn't lose more than half of your energy points. Enter the cell block and exit the mech.
![[#545] - Assault on Dark Athena - Celldecks Riot - Assault on Dark Athena - The Chronicles of Riddick: Assault on Dark Athena - Game Guide and Walkthrough](https://game.lhg100.com/Article/UploadFiles/201512/2015121710065441.jpg)
[#545]
Start off by turning right and heading towards the first cell from the left [#546]. Once you're inside examine your surroundings carefully in order to find a letter from Miles. Exit this cell and proceed towards an entrance to a ventilation shaft. This will trigger a very interesting cut-scene (starring Lynn and Silverman).
![[#546] - Assault on Dark Athena - Celldecks Riot - Assault on Dark Athena - The Chronicles of Riddick: Assault on Dark Athena - Game Guide and Walkthrough](https://game.lhg100.com/Article/UploadFiles/201512/2015121710065599.jpg)
[#546]
Wait for this new cut-scene to end. Follow Jaylor instructions and hide your current weapon. Stand in the middle of the control room and wait for Jaylor to come out of hiding [#547]. Quickly choose a shotgun or a tranquilizer gun from your inventory. Kill him without giving him a chance of a fair fight.
![[#547] - Assault on Dark Athena - Celldecks Riot - Assault on Dark Athena - The Chronicles of Riddick: Assault on Dark Athena - Game Guide and Walkthrough](https://game.lhg100.com/Article/UploadFiles/201512/2015121710065559.jpg)
[#547]
You'll now have to return to the communications center. It's where you've acquired a Data Pad some time ago. This means you going through a door located in the darker section of the corridor [#548]. Be careful, because you'll encounter a new enemy unit along the way (in the exact same room where you've defeated two guards before).
![[#548] - Assault on Dark Athena - Celldecks Riot - Assault on Dark Athena - The Chronicles of Riddick: Assault on Dark Athena - Game Guide and Walkthrough](https://game.lhg100.com/Article/UploadFiles/201512/2015121710065577.jpg)
[#548]
Head inside the comm station once you've dealt with the opponent and use a control panel on the left wall [#549] TWICE. Using the panel for the first time will result in Riddick talking to Dacher. When you use it for the second time you will be allowed to send a message from Miles (one of the sidequests).
![[#549] - Assault on Dark Athena - Celldecks Riot - Assault on Dark Athena - The Chronicles of Riddick: Assault on Dark Athena - Game Guide and Walkthrough](https://game.lhg100.com/Article/UploadFiles/201512/2015121710065535.jpg)
[#549]
Return to the main control room where you've defeated Jaylor. You shouldn't have any problems finding your way on the ship. Locate an entrance to a small elevator [#550] and use it to travel to a different location.
![[#550] - Assault on Dark Athena - Celldecks Riot - Assault on Dark Athena - The Chronicles of Riddick: Assault on Dark Athena - Game Guide and Walkthrough](https://game.lhg100.com/Article/UploadFiles/201512/2015121710065697.jpg)
[#550]
This level begins inside a large warehouse. At first you'll only see one mech, but I can assure you that there are two machines near your position. Obviously you'll have to avoid both mechs, because you don't weapons powerful enough to fight them. Press the crouch key and head left. Remain in the shadows. Eventually you'll get to a large hole [#551].
![[#551] - Assault on Dark Athena - Hangar Bay - Assault on Dark Athena - The Chronicles of Riddick: Assault on Dark Athena - Game Guide and Walkthrough](https://game.lhg100.com/Article/UploadFiles/201512/2015121710065669.jpg)
[#551]
Turn on Eyeshine and enter a small ventilation shaft. You should be able to find a bounty card (Matt Docrew) along the way. Take it and decide how to get to your current destination. You can use the crates found near the exit from the tunnel. In order to do that you would have to climb the first crate without being seen by your opponents [#552].
![[#552] - Assault on Dark Athena - Hangar Bay - Assault on Dark Athena - The Chronicles of Riddick: Assault on Dark Athena - Game Guide and Walkthrough](https://game.lhg100.com/Article/UploadFiles/201512/2015121710065605.jpg)
[#552]
If you decide to use the crates you would also have to wait for the mechs to turn around before climbing on top of the first crate. From there you would have to perform several quick jumps to get to a balcony. I would strongly recommend going back to the start area. Wait for a right moment to make a move and start running towards a ramp [#553]. Ignore the fact that you're getting shot at and hide when you've reached an upper balcony. It would be a good idea to destroy nearby lamps before moving on.
![[#553] - Assault on Dark Athena - Hangar Bay - Assault on Dark Athena - The Chronicles of Riddick: Assault on Dark Athena - Game Guide and Walkthrough](https://game.lhg100.com/Article/UploadFiles/201512/2015121710065609.jpg)
[#553]
Proceed towards a nearby control room. Enter the room carefully and use a tranquilizer gun to get rid of a guard [#554]. Once he's gone approach a small console he was working on. Activate the ship, turn around and proceed towards a console located near the door. Interact with this console and you'll trigger an elevator.
![[#554] - Assault on Dark Athena - Hangar Bay - Assault on Dark Athena - The Chronicles of Riddick: Assault on Dark Athena - Game Guide and Walkthrough](https://game.lhg100.com/Article/UploadFiles/201512/2015121710065682.jpg)
[#554]
Return to the upper balcony and notice that one of the platforms has been raised. Jump over the railing and climb on top of this platform quickly [#555]. Remember that you can't stay here too long. Press the action key when you're at the top to turn the laser and return to the balcony as soon as possible. You can try using the crates or you can head down and use the ramp again. Either way avoid mechs at all costs.
![[#555] - Assault on Dark Athena - Hangar Bay - Assault on Dark Athena - The Chronicles of Riddick: Assault on Dark Athena - Game Guide and Walkthrough](https://game.lhg100.com/Article/UploadFiles/201512/2015121710065646.jpg)
[#555]
This time use the third control panel from the left. Watch an interesting cut-scene as the mechs get sucked into space. Wait for the door to your room to open and return to the large warehouse. This time you'll have more than enough time to explore your surroundings. Be on a look out for a new bounty card ("Screamer" Streger) [#556] which can be found on a small platform.
![[#556] - Assault on Dark Athena - Hangar Bay - Assault on Dark Athena - The Chronicles of Riddick: Assault on Dark Athena - Game Guide and Walkthrough](https://game.lhg100.com/Article/UploadFiles/201512/2015121710065732.jpg)
[#556]
Return to the control room, however don't enter it. Instead examine a large hatch located in front of you and you'll notice Dacher standing on the other side [#557]. Turn on Eyeshine to read his message and wait for the door to open. Don't forget to use a NanoMED health unit along the way. Examine the chair upon your arrival in a new room and get ready to defeat Revas!
![[#557] - Assault on Dark Athena - Hangar Bay - Assault on Dark Athena - The Chronicles of Riddick: Assault on Dark Athena - Game Guide and Walkthrough](https://game.lhg100.com/Article/UploadFiles/201512/2015121710065710.jpg)
[#557]
Notice that you've lost your tranquilizer gun, as well as other firearms. Once the battle has started move back to a safe distance and choose the blades from your inventory. The only real way to defeat Revas is to attack her with swift blows [#558]. Move back if she performs a successful counterattacks and you should have plenty of time to heal before her next strike. Don't try staying close to her all the time, because her most powerful combo can take up to three health units. Keep attacking her with quick moves until she's defeated (not killed :-)).
![[#558] - Assault on Dark Athena - Hangar Bay - Assault on Dark Athena - The Chronicles of Riddick: Assault on Dark Athena - Game Guide and Walkthrough](https://game.lhg100.com/Article/UploadFiles/201512/2015121710065717.jpg)
[#558]
This level begins on a beach, similar to the one from the first mission. Start off by heading towards a small entrance to the sewers [#559]. Keep going straight and turn right upon your arrival in a new room. Ignore commotion ahead and approach the fence. Turn left and press the action key. This will result in Riddick grabbing a ledge.
![[#559] - Assault on Dark Athena - Culvert - part 1 - Assault on Dark Athena - The Chronicles of Riddick: Assault on Dark Athena - Game Guide and Walkthrough](https://game.lhg100.com/Article/UploadFiles/201512/2015121710065786.jpg)
[#559]
Proceed towards a dark tunnel and you should end up standing near a partially destroyed staircase. Begin moving forward, but make sure not to lose balance and fall. Once you've reached a large gap head down to a lower balcony. Afterwards grab a new section part of the stairs [#560]. Climb up and continue your journey. Make sure to press the crouch key and to choose the blades from your arsenal when you get to the top. Head on to a new corridor.
![[#560] - Assault on Dark Athena - Culvert - part 1 - Assault on Dark Athena - The Chronicles of Riddick: Assault on Dark Athena - Game Guide and Walkthrough](https://game.lhg100.com/Article/UploadFiles/201512/2015121710065827.jpg)
[#560]
The corridor to your left is being patrolled by a drone [#561]. Wait for the drone to turn around and perform a silent execution to get rid of it. Grab drone's body, move back a little and wait for a second drone to show up. Use drone's weapon to eliminate this threat. Now wait for the final third drone to come running and repeat this action for the last time.
![[#561] - Assault on Dark Athena - Culvert - part 1 - Assault on Dark Athena - The Chronicles of Riddick: Assault on Dark Athena - Game Guide and Walkthrough](https://game.lhg100.com/Article/UploadFiles/201512/2015121710065841.jpg)
[#561]
Don't leave this area just yet. Take your time to explore your surroundings and you'll find a bounty card (Pally Peedleborn) near the stairs, behind a small crate [#562]. Jump over the railing to pick it up and continue to the next section when you have this item in your possession. You'll get to a ladder after a long walk.
![[#562] - Assault on Dark Athena - Culvert - part 1 - Assault on Dark Athena - The Chronicles of Riddick: Assault on Dark Athena - Game Guide and Walkthrough](https://game.lhg100.com/Article/UploadFiles/201512/2015121710065829.jpg)
[#562]
Open the door, use a new ladder and eventually you'll end up standing outside the building. Get ready for a series of jumps and other acrobatic moves. Thankfully you won't be interrupted by any real enemies while trying to get through this large area. Start off by turning left. Proceed to a lower platform and move forward to the end. Turn right, press the crouch key and CAREFULLY drop down to a lower platform [#563]. Remember that you can't end up in the water, because Riddick would automatically die.
![[#563] - Assault on Dark Athena - Culvert - part 1 - Assault on Dark Athena - The Chronicles of Riddick: Assault on Dark Athena - Game Guide and Walkthrough](https://game.lhg100.com/Article/UploadFiles/201512/2015121710065883.jpg)
[#563]
Turn right and approach the wall [#564]. Pressing the action key will allow you to grab the ledge. Begin moving left until you get to a small ledge which you can drop to. Turn around and head forward. Walk through a metal section of the roof after which find a narrow passageway. I would recommend slowing down here, so you're less likely to make a mistake and fall.
![[#564] - Assault on Dark Athena - Culvert - part 1 - Assault on Dark Athena - The Chronicles of Riddick: Assault on Dark Athena - Game Guide and Walkthrough](https://game.lhg100.com/Article/UploadFiles/201512/2015121710065833.jpg)
[#564]
Eventually you'll get to a new wall where you'll be forced to grab the ledge [#565]. Just as before, head to the left side of the screen. Keep moving in that direction until you get to a small ledge. Start moving forward until you notice a small crate. Get on top of the crate and from there you'll be allowed to climb to the upper platform.
![[#565] - Assault on Dark Athena - Culvert - part 1 - Assault on Dark Athena - The Chronicles of Riddick: Assault on Dark Athena - Game Guide and Walkthrough](https://game.lhg100.com/Article/UploadFiles/201512/2015121710065991.jpg)
[#565]
Look up and find a hangrail which you can use to get to a new platform [#566]. Notice you're moving on a very small balcony, so you should consider slowing down once again. In addition to that press the crouch key to walk under a few obstacles. Use a ladder to get to an upper balcony. Make a few steps forward there and turn right.
![[#566] - Assault on Dark Athena - Culvert - part 1 - Assault on Dark Athena - The Chronicles of Riddick: Assault on Dark Athena - Game Guide and Walkthrough](https://game.lhg100.com/Article/UploadFiles/201512/2015121710065953.jpg)
[#566]
You'll now have to make a jump towards a moving platform [#567]. Thankfully you won't have to worry about losing balance once you've completed the jump. Head forward until you get to a new ladder. Use the ladder and approach the wall once you're at the top. Allow Riddick to grab the nearest ledge.
![[#567] - Assault on Dark Athena - Culvert - part 1 - Assault on Dark Athena - The Chronicles of Riddick: Assault on Dark Athena - Game Guide and Walkthrough](https://game.lhg100.com/Article/UploadFiles/201512/2015121710065955.jpg)
[#567]
Start moving left while hanging on to the ledge and eventually you'll get to a large opening [#568]. Climb up and make a few steps forward in order to collect a bounty card (Veris Braggina). Get on top of a small crate and from there you should be able to jump over to the other side. Head on to the control room which will be located directly in front of you.
![[#568] - Assault on Dark Athena - Culvert - part 1 - Assault on Dark Athena - The Chronicles of Riddick: Assault on Dark Athena - Game Guide and Walkthrough](https://game.lhg100.com/Article/UploadFiles/201512/2015121710070074.jpg)
[#568]
There should be a large console to your right. Use it and watch a short cut-scene. Proceed towards the door marked as Pump Room. Once you're inside move to the left and wait for an enemy drone to appear [#569]. You can try landing on a drone or you can wait for it to move away, jump down and perform and perform a silent execution.
![[#569] - Assault on Dark Athena - Culvert - part 2 - Assault on Dark Athena - The Chronicles of Riddick: Assault on Dark Athena - Game Guide and Walkthrough](https://game.lhg100.com/Article/UploadFiles/201512/2015121710070059.jpg)
[#569]
Once you take care of the drone turn around and proceed towards a new corridor. You'll end up standing inside a pump room. You can now use a ladder like a normal person would or you can jump over the railing (you won't lose any health points). Locate a door leading to the next area [#570]. You'll end up in a previously explored area. Once again use the crate to get to the upper platform.
![[#570] - Assault on Dark Athena - Culvert - part 2 - Assault on Dark Athena - The Chronicles of Riddick: Assault on Dark Athena - Game Guide and Walkthrough](https://game.lhg100.com/Article/UploadFiles/201512/2015121710070014.jpg)
[#570]
Notice that the hangrail is now facing a different direction [#571]. Grab the railing and begin moving forward. Ignore some of the action taking place in front of you, because you won't be targeted by anyone. Once you've reached a new platform head down and proceed to the entrance to the sewers.
![[#571] - Assault on Dark Athena - Culvert - part 2 - Assault on Dark Athena - The Chronicles of Riddick: Assault on Dark Athena - Game Guide and Walkthrough](https://game.lhg100.com/Article/UploadFiles/201512/2015121710070089.jpg)
[#571]
You will soon find yourself standing in a small and dark room. Climb on top of a crate, turn right and grab the upper ledge [#572]. Head on to a new location and move forward to find a ladder. You'll soon end up standing outside the building again. Go to your right, using the stairs.
![[#572] - Assault on Dark Athena - Culvert - part 2 - Assault on Dark Athena - The Chronicles of Riddick: Assault on Dark Athena - Game Guide and Walkthrough](https://game.lhg100.com/Article/UploadFiles/201512/2015121710070131.jpg)
[#572]
Ignore the door located in front of you, because if you decide to step through the door you'll miss out on an opportunity to find a bonus area. Instead move to the left. Stand near the ledge and press the action key, allowing Riddick to climb down [#573]. Move to the right and drop down to a very small balcony.
![[#573] - Assault on Dark Athena - Culvert - part 2 - Assault on Dark Athena - The Chronicles of Riddick: Assault on Dark Athena - Game Guide and Walkthrough](https://game.lhg100.com/Article/UploadFiles/201512/2015121710070197.jpg)
[#573]
You may now proceed towards a small ladder. Use the ladder to get to the upper door. There's a medical station inside and obviously you should decide to use it in order to extend your life bar by one unit. Make sure to inspect some of the smaller pipes to your right [#574] in order to find a new bounty card (Dally McLester).
![[#574] - Assault on Dark Athena - Culvert - part 2 - Assault on Dark Athena - The Chronicles of Riddick: Assault on Dark Athena - Game Guide and Walkthrough](https://game.lhg100.com/Article/UploadFiles/201512/2015121710070193.jpg)
[#574]
Drop down once you have the card in your possession. You'll soon reach a room which is being patrolled by a single drone. You can either eliminate your opponent or ignore him by heading directly towards a drop point [#575]. Turn around and head on towards a long tunnel. You'll soon get to the exit.
![[#575] - Assault on Dark Athena - Culvert - part 2 - Assault on Dark Athena - The Chronicles of Riddick: Assault on Dark Athena - Game Guide and Walkthrough](https://game.lhg100.com/Article/UploadFiles/201512/2015121710070111.jpg)
[#575]
Map of the area:

Map legend: 1 - starting area; 2 - Plavo's hideout; 3 - Bounty Card; 4 - large gate; 5 - Bounty Card; 6 - Bounty Card, a gas mask and a SCAR rifle; 7 - passageway leading to the fortress; 8 - Bounty Card and exit
Use the sewers to get to a slightly larger area where you'll notice a body falling down from a ceiling. Use the ladder to leave the sewers. Make a few steps forward and WAIT for the guards to begin patrolling the area. Two of them will turn around and the third guard will go to your right. Approach the remaining guard carefully [#576] and snap his neck.
![[#576] - Assault on Dark Athena - Crash Site - part 1 - Assault on Dark Athena - The Chronicles of Riddick: Assault on Dark Athena - Game Guide and Walkthrough](https://game.lhg100.com/Article/UploadFiles/201512/2015121710070272.jpg)
[#576]
Once you've defeated the first opponent grab his body and retreat towards the ladder. Fire a few shots and wait for three other guards to arrive [#577]. If you can't see them, you'll probably have to eliminate them on your own. It all depends on how fast you were with getting of the first guard.
![[#577] - Assault on Dark Athena - Crash Site - part 1 - Assault on Dark Athena - The Chronicles of Riddick: Assault on Dark Athena - Game Guide and Walkthrough](https://game.lhg100.com/Article/UploadFiles/201512/2015121710070203.jpg)
[#577]
You may leave the shadows, because there aren't any other hostile units in the vicinity. Turn right, use the stairs and locate a cartridge. Once you have it in your possession head down and proceed to a passageway located to your right [#578]. That's where two of the guards showed up.
![[#578] - Assault on Dark Athena - Crash Site - part 1 - Assault on Dark Athena - The Chronicles of Riddick: Assault on Dark Athena - Game Guide and Walkthrough](https://game.lhg100.com/Article/UploadFiles/201512/2015121710070276.jpg)
[#578]
Keep heading forward and remain on the main path in order to avoid getting lost. You should be able to reach an area with two guards [#579]. Use the fact that one of them is trying to get inside an apartment. Surprise his colleague from the back, take his weapon and use it to kill the second guard.
![[#579] - Assault on Dark Athena - Crash Site - part 1 - Assault on Dark Athena - The Chronicles of Riddick: Assault on Dark Athena - Game Guide and Walkthrough](https://game.lhg100.com/Article/UploadFiles/201512/2015121710070372.jpg)
[#579]
Once you've won approach the door where the guard was trying to get in. The game should automatically trigger a conversation with an old man named Pavlo. Choose the first option from the list [#580] and Pavlo will ask Riddick to retrieve his gas mask. He'll also give you a key to the main gate, as well as inform you about the existence of a SCAR rifle.
![[#580] - Assault on Dark Athena - Crash Site - part 1 - Assault on Dark Athena - The Chronicles of Riddick: Assault on Dark Athena - Game Guide and Walkthrough](https://game.lhg100.com/Article/UploadFiles/201512/2015121710070383.jpg)
[#580]
Go back to the area where you've left the sewers using the exact same passageways as before. Watch out, because a new guard may show up [#581]. I would recommend hiding in the shadows and performing a surprise attack. You can also try landing on him from the area where you found the cartridge. There's a second guard nearby. Kill him as well.
![[#581] - Assault on Dark Athena - Crash Site - part 1 - Assault on Dark Athena - The Chronicles of Riddick: Assault on Dark Athena - Game Guide and Walkthrough](https://game.lhg100.com/Article/UploadFiles/201512/2015121710070377.jpg)
[#581]
Once you've reached a larger area go to your left in order to inspect a small alleyway. A new bounty card (Miss Kissy) can be found to your left [#582]. Take it and proceed to a large gate. Use the key received from Pavlo to open the gate.
![[#582] - Assault on Dark Athena - Crash Site - part 1 - Assault on Dark Athena - The Chronicles of Riddick: Assault on Dark Athena - Game Guide and Walkthrough](https://game.lhg100.com/Article/UploadFiles/201512/2015121710070481.jpg)
[#582]
Watch out, because one of the enemy units will appear directly in front of you. There are three ways to get rid of him - you can wait for him to turn around and surprise him, you can wait for him to start reloading his weapon and engage him in direct combat or you can drag the body of a nearby drone and kill him with drone's gun [#583]. Either way go to that new area once he's been eliminated.
![[#583] - Assault on Dark Athena - Crash Site - part 2 - Assault on Dark Athena - The Chronicles of Riddick: Assault on Dark Athena - Game Guide and Walkthrough](https://game.lhg100.com/Article/UploadFiles/201512/2015121710070460.jpg)
[#583]
You'll soon get to a junction and I would recommend choosing a passageway located to your left. Watch out for a new guard. It would be a good idea to wait for him to turn around. Approach him quickly and use your blades to get rid of him. Once he's gone choose a narrow passageway next to the water [#584].
![[#584] - Assault on Dark Athena - Crash Site - part 2 - Assault on Dark Athena - The Chronicles of Riddick: Assault on Dark Athena - Game Guide and Walkthrough](https://game.lhg100.com/Article/UploadFiles/201512/2015121710070441.jpg)
[#584]
Eventually you'll get to a supply depot mentioned to you by Pavlo. Start off by going to your left. Approach one of the corners of the building and notice you'll have to make a small jump [#585]. Doing this will allow you to get your hands on a bounty card (Fravin Candown). Perform a second jump and locate a ladder.
![[#585] - Assault on Dark Athena - Crash Site - part 2 - Assault on Dark Athena - The Chronicles of Riddick: Assault on Dark Athena - Game Guide and Walkthrough](https://game.lhg100.com/Article/UploadFiles/201512/2015121710070401.jpg)
[#585]
Don't use the hatch just yet. Instead find a small crate [#586]. Get on top of this crate and from there you should be able to reach an upper section of the roof. Collect yet another bounty card (Serth Yaltrow), go back down and open the hatch. Enter the ventilation tunnels in order to gain access to the inside of the building.
![[#586] - Assault on Dark Athena - Crash Site - part 2 - Assault on Dark Athena - The Chronicles of Riddick: Assault on Dark Athena - Game Guide and Walkthrough](https://game.lhg100.com/Article/UploadFiles/201512/2015121710070445.jpg)
[#586]
Drop down and you'll find yourself inside the supply depot. Heal Riddick using a NanoMED unit and pick up a gas mask. The most important reward you can take from this room is a SCAR rifle [#587]. It's a very unique weapon. You can fire special type of bullets by pressing the left mouse button. You can fire up to five bullets at a time and they will all stick to living or dead surfaces. Pressing the right mouse button will allow you to detonate the charges. Test this new toy on nearby crates and then on a wooden door in order to be able to leave the building.
![[#587] - Assault on Dark Athena - Crash Site - part 2 - Assault on Dark Athena - The Chronicles of Riddick: Assault on Dark Athena - Game Guide and Walkthrough](https://game.lhg100.com/Article/UploadFiles/201512/2015121710070575.jpg)
[#587]
As you've probably suspected, you're going to have to defeat A LOT of enemy units while trying to return to Pavlo. Make a few steps forward and notice that a spider-bot has appeared in the area. Don't be fooled by the fact that this robot is rather small, because if you're noticed by it you'll die almost instantly. Get rid of the spider-bot [#588] using a well-placed charge and proceed to the passageway you've used before.
![[#588] - Assault on Dark Athena - Crash Site - part 2 - Assault on Dark Athena - The Chronicles of Riddick: Assault on Dark Athena - Game Guide and Walkthrough](https://game.lhg100.com/Article/UploadFiles/201512/2015121710070540.jpg)
[#588]
You're going to be attacked by a drone in the near future and two other enemies will appear when you get to the junction. Don't forget that bullets fired using the SCAR rifle can stick to the ground, so you can use them as mines. Make a few steps forward and get rid of the spider located to your right [#589]. I would recommend leaning out a lot, so you'll be safer from possible attacks.
![[#589] - Assault on Dark Athena - Crash Site - part 2 - Assault on Dark Athena - The Chronicles of Riddick: Assault on Dark Athena - Game Guide and Walkthrough](https://game.lhg100.com/Article/UploadFiles/201512/2015121710070537.jpg)
[#589]
Choose the passageway located to your left, closer to the water. Press the crouch key and try surprising one of the enemy guards. Watch out for a new spider which will appear directly in front of you. Two other spider-bots can be found just around the corner [#590]. Eliminate both robots and proceed forward. Neutralize one more human opponent before he has a chance to surprise you.
![[#590] - Assault on Dark Athena - Crash Site - part 2 - Assault on Dark Athena - The Chronicles of Riddick: Assault on Dark Athena - Game Guide and Walkthrough](https://game.lhg100.com/Article/UploadFiles/201512/2015121710070555.jpg)
[#590]
Keep heading towards the previously unlocked gate. Watch out for a new spider located to your right [#591]. Remember that you should be leaning out instead of revealing your position and becoming an easy target. Proceed towards a new alleyway. You must neutralize a spider here (in front of you), as well as two drones. Enemy units will appear once you're close enough to a new large area.
![[#591] - Assault on Dark Athena - Crash Site - part 3 - Assault on Dark Athena - The Chronicles of Riddick: Assault on Dark Athena - Game Guide and Walkthrough](https://game.lhg100.com/Article/UploadFiles/201512/2015121710070614.jpg)
[#591]
Get closer to the passageway where you saw the drones. Inspect the wall to your right to find a new spider-bot [#592]. Neutralize the robot before moving on to the next location. Keep heading towards the area you've started exploring this level. Destroy a new spider located in front of you and monitor area to your right, because new enemy soldiers may appear there.
![[#592] - Assault on Dark Athena - Crash Site - part 3 - Assault on Dark Athena - The Chronicles of Riddick: Assault on Dark Athena - Game Guide and Walkthrough](https://game.lhg100.com/Article/UploadFiles/201512/2015121710070691.jpg)
[#592]
Keep heading towards Pavlo's hideout. You will probably encounter a few additional spiders along the way, however locating and eliminating them shouldn't be a problem. The only spider-bot you need to watch out for will appear in front of you [#593]. Make sure to eliminate all the drones as you go as well.
[#593]
Once you've gone through a narrow passageway don't forget to destroy one more spider-bot. You can find it above your current position. Enter Pavlo's hideout and deal with all enemy troops found inside [#594]. Sadly you'll notice that your ally has been killed during the firefight. You can't revive him, so the only thing you can do here is to use a nearby NanoMED health station in order to heal Riddick's injuries.
![[#594] - Assault on Dark Athena - Crash Site - part 3 - Assault on Dark Athena - The Chronicles of Riddick: Assault on Dark Athena - Game Guide and Walkthrough](https://game.lhg100.com/Article/UploadFiles/201512/2015121710070640.jpg)
[#594]
Proceed towards the stairs leading to a fortress seen in the distance. You'll have to be extremely careful here, because you'll be forced to deal with a lot of spiders and drones along the way. Some of the robots will also appear close to your character [#595], not giving you too many opportunities to hide or plan your next move.
![[#595] - Assault on Dark Athena - Crash Site - part 3 - Assault on Dark Athena - The Chronicles of Riddick: Assault on Dark Athena - Game Guide and Walkthrough](https://game.lhg100.com/Article/UploadFiles/201512/2015121710070601.jpg)
[#595]
Notice that two new spider-bots will appear on the walls of the fortress once you're close enough to this structure. Eliminate them from a large distance, so you won't have to risk your life by engaging them in a more direct combat. Once you've arrived at the fortress grab the left ledge [#596] and get on top of this small platform. Use a crate to get to a higher section of the roof.
![[#596] - Assault on Dark Athena - Crash Site - part 3 - Assault on Dark Athena - The Chronicles of Riddick: Assault on Dark Athena - Game Guide and Walkthrough](https://game.lhg100.com/Article/UploadFiles/201512/2015121710070703.jpg)
[#596]
Use your SCAR rifle in order to destroy a nearby wooden door. Once you've made it to the upper balcony take your time to locate a new soldier on the ground floor. Kill him and then use a hangrail to get to the other side of this structure [#597]. Turn around quickly and take care of a second assailant.
![[#597] - Assault on Dark Athena - Crash Site - part 3 - Assault on Dark Athena - The Chronicles of Riddick: Assault on Dark Athena - Game Guide and Walkthrough](https://game.lhg100.com/Article/UploadFiles/201512/2015121710070728.jpg)
[#597]
I would strongly recommend that you look around the balcony, because you'll have a chance to collect a bounty card ("Raizer") [#598]. Once you've taken this time head down CAREFULLY and proceed towards a small door to leave this area.
![[#598] - Assault on Dark Athena - Crash Site - part 3 - Assault on Dark Athena - The Chronicles of Riddick: Assault on Dark Athena - Game Guide and Walkthrough](https://game.lhg100.com/Article/UploadFiles/201512/2015121710070761.jpg)
[#598]
Ignore a large gate, because you won't be able to open it from this side. Instead head to your left. Use your SCAR rifle to destroy wooden boards [#599]. This will allow you to get to the upper balcony. Make sure to leave the balcony as soon as possible by landing inside the compound.
![[#599] - Assault on Dark Athena - Bazaar - Assault on Dark Athena - The Chronicles of Riddick: Assault on Dark Athena - Game Guide and Walkthrough](https://game.lhg100.com/Article/UploadFiles/201512/2015121710070778.jpg)
[#599]
A nearby square is heavily occupied by enemy units [#600]. I would recommend that you start leaning out for short periods of time. Target single enemies and prevent Riddick from losing more than one health unit during the course of this battle. Some of the enemy soldiers will occupy upper balconies, so don't forget to kill them as well.
![[#600] - Assault on Dark Athena - Bazaar - Assault on Dark Athena - The Chronicles of Riddick: Assault on Dark Athena - Game Guide and Walkthrough](https://game.lhg100.com/Article/UploadFiles/201512/2015121710070727.jpg)
[#600]
Start exploring this area once it's safe to move around. Destroy a small wooden structure to your left and you'll be able to get your hands on a bounty card (Jimmy Greshner). Getting to a second bonus item will require you to destroy a wooden entrance [#601]. Take a new bounty card (Slinger Remnan) from the building.
![[#601] - Assault on Dark Athena - Bazaar - Assault on Dark Athena - The Chronicles of Riddick: Assault on Dark Athena - Game Guide and Walkthrough](https://game.lhg100.com/Article/UploadFiles/201512/2015121710070706.jpg)
[#601]
When you have both cards in your possession head to the upper section of the city (that's where you've seen enemy troops). Locate a NanoMED health unit, turn left and begin moving forward. Once you've reached a dark tunnel use your rifle to destroy some of the nearby lamps [#602].
![[#602] - Assault on Dark Athena - Bazaar - Assault on Dark Athena - The Chronicles of Riddick: Assault on Dark Athena - Game Guide and Walkthrough](https://game.lhg100.com/Article/UploadFiles/201512/2015121710070744.jpg)
[#602]
Approach a large gate and notice that a new boss has appeared in the area [#603]. This creature is called an Alpha Drone. Move back to the dark corridor quickly. I wouldn't recommend engaging the beast in an open confrontation, because the drone is equipped with a rocket launcher and a minigun and it would be skilled at using these weapons.
![[#603] - Assault on Dark Athena - Bazaar - Assault on Dark Athena - The Chronicles of Riddick: Assault on Dark Athena - Game Guide and Walkthrough](https://game.lhg100.com/Article/UploadFiles/201512/2015121710070837.jpg)
[#603]
Your objective will be to stick five explosive bullets to drone's body. It can't be a smaller number, because your actions wouldn't result in a satisfying result. Don't forget to hide after each successful hit [#604]. The drone will probably fire about four rockets before it's safe to come out of hiding. You can also try moving between two exits from the dark corridor.
![[#604] - Assault on Dark Athena - Bazaar - Assault on Dark Athena - The Chronicles of Riddick: Assault on Dark Athena - Game Guide and Walkthrough](https://game.lhg100.com/Article/UploadFiles/201512/2015121710070808.jpg)
[#604]
Once you've finished your job press the right mouse button to detonate all five bullets. If you've done everything according to plan, you should notice that the drone has kneeled [#605]. If not - repeat all the actions mentioned above and make sure this time that all the bullets have reached the drone.
![[#605] - Assault on Dark Athena - Bazaar - Assault on Dark Athena - The Chronicles of Riddick: Assault on Dark Athena - Game Guide and Walkthrough](https://game.lhg100.com/Article/UploadFiles/201512/2015121710070817.jpg)
[#605]
The second you notice that the drone has kneeled start running towards the creature [#606] and press the action key once you're close enough. This will allow Riddick to perform a gruesome execution. You may now return to the NanoMED station to heal Riddick's injuries.
![[#606] - Assault on Dark Athena - Bazaar - Assault on Dark Athena - The Chronicles of Riddick: Assault on Dark Athena - Game Guide and Walkthrough](https://game.lhg100.com/Article/UploadFiles/201512/2015121710070891.jpg)
[#606]
There's only more thing for you to do here. Approach drone's body and notice that you can pick up a special kind of a grenade. I have to warn you - this grenade will explode only a few seconds after it's been taken. Move to the right quickly and throw the grenade at a smaller gate [#607]. Notice that a hole has appeared in the grating. Use it to travel to a new location.
![[#607] - Assault on Dark Athena - Bazaar - Assault on Dark Athena - The Chronicles of Riddick: Assault on Dark Athena - Game Guide and Walkthrough](https://game.lhg100.com/Article/UploadFiles/201512/2015121710070849.jpg)
[#607]
Map of the area:
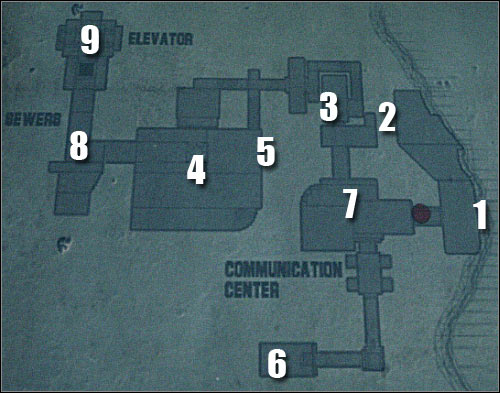
Map legend: 1 - starting area; 2 - small bridge; 3 - medical station; 4 - area where you'll have to defeat an Alpha Drone; 5 - Bounty Card; 6 - Bounty Card; 7 - Bounty Card and a terminal; 8 - entrance to the sewers; 9 - elevator
Proceed forward and it shouldn't take too long for you to exit the building. Approach the exit carefully and notice enemy units stationed to your right [#608]. Remember that you can set up a small minefield using the SCAR rifle. Prevent enemies from getting too close and consider creating a minefield near the start area if you see them heading your way.
![[#608] - Assault on Dark Athena - New Venice - part 1 - Assault on Dark Athena - The Chronicles of Riddick: Assault on Dark Athena - Game Guide and Walkthrough](https://game.lhg100.com/Article/UploadFiles/201512/2015121710070941.jpg)
[#608]
Aside from enemies standing relatively close to your position you'll also be dealing with more distant guards. Make sure to inspect a small balcony for possible enemy reinforcements [#609]. Retreat to the start area each time you suffer minor injuries and use the nearby crates for additional cover.
![[#609] - Assault on Dark Athena - New Venice - part 1 - Assault on Dark Athena - The Chronicles of Riddick: Assault on Dark Athena - Game Guide and Walkthrough](https://game.lhg100.com/Article/UploadFiles/201512/2015121710070907.jpg)
[#609]
Once the battle has ended take your time to examine the bodies and you should be able to find an assault rifle. Still - I would recommend that you keep using a SCAR rifle. Proceed to your right and fire a single explosive bullet at a nearby control panel [#610]. Detonating this object will allow you to extend a small wooden bridge.
![[#610] - Assault on Dark Athena - New Venice - part 1 - Assault on Dark Athena - The Chronicles of Riddick: Assault on Dark Athena - Game Guide and Walkthrough](https://game.lhg100.com/Article/UploadFiles/201512/2015121710070926.jpg)
[#610]
Watch out, because it's very likely to encounter more enemy units on the left balcony [#611]. I would recommend that you maintain a crouching stance, so you won't be an easy target for them. You can also try moving to your left to find a better shooting spot if you feel uncomfortable near the bridge.
![[#611] - Assault on Dark Athena - New Venice - part 1 - Assault on Dark Athena - The Chronicles of Riddick: Assault on Dark Athena - Game Guide and Walkthrough](https://game.lhg100.com/Article/UploadFiles/201512/2015121710070900.jpg)
[#611]
Watch out, because an Alpha Drone will appear in this area when you get rid of the guards. Move to your right an quickly destroy a wooden door [#612] to unlock access to a new building. Don't forget to use a NanoMED health station if you've suffered some injuries during the last fight. Once you're fully healed proceed to an upper floor.
![[#612] - Assault on Dark Athena - New Venice - part 1 - Assault on Dark Athena - The Chronicles of Riddick: Assault on Dark Athena - Game Guide and Walkthrough](https://game.lhg100.com/Article/UploadFiles/201512/2015121710070943.jpg)
[#612]
Notice a wooden door directly in front of you. Destroy the door and move towards a small balcony located between two buildings. You must be extremely careful here, because you'll soon notice that a new spider-bot has appeared in the area [#613]. Destroy the robot before it finds you and only then enter a second building. Head down the stairs and destroy a lamp along the way.
![[#613] - Assault on Dark Athena - New Venice - part 1 - Assault on Dark Athena - The Chronicles of Riddick: Assault on Dark Athena - Game Guide and Walkthrough](https://game.lhg100.com/Article/UploadFiles/201512/2015121710071079.jpg)
[#613]
Notice a wooden door just around the corner. Place an explosive device and unlock this passageway. Doing this will attract the attention of the Alpha Drone. You can start attacking the boss from here [#614] or you can try aiming from the balcony where you've destroyed a spider. The most important thing is to avoid the rockets being fired by the drone.
![[#614] - Assault on Dark Athena - New Venice - part 2 - Assault on Dark Athena - The Chronicles of Riddick: Assault on Dark Athena - Game Guide and Walkthrough](https://game.lhg100.com/Article/UploadFiles/201512/2015121710071077.jpg)
[#614]
Remember that you don't have to be in a hurry. Keep placing the objects fired from a SCAR rifle on drone's body and each time you've scored a hit hide to avoid his rocket attacks. Wait for all five bullets to reach the drone, detonate them and start running towards the boss [#615]. Press the action key to perform an execution.
![[#615] - Assault on Dark Athena - New Venice - part 2 - Assault on Dark Athena - The Chronicles of Riddick: Assault on Dark Athena - Game Guide and Walkthrough](https://game.lhg100.com/Article/UploadFiles/201512/2015121710071019.jpg)
[#615]
Remain near the defeated drone. Press the action key to pick up a drone grenade and throw this object at a nearby metal structure. Go there and collect two items - a cartridge and a bounty card (Trip Strider). Head on towards the river and find the stairs [#616]. Head down, turn left and enter a small ventilation shaft. You should be able to find a second bounty card (Cornwald Sanders) there.
![[#616] - Assault on Dark Athena - New Venice - part 2 - Assault on Dark Athena - The Chronicles of Riddick: Assault on Dark Athena - Game Guide and Walkthrough](https://game.lhg100.com/Article/UploadFiles/201512/2015121710071131.jpg)
[#616]
I would recommend that you take your time going back to the communications center. This is a small building where you noticed a lot of enemy units before. You couldn't go there right away, because you were interrupted by a boss. Once you're inside use the SCAR rifle to destroy a wooden door [#617]. Repeat this action with the second door and proceed to the end of the pier to find a bounty card (Marck Killinfel) next to a crate.
![[#617] - Assault on Dark Athena - New Venice - part 2 - Assault on Dark Athena - The Chronicles of Riddick: Assault on Dark Athena - Game Guide and Walkthrough](https://game.lhg100.com/Article/UploadFiles/201512/2015121710071113.jpg)
[#617]
Go back to the small building. This time try to get on top of a small platform [#618]. From there you'll get to the attic. Explore your surroundings to find a bounty card (Holly Jo). Head down. You can now initiate a new subquest. Doing this will allow you to get your hands on a sniper rifle. If you want to complete this quest go to the third chapter of my guide (Appendix) and read the section titled Riddick's arsenal (sniper rifle). I have to warn you that it will take some time to find this gun, so if you don't plan on expanding your arsenal return to the large square where you've defeated the drone.
![[#618] - Assault on Dark Athena - New Venice - part 2 - Assault on Dark Athena - The Chronicles of Riddick: Assault on Dark Athena - Game Guide and Walkthrough](https://game.lhg100.com/Article/UploadFiles/201512/2015121710071103.jpg)
[#618]
Locate a small opening [#619] and use it to get to an upper balcony. It shouldn't be a problem. Proceed to your left and slide down the ladder to get to the sewers. Once you're inside the sewers make a few steps forward and use the SCAR rifle to destroy a small wooden platform. Afterwards use the second ladder.
![[#619] - Assault on Dark Athena - New Venice - part 2 - Assault on Dark Athena - The Chronicles of Riddick: Assault on Dark Athena - Game Guide and Walkthrough](https://game.lhg100.com/Article/UploadFiles/201512/2015121710071125.jpg)
[#619]
I wouldn't recommend destroying nearby sources of light, because it would only mean more trouble for Riddick. Instead place explosive devices near the crates [#620]. Make a few steps forward and detonate the charges when you notice enemy units heading your way. Remain near the ladder and keep firing at the guards, waiting for more of them to show up. If you're having problem using the SCAR rifle you can also consider switching to an assault rifle.
[#620]
Approach a small elevator shaft when you're done getting rid of enemy guards. Notice that the elevator is not active. As a result you must place four explosive devices on the elevator, one for each support [#621]. Detonate the charges and wait for the elevator to get here. Use this object to travel to a new floor and travel to a new area.
![[#621] - Assault on Dark Athena - New Venice - part 2 - Assault on Dark Athena - The Chronicles of Riddick: Assault on Dark Athena - Game Guide and Walkthrough](https://game.lhg100.com/Article/UploadFiles/201512/2015121710071261.jpg)
[#621]
Map of the area:
Map legend: 1 - starting area; 2 - Bounty Card; 3 - Bounty Card; 4 - control panel; 5 - entrance to the arena; 6 - exit from the arena; 7 - area where you must defeat an Alpha Drone; 8 - Bounty Card; 9 - Bounty Card; 10 - passageway to the refinery
You begin your exploration while standing inside a small room. Thankfully there aren't any enemy units in the area, so you can look around. Start off by climbing on top of two crates [#622]. It shouldn't be a problem. From there get to the attic to find a cartridge. Head back down and exit the building.
![[#622] - Assault on Dark Athena - Old Town - part 1 - Assault on Dark Athena - The Chronicles of Riddick: Assault on Dark Athena - Game Guide and Walkthrough](https://game.lhg100.com/Article/UploadFiles/201512/2015121710071238.jpg)
[#622]
Head forward once you've left the building. Drop to a small hole and you'll find a bounty card (Ben Dere) to your right. Go back up and turn left. Notice new crates in front of you [#623]. Use these crates to gain access to an upper balcony. Head forward and turn right. It shouldn't take you too long to find a second bounty card (Acora Minola).
![[#623] - Assault on Dark Athena - Old Town - part 1 - Assault on Dark Athena - The Chronicles of Riddick: Assault on Dark Athena - Game Guide and Walkthrough](https://game.lhg100.com/Article/UploadFiles/201512/2015121710071257.jpg)
[#623]
Return to the ground floor and inspect the surrounding area to find two wooden doors [#624]. Destroy one of the doors with your SCAR rifle and head inside. Use a NanoMED health station before moving on. Once you're ready proceed towards a large square and find a small checkpoint (Arena Access Control).
![[#624] - Assault on Dark Athena - Old Town - part 1 - Assault on Dark Athena - The Chronicles of Riddick: Assault on Dark Athena - Game Guide and Walkthrough](https://game.lhg100.com/Article/UploadFiles/201512/2015121710071308.jpg)
[#624]
Destroy the entrance to the checkpoint. After that turn around and place a few mines in front of the entrance to the arena [#625]. Go inside the checkpoint and use a control panel to raise the main gate. Notice enemy soldiers coming out of the arena. Detonate the mines to deal with them and finish off the survivors. You can also hide inside the checkpoint, place the mines outside and wait for them to show up.
![[#625] - Assault on Dark Athena - Old Town - part 1 - Assault on Dark Athena - The Chronicles of Riddick: Assault on Dark Athena - Game Guide and Walkthrough](https://game.lhg100.com/Article/UploadFiles/201512/2015121710071345.jpg)
[#625]
Make sure you've eliminated all hostile units and head on to the arena. Once you're inside take your time to defeat one of the snipers on the upper balcony [#626]. After that place the mines in front of three other entrances. Make a few steps forward and notice that you've been trapped here.
![[#626] - Assault on Dark Athena - Old Town - part 1 - Assault on Dark Athena - The Chronicles of Riddick: Assault on Dark Athena - Game Guide and Walkthrough](https://game.lhg100.com/Article/UploadFiles/201512/2015121710071307.jpg)
[#626]
I would strongly recommend that you take cover behind a large pillar [#627]. Thankfully the guards are dumb enough not to perform any surprise attacks. Each time you want to eliminate a new group lean out carefully and detonate objects in their vicinity. Keep defending yourself until you notice that a boss has showed up inside the arena.
![[#627] - Assault on Dark Athena - Old Town - part 1 - Assault on Dark Athena - The Chronicles of Riddick: Assault on Dark Athena - Game Guide and Walkthrough](https://game.lhg100.com/Article/UploadFiles/201512/2015121710071368.jpg)
[#627]
You shouldn't change your tactics while trying to defeat the Alpha Drone. Keep using some of the nearby objects for cover, including pillars and the central platform. Try surprising your enemy from the back [#628] and don't forget that you must attach five bullets to drone's body before detonating them. Once this is done quickly approach the drone and finish it off.
![[#628] - Assault on Dark Athena - Old Town - part 2 - Assault on Dark Athena - The Chronicles of Riddick: Assault on Dark Athena - Game Guide and Walkthrough](https://game.lhg100.com/Article/UploadFiles/201512/2015121710071472.jpg)
[#628]
You can heal during your fight with the Alpha Drone or once the beast has been defeated. Notice small gratings found behind both pillars [#629]. You can destroy those easily with a SCAR rifle. Exploring darker tunnels will allow you to find a NanoMED health station. Go back to the arena once you're fully healed.
![[#629] - Assault on Dark Athena - Old Town - part 2 - Assault on Dark Athena - The Chronicles of Riddick: Assault on Dark Athena - Game Guide and Walkthrough](https://game.lhg100.com/Article/UploadFiles/201512/2015121710071433.jpg)
[#629]
Ignore drone's body, because you won't have to take its grenades. Instead focus on getting on top of a large platform located in the center of the room [#630]. Look up and fire a single bullet at a button located on the wall. Detonate this charge and notice that the elevator has begun moving. Take your time to explore this new area.
![[#630] - Assault on Dark Athena - Old Town - part 2 - Assault on Dark Athena - The Chronicles of Riddick: Assault on Dark Athena - Game Guide and Walkthrough](https://game.lhg100.com/Article/UploadFiles/201512/2015121710071488.jpg)
[#630]
Find a small hole in the wall [#631]. Drop down and eliminate a single guard before he begins firing at Riddick. If you're lucky you won't have any problems surprising him. Heal Riddick using a nearby NanoMED health station after which press a button. Go back to the arena where you've defeated the Alpha Drone and other guards.
![[#631] - Assault on Dark Athena - Old Town - part 2 - Assault on Dark Athena - The Chronicles of Riddick: Assault on Dark Athena - Game Guide and Walkthrough](https://game.lhg100.com/Article/UploadFiles/201512/2015121710071484.jpg)
[#631]
Notice that a new passageway has been unlocked for you. Don't get too excited, because you'll encounter yet another Alpha Drone when you get to a new area. Go to your right and slow down once you've reached the stairs [#632]. A new spider-bot will land here shortly and you must defeat it as soon as possible.
![[#632] - Assault on Dark Athena - Old Town - part 2 - Assault on Dark Athena - The Chronicles of Riddick: Assault on Dark Athena - Game Guide and Walkthrough](https://game.lhg100.com/Article/UploadFiles/201512/2015121710071595.jpg)
[#632]
Once you've taken care of the spider fire at the wooden door [#633] and set off the charge from a large distance. Run towards that new building and use your SCAR rifle once again to end up standing outside. Notice a large bridge to your right. Here's where you'll have to take part in a duel with a new Alpha Drone.
![[#633] - Assault on Dark Athena - Old Town - part 2 - Assault on Dark Athena - The Chronicles of Riddick: Assault on Dark Athena - Game Guide and Walkthrough](https://game.lhg100.com/Article/UploadFiles/201512/2015121710071522.jpg)
[#633]
The duel itself won't surprise you with any new features. Keep attacking the boss from a very large distance and make sure that all five charges have reached its body. Avoid being hit at the same time. Detonate the charges and execute the beast using a well-known move. Proceed towards a nearby grating. Plant four explosive charges [#634]. Detonating these objects will gain you access to weapons (including a shotgun) and to a bounty card ("Croucher" Ulong).
![[#634] - Assault on Dark Athena - Old Town - part 2 - Assault on Dark Athena - The Chronicles of Riddick: Assault on Dark Athena - Game Guide and Walkthrough](https://game.lhg100.com/Article/UploadFiles/201512/2015121710071513.jpg)
[#634]
Return to the bridge where you've left the last building. Ignore this structure and instead approach the ledge. Look down and you should notice a new bounty card (Zimto Rager) [#635]. Take it and go back to the area where you've defeated the Alpha Drone. Proceed towards a large gate located near its body.
![[#635] - Assault on Dark Athena - Old Town - part 2 - Assault on Dark Athena - The Chronicles of Riddick: Assault on Dark Athena - Game Guide and Walkthrough](https://game.lhg100.com/Article/UploadFiles/201512/2015121710071611.jpg)
[#635]
Start moving forward after which turn right. Enter an elevator, press the button and wait to be transported to a new level. Watch out, because there's going to be a spider to your right [#636]. Destroy the robot before moving on and avoid being seen by the spider before planning your attack.
![[#636] - Assault on Dark Athena - Refinery - part 1 - Assault on Dark Athena - The Chronicles of Riddick: Assault on Dark Athena - Game Guide and Walkthrough](https://game.lhg100.com/Article/UploadFiles/201512/2015121710071604.jpg)
[#636]
I assume that once again you may have some serious problems figuring out your next move. You'll have to position one of the small crates under the right balcony. In order to do that choose one of these objects, plant an explosive device on it and detonate the charge [#637]. Keep doing that until the crate reaches a satisfactory position.
![[#637] - Assault on Dark Athena - Refinery - part 1 - Assault on Dark Athena - The Chronicles of Riddick: Assault on Dark Athena - Game Guide and Walkthrough](https://game.lhg100.com/Article/UploadFiles/201512/2015121710071642.jpg)
[#637]
Once the crate is under the balcony climb on top of it and press the action key to grab the ledge and to get to the upper platform. Notice a NanoMED health station in your vicinity. Once you're fully healed find a hangrail [#638] and press the action key to use it. Keep heading forward and ignore voices heard along the way, because you won't be attacked by any hostile units.
![[#638] - Assault on Dark Athena - Refinery - part 1 - Assault on Dark Athena - The Chronicles of Riddick: Assault on Dark Athena - Game Guide and Walkthrough](https://game.lhg100.com/Article/UploadFiles/201512/2015121710071631.jpg)
[#638]
Eventually you'll get to a large warehouse which is going to be patrolled by a few soldiers. I would recommend that you deal with them swiftly [#639]. If you're having some problems with that try reloading the last checkpoint and there's a chance that the game will change their positions. An ideal situation would be to get them close to each target, so you'll kill two or more with a single action. Don't forget that you're not safe on the balcony, so it's important to win this fight as soon as you can.
![[#639] - Assault on Dark Athena - Refinery - part 1 - Assault on Dark Athena - The Chronicles of Riddick: Assault on Dark Athena - Game Guide and Walkthrough](https://game.lhg100.com/Article/UploadFiles/201512/2015121710071657.jpg)
[#639]
Make sure you're the only person alive and leave the balcony. Take your time collecting ammunition from fallen enemies. Once this is done go to a large console [#640]. Pressing the button will result in new guards arriving through a nearby gate. You can engage them as you go or you could try placing the mines a little earlier. I would recommend attacking them from a larger distance, so you won't have to risk your life.
![[#640] - Assault on Dark Athena - Refinery - part 1 - Assault on Dark Athena - The Chronicles of Riddick: Assault on Dark Athena - Game Guide and Walkthrough](https://game.lhg100.com/Article/UploadFiles/201512/2015121710071782.jpg)
[#640]
Once you've won proceed towards the passageway which has been used by the guards not long ago. Approach a new gate and place a few mines on a nearby ramp. Afterwards move closer to the ramp, allowing enemy units to show up. Move back to the gate, wait for the guards to show up near the ramp [#641] and detonate the charges. Deal with the remaining enemy forces without losing too many health units.
![[#641] - Assault on Dark Athena - Refinery - part 1 - Assault on Dark Athena - The Chronicles of Riddick: Assault on Dark Athena - Game Guide and Walkthrough](https://game.lhg100.com/Article/UploadFiles/201512/2015121710071738.jpg)
[#641]
Proceed to a new large section of the map. Keep moving forward and then turn left. It's extremely important that you STOP before moving on. There are five spider-bots in the area and you must destroy all of them from here. Thankfully it'll be easy to locate the robots, because they'll be using laser sights to monitor the surrounding area. The only less visible group of spiders is located to your left [#642].
![[#642] - Assault on Dark Athena - Refinery - part 1 - Assault on Dark Athena - The Chronicles of Riddick: Assault on Dark Athena - Game Guide and Walkthrough](https://game.lhg100.com/Article/UploadFiles/201512/2015121710071769.jpg)
[#642]
Use the ramp once you've eliminated all spider-bots. Turn right and get ready to defeat a small group of human opponents. Expect them to show up on the upper balconies [#643]. I would recommend shooting at them from a good cover. You should also maintain large distance, so they won't hit you too often. Thankfully there's a NanoMED unit nearby in case you sustain injuries. Head forward and kill two additional guards, but don't leave this area just yet.
![[#643] - Assault on Dark Athena - Refinery - part 1 - Assault on Dark Athena - The Chronicles of Riddick: Assault on Dark Athena - Game Guide and Walkthrough](https://game.lhg100.com/Article/UploadFiles/201512/2015121710071719.jpg)
[#643]
Go back to the first area of this warehouse (before you got to all five spider-bots). Your objective will be to get on top of a large structure in one of the corners [#644] and this means that you must use the trick with explosive charges again to position a crate next to this object.
![[#644] - Assault on Dark Athena - Refinery - part 1 - Assault on Dark Athena - The Chronicles of Riddick: Assault on Dark Athena - Game Guide and Walkthrough](https://game.lhg100.com/Article/UploadFiles/201512/2015121710071728.jpg)
[#644]
Get on top of the crate and from there you can get to a roof of the large structure [#645]. Notice a conveyor belt in front of you. Go there, turn right and go past the large container carefully. It's easy to fall down, so you must be moving slowly. Thankfully you'll be rewarded for your efforts with a bounty card (Stinga Yerassa). Head back down and proceed to the exit.
![[#645] - Assault on Dark Athena - Refinery - part 2 - Assault on Dark Athena - The Chronicles of Riddick: Assault on Dark Athena - Game Guide and Walkthrough](https://game.lhg100.com/Article/UploadFiles/201512/2015121710071828.jpg)
[#645]
Before you enter a new large hall it's important to eliminate three other spider-bots. The first robot will appear directly above Riddick, however the rest is going to be harder to find. Make sure you've destroyed a spider-bot located to your right, near the entrance [#646]. The remaining third spider will be located to your left. Once again - act quickly due to the fact that you'll be standing close to the spider.
![[#646] - Assault on Dark Athena - Refinery - part 2 - Assault on Dark Athena - The Chronicles of Riddick: Assault on Dark Athena - Game Guide and Walkthrough](https://game.lhg100.com/Article/UploadFiles/201512/2015121710071858.jpg)
[#646]
Approach a new ramp and you should notice enemy drones heading your way. If you have enough time try planting a few mines on the ground. Otherwise aim directly at them, hoping you won't be injured yourself. Once they're gone get rid of one more spider (it's to your right) and then inspect a large container in the corner of the room [#647]. You'll find a bounty card (Kivak Ragellen) behind the cylinder.
![[#647] - Assault on Dark Athena - Refinery - part 2 - Assault on Dark Athena - The Chronicles of Riddick: Assault on Dark Athena - Game Guide and Walkthrough](https://game.lhg100.com/Article/UploadFiles/201512/2015121710071868.jpg)
[#647]
Use the ramp to get to the area where you saw the drones. Turn right here and locate a narrow passageway {#648]. You must be extremely careful, because there's a spider-bot just around the corner. Lean out to destroy it without suffering any losses. Go there and find yet another bounty card (Corison Manguard).
![[#648] - Assault on Dark Athena - Refinery - part 2 - Assault on Dark Athena - The Chronicles of Riddick: Assault on Dark Athena - Game Guide and Walkthrough](https://game.lhg100.com/Article/UploadFiles/201512/2015121710071855.jpg)
[#648]
Notice a locked door in front of you. As a result choose a corridor located to your left. Once again - get ready to dispose of a spider-bot. When you get to a new area make sure to heal Riddick using a nearby NanoMED unit. Turn around and get on top of a large pipe [#649]. You must now use this pipe to get to the OTHER END of the warehouse. Eventually you'll come across a bounty card (Kaiula Beni). Go back to the area with the med station.
![[#649] - Assault on Dark Athena - Refinery - part 2 - Assault on Dark Athena - The Chronicles of Riddick: Assault on Dark Athena - Game Guide and Walkthrough](https://game.lhg100.com/Article/UploadFiles/201512/2015121710071834.jpg)
[#649]
Use one of two available ladders to get to balconies surrounding huge cylinders. Make sure to explore this entire area. The left group of balconies will lead you to a final bounty card (Bresser Ratt) [#650] of this map. Inspecting the balconies to your right will result in Riddick finding a control panel. Obviously you must press the action key there to interact with the console.
![[#650] - Assault on Dark Athena - Refinery - part 2 - Assault on Dark Athena - The Chronicles of Riddick: Assault on Dark Athena - Game Guide and Walkthrough](https://game.lhg100.com/Article/UploadFiles/201512/2015121710071945.jpg)
[#650]
Turn around and remain on the balconies. Notice that enemy guards have appeared near the medical station [#651] and it would be a good idea to surprise them. Thankfully even if you do suffer some injuries you'll still be able to heal yourself almost right away.
![[#651] - Assault on Dark Athena - Refinery - part 2 - Assault on Dark Athena - The Chronicles of Riddick: Assault on Dark Athena - Game Guide and Walkthrough](https://game.lhg100.com/Article/UploadFiles/201512/2015121710071935.jpg)
[#651]
You must now return to the area where you've encountered a locked door not long ago. Watch out for one more guard along the way. Also - the exit is going to be guarded by two spider-bots [#652]. Make sure to get rid of both robots before you decide to leave this area.
![[#652] - Assault on Dark Athena - Refinery - part 2 - Assault on Dark Athena - The Chronicles of Riddick: Assault on Dark Athena - Game Guide and Walkthrough](https://game.lhg100.com/Article/UploadFiles/201512/2015121710071976.jpg)
[#652]
Make sure to examine the first room of this level and you'll be able to get your hands on a bounty card (Uric VanDevlin) hidden behind large cylinders. There's a spider-bot in one of the corners of the room [#653]. Destroy the robot by leaning out and firing an explosive projectile. Head on to a much larger area.
![[#653] - Assault on Dark Athena - Star Port - part 1 - Assault on Dark Athena - The Chronicles of Riddick: Assault on Dark Athena - Game Guide and Walkthrough](https://game.lhg100.com/Article/UploadFiles/201512/2015121710071991.jpg)
[#653]
Keep heading forward, but consider retreating the second you notice enemy soldiers heading your way. Start attacking them from a larger distance [#654]. You can try using a SCAR rifle here to set up a minefield or you can switch to an assault rifle if you prefer a more classical approach. Notice that you won't be allowed to leave this area through a gate. As a result you'll have to get to the exit using a trickier path.
![[#654] - Assault on Dark Athena - Star Port - part 1 - Assault on Dark Athena - The Chronicles of Riddick: Assault on Dark Athena - Game Guide and Walkthrough](https://game.lhg100.com/Article/UploadFiles/201512/2015121710072082.jpg)
[#654]
Turn around while facing the gate and go to your left. Target two glowing objects [#655] and attach explosive bullets to them. Detonate the charges and you'll be allowed to travel to an upper balcony. Make a few steps forward there, allowing the game to create a new checkpoint.
[#655]
I would strongly recommend that you return to the lower floor, because new spider-bots have arrived in the area and it'll be easier to destroy them from there. Approach the ledge and destroy five robots (two pairs and a single spider above your position [#656]). Once this is done go back to the upper balcony. Move forward and then head left.
![[#656] - Assault on Dark Athena - Star Port - part 1 - Assault on Dark Athena - The Chronicles of Riddick: Assault on Dark Athena - Game Guide and Walkthrough](https://game.lhg100.com/Article/UploadFiles/201512/2015121710072074.jpg)
[#656]
There's one more spider you can eliminate only from this balcony and it will be attached to a ceiling. Once it's gone proceed to a central balcony and get past a large container [#657]. I guess I don't have to remind you to be careful here, because if you fall down you'll have to return to the last checkpoint.
![[#657] - Assault on Dark Athena - Star Port - part 1 - Assault on Dark Athena - The Chronicles of Riddick: Assault on Dark Athena - Game Guide and Walkthrough](https://game.lhg100.com/Article/UploadFiles/201512/2015121710072080.jpg)
[#657]
Turn left upon your arrival at a closed door. Locate a large pipe heading downwards [#658] and get on top of this object. Make sure to press the crouch key along the way, because otherwise you would have problems avoiding one of the obstacles. Eventually you'll get to a small horizontal beam with a bounty card (Ty Withrope). Take the card, go back up and find a small hole near the locked door.
![[#658] - Assault on Dark Athena - Star Port - part 1 - Assault on Dark Athena - The Chronicles of Riddick: Assault on Dark Athena - Game Guide and Walkthrough](https://game.lhg100.com/Article/UploadFiles/201512/2015121710072031.jpg)
[#658]
Turn around and quickly choose a shotgun from your arsenal. Get ready to be attacked a small group of drones [#659]. I would recommend that you start firing at the drones without spending too much time trying to aim properly. Remember that your shotgun is deadly at close range. Once you've defeated the first group hide and reload your weapon. Keep attacking other groups until you're the only one standing.
![[#659] - Assault on Dark Athena - Star Port - part 1 - Assault on Dark Athena - The Chronicles of Riddick: Assault on Dark Athena - Game Guide and Walkthrough](https://game.lhg100.com/Article/UploadFiles/201512/2015121710072055.jpg)
[#659]
Make sure it's safe here and heal Riddick using a nearby NanoMED unit. Go to a new area through two sets of doors. Stand in the passageway and get rid of three new spiders. Two bots can be found to your left. The remaining third robot is located to your right [#660].
![[#660] - Assault on Dark Athena - Star Port - part 1 - Assault on Dark Athena - The Chronicles of Riddick: Assault on Dark Athena - Game Guide and Walkthrough](https://game.lhg100.com/Article/UploadFiles/201512/2015121710072088.jpg)
[#660]
Make a few steps forward and you should hear some noises. If you're planning on using a SCAR rifle, you should consider staying in the passageway [#661]. Sadly you can't feel safe there, because enemies may still decide to breach the door. Prevent that from happening by setting up minefield. One you've won make a few steps forward, turn right and get rid of the final spider-bot.
![[#661] - Assault on Dark Athena - Star Port - part 1 - Assault on Dark Athena - The Chronicles of Riddick: Assault on Dark Athena - Game Guide and Walkthrough](https://game.lhg100.com/Article/UploadFiles/201512/2015121710072133.jpg)
[#661]
There's a new card in this area, however collecting it is going to be very difficult. Start off by going back to the previous room. Stand behind one of the smaller crates and begin moving it towards the door using explosive chargers. Now stand in the passageway and detonate a charge [#662] to allow the crate to move further away. You can't count on the door opening for the crate! Repeat these actions with the second gate.
![[#662] - Assault on Dark Athena - Star Port - part 1 - Assault on Dark Athena - The Chronicles of Riddick: Assault on Dark Athena - Game Guide and Walkthrough](https://game.lhg100.com/Article/UploadFiles/201512/2015121710072137.jpg)
[#662]
I would advise caution here [#663], because it's going to be very easy to lose the crate if you detonate the charge in a bad spot. If you lost the crate you can go back for the next one, however if you lose all of them you will have to reload the last checkpoint.
![[#663] - Assault on Dark Athena - Star Port - part 1 - Assault on Dark Athena - The Chronicles of Riddick: Assault on Dark Athena - Game Guide and Walkthrough](https://game.lhg100.com/Article/UploadFiles/201512/2015121710072178.jpg)
[#663]
The crate must stop near one of the large structures [#664]. Jump on top of the crate and from there you should be able to get to the roof of the bigger object. Take a bounty card (Crank Ricters) after which proceed towards a nearby elevator. Press a button and wait for the elevator to transport you to a new location.
![[#664] - Assault on Dark Athena - Star Port - part 2 - Assault on Dark Athena - The Chronicles of Riddick: Assault on Dark Athena - Game Guide and Walkthrough](https://game.lhg100.com/Article/UploadFiles/201512/2015121710072238.jpg)
[#664]
You'll soon have to deal with new drones. You can still try creating a minefield [#665], however I would recommend using an assault rifle for a more direct approach. Don't forget to zoom in the view and prevent hostile units from moving in too close. Once they're gone head forward, however watch out for a new spider-bot which will appear to your right.
![[#665] - Assault on Dark Athena - Star Port - part 2 - Assault on Dark Athena - The Chronicles of Riddick: Assault on Dark Athena - Game Guide and Walkthrough](https://game.lhg100.com/Article/UploadFiles/201512/2015121710072221.jpg)
[#665]
An Alpha Drone will be waiting for you just around the corner. Ignore the fact that you can't find a good cover. Just keep running while staying on the large ramp [#666] and you should be fine. Thankfully the drone shouldn't use its minigun, so you can get closer. Attach five bullets, detonate them and perform an execution on the boss.
![[#666] - Assault on Dark Athena - Star Port - part 2 - Assault on Dark Athena - The Chronicles of Riddick: Assault on Dark Athena - Game Guide and Walkthrough](https://game.lhg100.com/Article/UploadFiles/201512/2015121710072218.jpg)
[#666]
Head to the area where you've defeated the boss. Collect a drone grenade and throw this object at a set of barrels [#667]. Wait for an explosion to occur in your vicinity and notice that you can explore a small stash. Take two items from this stash - a cartridge and a bounty card ("Lucky" McFall).
![[#667] - Assault on Dark Athena - Star Port - part 2 - Assault on Dark Athena - The Chronicles of Riddick: Assault on Dark Athena - Game Guide and Walkthrough](https://game.lhg100.com/Article/UploadFiles/201512/2015121710072329.jpg)
[#667]
Use the ladder to get on top of a large container. Once you're there take some time trying to locate a narrow passageway [#688]. Go there and you'll be able to reach a new location of the map. Jump down upon your arrival and go to your left.
![[#668] - Assault on Dark Athena - Star Port - part 2 - Assault on Dark Athena - The Chronicles of Riddick: Assault on Dark Athena - Game Guide and Walkthrough](https://game.lhg100.com/Article/UploadFiles/201512/2015121710072304.jpg)
[#668]
Head on towards a smaller set of pipes and you should notice three enemy guards standing below [#669]. You shouldn't have any major problems eliminating them, especially if you detonate some of the first charges before they have a chance to fight back. Head down once they've all been killed.
![[#669] - Assault on Dark Athena - Star Port - part 2 - Assault on Dark Athena - The Chronicles of Riddick: Assault on Dark Athena - Game Guide and Walkthrough](https://game.lhg100.com/Article/UploadFiles/201512/2015121710072311.jpg)
[#669]
Take your time exploring your surroundings. There's a NanoMED health station nearby if you're in need of healing. Once you're fully operational proceed towards a large console. Pressing one of the buttons will activate nearby machinery. Get to the moving platform [#670] and wait for Riddick to be transported to a new area.
![[#670] - Assault on Dark Athena - Star Port - part 2 - Assault on Dark Athena - The Chronicles of Riddick: Assault on Dark Athena - Game Guide and Walkthrough](https://game.lhg100.com/Article/UploadFiles/201512/2015121710072368.jpg)
[#670]
Once you've reached a new warehouse HIDE IN THE SHADOWS. Do this before you'll be noticed by a new Alpha Drone. Try to take the beast by surprise [#671] and prevent Riddick from losing more than one health unit during the course of this duel. Thankfully, Alpha Drone shouldn't enter the shadows, so it'll be easier to avoid it. Finish it off with exploding bullets.
![[#671] - Assault on Dark Athena - Star Port - part 2 - Assault on Dark Athena - The Chronicles of Riddick: Assault on Dark Athena - Game Guide and Walkthrough](https://game.lhg100.com/Article/UploadFiles/201512/2015121710072343.jpg)
[#671]
Getting rid of the first Alpha Drone will result in... a second beast arriving inside the warehouse. Similar rules apply to this battle, so avoid losing too much health and keep using your SCAR rifle to plant more bullets on the drone. Detonate all five of them and finish off your opponent [#672] before the drone stands up again.
![[#672] - Assault on Dark Athena - Star Port - part 2 - Assault on Dark Athena - The Chronicles of Riddick: Assault on Dark Athena - Game Guide and Walkthrough](https://game.lhg100.com/Article/UploadFiles/201512/2015121710072444.jpg)
[#672]
It's not over yet! You'll now have to defend yourself against a mech controlled by Spinner. Thankfully this is going to be the easiest duel from all three. Use the fact that your opponent is moving slowly. Leave your cover for a short period of time in order to plant a bullet on the mech [#673] and immediately hide to avoid injuries.
![[#673] - Assault on Dark Athena - Star Port - part 2 - Assault on Dark Athena - The Chronicles of Riddick: Assault on Dark Athena - Game Guide and Walkthrough](https://game.lhg100.com/Article/UploadFiles/201512/2015121710072419.jpg)
[#673]
You won't have to wait for all five bullets to reach their target before detonating them. It should take about 15-20 explosions before the mech is finally destroyed. Once this is done approach the mech and press the action key in order to collect a keycard. Go towards a large gate [#674] when this item is in your possession and use a panel on the wall to unlock a passageway to the next area.
![[#674] - Assault on Dark Athena - Star Port - part 2 - Assault on Dark Athena - The Chronicles of Riddick: Assault on Dark Athena - Game Guide and Walkthrough](https://game.lhg100.com/Article/UploadFiles/201512/2015121710072487.jpg)
[#674]
The warehouse you're about to enter is being occupied by a small group of enemies [#675]. I wouldn't recommend choosing an open confrontation, because you would have been surrounded from both sides. Instead remain near the entrance to the warehouse. Use a SCAR rifle or an assault rifle to kill them.
![[#675] - Assault on Dark Athena - Executive - Assault on Dark Athena - The Chronicles of Riddick: Assault on Dark Athena - Game Guide and Walkthrough](https://game.lhg100.com/Article/UploadFiles/201512/2015121710072442.jpg)
[#675]
Make sure you've eliminated all hostile units before entering the warehouse for good. Look around and you'll be able to find a bounty card (Tocker Pudwill) on top of a black container [#676]. Once this item is in your possession proceed to the next area using the keycard acquired not long ago.
![[#676] - Assault on Dark Athena - Executive - Assault on Dark Athena - The Chronicles of Riddick: Assault on Dark Athena - Game Guide and Walkthrough](https://game.lhg100.com/Article/UploadFiles/201512/2015121710072566.jpg)
[#676]
Don't forget about the possibility of using a NanoMED health station along the way. After that go to a computer terminal found on the opposite wall. Witness a short conversation here, as well as a cut-scene. Once you've opened the door DON'T attack nearby drones, because they're friendly. Go to your left and eventually you'll get to a new door [#677].
![[#677] - Assault on Dark Athena - Executive - Assault on Dark Athena - The Chronicles of Riddick: Assault on Dark Athena - Game Guide and Walkthrough](https://game.lhg100.com/Article/UploadFiles/201512/2015121710072589.jpg)
[#677]
You shouldn't be too surprised to hear that there are enemy guards inside this room. At least one drone will appear in front of you and the rest will be occupying upper balconies [#678]. Make sure you've killed all enemy units before moving on to the next section. Use a keycard again to leave this warehouse.
![[#678] - Assault on Dark Athena - Executive - Assault on Dark Athena - The Chronicles of Riddick: Assault on Dark Athena - Game Guide and Walkthrough](https://game.lhg100.com/Article/UploadFiles/201512/2015121710072599.jpg)
[#678]
You'll soon have to use the keycard. Keep heading forward. Notice a new NanoMED health station along the way. Unlock access to a new room and make sure to go to the back. Destroy a glass wall with one of your weapons. This will allow you to collect the last bounty card (Pressy Banba) [#679].
![[#679] - Assault on Dark Athena - Executive - Assault on Dark Athena - The Chronicles of Riddick: Assault on Dark Athena - Game Guide and Walkthrough](https://game.lhg100.com/Article/UploadFiles/201512/2015121710072547.jpg)
[#679]
Go back to a large device which you may have noticed when you've entered this room. It operates in a similar manner to a machine which allowed you to control standard drones. Thankfully this time it'll get more interesting, because you'll be given control over an Alpha Drone! Start off by neutralizing nearby enemy units [#680]. Notice that you can use both the minigun as well as rockets.
![[#680] - Assault on Dark Athena - Executive - Assault on Dark Athena - The Chronicles of Riddick: Assault on Dark Athena - Game Guide and Walkthrough](https://game.lhg100.com/Article/UploadFiles/201512/2015121710072699.jpg)
[#680]
Begin exploring nearby corridors and rooms, eliminating anyone who's dumb enough to stand in your way. Once you've secured the area proceed to a room with a ventilation shaft [#681]. Approach the shaft and position the mech to the left of the tunnel (not in front of it!). Pressing the action key will allow Lynn to jump on your drone.
![[#681] - Assault on Dark Athena - Executive - Assault on Dark Athena - The Chronicles of Riddick: Assault on Dark Athena - Game Guide and Walkthrough](https://game.lhg100.com/Article/UploadFiles/201512/2015121710072640.jpg)
[#681]
Exit the room once the girl is with you. Follow her instructions on how to get to a new shaft. As a result you'll have to turn left twice. Obviously you'll come across new enemy guards along the way. Lynn needs to be delivered to a new tunnel [#682]. Sadly this is where you'll have to say goodbye to your powerful drone.
![[#682] - Assault on Dark Athena - Executive - Assault on Dark Athena - The Chronicles of Riddick: Assault on Dark Athena - Game Guide and Walkthrough](https://game.lhg100.com/Article/UploadFiles/201512/2015121710072613.jpg)
[#682]
Notice that you're controlling Riddick again. Go through the left door and get ready to defeat Revas (this time for good! ;-)). Wait for this duel to commence and start RUNNING towards a locked door [#683]. Use the panel to your right to open the door, unlocking access to a large elevator shaft.
![[#683] - Assault on Dark Athena - Executive - Assault on Dark Athena - The Chronicles of Riddick: Assault on Dark Athena - Game Guide and Walkthrough](https://game.lhg100.com/Article/UploadFiles/201512/2015121710072683.jpg)
[#683]
Once you've opened the door retreat towards one of nearby pillars, however notice that you won't be fully protected against Revas and her attacks [#684]. Focus on attaching a single explosive bullet to her body, but don't detonate it just yet.
![[#684] - Assault on Dark Athena - Executive - Assault on Dark Athena - The Chronicles of Riddick: Assault on Dark Athena - Game Guide and Walkthrough](https://game.lhg100.com/Article/UploadFiles/201512/2015121710072669.jpg)
[#684]
Wait for Revas to stop directly in front of the elevator shaft you've opened not long ago [#685]. Detonate the charge and start running towards her. Attach a few other bullets to her body and this time detonate them right away. Once you're close enough to Revas choose the blades from your inventory and finish her off. You have to do this before she's ready again to fight Riddick. If you've done everything according to the plan she's lose balance and fall into the shaft. Sit back and enjoy the ending. Congratulations for finishing the game!
![[#685] - Assault on Dark Athena - Executive - Assault on Dark Athena - The Chronicles of Riddick: Assault on Dark Athena - Game Guide and Walkthrough](https://game.lhg100.com/Article/UploadFiles/201512/2015121710072639.jpg)
[#685]
STAYING IN THE SHADOWS
The Chronicles of Riddick is a type of game where the best solution in most situations is to remain hidden. You will be allowed to perform open confrontations, however it will often increase the risk of Riddick losing his life. Acting stealth in both campaigns depends on two features of the game - identifying whether Riddick is fully hidden or not and using the Eyeshine feature. You can find out easily whether your character is safely hidden, because you'll notice that the screen has changed its colors to blue (screen). This will allow you to move around through guard infested areas unnoticed. Remember that you can't feel entirely safe in the shadows. For example you may be found by enemy units if they get too close or if they choose to use flashlights. The same goes with leaning out to both sides, however in most cases you won't leave cover when performing such action.
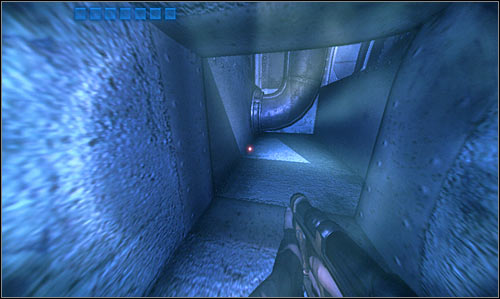
Using the Eyeshine ability has one purpose and that is to navigate easier through darker areas. Don't forget than you won't be able to use this feature in Escape from Butcher Bay campaign until Joe has helped Riddick in acquiring his powers. In Assault on Dark Athena Eyeshine is available right from the start. There's also one more thing you should remember about - don't use Eyeshine if you're going against enemies equipped with flashlights, because you may be blinded by a bright light, making it next to impossible to kill them before they open fire or sound the alarm. Staying in the shadows means that you must prevent enemy units from knowing that you're there. One of ways to do that is to hide bodies of all killed enemies (screen). This only applies to situations when you're going against humans, because drones from the second campaign won't respond to bodies of other people. The same goes with robots, aliens and mutants.

Are there any other advantages of staying in the shadows? One of the most important things is to be able to eliminate opponents silently, without their colleagues knowing they're missing. This can be done by performing two types of executions, triggered with a left or with a right mouse button. In Assault of Dark Athena you'll also be allowed to pick up drone's guns in order to use them against other foes (screen). It's a very interesting solution in the early stages of this campaign when you aren't carrying any real guns.
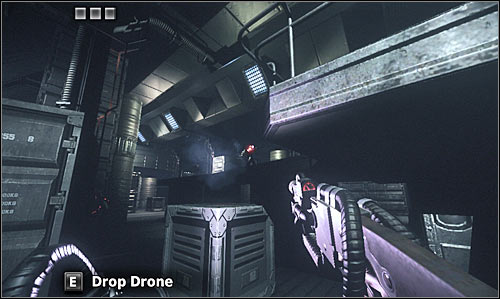
MELEE COMBAT
Melee combat can be divided into three main categories in The Chronicles of Riddick:
1) Executions - There are two types of executions in the game and I would strongly recommend performing slower versions of these moves. They'll take more of your time, but you won't have to worry about the dying opponent informing his colleagues that you've attacked him.
2) Fist fights - Remember that you can throw all kinds of punches, triggered by pressing different movement keys. Some of these features are covered in the main section of my guide. I would only like to remind you that you should be extremely careful while going after guards equipped with weapons.
3) Melee weapons duels - Some of the most useful melee weapons in both campaigns are the blades (Shiv in Escape from Butcher Bay and Ulaks in Assault on Dark Athena). Use melee weapons when you have the chance (screen) to increase your chances of winning. If you can't use the blades, consider switching to clubs and knives, but in most missions it won't be necessary.
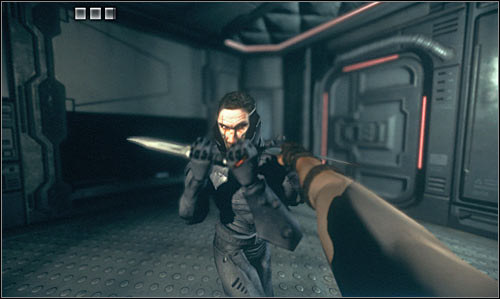
USING FIREARMS
This is an issue mostly in the new campaign, because it relies in a bigger way on a standard combat rather than on hiding all the time. In Escape from Butcher Bay there are only a few levels where you'll be forced to use firearms, including going mutant and alien infested sections.
One of the best weapons in the game is a shotgun. You shouldn't have any problems finding enough ammunition and it's deadly at close range, even when you're going after large group of enemies. In Assault on Dark Athena a SCAR rifle is the most useful toy (screen). Firing explosive bullets can be used in many different ways, depending on how skilled you are and how you want to get rid of enemy units.
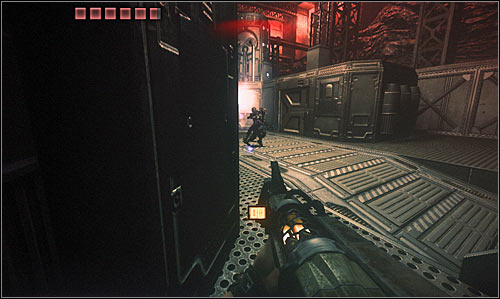
KEEPING RIDDICK ALIVE
In both campaigns of The Chronicles of Riddick you'll be dealing with a very unusual health management system. Notice small squares in the upper left corner of the screen (they will appear only if you're in danger). You'll see only a few of those at the beginning of each campaign, but you'll be allowed to extend your life bar using special medical stations (screen). The idea is that if you lose an entire square you can't bring it back until you've visited a health station. If you lose only a portion of the square it would be a good idea to hide and you'll heal your injuries in a few seconds. Remember about this while trying to survive with not many health stations around or if you run out of cartridges needed to recharge them.
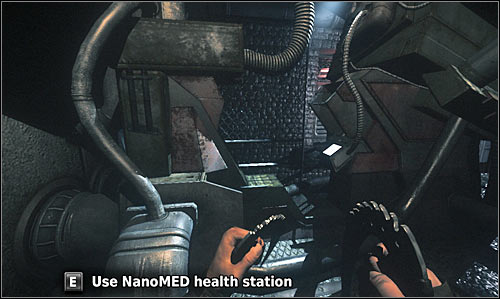
Here's a list of melee weapons and firearms you may find during different stages of both campaigns. I would like to add that some of these toys are exclusive for a certain campaign and there are also objects that appear in both scenarios.
Assault rifle
An assault rifle is a good alternative to a shotgun, especially if you like taking out targets from a large distance. I would also recommend using this weapon if you don't have a tranquilizer in your possession. One of the missions allows you to collect an experimental assault rifle, however it's very similar to the normal weapon.
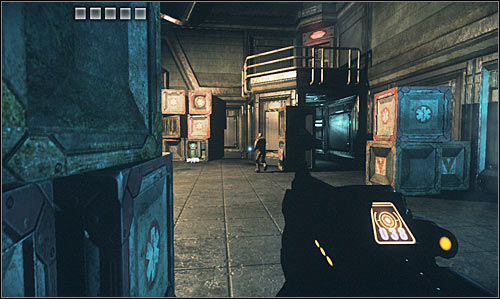
Club
A club is a very unique type of a melee weapon. The biggest advantage of using it the possibility of inflicting serious injuries. Sadly this comes at an expense of your movement capabilities. Ignore this weapon if you prefer to deal very swift blows rather than play it out slowly.
Combat knife
It's a good melee weapon you can choose to win some fights, however in most situations you'll strike more blows with the blades.
Drone's gun
This weapon becomes active only when you're playing Assault on Dark Athena campaign. It's a rather powerful gun, but the biggest disadvantage is that you can't take it with you. All you can do is to drag the drone slowly for a better shot.
Grenades
Grenades are a rare find and I wouldn't call them useful. You may try using these objects to defeat larger groups of enemy units, but don't expect miracles.
Knuckleduster
I would only recommend using this weapon if you don't have the blades yet, because otherwise it's useless.
Minigun
This powerful weapon becomes available near the end of the first campaign. The only real advantage of using a minigun is its awesome firepower. As for the biggest problem, you won't be allowed to move too fast while carrying a minigun, so you'll only want to use it to destroy a couple of mechs.
Pistol
Mediocre weapon that you may want to use instead of the blades, however you must acknowledge the fact that you'll be heard by all nearby guards.
Scalpel
Useless melee weapon. I wouldn't recommend exchanging it for a Shiv blade nor any other element of your weaponry.
SCAR rifle
Yet another reason to start playing Assault on Dark Athena. I would recommend that you use this rifle to set up traps for enemy units. Check the main section of my guide on how to win certain battle using a SCAR rifle.
Screwdriver
You'll find a lot of those next to killed workers, however I wouldn't recommend collecting these items, because you won't inflict serious injuries to your opponents.
Shiv blade
This is a very useful melee weapon which you'll want to use during most of the missions in Escape from Butcher Bay. Similar to Ulaks Blades, you can use a Shiv to surprise enemy units, as well as to win direct confrontations.
Shotgun
This is by far the best firearm in the game. Like I've already said a shotgun is the best choice for close combat encounters. You shouldn't have any problems defeating a large group of enemies before you'll be forced to reload this weapon.
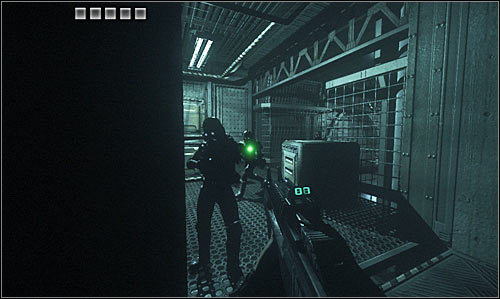
Sniper rifle
This is a very unique weapon you can obtain while playing Assault on Dark Athena. Sadly getting your hands on it means revisiting certain locations and exploring your surroundings more thoroughly. Here's a full list of steps you must undertake in order to unlock this gun:
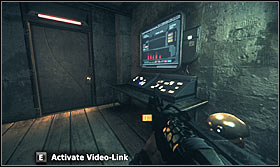
Step 1: During your stay in New Venice sector (level 56) get inside a small building where you've collected one of the bounty card. Use a large control panel on the wall.

Step 2: Initiate a new conversation with Gabril and agree to help him.

Step 3: Exit the building and destroy the first antenna.
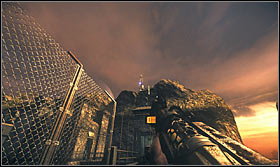
Step 4: Destroy the second antenna.
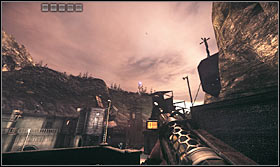
Step 5: Return to Bazaar sector (level 55), go to the large square where you've defeated an Alpha drone and destroy the third antenna.
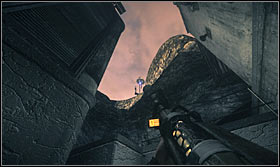
Step 6: Return to Crash Site sector (level 54) and check the area where you've unlocked a large gate. Destroy the fourth antenna.
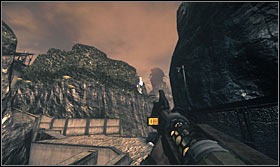
Step 7: Go to the supply depot. The fifth antenna can be found to your left.
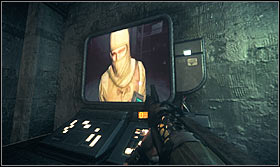
Step 8: Return to New Venice sector (level 56) and use the terminal again, delivering good news to Gabril.
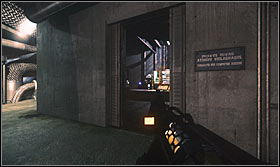
Step 9: Once you've reached the Refinery (later on during the game) head on to the first room to your right. The gun can be found on the table.
Tranquilizer gun
This is by far THE MOST USEFUL weapon of both campaigns. I can only say good things about this peace of your arsenal, because it doesn't have any serious limitations. You won't have to worry about running out of ammunition and you'll have plenty of time to finish off stunned opponents. Additionally your attacks won't raise any suspicion among enemy troops. The only situations when you'll want to switch a weapon are heavy firefights and boss challenges.

Ulaks blades
This is the most recognizable element of your arsenal in Assault on Dark Athena. I would strongly recommend using the blades whenever you're planning on staying in the shadows and avoiding unwanted attention. Thankfully even when it comes to direct combat you can still count on inflicting major injuries to your opponents.


 The Dark Eye - Chains of Satinav Game Guide & Walkthrough
 The Night of the Rabbit Game Guide & Walkthrough
 The LEGO Movie Videogame Game Guide & WalkthroughThe Da Vinci Code Game Guide & Walkthrough
 The Last of Us Game Guide & Walkthrough