This unofficial guide to The Banner Saga consists primarily of a very detailed walkthrough of the singleplayer mode. The solution focuses mainly on presenting all battles fought by main characters (also optional ones) and tracing their conversations for possible behavior variants and consequences of their decisions. Each decision is described and explained in detail, which should help you to make the right choice. First part of this guide describes in detail both basic and advanced mechanisms of turn-based fights and also addresses the issues of management of the caravan and taking care of playable characters. You'll also learn how to develop available heroes, which skills are most useful and how to choose proper equipment. Thanks to this information you'll have no problem to deal with encountered problems and no enemy will be a challenge for you. The guide is completed by a list of available achievements which can be unlocked via Steam service. The Banner Saga is a debut project of independent development studio named Stoic, founded by people who formerly worked at Star Wars: The Old Republic. This is RPG game distinguished by extensive turn-based fighting system and story plot set in Norse mythology. During the gameplay you are following a group of Vikings exploring the world, where gods were killed in unspecified circumstances.

The Banner Saga guide contains:
Jacek "Stranger" Halas ()
Translated by: Maciej "Elrond" Myrcha
The guide was created based on the normal difficulty level, set by the game by default. It is worth noting here that the game allows you to change the difficulty level at any time so you can decide to do it when for example the battle is too difficult for you.
In the walkthrough you can find following color markings:
In addition, names of the visited town and buildings and other locations are marked in bold.
The Banner Saga was primarily designed for PC's, so it was this version that was released in 2014. After finishing the PC edition, the authors started working on the conversion to mobile platforms, and after a couple months, the game was released also on iOS and Android. Smartphones and tablets got a Premium Edition. This means that for a single purchase you get the game's full content. There are no optional microtransactions. Besides, the conversion was by no means simplified nor deprived of any content. It is exactly the same product as on PC. The gameplay in The Banner Sage focuses mainly on turn-based battles fought on square grid maps, as well as making decisions during story sequences presented in a form of interactive scenes that resemble animated movies. The very nature of gameplay fits mobile devices perfectly. The controls system was specially designed for touchscreens, and is simple in use. At the same time, battles are fast and usually last no more than several minutes, which fits into mobile players' preferences, as they expect that even short game sessions will be satisfying.
The game can be launched on smartphones, however, it works much better on bigger screens of tablets or phablets. On 4 inches screens (e.g. in iPhone 5 and 5S) texts tend to be very small, although never unreadable. In other words, you can play on small screens, but it is not the best experience possible.
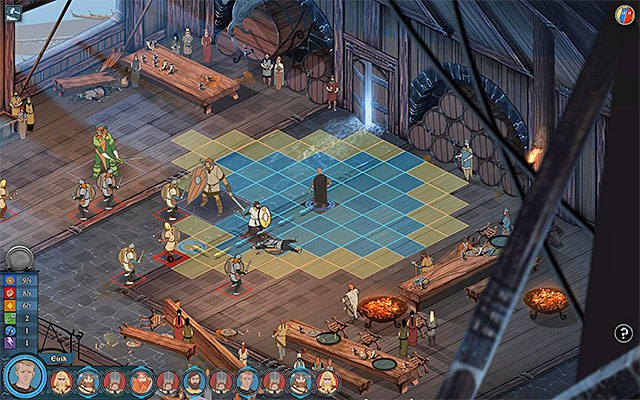
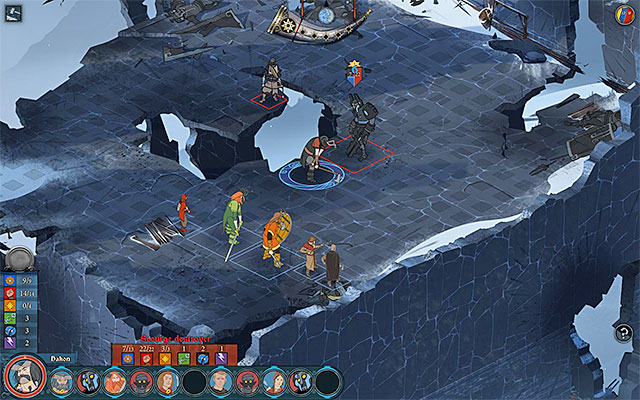
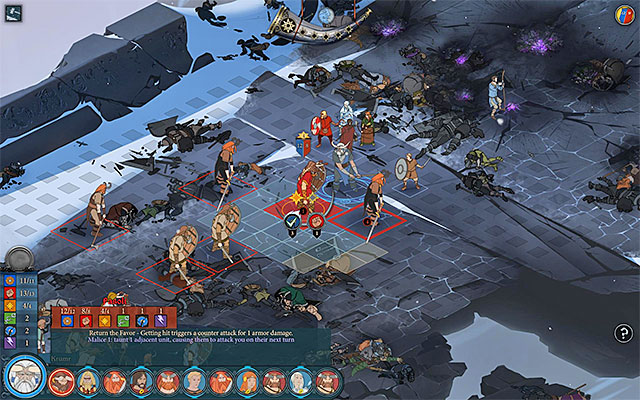
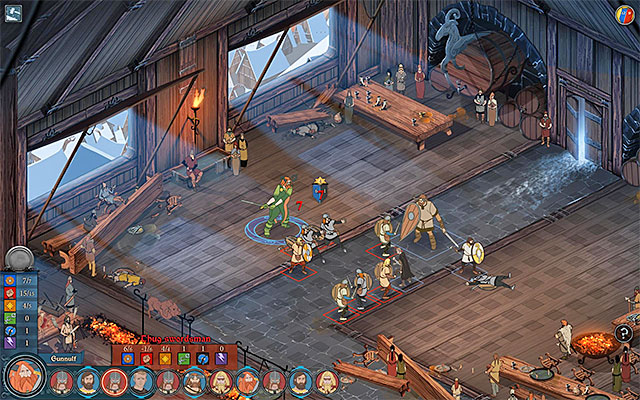
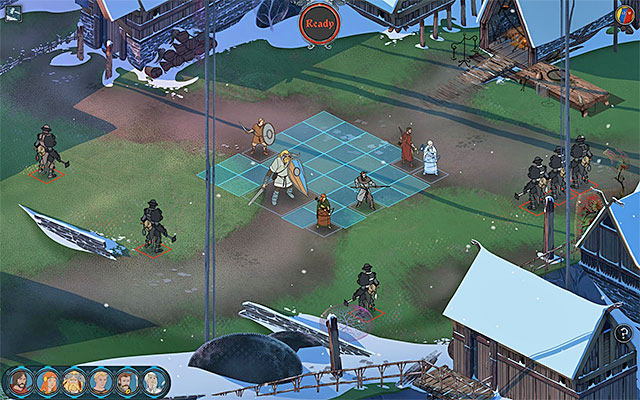
The picture above shows an example of a battle screen. It's worth mentioning that in the first few fights some elements (e.g. horn used to give willpower points to the allies) are unavailable and can be unlocked later on.
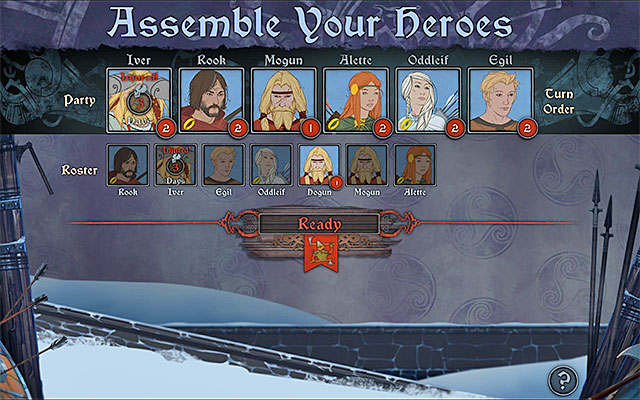
The picture above shows character selection screen. The upper list is most important because it contains the characters that will be used in the following battles. The lower list shows all owned artifacts.
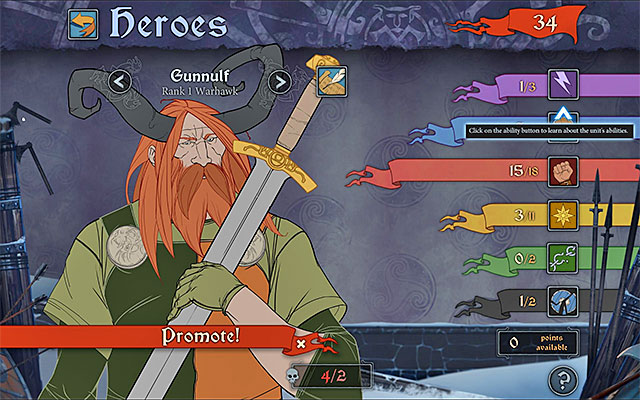
The picture above shows an example of a character development screen. The Promote button is available only when a character may go to a higher experience level (it happens even when the amount of renown points is too low to do so.
The picture above shows an example of a caravan screen. All of the most important buttons (placement of camp, supplies, morale etc.) are at the top. They stay visible when you visit a city or decide to set up a camp.
The picture above shows an example of a camp screen. It contains only a description of elements specific to this screen because the buttons have been described on the Caravan page. Note - not all of the elements are available all the time. Moreover, some of them (e.g. Training tent) become available later on.
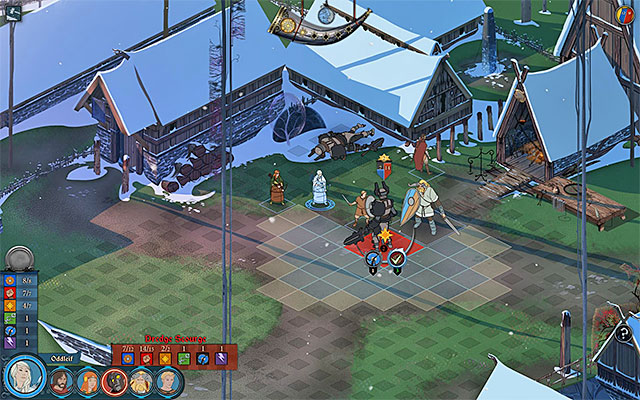
The picture above shows an example of a town/village screen. It contains only a description of elements specific to that screen because the buttons have been described on the Caravan page. Note - Not all of the elements are available all the time because some actions can't be performed in some of the smaller towns.
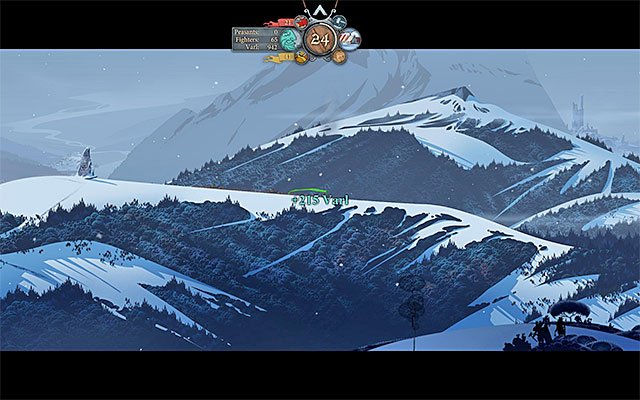
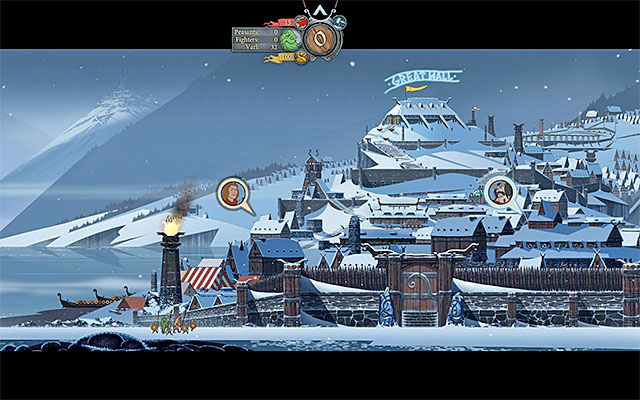
The picture above shows a world map. You can bring the map up during a travel or while staying in a camp or a city, of course when you're not talking to anybody or choosing actions for current events.
The world map in The Banner Saga does not have any significant applications because all travel is planned. You can only choose when to set up a camp site and if you want to stop at some optional locations (e.g. Many villages or Reynivik).
 Use willpower points to move around only when you see an opportunity to get rid of a distant enemy quickly and easily.
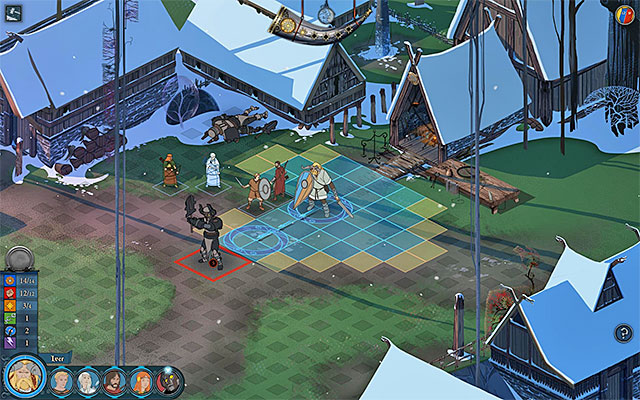
The game explains moving around the battlefield during the battle in the prologue. To remind you blue tiles are the "standard" range of a unit, while the yellow ones are the extended range - to move there, you must spend some willpower points. It means that the yellow tiles become visible only when the selected hero has enough willpower. You should use them only when you're determined to get rid of a specific opponent quickly. If you don't need to do it, you should spend the points on other things.
When you plan your next moves, you should check the range of enemy units - if you stand on a tile right out of opponent's range, they won't be able to attack you during their turn. Moving around is not obligatory so you may stay in one place during your turn. It's highly advised for archers (they may get an attack bonus for staying in place) and warriors with shields (they can use special abilities that improve defence).
Note - characters that use spears (e.g. Ludin) don't have to stand directly next to an enemy because they may also attack diagonally. It's worth keeping in mind, especially when standing in such a place might give the character a better protection or prevent them from the enemy's counter.
 Hide the archers behind stronger characters.
Right before most battles, the game lets you place your units on the battlefield and you shouldn't skip this part because in many cases default placements are completely useless.
If you're dealing with a "regular" battlefield, the area to place your units is usually in the shape of a large rectangle. In that case, you should place giants and good warriors in the first line and weaker characters (especially archers) behind them. Unfortunately, the game sometimes spreads your units around the battlefield, in that case finding the best formation is not so easy. Try to pick places from which your units may attack as quickly as possible (preferably in your first turn) and pay attention to safety of your weakest characters.
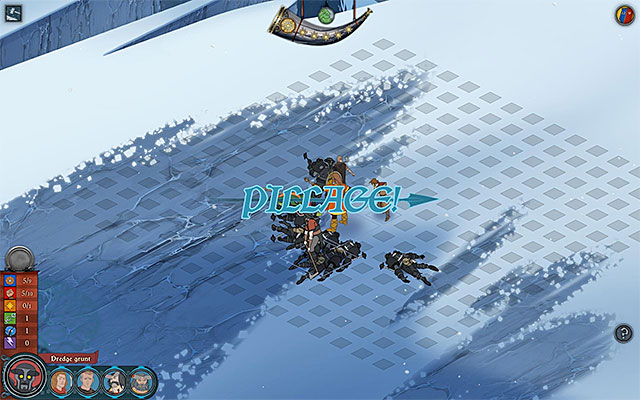 Only in the Pillage Mode the stronger side gets advantage in the order of turns
Another thing explained in the tutorial is that the sides of the battle take turns and in the beginning the number of units on each side does not affect it. For example, decreasing the number of enemy units from four to two won't make them take their turns half as often. Instead, the two remaining units will be able to take actions twice as often. It's one of the reasons why you should take on the strongest enemy units first - because of that, later in the battle the enemy won't be able to perform strong attacks as often. It changes only when there's only one enemy left on the battlefield and Pillage Mode starts, then all of your party may perform their moves before the enemy's turn comes.
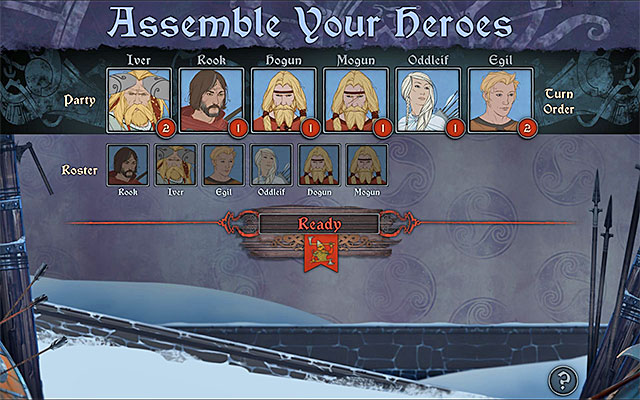
Remember to visit the Heroes screen between battles and plan the order of their turns in the following battles (Turn Order column). You should give the highest priority to the giants (varl) and the strongest warriors, thanks to that you increase their chance to defeat or weaken the enemy units before they even do anything. Put your archers at the very end. It is justified by the fact that the enemies will move closer to your units by that time and you won't even have to move your archers.
 While attacking stronger enemies, weaken their armor first, then focus on their strength bar.
Every participant of the battles (either from your or enemy's party) is described by two important factors that affect their effectiveness in attack and defence, i.e. Strength and Armor. In offence, Strength affects the power of attacks, so characters with high Strength deal more damage. In defence, it works as a health bar. That means that losing all strength points causes death (enemy) or faint (ally). Armor in offence affects the enemy's ability to avoid losing strength points, while in defence it works like that for your unit.
A really important fact is that before attacking you always have to decide if you want your attack to affect strength or armor of the enemy unit. In case of stronger enemies, you should start with weakening enemy's armor at least to half of the initial points. After that, you may start attacking the strength bar, the attacks will be more effective when armor is already weakened. While dealing with weaker units, you might want to begin with attacking the strength bars. Additional skills are also useful, Arc Lightning used by Eyvind is a great example - it weakens the strength bars regardless of armor points.
 Try to replace the heroes that have recently been wounded.
A bit earlier I mentioned that the members of your party faint when they lose all strength points, so you won't pay attention to them as much as to enemy's side. If you play on normal on hard difficulty, you should keep in mind that if your units get seriously wounded (Injured), their damage will take a few days to heal. Replacing them to different, healthy heroes is the best way to deal with this condition. You may choose the same character before the healing is complete but they won't have their full strength so it will be even easier to lose them.
 Usually willpower is used to improve effectiveness of attacks
Willpower is the most versatile factor of all used to describe units and you must pay attention to it. Willpower is used for:
You should use it in all of these ways, of course sensibly - don't use all of your willpower points to reach a distant enemy and perform just a regular attack.
 Use the horn when you really need willpower.
Exertion is closely related to willpower, you'll find more information about it in the Character development and equipment chapter. Right now I'll only tell you to try to max it out as soon as possible because it will let you spend more willpower points and, for example, you'll be able to use two or even three points instead of one to improve an attack.
All of the actions described above can obviously deplete your willpower points very quickly. In my opinion, Horn is the best way to regenerate them, you'll be able to use it at the end of the first chapter of the game. Every time you defeat an enemy, a yellow star will appear on the horn. You can use it at any moment to regenerate all willpower of the currently controlled character. Obviously, you should use the horn only when you really need it so you don't waste this precious bonus. Some artifacts may also help in regenerating willpower, in this case you should look for items that provide regenerating two or three points if you decide to rest during a turn.
 Nearly all special skills of playable characters are really useful
When you plan attacks, you don't have to choose only from standard ones - every hero has special abilities, most of them are offensive (more information on the page with the list of playable characters). It's a good idea to keep it in mind and use them sensibly on the battlefield because they aren't "free", you have to spend some willpower points on them. For example, if you have a skill that deals damage to several opponents, wait until they are near your character instead of wasting it on a single enemy.
 You should set some traps on the enemy's path.
We covered the topic of offence, now some information about defensive actions. You should especially pay attention to characters who use sword and shield (like Egil) because when you place them close to other allies, you may form something like a wall and improve defence of all characters that built it.
Another type of a more advanced tactical action is to make it hard for the enemies to reach specific places, defending archers and other weak units in defence. You should especially pay attention to giants because they take four tiles and enemies have to cover a longer distance to reach their target. Traps may also come in handy, for example Rain of Arrows used by Oddleif. Lastly, artifacts are worth mentioning here. Some of them have a property called Aggro, it makes enemies attack a selected character more often. Objects like that work best while given to giants or other characters that are good at defence.
 Scourge type of the Dredge can summon support
In The Banner Saga the enemies can be divided to three groups. The first are the Dredge, they come in various types. In the beginning you encounter mostly the weakest type - Grunts, but later on you'll fight more powerful types of the Dredge. While attacking them, you should aim primarily at their armor, very often they have more than 10 points of it. Scourge are a type that deserve a special attention here because they can summon supporting units to the battlefield. If you don't have a visible advantage over the enemy, you should try to stop them as quickly as possible. The only exception is when the enemy is close to losing because a new monster on the battlefield is a great opportunity to get some renown points.
Around the last part of the third chapter you'll also encounter monsters that can perform long-distance attacks. They are really bad at melee so you should try to reduce distance to them as soon as possible. This type of enemies can usually set traps. Try to move your units far from them because they explode after a few turns, affecting both strength and armor of nearby units.
 Unwatched Thrasher can quickly and effectively weaken the party members.
The second group of enemies are various thugs, most of them are definitely less dangerous than the Dredge. They are divided into types similar to your characters - warriors, units with shields, archers etc.
You have to pay attention "only" to two elite types of human enemies. The first one are the Thrashers - they have the same special abilities as Hogun and Mogun. If you let them perform attacks, they will make your characters lose a lot of strength and armor points very quickly. Another type worth mentioning are the Backbiters. They perform charges and attack several of your party members at a time.
 While fighting against giants, remember to focus on one at a time.
The last group are unique opponents, you'll encounter them quite rarely. For example, you'll have to fight against a group of giants in one battle. You have to keep in mind all the actions you used earlier in battles. It's the best idea to attack them one by one.
In two places your party will encounter an elite Stonesinger who can strengthen his allies and provide them with more damage dealt to your units. As soon as you see an opportunity, try to get rid of this enemy before he spends all his willpower points.
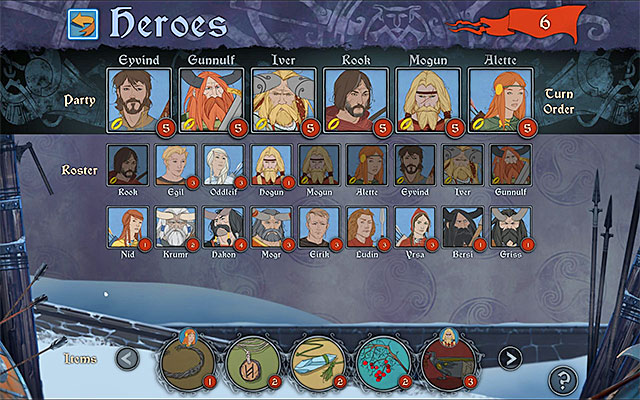
 Making a good decision may result in increasing the number of units in caravan.
All the gameplay in The Banner Saga is centered around watching caravans travelling around the game world and visiting locations. In the beginning you'll watch two caravans, later on they will merge into one. Each caravan consists of:
Of course people from the caravan who aren't in the active party also matter. Maybe except Clansmen, because taking more of them with you does not give you more profits. In case of Fighters and Varl, having more of them improves general strength of the caravan. It affects its effectiveness in warfare (described at the end of this chapter).
Make-up of the caravan changes quite often and usually you decide about it. You can get new heroes, clansmen, fighters and Varl mainly as a result of conversations and decisions made in some events (the walkthrough describes all of them). It works both ways, making wrong decisions, spending all supplies or being defeated in a battle may reduce the caravan, sometimes you may even lose few dozen people.
 Having a stop in a location with a Godstone is a good way to increase morale for free
Morale is not the most important thing related to caravan, however you should not ignore it. It affects the number of willpower points given to heroes at the beginning of each battle. Travelling with a caravan that has a high level of morale might provide you with additional willpower points that you can use for better attacks. Having low morale might not only take away the bonus points, it might even lower the starting level of them.
Morale of the caravan drops when:
You can improve morale by:
 Buying supplies is a last resort, there are better ways to spend renown points
Supplies are much more important than morale because they symbolise food and all the essential things needed to satisfy the needs of people in the caravan. Losing all supplies will make you lose some of the Clansmen, Fighters and Varl every day, which will drastically lower your morale. Every longer journey should be planned in advance to make sure that you have enough supplies. It's impossible to predict every bad situation but preparing well should lower the loss.
The game doesn't show a specific number of supplies. Instead, you'll see the number of days until you run out of them. It's mostly affected by the number of people in the caravan. In my opinion, you should always accept offers of joining the caravan made by Fighters and Varl. Accept Clansmen only if you're not currently struggling with low supplies.
There are three ways of getting supplies:
1) Progressing in the main story - At some points you'll get a lot of supplies regardless of choices made. You shouldn't, however, spend them on resting for a very long time because you'll need them later on.
2) Additional events - You should read the description of additional events in the walkthrough because decisions made there will give you more supplies.
3) Visiting marketplaces - Use them as a last resort, when you don't have any supplies or you only have a few days worth of them and you're going to travel for a longer time. You buy supplies for Renown points and there are better ways to spend them, for example developing heroes.
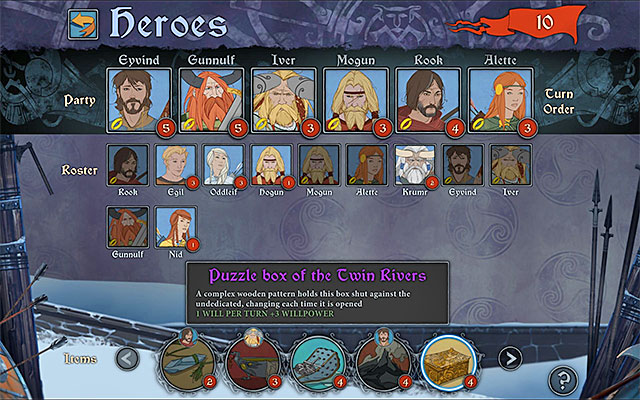
 You should spend almost all Renown points on developing the characters
Renown works as both currency and experience points. They can be used for:
As I mentioned on the previous page, spending Renown to buy supplies is not a good idea and you should use it as a last resort. Buying artifacts at marketplaces is an even worse idea. They are very expensive (up to a few dozen points for each) and mostly don't give a bonus that will suddenly make a character invincible. Moreover, many artifacts can be found and since each hero can hold only one artifact, you won't need many of them.
Renown points are mainly used to get heroes to higher levels of experience. In the beginning you may think it's not pricey - advancing from 1st to 2nd level costs only five points. However, with each level the cost increases by 5 points and advancing from 4th to the highest, 5th level costs 20 points.
 After winning a battle you'll know how many points you got
That's all about spending Renown points, now some information about acquiring them. Just like with supplies, you might get Renown by progressing in the main story and making right decisions in additional events (walkthrough mentions every opportunity to get more Renown)
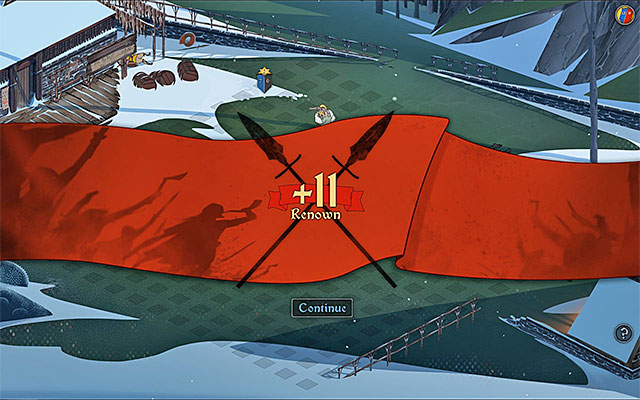
Battles are also a very good "source of income", you may even get over a dozen points in each. That's why you shouldn't avoid battles.
 In a camp you can train, rest, develop your characters and talk to them.
In each of seven chapters of the game you'll visit a city/village. You'll stay for a longer time in some of them and it's determined by the storyline but in most cases you decide how long you want to stay in a city. Things are a bit different with camps because during the game they are set up compulsorily only a few times. You decide when to set up a camp (if you want to do it). Do it only if the caravan has a very low morale.
As I mentioned many times before, you should not waste your supplies on resting, unless morale is really low. If not, ignore the Rest tent. You should, however, visit Heroes tent from time to time to get your heroes to higher levels or give them artifacts.
Training tents are an element specific for camps. Training doesn't really make sense because it doesn't give you any experience points. Marketplaces are specific for cities. As I said earlier, you shouldn't spend your Renown points there unless you're forced to by current situation.
There's one more element worth mentioning - optional conversations with party members. The game lets you perform them in several moments, usually when something important happened in the main storyline or when a new character joined your party. Usually nothing wrong will happen if you ignore it but some conversations will give you Renown points.
 Read the description, don't pick random options
The game contains a few dozen additional events during travelling and staying in cities. Some of them are triggered in very specific moments, others are more random. Sometimes the decision doesn't have a significant impact on the caravan, at other times it may result in getting supplies or losing a member of the party. You should definitely pay attention to following pages of the walkthrough because it describes all events and their consequences.
Note - don't worry if an event didn't occur for you because it might happen later on. Some of them will be triggered only if some characters are in the party or only if you made a specific decision before.
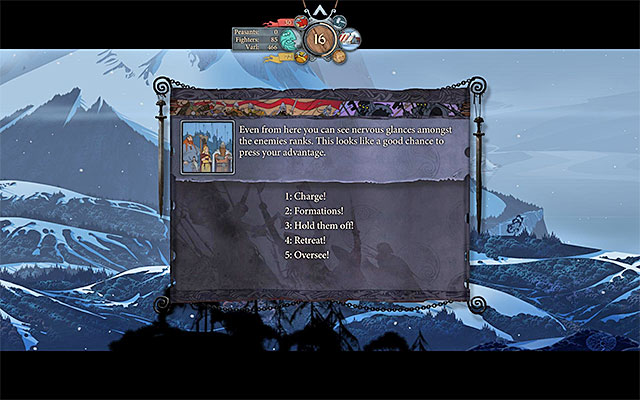 List of commands for the army
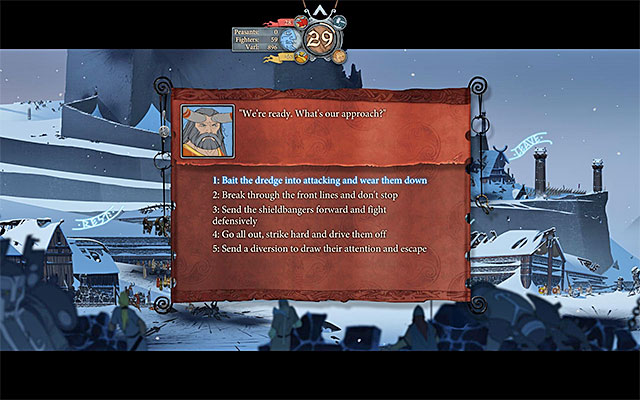
Warfare appears in the third chapter of the game, when you travel to Ridgehorn. It happens always when the caravan encounters a large group of enemies. All decisions you make and battles you fight will affect all the caravan. For example, when you win a battle with your active party, all of your army will win it.
The game gives you five options, the decision should be based on number of enemy units (it's shown for both sides of the conflict so you may determine who has an advantage):
1) Charge! - an aggressive charge is a good idea only if you have a significant advantage.
2) Formations! - Making a formation is good when both armies are similar in number.
3) Hold Them Off! - Trying to hold the enemy off is a good idea when they have an advantage.
4) Retreat! - Running away is a good idea only when the opponent has a very significant advantage. Choosing it will let you avoid the battle but many of your Fighters and Varl will die.
5) Oversee! - Watching the battle passively. Not recommended, your units' results will be much worse than your own.
To sum up, you should actively take part in all major battles, choosing option 1, 2 or 3. Use option 4 only as a last resort.
After each battle like that you'll be asked if you want the caravan to keep going (Pull back before they regroup) or attack more enemies (Kill a few more as they flee). Choosing the second option will let you get renown points and improve morale but you might encounter some elite enemies. Choose this option only if you've won easily and your units are not severely damaged.
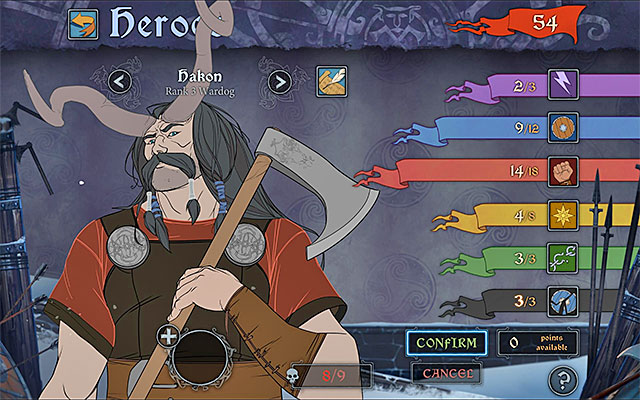
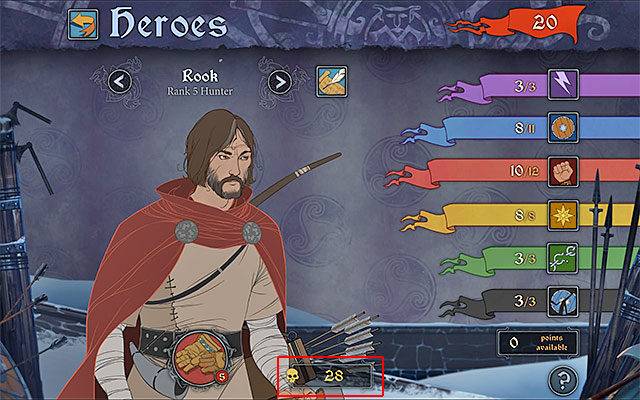
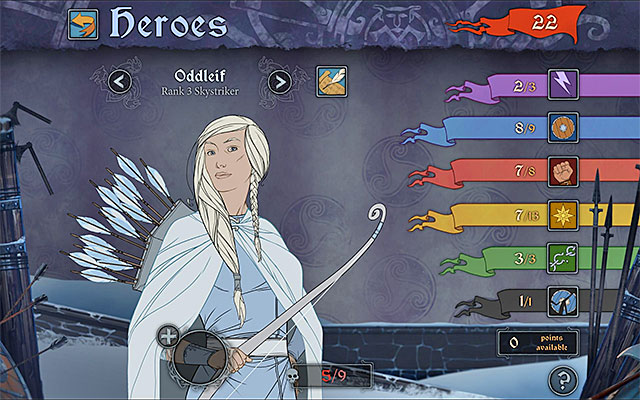 Example of a character screen
Each character in The Banner Saga is described with five basic stats, they grow every time a hero gets to a higher rank. The game won't let you max out all of them so you always have to decide which ones you want to upgrade and which to ignore or upgrade later.
Armor - how many armor points the character has. Don't spend too many points on this because nearly all heroes have quite a lot of armor. You can make an exception for the heroes that get attacked the most. In case of archers upgrading armor won't help because even when it's maxed out, they will die after one or two strong enemy attacks.
Strength - how many strength points the character has. It affects the power of attacks and work as health points. It's a good idea to spend some points on this throughout the game. Your characters will be able to deal more damage and your long distance units won't faint as often as before.
Willpower - how many willpower points the character has. The meaning of willpower has been described in one of the previous chapters. To remind you - it's used for covering longer distance, performing more powerful attacks and using special abilities. It's a good idea to upgrade it, maybe not to the max, but at least by a few points.
Exertion - how many willpower points might be spent on a single action. It's the most important of these stats and you should focus on maxing it out as soon as possible (regardless of character's specialization). Thanks to that you'll be able to power up your attacks - either aimed at armor or strength, on short or long distance.
Armor Break - how many armor points can be taken from the enemy in a single attack. You should upgrade it rather quickly, usually one or a few points should be enough to max it out. It's useful especially when fighting against the Dredge.
Character development in The Banner Saga isn't very complex but it has several unusual elements that you should know about before you play. The most important information is that your characters can advance up to fifth rank. The development is not very long but you have to do it for each hero in your party so it might be quite expensive.
In The Banner Saga you don't collect any experience points. What matters is the number of enemies killed by a specific character (you can see it on their screen in a city or a camp). Reaching a required number (for example 5 killed enemies) makes the upgrade available. An ally may fight in 20 battles but without killing any enemies they won't advance to the next rank. You should keep that in mind and let everyone get their kills, for example by skipping turns in battles and letting another character perform the finishing attack or changing the active party often. In easier battles you should also avoid using characters with the highest, fifth rank.
Killing a required number of enemies is not the only requirement because you also need renown points:
It's important to set your priorities. If you need one strong warrior, you should spend 20 points on him. If you want to improve all of the party, spend 20 points on advancement of two or three heroes with lower ranks.
 In later chapters your party will grow, letting you change the people in it more often.
There might be six characters at a time in your active party (which is the one that fights in battles) so if you have enough heroes, you should fill all of the slots. If there are more playable characters in your caravan, you may start planning who'll be in it. I would recommend one of these two options:
1) Option 1 - two giants, two melee fighters, two long distance characters (archers, Eyvind)
2) Option 2 - Three giants, one or two melee fighters, one or two long distance characters.
As I said on one of the previous pages, when you play on normal on hard difficulty setting, your characters may get seriously injured if they lose all strength points. You should keep that in mind and always have at least two additional characters that can replace a wounded unit. In easier fights you should use other members of the party so that they can get some kills.
 Example of an artifact
The characters in The Banner Saga don't have a typical inventory but it doesn't mean there aren't any special items in the game. You can use various artifacts, each character may hold one of them. There are two things you should know about them. Firstly, each artifact has a required rank to use it. For example, rank 3 artifact can be used by characters on third, fourth and fifth rank. Secondly, the artifacts vary in effects so you should spend some time matching them to the characters. Giants are most effective with offensive artifacts and ones that make enemies focus on them (aggro). Archers and other characters weak in defence should hold items that improve armor or chance to dodge.
New artifacts can be acquired in two ways. The first one is buying them in Markets. It's not the best way because they are incredibly expensive and you should spend renown points on character development or even buying supplies. The second option is finding artifacts during journeys. You should especially pay attention to them in locations with Godstones. Almost all of them provide you with new artifacts, of course if you've chosen the right options during conversations and events (more about them in the walkthrough). Basically, you should use only the artifacts that you've found. At the end of the game you should have around a dozen of them (much more than your active party needs).
 You should take some time to become familiar with every new character.
Each character has two special abilities. In most cases it's one active and one passive skill (only Eyvind has two active skills). An active skill is one that you have to turn on by yourself and it costs some willpower points. A passive skills doesn't require any action from the player and it can be for example dealing damage to enemies close to the attacked opponent or ability to run through a tile where your allies stand.
It's a good idea to use special abilities from time to time when you have enough willpower points. You should know that they are upgraded every time a character gets a higher rank, thanks to it they may get additional properties (e.g. Bigger range of an area attack). You don't have to spend any points on it because it happens automatically. You can always choose if you want to use a regular or special version of the ability (it uses more willpower points).
The chart below shows all the characters that may join your party (permanently, for some time or just for a moment). Most of them join the caravan automatically but in some cases you have to perform some actions (like fighting in an extra battle or joining a side of a conflict) for them to appear on the list of active characters.
Name (class)
How they join the party
Special abilities
Alette (eagle eye)
Joins automatically (2nd chapter)
Active skill called Thread the Needle lets you attack all characters on the line of shot. Unfortunately you can also harm your allies so you won't use it as often as you'd like to. Passive skill called Puncture lets you increase damage if the archer hasn't moved.
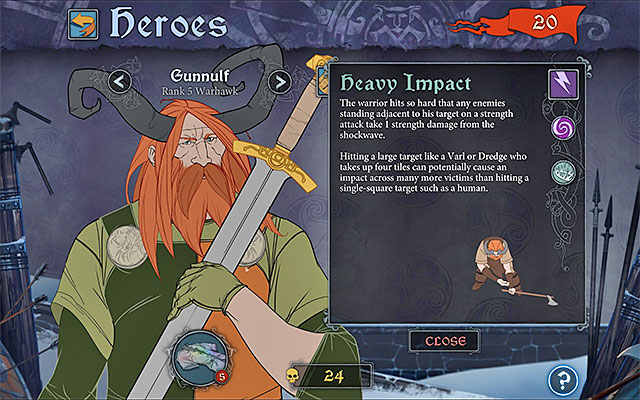
Bersi (warhawk)
Joins automatically (3rd chapter).
Tempest (active) lets you attack several enemies near Bersi but you must be careful because it can hurt allies. Heavy Impact (passive) deals (a little) damage to units standing close to the attacked enemies.
Egil (raidmaster)
Joins automatically (2nd chapter).
Stone Wall (active) is purely defensive because Egil will "absorb" attacks (to a certain point). Shield Wall (passive) lets you increase defence when he stands close to an ally.
Eirik (warden)
Joins automatically in the beginning of the game.
Rally (active) is a supporting skill that restores a few willpower points for a selected ally. When it's maxed out, it regenerates 6 points of willpower. Light Step (passive) lets Eirik walk through tiles occupied by allies.
Ekkill (grudgewielder)
Ekkill may join the party in the 4th or 6th chapter if you let him.
Guts (active) knocks back all enemies around Ekkill. Shield Wall (passive) increases defence when he stands close to an ally.
Eyvind (mender)
Joins automatically (5th chapter)
Arc Lightning (active) is one of the most powerful attacks in the game. It takes a few points of strength from one or several enemies even if their armor is full. Mend (active) restores armor points of allies.
Fasolt (provoker)
Joins automatically (3rd chapter)
Malice (active) makes the enemies attack Fasolt. It's really useful when someone from your party has been damaged. Return the Favor (passive) takes 1 point of armor from every enemy that attacks Fasolt.
Griss (strongarm)
Joins automatically (3rd chapter).
Battering Ram (active) isn't really useful. It knocks an enemy back and takes one or several armor points from him. Return the Favor (passive) takes 1 point of armor from every enemy that attacks Griss.
Gunnulf (warhawk)
Joins automatically in the beginning of the game.
Tempest (active) attacks several enemies close to Gunnulf but you have to be careful because it may also harm your allies. Heavy Impact (passive) deals (a little) damage to opponents close to attacked enemy.
Hakon (warmaster)
Joins automatically in the beginning of the game.
Sundering Impact (active) lets you weaken a few enemies close by. Heavy Impact (passive) deals (a little) damage to opponents close to attacked enemy.
Hogun (thrasher)
Hogun and Mogun may join the party when you travel to Frostvellr (2nd chapter) but only if you join their side and fight the villagers.
Bloody Fail (active) is incredibly useful (especially when upgraded), it strikes the enemy with a series of hits that weaken both strength and armor. Shield Wall (passive) increases defence when he stands close to an ally.
Iver (strongarm)
Joins automatically (2nd chapter).
Battering Ram (active) isn't really useful. It knocks an enemy back and takes one or several armor points from him. Heavy Impact (passive) deals (a little) damage to opponents close to attacked enemy.
Krumr (warleader)
Joins automatically when you reach Wyrmtoe (4th chapter).
Forge Ahead (active) is not very helpful, it makes the turn of a selected ally close to Krumr come faster. Heavy Impact (passive) deals (a little) damage to opponents close to attacked enemy.
Ludin (spearmaster)
Joins automatically in the beginning of the game.
Impale (active) is very useful. It lets you pierce an enemy with Ludin's spear and knock them back while dealing damage. Embolden (passive) makes Ludin and nearby allies get one point of willpower every time he kills someone.
Mogr (shieldmaster)
Joins automatically in the beginning of the game.
Bring the Pain (active) is useful when you want to attack the enemies' armor points. Return the Favor (passive) takes 1 point of armor from every enemy that attacks Mogr.
Mogun (thrasher)
Hogun and Mogun may join the party when you travel to Frostvellr (2nd chapter) but only if you join their side and fight the villagers.
Bloody Fail (active) is incredibly useful (especially when upgraded), it strikes the enemy with a series of hits that weaken both strength and armor. Shield Wall (passive) increases defence when he stands close to an ally.
Nid (bowmaster)
Nid may join the party in the 6th chapter (when you travel to Sigrholm) but only if you let Oddleif train women from the caravan.
Bird of Prey (active) is very useful, it increases the range of attack and makes every attack successful. Puncture (passive) lets you increase damage if the archer hasn't moved.
Oddleif (skystriker)
Joins automatically (2nd chapter).
Rain of Arrows (active) lets you create traps which will deal damage and stop the enemy when they walk on them. It's not very useful, especially on more open battlefields. Puncture (passive) lets you increase damage if the archer hasn't moved.
Onef (backbiter)
Onef may join in the 4th chapter if you let him.
Run Through (active) is quite useful, it lets you perform a charge that deals damage to one or several enemies (if they stand on tiles on the path of charge). Shield Wall (passive) increases defence when he stands close to an ally.
Rook (hunter)
Joins automatically (2nd chapter).
Mark Prey (passive) is quite useful, it lets you attack a mark enemy by every ally in range of the attack. Light Step (passive) lets Rook walk through tiles occupied by allies.
Shieldbanger
Joins automatically in the beginning of the game.
Return a Favor (passive) - A character who attacks a shieldbanger loses 1 point of armor for each attack he performs.
Sigbjorn (warhawk)
May join the party if you decide to help the villagers of Reynivik (6th chapter).
Tempest (active) attacks several enemies close to Sigbjorn but you have to be careful because it may also harm your allies. Heavy Impact (passive) deals (a little) damage to opponents close to attacked enemy.
Valgard (raidmaster)
Joins automatically in the beginning of the game.
Stone Wall (active) is purely defensive because Valgard will "absorb" attacks (to a certain point). Shield Wall (passive) lets you increase defence when he stands close to an ally.
Yrsa (siege archer)
Joins automatically (3rd chapter).
Slag and Burn (active) is very helpful because it lets you set a part of the battlefield on fire. All characters who step on these tiles will be damaged (strength bar). Puncture (passive) lets you increase damage if the archer hasn't moved.
The chart below shows all locations (cities, villages etc.) where you can find a marketplace. You'll visit most of them regardless of previous decisions.
Location
Chapter
Commentary
Skogr
2
You'll be able to trade after you win your first battle.
Village
2
Visited on the way to Frostvellr.
Frostvellr
2
Use it before you make the decision that ends the 2nd chapter.
Village
3
On the way to Ridgehorn, you can visit it if you attack enemies in the village.
Frostvellr
4
Use it before you go to Wyrmtoe.
Wyrmtoe
4
-
Village
4
On the way to Einartoft.
Einartoft
4
Use it before you go to the gathering.
Einartoft
5
Use it before making the decision about the siege of Varl city
Village
6
On the way to Sigrholm.
Haukstorp
6
On the way to Sigrholm, you can visit it only if you attack enemies in the village.
Sigrholm
6
-
Village
6
On the way to Boersgard.
Boersgard
7
Visit it at least two times - right after you arrive and before fighting against Bellower.
At this page, you will find a list of all the more important decisions to take throughout the game, i.e. ones that have considerable bearing on the course of the campaign and which, as a result of careless actions, may end in death of one of the playable characters.
Later on in the text, for obvious reasons, numerous spoilers can be found so, I recommend that you use the information only if you have already beaten the main storyline and you are going to play the game again, in order to find out about the outcomes of alternative decisions.
Note - each of the mentioned decisions has been described, in much more detail, in the chapter devoted to the walkthrough for the game. The purpose of the below list is only to draw your attention to all the important events, so that you do not have to look for them in the main part of this guide.
 Egil may die if you select the wrong dialogue options.
If, during the battles that you fight in Skogr you let Alette and Egil take part in the fights, alongside with the rest of the party, Egil's life will be threatened at some point. If you want to save the boy from death, you need to wait for a window, which informs of the appearance of a monster right next to Alette, to pop up. First, you need to select the "Shoot it with an arrow" dialogue option, and then "Stop thinking! Shoot the dredge!". More about this, at the page entitled "Skogr".
 Selection of the last dialogue option on the list results in Hogun's and Mogun's joining the caravan
Along your way to Frostvellr the caravan will stop, for a moment, in a small Village. Right after you leave it, a cutscene of the meeting with Hogun and Mogun will start. If you want them to join your caravan permanently, you need to select the third dialogue option (Side with the brothers) and, additionally, fight a battle with a group of hostile villagers. To learn more, see the page entitled "The journey to Frostvellr".
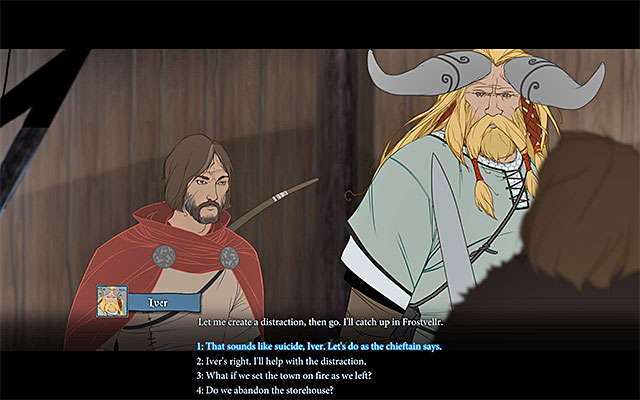
 Meeting with Ekkill is only one of the alternatives
You can complete the second chapter of the game in several different ways, by making your decision during the stay in Frostvellr. The important piece of information is that the decisions that you make will have a bearing on how chapter four of the campaign mode starts so, the effects are not immediate. In general terms, you can behave in three different ways, i.e. stay behind the city walls (using the Rest building or retreating from the city after the meeting with Onef or Ekkill), gain access into the city and start cooperation with Ekkill or to gain access to the city and reject working with Ekkill. Additionally, I recommend that you discourage Hogun and Mogun (if they are travelling on the caravan) from attacking the gates (this will happen if you decide to wait through the situation) because, they will die otherwise. To learn more, see the page entitled "Frostvellr".
 You need to decide the fate of prince Ludin
During your journey to Ridgehorn, the caravan will encounter a group of giants commanded by Fasolt. Towards the end of the meeting, you will have to decide whether to leave prince Ludin with the caravan (Walk away) or to send him away, against his will, to Grofheim (Lay the prince flat and send him off to Grofheim). The former is a definitely better choice because, even if Ludin continues along with your caravan, his life will never be put to any threat. By sending him away, you will lose the opportunity to take the service of, as many as, three characters, because also Yrsa and Bersi will leave with Ludin. To learn more, see the page entitled "Journey to Ridgehorn".
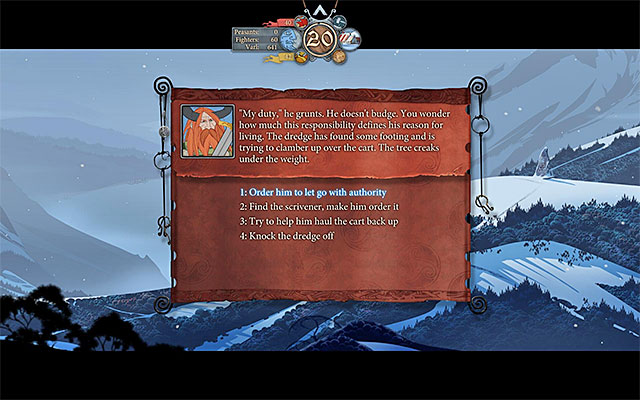 You need to react in the right way, if you want Gunnulf to survive
Along your journey to Ridgehorn the caravan will encounter a group of monsters capable of ranged attacks and, soon after you defeat them, an event concerning Gunnulf will start, and his life will be in danger. If you want to keep this character alive, you need to select the first dialogue option twice (Tell Gunnulf to let go and then Order him to let go with authority). To learn more, see the page entitled "Journey to Ridgehorn".
 The last two options on the list may result in your losing the hero
Soon before you reach Ridgehorn the caravan will encounter a group of monsters in the forest. While reacting to the appearance of the enemy army, avoid the fourth (Draw them into the woods and set them on fire) and the fifth (Lure them into the woods without the fire) option because, in the heat of the events, you can lose Yrsa irreversibly (as long as she is still travelling on the caravan). To learn more, see the page entitled "Journey to Ridgehorn".
 The last option on the list lets you avoid fighting, but at the cost of Mogr as the member of the party
In the final part of your stay in Ridgehorn you will have to decide how you want to leave the city. It is worthwhile to watch out here, because selecting the last option on the list (Send a diversion to draw their attention and escape) may result in Mogr's leaving the party. To learn more, see the page entitled "Ridgehorn".
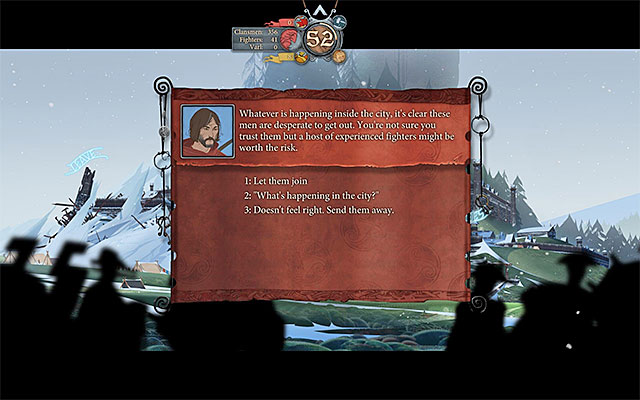
 Ekkill may be a member of the caravan from the very beginning, or the option to join him will appear later on
The beginning of the fourth chapter of the game (the visit to Frostvellr) depends on the choices that you make towards the end of the second chapter. Depending on how you behaved earlier, you can be in the city or outside of it. What is even more, Ekkill can be a member of the caravan from the very beginning or, about what you want to decide on his proposal to join the caravan, you may be asked later (while attempting to leave the city or after you meet him on your way to Wyrmtoe). To learn more, see the pages entitled "Frostvellr" and "Journey to Wyrmtoe".
 It is best to refuse Onef
Still before you leave Frostvellr it is very important how you are going to behave towards Onef and his request to travel on the caravan. It is best to refuse his offer, because he will betray its trust in chapter six and this may lead to the death of Oddleif and Egil. To learn more, see the pages entitled "Frostvellr" (Chapter 4) and "Journey to Boersgard" (Chapter 6).
 Supporting Oddleif's action will let you strengthen the caravan
Along your path to Wyrmtoe or Grofheim an event, connected with Oddleif, and her desire to train new archers, will occur. It is a good idea to let her do so, (Encourage Oddleif to train the women), thanks to which a group of villagers will be turned into fighters, later in the journey. What is even more, in the sixth chapter of the game, soon after you leave Haukstorp, the current party should be joined by a new archer named Nid. To learn more, see the pages entitled "Journey to Wyrmtoe/Grofheim" (Chapter 4) and "Journey to Sigrholm" (Chapter 6).
 Leaving the city, without helping the giants, is not a good idea
The entire fifth chapter takes place in Einartoft and the most important decision concerns the onslaught of the army of monsters. You can deal with blowing up of the bridge, with the help from Eyvind, immediately, take part in the fights on the bridge, or leave the city without helping the giants. In the case of the last one, the caravan will be left by Krumr and he will not appear in the following two chapters of the campaign mode. To learn more, see the page entitled "Einartoft".
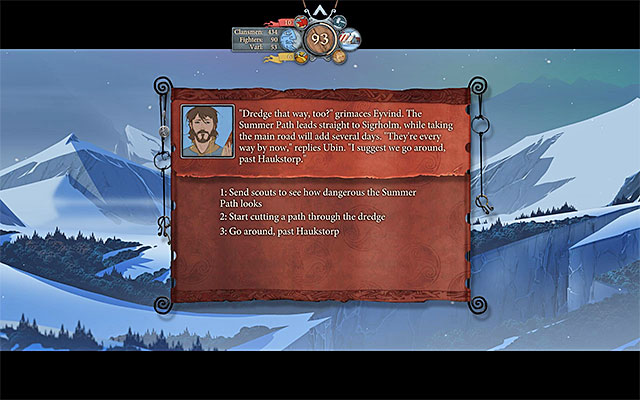 It is best to ignore the monsters or fight, at most, one battle
Along your way to Sigrholm the caravan will encounter a group of monsters that guard access to Haukstorp. The best thing to do is go around the monsters (Go around, past Haukstorp), or fight, at most, one battle because otherwise, Hogun and Mogun will die (someone else may die, if the two do not journey on the caravan). To learn more, see the page entitled "Journey to Sigrholm".
 Thanks to helping the villagers, you will gain a new ally
Soon before you reach Boersgard the caravan will reach Reynivik and it is a good idea to help the villagers (Rush to help), because Sigbjorn will join the party for the journey, to the last location in the game, as a result. What is even more, with Sigbjorn on the party, you will not have to fight an additional battle with monsters, right after you reach Boersgard. To learn more, see the page entitled "Journey to Boersgard".
 Accepting Krumr's help may lead to his death afterwards
The selection of the ways to behave, on the successive days of the siege of Boersgard, does not play any vital role. The only exception is the variant connected with Krumr (Put Krumr in charge of leading the warriors). It is not a good idea to choose him, in spite of the initial advantages, because the giant may die on the fourth day of the siege. To learn more, see the page entitled "Boersgard - the siege".
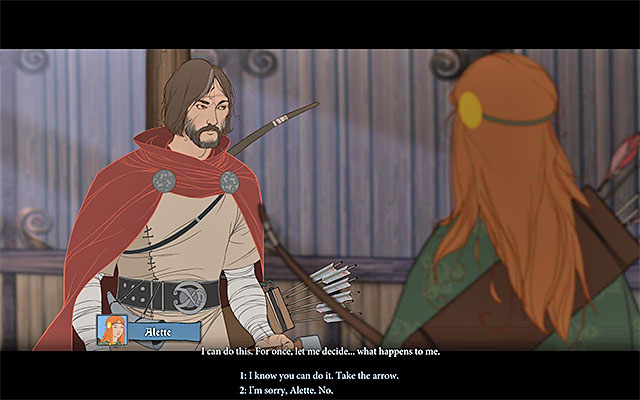 The final decision is connected with the game's ending
The final important decision that you take during the game, is the one connected with the ending. It is connected with giving the magic arrow to either Rook or Alette. To learn more about this choice, see "Boersgard - preparations for the final battle".
Game begins in the seaside town of Strand and after finding yourself in a Great Hall you'll be forced to fight the first battle. Playable characters are Shieldbanger and Gunnulf and you have to deal with hostile Chieftain and his three helpers - Enemy Raider.
Note - the entire fight is some sort of extended tutorial. This means that its course is fully directed by the game and you can't lose it. Do not worry about the fact that some actions are blocked by the game because the aim is to test very specific moves and attacks.
Note - battle rules are more detailed described in a separate guide chapter.
 Tempest attack allows dealing damage to several enemies at once
Your first task is to move Shieldbanger to the marked spot so he will find himself next to one of chieftain's helpers. Click on the hostile character and accordingly to game hint, choose the fist icon, confirming your attempt to weaken the Strength attribute of your enemy. Shieldbanger should kill enemy with a single attack, gaining first Renown points and ending his turn (the sequence of movement of characters is shown in the bottom left corner of the display).
Wait until enemy Chieftain moves towards your Shieldbanger, dealing minimum damage. After a moment you'll gain control over and once again you have to move this character to the arbitrary fixed place, getting to know how mechanism of spending Willpower points on "extra" actions works. The next element of the tutorial is to become familiar with special abilities of playable characters. Click Gunnulf and choose Tempest ability, which allows you to deal damage to several nearby enemies. Select the Enemy Rider on the right and wait for the action to be completed - it should eliminate both weaker enemies, leaving only Chieftain alive.
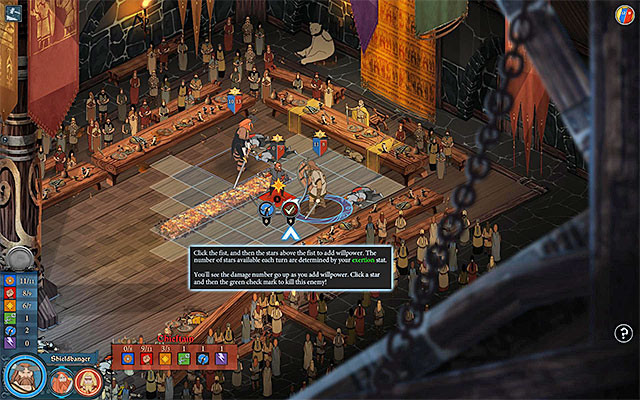 Spending Willpower point allows you to use stronger attack
Due to the fact, that only enemy Chieftain is left on the battlefield, the game will start the Pillage Mode, which modifies the sequence of character movements. After you gain control over Shieldbanger, click on the enemy chieftain and select an attack aimed at his strength (fist icon). By default this action would deal only 8 points of damage, but you can strengthen it by spending one Willpower point. In order to do this, click on the star, so the attack will deal 9 points of damage to your enemy, resulting in defeating him.
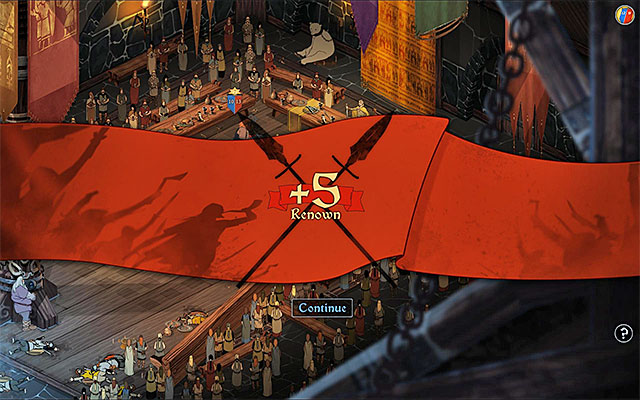 Battle summary
After each won fight the game will display its summary. You can learn here about advancements of your heroes, as well as the potential rewards. In this case you'll earn 5 Renown points (fame is awarded after each won fight and the number depends on the difficulty level or type and number of opponents among other things.
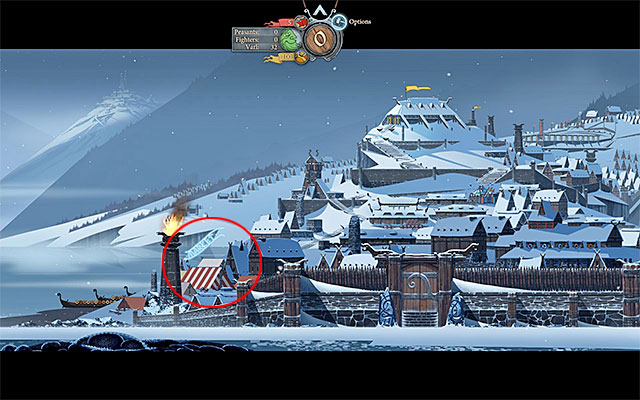
This chapter starts with conversation which you as Ubin have with Eirik (town steward). Dialog options which can be chosen during this conversation do not have a key influence on its course. After the meeting the game will display Strand view. As you progress in the chapter, more and more locations in the town will be available and you'll know that by the blue surrounding around them. In this case the only new location the Market shown on the attached screen.
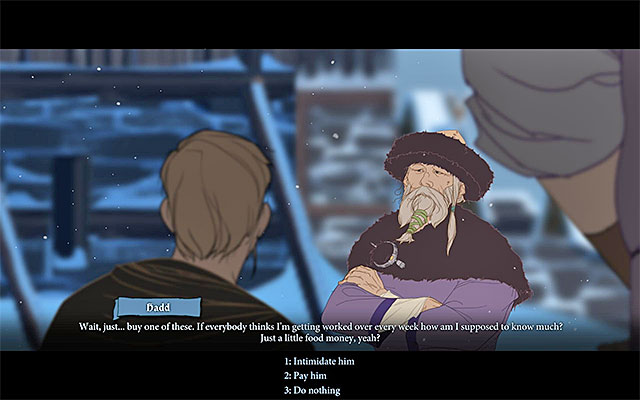 Option to intimidate or to pay Hadd appears only if you join the conversation
The next conversation takes place when you reach the market. Ubin and Eirik will meet here a merchant Hadd and you can act in two ways. If you want to join the conversation, you have to choose 1st or 2nd dialog option and this will allow you to intimidate Hadd or bribe him. You can also leave the conversation at its beginning or after listening to some sentences by selecting the 3rd dialog option.
Before leaving the market Ubin will meet Gunnulf. You can playfully offend him (1st dialog option), maintain a neutral state (2nd option) or praise him for buying a new outfit (3rd option). The end of conversation with allies doesn't really matter.
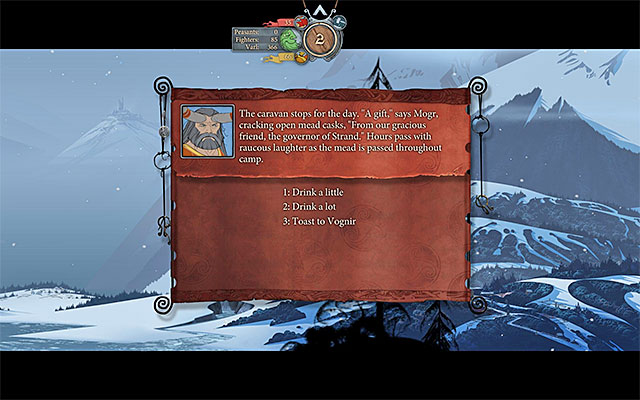
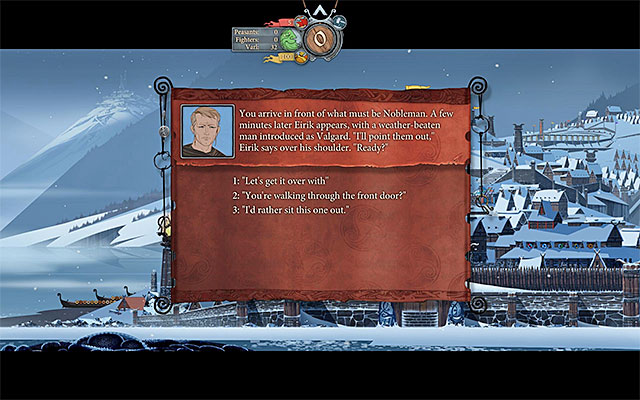 First important decision
Regardless of how you acted on the market, you'll have to go now to the Mead House building, so choose this location on the town view. Prepare to make your first decision, which will significantly affect the future course of events:
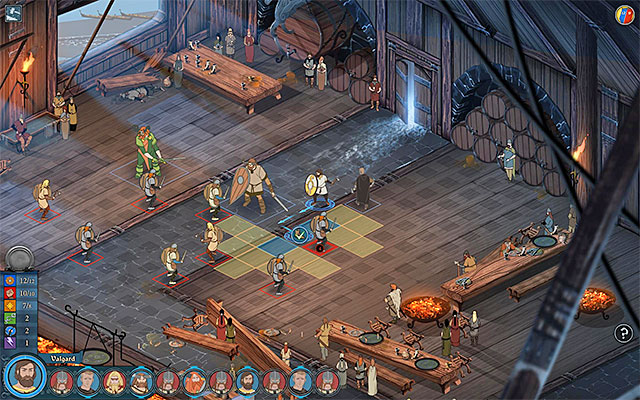 Do not rush with reducing distance to thugs
If you've chosen 1st or 2nd dialog option, the action will move to Mead House, where Shieldbanger, Gunnulf, Eirik and Valgard will have to fight a group of bandits (Thug Swordsman, Thug Leader). Notice, that first of all you are able to place your characters on the area marked in blue before the fight. But this is obligatory and default placement of giants and allied warriors is also acceptable.
After the fight begins, do not rush with sending your people toward bandits, because otherwise they can be attacked as first ones. It is better to move on shorter distance and look for an opportunity to place your character near the enemy when you have an active turn. Such behavior will allow you in addition to keep Willpower points, which can be spent to increase damage dealt in subsequent attacks.
 Tempest attack will allow you to kill or seriously weaken two enemies
During the described battle do not forget about special abilities of your characters. Valgard has Stonewall ability, which should be activated after getting close to bandits. Eirik can use Rally ability which replenishes Willpower points of given ally (it is best to keep this action for the later part of the fight). Gunnulf can use already known Tempest attack and it should be used when two bandits are close to the giant.
As you've probably noticed, two Thug Leaders are a bit tougher. So it would be good to attack them with character with high Strength attribute and also strengthen attacks with Willpower points. Behave identically when enemies place themselves close to each other, because then the effectiveness of their defense is improving.
 Before returning to the great hall you should meet Hakon and prince Ludin
After the fight Ubin will talk to Eirik and this will happen irrespective of whether you took part in previously described battle (1st and 2nd variants) or you haven't helped Eirik and Valgard (3rd variant). At the end of the meeting Eirik will ask Ubin for a favor and it would be good to agree to help him.
Wait until the game returns to the town view and go to Docks. Ubin will meet there Vognir and Hakon. You'll return to the town view again. Before you head to the great hall, you should click on images of Hakon and prince Ludin to make optional meetings with those characters. The meeting with Hakon has no behavior options but in case of talking to prince Ludin you'll be able to react on his question - mention only about presenting yourself (1st dialog option), express interest of the prince (2nd option) or try to find out more about Ludin visit (3rd option).
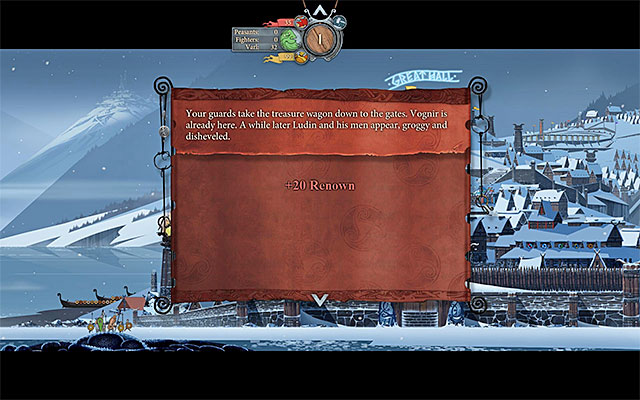 You'll get the bonus only if you helped Eirik and Valgard earlier
At the end click on the Great Hall. The action will move forwards to the next day, resulting in end of your visit in Strand town. If you have helped Eirik and Valgard in the last battle and made optional conversation, you'll gain maximum amount of 20 Renown points. Otherwise you'll get no reward or you'll receive only 5 Renown points. Regardless of the course of events you'll have to confirm your willingness to join the caravan.
On this and the following pages of the guide regarding the caravan, all moments associated with various types of journey breaks will be described in two separate chapters:
Important note: Do not worry if a particular side event didn't happen in your case or didn't happen at the first possible moment, because it might occur later in the journey (I suggest reading descriptions of additional events, also from the chapter adjacent to the current one). What's more, some of events are activated only if you have some particular characters in your team or you made some particular decisions earlier in the gameplay.
 You could advance one of your heroes to the next level
Later on when traveling to Vedrfell giants will decide to make a camp. After listening to the first part of the conversation between Ubin, Vognir, Hakon and prince Ludin, you'll be able to take a look at World Map. Close the map after you've studied it carefully unlocking the access to other activities connected with the camp. First of all I recommend visiting Heroes tent and that is because you'll probably be able to advance Gunnulf to the next experience level.
It is worth to look at the dependency on the order of movements of team members in future fights, which coincides with the visible list of heroes (from left to right). You can change the suggested order by moving team members pictures to other slots. It would be good if in every battle most powerful giants do their actions first, followed by "normal" warriors and archers at the end.
Rest tent can be ignored for the moment, because in such early stage of the game increasing warriors' morale by spending supplies is not needed. Training tent will allow you to play optional sparrings and in first of them you'll see two giants and one female archer. Personally I do not recommend wasting time on such fights because you won't get any new Renown points. After dealing with all issues Leave the camp resuming the journey. The caravan soon will reach Vedrfell village.
Note - More information on caravans, camps and character development can be found in other part of this guide.
Soon after leaving the Strand town you should see and additional event connected with gift received from Mogr - a honey barrel. You can act in three ways:
 Ludin fortunately won't die - he will be only unconscious
After getting to Vedrfell village listen to the conversation with Peasant - you do not have any influence on its course. Soon you'll gain control over prince Ludin starting a new battle, which first part is a new stage of the tutorial. At the beginning familiarize yourself with a mechanism of setting waypoints on the march route of controlled character. In this particular battle it is kind of useless but later on in the game you'll encounter various obstacles and you'll be able to avoid them in this way.
One more important part of the tutorial refers to the usage of the spear and prince Ludin is equipped with such weapon. The novelty is that you do not have to stand next to the enemy but instead you can attack him diagonally. At the end try to attack the Dredge Brute and you'll learn that in case of good armored enemies (high amount of Armor points) direct attacks on strength bar (fist icon) will fail or deal very little damage (more on coping with this problem can be found later).
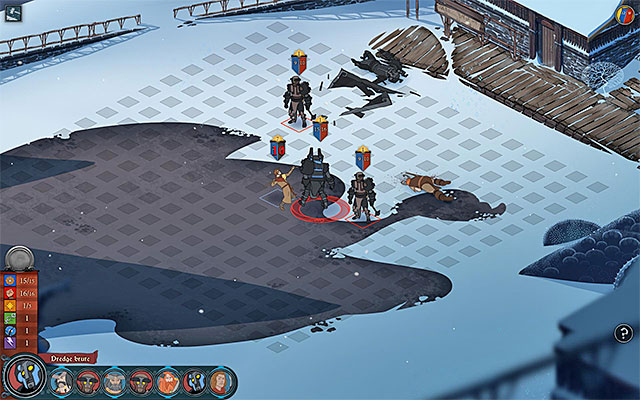
 Aim at weakening the armor of the biggest monster
After prince Ludin gets attacked by Dredge Brute, he will lose consciousness and the main battle will begin, where you control Hakon, Mogr and Gunnulf. There is one more big monster to be defeated - Dredge Brute, as well as two smaller enemies - Dredge Grunts.
In the beginning stage of the battle focus only on Dredge Brute, trying to surround him. According to the hint obtained earlier, you have to change your tactics and try initially to deprive as many his Armor points as possible. Remember to select a blue armor icon on the list, as well as to strengthen your attacks with Willpower points. Attack Dredge Brute in such way at least twice, so he will be left with few armor points only. Only then switch to attacks aimed at his health bar (red fist icon).
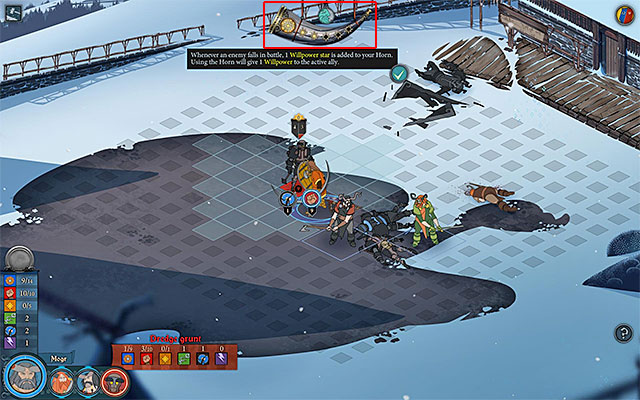
After defeating the first monster, the game will present you a new combat mechanism - Horn displaying at the top of the screen (shown on the attached screen). Once you kill the enemy, a star is activated on the horn and you can use this item at any time you want in order to get the Willpower point back. You can try to use it now, because you giants are probably a bit exhausted after killing Dredge Brute.
Now focus on two smaller enemy creatures - Dredge Grunts. In their case you also should weaken enemy armors before activating attack aimed at Strength. Also watch out for Gunnulf because he is the weakest one of the three giants and he could get attacked by monsters and defeated by them. It doesn't mean the end of the battle of course but I suggest finishing it with best possible result. You can help Gunnulf by attacking the monster who takes out his strength points. Listen to the conversation of Ubin, Hakon and prince Ludin, which ends this chapter.
 Try to attack the monster from a distance as long as possible
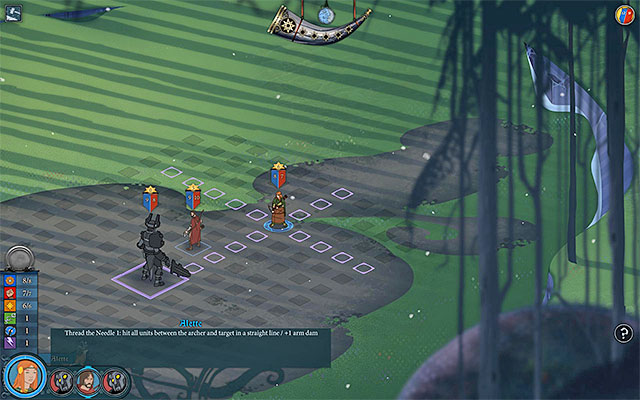
This chapter, same as a prologue, starts with a fight which takes place in the wood east from Skogr village. In this battle you control Rook and his daughter, Alette. You'll have to defeat Starving Dredge monster.
Before joining the fight familiarize yourself with the equipment and abilities of your heroes. Both Rook and Alette have bows, so they can attack their targets from a distance. As for their special abilities, Rook has Mark Prey action which will be useful in fights with more allies. And Thread the Needle from Alette can be used right in this battle, but it will be most useful against more enemies at once. Also make sure that Rook doesn't stand in the line of the arrow after activating this ability, because it doesn't distinguish allies from enemies as it is in the case of standard bow's attacks. Initially try to attack Starving Dredge from a distance and when he gets closer to the team, send Rook towards him, because he is better in a melee fight than Alette.
 Selection window
After the fight you'll face the choice how to act when it comes to dealing with more monsters. I do not recommend choosing 1st option (Forget the supplies, let's get back to Skogr) and 3rd one (Do you think you can handle more of them?), because you'll start the journey to Skogr only with 3 units of Supplies. It is best to choose 2nd variant (If we hurry we can gather them before more dredge appear) and that's because main heroes will be able to take with them most of Supplies. Regardless of your choice wait until Rook and Alette reach Skogr village.
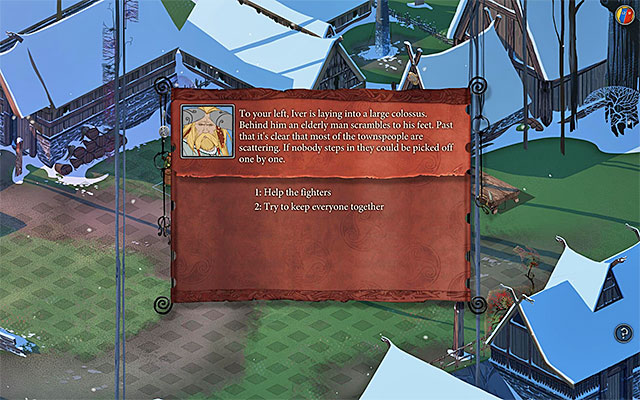
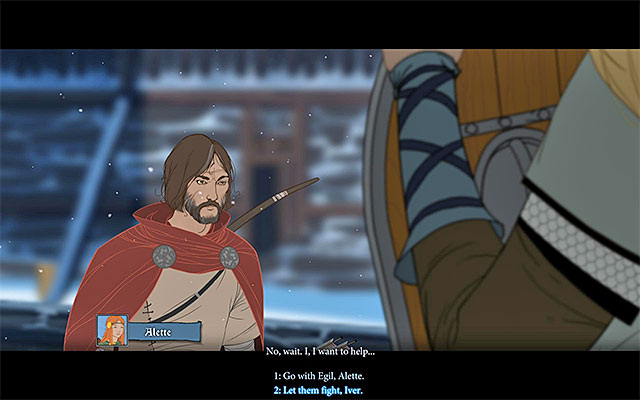 It will be better to let Egil and Alette join the next fight
Your visit in Skogr starts with meeting with giant Iver. At the end of this conversation you'll have to make a new decision:
In order to start the fight click on the Great Hall and confirm team line-up (in this particular case it is only formality because you can't add anyone else).
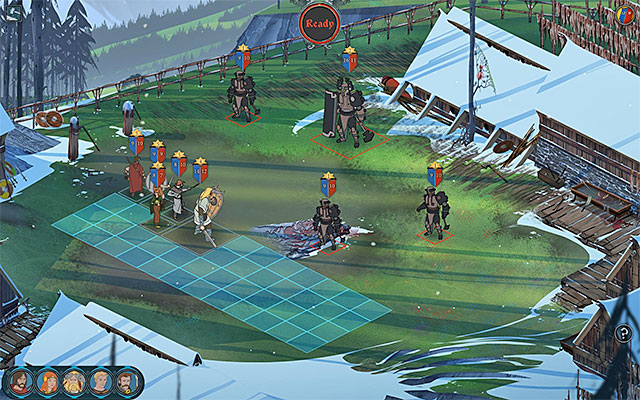
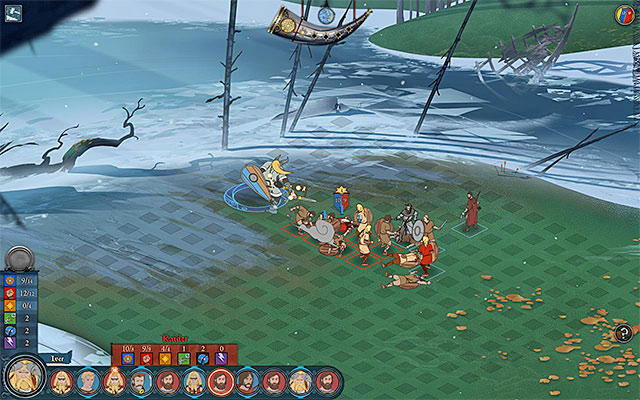
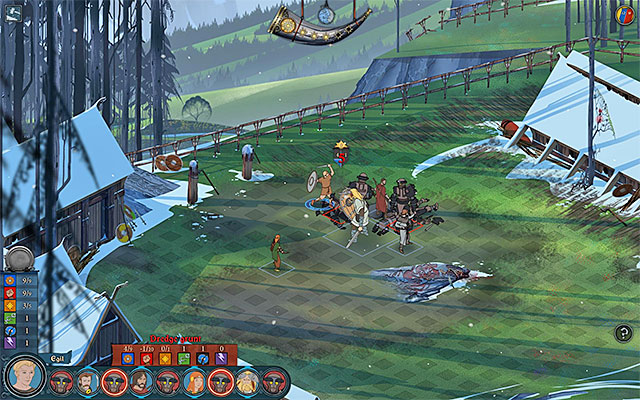
The characters that will take part in the fights are, first of all Rook and Iver. You already know Rook and Iver has the Battering Ram ability, thanks to which he can push enemies away. If you have selected the second dialogue option in the recent conversation, then also Alette and Egil will join the party. You have already has the opportunity to met Alette, and Egil is equipped with a shield, thanks to which he can block enemy attacks. There are four monsters to defeat - one larger (Dredge Stoneguard) and three smaller ones (Dredge Grunt).
In this particular case I suggest spending some time to skillfully place your team members. The sample setting is shown on the attached screen. It involves occupying left side of the battlefield resulting in getting as close as possible to Dredge Stoneguard. It would be good to form a wall (passive ability of Egil, Shield Wall, adds a bonus to defense in such cases) and send Alette to the second line, because she is the worst character in defense.
 Dredge Stoneguard is able to push away other creatures
After the fight begins focus your team members' efforts on weakening Dredge Stoneguard because this monster is the biggest threat for you. But avoid placing next to him several of your heroes because Dredge Stoneguard has a special ability which pushes away all nearby characters, resulting in taking off valuable armor points. Do not forget to repel him of most of his armor points and then focus on attacking his health bar.
 During attacking lesser monsters also focus on particular opponents
During this fight, you need to remember that you can use special attacks of the individual party members. Rook's Mark Prey ability is going to be much more useful now and it is better to use it to mark enemies within the attack range of, at least, one of the remaining allies. At the same time, to weaken several enemies, I recommend that you use Alette's Thread the Needle, and Iver's Battering Ram. Egil's Stonewall is good not only to avoid taking damage, but also to stop Dredge Stoneguard from reaching archers and the other, weaker characters.
Besides Dredge Stoneguard there are three lesser monsters (Dredge Grunt) you have to deal with. It is best to eliminate those beasts in some particular order and that's because they also have quite good armors and they won't die as fast as you would like to. Do not forget about possibility of using the horn in order to replenish Willpower points and take care of less armored team members.
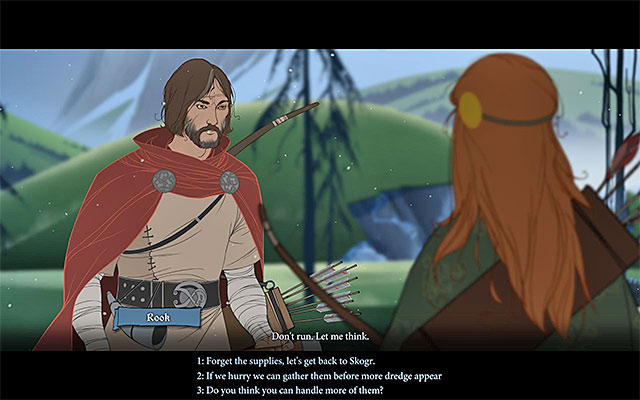
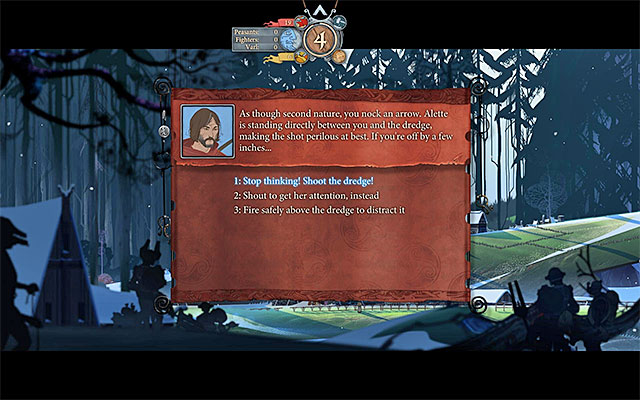 Egil can die if you choose wrong dialog options
After the fights there will be a new encounter and its course depends on the previous conversation. If you have previously sent Alette and Egil to the great hall then choosing dialog option ("Got it" or "Maybe we should skip the houses") doesn't really matter.
If Alette and Egil took part in just won battle then Egil's life will be in danger now. If you want to protect him from death you have to wait until a window with information of a monster appearing next to Alette pops up. First choose the "Shoot it with an arrow" dialog option and then choose "Stop thinking! Shoot the dredge!" option.
 Village view
You can now allow yourself some rest. I recommend that you, first of all, take a peek into the Heroes tent, because one of the party members gained the next experience level, most probably. The tent can also be used to select the elements of the equipment and, one of the heroes (Alette) already has an artifact.
In addition it would be good to visit Market where you can buy supplies and artifacts. Of course you do not have to buy anything right now but it would be good to familiarize with rules of marketplaces. Finally click on Iver icon in order to listen to the conversation with Rook and him.
 Meeting the chieftain
Now go to the Great Hall in order to meet Chieftain and his wife - Oddleif. Once again you'll be forced to make an important decision and here are possible variants of your behavior:
Regardless of what you did, you can expect that Oddleif, who is an archer, will join in, in the battles to come. Apart from that, in each of the variants, also Rook, Alette (if you have chosen variant B, then you additionally need to agree on her joining the battle), Iver and Egil (only if he has not died earlier) will join the battle.
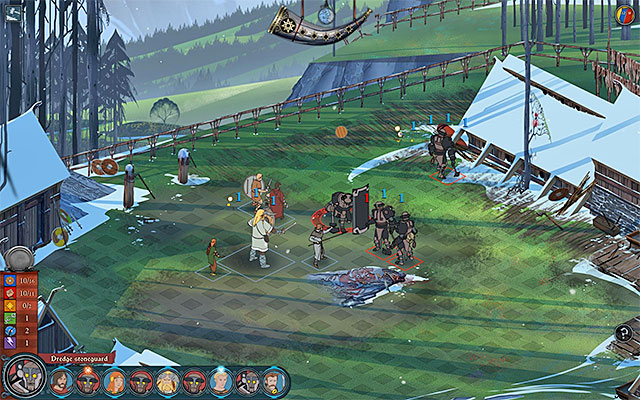
 One of sample variations of the battle fought in the village
Contrary to what you can think, the variant you chose will not significantly affect the battle, because you'll have to fight it, regardless of decision you made during the meeting with the chieftain (changes will appear only after end of the fight). The game randomizes the setting of your team members each time (you can be placed for example in the board center, on its sides or command two groups of separated heroes), as well as type of the monsters you have to defeat and their numbers (between 4 and 6).
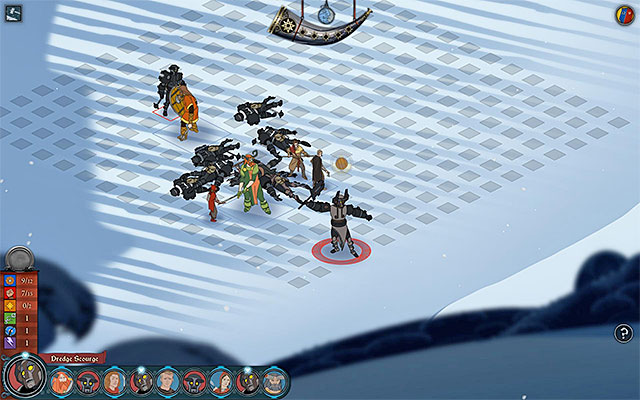
As for enemies, there will be Dredge Stoneguard and Dredge Grunt among them, as well as Dredge Scourge units, seen for the first time.
 Special ability of Oddleif may hinder enemies moving around the battlefield
As always your first step should be skilful placing your team members on the battlefield. Once again I remind about protecting archers and I suggest forming walls, which can be more robust thanks to Egil's support. Try to place your people in such places that they are not too far from stronger monster (if they appear in the battle), so they can early start to weaken enemies' armors.
A new team member is previously mentioned Oddleif, wife of the Skogr village chieftain. She is and archer and her special ability is Rain of arrows. You should use this action when you see that some stronger monster is approaching your archers - it will make his way harder or even force him to step into a trap.
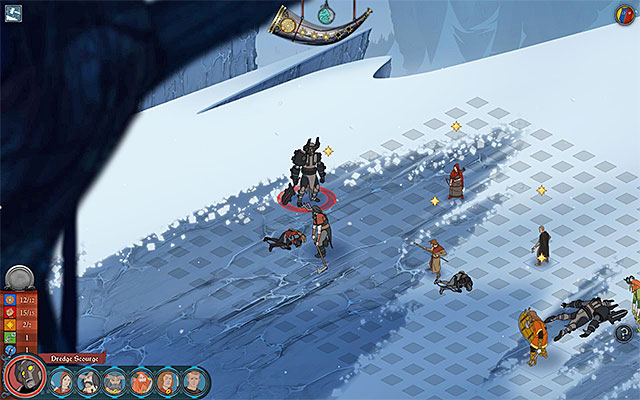
Another novelty is connected with Dredge Scourge beasts - you haven't dealt with them so far. Those monsters are of course very tough and their special attack is to call for reinforcements. When you see that the Dredge Scourge gets away from the battlefield and he started the summoning process (example is shown on the above screen), quickly attack him because otherwise after several turns you'll have to fight a new Dredge Grunt and defeating enemies will be even harder. Fortunately such action happens mainly when Dredge Scourge is seriously wounded so finishing him shouldn't be a problem.
Same as in previous fights try to attack monsters one after another because even standard Dredge Grunts have good armor. Reward for winning the battle is not arbitrarily fixed because it depends on the strength of defeated enemies and you can obtain 8 Renown points maximum.
 End of the visit in Skogr for variant A
If you have chosen variant A before starting the described battle, you'll have a choice now:
 End of the visit in Skogr for variant B
If, before this battle started, you have chosen variant B, then you will not have to take any additional decisions, and only accept the consequences of your previous choices. If you allowed Alette to join in for the battlem then the Chieftain will die, and you will receive 20 renown points. If, however, Alette did not take part in the battle, the Chieftain will live, and you will receive 30 renown points.
 End of the visit in Skogr for variant C
If you have chosen variant C before starting the described battle, you'll have a choice now:
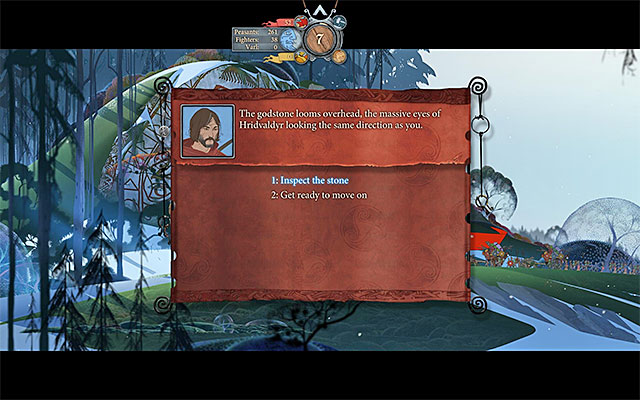 You can examine huge rock
The entire caravan will stop for the first time after reaching Hridvaldyr location. For start, listen to the conversation between Rook and Iver. The game will allow you to alter the course of this meeting, although the choice of the dialog option does not influence further events. After the conversation, decide to examine a huge rock (Inspect the Stone) - do not worry, you won't lose much time.
If you helped Skogr villagers then before leaving this location you'll receive a medallion (Bjarken Rune) from some little girl - you should equip it with one of the playable characters (it increases chances of successful dodge, so it is worth to give it to the person who is not the best in defense).
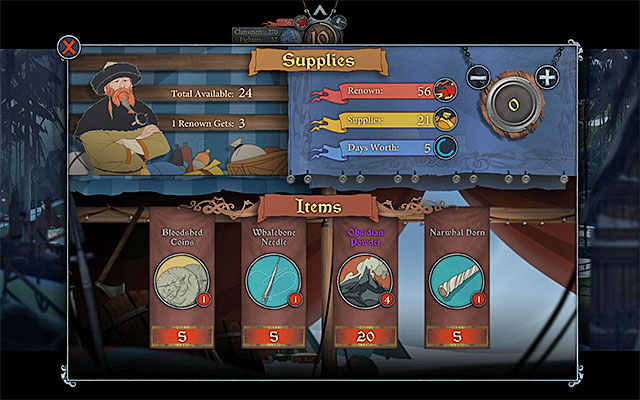
Soon the caravan will reach the Village where you can rest. I suggest visiting Market first of all, because in addition to new items, you'll be able to buy supplies here (above screen). Try to buy all available supplies, so you won't to face lack of them soon.
Spend some moments to meet Egil by clicking his icon and choosing all possible conversation subjects. Use this opportunity to visit Heroes tent to give them items and advance them to the next experience levels. I do not recommend using Rest option, unless the morale of caravan members is very low because of previous bad decisions. After dealing with all issues, leave the village.
 The conflict can be solved in several ways
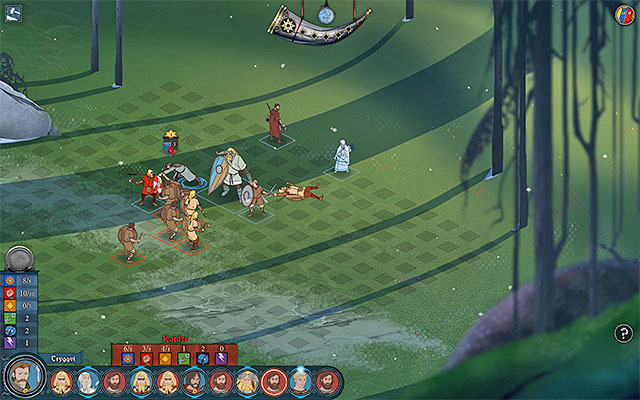
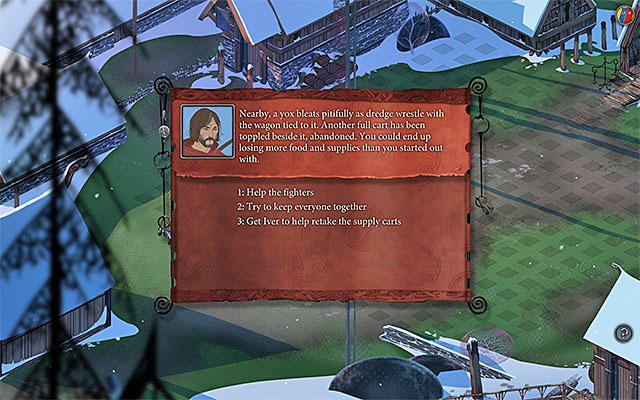
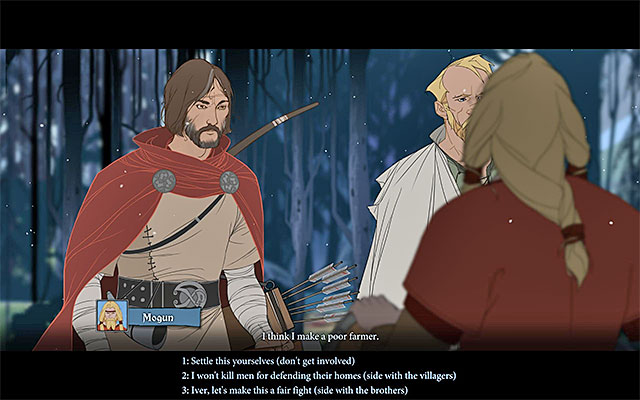
Right after leaving the village the caravan will encounter two warriors - Hogun and Mogun. The conversation with both of them will be soon joined by the Town Leader of previously visited village and you'll learn about serious conflict. Hogun and Mogun want to join the caravan, as well as some of villagers and they want to leave their houses being afraid of invasion of monsters. But the Town Leader doesn't allow them to do it. I suggest acting neutral at the beginning so the decision how to solve the problem will come at the end of the conversation. These are possibilities:
 You can choose only one brother or both of them to join your active party
If you sided with Hogun and Mogun in the described conversation, you'll have to fight additional and quite difficult battle. First, you have to make decision that will join the fight. It is because you have more playable characters than the maximum limit of 6 characters which can fight (provided that none of them has died). I personally recommend taking only one of brothers for the battle, because instead of two same warriors on the battlefield it would be better to take an additional archer for example.
 Bloody Flail attack allows you to hit several times in one turn
After you are moved to the battlefield make sure to properly place your characters (starting positions of all characters are random) trying to make some kind of wall and place archers at its back. You'll have to fight with better trained warriors (Thrasher), who have same abilities like brothers, as well as standard bandits (Raider). Watch out also for Archers, trying to get them as soon as possible and enemies with shields (Backbiter), trying to make it harder for them to charge on you but not placing your people in the straight line.
During the fights here I recommend using regularly special ability of Hogun and Mogun named Bloody Flail, which allows you to make four attacks. This action is best useful when you attack bandits surrounded by others, although the last attack in the series might fail.
Regardless of whether you have acted during the meeting with Hogun, Mogun and Town Leader, the caravan will continue the journey.
 Make your choice
First event relates to excessive separation of particular caravan members. There are four possible variants of behavior:
 Encountering warriors
Soon after leaving Hridvaldyr location, the caravan will encounter Fighters who want to join, offering their support and supplies. You can act in two ways here (the middle option is just a question):
Next additional event is a fight among caravan members - it will be initiated by Rafnsvartr. In this case you have 4 variants of behavior:
 Meeting Oddleif in the camp will allow you to obtain additional Renown points
During one of the stops, Oddleif will give Rook the cheftain's banner and this will happen even if the previous Chieftain survived the attack of monsters on Skogr. This is so, because the most "optimistic" variant assumes that he takes severe damage. Listen to the conversation with Alette, which will not play any vital role, again. It is worth adding here that, if you have taken part in the battle with bandits, the girl will want to talk about this.
After the next camp is automatically made, in addition to standard activities (advancing heroes to higher experience levels, visiting training tent) it would be good to visit Oddleif by clicking her icon. You do not have to watch carefully dialog options because regardless of how you act, you'll gain 5 Renown points at the end of the conversation with chieftain's wife.
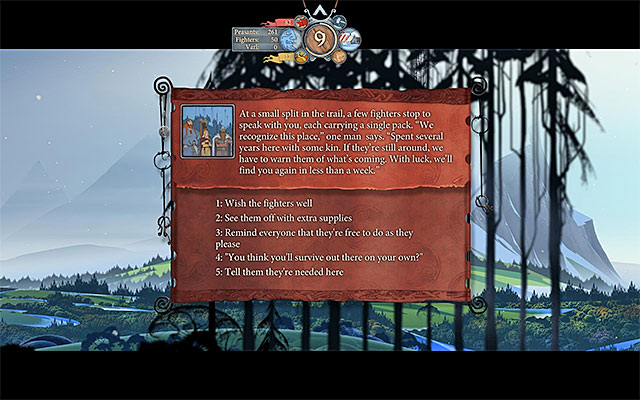 One of last events refers to a group of warriors who want to temporarily leave the caravan
In the final phase of the journey to Frostvellr additional events are activated and most choices you'll have in first of them, which refers to group of Fighters from caravan who want to temporarily lave the main group. Here are possible choices:
Two last events refer to more troubles with Rafnsvartr. First of them will allow you to behave in such ways:
Also the second event referring to Rafnsvartr offers three options:
 Frostvellr
After getting near Frostvellr town listen to the conversation between Rook, Iver and Oddleif. You'll learn that the chieftain Has barricaded himself in the town along with his people and he doesn't open the gate for anyone. The choice of dialog options in this case doesn't matter because the decision about solving this problem will be made a bit later. After the conversation is over, think about visiting local Market where you can buy new supplies and artifacts.
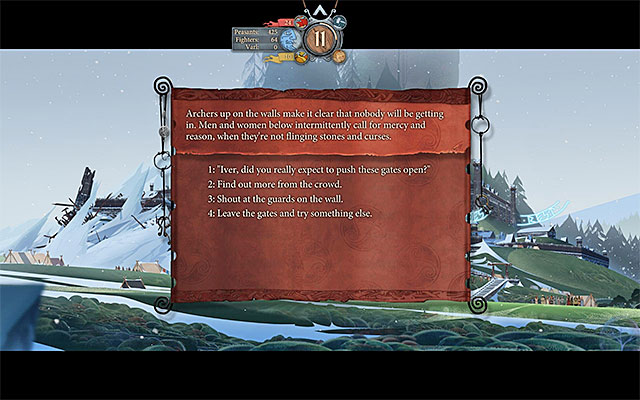 Gate
GateThe second game chapter can be ended in many different ways, but the most obvious behavior variant is to get to the Gate which is closed because of the chieftain. This is how you can act here:
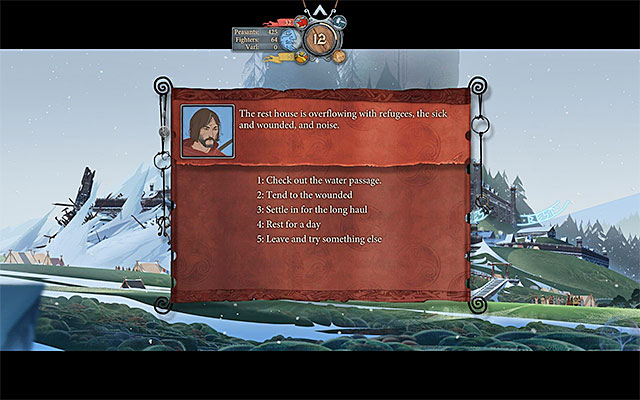 The list of possible options varies
Closed gate is not the only place which can be examined because you can also visit Rest building. As for the start the game will count on one rest day but then you'll be able to make a decision:
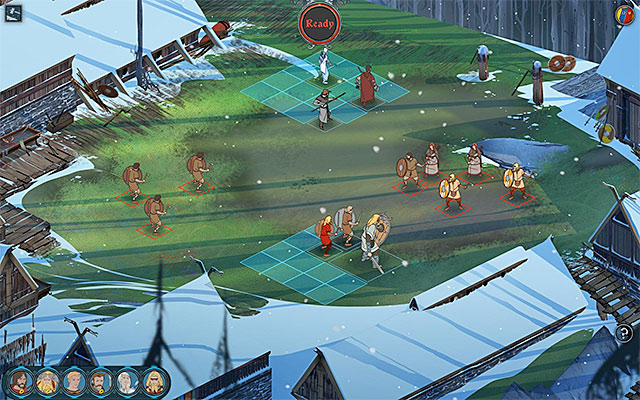 Begin of sample fight
Many of variants described above lead to the battle and like with battles fought in Skogr village these fights have quite random settings. This randomness refers to the arena appearance, starting places of characters or types and amount of enemies. All available characters can take part in fights. The only exception is Iver, because if you chosen to go through the narrow passage, he will be unavailable during the battle.
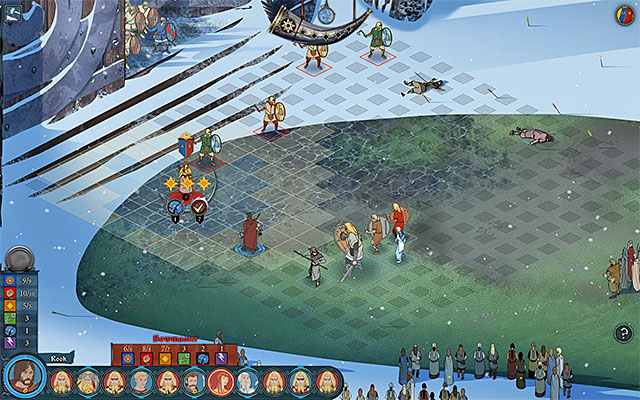 Get rid of archers quickly
You have to reckon with the fact that right after starting the fight you'll encounter new enemy units. First of all there are enemy female archers (Bowmaster and Archer), which should be eliminated as fast as possible. This tactics is good also because they are very weak in defense and can die even with one strong attack. Elite warriors (Thrasher Champion) are very tough and it would be good to attack them with several characters at one. The last one among new enemies is elite opponent with a shield (Backbiter). In this case the most important thing is not to place your people in a straight line and that's because his special attack is a powerful charge. As a reward for winning the battle you can get even 12 Renown points - this depends on difficulty of the fight.
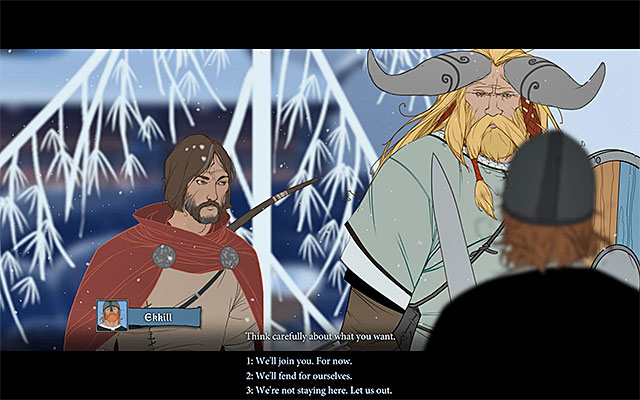 Meeting Ekkill
The meeting with Ekkill, which ends this chapter, can be started mainly if you won one of fights described above. But you can also meet him if you didn't choose violent solutions - you just have to stop the supply cart in order to meet with transport guards and properly lead a conversation with Onef.
From the conversation with Ekkill you'll learn that he wants to take Frostvellr back from the chieftain and he will offer you cooperation. You can act in three ways here:
Regardless of your actions the chapter will end here.
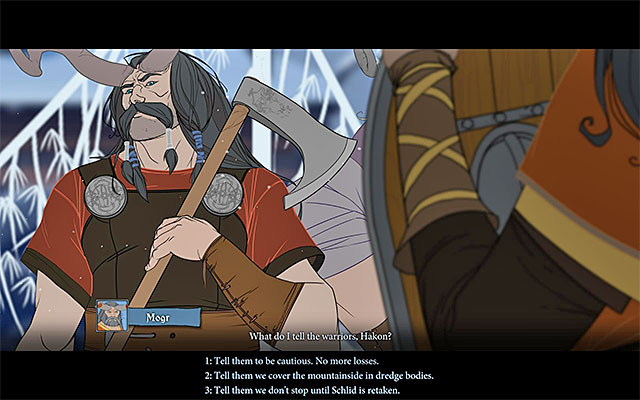 Final part of the conversation
The adventure starts in Vedrfell village, so in the location when you have ended the first game chapter. Listen to the conversation between Ubin, prince Ludin, Hakon and Mogr. You'll learn that high numbers of giants (Varl) and warriors (Fighters) have joined the caravan and you have also obtained much new Supplies. You can suggest Ludin to return to Strand (1st and 3rd dialog options) or leave the decision up to him (2nd dialog option) but it won't influence directly future events.
In the final phase of the conversation you'll have to make decision about how caravan warriors have to act later during the journey. Available options are:
Before leaving Vedrfell I suggest visiting Heroes tent and clicking on Ubin and Mogr icons to talk to them. What's interesting, you do not have to think what to ask them because you'll be able to select all available subjects.
 Available orders
The first key moment in the journey to Ridgehorn refers to encountering a large group of monsters and here you'll get familiarized with a new mechanism of waging the war. War starts always when the caravan encounters larger group of monsters which can be defeated by the active team. It can consist with several hundreds or even several thousands of monsters. In such situations all decisions and fights directly influence the entire caravan. For example, if you win the fight only with the active team, the rest of your army will also win this battle.
Each time you can act in 5 ways and the choice of the tactics should depend mainly on amount of enemies (you see numbers of both sides of the conflict, so you can easily determine who has advantage):
1) Charge! - Aggressive charge is a good idea only if you have clear advantage over the enemy.
2) Formations! - Formation is a good idea if numbers of your warriors and enemies are almost the same.
3) Hold Them Off! - Trying to stop the enemy is a good idea if he has advantage.
4) Retreat! - Fleeing from the battlefield is a good idea if the enemy has clear advantage. This variant allows you to avoid the battle but you have to reckon the fact that because of the retreat more warriors (Fighters) and giants (Varl) from your caravan will die.
5) Oversee! - Passive participation in the battle. I strongly do not recommend this solution because although you do not have to participate in the battle personally, you have to reckon with the fact that your subordinates will achieve much worse outcome in the battle than you could get.
In summary, you should participate actively in all bigger battles, choosing options 1, 2 or 3 depending on the difference in the numbers of both armies. Use 4th option only as a last resort, when the enemy outnumbers you greatly.
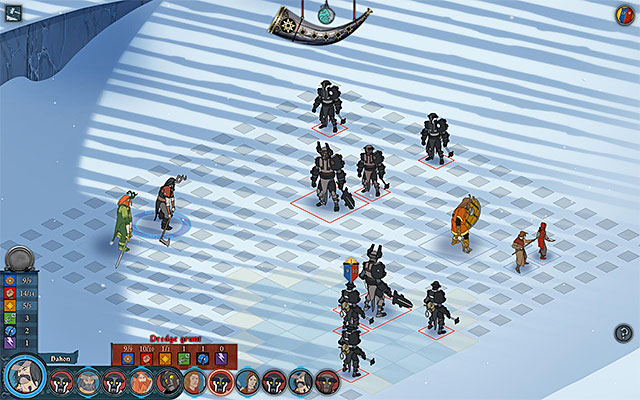 Depending on the previously made choice, you'll have to fight with larger or smaller group of monsters
If you decided to choose option 1, 2 and 3 when it comes to commanding the army, then you'll have to fight one battle where you'll face smaller or larger group of already known monsters (mainly Dredge Grunts). During the fights watch out for monsters which are able to call reinforcements (Dredge Scourge), stopping them when possible. It is worth mentioning that in the described battle you'll see for the first time Bersi and Yrsa. I recommend interesting mainly in the archer, because Yrsa has very useful ability named Slag and Burn, which can set some ground elements in fire. This action can be used to stop enemies from marching towards you as well as burning tiles with fighting monsters (explosion and fire deal damage both to strength points and armor points and can weaken more than one enemy at the time).
After each battle connected with war actions you'll be asked if you want to resume the journey immediately (Pull back before they regroup) or to attack additional monsters (Kill a few more as they flee). If you choose the second option, the caravan morale will increase and you'll be able to obtain more Renown points. But this is also risky, because you could encounter elite units on the battlefield. So I recommend doing this only if you've won the main battle without bigger problems and your subordinates weren't seriously injured.
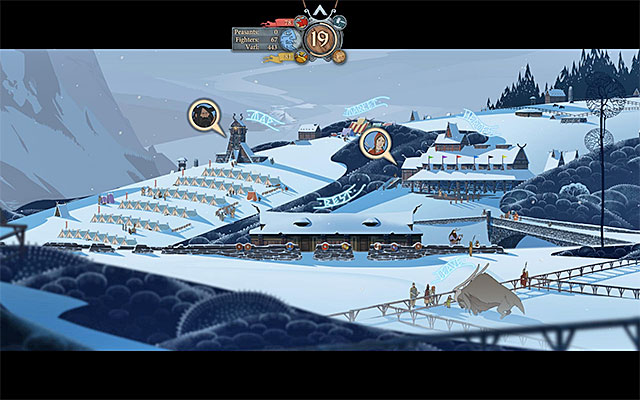 The village destroyed by monsters
Regardless of whether you won, ignored or lost the first big battle, the caravan will continue its journey. The peace won't last long because scouts will soon spot another large group of monsters. If you decide to attack them immediately (Draw some of them forward and split them), then you'll start military actions again, so choose a proper tactics depending in current amount of your fighters. The attack is a good idea, because it will allow you to split enemy forces into two parts (it mean of course that you'll have to fight two battles). But you can also make decision to get closer to the enemy (Get closer before making a move) and then fight one big battle in the village (Take the fight to them!). The least aggressive variant is to pass by the enemy forces without engaging them and risking losing more and more warriors (I don't like this. We'll skirt the village).
If you've decided to attack enemy forces in the Village, you'll be able to visit it now. You should activate a new event here. It would be good to open the hatch (Open the hatch) in order to find peasants hiding there. You can send those people to Strand without any guards (Go to Strand. We've cleared the way) or with some escort (Go to Strand. We'll send escorts with you) or propose them to stay in the village (Stay here if you'd like). If you plan to send peasants away, Eirik would like to accompany them and you can agree to it (Go if you wish) or forbid it (We need you here). Before leaving the village I suggest to talk to Bersi and Yrsa (try to use all available topics). In addition you can Rest, advance Heroes and but supplies on Market.
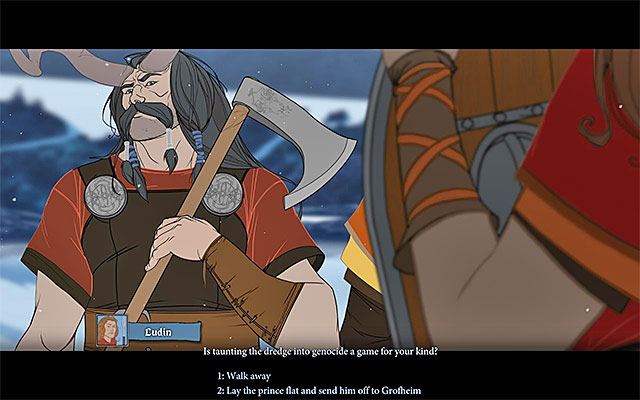 You have to make a decision about fate of prince Ludin
Prepare for very important encounter with group of several hundreds of giants travelling from Schild and commanded by Fasolt. During the conversation you can be rude and disrespectful towards prince Ludin or to use a balanced vocabulary. Time to decide traditionally comes at the end of the meeting:
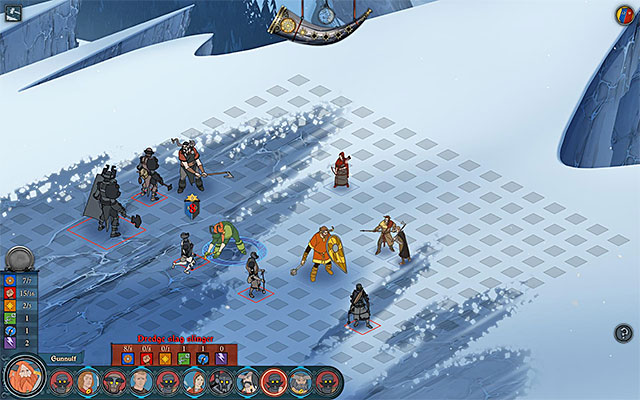 Try to get to monsters able to fight from a distance as fast as possible
In a few moments a new battle with monsters will start and since you can't avoid it, you have to decide how you'll react on it. If you have joined giant to your caravan, you should outnumber the enemy. Otherwise monsters can have more units, so make sure to choose a good tactics. During the fight you'll encounter for the first time new type of monsters (Dredge Slag Slinger, Slag Slinger Marksman, Slag Slinger Veteran), who use slings to attack from distance. Same as with archers from the previous chapter, try to quickly reduce your distance to enemies so you could attack them in melee and stop them from using the slings.
 You have to react properly if you want Gunnulf to stay alive
Regardless of the battle result, you'll see one more event. This is the conversation about just encountered monsters. Same as in one of previous chapters you have to be very careful when choosing dialog options, because otherwise you can lead to death of Gunnulf. If you want to keep him alive, choose the 1st dialog option twice (Tell Gunnulf to let go and then Order him to let go with authority). At the end of the event you have to decide what you will do with treasure cart, which has fallen down. You can:
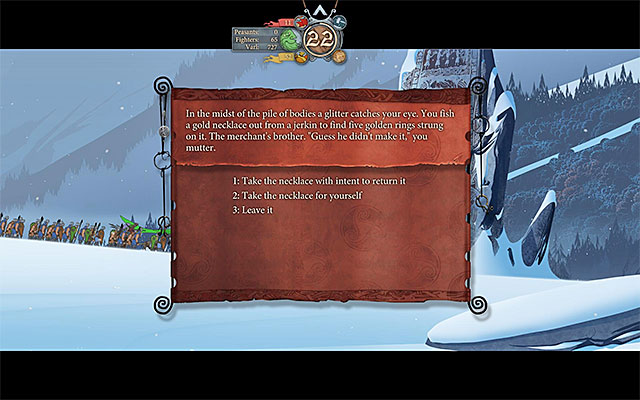 You can keep the necklace for yourself, or behave in an honorable way
Soon, the caravan will reach Denglr and you will have to make another decision here. You can:
Regardless of how you behaved, it is a good idea to examine the godstone towards the end of your visit, especially that you will lose no time this way.
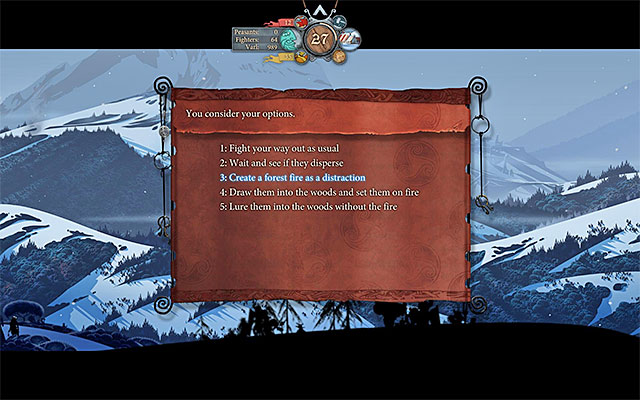 It is best to distract monsters by immediately setting the forest in fire
Mogr should tell the caravan after some time that they are being followed by monsters. If you choose 1st (No, stop everyone and get ready to fight) or 3rd dialog option (Good, more slags to kill) then you'll start the battle counted in military operations, so choose a proper tactics. If you select 2nd option (We'll lose them) then you'll avoid fights. I personally recommend fighting monsters, because the number of monsters in the next army you'll encounter will be now decreased.
Before you get to Ridgehorn you'll encounter one more large group of monsters. If you didn't send prince Ludin previously, you should have 5 options now:
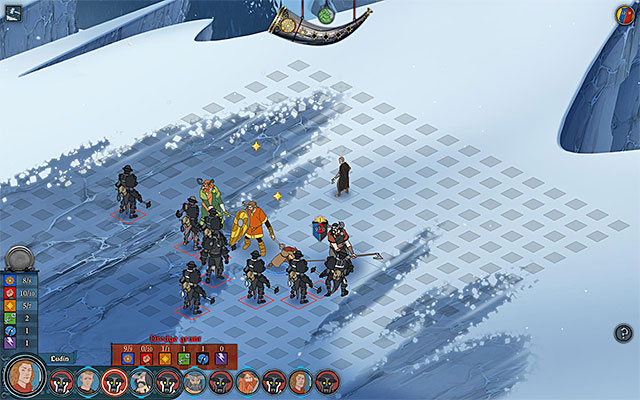 You can deal with monsters or ignore them
Soon after leaving the Verdfell village the caravan should notice a new group of monsters heading towards Strand town and since it is not too large, Mogr will suggest attacking them by a surprise. You can:
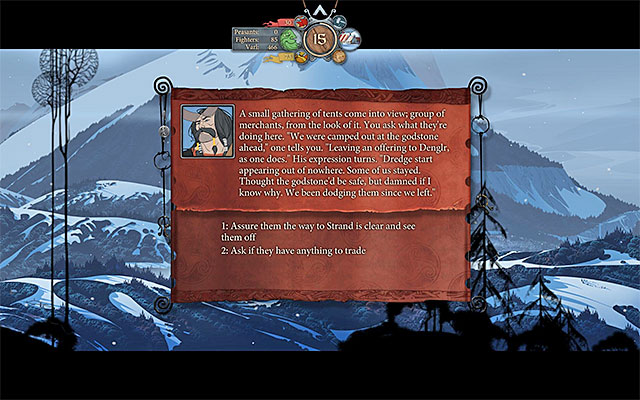
The next event is a conversation between Hakon and prince Ludin, but you do not have to think too much which dialog options you have to choose. Soon after the conversation is over, another event will be activated - you'll learn that one of giants (Varl) in the caravan doesn't respect Hakon as he should do. It would be best to solve this problem by challenging him to a duel (Challenge the varl to a fight) or hitting him by surprise (Blindside him) - this will result in 5 Renown points.
The next random event is more important and it is presented on the above screen. It refers to meeting a group of merchants and at the beginning you can act in two ways:
If you have chosen the second option then you'll have opportunity to gain large amount of Supplies for free (We'll take them. How much?). I DO NOT RECOMMEND this solution because later on it will turn out that supplies are poisoned. Morale will then decrease and it will be very likely that you have to get rid of a large part of your own supplies because plague gets also to them. Overall, this situation is very bad for you.
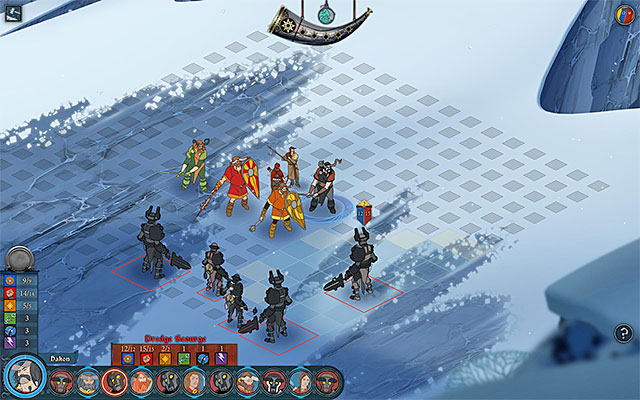 It is worth to fight monsters, because thanks to that the caravan will be joined by the largest group of giants
Soon after leaving Denglr the members of the caravan should notice a smoke in a distance. You can act here in several ways:
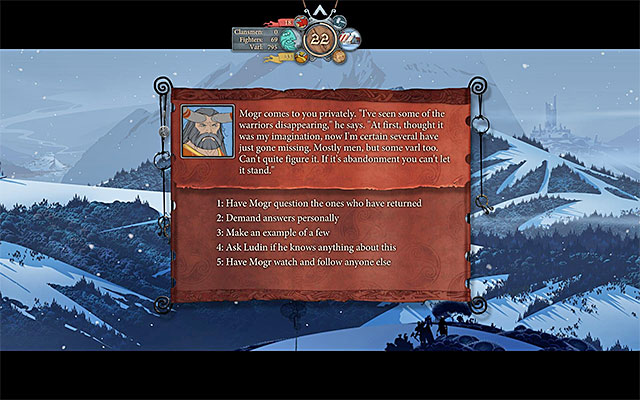 The option selection window
If you have let prince Ludin stay on the caravan and you have left alone the supply wagon that the caravan encountered after leaving Denglr, still before you reach Ridgehorn, Rook may be contacted by Mogr, and inform him of Fighters and Varl that disappear in unclear cuircumstances. You can react aggressively to the problem of desertion and punish several random characters on the caravan (Make an example of a few), where nearly all the remaining options point to Ludin as the one responsible for this. As a result, it is a good idea to meet with the prince, because you will learn that he has been sending more and more people for gold from the abovementioned wagon. You can react to this in four different ways:
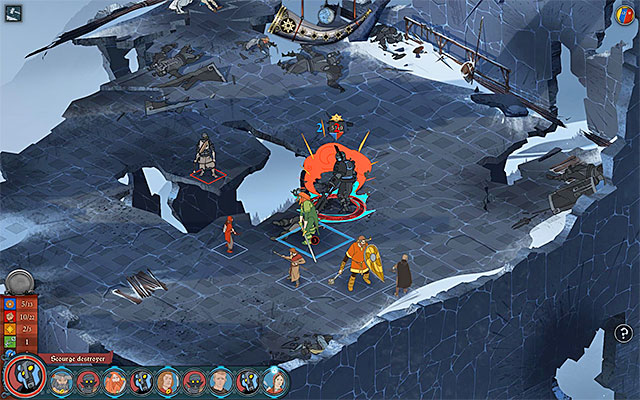 Take care of weaker team members
After reaching Ridgehorn listen to the conversation about the status of the city - you can't change its course. I strongly recommend visiting Heroes tent, because you'll fight demanding battles in near future. After dealing with all issues go to the Tower.
If you haven't previously sent prince Ludin away then he will be able to take part in the first battle in Ridgehorn and this is true also in case of Bersi and Yrsa. Use the mentioned female archer to attack monsters from a distance, using also her special ability. If prince Ludin was sent away you'll probably have no archers in your team so decide to perform more open actions, seeking to eliminate monsters in melee fight. Regardless of your team line-up try not to weaken it too much, because you'll have to fight one more battle described below.
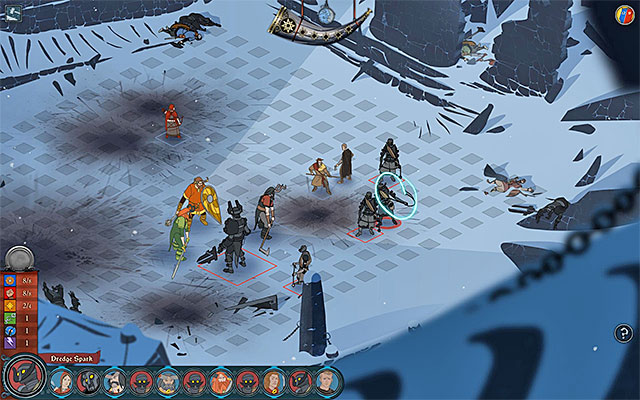 Take care of your people, because it's not all fighting in this chapter
Unfortunately you won't be able to rest because after listening to the conversation on found people (dialog options do not matter), you'll encounter a new group of monsters. This battle will also count into military operations, so think as usual which tactics you should use, depending on which side has an advantage over the opponent.
Notice - in this battle you'll probably encounter for the first time more elite types of monsters fighting from a distance (Dredge Spark Slinger, Inferno Slinger or Flame Slinger). Attack them as first ones and quickly move away from explosives so you won't get seriously and unnecessarily injured.
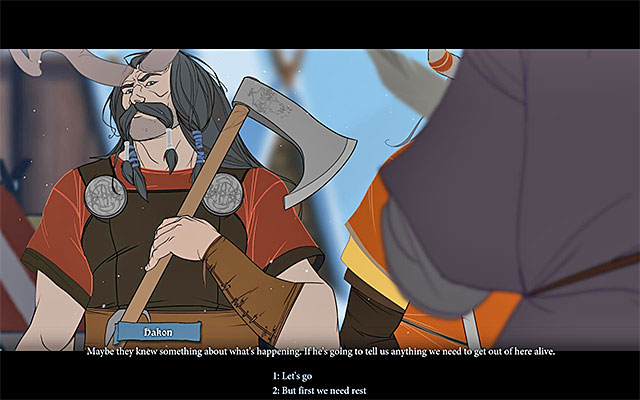 The choice is quite important
Soon you'll have a longer conversation and this time you should watch out when choosing dialog options because they will refer to further plan of actions. Generally you can act in three different ways:
 Possible choices
If you've chosen the variant connected to additional rest, I suggest visiting Heroes building again and only then Leave Ridgehorn. Sooner or later you'll have to make one more decision - how to deal with monsters blocking the exit from the city. These are possible options:
 Grofheim on fire
Regardless of how you behave in the last stage of the visit in Ridgehorn, the caravan will move on to Grofheim. What's interesting, this journey will lack fights with monsters or additional events. Near Grofheim you'll encounter Eyvind, but you won't have any influence on conversation with him. This chapter will end soon.
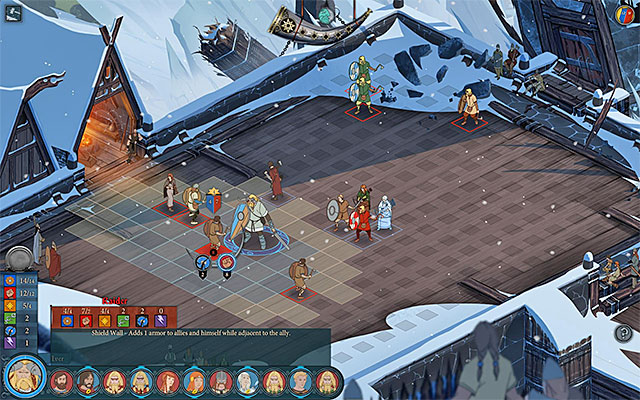 You will either have to fight the bandits or you will avoid the battle
The beginning of chapter four of the game depends on how you ended the second one. If you have selected, earlier, one of the variants concerning cutting through into the city (a frontal attack), the secret passage, the wagon with supplies) then it will be necessary to fight a group of bandits. You should not have any problems with that, although you should try to eliminate, during the battle, the elite enemy units, like the Veteran Thrashers as quickly as possible.
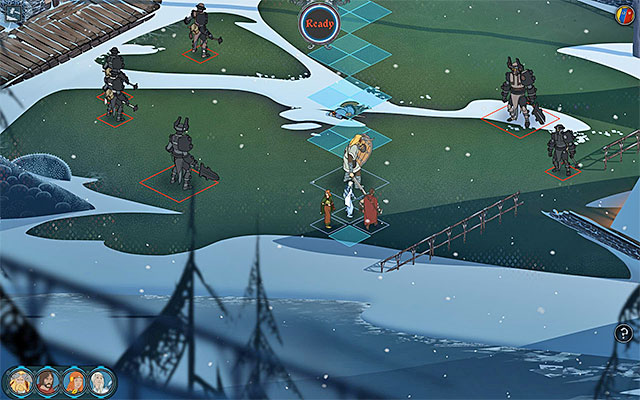 You can follow Oddleif's idea and stert saving the villagers, or leave them to their fate
If you have selected earlier one of the variants concerning staying behind the city walls (the attempt to wait through the situation in the Rest building, retreating from the city after the meeting with Onef or Ekkill), you will learn that the members of the caravan spent the entire time defending against monsters that appeared in this area. In the first conversation, Rook, Iver and Oddleif will take part. You can agree to help the villagers (Not yet. We need to help here) or do what Iver suggests and hide in one of the buildings (Iver's right. We have to cut our losses).
If you go for the first variant of behavior, this will mean that you have to fight and receive a reward for winning that battle, which apart from fame, is a group of Clansmen that will join the caravan. What is interesting, you can also fight two more battles (the "Show us where" and "Head in their direction" options). Each time, this will increase the caravan in numbers. It is worth knowing that Iver will be annoyed, towards the end, and he will refuse to participate in the last battle. If you select te second variant, you will not have to fight the monsters, but Rook's relationship with Oddleif will deteriorate.
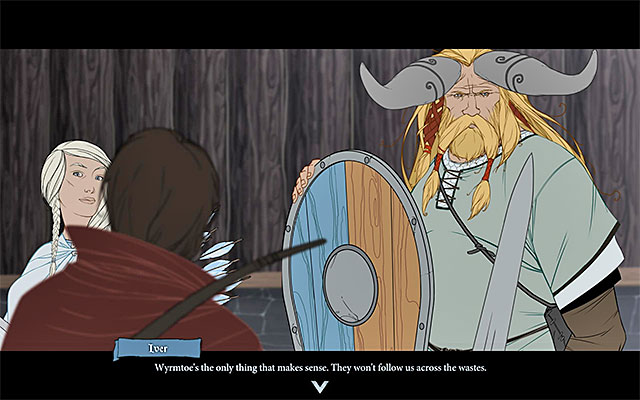 A conversation in one of the village's building
Listen to the conversation between Iver and Rook, during which the caravan members will plan on their journey to Wyrmtoe. If you have agreed to cooperate with Ekkill earlier, he will automatically join your caravan. If, however, you refused Ekkill's offer earlier, you will meet with Onef, who will be trying to convince Rook that he should betray Ekkill. Towards the end of the conversation with Onef you can behave in two different ways, i.e. allow him to join the caravan (Onef will become a new member of the active party and you will gain, at the same time, some Supplies) or refuse him. Personally, I recommend that you select the second variant, because you will later regret your decision to trust Onef, otherwise.
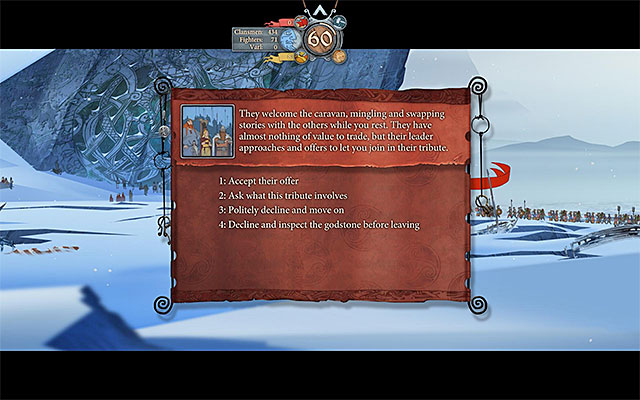 You can bump into Onef while attempting to leave Frostvellr
If you, however, have not contacted Onef, nor Ekkill earlier, while attempting to leave the city, you will listen to another conversation. The party wil be stopped by Onef, who will ask you to let him join the caravan, alongside with the Fighters subordinate to him. You can let him do that (Let them join) and receive some Supplies as a result, and 10 Renown points, but I warn you again of the negative outcome of this decision, which you will find about later throughout the journey. A better way to follow is refuse Onef's request (Doesn't feel right. Send them away).
Note - regardless of the course of events, and decisions that you have made, do not forget to visit the Market, still before you leave Frostvellr. This is to buy more supplies, of course.
RadormyrOn the way to Wyrmtoe the caravan will visit Radormyr. You'll be able to act here in several ways. I strongly recommend to accept a proposal of encountered people (Accept the offer), because it will allow you to get the artifact - Gullinfyri. This item increases chances for dealing double damage so it would be good to give it to one of strongest warriors. Regardless of how you behave towards encountered people, examine a large stone here (Inspect the godstone before departing) - you won't waste any time and any supplies.
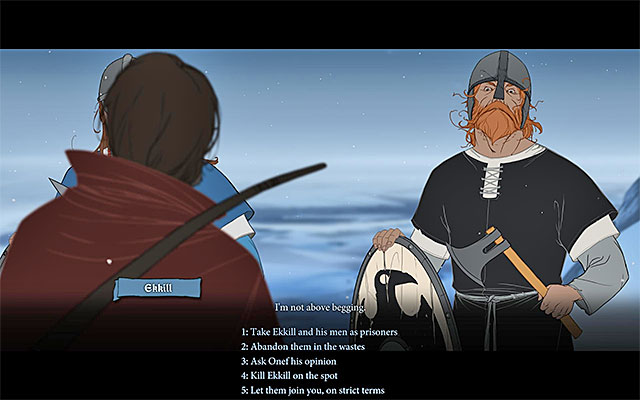 You may let Ekkill join the caravan, imprison him, send him away, or even kill him!
If, during your stay in Frostvellr you have not met Ekkill and he has not joined the caravan, as a result, right after you leave the village, an event wil occur. You will notice Ekkill at the road. Regardless of what you do about that, at the beginning of the event, you will have to talk to him and, just like in the case of the other events of this kind, you will have to voice your decision. You can:
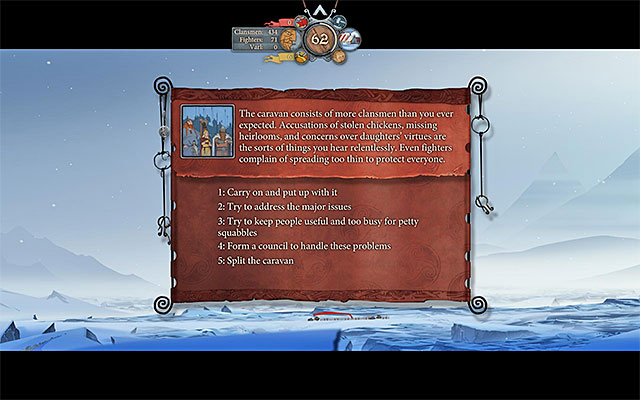 The caravan and its problems...
Soon after leaving Frostvellr the caravan will get to a small farm. You can act here in two ways referring to the farm owner (Farmer). First variant is to take the food and livestock with the force (options "Threaten the farmer", "Take the food by force" and "Intimidate the farmer into giving you livestock"). As a result you'll get valuable Supplies but relation between Rook and Alette, as well as caravan morale, will get worse. Another variant is to leave farmer alone (Leave the farmer and the livestock alone). You won't get anything but the relation with Alette and the morale won't change (this is not a good solution if you are running out of supplies).
Another event is connected to vultures seen in the sky. Oddleif will start shooting at them and you can react to it in different ways. The first part of the conversation is not so important, because you'll decide how to behave at its end:
Next even should involve too many clansmen travelling with the caravan, which causes more and more incidents. The game will allow you to act here in five ways:
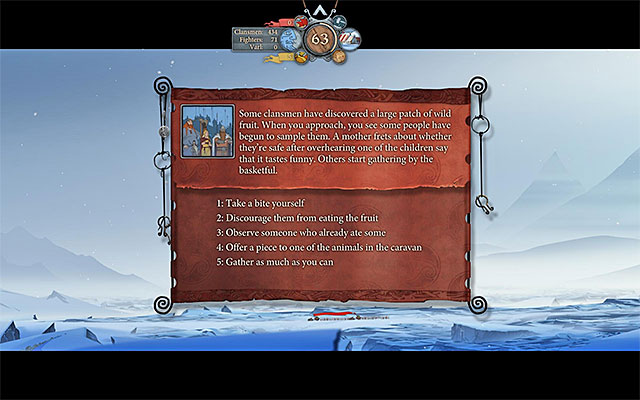 Do not lose the opportunity to get some supplies
The caravan should get to the location with wild fruits. Despite the fact that they have bad influence on your mind, you should get interested in them because they are good source of supplies (and won't kill anyone in the caravan). Available behavior options are:
The last event before getting to Wyrmtoe (note - it can also start only when travelling to Grofheim) refers to caravan members who got lost in a snowstorm. Unfortunately you can't gain anything here but only limit loses. I suggest choosing option "Make a thorough search for the lost clansmen". You'll spend one day searching for lost people and use some supplies, but the caravan will lose the least possible number of members (Clansmen). Regardless of how you acted, do not forget to increase caravan's morale when it is possible, because it probably got worse.
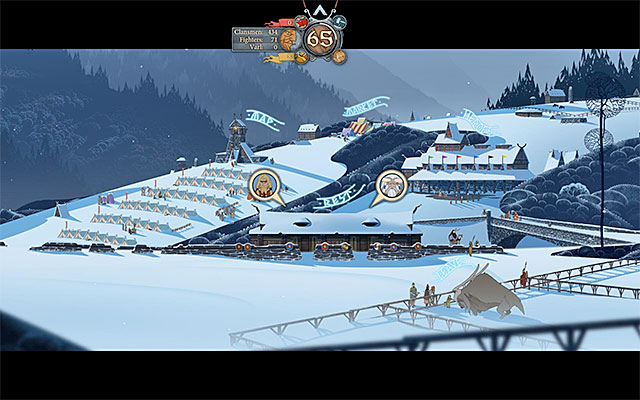 Wyrmtoe village view
Despite what you can think, you won't stay in Wyrmtoe long. Good news is that you do not have to fight any battles here. First of all prepare to a longer meeting with Rook, Iver, Alette and Krumr. The game won't allow you to influence its course.
Use the opportunity and visit the Market, buying supplies and artifacts (if you have many Willpower points). In addition you could Rest and advance Heroes and make some additional conversation. You can meet with Hogun and Mogun (only if they have joined the caravan and haven't died) and Krumr (I suggest using all dialog options). After dealing with all issues, decide to Leave and start the journey to Grofheim. It is worth noting that you'll get 20 units of Supplies from villagers and a group of giants will join the caravan (with Krumr of course).
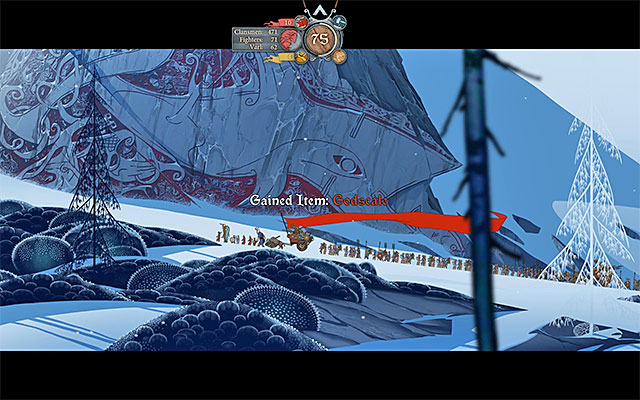 A longer stay will grant you an access to powerful item
The caravan will soon reach Marek location. I strongly recommend staying here for longer time ("Let the caravan take their time" and then "Let them continue the task"). Although it means spending 3 days at the altar, it will pay off because you'll get a powerful artifact Godscale. This item adds armor points and makes enemies to focus on the character who wields it, so it would be good to equip one of giants with the artifact.
If you do not have any supplies or they are almost out, make a decision to leave Marek immediately by the third option in the list (Leave now, before this gets out of hand).
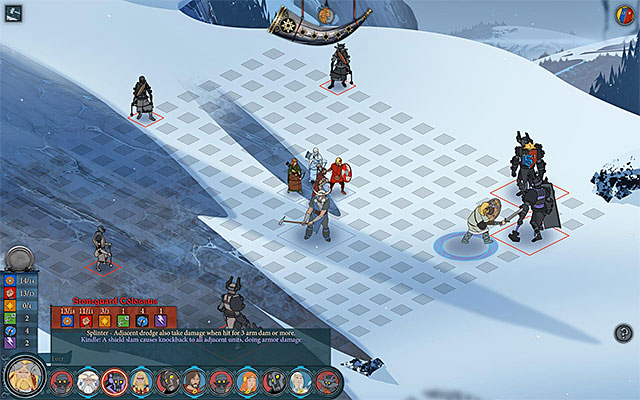 Watch out for new, powerful monster
In the next stage of the march the caravan will notice a group of giants (Varl), chased by monsters. Soon you'll be forced to fight the battle, which is counted as war actions. Choose the tactics depending on strength of your and hostile armies (if you didn't lose to many people, the best tactics would be probably Formations). After starting the battle pay attention to very powerful Stoneguard Colossus, focusing your attacks on this monster and watching out for his shield bashes (it is not recommended to place several characters next to him).
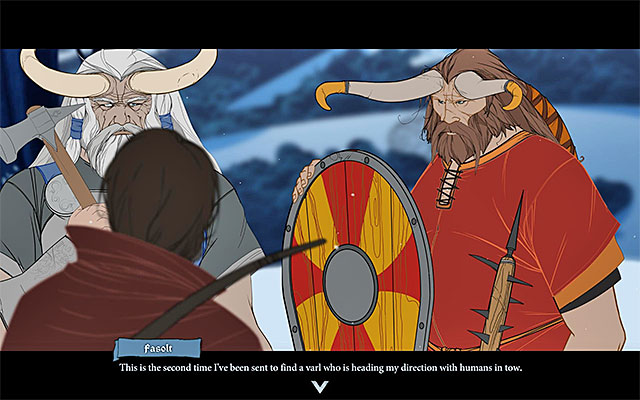 Conversation with giants
After fights the conversation will start automatically, between Rook, Krumr and Fasolt - a giant who was travelling with another caravan. The way Rook reacts to rude and disrespectful statements of other giants doesn't really matter. Since your caravan will learn about destroying Grofheim, a new plan will be prepared and actual target will be change. The new one is Einartoft.
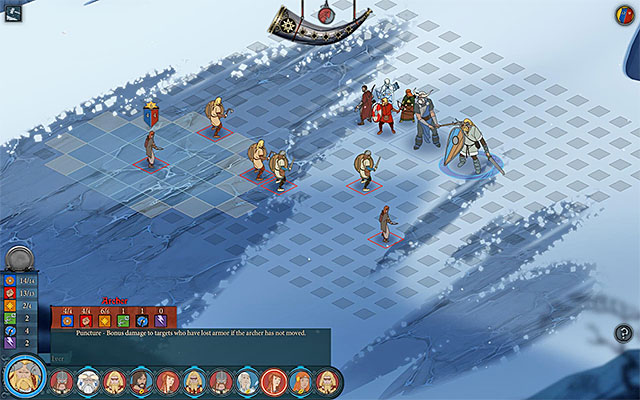 Eliminating bandits will be rewarded in Renown and supplies
Soon after leaving Wyrmtoe the caravan should notice a group of peasants surrounded by bandits. You can act here in three ways:
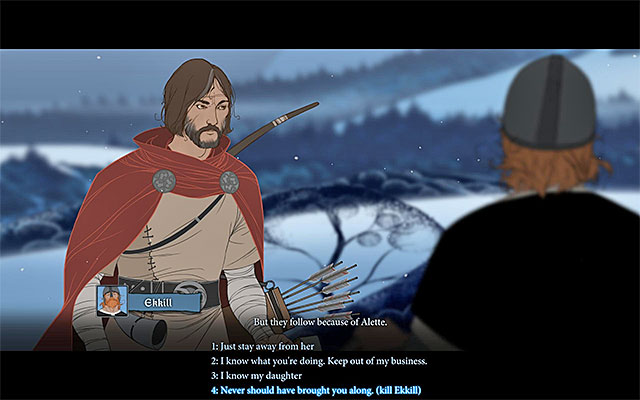 The most aggressive variant involves murdering Ekkill
If, as a result of the decisions that you have made earlier, Ekkill joined the caravan (as its rightful member or as a prisoner) an event concerning Rook and Alette will start. If you want to learn why Alette is in a bad mood, you should select the "Ask here what's going on" or the "Sit quietly beside her" option, thanks to which you will learn that she has been talking to Ekkill a lot recently. You can:
If you do not want to get into topic then at the very beginning of this event you can choose the option "Give her some space", so Rook won't talk to Alette at all.
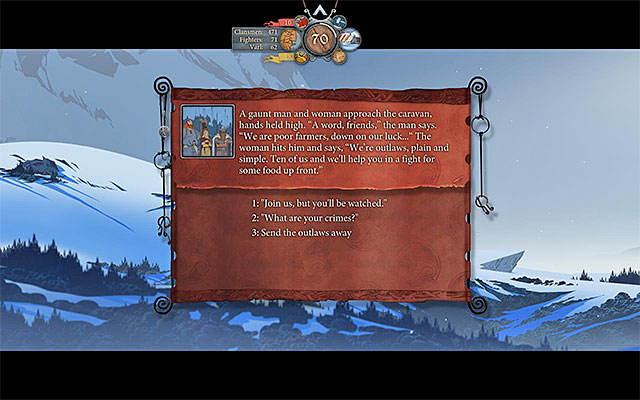 You can let thugs join the caravan or send them off
The caravan might encounter heavily wounded giant (Varl). Possible options are:
Other similar event refers to finding much frozen girl. In this case you can act in 3 ways:
The caravan may bump into outlaws. It is a good idea to ask why they were driven away (the "What are your crimes?" option), to learn that they have perpetrated several thefts and killed several people. You can then let the people join the caravan (Join us, but you'll be watched) or send them away (Send the outlaws away). If you have selected the first variant, you will gain 10 Fighters, but they will betray you later into the journey and you will lose quite an amount of your supplies. If you have selected variant two, you will not gain new Fighters, but you will also lose some of the supplies but, you are not going to lose as much, as in the case of the first variant above.
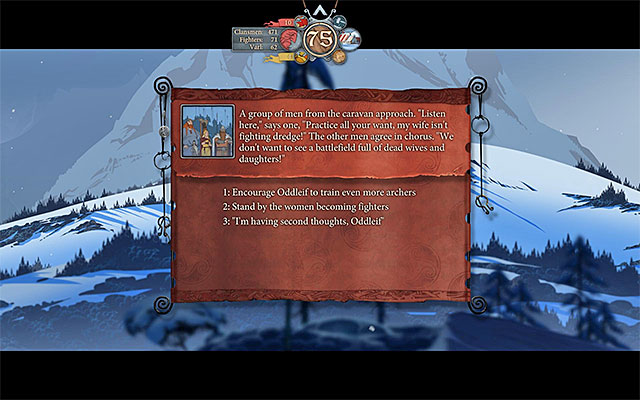 Trained warriors will strengthen your caravan
If you let Oddleif to train other caravan women during the journey to Wyrmtoe, you'll learn now that she made it. It is best to encourage Oddleif to recruit more people (Encourage Oddleif to train even more archers), so 25 female clan members (Clansmen) will be transformed into 25 new warriors (Fighters). The option of passive watching the "transformation process" is somewhat less attractive. Despite the fact that in this case you'll gain also 25 fighters, you'll unfortunately lose 35 clansmen instead of 25. I definitely do not recommend the last option (I'm having second thoughts, Oddleif), because you'll make your relation with Oddleif worse and you won't get any new warriors.
During the journey you can encounter an event connected to a competition for a best poem. You can react to it in four ways:
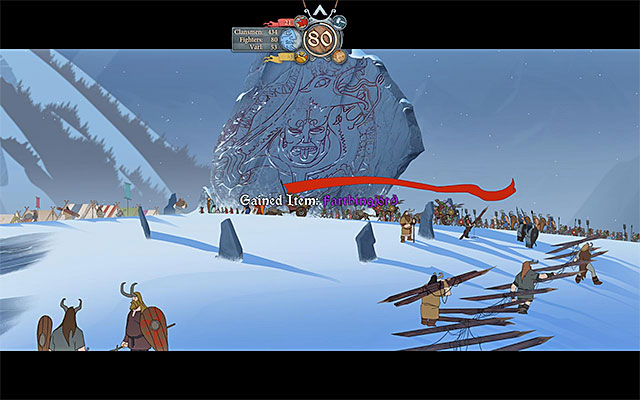 Hadrborg
Right after first meeting with Fasolt and giants commanded by him and watching interesting events in the background, the caravan will reach Hadrborg location. Listen to the next conversation with Rook, Fasolt, Iver and Krumr (you can't influence its course). After getting to the great stone I recommend examining it (Inspect the godstone), because Rook will meet then with Krumr and get a new artifact - Farthingjord (this item upgrades Armor Break). In addition, regardless of how you behave, the caravan will get 20 units of Supplies.
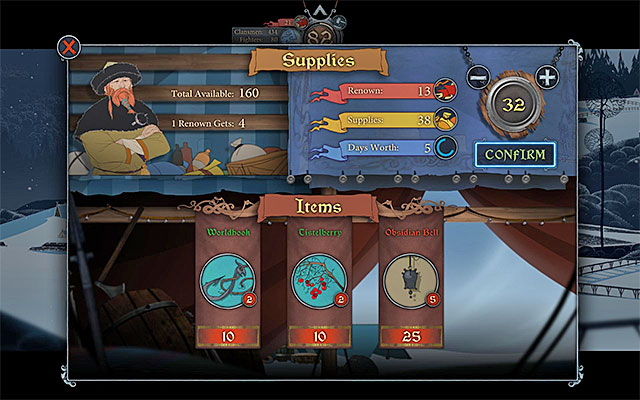 Make sure that the caravan has enough supplies
The caravan will get soon to the small Village, where you can rest before finishing your journey to Einartoft. I strongly recommend buying Supplies for at least three more days, because you need this time to get to the town of giants. If you have some Willpower points, you should spend them on advancing Heroes. After dealing with all issues, Leave the village and wait until the caravan gets to Einartoft.
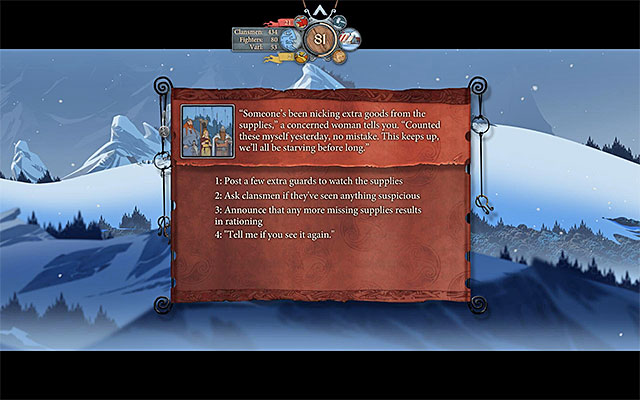 It doesn't matter what you choose
Soon after leaving Hadrborg location you should encounter an event referring to disappearing supplies. You can solve this problem in four ways:
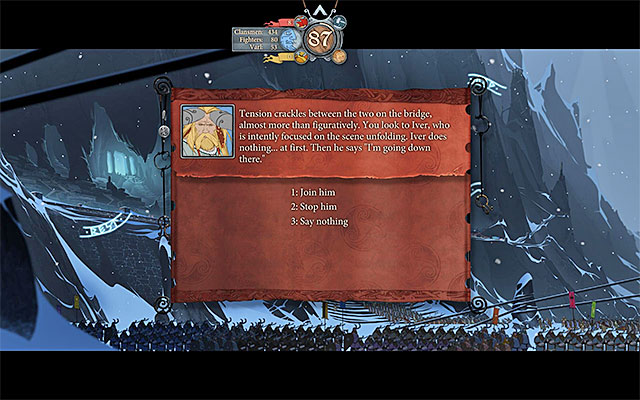 Time to make a decision
After getting to the town, listen to the conversation with Rook, Iver and Krumr. The game will allow you to visit the Market again as well as Heroes tent. Finally go to Rest. On the next day you'll be able to enter the Great Hall. Prepare for the new important meeting joined by characters mentioned above plus Fasolt, Eyvind, Jorundr and members of the other caravan.
You'll have to make a decision only after leaving the great hall. Rook can act in two ways:
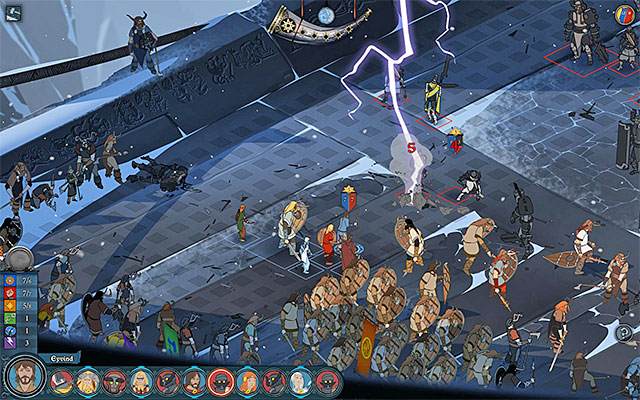 Main Eyvind's attack can weaken few monsters at once
If you have chosen the first of above described variant, the game will allow you to set the team which will fight in the battle. Make sure that Eyvind joins it because this is the most powerful character you can control. In addition it would be good to take at least one giant and one or two archers.
After the battle begins pay attention to special skills of Eyvind. More useful is Arc Lighting which shocks the target with electricity. This attack has quite long range and the lightening can jump to adjacent creatures. Later in the battle make sure that your allies are not standing next to the attacked monster because they could get weaken too by accident. The second Eyvind's special ability is Mend and this will be more useful at the end of the fight, allowing you to repair armors of your allies.
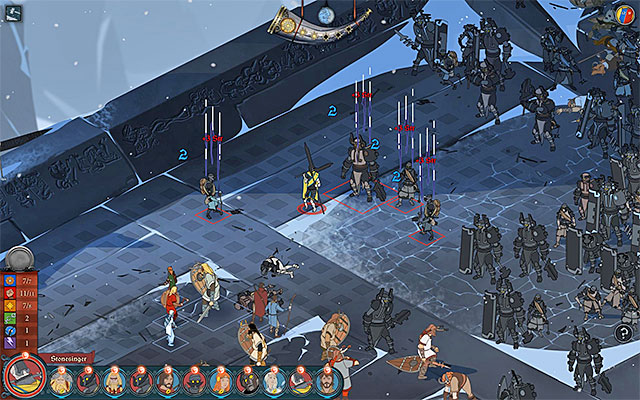 Stonesinger can unfortunately strengthen his helpers
The most troubles will be cause probably by "mini-boss" - Stonesinger. This beast will surely use the special action Umbrage at the beginning of the fight, which will add strength points to his helpers (it will though weaken their armors). Another unique ability of Stonesinger is Rupture, but he rather won't use it because other monsters should die fast. Stonesinger is also not very demanding as opponent, so you should focus on him in the beginning stage of the fight. After eliminating Stonesinger start dealing with all other monsters. In this case watch out for Dredge Scourge, not letting him to call reinforcements.
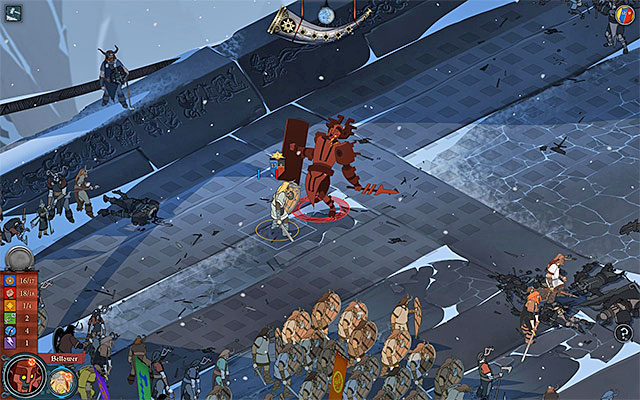 Fighting Bellower
Soon Bellower will appear on the bridge and Iver will join this unequal fights. Unfortunately the fight is directed because you are not able to defeat Bellower (attacks on his strength bar fail and lost armor points regenerate quickly). So you have to reckon with the fact that after several turns Iver will lose.
Watch the cutscene and wait until you get back to the town. You can use the newly gained Renown points or click Eyvind icon right away. This chapter will end soon.
 Encounter with Jorundr is not particularly important
This chapter starts in limbo with fairy unusual conversation between Juno and giant snake (Serpent). Choice of the dialog options has no influence on its course so you do not have to watch yourself carefully. After the conversation Juno will contact Eyvind and in this case you do not have any dialog options to choose at all. After you'll be returned back to the Einartoft town, listen to one more conversation between Eyvind, Rook and Alette. The game will allow you to choose all dialog options before the conversation is over.
Wait until you're back to the town view. I recommend going back to the Great Hall in order to meet Jorundr. You can try to suggest Jorundr that the best method will be destroying the bridge (first or second dialog options) but he will refuse the plan and throw Rook out of his house. If you do not want to make the chieftain angry, then choose the 3rd dialog option any time ("I'm sorry to waste your time, I should go" or "I'll leave"). Generally you do not have to watch yourself during this meeting because regardless of its result, you will not block any behavior variants described below.
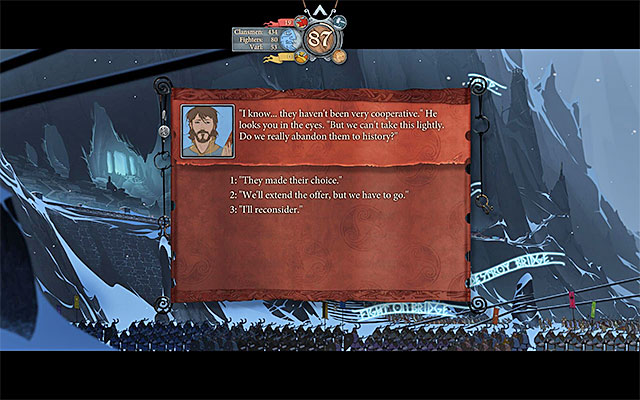 You can ignore problems of giants and leave the town right away
This quite short chapter can be finished in three ways. First variant of behavior is to leave Einartoft as soon as possible. In order to do this you have to choose a proper building (Leave). Regardless of whether you decide to choose dialog option "They made their choice" or "We'll extend the offer, but we have to go", the caravan will continue its journey and will be joined by Eyvind and group of 38 giants (Varl) sent by Jorundr. Unfortunately, Krumr will leave the caravan and will stay in the town to protect it.
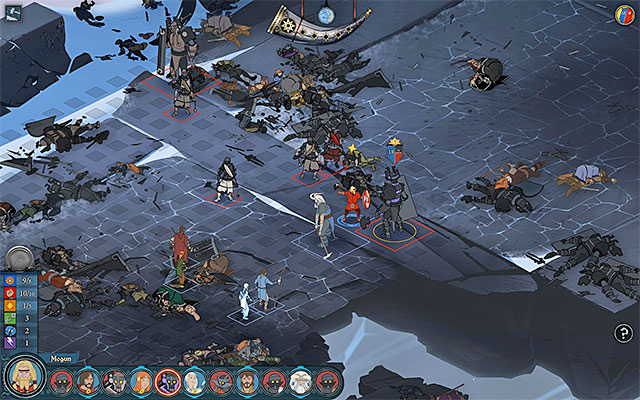 Watch out for the most powerful Stoneguard Colossus
The second variant of behavior is about destroying the bridge - this is the plan presented by Eyvind. You can start executing it now or after meeting with Jorundr described previously (regardless of its result). Click on the bridge (Destroy Bridge) and confirm your willingness (We're ready). Make sure that you have Eyvind in your team and start the first battle with monsters. The battle will probably introduce powerful Stoneguard Colossus, so with weakening this monster. In the meantime take care of other members of your team because you may need them soon.
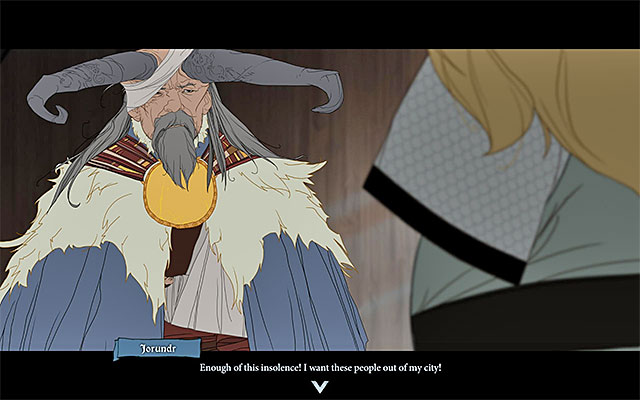 You can surrender but this is not a good idea
After winning the first fight, angry giants will appear on the bridge - they are commanded by Fasolt. I definitely do not recommend surrendering (Surrender to the varl), because after short audience at Jorundr the team would be thrown out of the city and as result wouldn't gain anything. It is much better to decide to continue fights by starting covering Eyvind (Defend Eyvind) when he is busy with destroying bridge supports.
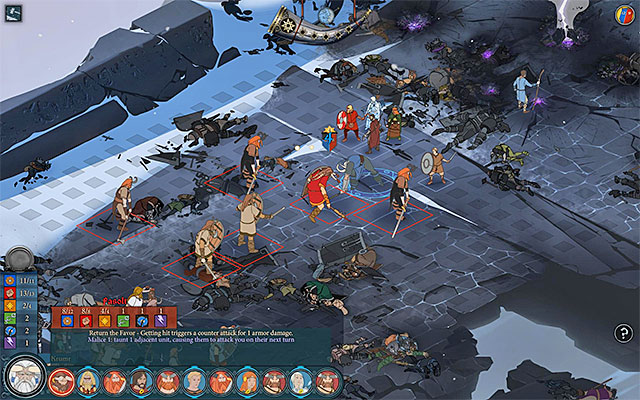 Eliminate giants one by one
The most important information on second fights is that Eyvind who is busy with destroying the bridge won't be able to participate in it. Try to fix this somehow, choosing Krumr or another character to your team. You'll have to deal with group of giants (Varl Warhawk, Warhawk Champion, Varl Shieldbanger, Varl Warrior) commanded by Fasolt. It is best to kill enemies one by one, but you do not have to focus on Fasolt right now, because he is not clearly stronger than his subordinates. Remember about your archers, trying to block giants so they can't reach your people. Winning the battle will allow Eyvind to destroy the bridge and after meeting Jorundr this chapter will be over.
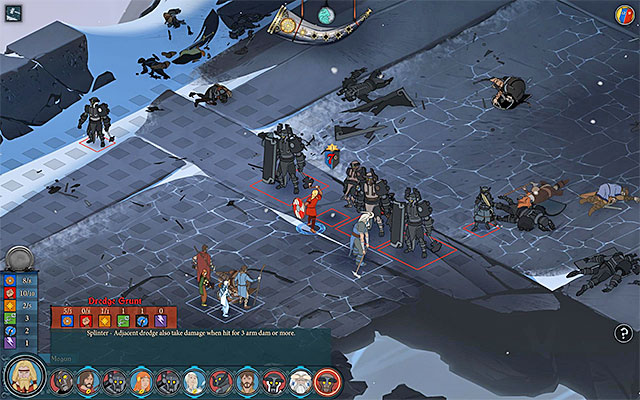 First fight
Third variant of behavior is connected with helping giants fighting on the bridge and you can do this only after meeting Jorundr in the Great Hall. I suggest getting some supplies because fights will last up to three days! Click on the army of giants standing next to the bridge (Fight on Bridge) and accept your willingness to help (Offer help). In the first day of fights you can acts in two ways. If you do not want to participate in battle, you can take care of wounded (We can treat the wounded), raising the morale of caravan members.
But if you prefer to fights for Renown points, you can join the fights together with giants. Make sure that Eyvind is in your team - once again he will be most valuable member of the group (you do not have to take Fasolt with you, but of course it is possible). You won't encounter any new monsters in the battle so count on already known tactics and characters'' abilities.
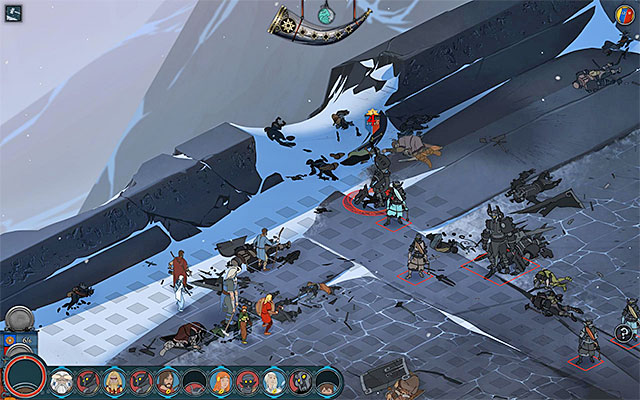 Second fight
On the second day of fight you'll also have to make a decision. One of option is to remove bodies from the battlefield (Help remove the bodies), but I DO NOT RECOMMEND IT because Egil can die in the meantime. In new fights you'll have to face probably several monsters capable to attack targets from a distance so try to quickly get close to them and use the fact that they are not good in melee fights.
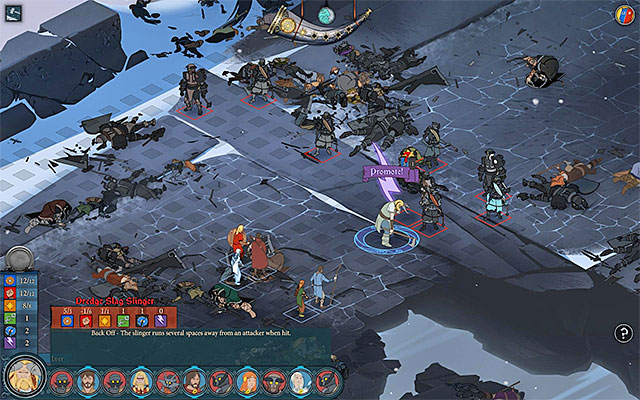 The last, third fight with participation of Iver
On the last, third day of fights you won't have to make any additional decisions, but you'll learn that Fasolt has died in the last skirmish. The balance of the team will be restored by appearance of Iver, who got back to his strengths. I definitely recommend selecting this giant to the last battle with monsters. There will be probably many of enemies to be defeated in those fights, but this also means gaining Willpower and Renown points more often.
Winning the third battle will start a series of conversations where Iver will force Jorundr to destroy the bridge. This chapter will be over soon.
 You can either continue you journey or try fighting the monsters
Some time after you have left Einartoft, a group of giants, commanded by Ubin, should catch up with the caravan. They will inform you of the situation in the city and of the current actions of the army of monsters. Ubin and Gunnulf (if he has not died earlier), will join the party and you will, additionally, receive 30 units of Supplies.
The next important event takes place as soon as you reach the fork . It will turn out that the path to Sigrholm is being guarded by monsters. The game will present you with a choice, and the most reasonable thing to do is select to "Go around, past Haukstorp", thanks to which the caravan will decide to walk around the army of monsters.
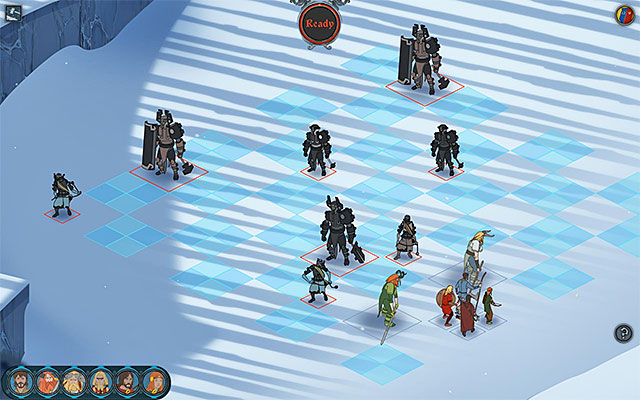 Each one of the fights is going to be quite demanding.
If you prefer to fight, elect the "Start cutting a path through the dredge" option (there is no point in dispatching scouts, because you would have one of them die and you would gain nothing, as a result) Since the monsters probably outnumber you, you should consider if it is better to choose the "Hold Them Off" option, instead of the standard " Formations" tactic. Right after the fights start, you should deploy your party members and focus on eliminating the beasts one by one. Starting with the weakest monsters that specialize in ranged combat.
Succeeding in the first battle will not take you closer to clearing the way for yourself. In this situation, I recommend that you decide to resume your journey (We tried... back to the main road). If you are bent on winning and start the second (just as demanding) battle, then Hogun and Mogun will, unfortunately, die in the course of it (or someone else, if these two are no longer traveling with the caravan). Iver will, in this situation, have Rook give up any further attempts to cut through the enemy army and, as a result, the abovementioned characters will have died in vain
 You can take the villagers along, or refuse to
Soon after you have encountered the first monster group, the caravan will reach a small village. First of all, you need to decide here about the villagers:
Before you leave the village, do not forget to visit the Market, promote your Heroes, talk to Gunnulf (only if he has not died earlier) and Rest (only if the caravan's morale has dropped considerably in the meantime).
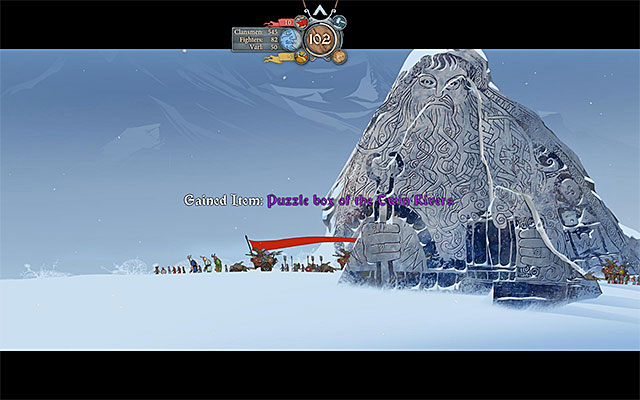 The correct performance of al actions will grant you a valuable artifact
Another important location, along the caravan's path, is Dundr and, after you have learned its description, you will have to decide if you want to stay here for longer or leave (the "Inspect the godstone but move on afterward" and "Get back to the road without stopping" options). If the caravan's supplies have not yet depleted, I recommend that you stay here for longer. Start by selecting the "Stay here overnight" option, then select "Try to open it" and finally "Give up and go to sleep". On the next day, you will receive a valuable artifact, named the Puzzle Box of the Twin Rivers, that reinforces the Willpower points regeneration process. As a result, it pays off to allot this item to the character that often uses willpower to reinforce their attacks or to initiate their special abilities.
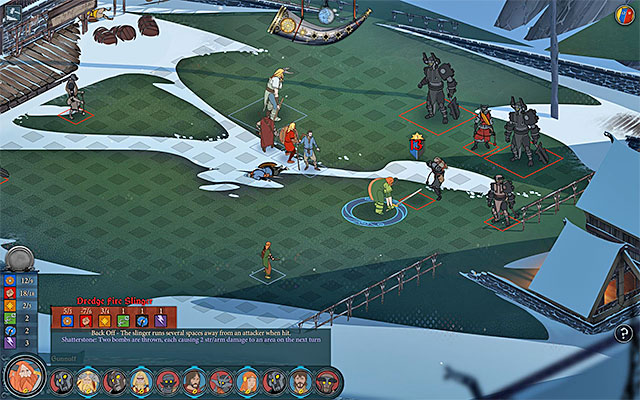 Exploration of the village means that you will have to fight a battle
The caravan will soon reach a destroyed village of Haukstorp and you will be able to do two different things here. By selecting the "Check it out, just in case" case means that you will explore the village. Reaching Haukstorp itself, will take you one day and, additionally, you will need to have to fight here, against a quite big group of monsters. As a reward for winning the battle, you will be allowed to stay in the village. You can talk to Nid (I only she has joined your party earlier - it is one of the archers trained by Oddleif), promote your Heroes and check out the Market. It is worth noting here that Haukstorp does not offer Supplies. So, if you were close to depleting them even before you reached the village, it is better to give up visiting it altogether and resume your journey without further stops (the "There's no time. Keep moving" variant).
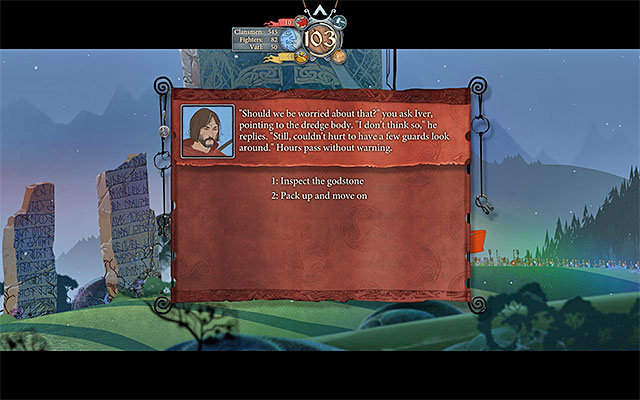 Ingrid
The next stop in the caravan's path is Ingrid. Here (regardless of whether you inspect the godstone closely or not) you will make quite an interesting discovery; namely at the dead monster, you will notice a creature that resembles a baby. First of all, listen to the conversation between Rook, Iver, Oddleif and Eyvind (the dialogue options that you pick here has no bearing on the story). After the conversation, you will have to take a decision about what should be done.
 You do not have much influence on the course of the conversation with Krumr
Before the caravan reaches Sigrholm you will take part in two more events involving Krumr and the giants subject to him (with the exception of the situation in which he stayed in Einartoft after you decided to flee the town). Krumr will bring to your attention the monsters that are following the caravan and decides to square off against them in the battlefield. Also Iver and Ubin, will participate in this conversation but regardless of which dialogue options you pick, you will not be able to talk Krumr out of it. As a result, a group of 40 giants (varl) will leave the caravan .
Krumr should return still before you reach your destination (36 giants will join the caravan so, four of them did not make it in the battlefield). Listen to the new conversation, which will grant you 20 points of Renown and a new artifact- Dundr's Hand (this item adds 3 points to the strength bar).
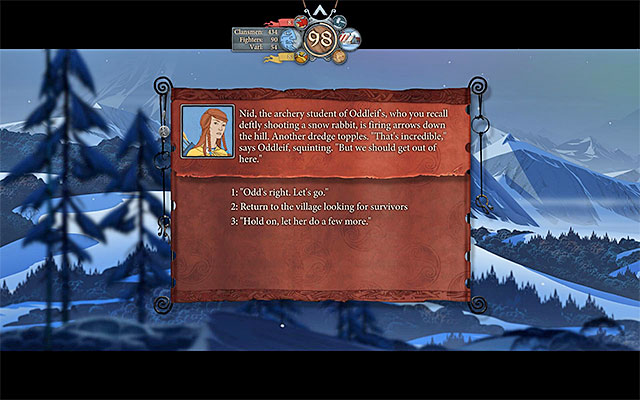 Nid will permanently join the party
The caravan may encounter an old man wishing to join it. The best thing to do is allow him to do that (the "You're welcome to join if you can keep pace" option), because this will improve on your morale. You can reject the man ("We've already got enough mouths to feed").
If, early in the game, you have allowed Oddleif to train new archers then, soon after you leave the village, an event, connected with one of them - Nid - should occur. You can immediately continue your journey (Odd's right. Let's go), allow Nid to eliminate a few additional monsters (Hold on, let her do a few more) or return to the village that they have attacked (Return to the village looking for survivors). In the last case, you will have to fight a quite difficult battle in the village but, if you manage to win it, you will save, this way, a dozen or so Clansmen, who will join the caravan. Regardless of what you did, Nid will join the active party and you will be able to select her in the future battles.
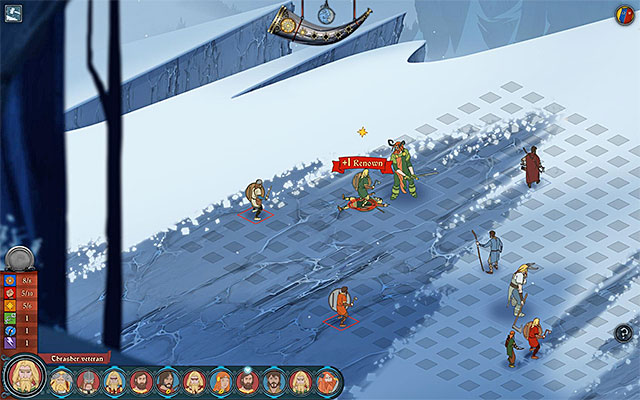 You can deal with bandits, intimidate them, or give them some of your supplies
The caravan may be stopped by a group of bandits, who are trying to extort a toll. In this situation, you can do one of four things:
It is possible that fire will start in the caravan, which will put supplies, and the boy's life, to threat. The game will allow you to react to this situation in four different ways:
During the journey, a heated argument may occur in the caravan, between two women. You will be able to react to that in several ways:
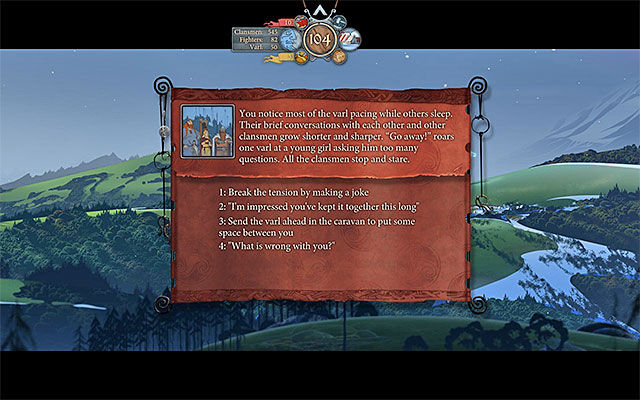 In the case of the event with the giant and the woman scared by him it is best to make both sides reconcile
In the course of its journey, the caravan may encounter a big, empty chamber, which can be used as shelter. The available options are:
One of the giants and one of the Clansmen may fall out. You can react to this in four different ways:
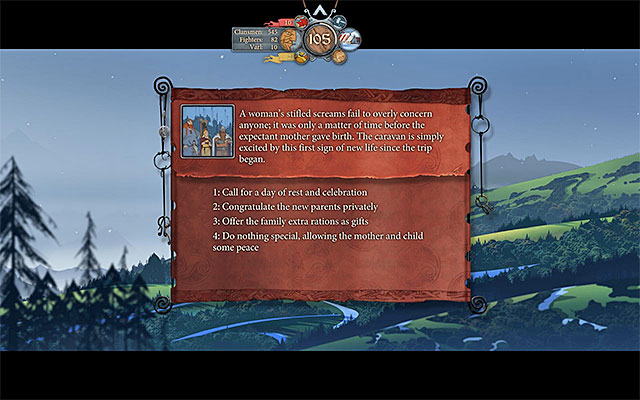 In the event connected with the birth, it is best to chose the variant that guarantees the most renown
The caravan can be stopped by two shady-looking individuals and one of them will ask you for food. There are five ways in which you can react to this request:
During the journey, you may learn that a baby was born and it is a good idea to consider your reaction, because you may earn a lot of renown for that. The available options are:
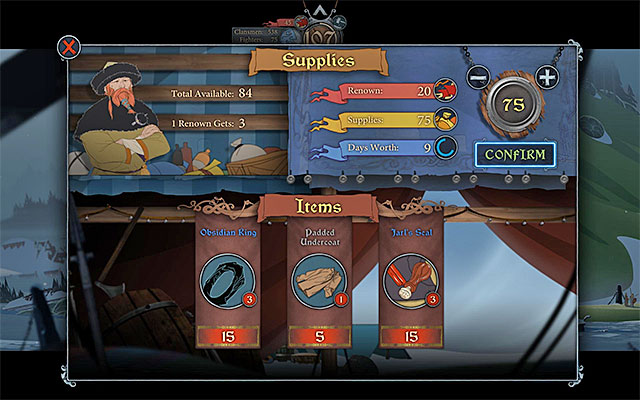 It is a good idea to replenish your supplies, because there is a long journey ahead
After you reach the flooded Sigrholm the game will automatically initiate a conversation, participated by Rook, Alette, Oddleif and Eyvind (you will be allowed no influence on its course, however). After the conversation, you need to go to the market, because your supplies are probably dwindling and, what is even more, you will set out for another journey soon. I also recommend that you promote he heroes and have a conversation with Eyvind (try to bring up al the available topics). Take your time when it comes to using the building where you are going to rest - more about this below.
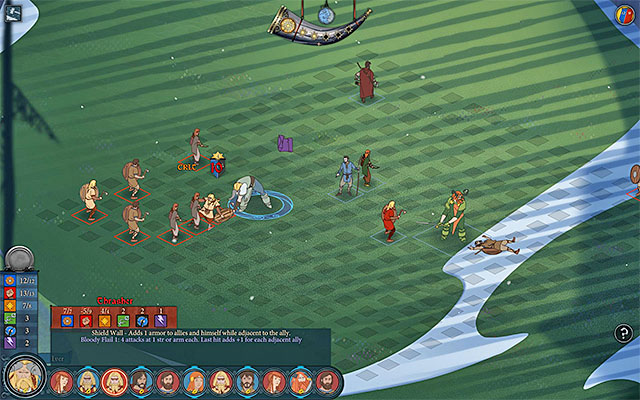 Dealing with the thieves will not save you from losing some of your supplies
Eyvind's plan is to wait through the situation, in hope that Juno will arrive in the city. It is worth knowing that this plan is bound to fail, because staying in Sigrholm, even for a dozen of days, will not result in Juno's being found. What is even more, you need to take additional problems into consideration, and the first situation of this kind will happen as soon as you try to use the building for resting. You will receive information that the caravan has been robbed and you need to react to that:
Note! If you have arrived in Sigrholm with scarce supplies, or without them, you can sacrifice the few people from the caravan and use the Rest building, before you visit the market. Thieves will then have nothing to steal (the variants of behavior will not change, of course).
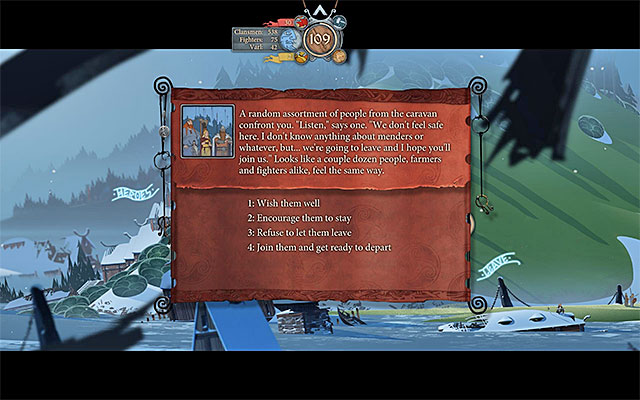 Instead of bidding fare well to the part of some of the people from the caravan, it is better to leave Sigrholm
If, in spite of the supply theft, you have not decided to leave Sigrholm, on the next day, you will have to deal with one more event. This time around, it is going to concern the will to leave the village by many of the people travelling on the caravan. The game will provide you with four options to choose from:
 The caravan may reach the main road in several ways
A much better idea, than to wait for Juno is to leave Sigrholm right after you have attended to all your business in that village. Therefore, click on the Leave button and select the "I'm sure she'll catch up with us" or the "She's not coming" option. You need to decide how to solve the problem of the flooded area that separate the caravan from another big location. The available variants are:
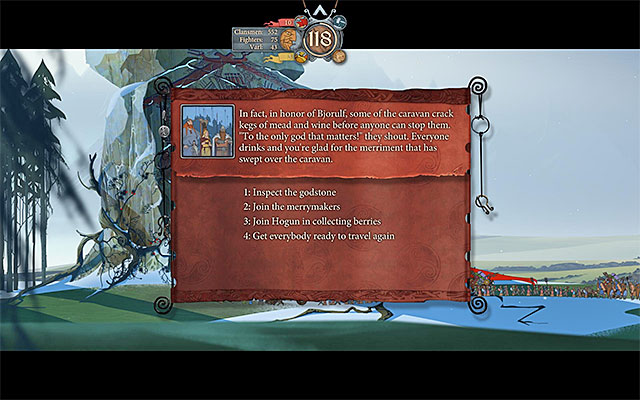 Bjorulf
The first new location, where the caravan stops, is a small Village. The caravan will be joined by a group of clansmen. Apart from that, you will be able to buy supplies in the market and promote your heroes.
The next location on your path is Bjorulf. I recommend that you inspect the godstone, thanks to which morale in the caravan will increase. If Hogun and Mogun are still travelling on the caravan, you will also have an option to join Hogun, who is busy gathering berries. Selection of this variant will reward you with the Tistelberry artifact. Unfortunately, it is not particularly powerful, because its only power is adding willpower points, if the character decides to take rest in a given turn.

After several days, the caravan will reach a village called Reynivik and it will turn out that it has been seized by monsters. You can do one of three things here:
This chapter will end as soon as you reach Boersgard.
 Onef will betray trust of Rook and the rest of the party
If, in spite of my warning, you decided to join Onef and his people to the party, in chapter four, soon after you leave Sigrholm an event, connected with this character, will occur. Regardless of the dialogue options selected by you, Onef will betray the trust of the rest of the caravan. You need to come to terms with the fact that Rook will be wounded. What is even more, Egil, Oddleif and a group of Clansmen, may die and you will not be able to do anything about this. This is not the end to problems, though, because you will also have to defeat Onef in fight.
After the successful fight, you will learn that Alette managed to murder Onef. Listen to the conversation with Iver, whose end result will not matter that much. If there also is Ekkill, travelling on the caravan, you will meet him right after you start a camp. You can let him stay with the caravan, free him We could use a good fighter" - only if he was a prisoner earlier) or have him leave the caravan (I want you to leave). Of course, I recommend that you leave Ekkill alone, because he will not follow in his colleague stead.
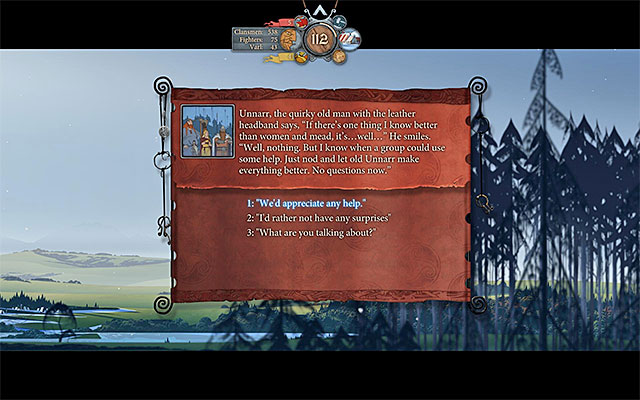 It pays off to accept Unnarr's help
The caravan may encounter a single Varl ambushed by a group of fighters. You can do either of the two things here. Variant one assumes that you defend the giant (Defend the varl), thanks to which he will join the caravan, and you gain 5 renown points. The second variant assumes that you do not get involved in the fight (Return to the caravan without interfering or Let them settle their own dispute). Also this variant assumes that you receive 5 renown points, although the morale of the caravan will drop slightly.
There is one event connected with Unnarr and it pays off to watch out while taking your decision, because you can gain a lot from this decision. Accepting the old man's help (We'd appreciate any help) will mean that you get to listen to his poem and gain 20 units of supplies. All of the remaining options will not influence the caravan in any way and will not let you receive additional supplies.
If, during one of the earlier events, you have not moderated the argument between the two women,, after some time you will have part two on your hands. The end to this argument will be fatal, because the corpse of the daughter of one of the two will be found. You can react to this situation in four different ways:
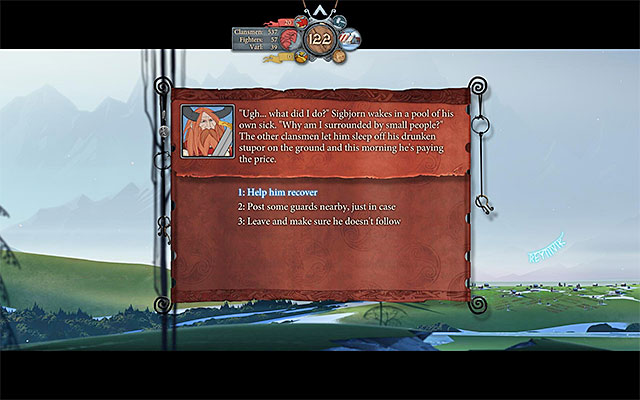 In return for the your help Sigbjorn will give you a valuable artifact
If your stay in Reynivik ended in Sigbjorn's joining the party, soon after you leave that village, an event connected with him will start. The problem of the drunken giant can be solved in three ways:
If, in one of the previous events, you have helped a freezing girl, after some time you will learn that her name is Aukfrosta and an event connected with her will occur. You can take a look at her drawings (Study Aukfrosta's drawings) and take one of the actions:
The Varl on the caravan may organize a competition in telling stories and drinking mead in large amounts. You can join the giants
(Join the giants in drinking), and caution them (This will only make things worse), or ignore this event (Leave the others to their drinking game). Personally, I recommend that you select either 1 or 3 because, this way, the caravan's morale will improve.
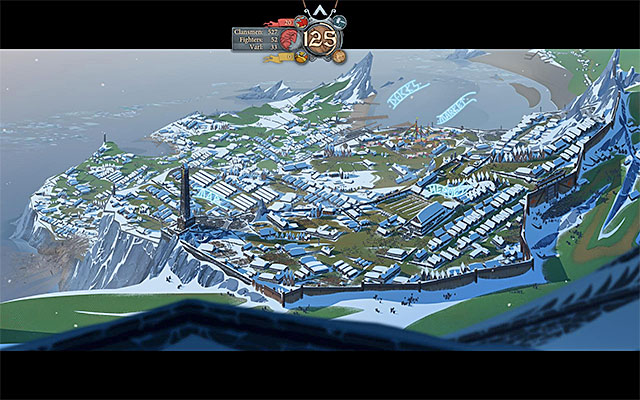 The view on Boersgard
After you reach the city of Boersgard the action may go in either of the two ways. If, at an earlier stage of the journey, you have stopped in the village of Reynivik and helped Sigbjorn defeat monsters, he will join the conversation between Iver, Rook and Bolverk (the chief of the Ravens). As a result, you will be allowed into the city immediately. If you, however, stopped in the village of Reynivik and/or have not helped Sigbjorn, then Bolverk will not want to open the city gates at first and it may turn out to be necessary to fight monsters.
Wait until you are allowed into the city. Bolverk will soon go to meet up with Eyvind and, if Sigbjorn reached Boersgard with the party, he will join the abovementioned characters and you will never see him again. (as a result, he will be unavailable in the future fights). I recommend that you visit the Market and buy all the supplies that you need, which will be scarce, unfortunately. Apart from that, make sure that you promote your heroes. Finally, go to the docks and listen to another conversation between Eyvind, Rook, Alette and Iver.
In Boersgard, you will spend several days and, on each day, you will be able to perform only one of the many suggested activities. Some of the actions (like e.g. fighting monsters), will bee available every day, whereas the other ones (e.g. defending the ships in the shipyard) only once. Start by talking to Iver who is guarding the walls (the dialogue options that you select during this conversation will not influence the course, nor the ending) After this meeting ends, the game will display a list of six groups of actions available on the first day in Boersgard. The descriptions of the individual actions have been provided below.
 The caravan can be dispatched, e.g. to the abandoned houses
The first option is to ensure a safe place to stay for the caravan (Find a safe place for a caravan to stay). This will allow you to avoid the necessity to fight monsters but, it includes losing some fighters and varl towards the end of the day.
There are many branches to this variant. You can take a decision of gathering in one of the public houses (Gather in the public rest house), make a camp (Make camp in an open space, keeping everyone together), find abandoned houses (Look for abandoned houses) or even let the rest decide (Put some people in charge and let them deal with it). In general, the selection of the variant of behavior does not play a key role here, because no surprises will crop up at night.
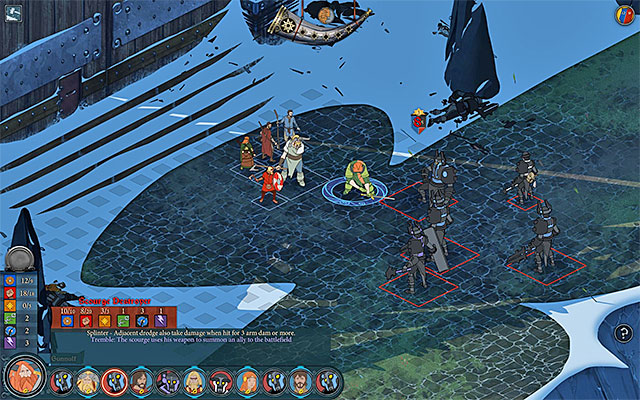 Joining Iver means fighting a quite demanding fight
The second option is joining Iver at the defense of the city walls (Join Iver in defending the walls). This requires you to fight but, as a reward for winning it, the caravan will lose no fighters nor Varl.
As it has been mentioned above, Sigbjorn will not be able to take part in the fights. Select the best characters possible, because it will not be easy to win. Right after the battle starts, focus on the bigger monsters in the first place (Scourge Destroyer, Stoneguard Colossus etc.) and watch Eyvind's and your archers' health, try not to let the situation, in which they lose their entire health bars, happen (this will weaken them in the forthcoming fights, if you select them again).
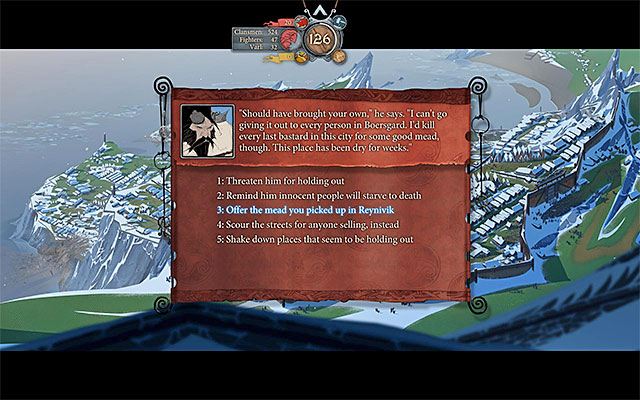
The third option is to find a source for supplies. This allows you to avoid the necessity to fight a battle with monsters, but it involves losing a group of Fighters and Varl towards the end of the day.
This variant has many branches. You can locate the giants from the Raven group and ask them questions (Track down the ravens and see what they know), explore the city in search of people interested in selling supplies (Scour the city for anyone willing to sell supplies), check out the places where supplies may be found (Shake down the places that seem to be holding out) or order the rationing of supplies (Tell the caravan to start rationing tighter).
I recommend that you decide on one of the two variants of behavior. If, earlier in the game, you have visited Reynivik and helped Sigbjorn you will now have plenty of mead. In such a situation, it is best to contact the Ravens (Track down the ravens and see what they know) and Offer the mead you picked up in Reynivik; the above screenshot. This will give you as many as 70 units of supplies. If you have not visited the town, the best idea is to start rationing supplies (Tell the caravan to start rationing tighter), thanks to which you will gain 30 units of supplies.
 Ordering people to work harder includes numerous objections
The fourth option is to lend a hand to the people who build ships at the docks (Help down at the docks). This allows you to avoid the necessity to fight monsters but, includes losing the group of fighters and Varl towards the end of the day.
There are multiple possibilities to this variant. You can assign people to work at the construction of the ships (Get volunteers involved in building the ships), make everybody work in shifts (Force everybody to work, taking shifts), not get the others involved to keep the right working conditions (Don't get the others involved for safety reasons) or help by keeping the onlookers away. In general, the choice of a variant does not play a key role here, because no unpredictable events will occur.
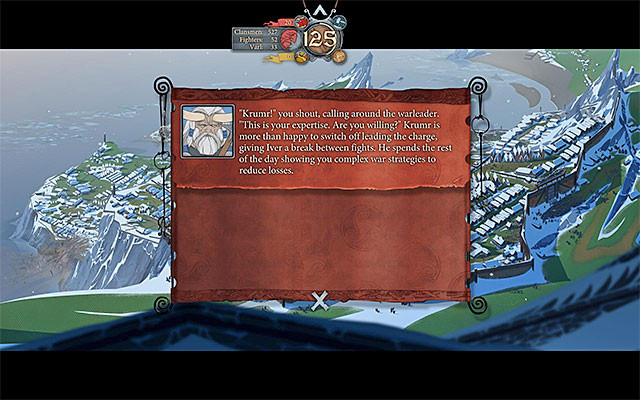 Krumr takes the lead of the fighters
The fifth option is to delegate Krumr to command fighters (Put Krumr in charge of leading the warriors). It is available only if Krumr has reached Boersgard with the rest of the caravan. This allows you to avoid fighting monsters and, unlike the above variants, allows you to limit your losses of Fighters and Varl towards the end of the day. The downside of this variant is that Krumr may die on the fourth day of fighting and you will not be able to prevent it.
The final, sixth option is to go to rest (Try to get some rest). This allows you to avoid fighting the monsters but it involves losing a group of Fighters and Varl towards the end of the day.
SUMMARY: The only variant that allows you to avoid any losses is fighting with monsters. You need to, in such a situation, make sure that as little people of the active party, as possible lose consciousness because, otherwise, they will be too strained in the next fights. If you do not want to fight, (a good idea if you play at the highest difficulty level) and want to keep your subordinates for later), I recommend that you barter mead for 70 units of supplies.
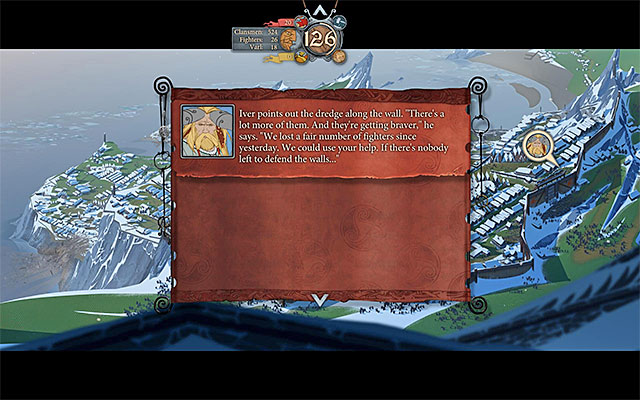 The list of options of behavior, for the second day is similar
On the second day you will have to make the same choices as earlier. The only difference is that the options that you have selected earlier, will not be available this time, which makes you take a different action There are two exceptions though - it is possible to fight a battle, in which Iver participates, and take rest.
SUMMARY: The best idea would be to enter another fight but, achieving victory may prove even more difficult. If you do not feel like fighting, you should select any of the "better" options which you have not used earlier, i.e. one that guarantees limiting your losses in men or is connected with receiving supplies.
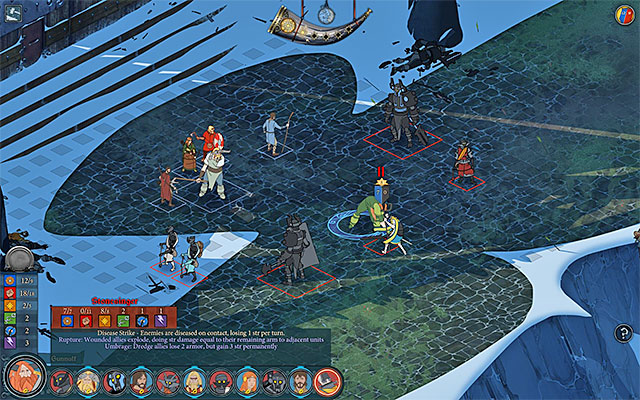 Concentrate your party's attempts on killing Stonesinger
On the third day, you will be informed of the increased activity of monsters and of the appearance of the Stonesinger in the area. Apart from the options that you know from the previous days (fight, searching for supplies, resting, etc.) there will appear one more, connected with looking into the riots in the docks (Investigate the riots down by the docks). You can join the Ravens that are defending the ships (Fight alongside the Ravens), make it over to the rooftops of the buildings and attacking villagers with the bows (Get up on a roof and fire arrows into the crowds), try to calm down the people (Try to calm people down) or leave the fight with the villagers in the hands of the Ravens (Leave the fighting to the Ravens). Selection of the action will not play a vital role here.
If you decide to fight, you will have to defeat, among others, the abovementioned Stonesinger, which you have already dealt with earlier throughout the campaign. Try to eliminate this monster at the very beginning of the battle, before it manages to use the Umbrage skill and reinforce the remaining monsters. If you, however, did not manage to prevent this from happening, take advantage of the fact that this skill has weakened the armors of the enemies.
SUMMARY: Again, I recommend that you take part in the fights, unless some of the characters in your party are already weakened and you do not want to make it additionally difficult for yourself during the skirmishes to come.
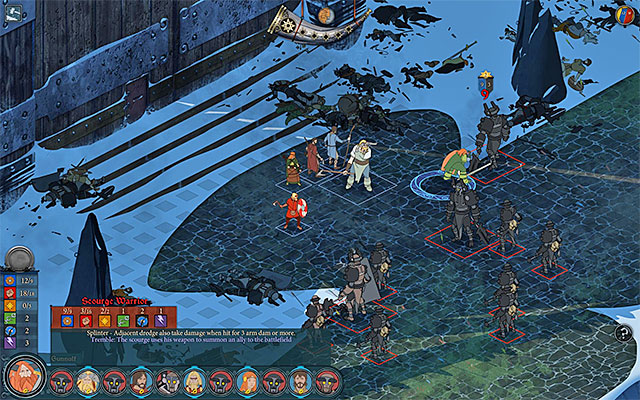 Another day, another battle
On day four, things will change radically. If you have been helping Iver achieve victories, during the previous days, the perfectly known list of actions will appear on the screen so, you will be able to select the one that is not connected with fighting (acquiring supplies, investigating the docks meeting Krumr, resting) or enter another battle with Iver. In the last case, the new battle will be nothing different than the previous ones, apart from the fact that there will be more monsters to eliminate.
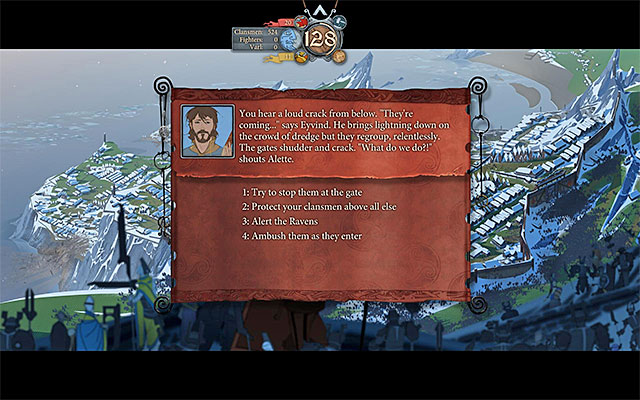 Each of the options in the list results in a different battle
If you, on the previous days, have not been helping Iver enough, a situation in which the monsters cut through the main gates, may occur. In such a situation, you will have to make a choice from among four options and each one of them results in a different fight. The available actions are:
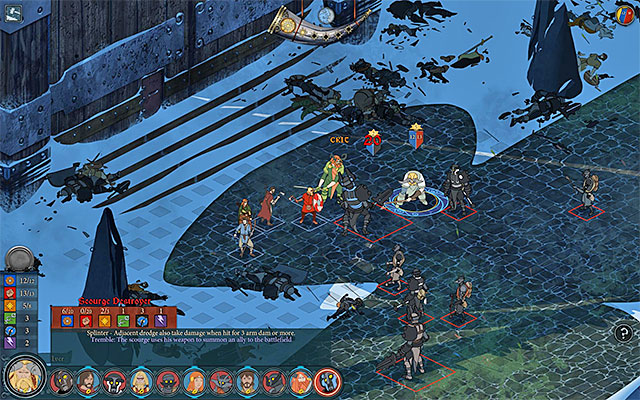 Before you will be allowed to meet up with Hakon it will be necessary to defeat monsters
Regardless of the course of day four, and the decisions that you have taken, the events that occur next are common to all of the abovementioned variants of behavior. Eyvind will point out that there appeared an army of giants in this area, commanded by Hakon, and he will set out to meet them. Unfortunately, before you will be able to meet up with the ally, you will have to fight a quite standard battle with monsters.
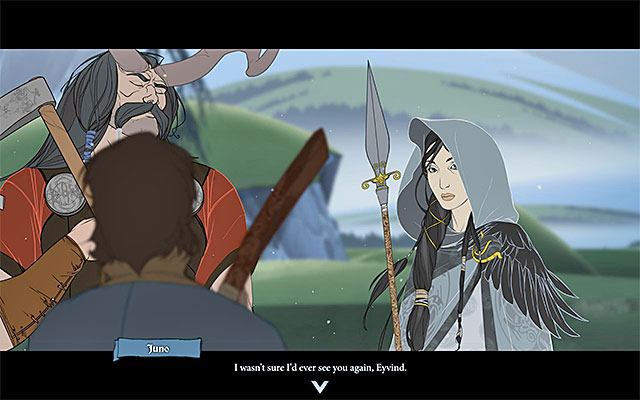 One of the people participating the meeting is Juno
After the fights end, the game will automatically display a cutscene of the meeting, during which you will learn that, apart from Hakon, Mogr and prince Ludin, also Juno arrived in Boersgard. The good news is that , after the meeting ends, your caravan will be joined by 280 Varl. Apart from that, you will receive 315 units of supplies.
The next conversation will be participated by Rook and Juno. Rook will be asked by Juno to take his last journey, as a result of which, he will have to leave the caravan. It is worth adding now, that choosing any of the dialogue options will have no bearing on the meeting with Juno.
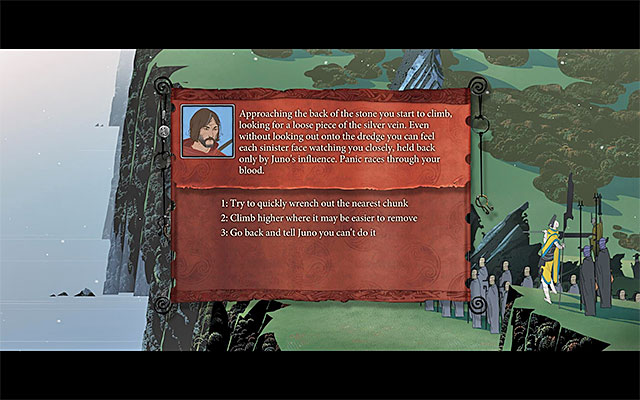 Stravhs
After you reach Stravhs listen to the conversation between Rook and Juno (you need to deplete all of the dialogue options), from which you will learn that Bellower can be tricked and defeated with the magical silver arrow. Wait for the available actions list to appear. I recommend that you select the second option on the list (Climb higher where it may be easier to remove) and then, the first one (Look for another piece), because after you return to Boersgard you will receive a valuable artifact named Stravh's Whestone. This item doubles the amount of damage that you deal so, it is a good idea to give it to one of the stronger characters in the party.
Note - If, in spite of my suggestions, you have chosen a different variant, nothing bad will happen, but you will miss the opportunity to obtain this item.

It is necessary that you spend some time on preparations, before you are up for a grand duel with Bellower, which will, additionally, consist of two parts. I recommend that you, first of all, visit the building of the Heroes and spend the earned fame points on promoting these of the characters, who will take part in the final battles. Also, do not forget to assign the received artifacts to the heroes (additional ones need to be bought at the market).
After you have dealt with all business, go to the Crafters to craft the silver arrow. Now, the game will initiate a conversation between Rook and Alette and it is VERY important, because it will concern the choice to make at the end of the game. At the end of the conversation (the choice of the previous dialogue options makes no difference) you can behave in two different ways (the above screenshot):
After you choose if Rook or Alette should use the silver arrow, click on the icon with Juno and then, on the icon of Bellower (the bottom of the screen). Confirm the make-up of the party and transfer them onto the battlefield.
This ending assumes that it is Alette that uses the silver arrow to weaken the Bellower and the moment of taking this decision itself, has been described on page Boersgard - preparations for the final battle. If it is Rook that you singled out for this task, see the description of Ending 2.
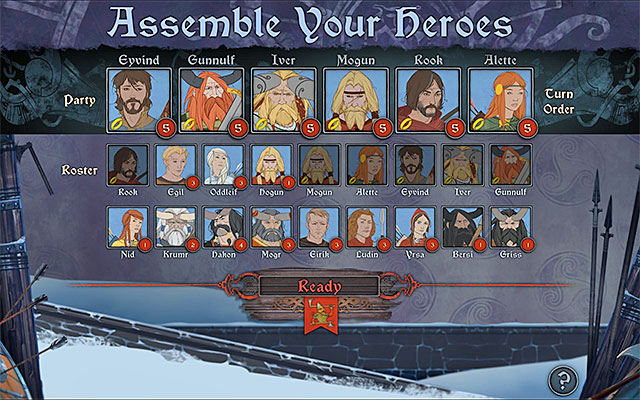 An example make-up of the final party
As I have already mentioned, the fight with Bellower consists of two parts and all of the members of both caravans, which you have led throughout the campaign, will be able to take part in the first one. I recommend, of course, that you select the strongest characters, and it would be a good thing if all of the selected characters were at the highest, fifth, experience level. The make-up of the party for the final battles, recommended by me, is: Eyvind (you will, of course, find his special skill very useful), Gunnulf and Iver (you can also select some other high-level giants), Hogun/Mogun, Rook and Alette.
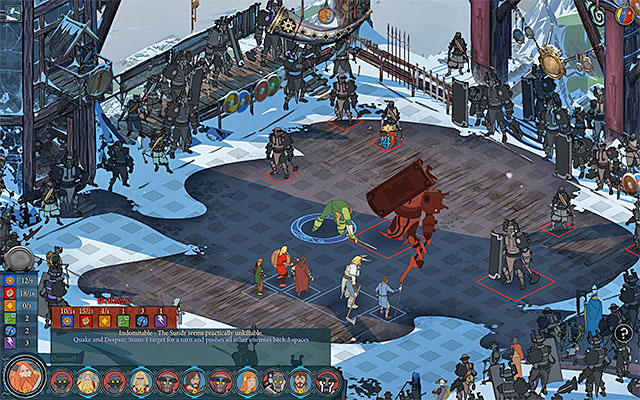 Weaken the boss's armor and then, deprive him of some of his points
Wait until you are transferred to the battlefield and note that, apart from Bellower, there also is a group of weaker monsters there. Ignore them and focus on Bellower. Start using consecutive, strong, characters in the party to weaken the armor of the main boss. At the same time, ignore Bellower's attacks, including his Quake and Despair skill, which tosses the nearby characters away. After Bellower is left with only several armor points, start, for a change, weakening his strength bar. Try to bring about a situation in which he has less than 10 health points left.
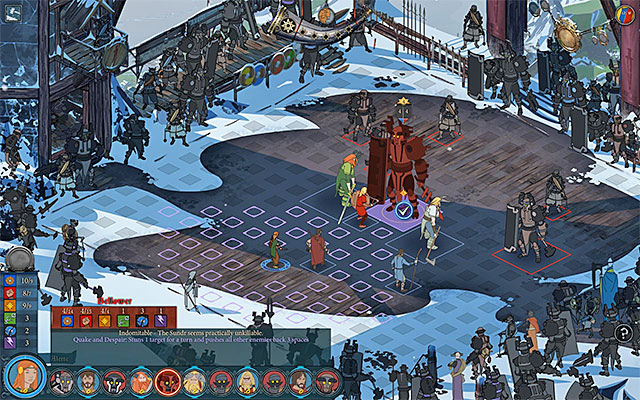
Alette should, at first, stay at the back and not approach the boss too much. Apart from that, it would be a good thing to put her at the end of the "movement queue", still before the beginning of the battle, thanks to which, before her turn comes, Bellower will be weak enough (the armor and the health bars at low level). What speaks in favor of this tactic is that Alette's special skill, named the Silver Arrow (the above screenshot), becomes available only if this attack can be 100% successful (and if Bellower is within the archer's range).
Note - if the game allows you to attack with the Silver Arrow, you should perform the standard attack and wait until Alette's turn comes again. In the meantime, protect the archer and do not forget about the boss, attack Bellower occasionally, which will prevent him from regenerating his health bar.
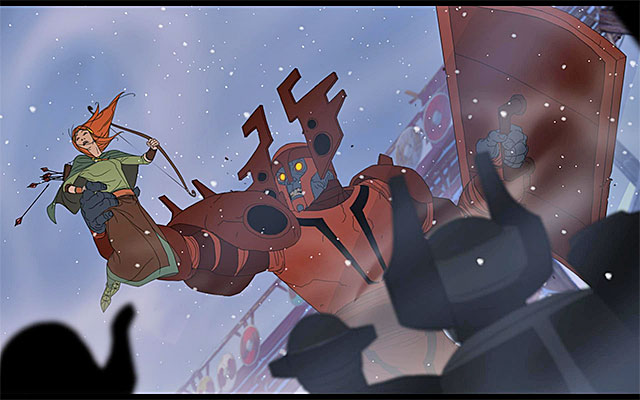 Alette's death
The successful use of the Silver Arrow skill will weaken Bellower and end the first part of the battle (there still may remain the weaker monsters, because they are not taken into account). The game will display a cutscene, from which you will learn that, unfortunately, Alette died. Do not worry about that, though, because you will start the second part of the battle, according to the plan.
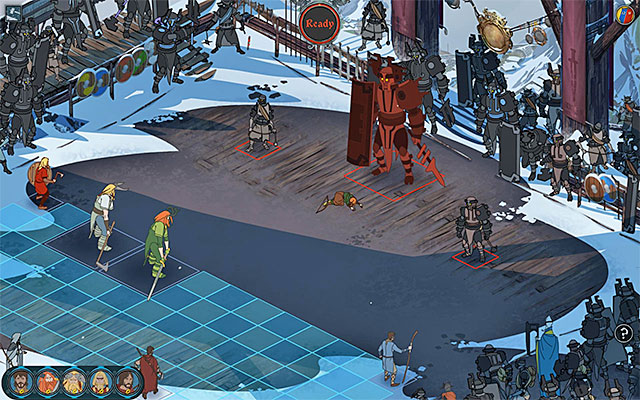 The beginning of the second battle
At the beginning of the battle's second phase, the party will shrink to five characters (unfortunately, you cannot choose anybody to take Alette's place but, on the other hand, Bellower will have only two, very weak, minions. Right after the battle starts, focus your efforts on the boss. I recommend against eliminating his minions because, even after the Pillage Mode is initiated, the boss will, in accordance with Juno's warning, not wait for his turn and will be able to respond to all attacks against him.
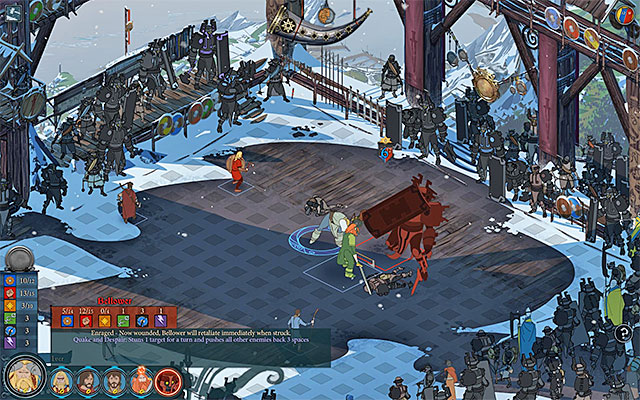 Attack the boss only
Start attacking Bellower and treat him in the same way as you would any strong monster so, first of all weaken his armor. Start attacking his health bar only after you deprive him of, at least, a half of the armor's health points. Attack the boss with all available characters and do not bother, too much, about his special abilities. The fight will draw to an end at the moment at which his health bar drops to zero (even if his minions are still in the battlefield).
 Alette's funeral
The last thing left for you to do, is listen to several conversations and watch the cutscene of Alette's funeral. Congratulations and see you in the next episode of the Banner Saga!
This ending assumes that Rook uses the silver arrow to weaken Bellower and the moment of taking this decision itself, has been described on page Boersgard - preparations for the final battle. If you have chosen Alette for this task, see the description of Ending 1.
 An example make-up of the party for the final battle
As I have already mentioned, the fight with Bellower consists of two parts and all of the members of both caravans, which you have led throughout the campaign, will be able to take part in the first one. I recommend, of course, that you select the strongest characters, and it would be a good thing if all of the selected characters were at the highest, fifth, experience level. The make-up of the party for the final battles, recommended by me, is: Eyvind (you will, of course, find his special skill very useful), Gunnulf and Iver (you can also select some other high-level giants), Hogun/Mogun, Rook and Alette.
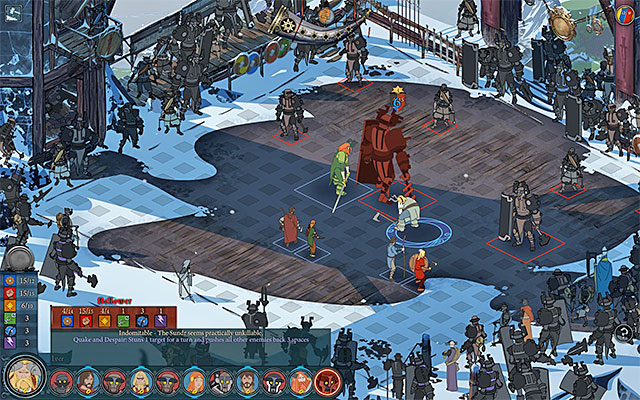 Weaken the boss's armor and then, deprive him of some of his health points
Wait until you are transferred to the battlefield and note that, apart from Bellower, there also is a group of weaker monsters there. Ignore them and focus on Bellower. Start using consecutive, strong, characters in the party to weaken the armor of the main boss. At the same time, ignore Bellower's attacks, including his Quake and Despair skill, which tosses the nearby characters away. After Bellower is left with only several armor points, start, for a change, weakening his strength bar. Try to bring about a situation in which he has less than 10 health points left.
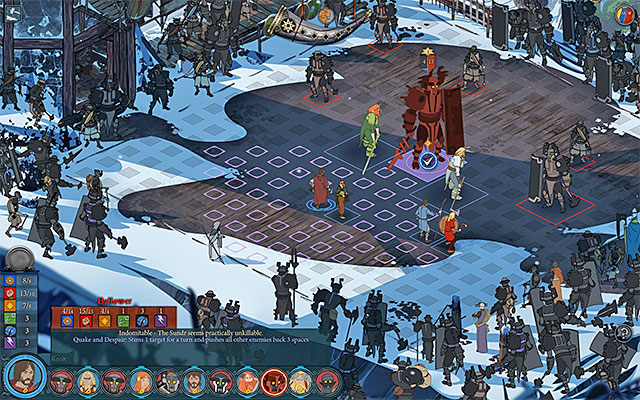
Rook should, at first, stay at the back and not approach the boss too much. Apart from that, it would be a good thing to put her at the end of the "movement queue", still before the beginning of the battle, thanks to which, before her turn comes, Bellower will be weak enough (the armor and the health bars at low level). What speaks in favor of this tactic is that Rook's special skill, named the Silver Arrow (the above screenshot), becomes available only if this attack can be 100% successful (and if Bellower is within the archer's range).
Note - if the game allows you to attack with the Silver Arrow, you should perform the standard attack and wait until Rook's turn comes again. In the meantime, protect the archer and do not forget about the boss, attack Bellower occasionally, which will prevent him from regenerating his health bar.
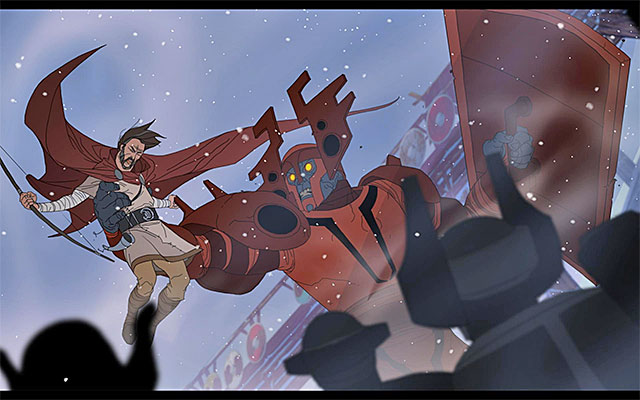 Rook's death
The successful use of the Silver Arrow skill will weaken Bellower and end the first part of the battle (there still may remain the weaker monsters, because they are not taken into account). The game will display a cutscene, from which you will learn that, unfortunately, Rook died. Do not worry about that, though, because you will start the second part of the battle, according to the plan.
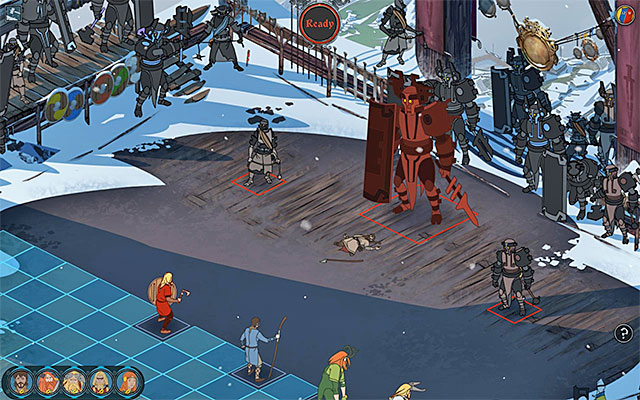 The beginning of the second phase of the battle
At the beginning of the battle's second phase, the party will shrink to five characters (unfortunately, you cannot choose anybody to take Alette's place but, on the other hand, Bellower will have only two, very weak, minions. Right after the battle starts, focus your efforts on the boss. I recommend against eliminating his minions because, even after the Pillage Mode is initiated, the boss will, in accordance with Juno's warning, not wait for his turn and will be able to respond to all attacks against him..
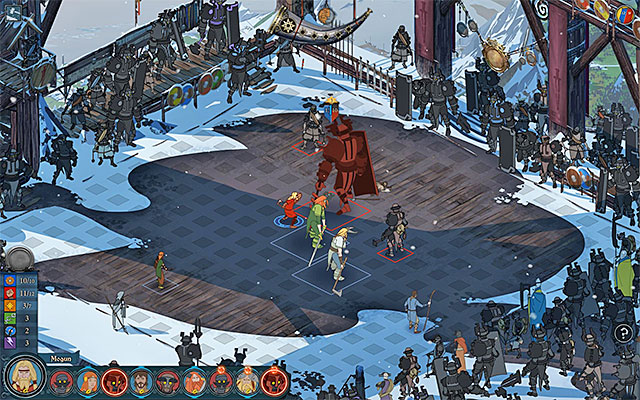 Attack the boss only
Start attacking Bellower and treat him in the same way as you would any strong monster so, first of all weaken his armor. Start attacking his health bar only after you deprive him of, at least, a half of the armor's health points. Attack the boss with all available characters and do not bother, too much, about his special abilities. The fight will draw to an end at the moment at which his health bar drops to zero (even if his minions are still in the battlefield).
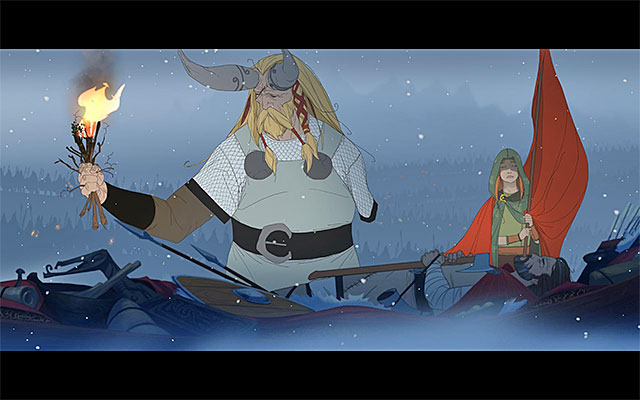
 Rook's funeral
The last thing left for you to do, is listen to several conversations and watch the cutscene of Rook's funeral. Congratulations and see you in the next episode of the Banner Saga!
The below table presents a list of all the achievements available within the Steam platform, and it tells you how to unlock them.
ACHIEVEMENT'S NAME
WAY TO UNLOCK
Backbiter
You need to kill, at least, one enemy with a backbiter class character. The list of all the characters, and their respective classes, can be found in the chapter entitled Lists.
Beat the Odds
In the second chapter of the game, you need to keep Egil alive.
Bowmaster
You need to kill, at least, one enemy with a bowmaster class character. The list of all the characters, and their respective classes, can be found in the chapter entitled Lists.
Challenge
You need to complete the game without losing any battle
Diplomat
During your stay in Einartoft, you need to select the variant connected with fighting more battles on the bridge. This will let you destroy the bridge without the necessity to oppose giants.
Eagle Eye
You need to kill, at least, one enemy with an eagle eye class character. The list of all the characters, and their respective classes, can be found in the chapter entitled Lists.
Forced March
You need to reach Boersgard within 120 days. The easiest way to do that is by skipping the additional stops in cities, villages and camps, and by ignoring the caravan's low morale.
Godstone Bjorulf
You need to stop in Bjorulf.
Godstone Denglr
You need to stop in Denglr.
Godstone Dundr
You need to stop in Dundr.
Godstone Hadrborg
You need to stop in Hadrborg.
Godstone Hridvaldyr
You need to stop in Hridvaldyr.
Godstone Ingrid
You need to stop in Ingrid.
Godstone Marek
You need to stop in Marek.
Godstone Radormyr
You need to stop in Radormyr.
Godstone Stravhs
You need to stop in Stravhs.
Grudgewielder
You need to kill, at least, one enemy with a grudgewielder class character. The list of all the characters, and their respective classes, can be found in the chapter entitled Lists.
Hard Difficulty
You need to complete the game on the Hard difficulty level. Do not attempt changing the difficulty level during the game, because this will lock off this achievement.
High Spirits
You need to complete the game without letting morale fall to a low level. Take frequent stops and use supplies to improve on the caravan's morale.
Hunter
You need to kill, at least, one enemy with a hunter class character. The list of all the characters, and their respective classes, can be found in the chapter entitled Lists.
Innocent
Alette may not wound anybody during the game. The best thing to do here is not selecting her for battles.
Master Tactician
While playing at the Hard difficulty level, use the Training tent and win a battle using a party at the fifth experience level.
Mender
You need to kill, at least, one enemy with a mender class character. The list of all the characters, and their respective classes, can be found in the chapter entitled Lists.
Normal Difficulty
You need to complete the game on the Normal difficulty level. Do not attempt changing the difficulty level during the game, because this will lock off this achievement.
Provoker
You need to kill, at least, one enemy with a provoker class character. The list of all the characters, and their respective classes, can be found in the chapter entitled Lists.
Quartermaster
You need to complete the game without depleting your supplies. Buy supplies in cities and villages and also select those of the behavior variants, in the additional events, which guarantee receiving additional supplies.
Raidmaster
You need to kill, at least, one enemy with a raidmaster class character. The list of all the characters, and their respective classes, can be found in the chapter entitled Lists.
Shieldmaster
You need to kill, at least, one enemy with a shieldmaster class character. The list of all the characters, and their respective classes, can be found in the chapter entitled Lists.
Siege Archer
You need to kill, at least, one enemy with a siege archer class character. The list of all the characters, and their respective classes, can be found in the chapter entitled Lists.
Skystriker
You need to kill, at least, one enemy with a skystriker class character. The list of all the characters, and their respective classes, can be found in the chapter entitled Lists.
Spearmaster
You need to kill, at least, one enemy with a spearmaster class character. The list of all the characters, and their respective classes, can be found in the chapter entitled Lists.
Strongarm
You need to kill, at least, one enemy with a strongarm class character. The list of all the characters, and their respective classes, can be found in the chapter entitled Lists.
Thrasher
You need to kill, at least, one enemy with a thrasher class character. The list of all the characters, and their respective classes, can be found in the chapter entitled Lists.
Treasure Hunter
You need to gather 5 level five artifacts. Some of the artifacts you will get on your own, and you have to buy the rest.
Warden
You need to kill, at least, one enemy with a warden class character. The list of all the characters, and their respective classes, can be found in the chapter entitled Lists.
Warhawk
You need to kill, at least, one enemy with a warhawk class character. The list of all the characters, and their respective classes, can be found in the chapter entitled Lists.
Warleader
You need to kill, at least, one enemy with a warleader class character. The list of all the characters, and their respective classes, can be found in the chapter entitled Lists.
Warmaster
You need to kill, at least, one enemy with a warmaster class character. The list of all the characters, and their respective classes, can be found in the chapter entitled Lists.
Warmonger
You need to fight 40 battles.


 The Amazing Spider-Man Game Guide & Walkthrough
 The Elder Scrolls IV: Oblivion Game Guide & Walkthrough
 The Next Big Thing Game Guide & Walkthrough
 The Sims 4 Game Guide & Walkthrough
 The Elder Scrolls Online Game Guide & Walkthrough