
Welcome to the Drakensang walkthrough. The text below covers both the main plot and the sidequests along with different approaches to completing them. The guide has been split into eleven sections each with its own map showing the locations of key places and characters. This division is not present in the game but it makes the text a bit clearer. I also encourage you to read through the general tips section where you can find useful information for both rookies and more experienced players. I hope that this guide makes your game even more enjoyable. Good luck!
Karol "Karolus" Wilczek
Lockpicking and pickpocketing
Don't worry about people nearby when you try to pick a lock on a door or a closed chest. It seems that the good folk of Aventuria doesn't mind that. There is, of course, an exception to that rule - pickpocketing. If you fail a pickpocket attempt your target will become cautious and you won't be able to try again.
When trying to pick a lock use lockpicks or hair pins - they'll greatly improve your chances of success.
Looting
Be sure to destroy barrels set throughout the game world. It's a good way of earning some money early on, and sometimes the drops from the barrels can prove to be very useful.
Search the bodies after each fight. Animals and monsters provide some ingredients, while humans and other humanoid beings usually carry gold, weapons and other useful items.
Talking
Try to talk to every character you'll encounter. Some of them offer you quests, some are vendors, while the rest can just tell you something interesting or funny.
Social skills come in handy during dialogs - the one you will use most often is Fast Talk. Etiquette comes in handy on some occasions, while Seduce is most useful for female characters - men won't use it to often. Human Nature seems to be the least useful, but it can provide some handy information like the attitude of the NPC, find out whether he's lying or not or just learn about his mood. The last (but not least) of the social skills is Haggle - you'll use it almost as often as Fast Talk and it will allow you to pay a lower bribe, buy or sell for special items for a better price. Also, with high Haggle all items in store will be less expensive.
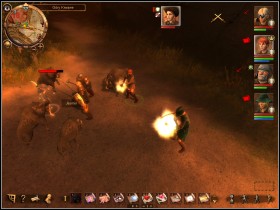
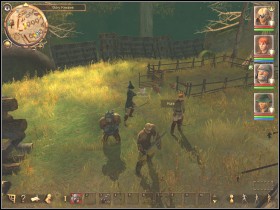
Fighting
The difficulty of the fights can very greatly throughout the game - sometimes you're in for a rather unchallenging fight with a bunch of rats, other a tough boss fight awaits you. In order to get on top of each of those fights you need to come prepared:
Make sure your characters are at full health and have no wounds.
Drink potions and use unguents during the challenging fights..
Use active pause as often as you can - take a closer look at the situation and act accordingly.
Make use of special abilities but be sure not to waste them - mighty blow that deals 30 damage is a bit of a overkill against an enemy left on 5.
Support your characters with magic. Pay close attention to their health and heal those, who are severely wounded. Tough enemies can be weakened with magic, while fireball is great at dealing with larger groups foes.
Bear in mind that you can save the game mid-combat.
The best strategy is to single out opponents rather than fighting the whole group at once.
Party
You can have up to three companions in your party at any given time, while the rest will await you in your residence. Try to fit your party to the area you're going to explore - moving about the city you will make most use out of characters with developed social skills and someone with rogue skills if you want to pickpocket and open closed containers. In areas where you expect some heavy fighting your party should consist of fighters supported by a spellcasting character. When you need to get components off animals or plants you'll need character with high Animal and Plant Lore. It is crucial that you always bring along a character capable of healing and removing poison.
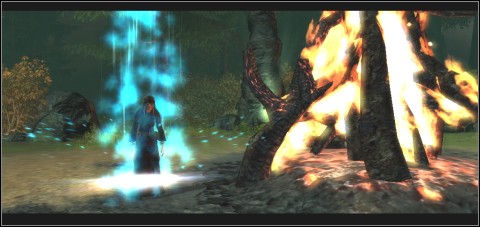
Magic
Mage cannot cast spells while wearing a heavy armor, so you'll need to find some lighter protection or just regular robes that won't impede his movement.
Each mage should have Balm of Healing and Clarum Purum at his disposal.
Workshops
In almost every location throughout the game you will find encounter three kinds of workshops - an anvil, a lab and a workbench. Each of those workshops can be used to create certain items
In the lab characters with the Alchemy skill can brew potions.
Characters with Blacksmith can use the anvil to create weapons and armor.
The Workbench allows characters with Bowyer to create items connected with ranged combat.
Try to have as many characters able to use workshops as you can - the resources to create new items are quite easy to come by, especially if you have access to Animal and Plant Lore.
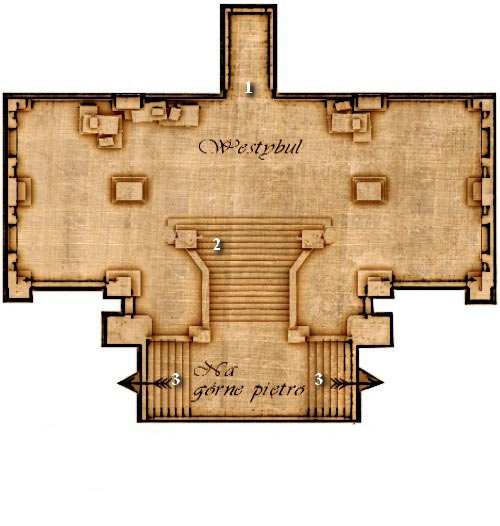
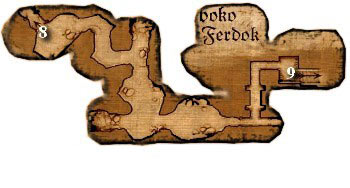
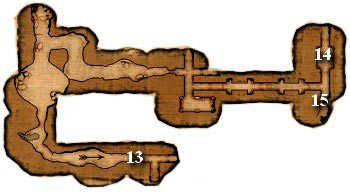
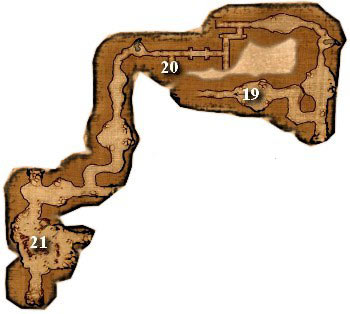
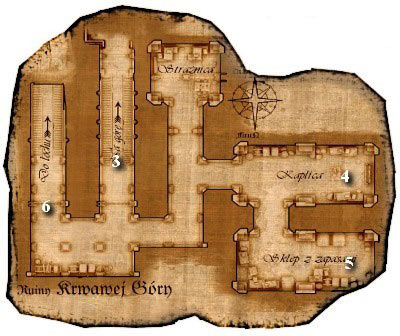
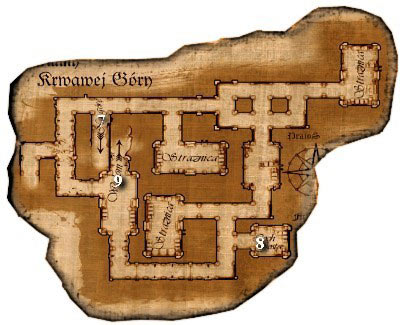
Map:
The numbers indicate important people and places and are explained below each map.
6. Inn:
Rhulana - talk to her and she will join you
Innkeeper Thalion
The text above means that the place marked on the map with 6 is an inn, where you will find two important characters: Rhuana and Innkeeper Thalion.
9. Old Mineshaft M1.1 - when you see a location marked this way, it means that there's an Old Mineshaft situated in the spot marked with 9 and it leads you to map M1.1.
Quests:
Quest order
The main plot of the game entwines with many quests, which means that in some cases you won't be able to finish a quest until the story progresses a bit, while other quests can be only completed when doing other quests. The quests listed here are only those you need to complete.
Shortcuts
Q - main quest
SQ - sidequest
Q1 - quest number one
Q2.1 - phase one of quest two
SQ1 - sidequest number one.
Salina M1(3) - this means that Salina can be found on the map M1 (the map of Avestreu) in a spot marked as 3
Rakorium M1.1(2) - this means that Rakorium can be found on the map M1.1 (the map of Old Groove) in a spot marked as 2
Green Color marks the characters
Orange Color marks the items
Brown Color marks the quests
Reward: - lists the rewards obtained from the quest apart from experience
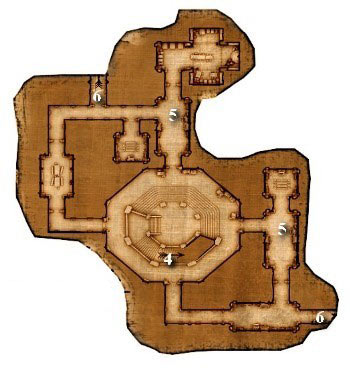
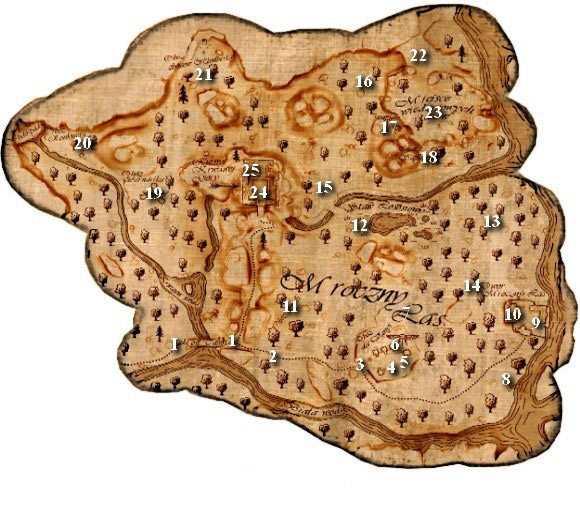
Map: M1. Avestreu
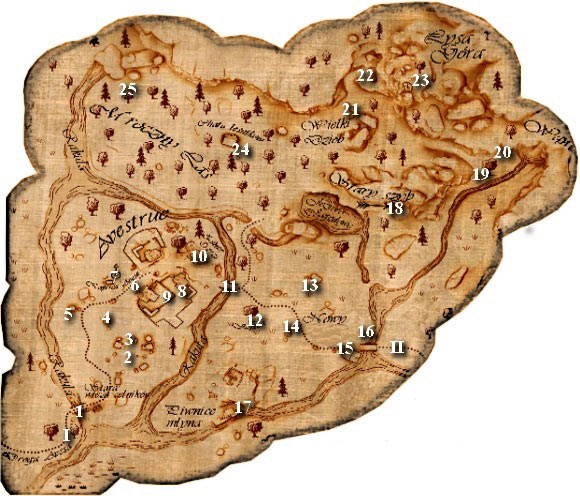
Exits:
I. World map - this is where you start the game
II. to Ferdok
Important characters and locations:
1. Sergeant Erland
2. Salina - the Busker Queen, Hamlok the Busker
3. Alchemist Auralia (merchant. trainer) - you will meet her again in chapter three
4. Runkel Bagthumper
5. Mercenary Humbold - agree to fight him and his companion to win Bolthillian sword. It's best to get into that fight after Rhulana and Dranor join you.
6. Bredo Bento - wanders about the area
7. Shrine:
Follower Peraine - heals for free
Chest
8. Binga Meadowbolt
9. Hen house
10. Inn:
Rhulana - talk to her and she will join you
Innkeeper Thalion, Gallo Frantric
11. Novices Nottel and Rufus
12. Grantel Meadowbolt, Barnabas Goodbeet
13. Erna Goodbeet - she asks you for a password that cannot be obtained either in game or via this walkthrough, you will only find it in collector's edition of the game. The reward for giving her the password is a unique item, boosting Charisma by 3.
14. Pack of tongues
15. Nandor - buys bandit emblems for 2 thalers
16. Parzalon of Scufflewick - listen to his story patiently to gain experience
17. Mill cellar
18. Old Mineshaft
19. Body - on it you will find a letter and a key to a treasure. The Letter points to the nearby chest.
20. Chest - you can open it using the key found on the body
21. Botho Chest - two bandits are arguing right in front of the chest - kill them, and collect the contents.
22. Exit to Bald Mountain
23. Bald Mountain:
Dranor
24. Hunter Owlstone (merchant, trainer)
25. White Fur
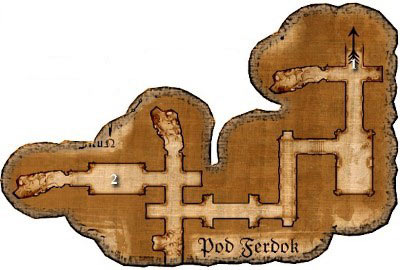
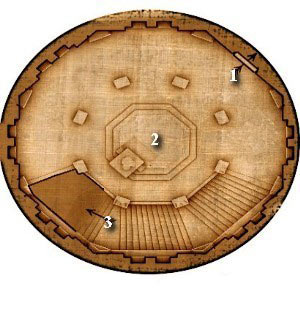
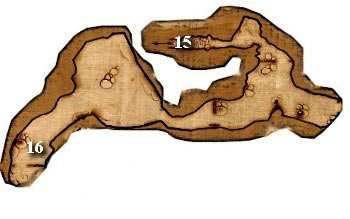
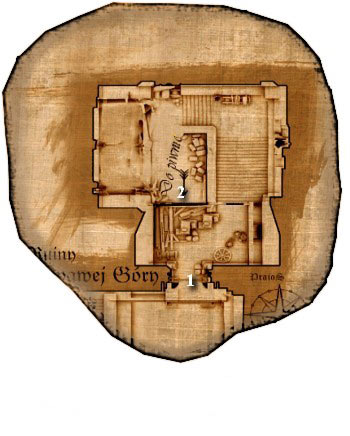
Map: M1.1 Old Mineshaft
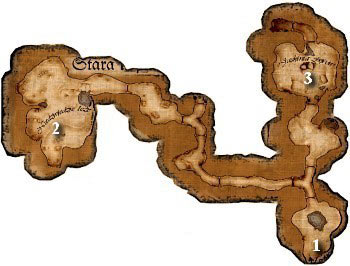
1. Entrance
2. Archmage Rakorium
3. Bear
Map: M1.2 Mill Cellar
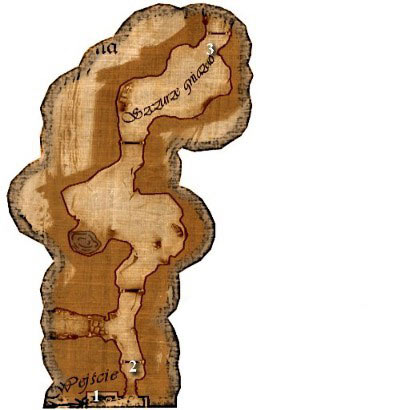
1. Entrance
2. Wooden Floor - click on it to destroy it.
3. Chest
Quest Order:
Q1.1 Find 2 character witnesses
Q2.2 Find Runkel Bagthumper
Q2.3 Talk to the innkeeper
Q2.4 Find the bandit hideout
Q2.5 Talk to Salina
Q3.1 Find mage Rakorium
Q3.2 Lead Rakorium out of the cave
Q3.3 Meet with Rakorium in Avestreu
Q1.2 Go to Nandor
Q1.3 Journey to Ferdok
Z1 An Invitation from an Old Friend
You begin in a small hamlet of Avestreu. Your first mission is to reach Ferdok where your friend Ardo lives. You have recently received a letter from him in which he asks you to come as soon as you can. Head towards the bridge to encounter your first NPC.
1. Find two character witnesses
Talk to Sergeant Erland M1(1). You will learn that Ferdok is closed and no one is allowed unless recommended by two people. Those people are Salina M1(2) and Rakorium M1.1(2). You can use Etiquette on sergeant to gain some experience.
1.1 Get Salina to help you
You need to complete Q2 The Diadem and the Lover
1.2. Convince Rakorium to help you
You need to complete Q3 The Missing Magician
2. Go to Nandor
Nandor M1(15) can be found by the road to Ferdok M1(II). Once you tell him that you have Salina's and Rakorium's, support he will allow you into the city.
3. Journey to Ferdok
You can finally go to Ferdok
Important! Once you leave Avestreu becomes unavailable once you leave it, so if you have any unfinished quests be sure to finish them before heading to Ferdok.
Quest continues in chapter two.
End of chapter one!
Q2 The Diadem and the Lover
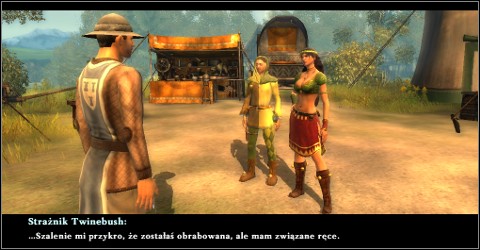
Head towards the tents you will witness a conversation between Salina - the Busker Queen, Hamlok the Busker M1(2) and a guard. After the cutscene talk to Salina. She will tell you about her missing diadem, and that she suspects her lover, Dranor M1(23).
1. Find Dranor
You have to complete Q2.4 Find the Bandit hideout.
2. Find Runkel Bagthumper
Salina will tell you to talk to Dranor's friend, Runkel M1(4). You will find him near the shrine M1(7). He will suggest that you talk to the innkeeper M1(10), who might know where Dranor is.
3. Talk to the innkeeper
Innkeeper Thalion will tell you that the bandits are most likely in Bald Mountain M1(23).
4. Find the bandit hideout
Follow the lead and head to Bald Mountain. Watch the cutscene featuring the mysterious mage and help Dranor defeat the bandits. He will thank you for help and join your party.
5. Talk to Salina
All you need to do now is talk to Salina. She will thank you and promise to say a good word for you to Nandor M1(15).
Q3 The Missing Magician
Two novices will approach you on the bridge M1(11). They will ask whether you've seen their master, Rakoriuma M1.1(2).
1. Find Mage Rakorium
You will find Rakorium in one of the caves of the Old Mineshaft.
Convince him to come with you and he will join your party until you leave the caves.
IT seems almost impossible for those two to find their mentor, so you're their only hope. You will find the magician in the Old Mineshafti M1(18).
2. Lead Rakorium out of the Caves
Archmage Rakorium will try to teleport you out of the caves, but apparently he doesn't remember the spell formula, so you will have to get out the traditional way. For the length of the "journey" Rakorium will join you. After you leave the caves he will remember the spell and will teleport away.
3. Meet Rakorium in Avestreu
You will meet him on the bridge with his novices. There, he will give you the letter for Nandor M1(15).
SQ1 The Examination
You will receive this quest from Runkel M1(4). He asks you to help him pass the examinations held by the Thieves Guild
1. Pass the first test
The first test is: "Find a chest in Aves' shrine and steal its contents".
2. Find the chest and open it
The chest is right besides the shrine M1(7). Open it and take the coded note.
Reward: note
3. Pass the message to Runkel
Go back to Runkel and give him the note.
4. Pass the second test
The uncoded message says: "Find the key and the second clue in the hen house."
5. Find the key
Convince Binga to give you the dog bone or steal it from her.
Give the bone to the dog and head to the hen house where you will find the key and another clue.
The hen house M1(9) is guarded by a dog. You have to give it a dog bone, which you can get from Binga Meadowbolt M1(8).
Option 1: Steal the dog bone.
Option 2: Talk to her and use your social skills to get the dog bone.
Once you get the bone, give it to the dog. You will now be able to enter the hen house and take the key and another note.
Reward: note
6. Give your findings to Runkel
Give Runkel the note to decipher.
7. Pass the third test
The uncoded message is: "You will find a chest in the ruined mill. Open it and take the message".
8. Chest in the Old Mill
The chest M1.2(3) can be found in the mill cellar M1(17). Open it and take the note containing the information on finding the thieves' guild liaison in Ferdok.
Reward: note
9. Find the thieves' guild
The quest continues in chapter two.
SQ2 Berry Hunting
The peddler Bredo Bento M1(6) will ask you a favor.
1. Collect ten Oneberries
You need to find 10 oneberries. You can collect them using Plant Lore which can be taught to you by Alchemist Auralia M1(3). Oneberries can also be found in barrels throughout the area.
2. Bring the oneberries to Bredo
Talk to Bredo and give him the oneberries.
Reward: 2 Ducats
SQ3 A Tasty Delicacy
Talk to the man by the name of Gallo Frantric M1(10). He will ask you to find a lost package M1(14). Use Human Nature during the conversation to find out that he cannot be trusted.
1. Find the pouch candied kosh bunting tongues
The pouch can be found near the wagon sitting between the apple tree and the bridge leading to Ferdok.
2. Take the Parcel to Gallo
Option 1: Gallo will offer you 2 thalers for the pouch. Don't agree and haggle over the price, refusing his propositions, then ask for 2 ducats. He won't agree at first, but if you talk to him again, he will pay you.
Reward: between 2 thalers and 2 ducats
Option 2: Haggle for a while then decide that you will keep them to yourself and sell to someone else.
Reward: Candied kosh bunting tongues (you can sell it later for up to 50 ducats)
Option 3: When Gallo refuses to pay you 2 ducats eat the tongues. He will call you a madman and tell you that you just ate 50 ducats.
Reward: Full stomach
3. Find another buyer
The quest continues in the next chapters.
SQ4 Owlstone the Hunter
Talk to the Innkeeper Thalion M1(10). He will tell you the story of the local hunter M1(24).
1. Find hunter Owlstone
Your mission is to find Owlstone. He resides in the forester's lodge in the Dark Forest. When you'll arrive on the spot you will find him in the middle of the fight with a wolf. Help him (the hunter, not the wolf) and he will thank you for assistance.
SQ5 The bear in the Dark Forest
You will receive this quest from Hunter Owlstone M1(24) after completing SQ4 Hunter Owlstone.
1. Slay the bear
The bear M1.1(3) is in the cave in the Old Mineshaft M1(18). This far in the game it is quite a challenging opponent, so prepare for a tough fight.
2. Talk to Owlstone
After slaying the bear talk to the hunter.
Reward: 2 ducats 5 thalars
SQ6 The Wild Wolves of the Dark Forest
You will receive the quest from Hunter Owlstone M1(24) after completing SQ4 Hunter Owlstone
1. White Fur
White fur M1(25) appears along with the regular wolves. Kill them and return to the hunter.
2. Talk to hunter Owlstone
Tell him that you've slain White Fur.
Reward: 2 ducats
SQ7 The Hunting Trophy
You will receive the quest from Hunter Owlstone M1(24) after completing SQ5 The bear in Dark Forest.
1. Take the bear's head to Innkeeper Thallion
Give Thalionowi M1(10) the bear's head. He will appreciate such a grand trophy.
Reward: 2 ducats
SQ8 A Boundary Dispute
Two farmers: Grantel Meadowbolt and Barnabas Goodbeet M1(12) are arguing over an apple tree: one of them wants to cut it down, while the other wants to preserve it and keep on collecting fruits.
1. Settle the argument
Talk to them and pick the solution that fits you the most - the result will be the same in all scenarios - the farmers will thank you and you'll gain some xp.
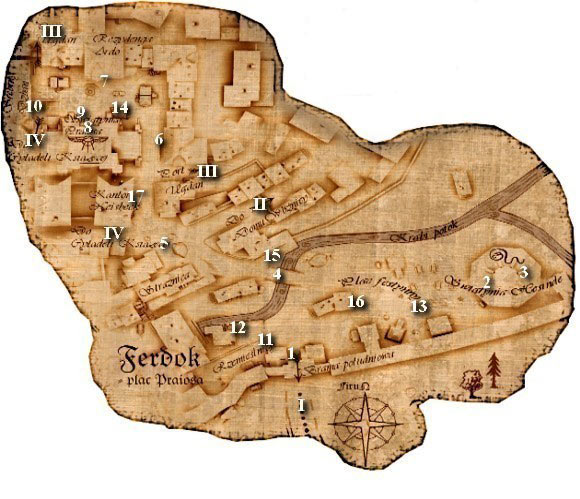
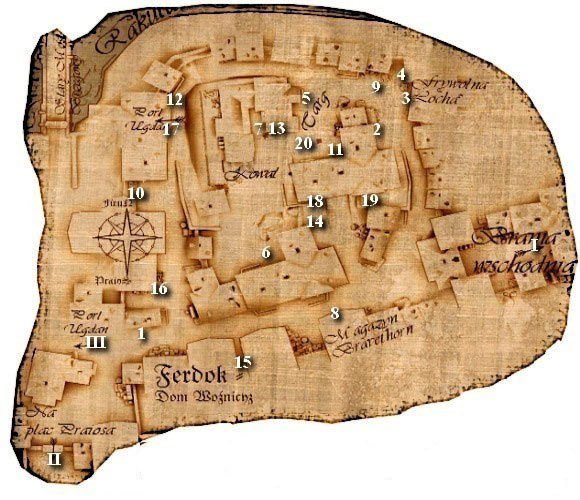
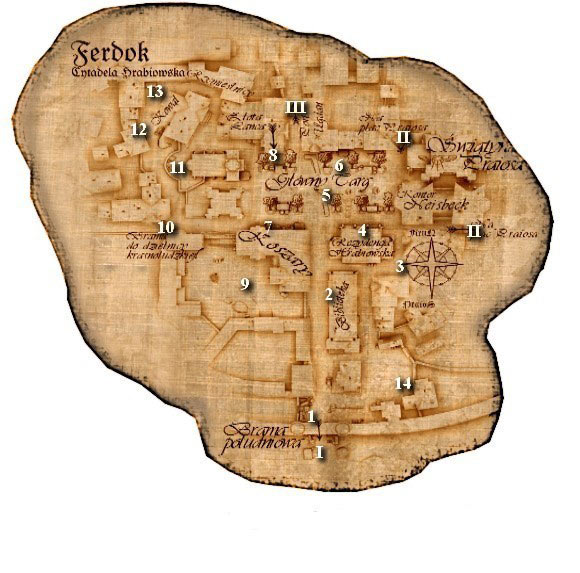
Maps: M2. Ferdok - Praios Square
Exits:
I. World map
II. Wagoner's Home
III. Port Ugdan
Important characters and places:
1. Gate guard Grobbinger
2. Temple of Hesinde M2.2
3. Archivist Loisane - you will find her here after receiving the quest Q4.5 Meet the informant in the Temple of Hesinde.
4. Ferio of Ferdok, Kastan Gamblack - you will witness the two noblemen mistreating some poor townsman. There's nothing you can do right now, but you'll meet them again later on.
5. Barla Darksmith - she will tell you that Dranor has been captured and imprisoned. There isn't much you can do about it now, but you will be able to go and rescue him in the next chapter.
City Guard Reuben
6. Tailor Grosso
Ferdok Sewers M2.3
7. Ardo's Residence:
Guard Hassler
8. Temple of Praios
9. Archivist Loisane - you will find her here after receiving the quest Q4.6 Meet with the secret informant.
10. Silver Pitcher M2.1
From chapter three on:
IV. Ducal Citadel
11. Bear Master Firnjan
12. Fluffy, the dancing bear
13. Salina, the Busker Queen, Hamlok
14. Dwarf Ragesh
From chapter five on:
15. Hugo and his wife
From chapter six on:
16. Laurelin
From chapter seven on:
17. House of Ulwina Neisbeck
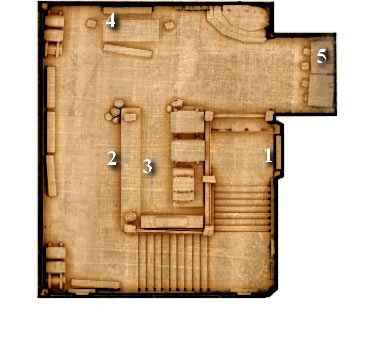
Maps: M2.1 Silver Pitcher
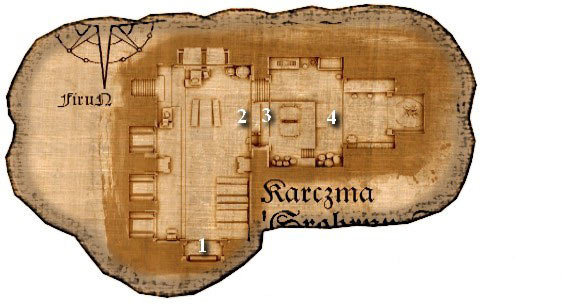
1. Entrance
2. Forgrimm
3. Tradan Brewmore
4. Cook is buying rat tails for 2 farthings each. If you try to haggle you might raise the price to 4 farthings for each tail.
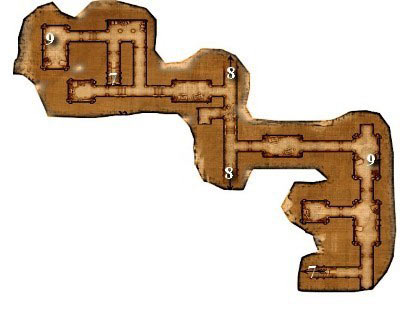
Maps: M2.3 Ferdok Sewers
1. Entrance
2. Rat with an amulet
Maps: M3. Ferdok - Wagoner's House
Exits:
I. World Map
II. To Praios Square
III. To Port Ugdan
Important characters and locations:
1. Boris the Bandit - he tells you to pay the toll of 1 thaler for passing. If you decide not to pay you will have to fight him and his men.
2. Cellar M3.3
3. Serene Sow M3.1
4. Ferdok Sewers M3.2
5. Fishmonger Strunkler
6. Eelko's murder scene
7. Eelko's hiding place
From chapter three on:
8. Dark Eyes hideout
9. Alms the Beggar
10. Thieves
11. Loot crate
From chapter five on:
12. Firefly egg
13. Firefly egg
14. Firefly egg
15. Firefly egg
16. Firefly egg
From chapter six on:
17. Port Gate
18. Vantage Point
19. Better Vantage Point
From chapter seven on:
20. Smuggler
Maps: M3.1 Serene Sow
1. Entrance
2. Goldtooth Jallik
3. Innkeeper Ibrom Soapstone
4. Cripple Reto
5. Salm Four-fingers
Maps: M3.2 Ferdok Sewers
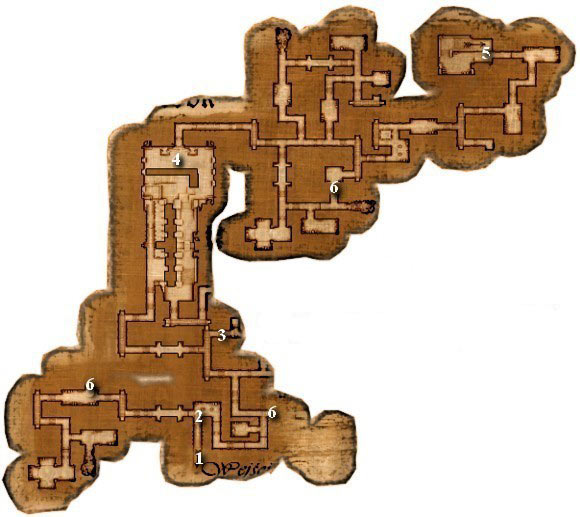
1. Entrance
2. Deceased Jessica
3. Blocked passage
4. Cultists
5. Entrance to building M 5.1
6. Hidden passages - it's worth to investigate them, as they hold quite a few valuable items.
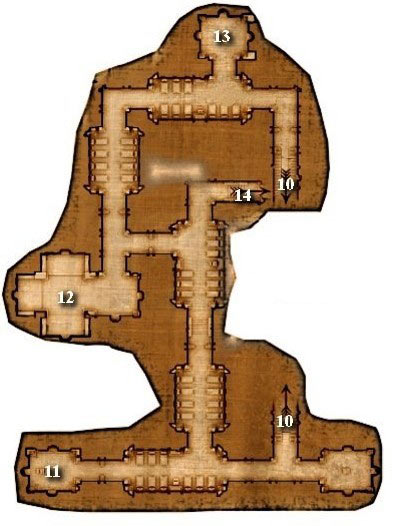
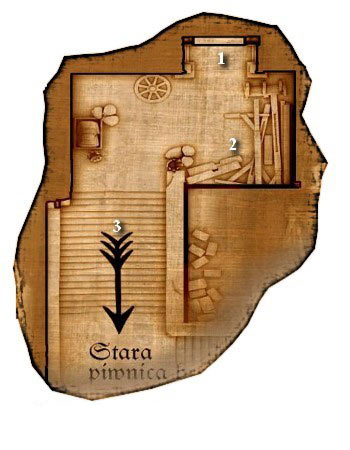
Maps: M3.3 Cellar crypt
1. Entrance
2. Debero
3. Thieves' Guild entrance
4. Exit to cellar crypts
5. Cano
6. Chest
7, 8, 9, 11, 12, 13, 14, 15 Chest
10. Thief
16. Moving wall
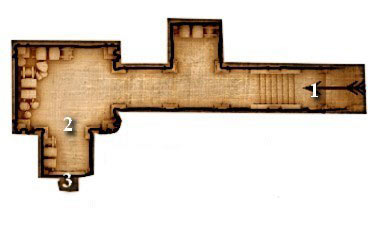
Maps: M4. Ferdok - Port Ugdan
Exits:
I. To Praios Square
II. To Wagoner's Home
Important characters and places:
1. Fleet Footed Ferret M4.1
2. Nasreddin - there's nothing you can do about him for now, but you'll learn more about him in the fifth chapter
3. Dragon's murder scene
Barrel
4. Boat seller
5. Guard Brintel
6. Ardo's murder scene
7. Durdan Jesolo - you can place bets on fights between two fighters. The bet is 2 ducats and, in theory you can win twice as much. In practice Durdan proves to be a con man and is setting up the fights so that you'll lose every time. After losing your second bet you can talk to him using Human Nature to reveal his scam and aggravate the crowd. Now you can chase him with the newly created angry mob or stay at the arena and wait for the fighters to leave and then check the barrels.
8. Guard commander Tashman
From chapter three on:
III. To Ducal Citadel
9. Pagol Babek - Neisbeck representative
10. Laran Dykemiller - Stoerrebrandt representative
11. Muddlemosh
From chapter five on:
12. Steorrebrandt's envoy
13. Stoerrebrandt's workers
14. Tashman (if you work for house Neisbeck)
15. Bandits
16. A rich man
17. Irniane
18. Negotiations place
19. Tashman (if you work for house Stoerrebrandt)
From chapter six on:
20. Stoerrebrandt's workers
21. Stoerrebrandt's workers
22. Stoerrebrandt's workers
23. Gate to Wagoners Home
Maps: M4.1 Fleet Footed Ferret
1. Entrance
2. Innkeeper Pebblebush
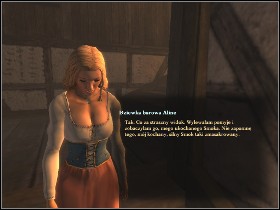
3. Aline the waitress
Dranor will meet you outside the Ferdok gates - he's wanted for a crime that, as he claims, he didn't commit. He asks you to meet him in the Ducal Citadel and runs off. You will meet him again in the third chapter .
Quest order:
Q1.4 Head to your friend's house
Q4.1 Head to the guard post and talk to Barla
Q4.2.2 Find Forgrimm the dwarf
Q4.2.3 Find Gladys Shladromir
Q4.2.4 Talk to guard commander Tashman
Q4.3.1 Collect the information concerning the murderer
Q4.3.2 Report to Barla
Q4.5 Meet with the secret informant
Q4.4 Investigate Erick's murder
Q4.4.1 Collect information concerning the murder
Q4.4.2 Get Mimi to trust you
Q4.4.3 Report to Barla
Q4.6. Meet the informant in the temple of Hesinde.
Q4.7 Find Jessica
Q4.8 Pursuit Jessica's murderers
Q4.9 Save the archivist
Q4.10 Talk to Barla Darksmith
Q1 An Invitation from an Old Friend (continued)
4 Head to your friend's house
Right besides the city gate you will meet guard Grobbinger M2(1). Talk to him to learn about the recent murders. He will also point you the way to your friend's house M2(7) Bad news await you on the spot - Ardo, your friend is one of the murder victims. Talk to guard Hassler you won't learn much from him but he will point you to the person leading the investigation - Barla Darksmith M2(5).
Q4 Murders in Ferdok
1. Head to the guard post and talk to Barla
Talk to Barla M2(5). Ask her to assign you to the investigation. She will agree and give you permission to conduct the investigation as well as all the information she's gathered so far.
Reward: permission to conduct the investigation
2. Investigate the murder of Ardo of Boarstock
2.1 Find Forgrimm the dwarf
Forgrimm M2.2(2) can be found in the "Silver Pitcher" M2(10). He is devastated by Ardo's death and totally drunk. Talk to Tradan Brewmor M2.2(3). Tell him that you need to get something from Forgrimm, but he is in no condition to talk. You will receive some kind of "sober up" brew, for the dwarf. Get back to Forgrimm and give him the drink you just received. Once he's sober you can talk to him - you will gain a lot of useful information concerning the murders and Forgrimm will join your party.
2.2 Find Gladys Shladromir
Start looking for her in "Serene Sow" M3(3), in Wagoner's Home M3. Start by talking to the innkeeper M3.1(3). Ask him about Gladys, and he will send you to Salm Four Fingers M3.1(5), who, in turn will tell you to talk to Cripple Reto M3.1(4). Reto will send you over to Jallik M3.1(2). After talking to him leave the Inn. Goldtooth Jallik will appear on the street and start following you - don't mind him and just walk in any direction. Few moments later Gladys will approach you. When you'll tell her you're looking for Ardo's killers, she will join you.
2.3 Talk to guard commander Tashman
Head to Port Ugdan. Approach the pier and talk to guard Brintel M4(5) who is in charge of securing the crime scene M4(6). You will learn that guard commander Tashman M4(8) may be able to provide you with some additional information. You will find him near the brewery/ Reluctantly, he will share some facts about Ardo's murder.
3. Investigate Dragon's murder
3.1 Gather the information on the murderer
On the Dragon's murder scene destroy the barrel and collect the talisman you'll find inside.
Head to the "Fleet Footed Ferret" and talk to waitress Aline.
The murder took place in Port Ugdan. Head there, and get into the alley behind the "Fleet Footed Ferret" M4(1), where the murder took place M4(3). There is a barrel behind the blood stains - destroy it to find a talisman. Now head to the "Ferret", and talk to the innkeeper M4.1(2) ask him about Dragon, and then try talking to Aline M4.1(3). She won't be much of an assistance so head out. Before you'll leave, however she will stop you and tell you about her lover. During the conversation be sure to mention Dragon's talisman and show it to her.
3.2 Report to Barla
Tell Barla M2(5) about your discovery.
4. Investigate Erick's murder
4.1 Gather information about the murder
Go to Eelko's murder scene M3(6). You will see bloodstains and a kitty standing right beside them. Soon, miss Lovinger, an elderly lady living nearby will talk to you. She will give you some information about the victim and tell you that Eelko used to wear a beautiful brooch and that he was very attached to hiss kitty Mimi.
4.2 Get Mimi to trust you
Approach miss Strunkler M3(5) and ask her for some salmon. With a fish in your pocket return to the crime scene, feed the cat and then follow it to the spot where Eelko hid his brooch M3(7).
4.3 Report to Barla
Relate your findings Barla M2(5).
5. Meet with the secret informant
After completing quest Q4.3.2 Report to Barla or Q4.4.3 Report to Barla you will be approached by city guard Reuben M2(5). He will tell you that there's an informant who wants to talk to you. You will also receive a password - the informant will be waiting near the temple of Praios M2(9). Meet with archivist Loisane, give her the password and listen to what she has to say.
Important! If you'll leave the Praios Square before completing this quest you will fail it.
6. Meet the informant at the temple of Hesinde
After completing the quests: Q4.3.2 Report to Barla and Q4.4.3 Report to Barla you will be once again approached by city guard Reuben M2(5). This time Loisane M2(3) wants to meet you by the temple of Hesinde. Head there to learn that Jessice who is somewhere in the Wagoner's Home is probably next target of the murderers.
7. Find Jessica
Once you get to the Wagoner's Home head towards "Serene Sow" M3(3). When you get close enough you will be approached by a scared woman who will tell you that some men in red have dragged Jessica to the sewers M3(4).
8. Pursue Jessica's murderers
You don't need to rush as there is no time limit and you can explore the sewers. Every now and then you will see running cultists follow them until you reach a spacious room M3.3(4). Here one of the cultists will try and stop you while the rest will escape along with their leader. Kill the cultist and follow them to reach the exit M3.2(5).
9. Save the archivist
You will find yourself in the archives, and learn that the leaders of the cultists are Kastan Gamblack and his right hand man Ferio of Ferdok. You will witness a talk between them and hear that they're planning to kill archivist Loisane. Kastan will then run away and you will be forced to fight cultists and Ferio M5.1(8). After the fight Grand Inquisitor da Vanya will appear and start questioning you and the archivist. After you tell him what he wants to know he will tell you not to continue the investigation.
10. Talk to Barla Darksmith
Time to visit Barla M5.1(5). Tell her about what has happened and then accompany her on her way to the duke M5.2(7).
End of chapter two!
SQ1 Examination (continued)
9. Find the thieves' guild
Debero guards the secret passageway to the thieves' guild. Give him the password and he will let you in.
From Cano, the guild leader you can learn thieving skills, buy useful items or just sign yourself up for a challenge.
The guild is situated within Wagoner's Home M3. It is right It's right beside peddler Holwick, near "Serene Sow" M3(3) in a basement M3(2). Enter it and talk to Debero M3.1(2). After giving him the password you've obtained earlier you will be allowed inside - go and talk to the guild leader, Cano M3.1(5). He will give you a new quest: Q14 The Thieves' Guild Obstacle Course.
SQ9 The Thieves' Guild Obstacle Course
Cano M3.3(5) you a chance to test your thieving skills. You're supposed to find 9 guild emblems spread all throughout the building.
1. Open Cano's chest
In his chest, Cano has placed a M3.3(6) key, that open the way to the remaining rooms. Your first task is to open that chest.
2. Find nine emblems
After you open the chest and take the key you can continue on to find the 9 emblems. You will find them placed within chests M3.3(7, 8, 9, 11, 12, 13, 14, 15) and on the thief M3.3(10), on whom you will have to sneak upon and pickpocket. You can then return to Cano using the moving wall M3.3(16).
SQ10 Luckless Tailor
On Praios Square you will meet tailor Grosso M2(6). It seems that his Do canal good luck charm has fallen into the sewers M2(6). He is afraid to go and luck for it, so he asks you to do it for him.
1. Find the touchstone
Enter the sewers via the entrance right next to the tailor. Once you're there you will see a rat, that carries the amulet.
2. Follow the rat
Follow the rat M2.3(2), all the way to a large rooms at the end of the sewers. Kill the wolf rats that will attack you here and collect the amulet.
Reward: amulet
3. Return the amulet to the tailor
All you need to do now is to return to the tailor and collect your reward.
Reward: 2 Thalers
SQ11 Shuffler Skipper
In Port Ugdan there is a man selling boats M4(4). He offers to sell you a ship for a mere price of 1000 Ducats. This kind of money cannot be obtained until later in the game, but once you get it, talk to him and buy... a small boat!
1. Follow the skipper
After the transaction the skipper makes a run for it - you have to follow him all the way to Praios square.
2. Find the skippers
The skipper disappears on Praios Square. You will however pass by a suspicious looking character near the guard outpost. Listen to him laughing at you, then talk to him. All that you need to do now is force him to give you your money back.
Reward: Getting back your 1000 Ducats and a boat (nothing you can do with it however)
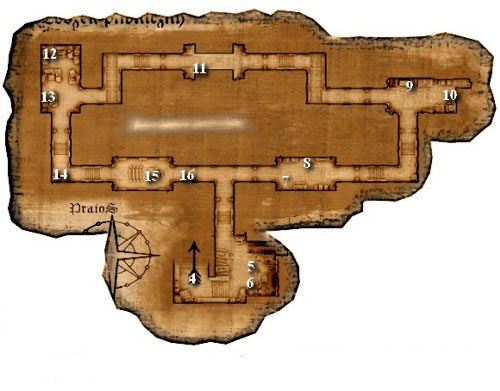
Maps: M5. Ferdok: Ducal Citadel
Exits:
I. World Map
II. To Praios Square
III. To Port Ugdan
Important characters and locations:
1. Gate guard
2. City house M5.1
3. Dwarven triplets - they have a game to offer - they stand in a row and then start running around for some time after which you most point to the one that stood in the middle. The stake is 1 Ducat, and you can double it by winning. You'll always win the first game and always use the second. After losing use Human Nature on them and tell them that you know they're cheating. The Triplets will admit they weren't playing fair, give you your money back and promise that they won't be playing like that anymore.
4. duke's residence M5.2
5. Ferdok city guard
6. Horasian trader Floris
7. Auralia
8. Golden lance - the inn is closed for now and will open after completing one of the quests in sixth chapter
9. Barla Darksmith
10. Gate to the dwarven district
11. Dishonest Otto - he sells animals you can then place in your residence.
12. Ugin, son of Umbash
13. Trader Harpel, Trader Viola
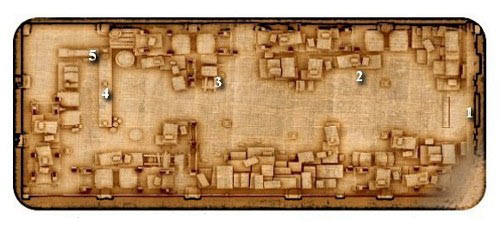
Maps: M5.1 City house
1. Door opening mechanism
2. Cultists
3. Stairs up
4. Follower of Praios Warina, da Vanyasa bodyguard - they are guarding the passage until the end of chapter five
5. Barla Darksmith
6. Entrance
7. Stairs to ground level
8. Ferio of Ferdok, archivist Loisane
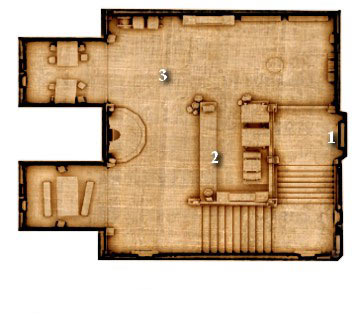
Maps: M5.2 Duke's residence
1. Entrance
2. Lady Protector Dariana - you will meet her here later in game
3. Stairs to audience room
4. Stairs to the entrance
5. Major-domo Muddlemosh
6. Lady Protcktor Dariana
7. Prince Growin
8. Barla Darksmith
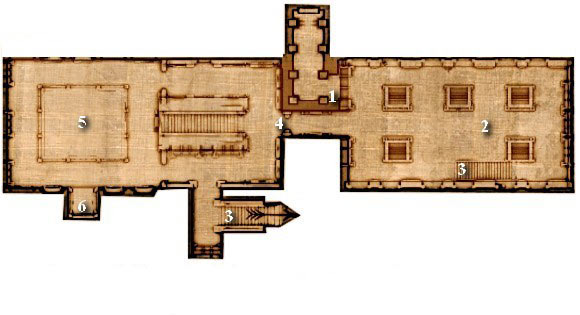
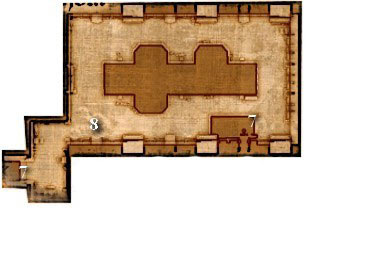
Maps: M2.2 Temple of Hesinde
1. Entrance
2. Dorion, Ardat Whitecliff
3. Down to level 1
4. Back to the temple
5. Novice Avanti - you can meet him in either of the two locations
6. Down to level 2
7. Back to level 1
8. Down to level 3
9. Magica Lominosus - it can be in one of the two locations, depending on where you met novice Avanti
10. Back to level 2
11. Stone sarcophagus - yellowed diary
12. Right wing of Umberacor's statue
13. Left wing of Umberacor's statue
14. Down to level 4
15. Back to level 3
16. Back of the Umberacor's statue
Red Butcher - on him you will find orders considering the amebas
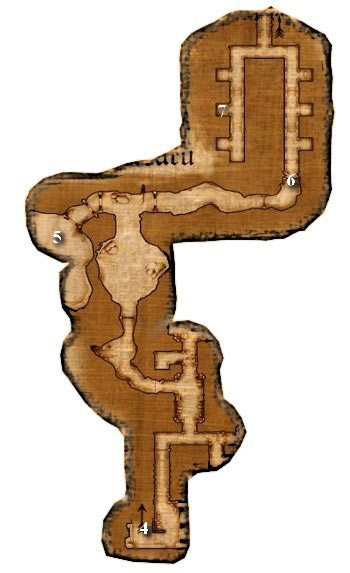
Maps: M3.4 Dark Eyes Hideout
1. Entrance
2. Ladder
3. Wooden ledge
4. Chest with a hammer
5. Ladder
Maps: M4.2 Old Brewery
1. Entrance
2. Worrowosh - he can take you to levels you have already visited
3. Down to the cellar
4. Back to the entrance
5. Down to level 1
6. Moving wall
7. Dranor
8. Back to the cellar
9. Down to level 2

10. Back to level 1
11. Worrowosh - he can take you to levels you have already visited
12. Down to level 3
13. Back to level 2
14. Worrowosh - he can take you to levels you have already visited
15. Down to level 4

16. Back to level 3
17. Worrowosh - he can take you to levels you have already visited
18. Down to level 5
19. Back to level 4
20. Worrowosh - he can take you to levels you have already visited
21. Rat Queen
Chapter three starts with an audience in M5.2. Talk to Prince Growin M5.2(7) and Ladyq Protector Dariana M5.2(6). You will receive quest Q5 The House. Prince M5.2(7) will also reward you for finding the murderers.
Reward: 50 Ducats, medal of Ferdok (+5 to Etiquette), Ardo's residence
Quest order:
Q5.1 Meet with the residences major-domo
Q6.1 Talk to Dorion
Q6.2 Acquire cellar key
Q6.3 Help Avanti in his search
Q6.4 Search for Oracle Stones
Q6.5 Find pieces of Dorion's statue
Q7.1 Journey to Moorbridge
Q5 The House
On leaving the audience hall you will encounter Major-domo Muddlemosh M5.2(5). Dwarf used to be Ardo's servant and he took care of his house M2(7). He will ask whether you want him to work for you. Agree, and he will run home to make preparations for your arrival.
1. Meet with the Major-domo in the residence
Once you arrive at your residence Major-domo Muddlemosh will give you a message - it seems that Mage Rakorium wants you to come to the temple of Hesinde M2(2) and talk to it's guardian Dorion M2.2(2) about the problem with the Dragon Quest.
From this point on your residence will become your "base of operations" - the companions that aren't in your party will await you there. There's also a map just by the residence's door that allows you to travel more quickly. If you want, you can buy workshops for 50 ducats each, and there are some plants in the garden.
Q6 Preparation for the Dragon Quest
1 Talk to Dorion
Head to the temple and ask Dorion M2.2(2) about temple's problem. It appears that there are giant amebas in the crypts and they want you to clear them out and find three pieces of a broken relic.
2. Get the key to the cellar
Go down to level 1 and approach novice Avanti M2.2(5), who will give you the key.
3. Help Avanti in his search
If you ask Avanti about his problem he will tell you that he's supposed to look for a magic tome called Magica Luminosus M2.4(9). He cannot find it however and asks you for help. You will find the book on level 2.
Reward: Elixir recipe
4. Search for Oracle stones
Statue pieces M2.4(12, 13 and 16) can be found on levels 3 and 4. The last part of the relic is guarded by an emerald spider.
Reward: Right wing of Umbacor's statue, Left wing of Umbarcor's statue, Back of Umbacor's statue
5. Take the statue pieces do Dorion
Once you'll get all of the pieces return to Dorion. The relic will be assembled and you will take part in a ceremony during which an Oracle will speak
Q7 The Addled Mind in Moorbridge
After completing Q6 Preparation for the Dragon Quest and listening Oracle, Dorion M2.2(2) will try and interpret her words stating, the person she was talking about may be Rakorium, who is currently in Moorbridge.
1. Journey to Moorbridge
Leave Ferdok and head for Moorbridge.
Quest continues in chapter four.
End of chapter three!
Sidequests
SQ3 A Tasty Delicacy (continued)
3. Find another buyer
Talk to horatian trader Floris M5(6). He will smell the kosh bunting tongues and will want to buy them. You can either sell them now or keep on searching for a better buyer.
Reward: 5 Ducats
SQ11 Kastan Gamblack
You will receive this quest at the beginning of the chapter from Prince Growin M5.2(7).
1. Track Kastan Gamblack
The quest continues in chapter five.
SQ12 Investigations at the Harbour
You will receive this quest at the beginning of the chapter from Lady Protector Dariana M5.2(6).
1. Contact the Neisbecks
Head to Port Ugdan and talk to Pagol Babek M4(9). He will ask you to receive an order from innkeeper at "Silver Pitcher".
2. Contact the Stoerrebrandts
Head to Port Ugdan and talk to Laran Dykemiller M4(10). Ask him for work and he will tell you that their messenger is sick and will offer you a small job.
3. Report to Lady Protector Dariana
After contacting the Neisbecks or the Soerrebrants head to duke's residence M5(4). Lady Protector M5.2(2) will await you on the stairway near the entrance. Tell her that you have made your first move.
SQ13 For a handful of ducats (working for the Neisbecks)
You will receive the quest after contacting Pagol Babek M4(9).
1. Doing Errands
1.1 Offer for innkeeper Tradan
Head to the Praios Square and enter the "Silver Pitcher". Talk to the innkeeper Tradan M2.2(3) about Neisbecks' offer. When he accepts it, return to Pagol Babek.
Reward: 5 thalers
Quest continues in chapter five.
SQ13 For a Handful of Ducats (working for the Stoerrebrandts)
You will receive the quest after contacting Laran Dykemiller M4(10).
1. Doing Errands
Your first job is to deliver a message. Head to the "Silver Pitcher" M2.2.
1.1 Pick up an order from innkeeper Tradan
Talk to Tradan Brewmore M2.2(3) and take an order list from him.
1.2 Take back the order list
Go back to Laran M4(10) and give him the order. He will tell you that he might have some kind of work for you in the future.
Reward: 5 thalers
Quest continues in chapter five.
SQ14 The Boltan Card Trick
After hearing the words of the Oracle (Q6 Preparation for the Dragon Quest) and leaving the temple you will meet the innkeeper Ibrom Soapstone. He will ask you to look for a thief known as Thalya di Ravendoza in Moorbridge. Apparently, she stole his jewlery box.
1. Find the thief
Quest continues in chapter four.
SQ15 The broken fountain
Talk to the city guard M5(5). He is responsible for the preparation of the celebrations that are going to be held on the square, but the fountain just broke. He also cannot find the person responsible for repairs, so he will ask you to help him with the repairs.
1. Help repair the fountain
In order to repair the fountain you will need to set the levers in the right order, beginning from the left: 1) up 2) down 3) down 4) up 5) down.
Use the block and the mechanism should start working again.
You will be transported to the sewers in order to fix the fountain you will need to set the levers in the right order, beginning from the left: 1) up 2) down 3) down 4) up 5) down.
Reward: 2 thalers
SQ16 The Recipe for the Potion of Power
On the market in Ducal Citadel M5 you will meet Auralia M5(7), the alchemist you've met in Avestreu M1. She will tell you about her problem with a certain recipe for a powerful potion. She doesn't know one of the components and will ask you to find someone who knows something about it.
1. Find an expert
Quest continues in chapter seven.
SQ17 The False Beard
There is a barrel in the bushes and it seems that there's someone inside it. This someone proves to be Ugin, son of Umbasha M5(12). He is ashamed to come out because he lost his beard while fighting a dog M5(14), who was stealing his chicken. He will ask you to find a replacement beard for him - the best possible one would be the fur of the dog he fought.
1. Find a replacement beard
Head to the place dwarf told you about and you will be attacked by a wild dog. Kill it and you will receive a thick fur which will make for a perfect beard.
Reward: fur
2. Take the fur to the dwarf
Ugin will be extremely pleased when you'll hand him his new beard. He will put it on and come out of the barrel, rewarding you for your help.
Reward: 3 Ducats
SQ18 The Escaped Dancing Bear
Animal Tamer M2(11) has lost his bear M2(12). It is standing by the river but is not willing to come back. The Tamer will ask you to try and tame the bear.
1. Pacify the bear
Option 1: A character with high Animal Lore may tame it just using words.
Option 2: Treat Fluffy with a Be Calm spell.
SQ19 Salina's Request
You will meet your old friend M2(13) near the temple of Hesinde M2(2). Salina will tell you that Dranor has been captured. He will ask you to help free him and explain her plan - you're supposed to get inside the prison through an old tunnel leading from Brewery.
1. Get inside the brewery
Go to the brewery and talk to the dwarf Muddlemosh M4(11). Offer him to get rid of the rats living in the cellar and you will receive a new quest: SQ20 The Plague of Rats.
2. Free Dranor from his cell
When you'll reach the holding cells M4.2(7) and try to free Dranor you will learn that he doesn't want to get out. He thinks he's not guilty and will remain in his cell until someone proves his innocence. The task, obviously, is falls into your hands. You'll need to find the merchant who accused him of stealing.
3. Merchant Wulfric Harpel
The Merchant M5(13) can be found in the Ducal Citadel M5. Talk to him about the stealing of the chronograph supposedly conducted by Dranor. Then talk to his daughter, Viola M5(13). There are some differences in what they've said to you - Wulfric didn't tell you everything and Dranor had been wrongfully accused. The merchant will give you a letter clearing Dranor of all suspicion.
Reward: a letter
4. Give the letter to Barla
Go to Barla M5(9) and give her the letter. She will get mad at the merchant and release Dranor.
5. Inform Salina
Now go to Salina, and tell her about how the things turned out. When you'll reach the spot however Salina will be gone - her brother will be the only one around. Tell him about Dranor's release and ask him to convey the message to his sister.
SQ20 The Plague of Rats
You will need to initiate SQ19 Salina's Request and head to Port Ugdan to talk with the dwarf Muddlemoshem M4(11) to get this quest.
1. Find the Source of the plague of rats
You will need to go down to level 5 and enter the lair of the rat queen M4.2(21).
2. Kill the rat queen
The fight with the rat queen is pretty challenging as she is quite resilient and waves of smaller rats are making the whole thing even more difficult. Once you'll kill her search her body to find a magic ring.
Reward: Ring of Life (Hit Points +10)
3. Relate the situation to major-domo
Return to major-domo, and he will give you the money.
Reward: 20 Ducats
SQ21 The Dine-and-Dasher
Head to the "Fleet Footed Ferret" M4(1) in Port Ugdan, then talk to innkeeper Pebblebush M4.1(2). He has a problem - one of his clients has been drinking on a tab and disappeared without paying it. Head to the "Silver Pitcher" M2(10) in Praios Square, where the fraud has last been seen.
1. Gather information at the "Silver Pitcher"
Head to the "Silver Pitcher" and talk to the innkeeper M2.1(3), to learn that dwarf Regash M2(14) has just left.
2. Locate Regash
Leave the inn and you'll see a red bearded dwarf standing by the stalls. Approach and talk to him:
Option 1: Regash will pay you 5 thalers for not turning him in.
Option 2: When Regash offers you 5 Thalers haggle and he will pay you 3 Ducats.
Option 3: Threaten to call the guards and he will promise to go back and pay his tab.
Option 4: Threaten to call the guards and use Human Nature to learn something about the dwarf. At the end of the conversation he will promise to pay the debt.
Reward: you can receive between 3 Ducats and 5 thalers
3. Inform Pebbelbush
Return to innkeeper Pebbelbush and tell him that you've met the dwarf. If you've chosen options 3 or 4 the innkeeper will pay you 3 Ducats.
Reward: you can receive 3 Ducats
SQ22 The Bar Brawl
Innkeeper Ibrom Soapstone M3.2(3) will ask you to break the fight between two of his guests.
1. Break the Brawl
There are three ways you can end the fight.
Option 1: Threaten them
Option 2: Use fast talk and convince them to go to the "Fleet Footed Ferret".
Option 3: Join in the fight and land a few blows - this scare the fighters off.
Then talk to the innkeeper, who will thank you for solving the situation.
SQ23 A Charitable Donation
In the Wagoner's Home M3 you will meet a beggar M3(9) asking for some money. You can give him either 1 Farthing, 1 Thaler or 1 Ducat. If you want to pay him as little as possible give him 1 Farthing twice and 1 Thaler once. Thankful for the donation the beggar will tell you about two thieves M3(10) talking about their loot.
1. Gather information
Go near the thieves and listen to them from a safe distance. After they're done talking they will go to hide the loot. Follow them but don't get to close.
2. Find the loot
Loot will be hidden in a chest M3(11) on a wagon. Once the thieves are gone, approach the wagon and gather the valuables.
Reward: Necklaces, rings, jewels
SQ24 A question of honor
Cano M3.1(5) has a special assignment for you - you'll need to get inside the Dark Eyes hideout M3(8) and retrieve Hammer of Growina.
1. Get Inside the Dark Eyes hideout
Jallik will await you near the entrance to the compound. Talk to him and get inside.
2. Find the hammer of Growin
Hammer rests in a chest M3.4(4) at the end of the room, it is, however, guarded. Get onto the ladder M3.4(2) and destroy the wooden ledge M3.4(3). This will cause the thug to abandon his post now use the other ladder M3.4(5) to get to the floor level, open the chest and grab the hammer. Get back on the ladder M3.4(5), get to the other side of the room and leave the hideout M3.4(1).
3. Don't let yourself be recognized
You will have to keep on sneaking and stay clear of the thugs in order not to get noticed. If any one of them notices you, you will be forced to fight and receive a quest SQ25.5 Get rid of the witnesses.
4. Give the Hammer to Jallik
Give the hammer to Jallik M3(8).
Reward: Gloves of the Shadow (Dexterity +3)
5. Get rid of the witnesses
You will receive this quest if you fail SQ24.3 Don't let yourself be recognized. You and Jallik M3(8) will have to kill the attacking bandits.
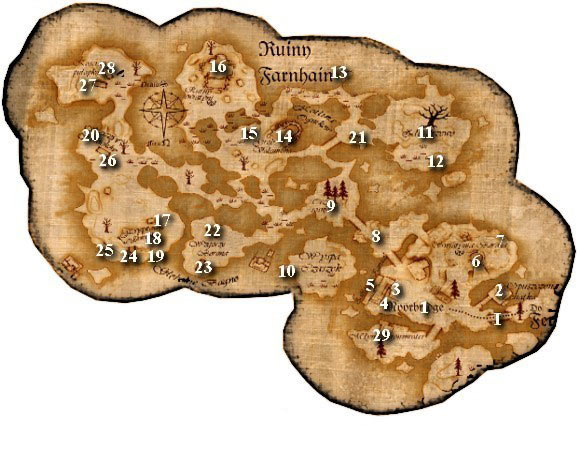
Maps: M6. Moorbridge Marshes
Exits:
I. World Map
Important characters and locations:
1. The Square - when you first arrive at this location you will witness a scene between Bredo Bento and the sheriff
2. Bredo Bento
3. Muddy Boot
4. Leadfinger the Blacksmith - he will appear after you get back from the peat bog. Before talking to him make sure you have a shovel - he will reforge it into a sword for free
5. Rats
6. Temple:
Morlinde - you will meet her here after completing SQ25.2 Locate Morlinde in Moorbridge
7. Treasure Map - you will find it during SQ30 And Old Treasure Map.
8. Ambush - after you return from the marshes you will be attacked by the sheriff and the local militia. If you found any proof of the sheriff's involvement in the undead plague, you should be able to convince the militia to your side. The possible proofs are:
Proof 1: Complete the SQ26 Wolf rats of Moorbridge and don't take the money from the innkeeper and then pay for everyone's drinks for the night. The innkeeper will tell you that something is troubling one of the militiamen. Talk to Mirosh about the sheriff, then go and talk to Ilra.
Proof 2: In one of the crypts M6(22) you will encounter two graverobbers. If you manage to convince them not to fight you and then use Human Nature on them, they will tell you that they've seen sheriff in the marshes.
Proof 3: Before fighting the necromancer approach the ruins from behind and listen to him talking about his cooperation with the sheriff.
9. Undead Rufus
10. Treasure Barrel
11. Evil Tree, Gwendala
12. Mandragor
13. Treasure Barrel
14. Rakorium, Novice Nottel
15. Grave with buttons
16. Ruins
Necromancer
17. Fourth mercenary's grave
18. Harpy egg
19. Graves of three mercenaries
20. Treasure chest
21. Crypt with deont Morlinde inside
22. Crypt with graverobbers inside
23. Crypt to which Thalya will lead you
24. Crypt
25. Crypt with a sarcophagus. Inside you will find the treasure connected with the SQ30 An Old Treasure Map
26. Crypt - inside you will find a rock goblin
27. Crypt
28. Crypt
29. Mill
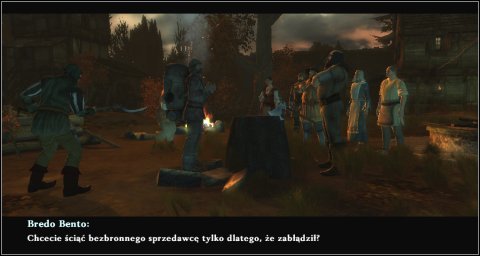
Upon your arrival to Moorbridge you will see a vendor you've met in Avestreu, Bredo Bento surrounded by peasants. Burgumil Scheffler leading the group will accuse the trader of being undead. Bredo will call on you for help. Talk to the sheriff and convince him that he is mistaken. Once the group dissolves you will be able to talk to Bredo. He will tell you that he has something to deliver to deont Morlinde, who has recently gone missing. Thankful for saving his skin the trader will give you a jar of leeches and a crypt key.
Quest order:
Q7.2 Find master Rakorium
Q7.3 Look for Rakorium in the marshes
Q8.1 Eliminate the undead plague
Q8.2 Pass news to Rakorium
Q8.3 Provide the ingredients for rock acid
Q8.4 Return to the temple of Hesinde
Q7 The Addled Mind in Moorbridge (continued)
2. Find master Rakorium
Enter the inn M6(3) and ask the locals about the mage M6(14). You will learn that some time has passed since he disappeared into the marshes. Head north west - on your way you will be attacked by a zombie. After taking a closer look at him you will recognize him as one of Rakoriums, novices Rufus M6(9). You will be forced to kill him, but you will find Rakorium's recipe book, which will come in handy later on.
Reward: Rakorium's recipe book
3. Look for Rakorium in the marshes
After the encounter with Rufus you should be certain that Rakorium is somewhere in the marshes. The shining dome seems like a good trace - head towards it and you will see Rakorium along with his second novice, Nottelem hiding behind the magic shield. Exterminate the undead trying to get through the mage's defences, then talk to Rakorium who seems to be preoccupied creating rock acid, but cannot really focus due to the constant onslaught of the undead. He will ask you to find and eliminate the source of the plague.
4. For Rakorium
You have to complete Q8.1 A Magician's Worries and Q8.3 Provide the components for rock acid, and then deal with Valonion.
Q8 A Magician's Worries
1. Eliminate the undead plague
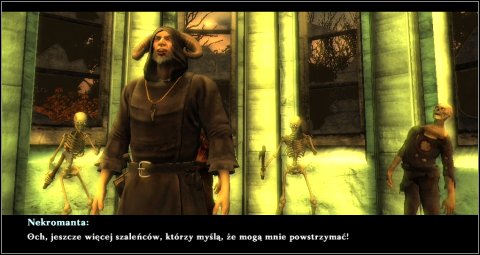
You will have to find the source of the undead. Head towards a small isle to the north west - it seems that the undead are coming from the ruined temple M6(16) which happens to be a lair of a necromancer. If you decide to circle the temple before going inside to fight the evil mage you may learn some interesting things about the sheriff. Once you're done listening enter the temple and kill the necromancer, to end the undead threat. During the fight focus on the mage - the skeletons will crumble once he is defeated.
2. Pass the news to Rakorium
You will now have to get back to Rakorium M6(14) and tell him about what's happened.. The magician will be very pleased and will reveal what does he need the rock acid for. He will also take the recipe book, you've found on Rufus' body. He will take a close look at the recipe and ask you another favor.
3. Provide the ingredients for rock acid
You are supposed to bring him three specific ingredients to make the acid. Once it is complete watch as it dissolves the crystal. Once the magician gets what he wants the lizard statue will come to life and attack the mage and his student. Once they both hall unconscious to the ground it will be up to you to fight Valonion. On his body you will find Greaves of fire. Once Rakorium and Nottel awake the magician will decide to go back to Ferdok, to analyse the crystal but he will promise you that you will meet again.
Reward: Greaves of fire
3.1 Find some mandragor
Mandragor M6(12) can be found near the evil tree M6(11).
3.2 Bring the yolk of the harpy egg
Harpy egg M6(18) can be found in a nest on the edge of the cliff. Before taking it you will have to fight some harpies.
3.3 Get the teeth of a rock goblin
Rock goblin can be found in a crypt M6(26). It's quite strong but it fights alone, so should be much of a challenge.
4. Return to the temple of Hesinde
You have completed the quest ordered by the Oracle you now have to return to Ferdok. Head to the temple of Hesinde M2(2), to tell Dorion M2.2(2) about your success. The Oracle, will speak to you again entrusting you with yet another mission. Talk to Dorion and ask him about the interpretation. Time to go to the Blood Mountains.
End of chapter four!
SQ14 The Boltan Card Trick (continued)
1. Find the thief
You will find the thief in the inn M6(3). She claims to have been cursed. You can help her by following her into the marshes, but not before the undead are dealt with.
2. Deal with the undead plague
You need to complete Q8.1 Eliminate the undead plague.
3. Tell Thalya about your success
Return to Thalya and tell her that the undead are gone.
4. Lead Tayle through the marshes
Follow Thalya to the crypt she mentioned M6(23). Once you'll reach the spot she will open the door and let you inside.
5. Save the cursed one
The crypts holds the remains of her lover - Ailric Farfar. Ailric will keep Thalya within the crypt unless she pays him 27 Ducats. Since she doesn't have the money you'll have to pay. Once you'll do that Ailric's soul will be free. Be sure to pick up a rapier from his remains.
Reward: Rapier of Fanfare (1K+5, 25% chance of dealing a deep wound)
6. Collect the unpaid debts
Return to the inn where Thalya was supposed to await you. You'll find out that she's not there and that she has robbed innkeeper Pebblebeer.
7. When it rains, it pours
Head to the mill M6(29), where Thalya will be waiting for you.
8. The meeting in the old mill
She will explain to you why she stole the money and will give it back.
Reward: Chain, innkeeper's money
9. Return the stolen money to the innkeeper
Return the stolen money to innkeeper Pebbleber of Moorbridge and Ibrom from Wagoner's Home.
SQ25 The Boron Deont of Moorbridge
You will receive the quest at the beginning of the chapter from Bredo Bento.
1. Search for Morlinde in the marsh
Morlinde M6(21) is in one of the crypts. The key to the door can be found on necromancer's body M6(16).
2. Find Morlinde in Moorbridge
After freeing Morlinde you will have to meet with her in Moorbridge. She can be found at the temple M6(6).
Reward: Hammer 1D+4
3. Meet with Bredo Bento
When talking to Morlinde be sure to mention Bredo Bento M6(2), and then head off to tell him that he can meet the deont.
Reward: Perfume
SQ26 The wolf rats of Moorbridge
Innkeeper Pebblebeer will tell you about his rat problem M6(5) the creatures are swarming behind the inn - go out and wipe them out.
1. Tell the news to the innkeeper
Go back to the innkeeper and tell him that you have killed off the rats.
Option 1: Innkeeper will pay you for your help.
Reward: 4 Thalers
Option 2: You'll refuse to take the money.
SQ27 An Elf in Distress
Running around the marshes you will encounter an elf M6(11) who is being held prisoner by the evil tree. The only way to release her is to destroy the tree.
1. Destroy the evil tree
The fight with the tree is not easy. You will be under constant attacks from the dragon plants and fireflies, but focus on the tree, because the fireflies will keep on appearing until you kill it. It appears that killing the tree does not resolve the problem - the roots are still holding the elf in place. She thinks that you should enter the trunk and meet with her ancestor, who may be responsible for the whole situation. The tells you to take the flute, that belonged to her ancestor.
2. Calm the uneasy spirit
Enter the tree and talk to the elven ghost.
Option 1: Give him the flute and let him leave in peace.
Option 2: Persuade him that he doesn't really need the flute.
Option 3: Fight the ghost.
Reward: If you decide to go with options 2 or 3 you will receive Soul Instrument (Charisma +2)
2.1 The elven ghost had been defeated/convinced to leave
After the talk/fight the ghost will leave.
3. Talk to Gwendala about your success
Now is the time to talk to Gwendala. She will be happy you managed to solve her ancestral problem, no matter how you did it. Thankful, she will join your party.
SQ28 The Burial Jewelry
In one of the crypts M6(22) you will be attacked by two graverobbers.
Option 1: Fight them. If you kill them you will receive the burial jewelery.
Option 2: Try to resolve the matter without bloodshed. Tell them you've killed the necromancer and use Human Nature to find out that they were responsible for locking up Morlinde. Continue the conversation and try to convince them to stop robbing graves. At the end of the conversation they will hand over the burial jewelry.
Now head to the temple and talk to Morlinde. Give her the jewelry to receive experience.
SQ29 The Cleansing of the Crypts
Morlinde M6(6), will give you this quest after you've completed SQ25.2 Find Morlinde in Moorbridge. There are eight crypts. Enter each of them and clear the altar. Once you're done, report to Morlinde.
Reward: 7 Ducats, 2 x healing potions
SQ30 An Old Treasure Map
In the inn M6(3) talk to the gardener Wigur. He will tell you about Krobber's treasure. Go to gardener Krobber and mention the treasure. He won't give you anything solid until you complete the SQ25.1 Search for Mordlinde in the Marshes
1. Find the treasure map
Map M6(7) can be found in the cave between two bottles.
2. Solve the puzzle
2.1 First part of the puzzle
Read the description on three graves M6(19).
2.2 Second part of the puzzle
Read the description on the fourth grave M6(17).
2.3 Third part of the puzzle
You'll have to press the bottommost button on this grave.
Mouse over the warrior's mouth - the description will change and now say "a button". Press it, to get the treasure.
Near the place where you met Rakorium is a grave with three buttons M6(15). Press the bottommost one to receive a key and a piece of paper.
2.4 The missing fragment
Even though you've found the next puzzle you're still missing a piece. You have to complete SQ30.2.6 Find the lock, to solve the mystery.
2.5 The fourth part of the puzzle
Enter one of the crypts M6(25). You'll be able to open the door using the key you received at the beginning of the chapter from Bredo Bento.
2.6 Find the lock
There is a sarcophagus in the back of the crypt. Mouse over it's mouth and you'll find a hidden button. Pressing it will open a secret cache with treasure in it.
Reward: Tenobaal's arrows recipe, 5 x Tenobaal's arrow
Maps: M7. Blood Mountains
Exits:
I. World Map
Important characters and locations:
1. Yasmin
2. Bandit ambush
3. Warina, follower of Praios
4. Arngeld
5. Quartermaster
6. Grand Inquisitor da Vanya
7. Woodcutter Holdwig
8. Danos
9. The Mansion in the Dark Forest
10. Kitchen
11. Alvina
12. Knowall
13. Fat firefly
14. Magic tree
15. Magic tree
16. Magic tree
17. Inquisition encampment:
Enchanted pot
18. Saphira
19. Berndrik
20. Ronkwer
21. Humbert
22. Path leading to witches' meeting grounds.
23. Witches' meeting grounds
24. Ruined castle
25. Ruin entrance
Maps: M7.1 Ruins
1. Entrance
2. Down to level 2
3. Back to level 1
4. Cultists
5. Block
6. Down to level 3
7. Back to level 2
8. Jost
9. Down to level 4

10. Back to level 3
11. Kastan Gamblack
12. Book of the Serpent
13. Exit
The chapter begins with a sight of a magical barrier surrounding the ruins you're supposed to reach. In order to get through the field you will have to ally yourself with one of two forces operating in the area: the witches or the inquisition. Depending on which side you choose you will find different ways around the barrier.
Quest order:
INQUSITION:
Q9a.4 Join the Sun Crusade
Q9a.4.1 Kill witch Yasmin
Q9a.4.2 Take the talisman to Warina
Q12a.1 Talk to da Vanya
Q12a.6 Find the mansion in the Dark Forest
Q12a.3.1 Find out Alvina's weakness
Q12a.3.2 Arrest Danos
Q12a.3.3 Take Danos to Praiotes camp
Q12a.3.4 Break the ambush
Q12a.3 Kill Alvina
Q12a.4.2 Talk to Berndrik
Q12a.4.3 Kill the toads in the pond
Q12a.4 Kill Morla
Q12a.5.1 Find out Saphira's weakness
Q12a.5.2 Destroy Saphira's hut
Q12a.5 Kill Saphira
Q12a.7 Report to da Vanya
Q12a.8.1 Find the witches' meeting place
Q12a.8.2 Summon Heidrune
Q12a.8 Defeat Heidrune in the witches' meeting place
Q12a.9 Defeat da Vayna
WITCHES:
Q9b.4 Help Yasmin
Q9b.4.1 Steal sacramental wine
Q9b.4.2 Take the wine to Yasmin
Q12b.2. Earn Morla's trust
Q12b.2.2 Save Knowall from the Praiots
Q12b.2.1 Take Knowall to Morla
Q12b.3. Earn Alvina's trust
Q12b.3.1 Take the bracelet to Danos
Q12b.3.2 Return to Alvina
Q12b.4. Earn Saphira's trust
Q12b.4.1 Find Saphira's pot
Q12b.4.2 Take the pot to Saphira
Q12b.6.1 Summon Heidrune
Q12b.7. Kill the Grand Inquisitor
SHARED:
Q9.3.1 Enter the ruins
Q9.1 Retrieve the book from the ruins
Q11 Return to the temple of Hesinde
Q9 The Stolen Knowledge
1. Retrieve the book from the ruins
On the lowest level of the ruins you will encounter the one you've been chasing after for quite some time - Kastan Gamblack M7.1(11) and a mysterious hooded figure. They will be talking about the released dragon and the slain Grand Inquisitor. Once they see you, the hooded figure will disappear and you will have to fight the cultists. After dispatching them approach the pedestal and grab the Book of the Serpent M7.1(12).
Reward: Book of the Serpent
2. Penetrate the magical barrier
2.1 Destroy the magical shield
You have to complete either Q12a Praiots in Blood Forest or Q12b The Witches of the Dark Forest.
3. Find out the secret of the ruins
3.1 Enter the ruins
The ruins entrance M7(25) is on the far side of the castle. In order to get there you will need to hack your way through groups of cultists.
3.2 Find the Book of the Serpent
Book of the Serpent can be found on level 4.
Q10 Like a Shadow
1. Reach the heart of the ruins undetected
You cannot get noticed before reaching level 4. In order to do that one of your party members needs to be able to disable the traps as there are quite a few on level three and springing anyone of them means the failure of this quest. If you manage to complete this quest the number of the cultists on the 4th level will be considerably smaller.
Q11 Return to the temple of Hesinde
Leave through the back exit M7.1(13) and return to the temple M2(2). When you're there, talk to Dorion M2.2(2) and give him the Book of the Serpent. You will get to listen to the Oracle once more. This time Dorion won't be able to interpret it but he will point you to a person who will - Ardat Whitecliff M2.2(2). You will learn that the next part of your quest will take place in the Grimtooth Castle, but first you will need to talk to Gerling, duke's advisor who is responsible for diplomatic contacts with the lord of the castle.
End of chapter five!
INQUISITION:
Q9a Stolen Knowledge
4. Join the Sun Crusade
At the entrance to the Inquisition Camp you will meet Warina, the Follower of Praios M7(3). Talk to her and she will invite you to join the Inquisition's cause. If you'll agree, Warina will give you your first mission - you have to kill one of the witches, Yasmin M7(1).
4.1 Kill witch Yasmin
You will join the Inquisition once you complete Warina's quest
You must prove your worth by killing witch Yasmin.
Return to the witch that you've met by the bridge. Tell her that you've been recruited by the Inquisition and that she has to die. Yasmin will transform her pigs into boars and attack you. For killing her you'll get Yasmin's owl skull.
Reward: Yasmin's owl skull
4.2 Take the talisman to Warina
Take the talisman back to Warina. She will praise you for your deed and send you to Grand Inquisitor da Vanya M7(6).
Q12a Praiots in Blood Forest
1. Talk to da Vanya
You will finally get the chance to talk to the Grand Inquisitor M7(6). Tell him that you want to get through the magic barrier covering the ruins. He will tell you that the barrier will disappear once you kill the remaining witches.
Reward: Inquisition Robes
2. Kill the witches
You have to kill Alvina, Morla and Saphira.
3. Kill Alvina
After completing Q12a3.3 Take Danos to Praiotes camp and leaving the camp you will be attacked by Alvina and her wolves. Kill her, and you will receive another owl skull.
Reward: Alvina's Owl Skull
3.1 Find out Alvina's weakness
Option 1: Near the tent in the woods M7(11) you will find a chest. Inside, you'll find Alvina's Journal, which will tell you about feelings she has for Danos M7(8).
Option 2: Head to the mansion in the Dark Forest M7(9) and talk to Firniane. Tell her that you were sent by the Inquisition. In fear, she will tell you about a relationship between Alvina and Danos M7(8).
3.2 Arrest Danos
Danos can be found near the forest trail. Tell him that he's under arrest. He'll try to resist, but once you'll land a successful hit he will surrender and agree to follow you to the camp.
3.3 Take Danos to the Praiot camp
Half way to the camp you will be stopped by Firniane and some bandits. She has paid them to free her man. After the fight (Q12a.3.4 Break the ambush) continue your way to the camp. Hand the prisoner to Arngeld M7(4) and leave the camp.
3.4 Break the ambush
Option 1: Try to scare them off. If you'll succeed the bandits will just run away.
Option 2: You may pay them a few ducats to leave you in peace. The more you offer, the greater your chance of convincing them.
Option 3: Fight the bandits.
4. Kill Morla
After you kill Knowall (Q12a.4.3 Kill the toads in the pond) Morla will appear and she will be pretty angry. Kill her and take her owl skull.
Reward: Morla's owl skull
4.1 Find out Morla's weakness
You need to complete Q12a4.2 Talk to Berndrik.
4.2 Talk to Berndrik
You'll need to talk to Warina again. She will advise you to talk to Berndrik M7(19), who may have some vital information concerning the witch. Go get him. Once you'll get to the spot you'll see that the camp is being attacked by spirits of nature. Help Berndrik in fighting them off. He will be very grateful for help and will tell you, that her most treasured possession is her toad.
4.3 Kill the toads in the pond
Head to the pond Berndrik told you about. You will find there a toad by the name Knowall M7(12). Try talking to it, but it will sense you're hostile and will attack you.
5. Kill Saphira
After burning down Saphira's (Q12a5.2 Destroy Saphira's hut) house the witch herself will appear, accompanied by some nature spirits. Kill her to get her owl skull.
Reward: Saphira's owl skull
5.1 Find out Saphira's weakness
The person to reveal Saphira's weakness is the cook living in the kitchen of the M7(10) mansion in the Dark Forest. There are a few ways of getting the information from him. You'll need to use Human Nature or take the enchanted pot, from the back of the kitchen and then:
Option 1: Try to seduce the cook.
Option 2: Taunt him.
Option 3: Fight him until he surrenders and tells you what you need.
5.2 Destroy Saphira's hut
Knowing how Saphira M7(18) loves her hut in the woods head there. You'll find a burning brazier. Knock it over to set the hut on fire.
6. Find the mansion in the Dark Forest
This quest will be completed once you enter the mansion M7(9).
7. Report to da Vanya
Once all of the witches are dead (Q12a.2 Kill the witches) report it to the Grand Inquisitor to learn that there is one more thing you need to do - you need to kill the one remaining witch, Heidrune. In order to do that you will need to summon her in the special spot M7(23) using the owl skulls.
8. Defeat Heidrune in the witches' meeting place
After summoning the witch (Q12a.8.2 Summon Heidrune) talk to her. You won't be able to tell her much as the Grand Inquisitor will appear and talk to Heidrune. When he's done he will transform into a lizard-like creature and his knights will reveal themselves as dragon cultists. The lizard will cast some kind of spell on the witch and then it will turn against you.
8.1 Find the dancing place
The magical spot can be found in north-eastern part of the map M7(23).
8.2 Summon Heidrune
Heidrune can be summoned by placing the owl skulls on the right statues.
9. Defeat da Vayna
Focus your attacks on the Grand Inquisitor. He is pretty tough so you need to take him down as soon as possible - the cultists may wait a bit. After the fight search the body - you'll find quite a lot of money and some valuable items. Talk to Heidrune.
Reward: Fire Opals
WITCHES:
Q9b Stolen knowledge
4. Help Yasmin
You will encounter the first witch just after passing the bridge. It will be Yasmin M7(1). Tell her that you need to get to the ruins. She will offer to help you if you'll bring her the ceremonial wine from the Inquisition camp.
4.1 Steal the ceremonial wine

One of the ways to get the quartermaster to move is letting out the hens...
And telling him about it
Take the path to the camp - it is guarded by Warina, the Follower of Praios M7(3). She will let you in only if you promise to kill Yasmin.
Now go to talk with the Quartermaster M7(5). You need to convince him to allow you inside the tent so that you can take the wine. You have a few options of doing that.
Option 1: A female character may attempt to seduce him.
Option 2: Pay him a couple of ducats, to turn his head the other way.
Option 3: One of the Quartermaster's responsibilities is keeping the hens safe. Open the pen they're kept in and let them out, then run back to the Quartermaster and tell him about the situation. He will run off after the hens allowing you access to the wine.
Reward: Ceremonial wine
4.2 Take the wine to Yasmin
Once you have the wine take it back to Yasmin. Give her the bottle and she will tell you that you've passed the test and will get help from the witches. You will also receive an owl skull, which will come in handy later.
After the conversation Warina and a few soldiers will appear. She will consider you a traitor and attack you. From this point on Inquisition soldiers are your enemies.
Reward: Yasmin's Owl Skull
Q12b Witches of Dark Forest
1. Earn the witches' trust
The quests for the witches can be performed in any order with one notable difference - if you complete Q12b.2 Earn Alvina's before Q12b.1 Earn Morla's trust, there will be an ambush awaiting you in the mansion M7(9) When you enter the mansion Firniane, Danos' girlfriend will sell you out as the supporter of the witches and a group of Inquisition soldiers will attack you.
2. Earn Morla's trust
Morla can be found in the mansion M7(9). Ask what can you do for her and she will tell you about her favorite pet gone missing - it's name is Knowall M7(12).
2.1 Take Knowall to Morla
After completing 12b.2.2 Save Knowall from the Praiots take it to Alvina's camp M7(11).
2.2 Save Knowall from the Praiots
Knowall can be found by the pond. Nearby there's an Inquisition squad lead by Berndrik whose sole purpose is to wipe out the toads who seem to be spying for the witches. Talk to him and try to resolve the situation.
Option 1: Talk to him about his mission and try using Flattery.
Option 2: Lie to him and tell him that the Inquisition camp is under attack. Before he believes you he will test your knowledge of the Grand Inquisitor da Vanya. The correct answers are: 1) a 2) c 3) c. Berndrik will believe you and pull his men back to the camp.
Option 3: Fight the soldiers.
Knowall will thank you for the rescue and jump into your pocket. Take him to Morla, who you'll find in Alvina's camp M7(11). Witch will he very pleased with you and will give you her owl skull.
Reward: Morla's owl skull
3. Earn Alvina's trust
Alvina M7(11) has her camp in the middle of the forest. Meet with her and listen to the accusations she makes towards her lover. Ask whether you could help her and she will give you a cursed bracelet that you are to give Danos M7(8).
3.1 Take the bracelet to Danos
Go to Danos and convince him to wear the bracelet:
Option 1: Tell him that you will sell it to him for 1 Thaler.
Option 2: Tell him it's a gift from Alvina, and then try to fast talk him into believing that it's her of reconciling with him.
Option 3: Tell him it's a gift from Alvina and force him to wear it.
3.2 Return to Alvina
Once Danos puts the bracelet on he will turn into a toad and Alvina will appear and thank you for help. In return she will give you her owl skull.
After completing this quest an ambush will await you in the mansion M7(9) Firniane, Danos' girlfriend will sell you out as the supporter of the witches and you will be attack by a squad of Inquisition soldiers.
Reward: Alvina's owl skull
4. Earn Saphira's trust
Saphira M7(18) can be found by her hut in the woods. She wants you to go to the Inquisition camp and retrieve her enchanted pot.
4.1 Retrieve Saphira's pot
pot can be found in the Inquisition camp M7(17). There are two ways you can get it:
Option 1: Notice, that the guard has moved away from the camp and sneak in.
Option 2: Enter the camp and kill the guards.
4.2 Take the pot to Saphira
Take the pot back to Saphira, to receive her owl skull.
Reward: Saphira's owl skull
5. Break the ambush
After completing Q12b3 Earn Alvina's trust there will be an ambush awaiting you in the mansion M7(9) you will have to fight some Inquisition soldiers
6. Talk to Heidrune
6.1 Summon Heidrune
Having all four owl skulls you can head down to the witches' dancing place M7(23). You now have to summon Heidrune, the oldest witch. Place the skulls on the appropriate statues and watch Heidrune appear. Talk to her to learn that the barrier has been created by a mage - if you kill him, the barrier will fade away. Soon, Grand Inquisitor da Vanya will arrive.
7. Kill the Grand Inquisitor
Witch will order him to assume his original form and he will turn into a lizard-like creature. Fight him and his cultist-transformed companions and watch the cinematic after you bring him down. After the fight search the body - you'll find quite a lot of money and some valuable items. Talk to Heidrune - she will tell you some very interesting things.
Now, since the barrier no longer protects the ruins you may continue your pursuit of the Book of the Serpent. On your way to the ruins you will encounter the witches, who will hand you some very valuable presents, though what you get exactly depends on how much blood you've shed - the less, the better.
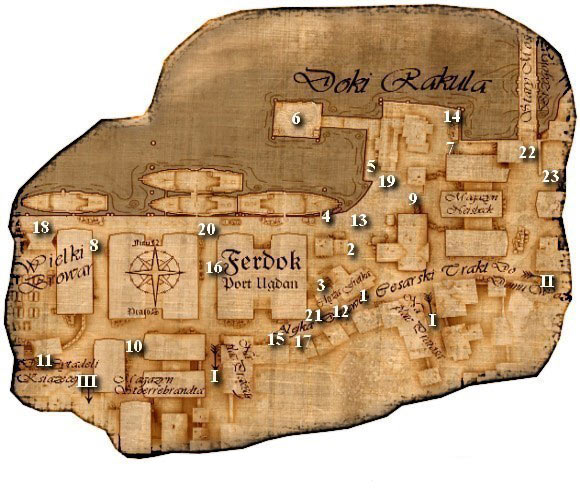
Ferdok:
SQ13 For a handful of Ducats (continued - house Neisbeck)
2. Malt and hop
Pagol Babek M4(9) has another work for you. This time you will have to force Storrebrandt messenger M4(12) to hand over the delivery receipt.
2.1 Get the delivery receipt
Messenger can be found near "Fleet Footed Ferret".
Option 1: Taunt him to give you what you need.
Option 2: Haggle with him - getting what you need will cost you only 2 Ducats.
Option 3: Fight him and rob his body.
Reward: Deliverer's notes
2.2 Go to the harbour
Go to the harbour and talk to the Stoerrebrandt's port worker M4(13). Show him the document and collect the secret ingredient.
2.3 Take the package to the warehouse
Take the ingredient to Pagol Babek.
Reward: 10 Ducats
3. Beer trouble
Talk to Pagol Babek. He will have another quest for you - you have to bribe the Guard Commander Tashman M4(14). In order to do this you will receive 60 Ducats.
3.1 Bribe the guard commander
Give Tashman the money and then follow him in search of the "culprits".
3.2 Find the culprits
Tashman will find two robbers M4(15) and after the conversation he will attack them. Join in and kill the robbers.
3.3 Report your doubtful success
Get back to Pagol Babek and tell him what's happened.
Reward: 12 Ducats
4. Exclusiveness contract
Pagol Babek has one final mission for you in this chapter. You need to kill Stoerrebrandt's negotiator M4(18) and strike a deal with the brewery owner.
4.1 Stop the agreement
Head to the brewery where the negotiations are taking place. Talk to the workers and the negotiator and kill them.
4.2 Strike a deal
Threatened by what you did brewery owner won't refuse signing a contract with house Neisbeck.
4.3 Take the contract back
Return to Pagol Babek and hand him the contract.
Reward: 20 Ducats
SQ13 For a handful of ducats (continued - house Stoerrebrandt)
2. Malt and hop
Talk to Laran Dykemiller M4(10). He will ask you to escort a transport from the harbor to the "Lager Beer of Ferdok" brewery.
2.1 Report to the harbor
Head to the harbor and talk to the port worker M4(13). He will let you take the secret ingredient that's on the wagon.
Reward: Secret ingredient
2.2 Deliver the ingredient to the brewery
On your way you will be attacked by a few Dark Eye members. Kill them and talk to the brewery owner M4(18).
Reward: Brewery payment
2.3 Deliver the money
Take the money you've gathered to Laran.
Reward: 10 Ducats
3. Beer trouble
Laran Dykemiller will have another mission for you. You have to talk to the Guard Commander Tashman and tell him that you've been attacked during the transport mission.
3.1 Attack report
Go talk to Tashman. He will refuse taking the case, but you can use Fast Talk to convince him. If this doesn't work you can also haggle with him, but you'll have to pay around 30 Ducats - the exact price depends on how good are you at haggling.
3.2 Find the culprits
Follow Tashman to the spot where you'll encounter two robbers M4(15). He will talk to them and then kill them.
3.3 Report your doubtful success
Return to Laran and tell him what's happened.
Reward: 12 Ducats
4. Exclusiveness agreement
There's one final quest for you to complete in this chapter. You will have to work as a bodyguard for the negotiator.
4.1 Escort the negotiator
Follow the negotiator to the brewery M4(18).
4.2 Watching over the negotiations
Negotiator will begin talking to the brewery owner, and your job will be protecting them. Soon you will be attacked by a group of Dark Eyes.
4.3 Take the negotiator to safety
You'll need to escort the negotiator to Laran Dykemiller.
Reward: 20 Ducats
SQ31 The worried old woman
On Praios Square you will meet an Old Woman M2(15) shouting for help. Her husband - Hugo has fallen off a high threshold and requires help.
1. Bring the healer
You need to go and fetch a healer from the Ducal Citadel - you'll find him near the temple of Praios. Approach follower Peraine and talk to him. You will learn that the healer knows the couple and will tell you to give Hugo herbal tea.
2. Take the tea to the old woman
After being given the tea, Hugo will get up and head out to work.
SQ32 The Giant Firefly Eggs
Fireflies have spread wide throughout the Wagoner's Home. Your mission is to destroy their eggs laying all around the district M3(12, 13, 14, 15 and 16).
SQ33 The Snuffbox
In Port Ugdan you can encounter a rich man M4(16). Talking to him you will learn that while he was at "Miss" Iriane's M4(17) place he left his precious snuffbox. You can get more out of him using Human Nature. This will tell you that Iriane is a courtesan.
1. Retrieve the snuffbox from Iriane
Iriane is standing nearby talking to a suspicious looking character. When you get close she will ask you to get rid of the thug.
Option 1: You can try Taunting him - if you'll succeed he will just run away. If it results in a failure you will have to beat him up.
Option 2: Beat up the thug.
Talk to Iriane. She will thank you for your help and give you the snuffbox, asking to give him regards from the "Sweet cake".
Reward: Snuffbox
2. Return the snuffbox to the owner
Return to the rich man. He's right where you left him, but this time he's talking to his wife.
Option 1: Give him the snuffbox with regards from "sweet cake" or just tell him that you have the snuffbox but don't use Fast Talk. His wife will get pretty mad upon learning of his infidelity. You won't get any reward but will be able to listen to a rather interesting dialog.
Option 2: Give him the snuffbox with regards from "sweet cake" or just say that you have the snuffbox, then use Fast Talk. You can also use the line beginning with "Good man..." - each of these options will result in a reward, though the last one doesn't require you to use Fast Talk.
Reward: 1 Ducat
SQ34 Changing of the Guard
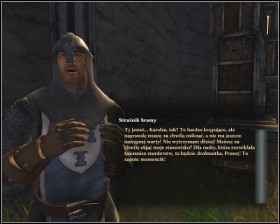
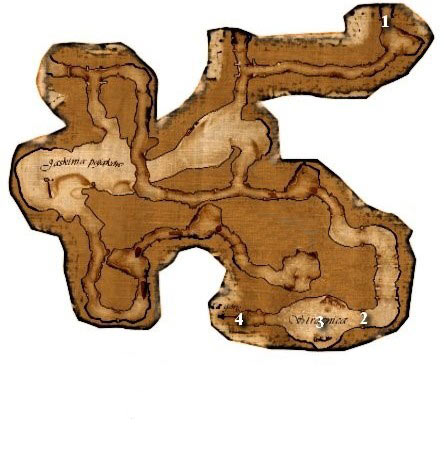
Gate Guard needs to go on the side and wants you to take over for a few minutes.
Allow the first two people in but halt the third one - this woman is a famous con.
By the entry gate to the Ducal Citadel you'll meet a guard M5(1) that requires your help. He needs to go on the side and wants you to take over while he's gone. When the first two men approach, tell them that they look suspicious but then use Human Nature to learn that you're wrong. The third person is a woman tell her that you suspect her of being the Fox and then use the social skills to confirm it. Fox will admit you're right and leave the city. Then the guard will return and thank you for your help.
Blood mountains:
It's good to complete the sidequests before siding with either witches or the Inquisition as some quest may become unavailable once you choose your side.
SQ35 Robbers and bandits
Upon entering the Dark Forest for the first time you will be attacked by bandits M7(2).
1a. Defeat the bandit groups
Tell that you won't pick sides and fight both groups. In future you will be attacked by both Ronkwer's and Humbert's men.
1b. Defeat Ronkwer's men
Join Humbert's men and fight the other group.
1c. Defeat Humbert's men
Join Ronkwer's men and fight the other group.
2. Challenge Humbert in his camp
Head to Humbert's M7(21) camp and talk to him.
3. Challenge Ronkwer in his camp
Head to Ronkwer's M7(20) camp and talk to him.
SQ36 New rule
You need to complete SQ35.3 Challenge Ronkwer in his camp
1. Get rid of Humbert
Bandit leader M7(20) will ask you to kill his enemy - Humbert M7(21) Head to his camp, talk to him and then attack him. Plunder his camp and head back to Ronkwer.
2. Report to Ronkwer
Ronkwer will refuse to pay you. If you want to fight him, tell him that you've plundered Humbert's camp or that you want your gold.
SQ37 Intruders
You need to complete SQ35.2 Challenge Humbert in his camp
1. Kill Ronkwer
Bandit leader M7(21) will ask you to kill his enemy - Ronkwer M7(20). Head to his camp, talk to him and then attack him. Plunder the camp and head back to Humbert.
2. Report to Humbert
After reporting to Humbert you will receive your reward.
Reward: Key to the chest in the ruins
SQ38 The Salmon Pool
At the pond you will encounter a talking toad - Knowall M7(12). It will ask you to bring him some fat firefly meat, which he will exchange for a treasure.
1. Find giant firefly meat for Knowall
In the east you will come across a fat firefly M7(13). Kill it to get the meat.
Reward: Firefly meat
2. Take the firefly meat to Knowall
Take the meat to Knowall. Pleased, it will give you it's treasure.
Reward: Knowall's Ring (Agility and Dexterity +1)
SQ39 Woodcutter's Lunch
In the middle of the forest you will find woodcutter's camp. Talk to them and they will tell you that their friend, Holdwin M7(7) was supposed to bring them lunch but hasn't come back yet. There are worried about what may have happened to him and ask you to find him.
1. Find the missing woodcutter
Holdwin can be found north of the Praiotes camp. He is surrounded by Ronkwer's bandits.
2. Save the woodcutter from the bandits
Talk to the bandits.
Option 1: If you've killed Humbert - SQ36.1 Get rid of Humbert you can tell them that and use Fast Talk to convince them to run away.
Option 2: Fight the bandits.
Holdwin will thank you for help and will hand you the lunch for the woodcutters.
Reward: Supplies
3. Take the lunch to the woodcutters
Take the lunch to the woodcutters.
Reward: 10 Ducats
SQ40 The Witch Trees (Witches)
After joining the witches - Q9b.4.2 Take the wine to Yasmin, Yasmin M7(1) will ask you to protect the magic trees which are being attacked by the Praiotes - you must kill them before they destroy the trees.
1. Tree by the bridge
Save the tree M7(15).
2. Tree in the heart of the forest
Save the tree M7(14).
3. Tree near the plateau
Save the tree M7(16).
4. Report to Yasmin
After you save the trees report back to Yasmin.
Reward: 10 Ducats, Warina's Hammer (Two-handed hammer 1D+6)
SQ40 Chop down the witch trees (Inquisition)
After completing Q12a.1 Talk to da Vanya, Warina M7(3) will ask you to cut down the magic trees.
1. Tree by the bridge
Chop down the tree M7(15).
2. Tree in the heart of the forest
Chop down the tree M7(14).
3. Tree near the plateau
Chop down the tree M7(16).
4. Report to Warina
After chopping down the trees report back to Warina.
Reward: Warina's Hammer (Two-handed hammer 1D+6)
SQ41 The frog prince
After completing Q12b.5. Break the ambush talk to the Lord Protector and Firniane M7(9). Tell the girl, that you're sorry about what happened to Danos M7(8) and that you are going to bring him back so that she can take care of him.
1. Take the toad Danos from the river bank
Go to the toad-changed Danos. Besides him, you will see Alvina.
Option 1: Talk to her and use Fast Talk or Seduce her to give you Danos.
Option 2: Talk to her and say that you give up and that Firniane will have to talk to the witch in person.
2a. Take Danos to Firniane
If in ZPSQ41.1 Take the toad Danos from the river bank you chose option 1 you can now return to Firniane and give her the toad.
2b. Give Firniane the bad news
If in SQ41.1 Take the toad Danos from the river bank you went for option 2 return to Firniane and tell her of your failure. She will go mad and run to Alvina. You can follow her to watch the witch turn Firniane into a toad as well. Talk to Alvina to make sure that the couple will be ok.
SQ42 A fine mix of spices
After completing Q12b.4. Earn Saphira's trust the witch M7(18) will give you spices that you need to give to the cook.
1. Take the mix of spices to the cook
Cook M7(10) can be found in the mansion.
Option 1: Tell him the truth about the spices. Thankful, he will give you a sword.
Reward: Engraved Sword (1D+5)
Option 2: Use Fast Talk to convince the cook, to accept the spices.
2. Relate everything to Saphira
If in SQ42.1 Take the mix of spices to the cook you went for option 2 go back to Saphira and tell her what you've done. She will be very pleased and reward.
Reward: Herb Sickle (Plant Lore +2)
SQ43 The Prisoner
In one of the rooms on the second level of the ruins you'll find an imprisoned mage M7.1(8). You need to obtain the key to his cell in order to free him.
1. Get the key from the priest
Priest M7(4) resides on first floor. If you have the Q10 Like a shadow he will be alone. Sneak up to him and pick his pockets - get the key and get back to the mage. If you're not doing Q10 Like a shadow, just kill the priest and take the key.
Reward: Jost's Key
2. Let the mage out of the treasury
Release the mage. Jost will be very thankful and will offer to join your party.
Maps: M8. Over the Silver Waterfall
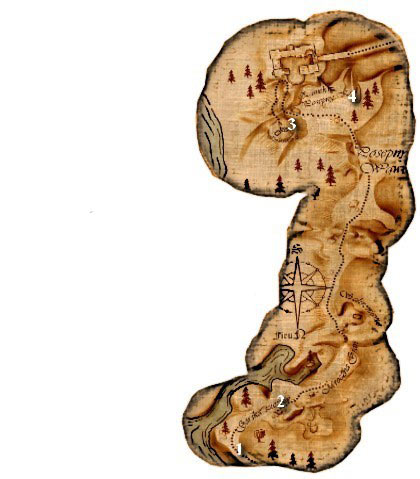
1. Location exit
2. Mercenary Humbold
3. Secret passage
4. Messenger Gondwin
M8.1 Castle treasury
1. Entrance
2. Blocked passage - you can get through it only after you enter the watchtower
3. Guard room
4. To level 2
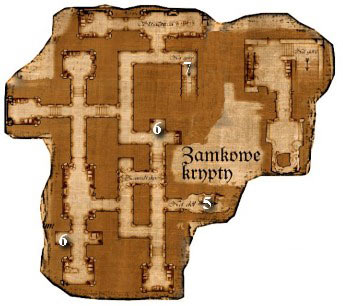
5. Back to level 1
6. Hidden passage
7. To level 3
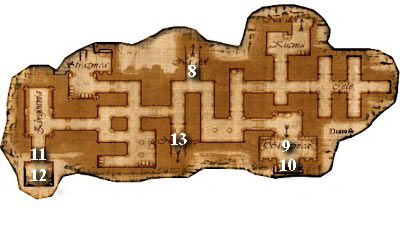
8. Back to level 2
9. Guard room - search the room to find lots of money and valuable items.
10. Levers
11. Secret passage
12. Secret passage - check all the chests and stands here - you will find some high quality weapons and armor.
13. To level 4
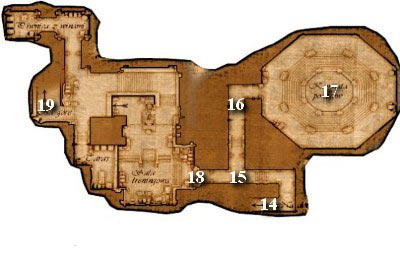
14. Back to level 3
15. Torches
16. Grates
17. Statues and the pedestal
18. Door
19. Exit to the courtyard
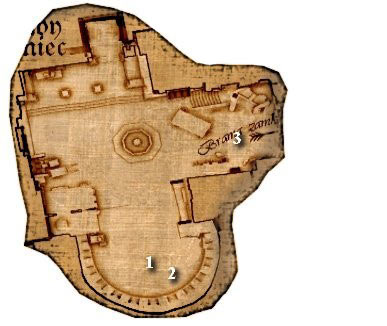
1. Knight Tradan, Malgorra, Bloodfang
2. Phenar, Mercenary Gudwin
3. Exit
Quest order:
Q13.1 Meet with Gerling
Q14.1 Stop Humbold's Pursuers
Q13.2 Get to the hidden passage
Q13.3 Find the Dragon's Eye
Q13.4 Return to the temple of Hesinde
Q13 The Dragon's Eye
1. Meet with Gerling
Gerling M5(10) can be found by the gate leading to the dwarven district. Wait for him to finish the conversation with the guard and chat him up. Explain him your mission and he will tell you about a secret passage leading to the Grimtooth Castle that you will need to use.
2. Head to the secret passage
Continue on towards the castle. On your way you will encounter some orc squads. The secret passage M8(3) leading to the castle vault is in the nearby graveyard. Defeat the orcs guarding the spot and enter the caves.
3. Sneak past the orcs
If you'll manage to proceed unseen to the third level you will gain extra experience.
4. Find the Dragon's Eye
Tunnels beneath the castle - level 1
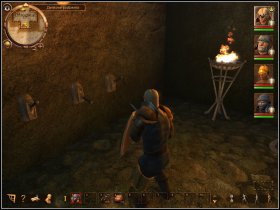
First you need to get past the caves and onto the next level M8.1(4). On your way you will encounter loads of orcs and spiders who hatch in these caves. In the guard post M8.1(3) you will encounter some orc warriors and an ogre that can't attack the orcs due to the spell that has been cast on him. The ogre is pretty angry and keeps on smashing his club against the ground - this has caused the cave-in that blocks your way back. M8.1(2). You have no choice but to fight the orcs and the ogre and head to the next level M8.1(4).
Tunnels beneath the castle - level 2
It's a good idea to use the hidden passages set throughout this level M8.1(6) and collect the valuable items stored there. There are orcs all throughout this level so you'll need to either sneak your way up to the next level M8.1(7) or hack your way through them.
Tunnels beneath the castle - level 3
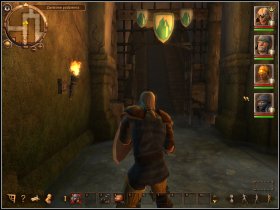
The right lever setting is, beginning from the left: up / down / up.
The grates blocking your way will be lifted and you will be able to continue.
The treasure room M8.1(13) can be reached after completing a simple riddle. The guard room M8.1(9) contains three levers M8.1(10). That you will need to set to match the shields above. Set the first on the left up, the middle one down and the right one up. You could just go on to the next level M8.1(13), but it's better to look around a bit, and collect the money and valuables laying around. The most interesting room is M8.1(12) where you will find some very interesting weapons and armor.
Tunnels beneath the castle - level 4
Another riddle blocks your path - in order to pull the grates M8.1(16) up you will need to pull the torch handles in the right order M8.1(15). Face the door and pull the one to the right. Then turn so that you're facing away from the door and pull the right one, then the left one. You can now continue on until you reach the large, round chamber with pedestal and four statues M8.1 (17). You need to rotate the statues so that each of them is facing inside. The trick is that each of the statues rotates a different number of statues - one only rotates itself, the second rotates two, the third rotates three and the fourth rotates each of them. The solution to the riddle is: rotate the eastern statue three times, the northern two times and the southern twice. After you solve the riddle the Dragon's Eye will appear on the pedestal.
Reward: Dragon's Eye
5. Return to the temple of Hesinde
A. Courtyard
Once you have what you wanted it's time to leave the castle. Exit to the courtyard M8.1(19), where a fight is on. You will see that orcs are very close to victory. Among the defenders only Knight Traldar M8.2(1), his son Phenar and Mercenary Gudwin M8.2(2) seem fit to fight. The sorceress Malgorra M8.2(1), is threatening Traldar, but when she sees you she will tell you to hand over the Dragon's Eye.
Option 1: Give her the item right away.
Option 2: Tell her that you will never surrender the jewel and Malgorra will kill Mercenary Gudwin, and you will still have to give her the Dragon's Eye.
After getting what she wanted the sorceress will disappear and you will be forced to fight the orc leader, Bloodfang M8.2(1). Once you land a few blows he will transform into a mage you've previously encountered in Avestreu and Blood Mountains - Noldrokon M8.2(1). Next few hits will force him to reveal his true form - he's one of the lizard-like M8.2(1) creatures. Kill it and listen to orcish captain, who will say that he had no idea what his leader truly was and apparently has lost his will to fight. Let the orcs leave and talk to Knight Traldar. Tell him that you are the warrior of the Dragon Quest. Traldan will surprise you by giving you the real Dragon's Eye and another armor piece. Tradan will head out to the Ducal Citadel. After you get back to Ferdok go and visit him and he will join your party.
Reward: Real Dragon's Eye, Fire Armlet
B. Temple of Hesinde
Leave the courtyard bearing in mind that you won't be able to return to this place. Head out to the Temple of Hesinde M2(2) and talk to Dorion M2.2(2). Watch the cinematic and you will receive the Shield of Fire. Your new goal will be retrieving the Adamantine Heart. After listening to the Oracle talk to Dorion. He will tell you that according to the Book of the Serpent you will need a powerful wizard. The only one you know seems to be Rakorium, so you should head out and talk to him.
Reward: Fendral's Shield
End of chapter six!
Q14 The Messenger
1. Stop Humbold's pursuers
You can now head out to the newly revealed location. First notable thing is the burning castle. Move along to encounter the running Mercenary Humbold M8(2). He will tell you that the castle is being attacked by the orcs and that he and a few others were sent to bring help via the secret entrance. He is pursued by a band of orcs and will ask you to halt the creatures for him to run away. The group that you will need to stop is composed of orcs supported by a powerful ogre. Try to focus your attacks on the huge creature and only after it's dead take care of the rest.
Ferdok:
SQ11 Kastan Gamblack (continued)
2. Inform Growin of Gamblack's demise
Approach Growin M5.2(7) and tell him that you've killed Gamblack.
Reward: 50 Ducats
SQ13 For a Handful of Ducats (continued - house Neisbeck)
5. New General
Go and talk to Pagol Babek M4(9). He will tell you that Vito Neisbeck wants to meet you - he's standing right behind Pagol and the wagons. He has a new mission for you.
5.1 Keep Tarosh in the "Fleet Footed Ferret"
You need to go to the "Fleet Footed Ferret" M4(1) and learn what a drunkard by the name Tarosh has told the Storrenbrandts. After he tells you everything kill him. You will be approached by the angry innkeeper who will calm down once you pay him 5 Thalers - this will also net you some additional experience.
5.2 Locate Ralph Chandler
Go to Ralph Chandler M4(23). You will see that he's surrounded by Storrebrandt's workers. Once you get closer a fight will break out.
5.3 Talk to Vito
After killing the workers report back to Vito and report him on your actions.
Reward: 25 Ducats
6. Times of Trial
Vito has another job for you. This time you'll have to give a lesson to the Stoerrebrandts and kill their workers in three different locations.
6.1 The trouble at "Fleet Footed Ferret"
Workers M4(21) are standing near the inn.
6.2 The attack at the docks
Workers M4(20) are standing near the ships.
6.3 On the bridge
Workers M4(22) are gathered on the bridge
6.4 Report to Vito
After dealing with the three groups return to Vito and tell him of your success.
Reward: 30 Ducats
SQ13 For a Handful of Ducats (continued - house Stoerrebrandt)
5. New general
Report to Laran Dykemiller M4(10) for another mission. He will tell you to pick up Stoerrebrandt's son from the port.
5.1 Pick up Reginald from the bay
Head to the pier to pick up Reginald M4(6). Talk to him to learn that his plans differ a bit from his father's and he is not going straight home.
5.2 Help Reginald find the informant
Follow him to trader Cupinez. Reginald will talk to him and learn that there's someone worth talking to in the "Fleet Footed Ferret" M4(1). In the inn drunkard Tarosh will give you some valuable information. Continue following Reginald and you'll reach the gate guarded by Radulf. After talking to him a fight will break out after which you will both move to the Wagoner's Home.
5.3 Intelligence
Move a bit deeper into the district you will see that the Dark Eyes are patrolling the streets and you'll need some vantage point in order to gather information M3(18).
5.4 Don't let yourself be noticed
You cannot get noticed so move about in stealth mode.
5.5 Find a better vantage point
You need to get to the second vantage point M3(19).
5.6 Return to the warehouse
Return with Reginald to the warehouse
Reward: 25 Ducats
6. Times of trial
Talk to Reginald. He has another mission for you - the Dark Eyes are attacking Stoerrebrandt's workers. You need to try and help them.
6.1 Trouble at "Fleet Footed Ferret"
Get to the Fleet Footed Ferret and kill the Dark Eyes M4(21).
6.2 The assault at the docks
Head to the docks and kill the Dark Eyes M4(20).
6.3 Danger at the bridge
Head to the bridge and kill the Dark Eyes M4(22).
6.4 Ambush
After you deal with the Dark Eyes on the bridge more will appear to fight you.
6.5 Talk to Reginald
Get back to Reginald and tell him what has happened.
Reward: 30 Ducats
SQ44 Elven Instructor's Order
There's a new character on the Praios' Square - Laurelin M2(16). If you have a character with high bowyer in your party, the elf will have a job for you - he will ask you to pick up a package for him - it contains wood.
1. Pick up the order in the docks
Head to Port Ugdan - you will see some port workers surrounding a giant crab. Talk to one of them to one of them to learn about the situation.
2. Kill the crab
Kill the crab, to retrieve the wood it swallowed.
Reward: Wood
3. Take the wood back
Return to Laurelin and give him his wood.
Reward: Gourd Wood, Gourd Wood bow recipe
SQ45 Mactaleanata
Head to your house. Inside you will meet Aydan, Rhulana's sister. She wants you and Rhulana to help her fight the Black Amazons. She wants to meet with you in the Ducal Citadel.
1. Meet Aydan in the main square
Meet Aydan in front of Rondra's temple. You must leave your companions and approach her with only Rhulana in your party. You will be headed to the "Golden Lance" M5(8), where the Black Amazons are hiding.
2. Defeat the Mactaleanata group
Once you'll get to the spot Aydan will prove to be a traitor. You have to kill her and the rest of the Amazons.
3. Find the kurkumian armor
Kurkumian armor can be found in a chest near the battlefield. The key to open the chest can be found on one of the bodies.
Reward: Kurkumian armor
SQ46 Changing sides
If you have the SQ13 For a handful of ducats active, you will see a worker hired by the other faction standing near your employer. He will offer you to join the other house and will pay you 20 Ducats if you agree. You can haggle with him to rise that amount to 100 Ducats. Money will be given to you in the warehouse of your new employers.
Reward: 20 lor 100 Ducats
At the Silver Waterfall
SQ47 Captured!
You will receive this quest at the beginning of the chapter from the escaping mercenary M8(2).
1. Save messenger Gondwin
Head towards the castle. On your way you will come across an orc camp in which Gondwin M8(4) is being held.
2. Kill Gondwin's oppressors
Kill orcs guarding Gondwin and free him. He will lead you to the hidden passage leading to the castle M8(3).
Maps: M9. Tallon
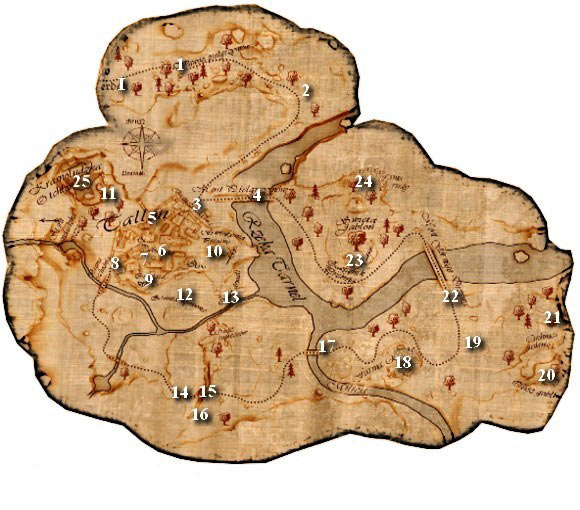
Exits:
I. World Map
Important characters and locations:
1. Ingania of the mountain
2. Wagoner
3. Eastern Gate
Guard
4. Bridge
Darian and Viburn
5. Artistocrat, Mother Sweeting
6. Merchant Oakrich
7. "Lucky Apple" Inn
Mayor Dipwidge
8. Western Gate:
Captain from Tallon
9. Crypt
10. Temple of Peraine
11. Mandragor
12. Kobold
13. Woodcutters
14. Archon Megalon
15. Ancoron
16. Marauder Camp Entrance
17. Wounded Worker
18. Farm:
Groat
19. Prancelot
20. Gorge
21. Stinking Caves
22. Archon Megalon
23. Prenn's Grove
Prince Arom and Gerling
24. Abandoned ore mine
25. Tower
Prince Arom
Maps: M9.1 Abandoned ore mine
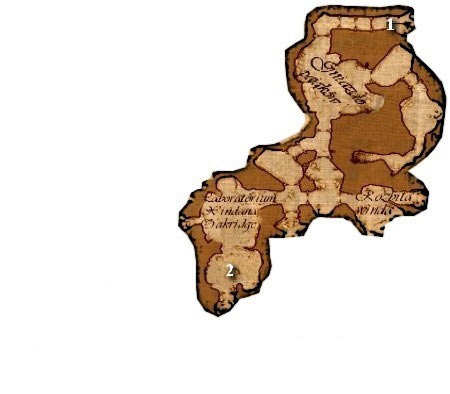
1. Entrance
2. Meredin
Maps: M9.2 Dragon lair
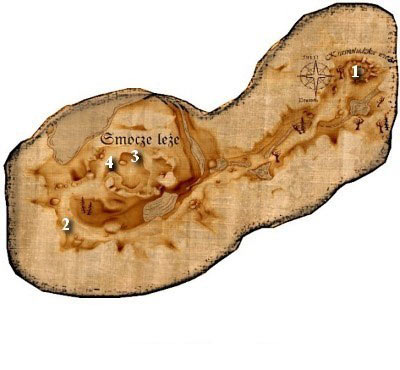
1. Peak of the Tower
Chest
2. Archon Megalon
3. Dragon
4. Prince Arom
Quest Order:
Q15 Prologue: The Adamantine Heart
Q16.1 Talk to Duke Growin
Q16.2.1 Meet with Gerling in Tallon
Q18.1 Defeat the goblin marauders
Q18.2 Path to Prenn's Grove
Q16.3.1 Find the key to the lair
Q16.3.2 Meet with Arom in the Tower
Q16.3.3 Kill the Dragon
Q16.4 Meet with Arom in Murlosh
Q15 Prologue: The Adamantine Heart
1. The Secret of the Dragon's Eye
Pay a visit to Rakorium M2(7). Tell him what you've heard from the Oracle. The Archmage will look into the Dragon's Eye and will tell you that you should now go to Murlosh, but in order to get there you will need a permit given by the dwarven king Arombolosh. He will also point to Duke Growin M5.2(7), as a person who might be able to help you.
Q16 The Road to Murolosh
1. Talk to Duke Growin
Head to the Ducal Citadel and approach Growin M5.2(7). Ask him to help you get to Murolosh. You will be told that there has been little diplomatic activity with Murolosh recently and that diplomat Gerling has been sent to meet with king Arombolosh. Gerling is supposed to stay in Tallon and that's where you are going to meet up with him.
2. Diplomat Gerling
2.1 Meet with Gerling in Tallon
First person you'll encounter in Tallon is Swineherd Jargold. You may talk to him for a while to learn what is going on in the area. Now you need to get to the city, but as Jargold has told you, not everyone is allowed inside.
Option 1: Talk to the Guard M9(3) at the gate. He won't let you in but if you try and bribe him 15 Ducats, he will change his mind.
Option 2: Complete the Q17 The Noblewoman Ingiana.
Option 3: Talk to builder Viburne M9(4), once Darian M9(4) is not around. Ask him, how is he able to get in and out of the city. You will learn that there is a special password. You can obtain it by using Threaten, Fast Talk, Seduce or just an old fashioned bribe of 10 Ducats.
After you get past the gates head to the "Lucky Apple" inn M9(7). That's where you were supposed to meet Gerling. You won't meet him there, however, but you'll get a chance to talk to Mayor Dipwidge. According to him, the advisor has left for the sanctuary at Prenn's Grove M9(23). You can reach it only via western gate M9(8), as the eastern is closed due to the collapsed bridge.
2.2 Find Gerling
You will complete this quest once you reach Prenn's Grove M9(23).
3. Dwarven respect
You will receive this quest once you reach Prenn's Grove.
3.1 Find the key to the lair
The key can be found in a cavern M9(24) near the sanctuary. Go there, killing a group of harpies as you go. The now-derelict mine is full of spiders and skeletons. Get through the creatures and into the Lab. Some undead will await you here, along with their leader - skeleton mage, Meredin M9.1(2). Killing it will give you not only the key but also another piece of the golden armor - breastplate of fire.
Reward: Key to the dwarven tower and Breastplate of Fire
3.2 Meet up with Arom in the Tower
Leave the cave slaying the hordes of skeletons and spiders as you go. The collapsed bridge near the eastern gate has already been repaired. Use it to get to the tower M9(25). Talk to Arom. Seeing that you've obtained the key, he will tell you to activate the portal and go through it to fight the dragon.
3.3 Slay the dragon
You will appear at the top of the tower M9.2(1). Arom has brought along a chest M9.2(1) full of equipment, that may come in handy when fighting the dragon. Take everything you can, especially the burn ointment, which provides fire resistance. Head down and along the path to the lair. On your way you will encounter a few groups of harpies. Since they keep so close together the fireball spell becomes very useful here. After dealing with the harpies you will again cross paths with Archon Megalon M9.2(2). If you won't criticize him you will be allowed to access his wares. Prepare for the fight and enter the dragon's lair M9.2(3). The beast is constantly breathing fire so you should use the ointment on each of your party members, and once it ceases to work, put it on again. The dragon has as much as 900 hit points, but if you play it out carefully and don't forget to use the ointment and the occasional healing potion you should come out on top. Take everything the dragon drops and talk to Arom M9.2(4). He will thank you for your help, give you the recipes for items that can be made from the dragon's carcass and will invite you to Murolosh.
Reward: dragon's hoard, recipe for dragon brew, wurm dagger recipe, wurm spear recipe, wurm crossbow recipe, dragon slayer crossbow recipe.
4. Meet Arom in Murolosh
The quest is complete once you reach Murolosh.
End of chapter seven!
Q17 Noblewoman Ingania

The damsel in distress can be found by a broken carriage. She will ask you to find her wagoner.
Sadly, he's dead. He got killed by goblins which will now attack you.
On your way to the town you will encounter Ingania of the Mountain M9(1). The noblewoman has had an accident which resulted in breaking her carriage. Her wagoner M9(2) has gone looking for help, but hasn't returned yet. You goal is to find him.
1. Ingania's Wagoner
1.1 Find the wagoner
Go a bit further to find a body surrounded by a group of goblins.
1.2 Pass the news to Ingania
Kill the creatures and return to Ingania, to give her the sad news.
2. Escort Ingania to Tallon
Inagania is afraid to walk alone all the way to Tallon and will ask you to escort her. The reward for that will be 20 Ducats. Agree, and take her along. Once you reach the city gates wait for her to talk to the guard. She will convince him that you and your companions are her bodyguards, and the mayor M9(7) is her good friend. When she wants to pay you for your assistance you can refuse to gain some extra experience.
Reward: 20 Ducats or experience
Q18 The Marauders
1. Defeat goblin marauders
If you try to get through the western gate you will be halted by Tallon Captain M9(8). He will tell you that the gate has been closed due to the increased goblin activity outside. If you try to convince him he will make you an offer beneficial both for you and the guard. You can get past the gate with a squad of local guards and clean out the goblins. Agree and head outside. After the job is done, he will offer you a reward but you can refuse to gain some extra experience.
Reward: 20 Ducats or experience
Route to Prenn's Grove
Before passing the first bridge you will encounter a mysterious mage, Archon Megalon M9(14). He will say a few words and will disappear after the first question you ask. The next person on your way is elf called Ancoron. He seeks vengeance upon the ogres who destroyed his village. You can help him fight them, and if you do, he will join your party. Continue on your way towards the Grove. After you pass the next bridge you will see a farmer begging for help. You can aid him by giving him a healing potion or using healing skills of one of your characters. Near the next bridge Archon Megalon M9(14). Will await you, this time more willing to talk. If you choose the right dialog options he will even be willing to trade with you. You need to tell him that he's helped you overcome your fears and then ask him for a practical advice. Among his wares burn ointment, shouldn't go unnoticed - it will come in real handy further in game. Once you step on the bridge a cinematic will begin with the dragon flying over your head and attacking the Grove. Run to Prenn's Grove M9(23) to witness a conversation between Librarian Zorjan weeping over lost books and dwarven prince Arom. Soon, Gerling will join in the conversation. He knows the location of the stone disc that is the key to the dragon's lair and makes you responsible for finding it.
Ferdok:
SQ13 For a handful of Ducats (continued - house Neisbeck)
7. Nature of things
Talk to Vito. He will tell you to enter the warehouse - inside there will be Ulwina. Leader of the Neisbecks, who will give you your mission - you are to kill Tashman, who is no longer of use.
Reward: Poison Bottle
7.1 Poison Tashman
Start by destroying the barrel.
Once the barkeep goes away approach the bar and sip poison into the beer.
Head to the "Fleet Footed Ferret" M4(1). Destroy the barrel just opposite from the bar. This will cause the innkeeper to move away from the bar. Use the poison on the beer pitcher standing on the bar. After you poison the beer talk to the innkeeper and tell him you want to give a round of beer to the guards. Tashman will get the poisoned beer and drink it. Few moments later he will feel sick and leave the inn.
7.2 Follow Tashman
Follow Tashman. When you try to leave the inn Pebblebush will stop you and ask to pay for the beer. You can either pay him or haggle to avoid the payment. Leave the Ferret and head to the docks where you'll find the guard commander. Tashman will get up and walk over to the spot where Ardo was found M4(6). Stay with him until you reach the harbor, and talk to him. You will learn some interesting things and will receive the key to Ardo's workshop (which opens the locked door on the top floor of your house. Inside the workshop you will find 80 Ducats, Ardo's family sword and the description of his adventures). Tashman will die and Yandrik will appear.
7.3 Defeat Yandrik
The mage will tell you that he is responsible for killing Ardo and will attack you.
SQ13 For a Handful of Ducats (continued - house Stoerrebrandt)
7. The Nature of things
Talk to Laran Dykemiller M4(10). He will tell you that Emmeran Stoerrebrandt wants to talk to you. Head to the warehouse and meet him. He will tell you of his son's death and will ask you to find Tashman.
7.1 Gather information
Go talk to merchant Cupinez - his shop is right next to the boat seller M4(4).
7.2 Find the human smuggler
Smuggler M3(20) and Tashman can be found in Wagoner's Home. Tashman will run away and the smuggler, will tell you that he's headed for a ship.
7.3 Find Tashman
Tashman can be found in the harbor M4(6).
7.4 Stop Tashman
Talk to him. You will learn some interesting things and will receive the key to Ardo's workshop (which opens the locked door on the top floor of your house. Inside the workshop you will find 80 Ducats, Ardo's family sword and the description of his adventures). Tashman will die and Yandrik will appear.
7.5 Defeat Yendrik
The mage will tell you that he is responsible for killing Ardo and will attack you.
SQ48 Trolls in the tavern
In the "Silver Pitcher" on Praios Square M2(10) three trolls have made their home. The innkeeper wants you to get rid of them. Talk to him a second time to haggle over your payment - you should be able to triple his original offer of 2 Ducats. Approach the troll standing by the bar and talk to him. Few moments later the innkeeper will talk to you.
Option 1: Use Fast Talk or Human Nature to convince the innkeeper to give some extra food and drink to the trolls.
Option 2: Haggle and pay him 5 Ducats for the damage the trolls have caused.
Reward: 2 or 6 Ducats
SQ49 The cockroach in the tavern
In Wagoner's Home by the "Serene Sow" M3(3) innkeeper Ibrom Soapstone has a problem and wants you to take care of it. Talk to him to learn that there's a giant cockroach running around, apparently summoned by some magician. You need to get rid of it.
1. Kill the beast
Get inside and kill the creature.
2. Inform the owner
After you're done go outside and talk to Ibrom.
SQ50 Enchanted Stool
After completing Q13 For a Handful of Ducats "Fleet Footed Ferret" M4(1) will host two new guests - Sylvene and her husband, floating by on a stool. It appears that it has been enchanted by a with and Sylvene asks you to do something about it.
1. Ask Rakorium for advice
A good starting point would be Rakorium, whom you'll find in your home M2(7). Ask him for help.
2. Rakorium
Rakorium will ask you to bring him powdered mandragor, beer from Ferdok and a linen (canvas) shirt. Once you get all of these, he will produce a magic powder.
3. Take the magic powder to the couple
Head over to the Tavern and give Sylvene the powder. The spell will fade and the happy couple will reward you with some money.
Reward: 5 Thalers
SQ51 Revenge for Ardo
You will receive the quest after completing Q13 For a Handful of Ducats.
1. Arrest Ulwina Neisbeck
Knowing that Ulwin Neisbeck is responsible for Ardo's death head over to her place M2(17) on Praios Square. Talk to the workers outside to get in.
2. Last Bastion
Quite a challenging battle awaits you here, facing Yandrik and the workers. The mage's death will cause an explosion and he will be replaced by a spirit of fire. In place of every worker you slay there will be another, but the reinforcements will only arrive a few times. After you deal with all of the enemies go up to the spot where Ulwina is standing. Watch the cinematic that completes the quest.
Tallon:
SQ3 A tasty delicacy (continued)
3. Find another buyer
In Tallon you will encounter an aristocrat M9(5), who will make an offer of 20 Ducats.
Reward: 20 Ducats
SQ16 The Recipe for the potion of power (continued)
1. Find an expert
An expert in this field appears to be a kobold M9(12). After solving SQ52 3.1.4 Solve the kobold's riddle talk to him about alchemy and Auralia, and he will give you the ingredient you need.
2. Take the recipe back to Auralia
Return to Ferdok and give the recipe to Auralia. She will join your party.
SQ52 The Marauder camp
You will get the quest from Captain of Tallon M9(8) as a continuation of Q18 The Marauders.
1. Locate the Marauder Camp
Talk to Ancoron M9(15), who can be found on one of the bridges leading to the Grove. Elf will tell you where the camp is.
2. Report to the captain
Return to the captain and tell him of the camp.
3. Mobilization
Captain needs you to convince three people so that he can send the guards to fight the goblins.
3.1 Convince the mayor
Talk to the mayor M9(7). He will agree only if you do something for him
3.1.1 Retrieve the items stolen by the kobold
Head over to the field where the kobold is M9(12) and tell it to give the items it stole.
3.1.2 Convince the woodcutters
Kobold wants you to play a game with you first, but it requires more players. He will send you over to the woodcutters M9(13), and ask you to convince them to take part.
Option 1: Bribe the woodcutters
Option 2: Convince them using Fast Talk
3.1.3 Return to the Kobold
Once you convince the woodcutters return with them to the kobold.
3.1.4 Solve the kobold's riddle
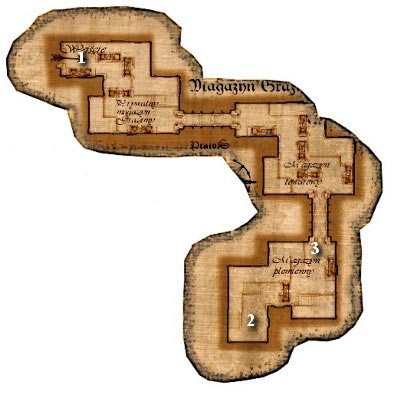
Convince the woodcutters to take part in the game. Then return to the kobold who will turn them into hen.
You can return them to their original form by clicking (from the left) the first woodcutter 4 times, the second 2 times and the last one once.
Kobold will turn the woodcutters into hen and will tell you that you need to solve the riddle in order for them to regain their original form. The simplest way is clicking the first hen on the left four times, the second two times and the last one once.
3.1.5 Return the stolen items to Dipwidge
Return to the mayor with the stolen items.
3.2 Convince the high dront
Abbot can be found in the temple of Peraine M9(10). Talk to him about sending the guards to fight the goblins
3.2.1 Find some mandragor
Mandragor M9(11) can be found outside the town.
3.2.2 Bring the mandragor to the abbot
Return to the abbot and give him the mandragor. He will move out to fix the well.
3.3 Convince the merchant
Talk to the merchant Oakrich M9(6) about sending the guard to fight the goblins.
3.3.1 Talk to the mother
Merchant will tell you to talk to his wife - mother Sweeting M9(5). Talk to her and she will tell you that her daughter may be in a crypt M9(9).
3.3.2 Search the crypt
Enter the crypt. In one of the rooms you will find Niame.
3.3.3 Save Niame
Undead will spawn in the room. Kill them off while protecting Niame.
3.3.4 Save Ulfinga
After dealing with the undead talk to Niame. She will tell you that her boyfriend - Ulfing is being held against his will by some horrible creature. Go deeper into the crypt to meet the undead necromancer.
Option 1: Fight him.
Option 2: Talk to him in a right way and you should be able to avoid a fight:
1. I know your logs...(they're scattered all around the crypt)
1.1 Doesn't matter?
2. I know about the incident...
2.1 Is the missing object you mentioned...
3. I know about your ring.
3.1 No, no but it terrifies...
4. You mean...
4.1 And I'm the one defiling her memory...
5. Do you still want her...
5.1 You really want to kill...
4. Inform the captain
After completing all three subquests report to the captain M9(8) and tell him about it. You will be automatically transported to the entrance to the marauder camp M9(16).
5. Force the goblins out of the camp
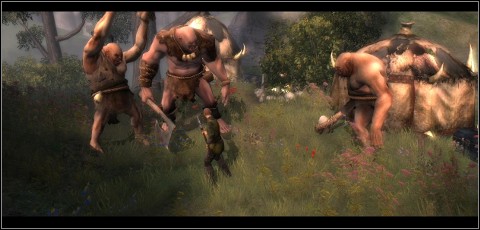
Kill all of the goblins and ogres. Once the fight is over Ancoron will join your party.
SQ53 Rattle Farm
1. Help the wounded worker
One of the farmers M9(17) is laying wounded near the bridge. Heal him using skills or a healing potion.
2. Talk to Groat
Talking to Groat M9(18) you will learn that his workers have gone missing and some kind of beast has made it's lair nearby.
3. Missing workers
3.1 Find the ravine
Head to the ravine M9(20). It appears to be crawling with goblins who hold the workers from the farm.
3.2 Free the workers
Option 1: Fight the goblins.
Option 2: Talk to the goblin shaman. She will offer to exchange the workers for three or five pigs (depending on whether you did SQ52.5 Force the goblins out of the camp).
3.3 Talk to the workers
After completing SQ53.4.3 Talk to Treesha Suula go and talk to the workers.
3.4 Return to Groat
Report your success back to Groat.
4. Pigherds
4.1 Find five/three pigs
Ask Groat for the pigs. He will tell you that he will give them to you, but at the expense of your reward - he will cut it by Ducats. You can try Fast Talking him - if you succeed you won't have to pay.
4.2 Take the pigs to the shaman
Time to take the pigs to the shaman. On your way to her you will be attacked by wolves. Kill them and regather your flock.
4.3 Talk to Treesha Suula
Shaman will be very pleased when you bring her the pigs and will let the workers go.
5. The Beast
5.1 Find Prancelot
Prancelot M9(19) can be found near the farms.
5.2 Help the great hero
He is fighting two wolves but he isn't doing very well. Help him get rid of them and then talk to him.
5.3 Follow Prancelot to the cave
Follow Prancelot. Mid way you will be attacked by some goblins. Prancelot will run away leaving you to kill them. After the fight go back to Prancelot, talk to him and follow him again.
5.4 Bring help
The cave entrance M9(21) has collapsed. You will need to return to the farms to get the workers to help you. Talk to Groat and he will send his men to help you.
5.5 Fight the beast

At the very end of the cave the beast awaits you
5.6 Kill linnorm
Kill the lizard and collect it's remains.
6. Get the bounty
After killing the beast return to Groat for your reward.
Reward: 100 Ducats
Maps: M10. Murolosh
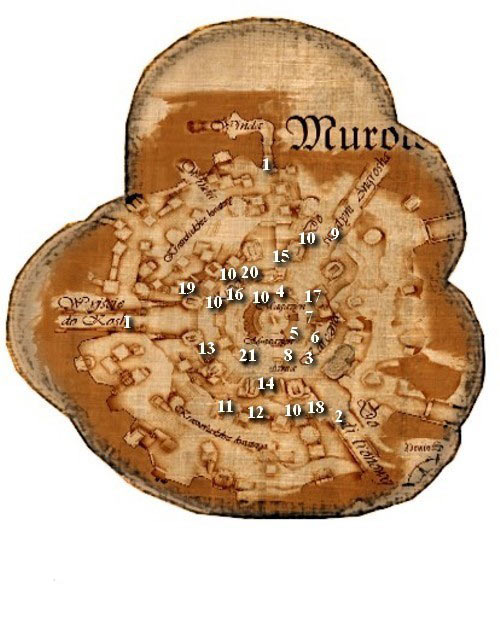
Exits:
I. World Map
Important characters and locations:
1. Mushroom garden M10.1
Orgrim
2. Throne Room
3. Gerling
4. Grazima's warehouse M10.2
Beer warehouse M10.3
Aldessia's Chambers M10.5
5. Grimbeard
6. Innkeeper Bashur
7. Guard Argmar, Orgrim, Angraxa
8. Treasurer Otosh
9. Follower of Lugosh
10. Miners
11. Salina's Chamber
12. Shrobosh, son of Simosha
13. Secret Passage M10.4
14. Armorer Dornax
15. Aldessiia
16. Felika, Simbeard
17. Merchant Momplosh
18. Darelitta
19. Diota
20. Fadelika
21. Merchant Watmoss, Armorer Dornax
Maps: M10.1 Mushroom Garden
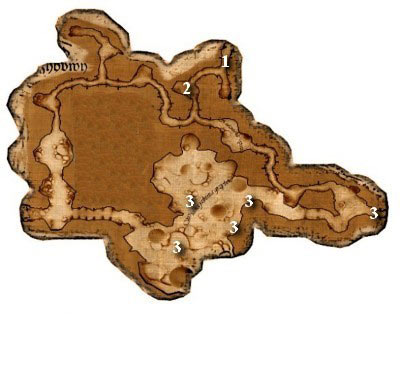
1. Entrance
2. Grimbolosh
3. Mushroom Glautamash
Maps: M10.2 Grazima's warehouse
1. Entrance
2. Yellow Liquid
3. Grazima
Maps: M10.3 Beer warehouse
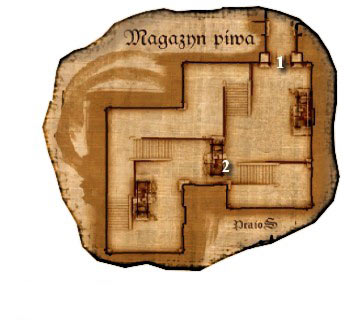
1. Entrance
2. Barrels
Lock of red hair
Maps: M10.4 Secret Passage
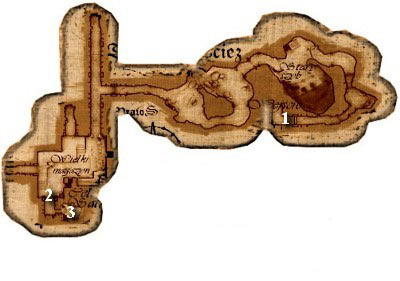
1. Entrance
2. Broken Wall
3. Cell
Salina, Aldessia's friend
Maps: M10.5 Aldessia's chambers
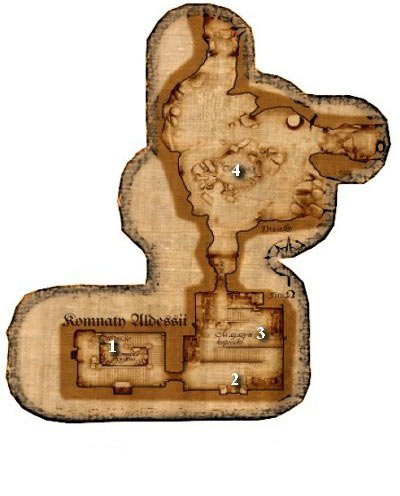
1. Entrance
2. Aldessia
3. Arom, Xolgorax
4. Portal
The dwarven town of Murolosh is now available to you. You are to meet with Aromem - once you do, the prince will take you to the throne room M10(2), where you'll witness the ceremony of setting the carbuncle in the king's crown. After the ceremony Arom will tell you to talk to the treasurer M10(8), who has a reward for you.
Quest Order:
Q19.1 Accept the Gift
Q21.1 Talk to Lugosh in the temple
Q21.2.1 Pay a visit to Grimbolosha
Q21.3 Find the mushroom Glautamash
Q21.4 Take the mushroom to Lugosh
Q22.1 Head to the throne room
Q20.1 Learn more about the caves under Murolosh
Q24 The Plague of Lice
Q25 The Yellow Liquid
Q23 The Witness
Q26 The Poisoned Beer
Q27 The Collapsed Tunnel
Q28 The Scrap of Cloth
Q22.3.4 Break-in
Q22.3.5 Juggling ball
Q22.3.6 Aldessia's disappearance
Q22.3.7 Aldessia's Curiosity
Q29 Win the Trial
Q30 Saving Salina (only if you fail Q29)
Q31 Aldessia
Q19 Esteemed Guests
1. Accept the gift
Leave the Throne Room - you will meet Treasurer Otosh M10(8) near the stair you followed down. He will offer you one of the four treasures as a reward. Take what you need the most and end the conversation. This will trigger the arrival of Arom who will tell you about poisoning of Xolgorax's, the dwarf who has the knowledge about the caves below Morolosh.
Reward: Titanium ring of untamed power or Robe of Confusion or Kangroshes Axe or Malmargarashno two-handed axe
Q20 Caves of Murolosh
1. Learn as much as you can about the caves beneath Murolosh
Talk to Xolgorax about the caves. He can be found in the Throne Room M10(2) after you complete Q21 Poisoning of Xolgorax.
2. Earn king's trust
You will complete this quest in chapter nine.
3. Find the Adamantine Heart
You will complete this quest in chapter nine.
3.1 Find a way to reach the caves
You will complete this quest in chapter nine.
3.2 Gather the clues
You will complete this quest in chapter nine.
Q21 Poisoning of Xolgorax
1. Talk to Lugosh at the temple
You will learn more about the poisoning from Lugosh M10(9). He will tell you that the poison acts slowly and that you should find the Glautamash mushroom M10.1(3) in order to save Xolgorax. The mushroom can be in the possession of dwarf Grimbolosh M10.1(2).
2. Find the healing mushrooms
2.1. Go and talk to Grimbolosh
He can be found in the Mushroom Gardens M10(1). Talk to him, and he will tell you how the mushroom looks like - it's purple and it should be growing alone.
3. Find the Glautamash mushroom
There are five purple mushrooms in the gardens - you can take any of them.
Now take the mushroom to the follower of Lugosh to complete the quest.
There is a total of five mushrooms in the caves - you can take any of them, but be wary of the scorpions, toads and spiders living in the caves.
4. Take the mushroom to Lugosh
Return to Lugosh M10(9) with the mushroom. The dwarf should now be able to prepare the antidote. Before he gets to work he will give you a message from Arom. There were some arrests and among the suspects there is a woman who claims to know you. You are to appear in the Throne Room M10(2), to resolve the matter.
Q22 The Suspicion Falls on a friend
1. Head to the throne room
In the Throne Room M10(2) you'll see Salina. She is the main suspect in the case of poisoning Xolgorax as well as few other crimes. Talk to the king about the accusations and tell him that you will try to prove her innocence. Ask the Busker Queen about people who could speak in her favor. She will point to the dwarf Grimbeard (Q23 The Witness). He was attending her performance during the accident in the mine. Ask Xologorax about the caves beneath the city.
2. Prove Salina's innocence
You have to complete either Q29 Win the trial or Q30 Saving Salina.
3. The Investigation
3.1 Liaison of Khom
You need to complete Q25 The Yellow Liquid.
3.2 Alibi
You need to complete Q23 The Witness.
3.3 The scrap of cloth
You need to complete Q28 The scrap of cloth.
3.4 The Break-in
Near Salina's chambers M10(11) you will come across a wounded dwarf M10(12). Heal him or give him a potion. Shrobosh will thank you for your help and will tell you that he witnessed the break-in to the busker's chambers.
3.5 Juggling ball
Talk to Salina about her ball found on the crime scene. She will tell you that the ball was smashed when one of the guards showed her the king's orders. You are supposed to find this guard - his name is Argmar M10(7). Ask him, whether he was witness of breaking the ball and saw Salina throw it away. He will say that this has indeed taken place and that he will testify in her favor.
3.6 Aldessia's Disappearance
Ask Armorer Dornax M10(14) about Aldessia. He will say that she's been acting weird recently and that she's wandering about the caves. She also seems to spend a lot of time with Xolgorax.
3.7 Aldessia's Curiosity
After Completing 23.3.6 Aldessia's Disappearance talk about Aldessia with the Follower of Lugosh M10(9). He will say that she's visited the temple quite often talking about the history and ancient treasures buried beneath the city.
3.8 A lock of red hair
You need to complete Q27 The Poisoned Beer.
Q23 The Witness
1. Talk to Grimbeard
Talk to Grimbeard M10(5) whom you can find in the tavern. Tell him about Salina's trouble and convince him to testify using Fast Talk or by threatening him.
Q24 The Plague of Lice
When you try to leave the throne room after Q22.1 Head to the throne room you will be approached by Grazina. She claims, that her family warehouse M10(4) has been sabotaged. For no apparent reason grave lice have appeared inside it, causing huge damage. She think that you can find some clues for your investigation within the warehouse but you'll need to clean out the lice.
1. Meet Grazima by her warehouse
Follow Grazima and meet her by the entrance to the warehouse your objective now is to kill the creatures while following the dwarven woman, who will open the door to the next rooms.
2. Kill the lice in the first room
Enter the first room. You will see that the lice have indeed overrun the place - while Grazima is repairing two mechanisms you need to cover her and kill the lice.
3. Kill the lice in the second room
Next room, same story - cover Grazima as she's repairing the third mechanism.
4. Finish off the lice plague
Go to the back of the last room - the lice breed here. Kill them and pick up the yellow liquid M10.2(2). After you're done talk to Grazima M10.2(3). She will suggest to take the bottle to Lugosh M10(9) and will tell you that an ancient tablet found by her grandfather is missing from the warehouse. This information will be useful inQ22.3.7 Aldessia's Curiosity.
Q25 The Yellow Liquid
1. Ask Lugosh for advice
Liquid you found during Q24 The Plague of Lice should be taken to the Follower of Lugosh Z10(9). The dwarf will analyze it and tell you that it's some kind of bug attracting substance made on Khom desert. There's only one person living in the city that comes from there - Aldessia M10(15).
Q26 The Poisoned Beer
1. Talk to the innkeeper
Follower of Lugosh M10(9) will tell you that the poison used on Xolgorlax has been added to his beer. The only source of beer around is the nearby inn. Talk to Innkeeper Bashur M10(6). He will admit that the poisoned beer must've come from his storage but he will swear that he had nothing to do with the poisoning.
2. Convince the innkeeper
Try to convince him to give you the storage key. Tell him, that the king has ordered you to defend Salina, and then:
Option 1: Try bribing him by offering him several dozen Ducats.
Option 2: Tell him that you will take the key on your own responsibility and then Fast Talk him or make a deposit.
Option 3: Tell him that it's a matter of justice, and if you already have any advice clearing Salina show them to him.
3. Look around the cellar
You can now enter the storage M10.4. Kill some rats and take a look at the barrels M10.3(2). You will find a lock of red hair, which undoubtedly proves that it wasn't Salina who poisoned the beer.
Q27 The Collapsed Tunnel
Orgrim M10(7) needs your help. One of the tunnels has collapsed.
1. Find five miners
He needs five miners to help dig up the tunnel. You need to find them and tell them about the accident. They can be found all throughout Murolosh M10(10).
2. Return to the accident site
After you find all of the miners head back to the mine and talk to Orgrim M10(3). He will thank you for your help and give you a scrap of cloth, he found, which is probably part of Salina's clothes.
Q28 The Scrap of cloth
1. Talk to Salina about the scrap of cloth
A scrap of clothing you received after completing Q27 The Collapsed Tunnel should be taken to Salina M10(2). She will claim never to have visited the mines and will tell you that her dress is in her house M10(11). You need to go there and ask dwarf Ungrimm, looking after her possessions to let you have a look at the dress.
2. Talk to Ungrimm
Do what Salina asks you to - convince Ungrimm, that it can be a crucial evidence in the case. He will give you the dress, from which someone seems to have cut out a piece.
Q29 Win the Trial
You need at least five out of eight possible pieces of evidence to start the trial - the more you manage to gather the higher your chance of winning.
Option 1: Winning
Respond to king's accusations with evidence, or if you don't have a fitting one with the most precise and smart dialog option. At the end use all possible dialog options and present a final statement. The King will decide that Salina is not guilty and will have Aldessia summoned in front of him.
Option 2: Failure
You will need to complete Q30 Saving Salina.
Q30 Saving Salina
1. Get Salina out of the dungeons
Losing the trial doesn't mean that all is lost. You will be approached by Grimbeard, who feels sorry for Salina, as he thinks that she's innocent. He claims to know a secret passage M10(13) leading to the dungeons and wants you to follow him. Use the passage and find the right cell M10.4(3), which is the one near the cracked wall M10.4(2).
2. Defeat Aldessia's associate
There seems to be another person in the cell - Aldessia's friend. Kill him and return to the king. He will get angry at you at first, but once you tell him what's happened he will acquit your friend of all charges and order to hunt down Aldessia.
Q31 Aldessia
1. Arrest Aldessia
Head over to her chambers M10(4). Aldessia M10.5(2) will be inside, but quite unwilling to surrender without a fight - she and her two golem buddies will attack you. Once the fight is over Arom and High Priest Xolgorax M10.5(3) will arrive.
Reward: Plate boots of fire
2. Use the teleportation portal
Xolgorax will take a look at Aldessia's notes and will tell you about the teleportation portal and a method to use it. Enter the cavern and head to it's middle M10.5(4) watch the cinematic and after it's over enter the portal.
End of Chapter Eight!
SQ3 A Tasty Delicacy (continued)
3. Find another buyer
In Murolosh you will meet Treasurer Otosh M10(8), who will offer you 50 ducats for the tongues.
Reward: 50 Ducats
SQ54 Drink the Dwarf under the Table
Angraxa M10(7) wants to bet you 10 Ducats, that you won't beat her in a drinking competition. Prove her wrong.
Reward: 10 Ducats
SQ55 The Traveler's Guide
In the dwarven city you will come across a writer - Simbearda M10(16). He wants you to walk around the area and tell him about your experiences.
1. Visit innkeeper Bashuur
See what you can buy from the innkeeper M10(6).
2. Visit Aldessia
See what you can buy from Aldessia M10(15).
3. Visit armorer Dornax
See what you can buy from the armorer M10(21).
4. Visit trader Watmos
See what you can buy from Watmos M10(21).
5. Visit trader Momplosh
See what you can buy from Momplosh M10(17).
6. Tell the scribe about the city
Return to Simbeard and tell him about what you've seen.
SQ56 Fighting Pests
You will receive the quest from Grimbolosh M10.1(2). Whom you will be able to access after completing Q21.2.1 Go talk to Grimbolosh.
1. Kill all of the scorpions
You need to kill all of the scorpions in the mine.
2. Talk to Grimbolosh
After you're done return to Grimbolosh and tell him about it.
Reward: 10 x Dragon spit trap
SQ57 Unlucky heritage
Talk to Darelitta M10(18). Who is standing near the Throne Room. She will tell you of her problem with her sister and her mother's jewelry. Darelitta would like to get the bracelets, but they belong to another sister.
Option 1: You'll get the earrings, but you'll leave a deposit of 15 Ducats.
Option 2: You will convince her using Seduce or Fast talk to give them to you for free.
Reward: Earrings
1. Find a sister willing for an exchange
Earrings can be exchanged with Diota M10(19), for a necklace.
Reward: Necklace
2. Give the jewelery to the sisters
Now make an exchange with Felika M10(16). To get the ring.
Reward: Ring
Go to the last of the sisters - Fadelika M10(20). She will give you the bracelets.
Reward: Bracelets
Return to Darelitta and give her the jewelry.
Reward: Recipe for ironwood Marimrosh crossbow
Maps: M11 - Depths of Gruldur
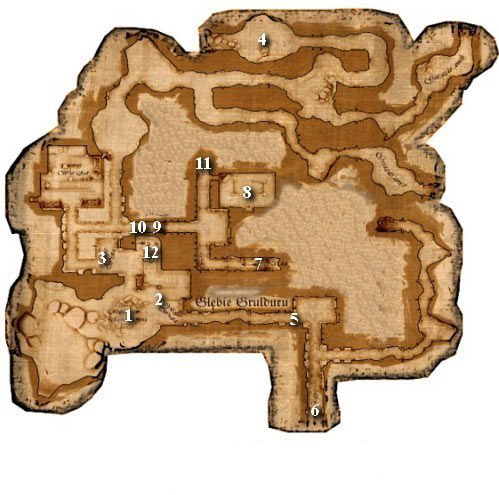
1. Portal
2. Dwarven remains
3. Cyclopean door
4. Cyclopean artifact
5. Cyclopean door
6. Passage to level 1 A
7. Passage to level 1 B
8. Cyclopean artifact
9. Block
10. Broken wall
11. Secret passage
12. Level 2 entrance
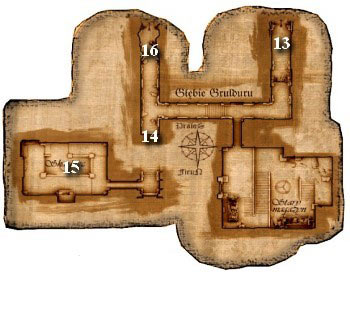
13. Back to level 1
14. Secret passage
15. Treasury
16. Passage to level 1 B
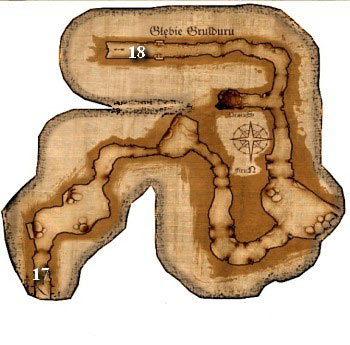
17. Back to level 1 A
18. Back to level 1
Maps: M11.1 Level 2
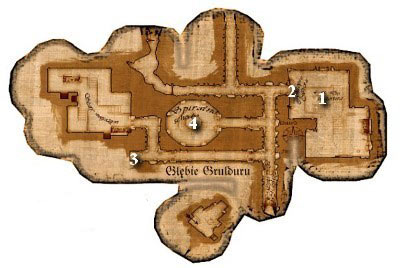
1. Back to level 1
2. Cyclopean door
3. Secret passage
4. Entrance to level 3
Maps: M11.2 Level 3
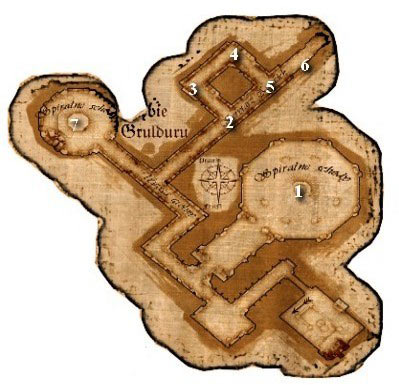
1. Back to level 2
2. Switch S1
3. Switch S2
4. Switch S3
5. Switch S4
6. Key to Grolm
7. Entrance to level 4
Maps: M11.3 Level 4
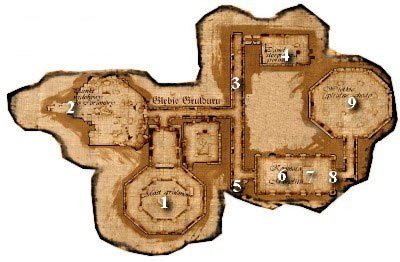
1. Back to level 3
2. Chest - dwarven treasure
3. Door
4. Switch
5. Statue
6. Monolith
Helm of Fire
7. Switch
8. Door
9. Down to level 2
Quest order:
Q32.2.1 Find the key
Q32.2.2 Use the key
Q32.2.3 Find another key
Q32.2.4 Use the second key
Q32.2.5 Find the third key
Q32.2.6 Read the final inscription
Q32.3 Find the helm of fire
Q32.1.2 Return to Murolosh
Q33 Madness in Murolosh
Q20 Caves below Murolosh (continued)
2. Earn the king's trust
You need to complete Q33 Madness in Murolosh.
3. Find the Adamantine Heart
3.1 Find your way to the caves
You need to complete Q32.2.2 Use the key.
3.2 Gather the clues
You need to complete Q32.2.6 Read the final inscription.
3.3 Pass through the Fire Fall
You will complete this quest in chapter ten.
Q32 Depths of Gruldur
1. Explore the caves
1.1 Find the teleporter disc
You need to complete Q32.3 Find the Helm of Fire.
1.2 Return to Murolosh
After completing Q32.3 Find the Helm of fire return to the portal M11(1) using the shorter path. Get through the now open door M11.3(8) and take the stairs M11.3(9) down. Get to the first level and enter the portal.
2. Decipher the writings
2.1 Find the key
Approach the dwarven remains M11(2). A ghost, who will want to give you the cyclopean artifact. You will find it by the body.
2.2 Use the key

Artifact, you just got is the key to the first cyclopean door M11(3). Approach them and watch the cinematic after which the door will open and the sign appears: "The Black Adamantine Heart is safely held behind the Fire Falls of Algormorsh".
2.3 Find another key
Another key M11(4) can be found in one of the caves behind the open door - it is guarded by fire spirits. Deal with them and collect the Cyclopean artifact.
2.4 Use the second key
Open the second set of doors M11(5) and read the inscription. "Great number of cyclops protect the Heart from the greedy hands of grolms and the sight of the evil dragon's progeny".
2.5 Find the third key
In order to reach the third key M11(8) you need to get to level 1 A M11(6). While there use the hidden door M11(14) to get to the treasure room M11(15). Then proceed to level 1 B M11(16). Keep going forward until you get to the passage to level 1 M11(18). Enter the room M11(8), where another group of spirits guards the key and get through them to get the artifact.
2.6 Read the final inscription
Use the block M11(9) to open your way forward M11(10) then go back near the portal. Go down the stairs to level 2 M11(12), approach the third door M11.1(2) and read the final inscription "Only the one wearing the Helm of Fire will get through the mountain flames unharmed".
3. Find the Helm of Fire

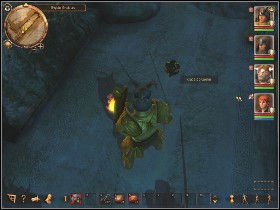
The right order of flipping the switches is: S1, S2 twice, S1, S3.
The door will open.
Helm of Fire M11.3(6) is in the big room on level 4. In order to enter it you need to pass through the corridor in which you will be attacked by a statue M11.3(5). It will cast a few spells weakening you before the fight.
You can avoid the damage dealt by the statue - in order to do that you need to solve the puzzle on level three - one of the chambers has four switches M11.2 (2, 3, 4 and 5). Using one of them will open up the way to one of the switches and closing of another set of door. The point of the riddle is to open the final door. The right order is S1, S2 twice, S1, S3. The door will open and you will find a key to Grolm M11.2(6) in a hidden room. Return to level 4 and approach the door M11.3(3). They will open when you use the key. Enter the chamber and take the stairs down. Use the switch M11.3(4), which will disarm the statue. This will make the fight for the Helm much easier.
Helm of Fire is guarded by a very powerful enemy - a cyclopean skeleton supported by undead grolms. The cyclops is quite slow so try to lure him with one of your characters (just keep running until the rest of the party deals with grolms). And once he's alone focus your attacks on him.
After the fight use the switch M11.3(7), to lower the monolith M11.3(6) and take the Helm of Fire. A moment after you pick it up a ghost of the Dragon Quest Warrior. Will appear and hand you over the teleportation disc, which you can use to return to Murolosh.
Reward: Helm of Fire, teleportation disc
Q33 Madness in Murolosh
Right after you enter the Murolosh you will run into the Follower of Lugosh. Who will tell you that the king and his guards have gone mad and are attacking the other dwarves. He will also tell you that Xolgorax wants to see you.
1. Meet Xolgorax in the Throne Room
Head to the throne room M10(2), where Xolgorax Awaits you High Priest thinks that the madness is caused by the dragon carbuncle and wants you to destroy it.
2. Make king Arombolosh regain sanity
Enter the throne room and fight the king and the other dwarves. Once you land a few successful blows on him he will fall to the ground allowing you to destroy the jewel set in his crown. Arombolosh will regain sanity, thank you for your help and send you to the treasurer M10(8), who has a reward for you. He will also create a new item from the armor pieces you've assembled - Armor of Fire. The treasurer will give you one of the items you haven't picked before (Q19.1 Accept the gift).
Reward: Armor of Fire, Titanium ring of untamed power or Robe of Confusion or Kangroshes Axe or Malmargarashno two-handed axe
3. Ask about the Fire Falls
Ask the king for the permission to head to the Fire Falls and Xolgorax will join in the conversation saying that after reading through Aldessia's notes he found a way to reach the spot where the Adamantine Heart rests. You can now go to Aldessia's chambers M10(4) and use the portal M10.5(4), to reach a new location.
End of chapter nine!
SQ58 Dwarven Ghost
Approach the dwarven remains M11(2). A ghost will appear asking you to find his amulet.
1. Find the Amulet
Amulet can be found in a chest M11.3(2) on fourth floor.
Reward: Amulet
2. Take the amulet to the ghost
Take the amulet to the ghost and place it by the remains.
SQ59 Strange Apparitions
1. Watch the phantoms
You will see phantoms every once in a while.
2. Find the dwarven treasure
The dwarven treasure M11.3(2) can be found on fourth floor
3. Defeat the grolm ghosts
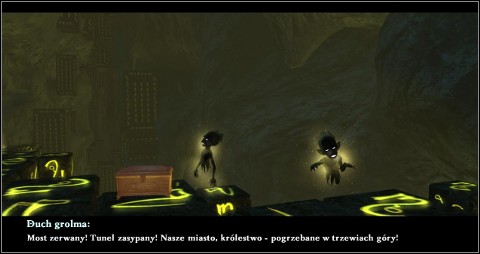
Kill the ghosts guarding the treasure and empty the chest.
Reward: 74 Ducats, Gold Foil, Jewels, Tumlarbrag
Maps: M12. Behind the Fire Falls
1. Portal
2. Pillar
3. Lava curtain - when you open one of the stone niches by the bridge the curtain will disappear.
Treasure chest
4. Cyclopean door
5. Stone niche
6. Flame bridge
7. Lava curtain
8. Traps
9. Cyclopean door
10. Grolm crystal
11. Grolm control panel
12. Grolm king's ghost
13. Adamantine Heart
14. Stone niche
15. Cyclopean door
16. Pal'Na'Thar
17. Way to the portal - available at the end of the chapter
Quest order:
Q34.1.1 Open the cyclopean door
Q34.1.2 Pass the flame bridge
Q34.1.3 Pass the lava fall
Q34.1.4 Get the Adamantine Heart
Q34.2 Convince Pal'Na'Thar
Q20.4 Return to Murolosh
Q34 Carbuncle Cave
1. Find the Adamantine Heart
1.1 Open the cyclopean door


Click at the base of the pillar to topple it right onto the pressure plate.
The cyclops door will open.
Go to the chamber with the cyclopean skeleton. Right beside the entrance you will see a pillar M12(2). Topple it to fall onto the pressure plate.
1.2 Pass the flame bridge
Another obstacle is the broken bridge M12(6). Right by it there are two stone niches M12(5). Inside each of them you'll find a certain amount of chilled flame hearts. You need to place there a same amount of flame hearts. You will get them from the remains of the fire spirits. After placing the flame hearts the bridge will appear.
After opening the stone niche the lava curtain in the southern part of the area M12(3) Go back and open the chest hidden behind the curtain. You will find some elixirs and other valuable items inside.
1.3 Pass the lava falls
On the other side of the bridge you will find another set of niches. Repeat what you've done before - replace the chilled fire hearts with new ones. Once you do that, the lave curtain will disappear. There are some traps in a corridor behind it. You need to step on the right tiles in order to avoid them. Once you approach the cyclopean door M12(9) a cinematic will trigger.
1.4 Get the Adamantine Heart
Grolm Ghosts will cease to appear once you destroy the crystal.
Control panels summon the blocks.
Adamantine Heart M12(13) is guarded by the mad Grolm king ghost. In order to get to him you will need to take the stairs up - on your way you will be attacked by ghosts. For now you need to wound the king only once to make him disappear. A good idea is destroying the crystals from a distance using magic or ranged weapons. The stairs are broken in few spots. Near the holes there are grolm control panels. Each of them summons a stone platform that allows you to continue on, but moving the wrong one will trigger the trap. Each of the panels is split into four parts - for the first two panels you need to pick level three. The next one is unusable 0 take the stairs up, pick level two, and then level three in the last one.
If you don't make any mistakes when setting the five panels - including the one by the stairs to the second floor. A grolm locker will appear. Go down and enter the stone niche M12(14). Inside you will find some valuable items and a magic ring (+10 to constitution).
Before reaching the Adamantine Heart you will be forced to fight the Grolm King and his ghosts. Prepare for this fight as it is really challenging. Magic resistance and burn ointment will come in handy. After the fight approach the Adamantine Heart. You won't be able to take it as it is warded by magic. The door below will open M12(15).
2. Convince Pal'Na'Thar
Enter the new chamber which proves to be a forge. Inside, you will see a cyclops M12(16). Go down to talk to him. Pal'Na'Thar will explain what you got involved in and will tell you that your destiny is guarding the Adamantine Heart.
You now need to convince him to give you the carbuncle. Talk to him once again and ask about the ancient times and the balance after the dragon's death. Ask him whether Umbracor is talking to him in death and say that the dragon isn't dead, just asleep and use the remaining dialog options Pal'Na'Thar will agree and will go to remove the barrier from the Adamantine Heart.
Once the barrier is gone, Malgorra will appear. She will take the Heart and disappear.
3. Retrieve the Carbuncle
You will complete this quest in chapter eleven.
Q20 The Caves Below Murolosh (continued)
3.3 Pass the Fire Fall
You need to complete Q34.1.3 Get through the lava falls.
4. Return to Murolosh
Talk to Pal'Na'Thar. Convince him that there still is hope and he will let you take one of the weapons from the forge. Remember that it is only usable by you so pick a weapon you're best at. Pal'Na'Thar will open a way to the portal M12(17). Which you need to use to return to Murolosh.
Reward: Weapon forged by Pal'Na'Thar
End of chapter ten!
Maps: M13. Drakensang Mountain
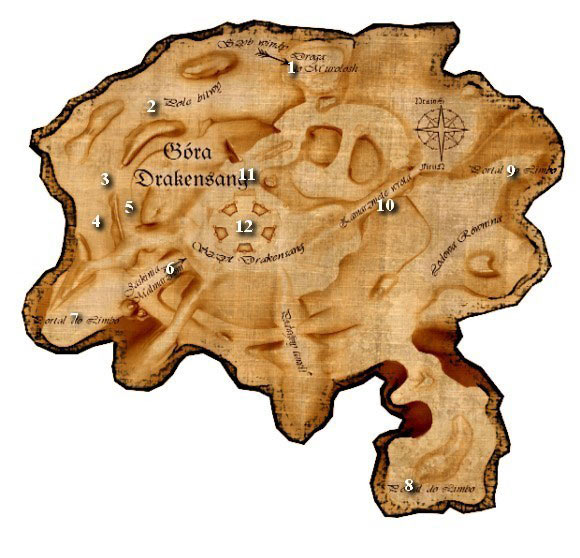
1. Entrance
2. King Arombolosh - he is here at the beginning , then moves with you to the Hammer Cave
3. Fork
4. Main Path
5. Side path
6. Hammer Cave
Stone Angraxa , King Arombolosh, Field trader
7. First Portal
8. Second Portal
9. Third Portal
10. Gate
11. Malgorra's Guard
12. Peak
Malgorra
Quest order:
Q35.1 Talk to Rakorium
Q35.2 Journey to the Drakensang Mountain
Q36 Help the dwarven priest
Q37.1.2 Destroy the second portal
Q37.1.3 Destroy the third portal
Q37.1.1 Get through the gate
Q37.1.4 Kill Malgorra's guards
Q37.2 Stop Malgorra
Q37.3 Awaken the Adamantine Heart
Q37.4 Kill Malgorra once and for all
Q34 The Carbuncle Cave (continued)
3. Retrieve the carbuncle
You need to complete Q37.3 Awaken the Adamantine Heart.
Q35 Drakensang Mountain
Right after you get back to Murolosh Xolgorax will approach you and tell you what's been going on when you were gone - some dragonlike creatures have appeared on the peak of the Drakensang Mountain and King Arombolosh gathered his army to stop them. The priest will also tell you that Rakorium is in the city and wants to talk to you.
1. Talk to Rakorium
Rakorium awaits you in the throne room. He is convinced that his Thesis Crystal should be able to awaken Umbracora. At the end of the conversation he will give you the crystal.
Reward: Thesis Crystal
2. The Journey to the Drakensang Mountain
In order to get to Drakensang you need to talk to Arom.
IMPORTANT! Once you say you're ready to leave you won't be able to return to any of the other locations. Make sure to make every possible preparation - supply on elixirs (especially the healing ones), bandages and get the best weapons and armor you can. On the mountain you will be almost constantly fighting, so pick the best fighters and a mage to support and heal them.
3. Reach the Adamantine Heart
You need to complete Q37.3 Awaken the Adamantine Heart.
4. Don't let Ardakor to be awakened
You need to complete Q37.4 Malgorra once and for all.
Q36 Help the Dwarven Priest
Near the spot you appear at you will see King Arombolosh M13(2). After dealing with nearby enemies talk to him. The King will ask for your help in defending the Sacred Hammer Cave M13(6). He will also allow you to pick a path - a side path M13(5), suited for ranged combat or the main path M13(4),where more melee awaits you. You will cover a part of the way together, then, when you reach the crossroads each party will go it's way.
1a. Follow the main path
Take the lower path to the Hammer Cave.
1b. Follow the side path
Take the upper path to secure your position above the Hammer Cave
2. Defeat the enemies
Once you get near the Hammer Cave you will see that it is being attacked by some dragon-like creatures. You will also be noticed by Stone Angraxa who will call out to you for help. Watch the cinematic in which the first portal is being destroyed M13(7), and then talk to the King (from this point on he will be defending the cave) and Angraxa (she heals for free, so you might want to consider returning to her). You can also buy some things from the field trader.
Q37 The Battle on the Drakensang Mountain
1. Find a way to the peak
1.1 Get past the gate
The gate M13(10) will be opened once the two remaining portals are gone (check 1.2 and 1.3). Before getting through it make sure you are prepared for a fight as there's an ambush awaiting you.
1.2 Destroy the second portal
Portal M13(8) can be found in the southern piece of the location. Enemies keep getting through it so destroy it as fast as possible.
1.3 Destroy the third portal
Path leading to the portal M13(9) is full of traps. Once you destroy it a gate will open leading to the peak of the mountain.
1.4 Kill Malgorra's Guards
Malgorra's Guards M13(11) are four dragon-like creatures. Get rid of them to continue.
2. Stop Malgorra
Get to the peak M13(12) where a ritual is being held and kill Malgorra and her servants.
3. Awaken the Adamantine Heart
Approach the Adamantine Heart and touch it with the Thesis Crystal.
4. Kill Malgorra once and for all

It appears that Malgorra isn't dead yet. She will reappear. And transform into a three-headed hydra. Prepare for a tough final fight.
Monster will move to another location every now and then causing an explosion in the process. Your main character wearing the Armor of Fire will receive little damage, so it should be him/her attacking Malgorra. The remaining characters should be focusing on the creatures she summons and support your hero in fighting the main enemy. You should bear in mind that if Malgorra is not engaged she will cast spells which makes her even more dangerous - that's why she shouldn't be left on her own. Kill the monster she summons as they appear - if you let them grow in numbers they may become dangerous.
Once the fight is over all you need to do is watch the final cinematic


 Drakensang: The Dark Eye Game Guide & Walkthrough
 DARK Game Guide & Walkthrough
 Darksiders II Game Guide & Walkthrough
 Diablo III Game Guide & Walkthrough
 Divinity II: Ego Draconis Game Guide & Walkthrough