SSX Game Guide
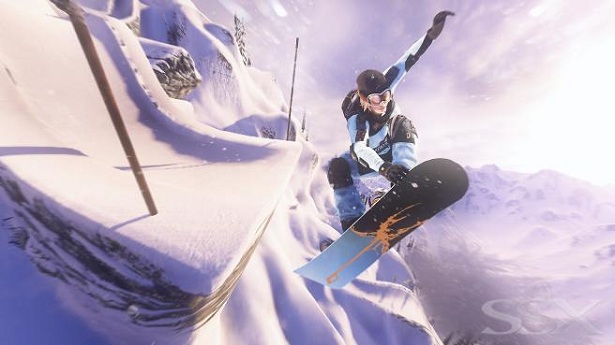
The SSX series returns to consoles after a long hiatus with the simply titled SSX. Not exactly a reboot, but definately a refinement of the series core boarding principles, SSX (2012) distinguishes itself with a handful of new features like the “Deadly Descents,” and equipment functions. As you play through the different circuits, you’ll be able to equip your characters with armor, pulse goggles, or spotlights to fight against the dangerous conditions of the world’s most killer slopes. Think you can survive?
Below you’ll find Game Front’s own Game Guide, where we break down the features and content available in SSX for newcomers or latecomers alike. For even more SSX insider information, take a short trip to our SSX achievements, trophies, or cheats pages.
9 Deadly Descents Part 1
Start with the 9 Deadly Descent Tour. This will give you a chance to get acquainted with the characters, build up some armor, and get used to the game.
Go through the tutorial and pay extra attention to and super tricky mode . You will also need to know how to combine tricks and deploy your wingsuit.
Complete your first drop to earn the That Was Easy Achievement. Along the way you will learn how to control your character. The key to landing tricks is to let go of the L pad and whatever trick buttons you chose to use before you hit the ground.
You will now have the option to upgrade your suit and board.. but chances are you don’t have enough points yet so let’s move on to the next unlocked area.
Your first race down the mountain is going to be pretty tough. The course takes pretty rapid turns and drops. It’s a good way for you to get used to the game. Make sure to land your air tricks by letting go of the buttons before you come down and use the boost that you gain to win. You can stick around Whitehorn Mountain if you want, but I’d head over to the Extinguisher Tower.
The drop in Extinguisher Tower is more challenging in that you will need to upgrade (or at least have the computer optimize) your armor. The racers in this trial aren’t too fast.. so just focus on being safe and not having your armor completely depleted.
After this, you will be ready to take on the first Deadly Descent- Trees. You don’t need to use the turbo at all. In fact.. the point is just to make it down the mountain. So take your time, maneuver and do just that.
After completing the Rockies, you will unlock Patagonia and Sibera. Let’s head to Siberia.
Your first run in Siberia is actually much more manageable if you use your speed to the max. Get yourself TRICKY and use the heck out of that boost. Whenever you reach forks in the paths, try your best to take the direction that has less elevated ground. I find that these paths get you through the level faster.
Enjoy the comic book type cutscene.
The Vapor Trail is going to be your next obstacle. You’ve gotta race this one. Rails are probably your best friends. Grind them out for sick combinations. Stay to the right whenever the road forks. As opposed to the last level, this level’s high paths are actually better for you because you can get much more air to do your tricks. You know what that means. TRICKY TIME.
Your next destination is The Big Show . This is a Trick It level, meaning take your time and make sure you are getting the best combinations that you can as opposed to rushing. Get out of that racing mentality and you’ll find yourself taking care of this one.
To get into your best option for the next level Don’t Make Me: , you’ll need to acquire an Ice Axe. Go upgrade your gear, you should definitely have enough points at least for the Ice Axe.
Finishing the next drop will earn you a Geotag. You will also have now completed Siberia!
9 Deadly Descents Part 2
After Siberia, your next destination on the map is Patagonia.
Your first encounter is going to be a place called Weirdsville . To complete the Race It!, you need to not be afraid of jumping off the higher cliffs as you are racing. Even if you don’t see where you will land… chances are that if you went off a supermassive cliff that looked very intimidating, it’s a shortcut in this level.
There are hardly any obstacles in this level. The toughest bit of the whole course will be some narrow passages that will test your maneuvering. They pop up at random, so make sure your turns are CONTROLLED as much as possible.
To get to the Broken Elbow survival portion of Patagonia, you will need a Wingsuit.
Alright, Broken Elbow looks tough but is really fun once you get the hang of it. You will need to use your Wingsuit, timing it before you hit the ground on your jumps, in order to survive.
You will get another Geotag and will have completed Siberia after surviving Broken Elbow. This is point of the game where things start getting a bit more difficult.
The Himalayas are your next destination. See how the intro animation hints at “Thin Air”? You have no idea yet..
Your first run will be Fast Forward, which is a Trick It course. Make sure you upgrade your equipment and suit if you have enough points for it.
You may get another comic cutscene or not. Either way, head over to Trickypedia: Race It next.
In Trickypedia, the best thing to do is to get a Massive jump off of the first large cliff. That way, you can get into TRICKY mode immediately and secure the lead.
Once the courses are completed, you will unlock Elise. Enjoy the comic cutscene after.
9 Deadly Descents Part 3
Continue onto Code Blue in Patagnia. Here, you will have to race it. After being dropped off by the helicopter, start the Blackbox race off booking it straight ahead. About 50 feet after the start, there will be a massive jump. You wouldn’t usually see it coming, but now that you know, use it to your advantage. Racking up points here will get you very close to being in Tricky mode early on in the race.
You will have to use your wing suit quite often in this level. It’s actually an easier race than some of the ones you have been having thus far. Just be sure to watch out for the geysers.. those things can mess you up if you’re not careful and run into them.
In this race, make sure to take advantage of your rewind function. Doing this right before the bigger jumps will help you get a headstart into TRICKY mode.
There are giant chasms to fall into scattered all throughout this level. If you ever find that you didn’t get enough air on a jump and see yourself starting to fall into the black abyss, IMMEDIATELY use the rewind function. You can typically tell that these are coming up when you are grinding on an elongated rail. Once the rail ends, be prepared to make the jump or rewind.
The next deadly descent is the Fitz Roy descent. Specialty? Gravity.
Once you drop into the level, there will be an immediate jump, followed by another bigger one. You will have to bust out the hang glider on both of these. In fact, you will have to use it on most jumps.
For optimal timing to use your hang glider on the bigger jumps, wait until just past the halfway point of the jump and then use it. You should be activating it when you’re 60% of the way through your airtime. Using this method, you will be able to survive this descent without breaking a sweat.
The Kaori descent in the Himalayas is pretty straightforward. It’s a short course, and you will have to use your oxygen mask to survive.
Once you hit Serenity in the Himalayas, you will need to use your oxygen mask once again. Make sure you watch your oxygen in the lower right hand corner.
Serenity is a trick-it course. Rack up the points as quickly as you can. Combos is the name of the game. Feel free to rewind anytime you feel like you’ve gotten yourself in a bind.
Once again, you will have to use an oxygen mask as you race Fall From Grace. In this level, DON’T worry too much about tricking or getting too many points. I know this sounds counter intuitive since you would usually want to get into TRICKY mode as quickly as possible, but it’s not worth the effort in this level.
9 Deadly Descents Part 4
The next deadly descent will be aptly titled Thin Air. But hey, you’re a pro with the gas mask by now right? The drill is to survive until you make it to the bottom. Keep a careful eye on your oxygen level at the bottom right.
ONLY trick on this deadly descent when you are up in the air. Do not do any tricks or combos that will slow you down at all. It’s a race against time!
Once you hit Antarctica, you will be introduced to the solar panel pack.
Rolling Thunder is going to be a race course, so as always, try to go for the big points in the beginning. Don’t be afraid to fall behind a little. Once you get into Tricky mode, you’ll more than make up for it.
Enjoy the next comic sequence before moving on to Evil Genius. This one’s a Trick It course, and to be honest, you’re not going to get much air throughout the majority of it. Use your best grinds and your combos to rack up the points.
After going through the tunnel (most likely on the red rail), you will reach the point of the level where you will have to mostly depend on getting big air and landing tricks. Be prepared for this switch.
Your next task in Antarctica will be to race Off the Grid. It’s a hard level to see in for the most part, but stay clinging to the right wall in the awkward narrow cavern passages and you should be fine.
The lighting in Off The Grid gets progressively better so don’t worry if you fall behind a little more than you usually would. Consequently, you are also able to get much more air in the latter portions of this level. Use a final push here and you should come out on top.
Once you reach the root down race, you are really going to have to watch your core temperature at the bottom right of the screen. It’s not terribly different than managing your oxygen, but it can still cost you a race if you’re not careful.
There will be a key point in this race as you approach an elongated red rail. You will be able to combine a few consecutive rails for a grind that’s worth a whopping point total.
Your next deadly descent is Cold. Survival is your goal, so proceed through the level as quickly as possible.
Make sure not to go out of your way to do too many tricks that will slow you down too much. Your core temperature will decrease much more rapidly in this level so don’t take your eye off of it.
9 Deadly Descents Part 5
Time to be hitting Alaska. Your first race is the Old School slope. You will get a headlight. The layout of this level is certainly a little awkward so be prepared for some rewinding.
Pan is going to be a little tougher in the sense that you will have to watch your point total and try to maximize it. After the first jump, go straight at the three way split and start getting some points with the big air you’re getting.
See that red rail high above you? If you find a way to get up there, try to stay on it for as long as possible. It’s short, quick, and a good way to get into tricky quickly. If you fall off, try getting back on when you can.
Your next mission is the Unsanctioned course. At the beginning, go to the left of the first big jump and you will get a sequence of a lot of them.
After the red rail, stay to the right on the higher ledges. You will get more speed and air for tricks by doing so.
Watch out once you reach the area that gets a little flatter. It’s hard not to run into the trees and polls so slow down a bit and get ready to rewind if worst comes to worst.
In Invincible, you will have to beat Griff to win. This level is a little bit different, and you will immediately see why. Yes, it’s the avalanche.
The most important part about making it down quickly on this level is maneuvering. Try to slip in between all of the trees and stay to the left for most of your way down.
For Emergency Exit, you will be in yet another avalanche zone. The strategy is exactly the same as for the last level- keep left and be conscious of your maneuvering above everything else.
9 Deadly Descents Part 6
Your next destination is going to be Corkscrew in Africa. Star this race off by hitting the first ramp, keeping left to hit the second ramp, and jump off the second ramp onto the red rail.
Keep your grind going for as long as you can through the tunnel, and you’ll be in Tricky Mode in no time.
The rest of this course is actually surprisingly straightforward. The only thing to mention is that you will run into chasms, so be ready to rewind if you don’t see one in time.
Start off Red Light going directly straight and not veering off at any of the forks. Keep yourself as elevated as you can throughout this level. There are rails at the very top that will really speed up your progress if you can hit them.
This is a very easy course to get Tricky in so don’t feel like you have to spare any of the boost. In fact, most of this course is so narrow that you’re going to need to use as much boost as possible if you want to get ahead.
You are going to have to beat Griff once again in Hush. This time, your head lamp will really need to be used. Keep track of the battery at the bottom right of the screen.
Try to keep your light as steady and pointing straight ahead as much as possible. It’s going to swing around a lot because of the chaotic layout of the level, but a steady hand will really help.
Snake Bite is going to be the toughest course in Africa by far. It is pitch black aside from where you can shine your light. See why it was important to learn how to keep a steady hand last time? The course is pretty easy, but if you can’t see where you’re going you’re not going to survive regardless. Always keep the light pointing straight ahead.
Once you reach about 500 meters remaining, you will hit a red rail. Immediately after, there will be a practically invisible chasm so WATCH OUT FOR IT!
You now get to move on to the Alps. And.. you get pulse goggles. That doesn’t sound good.
Beyond The Fall is a pretty straightforward level all around, but you will want to stay away from the red rails for most of it. They’re very easy to get on but they will end up slowing you down.
In Broken Pass, you are going to have to outscore Psymon to win. See those train tracks? You can grind on those..
You will be able to get plenty of air after the opening of this course, but there are plenty of trees scattered around so be careful when it comes to your landings.
Hard Currency is going to be another Griff level. This guy must really hate you by now. Be forewarned, there are plenty of rocks to crash into in this level, especially in the onset. Watch your steering.
The ramps in this level are very visible and the path is pretty singular. If it seems like the obvious route, take it.
9 Deadly Descents Part 7
Much like in the last Alps level, your maneuvering is going to be tested pretty hardcore here. You are mostly going to find yourself going down very narrow paths for the first bit. Once you hit more of the open areas, you’ll be able to move around a bit more. These areas don’t last long though0- it’s a pretty short course that you’re just going to have to sprint through by mashing your directional pad and steering around the rocks and trees.
Your next task will be racing Bulldog. You will have to outscore Ty this time around. Go off the first jump straight and you will be able to go off the arrowed ramp. Keep to the right and use your combinations with your grinds to rack up the quick points.
Whenever you get a chance, take the more elevated paths in this level. The higher you stay, the more quickly and fluidly you will be able to move and flow with your combinations.
Your next course, Zombies and Jetpacks, probably has the coolest name of any track here. Or is it just me? You’re going to want to keep right to the beginning, but once you see the red rail, don’t be afraid to grind it as it goes off the ledge. It will take you to an easier and quicker path, giving you the advantage.
This race is a bit tough and there is little room for error- do not do anything to break your rhythm or speed. If you do, you may want to save yourself the trouble and restart the race. You don’t have to be perfect in this race but you can’t stagnate at all.
Your next level is New Zealand’s Mornin’ Tiger. This level is very open (essentially the opposite of those rocky courses you had to deal with in the Alps). Don’t be afraid to pick up as much speed as you want since your steering has some flexibility this time around. In fact, everyone’s going to be moving very quickly in this race. Much like the last one, keep the speed going, even if it seems out of control, and do not stagnate.
In Jack Knife, you will have to place in the Top 3 to advance. This one is tough as your visibility will be limited.
Be conscious of your pulse at the bottom right of your screen. Be ready to make very quick moves since you can’t see too far ahead of you. You will probably find yourself accidentally dropping into some impossible to spot chasms. If this happens, don’t panic- rewind immediately.
Your very last Deadly Descent race is going to take place against, you guessed it Griff. Let’s piss him off one more time, eh?
Never take your eye off your pulse in this race. Move quickly and trust your instincts- a lof of these jumps are intimidating as heck. The good news is that you will be able to get massive amounts of points and get yourself to Tricky quickly. You will need to do just that- Griff brought his A game.
Stay to the right of the course on the ledge. Once the ledge runs out, stay in the middle and be ready to avoid a series of very tall trees. Once again, there are chasms that you might slip into. Quickly rewind your way out of them. At the very end of the race, you will get a whole bunch of consecutive arrows and boosts. Victory is yours. Congratulations on finishing the 9 Deadly Descent playthrough of SSX!




 8 Tips for How to Learn Excel Quickly
 Majora's Mask 3D Guide: How To Complete Snowhead Temple
 The Consumer Unfriendly Pricing of Destiny: The Taken King Leaves Fans Unhappy
 Top 5 Best Gaming Phones of 2015
 How to become the best on the newest Moba on Xbox - Smite